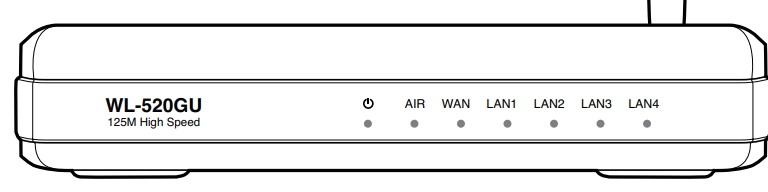
WL-520GU Wireless Router
WL-520GU
125M High Speed
AIR WAN LAN1 LAN2 LAN3 LAN4
User Manual

E4258
First Edition
November 2008
Copyright © 2008 ASUSTeK Computer Inc. All Rights Reserved.
No part of this manual, including the products and software described in it, may be
reproduced, transmitted, transcribed, stored in a retrieval system, or translated into any
language in any form or by any means, except documentation kept by the purchaser for
backup purposes, without the express written permission of ASUSTeK Computer Inc.
(“ASUS”).
Product warranty or service will not be extended if: (1) the product is repaired, modied or
altered, unless such repair, modication of alteration is authorized in writing by ASUS; or (2)
the serial number of the product is defaced or missing.
ASUS PROVIDES THIS MANUAL “AS IS” WITHOUT WARRANTY OF ANY KIND, EITHER
EXPRESS OR IMPLIED, INCLUDING BUT NOT LIMITED TO THE IMPLIED WARRANTIES
OR CONDITIONS OF MERCHANTABILITY OR FITNESS FOR A PARTICULAR PURPOSE.
IN NO EVENT SHALL ASUS, ITS DIRECTORS, OFFICERS, EMPLOYEES OR AGENTS BE
LIABLE FOR ANY INDIRECT, SPECIAL, INCIDENTAL, OR CONSEQUENTIAL DAMAGES
(INCLUDING DAMAGES FOR LOSS OF PROFITS, LOSS OF BUSINESS, LOSS OF USE
OR DATA, INTERRUPTION OF BUSINESS AND THE LIKE), EVEN IF ASUS HAS BEEN
ADVISED OF THE POSSIBILITY OF SUCH DAMAGES ARISING FROM ANY DEFECT OR
ERROR IN THIS MANUAL OR PRODUCT.
SPECIFICATIONS AND INFORMATION CONTAINED IN THIS MANUAL ARE FURNISHED
FOR INFORMATIONAL USE ONLY, AND ARE SUBJECT TO CHANGE AT ANY TIME
WITHOUT NOTICE, AND SHOULD NOT BE CONSTRUED AS A COMMITMENT BY
ASUS. ASUS ASSUMES NO RESPONSIBILITY OR LIABILITY FOR ANY ERRORS OR
INACCURACIES THAT MAY APPEAR IN THIS MANUAL, INCLUDING THE PRODUCTS
AND SOFTWARE DESCRIBED IN IT.
Products and corporate names appearing in this manual may or may not be registered
trademarks or copyrights of their respective companies, and are used only for identication or
explanation and to the owners’ benet, without intent to infringe.
2

Table of contents
About this guide ………………………………………………………………………… 4
How this guide is organized …………………………………………………….. 4
Conventions used in this guide ………………………………………………… 5
Chapter 1: Knowing your wireless router
Package contents ………………………………………………………………………. 6
System requirements …………………………………………………………………. 6
Before you proceed ……………………………………………………………………. 6
Hardware features ……………………………………………………………………… 7
Front panel ……………………………………………………………………………. 7
Rear panel …………………………………………………………………………….. 8
Bottom panel …………………………………………………………………………. 9
Mounting options ……………………………………………………………………… 10
Chapter 2: Setting up the hardware
Setting up the wireless router …………………………………………………….11
Setting up a wired connection ………………………………………………….11
Setting up a wireless connection …………………………………………….. 12
Conguring the wireless router ………………………………………………… 12
Using the web GUI ……………………………………………………………….. 12
Chapter 3: Conguring the network clients
Accessing the wireless router …………………………………………………… 14
Setting an IP address for wired or wireless client ……………………… 14
Chapter 4: Conguring via the web GUI
Conguring via the web GUI ……………………………………………………… 21
Using the Network Map …………………………………………………………….. 22
Setting up WAN using the Quick Internet Setup (QIS) ……………….. 23
Managing EzQoS bandwidth …………………………………………………….. 24
Upgrading the rmware ……………………………………………………………. 25
Restoring/Saving/Uploading settings ………………………………………… 26
3

Table of contents
Chapter 5: Installing the utilitieInstalling the utilities
Installing the utilities ………………………………………………………………… 27
Device Discovery ……………………………………………………………………… 29
Firmware Restoration ……………………………………………………………….. 29
EZSetup …………………………………………………………………………………… 30
Using EZSetup ……………………………………………………………………. 30
Network Printer Setup ………………………………………………………………. 36
Chapter 6: Troubleshooting
Troubleshooting ……………………………………………………………………….. 39
Appendices
Notices …………………………………………………………………………………….. 42
GNU General Public License …………………………………………………….. 44
ASUS Contact information ………………………………………………………… 50
About this guide
This user guide contains information that you need to install and congure the
ASUS Wireless Router.
How this guide is organized
This guide contains the following parts:
• Chapter 1: Knowing your wireless router
This chapter provides information on the package contents, system
requirements, hardware features, and LED indicators of the ASUS Wireless
Router.
• Chapter 2: Setting up the hardware
This chapter provides instructions on setting up, accessing, and conguring the
ASUS Wireless Router.
• Chapter 3: Conguring the network clients
This chapter provides instructions on setting up the clients in your network to
work with your ASUS Wireless Router.
4
• Chapter 4: Conguring via the web GUI
This chapter provides instructions on conguring the ASUS Wireless Router
using its web graphics user interface (web GUI).
• Chapter 5: Installing the utilities
This chapter provides information on the utilities that are available from the
support CD.
• Chapter 6: Troubleshooting
This chapter provides you with a troubleshooting guide for solving common
problems you may encounter when using the ASUS Wireless Router.
• Appendices
This chapter provides you with the regulatory Notices and Safety Statements.
Conventions used in this guide
WARNING: Information to prevent injury to yourself when trying to
complete a task.
CAUTION: Information to prevent damage to the components when
trying to complete a task.
IMPORTANT: Instructions that you MUST follow to complete a task.
NOTE: Tips and additional information to aid in completing a task.
5

Knowing your
1
wireless router
Package contents
Check the following items in your ASUS Wireless Router package.
WL-520GU Wireless Router
Power adapter
Support CD (manual, utilities)
RJ45 cable
Quick Start Guide
Note: If any of the items is damaged or missing, contact your retailer.
System requirements
Before installing the ASUS Wireless Router, ensure that your system/network
meets the following requirements:
• An Ethernet RJ-45 port (10Base-T/100Base-TX)
• At least one IEEE 802.11b/g device with wireless capability
• An installed TCP/IP and Internet browser
Before you proceed
Take note of the following guidelines before installing the ASUS Wireless Router:
• The length of the Ethernet cable that connects the device to the network (hub,
ADSL/cable modem, router, wall patch) must not exceed 100 meters.
• Place the device on a at, stable surface as far from the ground as possible.
• Keep the device clear from metal obstructions and away from direct sunlight.
• Keep the device away from transformers, heavy-duty motors, uorescent lights,
microwave ovens, refrigerators, and other industrial equipment to prevent
signal loss.
WL-520GU Chapter 1: Knowing your wireless router
6
• Install the device in a central area to provide ideal coverage for all wireless
WL-520GU
125M High Speed
AIR WAN LAN1 LAN2 LAN3 LAN4
mobile devices.
• Install the device at least 20cms from a person to insure that the product is
operated in accordance with the RF Guidelines for Human Exposure adopted
by the Federal Communications Commission.
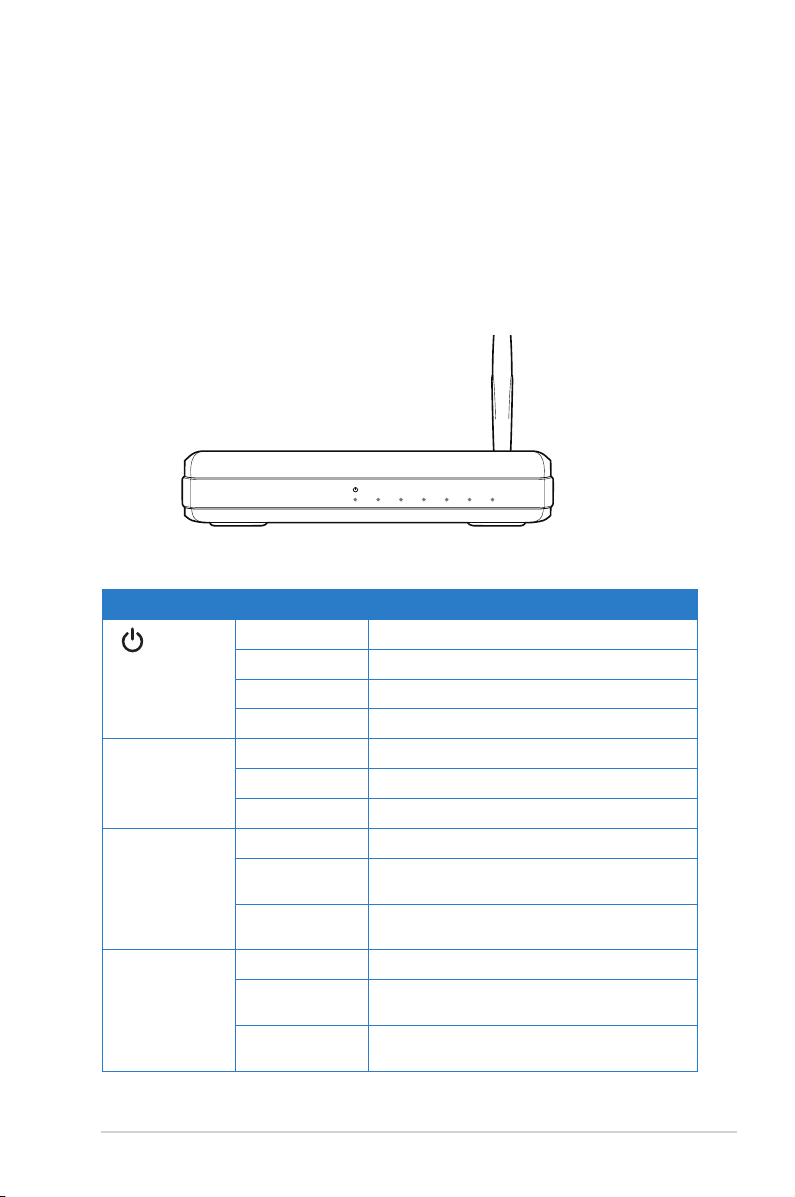
Hardware features
Front panel
Status indicators
LED Status Indication
(Power)
AIR (Wireless
Network)
WAN
(Wide Area
Network)
LAN 1-4
(Local Area
Network)
Off No power
On System ready
Flashing-slow Firmware upgrade failed
Flashing-quick EZSetup processing
Off No power
On Wireless system ready
Flashing Transmitting or receiving data (wireless)
Off No power or no physical connection
On Has physical connection to an Ethernet
network
Flashing Transmitting or receiving data (through
Ethernet cable)
Off No power or no physical connection
On Has physical connection to an Ethernet
network
Flashing Transmitting or receiving data (through
Ethernet cable)
Chapter 1: Knowing your wireless router WL-520GU
7
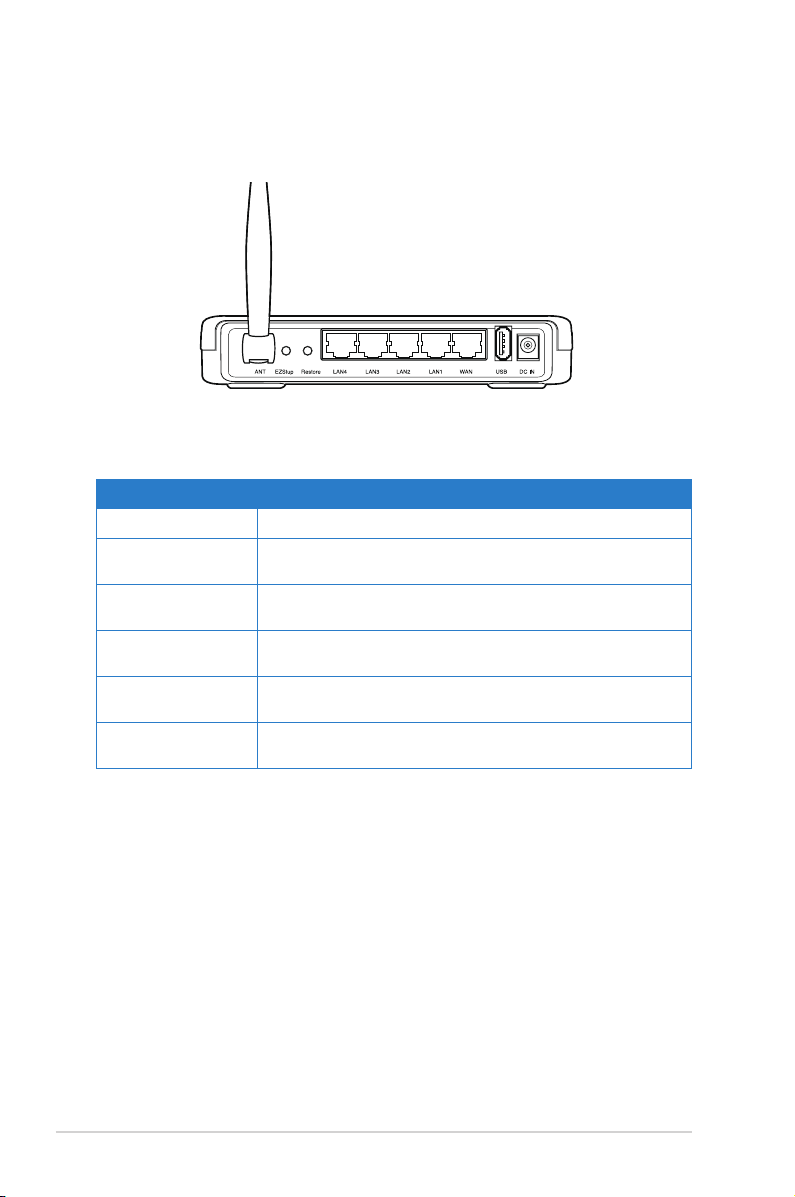
Rear panel
Status indicators
Item Description
EZSetup Press this button to launch the EZSetup utility.
Restore Press this button to restore the router’s system to its
LAN1-LAN4 Connect RJ-45 Ethernet cables to these ports to
WAN Connect an RJ-45 Ethernet cable to this port to establish
USB Insert USB2.0 devices such as USB ash drives into this
DC In Insert the AC adapter into this port to connect your
factory default settings.
establish LAN connection.
WAN connection.
port.
router to a power source.
WL-520GU Chapter 1: Knowing your wireless router
8
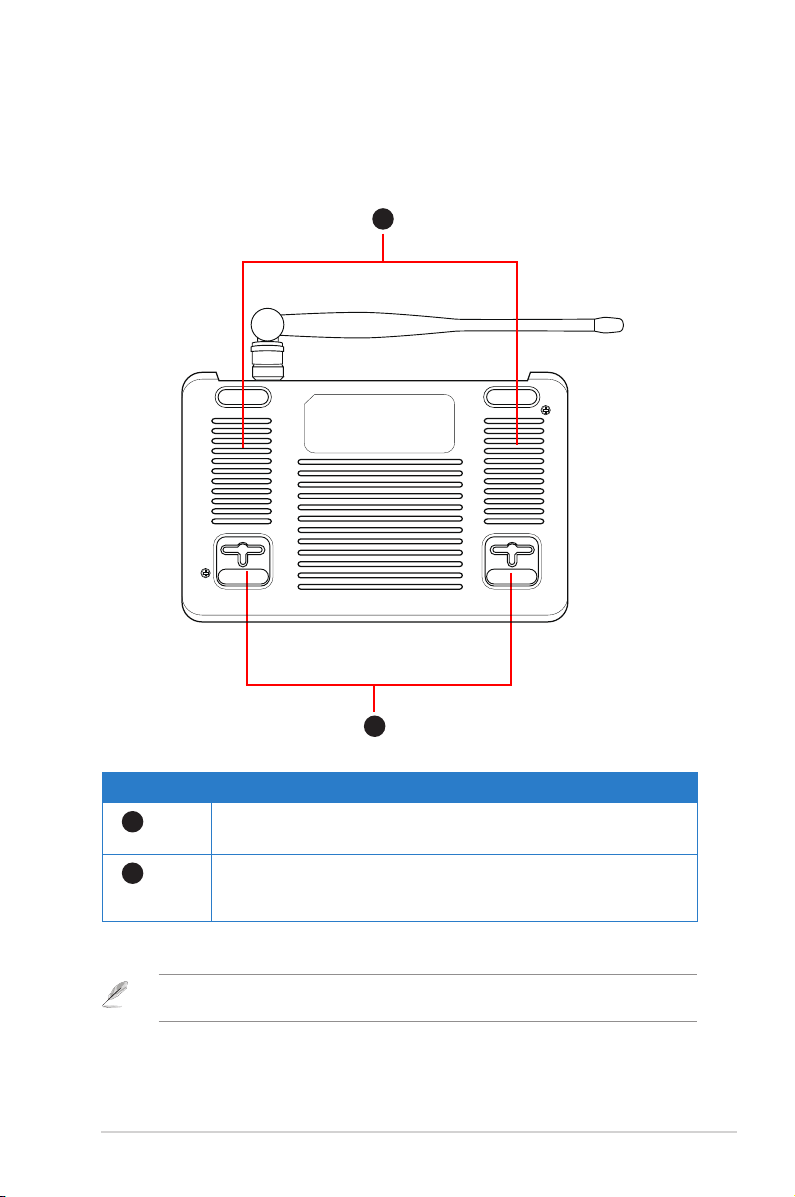
Bottom panel
1
2
Item Description
1
Air vents
These vents provide ventilation to your router
2
Mounting hooks
Use the mounting hooks to mount your router on concrete or
wooden surfaces using two roundhead screws.
Note: For details on mounting your router on a wall or ceiling, refer to the section Mounting
options on the next page of this user manual.
Chapter 2: Setting up the hardware WL-520GU
9
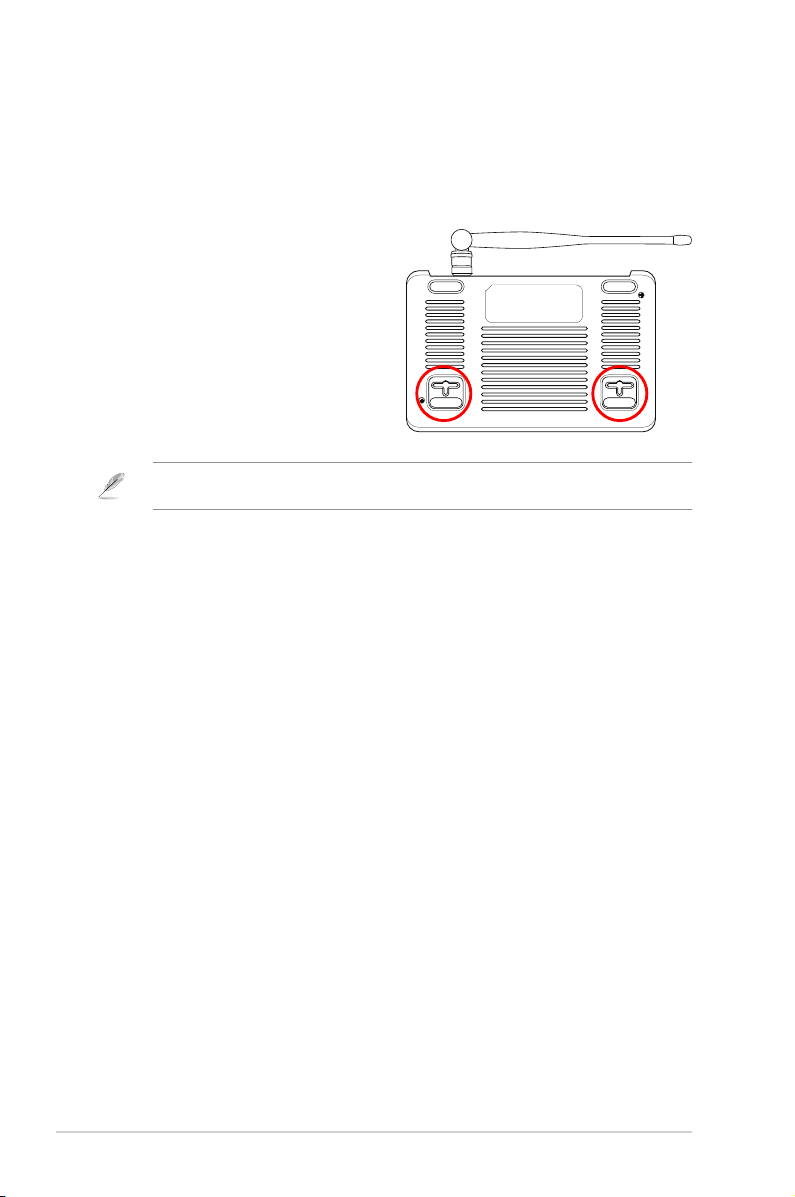
Mounting options
Out of the box, the ASUS Wireless Router is designed to sit on a raised at surface
like a le cabinet or book shelf. The unit may also be converted for mounting to a
wall or ceiling.
To mount the ASUS Wireless Router:
1. Look on the underside for the two
mounting hooks.
2. Mark two upper holes in a at surface.
3. Tighten two screws until only 1/4» is
showing.
4. Latch the hooks of the ASUS
Wireless Router onto the screws.
Note: Re-adjust the screws if you cannot latch the ASUS Wireless Router onto the screws or if
it is too loose.
WL-520GU Chapter 2: Setting up the hardware
10
Setting up the hardware
2
Setting up the wireless router
The ASUS Wireless Router meets various working scenarios with proper
congurations. You may need to change the wireless router’s default settings so
as to meet the requirements in your wireless environment. It also provides you with
EZSetup, a utility that enables you to easily set up a secure wireless network.
Notes:
• We recommend that you use wired connection for initial conguration to avoid possible
setup problems due to wireless uncertainty.
• For more details on EZSetup, refer to the section EZSetup in Chapter 4 of this user
manual.
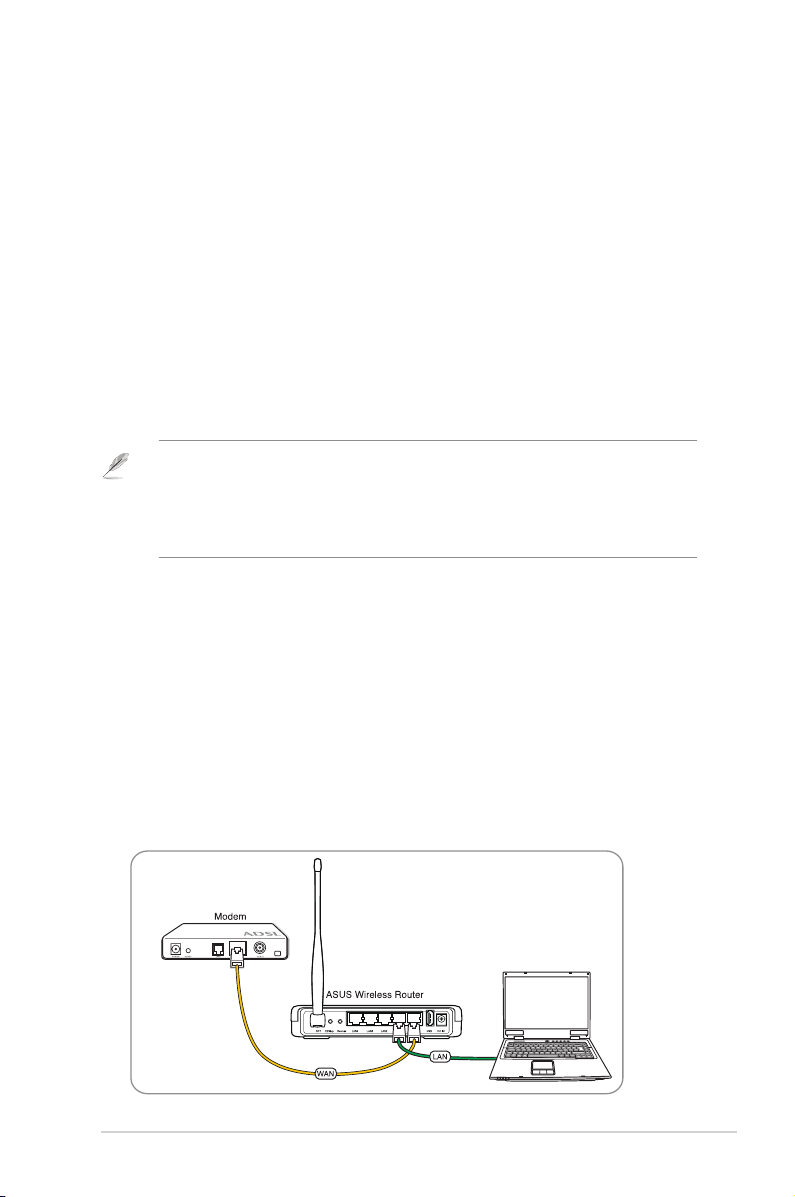
Setting up a wired connection
The ASUS Wireless Router is supplied with an Ethernet cable in the package. The
wireless router has integrated auto-crossover function, so use either straight-through
or crossover cable for wired connection.
To set up the wired connection:
1. Turn on your router and the modem.
2. Using an Ethernet cable, connect the router’s WAN port to the modem.
3. Using another Ethernet cable, connect the router’s LAN port to your PC’s LAN
port.
Chapter 2: Setting up the hardware WL-520GU
11
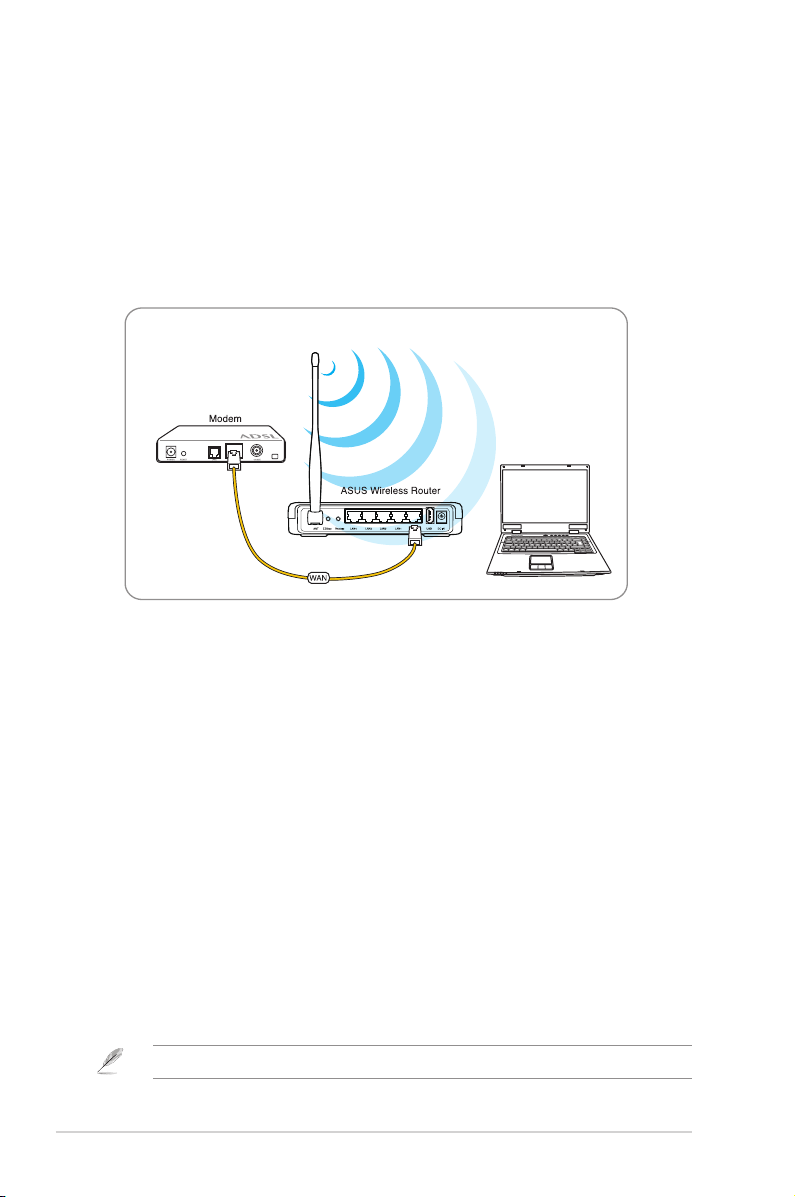
Setting up a wireless connection
To set up a wireless connection:
1. Turn on your router and the modem.
2. Using an Ethernet cable, connect the modem to the router’s WAN port.
3. Connect an IEEE 802.11b/g/n compatible WLAN card. Refer to your wirelessRefer to your wireless
adapter user manual for wireless connection procedures. By default, the SSID
of ASUS Wireless Router is “default” (in lower case), encryption is disabled and
open system authentication is used.
Conguring the wireless router
The ASUS Wireless Router includes a web graphics user interface (web GUI)
which allows you to congure the wireless router using a web browser on your
computer.
Using the web GUI
If your PC connects to the router using a cable, launch a web browser and the
login page of the router’s web GUI is automatically launched.
If your PC connects to the router wirelessly, you have to select the network rst.
To select the network:
1. Click Start > Control Panel > Network Connections > Wireless Network
Connection.
2. Select a network from the Choose a wireless network window. Wait for it to
connect.
Note: By default, the SSID of the wireless router is default. Connect to this default SSID.
WL-520GU Chapter 2: Setting up the hardware
12

3. After establishing a wireless connection, launch a web browser.
Notes:
• You may also manually key in the router’s default IP address (192.168.1.1) to launch the
router’s web interface.
• For more details on conguring your wireless router using the web GUI, refer to Chapter 4:
Conguring via the web GUI.
Chapter 2: Setting up the hardware WL-520GU
13

Conguring the
network clients
3
Accessing the wireless router
Setting an IP address for wired or wireless client
To access the ASUS Wireless Router, you must have the correct TCP/IP settings on
your wired or wireless clients. Ensure that the clients’ IP addresses are within the same
subnet as the ASUS Wireless Router.
By default, the ASUS Wireless Router integrates the DHCP server functions, which
automatically assigns IP addresses to the clients in your network.
But in some instances, you may want to manually assign static IP addresses on
some of the clients or computers in your network rather than automatically getting
IP addresses from your wireless router.
Follow the instructions below that correspond to the operating system installed on
your client or computer.
Note: If you want to manually assign an IP address to your client, we recommend that you use
the following settings:
• IP address: 192.168.1.xxx (xxx can be any number between 2 and 254. Ensure that the IP
address is not used by another device)
• Subnet Mask: 255.255.255.0 (same as the ASUS Wireless Router)
• Gateway: 192.168.1.1 (IP address of the ASUS Wireless Router)
• DNS: 192.168.1.1 (ASUS Wireless Router) or assign a known DNS server in your network
WL-520GU Chapter 3: Conguring the clients
14
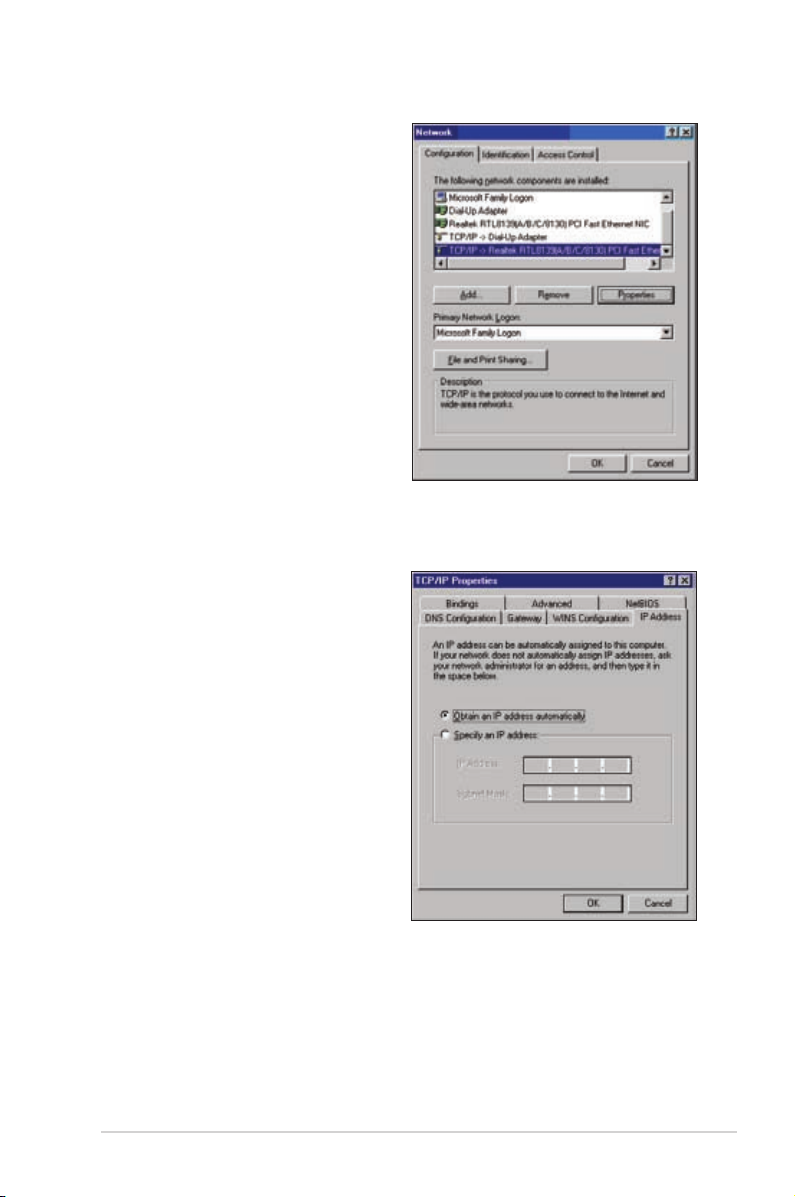
Windows® 9x/ME
1. Click Start > Control Panel >
Network to display the Network
setup window.
2. Select TCP/IP then click
Properties.
3. If you want your computer to
automatically obtain an IP address,
click Obtain an IP address
automatically then click OK.
Otherwise, click Specify an
IP address, then key in the IP
address and Subnet Mask.
Chapter 3: Conguring the clients WL-520GU
15
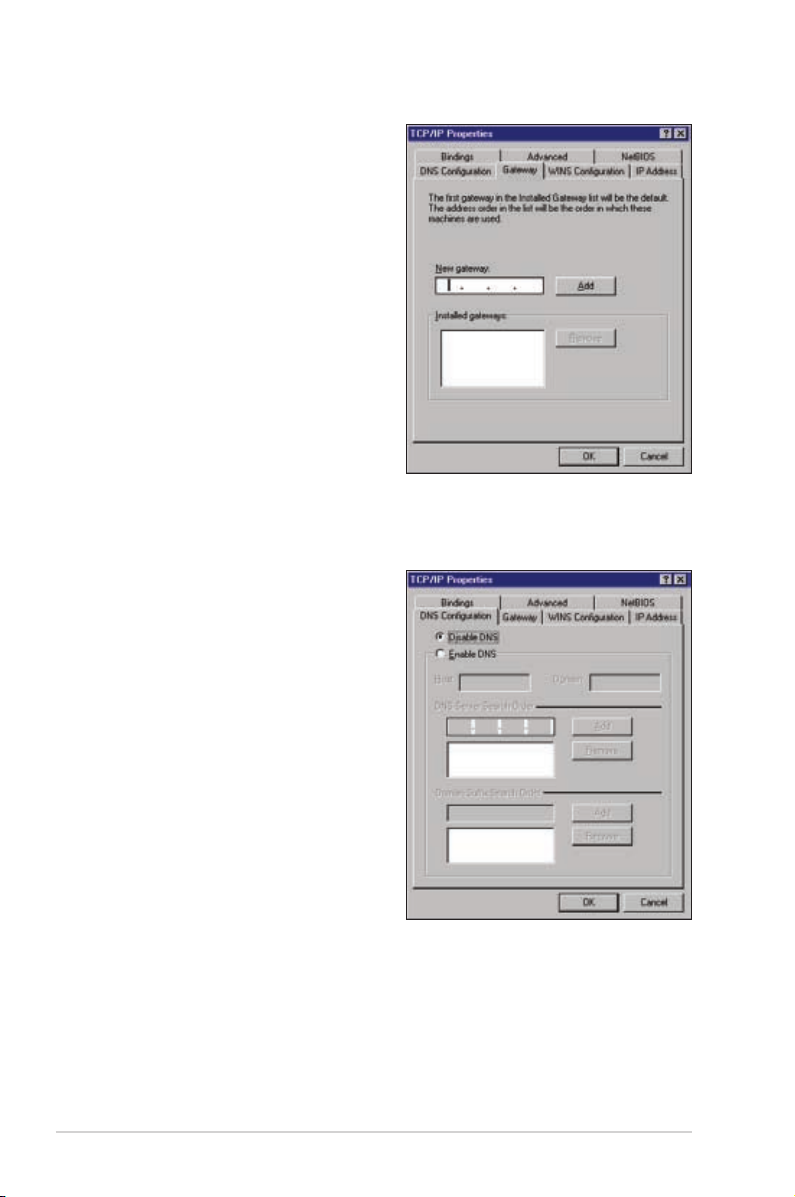
4. Select Gateway tab, and key in
New gateway then click Add.
5. Select the DNS conguration tab
and click Enable DNS. Key in Host,
Domain, and DNS Server Search
Order, then click Add.
6. Click OK.
WL-520GU Chapter 3: Conguring the clients
16
Loading…
View the manual for the Asus WL-520GU here, for free. This user manual comes under the category routers and has been rated by 2 people with an average of a 7.1. This manual is available in the following languages: English. Do you have a question about the Asus WL-520GU?
Ask your question here
Frequently asked questions
Can’t find the answer to your question in the manual? You may find the answer to your question in the FAQs about the Asus WL-520GU below.
What is the weight of the Asus WL-520GU?
The Asus WL-520GU has a weight of 262 g.
What does the download speed on the internet depend on?
The download speed on the internet depends on the type of connection you have. If you have a 25 Mb/s connection this means that theoretically you should be able to download 25 MB per second.
What is the difference between a router and a modem?
A modem provides the internet connection via the internet provider. A router then distributes the Internet signal to the devices connected to the router.
Is WIFI radiation harmful?
WIFI is a radio frequency signal in the form of non-ionising radiation. This radiation cannot damage cells and tissues and is therefore not harmful to human health.
Is the manual of the Asus WL-520GU available in English?
Yes, the manual of the Asus WL-520GU is available in English .
Is your question not listed? Ask your question here
Content
English …………………………………………………………………………………………………. 1
Česky…………………………………………………………………………………………………… 6
Deutsch ……………………………………………………………………………………………….11
Français ……………………………………………………………………………………………… 16
Italiano ……………………………………………………………………………………………….. 21
Español………………………………………………………………………………………………. 26
Hollands……………………………………………………………………………………………… 31
Polski …………………………………………………………………………………………………. 36
Português …………………………………………………………………………………………… 41
Pусский ………………………………………………………………………………………………. 46
Magyar……………………………………………………………………………………………….. 51
Türkçe………………………………………………………………………………………………… 56
Bahasa Indonesian ………………………………………………………………………………. 61
Български
…………………………………………………………………………………………….. 66
Eesti…………………………………………………………………………………………………… 71
Suomi ………………………………………………………………………………………………… 76
……………………………………………………………………………………………. 81
Română ……………………………………………………………………………………………… 86
Slovensky ………………………………………………………………………………………….. 91
ไทย
……………………………………………………………………………………………………. 96
Українська
………………………………………………………………………………………….. 101
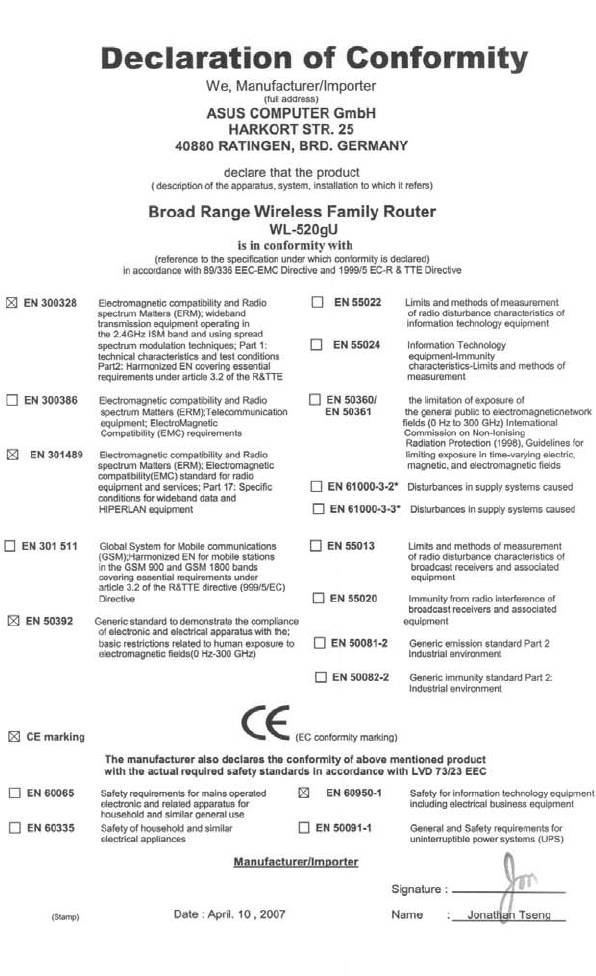
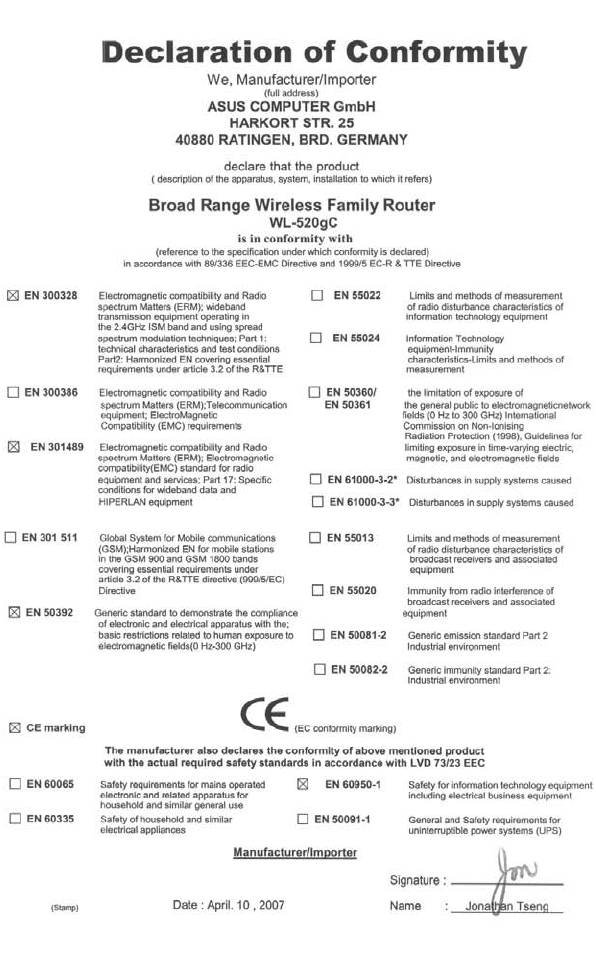
FCC Warning Statement
This device complies with Part 15 of the FCC Rules. Operation is subject to the following two
conditions:
1. this device may not cause harmful interference, and
2. this device must accept any interference received, including interference that may cause
undesired operation.
This equipment has been tested and found to comply with the limits for a class B digital
device, pursuant to part 15 of the FCC Rules. These limits are designed to provide reasonable
protection against harmful interference in a residential installation.
This equipment generates, uses and can radiate radio frequency energy and, if not installed
and used in accordance with the instructions, may cause harmful interference to radio
communications. However, there is no guarantee that interference will not occur in a particular
installation. If this equipment does cause harmful interference to radio or television reception,
which can be determined by turning the equipment off and on, the user is encouraged to try to
correct the interference by one or more of the following measures:
— Reorient or relocate the receiving antenna.
— Increase the separation between the equipment and receiver.
— Connect the equipment into an outlet on a circuit different from that to which the receiver
is connected.
— Consult the dealer or an experienced radio/TV technician for help.
CAUTION
Any changes or modications not expressly approved by the party responsible for compliance
could void the user’s authority to operate the equipment.
Prohibition of Co-location
This device and its antenna(s) must not be co-located or operating in conjunction with any other
antenna or transmitter.
Safety Information
To maintain compliance with FCC’s RF exposure guidelines, this equipment should beinstalled
and operated with minimum distance 20cm between the radiator and your body. Use on the
supplied antenna.

Declaration of Conformity for R&TTE directive 1999/5/EC
Essential requirements – Article 3
Protection requirements for health and safety – Article 3.1a
Testing for electric safety according to EN 60950-1 has been conducted. These are
considered relevant and sufcient.
Protection requirements for electromagnetic compatibility – Article 3.1b
Testing for electromagnetic compatibility according to EN 301 489-1 and EN 301 489-17 has
been conducted. These are considered relevant and sufcient.
Effective use of the radio spectrum – Article 3.2
Testing for radio test suites according to EN 300 328- 2 has been conducted. These are
considered relevant and sufcient.
CE Mark Warning
This is a Class B product, in a domestic environment, this product may cause radio
interference, in which case the user may be required to take adequate measures.
DGT 警語
經型式認證合格之低功率射頻電機,非經許可,公司、商號或使用者均不得擅自變更頻率、
加大功率或變更原設計之特性及功能。
低功率射頻電機之使用不得影響飛航安全及干擾合法通信;經發現有干擾現象時,應立即
停用,並改善至無干擾時方得繼續使用。
前項合法通信,指依電信法規定作業之無線電通信。
低功率射頻電機須忍受合法通信或工業、科學及醫療用電波輻射性電機設備之干擾。
WL-520GU/GC Broad Range Wireless Family Router Quick Start Guide
1
R
1. Package Contents
• WL-520GU/GC wireless router x 1
• Power adapter x 1
English
• Utility CD x 1
• RJ45 cable x 1
• Quick Start Guide x 1
2. Specication summary
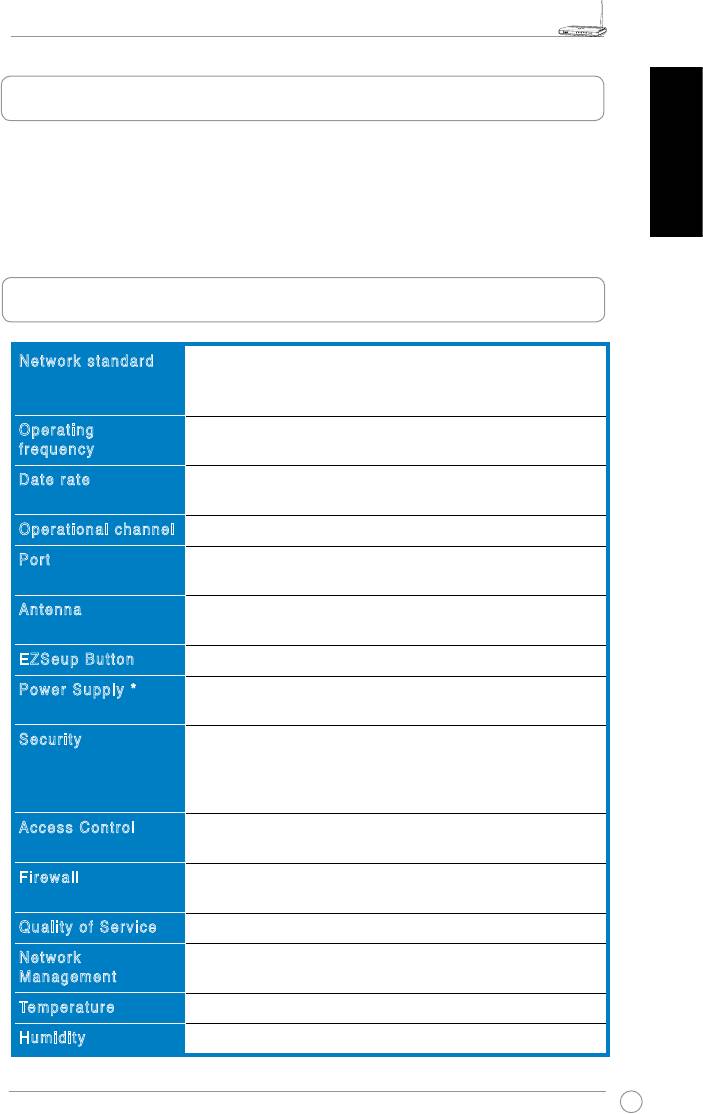
Network standard
IEEE 802.11b, IEEE 802.11g, IEEE 802.3, IEEE802.3x, IEEE
802.3u, IEEE 802.1x, IEEE 802.11i, IPv4, IPv6, CSMA/CA,
CSMA/CD, ICMP
Operating
2.4G ~ 2.5GHz
frequency
Date rate
802.11g: 6, 9, 12, 18, 24, 36, 48, 54Mbps
802.11b: 1, 2, 5.5, 11Mbps
Operational channel
11 for N. America, 14 Japan, 13 Europe (ETSI)
Port
WAN x 1, LAN x 4 RJ45 for 10/100 BaseT, 1 x USB2.0 for
printer sharing(
WL-520GU only
)
Antenna
Support Antenna Diversity, 1 x Reverse-SMA antenna
connector
EZSeup Button
Automatically SSID and WEP or WPA conguration
Power Supply *
WL-520GU: DC: +5V with max. 2A current
WL-520GC: DC EU/UK: +9V/1A; TW/US: +9V/800mA
Security
WEP-64bits, WEP-128bits, WPA-Personal, WPA2-Personal,
WPA-Auto-Personal (TKIP. AES. TKIP+AES), WPA-Enterprise,
WPA2-Enterprise, WPA-Auto-Enterprise (TKIP. AES.
TKIP+AES), Radius with 802.1x
Access Control
MAC-level Access Control, Inbound/Outbound IP Filter,
Domain Access Control
Firewall
NAT Firewall, SPI (Stateful Package Inspection) Firewall, WAN
ping control
Quality of Service
BOD (
WL-520GU only
), WMM
Network
Support UPnP, DHCP Server, DNS Proxy, NTP Client, DDNS,
Management
Port Trigger, Virtual Server, Virtual DMZ, VPN Pass-Through
o
o
Temperature
Operating: 0~40
C Storage: -30~50
C
Humidity
Operating: 50~90% Storage: 20~90%
* Use only the adapter included in the package.
-
Драйверы
2
-
Инструкции по эксплуатации
12
Языки:
ASUS WL-520GU инструкция по эксплуатации
(11 страниц)
- Языки:Китайский
-
Тип:
PDF -
Размер:
1.21 MB -
Описание:
ASUS WL-5XX Series Wireless Router Internet Configuration User’s Guide(Simplified Chinese Version)
This document describes how to set up ASUS WL-5XX series wireless router to getting connection to the Internet and provides troubleshooting tips to help you fix some simple problems.
ASUS WL-520GU инструкция по эксплуатации
(14 страниц)
-
Тип:
PDF -
Размер:
742.64 KB -
Описание:
ASUS Router Virtual Server Configuration Guide for WL-5xx series/WL-600g/700gE/RX3041/SL200/SL500/ SL1000/SL1200
This document describes how to configure virtual server on the WL-5xx series/WL-600g/700gE/RX3041/SL200/SL500/ SL1000/SL1200
На NoDevice можно скачать инструкцию по эксплуатации для ASUS WL-520GU. Руководство пользователя необходимо для ознакомления с правилами установки и эксплуатации ASUS WL-520GU. Инструкции по использованию помогут правильно настроить ASUS WL-520GU, исправить ошибки и выявить неполадки.
Всем привет! Сегодня мы будем заниматься настройкой роутера ASUS WL-520gU. Пугаться не стоит, все делается достаточно легко, и вы сейчас сами в этом убедитесь. Если он у вас совершенно новый, то пора вытаскивать его из коробки и начинать настройку. Для начала давайте с ним познакомимся, чтобы в дальнейшем у вас возникало как можно меньше вопросов.
Я постараюсь рассказывать как можно понятнее, но если у вас возникнут какие-то вопросы или вылезет ошибка, интернет не будет работать – то сразу же пишем в комментариях.
Содержание
- Индикаторы и подключение
- Настройка
- PPPoE
- PPTP и L2TP
- Статический IP
- Дополнительные данные
- Настройка Wi-Fi
- Смена пароля администратора
- Задать вопрос автору статьи
Индикаторы и подключение
Поверните его лицом к себе и взгляните на индикаторы или так называемые лампочки. Они будут сигнализировать о правильной или не правильной работе маршрутизатора, поэтому с ними нужно быть знакомым сразу.
- Питания – включен или выключен роутер.
- AIR – работа Wi-Fi.
- WAN – интернет.
- LAN1-LAN4 – подключение устройств по кабелю к локальным портам.
Тут все ясно и понятно, если индикатор горит или мигает, значит идёт работа в данной среде, а информация передается. Если индикатор не горит, то значит есть какие-то проблемы на этой линии.
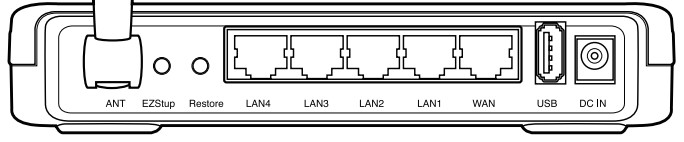
Теперь, давайте познакомимся со всеми портами и кнопками аппарата:
- ANT – это антенна, она у нас всего одна.
- EZStup – клавиша для запуска утилиты EZStup.
- Restore – кнопка для сброса роутера до заводских настроек. Если вы его получили от знакомого или друга, то стоит при включенном маршрутизаторе зажать эту кнопку на 10 секунд.
- LAN1-LAN4 – сюда можно подключить любое локальное устройство: компьютер, ноутбук, камеру, принтер, телевизор. Для этого используем обычный сетевой кабель. Один есть в коробке. Для настройки я буду использовать именно локальное прямое подключение и подключу ноутбук к первому порту.
- WAN – сюда нужно подключить кабель от провайдера или от aDSL модема.
- USB – для подключения 3G/4G модема и накопителя.
- DC ln – питание. Подключите сюда блок питания.
Настройка
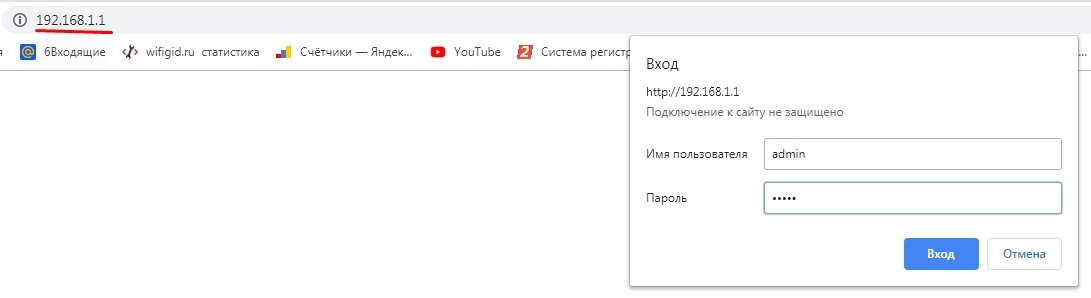
- После того как вы подключились к роутеру ASUS WL-520gU с помощью кабеля. С ноутбука или компьютера нужно запустить браузер и ввести в адресную строку: 192.168.1.1. Далее в обе строки введите: admin. Если пароль не подходит, то ещё раз сбросьте интернет-центр до заводской конфигурации.
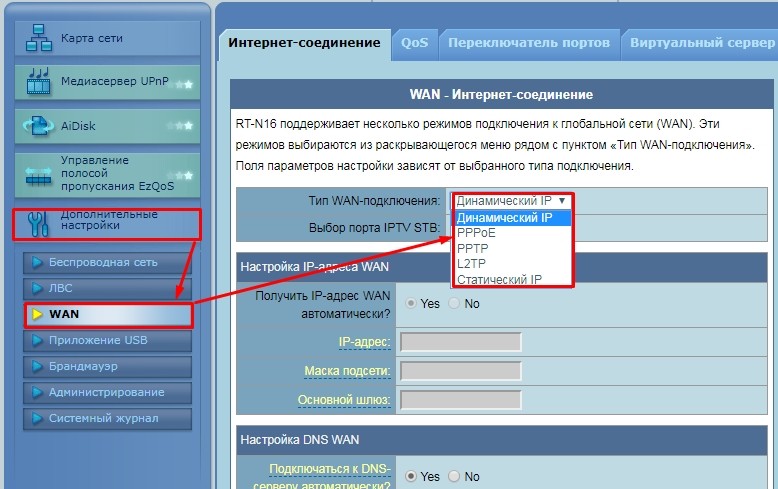
- Чтобы выполнить настройку интернета, откройте вкладку «Дополнительные настройки», далее переходим в «WAN». Теперь вам нужно взять договор от провайдера – там будет указан тип подключения, а также возможно нужно будет указать дополнительные данные. Так что выбираем «Тип WAN подключения»: Динамический IP, PPPoE, PPPTP, L2TP, статический IP. Если в договоре вообще ничего не сказано, то скорее всего ваш провайдера использует «динамический IP». В остальных случаях, нужно указать только то, что указано в договоре, а остальные строки оставляем со значениями по умолчанию или пустыми.
- После того как вы внесете изменения, обязательно нажмите на кнопку «Применить».
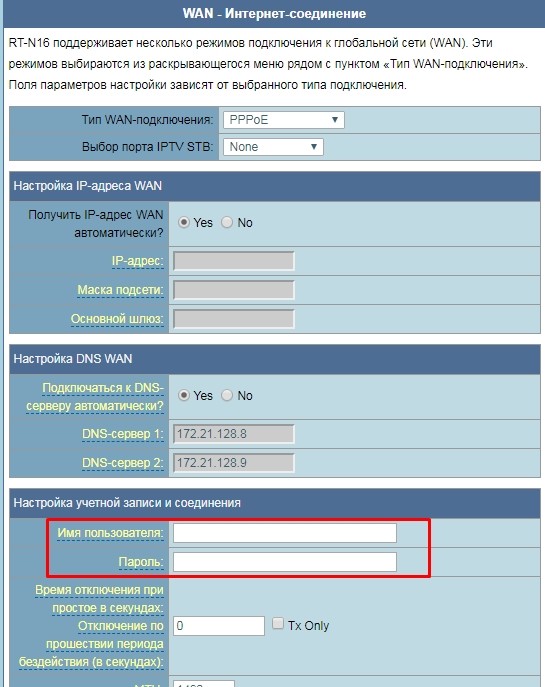
PPPoE
Чаще всего тут нужно указать только логин и пароль.
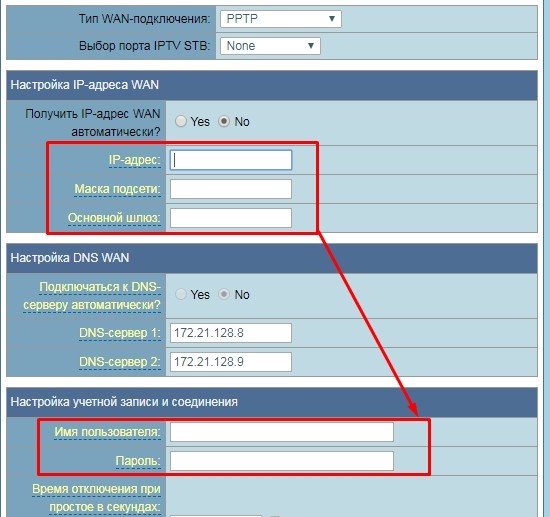
PPTP и L2TP
Сначала указываем IP адрес, маску и IP основного шлюза, а уже потом вводим имя пользователя и ключ.
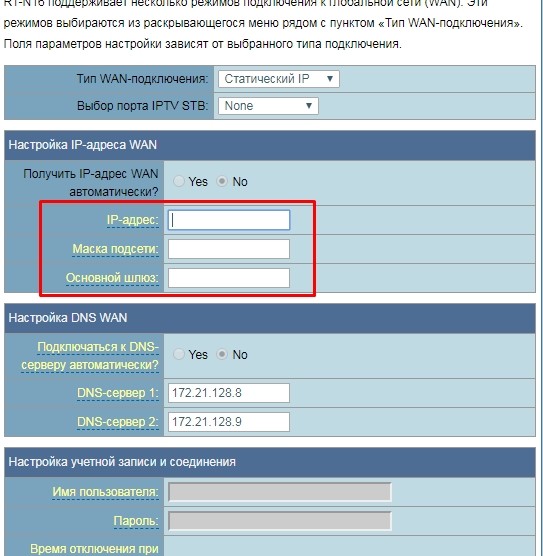
Статический IP
Здесь нужно указать только данные адреса: IP, маску, шлюз.
Дополнительные данные
Иногда также нужно указать адреса DNS, их просто вводим с листа. Но как я уже и говорил, если они не указаны, то оставляем данные по умолчанию. Это касается и другой информации в настройках.
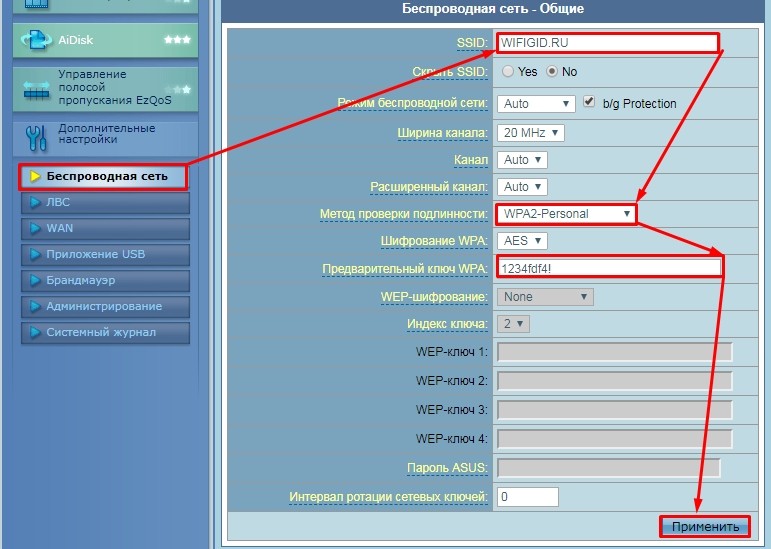
«Дополнительные настройки» – «Беспроводная сеть». Теперь, чтобы поменять имя WiFi в строку «SSID» вводим новое значение (имя может быть любым). Далее, чтобы установить пароль в строке «Метод проверки подлинности» указываем тип «WPA2-Personal». Для установки пароля вводим значение в строку «Предварительный ключ WPA». Нажимаем «Применить».
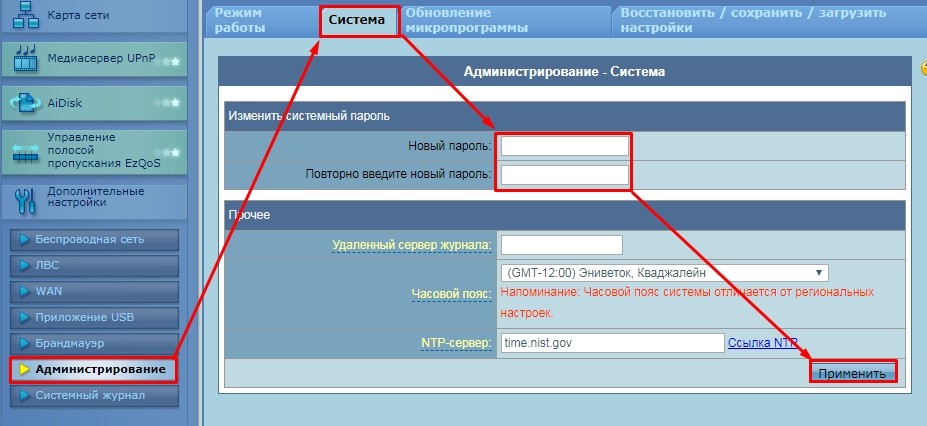
Смена пароля администратора
В качестве безопасности стоит поменять стандартный пароль от Web-интерфейса. Для этого там же переходим в раздел «Администрирование», далее во вкладку «Система». Два раза вписываем новый пароль и нажимаем «Применить».