

PiranhaMAX 143, 153, and 180
PiranhaMAX 143,153, and 180
Installation and Operations Manual
Installation and Operations Manual
532044-1_B

Thank You!
Thank you for choosing Humminbird®, the #1 name in fishfinders. Humminbird®
has built its reputation by designing and manufacturing top-quality, thoroughly
reliable marine equipment. Your Humminbird® is designed for trouble-free use
in even the harshest marine environment. In the unlikely event that your
Humminbird® does require repairs, we offer an exclusive Service Policy-free of
charge during the first year after purchase,and available at a reasonable rate
after the one-year period. For complete details, see the Warranty section of this
manual. We encourage you to read this installation and operations manual
carefully in orderto get full benefitfrom all the features and applications of your
Humminbird® product.
Contactour Customer Resource Center at 1-800-633-1468or visit our Web site
at humminbird.com. The following models are covered in this manual:
• PiranhaMAX 143 — Single Beam, 160 V x 128 H Monochrome Display
• PiranhaMAX 153 — Dual Beam, 160 V x 128 H Monochrome Display
• PiranhaMAX 180 — Tri Beam, 240 V x 160 H Monochrome Display
WARNING! This device should not be used as a navigational aid to prevent collision,
grounding, boatdamage,or personal injury. When the boat is moving, water depth may
change too quickly to allow time for you to react. Always operate the boat at very slow
speeds if you suspect shallow water or submerged objects.
WARNING! Disassembly and repair of this electronic unit should only be performed by
authorized service personnel. Any modification of the serial numberor attempt to repair
the original equipment or accessories by unauthorized individuals will void thewarranty.
WARNING! Do not travel at high speed with the unit cover installed. Remove the unit
cover before traveling at speeds above 20 mph.
WARNING! This product contains chemicals known to the State of California to cause
cancer and/or reproductive harm.
NOTE: Some features discussed in this manual require a separate purchase, and
some features are onlyavailable on international models.Every effort has been made
to clearly identify those features. Please read the manual carefully in order to
understand the full capabilities of your model.
NOTE: To purchase accessories for your fishfinder, visit our Web site at
humminbird.com or contact our Customer Resource Center at 1-800-633-1468.
i

NOTE: The procedures and features described in this manual are subject to change
without notice. This manual was written in English and may have been translated to
another language. Humminbird® is not responsible for incorrect translations or
discrepancies between documents.
NOTE: Illustrations in this manual may not look the same as your product, but your
unit will function in the same way.
ATTENTION INTERNATIONAL CUSTOMERS: Products sold in the U.S. are not
intended for use in the international market. Humminbird® international units
provide international features and are designed to meet country and regional
regulations. Languages, maps, time zones, units of measurement, and warranty
are examples of features that are customized for Humminbird®international units
purchased through our authorized international distributors.
To obtain a list of authorized international distributors, please visit our Web site at
humminbird.com or contact our Customer Resource Center at (334) 687-6613.
Humminbird®, Fish ID+™, Structure ID®, and WhiteLine™ are trademarked by or
registered trademarks of Johnson Outdoors Marine Electronics, Inc.
Baekmuk Batang, Baekmuk Dotum, Baekmuk Gulim, and Baekmuk Headline are
registered trademarks owned by Kim Jeong-Hwan.
© 2012 Johnson OutdoorsMarine Electronics, Inc. All rights reserved.
ii

Table of Contents
Installation Overview 1
Control Head Installation 2
Determine Where to Mount ……………………………………………………………… 2
Connect the Power Cable to the Boat ……………………………………………… 2
Assembling the Control Head Base …………………………………………………… 4
Routing the Control Head Cables Under the Deck ……………………………… 5
Attaching the Control Head to the Base ……………………………………………. 6
Attaching the Cables to the Control Head………………………………………….. 7
Transducer Installation Overview 8
Transom Transducer Installation 8
Locating the Transducer Mounting Position ………………………………………. 8
Preparing the Mounting Location …………………………………………………… 10
Assembling the Transducer and Initial Mounting ……………………………… 12
Routing the Cable………………………………………………………………………….. 16
Test and Finish the Installation ………………………………………………………. 18
Inside the Hull Transducer Installation 20
Determine the Transducer Mounting Location …………………………………. 21
Trial Installation ……………………………………………………………………………. 22
Route the Cable ……………………………………………………………………………. 23
Permanently Mount the Transducer ……………………………………………….. 23
Trolling Motor Transducer Installation 24
Powering ON and OFF 25
What You See On the Display 26
PiranhaMAX Sonar Technology 28
Single Beam Sonar ………………………………………………………………………… 29
Dual Beam Sonar ………………………………………………………………………….. 29
Tri Beam Sonar ……………………………………………………………………………… 29
iii

Table of Contents
The Menu System 30
Light (Setting Not Saved in Memory) ……………………………………………….. 30
Sensitivity (Setting Saved in Memory) ……………………………………………… 30
Depth Range (Setting Not Saved in Memory) …………………………………… 31
Zoom (Setting Not Saved in Memory)……………………………………………….. 31
Chart Speed (Setting Saved in Memory) ………………………………………….. 32
Fish Alarm (Setting Saved in Memory) ……………………………………………… 32
Depth Alarm (Setting Saved in Memory) ………………………………………….. 32
Filter (Setting Saved in Memory) …………………………………………………….. 33
Setup Menu (Setting Not Saved in Memory) …………………………………….. 33
Contrast (Setting Saved in Memory) ……………………………………………. 33
Fish ID+™ (Setting Saved in Memory) ………………………………………… 34
Bottom View (Setting Saved in Memory)………………………………………. 34
Battery Alarm (Setting Saved in Memory) …………………………………….. 36
Language (Setting Saved in Memory, International Only)……………….. 36
Units (Setting Saved in Memory, International Only) …………………….. 36
Maintenance 37
Troubleshooting 38
International Purchases 41
1-Year Limited Warranty 42
Humminbird® Service Policy 43
Returning Your Unit for Service 44
Specifications 45
Contact Humminbird® 47
NOTE: Entries inthis Table of Contentswhich list(International Only)are only available
on products sold outside of the U.S. by our authorized International Distributors. It is
important to note that products sold in the U.S. are not intended for resale in the
international market. To obtain a list of authorized International Distributors, please
visit our Web site at humminbird.com or contact our Customer Resource Center at
1-800-633-1468 to locate the distributor nearest you.
iv


Installation Overview
Installation Overview
Before you start installation, we encourage you to read these instructions
carefully in order to get the full benefit from your PiranhaMAX.
There are three basic installation tasks that you must perform for the
PiranhaMAX:
• Installing the control head
• Installing the transducer
• Testing the complete installation and locking the transducer position.
1
Control Head Installation
Control Head Installation
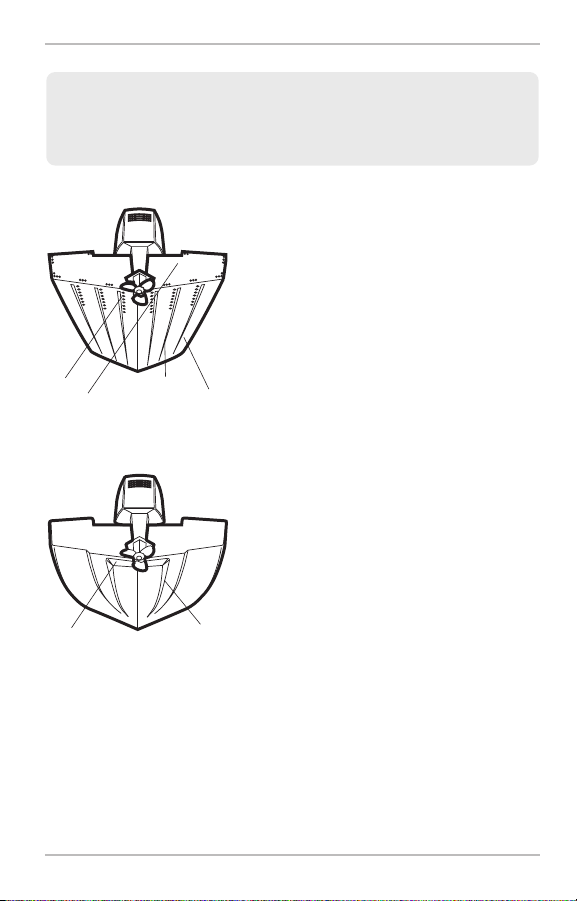
Determine Where to Mount
Begin the installation by determining where to mount the control head.
Consider the following to determine the best location:
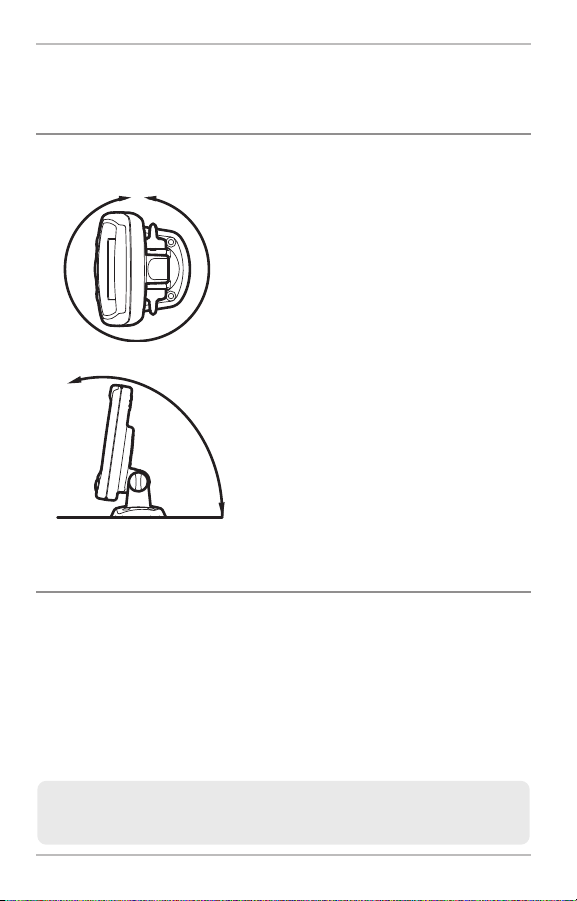
• To check the location planned for the control
head, test run the cables for the power and
transducer. See the installation section for
your transducer type in order to plan the
location of the transducer.
• The mounting surface should be stable
Figure 1
Figure 2
Connect the Power Cable to the Boat
A 6′ long power cable is included to supply power to the control head. You
may shorten or lengthen the cable using 18 gauge multi-stranded copper wire.
CAUTION! Some boats have 24 or 36 Volt electric systems, but the control head
MUST be connected to a 12 VDC power supply.
enough to protect the control head from
excessive wave shock and vibration, and
should provide visibility while in operation.
• Your PiranhaMAX may have one of two
different types of mountingbases,eithera tilt
mounting base or a tilt and swivel mounting
base. The mounting area should allow
sufficient room for the unit to pivot freely, to
swivel if capable, and for easy removal and
installation (Figures 1 and 2).
The control head power cable can be connected to the electrical system of the
boat at two places: a fuse panel usually located near the console, or directly
to the battery.
NOTE: Make sure that the power cable is not connected to the control head at the
beginning of this procedure.
2
GROUNDGROUND
POSITIVEPOSITIVE
Control Head Installation
NOTE: Humminbird® is not responsible for over-voltage or over-current failures. The
control head must have adequate protection through the proper selection and
installation of a 1 amp fuse.
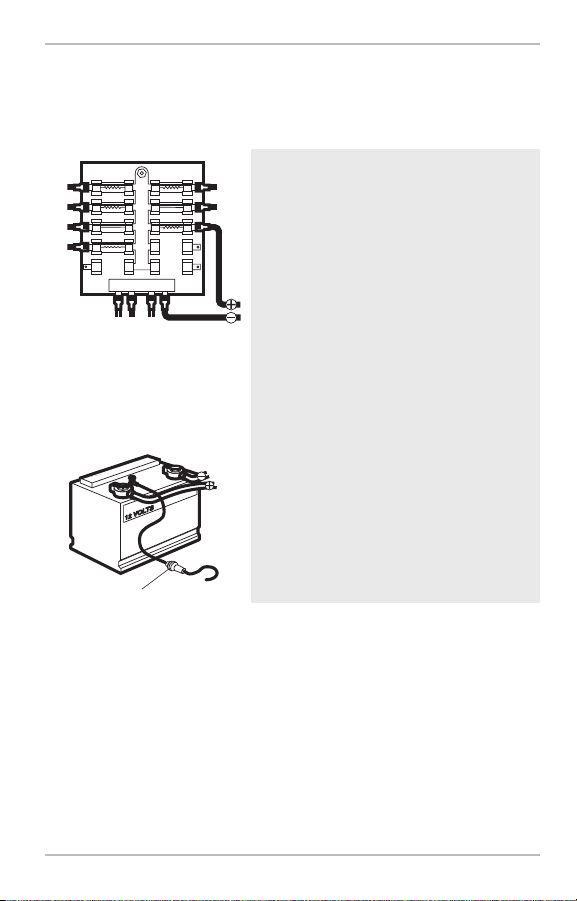
1a. If a fuse terminal is available, use
crimp-on type electrical connectors
(not included) that match the terminal
on the fuse panel. Attach the black
wire to ground (-), and the red wire to
positive (+) 12 VDC power (Figure 3).
Install a 1 amp fuse (not included) for
protection of the unit. Humminbird® is
Figure 3
not responsible for over-voltage or
over-current failures.
or…
1b. If you need to wire the control head
directly to a battery, obtain and install
an inline fuse holder and a 1 amp
fuse (not included) for the protection
of the unit (Figure 4). Humminbird® is
not responsible for over-voltage or
Inline Fuse Holder
Figure 4
over-current failures.
NOTE: In order tominimizethe potentialfor interference with other marine electronics,
a separate power source (such as a second battery) may be necessary.
3

Control Head Installation
Assembling the Control Head Base
Your control head base will either have a tilt mount or a tilt and swivel mount.
Refer to procedures A or B below to assemble and mount the control head
base.
A. If you have a tilt mount, follow these steps:
1. Set the tilt mount control head base in place on the mounting surface.
Mark the four mounting screw locations with a pencil or punch.
2. Set the base aside, and drill the four mounting screw holes using a
9/64″ bit.
3. Proceed to Routing the Control Head Cables Under the Deck.
Tilt and Swivel Mount
Control Head Base Assembly
Mount Arms
B. If you have a tilt and swivel mount, follow
these steps:
1. Insert the mount arms into the base.
Then, hold the mount arms in place as
you turn the base upside down.
2. Insert the swivel ring into the base, with
Base
the countersink holes for the arm screws
facing out.
3. Secure the mount arms with the four #6
Swivel
Ring
screws provided (Figure 5). Hand tighten
only!
Countersink
Side Out
Arm Screws,
4 #6 x7/16″
Figure 5
4. Set the assembled control head base in
place on the mounting surface. Mark the
four mounting screw locations with a
pencil or punch.
5. Set the base aside, and drill the four
mounting screw holes using a 9/64″ bit.
6. Proceed to Routing the Control Head
Cables Under the Deck.
4
Control Head Installation
Routing the Control Head Cables Under the Deck
Use the following steps to route the control head cables under the deck.
NOTE: Under the deck cable routing is not always possible. If this is not an option,
the cables should be routed and secured above deck.
NOTE: See the installation section for your transducer type in order to plan the
location of the transducer and cable route.
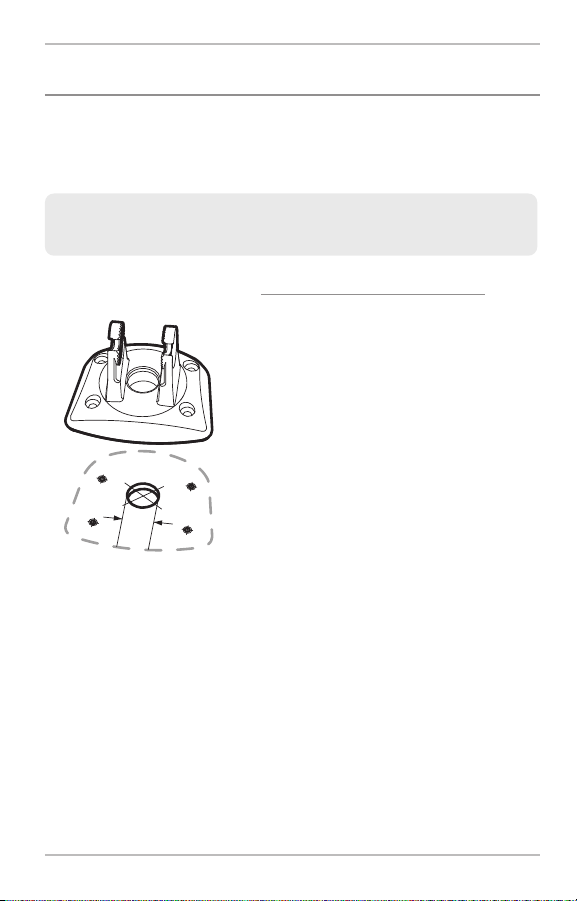
Tilt Mount or Tilt and Swivel Mount
Control Head Base
Figure 6
Tilt Mount or Tilt and Swivel Mount:
1a. Mark and drill a 3/4″ hole as shown in
Figure 6. Route the cables through the
hole. The cables will exit through the
center hole on the control head base.
1b. If the cables cannot be routed directly
beneath the control head base, mark
and drill a 3/4″ hole that will allow you
to run the cables close to the control
head base.
5
Control Head Installation
Attaching the Control Head to the Base
Follow these steps to attach the control head to the already-assembled base:
NOTE: The transducer cable and power cable should be routed prior to securing the
mounting bracket to the deck.
1. Apply marine-grade silicone sealant to the drilled holes for the
mounting bracket.
2. Place the mounting bracket on the mounting surface, aligning with the
drilled holes.
3. Insert the four #8 Phillips countersink wood screws into the mounting
holes and hand tighten only!
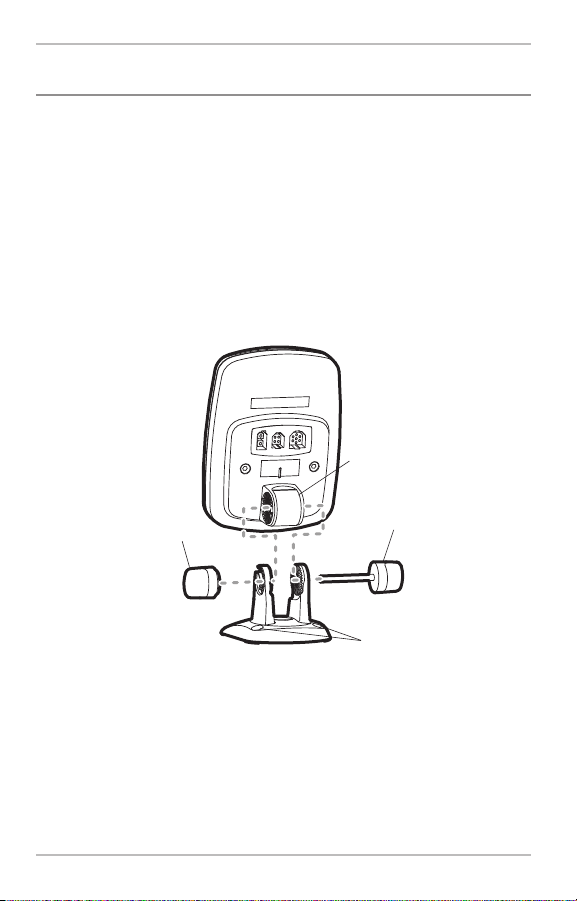
Pivot Knuckle
Gimbal Knob
Figure 7
Thumbknob Bolt
Mounting Holes
4. Insert the thumbknob bolt through the pivot knuckle on the control head
(Figure 7).
5. Align the pivot knuckle with the mount base arms and slide into place,
twisting slightly if necessary, until the unit is firmly seated.
6. Rotate the control head to the desired angle and hand tighten the
thumbknob bolt.
7. Thread the gimbal knob onto the pivot bolt and tighten.
6

Control Head Installation
Attaching the Cables to the Control Head
Follow these stepsto attach the power andtransducercablesto the control head:
1. Matching the cable plugs to the shape
and orientation of the sockets, insert the
transducer and power cables into the
correct sockets on the control head
(Figure 8).
Power Serial Transducer
Figure 8
You are now ready to install the transducer. See Transducer Installation
Overview and then find the section that refers to your transducer type.
NOTE: The serial port is for authorized service
personnel use only. Do not connect a cable to
this port. The serial port does not require a port
cover.
2. With the control head in place, tilt
and/or swivel the unit through its full
range to make sure there is enough
cable slack for the unit to move freely.
Hand tighten the thumbknob bolt when
you achieve the desired position for the
control head.
7

Transducer Installation Overview
Transducer Installation Overview
The transducer can be installed on the transom of the boat, inside the hull, or
onto a trolling motor, depending on your transducer type. The type of
transducer you have will also determine how the cable will be routed. Go to
the section that describes your transducer, and follow the steps to position
and mount the transducer on your boat.
NOTE: Due to the wide variety of hulls, only general instructions are presented
in this installation guide. Each boat hull represents a unique set of requirements
that should be evaluated prior to installation. It is important to read the
instructions completely and understand the mounting guidelines before
beginning installation.
NOTE: If the included transducer will not work for your application, you may
exchange it, NEW and UNASSEMBLED, with mounting hardware included, for a
transducer appropriate for your application — often at very little or no charge
depending on the transducer. Call the Humminbird® Customer Resource Center at
1-800-633-1468 for details and pricing, or visit humminbird.com.
NOTE: In addition to the hardware supplied with your transducer, you will need a
powered hand drill and various drill bits, various hand tools, including a ruler or
straightedge,a level, a 12″ plumb line (weighted string or monofilament line), marker
or pencil, safety glasses and dust mask, and marine-grade silicone sealant.
NOTE: Whendrillingholesin fiberglass hulls, it is best tostartwitha smaller bit and use
progressively largerdrill bitsto reducethe chance of chippingor flaking theoutercoating.
Transom Transducer Installation
Locating the Transducer Mounting Position
Turbulence: You must first determine the best location on the transom to
install the transducer. It is very important to locate the transducer in an area
that is relatively free of turbulent water. Consider the following to find the best
location with the least amount of turbulence:
8
Transom Transducer Installation
NOTE: Traveling over 65 mph with the transducer in the water is not recommended for
theTriBeamtransom mount transducer,as damagemightoccur. Ifspeedabove65 mph
is critical, you may want to consider mounting it inside the hull. See Inside the Hull
Transducer Installation for details.
Areas of Possible Turbulence
Rivets Strakes
Transom Hull
Figure 9
Stepped Hull
Step
Figure 10
• As the boat moves through the water,
turbulence is generated by the weight of the
boat and the thrust of the propeller(s) — either
clockwise or counter-clockwise. This turbulent
water is normally confined to areas
immediately aftof ribs,strakesor rows of rivets
on the bottom of the boat, and in the
immediate area of the propeller(s). Clockwise
propellers create more turbulence on the port
side. On outboard or inboard/outboard boats,
it is best to locate the transducer at least 15″
to the side of the propeller(s) (Figure 11).
•
The best way to locate turbulence-free wateris
to view the transom while the boat is moving.
Thismethod is recommended if maximum highspeed operation is a high priority. If this is not
possible, select a location on the transom where
the hull forward of this location is smooth, flat
and free of protrusions or ribs (Figure 9).
Rib
• On boatswith stepped hulls, it maybe possible
to mount the transducer on the step. Do not
mount the transducer on the transom behinda
step to avoid popping the transducer out of the
water at higher speeds. The transducer must
remain in the water for the control head to
maintain the sonar signal (Figure 10).
9
Transom Transducer Installation
• If the transom is behind the propeller(s), it may be impossible to find an
area clear from turbulence, and a different mounting technique or
transducer type should be considered, such as an Inside the Hull
Transducer.
• If you plan to trailer your boat, do not mount the transducer too close to
trailer bunks or rollers to avoid moving or damaging the transducer
during loading and unloading of the boat.
• If high speed operation is critical, you may want to consider using an
In-Hull transducer instead of this Transom Mount transducer.
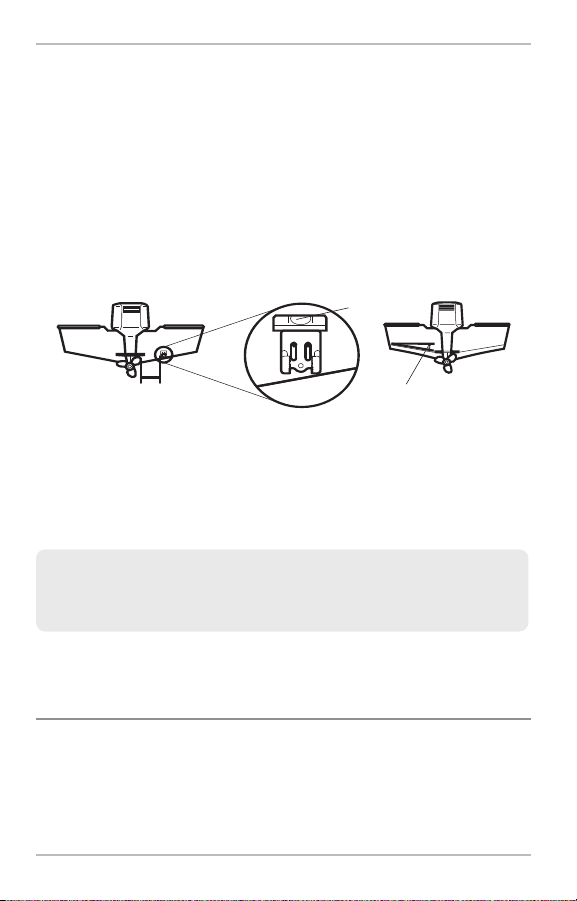
Level
Deadrise Angle
Find a turbulence-free location at least 15” from the propeller(s)
and not in line with trailer bunks or rollers. (Figure 11).
NOTE: The hydrodynamic shape of your transducer allows it to point straight down
without deadriseadjustment (Figure 12).
NOTE: If you cannot find a transom mount location that will work for your high-speed
application,find an In-Hull Transducer by contacting our CustomerResource Center at
either 1-800-633-1468 or by visiting our Web site at humminbird.com.
Figure 12
Preparing the Mounting Location
After determining themounting location for thetransducer, followthe stepsbelow
to position and mount the transducer bracket.
10
Loading…
View the manual for the Humminbird PiranhaMax 153 here, for free. This user manual comes under the category GPS devices and has been rated by 3 people with an average of a 8.7. This manual is available in the following languages: English. Do you have a question about the Humminbird PiranhaMax 153?
Ask your question here
Frequently asked questions
Can’t find the answer to your question in the manual? You may find the answer to your question in the FAQs about the Humminbird PiranhaMax 153 below.
What is the weight of the Humminbird PiranhaMax 153?
The Humminbird PiranhaMax 153 has a weight of — g.
What is the height of the Humminbird PiranhaMax 153?
The Humminbird PiranhaMax 153 has a height of 155 mm.
What is the width of the Humminbird PiranhaMax 153?
The Humminbird PiranhaMax 153 has a width of 109 mm.
What is the depth of the Humminbird PiranhaMax 153?
The Humminbird PiranhaMax 153 has a depth of 82 mm.
What is the screen size of the Humminbird PiranhaMax 153?
The screen size of the Humminbird PiranhaMax 153 is 4 «.
What is the screen resolution of the display of the Humminbird PiranhaMax 153?
The screen resolution of the Humminbird PiranhaMax 153 is 160 x 128 pixels.
Is the manual of the Humminbird PiranhaMax 153 available in English?
Yes, the manual of the Humminbird PiranhaMax 153 is available in English .
Is your question not listed? Ask your question here
Обзор эхолота Humminbird PiranhaMAX 153
Североамериканская компания Humminbird более 40 лет производит цифровую технику для охоты и рыбалки. Хамминберд — лидеры в инновационных разработках. Приборы этой марки всегда продуманы до мелочей, даже если речь идёт о самых простых моделях техники. Такой простой и очень полезный на рыбалке гаджет — эхолот Humminbird PiranhaMAX 153. Модификация Humminbird 153 — базовая модель гидроэхолокационного сканера.
Обзор модели
Эхолот Humminbird PiranhaMAX 153 — простая, но при этом функциональная модификация портативных гидроэхолокационных систем Хамминберд. Система исследования водной акватории состоит из датчика и цифрового аналитического блока.
Эхолот Хамминберд 153 делает любую рыбалку приятной. Ведь он позволяет выявить участки с большим скоплением рыбы или определить какую-то редкую крупную рыбу. Характеристики эхолота Humminbird 153 не уступают технической составляющей многих эхолотов, относящихся к премиальному сегменту.
Как работает эхолот
Принцип работы эхолота Humminbird PiranhaMAX 153 — традиционный принцип функционирования всех гидроэхолокационных систем. Работает прибор по следующей схеме:
• Пользователь с цифрового блока управления посылает сигнал на датчик системы.
• Получив команду “Старт” от блока управления, датчик отправляет в водную толщу зондирующие лучи.
• Информация о составе водной толщи, об объектах на пути зондирующего луча определяется по скорости и времени прохождения пути от датчика и обратно лучом.
• Информация от каждого прохождения лучом пути туда и обратно аккумулируется в цифровом блоке обработки данных.
• На основе всех собранных данных и в режиме реального времени (или с некоторой задержкой) составляется общая картина состояния исследуемого участка водной толщи.
• После того, как система согласно заложенным алгоритмам, проанализирует данные, на информационный дисплей выводится информация в общем виде. Свод данных предоставляется в виде схематичного графического изображения.
Принципиально простая схема зондирования пространства водной акватории эхолотом Humminbird 153 даёт отличный результат.
Технические характеристики
Производитель Хамминберд даёт эхолоту модификации PiranhaMAX 153 следующие технические характеристики:
• Тип трансдьюсера — двухлучевой (83 и 200 кГц, 20 и 60 градусов).
• Питание системы — 12 В.
• Размер информационного дисплея — 4 дюйма.
• Длина кабеля — 6 метров.
• Тип экрана — ЖК с подсветкой.
• Класс влагопылезащиты — IPX7.
• Потребляемая мощность — 200 Вт.
Независимые эксперты заявляются о полном соответствии официальных характеристик и характеристик, установленных опытным путём.
Основные возможности эхолота
Эхолот Humminbird 153, цена которого относится к низким, предоставляет поклоннику рыболовецкого ремесла широкий спектр возможностей:
• Определение факта наличия или отсутствия рыбы.
• Определение размера рыбы по шкале “малая-средняя-крупная” особь.
• Определение глубины нахождения рыбы.
• Замер глубины исследуемого участка водоёма.
• Замер температуры воды.
• Замер температуры воздуха.
• Определение объектов в водной толще (коряги, камни, водные пузыри, искусственные предметы).
• Исследование состава донной толщи.
• Исследование донного рельефа.
• Выбор режима отображения информации: автоматический или пользовательский.
Для максимально эффективного использования эхолота Humminbird PiranhaMAX 153 нужно внимательно изучить инструкцию перед началом применения.
Как пользоваться эхолотом
Включение эхолота Хамминберд 153 осуществляется кнопкой POWER с соответствующим обозначением. Далее нужно дождаться включения и загрузки системы. Когда система загрузится, можно погружать датчик в воду.
После погружения датчика нужно выбрать режим отображения информации. Это может быть либо автоматический режим, либо пользовательский. Использовать эхолот этой модификации в автоматическом предустановленном режиме сможет даже новичок. А для работы с системой в режиме индивидуальной настройки нужны опыт и знания.
После завершения использования эхолота нужно выключить электропитание системы.
Преимущества и недостатки
У Humminbird PiranhaMAX 153, как и любого гидроэхолокационного прибора, есть и преимущества, и недостатки. Но минусы покупки эхолота Humminbird PiranhaMAX 153 скорее относятся к несущественным, чем к важным. Плюсы применения на рыбалке такого прибора существеннее минусов. Humminbird 153 отзывы, как правило, имеет положительные.
Преимущества
• Компактный размер. Это удобно при транспортировке портативной гидроэхолокационной системы.
• Маленький вес. С прибором легко управляться, это не требует значительных физических усилий.
• Длинный кабель. Шестиметровой длины хватает для исследования доступного для рыбалки многими удилищами чистка водной акватории.
• Отлично определяет факт наличия рыбы. Безошибочность высокой степени редкость среди портативных эхолотов.
• Точно распознаёт размер рыбы в градации (крупная, средняя, маленькая). Это удобно, когда есть цель поймать рыбу какой-то конкретной породы или получить богатый улов.
• Определяет глубину обитания той или иной рыбы. Эта информация позволяет оперативно корректировать действия во время охоты на рыбу.
• Комфортное для слуха человека и при этом заметное звуковое оповещение о факте обнаружения рыбы.
• Отличный уровень влагозащиты.
• Humminbird 153 по цене относится к низкому ценовому сегменту.
• Лаконичный дизайн.
• Система имеет понятный пользовательский интерфейс.
• Двухгодичный срок гарантийного обслуживания.
• Сервисные центры с профессиональными мастерами.
Недостатки
• Некоторые пользователи отмечают, что аккумуляторная батарея не выдерживает в автономном режиме работы заявленный производителем срок.
• Комплект поставки включает только базовый набор. Некоторые удобные аксессуары нужно докупать самостоятельно.
Использование на рыбалке эхолота Humminbird PiranhaMAX 153 — способ получить большой улов. Купить Humminbird 153 можно в специализированных магазинах товаров для охоты и рыбалки. Либо можно заказать прибор у официального распространителя. На все эхолоты марки Humminbird модификации PiranhaMAX 153 предоставляется гарантия. Срок обслуживания прибора по гарантии — 2 года. Сервисные центры Хамминберд есть во многих городах мира.
Обзор эхолотов для рыбалки: для каяка, лодки ПВХ, байдарки. Эхолоты – устройства, определяющие рельеф дна, и позволяющие быстро найти места для хорошего улова.
-
Страница 1
Inst alla tion and Operati ons Manua l 532044-1_B Inst alla tion and Operati ons Manua l P i r a n h a M A X 1 4 3 , 1 5 3 , an d 18 0 P i r a n h a M A X 1 4 3 , 1 5 3 , an d 18 0 PiranhaMAX_Manual_532044-1EN_B.qxp:Layout 1 4/25/12 12:47 PM Page A[…]
-
Страница 2
N w an di N un Hum regis Baek regis © 20 A i p r a p T h T hank Y ou! T han k you for cho osin g Hummi nbir d®, the #1 name in fishf ind ers . Hummi nbir d® has built its reput ati on by desig nin g and manuf act urin g top- qua lity , tho rou ghl y re liab le mar ine equ ipme nt. Y our Hummi nbir d® is desig ned for tro uble -fr ee use in ev e[…]
-
Страница 3
NO TE: The pro ced ure s and fea tur es desc rib ed in this manu al are subje ct to cha nge wit hout not ice. Th is ma nua l was wri tte n in Engl ish and may ha ve bee n tra nslat ed to ano ther la ngu age . Hum minb ird ® is not res pons ibl e for in cor rec t tr ans lat ions or dis crep anc ies betw een docu men ts. NO TE: Il lus tr ati ons in […]
-
Страница 4
T ab The L S D Z C F D F S Mai T rou Inte 1- Y e Hum Retu Spe Con N on im in vi 1- T abl e of Con ten ts Installation Overview 1 Control Head Installation 2 Determine Where to Mount ……………………………………………………………… 2 Connect the Pow er Cable to the Boat ……………………………………………… 2[…]
-
Страница 5
iv T abl e of Con ten ts The Menu System 30 Light (Setting Not Saved in Memory) ……………………………………………….. 30 Sensitivity (Setting Saved in Memory) ……………………………………………… 30 Depth Range (Setting Not Saved in Memory) …………………………………… 31 Zoom (Setting Not Saved in[…]
-
Страница 6
In Befo care Ther Piran • • • PiranhaMAX_Manual_532044-1EN_B.qxp:Layout 1 4/25/12 12:47 PM Page v[…]
-
Страница 7
Installation Overvie w Befo re you sta rt inst all atio n, we en coura ge yo u to rea d th ese ins truc tio ns carefully in order to get the full benefit from your PiranhaMAX. There are t hree bas ic insta llat ion tas ks that you must perfo rm for t he PiranhaMAX: • Installing the control head • Installing the transducer • T esting the compl[…]
-
Страница 8
NO co ins NO a s Figu Fig Control Head Installation Determine Where to Mount Beg in the insta lla tion by d eter mini ng where to m oun t t he control head. Consider the following to determine the best location: • T o check the locat ion plan ned for the contr ol hea d, test run the cable s for the pow er an d transducer . See the installation se[…]
-
Страница 9
NO TE: Humminbird® is not responsible for over-voltage or over-current failures. The cont rol hea d m ust have ade quat e p rote ctio n th roug h t he prop er sele ctio n a nd installation of a 1 amp fuse. 1a. I f a f use term inal is availa ble , u se cri mp-o n type el ect rica l conn ecto rs (not included) that match the terminal on t he f use […]
-
Страница 10
Rou Use NO the Figure Tilt NO loc Assembling the Control Head Base Y our control head base will either have a tilt mount or a tilt and swivel mount. Refer to procedu res A or B below to a ssemble and m ount the cont rol head base. A. If you have a tilt mount, follow these steps: 1. Set the tilt mount control head base in place on the mounting surfa[…]
-
Страница 11
Routing the Control Head Cables Under the Deck Use the following steps to route the control head cables under the deck. NO TE: Under the deck cable routing is not always possible. If this is not an option, the cables should be routed and secured above deck. T ilt Mo unt or T ilt an d Swi vel Moun t: 1a. Mark and drill a 3/4″ hole as shown in F[…]
-
Страница 12
Att F ol lo Y ou Over F Attaching the Control Head to the Base Follow these steps to attach the control head to the already-assembled base: NO TE: The transducer cable and power cable should be routed prior to securing the mounting bracket to the deck. 1. Apply marine -grade silicon e sealant to the dr illed ho les for the mounting bracket. 2. Pl a[…]
-
Страница 13
Attaching the Cables to the Control Head F ol lo w the se ste ps to att ac h the po we r and tr ans du ce r cab les to th e con tro l hea d: 1. Ma tch ing t he ca ble p lugs t o t he s hape an d orie ntat io n of the soc ke ts, ins er t the tr ansd uce r and pow er ca ble s into the correct socket s on the cont rol head (F igur e 8). NOTE: The seri[…]
-
Страница 14
A Rivet T ra Figure Step Figure NO th e is c T r a T ransducer Installation Ov erview The transducer can be installed on the transom of the boat, inside the hull, or ont o a troll ing motor, de pen ding on yo ur t rans duce r t ype . The type of transducer you have will also determine how the cable will be routed. Go to the section th at describes […]
-
Страница 15
• As the boat moves through the water , turbul ence is gene rated by the we ight of the boa t and the thrus t of the pro peller (s) — ei the r clo ckwi se or count er -clo ckwi se. Thi s turbu lent water is normally confined to areas imm ediat ely aft of ribs , stra kes or ro ws of riv ets on the bottom of the boat, and in the imme diate are a of[…]
-
Страница 16
Us M D D P o • If the transom is behind the propeller(s), it may be impossible to find an area clear from turbu lenc e, and a d iffere nt mount ing techn ique or tran sduc er typ e shou ld be con sid ered, s uch as an In sid e the Hul l T ransducer . • If you plan to trailer your boat, do not mount the transducer too close to trai ler bun ks o […]
-
Страница 17
1. M ak e sur e th at the bo at is le vel on the tra ile r , bo th fr om por t to s ta rb oar d a nd fro m b ow to st er n, by plac ing you r lev el on the dec k of th e bo at , fir st in on e dir ect ion, the n in th e oth er . 2. H old the moun tin g bra cke t aga inst the tr ans om of the bo at in the loc atio n y ou hav e s elec ted (F igu re 1[…]
-
Страница 18
2. NO the Hol d mou to th Rib 4. Ma ke sur e tha t the dri ll bit is per pe nd ic ula r to th e ac tua l sur fa ce of the tr ans om, NO T pa ra llel to the gr oun d, bef ore yo u dri ll. Usin g a 5/3 2” bi t, dri ll th e tw o hol es onl y to a dep th of ap pr oxim atel y 1” . NO TE: On fibe rgla ss hu lls , it is bes t to use pro gre ssiv ely l[…]
-
Страница 19
2. Pla ce the two ratc hets , one on eithe r sid e of the tran sduc er kn uckl e, so tha t the beads on each ratch et line up with the desir ed pos itio n numbe r on the knuck le (F igu re 18a). If you ar e sett ing the rat chet s at posi tion 1, the beads on eac h ratc het wil l line up with the rib on the tr ansd uce r knu ckle to for m one conti[…]
-
Страница 20
Sea Figu Fig 3. Put the piv ot bo lt thr ough the as sem bly to ho ld it in pos it ion and lo ose ly ins tall the nut , bu t do NOT ti ghte n the nut at th is tim e (F igur e 19). CA UTI ON! Do not use a hi gh spee d dr iv er on th is com bina tio n of fa ste ner s. Han d tigh ten only . 4. Align th e mounti ng bracket transducer assembly with the […]
-
Страница 21
6. Adju st the tra ns duc er asse mb ly ve rti call y , un til the se am on th e lea ding edge of the tr ansd uc er (the edg e clo ses t to the tra nso m of the boat ) is le ve l and just slig ht ly bel ow th e hul l (Fi gur e 23) . NO TE : T he tr an sd uc er has a na tur al dow nwa rd sla nt of 4-5 deg re es fro m le ad in g edg e (c lo se st to […]
-
Страница 22
Figu Fig Routing the Cable The transducer cable has a low profile connector , which must be routed to the point where the control head is mounted. There are several ways to route the transd ucer c able t o the a rea where the co ntrol h ead is i nstal led. The m ost common procedure routes the cable through the transom into the boat. NO TE: Y our b[…]
-
Страница 23
3. P la ce t he e scu tc he on p lat e ove r th e cable hole a nd use it as a gui de to ma r k th e t wo e sc u t ch e on p l at e mounti ng h oles. Remove th e p late, drill two 9/6 4″ diam eter x 5/8″ deep h oles, an d th e n fi l l bo th h ol e s wi th marine -grade silico ne se alant. Plac e the escutc heon plate over the cable hole a[…]
-
Страница 24
NO be hu 6. 7. NO ch Figu T est and Finish the Installation On ce yo u ha ve ins tal led bo th th e con tr ol head and th e tra nsom tra nsd ucer , and hav e rout ed all the cables , you must perform a final test befo re locking the tr ansd uc er in pla ce. T est ing shou ld be per fo rm ed wit h the boa t in th e wat er . 1. Press POWER once to tu[…]
-
Страница 25
NOTE: It i s ofte n neces sary t o make several incre mental transducer adjustment s before optimum high speed performance is achie ved. Due to the wide variety of boat hulls, howe ver, it is not always possible to obtain high speed depth readings. 6. On ce yo u ha ve re ac he d a co ns ist en tly goo d so nar sig nal at th e de si red sp eed s, y […]
-
Страница 26
Det Deci follo Figu Figu I ns i d e th e H ul l T r a n sd u c e r In s ta l l at i o n In -hu ll mou ntin g ge ner all y pr oduc es goo d re sult s in sin gl e thi ckne ss fib ergl ass- hulled boats. Humminbird ® cannot guarantee depth perfo rmance when tr an smi tti ng and rec eivin g th ro ugh the hul l of the boa t, sinc e some sign al los s o[…]
-
Страница 27
Determine the T ransducer Mounting Location Decide where to install the transducer on the inside of the hull. Consider the following to find the best location: • Observe the outside of the boat hull to find the areas that are mostly free from turbulent water . Av oid ribs, strak es and ot he r p rot r us io n s, a s t h es e c re a te turbulence […]
-
Страница 28
Rou 1. P er 1. 2. 3. NO Figure T rial Installation Y ou will not be able to adjust the mounting after an inside the hull transducer is install ed. It is best, therefo re, to perf orm a trial installa tion firs t that includes running the boat at various speeds, in order to determine the best mounting area before permanently mounting the transducer […]
-
Страница 29
Route the Cable 1. Once the mounting location is determined and you have marked the position of the transducer , route the cable from the transducer to the control head. P ermanently Mount the T ransducer 1. Make sure the position of the transducer is marked. 2. Y ou may have to disconnect the cable to the control head and reconnect it at the end o[…]
-
Страница 30
P ow Pres relea unit T r ol lin g Moto r T ra ns duc er Ins tall atio n Severa l styles of the transd ucer are com pati ble w ith t rolli ng m oto r mo unti ng. (Figu re 32) . If you have a t roll ing mo tor brac ket, refe r to the se parat e inst all atio n ins truc tio ns t hat are in clud ed wit h t he bracket. Y ou may purch ase a T rolli ng Mo[…]
-
Страница 31
P owering ON and OFF Press and hold the POWER-MENU key until the PiranhaMAX powers on, then release the key . T o power off, press and hold the POWER-MENU key until the unit shuts down. Wh en the Piran haMA X pow ers on, the Star t-Up menu tem- pora rily app ears . From t his men u, selec t eithe r Start-Up, Simulator, or Setup. • Use Start-Up fo[…]
-
Страница 32
What Y ou See On the Display The PiranhaMAX di splays underwater information in an easy-to-understand form at. The top of t he disp lay cor resp onds t o the wate r surfa ce at the transduc er , a nd the bo ttom of t he display correspon ds to the D epth Ran ge automatically selected for the current water depth. Th e Bottom Contour varies as t he d[…]
-
Страница 33
PiranhaMAX 143 (Single Beam) and PiranhaMAX 153 (Dual Beam) Display PiranhaMAX 180 (T ri Beam) Display * Unit s with 83 kHz Dua l Beam sona r show targ ets in the wid e beam as holl ow fis h icon s. ** Uni ts with 455 kHz T ri Beam son ar show tar gets in the left beam as left -loo king fis h sym bols , and tar get s in the rig ht bea m as righ t-l[…]
-
Страница 34
Sin The are a cond Du Th e (60° bott in th is ide in bo cond T ri The elem strai of co bott area bott dept PiranhaMAX Sonar T echnolog y T he Pira nhaM AX is the easi est to use fishfin der ever . For most angl ers , all you’ ll ever need to do is power on and fish ! The Pir anha MAX aut omat ical ly determines depth and makes adjustments to kee[…]
-
Страница 35
Single Beam Sonar The PiranhaM AX 143 us es a 200 kHz single beam sonar system with a 20° are a o f c over age . B oa t s pe ed, wa ve a ct ion , b ot to m h ard nes s, wa ter condit ions and trans ducer inst allatio n ca n a ll a ffect depth ca pabilit y . Dual Beam Sonar Th e PiranhaMAX 153 uses a 200/83 kHz dual beam sonar system with a wide (6[…]
-
Страница 36
Pres de fa to fo [P ir a N th op Pr es ar ea th at up pe an d (O ff , Ther dept T he Menu System A sim ple m enu s yste m all ows you t o acc ess yo ur Pi ranha MAX a djus tab le settings. T o activate the menu system, press the POWER-MENU key . Press the POWER-MENU key repeatedly to display the PiranhaMAX menu settings, one at a ti me. When a menu[…]
-
Страница 37
Depth Range (Setting Not Saved in Memory) Pres s the POWER- MENU key until DEPT H RANGE appears. Aut omatic is the de fa ul t set ting . Whe n in aut om ati c, the lo we r ran ge wil l be adj ust ed by the uni t to fo llow the bottom . (Au to, 15 to 600 ft [PiranhaM AX 143/1 53], 15 to 800 ft [P ir an haM AX 18 0], Def aul t = Au to) NO TE: In manu[…]
-
Страница 38
Pres Fil te so ur (On, Pres to se Whe are POW Men • • • Scro Ma k un til Scro Chart Speed (Setting Saved in Memory) Press t he POW ER-ME NU key un til CH ART SPE ED app ears. Se lect a sett ing from 1-5 to increase or decrease the chart speed, where 1 is the slowest and 5 is the fastest chart speed. Chart speed determines the speed at which t[…]
-
Страница 39
Filter (Setting Saved in Memory) Press the P OWER- MENU key unti l FILTER appea rs. Se lect eithe r Off or On . Fil ter adj us ts t he son ar filt er to l im it int erf ere nce on t he disp lay fro m so urc es s uch a s yo ur b oa t en gi ne, t ur bul en ce , or o th er s on ar d evi ce s. (On, Off, Default = Off) Setup Menu (Setting Not Saved in M[…]
-
Страница 40
Fish ID+ TM (Setup Menu) (Setting Saved in Memory) Make sure that the Setup menu is selec ted, then press the POWER-M ENU key until FISH ID+ TM appear s. Selec t either Off to view “raw” sonar return s or On to view Fish symbols. Fish ID+ TM uses advanced sig nal processing to in terpret sonar returns, and will display a Fish Symbol when very s[…]
-
Страница 41
Structure ID® represents weak returns as light pixels and stro ng return s a s d ark pix els. This h as the benefit of ensuring that strong returns will be clearly visible on the display . Bla ck (B otto m Bla ck) d isp lays a ll pi xels below t he bott om contou r as black, regard less of signal stre ngth. This has th e ben efit of p rovidi ng a […]
-
Страница 42
Ma Y our virtu Pi ra n If th e cl oth Do n th e l Wh e clea sc ra t If yo redu tr ans If yo tim e cl ing bu bb fi nge Ne ve ge ne Battery Alarm (Setup Menu) (Setting Saved in Memory) Make sure that the Setup menu is selected, then press the POWER-MENU key until BA TTERY ALARM appears. Select Off or 8.5 to 13.5 V olts. Battery Alarm sou nds w hen t […]
-
Страница 43
Maintenance Y our Piranha MAX is designed to pro vide years of troubl e-fre e oper ation with virtua lly no maintenanc e. Follo w these simple proce dures to ensur e your Pi ra nh aMA X con tin ues to deli ver top perf orma nce. If th e uni t come s int o con tact with salt spr ay , wipe the af fe cte d sur fac es wit h a cl oth damp en ed in fre s[…]
-
Страница 44
3. T If tr d se yo P tr tr ac b co an tr th 4. W in T h R su 5. T tu C an el fr p 6. I Y o ar ad ta ai T roubleshooti ng Do no t a tte mpt to r epai r t he Pi ranha MAX yo urse lf. There are n o user -serviceable parts inside, and specia l tools and techniques are required for assembly to ensure the waterpr oof integrity of the housing. Repairs sho[…]
-
Страница 45
3. T her e is no bo tt om re adin g vis ible on the dis pla y . If th e loss of bo ttom i nfo rmati on occ urs on ly at h igh bo at sp eeds, th e tra nsduc er needs adjust ing – see your Pira nhaMA X Inst alla tion Guide for deta ils. Als o, in very dee p water , it may be ne cessa ry to incr ease the se ns iti vit y set ti ng ma nu all y to mai […]
-
Страница 46
Int A se out s thi s th e a mus t 7. M y unit lose s pow er at hig h spe eds . Y our Pir an haM AX ha s ov er — v ol tag e pr ot ect ion th at tur ns th e un it of f wh en in pu t vo lta ge ex ce ed s 20 VDC . Som e ou tbo ard mot or s do no t eff ect iv ely re gul at e the po wer out put of the engi ne’s alte rna tor and can pro duc e vol tage i[…]
-
Страница 47
International Purchases A separ ate war ra nty is pr ovi ded by inter nation al distr ibutor s for unit s pur cha sed out side the Unit ed States . T his war ran ty is incl uded by you r loca l dis trib uto r and thi s dis trib utor maint ains loc al servi ce for your unit. W arr anties ar e onl y va lid in th e are a of in te nd ed dis trib utio n[…]
-
Страница 48
Hu Even serv W e your fact o rece rece All r facto testi Afte asse Any addi Y ou flat r W e parts in th to o with PL Humminbird® 1- Y ear Limited W arranty W e wa rra nt the origi nal ret ail pur chas er that pro duct s made by Hummi nbir d® ha ve been man ufa cture d fre e fro m def ects in mate ria ls and work man ship . T his warranty is effec[…]
-
Страница 49
Humminbird® Service P olicy Even though you’ll probably never need to take advantage of our incredible service policy , it’s good to know that we back our products this confidently . W e do it because you deserve the best. We will make every effort to repair your un it wit hin th ree bus ine ss days fro m t he rec eipt of yo ur uni t a t[…]
-
Страница 50
Spe De pt P ow Op er Ar ea Ar ea Ar ea T arg e P ow L CD T ra ns T ran N N ho ty Returning Y our Unit for Service Bef ore send ing yo ur unit in for rep air , plea se cont act the fa cto ry , eith er by phon e or by ema il, to obta in a Repai r Au thor iza tion Numb er for your unit. NO TE: Please do not return your Humminbird® to the store for se[…]
-
Страница 51
Specifications De pth Capa bili ty .. .. … …. …. …. …. …. …. …. …. …. …. .. Pi ra nhaM AX 143/ 153: 600 ft (185 m) Pi ra nhaM AX 180: 800 ft (250 m) P owe r Out put …. …. …. …. …. …. …. …. …. …. …. …. …. … … Pir anh aMAX 143: 800 W att s (PT P) Pi ra nhaM AX 153/ 180: 1600 W att s (PTP ) Op er ati[…]
-
Страница 52
( (t ENV IRON MEN T AL COM PLIAN CE S T A TE MEN T: It is the in ten tio n of John son Out door s Marin e Ele ctr oni cs, Inc. to be a res pon sibl e corp ora te cit izen , oper atin g in com plia nce w ith k no wn an d app lic able en viro nment al reg ula tio ns, and a g ood nei ghbo r in the commu niti es wher e we mak e or se ll our pro duc ts.[…]
-
Страница 53
47 Contact Humminbird® Co nta ct the Hum min bi r d® Cus tom er Res our ce Ce nt er in an y of the fo llo win g wa ys : By T e le ph one (M ond ay — Fr ida y 8:0 0 a.m . to 4:3 0 p.m . Ce nt r al Sta nda rd T ime ): 1- 800 -6 33 -1 46 8 By e-m ail (t ypi ca ll y we re spo nd to you r e-m ai l wi thi n th re e bus in es s day s): se rvi ce @h um m[…]
Инструкция HUMMINBIRD PIRANHA143x/sysfiles/files/piranhamax-143.pdf
Инструкция HUMMINBIRD 153x/sysfiles/files/piranhamax-153x%281%29.pdf
Инструкция HUMMINBIRD 150/sysfiles/files/piranhamax-150.pdf
Инструкция HUMMINBIRD 160/sysfiles/files/piranhamax-160.pdf
Инструкция HUMMINBIRD 165 x/sysfiles/files/piranhamax-165x-1.pdf
Инструкция HUMMINBIRD 176xi/sysfiles/files/piranhamax-176xi.pdf
Инструкция HUMMINBIRD 180x/sysfiles/files/piranhamax-180.pdf
Инструкция HUMMINBIRD 195 Cx/sysfiles/files/piranhamax-195cx.pdf
Инструкция HUMMINBIRD FISHINBUDDY140cx/sysfiles/files/humminbird-fishinbuddi-140cx.pdf
Инструкция HUMMINBIRD SMARTCAST RF15/sysfiles/files/humminbird-smartcast-rf15e.pdf
Инструкция HUMMINBIRD SMARTCAST RF25/sysfiles/files/humminbird-smartcast-rf25e.pdf
Инструкция HUMMINBIRD FISHINBUDDY 110x/sysfiles/files/humminbird-fishinbuddi-110x.pdf
Инструкция HUMMINBIRD 718x/sysfiles/files/humminbird-718x.pdf
Инструкция HUMMINBIRD 728x/sysfiles/files/humminbird-728x.pdf
Инструкция HUMMINBIRD 748 3D/sysfiles/files/humminbird-748-3d.pdf
Инструкция HUMMINBIRD 778Cx HD/sysfiles/files/humminbird-778cx-hd.pdf
Инструкция HUMMINBIRD 788cxi- HD/sysfiles/files/humminbird-788cxi-hd-combo.pdf
Инструкция HUMMINBIRD 788Cxi HD Combo Di/sysfiles/files/humminbird-788cxi-hd-combo-di.pdf
Инструкция Humminbird 788Cxi HD Combo Si/sysfiles/files/humminbird-788cxi-hd-combo-si.pdf
Инструкция HUMMINBIRD 898Сx Combo Si/sysfiles/files/humminbird-898cx-combo-si.pdf
Инструкция HUMMINBIRD 899 Cx HD Combo Si/sysfiles/files/humminbird-899-cx-hd-combo-si.pdf
Инструкция HUMMINBIRD 998Cx Combo Si/sysfiles/files/humminbird-998cx-combo-si.pdf
Инструкция HUMMINBIRD 998 Cx HD Combo Si/sysfiles/files/humminbird-998cx-hd-combo-si.pdf
Инструкция HUMMINBIRD 999Cx HD Combo Si/sysfiles/files/humminbird-999cxi-hd-combo-si.pdf
Инструкция HUMMINBIRD 1198 Cx Combo Si/sysfiles/files/humminbird-1198cx-si-combo.pdf
Инструкция HUMMINBIRD ONIX /sysfiles/files/humminbird-onix-ion.pdf
Чтобы ознакомиться с инструкцией выберите файл в списке, который вы хотите скачать, нажмите на кнопку «Скачать» и вы перейдете на страницу, где необходимо будет ввести код с картинки. При правильном ответе на месте картинки появится кнопка для получения файла.
Если в поле с файлом есть кнопка «Просмотр», это значит, что можно просмотреть инструкцию онлайн, без необходимости скачивать ее на компьютер.
В случае если материал по вашему не полный или нужна дополнительная информация по этому устройству, например драйвер, дополнительные файлы например, прошивка или микропрограмма, то вы можете задать вопрос модераторм и участникам нашего сообщества, которые постараются оперативно отреагировать на ваш вопрос.
Также вы можете просмотривать инструкции на своем устройстве Android
Источник
Эхолот Humminbird PiranhaMAX 153
Североамериканская компания Humminbird более 40 лет производит цифровую технику для охоты и рыбалки. Хамминберд — лидеры в инновационных разработках. Приборы этой марки всегда продуманы до мелочей, даже если речь идёт о самых простых моделях техники. Такой простой и очень полезный на рыбалке гаджет — эхолот Humminbird PiranhaMAX 153. Модификация Humminbird 153 — базовая модель гидроэхолокационного сканера.

Обзор модели
Эхолот Humminbird PiranhaMAX 153 — простая, но при этом функциональная модификация портативных гидроэхолокационных систем Хамминберд. Система исследования водной акватории состоит из датчика и цифрового аналитического блока.
Эхолот Хамминберд 153 делает любую рыбалку приятной. Ведь он позволяет выявить участки с большим скоплением рыбы или определить какую-то редкую крупную рыбу. Характеристики эхолота Humminbird 153 не уступают технической составляющей многих эхолотов, относящихся к премиальному сегменту.
Как работает эхолот
Принцип работы эхолота Humminbird PiranhaMAX 153 — традиционный принцип функционирования всех гидроэхолокационных систем. Работает прибор по следующей схеме:
• Пользователь с цифрового блока управления посылает сигнал на датчик системы.
• Получив команду “Старт” от блока управления, датчик отправляет в водную толщу зондирующие лучи.
• Информация о составе водной толщи, об объектах на пути зондирующего луча определяется по скорости и времени прохождения пути от датчика и обратно лучом.
• Информация от каждого прохождения лучом пути туда и обратно аккумулируется в цифровом блоке обработки данных.
• На основе всех собранных данных и в режиме реального времени (или с некоторой задержкой) составляется общая картина состояния исследуемого участка водной толщи.
• После того, как система согласно заложенным алгоритмам, проанализирует данные, на информационный дисплей выводится информация в общем виде. Свод данных предоставляется в виде схематичного графического изображения.
Принципиально простая схема зондирования пространства водной акватории эхолотом Humminbird 153 даёт отличный результат.
Технические характеристики
Производитель Хамминберд даёт эхолоту модификации PiranhaMAX 153 следующие технические характеристики:
• Тип трансдьюсера — двухлучевой (83 и 200 кГц, 20 и 60 градусов).
• Питание системы — 12 В.
• Размер информационного дисплея — 4 дюйма.
• Длина кабеля — 6 метров.
• Тип экрана — ЖК с подсветкой.
• Класс влагопылезащиты — IPX7.
• Потребляемая мощность — 200 Вт.
Независимые эксперты заявляются о полном соответствии официальных характеристик и характеристик, установленных опытным путём.
Основные возможности эхолота
Эхолот Humminbird 153, цена которого относится к низким, предоставляет поклоннику рыболовецкого ремесла широкий спектр возможностей:
• Определение факта наличия или отсутствия рыбы.
• Определение размера рыбы по шкале “малая-средняя-крупная” особь.
• Определение глубины нахождения рыбы.
• Замер глубины исследуемого участка водоёма.
• Замер температуры воды.
• Замер температуры воздуха.
• Определение объектов в водной толще (коряги, камни, водные пузыри, искусственные предметы).
• Исследование состава донной толщи.
• Исследование донного рельефа.
• Выбор режима отображения информации: автоматический или пользовательский.
Для максимально эффективного использования эхолота Humminbird PiranhaMAX 153 нужно внимательно изучить инструкцию перед началом применения.
Как пользоваться эхолотом
Включение эхолота Хамминберд 153 осуществляется кнопкой POWER с соответствующим обозначением. Далее нужно дождаться включения и загрузки системы. Когда система загрузится, можно погружать датчик в воду.
После погружения датчика нужно выбрать режим отображения информации. Это может быть либо автоматический режим, либо пользовательский. Использовать эхолот этой модификации в автоматическом предустановленном режиме сможет даже новичок. А для работы с системой в режиме индивидуальной настройки нужны опыт и знания.
После завершения использования эхолота нужно выключить электропитание системы.
Преимущества и недостатки
У Humminbird PiranhaMAX 153, как и любого гидроэхолокационного прибора, есть и преимущества, и недостатки. Но минусы покупки эхолота Humminbird PiranhaMAX 153 скорее относятся к несущественным, чем к важным. Плюсы применения на рыбалке такого прибора существеннее минусов. Humminbird 153 отзывы, как правило, имеет положительные.
• Компактный размер. Это удобно при транспортировке портативной гидроэхолокационной системы.
• Маленький вес. С прибором легко управляться, это не требует значительных физических усилий.
• Длинный кабель. Шестиметровой длины хватает для исследования доступного для рыбалки многими удилищами чистка водной акватории.
• Отлично определяет факт наличия рыбы. Безошибочность высокой степени редкость среди портативных эхолотов.
• Точно распознаёт размер рыбы в градации (крупная, средняя, маленькая). Это удобно, когда есть цель поймать рыбу какой-то конкретной породы или получить богатый улов.
• Определяет глубину обитания той или иной рыбы. Эта информация позволяет оперативно корректировать действия во время охоты на рыбу.
• Комфортное для слуха человека и при этом заметное звуковое оповещение о факте обнаружения рыбы.
• Отличный уровень влагозащиты.
• Humminbird 153 по цене относится к низкому ценовому сегменту.
• Система имеет понятный пользовательский интерфейс.
• Двухгодичный срок гарантийного обслуживания.
• Сервисные центры с профессиональными мастерами.
• Некоторые пользователи отмечают, что аккумуляторная батарея не выдерживает в автономном режиме работы заявленный производителем срок.
• Комплект поставки включает только базовый набор. Некоторые удобные аксессуары нужно докупать самостоятельно.
Использование на рыбалке эхолота Humminbird PiranhaMAX 153 — способ получить большой улов. Купить Humminbird 153 можно в специализированных магазинах товаров для охоты и рыбалки. Либо можно заказать прибор у официального распространителя. На все эхолоты марки Humminbird модификации PiranhaMAX 153 предоставляется гарантия. Срок обслуживания прибора по гарантии — 2 года. Сервисные центры Хамминберд есть во многих городах мира.
Источник
Эхолот Humminbird PiranhaMAX 153
#1 Ivan
[/URL]
PiranhaMAX 153x — один из самых простых эхолотов Humminbird по доступной цене. Имеет 4-х дюймовый экран с разрешением 160 х 128 точек, 4-мя уровнями серого и подсветкой. Мощность излучения 100 Вт позволяет ему работать с глубинами до 180 м. Двухлучевой датчик Dual Beam с углами покрытия 20°/200 кГц и 60°/83 кГц делает этот эхолот идеальным инструментом для поиска рыбы на неглубоких озерах и реках. Угол обзора у него в 2 раза больше, чем у всех остальных эхолотов серии PiranhaMAX (кроме PiranhaMAX 180 с углом 90°). Диаметр просматриваемого “пятна” на дне равен текущей глубине, что позволяет увидеть гораздо больше рыбы, особенно на малых глубинах до 15 м.
В стандартную поставку эхолота входит датчик XNT–9–20-T с комплектом крепления на саморезах на транец лодки. Он способен определять температуру воды и поддерживает технологию Fish ID+, отображающую рыбу специальными символами и позволяющую приблизительно определить ее размер, а также, где именно и на какой глубине эта рыба находится.
Основные технологии, применяемые в данном эхолоте:
- Structure ID, позволяющая определить особенности структуры дна;
- Fish ID+, позволяющая определить размер рыбы;
- Bottom Black View, отображающая дно в виде однородной черной полосы;
- Использование встроенного датчика температуры.
Эхолот с двухлучевым датчиком от флагмана линейки PiranhaMAX 170, снятого с производства, но с экраном меньшего разрешения, имеет отличные расширенные функции, которые позволяют настроить сигнализацию обнаружения рыбы или достижения определенной глубины. Настройка увеличения, диапазона глубины и чувствительности позволит персонализировать этот эхолот под заданные требования.
Вы также имеете возможность сохранять различные режимы для дальнейшего использования. Русифицированный интерфейс и подробное руководство на русском языке поможет без проблем разобраться с данным эхолотом.
- Эхолот PiranhaMAX 153xRU (дисплей)
- Датчик основной XNT-9-20-T (длина кабеля — 6 метров)
- Крепёжное основание для дисплея эхолота
- Крепление на саморезах для основного датчика на транец лодки
- Кабель питания эхолота PC-10 (длина — 1.8 метра)
- Цена — 3000 рублей (торг)
Верь . Только СЕБЕ , остальное бери НАЛИЧНЫМИ !
Источник
Общие рекомендации по настройке эхолота Humminbird
1. Компания-производитель Humminbird предлагает большой выбор эхолотов, которые отличаются техническими характеристиками, набором функций и размером экрана. Каждая модель требует своей индивидуальной настройки. Используйте инструкцию именно для вашего эхолота. Она есть в комплекте, или вы можете скачать русифицированную инструкцию в интернете.
2. Не бойтесь экспериментировать с настройками. Вы всегда сможете вернуться к заводским.
3. Старайтесь настраивать эхолот под себя и под свои особенности в рыбалке. Например, если вы рыбачите на глубине 3-5 метров, то исследовать водоем необходимо именно на такой глубине. При помощи ручных настроек можно добиться максимально четкого и точного отображения происходящего на нужной глубине.
4. Настройка чувствительности эхолота Humminbird — единых правил для разных видов рыбалки не существует. На 75% настройка всегда производится в процессе эксплуатации прибора. Далее, постоянно и регулярно нужно их корректировать для получения оптимальных показателей.
В холодной воде чувствительность эхолота можно ставить до 100%. В летнее время рекомендуется уменьшать пока с экрана не исчезнет большинство помех (при увеличении чувствительности увеличивается чувствительность луча).
5. Настройка цветовой гаммы также проводится под ваше восприятие. Методом проб и ошибок проводится настройка при которой изображение максимально четкое. В цветных эхолотах с функциями DI и SI нижнее сканирование необходимо настроить черно-белыми, а боковые лучи — коричневыми.
6. Шумоподавление и очистка изображения — производитель рекомендует устанавливать настройки на самый низкий уровень. Это поможет получить наиболее четкую и качественную картинку. В случае большого количества помех, уменьшаем до приемлемого.
7. Скорость прокрутки экрана необходимо установить на максимальное значение и уменьшать по надобности.
8. Определение рыбы — при включенной функции Fish ID+ рыба будет показываться символом и характерной дугой под ним. Большинство опытных рыболовов отключают ее и ориентируются только по дугам — определяя величину рыбы.
Это всего лишь общие рекомендации, но они помогут новичкам быстро и легко справиться с первыми трудностями, которые могут возникнуть при самостоятельной настройке эхолота Humminbird. Вы всегда можете обратиться к специалистам нашего интернет-магазина за профессиональной консультацией по настройке.
И помните — идеальных настроек не существует!
Источник
Adblock
detector
Humminbird PiranhaMax 153 — это передовой эхолот, разработанный для рыболовов, которые хотят улучшить свои навыки поиска рыбы и изучить подводный мир. Он обладает рядом уникальных особенностей и функций, которые делают его незаменимым инструментом для любого рыболова.
Одна из основных особенностей PiranhaMax 153 — это его инструкция на русском языке, которая позволяет легко понять и использовать все функции этого эхолота. Это особенно полезно для тех, кто не знаком с английским языком или предпочитает использовать свой родной язык при работе с электроникой.
Пиранимакс 153 предлагает широкий выбор режимов работы и функций, таких как отображение глубины, температуры воды, наличие рыбы и ее размер, а также структуры дна. Он оснащен ярким и четким дисплеем, который обеспечивает отличную видимость даже при ярком солнечном свете.
Рекомендации по использованию PiranhaMax 153 включают правильную установку эхолота на лодку, оптимальную настройку чувствительности и четкую интерпретацию данных на дисплее. Кроме того, важно учитывать особенности местности, в которой вы рыбачите, чтобы получить наилучшие результаты от использования эхолота.
Содержание
- Эхолот Humminbird PiranhaMax 153: инструкция, особенности работы, рекомендации
- Основные характеристики
- Инструкция по использованию
- Рекомендации по использованию
- Описание эхолота Humminbird PiranhaMax 153
- Инструкция на русском языке для эхолота Humminbird PiranhaMax 153
- Установка и подключение эхолота
- Основные функции эхолота
- Рекомендации по использованию эхолота
- Результаты и особенности работы эхолота
- Таблица с характеристиками эхолота Humminbird PiranhaMax 153
- Особенности работы эхолота Humminbird PiranhaMax 153
- Рекомендации по использованию эхолота Humminbird PiranhaMax 153
- Вопрос-ответ
- Где можно найти инструкцию на русском языке к эхолоту Humminbird PiranhaMax 153?
- Какие особенности работы имеет эхолот Humminbird PiranhaMax 153?
- Какие рекомендации можно дать по использованию эхолота Humminbird PiranhaMax 153?
- Какие преимущества и недостатки имеет эхолот Humminbird PiranhaMax 153?
Эхолот Humminbird PiranhaMax 153: инструкция, особенности работы, рекомендации
Humminbird PiranhaMax 153 — это простой и функциональный эхолот, который поможет вам определить глубину воды и обнаружить рыбу в реальном времени. В этой статье мы рассмотрим основные особенности работы этого эхолота и дадим рекомендации по его использованию.
Основные характеристики
| Тип датчика | Двулучевой эхолот |
| Мощность | 200 Вт RMS, 1600 Вт пиковая |
| Частота | 200 кГц |
| Экран | 4-дюймовый цветной ЖК-дисплей |
| Разрешение экрана | 320 x 240 пикселей |
| Глубина обнаружения | 600 футов (183 метра) |
Инструкция по использованию
1. Установите эхолот на судно или лодку. Убедитесь, что датчик погружен в воду на достаточную глубину.
2. Включите эхолот, нажав кнопку питания. На экране должно появиться изображение дна и воды.
3. При необходимости настройте яркость и контрастность экрана, используя соответствующие кнопки на передней панели эхолота.
4. Для определения глубины воды обратите внимание на шкалу на левой стороне экрана. Она покажет вам текущую глубину.
5. Чтобы обнаружить рыбу, обратите внимание на экран. Если вы видите показания эхолота, которые указывают на наличие объекта в воде, это может означать наличие рыбы.
Рекомендации по использованию
- Используйте эхолот в местах, где вы уверены в наличии рыбы, например, рядом с подводными растениями или подводными преградами.
- Установите правильную частоту эхолота в зависимости от условий рыбалки. Высокая частота (200 кГц) лучше подходит для мелких водоемов, низкая частота (50 кГц) подходит для глубоких водоемов.
- Не забывайте, что некоторые объекты в воде могут выглядеть как рыба на экране эхолота. Обратите внимание на их движение и форму, чтобы определить, являются ли они действительно рыбой.
- По возможности используйте функцию «Чувствительность» на эхолоте, чтобы уловить даже самую слабую рыбу. Корректируйте эту функцию, пока не достигнете наилучших результатов.
Следуя этим рекомендациям, вы сможете эффективно использовать эхолот Humminbird PiranhaMax 153 и повысить свои шансы на успешную рыбалку.
Описание эхолота Humminbird PiranhaMax 153
Humminbird PiranhaMax 153 — это портативный эхолот, предназначенный для рыбаков, которые хотят расширить свои возможности при рыбалке. Устройство оснащено передовыми технологиями, которые обеспечивают точное отображение дна водоема и обнаружение рыбы.
Основные характеристики эхолота Humminbird PiranhaMax 153:
- Дисплей: 4-дюймовый цветной ЖК-экран
- Разрешение: 240 x 160 пикселей
- Частоты: 200 кГц/455 кГц
- Максимальная глубина обзора: 600 футов
- Угол обзора: 60 градусов
- Функция Zoom: позволяет увеличивать изображение для более детального просмотра
С помощью эхолота Humminbird PiranhaMax 153 вы сможете легко находить рыбу и определять ее размеры и количество. Устройство отображает информацию о глубине, температуре воды, структуре дна и препятствиях под водой.
Эхолот оснащен функцией истории трека, которая позволяет сохранять треки передвижения и область их прокладки. Благодаря этой функции вы сможете возвращаться в места с хорошей рыбой или исследовать новую область на основе сохраненных данных.
Устройство легкое и компактное, что делает его идеальным для переноски. Встроенный аккумулятор обеспечивает длительное время работы, а водонепроницаемый корпус защищает от влаги и позволяет использовать эхолот даже в дождливую погоду.
Humminbird PiranhaMax 153 — надежный помощник для всех рыбаков, который обеспечивает высокую производительность и точность при поиске и обнаружении рыбы. Это отличный выбор как для начинающих, так и для опытных рыболовов.
Инструкция на русском языке для эхолота Humminbird PiranhaMax 153
Эхолот Humminbird PiranhaMax 153 представляет собой компактную и удобную модель, предназначенную для рыболовства. Этот эхолот позволяет быстро и точно находить рыбу и определять глубину водоема. В данной инструкции на русском языке представлены основные рекомендации по использованию этого устройства.
Установка и подключение эхолота
1. Распакуйте эхолот и проверьте наличие всех комплектующих деталей.
2. Подготовьте лодку или другое плавсредство для установки эхолота.
3. Установите датчик эхолота на донную часть плавсредства, желательно в районе кормы.
4. Подключите кабель датчика к основному блоку эхолота.
5. Установите основной блок эхолота на рулевую колонку лодки или другое удобное для вас место.
6. Подключите питание к эхолоту и убедитесь, что он включается.
Основные функции эхолота
1. Отображение глубины воды.
2. Отображение рыбы и других обьектов в воде.
3. Поддержка различных режимов работы (спидометр, температура воды, режим «Рыбалка» и др.).
Рекомендации по использованию эхолота
1. Перед использованием эхолота обязательно ознакомьтесь с инструкцией по эксплуатации.
2. Во время рыбалки регулярно проверяйте отображаемую информацию на экране эхолота.
3. Старайтесь использовать эхолот в водоемах с нормальной прозрачностью воды для более точного определения рыбы и глубины воды.
4. Перед использованием эхолота, убедитесь, что все подключения и фиксации корректны.
Результаты и особенности работы эхолота
1. Эхолот Humminbird PiranhaMax 153 помогает определить глубину водоема, что важно для безопасной навигации.
2. Эхолот позволяет определить наличие рыбы и других объектов в воде, что упрощает и улучшает процесс рыбалки.
3. Встроенные функции эхолота обеспечивают дополнительную информацию для рыболова, такую как спидометр и температура воды.
Таблица с характеристиками эхолота Humminbird PiranhaMax 153
| Характеристика | Значение |
|---|---|
| Диагональ экрана | 4.3 дюйма |
| Разрешение экрана | 480×272 пикселей |
| Диапазон работы датчика | От 1.5 до 100 метров |
| Частота работы датчика | 200 кГц |
| Мощность передачи сигнала | 1600 Вт РМП |
Обратите внимание, что эта инструкция предоставлена в общем виде и может быть дополнена или изменена производителем. Перед использованием эхолота Humminbird PiranhaMax 153 рекомендуется ознакомиться с официальной инструкцией, прилагаемой к устройству.
Особенности работы эхолота Humminbird PiranhaMax 153
1. Высокое качество изображения: Эхолот Humminbird PiranhaMax 153 оснащен высококачественным ЖК-дисплеем, который обеспечивает четкое и детализированное изображение. Вы сможете увидеть все детали дна, рыбу и другие объекты под водой.
2. Высокая чувствительность и разрешение: Благодаря мощному эхолоту, Humminbird PiranhaMax 153 способен обнаруживать объекты и структуры под водой с высокой чувствительностью. Вы сможете видеть даже самые мелкие изменения на дне, а также миграцию рыбы и других важных объектов.
3. Легкость использования: Эхолот Humminbird PiranhaMax 153 имеет интуитивно понятный интерфейс, который позволяет легко навигировать по различным настройкам и функциям. Вы сможете быстро переключаться между режимами работы и настраивать яркость и контрастность дисплея.
4. Функция «Рыбопривлекательность»: Humminbird PiranhaMax 153 обладает специальной функцией, которая помогает привлечь рыбу к вашей лодке. Она создает мультимедийный показ и звуковые имитации, которые привлекают внимание рыбы и повышают шансы на успешную рыбалку.
5. Встроенный GPS: Эхолот Humminbird PiranhaMax 153 имеет встроенный GPS-приемник, который позволяет отслеживать ваше местоположение и сохранять координаты важных мест. Это удобно для поиска рыбных мест, запоминания рыболовных точек и возвращения к ним в будущем.
6. Надежность и долговечность: Humminbird PiranhaMax 153 изготовлен из высококачественных материалов и имеет прочную конструкцию, которая обеспечивает его надежность и долговечность. Вы можете быть уверены, что эхолот прослужит вам долгое время без поломок и сбоев.
Используя эхолот Humminbird PiranhaMax 153, вы сможете повысить свои рыболовные навыки и сделать свою рыбалку более увлекательной и успешной. Он предоставляет необходимую информацию о дне озера, наличии рыбы и других объектов под водой, а также помогает выбирать оптимальные места для ловли.
Рекомендации по использованию эхолота Humminbird PiranhaMax 153
Humminbird PiranhaMax 153 — это простой и удобный в использовании эхолот, который позволяет увидеть подводный мир и определить глубину воды в реальном времени. Вот несколько рекомендаций, которые помогут вам максимально эффективно использовать данный эхолот:
- Установите эхолот правильно. При установке эхолота следует обратить внимание на следующие моменты: установите эхолот так, чтобы датчик был расположен как можно ближе к центру лодки, убедитесь, что датчик находится в воде при работе эхолота, и установите его так, чтобы он был расположен как можно более горизонтально.
- Настройте чувствительность. Подберите оптимальную чувствительность эхолота для конкретных условий и типа дна. Изначально установите среднее значение чувствительности и отслеживайте изменения глубины и структуры дна. Отрегулируйте чувствительность, чтобы получить наиболее четкое отображение дна и обнаруживаемых объектов.
- Используйте различные режимы отображения. Humminbird PiranhaMax 153 позволяет выбрать различные режимы отображения, такие как «Fish ID+», «ClearPulse», «Max View» и другие. Попробуйте разные режимы и выберите тот, который наиболее полно отображает информацию о дне и обнаруженных объектах.
- Учитывайте влияние погодных условий. При использовании эхолота помните, что погодные условия, такие как солнечный свет, ветер и волны, могут влиять на качество и четкость отображения информации на экране. Учитывайте эти факторы и адаптируйте работу эхолота под погодные условия.
- Используйте функцию сохранения и восстановления. Humminbird PiranhaMax 153 имеет функцию сохранения и восстановления настроек. Установите оптимальные параметры работы эхолота и сохраните их для дальнейшего использования. Это позволит быстро восстановить идеальные настройки при следующей рыбалке.
- Изучайте карты местности. При использовании эхолота полезно иметь представление о местности, на которой вы находитесь. Изучите карты перед выходом на воду, чтобы иметь представление о глубине водоема, наличии растительности, подводных преград и других интересующих вас объектов.
Следуя этим рекомендациям, вы сможете максимально эффективно использовать эхолот Humminbird PiranhaMax 153 и получить максимум удовольствия от рыбалки.
Вопрос-ответ
Где можно найти инструкцию на русском языке к эхолоту Humminbird PiranhaMax 153?
Инструкцию на русском языке к эхолоту Humminbird PiranhaMax 153 вы можете найти на официальном сайте производителя. Там она доступна для скачивания в формате PDF.
Какие особенности работы имеет эхолот Humminbird PiranhaMax 153?
Эхолот Humminbird PiranhaMax 153 оснащен дисплеем с диагональю 4 дюйма и разрешением 240х160 пикселей. Устройство работает в диапазоне частот 200/455 кГц, что позволяет определять глубину и наличие рыбы на разных глубинах. Он имеет функцию Side Imaging, позволяющую сканировать дно и структуры на боковых сторонах эхолота. Также у эхолота есть возможность включения режима четкого отображения, что делает изображение на экране более четким и детализированным.
Какие рекомендации можно дать по использованию эхолота Humminbird PiranhaMax 153?
Для более точного и качественного использования эхолота Humminbird PiranhaMax 153 рекомендуется установить его в правильном месте на судне, так чтобы лучи эхолота покрывали весь интересующий участок воды. Также неплохо использовать специальные позиции датчика, выбранного из меню, которые дают оптимальное отображение дна и рыбы. Кроме того, стоит учесть, что при сканировании дна и структур, лучше использовать режим Side Imaging для более детального и полного представления о ситуации под водой. Не забудьте ознакомиться с инструкцией, чтобы освоить все возможности эхолота и достичь максимального качества работы.
Какие преимущества и недостатки имеет эхолот Humminbird PiranhaMax 153?
Эхолот Humminbird PiranhaMax 153 имеет ряд преимуществ. Во-первых, он обладает компактным размером и легким весом, что делает его удобным для переноски. Во-вторых, устройство оснащено качественным дисплеем, который позволяет четко видеть информацию на экране даже при ярком солнечном свете. В-третьих, эхолот обладает функцией Side Imaging, что позволяет сканировать дно и структуры на боковых сторонах устройства. Однако у него также есть и некоторые недостатки, например, относительно небольшой экран, что может затруднять чтение информации. Также стоит отметить, что он не имеет встроенной GPS-навигации и памяти для сохранения данных.