
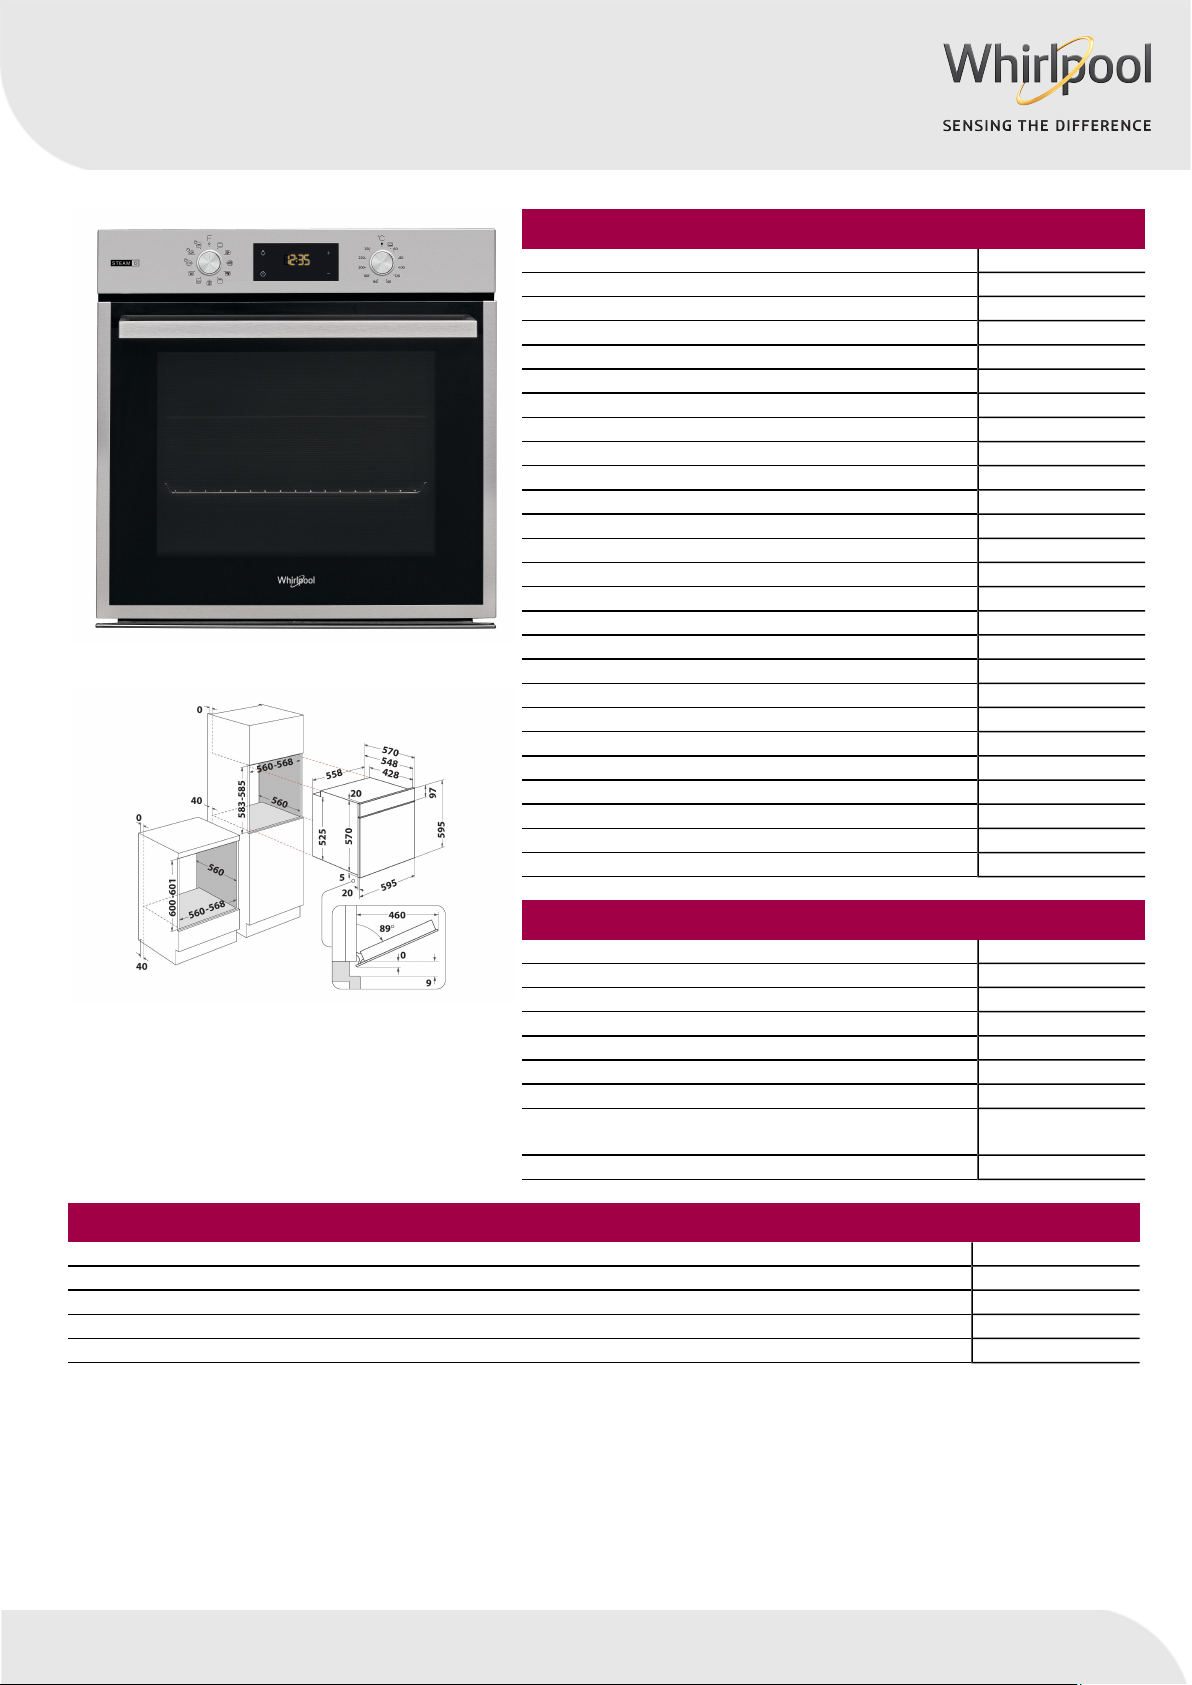
OAS KN8V1 IX
12NC: 859991558460
EAN-Nummer: 8003437938801
AAUSSUSSTTAATTUNGTTUNG
Produktgruppe Einbauherd/Backofen
Internationale Bestellbezeichnung OAS KN8V1 IX
Farbe Gerät Inox
Bauform Eingebaut
Steuerung Elektronisch
Bedienelemente Integrierte Kochfeldsteuereinheiten Nein
Kochfeldarten Automatikprogramm Ja
Absicherung 13
Spannung 220-240
Frequenz 50/60
Länge Anschlusskabel 100
Steckerart Nein
Tiefe Produkt bei geöneter Tür (90°) Gerätehöhe 595
Gerätebreite 595
Gerätetiefe 551
Nischenhöhe minimal 0
Nischenbreite minimal 0
Nischentiefe 0
Nettogewicht 26.9
Nettovolumen 71
Integriertes Reinigungssystem Nein
Gitter 1
Anzahl Backbleche 2
TECHNISCHE DETTECHNISCHE DETAILAILSS
Elektronik-Uhr Ja
Zeitsteuerung Elektronisch
Zeitfunktionen Stopp
Sicherheitsvorrichtungen Innenbeleuchtung Ja
Anzahl eingebauter Leuchten 0
Lage Innenbeleuchtung Linke Vorderseite
Backblechführung
Sicherung Nein
Teleskopische
Schienen
GERÄGERÄTEEIGENSCHAFTENTEEIGENSCHAFTEN
Energiequelle Elektro
Energieart Elektro
Energieezienzklasse — neu (2010/30/EU) A+
Energieverbrauch pro Ober-/Unterhitze Zyklus- neu (2010/30/EC) 0.89
Energieverbrauch pro Heißluft-Zyklus — neu (2010/30/EC) 0.69
www.whirlpool.eu
Table of Contents
- Owner’s Manual
- PRODUCT DESCRIPTION
- CONTROL PANEL DESCRIPTION
- ACCESSORIES
- INSERTING THE WIRE SHELF AND OTHER ACCESSORIES
- SLIDING SHELVES AND SHELF GUIDES
- REMOVING THE SLIDING RUNNERS [c]
- REFITTING THE SLIDING RUNNERS [d]
- REMOVING AND REFITTING THE SHELF GUIDES
- FUNCTIONS
- FLEXI CLEAN PACK
- FIRST TIME USE
- DAILY USE
- PROGRAMMING THE END COOKING TIME/DELAYED START
- END OF COOKING
- COOKING TABLE
- COOKING TABLE STEAM+
- CLEANING AND MAINTENANCE
- REMOVING AND REFITTING THE DOOR
- REPLACING THE LAMP
- CLEANING OF THE DOOR GLASSES
- TROUBLESHOOTING
- PRODUCT DESCRIPTION
- Documents / Resources
- References
- Read User Manual Online (PDF format)
- Download This Manual (PDF format)
Owner’s Manual
THANK YOU FOR BUYING A WHIRLPOOL PRODUCT
In order to receive a more complete assistance, please register your product
on www.whirlpool.eu/register
Before using the appliance carefully read the Safety Instruction.
PLEASE SCAN THE QR CODE ON YOUR APPLIANCE IN ORDER TO REACH MORE
INFORMATION
PRODUCT DESCRIPTION
- Control panel
- Fan
- Lamp
- Shelf guides (the level is indicated on the wall of the cooking compartment)
- Door
- Door lock (locks the door while automatic cleaning is in progress and afterwards)
- Top heating element/grill
- Circular heating element (not visible)
- Identification plate (do not remove)
- embossing for drinking water
CONTROL PANEL DESCRIPTION

1. SELECTION KNOB
For switching the oven on by selecting a function. Turn to the position to
switch the oven off.
2. LIGHT
With the oven switched on, press to turn the oven compartment lamp on or off.
3. SETTING THE TIME
For accessing the cooking time settings, delayed start and timer.
For displaying the time when the oven is off.
4. DISPLAY
5. ADJUSTMENT BUTTONS
For changing the cooking time settings.
6. THERMOSTAT KNOB
Turn to select the temperature you require when activating manual functions.
Please note: Type of knob may vary from model type. If the knobs are push-
activated, push down on the center of the knob to release it from seating.
ACCESSORIES
WIRE SHELF
Use to cook food or as a support for pans, cake tins and other ovenproof items
of cookware.
**DRIP TRAY ***
Use as an oven tray for cooking meat, fish, vegetables, focaccia, etc. or
position underneath the wire shelf to collect cooking juices.
**BAKING TRAY ***
Use for cooking all bread and pastry products, but also for roasts, fish en
papillotte, etc.
**SLIDING RUNNERS ***
To facilitate inserting or removing accessories.
- Available only on certain models
The number and the type of accessories may vary depending on which model is
purchased.
Other accessories can be purchased separately from the After-sales Service.
INSERTING THE WIRE SHELF AND OTHER ACCESSORIES
Insert the wire shelf onto the level you require by holding it tilted slightly
upwards and resting the raised rear side (pointing upwards) down first.
Then slide it horizontally along the runners as far as possible.
Other accessories, like the baking tray, are to be inserted horizontally,
letting them slide on the runners.
SLIDING SHELVES AND SHELF GUIDES
Before using the oven remove the protective tape [a] and then remove the
protective foil [b] from the sliding runners.
[a] [b]
REMOVING THE SLIDING RUNNERS [c]
Pull the lower part of the sliding runner to uncouple the lower hooks (1) and
pull the the sliding runners upwards, removing them from the upper hooks (2).
REFITTING THE SLIDING RUNNERS [d]
Hook the upper hooks on the shelf guides (1) then press the lower part of the
sliding runners against the shelf guides, until the lower hooks are clicking
(2).
[c] [d]
REMOVING AND REFITTING THE SHELF GUIDES
- To remove the shelf guides, firmly grip the external part of the guide, and pull it towards you to extract the support and the two internal pins from the lodging.
- To reposition the shelf guides, position them near the cavity and initially insert the two pins into their lodgings. Next, position the external part near its lodging, insert the support, and firmly press towards the wall of the cavity to make sure the shelf guide is properly secured.
FUNCTIONS
CONVENTIONAL
For cooking any kind of dish on one shelf only.
RISING
For helping sweet or savoury dough to rise effectively. Turn the thermostat
knob to the icon to activate this function.
FORCED AIR
For cooking different foods that require the same cooking temperature on
several shelves (maximum three) at the same time. This function can be used to
cook different foods without odours being transferred from one food to
another.
PIZZA
For baking different types and sizes of pizza and bread. It is a good idea
to swap the position of the baking trays halfway through cooking.
ECO FORCED AIR
For cooking roasts and stuffed roasting joints on a single shelf. Food is
prevented from drying out excessively by gentle, intermittent air circulation.
When this ECO function is in use, the light will remain switched off during
cooking but can be switched on again by pressing .
GRILL
For grilling steaks, kebabs and sausages, cooking vegetables au gratin or
toasting bread. When grilling meat, we recommend using a dripping pan to
collect the cooking juices: position the pan on any of the levels below the
wire shelf and add 200 ml of drinking water.
TURBO GRILL
For roasting large joints of meat (legs, roast beef, chicken). We recommend
using a dripping pan to collect the cooking juices: position the pan on any of
the levels below the wire shelf and add 200 ml of drinking water.
MAXI COOKING
For cooking large joints of meat (above 2.5 kg).
We recommend turning the meat over during cooking to ensure that both sides
brown evenly. We also recommend basting the joint every so often to prevent it
from drying out excessively.
PASTRY AUTO
This function automatically selects the ideal temperature and baking time
for cakes. Activate the function when the oven is cold.
STEAM +
The Steam+ function allows to obtain excellent performances thanks to the
presence of steam in the cooking cycle. This function automatically manages
the ideal temperature for cooking a wide range of recipes; the cooking times
of the main dishes are shown in the relative cooking table. Always activate
the steam function when the oven is cold, and after pouring 200 ml of drinking
water into the bottom of the cavity. To activate Steam+ function, the
thermostat knob needs to be turned in to position of icon.
FLEXI CLEAN PACK
SMARTCLEAN
The action of the steam released during this special low-temperature
cleaning cycle allows dirt and food residues to be removed with ease. To
activate the “Smart Clean” function, pour 100-120 ml of drinking water on the
bottom of the oven then turn the selection knob and the thermostat knob to the
icon. It is best to use the function for 35′. Activate the function when the
oven is cold. The position of the icon does not correspond to the temperature
reached during the cleaning cycle.
AUTOMATIC CLEANING – PYRO
For eliminating cooking spatters using a cycle at very high temperature. To
activate this function move thermostat knob to . The position of the icon does
not correspond to the real temperature reached during the cleaning cycle.
FIRST TIME USE
1. SETTING THE TIME
You will need to set the time when you switch on the appliance for the
first time: Press until the icon and the two digits for the hour start
flashing on the display.
Use + or – to set the hour and press to confirm. The two digits for the
minutes will start flashing. Use or to set the minutes and press to confirm.
Please note: When the icon is flashing, for example following lengthy power
outages, you will need to reset the time.
2. SET THE POWER CONSUMPTION
By default the oven is programmed to work at a power higher than 3kW (Hi).
To operate the oven at a power that is compatible with a domestic power supply
less than 2,9 kW (Lo), you will need to change the settings.
To go to the change menu, turn the selection knob to , then turn it back to
0.
Press and hold + and – for five seconds immediately afterwards.
Use + o – to change the setting, then press and hold for at least two seconds
to confirm.
3. HEAT THE OVEN
A new oven may release odours that have been left behind during
manufacturing: this is completely normal. Before starting to cook food, we
therefore recommend heating the oven with it empty in order to remove any
possible odours.
Remove any protective cardboard or transparent film from the oven and remove
any accessories from inside it.
Heat the oven to 250 °C for about one hour. The oven must be empty during this
time.
Please note: It is advisable to air the room after using the appliance for the
first time.
DAILY USE
1. SELECT A FUNCTION
To select a function, turn the selection knob to the symbol for the function
you require: the display will light up and an audible signal will sound.
2. ACTIVATE A FUNCTION
MANUAL
To start the function you have selected, turn the thermostat knob to set the
temperature you require.
Please note: During cooking you can change the function by turning the
selection knob or adjust the temperature by turning the thermostat knob. The
function will not start if the thermostat knob will be on 0/AUTO position
(except for PASTRY AUTO function). You can set the cooking time, cooking end
time (only if you set a cooking time) and a timer.
RISING
To start the “Rising” function, turn the thermostat knob to Rising position
(40 deg) and put function knob in Conventional position; if the oven is set to
a different temperature, the function will not start.
Please note: You can set the cooking time, cooking end time (only if you set a
cooking time) and a timer.
To start the Steam function, pour 200 ml of drinking water in the oven bottom.
Select the function turning clockwise the selection knob on the relevant icon,
and the thermostat knob in any position between 160 and 180°C (as suggested by
the icon). The function will start and the display will show the current time
of the day. No preheating is needed. To end the cooking, turn the selection
knob on position. During Steam cooking do not open the door and never top up
the water.
Please note: Opening the door and topping up the water during cooking may have
an adverse effect on the final cooking result.
3. PREHEATING AND RESIDUAL HEAT
Once the function starts, an audible signal and a flashing icon on the display
indicate that the preheating phase has been activated. At the end of this
phase, an audible signal and the fixed icon on the display will indicate that
the oven has reached the set temperature: at this point, place the food inside
and proceed with cooking.
Please note: Placing the food in the oven before preheating has finished may
have an adverse effect on the final cooking result.
After cooking and with the function deactivated, the icon may continue to
remain visible on the display even after the cooling fan has switched off to
indicate that there is residual heat in the compartment.
Please note: The time after which the icon switches off varies because it
depends on a series of factors such as ambient temperature and function used.
In any case, the product should be considered to be off when the pointer on
the selection knob is at “0”.
4. PROGRAMMING COOKING
You will need to select a function before you can start programming cooking.
DURATION
Keep pressing until the icon and”00:00″start flashing on the display.
Use + or – to set the cooking time you require, then press to confirm.
Activate the function by turning the thermostat knob to the temperature you
require: an audible signal will sound and the display will indicate that
cooking is complete.
Please note: To cancel the cooking time you have set, keep pressing until the
icon starts flashing on the display, then use – to reset the cooking time to
“00:00”. This cooking time includes a preheating phase.
PROGRAMMING THE END COOKING TIME/DELAYED START
After a cooking time has been set, starting the function can be delayed by
programming its end time: press until the icon and the current time start
flashing on the display.
Use + or – to set the time you want cooking to end and press to confirm.
Activate the function by turning the thermostat knob to the temperature you
require: the function will remain paused until it starts automatically after
the period of time that has been calculated in order for cooking to finish at
the time you have set.
Please note: To cancel the setting, switch the oven off by turning the
selection knob to the 0 position.
Delay to start functionality in not available for Grill and Turbo Grill
functions.
END OF COOKING
An audible signal will sound and the display will indicate that the function
has finished.
Turn the selection knob to select a different function or to 0 to switch the
oven off.
Please note: If the timer is active, the display will show “END” alternately
with the remaining time.
5. SETTING THE TIMER
This option does not interrupt or program cooking but allows you to use the
display as a timer, either during while a function is active or when the oven
is off.
Keep pressing until the and “00:00” icon and “00:00” start flashing on the
display.
Use + or – to set the time you require and press to confirm. An audible signal
will sound once the timer has finished counting down the selected time.
Notes: To cancel the timer, keep pressing until the icon starts flashing, then
use – to reset the time to “00:00”.
6. AUTOMATIC CLEANING FUNCTION – PYRO
Do not touch the oven during the Pyro cycle. Keep children and animals away
from the oven during and after (until the room has finished airing) running
the Pyro cycle.
Remove all accessories – including shelf guides – from the oven before
activating the function. If the oven is installed below a hob, make sure that
all the burners or electric hotplates are switched off while running the
selfcleaning cycle.
For optimum cleaning results, remove the worst soiling with a damp sponge
before using the Pyro function.
Avoid activating the pyro cycle cleaning in the presence of limescale
residues.
We recommend only running the Pyro function if the appliance contains heavy
soiling or gives off bad odours during cooking.
To activate the automatic cleaning function, turn the selection knob and the
thermostat knob to the icon. The function will be activated automatically, the
door locked and the light inside the oven switched off: The display will show
the time remaining to the end, alternating with “Pyro”.
Once the cycle has been completed, the door remains locked until the
temperature inside the oven has returned to a safe level. Air the room during
and after running the Pyro cycle.
COOKING TABLE
RECIPE| FUNCTION| PREHEAT| TEMPERATURE (°C)| DURATION
(Min)| LEVEL AND ACCESSORIES
—|—|—|—|—|—
Leavened cakes| | Yes| 170| 30 – 50|
| Yes| 160| 30 – 50|
| Yes| 160| 40 – 60|
Filled cake
(cheese cake, strudel, fruit pie)| | Yes| 160 – 200| 35 – 90|
| Yes| 160 – 200| 40 – 90|
Biscuits / tartlets| | Yes| 160| 25 – 35|
| Yes| 160| 25 – 35|
| Yes| 150| 35 – 45|
Choux buns| | Yes| 180 – 210| 30 – 40|
| Yes| 180 – 200| 35 – 45|
| Yes| 180 – 200| 35 – 45|
Meringues| | Yes| 90| 150 – 200|
| Yes| 90| 140 – 200|
| Yes| 90| 140 – 200|
Pizza / Focaccia| | Yes| 190 – 250| 15 – 50|
| Yes| 190 – 250| 20 – 50|
Frozen pizza| | Yes| 250| 10 – 20|
| Yes| 230-250| 10 – 25|
Salty cakes
(vegetable pie, quiche)| | Yes| 180 – 200| 40 – 55|
| Yes| 180 – 200| 45 – 60|
| Yes| 180 – 200| 45 – 60|
Vols-au-vents / puff pastry crackers| | Yes| 190 – 200| 20 – 30|
| Yes| 180 – 190| 20 – 40|
| Yes| 180 – 190| 20 – 40|
Lasagne / baked pasta / canneloni / flans| | Yes| 190 – 200| 45 – 65|
Lamb / veal / beef 1 kg| | Yes| 190 – 200| 80 – 110|
Roast meat with crispy skin 2 kg| | Yes| 180 – 190| 110 – 150|
Chicken / rabbit / duck 1 kg| | Yes| 200 – 230| 50 – 100|
Turkey / goose 3 kg| | –| 190 – 200| 100 – 160|
Baked fish / en papillote
(fillets, whole) | | Yes| 170 – 190| 30 – 45|
Stuffed vegetables
(tomatoes, courgettes, aubergines)| | Yes| 180 – 200| 50 – 70|
Toasted bread| | 5′| 250| 2 – 6|
ACCESSORIES
|
Wire shelf
|
Baking dish on the wire shelf
|
Baking tray/Drip tray or baking dish on the wire shelf
|
Drip tray / Baking tray
|
Drip tray / Baking tray with 200 ml of water
—|—|—|—|—|—
FUNCTIONS
|
Conventional
|
Forced air
|
Pizza
|
Grill
|
Turbo grill
|
Eco forced air
—|—|—|—|—|—|—
RECIPE| FUNCTION| PREHEAT| TEMPERATURE (°C)| DURATION
(Min)| LEVEL AND ACCESSORIES
—|—|—|—|—|—
Fish fillets / slices| | –| 230 – 250| 15 – 30 |
Sausages / kebabs / spare ribs / hamburgers| | –| 250| 15 – 30 |
Roast chicken 1-1.3 kg| | Yes| 200 – 220| 55 – 70 |
Roast beef rare 1 kg| | Yes| 200 – 210| 35 – 50 |
Leg of lamb / knuckle| | Yes| 200 – 210| 60 – 90 |
Roast potatoes| | Yes| 200 – 210| 35 – 55|
Vegetable gratin| | –| 200 – 210| 25 – 55|
Meat and potatoes| | Yes| 190 – 200| 45 – 100 **|
Fish and vegetables| | Yes| 180| 30 – 50 |
Lasagne and meat | | Yes| 200| 50 – 100 |
Complete meal: fruit tart (level 5) / lasagne (level 3) / meat (level 1)| |
Yes| 180 – 190| 40 – 120 |
Roast meat / stuffed roasting joints| | –| 170 – 180| 100 – 150|
- Turn food halfway through cooking
** Turn food two thirds of the way through cooking (if necessary).
*** Estimated length of time: dishes can be removed from the oven at different
times depending on personal preference.
COOKING TABLE STEAM+
FOOD| RECIPE| QUANTITY| TIME (min)| ACCESSORIES|
LEVEL| WATER
—|—|—|—|—|—|—
BREAD| Small breads| 80-100 g| 30 – 45| |
2
|
200 ml
Sandwich loaf in tin| 300-500 g| 40 – 60|
Bread| 500g-2 kg| 50 – 100|
Baguettes| 200-300 g| 30 – 45|
MEAT| Roast| 1 kg| 60 – 110|
Ribs| 500g-1,5 kg| 50 – 75|
Chicken| 1-1,5 kg| 55 – 80|
Chicken/Turkey| 3 kg| 100 – 140|
FISH| Fillet Steak| 0.5-2 cm| 15 – 25|
Fillet Steak| 2-4 cm| 20 – 35|
Whole Fish| 300- 600 g| 20 – 30|
Whole Fish| 600 -1200 g| 25 – 45|
VEGETABLES| Steamed Potatoes| 0.5-1.5 kg| 45 – 60|
Stuffed Peppers| 1-2 kg| 35 – 55|
Steamed Broccoli| 0.3-1 kg| 30 – 50|
Steamed Zucchini| 0.5-1.5 kg| 30 – 50|
PASTRIES| Cookies| a tray| 25 – 35|
Muffin| 30-60 g| 25 – 45|
Sponge Cake| 500-700 g| 30 – 50|
Tart| a tin| 35 – 55|
Start the STEAM+ function only when the oven is cold. Opening the door and
topping up the water during cooking may have an adverse effect on the final
cooking result.
ACCESSORIES
|
Wire shelf
|
Baking dish on the wire shelf
|
Baking tray/Drip tray or baking dish on the wire shelf
|
Drip tray / Baking tray
|
Drip tray / Baking tray with 200 ml of water
—|—|—|—|—|—
FUNCTIONS
|
Conventional
|
Forced air
|
Pizza
|
Grill
|
Turbo grill
|
Eco forced air
—|—|—|—|—|—|—
CLEANING AND MAINTENANCE
Make sure that the oven has cooled down before carrying out any maintenance
or cleaning.
Do not use steam cleaners.
Do not use wire wool, abrasive scourers or abrasive/corrosive cleaning
agents, as these could damage the surfaces of the appliance.
Wear protective gloves.
The oven must be disconnected from the mains before carrying out any kind
of maintenance work.
EXTERIOR SURFACES
Clean the surfaces with a damp microfibre cloth. If they are very dirty, add a
few drops of pH-neutral detergent. Finish off with a dry cloth.
Do not use corrosive or abrasive detergents. If any of these products
inadvertently comes into contact with the surfaces of the appliance, clean
immediately with a damp microfibre cloth.
INTERIOR SURFACES
-
After every use, leave the oven to cool and then clean it, preferably while it is still warm, to remove any deposits or stains caused by food residues. To dry any condensation that has formed as a result of cooking foods with a high water content, leave the oven to cool completely and then wipe it with a cloth or sponge.
-
To remove the remaining limescale from the bottom of the cavity after the cooking, we recommend to clean the cavity with the products provided by After Sales Service (please follow instructions attached to the product).
Cleaning is recommended at least for every 5 to 10 cooking cycles. -
If there is stubborn dirt on the interior surfaces, we recommend running the automatic cleaning function for optimal cleaning results. Avoid activating the pyrolitic cycle cleaning in the presence of limescale residues. Before activating, perform limescale cleaning as described above.
-
The door can be easily removed and refitted to facilitate cleaning of the glass.
-
Clean the glass in the door with a suitable liquid detergent.
ACCESSORIES
Soak the accessories in a washing-up liquid solution after use, handling them
with oven gloves if they are still hot. Food residues can be removed using a
washing-up brush or a sponge.
REMOVING AND REFITTING THE DOOR
1. To remove the door, open it fully and lower the catches until they
are in the unlock position.
2. Close the door as much as you can.
Take a firm hold of the door with both hands – do not hold it by the handle.
Simply remove the door by continuing to close it while pulling it upwards (a)
at the same time until it is released from its seating (b).
Put the door to one side, resting it on a soft surface.
3. Refit the door by moving it towards the oven, aligning the hooks of
the hinges with their seating and securing the upper part onto its seating.
4. Lower the door and then open it fully.
Lower the catches into their original position: Make sure that you lower them
down completely.
5. Try closing the door and check to make sure that it lines up with the
control panel. If it does not, repeat the steps above.
REPLACING THE LAMP
- Disconnect the oven from the power supply.
- Unscrew the cover from the light, replace the bulb and screw the cover back on the light.
- Reconnect the oven to the power supply.
Please note: Use 25 W/230 V type G9, T300 °C halogen lamps. The bulb used in
the product is specifically designed for domestic appliances and is not
suitable for general room lighting within the home (EC Regulation 244/2009).
Light bulbs are available from our After-sales Service. – Do not handle bulbs
with your bare hands as your fingerprints could damage them. Do not use the
oven until the light cover has been refitted.
CLEANING OF THE DOOR GLASSES
1. After removing the door and resting it on a soft surface with the handle
downwards, simultaneously press the two retaining clips and remove the upper
edge of the door by pulling it towards you.

2. Lift and firmly hold the inner glass with both hands, remove it and place
it on a soft surface before cleaning it.
3. Refit the intermediate pane (marked with “1R”) before refitting the inside
pane: To position the panes of glass correctly, make sure that the “R” mark
can be seen in the left-hand corner. First insert the long side of the glass
marked “R” into the support seats, then lower it into position. Repeat this
procedure for both panes of glass.
4. Refit the upper edge: A click will indicate correct positioning. Make sure
the seal is secure before refitting the door.
TROUBLESHOOTING
| PROBLEM | POSSIBLE CAUSE | SOLUTION |
|---|---|---|
| The oven is not working. | Power cut. Disconnection from the mains. | Check for |
the presence of mains electrical power and whether the oven is connected to
the electricity supply.
Turn off the oven and restart it to see if the fault persists.
The display shows the letter “F” followed by a number or letter.| Oven
failure.| Contact you nearest Client After-sales Service Centre and state the
number following the letter “F”.
The display is showing the message “Hot” and the selected function will not
start.| Temperature too high.| Allow the oven to cool down before activating
the function. Select a different function.
The display shows unclear text and appears to be broken.| Another language
set.| Contact your nearest Client After-sales Service Center.
-
Available only on certain models
-
-
Policies, standard documentation and additional product information can be
found by:
-
Using the QR code in your appliance
-
Visiting our website docs.whirlpool.eu
-
Alternatively, contact our After-sales Service (See phone number in the warranty booklet). When contacting our After-sales Service, please state the codes provided on your product’s identification plate.
-
-
400011710179
Documents / Resources
|
Whirlpool OAS KN8V1 IX Built In Electric
Oven
[pdf] Owner’s Manual
OAS KN8V1 IX Built In Electric Oven, OAS KN8V1 IX, Built In Electric Oven,
Electric Oven, Oven
—|—
References
- Register | Whirlpool Europe
Read User Manual Online (PDF format)
Read User Manual Online (PDF format) >>
Download This Manual (PDF format)
Download this manual >>
SAFETY INSTRUCTIONS
IMPORTANT TO BE READ AND OBSERVED
Before using the appliance, read these safety
instructions. Keep them nearby for future reference.
These instructions and the appliance itself provide
important safety warnings, to be observed at all
times. The manufacturer declines any liability for
failure to observe these safety instructions, for
inappropriate use of the appliance or incorrect
setting of controls.
Very young children (0—3 years) should be kept
away from the appliance. Young children (3-8 years)
should be kept away from the appliance unless
continuously supervised. Children from 8 years old
and above and persons with reduced physical,
sensory or mental capabilities or lack of experience
and knowledge can use this appliance only if they
are supervised or have been given instructions on
safe use and understand the hazards involved.
Children must not play with the appliance. Cleaning
and user maintenance must not be carried out by
children without supervision.
WARNING: The appliance and its accessible parts
become hot during use. Care should be taken to
avoid touching heating elements. Children less than
8 years of age must be kept away unless continuously
supervised.
Never leave the appliance unattended during
food drying. If the appliance is suitable for probe
usage, only use a temperature probe recommended
for this oven — risk of fire.
Keep clothes or other flammable materials away
from the appliance, until all the components have
cooled down completely — risk of fire. Always be
vigilant when cooking foods rich in fat, oil or when
adding alcoholic beverages — risk of fire. Use oven
gloves to remove pans and accessories. At the end
of cooking, open the door with caution, allowing
hot air or steam to escape gradually before accessing
the cavity — risk of burns. Do not obstruct hot air
vents at the front of the oven — risk of fire.
Exercise caution when the oven door is in the
open or down position, to avoid hitting the door.
PERMITTED USE
CAUTION: The appliance is not intended to be
operated by means of an external switching device,
such as a timer, or separate remote controlled system.
This appliance is intended to be used in household
and similar applications such as: staff kitchen areas
in shops, offices and other working environments;
farm houses; by clients in hotels, motels, bed &
breakfast and other residential environments.
No other use is permitted (e.g. heating rooms).
This appliance is not for professional use. Do not
use the appliance outdoors.
Do not store explosive or flammable substances
(e.g. gasoline or aerosol cans) inside or near the
appliance — risk of fire.
INSTALLATION
The appliance must be handled and installed by
two or more persons — risk of injury. Use protective
gloves to unpack and install — risk of cuts.
Installation, including water supply (if any),
electrical connections and repairs must be carried
out by a qualified technician. Do not repair or replace
any part of the appliance unless specifically stated in
the user manual. Keep children away from the
installation site. After unpacking the appliance, make
sure that it has not been damaged during transport.
In the event of problems, contact the dealer or your
nearest After-sales Service. Once installed, packaging
waste (plastic, styrofoam parts etc.) must be stored
out of reach of children — risk of suffocation. The
appliance must be disconnected from the power
supply before any installation operation — risk of
electric shock. During installation, make sure the
appliance does not damage the power cable — risk of
fire or electric shock. Only activate the appliance
when the installation has been completed.
Carry out all cabinet cutting operations before
fitting the appliance and remove all wood chips and
sawdust.
Do not obstruct the minimum gap between the
worktop and the upper edge of the oven — risk of
burns.
Do not remove the oven from its polystyrene foam
base until the time of installation.
After installation, the bottom of the appliance
must no longer be accessible — risk of burns.
Do not install the appliance behind a decorative
door — risk of fire.
ELECTRICAL WARNINGS
The rating plate is on the front edge of the oven
(visible when the door is open).
It must be possible to disconnect the appliance
from the power supply by unplugging it if plug is
accessible, or by a multi-pole switch installed
upstream of the socket in accordance with the
wiring rules and the appliance must be earthed in
conformity with national electrical safety standards.
Do not use extension leads, multiple sockets or
adapters. The electrical components must not be
accessible to the user after installation. Do not use
the appliance when you are wet or barefoot. Do not
operate this appliance if it has a damaged power
cable or plug, if it is not working properly, or if it has
been damaged or dropped.
If the supply cord is damaged, it must be replaced
with an identical one by the manufacturer, its service
agent or similarly qualified persons in order to avoid
a hazard — risk of electric shock.
In case of replacement of power cable, contact an
authorised service centre.
EN
FAQ: Types of Manuals and Their Contents
Whirlpool OAS KN8V1 IX Manuals come in various types, each serving a specific purpose to help users effectively operate and maintain their devices. Here are the common types of Whirlpool OAS KN8V1 IX User Guides and the information they typically include:
- User Manuals: Provide comprehensive instructions on how to use the device, including setup, features, and operation. They often include troubleshooting tips, safety information, and maintenance guidelines.
- Service Instructions: Designed for technicians and repair professionals, these manuals offer detailed information on diagnosing and repairing issues with the device. They include schematics, parts lists, and step-by-step repair procedures.
- Installation Guides: Focus on the installation process of the device, providing detailed instructions and diagrams for proper setup. They are essential for ensuring the device is installed correctly and safely.
- Maintenance Manuals: Provide guidance on routine maintenance tasks to keep the device in optimal condition. They cover cleaning procedures, part replacements, and regular servicing tips.
- Quick Start Guides: Offer a concise overview of the essential steps needed to get the device up and running quickly. They are ideal for users who need immediate assistance with basic setup and operation.
Each type of Whirlpool OAS KN8V1 IX instruction is designed to address specific needs, ensuring users have the necessary information to use, maintain, and repair their devices effectively.
Related Instructions for Whirlpool OAS KN8V1 IX:
1
GZ9736XSS0
Use & care manual Whirlpool GZ9736XSS0 User Manual (Use & care manual), @88313M
32
1111
200
5
WCC31430AB00
Use & care manual User Manual: Whirlpool WCC31430AB00 (957988, Upd.Tuesday 14-01-2025)
16
445
72
6
WOC97ES0ES
User instructions Whirlpool WOC97ES0ES User Manual (User instructions), @C85L46
36
1003
151
8
WTW6300S
Use and care manual Whirlpool Washer Use and care manual (File: whirlpool-wtw6200s-washer-72, 25th Oct 2024)
72
1340
201
9
AWSE7000
Programme chart PDF Manual (@7PFX3U), Whirlpool AWSE7000 Washer (Sunday 19-01-2025)
11
713
122
10
3ET22DKXDN00
51
654
151
Oven Devices by Other Brands:
|
Smeg Hob User Manual Manual Manual: Smeg Hob (V1972J, Upd.28/10/2024) 29 28 Oct 2024 | 26 |
|
|
Bauknecht BLVE 8110 User And Maintenance Manual Bauknecht BLVE 8110 Manual (User and maintenance manual), @G6Q1MC BLVE 8110 14 Nov 2024 | 84 |
|
|
TurboChef Tornado 2 Features & Benefits Tornado 2 Features & benefits — TA638Y Features & Benefits 09 May 2025 | 1 |
|
|
Bush G56DW Operating Instructions Manual PDF Manual (@M9X3Y6), Bush G56DW Oven (Fri 01.2025) These instructions contain important information that will help you get the best from your 31 Jan 2025 | 20 |
Categories:
Automatic washer
Cooker
Bathtubs
Dryers
Cooker & oven
Ovens