
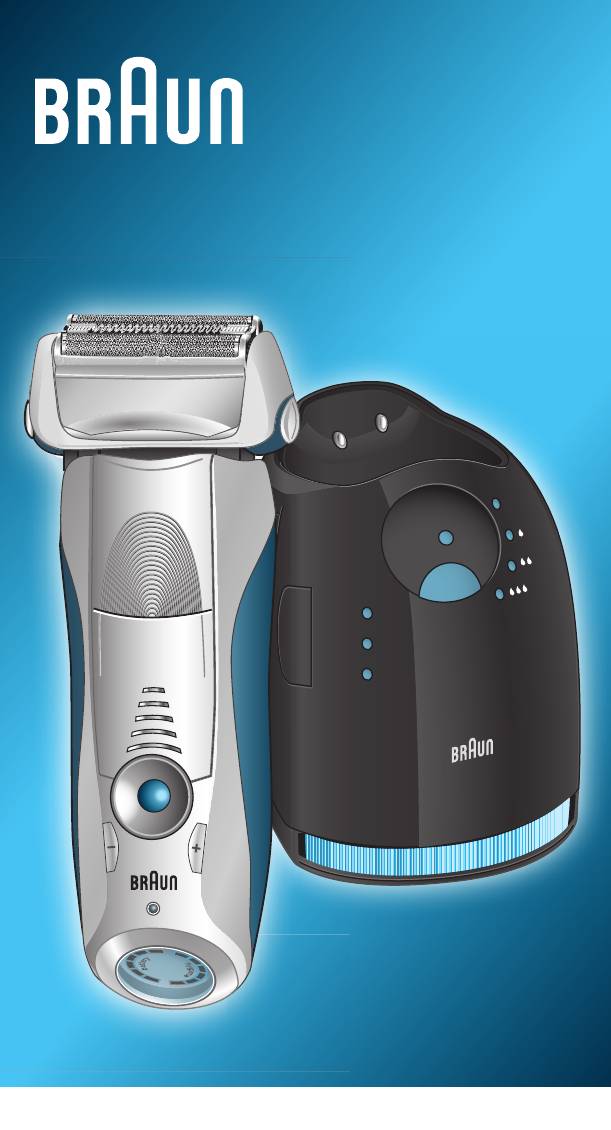
Braun Series 7 70-N7200cc
www.braun.com
Type 5764
91940941/XI-18
91940941_S7_EURO.indd 191940941_S7_EURO.indd 1 04.01.19 09:2804.01.19 09:28
Stapled booklet, 120 x 170 mm, 56 pages (incl. 4 pages cover), 2/2 = PMS485C + black
Business Use — P&G AUTHORIZED POA-00096223 Rev 001 Effective Date 2019-01-04 Printed 2020-03-20 Page 1 of 56Business Use — P&G AUTHORIZED POA-00096223 Rev 001 Effective Date 2019-01-04 Printed 2020-03-20 Page 1 of 56
View the manual for the Braun Series 7 70-N7200cc here, for free. This manual comes under the category razors and has been rated by 5 people with an average of a 6.7.
This manual is available in the following languages: English. Do you have a question about the Braun Series 7 70-N7200cc or do you need help?
Ask your question here
Product Images (1)
Braun Series 7 70-N7200cc specifications
Below you will find the product specifications and the manual specifications of the Braun Series 7 70-N7200cc.
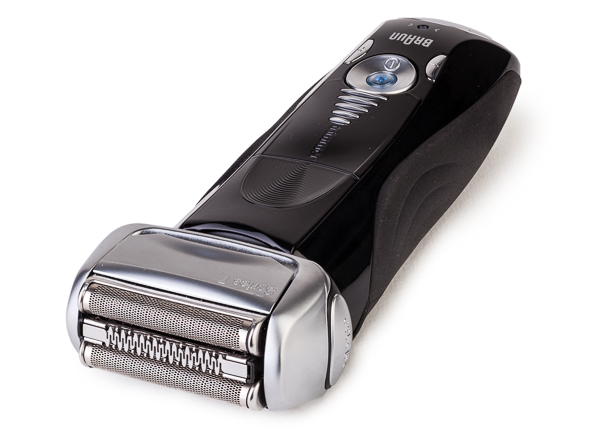
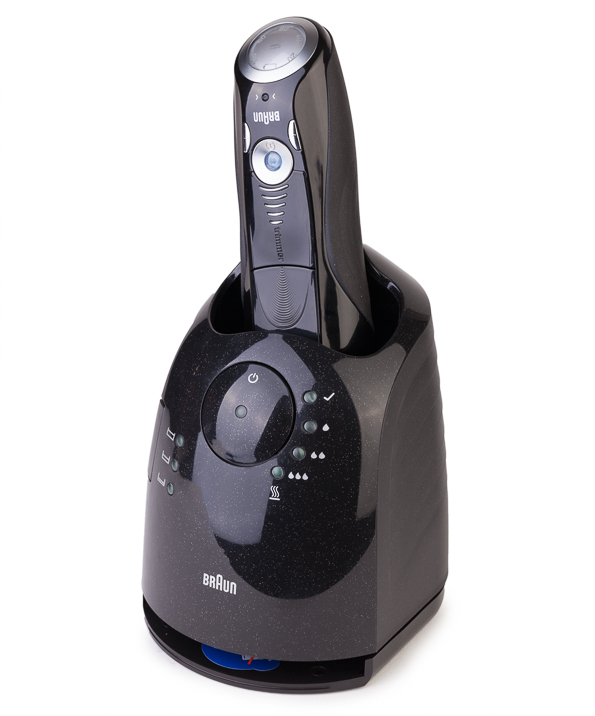
The Braun Series 7 70-N7200cc razor is a grooming tool designed to provide a close and comfortable shave. This razor is equipped with advanced technology to deliver a smooth shaving experience.
The razor features a powerful motor that generates sonic vibrations to capture more hair with every stroke. This helps to minimize skin irritation and provide a more efficient shave. The device also has a pivoting head that adapts to the contour of the face, ensuring optimal contact with the skin for an even shave.
The Series 7 70-N7200cc razor also has a built-in precision trimmer that allows for detailed grooming. It is designed to trim sideburns, beards, and mustaches with accuracy and ease.
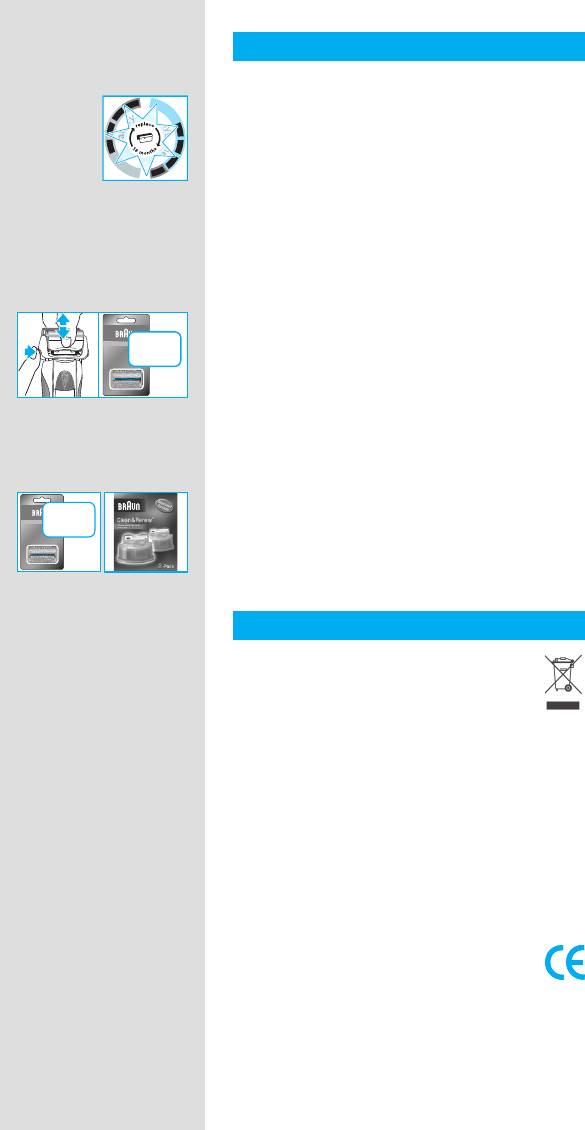
The razor comes with a cleaning and charging station, which automatically cleans, lubricates, and charges the device after each use. This ensures that the razor is always ready for the next shave.
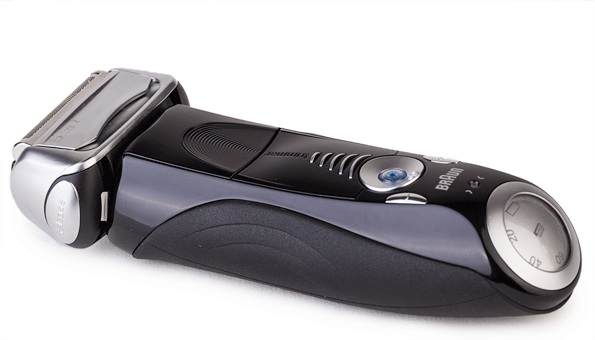
The Braun Series 7 70-N7200cc razor also offers a wet and dry shaving option, giving users the flexibility to shave with either foam or gel for added comfort.
Overall, the Braun Series 7 70-N7200cc razor is a reliable grooming tool that aims to provide a close and comfortable shave. Its advanced features, such as the powerful motor and pivoting head, contribute to a smooth shaving experience. The inclusion of a precision trimmer and a cleaning and charging station further enhance the usability and convenience of this razor.
General
| Brand | Braun |
| Model | Series 7 70-N7200cc |
| Product | razor |
| Language | English |
| Filetype | User manual (PDF) |
Frequently Asked Questions
Can’t find the answer to your question in the manual? You may find the answer to your question in the FAQs about the Braun Series 7 70-N7200cc below.
How do I clean the razor properly?
A thorough cleaning is essential to maintain the performance of your Braun Series 7 70-N7200cc. To clean, simply remove the shaver head and rinse it under running water. You can also use the Clean & Charge Station by placing the shaver inside and pressing the cleaning button for automatic cleaning.
How can I ensure optimal shaving performance?
To achieve the best shaving results, you can adjust the intensity level of the shaver. The Braun Series 7 70-N7200cc offers 5 intensity settings. Experiment with different levels to suit your preferences.
How do I replace the shaver head?
Over time, you may need to replace the shaver head for optimal cutting performance. To do so, simply press the release buttons on both sides of the shaver head and lift it off. Then, align the new shaver head and gently push it until it clicks into place.
How can I maximize the battery life?
To extend battery life, it is advisable to fully discharge and recharge the razor at least once every six months. Also, avoid leaving the shaver plugged in continuously, as overcharging can negatively impact battery performance.
What do the LED indicators on the razor mean?
The Braun Series 7 70-N7200cc is equipped with LED indicators to provide important information. The battery level indicator displays the remaining battery charge, while the hygiene status indicator alerts you when it’s time to clean the shaver head. Additionally, the travel lock indicator notifies you if the travel lock is active, preventing accidental activation of the shaver during transportation.
Is the manual of the Braun Series 7 70-N7200cc available in English?
Yes, the manual of the Braun Series 7 70-N7200cc is available in English .
Is your question not listed? Ask your question here
Быстро, чисто и легко
Оглавление
- Характеристики
- Комплектация
- Инструкция
- Управление
- Эксплуатация
- Тестирование
- Выводы
Сегодня мы познакомимся с электробритвой Braun, относящейся к модельному ряду Series 7. Это старшая серия — то есть здесь сосредоточены все последние наработки этого производителя в сфере сеточных бритв. Учитывая, что Series 1 и Series 3 мы уже исследовали (и они оказались весьма неплохи), главной интригой сегодняшнего теста был вопрос: сможет ли Braun удивить нас еще раз? И чем?
Характеристики
| Производитель | Braun |
| Наименование модели | Series 7 760сс-4 |
| Тип | сеточная электробритва |
| Количество и тип ножей | 3 (2 сеточных и 1 триммерный) |
| Плавающая головка | да |
| Плавающие ножи | да |
| Триммер | встроенный |
| Аккумулятор | литий-ионный |
| Индикаторы | уровня зарядки, интенсивности бритья, необходимости замены режущих элементов |
| Водозащищенная | да* |
| Работа от аккумулятора | да |
| Работа от адаптера питания | да |
| Дополнительно | зарядка, щеточка, дорожный футляр, док-станция, контейнер с очищающей жидкостью |
| Вес | 215 г |
| Размер | 160×65×45 мм |
| Гарантия | 2 года |
| Доступность запасных ножей/головок | в рекомендованных производителем СЦ и магазинах |
| Срок службы ножей/головок | 18 месяцев |
| Средняя цена | T-1632500 |
| Розничные предложения | L-1632500-10 |
* допускается промывка всей бритвы под струей воды, однако нам не удалось найти в инструкции ни одного упоминания о возможности «мокрого» бритья
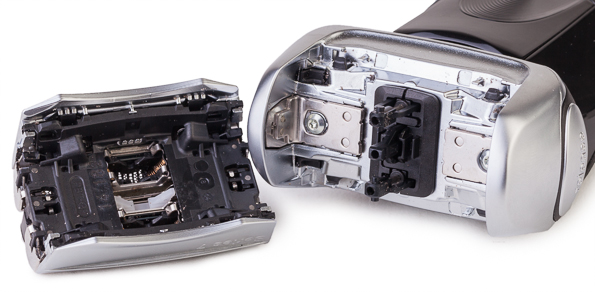
Комплектация
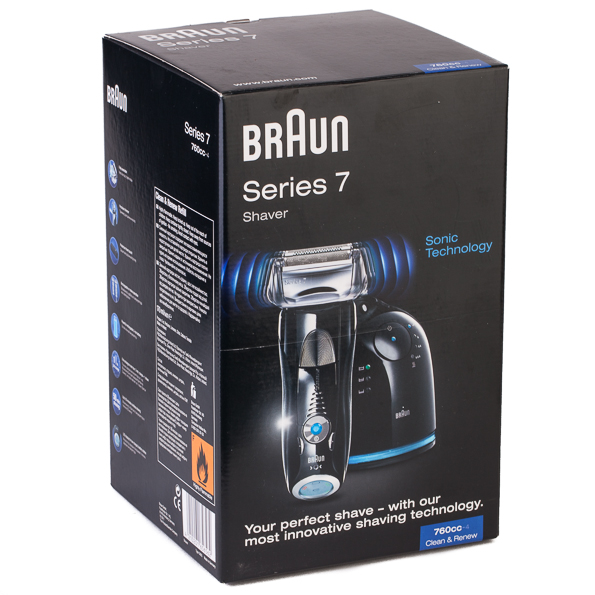
Braun любит черный цвет — и в упаковке тоже. Надписи (в подавляющем большинстве на английском языке) и картинки на всех сторонах коробки традиционно рассказывают нам о том, какой замечательный продукт мы приобрели и какая бездна новейших технологий в нем сосредоточена. Учитывая цену — мы верим, почему бы нет?
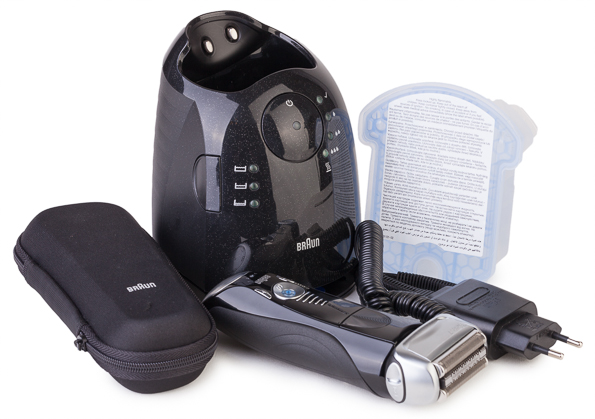
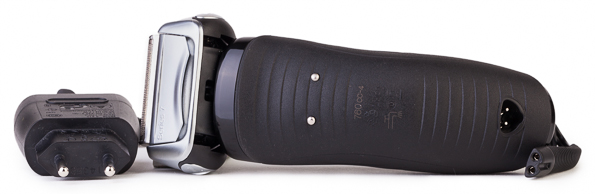
Комплект поставки включает в себя:
- собственно электробритву;
- док-станцию с функцией очистки и подзарядки;
- картридж с моюще-дезинфицирующей жидкостью для док-станции;
- адаптер питания для присоединения к бритве или док-станции;
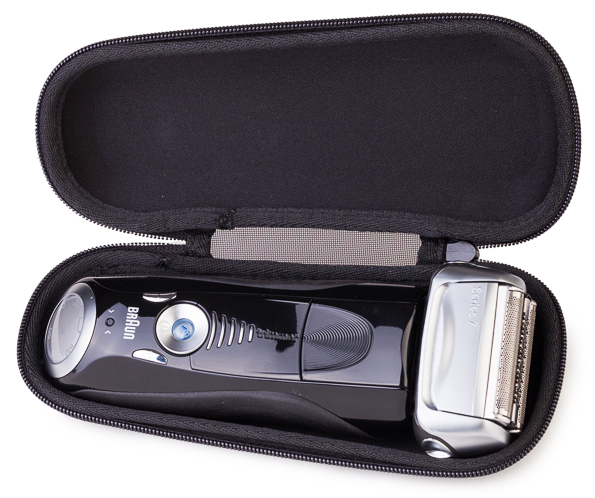
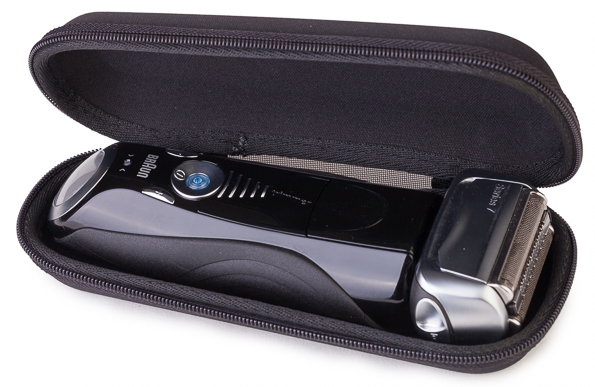
- походный футляр;
- щеточку для очистки;
- гарантийный талон;
- инструкцию.
Походный чехол вмещает в себя только и исключительно бритву, больше ни для чего места не остается. Видимо, считается, что полной зарядки хватит на все путешествие, поэтому зарядное устройство брать с собой нет необходимости. Забегая вперед: похоже, что в подавляющем большинстве случаев именно так и будет.
Инструкция
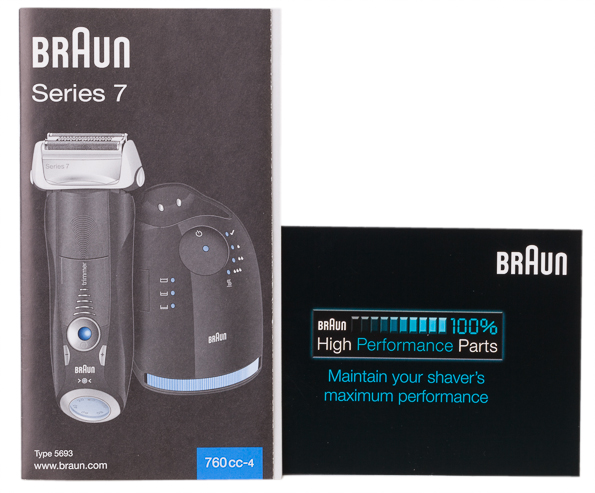
Инструкция мультиязычна, русский в наличии. В целом, качество текста стоит признать хорошим: максимум по делу (и минимум «не сушите вашу кошку в нашей микроволновке»), все изложено кратко и доходчиво. Присутствуют даже рекомендации, как достичь максимальной эффективности бритья. Прочитать этот мануал стоит — например, иначе вы вряд ли догадаетесь, для чего на вашей бритве предусмотрена клавиша «Reset». 
Управление
Всего на бритве 6 кнопок:
- включения/выключения;
- 2 кнопки «+» и «−» для выбора интенсивности бритья (3 ступени)
- блокирование головки (она перестает быть «плавающей»)
- отсоединения ножей от головки (для промывки)
- Reset
Степени интенсивности бритья Braun делит на «чувствительную», «нормальную» и «интенсивную». По идее, «чувствительная» должна вызывать меньшее раздражение кожи у тех, кто к нему склонен или при бритье в особо нежных местах. Однако сама же компания пишет, что для быстрого и полного бритья советует интенсивный режим. Нам почувствовать разницу между ними, честно говоря, не удалось.

Кнопка Reset служит для того чтобы «сбросить» бритву после замены блока ножей (которую рекомендуют производить раз в 18 месяцев, а если вы вдруг об этом забыли — вам напомнит специальный индикатор).
Эксплуатация
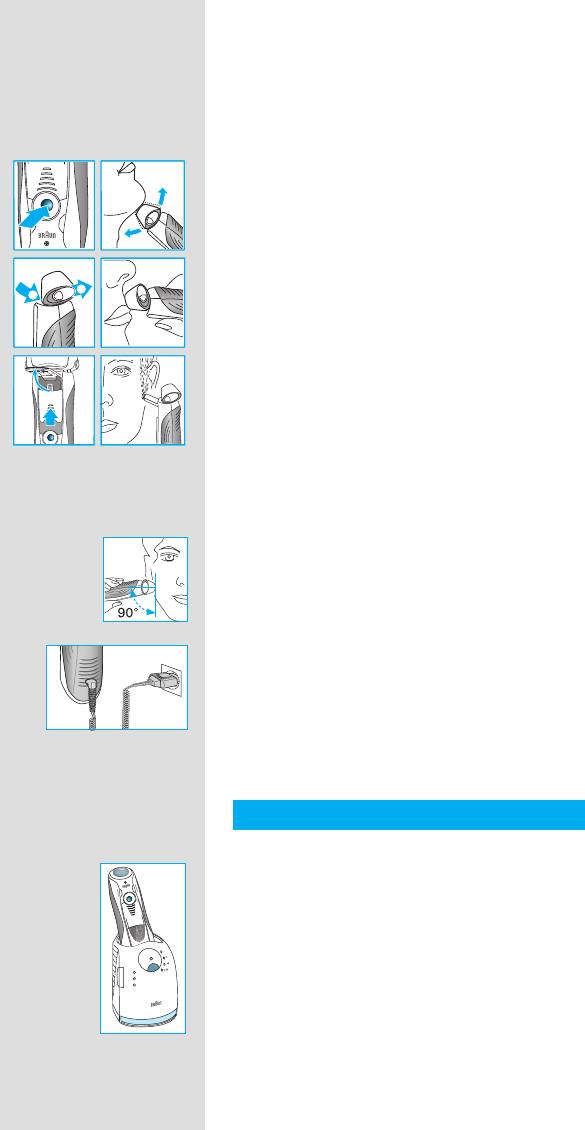
Подготовка
Рекомендации по подготовке устройства к использованию собственно бритвы вообще не касаются — в этом разделе инструкции нам рассказывают, как подготовить к работе док-станцию: открыть предохранительные пробки на картридже с чистящей жидкостью, установить его в док-станцию и подключить ее к сети с помощью прилагаемого адаптера. Мы логично решили, что также будет полезно полностью зарядить бритву, что и было сделано.
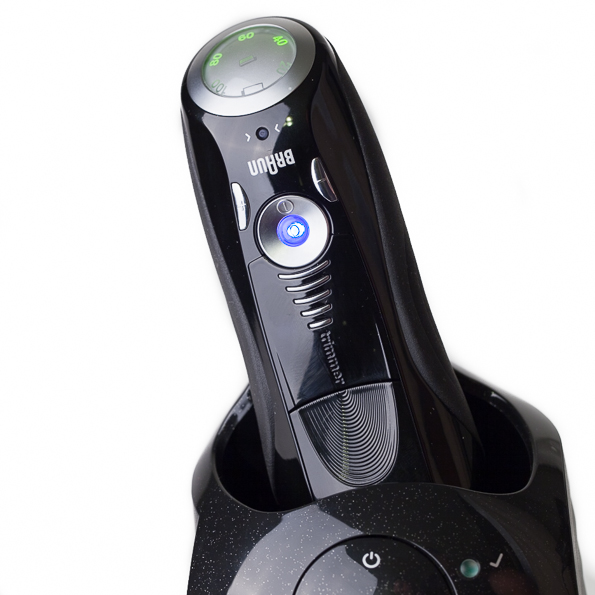
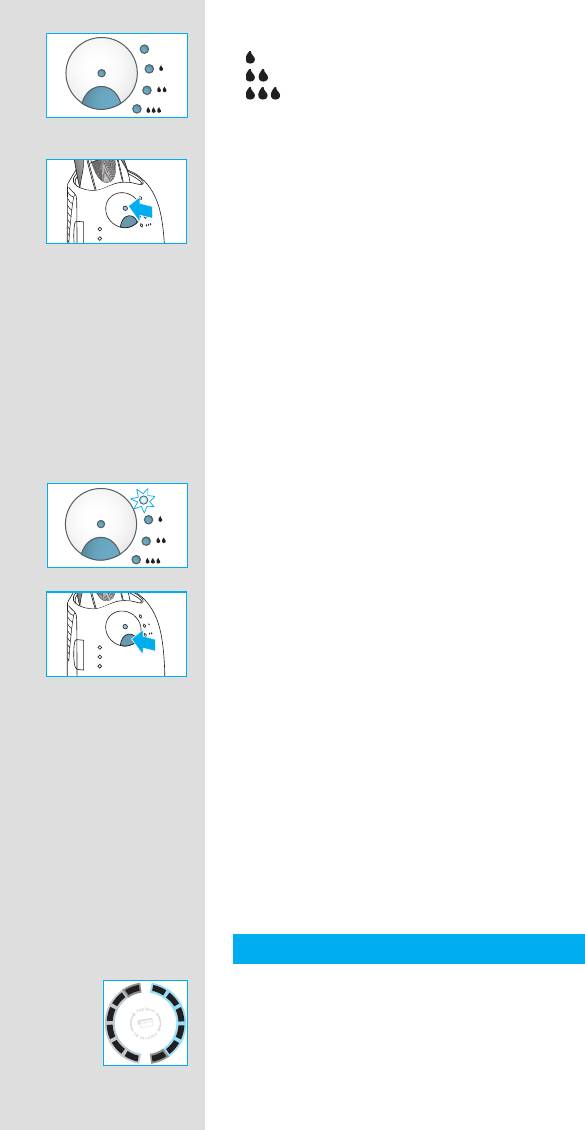
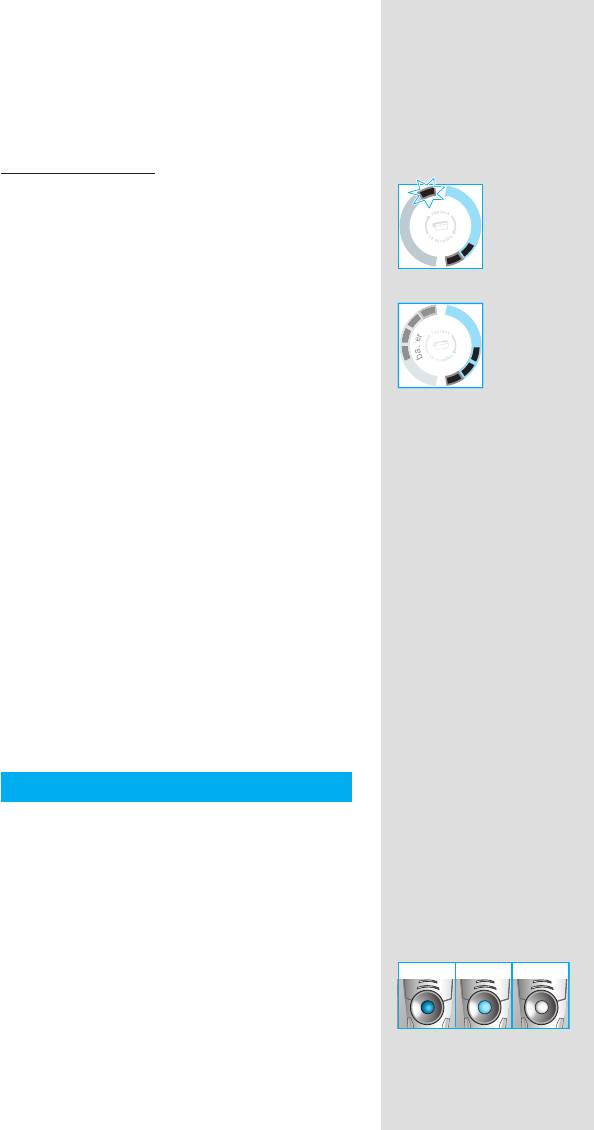
Индикатор заряда включается во время зарядки и во время работы бритвы и показывает степень заряда аккумулятора в процентах. Удобно. Кроме того, когда заряд становится меньше 20%, индикатор меняет цвет со спокойного зеленого на тревожный красный.
Использование
Адаптер питания можно подключить не только к док-станции, но и непосредственно к бритве, и в этом состоянии ей можно пользоваться — так что даже если заряд «на нуле», побриться это вам не помешает. До 100% бритва заряжается примерно за час. Длительность работы при полной зарядке согласно инструкции составляет 50 минут.
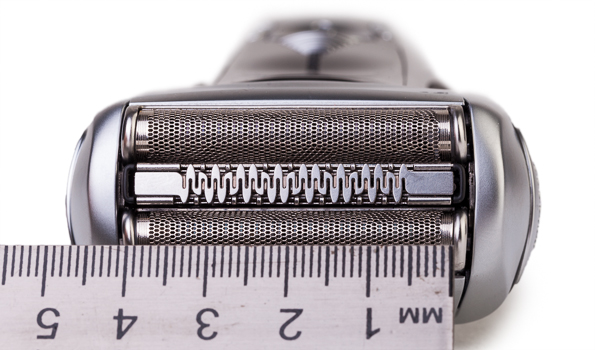
Встроенный триммер скрыт так хитро, что поначалу мы даже решили, что его нет. Появляется он, если сместить ребристую поверхность, находящуюся рядом с кнопкой включения, в сторону бреющей головки.
Триммер достаточно простой, разве что стригущая поверхность у него не традиционно-прямая, а слегка изогнутая.

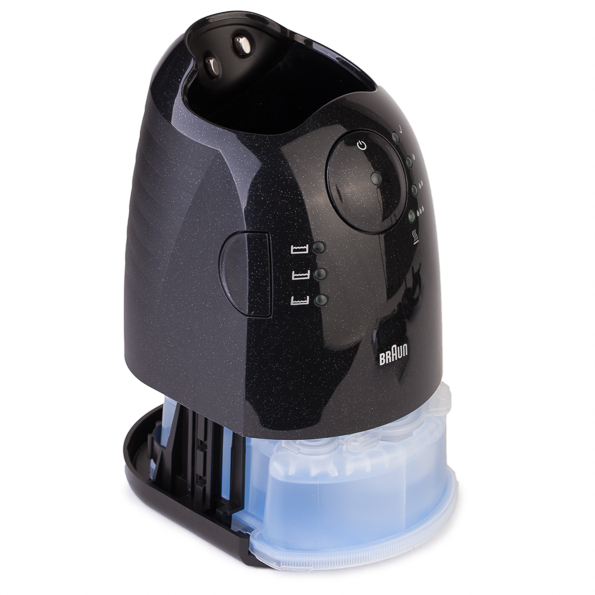
Док-станция предназначена для хранения, подзарядки и очистки бритвы.
Внутрь док-станции устанавливается картридж с дезинфицирующим раствором, который предназначен для промывки и смазки бритвенной головки. Один картридж входит в комплект поставки бритвы, дополнительные придется покупать. Минимальный комплект — 2 картриджа, на момент написания статьи можно было приобрести за сумму порядка полутора тысяч рублей. Это примерно столько же, сколько хочет за пару картриджей для своих док-станций другой известный производитель электробритв — Philips.
Уход
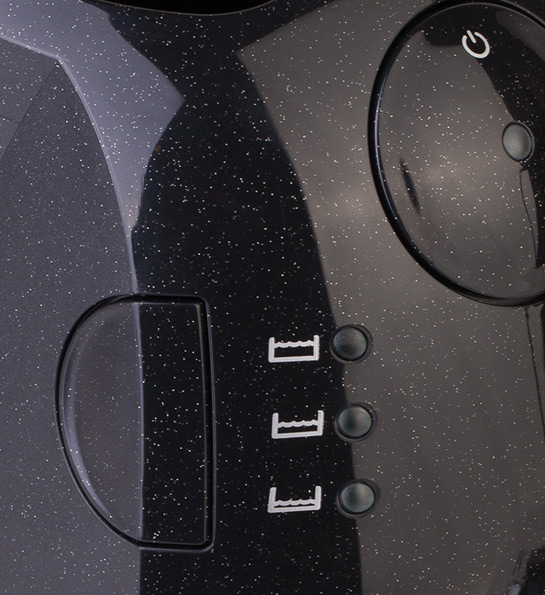
По идее, вы можете просто регулярно устанавливать бритву в док-станцию — вот и весь уход. О необходимости замены картриджа с чистящей жидкостью вас оповещает сама док-станция с помощью светодиодов на левой стороне, загорающихся напротив соответствующих иконок. Самая верхняя иконка означает, что осталось «более 30 очисток» (что косвенно позволяет судить о ресурсе картриджа), средняя — «примерно 7 очисток», нижняя — картридж пора менять.
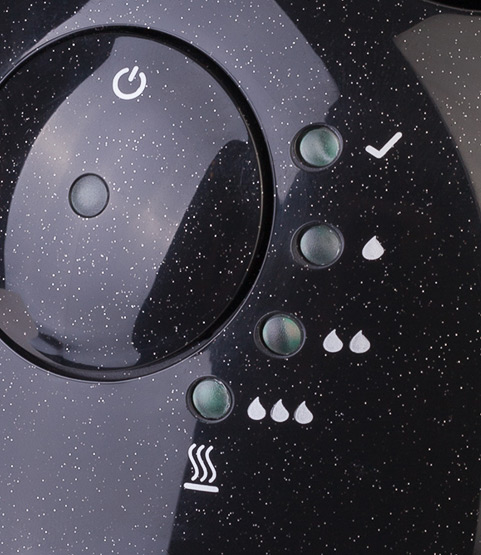
Иконки справа загораются после установки бритвы в док-станцию и информируют вас о степени загрязненности, и, соответственно, необходимости более или менее интенсивной очистки. Смысл их, в принципе, понятен и без объяснений, но для страховки скажем, что самая верхняя означает «бритва чиста».
Мы, как взрослые мальчики, в Деда Мороза уже не верим, и в специальные датчики внутри бреющей головки, следящие за реальной степенью ее загрязнения — тоже. Поэтому, рассуждая логически, предположили, что все устроено намного проще: скорее всего, бритва просто отсчитывает, сколько времени она проработала с момента последней очистки в док-станции, и исходя из этого сообщает последней степень своей «загрязненности».
Наши предположения полностью оправдались: пропользовавшись бритвой неделю без установки в док-станцию, мы вручную отсоединили блок с ножами и тщательнейшим образом промыли его и головку под струей воды. Устанавливаем бритву… и нам радостно сообщают, что она очень, очень грязная — срочно нужна самая интенсивная очистка! 
Одно хорошо: местный «искусственный интеллект» своевольничать не обучен, поэтому какими бы грозными ни были рекомендации, пока вы не нажмете на большую круглую кнопку, процесс очистки не начнется. Так что возможность руководствоваться собственным здравым смыслом нам все же оставили.
Сам процесс очистки выглядит вполне стандартно: в «ванночку», в которую утоплена бреющая головка, накачивается очищающая жидкость, после чего бритва на некоторое время включается, после чего жидкость из ванночки откачивается обратно в картридж. В зависимости от степени интенсивности очистки этот процесс после довольно продолжительной паузы может быть повторен — и не один раз.
Инструкция предупреждает, что процесс очистки ни в коем случае нельзя прерывать (непонятно, что делать, если вдруг отключат электричество), а также о том, что по его окончании ножи могут быть нагреты, т. к. в конце производится их сушка. Также нас предупреждают, что на ножах может остаться небольшой налет, что нормально — это всего лишь остатки смазки, необходимой для лучшего функционирования бритвенной головки.
Разумеется, проверили мы и качество очистки. Если вкратце — мы охотно верим, что оно вполне достаточно для того, чтобы никаких проблем с бритьем у вас не возникало. Но если эффект от снятия блока ножей и тщательной промывки его и головки под струей воды принять за 100%, то док-станция обеспечивает не более 70%.
Тестирование
Бритье
Основываясь на разумном компромиссе между качеством и длительностью тестирования, мы пришли к следующей процедуре:
- основной набор тестов проводит один человек, последовательно отращивая после «образцового» бритья станком 1-дневную, 2-дневную, и 4-дневную щетину;
- после этого впечатления первого тестера проверяет еще один эксперт на своей 2-дневной щетине;
- после этого один из тестеров, имеющих бороду, выдает свой вердикт о функциональности насадки-триммера.
4-дневная щетина
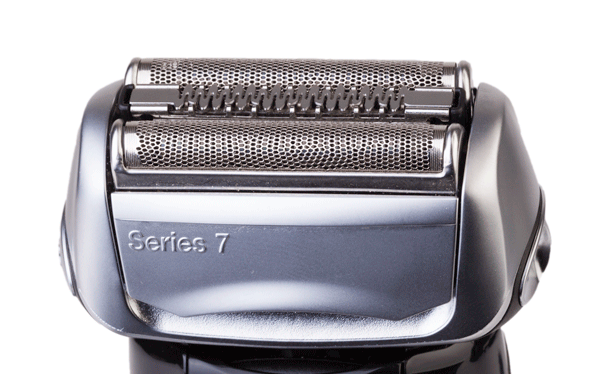
Бритье заняло 4 минуты 35 секунд… и это было очень эффектно. Грубо говоря, возникает впечатление, что этой бритве просто все равно, какой длины у вас наросла щетина. С первого же прохода остаются редкие длинные волоски, а после второго-третьего их количество сводится к нулю — и дальше уже можно спокойно «шлифовать поверхность», добиваясь идеальной выбритости. По всей видимости, стоит благодарить патентованный нож-триммер, расположенный между двумя сетчатыми ножами.
Есть, правда, одна небольшая ложка дегтя: длинные волоски, срезанные триммером, отнюдь не все остаются внутри бритвенной головки — существенная часть просто «осыпается» вниз. Таким образом, брить длинную щетину этой бритвой в рубашке не стоит — вся рубашка будет засыпана продуктами «стрижки».
Качество бритья мы оцениваем как близкое к идеалу — насколько он вообще возможен для электробритвы.
2-дневная щетина
Бритье заняло 2 минуты 25 секунд. Результат отличный, причем даже в традиционно сложных для электробритвы местах — например, на шее.
1-дневная щетина
Бритье заняло 2 минуты 10 секунд. Результат аналогичен предыдущему.
Второй эксперт, 2-дневная щетина
Бритье заняло 2 минуты ровно. Никаких жалоб на раздражение кожи (как и от первого эксперта) не поступало.
Триммер
Пожалуй, самая «рядовая» часть этой в целом впечатлившей нас бритвы. Обычный встроенный триммер. К тому же довольно узкий по сравнению с той же 3-й серией, что не плюс. Видимо, здесь функциональность была принесена в жертву «красивости» — пока не нажмешь на нужную кнопку, вообще непонятно, что он здесь есть.
Вольные комментарии
Количество сеансов бритья после одной полной зарядки велико: бритва подошла к нижнему критическому пределу в 20% только после 12 сеансов бритья, а полностью ее разрядить нам так и не удалось, потому что подошла пора тестирования док-станции, где она, естественно, тут же зарядилась.
В руке прибор лежит хорошо, а относительно большой вес компенсируется тем, что он бреет очень быстро — тяжесть не успеваешь заметить.
Выводы
И все-таки Braun удалось нас удивить еще раз. Наши основные претензии к Series 3 состояли в том, что длинная щетина — явно не ее конек. И вот — Series 7 760cc-4 полностью устранила этот недостаток: длинная щетина, короткая — ей практически все равно. Конечно, продолжительность бритья возрастает, но не так уж критично, и что самое главное — это совершенно не влияет на качество.
Качество по впечатлениям сразу после бритья кажется сравнимым со станком — везде гладко, никаких «артефактов», никаких хуже выбритых областей. Но, конечно, чудес на свете не бывает: все-таки «ощущение небритости» появляется раньше, чем после бритья станком. Однако, несомненно, на пути к идеалу Braun Series 7 760cc-4 сделала впечатляющий шаг вперед. Мы еще не тестировали Series 5, но если сравнивать «семерку» с «тройкой», то никаких вопросов из серии «за что я платил такие деньги?» не возникает: Series 7 — это просто более чистое и быстрое бритье, вот и вся разница.
Что же касется док-станции, то она вполне адекватно справляется со всеми задачами, которые на нее возложены. Хотя, конечно, если говорить о субъективном мнении наших экспертов — то все равно это больше «баловство». Моется эта бритва легко, заряжать ее нужно редко, поэтому специальный прибор, предназначенный для этих целей, смотрится как аксессуар для совсем ленивых.
Плюсы
- Отлично справляется как с короткой, так и с длинной щетиной
- Впечатляющие скорость и чистота бритья
- Ни у кого в процессе тестирования не возникло раздражения кожи
Минусы
- Высокая цена
- Невнятный триммер
Series7
790 cc
Series 7
Series 7Series 7
&
d
r
y
a
n
l
e
c
clean
790 cc
f
a
c
l
e
a
n
s
t
Series 7
high
low
trimmer
empty
trimmer
trimmer
on
on
off
off
sensitive
intensive
reset
Type 5692
www.braun.com/register
98913707_790cc_CEEMEA_S1.indd 198913707_790cc_CEEMEA_S1.indd 1 03.02.2009 12:04:31 Uhr03.02.2009 12:04:31 Uhr
Braun Infolines
English 4
GB
0800 783 70 10
Français 12
Polski 21
IRL
1 800 509 448
âesk˘ 30
F
0 810 309 780
Slovensk˘ 38
B
0 800 14 592
Magyar 46
Hrvatski 54
PL
0 801 127 286
0 801 1 BRAUN
Slovenski 62
Türkçe 70
CZ
221 804 335
êÛÒÒÍËÈ 77
SK
02/5710 1135
ì͇ªÌҸ͇ 87
H
(06-1) 451-1256
106
HR
01/6690 330
SLO
080 2822
TR
0 212 473 75 85
RUS
8 800 200 20 20
UA
+ 38 044 428 65 05
HK
852-25249377
(Audio Supplies Company Ltd.)
www.service.braun.com
Braun GmbH
Frankfurter Straße 145
61476 Kronberg/Germany
98913707/II-09
GB/F/PL/CZ/SK/H/HR/SLO/TR/
RUS/UA/Arab
98913707_790cc_CEEMEA_S2.indd 198913707_790cc_CEEMEA_S2.indd 1 03.02.2009 12:05:56 Uhr03.02.2009 12:05:56 Uhr
Series 7
Series 7Series
7
790 cc
trimmer
trimmer
trimmer
Series 7
on
on
sensitive
off
off
res
e
t
intensive
34
4a
8
Series 7
9
e
a
n
&
d
r
y
10
c
l
clean
5
n
11
f
a
s
t
c
l
e
a
790 cc
high
2
low
Series 7
trimmer
trimmer
trimmer
empty
1
6
trimmer
trimmer
trimmer
on
on
on
on
12
13
off
off
off
off
sensitive
intensive
14
15
reset
7
17
20
18
19
Series 7
Series 7
16
98913707_790cc_CEEMEA_S3.indd 198913707_790cc_CEEMEA_S3.indd 1 03.02.2009 12:07:05 Uhr03.02.2009 12:07:05 Uhr
Our products are designed to meet the highest
English
standards of quality, functionality and design.
We hope you enjoy your new Braun Shaver.
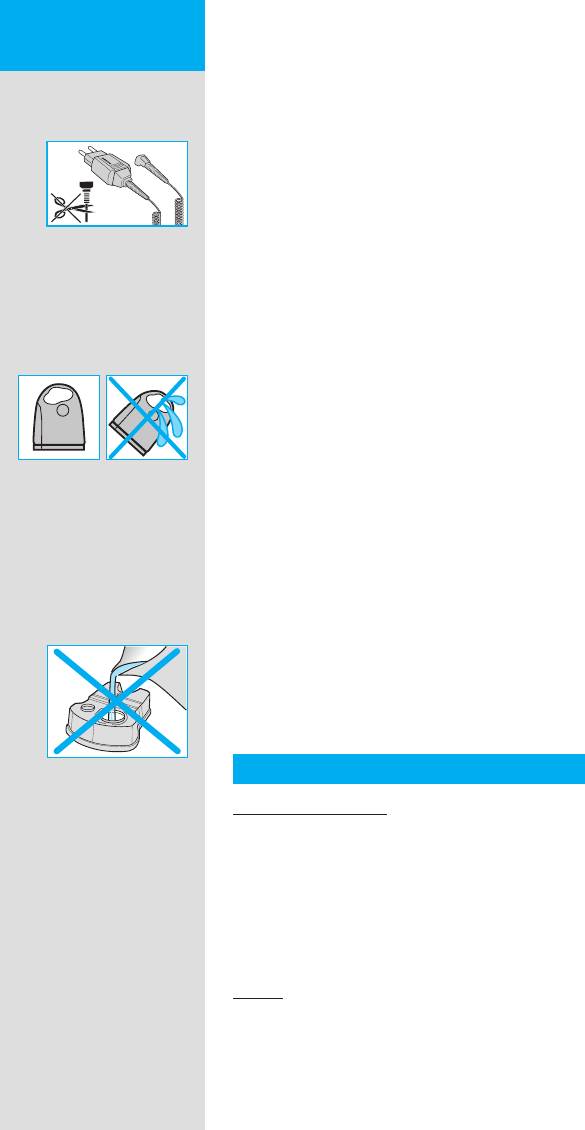
Warning
Your shaving system is provided with a special
cord set, which has an integrated Safety Extra
Low Voltage power supply. Do not exchange or
STOPSTOP
tamper with any part of it, otherwise there is risk
of an electric shock.
This appliance is not intended for use by children
or persons with reduced physical or mental
capabilities, unless they are supervised by a
person responsible for their safety. In general,
we recommend that you keep the appliance out
of reach of children.
To prevent the cleaning fl uid from leaking, ensure
that the Clean&Renew station is placed on a fl at
surface. When a cleaning cartridge is installed,
do not tip, move suddenly or transport the
station in any way as cleaning fl uid might spill
out of the cartridge. Do not place the station
inside a mirror cabinet, nor over a radiator, nor
place it on a polished or lacquered surface.
The cleaning cartridge contains a highly
fl ammable liquid so keep it away from sources of
ignition. Do not smoke near the station. Do not
expose to direct sunlight for long periods of time.
Do not refi ll the cartridge and use only original
Braun refi ll cartridges.
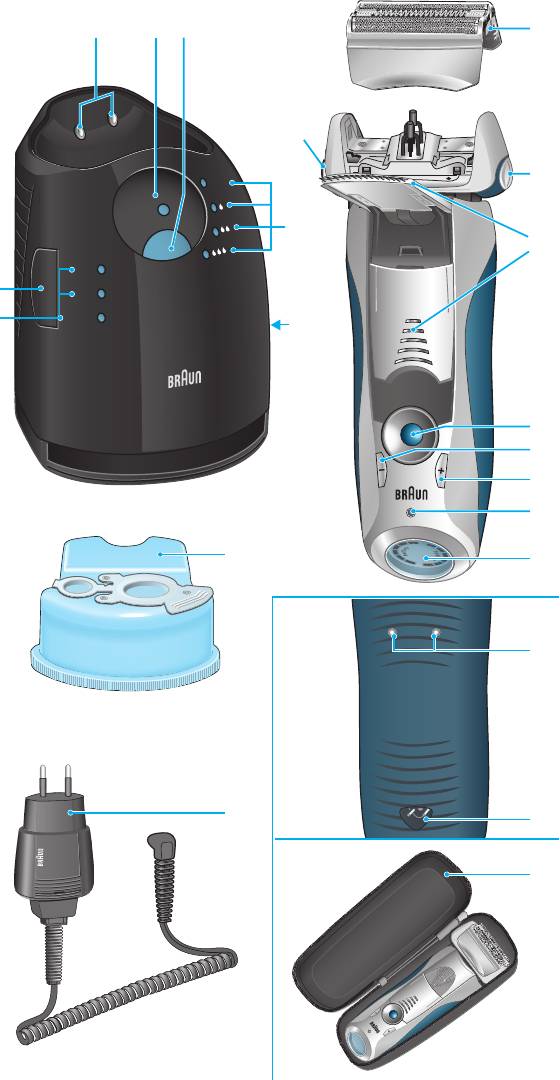
Description
Clean&Renew station
1 Cleaning fl uid display
2 Lift button for cartridge exchange
3 Station-to-shaver contacts
4 «clean & dry» button
D «fast clean» button
5 Cleaning program indicators
6 Station power socket
7 Cleaning cartridge
Shaver
8 Foil & Cutter cassette
9 Cassette release button
0 Shaver head «lock» switch
q Pop-out long hair trimmer
4
98913707_790cc_CEEMEA_S4—110.ind4 498913707_790cc_CEEMEA_S4-110.ind4 4 03.02.2009 12:07:51 Uhr03.02.2009 12:07:51 Uhr
w On/off switch
e «sensitive» (–) setting button
r «intensive» (+) setting button
t Reset button
z Shaver display
u Shaver-to-station contacts
i Shaver power socket
o Travel case
p Special cord set
Before shaving
Prior to fi rst use you must connect the shaver to
an electrical outlet using the special cord set p
cle
cle
an
an
or alternatively proceed as below.
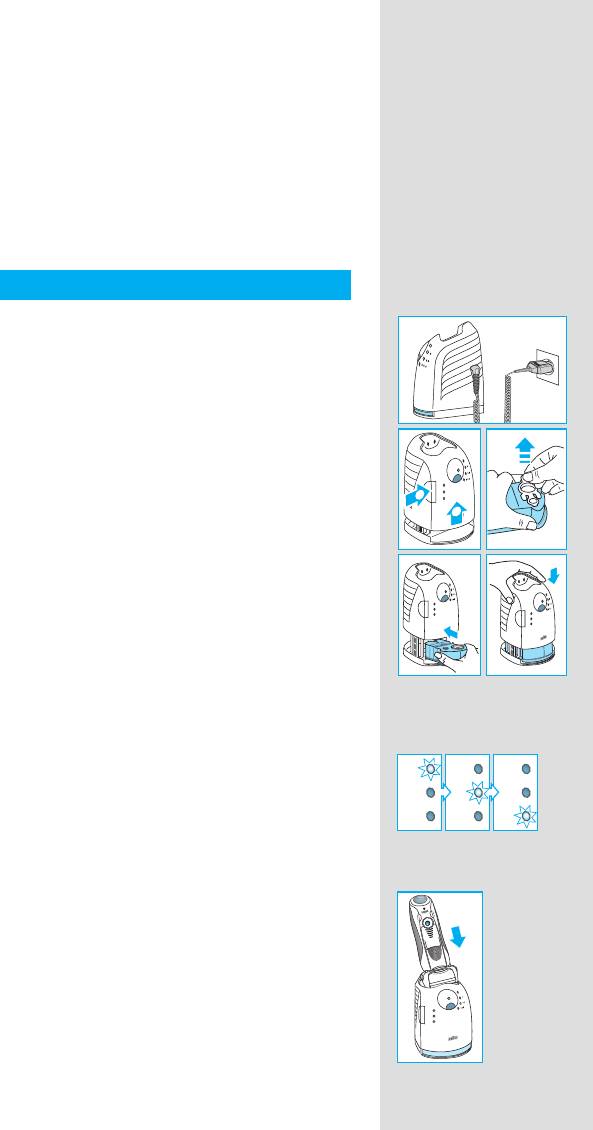
Installing the Clean&Renew station
• Using the special cord set p, connect the
station power socket 6 to an electrical outlet.
c
c
e
l
e
l
a
n
n
a
&
&
d
d
r
y
r
y
clean
clean
f
f
s
a
a
s
t
t
c
c
l
e
e
l
a
a
n
n
high
high
• Press the lift button 2 to open the housing.
low
low
1
1
empty
empty
2
2
• Hold the cleaning cartridge 7 down on a fl at,
f
f
a
a
s
s
t
t
c
c
l
e
e
l
a
a
n
n
stable surface (e.g. table).
new
new
• Carefully remove the lid from the cartridge.
e
l
c
c
l
e
a
a
n
n
&
&
d
d
r
r
y
y
cle
an
an
cle
e
l
c
c
e
l
a
n
n
a
&
d
d
&
r
y
y
r
clean
clean
a
f
a
f
s
t
t
s
c
c
l
e
a
l
e
a
n
n
high
high
low
low
f
a
f
a
s
s
t
t
l
c
c
l
e
a
e
a
n
n
• Slide the cartridge into the base of the station
empty
empty
high
high
low
low
empty
empty
as far as it will go.
f
a
f
a
s
s
t
c
t
c
l
e
e
l
a
a
n
n
a
f
a
f
s
s
t
t
c
c
l
l
e
e
a
a
n
n
• Slowly close the housing by pushing it down
until it locks.
The cleaning fl uid display 1 will show how much
fl uid is in the cartridge:
high
high
high
high
high
high
«high» up to 30 cleaning cycles available
low
low
low
low
low
low
«low» up to 7 cleaning cycles remaining
empty
empty
empty
empty
empty
empty
«empty» new cartridge required
Charging and cleaning the shaver
Insert the shaver head down into the cleaning
station. (The contacts u on the back of the
shaver will align with the contacts 3 in the
cleaning station).
If required, the Clean&Renew station will auto-
c
l
e
a
n
&
d
r
y
clean
matically charge the shaver. The hygiene status
high
low
empty
of the shaver will also be analyzed and one of
the following cleaning program indicators 5 will
light up:
5
Series 7
l
c
e
a
n
&
d
y
r
clean
high
f
a
s
t
c
e
l
a
n
low
empty
Series 7
f
a
s
t
c
l
e
a
n
98913707_790cc_CEEMEA_S4—110.ind5 598913707_790cc_CEEMEA_S4-110.ind5 5 03.02.2009 12:07:53 Uhr03.02.2009 12:07:53 Uhr
l
l
e
e
a
a
n
n
&
&
d
d
r
r
«clean» shaver is clean
c
c
y
y
clean
clean
«
» short economical cleaning required
« » normal level of cleaning required
« » high intensive cleaning required
f
f
a
a
s
s
t
t
c
c
l
l
e
e
a
a
n
n
If the station selects one of the required cleaning
programs, it will not start unless you press
c
c
l
l
e
e
a
a
n
n
&
&
d
d
r
r
y
y
clean
clean
the «clean & dry» button
4. For best shaving
f
f
a
a
s
s
t
t
c
c
l
e
l
e
a
a
n
n
results, we recommend cleaning after each
high
high
low
low
shave.
Whilst cleaning is in progress, the respective
cleaning program indicator will blink. Each
cleaning program consists of several cycles,
where cleaning fl uid is fl ushed through the
shaver head and a heat drying process dries
the shaver. Depending on the program selected
the total cleaning time will range from 32 to 43
minutes.
The cleaning programs should not be inter—
rupted. Please note that whilst the shaver is
drying, the shaving head may be hot and wet.
l
l
e
e
a
a
n
n
&
&
d
d
r
r
c
c
y
y
When the program is fi nished, the blue «clean»
clean
clean
indicator will light up. Your shaver is now clean
and ready for use.
f
f
a
a
s
s
t
t
c
c
l
l
e
e
a
a
n
n
Fast cleaning
Push the «fast clean» button D to activate
c
c
e
l
l
e
a
a
n
n
&
&
d
d
r
r
y
y
clean
clean
the fast clean program without drying. This
program takes about 25 seconds only and is
f
f
a
a
s
s
t
t
c
c
l
e
e
l
a
a
n
n
high
high
low
low
recommended when you do not have time to
empty
empty
wait for one of the automatic cleaning programs.
If you remove the shaver just after the program
has fi nished, wipe off the shaver head with a
tissue to avoid dripping.
Stand-by mode
10 minutes after completing the charging or
cleaning session, the Clean&Renew station
switches to the stand-by mode: The indicators
of the Clean&Renew station turn off.
Shaver display
The shaver display z shows the charge status of
h
h
the battery on the left, and the hygiene status on
y
y
y
y
r
r
g
g
e
e
t
t
i
i
t
t
e
e
the right. (6 dark segments are shown on each
a
a
n
n
b
b
e
e
side when the battery is fully charged and the
shaver is hygienically clean).
6
98913707_790cc_CEEMEA_S4—110.ind6 698913707_790cc_CEEMEA_S4-110.ind6 6 03.02.2009 12:07:53 Uhr03.02.2009 12:07:53 Uhr
Battery segments:
During charging or when using the shaver, the
respective battery segments will blink. When
fully charged all 6 segments are shown. With
decreasing charge the segments gradually
disappear.
Low charge indicator:
The «low» charge indicator provided with a red
frame blinks to indicate that the charge has
h
h
y
y
r
r
y
y
g
g
dropped below 20%. The remaining battery
e
e
t
t
t
t
e
i
e
i
a
a
n
n
b
b
e
e
capacity is suffi cient for 2 to 3 shaves.
Hygiene segments:
All 6 hygiene segments will appear after the
shaver has been cleaned in the Clean&Renew
h
y
y
r
g
e
t
t
e
i
station. When the shaver is being used, the
a
n
b
e
hygiene segments will gradually disappear.
Once the shaver is returned to the station, the
system will automatically select the appropriate
cleaning program and restore the segments
to maximum hygiene. Given that rinsing the
shaver under tap water is not as hygienic as the
cleaning station, the hygiene segments will only
restore themselves when the shaver has been
cleaned in the Clean&Renew station.
Charging information
• A full charge provides up to 50 minutes
of cordless shaving time. This may vary
according to your beard growth.
• The best environmental temperature for
charging is between 5 °C to 35 °C. Do not
expose the shaver to temperatures higher than
50 °C for extended periods of time.
Personalizing your shaver
Personalizing your shaver
With the «sensitive» e and «intensive» r
buttons you can choose the best setting for
shaving different areas of your face and as per
your specifi c needs. The different settings are
indicated by the pilot light incorporated in the
on/off switch w:
• «Intensive» = dark blue (powerful shave)
• «Normal» = light blue
• «Sensitive» = white (for a thorough comfortable
shave in sensitive areas of your
face such as neck)
7
b
a
t
a
t
e
r
y
r
h
y
y
r
g
e
t
i
t
e
a
n
b
e
b
a
t
a
t
e
r
y
r
on
on
off
off
n
siv
on
on
off
off
itive
n
siv
on
on
off
off
itive
n
siv
sensitivenormalintensive
on
on
off
off
itive
n
siv
on
on
off
off
itive
n
siv
on
on
off
off
itive
n
siv
sensitivenormalintensive
itive
98913707_790cc_CEEMEA_S4—110.ind7 798913707_790cc_CEEMEA_S4-110.ind7 7 03.02.2009 12:07:55 Uhr03.02.2009 12:07:55 Uhr
For a thorough and fast shave we recommend
the «intensive» setting.
Pressing the « + » or « – » button activates your
preferred setting. When switching on next time,
the last used setting will be activated.
How to use
Press the on/off switch
w to operate the shaver:
• The pivoting shaver head and fl oating foils
automatically adjust to every contour of your
face.
• To shave hard to reach areas (e.g. under the
nose) slide the shaver head «lock» switch
0 to
the back position to lock the pivoting head at
an angle.
• To trim sideburns, moustache or beard, slide
the pop-out long hair trimmer upwards.
Tips for the perfect shave
For best shaving results, Braun recommends you
follow 3 simple steps:
1. Always shave before washing your face.
2. At all times, hold the shaver at right angles
(90°) to your skin.
3. Stretch your skin and shave against the
direction of your beard growth.
Shaving with the cord
If the shaver has run out of power (discharged),
and you do not have the time to recharge it in the
Clean&Renew station, you may also shave with
the shaver connected to an electrical outlet via
the special cord set.
Cleaning
Automatic cleaning
After each shave, return the shaver to the
Clean&Renew station and proceed as described
above in the section «Before shaving».
All charging and cleaning needs are then
automatically taken care of. With daily use, a
cleaning cartridge should be suffi cient for about
30 cleaning cycles.
The hygienic cleaning cartridge contains alcohol,
which once opened will naturally evaporate
slowly into the surrounding air. Each cartridge,
if not used daily, should be replaced after
approximately 8 weeks.
8
lock
trimmer
lock
lock
lock
on
off
sensitive
intensive
on
off
lock
trimmer
lock
lock
lock
on
off
sensitive
intensive
on
off
releaserelease
c
l
e
a
n
&
d
r
y
clean
high
low
empty
l
c
a
e
n
&
d
r
y
clean
high
f
a
s
t
c
e
l
a
n
low
empty
f
a
s
t
c
l
e
a
n
98913707_790cc_CEEMEA_S4—110.ind8 898913707_790cc_CEEMEA_S4-110.ind8 8 03.02.2009 12:07:55 Uhr03.02.2009 12:07:55 Uhr
The cleaning cartridge also contains lubricants,
which may leave residual marks on the outer foil
frame after cleaning. However, these marks can
be removed easily by wiping gently with a cloth
or soft tissue paper.
Manual cleaning
The shaver head is suitable for cleaning
under running tap water.
Warning: Detach the shaver from the
power supply before cleaning the shaver
head in water.
Rinsing the shaving head under running water
trimmer
is an alternative way to keep the shaver clean,
especially when travelling:
• Switch the shaver on (cordless) and rinse
the shaving head under hot running water.
You may use liquid soap without abrasive
substances. Rinse off all foam and let the
shaver run for a few more seconds.
• Next, switch off the shaver, press the release
button 9 to remove the Foil & Cutter cassette
8 and let it dry.
oil
• If you regularly clean the shaver under
water, then once a week apply a drop of
light machine oil on top of the Foil & Cutter
cassette.
Alternatively, you may clean the shaver using the
brush provided:
• Switch off the shaver. Remove the Foil & Cutter
cassette 8 and tap it out on a fl at surface.
Using the brush, clean the inner area of the
pivoting head. However, do not clean the
cassette with the brush as this may damage it.
Cleaning the housing
From time to time clean the housing of the
shaver and the Clean&Renew station with a
damp cloth, especially inside the cleaning
chamber where the shaver rests.
Replacing the cleaning cartridge
After having pressed the lift button 2 to open the
housing, wait for a few seconds before removing
the used cartridge to avoid any dripping.
Before discarding the used cartridge, make sure
to close the openings using the lid of the new
cartridge, since the used cartridge will contain
contaminated cleaning solution.
9
on
re
le
a
s
e
er
re
le
a
s
e
trimmer
trimmer
Series
Series
oil
Series 7
click!
Series 7
on
re
le
a
s
e
er
re
le
a
s
e
trimmer
Series
Series
Series 7
click!
Series 7
Series 7
Series 7
a
le
re
le
re
a
s
s
e
e
Series 7
Series 7
re
le
le
re
a
a
s
s
e
e
le
le
re
re
a
s
a
s
e
e
new
new
old
old
98913707_790cc_CEEMEA_S4—110.ind9 998913707_790cc_CEEMEA_S4-110.ind9 9 03.02.2009 12:07:56 Uhr03.02.2009 12:07:56 Uhr
Keeping your shaver in top shape
Replacing the Foil & Cutter cassette
/
reset
To maintain 100% shaving performance, re-
y
y
r
r
h
h
place the Foil & Cutter cassette 8, when the
e
e
y
y
t
t
t
t
g
g
a
a
i
i
e
e
b
b
replacement symbol lights up on the shaver
n
n
e
e
display z (after about 18 months) or when
cassette is worn.
The replacement symbol will remind you during
the next 7 shaves to replace the Foil & Cutter
cassette. Then the shaver will automatically reset
the display.
After you have replaced the Foil & Cutter
cassette, use a ball-pen to push the reset button
t for at least 3 seconds to reset the counter.
While doing so, the replacement light blinks and
goes off when the reset is complete. The manual
reset can be done at any time.
Accessories
Available at your dealer or Braun Service
Centres:
• Foil & Cutter cassette 70S
• Cleaning cartridge Clean&Renew CCR
Environmental notice
This product contains rechargeable
batteries. In the interest of protecting the
environment, please do not dispose of the
product in household waste at the end of
its useful life. Disposal can take place at a
Braun Service Centre or at appropriate
collection points provided in your country.
The cleaning cartridge can be disposed with
regular household waste.
Subject to change without notice.
This product conforms to the European
Directives EMC 2004/108/EC and Low
Voltage 2006/95/EC.
For electric specifi cations, see printing on the
special cord set.
10
m
Series 7
re
le
a
s
e
70S
er
m
Series 7
re
le
a
s
e
70S
er
70S70S
98913707_790cc_CEEMEA_S4—110.ind10 1098913707_790cc_CEEMEA_S4-110.ind10 10 03.02.2009 12:07:57 Uhr03.02.2009 12:07:57 Uhr
Guarantee
We grant 2 years guarantee on the product
commencing on the date of purchase. Within
the guarantee period we will eliminate, free of
charge, any defects in the appliance resulting
from faults in materials or workmanship, either
by repairing or replacing the complete appliance
as we may choose.
This guarantee extends to every country where
this appliance is supplied by Braun or its
appointed distributor.
This guarantee does not cover: damage due
to improper use, normal wear and tear (e.g. foil
& cutter cassette) as well as defects that have
a negligible effect on the value or operation of
the appliance. The guarantee becomes void if
repairs are undertaken by unauthorised persons
and if original Braun parts are not used.
To obtain service within the guarantee period,
hand in or send the complete appliance with
your sales receipt to an authorised Braun
Customer Service Centre.
For UK only:
This guarantee in no way affects your rights
under statutory law.
11
98913707_790cc_CEEMEA_S4—110.ind11 1198913707_790cc_CEEMEA_S4-110.ind11 11 03.02.2009 12:07:58 Uhr03.02.2009 12:07:58 Uhr
|
Код: 126723 Инструкция: Электробритва Braun 70-N7200cc Black/Grey Series 7Извините, товара сейчас нет в наличии
Бесплатная доставка Извините, товара сейчас нет в наличии Сравнить Новости интернет-магазина «Лаукар»:23.04.2025 26.02.2025 17.02.2025 Дополнительная информация в категории Электробритва:Мужские электробритвы — разбираемся в терминах Таблица Авторизованных сервисных центров по брендам. Описание Инструкция Отзывы (0) В интернет-магазине бытовой техники «Лаукар» Вы можете скачать инструкцию к товару Электробритва Braun 70-N7200cc Black/Grey Series 7 совершенно бесплатно. Все инструкции, представленные на сайте интернет-магазина бытовой техники «Лаукар», предоставляются производителем товара. Для того чтобы скачать инструкцию, Вам необходимо нажать на ссылку «скачать инструкцию», расположенную ниже, а в случае, если ссылки нет, Скачать инструкцию Смотреть инструкцию 
Фирма-производитель оставляет за собой право на внесение изменений в конструкцию, дизайн и комплектацию товара: Электробритва Braun 70-N7200cc Black/Grey Series 7. Пожалуйста, сверяйте информацию о товаре с информацией на |