
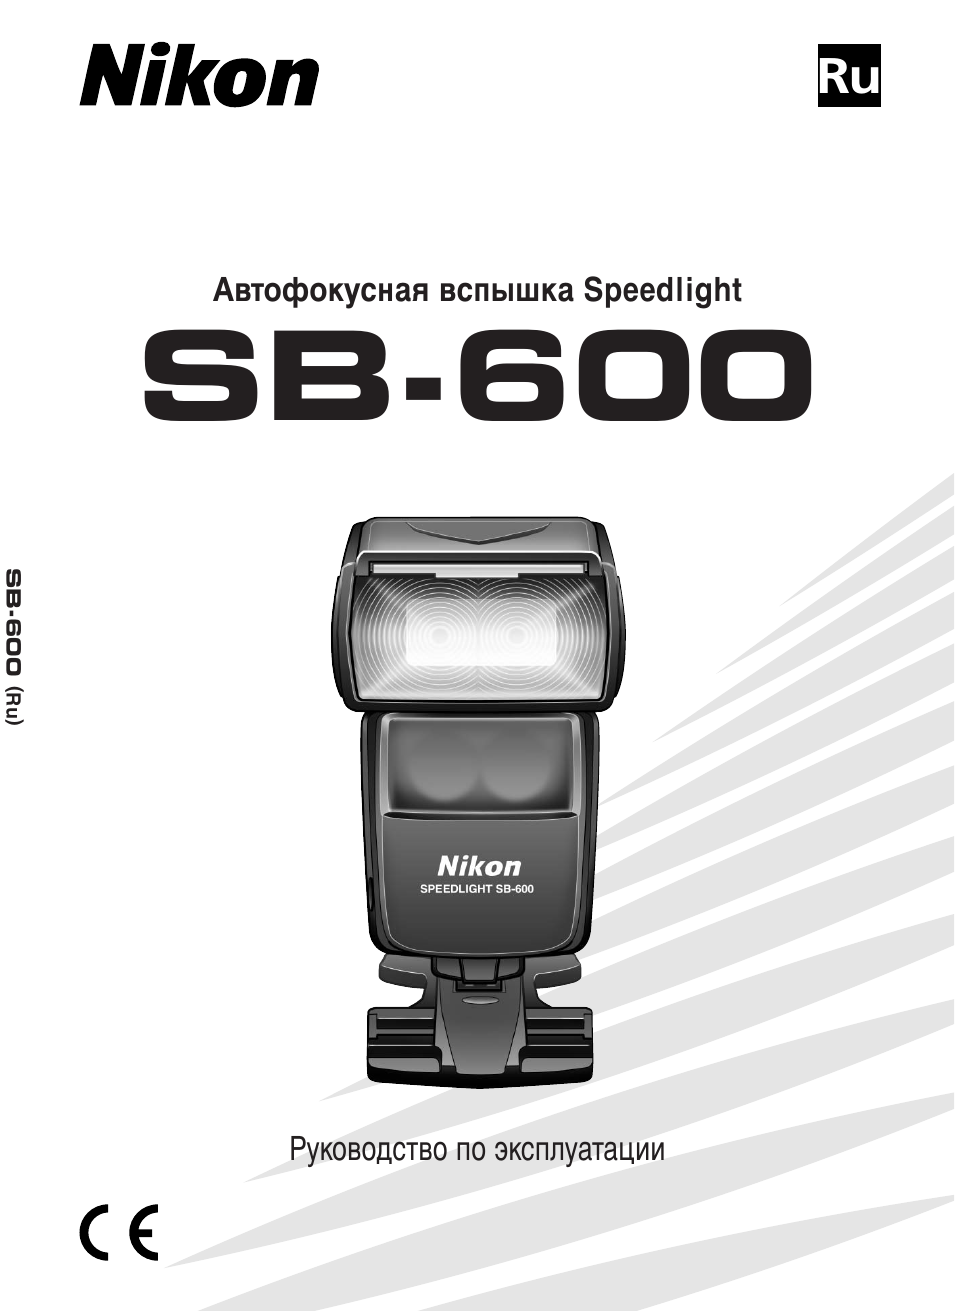
Nikon
Автофокусная вспышка Speedlight
С С
Руководство по эксплуатации
Ru
Меры по обеспечению вашей безопасности
Перед началом использования приобретенного вами устройства
внимательно ознакомьтесь с приведенными ниже мерами
предосторожности. Это обеспечит правильную и безопасную
эксплуатацию данного устройства фирмы Nikon, предотвратит его
повреждение, а также защитит вас и окружающих вас людей от
возможных травм.
Данные инструкции по безопасности должны храниться вблизи
устройства для того, чтобы ими можно было воспользоваться в
случае необходимости.
В настоящем руководстве инструкции по безопасности отмечены
следующими значками:
ПРЕЛУПРЕЖЛЕНИЕ Невыполнение инструкций, отмеченных данным
^
^
^ значком, может привести к травме, смерти или
нанесению ущерба имуществу.
А
ВНИМАНИЕ!
Невыполнение инструкций, отмеченных данным
значком, может привести к нанесению ущерба
имуществу.
Символ сортировки мусора, использующийся в европейских странах
Данный символ означает, что этот продукт должен
утилизироваться отдельно от других.
Приведенная ниже информация касается только
пользователей из стран Европы.
• Данный продукт должен утилизироваться отдельно от
других в соответствующих приемных пунктах. Не
выбрасывайте данный продукт вместе с бытовым
мусором.
•
• Дополнительную информацию Вы можете получить у
продавца или у местных властей, отвечающих за
утилизацию мусора.
ПРЕДУПРЕЖДЕНИЯ — Использование вспышки Speedlights
1 Если вытекшая из батарей агрессивная корродирующая жидкость попадет в
глаза, следует незамедлительно промыть глаза проточной водой и обратиться
к врачу.
Если не принять оперативные меры, вашему зрению может быть
нанесен серьезный ущерб.
2 Если вытекшая из батарей агрессивная корродирующая жидкость попадет на
кожу или на одежду, ее следует незамедлительно смыть проточной водой.
Длительный контакт с кожей может привести к повреждению кожного покрова.
3 Никогда не пробуйте самостоятельно разбирать или чинить вспышк,
так как
это может привести к поражению электрическим током или неправильному
срабатыванию вспышки, в результате чего вы можете получить травму.
4 Если вы уронили и повредили вспышку, не следует прикасаться к каким-либо
внутренним металлическим частям.
Эти части, в частности конденсатор
вспышки Speedlight и связанные с ним компоненты, могут находиться в
заряженном состоянии, и прикосновение к ним может привести к поражению
электрическим током. Отключите подачу электроэнергии или удалите батареи,
не касаясь каких-либо электрических компонентов, и отнесите вспышку на
ремонт в местное представительство фирмы Nikon или авторизированный
сервисный центр.
5 Если устройство нагрелось, появился дым или запах гари, следует
незамедлительно прекратить использование устройства и удалить батареи,
чтобы предотвратить возгорание устройства или оплавление. Подождите, пока
вспышка остынет, после чего вы сможете взять ее в руки и удалить батареи.
Затем отнесите вспышку на ремонт в местное представительство фирмы Nikon
или авторизированный сервисный центр.
6 Вспышка не должна попадать в жидкость и подвергаться воздействию
дождя, соленой воды или влаги, если она не защищена должным образом от
воздействия жидкости и влаги. Для использования вспышки под водой
требуется специальный футляр для подводной съемки.
Вода или влага,
попавшие в устройство, могут вызвать возгорание устройства или поражение
электрическим током. В таких случаях следует незамедлительно удалить
батареи из вспышки Speedlight и отнести вспышку на ремонт в местное
представительство фирмы Nikon или авторизированный сервисный центр.
Примечание: В большинстве случаев ремонт электронных устройств, в которые
попала вода или влата, обходится очень дорото.
7 Не пользуйтесь устройством в помещениях, в которых присутствует горючий
или взрывоопасный газ.
Использование вспышки в помещениях, в которых
присутствует горючий газ, включая пропан, а также бензин и пыль, может
вызвать взрыв или пожар.
8 Не направляйте вспышку непосредственно на водителя двигающегося
автомобиля,
так как это может временно ослепить водителя и привести к
дорожно-транспортному происшествию.
с[
о
С
II
Меры по обеспечению вашей безопасности
11
12
9 Не следует направлять вспышку в глаза человека, находящегося от вас на
близком расстоянии,
так как вспышка может повредить сетчатую оболочку
глаза. Ни при каких обстоятельствах не следует пользоваться вспышкой на
расстоянии ближе 1 метра от грудных детей.
10
Не пользуйтесь вспышкой, если головка вспышки касается человека или
какого-либо предмета.
Это может привести к ожогу этого человека и/или
возгоранию его одежды от тепла, выделившегося при вспышке.
Вспомогательные принадлежности небольшого размера следует хранить в
недоступных для детей местах,
чтобы дети не могли их случайно проглотить.
Если ребенок случайно проглотил мелкую вспомогательную принадлежность,
следует незамедлительно обратиться к врачу.
Следует использовать только батареи, указанные в данном руководстве.
Использование других батарей может привести к протеканию агрессивных
корродирующих жидкостей, взрыву, возгоранию или неудовлетворительной
работе батарей.
13 Не следует одновременно использовать батареи разного типа или марки, а
также новые и старые батареи,
так как это может привести к протеканию
агрессивных жидкостей, взрыву или возгоранию. Если для устройства
требуется несколько батарей, всегда следует устанавливать одинаковые
батареи, которые были приобретены в одно время.
14 Обычные батареи, например марганцевые, щелочно-марганцевые и литиевые,
ни при каких обстоятельствах не должны помещаться в зарядное устройство,
так как это может вызвать протекание агрессивных корродирующих жидкостей,
взрыв или возгорание.
15 При использовании батарей стандартного размера (АА, ААА, С, О) или других
распространенных видов перезаряжаемых батарей, таких как никель
кадмиевые (NiCd) и никель- металлогидридные (Ni-MH) или для их зарядки,
следует использовать только зарядное устройство, указанное фирмой,
изготовившей батареи, и внимательно ознакомиться с инструкциями. При
зарядке этих батарей в зарядном устройстве следует соблюдать полярность и
не устанавливать батареи в зарядное устройство до того, как они в
достаточной степени остыли,
так как это может привести к протеканию
агрессивных корродирующих жидкостей, взрыву или возгоранию. Таким же
мерам предосторожности необходимо следовать при использовании
перезаряжаемых батарей, которые могли быть предоставлены изготовителем
вашего фотоаппарата.
А ВНИМАНИЕ! — Меры предосторожности при использовании
вспышки 8реес1МдИ18
1 Не прикасайтесь к вспышке мокрыми руками,
так как это может привести к
поражению электрическим током.
2 Вспышку следует хранить в недоступном для детей месте, чтобы они не могли
положить устройство в рот, поднести его ко рту или прикоснуться к
представляющим опасность частям устройства,
так как это может привести к
поражению электрическим током.
III
Не следует сильно трясти устройство,
так как это может привести к
неправильному срабатыванию устройства, в результате которого может
произойти взрыв или возгорание.
Никогда не используйте для чистки устройства химически активные реагенты,
содержащие легковоспламеняющиеся вещества, например разбавитель
краски, бензин или растворитель для краски, и никогда не храните устройство
рядом с такими химикатами, как камфара и нафталин,
так как это может
повредить пластмассовый корпус, вызвать пожар или поражение
электрическим током.
Перед длительным хранением устройства батареи следует удалить,
чтобы
предотвратить возгорание устройства или протекание агрессивных
корродирующих жидкостей
А
ПРЕДУПРЕЖДЕНИЯ — Использование батарей
Никогда не нагревайте батареи и не бросайте их в огонь,
так как это может
вызвать протекание агрессивных корродирующих жидкостей, нагревание
или взрыв.
Никогда не замыкайте и не разбирайте батареи,
так как это может вызвать
протекание агрессивных корродирующих жидкостей, нагревание или взрыв.
Не следует одновременно использовать батареи разного типа или марки, а
также новые и старые батареи,
так как это может привести к протеканию
агрессивных корродирующих жидкостей, нагреванию или взрыву.
Не устанавливайте батареи с нарущением полярности, так как это может
вызват
протекание агрессивных корродирующих жидкостей, нагревание или
взрыв.
Даже если только одна батарея установлена с нарущением полярности,
это приведет к неправильному срабатыванию вспыщки Speedlight.
Следует пользоваться только зарядным устройством, указанным фирмой,
изготовивщей батареи,
чтобы избежать возможности протекания агрессивных
корродирующих жидкостей, нагревания или взрыва.
Не следует носить или хранить батареи вместе с металлическими предметами,
например ожерельями и щпильками для волос,
так как подобные предметы
могут вызвать замыкание, которое может привести к протеканию, нагреванию
или взрыву батарей.
Кроме того, при переноске нескольких батарей, их следует осторожно
поместить в контейнер, в котором они не будут соприкасаться клеммами,
так
как соприкосновение клемм с противоположной полярностью может вызвать
замыкание, которое может привести к протеканию, нагреванию или взрыву.
Если вытекщая из батарей агрессивная корродирующая жидкость попадет в
глаза, следует незамедлительно промыть глаза проточной водой и обратиться
к врачу.
Если не принять оперативные меры, вашему зрению может быть
нанесен серьезный ущерб.
Если вытекщая из батарей агрессивная корродирующая жидкость попадет на
кожу или на одежду, ее следует незамедлительно смыть проточной водой.
Длительный контакт с кожей может привести к повреждению кожного покрова.
с[
о
С
IV
3
4
5
1
2
3
4
5
6
7
8
Меры по обеспечению вашей безопасности
11
12
9 Всегда следуйте предупреждениям и инструкциям, напечатанным на батареях,
чтобы избежать действий, в результате которых может произойти вытекание
агрессивных корродирующих жидкостей, нагревание или возгорание батарей.
10 Следует использовать только батареи, указанные в настоящем руководств,
чтобы избежать возможного протекания агрессивных корродирующих
жидкостей, нагревания или взрыва.
Никогда не открывайте корпус батарей и не устанавливайте батареи с
поврежденным корпусом,
так как это может привести к протеканию
агрессивных корродирующих жидкостей, нагреванию или взрыву.
Батареи следует хранить в недоступных для детей местах,
чтобы дети не могли
их случайно проглотить. Если ребенок случайно проглотил батарею, следует
незамедлительно обратиться к врачу.
13 Батареи не должны попадать в воду и подвергаться воздействию дождя,
влаги или соленой воды, если они должным образом не защищены от
воздействия влажной окружающей среды.
Попадание воды или влаги в
батареи может привести к протеканию агрессивных корродирующих жидкостей
или нагреванию батарей.
14 Не используйте батареи, которые выглядят не так, как обычно, в том числе
батареи с изменившимися цветом или формой.
Использование таких батарей
может привести к протеканию агрессивных корродирующих жидкостей
или нагреванию.
15 Если вы заметили, что зарядка перезаряжаемых батарей не завершилась в
установленное время, следует прекратить зарядку,
чтобы предотвратить
возможное протекание агрессивных корродирующих жидкостей или
нагревание батарей.
16 Если вы выбрасываете или сдаете батареи на утилизацию, клеммы батарей
следует изолировать лентой.
Замыкание, вызванное контактом положительных
и отрицательных клемм батареи с металлическим предметом, может привести
к возгоранию, нагреванию или взрыву. Выбрасывать использованные батареи
следует в соответствии с правилами, установленными местными
законодательными органами.
17 Обычные батареи ни при каких обстоятельствах не должны помещаться в
зарядное устройство,
так как это может вызвать протекание агрессивных
корродирующих жидкостей, взрыв или возгорание.
18 Полностью разряженные батареи следует незамедлительно удалить из
вашего устройства,
так как это может вызвать протекание агрессивных
корродирующих жидкостей, нагревание или взрыв.
А
ВНИМАНИЕ! — Меры предосторожности при использовании батарей
Не следует бросать или сильно трясти батареи,
так как это может вызвать
протекание агрессивных корродирующих жидкостей, нагревание или взрыв.
V

Содержание
• Режим медленной синхронизации, подавление эффекта
“красили глаз” и синхронизация по задней шторке…………… 46-47
• Режим автоматической высокоскоростной синхронизации
(для совместимых фотокамер)……………………………………………..48-49
• Блокировка мощности вспышки (FV Lock)
(для совместимых фотокамер)…………………………………………………. 50
• Подсветка автофокуса при слабом освещении……………………….51-52
• Пользовательские настройки………………………………………………… 53-55
Расширенные возможности………………………………………….. 57
• О съемке с несколькими вспышками……………………………………. 58-59
• Съемка с несколькими всп^
1
шками
в беспроводном режиме………………………………………………………..60-61
• Съемка со вспышкой в режиме улучшенного
беспроводного управления………………………………………………….. 62-66
• Подтверждение съемки с несколькими всп^хшками в
беспроводном режиме при помощи лампочки
готовности или звукового сигнала……………………………………………67
• Съемка с несколькими всп^хшками,
соединенными кабелями………………………………………………………68-69
• Системная таблица использования нескольких
всп^
1
шек в режиме TTL……………………………………………………….70-71
• Съемка с отраженной всп^хшкой………………………………………….. 72-74
• Макросъемка со вспышкой…………………………………………………….75-77
Съемка со вспышкой в режиме высокоскоростной
синхронизации 1/300 TTL (только для F5)…………………………….. 78
•
• Справочная информация………………………………………….. 79
• Автоматические TTL режимах всп^хшки,
имеющееся в SB-600…………………………………………………………….. 80-82
• Дополнительн^
1
е принадлежности………………………………………… 83-84
• Рекомендации по уходу и хранению…………………………………………….85
• Замечания по уходу за батареями………………………………………………..86
• Возможные проблемы и их устранение…………………………………..87-88
• Технические характеристики………………………………………………… 89-91
• Алфавитн^
1
й указатель…………………………………………………………. 92-93
2
Подготовка, Основные операции, Другие функции
Расширенные возможности, Подробнее о работе со вспышкой, Справочная информация Чат поддержки
- Изображение
- Текст
Подготовка
В этом разделе дается
информация о подготовке SB-600
к работе.
Основные операции
В разделе перечисляются основные действия
для простого получения правильно
экспонированной фотографии со вспышкой в
режиме автоматической TTL вспышки.
Подробнее о работе со вспышкой
В разделе рассказывается о
различных режимах вспышки,
имеющихся у SB-600
Другие функции
В разделе дается подробная
информация о каждой функции,
имеющейся в SB-600.
Расширенные возможности
В этом разделе описываются
различные технические приемы
съемки с использованием
вспышки SB-600.
Справочная информация
В разделе рассказывается о
дополнительных принадлежностях,
возможных проблемах со вспышкой и
их устранении, уходе, хранении и т.п.
3

I
Предисловие
Благодарим Вас за покупку вспышки Nikon Speedlight SB-600.
Чтобы максимально использовать все функциональные
возможности новой вспышки, пожалуйста, прочтите данное
руководство, прежде чем начинать с ней работать. Прочтите
также отдельный буклет «Образцы фотографий”, в котором
представлен обзор возможностей съемки со вспышкой SB-600 с
примерами фотографий. Помимо этого, держите под рукой
инструкцию по эксплуатации от Вашей фотокамеры, чтобы
обращаться к ней при необходимости.
•И Основные функциональные возможности SB-600
* •
• SB-600 является мощной всп^
1
шкой системы Speedlight с ведущим числом 30/98
(ISO 100, метры/футы) или 42/138 (ISO 200, метры/футы) (для позиции 35 мм
зума головки вспышки, при температуре 20°C). В зависимости от комбинации
фотокамер и объективов, исполъзуем^и вместе в SB-600, Вам будут доступны
при работе различные вид
^1
автоматической TTL вспышки (стр. 33) и всп^
1
шка с
ручным управлением (стр. 34).
• Автоматический зум головки всп^
1
шки постоянно отслеживает изменения
фокусного расстояния объектива (за исключением некоторых комбинаций
фотокамера/объектив) (стр. 40). При исполъзовании встроенного
широкоуголъного рассеивателя зум головки вспышки автоматически
устанавливается в положение, соответствующее объективу 14 мм (стр. 41).
• Головка всп^
1
шки может подниматъся вверх на 90° и поворачиватъся в
горизонталъной плоскости на 180° влево и на 90° вправо для съемки с
отраженной вспышкой (стр. 72) или при макросъемке со вспышкой (стр. 75).
• При беспроводной съемке с несколъкими всп^хшками SB-600 может
исполъзоватъся в качестве беспроводной ведомой вспышки, если SB-600
исполъзуется с фотокамерами, совместимыми с системой креативного
освещения Nikon (стр. 5).
• Исполъзуйте встроенн^хй широкоуголън^хй рассеивателъ при съемке с
отраженной вспышкой и при макросъемке со вспышкой для смягчения теней и
получения эффекта более сбалансированного, похожего на натуралъное,
освещения (стр. 72, 75).
• Предусмотрены полъзователъские настройки для установки параметров,
включения и отключения функций, чтобы не требовалосъ устанавливатъ их
каждый раз (стр. 53).
4
08:08
Nikon School: Возможности вспышек Nikon Speedlight
05:44
NIKON SB 600 FLASH REVIEW
10:06
Мастер-класс: Константин Занчевский | Фото со вспышками Nikon Speedlight
09:20
Nikon SB700 vs Nikon SB600 Basic over view and comparison of the Flash Speed Light
06:28
Nikon SB-600: A Great Speedlite Flash For New Nikon DSLR Shooters To Start Off With
26:47
Nikon Speedlights Tutorial SB-600,SB-700,SB-900/910
Нажмите на кнопку для помощи

SB-600
Autofocus Speedlight
Instruction Manual
SB-600
(
En
)

2
Contents
Preparation
· Foreword ………………………………………………………………….4-6
·Tips on using the Speedlight …………………………………………7
· Camera groups and available flash modes ………………….8-9
· Speedlight parts and their functions ………………………..10-11
· Control buttons…………………………………………………………..12
Easy setting for the optimum TTL auto flash mode……………13
· LCD panel …………………………………………………………….14-15
· Lenses………………………………………………………………………16
•
Basic operation ………………………………………………………..17
1 Installing the batteries …………………………………………..18-19
2Test firing (Confirming the exposure) ………………………20-21
3 Attach the SB-600 to the camera and adjust
the flash head ……………………………………………………22-23
4 Setting the camera’s exposure mode and
metering system…………………………………………………24-25
5 Setting the SB-600’s flash mode …………………………….26-27
6 Compose the picture and shoot with flash……………….28-29
Using the SB-600 with the COOLPIX………………………………30
•
Detailed operation…………………………………………………….31
· SB-600’s available flash modes……………………………………32
· TTL auto flash mode …………………………………………………..33
· Manual mode ………………………………………………………..34-37
· Notes on continuous flash shooting………………………………38
•
Other functions ………………………………………………………..39
· Setting the zoom-head position ……………………………….40-41
· Exposure compensation and flash output-level
compensation……………………………………………………..42-44
· Checking the illumination before actually taking
the picture (Modeling illuminator)……………………………….45
· Slow-sync flash mode, red-eye reduction control,
and rear-curtain sync …………………………………………..46-47
·
Auto FP High-Speed Sync mode (for compatible cameras)
…48

3
Preparation
This section provides
preliminary information
on using the SB-600.
Basic operation
Basic procedures to
take simple, properly
exposed flash
photographs in the TTL
auto flash mode.
Detailed operation
A variety of flash modes
available with the
SB-600 are explained.
Other functions
Detailed information on
each function of the
SB-600 is provided.
Advanced operations
Information on
advanced flash shooting
techniques using the
SB-600 is described.
Reference information
Optional accessories,
Tr oubleshooting,
Speedlight care,
Specifications, etc. are
presented in this section.
· Flash Value Lock (FV Lock)
(for compatible cameras)…………………………………49
· Autofocus flash operation in dim light ……………..50-51
· Custom Settings……………………………………………52-54
• Advanced operations……………………………………….55
·Overview of multiple flash operation ……………….56-57
·Wireless multiple flash shooting ……………………..58-59
· Flash shooting in Advanced Wireless Lighting …60-64
· Confirming wireless multiple flash operation
using the ready-light or the beeping sound………..65
· Multiple flash shooting using cords…………………66-67
· System chart for TTL multiple flash shooting
using cords ……………………………………………….68-69
· Bounce flash operation………………………………….70-72
· Close-up flash operation ……………………………….73-75
Flash shooting in the 1/300 TTL High-Speed
Flash sync mode (F5 only)……………………………….76
• Reference information……………………………………..77
· TTL auto flash modes available
with the SB-600 ………………………………………….78-80
· Optional accessories…………………………………….81-82
·Tips on Speedlight care……………………………………..83
· Notes on handling batteries………………………………..84
·Troubleshooting ……………………………………………85-86
· Specifications ………………………………………………87-89
·Index …………………………………………………………..90-91

4
Foreword
Thank you for purchasing the Nikon Speedlight SB-600. To get the most
out of your Speedlight, please read this instruction manual thoroughly
before use. Also, read the separate booklet, “A collection of example
photos,” which provides an overview of the SB-600’s flash-shooting
capabilities with example photos. In addition, keep your camera
instruction manual handy for quick reference.
●●●
Main features and functions of the SB-600
•The SB-600 is a high-performance Speedlight with a guide number of 30/98
(ISO 100, m/ft.) or 42/138 (ISO 200, m/ft.) (at the 35mm zoom-head position,
20°C/68°F.) According to the camera and lens combination used with the
SB-600, you can perform various types of TTL auto flash (p. 33) and Manual
flash operations (p. 34).
•A power zoom function automatically adjusts the zoom-head position to
match the lens focal length (with the exception of some camera/lens
combinations) (p. 40). When the built-in wide-flash adapter is used, the
zoom-head position is automatically set to match a 14mm lens (p. 41).
• The flash head can be tilted from 0° to 90° and rotated horizontally 180° to
the left and 90° to the right, enabling bounce flash (p. 70) or close-up flash
photography (p. 73).
•In wireless multiple flash photography, the SB-600 can be used as a wireless
remote flash unit when the SB-600 is used with cameras compatible with
Nikon’s Creative Lighting System (p. 5).
• When using bounce flash or taking close-ups with flash, you can use the
built-in wide-flash adapter to create soft, diffused lighting with virtually no
shadows, while maintaining balanced lighting for the main subject and the
background (pp. 70, 73).
• Custom settings are provided to set values, or activate or cancel functions
that are unnecessary to set each time (p. 52).

5
The SB-600 features a new Nikon Speedlight system, called Creative Lighting
System (CLS). This system offers additional flash shooting possibilities with
digital cameras by taking advantage of a camera’s digital communication
capabilities. CLS is available only when the SB-600 is used with compatible
Nikon cameras. The SB-600 offers these major features:
• i-TTL mode
This is a new TTL auto flash mode in the Creative Lighting System.
Monitor Preflashes are fired at all times. The subject is correctly exposed by
the light from the flash lighting and the exposure is less affected by the
ambient light than in the conventional TTL mode. (p. 32).
• Advanced Wireless Lighting
With Advanced Wireless Lighting, wireless multiple flash operation in the
TTL (i-TTL) mode can now be accomplished with digital SLRs. In this mode,
you can divide the remote flash units into three groups and control the flash
output independently for each group, expanding your range of creative
multiple-flash shooting techniques. The SB-600 can be used only as a
wireless remote flash unit (p. 60).
• Flash Value Lock
Flash Value (FV) is the amount of flash exposure needed for a subject.
Using FV Lock with compatible cameras, you can lock in the appropriate flash
exposure for the main subject. This flash exposure will remain fixed, even if
you change the aperture or composition, or zoom the lens in or out (p. 49).
• Flash Color Information Communication
When the SB-600 is used with compatible digital SLRs, color temperature
information is automatically transmitted to the camera. In this way, the
camera’s white balance is automatically adjusted to give you the correct
color temperature when taking photographs with the SB-600.
•Auto FP High-Speed Sync
High-Speed flash synchronization at your camera’s highest shutter speed is
now possible. This is useful when you want to use a wider aperture to
achieve shallow depth of field to blur the background (p. 48).
• Wide-Area AF-Assist Illuminator
In autofocus operation, the SB-600 emits AF-Assist illumination over a much
wider area than existing Speedlights. This enables you to perform autofocus
photography in dim light even after you change the focus area of cameras
supporting this function (p. 50).
See your equivalent camera’s instruction manual for details on the Creative
Lighting System.
Preparation
Creative Lighting System

6
Foreword
●●●
Notes
• Default: Functions and flash modes preset when shipped from the factory
are referred to as “Default” settings in this manual.
• CLS: Hereafter, Nikon’s new Speedlight system “Creative Lighting
System” is abbreviated “CLS.”
●●●
Marks used in this manual
•v: Denotes important points to prevent malfunction or shooting failure.
•t: Useful points that should be remembered for better usage of the SB-600.
•
u
: Provides convenient reference information when using the SB-600.
●●●
Supplied accessories
Soft Case
SS-600
Speedlight Stand
AS-19

7
Tips on using the Speedlight
Take trial shots
Take trial shots before photographing important occasions like weddings
or graduations.
Have Nikon spot-check your Speedlight regularly
Nikon recommends that you have your Speedlight serviced by an authorized
dealer or service center at least once every two years.
Using your Speedlight correctly
The Nikon Speedlight SB-600’s performance has been optimized for use with
Nikon brand cameras/accessories, including lenses.
Camera/accessories made by other manufacturers may not meet Nikon’s
criteria for specifications, and nonconforming cameras/accessories could
damage the SB-600’s components. Nikon cannot guarantee the SB-600’s
performance when used with non-Nikon products.
u
Life-long learning
As part of Nikon’s “Life-long learning” commitment to ongoing product support
and education, continually updated information is available on-line at the
following sites:
• For users in the U.S.A.: http://www.nikonusa.com/
• For users in Europe: http://www.europe-nikon.com/support
• For users in Asia, Oceania, the Middle East, and Africa: http://www.nikon-asia.com/
Visit these sites to keep up to date with the latest product information, tips,
answers to frequently asked questions (FAQs), and general advice on digital
imaging and photography. Additional information is available from the Nikon
representative in your area. See the URL below for contact information:
http://nikonimaging.com/
Preparation
Notes:
• The Nikon N90s, N90, N75-Series, N70, N60, N55-Series, N50, N8008, N8008s,
PRONEA 6i, N6006, N6000, N5005, N4004s and N4004 are sold exclusively in the U.S.A.
• The Nikon N80-Series, N65-Series are sold exclusively in the U.S.A. and Central and
South America.
• The Nikon N2020 and N2000 are sold exclusively in the U.S.A and Canada.

8
Camera groups and available flash modes
In this manual, Nikon SLR cameras are divided into nine groups: cameras
compatible with CLS*, digital SLRs not compatible with CLS*, and cameras in
Groups I to VII unless otherwise noted. First, consult the camera group table to
see which group your camera belongs to. Then as you read the manual, you will
find specific information on how to use the SB-600 with your particular camera.
* CLS: Creative Lighting System (p. 5)
*1o: Balanced Fill-Flash. This always appears together with D(p. 33).
*2Wireless multiple flash in the i-TTL mode is possible. (Works as a remote flash unit
only.) (p. 60)
*3 While performing Balanced Fill-Flash, no oindicator appears.
Group Camera name
Cameras compatible
with CLS*
D2H, D70
Digital SLRs not
compatible with CLS*
D1-Series, D100
I
F5, F100, F90X/N90s, F90-Series/N90, F80-Series/
N80-Series, F75-Series/N75-Series, F70-Series/N70
II
F4-Series, F65-Series/N65-Series, F-801s/N8008s,
F-801/N8008, Pronea 600i/6i
III F-601/N6006, F-601M/N6000
IV F60-Series/N60, F50-Series/N50, F-401x/N5005
V
F-501/N2020, F-401s/N4004s, F-401/N4004,
F-301/N2000
VI
FM3A, FA, FE2, Nikonos V, F3-Series
(with the AS-17)
VII
New FM2, FM10, FE10, F3-Series, F55-Series/
N55-Series
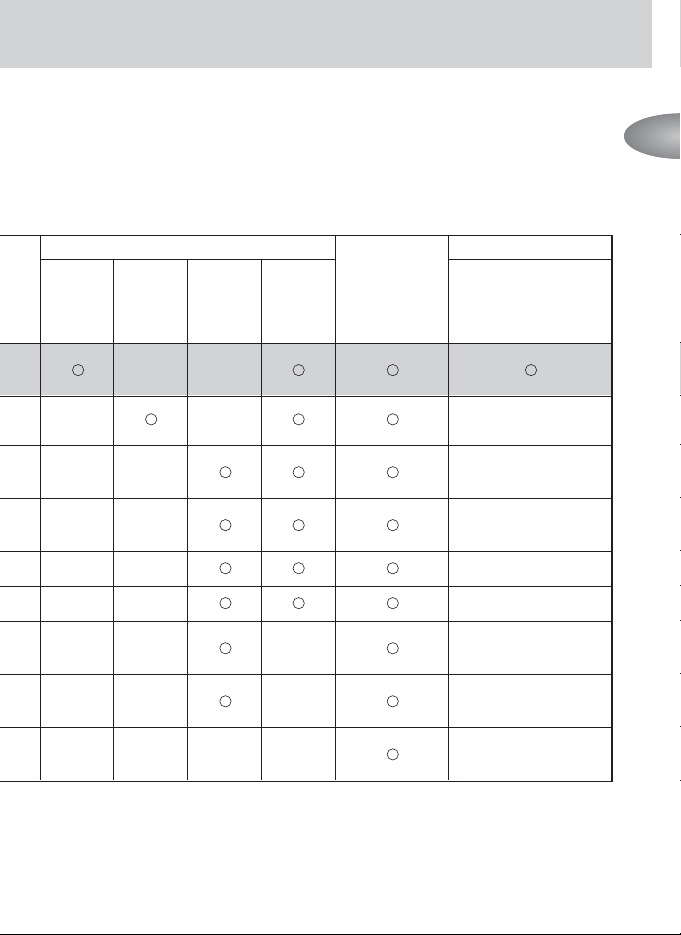
9
The SB-600’s available flash modes vary, depending on the cameras and lenses in use or
the camera’s exposure mode and metering system. For more details, refer to “Detailed
operation” (p. 31), “TTL auto flash modes available with the SB-600” (p. 78) and your
camera’s instruction manual.
●● : Available
–: Not available
Preparation
TTL auto flash mode (p. 33)
Wireless multiple flash
DDD
o
*
1
i-TTL D-TTL TTL
––
*
2
–– –
–– –
–– –
––
*
3
–
––
*
3
–
–– – –
–– – –
–––– –
Advanced Wireless
Lighting (works as a
remote flash unit only)
(p. 60)
G
Manual mode
(p. 34)

10
Speedlight parts and their functions
1 Built-in wide-flash adapter (p. 74)
Increases the angle of coverage to match a
14 mm lens.
2 Flash head (p. 72)
Can be tilted from 0° to 90° and rotated
horizontally 180° to the left and 90° to the right.
3 Flash head tilting/rotating lock-
release button
(p. 22)
4 Battery chamber lid open-close
index
(p. 18)
5 Battery chamber lid (p. 18)
6Auxiliary ready-light (p. 65)
Works as a ready-light when the SB-600 is used
as a wireless remote flash unit.
7 Wide-area AF-assist illuminator
(p. 50)
Automatically turns on for autofocus operation
when the light is dim.
8 Light sensor window for wireless
remote flash
(p. 58)
9External AF-assist illuminator
contacts
Accepts optional TTL Remote Cord SC-29
10 Mount pin
11 Hot-shoe contacts
12 Mounting foot
1
2
3
4
5
6
7
8
9
10
11
12
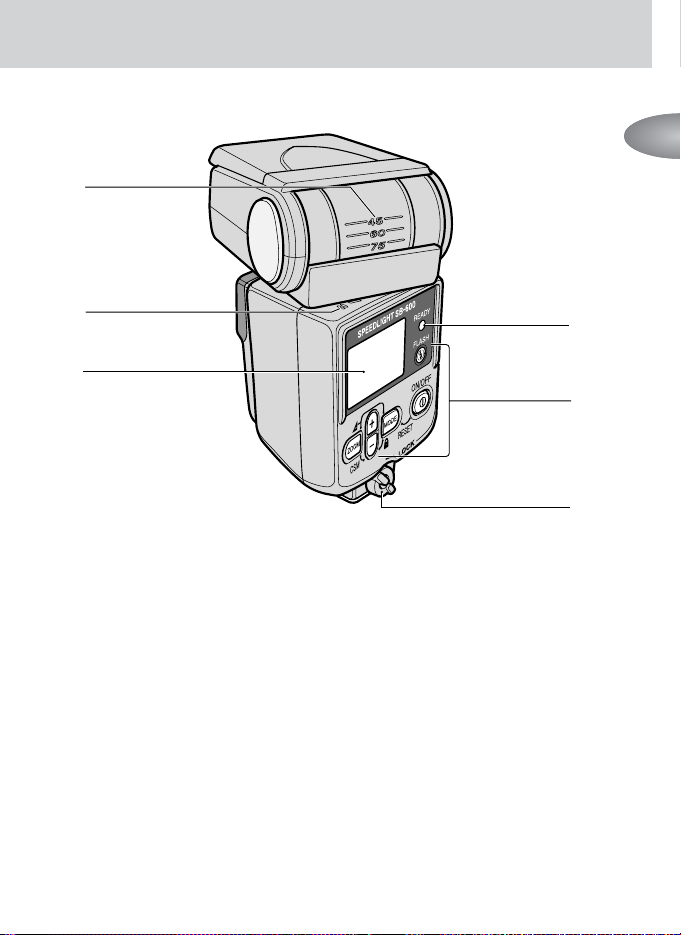
11
13 Flash head tilting-angle scale
(p. 72)
14 Flash head rotating-angle scale
(p. 72)
15 LCD panel (p. 14)
16 Ready-light
Lights up when the SB-600 is fully recycled and
ready to fire. Blinks after the SB-600 fires at its
maximum output in the TTL auto flash mode,
indicating that the light may be insufficient.
17 Control buttons
(p. 12)
18 Mounting-foot lock lever (p. 22)
Preparation
13
14
15
16
17
18

12
Control buttons
Two-button control function
Press two buttons simultaneously to perform the following operations.
Follow the procedures shown on the flash unit.
a
button
Press to set the flash mode (p. 26).
•Press to adjust the settings in the Custom
Settings mode (p. 52).
•Press to choose the desired settings when
setting the remote flash unit (p. 61).
ZOOM button
Press to change the zoom-head position (p. 40).
•Press to adjust the settings in the Custom
Settings mode (p. 52).
FLASH button
Press to test fire the flash (p. 20).
i
button/jbutton
Press to increase or decrease the values.
•Press to choose the desired settings in
the Custom Settings mode (p. 52).
•Press to adjust the settings when setting
the remote flash unit (p. 61).
ON/OFF button
Press for approx. 0.3 second to turn the power on
or off.
Recalling the underexposure value in the
TTL auto flash mode
Press the
s
and
a
buttons simultaneously to
recall the underexposure value (p. 29).
Resetting the settings to default values
Press the
a
and bbuttons simultaneously for
approx. 2 seconds to reset all settings, including the
custom settings, to their default settings.
Button lock
Press the
a
and jbuttons simultaneously for
approx. 1 second to lock the functions of the control
buttons (except the band FLASH buttons) to avoid
accidental malfunction. Press the buttons again to
release the lock.
Switching to Custom Settings
Press the
s
and jbuttons simultaneously for
approx. 2 seconds to enter the Custom Settings mode
(p. 52).
MODEZOOM
MODE
MODE
ZOOM
13
Preparation
Press the
a
and bbuttons simultaneously for
approx. 2 seconds to reset all settings, including the
custom settings, to their default settings.
While the SB-600 is used with cameras compatible with
CLS, digital SLRs not compatible with CLS and cameras in
Groups I to II in combination with a CPU lens, the optimum
TTL auto flash mode available with that combination will be
performed when you set the camera’s exposure mode to
Programmed Auto (P), and turn on the SB-600 to execute
“Resetting the settings to default values.”
Press these buttons
simultaneously for approx.
2 seconds.
Easy setting for the optimum TTL auto
flash mode
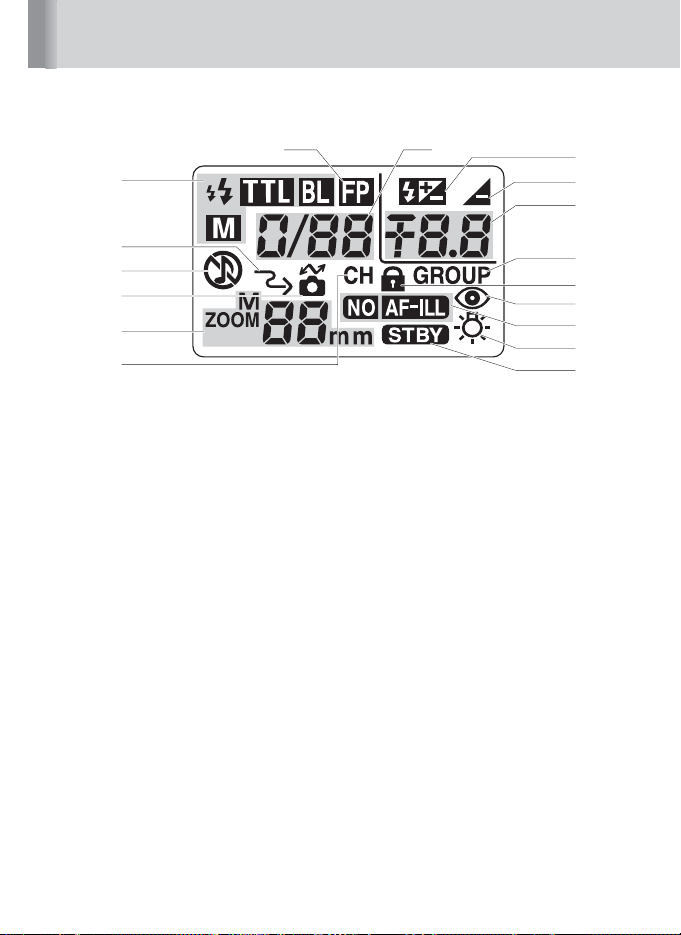
For reference, all indications are displayed in the illustration.
1
2
3
4
5
7
8
9
10
11
6
12
13
14
15
16
17
14
LCD panel
1 Flash mode (p. 26)
2 Wireless remote flash (p. 60)
In the wireless multiple flash mode,
the SB-600 is set as a remote flash unit,
which fires in sync with the master flash unit.
3 Sound monitor
(p. 65)
When the SB-600 is set as a remote flash unit,
you can monitor its operation by listening to
the beeping sound.
4 Compatible with CLS*
(p. 5)
The SB-600 is connected to cameras
compatible with CLS*.
5 Zoom-head position (p. 40)
6 Channel (p. 61)
Represents the communication channel
number through which the master and remote
flash units exchange data in the Advanced
Wireless Lighting mode.
7Auto FP High-Speed Sync
(p. 48)
The SB-600 automatically fires at faster
shutter speeds exceeding the camera’s sync
shutter speed.
8 Flash output level
(p. 34)
9 Flash output-level compensation
(p. 44)
10 Underexposure in TTL auto flash
(p. 29)
11 Flash output-level compensation
value
(p. 44)
Underexposure value in TTL auto
flash
(p. 29)
Indicates the underexposure value, showing
that the light might be insufficient in the TTL
auto flash mode.
Flash output level in Manual flash
(p. 34)
12 Group (p. 61)
Represents the group of each remote flash unit
in the Advanced Wireless Lighting mode.
13 Control buttons being locked
(p. 12)
Control buttons (except the ON/OFF and
FLASH buttons) are locked.
14 Red-eye reduction (p. 46)
15 AF assist illuminator (p. 50)
16 LCD panel illuminator (p. 15)
Pressing any control button turns on the LCD
panel illuminator.
17 Standby function (p. 21)

15
●●●
Characteristics of the LCD panel
• Due to the directional characteristics of LCDs, the display is difficult to read when viewed
from above. However, the display can be seen clearly from a slightly lower angle.
• The LCD display becomes darker at high temperatures (approx. 60°C/140°F), but
returns to normal at normal temperatures (20°C/68°F).
• The LCD’s response time decreases at low temperatures (approx. 5°C/41°F and below),
but returns to normal at normal temperatures (20°C/68°F).
u
Using the SB-600 in dim light
Press any button on the SB-600 to turn the illuminator on (when the SB-600
power is on), and it will remain lit for 16 seconds.
•To cancel the LCD panel illumination, go to the Custom Settings mode (p. 52) and set it
to OFF.
• Even if the LCD panel illuminator is set to OFF, the SB-600’s LCD panel illuminator turns
on when the camera’s LCD panel illuminator is turned on. The LCD panel illuminator also
lights up when the Custom Settings mode is displayed.
* CLS: Creative Lighting System (p. 5)
Preparation
16
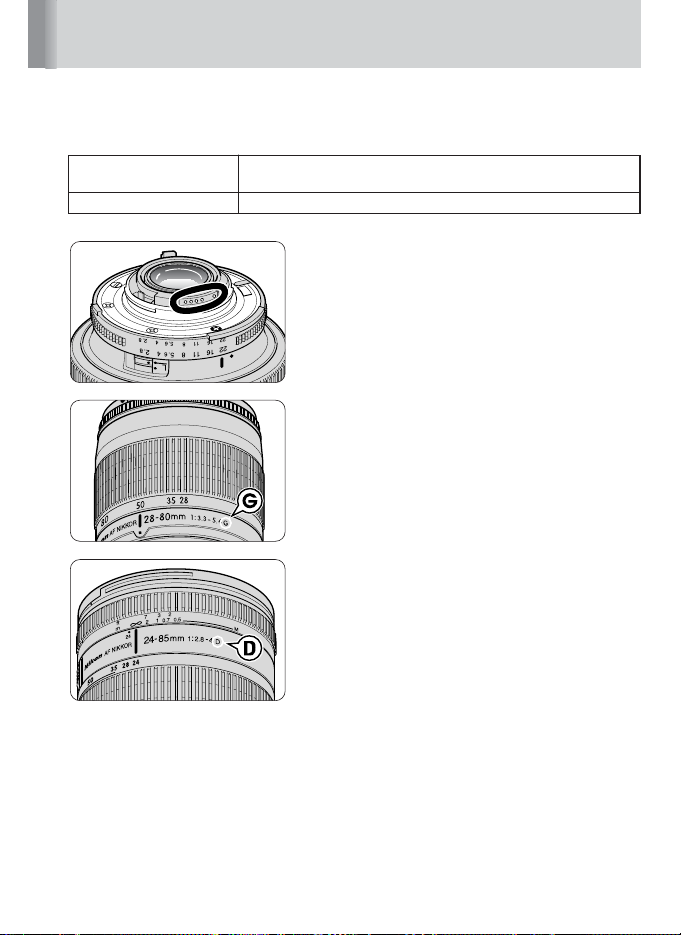
Lenses
In this manual, Nikkor lenses are divided into two types: CPU Nikkor lenses
and non-CPU Nikkor lenses.
CPU Nikkor lenses
G-type Nikkor, D-type Nikkor, Non-G/D-type AF Nikkor (except
for AF Nikkor for the F3AF), AI-P Nikkor
Non-CPU Nikkor lenses AI-S Nikkor, AI Nikkor, Series E, etc.
CPU lenses
CPU lenses have CPU contacts.
G-type Nikkor lenses
G-type Nikkor lenses send distance information to
the camera body, but do not have an aperture ring.
Therefore, set the aperture on the camera body.
With some cameras, the usable exposure mode is
limited. For more details, refer to the lens
instruction manual.
D-type Nikkor lenses
D-type Nikkor lenses send distance information to
the camera body. Set the aperture either on the lens
aperture ring or on the camera body. For more
details, refer to the lens instruction manual.

Basic operation
In this section, basic procedures are
illustrated so that you can easily perform flash
photography in the TTL auto flash mode.
You can easily perform flash photography by
following Steps 1-6 on the left-hand pages.
The procedures are based on the use of a CPU lens
mounted on cameras compatible with CLS*, digital SLRs
not compatible with CLS*, and cameras in Groups I to II.
The SB-600’s functions and the LCD display vary
depending on the camera/lens combination used.
* CLS: Creative Lighting System (p. 5)
18
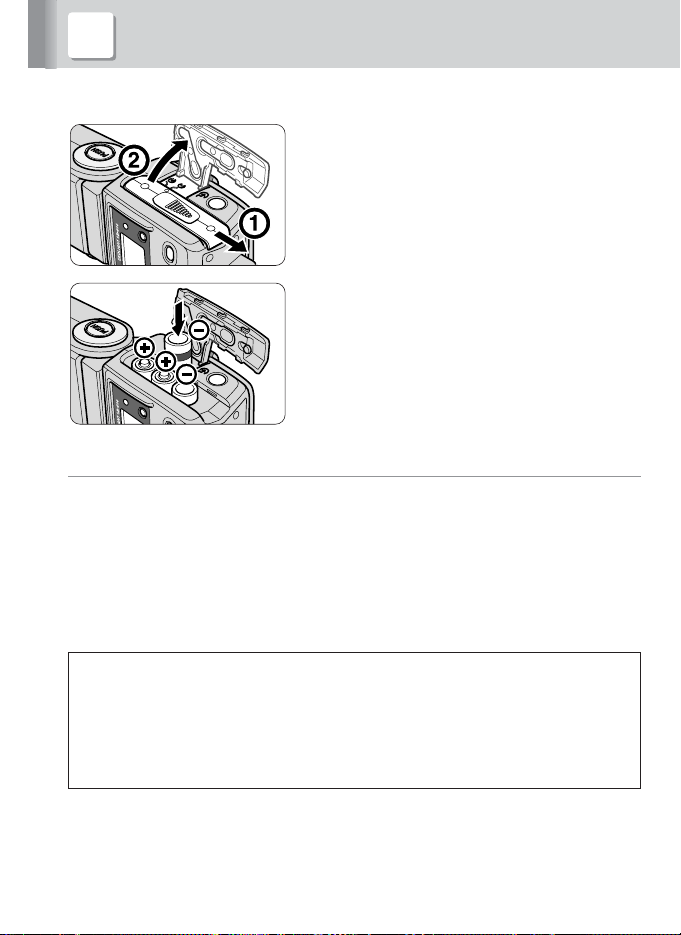
1
Slide the battery chamber lid in the
direction of the arrow to open.
2
Install the batteries following the i and
j marks as shown. Close the battery
chamber lid by sliding it into place while
pressing down.
v
Usable batteries
Install four AA-type penlight batteries (1.5 V or lower) of any of these types:
(1) Alkaline-manganese (1.5 V) (2) Lithium (1.5 V) (3) Nickel (1.5 V)
(4) NiCd (rechargeable, 1.2 V)
(5) Ni-MH (Nickel Metal Hydride) (rechargeable, 1.2 V)
• When replacing batteries, replace all four with fresh ones of the same brand.
• High-power manganese batteries are not recommended for use with the SB-600.
• Always carry extra batteries when travelling.
• For details on batteries, refer to “Notes on handling batteries” (p. 84).
CAUTION!
• Do not use batteries not specified in this instruction manual, as this may
cause them to explode, leak corrosive liquids or catch on fire.
• Do not mix battery brands or types, or use old with new batteries, as they
might explode, leak corrosive liquids or catch on fire.
• Do not place non-rechargeable batteries in a battery charger, as this
might cause them to leak corrosive liquids or generate heat.
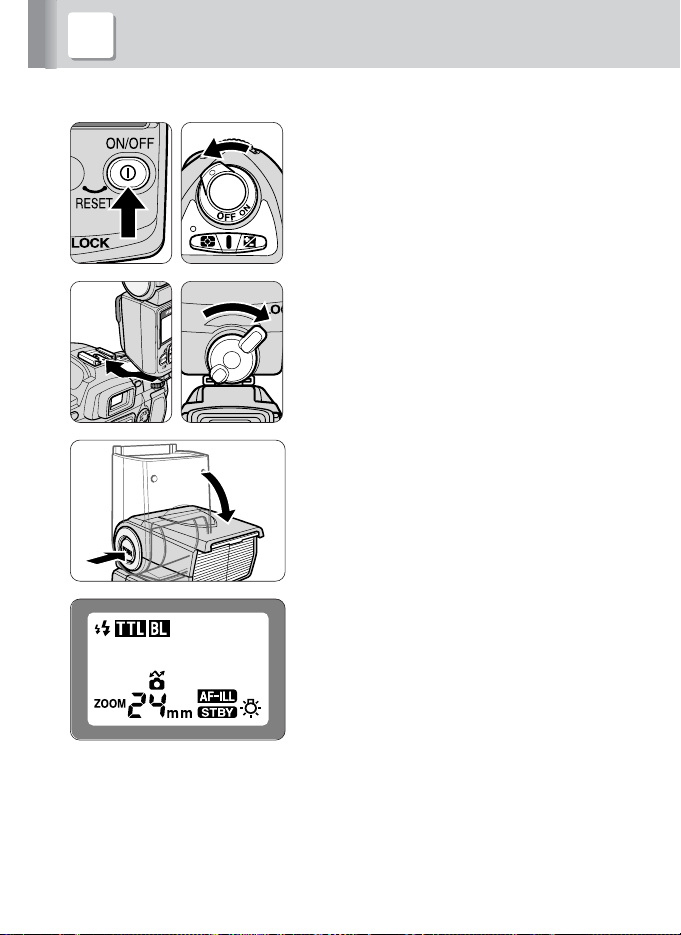
1 Installing the batteries

19
●●●
Minimum number of flashes and recycling times
The following data are based on a situation in which four fresh batteries of the
same type are used and the Speedlight fires at M1/1 output.
Batteries
Min. recycling time Min. number of flashes/
(approx.)* recycling time*
Alkaline-manganese 3.5 sec. 200/6-30 sec.
Lithium 4.0 sec. 400/7.5-30 sec.
Nickel 2.5 sec. 180/6-30 sec.
NiCd (1000 mAh) (rechargeable) 2.9 sec. 90/4-30 sec.
Ni-MH (2000 mA) (rechargeable) 2.5 sec. 220/4-30 sec.
* With fresh batteries
• These data were measured without using the wide-area AF-assist illuminator, zoom-head
position adjustment or LCD panel illumination.
• The above data may vary due to variations in battery performance.
●●●
Replacing/recharging the batteries
Refer to the following table to determine when to replace or recharge your
batteries, if the ready-light takes a long time to come on.
Type of battery Recycling time Remedy
Alkaline-manganese More than 30 seconds
Lithium More than 10 seconds Replace
Nickel More than 10 seconds
Ni-Cd (rechargeable)
More than 10 seconds Recharge
Ni-MH (rechargeable)
Basic operation
20
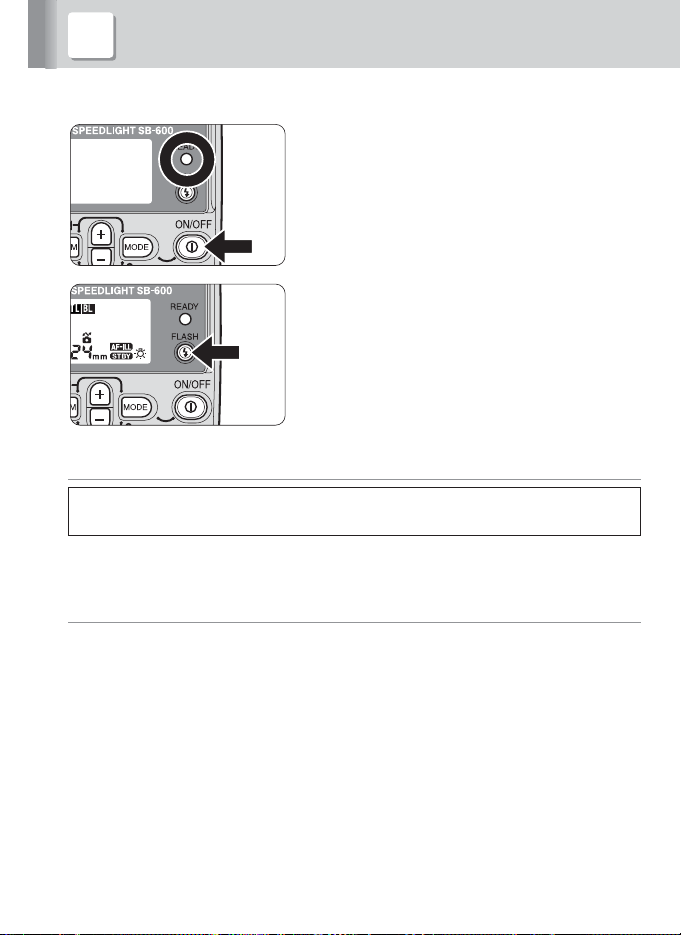
2 Test firing (Confirming the exposure)
1
Press the bbutton for approx. 0.3
second to turn on the SB-600. Make sure
the ready-light comes on.
2
Press the hbutton to test fire the flash.
●●●
Test firing
CAUTION!
Do not test fire the Speedlight near your eyes.
• The SB-600 fires at specified output in the Manual flash mode or at approx. 1/16 output
in the TTL auto flash mode.
●●●bbutton
Pressing the bbutton for approx. 0.3 second turns on the SB-600 and the
indications appear on the LCD panel. Pressing the button again turns off the
SB-600 and the indications disappear.
21
t
Standby function to conserve battery power
If the SB-600 and camera are not being used, the standby function will
automatically activate after 40 seconds, switching the SB-600 to standby mode
to conserve battery power.
• In the standby mode, the
R
indicator appears on the LCD panel.
• When used with a camera body that is compatible with the TTL auto flash mode (p. 8),
the SB-600 will automatically turn off after the camera’s exposure meter is switched off.
• When in standby mode, the SB-600 turns back on again when its bor hbutton is
pressed or the shutter release button is lightly pressed (when using a camera body that
is compatible with the TTL auto flash mode) (p. 8).
• The standby function does not work in the wireless flash mode, regardless of the
SB-600’s setting, when the Speedlight is used as a remote flash unit (p. 57).
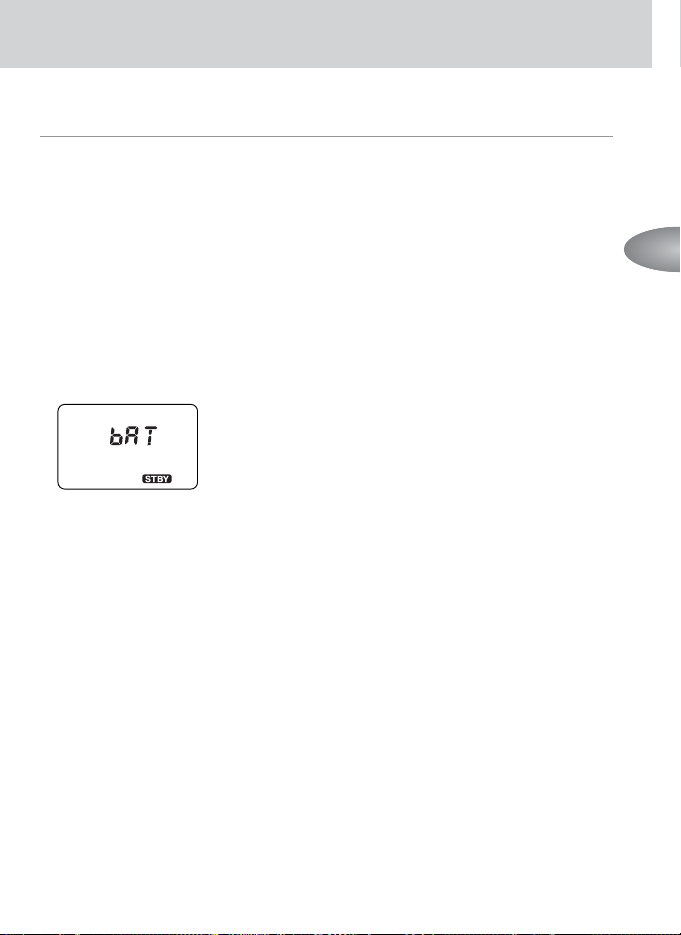
• If, due to battery exhaustion, the ready-light does not come on within 60 seconds of
turning on the power or after the flash has fired, the following indicator appears on the
LCD panel and the SB-600 enters standby mode regardless of its setting. In this case,
replace or recharge your batteries.
•To avoid accidental firing or a malfunction when carrying the SB-600 in your camera
bag, press the bbutton to turn off the flash unit, and make sure the
R
indicator disappears.
Setting the standby function
Set the standby function in the Custom Settings mode (p. 52).
Basic operation
22
3 Attach the SB-600 to the camera and adjust
1
Make sure the SB-600 and camera body
are turned off.
2
Rotate the mounting-foot lock lever to the
left, slide the SB-600’s mounting foot into
the camera’s accessory shoe and turn the
lock lever to the right.
3
Hold down the flash head tilting/rotating
lock-release button to adjust the flash
head to the horizontal/front position.
4
Tu rn on the SB-600 and the camera body.
• The zoom-head position is automatically
adjusted according to the lens focal length
when the SB-600 is used with cameras
compatible with CLS, digital SLRs not
compatible with CLS and cameras in Groups I
to II in combination with a CPU lens.
• When the SB-600 is used with cameras other
than those listed above, or you want to adjust
the zoom-head position manually, refer to
“Setting the zoom-head position” (p. 40).
23
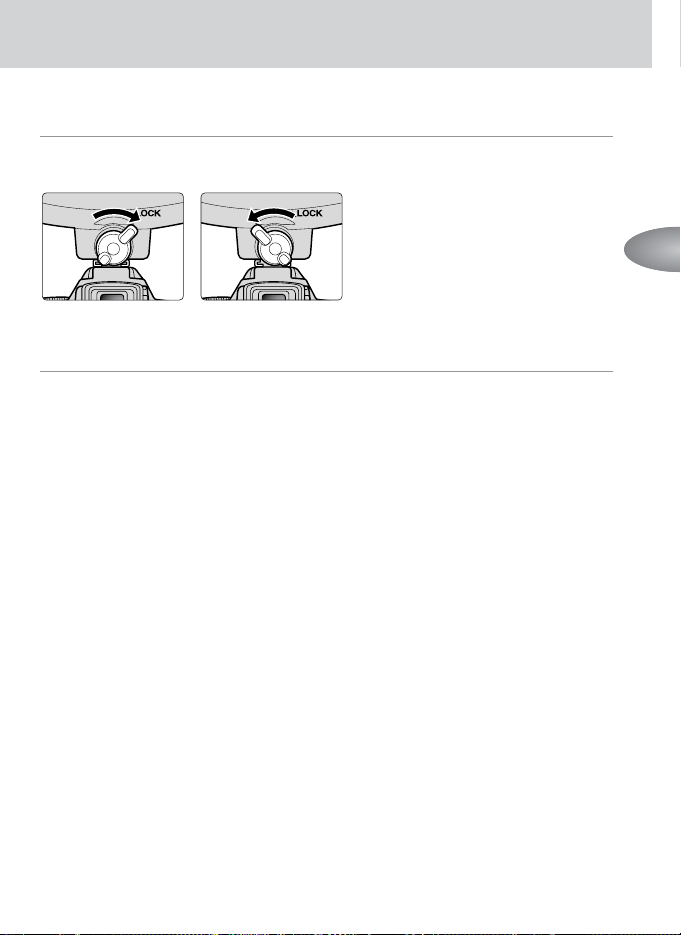
the flash head.
v
Turn the mounting-foot lock lever securely until it stops.
To lock the Speedlight in place, turn the lock lever approx. 90° clockwise until it
stops. To unlock, turn the lever counter-clockwise until it stops.
Lock Unlock
t
Digital data communication with the SB-600
Digital data communication is performed when the SB-600 is used with
cameras compatible with CLS, digital SLRs not compatible with CLS and
cameras in Groups I to II. With a CPU lens, data such as focal length are
automatically transferred to the SB-600.
Basic operation
24
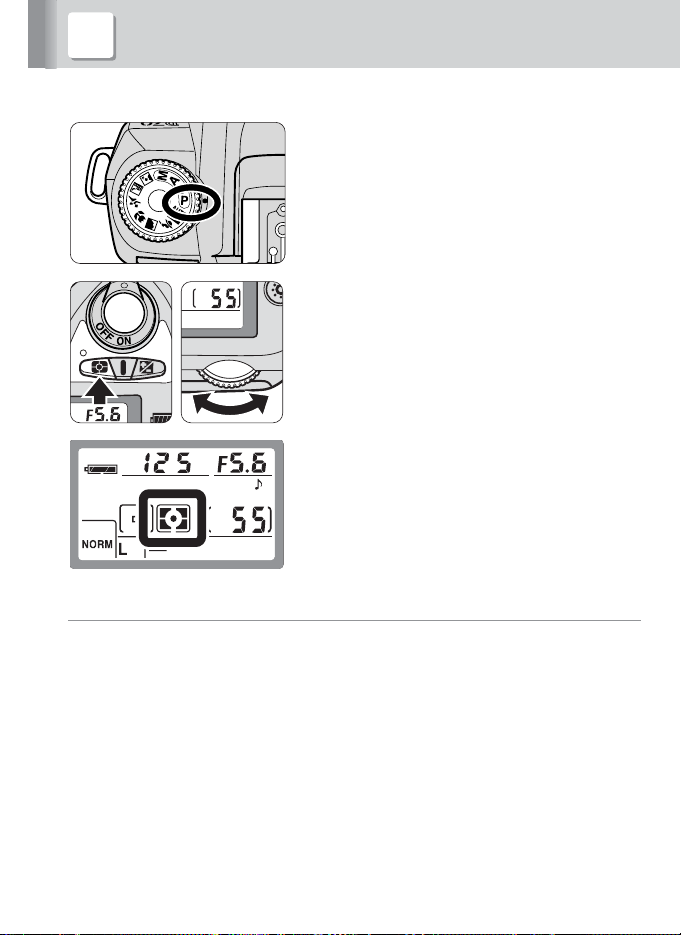
1
Set the camera’s exposure mode to
Programmed Auto (P).
• If Programmed Auto (P) cannot be set, select
another exposure mode. See the opposite page.
2
Set the camera’s metering system to
Matrix MeteringY.
• If Matrix Metering Ycannot be set, select
Center-Weighted Metering W.
t
Exposure mode and metering system
The camera’s available exposure mode and metering system vary, depending
on the cameras and lenses in use or the SB-600’s flash modes. For details,
refer to “Detailed operation” (p. 31), “TTL auto flash modes available with the
SB-600” (p. 78) and your camera’s instruction manual.
• In the Programmed Auto (P) mode, the shutter speed is automatically set to the
camera’s sync shutter speed.
4 Setting the camera’s exposure mode and

25
metering system
u
Exposure modes other than Programmed Auto exposure (P)
In Shutter-Priority Auto exposure (S) mode
By selecting a slower shutter speed, the proper exposure for the background
can be achieved.
• The camera selects the correct aperture. For details, see your camera’s instruction
manual. However, set the shutter speed on the camera after confirming that the
automatically controlled aperture will provide an appropriate shooting distance range for
your subject. Refer to “Flash shooting distance range in the TTL auto flash mode” (p. 27).
• If you set a shutter speed faster than the flash sync speed, the camera automatically
shifts to its fastest sync speed when the SB-600 is turned on (except in the Auto FP
High-Speed sync mode) (p. 48).
In Aperture-Priority Auto exposure (A) mode
By selecting the aperture, you can control depth of field and the flash shooting
distance range.
• The camera selects the correct shutter speed. For details, see your camera’s
instruction manual.
•To determine the aperture, refer to the “Guide number” (p. 35) and “Flash shooting
distance range in the TTL auto flash mode” (p. 27).
In Manual exposure (M) mode
By selecting the shutter speed and aperture, you can control the exposure of
the background, the depth of field and the flash shooting distance range.
• If you set a shutter speed faster than the flash sync speed, the camera automatically
shifts to its fastest sync speed when the SB-600 is turned on. This is true of all cameras,
except mechanical shutter cameras and when using the Auto FP High-Speed sync
mode (p. 48).
•To determine the aperture, refer to “Guide number” (p. 35) and “Flash shooting distance
range in the TTL auto flash mode” (p. 27).
Basic operation

26
1
Press the
a
button to set
the flash mode.
• Display
Do
on the
LCD panel.
●●●
Selecting the flash mode
The available flash mode changes each time the
a
button is pressed.
• The information above appears on the LCD panel when the SB-600 is used with digital
SLR cameras compatible with CLS.
• Note that when pressing the abutton, only the usable flash modes appear;
unavailable modes will be skipped.
• The SB-600’s available flash modes vary, depending on the cameras and lenses in use
or the camera’s exposure mode and metering system. Refer to “Detailed operation”
(p. 31), “TTL auto flash modes available with the SB-600” (p. 78) and your camera’s
instruction manual.
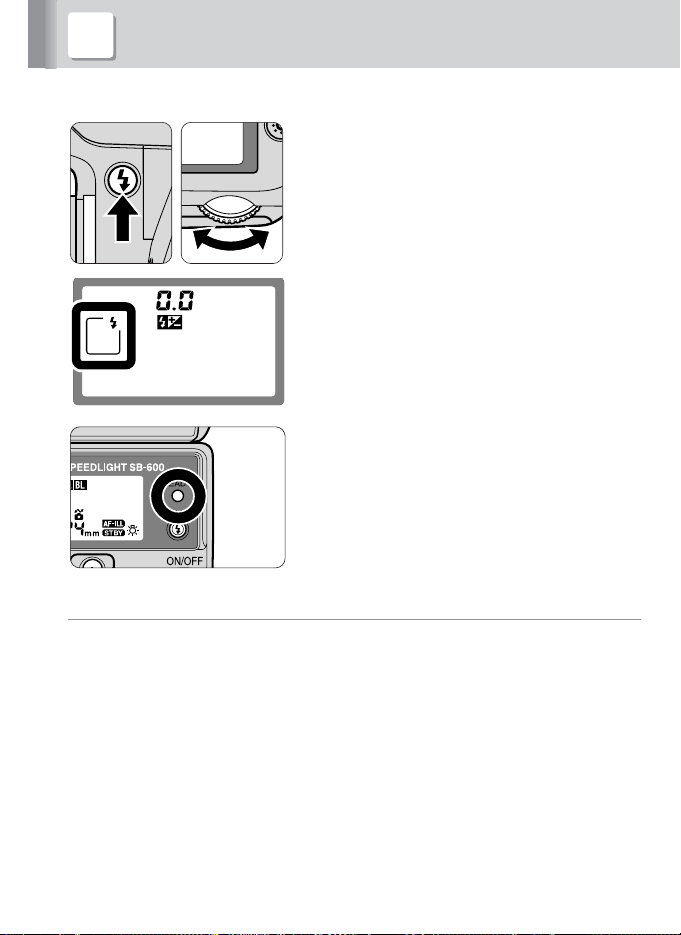
5 Setting the SB-600’s flash mode
i-TTL Automatic Balanced
Fill-Flash (Monitor
Preflashes are fired)
Standard i-TTL flash
(Monitor Preflashes
are fired) Manual flash
27
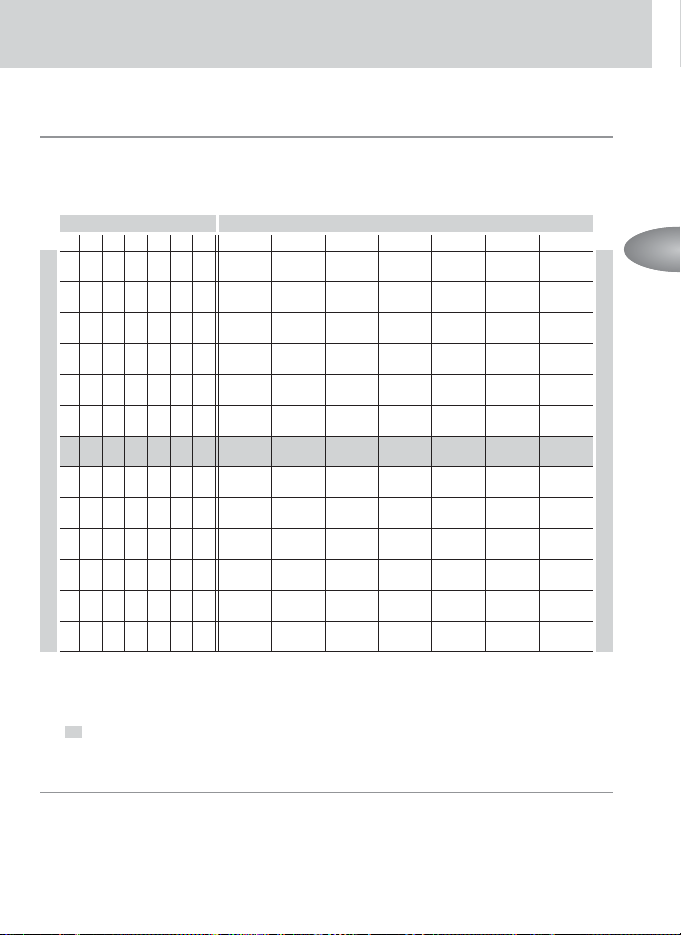
●●●
About the flash shooting distance range
The SB-600’s flash shooting distance range is 0.6 m to 20 m (2 to 66 ft.) and varies,
depending on the ISO sensitivity, zoom-head position and lens aperture in use.
Flash shooting distance range in the TTL auto flash mode
1600
800 400 200 100 50 2514*124 28 35 50 70 85
*
2
2.8 2 1.4
42.821.4
5.6 4 2.8 2 1.4
0.9-9.8/ 1.5-16/ 1.6-17/ 1.8-19/ 2.0-20/ 2.3-20/ 2.5-20/
3.0-32 4.9-52 5.2-56 5.9-62 3.3-66 7.5-66 8.2-66
85.642.821.4
0.7-7.0/ 1.1-11/ 1.2-12/ 1.3-14/ 1.5-16/ 1.6-18/ 1.8-20/
2.3-23 3.6-36 3.9-39 4.3-46 4.9-52 5.2-59 5.9-66
11 8 5.6 42.821.4
0.6-4.9/ 0.8-8.1/ 0.8-8.8/ 0.9-9.8/ 1.0-11/ 1.2-12/ 1.2-14/
2.0-16 2.6-27 2.6-29 3.0-32 3.3-36 3.9-39 3.9-44
16
*311 8 5.6 42.82
0.6-3.5/ 0.6-5.7/ 0.6-6.2/ 0.7-7.0/ 0.8-8.0/ 0.8-9.0/ 0.9-10/
2.0-11 2.0-19 2.0-20 2.3-23 2.6-26 2.6-30 2.9-33
22 16 11 8 5.6 4 2.8
0.6-2.4/ 0.6-4.0/ 0.6-4.4/ 0.6-4.9/ 0.6-5.6/ 0.6-6.3/ 0.7-7.0/
2.0-7.9 2.0-13 2.0-14 2.0-16 2.0-18 2.0-21 2.3-23
32 22 16 11 8 5.6 4
0.6-1.7/ 0.6-2.8/ 0.6-3.1/ 0.6-3.5/ 0.6-4.0/ 0.6-4.5/ 0.6-5.0/
2.0-5.6 2.0-9.2 2.0-10 2.0-11 2.0-13 2.0-15 2.0-16
32 22 16 11 8 5.6
0.6-1.2/ 0.6-2.0/ 0.6-2.2/ 0.6-2.4/ 0.6-2.8/ 0.6-3.1/ 0.6-3.5/
2.0-3.9 2.0-6.6 2.0-7.2 2.0-7.9 2.0-9.2 2.0-10 2.0-11
32 22 16 11 8
0.6-0.8/ 0.6-1.4/ 0.6-1.5/ 0.6-1.7/ 0.6-2.0/ 0.6-2.2/ 0.6-2.5/
2.0-2.6 2.0-4.6 2.0-4.9 2.0-5.6 2.0-6.6 2.0-7.2 2.0-8.2
32 22 16 11
-0.6-1.0/ 0.6-1.1/ 0.6-1.2/ 0.6-1.4/ 0.6-1.5/ 0.6-1.7/
2.0-3.3 2.0-3.6 2.0-3.9 2.0-4.6 2.0-4.9 2.0-5.6
32 22 16
-0.6-0.7/ 0.6-0.7/ 0.6-0.8/ 0.6-1.0/ 0.6-1.1/ 0.6-1.2/
2.0-2.3 2.0-2.3 2.0-2.6 2.6-3.3 2.0-3.6 2.6-3.9
*1With the wide-flash adapter in place
*2 TTL auto flash operation is not possible at this ISO sensitivity. For ISO 1000, use an
aperture 2/3 of an f/stop smaller than the aperture for ISO 1600, or 1/3 larger than the
aperture for ISO 800.
*3Programmed TTL Auto Flash with the F-501/N2020, F-401s/N4004s, F-401/N4004,
and F-301/N2000. (ISO 25 to ISO 400 for the F-401s/N4004s and F-401/N4004)
t
ISO sensitivity
The sensitivity of digital SLRs and the film speed for film-based cameras are
referred to as ISO sensitivity in this manual.
Zoom-head position (mm)ISO sensitivity
Basic operation
Aperture
Flash shooting distance range (m/ft.)
28
1
Confirm the camera’s sync mode.
• For normal flash photography, use the
camera’s front-curtain sync mode.
2
Compose the picture, confirm that the
ready-light on the SB-600 or in the
camera’s viewfinder is on, then shoot.
v
Set the camera’s flash sync mode to front-curtain sync.
With cameras featuring a rear-curtain sync flash mode, make sure the camera’s
flash sync mode is set to front-curtain sync.
• For other flash sync modes, refer to “Slow-sync flash” (p. 46), “Red-eye reduction with
slow-sync flash mode” (p. 46), or “Rear-curtain sync” (p. 47).
• Refer to the camera’s instruction manual for details on the flash sync mode.
6 Compose the picture and shoot with flash
Loading…
Просмотр
Доступно к просмотру 98 страниц. Рекомендуем вам скачать файл инструкции, поскольку онлайн просмотр документа может сильно отличаться от оригинала.
-
Ru
A‚UOUOIUOI‡? ‚OO??I‡ Speedlight
SB-600
SB-600
(Ru)
eUIO‚O‰OU‚O  OOI?AO‚‡UAI?
-
aA?? OO O·AOOA?AIE? ‚‡?AE ·AAOO‡OIOOUE
eA?A‰ I‡?‡IOI EOOOI?AO‚‡IE? O?EO·?AUAIIO„O ‚‡IE UOU?OEOU‚‡
‚IEI‡UAI?IO OAI‡IOI?UAO? O O?E‚A‰AII?IE IEEA IA?‡IE
O?A‰OOUO?OEIOOUE. uUO O·AOOA?EU O?‡‚EI?IU? E ·AAOO‡OIU?
?IOOIU‡U‡?E? ‰‡IIO„O UOU?OEOU‚‡ UE?I? Nikon, O?A‰OU‚?‡UEU A„O
OO‚?AE‰AIEA, ‡ U‡IEA A‡?EUEU ‚‡O E OI?UE‡??E? ‚‡O I?‰AE OU
‚OAIOEI?? U?‡‚I.
N‡II?A EIOU?UI?EE OO ·AAOO‡OIOOUE ‰OIEI? ??‡IEU?O? ‚·IEAE
UOU?OEOU‚‡ ‰I? UO„O, ?UO·? EIE IOEIO ·?IO ‚OOOOI?AO‚‡U?O? ‚
OIU?‡A IAO·?O‰EIOOUE.
C I‡OUO??AI ?UIO‚O‰OU‚A EIOU?UI?EE OO ·AAOO‡OIOOUE OUIA?AI?
OIA‰U??EIE AI‡?I‡IE:
cA‚?OOIIAIEA EIOU?UI?EE, OUIA?AII?? ‰‡II?I
eeONieeOUNOcaO
AI‡?IOI, IOEAU O?E‚AOUE I U?‡‚IA, OIA?UE EIE
I‡IAOAIE? U?A?·‡ EIU?AOU‚U.
cA‚?OOIIAIEA EIOU?UI?EE, OUIA?AII?? ‰‡II?I
CcaaAcaO!
AI‡?IOI, IOEAU O?E‚AOUE I I‡IAOAIE? U?A?·‡
EIU?AOU‚U.
eEI‚OI OO?UE?O‚IE IUOO?‡, EOOOI?AU??EEO? ‚ A‚?OOAEOIE? OU?‡I‡?
N‡II?E OEI‚OI OAI‡?‡AU, ?UO ?UOU O?O‰UIU ‰OIEAI
UUEIEAE?O‚‡U?O? OU‰AI?IO OU ‰?U„E?.
e?E‚A‰AII‡? IEEA EIUO?I‡?E? I‡O‡AUO? UOI?IO
OOI?AO‚‡UAIAE EA OU?‡I O‚?OO?.
• N‡II?E O?O‰UIU ‰OIEAI UUEIEAE?O‚‡U?O? OU‰AI?IO OU
‰?U„E? ‚ OOOU‚AUOU‚U??E? O?EAII?? OUIIU‡?. cA
‚?·?‡O?‚‡EUA ‰‡II?E O?O‰UIU ‚IAOUA O ·?UO‚?I
IUOO?OI.
•NOOOIIEUAI?IU? EIUO?I‡?E? C? IOEAUA OOIU?EU? U
O?O‰‡‚?‡ EIE U IAOUI?? ‚I‡OUAE, OU‚A?‡??E? A‡
UUEIEA‡?E? IUOO?‡.
i
-
eeONieeOUNOcau – aOOOI?AO‚‡IEA ‚OO??IE Speedlights
1 OOIE ‚?UAI?‡? EA ·‡U‡?AE ‡„?AOOE‚I‡? IO??O‰E?U??‡? EE‰IOOU? OOO‡‰AU ‚
„I‡A‡, OIA‰UAU IAA‡IA‰IEUAI?IO O?OI?U? „I‡A‡ O?OUO?IOE ‚O‰OE E O·?‡UEU?O?
I ‚?‡?U. OOIE IA O?EI?U? OOA?‡UE‚I?A IA??, ‚‡?AIU A?AIE? IOEAU ·?U?
I‡IAOAI OA??AAI?E U?A?·.                                  eO‰„OUO‚I‡
2 OOIE ‚?UAI?‡? EA ·‡U‡?AE ‡„?AOOE‚I‡? IO??O‰E?U??‡? EE‰IOOU? OOO‡‰AU I‡
IOEU EIE I‡ O‰AE‰U, AA OIA‰UAU IAA‡IA‰IEUAI?IO OI?U? O?OUO?IOE ‚O‰OE.
NIEUAI?I?E IOIU‡IU O IOEAE IOEAU O?E‚AOUE I OO‚?AE‰AIE? IOEIO„O OOI?O‚‡.
3 cEIO„‰‡ IA O?O·UEUA O‡IOOUO?UAI?IO ?‡A·E?‡U? EIE ?EIEU? ‚OO??I, U‡I I‡I
?UO IOEAU O?E‚AOUE I OO?‡EAIE? ?IAIU?E?AOIEI UOIOI EIE IAO?‡‚EI?IOIU
O?‡·‡U?‚‡IE? ‚OO??IE, ‚ ?AAUI?U‡UA ?A„O ‚? IOEAUA OOIU?EU? U?‡‚IU.
4 OOIE ‚? U?OIEIE E OO‚?A‰EIE ‚OO??IU, IA OIA‰UAU O?EI‡O‡U?O? I I‡IEI-IE·O
‚IUU?AIIEI IAU‡IIE?AOIEI ?‡OU?I. uUE ?‡OUE, ‚ ?‡OUIOOUE IOI‰AIO‡UO?
‚OO??IE Speedlight E O‚?A‡II?A O IEI IOIOOIAIU?, IO„UU I‡?O‰EU?O? ‚
A‡??EAIIOI OOOUO?IEE, E O?EIOOIO‚AIEA I IEI IOEAU O?E‚AOUE I OO?‡EAIE?
?IAIU?E?AOIEI UOIOI. eUII??EUA OO‰‡?U ?IAIU?O?IA?„EE EIE U‰‡IEUA ·‡U‡?AE,
IA I‡O‡?O? I‡IE?-IE·O ?IAIU?E?AOIE? IOIOOIAIUO‚, E OUIAOEUA ‚OO??IU I‡
?AIOIU ‚ IAOUIOA O?A‰OU‡‚EUAI?OU‚O UE?I? Nikon EIE ‡‚UO?EAE?O‚‡II?E
OA?‚EOI?E ?AIU?.
5 OOIE UOU?OEOU‚O I‡„?AIOO?, OO?‚EIO? ‰?I EIE A‡O‡? „‡?E, OIA‰UAU
IAA‡IA‰IEUAI?IO O?AI?‡UEU? EOOOI?AO‚‡IEA UOU?OEOU‚‡ E U‰‡IEU? ·‡U‡?AE,
?UO·? O?A‰OU‚?‡UEU? ‚OA„O?‡IEA UOU?OEOU‚‡ EIE OOI‡‚IAIEA. eO‰OE‰EUA, OOI‡
‚OO??I‡ OOU?IAU, OOOIA ?A„O ‚? OIOEAUA ‚A?U? AA ‚ ?UIE E U‰‡IEU? ·‡U‡?AE.
a‡UAI OUIAOEUA ‚OO??IU I‡ ?AIOIU ‚ IAOUIOA O?A‰OU‡‚EUAI?OU‚O UE?I? Nikon
EIE ‡‚UO?EAE?O‚‡II?E OA?‚EOI?E ?AIU?.
6 COO??I‡ IA ‰OIEI‡ OOO‡‰‡U? ‚ EE‰IOOU? E OO‰‚A?„‡U?O? ‚OA‰AEOU‚E?
‰OE‰?, OOIAIOE ‚O‰? EIE ‚I‡„E, AOIE OI‡ IA A‡?E?AI‡ ‰OIEI?I O·?‡AOI OU
‚OA‰AEOU‚E? EE‰IOOUE E ‚I‡„E. NI? EOOOI?AO‚‡IE? ‚OO??IE OO‰ ‚O‰OE
U?A·UAUO? OOA?E‡I?I?E UUUI?? ‰I? OO‰‚O‰IOE O?AIIE. CO‰‡ EIE ‚I‡„‡,
OOO‡‚?EA ‚ UOU?OEOU‚O, IO„UU ‚?A‚‡U? ‚OA„O?‡IEA UOU?OEOU‚‡ EIE OO?‡EAIEA
?IAIU?E?AOIEI UOIOI. C U‡IE? OIU?‡?? OIA‰UAU IAA‡IA‰IEUAI?IO U‰‡IEU?
·‡U‡?AE EA ‚OO??IE Speedlight E OUIAOUE ‚OO??IU I‡ ?AIOIU ‚ IAOUIOA
O?A‰OU‡‚EUAI?OU‚O UE?I? Nikon EIE ‡‚UO?EAE?O‚‡II?E OA?‚EOI?E ?AIU?.
e?EIA?‡IEA: C ·OI??EIOU‚A OIU?‡A‚ ?AIOIU ?IAIU?OII?? UOU?OEOU‚, ‚ IOUO??A
OOO‡I‡ ‚O‰‡ EIE ‚I‡„‡, O·?O‰EUO? O?AI? ‰O?O„O.
7 cA OOI?AUEUAO? UOU?OEOU‚OI ‚ OOIA?AIE??, ‚ IOUO??? O?EOUUOU‚UAU „O???EE
EIE ‚A??‚OOO‡OI?E „‡A. aOOOI?AO‚‡IEA ‚OO??IE ‚ OOIA?AIE??, ‚ IOUO???
O?EOUUOU‚UAU „O???EE „‡A, ‚II??‡? O?OO‡I, ‡ U‡IEA ·AIAEI E O?I?, IOEAU
‚?A‚‡U? ‚A??‚ EIE OOE‡?.
8 cA I‡O?‡‚I?EUA ‚OO??IU IAOOO?A‰OU‚AIIO I‡ ‚O‰EUAI? ‰‚E„‡??A„OO?
‡‚UOIO·EI?, U‡I I‡I ?UO IOEAU ‚?AIAIIO OOIAOEU? ‚O‰EUAI? E O?E‚AOUE I
‰O?OEIO-U?‡IOOO?UIOIU O?OEO?AOU‚E?.
ii
- 1
- 2
- 3
- 4
- 98
-
Руководства по ремонту
1
-
Инструкции по эксплуатации
9
Языки:
Nikon SB600 инструкция по эксплуатации
(100 страниц)
- Языки:Русский
-
Тип:
PDF -
Размер:
2.09 MB -
Описание:
Фотовспышка
Просмотр
Nikon SB600 инструкция по эксплуатации
(100 страниц)
- Языки:Русский
-
Тип:
PDF -
Размер:
2.05 MB
Просмотр
Nikon SB600 инструкция по эксплуатации
(100 страниц)
- Языки:Английский
-
Тип:
PDF -
Размер:
1.95 MB
Просмотр
Nikon SB600 инструкция по эксплуатации
(100 страниц)
- Языки:Шведский
-
Тип:
PDF -
Размер:
1.95 MB
Просмотр
Nikon SB600 инструкция по эксплуатации
(100 страниц)
- Языки:Нидерландский
-
Тип:
PDF -
Размер:
1.96 MB
Просмотр
Nikon SB600 инструкция по эксплуатации
(100 страниц)
- Языки:Корейский
-
Тип:
PDF -
Размер:
2.63 MB
Просмотр
Nikon SB600 инструкция по эксплуатации
(100 страниц)
- Языки:Датский
-
Тип:
PDF -
Размер:
1.97 MB
Просмотр
Nikon SB600 инструкция по эксплуатации
(100 страниц)
- Языки:Португальский
-
Тип:
PDF -
Размер:
1.96 MB
Просмотр
Nikon SB600 инструкция по эксплуатации
(100 страниц)
- Языки:Итальянский
-
Тип:
PDF -
Размер:
1.96 MB
Просмотр
На NoDevice можно скачать инструкцию по эксплуатации для Nikon SB600. Руководство пользователя необходимо для ознакомления с правилами установки и эксплуатации Nikon SB600. Инструкции по использованию помогут правильно настроить Nikon SB600, исправить ошибки и выявить неполадки.
- Canon
- Canon EOS
- Canon PowerShot
- Canon IXUS
- Объективы Canon
- Canon аксессуары
- Nikon
- Nikon 1
- Nikon COOLPIX
- Nikon зеркальные камеры
- Nikon аксессуары
- Объективы Nikon
- Fujifilm
- Инструкции Fujifilm X
- Инструкции Fujifilm FinePix
- Инструкции Fujifilm аксессуары
- Инструкции объективы Fujifilm
- Olympus
- Olympus OM-D
- Olympus PEN
- Olympus STYLUS
- Olympus зеркальные камеры
- Объективы Olympus
- Lumix
- Samsung
- Samsung GALAXY Camera
- Samsung Компактные Smart-камеры
- Samsung Smart-камеры NX
- Samsung GX (зеркальная камера)
- Samsung Digimax
- Sony
- Sony Cyber-shot
- Sony α Камеры
- Объективы Sony
- Sony аксессуары
- Pentax
Инструкции для фотоаппаратов, пультов для фотоаппаратов, инструкции для вспышек
Как использовать фотовспышку Nikon Speedlight SB-600? Изучив это руководство пользователя выспышки Nikon Speedlight SB-600 у Вас не будет таких вопросов. Скачать инструкцию для Nikon Speedlight SB-600 можно по ссылке с сайта.

Скачать инструкцию для Nikon Speedlight SB-600
© 2014 —
Инструкции для фотоаппаратов и других устройств