
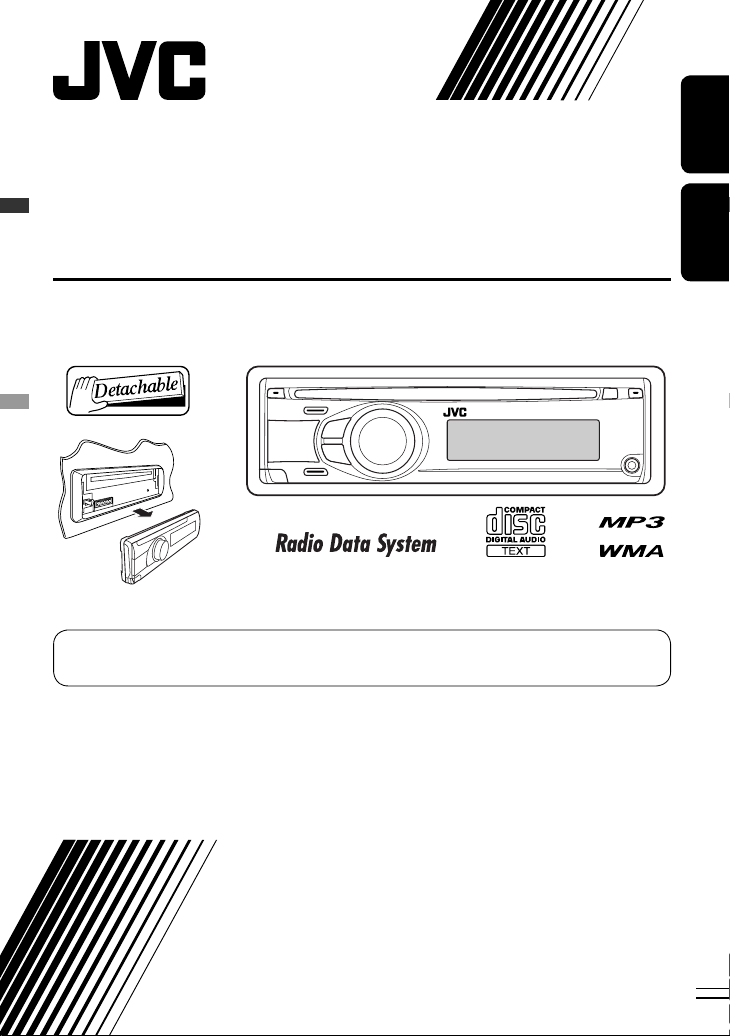
CD RECEIVER
RÉCEPTEUR CD
KD-R303/KD-R302/KD-R301
For canceling the display demonstration, see page 6.
Pour annuler la démonstration des affichages, référez-vous à la page 6.
ENGLISHFRANÇAIS
For installation and connections, refer to the separate manual.
Pour l’installation et les raccordements, se référer au manuel séparé.
INSTRUCTIONS
MANUEL D’INSTRUCTIONS
GET0568-003A
[EX/EU]
Thank you for purchasing a JVC product.
Please read all instructions carefully before operation, to ensure your complete understanding and to obtain the best
possible performance from the unit.
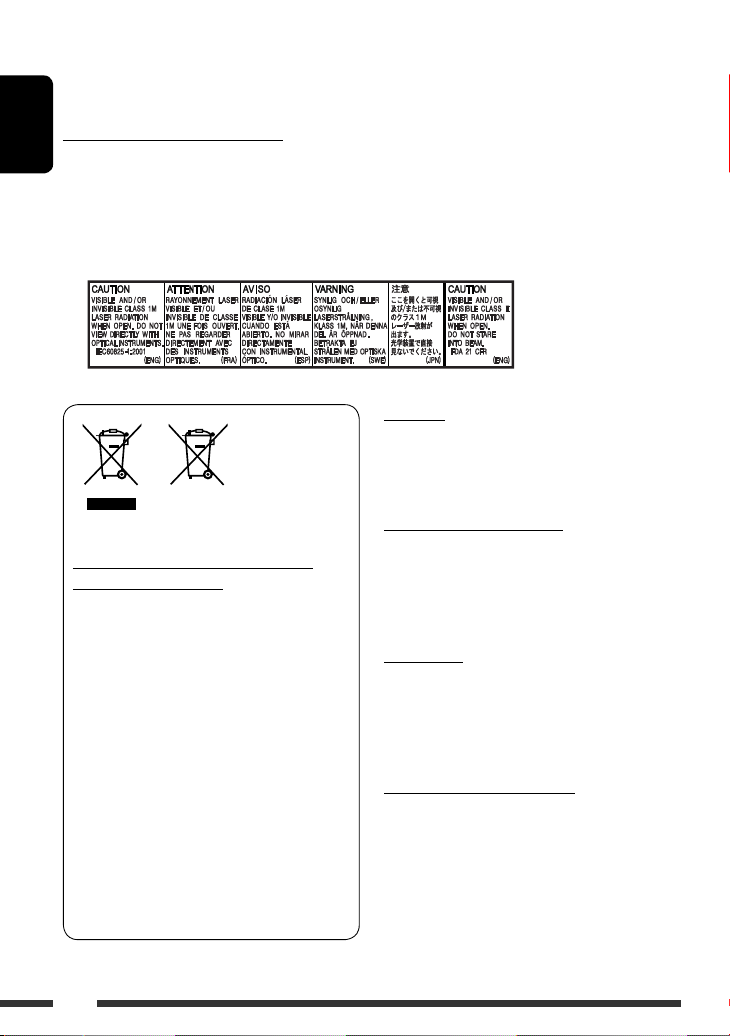
IMPORTANT FOR LASER PRODUCTS
ENGLISH
1. CLASS 1 LASER PRODUCT
2. CAUTION: Do not open the top cover. There are no user serviceable parts inside the unit; leave all servicing to
qualified service personnel.
3. CAUTION: Visible and/or invisible class 1M laser radiation when open. Do not view directly with optical
instruments.
4. REPRODUCTION OF LABEL: CAUTION LABEL, PLACED OUTSIDE THE UNIT.
Warning:
If you need to operate the unit while driving, be sure to
look around carefully or you may be involved in a traffic
Battery
Products
Information for Users on Disposal of Old
Equipment and Batteries
[European Union only]
These symbols indicate that the product and the
battery with this symbol should not be disposed as
general household waste at its end-of-life.
If you wish to dispose of this product and the
battery, please do so in accordance with applicable
national legislation or other rules in your country
and municipality.
By disposing of this product correctly, you will help
to conserve natural resources and will help prevent
potential negative effects on the environment and
human health.
Notice:
The sign Pb below the symbol for batteries indicates
that this battery contains lead.
accident.
Caution on volume setting:
Discs produce very little noise compared with other
sources. Lower the volume before playing a disc to
avoid damaging the speakers by the sudden increase of
the output level.
For safety…
• Do not raise the volume level too much, as this will
block outside sounds, making driving dangerous.
• Stop the car before performing any complicated
operations.
Temperature inside the car…
If you have parked the car for a long time in hot or cold
weather, wait until the temperature in the car becomes
normal before operating the unit.
2
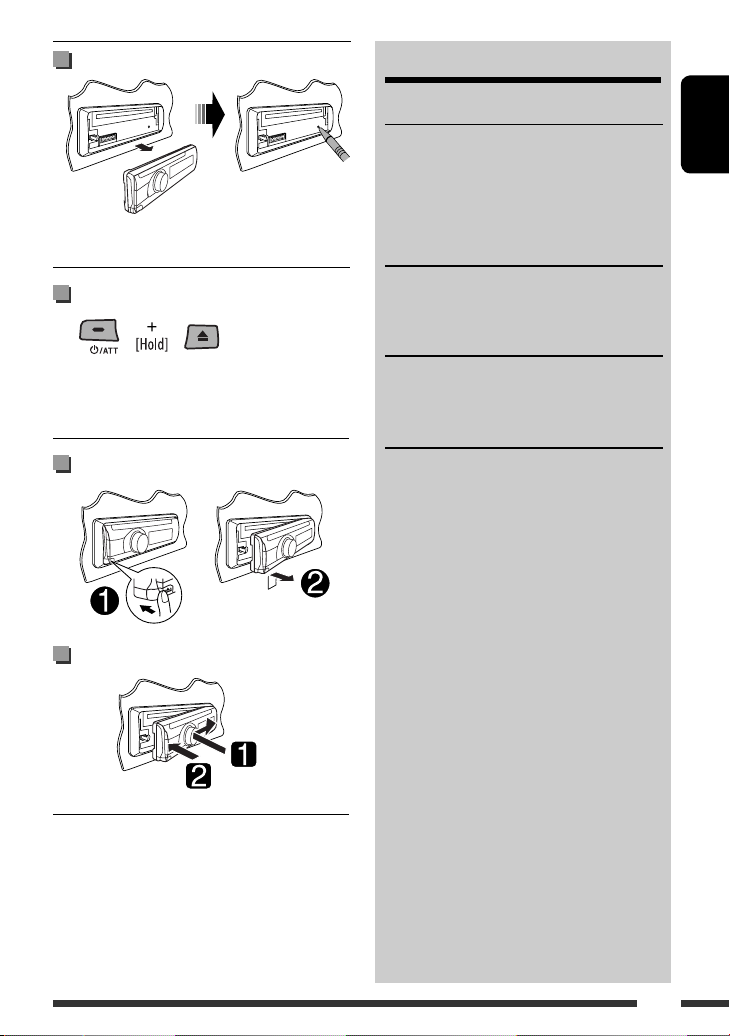
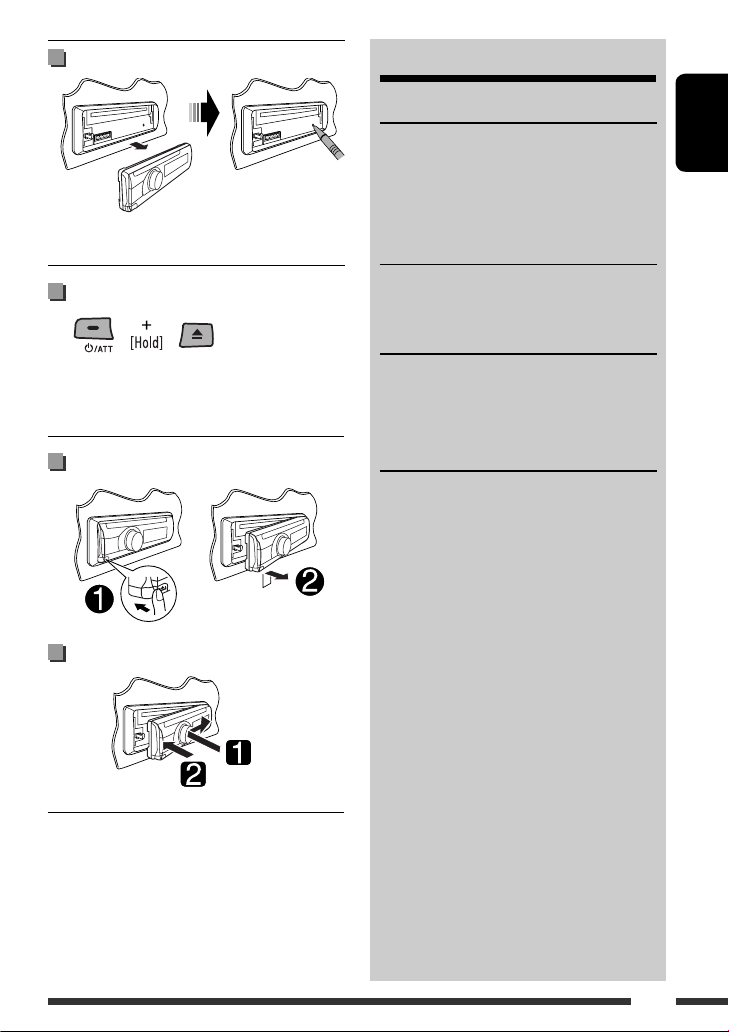
How to reset your unit
• Your preset adjustments will also be erased.
How to forcibly eject a disc
• Be careful not to drop the disc when it ejects.
• If this does not work, reset your unit.
Detaching the control panel
CONTENTS
OPERATIONS
Basic operations ……………………………………. 4
Preparation ………………………………………….. 6
Listening to the radio …………………………….. 7
Disc operations ……………………………………… 10
EXTERNAL DEVICES
Listening to the other external
components ………………………………………. 11
SETTINGS
Selecting a preset sound mode ……………….. 12
Menu operations …………………………………… 13
REFERENCES
More about this unit ……………………………… 15
Troubleshooting ……………………………………. 17
Maintenance ………………………………………… 19
Specifications ……………………………………….. 20
ENGLISH
Attaching the control panel
3
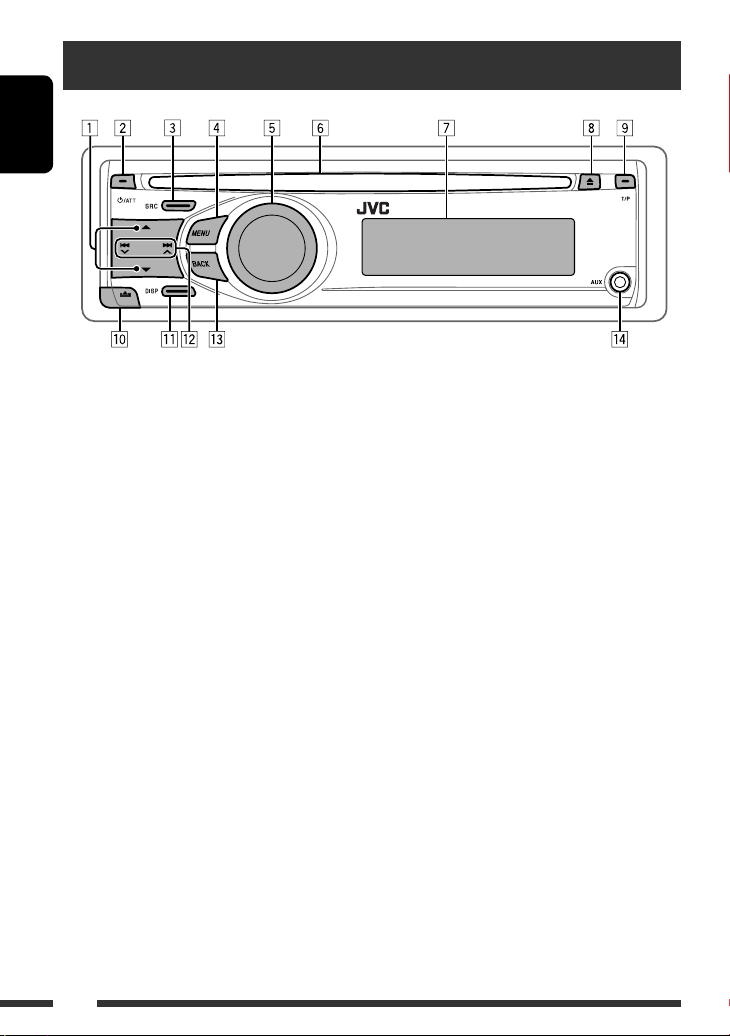
Basic operations
ENGLISH
1 • FM/AM: Select preset station.
• CD: Select folder.
2 • Turn on the power.
• Attenuate the sound (if the power is on).
• Turn off the power [Hold].
3 Select the source.
FM = CD *1 = AUX IN *2 = AM *2 = (back to
the beginning)
4 • Enter list operations.
• Enter Menu setting [Hold] .
5 • Control the volume or selection [Turn]. *
• Confirm the selection [Press] . *
• FM: Enter SSM preset mode [Hold] . *
• CD: Enter playback mode [Hold] . *
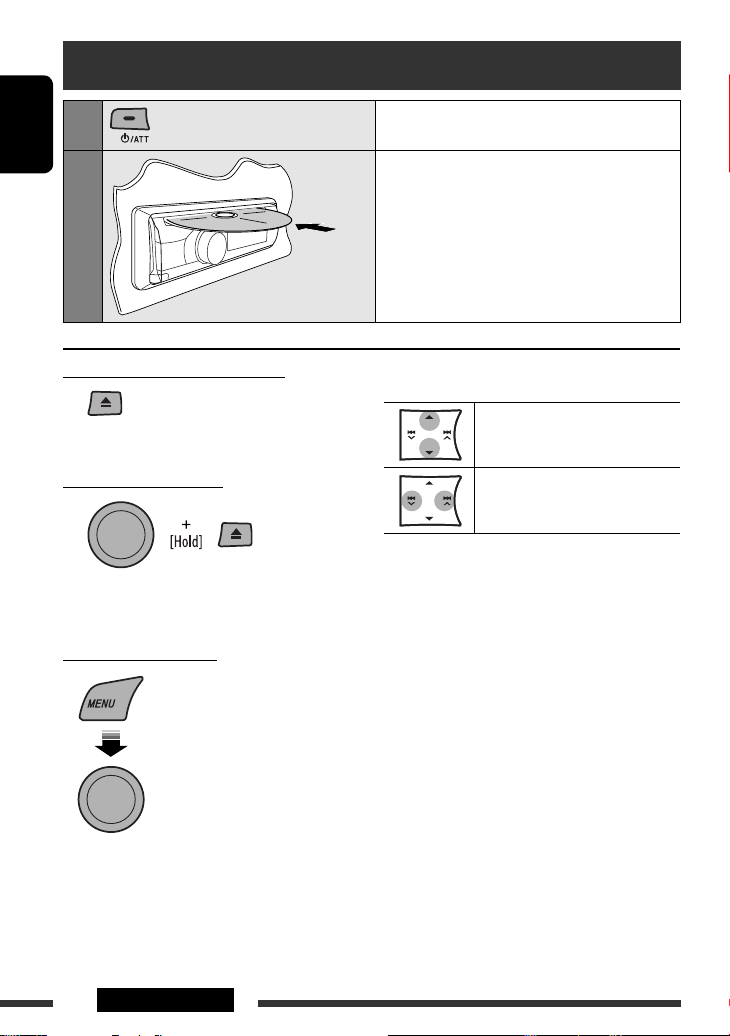
6 Loading slot
7 Display window
3
3
3
3
8 Eject disc.
9 • Activate/deactivate TA Standby Reception.
• Enter PTY Searching mode [Hold].
p Detach the panel.
q Change the display information.
w • FM/AM: Search for station.
• CD: Select track.
e Return to the previous menu.
r AUX (auxiliary) input jack
*1 You cannot select “CD” as the playback source if no
disc is in the unit.
*2 You cannot select these sources if they were disabled
in the Menu (see “Menu operations” on page 15).
*3 Also known as “Control dial” in this manual.
4
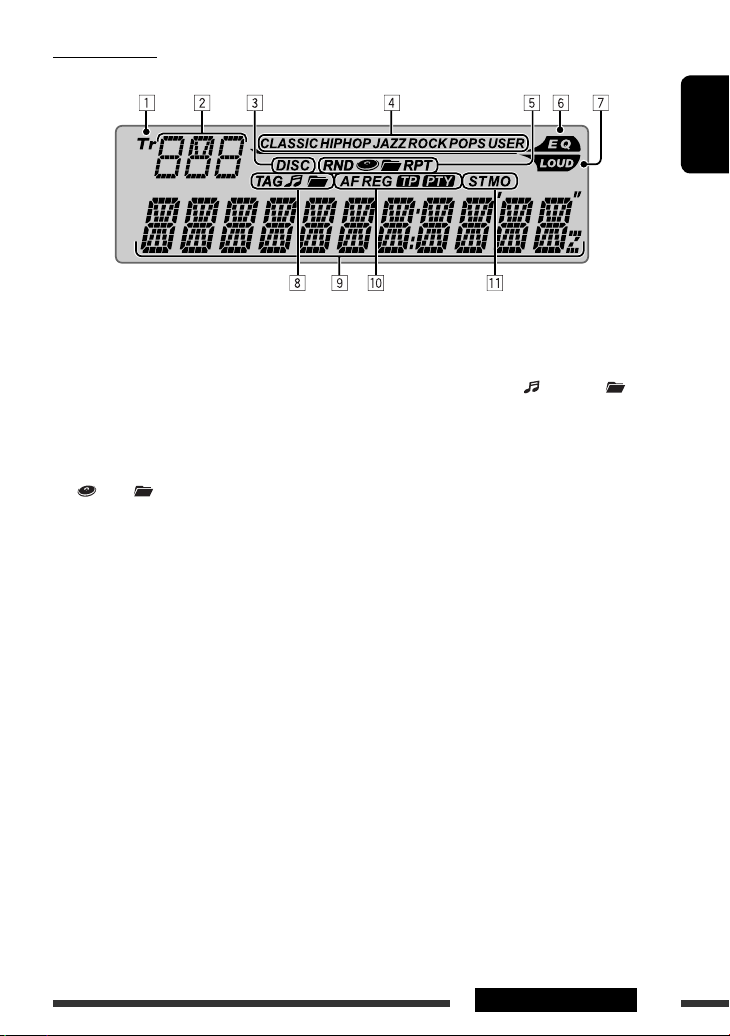
Display window
ENGLISH
1 Tr (track) indicator
2 Source display / Track number / Folder number /
Time countdown indicator
3 DISC indicator
4 Sound mode indicators—CLASSIC, HIP HOP, JAZZ,
ROCK, POPS, USER
5 Playback mode / item indicators— RND (random),
(disc), (folder), RPT (repeat)
6 EQ (equalizer) indicator
7 LOUD (loudness) indicator
8 Disc information indicators—
TAG (Tag information), (track/file), (folder)
9 Main display
p Radio Data System indicators—AF, REG, TP, PTY
q Tuner reception indicators—ST (stereo),
MO (monaural)
5OPERATIONS
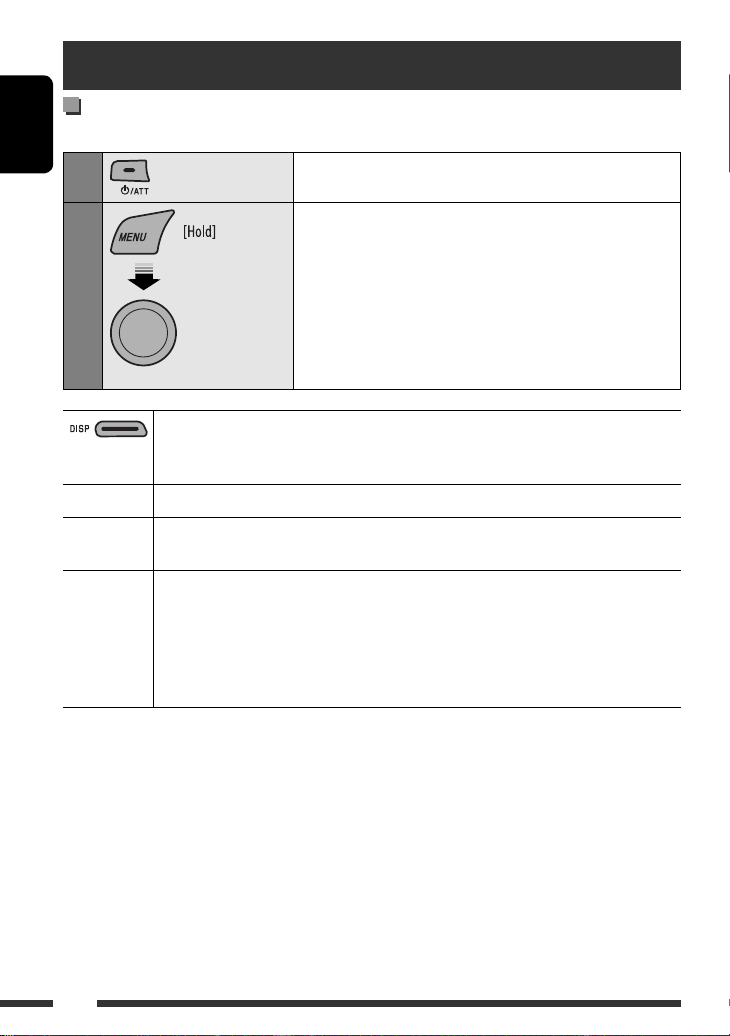
Preparation
Cancel the display demonstration and set the clock
• See also page 13.
ENGLISH
1
Turn on the power.
2
Cancel the display demonstrations
Select “DEMO,” then “DEMO OFF.”
Set the clock
Select “CLOCK” = “CLOCK SET.”
Adjust the hour, then press control dial once to proceed to adjust
[Turn] = [Press]
When the power is turned off: Check the current clock time when “CLOCK DISP” is set to
“CLOCK OFF,” (see page 13)
When the power is turned on: Change the display information of the current source
FM/AM Station Frequency
FM Radio
Data System
CD Audio CD/CD Text: Disc title/performer *
1
*
If the current disc is an audio CD, “NO NAME” appears.
2
If an MP3/WMA file does not have Tag information or “TAG DISPLAY” is set to “TAG OFF” (see page 13),
*
folder name and file name appear.
Station name (PS)
beginning)
MP3/WMA: Album name/performer (folder name) *2 = Track title (file name) *2 =
the minute.
Select “24H/12H,” then “24 HOUR” or “12 HOUR.”
• To return to the previous menu, press BACK.
= Clock = (back to the beginning)
= Station Frequency = Programme type (PTY) = Clock = (back to the
1
= Track title *1 = Current track number with the
elapsed playing time = Current track number with the clock time = (back
to the beginning)
Current track number with the elapsed playing time = Current track number
with the clock time = (back to the beginning)
6
Listening to the radio
1
2
Select “FM” or “AM.”
Search for a station to listen—Auto Search.
Manual Search: Hold either one of the buttons until “M” flashes on the display,
then press it repeatedly.
• When receiving an FM stereo broadcast with sufficient signal strength, “ST”
lights up on the display.
When an FM stereo broadcast is
hard to receive
• See also page 14.
[Turn] = [Press]
Select “TUNER” = “MONO”
= “MONO ON”
Reception improves, but stereo effect will be lost.
• “MO” lights up on the display.
To restore the stereo effect, repeat the same
procedure to select “MONO OFF.” The MO indicator
goes off.
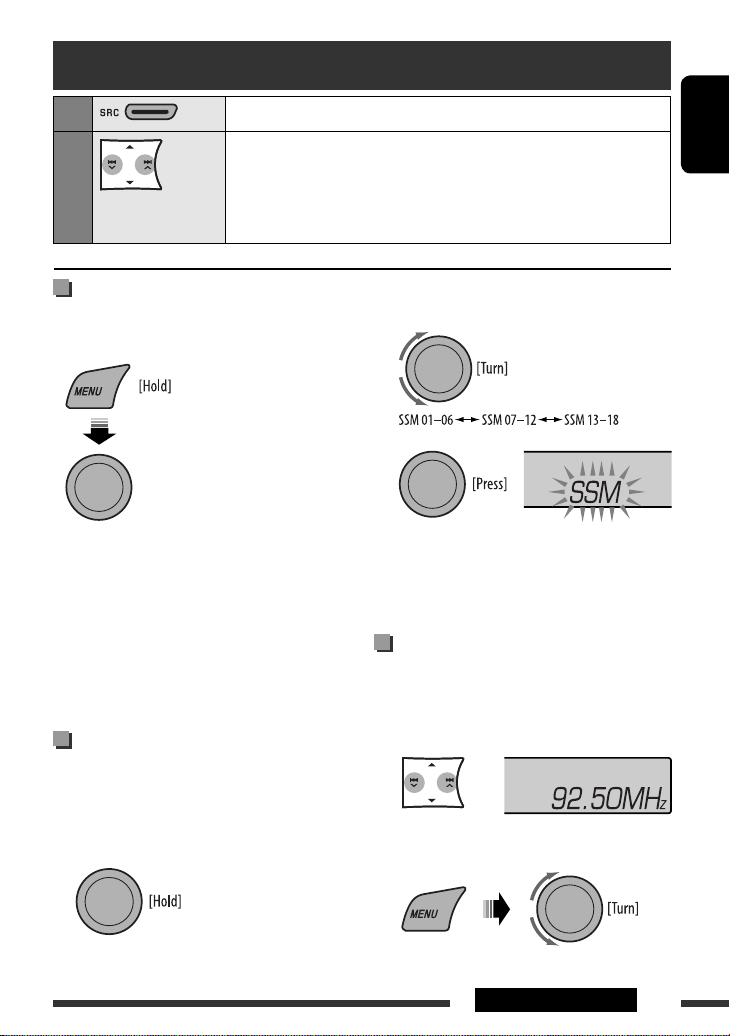
FM station automatic presetting
— SSM (Strong-station Sequential
Memory)
You can preset up to 18 stations for FM.
1 While listening to a station…
ENGLISH
2 Select the preset number range you want to
store.
3
Local FM stations with the strongest signals are
searched and stored automatically.
To preset other 6 stations, repeat from step 1 again.
Manual presetting (FM/AM)
You can preset up to 18 stations for FM and 6 stations
for AM.
Ex.: Storing FM station of 92.50 MHz into preset
number “04.”
1
2 Select preset number “04.”
Continued on the next page
7OPERATIONS
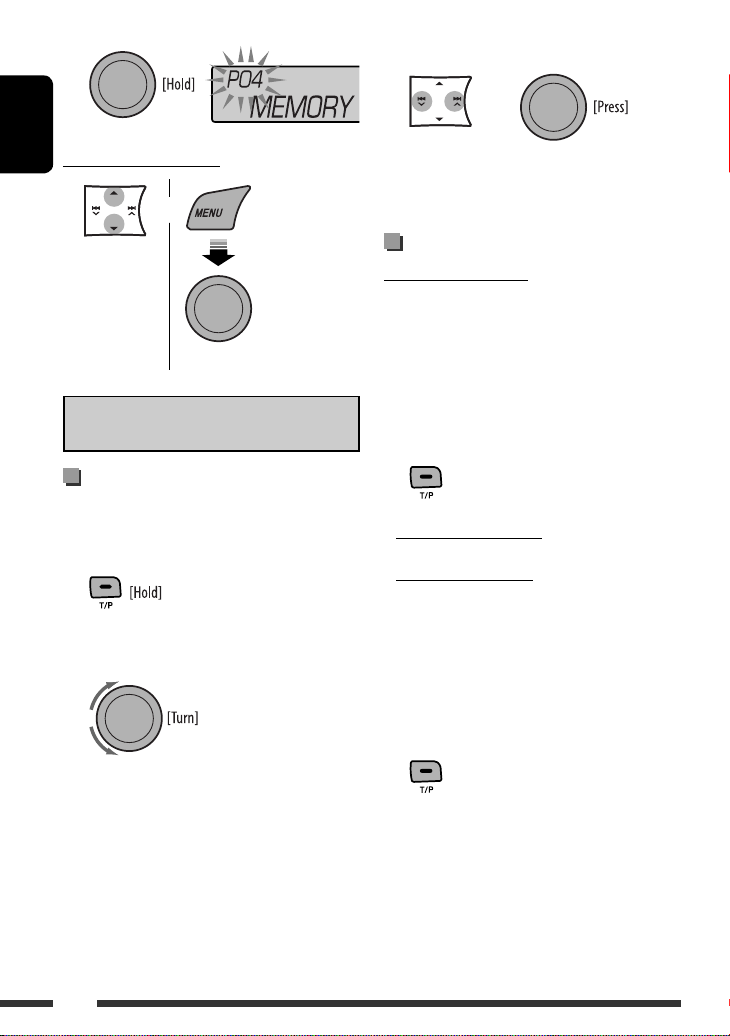
3
3 Start searching for your favorite programme.
or
ENGLISH
Selecting preset station
or
[Turn] = [Press]
The following features are available only for FM
Radio Data System stations.
Searching for FM Radio Data
System programme — PTY Search
You can tune in to a station broadcasting your favorite
programme by searching for a PTY code.
1 The last selected PTY code
appears.
2 Select one of your favorite programme types
or a PTY code.
If a station is broadcasting a programme of the
same PTY code as you have selected, that station is
tuned in.
Using the standby receptions
TA Standby Reception
TA Standby Reception allows the unit to switch
temporarily to Traffic Announcement (TA) from any
source other than AM.
The volume changes to the preset TA volume level if the
current level is lower than the preset level (see
page 14).
To activate TA Standby Reception
The TP (Traffic Programme)
indicator either lights up or flashes.
• If the TP indicator lights up, TA Standby Reception is
activated.
• If the TP indicator flashes, TA Standby Reception is
not yet activated. (This occurs when you are listening
to an FM station without the Radio Data System
signals required for TA Standby Reception.)
To activate the reception, tune in to another station
providing these signals. The TP indicator will stop
flashing and remain lit.
To deactivate the TA Standby Reception
The TP indicator goes off.
8
PTY Standby Reception
PTY Standby Reception allows the unit to switch
temporarily to your favorite PTY programme from any
source other than AM.
To activate and select your favorite PTY code for
PTY Standby Reception, see page 14.
The PTY indicator either lights up or flashes.
• If the PTY indicator lights up, PTY Standby Reception
is activated.
• If the PTY indicator flashes, PTY Standby Reception is
not yet activated.
To activate the reception, tune in to another station
providing these signals. The PTY indicator will stop
flashing and remain lit.
To deactivate the PTY Standby Reception, select
“PTY OFF” for the PTY code (see page 14). The PTY
indicator goes off.
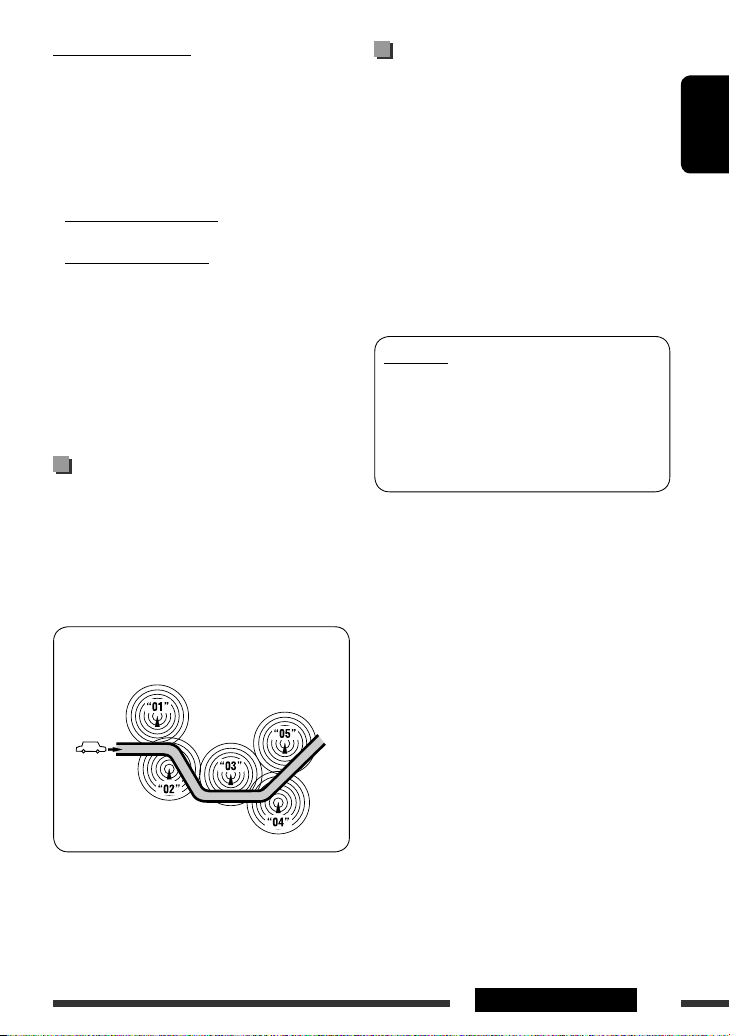
Tracing the same programme—
Network-Tracking Reception
When driving in an area where FM reception is not
sufficient enough, this unit automatically tunes in to
another FM Radio Data System station of the same
network, possibly broadcasting the same programme
with stronger signals (see the illustration below).
Automatic station selection—
Programme Search
Usually when you select a preset number, the station
preset in that number is tuned in.
If the signals from the FM Radio Data System preset
station are not sufficient for good reception, this
unit, using the AF data, tunes in to another frequency
possibly broadcasting the same programme as the
original preset station is broadcasting.
• The unit takes some time to tune in to another
station using programme search.
• See also page 14.
PTY codes
NEWS, AFFAIRS, INFO, SPORT, EDUCATE, DRAMA, CULTURE,
SCIENCE, VARIED, POP M (music), ROCK M (music), EASY
M (music), LIGHT M (music), CLASSICS, OTHER M (music),
WEATHER, FINANCE, CHILDREN, SOCIAL, RELIGION, PHONE
IN, TRAVEL, LEISURE, JAZZ, COUNTRY, NATION M (music),
OLDIES, FOLK M (music), DOCUMENT
ENGLISH
Programme A broadcasting on different frequency areas
(01 – 05)
When shipped from the factory, Network-Tracking
Reception is activated.
To change the Network-Tracking Reception
setting, see “AF-REG” on page 14.
9OPERATIONS
Disc operations
1
ENGLISH
2
Stop playing and ejecting the disc
• “NO DISC” appears.
Press SRC to listen to another
playback source.
Prohibiting disc ejection
To cancel the prohibition, repeat the same
procedure.
Selecting a track/folder
Turn on the power.
Insert a disc.
All tracks will be played repeatedly until you change
the source or eject the disc.
Pressing (or holding) the following buttons allows you
to…
MP3/WMA: Select folder
[Press] Select track
[Hold] Reverse/fast-forward track
[Turn] = [Press]
• For MP3/WMA discs, select the desired folder, then
the desired track by performing the control dial.
• To return to the previous menu, press BACK.
10
OPERATIONS
Selecting the playback modes
You can use only one of the following playback modes
at a time.
1
2
[Turn] = [Press]
REPEAT Ô RANDOM
REPEAT
TRACK RPT : Repeats current track
FOLDER RPT : MP3/WMA: Repeats current folder
RANDOM
FOLDER RND : MP3/WMA: Randomly plays all
tracks of current folder, then
tracks of next folders
ALL RND : Randomly plays all tracks
• To cancel repeat play or random play, select
“RPT OFF” or “RND OFF.”
• To return to the previous menu, press BACK.
3
[Turn] = [Press]
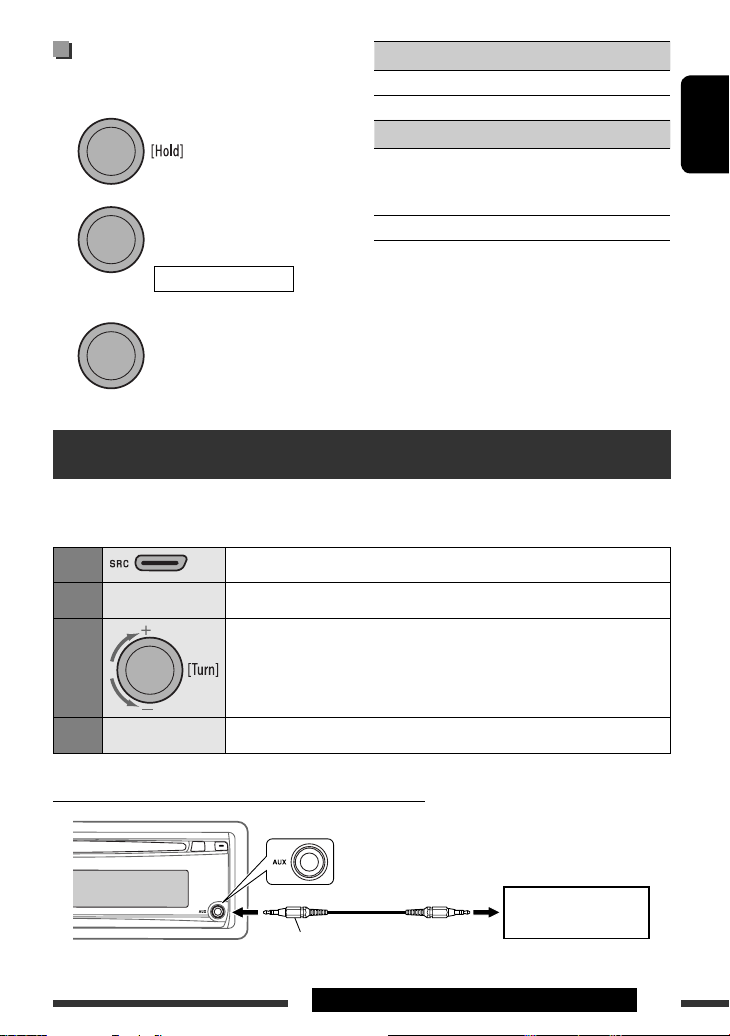
Listening to the other external components
You can connect an external component to AUX (auxiliary) input jack on the control panel.
Preparation: Make sure “AUX ON” is selected in the “SRC SELECT” = “AUX IN” setting, see page 15.
ENGLISH
1
2
—
3
4
Connecting an external component to the AUX input jack
—
Select “AUX IN.”
Turn on the connected component and start playing the source.
Adjust the volume.
You can adjust the auxiliary input level to avoid the sudden increase of the output
level (see “AUX ADJUST” on page 14).
Adjust the sound as you want (see page 12).
3.5 mm stereo mini plug
(not supplied)
OPERATIONS & EXTERNAL DEVICES
Portable audio player, etc.
11
Selecting a preset sound mode
You can select a preset sound mode suitable to the
music genre.
• See also page 13 (“EQ”).
ENGLISH
[Turn] = [Press]
Select “EQ”
Preset value setting for each sound mode
Preset values
Indication (For)
USER (Flat sound) 00 00 OFF
ROCK (Rock or disco music) +03 +01 ON
CLASSIC (Classical music) +01 –02 OFF
POPS (Light music) +04 +01 OFF
HIP HOP (Funk or rap music) +02 00 ON
JAZZ (Jazz music) +02 +03 OFF
BASS
TREBLE
Storing your own sound mode
You can store your own adjustments in memory.
1 Select “USER” for “EQ.”
[Turn] = [Press]
Select “EQ”
= “USER”
2 While “USER” is shown on the display…
LOUD
• If no operation is done for about 30 seconds, the
operation will be canceled.
3 Select a tone.
[Turn] = [Press]
BASS Ô TREBLE
12
4 Adjust the level.
Tone Level
BASS –06 to +06
TREBLE –06 to +06
• To return to the previous menu, press BACK.
5 Finish the procedure.
Menu operations
1 2 3 Repeat step 2 if necessary.
[Turn] = [Press]
Category Menu items Selectable settings, [reference page]
DEMO
Display
DEMO
demonstration
CLOCK DISP *
Clock display
CLOCK SET
Clock setting
CLOCK
24H/12H
Time display mode
CLOCK ADJ *
Clock adjustment
EQ
EQ
Equalizer
DIMMER
Dimmer
3
SCROLL*
Scroll
DISPLAY
TAG DISPLAY
Tag display
1
If the power supply is not interrupted by turning off the ignition key of your car, it is recommended to select
*
“CLOCK OFF” to save the car’s battery.
*2 Takes effect only when CT (clock time) data is received.
*3 Some characters or symbols will not be shown correctly (or will be blanked) on the display.
• DEMO ON
• DEMO OFF
1
• CLOCK ON
• CLOCK OFF
: Adjust the hour, then the minute, [6].
[Initial: 0:00]
• 24 HOUR
• 12 HOUR
2
• AUTO
• OFF
: Select a preset sound mode suitable to the music genre.
USER, ROCK, CLASSIC, POPS, HIP HOP, JAZZ
• DIMMER ON
• DIMMER OFF
• SCROLL ONCE
• SCROLL AUTO
• SCROLL OFF
Pressing DISP for more than one second can scroll the display regardless of the
setting.
• TAG ON
• TAG OFF
: Display demonstration will be activated automatically if no
operation is done for about 20 seconds, [6].
: Cancels.
: Clock time is shown on the display at all times when the
power is turned off.
: Cancels; pressing DISP will show the clock time for about 5
seconds when the power is turned off, [6].
: See also page 6 for setting.
: The built-in clock is automatically adjusted using the CT
(clock time) data in the Radio Data System signal.
: Cancels.
: Dims the display and button illumination.
: Cancels.
: Scrolls the displayed information once.
: Repeats scrolling (at 5-second intervals).
: Cancels.
: Shows the Tag information while playing MP3/WMA
tracks.
: Cancels.
• To return to the previous menu,
press BACK.
Initial: Underlined
ENGLISH
Continued on the next page
SETTINGS
13
Category Menu items Selectable settings, [reference page]
4
ENGLISH
AF-REG *
Alternative
frequency/
regionalization
reception
• AF ON
• AF-REG ON
: When the currently received signals become weak, the unit
switches to another station (the programme may differ
from the one currently received), [9].
• The AF indicator lights up.
: When the currently received signals become weak, the
unit switches to another station broadcasting the same
programme.
• The AF and REG indicators light up.
PTY-STANDBY *
PTY standby
TA VOLUME *
Traffic
TUNER
announcement
volume
P-SEARCH *
Programme search
MONO *
Monaural mode
IF BAND
Intermediate
frequency band
• OFF
4
PTY OFF, PTY
codes
4
VOLUME 00
– VOLUME 50
(or VOLUME 00
– VOLUME 30)*
4
• SEARCH ON
• SEARCH OFF
6
• MONO ON
• MONO OFF
• AUTO
• WIDE
: Cancels.
Activates PTY Standby Reception with one of the PTY codes,
[9].
Initial: VOLUME 15
5
: Activates Programme Search, [9].
: Cancels.
: Activate monaural mode to improve FM reception, but
stereo effect will be lost, [7].
: Restore the stereo effect.
: Increases the tuner selectivity to reduce interference noises
between adjacent stations. (Stereo effect may be lost.)
: Subject to interference noises from adjacent stations, but
sound quality will not be degraded and the stereo effect
will remain.
7
FADER*
Fader
BALANCE
Balance
LOUD
Loudness
AUDIO
AUX ADJUST
Auxiliary input
level adjustment
R06 – F06 : Adjust the front and rear speaker output balance.
[Initial: 00]
L06 – R06 : Adjust the left and right speaker output balance.
[Initial: 00]
• LOUD OFF
• LOUD ON
: Cancels.
: Boost low and high frequencies to produce a well-balanced
sound at a low volume level.
AUX ADJ 00
— AUX ADJ 05
: Adjust the auxiliary input level to avoid the sudden
increase of the output level when changing the source to
external component connected to the AUX input jack on
the control panel.
4
Only for FM Radio Data System stations.
*
5
*
Depends on the amplifier gain control.
*6 Displayed only when the source is “FM.”
7
If you are using a two-speaker system, set the fader level to “00.”
*
14
SETTINGS

Category Menu items Selectable settings, [reference page]
BEEP
Keypress tone
TEL MUTING
Telephone
muting
AUDIO
AMP GAIN *
Amplifier gain
control
9
AM *
AM station
AUX IN *
SRC SELECT
Auxiliary input
8
The volume level automatically changes to “VOLUME 30” if you change to “LOW POWER” with the volume level
*
set higher than “VOLUME 30.”
*9 Displayed only when any source other than “AM” is selected.
*10 Displayed only when any source other than “AUX IN” is selected.
8
10
• BEEP OFF
• BEEP ON
• MUTING 1/
MUTING 2
• MUTING OFF
• LOW POWER
• HIGH POWER
• AM OFF
• AM ON
• AUX OFF
• AUX ON
: Deactivates the keypress tone.
: Activates the keypress tone.
: Select either one which mutes the sounds while using a
cellular phone.
: Cancels.
: VOLUME 00 – VOLUME 30 (Select if the maximum power
of each speaker is less than 50 W to prevent damaging the
speaker.)
: VOLUME 00 – VOLUME 50
: Disable “AM” in source selection.
: Enable “AM” in source selection, [4].
: Disable “AUX IN” in source selection.
: Enable “AUX IN” in source selection, [4].
More about this unit
ENGLISH
Basic operations
Turning on the power
• By pressing SRC button on the unit, you can also turn
on the power. If the source is ready, playback also
starts.
Turning off the power
• If you turn off the power while listening to a track,
playback will start from where it had been stopped
previously next time you turn on the power.
General
• If you change the source while listening to a disc,
playback stops.
Next time you select “CD” as the playback source,
playback will start from where it had been stopped
previously.
• After ejecting a disc, “NO DISC” appears and you
cannot operate some of the buttons. Insert another
disc or press SRC to select another playback source.
• If no operation is done for about 30 seconds after
pressing MENU button, the operation will be
canceled.
Tuner operations
Storing stations in memory
• During SSM search…
– All previously stored stations are erased and the
stations are stored anew.
– When SSM is over, the station stored in the lowest
preset number will be automatically tuned in.
• When storing a station manually, the previously
preset station is erased when a new station is stored
in the same preset number.
SETTINGS & REFERENCES
15

FM Radio Data System operations
• Network-Tracking Reception requires two types
of Radio Data System signals—PI (Programme
Identification) and AF (Alternative Frequency)
to work correctly. Without receiving these data
ENGLISH
correctly, Network-Tracking Reception will not
operate correctly.
• If a Traffic Announcement is received by TA Standby
Reception, the volume level automatically changes to
the preset level (TA VOL) if the current level is lower
than the preset level.
• When Alternative Frequency Reception is activated
(with AF selected), Network-Tracking Reception is
also activated automatically. On the other hand,
Network-Tracking Reception cannot be deactivated
without deactivating Alternative Frequency
Reception. (See page 14.)
Disc operations
Caution for DualDisc playback
• The Non-DVD side of a “DualDisc” does not comply
with the “Compact Disc Digital Audio” standard.
Therefore, the use of Non-DVD side of a DualDisc on
this product may not be recommended.
• This unit can play back multi-session discs; however,
unclosed sessions will be skipped while playing.
• Some CD-Rs or CD-RWs may not play back on this
unit because of their disc characteristics, or for the
following reasons:
– Discs are dirty or scratched.
– Moisture condensation has occurred on the lens
inside the unit.
– The pickup lens inside the unit is dirty.
– The files on the CD-R/CD-RW are written using the
“Packet Write” method.
– There are improper recording conditions (missing
data, etc.) or media conditions (stained, scratched,
warped, etc.).
• CD-RWs may require a longer readout time since the
reflectance of CD-RWs is lower than that of regular
CDs.
• Do not use the following CD-Rs or CD-RWs:
– Discs with stickers, labels, or a protective seal stuck
to the surface.
– Discs on which labels can be directly printed by an
ink jet printer.
Using these discs under high temperature or high
humidity may cause malfunctions or damage to the
unit.
General
• This unit has been designed to reproduce
CDs/CD Texts, and CD-Rs (Recordable)/CD-RWs
(Rewritable) in audio CD (CD-DA), MP3/WMA
formats.
• When a disc is inserted upside down, “PLEASE” and
“EJECT” appear alternately on the display. Press 0 to
eject the disc.
• MP3 and WMA “tracks” (words “file” and “track” are
used interchangeably) are recorded in “folders.”
• While fast-forwarding or reversing on an MP3 or
WMA disc, you can only hear intermittent sounds.
Playing a CD-R or CD-RW
• Use only “finalized” CD-Rs or CD-RWs.
• This unit can only play back files of the same type as
those detected first if a disc includes both audio CD
(CD-DA) files and MP3/WMA files.
16
Playing an MP3/WMA disc
• This unit can play back MP3/WMA files with the
extension code <.mp3> or <.wma> (regardless of
the letter case—upper/lower).
• This unit can show the names of albums, artists
(performer), and Tag (Version 1.0, 1.1, 2.2, 2.3, or
2.4) for MP3 files and for WMA files.
• This unit can display only one-byte characters. No
other characters can be correctly displayed.
• This unit can play back MP3/WMA files meeting the
conditions below:
– Bit rate: 8 kbps — 320 kbps
– Sampling frequency:
48 kHz, 44.1 kHz, 32 kHz (for MPEG-1)
24 kHz, 22.05 kHz, 16 kHz (for MPEG-2)
– Disc format: ISO 9660 Level 1/Level 2, Romeo,
Joliet, Windows long file name
• The maximum number of characters for file/folder
names vary depending on the disc format used
(includes 4 extension characters—<.mp3> or
<.wma>).
– ISO 9660 Level 1: up to 12 characters
– ISO 9660 Level 2: up to 31 characters
– Romeo: up to 128 characters
– Joliet: up to 64 characters
– Windows long file name: up to 128 characters
• This unit can recognize a total of 512 files,
255 folders, and 8 hierarchical levels.
• This unit can play back files recorded in VBR (variable
bit rate).
Files recorded in VBR have a discrepancy in the
elapsed time display, and do not show the actual
elapsed time. In particular, this difference becomes
noticeable after performing the search function.
• This unit cannot play back the following files:
– MP3 files encoded in MP3i and MP3 PRO format.
– MP3 files encoded in an inappropriate format.
– MP3 files encoded with Layer 1/2.
– WMA files encoded in lossless, professional, and
voice format.
– WMA files which are not based upon Windows
Media ® Audio.
– WMA files copy-protected with DRM.
– Files which have data such as AIFF, ATRAC3, etc.
• The search function works but search speed is not
constant.
Ejecting a disc
• If the ejected disc is not removed within 15 seconds,
it is automatically inserted into the loading slot again
to protect it from dust. Playback starts automatically.
Menu operations
• If you change the “AMP GAIN” setting from
“HIGH POWER” to “LOW POWER” while the
volume level is set higher than “VOLUME 30,” the
unit automatically changes the volume level to
“VOLUME 30.”
Troubleshooting
What appears to be trouble is not always serious. Check the following points before calling a service center.
Symptoms Remedies/Causes
ENGLISH
• Sound cannot be heard from the speakers. • Adjust the volume to the optimum level.
• Check the cords and connections.
• The unit does not work at all. Reset the unit (see page 3).
General
• “AUX IN” cannot be selected. Check the “SRC SELECT”
page 15).
• SSM automatic presetting does not work. Store stations manually.
• Static noise while listening to the radio. Connect the aerial firmly.
FM/AM
• “AM” cannot be selected. Check the “SRC SELECT”
page 15).
= “AUX IN” setting (see
= “AM” setting (see
REFERENCES
Continued on the next page
17

Symptoms Remedies/Causes
• Disc cannot be played back. Insert the disc correctly.
ENGLISH
Disc playback
MP3/WMA playback
• CD-R/CD-RW cannot be played back.
• Tracks on the CD-R/CD-RW cannot be
skipped.
• Disc can neither be played back nor ejected. • Unlock the disc (see page 10).
• Disc sound is sometimes interrupted. • Stop playback while driving on rough roads.
• “NO DISC” appears on the display. Insert a playable disc into the loading slot.
• “PLEASE” and “EJECT“ appear alternately
on the display.
• Disc cannot be played back. • Use a disc with MP3/WMA tracks recorded in a format
• Noise is generated. Skip to another track or change the disc. (Do not add the
• A longer readout time is required
(“READING” keeps flashing on the display).
• Tracks do not play back in the order you
have intended them to play.
• Insert a finalized CD-R/CD-RW.
• Finalize the CD-R/CD-RW with the component which
you used for recording.
• Eject the disc forcibly (see page 3).
• Change the disc.
• Check the cords and connections.
Press
0, then insert a disc correctly.
compliant with ISO 9660 Level 1, Level 2, Romeo, or
Joliet.
• Add the extension code <.mp3> or <.wma> to the
file names.
extension code <.mp3> or <.wma> to non-MP3 or
WMA tracks.)
Do not use too many hierarchical levels and folders.
The playback order is determined when the files are
recorded.
• The elapsed playing time is not correct. This sometimes occurs during playback. This is caused by
how the tracks are recorded on the disc.
• The correct characters are not displayed
(e.g. album name).
• Microsoft and Windows Media are either registered trademarks or trademarks of Microsoft Corporation in the
United States and/or other countries.
This unit can only display letters (upper case), numbers,
and a limited number of symbols.
18
Maintenance
How to clean the connectors
Frequent detachment will deteriorate the connectors.
To minimize this possibility, periodically wipe the
connectors with a cotton swab or cloth moistened with
alcohol, being careful not to damage the connectors.
Connectors
Moisture condensation
Moisture may condense on the lens inside the unit in
the following cases:
• After starting the heater in the car.
• If it becomes very humid inside the car.
Should this occur, the unit may malfunction. In this
case, eject the disc and leave the unit turned on for a
few hours until the moisture has evaporated.
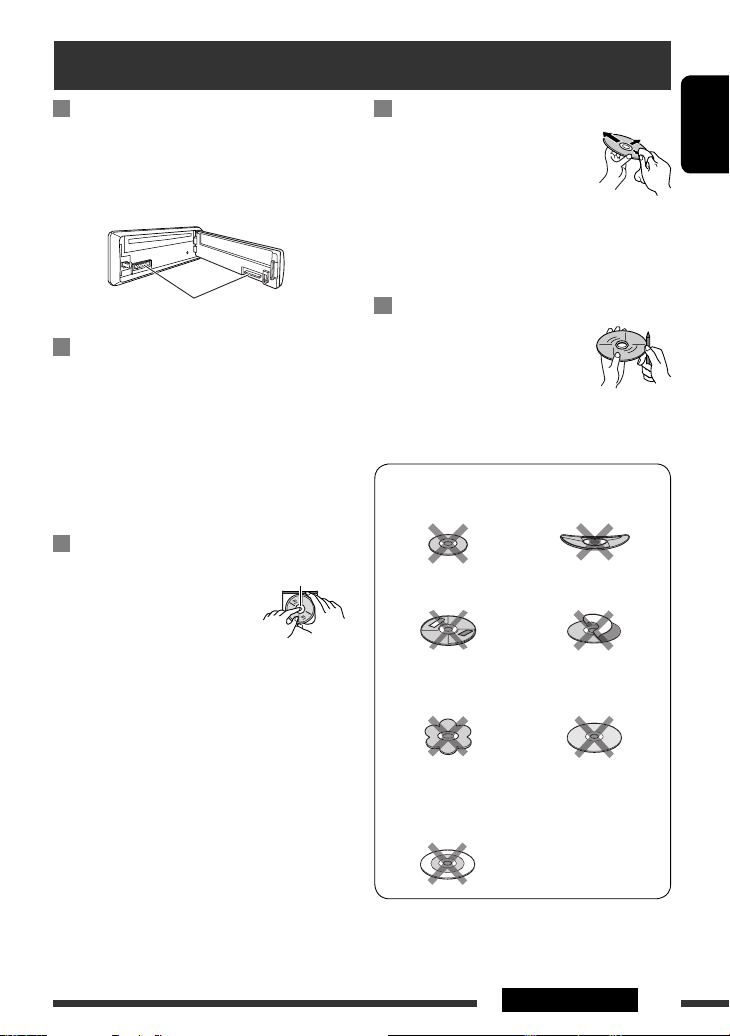
How to handle discs
When removing a disc from its
case, press down the center holder
of the case and lift the disc out,
holding it by the edges.
• Always hold the disc by the edges. Do not touch its
recording surface.
When storing a disc in its case, gently insert the
disc around the center holder (with the printed surface
facing up).
• Make sure to store discs in cases after use.
Center holder
To keep discs clean
A dirty disc may not play correctly.
If a disc does become dirty, wipe it with
a soft cloth in a straight line from center
to edge.
• Do not use any solvents (for example, conventional
record cleaner, spray, thinner, benzine, etc.) to clean
discs.
To play new discs
New discs may have some rough spots
around the inner and outer edges. If
such a disc is used, this unit may reject
the disc.
To remove these rough spots, rub the edges with a
pencil or ball-point pen, etc.
Do not use the following discs:
Single CD (8 cm disc) Warped disc
Sticker and sticker residue Stick-on label
Unusual shape
Transparent or semi-
transparent parts on its
recording area
C-thru Disc (semi-
transparent disc)
ENGLISH
19REFERENCES
Specifications
AUDIO AMPLIFIER SECTION
Maximum Power Output: Front/Rear: 50 W per channel
ENGLISH
Continuous Power Output (RMS): Front/Rear: 19 W per channel into 4 Ω, 40 Hz to 20 000 Hz
at no more than 0.8% total harmonic
distortion.
Load Impedance: 4 Ω (4 Ω to 8 Ω allowance)
Tone Control Range: Bass: ±12 dB at 100 Hz
Treble: ±12 dB at 10 kHz
Frequency Response: 40 Hz to 20 000 Hz
Line-Out Level/Impedance: 2.5 V/20 kΩ load (full scale)
Output Impedance: 1 kΩ
Other Terminal: AUX (auxiliary) input jack
TUNER SECTION
Frequency Range: FM: 87.5 MHz to 108.0 MHz
AM: MW: 522 kHz to 1 620 kHz
LW: 144 kHz to 279 kHz
FM Tuner Usable Sensitivity: 11.3 dBf (1.0 μV/75 Ω)
50 dB Quieting Sensitivity: 16.3 dBf (1.8 μV/75 Ω)
Alternate Channel Selectivity (400 kHz): 65 dB
Frequency Response: 40 Hz to 15 000 Hz
Stereo Separation: 30 dB
MW Tuner Sensitivity: 20 μV
Selectivity: 35 dB
LW Tuner Sensitivity: 50 μV
20
CD PLAYER SECTION
Type: Compact disc player
Signal Detection System: Non-contact optical pickup
(semiconductor laser)
Number of Channels: 2 channels (stereo)
Frequency Response: 5 Hz to 20 000 Hz
Dynamic Range: 93 dB
Signal-to-Noise Ratio: 98 dB
Wow and Flutter: Less than measurable limit
MP3 Decoding Format: (MPEG1/2 Audio Layer 3) Max. Bit Rate: 320 kbps
WMA (Windows Media® Audio) Decoding Format: Max. Bit Rate: 192 kbps
GENERAL
Power Requirement: Operating Voltage: DC 14.4 V (11 V to 16 V allowance)
Grounding System: Negative ground
Allowable Operating Temperature: 0°C to +40°C
ENGLISH
Dimensions (W × H × D): (approx.) Installation Size: 182 mm × 52 mm × 160 mm
Panel Size: 188 mm × 58 mm × 13 mm
Mass:
Design and specifications are subject to change without notice.
1.3 kg (excluding accessories)
21REFERENCES

Having TROUBLE with operation?
Please reset your unit
Refer to page of How to reset your unit
Vous avez des PROBLÈMES de fonctionnement?
Réinitialisez votre appareil
Référez-vous à la page intitulée Comment réinitialiser votre appareil
Dear Customer,
This apparatus is in conformance with the valid European
directives and standards regarding electromagnetic
compatibility and electrical safety.
European representative of Victor Company of Japan, Limited
is:
JVC Technical Services Europe GmbH
Postfach 10 05 04
61145 Friedberg
Germany
Cher(e) client(e),
Cet appareil est conforme aux directives et normes
européennes en vigueur concernant la compatibilité
électromagnétique et à la sécurité électrique.
Représentant européen de la société Victor Company of Japan,
Limited:
JVC Technical Services Europe GmbH
Postfach 10 05 04
61145 Friedberg
Allemagne
EN, FR
© 2008 Victor Company of Japan, Limited
0908DTSMDTJEIN
GET0568-010A
[EX/EU]
KD-R303/KD-R302/KD-R301
Installation/Connection Manual
Manuel d’installation/raccordement
0908DTSMDTJEIN
EN, FR
© 2008 Victor Company of Japan, Limited
ENGLISH
This unit is designed to operate on 12 V DC, NEGATIVE ground electrical systems. If your vehicle
does not have this system, a voltage inverter is required, which can be purchased at JVC IN-CAR
ENTERTAINMENT dealers.
WARNINGS
To prevent short circuits, we recommend that you disconnect the battery’s negative terminal and make all
electrical connections before installing the unit.
• Be sure to ground this unit to the car’s chassis again after installation.
Notes:
• Replace the fuse with one of the specified rating. If the fuse blows frequently, consult your JVC IN-CAR
ENTERTAINMENT dealer.
• It is recommended to connect to the speakers with maximum power of more than 50 W (both at
the rear and at the front, with an impedance of 4 Ω to 8 Ω). If the maximum power is less than
50 W, change “AMP GAIN” setting to prevent the speakers from being damaged (see page 15 of the
INSTRUCTIONS).
• To prevent short-circuit, cover the terminals of the UNUSED leads with insulating tape.
• The heat sink becomes very hot after use. Be careful not to touch it when removing this unit.
Heat sink
Dissipateur de chaleur
FRANÇAIS
Cet appareil est conçu pour fonctionner sur des sources de courant continu de 12 V à masse NEGATIVE.
Si votre véhicule n’offre pas ce type d’alimentation, il vous faut un convertisseur de tension, que vous pouvez
acheter chez un revendeur d’autoradios JVC.
AVERTISSEMENTS
Pour éviter tout court-circuit, nous vous recommandons de débrancher la borne négative de la batterie et
d’effectuer tous les raccordements électriques avant d’installer l’appareil.
• Assurez-vous de raccorder de nouveau la mise à la masse de cet appareil au châssis de la
voiture après l’installation.
Remarques:
• Remplacer le fusible par un de la valeur précisée. Si le fusible saute souvent, consulter votre revendeur
d’autoradios JVC.
• Il est recommandé de connecter des enceintes avec une puissance de plus de 50 W (les enceintes arrière
et les enceintes avant, avec une impédance comprise entre 4 Ω et 8 Ω). Si la puissance maximum est
inférieure à 50 W, changez “AMP GAIN” pour éviter d’endommager vos enceintes (voir page 15 du
MANUEL D’INSTRUCTIONS).
• Pour éviter les court-circuits, couvrir les bornes des fils qui ne sont PAS UTILISÉS avec de la bande
isolante.
• Le dissipateur de chaleur devient très chaud après usage. Faire attention de ne pas le toucher en retirant
cet appareil.
PRECAUTIONS on power supply and speaker connections:
• DO NOT connect the speaker leads of the power cord to the car battery; otherwise, the unit
will be seriously damaged.
• BEFORE connecting the speaker leads of the power cord to the speakers, check the speaker wiring in
your car.
Parts list for installation and connection
The following parts are provided for this unit. If any item is missing, consult your JVC IN-CAR
ENTERTAINMENT dealer immediately.
PRECAUTIONS sur l’alimentation et la connexion des enceintes:
• NE CONNECTEZ PAS les fils d’enceintes du cordon d’alimentation à la batterie; sinon,
l’appareil serait sérieusement endommagé.
• AVANT de connecter les fils d’enceintes du cordon d’alimentation aux enceintes, vérifiez le câblage des
enceintes de votre voiture.
Liste des pièces pour l’installation et raccordement
Les pièces suivantes sont fournies avec cet appareil. Si quelque chose manquait, consultez votre revendeur
autoradio JVC immédiatement.
A
Control panel
Panneau de commande
D
Power cord
Cordon d’alimentation
G
Mounting bolt
(M4 × 5 mm; M5 × 12.5 mm)
Boulon de montage
(M4 × 5 mm; M5 × 12,5 mm)
B
Sleeve
Manchon
E
Washer (ø5)
Rondelle (ø5)
H
Rubber cushion
Amortisseur en caoutchouc
C
Trim plate
Plaque d’assemblage
F
Lock nut (M5)
Ecrou d’arrêt (M5)
I
Handles
Poignées
INSTALLATION (IN-DASH MOUNTING)
Removing the unit
Before removing the unit, release the rear section.
Retrait de l’appareil
Avant de retirer l’appareil, libérer la section arrière.
The following illustration shows a typical installation. If you have any questions or require information
regarding installation kits, consult your JVC IN-CAR ENTERTAINMENT dealer or a company supplying
kits.
• If you are not sure how to install this unit correctly, have it installed by a qualified technician.
INSTALLATION (MONTAGE DANS LE TABLEAU DE BORD)
L’illustration suivante est un exemple d’installation typique. Si vous avez des questions ou avez besoin
d’information sur des kits d’installation, consulter votre revendeur d’autoradios JVC ou une compagnie
d’approvisionnement.
• Si l’on n’est pas sûr de pouvoir installer correctement cet appareil, le faire installer par un technicien
qualifié.
Do the required electrical connections.
Réalisez les connexions électriques.
When using the optional stay / Lors de l’utilisation du
hauban en option
Bend the appropriate tabs to hold the
sleeve firmly in place.
Tordez les languettes appropriées
pour maintenir le manchon en place.
Insert the two handles, then pull them as
illustrated so that the unit can be removed.
Insérez les deux poignées, puis tirez de la façon
illustrée de façon à retirer l’appareil.
When installing the unit without using the sleeve / Lors de l’installation de l’appareil
scans utiliser de manchon
In a Toyota car for example, first remove the car radio and install the unit in its place.
Dans une voiture Toyota, par exemple, retirez d’abord l’autoradio et installez l’appareil à sa place.
Dashboard
Tableau de bord
Stay (option)
Hauban (en option)
Fire wall
Cloison
Screw (option)
Vis (en option)
Install the unit at an angle of less than 30˚.
Installez l’appareil avec un angle de moins
de 30˚.
2
Flat type screws (M5 × 8 mm)
Vis à tête plate (M5 × 8 mm)*
Bracket*
Support*
Poche
2
2
*
2
2
2
Bracket*
Support*
Flat type screws (M5 × 8 mm)*
Vis à tête plate (M5 × 8 mm)*
2
2
Note : When installing the unit on the mounting bracket, make sure to use the 8 mm-long screws. If longer screws
are used, they could damage the unit.
Remarque : Lors de l’installation de l’appareil sur le support de montage, s’assurer d’utiliser des vis d’une longueur de
8 mm. Si des vis plus longues sont utilisées, elles peuvent endommager l’appareil.
1
*
When you stand the unit, be careful not to damage the fuse on the rear.
2
*
Not supplied for this unit.
1
*
Lorsque vous mettez l’appareil à la verticale, faire attention de ne pas endommager le fusible situé sur l’arrière.
2
*
Non fourni avec cet autoradio.
ENGLISH FRANÇAIS
E
F
B
D
H
G
A
C
N
J
I
K
M
L
P
O
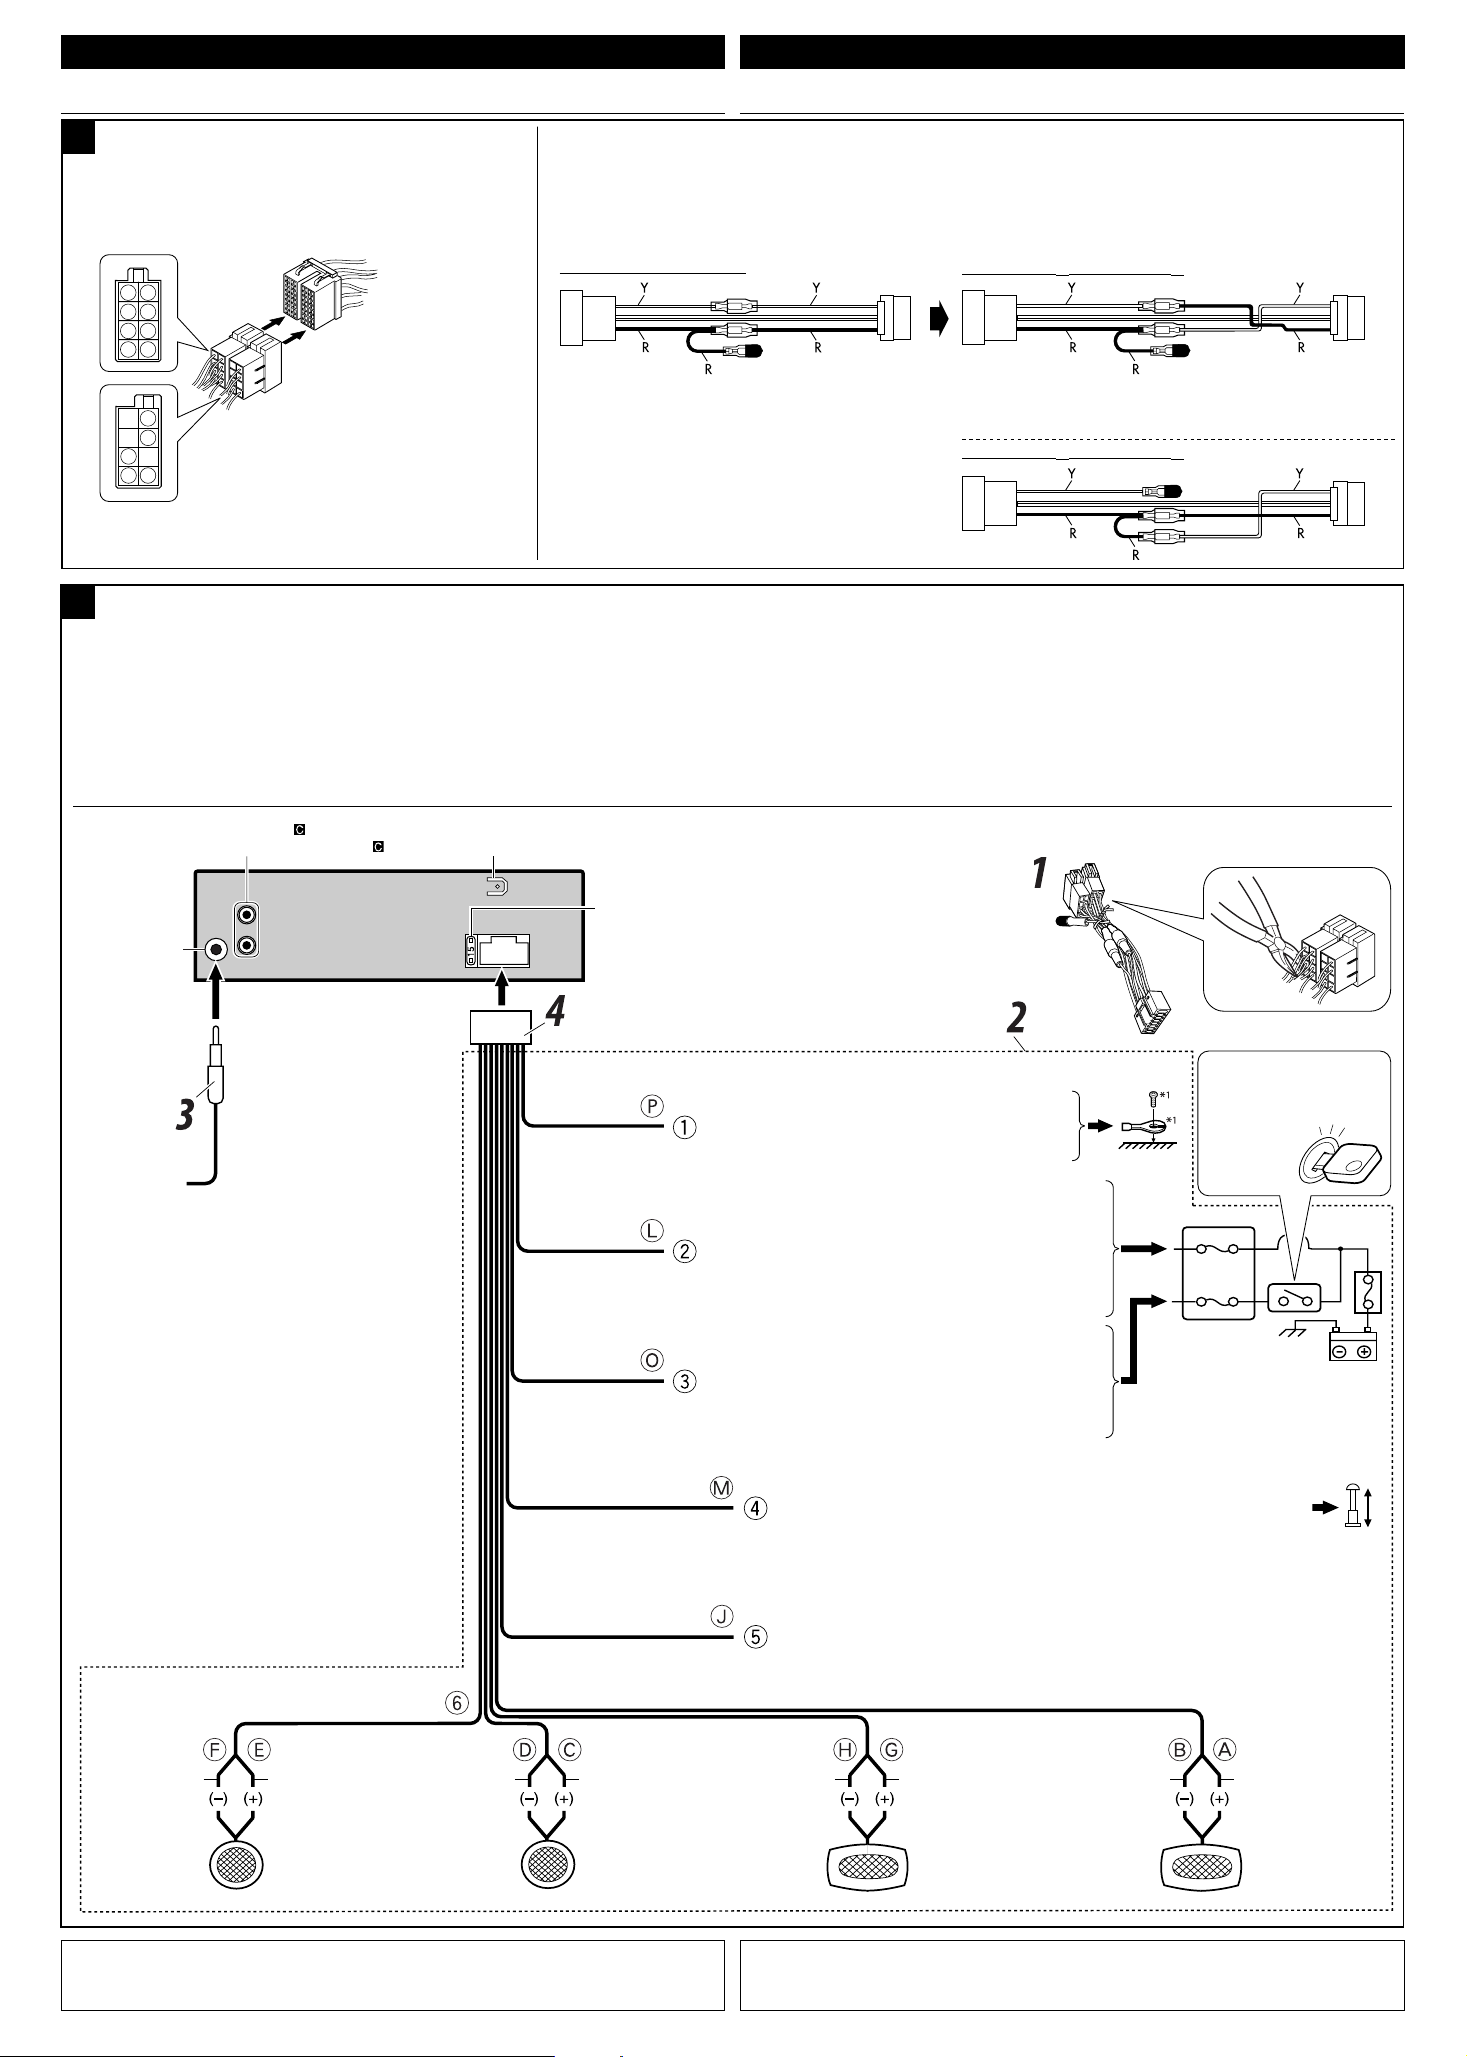
ELECTRICAL CONNECTIONS RACCORDEMENTS ELECTRIQUES
If your car is equipped with the ISO
A
connector / Si votre voiture est équippée
d’un connecteur ISO
• Connect the ISO connectors as illustrated.
• Connectez les connecteurs ISO comme montré sur l’illustration.
For some VW/Audi or Opel (Vauxhall) automobiles / Pour certaines automobiles VW/Audi ou
Opel (Vauxhall)
You may need to modify the wiring of the supplied power cord as illustrated.
• Contact your authorized car dealer before installing this unit.
Vous aurrez peut-être besoin de modifier le câblage du cordon d’alimentation fourni comme montré sur l’illustration.
• Contactez votre revendeur automobile autorisé avant d’installer l’appareil.
From the car body
De la carrosserie de la
voiture
ISO connector of the supplied power cord
Connecteur ISO pour le cordon d’alimentation
fourni
View from the lead side
Vue à partir du côté des fils
Connections without using the ISO connector / Connexions sans utiliser le connecteur ISO
B
Before connecting: Check the wiring in the vehicle carefully. Incorrect connection may cause serious
damage to this unit.
The leads of the power cord and those of the connector from the car body may be different in color.
1 Cut the ISO connector.
2 Connect the colored leads of the power cord in the order specified in the illustration below.
3 Connect the aerial cord.
4 Finally connect the wiring harness to the unit.
Original wiring / Câblage original
ISO connector
Connecteur ISO
Y: Yellow
Jaune
R: Red
Rouge
Avant de commencer la connexion: Vérifiez attentivement le câblage du véhicule. Une connexion
incorrecte peut endommager sérieusement l’appareil.
Le fil du cordon d’alimentation et ceux des connecteurs du châssis de la voiture peuvent être différents en
couleur.
1 Coupez le connecteur ISO.
2
Connectez les fils colorés du cordon d’alimentation dans l’ordre spécifié sur l’illustration ci-dessous.
3 Connectez le cordon d’antenne.
4 Finalement, connectez le faisceau de fils à l’appareil.
Modified wiring 1 / Câblage modifié 1
Use modified wiring 2 if the unit does not turn on.
Utilisez le câblage modifié 2 si l’appareil ne se met pas sous tension.
Modified wiring 2 / Câblage modifié 2
Rear line out (see diagram )
Sortie de ligne arrière (voir le diagramme )
Aerial terminal
Borne de l’antenne
Rear ground terminal
Borne arrière de masse
Black
Noir
Yellow
Jaune *
Red
Rouge
15 A fuse
Fusible 15 A
2
*
2
Ignition switch
Interrupteur d’allumage
To the metallic body or chassis of the car
Vers corps métallique ou châssis de la voiture
To a live terminal in the fuse block connecting to the car battery
(bypassing the ignition switch) (constant 12 V)
À une borne sous tension du porte-fusible connectée à la batterie de la
voiture (en dérivant l’interrupteur d’allumage) (12 V constant)
Fuse block
Porte-fusible
To an accessory terminal in the fuse block
Vers borne accessoire du porte-fusible
Blue with white stripe
Bleu avec bande blanche
Brown
Marron
White with black
stripe
Blanc avec bande
noire
1
*
Not supplied for this unit.
2
*
Before checking the operation of this unit prior to installation, this lead must be connected; otherwise, the
power cannot be turned on.
White
Blanc
Left speaker (front)
Enceinte gauche (avant)
Gray with black stripe
Gris avec bande noire
Gray
Gris
Right speaker (front)
Enceinte droit (avant)
Green with black stripe
Vert avec bande noire
To the remote lead of other equipment or power aerial if any (200 mA max.)
Au fil de télécommande de l’autre appareil ou à l’antenne automatique s’il y en a une
(200 mA max.)
To cellular phone system
À un système de téléphone cellulaire
Green
Vert
Left speaker (rear)
Enceinte gauche (arrière)
1
*
Non fourni avec cet autoradio.
2
*
Pour vérifier le fonctionnement de cet appareil avant installation, ce fil doit être raccordé, sinon l’appareil ne peut
pas être mis sous tension.
Purple with black stripe
Violet avec bande noire
Purple
Violet
Right speaker (rear)
Enceinte droit (arrière)
C
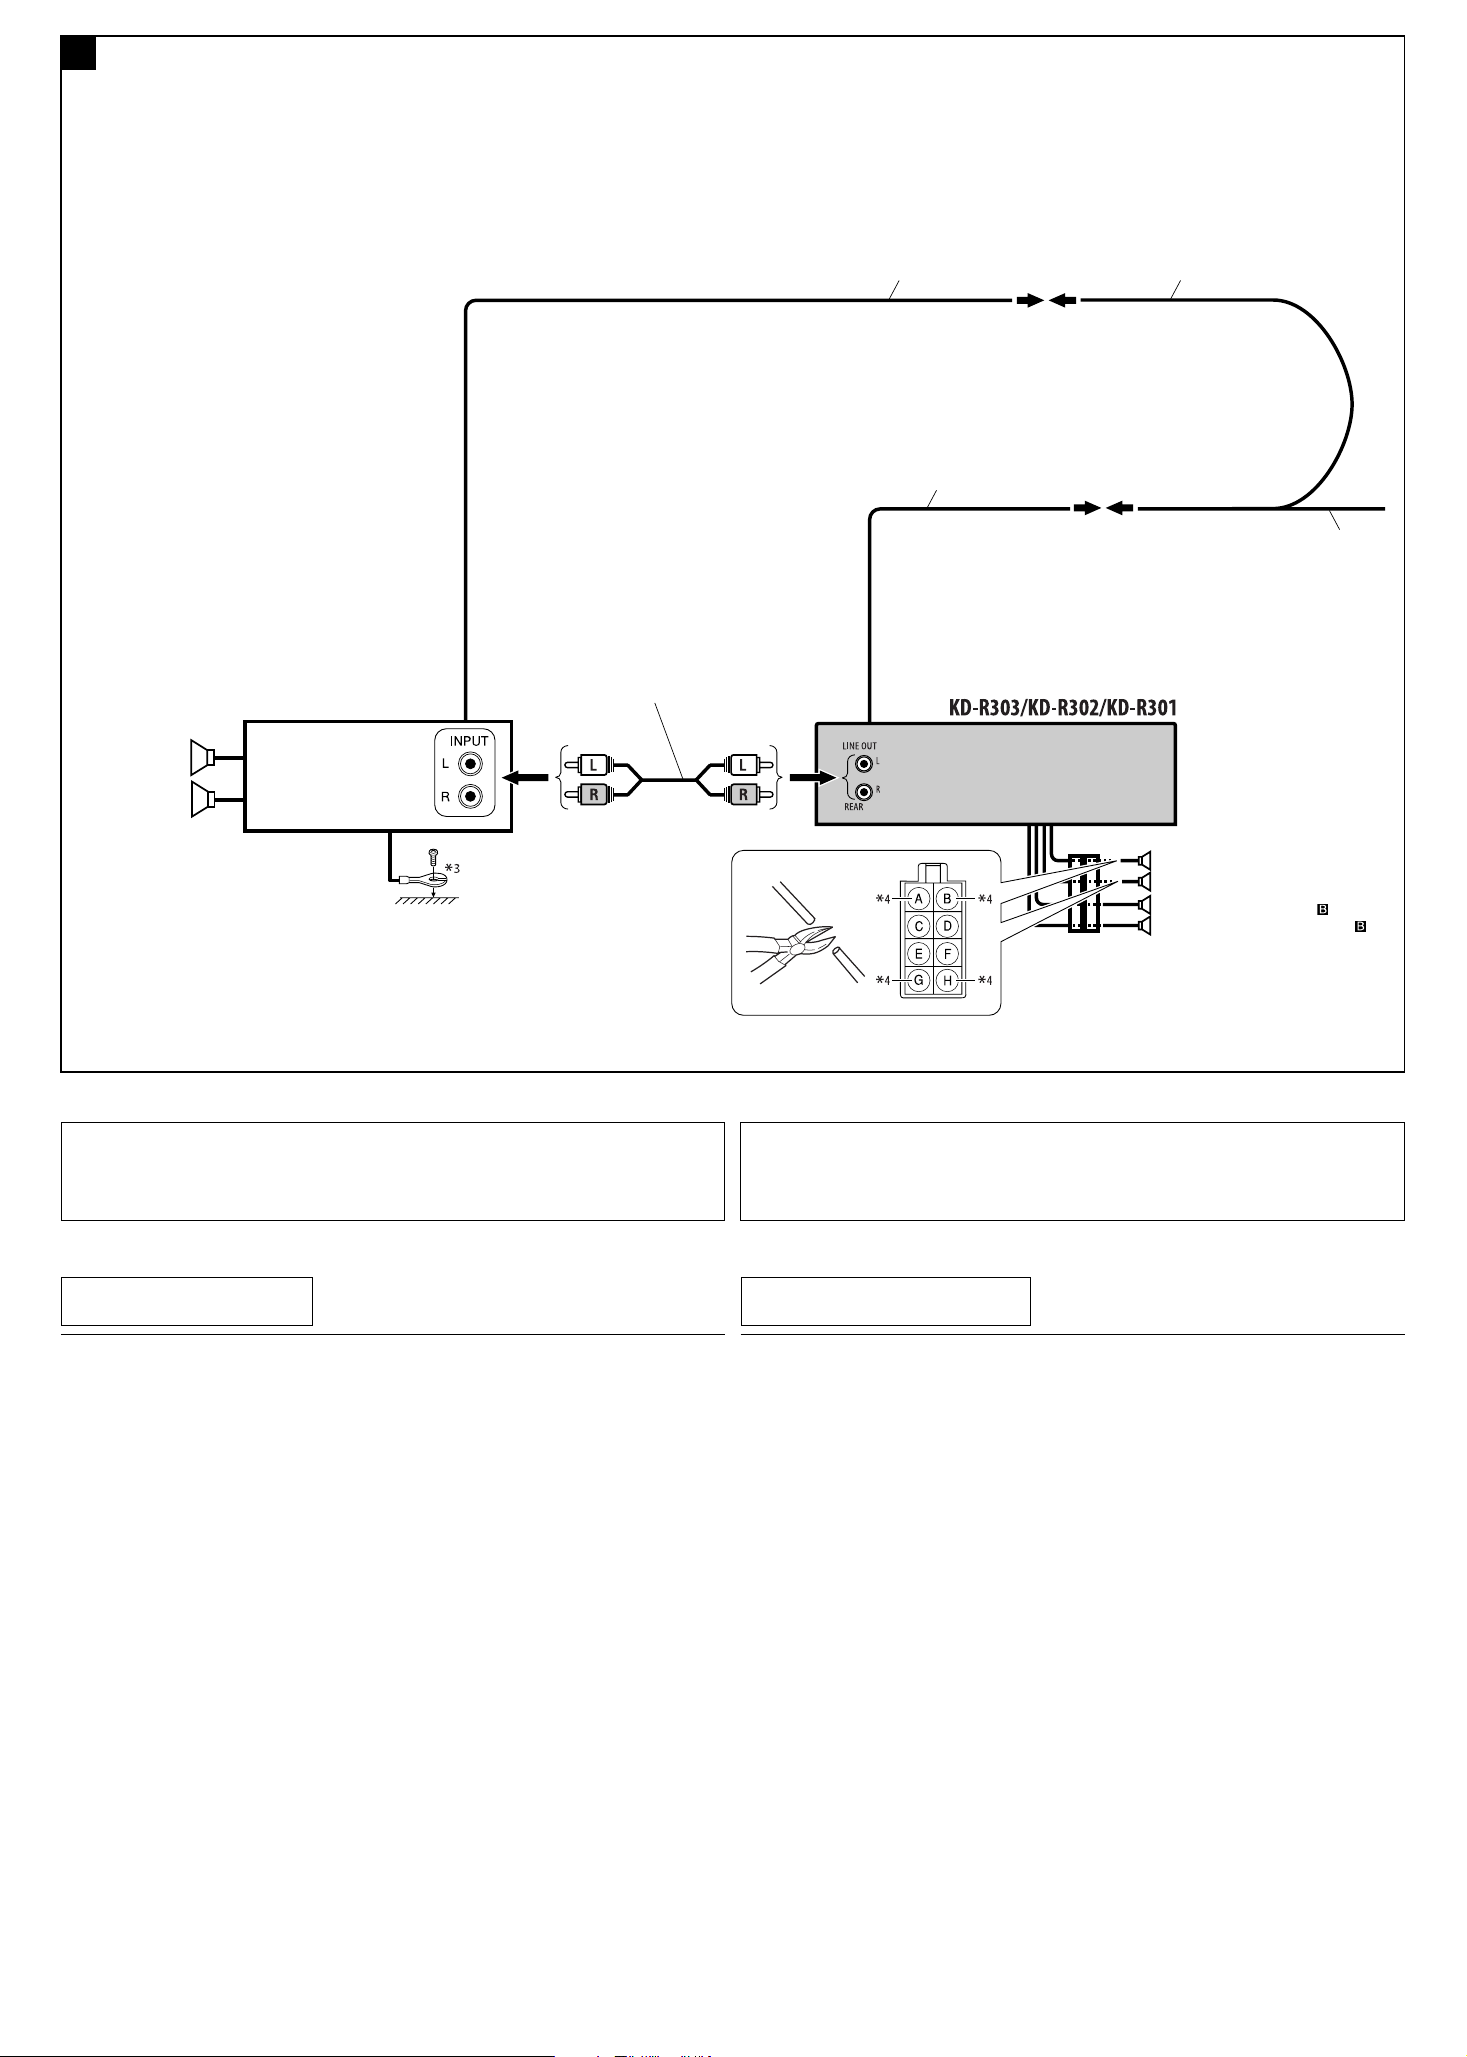
Connecting the external amplifier / Connexion d’un amplificateur extérieur
You can connect an amplifier to upgrade your car stereo system.
• Connect the remote lead (blue with white stripe) to the remote lead of the other equipment so that it
can be controlled through this unit.
• Disconnect the speakers from this unit, connect them to the amplifier. Leave the speaker
leads of this unit unused.
Signal cord
(not supplied for this unit)
Cordon de signal
(non fourni avec cet autoradio)
Vous pouvez connecter un amplificateur pour améliorer votre système autoradio.
• Connectez le fil de commande à distance (bleu avec bande blanche) au fil de commande à distance de
l’autre appareil de façon qu’il puisse être commandé via cet appareil.
• Déconnectez les enceintes de cet appareil et connectez-les à l’amplificateur. Laissez les fils
d’enceintes de cet appareil inutilisés.
Remote lead
Fil d’alimentation à distance
Remote lead (blue with white stripe)
Fil d’alimentation à distance (bleu avec bande blanche)
Y-connector (not supplied for this unit)
Connecteur Y (non fourni avec cet autoradio)
To the remote lead of other equipment
or power aerial if any
Au fil de télécommande de l’autre
appareil ou à l’antenne automatique s’il
y en a une
Rear speakers
Enceintes arrière
3
*
Firmly attach the ground wire to the metallic body or to the chassis of the car—to the place uncoated with paint
(if coated with paint, remove the paint before attaching the wire). Failure to do so may cause damage to the
unit.
4
*
Cut the rear speaker leads of the car’s ISO connector and connect them to the amplifier.
JVC Amplifier
JVC Amplificateur
TROUBLESHOOTING
Rear speakers
Enceintes arrière
Front speakers (see diagram
Enceintes avant (voir le diagramme )
3
*
Attachez solidement le fil de mise à la masse au châssis métallique de la voiture—à un endroit qui n’est pas
recouvert de peinture (s’il est recouvert de peinture, enlevez d’abord la peinture avant d’attacher le fil). L’appareil
peut être endommagé si cela n’est pas fait correctement.
4
*
Coupez les fils des enceintes arrière du connecteur ISO de la voiture et connectez-les à l’amplificateur.
EN CAS DE DIFFICULTES
)
• The fuse blows.
* Are the red and black leads connected correctly?
• Power cannot be turned on.
* Is the yellow lead connected?
• No sound from the speakers.
* Is the speaker output lead short-circuited?
• Sound is distorted.
* Is the speaker output lead grounded?
* Are the “–” terminals of L and R speakers grounded in common?
• Noise interfere with sounds.
* Is the rear ground terminal connected to the car’s chassis using shorter and thicker cords?
• This unit becomes hot.
* Is the speaker output lead grounded?
* Are the “–” terminals of L and R speakers grounded in common?
• This unit does not work at all.
* Have you reset your unit?
• Le fusible saute.
* Les fils rouge et noir sont-ils racordés correctement?
• L’appareil ne peut pas être mise sous tension.
* Le fil jaune est-elle raccordée?
• Pas de son des enceintes.
* Le fil de sortie d’enceinte est-il court-circuité?
• Le son est déformé.
* Le fil de sortie d’enceinte est-il à la masse?
* Les bornes “–” des enceintes gauche et droit sont-elles mises ensemble à la masse?
• Interférence avec les sons.
* La prise arrière de mise à la terre est-elle connectée au châssis de la voiture avec un cordon court et épais?
• L’appareil devient chaud.
* Le fil de sortie d’enceinte est-il à la masse?
* Les bornes “–” des enceintes gauche et droit sont-elles mises ensemble à la masse?
• Cet appareil ne fonctionne pas du tout.
* Avez-vous réinitialisé votre appareil?
CD RECEIVER
CD-RECEIVER
РЕСИВЕР С ПРОИГРЫВАТЕЛЕМ КОМПАКТ-ДИСКОВ
∆ΕΚΤΗΣ ΜΕ CD
KD-R303/KD-R302/KD-R301/
KD-R33
For canceling the display demonstration, see page 6.
Zum Abbrechen der Displaydemonstration siehe Seite 6.
Информацию об отмене демонстрации функций дисплея см. на стр. 6.
Για να ακυρώσετε την επίδειξη λειτουργίας στην θóνη, βλ. σελίδα 6.
ENGLISHDEUTSCHРУCCKИЙ
ΕΛΛΗΝΙΚΑ
For installation and connections, refer to the separate manual.
Für den Einbau und die Anschlüsse siehe das eigenständige Handbuch.
Указания по установке и выполнению соединений приводятся в отдельной инструкции.
Για πληρoφoρίες σχετικά µε την εγκατάσταση και τις συνδέσεις, ανατρέξτε στo αντίστoιχo ξεχωριστό εγχειρίδιo.
INSTRUCTIONS
BEDIENUNGSANLEITUNG
ИНСТРУКЦИИ ПО ЭКСПЛУАТАЦИИ
Ο∆ΗΓΙΕΣ
GET0568-006A
[EY]
Thank you for purchasing a JVC product.
Please read all instructions carefully before operation, to ensure your complete understanding and to obtain the best
possible performance from the unit.
IMPORTANT FOR LASER PRODUCTS
ENGLISH
1. CLASS 1 LASER PRODUCT
2. CAUTION: Do not open the top cover. There are no user serviceable parts inside the unit; leave all servicing to
qualified service personnel.
3. CAUTION: Visible and/or invisible class 1M laser radiation when open. Do not view directly with optical
instruments.
4. REPRODUCTION OF LABEL: CAUTION LABEL, PLACED OUTSIDE THE UNIT.
Warning:
If you need to operate the unit while driving, be sure to
look around carefully or you may be involved in a traffic
Battery
Products
Information for Users on Disposal of Old
Equipment and Batteries
[European Union only]
These symbols indicate that the product and the
battery with this symbol should not be disposed as
general household waste at its end-of-life.
If you wish to dispose of this product and the
battery, please do so in accordance with applicable
national legislation or other rules in your country
and municipality.
By disposing of this product correctly, you will help
to conserve natural resources and will help prevent
potential negative effects on the environment and
human health.
Notice:
The sign Pb below the symbol for batteries indicates
that this battery contains lead.
accident.
Caution on volume setting:
Discs produce very little noise compared with other
sources. Lower the volume before playing a disc to
avoid damaging the speakers by the sudden increase of
the output level.
For safety…
• Do not raise the volume level too much, as this will
block outside sounds, making driving dangerous.
• Stop the car before performing any complicated
operations.
Temperature inside the car…
If you have parked the car for a long time in hot or cold
weather, wait until the temperature in the car becomes
normal before operating the unit.
2
How to reset your unit
• Your preset adjustments will also be erased.
How to forcibly eject a disc
• Be careful not to drop the disc when it ejects.
• If this does not work, reset your unit.
CONTENTS
OPERATIONS
Basic operations ……………………………………. 4
Preparation ………………………………………….. 6
Listening to the radio …………………………….. 7
Disc operations ……………………………………… 10
EXTERNAL DEVICES
Listening to the other external
components ………………………………………. 11
SETTINGS
Selecting a preset sound mode ……………….. 12
Menu operations …………………………………… 13
Color settings (for KD-R33) …………………….. 16
ENGLISH
Detaching the control panel
Attaching the control panel
REFERENCES
More about this unit ……………………………… 17
Troubleshooting ……………………………………. 19
Maintenance ………………………………………… 21
Specifications ……………………………………….. 22
3
Basic operations
ENGLISH
1 • FM/AM: Select preset station.
• CD: Select folder.
2 • Turn on the power.
• Attenuate the sound (if the power is on).
• Turn off the power [Hold].
3 Select the source.
FM = CD *1 = AUX IN *2 = AM *2 = (back to
the beginning)
4 • Enter list operations.
• Enter Menu setting [Hold] .
5 • Control the volume or selection [Turn]. *
• Confirm the selection [Press] . *
• FM: Enter SSM preset mode [Hold] . *
• CD: Enter playback mode [Hold] . *
6 Loading slot
7 Display window
3
3
3
3
8 Eject disc.
9 • Activate/deactivate TA Standby Reception.
• Enter PTY Searching mode [Hold].
p Detach the panel.
q Change the display information.
w • FM/AM: Search for station.
• CD: Select track.
e Return to the previous menu.
r AUX (auxiliary) input jack
*1 You cannot select “CD” as the playback source if no
disc is in the unit.
*2 You cannot select these sources if they were disabled
in the Menu (see “Menu operations” on page 15).
*3 Also known as “Control dial” in this manual.
4
Loading…
JVC KD-R302 Car Receiver PDF User Guides and Manuals for Free Download: Found (5) Manuals for JVC KD-R302 Device Model (Installation & Connection Manual, Instructions Manual)
The JVC KD-R302 is an entry-level car stereo that impresses with its set of features while remaining budget-friendly. This model caters to drivers who appreciate essential functionality without compromising on sound quality. With its intuitive interface and user-friendly controls, the KD-R302 packs a punch for both casual listeners and audio enthusiasts alike.
One of the key highlights of the JVC KD-R302 is its audio performance. The receiver delivers a robust sound, allowing users to enjoy their favorite tracks with clarity and depth. It comes equipped with a built-in amplifier that can easily power up to four speakers, providing an improved listening experience compared to standard factory units. Users can fine-tune their sound with a 3-band EQ, ensuring that their music always hits the right notes.
Another advantage of the KD-R302 is its compatibility with various media formats. The device supports CD, MP3, and WMA file formats, making it versatile for different audio sources. Moreover, the front USB and AUX inputs allow for effortless connectivity to smartphones and other portable devices. As a result, users can play their favorite playlists directly from their devices with ease.
In terms of design, the JVC KD-R302 features a sleek and modern look, complemented by an illuminated display that enhances usability, especially during nighttime driving. The buttons are well-spaced and clearly labeled, ensuring that drivers can operate the stereo without distraction. The adjustable display colors also add a custom touch, allowing users to match the head unit with their car’s interior.
Here are some key features of the JVC KD-R302:
- AM/FM radio tuner with 18 preset stations
- Detachable faceplate for added security
- Compatible with JVC’s KDSR series for added functionality
- Remote control for convenient usage from anywhere in the vehicle
- Support for Bluetooth connectivity (with an optional adapter)
The KD-R302 also prioritizes user convenience through its dedicated features. With the remote control, drivers can switch tracks or adjust volume levels without taking their hands off the wheel. This is especially vital for promoting road safety while enjoying music or podcasts. Furthermore, the detachable faceplate enhances security, helping to deter theft when the vehicle is parked.
Despite its array of features, the JVC KD-R302 is straightforward to install, making it a favorite among DIY enthusiasts. The included wiring harness and mounting kit simplify the installation process, allowing users to upgrade their car audio without seeking professional help. In addition, the product comes with a user manual that provides clear instructions for setup and operation.
However, the JVC KD-R302 does have some limitations. While it offers decent sound quality, audiophiles seeking an advanced listening experience may desire more high-end options or more advanced audio processing capabilities. Additionally, the lack of Bluetooth support out of the box, which many modern users expect, may deter some potential buyers who rely heavily on wireless connectivity.
In conclusion, the JVC KD-R302 is an excellent choice for anyone looking to upgrade their car’s audio system without breaking the bank. With its solid performance, easy connectivity options, and user-centered design, it stands out in the competitive market of car stereos. For those focused on essential features and reliable sound, the KD-R302 from JVC is certainly worth considering.
Страницы и текст этой инструкции
Инструкция автомагнитолы JVC KD-R302
Информация отображена на картинке
Информация отображена на картинке
Информация отображена на картинке
Информация отображена на картинке
Как использовать наш сайт инструкций OnlineManuals.ru
Наша цель состоит в том, чтобы предоставить вам быстрый доступ к содержанию инструкции для автомагнитолы JVC KD-R302.
С помощью онлайн просмотра, Вы можете быстро просмотреть содержимое инструкции и найти решение проблемы с автомагнитолы JVC KD-R302.
Для Вашего удобства
Если листать руководство пользователя автомагнитолы JVC KD-R302 прямо на сайте, не очень удобно для Вас, есть два возможных решения:
• Просмотр в полноэкранном режиме — легко просмотреть руководство пользователя (без загрузки его на свой компьютер), Вы можете использовать режим полноэкранного просмотра.
Для просмотра инструкции пользователя автомагнитолы JVC KD-R302 на полном экране, используйте кнопку «Открыть в Pdf-viewer».
• Загрузка на компьютер — Вы можете также скачать Инструкция автомагнитолы JVC KD-R302 на свой компьютер и сохранить его в файлах.
Многие люди предпочитают читать документы не на экране, а в печатной версии.
Возможность печати руководства пользователя также была предусмотрена на нашем сайте,
и вы можете использовать ее, нажав на иконку «печать» в Pdf-viewer.
Нет необходимости печатать все руководство автомагнитолы JVC KD-R302, можно выбрать только нужные страницы инструкции.
Home Audio > CD Player
When we buy new device such as JVC KD-R302 we often through away most of the documentation but the warranty.
Very often issues with JVC KD-R302 begin only after the warranty period ends and you may want to find how to repair it or just do some service work.
Even oftener it is hard to remember what does each function in CD Player JVC KD-R302 is responsible for and what options to choose for expected result.
Fortunately you can find all manuals for CD Player on our side using links below.
JVC KD-R302 Manual
148 pages6.35 Mb
42 pages1.69 Mb
Also you can find more JVC manuals or manuals for other Home Audio.
Русский
- Bedienungsanleitung JVC KD-R302
- JVC KD-R302 User Manual
- Manual Usuario JVC KD-R302
- Mode d’emploi JVC KD-R302
- Istruzioni JVC KD-R302
- инструкция JVC KD-R302
- JVC KD-R302の取扱説明書
- Handleiding JVC KD-R302
- Manual de uso JVC KD-R302
Вам нужна инструкция? Мы поможем Вам ее найти и сэкономить Ваше время.
- 42 stron
- 1.68 mb
Изделие JVC KD-R302, а также другие, которыми Вы пользуетесь ежедневно, наверняка вы получили в комплекте с инструкцией обслуживания. Из опыта наших пользователей мы знаем, что большинство из Вас не уделили этому особого внимания. Большая часть инструкций, сразу же после покупки попадает в корзину для мусора вместе с коробкой — это ошибка. Ознакомьтесь с информацией, касающейся инструкции JVC KD-R302, которая поможет Вам в будущем сэкономить нервы и избежать головной боли.
Важная подсказка — не забывайте хотя бы раз прочитать инструкцию JVC KD-R302
Если вы не хотите каждый раз читать информационные брошюры, касающиеся, тех или JVC KD-R302 иных изделий, достаточно, прочитать их раз — сразу же после покупки устройства. Вы получите основное знания, касающиеся поддержания изделия JVC KD-R302 в хорошем эксплуатационном состоянии, так, чтобы без проблем достигнуть его планируемого цикла работы. Затем инструкцию можно отложить на полку и вернуться к ней только в случае, если вы не уверены, правильно ли проводится техобслуживание изделия. Правильный уход является необходимым элементом Вашего удовольствия JVC KD-R302.
Раз в году пересмотрите шкафчик, в котором держите инструкции для всех устройств, — выбросите те, которыми вы уже не пользуетесься. Это поможет Вам сохранять порядок в своей домашней базе инструкций обслуживания.
Summary of Contents for JVC KD-R302
Что находится в инструкции JVC KD-R302? Почему стоит ее прочитать?
- Гарантия и подробности, касающиеся техобслуживания изделия
Хорошей идеей будет прикрепить чек к странице инструкции. Если что-то плохое случится во время использования JVC KD-R302, у вас будет комплект документов, необходимый для гарантийного ремонта. В этой части инструкции вы найдете информацию об авторизованных сервисных центрахJVC KD-R302 а также, как самостоятельно правильно ухаживать за оборудованием — так, чтобы не потерять гарантийных прав. - Указания по монтажу и Setup
Не терять нервов и времени на самостоятельную попытку установки и первого запуска изделия. Воспользуйтесь рекомендациями производителя JVC KD-R302 чтобы правильно запустить изделие, без лишнего риска повреждения оборудования. - Информация, касающаяся дополнительных запчастей (входящих в комплект а также являющихся опцией)
Пересматривая эту часть документа вы сможете проверить, доставлен ли ваш JVC KD-R302 с полним комплектом аксессуаров. Вы также сможете узнать, какие дополнительные запчасти или аксессуары для JVC KD-R302 Вы сможете найти и докупить к своему устройству. - Troubleshooting
Самые частые проблемы, касающиеся JVC KD-R302 и методы их решения. Это очень полезная часть руководства по обслуживанию — она позволит Вам сэкономить много времени на поиск решений. 90% проблем с JVC KD-R302 повторяется у многих пользователей. - Требования, касающиеся питания и энергетический класс
Информация, касающаяся количества потребляемой энергии, а также рекомендации, касающиеся установки и питания JVC KD-R302. Прочитайте, чтобы оптимально пользоваться JVC KD-R302 и не использовать большего количества ресурсов, нежели это необходимо для правильной работы изделия. - Специальные функции JVC KD-R302
Здесь вы можешь узнать, как персонализировать изделие JVC KD-R302. Вы узнаете, какие дополнительные функции могут помочь Вам удобно использовать продукт JVC KD-R302 а также, какие функции Вашего устройства оптимальны для выполнения конкретной деятельности.
Как видите в инструкции вы найдете информацию, которая реально поможет Вам в использовании Вашего изделия. Стоит с ней ознакомиться, чтобы избежать разочарований, возникающих из более короткого, нежели предусматривалось, периода исправности изделия JVC KD-R302. Если все же вы не хотите копить инструкции в своем доме, наш сайт поможет Вам в этом — вы должны найти у нас руководство по обслуживанию большинства из своих устройств, а также JVC KD-R302.