
Что делать в случае неисправности устройства?
После ознакомления с инструкциями по запуску прибора в руководстве пользователя убедитесь, что электрическая розетка находится в рабочем состоянии, подключив к ней другое устройство. Если прибор не заработал, не пытайтесь разобрать или отремонтировать его. Отнесите прибор в авторизованный центр технического обслуживания.
Какой уход требуется для ножей и решеток мясорубки?
Вымойте решетку и ножи в мыльной воде, тщательно прополощите и высушите. Смажьте вышеуказанные детали растительным маслом.
Как удалить из мясорубки остатки фарша?
По завершении процесса перемалывания мяса поместите в мясорубку кусочки хлеба, чтобы выдавить весь оставшийся фарш.
Можно ли разобрать мясорубку, чтобы очистить ее?
Да, но вы должны следовать инструкциям в руководстве пользователя, чтобы узнать, как правильно разбирать мясорубку и какие ее компоненты можно мыть в посудомоечной машине.
Что делать, если кабель питания прибора поврежден?
Не пользуйтесь устройством. Во избежание опасности, замените кабель в центре технического обслуживания.
Как можно утилизировать этот прибор по окончании срока его службы?
В Вашем приборе содержатся ценные материалы, которые могут быть подвергнуты вторичной переработке. Отнесите его на городской пункт сбора отходов.
Что делать, если устройство не работает?
После ознакомления с инструкциями по запуску прибора в руководстве пользователя убедитесь, что электрическая розетка находится в рабочем состоянии, подключив к ней другое устройство. Если прибор не заработал, не пытайтесь разобрать или отремонтировать его. Отнесите прибор в авторизованный центр технического обслуживания.
Как можно утилизировать этот прибор после окончания срока его службы?
В приборе содержатся ценные материалы, которые могут быть подвергнуты вторичной переработке. Отнесите его на городской пункт сбора отходов.
Я только что распаковал(-а) свой новый прибор, и мне кажется, что не хватает одной из частей. Что делать?
Если вам кажется, что каких-то частей не хватает, позвоните в службу поддержки, и мы поможем вам найти приемлемое решение.
Где я могу приобрести аксессуары, расходные материалы или запасные части к моему устройству?
Пожалуйста, перейдите в раздел «Аксессуары» веб-сайта, чтобы легко найти то, что вам нужно для вашего устройства.
Какие условия гарантии на мой прибор?
Дополнительные сведения содержатся в разделе «Гарантия» этого веб-сайта.
Я только что распаковал(-а) свой новый товар, и мне кажется, что не хватает одной из частей. Что делать?
Если вам кажется, что каких-то частей не хватает, позвоните в центр обслуживания покупателей, и мы поможем вам найти приемлемое решение.
MOULINEX
Loading…
H
- Hapto Click and Mix2
- Hapto DD406 D72
- Hapto DD407D72
- Hapto DD 408 D72
- HB 7001
- HF4041102
- HF45683
- HF800
- HF 800A
- HF800A13
- HF805810
- HF808800
- HF80C
- HF80C8
- HF80CB
- HF90012
- HF900110
- HF906B10
- HF9085
- HF908500
- HM2501B1
- HM3101B1
- HM3108B12
- HM3121B1
- HM3128B12
- HM 41013E2
- HM411110
- HM41214
- HM4121312
- HM 41213E
- HM450B10
- HM 500
- HM500012
- HM 5051
- HM 550
- HM 5551
- HM 555 Easy Max Power
- HM 6101
- HM610130
- HM 6111
- HM 6121
- HM6121102
- HM613130
- HM615115
- HM 6151302
- HOME BREAD6
- Home Bread Baguette5
- Home Bread OW5000
- hv10
- HV2 ME205
- HV32
- HV43
- HV8
- HV9 ME740
- HV9 ME740H30
I
- ID 2510
- ID 2525
- ID 5200
- ID 5300
- IFU PRINCIPIO
- IFURIDELYS
- IFU SNACK
- IFU WAFFLETIME
- I-HF900110
- illico3
- IM 11102
- IM 1110E1
- IM 1115
- IM 1115Е1
- IM11302
- IM 1130E1
- IM1130EO
- IM 1210 E0
- IM1211
- IM 1215E1
- IM 1220
- IM1221
- IM12302
- IM1739E0
- IM2030E0
- IM2035
- IM 2040
- IM2040E0
- IM2045
- IM30503
- IM 3050E0
- IM30702
- IM3166E0
- IM 4249
- INICIO
- INICIO 13
- Inox LT543E50
- Isilys Express
J
- JEANNETTE
- JU 2100
- JU 320113
- JU 380
- JU 380 Elea
- JU 40015
- JU 50012
Loading…
Loading…
Nothing found
HV3
User Manual
10 pgs352.81 Kb1
User Manual [fr]
8 pgs1.72 Mb3
Table of contents
Loading…
…
MOULINEX User Manual [fr]
Download
Specifications and Main Features
Frequently Asked Questions
User Manual

Loading…
+ 5 hidden pages
You need points to download manuals.
1 point = 1 manual.
You can buy points or you can get point for every manual you upload.
Buy points
Upload your manuals
Moulinex HV3 Meat Grinder PDF User Guides and Manuals for Free Download: Found (1) Manuals for Moulinex HV3 Device Model (Manual )
The Moulinex HV3 is a kitchen appliance that has been designed to make cooking a breeze. As a versatile and efficient tool, it has garnered attention from both amateur cooks and seasoned chefs. Known for its robust performance and user-friendly features, the HV3 promises to enhance your culinary experience in a variety of ways.
One of the standout features of the Moulinex HV3 is its powerful motor. This high-performance machine is equipped to handle a range of tasks, from chopping vegetables to kneading dough. This makes it an invaluable addition for anyone looking to save time and effort in the kitchen. Additionally, the HV3 comes with a selection of attachments which expand its functionality, enabling users to create everything from smoothies to sauces.
Another significant aspect of the HV3 is its design. With a sleek and modern appearance, this appliance is not only functional but also adds aesthetic appeal to your kitchen. Its compact size ensures it doesn’t take up much counter space, making it easier for you to manage your kitchen environment. Moreover, the ease of cleaning is one of its most appealing characteristics. Most detachable parts are dishwasher-safe, and the smooth surfaces can be wiped clean without hassle.
The Moulinex HV3 also excels in user-friendliness. The control panel is intuitively designed, allowing users of all skill levels to operate it without difficulty. You don’t need to be a culinary expert to make the most of this appliance; beginners will appreciate the straightforward instructions and handy presets. Some key controls include:
- **Speed settings**: Multiple speeds that accommodate different tasks.
- **Pulse function**: For precise chopping or mixing as per your requirements.
- **Easy-to-read digital display**: Provides clarity and enhances the cooking experience.
Performance-wise, the HV3 does not disappoint. Users have reported consistent results, whether they’re blending, grinding, or whipping. The motor operates quietly compared to other products in its category, which is an added bonus for those who enjoy cooking without disruptive noise. Additionally, the efficiency of the Moulinex HV3 means that you can prepare larger quantities in less time, making it perfect for meals with family or entertaining guests.
However, like any product, the HV3 has its downsides. Some users have pointed out that while the appliance excels in most tasks, it might struggle with particularly hard ingredients or very thick mixtures. Although this isn’t a dealbreaker for all users, it’s an important consideration if your cooking style relies on these types of recipes. Support and service from the Moulinex brand are generally well-regarded, so should you encounter any issues, help is often just a call away.
In conclusion, the Moulinex HV3 stands out as a reliable, efficient, and attractive kitchen appliance. Whether you’re a novice or a pro, its design and functionality can significantly streamline your cooking process. The trade-off for minor limitations is well worth the investment for most households. With the right maintenance and care, this appliance can serve you well for years to come, making it a worthy addition to your culinary arsenal.
R
R
R
7
14*
15b 15c
13 12* 11* 10* 9 8
1 3a3b 62 4
5
15*
15a
RU
UK
KK
AR
EN
FA
FR
ES
PT
EL
IT
NL
DE
8020000345
RU p. 3 4 UK p. 5 6 KK p. 7 8 EN p. 9 10 AR p. 12 11 FA p. 14 13 FR p. 15 16 ES p. 17 18 PT p. 19 20 IT p. 21 22 EL p. 23 24 NL p. 25 26 DE p. 27 28
3
RU
R
16 17
18
19
: LS-123456 . . , Moulinex.
1 2 3
3a / 3b
4 5 6 7 8 9
10 * 11 * 12 * 13 14 15 : -*
15a 15b 15c
, , . ( 2 2 ).
, / (3a) (. 8). : , .
*
.
. . .
(. . 19)
4
! , . , ,
, 5 ( ). / (3a) (. 15),
. . : , . , .
, 10 15 ( , ).
— . . — 3 .
? , O/1 (3a), R
, . /, .
(. . 1015)
/ (3a) (. 18). : , . , .
(. . 19)
(. . 16-18)
5
UK
. LS-123456 . . Moulinex.
1 2
3
3a ON/OFF (./.) 3b R
4 5 6 7 8
9 10 * 11 * 12 * 13 14 T 15 -*
15a 15b 15c
, , . (. 2 X 2 ).
/ (3), (. 8). : , .
*
.
. . .
(. . 19)
6
! . ,
, 5 . ( , ). / (3) (.15), ,
, , . . : , , .
, 10 15 ( , ).
: — . . — 3 .
? , O/1 (3a), R
, . /, .
(. . 1015)
/ (3a) (. 18). : , . , .
(. . 19)
(. . 16-18)
7
KK
: LS-123456 . , . Moulinex .
— . , . . .
— , , . ( 2 2 ).
/ (3a) (8-.). : . : — . . — 3 .
1 2 3
3a / 3b R
4 5 6 7 8 9
10 * 11 * 12 * 13 14 C 15 *
15a 15b 15c
*
(1 9 .)
8
! — .
5 — ( ). / (3a) (15-.)
, . . : , . .
, 10- 15 — ( — ).
/ (3a) (18-.) . : — . , , .
? O/1 (3a) R
. / .
(19-.)
— (10 15 .)
(16 18 .)
9
EN
Caution: safety instruction booklet LS-123456 is supplied with the appliance. Before using your appliance for the first time, read the booklet carefully and keep it in a safe place. Thanks you for choosing an appliance from the Moulinex range.
BEFORE FIRST USE Wash all accessories in warm water and washing up liquid. Rinse, and carefully dry them
straight away. The perforated plate and the cutter must remain greased. Coat them with cooking oil. Do not switch on the appliance when it is empty or if the mincer plates are not greased. ATTENTION: The blades of the cones are extremely sharp; handle the cones with great care.
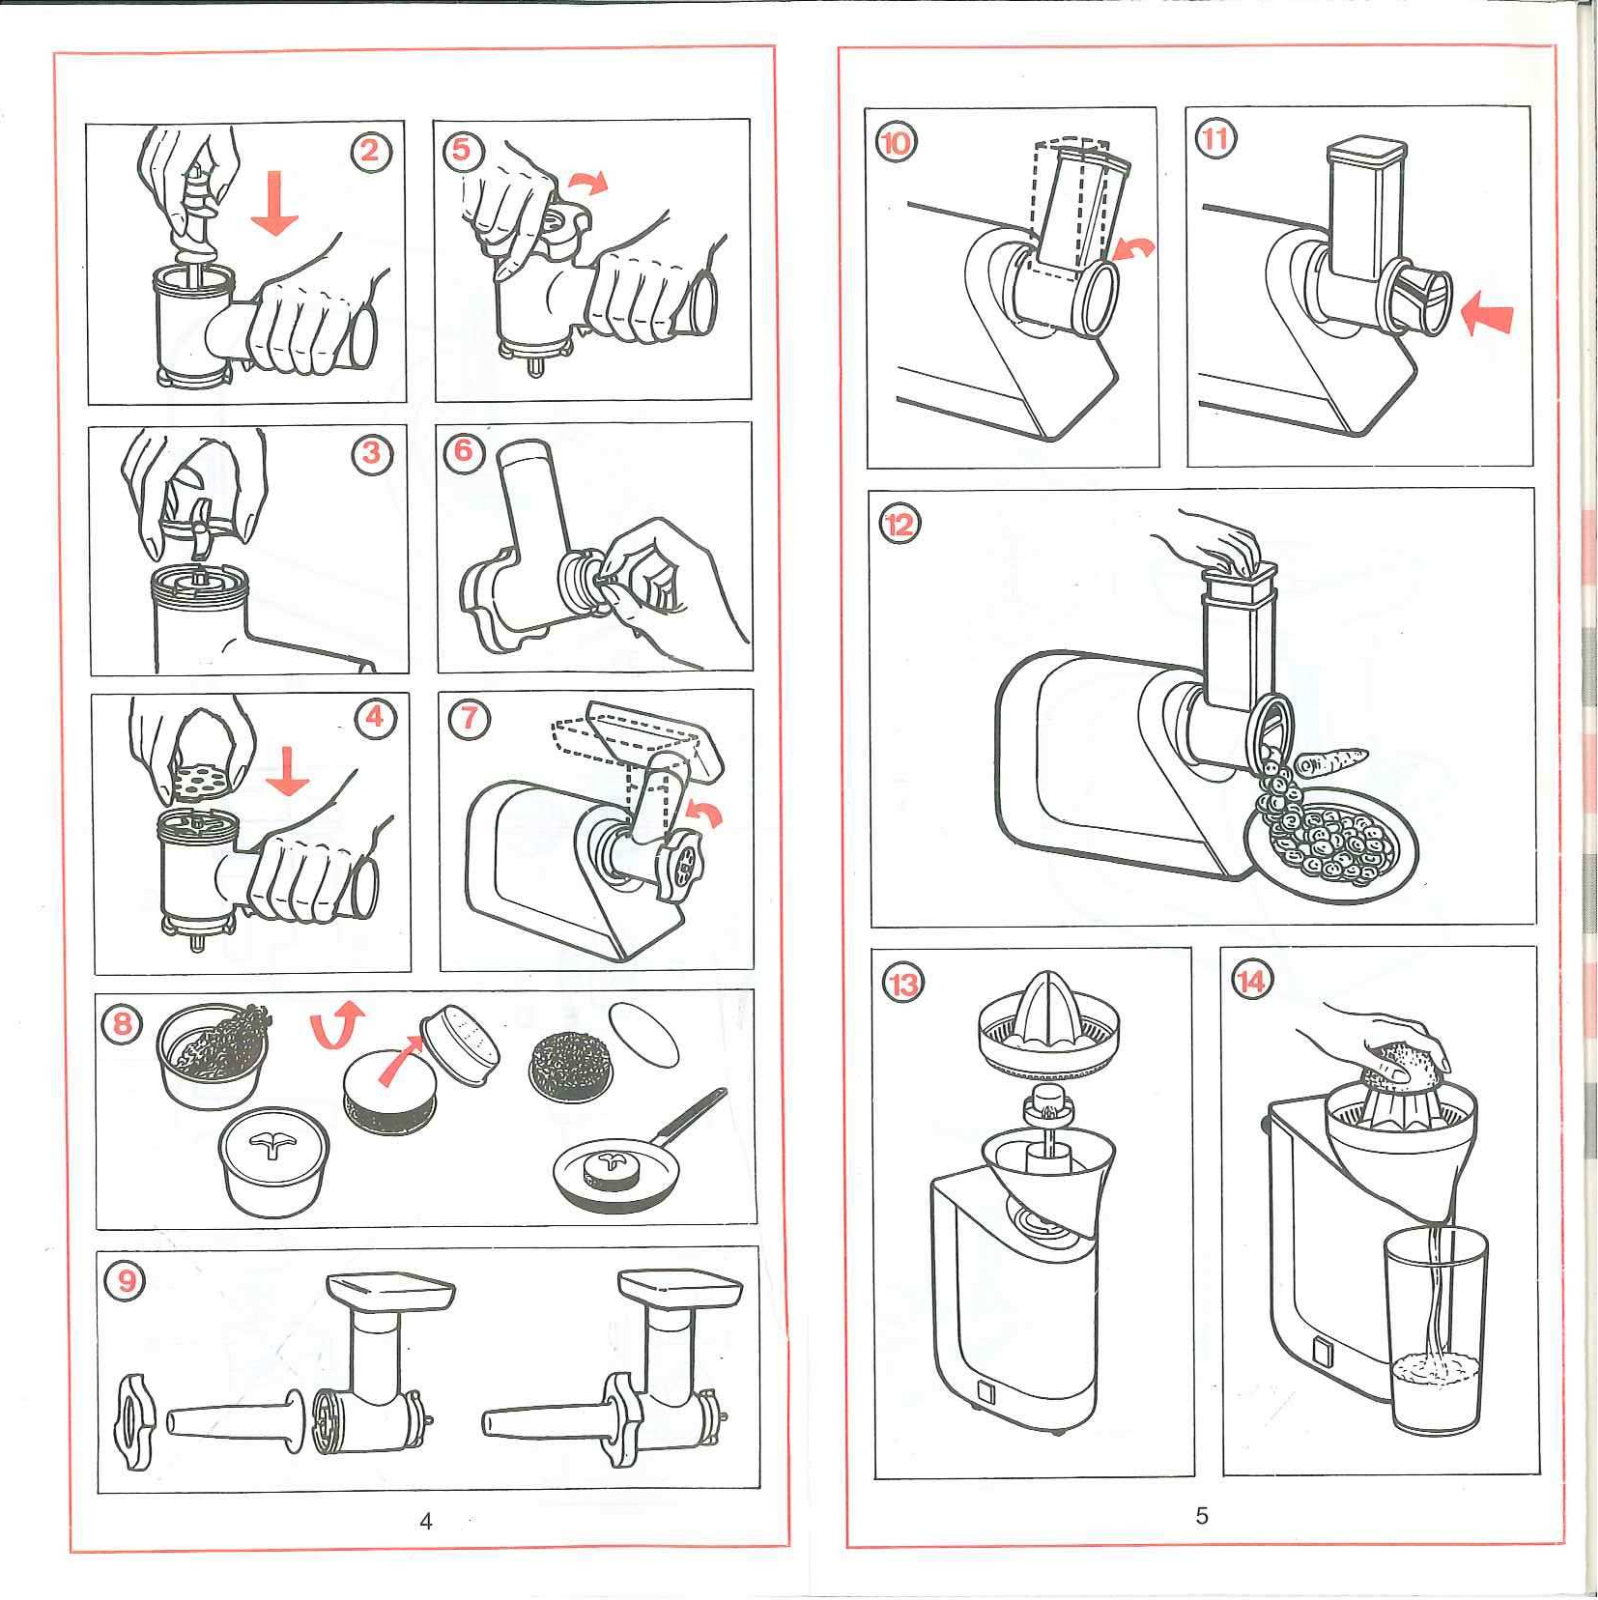
USE: MEAT GRINDER HEAD (FIG. 1-9) Prepare the entire quantity of food to be minced, remove any bones, gristle and tendons.
Cut the meat into pieces. (approx. 2 cm x 2 cm) Press the on/off button (3a) start the appliance (Fig.8). Tip: At the end of operation, you can pass a few pieces of bread through the grinder in order to extract all the ground meat. Notes: — Only use your appliance for mincing raw meat. Do not mince cooked meat. — Do not use your appliance for more than 3 minutes.
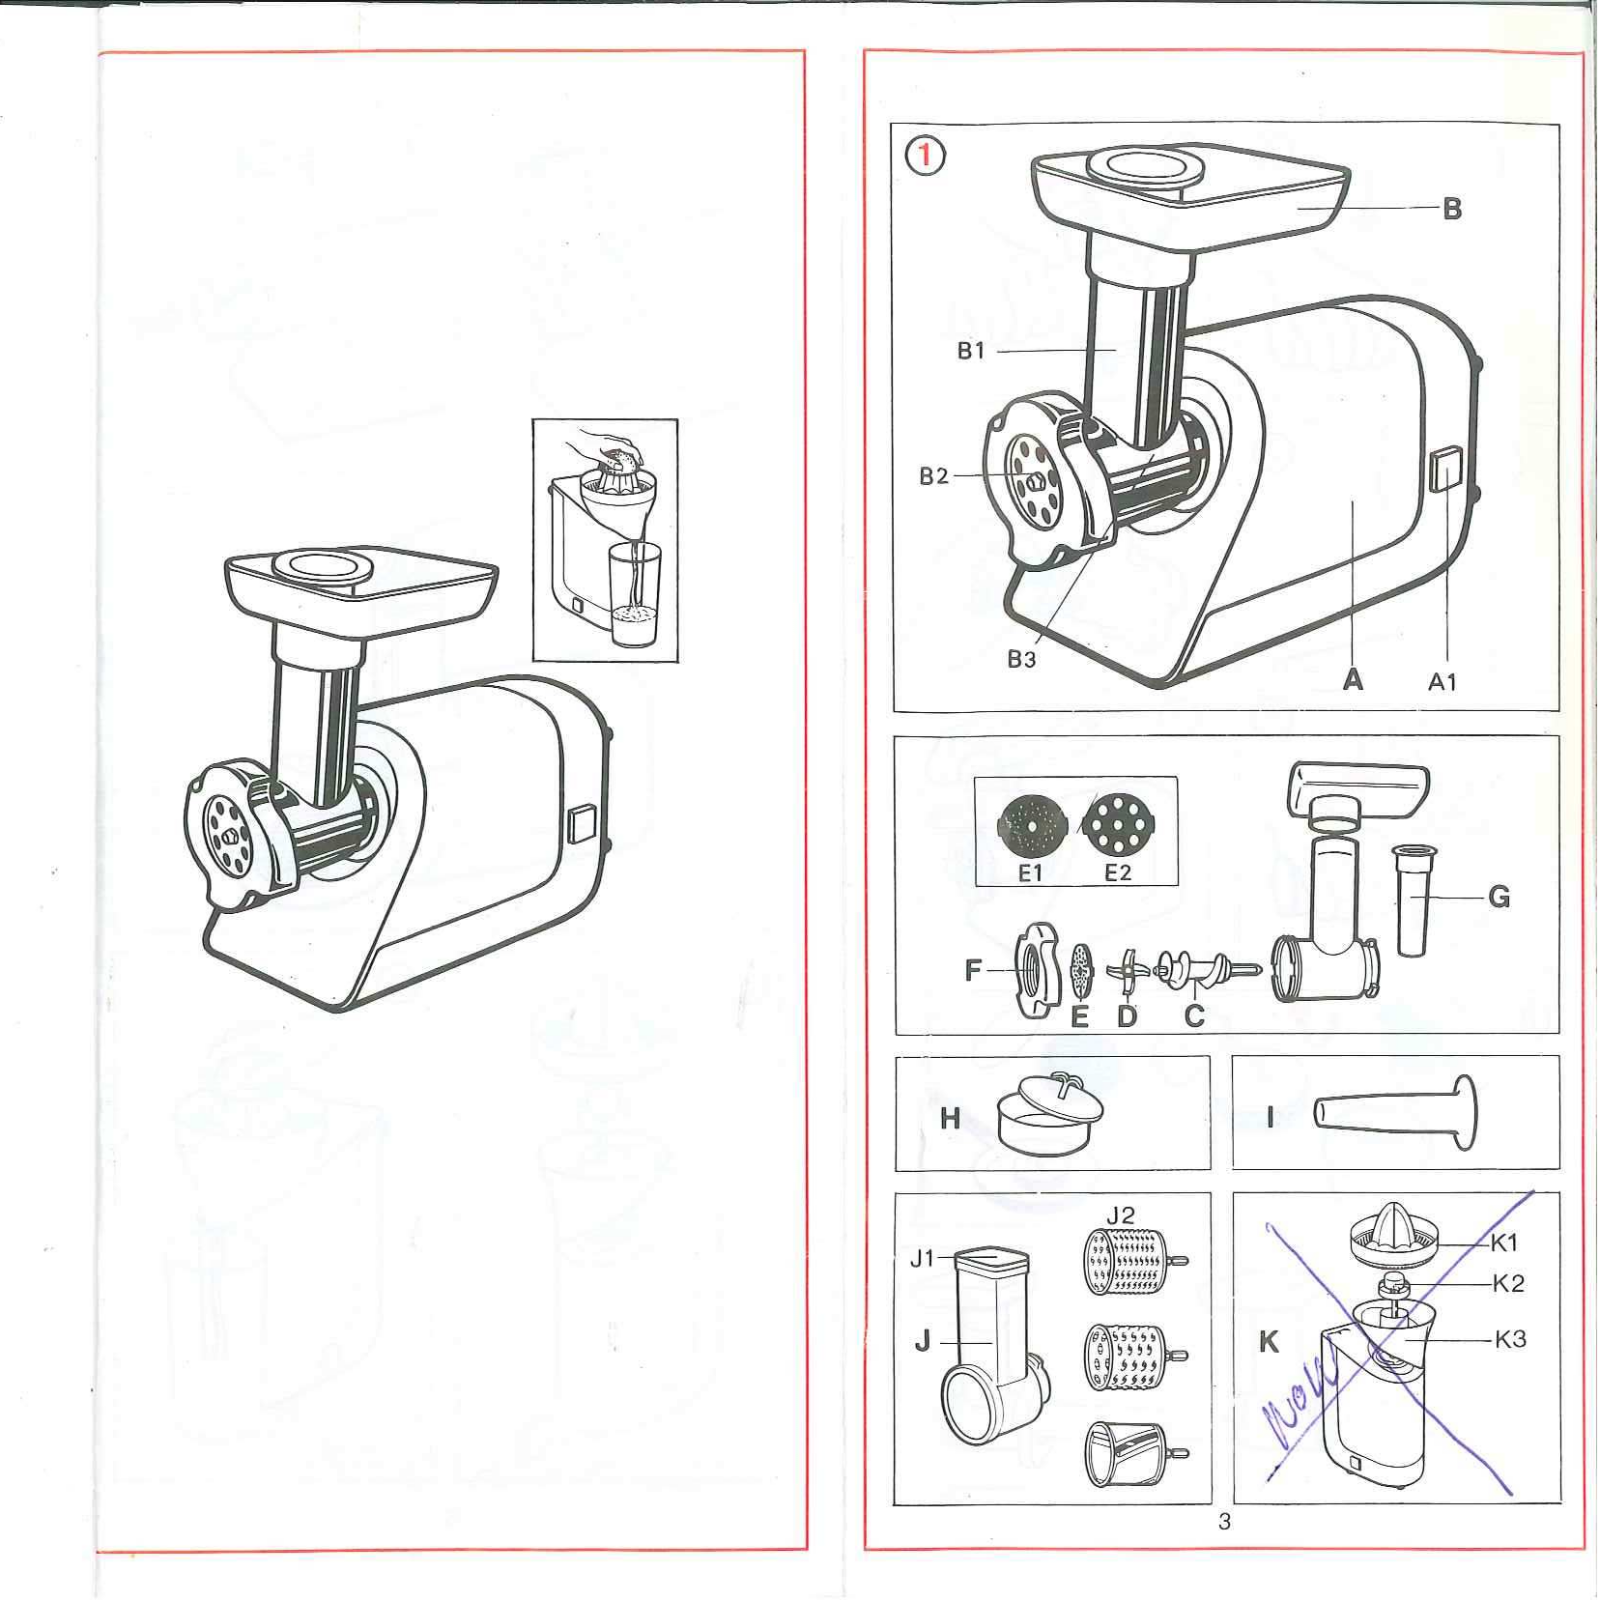
DESCRIPTION 1 Motor unit 2 Mincer head release button 3 Button
3a ON/OFF 3b R button
4 locking handle 5 Removable meat mincer head 6 Removable tray 7 Meat pusher 8 Feed screw
9 Self-sharpening stainless steel blade 10 Small hole grid* 11 Medium hole grid* 12 large hole grid* 13 Fixing ring 14 Sausage tube 15 Shredder drums*
15a Pusher 15b Slicer 15c Grater
*Depends on model
10
USE: SAUSAGE ACCESSORY (FIG. 10-15)
Important: this accessory can only be used after the meat has been minced, seasoned and the preparation has been well mixed. After leaving the skin to soak in warm water to regain its elasticity, slide it onto the funnel and
let it overhang by around 5 cm (which you will seal by tying a knot with a link). Press the on/off button (3a) (Fig.15) to start the appliance and feed the mince through the
mincer, following the skin as it fills. Note: this work will be done more easily with two people, one to feed the mince through and the other to take care of filling the skin. Give the sausages the required length by clamping and twisting the skin. For a quality sausage,
take care to avoid trapping air during filling and make sausages that are 10 to 15 cm long (separate the sausages by making a link and tying a knot with the link).
What should you do if the machine is clogged? Stop the meat mincer by pushing the O/1 button (3a) and press button R for a few seconds
to release meat. Press the on/off button continue mincing.
CLEANING (FIG. 19)
USE: VEGETABLE CHOPPER (FIG. 16-18)
To shredd, press the on/off button (3a) (Fig.18). Useful tips for best results: The ingredients that you use must be firm to obtain satisfactory results and to avoid the accumulation of food in the compartment. Do not use the appliance to grate or cut food products that are too hard such as sugar cubes or pieces of meat.
11
AR )15 10 (
. :
( 5
)
)15 ( )3a( /
.
. :
.
( 15 10
.)
. R O/1 )3a(
. /
)18 16 (
.)18 ( )3a( /
:
.
.
:
. .
. 3
)19 (
12
)9 1(
. .
. .
*
. .
.) 2 x 2 (
.)8 ( )3a( /
:
.
:LS-123456 :
.
Moulinex
1
2
3
3a /
3b R
4
5
6
7
8
9
10 *
11 *
12 *
13
14
15 *
15a
15b
15c
13
FA
)15 10 (
. :
5
.) (
)3a( )15 ( /
.
:
.
.
(
.)
R 3a( O/1(
.
. /
)18 16 (
.)18 ( )3a( /
:
.
.
)19 (
14
)9 1 (
. .
. .
. .
) (
.)8 ( )3a( /
:
.
:
.
. 3
. 123456-LS :
.
Moulinex
1
2
3
3a /
3b R
4
5
6
7
8
9
10 *
11 *
12 *
13
14
15 *
15a
15b
15c
15
FR
Attention: le livret d’instructions de scurit LS- 123456 est fourni avec l’appareil. Avant dutiliser votre appareil pour la premire fois, lisez attentivement ce livret et conservez-le soigneusement. Nous vous remercions davoir choisi cet appareil de la gamme Moulinex.
DESCRIPTION 1 Bloc moteur 2 Bouton de dverrouillage de la tte 3 Bouton
3a MARCHE/ARRT 3b Bouton R
4 Poigne de verrouillage 5 Tte dtachable du hachoir 6 Plateau dtachable 7 Poussoir viande 8 Vis sans fin
9 Lame en acier inoxydable auto-affte 10 Grille petits trous * 11 Grille trous moyens* 12 Grille gros trous * 13 Bague de fixation 14 Tube saucisse 15 Roulement de coupe
15a Poussoir 15b Trancheuse 15c Rpeuse
CONSEILS DUTILISATION Avant la premire utilisation, lavez tous les accessoires leau savonneuse. Rincez, et essuyez-les aussitt soigneusement. La grille et le couteau doivent rester gras. Enduisez-les dhuile.
UTILISATION : TTE HACHOIR (SCHMA 1-9) Prparez toute la quantit daliment hacher, liminez les os, cartilages et nerfs. Coupez la
viande en morceaux (2cm X 2cm environ). Appuyez sur le bouton marche/arrt (3a) pour allumer lappareil (Image 8). Astuce : En fin dopration, vous pouvez passer quelques morceaux de pain afin de faire sortir tout le hachis. Remarque : — Utilisez uniquement votre appareil pour hacher de la viande crue. Ne hachez pas de la viande cuite. — Ne faites pas fonctionner l’appareil pendant plus de 3 minutes.
*Selon modle
16
UTILISATION : ACCESSOIRE SAUCISSE (SCHMA10-15)
Que faire en cas dengorgement ? Appuyez sur le bouton marche/arrt (3a) pour arrter le hachoir viande et appuyez sur le
bouton R pendant quelques secondes pour faire sortir la viande. Appuyez sur le bouton marche/arrt pour continuer hacher.
Important : cet accessoire nest utiliser quaprs avoir hach la viande, avoir rajout lassaisonnement et avoir bien brass la prparation. Aprs avoir laiss la peau tremper dans de l’eau chaude pour retrouver son lasticit, glissez-la
sur l’entonnoir et laissez-la suspendue environ 5 cm du plan de travail (pour la sceller en attachant un nud avec un lien).
Appuyez sur le bouton marche/arrt (3a) (Image 15) pour allumer lappareil et mettez la viande dans le hachoir en surveillant le boyau pendant son remplissage.
Nota : ce travail se fera plus facilement deux, lun soccupera dapprovisionner en hachis, lautre soccupera du remplissage du boyau. Donner aux saucisses la longueur dsire en pinant et en tournant le boyau. Pour avoir une
saucisse de qualit, prenez soin dviter demprisonner de lair lors du remplissage et faites des saucisses de 10 15 cm (sparez les saucisses en plaant un lien et en faisant un noeud laide de celui-ci).
UTILISATION : ACCESSOIRES COUPE LEGUMES (SCHMA 16-18)
Pour rper, appuyez sur le bouton marche/arrt (3a) (Image 18). Conseils pour obtenir de bons rsultats : Les ingrdients que vous utilisez doivent tre fermes pour obtenir des rsultats satisfaisants et viter toute accumulation daliment dans le magasin. Ne pas utiliser lappareil pour rper ou trancher des aliments trop durs tels que du sucre ou des morceaux de viande.
NETTOYAGE (SCHMA19)
17
ES
Precaucin: el folleto de instrucciones de seguridad LS-123456 se suministra con el aparato. Antes de usar el aparato por primera vez, lea atentamente el manual y gurdelo en un lugar seguro. Gracias por elegir un aparato de la gama Moulinex.
1 Unidad de motor 2 Botn de liberacin del cabezal del
picador 3 Botn
3a ON/OFF 3b Botn R
4 Asa de bloqueo 5 Cabezal extrable del picador de carne 6 Bandeja extrable 7 Empujador de carne 8 Tornillo de alimentacin
9 Cuchilla de acero inoxidable autoafilable 10 Rejilla pequea* 11 Rejilla mediana* 12 Rejilla grande* 13 Anillo de fijacin 14 Tubo de salchicha 15 Tambores para triturar*
15a Empujador 15b Cortador 15c Rallador
DESCRIPCIN
USO
USO: DEL CABEZAL DE LA PICADORA DE CARNE (FIG. 1-9) Prepare la cantidad total de alimento que desea picar, quite todos los huesos, los cartlagos y
los tendones. Corte la carne en pedazos. (aprox. 2 cm x 2 cm) Presione el botn de encendido/apagado (3a) para poner el aparato en funcionamiento
(Fig. 8). Consejo: al final de la operacin, puede pasar algunos pedazos de pan a travs de la picadora para sacar toda la carne del fondo. Nota: — Utilice el aparato nicamente para picar carne cruda. No picar carne cocinada. — No utilizar el aparato durante ms de 3 minutos.
*Segn el modelo
Antes de usar el aparato por primera vez, lave todos los accesorios con agua jabonosa. Enjuguelos bien y squelos completamente. Las rejillas y la cuchilla deben engrasarse ligeramente. Recbralas con aceite.
18
USO: ACCESORIO PARA EMBUTIDO (FIG. 10-15)
Importante: este accesorio solo se puede utilizar despus de que la carne haya sido picada y aderezada, y la masa se haya mezclado bien. Despus de dejar la piel en remojo en agua tibia para que recupere su elasticidad, deslcela
sobre el embudo y deje que sobresalga alrededor de 5 cm (que sellar atando un nudo con un eslabn).
Presione el botn de encendido/apagado (3a) (Fig. 15) para poner el aparato en funcionamiento y echar la carne a travs de la picadora, siguiendo la piel conforme se va llenando.
Nota: es ms fcil hacer este trabajo entre dos personas, una introduciendo la carne picada y la otra ocupndose del llenado de la tripa. Para que las salchichas tengan la longitud que desee, pince la tripa y returzala. Para que sus
embutidos tengan una gran calidad, evite que quede aire atrapado durante el llenado y haga salchichas de 10 a 15 cm de longitud (separe las salchichas haciendo un nudo con el hilo).
Qu hacer si la mquina se atasca? Detenga la picadora de carne presionando el botn O/1 (3a) y presione el botn R durante
unos segundos para liberar la carne. Presione el botn de encendido/apagado para continuar picando.
USO: RALLADOR DE VERDURAS (FIG. 16-18) Para triturar, presione el botn de encendido/apagado (3a) (Fig. 18). Consejos tiles para obtener los mejores resultados: Los ingredientes que utilice deben ser firmes para que los resultados sean satisfactorios y para evitar la acumulacin de alimento en el compartimento. No use el aparato para rallar o cortar productos que sean demasiado duros, como terrones de azcar o pedazos de carne.
LIMPIEZA (FIG. 19)
19
PT
Cuidado: fornecido com o aparelho o manual com instrues de segurana LS-123456. Antes de utilizar o seu aparelho pela primeira vez, leia este manual com ateno e guarde-o. Agradecemos a sua preferncia por um aparelho da gama Moulinex.
1 Unidade do motor 2 Boto de libertao da cabea da picadora 3 Boto
3a LIGAR/DESLIGAR 3b Boto R
4 Pega de bloqueio 5 Cabea para moer carne amovvel 6 Tabuleiro amovvel 7 Acessrio calcador 8 Parafuso de alimentao
9 Lmina de ao inoxidvel auto afivel 10 Grelha com orifcios pequenso* 11 Grelha com orifcios mdios* 12 Grelha com orifcios grandes* 13 Anel de fixao 14 Tubo para salsichas 15 Tambores de corte*
15a Calcador 15b Fatiador 15c Ralador
DESCRIO
UTILIZAO: CABEA PICADORA (IMAGEM. 1-9) Prepare toda a quantidade de alimentos a picar, retire os ossos, cartilagem e nervos. Corte a
carne em pedaos (cerca de 2 cm X 2 cm). Prima o boto de ligar/desligar (3a) para ligar o aparelho (Imagem 8). Dica: No final da operao, pode passar alguns pedaos de po, de modo a retirar eventuais pedaos que tenham ficado colados. Nota: — Use apenas o seu aparelho para picar carne crua. No pique carne cozinhada. — No use o seu aparelho durante mais de 3 minutos.
*Consoante o modelo
CONSELHOS DE UTILIZAO Antes da primeira utilizao, lave todos os acessrios com gua e detergente para a loia. Passe por gua e seque cuidadosamente. A grelha e a lmina devem permanecer lubrificadas. Unte-as com leo.
20
UTILIZAO: ACESSRIO PARA SALSICHAS (IMAGEM 10-15)
Importante: Este acessrio s pode ser utilizado aps ter picado a carne, ter adicionado os temperos e ter misturado bem a preparao. Aps deixar a pele embeber em gua morna para recuperar a elasticidade, faa-a deslizar para
o funil e deixe pendurado cerca de 5 cm (que ir fechar dando um n com fio de cozinha). Prima o boto de ligar/desligar (3a) (Imagem 15) para ligar o aparelho e passar a carne picada
pelo picador, seguindo a tripa medida que vai enchendo. Nota: Este trabalho fica mais fcil se for feito por duas pessoas: Uma insere os ingredientes e a outra enche a tripa. D s salsichas o comprimento desejado, apertando e virando a tripa. Para obter uma salsicha
de qualidade, tenha o cuidado de evitar deixar ar no interior, e faa salsichas com 10 a 15 cm (separe as salsichas, com fio de cozinha, d um n).
O que fazer no caso de entupimento? Pare o picador de carne premindo o boto O/1 (3a) e prima o boto R durante alguns
segundos para libertar a carne. Prima o boto de ligar/desligar para continuar a picar.
UTILIZAO: ACESSRIOS PARA CORTAR LEGUMES (IMAGEM 16-18)
Para triturar, prima o boto de ligar/desligar (3a) (Imagem 18). Conselhos para obter bons resultados: Os ingredientes que utiliza devem ser firmes, para obter resultados satisfatrios e evitar qualquer acumulao de alimentos no tubo de alimentao. No utilize o aparelho para ralar ou cortar alimentos demasiado duros, como acar ou pedaos de carne.
LIMPEZA (IMAGEM 19)
21
IT
Attenzione! Il libretto di avvertenze di sicurezza LS-123456 fornito insieme all’apparecchio. Prima di usare lapparecchio per la prima volta, leggere attentamente il libretto e conservarlo con cura. Grazie per aver scelto un apparecchio della linea Moulinex.
1 Unit motore 2 Pulsante di rilascio della testa tritacarne 3 Pulsante
3a Acceso/Spento 3b Retromarcia
4 Impugnatura di bloccaggio 5 Testa tritacarne removibile 6 Vassoio removibile 7 Pressino 8 Vite
9 Lama in acciaio inox auto-affilante 10 Griglia a fori piccoli* 11 Griglia a fori medi* 12 Griglia a fori grandi* 13 Anello di fissaggio 14 Tubo per salsicce 15 Cilindri taglia-verdure*
15a Pressino 15b Affettatore 15c Grattugia
DESCRIZIONE
UTILIZZO: ACCESSORIO TRITACARNE (FIG. 1-9) Preparare gli alimenti da tritare ed eliminare ossi, cartilagine e nervi. Tagliare la carne a dadini
(2 cm X 2 cm circa). Premere il pulsante Acceso/Spento (3a) per avviare lapparecchio (Fig. 8). Suggerimento: al termine delloperazione, introdurre qualche pezzetto di pane affinch tutto il macinato fuoriesca. Nota: — Usare l’apparecchio esclusivamente per tritare carne cruda. Non tritare carne cotta. — Non usare l’apparecchio per pi di 3 minuti consecutivi.
*In base al modello
SUGGERIMENTI PER L’USO Prima del primo utilizzo, lavare tutti gli accessori con acqua calda e detersivo. Risciacquarli e asciugarli con cura. La griglia e la lama devono rimanere lubrificate. Rivestirle d’olio.
22
UTILIZZO: ACCESSORIO PER SALSICCE (FIG. 10-15)
Importante! Questo accessorio deve essere utilizzato esclusivamente dopo aver tritato la carne, aggiunto il condimento e mescolato la preparazione. Dopo aver immerso il budello in acqua tiepida affinch riprenda elasticit, infilarlo sullimbuto
lasciandone fuoriuscire 5 cm (da otturare praticando un nodo con un laccio). Premere il pulsante Acceso/Spento (3a) (Fig. 15) per avviare il tritacarne, inserire il macinato
nel tritacarne e far seguire il budello mano a mano che si riempie. Nota: pi facile eseguire questo lavoro in due; uno si occuper di inserire il macinato, laltro di riempire il budello. Dare alle salsicce la lunghezza desiderata stringendo e ruotando il budello. Per ottenere una
salsiccia di qualit, evitare di imprigionare laria durante il riempimento e preparare delle salsicce di 10-15 cm (separare le salsicce facendo un nodo con un laccio).
Che cosa fare in caso di intasamento? Arrestare il tritacarne premendo il pulsante O/1 (3a), quindi premere il pulsante R per qualche
secondo per espellere la carne. Impostare il pulsante Acceso/Spento per continuare a tritare.
UTILIZZO: ACCESSORIO TAGLIA-VERDURE (FIG. 16-18)
Per tagliare le verdure, premere il pulsante Acceso/Spento (3a) (Fig. 18). Suggerimenti per ottenere risultati ottimali Gli ingredienti devono essere duri per ottenere risultati soddisfacenti ed evitare laccumulo di alimenti allinterno dellapparecchio. Non usare lapparecchio per grattugiare o tagliare alimenti eccessivamente duri, ad esempio zucchero o pezzi di carne.
PULIZIA (FIG. 19)
23
EL
: LS- 123456 . , . Moulinex.
1 2
3
3a / 3b R
4 5 6 7 8
9
10 * 11 * 12 * 13 14 15 *
15a 15b 15c
: (. 1-9) , , .
( 2 . x 2 .). ON/OFF (3a) (.8). : , , .
*A
, . . . .
24
: (. 10-15) : , .
, 5 . ( ).
ON/OFF (3a) (.15) , .
: , . , .
, 10 15 ( ).
: (. 16-18) , ON/OFF (3a) (.18). : . , .
: — . . — 3 .
; O/1 (3a) R
. ON/OFF .
(. 19)
25
NL
Opgelet: De gids met veiligheidsinstructies LS- 123456 wordt samen met het apparaat geleverd. Voordat u het apparaat in gebruik neemt, lees de gids aandachtig door en bewaar het op een veilige plaats. Hartelijk dank voor het kiezen van een apparaat van het Moulinex assortiment.
BESCHRIJVING 1 Motoreenheid 2 Ontgrendelingsknop voor gehaktkop 3 knop
3a AAN/UIT 3b R knop
4 Vergrendelingshendel 5 Afneembare gehaktkop 6 Afneembare bak 7 Vleesduwer 8 Toevoerschroef
9 Zelfslijpend roestvrijstalen mes 10 Rooster met kleine gaten* 11 Rooster met medium gaten* 12 Rooster met grote gaten* 13 Vastzetring 14 Worstenbuis 15 Schaaftrommels*
15a Duwer 15b Allessnijder 15c Rasp
VOOR INGEBRUIKNAME Was alle accessoires in een warm sopje. Spoel en veeg ze vervolgens onmiddellijk droog. De geperforeerde plaat en het mes moeten gesmeerd blijven. Breng een laagje spijsolie aan. Schakel het apparaat niet in wanneer het leeg is of de gehaktplaten niet gesmeerd zijn. OPGELET: De messen en kegels zijn zeer schep, wees voorzichtig wanneer u ze aanraakt.
GEBRUIK: GEHAKTKOP (AFB. 1-9) Maak de hoeveelheid fijn te hakken voedsel klaar door het verwijderen van eventuele botten,
kraakbeen en pezen. Snij het vlees vervolgens in stukjes. (ca. 2 cm x 2 cm) Druk op de aan/uit-knop (3a) om het apparaat in te schakelen (Afb.8). Tip: Na gebruik, stop enkele stukjes brood in de vleesmolen en schakel het apparaat in om eventuele gehaktresten te verwijderen. Opmerkingen: — Gebruik uw apparaat alleen voor het fijnhakken van rauw vlees. Hak geen bereid vlees fijn. — Gebruik uw apparaat niet langer dan 3 minuten.
*Afhankelijk van het model
26
GEBRUIK: WORSTOPZETSTUK (AFB. 10 -15)
Belangrijk: dit accessoire kan alleen worden gebruikt na het fijnhakken, kruiden en goed doormengen van het vlees. Doe het worstvel in warm water om het opnieuw elastisch te maken, schuif het vervolgens
over de trechter en laat het circa 5 cm overhangen (dicht het worstvel af door een knoop met behulp van een klem te maken).
Druk op de aan/uit-knop (3a) (Afb.15) om het apparaat in te schakelen. Duw het gehakt door de vleesmolen zodat het worstvel wordt gevuld.
Opmerking: het wordt aanbevolen om dit door twee personen te laten doen, n persoon om het gehakt door de vleesmolen de duwen en n persoon om het worstvel te vullen. Geef de worsten de gewenste lengte door het worstvel vast te klemmen en te draaien. Voor
de beste worsten, vermijd dat er tijdens het vullen lucht in het worstvel komt en maak de worsten 10 tot 15 cm lang (splits de worsten door ze dicht te klemmen en vervolgens een knoop te maken).
Wat moet ik doen als mijn apparaat verstopt is? Stop de vleesmolen door de O/1 knop (3a) in te duwen en houd de knop R enkele seconden
ingedrukt om het vlees vrij te geven. Druk op de aan/uit-knop om verder te malen.
GEBRUIK: GROENTEHAKKER (AFB. 16-18)
Om te hakken, druk op de aan/uit-knop (3a) (Afb.18). Nuttige tips voor het beste resultaat: Gebruik stevige ingredinten om het beste resultaat te krijgen en het ophopen van voedsel in het apparaat te vermijden. Gebruik het apparaat niet voor het hakken of snijden van zeer harde levensmiddelen, zoals suikerklontjes of stukken vlees.
REINIGING (AFB. 19)
27
DE
Achtung: Sicherheitsbroschre LS-123456 wird mit dem Gert geliefert. Bevor Sie Ihr Gert zum ersten Mal benutzen, lesen Sie die Broschre sorgfltig durch und bewahren Sie sie an einem sicheren Ort auf. Vielen Dank, dass Sie ein Gert aus der Moulinex-Produktlinie ausgewhlt haben.
BESCHREIBUNG 1 Motorblock 2 Entriegelungstaste fr den Fleischwolfkopf 3 Taste
3a EIN/AUS 3b R-Taste
4 Feststellgriff 5 Abnehmbarer Fleischwolfkopf 6 Abnehmbare Schale 7 Fleisch-Stopfer 8 Zufhrschnecke
9 Selbstschrfendes Edelstahlmesser 10 Passierscheibe mit kleinen Lchern* 11 Passierscheibe mit mittelgroen Lchern* 12 Passierscheibe mit groen Lchern* 13 Befestigungsring 14 Wurstrohr 15 Gemsehobeltrommeln*
15a Stopfer 15b Schneider 15c Reibe
VOR DEM ERSTEN GEBRAUCH Waschen Sie smtliches Zubehr in warmem Wasser mit Geschirrsplmittel ab. Elemente
absplen und anschlieend sofort grndlich abtrocknen. Die Lochscheibe und das Messer mssen gefettet sein. Fetten Sie die Elemente mit Speisel ein. Schalten Sie das Gert nicht ein, wenn es leer ist oder wenn die Fleischwolfscheiben nicht
gefettet sind. ACHTUNG: Die Klingen der Kegel sind sehr scharf; seien Sie bei der Handhabung der Kegel besonders vorsichtig.
BENUTZUNG: FLEISCHWOLFKOPF (ABB. 1-9) Bereiten Sie alle Lebensmittel vor, die durch den Fleischwolf gedreht werden sollen. Entfernen
Sie Knochen, Knorpel und Sehnen. Schneiden Sie das Fleisch in Stcke (ca. 2 cm x 2 cm). Drcken Sie die Ein-/Aus-Taste (3a) , um das Gert zu starten (Abb. 8). Tipp: Am Ende des Vorgangs knnen Sie einige Brotstcke durch den Fleischwolf drehen, um alle Hackfleischreste zu entfernen.
*Je nach Modell
28
BENUTZUNG: WURSTZUBEHR (ABB. 10-15) Wichtig: Dieses Zubehr kann erst benutzt werden, nachdem das Fleisch zu Hackfleisch verarbeitet, gewrzt und die Mischung gut vermengt wurde. Lassen Sie die Wursthaut in warmem Wasser einweichen, damit sie ihre Dehnbarkeit zurckerhlt.
Schieben Sie die Haut ber den Trichter und lassen Sie diese etwa 5 cm berhngen (die Sie mit einem Knoten und einer Klammer verschlieen).
Drcken Sie die Ein-/Aus-Taste (3a) (Abb. 15), um das Gert zu starten und leiten Sie das Hackfleisch durch den Fleischwolf, indem Sie der Haut folgen, whrend sie sich fllt.
Hinweis: Dieser Schritt ist leichter mit zwei Personen durchzufhren. Eine Person gibt das Hackfleisch in den Fleischwolf, die andere kmmert sich um das Fllen der Haut. Geben Sie den Wrsten die gewnschte Lnge, indem Sie die Wursthaut abklemmen und verdrehen.
Um eine Wurst von guter Qualitt zu erhalten, achten Sie darauf, dass keine Luft whrend des Fllens eingeschlossen wird, und machen Sie die Wrste etwa 10 bis 15 cm lang (trennen Sie die Wrste, indem Sie eine Klammer machen und mit der Klammer einen Knoten binden).
Hinweise — Benutzen Sie Ihr Gert nur zum Zerkleinern von rohem Fleisch. Zerkleinern Sie kein gegartes Fleisch. — Lassen Sie Ihr Gert nicht lnger als drei Minuten laufen.
Was knnen Sie tun, wenn das Gert verstopft ist? Drcken Sie die O/1-Taste (3a), um den Fleischwolf anzuhalten. Halten Sie R einige Sekunden
lang gedrckt, um das Fleisch zu lsen. Drcken Sie die Ein-/Aus-Taste, um das Faschieren fortzusetzen.
BENUTZUNG: GEMSEZERKLEINERER (ABB. 16-18) Drcken Sie zum Zerkleinern die Ein-/Aus-Taste (3a) (Abb. 18). Ntzliche Tipps fr