
BUYER’S MODEL NO. 2662 FACTORY MODEL ORIGINAL ISSUE MARCH, 2003 SECTION —-
CA97861
REFER TO IMPORTANT NOTICE BELO
PARTS LIST
FOR
Model 2662
IMPORTANT:
WHEN ORDERING THE PARTS
LWAYS CHECK THE SERIAL
NUMBER OF THE MACHINE.
FIRST DIGIT OF THE SERIAL
NUMBER MUST MATCH WITH
THE LAST DIGIT OF THE FACTOR
MODEL ABOVE.
FACTORY
MODEL
SERIAL
NO.
FIRST DIGIT
ЧЧЧЧЧЧЧ
P.NO.77327
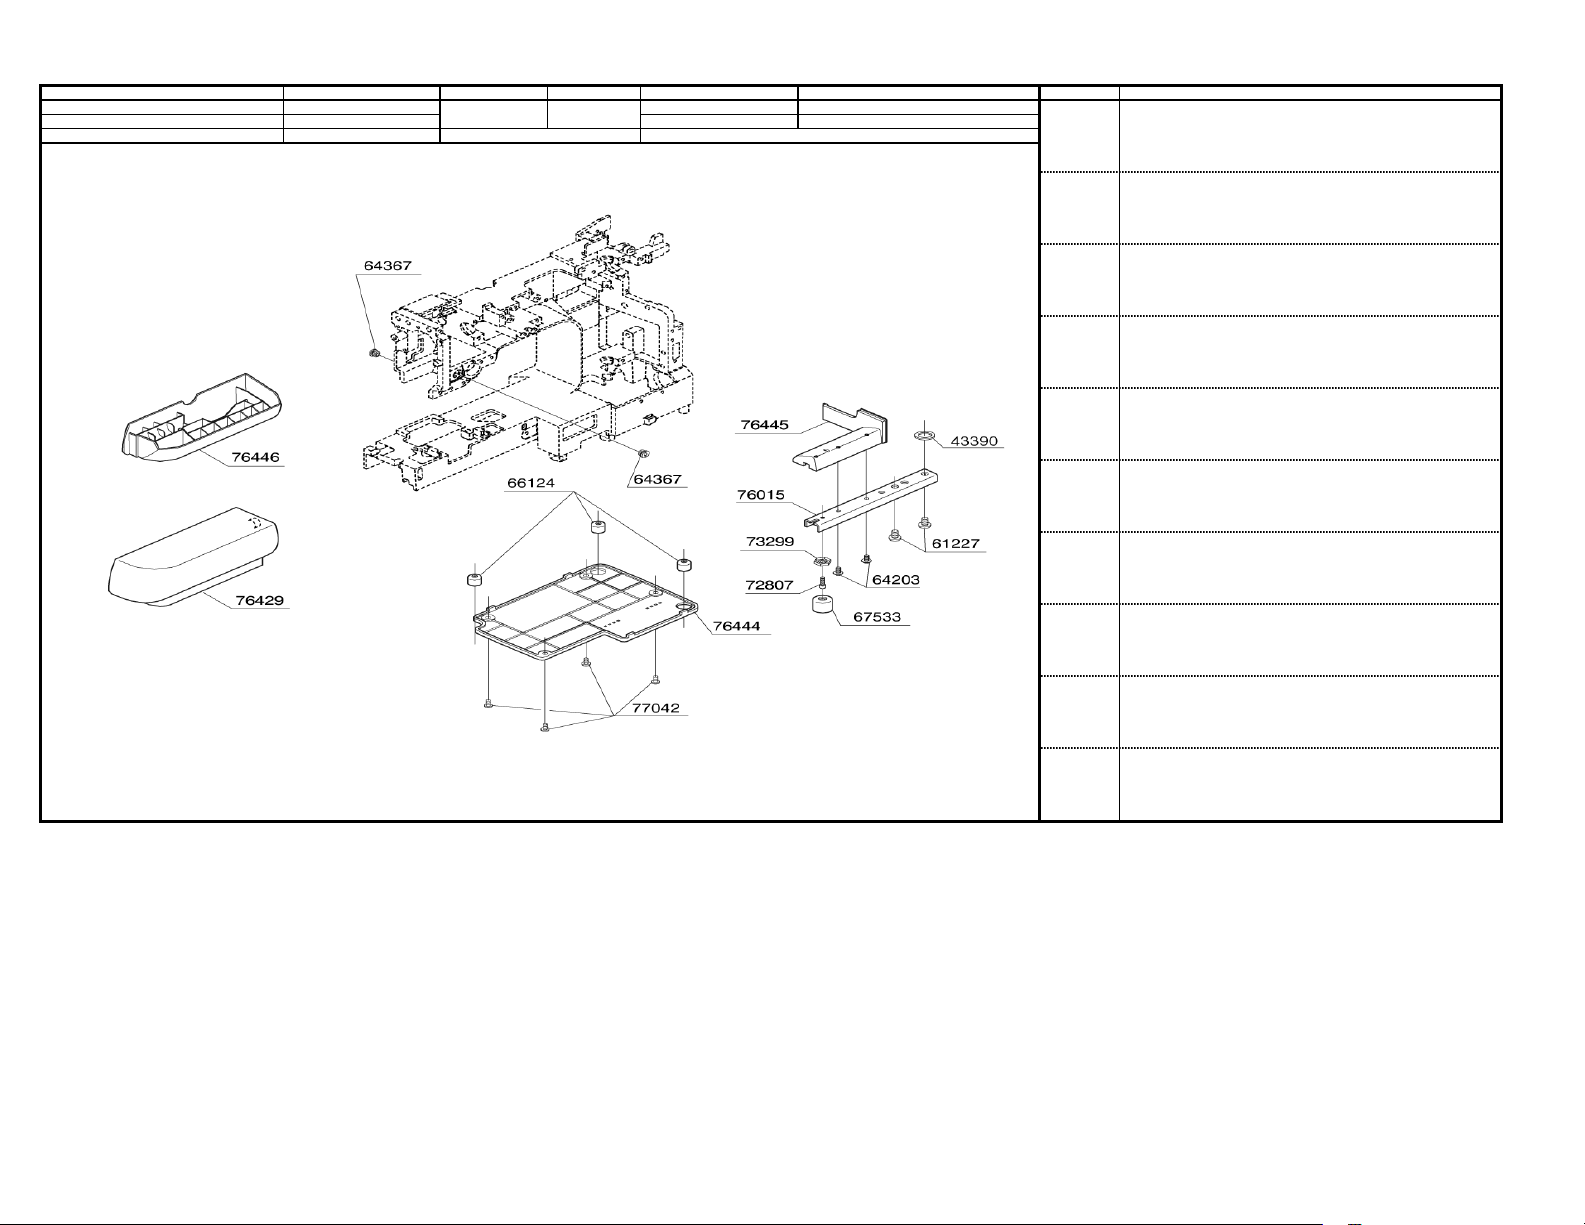
BUYER’S MODEL NO. 2662 SECTION PAGE REVISION REMARKS PART NO. DESCRIPTION
BUYER’S MODEL NAM
FACTORY MODEL CA97861
ORIGINAL ISSU
March, 2003
SERIAL NO.
1
43390 THRUST WASHE
61227 E6 PHILLIPS SCRE
64203 TAPPING SCRE
64367 M8 SCRE
66124 RUBBER FOOT
67533 RUBBER CUSHION
72807 M4 STUD SCRE
73299 M4 TORQUE NUT
76015 LEG
76429 EXTENSION TABLE
76444 BOTTOM COVE
76445 LEG COVE
76446ACCESSORY BOX
77042 M4 PHILLIPS SCRE
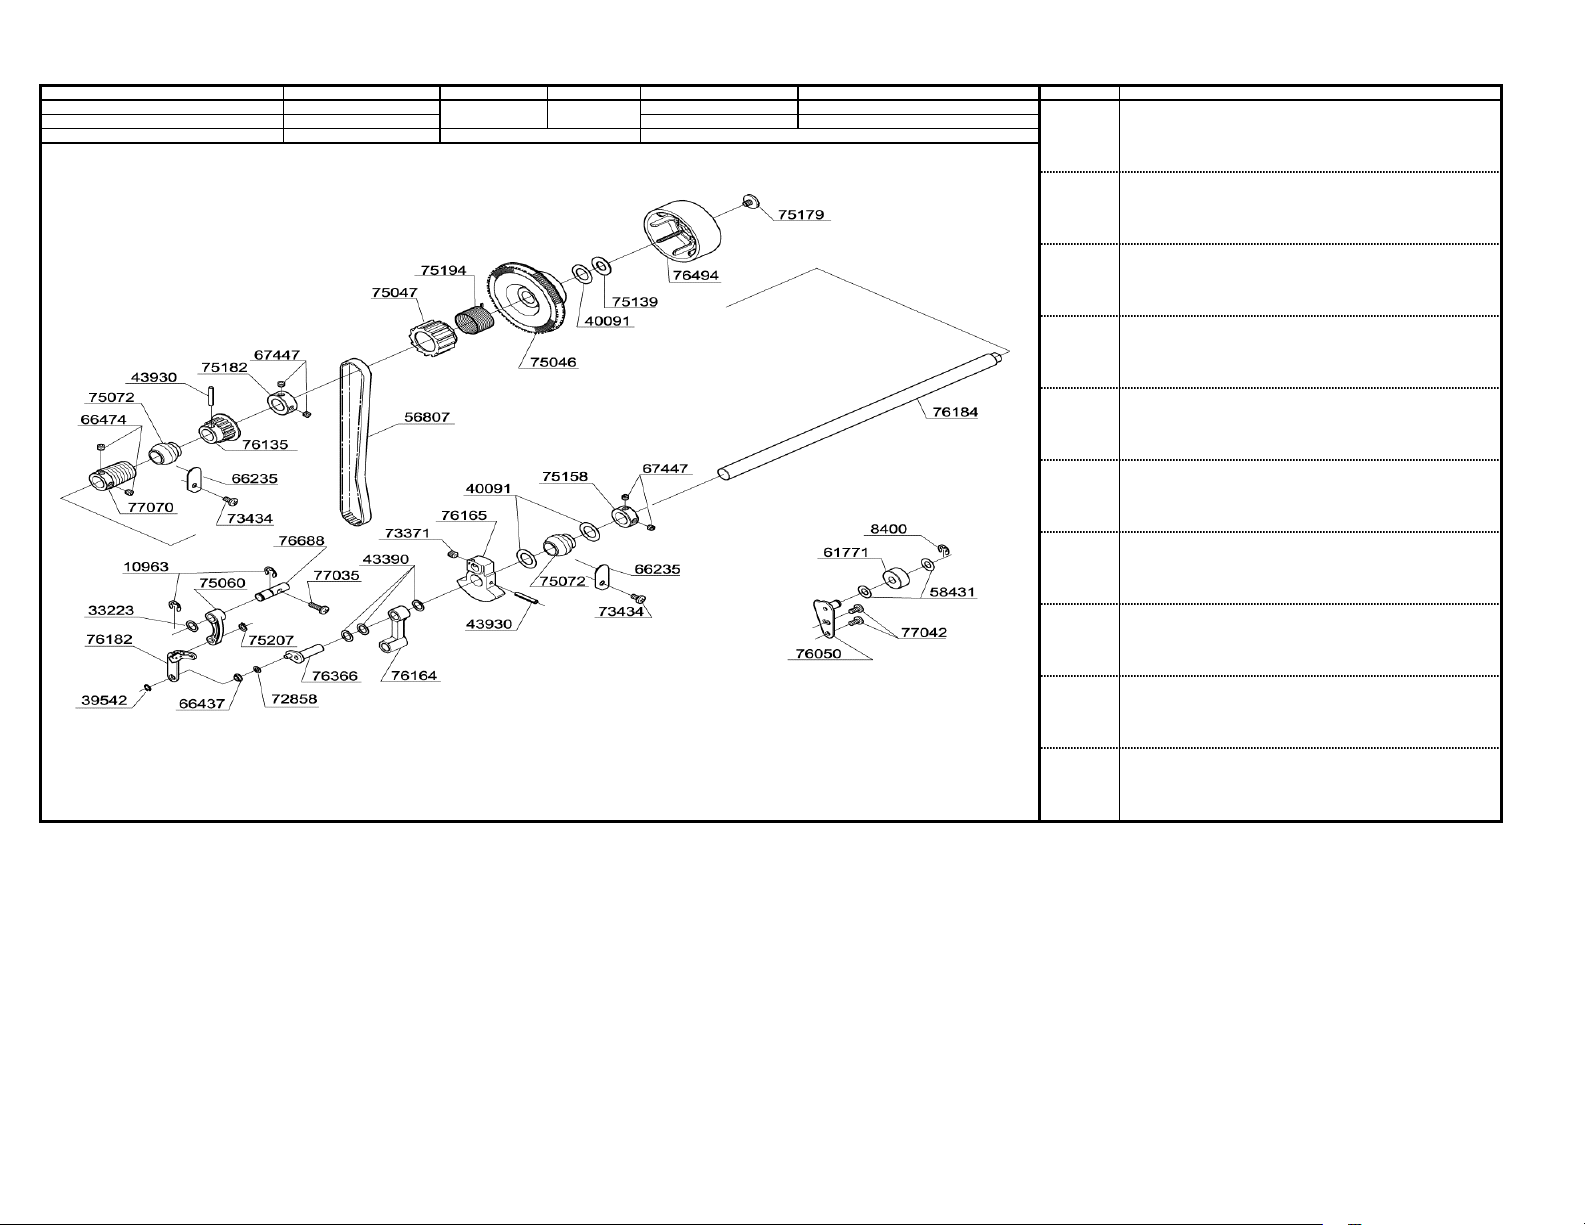
BUYER’S MODEL NO. 2662 SECTION PAGE REVISION REMARKS PART NO. DESCRIPTION
BUYER’S MODEL NAM
FACTORY MODEL CA97861
ORIGINAL ISSU
March, 2003
SERIAL NO.
2
8400 E5 CLIP-ON-WASHE
10963 E6 CLIP-ON-WASHE
33223 WASHER
39542 CLIP-ON-WASHE
40091 THRUST WASHE
43390 THRUST WASHE
43930 SPRING PIN
56807 TIMING BELT
58431 FIBER WASHE
61771 TENSION ROLLE
66235 SECURING PLATE
66437 BUSH
66474 M5 SCRE
67447 M5 SCRE
72858 WASHER
73371 M6 SCRE
73434 M4 PHILLIPS SCRE
75046 BELT PULLE
75047 CLUTCH
75060 TAKE-UP LEVER CRAN
75072 BALL BUSHING
75139 WASHER
75158 COLLAR
75179 M5 SCRE
75182 COLLAR
75194 TORSION SPRING
75207 GRIP RING
76050 TENSIONING PULLEY BASE
76135 BELT PULLE
76164 NEEDLE BAR CRAN
76165 BALANCER
76182 TAKE-UP LEVE
76184 MAIN SHAFT
76366 CRANK SHAFT
76494 HAND WHEEL
76688 SHAFT
77035 M4 PHILLIPS SCRE
77042 M4 PHILLIPS SCRE
77070 SPRING GEA
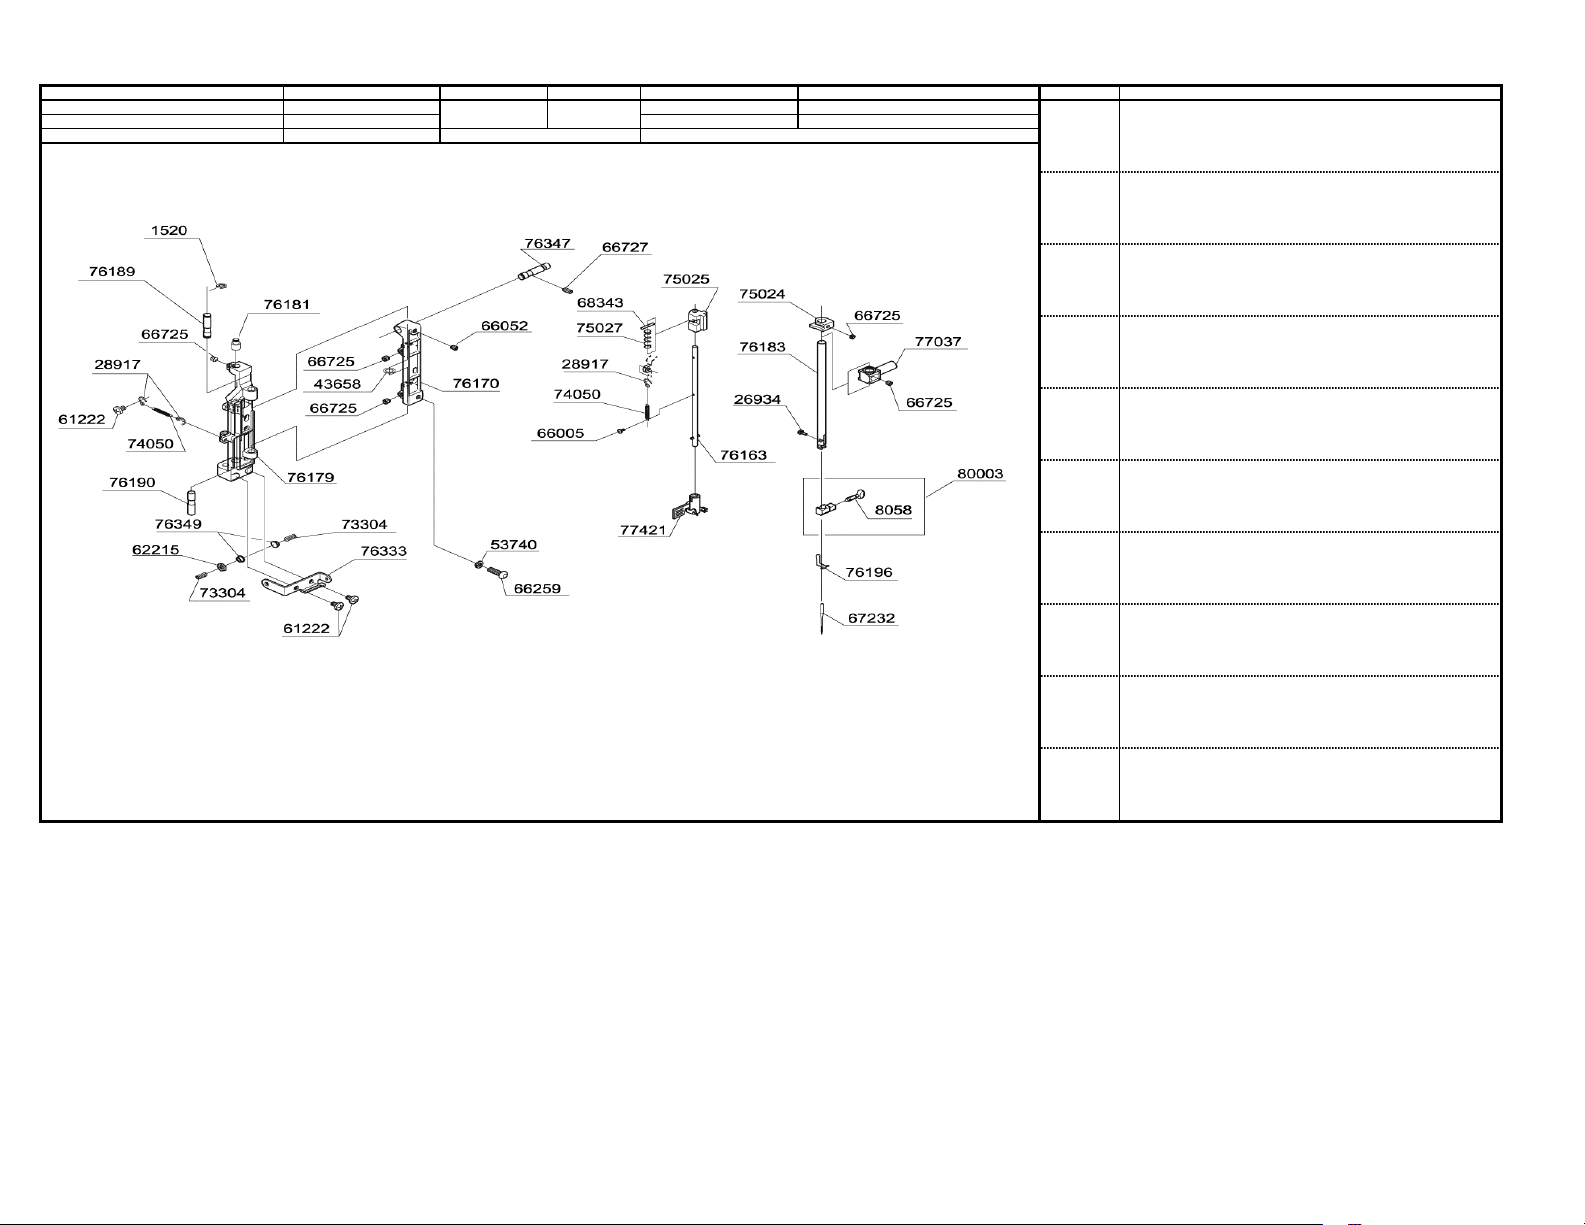
BUYER’S MODEL NO. 2662 SECTION PAGE REVISION REMARKS PART NO. DESCRIPTION
BUYER’S MODEL NAM
FACTORY MODEL CA97861
ORIGINAL ISSU
March, 2003
SERIAL NO.
3
1520 E3 CLIP-ON-WASHE
8058 NEEDLE CLAMP SCRE
26934 #8 SCREW
28917 HOOK FOR SPRING
43658 THRUST WASHE
53740 SPRING WASHE
61222 M4 PHILLIPS SCRE
62215 M4 TORQUE NUT
66005 M2 PHILLIPS SCRE
66052 M4 SCRE
66259 M4 SCRE
66725 M4 SCRE
66727 M4 SCRE
67232 NEEDLE
68343 PIN
73304 M4 SCRE
74050 EXTENSION SPRING
75024 STOPPER
75025 GUIDE BLOC
75027 COMPRESSION SPRING
76163 THREADER SHAFT SE
76170 SUPPORT BRACKE
76179 NEEDLE BAR SUPPOR
76181 SUPPORT CENTER PIN
76183 NEEDLE BA
76189 SUPPORT PIN
76190 SUPPORT CENTER PIN
76196 THREAD GUIDE
76333 SUPPORT THREAD GUIDE
76347 SUPPORT BASE PIN
76349 CAP
77037 NEEDLE BAR CLAMP
77421 THREADER ASSEMBL
80003 NEEDLE CLAMP SE
BUYER’S MODEL NO. 2662 SECTION PAGE REVISION REMARKS PART NO. DESCRIPTION
BUYER’S MODEL NAM
FACTORY MODEL CA97861
ORIGINAL ISSU
March, 2003
SERIAL NO.
4
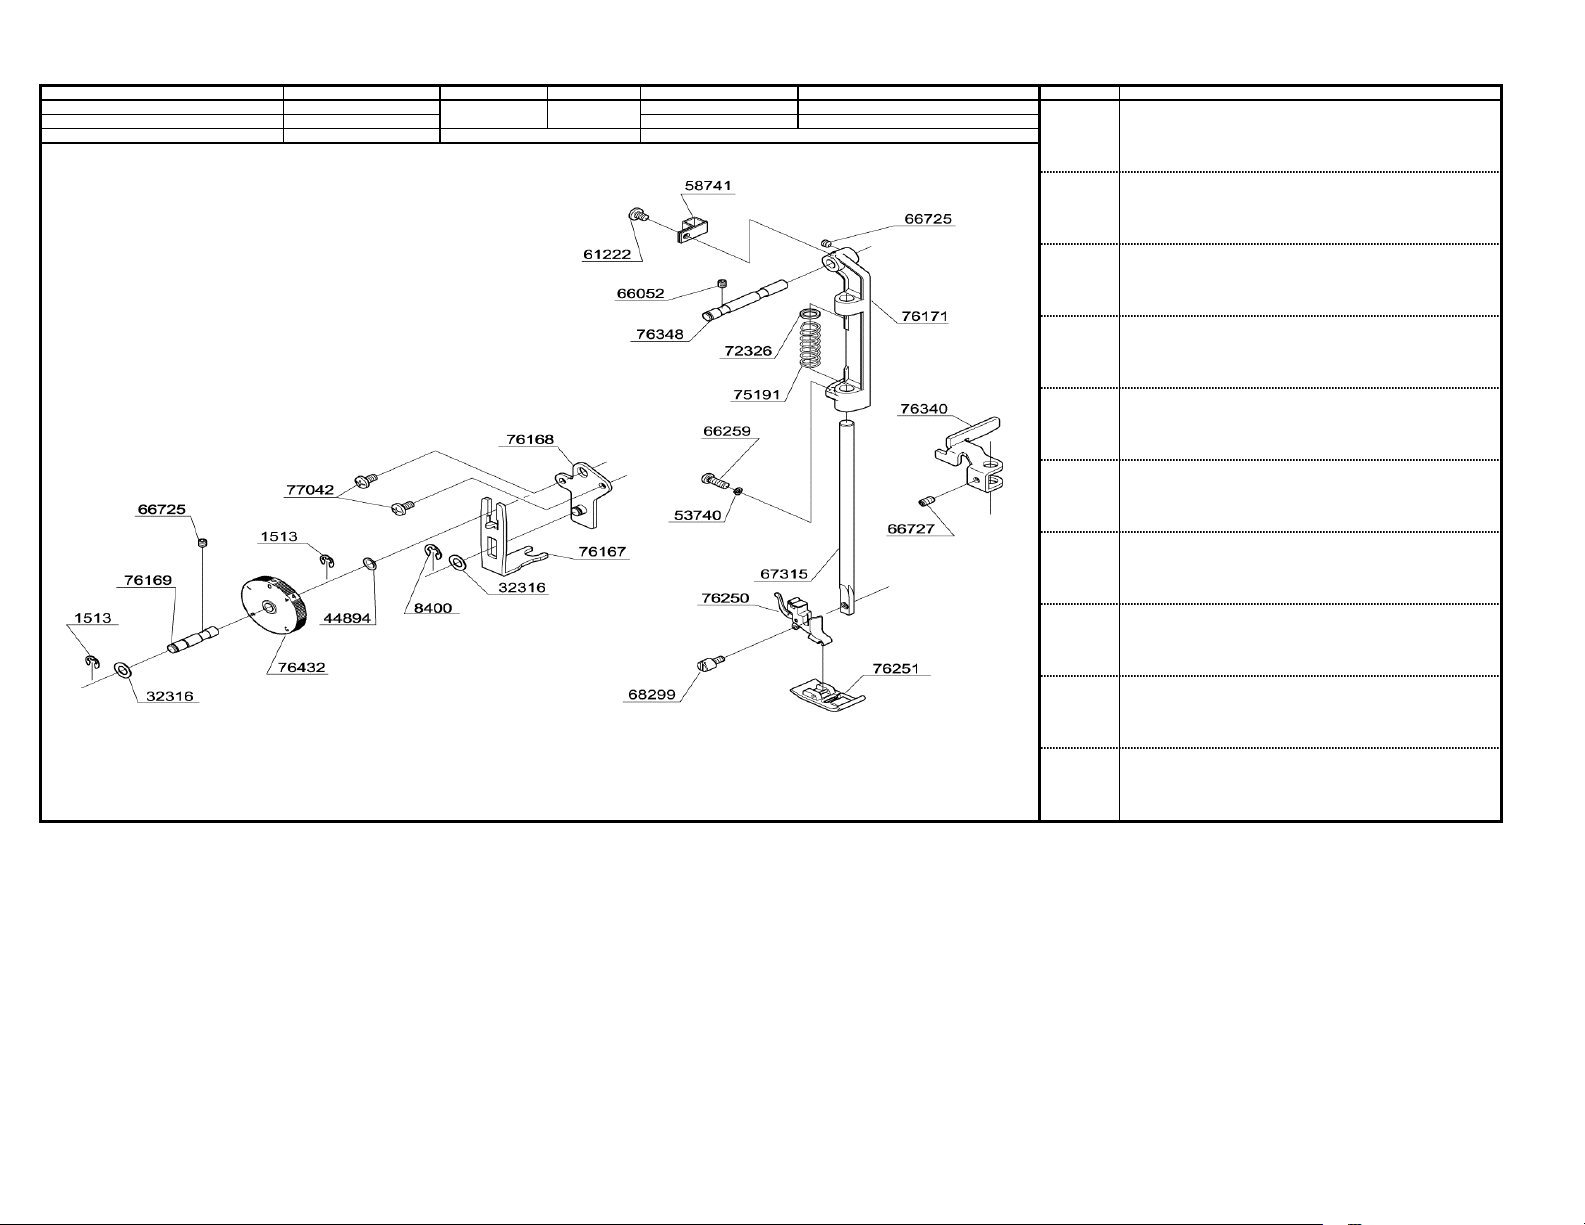
1513 E4 CLIP-ON-WASHE
8400 E5 CLIP-ON-WASHE
32316 WASHER
44894 WASHER
53740 SPRING WASHE
58741 CORD GUARD
61222 M4 PHILLIPS SCRE
66052 M4 SCRE
66259 M4 SCRE
66725 M4 SCRE
66727 M4 SCRE
67315 PRESSER BA
68299 #7 SCREW FOR SHAN
72326 WASHER
75191 COMPRESSION SPRING
76167 DARNING CONTROL PLATE
76168 DARNING CONTROL BASE
76169 STRAIGHT PIN
76171 PRESSER BAR BRACKE
76250 PRESSER FOOT HOLDE
76251 ZIGZAG PRESSER FOO
76340 PRESSER BAR BLOC
76348 STRAIGHT PIN
76432 PRESSER CONTROL DIAL
77042 M4 PHILLIPS SCRE
BUYER’S MODEL NO. 2662 SECTION PAGE REVISION REMARKS PART NO. DESCRIPTION
BUYER’S MODEL NAM
FACTORY MODEL CA97861
ORIGINAL ISSU
March, 2003
SERIAL NO.
5
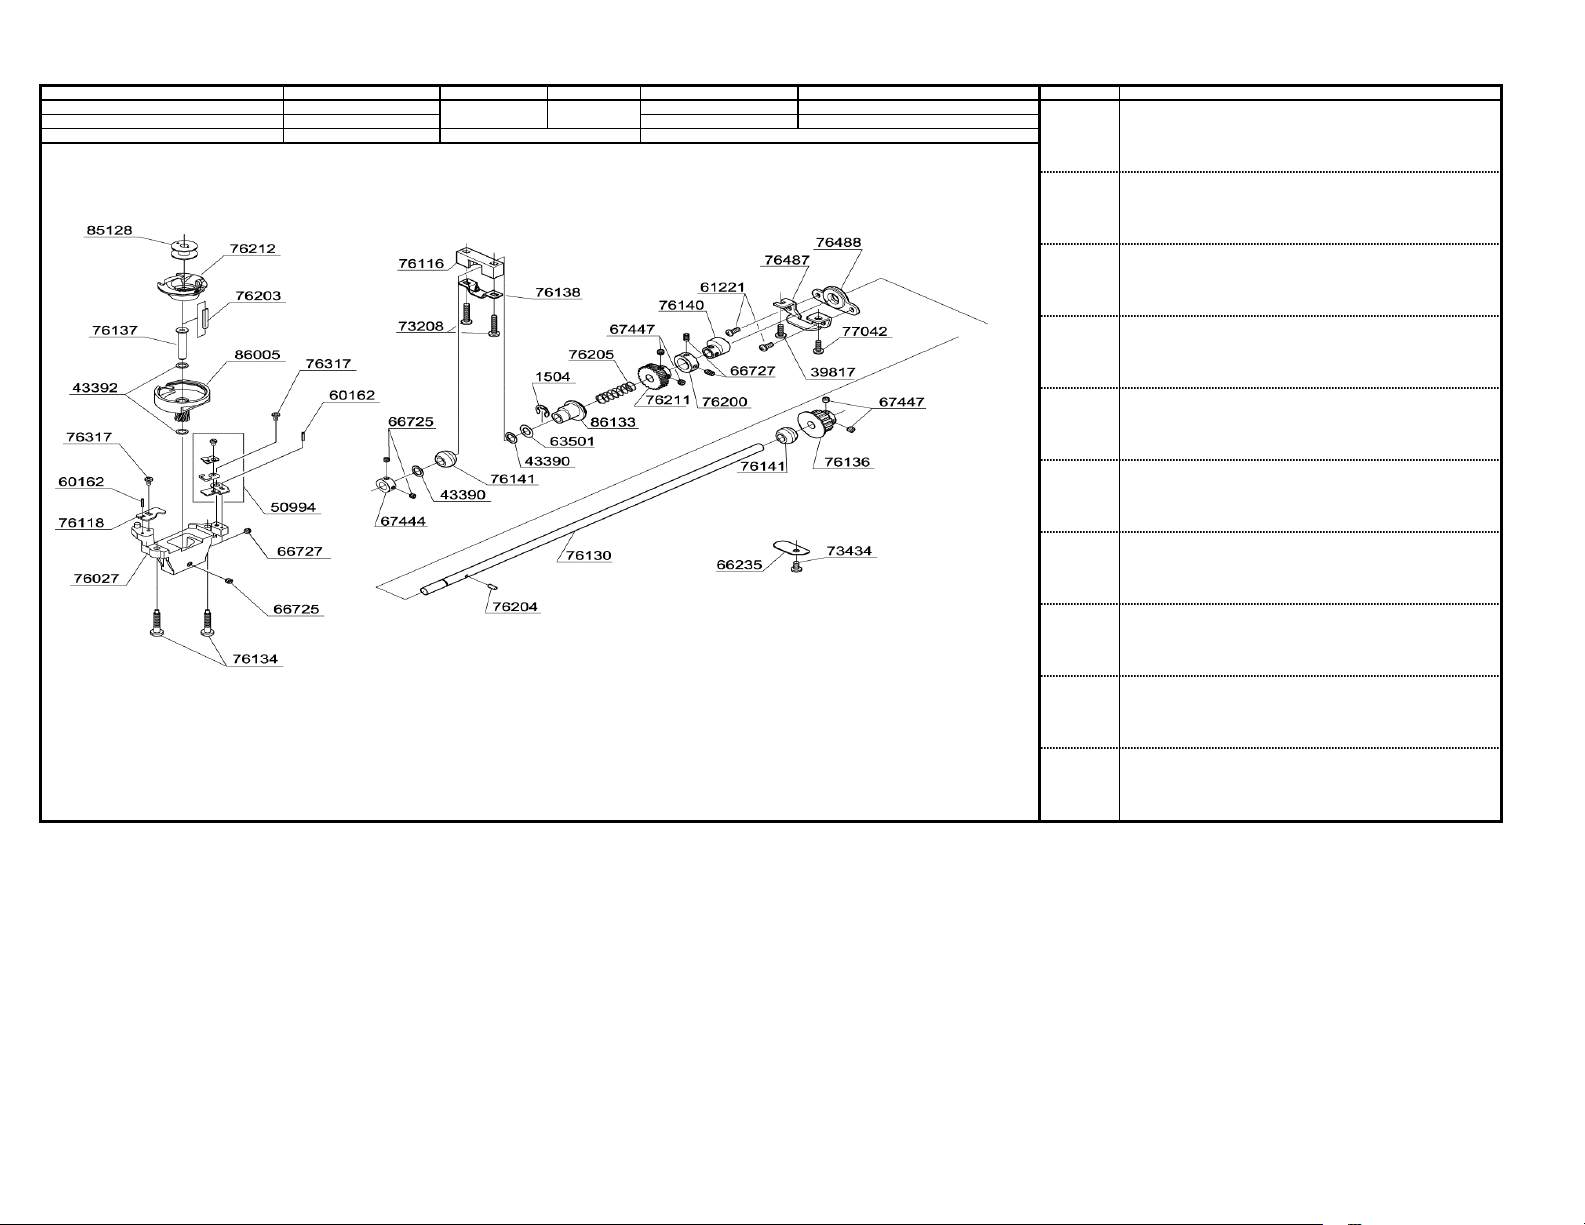
1504 E7 CLIP-ON-WASHE
39817 M4 PHILLIPS SCRE
43390 THRUST WASHE
43392 THRUST WASHE
50994 RETAINER SET
60162 KNOCK PIN
61221 M4 PHILLIPS SCRE
63501 WASHER
66235 SECURING PLATE
66725 M4 SCRE
66727 M4 SCRE
67444 COLLAR
67447 M5 SCRE
73208 M4 PHILLIPS SCRE
73434 M4 PHILLIPS SCRE
76027 SHUTTLE RACE BASE
76116 BALL METAL GUIDE
76118 BOBBIN CASE STOPPE
76130 LOWER SHAFT
76134 SCREW
76136 BELT METAL
76137 SHUTTLE RACE SHAF
76138 SECURING PLATE
76140 FEED REGULATING
76141 BALL METAL
76200 COLLAR
76203 OILING CORD
76204 PIN
76205 TORSION SPRING
76211 BEVEL GEA
76212 BOBBIN CASE
76317 M3 PHILLIPS SCRE
76487 LOWER SHAFT GUIDE BRACKE
76488 LOWER SHAFT GUIDE
77042 M4 PHILLIPS SCRE
85128 BOBBIN
86005 SHUTTLE RACE
86133 FEED LIFTING CAM
Loading…
- Инструкции и руководства
- Бренды
- SINGER
- 2662
- Справочник Пользователя
INSTRUCTION MANUAL
MANUAL DE INSTRUCCIONES
MODE D’EMPLOI
Model/Modelo/Modèle
2662
Перейти к контенту
Швейные машинки Singer
- Размер инструкции: 1,016.64 kB
- Формат файла: pdf
Если вы потеряли инструкцию от швейной машинки Singer 2662, можете скачать файл для просмотра на компьютере или печати.
Инструкция для швейной машинки Singer 2662 на русском языке. В руководстве описаны возможности и полезные функции, а также правила эксплуатации. Перед использованием внимательно ознакомьтесь с инструкцией.
Чтобы не читать всю инструкцию вы можете выполнить поиск по содержимому внутри инструкции и быстро найти необходимую информацию. Рекомендации по использованию помогут увеличить срок службы швейной машинки Singer 2662. Если у вас появилась проблема, то найдите раздел с описанием неисправностей и способами их решения. В нем указаны типичные поломки и способы их решения.
1
POLARIZED PLUGS CAUTION
This appliance has a polarized plug (one blade
wider than the other). To reduce the risk of electric
shock, this plug is intended to fit in a polarized
outlet only one way. If the plug does not fit fully in
the outlet, reverse the plug. If it still does not fit,
contact a qualified electrician to install the proper
outlet. Do not modify the plug in any way.
“When using an electrical appliance, basic safety precautions should always be followed, including the following.”
“Read all instructions before using this sewing machine.”
“DANGER
—
—
To reduce the risk of electric shock:”
“IMPORTANT SAFETY INSTRUCTIONS”
1. “This sewing machine should never be left unattended when plugged in. Always unplug this sewing machine from the electric
outlet immediately after using and before cleaning.”
2. “Always unplug before replacing light bulb. Replace bulb with same type rated 15 watts.”
“WARNING
—
To reduce the risk of burns, fire, electric shock, or injury to persons: ”
1. “Do not allow to be used as a toy. Close attention is necessary when this sewing machine is used by or near children.”
2. “Use this sewing machine only for its intended use as described in this manual. Use only attachments recommended by the
manufacturer as contained in this manual.”
3. “Never operate this sewing machine if it has a damaged cord or plug, if it is not working properly, if it has been dropped or
damaged, or dropped into water. Return the sewing machine to the nearest authorized dealer or service center for examination,
repair, electrical or mechanical adjustment.”
4. “Never operate the sewing machine with any air openings blocked. Keep ventilation openings of the sewing machine and foot
control free from the accumulation of lint, dust, and loose cloth.”
5. “Never drop or insert any object into any opening.”
6. “Do not use outdoors.”
7. “Do not operate where aerosol (spray) products are being used or where oxygen is being administered.”
8. “To disconnect, turn switch to the off (“0”) position, then remove plug from outlet.”
9. “Do not unplug by pulling on cord. To unplug, grasp the plug, not the cord.”
10. “Keep fingers away from all moving parts. Special care is required around the sewing machine needle.”
11. “Never sew with a damaged needle plate as this can cause needle to break.”
12. “Do not use bent needles.”
13. “Do not pull or push fabric while stitching. It may deflect the needle causing it to break.”
14. “Switch the sewing machine off (“0”) when making any adjustments in the needle area, such as threading needle, changing
needle, threading bobbin, or changing presser foot, etc.”
15. “Always unplug sewing machine from the electrical outlet when removing covers, lubricating, or when making any other user
servicing adjustments mentioned in the instruction manual.”
“SAVE THESE INSTRUCTIONS”
“This product is for household use, or equivalent.”
SINGER
®
is a Registered Trademark of The Singer Company Limited.
“CAUTION
—
—
Moving parts
—
To reduce risk of injury, switch off before servicing. Close cover before operating machine.”
FOOT CONTROL (USA only)
Use Matsushita Electric, Model 4C-316B with this
sewing machine.
ENGLISH
This appliance complies with EEC Directive 89/336/EEC covering the electromagnetic compatibility.
-
Страница 1
INSTRUCTION MANU AL MANU AL DE INSTRUCCIONES MODE D’EMPL OI Model/Modelo/Modèle 2662[…]
-
Страница 2
1 POLARIZED PLUGS CA UTION This appliance has a polarized plug (one blade wider than the other). T o reduce the risk of electric shock, this plug is intended to fit in a polarized outlet only one way . If the plug does not fit fully in the outlet, reverse the plug. If it still does not fit, contact a qualified electrician to install the proper outl[…]
-
Страница 3
2 IMPORT ANTES INSTRUCCIONES DE SEGURIDAD Cuando se usa un aparato eléctrico, debe seguirse unas precauciones básicas y que vienen incluidas a continuación. «Leer las instrucciones antes de usar la máquina de coser .» PELIGRO — Para reducir el riesgo de una descarga eléctrica. — 1. La máquina no debe dejarse nunca desatendida mientr[…]
-
Страница 4
3 «Lorsqu’un appareil électrique est en usage, il faut toujours observer certaines mesures élémentaires de sécurité y compris les suivantes.» «Lire les instructions en entier avant d’utiliser cette machine à coudre.» «DANGER — — Pour réduire le risque de décharge électrique:» «MESURES DE SÉCURITÉ IMPORT ANTES» 1. «Un apparei[…]
-
Страница 5
4 Cleaning hook area and the feed dog, Chan ……………….. 47 — 48 Cleaning hook area and the feed doan …………………………………………………………….. 49 Cleaning hook area and the feed dog, Chan ……………………………………………………. 47 — 48 Cleaning hook area and the feed doan …………….[…]
-
Страница 6
5 Cleaning hook area and the fee d dog, ………………………………………………….. 47 — 48 Cleaning hook area and the feed doan …………………………………………………………….. 49 FRANÇAIS T ABLE DES MA TIERES 1. VOTRE MACHINE À COUDRE Description de la machine ……………………………………….[…]
-
Страница 7
6 1. Bobbin winder tension disc 2. Pressure regulator 3. Thread take-up 4. Thread tension control 5. Face cover 6. Thread cutter 7. Extension table 8. Feed dog control 9. Reverse stitch lever 10. Stitch width control 11. Bobbin winder shaft 12. Bobbin winder stop 13. Stitch indicator 14. Stitch length control 15. Stitch selector 16. Super pattern g[…]
-
Страница 8
7 1 2 3 4 5 6 7 8 91 1 10 12 14 15 16 13 17 18 19 20 21 23 24 25 26 28 29 27 35 32 34 33 36 38 22 31 30 37[…]
-
Страница 9
8 1. Needles 2. Bobbins 3. Spool pin cap (large) 4. Spool pin cap (small) 5. Buttonhole opener/Brush 6. Screwdriver (large) 7. Screwdriver (small) 8. Oiler 9. Zipper foot 10. Buttonhole foot 11. Blind stitch foot 12. Overcasting foot 13. Satin stitch foot 14. Rolled hemmer ACCES SORIES ENGLISH ESP AÑOL FRANÇAIS 1. Agujas 2. Canillas 3. T apa del […]
-
Страница 10
9 PRÉP ARA TION DE LA MACHINE Installez votre machine sur une surface bien plane. V otre machine à coudre a été huilée à fond par l’usine. ll est donc indispensable, avant de commencer à l’utiliser , de bien essuyer la plaque de recouvrement complète et ses abords. Faites ensuite un essai sur un échantillon de tissu pour bien éponger […]
-
Страница 11
10 SPOOL PINS Place a spool of thread on the spool pin. Secure it with a suitable size spool cap (A) to ensure smooth flow of thread. Pull up the spool pin (B). This is used for bobbin winding when the machine is already threaded. PRESSER FOOT LIF TER There are three positions for your presser foot. 1. Lower the presser foot to sew . 2 . Raise the […]
-
Страница 12
11 4 PRÉP ARA TION DE LA CANET TE 1. Passer le fil de la bobine dans le guide fil comme indiqué sur la gravure. 2. lntroduire le fil dans un des trous de la canette. 3 . Pousser l’axe du dévidoir vers la gauche, placer la canette sur cet axe. Pousser le tout vers la droite jusqu’au déclic. T enir le bout de fil à la verticale. 4. Mettre la[…]
-
Страница 13
12 ENFILAGE DU FIL DE CANET TE 1 . Relevez l’aiguille en position haute en tournant manuellement le volant vers vous. 2. Retirez la plaque du cache de canette en poussant le bouton de libération vers la droite tout en appuyant sur le coin gauche de la plaque. 3. Insérez la canette pleine en vérifiant qu’elle tourne dans le sens contraire des[…]
-
Страница 14
13 ENGLISH ESP AÑOL NEEDLE, THREAD AND F ABRIC CHART Y our fabric will determine the choice of a needle and thread. The following table is a practical guide to needle and thread selection. Always refer to it before a new sewing project. And be sure to use the same size and type of thread in the bobbin as in the top thread supply . T ABLA DE HIL O […]
-
Страница 15
14 Batiste Gaze Crêpe V elours côtelé Flanelle Gabardine Guigan T oile de lin Mousseline Crêpe de laine Tissus apprêtés T oile forte Tissu de manteau T oile de jean Coutil T oile à voiles Mailles apprêtés Maille double Jersey T ricot FRANÇAIS T ABLAU DES AIGUILLES, FIILS ET TISSUS Le choix d’une aiguille et du fil correspondant à votre[…]
-
Страница 16
15 ENFILAGE DU FIL SUPÉRIEUR 1. Relever le pied presseur avec le levier . 2. Amener l’aiguille en position haute en tournant le volant vers vous. 3. Procèder à l’enfilage suivant les numéros sur le croquis. THREADING THE TOP THREAD 1. Raise the presser foot lifter . 2. Raise the needle to its highest position by rotating the hand wheel towa[…]
-
Страница 17
16 USING A UTOMATIC NEEDLE THREADER Raise the needle to its highest position by rotating the hand wheel towards you. 1 . Hook thread to thread guide as illustrated. 2. Pull down lever holding the end of thread. 3. T urn the lever as far as it will go. 4. Guide thread into hooked end and pull it upward. 5 . Return the lever and needle will be thread[…]
-
Страница 18
17 UTILISA TION DE L’ENFILEUR DE CHAS D’AIGUILLE Amener l’aiguille en position haute en toumant le volant vers vous. 1. Accrocher le fil au guide-fil de la manière indiquée sur l’illustration. 2. Abaisser le levier tout en tenant l’extrémité du fil. 3. T ourner le levier au maximum. 4. Guider le fil dans la fourchette d’accrochage e[…]
-
Страница 19
18 1 3 2 4 RAPPEL DU FIL INFÉRIEUR 1. Relever le pied presseur avec le levier . 2. T enir le fil de l’aiguille et tourner le volant vers vous en faisant remonter l’aiguille à sa position la plus haute. 3. Faire remonter le fil inférieur en tirant légèrement sur le fil supérieur . 4. Placer les deux fils sous le pied presseur en laissant e[…]
-
Страница 20
19 RÉGLAGE DE LA TENSION DU FIL SUPÉRIEUR Point droit, l’aspect de votre point droit dépend surtout du bon équilibre entre la tension supérieure et la tension inférieure. Elle est parfaite lorsque les deux fils se nouent entre les deux épaisseurs de tissu. Laissez le bouton de tension sur la position < < AUTO > > pour la coutur[…]
-
Страница 21
20 REMPLACEMENT DU PIED PRES SEUR Relevez l’aiguille au maximum, ainsi que le levier du pied presseur . 1. Poussez le levier de verrouillage et enlever le pied (Fig. 1). 2. Placez le pied choisie sur la plaque-aiguille comme illustré (Fig. 1). 3. Rabaissez le levier du pied presseur de façon à ce que le pied s’enclenche de lui-même sur son […]
-
Страница 22
21 ABAIS SE -GRIFFES D’ENTRAîNEMENT Les griffes d’entraînement assurent le mouvement du tissu pendant la couture. Elles doivent être remontées pour la couture normale et abaissées pour le reprisage, la broderie à main libre et les monogrammes, soit lorsque vous (et non les griffes) entraînez le tissu directement. FEED DOG CONTROL The […]
-
Страница 23
22 STITCH SELECTOR AND INDICA TOR 1. T o select a stitch, be sure needle is out of fabric at its highest position. 2 . Then turn the selector until the required stitch is indicated by the red symbol on the indicator panel. STITCH LENG TH/ SUPER (STRETCH) STITCH CONTROL Stitch length can be selected easily according to thickness and type of fabric. […]
-
Страница 24
23 SUPER (STRETCH) P A T TERN GROUP SELECTOR T o select red patterns, push down the selector . Push it up for blue patterns. REVERSE STITCH LEVER It is recommended to begin, or end seams with several stitches in reverse for reinforcement. As long as you are pressing down this lever , the machine will continue to feed the fabric backwards. PRESSURE […]
-
Страница 25
24 STITCH WIDTH CONTROL The width of all the stitches produced on this machine can be made narrower or wider by adjusting the stitch width control. NOTE: When using twin-needles (option), the stitch width should never be set above twin needle mark, regardless of the stitch you have selected. Doing so will result in broken needles and possible damag[…]
-
Страница 26
25 ENGLISH MACHINE SET TING CHART ② ① ⑤ ① ① ① ① ① INDICA TOR ② ② ② ② ② STITCH LENG TH CONTROL ⑤ ⑤ ⑤ ⑤ ⑤ PRESSER FOOT ③ ③ ③ ③ ③ STITCH WIDTH CONTROL 2. ST ARTING TO SEW A. Zig-zag foot B. Blind stitch foot BUTTONHOLE STRAIGHT ZIGZAG BLIND MUL TI-STITCH ZIGZAG FOUR- POINT LINGERIE STRETCH BLIND DECORA TIV[…]
-
Страница 27
26 SOBRE-BORDE DOBLE SUPER DECORA TIVAS CHEVRON SOBREORILLA INCLINADO MAGO ALFILER INCLINADO PLUMA SOBREHILADO INCLINADO ALFILER INCLINADO CASUAL SUPER DECORA TIVAS PUNTO CRUZADO SOBRE-BORDE REFORZADO ESPINA INSERCION DE CREMALLERAS ZURCIDO ESP AÑOL ESQUEMA DE AJUSTE DE LA MAQUINA ② ① ⑤ ① ① ① ① ① INDICADOR ② ② ② ② ② CONTR[…]
-
Страница 28
27 SURJET DOUBLE DECORA TIFS CHEVRON ÉPINGLE OBLIQUE SORCIER ÉPINGLE OBLIQUE PLUME ÉPINGLE OBLIQUE INVERSÉ ÉPINGLE OBLIQUE HASARO DECORA TIFS CROISÉ SURJET RENFORCÉ ÉPINE PLACER UNE FERMETURE A GLISSIERE REPRISAGE FRANÇAIS T ABLEAU DE RÉGLAGE DE LA MACHINE ② ① ⑤ ① ① ① ① ① INDICA TEUR ② ② ② ② ② L ONGUEUR DE POINT […]
-
Страница 29
28 2 1 ENGLISH ESP AÑOL STRAIGHT STITCHES 1 Straight stitch at center needle position with following settings; Stitch selector — Stitch width control — 2 Straight stitch at left needle position with following settings; Stitch selector — Stitch width control — PUNT ADA RECT A 1 Puntada recta posición aguja en el centro realizar los siguientes ajus[…]
-
Страница 30
29 ENGLISH ESP AÑOL FRANÇAIS REMOVING F ABRIC First turn the handwheel towards you until the needle is at its highest position, then raise the presser foot, draw materials to the rear and cut off excess thread with the thread cutter located on the left end of working surface or on the presser bar . TURNING A SQUARE CORNER T o turn a square corner[…]
-
Страница 31
30 ENGLISH ESP AÑOL FRANÇAIS INSERTING ZIPPERS AND PIPING Use zipper foot which allows you to sew to the right or left of the zipper or close to the cord. INSERCION DE CREMALLERAS Y VIVO Utilizar el prensatelas de cremalleras que permite coser a la derecha o la izquierda de la cremallera o cerca del cordón vivo. INSERTING ZIPPERS T o sew down th[…]
-
Страница 32
31 ENGLISH ESP AÑOL FRANÇAIS ZIGZAG STITCH OVERCASTING This is one of the more frequent uses for the zigzag stitch in garment construction. Place material under the presser foot so that the needle pierces just short of the outside edge. PUNT ADA ZIG-ZAG SOBREHILADO Esta es una de las puntadas zig-zag más frecuentemente usadas en la fabricación […]
-
Страница 33
32 ENGLISH ESP AÑOL FRANÇAIS FREE MOTION STIPPLING, EMBROIDERY AND MONOGRAMS Drop feed dogs and remove presser foot. Using a marking pencil trace your design onto your fabric. Hoop your fabric before sewing. Sew using a straight stitch (stippling) or zigzag (Embroidery & Monograms) following your design line. Using a hoop will give you better[…]
-
Страница 34
33 BLIND STITCH 1. First finish the raw edge. Do this by turning it under on fine fabrics or overcasting it on medium to heavyweight fabrics. Then turn the hem up the required depth, press and pin in place. 2. Now fold the fabric as illustrated. 3. Place the fabric under the foot with the fold of the fabric positioned so that the needle just pierce[…]
-
Страница 35
34 ENGLISH ESP AÑOL FRANÇAIS MUL TI-STITCH ZIGZAG OVERCASTING This is a strong stitch because as its name implies, it makes multiple short stitches where the normal zigzag makes only one. For this reason it is highly recommended for overcasting all types of fabrics. It is also ideal for mending tears, patching, sewing towelling, patch- work and a[…]
-
Страница 36
35 SHELL STITCH Shell stitch is for seaming and overcasting sheer , soft fabrics in one operation. It also produces a delicate shell hem on lingerie and other fine garments. SEAM AND OVERCAST IN ONE OPERA TION Place the right sides of the fabric together and position under the presser foot so that the zig-zag part of the stitch sews just over the r[…]
-
Страница 37
36 PUNT ADA RECT A TRIPLE La puntada recta triple es mucho más fuerte que la puntada recta corriente, ya que entrelaza tres veces–hacia adelante, hacia atrás y hacia adelante. Es particularmente adecuada para reforzar las costuras de prendas deportivas de tejidos elásticos y no elásticos y para costuras curvas que requieren una gran resistenc[…]
-
Страница 38
37 POINT DROIT EXTENSIBLE Ce point est beaucoup plus solide que le point ordinaire, vu qu’il s’exécute en trois fois, une fois en avant, une fois en arrière et ecore une fois en avant. Ce point spécial convient particulièrement bien pour surpiquer les cols, poignets. POINT RIC RAC Avec ce point vous surfilez, vite et facilement les bords in[…]
-
Страница 39
38 OVEREDGE STITCH This is the same type stitch used by the garment industry in making sportswear — it forms and finishes the seam in one operation. It’s very effective for use in repairing raw or worn edges of older garments. PUNT ADA SOBRE-BORDE Este es el mismo tipo de puntada usada por la industria de la confección en la fabricación de pren[…]
-
Страница 40
39 CHEVRON STITCH Use to create decorative borders and for embroidery . PUNT ADA CHEVRON Utilicela para crear dobladillos decorativos y para bordados. SLANT O VE REDGE STITCH Stretch overlock seams and overcasts in one to produce a narrow , supple seam, particularly suited to swimwear , sportswear , T -shirts, babywear in stretch nylon, stretch tow[…]
-
Страница 41
40 SLANT PIN STITCH Excellent for hemstitching table and bed linens with an elegant touch. Picot-like stitch can also be made on sheer materials. Sew along the raw edge of fabric and trim close to the outside of the stitching. PUNT ADA ALFILER INCLINADO Es excelente para dobladillar manteles y sobrecamas dando un toque de elegancia. La puntada tipo[…]
-
Страница 42
41 CROS SED STITCH Use to sew and finish elastic fabrics or for decoration of borders. PUNTO CRUZADO Usela para coser y acabar tejidos elásticos o en la decoración de dobladillos. REINFORCED O VE R EDGE STITCH It is perfect for overcasting and seaming and overcasting in one on slightly stretch fabrics and non-stretch ones such as linen, tweed, an[…]
-
Страница 43
42 DECORA TIVE EMBROIDERY DESIGNS Y our Machine will produce a wide range of beautiful decorative embroidery patterns as illustrated on the Stitch indicator panel. Simply select the design of your choice and follow the settings on page 25. The final effect of each design will depend on the setting. TIPS ON DESIGN STITCHING 1. Always make a practice[…]
-
Страница 44
43 BUT TONHOLE MAKING 1 . Carefully mark the position of buttonhole on your garment. 2. Slide the button carrier and insert the button. 3. Attach the buttonhole foot. 4. Place the garment under the foot so that the needle pierces the fabric at the beginning of buttonhole. 5. Lower the buttonhole lever and the presser foot lever . 6. Push the button[…]
-
Страница 45
44 CORDED BUTTONHOLES Hook filler cord (crochet thread or buttonhole twist) to the spur and pull both ends of the cord forward under the guide. Sew buttonhole so that zig-zag stitches cover the cord. When completed, release the cord from foot, pull ends of cord forward and snip off extra length. Sewing a Button Drop feed dogs and select zigzag stit[…]
-
Страница 46
45 CARING FOR YOUR MACHINE T o ensure the best possible operation of your machine, it is necessary to keep the essential parts clean at all times. Cleaning hook area and the feed dogs 1. Raise the needle to its highest position. 2. Remove the needle plate (A). 3. Remove the bobbin case (B). 4. Clean the feed dogs and hook area with the lint brush. […]
-
Страница 47
46 Changing light bulb In USA 1. Remove the face cover . P ush up the bulb slightly and turn clockwise. 2. Insert new bulb, push up and turn counterclockwise. Replace the face cover . In Europe Remove the face cover . Unscrew the bulb and firmly screw in a new bulb. Replace the face cover . Disconnect the machine from power supply before changing a[…]
-
Страница 48
47 4. PERFORMANCE CHECKLIST 4. CU ADRO DE VERIFICACION DE RENDIMIENTO GENERAL PROBLEMS Machine does not sew . * Foot control is not connected. — See page 9. * Power switch is turned off . — T urn on the switch. Machine jams/knocks. * Thread is caught in hook. — Clean hook (see page 45). * Needle is damaged. — Replace needle (see page 13-14). F abri[…]
-
Страница 49
48 4. VÉRIFICA TION DES PETITS PROBLÈMES DE COUTURE PROBLÈMES GENERAUX La machine ne coud pas: * Le cordon électrique ou le rhéostat n’est pas branché — V oir page 9. * Le régulateur est sur “OFF” — le placer sur SL OW ou FAST . La machine est coince: * Le fil est cassé dans le crochet — le netoyer (voir page 45). * L’aiguille est e[…]
-
Страница 50
49 OVERCASTING FOOT This foot is used to guide fabric when overcasting. Place your fabric under the foot with its edge against the edge guide and start to sew . P A T A P ARA OVERL OCADO Este pata se utiliza para guiar el material durante el overlocado. Situe el género bajo la pata con su borde contra el canto de la guia y comience a coser . SA TI[…]
-
Страница 51
© Part No. 77131 2/03[…]