
Displayed below is the user manual for Tab P11 by Lenovo which is a product in the Tablets category.
This manual has pages.
Lenovo Tab P11
User Guide
Lenovo TB—J606F
Lenovo TB—J606L
All information labeled with * in this guide refers only to the WLAN+LTE model (Lenovo TB—
J606L ).

Basics
Before using this information and the product it supports, be sure to read the following:
Safety, Warranty & Quick Start Guide
Regulatory Notice
«Important safety and handling information» in «Appendix».
The Safety, Warranty & Quick Start Guide and the Regulatory Notice are available on the website at
http://support.lenovo.com.
Note: All pictures and illustrations in this document are for your reference only and may differ
from the final product.
Lenovo Help
Looking for help ? The Lenovo Help app can offer you support for getting direct access to Lenovo’s web
assistance and forums*, frequent Q&A*, system upgrades*, hardware function tests, warranty status
checks*, service requests**, and repair status**.
Note:
* requires data network access.
** is not available in some countries.
You have two ways to get this app:
Search for and download the app from Google Play.
Scan the following QR code with a Lenovo Android device.
Technical specifications
Model Lenovo TB-J606F Lenovo TB-J606L
CPU Qualcomm® Snapdragon™ 662 Qualcomm® Snapdragon™ 662
Battery 7500mAh 7500mAh
Wireless
communication
Bluetooth 5.1;
WLAN 802.11 a/b/g/n/ac;
GPS/GLONASS/A—GPS
Bluetooth 5.1;
WLAN 802.11 a/b/g/n/ac;
GPS/A-GPS/GLONASS;
FDD-LTE/TDD—LTE/WCDMA/GSM
Note: Lenovo TB—J606L supports LTE Bands 1,2,3,4,5,7,8,20,28,38,40,41 but in some countries LTE
is not supported. To know if your device works with LTE networks in your country, contact your
carrier.
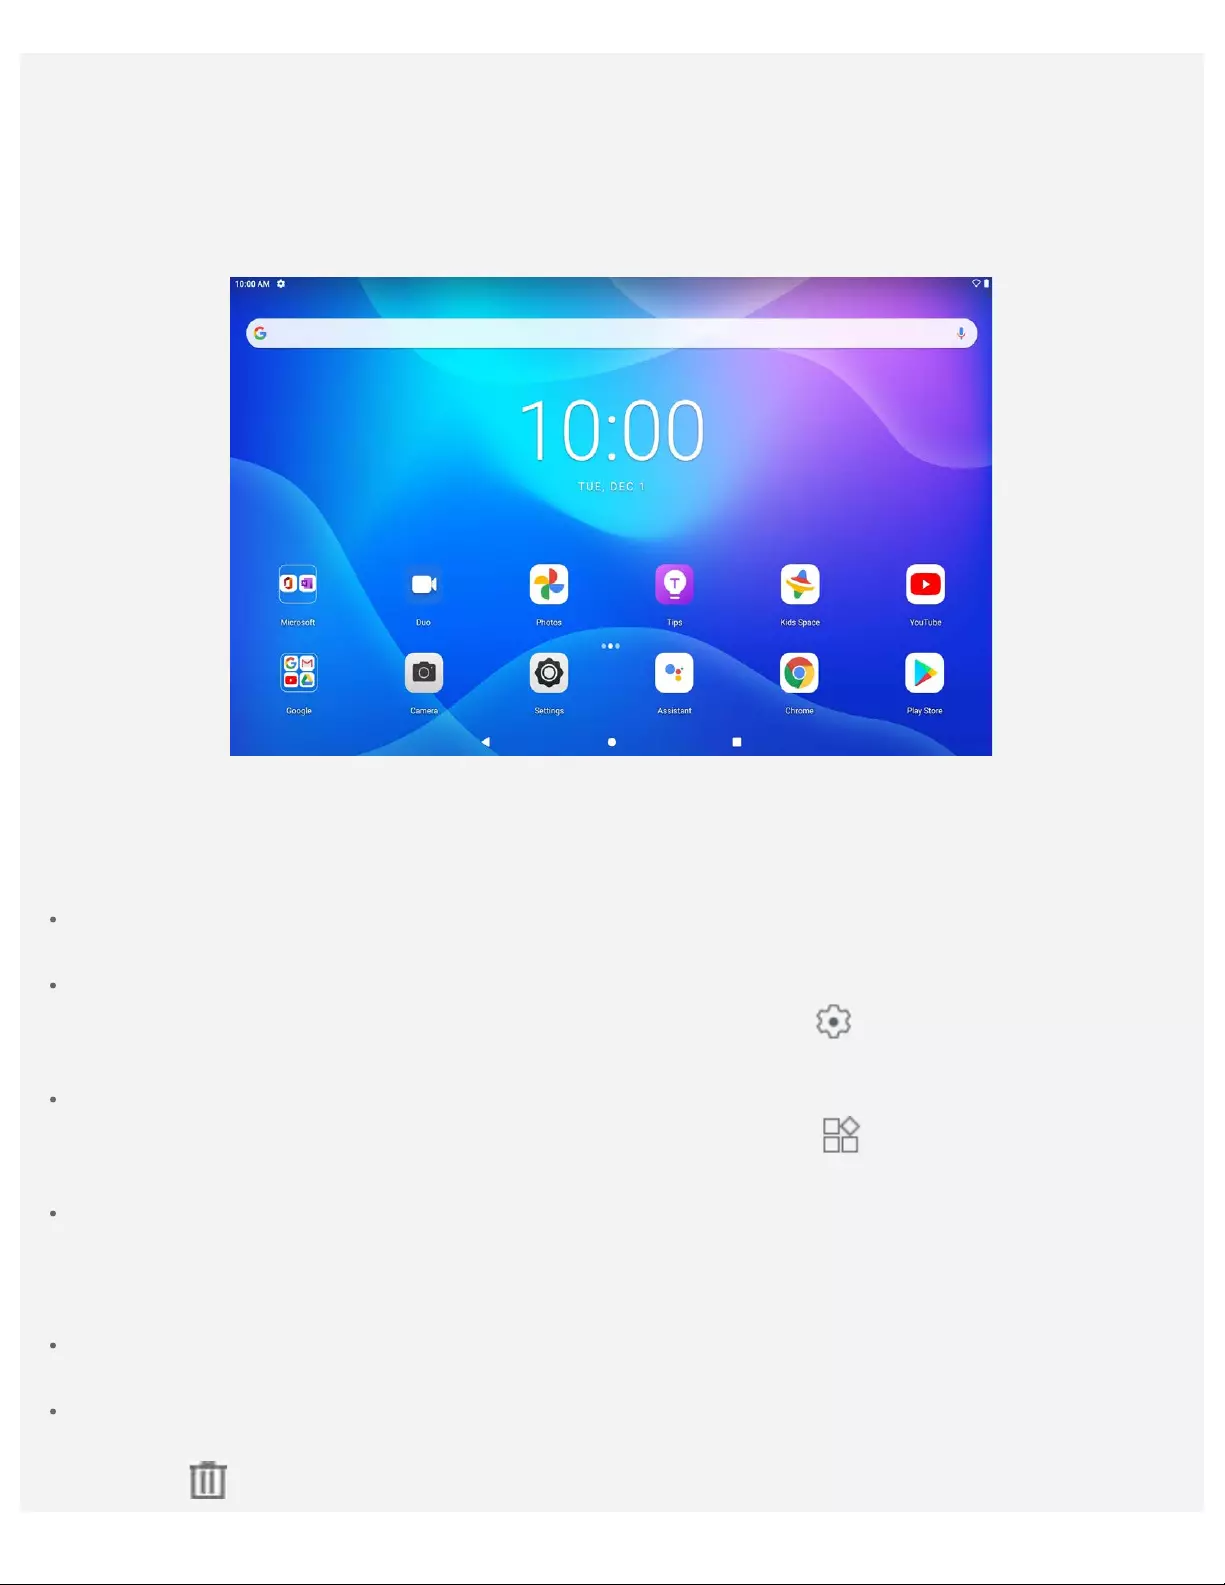
Home screen
The home screen is the starting point for using your device. For your convenience, the home screen is
already set up with some useful apps and widgets.
Note: Your device’s features and the home screen may be different depending on your
location, language, carrier, and device model.
You can customize your home screen at any time.
Home screen
On the default home screen, there is a Google Search bar and some useful apps.
Home Settings
Press and hold anywhere on the home screen except the icons. Tap , and then modify Home
settings.
Add a widget to a home screen
Press and hold anywhere on the home screen except the icons. Tap , press and hold the widget
you want to add, then drag it to where you want to place it, and release.
Change the wallpaper
Press and hold anywhere on the home screen except the icons, tap Wallpapers, and then choose
your preferred wallpaper.
Go to Settings > Display > Wallpaper and choose your preferred wallpaper.
Move an app to another screen
Press and hold an app that you want to move, drag it to where you want to place it, then release.
Uninstall an app
1. Press and hold the app that you want to uninstall.
2. Drag to , and then release and tap OK.

Note: Some of the system apps cannot be uninstalled.
Navigation bar
Screen buttons
There are three buttons at the bottom of the screen by default.
Go back button: Tap to go back to previous page.
Home button: Tap return to the home screen.
Switch apps button: Tap to display all the recent apps. You can do any of the followings:
Tap one app to start it.
Swipe an app window up to close it.
Swipe an app window down to lock or unlock it.
Tap Clear all to stop running all unlocked apps.
Set up navigation bar
Go to Settings > Display > System navigation , you can select Gesture navigation , 2—button
navigation or 3-button navigation .
Notifications and Quick Settings
The Notifications panel informs you of new messages, bluetooth sharing, and activities in progress such
as file downloading. The Quick Settings panel allows you to access frequently -used settings such as the
WLAN switch.
You can do any of the following:
To see notifications, swipe down from the top of the screen.
To close the Notifications panel, swipe up from the bottom of the screen.
To dismiss a notification, swipe left or right across the notification.
To dismiss all notifications, tap CLEAR ALL at the bottom of the Notifications panel.
To open the Quick Settings panel, swipe down from the top of the screen twice.
To quickly turn common functions on and off,click the appropriate icon.

To close the Quick Settings panel, swipe up from the bottom of the screen.
Split screen
Click the in the navigation bar to view the list of recently used apps, long press the app icon above
the screen, and then tap Split screen , and then select another one app to achieve the split screen.
Note: Not all applications support split screen mode.
Split screen settings
In split screen mode, you can do the following:
Adjust the split screen size
Slide the in the middle of the two screens to adjust the split screen size.
Replace the second application
Tap to choose another apps.
Exiting split screen mode
You can exit split screen mode :
Choosing an app that doesn’t support split screen mode.
Sliding the to the edge of the screen.
Force shutdown/reboot
Press and hold the Power button for about 8 seconds until the device turns off, press and hold the
Power button for about 10 seconds to reboot.
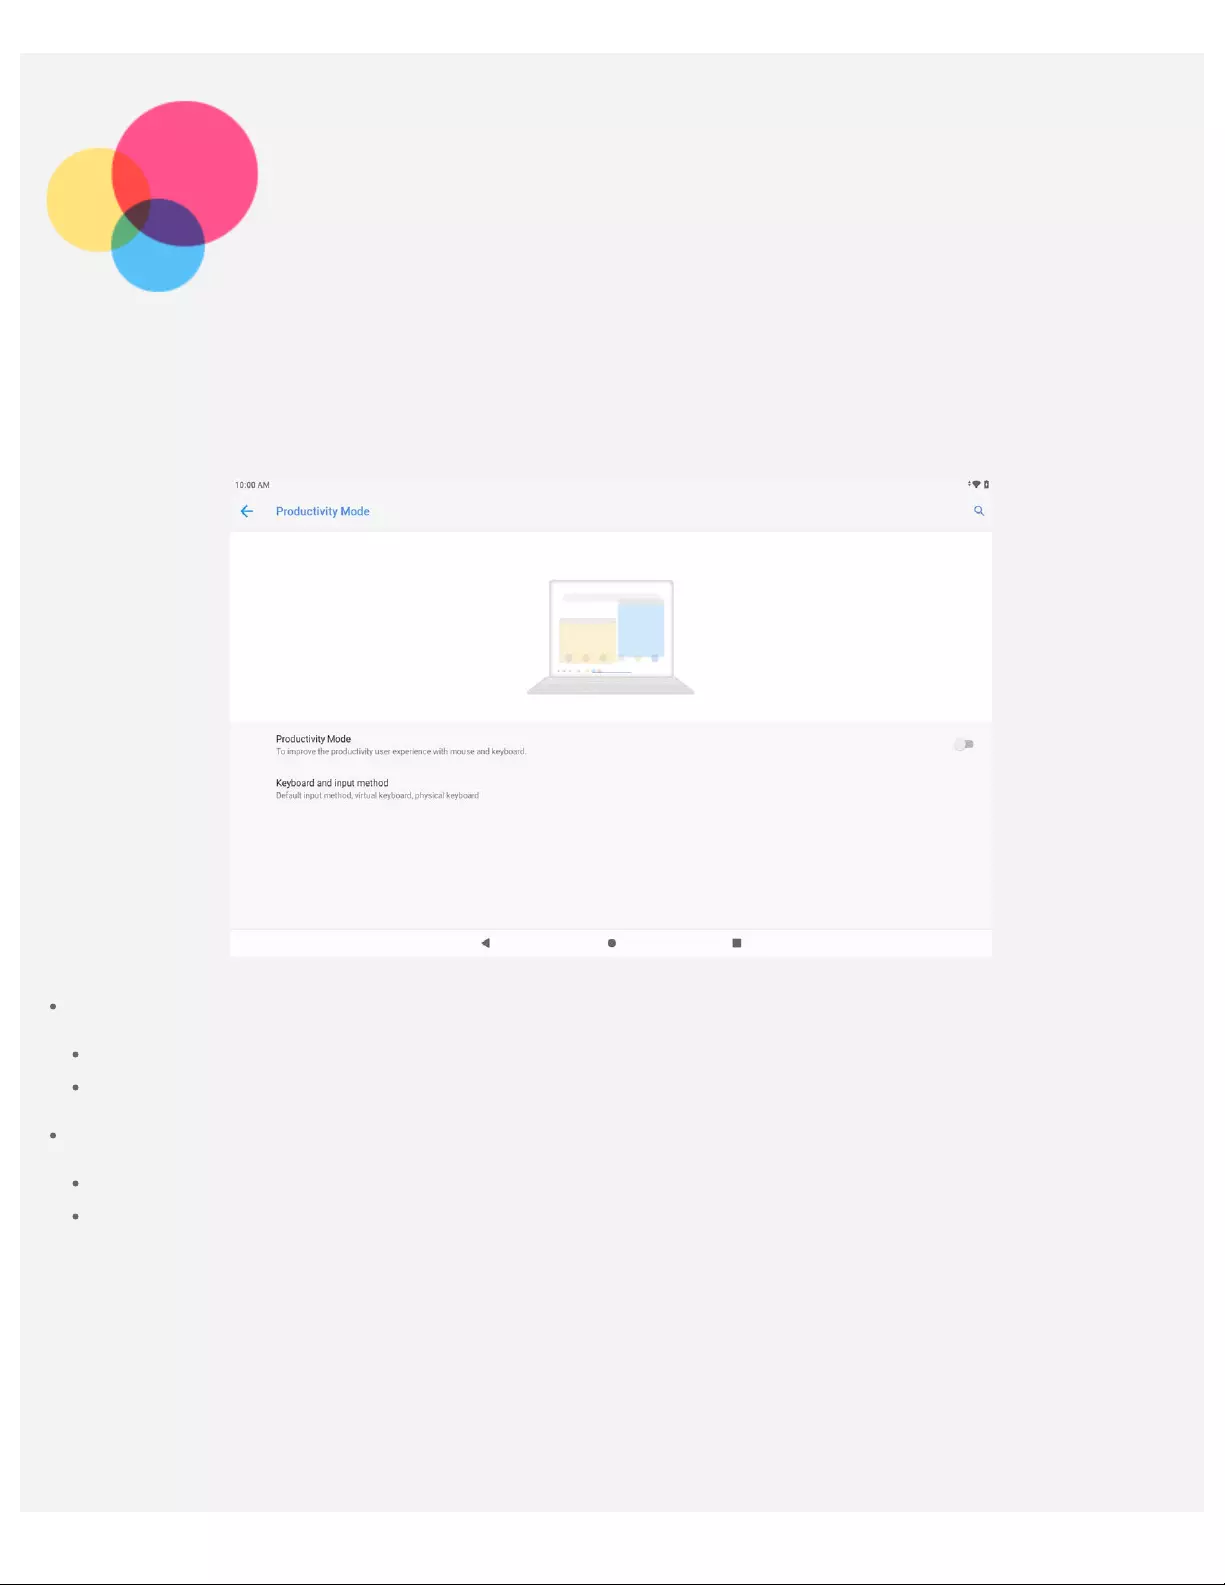
Productivity Mode
The productivity mode supports multiple windows on the screen at the same time if the productivity
mode is enabled. The productivity mode is off by default.
Set up the productivity mode
Turn on the productivity mode
Go to Settings > Productivity Mode to turn on the switch.
Connect to physics keyboard or mouse to enable the productivity mode automatically.
Turn off the productivity mode
Go to Settings > Productivity Mode to turn off the switch.
Remove the physics keyboard or mouse.
Customized navigation bar

When entering the productivity mode, the navigation bar changes to the productivity mode navigation
bar.
Application icon management
Icon will exist on the navigation bar if it can not display the whole application icon.
Drag the app icon to adjust the order.
Close application
Long press the app icon and drag the app icon upwards until Close application appears.
Long press or right click the app icon and then tap CLOSE APPLICATION.
Pin the application to system navigation
Long press or right click the app icon and then tap PIN TO SYSTEM NAVIGATION.
Shortcuts options
Long press or right click the app icon and then tap shortcuts options.
Multi-windows

When entering productivity mode, you can adjust the window size and window location. The optimal
number of windows displayed at the same time are three to five windows.
Open an app, you can do any of the followings:
Note: Some apps may affect the user experience in productivity mode.
Double tap the title bar to switch between the window mode and the full screen mode.
Drag the side of a window to adjust its size. The traceable area shows a highlighted border. If the
windows size reaches its smallest, the border shows a warning color.
Note: Some apps cannot support this feature.
To move a window, tap and hold the title bar and then drag it to anywhere you want.
Using the keyboard
After the keyboard is connected to the tablet, you can use the keyboard to input to enhance the user
experience.
Multi—User
Multi -User Preferences
There are three user types:
Owner: An owner has full control over all user permissions and manages all user accounts.
Guest: There is only one Guest account. A Guest has restricted access to the device.
New User: There can be multiple user accounts, and the additional users can share the device with
the owner.
Creating new user accounts
Tap Settings > Accounts > Multiple users > Add user or profile to create user accounts.
Select Add > User to create additional users, and then follow the on-screen instructions.
Switching between user accounts
Swipe down from the top of the screen, and then tap the users icon to switch between different user
accounts.
On the lock screen interface, select the user icon you want to switch to, then tap and switch to the
other account.
Deleting a user account
Tap Settings > Accounts > Multiple users , and tap the icon located beside the account you would
like to delete, then tap DELETE.

Camera
To open the Camera app, go to Camera.
Taking photos and videos
You can take photos and record videos with your device’s built—in camera.
Tap to take a photo.
Tap to switch between the front and the rear camera.
Tap to configure the other camera settings.
Tap to delay shooting.
Tap to set a filter.
Tap to set flash settings.
Tap Video to switch to video, and tap to record a video.
Taking screenshots
Press and hold the Power and the Volume down buttons at the same time to take a screenshot.
Viewing pictures and videos
Photos and videos are stored in your device’s internal storage. You can view your photos and videos by
using the following methods:
Tap the photo just taken when using the Camera app, and then tap to go to Google Photos.
Open the Google Photos app or the Files app to view your photos and videos.
Network
You need to set up a wireless network before connecting to the Internet.
Set up a WLAN network.
*Set up a mobile network.
Set up a VPN network.
You can also share your mobile network with others.
*Set up a hotspot.
Setting up a WLAN network
Go to Settings > Network & internet > WLAN. Turn on the WLAN switch and tap a WLAN hotspot in
the list to connect to the Internet. When you are connecting to a secure hotspot, you need to enter a
password to connect.
*Setting up a mobile network
Go to Settings > Network & internet > Mobile network.
Note: You need a valid SIM card with data service. If you don’t have a SIM card, contact your
carrier.
Setting up a VPN network
VPNs are used within organizations to allow you to communicate private information securely over a
non—private network. You may need to configure a VPN, for example, to access your work email. Ask the
network’s administrator for the settings necessary to configure a VPN for your network.
1. Go to Settings > Network & internet > VPN.
2. Tap to edit the VPN profile, including the name, type, and server address, and then tap SAVE.
3. Tap the VPN server name, enter the username and password, and then tap CONNECT to connect to
the VPN network.
4. Tap to edit or delete the VPN.
Setting up a hotspot
You can use a personal hotspot to share an Internet connection with a computer or other device.
Go to Settings > Network & internet > Hotspot & tethering and do the following:
*Tap WLAN hotspot to configure the hotspot.
You can also use Bluetooth tethering or * USB tethering.
Note: Tell your friends the Network name and password and then they can connect to your
network.

Internet
You can browse the web if your device is connected to a wireless network or a cellular network.
To open the browser app, go to Chrome.
Visiting websites
You can use the Chrome app to visit websites.
Type a web address
You don’t need to type the full web address of an «http://» website to access it.
To visit «http://www.lenovo.com», simply type «www.lenovo.com» into the address bar and Tap .
Search for keywords
You can also type keywords into the address bar to search for webpages.
You can set a search engine in > Settings > Search engine .
Add a new webpage
Tap > New tab to add a new webpage tab.
Tap > New incognito tab to visit a website without leaving any traces of your visit.
Close a webpage
Tap to close a webpage tab.
Refresh a webpage
Tap to refresh a webpage.
Tap to return to the previous webpage.
Tap to go forward to a recent webpage.
Saving webpages
You can save images and webpages in your device’s internal storage.
Save images
Press and hold the image, then tap Download image .
Bookmark webpages
Tap to add a webpage to Bookmarks.
Tap > Bookmarks to view bookmarks.
Setting accessibility preferences
Tap > Settings > Accessibility to set the Text scaling , Force enable zoom, Simplified view for
web pages and Captions.
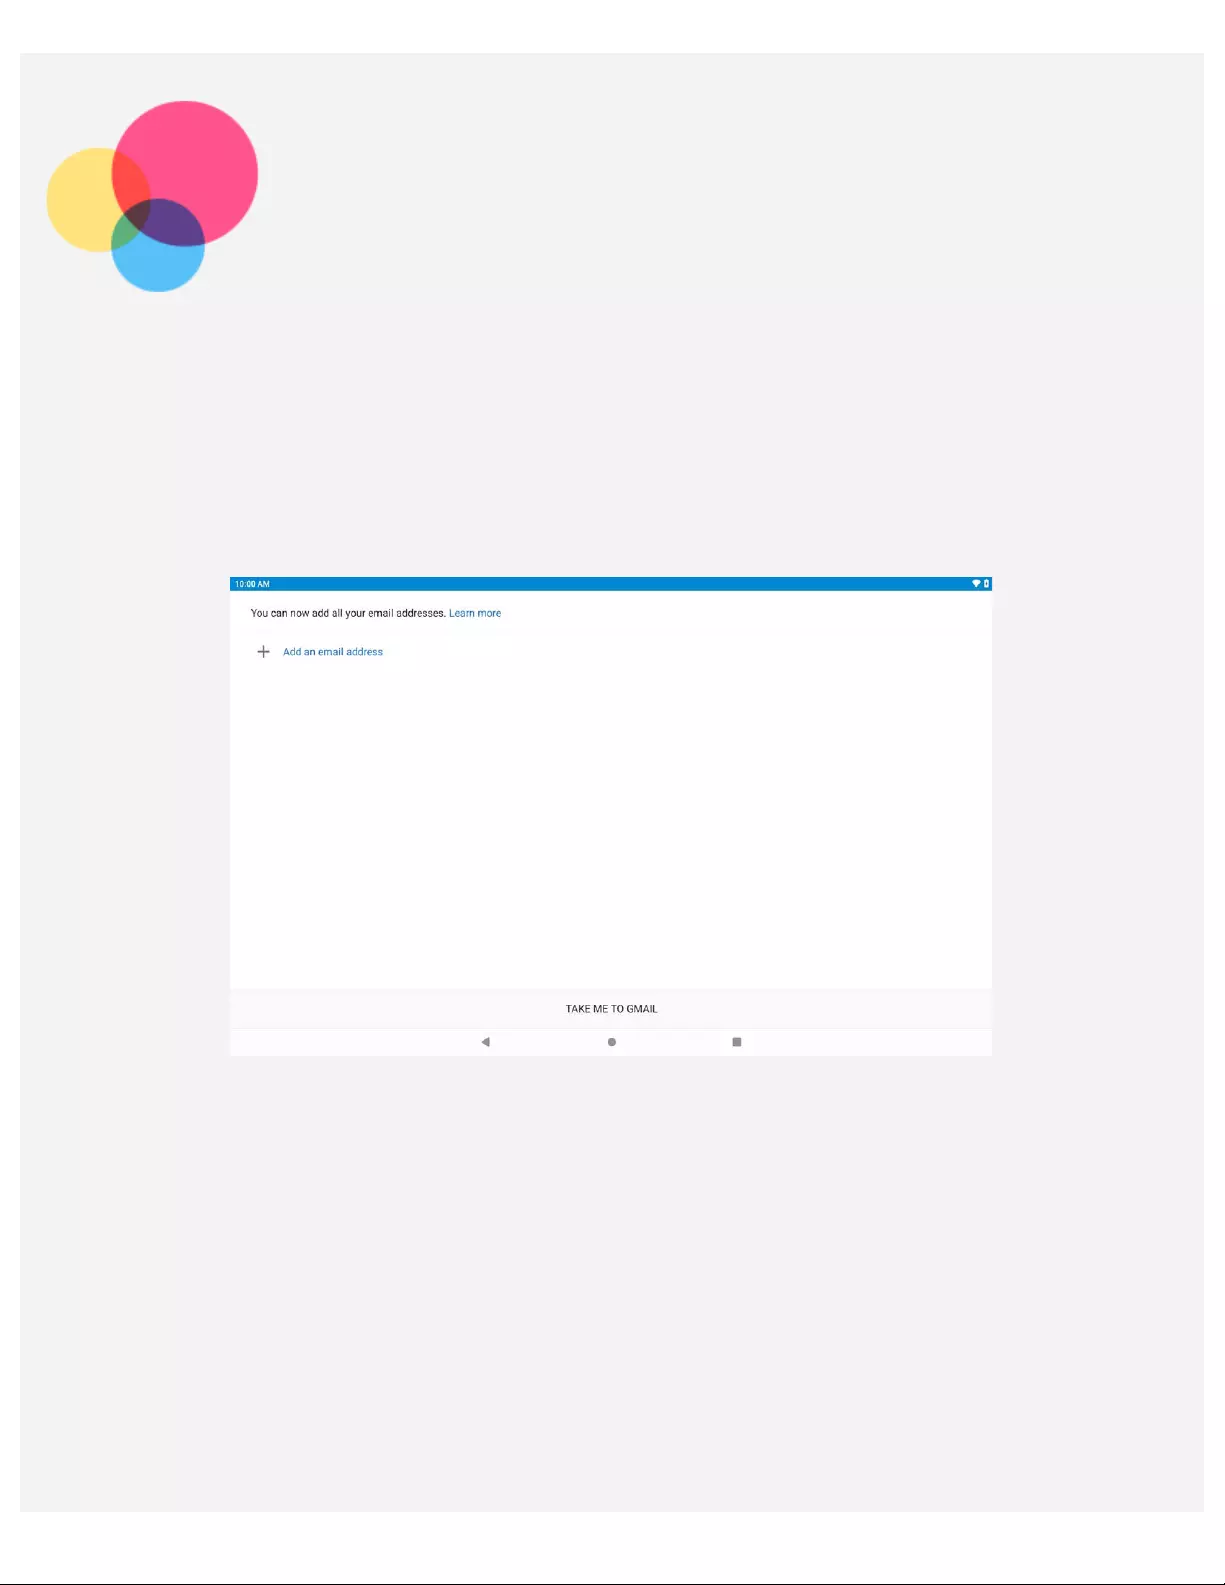
Gmail
You can send and receive emails if your device is connected to a wireless network.
To access the Gmail app, go to Gmail.
Setting up a Gmail account
You can sign into Gmail if you have a Gmail account. If not, you will need to create a Gmail account.
You can also sign in with email accounts provided by other companies.
Using Gmail
After setting up your gmail account, you can use the Gmail app to send and receive emails.
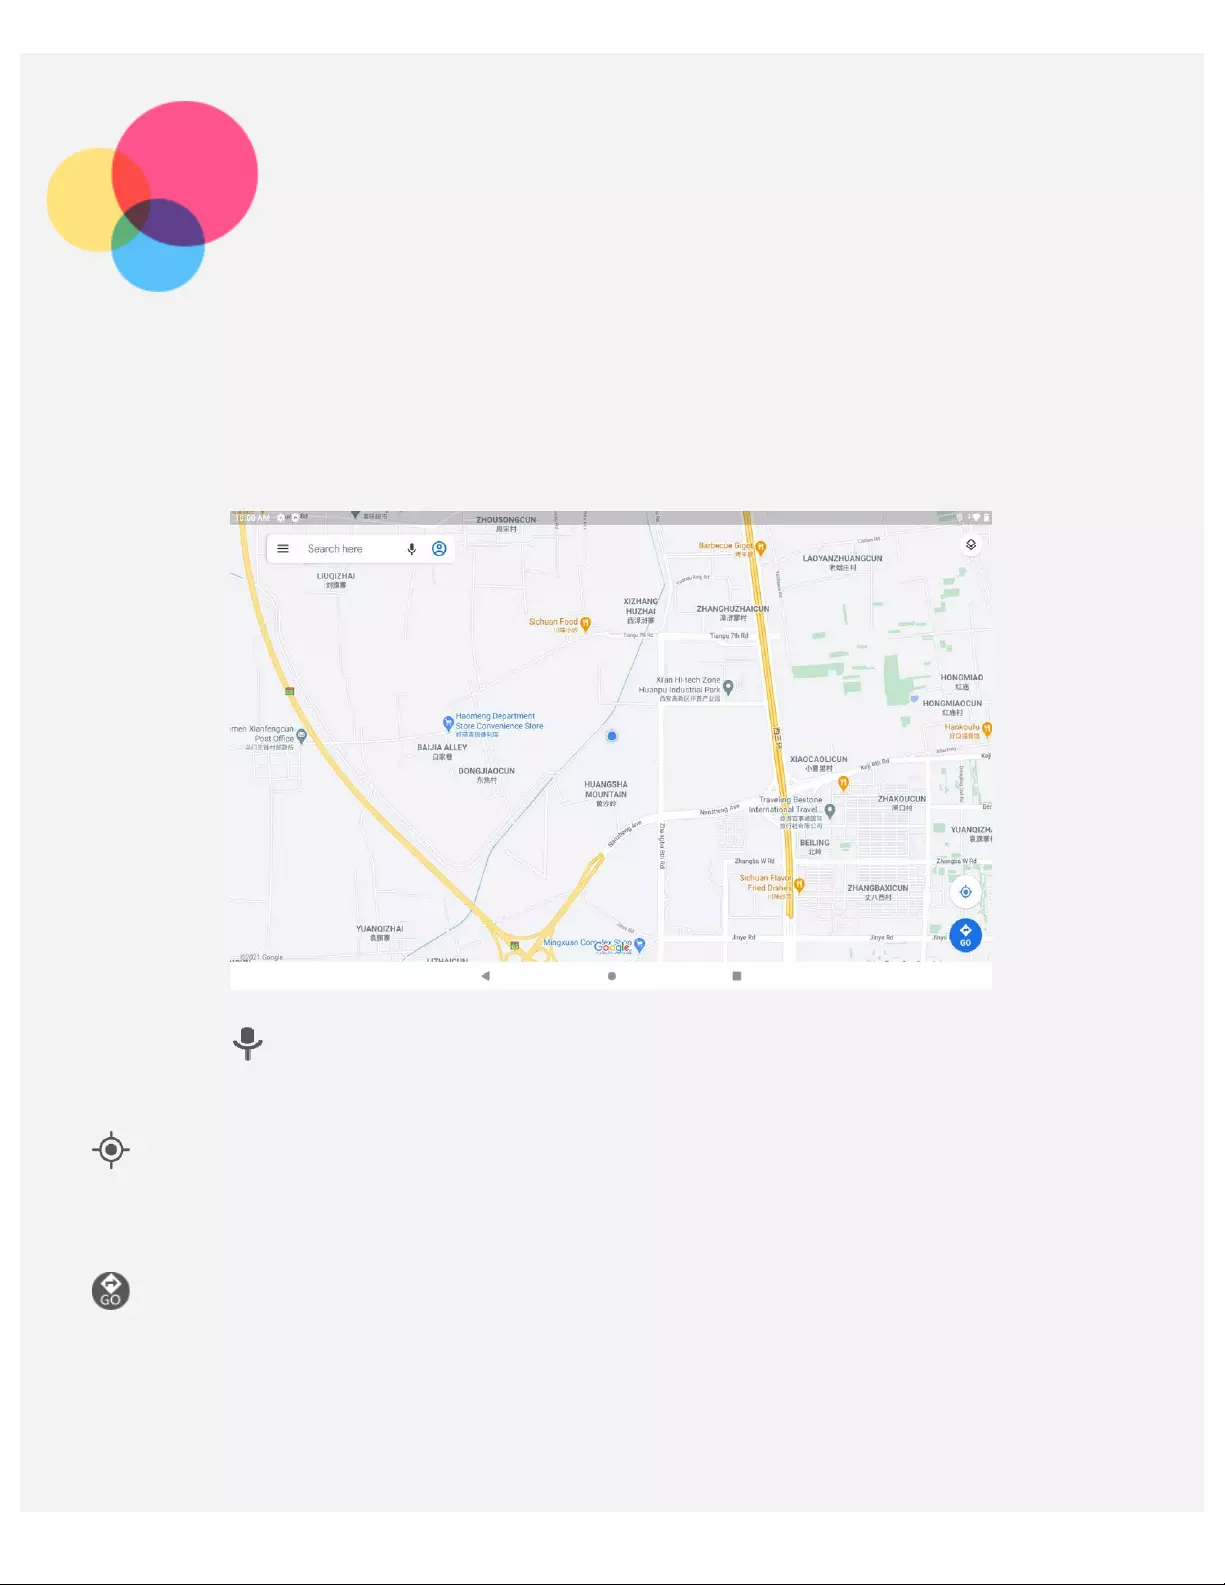
Maps
You need to select the following settings before you can use Maps.
Go to Settings > Location and enable location access for Google apps, the default is on.
Finding a location
Type the address that you want to find, then press Search here.
You can also tap to speak the address you want to search for.
Current location
Tap to see your current location.
Then tap Explore nearby to check what is nearby.
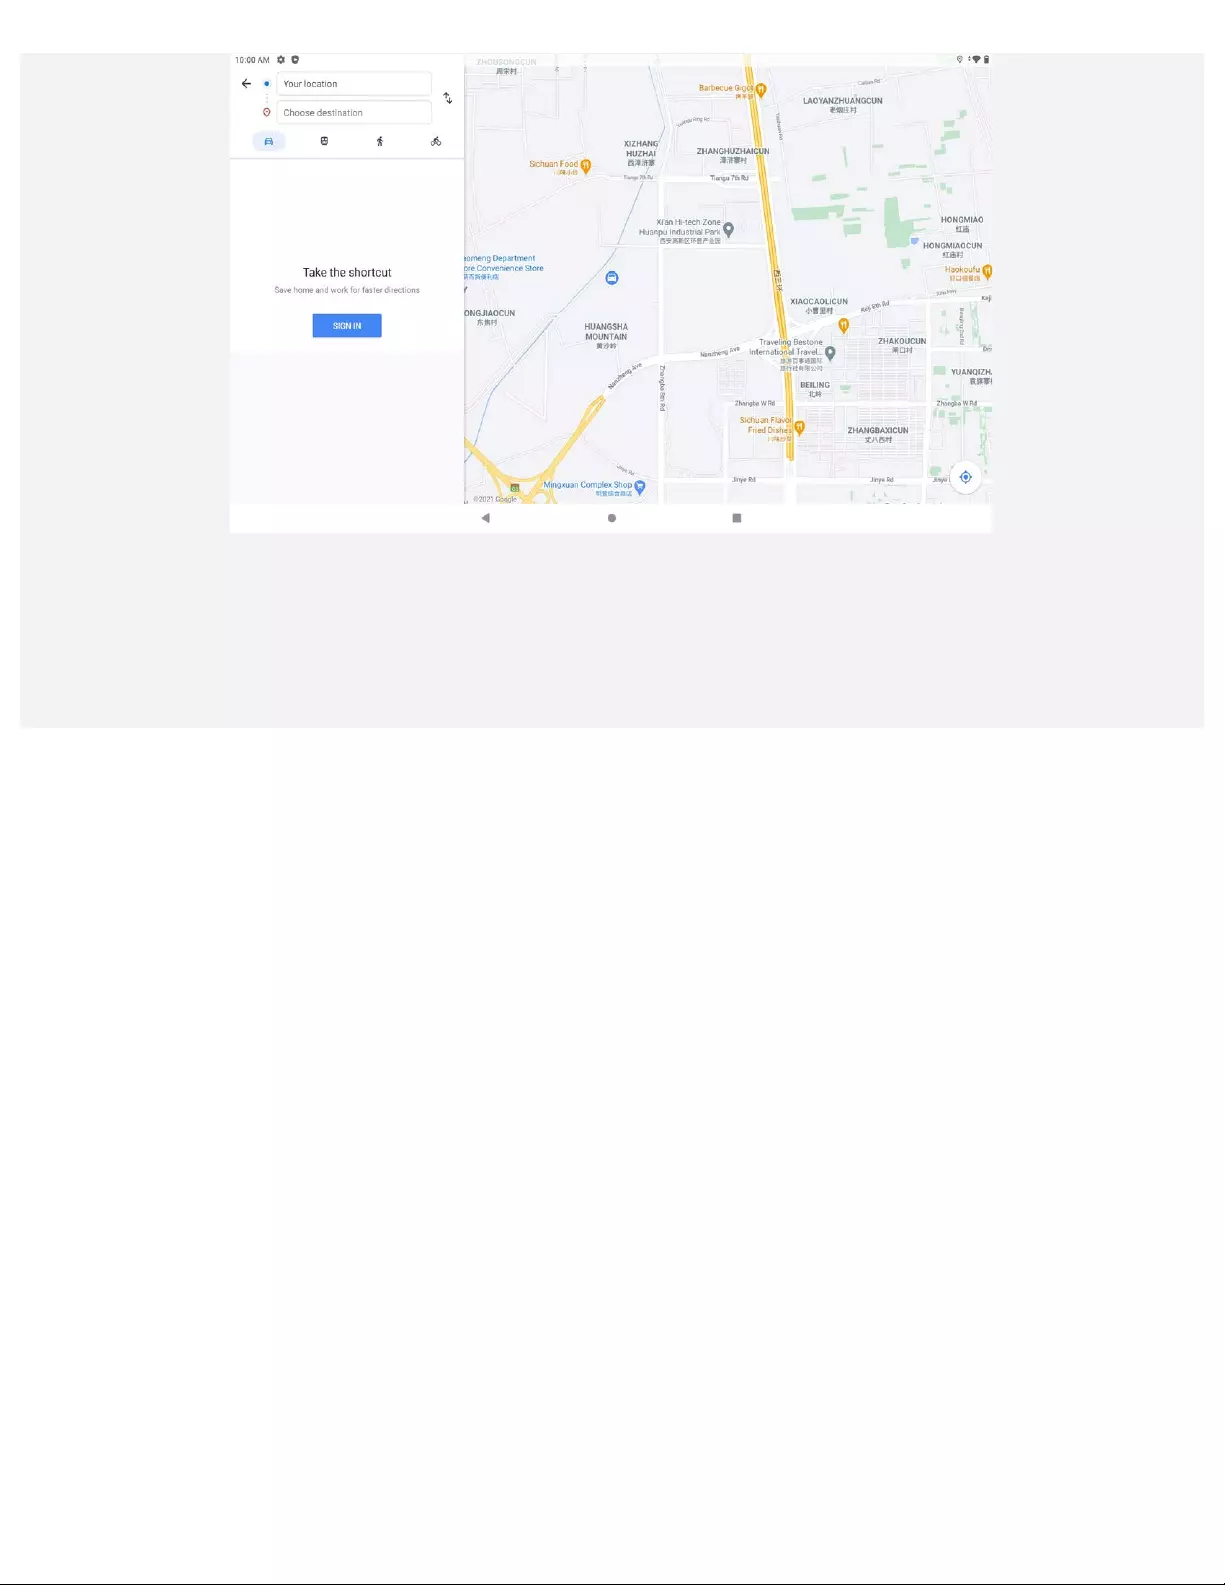
Planning a route
Tap and type in «Your location» and «Choose destination«, or just choose the starting point as
«Your location«.
Choose the travel mode: by car, by bus, by bike or on foot.

Sync
You can transfer data between your device and computer such as music, pictures, videos, documents,
Android application package (APK) files, and so on.
Connecting your device to your computer
Connect your device and computer using a USB cable.
Slide down from the top of the screen. You will see «Charging this device via USB« in the notifications
bar.
Tap Charging this device via USB to view other options.
Selecting the computer connection mode
You can select one of the following options:
File Transfer : Select this mode if you want to transfer files between your tablet and computer.
*USB tethering: For shared network.
MIDI: Select this mode if you want MIDI—enabled apps on your device to work with MIDI software on
the computer.
PTP: Select this mode if you only want to transfer only photos and videos between your tablet and
computer.
No data transfer : Select this mode if you want to charge your phone only.

Lenovo Precision Pen 2
You can use the Lenovo Precision Pen 2 in place of your fingers for a better experience, such as
working with specific applications to write or draw on the screen. Use the pen included with the
device, or purchase an additional one.
Use Lenovo Precision Pen 2, need to go to Settings > Smart navigation , turn on the smart navigation
function.
Pen buttons
The pen includes an upper button and a lower button, making it convenient to use with your tablet.
Tap the upper button to go back to the home screen.
Tap the lower button to bring up the smart navigation menu.
Bamboo Paper
Tap to open the Bamboo Paper app in the smart navigation menu. You can add new notes, edit
notes, share your notes in the Bamboo Paper app.
Managing the note list
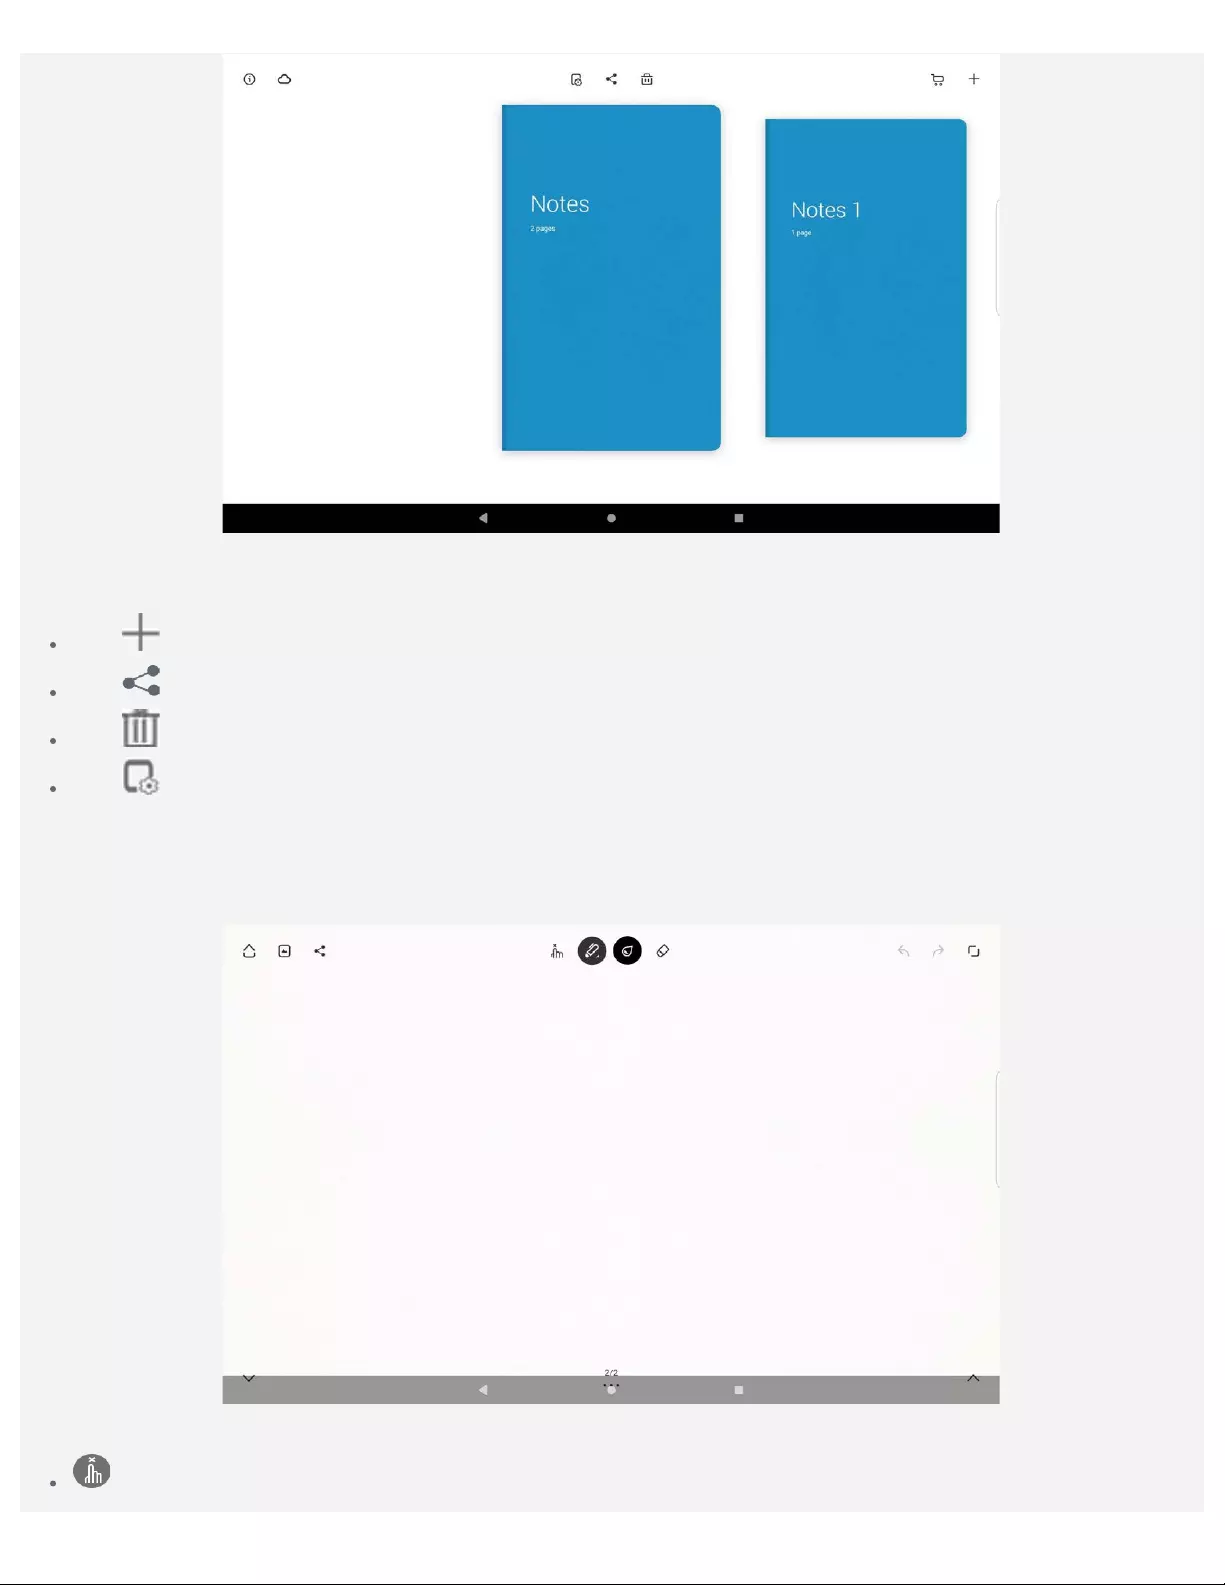
After entering the home page, you can swipe left or right to view the note list and do any of the
following:
Tap to create a new note.
Tap to generate a WILL/PDF file and share with others.
Tap to delete a note.
Tap to change the cover, change the paper type, or rename the note.
Editing the note
After entering the editing page, you can edit your notes using your hand or with your pen.
: Edit with the pen, or tap to switch to editing with your fingers.
: Choose the pen type.
: Choose the color.
: Use the eraser to erase any writing on the screen.
: Full screen.
: Select a sharing channel such as Gmail or Bluetooth to share this page with others.
: Select a picture and add it to your note.
: Go back to the home page.
/ : Go back/Go forward.
/ : Page down/Page up.

Settings
Setting the language
1. Go to Settings > System > Languages & input > Languages > Add a language.
2. Select the language that you want to add.
3. Press and hold to drag the added language to the first line.
Setting screen lock
Go to Settings > Security > Screen lock , and select screen lock mode.
Setting sound
Go to Settings > Sound. Here you can set the Media volume , Alarm volume , Notification volume ,
and other sound settings.
Setting face recognition
Go to Settings > Security > Face-recognition, follow the on-screen instructions to set up your device.
Battery protection mode
Battery protection mode prevents charging for extended periods, which exposes the battery to high
temperatures and high voltage that may cause it to age faster. Once turned on, charging is paused
when the battery level reaches 60%.
Go to Settings > Battery > Battery protection mode to turn on battery protection mode.
Eye Protection and Safety Information
Eye protection
When eye protection mode is enabled, the screen will have an amber tint, which reduces blue light. This
allows you to read or view the screen more comfortably in dimly lit environments.
Go to Settings > Display > Eye protection mode , and tap Status / *TURN ON NOW to turn it on.
Color Temperature adjustment: Enter Eye protection mode and slide the Intensity slider to adjust as
needed.
Safety Information
Please use the device in a well —lit area, and when using the device, keep it at a suitable distance from
your eyes. To avoid eyestrain, take a break from looking at the screen after a period of time.
Factory reset
Factory reset will erase all data from your tablet’s internal storage. Please back up important data on
the device before resetting your tablet. Go to Settings > System > Reset options > Erase all data

(factory reset), then tap Erase all data to reset to the manufacturer’s default settings.

Appendix
Important safety and handling information
To avoid personal injury, property damage, or accidental damage to the product, read all of the
information in this section before using the product. For additional tips to help you operate your device
safely, go to http://www.lenovo.com/safety.
Handle your device with care
Do not drop, bend, or puncture your device; do not insert foreign objects into or place heavy objects on
your device. Sensitive components inside might become damaged.
Your device screen is made of glass. The glass might break if the device is dropped on a hard surface,
is subjected to a high impact, or is crushed by a heavy object. If the glass chips or cracks, do not touch
the broken glass or attempt to remove it from the device. Stop using the device immediately and contact
Lenovo technical support for repair, replacement, or disposal information.
When using your device, keep it away from hot or high-voltage environments, such as electrical
appliances, electrical heating equipment, or electrical cooking equipment. Use your device only in the
temperature range of 0°C (32°F) to 40°C (104°F) (storage —20°C (-4°F) to 60 °C (140°F)) to avoid
damage.
Don’t expose your device to water, rain, extreme humidity, sweat or other liquids.
Do not disassemble or modify your device
Your device is a sealed unit. There are no end -user serviceable parts inside. All internal repairs must
be done by a Lenovo-authorized repair facility or a Lenovo-authorized technician. Attempting to open or
modify your device will void the warranty.
Built -in rechargeable battery notice
Do not attempt to replace the internal rechargeable lithium ion battery. There is risk of explosion if the
battery is replaced with an incorrect type. Contact Lenovo Support for replacement.
Plastic bag notice
DANGER:
Plastic bags can be dangerous. Keep plastic bags away from babies and children to avoid danger
of suffocation.
Adapter information
Prevent your device and AC adapter from getting wet.
Do not immerse your device in water or leave your device in a location where it can come into

contact with water or other liquids.
Use approved charging methods only.
Note: Please only use standard Lenovo power adapters. The use of third -party power adapters will
affect the charging speed, resulting in abnormal charging and potential damage to the equipment.
Connect a standard power adapter to a suitable power outlet.
Use a standard data cable to connect the device to a PC or a device that complies with USB 2.0 or
higher.
Charging devices might become warm during normal use. Ensure that you have adequate ventilation
around the charging device. Unplug the charging device if any of the following occurs:
The charging device has been exposed to rain, liquid, or excessive moisture.
The charging device shows signs of physical damage.
You want to clean the charging device.
Warning:
Lenovo is not responsible for the performance or safety of products not manufactured or
approved by Lenovo. Use only approved Lenovo ac adapters and batteries.
EU ErP (EcoDesign) Directive (2019/125/EC) — External Power Adapters (Regulation (EU) 2019/1782)
Lenovo Products are designed to work with a range of compatible power adapters. Access
https://www.lenovo.com/us/en/compliance/eu—doc to view the compatible power adapters. For the
detailed power adapter specifications for your computer, go to https://support.lenovo.com.
Alkaline battery warnings
When replacing the alkaline batteries, only use a compatible type or an equivalent to the one
recommended by the manufacturer. Alkaline batteries can explode when they are used, handled, or
disposed of improperly. When disposing of alkaline batteries, comply with all relevant local battery
disposal ordinances and regulations. In addition:
Do not disassemble or short-circuit batteries.
Insert the batteries correctly according to the +/ — symbols for their polarity.
Remove batteries from the product when not in use.
Do not recharge alkaline batteries.
Do not dispose of batteries in fires.
Do not allow metal objects to come in contact with the battery terminals.
Do not mix new batteries with used batteries, or mix batteries of different types (such as alkaline with
carbon zinc).
For proper battery installation and removal, follow the manufacturer’s instructions for this product. Keep
batteries away from small children. If swallowed, consult a physician immediately. If the batteries are
leaking, avoid letting the battery fluid come into contact with your skin and eyes. If battery fluid has
already come in contact with your skin, wash your skin with clean water. If battery fluid has already
come in contact with your eyes, avoid rubbing your eyes. Consult your physician immediately.
Caution about high volume usage
Warning:exposure to loud noise from any source for extended periods of time may affect your hearing.
The louder the sound, the less time is required before your hearing could be affected. To protect your
hearing:
Limit the amount of time you use headsets or headphones at high volume.
Avoid turning up the volume to block out noisy surroundings.
Turn the volume down if you can’t hear people speaking near you.
If you experience hearing discomfort, including a sensation of pressure or fullness in your ears, ringing
in your ears or muffled speech, you should stop listening to the device through your headset or
headphones and have your hearing checked.
To prevent possible hearing damage, do not listen at high volume levels for long periods.
Take care when using your device in a motor vehicle or on a bicycle
Always prioritize your safety and the safety of others. Follow the law. Local laws and regulations might
govern how you can use mobile electronic devices, such as your device, while you drive a motor vehicle
or ride a bicycle.
Dispose according to local laws and regulations
When your device reaches the end of its useful life, do not crush, incinerate, immerse in water, or
dispose of your device in any manner contrary to local laws and regulations. Some internal parts contain
substances that can explode, leak, or have adverse environmental effects if disposed of incorrectly.
See “Recycling and environmental information” for additional information.
Keep your device and accessories away from small children
Your device contains small parts that can be a choking hazard to small children. Additionally, the glass
screen can break or crack if dropped on or thrown against a hard surface.
Protect your data and software
Do not delete unknown files or change the name of files or directories that were not created by you;
otherwise, your device software might fail to work.
Be aware that accessing network resources can leave your device vulnerable to computer viruses,
hackers, spyware, and other malicious activities that might damage your device, software, or data. It is
your responsibility to ensure that you have adequate protection in the form of firewalls, antivirus
software, and anti-spyware software and keep such software up to date.
Keep electrical appliances away from your device. These include electric fans, radios, high—powered
speakers, air—conditioners, and microwave ovens. The strong magnetic fields generated by electrical
appliances can damage the screen and the data on the device.
Be aware of heat generated by your device
When your device is turned on or the battery is charging, some parts might become hot. The
temperature that they reach depends on the amount of system activity and the battery charge level.
Extended contact with your body, even through clothing, could cause discomfort or even a skin burn.
Avoid keeping your hands, your lap, or any other part of your body in contact with a hot section of the
device for any extended time.
Electronic emission notices
FCC Compliance Statement
This equipment has been tested and found to comply with the limits for a Class B digital device,
pursuant to Part 15 of the FCC Rules. These limits are designed to provide reasonable protection
against harmful interference in a residential installation. This equipment generates, uses, and can
radiate radio frequency energy and, if not installed and used in accordance with the instructions, may
cause harmful interference to radio communications. However, there is no guarantee that interference
will not occur in a particular installation. If this equipment does cause harmful interference to radio or
television reception, which can be determined by turning the equipment off and on, the user is
encouraged to try to correct the interference by one or more of the following measures:
Reorient or relocate the receiving antenna.
Increase the separation between the equipment and receiver.
Connect the equipment into an outlet on a circuit different from that to which the receiver is
connected.
Consult an authorized dealer or service representative for help.
Lenovo is not responsible for any radio or television interference caused by unauthorized changes or
modifications to this equipment. Unauthorized changes or modifications could void the user’s authority to
operate the equipment.
This device complies with Part 15 of the FCC Rules. Operation is subject to the following two conditions:
(1) this device may not cause harmful interference, and (2) this device must accept any interference
received, including interference that may cause undesired operation.
Responsible Party:
Lenovo (United States) Incorporated
1009 Think Place — Building One
Morrisville, NC 27560
Telephone: 1-919 -294-5900
ISED Caution
This device complies with Innovation, Science and Economic Development Canada license—exempt RSS
standard(s). Operation is subject to the following two conditions:
(1) This device may not cause interference, and
(2) this device must accept any interference, including interference that may cause undesired operation
of the device.
Le présent appareil est conforme aux CNR d’Industrie Canada applicables aux appareils radio exempts
de licence. L’exploitation est autorisée aux deux conditions suivantes:
(1) l’appareil ne doit pas produire de brouillage, et
(2) l’utilisateur de l’appareil doit accepter tout brouillage radioélectrique subi, même si le brouillage est
susceptible d’en compromettre le fonctionnement.
Japanese VCCI Class B statement
この装置は、クラスB情報技術装置です。この装置は、家庭環境で使用することを目的としていますが、この装
置がラジオやテレビジョン受信機に近接して使用されると、受信障害を引き起こすことがあります。 取扱説明書
に従って正しい取り扱いをして下さい。VCCI—B
Japan compliance statement for products that connect to power mains rated at less than or equal to 20A
per phase
日本の定格電流が 20A/相 以下の機器に対する高調波電流規制
高調波電流規格 JIS C 61000—3-2 適合品
Environmental, recycling, and disposal information

General recycling statement
Lenovo encourages owners of information technology (IT) equipment to responsibly recycle their
equipment when it is no longer needed. Lenovo offers a variety of programs and services to assist
equipment owners in recycling their IT products. For information on recycling Lenovo products, go to
http://www.lenovo.com/recycling.
Important battery and WEEE information
Batteries and electrical and electronic equipment marked with the symbol of a crossed -out wheeled bin
may not be disposed as unsorted municipal waste. Batteries and waste of electrical and electronic
equipment (WEEE) shall be treated separately using the collection framework available to customers for
the return, recycling, and treatment of batteries and WEEE. When possible, remove and isolate batteries
from WEEE prior to placing WEEE in the waste collection stream. Batteries are to be collected
separately using the framework available for the return, recycling, and treatment of batteries and
accumulators.
Country -specific information is available at http://www.lenovo.com/recycling.
Battery recycling information for Brazil
Declarações de Reciclagem no Brasil
Descarte de um Produto Lenovo Fora de Uso Equipamentos elétricos e eletrônicos não devem ser
descartados em lixo comum, mas enviados à pontos de coleta, autorizados pelo fabricante do produto
para que sejam encaminhados e processados por empresas especializadas no manuseio de resíduos
industriais, devidamente certificadas pelos orgãos ambientais, de acordo com a legislação local. A
Lenovo possui um canal específico para auxiliá-lo no descarte desses produtos. Caso você possua um
produto Lenovo em situação de descarte, ligue para o nosso SAC ou encaminhe um e-mail para:
reciclar@lenovo.com, informando o modelo, número de série e cidade, a fim de enviarmos as instruções
para o correto descarte do seu produto Lenovo.
Recycling information for Japan
Recycling and disposal information for Japan is available at http://www.lenovo.com/recycling/japan.
Recycling information for India
Recycling and disposal information for India is available at
http://www.lenovo.com/social_responsibility/us/en/sustainability/ptb_india.html.
Battery recycling marks
The battery recycling information of Taiwan
Battery recycling information for the United States and Canada

Battery recycling information for the European Union
ENERGY STAR model information
ENERGY STAR® is a joint program of the U.S. Environmental Protection Agency and the U.S.
Department of Energy aimed at saving money and protecting the environment through energy efficient
products and practices.
Lenovo is proud to offer our customers products with the ENERGY STAR qualified designation. You
might find an ENERGY STAR mark affixed on the computer or displayed on the power settings
interface. Lenovo tablets of the following model name, if carrying an ENERGY STAR mark, have been
designed and tested to conform to the ENERGY STAR program requirements for tablets.
Lenovo TB-J606F and Lenovo TB-J606L
By using ENERGY STAR qualified products and taking advantage of the power —management features of
the tablet, you can help reduce the consumption of electricity. Reduced electrical consumption can
contribute to potential financial savings, a cleaner environment, and the reduction of greenhouse gas
emissions.
For more information about ENERGY STAR, go to http://www.energystar.gov.
Export classification notice
This product is subject to the United States Export Administration Regulations (EAR) and has an Export
Classification Control Number (ECCN) of 5A992.c. It can be re -exported except to any of the embargoed
countries in the EAR E1 country list.
Troubleshooting
Insufficient memory prompt appears during app installation
Please free up some memory and try to install again.
The touch screen does not work or is not sensitive
Please press and hold the power button until the device turns off. Then switch it on again in the normal
Device does not power on or the system crashes
Please charge the battery for half an hour and then press and hold the power button until the device
turns off. Then switch it on again in the normal way.
The device cannot access the internet via a wireless network
Restart the wireless router or go to Settings and restart WLAN.
The device cannot wake up from sleep mode
Please press and hold the power button until the device turns off. Then switch it on again in the normal
way.
Перейти к контенту
Планшеты Lenovo
- Размер инструкции: 840.06 kB
- Формат файла: pdf
Если вы потеряли инструкцию от планшета Lenovo Tab P11 (TB-J606F/L), можете скачать файл для просмотра на компьютере или печати.
Инструкция для планшета Lenovo Tab P11 (TB-J606F/L) на русском языке. В руководстве описаны возможности и полезные функции, а также правила эксплуатации. Перед использованием внимательно ознакомьтесь с инструкцией.
Чтобы не читать всю инструкцию вы можете выполнить поиск по содержимому внутри инструкции и быстро найти необходимую информацию. Рекомендации по использованию помогут увеличить срок службы планшета Lenovo Tab P11 (TB-J606F/L). Если у вас появилась проблема, то найдите раздел с описанием неисправностей и способами их решения. В нем указаны типичные поломки и способы их решения.
Сложность разборки:
Сложно
Рекомендованные инструменты
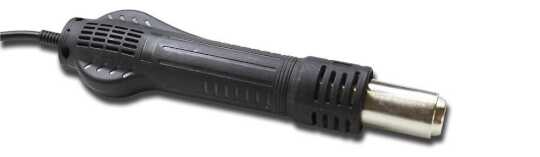
Фен
Крестовая отвертка 1,5 мм
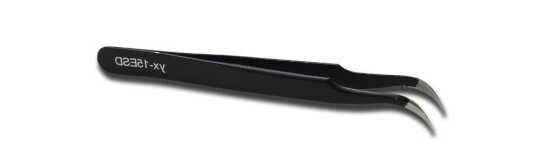
Пинцет

Пластиковый инструмент
Автор / Специалист по созданию контента с 10+ летним опытом работы
Шаг 1. Перед тем, как приступить к разборке
⚠️️ Перед разборкой не забудьте выключить телефон.
Шаг 2. Вынимаем Лоток карт
Прежде всего нам нужно вынуть лоток карт, для этого используем специальный инструмент и выдвигаем лоток для карт памяти.
⚠️️ Обратите внимание! Вставлять инструмент нужно в специальное отверстие на ребре корпуса телефона. Не нажимайте слишком сильно, это может привести к поломке механизма выталкивания лотка.
Шаг 3. Открываем дисплейный модуль
Нам необходимо нагреть поверхность дисплея до температуры около 70° С. Для этого используем нагревательный коврик, мы рекомендуем использовать нагревательный коврик или сепаратор.
Поскольку разборка имеет третью максимальную сложность, нам потребуется отсоединить дисплей. Это очень трудная задача. Равномерно нагреть дисплей достаточно сложно, а повредить дисплей крайне легко.
Итак, после 10-15 минут нагревания — используем тонкую пластиковую пленку.
Вставляем ее в зазор между корпусом и дисплеем и аккуратно проводим по краю, срезая клеевую основу.
⚠️️ Нужно быть очень осторожными в районе фронтальной камеры.
⚠️️ Нужно быть осторожным на краях.
⚠️️ Нам не нужно действовать силой. Если в некоторых местах дисплей приклеевается обратно, можно дополнительно использовать, например, пластиковую лопатку, чтобы слегка приподнять дисплей.
⚠️️ Отсоединение дисплея — трудоемкая процедура.
Шаг 4. Откручиваем винт
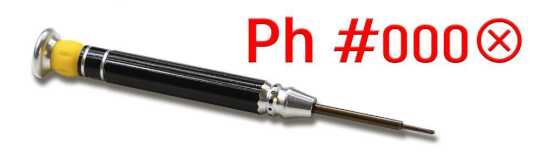
Одной рукой мы должны осторожно приподнять, а другой рукой открутить один винт (отвертка крестовая 1,5 мм (PH# 000)).
Затем снимаем фиксатор, удерживающий разъем дисплея.
Шаг 5. Отсоединяем коннектор
И мы отсоединяем разъем шлейфа дисплея. И затем мы можем аккуратно убрать, собственно, сам дисплей.
Шаг 6. Отсоединяем коннекторы
В нашем случае у нас два разъема аккумулятора. Сначала используем крестовую отвертку полтора миллиметра или Philips #000, откручиваем винты, затем снимаем фиксаторы.
Шаг 7. Отсоединяем коннектор аккумуляторной батареи
Отсоединяем разъемы аккумулятора неметаллическим инструментом.
ℹ️️ В модели Lenovo Tab P11 Pro Gen 2 установлен аккумулятор L22D2P31 емкостью 8200 мАч (также известный как аккумуляторная батарея).
Шаг 8. Откручиваем винты
С помощью отвертки Phillips 1,5 мм (PH №000) откручиваем 19 винтов фиксирующих рамку.
⚠️️ Мы не сможем снять ни один элемент, пока не открутим винты по краю и не снимем рамку, удерживающую динамики, материнскую плату и другие элементы.
Шаг 9. Открываем среднюю крышку
Мы пытаемся отделить рамку, котора удерживает различные элементы. Для этого используем тонкий пластиковый инструмент. Аккуратно вставляем в зазор, проводим по краю, отсоединяя клипсы.
Открепляем клипся и тем самым отсоединяем рамку.
⚠️️ Нужно быть осторожным в области фронтальной камеры, и на углах.
Шаг 10. Откручиваем винты
После этого переходим к откручиванию винтов.
Осторожно открутите винты, удерживающие небольшую плату с портом зарядки.
Также отсоединяем фиксатор порта зарядки.
Шаг 11. Откручиваем винты
Осторожно выкручиваем винты, удерживающие динамик. Используем отвертку Phillips 1,5 мм (PH#000). Винтов четыре.
Шаг 12. Отсоединяем коннектор
Отсоединяем разъем межплатного шлейфа на маленькой плате.
Шаг 13. Отсоединяем малую плату
Осторожно отсоединяем небольшую плату с портом зарядки.
Шаг 14. Отсоединяем динамик
Сначала нам нужно приподнять динамик с обратной стороны и с обратной стороны шлейфа аккуратно подцепляем и поддеваем контактную площадку, чтобы отсоединить динамик.
Шаг 15. Откручиваем винт
Откручиваем один винт крепления фронтальной камеры и снимаем фиксатор, удерживающий разъем.
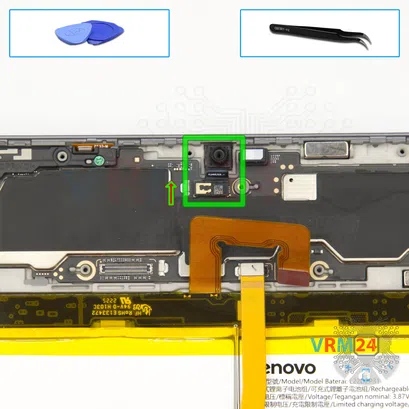
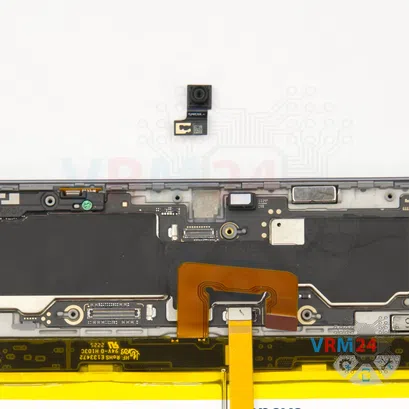
Шаг 16. Отсоединяем фронтальную камеру
Отсоединяем разъем и аккуратно поддеваем фронтальную камеру за основание, чтобы отклеить ее, и убираем ее в сторону.
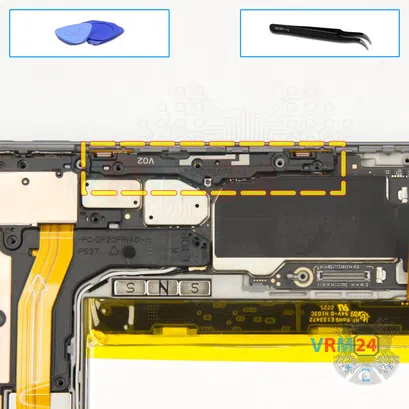
Шаг 17. Откручиваем винты
Затем откручиваем 11 винтов, которые держат материнскую плату, которые держат динамик, которые фиксируют небольшую крышку с антеннами, которые держат микрофоны.
Откручиваем их, откладываем на специальную поверхность, винты располагаем в определенном порядке, чтобы ничего не перепутать при обратной сборке.

Шаг 18. Открываем крышку
И аккуратно отсоединяем небольшую крышку с антеннами.
Шаг 19. Открываем крышку
И мы можем попробовать снять крышку с левой стороны верхней части, которая скрывает основную камеру.
Шаг 20. Отсоединяем основную камеру
Отсоединяем разъем, поддеваем основную камеру за основание и вынимаем камеру.
Шаг 21. Отсоединяем коннектор
Отксоединяем разъем межплатного шлейфа на материнской плате.
Шаг 22. Отсоединяем динамик
Осторожно пробуем приподнять и отсоединить динамик. Как мы видим, у этого динамика нет шлейфа, только контактная площадка, которая расположена на самом динамике.
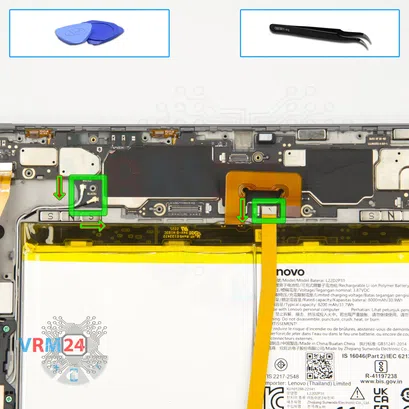
Шаг 23. Отсоединяем коннекторы
Затем отсоединяем разъемы двух коаксиальных кабелей на материнской плате.
Также отсоединяем разъем шлейфа с контактами на клавиатуру.
Шаг 24. Откручиваем винты
С помощью отвертки Phillips 1,5 мм (PH #000) выкручиваем шесть винтов и отсоединяем фиксатор, удерживающий разъем межплатного шлейфа.
Шаг 25. Отсоединяем коннектор
Отсоединяем разъем межплатного шлейфа.
Шаг 26. Отсоединяем печатную плату
Мы смотрим, что материнской плате ничего не мешает и что мы отключили все разъемы.
И пробуем осторожно приподнять и вынуть материнскую плату.
Отворачиваем шлейфы, чтобы они нам не мешали.
И вынимаем материнскую плату.
Шаг 27. Откручиваем винты
С помощью отвертки Phillips 1,5 мм (PH #000) откручиваем три винта и снимаем фиксатор, удерживающий вибромотор.
Шаг 28. Отсоединяем динамик
Наконец-то мы можем попытаться отсоединить динамик в правом верхнем углу.
Приподнимаем динамик, проводим инструмент под шлейф и контактную площадку и аккуратно отсоединяем динамик.
⚠️️ Не нужно действовать силой, не нужно торопиться, просто будьте максимально осторожны. Посмотрите, как правильно отсоединить шлейф. Используйте тот инструмент, который нвам более удобен.
Осторожно поддеваем за край контактной площадки и вынимаем динамик с межплатным шлейфом.
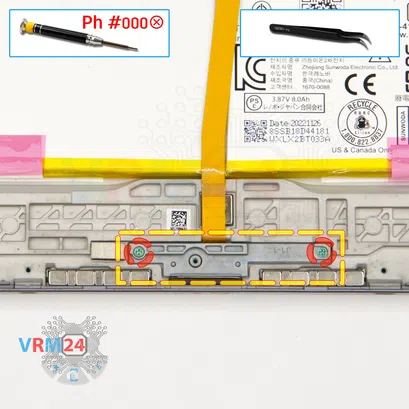
Шаг 29. Откручиваем винты
Прежде чем отсоединить батарею, конечно, лучше отклеить и отсоединить шлейф с контактами на клавиатуры.
Сначала откручиваем два винта, удерживающие крепление, и отсоединяем небольшую запирающую крышку в этой части.
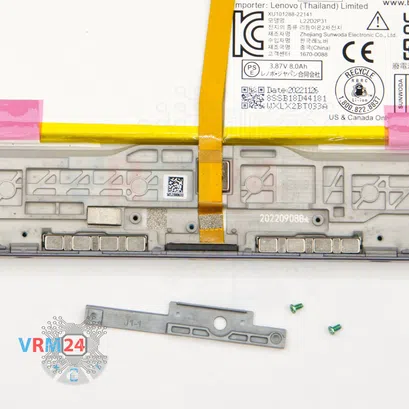
Шаг 30. Отсоединяем шлейф
И нам нужно отсоединить сам шлейф с контактами клавиатуры.
Нам нужно проверить, как он удерживается. Нам нужно понять, как можно аккуратно приподнять его. Проверяем, что нужно отклеить.
Поэтому мы аккуратно отклеиваем те участки, которые можно отклеить.
И аккуратно, не торопясь, отсоединяем шлейф с контактной площадкой для клавиатуры.
Шаг 31. Откручиваем винты
С помощью отвертки Phillips 1,5 мм (PH #000) откручиваем семь винтов, фиксирующих динамик.
Шаг 32. Отсоединяем динамик
И открутив винты, мы можем аккуратно отсоединить динамик.
Находим подходящее место, где можно его поднять, осторожно, не торопясь и не действуя силой.
Как всегда, очень важно найти подходящее место, где можно будет подцепить, приподнять и с легкостью вынуть динамик.
Шаг 33. Отсоединяем коннекторы
После этого отсоединяем разъем межплатного шлейфа на малой плате с коннектором карт.
Отключаем разъемы двух коаксиальных кабелей, чтобы они нам не мешали.
Шаг 34. Отсоединяем малую плату
И нам можно аккуратно приподнять и вынуть небольшую плату с коннектором карт.
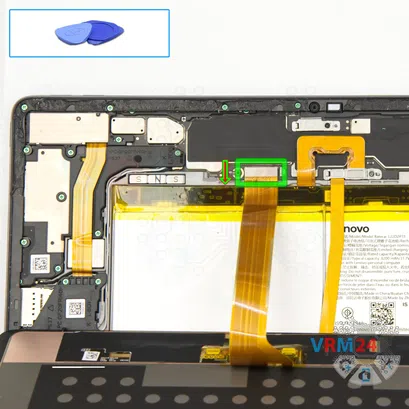
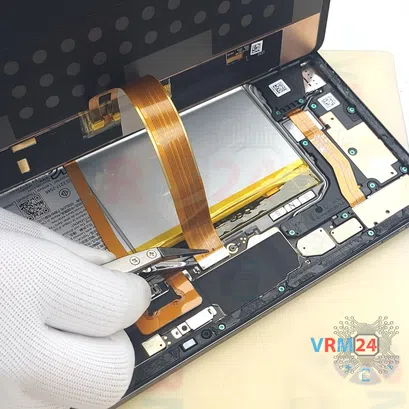
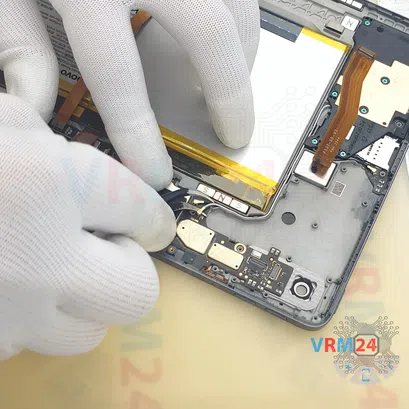
Шаг 35. Отсоединяем АКБ
И, наконец, переходим к отсоединению аккумулятора.
Итак, нам нужно отвернуть в сторону два черных язычка, а также нужно отклеить клейкую ленту, чтобы случайно не оторвать язычки и нам не пришлось долго отсоединять аккумулятор.
Осторожно разворачиваем язычки и отклеевыем клейкую ленту.
Осторожно, не торопясь, отклеиваем ленту этом месте, чтобы она не мешала нам при вытягивании клейкой ленты.
Затем аккуратно тянем язычки в сторону, вытягивая клейкую ленту.
Вытягиваем клейкую ленту с одной стороны и повторяем ту же процедуру с другой стороны.
⚠️️ Важно не забыть отклеить шлейф аккумулятора!
Подробные видео инструкции по разборке и ремонту Lenovo Tab P11 Pro Gen 2 TB-132FU от нашего сервисного центра:
Если у Вас есть вопрос, задайте его нам и мы постараемся ответить максимально подробно. Если статья оказалась полезной — оцените ее, пожалуйста.
Evgenii Kuzmin
Специалист сервисного центра
Разборка\Ремонт имеет высокую сложность и по времени занимает примерно 19 минут.
Наше руководство подходит для всех моделей Lenovo Tab P11 Pro Gen 2 TB-132FU — Леново Таб П11 Про Ген 2, выпущенных для рынков разных стран.
Возврат к списку
Вес: 490 г
SoC: Qualcomm Snapdragon 662 (SM6115)
Процессор: 4x 2.0 GHz Cortex-A73, 4x 1.8 GHz Cortex-A53 (Kryo 260), Количество ядер: 8
Графический процессор: Qualcomm Adreno 610, 950 МГц
Оперативная память: 4 ГБ, 6 ГБ, 1866 МГц
Встроенная память: 64 ГБ, 128 ГБ
Карты памяти: microSD, microSDHC, microSDXC
Экран: 11 in, IPS, 2000 x 1200 пикселей, 24 бит
Аккумулятор: 7700 мА·ч, Li-polymer (Литий-полимерный)
Oперационная система: Android 10
Камера: 4160 x 3120 пикселей, 1920 x 1080 пикселей, 30 кадров/сек
SIM-карта: Nano-SIM
Wi-Fi: a, b, g, n, n 5GHz, ac, Dual band, Wi-Fi Hotspot, Wi-Fi Direct, Wi-Fi Display
USB: 2.0, USB Type-C
Bluetooth: 5.1
Навигация: GPS, A-GPS, GLONASS, BeiDou
Добавить для сравнения
Предложить редактирование
| Марка
Имя компании-производителя устройства. |
Lenovo |
| Модель
Название модели устройства. |
Tab P11 |
| Толщина
Информация о толщине устройства в разных единицах измерения. |
7.5 мм (миллиметры) 0.75 см (сантиметры) 0.025 ft (футы) 0.295 in (дюймы) |
| Вес
Информация о весе устройства в разных единицах измерения. |
490 г (граммы) 1.08 lbs (фунты) 17.28 oz (унции) |
| Цвета
Информация о цветах, в которых предлагается в продаже данное устройство. |
Серебристый Чёрный |
| Материалы для изготовления корпуса
Материалы, использованные для изготовления корпуса устройства. |
Алюминиевый сплав |
| Размер SIM-карты
Информация о типе и размере (форм-факторе) SIM-карты, использованной в устройстве. |
Nano-SIM (4FF — четвертый форм-фактор, с 2012 года, 12.30 x 8.80 x 0.67 мм) |
| Количество SIM-карт
Информация о количестве SIM-карт, которые поддерживает устройство. |
1 |
| GSM
GSM (Global System for Mobile Communications) разработана, чтобы заменить аналоговую мобильную сеть (1G). По этой причине GSM очень часто называется и 2G мобильной сетью. Она улучшена добавлением GPRS (General Packet Radio Services), а позднее и EDGE (Enhanced Data rates for GSM Evolution) технологий. |
GSM 850 MHz (B5) GSM 900 MHz (B8) GSM 1800 MHz (B3) GSM 1900 MHz (B2) |
| UMTS
UMTS — это сокращение Universal Mobile Telecommunications System. Она базирована на GSM стандарт и относится к 3G мобильным сетям. Разработана 3GPP и ее самым большим преимуществом является предоставление большей скорости и спектральной эффективности благодаря W-CDMA технологии. |
UMTS 800 MHz (B6) UMTS 800 MHz (B19) UMTS 850 MHz (B5) UMTS 900 MHz (B8) UMTS 1900 MHz (B2) UMTS 2100 MHz (B1) |
| LTE
LTE (Long Term Evolution) определяется как технология четвертого поколения (4G). Она разработана 3GPP на базе GSM/EDGE и UMTS/HSPA с целью увеличить емкость и скорость беспроводных мобильных сетей. Последующее развитие технологий называется LTE Advanced. |
LTE-FDD 700 MHz (B28) LTE-FDD 800 MHz (B20) LTE-FDD 850 MHz (B5) LTE-FDD 850 MHz (B19) LTE-FDD 900 MHz (B8) LTE-FDD 1700 MHz (B4) LTE-FDD 1800 MHz (B3) LTE-FDD 1900 MHz (B2) LTE-FDD 2100 MHz (B1) LTE-FDD 2600 MHz (B7) LTE-TDD 2300 MHz (B40) LTE-TDD 2500 MHz (B41) LTE-TDD 2600 MHz (B38) |
| Технологии мобильной связи
Существует несколько технологий, улучшающих работу мобильных сетей главным образом путем увеличения пропускной способности. Информация о коммуникационных технологиях, которые поддерживает устройство, и поддерживаемых скоростях передачи данных. |
UMTS (384 kbit/s ) EDGE GPRS HSPA+ LTE Cat 6 (51.0 Mbit/s , 301.5 Mbit/s ) |
| Oперационная система (OS)
Информация об операционной системе, используемой устройством, а также о ее версии. |
Android 10 |
| SoC (Система на кристалле)
Система на кристалле (SoC) интегрирует различные хардверные компоненты, таких как процессор, графический процессор, память, периферия, интерфейсы и др., а также и софтвер, необходимый для их функционирования. |
Qualcomm Snapdragon 662 (SM6115) |
| Технологический процесс
Информация о технологическом процессе, по которому изготовлен чип. Величиной в нанометрах измеряют половину расстояния между элементами в процессоре. |
11 нм (нанометры) |
| Процессор (CPU)
Основная функция процессора (CPU) мобильного устройства — это интерпретация и выполнение инструкций, содержащихся в программных приложениях. |
4x 2.0 GHz ARM Cortex-A73, 4x 1.8 GHz ARM Cortex-A53 (Kryo 260) |
| Разрядность процессора
Разрядность (биты) процессора определяется размером (в битах) регистров, адресных шин и шин для данных. 64-битные процессоры обладают более высокой производительностью по сравнению с 32-битными, которые со своей стороны более производительны, чем 16-битные процессоры. |
64 бит |
| Архитектура набора команд
Инструкции — это команды, с помощью которых софтуер задает/управляет работой процессора. Информация об наборе командов (ISA), которые процессор может выполнять. |
ARMv8-A |
| Kоличество ядер процессора
Ядро процессора выполняет программные инструкции. Существуют процессоры с одним, двумя и более ядрами. Наличие большего количества ядер увеличивает производительность, позволяя параллельное выполнение множества инструкций. |
8 |
| Тактовая частота процессора
Тактовая частота процессора описывает его скорость посредством циклов в секунду. Она измеряется в мегагерцах (MHz) или гигагерцах (GHz). |
2000 МГц (мегагерцы) |
| Графический процессор (GPU)
Графический процессор (GPU) обрабатывает вычисления для различных 2D/3D графических приложений. В мобильных устройствах он используется чаще всего играми, потребительским интерфейсом, видео-приложениями и др. |
Qualcomm Adreno 610 |
| Тактовая частота графического процессора
Скорость работы — это тактовая частота графического процессора, которая измеряется в мегагерцах (MHz) или гигагерцах (GHz). |
950 МГц (мегагерцы) |
| Объём оперативной памяти (RAM)
Оперативная память (RAM) используется операционной системой и всеми инсталлированными приложениями. Данные, которые сохраняются в оперативной памяти, теряются после выключения или рестартирования устройства. |
4 ГБ (гигабайты) 6 ГБ (гигабайты) |
| Тип оперативной памяти (RAM)
Информация о типе оперативной памяти (RAM) используемый устройством. |
LPDDR4X |
| Количество каналов оперативной памяти
Информация о количестве каналов оперативной памяти каторые интегрированы в SoC. Больше каналов означает более высокие скорости передачи данных. |
Двухканальная |
| Частота оперативной памяти
Частота оперативной памяти определяет ее скорость работы, более конкретно, скорость чтения/записи данных. |
1866 МГц (мегагерцы) |
| Объём встроенной памяти
Информация об объеме встроенной памяти устройства. Часто данная модель предлагается в разных вариантах с разным объемом встроенной памяти. |
64 ГБ (гигабайты) 128 ГБ (гигабайты) |
| Типы
Различные типы карт памяти характеризуются разными размерами и объемом. Информация о поддерживаемых типах карт памяти. |
microSD microSDHC microSDXC |
| Тип/технология
Одна из основных характеристик экрана — это технология, по которой он изготовлен и от которой напрямую зависит качество изображения информации. |
IPS |
| Диагональ
У мобильных устройств размер экрана выражается посредством длины его диагонали, измеренной в дюймах. |
11 in (дюймы) 279.4 мм (миллиметры) 27.94 см (сантиметры) |
| Ширина
Приблизительная ширина экрана |
9.43 in (дюймы) 239.58 мм (миллиметры) 23.96 см (сантиметры) |
| Высота
Приблизительная высота экрана |
5.66 in (дюймы) 143.75 мм (миллиметры) 14.38 см (сантиметры) |
| Соотношение сторон
Соотношение размеров длинной стороны экрана к его короткой стороне |
1.667:1 5:3 |
| Разрешение
Разрешение экрана показывает количество пикселей по вертикали и горизонтали экрана. Более высокое разрешение означает более четкую деталь изображения. |
2000 x 1200 пикселей |
| Плотность пикселей
Информация о количестве пикселей на сантиметр или дюйм экрана. Более высокая плотность позволяет показывать информацию на экране с более четкими деталями. |
212 ppi (пикселей на дюйм) 83 ppcm (пикселей на сантиметр) |
| Глубина цвета
Глубина цвета экрана отражает общее количество битов, использованных для цветовых компонентов в одном пикселе. Информация о максимальном количестве цветов, которые экран может показать. |
24 бит 16777216 цветы |
| Другие характеристики
Информация о других функциях и характеристиках экрана. |
Ёмкостный Мультитач Устойчивость к царапинам |
| 70% NTSC 400 cd/m² TUV Rheinland Eye Safety Certified |
| Датчики
Датчики бывают разные по типу и предназначению и повышают общую функциональность устройства, в котором они интегрированы. |
Датчик приближения Датчик света Акселерометр Датчик Холла |
| ToF sensor Vibrator |
| Тип датчика
Информация о типе датчика камеры. Одни из наиболее широко используемых типов датчиков в камерах мобильных устройств — это CMOS, BSI, ISOCELL и др. |
CMOS (complementary metal-oxide semiconductor) |
| Тип вспышки
Задние (тыловые) камеры мобильных устройств в основном используют светодиодные вспышки. Они могут быть в конфигурации с одним, двумя или более источниками света и различаться по форме. |
LED |
| Разрешение изображения
Одной из основных характеристик камер является разрешающая способность. Она представляет собой количество горизонтальных и вертикальных пикселей в изображении. Для удобства производители смартфонов часто указывают разрешение в мегапикселях, указывая приблизительное количество пикселей в миллионах. |
4160 x 3120 пикселей 12.98 Мп (мегапикселей) |
| Разрешение видео
Информация о максимальной разрешающей способности видео, которое может записывать камера. |
1920 x 1080 пикселей 2.07 Мп (мегапикселей) |
| Скорость видео записи (кадровая частота)
Информация о максимальной скорости записи (кадров в секунду, fps), поддерживаемой камерой при максимальном разрешении. Некоторые из самых основных скоростей записи видео 24 fps, 25 fps, 30 fps, 60 fps. |
30 кадров/сек (кадры в секунду) |
| Характеристики
Информация о дополнительных программных и аппаратных функциях задней (тыловой) камеры. |
Автофокус Серийная съёмка Цифровой зум Географические метки Панорамная съёмка HDR съёмка Сенсорная фокусировка Настройка баланса белого Настройка ISO Компенсация экспозиции Автоспуск Режим выбора сцены |
| Разрешение изображения
Одной из основных характеристик камер является разрешающая способность. Она представляет собой количество горизонтальных и вертикальных пикселей в изображении. Для удобства производители смартфонов часто указывают разрешение в мегапикселях, указывая приблизительное количество пикселей в миллионах. |
3264 x 2448 пикселей 7.99 Мп (мегапикселей) |
| Разрешение видео
Информация о максимальной разрешающей способности видео, которое может записывать камера. |
1920 x 1080 пикселей 2.07 Мп (мегапикселей) |
| Скорость видео записи (кадровая частота)
Информация о максимальной скорости записи (кадров в секунду, fps), поддерживаемой камерой при максимальном разрешении. Некоторые из самых основных скоростей записи видео 24 fps, 25 fps, 30 fps, 60 fps. |
30 кадров/сек (кадры в секунду) |
| Характеристики
Информация о дополнительных программных и аппаратных функциях задней (тыловой) камеры. |
Разблокировка по лицу |
| Громкоговоритель
Громкоговоритель — это устройство, которое воспроизводит различные звуки, таких как музыка, звонки, мелодии звонков и др. Информация о типах громкоговорителей, используемых устройством. |
Громкоговоритель Наушник |
| Dual Microphone Array Smart Voice DSP Quad Speakers Dolby Atmos |
| Радио
Информация о том, имеет ли устройство FM-приемник или нет. |
Да |
| Навигация и определение местоположения
Определение местоположения осуществляется с помощью разных спутниковых навигационных систем, прослеживающих автономное геопространственное местоположение устройства, которое их поддерживает. Наиболее часто используемые спутниковые навигационные системы — это GPS и GLONASS. Существуют и неспутниковые технологии локализации мобильных устройств, как EOTD, Enhanced 911, GSM Cell ID. |
GPS A-GPS GLONASS BeiDou |
| Wi-Fi
Wi-Fi коммуникация между устройствами осуществляется через стандарты IEEE 802.11. Некоторые устройства имеют возможность служить в качестве Wi-Fi Hotspot, обеспечивая интернет-доступ для других устройств. Wi-Fi Direct (Wi-Fi P2P) — это другой полезный стандарт, позволяющий устройствам коммуницировать между собой без необходимости наличия беспроводной точки доступа (WAP). |
802.11a (IEEE 802.11a-1999) 802.11b (IEEE 802.11b-1999) 802.11g (IEEE 802.11g-2003) 802.11n (IEEE 802.11n-2009) 802.11n 5GHz 802.11ac (IEEE 802.11ac) Dual band Wi-Fi Hotspot Wi-Fi Direct Wi-Fi Display |
| Версия
Существует несколько версий Bluetooth, при этом каждая последующая улучшает скорость связи, охват, способствует более легкому обнаружению и подключению устройств. Информация о Bluetooth-версии устройства. |
5.1 |
| Характеристики
Bluetooth использует разные профили и протоколы, обеспечивающие более быстрый обмен данных, экономию энергии, улучшение обнаружения устройств и др. Некоторые из этих профилей и протоколов, которые поддерживает устройство, показаны здесь. |
A2DP (Advanced Audio Distribution Profile) EDR (Enhanced Data Rate) LE (Low Energy) |
| Тип разъёма
Существуeт несколько типов USB-разъёмов: стандартный, мини-, микро-, On-The-Go и др. Тип коннектора, который использует устройство. |
USB Type-C |
| Версия
USB-стандарт имеет несколько версий: USB 1.0 (1996), USB 2.0 (2000), USB 3.0 (2008), и т. д. В каждой последующей версии скорость переноса данных увеличивается. |
2.0 |
| Характеристики
USB-интерфейс в мобильных устройствах может использоваться в разных целях, например чтобы подзарядить аккумулятор, использовать устройство в качестве mass storage, host, и т. д. |
Зарядка через USB Хранение данных On-The-Go |
| Разъем для наушников
Информация о том, оборудовано ли устройство 3.5 мм аудиоразъемом. |
Нет |
| Подключение устройств
Информация об одних из наиболее используемых технологий подключения, поддерживаемых устройством. |
Computer sync OTA sync Tethering |
| Браузер
Информация о некоторых основных характеристиках и стандартах, поддерживаемых браузером устройства. |
HTML HTML5 CSS 3 |
| Форматы/кодеки звуковых файлов
Список некоторых основных форматов и кодеков звуковых файлов, стандартно поддерживаемых устройством. |
AAC (Advanced Audio Coding) AMR / AMR-NB / GSM-AMR (Adaptive Multi-Rate, .amr, .3ga) eAAC+ / aacPlus v2 / HE-AAC v2 FLAC (Free Lossless Audio Codec, .flac) MIDI MP3 (MPEG-2 Audio Layer II, .mp3) OGG (.ogg, .ogv, .oga, .ogx, .spx, .opus) WMA (Windows Media Audio, .wma) WAV (Waveform Audio File Format, .wav, .wave) |
| Форматы/кодеки видео файлов
Список некоторых основных форматов и кодеков видео файлов, стандартно поддерживаемых устройством. |
3GPP (3rd Generation Partnership Project, .3gp) AVI (Audio Video Interleaved, .avi) H.263 H.264 / MPEG-4 Part 10 / AVC video MKV (Matroska Multimedia Container, .mkv .mk3d .mka .mks) MP4 (MPEG-4 Part 14, .mp4, .m4a, .m4p, .m4b, .m4r, .m4v) WebM WMV (Windows Media Video, .wmv) Xvid |
| Ёмкость
Емкость аккумулятора показывает максимальный заряд, который он способен сохранить, измеренный в миллиампер-часах. |
7700 мА·ч (миллиампер-часы) |
| Тип
Тип аккумулятора определяется его структурой и, точнее, используемыми химикалами. Существуют разные типы аккумуляторов, при этом чаще всего в мобильных устройствах используются литий-ионные и литий-ион-полимерные аккумуляторы. |
Li-polymer (Литий-полимерный) |
| Время ожидания 2G
Время ожидания в 2G — это период времени, за которое заряд аккумулятора разряжается полностью, когда устройство находится в режиме ожидания (stand-by) и подключено к 2G сети. |
336 ч (часы) 20160 мин (минуты) 14 дней |
| Время ожидания 3G
Время ожидания в 3G — это период времени, за которое заряд аккумулятора разряжается полностью, когда устройство находится в режиме ожидания (stand-by) и подключено к 3G сети. |
336 ч (часы) 20160 мин (минуты) 14 дней |
| Выходная мощность адаптера
Информация о силе электрического тока (измеряется в амперах) и электрическом напряжении (измеряется в вольтах), которые подает зарядное устройство (выходная мощность). Более высокая выходная мощность обеспечивает более быстрое заряжание батареи. |
10 В (вольты) / 2 А (амперы) |
| Характеристики
Информация о некоторых дополнительных характеристиках аккумулятора устройства. |
Быстрая зарядка Несъемный |