

NEO X7
Quad Core Media Hub
16GB
Setup Guide
Android™ is a trademark of Google Inc.


Thank you for purchasing MINIX NEO X7.
Follow this guide to setup your device.
MINI
X NEO X7 is a revolutionary smart media hub based on a Quadcore ARM Cortex-A9 processor with Quad-core Mali-400MP4 GPU and
the latest Android™ OS. Sign into Google Play Store to download the
favorite applications and install them directly into MINIX NEO X7.
YouTube™, Internet radio and lots of other applications are all readily
available on Google Play Store. Alternatively, you could also download
the applications through other third-party stores or to install the .apk les
directly with the preloaded ApkInstaller.
MINIX NEO X7 comes with Ethernet, Bluetooth and Wi-Fi connection;
you could connect to many of your devices within the same network and
share the contents amongst them, such as videos, music and photos.

Content
Chapter 1: Connect ……………………………………………….5
What’s in the box ………………………..
MINIX NEO X7 at a glance …………………………………………………………..7
What you need …………………………………………………………………………..11
Setting up MINIX NEO X7 ……………………………………………………………12
Chapter 2: Basic Setup ………………
Language setup …………………………………………………………………………14
Time zone setup ………………………………………………………………………..14
Wi-Fi setup (basic) ……………………..
Chapter 3: Google Play Store ………………………………..15
Chapter 4: Control ……………………………………………….17
Different control methods …………………………………………………………….18
Using your MINIX remote …………………………………………………………….18
To
use the GridShow launcher ……………………………………………………..18
Functions of the MINIX remote ……………………………………………………..19
……………………………………………….6
…………………………13
……………………………………………..14

Chapter 1
Connect.
— 5 —

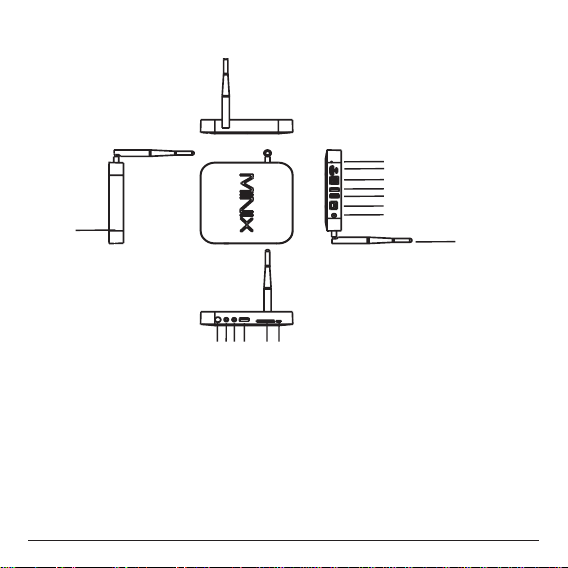
What’s in the box
— MINIX NEO X7 x 1
—
MINIX NEO X7 Antenna x 1
— 5V Power adapter x 1
— MINIX Remote x 1
— Micro-USB cable x 1 (connecting to a PC)
— OTG cable x 1 (extend one more USB port)
— HDMI cable x 1
— Setup guide x 1
— 6 —
MINIX NEO X7 at a glance
1
2
3
5 6 7
4
1. Power LED
2. Power button
3. Earphone jack
4. Microphone jack
5. USB port 1
6. SD/MMC card slot
7. OTG port (serves as
USB port 2 also)
— 7 —
8
9
10
11
12
13
14
15
8. Recover button (for
service and upgrade)
9. HDMI port
10. Optical audio port
11. USB 2.0 port 3
12. USB 2.0 port 4
13. Ethernet jack
14. DC 5V Power-in jack
15. Dual Band Antenna

Power LED
The LED glows when the MINIX NEO X7 is on.
Power button
T
o power on MI
seconds until the power LED glows. To power off MINIX NEO X7,
press and hold the power button and the display will prompt out the
conrmation dialogue for power off, select OK to conrm; OR hold the
power button for 8 seconds to force power off, the LED will be off.
Earphone jack
Connect to an external audio output device such as earphone or speaker.
Microphone jack
Connect to a microphone for voice input.
SD/MMC card slot
Increase the storage size or read files directly from a SD/MMC card,
support up to 32GB max.
NIX NEO
X7, press and hold the power button for 2-3
OTG port
Connect the micro
end to the computer for synchronization and upgrade purpose. This port
also serves as an extra USB port while used with the Micro-USB OTG
cable bundled in the package.
end of
the Micro-USB cable to this port and the other
— 8 —

Recover button
This button is to be used together with the OTG
to
a computer for service/upgrade purpose. To upgrade manually, rstly
connect the micro USB cable to a PC, then press and hold this button
AND power up NEO X7 at the same time. Release this button once the
PC detects NEO X7.
HDMI port
Connect MINIX NEO X7 to the HDMI port of a high-denition TV or PC
monitor using an HDMI cable.
Optical audio port (S/PDIF Out)
Connect to the optical audio input of an external sound processing unit,
such as an amplier.
USB 2.0 ports
Connect an external USB device to MINIX NEO X7 such as USB ash
drive, receiver of wireless keyboard and mouse, USB mouse, receiver
of wireless headset…etc. (You may need connecting to 2 ports to get
enough power for some external hard drives.)
— 9 —
port when
connecting

Ethernet jack
Connect to the Ethernet cable for Internet access. I
setting such as PPPoE dial-up, go into the setting page at: Settings ->More…
While connec
as a router and also a Wi-Fi hotspot; if you need to use the Wi-Fi
hotspot feature, please make sure that the Wi-Fi feature is OFF before
you enable the Wi-Fi hotspot service at:
Settings ->More…->Portable hotspot
DC 5V Power-in jack
Connect the 5V power adapter supplied in the package to this port.
MINIX NEO X7 requires less than 1A to operate however we have
supplied a 5V 3A adapter with consideration that you need to connect to
other power-drawing external devices such as an external hard drive.
ted with the Ethernet cable, MINIX NEO X7 can be used
— 10 —
f you need advanced

What you need
To start using MINIX NEO X7, you need the following:
High-denition TV/ PC monitor
A high-denition
with at least one HDMI input.
Cable
An HDMI cable to connect MINIX NEO X7 to your TV.
Wireless network
A wired network cable or an 802.1
(wireless video streaming requires 802.11g or n), your wireless network
name and password.
Software and accounts
To play
MINIX NEO X7, you need:
A UPnP™/DLNA® software pre-loaded in your smartphone or
PC. (e.g. iMediashare™)
— A Google account
the corresponding applications (e.g. iMediaShare™,
eHomeMediacenter) necessary for streaming the content
from a smartphone or PC.
Other accounts may be required for full access to some
Internet contents.
TV or PC monitor that can display 720p or 1080p video
1 b/g/n, or n Wi-Fi wireless network
content (videos, photos, music) from a smartphone or PC on
to sign-in to Google Play Store to download
— 11 —

Setting up MINIX NEO X7
MINIX NEO X7 conn
port that delivers both audio and video. Before you set up MINIX NEO
X7, look at the ports on the side/back of your TV or PC monitor to make
sure you have the right cable:
An HDMI cable: You can connect MINIX NEO X7 to an HDTV
or home theater receiver that has an HDMI port, using an
HDMI cable for both video and audio.
Step 1: Connecting the cable
1. Connect one end of the HDMI cable to the HDMI port of your TV/ PC
monitor.
2. Connect the other end of the cable to the HDMI port of MINIX NEO
X7.
Step 2: Connecting the power
Connect the 5V power adapter supplied in the package to this port.
Press and hold the power button for 2-3 seconds to power on MINIX
NEO X7 and the blue power LED glows when done.
ects to your TV or PC monitor through an HDMI
Step 3: T
Simply turn on your TV or PC monitor and select the corresponding
HDMI port connected to MINIX NEO X7.
urn on your TV/ PC monitor and select the input
— 12 —

Chapter 2
Basic Setup.
— 13 —

Language setup
You may choose the desired system language by the following steps:
Launcher Home Screen > Settings > Language & input > Language
The default language is English, you may choose your desired language
and click to conrm.
Time zone setup
You should
the following steps:
Launcher Home Screen > Settings > Date & time > Select time zone
Choose your time zone and click to conrm.
adjust the time zone according to your current location by
Wi-Fi setup (basic)
Connect to your wireless network so that you could access to the
Internet by the following steps:
L
auncher Home Screen > Settings > Wi-Fi > Check the option “To
see available networks, turn Wi-Fi on.”
Wi-Fi will turn on and automatically scan the wireless networks
available, then select the wireless network that you want to connect to
and conrm, key-in the password of the Wi-Fi network when the virtual
keyboard prompts, nally, hit the “Connect” button.
— 14 —

Chapter 3
Google Play Store.
— 15 —

Sign-in to your Google Account
Launch the Google Play Store by the following steps:
Launcher Home Screen -> Google Play Store, hit and conrm.
To
use Google Play Store you need a Google Account. If you already
had a Google Account, select “Sign in” and login with your Google
Account. If you don’t have a Google Account yet, select “Get a Google
Account” and complete the rest of the process.
Upon completion of the sign-in process will bring you into the Google
Play Store which allows you to download and install the applications you
need.
Alternatively, if you cannot find the applications you need on Google
Play Store because of language restriction, location restriction or some
other reasons; you may look for and download the application les in the
form of “.apk” from the Internet and install them through the “ApkInstaller»
which is pre-loaded in the system.
— 16 —

Chapter 4
Control.
— 17 —

Different control methods
You may control your MINIX NEO X7 with the following input devices:
1.) RKRemoteControl App. (for
2.) Wired mouse;
3.) 2.4GHz USB wireless keyboard and mouse set;
4.) 2.4GHz USB wireless AirMouse remote control (MINIX NEO A1+,
MINIX NEO A2, to be sold separately);
5.) MINIX infrared remote control(included).
Android Smartphone or tablet PC)
Using your MINIX remote
Read on to learn about using your MINIX remote with MINIX NEO X7.
This remote will
user interface — the GridShow launcher
Note: The MINIX remote will still function if you are not using the
GridShow launcher, however, some keys might become useless, e.g the
STOP button.
be 100% functional when working with our customized
To use the GridShow launcher:
Home -> Select “GridShow” launcher
Use the MINIX
your content. Make sure there are no obstructions between the MINIX
remote and MINIX NEO X7.
remote to
control MINIX
— 18 —
NEO X7 settings and navigate
Loading…
Хорошее руководство по эксплуатации
Законодательство обязывает продавца передать покупателю, вместе с товаром, руководство по эксплуатации Minix NEO X7. Отсутствие инструкции либо неправильная информация, переданная потребителю, составляют основание для рекламации в связи с несоответствием устройства с договором. В законодательстве допускается предоставлении руководства в другой, чем бумажная форме, что, в последнее время, часто используется, предоставляя графическую или электронную форму инструкции Minix NEO X7 или обучающее видео для пользователей. Условием остается четкая и понятная форма.
Что такое руководство?
Слово происходит от латинского «instructio», тоесть привести в порядок. Следовательно в инструкции Minix NEO X7 можно найти описание этапов поведения. Цель инструкции заключается в облегчении запуска, использования оборудования либо выполнения определенной деятельности. Инструкция является набором информации о предмете/услуге, подсказкой.
К сожалению немного пользователей находит время для чтения инструкций Minix NEO X7, и хорошая инструкция позволяет не только узнать ряд дополнительных функций приобретенного устройства, но и позволяет избежать возникновения большинства поломок.
Из чего должно состоять идеальное руководство по эксплуатации?
Прежде всего в инструкции Minix NEO X7 должна находится:
— информация относительно технических данных устройства Minix NEO X7
— название производителя и год производства оборудования Minix NEO X7
— правила обслуживания, настройки и ухода за оборудованием Minix NEO X7
— знаки безопасности и сертификаты, подтверждающие соответствие стандартам
Почему мы не читаем инструкций?
Как правило из-за нехватки времени и уверенности в отдельных функциональностях приобретенных устройств. К сожалению само подсоединение и запуск Minix NEO X7 это слишком мало. Инструкция заключает ряд отдельных указаний, касающихся функциональности, принципов безопасности, способов ухода (даже то, какие средства стоит использовать), возможных поломок Minix NEO X7 и способов решения проблем, возникающих во время использования. И наконец то, в инструкции можно найти адресные данные сайта Minix, в случае отсутствия эффективности предлагаемых решений. Сейчас очень большой популярностью пользуются инструкции в форме интересных анимаций или видео материалов, которое лучше, чем брошюра воспринимаются пользователем. Такой вид инструкции позволяет пользователю просмотреть весь фильм, не пропуская спецификацию и сложные технические описания Minix NEO X7, как это часто бывает в случае бумажной версии.
Почему стоит читать инструкции?
Прежде всего здесь мы найдем ответы касательно конструкции, возможностей устройства Minix NEO X7, использования отдельных аксессуаров и ряд информации, позволяющей вполне использовать все функции и упрощения.
После удачной покупки оборудования/устройства стоит посвятить несколько минут для ознакомления с каждой частью инструкции Minix NEO X7. Сейчас их старательно готовят или переводят, чтобы они были не только понятными для пользователя, но и чтобы выполняли свою основную информационно-поддерживающую функцию.
Report abuse
Libble takes abuse of its services very seriously. We’re committed to dealing with such abuse according to the laws in your country of residence. When you submit a report, we’ll investigate it and take the appropriate action. We’ll get back to you only if we require additional details or have more information to share.
Product:
Get your user manual by e-mail
Enter your email address to receive the manual of Minix NEO X7 in the language / languages: English, German as an attachment in your email.
The manual is 1,32 mb in size.
You will receive the manual in your email within minutes. If you have not received an email, then probably have entered the wrong email address or your mailbox is too full. In addition, it may be that your ISP may have a maximum size for emails to receive.
The manual is sent by email. Check your email
If you have not received an email with the manual within fifteen minutes, it may be that you have a entered a wrong email address or that your ISP has set a maximum size to receive email that is smaller than the size of the manual.
Your question is posted on this page
Would you like to receive an email when new answers and questions are posted? Please enter your email address.
Document Download |
‹
›
Minix NEO X7 Manual Online:
3.45,
681
votes
Minix NEO X7 User Manual
Minix NEO X7 User Guide
Minix NEO X7 Online Manual
Text of Minix NEO X7 User Guide:
Related Products and Documents (Modem):
-
NETGEAR Nighthawk R7100LG Modem Quick start
Nighthawk R7100LG
netgear/nighthawk-r7100lg.pdf, 2 -
NETGEAR A6200 Modem Installation manual
A6200
netgear/a6200.pdf, 2 -
Aztech HL110E Modem Operation & user’s manual
HL110E
aztech/hl110e.pdf, 40 -
Jinan USR IOT Technology USR-GPRS-MODEM Modem Operation & user’s manual
USR-GPRS-MODEM
jinan-usr-iot-technology/usr-gprs-modem.pdf, 12 -
NETGEAR DGN1000 — Wireless-N Router With Built-in DSL Modem Modem Installation manual
DGN1000 — Wireless-N Router With Built-in DSL Modem
netgear/dgn1000-wireless-n-router-with-built-in-dsl-modem.pdf, 2 -
A-Link 3GU Modem Installation manual
3GU
a-link/3gu.pdf, 20 -
Motorola SBG900 Modem Setup manual
SBG900
motorola/sbg900.pdf, 7 -
Nextel iM240 Modem Operation & user’s manual
iM240
nextel/im240.pdf, 87
Comparable Devices:
| # | Manufacturer | Model | Document Type | File | Updated | Pages | Size |
|---|---|---|---|---|---|---|---|
| 1 | MCM Electronics | MPA-10 | Operation manual | mcm-electronics/mpa-10-MBG.pdf | 31 Dec 2023 | 13 | |
| 2 | Charnwood | W619 | Operating instructions manual | charnwood/w619-R1G.pdf | 17 Apr 2025 | 16 | 1.51 Mb |
| 3 | Keys Fitness | 1350 | Owner’s manual | keys-fitness/1350-63S.pdf | 19 Dec 2023 | 20 | |
| 4 | MPMan | MP-F777 | Manual | mpman/mp-f777-X9W.pdf | 03 Apr 2025 | 56 | |
| 5 | Geemarc | Telephone Ring Amplifier and Flasher CL1 | Operation & user’s manual | geemarc/telephone-ring-amplifier-and-flasher-cl1-WE9.pdf | 19 Dec 2024 | 6 | 0.33 Mb |
| 6 | VOGELS | CFA 140 — CFAE 140 RC MOUNTING | Instructions manual | vogels/cfa-140-cfae-140-rc-mounting-JP9.pdf | 13 Jan 2024 | 16 | 3.11 Mb |
Similar Resources:
Modem Instructions:
-
Philips TV 60PP9363H
Philips 60PP9363H User Guide (Specifications), @OX6854
60PP9363H, 2
-
Nikon Digital Camera COOLPIX B700
Nikon Product Manual: COOLPIX B700 PDF Quick start manual — Y34SVG
COOLPIX B700, 44
-
Prorelax Massager TENS Back Pain
Massager #B9KA5O
TENS Back Pain, 56
-
Samsung Cell Phone SGH-Z728
Samsung SGH-Z728 Cell Phone Operation & user’s manual
SGH-Z728, 47
-
Fromm Power Tool P325.0001.01
#5373C7: P325.0001.01 Power Tool Service manual
P325.0001.01, 52
-
GET Dehumidifier DHMD025
DHMD025 (Dehumidifier ePDF Manual, #D6872C)
DHMD025, 6
-
MAC TOOLS Impact Driver 20V Max High Torque Impact Wrench
#45ZLA3 20V Max High Torque Impact Wrench: MAC TOOLS Impact Driver Owner Documentation
20V Max High Torque Impact Wrench, 52
-
Minox Digital Camera DCC Rolleiflex AF 5.0
DCC Rolleiflex AF 5.0 Specifications — V6Z812
DCC Rolleiflex AF 5.0, 1
-
Dell Laptop I14Z-2877BK
#CM66Q5: I14Z-2877BK Laptop Owner’s manual
I14Z-2877BK, 74
-
Allied Telesis Switch AT-8324SX
#18JWPA: AT-8324SX Switch Quick install manual
AT-8324SX, 34
-
Yamaha Projector YSP-900BL
Yamaha Product User Manual: YSP-900BL PDF Owner’s manual — Y37N54
YSP-900BL, 96
-
Breeze Mate Control Panel Attic Breeze
Attic Breeze (Control Panel ePDF User Manual, #G85T2H)
Attic Breeze, 20
Comments, Questions and Opinions:
Minix NEO X7 user guide recommended for: ML0700, SXI-LTE-001, DSL-100D, AC327U, SF 1156HV R21.
The Minix NEO X7 Modem manual (Minix Setup manual, 58 pages) is completely safe to download (last scan date: 09/03/2025). You can rest assured of your safety when interacting with Minix NEO X7 document.
1
CH-D3 Series
18
822
181
3
touchstone TM1602
36
819
205
5
R410
Instruction manual Campbell Modem Instruction manual (File: campbell-r410-instruction-manual-90, 14.12.2024)
90
640
141
9
LW272
Manual LW272 (Modem ePDF Guide, #7U9M4X)
11
720
173
10
F1303
Operation & user’s manual Four-Faith Modem Operation & user’s manual (File: four-faith-f1303-operation-user-s-manual-22, 21st Feb 2025)
22
933
140