
При запуске игр и программ, а в некоторых случаях при включении компьютера вы можете столкнуться с ошибкой «Инструкция по адресу обратилась к памяти по адресу. Память не может быть read» с указанием соответствующих адресов в памяти.
В этой инструкции подробно о том, чем может быть вызвана ошибка «Память не может быть read» и как исправить проблему в Windows 10, 8.1 и Windows 7.
Простые методы исправления ошибки Память не может быть read

Первое, что стоит попробовать, когда рассматриваемая ошибка возникает при запуске конкретной программы:
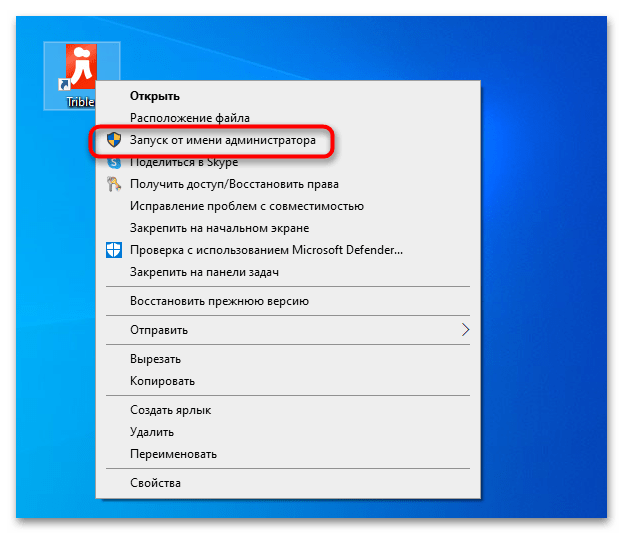
- Выполните запуск программы от имени администратора (для этого обычно достаточно нажать по ярлыку программы правой кнопкой мыши и выбрать соответствующий пункт контекстного меню).
- Отключить сторонний антивирус при его наличии. Если после отключения антивируса ошибка исчезла, попробуйте добавить программу в исключения антивируса.
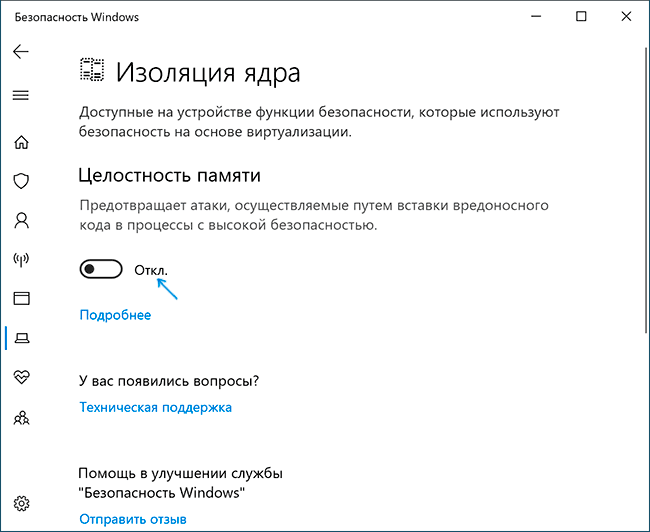
- Если у вас Windows 10 и работает Защитник Windows, попробуйте зайти в параметры безопасности (это можно сделать двойным кликом по значку защитника в области уведомлений) — Безопасность устройства — Сведения об изоляции ядра. Если изоляция ядра включена, попробуйте отключить этот пункт.

- Если вы ранее отключали файл подкачки Windows, попробуйте снова его включить и перезагрузить компьютер. Подробнее: Файл подкачки Windows 10 (актуально и для других версий ОС).
Еще один способ, который можно отнести к простым — отключение DEP в Windows. Для этого:
- Запустите командную строку от имени администратора. В командной строке введите следующую команду и нажмите Enter.
-
bcdedit.exe /set {current} nx AlwaysOff
В случае, если при выполнении команды вам сообщают, что значение защищено политикой безопасной загрузки, вы можете отключить DEP для конкретных программ, а не для системы в целом (второй способ из инструкции). Перезагрузите компьютер и проверьте, была ли решена проблема или же ошибка «Память не может быть read» всё так же возникает.
Дополнительные методы решения проблемы
Если описанные ранее способы не помогли, можно использовать следующие методы:
- Выполните проверку целостности системных файлов Windows с помощью sfc. Иногда ошибка может быть результатом повреждения библиотек DLL.
- Если ошибка возникает при загрузке системы, попробуйте выполнить чистую загрузку Windows. Если при чистой загрузке ошибка не появляется, причиной могут быть какие-то недавно добавленные в автозагрузку программы, либо службы Windows. Вспомните, какое ПО вы устанавливали в последнее время, возможно, ошибку вызывает оно.
- Если на вашем компьютере есть точки восстановления на дату, предшествующую появлению проблемы, можно просто использовать точки восстановления.
- Если проблема стала появляться после обновления каких-то драйверов (часто — видеокарты), попробуйте установить предыдущую версию.
- На всякий случай, имеет смысл проверить компьютер на наличие вредоносных программ.
Также иногда ошибка бывает вызвана проблемами самого файла программы либо его несовместимостью с текущей ОС. А в случае, если помимо рассматриваемой ошибки «Память не может быть read» у вас регулярно возникают и другие проблемы (зависания, синие экраны), теоретически ошибка может быть вызвана проблемами с оперативной памятью, здесь может пригодиться: Как проверить оперативную память RAM на ошибки.
|
Ошибка при завершении работы Win10 — Память не может быть read |
|||||
|
|||||
|
|||||
|
|||||
|
|||||
|
|||||
|
|||||
|
|||||
|
|||||
|
|||||
|
|||||
|
|||||
|
|||||
|
|||||
|
|||||
|
В связи с введением в действие Постановления Правительства Российской Федерации от 14.11.2023 № 1905 т.н. «о запрете популяризации VPN» с 1 марта 2024 года — любое обсуждение способов обхода блокировок и VPN на портале запрещено!
,
If you receive the application error message «The instruction at 0x00007FF******** referenced memory at 0x00000000000000024. The memory could not be written» when Windows starts or shuts down, continue reading below to learn how to fix the problem.
The Application errors «The instruction at 0x0000***** referenced memory at 0x0000******24. The memory could not be read or written», occurs when a program cannot access a memory location to read/write information in it (Access Violation Error ).
What can cause the «The memory could not be read/written» error?
The mentioned error can appear for various reasons, but the most common ones are the following:
- Culprit Service(s)
- Faulty Memory
- Faulty Software
- Faulty Drivers
- Corrupted System files
- Malware
In this tutorial you’ll find step by step instructions to solve the «memory could not memory written» application error in Windows 10/11.
- The instruction at 0x00007FFBEE743ACA referenced memory at 0x00000000000000024 the memory could not be written. The memory could not be written. Click OK to terminate the program
- The Instruction at 0x00007FFBCEAC3ACA referenced memory at 0x0000000000000024. The memory could not be written. Click OK to terminate the program.
- The Instruction at 0x00007FFDED523FAA reference memory at 0x0000000000000024. The memory could not be written. Click OK to terminate the program.
How to fix Application error «The memory could not be read/written at 0x00000000000000024» on Windows 10/11. *
* Important: If the error occurred after installing Windows updates, proceed to uninstall the latest updates before proceeding further.
- Disable GameInput service.
- Disable Third-party Programs & Services.
- Check for Malware/Viruses.
- Increase Virtual Memory.
- Repair Windows System Files.
- Check Memory for Errors.
- Disconnect External Devices.
- Update Chipset Drivers.
- Repair Windows with in-Place Upgrade.
Method 1. Disable GameInput Service.
The «GameInput» service is a next-generation input API developed by Microsoft that allows keyboards, mice, gamepads, and other input devices to be used with it.
However, since many users have reported that the «GameInput» service is causing their systems to display the «Memory could not be written» error, go ahead and disable it and check if the problem is resolved. To do that:
1. Press the Windows + R keys to open the ‘Run‘ command box.
2. Type services.msc and press Enter to open Windows Services.

3. Locate the GameInput Service and double-click on it to open its properties.

4. Press Stop to stop the service, then set the Startup type to Disabled and click OK.

5. Finally, restart your PC and check if the problem persists.
Method 2. Disable 3rd-party Programs & Services.
The most common cause of the mentioned error is a third-party program that can’t read or write in the memory because it has bugs, corrupted files or incomplete rights.
So the first thing you should do is see if the «Memory could not be written/read» error persists after a «clean» boot of Windows, and if not identify which third-party program or service is causing the error.
Step 1. Disable Startup programs.
1. Press CTRL + SHIFT + ESC to open Task Manager.
2. In the Startup tab, disable (one by-one) all the third-party programs running at Windows Startup. Then reboot your PC.

3. After rebooting, check if the problem remains and do the following according the result:
- If the problem remains, re-enable all the disabled startup programs and proceed to Step-2.
- If the problem is fixed, reopen the Task Manager and enable one by one the disabled programs and reboot until you find the culprit. *
* Note: If you find that a third-party program is causing the error, then either keep it disabled at startup, update it, or turn off Data Execution Prevention for that program.
Step 2. Disable Third-Party Services.
1. Press the Windows + R keys to open the ‘Run‘ command box.
2. Type msconfig and press Enter to open the System Configuration utility.

3a. At Services tab, check the Hide all Microsoft services checkbox.

3b. Then press the Disable all button, to disable all the third-party services that start with Windows. When done, click OK and restart your PC.

4. After rebooting, check if the problem remains and do the following according the result:
- If the problem remains, reopen the System Configuration utility (msconfig.exe), select Normal Startup in General tab to re-enable all the disabled services, restart your computer and continue to next method.

- If the problem is fixed, reopen the System Configuration utility (msconfig.exe), go to Services tab and enable one by one the disabled services and reboot until you find the culprit service. *
* Note: If you find that a third-party service is causing the error, then either keep it disabled, or go to Windows services (services.msc), open the service’s Properties and change the Startup type to Manual.

Method 3. Check for Malware/Viruses.
Before proceeding further, ensure that your computer is clean from viruses and malware. To accomplish this task you can use this Malware Scan and Removal Guide to check and remove viruses or/and malicious programs that may be running on your computer.
After scanning and cleaning your computer for malware, check if the problem persists. If not, you’re done here, otherwise continue to next method.
Method 4. Fix Error ‘Memory could not be written» by increasing Virtual Memory.
1. In File Explorer, right click on This PC and select Properties.

2. In Related settings, click Advanced system settings.

3. At Advanced tab open the Performance Settings.

4. At Performance options, select the Advanced tab and then click Change at Virtual memory section.

5. At Virtual Memory options:
a. Uncheck the box Automatically manage paging file size for all drives.
b. Make sure the C: drive where Windows is installed is selected.
c. Select Custom size and adjust/set the initial and maximum size, depending on the size in MB* of the installed memory as instructed below:
* Note: 1GB = 1024MB.
- If you have 4 GB of RAM, multiply its total size in Megabytes (MB) x 2.5 and write the result in the initial and maximum size fields.
- If you have 8 GB of RAM, multiply its total size in Megabytes (MB) x 2 and write the result in the initial and maximum size fields.
- If you have 16 or more GB of RAM, multiply its total size in Megabytes (MB) x 1,5 and write the result in the initial and maximum size fields.
Example: If your RAM size is 4 GB (like in this example), multiply 4 x 1024 and then multiply the result «4096» x 2,5. Then write the final result «10240» in both the initial size and maximum size fields.
5. When done, hit Set.

6. Then click OK and OK again and reboot the computer to apply;y the change.

Method 5. Repair Windows System Files.
Repairing Windows system files is a common but important step in solving Windows 10/11 problems like the one mentioned here.
1. Open Command Prompt as Administrator. To do that, type «cmd» or «command prompt» in the Search and then click Run as administrator in Command Prompt result.

2. At the command prompt window, type the following command & press Enter:
- dism.exe /Online /Cleanup-Image /Restorehealth

3. Be patient until ‘Deployment Image Servicing and Management’ (DISM) tool repairs component store.
4. When the operation is completed, give the command below and press Enter:
- sfc /scannow

5. When SFC scan is completed, restart your computer.
6. After restarting check if the problem is fixed.
Method 6. Diagnose Memory (RAM) for problems.
1. Close all open programs.
2. Type «memory» in Search and then open the Windows Memory Diagnostic tool.

3. Click Restart now and check for problems (recommended)

4. Now let the memory diagnostics tools to check the Memory for problems and complete all the tests.

5. If the diagnostics complete and no problems are found you computer will boot in Windows. (If any problems found, replace your memory).
Method 7. Disconnect External Devices.
In some cases, the «memory could not be read» error is caused by a connected device (eg Bluetooth Game controller, USB Wi-Fi card, Printer, etc.). So, do the following:
1. Shutdown your PC.
2. Disconnect all the external devices that are not necessary for Windows to operate.
3. Then, turn on your PC and check if the problem persists. If yes, continue to next method. If not, do the following:
a. Connect one of the disconnected devices and restart the computer to see if it is causing the problem. If not, do the same process for each device you had disconnected before until you find out which one is causing the problem.
b. Once you find which device is causing the problem, connect it to another USB port, or if e.g. you’ve plugged it into a USB 3.0 port, plug it into a USB 2.0 port (or vice versa) and restart your PC again. If the problem is solved, you’re done here. If not:
- Check the device manufacturer’s support site to see if there is a better Device driver for your device.
- Update the Chipset drivers (See next method),
Method 8. Update Chipset Drivers.
Depending on the CPU manufacturer, install the Chipset drivers using the corresponding tool:
- Intel Driver & Support Assistant
- AMD Auto-detect and Install tool
Method 9. Repair Windows with an In-place Upgrade.
If, after following the methods above, you’re still having problems, your last option is to repair Windows with an in-place upgrade. To do this, use the instructions in one of these tutorials, depending on your version of Windows.
- How to Repair Windows 10 with an In-Place Upgrade.
- How to Repair Windows 11 with an In-Place Upgrade.
That’s it! Which method worked for you?
Let me know if this guide has helped you by leaving your comment about your experience. Please like and share this guide to help others.
If this article was useful for you, please consider supporting us by making a donation. Even $1 can a make a huge difference for us in our effort to continue to help others while keeping this site free:
- Author
- Recent Posts
Konstantinos is the founder and administrator of Wintips.org. Since 1995 he works and provides IT support as a computer and network expert to individuals and large companies. He is specialized in solving problems related to Windows or other Microsoft products (Windows Server, Office, Microsoft 365, etc.).

The “instruction at 0x00007ff” error message denotes that the allotted physical memory cannot read the programs’ content.
All information in RAM gets stored at a specific location. When a particular software requires information stored in a specific address, and the process goes wrong, you get this error saying that the address is invalid.
Now this is a real problem as you have no idea why the address is invalid!
But do not worry if you are in the same situation because there are solutions to fix it.
Why Do You Get The Instruction At 0x00007ff Error?
You mostly get the “The instruction at 0x00007ff referenced memory could not be read” error message due to:
- Corrupted System Files
- Lack Of Virtual Memory
- Outdated Net Framework, Etc
Solutions For Windows Instruction At 0x00007ff Error Message
Here are the solutions for fixing the ‘instruction at 0x00007ff error. Follow the methods and find which one fixes your problem.
1) Perform A Clean Boot
A clean boot initiates Windows with the bare minimum of services and drivers.
If you get the ‘the instruction at 0x00007ff referenced memory could not be read’ error, perform a clean boot.
It will be easier for you to identify the root cause of the problem in a clean boot state.
To run Windows in clean boot, follow these steps:
- Press Windows + R keys to launch Run utility.
- Type msconfig in the Run command box. Then hit Enter or click on the OK button.

- Go to the General tab & click on the radio button for the Selective Startup option.

- Uncheck the Load startup items checkbox. Then go to the Services tab.

- Check the box for Hide all Microsoft services and click on the Disable option.

- All Microsoft services running in the background should get disabled this way.
- Next, open Task Manager by right-clicking on the Windows Start Menu.
- Right-click on each startup item from the Startup tab you want to disable. Choose the Disable option.

Once done, restart your system. Once done repair .NET Framework following the next method.
2) Repair .Net Framework
If your.Net framework installation gets corrupted, you can get ‘the instruction at 0x00000 referenced memory’ error message.
To fix it, repair the .Net Framework. Here is how to do so:
- First download NetFX Repair Tool.

- Open the NetFX Repair exe file. Then go through the page thoroughly and check the box next to ‘I have read ad accept the license terms’.

- When the next window opens, click on Next.
- Again, from the Recommended Changes window, click on the Next button.

- The program will now start searching for the problems related to the .Net dependencies.
- Once the process finishes and a pop-up window opens, click on Next.
- Restart your device and see if this could fix the error. If not, then run SFC and DISM scans.
3) Run SFC And DISM Scans
Missing or corrupted system files or Windows images can also be the reason why you are gettingthe ‘the instruction at 0x00007ff referenced memory could not be read’ error message. So, run SFC and DISM scans to fix it.
An SFC scan will check for any missing or corrupted system files and repair them.
Deployment Image Servicing and Management or DISM is a command line tool to repair Windows broken images.
After running the scans, if the problem persists, run a Chksdsk scan.
4) Run Chkdsk Scan
Achkdsk scan helps to check any corruption in the system’s memory.
So, if you get the Windows error due to this, it will be fixed.
Here is how to run the Chkdsk scan:
- Type cmd in the Windows Search box.
- Choose to run Command Prompt as an administrator to open an elevated Command Prompt window.

- Next copy & paste the following commands in the elevated Command Prompt window.Press the Enter key:
chkdsk C: /f /r /x

Here ‘C’ is my drive letter. Replace it accordingly.
5) Disable Automatically Hide The Taskbar Feature
Disabling the automatically hiding taskbar feature can sometimes fix the ‘the instruction at 0x00000 referenced memory’ error.
So, disable the feature and see if this can help:
- Click on the Windows Start Menu button and select Settings.
- Select Personalization > Taskbar.

- Expand the Taskbar Behaviors section and uncheck the Automatically hide taskbar.

6) Allocate Some More Memory
If your system runs low on virtual memory, this can also result in a Windows error.
To fix it, allocate some virtual memory and see if this can fix the issue.
- Type advanced system settings in the Windows Search bar and select View advanced system settings from the options.

- Click on the Settings button under Performance.

- Go to the Advanced tab and click on the Change button under Virtual Memory.
- From the next window, uncheck Automatically manage paging file size for all drives option.
- Next, select Custom.
- Depending upon your system’s RAM, enter the values as stated below:
Initial Size (MB): 1.5 x Total installed RAM
Maximum Size (MB): 3 x Total installed RAM
For example, if you have 8 GB RAM, the Initial size will be 1.5 x 16 X total allocated RAM.
- To check how much RAM you have on your system, open Windows Settings and click on System.
- Scroll down to find About and click on it.

- Here you will get the details of your system. Check the RAM installed on your device.

Once you have allocated some virtual RAM, restart your PC. Check if this fixes the issue; otherwise, reset Windows.
7) Reset Windows
If none of the above methods could fix the problem, reset Windows.
Follow these steps to do that:
- Open Windows Settings. Select System.
- Click on the Recovery option from the right pane.

- Under Recovery Options, select Reset this PC option.

- Click on Reset PC button.

- Next choose Remove Everything > Only the drive where Windows is installed.

- Next, click on Additional Settings > Next.
- Select remove my files option and follow the on-screen instructions.

After the process, reinstall your needed applications and restore all your backups.
If you encounter any problem resetting your PC, this guide can help you fix it easily.
Wrap Up
The above methods should fix the instruction at 0x00007ff referenced memory could not be read error.
For doubts and other related queries, turn up in the comments section.
Все способы:
- Способ 1: Отключение стороннего антивируса
- Способ 2: Запуск с повышенными правами
- Способ 3: Отключение «Изоляции ядра»
- Способ 4: Отключение DEP
- Способ 5: Восстановление целостности системных файлов
- Вопросы и ответы: 2
Основной причиной ошибки «Память не может быть read» являются ложные срабатывания механизмов защиты в стороннем антивирусе или встроенного модуля безопасности «Data Execution Prevention».
Способ 1: Отключение стороннего антивируса
Если вы используете сторонний антивирус, отключите его и попробуйте запустить приложение, вызывающее ошибку «Память не может быть read». Нормальный старт программы укажет на ее блокировку антивирусной программой, следовательно, вам нужно будет добавить приложение в исключения вашего антивируса.
Подробнее: Отключение антивируса
Способ 2: Запуск с повышенными правами
Некоторые программы для своей корректной работы требуют повышенных прав. Отсутствие таковых приведет тому, что программа не сможет реализовать часть своих функций либо вообще не сможет запуститься, а в некоторых случаях отсутствие привилегий может вызвать указанную ошибку. Запустите программу с повышенными правами, для чего кликните по ней правой кнопкой мыши и выберите из контекстного меню опцию «Запуск от имени администратора».
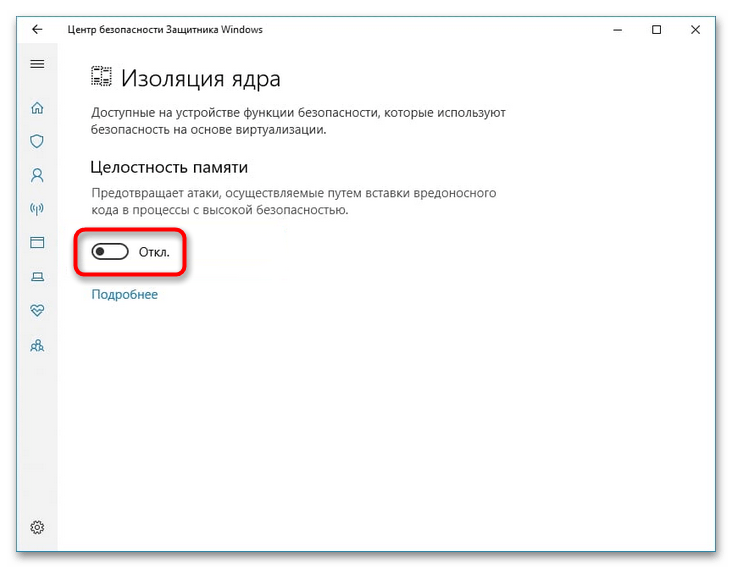
Способ 3: Отключение «Изоляции ядра»
Отключите дополнительную функцию безопасности «Изоляция ядра», контролирующую оперативную память. Функция предотвращает инъекцию вредоносного кода в важные процессы, но иногда она ошибается, что и приводит к ошибке чтения памяти.
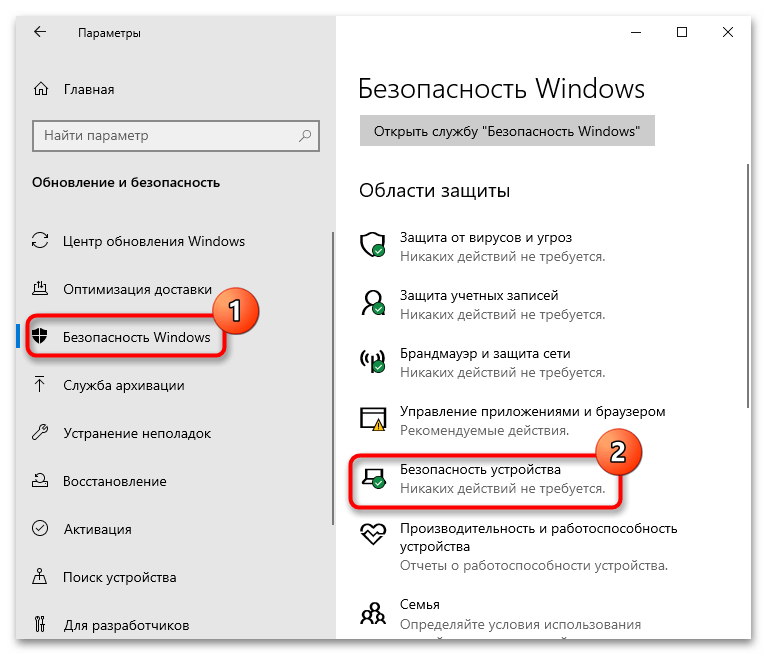
- Откройте приложение «Параметры» и перейдите в раздел «Обновления и безопасность» → «Безопасность Windows» → «Безопасность устройства».
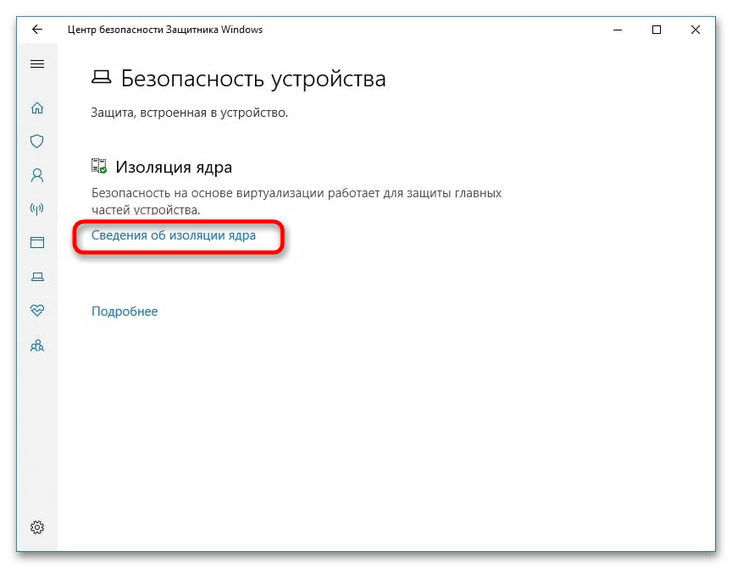
- В следующем окне кликните по ссылке «Сведения об изоляции ядра».
- Отключите опцию «Целостность памяти» и перезагрузите компьютер.
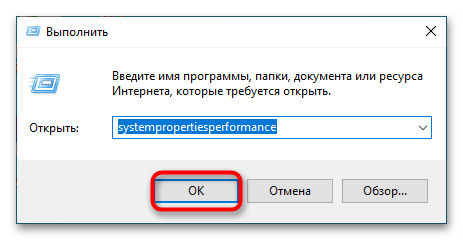
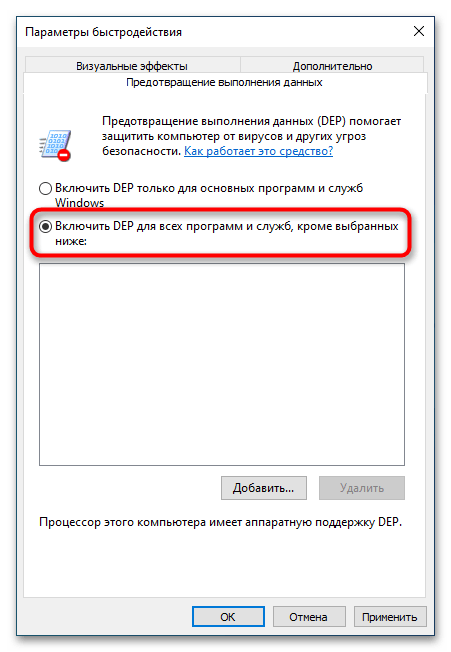
Способ 4: Отключение DEP
Помимо встроенного антивируса, для защиты от угроз в Windows 10 используется набор технологий «Data Execution Prevention», регистрирующих подозрительные изменения в памяти. Ложные срабатывания функции могут вызвать ошибку «Память не может быть read». Отключите DEP для программы, которая вызывает ошибку.
- Нажмите Win + R, чтобы открыть диалоговое окошко быстрого выполнения команд, вставьте в него команду
systempropertiesperformanceи нажмите клавишу ввода. - В открывшемся окне «Параметры быстродействия» переключитесь на вкладку «Предотвращение выполнения данных» и активируйте радиокнопку «Включить DEP для всех программ и служб, кроме выбранных ниже».
- Нажмите кнопку «Добавить» и укажите путь к исполняемому файлу программы, вызывающей ошибку чтения памяти.
- Сохраните настройки и перезагрузите компьютер.

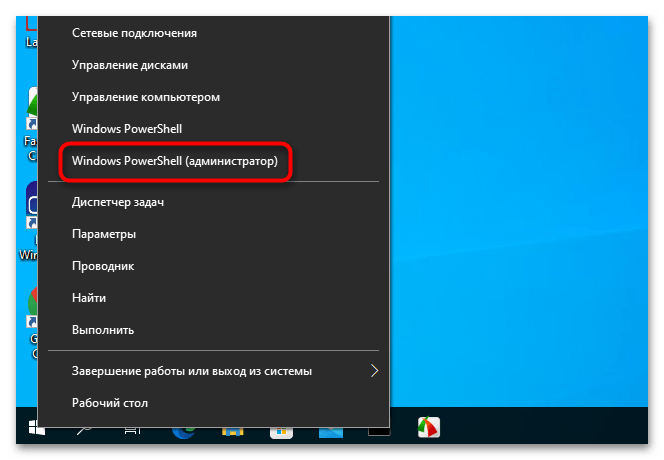
Способ 5: Восстановление целостности системных файлов
В некоторых случаях ошибка «Память не может быть read» может быть вызвана повреждением системных библиотек. Просканируйте систему на предмет таких повреждений с помощью штатного инструмента «SFC».
- Запустите от имени администратора «Командную строку» или «Windows PowerShell» любым удобным методом, например кликом ПКМ по кнопке «Пуск».
- Выполните в консоли команду
sfc /scannowи дождитесь завершения процедуры сканирования.
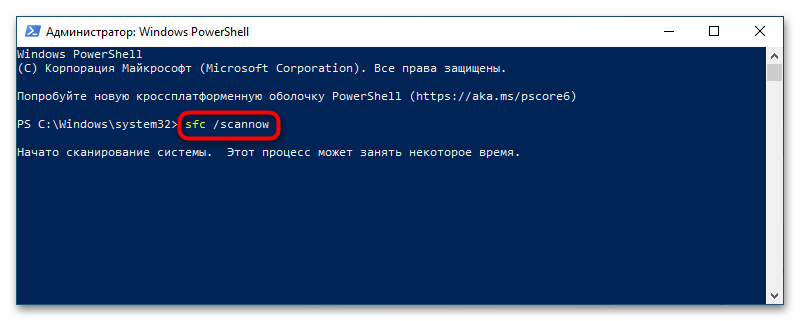
Если утилита обнаружит повреждения или отсутствие нужных для работы Windows файлов, последние будут автоматически восстановлены из встроенного хранилища компонентов. В случае, когда SFC завершилась с ошибкой, воспользуйтесь инструкциями из следующей статьи.
Подробнее: Использование и восстановление проверки целостности системных файлов в Windows 10
Если устранить ошибку не удалось, откатите систему к ближайшей точке восстановления, но для начала постарайтесь припомнить, какие действия вы выполняли до появления ошибки. Например, если проблемы начались после обновления драйвера, восстановите его старую версию, и тому подобное.
Подробнее: Откат к точке восстановления в Windows 10