
Язык
Руководство пользователя |
| Заголовок | Описание | Дата выпуска (Bерсия) |
файла (Размер) |
|---|---|---|---|
|
Руководство пользователя |
02.03.2018 (02) |
Загрузка (18.21MB) |
|
|
Базовое руководство пользователя |
04.04.2019 (01) |
Загрузка (5.42MB) |
Краткий справочник |
| Заголовок | Описание | Дата выпуска (Bерсия) |
файла (Размер) |
|---|---|---|---|
|
Краткий справочник |
02.03.2018 (02) |
Загрузка (0.29MB) |
Приложения |
| Заголовок | Описание | Дата выпуска (Bерсия) |
файла (Размер) |
|---|---|---|---|
|
Заявление о сборе данных при доступе к URL-адресу, начинающемуся с “https://s.brother/” |
16.09.2022 (01) |
Загрузка (0.12MB) |
Другие |
| Заголовок | Описание | Дата выпуска (Bерсия) |
файла (Размер) |
|---|---|---|---|
|
Каталог принадлежностей |
12.05.2025 (24.08) |
Загрузка (14.71MB) |
|
|
Каталог принадлежностей (HTML) |
15.05.2025 (24.09) |
Просмотр (-) |
Загрузите и просмотрите документ в формате PDF. Для просмотра документов в формате PDF требуется программное обеспечение Adobe® Acrobat® Reader®. Если у вас нет данного программного обеспечения, вы можете загрузить его, щёлкнув по ссылке «Adobe® Acrobat® Reader®».
Operation Manual
Sewing Machine
Product Code: 885-X06/X08/X16/X18/X26/X28
888-X06/X08/X16/X18/X26/X28
Please visit us at http://solutions.brother.com where you can get product
support and answers to frequently asked questions (FAQs).
———————————————————————————————————————————————————————————————————————————————————————————————————————————————————————————————————————————————————————————————————————————————————————————————————————————————————————————————————————————————————————————————————————
IMPORTANT SAFETY
INSTRUCTIONS
Please read these safety instructions
before attempting to use the machine.
DANGER — To
reduce the risk of electric shock:
1 Always unplug the machine from
the electrical outlet immediately after
using, when cleaning, when making
any user servicing adjustments
mentioned in this manual, or if you are
leaving the machine unattended.
WARNING — To
reduce the risk of burns, fire, electric
shock, or injury to persons.
2 Always unplug the machine from
the electrical outlet when making any
adjustments mentioned in the
instruction manual:
• To unplug the machine, switch the
machine to the symbol “O” position
to turn it off, then grasp the plug and
pull it out of the electrical outlet. Do
not pull on the cord.
• Plug the machine directly into the
electrical outlet. Do not use an
extension cord.
• Always unplug your machine if the
power is cut.
3 Never operate this machine if it has
a damaged cord or plug, if it is not
working properly, if it has been
dropped or damaged, or water is spilled
on the unit. Return the machine to the
nearest authorized dealer or service
center for examination, repair,
electrical or mechanical adjustment.
• While the machine is stored or in use
if you notice anything unusual, such
as an odor, heat, discoloration or
deformation, stop using the machine
and immediately unplug the power
cord.
• When transporting the machine, be
sure to carry it by its handle. Lifting
the machine by any other part may
damage the machine or result in the
machine falling, which could cause
injuries.
• When lifting the machine, be careful
not to make any sudden or careless
movements, otherwise you may
injure your back or knees.
4 Always keep your work area clear:
• Never operate the machine with any
air openings blocked. Keep
ventilation openings of the machine
and foot control free from the build
up of lint, dust, and loose cloth.
• Do not store objects on the foot
controller.
• Do not use extension cords. Plug the
machine directly into the electrical
outlet.
• Never drop or insert any object into
any opening.
• Do not operate where aerosol (spray)
products are being used or where
oxygen is being administered.
• Do not use the machine near a heat
source, such as a stove or iron;
otherwise, the machine, power cord
or garment being sewn may ignite,
resulting in fire or an electric shock.
• Do not place this machine on an
unstable surface, such as an unsteady
or slanted table, otherwise the
machine may fall, resulting in
injuries.
5 Special care is required when
sewing:
• Always pay close attention to the
needle. Do not use bent or damaged
needles.
1

———————————————————————————————————————————————————————————————————————————————————————————————————————————————————————————————————————————————————————————————————————————————————————————————————————————————————————————————————————————————————————————————————————————————
• Keep fingers away from all moving
parts. Special care is required around
the machine needle.
• Do not turn on the machine while
pressing down the foot controller.
The machine may start unexpectedly
and cause personal injury or damage
to the machine.
•
Switch the machine to the symbol “O”
position to turn it off when making any
adjustments in the needle area.
• Do not use a damaged or incorrect
needle plate, as it could cause the
needle to break.
• Do not push or pull the fabric when
sewing, and follow careful instruction
when freehand stitching so that you
do not deflect the needle and cause it
to break.
6 This machine is not a toy:
Your close attention is necessary when
•
the machine is used by or near children.
• The plastic bag that this machine was
supplied in should be kept out of the
reach of children or disposed of.
Never allow children to play with the
bag due to the danger of suffocation.
• Do not use outdoors.
7 For a longer service life:
• When storing this machine, avoid
direct sunlight and high humidity
locations. Do not use or store the
machine near a space heater, iron,
halogen lamp, or other hot objects.
• Use only neutral soaps or detergents
to clean the case. Benzene, thinner,
and scouring powders can damage
the case and machine, and should
never be used.
•
Always consult the operation manual
when replacing or installing any
assemblies, the presser feet, needle, or
other parts to assure correct installation.
8 For repair or adjustment:
• If the Light unit (light-emitting diode)
is damaged, it must be replaced by
authorized dealer.
• In the event a malfunction occurs or
adjustment is required, first follow the
troubleshooting table in the back of
the operation manual to inspect and
adjust the machine yourself. If the
problem persists, please consult your
local authorized Brother dealer.
Use this machine only for its intended
use as described in this manual.
Use accessories recommended by the
manufacturer as contained in this manual.
The contents of this manual and
specifications of this product are
subject to change without notice.
For additional product information,
visit our web site at www.brother.com
SAVE THESE
INSTRUCTIONS
This machine is intended
for household use.
This appliance is not intended for use
by persons (including children) with
reduced physical, sensory or mental
capabilities, or lack of experience and
knowledge, unless they have been
given supervision or instruction
concerning use of the appliance by a
person responsible for their safety.
Children should be supervised to
ensure that they do not play with the
appliance.
This appliance can be used by
children aged from 8 years and
above and persons with reduced
physical, sensory or mental
capabilities or lack of experience
and knowledge if they have been
given supervision or instruction
concerning use of the appliance in a
safe way and understand the hazards
involved. Children shall not play
with the appliance. Cleaning and
user maintenance shall not be made
by children without supervision.
2
———————————————————————————————————————————————————————————————————————————————————————————————————————————————————————————————————————————————————————————————————————————————————————————————————————————————————————————————————————————————————————————————————————
FOR USERS IN THE UK, EIRE,
MALTA AND CYPRUS ONLY
IMPORTANT
• In the event of replacing the plug fuse, use a fuse
approved by ASTA to BS 1362, i.e. carrying the
mark, rating as marked on plug.
CONTENTS
IMPORTANT SAFETY INSTRUCTIONS ………..1
1. KNOWING YOUR SEWING
MACHINE ……………………………. 4
ACCESSORIES ………………………………………….4
Optional accessories …………………………………… 4
THE MAIN PARTS …………………………………….5
Flat bed attachment …………………………………….. 5
USING YOUR SEWING MACHINE ……………. 6
Connecting plugs ……………………………………….. 6
Main power and sewing light switch ……………… 7
Foot controller ……………………………………………. 7
Checking the needle ……………………………………. 7
Replacing the needle …………………………………… 7
Changing the presser foot …………………………….. 8
THE CONTROLS ………………………………………9
Pattern selection dial …………………………………… 9
Stretch stitching ………………………………………….. 9
Patterns and stitch names …………………………… 10
Stitch length dial ………………………………………. 12
Stitch width dial ……………………………………….. 12
Reverse sewing lever …………………………………. 13
THREADING THE MACHINE …………………..13
Winding the bobbin ………………………………….. 13
Lower threading ……………………………………….. 15
Lower threading (for models equipped with a
quick-set bobbin) ……………………………………… 16
Upper threading ……………………………………….. 17
Using the needle threader (for models equipped
with a needle threader) ………………………………. 19
Drawing up the lower thread ………………………. 21
FABRIC, THREAD, AND NEEDLE
COMBINATIONS …………………………………..22
2. SEWING BASICS …………………. 23
Please read before sewing ………………………….. 23
Starting sewing …………………………………………. 23
Trial sewing ……………………………………………… 24
Changing the sewing direction ……………………. 24
Sewing thick fabrics ………………………………….. 24
Sewing thin fabrics ……………………………………. 25
Sewing stretch fabrics ………………………………… 25
• Always replace the fuse cover. Never use plugs with
the fuse cover omitted.
• If the available electrical outlet is not suitable for the
plug supplied with this equipment, you should
contact your authorized dealer to obtain the correct
lead.
Stitching cylindrical pieces …………………………. 25
Sewing with a twin needle (Option) ………………25
Thread tension ………………………………………….. 27
3. BUILT-IN STITCHES …………….. 28
Straight stitching ……………………………………….. 28
Zigzag stitching …………………………………………. 28
Blind hem stitching ……………………………………. 28
Shell tuck stitching …………………………………….. 30
Elastic stitching ………………………………………….30
Double action stitching ………………………………. 31
Fagoting ……………………………………………………31
Overedge stitching …………………………………….. 32
Feather stitching ………………………………………… 33
Triple zigzag stretch stitching ………………………. 33
Decorative stitching …………………………………… 33
4. SEWING BUTTONHOLES AND
BUTTONS …………………………. 34
Making a buttonhole
(1-step automatic buttonhole) ………………………34
Adjusting buttonholes ………………………………… 36
Sewing buttons …………………………………………. 37
5. USING ATTACHMENTS AND
APPLICATIONS ………………….. 38
Zipper insertion ………………………………………… 38
Gathering ………………………………………………….39
Darning ……………………………………………………39
Appliqués …………………………………………………39
OPTIONAL ACCESSORIES ……………………… 40
Using the blind stitch foot …………………………… 40
6. APPENDIX ………………………….. 41
MAINTENANCE ……………………………………. 41
Restrictions on oiling …………………………………. 41
Precautions on storing the machine ……………… 41
Cleaning …………………………………………………..41
TROUBLESHOOTING ……………………………. 43
INDEX …………………………………………………. 46
3
———————————————————————————————————————————————————————————————————————————————————————————————————————————————————————————————————————————————————————————————————————————————————————————————————————————————————————————————————————————————————————————————————————————————
1 KNOWING YOUR SEWING MACHINE
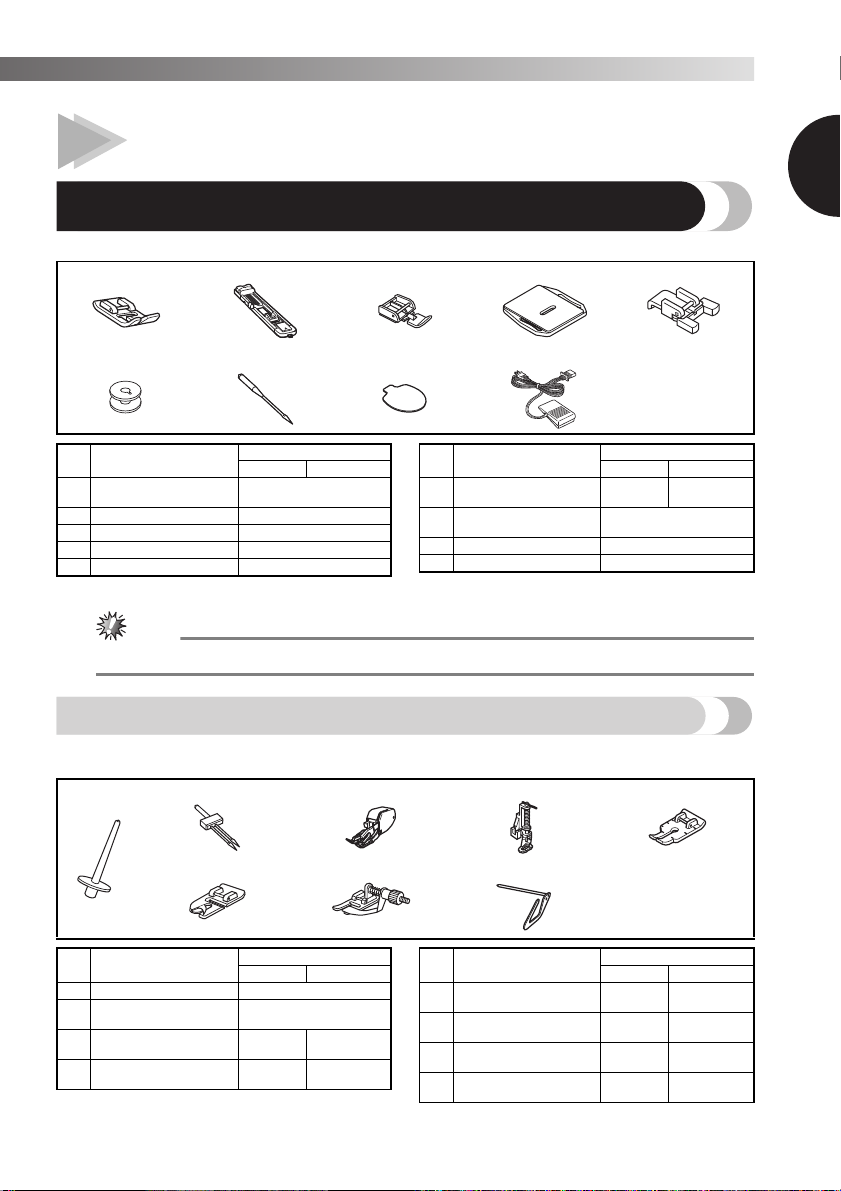
ACCESSORIES
We have designed these accessories to help you easily perform most sewing tasks.
1. 2. 3. 4. 5.
6. 7. 8. 9.
1
No. Part Name
Zigzag foot “J”
1
(on machine)
2 Buttonhole foot “A” XD1792-031
3 Zipper foot “I” XE9369-001
4 Darning Plate XC6063-021
5 Button sewing foot “M” XE2137-001
● The included accessories vary depending on the machine model.
Part Code
Americas Others
XC4901-121
No. Part Name
Bobbin
6
(One is on machine)
Needle set
7
(90/14 needle)
8 Oval screwdriver XE5241-001
9 Foot controller See page 5
Part Code
Americas Others
3-piece set: XE5328-001
2-piece set: XE7064-001
SA156
SFB:
XA5539-151
Optional accessories
The following are available as optional accessories to be purchased separately. Depending on the model you
purchased, the following accessory may be included with your machine.
1. 2. 3. 4. 5.
6. 7. 8.
No. Part Name
1 Extra spool pin XE2241-001
Twin needle
2
(2.0/75 needle)
3 Walking Foot SA107
4 Quilting Foot SA129
Part Code
Americas Others
X57521-021
F034N:
XC2165-002
F005N:
XC1948-052
No. Part Name
5 1/4-inch Quilting Foot SA125
6 Narrow Hemmer Foot SA127
7 Blind Stitch Foot SA134
8 Quilting guide SA132
Part Code
Americas Others
F001N:
XC1944-052
F003N:
XC1945-052
F018N:
XC1976-052
F016N:
XC2215-052
4
KNOWING YOUR SEWING MACHINE —————————————————————————————————————————————————————————————————————————————————————————————————————————————————————————————————————————————————————————————————————————————————
1
3
2
4
5
6
7
8
9
0
A
B
C
D
G
F
H
I
K
E
J
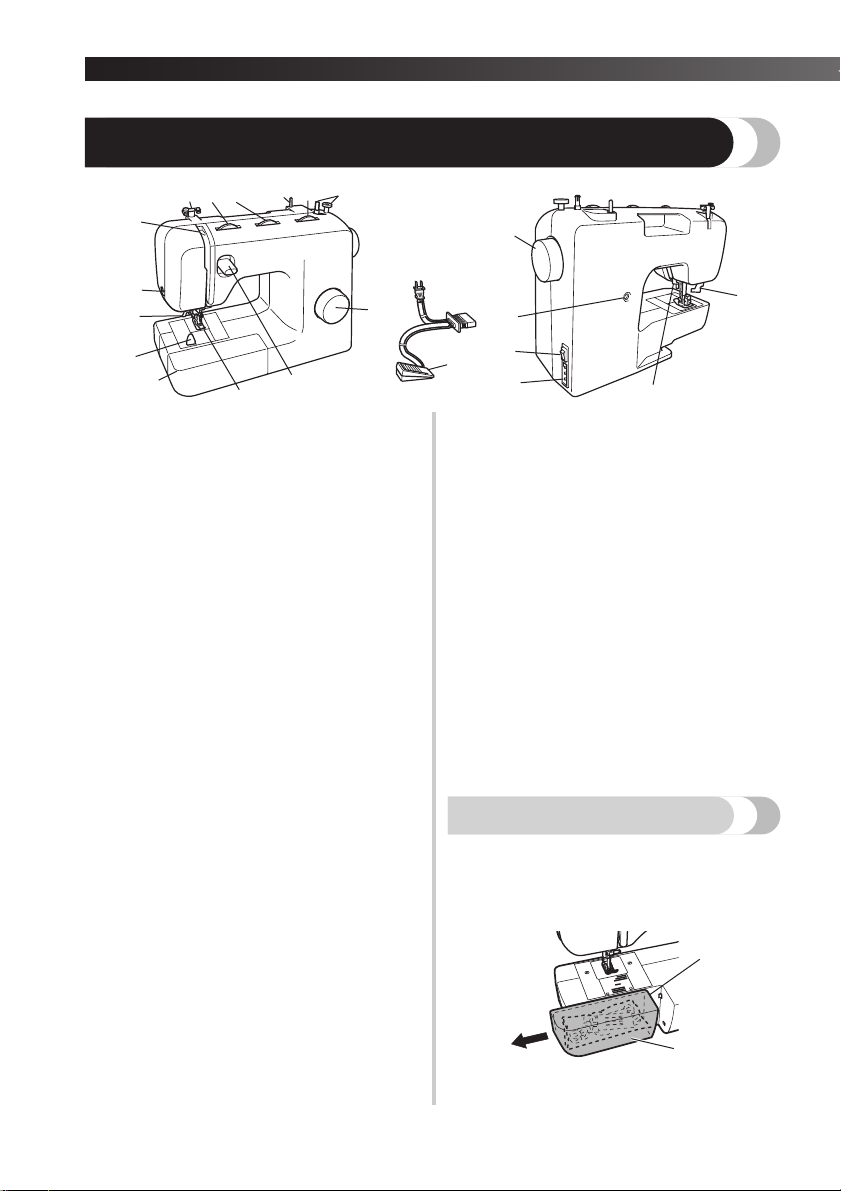
THE MAIN PARTS
1 Bobbin winder (Page 13)
This winds the thread onto the bobbin for use as the
lower thread.
2 Stitch length dial (Page 12)
Rotate the dial to control the stitch length.
3 Spool pin (Page 14, 17)
This holds the spool of thread.
4 Stitch width dial (Page 12)
Rotate the dial to control the stitch width.
5 Upper tension-control dial (Page 27)
This controls the tension of the upper thread.
6 Thread guide (Page 14, 17)
This is used when winding the thread onto the
bobbin and then threading the machine.
7 Thread take-up lever (Page 18)
8 Thread cutter (Page 24)
Pass the threads through the thread cutter to cut
them.
9 Needle threader (Page 19)
(This is only available on certain models.)
0 Quick-set bobbin (Page 16, 21)
(This is only available on certain models.)
A Flat bed attachment with accessory compartment
(Page 5)
B Presser foot (Page 
C Reverse sewing lever (Page 13)
Push this lever to stitch in the reverse direction.
D Pattern selection dial (Page 9)
Rotate the dial in either direction to choose the
stitch you want.
E Handwheel
Used to manually raise and lower the needle.
F Buttonhole fine-adjustment screw (Page 36)
G Main power and sewing light switch (Page 7)
You can turn the main power and sewing light
switch on and off.
H Foot controller jack / socket (Page 6)
Plug in the foot controller plug and connect the
machine to the power supply.
I Presser foot lever (Page 18)
Used to raise and lower the presser foot.
J
Buttonhole lever (1-Step automatic buttonhole)
Page 34
)
(
Lower the buttonhole lever when sewing
buttonholes.
K Foot controller (Page 7)
You can use this to control the sewing speed, and to
start and stop sewing.
Foot Controller:
Model KD-1902 for 110-120V area
KD-1902 for 110-127V area (Brazil only)
Model KD-2902 for 220-240V area
The foot controller part code differs depending on the
country or region. Contact your dealer or the nearest
authorized service center.
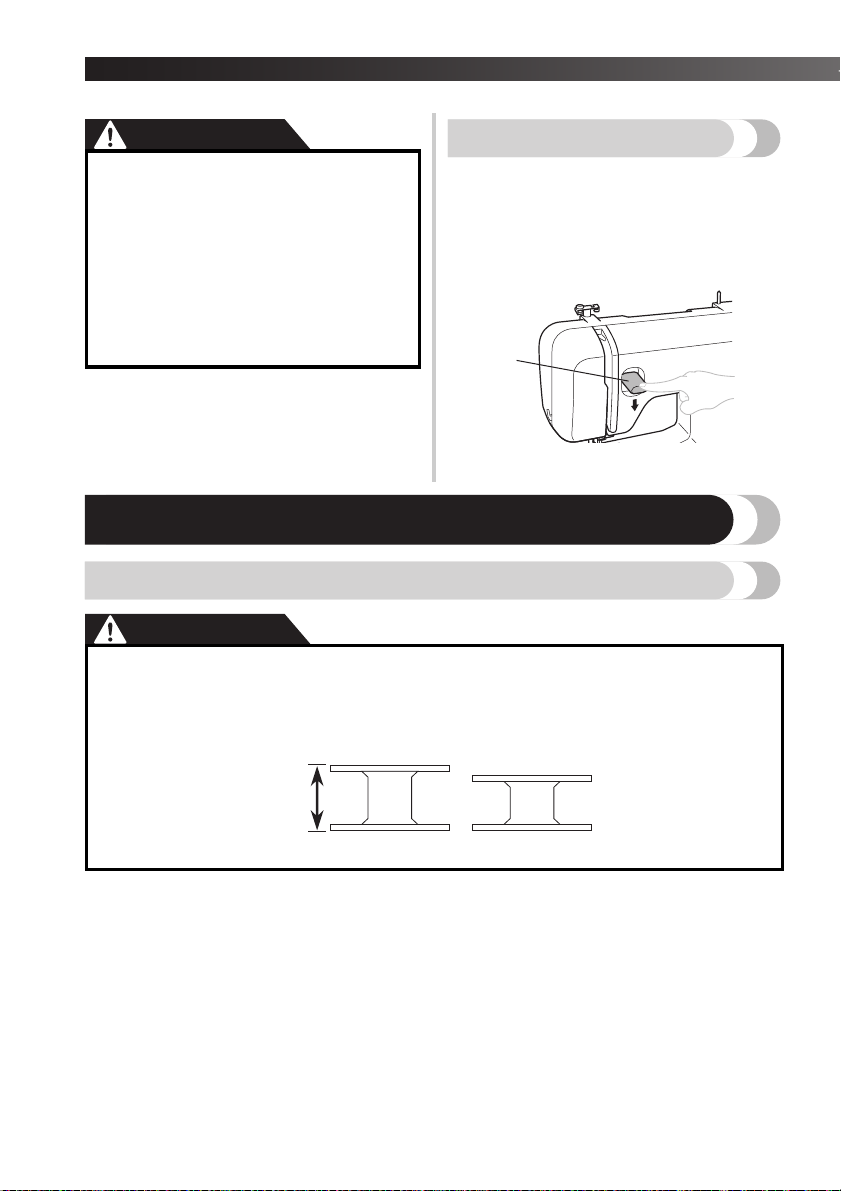
Flat bed attachment
The accessories can be stored in a compartment inside
the flat bed attachment.
Slide the flat bed attachment to the left to
1
open it.
5
1 Flat bed attachment
2 Storage compartment
———————————————————————————————————————————————————————————————————————————————————————————————————————————————————————————————————————————————————————————————————————————————————————————————————————————————————————————————————————————————————————————————————————————————
USING YOUR SEWING MACHINE
WARNING
● Use only regular household electricity for the power source. Using other power sources may
result in fire, electric shock, or damage to the machine.
● Make sure that the plugs on the power cord are firmly inserted into the electrical outlet and
the power supply jack on the machine.
● Do not insert the plug on the power cord into an electrical outlet that is in poor condition.
● Turn off the main power and remove the plug in the following circumstances:
• When you are away from the machine
• After using the machine
• When the power fails during use
• When the machine does not operate correctly due to a bad connection or a disconnection
• During electrical storms
CAUTION
● Use only the power cord included with this machine.
● Do not use extension cords or multi-plug adapters with many other appliances plugged in to
them. Fire or electric shock may result.
● Do not touch the plug with wet hands. Electric shock may result.
● When unplugging the machine, always turn off the main power first. Always grasp the plug to
remove it from the outlet. Pulling on the cord may damage the cord, or lead to fire or electric
shock.
● Do not allow the power cord to be cut, damaged, modified, forcefully bent, pulled, twisted,
or bundled. Do not place heavy objects on the cord. Do not subject the cord to heat. These
things may damage the cord and cause fire or electric shock. If the cord or plug is damaged,
take the machine to your authorized dealer for repairs before continuing use.
● Unplug the power cord if the machine is not to be used for a long period of time. Otherwise
a fire may result.
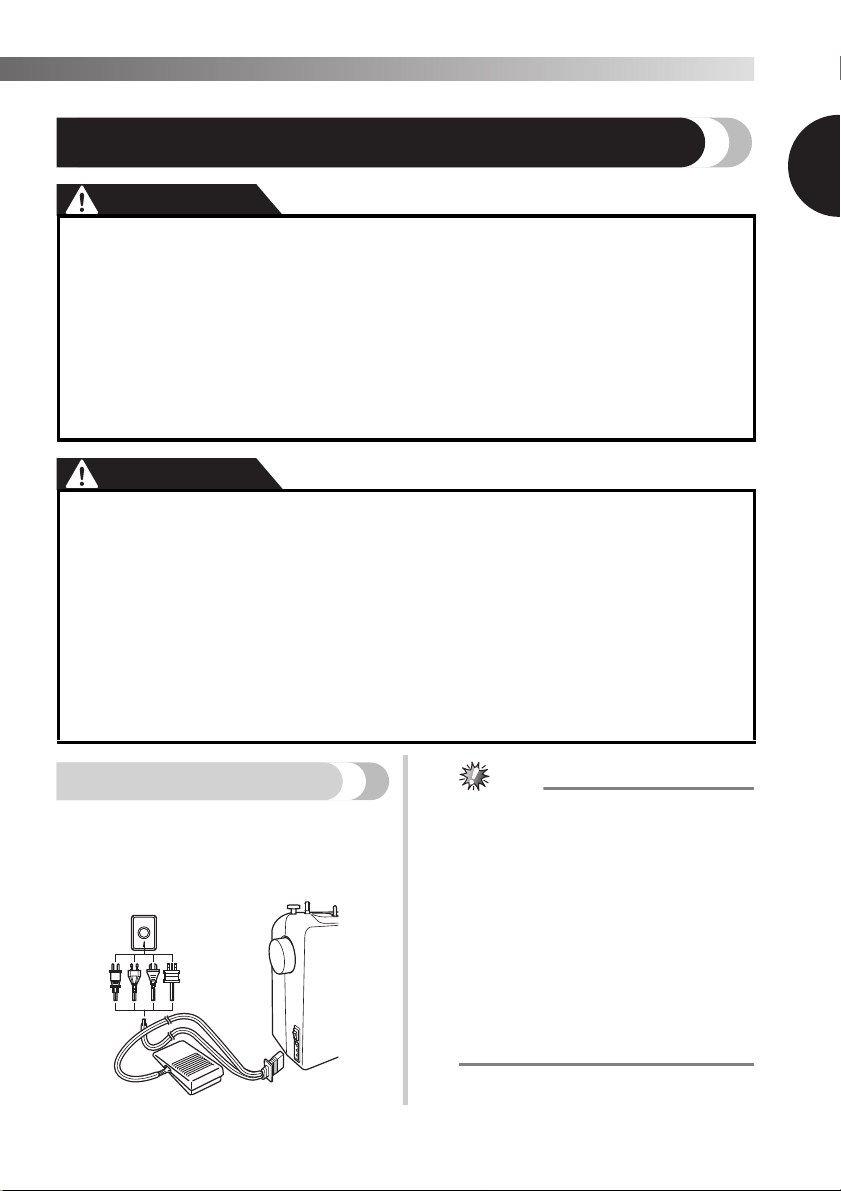
1
Connecting plugs
Connect the foot controller plug to the
1
machine.
Connect the power supply plug to a wall
2
outlet.
● If a power outage occurs while the sewing
machine is being operated, turn off the main
power and unplug the power supply cord.
When restarting the sewing machine, follow
the necessary procedure to correctly operate
the machine.
(For U.S.A. only)
● This appliance has a polarized plug (one
blade wider than the other). To reduce the
risk of electric shock, this plug is intended to
fit in a polarized outlet only one way. If the
plug does not fit fully in the outlet, reverse
the plug.
If it still does not fit, contact a qualified
electrician to install the proper outlet. Do
not modify the plug in any way.
6
KNOWING YOUR SEWING MACHINE —————————————————————————————————————————————————————————————————————————————————————————————————————————————————————————————————————————————————————————————————————————————————
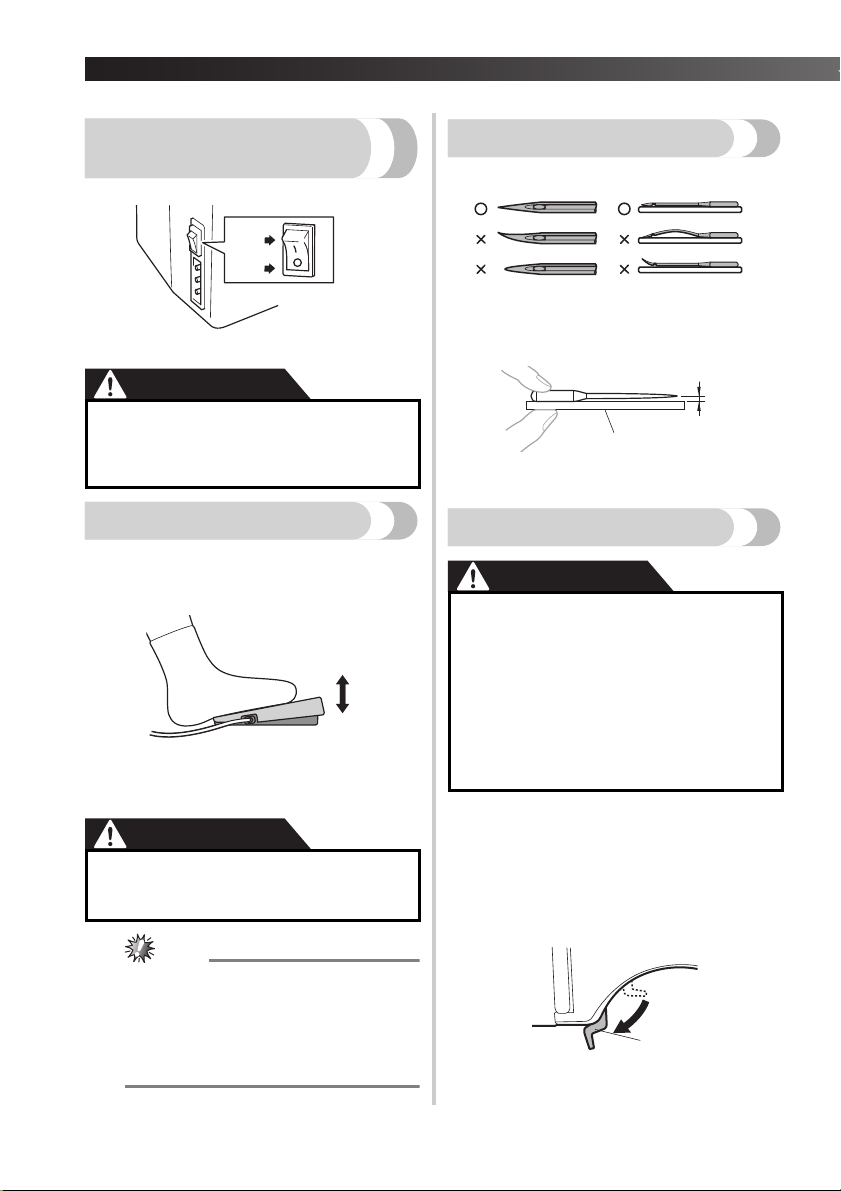
Main power and sewing
light switch
This switch turns the main power and sewing light on or off.
1 Turn on (toward the ‘I’ mark)
2 Turn off (toward the ‘O’ mark)
●
Do not turn on the machine while pressing
down the foot controller. The machine
may start unexpectedly and cause
personal injury or damage to the machine.
Foot controller
When you press the foot controller down lightly, the
machine will run at a low speed. When you press harder,
the machine’s speed will increase. When you take your
foot off the foot controller, the machine will stop.
1
2
1 Slower
2 Faster
You should make sure that nothing is placed on the foot
controller when the machine is not in use.
● Do not allow pieces of cloth and dust to
build up on the foot controller. Doing so
could cause a fire or an electric shock.
Checking the needle
The sewing needle must always be straight and sharp
for smooth sewing.
■ Checking the needle correctly
Put the flat side of the needle on a flat surface.
Check the needle from the top and the sides.
Dispose of any bent needles safely.
1 Parallel space
2 Level surface (bobbin cover, glass, etc.)
Replacing the needle
● Always turn off the machine before you
change the needle. Otherwise, injuries
may occur if the foot controller is
accidentally pressed and the machine
starts sewing.
● Only use sewing machine needles for
home use. Other needles may bend or
break and cause injury.
● Never sew with a bent needle. A bent
needle will easily break and cause injury.
Turn off the machine.
1
Raise the needle by turning the
2
handwheel toward you
(counterclockwise) so that the mark on
the wheel points up.
Lower the presser foot lever.
3
7
(For U.S.A. only)
● Foot Controller: Model KD-1902
This foot controller can be used on the
machine with product code 885-X06,
885-X08, 885-X26 and 885-X28.
The product code is mentioned on the
machine rating plate.
1 Presser foot lever
———————————————————————————————————————————————————————————————————————————————————————————————————————————————————————————————————————————————————————————————————————————————————————————————————————————————————————————————————————————————————————————————————————————————
CAUTION
● Before replacing the needle, place fabric
or paper under the presser foot to
prevent the needle from falling into the
hole in the needle plate.
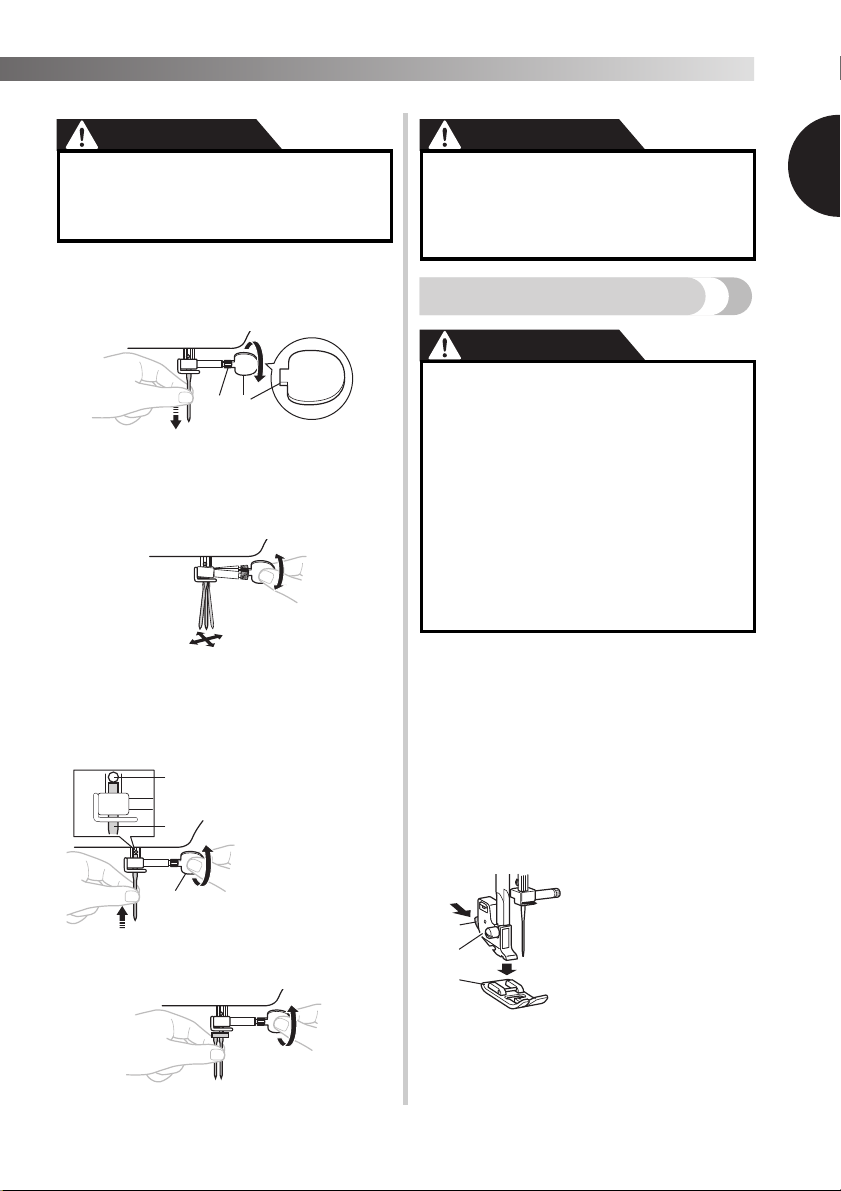
Hold the needle with your left hand, and
4
then use an oval screwdriver to turn the
needle clamp screw counterclockwise to
remove the needle.
21
1 Use an oval screwdriver
2 Needle clamp screw
• Do not use excessive force when loosening
or tightening the needle clamp screw,
otherwise certain parts of the sewing
machine may be damaged.
With the flat side of the needle toward the
5
back of the machine, insert the needle
until it touches the needle stopper. Next,
tighten the needle clamp using an oval
screwdriver.
CAUTION
● Make sure you insert the needle until it
touches the stopper, and securely tighten
the needle clamp screw with an oval
screwdriver, otherwise the needle may
break or the machine may be damaged.
Changing the presser foot
● Always turn off the machine before you
change the presser foot. If you leave the
power on and step on the controller, the
machine will start and you may be
injured.
● Always use the correct presser foot for
the stitch pattern you have chosen. If
you use the wrong presser foot, the
needle may strike the presser foot and
bend or break, and may cause injury.
● Only use presser feet that have been
designed to be used with this machine.
Using any other presser foot may cause
accident or injury.
You will have to change the presser foot depending on
what you want to sew and how.
Turn off the machine.
1
Raise the presser foot lever.
Raise the needle by turning the
2
handwheel toward you
(counterclockwise) so that the mark on
the wheel points up.
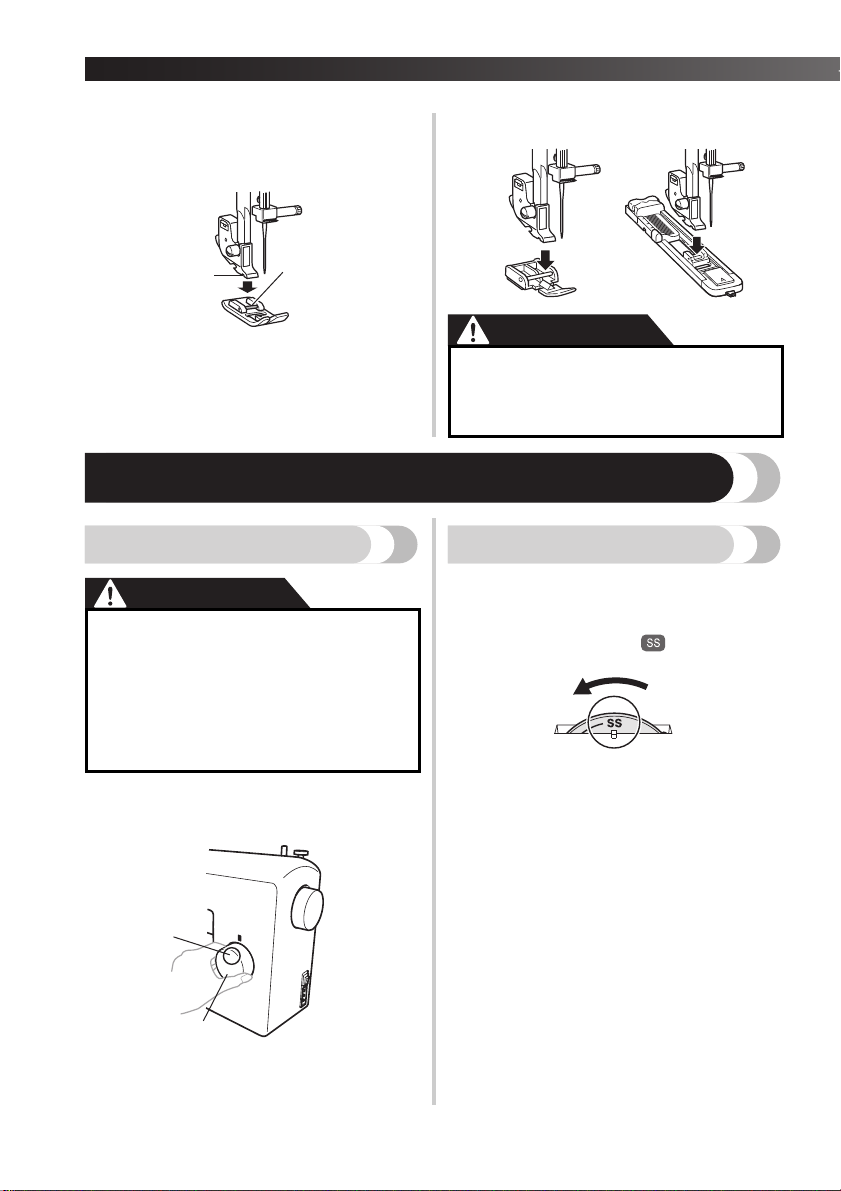
Press the black button at the back of the
3
presser foot holder to release the presser
foot.
1
Install the twin needle in the same way.
1 Use an oval
screwdriver
2 Needle stopper
3 Needle
1
2
3
Put a different presser foot on the needle
4
plate so that the bar on the presser foot is
in line with the slot on the shank.
1 Black button
2 Presser foot holder
3 Presser foot
8
KNOWING YOUR SEWING MACHINE —————————————————————————————————————————————————————————————————————————————————————————————————————————————————————————————————————————————————————————————————————————————————
Lower the presser foot lever and fix the
5
presser foot onto the shank. If the presser
foot is in the correct place, the bar should
snap in.
2
1 Shank
2 Bar
1
THE CONTROLS
Pattern selection dial
CAUTION
● When you use the pattern selection dial
to choose a pattern, raise the needle by
turning the handwheel toward you
(counterclockwise) so that the mark on
the wheel points up. If the needle is in
the down position when you turn the
pattern selection dial, the needle, presser
foot or fabric may be damaged.
To choose a stitch, simply turn the pattern selection dial
in either direction. The next section shows
recommended stitch lengths and widths.
■ Presser foot installation orientation
● If the presser foot is not installed with
the correct orientation, the needle may
strike the presser foot, which may bend
or break the needle and cause injury.
Stretch stitching
Raise the needle by turning the handwheel toward you
(counterclockwise) so that the mark on the wheel points
up.
Setting the stitch length dial to “ ” changes the
selected pattern to a stretch stitch.
9
2
1
1 Pattern selection dial
2 Chosen pattern number
———————————————————————————————————————————————————————————————————————————————————————————————————————————————————————————————————————————————————————————————————————————————————————————————————————————————————————————————————————————————————————————————————————————————
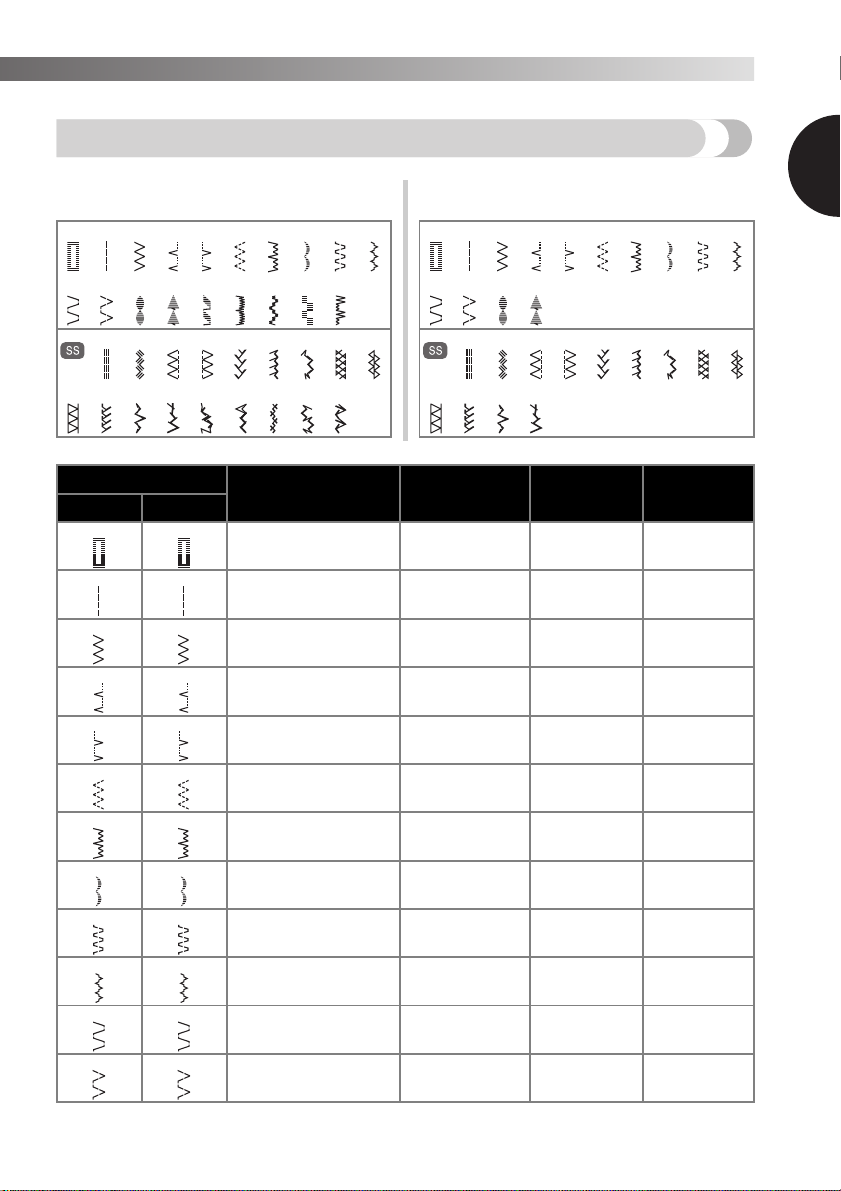
Patterns and stitch names
■ 37 Stitches
(only available on certain models)
5
4
6
8 9 10
■ 27 Stitches
2
1
3
5
4
6
8 9 10
1
12
13
20
21
30
31
15
23 24
33
Pattern
37 Stitches 27 Stitches
1 1
3 3
5 5
7 7
19
16
34
18
17
26
25
35
27
37
36
Stitch Name
1-STEP AUTOMATIC
BUTTONHOLE
STRAIGHT STITCH
ZIGZAG STITCH
BLIND HEM STITCH
SHELL TUCK STITCH
ELASTIC STITCH
STRETCH BLIND HEM
STITCH
28
12
11
24
Recommended
15
25
Width
13
16 17 18 19
26
(mm (inch))
3-5
(1/8 – 3/16)
0-5 (0-3/16)
(Changes needle
position)
0-5
(0-3/16)
3-5
(1/8-3/16)
3-5
(1/8-3/16)
3-5
(1/8-3/16)
3-5
(1/8-3/16)
14
27
Recommended
Length
(mm (inch))
F-1.5
(1/64-1/16)
1-4
(1/16-3/16)
F-4
(1/64-3/16)
F-2
(1/64-1/16)
F-3
(1/64-1/8)
F-2.5
(1/64-3/32)
F-1.5
(1/64-1/16)
21
20
Reference Page
28, 38, 39, 40
28, 37, 39, 40
28, 40
28, 40
22
23
34
30
30
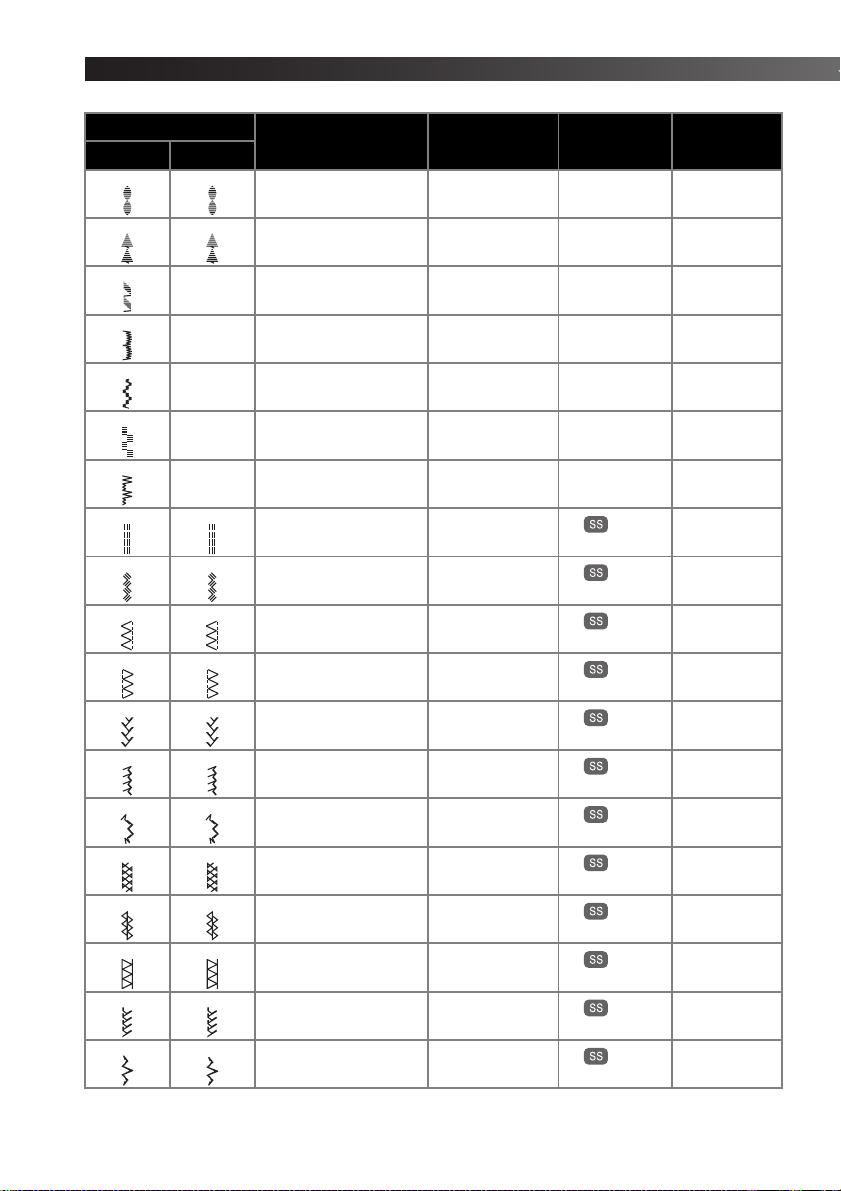
SCALLOP STITCH
9 9
DOUBLE ACTION STITCH
BRIDGING STITCH
11 11
RAMPART STITCH
ELASTIC SHELL TUCK
STITCH
3-5
(1/8-3/16)
3-5
(1/8-3/16)
3-5
(1/8-3/16)
3-5
(1/8-3/16)
3-5
(1/8-3/16)
F-1.5
(1/64-1/16)
F-3
(1/64-1/8)
F-3
(1/64-1/8)
F-3
(1/64-1/8)
F-3
(1/64-1/8)
33
31
31
31
32
10
KNOWING YOUR SEWING MACHINE —————————————————————————————————————————————————————————————————————————————————————————————————————————————————————————————————————————————————————————————————————————————————
Pattern
37 Stitches 27 Stitches
13 13
14 14
15
16
17
18
19
21 16
23 18
25 20
27 22
29 24
31
—
— SCALLOP STITCH
— LIGHTNING STITCH
— SQUARE STITCH
— DECORATIVE STITCH
26
Stitch Name
BEAD STITCH
ARROWHEAD STITCH
PARALLELOGRAM
STITCH
TRIPLE STRETCH STITCH
TRIPLE ZIGZAG STRETCH
STITCH
ELASTIC OVERLOCK
STITCH
ELASTIC OVERLOCK
STITCH
FEATHER STITCH
COMB STITCH
DECORATIVE STITCH
FAGOTING STITCH
DECORATIVE STITCH
DECORATIVE HEM
STITCH
DECORATIVE STITCH
DECORATIVE STITCH
Recommended
Width
(mm (inch))
3-5
(1/8-3/16)
3-5
(1/8-3/16)
3-5
(1/8-3/16)
3-5
(1/8-3/16)
5
(3/16)
5
(3/16)
5
(3/16)
0-5 (0-3/16)
(Changes needle
position)
3-5
(1/8-3/16)
3-5
(1/8-3/16)
3-5
(1/8-3/16)
3-5
(1/8-3/16)
3-5
(1/8-3/16)
3-5
(1/8-3/16)
3-5
(1/8-3/16)
3-5
(1/8-3/16)
3-5
(1/8-3/16)
5
(3/16)
5
(3/16)
Recommended
Length
(mm (inch))
F-1.5
(1/64-1/16)
F-1.5
(1/64-1/16)
F-1.5
(1/64-1/16)
F-1.5
(1/64-1/16)
F-1.5
(1/64-1/16)
F-1.5
(1/64-1/16)
F-1.5
(1/64-1/16)
Fixed
2.5 (3/32)
Fixed
2.5 (3/32)
Fixed
2.5 (3/32)
Fixed
2.5 (3/32)
Fixed
2.5 (3/32)
Fixed
2.5 (3/32)
Fixed
2.5 (3/32)
Fixed
2.5 (3/32)
Fixed
2.5 (3/32)
Fixed
2.5 (3/32)
Fixed
2.5 (3/32)
Fixed
2.5 (3/32)
Reference Page
33
33
33
33
33
33
33
28
33
32
32
33
32
33
31
31
31
33
33
11
———————————————————————————————————————————————————————————————————————————————————————————————————————————————————————————————————————————————————————————————————————————————————————————————————————————————————————————————————————————————————————————————————————————————
Pattern
37 Stitches 27 Stitches
32
33
34
35
36
37
27
— DECORATIVE STITCH
— DECORATIVE STITCH
— LINK STITCH
— DECORATIVE STITCH
— DECORATIVE STITCH
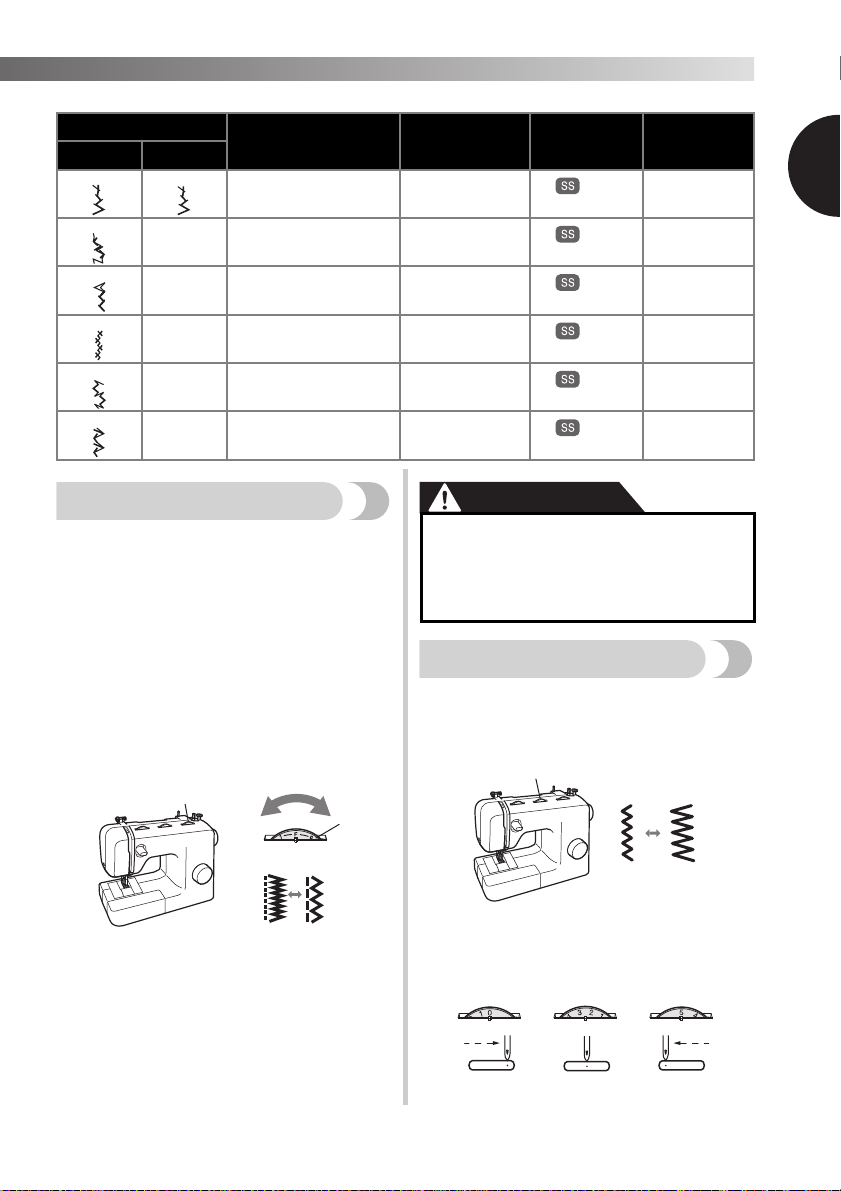
Stitch Name
DECORATIVE STITCH
Stitch length dial
Depending on the selected stitch, you may need to
adjust the stitch length for best results.
The numbers marked on the stitch length dial represent
the stitch length in millimeters (mm) (1/25 inch).
THE HIGHER THE NUMBER, THE LONGER THE
STITCH. With the “0” setting, material is not fed. This is
used when sewing a button.
The “F”-“1” range is for making a satin stitch (closed
zigzag stitch), which is used for making buttonholes
and decorative stitches. The position needed for making
the satin stitch varies according to the material and
thread being used. To determine the exact dial position,
first test the stitch and length settings on a scrap piece of
fabric to observe the feeding of the material.
Recommended
Width
(mm (inch))
5
(3/16)
5
(3/16)
5
(3/16)
5
(3/16)
3-5
(1/8-3/16)
5
(3/16)
Recommended
Length
(mm (inch))
Fixed
2.5 (3/32)
Fixed
2.5 (3/32)
Fixed
2.5 (3/32)
Fixed
2.5 (3/32)
Fixed
2.5 (3/32)
Fixed
2.5 (3/32)
Reference Page
33
33
33
33
33
33
CAUTION
● If the stitches are bunched together,
lengthen the stitch length and continue
sewing. Do not continue sewing without
lengthening the stitch length, otherwise
the needle may break and cause injury.
Stitch width dial
Raise the needle by turning the handwheel toward you
(counterclockwise) so that the mark on the wheel points
up. The numbers marked on the dial represent the stitch
width.
1
1 Stitch length dial
2 Shorter
3 Longer
1 Stitch width dial
When the Straight or Triple Stretch Stitch is selected, the
needle position can be changed from left to right by
adjusting the stitch width dial.
12
KNOWING YOUR SEWING MACHINE —————————————————————————————————————————————————————————————————————————————————————————————————————————————————————————————————————————————————————————————————————————————————
CAUTION
● After adjusting the stitch width, slowly
turn the handwheel toward you
(counterclockwise) and check that the
needle does not touch the presser foot. If
the needle hits the presser foot, the
needle may bend or break.
● If the stitches are bunched together,
Reverse sewing lever
You can use reverse sewing for back tacking and
reinforcing seams.
To sew in reverse, push the reverse sewing lever in as
far as possible and hold it in that position while you
lightly push the foot controller. To sew forward, release
the reverse sewing lever. The machine will then sew
forward.
increase the stitch length. Continuing to
sew with the stitches bunched together
may result in the needle bending or
breaking.
1
1 Reverse sewing lever
THREADING THE MACHINE
Winding the bobbin
● We designed the bobbin that comes with this machine. If you use bobbins from other models,
the machine will not work properly. Only use the bobbin that comes with this machine or
bobbins of the same type (part code: SA156, SFB: XA5539-151). Using other bobbins may
cause damage to the machine.
Actual size
13
11.5 mm
(7/16 inch)
This model Other models
———————————————————————————————————————————————————————————————————————————————————————————————————————————————————————————————————————————————————————————————————————————————————————————————————————————————————————————————————————————————————————————————————————————————
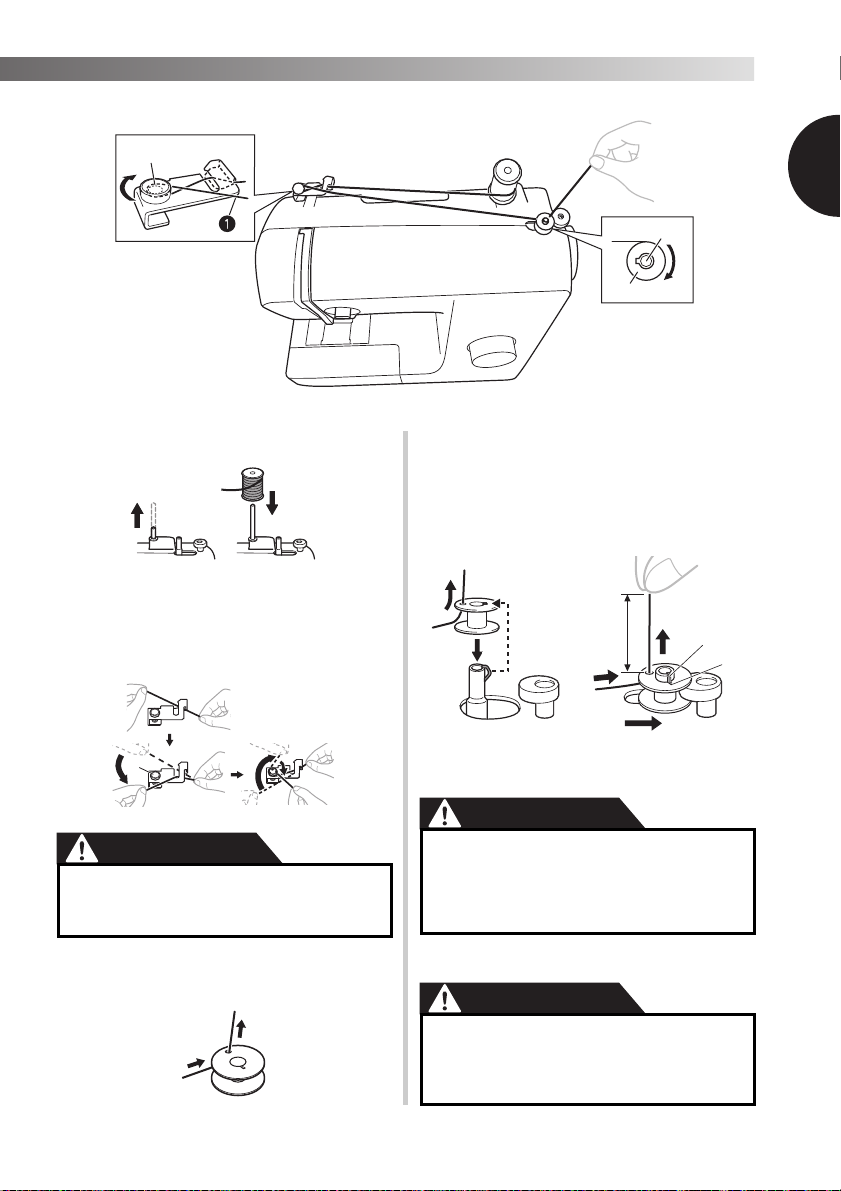
1 Pull the thread
in completely.
1 Pre-tension disk 2 Bobbin winder shaft 3 Bobbin
Pull up the spool pin and put a spool of
1
thread on this pin.
Put the bobbin onto the bobbin winder
4
shaft and slide the bobbin winder shaft to
the right. Turn the bobbin clockwise, by
hand, until the spring on the shaft slides
into the notch of the bobbin.
• Make sure to pull out 7 to 10 cm (3-4 inches)
of thread from the hole on the bobbin.
While holding the thread from the spool
2
with your right hand, pass the thread
toward you, in the groove on the thread
guide. Then, pass the thread around the
pre-tension disk and pull the thread in
completely.
1
1
1 Pre-tension disk
CAUTION
● If the spool of thread is in the wrong
place, or is set incorrectly, the thread
may tangle on the spool pin.
Pass the end of the thread through the
3
hole on the bobbin from the inside of the
bobbin.
1 Spring on the shaft
2 Notch
3 7-10 cm (3
● Pull the thread taut and hold the end of
—4 inches)
the thread straight up. If the thread is too
short, not pulled taut or held at an angle,
injuries may occur when the thread is
wound around the bobbin.
Turn on the machine.
5
●
Do not turn on the machine while pressing
down the foot controller. The machine
may start unexpectedly and cause
personal injury or damage to the machine.
14
Loading…
Артикул:
243696
27 швейных операций
Петля-автомат
Горизонтальный челнок
Рабочая область 160 мм
К начислению 310 баллов
Кредит
Узнать как оформить кредит в нашем магазине вы можете на нашем сайте
Подробнее
Описание
Характеристики
Комплектация
Инструкции
Доставка и оплата
Описание
Швейная машина Brother GS2700 — ваш надежный помощник в пошиве и ремонте одежды. Представленная электромеханическая модель имеет оригинальную бело-синюю расцветку корпуса, благодаря которой она придется по вкусу любому пользователю. Машина оснащена надежным горизонтальным челноком, работа с которым, проста и понятна. Благодаря автоматическому нитевдевателю вы будете тратить минимум времени на подготовку машины к работе. Длину и ширину стежка можно настроить: максимальный показатель этих двух параметров равняется 4 и 5 мм соответственно.
В швейной машине Brother GS2700 27 швейных операций, в том числе выполнения петли в автоматическом режиме. Вы сможете работать с трикотажными тканями благодаря наличию простой и потайной эластичных строчек. Наиболее распространенная операция — подрубка — доступна за счет присутствия в этой модели оверлочной и потайной строчек. Скорость шитья регулируется плавным нажатием на педаль. Предусмотрен отсек для хранения разнообразных швейных аксессуаров.
Основные характеристики
27 швейных операций
Петля-автомат
Горизонтальный челнок
Рабочая область 160 мм
Все характеристики
Характеристики
Основные характеристики
| Мощность, Вт | 51 |
| Тип управления | электромеханический |
| Тип челнока | горизонтальный |
| Количество операций | 27 |
| Оверлочные строчки | да |
| Трикотажные строчки | да |
| Декоративные строчки | да |
| Тип петли | автомат |
| Количество петель | 1 |
| Регулировка длины стежка | да |
| Макс. Длина стежка | 4 мм |
| Регулировка ширины стежка | да |
| Макс. Ширина стежка | 5 мм |
| Размер рабочей области | 160 |
| Дисплей | нет |
| Встроенный нитевдеватель | да |
Дополнительная информация
| Регулировка давления лапки на ткань | нет |
| Автоматическая обрезка нити | нет |
| Шитье без педали | нет |
| Регулировка положения иглы справа/слева | нет |
| Зубчатая рейка | 6-сегментная |
| Встроенный верхний транспортер | нет |
| Рукавная панель | да |
| Коленоподъемник | нет |
| Приставной столик | нет |
| Тип подсветки | светодиодная подсветка |
| Чехол в комплекте | нет |
| Потребляемая мощность (Вт) | 51 |
| Вес с упаковкой (кг) | 7.4 |
| Гарантия | 1 год |
| Производство | Вьетнам |
Комплектация
Лапка для зигзага «J» (установлена на машине)
Лапка для молнии «I»
Лапка для петель «А»
Лапка для пришивания пуговиц «М»
Набор игл
Шпуля 3 шт.
Игольная пластина для штопки
Отвертка
Педаль
Доставка и оплата
Варианты оплаты
Наличный платеж
Безналичный платеж
Online через сайт
Через Сбербанк Онлайн
Перейти к контенту
Швейные машинки Brother
- Размер инструкции: 1.30 Мб
- Формат файла: pdf
Если вы потеряли инструкцию от швейной машинки Brother GS2700, можете скачать файл для просмотра на компьютере или печати.
Инструкция для швейной машинки Brother GS2700 на русском языке. В руководстве описаны возможности и полезные функции, а также правила эксплуатации. Перед использованием внимательно ознакомьтесь с инструкцией.
Чтобы не читать всю инструкцию вы можете выполнить поиск по содержимому внутри инструкции и быстро найти необходимую информацию. Рекомендации по использованию помогут увеличить срок службы швейной машинки Brother GS2700. Если у вас появилась проблема, то найдите раздел с описанием неисправностей и способами их решения. В нем указаны типичные поломки и способы их решения.
Хорошее руководство по эксплуатации
Законодательство обязывает продавца передать покупателю, вместе с товаром, руководство по эксплуатации Brother GS2700. Отсутствие инструкции либо неправильная информация, переданная потребителю, составляют основание для рекламации в связи с несоответствием устройства с договором. В законодательстве допускается предоставлении руководства в другой, чем бумажная форме, что, в последнее время, часто используется, предоставляя графическую или электронную форму инструкции Brother GS2700 или обучающее видео для пользователей. Условием остается четкая и понятная форма.
Что такое руководство?
Слово происходит от латинского «instructio», тоесть привести в порядок. Следовательно в инструкции Brother GS2700 можно найти описание этапов поведения. Цель инструкции заключается в облегчении запуска, использования оборудования либо выполнения определенной деятельности. Инструкция является набором информации о предмете/услуге, подсказкой.
К сожалению немного пользователей находит время для чтения инструкций Brother GS2700, и хорошая инструкция позволяет не только узнать ряд дополнительных функций приобретенного устройства, но и позволяет избежать возникновения большинства поломок.
Из чего должно состоять идеальное руководство по эксплуатации?
Прежде всего в инструкции Brother GS2700 должна находится:
— информация относительно технических данных устройства Brother GS2700
— название производителя и год производства оборудования Brother GS2700
— правила обслуживания, настройки и ухода за оборудованием Brother GS2700
— знаки безопасности и сертификаты, подтверждающие соответствие стандартам
Почему мы не читаем инструкций?
Как правило из-за нехватки времени и уверенности в отдельных функциональностях приобретенных устройств. К сожалению само подсоединение и запуск Brother GS2700 это слишком мало. Инструкция заключает ряд отдельных указаний, касающихся функциональности, принципов безопасности, способов ухода (даже то, какие средства стоит использовать), возможных поломок Brother GS2700 и способов решения проблем, возникающих во время использования. И наконец то, в инструкции можно найти адресные данные сайта Brother, в случае отсутствия эффективности предлагаемых решений. Сейчас очень большой популярностью пользуются инструкции в форме интересных анимаций или видео материалов, которое лучше, чем брошюра воспринимаются пользователем. Такой вид инструкции позволяет пользователю просмотреть весь фильм, не пропуская спецификацию и сложные технические описания Brother GS2700, как это часто бывает в случае бумажной версии.
Почему стоит читать инструкции?
Прежде всего здесь мы найдем ответы касательно конструкции, возможностей устройства Brother GS2700, использования отдельных аксессуаров и ряд информации, позволяющей вполне использовать все функции и упрощения.
После удачной покупки оборудования/устройства стоит посвятить несколько минут для ознакомления с каждой частью инструкции Brother GS2700. Сейчас их старательно готовят или переводят, чтобы они были не только понятными для пользователя, но и чтобы выполняли свою основную информационно-поддерживающую функцию.