
Все способы:
- Обновление BIOS на ASRock
- Этап 1: Определение установленной версии БИОС
- Этап 2: Загрузка прошивки с сайта производителя
- Этап 3: Обновление прошивки
- Заключение
- Вопросы и ответы: 19
Продукция компании ASRock пользуется популярностью у пользователей, которые ориентируются на соотношение «цена-качество». Материнские платы этой компании хороши в том числе и легкостью обновления BIOS, если в этой процедуре появится нужда. Сегодня мы хотим познакомить вас с алгоритмом установки обновлений микропрограммы для плат этой компании.
Обновление BIOS на ASRock
Первым делом напомним, что обновлять БИОС следует только в случае необходимости – например, предполагается установка CPU, видеокарты или модулей ОЗУ, которые не поддерживаются текущей версией микропрограммы либо с ней наблюдаются проблемы.
Непосредственно процедура обновления состоит из нескольких этапов: определения версии установленного варианта прошивки, загрузки обновлений с сайта производителя и установки.
Этап 1: Определение установленной версии БИОС
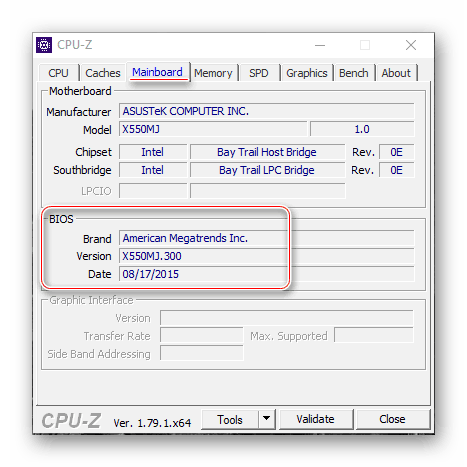
Перед тем как заниматься обновлением, следует узнать, какой вариант микропрограммы в текущий момент используется на материнской плате – это нужно для выбора новейшего варианта. Кроме того, по номеру версии можно найти заметки производителя, в которых указаны возможные неполадки. Определить вариант BIOS можно несколькими методами – подробности процедуры описаны в отдельном руководстве.
Урок: Как узнать версию BIOS
Этап 2: Загрузка прошивки с сайта производителя
После определения изначальной версии BIOS необходимо загрузить на компьютер новый вариант. Делать это следует с сайта ASRock — только в этом случае гарантируется совместимость и работоспособность микропрограммы.
Внимание! Загрузка файлов BIOS из неофициальных источников и попытка их установки может закончиться поломкой материнской платы!
Перейти на сайт ASRock
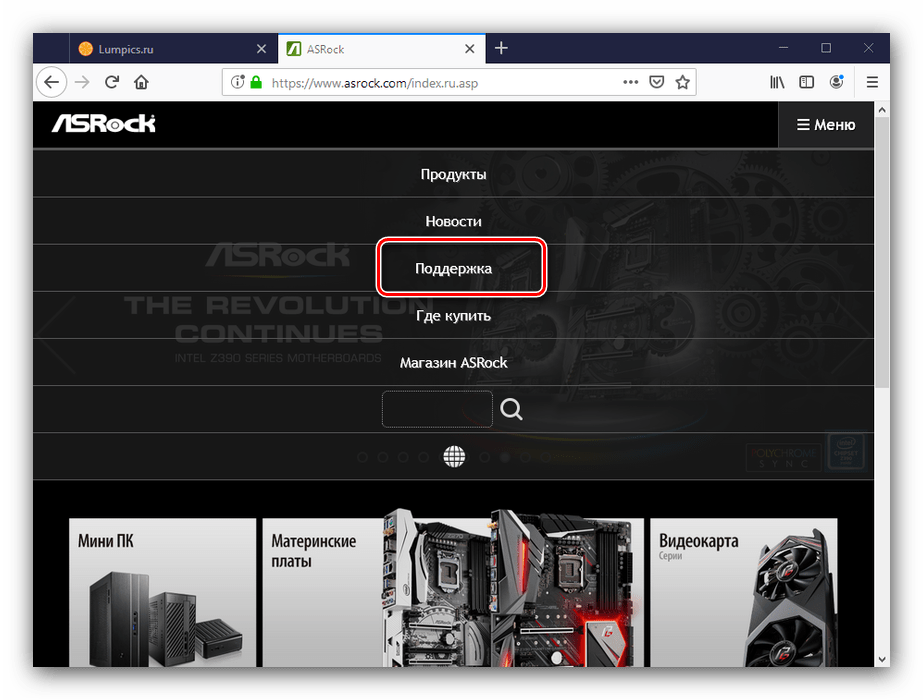
- Воспользуйтесь любым браузером, чтобы перейти к сайту производителя. После открытия страницы задействуйте пункт «Поддержка» в главном меню.
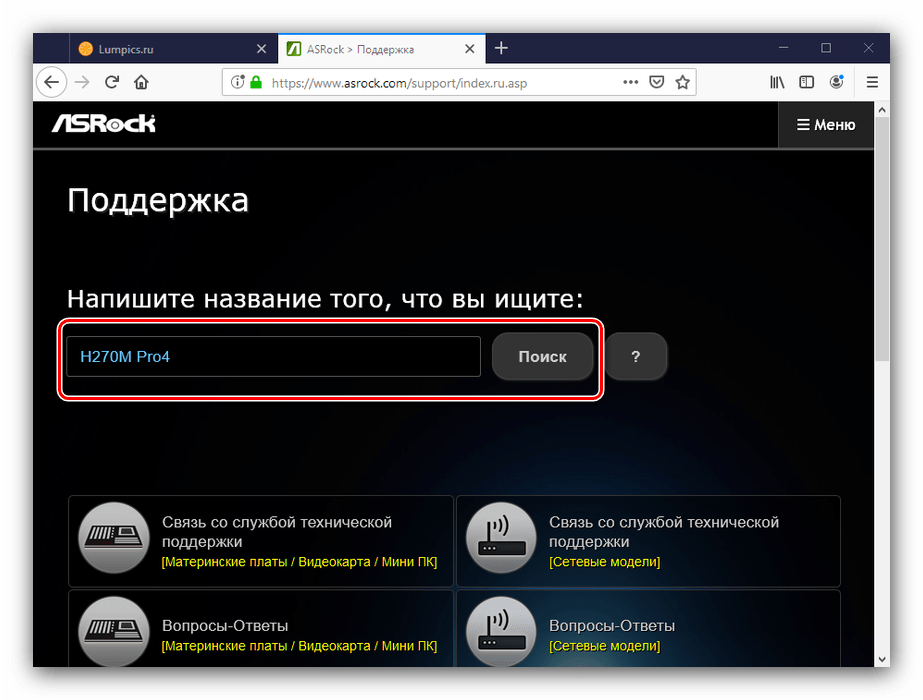
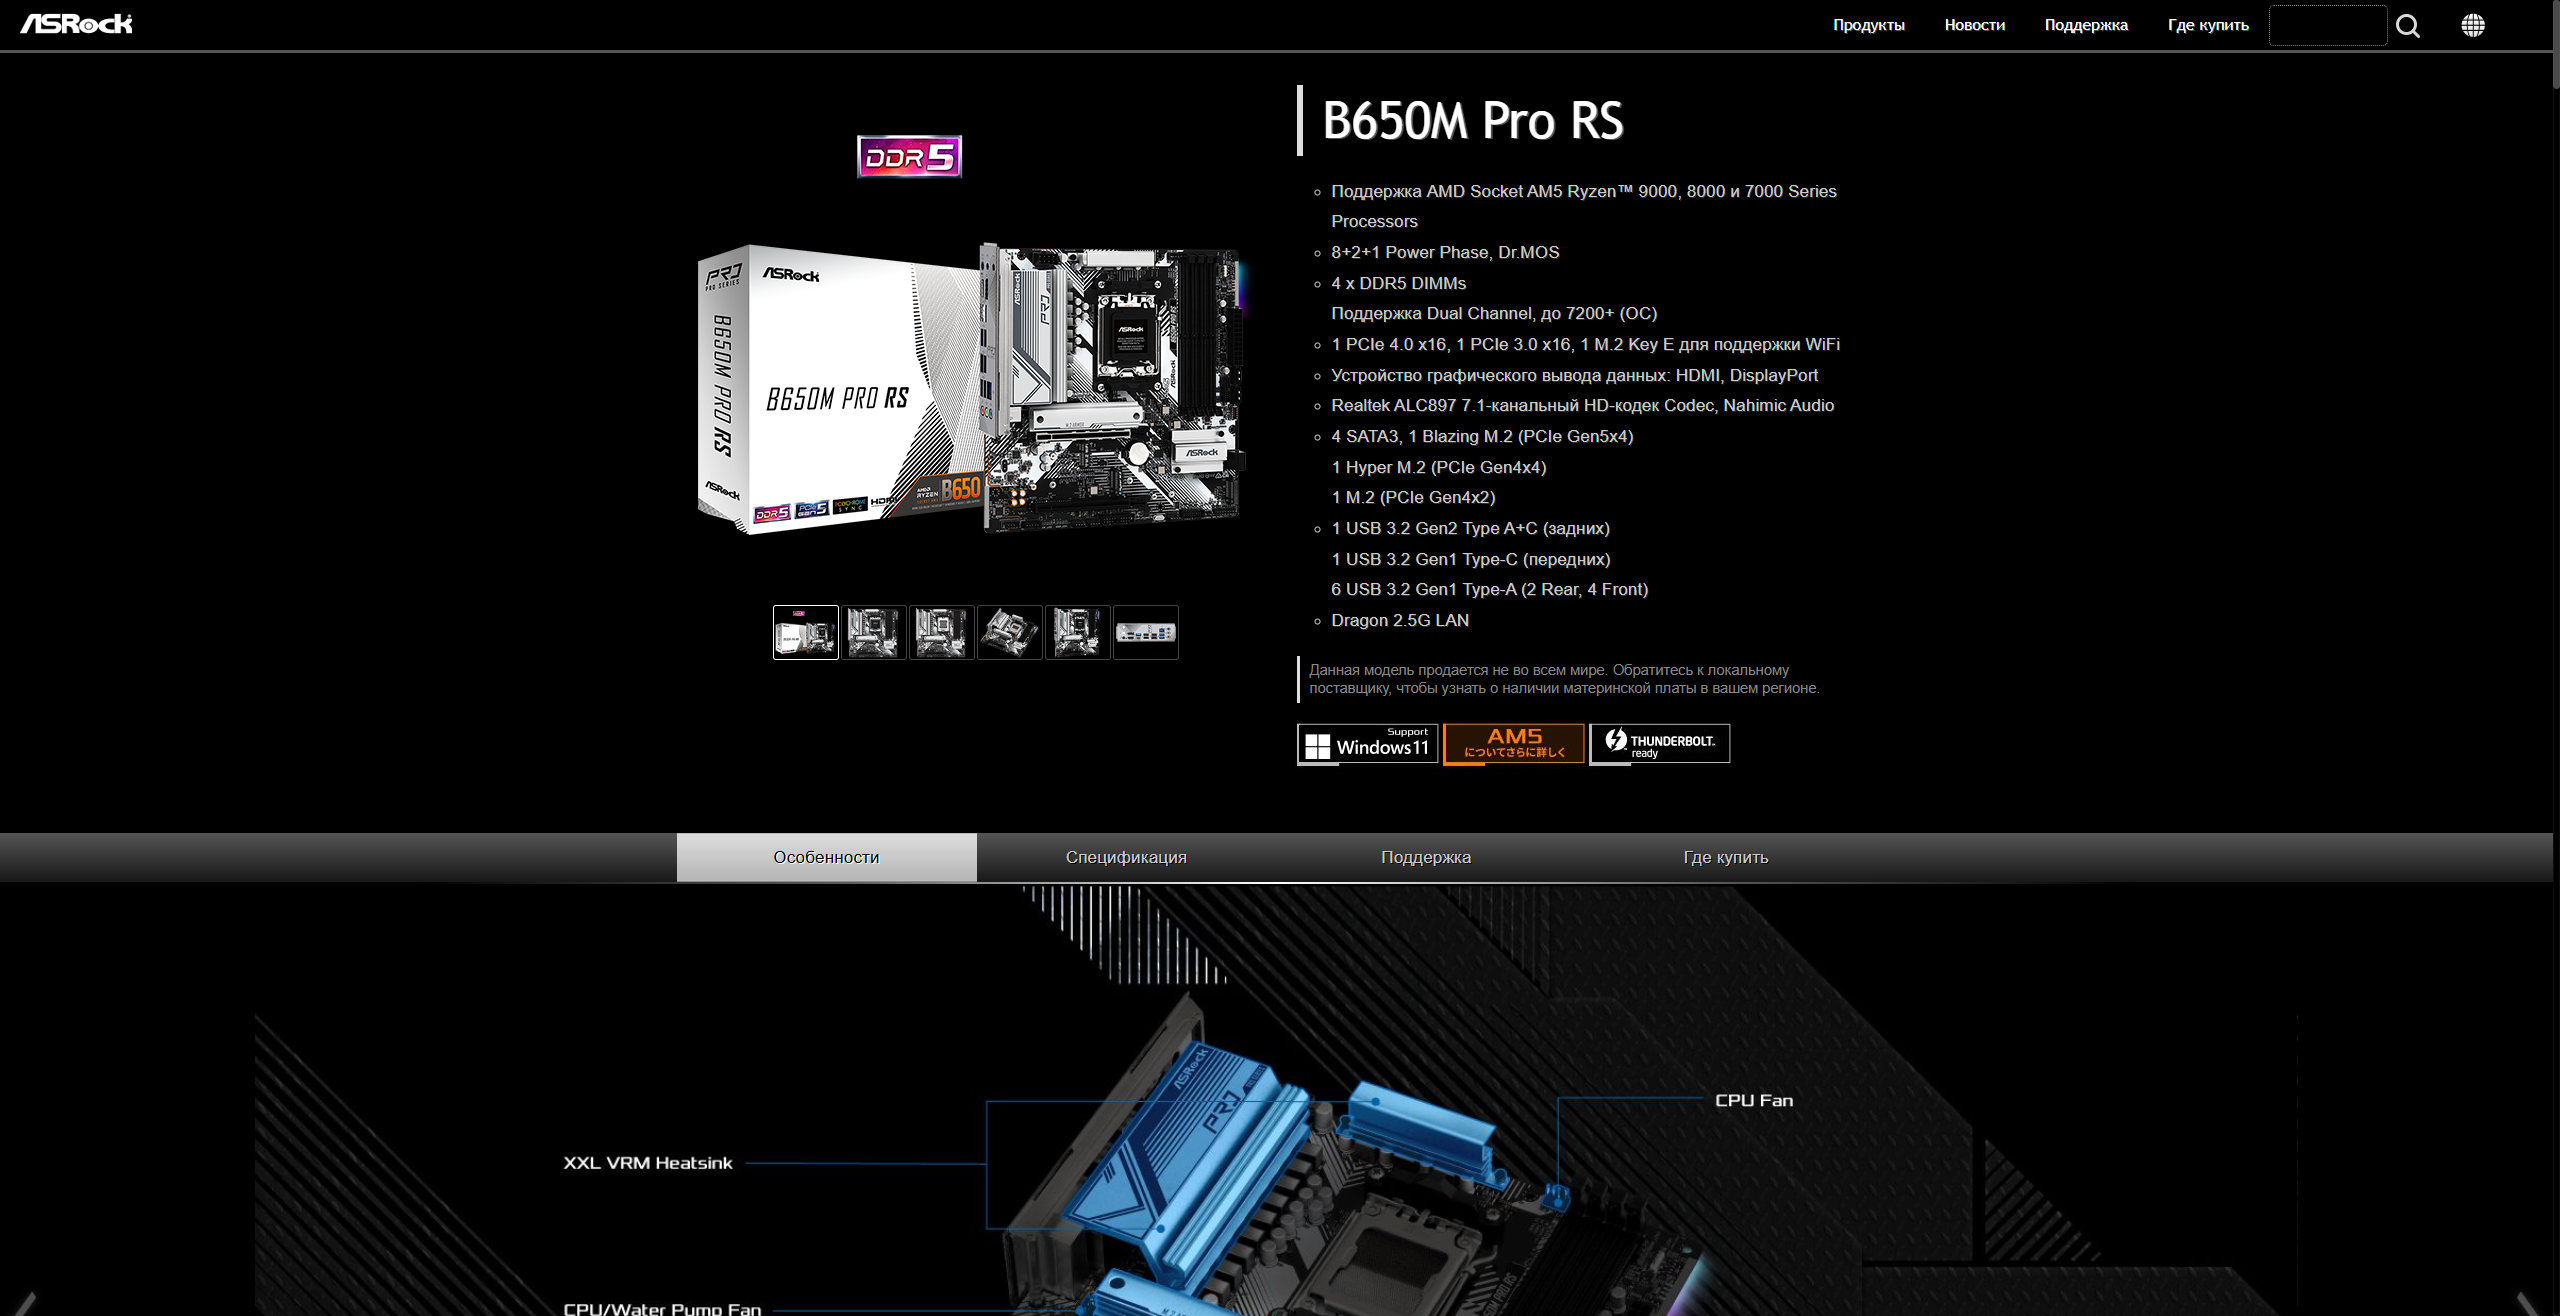
- Введите в поисковой строке название модели вашей «материнки» и нажмите на кнопку поиска. Если вы не знаете точное название модели платы, руководство далее поможет вам в решении этой задачи.

Урок: Как узнать модель материнской платы
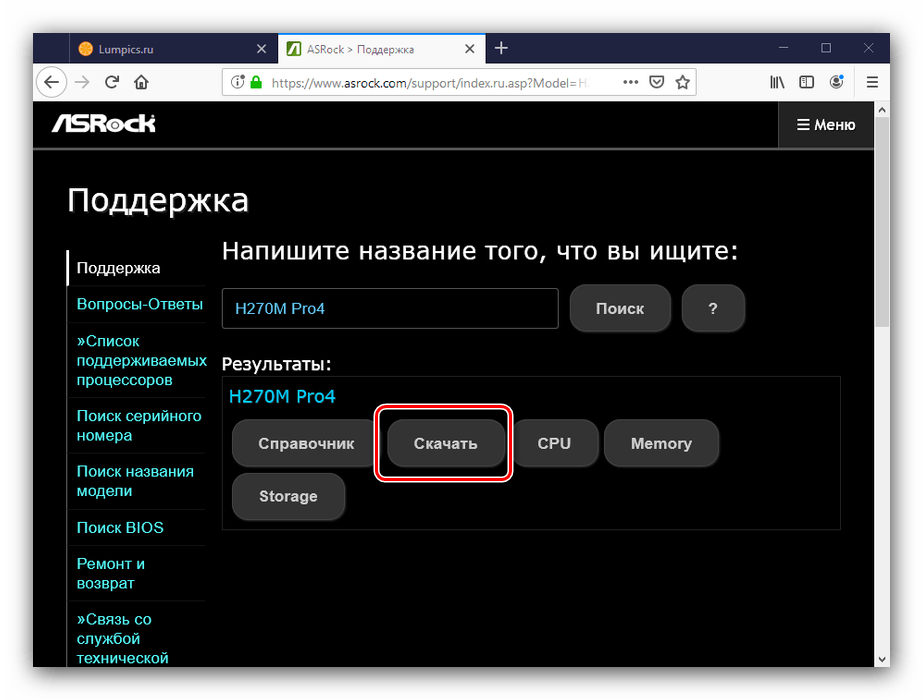
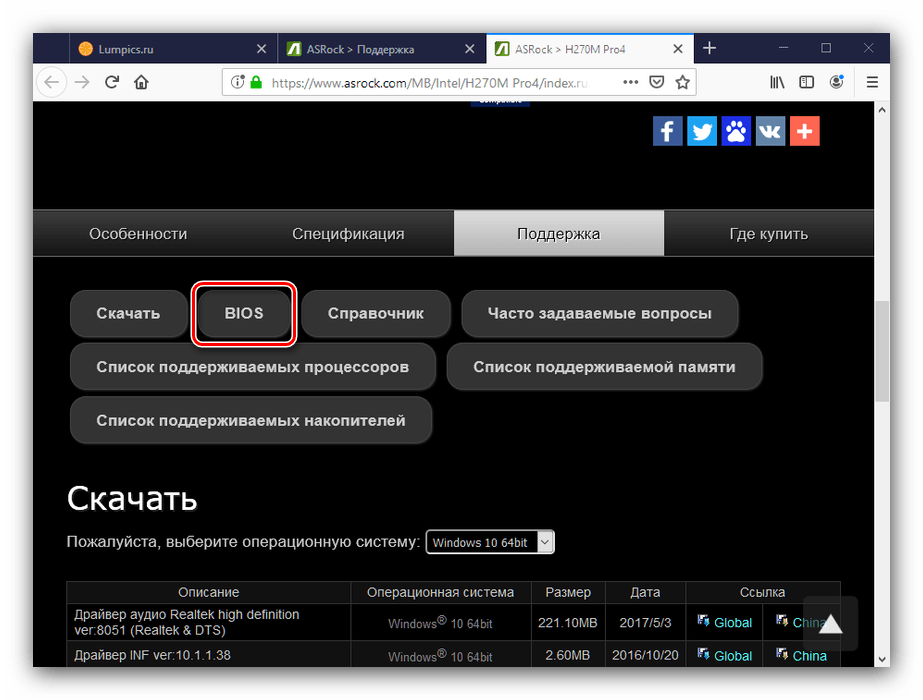
- В результатах поиска используйте кнопку «Скачать».
- Далее кликните по кнопке «BIOS».
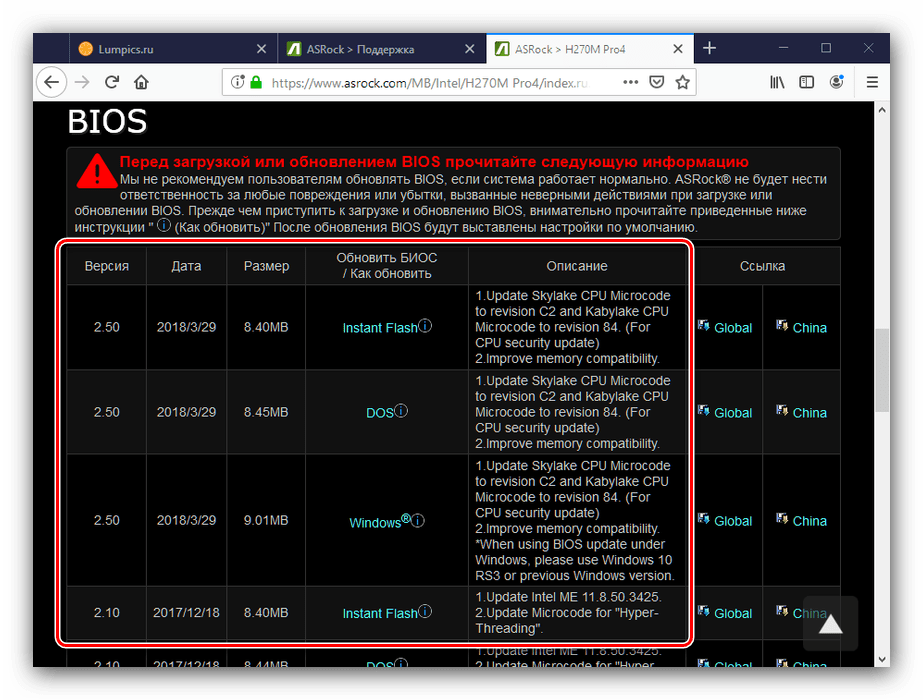
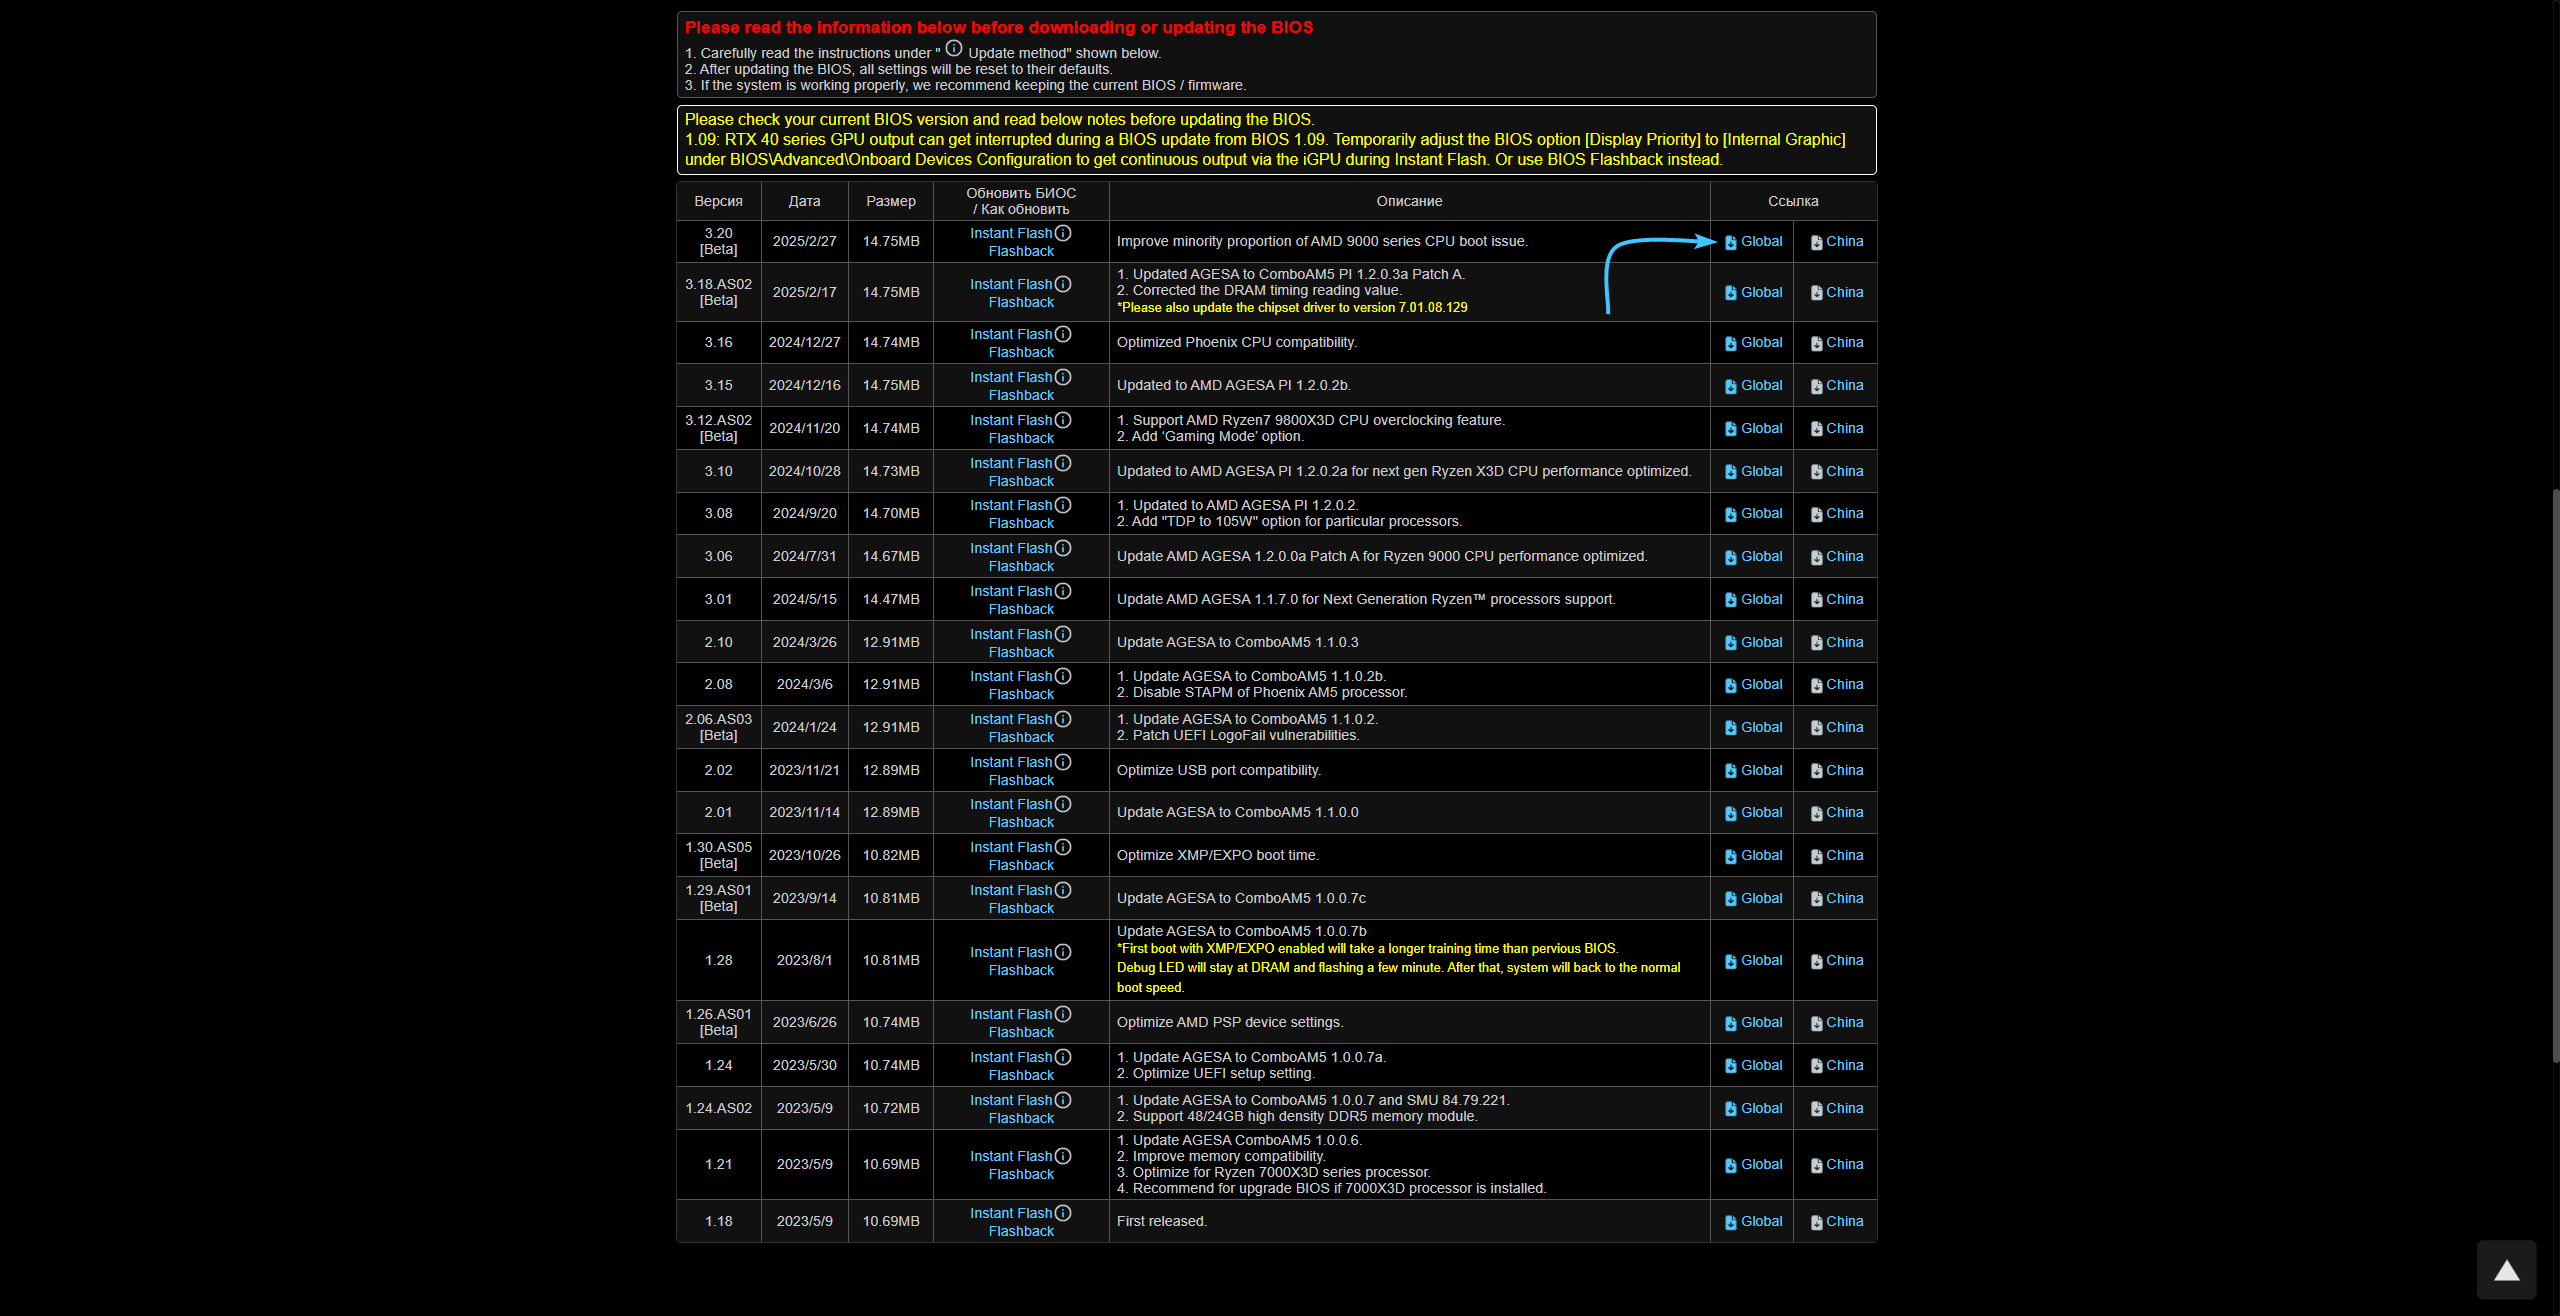
Появится список доступных прошивок. Ориентируйтесь на номер версии и на дату выпуска ПО.
Особое внимание следует обратить на третью колонку таблицы, «Обновить БИОС / Как обновить» – в ней указан метод, которым следует прошивать соответствующий вариант обновления микропрограммы:
Метод обновления Описание Instant Flash Предполагает использование прошивальщика, встроенного в BIOS DOS Прошивать обновления следует из-под специальной DOS-оболочки Windows ® Обновление поставляется в виде файла, который следует запускать в ОС Windows Об особенностях установки каждого из вариантов мы поговорим на третьем этапе.
- Скачать выбранный вариант прошивки можно в столбце «Ссылка», позиция «Global».
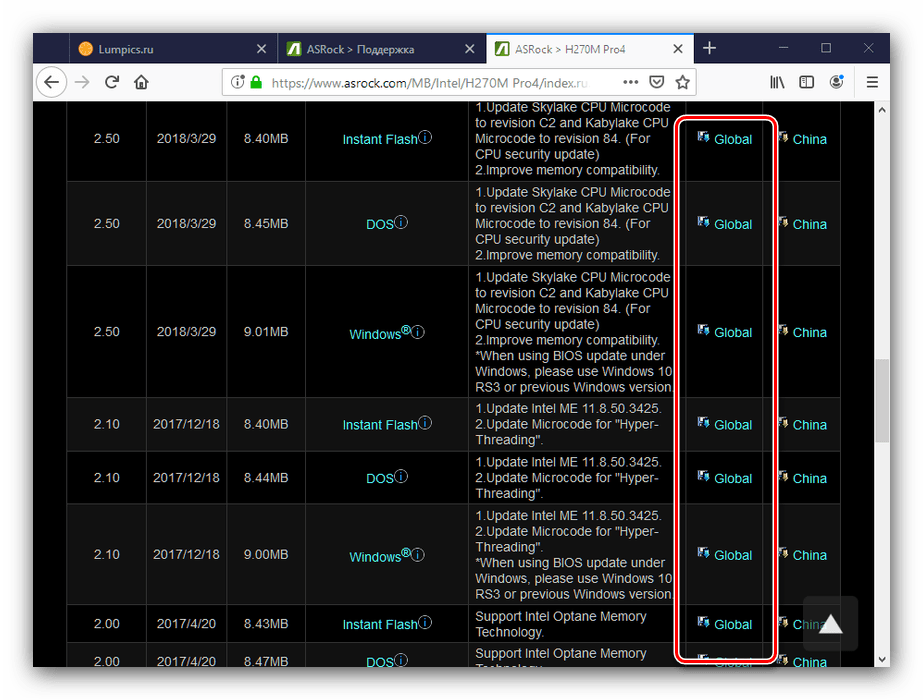
Загрузите прошивку в любое место на жестком диске компьютера и переходите к следующему этапу.
Этап 3: Обновление прошивки
После того как нужные файлы загружены, можно переходить к апдейту встроенного в плату ПО. Процедура может проводиться тремя разными методами, о чём мы упоминали выше. Начнём с самого универсального.
Внимание! Все дальнейшие действия вы совершаете на свой страх и риск!
ASRock Instant Flash
Обновлять БИОС на рассматриваемых платах проще всего через специальную утилиту, встроенную в микропрограмму. Алгоритм следующий:
- Подготовьте флеш-накопитель – объём не более 4 Гб, формат файловой системы FAT32.
Читайте также: Как отформатировать флешку
- Скопируйте файл прошивки в корневую папку используемого накопителя.
- Выключите целевой компьютер, затем подключите подготовленный USB-носитель к одному из портов.
Внимание! Используйте только порты USB 2.0, поскольку с третьей версией протокола процедура может работать нестабильно!
- Включите компьютер, и на этапе первоначальной загрузки нажмите клавиши F2 или Delete для входа в БИОС.
- Перейдите ко вкладке «Smart», на которой выберите «Instant Flash».
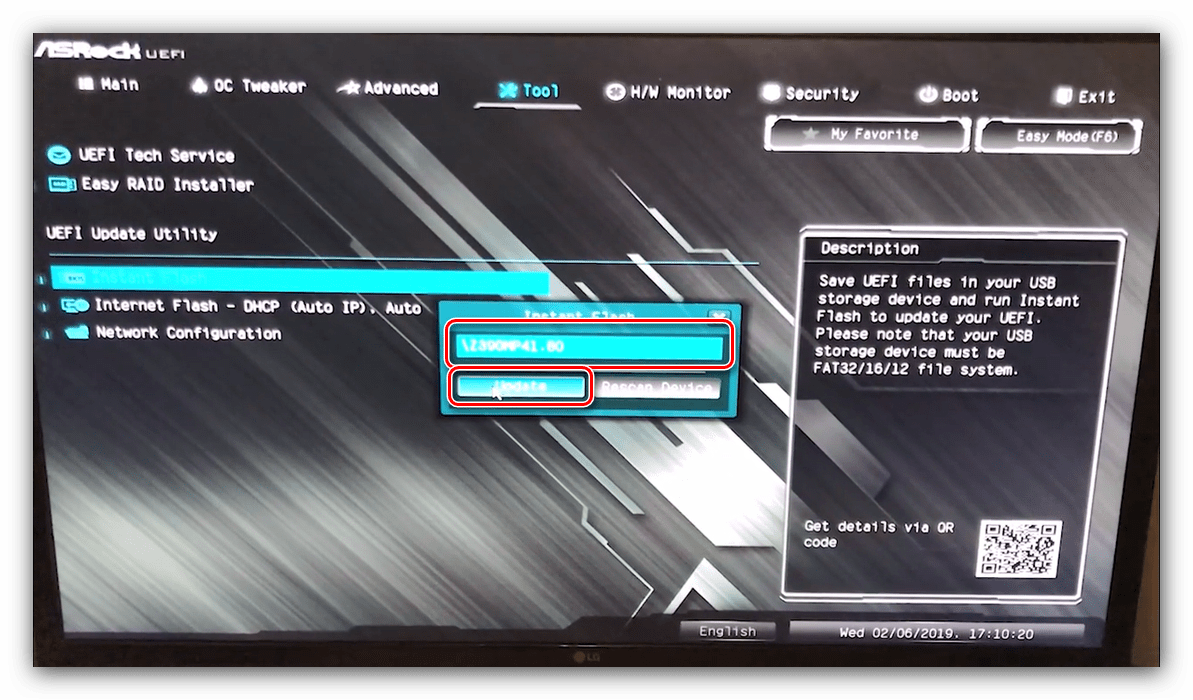
- Подождите, пока утилита проверит подключённый накопитель и записанные на нём версии обновлений. Выберите подходящий и кликните по кнопке «Update».
- Дождитесь окончания процедуры обновления, после чего перезагрузите компьютер.
Если всё проделано правильно, у вас будет установлена новейшая версия микропрограммы.
DOS-оболочка
Этот вариант самый сложный из представленных, поэтому использовать его следует только тогда, когда все остальные не подходят.
- Как и в случае с первым методом, сделайте загрузочный накопитель в виде пустой флешки, отформатированной в FAT32.
- Скопируйте в корень накопителя файлы из архива с обновлениями.
- Выключите компьютер и перейдите в BIOS, где настройте загрузку с флешки.
Подробнее: Как настроить БИОС для загрузки с USB
- Выключите компьютер, после чего подсоедините к нему подготовленный накопитель – помните про правило насчёт USB 2.0.
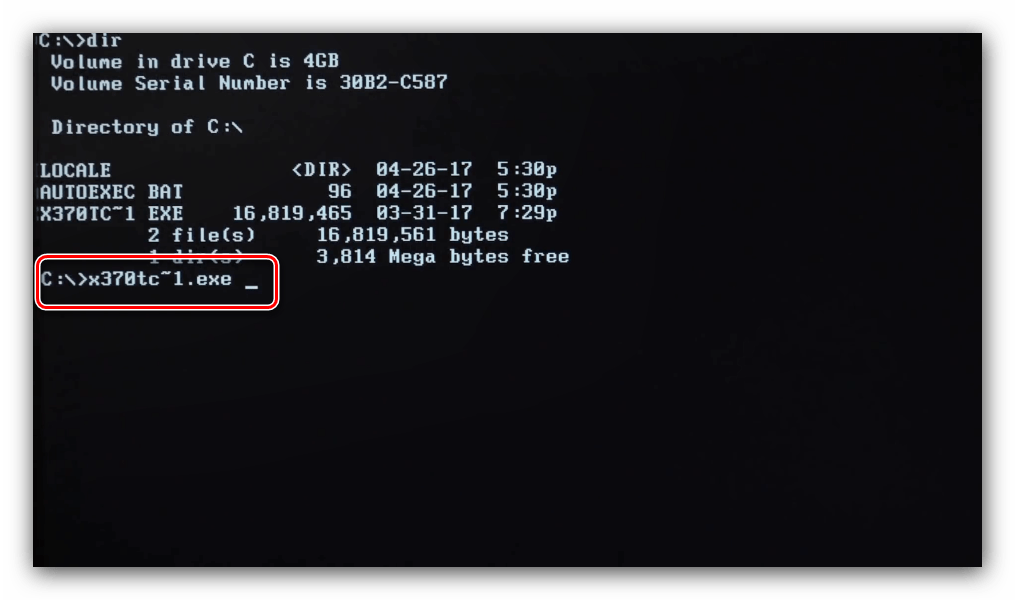
- Включите машину и дождитесь, пока появится интерфейс оболочки. В текстовой строке введите название EXE-файла с прошивкой (формат файла тоже нужно вводить), и нажмите Enter.
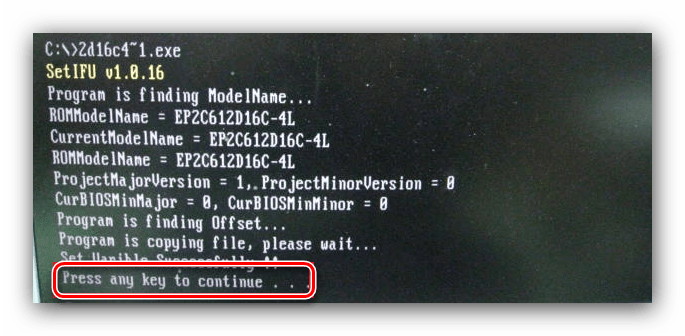
- Подождите, пока система определит совместимость выбранной версии. Если проблем не возникло, интерфейс предложит нажать любую кнопку для перезагрузки.
- После перезагрузки начнётся процесс обновления. Дождитесь, пока он завершиться. По окончании получите сообщение с предложением нажать Enter, проделайте это.
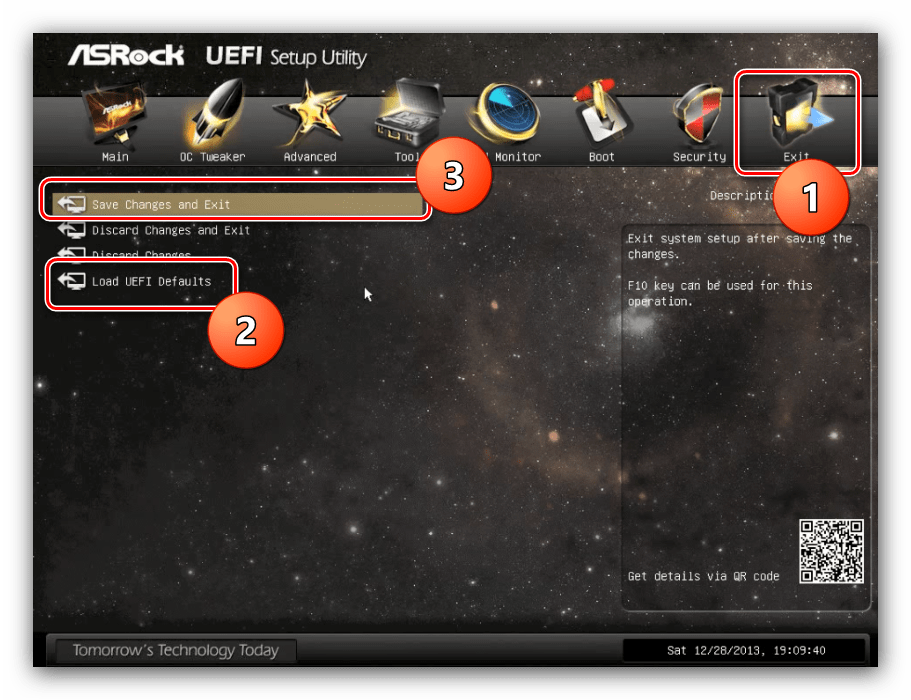
- Во время перезагрузки войдите в БИОС. В нём перейдите на вкладку «Exit», в которой задействуйте последовательно опции «Load Defaults» и «Exit Saving Changes».

Снова перезагрузите компьютер.
Windows
Вариант с обновлением из-под системы подобен предыдущему, но в некоторых случаях удобнее.
Обратите внимание! Обновление BIOS из-под Виндовс доступно только для версий Windows 10 RS3 и старше – новейшие варианты этой ОС возможность такого метода апдейта не поддерживают!
- Распакуйте архив с обновлениями в любую папку хранилища целевого компьютера. Найдите EXE-файл с обновлениями и запустите его от имени администратора.
- Подождите, пока файл подготовит обновления. Через некоторое время появится предложение закрыть все программы, нажмите «ОК».
- Далее понадобится сделать рестарт для установки апдейтов, нажмите на клавишу Y на клавиатуре.
- Компьютер перезагрузится и начнётся процедура обновления. По её окончании повторите шаги 6-7 предыдущей инструкции.
Технически этот метод подобен обновлению через DOS-оболочку, но не требует использования внешнего носителя. С другой стороны, существует ограничение совместимости по операционной системе, поэтому универсальным этот способ не назовёшь.
Заключение
Мы рассмотрели поэтапное выполнение процедуры обновления BIOS на материнских платах ASRock. Эта операция, как и подобные манипуляции с микропрограммой основной платы, требуют внимательности от пользователя и тщательного следования предложенным инструкциям.
Содержание
- Предупреждение об использовании
- Предварительная подготовка носителя
- Обновление «BIOS» на «ASRock»
- Другие руководства
Предупреждение об использовании
Внимание! Данное руководство может содержать советы, при выполнении которых устройство может быть повреждено в различном роде на уровне неисправной работы микропрограмм «BIOS».
Ни в коем случае не выключайте устройство в процессе обновления версии «BIOS». Если устройство является ноутбуком, то подключите его к сети при помощи оригинального адаптера и кабеля питания.
Компания «EXBO» не несёт ответственности за действия пользователя в соответствии с пунктом 1.7 правил центра поддержки и призывает пользователей быть внимательными при обновлении «BIOS».
Предварительная подготовка носителя
1. Вставьте в специальный порт устройство «USB-флэш-накопитель» объёмом минимум 1 гигабайт.
2. Откройте «Проводник» операционной системы «Windows». Далее откройте раздел «Этот компьютер».

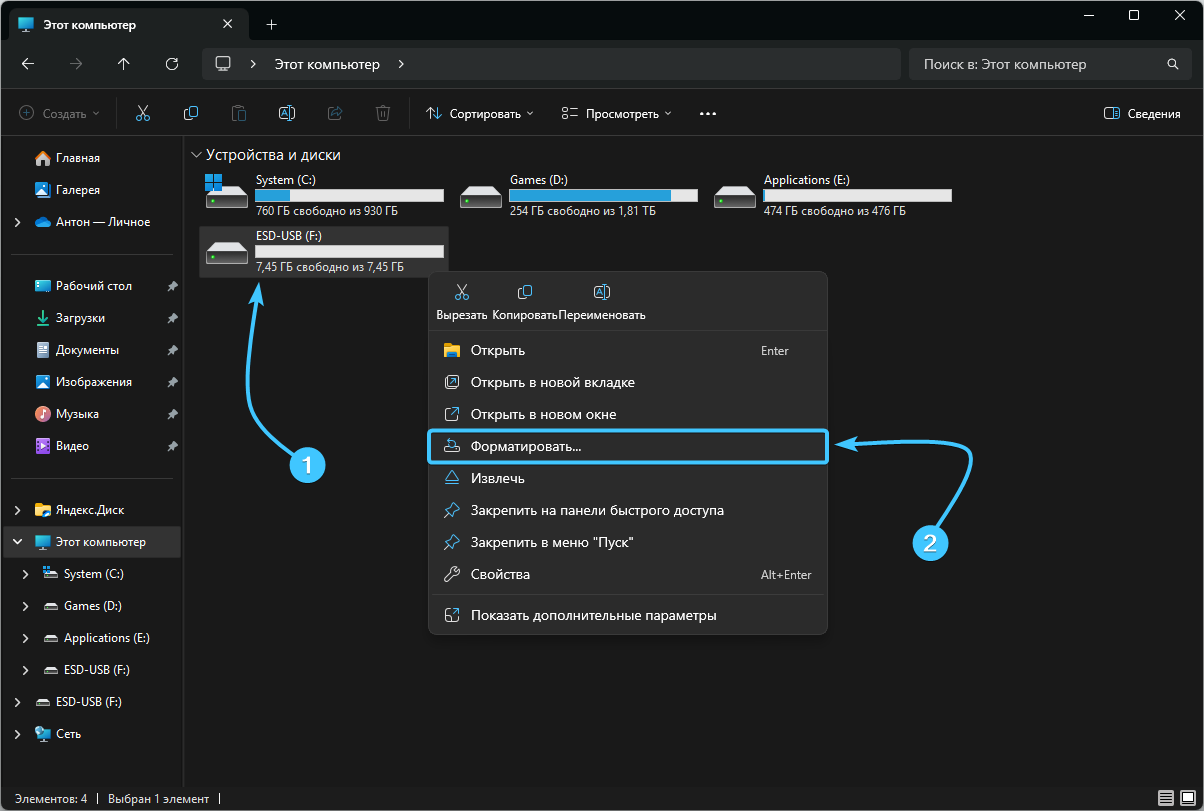
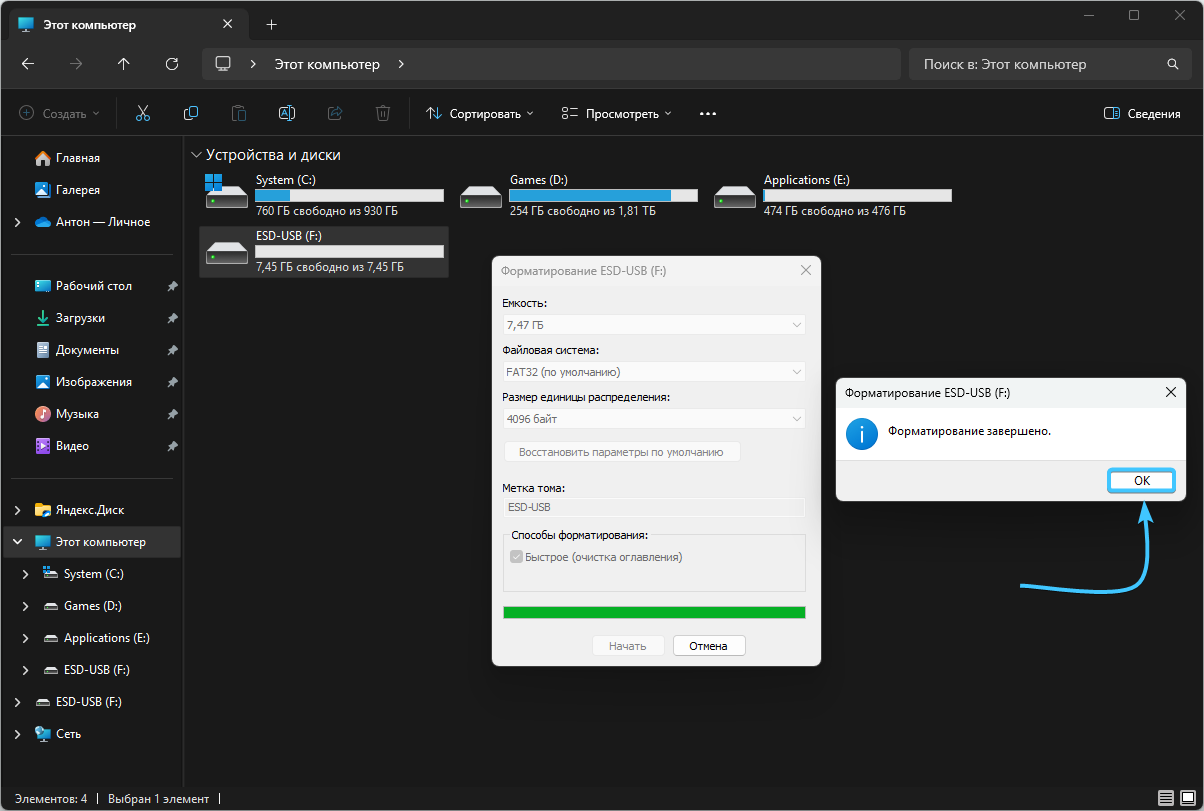
3. Отыщите накопитель и нажмите по нему правой кнопкой мыши (1). Нажмите «Форматировать» (2).
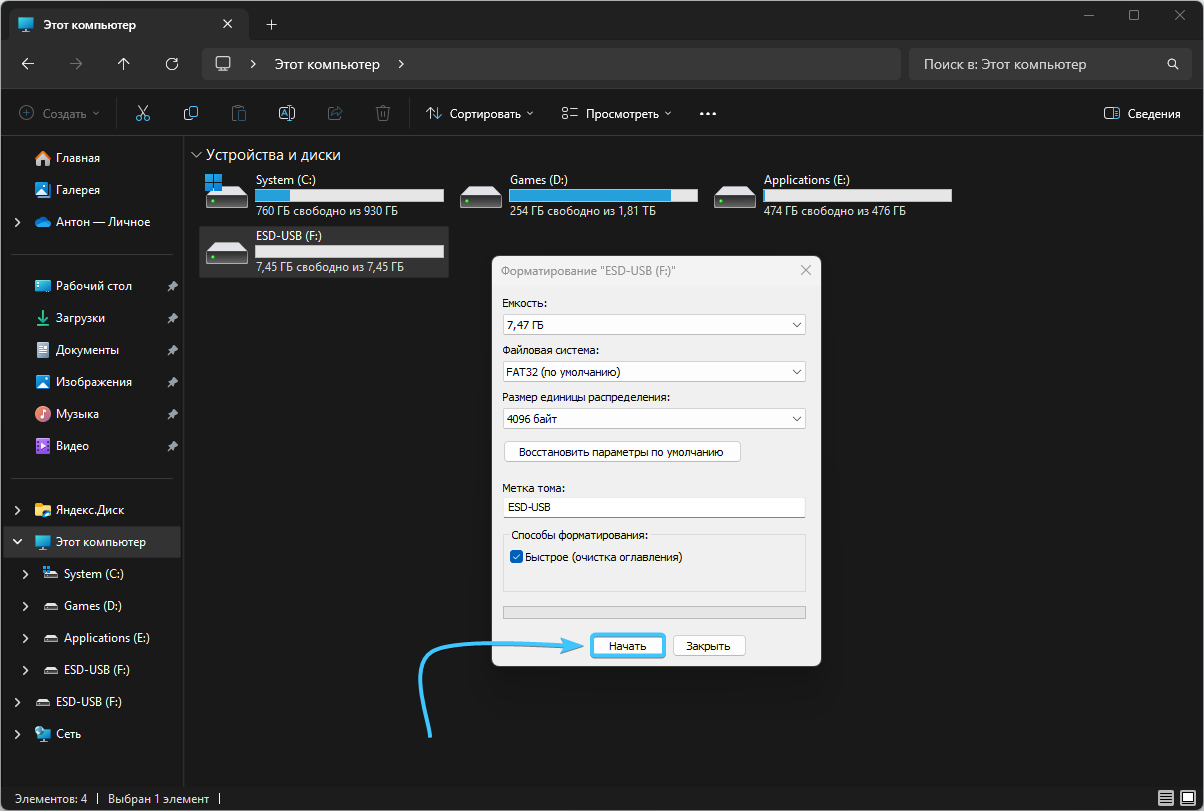
4. Появится новое окно. Какие-либо параметры менять не нужно. Просто нажмите кнопку «Начать».
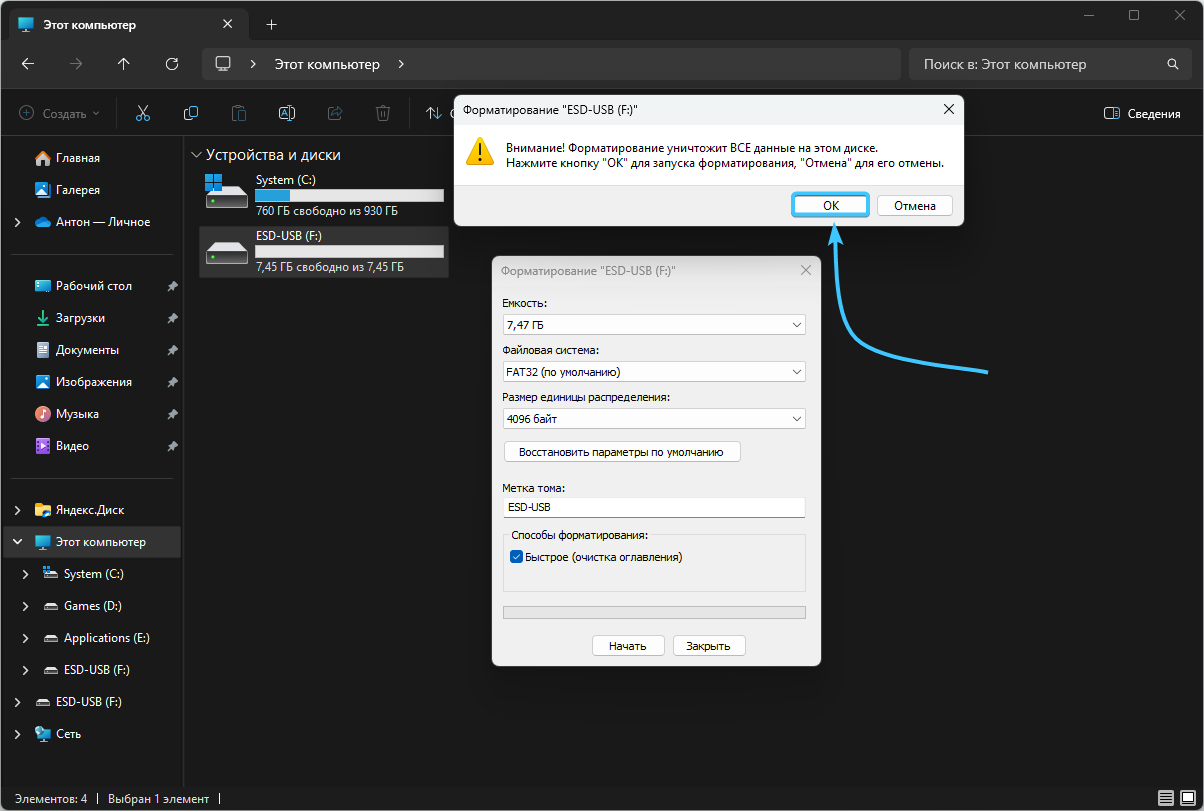
5. В появившемся окне нажмите кнопку «ОК» и дождитесь завершения процесса форматирования.
6. Появится уведомление о завершении процесса форматирования. Нажмите кнопку «ОК».
Обновление «BIOS» на «ASRock»
1. Определите модель материнской платы или же ноутбука. Откройте официальный сайт устройства.
2. Откройте категорию «Поддержка» (1). Затем откройте раздел под названием «BIOS» (2).

3. Находясь в данном разделе, отыщите и скачайте последнюю версию «BIOS» для устройства.
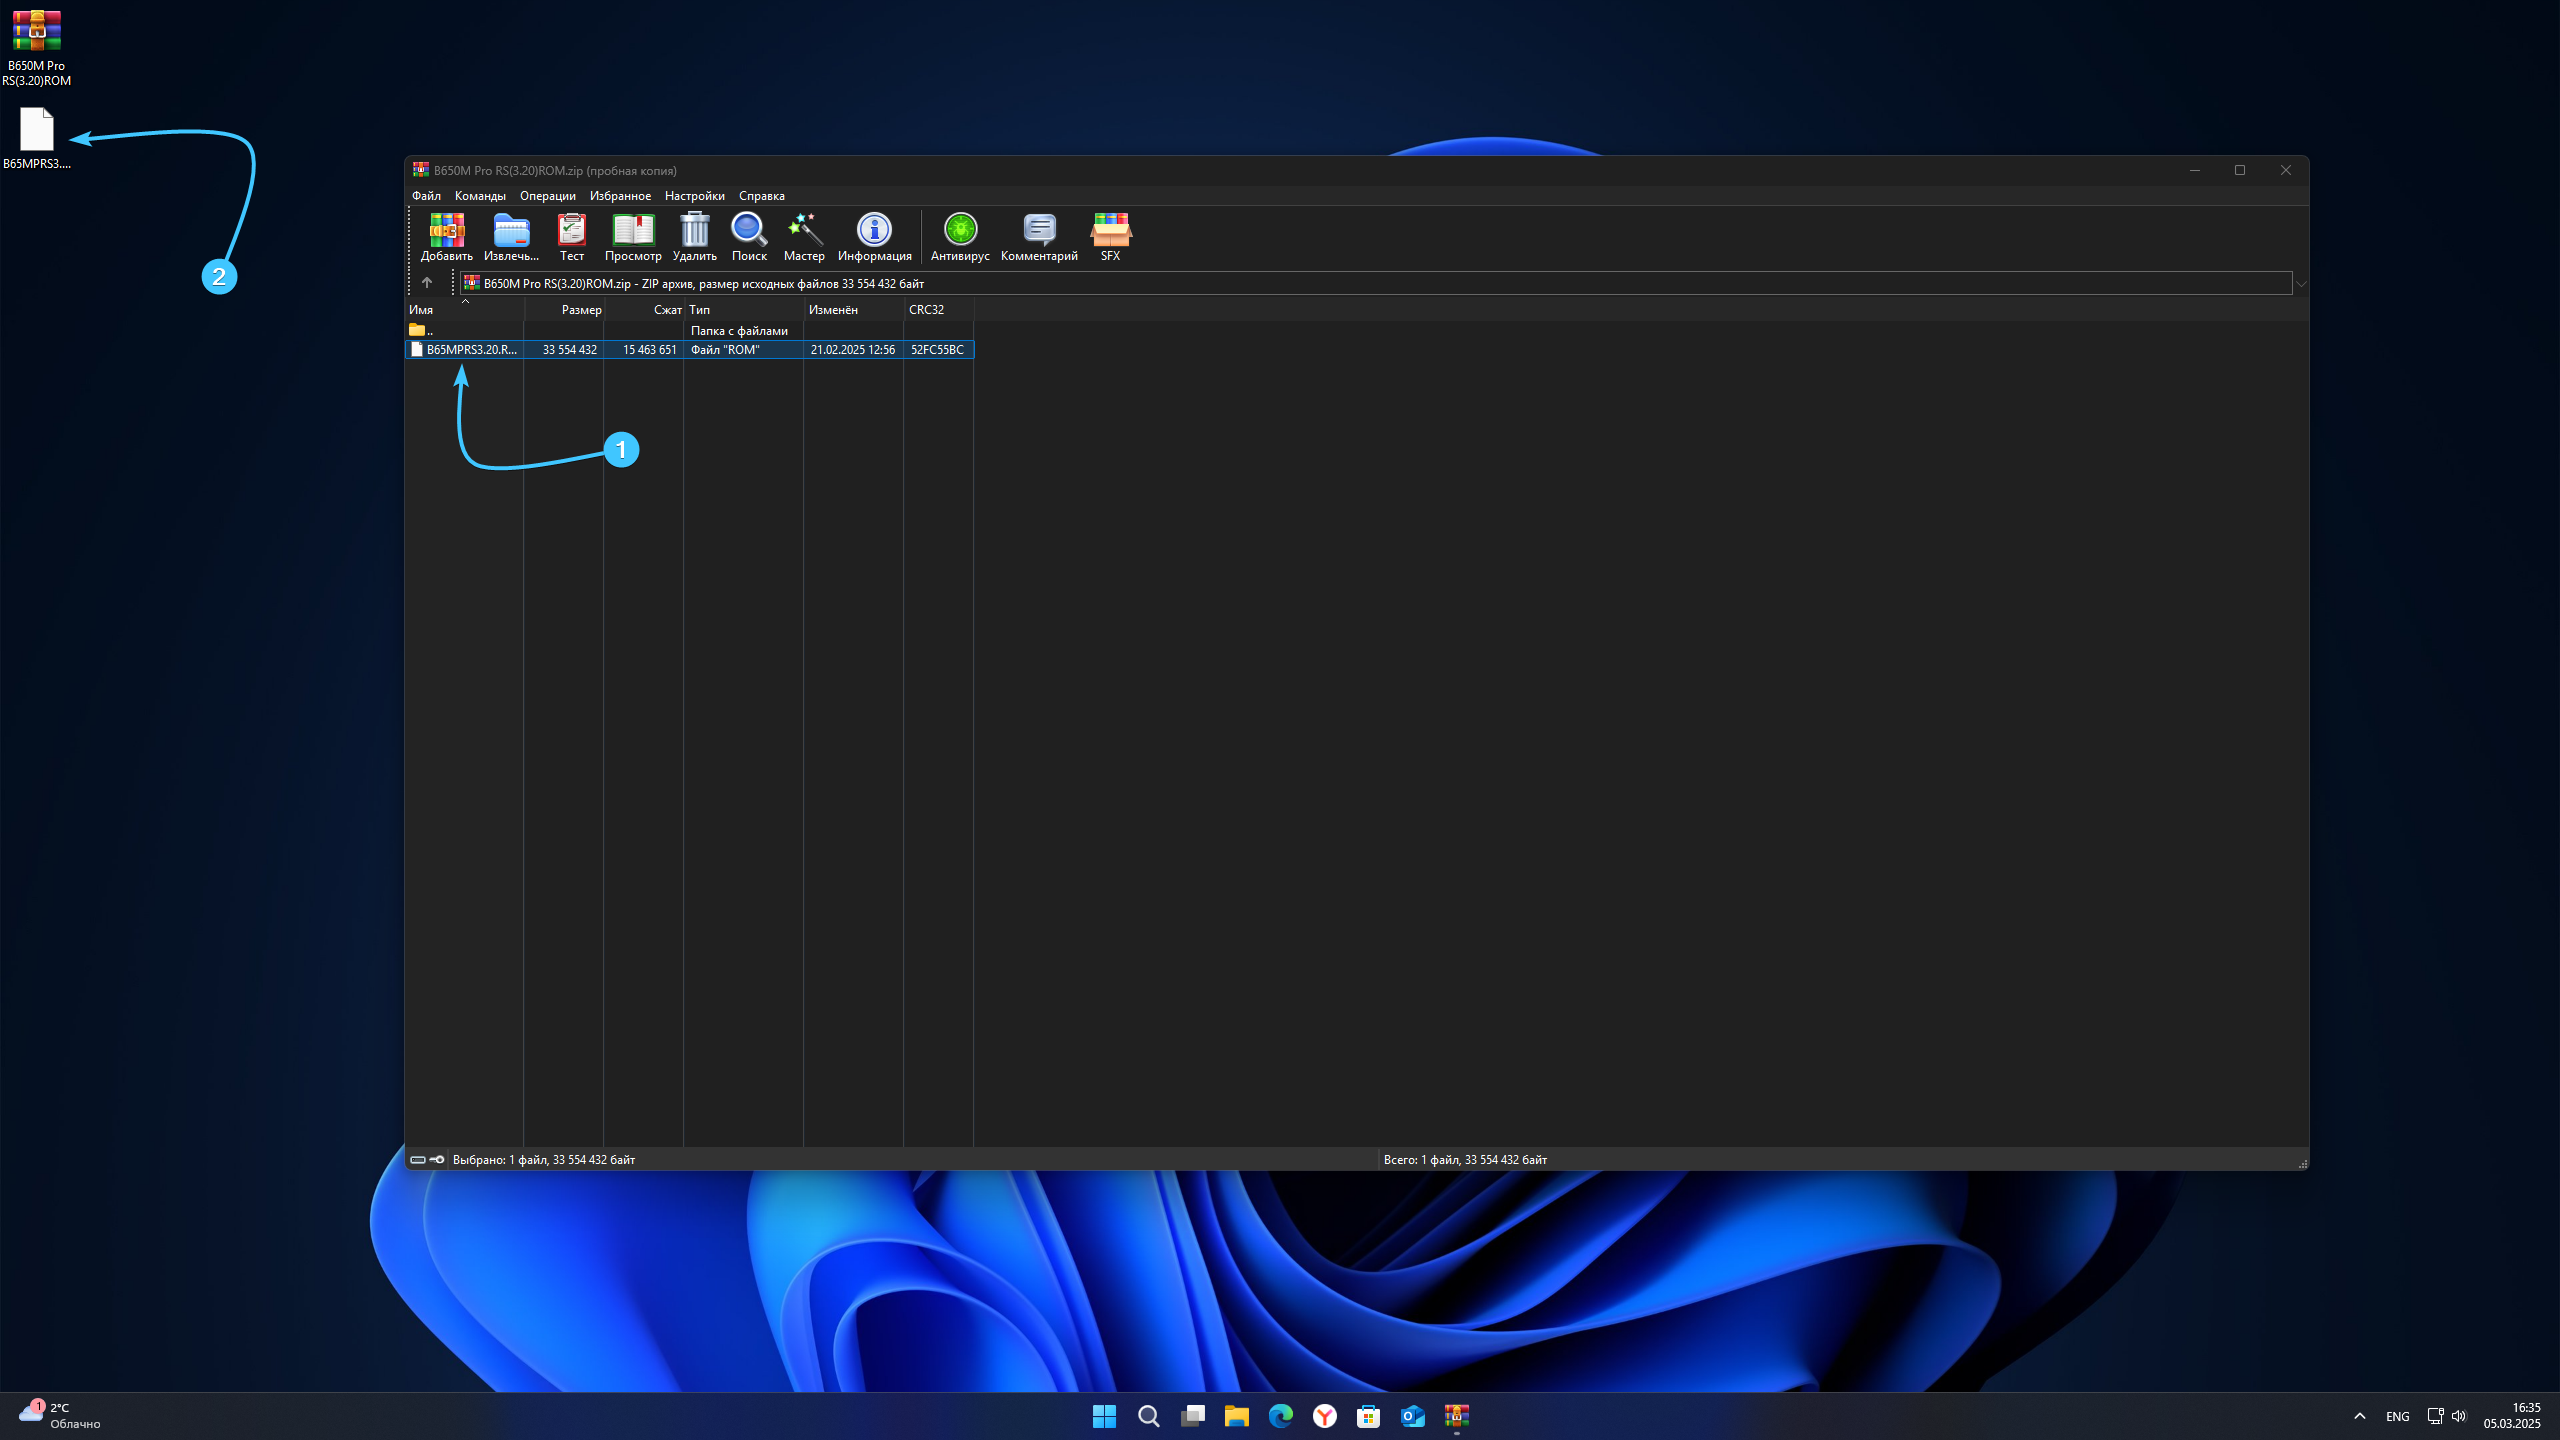
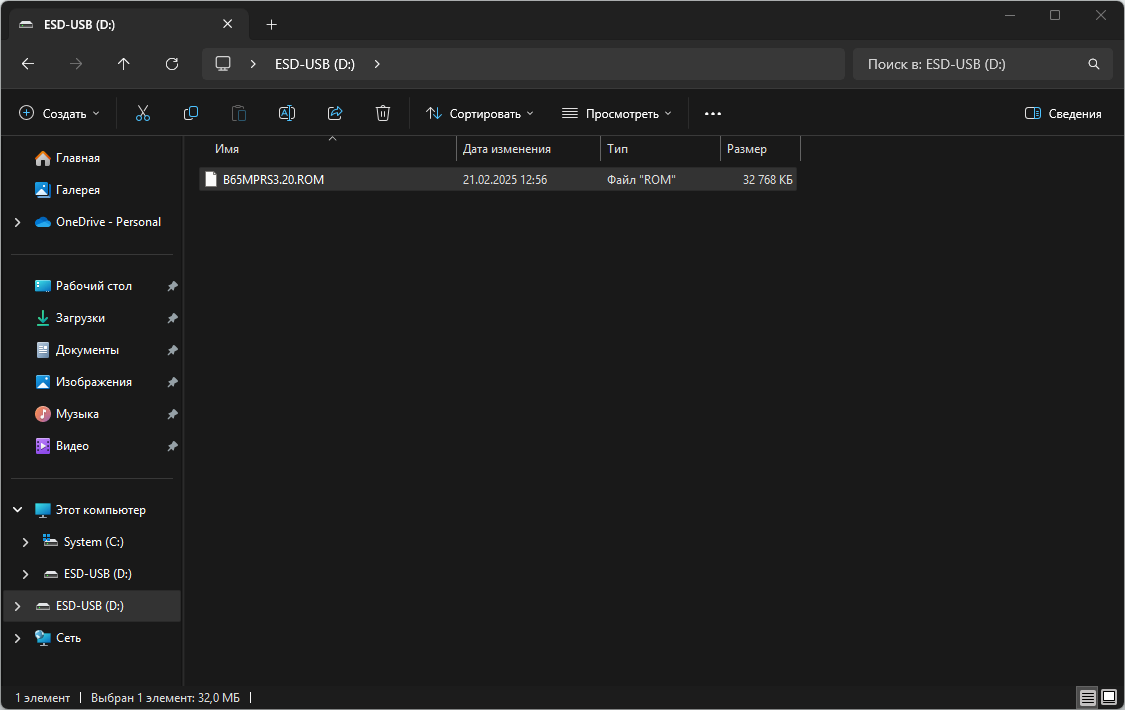
4. Откройте архив с «BIOS» (1) и перенесите файлы на рабочий стол или другое удобное место (2).
5. Перенесите все файлы «BIOS» на предварительно подготовленный установочный носитель.
6. Перезагрузите устройство. При загрузке нажимайте соответствующую клавишу для открытия «BIOS».
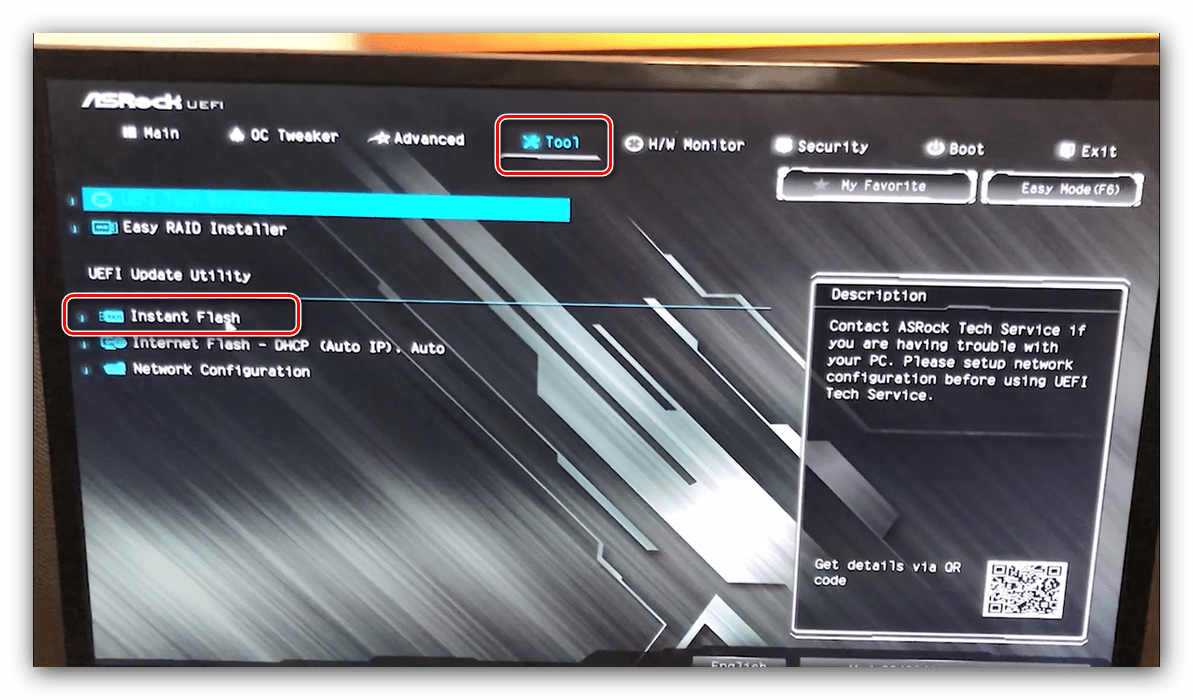
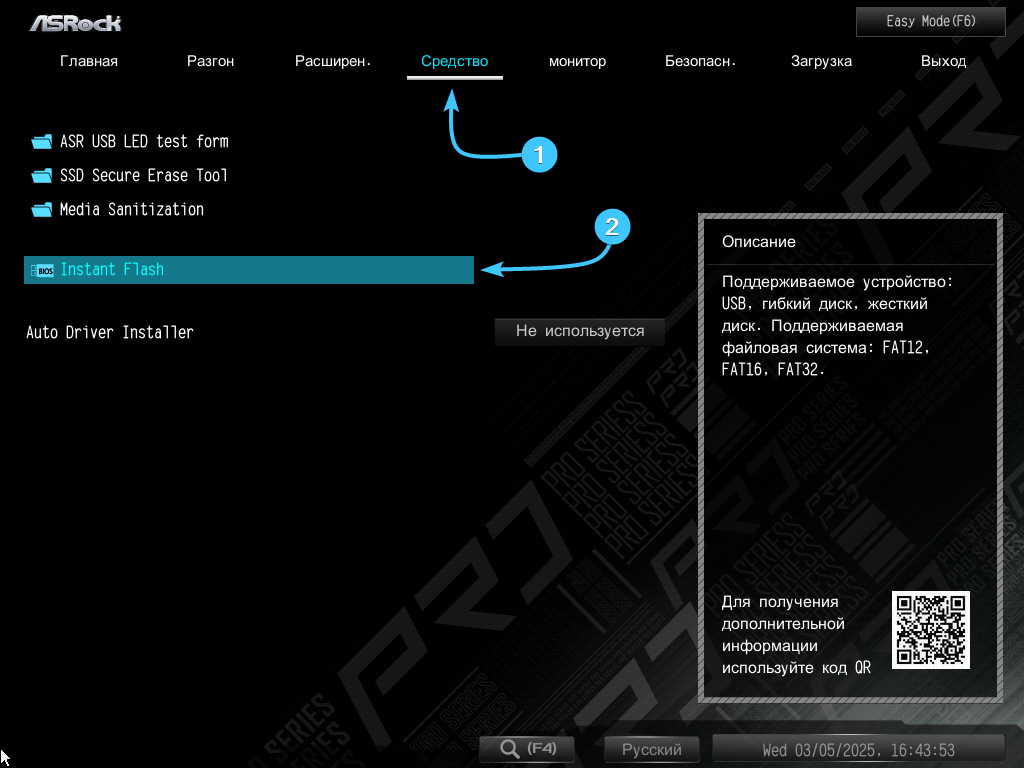
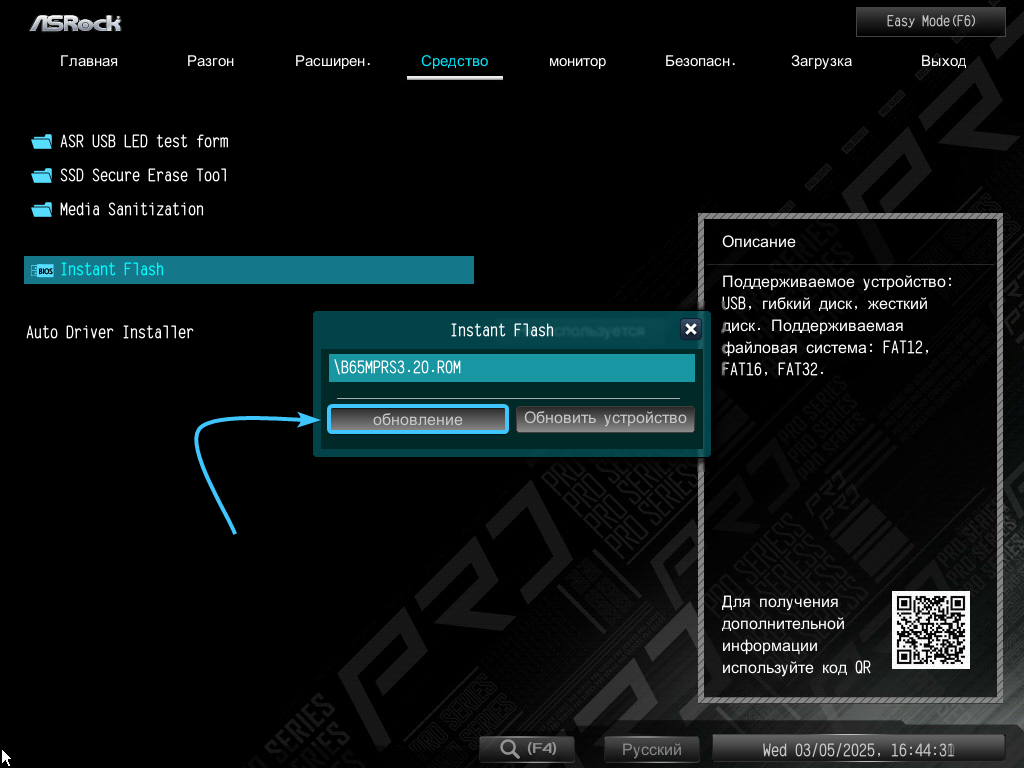
7. Сверху откройте вкладку «Средство». Находясь в ней нажмите «Instant Flash» для открытия утилиты.
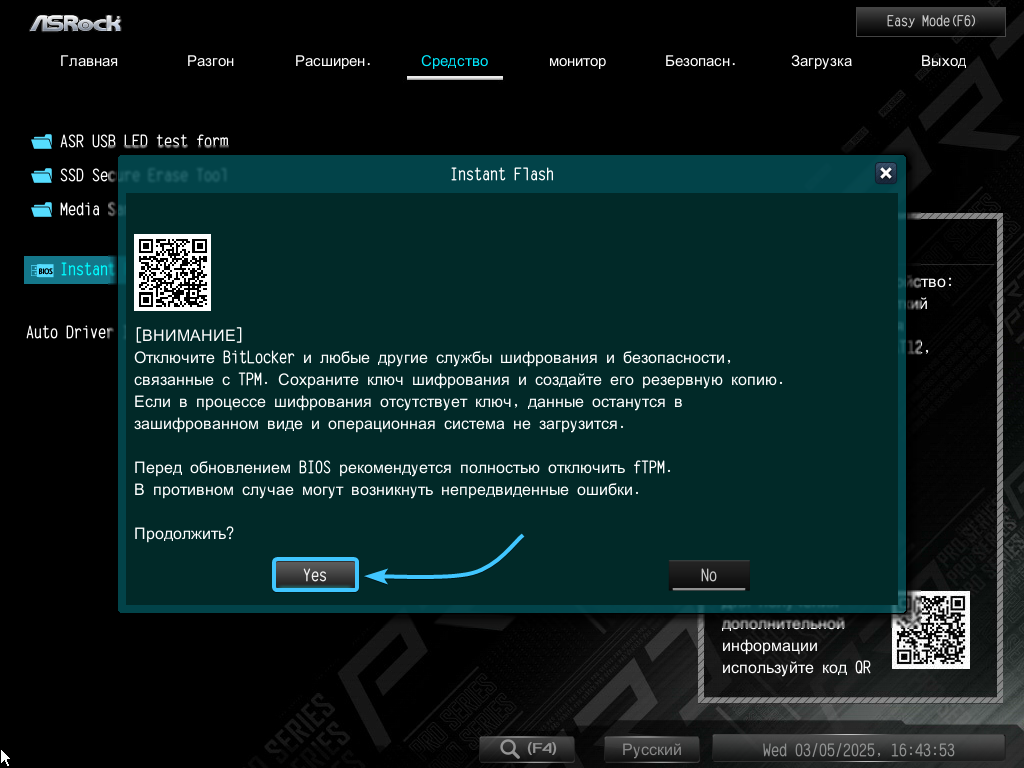
8. Ознакомьтесь с уведомлением, касающимся «BitLocker». Нажмите кнопку «Yes» для продолжения.
9. Появится окно выбора версии. Нажмите кнопку «Обновление», которая располагается слева.
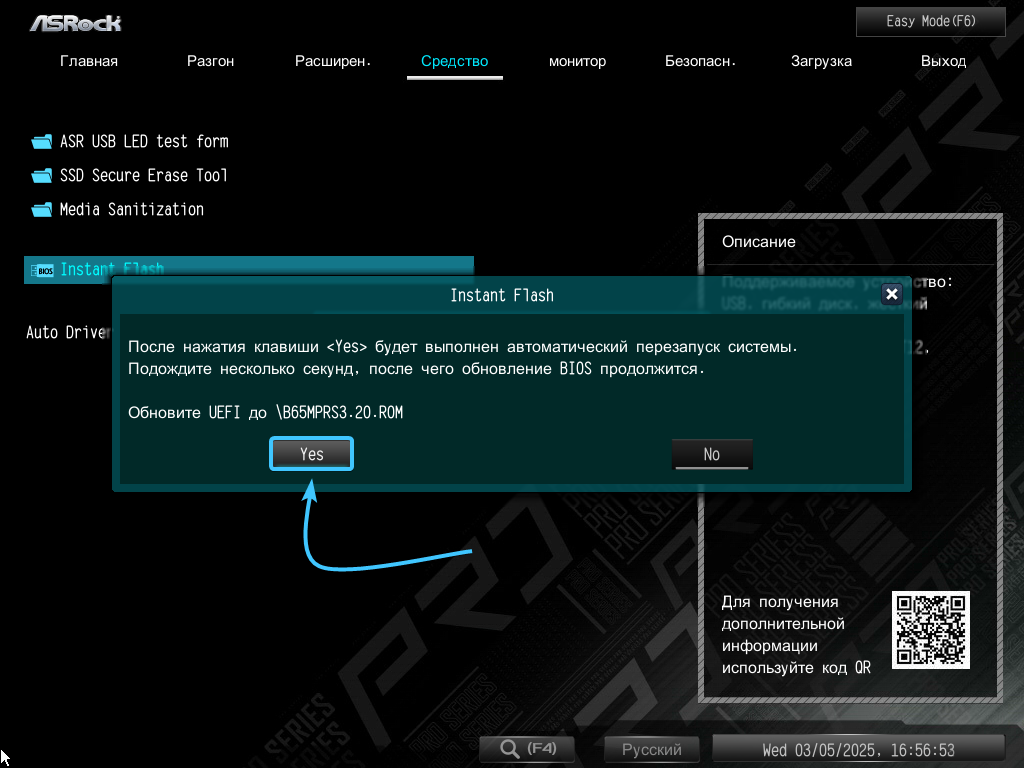
10. Появится окно подтверждения. Нажмите кнопку «Yes» для запуска процесса обновления «BIOS».
11. Дождитесь завершения процесса обновления «BIOS». После этого запустите операционную систему.
Другие руководства
- Открытие «BIOS» через «Windows»;
- Обновление «BIOS» на «ASUS»;
- Активация «XMP» на «ASUS»;
- Обновление «BIOS» на «MSI»;
- Активация «XMP» на «MSI»;
- Обновление «BIOS» на «GIGABYTE»;
- Активация «XMP» на «GIGABYTE»;
- Активация «XMP» на «ASRock»;
- Клавиши для открытия «BIOS»;
- Приоритет носителя на «ASUS»;
- Приоритет носителя на «MSI»;
- Приоритет носителя на «GIGABYTE»;
- Приоритет носителя на «ASRock»;
- Сброс «BIOS» на «ASUS»;
- Сброс «BIOS» на «MSI»;
- Сброс «BIOS» на «GIGABYTE»;
- Сброс «BIOS» на «ASRock».
Use this guide for general BIOS update guidance and to address Intel 13th and 14th Gen Processor issues.
Before updating your BIOS, it’s important to consider the risks involved. If something goes wrong—like a power failure during the update—it could render your computer inoperable. Additionally, BIOS updates are typically less frequent and only necessary when they address specific issues or add new features. Unlike Windows updates, which can often improve security and performance, unnecessary BIOS updates can introduce instability. Always ensure you really need the update before proceeding and follow manufacturer instructions carefully.
If you’re unsure if you might already be on the latest BIOS, you can check your system’s current BIOS version by referring to Step 5 below.
You will need:
- USB flash drive (at least 1GB or 2GB)
Before starting, confirm the model of your processor.
- Click the Start button or press Windows Key on your keyboard.
- Type System Information in the search bar.
- Click on System Information from the search results.
- It should open up to the System Summary. Check to see what is listed under Processor.

Step 1: How to identify your motherboard model before downloading the BIOS
Before we can start the process of flashing a new BIOS, we will first need to identify the exact model of your motherboard. Below are instructions for a few ways that you can do this.
Disclaimer: The motherboard model mentioned in the instructions below is provided solely as an example. Please ensure that you follow the specified steps to correctly identify your own motherboard model.
Method 1: Windows (System Information)
- Click the Start button or press Windows Key on your keyboard.
- Type System Information in the search bar.
- Click on System Information from the search results.
- It should open up to the System Summary. The BaseBoard Product will show the motherboard model.

Method 2: BIOS
- While the system is powering on or after restarting it, repeatedly press the DELETE key until you enter the BIOS. For alternative ways to enter the BIOS, refer to this article.
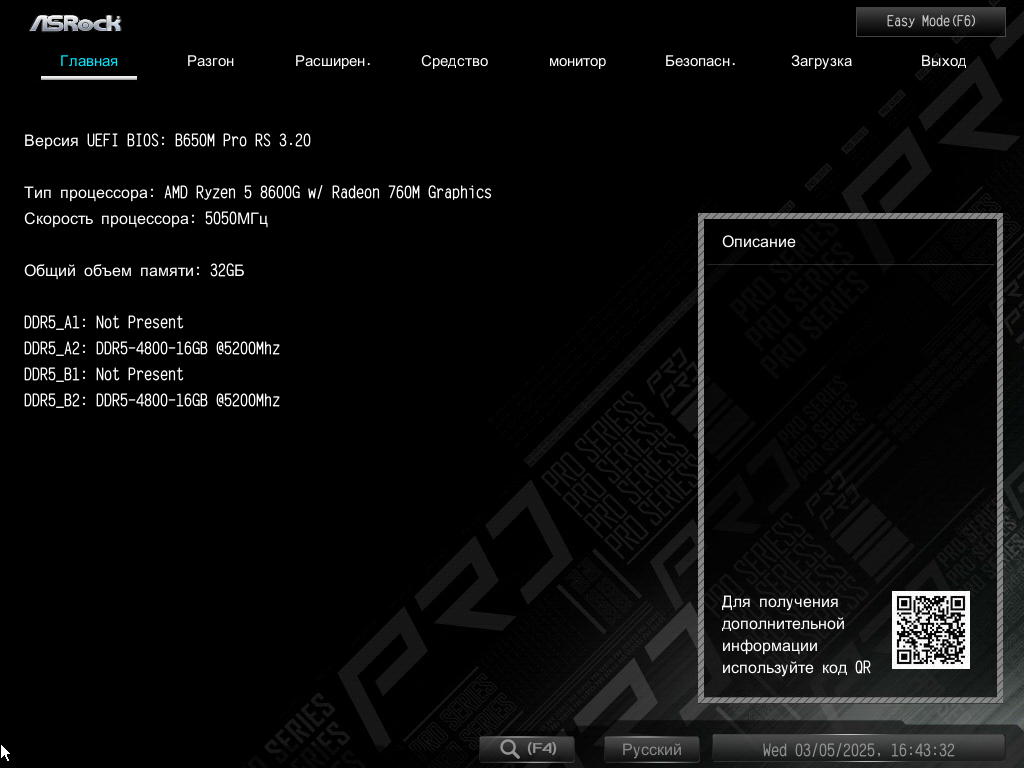
- While in the BIOS, you’ll see the motherboard model located in the upper left-hand corner where it says UEFI Version (if it says Advanced Mode in the top right instead of Easy Mode, press F6).

Step 2: Downloading a BIOS
Here are a few popular ASRock motherboards that MAINGEAR has offered:
- ASRock Z790 Nova WIFI
- Z690 Taichi Razer Edition
- Open your web browser and go to the ASRock official website.
- On the ASRock homepage, use the search bar at the top-right corner the page where it says «Model».
- Type in your motherboard model (e.g., «Z790 Nova WiFi»).
-
If there are multiple models listed, make sure that you select your exact motherboard (see image below for example of the Z790 Nova WiFi) from the search results to go to the product page.

- On the product page, scroll down until you see the Support tab and click on it.
- Under the Support tab, find and click on BIOS.
- A list of available BIOS versions will be displayed.
- Find the most recent BIOS version that is compatible with your motherboard model. We typically do not recommend using beta BIOSes.
-
Click on the Global download button next to the BIOS version you want to download.
- Save the downloaded ZIP file to your desktop.


Step 3: Formatting a USB and moving the BIOS onto it
- Connect a flash drive to one of the USB ports on your motherboard. For most BIOS updates, even a small capacity flash drive (1GB or 2GB) will be large enough.
- Open the File Explorer (press Windows Key + E).
- Find your flash drive under «This PC» or «My Computer.» It will usually be labeled as «Removable Disk» or similar.
-
Right-click the flash drive and select Properties and then Format.
- Enter the following:
- File System: FAT32.
- Allocation Unit Size: Default
- Volume Label: (Optional) You can name the flash drive if you want.
-
Quick Format: Ensure the «Quick Format» option is checked.
- Click Start.
- Open the File Explorer and navigate to your Desktop to locate the ZIP file containing the new BIOS.
-
Right-click the ZIP folder and choose Extract All.
- Select Browse.
-
Select This PC on the left menu and then click on the USB drive. Click Select Folder.
- Click Extract.
- Your USB is now ready to update the BIOS.


Step 4: Updating the BIOS
- Restart your computer and repeatedly press the Delete key as it boots to enter the BIOS. For alternative ways to enter the BIOS, refer to this article.
- In the BIOS menu, check to see if it says Easy Mode at the top. If it says Advanced Mode, press F6 to switch modes.
-
Click the Tool tab on the top navigation bar and then select Instant Flash.
If BitLocker is enabled on your system, follow the linked guides to back up the recovery key and suspend BitLocker before updating your BIOS.
How to back up the BitLocker recovery key
How to suspend BitLocker in Windows
-
Click Yes on the following windows that pop up to update the BIOS.
Disclaimer: During the update process, DO NOT turn off your computer, restart it, or remove the flash drive.
- The system will restart automatically after the BIOS update completes.

Step 5: Confirm the BIOS update was successful
We can verify that the BIOS was installed successfully in a few different ways. Please follow either of the sets of the instructions below to confirm this.
Method 1: Windows (System Information)
- Click the Start button or press Windows Key on your keyboard.
- Type System Information in the search bar.
- Click on System Information from the search results.
- It should open up to the System Summary. The BIOS Version/Date will show the current BIOS version and date of when it was released.

Method 2: BIOS
- Restart your computer and repeatedly press the Delete key as it boots to enter the BIOS. For alternative ways to enter the BIOS, refer to this article.
- Once in the BIOS, locate the UEFI Version in the top-left corner. This should match the version of the BIOS you installed.
-
If the BIOS version and Build Date match, your BIOS update was successful. If it does not match, you can follow the steps again or reach out to our support team via phone 908-620-9050 or email at support@maingear.com (click here to see hours of operation).

Step 6: After completing the BIOS update, you’ll want to follow these guides to complete setup.
How to set the Intel recommended processor power settings (click here)
How to enable XMP/EXPO (click here)
To request MAINGEAR’s recommended fan curves, please email our support team at support@maingear.com with your Order Number or Invoice ID.
If you have questions or concerns, please contact one of our MAINGEAR Support agents: (908-620-9050) or support@maingear.com
Looking for a new gaming PC? Unleash your gaming potential with cutting-edge performance and custom-built designs. Visit maingear.com and elevate your gameplay today!
Still need help?
Contact Us
Contact Us
The BIOS/UEFI is your system’s firmware. It’s a low-level software interface that facilitates communication between the hardware and OS.
If your system isn’t detecting some hardware components or a recently released BIOS update has added some new functionality, then you may want to update the BIOS version.
ASRock provides two ways to install such updates – the Instant Flash utility and UpdateCapsules to update from Windows.
Before You Begin
Before updating the BIOS, it’s important to confirm that the update is actually required. Some valid reasons include:
- Hardware incompatibility (e.g., new CPU doesn’t work due to old BIOS version)
- BSODs and boot errors
- Update introduces security patches, new features, or performance upgrades
If your system is running fine and there’s no real reason to update, then you should stick with your current BIOS version for now. There’s no point in risking potential issues that the new version might cause.
But if you do have valid reasons to update, keep a few things in mind before proceeding:
- Make sure the BIOS update isn’t interrupted as that could brick your motherboard. A power-backup source like a UPS can help with this.
- Download the update files from the official source and use the official methods to update the BIOS as we’ve done in this article. There’s no guarantee that third-party flashing tools are safe.
- It’s also important to make sure the file was downloaded completely without interruption as a corrupt file can lead to a failed update, or even a bricked motherboard in the worst case.
Check Motherboard Model & BIOS Version
You’ll need your motherboard model name to search for the available BIOS updates. It’s also a good idea to note the current BIOS version for comparison.
- Press Win + R, type
msinfo32, and press Enter. - In the System Summary page, check the BIOS Version/Date and BaseBoard Product entries.


As you can see, I’m using a Z370M-ITX/ac board. The firmware version is P1.50, installed on 11/16/2017.
Check Available BIOS Versions Online
Go to the ASRock Support page and search for your motherboard model. Multiple versions of the model (gaming, pro, mini, etc.) may be listed there, so make sure you find the exact match.

On the motherboard’s product page, expand Support > BIOS.
The available BIOS updates for your motherboard will be listed here, sorted by version. If you’re unsure which update to install, read their description. The main changes like added features or compatibility upgrades should be listed there.

Some updates are non-revertible, meaning you won’t be able to flash older BIOS versions after updating. Others may require specific OS versions (e.g., Windows 10 RS3 or older). Such warnings and instructions will be mentioned in the description section, so it’s important to read everything carefully.
Once you pick the update to install, I recommend using Instant Flash to update the BIOS. UpdateCapsules are a viable alternative if you want to update directly from Windows.
In either case, if you click on the method hyperlink, you’ll find step-by-step instructions for your chosen method. If you find the steps there confusing, you can follow along with our guide instead.
Download the file from the Global hyperlink and continue the steps from the appropriate section below.
Method 1: Instant Flash
Instant Flash is ASRock’s proprietary BIOS flashing utility. You’ll have to move the update files to a USB and select this USB with Instant Flash to update the BIOS.
- Connect a USB drive to your PC and format it as FAT32.

- Right-click the downloaded zip file and select Extract all. Move the extracted ROM file(s) to the USB.

- Reboot your PC and press F2 or Del as indicated on-screen to enter BIOS Setup. With some motherboards, you can also press F6 to directly access Instant Flash.
- Select Instant Flash from the Tools menu.

- Instant Flash will list all compatible BIOS versions. Select the BIOS version to flash and click on Yes.

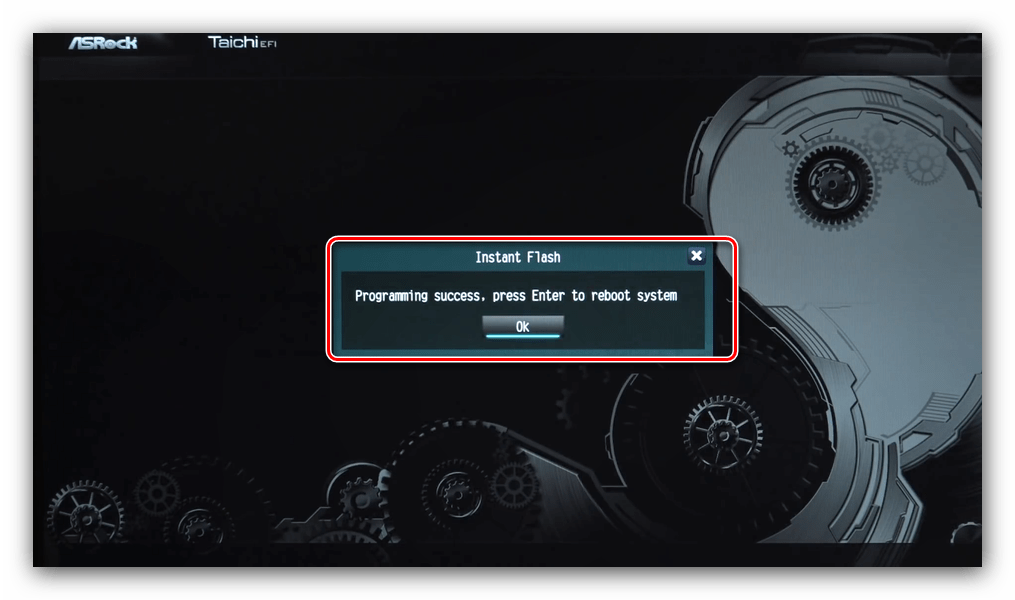
- The system will flash the BIOS now. Make sure the process isn’t interrupted. After it completes, press Ok to reboot the system.

- When rebooting, press F2/Del to enter BIOS Setup again.
- Switch to the Exit menu and select Load UEFI Defaults, then Save Changes and Exit. You’ll boot with the new BIOS upon restarting.


Method 2: UpdateCapsule
Windows supports servicing firmware updates as a driver package using the UEFI UpdateCapsule function. The upside to this is that you can install the update directly from Windows, and the process is mostly automated.
The downside is that this method is only supported on certain boards and requires specific OS versions (Windows 10 Version 1709 or older in my case).
If your board and OS are supported, you can follow the steps listed below to update the BIOS with this method:
- Right-click the downloaded zip file and select Extract all > Extract.
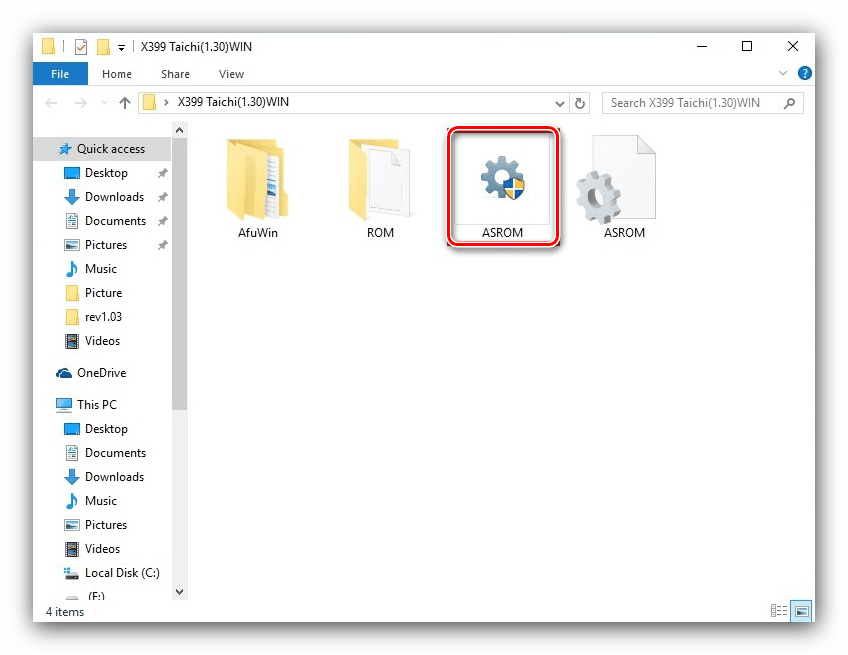
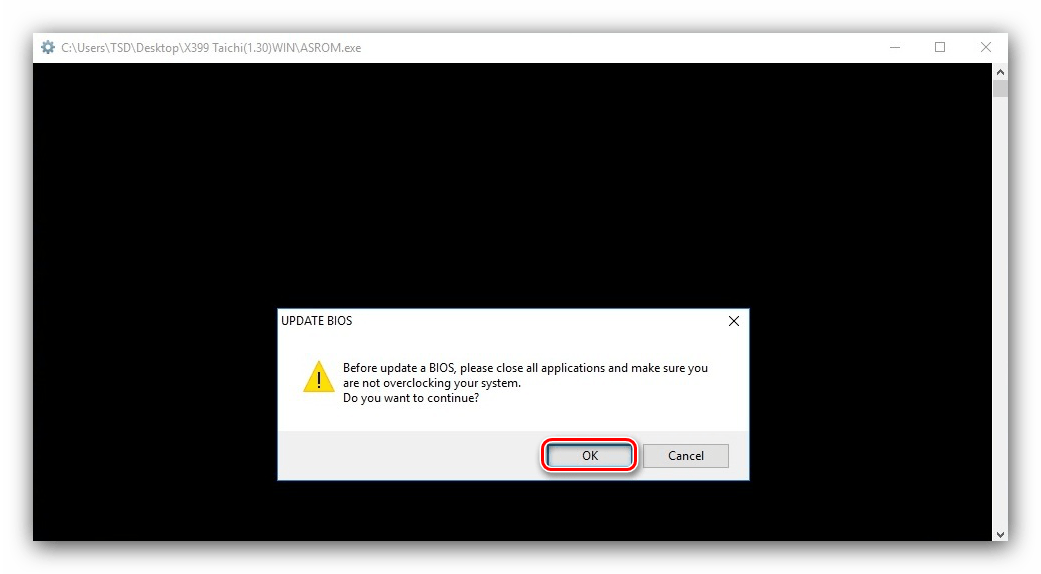
- Launch the extracted ASROM app and accept the prompt to continue.

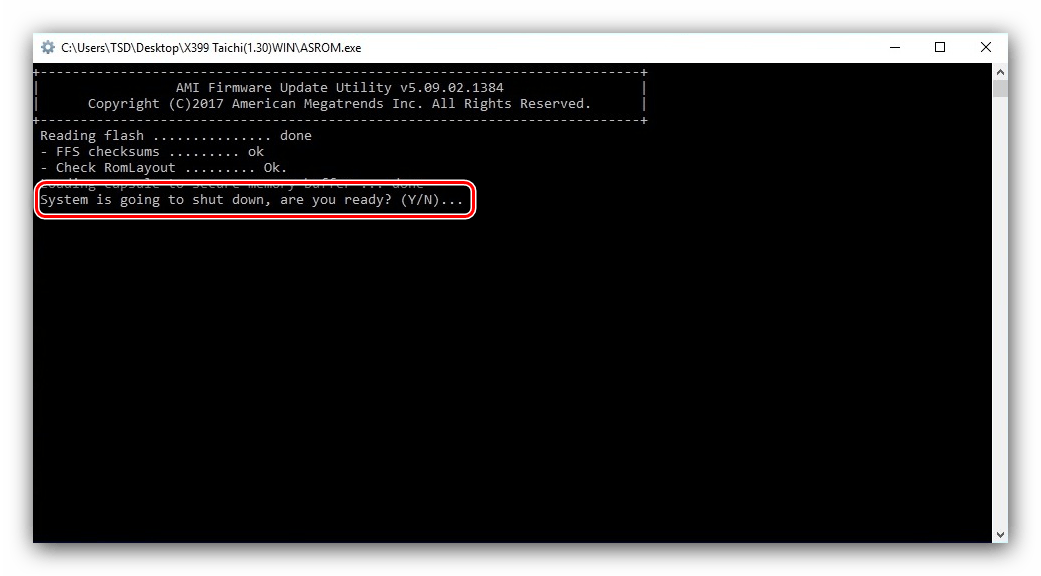
- The system will prompt you to reboot after loading the capsule to the secure memory buffer. Enter Y at this point.

- After restarting, the BIOS update will start automatically.
- Once the update completes, the PC will restart again. Press F2/Del to enter BIOS Setup when this happens.
- Switch to the Exit menu and select Load UEFI Defaults, then Save Changes and Exit. You’ll boot with the updated BIOS upon restarting.


