
Предпросмотр документа
· инструкция (руководство, документация) для проводного телефона Siemens Euroset 5020
·
14 ноября 2021 етырий
Руководство по эксплуатации
Файл: man3481-um_euroset-5020_rus.pdf
Размер: 565.56 Кб
Открыть файл
4 292 просмотра
добавить комментарий

euroset 5020 / IM eng-frk-rus-kro / A30350-M209-A801-2-UP19 / 5020.fm / 24.07.2006
1
RU
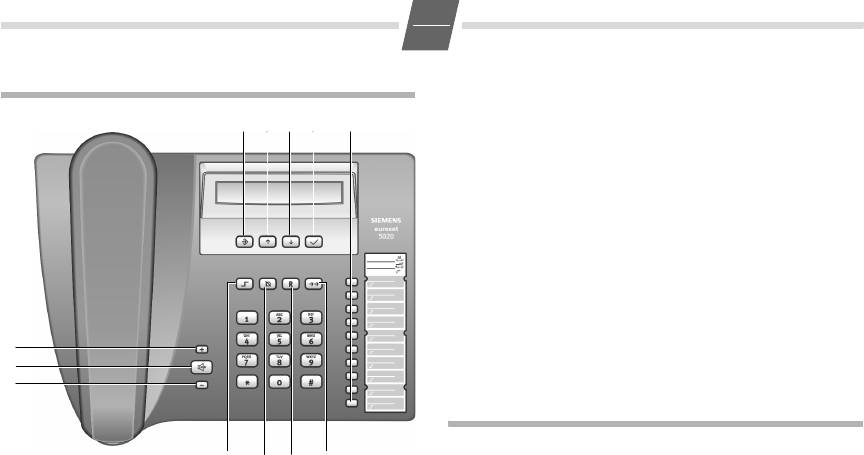
Обзор телефона Euroset 5020
Клавиши
1 Клавиши быстрого набора
2 Клавиша повторного набора
3 Клавиша наведения справки
4 Клавиша отключения звука
5 Клавиша регистра
6 Клавиша уменьшения громкости
7 Клавиша динамика (громкая связь)
8 Клавиша увеличения громкости
9 Клавиша сохранения
10 Клавиша Вверх
11 Клавиша Вниз
12 Клавиша OK (набор отображенного номера)
Дисплейные символы
P
в режиме сохранения
‡
нажата клавиша регистра
—
готовность к работе
y
микрофон отключен
}
динамик включен
è
установлен номер прямого вызова
o
ввод при настройке (напр. громкость)
u
нажата клавиша наведения справки
P
пауза
z
память пуста
{
телефон заблокирован
zzzz
при попытки соединения: телефон
заблокирован
0
–
9
номер телефона
В тоновом режиме:
n
– нажата клавиша
*
—
– нажата клавиша
#
При дополнительных услугах городской АТС:
|
новый вызов в списке вызовов
†
(мигающий) поступило новое сообщение
ë
ожидание вызова
™
немедленная переадресация вызова
˜
переадресация вызова при неответе
—
переадресация вызова, если занято
š
абонент неопределен
Меры предосторожности
При установке, подключении и использовании
телефона следует обязательно выполнять следующие
требования:
◆
Используйте только прилагаемые штекеры и шнуры!
◆
Подключайте соединительный шнур только к
предназначенной для этого розетке.
◆
Подключайте только разрешенные к использованию
аксессуары.
◆
Прокладывайте соединительный шнур так, чтобы
исключить возможность несчастного случая!
◆
Устанавливайте телефон на нескользкую
поверхность!
◆
Для обеспечения вашей безопасности телефон не
следует использовать в ванной или в душе
(помещениях с повышенной влажностью). Телефон
не защищен от брызг.
◆
Не подвергайте телефон воздействию источников
тепла, прямых солнечных лучей или других
электрических устройств.
◆
Защищайте телефон от влаги, пыли, агрессивных
жидкостей и паров.
◆
Никогда не разбирайте телефон самостоятельно!
◆
Не прикасайтесь к контактам острыми и
металлическими предметами!
◆
Не переносите телефон, держа его за шнур!
◆
Передавайте телефон Euroset 5020 другим только
вместе с этой инструкцией по эксплуатации.
1
2
3
4
5
6
7
8
12
11
10
9
EN
Dear Customer,
Gigaset Communications GmbH is the legal successor to
Siemens Home and Office Communication Devices GmbH &
Co. KG (SHC), which in turn continued the Gigaset business
of Siemens AG. Any statements made by Siemens AG or
SHC that are found in the user guides should therefore be
understood as statements of Gigaset Communications
GmbH.
We hope you enjoy your Gigaset.
DE
Sehr geehrte Kundin, sehr geehrter Kunde,
die Gigaset Communications GmbH ist Rechtsnachfolgerin
der Siemens Home and Office Communication Devices
GmbH & Co. KG (SHC), die ihrerseits das Gigaset-Geschäft
der Siemens AG fortführte. Etwaige Erklärungen der
Siemens AG oder der SHC in den Bedienungsanleitungen
sind daher als Erklärungen der Gigaset Communications
GmbH zu verstehen.
Wir wünschen Ihnen viel Freude mit Ihrem Gigaset.
FR
Chère Cliente, Cher Client,
la société Gigaset Communications GmbH succède en droit
à Siemens Home and Office Communication Devices GmbH
& Co. KG (SHC) qui poursuivait elle-même les activités Giga-
set de Siemens AG. Donc les éventuelles explications de Sie-
mens AG ou de SHC figurant dans les modes d’emploi
doivent être comprises comme des explications de Gigaset
Communications GmbH.
Nous vous souhaitons beaucoup d’agrément avec votre
Gigaset.
IT
Gentile cliente,
la Gigaset Communications GmbH è successore della Sie-
mens Home and Office Communication Devices GmbH &
Co. KG (SHC) che a sua volta ha proseguito l’attività della
Siemens AG. Eventuali dichiarazioni della Siemens AG o
della SHC nei manuali d’istruzione, vanno pertanto intese
come dichiarazioni della Gigaset Communications GmbH.
Le auguriamo tanta soddisfazione con il vostro Gigaset.
NL
Geachte klant,
Gigaset Communications GmbH is de rechtsopvolger van
Siemens Home and Office Communication Devices GmbH &
Co. KG (SHC), de onderneming die de Gigaset-activiteiten
van Siemens AG heeft overgenomen. Eventuele uitspraken
of mededelingen van Siemens AG of SHC in de gebruiksaan-
wijzingen dienen daarom als mededelingen van Gigaset
Communications GmbH te worden gezien.
Wij wensen u veel plezier met uw Gigaset
.
ES
Estimado cliente,
la Gigaset Communications GmbH es derechohabiente de la
Siemens Home and Office Communication Devices GmbH &
Co. KG (SHC) que por su parte continuó el negocio Gigaset
de la Siemens AG. Las posibles declaraciones de la
Siemens AG o de la SHC en las instrucciones de uso se
deben entender por lo tanto como declaraciones de la Giga-
set Communications GmbH.
Le deseamos que disfrute con su Gigaset.
PT
SCaros clientes,
Gigaset Communications GmbH é a sucessora legal da Sie-
mens Home and Office Communication Devices GmbH &
Co. KG (SHC), que, por sua vez, deu continuidade ao sector
de negócios Gigaset, da Siemens AG. Quaisquer declara-
ções por parte da Siemens AG ou da SHC encontradas nos
manuais de utilização deverão, portanto, ser consideradas
como declarações da Gigaset Communications GmbH.
Desejamos que tenham bons momentos com o seu Gigaset.
DA
Kære Kunde,
Gigaset Communications GmbH er retlig efterfølger til Sie-
mens Home and Office Communication Devices GmbH &
Co. KG (SHC), som fra deres side videreførte Siemens AGs
Gigaset-forretninger. Siemens AGs eller SHCs eventuelle
forklaringer i betjeningsvejledningerne skal derfor forstås
som Gigaset Communications GmbHs forklaringer.
Vi håber, du får meget glæde af din Gigaset.
FI
Arvoisa asiakkaamme,
Gigaset Communications GmbH on Siemens Home and
Office Communication Devices GmbH & Co. KG (SHC)-yri-
tyksen oikeudenomistaja, joka jatkoi puolestaan Siemens
AG:n Gigaset-liiketoimintaa. Käyttöoppaissa mahdollisesti
esiintyvät Siemens AG:n tai SHC:n selosteet on tämän
vuoksi ymmärrettävä Gigaset Communications GmbH:n
selosteina.
Toivotamme Teille paljon iloa Gigaset-laitteestanne.
SV
Kära kund,
Gigaset Communications GmbH övertar rättigheterna från
Siemens Home and Office Communication Devices GmbH &
Co. KG (SHC), som bedrev Gigaset-verksamheten efter Sie-
mens AG. Alla förklaringar från Siemens AG eller SHC i
användarhandboken gäller därför som förklaringar från
Gigaset Communications GmbH.
Vi önskar dig mycket nöje med din Gigaset.
NO
Kjære kunde,
Gigaset Communications GmbH er rettslig etterfølger etter
Siemens Home and Office Communication Devices GmbH &
Co. KG (SHC), som i sin tur videreførte Gigaset-geskjeften i
Siemens AG. Eventuelle meddelelser fra Siemens AG eller
SHC i bruksanvisningene er derfor å forstå som meddelelser
fra Gigaset Communications GmbH.
Vi håper du får stor glede av din Gigaset-enhet.
EL
Αγαπητή πελάτισσα, αγαπητέ πελάτη,
η Gigaset Communications GmbH είναι η νομική διάδοχος της
Siemens Home and Office Communication Devices GmbH &
Co. KG (SHC), η οποία έχει αναλάβει την εμπορική
δραστηριότητα Gigaset της Siemens AG. Οι δηλώσεις της
Siemens AG ή της SHC στις οδηγίες χρήσης αποτελούν
επομένως δηλώσεις της Gigaset Communications GmbH.
Σας ευχόμαστε καλή διασκέδαση με τη συσκευή σας Gigaset.
HR
Poštovani korisnici,
Gigaset Communications GmbH pravni je sljednik tvrtke
Siemens Home and Office Communication Devices GmbH &
Co. KG (SHC), koji je nastavio Gigaset poslovanje tvrtke
Siemens AG. Zato sve izjave tvrtke Siemens AG ili SHC koje
se nalaze u uputama za upotrebu treba tumačiti kao izjave
tvrtke Gigaset Communications GmbH.
Nadamo se da sa zadovoljstvom koristite svoj Gigaset
uređaj.
SL
Spoštovani kupec!
Podjetje Gigaset Communications GmbH je pravni naslednik
podjetja Siemens Home and Office Communication Devices
GmbH & Co. KG (SHC), ki nadaljuje dejavnost znamke
Gigaset podjetja Siemens AG. Vse izjave podjetja Siemens
AG ali SHC v priročnikih za uporabnike torej veljajo kot izjave
podjetja Gigaset Communications GmbH.
Želimo vam veliko užitkov ob uporabi naprave Gigaset.
Issued by
Gigaset Communications GmbH
Schlavenhorst 66, D-46395 Bocholt
Gigaset Communications GmbH is a trademark
licensee of Siemens AG
© Gigaset Communications GmbH 2008
All rights reserved.
Subject to availability. Rights of modifications
reserved.
www.gigaset.com
euroset 5020 / IM eng-fra-russ-kro / A30350-M209-A801-2—UP19 / 5020.fm / 24.07.2006
1
GB
{ Telephone locked
Euroset 5020 Quick Guide
zzzz
When trying to connect: telephone locked
1211109
1
0
–
9
Phone number
With tone dialling:
n
– * key pressed
—
– # key pressed
With additional services from public network providers:
| New call in calls list
† (Flashing) A new message has arrived
ë Call waiting
™ Call forwarding immediately
˜ Call forwarding on no reply
— Call forwarding when busy
8
š Anonymous call on
7
6
Safety precautions
When installing, connecting and operating the telephone,
45
23
always observe the following precautions:
◆ Only use the plugs and leads supplied.
Keys
◆ Only connect the connecting lead to the socket/jack
1 Repertory keys
provided for that purpose.
2 Redial key
◆ Only connect approved accessories.
3 Recall key
◆ Arrange the connecting lead where it will not cause
4Mute key
accidents.
5Shift key
◆ Position the telephone on a non-slip surface.
6Quiet key
◆ For your safety and protection, the telephone must not
be used in bath or shower rooms (wet locations).
7 Loudspeaker key (handsfree)
The telephone is not splash proof.
8Loud key
◆ Never expose the telephone to sources of heat, direct
9Set key
sunlight or other electrical devices.
10 Up key
◆ Protect your telephone from moisture, dust, corrosive
11 Down key
liquids and vapours.
12 OK key (dial number displayed)
◆ Never open up the telephone yourself.
Display symbols
◆ Do not touch the plug contact with pointed or metallic
objects.
P In setting mode
◆ Do not carry the telephone by the leads.
‡ Shift key pressed
◆ If you give your Euroset 5020 to someone else, make
— Ready for use
sure you also give them the user guide.
y Microphone off
è Baby Call (direct call) number set
o Entry mark when setting (e.g. volume)
u
Recall key pressed
P
Pause
z
No memory content
euroset 5020 / IM eng-fra-russ-kro / A30350-M209-A801-2—UP19 / 5020.fm / 24.07.2006
2
GB
All electrical and electronic products should be dis-
posed of separately from the municipal waste stream
via designated collection facilities appointed by the
government or the local authorities.
This crossed-out wheeled bin symbol on the product means
the product is covered by the European Directive 2002/96/
EC.
The correct disposal and separate collection of your old
appliance will help prevent potential negative conse-
quences for the environment and human health. It is a pre-
condition for reuse and recycling of used electrical and elec-
tronic equipment.
For more detailed information about disposal of your old
appliance, please contact your city office, waste disposal
service or the shop where you purchased the product.
Preparing the telephone for use
Recommended installation of telephone
◆ Do not expose the telephone to direct sunlight or other
Setting the internal clock
sources of heat.
?3 Initiate function.
◆ Operate at temperatures between +5°C and +40°C.
The current set time is displayed in 24-hour
◆ Maintain a distance of at least one metre between the
mode (default setting: 00:00).
telephone and radio equipment, e.g. wireless
o Enter the correct time in hours <hh> and
telephones, wireless pagers or TV sets. Otherwise,
minutes <mm> (24-hour mode).
telephone communication could be impaired.
? Press the Set key.
◆ Do not install the telephone in dusty areas as this can
shorten the service life of the telephone.
◆ To clean, wipe with a moist or antistatic cloth only, never
Making calls
with a dry cloth (risk of electrostatic charging and
discharge) or harsh cleaning agent.
Dialling a number
◆ Furniture lacquer and polish can be damaged by contact
co Lift handset, dial number.
with parts of the unit (e.g. device feet).
or …
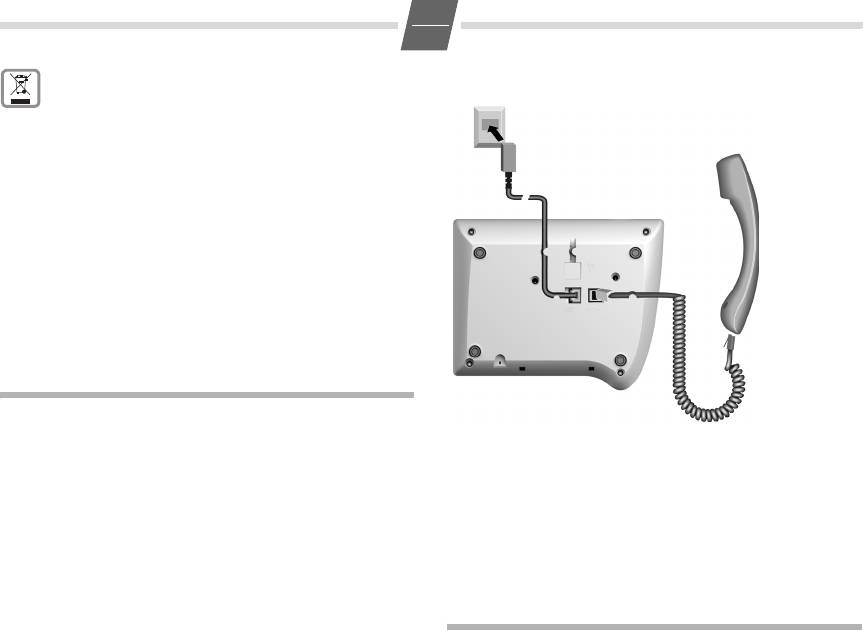
Connecting
o Bc Dial number (you can delete wrongly entered
digits with
A and then enter the correct
Insert the short end of the coiled handset cord in the socket
digit) and press the OK key.
provided in the handset and the long end in the socket
After 2 seconds the number is dialled.
marked with an
a on the underside of the device. Plug the
Lift the handset if you want to talk via the
phone cord into the outlet on the wall and the other end
handset.
into the socket marked with a
Y on the underside of the
device. Then your telephone is ready to use.
Any digits after the 20th digit are moved from right to left in
the display. The Last number redial key
; can be used to
insert pauses when dialling, starting from the 2nd digit.
Select phone number from the calls list (if available):
see 6.

euroset 5020 / IM eng-fra-russ-kro / A30350-M209-A801-2—UP19 / 5020.fm / 24.07.2006
3
GB
Activating/deactivating handsfree talking
Saving numbers
With this telephone you can also make calls (handsfree
Different telephone settings must be completed with the
mode) or settings without lifting the handset. The best
Set key
? so that they are available permanently.
distance from the microhone for speaking is about 50 cm.
In order to cancel without saving, e. g. after an incorrect
◆ Activating during a call via the handset
entry, replace the handset instead of pressing
? at the
L + a With the Loudspeaker key pressed replace the
end. The original setting is then retained.
handset.
Saving with notebook function
◆ Activating before dialling the number
You can also save phone numbers during a conversation
L Before dialling: hold down the Loudspeaker
with the notebook function.
key until you can hear the dialling tone.
Saving repertory numbers
Deactivating handsfree talking
You can save up to 20 phone numbers (or even functions,
c Lift the handset during the call.
see page 7) on both levels of the repertory keys.
Last number redial
? Press the Set key. (For 2nd memory level, also
The last 5 numbers dialled (up to 32 digits) are saved
press
=.)
automatically. You can retrieve these numbers from the last
: Press the repertory key under which you want
number redial list and dial them again:
to save the repertory number.
A number that has already been saved is
Redialling the last number dialled
shown in the display. If the memory for this
c; Lift the handset and press the last number
repertory key is empty,
z
appears in the display
redial key. The last number dialled is redialled
o Enter the number to be saved (up to 32 digits).
immediately.
or …
Dialling from the last number redial list
Saving from the calls list (if service is available)
; Without lifting the handset: Press the last
A…C Press the Down/Up key until the desired
number redial key.
number appears in the display.
The last number dialled is displayed. (You can
or …
leave the last number redial list at any time by
Saving from the redial list:
pressing
>.)
; Press the last number redial key.
A…C Using the Down/Up key, scroll through the list
to the desired number.
A…C If necessary, press the Down/Up key until the
desired number appears in the display.
B Press OK or L key.
After 2 seconds the number is dialled.
To terminate the process:
Lift the handset if you want to talk via the
? Press the Set key.
handset.
Saving during a call
You can also save phone numbers in the same way during a
Dialling using the repertory keys
call (notebook function).
c Lift handset. (If necessary, press = for a 2nd
Note:
level repertory key).
After the 20th digit, any following digits are moved from right to left
: Press repertory key.
in the display.
or …
Delete all repertory numbers
: Press repertory key. (If necessary, press = for
?1251
a 2nd level repertory key).
Initiate function.
Bc Press OK or L key.
? Press the Set key.
After 2 seconds the number is dialled.
Lift the handset if you want to talk via the
handset.

euroset 5020 / IM eng-fra-russ-kro / A30350-M209-A801-2—UP19 / 5020.fm / 24.07.2006
4
GB
Adjusting the telephone
Adjusting the loudspeaker
While in handsfree mode, you can set the volume to one of
Adjusting the ringer volume
7 levels and save it (default setting: 1).
H…I Adjust the volume with the Loud/Quiet key.
The volume of the ringer can be set to one of 4 levels and
can also be deactivated completely (default setting: level 4).
Activating/deactivating the mute melody
◆ To adjust when the telephone is idle:
You can activate and deactivate the mute melody for the
?5 Initiate function.
mute (default setting: on).
H…I Adjust the volume with the Loud/Quiet key.
?19 #
? Press the Set key.
Initiate function.
◆ To adjust while the telephone is ringing:
0/1 0: deactivate; 1: activate.
Press
H…I before lifting the handset.
? Press the Set key.
The last value set is saved.
Baby call (direct call) number setting
Setting the ringer frequency
If a phone number is set for the Baby Call function, it is
The frequency (speed) of the ringer can be set to one of
dialled automatically when the telephone is locked
three levels (default setting: level 3).
(s. «Activating/deactivating the telephone lock») after you
?6 Initiate function.
lift the handset (or press the Loudspeaker key) and press
1…3 Press one of the keys 1…3:
any key (except
?, L,H and I). The telephone
1: highest frequency; 3: lowest frequency.
does not allow other phone numbers to be dialled, but
incoming calls can be received.
? Press the Set key.
?82
Setting the ringtone
Initiate function.
Ten different ringtones can be set for the ringer (default
o Enter direct call number (max. 32 digits).
setting: ringtone 9).
? Press the Set key.
◆ To set with the telephone is idle:
When the baby call function is activated, you will see
è
?7 Initiate function.
and
{ in the display.
0…9 Press one of the keys 0 … 9
Deactivating
? Press the Set key.
?80
◆ To set while the telephone is ringing:
Initiate function.
0…9 Press one of the keys 0 to 9.
? Press the Set key.
Setting the handset volume
Deleting a baby call phone number
The volume on the handset can be set to one of 3 levels and
?1253
saved (default setting: level 1).
Initiate function.
?9 Initiate function.
? Press the Set key.
H…I Adjust the volume with the Loud/Quiet key.
Activating/deactivating the telephone lock
? Press the Set key.
The telephone can be locked completely (with the exception
of a baby call phone number if set) so that it cannot dial any
Mute
phone numbers, including the baby call phone number. You
You can deactivate the telephone’s handset and
can continue to receive incoming calls.
microphone. Then the other party can no longer hear you.
?8 Initiate function..
J During a call: Press the Mute key
0/ 1 0: unlock; 1: lock
Activate: Press the key again.
? Press the Set key.

euroset 5020 / IM eng-fra-russ-kro / A30350-M209-A801-2—UP19 / 5020.fm / 24.07.2006
5
GB
When the telephone is locked, you will see { in the
Operation on a PABX
display.
Activate/deactivate call duration display
Enter/delete an external line prefixe
The telephone can display the approximate call duration in
If you are using your telephone on a PABX, you may have to
the display (up to 99 min. 59 sec., default setting: on). If the
save one or more external line prefixes. A dialling pause is
call duration display is activated, the time display begins
set automatically with the external line prefixe. You can save
8 seconds after the last digit is dialled.
up to three external line prefixes.
?18#
?0 Initiate function.
Initiate function.
If no external line prefixe has been set in a
0/ 1 0: deactivate; 1: activate.
location,
z
appears in the display.
If several external line prefixes are saved, these
? Press the Set key.
are displayed next to one another; the current
Setting the pause time
external line prefixe to be edited flashes.
If necessary, use the
; key to toggle
If necessary, the pause time of the Pause key ; (pause
between the external line prefixes displayed,
function from second input position) can be changed to 1,
to edit them as follows:
3 or 6 seconds (default setting: 3 seconds).
To delete an external line prefix:
?102
Initiate function.
? Press the Set key.
0…2 0: 1 sec.; 1: 3 sec.; 2: 6 sec..
To enter an external line prefixe:
? Press the Set key.
o Enter a one- to three-digit code.
Enter additional external line prefixes:
Changing the dialling mode
; o Press the Redial key, enter next external line
?# Initiate function.
prefixe.
1/ 2 1: Tone dialling.
? Press the Set key.
2: Pulse dialling without flash function.
? Press the Set key.
Recall key (on a PABX)
During an external call, you can make a recall or divert the
Changing dialling modes during a call
call. To do this, press the Recall key
>. The subsequent
If your telephone is set to pulse dialling and you want to use
procedure depends on your PABX. By default, the Recall key
functions that require tone dialling (e.g. remote access to
is preset to a flash time (interruption time) of 90 ms for use
an answering machine), you can change the dialling mode
of new features on public telephone systems. With a
during a call.
connection to a PABX, it may be necessary to change the
* With an open connection: press the star key.
flash time (e.g. 600 ms). To do this, please refer to the
o Enter digits for remote control/data transfer.
operating instructions for your PABX.
The telephone is reset to the original dialling mode by hang-
ing up the handset.

euroset 5020 / IM eng-fra-russ-kro / A30350-M209-A801-2—UP19 / 5020.fm / 24.07.2006
6
GB
Setting the flash time for the Recall key
Calls list
?195
The calls list includes up to 50 entries. If the same subscriber
Initiate function.
calls more than once, a new entry is not created. Up to 99
0…4 Enter desired flash code:
repeated calls are displayed in the additional information.
0: 90 ms (default setting); 1: 120 ms;
Sequence of list entries: The most recent call is displayed
2: 270 ms; 3: 375 ms; 4: 600 ms.
in the first position (position number «01»). Older entries are
? Press the Set key.
moved downwards with each new incoming phone number
until they are deleted from the list.
In the calls list
Using functions for additional services of
◆ you can scroll through the phone numbers displayed,
public telephone systems
◆ query additional information:
(a) date and time, if this is transferred from the
If you want to use services that are to be triggered with the
telephone system, otherwise only the time according to
Recall key, make sure beforehand that the correct flash time
the telephone’s internal clock,
is set for the key.
(b) frequency of an incoming phone number,
◆ delete entries,
Recall key (in public telephone systems)
◆ save phone numbers from the calls list to a repertory key
In public telephone systems, this key is required to use
(see page 3),
certain additional services.
◆ dial a displayed phone number directly.
The appropriate flashtime for the specific country must be
set before using the Recall key can be used:
Viewing caller histories and dialling phone numbers
◆ Belgium, Netherlands, Switzerland: 120 ms
If there are entries in the calls list that have you have not yet
(access code 1)
seen,
| flashes in the display.
◆ France, Luxemburg, Portugal, Germany, Greece: 270 ms
You can retrieve the calls list, scroll through its entries, view
(access code 2)
additional information about a call and call back directly:
◆ other European countries: 90 ms (access code 0).
A Press the Down key.
Using Calling Line Identification
The phone number of the most recent call
appears in the display. Its position number «01»
Under the following conditions, the phone numbers of
is displayed to the left of the number.
incoming calls are
If the phone number contains more than
(a) shown on the display (up to the first 20 digits) and
17 digits, the first 17 digits will be displayed
(b) automatically saved in a calls list:
first, then the rest after one second. (You can
◆ Both your network provider and the caller’s network
leave the calls list at any time by pressing
>.)
provider must offer Calling Line Identification.
To scroll through the calls list:
◆ Both you and the caller must have requested this service
A…C Press the Down/Up key.
(if necessary) from your respective network providers.
If these conditions are met, but a caller has suppressed
To view additional information:
Calling Line Identification before making the call, you will
= Press the Shift key.
see
—P— on the display instead of the phone number. If it
The date and time of the displayed entry is dis-
has not been possible to identify the number for other (tech-
played with the number of calls (on the right).
nical) reasons, you will see
—0— or —-E— on the display.
Back to the calls list (calling line display):
Up to 20 digits can be shown on the display. Longer phone
= Press the Shift key again.
numbers are shown with the end of the number shortened.
Dial the phone number:
B Press OK or L key.
After 2 seconds the number is dialled.
Lift the handset if you want to talk via the
handset.
euroset 5020 / IM eng-fra-russ-kro / A30350-M209-A801-2—UP19 / 5020.fm / 24.07.2006
7
GB
Deleting entries in the calls list
Using the repertory keys as «function keys»
Delete all entries at the same time
Different public telephone services/functions – possibly by
A/C Press the Down/Up key.
order/request – can be selected via predetermined key com-
binations which you can obtain from your network provider.
?*?Press the Set key, star key and Set key one after
another.
You can save the necessary key combinations like normal
The calls list is deleted and closed.
phone numbers on repertory keys and similarly «select» and
also deactivate the service again.
Delete individual entries
Note:
A…C Scroll to the desired entry.
If you activate the symbol display and save the function calls
?? Press the Set key twice.
on the 2nd level of the repertory keys, you can link the
The entry is deleted.
activation and deactivation of different services for each
«function key» with the display or hiding of certain symbols
Activating/deactivating display of the area code
on the display.
You can set the telephone so that the area code is not dis-
Therefore, when setting the repertory keys on the 2nd
played for incoming calls. This can be useful, for example, if
level, bear in mind that activating and deactivating the dis-
you cannot see the last digits of a long phone number on
play symbols
™, ˜, —,ë and š is linked to very specific
the display.
keys in the 2nd level – regardless of the phone numbers or
You can deactivate the display for 2 area codes (up to
function calls stored on it!
5digits each).
?4 Initiate function.
Deactivating/activating the symbol display for additional
If no number has been set in a storage location
services
z
appears in the display.
Displaying the symbols can be activated or deactivated as
If both storage locations are in use, these are
needed. In the default setting, the display is activated.
displayed side by side; the current storage
location to be edited flashes. If necessary, use
?145
the
; key to toggle between the storage
Initiate function.
locations displayed to edit them as follows:
0/1 0: deactivate; 1: activate.
Delete a number:
? Press the Set key.
? Press the Set key.
Recommended assignment of symbols to keys
Enter a number:
When the symbol display
= is activated and you then
o Enter a one to five digit number.
press one of the following repertory keys, the display sym-
Enter another prefix:
bol assigned to each is activated or deactivated respectively
; o Press the last number redial key, enter next
(key numbering from top to bottom):
prefix.
? Press the Set key.
=+Assignment Display
icon
«You have a message» display
: 1
on
™
Call forwarding immediately
Different network providers offer services for saving
:
2off
messages (e.g. voice mail services).
: 3
on
˜
If one or more newly received messages have been stored
Call forwarding on no reply
with the network provider, it may inform you via your tele-
:
4off
phone. In the display, this notification from the network
: 5
on
—
provider is displayed with the flashing
† symbol and the
Call forwarding when busy
:
6off
phone number.
: 7
on
You can now dial the corresponding phone number in order
ë
Call waiting
to check the stored messages. If there are no more new
:
8off
messages for you, the
† symbol disappears.
: 9 Anonymous call (only the next call)
š
euroset 5020 / IM eng-fra-russ-kro / A30350-M209-A801-2—UP19 / 5020.fm / 24.07.2006
8
GB
Assigning/changing function keys
Saving call forwarding on a function key
?= Initiate function.
?= Initiate function.
: Press the function key (=repertory key) that is
: Press the repertory key that is designated for
to be assigned.
the symbol display «
™
on«, see «Deactivating/
If the function key is already assigned, the key
activating the symbol display for additional
assignment appears in the display. If the mem-
services» on page 7.
ory for this function key is empty,
z
appears in
A number already saved is shown in the
the display.
display. If the memory for this repertory key is
empty,
z
appears in the display.
o Enter the key combination/code for the desired
service.
*21*
Enter the select function for «Immediate call
Important!
forwarding«.
If a part of the key combination to be saved
includes numbers/characters that must be
(a) Set the phone number for the
changeable (e.g. a phone number for a
call forwarding
forwarded call destination, or a time for the
o Enter the phone number of the forwarded call
appointment reminder), the shift key
=
destination.
must be used in this place.
# Press the hash key to mark the function end.
During a later activation of the service, this key
? Press the Set key.
makes the cursor for entering the changeable
or …
part flash.
(b) Reserve changeable call forwarding
? Press the Set key.
= Press the Shift key.
Example: Call forwarding
When «Call forwarding immediately» is acti-
vated later, this key makes the cursor for enter-
In the following, you will see an example of repertory keys
ing the phone number of the forwarded call
used as «function keys». If the symbol display is activated, in
destination flash.
the «call forwarding» example when the service is activated,
the symbol provided for it is displayed, or hidden when the
# Press the hash key to mark the function end.
service is deactivated.
? Press the Set key.
The key sequence for activating the function «call forward-
Activating call forwarding with a function key
ing immediately» from your network provider consists of
e.g. three parts:
c = Lift handset, press Shift key.
: Press the repertory key for the symbol display
Select function Forwarded call destination End of
«
™
on«.
function
™
appears in the display.
*21*
Phone number of the
#
(a) Phone number for call forwarding set
forwarded call destination
You may hear an announcement that the
You now have the following options:
service is activated.
◆ You can dial the entire key sequence each time on the
a Replace the handset.
keypad.
From now on, incoming calls will be forwarded
◆ You can save the key sequence on Repertory keys as an
to the forwarded call destination. Your tele-
entire function together with the phone number of a
phone will not ring.
set forwarded call destination
or
only the select function and the function end. With
this, you still have the option to set a forwarded call
destination that may change on a case-by-case basis.

euroset 5020 / IM eng-fra-russ-kro / A30350-M209-A801-2—UP19 / 5020.fm / 24.07.2006
9
GB
(b) Changeable call forwarding
If your telephone is not working perfectly
o ; Enter the phone number of the forwarded call
No signal tone: The tone volume might be set to 0.
destination, press the last number redial key to
Lift handset, no dialling tone: Is the connecting lead
mark the end of the phone number entered.
correctly plugged into the telephone and the telephone
You may hear an announcement that the
socket?
service is activated.
Dialling tone audible but telephone will not dial:
a Replace the handset.
The connection is OK. Is the dialling mode set correctly
Incoming calls will be forwarded from now on
(see page 5)?
to the forwarded call destination. Your tele-
PABX only: No connection or incorrect connection when
phone will not ring.
dialling from memory (e.g. redial, speed dial):
Program external line prefixe.
Saving «Deactivate call forwarding» on a function key
The other party cannot hear you: Have you pressed the
The call forwarding, as described in the previous example,
Mute key? Press the key again. Is the plug from the handset
can be deactivated again with your network provider e.g.
cord inserted correctly?
with key sequence
#21#.
Recall key does not work: Set appropriate flash time.
You can save this key sequence on a dedicated repertory key
The caller’s phone number and the calls list are not
as well. If the symbol display is activated and the service is
displayed:
activated as described, the
™ symbol in the display disap-
Is the adapter connected (see page 2)?
pears after the service is deactivated.
Can Calling Line Identification be used (see page 6)?
?= Initiate function.
: Press the repertory key that is designated for
Insert strips
symbol display «
™ off«, see «Deactivating/acti-
Blank insert strips for the repertory keys can be found on the
vating the symbol display for additional serv-
Internet at http://www.siemens.com/euroset.
ices» on page 7.
Contacts
#21#
Enter the select function for «Immediate call
If you should encounter any problems when operating the
forwarding«.
telephone connected to a communication system with
? Press the Set key.
analogue network access, please contact the network
operator responsible or your dealer.
Deactivating call forwarding with a function key
Authorisation
c= Lift handset, press the Shift key.
This device is intended for analogue phone lines in your net-
:a Press the repertory key for symbol display
work.
«
™ off«. Replace handset.
Country-specific requirements have been taken into consid-
The
™ symbol disappears. You may hear an announcement
eration.
that the service is deactivated.
We, Siemens Home and Office Communication Devices
GmbH & Co. KG, declare that this device meets the essential
Appendix
requirements and other relevant regulations laid down in
Directive 1999/5/EC.
Care
A copy of the 1999/5/EC Declaration of Conformity is availa-
ble at this Internet address:
To clean, wipe with a moist or antistatic cloth only, never
http://www.siemens.com/gigasetdocs
.
with a dry cloth (risk of electrostatic charging and
discharge) or harsh cleaning agent.
Обзор телефона euroset 5020, Меры предосторожности – Siemens Euroset 5020 User Manual
Page 20
euroset 5020 / IM eng-frk-rus-kro / A30350-M209-A801-2-UP19 / 5020.fm / 24.07.2006
Обзор телефона Euroset 5020
1 Клавиши быстрого набора
2 Клавиша повторного набора
3 Клавиша наведения справки
4 Клавиша отключения звука
5 Клавиша регистра
6 Клавиша уменьшения громкости
7 Клавиша динамика (громкая связь)
8 Клавиша увеличения громкости
9 Клавиша сохранения
10 Клавиша Вверх
11 Клавиша Вниз
12 Клавиша OK (набор отображенного номера)
в режиме сохранения
нажата клавиша регистра
готовность к работе
установлен номер прямого вызова
ввод при настройке (напр. громкость)
нажата клавиша наведения справки
при попытки соединения: телефон
заблокирован
В тоновом режиме:
При дополнительных услугах городской АТС:
новый вызов в списке вызовов
(мигающий) поступило новое сообщение
немедленная переадресация вызова
переадресация вызова при неответе
переадресация вызова, если занято
При установке, подключении и использовании
телефона следует обязательно выполнять следующие
требования:
Используйте только прилагаемые штекеры и шнуры!
Подключайте соединительный шнур только к
предназначенной для этого розетке.
Подключайте только разрешенные к использованию
аксессуары.
Прокладывайте соединительный шнур так, чтобы
исключить возможность несчастного случая!
Устанавливайте телефон на нескользкую
поверхность!
Для обеспечения вашей безопасности телефон не
следует использовать в ванной или в душе
(помещениях с повышенной влажностью). Телефон
не защищен от брызг.
Не подвергайте телефон воздействию источников
тепла, прямых солнечных лучей или других
электрических устройств.
Защищайте телефон от влаги, пыли, агрессивных
жидкостей и паров.
Никогда не разбирайте телефон самостоятельно!
Не прикасайтесь к контактам острыми и
металлическими предметами!
Не переносите телефон, держа его за шнур!
Передавайте телефон Euroset 5020 другим только
вместе с этой инструкцией по эксплуатации.
Источник
Подготовка к работе, Разговор по телефону – Siemens Euroset 5020 User Manual
Page 21

euroset 5020 / IM eng-frk-rus-kro / A30350-M209-A801-2-UP19 / 5020.fm / 24.07.2006
Подготовка к работе
Рекомендации по установке телефона
Телефон не должен подвергаться воздействию
прямых солнечных лучей или других источников
тепла.
Рабочая температура от +5°C до +40°C.
Расстояние между телефоном и
радиоустройствами, например, радиотелефонами,
пейджерами или телевизорами должно быть не
менее одного метра. Если это требование не
выполнено, возможно создание помех телефонной
связи.
Не устанавливайте телефон в пыльных
помещениях, так как это сокращает срок службы
телефона.
Для чистки телефона используйте влажную ткань
или антистатическую салфетку. Никогда не
пользуйтесь сухой тканью (опасность
электростатического разряда) или сильными
чистящими средствами!
Мебельный лак и полировка могут портиться при
контакте с частями телефона (например, ножками).
Подключите короткий конец витого кабеля телефонной
трубки в гнездо трубки, а длинный конец — в гнездо в
нижней части устройства, обозначенное символом
Подключите телефонный кабель в настенную розетку, а
второй конец кабеля в гнездо в нижней части телефона,
обозначенное символом
. Телефон готов к работе.
Настройка внутренних часов телефона
Включите функцию.
Текущее установленное время
отображается в 24-часовом режиме (по
умолчанию: 00:00).
Введите верное время в часах и
минутах (24-часовой режим).
Нажмите клавишу сохранения.
Разговор по телефону
Снимите трубку, наберите номер.
Наберите номер (неверно введенные
цифры можно удалить с помощью клавиши
и ввести заново), нажмите клавишу
OK.
Через 2 сек. начинается набор.
Снимите трубку, если вы хотите говорить
через трубку.
Цифры после 20-й позиции смещаются на дисплее
справа налево. С помощью клавиши
добавлять паузы при наборе, начиная со второй
позиции.
Источник
GIGASET 5020 инструкция по эксплуатации онлайн — страница 20
Инструкция GIGASET 5020 для устройства проводной телефон содержит страницы на русском языке.
Размер файла: 906.93 kB. Состоит из 44 стр.
Вы можете скачать pdf файл этой инструкции: Скачать PDF
gigaset 5020 / IM eng-frk-rus-kro / A30350-M209-A801-7-UP19 / 5020.fm / 24.02.2011
Обзор телефона Gigaset 5020
Клавиши быстрого набора
Клавиша повторного набора
Клавиша наведения справки
Клавиша отключения звука
Клавиша уменьшения громкости
Клавиша динамика (громкая связь)
Клавиша увеличения громкости
Клавиша OK (набор отображенного номера)
в режиме сохранения
нажата клавиша регистра
готовность к работе
установлен номер прямого вызова
ввод при настройке (напр. громкость)
нажата клавиша наведения справки
при попытки соединения: телефон
заблокирован
В тоновом режиме:
При дополнительных услугах городской АТС:
новый вызов в списке вызовов
мигающий) поступило новое сообщение
немедленная переадресация вызова
переадресация вызова при неответе
переадресация вызова, если занято
При установке, подключении и использовании
телефона следует обязательно выполнять следующие
требования:
Используйте только прилагаемые штекеры и шнуры!
Подключайте соединительный шнур только к
предназначенной для этого розетке.
Подключайте только разрешенные к использованию
аксессуары.
Прокладывайте соединительный шнур так, чтобы
исключить возможность несчастного случая!
Устанавливайте телефон на нескользкую
поверхность!
Источник
Настройки телефона – Siemens Euroset 5020 User Manual
Page 24

euroset 5020 / IM eng-frk-rus-kro / A30350-M209-A801-2-UP19 / 5020.fm / 24.07.2006
Функция прямого вызова
Если установлен номер для прямого вызова, то при
заблокированном телефоне (см. „Включение/
выключение блокировки телефона“) после снятия
трубки (или нажатия клавиши громкой связи) и нажатия
любой клавиши (кроме
автоматически набирается этот номер. Набор другого
номера при заблокированном телефоне невозможен,
все же можно принимать входящие звонки.
Введите номер прямого вызова (максимум
32 цифры).
Нажмите клавишу сохранения.
При включенной функции прямого вызова на дисплее
вы видите символы
Отключение прямого вызова
Нажмите клавишу сохранения.
Удаление номера прямого вызова
Нажмите клавишу сохранения.
Включение/выключение блокировки телефона
Можно полностью заблокировать набор номеров (за
исключением установленного номера прямого вызова).
Входящие звонки можно принимать как обычно.
0: разблокировать; 1: заблокировать
Нажмите клавишу сохранения.
При заблокированном телефоне на дисплее вы видите
символ
Телефон может отображать приблизительную
продолжительность разговора (максимум 99 мин. 59
сек., настройка при поставке: включено). Если данная
функция включена, то индикация времени запускается
через 8 секунд после набора последней цифры.
0: выключить; 1: включить
Нажмите клавишу сохранения.
Настройка времени паузы
Если необходимо, вы можете изменить время паузы
клавиши
(функция установки паузы со второй
цифры номера) на 1, 3 или 6 секунд (настройка при
поставке: 3 секунды).
Нажмите клавишу сохранения.
Переключение способа набора номера
1: Тональный набор
2: Импульсный набор без размыкания
шлейфа.
Нажмите клавишу сохранения.
Переключение способа набора номера во время
Если включен импульсный набор номера и вы хотите
использовать функции, для которых необходим
тональный набор (например, дистанционное
управление автоответчиком), вы можете переключить
способ набора номера во время соединения.
Во время соединения: нажмите клавишу
звездочка.
Введите цифровой код для дистанционного
управления/передачи данных.
После того, как трубка положена, снова включается
первоначальный способ набора номера.
Источник
Настройки телефона – Siemens Euroset 5020 User Manual
Page 23

euroset 5020 / IM eng-frk-rus-kro / A30350-M209-A801-2-UP19 / 5020.fm / 24.07.2006
или .
Сохранение из списка вызовов (если услуга
доступна)
Нажимайте клавишу Вверх/Вниз до тех пор,
пока на дисплее не отобразится
необходимый номер.
или .
Сохранение из списка повторного набора:
Нажмите клавишу повторного набора.
Если необходимо, нажимайте клавишу
Вверх/Вниз до тех пор, пока на дисплее не
отобразится необходимый номер.
Для завершения процедуры:
Нажмите клавишу сохранения.
Сохранение во время соединения
Вы можете сохранять номера во время соединения,
выполнив описанную выше процедуру (функция
записной книжки).
Удаление всех номеров быстрого набора
Нажмите клавишу сохранения.
Вы можете выбрать один из четырех уровней громкости
звонка и полностью отключить звонок (настройка при
поставке: 4).
Настройка в режиме готовности:
С помощью клавиши Вверх/Вниз настройте
громкость.
Нажмите клавишу сохранения.
Настройка во время сигнализации вызова:
Перед снятием трубки нажмите
Последняя выбранная настройка сохраняется.
Настройка тональности звука
Вы можете выбрать одну из трех тональностей звонка
(настройка при поставке: 3).
Нажмите клавишу от 1 до 3:
1: быстрый; 3: медленный.
Нажмите клавишу сохранения.
Настройка мелодии звонка
Вы можете выбрать одну из 10 мелодий (настройка при
поставке: мелодия 9).
Настройка в режиме готовности:
Нажмите клавишу от 0 до 9.
Нажмите клавишу сохранения.
Настройка во время сигнализации вызова
Нажмите клавишу от 0 до 9.
Настройка громкости телефона
Вы можете выбрать один из трех уровней громкости
телефона (настройка при поставке: 1).
Настройте громкость с помощью клавиш
увеличения и уменьшения громкости.
Нажмите клавишу сохранения.
Вы можете отключить динамик и микрофон телефона.
Ваш собеседник не будет вас слышать.
Во время разговора: Нажмите клавишу
отключения звука.
Включение звука: Нажмите эту клавишу
еще раз.
При разговоре по громкой связи вы можете выбрать
один из семи уровней громкости (настройка при
поставке: 1).
Настройте громкость с помощью клавиш
увеличения и уменьшения громкости.
Включение/отключение мелодии отключения
Вы можете включить или отключить мелодию
отключения звука (настройка при поставке: вкл).
0: отключено; 1: включено.
Нажмите клавишу сохранения.
После двадцатой цифры последующие цифры на дисплее
Источник