

Руководство
пользователя
NPD4965-00 RU

Руководство пользователя
Авторские права и торговые марки
Авторские права и торговые марки
Авторские права и торговые марки
Никакую часть данного документа нельзя воспроизводить, хранить в поисковых системах или передавать
в любой форме и любыми способами (электронными, механическими, путем копирования, записи или
иными) без предварительного письменного разрешения Seiko Epson Corporation. По отношению
использования содержащейся здесь информации никаких патентных обязательств не предусмотрено.
Равно как не предусмотрено никакой ответственности за повреждения, произошедшие вследствие
использования содержащейся здесь информации. Относительно использования содержащейся здесь
информации не предусмотрено никаких патентных обязательств. Также не существует никаких
обязательств, касающихся ущерба, понесенного вследствие использования этой информации.
Seiko Epson Corporation и ее филиалы не несут ответственности перед покупателями данного продукта или
третьими сторонами за понесенные ими повреждения, потери, сборы или затраты, вызванные
несчастными случаями, неправильным использованием продукта, недозволенной модификацией,
ремонтом или изменением продукта и невозможностью (исключая США) строгого соблюдения
инструкций по работе и обслуживанию, разработанных Seiko Epson Corporation.
Seiko Epson Corporation не несет ответственности за любые повреждения или проблемы, возникшие из-за
использования любых функций или расходных материалов, не являющихся оригинальными продуктами
EPSON (Original EPSON Products) или продуктами, одобренными EPSON (EPSON Approved Products).
Seiko Epson Corporation не несет ответственности за любые повреждения, возникшие из-за
электромагнитных наводок, вызванных использованием любых интерфейсных кабелей, не являющихся
продуктами, одобренными Seiko Epson Corporation (Epson Approved Products).
EPSON
VISION — торговые марки Seiko Epson Corporation.
PRINT Image Matching
Copyright © 2001 Seiko Epson Corporation. All rights reserved.
Intel
PowerPC
Microsoft
Apple
Adobe, Adobe Reader, Acrobat и Photoshop — торговые марки Adobe System Incorporated, которые могут
быть зарегистрированы в некоторых юрисдикциях.
— зарегистрированная торговая марка, EPSON EXCEED YOUR VISION или EXCEED YOUR
®
и логотип PRINT Image Matching — торговые марки Seiko Epson Corporation.
™
— зарегистрированная торговая марка Intel Corporation.
®
— зарегистрированная торговая марка International Business Machines Corporation.
®
, Windows® и Windows Vista® — зарегистрированные торговые марки Microsoft Corporation.
®
, Macintosh®, Mac OS® и OS X® — зарегистрированные торговые марки Apple Inc.
®
Примечание: прочие названия продуктов упоминаются в документе только для идентификации и могут
являться торговыми марками соответствующих владельцев. Epson отрицает владение любыми правами
на эти марки.
Copyright © 2013 Seiko Epson Corporation. All rights reserved.
Содержание данного руководства и технические характеристики изделия могут меняться без
предварительного уведомления.
2

Руководство пользователя
Содержание
Содержание
Авторские права и торговые марки
Авторские права и торговые марки……….. 2
Введение
Поиск информации………………….. 6
Предостережения, важная информация
и примечания………………………. 6
Версии операционных систем……………. 6
Важные инструкции
Важные инструкции по безопасности………. 8
Рекомендации и предупреждения о работе с
устройством……………………….. 8
Установка/использование устройства. . . . . . . 8
Обращение с чернилами…………….. 10
Печать по размеру страницы…………. 25
Печать Pages per sheet (Страниц на листе)
……………………………… 26
Общий доступ к устройству для печати……. 28
Настройка в Windows………………. 28
Установка в Mac OS X………………. 31
Бутылки с чернилами
Перезаправка чернил
Важные инструкции по безопасности, меры
предосторожности при работе с бутылками
для чернил и их характеристики…………. 33
Важные инструкции по безопасности……. 33
Меры предосторожности при
перезаправке чернил……………….. 33
Характеристики бутылок с чернилами…… 34
Проверка уровня чернил………………. 34
Перезаправка контейнеров для чернил…….. 35
Знакомство с устройством
Детали устройства…………………… 11
Руководство к панели управления……….. 13
Кнопки и световые индикаторы……….. 13
Обращение с бумагой
Использование, загрузка и хранение
носителей………………………… 14
Хранение носителей……………….. 14
Выбор бумаги……………………… 14
Загрузка бумаги…………………….. 15
Идет печать
Драйвер принтера и утилита Status Monitor…. 17
Доступ к ПО принтера в Windows……… 17
Доступ к драйверу принтера в Mac OS X. . . . . 18
Основные операции…………………. 19
Основы печати…………………… 19
Отмена печати……………………. 22
Дополнительные возможности………….. 23
Предустановки устройства (только для
Windows)……………………….. 23
Двусторонняя печать (только для
Windows)……………………….. 24
Обслуживание устройства и ПО
Проверка дюз печатающей головки………. 38
Утилита проверки дюз Nozzle Check
(Проверка дюз) (для Windows)………… 38
Утилита проверки дюз Nozzle Check
(Проверка дюз) (для Mac OS X)………… 38
Панель управления………………… 39
Прочистка печатающей головки…………. 39
Утилита Head Cleaning (Прочистка
печатающей головки) (для Windows)……. 40
Утилита Head Cleaning (Прочистка
печатающей головки) (для Mac OS X)……. 40
Панель управления………………… 41
Калибровка печатающей головки………… 41
Утилита Print Head Alignment (Калибровка
печатающей головки) (для Windows)……. 41
Утилита Print Head Alignment (Калибровка
печатающей головки) (для Mac OS X)……. 42
Очистка направляющей для бумаги………. 42
Использование утилиты Paper Guide
Cleaning (Чистка направляющей бумаги)
для Windows…………………….. 42
Использование утилиты Paper Guide
Cleaning (Чистка направляющей бумаги)
для Mac OS X…………………….. 43
Замена чернил в тюбиках с чернилами…….. 43
3

Руководство пользователя
Содержание
Утилита Power Ink Flushing
(Технологическая прочистка чернил) для
Windows……………………….. 44
Утилита Power Ink Flushing
(Технологическая прочистка чернил) для
Mac OS X……………………….. 44
Сохранение электроэнергии……………. 45
В Windows………………………. 45
В Mac OS X……………………… 45
Тихий режим работы принтера………….. 46
В Windows………………………. 46
В Mac OS X……………………… 46
Проверка количества поданных листов
бумаги…………………………… 46
Очистка устройства………………….. 46
Очистка внешних деталей устройства……. 46
Очистка внутренних поверхностей
устройства………………………. 47
Транспортировка устройства…………… 47
Проверка и установка вашего ПО………… 50
Проверка ПО, установленного на вашем
компьютере……………………… 50
Установка ПО……………………. 51
Удаление ПО………………………. 51
В Windows………………………. 51
В Mac OS X……………………… 52
Индикаторы ошибок
Индикация ошибок в панели управления…… 54
Отпечатки получаются с небольшим
наклоном……………………….. 63
Изображение перевернуто…………… 63
Печатаются пустые страницы…………. 63
Отпечаток смазанный или потертый……. 63
Печать идет слишком медленно……….. 64
Бумага подается неправильно…………… 64
Бумага не подается………………… 64
Бумага подается по несколько листов сразу
……………………………… 64
Бумага загружена неправильно………… 65
Бумага выталкивается не полностью или
сминается………………………. 65
Устройство не печатает……………….. 65
Индикаторы не горят………………. 65
Индикаторы загорелись и погасли……… 65
Горит только индикатор питания………. 66
Информация о продукте
Требования к системе………………… 67
В Windows………………………. 67
В Mac OS X……………………… 67
Технические характеристики…………… 67
Характеристики принтера……………. 67
Механические характеристики………… 69
Электрические характеристики……….. 69
Условия окружающей среды………….. 69
Соответствие стандартам и допускам……. 70
Интерфейс………………………. 70
Устранение неисправностей
печати
Диагностирование проблемы…………… 56
Проверка состояния устройства……….. 56
Замятие бумаги…………………….. 58
Извлечение замятой бумаги из устройства
……………………………… 58
Предотвращение замятия бумаги………. 59
Справка по качеству печати……………. 59
Горизонтальные полосы…………….. 60
Несовпадение или полосы по вертикали. . . . 60
Цвета неправильные или отсутствуют…… 61
Расплывчатый или смазанный отпечаток. . . . 61
Проблемы отпечатков, не связанные
с качеством печати………………….. 62
Неправильные или искаженные символы. . . . 62
Неправильные поля……………….. 62
Служба поддержки
Web-сайт технической поддержки……….. 71
Обращение в службу поддержки
пользователей продукции EPSON………… 71
Перед обращением в Epson…………… 71
Информация в Интернет……………. 72
Сервисные центры на Тайване………… 72
Служба поддержки пользователей EPSON
……………………………… 73
Контактная информация для справки,
поддержки и сервиса:………………. 73
Справочная служба для пользователей во
Вьетнаме……………………….. 73
Справочная служба для пользователей в
Индонезии……………………… 74
Справочная служба для пользователей в
Гоконге………………………… 74
Справочная служба для пользователей в
Малайзии………………………. 75
4

Руководство пользователя
Справочная служба для пользователей в
Индии…………………………. 75
Справочная служба для пользователей на
Филипинах……………………… 76
Указатель
Содержание
5

Руководство пользователя
Введение
Введение
Поиск информации
Последние версии следующих руководств доступны на web-сайте поддержки пользователей Epson.
http://www.epson.eu/Support (Европа)
http://support.epson.net/ (за пределами Европы)
❏ Установка (печатный вариант):
Содержит информацию об установке устройства и установке ПО.
❏ Руководство пользователя (PDF-файл):
Содержит подробные инструкции о работе, технике безопасности и устранении неполадок. См. это
руководство при использовании устройства с компьютером.
Для просмотра руководства в формате PDF необходимы Adobe Acrobat Reader 5.0 или выше, или
Adobe Reader.
Предостережения, важная информация
и примечания
Предостережения, важная информация и примечания в этом Руководстве пользователя описаны ниже.
Предостережение
!
необходимо соблюдать во избежание телесных травм.
Важную информацию
c
необходимо соблюдать, чтобы не повредить оборудование.
Примечания
содержат полезные советы и ограничения при работе с устройством.
Версии операционных систем
В этом руководстве пользователя приняты следующие сокращения.
❏ Наименование Windows 8 относится к системам Windows 8, Windows 8 Proи Windows 8.1.
❏ Windows 7 означает Windows 7 Home Basic, Windows 7 Home Premium, Windows 7 Professional и
Windows 7 Ultimate.
❏ Windows Vista означает Windows Vista Home Basic Edition, Windows Vista Home Premium Edition,
Windows Vista Business Edition, Windows Vista Enterprise Edition и Windows Vista Ultimate Edition.
6

Руководство пользователя
Введение
❏ Windows XP означает Windows XP Home Edition, Windows XP Professional x64 Edition и Windows XP
Professional.
❏ В данном руководстве наименование Mac OS X 10.9.x относится к операционной системе X Mavericks,
наименование Mac OS X 10.8.x относится к операционной системе X Mountain Lion. Кроме этого,
наименование Mac OS X относится к ОС Mac OS X 10.9.x, Mac OS X 10.8.x, Mac OS X 10.7.x, Mac OS X
10.6.x и Mac OS X 10.5.8.
7

Руководство пользователя
Важные инструкции
Важные инструкции
Важные инструкции по безопасности
Прочтите и выполняйте эти инструкции, чтобы обеспечить безопасное использование устройства.
Убедитесь, что сохранили настоящее руководство для последующих ссылок. Также, следуйте всем
предупреждениям и инструкциям, которые нанесены на корпус устройства.
❏ Используйте только шнур питания, поставляемый с устройством, и не используйте шнур от любого
другого оборудования. Применение других шнуров с устройством или шнура питания, поставляемого
с устройством, для подключения другой аппаратуры может привести к возгоранию или поражению
электрическим током.
❏ Убедитесь, что шнур питания отвечает соответствующим местным стандартам безопасности.
❏ Запрещается разбирать, дорабатывать и ремонтировать питающий кабель, вилку, блок принтера или
дополнительные устройства, если это не оговорено специально в инструкциях по работе с данным
изделием.
❏ Отключите устройство от электросети и предоставьте для ремонта квалифицированным специалистам
в следующих случаях:
Шнур питания или вилка повреждены; внутрь устройства попала жидкость; устройство упало или
поврежден корпус; устройство работает неправильно или заметно медленнее. Не пытайтесь сделать
регулировки, которые не описаны в инструкции по эксплуатации.
❏ Устройство должно находиться рядом с электрической розеткой, от которой шнур питания можно
легко отсоединить.
❏ Не устанавливайте и не храните устройство на открытом воздухе, в сильно загрязненных или
запыленных местах, рядом с источниками воды и тепла, в местах, подверженных ударам, вибрации
или резким изменениям температуры или влажности.
❏ Будьте осторожны, не проливайте на устройство жидкости и не трогайте устройство мокрыми руками.
Рекомендации и предупреждения о работе с
устройством
Прочтите и выполняйте эти инструкции, чтобы избежать повреждения устройства или вашей
собственности. Убедитесь, что сохранили настоящее руководство для последующих ссылок.
Установка/использование устройства
❏ Не блокируйте и не закрывайте отверстия на корпусе устройства.
❏ Используйте источник питания только указанного на наклейке устройства типа.
❏ Не подключайте устройства к розеткам, от которых питаются регулярно включающиеся
и выключающиеся фотокопировальные аппараты или системы кондиционирования.
8

Руководство пользователя
Важные инструкции
❏ Не подключайте устройство к розеткам, оснащенным настенными выключателями или
автоматическими таймерами.
❏ Устанавливайте компьютер и устройство вдали от потенциальных источников помех, таких, как
громкоговорители или базовые модули беспроводных телефонов.
❏ Шнуры питания следует прокладывать в местах, где они не будут истираться, изнашиваться,
сплющиваться, скручиваться и подвергаться порезам. Не ставьте предметы на шнуры питания и
следите за тем, чтобы на адаптер переменного тока и шнуры питания не наступали и не переезжали их.
Особенно тщательно следите за тем, чтобы все шнуры питания были прямыми на концах и в местах
соединения с адаптером переменного тока.
❏ Если вы подключаете устройство через удлинитель, убедитесь, что общая нагрузка от всех устройств,
подключенных к этому удлинителю, не превышает максимально допустимой. Также убедитесь, что
общая нагрузка от всех устройств, подключенных к электрической розетке, не превышает
максимально допустимой.
❏ Если вы намерены использовать устройство в Германии, подключайте его через 10- или 16-амперный
автоматический выключатель для защиты от короткого замыкания или избыточного тока.
❏ При подключении данного продукта к компьютеру или другому устройству с помощью кабеля
убедитесь в правильности ориентации разъемов. Каждый разъем можно подключить лишь одним
способом. Если вставить разъем неправильно, можно повредить оба устройства, соединенные кабелем.
❏ Размещайте устройство на плоской устойчивой поверхности, которая шире основания устройства в
любом направлении. При установке устройства около стены, оставляйте между ним и стеной
промежуток не менее 10 см. Устройство не будет работать правильно, если оно установлено под углом
или качается.
❏ При хранении и транспортировке принтера не наклоняйте устройство, не переворачивайте его и не
устанавливайте на бок, иначе чернила могут вылиться.
❏ Необходимо обеспечить достаточное пространство с тыльной стороны для размещения кабелей, и
пространство над изделием для свободного открывания крышки.
❏ Не устанавливайте устройство в местах, подверженных резким изменениям температуры и влажности.
Держите устройство вдали от прямых солнечных лучей, источников яркого света и тепла.
❏ Не вставляйте предметы в отверстия на корпусе устройства.
❏ Не допускайте попадания рук во внутреннюю часть устройства во время печати.
❏ Не прикасайтесь к плоскому белому шлейфу и тюбикам с чернилами внутри устройства.
❏ Не используйте аэрозольные баллоны, содержащие воспламеняющиеся газы внутри или рядом с
устройством. Это может привести к пожару.
❏ Не перемещайте печатающую головку самостоятельно, этим вы можете повредить устройство.
❏ Всегда выключайте принтер при помощи кнопки P. Не отключайте устройство от источника питания
и не выключайте источник питания, пока индикатор P не прекратит мигать.
❏ Перед транспортировкой устройства убедитесь в том, что печатающая головка находится в обычном
(крайнем правом) положении.
9

Руководство пользователя
Важные инструкции
❏ Необходимо при ближайшей возможности заполнить контейнер для чернил, если их уровень не
превышает нижней линии. Длительное использование изделия при уровне чернил ниже минимальной
линии может привести к выходу его из строя.
❏ Если вы не планируете использовать устройство в течение долгого периода времени, обязательно
отключите его от электрической розетки.
Обращение с чернилами
Инструкции по технике безопасности при работе с чернильными картриджами, а также рекомендации/
предупреждения по работе с устройством находятся в разделе по ссылке.
& «Перезаправка чернил» на стр. 33
10
Руководство пользователя
Знакомство с устройством
Знакомство с устройством
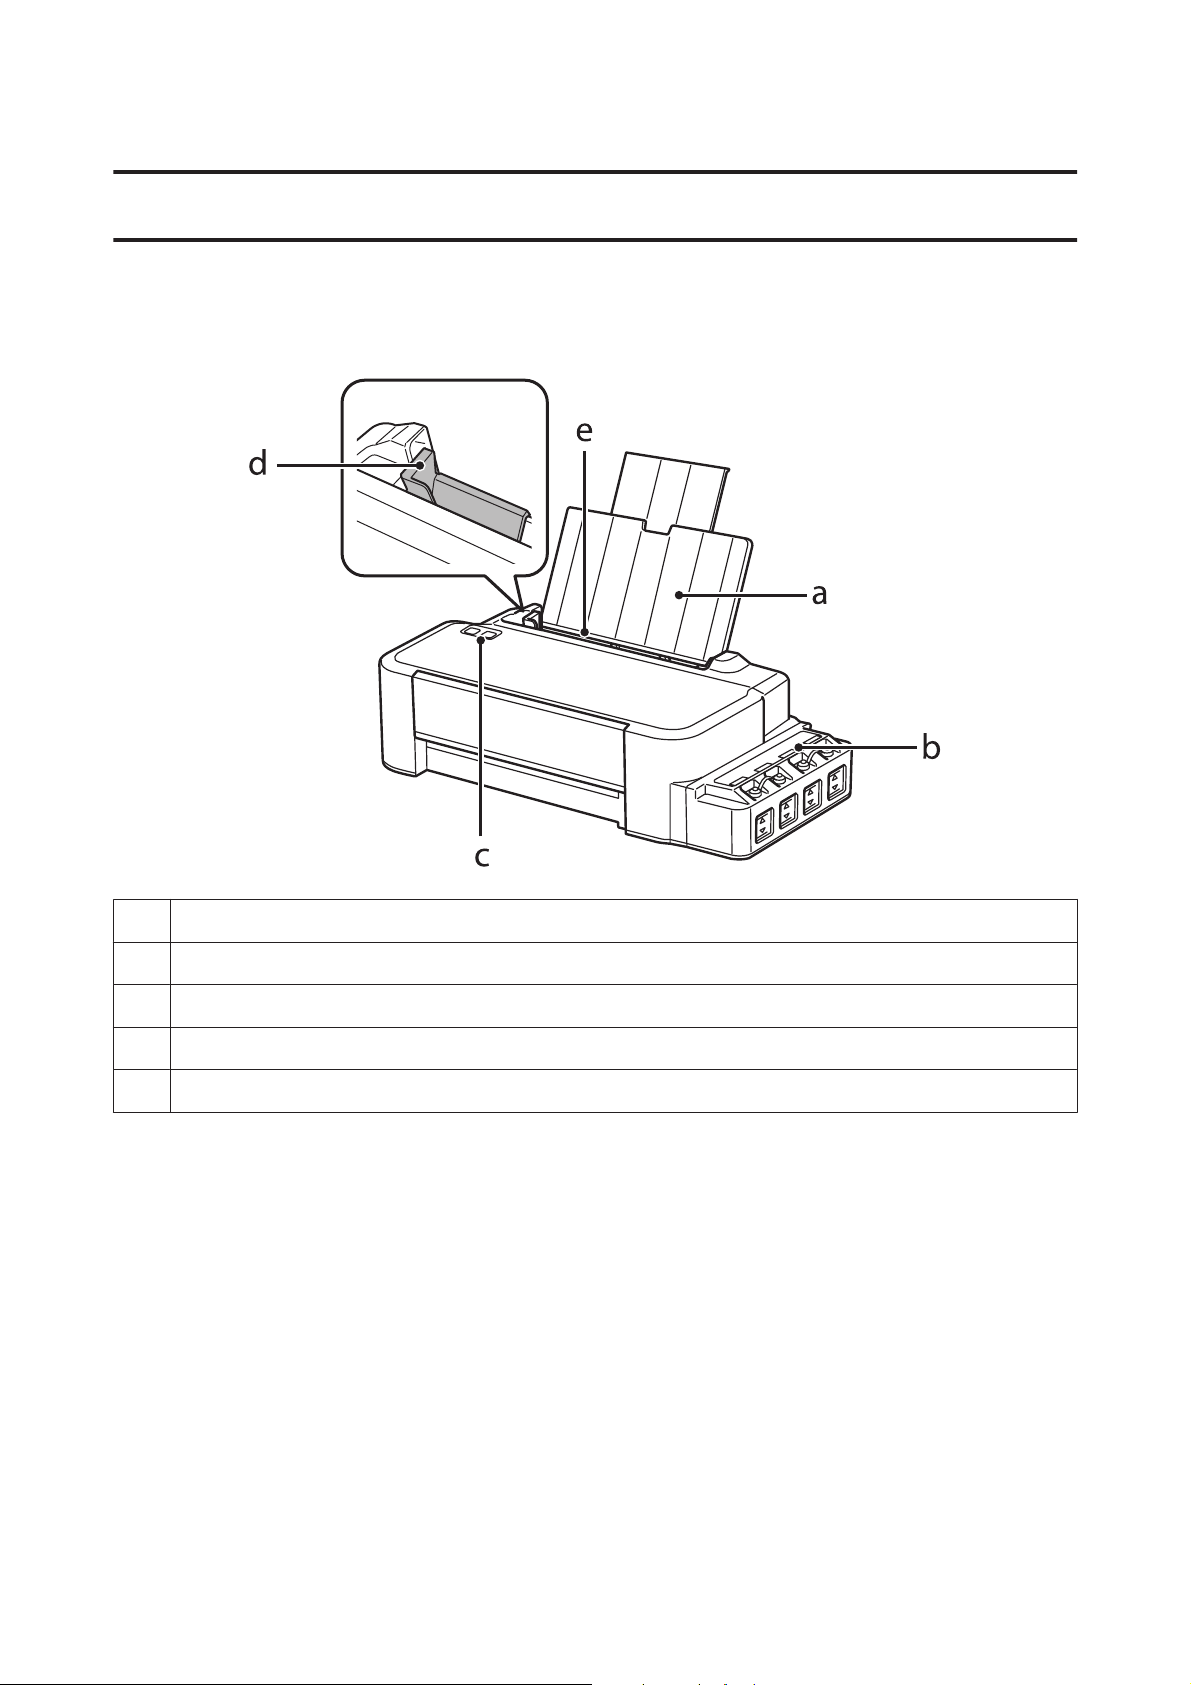
Детали устройства
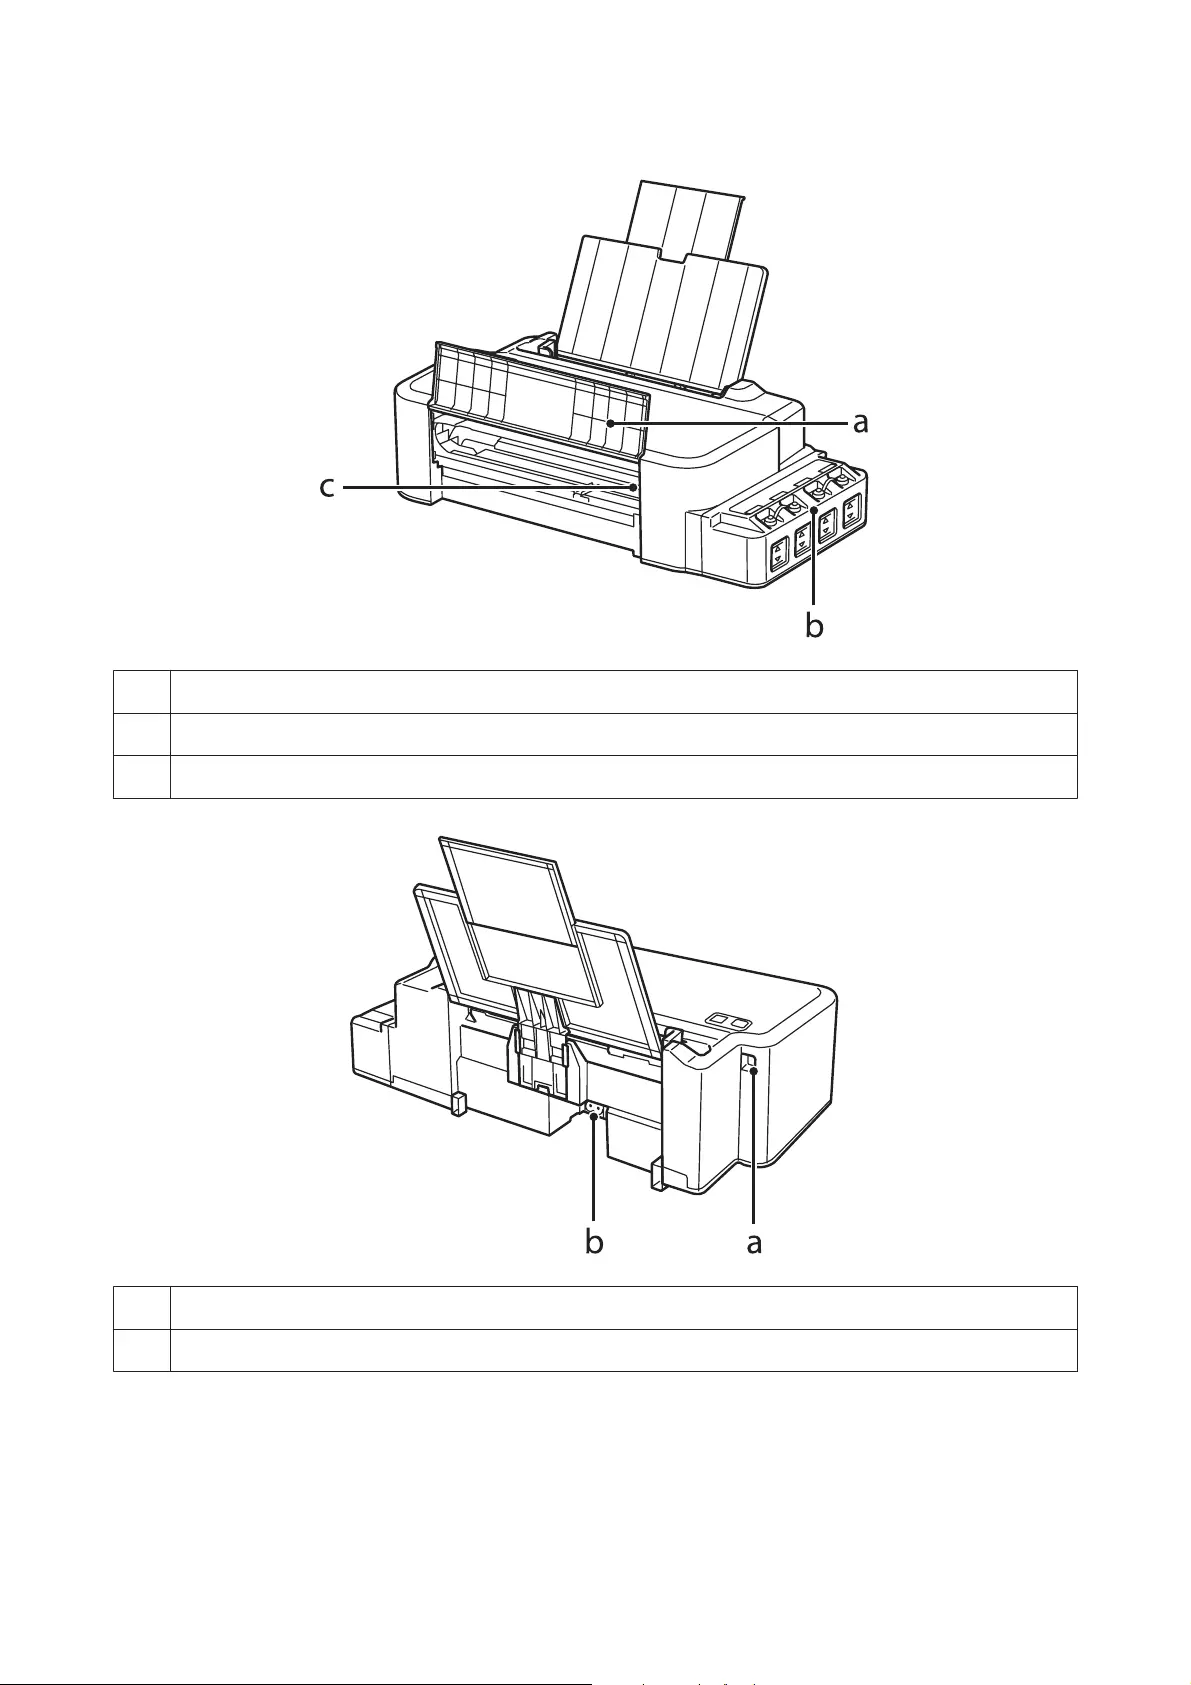
a. Держатель бумаги
b. Блок контейнеров для чернил
c. Панель управления
d. Боковая направляющая
e. Заднее устройство подачи бумаги
11

Руководство пользователя
Знакомство с устройством
a. Передняя крышка
b. Резервуары для чернил (контейнеры для чернил)
c. Печатающая головка (под данной частью)
a. USB-порт
b. Разъем для шнура питания
12

Руководство пользователя
Знакомство с устройством
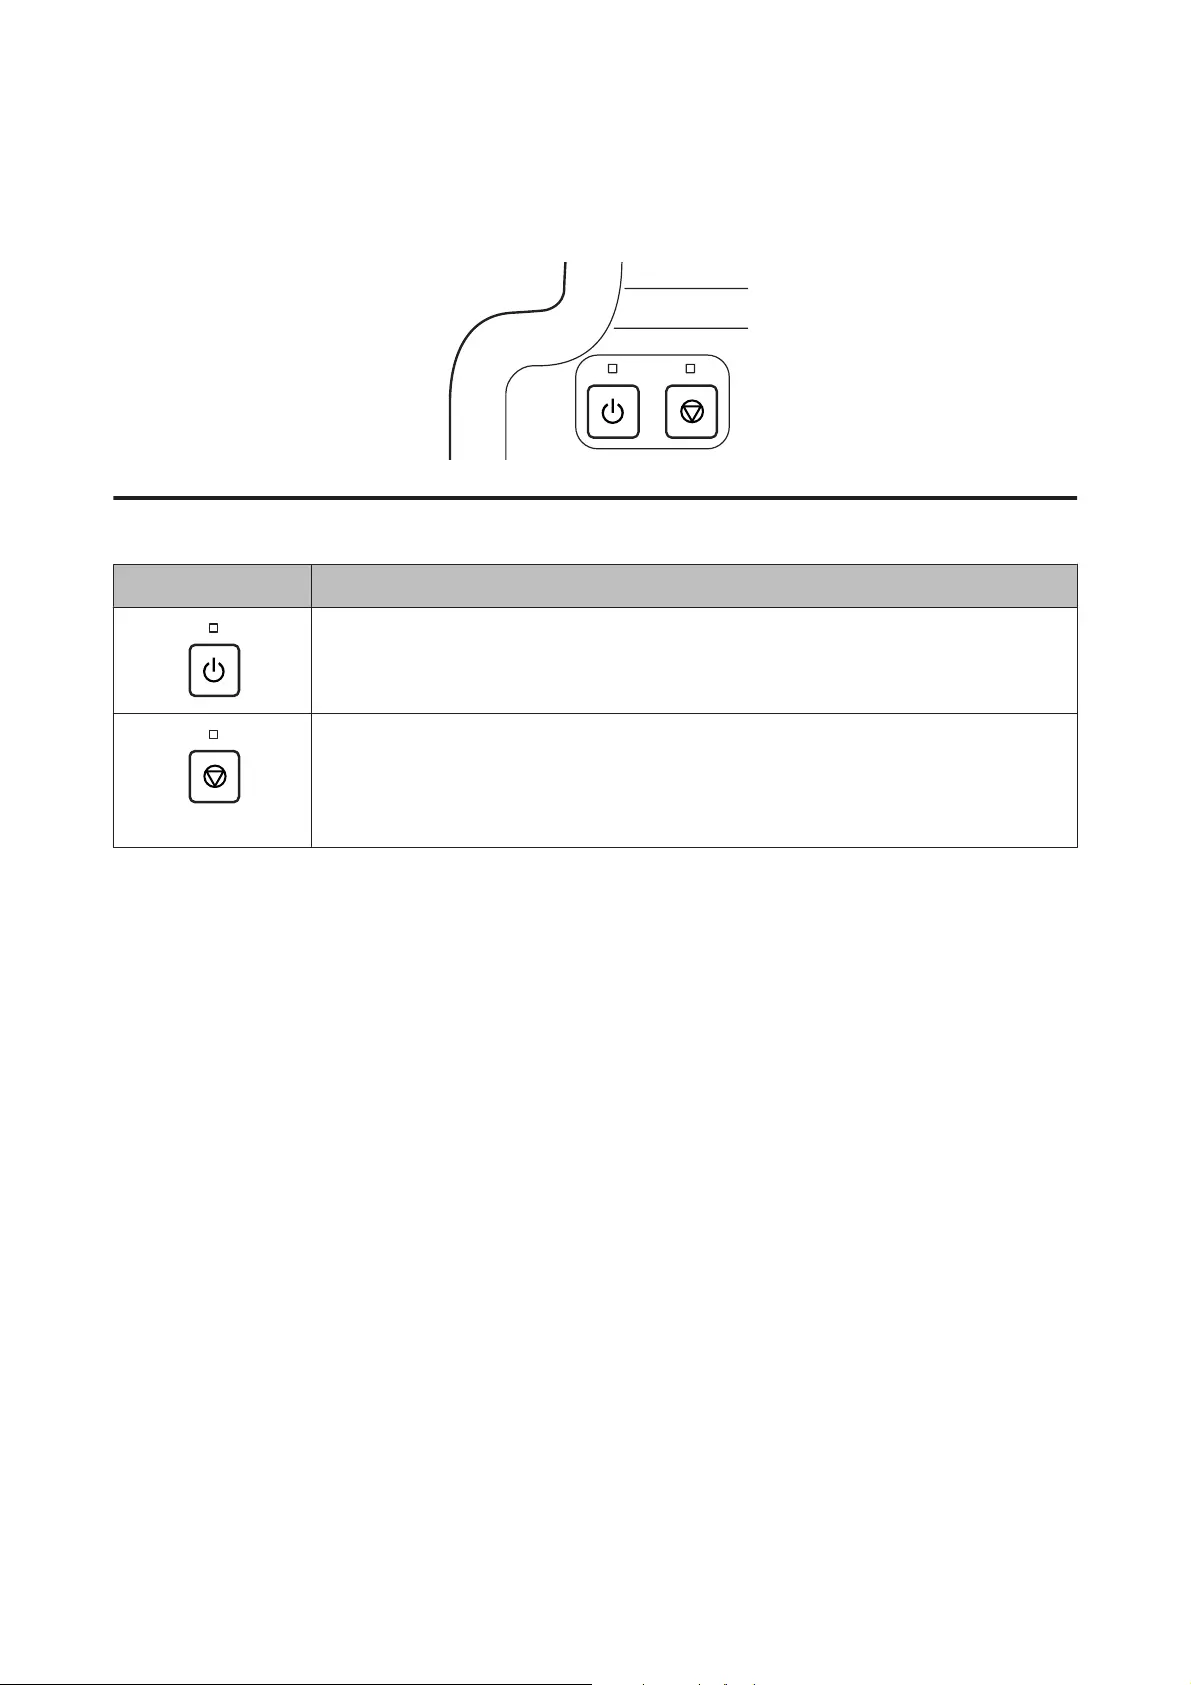
Руководство к панели управления
Кнопки и световые индикаторы
Кнопки Функция
Включает или выключает устройство. Индикатор P горит, когда устройство включено, и
мигает, когда устройство получает данные, выполняет печать или очистку печатающей
головки.
Возобновите печать после ошибок связанных с отсутствием бумаги, смятием бумаги,
захватом нескольких листов или засорением впитывающей прокладки.
Останавливает текущую операцию.
Если индикатор y горит или мигает, это означает, что во время печати возникла неполадка.
& «Индикация ошибок в панели управления» на стр. 54
13

Руководство пользователя
Обращение с бумагой
Обращение с бумагой
Использование, загрузка и хранение носителей
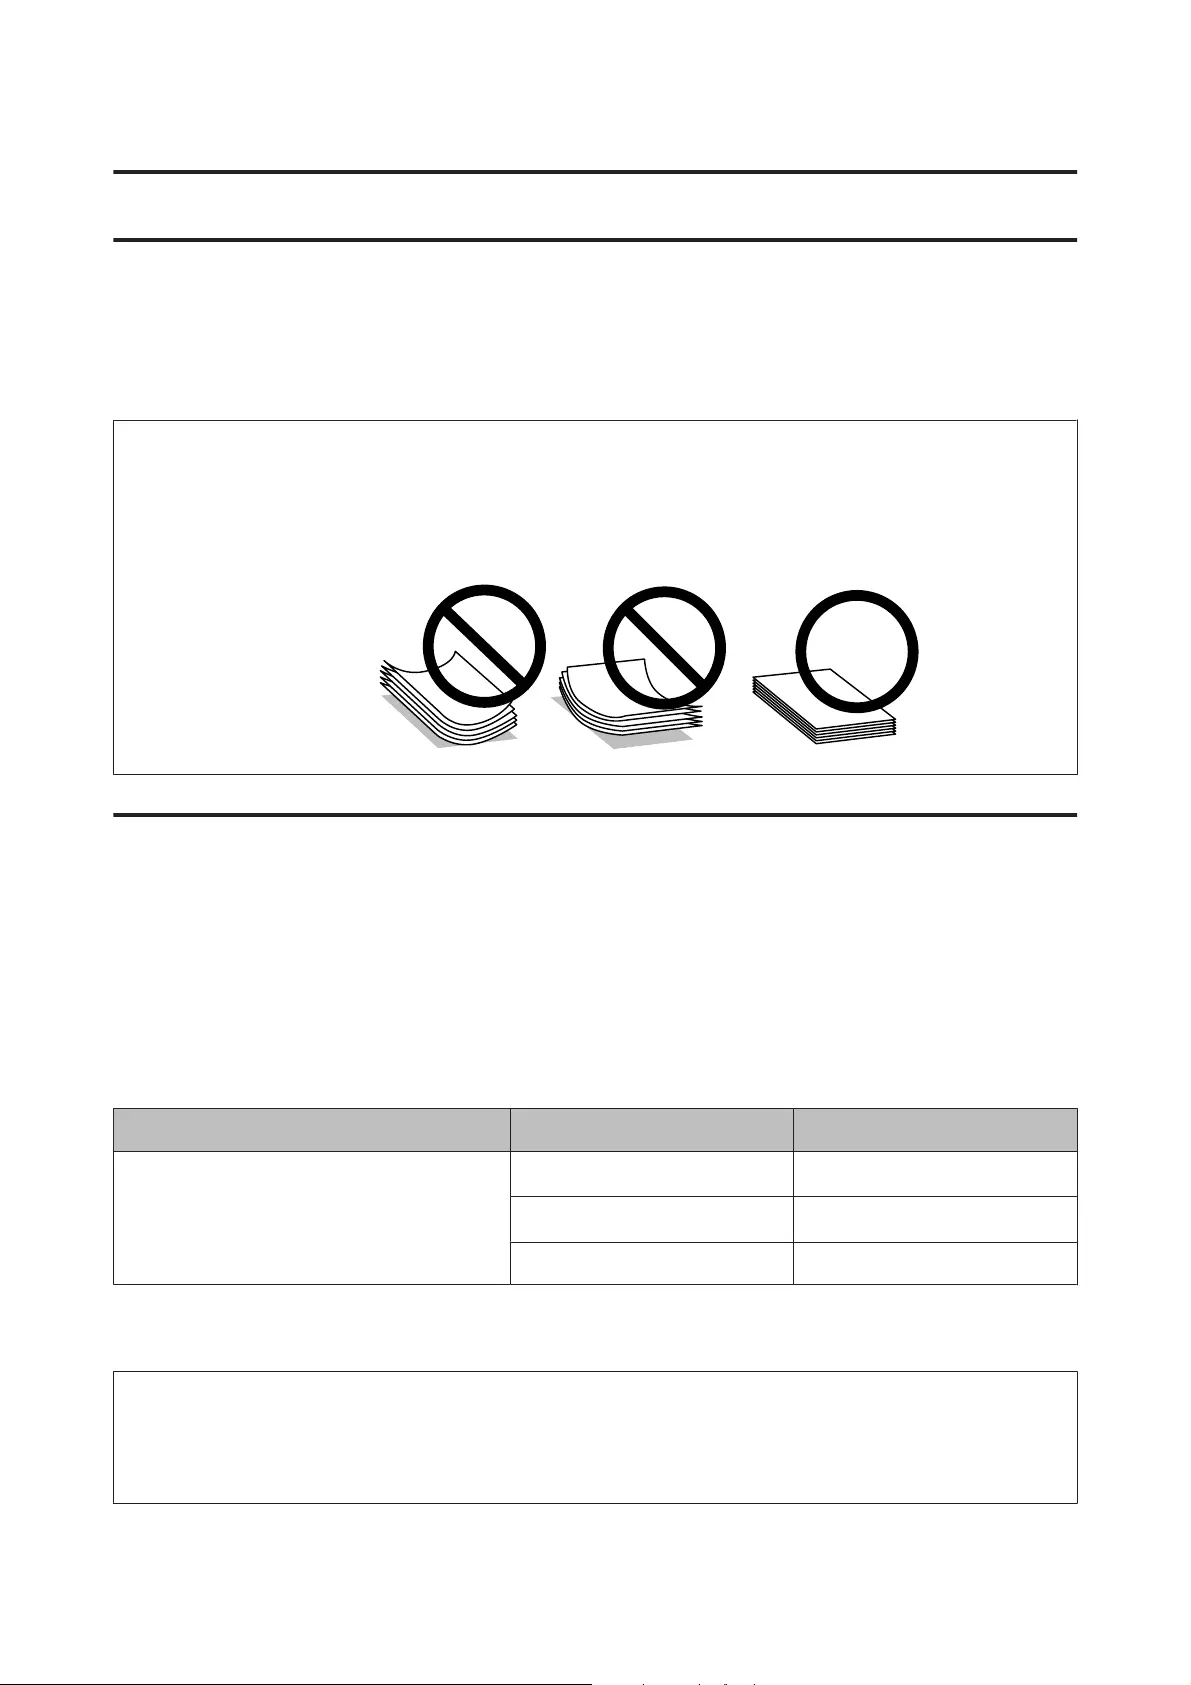
Для получения оптимального качества печати необходимо учитывать следующее.
Примечание:
❏ Бумагу в заднее устройство подачи необходимо загружать так, чтобы сторона для печати
располагалась сверху. Подробную информацию вы найдете в инструкции к бумаге.
❏ Если бумага согнута, перед загрузкой распрямите ее или слегка разогните. При печати на изогнутой
бумаге отпечаток может быть смазан.
Хранение носителей
Убирайте неиспользованную бумагу в оригинальную упаковку сразу же после окончания печати. Храните
бумагу вдали от мест с высокой температурой и влажностью и вдали от прямого солнечного света.
Выбор бумаги
Емкости загрузки бумаги и других носителей см. в таблице ниже.
Тип носителя Размер Емкость лотка (в листах)
Простая бумага*1
*1 Бумага плотностью от 64 г/м до 90 г/м
*2 Объем загрузки бумаги для ручной 2-сторонней печати составляет 15 листов.
Примечание:
В различных регионах в наличии могут быть разные типы специальных носителей. Свежую информацию
о наличии носителей в вашем регионе вы можете найти на web-сайте поддержки пользователей Epson.
& «Web-сайт технической поддержки» на стр. 71
*2
Letter
*2
A4
Legal 1
до 6 мм
до 6 мм
14
Руководство пользователя
Загрузка бумаги
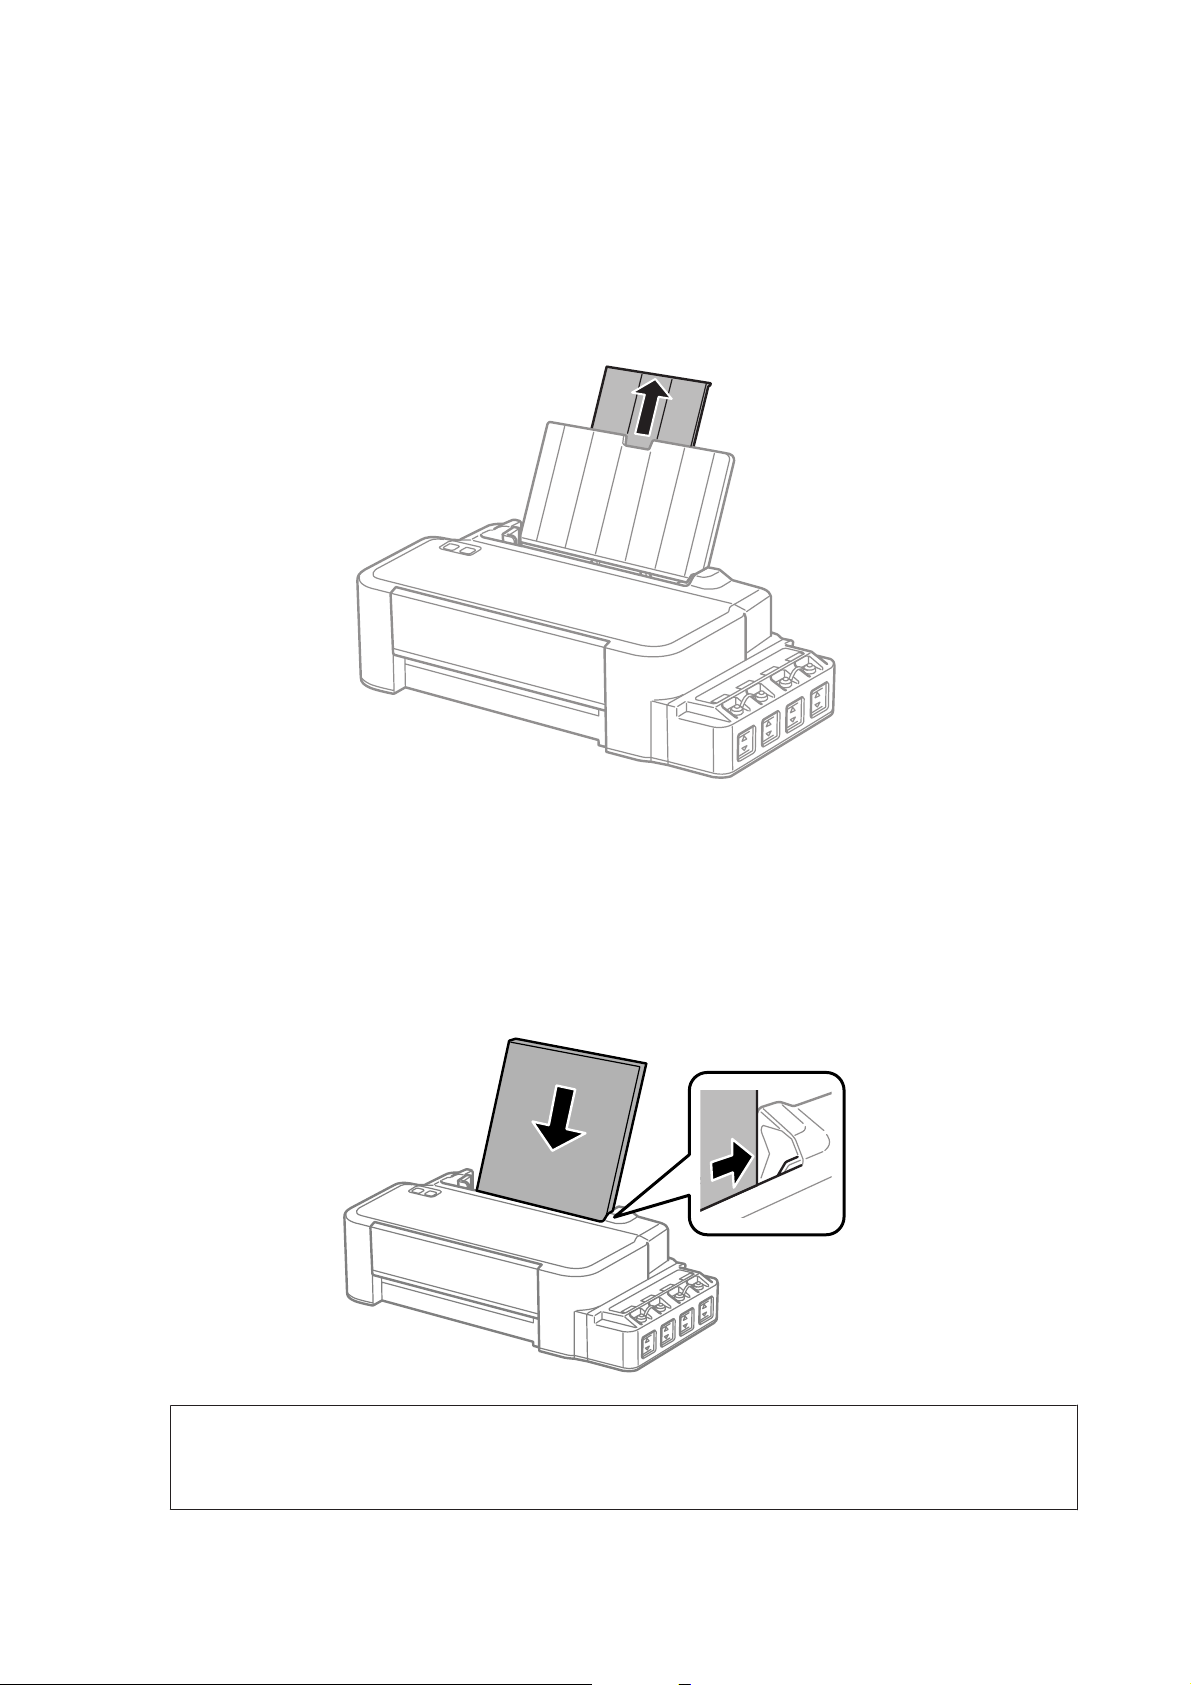
Для загрузки бумаги сделайте следующее.
Выдвиньте держатель бумаги.
A
Обращение с бумагой
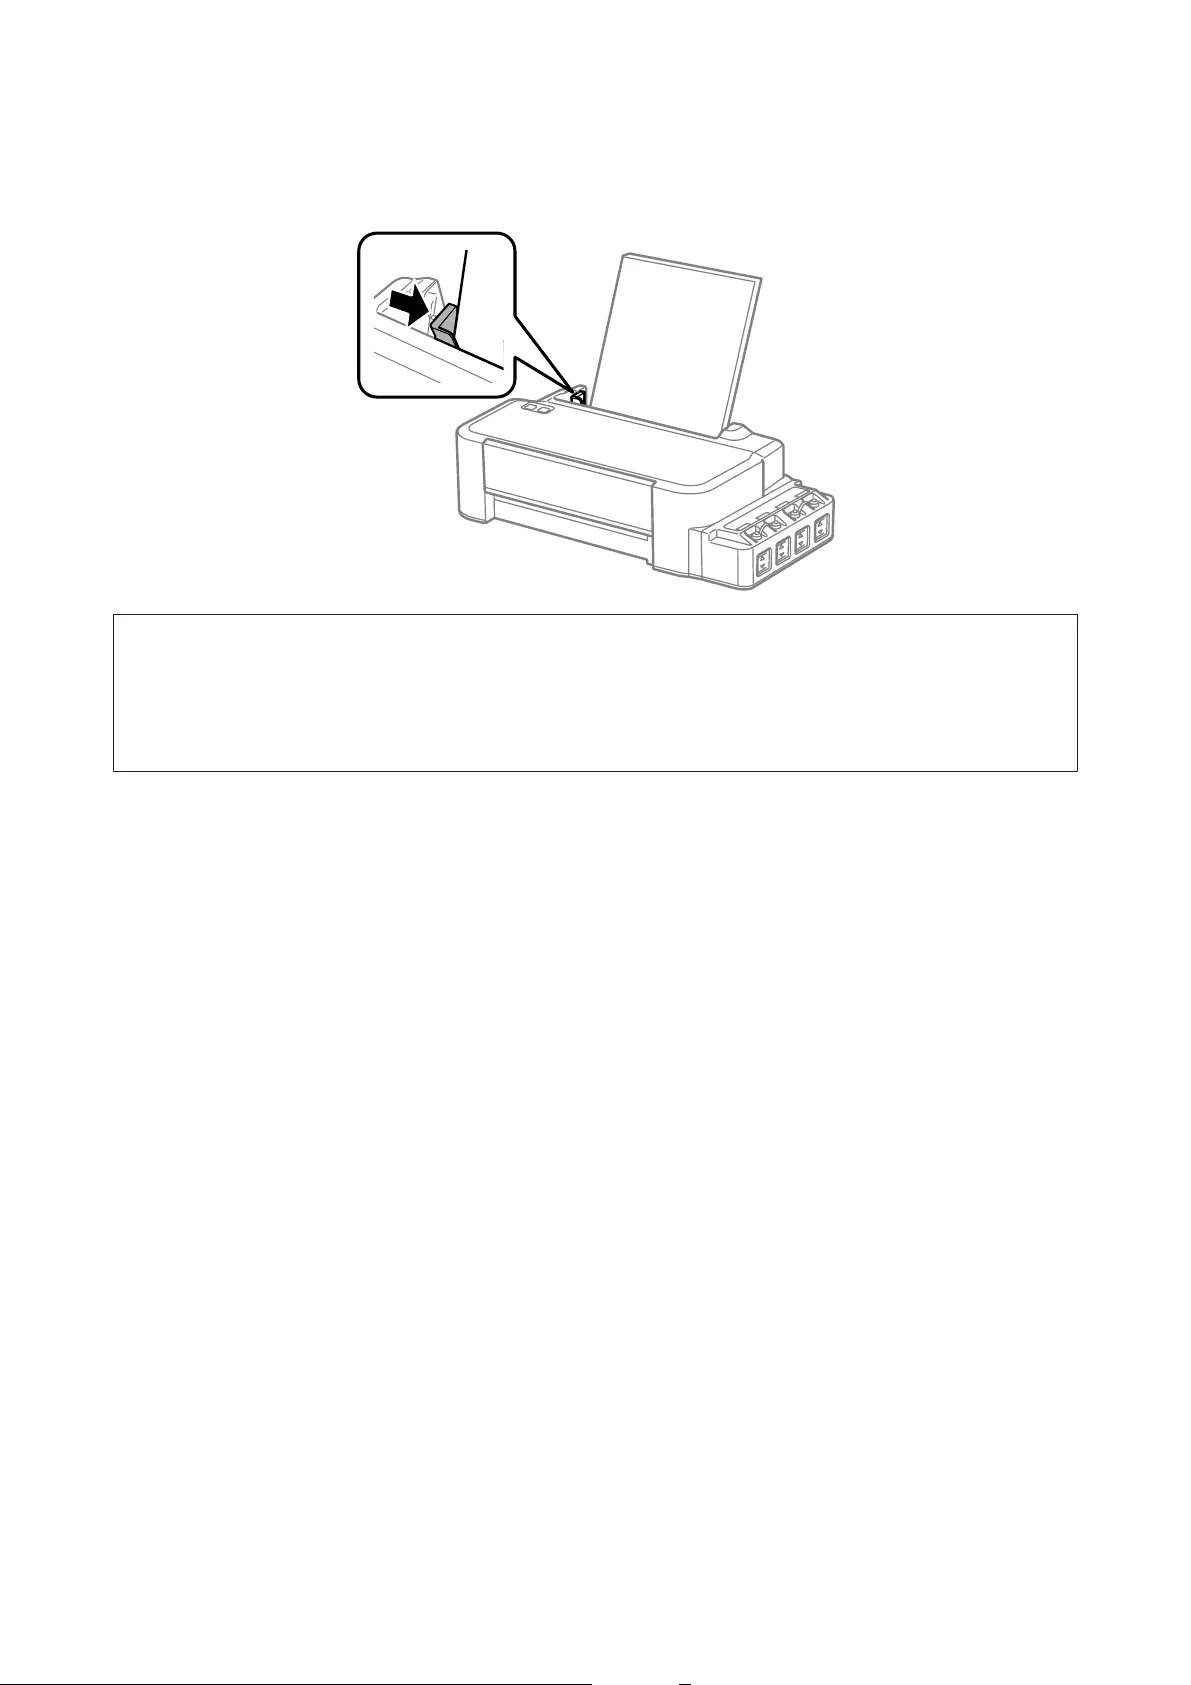
Передвиньте боковую направляющую к левому краю.
B
Встряхните пачку бумаги на ровной поверхности, чтобы выровнять края.
C
Загружайте бумагу, располагая сторону для печати сверху, напротив правой стороны заднего
D
устройства подачи бумаги.
Примечание:
Всегда сначала загружайте бумагу в короткую сторону заднего устройства подачи бумаги, даже если
вы печатаете изображения с альбомной ориентацией.
15
Руководство пользователя
Обращение с бумагой
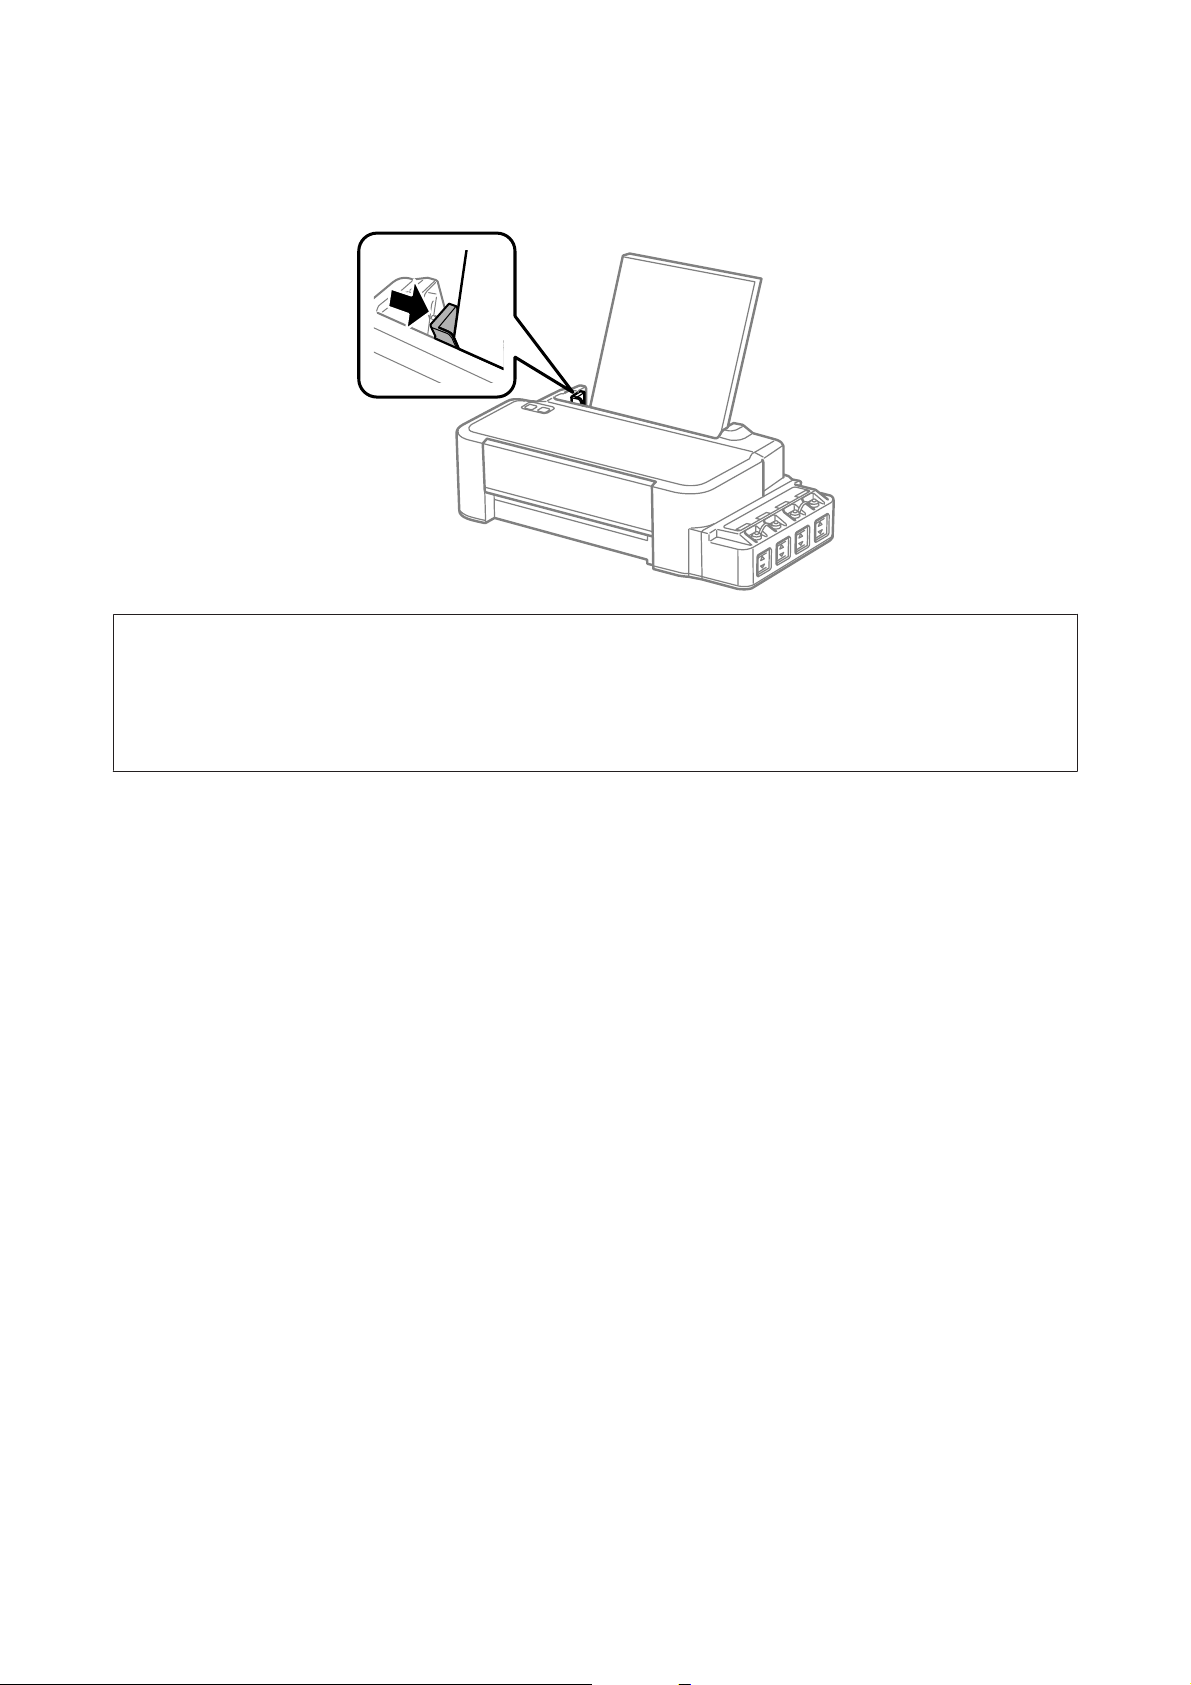
Передвиньте боковую направляющую к левому краю бумаги, но не слишком туго.
E
Примечание:
❏ Оставляйте перед устройством достаточно свободного пространства, куда будет поступать бумага.
❏ Не загружайте бумагу выше значка H в виде стрелки с внутренней стороны направляющей.
& «Выбор бумаги» на стр. 14
16

Руководство пользователя
Идет печать
Идет печать
Драйвер принтера и утилита Status Monitor
Драйвер принтера позволяет настраивать различные параметры для достижения наилучшего качества
печати. Утилиты, включая утилиту Status Monitor, помогают тестировать устройство и поддерживать
оптимальные условия работы.
Примечание для пользователей Windows:
❏ Драйвер принтера может автоматически проверять наличие новой версии драйвера на сайте Epson и
устанавливать её. В окне Maintenance (Сервис) драйвера принтера нажмите на кнопку Software Update
(Обновление программного обеспечения) и выполняйте инструкции, отображаемые на экране. Если
кнопка не отображается в окне Maintenance (Сервис), щелкните All Programs (Все программы) или
Programs (Программы) в стартовом меню Windows и найдите соответствующий ярлык в папке
EPSON.
❏ Если необходимо изменить язык, в окне драйвера принтера Maintenance (Сервис) выберите нужный язык
в области Language (Язык). В зависимости от региона поставки эта функция может быть недоступна.
Доступ к ПО принтера в Windows
Драйвер принтера можно открыть из большинства приложений Windows через меню Windows Start
(Пуск) или с taskbar (панель задач).
Если вы открываете драйвер принтера из приложения, сделанные настройки применяются только к этому
приложению.
Чтобы установить параметры настроек приложений Windows, откройте драйвер принтера с помощью
рабочего стола или taskbar (панели задач).
Доступ к драйверу принтера описан в следующем разделе.
Примечание:
В этом Руководство пользователя иллюстрации для драйвера принтера в Windows сделаны в Windows 7.
Из приложений Windows
Щелкните Print (Печать) или Print Setup (Параметры печати) в меню File (Файл).
A
В открывшемся диалоговом окне щелкните Printer (Принтер), Setup (Настройка), Options
B
(Параметры), Preferences (Настройки) или Properties (Свойства). (В зависимости от
используемого приложения может потребоваться щелкнуть одну из этих клавиш или их комбинацию.)
17

Руководство пользователя
Идет печать
С помощью рабочего стола
❏ Windows 8:
Выберите Desktop (Рабочий стол), Settings (Параметры) charm (Настройки рабочего стола) и Control
Panel (Панель управления). Затем выберите Devices and Printers (Устройства и принтеры) в
категории Hardware and Sound (Оборудование и звук). С помощью правой кнопки мыши нажмите на
устройство или нажмите на устройство и удерживайте кнопку нажатой, затем выберите Printing
preferences (Настройки печати).
❏ В Windows 7:
Нажмите кнопку Пуск, затем Devices and Printers (Устройства и принтеры). Правой кнопкой
щелкните по значку вашего устройства и выберите Printing preferences (Настройка печати).
❏ В Windows Vista:
Нажмите стартовую кнопку, выберите Control Panel (Панель управления), затем выберите Printer
(Принтер) в категории Hardware and Sound (Оборудование и звук). Затем выберите устройство и
нажмите Select printing preferences (Настройка параметров печати).
❏ В Windows XP:
Нажмите Start (Пуск), Control Panel (Панель управления), (Printers and Other Hardware (Принтеры
и другое оборудование)), а затем Printers and Faxes (Принтеры и факсы). Выберите устройство,
затем нажмите Printing Preferences (Настройка печати) в меню File (Файл).
Из значка принтера на taskbar (панель задач)
Правой кнопкой мыши щелкните по значку устройства в taskbar (панель задач), затем выберите Printer
Settings (Настройки принтера).
Для добавления значка принтера на taskbar (панель задач) Windows откройте драйвер принтера из меню
Start (Пуск), как описано выше. Затем перейдите на вкладку Maintenance (Сервис) и затем выберите
Monitoring Preferences (Контролируемые параметры) button. В диалоговом окне Monitoring Preferences
(Контролируемые параметры) установите флажок Shortcut Icon (Значок в панели задач).
Получение информации из интерактивного Справочного руководства
В окне драйвера принтера сделайте следующее.
❏ Щелкните интересующий элемент правой кнопкой мыши и выберите Help (Справка).
❏ Щелкните кнопку
в Windows XP).
в правом верхнем углу окна и затем щелкните интересующий элемент (только
Доступ к драйверу принтера в Mac OS X
В таблице описано, как открыть диалоговое окно драйвера принтера.
Диалоговое окно Доступ
Page Setup (Параметры
страницы)
В меню File (Файл) вашего приложения выберите Page Setup (Параметры страницы).
Примечание:
В зависимости от вашего приложения, пункт Page Setup (Парам. стр.) может не
отображаться в меню File (Файл).
18

Руководство пользователя
Идет печать
Print (Печать)
Epson Printer Utility 4
В меню File (Файл) вашего приложения выберите Print (Печать).
В Mac OS X 10.9, 10.8 или 10.7 нажмите System Preferences (Настройки системы) в
меню Apple, затем нажмите Printers & Scanners (Принтеры и сканеры) (в Mac OS X 10.9)
или Print & Scan (Печать и сканирование) (в Mac OS X 10.8 или 10.7). Выберите свое
устройство из списка Printers (Принтеры), нажмите Options & Supplies (Параметры и
запасы), Utility (Служебная программа), а затем нажмите Open Printer Utility
(Открыть служебную программу принтера).
В Mac OS X 10.6: щелкните System Preferences (Системные настройки) в меню Apple и
затем щелкните Print & Fax (Печать и факс). Выберите свое устройство из списка Printers
(Принтеры), нажмите Options & Supplies (Параметры и запасы), Utility (Служебная
программа), а затем нажмите Open Printer Utility (Открыть служебную программу
принтера).
В Mac OS X 10.5: щелкните System Preferences (Системные настройки) в меню Apple и
затем щелкните Print & Fax (Печать и факс). Выберите свое устройство из списка Printers
(Принтеры), нажмите Open Print Queue (Открыть очередь печати), а затем нажмите
кнопку Utility (Служебная программа).
Основные операции
Основы печати
Примечание:
❏ Перед началом печати правильно загрузите бумагу.
& «Загрузка бумаги» на стр. 15
❏ Об области печати см. следующий раздел.
& «Область печати» на стр. 68
❏ Завершив настройку, напечатайте одну тестовую копию и проверьте результаты печати перед тем,
как печатать все задание.
Основные настройки устройства в Windows
Выберите файл для печати.
A
19
Руководство пользователя
Откройте окно драйвера принтера.
B
& «Доступ к ПО принтера в Windows» на стр. 17
Идет печать
Перейдите на вкладку Main (Главное).
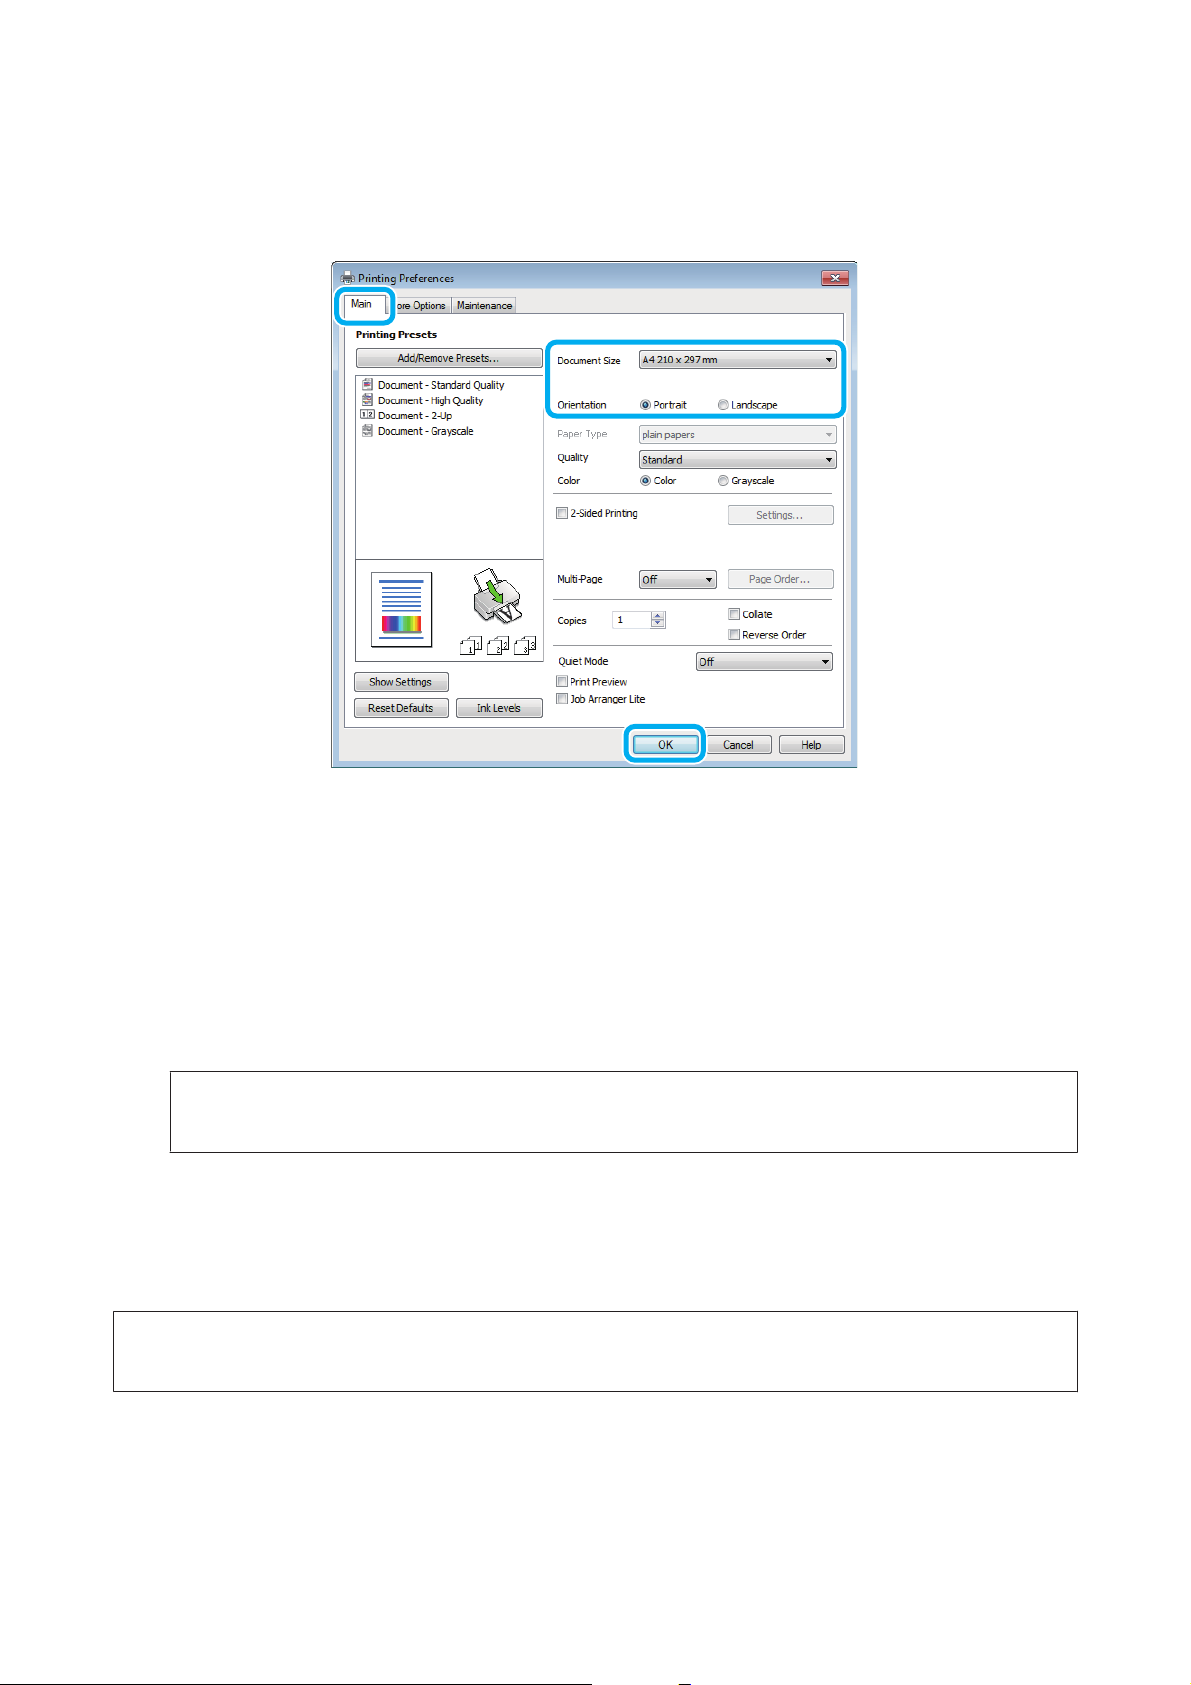
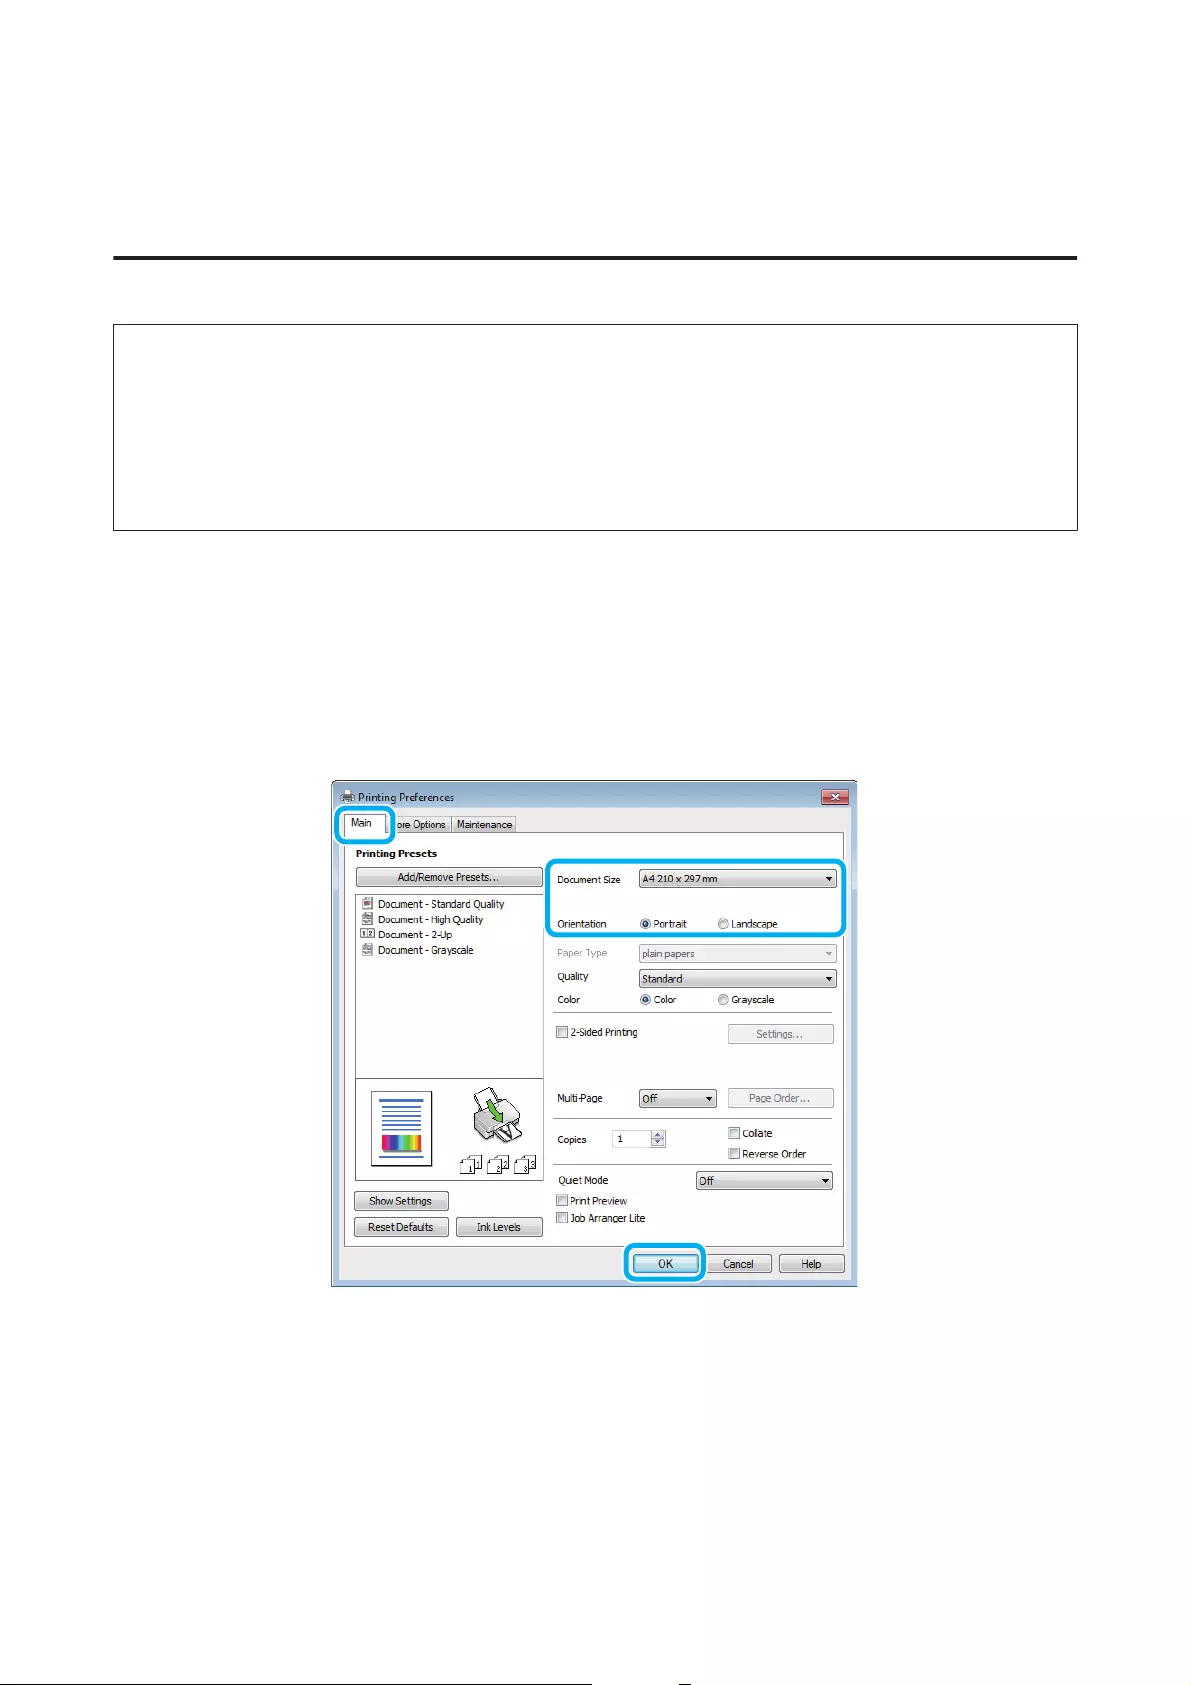
C
Выберите подходящее значение параметра Document Size (Размер документа). Вы также можете
D
задать пользовательский размер бумаги. Подробности см. в интерактивной справке.
Выберите ориентацию печати: Portrait (Книжная) или Landscape (Альбомная).
E
Щелкните OK, чтобы закрыть окно настроек принтера.
F
Примечание:
Для того чтобы задать расширенные настройки, см. соответствующий раздел.
Распечатайте выбранный файл.
G
Основные настройки устройства в Mac OS X
Примечание:
В этом разделе иллюстрации для драйвера принтера сделаны в Mac OS X 10.7.
Выберите файл для печати.
A
20
Руководство пользователя
Откройте диалоговое окно Print (Печать).
B
& «Доступ к драйверу принтера в Mac OS X» на стр. 18
Идет печать
Примечание:
При отображении упрощенного диалогового окна, чтобы расширить его, нажмите кнопку Show
Details (Показать детали) (в Mac OS X 10.9, 10.8 или 10.7) или кнопку d (в Mac OS X 10.6 или10.5).
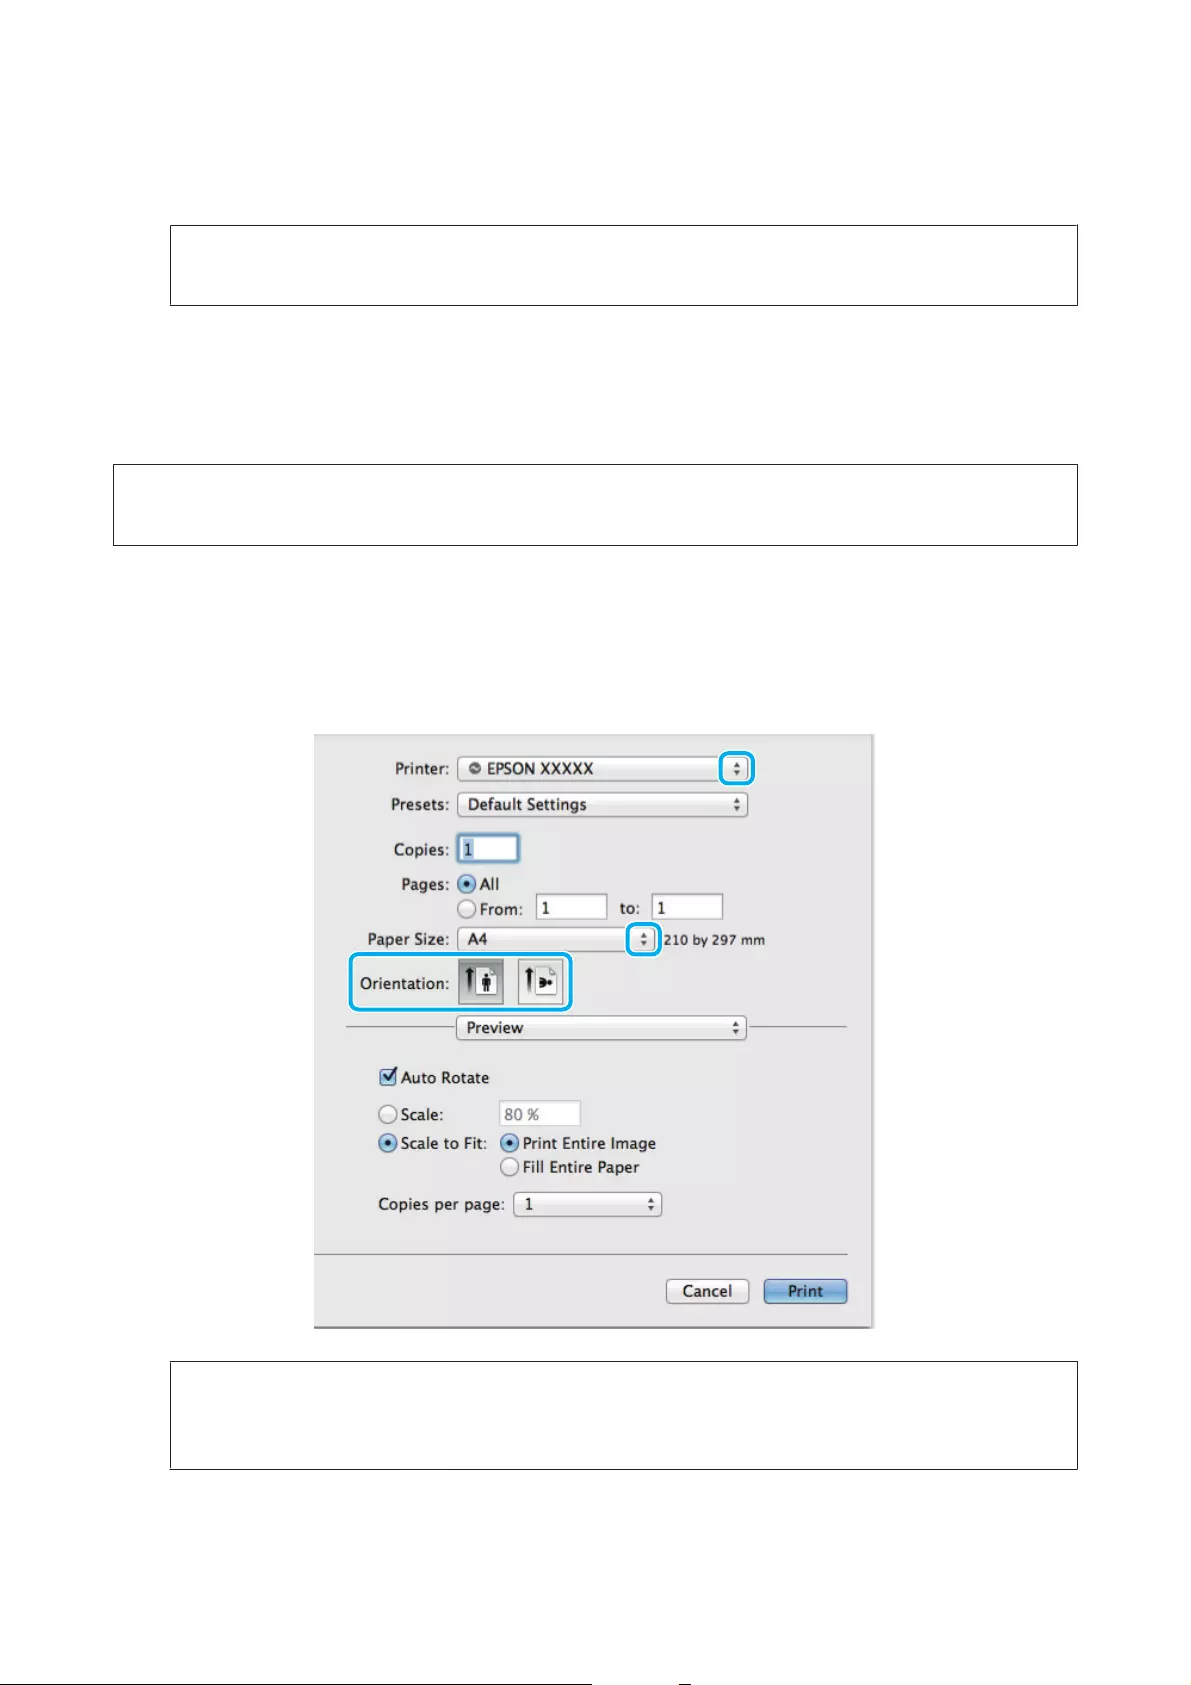
Выберите используемое устройство для параметра Printer (Принтер).
C
Примечание:
В некоторых приложениях часть элементов этого диалогового окна могут быть недоступны. В этом
случае в меню File (Файл) вашего приложения щелкните Page Setup (Парам. стр.) и затем выполните
нужные настройки.
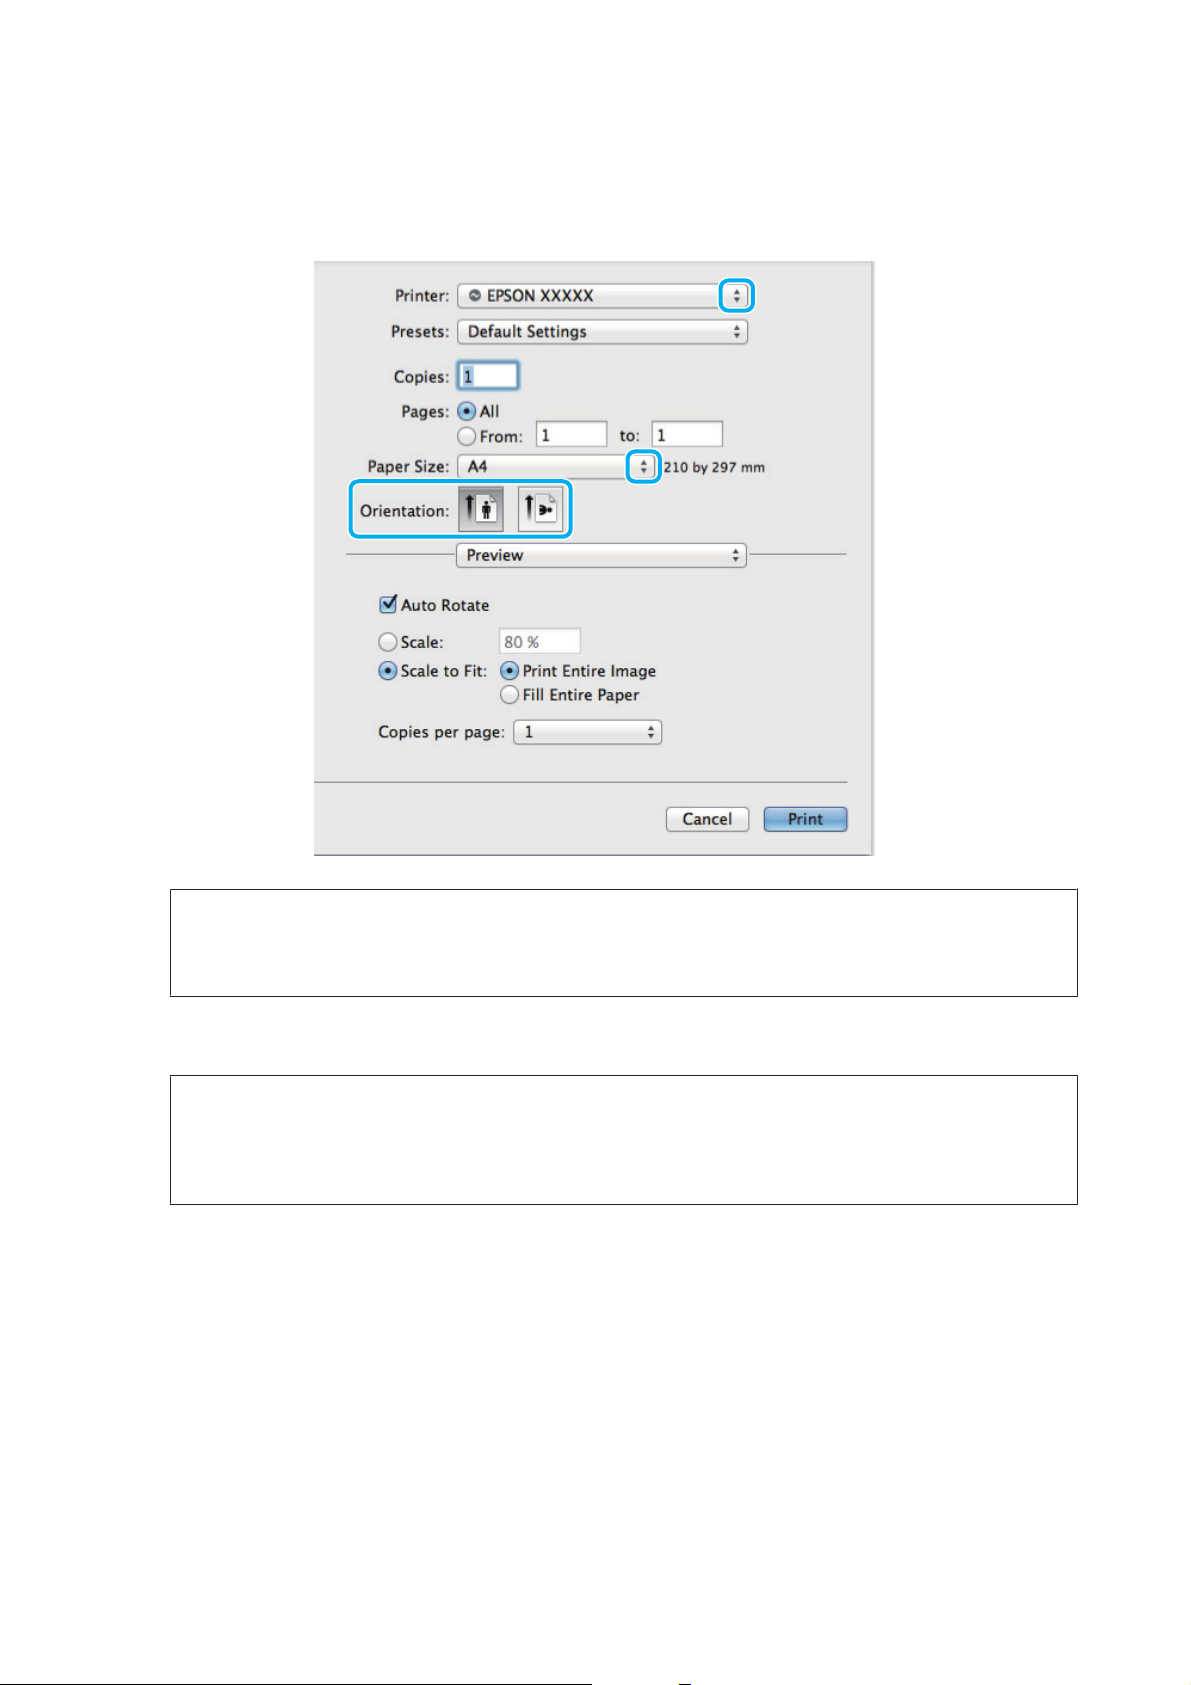
Выберите подходящее значение параметра Paper Size (Размер бумаги).
D
Выберите подходящее значение параметра Orientation (Ориентация).
E
21
Руководство пользователя
Идет печать
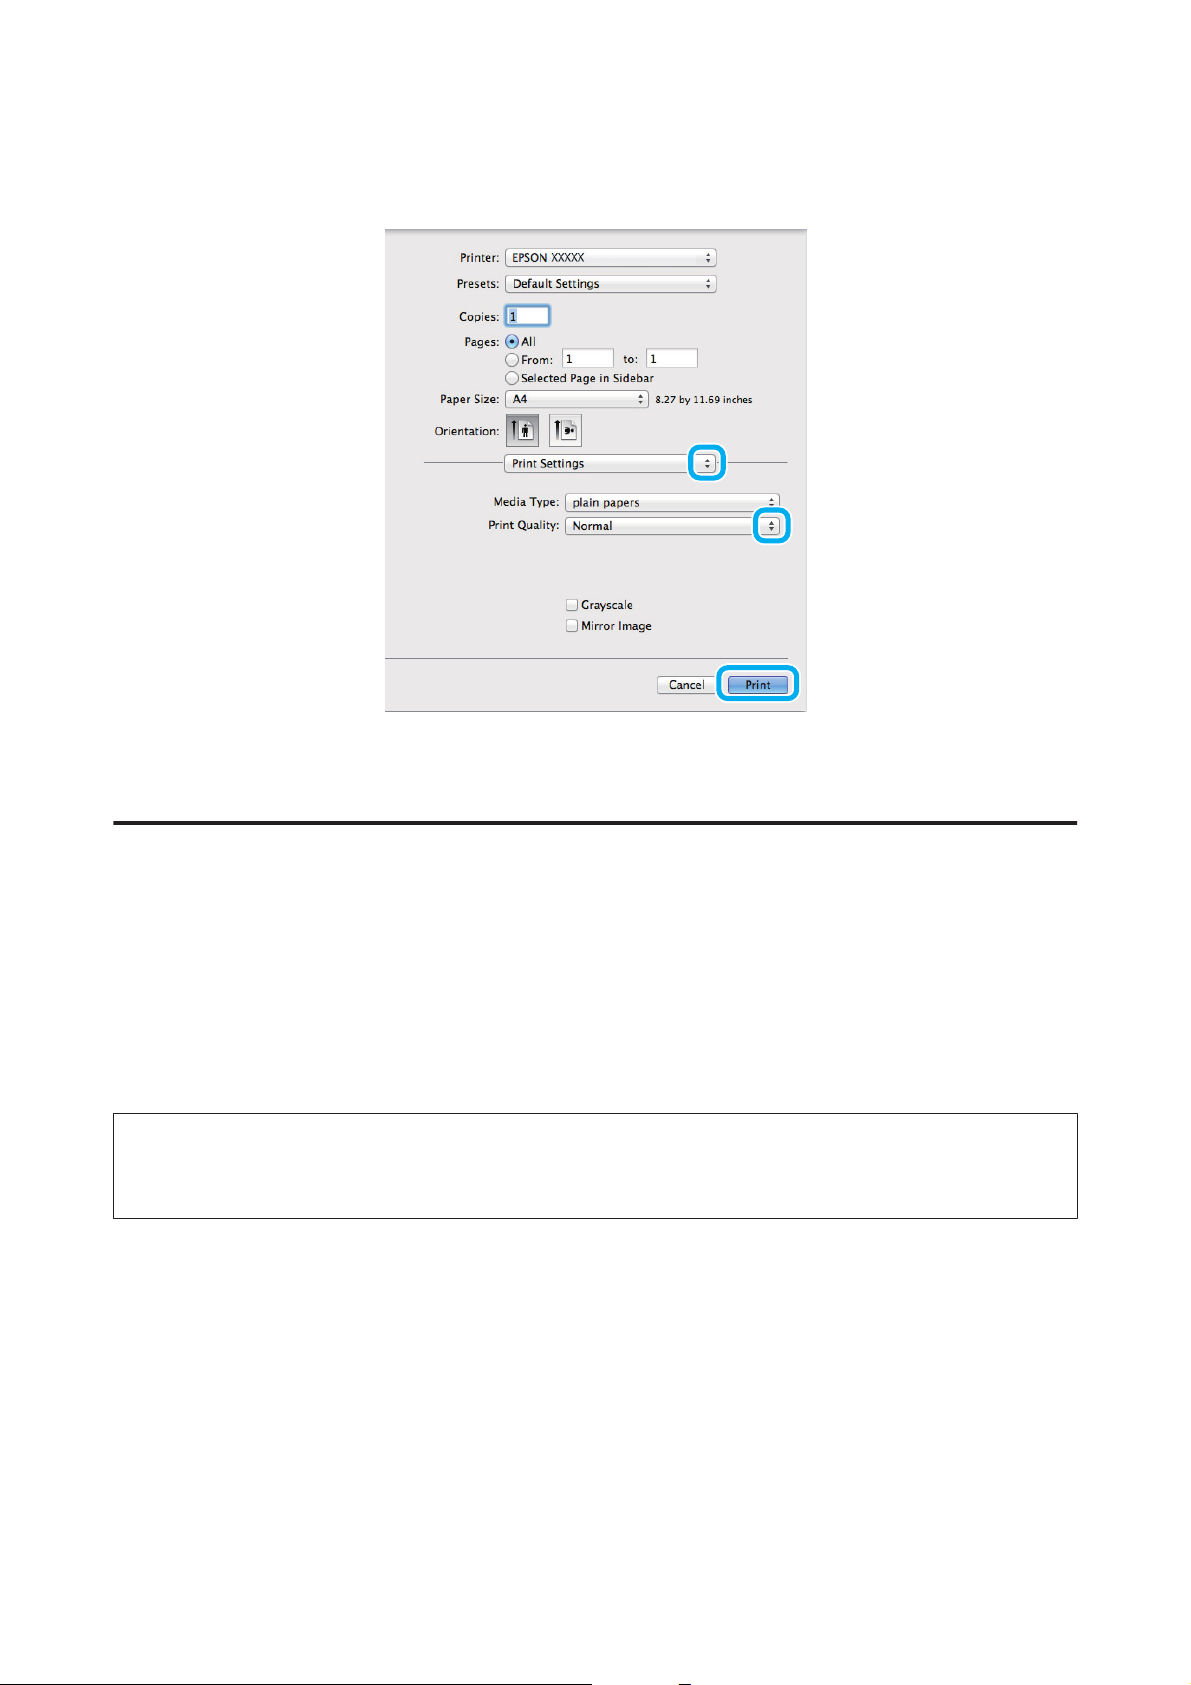
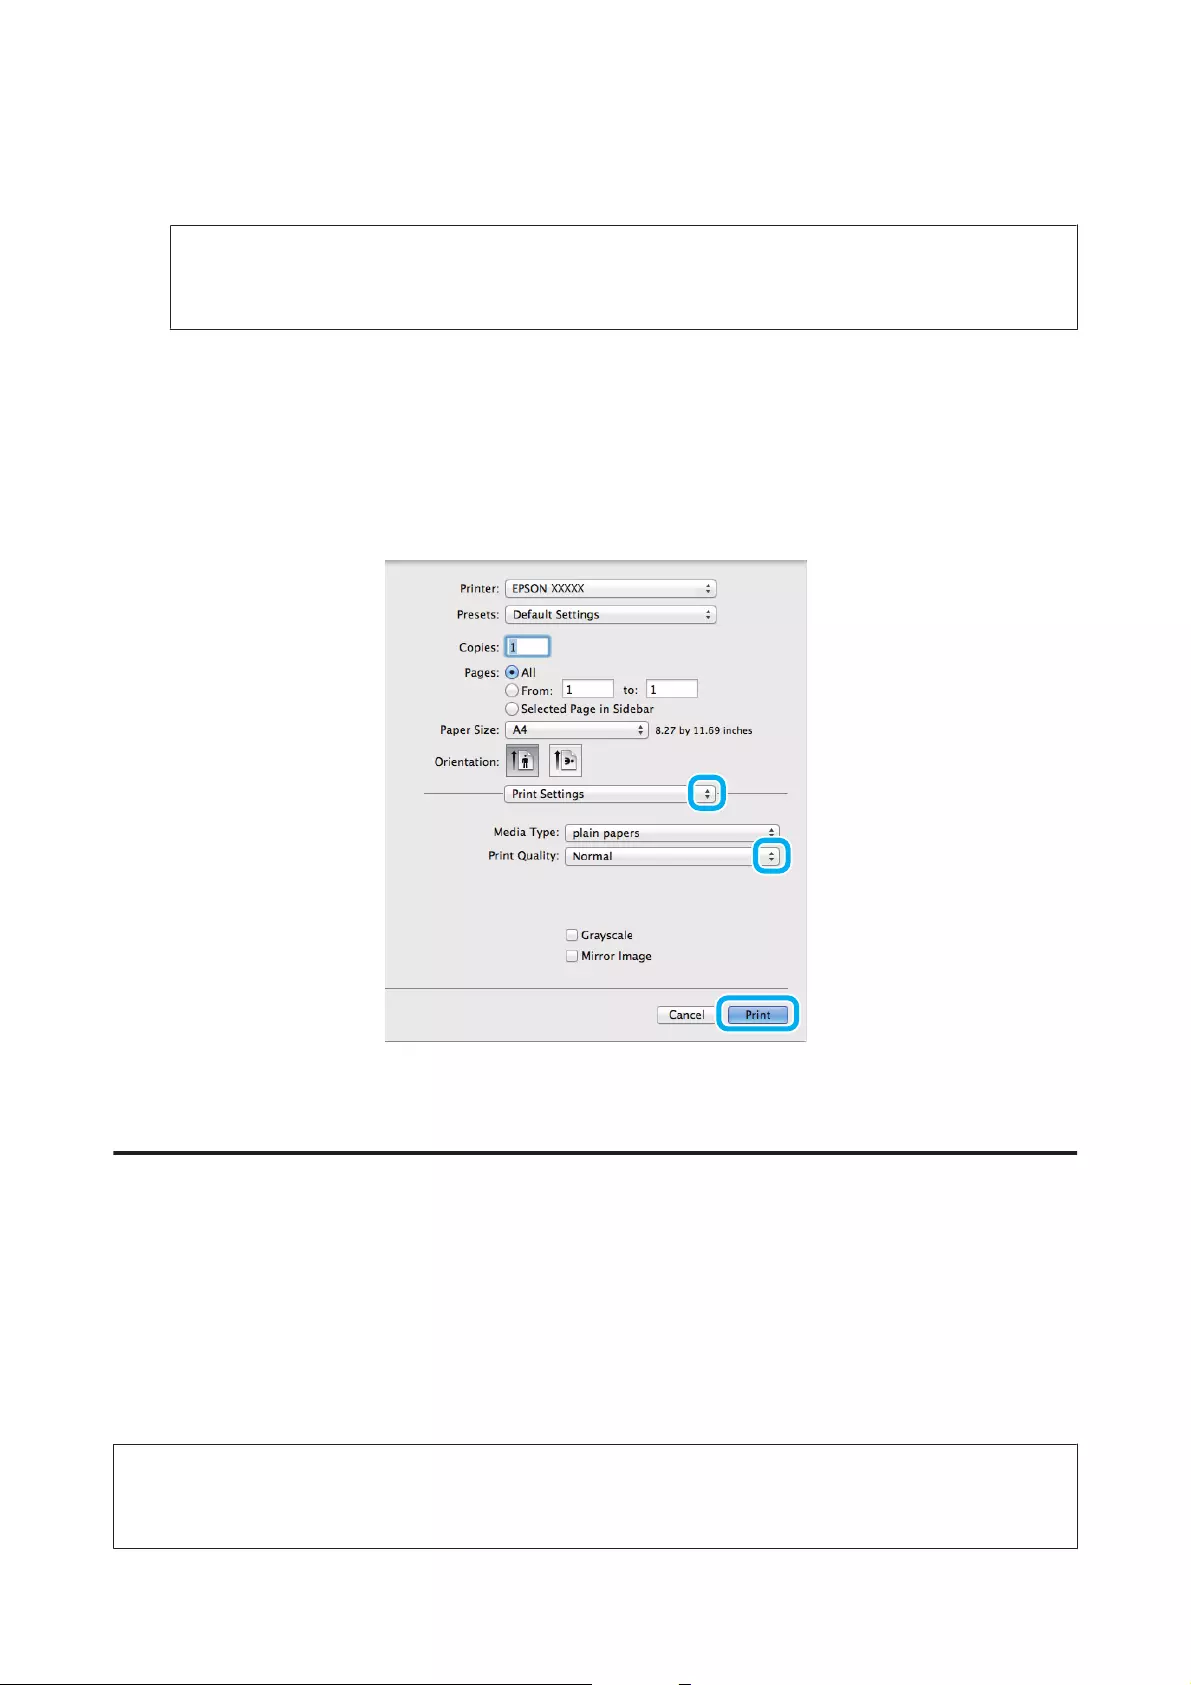
В раскрывающемся меню выберите Print Settings (Настройки печати).
F
Щелкните Print (Печать), чтобы начать печать.
G
Отмена печати
Чтобы остановить печать, выполните инструкции соответствующего раздела.
Использование кнопки устройства
Нажмите на кнопку y для отмены текущей печати.
В Windows
Примечание:
Вы не можете удалить задание, уже полностью отосланное на устройство. Для этого удалите задание с
помощью устройства.
Запуск EPSON Status Monitor 3.
A
& «В Windows» на стр. 56
Нажмите кнопку Print Queue (Очередь на печать). Откроется окно Windows Spooler.
B
Правой кнопкой мыши щелкните по заданию, которое хотите отменить, и выберите Cancel
C
(Отмена).
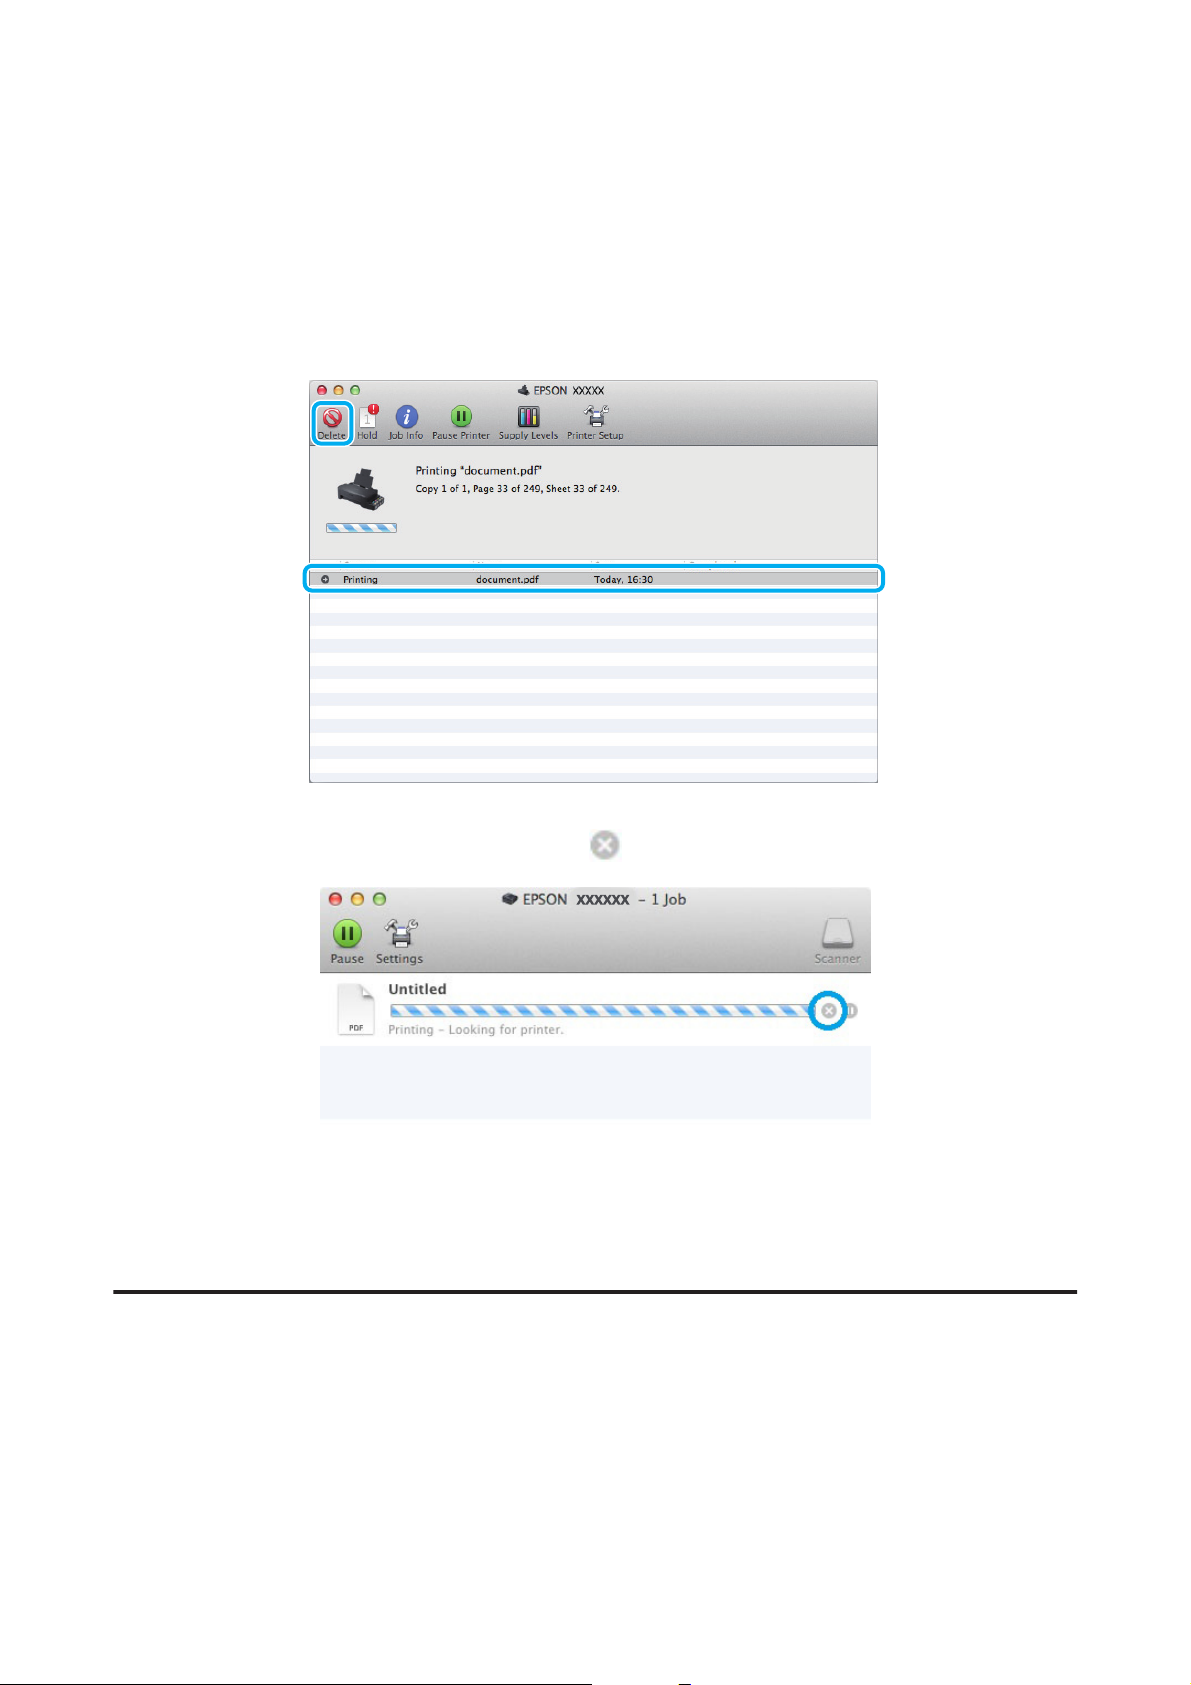
В Mac OS X
Сделайте следующее для отмены задания печати.
22
Руководство пользователя
Идет печать
В Dock (Эстакада) щелкните по значку вашего устройства.
A
В списке Document Name (Имя документа) выберите нужный документ.
B
Щелкните кнопку Delete (Удалить), чтобы отменить задание печати.
C
В Mac OS X 10.9 или 10.8:
Чтобы отменить задание на печать, нажмите кнопку
.
Дополнительные возможности
Предустановки устройства (только для Windows)
Предустановки драйвера принтера отправляют на печать мгновенный снимок. Вы также можете создать
собственные предустановки.
Настройки устройства в Windows
Откройте окно драйвера принтера.
A
& «Доступ к ПО принтера в Windows» на стр. 17
23
Руководство пользователя
Идет печать
Выберите Printing Presets (Предустановки печати) на вкладке Main (Главное). Значения настроек
B
устройства автоматически устанавливаются, как это указано во всплывающем окне.
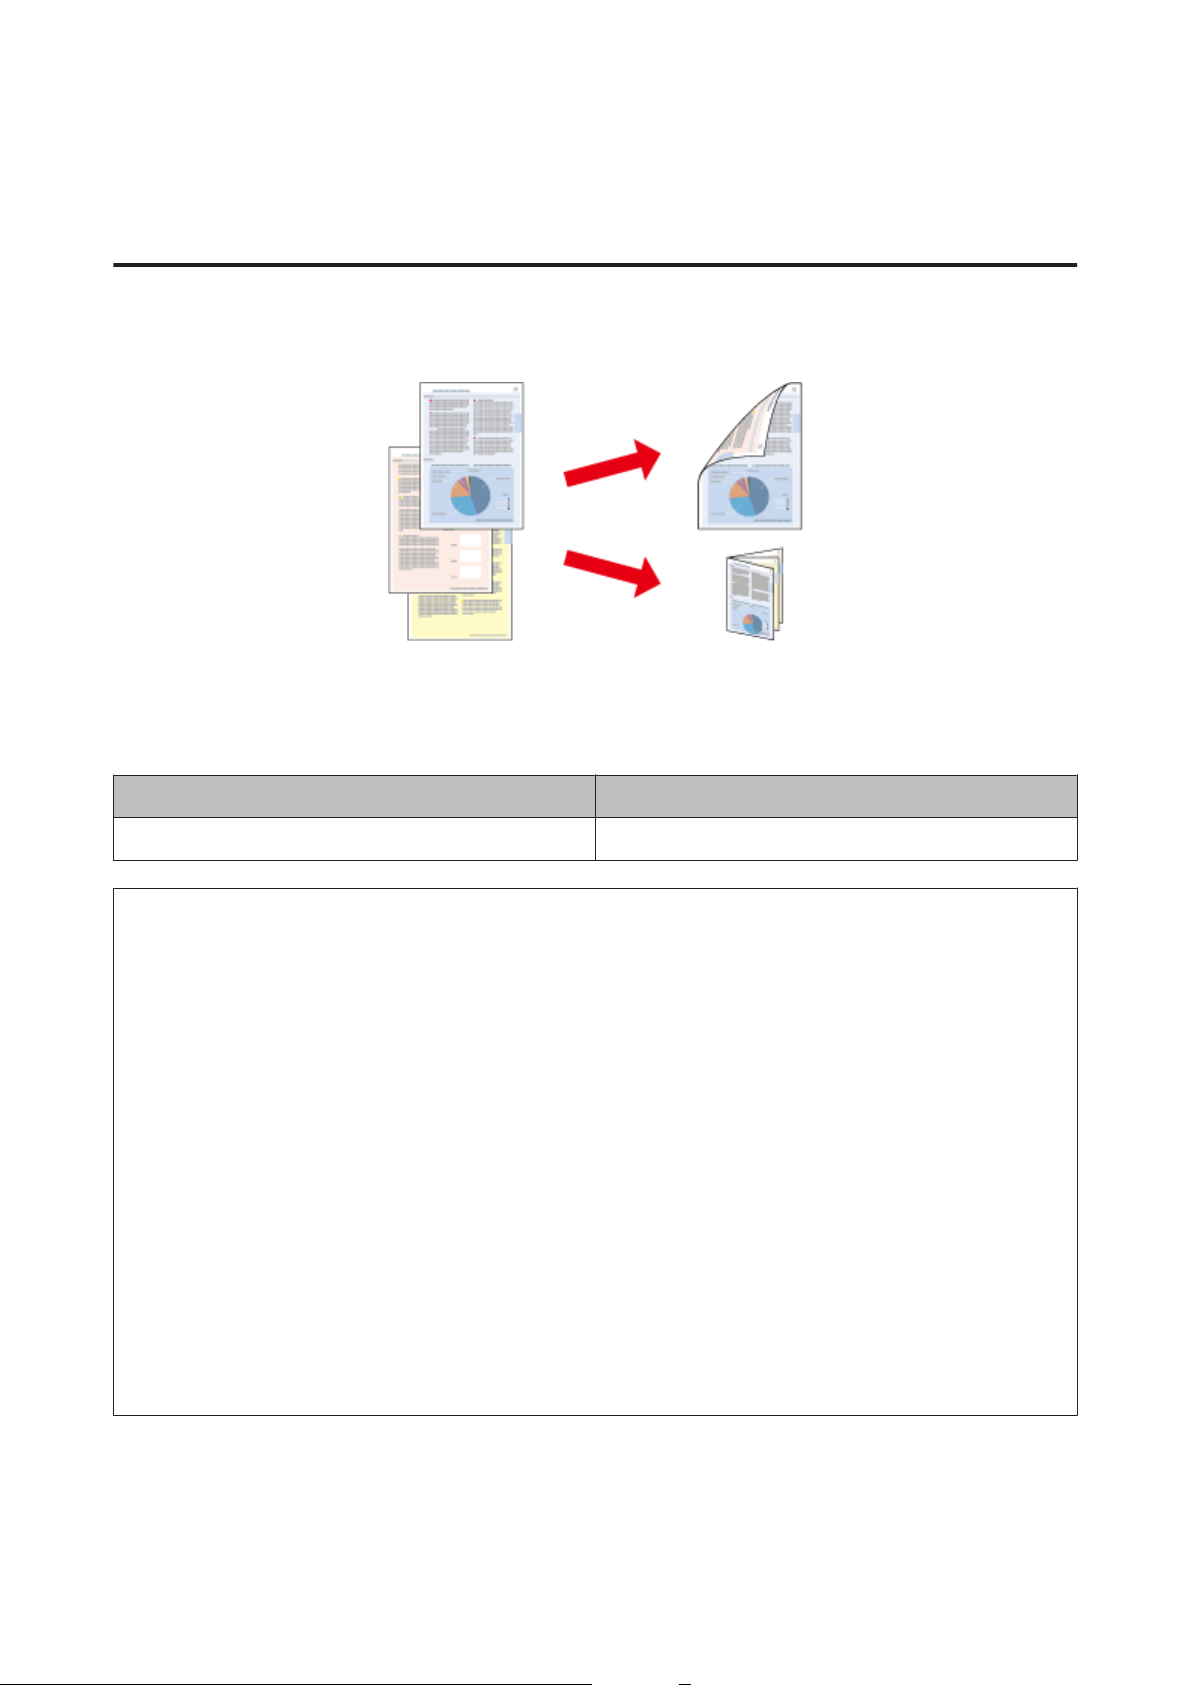
Двусторонняя печать (только для Windows)
Драйвер принтера используется, чтобы печатать с двух сторон листа.
Существует два типа двусторонней печати: стандартная и печать буклетов.
Двусторонняя печать доступна только на бумаге следующих типов и размеров.
Бумага Размер
Простая бумага Legal, Letter, A4
Примечание:
❏ Эта функция недоступна в Mac OS X.
❏ При некоторых параметрах эта функция может быть недоступна.
❏ Эта функция может быть недоступна, когда вы печатаете по сети, либо при совместном
использовании устройства.
❏ Емкость загрузки отличается при двусторонней печати.
& «Выбор бумаги» на стр. 14
❏ Используйте только ту бумагу, на которой возможна печать с обеих сторон. Иначе качество печати
может ухудшиться.
❏ В зависимости от типа бумаги и объема чернил, затрачиваемых для печати текста и изображений,
чернила могут проступать на другой стороне бумаги.
❏ Во время двусторонней печати поверхность может смазаться.
❏ Эта функция доступна, только если включена утилита EPSON Status Monitor 3. Для того чтобы
включить данную утилиту войдите в драйвер принтера и перейдите на вкладу Maintenance (Сервис) и
нажмите на кнопку Extended Settings (Расширенные параметры). В окне Extended Settings (Расширенные
параметры) установите флажок рядом с Enable EPSON Status Monitor 3 (Включить EPSON Status
Monitor 3).
Настройки устройства в Windows
Откройте окно драйвера принтера.
A
& «Доступ к ПО принтера в Windows» на стр. 17
24
Loading…

User’s Guide
NPD4965-00 EN

Copyright and Trademarks
Copyright and Trademarks
No part of this publication may be reproduced, stored in a retrieval system, or transmitted in any form or by any
means, electronic, mechanical, photocopying, recording, or otherwise, without the prior written permission of
Seiko Epson Corporation. No patent liability is assumed with respect to the use of the information contained
herein. Neither is any liability assumed for damages resulting from the use of the information herein. The
information contained herein is designed only for use with this Epson product. Epson is not responsible for any
use of this information as applied to other products.
Neither Seiko Epson Corporation nor its affiliates shall be liable to the purchaser of this product or third parties
for damages, losses, costs, or expenses incurred by the purchaser or third parties as a result of accident, misuse, or
abuse of this product or unauthorized modifications, repairs, or alterations to this product, or (excluding the U.S.)
failure to strictly comply with Seiko Epson Corporation’s operating and maintenance instructions.
Seiko Epson Corporation and its affiliates shall not be liable for any damages or problems arising from the use of
any options or any consumable products other than those designated as Original Epson Products or Epson
Approved Products by Seiko Epson Corporation.
Seiko Epson Corporation shall not be held liable for any damage resulting from electromagnetic interference that
occurs from the use of any interface cables other than those designated as Epson Approved Products by Seiko
Epson Corporation.
EPSON
®
is a registered trademark, and EPSON EXCEED YOUR VISION or EXCEED YOUR VISION is a
trademark of Seiko Epson Corporation.
PRINT Image Matching
™
and the PRINT Image Matching logo are trademarks of Seiko Epson Corporation.
Copyright © 2001 Seiko Epson Corporation. All rights reserved.
Intel
®
is a registered trademark of Intel Corporation.
PowerPC
®
is a registered trademark of International Business Machines Corporation.
Microsoft
®
, Windows
®
, and Windows Vista
®
are registered trademarks of Microsoft Corporation.
Apple
®
, Macintosh
®
, Mac OS
®
, and OS X
®
are registered trademarks of Apple Inc.
Adobe, Adobe Reader, Acrobat, and Photoshop are trademarks of Adobe systems Incorporated, which may be
registered in certain jurisdictions.
General Notice: Other product names used herein are for identification purposes only and may be trademarks of
their respective owners. Epson disclaims any and all rights in those marks.
Copyright © 2013 Seiko Epson Corporation. All rights reserved.
The contents of this manual and the specifications of this product are subject to change without notice.
User’s Guide
Copyright and Trademarks
2

Contents
Copyright and Trademarks
Copyright and Trademarks………………. 2
Introduction
Where to Find Information………………. 5
Caution, Important and Note….……….… 5
Operating System Versions………………. 5
Important Instructions
Safety Instructions……………………. 7
Product Advisories and Warnings………….. 7
Setting up/using the product………..….. 7
Handling ink……………………... 8
Getting to Know Your Product
Product Parts………………………. 10
Guide to the Control Panel……………… 12
Buttons and lights………………….. 12
Paper Handling
Introduction to Using, Loading, and Storing
Media……………………………. 13
Storing paper…………………….. 13
Selecting Paper…………….……….. 13
Loading Paper……….………..……. 14
Printing
Printer Driver and Status Monitor…………. 16
Accessing the printer driver for Windows….. 16
Accessing the printer driver for Mac OS X. . . . . 17
Basic Operations…..………..………. 18
Basic printing……………….……. 18
Canceling printing.………….…….. 20
Other Options……………………… 22
Product presets (for Windows only)………. 22
2-sided printing (for Windows only). . . . . . . . . 22
Fit to page printing…………………. 24
Pages per sheet printing………………. 25
Sharing the Product for Printing………….. 26
Setup for Windows……………….… 26
Setup for Mac OS X…………………. 29
Ink Bottles Information
Refilling Ink
Ink Bottle Safety Instructions, Precautions, and
Specifications………………..…….. 31
Safety instructions………………….. 31
Precautions on refilling ink……………. 31
Ink bottle specifications………………. 32
Checking the Ink Levels………………… 32
Refilling the Ink Tanks…….……….…. 32
Maintaining Your Product and
Software
Checking the Print Head Nozzles……..…… 35
Using the Nozzle Check utility for Windows
……………….…………….. 35
Using the Nozzle Check utility for Mac OS X
……………….…………….. 35
Using the control panel……..……….. 36
Cleaning the Print Head.………………. 36
Using the Head Cleaning utility for Windows
……………….…………….. 37
Using the Head Cleaning utility for Mac OS X
……………….…………….. 37
Using the control panel……..……….. 37
Aligning the Print Head……….………. 38
Using the Print Head Alignment utility for
Windows……………………….. 38
Using the Print Head Alignment utility for
Mac OS X….……..……..……… 38
Cleaning the Paper Guide………….…… 39
Using the Paper Guide Cleaning utility for
Windows……………………….. 39
Using the Paper Guide Cleaning utility for Mac
OS X…..………………….….. 39
Replacing Ink inside the Ink Tubes………… 40
Using the Power Ink Flushing utility for
Windows……………………….. 40
Using the Power Ink Flushing utility for Mac
OS X…..………………….….. 40
Saving Power………………………. 41
For Windows…………………….. 41
User’s Guide
Contents
3

For Mac OS X….……..……..…… 41
Quieter Printer Operations……………… 42
For Windows…………………….. 42
For Mac OS X….……..……..…… 42
Checking the Number of Sheets of Paper Fed….. 42
Cleaning the Product…………………. 42
Cleaning the exterior of the product………. 42
Cleaning the interior of the product………. 43
Transporting the Product………………. 43
Checking and Installing Your Software……… 46
Checking the software installed on your
computer………………..……… 46
Installing the software……..………… 47
Uninstalling Your Software……………... 47
For Windows…………………….. 47
For Mac OS X….……..……..…… 48
Error Indicators
Error Indications on the Control Panel.……... 50
Troubleshooting for Printing
Diagnosing the Problem……………….. 52
Checking product status……………… 52
Paper Jams……………………..…. 54
Removing jammed paper from inside the
product………………………… 54
Preventing paper jams……………….. 55
Print Quality Help..……..……..……. 55
Horizontal banding…….…………... 56
Vertical banding or misalignment……….. 56
Incorrect or missing colors……………. 57
Blurry or smeared print………………. 57
Miscellaneous Printout Problems………….. 58
Incorrect or garbled characters…………. 58
Incorrect margins…….…….……… 58
Printout has a slight slant.……………. 58
Inverted image……………………. 58
Blank pages print…………..……… 59
Printed side is smeared or scuffed……….. 59
Printing is too slow……………….… 59
Paper Does Not Feed Correctly…………… 60
Paper does not feed…………………. 60
Multiple pages feed…………………. 60
Paper is improperly loaded………..….. 60
Paper is not ejected fully or is wrinkled. . . . . . . . 60
The Product Does Not Print…………….. 61
All lights are off…………..………. 61
Lights came on and then went out……….. 61
Only the power light is on….…………. 61
Product Information
System Requirements…………………. 62
For Windows…………………….. 62
For Mac OS X…………..……..…. 62
Technical Specifications……………….. 62
Printer specifications………………… 62
Mechanical……….………….….. 64
Electrical…………..…………… 64
Environmental……………………. 64
Standards and approvals……………… 65
Interface…..……………………. 65
Where To Get Help
Technical Support Web Site……………… 66
Contacting Epson Support………………. 66
Before Contacting Epson……………… 66
Help for Users in Europe……………... 67
Help for Users in Taiwan……………… 67
Help for Users in Singapore……………. 68
Help for Users in Thailand……..…….. 68
Help for Users in Vietnam……….……. 69
Help for Users in Indonesia……………. 69
Help for Users in Hong Kong………….. 69
Help for Users in Malaysia…………….. 70
Help for Users in India………………. 70
Help for Users in the Philippines…….….. 71
Index
User’s Guide
Contents
4

Introduction
Where to Find Information
The latest version of the following manuals are available on the Epson support website.
http://www.epson.eu/Support (Europe)
http://support.epson.net/ (other than Europe)
❏Start Here (paper):
Provides you with information on setting up the product and installing the software.
❏User’s Guide (PDF):
Provides you with detailed operating, safety, and troubleshooting instructions. See this guide when using this
product with a computer.
To view the PDF manual, you need Adobe Acrobat Reader 5.0 or later, or Adobe Reader.
Caution, Important and Note
Caution, Important, and Note in this manual are indicated as below and have the following meaning.
!
Caution
must be followed carefully to avoid bodily injury.
c
Important
must be observed to avoid damage to your equipment.
Note
contain useful tips and restrictions on product operation.
Operating System Versions
In this manual, the following abbreviations are used.
❏Windows 8 refers to Windows 8, Windows 8 Pro, and Windows 8.1.
❏Windows 7 refers to Windows 7 Home Basic, Windows 7 Home Premium, Windows 7 Professional, and
Windows 7 Ultimate.
❏Windows Vista refers to Windows Vista Home Basic Edition, Windows Vista Home Premium Edition,
Windows Vista Business Edition, Windows Vista Enterprise Edition, and Windows Vista Ultimate Edition.
❏Windows XP refers to Windows XP Home Edition, Windows XP Professional x64 Edition, and Windows XP
Professional.
User’s Guide
Introduction
5

❏In this manual, Mac OS X 10.9.x refers to OS X Mavericks and Mac OS X 10.8.x refers to OS X Mountain
Lion. Additionally, Mac OS X refers to Mac OS X 10.9.x, Mac OS X 10.8.x, Mac OS X 10.7.x, Mac OS X 10.6.x,
and Mac OS X 10.5.8.
User’s Guide
Introduction
6

Important Instructions
Safety Instructions
Read and follow these instructions to ensure safe use of this product. Make sure you keep this guide for future
reference. Also, be sure to follow all warnings and instructions marked on the product.
❏Use only the power cord supplied with the product and do not use the cord with any other equipment. Use of
other cords with this product or the use of the supplied power cord with other equipment may result in fire or
electric shock.
❏Be sure your AC power cord meets the relevant local safety standard.
❏Never disassemble, modify, or attempt to repair the power cord, plug, printer unit, or options by yourself,
except as specifically explained in the product’s guides.
❏Unplug the product and refer servicing to qualified service personnel under the following conditions:
The power cord or plug is damaged; liquid has entered the product; the product has been dropped or the
casing damaged; the product does not operate normally or exhibits a distinct change in performance. Do not
adjust controls that are not covered by the operating instructions.
❏Place the product near a wall outlet where the plug can be easily unplugged.
❏Do not place or store the product outdoors, near excessive dirt or dust, water, heat sources, or in locations
subject to shocks, vibrations, high temperature or humidity.
❏Take care not to spill liquid on the product and not to handle the product with wet hands.
Product Advisories and Warnings
Read and follow these instructions to avoid damaging the product or your property. Make sure you keep this
guide for future reference.
Setting up/using the product
❏Do not block or cover the vents and openings in the product.
❏Use only the type of power source indicated on the product’s label.
❏Avoid using outlets on the same circuit as photocopiers or air control systems that regularly switch on and off.
❏Avoid electrical outlets controlled by wall switches or automatic timers.
❏Keep the entire computer system away from potential sources of electromagnetic interference, such as
loudspeakers or the base units of cordless telephones.
User’s Guide
Important Instructions
7

❏The power-supply cords should be placed to avoid abrasions, cuts, fraying, crimping, and kinking. Do not
place objects on top of the power-supply cords and do not allow the power-supply cords to be stepped on or
run over. Be particularly careful to keep all the power-supply cords straight at the ends and the points where
they enter and leave the transformer.
❏If you use an extension cord with the product, make sure that the total ampere rating of the devices plugged
into the extension cord does not exceed the cord’s ampere rating. Also, make sure that the total ampere rating
of all devices plugged into the wall outlet does not exceed the wall outlet’s ampere rating.
❏If you plan to use the product in Germany, the building installation must be protected by a 10 or 16 amp
circuit breaker to provide adequate short-circuit protection and over-current protection for the product.
❏When connecting the product to a computer or other device with a cable, ensure the correct orientation of the
connectors. Each connector has only one correct orientation. Inserting a connector in the wrong orientation
may damage both devices connected by the cable.
❏Place the product on a flat, stable surface that extends beyond the base of the product in all directions. If you
place the product by the wall, leave more than 10 cm between the back of the product and the wall. The
product will not operate properly if it is tilted at an angle.
❏When storing or transporting the product, avoid tilting it, placing it vertically, or turning it upside down;
otherwise ink may leak.
❏Allow spaces behind the product for the cables, and space above the product so that you can fully raise the
front cover.
❏Avoid places subject to rapid changes in temperature and humidity. Also, keep the product away from direct
sunlight, strong light, or heat sources.
❏Do not insert objects through the slots in the product.
❏Do not put your hand inside the product during printing.
❏Do not touch the white flat cable and ink tubes inside the product.
❏Do not use aerosol products that contain flammable gases inside or around the product. Doing so may cause
fire.
❏Do not move the print head by hand; otherwise, you may damage the product.
❏Always turn the product off using the P button. Do not unplug the product or turn off the power at the outlet
until the P light stops flashing.
❏Before transporting the product, make sure that the print head is in the home (far right) position.
❏If any of the ink tanks are not filled up to the lower line, refill the ink soon. Continued use of the product
when the ink level is below the lower line on the tanks could damage the product.
❏If you are not going to use the product for a long period, be sure to unplug the power cord from the electrical
outlet.
Handling ink
We will provide ink-related safety instructions and product advice/warnings in the linked section.
User’s Guide
Important Instructions
8

& “Refilling Ink” on page 31
User’s Guide
Important Instructions
9

Getting to Know Your Product
Product Parts
a. Paper support
b. Ink tank unit
c. Control panel
d. Edge guide
e. Rear paper feed
User’s Guide
Getting to Know Your Product
10
a. Front cover
b. Ink reservoir tanks (Ink tanks)
c. Print head (under this section)
a. USB port
b. AC inlet
User’s Guide
Getting to Know Your Product
11
Guide to the Control Panel
Buttons and lights
Buttons Function
Turns the product on or off. The P light stays on when the product is on and flashes when the
product is receiving data, printing, or cleaning the print head.
Resume printing after a paper out error, paper jam error, multiple-paper feed error, or ink waste
pad error.
Cancels the current operation.
If the y light is on or flashing, a problem has occurred during printing.
& “Error Indications on the Control Panel” on page 50
User’s Guide
Getting to Know Your Product
12
Paper Handling
Introduction to Using, Loading, and Storing Media
Keep the following points in mind to achieve optimum print results.
Note:
❏Load the paper into the rear paper feed with the printable side face up. See the instruction sheets packed with the
paper for more information.
❏If the paper is curled, flatten it or curl it slightly in the opposite direction before loading. Printing on curled paper
may cause ink to smear on your prints.
Storing paper
Return unused paper to the original package as soon as you finish printing. Keep unused paper and prints away
from high temperature, humidity, and direct sunlight.
Selecting Paper
Refer to the table below for the loading capacities of paper and other media.
Media Type Size Loading capacity (sheets)
Plain paper*1 Letter
*2
up to 6mm
A4
*2
up to 6mm
Legal 1
*1 Paper with a weight of 64 g/m (17 lb) to 90 g/m (24 lb).
*2 The loading capacity for manual 2-sided printing is 15 sheets.
Note:
The availability of special media varies by location. For the latest information on media available in your area, contact
Epson support.
& “Technical Support Web Site” on page 66
User’s Guide
Paper Handling
13
Loading Paper
Follow these steps to load paper:
A
Slide out the paper support.
B
Slide the edge guide to the left.
C
Fan a stack of paper, then tap it on a flat surface to even the edges.
D
Load the paper with the printable side face up, against the right side of the rear paper feed.
Note:
Always load paper into the rear paper feed short edge first, even when you are printing landscape-oriented pictures.
User’s Guide
Paper Handling
14
E
Slide the edge guide against the left edge of the paper, but not too tightly.
Note:
❏Leave enough space in front of the product for the paper to be fully ejected.
❏Do not load paper above the H arrow mark inside the edge guide.
& “Selecting Paper” on page 13
User’s Guide
Paper Handling
15

Printing
Printer Driver and Status Monitor
The printer driver lets you choose from a wide variety of settings to get the best printing results. The status
monitor and the printer utilities help you check the product and keep it in top operating condition.
Note for Windows users:
❏Your printer driver automatically finds and installs the latest version of the printer driver from Epson’s Web site.
Click the Software Update button in your printer driver’s Maintenance window, and then follow the on-screen
instructions. If the button does not appear in the Maintenance window, point at All Programs or Programs in the
Windows Start menu, and check in the EPSON folder.
❏If you want to change the language of the driver, select the language you want to use from the Language setting in
your printer driver’s Maintenance window. Depending on the location, this function may not be available.
Accessing the printer driver for Windows
You can access the printer driver from most Windows applications, the Windows Start menu, or the taskbar.
To make settings that apply only to the application you are using, access the printer driver from that application.
To make settings that apply to all of your Windows applications, access the printer driver from the desktop or the
taskbar.
Refer to the following sections to access the printer driver.
Note:
Screen shots of the printer driver windows in this User’s Guide are from Windows 7.
From Windows applications
A
Click Print or Print Setup on the File menu.
B
In the window that appears, click Printer, Setup, Options, Preferences, or Properties. (Depending on your
application, you may need to click one or a combination of these buttons.)
From the desktop
❏Windows 8:
Select Desktop, Settings charm, and Control Panel. Then select Devices and Printers from the Hardware
and Sound category. Right-click on the product, or press and hold the product, and select Printing
preferences.
❏Windows 7:
Click the start button, select Devices and Printers. Then right-click the product and select Printing
preferences.
User’s Guide
Printing
16
❏Windows Vista:
Click the start button, select Control Panel, and then select Printer from the Hardware and Sound category.
Then select the product and then click Select printing preferences.
❏Windows XP:
Click Start, Control Panel, (Printers and Other Hardware,) then Printers and Faxes. Select the product,
then click Printing Preferences on the File menu.
From the shortcut icon on the taskbar
Right-click the product icon on the taskbar, then select Printer Settings.
To add a shortcut icon to the Windows taskbar, first access the printer driver from the Start menu as described
above. Next, click the Maintenance tab, and then the Monitoring Preferences button. In the Monitoring
Preferences window, select the Shortcut Icon check box.
Getting information through online help
In the printer driver window, try one of the following procedures.
❏Right-click the item, then click Help.
❏Click the button at the top right of the window, then click the item (for Windows XP only).
Accessing the printer driver for Mac OS X
The table below describes how to access the printer driver dialog.
Dialog Box How to Access It
Page Setup Click Page Setup on the File menu of your application.
Note:
Depending on your application, the Page Setup menu may not appear in the File menu.
Print Click Print on the File menu of your application.
Epson Printer Utility 4 For Mac OS X 10.9, 10.8 or 10.7, click System Preferences on the Apple menu and then click
Printers & Scanners (for Mac OS X 10.9) or Print & Scan (for Mac OS X 10.8 or 10.7). Select
your product from the Printers list box, click Options & Supplies, Utility, and then click Open
Printer Utility.
For Mac OS X 10.6, click System Preferences on the Apple menu and then click Print & Fax.
Select your product from the Printers list box, click Options & Supplies, Utility, and then click
Open Printer Utility.
For Mac OS X 10.5, click System Preferences on the Apple menu and then click Print & Fax.
Select your product from the Printers list box, click Open Print Queue and then click Utility
button.
User’s Guide
Printing
17
Basic Operations
Basic printing
Note:
❏Before you print, load paper properly.
& “Loading Paper” on page 14
❏Refer to the section below for the printable area.
& “Printable area” on page 63
❏After completing the settings, print one test copy and examine the results before printing an entire job.
Basic product settings for Windows
A
Open the file you want to print.
B
Access the printer settings.
& “Accessing the printer driver for Windows” on page 16
C
Click the Main tab.
D
Select the appropriate Document Size setting. You can also define a custom paper size. For details, see the
online help.
E
Select Portrait (tall) or Landscape (wide) to change the orientation of your print.
User’s Guide
Printing
18
F
Click OK to close the printer settings window.
Note:
To make changes to advanced settings, refer to the relevant section.
G
Print your file.
Basic product settings for Mac OS X
Note:
Screen shots of the printer driver windows in this section are from Mac OS X 10.7.
A
Open the file you want to print.
B
Access the Print dialog box.
& “Accessing the printer driver for Mac OS X” on page 17
Note:
If the simplified dialog box is displayed, click the Show Details button (for Mac OS X 10.9, 10.8 or 10.7) or the d
button (for Mac OS X 10.6 or 10.5) to extend this dialog box.
User’s Guide
Printing
19
C
Select the product you are using as the Printer setting.
Note:
Depending on your application, you may not be able to select some of the items in this dialog box. If so, click
Page Setup on the File menu of your application, and then make suitable settings.
D
Select the appropriate Paper Size setting.
E
Select the appropriate Orientation setting.
F
Select Print Settings from the pop-up menu.
G
Click Print to start printing.
Canceling printing
If you need to cancel printing, follow the instructions in the appropriate section below.
Using the product button
Press y to cancel a print job in progress.
For Windows
Note:
You cannot cancel a print job that has been completely sent to the product. In this case, cancel the print job by using the
product.
User’s Guide
Printing
20
A
Access the EPSON Status Monitor 3.
& “For Windows” on page 52
B
Click the Print Queue button. The Windows Spooler appears.
C
Right-click on the job you want to cancel and then select Cancel.
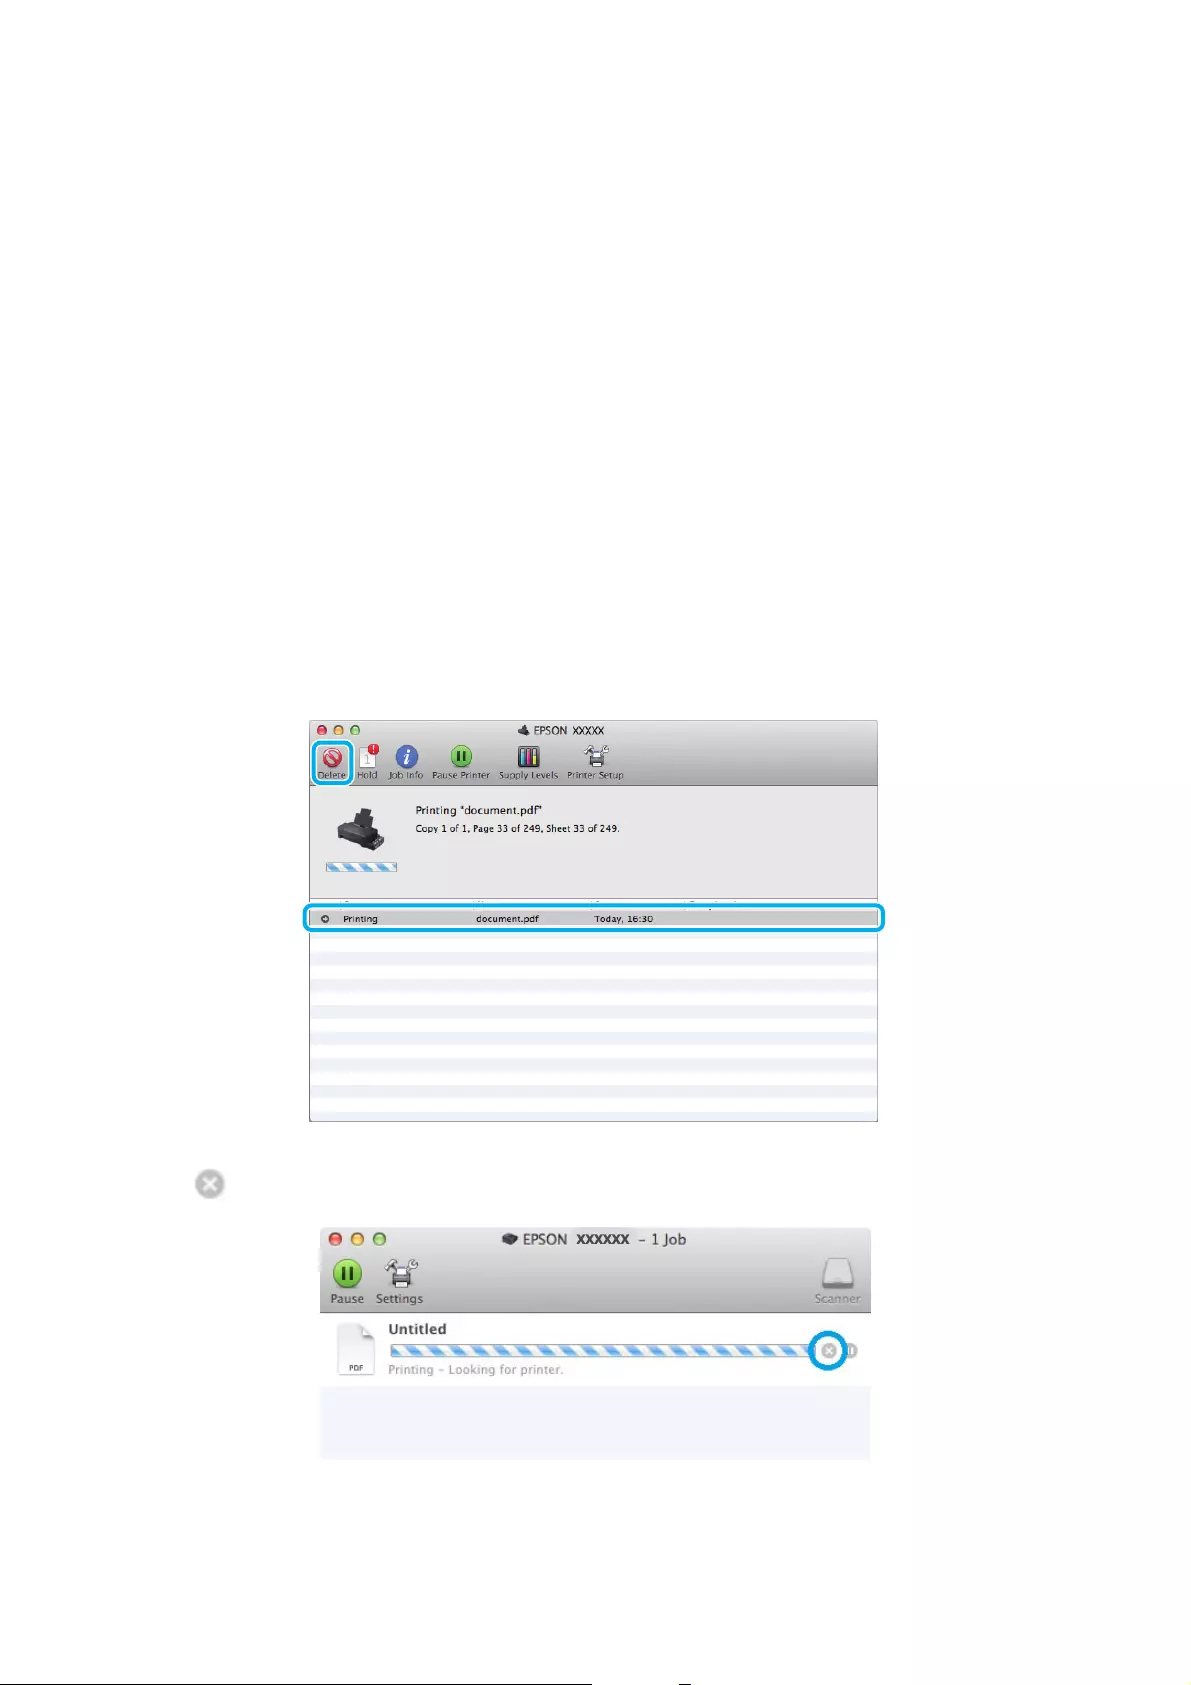
For Mac OS X
Follow the steps below to cancel a print job.
A
Click your product icon in the Dock.
B
In the Document Name list, select the document which is printing.
C
Click the Delete button to cancel the print job.
For Mac OS X 10.9 or 10.8:
Click the button to cancel the print job.
User’s Guide
Printing
21
Other Options
Product presets (for Windows only)
Printer driver presets make printing a snap. You can also create presets of your own.
Product settings for Windows
A
Access the printer settings.
& “Accessing the printer driver for Windows” on page 16
B
Select a Printing Presets in the Main tab. Product settings are automatically set to the values displayed in the
pop-up window.
2-sided printing (for Windows only)
Use the printer driver to print on both sides of the paper.
Two types of 2-sided printing are available: standard and folded booklet.
2-sided printing is only available for the following papers and sizes.
Paper Size
Plain paper Legal, Letter, A4
User’s Guide
Printing
22

Note:
❏This feature is not available for Mac OS X.
❏This feature may not be available at some settings.
❏This feature may not be available when the product is accessed over a network or is used as a shared printer.
❏The loading capacity differs during 2-sided printing.
& “Selecting Paper” on page 13
❏Only use papers that are suitable for 2-sided printing. Otherwise, the printout quality may deteriorate.
❏Depending on the paper and the amount of ink used to print text and images, ink may bleed through to the other
side of the paper.
❏The surface of the paper may be smeared during 2-sided printing.
❏This feature is available only when EPSON Status Monitor 3 is enabled. To enable the status monitor, access the
printer driver and click the Maintenance tab followed by the Extended Settings button. In the Extended Settings
window, check the Enable EPSON Status Monitor 3 check box.
Product settings for Windows
A
Access the printer settings.
& “Accessing the printer driver for Windows” on page 16
B
Select 2-Sided Printing check box.
C
Click Settings, and make the appropriate settings.
Note:
If you want to print a folded booklet, select Booklet.
D
Check the other settings and print.
Note:
❏The actual binding margin may be different from the specified settings depending on your application.
Experiment with a few sheets to examine actual results before printing the entire job.
❏Make sure that the ink is completely dry before reloading the paper.
User’s Guide
Printing
23

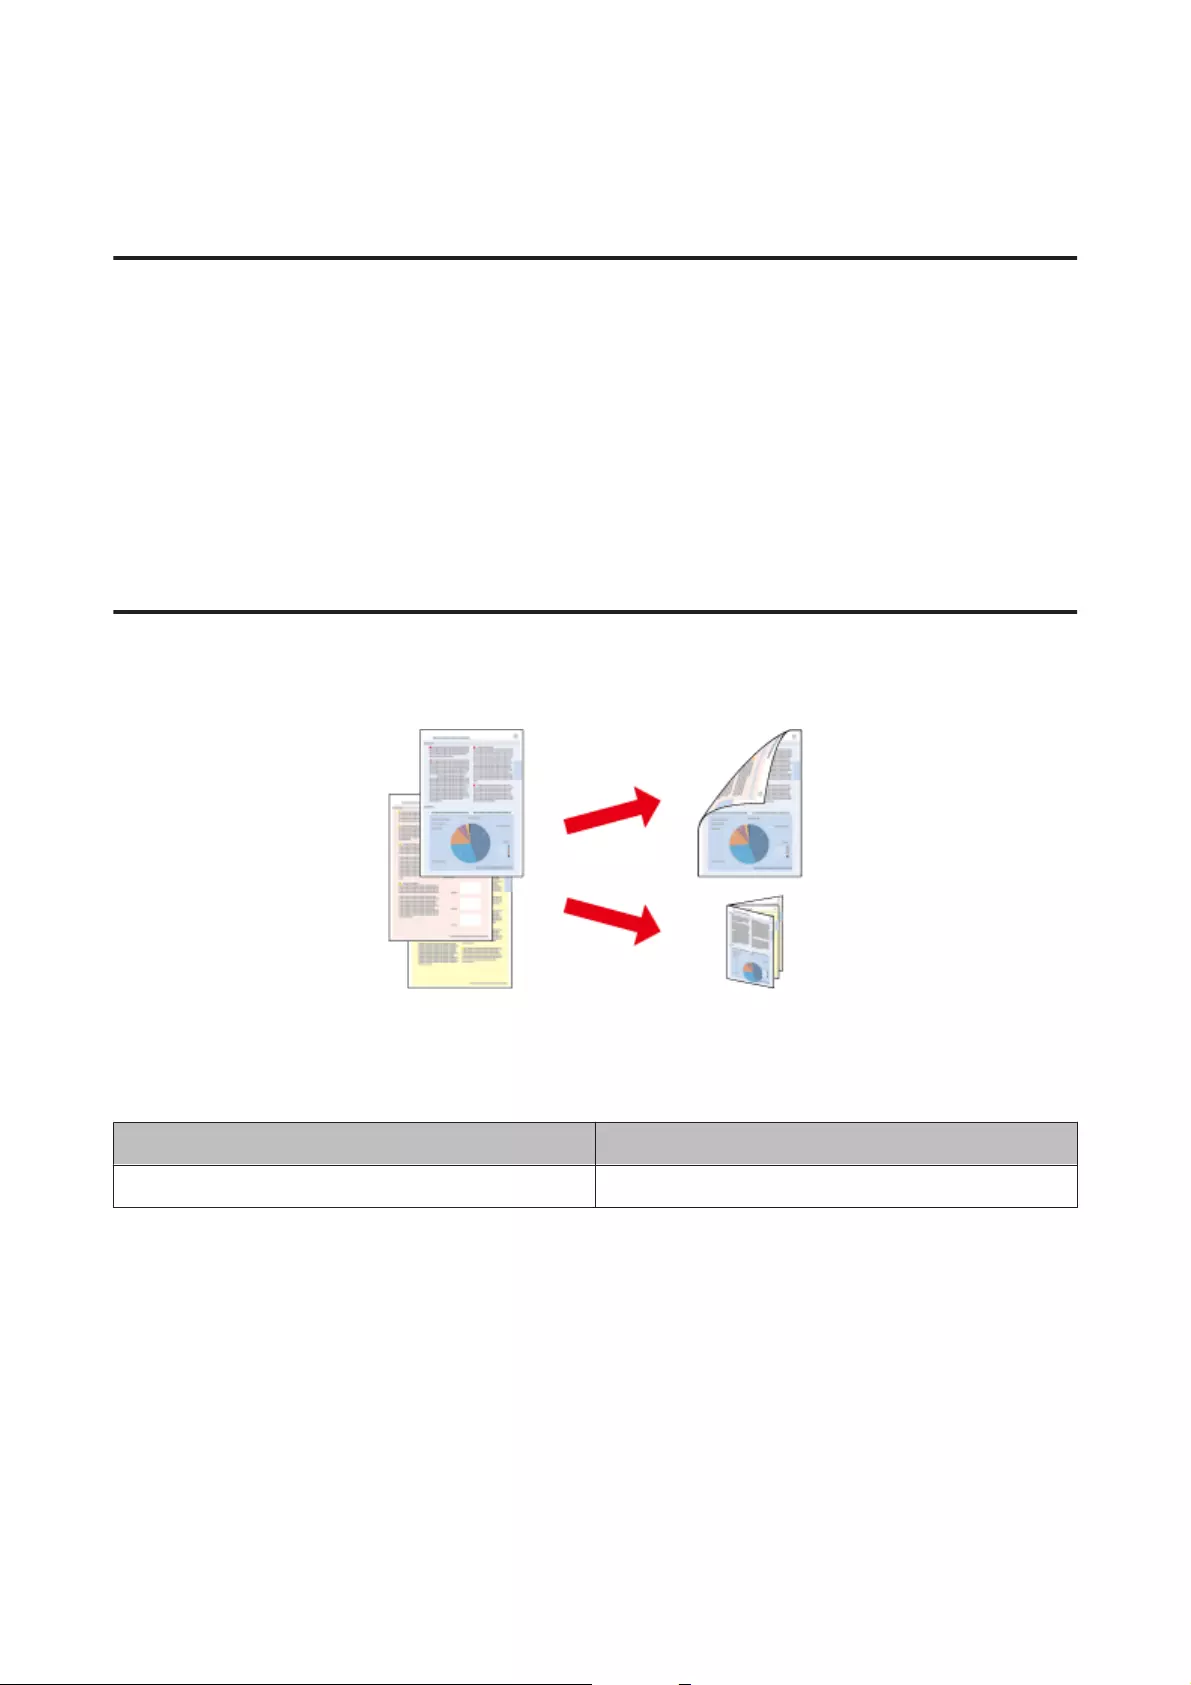
Fit to page printing
Lets you automatically enlarge or reduce the size of your document to fit the paper size selected in the printer driver.
Note:
This feature may not be available at some settings.
Product settings for Windows
A
Access the printer settings.
& “Accessing the printer driver for Windows” on page 16
B
Select Reduce/Enlarge Document and Fit to Page in the More Options tab, and then select the size of the
paper you are using from Output Paper.
C
Check the other settings and print.
Product settings for Mac OS X
A
Access the Print dialog box.
& “Accessing the printer driver for Mac OS X” on page 17
B
Choose Scale to fit paper size for Destination Paper Size in the Paper Handling pane and select the desired
paper size from the pop-up menu.
C
Check the other settings and print.
User’s Guide
Printing
24
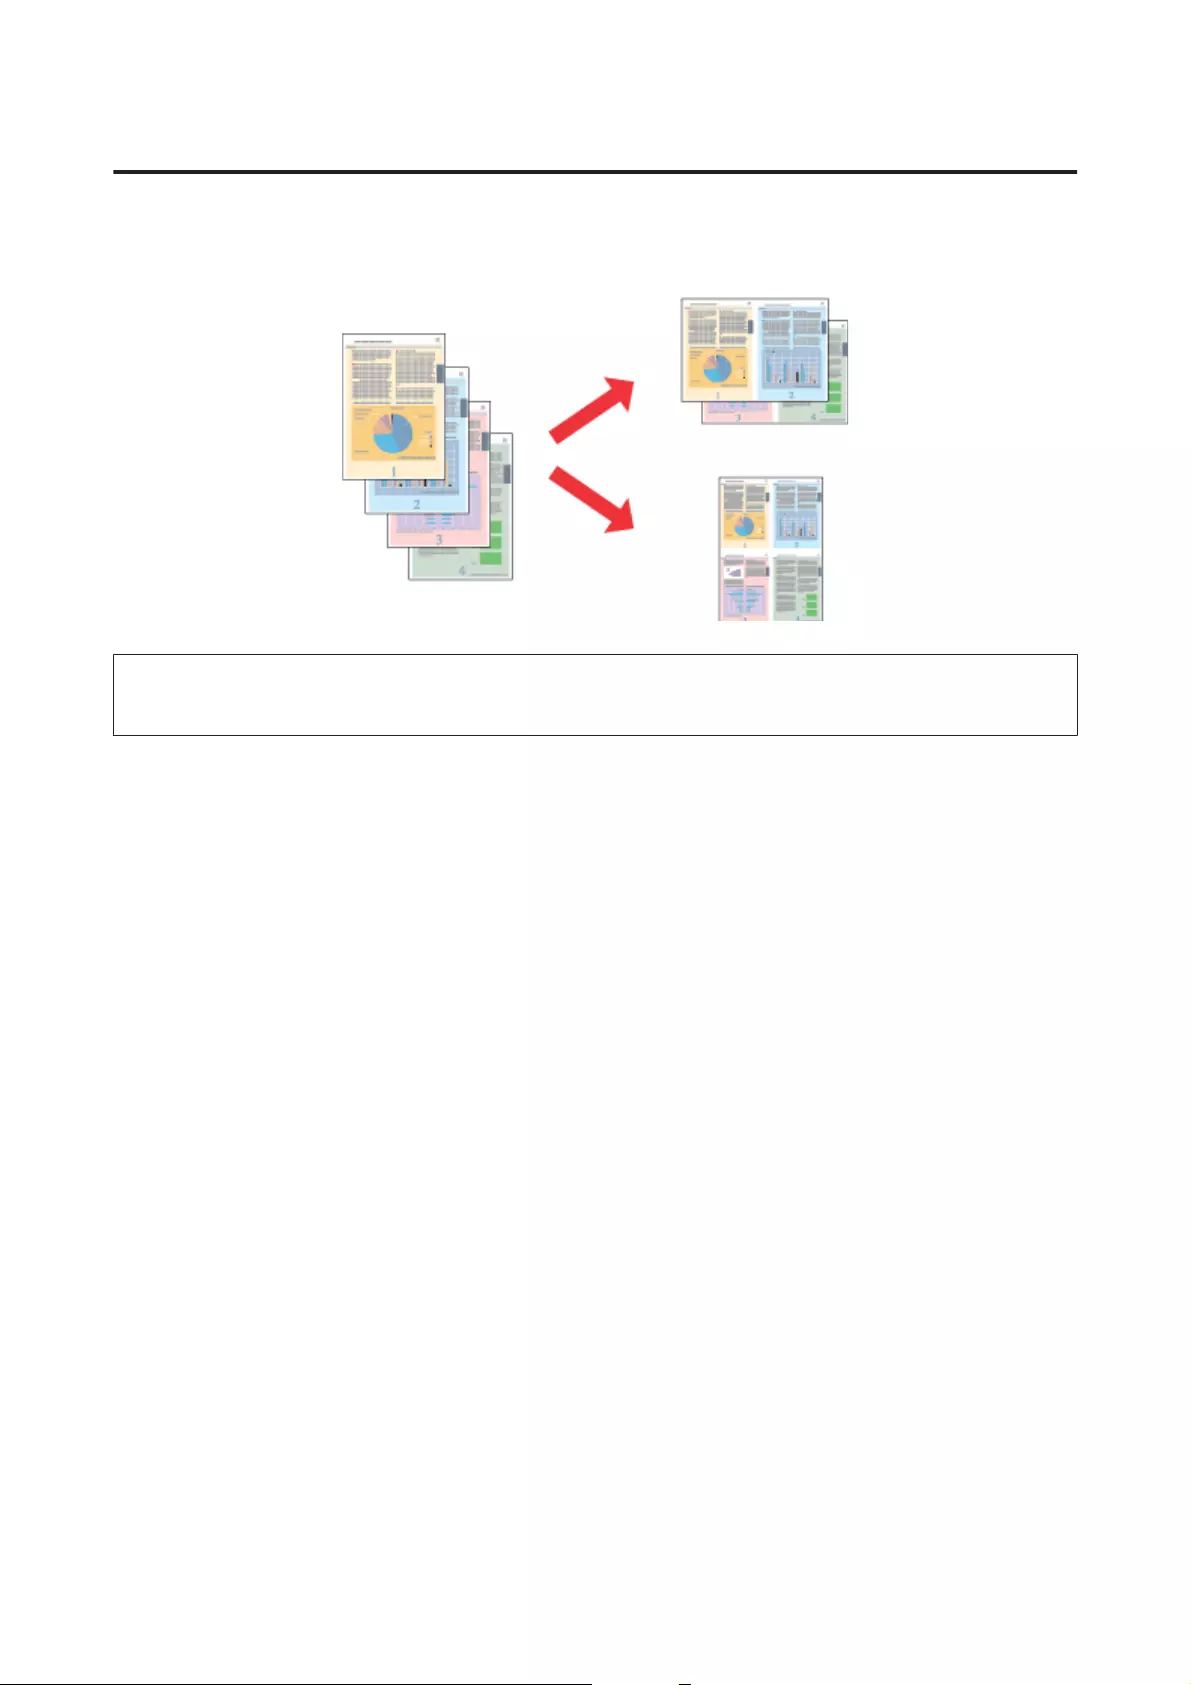
Pages per sheet printing
Lets you use the printer driver to print two or four pages on a single sheet of paper.
Note:
This feature may not be available at some settings.
Product settings for Windows
A
Access the printer settings.
& “Accessing the printer driver for Windows” on page 16
B
Select 2-Up or 4-Up as Multi-Page in the Main tab.
C
Click Page Order, and make the appropriate settings.
D
Check the other settings and print.
Product settings for Mac OS X
A
Access the Print dialog box.
& “Accessing the printer driver for Mac OS X” on page 17
B
Select the desired number of Pages per Sheet and the Layout Direction (page order) in the Layout pane.
C
Check the other settings and print.
User’s Guide
Printing
25

Sharing the Product for Printing
Setup for Windows
These instructions tell you how to set up your product so other users on the network can share it.
First you will set up the product as a shared printer on the computer directly connected to it. Then you will add
the product to each network computer that will access it.
Note:
❏These instructions are for small networks only. To share the product on a large network, consult your network
administrator.
❏The screen shots in the following section are from Windows 7.
Setting up the product as a shared printer
Note:
❏To set up the product as a shared printer in Windows 8, 7 or Vista, you will need an account with administrator
privileges and the password if you log on as a standard user.
❏To set up the product as a shared printer in Windows XP, you must log on to a Computer Administrator account.
Follow the steps below on the computer that is connected directly to the product:
A
Windows 8:
Select Desktop, Settings charm, and Control Panel. Then select Devices and Printers from the Hardware
and Sound category.
Windows 7:
Click the start button, select Devices and Printers.
Windows Vista:
Click the start button, select Control Panel, and then select Printer from the Hardware and Sound category.
Windows XP:
Click Start and select Control Panel, and then select Printers and Faxes, from the Printers and Other
Hardware category.
B
Windows 8 and 7:
Right-click on the product, or press and hold the product, and select Printer properties, and then select
Sharing. Then select the Change Sharing Options button.
Windows Vista:
Right-click the icon for your product, and then click Sharing. Click the Change sharing options button
and then click Continue.
Windows XP:
Right-click the icon for your product, then click Sharing.
User’s Guide
Printing
26
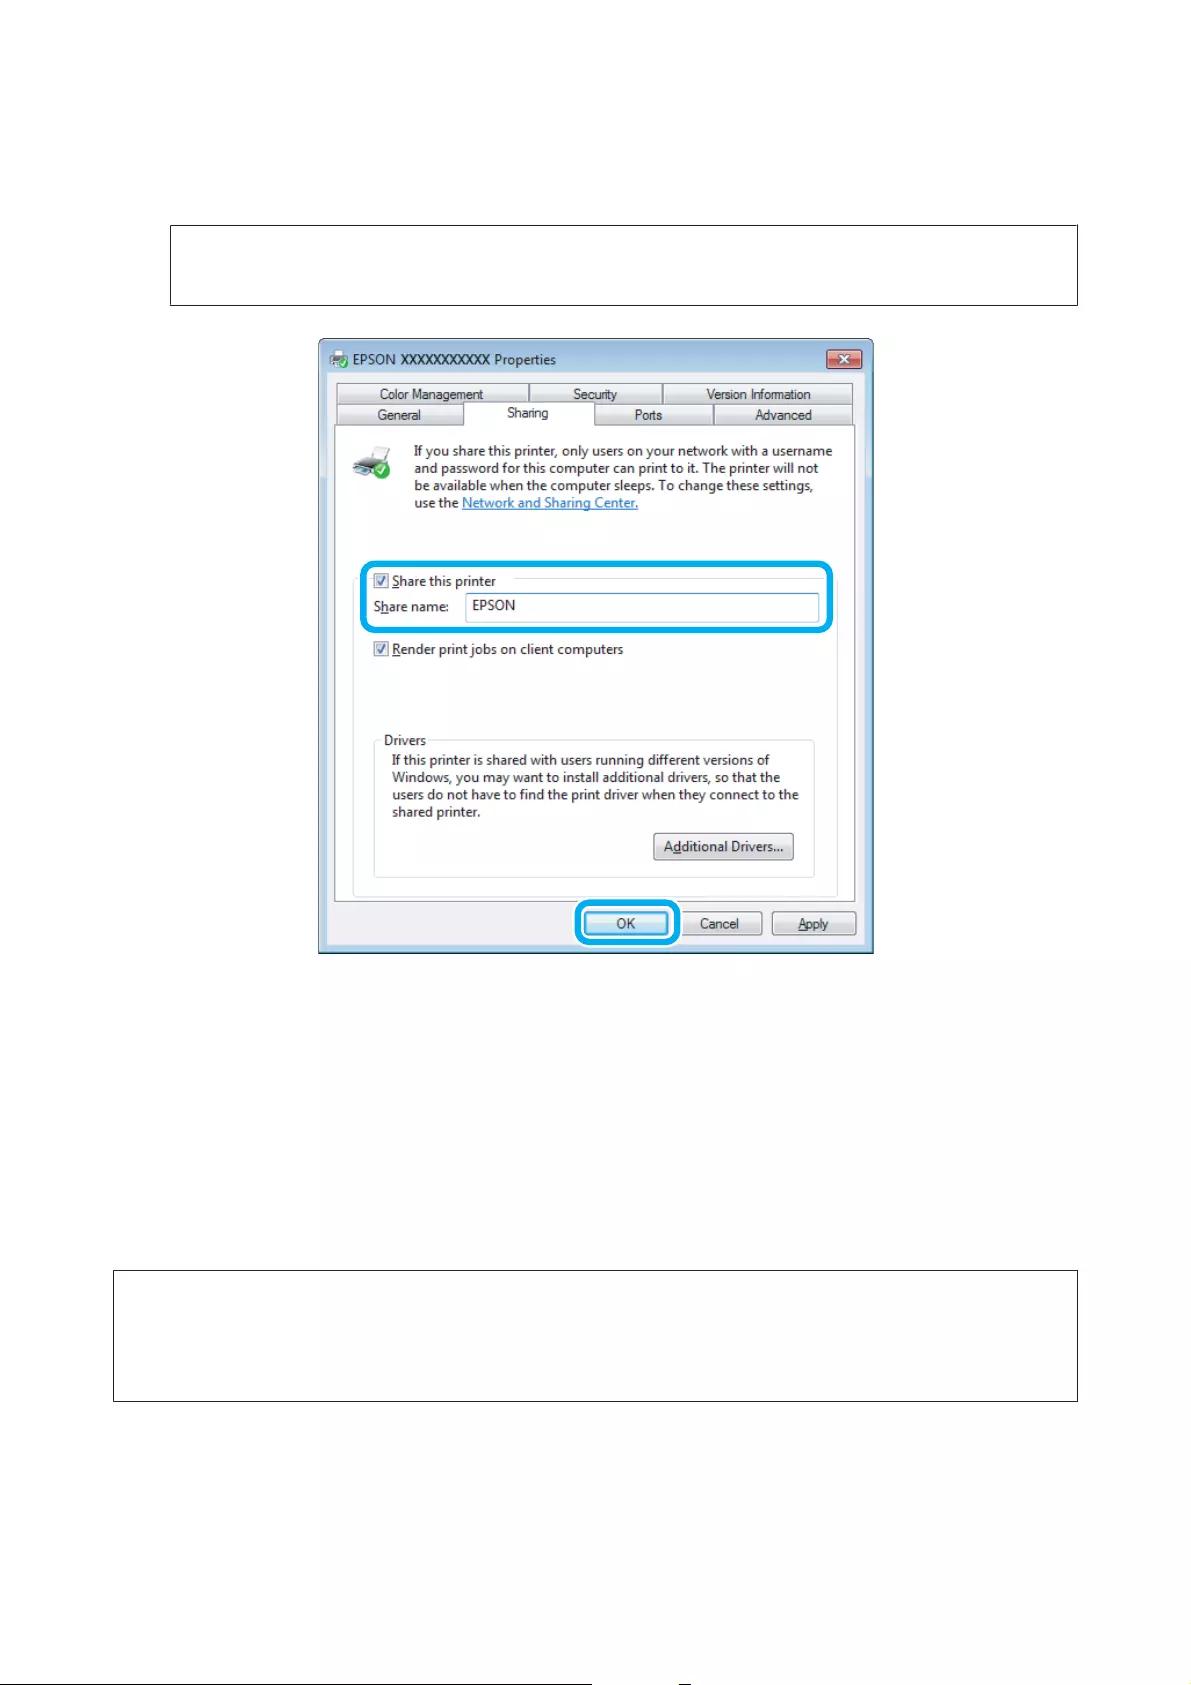
C
Select Share this printer, then type a Share name.
Note:
Do not use spaces or hyphens in the share name.
If you want to automatically download printer drivers for computers that are running different versions of
Windows, click Additional Drivers and select the environment and the operating systems of the other
computers. Click OK, then insert the product software disk.
D
Click OK or Close (if you installed additional drivers).
Adding the product to the other network computers
Follow these steps to add the product to each network computer that will access it.
Note:
Your product must be set up as a shared printer on the computer to which it is connected before you can access it from
another computer.
& “Setting up the product as a shared printer” on page 26.
User’s Guide
Printing
27
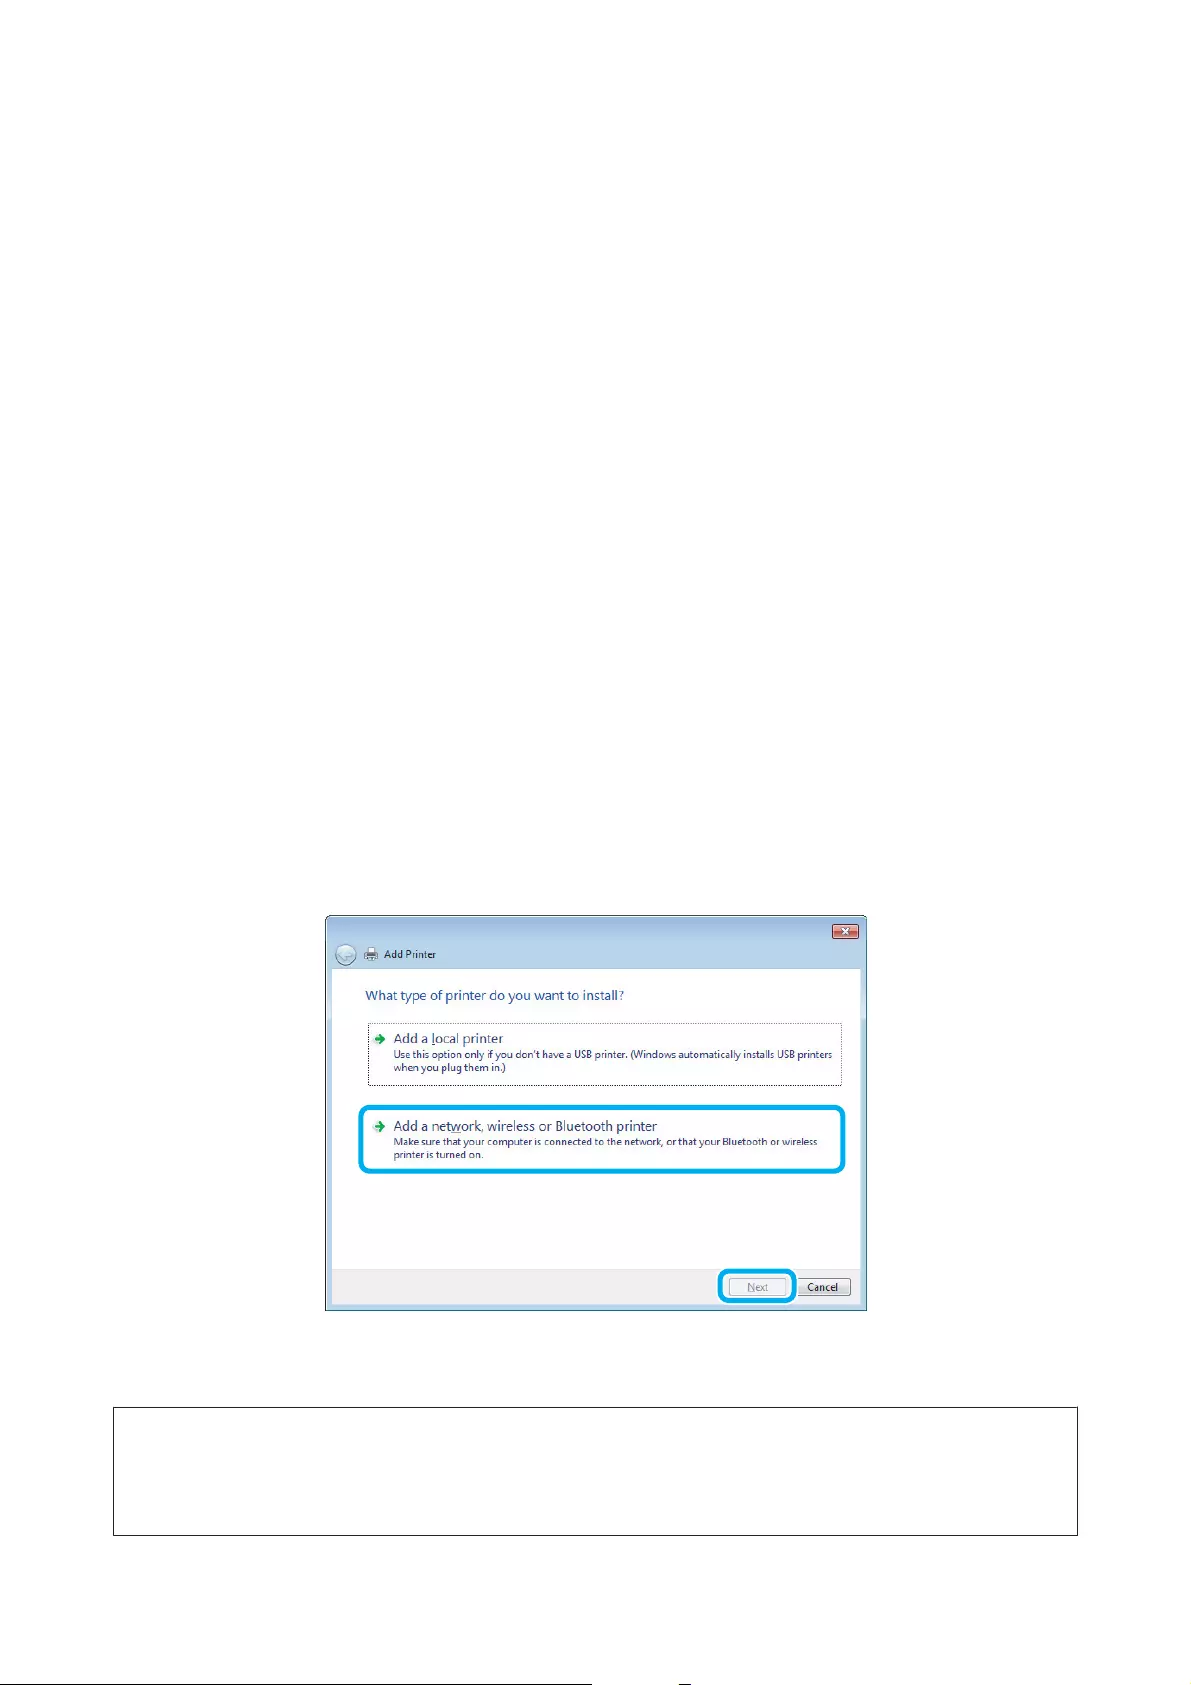
A
Windows 8:
Select Desktop, Settings charm, and Control Panel. Then select Devices and Printers from the Hardware
and Sound category.
Windows 7:
Click the start button, select Devices and Printers.
Windows Vista:
Click the start button, select Control Panel, and then select Printer from the Hardware and Sound category.
Windows XP:
Click Start and select Control Panel, and then select Printers and Faxes, from the Printers and Other
Hardware category.
B
Windows 8, 7 and Vista:
Select the Add a printer button.
Windows XP:
Click the Add a printer button. The Add Printer Wizard appears. Click the Next button.
C
Windows 8:
Go to Step 4.
Windows 7 and Vista:
Click Add a network, wireless or Bluetooth printer, and then click Next.
Windows XP:
Select A network printer, or a printer attached to another computer, then click Next.
D
Follow the on-screen instructions to select the product you want to use.
Note:
Depending on the operating system and the configuration of the computer to which the product is connected, the Add
Printer Wizard may prompt you to install the printer driver from the product software disk. Click the Have Disk button
and follow the on-screen instructions.
User’s Guide
Printing
28

Setup for Mac OS X
To set up your product on a Mac OS X network, use the Printer Sharing setting. See your Macintosh
documentation for details.
User’s Guide
Printing
29

Ink Bottles Information
You can use the following ink bottles with this product:
Ink bottles Part numbers
Black T6641
Cyan T6642
Magenta T6643
Yellow T6644
c
Important:
Use of genuine Epson ink other than specified could cause damage that is not covered by Epson’s warranties.
Color Black, Cyan, Magenta, Yellow
Temperature Storage:
-20 to 40 °C (-4 to 104 °F)
1 month at 40 °C (104 °F)
Freezing:*
-16 °C (3.2 °F)
* Ink thaws and is usable after approximately 3 hours at 25 °C (77 °F).
User’s Guide
Ink Bottles Information
30

Refilling Ink
Ink Bottle Safety Instructions, Precautions, and
Specifications
Safety instructions
Observe the following when handling the ink:
❏Keep ink bottles and the ink tank unit out of the reach of children. Do not allow children to drink from or
handle the ink bottles and ink bottle cap.
❏Do not tilt or shake an ink bottle after removing its seal; this can cause leakage.
❏Be careful not to touch any ink when you handle the ink tanks, ink tank caps, and opened ink bottles or ink
bottle caps.
If ink gets on your skin, wash the area thoroughly with soap and water.
If ink gets into your eyes, flush them immediately with water. If discomfort or vision problems continue after
a thorough flushing, see a doctor immediately.
If ink gets into your mouth, spit it out immediately and see a doctor right away.
Precautions on refilling ink
Read all of the instructions in this section before refilling ink.
❏Use ink bottles with the correct part number for this product.
& “Ink Bottles Information” on page 30
❏Epson recommends the use of genuine Epson ink bottles. Epson cannot guarantee the quality or reliability of
non-genuine ink. The use of non-genuine ink may cause damage that is not covered by Epson’s warranties,
and under certain circumstances, may cause erratic product behavior.
❏Other products not manufactured by Epson may cause damage that is not covered by Epson’s warranties, and
under certain circumstances, may cause erratic product behavior.
❏This product requires careful handling of ink. Ink may splatter when the ink tanks are filled or refilled with
ink. If ink gets on your clothes or belongings, it may not come off.
❏To maintain optimum print head performance, some ink is consumed from all ink tanks not only during
printing but also during maintenance operation such as print head cleaning.
❏Do not open the ink bottle package until you are ready to fill the ink tank. The ink bottle is vacuum packed to
maintain its reliability. If you leave an ink bottle unpacked for a long time before using it, normal printing
may not be possible.
❏If any of the ink tanks are not filled up to the lower line, refill the ink soon. Continued use of the product
when the ink level is below the lower line on the tanks could damage the product.
User’s Guide
Refilling Ink
31
❏After bringing an ink bottle inside from a cold storage site, allow it to warm up at room temperature for at
least three hours before using it.
❏Store ink bottles in a cool, dark place.
❏Store the ink bottles in the same environment as the product. When storing or transporting an ink bottle after
removing its seal, do not tilt the bottle and do not subject it to impacts or temperature changes. Otherwise, ink
may leak even if the cap on the ink bottle is tightened securely. Be sure to keep the ink bottle upright when
tightening the cap, and take measures to prevent ink from leaking when you transport the bottle.
Ink bottle specifications
❏Epson recommends using the ink bottle before the date printed on the package.
❏Some ink is consumed in the initial charging. In order to produce high quality printouts, the print head in
your product will be fully charged with ink.
❏Quoted yields may vary depending on the images that you are printing, the paper type that you are using, the
frequency of your prints and environmental conditions such as temperature.
❏Although the ink bottles may contain recycled materials, this does not affect product function or performance.
❏When printing in monochrome or grayscale, color inks instead of black ink may be used depending on the
paper type or print quality settings. This is because a mixture of color inks is used to create black.
Checking the Ink Levels
To confirm the actual ink remaining, visually check the ink levels in all of the product’s tanks.
c
Important:
If any of the ink tanks are not filled up to the lower line, fill them to the upper line on the ink tank. Continued use
of the product when the ink level is below the lower line on the tanks could damage the product.
Refilling the Ink Tanks
Note:
The illustrations show how to refill the ink tank at the far left. However, the instructions are the same for all of the inks.
User’s Guide
Refilling Ink
32
Ink can be refilled at any time.
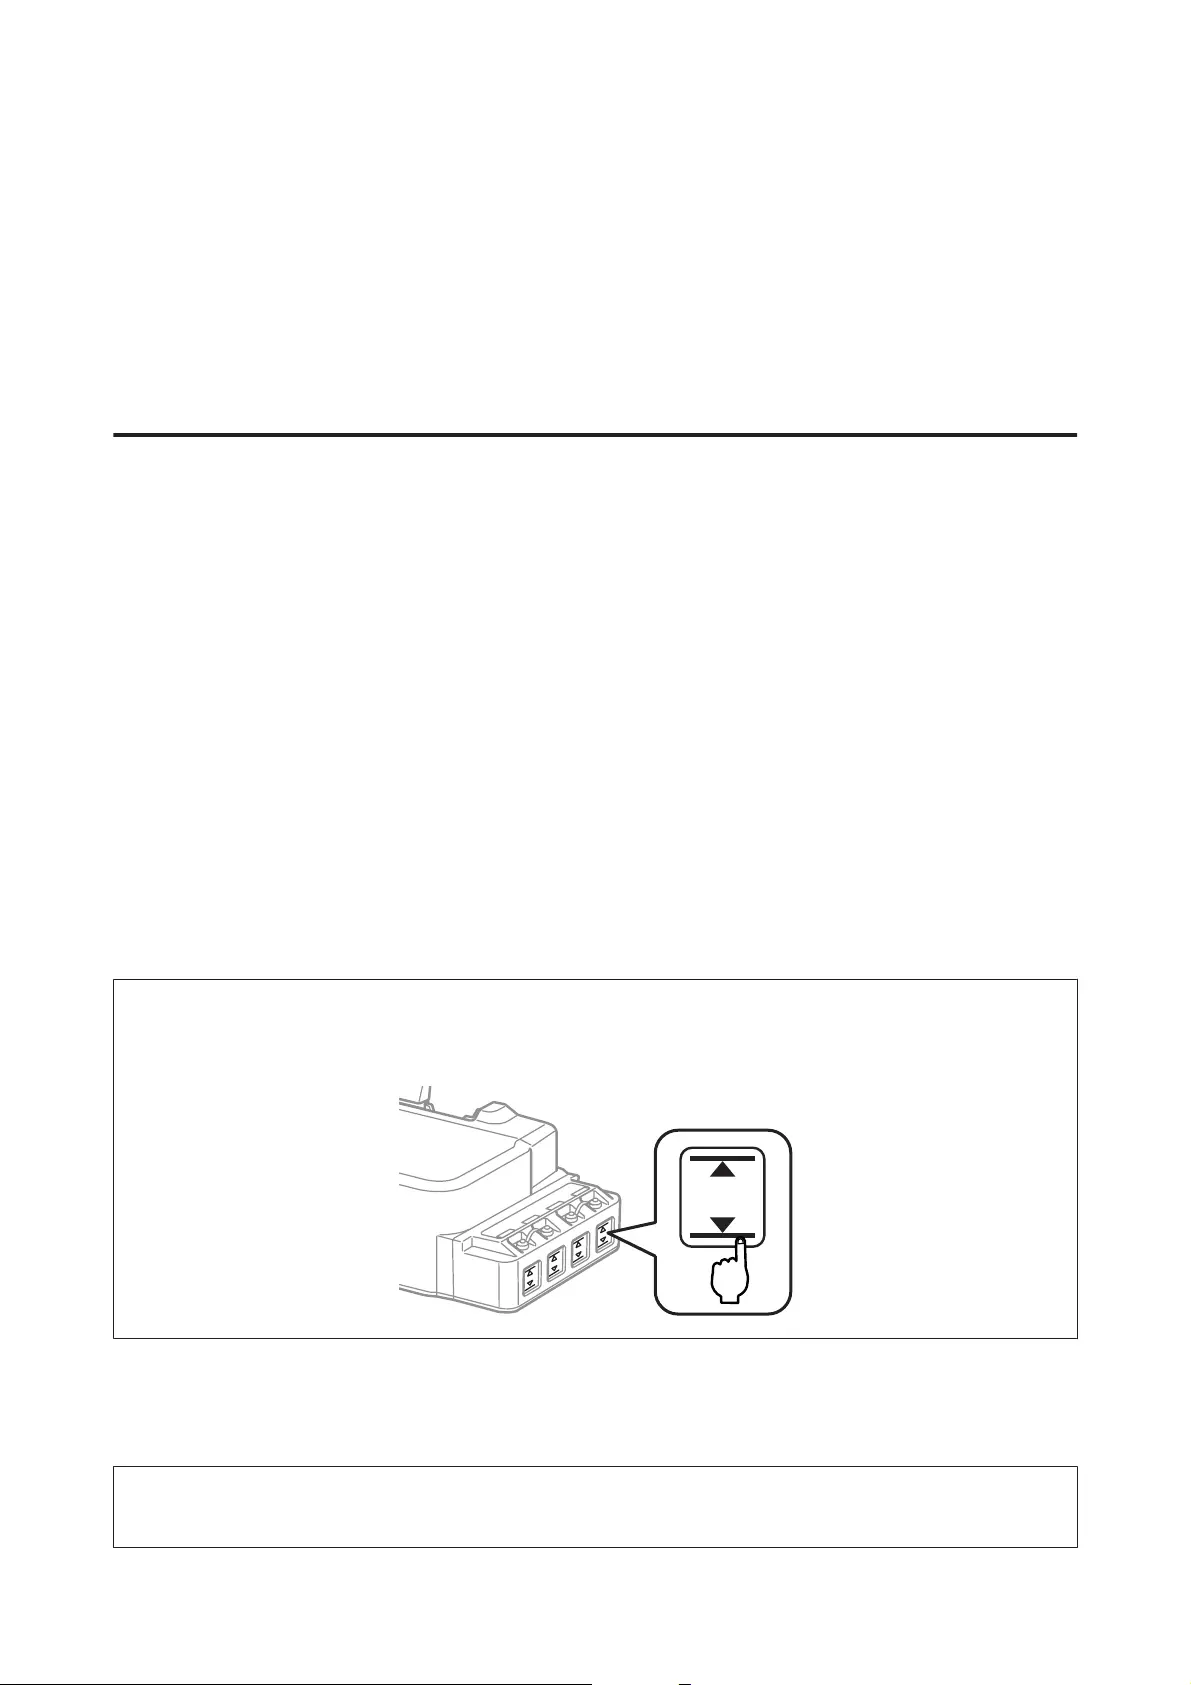
A
Remove the cap of the ink tank.
Note:
❏Be careful not to spill any ink.
❏Make sure that the color of the ink tank matches the ink color that you want to refill.
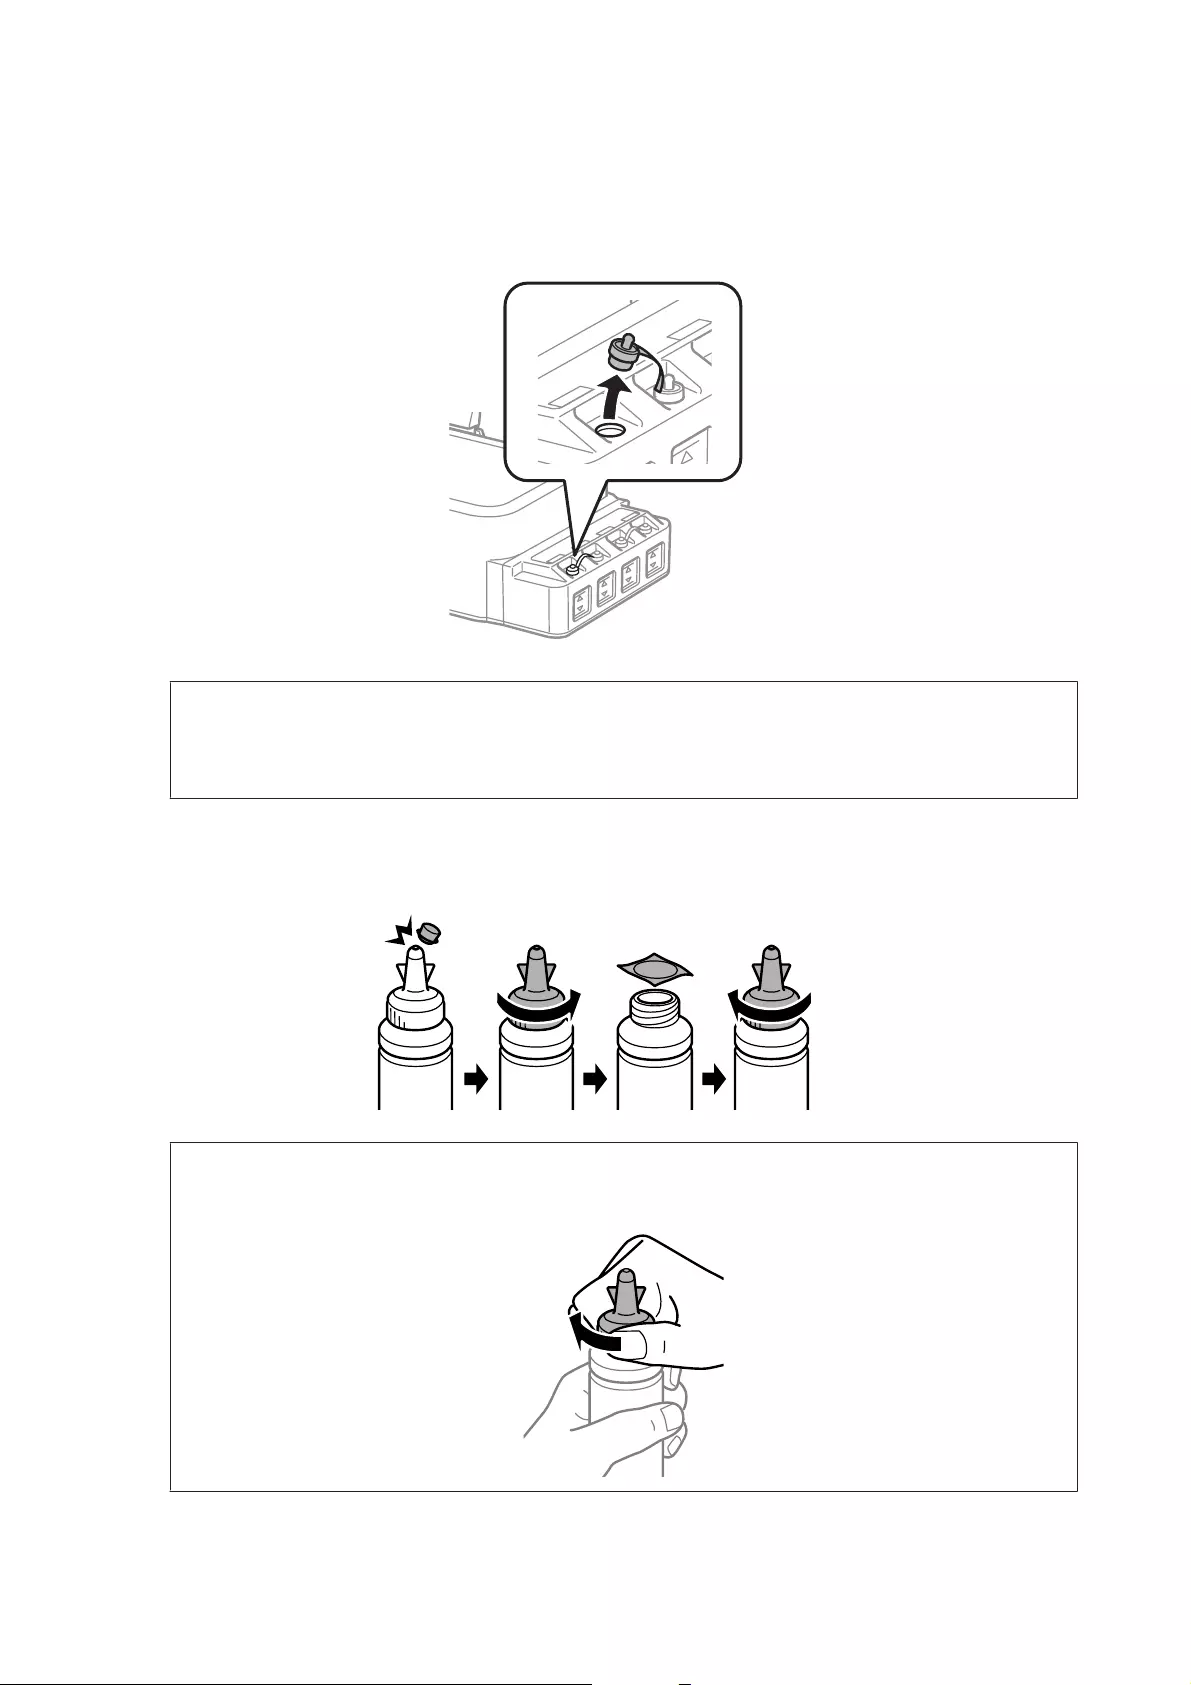
B
Snap off the top of the cap, remove the cap of the ink bottle, remove the seal from the bottle, and then close
the cap.
c
Important:
Close the ink bottle cap tightly; otherwise ink may leak.
User’s Guide
Refilling Ink
33
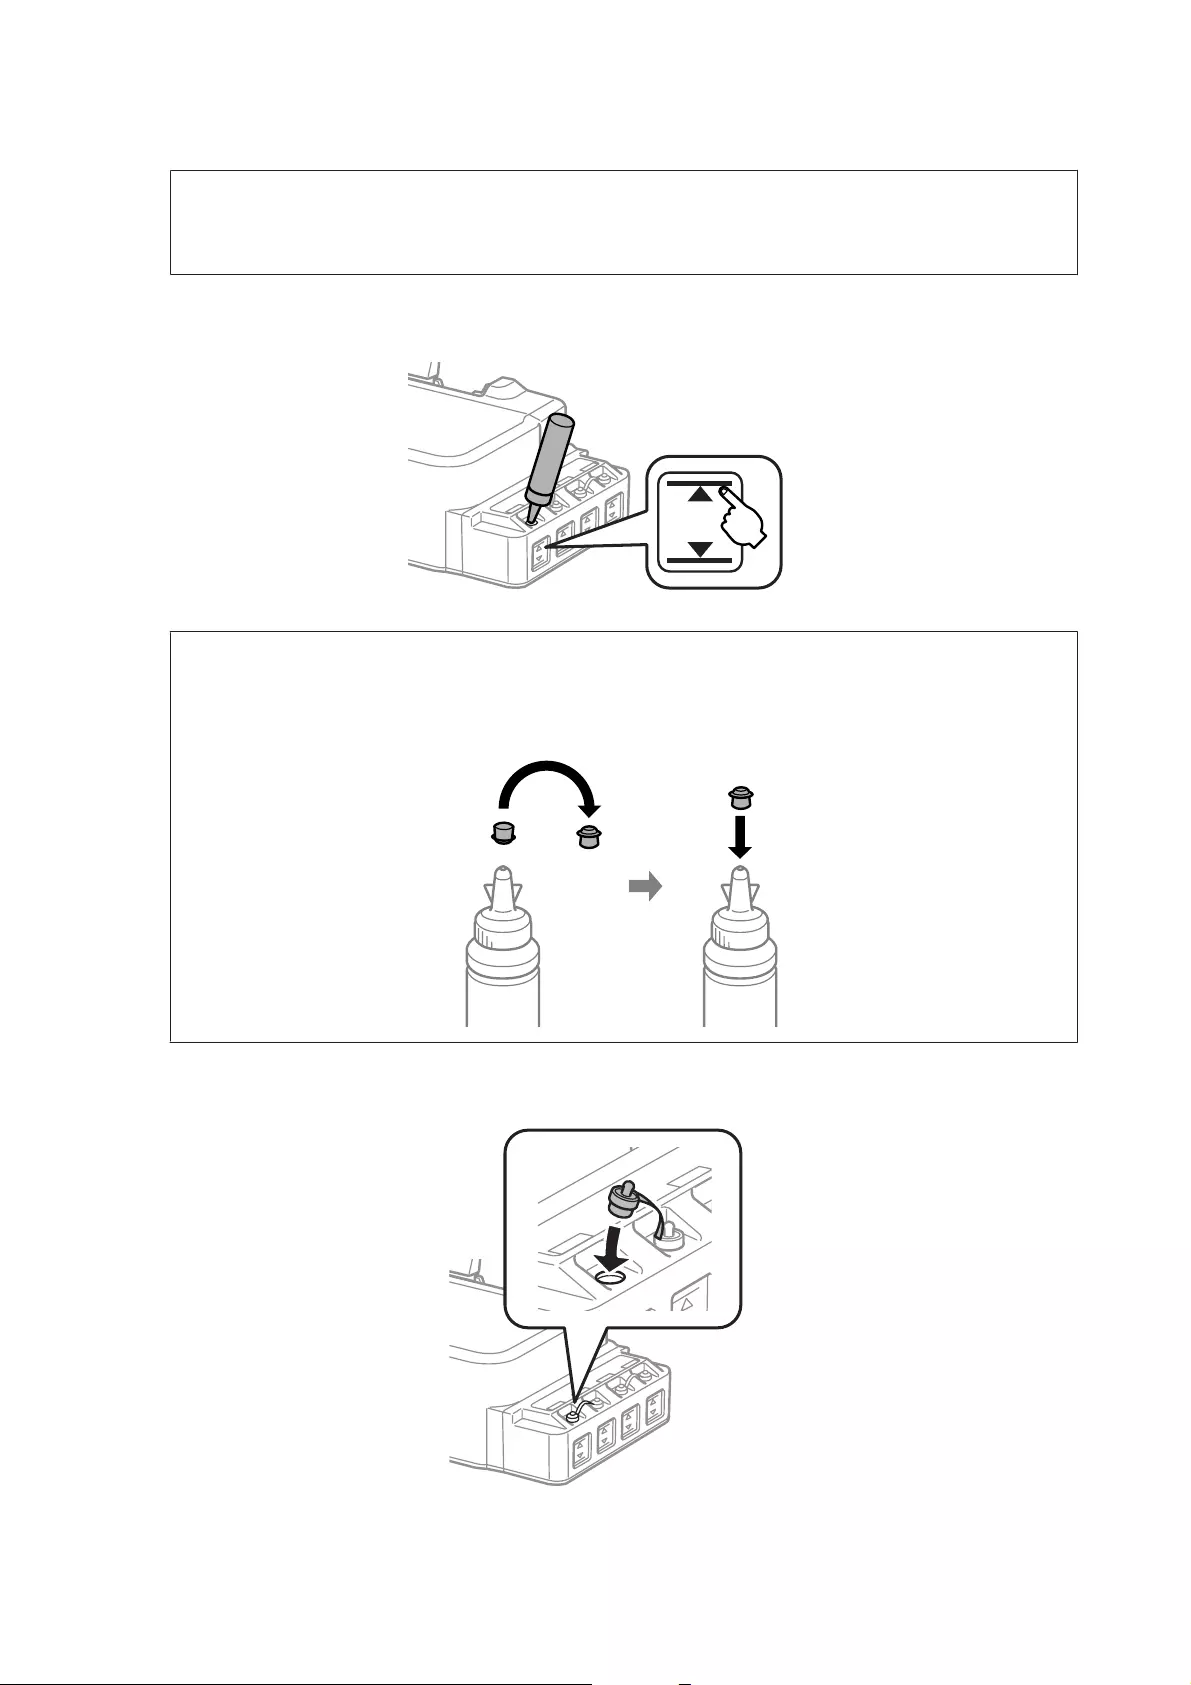
Note:
Do not dispose of the top of the cap. If any ink remains in the ink bottle after refilling the tank, use the top of the
cap to seal the ink bottle cap.
C
Refill the ink tank with the correct colored ink up to the upper line on the ink tank.
Note:
If any ink remains in the ink bottle after filling the ink tank up to the upper line, install the cap securely and
store the ink bottle upright for later use.
D
Close the cap onto the ink tank securely.
User’s Guide
Refilling Ink
34

Maintaining Your Product and Software
Checking the Print Head Nozzles
If you find that the printout is unexpectedly faint or that dots are missing, you may be able to identify the problem
by checking the print head nozzles.
You can check the print head nozzles from your computer by using the Nozzle Check utility or from the product
by using the buttons.
Using the Nozzle Check utility for Windows
Follow the steps below to use the Nozzle Check utility.
A
Make sure that no warnings or errors are indicated in the control panel.
B
Make sure that A4-size paper is loaded in the rear paper feed.
C
Right-click the product icon on the taskbar, then select Nozzle Check.
If the product icon does not appear, refer to the following section to add the icon.
& “From the shortcut icon on the taskbar” on page 17
D
Follow the on-screen instructions.
Using the Nozzle Check utility for Mac OS X
Follow the steps below to use the Nozzle Check utility.
A
Make sure that no warnings or errors are indicated in the control panel.
B
Make sure that A4-size paper is loaded in the rear paper feed.
C
Access the Epson Printer Utility 4.
& “Accessing the printer driver for Mac OS X” on page 17
D
Click the Nozzle Check icon.
E
Follow the on-screen instructions.
User’s Guide
Maintaining Your Product and Software
35

Using the control panel
Follow the steps below to check the print head nozzles using the product buttons.
A
Make sure that no warnings or errors are indicated in the control panel.
B
Turn off the product.
C
Make sure that A4-size paper is loaded in the rear paper feed.
D
While holding down the y button, press the P button to turn on the product.
E
When the product turns on, release both the buttons. The product prints the nozzle check pattern.
Below are two sample nozzle check patterns.
Compare the quality of the printed check page with the sample shown below. If there are no print quality
problems, such as gaps or missing segments in the test lines, the print head is fine.
If any segment of the printed lines is missing, as shown below, this could mean a clogged ink nozzle or a
misaligned print head.
& “Cleaning the Print Head” on page 36
& “Aligning the Print Head” on page 38
Cleaning the Print Head
If you find that the printout is unexpectedly faint or that dots are missing, you may be able to solve these problems
by cleaning the print head, which ensures that the nozzles are delivering ink properly.
You can clean the print head from your computer using the Head Cleaning utility in the printer driver or from the
product by using the buttons.
User’s Guide
Maintaining Your Product and Software
36

c
Important:
❏Do not open the front cover or turn off the product during head cleaning. If the head cleaning is incomplete,
you may not be able to print.
❏If print quality does not improve after repeating this procedure three times, turn the product off and wait for
at least twelve hours. Then run the nozzle check again and repeat head cleaning if necessary. If print quality
has still not improved, contact Epson support.
Note:
❏Because print head cleaning uses some ink from all tanks, clean the print head only if quality declines; for example,
if the printout is blurry or the color is incorrect or missing.
❏Use the Nozzle Check utility first to confirm that the print head needs to be cleaned. This saves ink.
❏When ink is low you may not be able to clean the print head. Prepare a new ink bottle.
❏To maintain print quality, we recommend printing a few pages on a regular basis.
Using the Head Cleaning utility for Windows
Follow the steps below to clean the print head using the Head Cleaning utility.
A
Make sure that no warnings or errors are indicated in the control panel.
B
Right-click the product icon on the taskbar, then select Head Cleaning.
If the product icon does not appear, refer to the following section to add the icon.
& “From the shortcut icon on the taskbar” on page 17
C
Follow the on-screen instructions.
Using the Head Cleaning utility for Mac OS X
Follow the steps below to clean the print head using the Head Cleaning utility.
A
Make sure that no warnings or errors are indicated in the control panel.
B
Access the Epson Printer Utility 4.
& “Accessing the printer driver for Mac OS X” on page 17
C
Click the Head Cleaning icon.
D
Follow the on-screen instructions.
Using the control panel
Follow the steps below to clean the print head using the product buttons.
User’s Guide
Maintaining Your Product and Software
37

A
Make sure that no warnings or errors are indicated in the control panel.
B
Hold down the y button for three seconds.
The product starts cleaning the print head and the P light begins flashing.
C
When the P light stops flashing, print a nozzle check pattern to confirm that the head is clean.
& “Checking the Print Head Nozzles” on page 35
Aligning the Print Head
If you notice a misalignment of vertical lines or horizontal banding, you may be able to solve this problem by
using the Print Head Alignment utility in your printer driver.
Refer to the appropriate section below.
Note:
Do not press y to cancel printing while printing a test pattern with the Print Head Alignment utility.
Using the Print Head Alignment utility for Windows
Follow the steps below to align the print head using the Print Head Alignment utility.
A
Make sure that no warnings or errors are indicated in the control panel.
B
Make sure A4-size paper is loaded in the rear paper feed.
C
Right-click the product icon on the taskbar, then select Print Head Alignment.
If the product icon does not appear, refer to the following section to add the icon.
& “From the shortcut icon on the taskbar” on page 17
D
Follow the on-screen instructions to align the print head.
Using the Print Head Alignment utility for Mac OS X
Follow the steps below to align the print head using the Print Head Alignment utility.
A
Make sure that no warnings or errors are indicated in the control panel.
B
Make sure A4-size paper is loaded in the rear paper feed.
User’s Guide
Maintaining Your Product and Software
38

C
Access the Epson Printer Utility 4.
& “Accessing the printer driver for Mac OS X” on page 17
D
Click the Print Head Alignment icon.
E
Follow the on-screen instructions to align the print head.
Cleaning the Paper Guide
You may see a smudge on the back of the printout when excessive ink remains on the paper guide. The paper
guide is the dark plastic strip inside the product. In this case, you can solve the problem by using the Paper Guide
Cleaning utility in your printer driver.
Refer to the appropriate section below.
Note:
Repeat the procedure until the inside of the product is cleaned.
Using the Paper Guide Cleaning utility for Windows
Follow the steps below to clean the paper guide using the Paper Guide Cleaning utility.
A
Make sure that no warnings or errors are indicated in the control panel.
B
Make sure A4-size paper is loaded.
C
Open the printer driver, click the Maintenance tab, then click the Paper Guide Cleaning button.
& “Accessing the printer driver for Windows” on page 16
D
Follow the on-screen instructions to clean the paper guide.
Using the Paper Guide Cleaning utility for Mac OS X
Follow the steps below to clean the paper guide using the Paper Guide Cleaning utility.
A
Make sure that no warnings or errors are indicated in the control panel.
B
Make sure A4-size paper is loaded.
C
Access the Epson Printer Utility 4 dialog box.
& “Accessing the printer driver for Mac OS X” on page 17
User’s Guide
Maintaining Your Product and Software
39

D
Click the Paper Guide Cleaning icon.
E
Follow the on-screen instructions to clean the paper guide.
Replacing Ink inside the Ink Tubes
If you have not used the product for a long time and notice banding or missing colors in the printouts, you may
need to replace the ink inside the ink tubes to solve the problem.
The Power Ink Flushing utility allows you to replace all of the ink inside the ink tubes.
c
Important:
This function consumes a lot of ink. Before using this function, make sure there is enough ink in the product’s ink
tanks. If there is not enough ink, refill the ink tanks.
Note:
❏This function effects the service life of the ink pads. Ink pads reach their capacity earlier by running this function.
Contact Epson Support or an authorised Epson service provider to request replacement before the end of their
service life. It is not a user-serviceable part.
❏After using the Power Ink Flushing utility, turn the product off and wait for at least twelve hours. Using this
function improves the print quality after twelve hours, however it cannot be used again within twelve hours of the
last use. If you still cannot solve the problem after trying all of the methods above, contact Epson support.
Using the Power Ink Flushing utility for Windows
Follow the steps below to use the Power Ink Flushing utility.
A
Make sure that no warnings or errors are indicated in the control panel.
B
Access the printer driver.
& “Accessing the printer driver for Windows” on page 16
C
Click the Maintenance tab, then click the Power Ink Flushing button.
D
Follow the on-screen instructions.
Using the Power Ink Flushing utility for Mac OS X
Follow the steps below to use the Power Ink Flushing utility.
A
Make sure that no warnings or errors are indicated in the control panel.
User’s Guide
Maintaining Your Product and Software
40

B
Access the Epson Printer Utility 4.
& “Accessing the printer driver for Mac OS X” on page 17
C
Click the Power Ink Flushing icon.
D
Follow the on-screen instructions.
Saving Power
The product enters sleep mode or turns off automatically if no operations are performed for a set period.
You can adjust the time before power management is applied. Any increase will affect the product’s energy
efficiency. Please consider the environment before making any change.
Follow the steps below to adjust the time.
For Windows
A
Access the printer settings.
& “Accessing the printer driver for Windows” on page 16
B
Click the Maintenance tab, and then click the Printer and Option Information button.
C
Select Off, 30 minutes, 1 hour, 2 hours, 4 hours, 8 hours, or 12 hours as the Power Off Timer setting, and
click the Send button.
D
Select 3 minutes, 5 minutes, 10 minutes, or 15 minutes as the Sleep Timer setting, and click the Send button.
E
Click the OK button.
For Mac OS X
A
Access the Epson Printer Utility 4.
& “Accessing the printer driver for Mac OS X” on page 17
B
Click the Printer Settings button. The Printer Settings screen appears.
C
Select Off, 30 minutes, 1 hour, 2 hours, 4 hours, 8 hours, or 12 hours as the Power Off Timer setting.
D
Select 3 minutes, 5 minutes, 10 minutes, or 15 minutes as the Sleep Timer setting.
E
Click the Apply button.
User’s Guide
Maintaining Your Product and Software
41

Quieter Printer Operations
You can make printer operations quiet without changing the print quality. However, printing speed might be reduced.
For Windows
A
Access the printer settings.
& “Accessing the printer driver for Windows” on page 16
B
In the Main window, select Off or On as the Quiet Mode.
For Mac OS X
A
Click System Preferences on the Apple menu.
B
Click Printers & Scanners (for Mac OS X 10.9), Print & Scan (for Mac OS X 10.8 or 10.7) or Print & Fax
(for Mac OS X 10.6 or 10.5), and then select your product from the Printers list box.
C
Click Options & Supplies, and then Driver.
D
Select Off or On as the Quiet Mode.
Checking the Number of Sheets of Paper Fed
You can check the number of sheets of paper fed from the printer driver.
Click the Printer and Option Information button on your printer driver’s Maintenance window (for Windows)
or on the Epson Printer Utility 4 (for Mac OS X).
Cleaning the Product
Cleaning the exterior of the product
To keep your product operating at its best, clean it thoroughly several times a year by using the following instructions.
c
Important:
Never use alcohol or thinner to clean the product. These chemicals can damage the product.
User’s Guide
Maintaining Your Product and Software
42

Cleaning the interior of the product
To keep your print results at their best, clean the roller inside by using the Paper Guide Cleaning utility.
& “Cleaning the Paper Guide” on page 39
!
Caution:
Be careful not to touch the parts inside the product.
c
Important:
❏Be careful to keep water away from the electronic components.
❏Do not spray the inside of the product with lubricants.
❏Unsuitable oils can damage the mechanism. Contact your dealer or a qualified service person if lubrication is
needed.
Transporting the Product
If you move the product some distance, you need to prepare it for transportation in its original box or one of a
similar size.
c
Important:
❏When storing or transporting the product, avoid tilting it, placing it vertically, or turning it upside down;
otherwise ink may leak.
❏When storing or transporting an ink bottle after removing its seal, do not tilt the bottle and do not subject it to
impacts or temperature changes. Otherwise, ink may leak even if the cap on the ink bottle is tightened
securely. Be sure to keep the ink bottle upright when tightening the cap, and take measures to prevent ink
from leaking when you transport the bottle.
A
Open the front cover and make sure the print head is in the home position on the right.
Note;
If the print head is not in the home position on the right, turn on the product and wait until the print head locks
in the far right position. Then turn off the product.
B
Turn off the product and unplug its power cord.
C
Disconnect the interface cable from the product.
User’s Guide
Maintaining Your Product and Software
43
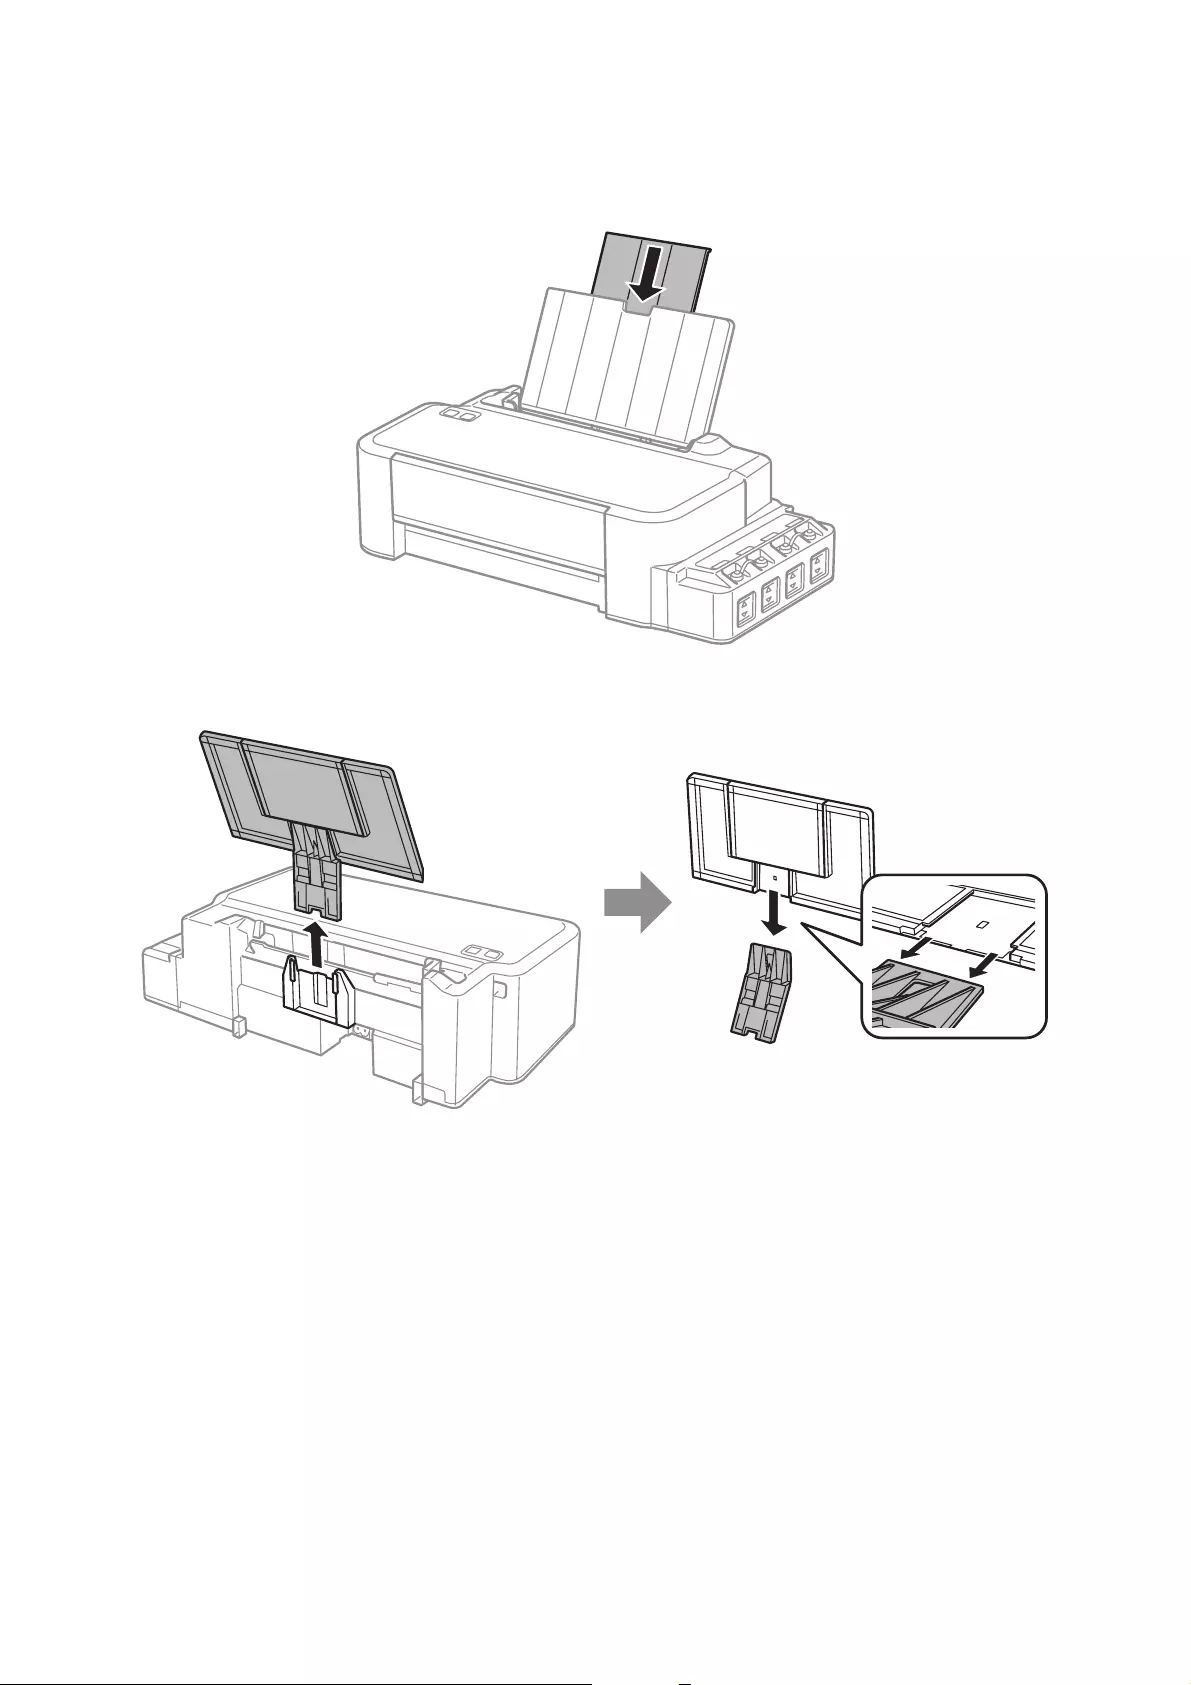
D
Remove all paper and close the paper support extension.
E
Remove the paper support, and then take it apart.
User’s Guide
Maintaining Your Product and Software
44
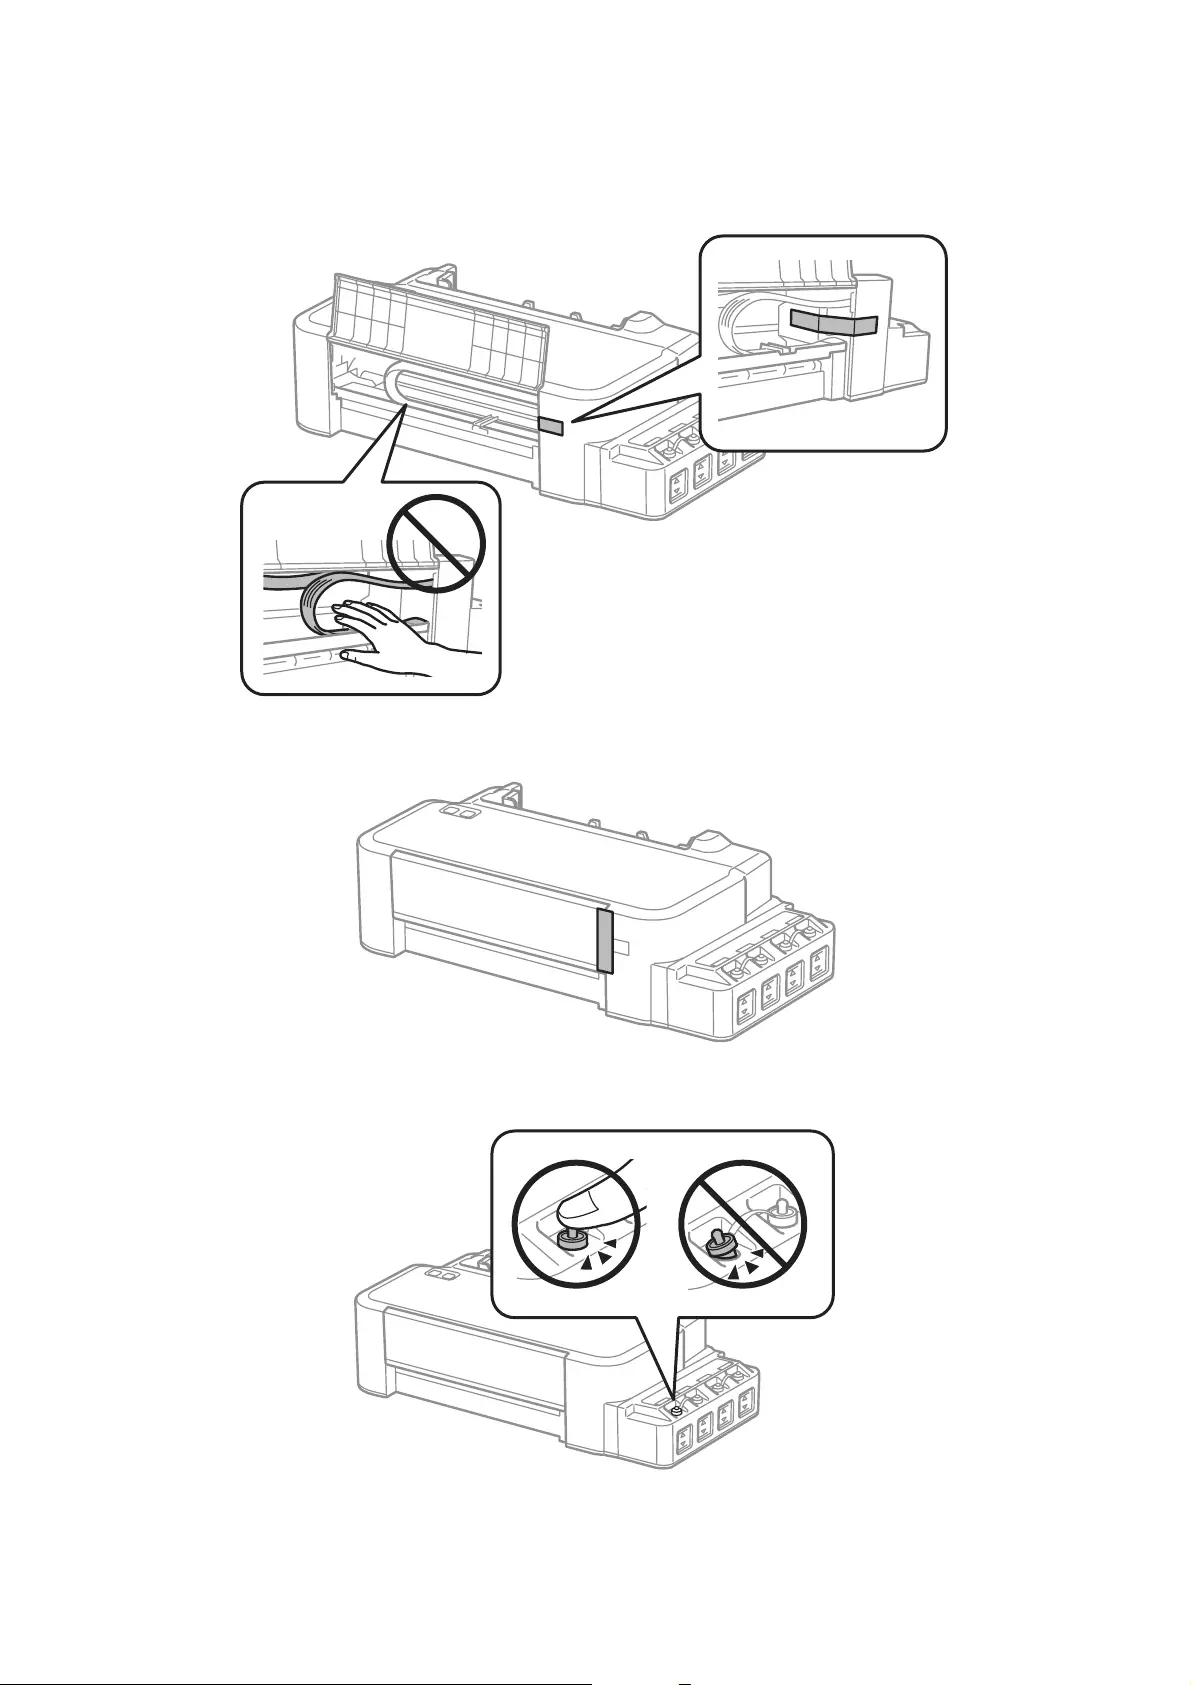
F
Open the front cover. Secure the print head with a tape, as shown below.
G
Close the front cover and secure it with a tape.
H
Make sure to close the cap onto the ink tank securely.
I
Repack the product in its box, using the protective materials that came with it.
User’s Guide
Maintaining Your Product and Software
45

c
Important:
❏Keep the product level during transport. Otherwise, ink may leak.
❏After you move it, remove the tape securing the print head. If you notice a decline in print quality, run a
cleaning cycle or align the print head.
❏Do not put opened ink bottles in the box with product.
Checking and Installing Your Software
Checking the software installed on your computer
To use the functions described in this User’s Guide, you need to install the following software.
Epson Driver and Utilities
Follow the steps below to check that the software is installed on your computer.
For Windows
A
Windows 8: Select Desktop, Settings charm and Control Panel.
Windows 7 and Vista: Click the start button and select Control Panel.
Windows XP: Click Start and select Control Panel.
B
Windows 8, 7 and Vista: Click Uninstall a program from the Programs category.
Windows XP: Double-click the Add or Remove Programs icon.
C
Check the list of currently installed programs.
For Mac OS X
A
Double-click Macintosh HD.
B
Double-click the Epson Software folder in the Applications folder and check the contents.
Note:
❏The Applications folder contains software provided by third parties.
❏To check that the printer driver is installed, click System Preferences on the Apple menu and then click Printers &
Scanners (for Mac OS X 10.9), Print & Scan (for Mac OS X 10.8 or 10.7) or Print & Fax (for Mac OS X 10.6 or
10.5). Then locate your product in the Printers list box.
User’s Guide
Maintaining Your Product and Software
46

Installing the software
Insert the product software disk that came with your product and select the software you want to install on the
Software Select screen.
If you are using Mac OS X, or if your computer does not have a CD/DVD drive, go to the following Epson website
to download and install the software.
http://support.epson.net/setupnavi/
Uninstalling Your Software
You may need to uninstall and then reinstall your software to solve certain problems or if you upgrade your
operating system.
See the following section for information on determining what applications are installed.
& “Checking the software installed on your computer” on page 46
For Windows
Note:
❏For Windows 8, 7 and Vista, you need an administrator account and password if you log on as a standard user.
❏For Windows XP, you must log on to a Computer Administrator account.
A
Turn off the product.
B
Disconnect the product’s interface cable from your computer.
C
Do one of the following.
Windows 8: Select Desktop, Settings charm and Control Panel.
Windows 7 and Vista: Click the start button and select Control Panel.
Windows XP: Click Start and select Control Panel.
D
Do one of the following.
Windows 8, 7 and Vista: Click Uninstall a program from the Programs category.
Windows XP: Double-click the Add or Remove Programs icon.
E
Select the software you want to uninstall such as your product’s driver and the application from the list
displayed.
F
Do one of the following.
Windows 8 and 7: Select Uninstall/Change or Uninstall.
User’s Guide
Maintaining Your Product and Software
47

Windows Vista: Click Uninstall/Change or Uninstall, and then click Continue in the User Account
Control window.
Windows XP: Click Change/Remove or Remove.
Note:
If you chose to uninstall your product’s printer driver in step 5, select the icon for your product and then click
OK.
G
When the confirmation window appears, click Yes or Next.
H
Follow the on-screen instructions.
In some cases, a message may appear to prompt you to restart your computer. If so, make sure I want to restart
my computer now is selected and click Finish.
For Mac OS X
Note:
❏To uninstall your software you need to download the Uninstaller.
Access the site at:
http://www.epson.com
Next, select the support section of your local Epson Web site.
❏To uninstall applications, you must log on to a Computer Administrator account.
You cannot uninstall programs if you log on as a limited account user.
❏Depending on the application, the Installer may be separated from the Uninstaller.
A
Quit all running applications.
B
Double-click the Uninstaller icon in your Mac OS X hard drive.
C
Select the check boxes for the software you want to uninstall, such as the printer driver and the application,
from the list displayed.
D
Click Uninstall.
E
Follow the on-screen instructions.
If you cannot find the software you want to uninstall in the Uninstaller window, double-click the Applications
folder in your Mac OS X hard drive, select the application you want to uninstall, and then drag it to the Trash icon.
User’s Guide
Maintaining Your Product and Software
48

Note:
If you uninstall the printer driver and the name of your product remains in the Printers & Scanners (for Mac OS X
10.9), Print & Scan (for Mac OS X 10.8 or 10.7) or Print & Fax (for Mac OS X 10.6 or 10.5) window, select the name of
your product and click the — remove button.
User’s Guide
Maintaining Your Product and Software
49
Error Indicators
Error Indications on the Control Panel
You can identify many common product problems using the lights on your product. If the product stops working
and the lights are on or flashing, use the following table to diagnose the problem, then follow the recommended
corrective measures.
= on, = flashing
Lights Problem and solution
Paper out
No paper is loaded. Load paper in the rear paper feed correctly and
press the y button.
Multiple-paper feed
More than one sheet has been fed at a time. Load paper in the rear paper feed correctly and
press the y button. If the paper remains in the
product, see “Paper Jams” on page 54.
Paper jam
Paper has jammed in the product. & “Paper Jams” on page 54
Flashing alternately
Maintenance
The product’s ink pad* is nearing or at the end
of its service life.
Contact Epson or an authorised Epson service
provider to replace the ink pad. If the ink pad
has not reached the end of its service life, you
can resume printing by pressing the y button.
It is not a user-serviceable part.
Fatal error
An unknown product error has occurred. Turn off the product. Then, remove the
jammed paper.
& “Paper Jams” on page 54
Then turn the product back on. If the error
does not clear, contact your dealer.
Waiting for initial ink to charge (Not ready to print)
Initial ink charging may not be complete. Fill the ink tanks using all of the ink bottles
supplied. Next, turn on the product and press
the y button for 3 seconds until the P light
starts flashing to start charging ink. Charging
ink takes about 20 minutes. Wait until the P
light stays on.
User’s Guide
Error Indicators
50

Lights Problem and solution
Recovery mode
The firmware update has failed, and the
product is in recovery mode.
You will need to try to update the firmware
again. Prepare a USB cable and visit your local
Epson website for further instructions.
* In some print cycles a very small amount of surplus ink may be collected in the ink pad. To prevent ink leakage from the pad,
the product is designed to stop printing when the pad has reached its limit. Whether and how often this is required will vary
according to the number of pages you print, the type of material that you print and the number of cleaning cycles that the
product performs. The need for replacement of the pad does not mean that your product has ceased to operate in accordance
with its specifications. The product will advise you when the pad requires replacing and this can only be performed by an
authorised Epson Service provider. The Epson warranty does not cover the cost of this replacement.
User’s Guide
Error Indicators
51

Troubleshooting for Printing
Diagnosing the Problem
Troubleshooting product problems is best handled in two steps: first diagnose the problem, then apply likely
solutions until the problem is fixed.
The information that you need to diagnose and solve most common problems is provided by online problem
solving, the control panel, or the status monitor. Refer to the appropriate section below.
If you have a specific problem relating to print quality, a printing problem not related to print quality, or a paper
feeding problem, or if the product does not print at all, refer to the appropriate section.
To solve a problem, you may need to cancel printing.
& “Canceling printing” on page 20
Checking product status
If a problem occurs while printing, an error message will appear in the status monitor window.
If an error message appears indicating the product’s ink pads are nearing the end of their service life, contact
Epson support to replace them. The message will be displayed at regular intervals until the ink pads are replaced.
When the product’s ink pads are saturated, the product stops and Epson support is required to continue printing.
For Windows
There are two ways to access EPSON Status Monitor 3:
❏Double-click the product shortcut icon on your Windows taskbar. To add a shortcut icon to the taskbar, see
the following section:
& “From the shortcut icon on the taskbar” on page 17
❏Open the printer driver, click the Maintenance tab, then click the EPSON Status Monitor 3 button.
User’s Guide
Troubleshooting for Printing
52
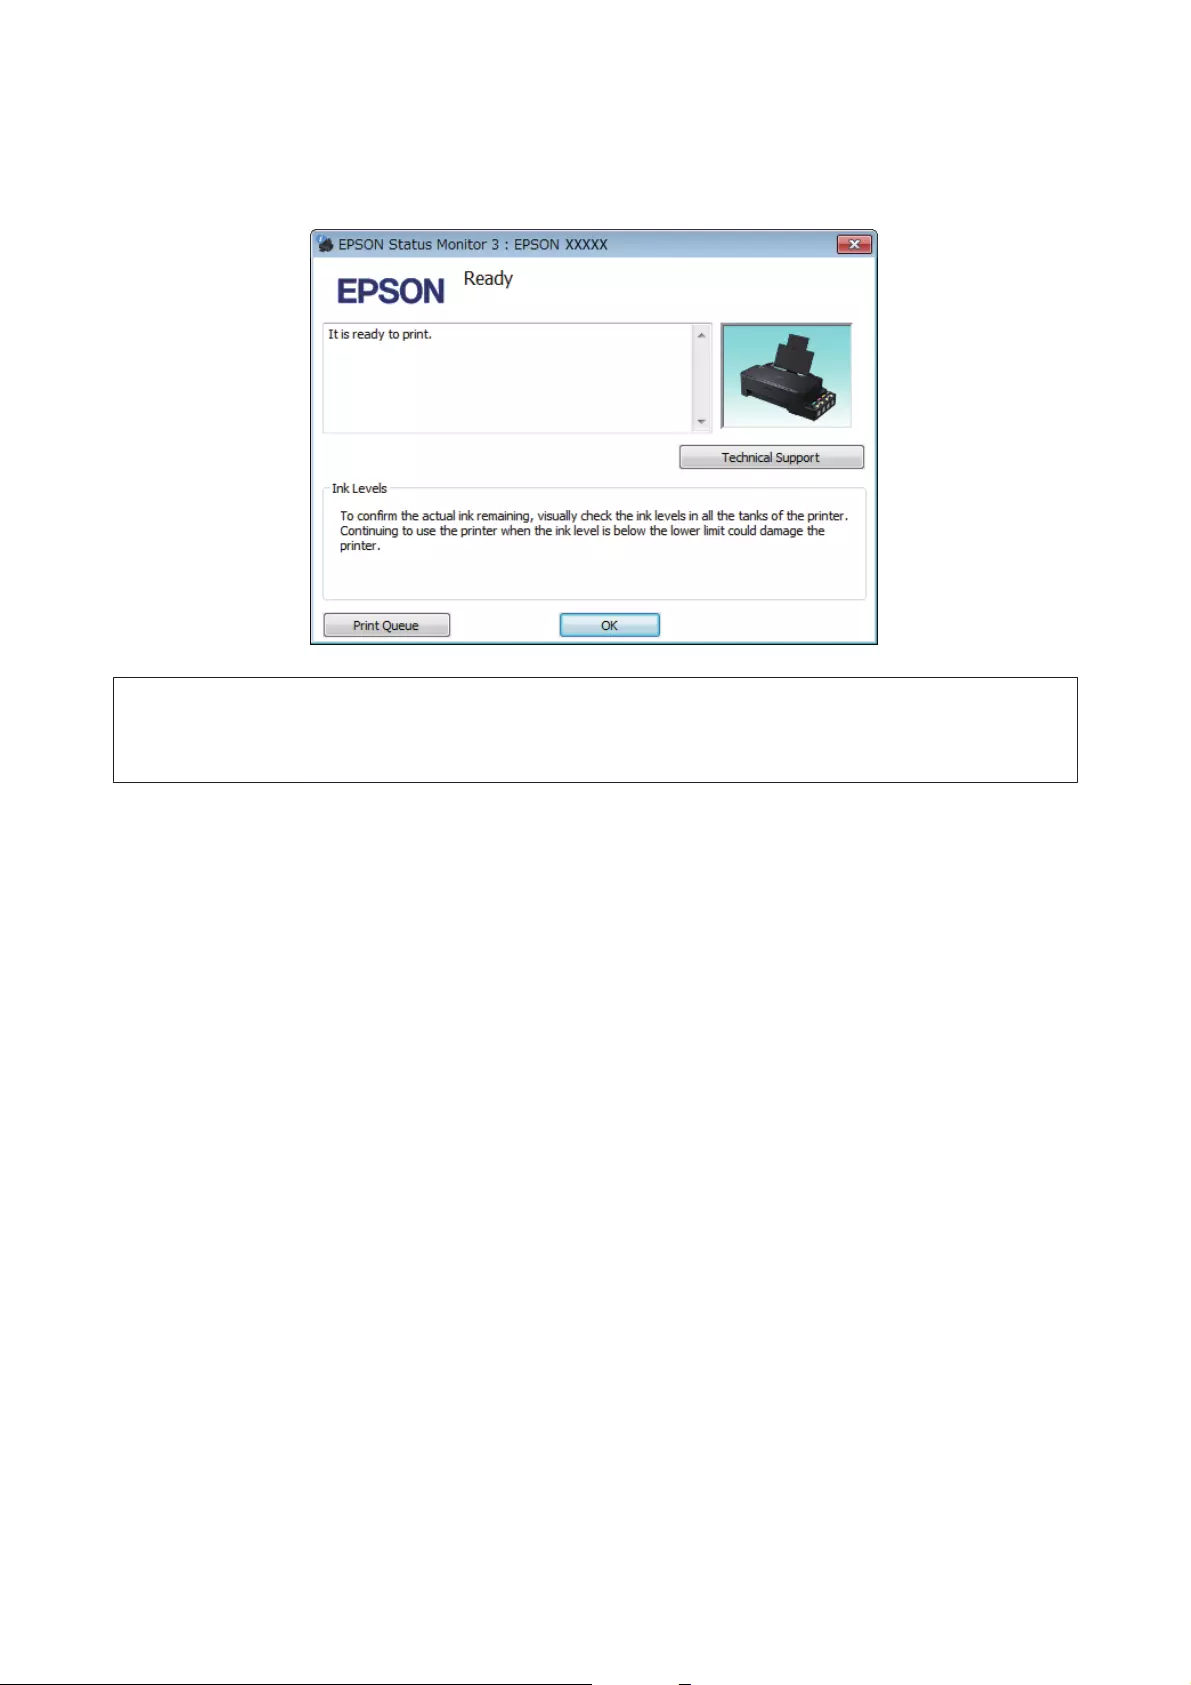
When you access EPSON Status Monitor 3, the following window appears:
Note:
If EPSON Status Monitor 3 does not appear, access the printer driver and click the Maintenance tab and then the
Extended Settings button. In the Extended Settings window, check the Enable EPSON Status Monitor 3 check box.
EPSON Status Monitor 3 provides the following information:
❏Technical Support:
Click Technical Support to access the Epson technical support website.
❏Print Queue:
You can view Windows Spooler by clicking Print Queue.
For Mac OS X
Follow these steps to access EPSON Status Monitor.
A
Access the Epson Printer Utility 4.
& “Accessing the printer driver for Mac OS X” on page 17
User’s Guide
Troubleshooting for Printing
53
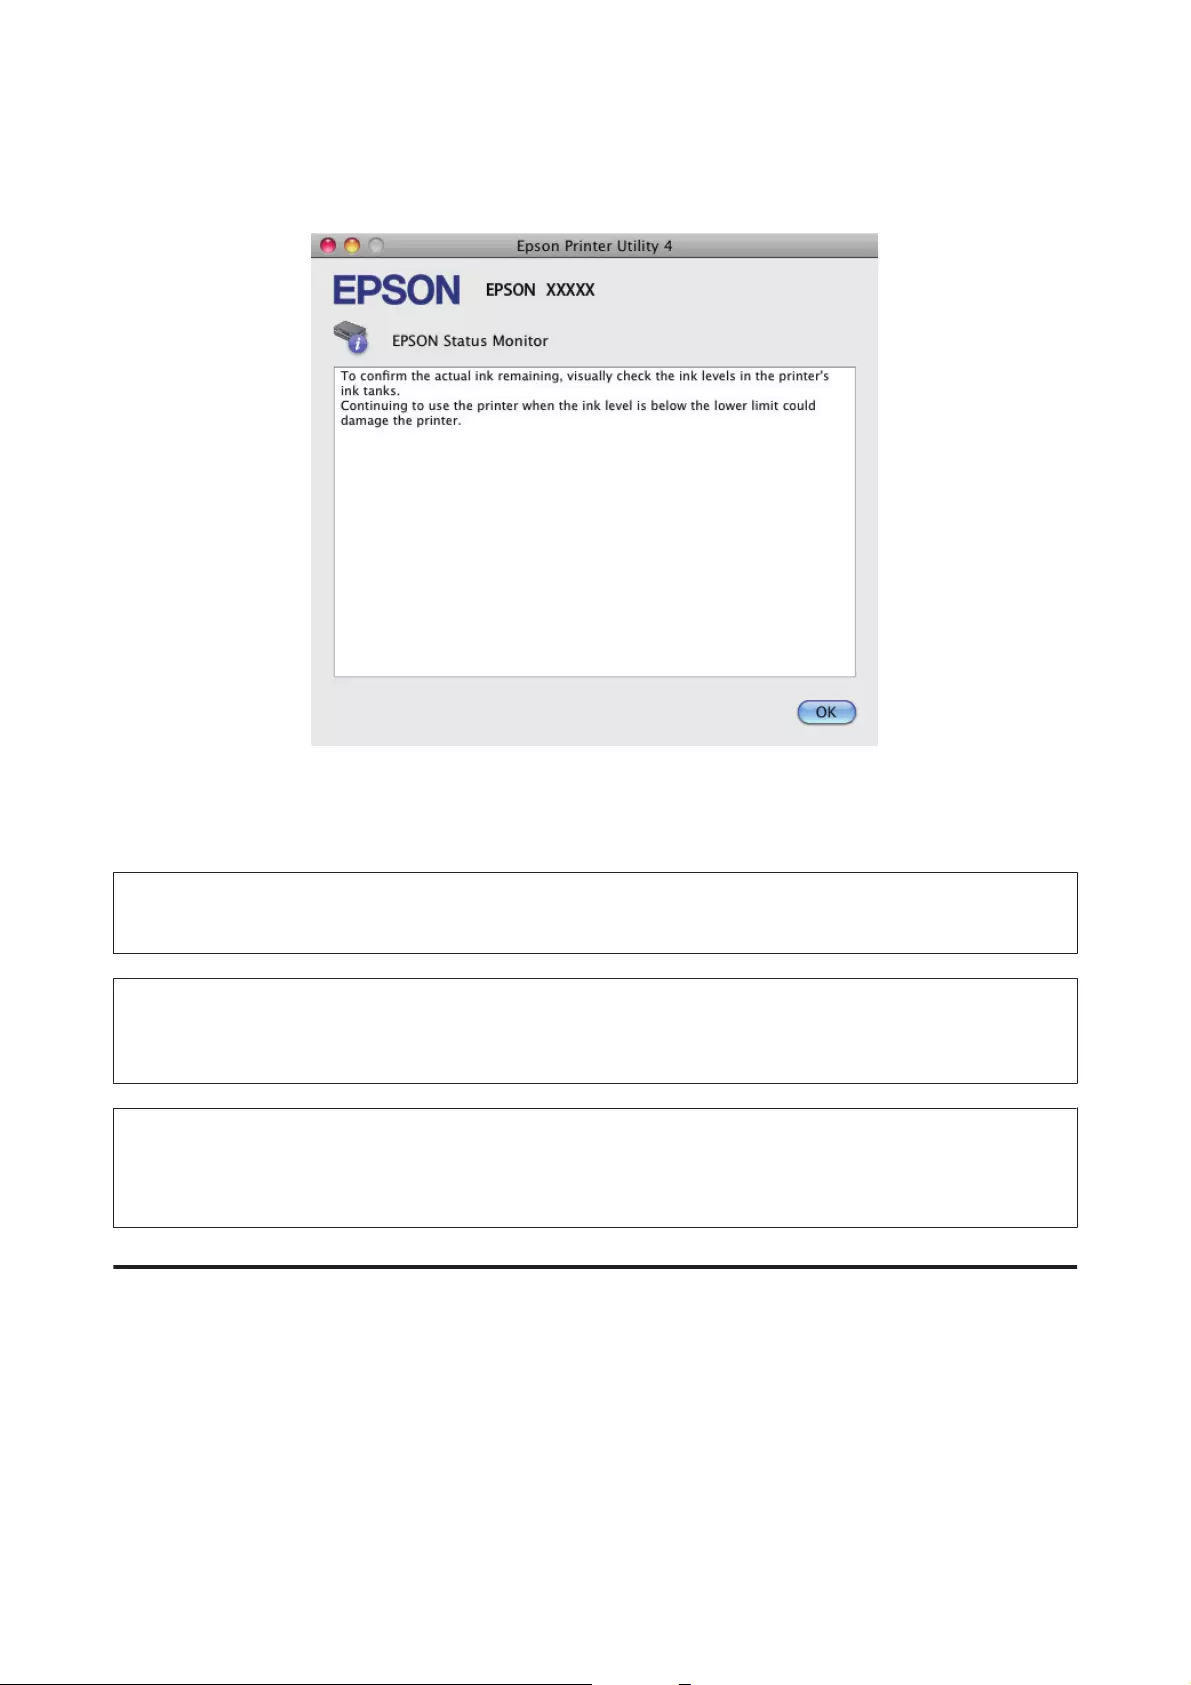
B
Click the EPSON Status Monitor icon. The EPSON Status Monitor appears.
Paper Jams
!
Caution:
Never touch the buttons on the control panel while your hand is inside the product.
c
Important:
Be careful not to pull the cables or ink tubes, or touch other components inside the product unnecessarily.
Otherwise, ink may leak or the product may be damaged.
Note:
❏Cancel the print job if prompted by a message from the printer driver.
❏If all of the lights on the control panel flash, clear the paper jam, and then press the y button.
Removing jammed paper from inside the product
A
Open the front cover.
User’s Guide
Troubleshooting for Printing
54
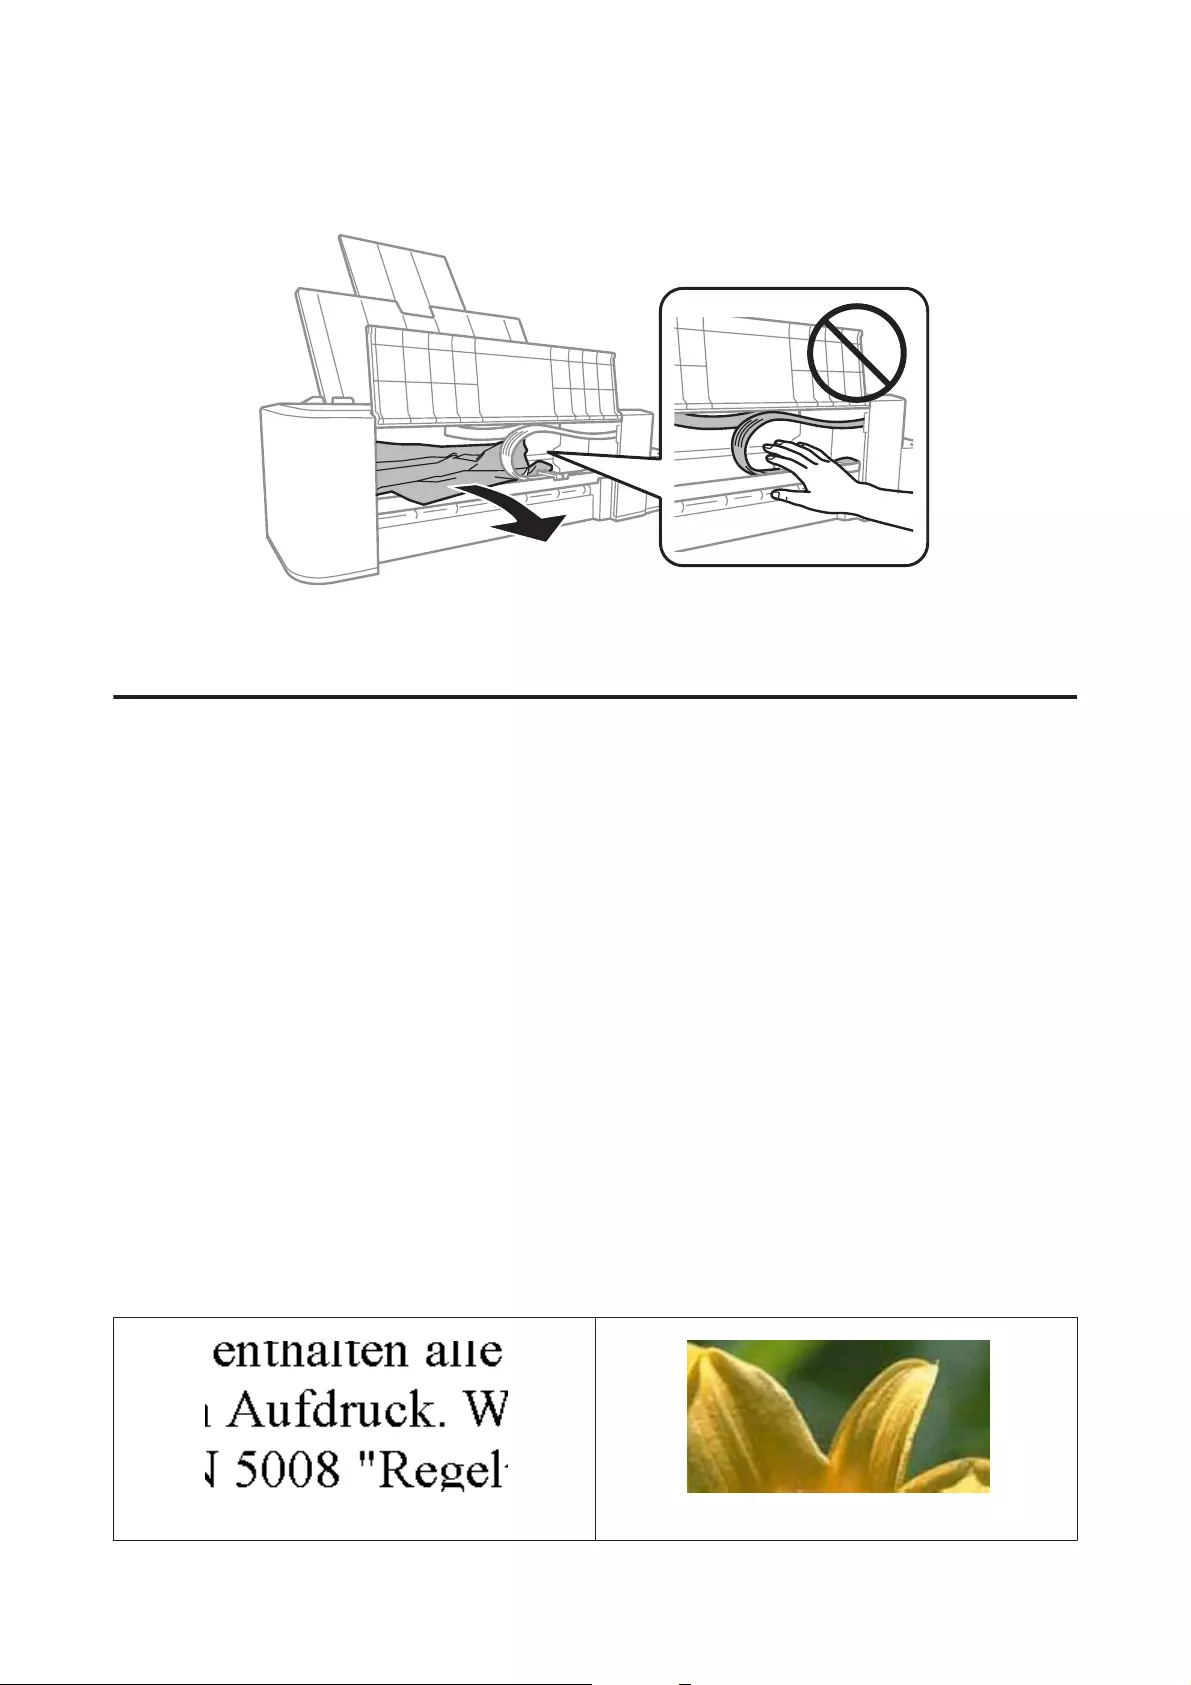
B
Remove all of the paper inside, including any torn pieces.
C
Close the front cover and press the y button.
Preventing paper jams
If your paper jams frequently, check the following.
❏The paper is smooth, not curled or wrinkled.
❏The printable side of the paper is face up in the rear paper feed.
❏The paper stack was fanned before loading.
❏Do not load paper above the line just under the H arrow mark inside the edge guide.
❏The edge guide is snug against the left edge of the paper.
❏The product is on a flat, stable surface that extends beyond the base in all directions. The product will not
operate properly if it is tilted.
Print Quality Help
If you are having print quality problems, then compare it with the illustrations below. Click the caption under the
illustration that best resembles your prints.
Good sample Good sample
User’s Guide
Troubleshooting for Printing
55
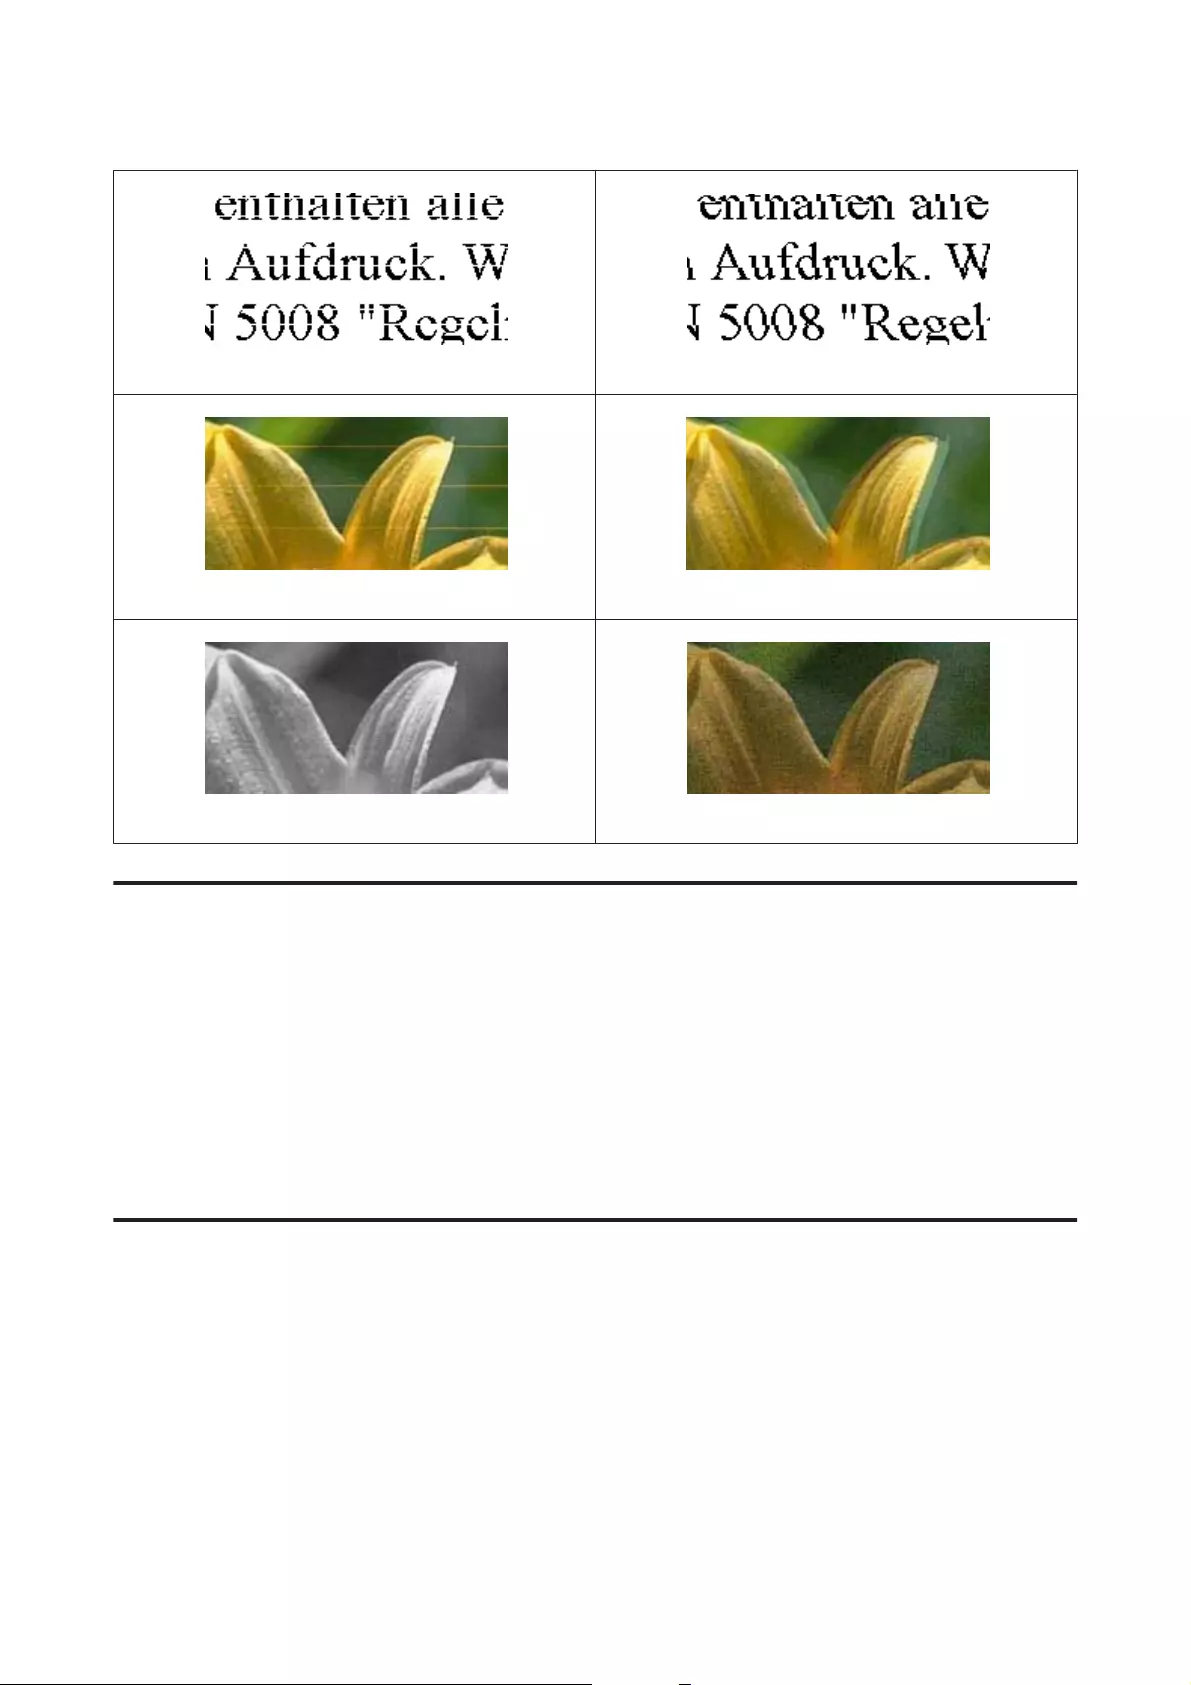
& “Horizontal banding” on page 56 & “Vertical banding or misalignment” on page 56
& “Horizontal banding” on page 56 & “Vertical banding or misalignment” on page 56
& “Incorrect or missing colors” on page 57 & “Blurry or smeared print” on page 57
Horizontal banding
❏Make sure the printable side of the paper is face up in the rear paper feed.
❏Run the Head Cleaning utility to clear any clogged ink nozzles.
& “Cleaning the Print Head” on page 36
❏If you have not used the product for a long time, use the Power Ink Flushing utility of the printer driver.
& “Replacing Ink inside the Ink Tubes” on page 40
❏Try to use genuine Epson ink bottles.
Vertical banding or misalignment
❏Make sure the printable side of the paper is face up in the rear paper feed.
❏Run the Head Cleaning utility to clear any clogged ink nozzles.
& “Cleaning the Print Head” on page 36
❏If you have not used the product for a long time, use the Power Ink Flushing utility of the printer driver.
& “Replacing Ink inside the Ink Tubes” on page 40
❏Run the Print Head Alignment utility.
& “Aligning the Print Head” on page 38
User’s Guide
Troubleshooting for Printing
56

❏For Windows, clear the High Speed check box from the More Options window in your printer driver. See the
online help for details.
For Mac OS X, select Off from the High Speed Printing. To display the High Speed Printing, click through the
following menus: System Preferences, Printers & Scanners (for Mac OS X 10.9) or Print & Scan (for Mac OS
X 10.8 or 10.7) or Print & Fax (for Mac OS X 10.6 or 10.5), your product (in the Printers list box), Options &
Supplies, and then Driver.
Incorrect or missing colors
❏Make sure the initial ink charging is complete.
❏Check the ink tank. If the tank is empty, refill the ink immediately and run the Head Cleaning utility.
& “Cleaning the Print Head” on page 36
❏For Windows, clear the Grayscale setting in the Main window in your printer driver.
For Mac OS X, clear the Grayscale setting in Print Settings in the Print dialog box in your printer driver.
See the online help for details.
❏Adjust the color settings in your application or in your printer driver settings.
For Windows, check the More Options window.
For Mac OS X, check the Color Options dialog box from the Print dialog box.
See the online help for details.
❏Run the Head Cleaning utility to clear any clogged ink nozzles.
& “Cleaning the Print Head” on page 36
❏If you have not used the product for a long time, use the Power Ink Flushing utility of the printer driver.
& “Replacing Ink inside the Ink Tubes” on page 40
❏Try to use genuine Epson ink bottles and paper recommended by Epson.
Blurry or smeared print
❏Try to use genuine Epson ink bottles and paper recommended by Epson.
❏Make sure the product is on a flat, stable surface that extends beyond the base in all directions. The product
will not operate properly if it is tilted.
❏Make sure your paper is not damaged, dirty, or too old.
❏Make sure your paper is dry and the printable side of the paper is face up in the rear paper feed.
❏If the paper is curled, flatten it or curl it slightly in the opposite direction before loading.
❏Remove each sheet as it is printed.
❏Do not touch or allow anything to come into contact with the printed side of paper with a shiny finish. To
handle your prints, follow the instructions of the paper.
❏Run the Head Cleaning utility to clear any clogged ink nozzles.
& “Cleaning the Print Head” on page 36
User’s Guide
Troubleshooting for Printing
57

❏If you have not used the product for a long time, use the Power Ink Flushing utility of the printer driver.
& “Replacing Ink inside the Ink Tubes” on page 40
❏Run the Print Head Alignment utility.
& “Aligning the Print Head” on page 38
❏If the paper is smeared with ink after printing, clean the interior of the product.
& “Cleaning the interior of the product” on page 43
Miscellaneous Printout Problems
Incorrect or garbled characters
❏Clear any stalled print jobs.
& “Canceling printing” on page 20
❏Turn off the product and computer. Make sure the product’s interface cable is securely plugged in.
❏Uninstall the printer driver, then reinstall it.
& “Uninstalling Your Software” on page 47
❏If you put your computer into Hibernate or Sleep mode manually while the computer is sending a print job,
pages of garbled text may be printed the next time you start your computer.
Incorrect margins
❏Make sure that the paper is loaded into the rear paper feed correctly.
& “Loading Paper” on page 14
❏Check the margin settings in your application. Make sure that the margins are within the printable area of the
page.
& “Printable area” on page 63
❏Uninstall the printer driver, then reinstall it.
& “Uninstalling Your Software” on page 47
Printout has a slight slant
Make sure that the paper is loaded into the rear paper feed correctly.
& “Loading Paper” on page 14
Inverted image
❏For Windows, clear the Mirror Image check box from the More Options window of your printer driver, or
turn off the Mirror Image setting in your application.
For Mac OS X, clear the Mirror Image check box in Print Settings in the Print dialog box of your printer
driver, or turn off the Mirror Image setting in your application.
For instructions, see the online help for your printer driver or for your application.
User’s Guide
Troubleshooting for Printing
58

❏Uninstall the printer driver, then reinstall it.
& “Uninstalling Your Software” on page 47
Blank pages print
❏Check the ink tank. If the tank is empty, refill the ink immediately and run the Head Cleaning utility.
& “Cleaning the Print Head” on page 36
❏Make sure the printer driver settings are appropriate for the paper size you are using.
For Windows, check the Main window.
For Mac OS X, check the Page Setup dialog box or Print dialog box.
❏For Windows, check the Skip Blank Page setting by clicking the Extended Settings button on the
Maintenance window of the printer driver.
For Mac OS X, select On from the Skip Blank Page. To display the Skip Blank Page, click through the
following menus: System Preferences, Printers & Scanners (for Mac OS X 10.9) or Print & Scan (for Mac OS
X 10.8 or 10.7) or Print & Fax (for Mac OS X 10.6 or 10.5), your product (in the Printers list box), Options &
Supplies, and then Driver.
❏Uninstall the printer driver, then reinstall it.
& “Uninstalling Your Software” on page 47
Printed side is smeared or scuffed
❏If the paper is curled, flatten it or curl it slightly in the opposite direction before loading.
❏Load and eject plain paper several times.
& “Cleaning the interior of the product” on page 43
❏Uninstall the printer driver, then reinstall it.
& “Uninstalling Your Software” on page 47
Printing is too slow
❏For Windows, choose a lower Quality in the printer driver Main window.
For Mac OS X, choose a lower Print Quality in the Print Settings dialog box from your printer driver’s Print
dialog box.
& “Accessing the printer driver for Windows” on page 16
& “Accessing the printer driver for Mac OS X” on page 17
❏Close any unnecessary applications.
❏If you print continuously for an extended period, the printing may be extremely slow. This is to slow down
the printing speed and prevent the product mechanism from overheating and being damaged. If this happens,
you can continue to print, but we recommend stopping and leaving the product idle for at least 30 minutes
with the power on. (The product does not recover with the power off.) After you restart, the product will print
at normal speed.
❏Uninstall the printer driver, then reinstall it.
& “Uninstalling Your Software” on page 47
User’s Guide
Troubleshooting for Printing
59

Paper Does Not Feed Correctly
Paper does not feed
Remove the stack of paper and make sure of the following:
❏The paper is not curled or creased.
❏The paper is not too old. See the instructions that came with the paper for more information.
❏Do not load paper above the line just under the H arrow mark inside the edge guide.
❏Paper is not jammed inside the product. If it is, remove the jammed paper.
& “Paper Jams” on page 54
❏You have followed any special loading instructions that came with your paper.
❏The paper does not have any binder holes.
Multiple pages feed
❏Do not load paper above the line just under the H arrow mark inside the edge guide.
& “Selecting Paper” on page 13
❏Make sure the edge guide is snug against the left edge of the paper.
❏Make sure the paper is not curled or folded. If so, flatten it or curl it slightly toward the opposite side before
loading.
❏Remove the stack of paper and make sure that the paper is not too thin.
& “Paper” on page 63
❏Fan the edges of the stack to separate the sheets, then reload the paper.
❏If too many copies of a file are being printed, check the Copies setting in your printer driver as follows, and
also check in your application.
For Windows, check the Copies setting on the Main window.
Mac OS X, check the Copies setting in the Print dialog.
Paper is improperly loaded
If you have loaded the paper too far into the product, the product cannot feed the paper correctly. Turn the
product off and gently remove the paper. Then turn the product on and reload the paper correctly.
Paper is not ejected fully or is wrinkled
❏If the paper does not eject fully, press the y button to eject the paper. If the paper is jammed inside the
product, remove it by referring to the following section.
& “Paper Jams” on page 54
User’s Guide
Troubleshooting for Printing
60

❏If the paper is wrinkled when it comes out, it may be damp or too thin. Load a new stack of paper.
Note:
Store any unused paper in its original packaging in a dry area.
The Product Does Not Print
All lights are off
❏Press the P button to make sure the product is on.
❏Make sure that the power cord is securely plugged in.
❏Make sure that your outlet works and is not controlled by a wall switch or timer.
Lights came on and then went out
The product’s voltage may not match the outlet rating. Turn off the product and unplug it immediately. Then
check the label on the back of the product.
!
Caution:
If the voltage does not match, DO NOT PLUG YOUR PRODUCT BACK IN. Contact your dealer.
Only the power light is on
❏Turn off the product and computer. Make sure the product’s interface cable is securely plugged in.
❏If you are using the USB interface, make sure your cable meets the USB standards.
❏If you are connecting the product to your computer via a USB hub, connect the product to the first-tier hub
from your computer. If the printer driver is still not recognized on your computer, try to directly connect the
product to your computer without the USB hub.
❏If you are connecting the product to your computer via a USB hub, make sure the USB hub device is
recognized by your computer.
❏If you are trying to print a large image, your computer may not have enough memory. Try reducing the
resolution of your image or printing the image at a smaller size. You may need to install more memory in
your computer.
❏Users of Windows can clear any stalled print jobs from the Windows Spooler.
& “Canceling printing” on page 20
❏Uninstall the printer driver, then reinstall it.
& “Uninstalling Your Software” on page 47
User’s Guide
Troubleshooting for Printing
61
Product Information
System Requirements
For Windows
System PC Interface
Windows 8.1 (32-bit, 64-bit), Windows 8 (32-bit, 64-bit), 7 (32-bit, 64-bit), Vista (32-bit,
64-bit), XP SP1 or higher(32-bit), or XP Professional x64 Edition
USB
For Mac OS X
System PC Interface
Mac OS X 10.5.8, 10.6.x, 10.7.x, 10.8.x, 10.9.x USB
Note:
The UNIX File System (UFS) for Mac OS X is not supported.
Technical Specifications
Note:
Specifications are subject to change without notice.
Printer specifications
Paper path Rear paper feed, top entry
Capacity 6 mm (0.2 in.)
User’s Guide
Product Information
62
Paper
Note:
❏Since the quality of any particular brand or type of paper may be changed by the manufacturer at any time, Epson
cannot attest to the quality of any non—Epson brand or type of paper. Always test samples of paper stock before
purchasing large quantities or printing large jobs.
❏Poor quality paper may reduce print quality and cause paper jams or other problems. If you encounter problems,
switch to a higher grade of paper.
❏The paper types supported by this product are compatible with Exif Print and PRINT Image Matching. For more
information, refer to the documentation that came with the Exif Print or PRINT Image Matching compatible
digital camera.
Single sheets:
Size A4 210 × 297 mm
Letter 8 1/2 × 11 in.
Legal 8 1/2 × 14 in.
Paper types Plain paper
Thickness 0.08 to 0.11 mm (0.003 to 0.004 in.)
Weight 64 g/m (17 lb) to 90 g/m (24 lb)
Printable area
Highlighted portions show printable area.
Single sheets
Minimum margin
Media type Single sheets
A 3.0 mm (0.12 in.)
B 3.0 mm (0.12 in.)
C 3.0 mm (0.12 in.)
User’s Guide
Product Information
63
Mechanical
Dimensions Storage
Width: 461 mm (18.1 inches)
Depth: 215 mm (8.5 inches)
Height: 130 mm (5.1 inches)
Printing
Width: 461 mm (18.1 inches)
Depth: 284 mm (11.2 inches)
Height: 285 mm (11.2 inches)
Weight Approx. 2.4 kg (5.3 lb) without the ink and the power cord.
Electrical
100-240 V Model 220–240 V Model
Input voltage range 90 to 264 V 198 to 264 V
Rated frequency range 50 to 60 Hz 50 to 60 Hz
Input frequency range 49.5 to 60.5 Hz 49.5 to 60.5 Hz
Rated current 0.5 to 0.3 A 0.3 A
Power consumption Printing Approx. 10 W (ISO/IEC24712) Approx. 10 W (ISO/IEC24712)
Ready mode Approx. 2.0 W Approx. 2.0 W
Sleep mode Approx. 0.6 W Approx. 0.6 W
Power off Approx. 0.3 W Approx. 0.3 W
Note:
Check the label on the back of the product for its voltage.
Environmental
Temperature Operation:
10 to 35 °C (50 to 95 °F)
Storage:
-20 to 40 °C (-4 to 104 °F)
1 month at 40 °C (104 °F)
Humidity Operation:*
20 to 80% RH
Storage:*
5 to 85% RH
* Without condensation
User’s Guide
Product Information
64

Standards and approvals
European model:
Low voltage directive 2006/95/EC EN60950-1
EMC directive 2004/108/EC EN55022 Class B
EN61000-3-2
EN61000-3-3
EN55024
Interface
USB — Compatible with the USB 2.0 Specification
User’s Guide
Product Information
65

Where To Get Help
Technical Support Web Site
Epson’s Technical Support Web Site provides help with problems that cannot be solved using the troubleshooting
information in your product documentation. If you have a Web browser and can connect to the Internet, access
the site at:
http://support.epson.net/
http://www.epson.eu/Support (Europe)
If you need the latest drivers, FAQs, manuals, or other downloadables, access the site at:
http://www.epson.com
http://www.epson.eu/Support (Europe)
Then, select the support section of your local Epson Web site.
Contacting Epson Support
Before Contacting Epson
If your Epson product is not operating properly and you cannot solve the problem using the troubleshooting
information in your product documentation, contact Epson support services for assistance. If Epson support for
your area is not listed below, contact the dealer where you purchased your product.
Epson support will be able to help you much more quickly if you give them the following information:
❏Product serial number
(The serial number label is usually on the back of the product.)
❏Product model
❏Product software version
(Click About, Version Info, or similar button in the product software.)
❏Brand and model of your computer
❏Your computer operating system name and version
❏Names and versions of the software applications you normally use with your product
❏Number of sheets of paper fed
& “Checking the Number of Sheets of Paper Fed” on page 42
User’s Guide
Where To Get Help
66

Help for Users in Europe
Check your Pan-European Warranty Document for information on how to contact Epson support.
Help for Users in Taiwan
Contacts for information, support, and services are:
World Wide Web (http://www.epson.com.tw)
Information on product specifications, drivers for download, and products enquiry are available.
Epson HelpDesk (Phone: +02-80242008)
Our HelpDesk team can help you with the following over the phone:
❏Sales enquiries and product information
❏Product usage questions or problems
❏Enquiries on repair service and warranty
Repair service center:
Telephone number Fax number Address
02-23416969 02-23417070 No.20, Beiping E. Rd., Zhongzheng Dist., Taipei City 100,
Taiwan
02-27491234 02-27495955 1F., No.16, Sec. 5, Nanjing E. Rd., Songshan Dist., Taipei City
105, Taiwan
02-32340688 02-32345299 No.1, Ln. 359, Sec. 2, Zhongshan Rd., Zhonghe City, Taipei
County 235, Taiwan
039-605007 039-600969 No.342-1, Guangrong Rd., Luodong Township, Yilan County
265, Taiwan
038-312966 038-312977 No.87, Guolian 2nd Rd., Hualien City, Hualien County 970,
Taiwan
03-2810606 03-2810707 No.413, Huannan Rd., Pingzhen City, Taoyuan County 324,
Taiwan
03-5325077 03-5320092 1F., No.9, Ln. 379, Sec. 1, Jingguo Rd., North Dist., Hsinchu
City 300, Taiwan
04-23291388 04-23291338 3F., No.510, Yingcai Rd., West Dist., Taichung City 403, Taiwan
04-2338-0879 04-2338-6639 No.209, Xinxing Rd., Wuri Dist., Taichung City 414, Taiwan
(R.O.C.)
05-2784222 05-2784555 No.463, Zhongxiao Rd., East Dist., Chiayi City 600, Taiwan
06-2221666 06-2112555 No.141, Gongyuan N. Rd., North Dist., Tainan City 704, Taiwan
User’s Guide
Where To Get Help
67

Telephone number Fax number Address
07-5520918 07-5540926 1F., No.337, Minghua Rd., Gushan Dist., Kaohsiung City 804,
Taiwan
07-3222445 07-3218085 No.51, Shandong St., Sanmin Dist., Kaohsiung City 807,
Taiwan
08-7344771 08-7344802 1F., No.113, Shengli Rd., Pingtung City, Pingtung County
900, Taiwan
Help for Users in Singapore
Sources of information, support, and services available from Epson Singapore are:
World Wide Web (http://www.epson.com.sg)
Information on product specifications, drivers for download, Frequently Asked Questions (FAQ), Sales Enquiries,
and Technical Support via e-mail are available.
Epson HelpDesk (Phone: (65) 6586 3111)
Our HelpDesk team can help you with the following over the phone:
❏Sales enquiries and product information
❏Product usage questions or problems
❏Enquiries on repair service and warranty
Help for Users in Thailand
Contacts for information, support, and services are:
World Wide Web (http://www.epson.co.th)
Information on product specifications, drivers for download, Frequently Asked Questions (FAQ), and e-mail are
available.
Epson Hotline (Phone: (66)2685-9899)
Our Hotline team can help you with the following over the phone:
❏Sales enquiries and product information
❏Product usage questions or problems
❏Enquiries on repair service and warranty
User’s Guide
Where To Get Help
68

Help for Users in Vietnam
Contacts for information, support, and services are:
Epson Hotline (Phone): 84-8-823-9239
Service Center: 59, Truong Dinh Street, District 1, Hochiminh City,
Vietnam
Help for Users in Indonesia
Contacts for information, support, and services are:
World Wide Web (http://www.epson.co.id)
❏Information on product specifications, drivers for download
❏Frequently Asked Questions (FAQ), Sales Enquiries, questions through e-mail
Epson Hotline
❏Sales enquiries and product information
❏Technical support
Phone (62) 21-572 4151
Fax (62) 21-572 4357
Help for Users in Hong Kong
To obtain technical support as well as other after-sales services, users are welcome to contact Epson Hong Kong
Limited.
Internet Home Page
Epson Hong Kong has established a local home page in both Chinese and English on the Internet to provide users
with the following information:
❏Product information
❏Answers to Frequently Asked Questions (FAQs)
❏Latest versions of Epson product drivers
Users can access our World Wide Web home page at:
http://www.epson.com.hk
User’s Guide
Where To Get Help
69

Technical Support Hotline
You can also contact our technical staff at the following telephone and fax numbers:
Phone: (852) 2827-8911
Fax: (852) 2827-4383
Help for Users in Malaysia
Contacts for information, support, and services are:
World Wide Web (http://www.epson.com.my)
❏Information on product specifications, drivers for download
❏Frequently Asked Questions (FAQ), Sales Enquiries, questions through e-mail
Epson Trading (M) Sdn. Bhd.
Head Office.
Phone: 603-55-215 888
Fax: 603-56288388/399
Epson Helpdesk
❏Sales enquiries and product information (Infoline)
Phone: 603-56288222
❏Enquiries on repair services & warranty, product usage and technical support (Techline)
Phone: 603-56288333
Help for Users in India
Contacts for information, support, and services are:
World Wide Web (http://www.epson.co.in)
Information on product specifications, drivers for download, and products enquiry are available.
User’s Guide
Where To Get Help
70

Epson India Head Office — Bangalore
Phone: 080-30515000
Fax: 30515005
Epson India Regional Offices:
Location Telephone number Fax number
Mumbai 022-28261515 /16/17 022-28257287
Delhi 011-30615000 011-30615005
Chennai 044-30277500 044-30277575
Kolkata 033-22831589 / 90 033-22831591
Hyderabad 040-66331738/ 39 040-66328633
Cochin 0484-2357950 0484-2357950
Coimbatore 0422-2380002 NA
Pune 020-30286000 /30286001/30286002 020-30286000
Ahmedabad 079-26407176 / 77 079-26407347
Helpline
For Service, Product info or to order a ink bottle — 18004250011 (9AM — 9PM) — This is a Toll-free number.
For Service (CDMA & Mobile Users) — 3900 1600 (9AM — 6PM) Prefix local STD code
Help for Users in the Philippines
To obtain technical support as well as other after sales services, users are welcome to contact the Epson Philippines
Corporation at the telephone and fax numbers and e-mail address below:
Trunk Line: (63-2) 706 2609
Fax: (63-2) 706 2665
Helpdesk Direct Line: (63-2) 706 2625
E-mail: epchelpdesk@epc.epson.com.ph
World Wide Web (http://www.epson.com.ph)
Information on product specifications, drivers for download, Frequently Asked Questions (FAQ), and E-mail
Enquiries are available.
Toll-Free No. 1800-1069-EPSON(37766)
User’s Guide
Where To Get Help
71

Our Hotline team can help you with the following over the phone:
❏Sales enquiries and product information
❏Product usage questions or problems
❏Enquiries on repair service and warranty
User’s Guide
Where To Get Help
72

Index
2
2-sided printing………..………….……………..…………..……………..…….22
A
Aligning print head………..…………..…………….…………..………..……38
B
Banding…..……..……….……………..……….……..……..………..……..…….56
Blank pages….……..………..……..……..………..……..……..………..……...59
Blurry prints……..………..…………………………..…………………..……….57
Buttons
control panel………….……………..………………….……………..………..12
C
Canceling printing…………………………………………….……….………...20
Mac OS X……..…………………………..………………………….…………..21
Windows……..………….……….…………………..……….………….………20
Cleaning
paper guide……………….……..……….……….………..……..…………….39
print head…………………………………………………..……………………..36
Color problems…..………………….…………..…………………..……………57
Contacting Epson………..………….…………………….……………………..66
Control panel……………………………………………………….……………….12
Copyright…………………….……..……..………..……………….……..……..….2
D
Documents
printing…………….………………….………………..…………………….……18
Driver
accessing for Mac OS X…….………………………………..……………..17
accessing for Windows…….……………………………..………………..16
uninstalling……………….………..…………………..………….……….……47
E
Enlarging pages….……..………..……..……..……….……..………..……..…24
Epson
paper…………..……….…………..……….……………………..……….………13
Errors
print…….………….………………..………………………………….………..…52
F
Fit to page printing………….………..……..……….……..………..……..….24
H
Head cleaning
Mac OS X…….………….………………………..………………………….…..37
product buttons….…………….………..……………..…………..………...37
Windows……….………..……….………………….……………………………37
Help
Epson………..………..…………..………..………….………..………..……….66
Horizontal banding……………………………..………….………..………….56
I
Incorrect characters……………..……….…………..……….…………..…….58
Ink
precaution……..………..………….………..………….……….………………31
Interface cables……………..…………..………..………..………………………65
L
Lights
control panel……………………..………………………………………………12
Loading
paper……………..………….……………..………….……………..……….13, 14
M
Mac OS X
accessing product settings……….………………………..……………...17
checking product status…..………………….…………..………………..53
Managing print jobs
Windows……….………..……….………………….……………………………52
Margins
problems……………………..…………………………..………………….……58
Mirror image…..……….………..……………….…………………..……………58
Misalignment………………………..………………….…………………………..56
Multiple pages per sheet….…………….……………..……………..……….25
N
Nozzle check…….…………..………..…………..………..………..…………….35
Mac OS X…….………….………………………..………………………….…..35
product buttons….…………….………..……………..…………..………...36
Windows……….………..……….………………….……………………………35
P
Pages per sheet printing…………………..………………..………………….25
Paper
Epson special paper………….……..………..…….……….……….………13
feeding problems..……………………..…………….…………..…………..60
jams…………….………………………..…………………………..……………...54
loading………………….………….……………..………….…………….………14
loading capacity…..……….………….………….……….………….……….13
printable area……….…………………………..……………………………….63
specifications….……..……..……….……………….……..……..………..…63
wrinkling……………………………..…………..……………………..………..60
Paper guide
cleaning……………..……..………………..……….……………..……….……39
User’s Guide
Index
73

Print head
aligning…………………………………………………………………..…………38
checking…………..……….……………..……………..……….……………….35
cleaning……………..………………..……..……….……………………….…..36
Print quality
improving……..…………………………..……….…………………………....55
Print speed
increasing………………..………..…………..…………………..…………..…59
Printable area specifications………………….………….……….………….63
Printing
2-sided……….……….……….………………….…………………..……….…..22
canceling…..………………..……………….………………..……………….…20
fit to page…….………..………..…………………………….………………….24
multiple pages per sheet……………………………………….…………...25
preset…..……..………..……….……………….………..……………….………22
shortcut……..……..……………..……….……..……………..……….……....22
text…..……….………..……….……….……….………..……..……….………..18
Problems
banding……..………..………..…………………………….……………………56
blank pages…….……..………….………………..………….…………………59
blurry prints………………….…………….………………………………..…..57
contacting Epson……………………..…………………..………….……….66
diagnosing……..…………….…………….………………..…………….……..52
incorrect characters……..……..……….……………….……………….….58
incorrect colors………..………………….………..………….………………57
margins…………….……………..……………..…………………………………58
mirror image………………….……………………….………..………….…..58
paper feeding………..……….………..…………………..……………………60
paper jams…………..…………..…………..……………..…………..………..54
print…….………….………………..………………………………….………..…52
print speed……..……..………..……..……..……….……..………..……..…59
product does not print………………………..………..…………………..61
smeared prints………………..……………..…………………………….57, 59
solving.………………………..……….………..………………..……….………66
Product
checking status…………………….……..……….……..………..……..……52
cleaning……………..………………..……..……….……………………….…..42
parts……….……….………..………………………..……..……………………..10
transporting….……….………….……….……….………….……….………..43
Product settings
accessing for Mac OS X…….………………………………..……………..17
accessing for Windows…….……………………………..………………..16
Power Off Timer…….………..……….…………………..………………….41
R
Reducing page size..………………………………………………………………24
Refilling the ink tanks……..…………….………………………….………….32
Resizing pages……….……………….…………………………………….……….24
S
Safety information………..……….………..……………………………………..7
Service………………………….……………………………….………………..…….66
Sharing printer
Mac OS X……..…………………………..………………………….…………..29
Windows……..………….……….…………………..……….………….………26
Shipping product.……….………………….……….………………….………..43
Smeared prints…………….……..………..………..……….………..…….57, 59
Software
uninstalling……………….………..…………………..………….……….……47
Specifications
mechanical……..………….………..………….……….………….……………64
paper…………..……….…………..……….………..………….…………………63
printer………………..…………….……………….…………….………………..62
standards and approvals…..………….………….………….………….…65
Speed
increasing………………..………..…………..………..………..…………..….59
Status Monitor
Mac OS X…….………….………………………..………………………….…..53
System requirements…………….………..……..……….……..……….…….62
T
Technical support…….……….……….………………..……….……….……..66
Text
printing documents……….………..………………..………..…………….18
Trademarks…………..………..……………………..……………………..………..2
Transporting product…………….………….…………..………….………….43
U
USB
connecter……….……………….…………………..……………….……………65
W
Windows
accessing product settings……….………………………..……………...16
checking product status…..………………….…………..………………..52
managing print jobs…………..………………………..……………………52
User’s Guide
Index
74
Additional Information:
Print, scan, and share directly from your iPhone®, iPad®, or iPod® Touch. Print photos, emails, webpages and files including Microsoft® Word, Excel®, PowerPoint® and PDF documents. Also supports Box, Dropbox, Evernote®*1, Google Drive™ and Microsoft OneDrive™. Epson iPrint makes printing easy and convenient whether your printer is in the next room or across the world. Key Features • Print, scan, and share directly from your iPhone, iPod Touch or iPad • Print from anywhere in the world to email-enabled Epson printers using remote print functionality • Print photos, PDFs and Microsoft Office documents such as Word, Excel and PowerPoint • Print stored files, email attachments, and online files from Box, Dropbox, Evernote, Google Drive and Microsoft OneDrive • Capture a document with your device camera, format, enhance, then save, ready to print • Scan from your Epson all-in-one and share your file (save to your device, send via email or save online) • Copy documents and photos using your mobile device and a nearby Epson printer • Transfer files between your device and an SD card or USB drive via an Epson printer • Check your printer’s status and ink levels • Print within a complex network environment using manual IP printer setup • Get help with a built-in FAQ section Advanced Features • Print high quality photos with automatic backlight and color cast correction • Choose and print multiple photos • Print your email attachments and stored files • Configure your print options including paper size and type, number of copies, page range and one- or two-sided printing • Print with and without borders • Switch between color or monochrome printing • Choose from different scanning resolutions and image types • Optimize print quality • Buy ink and supplies for your printer • Setup & register to Epson Connect • Manage remote printers

Руководство пользователя
Авторские права и торговые марки
Авторские права и торговые марки
Авторские права и торговые марки
Никакую часть данного документа нельзя воспроизводить, хранить в поисковых системах или передавать
в любой форме и любыми способами (электронными, механическими, путем копирования, записи или
иными) без предварительного письменного разрешения Seiko Epson Corporation. По отношению
использования содержащейся здесь информации никаких патентных обязательств не предусмотрено.
Равно как не предусмотрено никакой ответственности за повреждения, произошедшие вследствие
использования содержащейся здесь информации. Относительно использования содержащейся здесь
информации не предусмотрено никаких патентных обязательств. Также не существует никаких
обязательств, касающихся ущерба, понесенного вследствие использования этой информации.
Seiko Epson Corporation и ее филиалы не несут ответственности перед покупателями данного продукта или
третьими сторонами за понесенные ими повреждения, потери, сборы или затраты, вызванные
несчастными случаями, неправильным использованием продукта, недозволенной модификацией,
ремонтом или изменением продукта и невозможностью (исключая США) строгого соблюдения
инструкций по работе и обслуживанию, разработанных Seiko Epson Corporation.
Seiko Epson Corporation не несет ответственности за любые повреждения или проблемы, возникшие из-за
использования любых функций или расходных материалов, не являющихся оригинальными продуктами
EPSON (Original EPSON Products) или продуктами, одобренными EPSON (EPSON Approved Products).
Seiko Epson Corporation не несет ответственности за любые повреждения, возникшие из-за
электромагнитных наводок, вызванных использованием любых интерфейсных кабелей, не являющихся
продуктами, одобренными Seiko Epson Corporation (Epson Approved Products).
EPSON
— зарегистрированная торговая марка, EPSON EXCEED YOUR VISION или EXCEED YOUR
®
VISION — торговые марки Seiko Epson Corporation.
PRINT Image Matching
и логотип PRINT Image Matching — торговые марки Seiko Epson Corporation.
™
Copyright © 2001 Seiko Epson Corporation. All rights reserved.
Intel
— зарегистрированная торговая марка Intel Corporation.
®
PowerPC
— зарегистрированная торговая марка International Business Machines Corporation.
®
Microsoft
, Windows
и Windows Vista
— зарегистрированные торговые марки Microsoft Corporation.
®
®
®
Apple
, Macintosh
, Mac OS
и OS X
— зарегистрированные торговые марки Apple Inc.
®
®
®
®
Adobe, Adobe Reader, Acrobat и Photoshop — торговые марки Adobe System Incorporated, которые могут
быть зарегистрированы в некоторых юрисдикциях.
Примечание: прочие названия продуктов упоминаются в документе только для идентификации и могут
являться торговыми марками соответствующих владельцев. Epson отрицает владение любыми правами
на эти марки.
Copyright © 2013 Seiko Epson Corporation. All rights reserved.
Содержание данного руководства и технические характеристики изделия могут меняться без
предварительного уведомления.
2

Руководство пользователя
Содержание
Содержание
Печать по размеру страницы…………. 25
Авторские права и торговые марки
Печать Pages per sheet (Страниц на листе)
Авторские права и торговые марки……….. 2
……………….…………….. 26
Общий доступ к устройству для печати……. 28
Настройка в Windows………………. 28
Установка в Mac OS X….…………… 31
Введение
Поиск информации………………….. 6
Предостережения, важная информация
Бутылки с чернилами
и примечания……..……….………. 6
Версии операционных систем……………. 6
Перезаправка чернил
Важные инструкции по безопасности, меры
предосторожности при работе с бутылками
для чернил и их характеристики….……... 33
Важные инструкции
Важные инструкции по безопасности……. 33
Важные инструкции по безопасности………. 8
Меры предосторожности при
Рекомендации и предупреждения о работе с
перезаправке чернил…….…………. 33
устройством……………………….. 8
Характеристики бутылок с чернилами…… 34
Установка/использование устройства. . . . . . . 8
Проверка уровня чернил………………. 34
Обращение с чернилами…………….. 10
Перезаправка контейнеров для чернил…….. 35
Знакомство с устройством
Обслуживание устройства и ПО
Детали устройства…….…………….. 11
Проверка дюз печатающей головки………. 38
Руководство к панели управления……….. 13
Утилита проверки дюз Nozzle Check
Кнопки и световые индикаторы……….. 13
(Проверка дюз) (для Windows)………… 38
Утилита проверки дюз Nozzle Check
(Проверка дюз) (для Mac OS X)…..……. 38
Обращение с бумагой
Панель управления.……………….. 39
Использование, загрузка и хранение
Прочистка печатающей головки…………. 39
носителей………………………… 14
Утилита Head Cleaning (Прочистка
Хранение носителей……………….. 14
печатающей головки) (для Windows)……. 40
Выбор бумаги……………………… 14
Утилита Head Cleaning (Прочистка
Загрузка бумаги…………………..… 15
печатающей головки) (для Mac OS X)……. 40
Панель управления.……………….. 41
Калибровка печатающей головки….…….. 41
Идет печать
Утилита Print Head Alignment (Калибровка
Драйвер принтера и утилита Status Monitor…. 17
печатающей головки) (для Windows)……. 41
Доступ к ПО принтера в Windows……… 17
Утилита Print Head Alignment (Калибровка
Доступ к драйверу принтера в Mac OS X. . . . . 18
печатающей головки) (для Mac OS X)……. 42
Основные операции…………………. 19
Очистка направляющей для бумаги………. 42
Основы печати…….………..…… 19
Использование утилиты Paper Guide
Отмена печати……….………..…. 22
Cleaning (Чистка направляющей бумаги)
Дополнительные возможности………….. 23
для Windows………….…………. 42
Предустановки устройства (только для
Использование утилиты Paper Guide
Windows)……………………….. 23
Cleaning (Чистка направляющей бумаги)
Двусторонняя печать (только для
для Mac OS X…………………….. 43
Windows)……………………….. 24
Замена чернил в тюбиках с чернилами…….. 43
3
Руководство пользователя
Содержание
Утилита Power Ink Flushing
Отпечатки получаются с небольшим
(Технологическая прочистка чернил) для
наклоном……………………….. 63
Windows…………..…………… 44
Изображение перевернуто…………… 63
Утилита Power Ink Flushing
Печатаются пустые страницы…………. 63
(Технологическая прочистка чернил) для
Отпечаток смазанный или потертый……. 63
Mac OS X……………….………. 44
Печать идет слишком медленно……….. 64
Сохранение электроэнергии……………. 45
Бумага подается неправильно..…………. 64
В Windows………………………. 45
Бумага не подается………………… 64
В Mac OS X.…………………….. 45
Бумага подается по несколько листов сразу
Тихий режим работы принтера………..… 46
……………….…………….. 64
В Windows………………………. 46
Бумага загружена неправильно………… 65
В Mac OS X.…………………….. 46
Бумага выталкивается не полностью или
сминается………………………. 65
Проверка количества поданных листов
бумаги……….………..………… 46
Устройство не печатает………….……. 65
Очистка устройства………..………... 46
Индикаторы не горят…………..….. 65
Индикаторы загорелись и погасли……… 65
Очистка внешних деталей устройства……. 46
Горит только индикатор питания………. 66
Очистка внутренних поверхностей
устройства………………………. 47
Транспортировка устройства…………… 47
Информация о продукте
Проверка и установка вашего ПО………… 50
Требования к системе………………… 67
Проверка ПО, установленного на вашем
В Windows………………………. 67
компьютере…………..…………. 50
В Mac OS X………….………….. 67
Установка ПО……………………. 51
Технические характеристики…………… 67
Удаление ПО..……………….……. 51
Характеристики принтера……………. 67
В Windows………………………. 51
Механические характеристики………… 69
В Mac OS X.…………………….. 52
Электрические характеристики……….. 69
Условия окружающей среды………….. 69
Соответствие стандартам и допускам..….. 70
Индикаторы ошибок
Интерфейс…………….………… 70
Индикация ошибок в панели управления…… 54
Служба поддержки
Устранение неисправностей
Web—сайт технической поддержки……….. 71
печати
Обращение в службу поддержки
Диагностирование проблемы…………… 56
пользователей продукции EPSON………… 71
Проверка состояния устройства……….. 56
Перед обращением в Epson…………… 71
Замятие бумаги…………………….. 58
Информация в Интернет………….… 72
Извлечение замятой бумаги из устройства
Сервисные центры на Тайване………… 72
……………………………… 58
Служба поддержки пользователей EPSON
Предотвращение замятия бумаги………. 59
……………….…………….. 73
Справка по качеству печати……………. 59
Контактная информация для справки,
поддержки и сервиса:………………. 73
Горизонтальные полосы…………….. 60
Справочная служба для пользователей во
Несовпадение или полосы по вертикали. . . . 60
Вьетнаме……………………….. 73
Цвета неправильные или отсутствуют…… 61
Справочная служба для пользователей в
Расплывчатый или смазанный отпечаток. . . . 61
Индонезии……………………… 74
Проблемы отпечатков, не связанные
Справочная служба для пользователей в
с качеством печати……………..…… 62
Гоконге………………………… 74
Неправильные или искаженные символы. . . . 62
Справочная служба для пользователей в
Неправильные поля…….…………. 62
Малайзии….…………..………. 75
4
Руководство пользователя
Содержание
Справочная служба для пользователей в
Индии…………………………. 75
Справочная служба для пользователей на
Филипинах………………….….. 76
Указатель
5

Руководство пользователя
Введение
Введение
Поиск информации
Последние версии следующих руководств доступны на web-сайте поддержки пользователей Epson.
http://www.epson.eu/Support (Европа)
http://support.epson.net/ (за пределами Европы)
❏ Установка (печатный вариант):
Содержит информацию об установке устройства и установке ПО.
❏ Руководство пользователя (PDF-файл):
Содержит подробные инструкции о работе, технике безопасности и устранении неполадок. См. это
руководство при использовании устройства с компьютером.
Для просмотра руководства в формате PDF необходимы Adobe Acrobat Reader 5.0 или выше, или
Adobe Reader.
Предостережения, важная информация
и примечания
Предостережения, важная информация и примечания в этом Руководстве пользователя описаны ниже.
Предостережение
!
необходимо соблюдать во избежание телесных травм.
Важную информацию
c
необходимо соблюдать, чтобы не повредить оборудование.
Примечания
содержат полезные советы и ограничения при работе с устройством.
Версии операционных систем
В этом руководстве пользователя приняты следующие сокращения.
❏ Наименование Windows 8 относится к системам Windows 8, Windows 8 Proи Windows 8.1.
❏ Windows 7 означает Windows 7 Home Basic, Windows 7 Home Premium, Windows 7 Professional и
Windows 7 Ultimate.
❏ Windows Vista означает Windows Vista Home Basic Edition, Windows Vista Home Premium Edition,
Windows Vista Business Edition, Windows Vista Enterprise Edition и Windows Vista Ultimate Edition.
6
Руководство пользователя
Введение
❏ Windows XP означает Windows XP Home Edition, Windows XP Professional x64 Edition и Windows XP
Professional.
❏ В данном руководстве наименование Mac OS X 10.9.x относится к операционной системе X Mavericks,
наименование Mac OS X 10.8.x относится к операционной системе X Mountain Lion. Кроме этого,
наименование Mac OS X относится к ОС Mac OS X 10.9.x, Mac OS X 10.8.x, Mac OS X 10.7.x, Mac OS X
10.6.x и Mac OS X 10.5.8.
7

Руководство пользователя
Важные инструкции
Важные инструкции
Важные инструкции по безопасности
Прочтите и выполняйте эти инструкции, чтобы обеспечить безопасное использование устройства.
Убедитесь, что сохранили настоящее руководство для последующих ссылок. Также, следуйте всем
предупреждениям и инструкциям, которые нанесены на корпус устройства.
❏ Используйте только шнур питания, поставляемый с устройством, и не используйте шнур от любого
другого оборудования. Применение других шнуров с устройством или шнура питания, поставляемого
с устройством, для подключения другой аппаратуры может привести к возгоранию или поражению
электрическим током.
❏ Убедитесь, что шнур питания отвечает соответствующим местным стандартам безопасности.
❏ Запрещается разбирать, дорабатывать и ремонтировать питающий кабель, вилку, блок принтера или
дополнительные устройства, если это не оговорено специально в инструкциях по работе с данным
изделием.
❏ Отключите устройство от электросети и предоставьте для ремонта квалифицированным специалистам
в следующих случаях:
Шнур питания или вилка повреждены; внутрь устройства попала жидкость; устройство упало или
поврежден корпус; устройство работает неправильно или заметно медленнее. Не пытайтесь сделать
регулировки, которые не описаны в инструкции по эксплуатации.
❏ Устройство должно находиться рядом с электрической розеткой, от которой шнур питания можно
легко отсоединить.
❏ Не устанавливайте и не храните устройство на открытом воздухе, в сильно загрязненных или
запыленных местах, рядом с источниками воды и тепла, в местах, подверженных ударам, вибрации
или резким изменениям температуры или влажности.
❏ Будьте осторожны, не проливайте на устройство жидкости и не трогайте устройство мокрыми руками.
Рекомендации и предупреждения о работе с
устройством
Прочтите и выполняйте эти инструкции, чтобы избежать повреждения устройства или вашей
собственности. Убедитесь, что сохранили настоящее руководство для последующих ссылок.
Установка/использование устройства
❏ Не блокируйте и не закрывайте отверстия на корпусе устройства.
❏ Используйте источник питания только указанного на наклейке устройства типа.
❏ Не подключайте устройства к розеткам, от которых питаются регулярно включающиеся
и выключающиеся фотокопировальные аппараты или системы кондиционирования.
8
Руководство пользователя
Важные инструкции
❏ Не подключайте устройство к розеткам, оснащенным настенными выключателями или
автоматическими таймерами.
❏ Устанавливайте компьютер и устройство вдали от потенциальных источников помех, таких, как
громкоговорители или базовые модули беспроводных телефонов.
❏ Шнуры питания следует прокладывать в местах, где они не будут истираться, изнашиваться,
сплющиваться, скручиваться и подвергаться порезам. Не ставьте предметы на шнуры питания и
следите за тем, чтобы на адаптер переменного тока и шнуры питания не наступали и не переезжали их.
Особенно тщательно следите за тем, чтобы все шнуры питания были прямыми на концах и в местах
соединения с адаптером переменного тока.
❏ Если вы подключаете устройство через удлинитель, убедитесь, что общая нагрузка от всех устройств,
подключенных к этому удлинителю, не превышает максимально допустимой. Также убедитесь, что
общая нагрузка от всех устройств, подключенных к электрической розетке, не превышает
максимально допустимой.
❏ Если вы намерены использовать устройство в Германии, подключайте его через 10- или 16-амперный
автоматический выключатель для защиты от короткого замыкания или избыточного тока.
❏ При подключении данного продукта к компьютеру или другому устройству с помощью кабеля
убедитесь в правильности ориентации разъемов. Каждый разъем можно подключить лишь одним
способом. Если вставить разъем неправильно, можно повредить оба устройства, соединенные кабелем.
❏ Размещайте устройство на плоской устойчивой поверхности, которая шире основания устройства в
любом направлении. При установке устройства около стены, оставляйте между ним и стеной
промежуток не менее 10 см. Устройство не будет работать правильно, если оно установлено под углом
или качается.
❏ При хранении и транспортировке принтера не наклоняйте устройство, не переворачивайте его и не
устанавливайте на бок, иначе чернила могут вылиться.
❏ Необходимо обеспечить достаточное пространство с тыльной стороны для размещения кабелей, и
пространство над изделием для свободного открывания крышки.
❏ Не устанавливайте устройство в местах, подверженных резким изменениям температуры и влажности.
Держите устройство вдали от прямых солнечных лучей, источников яркого света и тепла.
❏ Не вставляйте предметы в отверстия на корпусе устройства.
❏ Не допускайте попадания рук во внутреннюю часть устройства во время печати.
❏ Не прикасайтесь к плоскому белому шлейфу и тюбикам с чернилами внутри устройства.
❏ Не используйте аэрозольные баллоны, содержащие воспламеняющиеся газы внутри или рядом с
устройством. Это может привести к пожару.
❏ Не перемещайте печатающую головку самостоятельно, этим вы можете повредить устройство.
❏ Всегда выключайте принтер при помощи кнопки P. Не отключайте устройство от источника питания
и не выключайте источник питания, пока индикатор P не прекратит мигать.
❏ Перед транспортировкой устройства убедитесь в том, что печатающая головка находится в обычном
(крайнем правом) положении.
9

Руководство пользователя
Важные инструкции
❏ Необходимо при ближайшей возможности заполнить контейнер для чернил, если их уровень не
превышает нижней линии. Длительное использование изделия при уровне чернил ниже минимальной
линии может привести к выходу его из строя.
❏ Если вы не планируете использовать устройство в течение долгого периода времени, обязательно
отключите его от электрической розетки.
Обращение с чернилами
Инструкции по технике безопасности при работе с чернильными картриджами, а также рекомендации/
предупреждения по работе с устройством находятся в разделе по ссылке.
& «Перезаправка чернил» на стр. 33
10