
CA-DXT7_T9_Cover[A].fm Page 1 Wednesday, August 10, 2005 1:04 PM COMPACT COMPONENT SYSTEM КОМПАКТНАЯ СИСТЕМА УСТРОЙСТВ CA-DXT9 CA-DXT7 РУКОВОДСТВО ПО ЭКСПЛУАТАЦИИ GVT0147-006A [EE]
CA-DXT7_9[A].book Page 1 Friday, August 12, 2005 7:07 AM Предупреждения, предостережения и прочее ПРЕДОСТЕРЕЖЕНИЕ — кнопка Для полного отключения питания отсоединяйте вилку шнура питания от сетевой розетки. Кнопка в любом положении не отключает питание полностью. Питание можно включать и выключать
CA-DXT7_9[A].book Page 1 Friday, August 12, 2005 7:07 AM Вступление Меры предосторожности Назначение Установка Подключение………………………………………………………….. 3 Индикация на дисплее …………………………………………… 8 Постоянно выполняемые операции—
CA-DXT7_9[A].book Page 2 Friday, August 12, 2005 7:07 AM Форматы аудиозаписи Типы дисков, доступных для воспроизведения INFO DIGITAL VIDEO Логотип DVD — товарный знак DVD Format/Logo Licensing Corporation. • CD-R/-RW: Записанные в форматах Audio CD/ Video CD/SVCD и MP3/WMA/JPEG/DivX/MPEG-4. •
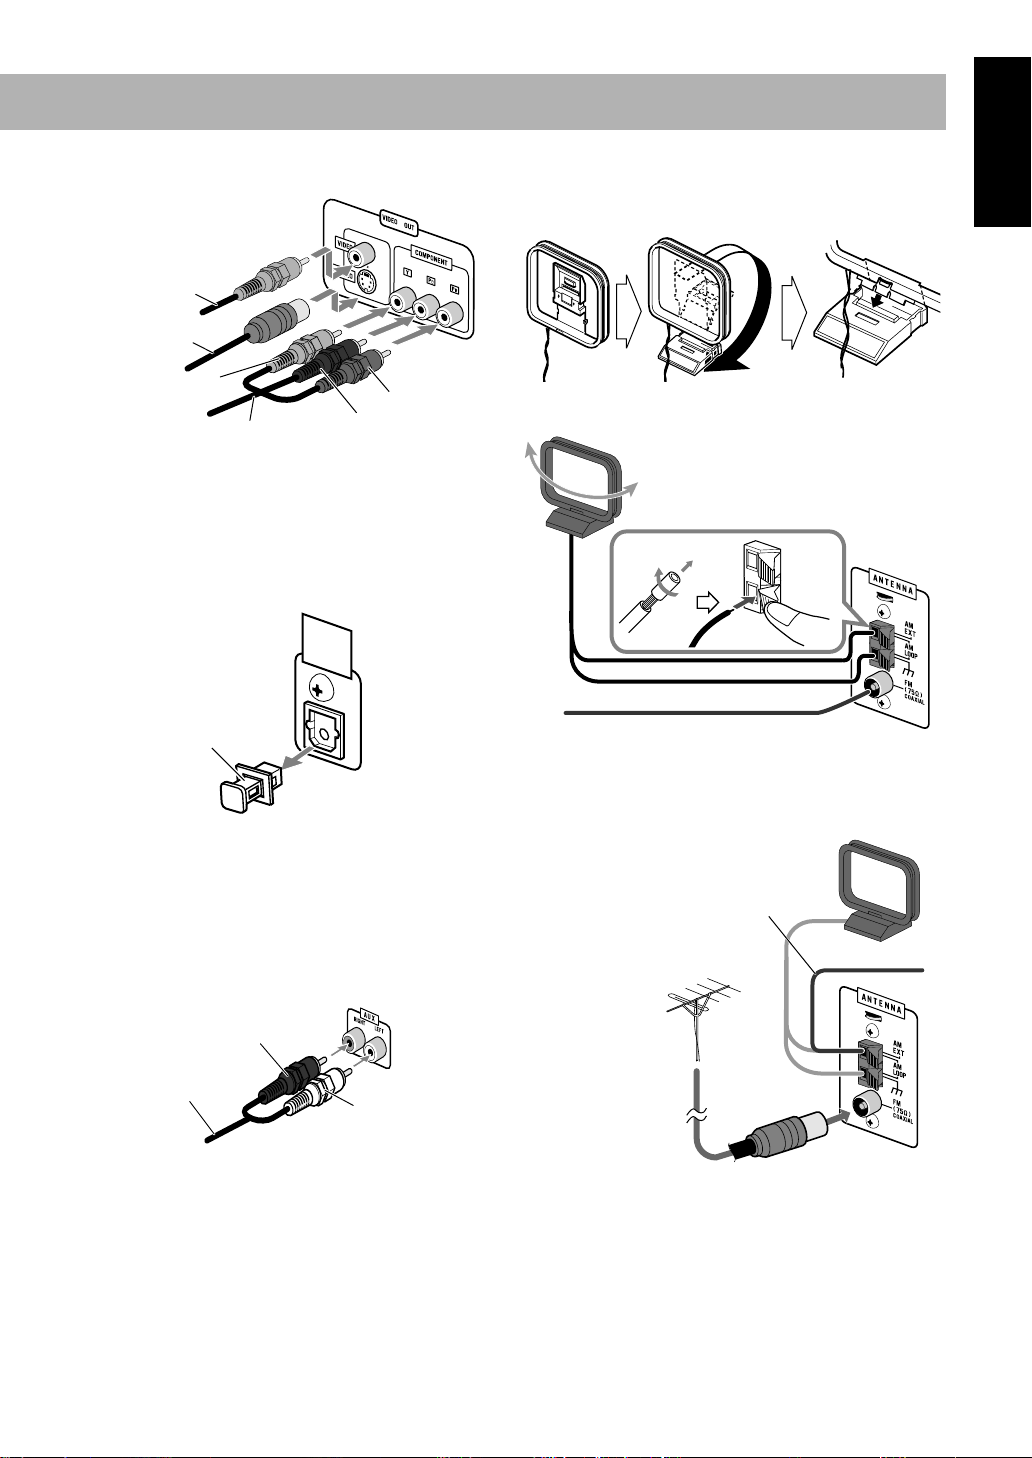
CA-DXT7_9[A].book Page 3 Friday, August 12, 2005 7:07 AM Подключение Не подсоединяйте сетевой шнур питания к сетевой розетке до тех пор, пока не выполните все остальные соединения. • Подсоедините разъем “VIDEO OUT” (Видеовыход) непосредственно к видеовходу вашего телевизора. Подсоединение разъема
CA-DXT7_9[A].book Page 4 Friday, August 12, 2005 7:07 AM CA-DXT7 ~ От видеовхода телевизора/монитора См. стр. 5. От цифрового входа цифрового аудиокомпонента, например CDрекордера См. стр. 5. ! От аналогового аудиовхода дополнительного устройства (видеомагнитофона и т.п.) См. стр. 5. От антенны
CA-DXT7_9[A].book Page 5 Friday, August 12, 2005 7:07 AM ~ Телевизор/видеомонитор Антенна AM/FM Сборка рамочной антенны AM Композитный видеокабель (прилагается) Кабель S-видео (не прилагается) Зеленый Красный Синий Компонентный видеокабель (не прилагается) • Для воспроизведения в режиме
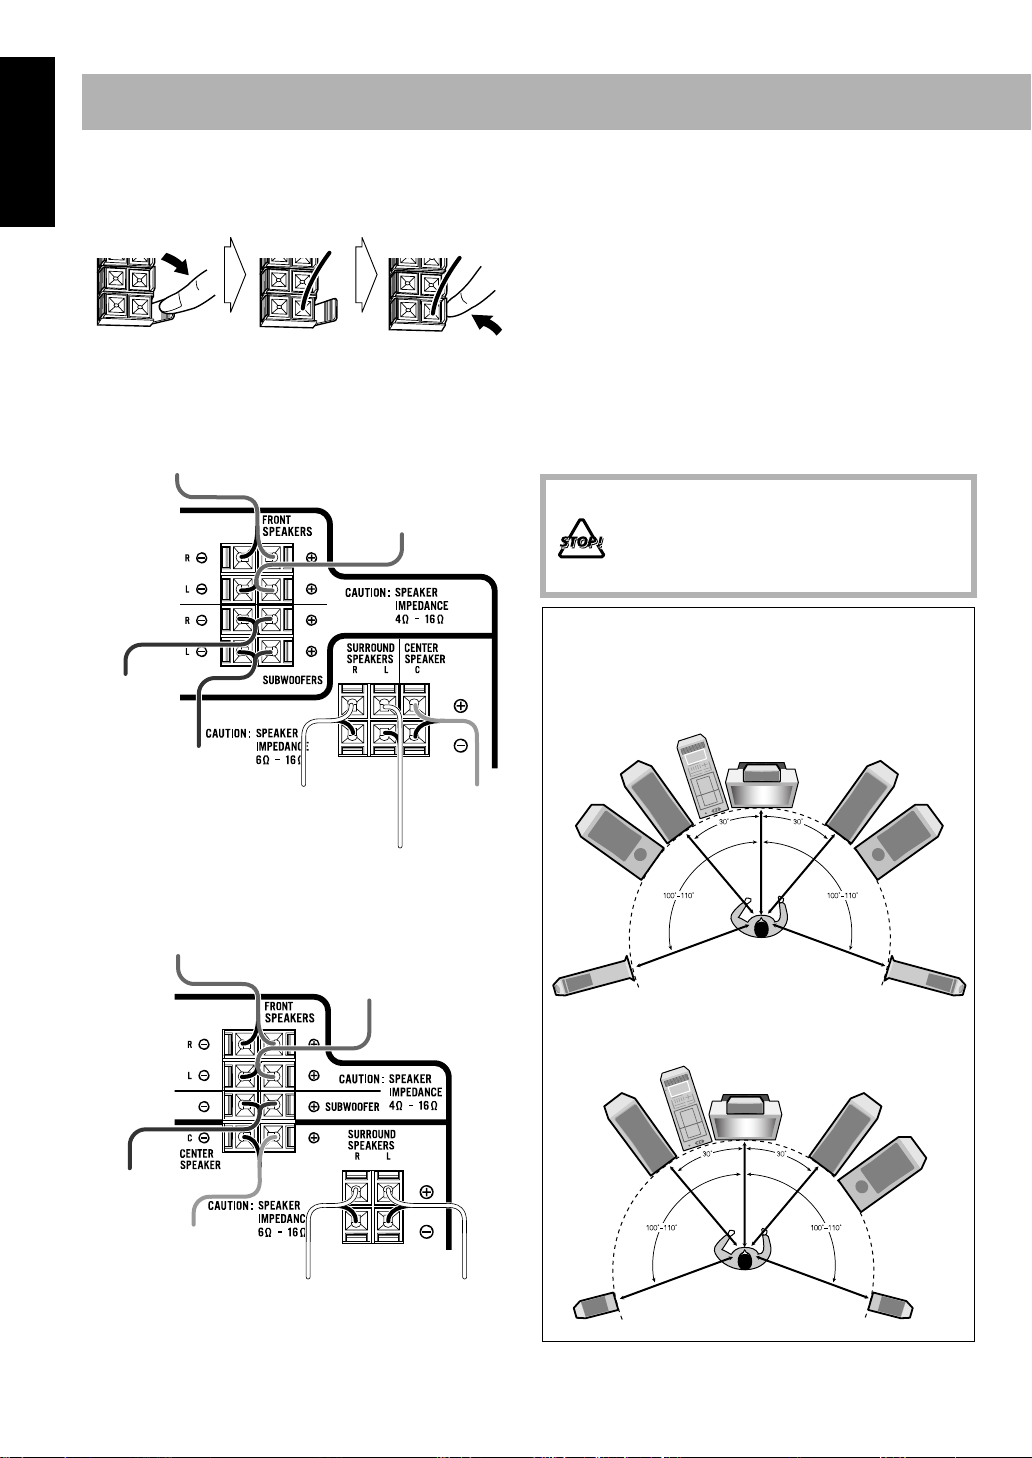
CA-DXT7_9[A].book Page 6 Friday, August 12, 2005 7:07 AM @ Акустические системы Чтобы подключить кабели акустических систем • При подключении кабелей акустических систем необходимо соблюдать полярность: синий, красный, зеленый, белый и серый провода подсоединяются к клеммам положительной полярности
CA-DXT7_9[A].book Page 7 Friday, August 12, 2005 7:07 AM Чтобы снять защитные решетки с акустических систем Отверстия Подготовка пульта ДУ к использованию Выступы Решетка акустической системы ¤ Чтобы изменить положение переключателя напряжения Поворачивайте переключатель напряжения с помощью
CA-DXT7_9[A].book Page 8 Friday, August 12, 2005 7:07 AM Индикация на дисплее Индикация на дисплее может вам многое рассказать о режимах работы системы. Перед началом эксплуатации системы ознакомьтесь со значением этих индикаторов. 1 2 3 45 6 7 8 9 p qwer t y u ; i o 1 Индикатор PROGRESSIVE
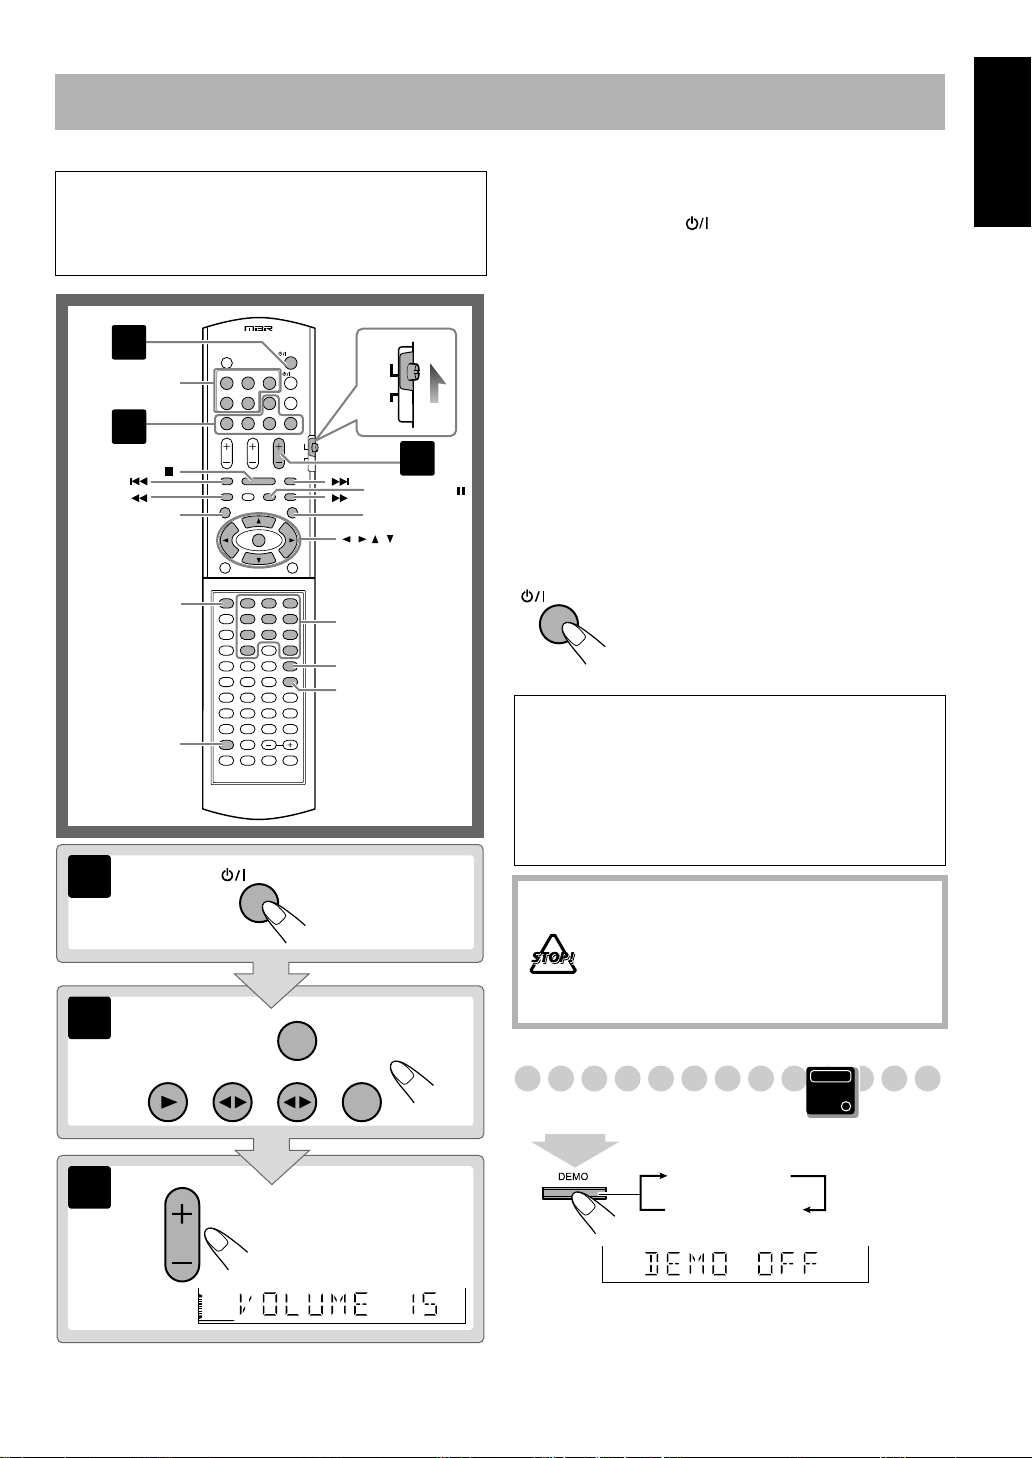
CA-DXT7_9[A].book Page 9 Friday, August 12, 2005 7:07 AM Постоянно выполняемые операции—Воспроизведение В этой инструкции описывается, главным образом, выполнение операций с использованием пульта дистанционного управления; тем не менее, вы можете использовать кнопки и органы управления основного
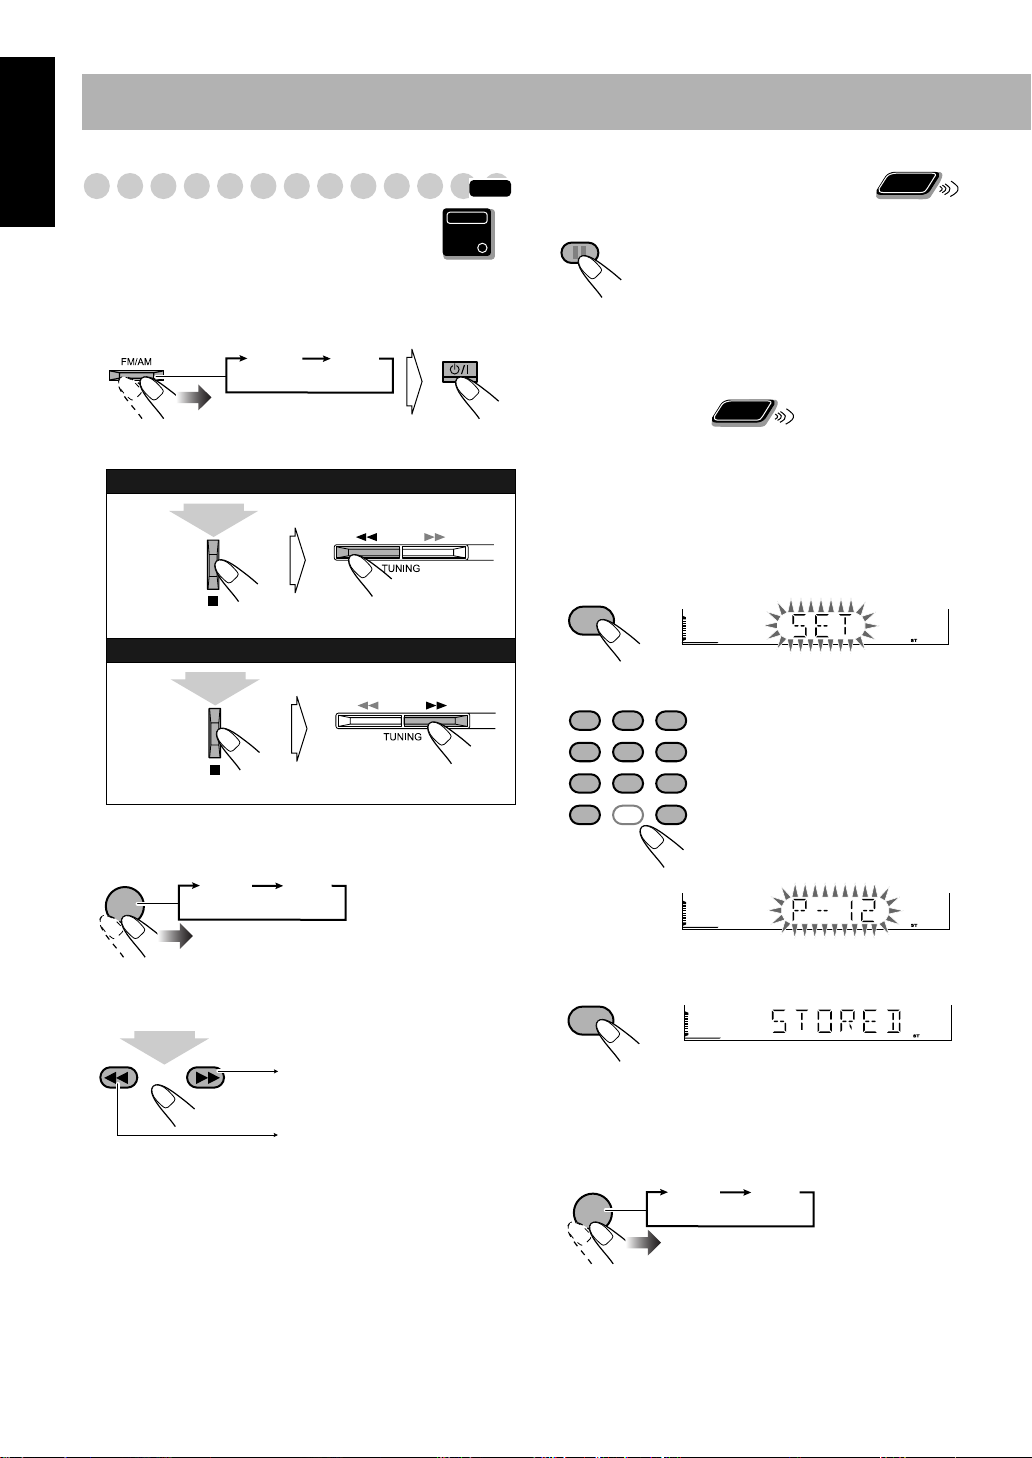
CA-DXT7_9[A].book Page 10 Friday, August 12, 2005 7:07 AM Прослушивание радио INFO 2 Начните программирование. SET Чтобы выбрать диапазон волн (FM/AM) FM/AM FM AM 3 Выберите номер, под которым вы хотите Чтобы настроиться на станцию После выбора диапазона FM или AM… Увеличение частоты. Уменьшение
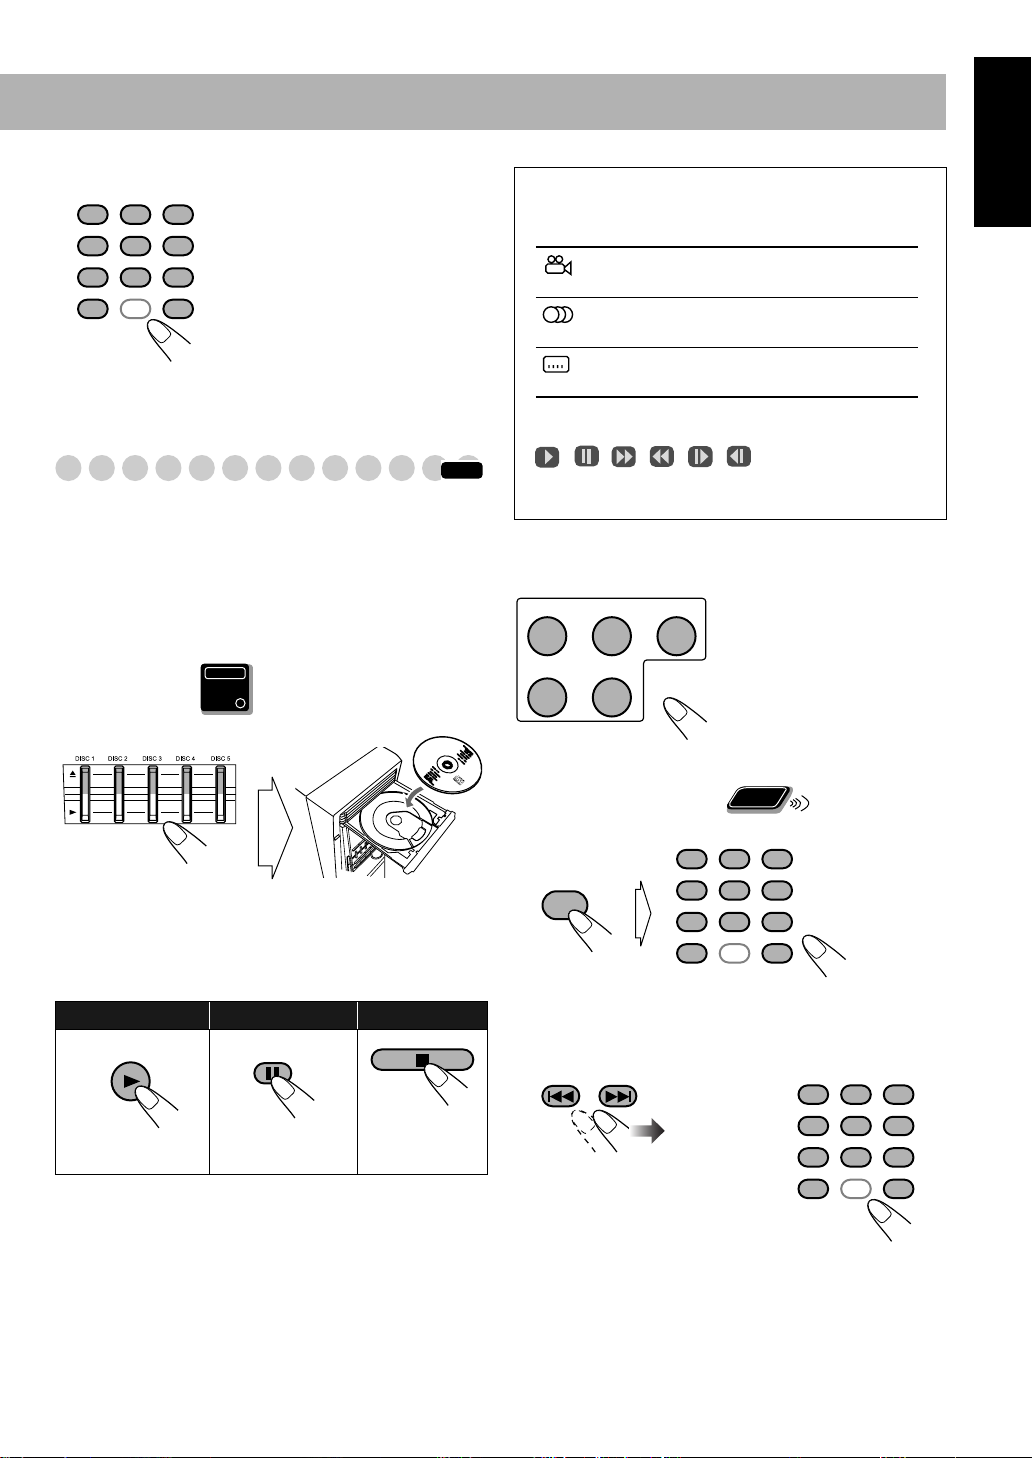
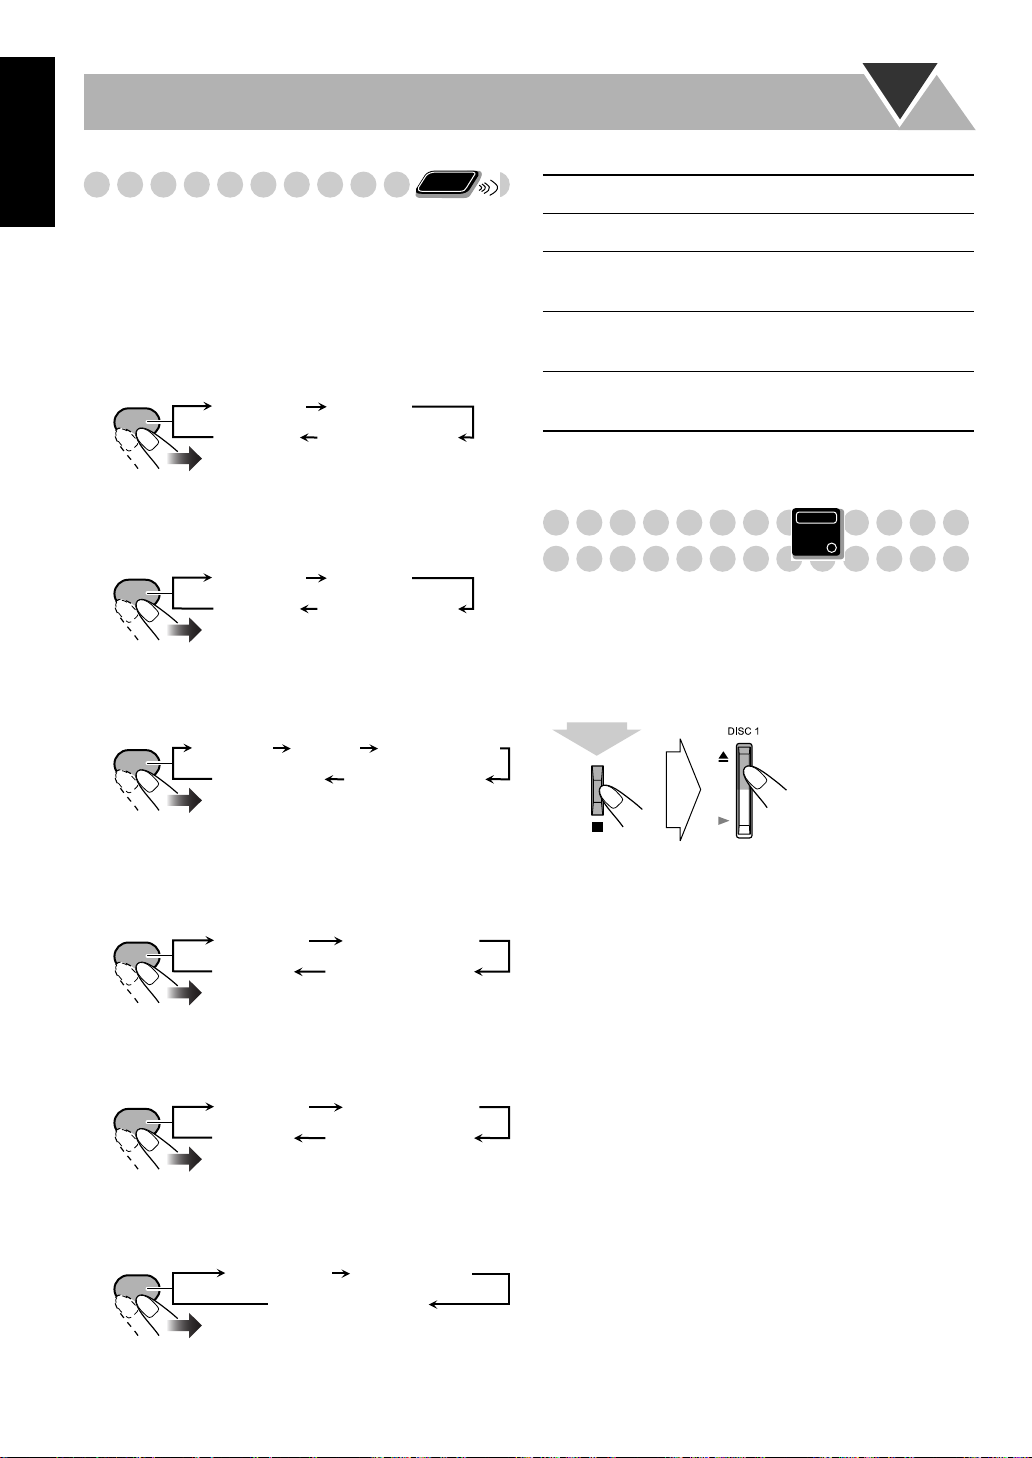
CA-DXT7_9[A].book Page 11 Friday, August 12, 2005 7:07 AM Воспроизведение диска INFO Прежде чем приступить к воспроизведению диска, ознакомьтесь со структурой этого диска. • Диск DVD Video содержит “эпизоды” (Titles), которые, в свою очередь, состоят из “глав” (Chapters); диски DVD Audio/MP3/WMA
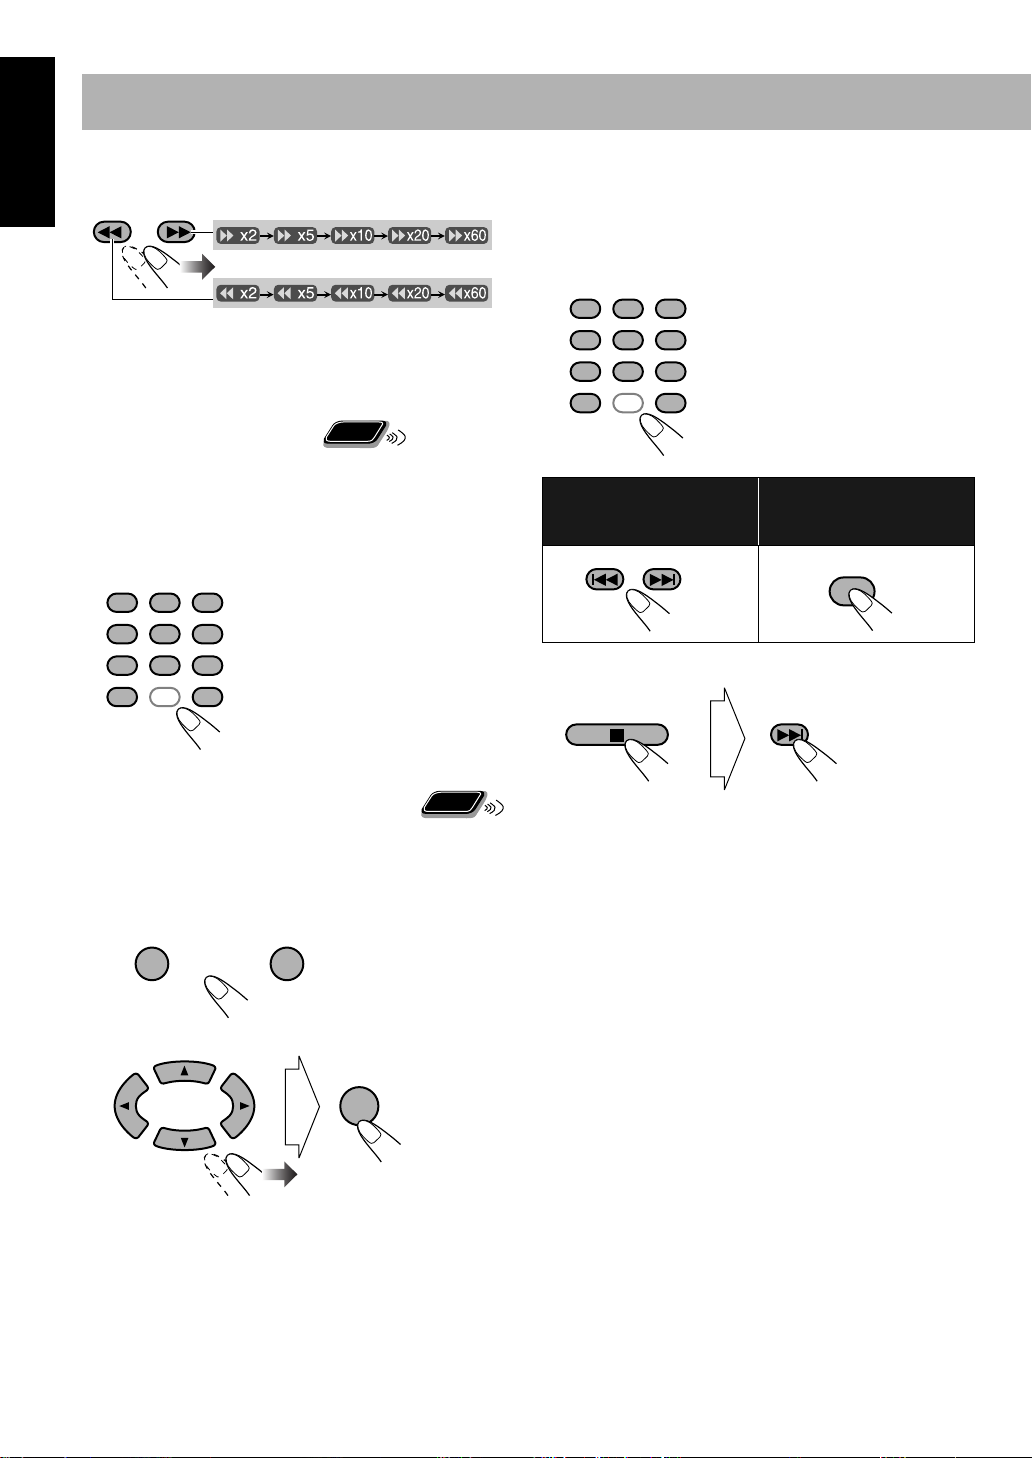
CA-DXT7_9[A].book Page 12 Friday, August 12, 2005 7:07 AM Чтобы найти необходимое место на диске • Во время поиска на диске DVD Video/SVCD/VCD/ MPEG-4 звук отключается. Для возврата к обычному режиму воспроизведения нажмите DVD/CD 3. Чтобы выбрать нужное место напрямую Remote ONLY Вы можете
CA-DXT7_9[A].book Page 13 Friday, August 12, 2005 7:07 AM Воспроизведение аудиокассет Установка кассеты Чтобы изменить направление движения ленты Вы можете воспроизводить ленты типа I. • Не рекомендуется использовать ленты C-120 или более длинные. Нажать Автоматическое изменение направления
CA-DXT7_9[A].book Page 14 Friday, August 12, 2005 7:07 AM Постоянно выполняемые операции — Настройка звучания и других параметров Регулировка громкости Пульт ДУ Уровень громкости имеет 32 градации (VOLUME MIN (Минимальный уровень), VOLUME 1 (Уровень 1) VOLUME 30 (Уровень 30) и VOLUME MAX
CA-DXT7_9[A].book Page 15 Friday, August 12, 2005 7:07 AM Усиление низких частот Постепенная настройка низких частот Создание собственных INFO Можно задать уровень сабвуфера от 0 (минимум) до 4 (максимум). Пульт ДУ: Основной модуль: Remote ONLY INFO режимов воспроизведения звука пользовательский
CA-DXT7_9[A].book Page 16 Friday, August 12, 2005 7:07 AM Выбор режимов INFO MUSIC пространственного звучания • Для дисков DVD/CD, TAPE-A, TAPE-B и дополнительного устройства AUX: SURROUND MODE ALL CH. ST * DANCE HALL MUSIC* MOVIE* AUTO STADIUM STEREO * Эти режимы недоступны для дисков в формате
CA-DXT7_9[A].book Page 17 Friday, August 12, 2005 7:07 AM 2 Выберите тональность изображения. Выбор системы цветности и режима развертки Remote ONLY INFO Вы можете выбрать режим видео в соответствии с системой цветности вашего телевизора (NTSC или PAL). • Если вы подключили телевизор,
CA-DXT7_9[A].book Page 18 Friday, August 12, 2005 7:07 AM Настройка яркости дисплея DIMMER DIMMER 1 Remote ONLY питания DIMMER 2 (Отмена) DIMMER 1 Уменьшает яркость дисплея и подсветку основного модуля*. DIMMER 2 Уменьшает яркость дисплея (как в пункте DIMMER 1) и выключает подсветку основного
CA-DXT7_9[A].book Page 19 Friday, August 12, 2005 7:07 AM Особые функции проигрывателя DVD/VCD Выбор звукового трека Пульт ДУ AUDIO DVD/CD 3 TV Remote ONLY INFO Для DVD Video/DivX: При воспроизведении части, содержащей аудиозапись на различных языках, вы можете выбрать требуемый язык. Для DVD
CA-DXT7_9[A].book Page 20 Friday, August 12, 2005 7:07 AM Выбор языка субтитров Remote ONLY Для DVD Video/DivX: При воспроизведении части, содержащей субтитры на различных языках, вы можете выбрать требуемый язык субтитров для показа на экране телевизора. Для DVD-VR: Во время воспроизведения можно
CA-DXT7_9[A].book Page 21 Friday, August 12, 2005 7:07 AM Воспроизведение дополнительной группы INFO 2 Покадровое переключение неподвижных изображений. Remote ONLY Только для DVD Audio: Некоторые диски DVD Audio содержат специальные дополнительные группы с ограниченным доступом. • Для
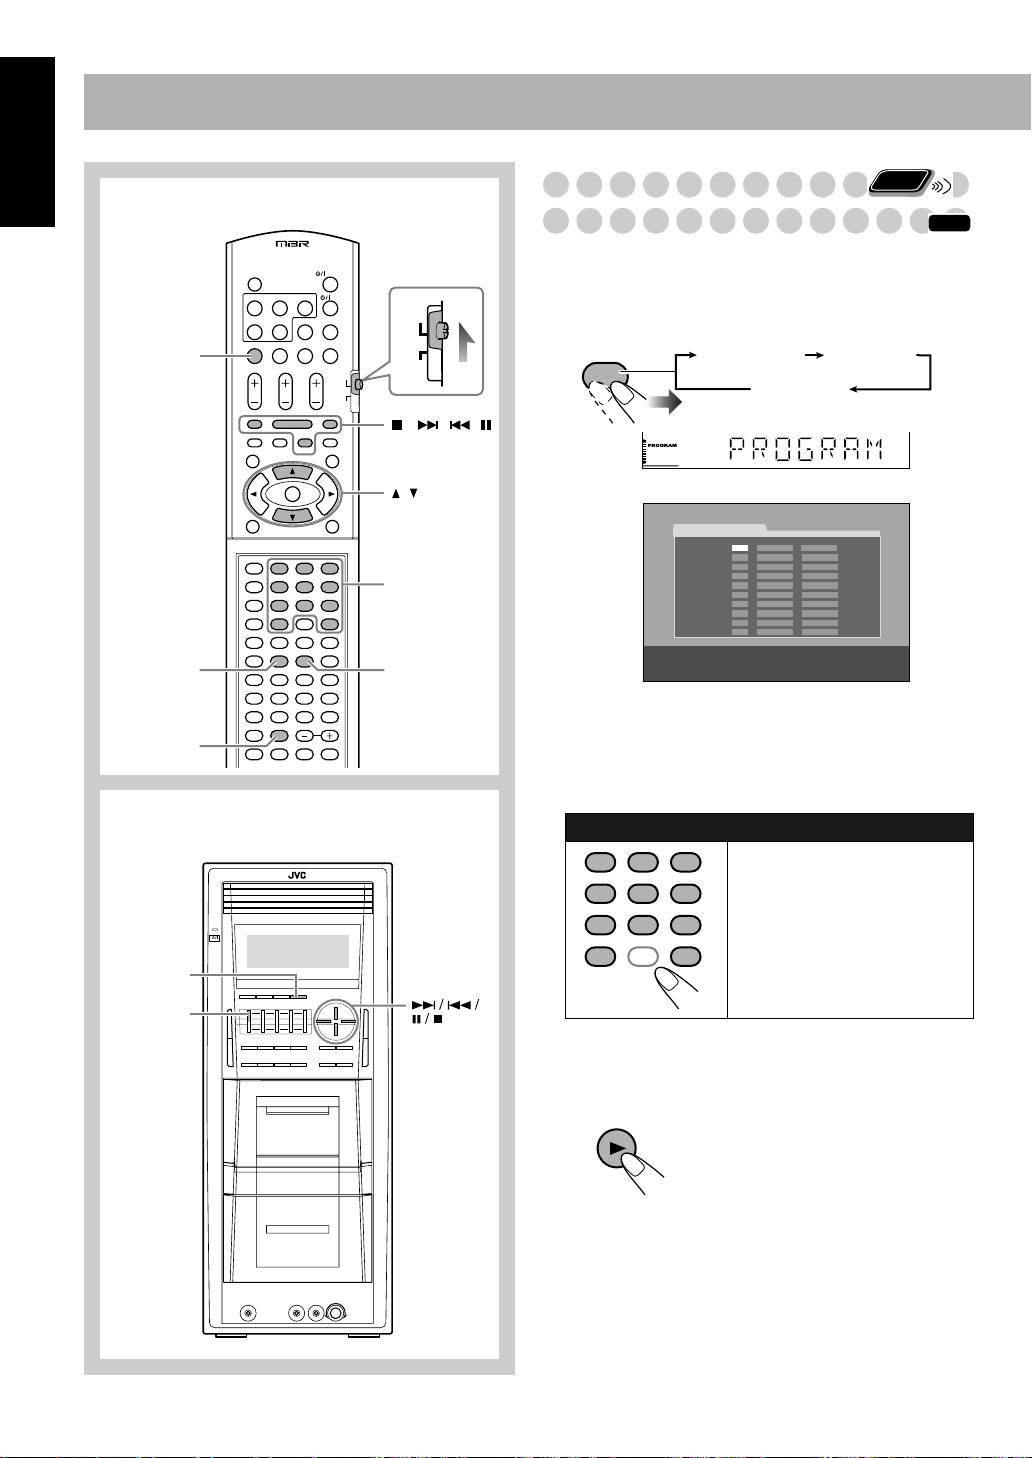
CA-DXT7_9[A].book Page 22 Friday, August 12, 2005 7:07 AM Дополнительные функции проигрывателя Программирование порядка Пульт ДУ воспроизведения Remote ONLY — функция Program Play AUDIO DVD/CD 3 TV / INFO Перед началом воспроизведения вы можете запрограммировать последовательность воспроизведения
CA-DXT7_9[A].book Page 23 Friday, August 12, 2005 7:07 AM 4 Начните воспроизведение. Воспроизведение выполняется в программной последовательности. DVD/CD Пропуск трека: Пауза: Стоп*: Произвольное воспроизведение —функция Random Remote ONLY Вы можете воспроизводить файлы на установленных дисках в
CA-DXT7_9[A].book Page 24 Friday, August 12, 2005 7:07 AM Повторное воспроизведение— REPEAT 1 Повтор текущей главы/дорожки. функция Repeat REPEAT Повтор текущего эпизода/группы. REPEAT 1 DISC* Повтор текущего диска. Remote ONLY Включение режима повторного воспроизведения. • Режим повтора можно
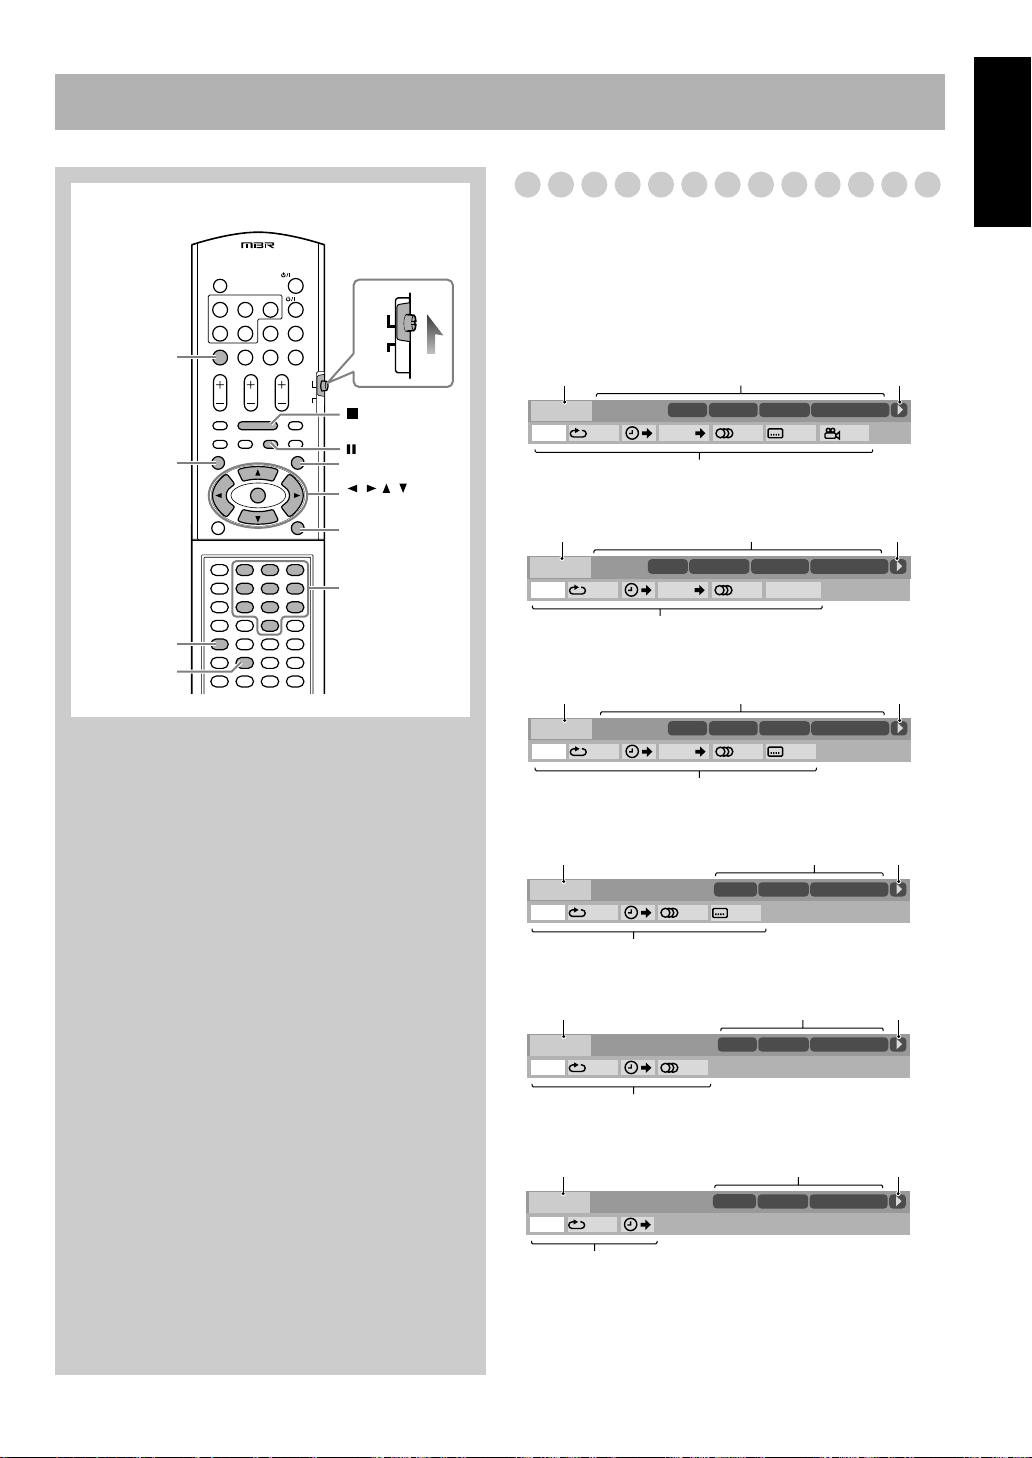
CA-DXT7_9[A].book Page 25 Friday, August 12, 2005 7:07 AM Управление проигрывателем с экрана Информация на экранной панели Пульт ДУ При помощи экранной панели вы можете знакомиться с информацией о диске (кроме дисков MP3/WMA/JPEG/ DivX/MPEG-4) и использовать ряд функций. AUDIO Экранные панели DVD
CA-DXT7_9[A].book Page 26 Friday, August 12, 2005 7:07 AM 1 Тип диска Операции, выполняемые с 2 Информация о воспроизведении Индикация Значение Dolby D/ PPCM Формат аудиозаписи 3/2.1 ch/ 2/0.0ch Номер канала DISC 1 Текущий диск TITLE 2 Текущий эпизод CHAP 3 Текущая глава GROUP 1 Текущая группа
CA-DXT7_9[A].book Page 27 Friday, August 12, 2005 7:07 AM Изменение настройки времени Повторное воспроизведение Вы можете изменить настройку времени при помощи экранной панели и в окне дисплея основного модуля. • См. также страница 24. 1 Активируйте экранную панель и выпадающее меню. Dolby D
CA-DXT7_9[A].book Page 28 Friday, August 12, 2005 7:07 AM Повтор фрагмента A-B Поиск по времени • Функция повтора эпизода А-В не используется для дисков в формате МР3/WMA/DivX/MPEG-4 и некоторых дисков в формате DVD. Вы можете перейти к определенной точке путем задания времени до нее от начала
CA-DXT7_9[A].book Page 29 Friday, August 12, 2005 7:07 AM Поиск главы/трека Можно найти нужный элемент для воспроизведения по номеру. Для DVD Video/DVD-VR: Глава Для DVD Audio: Трек 1 При воспроизведении активируйте экранную панель и выпадающее меню. 2 Выберите CHAP. или TRACK . 3 Активируйте
CA-DXT7_9[A].book Page 30 Friday, August 12, 2005 7:07 AM Экран управления для дисков MP3/ WMA/JPEG/MPEG-4/DivX Экран управления автоматически появляется на экране телевизора при загрузке диска MP3, WMA, JPEG, MPEG-4 или DivX. Перемещение полосы выделения (зеленого цвета) между списком групп и
CA-DXT7_9[A].book Page 31 Friday, August 12, 2005 7:07 AM Остановка воспроизведения Для повторного воспроизведения диска DivX/ MPEG-4 До начала или во время воспроизведения… Повтор эпизода/списка воспроизведения для DVD-VR Перед началом или во время воспроизведения… Отмена Для оригинальной
CA-DXT7_9[A].book Page 32 Friday, August 12, 2005 7:07 AM Операции записи Перед началом записи выберите для диска DVD Video стереофонический режим (“STEREO”страница 16) чтобы производить микширование многоканальных сигналов в 2 канала; в противном случае вы сможете записать на аудиокассету только
CA-DXT7_9[A].book Page 33 Friday, August 12, 2005 7:07 AM 3 Включите источник сигнала—“FM”, “AM”, 4 “DVD/CD”, “TAPE-A” или “AUX.” • При записи с диска вы можете использовать только режим синхронной записи (см. АС справа). • При записи с деки A, вы можете также использовать режим копирования (см.
CA-DXT7_9[A].book Page 34 Friday, August 12, 2005 7:07 AM Режим караоке Пульт ДУ KARAOKE SCORING AUDIO Кнопки выбора источнико в сигнала V.MASKING ECHO MIC MIX SET CANCEL TV AUDIO VOL +/– 1 2 3 4 5 6 7 8 9 10 0 +10 10 кнопок KEY / RESERVE +/– SETTING Основной модуль Кнопки выбора источнико в
CA-DXT7_9[A].book Page 35 Friday, August 12, 2005 7:07 AM Для отмены режима Mic Mixing выберите в пункте 3 параметр “MIC OFF”. Для использования только одного микрофона выберите в пункте 4 параметр “DVD/CD”, но воспроизведение не начинайте. Remote ONLY Наложение эхо на ваш голос При включенном
CA-DXT7_9[A].book Page 36 Friday, August 12, 2005 7:07 AM Включение/выключение звука фанфар 4 Активизируйте режим Mic Mixing. Remote ONLY MIC MIX 1 Войдите в режим настройки фанфар. SETTING MIC MIX MIC OFF 5 Начните воспроизведение. SET Для включения воспроизведения по программе для караоке: 2
CA-DXT7_9[A].book Page 37 Friday, August 12, 2005 7:07 AM Операции с таймером Настройка таймера Пульт ДУ AUDIO AUDIO TV Remote ONLY INFO При помощи ежесуточного таймера вы можете просыпаться под любимую музыку. Кроме того, используя таймер Recording Timer (Таймер записи), вы можете автоматически
CA-DXT7_9[A].book Page 38 Friday, August 12, 2005 7:07 AM 3 5 Выберите уровень громкости. • Вы можете выбрать уровень громкости (“VOLUME 0” – “VOLUME 30” и “VOLUME —”). Если вы выберите “VOLUME —” то громкость устанавливается на тот уровень, который использовался последний раз перед отключением
CA-DXT7_9[A].book Page 39 Friday, August 12, 2005 7:07 AM Использование меню настройки Исходные настройки Пульт ДУ INFO Некоторые пункты меню не могут быть изменены во время воспроизведения. 1 Нажмите SET UP (Настройка). AUDIO TV 2 С помощью кнопки 2 (или 3) выберите нужное / / / / ENTER SET UP 1 2
CA-DXT7_9[A].book Page 40 Friday, August 12, 2005 7:07 AM ТИП ФАЙЛA Вы можете выбрать тип файлов для воспроизведения. АУДИО: Для воспроизведения файлов в формате MP3/WMA. НЕПОДВИЖ. КАРТИНКА: Воспроизведение файлов в формате JPEG. ВИДЕО: Для воспроизведения файлов в формате DivX/MPEG-4. Меню АУДИО
CA-DXT7_9[A].book Page 41 Friday, August 12, 2005 7:07 AM Управление телевизором Управление функциями телевизора Пульт ДУ С помощью данного пульта дистанционного управления вы сможете управлять телевизорами JVC или телевизорами других производителей. 1 Сдвиньте переключатель AUDIO/TV в положение TV
CA-DXT7_9[A].book Page 42 Friday, August 12, 2005 7:07 AM Дополнительная информация Дополнительная информация о системе Вступление (см. страници 1 и 2) Типы дисков, доступных для воспроизведения: • Об аудиоформатах – Linear PCM (Линейный PCM): несжатый цифровой аудиосигнал, этот формат используется
CA-DXT7_9[A].book Page 43 Friday, August 12, 2005 7:07 AM • Часы могут спешить или отставать на 1 — 2 минуты в месяц. Если это произойдет, установите часы заново. Особые функции проигрывателя DVD/ VCD (см. страници 19 и 21) Выбор звукового трека: • При воспроизведении некоторых дисков DVD Video
CA-DXT7_9[A].book Page 44 Friday, August 12, 2005 7:07 AM – Некоторые файлы MPEG-4, записанные на персональном компьютере, могут быть недоступны для воспроизведения. Операции записи (см. страници 32 и 33) Общая информация: • Нельзя изменять источник сигнала во время записи. • В конце и в начале
CA-DXT7_9[A].book Page 45 Friday, August 12, 2005 7:07 AM • Если в качестве источника сигнала вы выберете диск DVD Video, то ежедневный таймер (Daily Timer) будет работать некорректно. Использование меню настройки Уход за системой Для обеспечения качественной работы системы содержите диски,
CA-DXT7_9[A].book Page 46 Friday, August 12, 2005 7:07 AM Очистка системы Функции проигрывателя: • Пятна с системы должны удаляться мягкой тканью. При значительном загрязнении системы протрите ее тканью, смоченной в водном растворе нейтрального моющего средства, затем протрите сухой тканью. • Во
CA-DXT7_9[A].book Page 47 Friday, August 12, 2005 7:07 AM Функции караоке: Не включается функция подсчета очков. ] Воспроизводится диск DVD Audio или DVD-VR. ] Функцию подсчета очков в режиме караоке нельзя использовать во время записи или когда меню диска DVD Video/SVCD/VCD отображается на экране
CA-DXT7_9[A].book Page 48 Friday, August 12, 2005 7:07 AM Технические характеристики CA-DXT9 Секция усилителя Выходная мощность: FRONT SPEAKERS: не менее 150 Вт на канал (эффективное значение), при нагрузке 4 Ω при частоте 1 кГц при суммарном коэффициенте нелинейных искажений не более 10%. CENTER
CA-DXT7_9[A].book Page 49 Friday, August 12, 2005 7:07 AM CA-DXT7 Секция усилителя Выходная мощность: FRONT SPEAKERS: не менее 150 Вт на канал (эффективное значение), при нагрузке 4 Ω при частоте 1 кГц при суммарном коэффициенте нелинейных искажений не более 10%. CENTER SPEAKER: не менее 50 Вт на
CA-DXT7_9[A].book Page 50 Friday, August 12, 2005 7:07 AM Цифровые выходные сигналы DIGITAL AUDIO OUTPUT ЦИФРОВОЙ АУДИО ВЫХОД Тип диска Выходные сигналы ЦИФРОВОЙ DIGITAL/ PCM ПОТОК/PCM ТОЛЬКО PCM DVD Video Линейный PCM (48 кГц, 16/20/ 24 бит) Линейный PCM (48 кГц, 16 бит)*1 Линейный PCM (96 кГц)
CA-DXT7_9[A].book Page 51 Friday, August 12, 2005 7:07 AM Перечень деталей Пульт ДУ Кнопка AUDIO Кнопка Страница Страница x 41 KARAOKE SCORING 7 8 11 –13, 23 KEY #/ : 35 33/1 9 Q 10, 12, 13, 21 MIC MIX d 34, 36 ¢/ 4 7 . 10, 11 8 P TV z 9 Кнопка 1 35 MENU/PL W 12, 29 11, 21 ON SCREEN R 26 – 29
CA-DXT7_T9_Cover[A].fm Page 2 Wednesday, August 10, 2005 1:04 PM Инструкция по использованию шнура питания (переменного тока) (не применимо для стран Европы, США, Канады и Великобритании) CA-DXT9/CA-DXT7 COMPACT COMPONENT SYSTEM ПРЕДОСТЕРЕЖЕНИИ для шнура питания (переменного тока) ПЕРЕД
Перейти к контенту
Музыкальные центры JVC
- Размер инструкции: 3.62 Мб
- Формат файла: pdf
Если вы потеряли инструкцию от музыкального центра JVC CA-DXT9, можете скачать файл для просмотра на компьютере или печати.
Инструкция для музыкального центра JVC CA-DXT9 на русском языке. В руководстве описаны возможности и полезные функции, а также правила эксплуатации. Перед использованием внимательно ознакомьтесь с инструкцией.
Чтобы не читать всю инструкцию вы можете выполнить поиск по содержимому внутри инструкции и быстро найти необходимую информацию. Рекомендации по использованию помогут увеличить срок службы музыкального центра JVC CA-DXT9. Если у вас появилась проблема, то найдите раздел с описанием неисправностей и способами их решения. В нем указаны типичные поломки и способы их решения.
Скачать
COMPACT COMPONENT SYSTEM
CA-DXT9
CA-DXT7
INSTRUCTIONS
GVT0147-001A
[US, UN]
English
DXT7_T9_Cover[USUN]-f.fm Page 1 Wednesday, February 16, 2005 1:24 PM
COMPACT COMPONENT SYSTEM
CA-DXT9
CA-DXT7
English
INSTRUCTIONS
GVT0147-001A
[US, UN]
Warnings, Cautions and Others
Caution–– button!
Disconnect the mains plug to shut the power off completely.
The button in any position does not
disconnect the mains line. The power can be remote
controlled.
CAUTION
To reduce the risk of electrical shocks, fire, etc.:
1. Do not remove screws, covers or cabinet.
2. Do not expose this appliance to rain or moisture.
CAUTION
• Do not block the ventilation openings or holes.
(If the ventilation openings or holes are blocked by a
newspaper or cloth, etc., the heat may not be able to get
out.)
• Do not place any naked flame sources, such as lighted
candles, on the apparatus.
• When discarding batteries, environmental problems must
be considered and local rules or laws governing the
disposal of these batteries must be followed strictly.
• Do not expose this apparatus to rain, moisture, dripping or
splashing and that no objects filled with liquids, such as
vases, shall be placed on the apparatus.
G-1
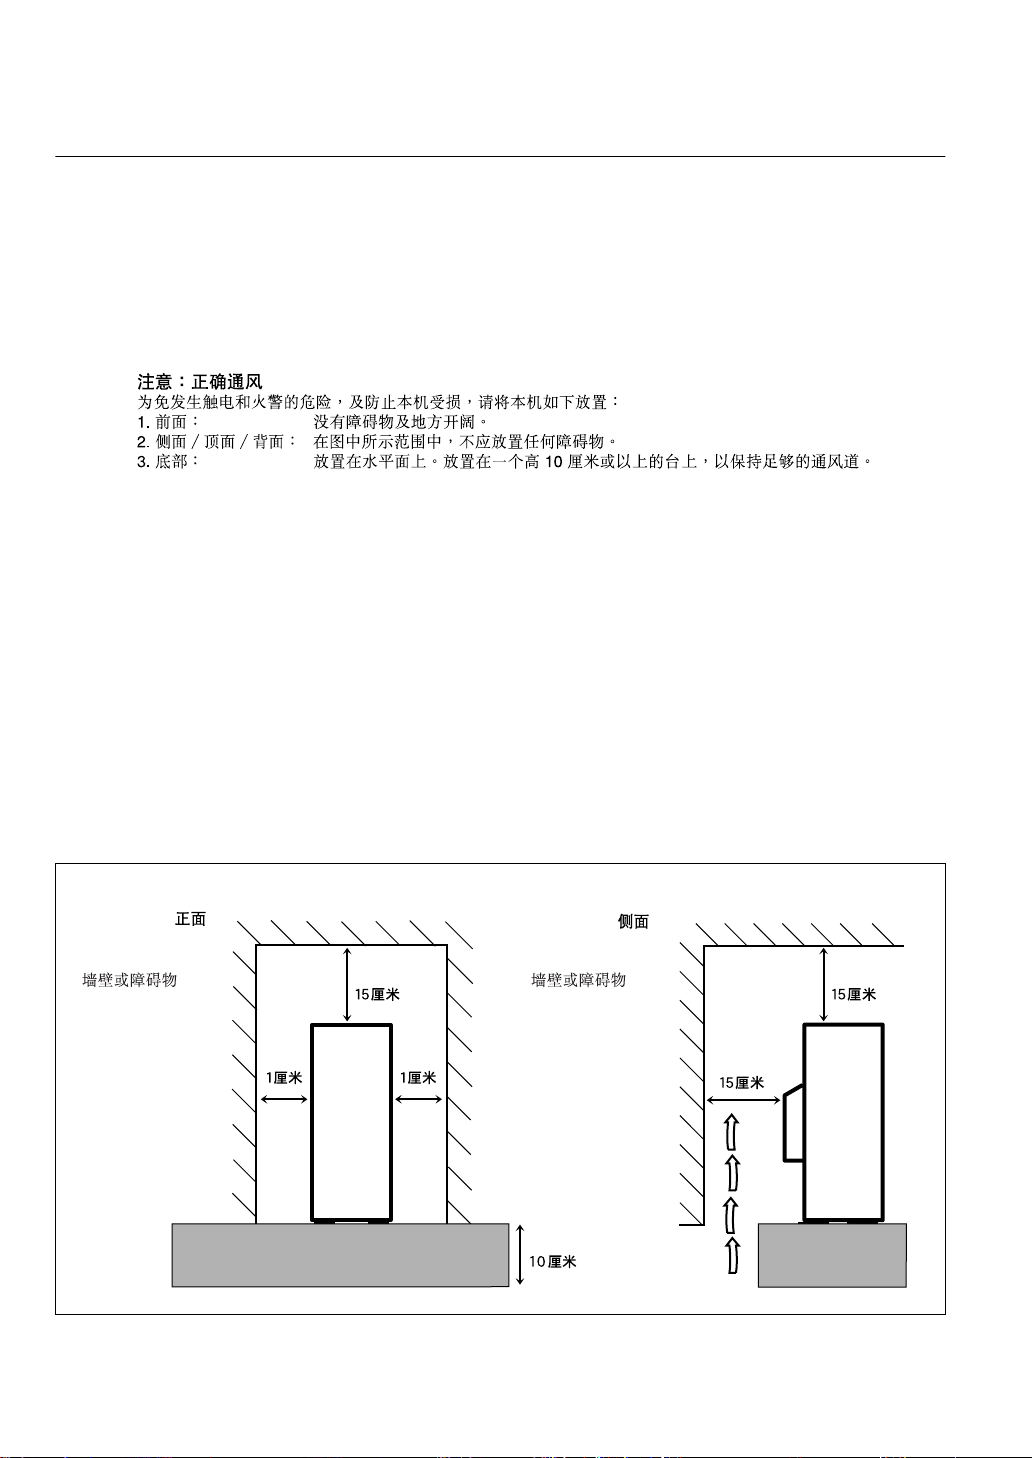
Caution: Proper Ventilation
To avoid risk of electric shock and fire, and to prevent damage, locate the apparatus as follows:
1. Front: No obstructions and open spacing.
2. Sides/Top/Back: No obstructions should be placed in the areas shown by the dimensions below.
3. Bottom: Place on the level surface. Maintain an adequate air path for ventilation by placing
on a stand with a height of 10 cm or more.
Front view Side view
Wall or obstructions Wall or obstructions
15 cm 15 cm
1 cm
1 cm
CA-DXT9
CA-DXT7
10 cm
15 cm
CA-DXT9
CA-DXT7
G-2
IMPORTANT FOR LASER PRODUCTS
1. CLASS 1 LASER PRODUCT
2.
CAUTION
inside the unit; leave all servicing to qualified service personnel.
3.
CAUTION
failed or defeated. Avoid direct exposure to beam.
4. REPRODUCTION OF LABEL: CAUTION LABEL, PLACED INSIDE UNIT.
: Do not open the top cover. There are no user serviceable parts
: Visible and invisible laser radiation when open and interlock
G-3
Introduction
Precautions
Installation
• Install the System in a location with adequate ventilation to
prevent internal heat buildup in the System.
DO NOT install the System in a location near
heat sources, or in a place subject to direct
sunlight, excessive dust or vibration.
• Install in a place which is level, dry and neither too hot nor
too cold—between 5°C and 35°C.
• Leave sufficient distance between the System and the TV.
• Keep the speakers away from the TV to avoid interference
with TV.
Power sources
• When unplugging the System from the wall outlet, always
pull on the plug, not the AC power cord.
DO NOT handle the AC power cord with wet
hands.
Moisture condensation
Moisture may condense on the lenses inside the System in
the following cases:
• After starting to heat the room
• In a damp room
• If the System is brought directly from a cold to a warm
place.
Should this occur, the System may malfunction. In this case,
leave the System turned on for a few hours until the moisture
evaporates, unplug the AC power cord, then plug it in again.
Internal heat
• Make sure there is good ventilation around the unit. Poor
ventilation could overheat and damage the unit.
–A cooling fan is inside the unit to prevent heat buildup.
DO NOT block the ventilation openings or
holes. If they are blocked by a newspaper or
cloth, etc., the heat may not be able to get out.
Others
• Should any metallic object or liquid fall into the System,
unplug the AC power cord and consult your dealer before
operating any further.
DO NOT disassemble the System since there
are no user serviceable parts inside.
• If you are not going to operate the System for an extended
period of time, unplug the AC power cord from the wall
outlet.
If anything goes wrong, unplug the AC power cord and
consult your dealer.
Contents
Connections……………………………………………………………… 3
Display Indication …………………………………………………….8
Daily Operations—Playback…………………………………….. 9
Canceling the Demonstration …………………………………… 9
Listening to the Radio …………………………………………… 10
Playing Back a Disc ……………………………………………… 11
Playing Back a Tape……………………………………………… 13
Daily Operations—Sound&Other Adjustments
Adjusting the Volume …………………………………………… 14
Adjusting the Speaker Output Level ……………………….. 14
Reinforcing the Bass Sound …………………………………… 15
Selecting the Sound Modes ……………………………………. 15
Creating Your Own Sound Modes—User Mode ………. 15
Selecting the Surround Modes ……………………………….. 16
Presetting Automatic DVD Video
Sound Increase Level ………………………………………… 16
Changing the Color System and Scanning Mode………. 17
Changing the Picture Tone…………………………………….. 17
Changing the Display Brightness……………………………. 18
Setting the Clock ………………………………………………….. 18
Turning Off the Power Automatically …………………….. 18
Unique DVD/VCD Operations………………………………… 19
Selecting the Sound Track……………………………………… 19
Selecting the Subtitle Language……………………………… 20
Selecting the View Angle………………………………………. 20
Reviewing the Playback Quickly ……………………………. 20
Selecting Browsable Still Pictures ………………………….. 20
Playing Back Bonus Group ……………………………………. 21
Special Picture Playback ……………………………………….. 21
Advanced Disc Operations ……………………………………… 22
Programming the Playing Order—Program Play………. 22
Playing at Random—Random Play…………………………. 23
Playing Repeatedly—Repeat Play ………………………….. 24
Prohibiting Disc Ejection—Child Lock …………………… 24
On-Screen Disc Operations …………………………………….. 25
On-screen Bar Information…………………………………….. 25
Operations Using the On-screen Bar……………………….. 26
Operations on the Control Screen …………………………… 29
Recording Operations…………………………………………….. 32
Enjoying Karaoke …………………………………………………..34
Singing Along (Karaoke) ………………………………………. 34
Reducing the Lead Vocal—Vocal Masking……………… 35
Scoring Your Karaoke Skill …………………………………… 35
Reserving Karaoke Songs—Karaoke Program Play….. 36
Timer Operations…………………………………………………… 37
Setup Menu Operations………………………………………….. 39
Operating the TV ……………………………………………………41
Additional Information…………………………………………… 42
Troubleshooting …………………………………………………… 45
Specifications ………………………………………………………. 47
Parts Index ……………………………………………………………. 50
…………. 14
English
1
English
Playable Disc Types
DIGITAL VIDEO
DVD Logo is a trademark of DVD Format/Logo Licensing
Corporation.
• CD-R/-RW: Recorded in the Audio CD/Video CD/
SVCD formats and MP3/WMA/JPEG files.
• DVD-R: Recorded in the DVD Video format.
• DVD-RW: Recorded in the DVD Video format or the
Video Recording (DVD-VR) format.
• DVD-RAM: Recorded in the Video Recording (DVDVR) format.
In addition to the above discs, this system can play back
audio data recorded on CD Text, CD-G (CD Graphics), and
CD-Extra.
• The following discs cannot be played back:
DVD+R, DVD+RW, CD-I (CD-I Ready), Photo CD, etc.
Playing back these discs will generate noise and damage
the speakers.
• In this manual, “file” and “track” are interchangeably used
for MP3/WMA/JPEG operations.
Caution for DualDisc playback:
The Non-DVD side of a “DualDisc” does not comply
with the “Compact Disc Digital Audio” standard.
Therefore, the use of Non-DVD side of a DualDisc on
this product may not be recommended.
About color system
This System accommodates both NTSC and PAL system
and can play back discs recorded with either system.
To change the color system, see page 17.
Note on Region Code
This System can play back only DVD Videos whose Region
Code numbers include “3.”
EX.:
INFO
IMPORTANT: Before playing a disc, make sure of
the following…
• Turn on the TV and select an appropriate input mode on
the TV to view the pictures or on-screen displays.
• For disc playback, you can change the initial setting to
your preference. See “Setup Menu Operations” on
page 39.
If “ ” appears on the TV screen when you press a
button,
the disc cannot accept the operation you have
tried to do.
How to Read This Manual
• Button and control operations are explained as listed in the
table below.
•
Some related tips and notes are explained later in the
sections “Learning More about This System” and
“Troubleshooting,” but not in the same section
explaining the operations ( indicates that the
content has some information).
Indicates that you press the button
Indicates that you press the button
repeatedly
selected.
Indicates that you press one of the buttons.
2
Indicates that you
sec.
for a specified period.
The number inside the arrow indicates the
period of press (in the example, 2 seconds).
Indicates that you turn the control toward the
specified direction(s).
Remote
ONLY
Indicates that this operation is only
possible using the remote control.
Indicates that this operation is only
possible using the main unit.
INFO
briefly.
briefly and
until an option you want is
press and hold
the button
Audio formats
The System can play back the following digital audio
formats.
•
LPCM
(Linear PCM),
DTS
(Digital Theater Systems),
Packing)
2
DIGITAL
MLP
(Dolby Digital),
(Meridian Lossless
Connections
Do not connect the AC power cord until all other
connections have been made.
• Connect VIDEO OUT directly to the video input of your
TV. Connecting VIDEO OUT to a TV via a VCR may
interfere with your viewing when playing back a copyprotected disc. Your viewing may be interfered when
connecting VIDEO OUT to an integrated TV/VCR system.
CA-DXT9
~ From the video input of TV/monitor
See page 5.
Ÿ From the digital input of digital audio
component such as CD recorder
See page 5.
! From the analog audio output of auxiliary
equipment (VCR, etc.)
See page 5.
⁄ From AM/FM antenna
See page 5.
Supplied accessories
English
• FM antenna (x1)
• AM loop antenna (x1)
• Composite video cord (x1)
• Remote control (x1)
• Batteries (x2)
• AC plug adapter (x1)
If any item is missing, consult your dealer immediately.
@ From the speakers
See page 6.
¤ Voltage selector
Before plugging in, confirm the position the
voltage selector points at. See page 7.
# To a wall outlet
Plug the AC power cord only after all
connections are complete.
• If the wall outlet does not match the AC plug,
use the supplied AC plug adapter.
3
English
CA-DXT7
~ From the video input of TV/monitor
See page 5.
Ÿ From the digital input of digital audio
component such as CD recorder
See page 5.
! From the analog audio output of auxiliary
equipment (VCR, etc.)
See page 5.
⁄ From AM/FM antenna
See page 5.
@ From the speakers
See page 6.
¤ Voltage selector
Before plugging in, confirm the position the
voltage selector points at. See page 7.
# To a wall outlet
Plug the AC power cord only after all
connections are complete.
• If the wall outlet does not match the AC plug,
use the supplied AC plug adapter.
4
~
TV/monitor
Composite video
cord (supplied)
S video cord
(not supplied)
⁄
AM/FM antenna
To assemble the AM loop antenna
English
Green
Component video cord (not supplied)
• To select progressive scanning mode (see page 17), use
COMPONENT jacks.
• Connect the VIDEO jack, S-VIDEO jack, or
COMPONENT jacks whichever you want to use.
Ÿ
Digital audio component
OPTICAL
DIGITAL
OUTPUT
Protective cap
• Set “DIGITAL AUDIO OUTPUT” in the “AUDIO” menu
correctly according to the connected digital audio
equipment (see page 40). If setting is incorrect, loud noise
may be generated causing damage to the speakers.
!
Auxiliary equipment
Red
Blue
To connect AM/FM antenna
AM loop antenna (supplied)
Turn it until the best reception is
obtained.
FM antenna (supplied)
Extend it so that you can obtain the best
reception.
For better AM/FM reception
AM loop antenna (supplied)
Keep it connected.
Vinyl-covered wire (not supplied)
Extend it horizontally.
Red
Stereo audio cord
(not supplied)
White
FM outdoor antenna
(not supplied)
• Disconnect the supplied FM antenna, and connect to an
outdoor FM antenna using a 75
connector (IEC or DIN45325).
• Make sure the antenna conductors do not touch any other
terminals, connecting cords and power cord. Also, keep the
antennas away from metallic parts of the System,
connecting cords, and the AC power cord. This could cause
poor reception.
Ω
wire with coaxial type
5
English
@
Speakers
To connect the speaker cords
• When connecting the speaker cords, match their polarity
with that of the speaker terminals: blue/red/green/white/
gray to (+) and black to (–).
For CA-DXT9
From right front speaker (blue/black)
From left front speaker
(blue/black)
From right
subwoofer
(red/black)
From left subwoofer
(red/black)
From right surround
speaker (white/black)
From left surround
speaker (white/black)
For CA-DXT7
From right front speaker (blue/black)
From left front speaker
(blue/black)
• Use only speakers with the same speaker impedance as
indicated by the speaker terminals on the rear of the System.
• The front and center speakers are magnetically shielded to
avoid color distortions on TVs. However, if not installed
properly, it may cause color distortions. So, pay attention to
the following when installing the speakers.
– When placing the speakers near a TV set, turn off the
TV’s main power switch or unplug it before installing the
speakers.
Then wait at least 30 minutes before turning on the TV’s
main power switch again.
Some TVs may still be affected even though you have
followed the above instruction. If this happens, move the
speakers away from the TV.
• DO NOT connect more than one speaker to
each terminal.
• DO NOT push or pull the speakers as this
will damage the foot spacers at the bottom
of the speakers.
Speaker layout
To enjoy multi-channel sound, locate the speakers as
follows. If you cannot locate like this, adjust the speaker
setting by using the Setup menu (see page 40).
For CA-DXT9
From center
speaker
(green/black)
From subwoofer
(red/black)
From center speaker
(green/black)
From right surround
speaker (gray/black)
6
For CA-DXT7
From left surround
speaker (gray/black)
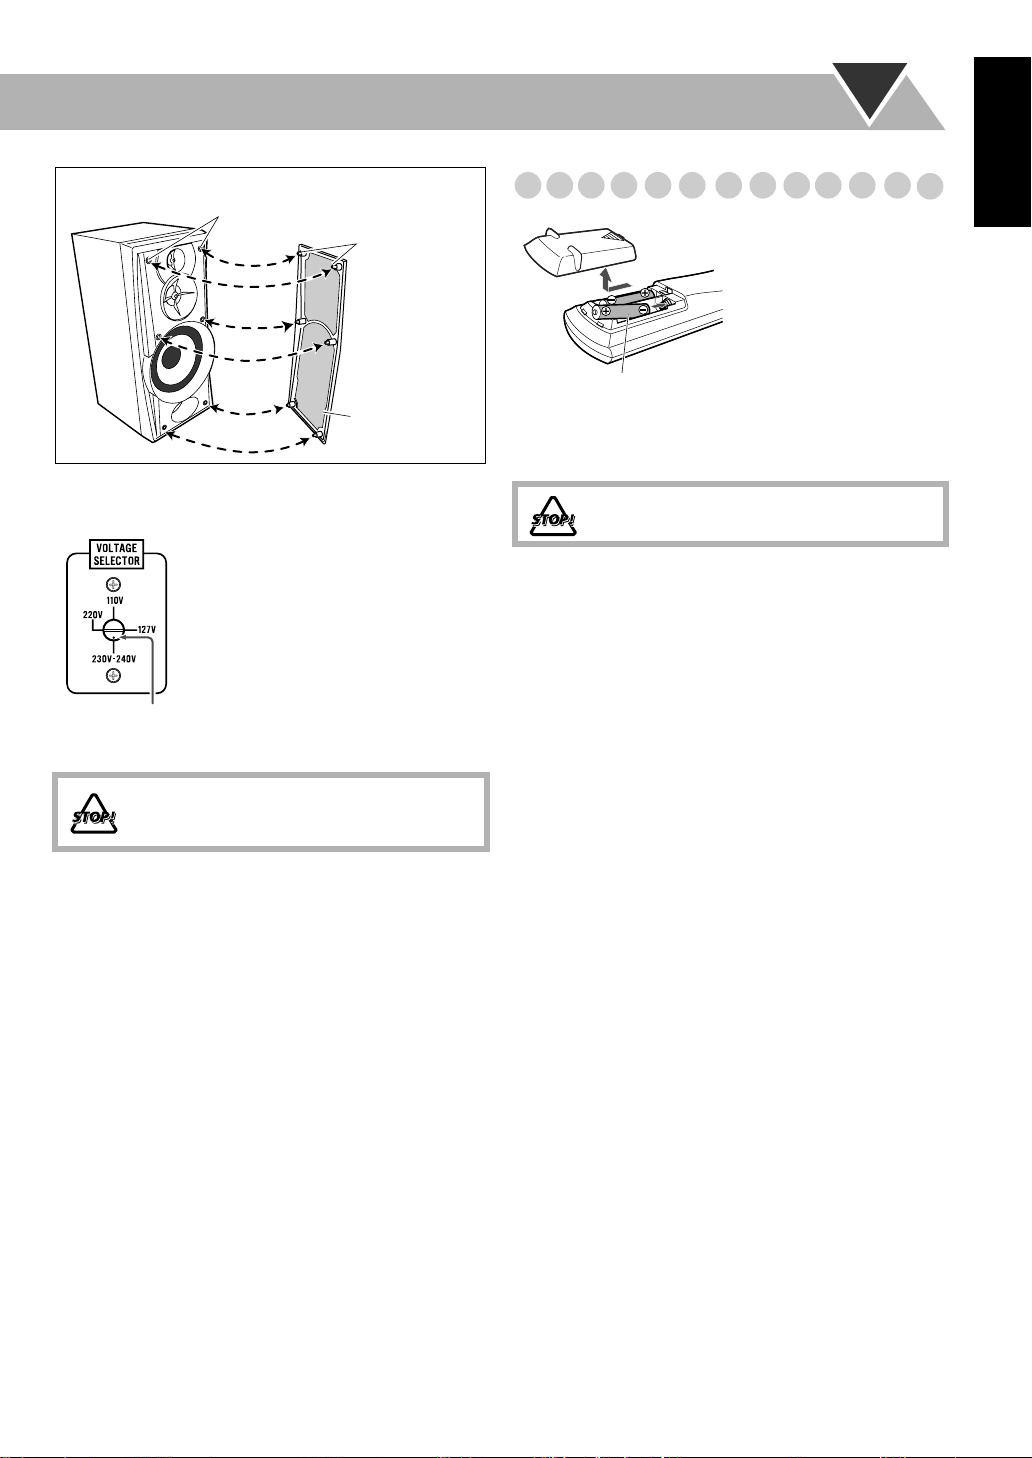
To remove the speaker grilles of the front speakers
Holes
Projection
Preparing the remote control
When using the remote
control,
remote control toward the
remote sensor as directly as
possible. If you operate it
from a diagonal position,
the operating range (approx.
R6(SUM-3)/AA(15F)
5 m) may be shorter.
English
point the top of the
To adjust the voltage selector
¤
Use a screwdriver to rotate the
voltage selector so that the voltage
mark is pointing at the same voltage
as where you are plugging in the unit.
(See also the back cover page.)
Voltage mark
DO NOT plug in before setting the voltage
selector and all connection procedures are
complete.
Speaker grille
• Dispose of batteries in the proper manner, according to
federal, state, and local regulations.
DO NOT recharge, short, disassemble or
heat the battery or dispose of it in a fire.
7
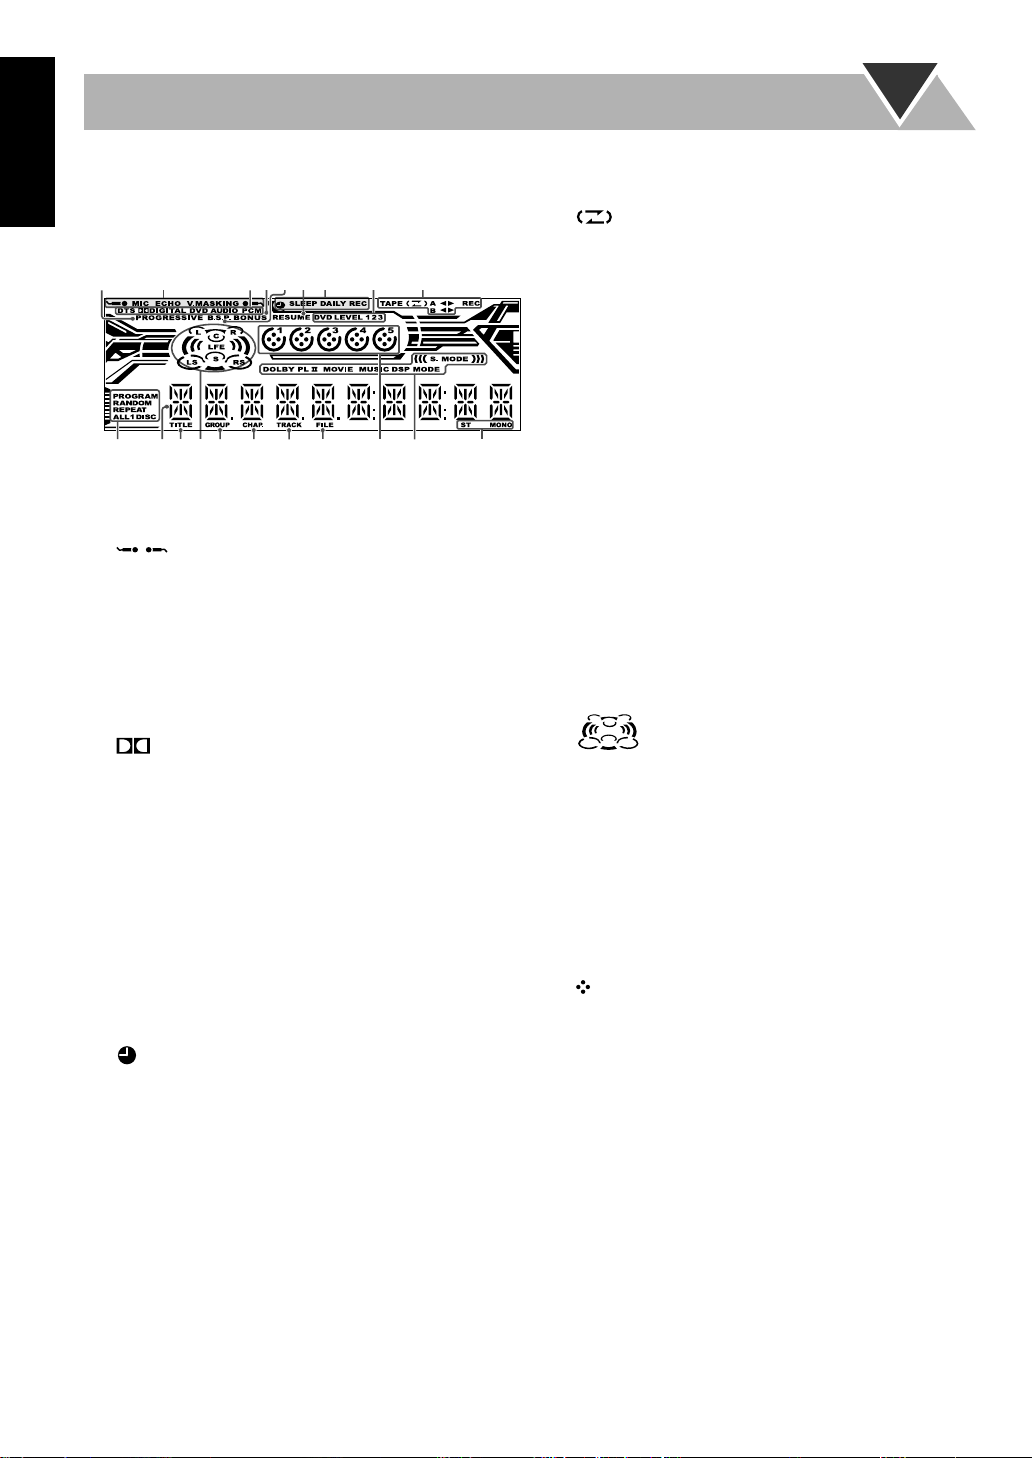
Display Indication
English
The indications on the display teach you a lot of things while
you are operating the System.
Before operating the System, be familiar with when and how
the indicator illuminates on the display.
13289
ewpq
1
PROGRESSIVE indicator
• Lights when the progressive scanning mode is selected.
2
Karaoke operation indicators
•: lights when the Mic Mixing Mode is activated;
/
flashes when scoring function is in use.
• MIC: lights when the Mic Mixing Mode is activated;
flashes when scoring function is in use.
• ECHO: lights when the echo effect is activated.
• V.MASKING: lights when the Vocal Masking Mode is
activated.
3
Source signal indicators
• DTS: lights when a source signal is DTS.
• DIGITAL: lights when a source signal is Dolby
Digital.
• DVD: lights when DVD Video is detected.
• DVD AUDIO: lights when DVD Audio is detected.
• PCM: l
4
BONUS indicator
• Lights when DVD Audio with bonus group is detected
5
B.S.P. indicator
• Lights when browsable still pictures on DVD Audio are
6
RESUME indicator
• Lights when Resume is activated (see page 40).
7
Timer indicators
•: lights when Daily Timer or Recording Timer stands
• SLEEP: lights when the Sleep Timer is activated.
• DAILY: lights when the Daily Timer stands by; flashes
• REC: lights when the Recording Timer stands by; flashes
8
DVD LEVEL 1/2/3 indicators
• Lights to indicate the DVD Video increase level.
ights when a source signal is linear PCM.
(see page 21).
available (see page 20).
by or is working or being set.
while working or being set.
while working or being set.
r
t
45
76
yu
(see pages 34 to 36)
i
9
Tape operation indicators
• TAPE: lights when a tape is loaded in either deck A or B.
• (Reverse Mode): lights to indicate the current
Reverse Mode (see page 13).
• A: lights when a tape is in the deck A.
• B: lights when a tape is in the deck B.
•
2 3
(tape direction):
– Lights to indicate the current tape running direction.
– Flashes slowly during playback and recording.
– Flashes quickly while rewinding a tape.
• REC: lights while recording.
p
Disc operation indicators
;o
• PROGRAM: lights when Program Play is activated.
• RANDOM: lights when Random Play is activated.
• REPEAT: lights when Repeat Play is activated.
• ALL DISC: lights when All Disc Repeat is activated.
•1 DISC: lights when One Disc Repeat is activated.
• 1: lights when One Track/Chapter/Step Repeat is
activated.
q
Main display
w
TITLE indicator
• Lights to indicate the title number for DVD Video.
e
Audio signal indicators
• L/R/C/LS/RS/LFE: Lights to indicate the incoming audio
channel signals.
•:Lights to indicate the speakers from which
sound is emitted.
r
GROUP indicator
• Lights to indicate the group number.
t
CHAP. indicator
• Lights to indicate the chapter number.
y
TRACK indicator
• Lights to indicate the track number.
u
FILE indicator
• Lights to indicate the file number.
i
Disc indicators
•1 – 5: lights to indicate the current disc tray.
•: lights when a disc is detected on the disc tray; rotates
during playback or paused.
o
Sound Mode/Surround Mode indicators
• DOLBY PL II MOVIE/MUSIC: lights when Dolby Pro
Logic Modes (Movie or Music) is activated.
• S.MODE: lights when one of the Sound Modes
Modes
is activated.
• DSP MODE: lights when one of the DSP Modes is
activated.
;
FM reception indicators
• ST (stereo): lights while an FM stereo station with
sufficient signal strength is tuned in.
• MONO: lights while receiving an FM stereo station in
monaural.
(see page 15)
/Surround
8
Daily Operations
—Playback
In this manual, the operation using the remote control
is mainly explained; however, you can use the buttons
and controls on the main unit if they have the same (or
similar) name and marks.
1
DISC 1 –
DISC 5
AUDIO
TV
2
3
FM MODE /
TOP MENU
GROUP/TITLE
SET
1
2
123
456
789
10 0 +10
AUDIO
AUX
MENU
////
ENTER
10 keys
RETURN
REVERSE
MODE
¥
Turn on the power.
The STANDBY lamp on the main unit goes off.
• Without pressing AUDIO, the System also turns
on by pressing one of the source select buttons in the
next step.
ø
Select the source.
Playback automatically starts if the selected source is
ready to start playback.
• If you press AUX, start playback source on the external
component.
π
Adjust the volume.
[
Operate the target source as explained
later.
To turn off (stand by) the system
AUDIO
For private listening
Connect a pair of headphones to the PHONES jack on the
main unit. The sound will no longer come out of the
speakers.
connecting or putting the headphones.
• Disconnecting the headphones will activate the
speakers again.
The STANDBY lamp on the main unit
lights in red.
•A small amount of power is always
consumed even while on standby.
Be sure to turn down the volume before
DO NOT turn off (stand by) the System with
the volume set to an extremely high level;
Otherwise, the sudden blast of sound can
damage your hearing, speakers and/or
headphones when you turn on the System or
start playback.
English
3
DVD/CD TAPE-A TAPE-B FM/AM
AUDIO VOL
Canceling the Demonstration
2
sec.
DEMO OFF
DEMO START
To start the demonstration,
select DEMO START.
Main Unit
ONLY
9
English
Listening to the Radio
To select the AM tuner interval spacing
Some countries space AM stations 9 kHz apart, and other
countries use 10 kHz spacing.
1
Select “AM,” then turn off (stand by) the System.
FM AM
2
Select the AM tuner interval spacing.
To select 9 kHz:
(holding then…)
To select 10 kHz:
(holding then…)
To select the band (FM/AM)
FM/AM
FM AM
Main Unit
ONLY
INFO
Remote
If the received FM station is hard to listen
FM MODE
The MONO indicator lights on the
display. Reception will improve though
ONLY
stereo effect is lost—monaural reception
mode.
To restore the stereo effect,
press the
button again (the MONO indicator goes
off).
Remote
To preset stations
ONLY
You can preset 30 FM and 15 AM stations.
• To cancel the operation during procedure, press CANCEL.
1
Tune in to a station you want to preset.
• You can also store the monaural reception mode for FM
preset stations if selected.
Start presetting.
2
3
Select a preset number.
123
456
789
10 0 +10
Examples:
To select preset number 5, press 5.
To select preset number 15, press +10,
then 5.
To select preset number 30, press +10,
+10, then 10.
• You can also use +/– buttons.
To tune in to a station
While FM or AM is selected…
1
sec.
Increases the frequencies.
Decreases the frequencies.
Frequency starts changing on the display.
When a station (frequency) with sufficient signal strength is
tuned in, the frequency search stops.
• When you repeatedly press the button, the frequency
changes step by step.
To stop searching manually,
press either button.
10
Store the station.
4
To tune in to a preset station
1
Select the band (FM or AM).
FM/AM
FM AM
2
Select a preset number.
123
456
789
10 0 +10
Examples:
To select preset number 5, press 5.
To select preset number 15, press
+10, then 5.
To select preset number 30, press
+10, +10, then 10.
• You can also use 4/¢
buttons on the remote control or
PRESET +/– buttons on the main
unit.
Playing Back a Disc
INFO
Before operating a disc, be familiar how a disc is recorded.
• DVD Video comprises of “
“
Chapters,
“
Groups
“
Groups
comprise of only “
” DVD Audio/MP3/WMA comprise of
” which includes “
” which includes “
Tracks
Titles
” which includes
” JPEG comprises of
Tracks,
Files,
” and CD/SVCD/VCD
.”
• For JPEG playback, see page 30.
To insert discs
Main Unit
ONLY
On-screen guide icons
• During disc playback, the following icons may appear for
a while on the TV screen:
Appears at the beginning of a scene containing
multi-angle views.
Appears at the beginning of a scene containing
multi-audio languages.
Appears at the beginning of a scene containing
multi-subtitle languages.
• The following icons will be also shown on the TV screen
to indicate your current operation.
, , , , ,
• To deactivate the on-screen guide icons, see “ON
SCREEN GUIDE” on page 40.
To select a disc
DISC 1 DISC 2
DISC 4 DISC 5
DISC 3
Playback starts.
English
• When using an 8 cm disc, place it on the inner circle of the
disc tray.
To close the disc tray,
• If you press 3
for the same tray, the disc tray closes
press the same 0
again.
automatically and playback starts.
To start:
DVD/CD
Playback of the
current disc starts.
While playing DVD/SVCD/VCD/MP3:
To pause: To stop:
FM MODE
To release it, press
DVD/CD 3
.
This System can
store the stop point, and when you start playback again by
pressing DVD/CD 3
, it starts from the position where you
have stopped—Resume Play. (RESUME indicator lights up
when you stop playback.)
press 7
To stop completely while Resume is activated,
twice. (To cancel Resume, see “RESUME” on page 40.)
To select a title/group
While playing a disc…
123
GROUP/TITLE
456
789
10 0 +10
To select a chapter/track
While playing a disc…
• First time you press
4
, you can go back
to the beginning of the
current chapter/track.
or
Remote
ONLY
123
456
789
10 0 +10
11
English
To locate a particular portion
While playing a disc except MP3/WMA…
7
For SVCD/VCD with PBC
While playing a disc with PBC, “PBC” appears on the
display instead of the playing time.
When disc menu appears on the TV screen, select an item on
the menu. Playback of the selected item starts.
• No sound comes out while searching on DVD Video/
SVCD/VCD.
To return to normal playback,
T
o select
an item directly
press DVD/CD 3
Remote
ONLY
.
You can select a title/chapter/track directly and start
playback.
• For DVD Video, you can select
playback
playback
, while you can select
.
123
456
789
10 0 +10
Examples:
To select number 5, press 5.
To select number 15, press +10,
then 5.
To select number 30, press +10,
+10, then 10.
To play back by using the disc menu
a title before starting
a chapter after starting
Remote
ONLY
You can operate the disc play using the disc menu.
123
456
789
10 0 +10
To move to the next or
previous page of the
Examples:
To select number 5, press 5.
To select number 15, press +10,
then 5.
To select number 30, press +10,
+10, then 10.
To return to the previous
menu:
current menu:
RETURN
To cancel PBC
You can also cancel PBC by pressing the 10 keys to start
playback when disc menu is not shown on the TV screen.
7
For DVD Video/DVD Audio
Show the disc menu.
1
TOP MENU/PG MENU/PL
or
Select an item on the disc menu.
2
ENTER
• On some discs, you can also select items by entering the
number using the 10 keys.
12
To reactivate PBC, press 7
, then press 4
.
Playing Back a Tape
To insert a tape
You can play back type I tapes.
• The use of C-120 or longer tape is not recommended.
To change the tape running direction
TAPE-A TAPE-B
3 (
2 (
forward
reverse
English
)
)
Push
Close
Insert
To reverse the tape automatically
REVERSE
MODE
Tape is reversed, and playback repeats until
you stop it.
Tape is not reversed. When the current side of
the tape reaches its end, playback stops.
Tape is reversed once.
To playback the both decks A and B continuously
—Relay Play
When the cassettes are set in the both decks…
REVERSE
MODE
To start:
To rewind tape:
TAPE-A TAPE-B
To stop:
You can start playback of either deck A or B.
13
Daily Operations
—Sound&Other Adjustments
English
Remote Control
DVD LEVEL
EFFECT
RHYTHM AX
SET
CLOCK/TIMER
SLEEP
Main unit
123
456
789
10 0 +10
AUDIO
TV
AUDIO VOL +/–
////
ENTER
VFP /
SCAN MODE
SUB WFR LEVEL
CHANNEL LEVEL
SOUND MODE
SURROUND MODE
+/–
DIMMER
Adjusting the Volume
The volume level can be adjusted in 32 steps (VOLUME
MIN, VOLUME 1 – VOLUME 30, and VOLUME MAX).
Remote control:
AUDIO VOL
Main unit:
Adjusting the Speaker Output
Remote
LEVEL
ONLY
(Front left
speaker)
(Front right
speaker)
FRONT L FRONT R
SURROUND R
(Surround right
speaker)
(Center
speaker)
CENTER
SURROUND L
(Surround left
speaker)
Level
You can adjust the speaker output level from –6 (dB) to +6
(dB).
• You can also use the setup menu to adjust the speaker
output level (see page 40).
1
Select the speaker you want to adjust.
CHANNEL
SUB WOOFER
LEVEL
SURROUND
DVD LEVEL
14
MODE
VOLUME
RHYTHM AX
SET
Adjust the output level.
2
3
Repeat steps 1 and 2 to adjust other speakers.
Reinforcing the Bass Sound
Creating Your Own Sound
Remote
ONLY
INFO
English
To adjust the bass level gradually
INFO
You can select the subwoofer level from level 0
(minimum) to level 4 (maximum).
Remote control:
SUB WFR
LEVEL
Main unit:
To emphasize rhythmical feeling—RHYTHM AX
This function emphasizes bass attack feeling.
RHYTHM AX
Selecting the Sound Modes
You can select one of the preset Sound Modes.
SOUND
MODE
ROCK
ON
OFF
SEA Modes
POP CLASSIC
Remote
ONLY
Modes—User Mode
You can adjust the preset Sound Modes to create your own
Sound Modes which suit your taste. The changed settings can
be stored as the USER1, USER2 and USER3 Modes.
While the Sound Mode name is shown on the display…
Enter the SEA Control Mode.
1
SET
2
SET
3
Adjust the SEA pattern.
1
Adjust BASS.
2
Adjust TREBLE.
SET
• You can adjust the bass and treble level from –5 to
+5.
Select one of the User Modes.
4
FLAT USER1–3
SEA (Sound Effect Amplifier) Modes
ROCK
POP
CLASSIC
User Modes
USER1/2/3
To cancel the Sound Mode,
Boosts low and high frequency. Good for
acoustic music (initial setting).
Good for vocal music.
Good for classical music.
Your individual mode stored in memory.
See the next column “Creating Your Own
Sound Modes—User Mode.”
select “FLAT.”
USER1 USER2 USER3
5
Store the setting.
SET
• The Sound Mode changes to the one you have stored.
15
English
Selecting the Surround Modes
• For DVD/CD, TAPE-A, TAPE-B, AUX:
SURROUND
MODE
MUSIC
DANCEALL CH. ST
MOVIE AUTO
HALL
INFO
STADIUM
STEREO
Remote
To adjust the DSP effect level
ONLY
When one of the DSP Modes (except for “ALL CH. ST”) is
selected…
EFFECT
EFFECT 1 EFFECT 2
EFFECT 3
•
For FM/AM:
SURROUND
MODE
ALL CH. ST
STEREO STADIUM
DSP Modes
ALL CH. ST
DANCE
HALL
STADIUM
Stereo Mode
STEREO
Auto Surround Mode
AUTO
Dolby Pro Logic II Modes
MOVIE
MUSIC
All Channel Stereo; Creates larger stereo
sound field using all the connected
speakers (initial setting).
Increases resonance and bass.
Adds depth and brilliance to the sound.
Adds clarity and spreads the sound, as in
an outdoor stadium.
Canceles the Surround Mode.
• When multi-channel surround signal
comes in, multi-channel surround mode
is activated.
• When Dolby Surround signal comes in,
MOVIE (Dolby Pro Logic II Movie)
mode is selected.
• When 2-channel signal comes in,
STEREO mode is selected.
Creates 5.1-channel surround field from
2-ch source (suitable for movie source).
Creates 5.1-channel surround field from
2-ch source (suitable for music source).
DANCE HALL
• The initial setting is “EFFECT3.”
Presetting Automatic DVD Video
Sound Increase Level
The DVD Video sound is sometimes recorded at a lower
level than for other discs and sources. You can set the
increase level for the currently loaded DVD Video, so you
do not have to adjust the volume when you change the
source.
DVD LEVEL
As the number increases, sound level also increases.
• The initial setting is “DVD LEVEL3.”
DVD LEVEL1 DVD LEVEL2
DVD LEVEL3
16
Changing the Color System and
Remote
Scanning Mode
ONLY
You can select the video output to match it to the color
system of your TV (NTSC or PAL).
• If you connect a progressive TV through the
COMPONENT jacks, you can enjoy a high quality picture
from the built-in DVD player by selecting progressive
scanning mode.
• You can change the setting only while the disc playback is
stopped.
1
Enter the color system setting mode.
4
sec.
SCAN MODE
VFP
Select the color system and scanning mode.
2
INFO
2
Select a preset picture tone.
NORMAL CINEMA
USER2 USER1
NORMAL
CINEMA
USER1/USER2
Normally select this.
Suitable for a movie source.
You can adjust parameters and can
store the settings (see below).
To adjust the picture tone
Select “USER1” or “USER2.”
1
• Follow steps 1 and 2 above.
2
Select a parameter you want to adjust.
ENTER
English
PAL
NTSC PROG
NTSC / PAL
NTSC
PAL PROG
NTSC or PAL Interlaced scanning.
For a conventional PAL or NTSC TV.
NTSC / PAL
PROG
3
Store the setting.
SET
Changing the Picture Tone
NTSC or PAL Progressive scanning.
For a progressive NTSC or PAL TV.
Remote
ONLY
While viewing a playback pictures on the TV, you can select
the preset picture tone, or adjust it and store your own
preference.
To select a preset picture tone
1
While playing, display VFP setting screen.
SCAN MODE
VFP
NORMAL
GAMMA
BRIGHTNESS
CONTRAST
SATURATION
TINT
SHARPNESS
On the TV screen
0
0
0
0
0
0
GAMMA
Adjust if the neutral color is bright
or dark. The brightness of dark and
bright portions is maintained
(–3 to +3).
BRIGHTNESS
Adjust if the picture is bright or dark
as a whole (–8 to +8).
CONTRAST
Adjust if the far and near position is
unnatural (–7 to +7).
SATURATION
Adjust if the picture is whitish or
blackish (–7 to +7).
TINT
Adjust if the human skin color is
unnatural (–7 to +7).
SHARPNESS
Adjust if the picture is indistinct
(–8 to +8).
3
Adjust the parameter.
ENTER
4
Repeat steps 2 to 3 to adjust other parameters.
To erase the VFP screen,
press VFP again.
17
English
Changing the Display Brightness
DIMMER
DIMMER 1 DIMMER 2
DIMMER OFF
(Canceled)
DIMMER 1
DIMMER 2
* Except for the RHYTHM AX and KARAOKE SCORING
lamps.
Setting the Clock
Without setting the build-in clock, you cannot use any
timers.
• To exit from the clock setting, press CLOCK/TIMER as
required.
• To correct a misentry during the process, press CANCEL.
You can return to the previous step.
1
Activate clock setting mode.
CLOCK/
TIMER
Dims the display and the illumination
on the main unit*.
Dims the display (same as DIMMER 1)
and turns off the illumination on the
main unit*.
Remote
ONLY
Remote
ONLY
INFO
Remote
Turning Off the Power Automatically
ONLY
With Sleep Timer, you can fall asleep while listening to
music.
1
Specify the time (in minutes).
SLEEP
Wait until the set time goes off.
2
10 20 30 60 90
Canceled
120150
To check the time remaining until the shut-off time
SLEEP
• If you press the button repeatedly, you can
change the shut-off time.
• If you have already adjusted the clock before, press the
button repeatedly until the clock time starts flashing.
Adjust the hour, then minute.
2
SET
Now the built-in clock starts working.
18

Unique DVD/VCD Operations
Remote Control
DVD/CD 3
GLANCE
BACK
AUDIO
SUB TITLE
ANGLE
ZOOM
PA GE
123
456
789
10 0 +10
AUDIO
TV
////
ENTER
10 keys
Remote
Selecting the Sound Track
For DVD Video:
While playing back a chapter containing
ONLY
INFO
audio languages, you can select the language to listen to.
For DVD Audio:
While playing back a track containing
audio channels, you can select the audio channel to listen to.
For DVD-VR/Karaoke SVCD/VCD:
When playing back a
track, you can select the audio channel to play.
• You can also select the audio track using the on-screen bar
(see page 26).
While playing DVD Video…
AUDIO
Ex.:
3/3
JAPANESE
3/3
JAPANESE
1/3
ENGLISH
1/3
ENGLISH
FRENCH
2/3
FRENCH
2/3
English
While playing a DVD-VR, SVCD, or VCD…
AUDIO
ST1/ST2/ST
ST1 ST2
L2
DVD-VR/VCD
ST L R
To listen to normal stereo (2 channel)
L1
R1R2
SVCD
playback.
L1/L2/L
R1/R2/R
To listen to the left audio channel.
To listen to the right audio channel.
• SVCD can have 4 audio channels. Karaoke SVCD usually
uses these 4 channels to record two 2-channel recordings
(ST1/ST2).
19
English
Selecting the Subtitle Language
For DVD Video:
While playing back a chapter containing
subtitles in different languages, you can select the subtitle
language to display on the TV screen.
For DVD-VR:
While playing, you can turn on or off the
subtitle.
For SVCD:
While playing, you can select the subtitles even
if no subtitles are recorded on the disc.
• You can also select the subtitle language using the on-
screen bar (see page 26).
Remote
ONLY
Remote
Selecting the View Angle
For DVD Video only:
While playing back a chapter
ONLY
containing multi-view angles, you can view the same scene
from different angles.
• You can also select the view angle using the on-screen bar
(see page 26).
While playing back…
ANGLE
While playing a DVD Video…
1
Display the subtitle selection window.
SUB TITLE
2
Select the subtitle language.
Ex.:
1/3 2/3
ENGLISH FRENCH JAPANESE
1/3
2/3
FRENCH JAPANESEENGLISH
While playing a DVD-VR…
SUB TITLE
3/3
JAPANESE
3/3
Ex.:
1/3
1
1/3
1
2/3
2
2/3
2
Reviewing the Playback Quickly
For DVD Video/DVD-VR only:
You can move the
3/3
3
3/3
3
Remote
ONLY
playback position to 10 seconds before the current position
(only within the same title)—Glance Back.
While playing back…
GLANCE BACK
Remote
Selecting Browsable Still Pictures
ONLY
ON
ON
OFF
OFF
While playing an SVCD…
SUB TITLE
20
For DVD Audio only:
While playing back a track linked to
browsable still pictures (B.S.P.), you can select the still
picture (turn the page) to be shown on the TV screen.
• If a track is linked to browsable still pictures (B.S.P.), they
are usually shown in turn automatically during playback.
• You can also select the page using the on-screen bar (see
page 26).
PAG E
Each time you press the button, the still
picture changes one after another (if
available).
Remote
Playing Back Bonus Group
For DVD Audio only:
Some DVD Audios have a special
ONLY
INFO
group called “bonus group” whose contents are not open to
the public.
• To play back a bonus group, you have to enter the specific
“key number” (a kind of password) for the bonus group.
The way of getting the key number depends on the disc.
1
Select the bonus group.
• The bonus group is usually recorded as the last group
(for example, if a disc contains 4 groups including a
bonus group, “group 4” is the bonus group).
• For how to select the group, see “To select a title/group”
on page 11.
Enter the key number.
2
123
456
789
10 0 +10
Follow the interactive instruction shown on the TV
3
ENTER
screen.
To cancel the key number entry,
press 7
.
Slow-motion playback
While playing…
1
FM MODE
Still picture playback starts.
Select slow motion speed.
2
1/32 1/16 1/8 1/4 1/2
1/32 1/16 1/8 1/4 1/2
* Not available for DVD-VR/SVCD/VCD.
To resume normal playback,
Remote
m
ZOOM
ONLY
ZOOM 1 ZOOM 2 ZOOM 3 ZOOM 4
ZOOM OFF
Zoo
1
While playing…
press DVD/CD 3
English
.
ZOOM 5ZOOM 6
Special Picture Playback
Still picture playback
While playing…
FM MODE
Still picture playback starts.
To resume normal playback,
Frame-by-frame playback
1
While playing…
FM MODE
Still picture playback starts.
Advance the still picture frame by frame.
2
FM MODE
To resume normal playback,
press DVD/CD 3
press DVD/CD 3
INFO
As the number increases, magnification also increases.
• For JPEG, see page 31.
2
Move the zoomed-in position.
.
To resume normal playback,
press ZOOM repeatedly until
“ZOOM OFF” appears on the TV screen.
.
21
Advanced Disc Operations
English
Remote Control
DVD/CD 3
REPEAT
CANCEL
Main unit
DVD/CD
123
456
789
10 0 +10
AUDIO
TV
////
10 keys
PLAY MODE
Remote
Programming the Playing Order
—Program Play
ONLY
INFO
You can arrange the playing order of the tracks (up to 99)
before you start playback.
1
Before starting playback, activate Program Play.
PLAY MODE
PROGRAM RANDOM
Canceled
On the display
PROGRAM
No Group/TitleDisc Track/Chapter
1
2
3
4
5
6
7
8
9
10
USE NUMERIC KEYS TO PROGRAM TRACKS.
USE CANCEL TO DELETE THE PROGRAM.
On the TV screen
Select chapters or tracks you want for Program Play.
2
1
Select a disc number.
2
Select a title or group number.
3
Select a chapter or track number.
To enter the numbers:
123
456
789
10 0 +10
Examples:
To enter number 5, press 5.
To enter number 15, press +10,
then 5.
To enter number 30, press +10,
+10, then 10.
22
DISC 1 0
3
Repeat the above step 2 until you finish what you want
to program.
4
Start playback.
DVD/CD
Playback starts in the order you
have programmed.

To skip a track:
To pause: To stop*:
FM MODE
To release, press
DVD/CD 3
.
* Resume does not work for Program Play.
To check the programmed contents
Before or after playback…
in the reverse order
in the programmed order
To modify the program
Before or after playback…
To erase the last step:
CANCEL
To erase the entire
program:
Remote
ONLY
Remote
Playing at Random—Random Play
ONLY
You can play the contents of all the loaded discs at random.
• Random Play cannot be used for some DVDs.
1
Before starting playback, activate Random Play.
PLAY MODE
PROGRAM RANDOM
Canceled
2
Start playback.
DVD/CD
To skip:
Playback of the current disc
starts in a random order. When
all chapters/tracks on the current
disc are played, playback of the
next disc starts. Random Play
ends when all loaded discs are
played.
To pause: To stop:
FM MODE
English
To add steps in the program:
Repeat step 2 on page 22.
To exit from Program Play
Before or after playback…
PLAY MODE
PROGRAM RANDOM
Canceled
To go to the
beginning of the
current track,
press 4
.
To release, press
DVD/CD 3
To exit from Random Play
Before or after playback…
PLAY MODE
PROGRAM RANDOM
.
Canceled
23
English
Playing Repeatedly—Repeat Play
You can repeat playback.
• You can also select the repeat mode using the on-screen bar
(see page 26).
• The indicator(s) lights on the display as follows to indicate
the current repeat mode.
•
For DVD Video:
While playing…
REPEAT
•
For DVD Audio:
REPEAT 1 REPEAT
Canceled
REPEAT ALL DISC
While playing or before playback…
REPEAT
For MP3/WMA:
•
REPEAT 1 REPEAT
Canceled
REPEAT ALL DISC
While playing or before playback…
REPEAT
REPEAT 1 REPEAT
Canceled
REPEAT ALL DISC
REPEAT 1 DISC
Remote
ONLY
REPEAT 1
REPEAT
REPEAT 1
DISC
*
REPEAT
ALL DISC
REPEAT
Repeats the current chapter/track.
Repeats the current title/group.
Repeats the current disc.
Repeats all discs.
*
Repeats all programmed tracks.
ALL
* These modes may not work correctly for DVD Video.
Prohibiting Disc Ejection
Main Unit
ONLY
—Child Lock
You can lock the disc trays so that no one can eject the
loaded discs.
• This operation is possible only when the source is the disc
player.
While in standby mode…
For CD/SVCD/VCD:
•
While playing or before playback (without PBC for SVCD/
VCD)…
REPEAT
•
For Random Play:
REPEAT 1
Canceled
REPEAT 1 DISC
REPEAT ALL DISC
While playing or before playback…
REPEAT
•
For Program Play:
REPEAT 1
Canceled
REPEAT 1 DISC
REPEAT ALL DISC
While playing or before playback…
REPEAT
REPEAT 1
Canceled
REPEAT ALL
24
(holding then…)
To cancel the prohibition,
repeat the same procedure.
“UNLOCKED” appears on the display.
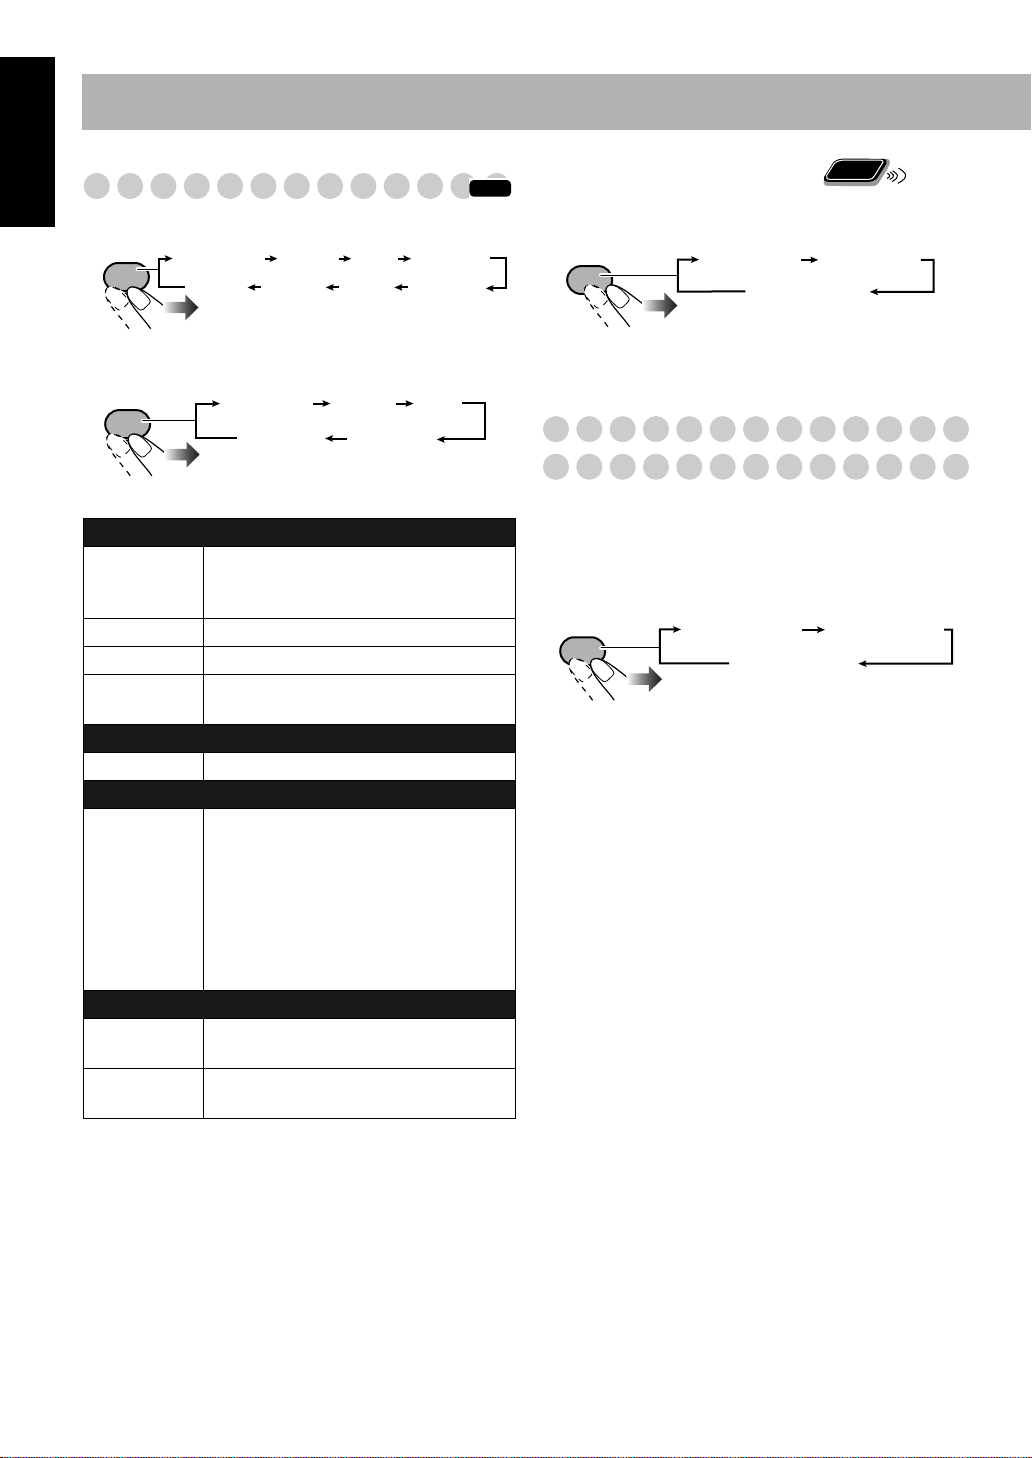
On-Screen Disc Operations
Remote control
DVD/CD 3
PG
ZOOM
REPEAT
123
456
789
10 0 +10
AUDIO
TV
PL
////
ENTER
ON SCREEN
10 keys
On-screen Bar Information
You can check the information on disc (except for MP3/
WMA/JPEG disc) and use some functions through the onscreen bar.
On-screen bars
DVD Video
12
DVD-VIDEO
TIME OFF CHAP. 1/31/31/1
Dolby D
3/2.1ch
DISC 1
TITLE 2
CHAP 3
TOTAL 1:01:58
4
DVD Audio
12
DVD-AUDIO
TIME
PPCM
3/2.1ch
OFF
DISC 2
TRACK
GROUP 14
1/31/3
TRACK 23
PAGE
TIME 0:15:58
4
DVD-VR
12
DVD-VR
TIME OFF CHAP. ST ON
Dolby D
2/0.0ch
DISC 1
PG 2
CHAP 3
TOTAL 0:01:58
3
3
3
English
4
SVCD
12
TIME 0:04:58
TRACK 3
DISC
SVCD
TIME OFF ST1
3
-/ 4
3
4
VCD
12
TIME 0:04:58
VCD
TIME OFF ST
TRACK 3DISC 4
3
4
CD
12
TIME 0:04:58
TRACK 3
CD
TIME OFF
DISC 5
3
4
25
English
1
Disc type
2
Playback information
Indication Meanings
Dolby D/
Audio format
PPCM
3/2.1 ch/
Channel number
2.0/0 ch
DISC
1
TITLE
2
CHAP
3
GROUP 1
TRACK
PG 2
PL 2
TOTAL
1:25:58
3
Playback conditions
14
Current disc
Current title
Current chapter
Current group
Current track
Current title
Current play list
Time indications
Indication Meanings
Playback
/ Forward/Reverse search
/ Forward/Reverse slow-motion
Pause
Stop
4
Operation icons (on the pull-down menu)
Indication Meanings
TIME
Select to change the time indication
(see also page 27).
Select to repeat playback (see also
pages 24, 27 and 28).
Select for time search (see also
page 28).
CHAP.
Select for chapter search (see also
page 29).
TRACK
Select for track search (see also
page 29).
1/3
Select to change the audio language or
channel (see also page 19).
1/3
Select to change subtitle language (see
also page 20).
1/3
Select to change view angle (see also
page 20).
PA GE 1/15
Select to change the page (see also
page 20).
Remote
perations Using the
O
On-screen Bar
ONLY
INFO
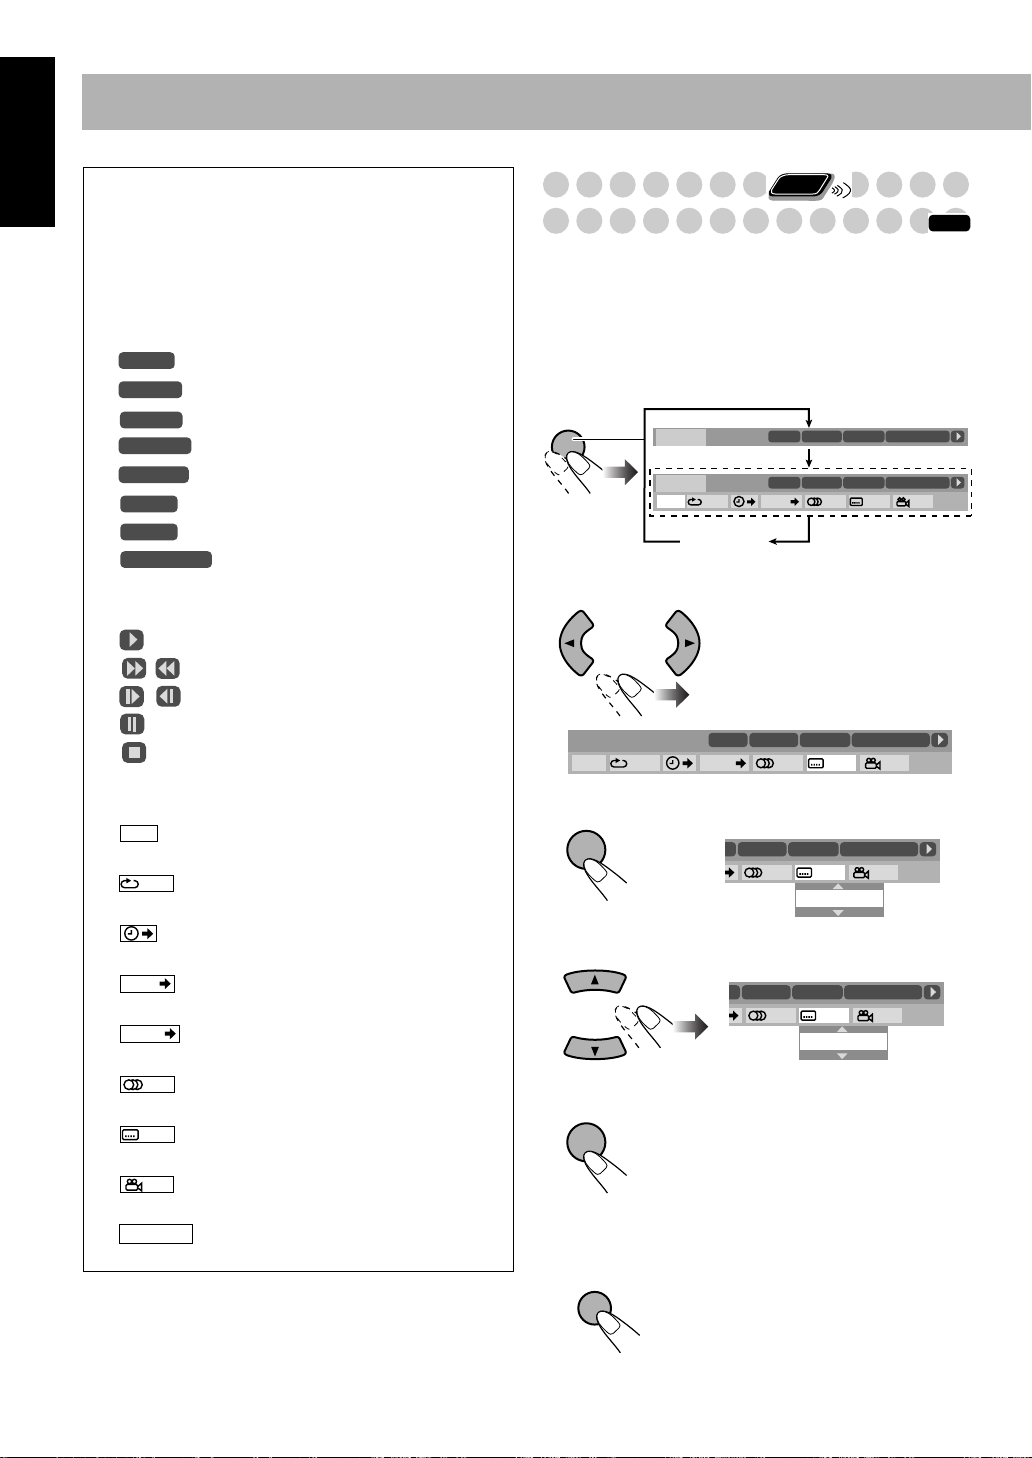
Basic operation procedure through the on-screen bar is as
follows:
Ex.: Selecting a subtitle (French) for DVD Video:
While a disc is selected as the source…
1
Display the on-screen bar with the pull-down menu.
ON
SCREEN
Dolby D
DISC 1
DISC 1
TITLE 2
TITLE 2
DVD-VIDEO
3/2.1ch
Dolby D
DVD-VIDEO
3/2.1ch
TIME OFF CHAP. 1/31/31/1
CHAP 3
CHAP 3
TOTAL 1:01:58
TOTAL 1:01:58
Goes off
Select (highlight) the item you want.
2
DVD-VIDEO
TIME OFF CHAP. 1/31/31/1
3
Display the pop-up window.
4
Select the desired option in the pop-up window.
Finish the setting.
5
Dolby D
3/2.1ch
DISC 1
TITLE 2
TITLE 21
TITLE 21
CHAP 3
1/31/31/1
1/32/31/1
Pop-up window goes off.
To erase the on-screen bar
ON
SCREEN
CHAP 3
ENGLISH
CHAP 3
FRENCH
TOTAL 1:01:58
TOTAL 1:01:58
TOTAL 1:01:58
26
Loading…
-
Страница 1
COMPACT COMPONENT SYSTEM CA-DXT9 CA-DXT7 INSTRUCTIONS GVT0147-001A [US, UN] English DXT7_T9_Cover[USUN]-f.fm Page 1 Wednesday, February 16, 2005 1:24 PM[…]
-
Страница 2
G-1 Warnings, Cautions and Others Caution–– button! Disconnect the mains plug to shut the power off completely. The button in any position does not disconnect the mains line. The power can be remote controlled. CAUTION To reduce the risk of electrical shocks, fire, etc.: 1. Do not remove screws, covers or cabinet. 2. Do not expose this applianc[…]
-
Страница 3
G-2 Caution: Proper Ventilation To avoid risk of electric shock and fire, and to prevent damage, locate the apparatus as follows: 1. Front: No obstructions and open spacing. 2. Sides/Top/Back: No obstructions should be placed in the areas shown by the dimensions below. 3. Bottom: Place on the level surface. Maintain an adequate air path for ventila[…]
-
Страница 4
G-3 IMPORTANT FOR LASER PRODUCTS 1. CLASS 1 LASER PRODUCT 2. CAUTION : Do not open the top cover. There are no user serviceable parts inside the unit; leave all servicing to qualified service personnel. 3. CAUTION : Visible and invisible laser radiation when open and interlock failed or defeated. Avoid direct exposure to beam. 4. REPRODUCTION OF LA[…]
-
Страница 5
1 English Precautions Installation • Install the System in a location with adequate ventilation to prevent internal heat buildup in the System. • Install in a place which is level, dry and neither too hot nor too cold—between 5°C and 35°C. • Leave sufficient distance between the System and the TV. • Keep the speakers away from the TV to[…]
-
Страница 6
2 English Playable Disc Types In addition to the above discs, this system can play back audio data recorded on CD Text, CD-G (CD Graphics), and CD-Extra. • The following discs cannot be played back: DVD+R, DVD+RW, CD-I (CD-I Ready), Photo CD, etc. Playing back these discs will generate noise and damage the speakers. • In this manual, “file”[…]
-
Страница 7
3 English Connections • Connect VIDEO OUT directly to the video input of your TV. Connecting VIDEO OUT to a TV via a VCR may interfere with your viewing when playing back a copy- protected disc. Your viewing may be interfered when connecting VIDEO OUT to an integrated TV/VCR system. Do not connect the AC power cord until all other connections hav[…]
-
Страница 8
4 English ⁄ From AM/FM antenna See page 5. Ÿ From the digital input of digital audio component such as CD recorder See page 5. ~ From the video input of TV/monitor See page 5. @ From the speakers See page 6. ¤ Voltage selector Before plugging in, confirm the position the voltage selector points at. See page 7. # To a wall outlet Plug the AC pow[…]
-
Страница 9
5 English ~ TV/monitor • To select progressive scanning mode (see page 17), use COMPONENT jacks. • Connect the VIDEO jack, S-VIDEO jack, or COMPONENT jacks whichever you want to use. Ÿ Digital audio component • Set “DIGITAL AUDIO OUTPUT” in the “AUDIO” menu correctly according to the connected digital audio equipment (see page 40). I[…]
-
Страница 10
6 English @ Speakers To connect the speaker cords • When connecting the speaker cords, match their polarity with that of the speaker terminals: blue/red/green/white/ gray to (+) and black to (–). For CA-DXT9 For CA-DXT7 • Use only speakers with the same speaker impedance as indicated by the speaker terminals on the rear of the System. • The[…]
-
Страница 11
7 English ¤ To adjust the voltage selector Preparing the remote control • Dispose of batteries in the proper manner, according to federal, state, and local regulations. To remove the speaker grilles of the front speakers Use a screwdriver to rotate the voltage selector so that the voltage mark is pointing at the same voltage as where you are plu[…]
-
Страница 12
8 English Display Indication The indications on the display teach you a lot of things while you are operating the System. Before operating the System, be familiar with when and how the indicator illuminates on the display. 1 PROGRESSIVE indicator • Lights when the progressive scanning mode is selected. 2 Karaoke operation indicators (see pages 34[…]
-
Страница 13
9 English Daily Operations —Playback ¥ Turn on the power. The STANDBY lamp on the main unit goes off. • Without pressing AUDIO, the System also turns on by pressing one of the source select buttons in the next step. ø Select the source. Playback automatically starts if the selected source is ready to start playback. • If you press AUX, star[…]
-
Страница 14
10 English Listening to the Radio To select the AM tuner interval spacing Some countries space AM stations 9 kHz apart, and other countries use 10 kHz spacing. 1 Select “AM,” then turn off (stand by) the System. 2 Select the AM tuner interval spacing. To select the band (FM/AM) To tune in to a station While FM or AM is selected… Frequency sta[…]
-
Страница 15
11 English 2 Select a preset number. Playing Back a Disc Before operating a disc, be familiar how a disc is recorded. • DVD Video comprises of “ Titles ” which includes “ Chapters, ” DVD Audio/MP3/WMA comprise of “ Groups ” which includes “ Tracks, ” JPEG comprises of “ Groups ” which includes “ Files, ” and CD/SVCD/VCD co[…]
-
Страница 16
12 English To locate a particular portion While playing a disc except MP3/WMA… • No sound comes out while searching on DVD Video/ SVCD/VCD. To return to normal playback, press DVD/CD 3 . T o select an item directly You can select a title/chapter/track directly and start playback. • For DVD Video, you can select a title before starting playbac[…]
-
Страница 17
13 English Playing Back a Tape To insert a tape You can play back type I tapes. • The use of C-120 or longer tape is not recommended. To change the tape running direction To reverse the tape automatically To playback the both decks A and B continuously —Relay Play When the cassettes are set in the both decks… You can start playback of either […]
-
Страница 18
14 English Daily Operations —Sound&Other Adjustments Adjusting the Volume The volume level can be adjusted in 32 steps (VOLUME MIN, VOLUME 1 – VOLUME 30, and VOLUME MAX). Adjusting the Speaker Output Level You can adjust the speaker output level from –6 (dB) to +6 (dB). • You can also use the setup menu to adjust the speaker output leve[…]
-
Страница 19
15 English Reinforcing the Bass Sound To adjust the bass level gradually You can select the subwoofer level from level 0 (minimum) to level 4 (maximum). To emphasize rhythmical feeling—RHYTHM AX This function emphasizes bass attack feeling. Selecting the Sound Modes You can select one of the preset Sound Modes. To cancel the Sound Mode, select ?[…]
-
Страница 20
16 English Selecting the Surround Modes • For DVD/CD, TAPE-A, TAPE-B, AUX: • For FM/AM: To adjust the DSP effect level When one of the DSP Modes (except for “ALL CH. ST”) is selected… • The initial setting is “EFFECT3.” Presetting Automatic DVD Video Sound Increase Level The DVD Video sound is sometimes recorded at a lower level tha[…]
-
Страница 21
17 English Changing the Color System and Scanning Mode You can select the video output to match it to the color system of your TV (NTSC or PAL). • If you connect a progressive TV through the COMPONENT jacks, you can enjoy a high quality picture from the built-in DVD player by selecting progressive scanning mode. • You can change the setting onl[…]
-
Страница 22
18 English Changing the Display Brightness * Except for the RHYTHM AX and KARAOKE SCORING lamps. Setting the Clock Without setting the build-in clock, you cannot use any timers. • To exit from the clock setting, press CLOCK/TIMER as required. • To correct a misentry during the process, press CANCEL. You can return to the previous step. 1 Activa[…]
-
Страница 23
19 English Unique DVD/VCD Operations Selecting the Sound Track For DVD Video: While playing back a chapter containing audio languages, you can select the language to listen to. For DVD Audio: While playing back a track containing audio channels, you can select the audio channel to listen to. For DVD-VR/Karaoke SVCD/VCD: When playing back a track, y[…]
-
Страница 24
20 English Selecting the Subtitle Language For DVD Video: While playing back a chapter containing subtitles in different languages, you can select the subtitle language to display on the TV screen. For DVD-VR: While playing, you can turn on or off the subtitle. For SVCD: While playing, you can select the subtitles even if no subtitles are recorded […]
-
Страница 25
21 English Playing Back Bonus Group For DVD Audio only: Some DVD Audios have a special group called “bonus group” whose contents are not open to the public. • To play back a bonus group, you have to enter the specific “key number” (a kind of password) for the bonus group. The way of getting the key number depends on the disc. 1 Select the[…]
-
Страница 26
22 English Advanced Disc Operations Programming the Playing Order —Program Play You can arrange the playing order of the tracks (up to 99) before you start playback. 1 Before starting playback, activate Program Play. 2 Select chapters or tracks you want for Program Play. 1 Select a disc number. 2 Select a title or group number. 3 Select a chapter[…]
-
Страница 27
23 English * Resume does not work for Program Play. To check the programmed contents Before or after playback… To modify the program Before or after playback… To exit from Program Play Before or after playback… Playing at Random—Random Play You can play the contents of all the loaded discs at random. • Random Play cannot be used for some […]
-
Страница 28
24 English Playing Repeatedly—Repeat Play You can repeat playback. • You can also select the repeat mode using the on-screen bar (see page 26). • The indicator(s) lights on the display as follows to indicate the current repeat mode. • For DVD Video: While playing… • For DVD Audio: While playing or before playback… • For MP3/WMA: Whi[…]
-
Страница 29
25 English On-Screen Disc Operations On-screen Bar Information You can check the information on disc (except for MP3/ WMA/JPEG disc) and use some functions through the on- screen bar. On-screen bars 123 456 789 10 0 +10 D VD/CD 3 REPEA T ZOOM ENTER ON SCREEN PL PG /// / A UDIO TV Remote control 10 keys DVD Video DVD Audio DVD-VR SVCD VCD CD 3 D VD-[…]
-
Страница 30
26 English O perations Using the On-screen Bar Basic operation procedure through the on-screen bar is as follows: Ex.: Selecting a subtitle (French) for DVD Video: While a disc is selected as the source… 1 Display the on-screen bar with the pull-down menu. 2 Select (highlight) the item you want. 3 Display the pop-up window. 4 Select the desired o[…]
-
Страница 31
27 English To change the time information You can change the time information in the on-screen bar and the display window on the main unit. 1 Display the on-screen bar with the pull-down menu. 2 Make sure is selected (highlighted). 3 Change the time indication. * Not available for DVD-VR. To erase the on-screen bar Repeat Play • See also page 24.[…]
-
Страница 32
28 English A-B Repeat 1 While playing, display the on-screen bar with the pull- down menu. 2 Select . 3 Display the pop-up window. 4 Select “A-B”. 5 Select the start point (A). • After selecting the starting point (A), you can search for the end point using ¡ . 6 Select the end point (B). To cancel A-B Repeat, repeat steps 1 to 3 , and selec[…]
-
Страница 33
29 English Chapter/Track Search You can search for the number of the item to play. For DVD Video/DVD-VR: Chapter For DVD Audio: Track 1 While playing, display the on-screen bar with the pull- down menu. 2 Select or . 3 Display the pop-up window. 4 Enter the desired chapter/track number. • To correct a misentry, press the 10 keys until the desired[…]
-
Страница 34
30 English Control screen for MP3/WMA/JPEG disc The control screen automatically appears on the TV screen when you load an MP3, WMA, or JPEG disc. To move the highlight (green) bar between group list and track list (for MP3/WMA/JPEG): To select an item in the list: To start playback • Once you start playing back a JPEG track, the control screen g[…]
-
Страница 35
31 English To stop playback To repeat title/play list for DVD-VR While playing or before starting playback… * Not available before starting playback. To repeat slide-show for JPEG While playing or before starting playback… • For Repeat Play of MP3/WMA, see pages 24 and 27. To zoom in the still picture (for JPEG) 1 During being paused… As th[…]
-
Страница 36
32 English Recording Operations Recording on a Tape You can use type I tapes for recording. • To play a tape, see page 13. 1 Insert a recordable cassette in deck B. 2 Check the tape running direction and Reverse Mode settings on the display. To change the direction Change the Reverse Mode if necessary DISC REC ST AR T T APE-A / T APE-B DISC 1–5[…]
-
Страница 37
33 English 3 Start playing the source—“FM,” “AM,” “DVD/CD,” “TAPE-A” or “AUX.” • When recording a disc, you can also use “Synchronized Disc Recording” (see the right column). • When recording from deck A, you can also use “Dubbing” (see below). 4 Start recording. To stop recording Dubbing Tapes 1 Change the source […]
-
Страница 38
34 English Enjoying Karaoke • For DVD Audio/DVD-VR: The functions described in this section are not available . • When you activate the Mic Mixing Mode or Voice Masking Mode, multi-channel sounds are downmixed into 2 channel. The multi-channel surround mode (“ALL CH. ST,” “MOVIE,” “MUSIC,” or “AUTO” for multi-channel surround si[…]
-
Страница 39
35 English To apply an echo to your voice While the Mic Mix Mode is activated… • As the number increases, echo level also increases. To adjust the Key (disc playback only) While playing back… To cancel the Key Control • Key Control is also canceled when you deactivate the Mic Mixing Mode, or select another track or disc. Reducing the Lead V[…]
-
Страница 40
36 English To turn on/off the fanfare 1 Enter the fanfare setting mode . 2 Select the fanfare setting. Reserving Karaoke Songs —Karaoke Program Play You can determine the playback order of the titles or tracks on the disc player. You can program up to 12 steps. 1 Change the source to “DVD/CD.” 2 Activate Karaoke Program Play. • PROGRAM indi[…]
-
Страница 41
37 English Timer Operations Setting the Timer Using Daily Timer, you can wake up with your favorite song. On the other hand, with Recording Timer, you can make a tape of a radio broadcast automatically. • You cannot activate Daily Timer and Recording Timer at a time. (Activating either timer deactivates the other timer.) • To correct a misentry[…]
-
Страница 42
38 English 3 Turn off the System (on standby) if you have set the timer with the System turned on. To turn off the Timer after the setting is done You can turn off the timer after it has been set. • Since Daily Timer is activated at the same time everyday, you may need to cancel it on some particular days. 1 Select the timer you want to cancel (R[…]
-
Страница 43
39 English Setup Menu Operations Initial settings Some items in the menus cannot be changed during playback. 1 Press SET UP. 2 Press 2 ( or 3 ) to select the menu. 3 Press 5 ( or ∞ ) to move to select the item. 4 Press ENTER. 5 Press 5 ( or ∞ ) to select the options, then press ENTER. To erase a preference display Press SET UP. 123 456 789 10 0[…]
-
Страница 44
40 English AUDIO menu Item Contents DIGITAL AUDIO OUTPUT Set this item correctly when using the OPTICAL DIGITAL OUTPUT terminal on the rear. PCM ONLY: When connecting to audio equipment which can decode only linear PCM signals. DOLBY DIGITAL/PCM: When connecting to a Dolby Digital decoder or an amplifier with a built- in Dolby Digital decoder. STRE[…]
-
Страница 45
41 English Operating the TV Operating TV You can operate the JVC’s or other manufacturers’ TV using this remote control. 1 Slide the AUDIO/TV selector to “TV.” 2 Press and hold until the following steps are complete. 3 4 Enter the 2-digit manufacture’s code number. 5 Release TV. To operate the TV 123 456 789 10 0 +10 TV V OL +/– TV TV/V[…]
-
Страница 46
42 English Additional Information Learning More about This System Introduction (see pages 1 to 2) Playable Disc Types: • About audio format – Linear PCM: Uncompressed digital audio, the same format used for CDs and most studio masters. – Dolby Digital: Compressed digital audio, developed by Dolby Laboratories, which enables multi-channel enco[…]
-
Страница 47
43 English Unique DVD/VCD Operations (see pages 19 to 21) Selecting the Sound Track: • On some DVD Videos, you cannot change audio languages while playing back. Playing Back Bonus Group: • You cannot select a track in the bonus group for Program Play. Special Picture Playback: • During slow-motion playback, no sound will be reproduced. • Yo[…]
-
Страница 48
44 English Enjoying Karaoke (see pages 34 to 36) General: • When the Mic Mixing or Vocal Masking Mode is activated: – Multichannel source will be downmixed into 2 channel temporarily. – Dolby Pro Logic II Mode will be canceled temporarily. Reducing the Lead Vocal—Vocal Masking: • The Vocal Masking Mode setting is not applied to the optica[…]
-
Страница 49
45 English Maintenance To get the best performance of the System, keep your discs, tapes, and mechanism clean. Handling discs • Remove the disc from its case by holding it at the edge while pressing the center hole lightly. • Do not touch the shiny surface of the disc, or bend the disc. • Put the disc back in its case after use to prevent war[…]
-
Страница 50
46 English Disc Operations: The disc does not play. ] Y ou have inserted a disc whose Re gion Code is not “3. ” (“REGION ERR” appears on the display .) ] The disc is placed upside down. Place the disc with the label side up. ID3 Tag on an MP3 disc cannot be shown. ] There are two types of ID3 T ag—V ersion 1 and V ersion 2. This System ca[…]
-
Страница 51
47 English Specifications CA-DXT9 Amplifier section Output Power: FRONT SPEAKERS: 150 W per channel, min. RMS, driven into 4 Ω at 1 kHz with no more than 10% total harmonic distortion. CENTER SPEAKER: 140 W per channel, min. RMS, driven into 6 Ω at 1 kHz with no more than 10% total harmonic distortion. SURROUND SPEAKERS: 140 W per channel, min.[…]
-
Страница 52
48 English CA-DXT7 Amplifier section Output Power: FRONT SPEAKERS: 150 W per channel, min. RMS, driven into 4 Ω at 1 kHz with no more than 10% total harmonic distortion. CENTER SPEAKER: 50 W per channel, min. RMS, driven into 6 Ω at 1 kHz with no more than 10% total harmonic distortion. SURROUND SPEAKERS: 50 W per channel, min. RMS, driven into[…]
-
Страница 53
49 English OPTICAL DIGITAL OUTPUT Signals *1 While playing some DVDs, digital signals may be emitted at 20 bits or 24 bits (at their original bit rate) through the OPTICAL DIGITAL OUTPUT terminal if the discs are not copy-protected. *2 There is no output for DVD Audio with content protection set. DIGITAL AUDIO OUTPUT Output Signals Playback disc ST[…]
-
Страница 54
50 English Parts Index Remote control Main unit Button Page Button Page AUDIO z 9 KARAOKE SCORING 1 35 TV x 41 7 7 7 7 8 11 – 13, 23 KEY #/ : 35 ¡ ¡ ¡ ¡ / 1 1 1 1 9 Q 10, 12, 13, 21 MIC MIX d 34, 36 ¢ ¢ ¢ ¢ / 4 4 4 4 7 . 11 MENU/PL W 12, 29 8 8 8 8 P 11, 21 ON SCREEN R 26 – 29 5 5 5 5 / ∞ ∞ ∞ ∞ / 3 3 3 3 / 2 2 2 2 / ENTER E 12, […]
-
Страница 55
0205AIMMDWJEM EN, CS © 2005 Victor Company of Japan, Limited Mains (AC) Line Instruction (not applicable for Europe, U.S.A., Canada, and U.K.) CAUTION for mains (AC) line BEFORE PLUGGING IN, do check that your mains (AC) line voltage corresponds with the position of the voltage selector switch provided on the outside of this equipment and, if diff[…]
-
Страница 56
COMPACT COMPONENT SYSTEM CA-DXT9 CA-DXT7 INSTRUCTIONS GVT0147-002A [UG, UX] English DXT7_T9_Cover[UGUX]-f.fm Page 1 Wednesday, February 16, 2005 1:23 PM[…]
-
Страница 57
G-1 Warnings, Cautions and Others Caution–– button! Disconnect the mains plug to shut the power off completely. The button in any position does not disconnect the mains line. The power can be remote controlled. CAUTION To reduce the risk of electrical shocks, fire, etc.: 1. Do not remove screws, covers or cabinet. 2. Do not expose this applianc[…]
-
Страница 58
G-2 Caution: Proper Ventilation To avoid risk of electric shock and fire, and to prevent damage, locate the apparatus as follows: 1. Front: No obstructions and open spacing. 2. Sides/Top/Back: No obstructions should be placed in the areas shown by the dimensions below. 3. Bottom: Place on the level surface. Maintain an adequate air path for ventila[…]
-
Страница 59
G-3 IMPORTANT FOR LASER PRODUCTS 1. CLASS 1 LASER PRODUCT 2. CAUTION : Do not open the top cover. There are no user serviceable parts inside the unit; leave all servicing to qualified service personnel. 3. CAUTION : Visible and invisible laser radiation when open and interlock failed or defeated. Avoid direct exposure to beam. 4. REPRODUCTION OF LA[…]
-
Страница 60
1 English Precautions Installation • Install the System in a location with adequate ventilation to prevent internal heat buildup in the System. • Install in a place which is level, dry and neither too hot nor too cold—between 5°C and 35°C. • Leave sufficient distance between the System and the TV. • Keep the speakers away from the TV to[…]
-
Страница 61
2 English Playable Disc Types In addition to the above discs, this system can play back audio data recorded on CD Text, CD-G (CD Graphics), and CD-Extra. • The following discs cannot be played back: DVD+R, DVD+RW, CD-I (CD-I Ready), Photo CD, etc. Playing back these discs will generate noise and damage the speakers. • In this manual, “file”[…]
-
Страница 62
3 English Connections • Connect VIDEO OUT directly to the video input of your TV. Connecting VIDEO OUT to a TV via a VCR may interfere with your viewing when playing back a copy- protected disc. Your viewing may be interfered when connecting VIDEO OUT to an integrated TV/VCR system. Do not connect the AC power cord until all other connections hav[…]
-
Страница 63
4 English ⁄ From AM/FM antenna See page 5. Ÿ From the digital input of digital audio component such as CD recorder See page 5. ~ From the video input of TV/monitor See page 5. @ From the speakers See page 6. ¤ Voltage selector Before plugging in, confirm the position the voltage selector points at. See page 7. # To a wall outlet Plug the AC pow[…]
-
Страница 64
5 English ~ TV/monitor • To select progressive scanning mode (see page 17), use COMPONENT jacks. • Connect the VIDEO jack, S-VIDEO jack, or COMPONENT jacks whichever you want to use. Ÿ Digital audio component • Set “DIGITAL AUDIO OUTPUT” in the “AUDIO” menu correctly according to the connected digital audio equipment (see page 40). I[…]
-
Страница 65
6 English @ Speakers To connect the speaker cords • When connecting the speaker cords, match their polarity with that of the speaker terminals: blue/red/green/white/ gray to (+) and black to (–). For CA-DXT9 For CA-DXT7 • Use only speakers with the same speaker impedance as indicated by the speaker terminals on the rear of the System. • The[…]
-
Страница 66
7 English ¤ To adjust the voltage selector Preparing the remote control • Dispose of batteries in the proper manner, according to federal, state, and local regulations. To remove the speaker grilles of the front speakers Use a screwdriver to rotate the voltage selector so that the voltage mark is pointing at the same voltage as where you are plu[…]
-
Страница 67
8 English Display Indication The indications on the display teach you a lot of things while you are operating the System. Before operating the System, be familiar with when and how the indicator illuminates on the display. 1 PROGRESSIVE indicator • Lights when the progressive scanning mode is selected. 2 Karaoke operation indicators (see pages 34[…]
-
Страница 68
9 English Daily Operations —Playback ¥ Turn on the power. The STANDBY lamp on the main unit goes off. • Without pressing AUDIO, the System also turns on by pressing one of the source select buttons in the next step. ø Select the source. Playback automatically starts if the selected source is ready to start playback. • If you press AUX, star[…]
-
Страница 69
10 English Listening to the Radio To select the AM tuner interval spacing Some countries space AM stations 9 kHz apart, and other countries use 10 kHz spacing. 1 Select “AM,” then turn off (stand by) the System. 2 Select the AM tuner interval spacing. To select the band (FM/AM) To tune in to a station While FM or AM is selected… Frequency sta[…]
-
Страница 70
11 English 2 Select a preset number. Playing Back a Disc Before operating a disc, be familiar how a disc is recorded. • DVD Video comprises of “ Titles ” which includes “ Chapters, ” DVD Audio/MP3/WMA comprise of “ Groups ” which includes “ Tracks, ” JPEG comprises of “ Groups ” which includes “ Files, ” and CD/SVCD/VCD co[…]
-
Страница 71
12 English To locate a particular portion While playing a disc except MP3/WMA… • No sound comes out while searching on DVD Video/ SVCD/VCD. To return to normal playback, press DVD/CD 3 . T o select an item directly You can select a title/chapter/track directly and start playback. • For DVD Video, you can select a title before starting playbac[…]
-
Страница 72
13 English Playing Back a Tape To insert a tape You can play back type I tapes. • The use of C-120 or longer tape is not recommended. To change the tape running direction To reverse the tape automatically To playback the both decks A and B continuously —Relay Play When the cassettes are set in the both decks… You can start playback of either […]
-
Страница 73
14 English Daily Operations —Sound&Other Adjustments Adjusting the Volume The volume level can be adjusted in 32 steps (VOLUME MIN, VOLUME 1 – VOLUME 30, and VOLUME MAX). Adjusting the Speaker Output Level You can adjust the speaker output level from –6 (dB) to +6 (dB). • You can also use the setup menu to adjust the speaker output leve[…]
-
Страница 74
15 English Reinforcing the Bass Sound To adjust the bass level gradually You can select the subwoofer level from level 0 (minimum) to level 4 (maximum). To emphasize rhythmical feeling—RHYTHM AX This function emphasizes bass attack feeling. Selecting the Sound Modes You can select one of the preset Sound Modes. To cancel the Sound Mode, select ?[…]
-
Страница 75
16 English Selecting the Surround Modes • For DVD/CD, TAPE-A, TAPE-B, AUX: • For FM/AM: To adjust the DSP effect level When one of the DSP Modes (except for “ALL CH. ST”) is selected… • The initial setting is “EFFECT3.” Presetting Automatic DVD Video Sound Increase Level The DVD Video sound is sometimes recorded at a lower level tha[…]
-
Страница 76
17 English Changing the Color System and Scanning Mode You can select the video output to match it to the color system of your TV (NTSC or PAL). • If you connect a progressive TV through the COMPONENT jacks, you can enjoy a high quality picture from the built-in DVD player by selecting progressive scanning mode. • You can change the setting onl[…]
-
Страница 77
18 English Changing the Display Brightness * Except for the RHYTHM AX and KARAOKE SCORING lamps. Setting the Clock Without setting the build-in clock, you cannot use any timers. • To exit from the clock setting, press CLOCK/TIMER as required. • To correct a misentry during the process, press CANCEL. You can return to the previous step. 1 Activa[…]
-
Страница 78
19 English Unique DVD/VCD Operations Selecting the Sound Track For DVD Video: While playing back a chapter containing audio languages, you can select the language to listen to. For DVD Audio: While playing back a track containing audio channels, you can select the audio channel to listen to. For DVD-VR/Karaoke SVCD/VCD: When playing back a track, y[…]
-
Страница 79
20 English Selecting the Subtitle Language For DVD Video: While playing back a chapter containing subtitles in different languages, you can select the subtitle language to display on the TV screen. For DVD-VR: While playing, you can turn on or off the subtitle. For SVCD: While playing, you can select the subtitles even if no subtitles are recorded […]
-
Страница 80
21 English Playing Back Bonus Group For DVD Audio only: Some DVD Audios have a special group called “bonus group” whose contents are not open to the public. • To play back a bonus group, you have to enter the specific “key number” (a kind of password) for the bonus group. The way of getting the key number depends on the disc. 1 Select the[…]
-
Страница 81
22 English Advanced Disc Operations Programming the Playing Order —Program Play You can arrange the playing order of the tracks (up to 99) before you start playback. 1 Before starting playback, activate Program Play. 2 Select chapters or tracks you want for Program Play. 1 Select a disc number. 2 Select a title or group number. 3 Select a chapter[…]
-
Страница 82
23 English * Resume does not work for Program Play. To check the programmed contents Before or after playback… To modify the program Before or after playback… To exit from Program Play Before or after playback… Playing at Random—Random Play You can play the contents of all the loaded discs at random. • Random Play cannot be used for some […]
-
Страница 83
24 English Playing Repeatedly—Repeat Play You can repeat playback. • You can also select the repeat mode using the on-screen bar (see page 26). • The indicator(s) lights on the display as follows to indicate the current repeat mode. • For DVD Video: While playing… • For DVD Audio: While playing or before playback… • For MP3/WMA: Whi[…]
-
Страница 84
25 English On-Screen Disc Operations On-screen Bar Information You can check the information on disc (except for MP3/ WMA/JPEG disc) and use some functions through the on- screen bar. On-screen bars 123 456 789 10 0 +10 D VD/CD 3 REPEA T ZOOM ENTER ON SCREEN PL PG /// / A UDIO TV Remote control 10 keys DVD Video DVD Audio DVD-VR SVCD VCD CD 3 D VD-[…]
-
Страница 85
26 English O perations Using the On-screen Bar Basic operation procedure through the on-screen bar is as follows: Ex.: Selecting a subtitle (French) for DVD Video: While a disc is selected as the source… 1 Display the on-screen bar with the pull-down menu. 2 Select (highlight) the item you want. 3 Display the pop-up window. 4 Select the desired o[…]
-
Страница 86
27 English To change the time information You can change the time information in the on-screen bar and the display window on the main unit. 1 Display the on-screen bar with the pull-down menu. 2 Make sure is selected (highlighted). 3 Change the time indication. * Not available for DVD-VR. To erase the on-screen bar Repeat Play • See also page 24.[…]
-
Страница 87
28 English A-B Repeat 1 While playing, display the on-screen bar with the pull- down menu. 2 Select . 3 Display the pop-up window. 4 Select “A-B”. 5 Select the start point (A). • After selecting the starting point (A), you can search for the end point using ¡ . 6 Select the end point (B). To cancel A-B Repeat, repeat steps 1 to 3 , and selec[…]
-
Страница 88
29 English Chapter/Track Search You can search for the number of the item to play. For DVD Video/DVD-VR: Chapter For DVD Audio: Track 1 While playing, display the on-screen bar with the pull- down menu. 2 Select or . 3 Display the pop-up window. 4 Enter the desired chapter/track number. • To correct a misentry, press the 10 keys until the desired[…]
-
Страница 89
30 English Control screen for MP3/WMA/JPEG disc The control screen automatically appears on the TV screen when you load an MP3, WMA, or JPEG disc. To move the highlight (green) bar between group list and track list (for MP3/WMA/JPEG): To select an item in the list: To start playback • Once you start playing back a JPEG track, the control screen g[…]
-
Страница 90
31 English To stop playback To repeat title/play list for DVD-VR While playing or before starting playback… * Not available before starting playback. To repeat slide-show for JPEG While playing or before starting playback… • For Repeat Play of MP3/WMA, see pages 24 and 27. To zoom in the still picture (for JPEG) 1 During being paused… As th[…]
-
Страница 91
32 English Recording Operations Recording on a Tape You can use type I tapes for recording. • To play a tape, see page 13. 1 Insert a recordable cassette in deck B. 2 Check the tape running direction and Reverse Mode settings on the display. To change the direction Change the Reverse Mode if necessary DISC REC ST AR T T APE-A / T APE-B DISC 1–5[…]
-
Страница 92
33 English 3 Start playing the source—“FM,” “AM,” “DVD/CD,” “TAPE-A” or “AUX.” • When recording a disc, you can also use “Synchronized Disc Recording” (see the right column). • When recording from deck A, you can also use “Dubbing” (see below). 4 Start recording. To stop recording Dubbing Tapes 1 Change the source […]
-
Страница 93
34 English Enjoying Karaoke • For DVD Audio/DVD-VR: The functions described in this section are not available . • When you activate the Mic Mixing Mode or Voice Masking Mode, multi-channel sounds are downmixed into 2 channel. The multi-channel surround mode (“ALL CH. ST,” “MOVIE,” “MUSIC,” or “AUTO” for multi-channel surround si[…]
-
Страница 94
35 English To apply an echo to your voice While the Mic Mix Mode is activated… • As the number increases, echo level also increases. To adjust the Key (disc playback only) While playing back… To cancel the Key Control • Key Control is also canceled when you deactivate the Mic Mixing Mode, or select another track or disc. Reducing the Lead V[…]
-
Страница 95
36 English To turn on/off the fanfare 1 Enter the fanfare setting mode . 2 Select the fanfare setting. Reserving Karaoke Songs —Karaoke Program Play You can determine the playback order of the titles or tracks on the disc player. You can program up to 12 steps. 1 Change the source to “DVD/CD.” 2 Activate Karaoke Program Play. • PROGRAM indi[…]
-
Страница 96
37 English Timer Operations Setting the Timer Using Daily Timer, you can wake up with your favorite song. On the other hand, with Recording Timer, you can make a tape of a radio broadcast automatically. • You cannot activate Daily Timer and Recording Timer at a time. (Activating either timer deactivates the other timer.) • To correct a misentry[…]
-
Страница 97
38 English 3 Turn off the System (on standby) if you have set the timer with the System turned on. To turn off the Timer after the setting is done You can turn off the timer after it has been set. • Since Daily Timer is activated at the same time everyday, you may need to cancel it on some particular days. 1 Select the timer you want to cancel (R[…]
-
Страница 98
39 English Setup Menu Operations Initial settings Some items in the menus cannot be changed during playback. 1 Press SET UP. 2 Press 2 ( or 3 ) to select the menu. 3 Press 5 ( or ∞ ) to move to select the item. 4 Press ENTER. 5 Press 5 ( or ∞ ) to select the options, then press ENTER. To erase a preference display Press SET UP. 123 456 789 10 0[…]
-
Страница 99
40 English AUDIO menu Item Contents DIGITAL AUDIO OUTPUT Set this item correctly when using the OPTICAL DIGITAL OUTPUT terminal on the rear. PCM ONLY: When connecting to audio equipment which can decode only linear PCM signals. DOLBY DIGITAL/PCM: When connecting to a Dolby Digital decoder or an amplifier with a built- in Dolby Digital decoder. STRE[…]
-
Страница 100
41 English Operating the TV Operating TV You can operate the JVC’s or other manufacturers’ TV using this remote control. 1 Slide the AUDIO/TV selector to “TV.” 2 Press and hold until the following steps are complete. 3 4 Enter the 2-digit manufacture’s code number. 5 Release TV. To operate the TV 123 456 789 10 0 +10 TV V OL +/– TV TV/V[…]
-
Страница 101
42 English Additional Information Learning More about This System Introduction (see pages 1 to 2) Playable Disc Types: • About audio format – Linear PCM: Uncompressed digital audio, the same format used for CDs and most studio masters. – Dolby Digital: Compressed digital audio, developed by Dolby Laboratories, which enables multi-channel enco[…]
-
Страница 102
43 English Unique DVD/VCD Operations (see pages 19 to 21) Selecting the Sound Track: • On some DVD Videos, you cannot change audio languages while playing back. Playing Back Bonus Group: • You cannot select a track in the bonus group for Program Play. Special Picture Playback: • During slow-motion playback, no sound will be reproduced. • Yo[…]
-
Страница 103
44 English Enjoying Karaoke (see pages 34 to 36) General: • When the Mic Mixing or Vocal Masking Mode is activated: – Multichannel source will be downmixed into 2 channel temporarily. – Dolby Pro Logic II Mode will be canceled temporarily. Reducing the Lead Vocal—Vocal Masking: • The Vocal Masking Mode setting is not applied to the optica[…]
-
Страница 104
45 English Maintenance To get the best performance of the System, keep your discs, tapes, and mechanism clean. Handling discs • Remove the disc from its case by holding it at the edge while pressing the center hole lightly. • Do not touch the shiny surface of the disc, or bend the disc. • Put the disc back in its case after use to prevent war[…]
-
Страница 105
46 English Disc Operations: The disc does not play. ] Y ou have inserted a disc whose Re gion Code is not “2. ” (“REGION ERR” appears on the display .) ] The disc is placed upside down. Place the disc with the label side up. ID3 Tag on an MP3 disc cannot be shown. ] There are two types of ID3 T ag—V ersion 1 and V ersion 2. This System ca[…]
-
Страница 106
47 English Specifications CA-DXT9 Amplifier section Output Power: FRONT SPEAKERS: 150 W per channel, min. RMS, driven into 4 Ω at 1 kHz with no more than 10% total harmonic distortion. CENTER SPEAKER: 140 W per channel, min. RMS, driven into 6 Ω at 1 kHz with no more than 10% total harmonic distortion. SURROUND SPEAKERS: 140 W per channel, min.[…]
-
Страница 107
48 English CA-DXT7 Amplifier section Output Power: FRONT SPEAKERS: 150 W per channel, min. RMS, driven into 4 Ω at 1 kHz with no more than 10% total harmonic distortion. CENTER SPEAKER: 50 W per channel, min. RMS, driven into 6 Ω at 1 kHz with no more than 10% total harmonic distortion. SURROUND SPEAKERS: 50 W per channel, min. RMS, driven into[…]
-
Страница 108
49 English OPTICAL DIGITAL OUTPUT Signals *1 While playing some DVDs, digital signals may be emitted at 20 bits or 24 bits (at their original bit rate) through the OPTICAL DIGITAL OUTPUT terminal if the discs are not copy-protected. *2 There is no output for DVD Audio with content protection set. DIGITAL AUDIO OUTPUT Output Signals Playback disc ST[…]
-
Страница 109
50 English Parts Index Remote control Main unit Button Page Button Page AUDIO z 9 KARAOKE SCORING 1 35 TV x 41 7 7 7 7 8 11 – 13, 23 KEY #/ : 35 ¡ ¡ ¡ ¡ / 1 1 1 1 9 Q 10, 12, 13, 21 MIC MIX d 34, 36 ¢ ¢ ¢ ¢ / 4 4 4 4 7 . 11 MENU/PL W 12, 29 8 8 8 8 P 11, 21 ON SCREEN R 26 – 29 5 5 5 5 / ∞ ∞ ∞ ∞ / 3 3 3 3 / 2 2 2 2 / ENTER E 12, […]
-
Страница 110
0205AIMMDWJEM EN, AR, PE © 2005 Victor Company of Japan, Limited Mains (AC) Line Instruction (not applicable for Europe, U.S.A., Canada, and U.K.) CAUTION for mains (AC) line BEFORE PLUGGING IN, do check that your mains (AC) line voltage corresponds with the position of the voltage selector switch provided on the outside of this equipment and, if […]
-
Страница 111
COMPACT COMPONENT SYSTEM DX-T5 —Consists of CA-DXT5, SP-XT5 and SP-XST5 CA-DXT5 SP-XT5 SP-XST5 INSTRUCTIONS GVT0146-001A [US, UN] English DXT5_Cover[USUN].fm Page 1 Tuesday, February 1, 2005 2:45 PM[…]
-
Страница 112
G-1 Warnings, Cautions and Others Caution–– button! Disconnect the mains plug to shut the power off completely. The button in any position does not disconnect the mains line. The power can be remote controlled. CAUTION To reduce the risk of electrical shocks, fire, etc.: 1. Do not remove screws, covers or cabinet. 2. Do not expose this applianc[…]
-
Страница 113
G-2 Caution: Proper Ventilation To avoid risk of electric shock and fire, and to prevent damage, locate the apparatus as follows: 1. Front: No obstructions and open spacing. 2. Sides/Top/Back: No obstructions should be placed in the areas shown by the dimensions below. 3. Bottom: Place on the level surface. Maintain an adequate air path for ventila[…]
-
Страница 114
G-3 IMPORTANT FOR LASER PRODUCTS 1. CLASS 1 LASER PRODUCT 2. CAUTION : Do not open the top cover. There are no user serviceable parts inside the unit; leave all servicing to qualified service personnel. 3. CAUTION : Visible and invisible laser radiation when open and interlock failed or defeated. Avoid direct exposure to beam. 4. REPRODUCTION OF LA[…]
-
Страница 115
1 English Precautions Installation • Install the System in a location with adequate ventilation to prevent internal heat buildup in the System. • Install in a place which is level, dry and neither too hot nor too cold—between 5°C and 35°C. • Leave sufficient distance between the System and the TV. • Keep the speakers away from the TV to[…]
-
Страница 116
2 English Playable Disc Types In addition to the above discs, this system can play back audio data recorded on CD Text, CD-G (CD Graphics), and CD-Extra. • The following discs cannot be played back: DVD+R, DVD+RW, CD-I (CD-I Ready), Photo CD, etc. Playing back these discs will generate noise and damage the speakers. • In this manual, “file”[…]
-
Страница 117
3 English Connections • Connect VIDEO OUT directly to the video input of your TV. Connecting VIDEO OUT to a TV via a VCR may interfere with your viewing when playing back a copy- protected disc. Your viewing may be interfered when connecting VIDEO OUT to an integrated TV/VCR system. Do not connect the AC power cord until all other connections hav[…]
-
Страница 118
4 English ~ TV/monitor • To select progressive scanning mode (see page 14), use COMPONENT jacks. • Connect the VIDEO jack, S-VIDEO jack, or COMPONENT jacks whichever you want to use. Ÿ Digital audio component • Set “DIGITAL AUDIO OUTPUT” in the “AUDIO” menu correctly according to the connected digital audio equipment (see page 37). I[…]
-
Страница 119
5 English @ Front main speakers and matrix surround speakers • When connecting the speaker cords, match their polarity with that of the speaker terminals: red/white to (+) and black to (–). • Use only speakers with the same speaker impedance as indicated by the speaker terminals on the rear of the System. • The front main speakers are magne[…]
-
Страница 120
6 English Display Indication The indications on the display teach you a lot of things while you are operating the System, Before operating the System, be familiar with when and how the indicator illuminates on the display. 1 PROGRESSIVE indicator • Lights when the progressive scanning mode is selected. 2 Karaoke operation indicators (see pages 31[…]
-
Страница 121
7 English Daily Operations —Playback ¥ Turn on the power. The STANDBY lamp on the main unit goes off. • Without pressing AUDIO, the System also turns on by pressing one of the source select buttons in the next step. ø Select the source. Playback automatically starts if the selected source is ready to start playback. • If you press AUX, star[…]
-
Страница 122
8 English Listening to the Radio To select the AM tuner interval spacing Some countries space AM stations 9 kHz apart, and other countries use 10 kHz spacing. 1 Select “AM,” then turn off (stand by) the System. 2 Select the AM tuner interval spacing. To select the band (FM/AM) To tune in to a station While FM or AM is selected… Frequency star[…]
-
Страница 123
9 English 2 Select a preset number. Playing Back a Disc Before operating a disc, be familiar how a disc is recorded. • DVD Video comprises of “ Titles ” which includes “ Chapters, ” DVD Audio/MP3/WMA comprise of “ Groups ” which includes “ Tracks, ” JPEG comprises of “ Groups ” which includes “ Files, ” and CD/SVCD/VCD com[…]
-
Страница 124
10 English To locate a particular portion While playing a disc except MP3/WMA… • No sound comes out while searching on DVD Video/ SVCD/VCD. To return to normal playback, press DVD/CD 3 . T o select an item directly You can select a title/chapter/track directly and start playback. • For DVD Video, you can select a title before starting playbac[…]
-
Страница 125
11 English Playing Back a Tape To insert a tape You can play back type I tapes. • The use of C-120 or longer tape is not recommended. To change the tape running direction To reverse the tape automatically To playback the both decks A and B continuously —Relay Play When the cassettes are set in the both decks… You can start playback of either […]
-
Страница 126
12 English Daily Operations —Sound&Other Adjustments Adjusting the Volume The volume level can be adjusted in 32 steps (VOLUME MIN, VOLUME 1 – VOLUME 30, and VOLUME MAX). Reinforcing the Bass Sound To adjust the bass level gradually—ACTIVE BASS EX. You can select the bass level from level 0 (minimum) to level 2 (maximum). To emphasize rhy[…]
-
Страница 127
13 English Selecting the Sound Modes You can select one of the preset Sound Modes. * Surround elements are added to the SEA elements to create being-there feeling in your room. To cancel the Sound Mode, select “OFF.” Creating Your Own Sound Modes—User Mode You can adjust the preset Sound Modes to create your own Sound Modes which suit your ta[…]
-
Страница 128
14 English Creating 3-dimensional Sound Field—3D Phonic While playing a disc… Presetting Automatic DVD Video Sound Increase Level The DVD Video sound is sometimes recorded at a lower level than for other discs and sources. You can set the increase level for the currently loaded DVD Video, so you do not have to adjust the volume when you change […]
-
Страница 129
15 English 2 Select a preset picture tone. To adjust the picture tone 1 Select “USER1” or “USER2.” • Follow steps 1 and 2 explained on the previous page. 2 Select a parameter you want to adjust. 3 Adjust the parameter. 4 Repeat steps 2 to 3 to adjust other parameters. To erase the VFP screen, press VFP again. Changing the Display Brightne[…]
-
Страница 130
16 English Unique DVD/VCD Operations Selecting the Sound Track For DVD Video: While playing back a chapter containing audio languages, you can select the language to listen to. For DVD Audio: While playing back a track containing audio channels, you can select the audio channel to listen to. For DVD-VR/Karaoke SVCD/VCD: When playing back a track, y[…]
-
Страница 131
17 English Selecting the Subtitle Language For DVD Video: While playing back a chapter containing subtitles in different languages, you can select the subtitle language to display on the TV screen. For DVD-VR: While playing, you can turn on or off the subtitle. For SVCD: While playing, you can select the subtitles even if no subtitles are recorded […]
-
Страница 132
18 English Playing Back Bonus Group For DVD Audio only: Some DVD Audios have a special group called “bonus group” whose contents are not open to the public. • To play back a bonus group, you have to enter the specific “key number” (a kind of password) for the bonus group. The way of getting the key number depends on the disc. 1 Select the[…]
-
Страница 133
19 English Advanced Disc Operations Programming the Playing Order —Program Play You can arrange the playing order of the tracks (up to 99) before you start playback. 1 Before starting playback, activate Program Play. 2 Select chapters or tracks you want for Program Play. 1 Select a disc number. 2 Select a title or group number. 3 Select a chapter[…]
-
Страница 134
20 English * Resume does not work for Program Play. To check the programmed contents Before or after playback… To modify the program Before or after playback… To exit from Program Play Before or after playback… Playing at Random—Random Play You can play the contents of all the loaded discs at random. • Random Play cannot be used for some […]
-
Страница 135
21 English Playing Repeatedly—Repeat Play You can repeat playback. • You can also select the repeat mode using the on-screen bar (see page 23). • The indicator(s) lights on the display as follows to indicate the current repeat mode. • For DVD Video: While playing… • For DVD Audio: While playing or before playback… • For MP3/WMA: Whi[…]
-
Страница 136
22 English On-Screen Disc Operations On-screen Bar Information You can check the information on disc (except for MP3/ WMA/JPEG disc) and use some functions through the on- screen bar. On-screen bars 123 456 789 10 0 +10 D VD/CD 3 REPEA T ZOOM ENTER ON SCREEN PL PG /// / A UDIO TV Remote control 10 keys DVD Video DVD Audio DVD-VR SVCD VCD CD 3 D VD-[…]
-
Страница 137
23 English O perations Using the On-screen Bar Basic operation procedure through the on-screen bar is as follows: Ex.: Selecting a subtitle (French) for DVD Video: While a disc is selected as the source… 1 Display the on-screen bar with the pull-down menu. 2 Select (highlight) the item you want. 3 Display the pop-up window. 4 Select the desired o[…]
-
Страница 138
24 English To change the time information You can change the time information in the on-screen bar and the display window on the main unit. 1 Display the on-screen bar with the pull-down menu. 2 Make sure is selected (highlighted). 3 Change the time indication. * Not available for DVD-VR. To erase the on-screen bar Repeat Play • See also page 21.[…]
-
Страница 139
25 English A-B Repeat 1 While playing, display the on-screen bar with the pull- down menu. 2 Select . 3 Display the pop-up window. 4 Select “A-B”. 5 Select the start point (A). • After selecting the starting point (A), you can search for the end point using ¡ . 6 Select the end point (B). To cancel A-B Repeat, repeat steps 1 to 3 , and selec[…]
-
Страница 140
26 English Chapter/Track Search You can search for the number of the item to play. For DVD Video/DVD-VR: Chapter For DVD Audio: Track 1 While playing, display the on-screen bar with the pull- down menu. 2 Select or . 3 Display the pop-up window. 4 Enter the desired chapter/track number. • To correct a misentry, press the 10 keys until the desired[…]
-
Страница 141
27 English Control screen for MP3/WMA/JPEG disc The control screen automatically appears on the TV screen when you load an MP3, WMA, or JPEG disc. To move the highlight (green) bar between group list and track list (for MP3/WMA/JPEG): To select an item in the list: To start playback • Once you start playing back a JPEG track, the control screen g[…]
-
Страница 142
28 English To stop playback To repeat title/play list for DVD-VR While playing or before starting playback… * Not available before starting playback. To repeat slide-show for JPEG While playing or before starting playback… • For Repeat Play of MP3/WMA, see pages 21 and 24. To zoom in the still picture (for JPEG) 1 During being paused… As th[…]
-
Страница 143
29 English Recording Operations Recording on a Tape You can use type I tapes for recording. • To play a tape, see page 11. 1 Insert a recordable cassette in deck B. 2 Check the tape running direction and Reverse Mode settings on the display. To change the direction Change the Reverse Mode if necessary DISC REC ST AR T T APE-A / T APE-B DISC 1–5[…]
-
Страница 144
30 English 3 Start playing the source—“FM,” “AM,” “DVD/CD,” “TAPE-A” or “AUX.” • When recording a disc, you can also use “Synchronized Disc Recording” (see the right column). • When recording from deck A, you can also use “Dubbing” (see below). 4 Start recording. To stop recording Dubbing Tapes 1 Change the source […]
-
Страница 145
31 English Enjoying Karaoke The functions described in this section are not available for DVD Audio/DVD-VR. Singing Along (Karaoke) You can enjoy singing along (Karaoke) by using two microphones. • By pressing REC START/STOP, you can record your singing-along. 1 Turn MIC LEVEL to MIN. 2 Connect the microphone(s) (not supplied) to the MIC 1 and/or[…]
-
Страница 146
32 English To apply an echo to your voice While the Mic Mixing Mode is activated… • As the number increases, echo level also increases. To adjust the Key (disc playback only) While playing back… To cancel the Key Control • Key Control is also canceled when you deactivate the Mic Mixing Mode, or select another track or disc. Reducing the Lea[…]
-
Страница 147
33 English To turn on/off the fanfare 1 Enter the fanfare setting mode. 2 Select the fanfare setting. Reserving Karaoke Songs —Karaoke Program Play You can determine the playback order of the titles or tracks on the disc player. You can program up to 12 steps. 1 Change the source to “DVD/CD.” 2 Activate Karaoke Program Play. • PROGRAM indic[…]
-
Страница 148
34 English Timer Operations Setting the Timer Using Daily Timer, you can wake up with your favorite song. On the other hand, with Recording Timer, you can make a tape of a radio broadcast automatically. • You cannot activate Daily Timer and Recording Timer at a time. (Activating either timer deactivates the other timer.) • To correct a misentry[…]
-
Страница 149
35 English 3 Turn off the System (on standby) if you have set the timer with the System turned on. To turn off the Timer after the setting is done You can turn off the timer after it has been set. • Since Daily Timer is activated at the same time everyday, you may need to cancel it on some particular days. 1 Select the timer you want to cancel (R[…]
-
Страница 150
36 English Setup Menu Operations Initial settings Some items in the menus cannot be changed during playback. 1 Press SET UP. 2 Press 2 ( or 3 ) to select the menu. 3 Press 5 ( or ∞ ) to move to select the item. 4 Press ENTER. 5 Press 5 ( or ∞ ) to select the options, then press ENTER. To erase a preference display Press SET UP. 123 456 789 10 0[…]
-
Страница 151
37 English AUDIO menu Item Contents DIGITAL AUDIO OUTPUT Set this item correctly when using the OPTICAL DIGITAL OUTPUT terminal on the rear. PCM ONLY: When connecting to audio equipment which can decode only linear PCM signals. DOLBY DIGITAL/PCM: When connecting to a Dolby Digital decoder or an amplifier with a built- in Dolby Digital decoder. STRE[…]
-
Страница 152
38 English Operating the TV Operating TV You can operate the JVC’s or other manufacturers’ TV using this remote control. 1 Slide the AUDIO/TV selector to “TV.” 2 Press and hold until the following steps are complete. 3 4 Enter the 2-digit manufacture’s code number. 5 Release TV. To operate the TV 123 456 789 10 0 +10 TV V OL +/– TV TV/V[…]
-
Страница 153
39 English Additional Information Learning More about This System Introduction (see pages 1 to 2) Playable Disc Types: • About audio format – Linear PCM: Uncompressed digital audio, the same format used for CDs and most studio masters. – Dolby Digital: Compressed digital audio, developed by Dolby Laboratories, which enables multi-channel enco[…]
-
Страница 154
40 English Special Picture Playback: • During slow-motion playback, no sound will be reproduced. • You cannot use frame-by-frame playback for DVD-VR. • While zoomed in, the picture may look coarse. Advanced Disc Operations (see pages 19 to 21) Programming the Playing Order—Program Play: • While programming steps… – Your entry will be […]
-
Страница 155
41 English Enjoying Karaoke (see pages 31 to 33) Reducing the Lead Vocal—Vocal Masking: • The Vocal Masking Mode setting is not applied to the optical digital output signals through the OPTICAL DIGITAL OUTPUT terminal. • When playing a Karaoke disc in the Vocal Masking Mode, the vocal may not be reduced or the volume may be lower. • On some[…]
-
Страница 156
42 English Handling cassette tapes • If the tape is loose in its cassette, take up the slack by inserting a pencil in one of the reels and rotate it. – If the tape is loose, it may get stretched, cut, or caught in the cassette. • Be careful not to touch the tape surface. • Avoid the following places to store the tape—in dusty places, in d[…]
-
Страница 157
43 English MP3 groups and tracks are not played back as you expect. ] The playing order is determined when the disc was recorded. It depends on the writing application. MP3/WMA or JPEG files are not played back. ] The inserted disc may include both type of tracks (MP3/ WMA files and JPEG files). In this case, you can only play back the files sel[…]
-
Страница 158
44 English Specifications Amplifier section Output Power: MAIN SPEAKERS: 150 W per channel, min. RMS, driven into 4 Ω at 1 kHz with no more than 10% total harmonic distortion. Digital output: OPTICAL DIGITAL OUTPUT: –21 dBm to –15 dBm (660 nm ±30 nm) Audio input sensitivity/Impedance (Measured at 1 kHz, with tape recording signal 300 mV) AUX[…]
-
Страница 159
45 English OPTICAL DIGITAL OUTPUT Signals *1 While playing some DVDs, digital signals may be emitted at 20 bits or 24 bits (at their original bit rate) through the OPTICAL DIGITAL OUTPUT terminal if the discs are not copy-protected. *2 There is no output for DVD Audio with content protection set. DIGITAL AUDIO OUTPUT Output Signals Playback disc ST[…]
-
Страница 160
46 English Parts Index Remote control Main unit Button Page Button Page AUDIO z 7 KARAOKE SCORING 1 32 TV x 38 7 7 7 7 8 9 – 11, 20 KEY # : 32 ¡ ¡ ¡ ¡ / 1 1 1 1 9 Q 8, 10, 11, 18 KEY A 32 ¢ ¢ ¢ ¢ / 4 4 4 4 7 . 9, 10 L / R BALANCE F 12 8 8 8 8 P 9, 18 5 5 5 5 / ∞ ∞ ∞ ∞ / 3 3 3 3 / 2 2 2 2 / ENTER E 10, 15, 17, 18, 23 – 28, 36, 38[…]
-
Страница 161
0205AIMMDWJEM EN, CS © 2005 Victor Company of Japan, Limited Mains (AC) Line Instruction (not applicable for Europe, U.S.A., Canada, and U.K.) CAUTION for mains (AC) line BEFORE PLUGGING IN, do check that your mains (AC) line voltage corresponds with the position of the voltage selector switch provided on the outside of this equipment and, if diff[…]
-
Страница 162
COMPACT COMPONENT SYSTEM DX-T5 —Consists of CA-DXT5, SP-XT5, and SP-XST5 CA-DXT5 SP-XT5 SP-XST5 SP-XT5 CA-DXT5 SP-XST5 INSTRUCTIONS GVT0146-002A [UG, UX] English DXT5_Cover[UGUX].fm Page 1 Tuesday, February 1, 2005 3:46 PM[…]
-
Страница 163
G-1 Warnings, Cautions and Others Caution–– button! Disconnect the mains plug to shut the power off completely. The button in any position does not disconnect the mains line. The power can be remote controlled. CAUTION To reduce the risk of electrical shocks, fire, etc.: 1. Do not remove screws, covers or cabinet. 2. Do not expose this applianc[…]
-
Страница 164
G-2 Caution: Proper Ventilation To avoid risk of electric shock and fire, and to prevent damage, locate the apparatus as follows: 1. Front: No obstructions and open spacing. 2. Sides/Top/Back: No obstructions should be placed in the areas shown by the dimensions below. 3. Bottom: Place on the level surface. Maintain an adequate air path for ventila[…]
-
Страница 165
G-3 IMPORTANT FOR LASER PRODUCTS 1. CLASS 1 LASER PRODUCT 2. CAUTION : Do not open the top cover. There are no user serviceable parts inside the unit; leave all servicing to qualified service personnel. 3. CAUTION : Visible and invisible laser radiation when open and interlock failed or defeated. Avoid direct exposure to beam. 4. REPRODUCTION OF LA[…]
-
Страница 166
1 English Precautions Installation • Install the System in a location with adequate ventilation to prevent internal heat buildup in the System. • Install in a place which is level, dry and neither too hot nor too cold—between 5°C and 35°C. • Leave sufficient distance between the System and the TV. • Keep the speakers away from the TV to[…]
-
Страница 167
2 English Playable Disc Types In addition to the above discs, this system can play back audio data recorded on CD Text, CD-G (CD Graphics), and CD-Extra. • The following discs cannot be played back: DVD+R, DVD+RW, CD-I (CD-I Ready), Photo CD, etc. Playing back these discs will generate noise and damage the speakers. • In this manual, “file”[…]
-
Страница 168
3 English Connections • Connect VIDEO OUT directly to the video input of your TV. Connecting VIDEO OUT to a TV via a VCR may interfere with your viewing when playing back a copy- protected disc. Your viewing may be interfered when connecting VIDEO OUT to an integrated TV/VCR system. Do not connect the AC power cord until all other connections hav[…]
-
Страница 169
4 English ~ TV/monitor • To select progressive scanning mode (see page 14), use COMPONENT jacks. • Connect the VIDEO jack, S-VIDEO jack, or COMPONENT jacks whichever you want to use. Ÿ Digital audio component • Set “DIGITAL AUDIO OUTPUT” in the “AUDIO” menu correctly according to the connected digital audio equipment (see page 37). I[…]
-
Страница 170
5 English @ Front main speakers and matrix surround speakers • When connecting the speaker cords, match their polarity with that of the speaker terminals: red/white to (+) and black to (–). • Use only speakers with the same speaker impedance as indicated by the speaker terminals on the rear of the System. • The front main speakers are magne[…]
-
Страница 171
6 English Display Indication The indications on the display teach you a lot of things while you are operating the System, Before operating the System, be familiar with when and how the indicator illuminates on the display. 1 PROGRESSIVE indicator • Lights when the progressive scanning mode is selected. 2 Karaoke operation indicators (see pages 31[…]
-
Страница 172
7 English Daily Operations —Playback ¥ Turn on the power. The STANDBY lamp on the main unit goes off. • Without pressing AUDIO, the System also turns on by pressing one of the source select buttons in the next step. ø Select the source. Playback automatically starts if the selected source is ready to start playback. • If you press AUX, star[…]
-
Страница 173
8 English Listening to the Radio To select the AM tuner interval spacing Some countries space AM stations 9 kHz apart, and other countries use 10 kHz spacing. 1 Select “AM,” then turn off (stand by) the System. 2 Select the AM tuner interval spacing. To select the band (FM/AM) To tune in to a station While FM or AM is selected… Frequency star[…]
-
Страница 174
9 English 2 Select a preset number. Playing Back a Disc Before operating a disc, be familiar how a disc is recorded. • DVD Video comprises of “ Titles ” which includes “ Chapters, ” DVD Audio/MP3/WMA comprise of “ Groups ” which includes “ Tracks, ” JPEG comprises of “ Groups ” which includes “ Files, ” and CD/SVCD/VCD com[…]
-
Страница 175
10 English To locate a particular portion While playing a disc except MP3/WMA… • No sound comes out while searching on DVD Video/ SVCD/VCD. To return to normal playback, press DVD/CD 3 . T o select an item directly You can select a title/chapter/track directly and start playback. • For DVD Video, you can select a title before starting playbac[…]
-
Страница 176
11 English Playing Back a Tape To insert a tape You can play back type I tapes. • The use of C-120 or longer tape is not recommended. To change the tape running direction To reverse the tape automatically To playback the both decks A and B continuously —Relay Play When the cassettes are set in the both decks… You can start playback of either […]
-
Страница 177
12 English Daily Operations —Sound&Other Adjustments Adjusting the Volume The volume level can be adjusted in 32 steps (VOLUME MIN, VOLUME 1 – VOLUME 30, and VOLUME MAX). Reinforcing the Bass Sound To adjust the bass level gradually—ACTIVE BASS EX. You can select the bass level from level 0 (minimum) to level 2 (maximum). To emphasize rhy[…]
-
Страница 178
13 English Selecting the Sound Modes You can select one of the preset Sound Modes. * Surround elements are added to the SEA elements to create being-there feeling in your room. To cancel the Sound Mode, select “OFF.” Creating Your Own Sound Modes—User Mode You can adjust the preset Sound Modes to create your own Sound Modes which suit your ta[…]
-
Страница 179
14 English Creating 3-dimensional Sound Field—3D Phonic While playing a disc… Presetting Automatic DVD Video Sound Increase Level The DVD Video sound is sometimes recorded at a lower level than for other discs and sources. You can set the increase level for the currently loaded DVD Video, so you do not have to adjust the volume when you change […]
-
Страница 180
15 English 2 Select a preset picture tone. To adjust the picture tone 1 Select “USER1” or “USER2.” • Follow steps 1 and 2 explained on the previous page. 2 Select a parameter you want to adjust. 3 Adjust the parameter. 4 Repeat steps 2 to 3 to adjust other parameters. To erase the VFP screen, press VFP again. Changing the Display Brightne[…]
-
Страница 181
16 English Unique DVD/VCD Operations Selecting the Sound Track For DVD Video: While playing back a chapter containing audio languages, you can select the language to listen to. For DVD Audio: While playing back a track containing audio channels, you can select the audio channel to listen to. For DVD-VR/Karaoke SVCD/VCD: When playing back a track, y[…]
-
Страница 182
17 English Selecting the Subtitle Language For DVD Video: While playing back a chapter containing subtitles in different languages, you can select the subtitle language to display on the TV screen. For DVD-VR: While playing, you can turn on or off the subtitle. For SVCD: While playing, you can select the subtitles even if no subtitles are recorded […]
-
Страница 183
18 English Playing Back Bonus Group For DVD Audio only: Some DVD Audios have a special group called “bonus group” whose contents are not open to the public. • To play back a bonus group, you have to enter the specific “key number” (a kind of password) for the bonus group. The way of getting the key number depends on the disc. 1 Select the[…]
-
Страница 184
19 English Advanced Disc Operations Programming the Playing Order —Program Play You can arrange the playing order of the tracks (up to 99) before you start playback. 1 Before starting playback, activate Program Play. 2 Select chapters or tracks you want for Program Play. 1 Select a disc number. 2 Select a title or group number. 3 Select a chapter[…]
-
Страница 185
20 English * Resume does not work for Program Play. To check the programmed contents Before or after playback… To modify the program Before or after playback… To exit from Program Play Before or after playback… Playing at Random—Random Play You can play the contents of all the loaded discs at random. • Random Play cannot be used for some […]
-
Страница 186
21 English Playing Repeatedly—Repeat Play You can repeat playback. • You can also select the repeat mode using the on-screen bar (see page 23). • The indicator(s) lights on the display as follows to indicate the current repeat mode. • For DVD Video: While playing… • For DVD Audio: While playing or before playback… • For MP3/WMA: Whi[…]
-
Страница 187
22 English On-Screen Disc Operations On-screen Bar Information You can check the information on disc (except for MP3/ WMA/JPEG disc) and use some functions through the on- screen bar. On-screen bars 123 456 789 10 0 +10 D VD/CD 3 REPEA T ZOOM ENTER ON SCREEN PL PG /// / A UDIO TV Remote control 10 keys DVD Video DVD Audio DVD-VR SVCD VCD CD 3 D VD-[…]
-
Страница 188
23 English O perations Using the On-screen Bar Basic operation procedure through the on-screen bar is as follows: Ex.: Selecting a subtitle (French) for DVD Video: While a disc is selected as the source… 1 Display the on-screen bar with the pull-down menu. 2 Select (highlight) the item you want. 3 Display the pop-up window. 4 Select the desired o[…]
-
Страница 189
24 English To change the time information You can change the time information in the on-screen bar and the display window on the main unit. 1 Display the on-screen bar with the pull-down menu. 2 Make sure is selected (highlighted). 3 Change the time indication. * Not available for DVD-VR. To erase the on-screen bar Repeat Play • See also page 21.[…]
-
Страница 190
25 English A-B Repeat 1 While playing, display the on-screen bar with the pull- down menu. 2 Select . 3 Display the pop-up window. 4 Select “A-B”. 5 Select the start point (A). • After selecting the starting point (A), you can search for the end point using ¡ . 6 Select the end point (B). To cancel A-B Repeat, repeat steps 1 to 3 , and selec[…]
-
Страница 191
26 English Chapter/Track Search You can search for the number of the item to play. For DVD Video/DVD-VR: Chapter For DVD Audio: Track 1 While playing, display the on-screen bar with the pull- down menu. 2 Select or . 3 Display the pop-up window. 4 Enter the desired chapter/track number. • To correct a misentry, press the 10 keys until the desired[…]
-
Страница 192
27 English Control screen for MP3/WMA/JPEG disc The control screen automatically appears on the TV screen when you load an MP3, WMA, or JPEG disc. To move the highlight (green) bar between group list and track list (for MP3/WMA/JPEG): To select an item in the list: To start playback • Once you start playing back a JPEG track, the control screen g[…]
-
Страница 193
28 English To stop playback To repeat title/play list for DVD-VR While playing or before starting playback… * Not available before starting playback. To repeat slide-show for JPEG While playing or before starting playback… • For Repeat Play of MP3/WMA, see pages 21 and 24. To zoom in the still picture (for JPEG) 1 During being paused… As th[…]
-
Страница 194
29 English Recording Operations Recording on a Tape You can use type I tapes for recording. • To play a tape, see page 11. 1 Insert a recordable cassette in deck B. 2 Check the tape running direction and Reverse Mode settings on the display. To change the direction Change the Reverse Mode if necessary DISC REC ST AR T T APE-A / T APE-B DISC 1–5[…]
-
Страница 195
30 English 3 Start playing the source—“FM,” “AM,” “DVD/CD,” “TAPE-A” or “AUX.” • When recording a disc, you can also use “Synchronized Disc Recording” (see the right column). • When recording from deck A, you can also use “Dubbing” (see below). 4 Start recording. To stop recording Dubbing Tapes 1 Change the source […]
-
Страница 196
31 English Enjoying Karaoke The functions described in this section are not available for DVD Audio/DVD-VR. Singing Along (Karaoke) You can enjoy singing along (Karaoke) by using two microphones. • By pressing REC START/STOP, you can record your singing-along. 1 Turn MIC LEVEL to MIN. 2 Connect the microphone(s) (not supplied) to the MIC 1 and/or[…]
-
Страница 197
32 English To apply an echo to your voice While the Mic Mixing Mode is activated… • As the number increases, echo level also increases. To adjust the Key (disc playback only) While playing back… To cancel the Key Control • Key Control is also canceled when you deactivate the Mic Mixing Mode, or select another track or disc. Reducing the Lea[…]
-
Страница 198
33 English To turn on/off the fanfare 1 Enter the fanfare setting mode. 2 Select the fanfare setting. Reserving Karaoke Songs —Karaoke Program Play You can determine the playback order of the titles or tracks on the disc player. You can program up to 12 steps. 1 Change the source to “DVD/CD.” 2 Activate Karaoke Program Play. • PROGRAM indic[…]
-
Страница 199
34 English Timer Operations Setting the Timer Using Daily Timer, you can wake up with your favorite song. On the other hand, with Recording Timer, you can make a tape of a radio broadcast automatically. • You cannot activate Daily Timer and Recording Timer at a time. (Activating either timer deactivates the other timer.) • To correct a misentry[…]
-
Страница 200
35 English 3 Turn off the System (on standby) if you have set the timer with the System turned on. To turn off the Timer after the setting is done You can turn off the timer after it has been set. • Since Daily Timer is activated at the same time everyday, you may need to cancel it on some particular days. 1 Select the timer you want to cancel (R[…]
-
Страница 201
36 English Setup Menu Operations Initial settings Some items in the menus cannot be changed during playback. 1 Press SET UP. 2 Press 2 ( or 3 ) to select the menu. 3 Press 5 ( or ∞ ) to move to select the item. 4 Press ENTER. 5 Press 5 ( or ∞ ) to select the options, then press ENTER. To erase a preference display Press SET UP. 123 456 789 10 0[…]
-
Страница 202
37 English AUDIO menu Item Contents DIGITAL AUDIO OUTPUT Set this item correctly when using the OPTICAL DIGITAL OUTPUT terminal on the rear. PCM ONLY: When connecting to audio equipment which can decode only linear PCM signals. DOLBY DIGITAL/PCM: When connecting to a Dolby Digital decoder or an amplifier with a built- in Dolby Digital decoder. STRE[…]
-
Страница 203
38 English Operating the TV Operating TV You can operate the JVC’s or other manufacturers’ TV using this remote control. 1 Slide the AUDIO/TV selector to “TV.” 2 Press and hold until the following steps are complete. 3 4 Enter the 2-digit manufacture’s code number. 5 Release TV. To operate the TV 123 456 789 10 0 +10 TV V OL +/– TV TV/V[…]
-
Страница 204
39 English Additional Information Learning More about This System Introduction (see pages 1 to 2) Playable Disc Types: • About audio format – Linear PCM: Uncompressed digital audio, the same format used for CDs and most studio masters. – Dolby Digital: Compressed digital audio, developed by Dolby Laboratories, which enables multi-channel enco[…]
-
Страница 205
40 English Special Picture Playback: • During slow-motion playback, no sound will be reproduced. • You cannot use frame-by-frame playback for DVD-VR. • While zoomed in, the picture may look coarse. Advanced Disc Operations (see pages 19 to 21) Programming the Playing Order—Program Play: • While programming steps… – Your entry will be […]
-
Страница 206
41 English Enjoying Karaoke (see pages 31 to 33) Reducing the Lead Vocal—Vocal Masking: • The Vocal Masking Mode setting is not applied to the optical digital output signals through the OPTICAL DIGITAL OUTPUT terminal. • When playing a Karaoke disc in the Vocal Masking Mode, the vocal may not be reduced or the volume may be lower. • On some[…]
-
Страница 207
42 English Handling cassette tapes • If the tape is loose in its cassette, take up the slack by inserting a pencil in one of the reels and rotate it. – If the tape is loose, it may get stretched, cut, or caught in the cassette. • Be careful not to touch the tape surface. • Avoid the following places to store the tape—in dusty places, in d[…]
-
Страница 208
43 English MP3 groups and tracks are not played back as you expect. ] The playing order is determined when the disc was recorded. It depends on the writing application. MP3/WMA or JPEG files are not played back. ] The inserted disc may include both type of tracks (MP3/ WMA files and JPEG files). In this case, you can only play back the files sel[…]
-
Страница 209
44 English Specifications Amplifier section Output Power: MAIN SPEAKERS: 150 W per channel, min. RMS, driven into 4 Ω at 1 kHz with no more than 10% total harmonic distortion. Digital output: OPTICAL DIGITAL OUTPUT: –21 dBm to –15 dBm (660 nm ±30 nm) Audio input sensitivity/Impedance (Measured at 1 kHz, with tape recording signal 300 mV) AUX[…]
-
Страница 210
45 English OPTICAL DIGITAL OUTPUT Signals *1 While playing some DVDs, digital signals may be emitted at 20 bits or 24 bits (at their original bit rate) through the OPTICAL DIGITAL OUTPUT terminal if the discs are not copy-protected. *2 There is no output for DVD Audio with content protection set. DIGITAL AUDIO OUTPUT Output Signals Playback disc ST[…]
-
Страница 211
46 English Parts Index Remote control Main unit Button Page Button Page AUDIO z 7 KARAOKE SCORING 1 32 TV x 38 7 7 7 7 8 9 – 11, 20 KEY # : 32 ¡ ¡ ¡ ¡ / 1 1 1 1 9 Q 8, 10, 11, 18 KEY A 32 ¢ ¢ ¢ ¢ / 4 4 4 4 7 . 9, 10 L / R BALANCE F 12 8 8 8 8 P 9, 18 5 5 5 5 / ∞ ∞ ∞ ∞ / 3 3 3 3 / 2 2 2 2 / ENTER E 10, 15, 17, 18, 23 – 28, 36, 38[…]
-
Страница 212
0205AIMMDWJEM EN, AR, PE © 2005 Victor Company of Japan, Limited Mains (AC) Line Instruction (not applicable for Europe, U.S.A., Canada, and U.K.) CAUTION for mains (AC) line BEFORE PLUGGING IN, do check that your mains (AC) line voltage corresponds with the position of the voltage selector switch provided on the outside of this equipment and, if […]