
1
KD-AVX40/KD-AVX20
Installation/Connection Manual
Руководство по установке/подключению
Керівництво зі встановлення та з’єднання
ENGLISH
This unit is designed to operate on 12 V DC, NEGATIVE ground
electrical systems. If your vehicle does not have this system, a
voltage inverter is required, which can be purchased at JVC IN-CAR
ENTERTAINMENT dealers.
WARNINGS
• DO NOT install any unit or wire any cable in a location where;
– it may obstruct the steering wheel and gearshift lever operations,
as this may result in a traffic accident.
– it may obstruct the operation of safety devices such as air bags, as
this may result in a fatal accident.
– it may obstruct visibility.
• DO NOT operate any unit while manipulating the steering wheel, as
this may result in a traffic accident.
• The driver must not watch the monitor while driving. It may lead to
carelessness and cause an accident.
• If you need to operate the unit while driving, be sure to look around
carefully.
• If the parking brake is not engaged, “Parking Brake” appears on the
monitor, and no playback picture will be shown.
– This warning appears only when the parking brake lead is
connected to the parking brake system built in the car.
Notes on electrical connections:
• Replace the fuse with one of the specified rating. If the fuse blows
frequently, consult your JVC IN-CAR ENTERTAINMENT dealer.
• It is recommended to connect speakers with a maximum power
of more than 50 W (both at the rear and at the front, with an
impedance of 4 Ω to 8 Ω).
If the maximum power is less than 50 W, change <Amplifier Gain>
setting to prevent the speakers from being damaged (see page 57 of
the INSTRUCTIONS).
• To prevent short circuits, cover the terminals of the UNUSED leads
with insulating tape.
• The heat sink becomes very hot after use. Be careful not to touch it
when removing this unit.
L
Rubber cushion
Резиновый чехол
Гумова прокладка
F
Crimp connector
Обжимные разъемы
Обтиснене рознімання
I
Washer (ø5)
Шайба (њ5)
Шайба (ø5)
J
Lock nut (M5)
Фиксирующая гайка (M5)
Стопорна гайка (М5)
M
Mounting bolt—M5 x 20 mm
Крепежный болт—M5 × 20 мм
Монтажний болт—M5 × 20 мм
C
Sleeve
Муфта
Екран
E
Power cord
Кабель питания
Шнур живлення
K
Handles
Рычаги
Ручки
A / B
Hard case/Control panel
Жесткий футляр/Панель управления
Жорсткий футляр/Панель управління
H
Batteries
Батареи
Батареї
РУCCKИЙ
Это устройство разработано для эксплуатации на 12 В
постоянного напряжения с минусом на массе. Если Ваш
автомобиль не имеет этой системы, требуется инвертор
напряжения, который может быть приобретен у дилера
автомобилнего специалиста JVC.
УКРАЇНА
Цей пристрій призначений для роботи під напругою 12 В
постійного струму; з електричними системами, що
мають заземлення ВІД’ЄМНОГО полюсу. Якщо ваше авто не
оснащене такою системою, потрібно використовувати інвертор
напруги, який можна придбати у дилерів устаткування JVC для
автомобілів.
ПОПЕРЕДЖЕННЯ
• НЕ встановлюйте ніяких пристроїв і не приєднуйте жодних
кабелів у місцях, де:
– вони можуть перешкоджати вправлятися з кермом і важелем
перемикання передач, тому що це може призвести до аварії
на дорозі;
– вони можуть перешкоджати роботі таких пристроїв
безпеки, як подушки безпеки, тому що це може призвести до
смертельного випадку.
– затуляти огляд.
• НЕ виконуйте ніяких операцій з пристроєм під час керування,
тому що це може призвести до аварії на дорозі.
• Під час руху водій не повинен відволікатися й дивитись на
монітор. Це може призвести до необачності та аварії.
• Якщо ж це необхідно зробити, уважно стежте за рухом.
• Якщо автомобіль не на ручному гальмі, на екрані монітора
з’являється напис “Parking Brake”, і зображення не буде
виводитися.
– Це попередження з’являється тільки тоді, коли провід
ручного гальма з’єднаний з ручним гальмом автомобіля.
Зауваження щодо електричних з’єднань:
• Заміняти запобіжник можна тільки запобіжником із вказаними
у специфікації номінальними характеристиками. Якщо
запобіжники часто виходять з ладу, проконсультуйтеся з
дилером устаткування JVC для автомобілів.
• Рекомендується підключати гучномовці з максимальною
потужністю, що перевищує 50 Вт (як для розташованих
спереду, так і для тих, що розміщуються позаду.
Рекомендований діапазон опору: від 4 до 8 Ом).
У разі, якщо потужність є меншою чим 50 Вт, змініть
налаштування <Amplifier Gain> (коефіцієнт підсилення)
задля запобігання пошкодженню гучномовців (див. стор. 57
ІНСТРУКЦІЇ).
• Для запобігання короткому замиканню, заізолюйте клеми
провідника, ЩО НЕ ВИКОРИСТОВУЄТЬСЯ, ізоляційною
стрічкою.
• По закінчені роботи радіатор стає надто гарячим. Будьте
обережні, не торкайтесь його при видалені цього пристрою.
D
Trim plate
Декоративную панель
Знімна пластина
Heat sink
Радиатор
Радіатор
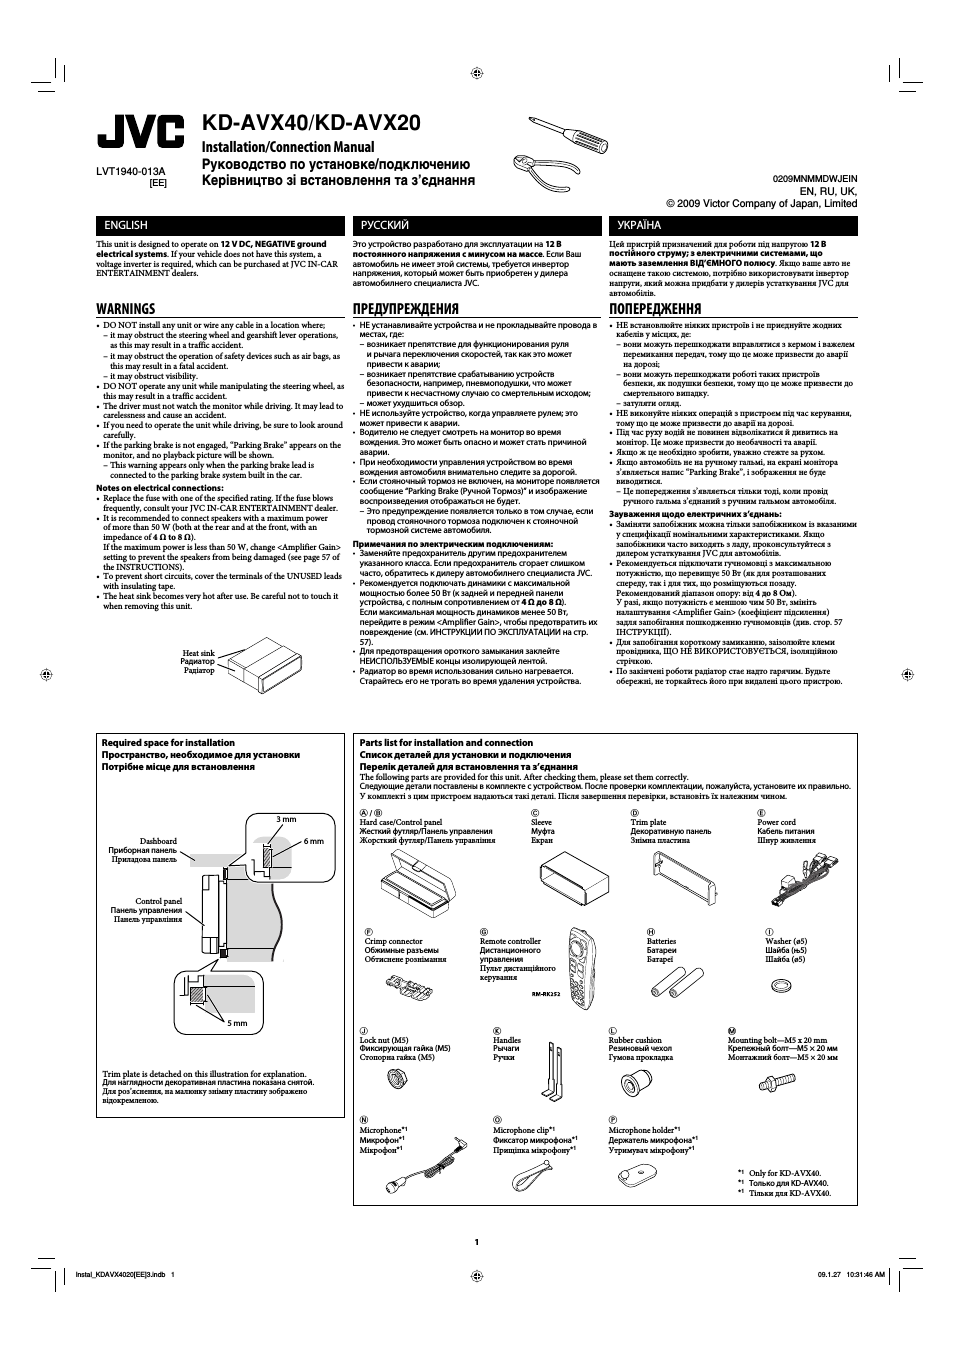
Required space for installation
Пространство, необходимое для установки
Потрібне місце для встановлення
Control panel
Панель управления
Панель управління
G
Remote controller
Диcтaнциoннoго
yпpaвлeния
Пульт дистанційного
керування
LVT1940-013A
[EE]
Parts list for installation and connection
Список деталей для установки и подключения
Перелік деталей для встановлення та з’єднання
The following parts are provided for this unit. After checking them, please set them correctly.
Следующие детали поставлены в комплекте с устройством. После проверки комплектации, пожалуйста, установите их правильно.
У комплекті з цим пристроєм надаються такі деталі. Після завершення перевірки, встановіть їх належним чином.
Dashboard
Приборная панель
Приладова панель
ПРЕДУПРЕЖДЕНИЯ
• НЕ устанавливайте устройства и не прокладывайте провода в
местах, где:
– возникает препятствие для функционирования руля
и рычага переключения скоростей, так как это может
привести к аварии;
– возникает препятствие срабатыванию устройств
безопасности, например, пневмоподушки, что может
привести к несчастному случаю со смертельным исходом;
– может ухудшиться обзор.
• НЕ используйте устройство, когда управляете рулем; это
может привести к аварии.
• Водителю не следует смотреть на монитор во время
вождения. Это может быть опасно и может стать причиной
аварии.
• При необходимости управления устройством во время
вождения автомобиля внимательно следите за дорогой.
• Если стояночный тормоз не включен, на мониторе появляется
сообщение “Parking Brake (Ручной Тормоз)” и изображение
воспроизведения отображаться не будет.
– Это предупреждение появляется только в том случае, если
провод стояночного тормоза подключен к стояночной
тормозной системе автомобиля.
Примечания по электрическим подключениям:
• Заменяйте предохранитель другим предохранителем
указанного класса. Если предохранитель сгорает слишком
часто, обратитесь к дилеру автомобилнего специалиста JVC.
• Рекомендуется подключать динамики с максимальной
мощностью более 50 Вт (к задней и передней панели
устройства, с полным сопротивлением от 4 Ω до 8 Ω).
Если максимальная мощность динамиков менее 50 Вт,
перейдите в режим <Amplifier Gain>, чтобы предотвратить их
повреждение (cм. ИНСТРУКЦИИ ПО ЭКСПЛУАТАЦИИ на стр.
57).
• Для предотвращения ороткого замыкания заклейте
НЕИСПОЛЬЗУЕМЫЕ концы изолирующей лентой.
• Радиатор во время использования сильно нагревается.
Старайтесь его не трогать во время удаления устройства.
0209MNMMDWJEIN
EN, RU, UK,
© 2009 Victor Company of Japan, Limited
Trim plate is detached on this illustration for explanation.
Для наглядности декоративная пластина показана снятой.
Для роз’яснення, на малюнку знімну пластину зображено
відокремленою.
3 mm
5 mm
6 mm
N
Microphone*
1
Микрофон*
1
Мікрофон*
1
O
Microphone clip*
1
Фиксатор микрофона*
1
Прищіпка мікрофону*
1
P
Microphone holder*
1
Держатель микрофона*
1
Утримувач мікрофону*
1
*
1
Only for KD-AVX40.
*
1
Только для KD-AVX40.
*
1
Тільки для KD-AVX40.
Instal_KDAVX4020[EE]3.indb 1
Instal_KDAVX4020[EE]3.indb 1
09.1.27 10:31:46 AM
09.1.27 10:31:46 AM
Installation (in-dash mounting), Установка (установка в приборную панель), Встановлення (монтаж на приладову панель)
Страница 2 Чат поддержки
- Изображение
- Текст
2
*
2
*
2
When you stand the unit, be careful not to damage the fuse on
the rear.
*
2
Устанавливайте устройство таким образом, чтобы не
повредить предохранитель, расположенный сзади.
*
2
При встановленні пристрою, будьте обережні, не
пошкодьте запобіжник, розташований у тильній частині.
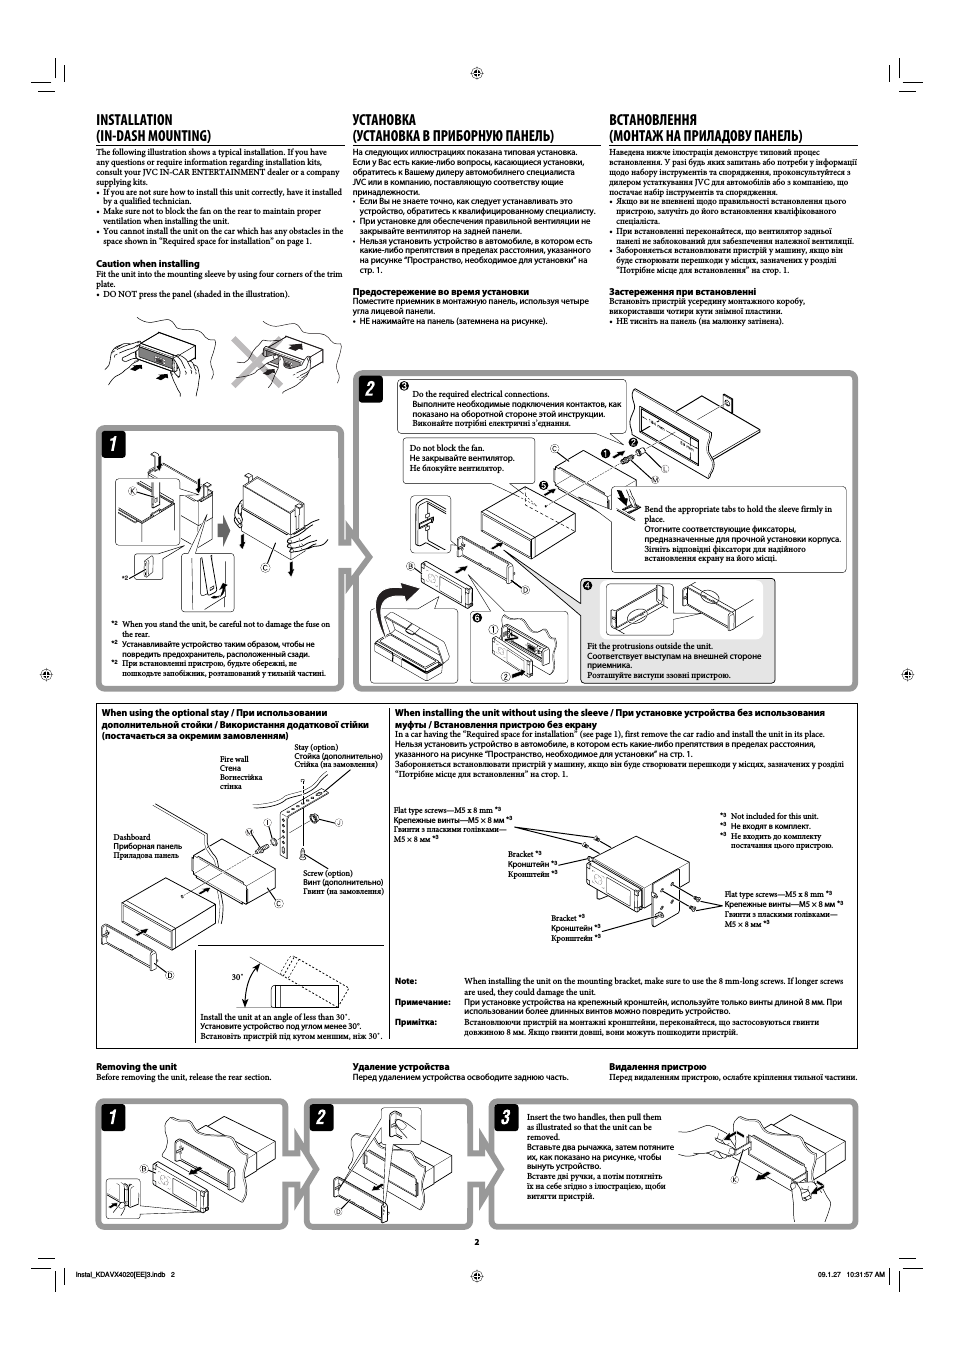
Do the required electrical connections.
Выполните необходимые подключения контактов, как
показано на оборотной стороне этой инструкции.
Виконайте потрібні електричні з’єднання.
Bend the appropriate tabs to hold the sleeve firmly in
place.
Отогните соответствующие фиксаторы,
предназначенные для прочной установки корпуса.
Зігніть відповідні фіксатори для надійного
встановлення екрану на його місці.
When using the optional stay / При использовании
дополнительной стойки / Використання додаткової стійки
(постачається за окремим замовленням)
When installing the unit without using the sleeve / При установке устройства без использования
муфты / Встановлення пристрою без екрану
In a car having the “Required space for installation” (see page 1), first remove the car radio and install the unit in its place.
Нельзя установить устройство в автомобиле, в котором есть какие-либо препятствия в пределах расстояния,
указанного на рисунке “Пространство, необходимое для установки” на стр. 1.
Забороняється встановлювати пристрій у машину, якщо він буде створювати перешкоди у місцях, зазначених у розділі
“Потрібне місце для встановлення” на стор. 1.
Bracket *
3
Кронштейн *
3
Кронштейн *
3
*
3
Not included for this unit.
*
3
Не входят в комплект.
*
3
Не входить до комплекту
постачання цього пристрою.
Flat type screws—M5 x 8 mm *
3
Крепежные винты—M5 × 8 мм *
3
Гвинти з пласкими голівками—
M5 × 8 мм *
3
Bracket *
3
Кронштейн *
3
Кронштейн *
3
Install the unit at an angle of less than 30˚.
Установите устройство под углом менее 30°.
Встановіть пристрій під кутом меншим, ніж 30˚.
Note:
When installing the unit on the mounting bracket, make sure to use the 8 mm-long screws. If longer screws
are used, they could damage the unit.
Примечание:
При установке устройства на крепежный кронштейн, используйте только винты длиной 8 мм. При
использовании более длинных винтов можно повредить устройство.
Примітка:
Встановлюючи пристрій на монтажні кронштейни, переконайтеся, що застосовуються гвинти
довжиною 8 мм. Якщо гвинти довші, вони можуть пошкодити пристрій.
Removing the unit
Before removing the unit, release the rear section.
Удаление устройства
Перед удалением устройства освободите заднюю часть.
Insert the two handles, then pull them
as illustrated so that the unit can be
removed.
Вставьте два рычажка, затем потяните
их, как показано на рисунке, чтобы
вынуть устройство.
Вставте дві ручки, а потім потягніть
їх на себе згідно з ілюстрацією, щоби
витягти пристрій.
Видалення пристрою
Перед видаленням пристрою, ослабте кріплення тильної частини.
Do not block the fan.
Не закрывайте вентилятор.
Не блокуйте вентилятор.
INSTALLATION
(IN-DASH MOUNTING)
The following illustration shows a typical installation. If you have
any questions or require information regarding installation kits,
consult your JVC IN-CAR ENTERTAINMENT dealer or a company
supplying kits.
• If you are not sure how to install this unit correctly, have it installed
by a qualified technician.
• Make sure not to block the fan on the rear to maintain proper
ventilation when installing the unit.
• You cannot install the unit on the car which has any obstacles in the
space shown in “Required space for installation” on page 1.
Caution when installing
Fit the unit into the mounting sleeve by using four corners of the trim
plate.
• DO NOT press the panel (shaded in the illustration).
УСТАНОВКА
(УСТАНОВКА В ПРИБОРНУЮ ПАНЕЛЬ)
На следующих иллюстрациях показана типовая установка.
Если у Вас есть какие-либо вопросы, касающиеся установки,
обратитесь к Вашему дилеру автомобилнего специалиста
JVC или в компанию, поставляющую соответству ющие
принадлежности.
• Если Вы не знаете точно, как следует устанавливать это
устройство, обратитесь к квалифицированному специалисту.
• При установке для обеспечения правильной вентиляции не
закрывайте вентилятор на задней панели.
• Нельзя установить устройство в автомобиле, в котором есть
какие-либо препятствия в пределах расстояния, указанного
на рисунке “Пространство, необходимое для установки” на
стр. 1.
Предостережение во время установки
Поместите приемник в монтажную панель, используя четыре
угла лицевой панели.
• НЕ нажимайте на панель (затемнена на рисунке).
ВСТАНОВЛЕННЯ
(МОНТАЖ НА ПРИЛАДОВУ ПАНЕЛЬ)
Наведена нижче ілюстрація демонструє типовий процес
встановлення. У разі будь яких запитань або потреби у інформації
щодо набору інструментів та спорядження, проконсультуйтеся з
дилером устаткування JVC для автомобілів або з компанією, що
постачає набір інструментів та спорядження.
• Якщо ви не впевнені щодо правильності встановлення цього
пристрою, залучіть до його встановлення кваліфікованого
спеціаліста.
• При встановленні переконайтеся, що вентилятор задньої
панелі не заблокований для забезпечення належної вентиляції.
• Забороняється встановлювати пристрій у машину, якщо він
буде створювати перешкоди у місцях, зазначених у розділі
“Потрібне місце для встановлення” на стор. 1.
Застереження при встановленні
Встановіть пристрій усередину монтажного коробу,
використавши чотири кути знімної пластини.
• НЕ тисніть на панель (на малюнку затінена).
30˚
Flat type screws—M5 x 8 mm *
3
Крепежные винты—M5 × 8 мм *
3
Гвинти з пласкими голівками—
M5 × 8 мм *
3
Screw (option)
Винт (дополнительно)
Гвинт (на замовлення)
Stay (option)
Стойка (дополнительно)
Стійка (на замовлення)
Fire wall
Стена
Вогнестійка
стінка
Dashboard
Приборная панель
Приладова панель
Fit the protrusions outside the unit.
Соответствует выступам на внешней стороне
приемника.
Розташуйте виступи ззовні пристрою.
Instal_KDAVX4020[EE]3.indb 2
Instal_KDAVX4020[EE]3.indb 2
09.1.27 10:31:57 AM
09.1.27 10:31:57 AM
3
A
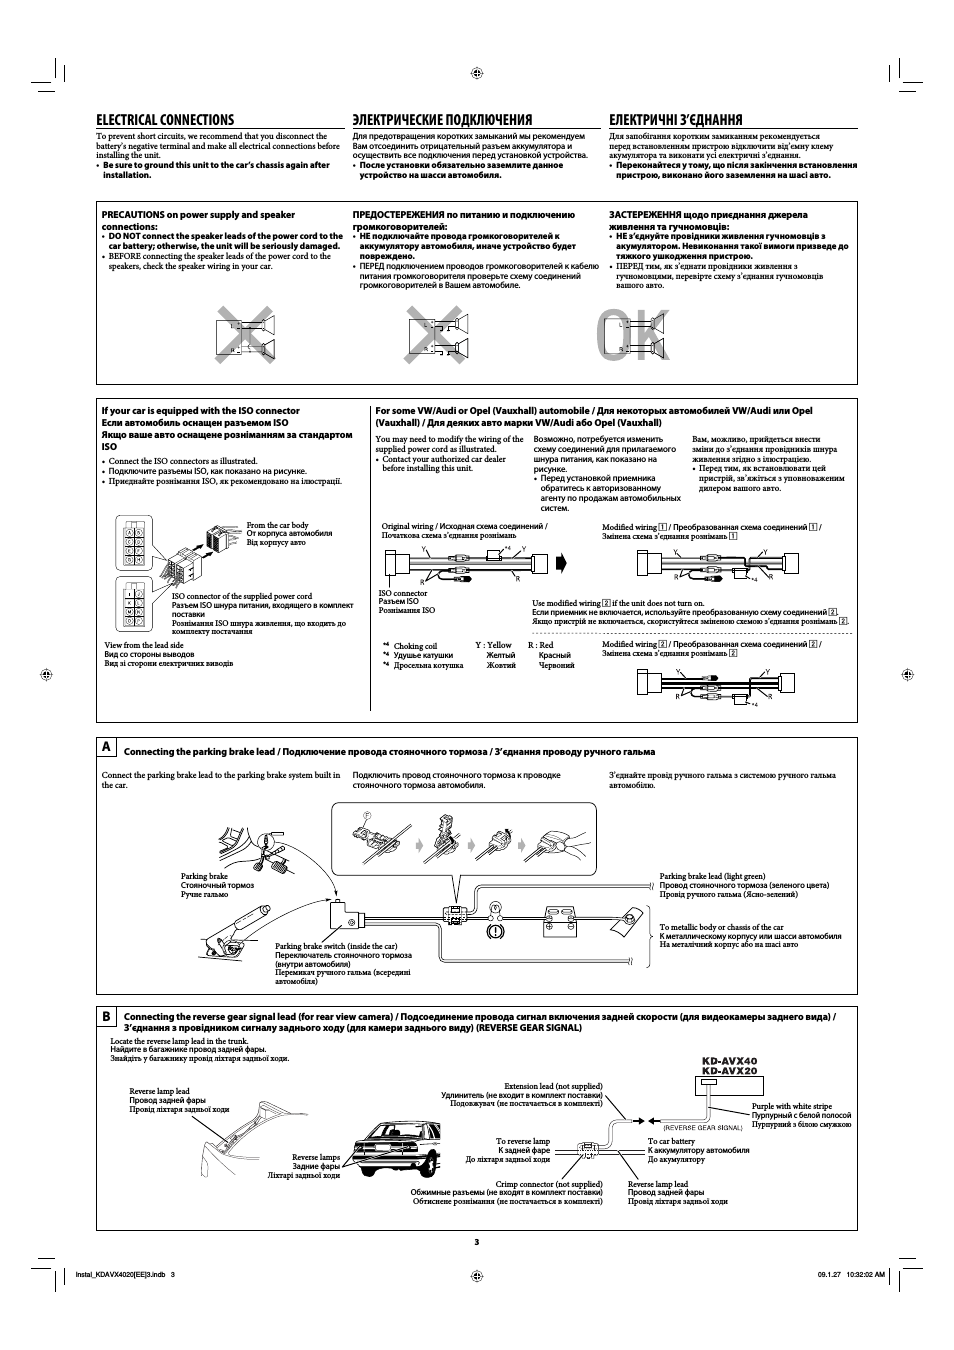
PRECAUTIONS on power supply and speaker
connections:
• DO NOT connect the speaker leads of the power cord to the
car battery; otherwise, the unit will be seriously damaged.
• BEFORE connecting the speaker leads of the power cord to the
speakers, check the speaker wiring in your car.
ПРЕДОСТЕРЕЖЕНИЯ по питанию и подключению
громкоговорителей:
• НЕ подключайте провода громкоговорителей к
аккумулятору автомобиля, иначе устройство будет
повреждено.
• ПЕРЕД подключением проводов громкоговорителей к кабелю
питания громкоговорителя проверьте схему соединений
громкоговорителей в Вашем автомобиле.
ЗАСТЕРЕЖЕННЯ щодо приєднання джерела
живлення та гучномовців:
• НЕ з’єднуйте провідники живлення гучномовців з
акумулятором. Невиконання такої вимоги призведе до
тяжкого ушкодження пристрою.
• ПЕРЕД тим, як з’єднати провідники живлення з
гучномовцями, перевірте схему з’єднання гучномовців
вашого авто.
Y : Yellow
Желтый
Жовтий
R : Red
Красный
Червоний
If your car is equipped with the ISO connector
Если автомобиль оснащен разъемом ISO
Якщо ваше авто оснащене розніманням за стандартом
ISO
• Connect the ISO connectors as illustrated.
• Подключите разъемы ISO, как показано на рисунке.
• Приєднайте рознімання ISO, як рекомендовано на ілюстрації.
From the car body
От корпуса автомобиля
Від корпусу авто
ISO connector of the supplied power cord
Разъем ISO шнура питания, входящего в комплект
поставки
Рознімання ISO шнура живлення, що входить до
комплекту постачання
View from the lead side
Вид со стороны выводов
Вид зі сторони електричних виводів
For some VW/Audi or Opel (Vauxhall) automobile / Для некоторых автомобилей VW/Audi или Opel
(Vauxhall) / Для деяких авто марки VW/Audi або Opel (Vauxhall)
Original wiring / Исходная схема соединений /
Початкова схема з’єднання рознімань
Modified wiring 1 / Преобразованная схема соединений 1 /
Змінена схема з’єднання рознімань 1
Use modified wiring 2 if the unit does not turn on.
Если приемник не включается, используйте преобразованную схему соединений 2.
Якщо пристрій не включається, скористуйтеся зміненою схемою з’єднання рознімань 2.
Modified wiring 2 / Преобразованная схема соединений 2 /
Змінена схема з’єднання рознімань 2
ISO connector
Разъем ISO
Рознімання ISO
*
4
Choking coil
*
4
Удушье катушки
*
4
Дросельна котушка
You may need to modify the wiring of the
supplied power cord as illustrated.
• Contact your authorized car dealer
before installing this unit.
Возможно, потребуется изменить
схему соединений для прилагаемого
шнура питания, как показано на
рисунке.
• Перед установкой приемника
обратитесь к авторизованному
агенту по продажам автомобильных
систем.
Вам, можливо, прийдеться внести
зміни до з’єднання провідників шнура
живлення згідно з ілюстрацією.
• Перед тим, як встановлювати цей
пристрій, зв’яжіться з уповноваженим
дилером вашого авто.
ELECTRICAL CONNECTIONS
To prevent short circuits, we recommend that you disconnect the
battery’s negative terminal and make all electrical connections before
installing the unit.
• Be sure to ground this unit to the car’s chassis again after
installation.
ЭЛЕКТРИЧЕСКИЕ ПОДКЛЮЧЕНИЯ
Для предотвращения коротких замыканий мы рекомендуем
Вам отсоединить отрицательный разъем аккумулятора и
осуществить все подключения перед установкой устройства.
• После установки обязательно заземлите данное
устройство на шасси автомобиля.
ЕЛЕКТРИЧНІ З’ЄДНАННЯ
Для запобігання коротким замиканням рекомендується
перед встановленням пристрою відключити від’ємну клему
акумулятора та виконати усі електричні з’єднання.
• Переконайтеся у тому, що після закінчення встановлення
пристрою, виконано його заземлення на шасі авто.
Connect the parking brake lead to the parking brake system built in
the car.
Подключить провод стояночного тормоза к проводке
стояночного тормоза автомобиля.
З’єднайте провід ручного гальма з системою ручного гальма
автомобілю.
Parking brake lead (light green)
Провод стояночного тормоза (зеленого цвета)
Провід ручного гальма (Ясно-зелений)
To metallic body or chassis of the car
К металлическому корпусу или шасси автомобиля
На металічний корпус або на шасі авто
Parking brake switch (inside the car)
Переключатель стояночного тормоза
(внутри автомобиля)
Перемикач ручного гальма (всередині
автомобіля)
Parking brake
Стояночный тормоз
Ручне гальмо
Connecting the parking brake lead / Подключение провода стояночного тормоза / З’єднання проводу ручного гальма
Connecting the reverse gear signal lead (for rear view camera) / Подсоединение провода сигнал включения задней скорости (для видеокамеры заднего вида) /
З’єднання з провідником сигналу заднього ходу (для камери заднього виду) (REVERSE GEAR SIGNAL)
Locate the reverse lamp lead in the trunk.
Найдите в багажнике провод задней фары.
Знайдіть у багажнику провід ліхтаря задньої ходи.
To reverse lamp
К задней фаре
До ліхтаря задньої ходи
Reverse lamp lead
Провод задней фары
Провід ліхтаря задньої ходи
Reverse lamp lead
Провод задней фары
Провід ліхтаря задньої ходи
To car battery
К аккумулятору автомобиля
До акумулятору
Reverse lamps
Задние фары
Ліхтарі задньої ходи
B
Purple with white stripe
Пурпурный с белой полосой
Пурпурний з білою смужкою
Crimp connector (not supplied)
Обжимные разъемы (не входят в комплект поставки)
Обтиснене рознімання (не постачається в комплекті)
Extension lead (not supplied)
Удлинитель (не входит в комплект поставки)
Подовжувач (не постачається в комплекті)
Instal_KDAVX4020[EE]3.indb 3
Instal_KDAVX4020[EE]3.indb 3
09.1.27 10:32:02 AM
09.1.27 10:32:02 AM
4
A
Connecting to the steering wheel remote controller / Подключение к рулевому пульту дистанционного управления / З’єднання з блоком дистанційного
керування, що встановлений на кермі
If your car is equipped with the steering wheel remote controller, you can operate this unit
using the controller. To do it, a JVC’s OE remote adapter (not supplied) which matches
with your car is required. Consult your JVC IN-CAR ENTERTAINMENT dealer for
details.
Если автомобиль оборудован рулевым пультом дистанционного управления, его
можно использовать для управления данным устройством. Для этого необходим
адаптер рулевого пульта дистанционного управления JVC OE (не поставляется),
подходящий для Вашего автомобиля. За более подробной информацией
обратитесь к поставщику автомобильных аудиосистем компании JVC.
Якщо авто оснащене блоком дистанційного керування, який встановлюється на
кермі, можна керувати пристроєм за його допомогою. Щоб зробити це, потрібен
адаптер OE блоку дистанційного керування компанії JVC (не входить до комплекту),
що підходить до даного типу авто. За додатковою інформацією зверніться до свого
регіонального дилера JVC.
OE remote adapter (not supplied)
Aдаптер рулевого пульта дистанционного
управления OE (не поставляется)
Адаптер OE блоку дистанційного керування OE
(не входить до комплекту)
Steering wheel remote controller (equipped in the car)
Рулевой пульт дистанционного управления (устанавливаемый в автомобиле)
Блок дистанційного керування, встановлений на кермі (оснащення у авто)
ENGLISH
УКРАЇНА
РУCCKИЙ
Before connecting: Check the wiring in the vehicle carefully.
Incorrect connection may cause serious damage to this unit.
The leads of the power cord and those of the connector from the car
body may be different in color.
1
Cut the ISO connector.
2
Connect the colored leads of the power cord in the order specified
in the illustration below.
3
Connect the aerial cord.
4
Finally connect the wiring harness to the unit.
Перед началом подключений: Тщательно проверьте
проводку в автомобиле. Неправильное подключение может
привести к серьезному повреждению устройства.
Жилы силового кабеля и жилы соединителя от кузова
автомобиля могут быть разного цвета.
1
Обрежьте разъем ISO.
2
Подсоедините цветные провода шнура питания в указанном
ниже порядке.
3
Подключите кабель антенны.
4
В последнюю очередь подключите электропроводку к
устройству.
Перед тим, як з’єднати: Уважно перевірте електричну
схему з’єднання вашого авто. Неправильне з’єднання може
спричинити тяжке пошкодження вашого пристрою.
Контакти шнура живлення та рознімання, яке йде від корпуса
авто можуть мати різні кольори.
1
Від’єднайте рознімання ISO.
2
З’єднайте кольорові провідники шнура живлення у порядку,
що наведений нижче на ілюстрації.
3
Приєднайте провід антени.
4
Виконайте кінцеве приєднання джгута провідників до
пристрою.
15 A fuse
Предохранитель 15 A
Запобіжник 15 А
Rear ground terminal
Задний разъем заземления
Тильна клема заземлення
To an external component
(see diagram )
К внешнему устройству
(см. схему )
До зовнішнього
компоненту (див. схему )
*
5
Not included for this unit
*
5
Не входит в комплект
*
5
Не входить до комплекту постачання цього
пристрою
Ignition switch
Переключатель зажигания
Перемикач запалювання
Fuse block
Блок
предохранителя
Блок запобіжників
White with black stripe
Белый с черной
полосой
Білий з чорною
смужкою
White
Белый
Білий
Gray with black stripe
Серый с черной
полосой
Сірий з чорною
смужкою
Gray
Серый
Сірий
Green with black stripe
Зеленый с черной
полосой
Зелений з чорною
смужкою
Green
Зеленый
Зелений
Purple with black stripe
Пурпурный с черной
полосой
Пурпурний з чорною
смужкою
Purple
Пурпурный
Пурпурний
Left speaker (front)
Левый громкоговоритель
(передний)
Лівий гучномовець (передній)
Right speaker (front)
Правый громкоговоритель
(передний)
Правий гучномовець (передній)
Left speaker (rear)
Левый громкоговоритель
(задний)
Лівий гучномовець (задній)
Right speaker (rear)
Правый громкоговоритель
(задний)
Правий гучномовець (задній)
To metallic body or chassis of the car
К металлическому корпусу или шасси автомобиля
На металічний корпус або на шасі авто
To a live terminal in the fuse block connecting to the car battery
(bypassing the ignition switch) (constant 12 V)
К разъему фазы в блоке предохранителя (минуя блок зажигания)
(постоянный 12 В)
На клему фази у блоці запобіжників для з’єднання з акумулятором
авто (обминаючи перемикач запалення)—постійний струм 12 В
To an accessory terminal in the fuse block
К вспомогательному разъему в блоке предохранителя
На допоміжну клему у блоці запобіжників
To car light control switch
К контрольному переключателю освещения автомобиля
До реле управління освітленням автомобіля
To cellular phone system
К системе сотового телефона
На систему стільникового телефону
To parking brake (see diagram )
К стояночному тормозу (см. схему )
До ручного гальма (див. схему )
Black
Черный
Чорний
Yellow *
7
Желтый *
7
Жовтий *
7
Red
Красный
Червоний
Blue with white stripe
Синий с белой полосой
Синій з білою смужкою
Orange with white stripe
Оранжевый с белой полосой
Помаранчевий із білою смужкою
Brown
Коричневый
Коричневий
Light green
Зеленого цвета
Ясно-зелений
To the remote lead of other equipment or power aerial if any (200 mA max.)
К удаленному проводу другого оборудования или антенны (макс. 200 мА)
На провідник зовнішнього пристрою іншого обладнання або на антену (якщо
встановлена) (максимальний струм 200 мА)
USB cable (see diagram )
Кабель USB (см. схему )
Кабель USB (див. схему )
*
7
Before checking the operation of this unit prior to
installation, this lead must be connected, otherwise
power cannot be turned on.
*
7
Перед проверкой работы устройства подключите
этот провод, иначе питание не включится.
*
7
Перед тим, як перевірити працездатність цього
виробу до його встановлення, цей контакт
необхідно приєднати, інакше живлення на прилад
подаватися не буде.
OE REMOTE
Steering wheel remote input
Вход рулевого пульта дистанционного
управления
До зовнішнього компоненту
Fan
Вентилятор
Вентилятор
Connections without using the ISO connector / Подключение без использования разъемов ISO / З’єднання без допомоги рознімань ISO
*
6
Only for KD-AVX40.
*
6
Только для KD-AVX40.
*
6
Тільки для KD-AVX40.
Instal_KDAVX4020[EE]3.indb 4
Instal_KDAVX4020[EE]3.indb 4
09.1.27 10:32:07 AM
09.1.27 10:32:07 AM

5
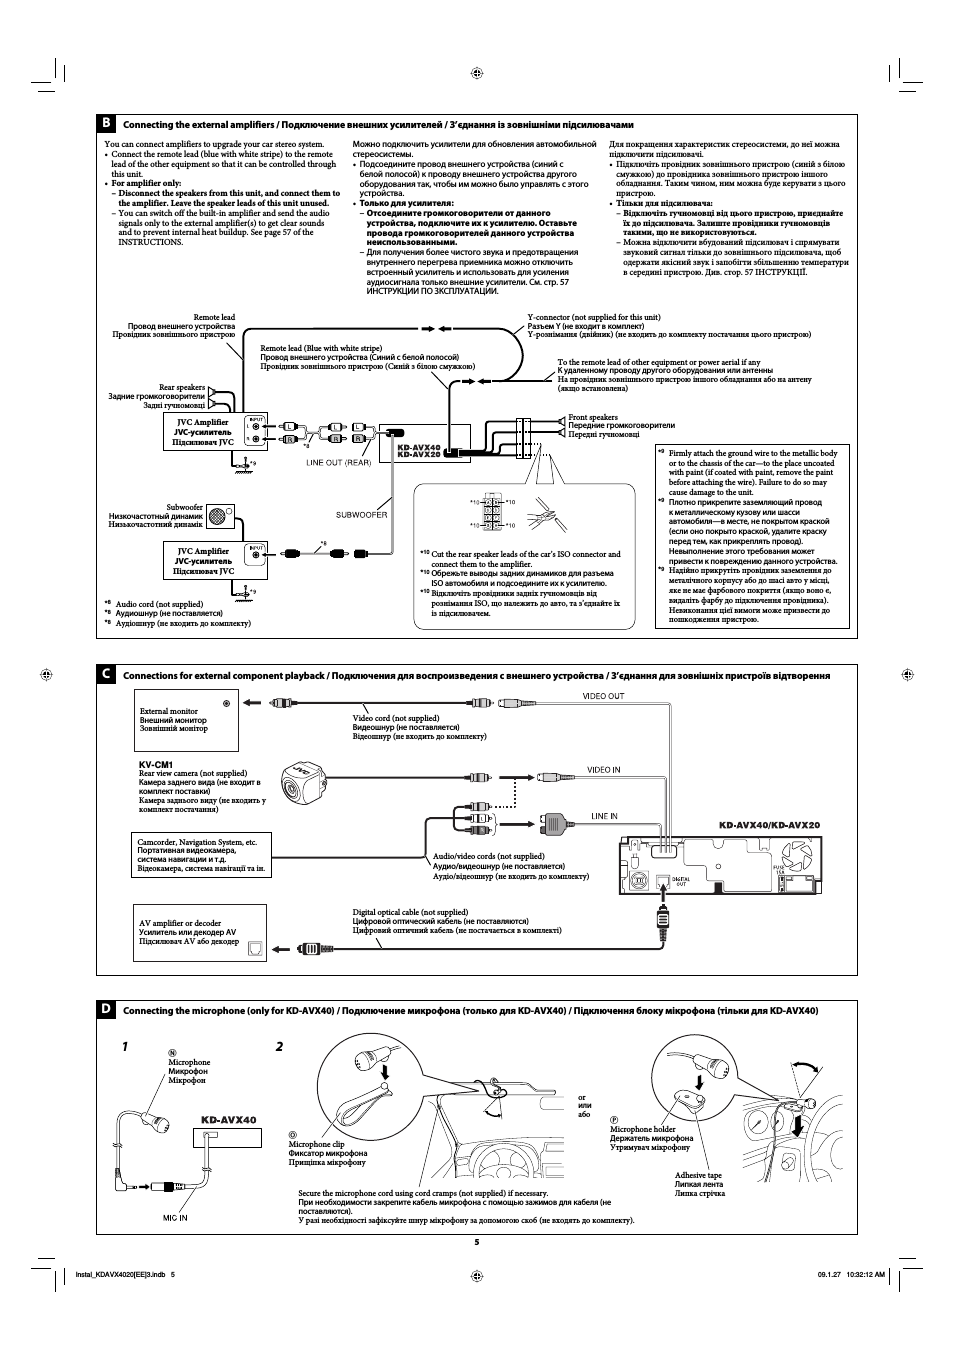
Connecting the external amplifiers / Подключение внешних усилителей / З’єднання із зовнішніми підсилювачами
You can connect amplifiers to upgrade your car stereo system.
• Connect the remote lead (blue with white stripe) to the remote
lead of the other equipment so that it can be controlled through
this unit.
• For amplifier only:
– Disconnect the speakers from this unit, and connect them to
the amplifier. Leave the speaker leads of this unit unused.
– You can switch off the built-in amplifier and send the audio
signals only to the external amplifier(s) to get clear sounds
and to prevent internal heat buildup. See page 57 of the
INSTRUCTIONS.
*
9
Firmly attach the ground wire to the metallic body
or to the chassis of the car—to the place uncoated
with paint (if coated with paint, remove the paint
before attaching the wire). Failure to do so may
cause damage to the unit.
*
9
Плотно прикрепите заземляющий провод
к металлическому кузову или шасси
автомобиля—в месте, не покрытом краской
(если оно покрыто краской, удалите краску
перед тем, как прикреплять провод).
Невыполнение этого требования может
привести к повреждению данного устройства.
*
9
Надійно прикрутіть провідник заземлення до
металічного корпусу або до шасі авто у місці,
яке не має фарбового покриття (якщо воно є,
видаліть фарбу до підключення провідника).
Невиконання цієї вимоги може призвести до
пошкодження пристрою.
Можно подключить усилители для обновления автомобильной
стереосистемы.
• Подсоедините провод внешнего устройства (синий с
белой полосой) к проводу внешнего устройства другого
оборудования так, чтобы им можно было управлять с этого
устройства.
• Только для усилителя:
– Отсоедините громкоговорители от данного
устройства, подключите их к усилителю. Оставьте
провода громкоговорителей данного устройства
неиспользованными.
– Для получения более чистого звука и предотвращения
внутреннего перегрева приемника можно отключить
встроенный усилитель и использовать для усиления
аудиосигнала только внешние усилители. Cм. стр. 57
ИНСТРУКЦИИ ПО ЗКСПЛУАТАЦИИ.
Для покращення характеристик стереосистеми, до неї можна
підключити підсилювачі.
• Підключіть провідник зовнішнього пристрою (синій з білою
смужкою) до провідника зовнішнього пристрою іншого
обладнання. Таким чином, ним можна буде керувати з цього
пристрою.
• Тільки для підсилювача:
– Відключіть гучномовці від цього пристрою, приєднайте
їх до підсилювача. Залиште провідники гучномовців
такими, що не використовуються.
– Можна відключити вбудований підсилювач і спрямувати
звуковий сигнал тільки до зовнішнього підсилювача, щоб
одержати якісний звук і запобігти збільшенню температури
в середині пристрою. Див. стор. 57 ІНСТРУКЦІЇ.
Remote lead
Провод внешнего устройства
Провідник зовнішнього пристрою
Remote lead (Blue with white stripe)
Провод внешнего устройства (Синий с белой полосой)
Провідник зовнішнього пристрою (Синій з білою смужкою)
To the remote lead of other equipment or power aerial if any
К удаленному проводу другого оборудования или антенны
На провідник зовнішнього пристрою іншого обладнання або на антену
(якщо встановлена)
Y-connector (not supplied for this unit)
Разъем Y (не входит в комплект)
Y-рознімання (двійник) (не входить до комплекту постачання цього пристрою)
Subwoofer
Низкочастотный динамик
Низькочастотний динамік
Rear speakers
Задние громкоговорители
Задні гучномовці
C
JVC Amplifier
JVC-усилитель
Підсилювач JVC
Front speakers
Передние громкоговорители
Передні гучномовці
*
10
Cut the rear speaker leads of the car’s ISO connector and
connect them to the amplifier.
*
10
Обрежьте выводы задних динамиков для разъема
ISO автомобиля и подсоедините их к усилителю.
*
10
Відключіть провідники задніх гучномовців від
рознімання ISO, що належить до авто, та з’єднайте їх
із підсилювачем.
Connections for external component playback / Подключения для воспроизведения с внешнего устройства / З’єднання для зовнішніх пристроїв відтворення
Video cord (not supplied)
Видеошнур (не поставляется)
Відеошнур (не входить до комплекту)
B
*
8
Audio cord (not supplied)
*
8
Аудиошнур (не поставляется)
*
8
Аудіошнур (не входить до комплекту)
Camcorder, Navigation System, etc.
Портативная видеокамера,
система навигации и т.д.
Відеокамера, система навігації та ін.
Audio/video cords (not supplied)
Аудио/видеошнур (не поставляется)
Аудіо/відеошнур (не входить до комплекту)
KV-CM1
Rear view camera (not supplied)
Камера заднего вида (не входит в
комплект поставки)
Камера заднього виду (не входить у
комплект постачання)
JVC Amplifier
JVC-усилитель
Підсилювач JVC
External monitor
Внешний монитор
Зовнішній монітор
AV amplifier or decoder
Усилитель или декодер AV
Підсилювач AV або декодер
Digital optical cable (not supplied)
Цифровой оптический кабель (не поставляются)
Цифровий оптичний кабель (не постачається в комплекті)
D
Connecting the microphone (only for KD-AVX40) / Подключение микрофона (только для KD-AVX40) / Підключення блоку мікрофона (тільки для KD-AVX40)
Secure the microphone cord using cord cramps (not supplied) if necessary.
При необходимости закрепите кабель микрофона с помощью зажимов для кабеля (не
поставляются).
У разі необхідності зафіксуйте шнур мікрофону за допомогою скоб (не входять до комплекту).
or
или
або
O
Microphone clip
Фиксатор микрофона
Прищіпка мікрофону
P
Microphone holder
Держатель микрофона
Утримувач мікрофону
Adhesive tape
Липкая лента
Липка стрічка
N
Microphone
Микрофон
Мікрофон
1
2
Instal_KDAVX4020[EE]3.indb 5
Instal_KDAVX4020[EE]3.indb 5
09.1.27 10:32:12 AM
09.1.27 10:32:12 AM
You cannot connect a computer to the USB (
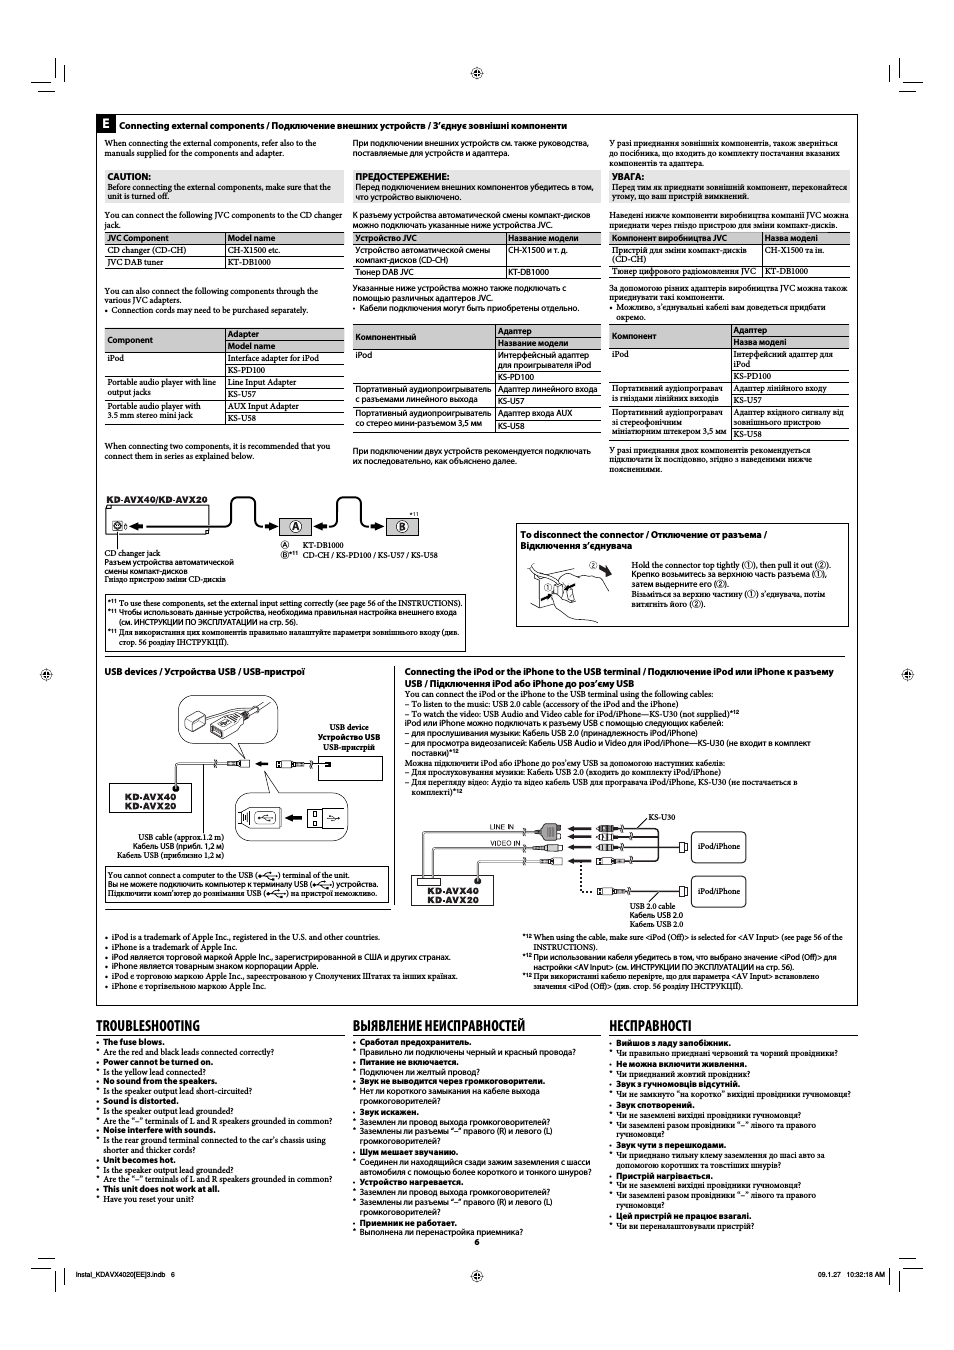
) terminal of the unit.
Вы не можете подключить компьютер к терминалу USB (
) устройства.
Підключити комп’ютер до рознімання USB (
) на пристрої неможливо.
• iPod is a trademark of Apple Inc., registered in the U.S. and other countries.
• iPhone is a trademark of Apple Inc.
• iPod является торговой маркой Apple Inc., зарегистрированной в США и других странах.
• iPhone является товарным знаком корпорации Apple.
• iPod є торговою маркою Apple Inc., зареєстрованою у Сполучених Штатах та інших країнах.
• iPhone є торгівельною маркою Apple Inc.
6
??
E
USB cable (approx.1.2 m)
Кабель USB (прибл. 1,2 м)
Кабель USB (приблизно 1,2 м)
TROUBLESHOOTING
• The fuse blows.
*
Are the red and black leads connected correctly?
• Power cannot be turned on.
*
Is the yellow lead connected?
• No sound from the speakers.
*
Is the speaker output lead short-circuited?
• Sound is distorted.
*
Is the speaker output lead grounded?
*
Are the “–” terminals of L and R speakers grounded in common?
• Noise interfere with sounds.
*
Is the rear ground terminal connected to the car’s chassis using
shorter and thicker cords?
• Unit becomes hot.
*
Is the speaker output lead grounded?
*
Are the “–” terminals of L and R speakers grounded in common?
• This unit does not work at all.
*
Have you reset your unit?
BЫЯВЛЕНИЕ НЕИСПРАВНОСТЕЙ
• Сработал предохранитель.
* Правильно ли подключены черный и красный провода?
• Питание не включается.
* Подключен ли желтый провод?
• Звук не выводится через громкоговорители.
* Нет ли короткого замыкания на кабеле выхода
громкоговорителей?
• Звук искажен.
* Заземлен ли провод выхода громкоговорителей?
* Заземлены ли разъемы “–” правого (R) и левого (L)
громкоговорителей?
• Шум мешает звучанию.
* Соединен ли находящийся сзади зажим заземления с шасси
автомобиля с помощью более короткого и тонкого шнуров?
• Устройство нагревается.
* Заземлен ли провод выхода громкоговорителей?
* Заземлены ли разъемы “–” правого (R) и левого (L)
громкоговорителей?
• Приемник не работает.
* Выполнена ли перенастройка приемника?
НЕСПРАВНОСТІ
• Вийшов з ладу запобіжник.
*
Чи правильно приєднані червоний та чорний провідники?
• Не можна включити живлення.
*
Чи приєднаний жовтий провідник?
• Звук з гучномовців відсутній.
*
Чи не замкнуто “на коротко” вихідні провідники гучномовця?
• Звук спотворений.
*
Чи не заземлені вихідні провідники гучномовця?
*
Чи заземлені разом провідники “–” лівого та правого
гучномовця?
• Звук чути з перешкодами.
*
Чи приєднано тильну клему заземлення до шасі авто за
допомогою коротших та товстіших шнурів?
• Пристрій нагрівається.
*
Чи не заземлені вихідні провідники гучномовця?
*
Чи заземлені разом провідники “–” лівого та правого
гучномовця?
• Цей пристрій не працює взагалі.
*
Чи ви переналаштовували пристрій?
USB device
Устройство USB
USB-пристрій
USB devices / Устройства USB / USB-пристрої
To disconnect the connector / Отключение от разъема /
Відключення з’єднувача
Hold the connector top tightly (1), then pull it out (2).
Крепко возьмитесь за верхнюю часть разъема (1),
затем выдерните его (2).
Візьміться за верхню частину (1) з’єднувача, потім
витягніть його (2).
A KT-DB1000
B*
11
CD-CH / KS-PD100 / KS-U57 / KS-U58
When connecting the external components, refer also to the
manuals supplied for the components and adapter.
CAUTION:
Before connecting the external components, make sure that the
unit is turned off.
You can connect the following JVC components to the CD changer
jack.
JVC Component
Model name
CD changer (CD-CH)
CH-X1500 etc.
JVC DAB tuner
KT-DB1000
You can also connect the following components through the
various JVC adapters.
• Connection cords may need to be purchased separately.
Component
Adapter
Model name
iPod
Interface adapter for iPod
KS-PD100
Portable audio player with line
output jacks
Line Input Adapter
KS-U57
Portable audio player with
3.5 mm stereo mini jack
AUX Input Adapter
KS-U58
When connecting two components, it is recommended that you
connect them in series as explained below.
Connecting external components / Подключение внешних устройств / З’єднує зовнішні компоненти
KS-U30
CD changer jack
Разъем устройства автоматической
смены компакт-дисков
Гніздо пристрою зміни CD-дисків
iPod/iPhone
USB 2.0 cable
Кабель USB 2.0
Кабель USB 2.0
Connecting the iPod or the iPhone to the USB terminal / Подключение iPod или iPhone к разъему
USB / Підключення iPod або iPhone до роз’єму USB
You can connect the iPod or the iPhone to the USB terminal using the following cables:
– To listen to the music: USB 2.0 cable (accessory of the iPod and the iPhone)
– To watch the video: USB Audio and Video cable for iPod/iPhone—KS-U30 (not supplied)*
12
iPod или iPhone можно подключать к разъему USB с помощью следующих кабелей:
– для прослушивания музыки: Кабель USB 2.0 (принадлежность iPod/iPhone)
– для просмотра видеозаписей: Кабель USB Audio и Video для iPod/iPhone—KS-U30 (не входит в комплект
поставки)*
12
Можна підключити iPod або iPhone до роз’єму USB за допомогою наступних кабелів:
– Для прослуховування музики: Кабель USB 2.0 (входить до комплекту iPod/iPhone)
– Для перегляду відео: Аудіо та відео кабель USB для програвача iPod/iPhone, KS-U30 (не постачається в
комплекті)*
12
*
12
When using the cable, make sure <iPod (Off)> is selected for <AV Input> (see page 56 of the
INSTRUCTIONS).
*
12
При использовании кабеля убедитесь в том, что выбрано значение <iPod (Off)> для
настройки <AV Input> (см. ИНСТРУКЦИИ ПО ЭКСПЛУАТАЦИИ на стр. 56).
*
12
При використанні кабелю перевірте, що для параметра <AV Input> встановлено
значення <iPod (Off)> (див. стор. 56 розділу ІНСТРУКЦІЇ).
При подключении внешних устройств см. также руководства,
поставляемые для устройств и адаптера.
ПРЕДОСТЕРЕЖЕНИЕ:
Перед подключением внешних компонентов убедитесь в том,
что устройство выключено.
К разъему устройства автоматической смены компакт-дисков
можно подключать указанные ниже устройства JVC.
Устройство JVC
Название модели
Устройство автоматической смены
компакт-дисков (CD-CH)
CH-X1500 и т. д.
Тюнер DAB JVC
KT-DB1000
Указанные ниже устройства можно также подключать с
помощью различных адаптеров JVC.
• Кабели подключения могут быть приобретены отдельно.
Компонентный
Адаптер
Название модели
iPod
Интерфейсный адаптер
для проигрывателя iPod
KS-PD100
Портативный аудиопроигрыватель
с разъемами линейного выхода
Адаптер линейного входа
KS-U57
Портативный аудиопроигрыватель
со стерео мини-разъемом 3,5 мм
Адаптер входа AUX
KS-U58
При подключении двух устройств рекомендуется подключать
их последовательно, как объяснено далее.
У разі приєднання зовнішніх компонентів, також зверніться
до посібника, що входить до комплекту постачання вказаних
компонентів та адаптера.
УВАГА:
Перед тим як приєднати зовнішній компонент, переконайтеся
утому, що ваш пристрій вимкнений.
Наведені нижче компоненти виробництва компанії JVC можна
приєднати через гніздо пристрою для зміни компакт-дисків.
Компонент виробництва JVC
Назва моделі
Пристрій для зміни компакт-дисків
(CD-CH)
CH-X1500 та ін.
Тюнер цифрового радіомовлення JVC
KT-DB1000
За допомогою різних адаптерів виробництва JVC можна також
приєднувати такі компоненти.
• Можливо, з’єднувальні кабелі вам доведеться придбати
окремо.
Компонент
Адаптер
Назва моделі
iPod
Інтерфейсний адаптер для
iPod
KS-PD100
Портативний аудіопрогравач
із гніздами лінійних виходів
Адаптер лінійного входу
KS-U57
Портативний аудіопрогравач
зі стереофонічним
мініатюрним штекером 3,5 мм
Адаптер вхідного сигналу від
зовнішнього пристрою
KS-U58
У разі приєднання двох компонентів рекомендується
підключати їх послідовно, згідно з наведеними нижче
поясненнями.
*
11
To use these components, set the external input setting correctly (see page 56 of the INSTRUCTIONS).
*
11
Чтобы использовать данные устройства, необходима правильная настройка внешнего входа
(см. ИНСТРУКЦИИ ПО ЭКСПЛУАТАЦИИ на стр. 56).
*
11
Для використання цих компонентів правильно налаштуйте параметри зовнішнього входу (див.
стор. 56 розділу ІНСТРУКЦІЇ).
iPod/iPhone
Instal_KDAVX4020[EE]3.indb 6
Instal_KDAVX4020[EE]3.indb 6
09.1.27 10:32:18 AM
09.1.27 10:32:18 AM
09:54
JVC KD-AVX44 DVD/CD Receiver Tour
09:43
DVD/CD/MP3-ресивер JVC KD-AVX22
03:14
JVC KD-AVX44 v provozu
03:01
autoestereo jvc kd-avx44
05:01
jvc KD-AVX40 Bluetooth, DVD/CD/USB Receiver
04:16
JVC-AVX40 montado en E-46.AVI
Нажмите на кнопку для помощи

DVD/CD RECEIVER
RECEPTOR CON DVD/CD
RÉCEPTEUR DVD/CD
KD-AVX40
For canceling the display demonstration, see page 7.
Para cancelar la demonstración en pantalla, consulte la página 7.
Pour annuler la démonstration des affichages, référez-vous à la page 7.
ENGLISHFRANÇAIS ESPAÑOL
For installation and connections, refer to the separate manual.
Para la instalación y las conexiones, refiérase al manual separado.
Pour l’installation et les raccordements, se référer au manuel séparé.
INSTRUCTIONS
MANUAL DE INSTRUCCIONES
MANUEL D’INSTRUCTIONS
For customer Use:
Enter below the Model
No. and Serial No. which
are located on the top or
bottom of the cabinet. Retain
this information for future
reference.
Model No.
Serial No.
LVT1939-001A
[J]
Thank you for purchasing a JVC product.
Please read all instructions carefully before operation, to ensure your complete understanding and to obtain the best
possible performance from the unit.
IMPORTANT FOR LASER PRODUCTS
1. CLASS 1 LASER PRODUCT
ENGLISH
2. CAUTION: Do not open the top cover. There are no user serviceable parts inside the unit; leave all servicing to
qualified service personnel.
3. CAUTION: (For U.S.A.) Visible and/or invisible class II laser radiation when open. Do not stare into beam.
4. REPRODUCTION OF LABEL: CAUTION LABEL, PLACED OUTSIDE THE UNIT.
(For Canada) Visible and/or invisible class 1M laser radiation when open. Do not view directly with
optical instruments.
INFORMATION (For U.S.A.)
This equipment has been tested and found to
comply with the limits for a Class B digital device,
pursuant to Part 15 of the FCC Rules. These limits are
designed to provide reasonable protection against
harmful interference in a residential installation.
This equipment generates, uses, and can radiate
radio frequency energy and, if not installed and
used in accordance with the instructions, may cause
harmful interference to radio communications.
However, there is no guarantee that interference
will not occur in a particular installation. If this
equipment does cause harmful interference to radio
or television reception, which can be determined
by turning the equipment off and on, the user is
encouraged to try to correct the interference by one
or more of the following measures:
– Reorient or relocate the receiving antenna.
– Increase the separation between the equipment
and receiver.
– Connect the equipment into an outlet on a
circuit different from that to which the receiver is
connected.
– Consult the dealer or an experienced radio/TV
technician for help.
Caution
Changes or modifications not approved by JVC could
void the user’s authority to operate the equipment.
[European Union only]
WARNINGS:
To prevent accidents and damage
• DO NOT install any unit or wire any cable in a
location where;
– it may obstruct the steering wheel and
gearshift lever operations.
– it may obstruct the operation of safety devices
such as air bags.
– it may obstruct visibility.
• DO NOT operate the unit while driving.
If you need to operate the unit while driving, be
sure to look around carefully.
• The driver must not watch the monitor while
driving.
Cautions on the monitor:
• The monitor built in this unit has been produced
with high precision, but it may have some
ineffective dots. This is inevitable and is not
malfunction.
• Do not expose the monitor to direct sunlight.
• When the temperature is very cold or very hot…
– Chemical changes occur inside, causing
malfunction.
– Pictures may not appear clearly or may move
slowly. Pictures may not be synchronized
with the sound or picture quality may decline
in such environments.
2
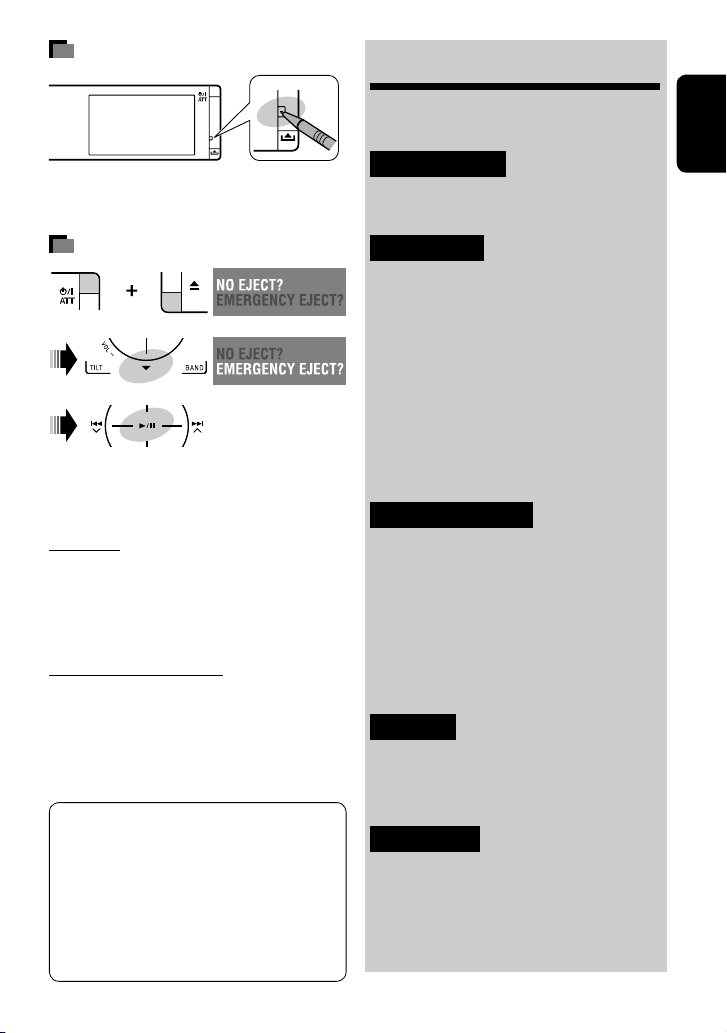
How to reset your unit
• Your preset adjustments (except for the registered
Bluetooth devices) will also be erased.
How to forcibly eject a disc
[Hold]
• Be careful not to drop the disc when it ejects.
• If this does not work, reset the unit.
For safety…
• Do not raise the volume level too much, as this will
block outside sounds, making driving dangerous.
• Stop the car before performing any complicated
operations.
Temperature inside the car…
If you have parked the car for a long time in hot or cold
weather, wait until the temperature in the car becomes
normal before operating the unit.
This product incorporates copyright protection
technology that is protected by U.S. patents
and other intellectual property rights. Use of
this copyright protection technology must be
authorized by Macrovision, and is intended for
home and other limited viewing uses only unless
otherwise authorized by Macrovision. Reverse
engineering or disassembly is prohibited.
Contents
How to reset your unit …………………….. 3
How to forcibly eject a disc ……………….. 3
INTRODUCTION
Playable disc type …………………………… 4
Before operations …………………………… 5
OPERATIONS
Basic operations—AV menu ……………… 6
Basic operations—Control panel ……….. 8
Basic operations—
Remote controller (RM-RK252) ……….. 10
Listening to the radio ……………………… 12
Disc operations ………………………………. 15
USB operations ………………………………. 28
Bluetooth® operations—
Cellular phone/audio player ………….. 30
EXTERNAL DEVICES
Listening to the iPod/iPhone …………….. 37
Listening to the CD changer ………………. 40
Listening to the satellite radio ………….. 42
Listening to
the HD Radio™ Broadcast ………………. 45
Listening to other external
components ……………………………….. 47
SETTINGS
Sound equalization …………………………. 49
Assigning titles to the sources …………… 50
Menu items …………………………………… 51
REFERENCES
Maintenance …………………………………. 59
More about this unit ……………………….. 60
Troubleshooting …………………………….. 67
Specifications ………………………………… 72
3
ENGLISH
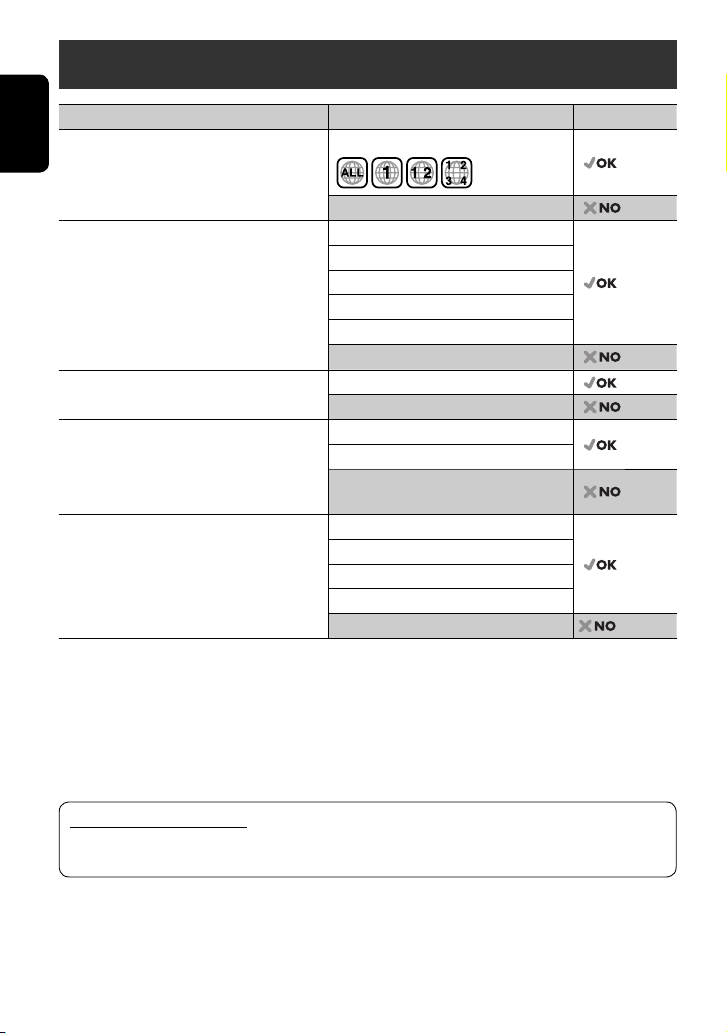
Playable disc type
Disc type Recording format, file type, etc. Playable
DVD
ENGLISH
• DTS sound cannot be reproduced.
DVD Recordable/Rewritable
(DVD-R/-RW*2, +R/+RW*3)
• DVD Video: UDF bridge
• DVD-VR
• MPEG1/MPEG2/JPEG/MP3/WMA/WAV:
Compliant to ISO 9660 level 1, level 2, Romeo,
Joliet
DualDisc DVD side
CD/VCD Audio CD/CD Text (CD-DA)
CD Recordable/Rewritable
(CD-R/-RW)
• Compliant to ISO 9660 level 1, level 2, Romeo,
Joliet
*1 If you insert a DVD Video disc of an incorrect Region Code, “Region code error” appears on the monitor.
*2 DVD-R recorded in multi-border format is also playable (except for dual layer discs). DVD-RW dual layer discs are not
playable.
*3 It is possible to play back finalized +R/+RW (Video format only) discs. “DVD” is selected as its disc type when a
+R/+RW disc is loaded. +RW double layer discs are not playable.
DVD Video (Region Code: 1)*
DVD Audio/DVD-ROM
DVD Video
DVD-VR
MPEG1/MPEG2
JPEG
MP3/WMA/WAV
AAC/MPEG4/DivX/DVD+VR/DVD-RAM
Non-DVD side
VCD (Video CD)
DTS-CD/SVCD (Super Video CD)/CD-ROM/
CD-I (CD-I Ready)
CD-DA
MP3/WMA/WAV
JPEG
MPEG1/MPEG2
AAC/MPEG4/DivX
1
Caution for DualDisc playback
The Non-DVD side of a “DualDisc” does not comply with the “Compact Disc Digital Audio” standard. Therefore,
the use of Non-DVD side of a DualDisc on this product may not be recommended.
4
Before operations
ENGLISH
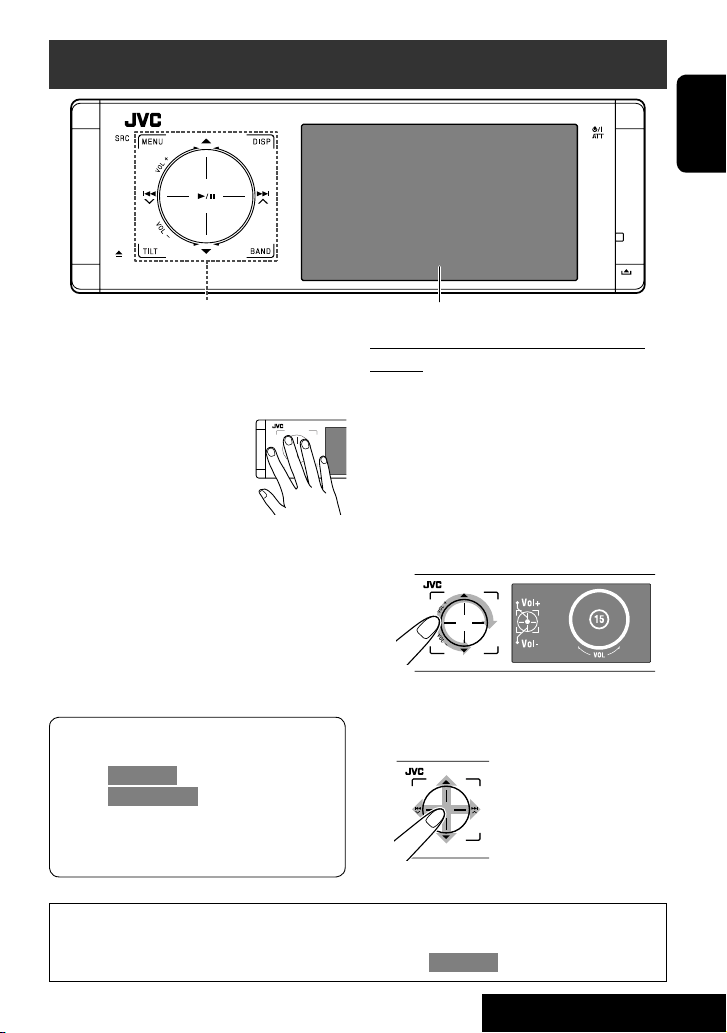
Touch pad controls
The lights of the touch pad controls and monitor are
turned off when no operation is done for about 10
seconds.
The lights are turned on in the following cases:
– When you move your hand close
to the touch pad controls.*
– When your finger touches the
touch pad controls.*
– When you use the remote
controller.
– When a call/Text message comes in.
– When the signal from the rear view camera comes in.
* Depending on the setting. To change the setting, ☞
page 55.
The lights are always turned on in the following
cases:
– While <AV Menu> is displayed.
– While <Source Menu> is displayed.
– While the control panel is open.
– When <Illumination> is set to <Normal>.
(☞ page 55)
Monitor
How to operate the unit by the touch pad
controls
You can operate the unit by touching the appropriate
part of the touch pad controls.
• To adjust the volume, move your finger on the
touch pad knob as illustrated below to display the
animation on the monitor, then touch 5 or ∞
repeatedly.
– You can also adjust the volume by just continuing
to move your finger on the touch pad knobs as
illustrated below.
• When you slide your finger on the touch pad knob
as illustrated below, it functions in the same way as
touching 5 / ∞ / 4 / ¢.
• Operations are explained mainly using the touch pad controls and buttons of the unit; however, the buttons
on the remote controller can work in the same way if they have the same names or marks.
• In the explanation, the screen names are highlighted. For example, <AV Menu>.
5
INTRODUCTION
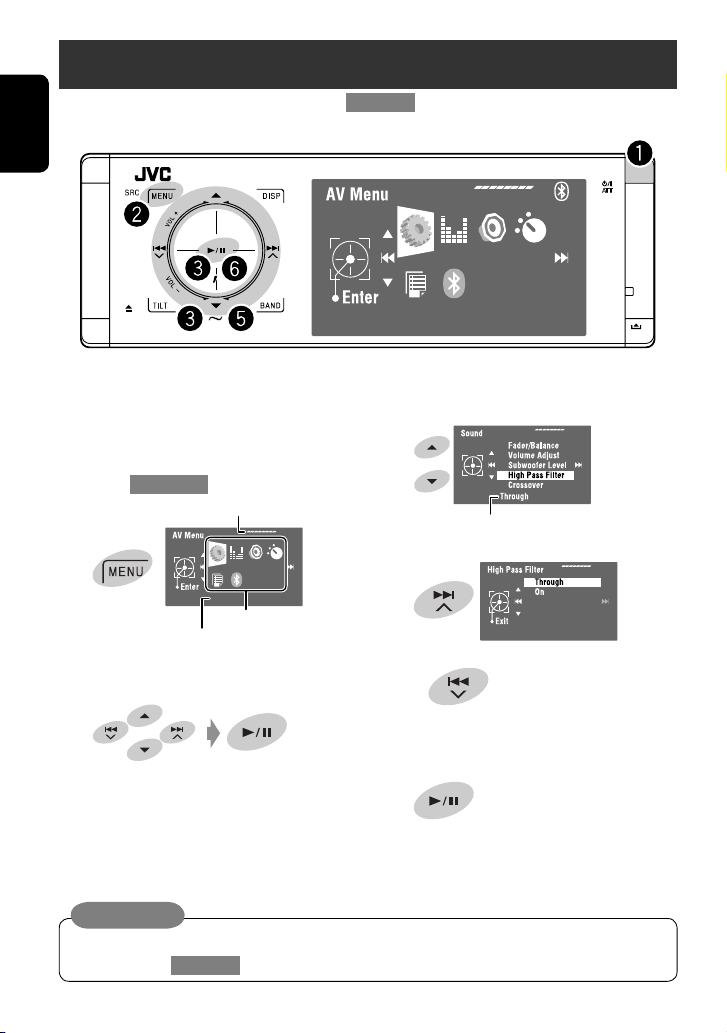
Basic operations— AV menu
You can use the menus to set up various settings from <AV Menu>. For details of each menu and setting, see “Menu
items.” (☞ pages 51 to 58)
ENGLISH
AV Setup
~ Turn on the power.
The lights of the touch pad controls and monitor
are turned on.
⁄ Select an item.
Ÿ Enter <AV Menu>.
Time countdown indicator
Current setting of the selected item
@ Enter the next screen.
AV Setup
Current selected icon name
• Non-available items will be shaded.
Setup icons
• To return to the previous screen:
! Select an icon to enter the setup screen.
• Repeat steps ⁄ and @ to set the sub-item if
needed.
¤ Finish the procedure.
Important
Indication language: English indications are used for the purpose of explanation. You can select the indication
language from the <AV Menu>. (☞ page 52)
6
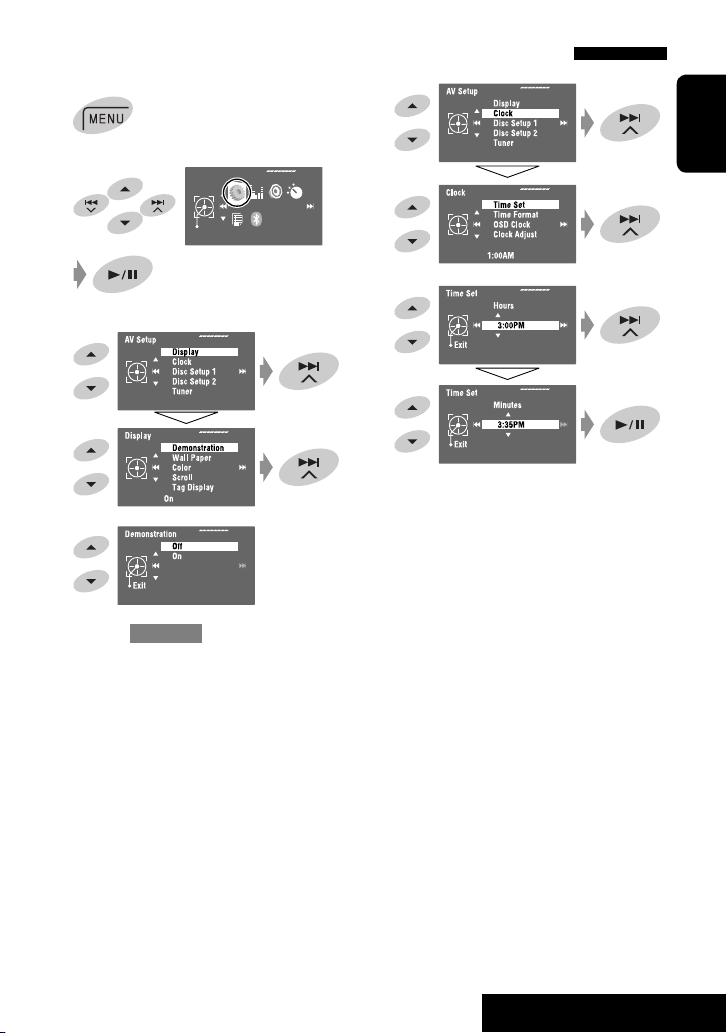
Canceling the display demonstration and setting the clock
1
6
2
AV Menu
Enter
AV Setup
3
4
5
Return to <AV Setup> by touching 4
repeatedly.
ENGLISH
7
7
OPERATIONS
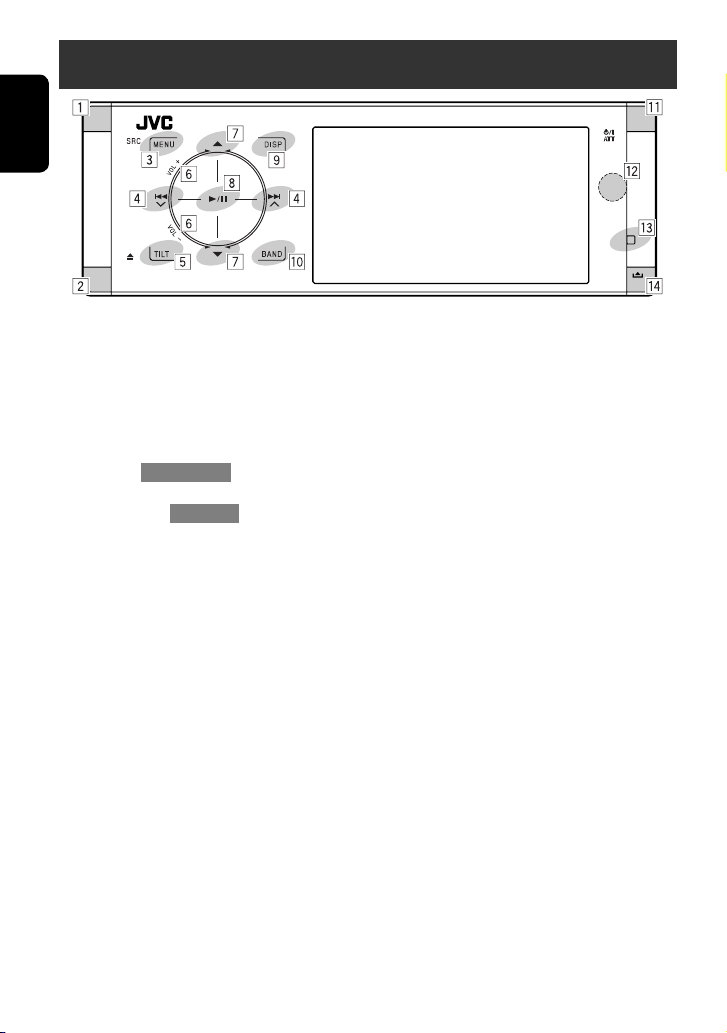
Basic operations — Control panel
ENGLISH
1 Selects sources.*
“Tuner” or “HD Radio” = “Satellite Radio
(SIRIUS/XM)” = “Disc” = “USB” or ”USB iPod”
= “Changer,” ”iPod,” or ”External Input” =
“Bluetooth” = “AV Input”
• You can also select sources by touching
5 / ∞ / 4 / ¢ after holding SRC for
entering <Source Menu>.
2 Ejects the disc.
3 • Enters or exits <AV Menu>.
• Activates Voice Dialling [Hold].
• While talking: Adjusts the volume of the
microphone connected to the unit.
4 • “Tuner” and “HD Radio”: Searches for stations.
• “Satellite Radio”: Selects channels.
• “Disc,” “USB,” “USB iPod,” “Changer,” “iPod,” and
“Bluetooth”: Reverse skip/forward skip
• On menus:
– Enters the previous/next screen.
– Selects items.
5 Tilts the control panel. (☞ page 9)
6 Adjusts the volume level. (☞ page 5)
1
7*2 • “Tuner”: Selects preset stations.
• “HD Radio”: Selects multicast channels.
• “Satellite Radio”: Selects categories.
• “Disc,” “USB,” and “Changer”: Selects titles/
folders.
• “USB iPod”: Selects the next/previous items.
• “iPod”: Enters the player’s menu and pauses
playback.
• “Bluetooth”: Selects group/folder.
• On menus: Selects items.
8 • “Disc,” “USB,” “USB iPod,” and “Changer”: Starts
and pauses playback.
• “Bluetooth”: Starts playback.
• On menus: Enters the next screen or exits the
displayed screen.
9 Changes the display information. (☞ page 9)
p • “Tuner,” “HD Radio,” and “Satellite Radio”:
Selects the bands.
• “Disc” and “USB”: Stops playback.
• “Bluetooth”: Pauses playback.
q • Turns on the power.
• Turns off the power [Hold].
• Attenuates the sound (when the power is on).
w Remote sensor
e Resets the unit.
• Use only when the internal system malfunctions.
r Detaches the control panel (To attach, ☞ page 9).
*1 You cannot select these sources if they are not ready.
*2 By holding 5 / ∞, you can display the list accessible
for the selected source.
8
To tilt the control panel
Touch TILT repeatedly.
To attach the control panel
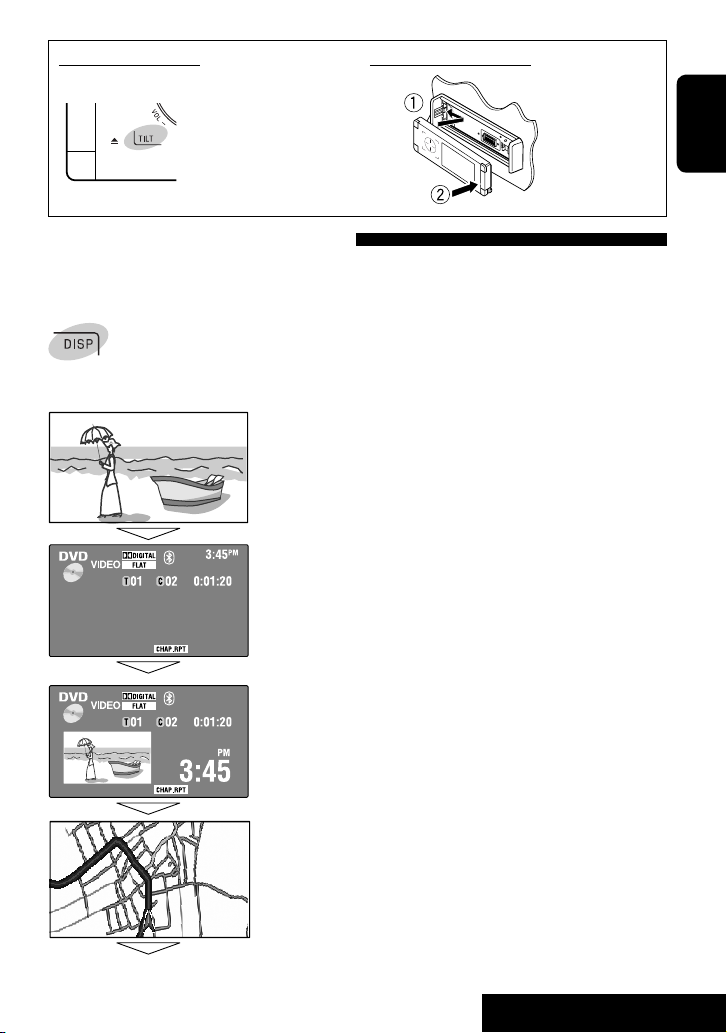
Changing the display information
Available display information varies among the playback sources.
Each time you touch DISP, the display changes to show the various information.
Ex.: When the playback source is a DVD video disc.
Playback picture screen (only for video sources)
Source information screen
ENGLISH
Back to the beginning
Playback picture and the source information screen
• When the source is “USB iPod,” the Artwork of the song is shown if the
song has an Artwork data. (☞ page 53)
• While MP3/WMA file is played, “Jacket picture” is shown if the file has the
tag data including “Jacket picture.”
Navigation screen
• This screen is displayed when <Navigation> is selected for <AV Input>.
(☞ pages 47 and 54)
9
OPERATIONS
Basic operations — Remote controller (RM-RK252)
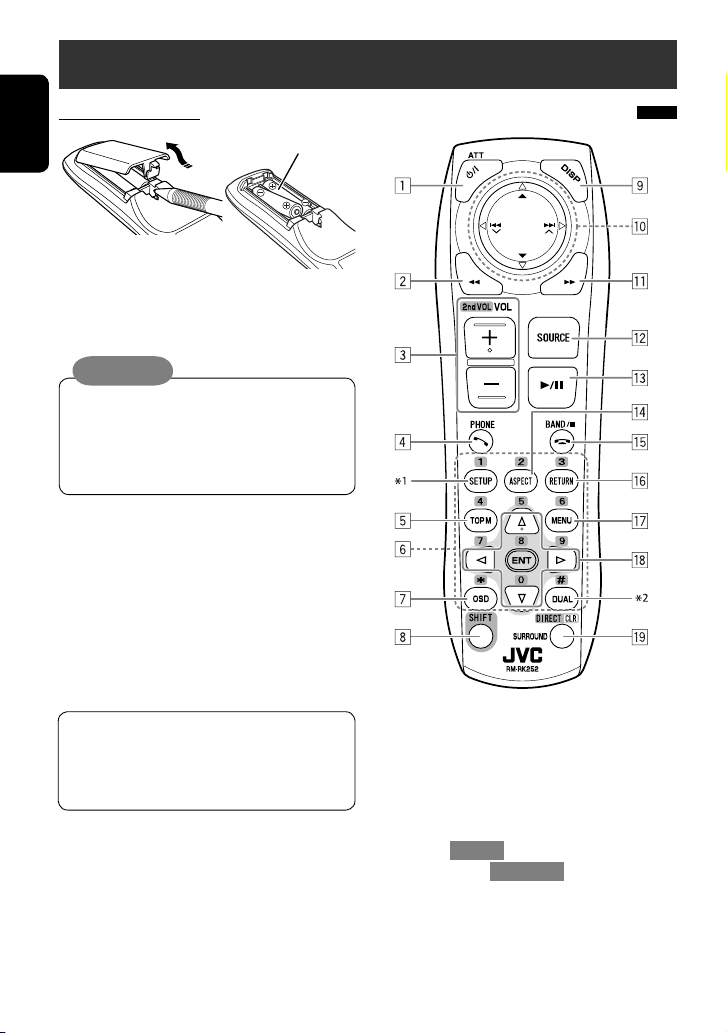
Installing the battery
ENGLISH
Insert the batteries into the remote controller by
matching the polarity (+ and –) correctly.
R03/LR03/AAA
Caution:
• Danger of explosion if battery is incorrectly
replaced. Replace only with the same or
equivalent type.
• Battery shall not be exposed to excessive heat
such as sunshine, fire or the like.
If the range or effectiveness of the remote
controller decreases, replace both batteries.
Before using the remote controller:
• Aim the remote controller directly at the remote
sensor on the unit.
• DO NOT expose the remote sensor to bright light
(direct sunlight or artificial lighting).
The unit is equipped with the steering wheel
remote control function.
• See the Installation/Connection Manual (separate
volume) for connection.
Main elements and features
1 • Turns on the power.
• Turns off the power [Hold].
• Attenuates the sound (when the power is on).
2 “Disc,” “USB,” and “USB iPod”: Reverse search
3 • Adjusts the volume level.
• Does not function as “2nd VOL.”
4 • Answers incoming calls.
• Enters <Redial> [Hold].
• You can enter <Dial Menu> by pressing the
button then touching 6 on the unit.
5 • DVD: Displays the disc menu.
• VCD: Resumes PBC playback (☞ page 23).
• DVD-VR: Displays the Original Program screen.
10

6 • Enters numbers (while holding SHIFT). (☞ pages
14, 20 to 24, 35, and 44)
• Selects the preset phone number (while holding
SHIFT).
• “Tuner,” “HD Radio,” and “Satellite Radio”:
Selects the preset stations (while holding SHIFT).
7 Displays the on-screen bar.
8 Functions with other buttons (see 6 and o).
9 Displays the display information.
p “Tuner”:
• 5 / ∞: Selects preset stations.
•
/ : Searches for stations.
– Auto Search
– Manual Search [Hold]
“HD Radio”:
• 5 / ∞: Selects multicast channels.
• 4 / ¢: Searches for stations.
– Auto Search
– Manual Search [Hold]
“Satellite Radio”:
• 5 / ∞: Selects categories.
• 4 / ¢:
– Selects channels.
– Selects channels rapidly. [Hold]
“Disc” and “Changer”:
• 5 / ∞:
– DVD: Selects the title.
– DVD-VR: Selects the program/play list.
– Other discs (except VCD/CD): Selects the
folders.
• 4 / ¢:
– Reverse skip/forward skip
– Reverse search/forward search [Hold]
“USB”:
• 5 / ∞: Selects the folders.
• 4 / ¢:
– Reverse skip/forward skip
– Reverse search/forward search [Hold]
“USB iPod”:
• 5 / ∞: Selects previous/next item.
• 4 / ¢:
– Reverse skip/forward skip
– Reverse search/forward search [Hold]
“iPod”:
• ∞: Pauses or resumes playback.
• 5: Enters the main menu (then 5 / ∞ / 4 /
¢ work as the menu selecting buttons).*
3
• 4 / ¢:
– Reverse skip/forward skip
– Reverse search/forward search [Hold]
In menu selecting mode:
– Selects an item. (Then, press ∞ to confirm the
selection.)
– Skips 10 items at a time [Hold].
“Bluetooth”:
• 5 / ∞: Selects group/folder.
• 4 / ¢:
– Reverse skip/forward skip
– Reverse search/forward search [Hold]
q “Disc,” “USB,” and “USB iPod”: Forward search
w Selects the source.
e • “Disc,” “USB,” and “USB iPod”: Starts and pauses
playback.
• “Bluetooth”: Starts and pauses playback.
• Answers incoming calls.
r Changes the aspect ratio of the playback pictures.
t • “Tuner,” “HD Radio,” and “Satellite Radio”:
Selects the bands.
• “Disc” and “USB”: Stops playback.
• “Bluetooth”: Pauses playback.
• Ends the call.
y VCD: Returns to the PBC menu.
u • DVD Video: Displays the disc menu.
• VCD: Resumes PBC playback. (☞ page 23)
• DVD-VR: Displays the Play List screen.
i • Makes selection/settings.
• @ / #: Skips back or forward by 5 minutes for
MPEG1/MPEG2.
• % / fi: Changes discs for “Changer.”
o • “Disc” and “USB”: Switches the number entry
mode (while holding SHIFT).
• Erases the misentry after entering a wrong
number (while holding SHIFT).
• Does not function as “SURROUND.”
1
Does not function as “SETUP.”
*
*2 Does not function as “DUAL.”
*3 5 : Returns to the previous menu.
∞ : Confirms the selection.
ENGLISH
11
OPERATIONS
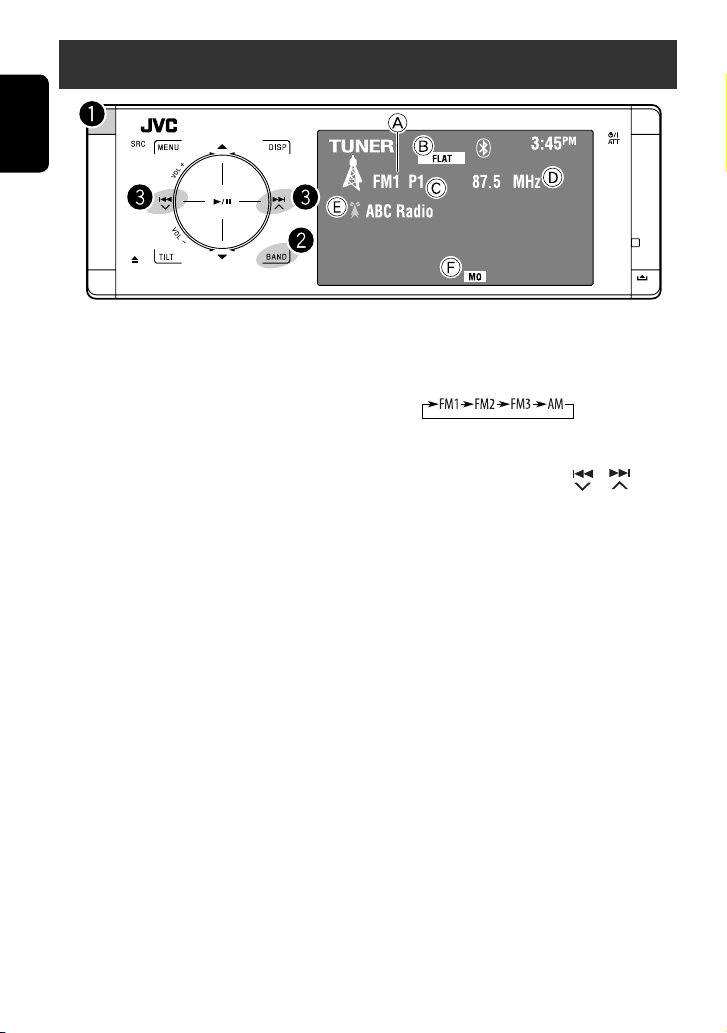
Listening to the radio
ENGLISH
A Band
B Sound mode (
C Preset no.
D Frequency
E Assigned station name (
F FM reception indicator
☞ page 49)
~ Select “Tuner.”
Ÿ Select the band.
☞ page 50)
! Search for a station—Auto Search.
• Manual Search: Hold either or until
“Manual Search” appears on the monitor, then
touch it repeatedly.
• The ST indicator lights up when receiving an
FM stereo broadcast with sufficient signal
strength.
12
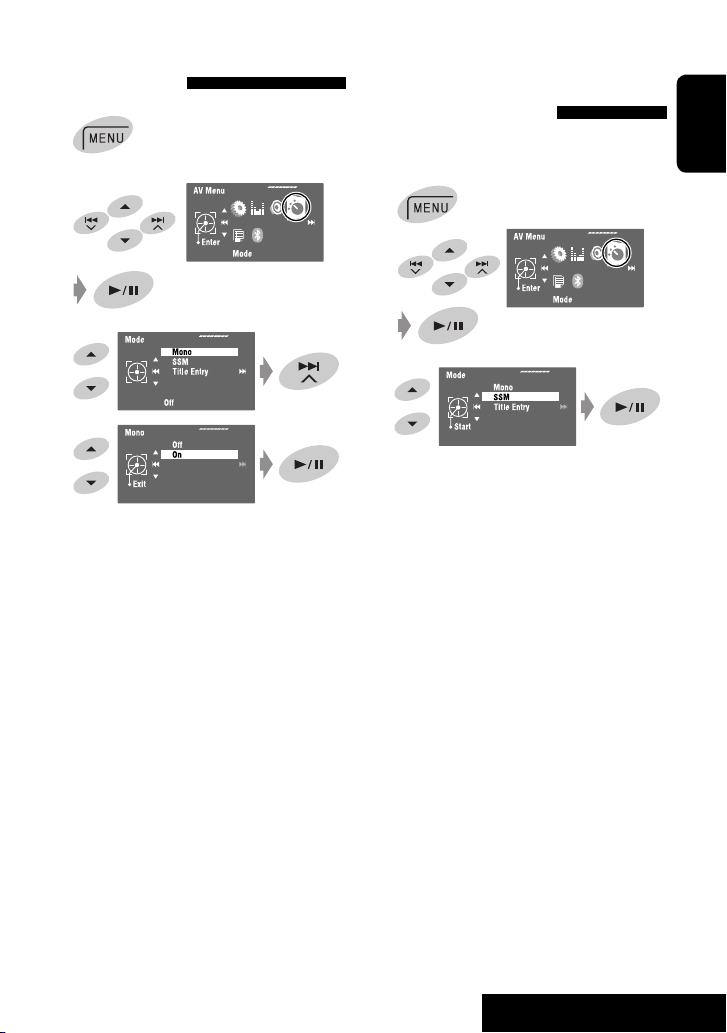
When an FM stereo broadcast is
hard to receive
1
2
3
4
FM station automatic presetting
—SSM (Strong-station
Sequential Memory)
This function works only for FM bands.
You can preset six stations for each band.
1
2
3
Local FM stations with the strongest signals are
searched and stored automatically in the FM band.
ENGLISH
Reception improves, but the stereo effect will be
lost.
• The MO indicator lights up.
To restore the stereo effect, select <Off> in step 4.
• When an HD Radio tuner box is connected (☞ page
45), you can also search and store the AM station
automatically.
13
OPERATIONS
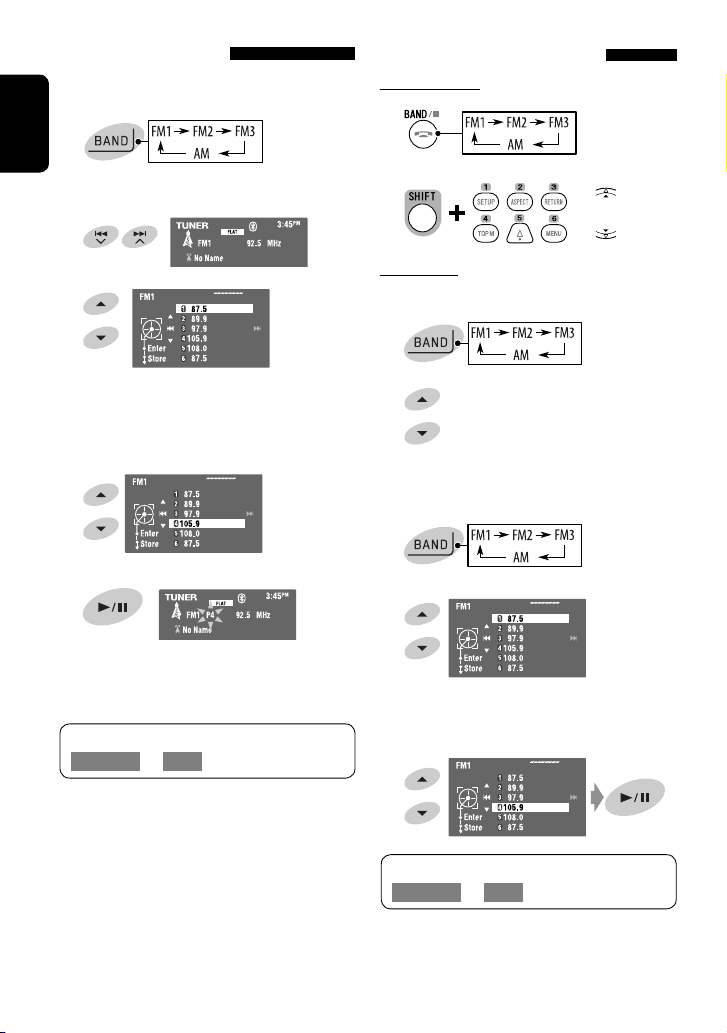
Manual presetting
Ex.: Storing the FM station of 92.5 MHz into preset
number 4 of the FM1 band.
1
ENGLISH
Tune in to a station you want to preset.
2
Selecting preset stations
On the remote:
1
2
or
3
[Hold]
The Preset List appears.
• For FM: Each time you hold 5 / ∞ , you can
change the bands.
4 Select a preset number.
5 Store the station.
[Hold]
The station selected in step 2 is now stored in
preset number 4.
The Preset List can also be accessed through
<AV Menu> = <List>.
On the unit:
To select directly
1
2
To select from the Preset List
1
2
[Hold]
• For FM: Each time you hold 5 / ∞ , you can
change the bands.
3 Select the preset number.
The Preset List can also be accessed through
<AV Menu> = <List>.
14
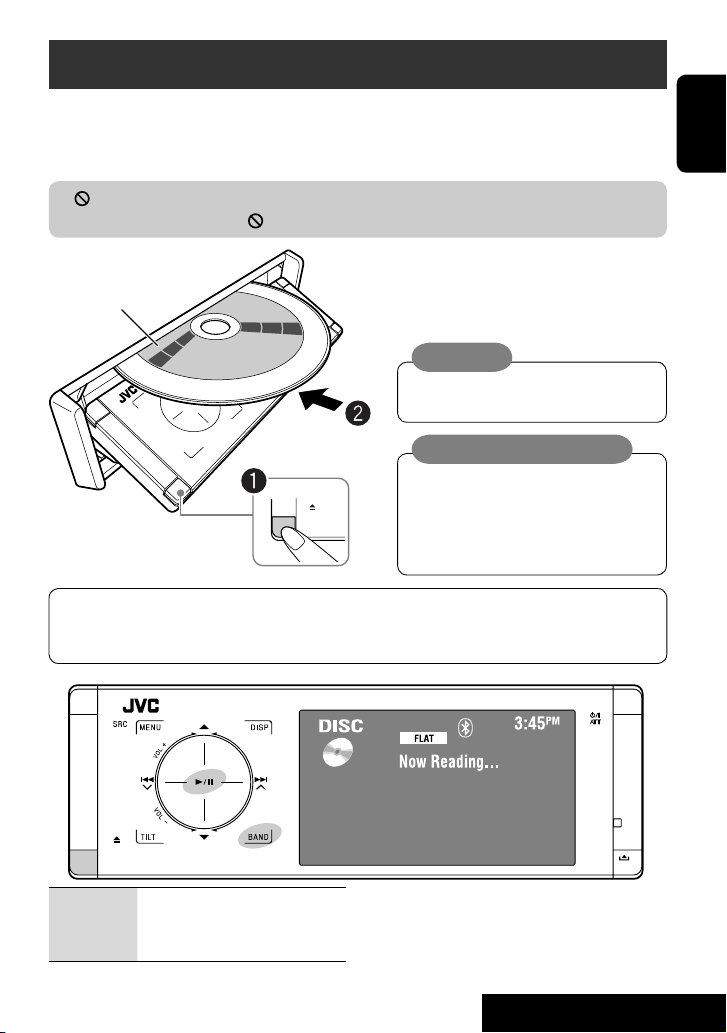
Disc operations
The disc type is automatically detected, and playback starts automatically (for some discs: automatic start depends
on its internal program).
If a disc does not have any disc menu, all tracks in it will be played repeatedly until you change the source or eject the
disc.
If “ ” appears on the monitor, the unit cannot accept the operation you have tried to do.
• In some cases, without showing “ ,” operations will not be accepted.
~ Open the front panel.
Label side
When playing back a multi-channel encoded disc, the multi-channel signals are downmixed.
• You can fully enjoy multi-channel sound by connecting an amplifier or a decoder compatible with these
multi-channel sources. (☞ also page 65)
Ÿ Insert the disc.
Playback starts automatically.
Caution:
Do not place your finger behind the control
panel.
Caution on volume setting:
Discs and connected USB devices produce
very little noise compared with other sources.
Lower the volume before playing a disc to
avoid damaging the speakers by the sudden
increase of the output level.
ENGLISH
0: Ejects the disc.
3/8: Starts and pauses playback.
BAND: Stops playback.
15
OPERATIONS
ENGLISH
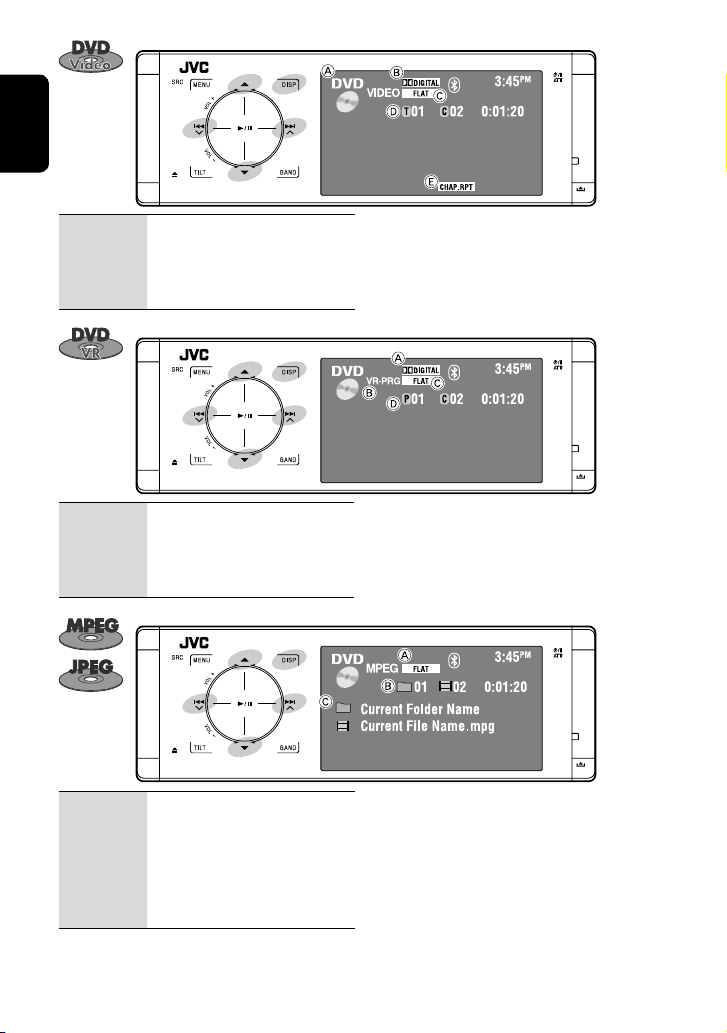
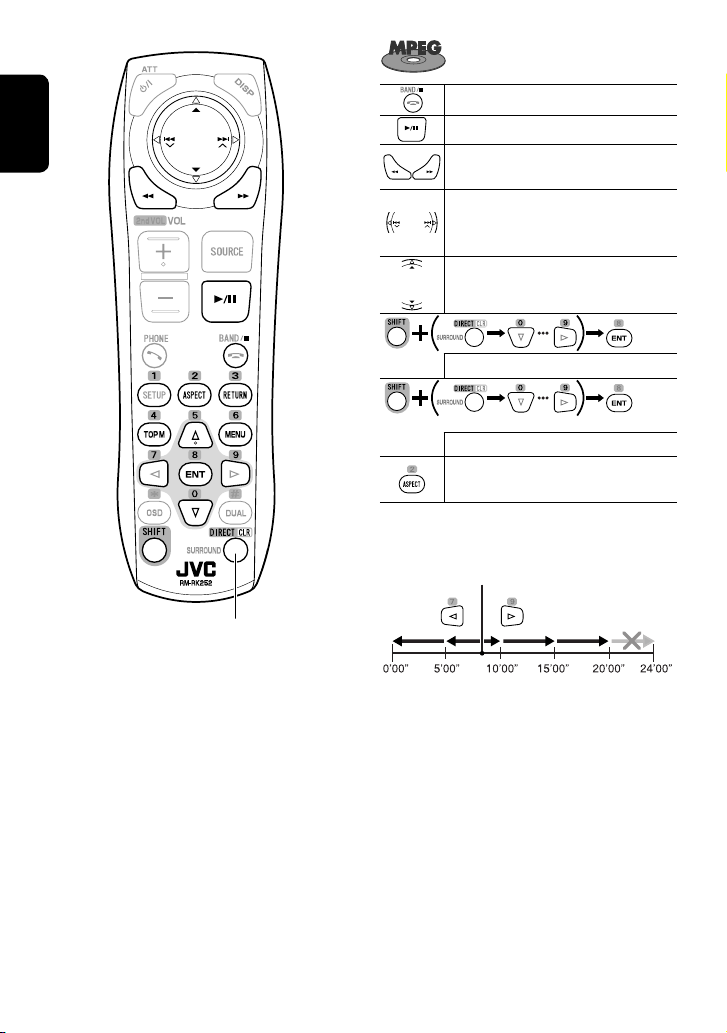
4 ¢: Touch: Selects chapter.
Hold: Reverse/forward search*
5 ∞: Selects title.
DISP:
Touch if necessary (☞ page 9).
4 ¢: Touch: Selects chapter.
Hold: Reverse/forward search*
5 ∞: Selects program no./Play List no.
DISP:
Touch if necessary (☞ page 9).
4 ¢: Touch: Selects track.
Hold: Reverse/forward search for
2
MPEG*
5 ∞: Touch: Selects folder.
Hold: Displays Folder List.
DISP:
Touch if necessary (☞ page 9).
A Disc type
1
1
B Audio format
C Sound mode (
D Title no./Chapter no./Playing time
E Playback mode (
A Audio format
B VR-PRG: Original program
VR-PL: Play List
C Sound mode (
D Program no. (or Play List no.)/Chapter no./Playing time
A Sound mode (☞ page 49)
B For MPEG: Folder no./Track no./Playing time
For JPEG: Folder no./File no.
C Current folder name/current file name
☞ page 49)
☞ pages 18)
☞ page 49)
*1 Search speed: x2 ] x10
*2 Search speed: ¡1 ] ¡2
16
ENGLISH
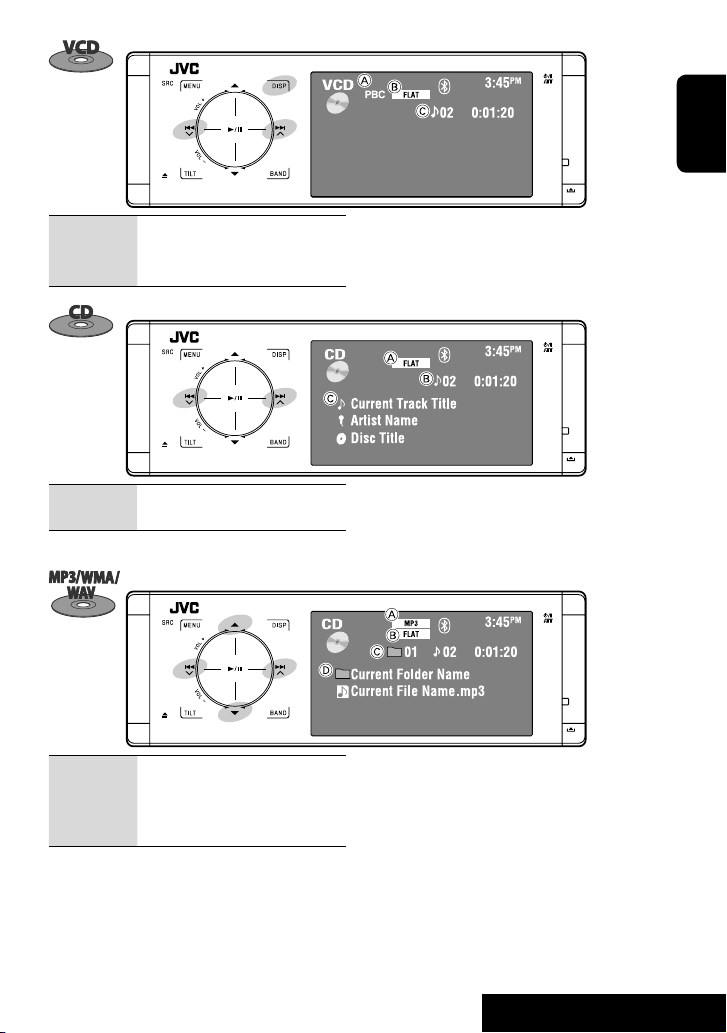
4 ¢: Touch: Selects track.
Hold: Reverse/forward search*
DISP:
Touch if necessary (☞ page 9).
4 ¢: Touch: Selects track.
Hold: Reverse/forward search*
4 ¢: Touch: Selects track.
Hold: Reverse/forward search*
5 ∞: Touch: Selects folder.
Hold: Displays Folder List.
A PBC indicator lights up when PBC is in use.
1
1
1
B Sound mode (
C Track no./Playing time
A Sound mode (☞ page 49)
B Track no./Playing time
C Track title/Artist Name/Disc title
A Audio format (MP3/WMA/WAV)
B Sound mode (
C Folder no./Track no./Playing time
D Current folder name/current file name
☞ page 49)
☞ page 49)
2
*
3
*
*1 Search speed: x2 ] x10
*2 “No Name” appears for conventional CDs.
*3 Tag data will be shown instead of folder/file names
when they are recorded and <Tag Display> is set to
<On>. (☞ page 51)
17
OPERATIONS
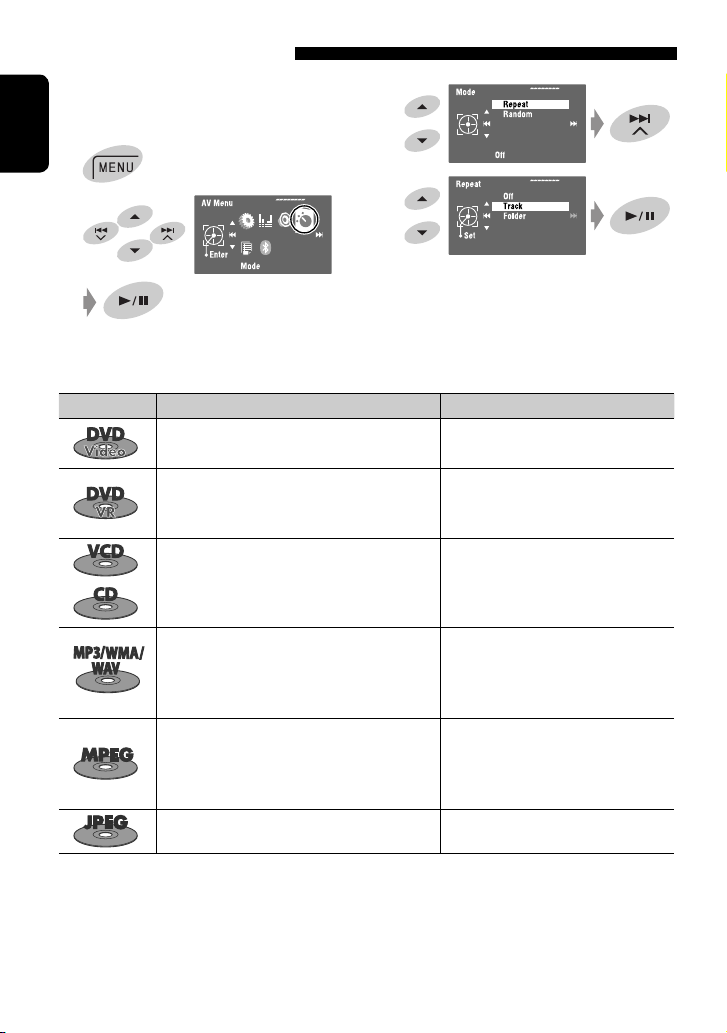
Selecting playback modes
You can use Repeat or Random playback mode.
Ex.: To select Track Repeat
1
ENGLISH
2
Disc type Repeat Random
Chapter: Repeats current chapter.
Title: Repeats current title.
Chapter: Repeats current chapter.
Program: Repeats current program (not available
for Playlist playback).
Track: Repeats current track (for VCD: PBC not
in use).
3
4
When one of the playback modes is selected, the
corresponding indicator lights up on the source
information screen.
To cancel, select <Off> in step 4.
Disc (All): Randomly plays all tracks (for
—
—
VCD: PBC not in use).
Track: Repeats current track. Folder: Randomly plays all tracks of
current folder, then tracks of
next folders.
Folder: Repeats all tracks of the current folder. Disc (All): Randomly plays all tracks.
Track: Repeats current track. Folder: Randomly plays all tracks of
current folder, then tracks of
next folders.
Folder: Repeats all tracks of the current folder. Disc (All): Randomly plays all tracks.
Folder: Repeats all tracks of the current folder.
18
—
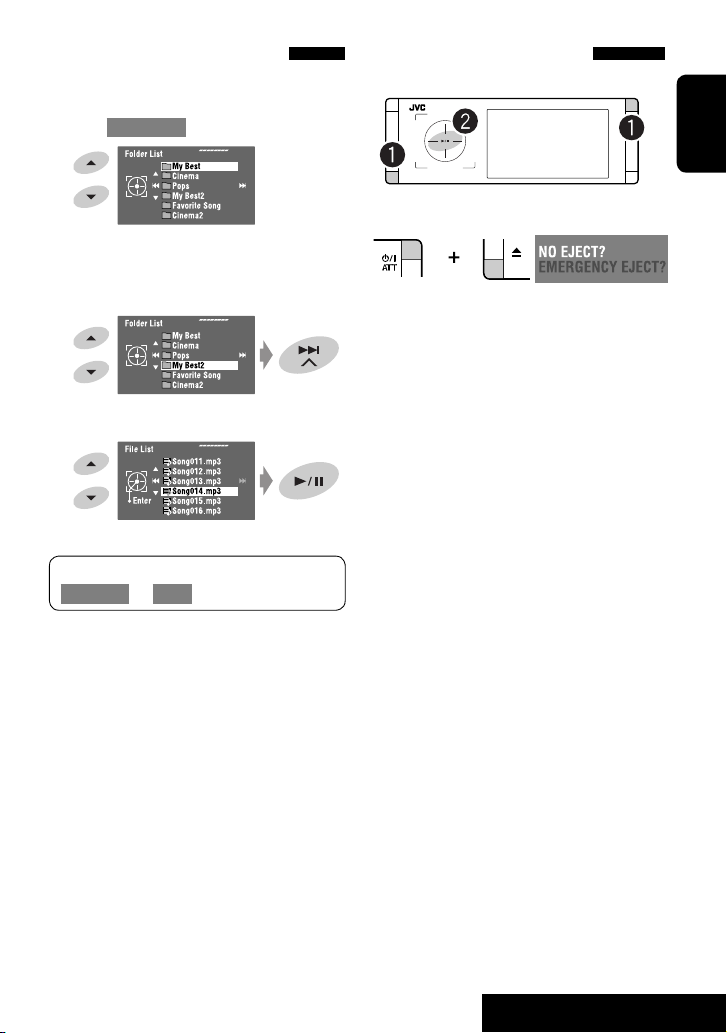
Selecting tracks on the list
If a disc includes folders, you can display the Folder/
Track (File) Lists, then start playback.
1 Enter <Folder List>.
Prohibiting disc ejection
You can lock a disc in the loading slot.
ENGLISH
[Hold]
• Hold the button to display the next/previous
folders.
2 Select a folder.
3 Select a file.
The Folder List can also be accessed through
<AV Menu> = <List>.
~ Hold the buttons at the same time.
[Hold]
Ÿ Activate the prohibition.
“No Eject” appears.
To cancel the prohibition, repeat the same procedure
to select <EJECT OK?>.
19
OPERATIONS
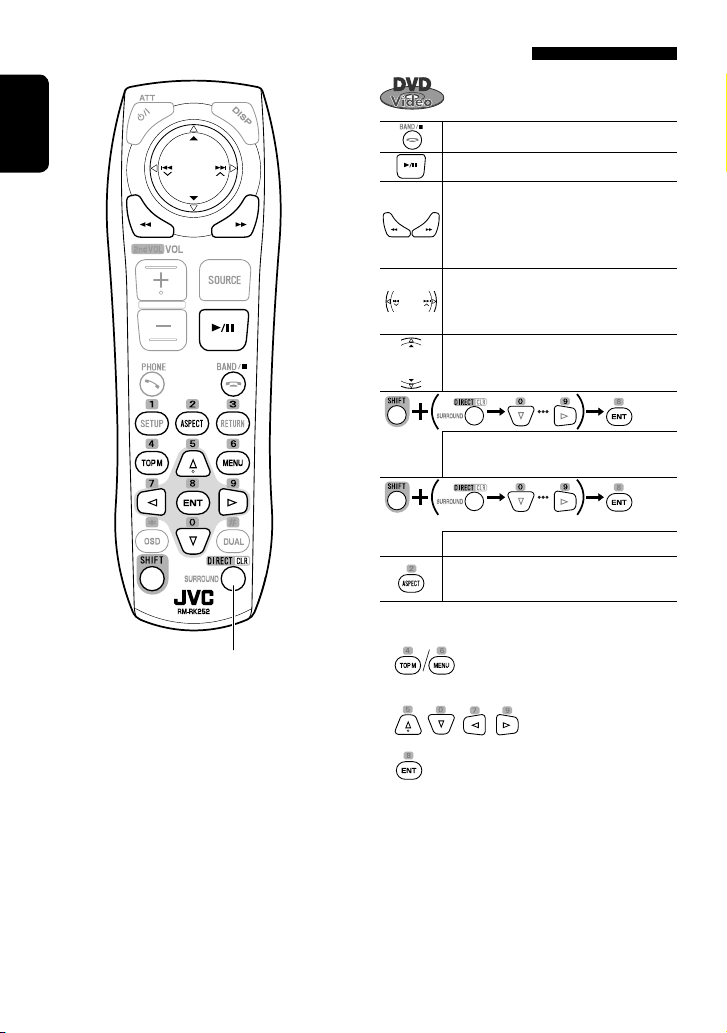
Operations using the remote controller—RM-RK252
ENGLISH
Also functions as CLR (clear):
Erases a misentry if pressed while
holding SHIFT.
Stops playback.
Starts or pauses playback.
• Reverse/forward search*1 (No sound
can be heard.)
• Slow motion*2 during pause. (No sound
can be heard.)
• Selects chapter (during playback or
pause).
• Reverse/forward search*
Selects title (during playback or pause).
• Selects chapter.
• Selects title (when not playing).
[Twice]
Selects title (during playback or pause).
Changes the aspect ratio of the playback
pictures.
Using menu driven features
1.
2. Select an item you want to start playback.
3
[Hold]
20
3.
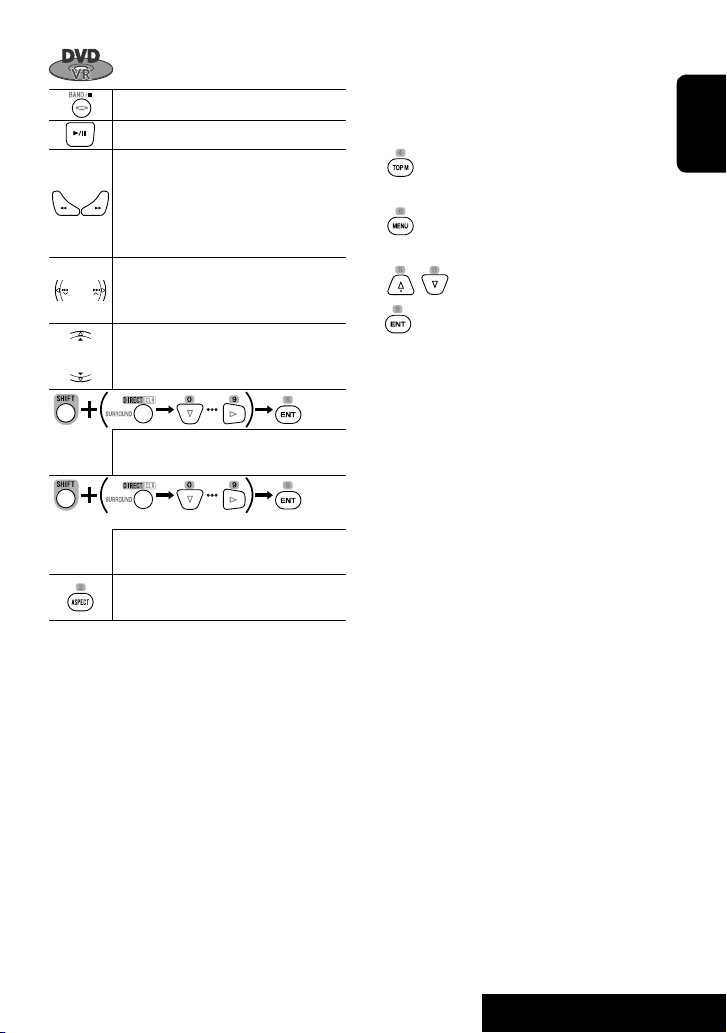
Stops playback.
Starts or pauses playback.
• Reverse/forward search*1 (No sound
can be heard.)
• Forward slow motion
*2
during pause.
(No sound can be heard.)
• Reverse slow motion does not work.
• Select chapter (during playback or
pause).
• Reverse/forward search*3 [Hold]
• Selects program.
• Selects Play List (during playback or
pause).
• Selects chapter.
• Selects program (when not playing).
[Twice]
Selects program/Play List (during
playback or pause).
Changes the aspect ratio of the playback
pictures.
Using Original Program/Play List screens
(☞ page 24)
1. For Original Programs:
ENGLISH
For Play List:
2. Select the item you want to start playback.
3.
*1 Search speed: x2 ] x5 ] x10 ] x20 ] x60
*2 Slow motion speed: 1/32 ] 1/16 ] 1/8 ] 1/4
] 1/2
*3 Search speed: x2 ] x10
21
OPERATIONS
ENGLISH
Also functions as CLR (clear):
Erases a misentry if pressed while
holding SHIFT.
Stops playback.
Starts or pauses playback.
Reverse/forward search*1 (No sound can
be heard.)
• Selects track.
• Reverse/forward search*
sound can be heard.)
Selects folder.
Selects track (within the same folder).
[Twice]
Selects folder.
Changes the aspect ratio of the playback
pictures.
While playing…
Back/advance the scenes by 5 minutes.
Current playback position
1st press
1st press 2nd press
2
[Hold] (No
3rd press2nd press
22
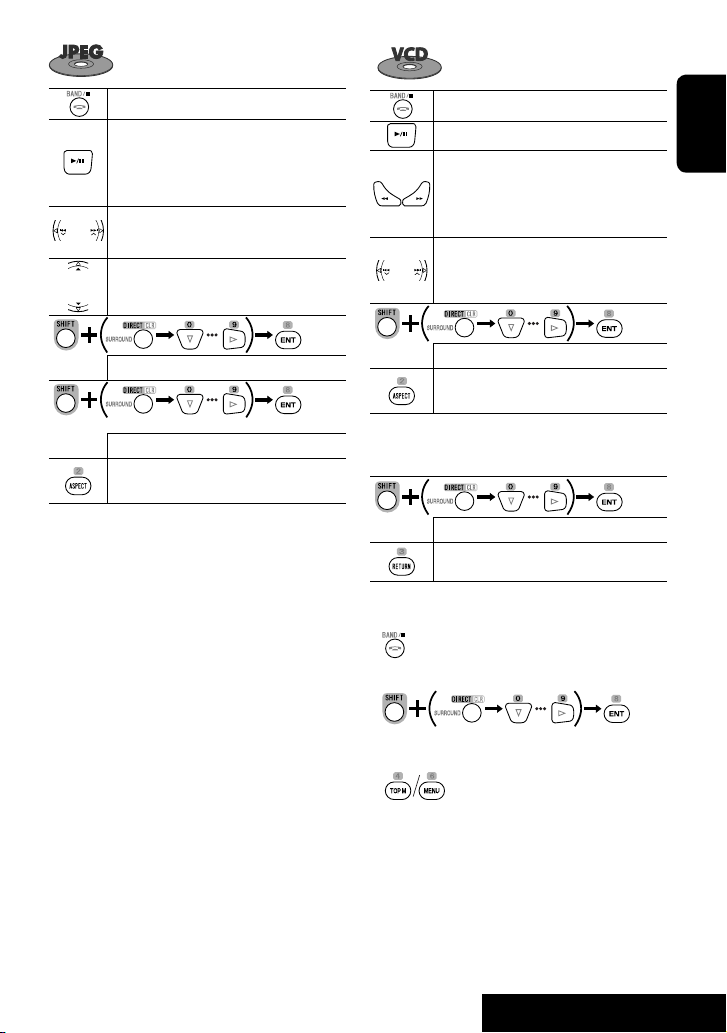
Stops playback.
Starts or pauses playback. (Slide show:
each track is shown for a few seconds.)
Shows the current file until you change it if
pressed during Slide show.
Selects track.
Selects folder.
Stops playback.
Starts or pauses playback.
• Reverse/forward search*
3
• Forward slow motion*4 during pause.
(No sound can be heard.)
• Reverse slow motion does not work.
• Selects track.
• Reverse/forward search*
5
[Hold] (No
sound can be heard.)
ENGLISH
Selects file (within the same folder).
[Twice]
Selects folder.
Changes the aspect ratio of the playback
pictures.
Selects track.
Changes the aspect ratio of the playback
pictures.
During PBC playback…
Selects an item on the menu.
Returns to the previous menu.
To cancel PBC playback
1
2 Start the desired track.
• To resume PBC:
*1 Search speed: ¡1 ] ¡2 ] ¡3
*2 Search speed: ¡1 ] ¡2
*3 Search speed: x2 ] x5 ] x10 ] x20 ] x60
*4 Slow motion speed: 1/32 ] 1/16 ] 1/8 ] 1/4
] 1/2
*5 Search speed: x2 ] x10
23
OPERATIONS
ENGLISH
Stops playback.
Starts or pauses playback.
Reverse/forward search*
• Selects track.
• Reverse/forward search*
1
2
[Hold]
Selects folder.
Selects track (within the same folder).
[Twice]
Selects folder.
Stops playback.
Starts or pauses playback.
Reverse/forward search*
1
• Selects track.
• Reverse/forward search*2 [Hold]
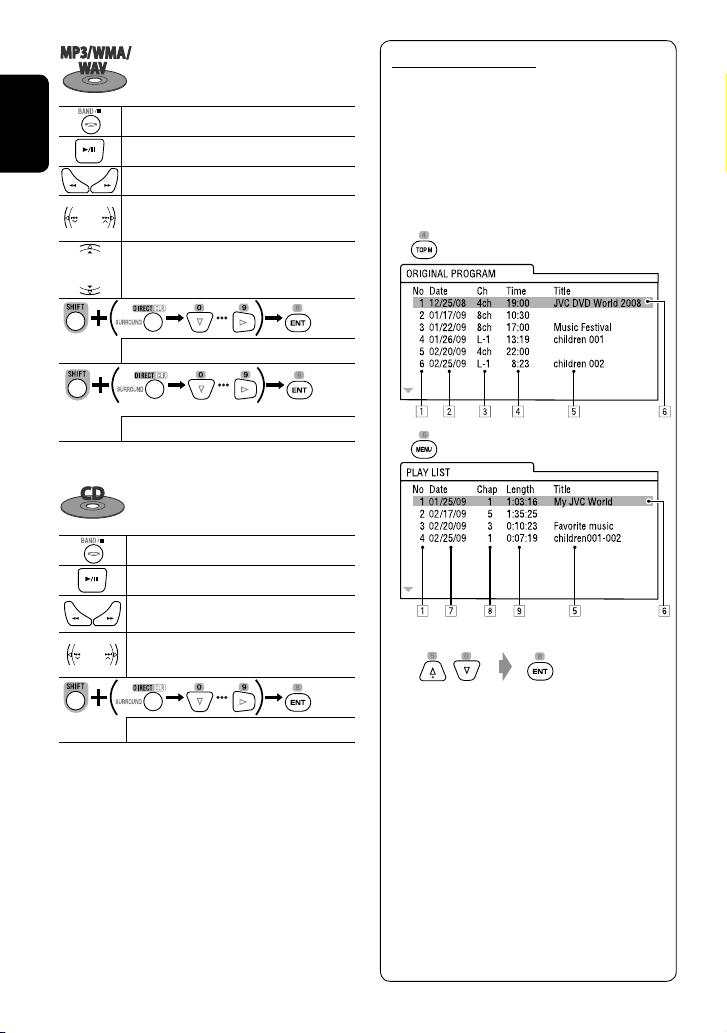
List screen for DVD-VR
You can use the Original Program and Play List
screen anytime while playing DVD-VR with its data
recorded.
• These screens can be displayed on the built-in
monitor and the external monitor.
1 Display the Original Program/Play List
screen.
2 Select the item you want.
Selects track.
1
Search speed: x2 ] x5 ] x10 ] x20 ] x60
*
*2 Search speed: x2 ] x10
1 Program/Play List number
2 Recording date
3 Recording source (TV station, the input
terminal of the recording equipment, etc.)
4 Start time of recording
5 Title of the program/Play List*
6 Highlighted bar (current selection)
7 Creating date of Play Lists
8 Total number of chapters
9 Playback time
3
*
The title of the original program or Play List may
not be displayed depending on the recording
equipment.
24
3
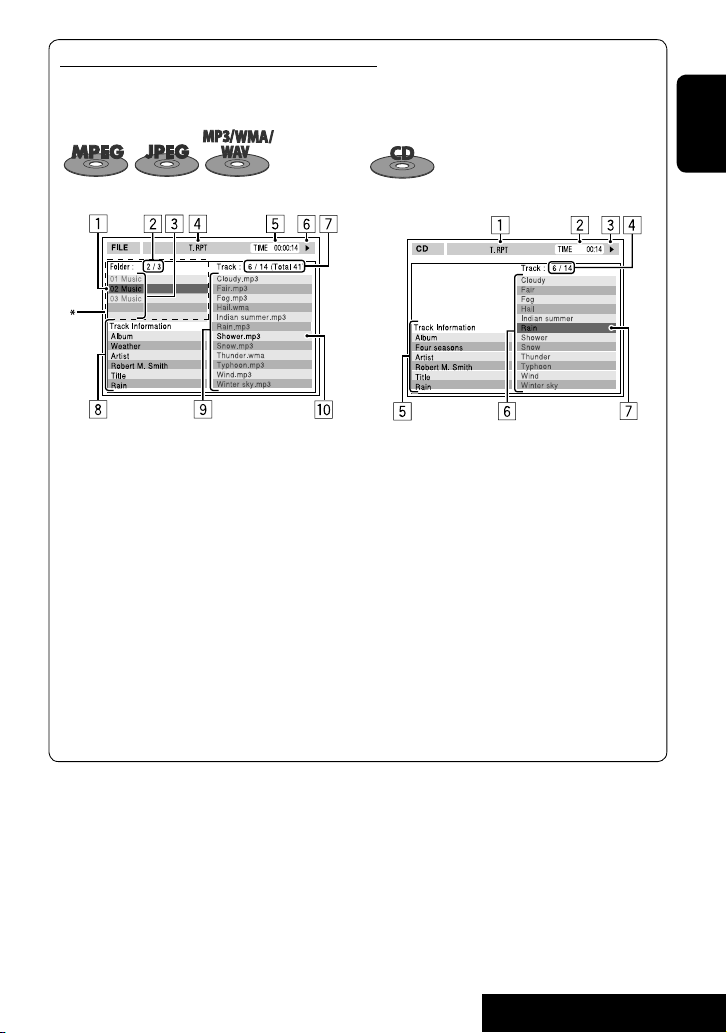
Disc information shown on the external monitor
The following screens appear only on the external monitor when you insert a disc. (For MPEG1/MPEG2/JPEG;
while not playing.)
ENGLISH
Ex.: MP3/WMA
1 Current folder (highlighted bar)
2 Current folder no./total folder no.
3 Folder list
* If tag data includes “Jacket Picture” (baseline JPEG), it
will be displayed.
4 Selected playback mode (☞ page 18)
5 Elapsed playing time of the current track (not
displayed for JPEG)
6 Operation status
7 Current track no./total number of tracks in the
current folder (total number of tracks on the disc)
8 Track information (only for MP3/WMA/WAV)
9 Track list
p Current track (highlighted)
Ex.: CD Text
1 Selected playback mode (☞ page 18)
2 Elapsed playing time of the current track
3 Operation status
4 Current track number/total number of tracks on
the disc
5 Track information
6 Track list
7 Current track (highlighted bar)
25
OPERATIONS

Operations using the on-screen bar (DVD/VCD/MPEG1/MPEG2/JPEG)
These operations are possible on the monitor using the remote controller.
~ Display the on-screen bar. (☞ page 27)
ENGLISH
Ÿ Select an item.
! Make a selection.
• When a pop-up menu appears…
• For entering time/numbers…
To move the entry position:
To select a number:
To remove the pop-up menu:
Repeat steps Ÿ and ! to set other items if needed.
To remove the on-screen bar
26
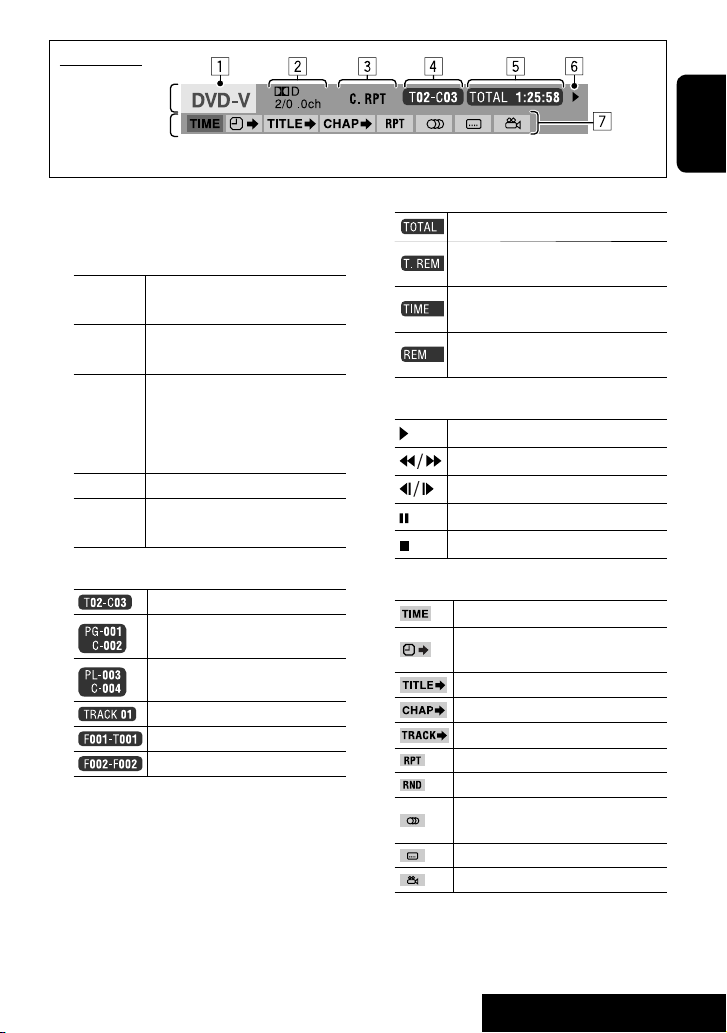
On-screen bar
Information
Operation
Above example is of DVD Video. Items shown on the bar vary depending on the disc type.
ENGLISH
1 Disc type
2 • DVD: Audio signal format
• VCD: PBC
3 Playback mode*
1
DVD Video C. RPT: Chapter repeat
T. RPT: Title repeat
DVD-VR C. RPT: Chapter repeat
PG. RPT: Program repeat
MPEG1/
MPEG2
T. RPT: Track repeat
F. RPT: Folder repeat
F. RND: Folder random
A. RND: All (disc) random
JPEG F. RPT: Folder repeat
VCD T. RPT: Track repeat
A. RND: All (Disc) random
4 Playback information
Current title/chapter
Current program/chapter
Current play list/chapter
Current track
Current folder/track
Current folder/file
5 Time indication
Elapsed playing time of the disc
• Remaining title time (for DVD)
• Remaining disc time (for others)
Elapsed playing time of the current
chapter/track*
Remaining time of the current chapter/
track*
6 Playback status
Play
Reverse/forward search
Reverse/forward slow-motion
Pause
Stop
7 Operation icons
Change time indication (see 5)
Time Search (Specify a certain scene
by entering the time.)
Title Search (by its number)
Chapter Search (by its number)
Track Search (by its number)
Repeat play*
Random play*
Change the audio language, audio
channel or audio stream
Change the subtitle language
Change the view angle
2
2
1
1
1
☞ page 18
*
*2 Not applicable for DVD-VR.
27
OPERATIONS
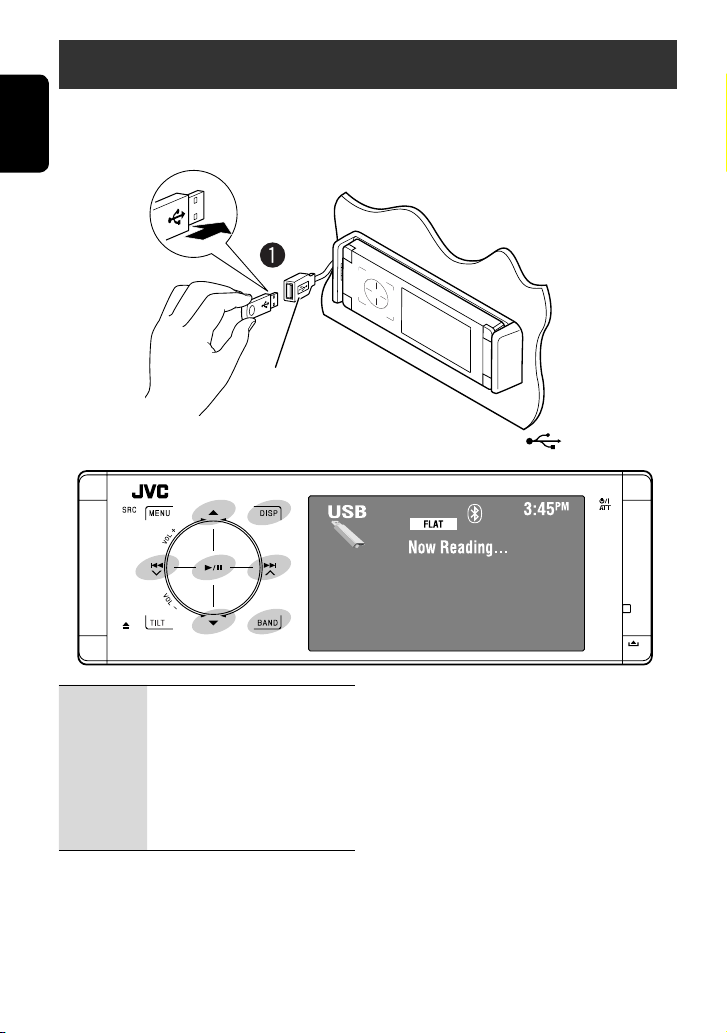
USB operations
You can connect a USB mass storage class device such as a USB memory, Digital Audio Player, portable HDD, etc. to
the unit.
• You can also connect the iPod/iPhone to the USB terminal of the unit. For details of the operations, ☞ pages 37
ENGLISH
and 38.
USB cable from the rear of the unit.
• You cannot connect a computer to the USB ( ) terminal of the unit.
4 ¢: Touch: Selects track
Hold: Reverse/forward search
5 ∞: Touch: Selects folder
Hold: Displays Folder List
3 / 8: Starts/pauses playback.
DISP:
BAND: Stops playback.
Touch if necessary. (☞ page 9)
~ Connect a USB device.
“USB” is selected as the source and playback
starts automatically.
This unit can play JPEG/MPEG1/MPEG2*/MP3/WMA/
WAV files stored on a USB mass storage class device.
• You can operate the USB device in the same way you
operate the files on discs. (☞ pages 18 to 27)
• All tracks on the USB device will be played repeatedly
until you change the source.
* Except for MPEG2 files recorded by JVC Everio camcorder
(extension code <.mod>).
28
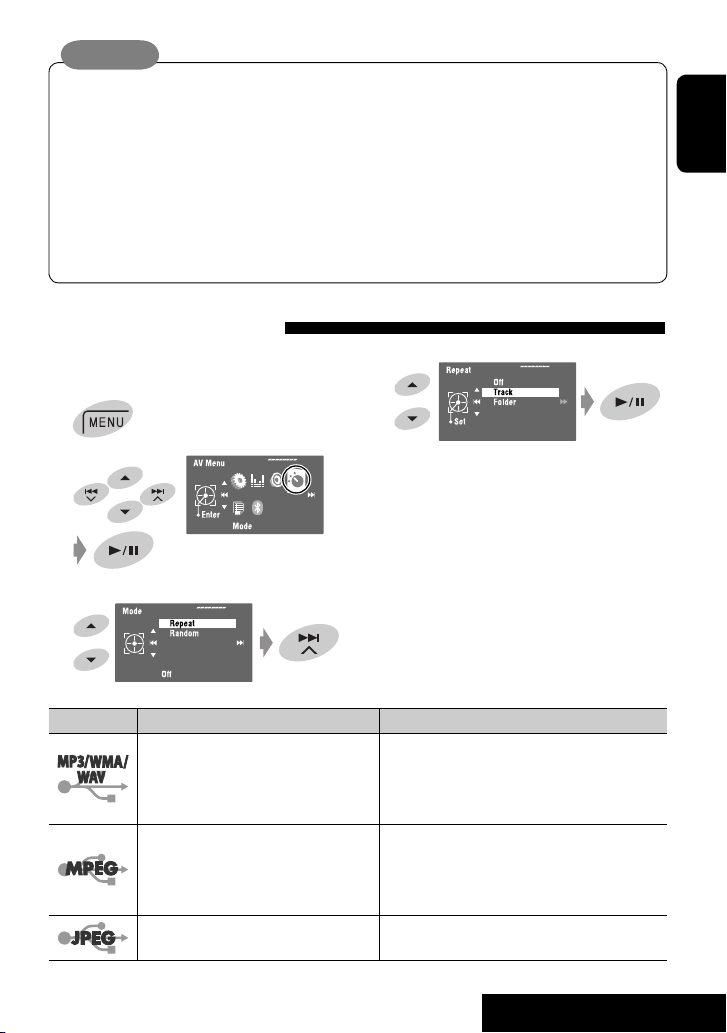
Caution:
• Avoid using the USB device if it might hinder your safety driving.
• Do not pull out and attach the USB device repeatedly while “Now Reading…” is flashing on the monitor.
• Do not start the car engine if a USB device is connected.
• Stop playback before disconnecting a USB device.
• Make sure all important data has been backed up to avoid losing the data.
• Electrostatic shock at connecting a USB device may cause abnormal playback of the device. In this case,
disconnect the USB device then reset this unit and the USB device.
• Do not leave a USB device in the car, expose to direct sunlight, or high temperature to avoid deformation or
cause damages to the device.
• For more details about USB operations, ☞ page 61.
Selecting playback modes
You can use Repeat or Random playback mode.
Ex.: To select Track Repeat
1
4
ENGLISH
2
When one of the playback modes is selected, the
corresponding indicator lights up on the source
information screen.
To cancel, select <Off> in step 4.
3
File type Repeat Random
Track: Repeats current track. Folder: Randomly plays all tracks of current
folder, then tracks of next folders.
Folder: Repeats all tracks of the current
folder.
Track: Repeats current track. Folder: Randomly plays all tracks of current
Folder: Repeats all tracks of the current
folder.
Folder: Repeats all tracks of the current
folder.
USB (All): Randomly plays all tracks.
folder, then tracks of next folders.
USB (All): Randomly plays all tracks.
29
—
OPERATIONS
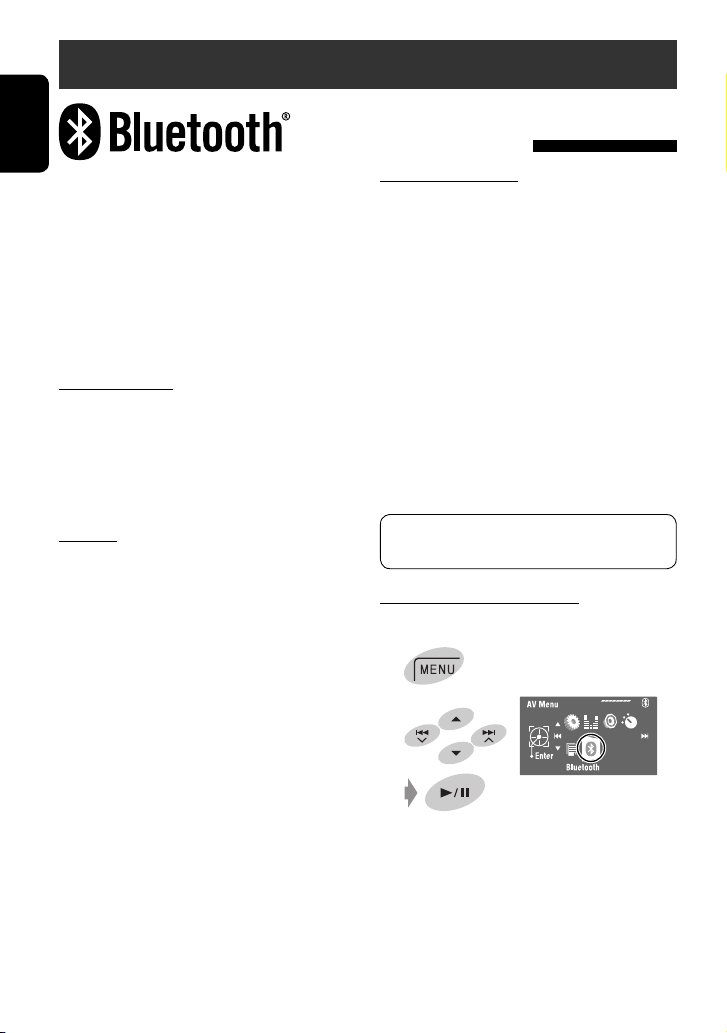
Bluetooth® operations — Cellular phone/audio player
Connecting a Bluetooth device
ENGLISH
Bluetooth is a short-range wireless radio
communication technology for the mobile device such
as mobile phones, portable PCs, and other devices. The
Bluetooth devices can be connected without cables and
communicate with each other.
• Refer to the list (included in the box) to see the
countries where you may use the Bluetooth®
function.
Bluetooth profile
This unit supports the following Bluetooth profiles;
HFP (Hands-Free Profile) 1.5
OPP (Object Push Profile) 1.1
A2DP (Advanced Audio Distribution Profile) 1.2
AVRCP (Audio/Video Remote Control Profile) 1.3
for the first time
Pairing and PIN Code
When you connect a Bluetooth device to the unit
for the first time, make pairing between the unit
and the device. Pairing allows Bluetooth devices to
communicate each other.
To make pairing, you may need to enter the PIN
(Personal Identification Number) code of your Bluetooth
device you want to connect.
• Once the connection is established, it is registered in
the unit even if you reset the unit. Up to five devices
can be registered in total.
• Only one device for Bluetooth phone and one for
Bluetooth audio can be connected at a time.
• To use the Bluetooth function, you need to turn on
Bluetooth function of the device.
Features
You can operate Bluetooth devices through the unit as
follows:
• Receiving a call
• Making a call—from phone book, from call history
(Redial and Received Call), by dialing number, by
preset numbers, by voice command
• Receiving the Text message
• Playing back a Bluetooth audio player
Refer also to the instructions supplied with the
Bluetooth device.
• The Bluetooth word mark and logos are owned by
the Bluetooth SIG, Inc. and any use of such marks
by Victor Company of Japan, Limited (JVC) is under
license. Other trademarks and trade names are those
of their respective owners.
Preparation: Operate the device to turn on its
Bluetooth function.
Registration (Pairing) method
Register and establish the connection with a device.
1
2
30
Loading…
KD-AVX40/KD-AVX20
For installation and connections, refer to the separate manual.Für den Einbau und die Anschlüsse siehe das eigenständige Handbuch.Pour l’installation et les raccordements, se référer au manuel séparé.Bijzonderheden over de installatie en aansluiting van het apparaat vindt u in de desbetreffende handleiding.
INSTRUCTIONS
BEDIENUNGSANLEITUNGMANUEL D’INSTRUCTIONSGEBRUIKSAANWIJZINGLVT1940-001A
[E]
DVD/CD RECEIVER
DVD-/CD-RECEIVERRÉCEPTEUR DVD/CDDVD/CD-RECEIVERFor canceling the display demonstration, see page 7.Zum Abbrechen der Displaydemonstration siehe Seite 7.Pour annuler la démonstration des affichages, référez-vous à la page 7.Zie bladzijde 7 voor het annuleren van de displaydemonstratie.Only for KD-AVX40EN, GE, FR, NL0109MNMMDWJEIN
Having TROUBLE with operation?
Please reset your unit
Refer to page of How to reset your unit
Haben Sie PROBLEME mit dem Betrieb?
Bitte setzen Sie Ihr Gerät zurück
Siehe Seite Zurücksetzen des Geräts
Vous avez des PROBLÈMES de fonctionnement?
Réinitialisez votre appareil
Référez-vous à la page intitulée Comment réinitialiser votre appareil
Hebt u PROBLEMEN met de bediening?
Stel het apparaat terug
Zie de pagina met de paragraaf Het apparaat terugstellen© 2009 Victor Company of Japan, Limited
Dear Customer,
This apparatus is in conformance with the valid European
directives and standards regarding electromagnetic
compatibility and electrical safety.
European representative of Victor Company of Japan, Limited
is:
JVC Technical Services Europe GmbH
Postfach 10 05 04
61145 Friedberg
Germany
Cher(e) client(e),
Cet appareil est conforme aux directives et normes
européennes en vigueur concernant la compatibilité
électromagnétique et à la sécurité électrique.
Représentant européen de la société Victor Company of Japan,
Limited :
JVC Technical Services Europe GmbH
Postfach 10 05 04
61145 Friedberg
Allemagne
Sehr geehrter Kunde, sehr geehrte Kundin,
dieses Gerät stimmt mit den gültigen europäischen Richtlinien
und Normen bezüglich elektromagnetischer Verträglichkeit
und elektrischer Sicherheit überein.
Die europäische Vertretung für die Victor Company of Japan,
Limited ist:
JVC Technical Services Europe GmbH
Postfach 10 05 04
61145 Friedberg
Deutschland
Geachte klant,
Dit apparaat voldoet aan de geldende Europese normen en
richtlijnen inzake elektromagnetische compatibiliteit en
elektrische veiligheid.
De Europese vertegenwoordiger van Victor Company of Japan,
Limited is:
JVC Technical Services Europe GmbH
Postfach 10 05 04
61145 Friedberg
Duitsland
Instructions DVD/CD RECEIVER KD-AVX40/KD-AVX20

1
KD-AVX40
Installation/Connection Manual
Manual de instalación/conexión
Manuel d’installation/raccordement
ENGLISH
This unit is designed to operate on 12 V DC, NEGATIVE ground
electrical systems. If your vehicle does not have this system, a
voltage inverter is required, which can be purchased at JVC car audio
dealers.
WARNINGS
• DO NOT install any unit or wire any cable in a location where;
– it may obstruct the steering wheel and gearshift lever operations,
as this may result in a traffic accident.
– it may obstruct the operation of safety devices such as air bags, as
this may result in a fatal accident.
– it may obstruct visibility.
• DO NOT operate any unit while manipulating the steering wheel, as
this may result in a traffic accident.
• The driver must not watch the monitor while driving. It may lead to
carelessness and cause an accident.
• If you need to operate the unit while driving, be sure to look around
carefully.
• If the parking brake is not engaged, “Parking Brake” appears on the
monitor, and no playback picture will be shown.
– This warning appears only when the parking brake lead is
connected to the parking brake system built in the car.
Notes on electrical connections:
•
Replace the fuse with one of the specified rating. If the fuse blows
frequently, consult your JVC car audio dealer.
•
It is recommended to connect speakers with a maximum power
of more than 50 W (both at the rear and at the front, with an
impedance of 4 Ω to 8 Ω).
If the maximum power is less than 50 W, change <Amplifier Gain>
setting to prevent the speakers from being damaged (see page 56 of
the INSTRUCTIONS).
•
To prevent short circuits, cover the terminals of the UNUSED leads
with insulating tape.
•
The heat sink becomes very hot after use. Be careful not to touch it
when removing this unit.
L
Rubber cushion
Cojín de goma
Amortisseur en
caoutchouc
F
Crimp connector
Conector de sujeción
Raccord à sertir
I
Washer (ø5)
Arandela (ø5)
Rondelle (ø5)
J
Lock nut (M5)
Tuerca de seguridad (M5)
Ecrou d’arrêt (M5)
M
Mounting bolt—M5 x 20 mm
(M5 x 13/16″)
Perno de montaje—M5 x 20 mm
(M5 x 13/16 pulgada)
Boulon de montage—M5 x 20 mm
(M5 x 13/16 pouces)
K
Handles
Manijas
Poignées
H
Batteries
Pilas
Piles
FRANÇAIS
Cet appareil est conçu pour fonctionner sur des sources de courant
continu de 12 V à masse NEGATIVE. Si votre véhicule n’offre pas ce
type d’alimentation, il vous faut un convertisseur de tension, que vous
pouvez acheter chez un revendeur d’autoradios JVC.
AVERTISSEMENTS
• N’INSTALLEZ aucun appareil ni aucun câble dans un endroit où:
– où il peut gêner l’accès au volant ou au levier de vitesse car cela
peut entraîner un accident de la circulation.
– où il peut gêner la manipulation de dispositifs de sécurité tels que
les airbags car cela peut entraîner un accident fatal.
– où il peut gêner la visibilité.
• NE COMMANDEZ pas l’appareil lors de la manipulation du volant
car cela peut entraîner un accident de la circulation.
• Le conducteur ne doit pas regarder le moniteur lorsqu’il conduit. Cela
peut lui faire perdre sa concentration et causer un accident.
• Si vous devez commander l’appareil pendant que vous conduisez,
assurez-vous de bien regarder autour de vous.
• Si le frein à main n’est pas engagé, “Parking Brake (Frein à Main)”
s’affiche sur le moniteur et aucune image de lecture n’apparaît.
– Cet avertissement apparaît uniquement quand le fil du frein de
stationnement est connecté au système de frein de stationnement
intégré à la voiture.
Remarques sur les connexions électriques:
• Remplacer le fusible par un de la valeur précisée. Si le fusible saute
souvent, consulter votre revendeur d’autoradios JVC.
• Il est recommandé de connecter des enceintes avec une puissance de
plus de 50 W (les enceintes arrière et les enceintes avant, avec une
impédance comprise entre 4 Ω et 8 Ω).
Si la puissance maximum est inférieure à 50 W, changez <Amplifier
Gain> pour éviter d’endommager vos enceintes (voir page 56 du
MANUEL D’INSTRUCTIONS).
• Pour éviter les court-circuits, couvrir les bornes des fils qui ne sont
PAS UTILISÉS avec de la bande isolante.
• Le dissipateur de chaleur devient très chaud après usage. Faire
attention de ne pas le toucher en retirant cet appareil.
Heat sink
Sumidero térmico
Dissipateur de chaleur
Required space for installation
Espacio requerido para la instalación
Espace nécessaire pour l’installation
Control panel
Panel de control
Panneau de commande
G
Remote controller
Control remoto
Télécommande
LVT1939-002A
[J]
0109MNMMDWJEIN
EN, SP, FR
© 2009 Victor Company of Japan, Limited
Parts list for installation and connection
Lista de piezas para instalación y conexión
Liste des pièces pour l’installation et raccordement
The following parts are provided for this unit. After checking them, please set them correctly.
Con esta unidad se suministran las siguientes piezas. Después de inspeccionarlas, colóquelas correctamente.
Les pièces suivantes sont fournies avec cet appareil. Après vérification, veuillez les placer correctement.
Dashboard
Tablero de instrumentos
Tableau de bord
ESPAÑOL
Esta unidad está diseñada para funcionar con 12 V de CC, con
sistemas eléctricos de masa NEGATIVA. Si su vehículo no posee
este sistema, será necesario un inversor de tensión, que puede ser
adquirido en los concesionarios de JVC de equipos de audio para
automóviles.
ADVERTENCIAS
• NO instale ningún receptor o tienda ningún cable en una ubicación
donde;
– Donde pueda obstruir la maniobra del volante de dirección y del
cambio de engranajes, con el consiguiente riesgo de accidentes
de tráfico.
– Donde pueda obstruir el funcionamiento de dispositivos de
seguridad tales como bolsas de aire, pues podría resultar en un
accidente fatal.
– Donde pueda obstruir la visibilidad.
• NO OPERE la unidad mientras está maniobrando el volante de
dirección, pues podría producirse un accidente de tráfico.
• El conductor no debe mirar el monitor mientras conduce. Podría
producirse un descuido, y causar un accidente.
• Si es necesario operar la unidad mientras maneja, asegúrese de
mirar atentamente en todas las direcciones.
• Si el freno de mano no está en uso, aparecerá “Parking Brake (Freno
de Mano)” en la pantalla y no se mostrará ninguna secuencia de
imagen.
– Esta advertencia aparece únicamente cuando el cable del freno de
estacionamiento se encuentra conectado al sistema del freno de
estacionamiento incorporado al automóvil.
Notas sobre las conexiones eléctricas:
• Reemplace el fusible por uno con la corriente especificada. Si el
fusible se quemase frecuentemente consulte con su concesionario
de JVC de equipos de audio para automóviles.
• Se recomienda conectar los altavoces con una potencia máxima de
más de 50 W (tanto atrás como adelante, con una impedancia de
4 Ω a 8 Ω).
Si la potencia máxima es de menos de 50 W, cambie <Amplifier
Gain> para evitar daños en los altavoces (consulte la página 56 del
MANUAL DE INSTRUCCIONES).
• Para evitar cortocircuitos, cubra los cables NO UTILIZADOS con cinta
aislante.
• El sumidero térmico estará muy caliente después del uso. Asegúrese
de no tocarlo al desmontar esta unidad.
C
Sleeve
Cubierta
Manchon
E
Power cord
Cordón de alimentación
Cordon d’alimentation
A
/
B
Hard case/Control panel
Estuche duro/Panel de control
Etui de transport/Panneau de commande
D
Trim plate
Placa de guarnición
Plaque d’assemblage
3 mm (1/8″)
5 mm (1/4″)
6 mm (1/4″)
Trim plate is detached on this illustration for explanation.
Para fines explicativos, se ha retirado la placa de guarnición en
esta ilustración.
La plaque de garniture est montrée détachée sur cette illustration
pour les besoins de l’explication.
N
Microphone
Micrófono
Microphone
O
Microphone clip
Presilla para micrófono
Attache de microphone
P
Microphone holder
Soporte del micrófono
Support de microphone
Instal_KDAVX40[J]f.indb 1
Instal_KDAVX40[J]f.indb 1
09.1.7 1:53:53 PM
09.1.7 1:53:53 PM
- Topics
- manualsbase, manuals,
- Collection
- manuals_jvc; manuals; additional_collections
- Language
- English
- Item Size
- 134.0M
- Addeddate
- 2020-06-13 03:44:03
- Identifier
- manualsbase-id-51328
- Identifier-ark
- ark:/13960/t7gr5rq6z
- Ocr
- ABBYY FineReader 11.0 (Extended OCR)
- Page_number_confidence
- 99.54
- Ppi
- 600
- Scanner
- Internet Archive Python library 1.9.3
comment
Reviews
There are no reviews yet. Be the first one to
.
100
Views
DOWNLOAD OPTIONS
download 1 file
ABBYY GZ download
Temporarily Unavailable
DAISY
For users with print-disabilities
Temporarily Unavailable
EPUB
download 1 file
FULL TEXT download
download 1 file
ITEM TILE download
download 1 file
PAGE NUMBERS JSON download
download 1 file
PDF download
download 1 file
SINGLE PAGE PROCESSED JP2 ZIP download
download 1 file
TORRENT download
download 12 Files
download 6 Original
SHOW ALL
IN COLLECTIONS
Manuals: JVC (Japan Victor Corporation) Manuals
The Manual Library
Additional Collections
Uploaded by
chris85
on