
View the manual for the JVC KD-X110 here, for free. This user manual comes under the category car radios and has been rated by 6 people with an average of a 8.4. This manual is available in the following languages: English. Do you have a question about the JVC KD-X110?
Ask your question here
Frequently asked questions
Can’t find the answer to your question in the manual? You may find the answer to your question in the FAQs about the JVC KD-X110 below.
What is bluetooth?
Bluetooth is a way of exchanging data wirelessly between electronic devices via radio waves. The distance between the two devices that exchange data can in most cases be no more than ten metres.
My car radio does not turn on, now what?
If your car radio does not turn on, it will not receive any power. Check that the red wire is connected to the contact power supply and the yellow wire to the constant power supply.
When is my volume too loud?
A volume above 80 decibels can be harmful to hearing. When the volume exceeds 120 decibels, direct damage can even occur. The chance of hearing damage depends on the listening frequency and duration.
How can I best clean my car radio?
A slightly damp cleaning cloth or soft, dust-free cloth works best to remove fingerprints. Dust in hard-to-reach places is best removed with compressed air.
What is the difference between FM and AM?
FM stands for Frequency Modulation and AM stands for Amplitude Modulation. The biggest difference between FM radio stations compared to AM radio stations is the sound quality.
Is the manual of the JVC KD-X110 available in English?
Yes, the manual of the JVC KD-X110 is available in English .
Is your question not listed? Ask your question here

KD-X210 / KD-X110
DIGITAL MEDIA RECEIVER
INSTRUCTION MANUAL
RÉCEPTEUR MULTIMÉDIA NUMÉRIQUE
MANUEL D’INSTRUCTIONS
ENGLISH
FRANÇAIS
Please read all instructions carefully before
operation to obtain the best possible performance
from the unit.
Veuillez lires les instructions attentivement avant
d’utiliser l’appareil afin d’obtenir les meilleures
performances possibles de l’appareil.
GET0946-001A [E/EN/EU]
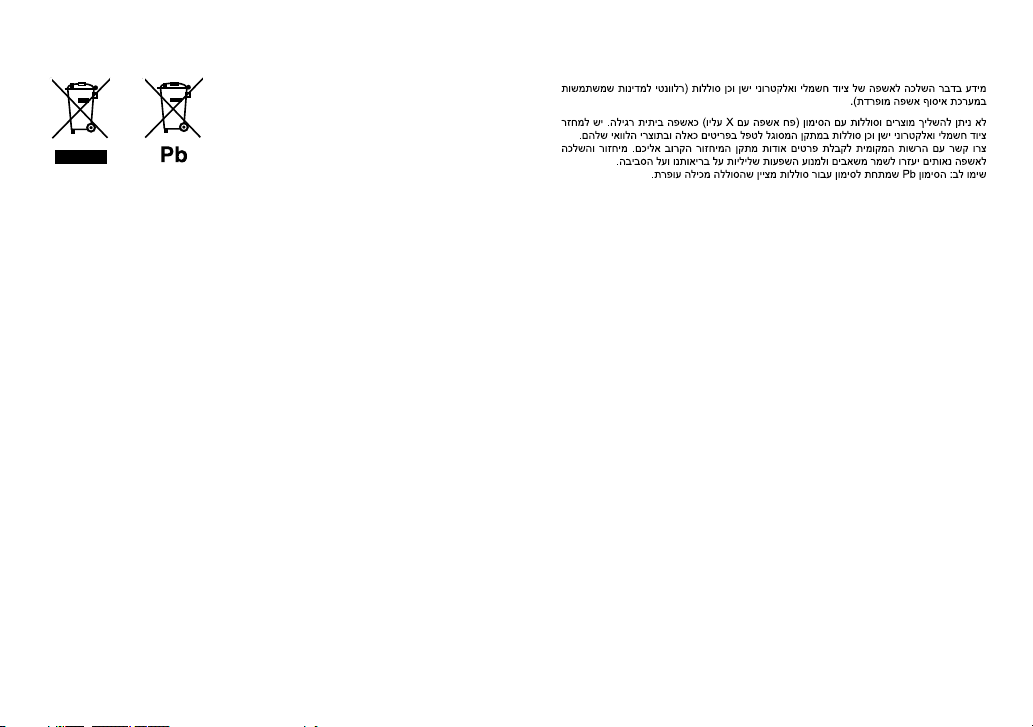
Information on Disposal of Old Electrical and Electronic Equipment and Batteries
(applicable for EU countries that have adopted separate waste collection systems)
Products and batteries with the symbol (crossed-out wheeled bin) cannot be disposed as
household waste.
Old electrical and electronic equipment and batteries should be recycled at a facility capable of
handling these items and their waste byproducts.
Contact your local authority for details in locating a recycle facility nearest to you. Proper
recycling and waste disposal will help conserve resources whilst preventing detrimental effects
on our health and the environment.
Notice: The sign “Pb” below the symbol for batteries indicates that this battery contains lead.
Information sur l’élimination des anciens équipements électriques et électroniques
et piles électriques (applicable dans les pays de l’Union Européenne qui ont adopté
des systèmes de collecte sélective)
Les produits et piles électriques sur lesquels le pictogramme (poubelle barrée) est apposé ne
peuvent pas être éliminés comme ordures ménagères.
Les anciens équipements électriques et électroniques et piles électriques doivent être recyclés
sur des sites capables de traiter ces produits et leurs déchets.
Contactez vos autorités locales pour connaître le site de recyclage le plus proche. Un recyclage
adapté et l’élimination des déchets aideront à conserver les ressources et à nous préserver des
leurs effets nocifs sur notre santé et sur l’environnement.
Remarque: Le symbole “Pb“ ci-dessous sur des piles électrique indique que cette pile contient
du plomb.
For Israel
i

Declaration of Conformity with regard to the EMC Directive 2004/108/EC
Declaration of Conformity with regard to the RoHS Directive 2011/65/EU
Manufacturer:
JVC KENWOOD Corporation
3-12, Moriya-cho, Kanagawa-ku, Yokohama-shi, Kanagawa, 221-0022, Japan
EU Representative’s:
JVC Technical Services Europe GmbH
Konrad-Adenauer-Allee 1-11, D-61118 Bad Vilbel, Germany
Déclaration de conformité se rapportant à la directive EMC 2004/108/EC
Déclaration de conformité se rapportant à la directive RoHS 2011/65/EU
Fabricant:
JVC KENWOOD Corporation
3-12, Moriya-cho, Kanagawa-ku, Yokohama-shi, Kanagawa, 221-0022, Japan
Représentants dans l’UE:
JVC Technical Services Europe GmbH
Konrad-Adenauer-Allee 1-11, D-61118 Bad Vilbel, Germany
ENGLISH |
ii
CONTENTS BEFORE USE
BEFORE USE 2
BASICS 3
GETTING STARTED 4
USB / iPod 5
RADIO 7
AUX 8
AUDIO SETTINGS 9
DISPLAY SETTINGS 10
MORE INFORMATION 11
TROUBLESHOOTING 12
SPECIFICATIONS 13
INSTALLATION /
CONNECTION 14
How to read this manual
• Operations are explained mainly
using buttons on the faceplate of
KD-X110
.
•
[XX]
indicates the selected items.
•
( XX)
indicates references are
available on the stated page.
Warning
Do not operate any function that takes your attention away from safe driving.
Caution
Volume setting:
• Adjust the volume so that you can hear sounds outside the car to prevent accidents.
• Lower the volume before playing digital sources to avoid damaging the speakers by the sudden increase of
the output level.
General:
• Avoid using the USB device or iPod/iPhone if it might hinder safe driving.
• Make sure all important data has been backed up. We shall bear no responsibility for any loss of recorded
data.
• Never put or leave any metallic objects (such as coins or metal tools) inside the unit, to prevent a short
circuit.
Remote control (RM-RK52):
• Do not leave the remote control in hot places such as on the dashboard.
• The Lithium battery is in danger of explosion if replaced incorrectly. Replace it only with the same or
equivalent type.
• The battery pack or batteries shall not be exposed to excessive heat such as sunshine, fire or the like.
• Keep the battery out of reach of children and in its original packaging when not in used. Dispose of used
batteries promptly. If swallowed, contact a physician immediately.
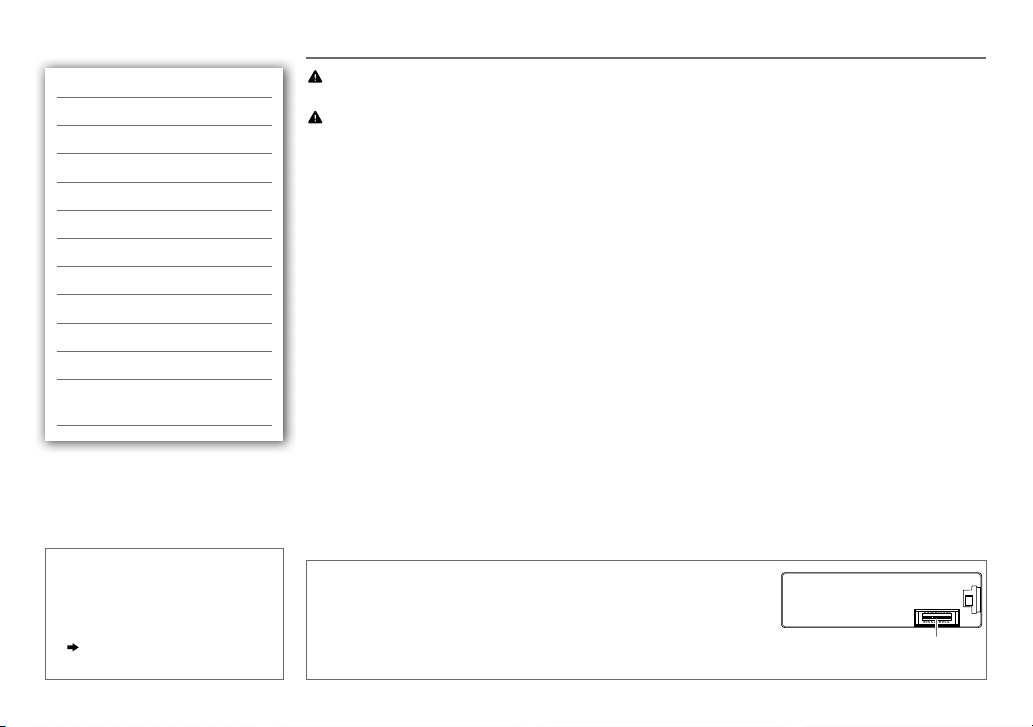
Maintenance
Cleaning the unit: Wipe off dirt on the faceplate with a dry silicone or soft
cloth.
Cleaning the connector: Detach the faceplate and clean the connector
gently with a cotton swab, being careful not to damage the connector.
Connector (on the reverse
side of the faceplate)
2
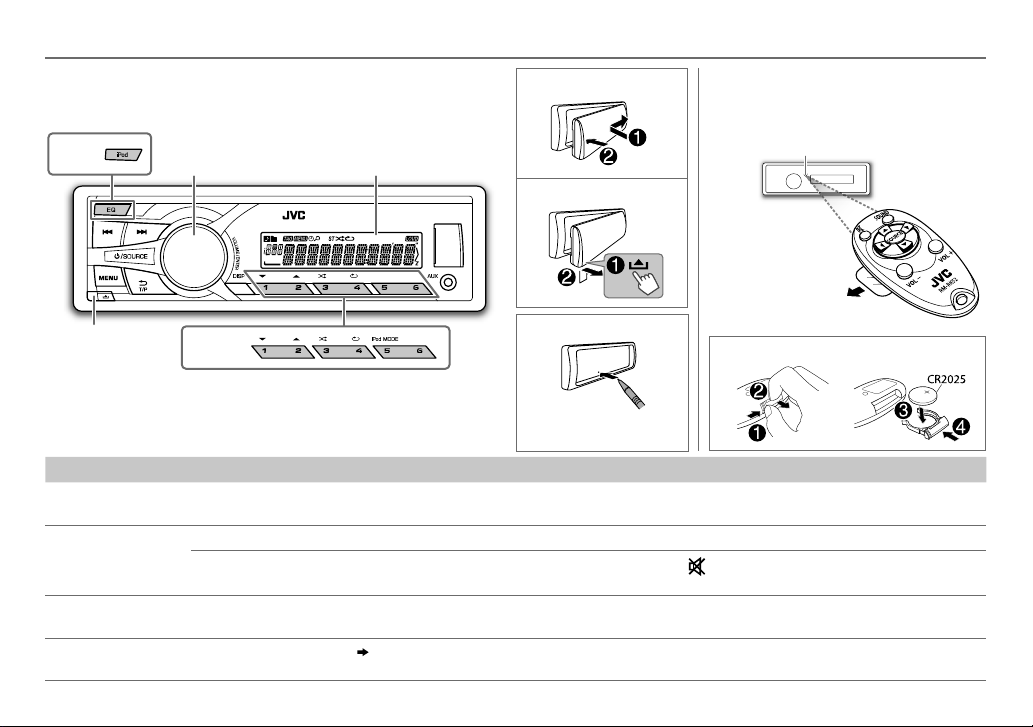
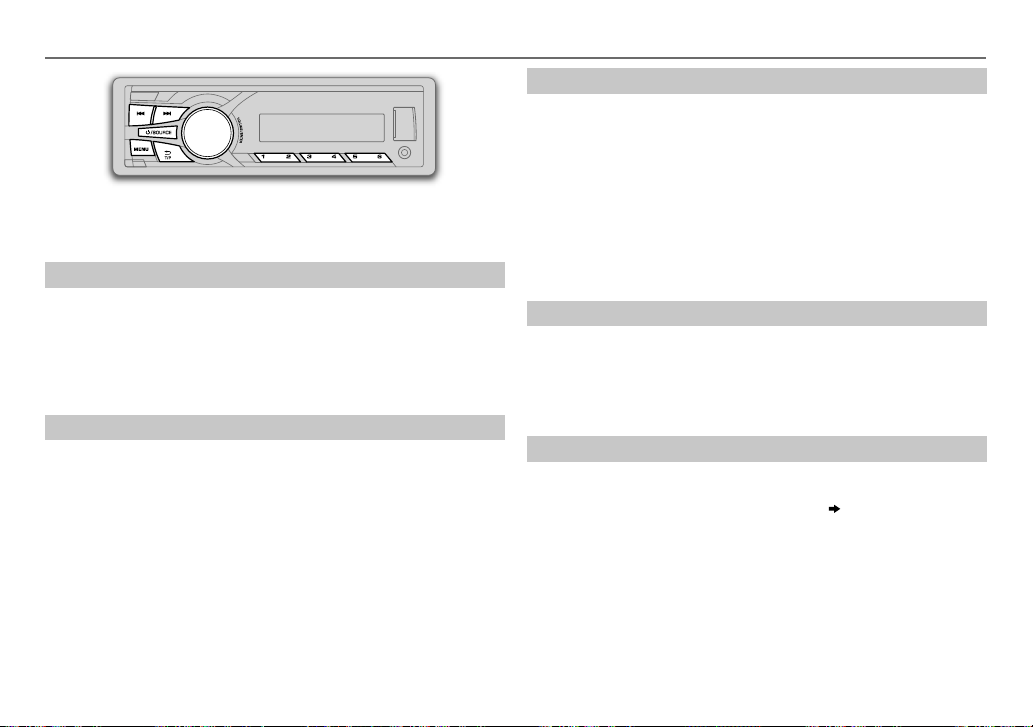
BASICS
Faceplate
KD-X210
Volume knob
(turn/press)
Display window
Attach
Detach
Detach
button
KD-X210
How to reset
Your preset adjustments
will also be erased.
To Do this (on the faceplate) Do this (on the remote control)
Turn on the power
Adjust the volume Turn the volume knob. Press VOL + or VOL –.
Select a source
Change the display
information
Press B /SOURCE.
• Press and hold to turn off the power.
Press the volume knob to mute the sound or pause playback.
• Press again to cancel.
• Press B /SOURCE repeatedly.
• Press B /SOURCE, then turn the volume knob within 2 seconds.
Press DISP repeatedly.
• Press and hold to scroll the current display information.
( 11)
Remote control (RM-RK52)
KD-X110
can be remotely controlled with an
optionally purchased remote control.
Remote sensor
(Do not expose to bright sunlight.)
Pull out the insulation sheet
when using for the first time.
How to replace the battery
( not available )
Press
to mute the sound or pause playback.
• Press again to cancel.
Press SOURCE repeatedly.
( not available )
ENGLISH |
3

GETTING STARTED
1
Cancel the demonstration
Press and hold MENU.
1
2 Turn the volume knob to select
3 Turn the volume knob to select
4 Press MENU to exit.
2
Set the clock
Press and hold MENU.
1
2 Turn the volume knob to select
3 Turn the volume knob to select
4 Turn the volume knob to make the settings, then press the knob.
Day
Hour Minute
5 Turn the volume knob to select
6 Turn the volume knob to select
knob.
7 Press MENU to exit.
3
Set the basic settings
Press and hold MENU.
1
2 Turn the volume knob to make a selection (see the following table),
then press the knob.
3 Press MENU to exit.
To return to the previous setting item or hierarchy, press T/P.
[DEMO]
, then press the knob.
[DEMO OFF]
[CLOCK]
[CLOCK SET]
[24H/ 12H]
[12 HOUR]
, then press the knob.
, then press the knob.
, then press the knob.
, then press the knob.
or
[24 HOUR]
, then press the
CLOCK
CLOCK ADJ
CLOCK DISP ON
SETTINGS
BEEP
SRC SELECT
AM
*
AUX
*
LANGUAGE
AUTO
:The clock time is automatically set using the Clock Time (CT) data in
FM Radio Data System signal.;
:The clock time is shown on the display even when the unit is turned
off.;
OFF
:Cancels.
ON
:Activates the keypress tone.;
ON
:Enables AM in source selection.;
ON
:Enables AUX in source selection.;
when the KS-BTA100 Bluetooth adapter is connected to the auxiliary input
jack
( 
. The source name will change to BTAUDIO.
Selects the display language for menu and Tag information (folder name, file
name, song title, artist name, album name) if applicable.
ENGLISH
:Display language is English.
РУССКИЙ
:Display language is Russian.
OFF
:Cancels.
OFF
:Deactivates.
OFF
OFF
:Disables.
:Disables.;
BT ADAPTER
F/W UPDATE
SYSTEM
F/W xxxx
* Not displayed when the corresponding source is selected.
YES
:Starts upgrading the firmware.; NO:Cancels (upgrading is not
activated).
For details on how to update the firmware, see:
<http://www.jvc.net/cs/car/>.
Default:
:Select
XX
4
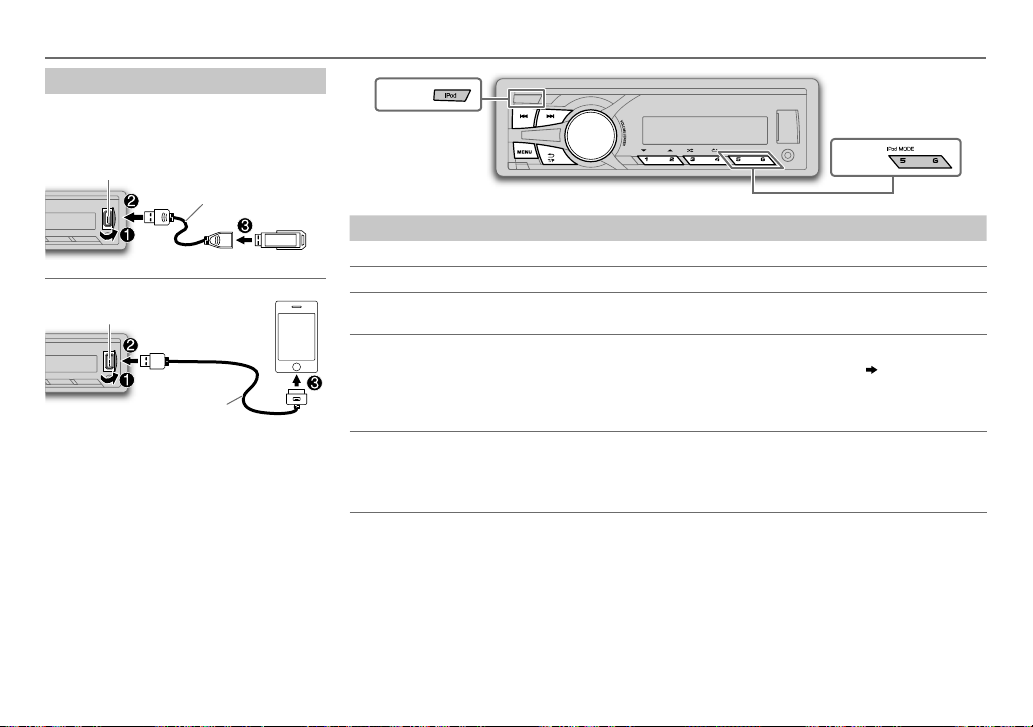
USB / iPod
Start playback
The source changes automatically and
playback starts.
USB
USB input terminal
USB 2.0 cable
*1
(commercially available)
iPod/iPhone (for
KD-X210
)
USB input terminal
1
(Accessory of the iPod/iPhone)
*
• You can also change the source from the
other source to iPod by pressing iPod.
Press 5 iPod MODE repeatedly to select the
control mode (
[HEAD MODE]
/
[IPHONE MODE]
).
KD-X210
To Do this
Select a file
Select a folder
Reverse/
*
Press S/ T (or press H / I on RM-RK52).
2
Press 1 K / 2 J (or press J / K on RM-RK52).
Press and hold S/ T (or press and hold H / I on RM-RK52).
Fast-forward
3
Repeat play
*
Press 4 repeatedly to make a selection.
• JVC Playlist Creator (JPC) / JVC Music Control (JMC) file
RPTOFF
• MP3/WMA/WAV/FLAC file: TRACKRPT, FOLDERRPT, RPTOFF
• iPod: ONE RPT, ALL RPT, RPT OFF
3
Random play
*
Press 3 repeatedly to make a selection.
• MP3/WMA/WAV/FLAC file or JPC / JMC file: FOLDERRND, ALLRND,
RNDOFF
• iPod: SONGRND, ALLRND, RNDOFF
1
*
Do not leave the cable inside the car when not using.
2
*
Only for MP3/WMA/WAV/FLAC files. This does not work for iPod.
3
*
For iPod: Applicable under
[HEAD MODE]
only.
KD-X210
( 11)
: TRACKRPT,
ENGLISH |
5

USB / iPod
Select a file from a list
For iPod: Applicable only when
[HEAD MODE]
is selected.
( 5)
1 Press MENU
2 Turn the volume knob to make a selection, then press the knob.
• MP3/WMA/WAV/FLAC file: Select the desired folder, then a file.
• iPod or JPC / JMC file: Select the desired file from the list (PLAYLISTS,
ARTISTS, ALBUMS, SONGS, PODCASTS*, GENRES, COMPOSERS*,
AUDIOBOOKS*).
*
Only for iPod.
If you have many files….
You can search through them quickly (on step
volume knob quickly.
• Not applicable for iPod.
2 above) by turning the
Select a song by name
(For
KD-X210
While listening to the iPod and
If you have many folders or files, you can search through them quickly
according to the first character (A to Z, 0 to 9 and OTHERS).
• “OTHERS” appear if the first character is other than Ato Z, 0 to 9.
)
[HEAD MODE]
is selected
( 5)
….
1 Press MENU .
2 Turn the volume knob to select the desired list, then press the
knob.
3 Press 1 K / 2 J or turn the volume knob quickly to select the desired
character.
4 Turn the volume knob to select the desired folder or file, then press
the knob.
Change the USB drive
When a smartphone (Mass Storage Class) is connected to the USB input
terminal, you can select its internal memory or external memory (such as an
SD card) to playback the stored songs.
You can also select the desired drive to playback when a multiple drives
device is connected.
Press number button 5 repeatedly to select the desired drive.
(or)
1 Press and hold MENU .
2 Turn the volume knob to select
3 Turn the volume knob to select
4 Press the volume knob to select
The next drive is selected automatically.
Repeat steps 1 to 4 to select the following drives.
Selectable items:
[DRIVE1]
to
[DRIVE5]
[USB/IPOD]
[USB]
, then press the knob.
, then press the knob.
[DRIVECHANGE]
.
Change the playback speed of the Audiobook
(For
KD-X210
While listening to the iPod and
)
[HEAD MODE]
is selected
( 5)
….
1 Press and hold MENU .
2 Turn the volume knob to select
3 Turn the volume knob to select
[USB/IPOD]
[IPOD]
, then press the knob.
, then press the knob.
4 Turn the volume knob to make a selection, then press the knob.
BOOK NORMAL
speed of the Audiobooks sound file in your iPod/iPhone.
(Default: Depends on your iPod/iPhone setting.)
• To return to the previous setting item or hierarchy, press T/P.
• To cancel, press MENU.
/
BOOK FASTER
/
BOOK SLOWER
: Select the desired playback
6
RADIO
“ST” lights up when receiving an FM stereo broadcast with sufficient
signal strength.
Search for a station
Press B /SOURCE to select FM or AM.
1
2 Press S/ T (or press H / I on RM-RK52) to search for a station
automatically.
(or)
Press and hold S/ T (or press and hold H / I on RM-RK52) until
“M” flashes, then press repeatedly to search for a station manually.
Store a station
You can store up to 18 stations for FM and 6 stations for AM.
While listening to a station….
Press and hold one of the number buttons (1 to 6) to store.
(or)
1 Press and hold the volume knob until “PRESETMODE” flashes.
2 Turn the volume knob to select a preset number, then press the
knob.
The preset number flashes and “MEMORY” appears.
• To select a stored station: Press one of the number buttons (1to6).
(or)
Press MENU, then turn the volume knob to select a preset number and
press the knob to confirm.
Search for your favorite program (PTY Search)
Available only for FM source.
1 Press and hold T/P.
2 Turn the volume knob to select a PTY code, then press the knob to
start searching.
If there is a station broadcasting a program of the same PTY code as
you have selected, that station is tuned in.
PTY code:
NEWS, AFFAIRS, INFO, SPORT, EDUCATE, DRAMA, CULTURE, SCIENCE, VARIED
POP M
(music),
ROCK M
(music),
EASY M
(music),
LIGHT M
(music),
(music),
WEATHER, FINANCE, CHILDREN, SOCIAL, RELIGION, PHONE IN, TRAVEL, LEISURE
JAZZ, COUNTRY, NATION M
(music),
OLDIES, FOLK M
(music),
CLASSICS, OTHER M
DOCUMENT
Activate TA Standby Reception
Available only for FM source.
Press T/P.
The unit will temporarily switch to Traffic Announcement (TA) (if
available) from any source other than AM.
• To deactivate, press T/P again.
Other settings
Press and hold MENU.
1
2 Turn the volume knob to select
3 Turn the volume knob to make a selection
knob.
[TUNER]
, then press the knob.
(
, then press the
4 Press MENU to exit.
To return to the previous setting item or hierarchy, press T/P.
,
,
ENGLISH |
7
RADIO
Default:
RADIO TIMER
SSM
IF BAND
MONO
NEWS-STBY*ON
REGIONAL*ON
AF SET
* Only for FM source.
8
Turns on the radio at a specific time regardless of the current source.
1 ONCE/ DAILY/ WEEKLY/ OFF
on.
2 FM/ AM
:Select the FM or AM band.
3 01
to 18 (for FM)/ 01 to 06 (for AM):Select the preset station.
4
Set the activation day and time.
• “
M
” lights up when complete.
Radio Timer will not activate for the following cases.
• The unit is turned off.
•
[OFF]
is selected for
selected.
( 4)
SSM 01 – 06
18 stations for FM. “SSM” stops flashing when the first 6 stations are stored.
Select
*
AUTO
adjacent FM stations. (Stereo effect may be lost.);
interference noises from adjacent FM stations, but sound quality will not be
degraded and the stereo effect will remain.
*
ON
OFF
OFF
control.;
*
ON
program in the same Radio Data System network with better reception
when the current reception is poor.;
/
SSM 07 – 12
SSM 07 – 12
:Increases the tuner selectivity to reduce interference noises from
:Improves the FM reception, but the stereo effect will be lost.;
:Cancels.
:The unit will temporarily switch to News Programme if available.;
:Cancels.
: Switches to another station only in the specific region using the “AF”
: Automatically searches for another station broadcasting the same
OFF
/
:Cancels.
:Select how often the timer will be turned
[AM]
in
[SRC SELECT]
/
SSM 13 – 18
SSM 13 – 18
after Radio Timer for AM is
:Automatically presets up to
to store the following 12 stations.
OFF
: Cancels.
WIDE
:Subjects to
AUX
XX
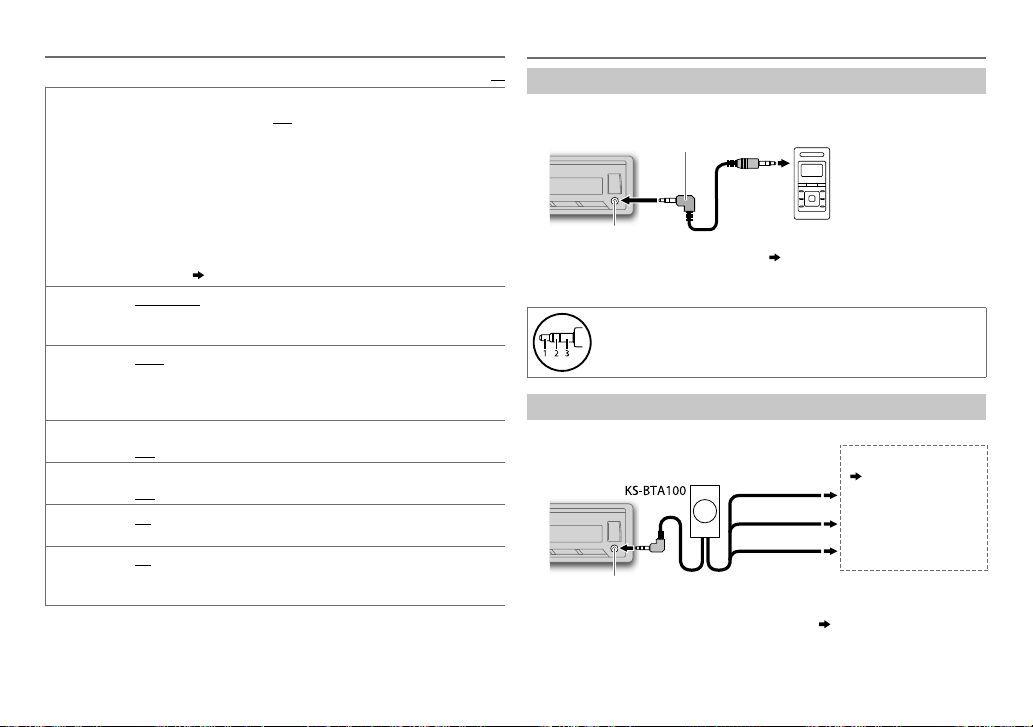
Use a portable audio player
Connect a portable audio player (commercially available).
1
2 Select
3 Press B /SOURCE to select AUX.
4 Turn on the portable audio player and start playback.
Use a Bluetooth® device
Connect the Bluetooth adapter, KS-BTA100 (separately purchased).
1
2 Register (pair) the Bluetooth device with KS-BTA100.
3 Select
4 Press B /SOURCE to select BT AUDIO.
5 Start using the Bluetooth device.
For details, refer to the instruction manual of KS-BTA100.
3.5mm stereo mini plug with “L” shaped connector
(commercially available)
Auxiliary input jack
[ON]
for
[AUX]
in
[SRC SELECT]. ( 4)
Use a 3-core plug head stereo mini plug for optimum audio
output.
Auxiliary input jack
[BT ADAPTER]
for
[AUX]
Portable audio player
Blue/white
Black
Brown
in
[SRC SELECT]. ( 4)
Wiring harness of the unit
( 15)
Blue/white: Remote
Black: Ground
Brown: Tel muting

AUDIO SETTINGS
(For
KD-X110
)
To Do this
Select a preset
equalizer
Store your
own sound
settings
Default:
* Displayed only when
to
[ON]. ( 9)
Other settings
Press and hold MENU.
1
2 Turn the volume knob to make a selection
then press the knob.
Repeat step 2 until the desired item is selected.
3 Press MENU to exit.
To return to the previous setting item or hierarchy, press GT/P.
Press EQ repeatedly.
(or)
Press EQ, then turn the volume knob within
2seconds.
FLAT (default), HARD ROCK, JAZZ, POP, R&B,
TALK, USER1, USER2, VOCAL BOOST, BASS BOOST,
CLASSICAL, DANCE
1 Press and hold EQ.
2 Turn the volume knob to select
00
the knob.
3 Turn the volume knob to select
then press the knob.
4 Turn the volume knob to make a selection, then
press the knob.
SUB.W *: –08 to +08
BASSLVL: –06 to +06
MIDLVL:–06to+06
TRELVL: –06 to +06
• To return to the previous setting item, press GT/P.
• To exit, press EQ.
[L/OMODE]
is set to
[SUB.W] ( 10)
(
see the following table),
[EASY EQ]
[USER1]
and
, then press
or
[SUB.W]
[USER2]
,
is set
EQ SETTING
EQ PRESET
EASY EQ
Default:
00
PRO EQ
AUDIO
2
BASS BOOST
LOUD 01
SUB.W LEVEL
SUB.W
SUB.WLPF
*
3
*
4
*
3
*
Default:
FLAT/
HARD ROCK/
VOCAL BOOST/
equalizer.
1 USER1/ USER2
2
Adjust your own sound settings.
SUB.W
MIDLVL: –06
1 USER1/ USER2
2 BASS
/
3
Adjust the sound elements of the selected sound tone.
BASS
Frequency: 60/ 80/
Level:
Q:
MIDDLE
Level:
Q:
TREBLE
Level:
Q:
+01
/
+02
/02:Boosts low or high frequencies to produce a well-balanced sound
at low volume.;
–08
—
+08(00
ON
/
OFF
: Turns on or off the subwoofer output.
THROUGH
MID85Hz
55Hz/ 85Hz/ 120Hz are sent to the subwoofer.
JAZZ/
POP/
R&B/
BASS BOOST/
:Select a preset name.
1
*
:
–08
to
+08/ BASSLVL: –06
to
+06/ TRELVL: –06
:Select a preset name.
MIDDLE
/
TREBLE
:Select a sound tone.
–06
to
Frequency:
Frequency:
: Selects your preferred bass boost level.;
:All signals are sent to the subwoofer. ;
/
HIGH 120Hz
Q1.0/ Q1.25/ Q1.5/ Q2.0 (
0.5/ 1.0/ 1.5/ 2.5 kHz
–06
to
Q0.75/ Q1.0/ Q1.25
10.0/ 12.5/ 15.0/ 17.5 kHz
–06
to
Q FIX
OFF
:Cancels.
):Adjusts the subwoofer output level.
:Audio signals with frequencies lower than
TALK/
CLASSICAL/
100/ 200 Hz
+06
+06
+06
DANCE
to
to
+06
(
USER1/
:Selects a preset
+06
/
Default: (
Default: (
(00)
(
Default: (
(00)
(
OFF
:Cancels.
LOW55Hz
USER2/
/
80 Hz
00
)
Q1.0
)
1.0 kHz
Q1.25
10.0 kHz
Q FIX
XX
)
)
)
)
)
ENGLISH |
9

2
5
*
*
FADER
2
5
*
BALANCE
VOLADJUST –05
*
R06
L06
—
—
—
F06(00
):Adjusts the front and rear speaker output balance.
R06(00
):Adjusts the left and right speaker output balance.
+05(00
):Presets the volume adjustment level of each source
AUDIO SETTINGS
(compared to the FM volume level). Before adjustment, select the source
you want to adjust. (“VOLADJFIX” appears if FM is selected.)
AMPGAIN LOWPOWER
:Limits the maximum volume level to 30. (Select if the
maximum power of each speaker is less than 50W to prevent damaging
the speakers.);
D.T.EXP
(Digital Track
Expander)
TELMUTING
ON
:Creates realistic sound by compensating the high-frequency
components and restoring the rise-time of the waveform that are lost in
audio data compression.;
6
*
ON
:Mutes the sounds while using the cellular phone (not connected
through KS-BTA100).;
L/OMODE SUB.W
HIGH POWER
/
REAR
:Selects whether rear speakers or a subwoofer are
:The maximum volume level is 50.
OFF
:Cancels.
OFF
:Cancels.
connected to the REAR/SW line out terminals on the rear panel (through an
external amplifier).
1
*
Displayed only when
[ON]
.
2
*
This adjustment will not affect the subwoofer output.
3
*
Displayed only when
4
*
Displayed only when
5
*
If you are using a two-speaker system, set the fader level to
6
*
Does not work if
[L/OMODE]
[SUB.W]
[L/OMODE]
[BTADAPTER]
is set to
[SUB.W]
is set to
[ON]
is set to
[SUB.W]
is selected for
and
[SUB.W]
.
.
[AUX]
in
[SRCSELECT].
is set to
[00]
.
( 4)
DISPLAY SETTINGS
1 Press and hold MENU.
2 Turn the volume knob to make a selection (see the following table),
then press the knob.
Repeat step
3 Press MENU to exit.
To return to the previous setting item or hierarchy, press GT/P.
DISPLAY
DIMMER
BRIGHTNESS
SCROLL
1
*
The illumination control wire connection is required.
2
*
Some characters or symbols will not be shown correctly (or will be blanked).
2 until the desired item is selected.
Selects the display and button illumination adjusted in the
setting.
AUTO
:Changes between the day and night adjustments when you turn off
or on the car headlights. *
1
; ON:Selects the night adjustments.;
the day adjustments.
Sets the button, display and USB input terminal brightness for day and night
separately.
1 DAY / NIGHT
2
Select a zone for setting.
3
Set the brightness level (00 to 31).
(Default:
*2ONCE
5-second intervals.;
:Select day or night.
( Illustration above)
BUTTON ZONE: DAY:25
DISP ZONE: DAY:31
;
;
NIGHT:12
:Scrolls the display information once.;
OFF
:Cancels.
NIGHT:09
)
AUTO
:Repeats scrolling at
( 15)
Default:
[BRIGHTNESS]
OFF
:Selects
XX
10

MORE INFORMATION
Playable files
• Playable audio file: MP3 (.mp3), WMA (.wma), WAV(.wav), FLAC (.flac)
• Playable USB device file system: FAT12, FAT16, FAT32
Even when audio files comply with the standards listed above, playback may be impossible
depending on the types or conditions of media or device.
About USB devices
• This unit can play MP3/WMA/WAV/FLAC files stored on a USB mass storage class device.
• You cannot connect a USB device via a USB hub.
• Connecting a cable whose total length is longer than 5m may result in abnormal playback.
• The maximum number of characters for:
— Folder names: 64 characters
— File names: 64 characters
— MP3 Tag: 64 characters
— WMA Tag: 64 characters
— WAV Tag: 64 characters
• This unit can recognize a total of 20 480 files, 999 folders (999 files per folder including folder
without unsupported files), and of 8 hierarchies.
• This unit cannot recognize a USB device whose rating is other than 5V and exceeds 1A.
About iPod/iPhone
• Made for
— iPod touch (1st, 2nd, 3rd, 4th, and 5th generation)
— iPod classic
— iPod nano (3rd, 4th, 5th, 6th and 7th generation)
— iPhone, iPhone 3G, 3GS, 4, 4S, 5
• It is not possible to browse video files on the “Videos” menu in
• The song order displayed on the selection menu of this unit may differ from that of the iPod/
iPhone.
• If some operations are not performed correctly or as intended, visit:
<http://www.jvc.net/cs/car/>.
[HEAD MODE]
.
About JVC Playlist Creator and JVC Music Control
• This unit supports the PC application JVC Playlist Creator and AndroidTM application JVC Music
Control.
• When you play audio file with song data added using the JVC Playlist Creator or JVC Music
Control, you can search for audio file by Genres, Artists, Albums, Playlists, and Songs.
• JVC Playlist Creator and JVC Music Control are available from the following web site:
<http://www.jvc.net/cs/car/>.
Available Cyrillic letters
Available characters
Display indications
Change the display information
Press DISP repeatedly.
FM
or AMStation name (PS)*1 Frequency Program type (PTY)*1*2 Title*1*2
USB
USB-IPOD
AUX
BT AUDIO
Day/Clock
*
*
Playing time Day/Clock Album title/Artist*3 Track title*3 Folder/file
name
*
Playing time Day/Clock Album title/Artist*4 Track title*4 (back to
the beginning)
*
AUX Day/Clock
BT AUDIO Day/Clock
(back to the beginning)
1
For FM Radio Data System stations only.
2
If unavailable, “NO PTY” / “NO TEXT” appears.
(back to the beginning)
3
If not recorded, “NO NAME” appears.
4
If not recorded, “NO NAME” appears.
ENGLISH |
11

TROUBLESHOOTING
Symptom Remedy
Sound cannot be heard. • Adjust the volume to the optimum level.
“MISWIRING CHK WIRING THEN
RESET UNIT” / “WARNING CHK
WIRING THEN RESET UNIT”
appears and no operations can
be done.
Source cannot be selected. Check the
Radio reception is poor. / Static
noise while listening to the radio.
Correct characters are not
displayed.
Playback order is not as intended. The playback order is determined by the file name (USB).
Elapsed playing time is not
correct.
“NOT SUPPORT” appears and
track skips.
“CANNOT PLAY” flashes and/
or connected device cannot be
detected.
“READING” keeps flashing. • Do not use too many hierarchical levels and folders.
The iPod/iPhone does not turn on
or does not work.
• Check the cords and connections.
Check to be sure the terminals of the speaker wires are
insulated properly, then reset the unit. If this does not solve
the problem, consult your nearest service center.
[SRC SELECT]
• Connect the antenna firmly.
• Pull the antenna out all the way.
This unit can only display uppercase letters, numbers, and
a limited number of symbols. The unit can also display
uppercase Cyrillic letters.
This depends on the recording process earlier.
Check whether the track is a playable format.
• Check whether the connected device is compatible with this
unit and ensure the files are in supported formats.
• Reattach the device.
• Reattach the USB device.
• Check the connection between this unit and iPod/iPhone.
• Detach and reset the iPod/iPhone using hard reset.
setting.
( 11)
( 4)
( 11)
( 11)
12
If you still have troubles, reset the unit. ( 3)

SPECIFICATIONS
FM Frequency Range 87.5MHz to 108.0MHz (50kHz step)
Usable Sensitivity (S/N=26dB) 0.71μV/75Ω
Quieting Sensitivity
(DINS/N=46dB)
Frequency Response (±3dB) 30Hz to 15kHz
Signal-to-Noise Ratio (MONO) 64dB
TUNER
Stereo Separation (1kHz) 40dB
AM Frequency Range MW 531kHz to 1611kHz (9kHz step)
Usable Sensitivity (S/N=20dB) MW 28.2μV
USB Standard USB1.1, USB2.0 (Full speed)
Compatible Devices Mass storage class
File System FAT12/16/32
Maximum Supply Current DC5V
D/A Converter 24 Bit
Frequency Response (±1dB) 20Hz to 20kHz
Signal-to-Noise Ratio (1kHz) 105dB
USB
Dynamic Range 88dB
Channel Separation 90dB
MP3 Decode Compliant with MPEG-1/2 Audio Layer-3
WMA Decode Compliant with Windows Media Audio
WAV Decode RIFF waveform Audio Format (Linear PCM only)
FLAC Decode FLAC files
2.0μV/75Ω
LW 153kHz to 279kHz (9kHz step)
LW 50μV
1A
Frequency Response (±3dB) 20Hz—20kHz
Input Maximum Voltage 1200mV
Auxiliary
Input Impedance 30kΩ
Maximum Output Power 50W×4
Output Power
(DIN 45324, +B = 14.4 V)
Speaker Impedance 4Ω—8Ω
Audio
Preout Level/Load (USB) 2500mV/10kΩ
Preout Impedance ≤600Ω
Operating Voltage 14.4V (10.5V—16V allowable)
Maximum Current Consumption 10A
Operating Temperature Range 0°C to +40°C
General
Installation Size (W×H×D) 182mm×53mm×106mm
Weight
Subject to change without notice.
30W×4
0.62k
g
ENGLISH |
13

Warning
• The unit can only be used with a 12V DC power supply, negative ground.
• Disconnect the battery’s negative terminal before wiring and mounting.
• Do not connect Battery wire (yellow) and Ignition wire (red) to the car
chassis or Ground wire (black) to prevent a short circuit.
• Insulate unconnected wires with vinyl tape to prevent a short circuit.
• Be sure to ground this unit to the car’s chassis again after installation.
Caution
• For safety’s sake, leave wiring and mounting to professionals. Consult the
car audio dealer.
• Install this unit in the console of your vehicle. Do not touch the metal
parts of this unit during and shortly after use of the unit. Metal parts such
as the heat sink and enclosure become hot.
• Do not connect the
(black), or connect them in parallel.
• Connect speakers with a maximum power of more than 50W. If the
maximum power of the speakers is lower than 50W, change the
[AMP GAIN]
•
Mount the unit at an angle of less than 30º.
• If your vehicle wiring harness does not have the ignition terminal,
connect Ignition wire (red) to the terminal on the vehicle’s fuse box
INSTALLATION / CONNECTION
which provides 12 V DC power supply and is turned on and off by the
ignition key.
• After the unit is installed, check whether the brake lamps, blinkers,
wipers, etc. on the car are working properly.
• If the fuse blows, first make sure the wires are not touching car’s chassis,
then replace the old fuse with one that has the same rating.
[
wires of speakers to the car chassis or Ground wire
setting to avoid damaging the speakers. (
10)
Basic procedure
1
Remove the key from the ignition switch, then
disconnect the [ terminal of the car battery.
2 Connect the wires properly.
See Wiring connection.
(15)
3 Install the unit to your car.
See Installing the unit (in-dash mounting).
4 Connect the [ terminal of the car battery.
5 Reset the unit.
(3)
Installing the unit (in-dash mounting)
Hook on the top side
Orientate the trim plate as
illustrated before fitting.
When installing without the mounting
sleeve
Use only the specified screws. Using wrong screws
might damage the unit.
Flat or round head screws
(not supplied) M5 × 8mm
Bracket (not supplied)
Do the required wiring.
(15)
Dashboard of
your car
Bend the appropriate tabs to
hold the sleeve firmly in place.
How to remove the unit
14

Wiring connection
To Blue/white wire of the
wiring harness
(D)
Remote wire (not supplied)
JVC Amplifier
Signal cord (not supplied)
Rear/subwoofer output
Part list for
installation
(A)
Faceplate
To the steering wheel
remote control adapter
For some VW/Audi or Opel (Vauxhall)
automobiles
You may need to modify the wiring of the
supplied power cord
(D)
as illustrated.
If the unit does not turn on with modified
wiring 1, use modified wiring 2 instead.
Y: Yellow R: Red
Original wiring
Modified wiring 1
( or )
Modified wiring 2
Fuse (10A)
Light blue/yellow
STEERING
WHEEL
REMOTE
(For
KD-X210
)
If your car does NOT have an
ISO terminal
* Custom wiring harness (separately
purchased)
IMPORTANT:
A custom wiring harness
(separately purchased) which is suitable for
your car is recommended for connection.
Aerial terminal
ISO connector
Pin
Color and function
A2 Brown : To mobile phone system
A4 Yellow : Battery
A5 Blue/White : Power control
A6 Orange/white : Car light control switch
A7 Red : Ignition (ACC)
A8 Black : Earth (ground) connection
B1
B2
B3
B4
B5
B6
B7
B8
Purple
Purple/black
Gray
Gray/black
White
White/black
Green
Green/black
: Rear speaker (right)
: Front speaker (right)
: Front speaker (left)
: Rear speaker (left)
(B)
Trim plate
(C)
Mounting sleeve
(D)
Wiring harness
(E)
Extraction key
ENGLISH |
15

TABLE DES MATIERES
AVANT L’UTILISATION 2
FONCTIONNEMENT DE BASE
PRISE EN MAIN 4
USB / iPod 5
RADIO 7
AUX 8
RÉGLAGES AUDIO 9
RÉGLAGES D’AFFICHAGE 10
PLUS D’INFORMATIONS 11
GUIDE DE DÉPANNAGE 12
SPÉCIFICATIONS 13
INSTALLATION /
RACCORDEMENT 14
3
AVANT L’UTILISATION
Avertissement
N’utilisez aucune fonction qui risque de vous distraire de la conduite sure de votre véhicule.
Précautions
Réglage du volume:
• Ajustez le volume de façon à pouvoir entendre les sons extérieurs à la voiture afin d’éviter tout risque d’accident.
• Réduisez le volume avant de reproduire des sources numériques afin d’éviter d’endommager les enceintes par la soudaine
augmentation du niveau de sortie.
Généralités:
• Évitez d’utiliser un périphérique USB ou un iPod/iPhone s’il peut gêner la conduite en toute sécurité.
• Assurez-vous que toutes les données importantes ont été sauvegardées. Nous ne pouvons pas être tenu responsable pour toute
perte des données enregistrées.
• Veuillez faire en sorte de ne jamais mettre ou laisser d’objets métalliques (tels que des pièces ou des outils) dans l’appareil, afin
d’éviter tout risque de court-circuit.
Télécommande (RM-RK52):
• Ne laissez pas la télécommande dans des endroits exposés à la chaleur, comme sur le tableau de bord par exemple.
• La pile au lithium risque d’exploser si elle est remplacée incorrectement. Ne la remplacez uniquement qu’avec le même type de
pile ou son équivalent.
• Le boîtier de la pile ou les piles ne doivent pas être exposés à des chaleurs excessives telles que les rayons du soleil, du feu, etc.
• Gardez la pile hors de la portée des enfants et dans son emballage d’origine quand elle n’est pas utilisée. Débarrassez-vous des
piles usagées rapidement. En cas d’ingestion, contactez un médecin immédiatement.
Comment lire ce manuel
• Les opérations sont expliquées
principalement en utilisant les touches
de la façade du
•
[XX]
•
( XX)
disponibles aux page citées.
KD-X110
indique les éléments choisis.
indique que des références sont
.
2
Entretien
Nettoyage de l’appareil:
ou un chiffon doux.
Nettoyage du connecteur:
coton tige en faisant attention de ne pas endommager le connecteur.
Essuyez la saleté de la façade avec un chiffon sec au silicone
Détachez la façade et nettoyez le connecteur à l’aide d’un
Connecteur (sur la face arrière
de la façade)

FONCTIONNEMENT DE BASE
Façade
KD-X210
Bouton de volume
(tournez/appuyez)
Fenêtre d’affichage
Attachez
Détachez
Touche de
détachement
KD-X210
Comment réinitialiser
Vos ajustements préréglés sont
aussi effacés.
Pour Faire (sur la façade) Faire (sur la télécommande)
Mettez l’appareil sous
tension
Ajustez le volume Tournez le bouton de volume.
Sélectionner la source
Changez l’information
sur l’affichage
Appuyez sur
• Maintenez la touche enfoncée pour mettre l’appareil hors tension.
Appuyez sur le bouton de volume pour couper le son ou mettre la lecture en
pause.
• Appuyez une nouvelle fois pour annuler.
• Appuyez répétitivement sur
• Appuyez sur
Appuyez répétitivement sur
• Maintenez la touche enfoncée pour faire défiler les informations actuelles de
2 secondes.
l’affichage.
B /SOURCE
B /SOURCE
.
B /SOURCE
, puis tournez le bouton de volume avant
.
DISP. ( 11)
Télécommande (RM-RK52)
KD-X110
peut être commandé à distance avec une
télécommande vendue séparément.
Capteur de télécommande
(Ne l’exposez Pas à la lumière directe du soleil.)
Retirez la feuille d’isolant lors de la
première utilisation.
Comment remplacer la pile
( non disponible )
Appuyez sur
Appuyez sur
pause.
• Appuyez une nouvelle fois pour annuler.
Appuyez répétitivement sur
( non disponible )
VOL+
ou
VOL–
.
pour couper le son ou mettre la lecture en
SOURCE
.
FRANÇAIS |
3

PRISE EN MAIN
1
Annulez la démonstration
1
Maintenez enfoncée MENU.
2 Tournez le bouton de volume pour choisir
bouton.
3 Tournez le bouton de volume pour choisir
le bouton.
4 Appuyez sur MENU pour quitter.
2
Réglez l’horloge
1
Maintenez enfoncée MENU.
2 Tournez le bouton de volume pour choisir
bouton.
3 Tournez le bouton de volume pour choisir
le bouton.
4 Tournez le bouton de volume pour faire les réglages, puis appuyez sur
le bouton.
Jour Heure Minute
5 Tournez le bouton de volume pour choisir
le bouton.
6 Tournez le bouton de volume pour choisir
appuyez sur le bouton.
7 Appuyez sur MENU pour quitter.
3
Faites les réglages de base
1
Maintenez enfoncée MENU.
2 Tournez le bouton de volume pour réaliser une sélection (voir le tableau
suivant), puis appuyez sur le bouton.
3 Appuyez sur MENU pour quitter.
Pour retourner à l’option de réglage ou à la hierarchie précédente, appuyez sur
4
[DEMO]
, puis appuyez sur le
[DEMOOFF]
[CLOCK]
[CLOCKSET]
[24H/ 12H]
[12 HOUR]
, puis appuyez sur
, puis appuyez sur le
, puis appuyez sur
, puis appuyez sur
ou
[24 HOUR]
, puis
T/P
CLOCK
CLOCK ADJ
CLOCK DISP ON
AUTO
:L’horloge est réglée automatiquement à l’aide des données d’horloge (CT) comprises
dans les données du signal FM Radio Data System.;
:L’horloge apparaît sur l’affichage même quand l’appareil est hors tension.;
OFF
:Annulation.
OFF
SETTINGS
BEEP
ON
:Met en service la tonalité des touches.;
OFF
:Met hors service la fonction.
SRC SELECT
AM
*
AUX
*
LANGUAGE
ON
:Met en service AM dans la sélection de la source.;
ON
:Met en service AUX dans la sélection de la source.;
Sélectionnez ce réglage quand l’adaptateur Bluetooth KS-BTA100 est connecté à la prise
d’entrée auxiliaire
Sélectionnez la langue d’affichage pour les menus et les informations des balises (nom de
dossier, nom de fichier, titre du morceau, nom de l’artiste, nom de l’album) si applicable.
ENGLISH
РУССКИЙ
( 8)
. Le nom de la source change sur BT AUDIO.
:La langue d’affichage est l’anglais.
:La langue d’affichage est le russe.
F/W UPDATE
SYSTEM
F/W xxxx
* Pas d’affichage quand la source correspondante est sélectionnée.
.
YES
:Démarrer la mise à niveau du micrologiciel.; NO:Annulation (la mise à niveau n’est
pas activée).
Pour en savoir plus sur la mise à niveau du micrologiciel, référez-vous à:
<http://www.jvc.net/cs/car/>.
:Annulation.
OFF
:Hors service.
OFF
:Hors service.;
Défaut:
BTADAPTER
XX
:

USB / iPod
Démarrez la lecture
La source change automatiquement et le lecture
démarre.
USB
Prise d’entrée USB
iPod/iPhone (pour
Prise d’entrée USB
(Accessoire du iPod/iPhone)
• Vous pouvez aussi changer la source à partir d’une
autre source sur iPod en appuyant sur
Appuyez répétitivement sur
sélectionner le mode de commande (
[IPHONE MODE]
KD-X210
).
*1
Câble USB 2.0
(en vente dans le commerce)
)
1
*
iPod.
5 iPod MODE
pour
[HEAD MODE]
/
KD-X210
Pour Faire
Sélectionnez un fichier
Sélectionnez un
2
*
dossier
Recherche rapide vers
l’arrière/vers l’avant
Répéter la lecture
Lecture aléatoire
1
*
Ne laissez pas le câble à l’intérieur de la voiture quand il n’est pas utilisé.
2
*
Uniquement pour les fichiers MP3/WMA/WAV/FLAC. Cela ne fonctionne pas pour l’iPod.
3
*
Pour iPod:
*
*
Applicable uniquement avec
Appuyez sur
Appuyez sur 1 K / 2 J (ou appuyez sur J / K sur la RM-RK52).
Maintenez pressée
3
Appuyez répétitivement sur la touche 4 pour faire un choix.
• Fichier JVC Playlist Creator (JPC) / JVC Music Control (JMC)
• Fichier MP3/WMA/WAV/FLAC: TRACKRPT, FOLDER RPT, RPT OFF
• iPod: ONE RPT, ALL RPT, RPT OFF
3
Appuyez répétitivement sur la touche 3 pour faire un choix.
• Fichier MP3/WMA/WAV/FLAC ou fichier JPC / JMC: FOLDERRND, ALL RND, RND OFF
• iPod: SONG RND, ALL RND, RND OFF
S/ T
(ou appuyez sur H / I sur la RM-RK52).
S/ T
(ou maintenez pressée H / I sur la RM-RK52).
[HEADMODE]
.
( 11)
KD-X210
: TRACKRPT, RPT OFF
FRANÇAIS |
5

USB / iPod
Sélectionnez un fichier à partir d’une liste
Pour iPod
: Fonctionne uniquement quand
1 Appuyez sur MENU
2 Tournez le bouton de volume pour faire une sélection, puis appuyez sur
le bouton.
• Fichier MP3/WMA/WAV/FLAC: Sélectionnez le dossier souhaité, puis un fichier.
• iPod ou fichier JPC / JMC: Sélectionnez le fichier souhaité à partir de la liste
(PLAYLISTS, ARTISTS, ALBUMS, SONGS, PODCASTS
AUDIOBOOKS
*
Uniquement pour iPod.
S’il y a beaucoup de fichiers….
Vous pouvez faire une recherche rapidement (à l’étape
bouton de volume rapidement.
• Ne peut pas être utilisé pour iPod.
*
).
[HEADMODE]
est sélectionné.
*
, GENRES, COMPOSERS*,
2
ci-dessus) en tournant le
( 5)
Sélectionnez un morceau par son nom
(Pour
KD-X210
Pendant l’écoute de l’iPod et quand
Si vous avez beaucoup de dossiers ou de fichiers, vous pouvez faire une recherche parmi
eux rapidement à partir du premier caractère (A à Z, 0 à 9 et OTHERS).
• “OTHERS” apparaît si le premier caractère est autre que Aà Z, 0 à 9.
1 Appuyez sur MENU .
2 Tournez le bouton de volume pour choisir la station souhaitée, puis
3 Appuyez sur 1 K / 2 J ou tournez le bouton de volume rapidement pour
4 Tournez le bouton de volume pour choisir le dossier ou fichier souhaité,
)
[HEADMODE]
appuyez sur le bouton.
sélectionner le caractère souhaité.
puis appuyez sur le bouton.
est sélectionné
( 5)
….
Changez le lecteur USB
Quand un smartphone (périphérique à mémoire de grande capacité) est connecté à la
prise d’entrée USB, vous pouvez sélectionnez sa mémoire interne ou sa mémoire externe
(une carte SD par exemple) pour lire les morceaux mémorisés.
Vous pouvez aussi choisir le lecteur que vous souhaitez quand plusieurs lecteurs sont
connectés.
Appuyez répétitivement sur la touche numérique
(ou)
1 Maintenez enfoncée MENU .
2 Tournez le bouton de volume pour choisir
3 Tournez le bouton de volume pour choisir
4 Appuyez sur le bouton de volume pour sélectionner
Le lecteur suivant est sélectionné automatiquement.
Répétez les étapes
Options sélectionnables:
Change la vitesse de lecture des livres audio
(Pour
Pendant l’écoute de l’iPod et quand
1 Maintenez enfoncée MENU .
2 Tournez le bouton de volume pour choisir
3 Tournez le bouton de volume pour choisir
4 Tournez le bouton de volume pour faire une sélection, puis appuyez sur
(Défaut: Dépend du réglage de votre iPod/iPhone.)
• Pour retourner à l’option de réglage ou à la hierarchie précédente, appuyez sur
T/P
• Pour annuler, appuyez sur
5
pour choisir le lecteur souhaité.
[USB/IPOD]
le bouton.
bouton.
, puis appuyez sur
[USB]
, puis appuyez sur le
[DRIVECHANGE]
1
à 4 pour choisir les lecteurs suivants.
[DRIVE1]
à
[DRIVE5]
KD-X210
)
le bouton.
bouton.
le bouton.
BOOKNORMAL
souhaité du fichier sonore des livres audio dans votre iPod/iPhone.
/
BOOKFASTER
.
MENU
[HEADMODE]
/
BOOKSLOWER
.
est sélectionné
[USB/IPOD]
[IPOD]
: Choisissez la vitesse de lecture
( 5)
….
, puis appuyez sur
, puis appuyez sur le
.
6

RADIO
Recherche de votre programme préféré (recherche PTY)
Disponible uniquement pour la source FM.
1 Maintenez enfoncée T/P.
2 Tournez le bouton de volume pour sélectionner un code PTY, puis
S’il y a une station diffusant un programme du code PTY que vous avez choisi, la
“ST” s’allume lors de la réception d’une émission FM stéréo avec un signal suffisamment
fort.
Recherchez une station
1
Appuyez sur B /SOURCE pour choisir FM ou AM.
2 Appuyez sur S/ T (ou appuyez sur H / I sur la RM-RK52) pour
rechercher une station automatiquement.
(ou)
Maintenez en enfoncé S/ T (ou maintenez pressée H / I sur la
RM-RK52) jusqu’à ce que “M” clignote, puis appuyez répétitivement
dessus pour rechercher une station manuellement.
Code PTY:
POP M
(musique),
JAZZ, COUNTRY, NATION M
Mise en service de l’attente de réception TA
Disponible uniquement pour la source FM.
Appuyez sur
L’appareil commute temporairement sur l’annonce d’informations routières (TA) (s’il y en
a une), à partir de n’importe quelle source autre que AM.
• Pour désactiver, appuyez à nouveau sur
appuyez sur la bouton pour démarrer la recherche.
station est accordée.
NEWS, AFFAIRS, INFO, SPORT, EDUCATE, DRAMA, CULTURE, SCIENCE, VARIED
(musique),
ROCK M
(musique),
EASY M
(musique),
LIGHT M
(musique),
CLASSICS, OTHER M
WEATHER, FINANCE, CHILDREN, SOCIAL, RELIGION, PHONE IN, TRAVEL, LEISURE
(musique),
T/P
OLDIES, FOLK M
.
T/P
(musique),
.
DOCUMENT
,
,
Mémorisez une station
Vous pouvez mémoriser un maximum de 18 stations pour FM et de 6 stations pour AM.
Pendant l’écoute d’une station….
Maintenez pressée une des touches numériques (
(ou)
1 Maintenez enfoncé le bouton de volume jusqu’à ce que “PRESETMODE”
clignote.
2 Tournez le bouton de volume pour choisir un numéro de préréglage,
puis appuyez sur le bouton.
Le numéro de préréglage clignote et “MEMORY” apparaît.
Pour choisir une station mémorisée:
•
(
1
à 6).
(ou)
Appuyez sur
préréglé, puis appuyez sur le bouton pour valider.
MENU
, puis tournez le bouton de volume pour choisir un numéro
1
à 6) pour mémoriser.
Appuyez sur l’une des touches numériques
1
2 Tournez le bouton de volume pour choisir
3 Tournez le bouton de volume pour faire une sélection
4 Appuyez sur MENU pour quitter.
Pour retourner à l’option de réglage ou à la hierarchie précédente, appuyez sur
Autres paramètres
Maintenez enfoncée MENU.
bouton.
appuyez sur le bouton.
[TUNER]
, puis appuyez sur le
FRANÇAIS |
( 8)
, puis
T/P
.
7

RADIO
Défaut:
RADIO TIMER
SSM
IF BAND
MONO
NEWS-STBY*ON
REGIONAL*ON
AF SET
* Uniquement pour la source FM.
Met la radio sous tension à une heure spécifique quelle que soit la source actuelle.
1 ONCE/ DAILY/ WEEKLY/ OFF
minuterie.
2 FM/ AM
:Choisissez la bande FM ou AM.
3 01
à 18 (pour FM)/ 01 à 06 (pour AM):Sélectionnez la station préréglée.
4
Réglez l’heure et le jour de mise en service.
• “
M
” s’allume quand le réglage est terminé.
La minuterie de radio ne se met pas en service dans les cas suivants.
• L’appareil est mis hors tension.
•
[OFF]
est sélectionné pour
de radio pour AM.
SSM01–06
maximum de 18 stations pour FM. “SSM” s’arrête de clignoter quand les 6 premières stations
sont mémorisées. Sélectionnez
stations suivantes.
*
AUTO
adjacentes. (L’effet stéréo peut être perdu.);
adjacentes, mais la qualité du son n’est pas dégradée et l’effet stéréo est conservé.
*
ON
: Améliore la réception FM mais l’effet stéréo sera perdu.;
:L’appareil commute temporairement sur le programme d’information s’il est disponible.;
OFF
: Commute sur une autre station uniquement dans la région spécifiée, à l’aide de la
commande “AF”.;
*
ON
: Recherche automatiquement une autre station diffusant le même programme dans le
même réseau Radio Data System mais qui possède une meilleure réception quand la réception
actuelle est mauvaise.;
( 4)
/
SSM07–12
:Augmente la sélectivité du tuner pour réduire les interférences des stations FM
:Annulation.
OFF
:Annulation.
OFF
:Sélectionnez la fréquence de mise en service de la
[AM]
dans
/
SSM13–18
SSM07–12
: Annulation.
[SRCSELECT]
WIDE
après la sélection de la minuterie
: Prérègle automatiquement un
/
SSM13–18
pour mémoriser les 12
:Il y a des interférences des stations FM
OFF
:Annulation.
AUX
XX
Utilisation d’un lecteur audio portable
1
Connectez un lecteur audio portable (en vente dans le commerce).
2 Sélectionnez
3 Appuyez sur B /SOURCE pour choisir AUX.
4 Mettez sous tension le lecteur audio portable et démarrez la lecture.
Utilisation d’un périphérique Bluetooth®
1
Connectez l’adaptateur Bluetooth, KS-BTA100 (vendu séparément).
2 Enregistrement (pairage) d’un appareil Bluetooth avec le KS-BTA100.
3 Sélectionnez
4 Appuyez sur B /SOURCE pour choisir BT AUDIO.
5 Commencez à utiliser le périphérique Bluetooth.
Pour plus de détails, se reporter au manuel d’instructions du KS-BTA100.
Mini fiche stéréo de 3,5 mm avec connecteur en forme de “L”
(en vente dans le commerce)
dans
[SRC SELECT]. ( 4)
Bleu/blanc
Noir
Marron
[AUX]
Lecteur audio portable
Faisceau de fils de l’appareil
( 15)
Bleu/blanc: Télécommande
Noir: Masse
Marron: Sourdine téléphonique
dans
[SRC SELECT]. ( 4)
Prise d’entrée auxiliaire
[ON]
pour
[AUX]
Utilisez une mini fiche stéréo munie d’une fiche à 3 connecteurs pour
obtenir une sortie audio optimum.
Prise d’entrée auxiliaire
[BT ADAPTER]
pour
8

RÉGLAGES AUDIO
(Pour
KD-X110
)
Pour Faire
Choisissez
un égaliseur
préréglé
Mémorisez
vos propres
ajustements
sonores
Défaut:
* Affichez uniquement quand
est réglé sur
Autres paramètres
1
Maintenez enfoncée MENU.
2 Tournez le bouton de volume pour réaliser une sélection
suivant
Répétez l’étape 2 jusqu’à ce que l’élément souhaité soit sélectionné.
3 Appuyez sur MENU pour quitter.
Pour retourner à l’option de réglage ou à la hierarchie précédente, appuyez sur
Appuyez répétitivement sur EQ.
(ou)
Appuyez sur EQ, puis tournez le bouton de volume
avant 2 secondes.
FLAT (défaut), HARD ROCK, JAZZ, POP, R&B, TALK, USER1, USER2,
VOCAL BOOST, BASS BOOST, CLASSICAL, DANCE
1 Maintenez pressée EQ.
2 Tournez le bouton de volume pour choisir
puis appuyez sur le bouton.
3 Tournez le bouton de volume pour choisir
00
[USER2]
4 Tournez le bouton de volume pour faire une sélection,
SUB.W *: –08 à +08
BASSLVL: –06 à +06
MIDLVL:–06 à +06
TRELVL: –06 à +06
• Pour retourner à l’option de réglage précédente, appuyez sur
• Pour quitter, appuyez sur
, puis appuyez sur le bouton.
puis appuyez sur le bouton.
T/P
.
EQ
[L/OMODE]
est réglé sur
.
[SUB.W] ( 10)
[ON]. ( 9)
(
)
, puis appuyez sur le bouton.
[EASY EQ]
[USER1]
et que
[SUB.W]
voir le tableau
ou
T/P
,
.
EQSETTING
EQPRESET
EASYEQ
Défaut:
00
PRO EQ
AUDIO
BASS BOOST
2
*
LOUD 01
3
SUB.W LEVEL
SUB.W
SUB.WLPF
*
4
*
3
*
Défaut:
FLAT
/
HARD ROCK
VOCALBOOST
préréglé.
1 USER1/ USER2
2
Ajustez vos propres ajustements sonores.
SUB.W
MIDLVL:–06
1 USER1/ USER2
2 BASS
3
Ajustez les éléments sonores de la tonalité de son choisie.
BASS
Niveau:
Q:
MIDDLE
Niveau:
Q:
TREBLE
Niveau:
Q:
+01
/
+02
/02:Accentue les basses ou hautes fréquences pour produire un son plus équilibré aux
faibles niveaux de volume.;
–08
—
ON
/
OFF
THROUGH
MID85Hz
85 Hz/ 120 Hz sont envoyés sur le caisson de grave.
/
JAZZ
/
POP
/
R&B
/
TALK
/
/
BASSBOOST
1
*
:
–08
/
MIDDLE
Fréquence: 60/ 80/
/
CLASSICAL
:Sélectionnez un nom préréglé.
à
+08/ BASSLVL: –06
à
+06/ TRELVL: –06
:Sélectionnez un nom préréglé.
/
TREBLE
:Choisissez une tonalité de son.
100/ 200Hz
–06
à
+06
Q1.0/ Q1.25/ Q1.5/ Q2.0
Fréquence:
0.5/ 1.0/ 1.5/ 2.5 kHz
–06
à
+06
Q0.75/ Q1.0/ Q1.25
Fréquence:
: Choisit votre niveau préféré d’accentuation des graves.;
+08(00
: Active ou désactive la sortie de caisson de grave.
:Tous les signaux sont envoyés au caisson de grave. ;
/
HIGH120Hz
10.0/ 12.5/ 15.0/ 17.5 kHz
–06
à
+06
QFIX
OFF
:Annulation.
):Ajuste le niveau de sortie du caisson de grave.
:Les signaux audio avec des fréquences inférieures à 55 Hz/
USER1
/
DANCE
à
+06
/
à
+06
(
Défaut: (
/
USER2
/
: Choisit un égaliseur
Défaut: (
80 Hz
00
)
(
Q1.0
1.0 kHz
(00)
(
Q1.25
Défaut: (
10.0 kHz
(00)
(
QFIX
OFF
:Annulation.
LOW55Hz
/
)
)
)
)
XX
)
)
FRANÇAIS |
9

2
5
*
*
FADER
R06
—
F06(00
2
5
*
BALANCE
VOLADJUST –05
AMPGAIN LOWPOWER
D.T.EXP
(Extension
numérique de plage)
TELMUTING
L/OMODE SUB.W
*
*
*
*
*
*
*
L06
comparaison avec le niveau de volume FM). Avant un ajustement, choisissez la source que
vous souhaitez ajuster. (“VOLADJFIX” apparaît si FM est choisi.)
maximum de chaque enceinte est inférieure à 50 W pour éviter tout dommage des
enceintes.);
ON
:Crée un son réaliste en compensant les composants haute fréquence et en rétablissant
le temps de montée de la forme d’onde qui est perdu lors de la compression des données
audio.;
6
*
ON
:Coupe le son pendant l’utilisation d’un téléphone portable (non connecté par le
KS-BTA100).;
1
Affichez uniquement quand
réglé sur
2
L’ajustement ne peut pas affecter la sortie du caisson de grave.
3
Affiché uniquement quand
4
Affiché uniquement quand
5
Si vous utilisez un système à deux enceintes, réglez le niveau du fader sur
6
Ne fonctionne pas si
prises de sortie de ligne REAR/SW sur le panneau arrière (à travers un amplificateur extérieur).
[ON]
.
):Ajustez la balance de sortie avant-arrière des enceintes.
—
R06(00
):Règle la balance de sortie gauche-droite des enceintes.
—
+05(00
):Prérègle le niveau d’ajustement du volume de chaque source (en
:Limite le volume maximum à 30. (Choisissez ce réglage si la puissance
HIGHPOWER
OFF
: Annulation.
OFF
/
REAR
[BTADAPTER]
:Le niveau de volume maximum est de 50.
:Annulation.
:Choisit si les enceintes arrière ou un caisson de grave sont connectés aux
[L/OMODE]
[SUB.W]
[L/OMODE]
est réglé sur
est réglé sur
est réglé sur
est sélectionné pour
RÉGLAGES AUDIO
[SUB.W]
et que
[SUB.W]
[ON]
.
[SUB.W]
.
[AUX]
dans
[SRCSELECT]
[00]
( 4)
est
.
RÉGLAGES D’AFFICHAGE
1 Maintenez enfoncée MENU.
2 Tournez le bouton de volume pour réaliser une sélection (voir le tableau
suivant), puis appuyez sur le bouton.
Répétez l’étape 2 jusqu’à ce que l’élément souhaité soit sélectionné.
3 Appuyez sur MENU pour quitter.
Pour retourner à l’option de réglage ou à la hierarchie précédente, appuyez sur G
DISPLAY
DIMMER
.
BRIGHTNESS
SCROLL
1
*
La connexion du fil de commande de l’éclairage est requise.
2
*
Certains caractères ou symboles n’apparaissent pas correctement (ou un blanc apparaît à leur place).
Permet de sélectionner l’éclairage de l’affichage et des touches ajusté dans le réglage
[BRIGHTNESS]
AUTO
les feux de la voiture. *
le jour.
Règle la luminosité des touches, de l’affichage et de la prise d’entrée USB séparément pour le
jour et la nuit.
1 DAY/ NIGHT
2
Choisissez une zone pour le réglage.
3
Réglez le niveau de luminosité (00 à 31).
2
*
ONCE
secondes d’intervalle.;
.
:Commute entre les réglages pour la journée et la nuit quand vous allumez ou éteignez
1
; ON:Choisit les réglages pour la nuit.;
:Choisissez le jour ou la nuit.
OFF
( illustration ci-dessus)
(Défaut:
BUTTONZONE: DAY:25
DISPZONE: DAY:31
:Fait défiler une fois les informations de l’affichage.;
OFF
:Annulation.
;
NIGHT:09
;
NIGHT:12
)
AUTO
:Répète le défilement à 5
( 15)
T/P
.
Défaut:
XX
:Choisit les réglages pour
10

PLUS D’INFORMATIONS
Fichiers pouvant être lus
• Fichier audio reproductible: MP3 (.mp3), WMA (.wma), WAV(.wav), FLAC (.flac)
• Systèmes de fichier de périphérique USB compatibles: FAT12, FAT16, FAT32
Même quand les fichiers audio sont conformes aux normes établies ci-dessus, il est possible que la lecture ne soit pas
possible suivant le type ou les conditions du support ou périphérique.
À propos des périphériques USB
• Cet appareil peut reproduire les fichiers MP3/WMA/WAV/FLAC mémorisés sur un périphérique USB à mémoire de
grande capacité.
• Vous ne pouvez pas connecter un périphérique USB via un hub USB.
• La connexion d’un câble dont la longueur totale dépasse 5 m peut avoir pour conséquence un fonctionnement
anormal de la lecture.
• Nombre maximum de caractère pour:
— Noms de dossier: 64 caractères
— Noms de fichier: 64 caractères
— Balises MP3: 64 caractères
— Balises WMA: 64 caractères
— Balises WAV: 64 caractères
• Cet appareil peut reconnaître un maximum de 20480 fichiers, 999 dossiers (999 fichiers par dossier y compris les
dossiers sans fichier) et 8 hiérarchies.
• Cet appareil ne peut pas reconnaître les périphériques USB dont l’alimentation n’est pas de 5 V et dépasse 1 A.
À propos de l’iPod/iPhone
• Made for
— iPod touch (1st, 2nd, 3rd, 4th et 5th generation)
— iPod classic
— iPod nano (3rd, 4th, 5th, 6th et 7th generation)
— iPhone, iPhone 3G, 3GS, 4, 4S, 5
• Il n’est pas possible de parcourir les fichiers vidéo sur le menu “Videos” en mode
• L’ordre des morceaux affichés sur le menu de sélection de cet appareil peut être différent de celui de iPod/iPhone.
• Si certaines opération ne sont pas effectuées correctement ou comme vous le souhaitez, consultez:
<http://www.jvc.net/cs/car/>.
[HEAD MODE]
.
À propos de JVC Playlist Creator et de JVC Music Control
• Cet appareil prend en charge l’application PC JVC Playlist Creator et l’application AndroidTM JVC Music Control.
• Quand vous reproduisez un fichier audio avec des données de chanson ajoutée en utilisant JVC Playlist Creator ou
• JVC Playlist Creator et JVC Music Control, sont disponibles à partir des sites web suivants:
Lettres cyrilliques disponibles
Changez l’information sur l’affichage
Appuyez répétitivement sur
JVC Music Control, vous pouvez rechercher des fichiers audio par genre, artiste, album, liste de lecture et chansons.
<http://www.jvc.net/cs/car/>.
Caractères disponibles
Indications sur l’affichage
DISP
.
FM
USB
USB-IPOD
AUX
BT AUDIO
Nom de la station (PS)*1 Fréquence Type de programme (PTY)*1*2 Titre*1*2 Jour/
ou
AM
Horloge
(retour au début)
1
*
Pour les stations FM Radio Data System uniquement.
2
*
Si elle n’est pas disponible, “NO PTY” / “NO TEXT” apparaît.
Durée de lecture Jour/Horloge Titre d’album/Artiste*3 Titre de plage*3 Noms de
dossier/fichier
3
*
Durée de lecture Jour/Horloge Titre d’album/Artiste*4 Titre de plage*4 (retour au
début)
4
*
AUX Jour/Horloge
BT AUDIO Jour/Horloge
(retour au début)
Si rien n’est enregistré, “NO NAME” apparaît.
Si rien n’est enregistré, “NO NAME” apparaît.
FRANÇAIS |
11

GUIDE DE DÉPANNAGE
Symptôme Remède
Le son ne peut pas être entendu. • Ajustez le volume sur le niveau optimum.
“MISWIRING CHK WIRING THEN RESET
UNIT” / “WARNING CHK WIRING THEN
RESET UNIT” apparaît et aucune opération
ne peut être réalisée.
Vous ne pouvez pas choisir la source.
La réception radio est mauvaise. / Bruit
statique pendant l’écoute de la radio.
Les caractères corrects ne sont pas affichés. Cet appareil peut uniquement afficher les lettres majuscules, les chiffres et
L’ordre de lecture n’est pas celui que
vous pensiez.
La durée de lecture écoulée n’est
pascorrecte.
“NOT SUPPORT” apparaît et la plage
est sautée.
“CANNOT PLAY” clignote et/ou le
périphérique connecté ne peut pas etre
détecté.
“READING” clignote sur. • N’utilisez pas trop de niveaux de hiérarchie et de dossiers.
iPod/iPhone ne peut pas être mis sous
tension ou ne fonctionne pas.
Si vous avez toujours des problème, réinitialisez l’appareil. ( 3)
• Vérifiez les cordons et les connexions.
Assurez-vous que les prises des fils d’enceintes sont isolées correctement,
puis réinitialisez l’appareil. Si cela ne résout pas le problème, consultez
votre centre de service le plus proche.
Cochez le réglage
• Connectez l’antenne solidement.
• Sortez l’antenne complètement.
un nombre limité de symboles. Cet appareil peut aussi afficher l’alphabet
cyrillique majuscule.
L’ordre de lecture est déterminé par le nom du fichier (USB).
Cela dépend du processus d’enregistrement utilisé.
Vérifiez si la plage est dans un format compatible.
• Vérifiez si le périphérique connecté est compatible avec cet appareil et
assurez-vous que les fichiers sont dans un format compatible.
• Reconnectez le périphérique.
• Reconnectez le USB périphérique.
• Vérifiez la connexion entre cet appareil et l’iPod/iPhone.
• Détachez et réinitialisez l’iPod/iPhone en utilisant un réinitialisation
matérielle.
[SRCSELECT]. ( 4)
( 11)
( 11)
( 11)
12

SPÉCIFICATIONS
FM Plage de fréquences 87,5 MHz à 108,0 MHz (pas de 50 kHz)
Sensibilité utilisable (S/B = 26dB) 0,71 V/75 Ω
Seuil de sensibilité (DIN S/N = 46dB) 2,0 V/75 Ω
Réponse en fréquence (±3 dB) 30 Hz à 15 kHz
Taux de Signal/Bruit (MONO) 64 dB
Séparation stéréo (1 kHz) 40 dB
TUNER
AM Plage de fréquences PO 531 kHz à 1611 kHz (pas de 9 kHz)
Sensibilité utilisable (S/B = 20dB) PO 28,2V
Standard USB USB1.1, USB2.0 (vitesse maximale)
Périphériques compatibles À mémoire de grande capacité
Système de fichiers FAT12/16/32
Courant d’alimentation maximum CC5 V
Convertisseur D/A 24 Bit
Réponse en fréquence (±1 dB) 20 Hz à 20 kHz
Taux de Signal/Bruit (1 kHz) 105 dB
USB
Gamme dynamique 88 dB
Séparation des canaux 90 dB
Décodage MP3 Compatible avec le format MPEG-1/2 Audio Layer-3
Décodeur WMA Compatible Windows Media Audio
Décodeur WAV Format audio de forme d’onde RIFF (PCM linéaire
Décode FLAC Fichiers FLAC
GO 153 kHz à 279 kHz (pas de 9 kHz)
GO 50V
1A
uniquement)
Réponse en fréquence (±3 dB) 20Hz—20kHz
Tension maximum d’entrée 1200 mV
Impédance d’entrée 30k
Auxiliaire
Puissance de sortie maximum 50W×4
Puissance de sortie
(DIN 45324, +B = 14,4 V)
Impédance d’enceinte 4—8
Audio
Niveau de préamplification/charge (USB) 2500 mV/10k
Impédance du préamplificateur ≤600
Tension de fonctionnement 14,4V (10,5 V — 16V admissible)
Consommation de courant maximale 10 A
Gamme de température de fonctionnement 0°C à +40°C
Dimensions d’installation (L × H × P) 182 mm × 53 mm × 106 mm
Généralités
Poids
Sujet à changement sans notification.
30W×4
0,62 k
g
FRANÇAIS |
13

Avertissement
• L’appareil peut uniquement être utilisé avec une alimentation de 12 V CC, à masse
négative.
• Déconnectez la borne négative de la batterie avant le câblage et le montage.
• Ne connectez pas le fil de batterie (jaune) et le fil d’allumage (rouge) au châssis de la
voiture ou au fil de masse (noir) pour éviter les courts-circuits.
• Isolez les fils non connectés avec du ruban adhésif pour éviter les courts-circuits.
• Assurez-vous de raccorder de nouveau la mise à la masse de cet appareil au châssis de la
voiture après l’installation.
Précautions
• Pour des raison de sécurité, laissez le travail de câblage et de montage des professionnels.
Consultez votre revendeur autoradio.
• Installez cet appareil dans la console de votre véhicule. Ne touchez pas les parties
métalliques de cet appareil pendant ou juste après son utilisation. Les parties métalliques,
comme le dissipateur de chaleur et le boîtier, deviennent chaudes.
• Ne connectez pas les fils
ou en parallèle.
• Connectez des enceintes avec une puissance maximum de plus de 50 W. Si la puissance
maximum des enceintes est inférieure à 50W, changez le réglage
éviter d’endommager les enceintes.
• Montez l’appareil avec un angle de moins de 30˚.
• Si le faisceau de fils de votre véhicule ne possède pas de borne d’allumage, connectez
le fil d’allumage (rouge) à la borne du boîtier de fusible de votre véhicule qui offre une
alimentation de 12 V CC et qui se met en et hors service avec la clé de contact.
• Après avoir installé l’appareil, vérifiez si les lampes de frein, les indicateurs, les clignotants,
etc. de la voiture fonctionnent correctement.
INSTALLATION / RACCORDEMENT
• Si un fusible saute, assurez-vous d’abord que les câbles ne touches pas le châssis de la
voiture puis remplacez le vieux fusible par un nouveau de même valeur.
[
des l’enceintes au châssis de la voiture, au fil de masse (noir)
[AMPGAIN]
pour
(10)
Procédure de base
1
Retirez la clé de contact, puis déconnectez la borne [
de la batterie de la voiture.
2 Connectez les fils correctement.
Reportez-vous à Connexions. (
3 Installez l’appareil dans votre voiture.
Reportez-vous à Installation de l’appareil (montage encastré).
15)
4 Connectez la borne [ de la batterie de la voiture.
5 Réinitialisez l’appareil.
(3)
Installation de l’appareil (montage encastré)
Crochet sur le côté supérieur
Orientez la plaque de garniture de la
façon illustrée avant la fixation.
Lors d’une installation sans manchon
Comment retirer l’appareil
de montage
N’utiliser que les vis spécifiés. L’utilisation de vis incorrects peut
endommager l’appareil.
Vis à tête plate ou ronde (non
fournie) M5 × 8mm
Poche
Applique (non fournie)
Réalisez les connexions
nécessaires.
(15)
Tableau de bord de
votre voiture
Tordez les languettes appropriées pour
maintenir le manchon en place.
14

Connexions
Le fil bleu/blanc du faisceau de
fils
(D)
Fil de télécommande (non fournie)
JVC Amplificateur
Cordon de signal (non fournie)
Sortie arrière/caisson de grave
Liste des pièces pour
l’installation
(A)
Façade
À l’adaptateur de
télécommande volant
Pour certaines automobiles VW/Audi
ou Opel (Vauxhall)
Vous aurez peut-être besoin de modifier le câblage
du cordon d’alimentation
sur l’illustration.
Si l’appareil ne se met pas sous tension avec le câblage
modifié 1, utilisez le câblage modifié 2 à la place.
Y: Jaune R: Rouge
(D)
fourni comme montré
Câblage original
Câblage modifié 1
(ou)
Câblage modifié 2
Fusible (10 A)
Bleu clair/jaune
STEERING
WHEEL
(Pour
KD-X210
REMOTE
)
Si votre voiture ne possède
pas de prise ISO
* Faisceau de fils personnalisé (vendu
séparément)
IMPORTANT:
(vendu séparément) qui est adapté à votre voiture est
recommandé pour la connexion.
Un faisceau de fils personnalisé
Prise d’antenne
Connecteur ISO
Broche
A2 Marron : Au système de téléphone
A4 Jaune : Pile
A5 Bleu/Blanc : Commande d’alimentation
A6 Orange/blanc : Éclairage de la voiture
A7 Rouge : Allumage (ACC)
A8 Noir : Connexion à la terre (masse)
B1
Violet
B2
Violet/noir
B3
Gris
B4
Gris/noir
B5
Blanc
B6
Blanc/noir
B7
Vert
B8
Vert/noir
Couleur et fonction
portable
: Enceinte arrière (droit)
: Enceinte avant (droit)
: Enceinte avant (gauche)
: Enceinte arrière (gauche)
(B)
Plaque d’assemblage
(C)
Manchon de montage
(D)
Faisceau de fils
(E)
Clé d’extraction
FRANÇAIS |
15

libFLAC
Copyright (C) 2000,2001,2002,2003,2004,2005,2006,2007,2008,2009 Josh Coalson
Redistribution and use in source and binary forms, with or without modification, are permitted
provided that the following conditions are met:
— Redistributions of source code must retain the above copyright notice, this list of conditions and
the following disclaimer.
— Redistributions in binary form must reproduce the above copyright notice, this list of conditions
and the following disclaimer in the documentation and/or other materials provided with the
distribution.
— Neither the name of the Xiph.org Foundation nor the names of its contributors may be used
to endorse or promote products derived from this software without specific prior written
permission.
THIS SOFTWARE IS PROVIDED BY THE COPYRIGHT HOLDERS AND ONTRIBUTORS “AS IS” AND ANY
EXPRESS OR IMPLIED WARRANTIES, INCLUDING, BUT NOT LIMITED TO, THE IMPLIED WARRANTIES OF
MERCHANTABILITY AND FITNESS FOR A PARTICULAR PURPOSE ARE DISCLAIMED. IN NO EVENT SHALL
THE FOUNDATION OR CONTRIBUTORS BE LIABLE FOR ANY DIRECT, INDIRECT, INCIDENTAL, SPECIAL,
EXEMPLARY, OR CONSEQUENTIAL DAMAGES (INCLUDING, BUT NOT LIMITED TO, PROCUREMENT OF
SUBSTITUTE GOODS OR SERVICES; LOSS OF USE, DATA, OR PROFITS; OR BUSINESS INTERRUPTION)
HOWEVER CAUSED AND ON ANY THEORY OF LIABILITY, WHETHER IN CONTRACT, STRICT LIABILITY,
OR TORT (INCLUDING NEGLIGENCE OR OTHERWISE) ARISING IN ANY WAY OUT OF THE USE OF THIS
SOFTWARE, EVEN IF ADVISED OF THE POSSIBILITY OF SUCH DAMAGE.
• Microsoft and Windows Media are either registered trademarks or trademarks of Microsoft
Corporation in the United States and/or other countries.
• “Made for iPod,” and “Made for iPhone” mean that an electronic accessory has been designed to
connect specifically to iPod, or iPhone, respectively, and has been certified by the developer to
meet Apple performance standards. Apple is not responsible for the operation of this device or
its compliance with safety and regulatory standards. Please note that the use of this accessory
with iPod or iPhone may affect wireless performance.
• iPhone, iPod, iPod classic, iPod nano, and iPod touch are trademarks of Apple Inc., registered in
the U.S. and other countries.
• Lightning is a trademark of Apple Inc.
• Android is trademark of Google Inc.
© 2013 JVC KENWOOD Corporation
1113DTSMDTJEIN
Loading…
Страницы и текст этой инструкции
Инструкция автомагнитолы JVC KD-X110
Информация отображена на картинке
Информация отображена на картинке
Информация отображена на картинке
Информация отображена на картинке
Как использовать наш сайт инструкций OnlineManuals.ru
Наша цель состоит в том, чтобы предоставить вам быстрый доступ к содержанию инструкции для автомагнитолы JVC KD-X110.
С помощью онлайн просмотра, Вы можете быстро просмотреть содержимое инструкции и найти решение проблемы с автомагнитолы JVC KD-X110.
Для Вашего удобства
Если листать руководство пользователя автомагнитолы JVC KD-X110 прямо на сайте, не очень удобно для Вас, есть два возможных решения:
• Просмотр в полноэкранном режиме — легко просмотреть руководство пользователя (без загрузки его на свой компьютер), Вы можете использовать режим полноэкранного просмотра.
Для просмотра инструкции пользователя автомагнитолы JVC KD-X110 на полном экране, используйте кнопку «Открыть в Pdf-viewer».
• Загрузка на компьютер — Вы можете также скачать Инструкция автомагнитолы JVC KD-X110 на свой компьютер и сохранить его в файлах.
Многие люди предпочитают читать документы не на экране, а в печатной версии.
Возможность печати руководства пользователя также была предусмотрена на нашем сайте,
и вы можете использовать ее, нажав на иконку «печать» в Pdf-viewer.
Нет необходимости печатать все руководство автомагнитолы JVC KD-X110, можно выбрать только нужные страницы инструкции.
-
Page 1: JVC KD-X110
Data Size: B6L (182 mm x 128 mm) Book Size: B6L (182 mm x 128 mm) ENGLISH FRANÇAIS GET0946-001A [E/EN/EU] KD-X210 / KD-X110 DIGITAL MEDIA RECEIVER INSTRUCTION MANUAL RÉCEPTEUR MULTIMÉDIA NUMÉRIQUE MANUEL D’INSTRUCTIONS Please read all instructions carefully before operation to obtain the best possible performance from the unit. Veuillez lires[…]
-
Page 2: JVC KD-X110
i Data Size: B6L (182 mm x 128 mm) Book Size: B6L (182 mm x 128 mm) Information on Disposal of Old Electrical and Electronic Equipment and Batteries (applicable for EU countries that have adopted separate waste collection systems) Products and batteries with the symbol (crossed-out wheeled bin) cannot be disposed as household waste. Old electrical […]
-
Page 3: JVC KD-X110
ii ENGLISH | Data Size: B6L (182 mm x 128 mm) Book Size: B6L (182 mm x 128 mm) Declaration of Conformity with regard to the EMC Directive 2004/108/EC Declaration of Conformity with regard to the RoHS Directive 2011/65/EU Manufacturer: JVC KENWOOD Corporation 3-12, Moriya-cho, Kanagawa-ku, Yokohama-shi, Kanagawa, 221-0022, Japan EU Representative’[…]
-
Page 4: JVC KD-X110
2 Data Size: B6L (182 mm x 128 mm) Book Size: B6L (182 mm x 128 mm) CONTENTS BEFORE USE Warning Do not operate any function that takes your attention away from safe driving. Caution Volume setting: • Adjust the volume so that you can hear sounds outside the car to prevent accidents. • Lower the volume before playing digital sources to avoid dam[…]
-
Page 5: JVC KD-X110
3 Data Size: B6L (182 mm x 128 mm) Book Size: B6L (182 mm x 128 mm) BASICS Remote control (RM-RK52) KD-X110 can be remotely controlled with an optionally purchased remote control. To Do this (on the faceplate) Do this (on the remote control) Turn on the power Press B /SOURCE . • Press and hold to turn off the power. ( not available ) Adjust th[…]
-
Page 6: JVC KD-X110
4 Data Size: B6L (182 mm x 128 mm) Book Size: B6L (182 mm x 128 mm) GETTING STARTED Cancel the demonstration 1 Press and hold MENU . 2 Turn the volume knob to select [DEMO] , then press the knob. 3 Turn the volume knob to select [DEMO OFF] , then press the knob. 4 Press MENU to exit. Set the clock 1 Press and hold MENU . 2 Turn the volume knob to s[…]
-
Page 7: JVC KD-X110
5 ENGLISH | Data Size: B6L (182 mm x 128 mm) Book Size: B6L (182 mm x 128 mm) USB / iPod KD-X210 KD-X210 To Do this Select a file Press S / T (or press H / I on RM-RK52). Select a folder * 2 Press 1 K / 2 J (or press J / K on RM-RK52). Reverse/ Fast-forward Press and hold S / T (or press and hold H / I on RM-RK52). Repeat play * 3 Press 4 repea[…]
-
Page 8: JVC KD-X110
6 Data Size: B6L (182 mm x 128 mm) Book Size: B6L (182 mm x 128 mm) Select a file from a list For iPod : Applicable only when [HEAD MODE] is selected. ( 5) 1 Press MENU 2 Turn the volume knob to make a selection, then press the knob. • MP3/WMA/WAV/FLAC file: Select the desired folder, then a file. • iPod or JPC / JMC file: Select the desired fi[…]
-
Page 9: JVC KD-X110
7 ENGLISH | Data Size: B6L (182 mm x 128 mm) Book Size: B6L (182 mm x 128 mm) RADIO “ST” lights up when receiving an FM stereo broadcast with sufficient signal strength. Search for a station 1 Press B /SOURCE to select FM or AM. 2 Press S / T (or press H / I on RM-RK52) to search for a station automatically. (or) Press and hold S / T (or press […]
-
Page 10: JVC KD-X110
8 Data Size: B6L (182 mm x 128 mm) Book Size: B6L (182 mm x 128 mm) Use a portable audio player 1 Connect a portable audio player (commercially available). 2 Select [ON] for [AUX] in [SRC SELECT] . ( 4) 3 Press B /SOURCE to select AUX. 4 Turn on the portable audio player and start playback. Use a 3-core plug head stereo mini plug for optimum audio […]
-
Page 11: JVC KD-X110
9 ENGLISH | Data Size: B6L (182 mm x 128 mm) Book Size: B6L (182 mm x 128 mm) AUDIO SETTINGS (For KD-X110 ) To Do this Select a preset equalizer Press EQ repeatedly. (or) Press EQ , then turn the volume knob within 2seconds. FLAT (default), HARD ROCK, JAZZ, POP, R&B, TALK, USER1, USER2, VOCAL BOOST, BASS BOOST, CLASSICAL, DANCE Store your ow[…]
-
Page 12: JVC KD-X110
10 Data Size: B6L (182 mm x 128 mm) Book Size: B6L (182 mm x 128 mm) 1 Press and hold MENU . 2 Turn the volume knob to make a selection (see the following table), then press the knob. Repeat step 2 until the desired item is selected. 3 Press MENU to exit. To return to the previous setting item or hierarchy, press G T/P . Default: XX DISPLAY DIM[…]
-
Page 13: JVC KD-X110
11 ENGLISH | Data Size: B6L (182 mm x 128 mm) Book Size: B6L (182 mm x 128 mm) MORE INFORMATION Playable files • Playable audio file: MP3 (.mp3), WMA (.wma), WAV(.wav), FLAC (.flac) • Playable USB device file system: FAT12, FAT16, FAT32 Even when audio files comply with the standards listed above, playback may be impossible depending on the […]
-
Page 14: JVC KD-X110
12 Data Size: B6L (182 mm x 128 mm) Book Size: B6L (182 mm x 128 mm) TROUBLESHOOTING Symptom Remedy Sound cannot be heard. • Adjust the volume to the optimum level. • Check the cords and connections. “MISWIRING CHK WIRING THEN RESET UNIT” / “WARNING CHK WIRING THEN RESET UNIT” appears and no operations can be done. Check to be sure the […]
-
Page 15: JVC KD-X110
13 ENGLISH | Data Size: B6L (182 mm x 128 mm) Book Size: B6L (182 mm x 128 mm) SPECIFICATIONS Auxiliary Frequency Response (±3dB) 20Hz—20kHz Input Maximum Voltage 1200mV Input Impedance 30kΩ Audio Maximum Output Power 50W×4 Output Power (DIN 45324, +B = 14.4 V) 30W×4 Speaker Impedance 4Ω—[…]
-
Page 16: JVC KD-X110
14 Data Size: B6L (182 mm x 128 mm) Book Size: B6L (182 mm x 128 mm) INSTALLATION / CONNECTION Warning • The unit can only be used with a 12V DC power supply, negative ground. • Disconnect the battery’s negative terminal before wiring and mounting. • Do not connect Battery wire (yellow) and Ignition wire (red) to the car chassis or Groun[…]
-
Page 17: JVC KD-X110
15 ENGLISH | Data Size: B6L (182 mm x 128 mm) Book Size: B6L (182 mm x 128 mm) STEERING WHEEL REMOTE Part list for installation (A) Faceplate (C) Mounting sleeve (B) Trim plate (D) Wiring harness (E) Extraction key Light blue/yellow (For KD-X210 ) To the steering wheel remote control adapter IMPORTANT: A custom wiring harness (separately purchased)[…]
-
Page 18: JVC KD-X110
2 Data Size: B6L (182 mm x 128 mm) Book Size: B6L (182 mm x 128 mm) TABLE DES MATIERES AVANT L’UTILISATION Avertissement N’utilisez aucune fonction qui risque de vous distraire de la conduite sure de votre véhicule. Précautions Réglage du volume: • Ajustez le volume de façon à pouvoir entendre les sons extérieurs à la voiture afin d’[…]
-
Page 19: JVC KD-X110
3 Data Size: B6L (182 mm x 128 mm) Book Size: B6L (182 mm x 128 mm) FONCTIONNEMENT DE BASE Télécommande (RM-RK52) KD-X110 peut être commandé à distance avec une télécommande vendue séparément. Pour Faire (sur la façade) Faire (sur la télécommande) Mettez l’appareil sous tension Appuyez sur B /SOURCE . • Maintenez la touche enfoncée[…]
-
Page 20: JVC KD-X110
4 Data Size: B6L (182 mm x 128 mm) Book Size: B6L (182 mm x 128 mm) PRISE EN MAIN Annulez la démonstration 1 Maintenez enfoncée MENU . 2 Tournez le bouton de volume pour choisir [DEMO] , puis appuyez sur le bouton. 3 Tournez le bouton de volume pour choisir [DEMOOFF] , puis appuyez sur le bouton. 4 Appuyez sur MENU pour quitter. Réglez l’ho[…]
-
Page 21: JVC KD-X110
5 FRANÇAIS | Data Size: B6L (182 mm x 128 mm) Book Size: B6L (182 mm x 128 mm) USB / iPod KD-X210 KD-X210 Pour Faire Sélectionnez un fichier Appuyez sur S / T (ou appuyez sur H / I sur la RM-RK52). Sélectionnez un dossier * 2 Appuyez sur 1 K / 2 J (ou appuyez sur J / K sur la RM-RK52). Recherche rapide vers l’arrière/vers l’avant Mainte[…]
-
Page 22: JVC KD-X110
6 Data Size: B6L (182 mm x 128 mm) Book Size: B6L (182 mm x 128 mm) Sélectionnez un fichier à partir d’une liste Pour iPod : Fonctionne uniquement quand [HEADMODE] est sélectionné. ( 5) 1 Appuyez sur MENU 2 Tournez le bouton de volume pour faire une sélection, puis appuyez sur le bouton. • Fichier MP3/WMA/WAV/FLAC: Sélectionnez le d[…]
-
Page 23: JVC KD-X110
7 FRANÇAIS | Data Size: B6L (182 mm x 128 mm) Book Size: B6L (182 mm x 128 mm) RADIO “ST” s’allume lors de la réception d’une émission FM stéréo avec un signal suffisamment fort. Recherchez une station 1 Appuyez sur B /SOURCE pour choisir FM ou AM. 2 Appuyez sur S / T (ou appuyez sur H / I sur la RM-RK52) pour rechercher une station au[…]
-
Page 24: JVC KD-X110
8 Data Size: B6L (182 mm x 128 mm) Book Size: B6L (182 mm x 128 mm) Utilisation d’un lecteur audio portable 1 Connectez un lecteur audio portable (en vente dans le commerce). 2 Sélectionnez [ON] pour [AUX] dans [SRC SELECT] . ( 4) 3 Appuyez sur B /SOURCE pour choisir AUX. 4 Mettez sous tension le lecteur audio portable et démarrez la lecture[…]
-
Page 25: JVC KD-X110
9 FRANÇAIS | Data Size: B6L (182 mm x 128 mm) Book Size: B6L (182 mm x 128 mm) RÉGLAGES AUDIO (Pour KD-X110 ) Pour Faire Choisissez un égaliseur préréglé Appuyez répétitivement sur EQ . (ou) Appuyez sur EQ , puis tournez le bouton de volume avant 2 secondes. FLAT (défaut), HARD ROCK, JAZZ, POP, R&B, TALK, USER1, USER2, VOCAL BOOST, BAS[…]
-
Page 26: JVC KD-X110
10 Data Size: B6L (182 mm x 128 mm) Book Size: B6L (182 mm x 128 mm) 1 Maintenez enfoncée MENU . 2 Tournez le bouton de volume pour réaliser une sélection (voir le tableau suivant), puis appuyez sur le bouton. Répétez l’étape 2 jusqu’à ce que l’élément souhaité soit sélectionné. 3 Appuyez sur MENU pour quitter. Pour retourner à l[…]
-
Page 27: JVC KD-X110
11 FRANÇAIS | Data Size: B6L (182 mm x 128 mm) Book Size: B6L (182 mm x 128 mm) PLUS D’INFORMATIONS Fichiers pouvant être lus • Fichier audio reproductible: MP3 (.mp3), WMA (.wma), WAV(.wav), FLAC (.flac) • Systèmes de fichier de périphérique USB compatibles: FAT12, FAT16, FAT32 Même quand les fichiers audio sont conformes aux normes[…]
-
Page 28: JVC KD-X110
12 Data Size: B6L (182 mm x 128 mm) Book Size: B6L (182 mm x 128 mm) GUIDE DE DÉPANNAGE Symptôme Remède Le son ne peut pas être entendu. • Ajustez le volume sur le niveau optimum. • Vérifiez les cordons et les connexions. “MISWIRING CHK WIRING THEN RESET UNIT” / “WARNING CHK WIRING THEN RESET UNIT” apparaît et aucune opération ne[…]
-
Page 29: JVC KD-X110
13 FRANÇAIS | Data Size: B6L (182 mm x 128 mm) Book Size: B6L (182 mm x 128 mm) SPÉCIFICATIONS Auxiliaire Réponse en fréquence (±3 dB) 20Hz—20kHz Tension maximum d’entrée 1200 mV Impédance d’entrée 30k Audio Puissance de sortie maximum 50W×4 Puissance de sortie (DIN 45324, +B = 14,4 V) 30W×[…]
-
Page 30: JVC KD-X110
14 Data Size: B6L (182 mm x 128 mm) Book Size: B6L (182 mm x 128 mm) INSTALLATION / RACCORDEMENT Avertissement • L’appareil peut uniquement être utilisé avec une alimentation de 12 V CC, à masse négative. • Déconnectez la borne négative de la batterie avant le câblage et le montage. • Ne connectez pas le fil de batterie (jaune) et le[…]
-
Page 31: JVC KD-X110
15 FRANÇAIS | Data Size: B6L (182 mm x 128 mm) Book Size: B6L (182 mm x 128 mm) STEERING WHEEL REMOTE Liste des pièces pour l’installation (A) Façade (C) Manchon de montage (B) Plaque d’assemblage (D) Faisceau de fils (E) Clé d’extraction Bleu clair/jaune (Pour KD-X210 ) À l’adaptateur de télécommande volant IMPORTANT: Un faisceau de[…]
-
Page 32: JVC KD-X110
Data Size: B6L (182 mm x 128 mm) Book Size: B6L (182 mm x 128 mm) © 2013 JVC KENWOOD Corporation 1113DTSMDTJEIN • Microsoft and Windows Media are either registered trademarks or trademarks of Microsoft Corporation in the United States and/or other countries. • “Made for iPod,” and “Made for iPhone” mean that an electronic accessory has[…]