
Installing a Samsung 870 EVO SSD is a straightforward process that can significantly enhance your computer’s performance and storage capabilities.
This step-by-step guide will walk you through the simple and essential tasks required to successfully install the SSD, from powering off your computer to connecting cables and ensuring proper recognition in the system.
Whether you’re a beginner or an experienced user, this concise guide will help you seamlessly integrate the Samsung 870 EVO SSD into your system for an upgraded computing experience.

Key Takeaway
Installing a Samsung 870 Evo SSD enhances your computer’s performance by offering faster load times for applications and games.
It is significantly quicker and more reliable than traditional hard drives.
The Samsung 870 Evo SSD can easily be installed on both desktop and laptop computers.
A proper setup of the SSD includes cloning your current drive or a fresh installation of your operating system.
Installing Samsung 870 EVO SSD: Step-by-Step Guide
Step 1: Power Off Your Computer
Turn off your computer and disconnect the power cable to ensure safety during installation.
Step 2: Ground Yourself
Prevent static electricity damage by touching a metal surface to ground yourself.
Step 3: Identify SATA Ports
Locate the SATA ports on your motherboard; they are usually labeled SATA0, SATA1, etc.
Step 4: Connect SATA Data Cable
Attach one end of the SATA data cable to the Samsung 870 EVO SSD and the other end to an available SATA port on the motherboard.
Step 5: Choose Mounting Option
Decide whether to use a mounting bracket or a 2.5-inch drive bay based on your computer case.
Step 6: Secure SSD
If using a bracket, secure the SSD with screws. If placing it in a drive bay, align connectors and push until it clicks.
Step 7: Connect Power
Find a free SATA power connector from your power supply and plug one end of the SATA power cable into the SSD and the other end into the power connector.
Step 8: Power On
Reconnect the power cable and turn on your computer to initiate the installation process.
Step 9: Check in BIOS/UEFI
Enter the BIOS/UEFI settings to ensure the system recognizes the new SSD. Verify that the SSD appears in the list of connected drives.
Step 10: Data Migration (Optional)
If replacing an existing drive, use Samsung Data Migration software or other cloning tools to transfer your data to the new SSD.
Step 11: Secure Cables
Ensure all cables are securely connected to prevent any potential issues.
Step 12: Close Case
If applicable, close your computer case and secure it with screws.
Your Samsung 870 EVO SSD is now successfully installed. Enjoy improved performance and storage reliability.
Configuring Bios Settings
Learn how to configure BIOS settings for installing a Samsung 870 Evo SSD in a few simple steps. Adjusting the BIOS can ensure optimal performance and compatibility for your new SSD.
Accessing The Bios Menu
To configure the BIOS settings for your Samsung 870 Evo SSD, you first need to access the BIOS menu.
Here’s how you can do it:
- Restart your computer and be ready to tap the designated key to enter the BIOS. The specific key to access the BIOS varies depending on your computer manufacturer. It is usually one of the function keys (F1, F2, F10, etc.) Or the “Delete” key.
- As soon as your computer starts up, start tapping the designated key repeatedly until the BIOS menu appears. Be cautious not to press and hold the key, as it might bring up a different menu.
- Once you successfully access the BIOS menu, you will see a variety of configuration options that you can modify to optimize your SSD’s performance.
Configuring The Boot Order And Drive Settings
After accessing the BIOS menu, the next step is to configure the boot order and drive settings to ensure that your Samsung 870 Evo SSD is properly recognized.
Here’s how you can do it:
- Navigate to the “Boot” or “Boot Order” section in the BIOS menu. This section controls the order in which your computer boots from different drives.
- Set the Samsung 870 Evo SSD as the primary boot device by moving it to the top of the boot order list. This ensures that your computer will prioritize booting from the SSD instead of other drives.
- Save your changes and exit the BIOS menu. This will prompt your computer to restart and apply the new boot order settings.
- After the restart, your computer should now be booting from the Samsung 870 Evo SSD.
- Additionally, you may want to check the SATA mode settings in the BIOS to ensure the best performance for your SSD. Navigate to the “Advanced” or “Drive Configuration” section in the BIOS and set the SATA mode to “AHCI” (Advanced Host Controller Interface) or “RAID” if applicable.
- Save your changes and exit the BIOS menu again.
- Your Samsung 870 Evo SSD is now properly configured in the BIOS, and you can enjoy its improved speed and storage capacity.
Remember, configuring the BIOS settings correctly is essential for the optimal performance and recognition of your Samsung 870 Evo SSD.
Initializing And Formatting The Samsung 870 Evo Ssd
Learn how to initialize and format your Samsung 870 Evo SSD easily with these step-by-step instructions for a seamless installation process.
Accessing The Disk Management Utility
To initialize and format your new Samsung 870 Evo SSD, you will need to access the Disk Management utility on your Windows computer.
This tool allows you to manage and configure storage devices connected to your system.
Here’s how you can access it:
- Press the Windows key + R on your keyboard to open the Run dialog box.
- Type “diskmgmt.msc” in the text field and click OK.
- The Disk Management window will open, displaying a list of all connected storage devices.
Initializing The Ssd And Creating Partitions
Before you can use your Samsung 870 Evo SSD, you need to initialize it and create partitions to divide the storage space as per your requirements.
Follow these steps to get started:
- In the Disk Management window, locate your Samsung 870 Evo SSD. It will be listed as a new, unallocated disk.
- Right-click on the unallocated space and select “Initialize Disk” from the context menu.
- In the Initialize Disk dialog box, select the appropriate disk (your Samsung SSD) and choose the partition style (MBR or GPT). Note that GPT is recommended for larger drives.
- Click OK to initialize the disk.
- Next, you need to create partitions on the initialized SSD. Right-click on the unallocated space and choose “New Simple Volume” from the context menu.
- The New Simple Volume Wizard will open. Follow the on-screen instructions to specify the partition size, assign a drive letter, and format the partition using the desired file system (typically NTFS).
- Repeat the process for any additional partitions you want to create on your Samsung 870 Evo SSD.
Your SSD is now ready for use, and you can start transferring files or installing your operating system for improved performance and storage capacity.
Verifying The Samsung 870 Evo Ssd
Learn how to verify and install this high-performance solid-state drive with ease. When it comes to installing a new SSD in your computer, it’s crucial to ensure that it is properly recognized by your system.
Checking For Proper Detection In The Bios:
- Restart your computer and access the BIOS settings by pressing the designated key (commonly Del, F2, or Esc) during the boot-up process.
- Navigate to the “Storage” or “Drives” section in the BIOS menu using the arrow keys.
- Look for the Samsung 870 Evo SSD in the list of detected devices. It should be displayed with its corresponding capacity.
- Ensure that the SSD is recognized as the primary storage drive. If it’s not, adjust the boot order to prioritize the Samsung 870 Evo SSD over other drives.
Verifying Device Manager Recognition:
- Open the “Device Manager” by right-clicking on the Windows Start button and selecting it from the menu.
- Click on the “Disk Drives” category to expand it and check if the Samsung 870 Evo SSD is listed.
- The SSD should be displayed with its full name, indicating successful recognition by the operating system.
- Additionally, verify that there are no yellow exclamation marks or error symbols next to the Samsung 870 Evo SSD. If any issues are present, troubleshoot them accordingly.
Now that you have confirmed the SSD’s detection in the BIOS and device manager, you can proceed with the installation process and begin enjoying the enhanced performance and storage capacity provided by the Samsung 870 Evo SSD.
Testing And Optimizing Performance
Optimize the performance of your computer by installing the Samsung 870 Evo SSD. Enhance speed and storage capacity with these simple steps.
Running Benchmark Tests:
- CrystalDiskMark: This benchmark tool measures the read and write speeds of your SSD, providing you with valuable information about its performance.
- AS SSD Benchmark: Another popular benchmarking tool, AS SSD Benchmark evaluates sequential and random read and write speeds, as well as access time and IOPS (Input/Output Operations Per Second).
- ATTO Disk Benchmark: This tool is commonly used to measure the performance of storage devices, including SSDs, by simulating various transfer sizes and compressibility scenarios.
Adjusting Settings For Maximum Performance:
- Enable AHCI Mode: Advanced Host Controller Interface (AHCI) mode allows your SSD to take advantage of advanced features, such as Native Command Queuing (NCQ), which improves overall performance.
- Disable Indexing: SSDs do not require the indexing feature that traditional hard drives rely on. Disabling indexing can help reduce unnecessary disk writes and improve performance.
- Enable TRIM: TRIM is a command that communicates with your SSD to optimize performance by clearing previously used data blocks. Enabling TRIM ensures your SSD operates efficiently.
- Update Firmware: Regularly check for firmware updates from Samsung to ensure your SSD is running the latest software, which can improve performance and fix any issues.
By running benchmark tests and adjusting settings for maximum performance, you can optimize the performance of your Samsung 870 Evo SSD.
This will result in faster application loading times, improved system responsiveness, and an overall smoother computing experience. Take the time to fine-tune your SSD settings and make the most of your investment.
Conclusion
You have successfully learned how to install a Samsung 870 Evo SSD. By following the step-by-step guide provided in this blog post, you can now upgrade your computer’s storage with ease.
Remember to backup your data before starting the installation process, and ensure that you have the necessary tools and cables.
It is important to proceed carefully, taking note of any differences in instructions for different computer models. The Samsung 870 Evo SSD offers faster speeds and improved performance, giving your computer a significant boost.
Looking to upgrade your computer’s storage capacity? You might want to consider installing the Samsung 870 EVO SSD. This solid-state drive is one of the best options on the market when it comes to speed, reliability, and affordability. But if you’re not sure how to install it, don’t worry.
With just a few simple steps, you can easily upgrade your computer’s storage and enjoy faster read and write speeds, quicker boot times, and smoother overall performance. So, let’s get started and learn how to install the Samsung 870 EVO SSD in your computer.
Prepare Your System
To install a Samsung 870 EVO SSD into your system, you will first need to prepare your system. This means powering off your computer and disconnecting all cables, including the power cable. You will then need to locate the storage drive bay in your system, which is where the SSD will be installed.
Once you have located the drive bay, you will need to remove the existing storage device, if there is one. This can typically be done by unscrewing any screws on the bracket or cage that hold the drive in place. Once the old drive has been removed, you can install the Samsung 870 EVO by sliding it into the bay and securing it with screws.
Be sure to consult your system’s manual to ensure you are installing the SSD correctly and securely. With the SSD installed and secured, you can then reconnect the cables and power on your system to begin using your new storage device. By following these steps, you can easily install a Samsung 870 EVO SSD into your system to improve its performance and storage capacity.
Check Compatibility and Requirements
If you’re thinking about installing new software or updating your current application, one of the first things you should do is check the compatibility and requirements of the software with your system. The last thing you want is to download a program that won’t work as expected or doesn’t support your operating system. Before proceeding with the installation, take a few minutes to check out the system requirements.
Typically, software requirements include the operating system, RAM, disk space, graphics card, and other hardware or software requirements. You don’t want to spend hours downloading and installing software, only to find out that it doesn’t work with your system. So, take time to review the compatibility and requirements before moving forward with the installation.
This will help save you time and prevent any unexpected problems from arising. Always bear in mind that a thorough understanding of the compatibility and requirements can ensure a smooth and successful installation, so do your due diligence.
Gather Necessary Tools and Accessories
To prepare your system for a successful project, it’s essential to gather all necessary tools and accessories. Depending on the type of project, you may need various tools, such as a screwdriver set, a hammer, pliers, wire cutters, or a power drill. Make a list of everything you’ll need and ensure that all items are in good working condition.
Additionally, it’s crucial to have the proper safety equipment, such as gloves, goggles, and a face mask, to protect yourself from potential hazards. When you have all the necessary tools and accessories, you can confidently begin your project knowing that you have everything you need to complete the task at hand. By ensuring that you have all the right tools, you can stay focused on the project and avoid unnecessary distractions or setbacks that could delay completion.
So, before you get started, take the time to gather everything you’ll need so that you can work efficiently and effectively.
Clone and Transfer Data
If you’re looking to upgrade your computer’s storage, installing a Samsung 870 EVO SSD is a great choice. The process of installing the new SSD involves cloning and transferring your data from your old hard drive to your new SSD. Fortunately, Samsung provides an easy-to-use software called Data Migration that automates this process for you.
Once you’ve connected your new SSD to your computer, simply download and install the software, select the source and destination drives, and let it work its magic. It’s important to note that you’ll need to make sure you have enough space on your new SSD to transfer all of your data. Once the transfer is complete, you can enjoy faster boot and load times as well as overall improved performance.
Don’t let the thought of transferring your data scare you – with Samsung’s Data Migration software, it’s a breeze to install your new Samsung 870 EVO SSD.
Create a Backup of Your Data
Creating a backup of your data is crucial if you want to ensure that all the important information in your device is secure and retrievable. One effective way of doing this is through cloning and transferring data. This involves copying the entire contents of your device and transferring it to another storage device such as an external hard drive.
By doing this, you can rest assured that even if your device malfunctions or is lost, you still have access to your data. Additionally, transferring data to another storage device is particularly useful when upgrading to a new device or when dealing with limited storage space. You can easily transfer all your data to a larger storage device without having to go through the hassle of manually transferring individual files.
So, take the time to clone and transfer your data to ensure peace of mind and seamless accessibility of your important information.
Use Samsung Data Migration Software
If you’re looking to upgrade your hardware or move your data to a new device, Samsung Data Migration Software is a great option to consider. This software tool is specifically designed to help you clone and transfer data, making the entire process quick and seamless. With Samsung Data Migration Software, you can easily transfer your operating system, data, and applications to a new SSD or hard drive.
This eliminates the need to manually transfer files and settings, saving you time and effort in the long run. Simply install the software and follow the steps outlined in the user-friendly interface to complete the transfer. So if you’re looking for a hassle-free way to move your data, Samsung Data Migration Software is definitely worth checking out.
Transfer Data to the SSD
Once you’ve installed your new SSD, it’s time to transfer all your data from the old drive – and the best way to do that is to clone it. Cloning allows you to make a perfect copy of your old drive onto your new SSD, so you can seamlessly transfer over all your files, programs, and settings without having to start from scratch. There are several cloning tools available, but one of the most popular is the Samsung Data Migration software, which is free and easy to use.
Simply connect your new SSD and run the software, and it will guide you through the process step by step. Once the clone is complete, you can remove the old drive and replace it with your new, faster SSD. With the cloning process, you won’t have to worry about losing any data or spending hours manually transferring files – it’s a fast and efficient way to upgrade your computer’s storage and performance.
So, don’t hesitate to clone your old drive and transfer your data to your speedy new SSD today!
If you’re looking to boost your computer’s performance, upgrading to a Samsung 870 EVO SSD is a great idea. But how do you install it? First, you’ll need to open up your computer and locate the hard drive bay. After unplugging the power cable and any other connectors, carefully slide out your old hard drive and replace it with the Samsung SSD.
Make sure to securely fasten any screws or brackets to keep the SSD in place. Next, reconnect the power cable and any other necessary connectors. Finally, turn on your computer and make sure it recognizes the new SSD.
With the Samsung 870 EVO SSD installed, you can expect faster boot times and improved overall performance. So don’t be afraid to give it a go!
Open Your System and Locate the Drive Bay
Before installing your SSD, you need to locate the drive bay in your system. This is where your hard drives are stored, and it’s usually located in the front of your CPU. To find it, you may need to consult your system manual or search online for the specific model of your desktop or laptop.
Once you locate the drive bay, gently remove the cover and check if there is enough space to accommodate your SSD. If there are no available slots, you may need to remove one of your hard drives or use a mounting bracket to secure your SSD in place. Installing your SSD may seem like a daunting task, but with the right tools and a little know-how, it can be done in no time.
Install the SSD into the Drive Bay
To install the SSD into the drive bay, you first need to ensure that you have the correct drive bay for your SSD. Most modern desktop computers come with a standardized drive bay, which is typically located near the bottom of the case. Once you have located your drive bay, gently insert the SSD into the bay, making sure it is aligned properly.
Then, use the screws provided to secure the SSD in place. Some desktops may also require you to connect a SATA cable to the drive bay to ensure your SSD is able to communicate with your computer’s motherboard. Finally, be sure to double-check your work and make sure the SSD is fully secured in the drive bay before powering on your computer.
With these simple steps, you can easily install your SSD and start enjoying faster boot times and improved system performance.
Secure the SSD using Screws
Once you have chosen your SSD, the next step is to install it properly to ensure its security and long-term functionality. This involves securing the SSD using screws to prevent damage or dislocation from the motherboard’s vibrations or movement. Align the SSD with the mounting holes on the motherboard or PC case and tightly screw it into place with the necessary hardware.
This step provides adequate security to the SSD, preventing it from dislodging or being accidentally removed while the PC is working. It also helps prevent excessive heat or any other external factors that could harm the drive and affect its performance. Always make sure to use the appropriate screws for your device to avoid any complications or damage.
Properly securing your SSD not only ensures its safety and longevity, but also contributes to the overall performance and efficiency of your computer.
Close Your System and Power On
Installing an SSD in your computer can provide a significant performance boost to your system. Before getting started, it’s important to shut down your computer and disconnect any power sources. Once you’ve opened up your computer’s case, locate the hard drive bay and remove the existing hard drive.
It’s essential to handle the SSD with care, as it’s vulnerable to static electricity. Make sure to ground yourself before handling the SSD or use an anti-static wrist strap. Next, attach the SSD to the mounting bracket and then secure the bracket into the hard drive bay.
Finally, connect the SATA and power cables, and then close your computer’s case. Power on your system to make sure everything is working properly, and enjoy the faster speed and improved performance of your newly installed SSD. With these easy steps, anyone can upgrade their computer and take their computing experience to a whole new level.
Optimize and Test the SSD
If you’ve recently got your hands on the Samsung 870 EVO SSD, congratulations on your purchase! Before you can fully benefit from the increased speed and storage capacity of your SSD, you’ll need to install it and optimize it for your system. First, physically install the SSD into your computer, making sure to connect it securely and correctly. Then, you’ll want to migrate your data from your old hard drive to your new SSD.
Next, optimize the SSD by enabling TRIM, disabling indexing, and tweaking other performance settings in your operating system. Finally, you’ll want to run tests to ensure the SSD is performing optimally. Use benchmarking tools like CrystalDiskMark or AS SSD to evaluate the read and write speeds of your SSD.
With these steps, you can be sure your Samsung 870 EVO SSD is running at its best and giving you the performance boost you deserve.
Set the SSD as the Startup Disk
If you’ve successfully installed your SSD, the next step is to set it as the startup disk. Doing so will allow your computer to boot up faster and run smoother. To set your SSD as the startup disk, click on the Apple menu and select “System Preferences.
” From there, click on “Startup Disk” and select your newly installed SSD. After selecting it, your computer will restart, and your SSD will be the new default startup disk. Once your computer has finished restarting, it’s time to optimize and test your SSD’s performance.
One way to do this is by running benchmark tests using software such as CrystalDiskMark. This will allow you to see how your SSD performs under different conditions and compare it to other similar SSDs on the market. Additionally, make sure to keep your SSD’s firmware and drivers up to date, as this can help enhance its performance and longevity.
With these optimization and testing tips, you can get the most out of your new SSD and experience faster and smoother computing.
Update the SSD Firmware
One important step to optimize and test your SSD is to update its firmware. Firmware updates can improve the performance and stability of your SSD, as well as fix any known issues or bugs. Plus, newer firmware versions may have features that were not available before.
To update your SSD firmware, you should first download the latest version from the manufacturer’s website. Then, follow the instructions provided with the firmware update tool. It’s crucial to make sure that your SSD is not in use during the firmware update process, as any interruption could cause data loss or damage to the drive.
With a successfully updated firmware, you can rest assured that your SSD is running at its best and can handle all your storage needs without any hiccups.
Benchmark and Test Your SSD Performance
When it comes to optimizing and testing your SSD performance, there are a few things you can do to make sure you’re getting the most out of your drive. One important step is to benchmark your drive to see how it performs in different tasks and workloads. This can help you identify any potential bottlenecks or areas for improvement.
You can use a variety of benchmarking tools to test read and write speeds, random access times, and other key metrics. It’s also important to make sure your SSD is properly configured for optimal performance. This may involve enabling certain settings or features, such as TRIM support or power management modes.
By taking the time to optimize and test your SSD, you can ensure that you’re getting the best possible performance and longevity from your drive.
Conclusion
Congratulations! You’ve successfully navigated the winding roads of technology and emerged victorious with a shiny new Samsung 870 EVO SSD installed in your system. With lightning-fast speeds and ample storage space, your computer is now ready to take on any task with ease. So don’t let slow load times or limited storage hold you back any longer – embrace the power of the solid-state drive and experience the future of computing today! And if you ever need to upgrade again in the future, just remember these simple steps and you’ll be a pro in no time.
Happy computing!”
FAQs
What are the system requirements for installing a Samsung 870 EVO SSD?
The system requirements for installing a Samsung 870 EVO SSD include: SATA interface, 2.5-inch form factor, and a compatible operating system such as Windows 10 or Linux.
Can I clone my existing hard drive to the Samsung 870 EVO SSD during installation?
Yes, you can use Samsung Data Migration software to clone your existing hard drive to the Samsung 870 EVO SSD during installation.
How do I physically install the Samsung 870 EVO SSD in my computer?
To physically install the Samsung 870 EVO SSD in your computer, you will need to turn off your computer, disconnect all cables, locate the SATA port on your motherboard, attach the SSD to the mounting bracket, and then secure it in place.
Do I need to format the Samsung 870 EVO SSD before installation?
No, the Samsung 870 EVO SSD comes formatted and ready to use out of the box. You can simply plug it in and install necessary software or clone data from your existing hard drive.
How to Install Samsung SSD 870 EVO: A Step-by-Step Guide
Preparation is Key
Before you start installing your Samsung SSD 870 EVO, make sure you have the following:
- A compatible motherboard
- A power supply unit (PSU) with sufficient power
- A screwdriver (preferably a Torx T5)
- The Samsung SSD 870 EVO itself
- The installation manual
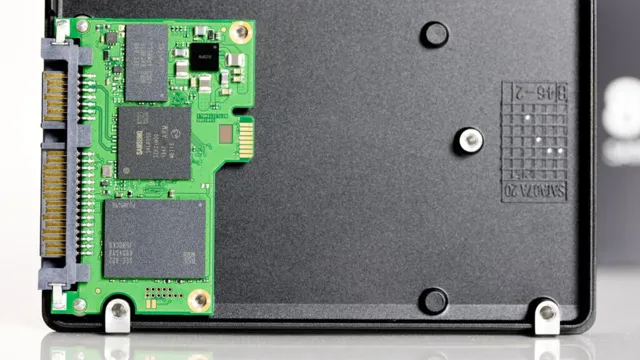
Step 1: Unpack and Prepare the SSD
- Carefully unpack the Samsung SSD 870 EVO from its packaging materials.
- Remove any protective covering from the SSD.
- Inspect the SSD for any physical damage or defects.
Step 2: Connect the SSD to the Motherboard
- Locate the SATA ports on your motherboard. These are usually labeled as SATA 1, SATA 2, and SATA 3.
- Identify the SATA port that matches the one on your motherboard.
- Connect the SATA cable to the SSD and the other end to the SATA port on your motherboard.
- Make sure the SATA cable is securely connected to prevent data loss or corruption.
Step 3: Connect the Power Cable
- Locate the power supply unit (PSU) and identify the SATA power connector.
- Connect the SATA power cable to the PSU and the other end to the SATA power connector on your motherboard.
- Ensure the PSU is properly connected to the motherboard and the SSD to prevent data loss or corruption.
Step 4: Connect the Data Cables
- Locate the SATA data connector on the SSD.
- Connect the SATA data cable to the SATA data connector on your motherboard.
- Make sure the SATA data cable is securely connected to prevent data loss or corruption.
Step 5: Install the SSD in the Motherboard
- Locate the mounting holes on your motherboard.
- Carefully remove the screws holding the SSD in place.
- Gently lift the SSD and align it with the mounting holes.
- Make sure the SSD is properly seated in the mounting holes to prevent data loss or corruption.
Step 6: Secure the SSD
- Use the screws to secure the SSD in place.
- Make sure the screws are tightened securely to prevent data loss or corruption.
Step 7: Connect the Power and Data Cables
- Connect the power cable to the PSU and the other end to the motherboard.
- Connect the data cable to the motherboard and the other end to the SSD.
- Make sure all cables are securely connected to prevent data loss or corruption.
Step 8: Boot Up Your System
- Plug in the power cord and press the power button.
- Your system should now boot up and recognize the new SSD.
- Verify that the SSD is recognized by your system and that data is being written to it.
Troubleshooting Tips
- If the SSD is not recognized by your system, check the SATA cable and ensure it is securely connected.
- If the SSD is not booting up, check the power supply unit (PSU) and ensure it is properly connected to the motherboard.
- If the SSD is experiencing data loss or corruption, check the SATA data cable and ensure it is securely connected.
Conclusion
Installing a Samsung SSD 870 EVO is a relatively straightforward process that requires some basic technical knowledge. By following these steps and taking the necessary precautions, you should be able to successfully install your new SSD and enjoy improved performance and faster loading times.
Important Notes
- Make sure to purchase a compatible motherboard and power supply unit (PSU) to ensure compatibility with your SSD.
- Use a high-quality SATA cable to prevent data loss or corruption.
- Ensure the SSD is properly seated in the mounting holes to prevent data loss or corruption.
- Use a screwdriver (preferably a Torx T5) to secure the SSD in place.
- Verify that the SSD is recognized by your system and that data is being written to it.
Table: Samsung SSD 870 EVO Installation Requirements
| Component | Required |
|---|---|
| Motherboard | Compatible |
| Power Supply Unit (PSU) | Compatible |
| SATA Cable | High-quality |
| SATA Data Cable | High-quality |
| Screwdriver (Torx T5) | Required |
| SSD | Compatible |
Additional Resources
- Samsung SSD 870 EVO Installation Manual
- Samsung SSD 870 EVO User Guide
- Online forums and communities for troubleshooting and support
Unlock the Future: Watch Our Essential Tech Videos!
- If your laptop currently has a hard drive or SSD installed, you need to remove it to make way for the Samsung SSD 870 EVO.
- If your laptop doesn’t have a SATA cable, connect the SSD to the motherboard using the SATA cable provided with the SSD.
- If you’re migrating your existing operating system from the old storage device, you can use cloning software to transfer the data to the new SSD.
Upgrading your laptop’s storage with a Samsung SSD 870 EVO is a great way to boost its performance and speed up boot times, loading screens, and file transfers. The Samsung SSD 870 EVO is a reliable and high-performance solid-state drive that offers excellent read and write speeds, making it an ideal choice for demanding tasks like video editing, gaming, or running multiple programs simultaneously. In this comprehensive guide, we will walk you through the step-by-step process of installing a Samsung SSD 870 EVO in your laptop. Whether you’re a seasoned tech enthusiast or a beginner, this guide will ensure a smooth and successful installation.
Prerequisites
Before you begin the installation process, ensure you have the following items:
- Samsung SSD 870 EVO
- Phillips head screwdriver
- Anti-static wrist strap (optional)
- SATA cable (if your laptop doesn’t have one)
- External enclosure or USB adapter (optional)
Step 1: Back Up Your Data
Before proceeding with the installation, it’s crucial to back up all your important data from your laptop’s hard drive. This includes documents, photos, videos, music, and any other essential files. You can use an external hard drive, a USB flash drive, or a cloud backup service to store your data safely.
Step 2: Power Down and Disconnect Your Laptop
To prevent any damage to your laptop or the SSD, ensure it is powered off and disconnected from any power source. Additionally, remove the battery from your laptop if it’s removable.
Step 3: Open the Laptop’s Back Cover
Locate the screws that secure the back cover of your laptop. These screws are typically found on the bottom of the laptop. Use the Phillips head screwdriver to remove the screws and carefully lift the back cover off.
Step 4: Locate the Storage Bay
Once the back cover is removed, identify the storage bay where the hard drive or SSD is installed. It’s usually a 2.5-inch or M.2 slot. Refer to your laptop’s user manual for specific instructions on locating the storage bay.
Step 5: Remove the Existing Storage Device (Optional)
If your laptop currently has a hard drive or SSD installed, you need to remove it to make way for the Samsung SSD 870 EVO. Carefully disconnect any cables or connectors attached to the existing storage device. Then, unscrew the mounting screws that secure it in place and gently remove it from the storage bay.
Align the Samsung SSD 870 EVO with the storage bay and gently slide it into place. Ensure that the SATA or M.2 connectors are properly aligned. Secure the SSD with the mounting screws. If your laptop doesn’t have a SATA cable, connect the SSD to the motherboard using the SATA cable provided with the SSD.
Step 7: Reassemble Your Laptop
Replace the back cover of your laptop and secure it with the screws you removed earlier. Reconnect the battery if you removed it.
Step 8: Boot Your Laptop and Initialize the SSD
Power on your laptop and press the key required to enter the BIOS or UEFI setup menu (usually F2, F10, or Delete). In the BIOS/UEFI settings, locate the option to initialize or format the new SSD. Follow the on-screen instructions to complete the initialization process.
Step 9: Install the Operating System (Optional)
If you’re installing a fresh copy of the operating system, you can proceed with the installation process by following the on-screen instructions. If you’re migrating your existing operating system from the old storage device, you can use cloning software to transfer the data to the new SSD.
Step 10: Restore Your Data
Once the operating system is installed, you can restore your backed-up data to the new Samsung SSD 870 EVO. Connect the external hard drive, USB flash drive, or cloud storage device containing your backup and follow the necessary steps to restore your files.
Step 11: Enjoy the Performance Boost
After completing the installation and data transfer process, you’ll notice a significant improvement in your laptop’s performance. Boot times, loading screens, and file transfers will be significantly faster, and overall system responsiveness will be enhanced.
Wrapping Up
Installing a Samsung SSD 870 EVO in your laptop is a straightforward process that can significantly improve your laptop’s performance. By following the steps outlined in this guide, you can ensure a smooth and successful installation. Enjoy the benefits of faster boot times, improved loading speeds, and enhanced system responsiveness with your new Samsung SSD 870 EVO.
Frequently Asked Questions
Q1: How do I know if my laptop is compatible with the Samsung SSD 870 EVO?
A: Check your laptop’s specifications to ensure it has a 2.5-inch or M.2 storage bay compatible with SATA or NVMe interfaces. You can also refer to the Samsung SSD 870 EVO’s product specifications for compatibility information.
Q2: Can I clone my existing hard drive or SSD to the Samsung SSD 870 EVO?
A: Yes, you can use cloning software to transfer all the data from your existing storage device to the Samsung SSD 870 EVO. This is a convenient way to migrate your operating system, programs, and files without reinstalling everything.
Q3: What are the benefits of using a Samsung SSD 870 EVO compared to a traditional hard drive?
A: Samsung SSD 870 EVO offers several benefits over traditional hard drives, including faster boot times, improved loading speeds, enhanced system responsiveness, lower power consumption, and increased durability.
SSD Samsung 870 EVO — это превосходное решение для обновления вашего компьютера или ноутбука. Он существенно ускоряет работу системы и повышает производительность приложений. Если вы хотите установить новый SSD Samsung 870 EVO в свое устройство, но не знаете, с чего начать, не волнуйтесь. В этой подробной инструкции я расскажу вам, как выполнить установку SSD Samsung 870 EVO шаг за шагом.
Шаг 1: Подготовительные меры
Перед установкой SSD Samsung 870 EVO вам потребуется сделать несколько подготовительных шагов. Во-первых, убедитесь, что у вас есть необходимые инструменты, включая отвертку и кабель SATA. Во-вторых, перед установкой SSD отключите питание компьютера и снимите батарейку ноутбука, если это возможно. Это обезопасит вас от случайного повреждения оборудования.
Шаг 2: Откройте корпус устройства
Теперь, когда вы подготовились, пришло время открыть корпус вашего устройства. Для этого вам нужно найти специальные винты на задней панели и аккуратно их открутить. Обычно они помечены символом «HDD» или «SSD». Если вы затрудняетесь, обратитесь к руководству пользователя для вашего устройства.
Шаг 3: Установите SSD Samsung 870 EVO
Когда корпус открыт, найдите свободный слот для подключения SSD Samsung 870 EVO. Он должен иметь несколько контактов и открытый разъем SATA. Отсоедините кабель SATA от материнской платы и аккуратно вставьте его в разъем SSD. Затем аккуратно установите SSD в свободный слот, убедившись, что он надежно закреплен.
Шаг 4: Завершающие шаги
После установки SSD Samsung 870 EVO вам остается только закрепить его в корпусе устройства, закрутить винты и закрыть корпус. Убедитесь, что все винты прочно закручены, чтобы избежать любого движения или шевеления SSD при работе устройства. После этого можно подключить питание к компьютеру или вставить батарейку в ноутбук.
Вот и все! Теперь, когда вы установили SSD Samsung 870 EVO, ваше устройство будет работать намного быстрее, сокращая время загрузки системы и ускоряя запуск и выполнение приложений. Не забывайте регулярно резервировать свои данные на внешний носитель, чтобы сохранить их целостность и обеспечить безопасность.
Содержание
- Подготовка перед установкой SSD Samsung 870 EVO
- Важность подготовки
- Необходимые инструменты
- Распаковка SSD Samsung 870 EVO
- Проверка комплектации
- Предварительные манипуляции с SSD
- Физическая установка SSD Samsung 870 EVO
Подготовка перед установкой SSD Samsung 870 EVO
Перед началом установки SSD Samsung 870 EVO необходимо выполнить несколько подготовительных шагов:
- Выключите компьютер и отсоедините его от электрической сети.
- Откройте корпус компьютера. Для этого может понадобиться открутить несколько винтов, закрепляющих крышку.
- Определите свободное место для установки SSD Samsung 870 EVO. Обычно это бывает одно из отсеков для жестких дисков.
- Проверьте доступность свободных SATA-портов на материнской плате. Откройте компьютер и проверьте наличие свободных портов для подключения жесткого диска.
- Проверьте наличие свободного кабеля SATA. Убедитесь в наличии свободных кабелей SATA, которые позволят подключить SSD.
- Подготовьте необходимые инструменты. Для установки SSD может понадобиться отвертка, а для открытия корпуса компьютера – отвертка или специальные ключи.
- Определите правильное положение установки. Обычно SSD устанавливают на отсек с монтажными отверстиями снизу или с боку корпуса.
- Анализируйте нужность клонирования жесткого диска. Если на компьютере уже установлена ОС и нужно перенести данные на новый SSD, рассмотрите вариант клонирования.
- Проверьте совместимость SSD с вашим компьютером. Удостоверьтесь, что выбранный SSD Samsung 870 EVO совместим с вашим компьютером, с учетом таких факторов, как интерфейс подключения и поддержка соединения.
Важность подготовки
Перед установкой SSD-накопителя Samsung 870 EVO необходимо правильно подготовиться, чтобы снизить риски повреждения компонентов и обеспечить безопасность данных.
1. Резервное копирование данных: Перед началом установки рекомендуется создать резервные копии всех важных данных с текущего жесткого диска. Это позволит избежать потери информации в случае непредвиденных ситуаций или ошибок в процессе установки.
2. Проверка совместимости: Убедитесь, что ваша система поддерживает установку SSD-накопителя Samsung 870 EVO. Проверьте требования производителя и узнайте, совместим ли ваш компьютер с этой моделью.
3. Проверка свободного места: Оцените объем свободного места на вашем жестком диске. Убедитесь, что на SSD будет достаточно места для установки операционной системы и ваших данных.
4. Приобретение необходимых инструментов: Для успешной установки вам понадобятся отвертка, SATA-кабельы, возможно, адаптер для установки SSD в ваш ноутбук. Озаботьтесь заранее приобретением необходимых инструментов.
Следуя этим рекомендациям, вы готовы к установке SSD-накопителя Samsung 870 EVO и сможете выполнять дальнейшие шаги без лишних проблем и рисков.
Необходимые инструменты
Перед установкой SSD Samsung 870 EVO вам понадобятся следующие инструменты:
- Отвертка Phillips (крестовая) или отвертка Torx. Выбор инструмента зависит от вашего компьютера.
- Антистатический ремень или браслет. Это поможет предотвратить повреждение SSD от электростатического разряда.
- Калибровочный ключ или шестигранный ключ. Это может потребоваться, если ваш компьютер имеет специальные крепления для SSD.
- Компьютерные шпильки или скрепки. Если ваш компьютер не имеет специальных креплений для SSD, вы можете использовать эти предметы для временной фиксации SSD.
- Материнская плата вашего компьютера может потребовать кабель SATA для подключения SSD. Убедитесь, что у вас есть необходимый кабель.
Убедитесь, что у вас есть все необходимые инструменты, прежде чем приступать к установке SSD Samsung 870 EVO.
Распаковка SSD Samsung 870 EVO
Перед началом установки SSD Samsung 870 EVO необходимо правильно распаковать устройство. Следуя этой простой инструкции по распаковке, вы сможете безопасно извлечь SSD из упаковки и подготовить его к установке.
- Проверьте упаковку на наличие повреждений или следов открытия. Если упаковка повреждена или вы заметили признаки вмешательства, обратитесь к продавцу или поставщику для замены.
- Поставьте упаковку на стабильную поверхность и аккуратно разрежьте скотч или распечатайте пломбу упаковки, чтобы открыть ее.
- Аккуратно откройте упаковку, избегая резких движений, чтобы не повредить содержимое.
- Проверьте, что внутри упаковки находится SSD Samsung 870 EVO, а также инструкция по установке или любые другие документы, предоставленные производителем.
После того как вы распаковали SSD Samsung 870 EVO, рекомендуется оставить упаковку для хранения в случае необходимости отправить устройство на гарантийное обслуживание или для других целей. Теперь вы можете приступить к установке SSD на свое устройство.
Проверка комплектации
Перед тем, как начать установку SSD Samsung 870 EVO, важно проверить комплектацию и убедиться, что вы имеете все необходимые компоненты:
- SSD Samsung 870 EVO
- Кабель SATA (обычно входит в комплект)
- Крепление для SSD (если требуется)
- Отвертка
- Подходящие кабели и разъемы для подключения SSD к вашему компьютеру
Если какие-либо компоненты отсутствуют, обратитесь к поставщику или производителю, чтобы получить недостающие части перед тем, как продолжать установку SSD.
Предварительные манипуляции с SSD
Перед установкой SSD Samsung 870 EVO, необходимо выполнить несколько предварительных манипуляций для обеспечения корректной установки и настройки диска.
1. Проверьте совместимость: перед покупкой обязательно убедитесь, что SSD Samsung 870 EVO совместим с вашей системой. Проверьте требования к интерфейсу (обычно SATA или NVMe) и физическому размеру диска (2,5 дюйма или M.2).
2. Резервное копирование данных: перед установкой SSD рекомендуется создать резервные копии важных данных. Это поможет избежать потери информации при переносе данных с старого диска на новый.
3. Подготовьте необходимые инструменты: для установки SSD вам понадобятся отвертки, кабель SATA или адаптер M.2, если таковые отсутствуют в комплекте с SSD.
4. Отключите питание и выньте аккумулятор (если необходимо): перед установкой SSD рекомендуется отключить питание на устройстве и, при необходимости, вынуть аккумулятор. Это позволит избежать повреждения компонентов системы.
5. Откройте доступ к слоту для SSD: в зависимости от модели ноутбука или компьютера может потребоваться удалить крышку, отвинтить несколько винтов или выполнить другие действия, чтобы получить доступ к слоту для установки SSD.
6. Поставьте SSD в соответствующий слот: аккуратно вставьте SSD Samsung 870 EVO в слот для SSD, удостоверившись, что контакты диска соединены с соответствующими разъемами.
7. Закрепите SSD: убедитесь, что SSD надежно закреплен в слоте. В случае необходимости, используйте специальные крепежные элементы, винты или замки, предоставленные производителем.
8. Подключите кабель или адаптер: подключите кабель SATA или установите адаптер M.2, чтобы обеспечить соединение SSD с материнской платой или контроллером.
9. Соберите обратно систему: установите крышку или верните аккумулятор на свое место, включите питание и проверьте работу SSD Samsung 870 EVO.
Теперь, когда предварительные манипуляции с SSD выполнены, вы готовы к настройке и использованию нового диска.
Физическая установка SSD Samsung 870 EVO
Перед установкой SSD Samsung 870 EVO, убедитесь, что ваш компьютер находится в выключенном состоянии и отключен от источника питания.
1. Откройте корпус компьютера, используя отвертку или другой инструмент, который обычно используется для этой цели. Внимательно поместите корпус на столе или другой ровной поверхности.
2. Найдите свободный отсек для установки SSD. Обычно он находится рядом с жестким диском или уже имеющимся SSD. Убедитесь, что отсек совместим с размерами SSD Samsung 870 EVO – 2,5 дюйма.
3. Расстегните крепежные винты на отсеке для установки SSD.
4. Осторожно подключите кабель SATA SSD к материнской плате. Убедитесь, что разъемы на кабеле и на материнской плате совпадают. Обычно разъемы имеют пластиковые направляющие, чтобы гарантировать правильное подключение.
5. На SSD Samsung 870 EVO имеется винт, который используется для его крепления в отсеке. Отверните винт не до конца, чтобы иметь возможность закрепить SSD в отсеке.
6. Осторожно установите SSD в отсек и закрепите его с помощью винта.
7. Закрепите отсек для установки SSD обратно в корпус компьютера, затянув крепежные винты.
8. Закройте корпус компьютера и подключите его к источнику питания.
Поздравляю! Теперь вы успешно установили SSD Samsung 870 EVO и готовы получить все преимущества его использования.