
So, you want to use Wifite to efficiently attack WiFi networks, eliminating the need for manual setup and configuration?
Whether you’re learning about WiFi hacking or the security of wireless devices, this tool streamlines the process so you can jump right into action as it automates several WiFi hacking techniques allowing you to capture WPA handshakes and attempt to crack passwords with minimal effort.
This article will show you how to use Wifite. We’ll introduce you to the tool, explain the hardware you need, and show you how to set up your own lab to perform these attacks.
Finally, we’ll walk you through capturing and cracking a WPA handshake and explain some pros and cons of using Wifite.
If you’re ready to start, let’s begin.
Disclaimer
Everything in this article is for practicing your hacking skills ethically in your home lab environment.
Remember: hacking into someone else’s WiFi network without explicit permission is unethical and illegal and could result in serious consequences.
Ethical hacking focuses on learning and improving security through authorized testing—never for causing harm or pursuing malicious intent.
To use tools like Wifite on networks other than your own, you must have full written consent and authorization from the network owner.
Your respect as an ethical hacker is worth more than a few hacked WiFi networks.
If you decide to hack without explicit permission, you could face hefty penalties and potentially jail time, depending on where you live. These laws include:
- The Computer Fraud and Abuse Act (United States)
- Sections 184, 342.1, 380, and 430 of the Criminal Code of Canada (Canada)
- Computer Misuse Act 1990 (England)
- Sec. 202a and 202b of the German Criminal Code (Germany)
- Information Technology Act Sec. 43 and 66 (India)
- The Act on the Prohibition of Unauthorised Computer Access (Japan)
Before We Begin Our Wifite Tutorial
Before we begin hacking with Wifite, there’s some information we need to go over, including the required hardware and how to set up your lab.
What is Wifite?
Wifite is a Python hacking tool that automates various attacks against WiFi networks aiming to retrieve the password—e.g., pixie dust attacks against WPS and PMKID attacks on WPA encrypted wireless networks without client connections. It’s designed for use with Kali Linux and Parrot OS.
Attacks include:
WPS attacks
- The Offline Pixie-Dust attack
- The Online Brute-Force PIN attack
- The Offline NULL PIN attack
WEP attacks
- Fragmentation
- Chop-chop
- Aireplay
WPA attacks
- The WPA Handshake Capture
- The PMKID Hash Capture
With just a few commands, Wifite scans for WiFi networks, captures handshakes, and attempts to crack passwords.
Under the hood, it utilizes other popular wireless security tools, such as Aircrack-ng suite, reaver, tshark, coWPAtty, and Hashcat, to perform these tasks efficiently and effectively.
This makes it a powerful tool for testing the security of WiFi networks and identifying potential vulnerabilities.
Required Hardware
To use Wifite, you’ll need a wireless adapter that supports packet injection and monitor mode.
For this demo, we’ll be using an ALFA AWUS036NHA adapter. You can check out our list of the best WiFi adapters for Kali Linux to find others that will work with Kali.

We’ll run our demos from a Kali 2024.1 virtual machine inside VMWare.
If you prefer to use VirtualBox instead of VMware, refer to the following two articles to get everything set up, and you’ll be ready to follow along with our demo.
How to Install Kali Linux on VirtualBox & Start Hacking Now
How to Hack WiFi With Kali Linux Like a Pro
Setting Up Kali
Before we begin, we must ensure our adapter is connected to Kali.
If you need help installing Kali on VMware, see How to Install Kali Linux on VMware: The Ultimate Guide.
To get started, with Kali open, simply plug your adapter into any open USB port, and VMware should detect it and ask if you want to connect it to the host computer or one of the virtual machines.
Choose “Connect to a virtual machine” and select the corresponding machine with which you wish to use it. Then, select “OK” to continue.

You can verify the adapter is connected in a couple of different ways. The first way of checking is by going to “VM” and then “Removable Devices.” This way, your adapter should be listed with a checkmark indicating a successful connection.

The second way to verify is to go to the terminal and type ip a. If you see a WLAN network interface, Kali has the wireless network adapter installed.

If you have issues connecting your adapter, you’ll likely need to install drivers. Refer to the adapter manufacturer’s website or documentation for more information.
Our Wireless Hacking Lab
To use Wifite, we’ll set up a WiFi hacking lab to practice using it in a controlled environment. This will allow us to test it safely and legally.
In addition to the wireless adapter, we’ll also need a router to use as an access point. For our demo, we’re using a Linksys WiFi 5 Router.
You can use any capable router. You don’t need the router to be connected to the internet or other devices, and you only need it to be able to broadcast a WiFi signal.
While we won’t be able to show how to set up every router, most have similar options and settings that can be adjusted similarly.
You must log in to your router’s interface and ensure a few settings are configured correctly.
In your wireless settings, set a name for your wireless access point. We’re choosing “Another Brick in the Firewall.”

Then, in the wireless security settings, choose WPA2 Personal and set a passphrase. We used “SuperSecretPassword.”

Finally, ensure the network is visible, and you’ll be ready to begin.

Wifite Download and Install
Wifite is installed in the current version of Kali, which is 2024.1 as of this writing.
If you need to install Wifite on Kali Linux, you can follow these steps:
First, ensure your Kali Linux repositories are up-to-date by running the command:
sudo apt update -y
Once the repositories are updated, you can install Wifite by running the command:
sudo apt install wifite
Now that everything is set up let’s see how to use Wifite.
Wifite Settings and Options
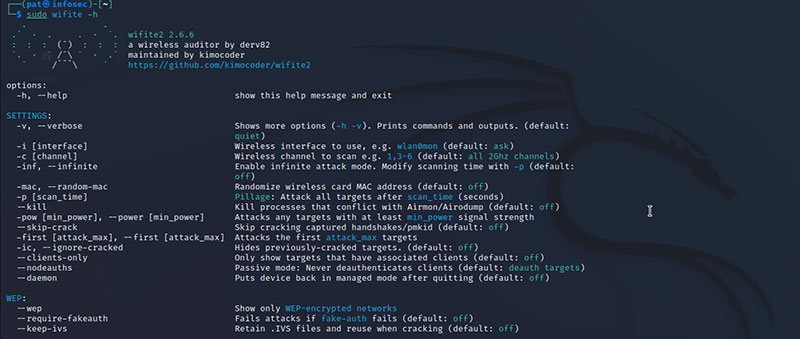
Before we start Wifite, let’s look at some options you can use with this automated wireless auditing tool.
You can see all of the available options by using the command:
wifite -h
The first thing you’ll see is a list of settings.

Some of the settings include:
-v, —verbose: This will increases the information Wifite displays during operation. The more «verbose» it is, the more it tells you about what it’s doing at any given moment.
-i {interface}: This specifies which wireless interface to use, like wlan0mon. If you don’t specify, Wifite will ask you which interface you want to use if you have more than one when it starts.
-c [channel]: This sets the wireless channel to scan. This can be a single channel, like 6, or a range, like 1–6. If you’re looking for a specific network, you might know the channel and can set it here to speed up the scan.
-mac: This allows you to randomize the MAC address of the wireless card.
—kill: This terminates processes that could conflict with its operation, such as other network managers or instances of Airodump.
-pow [min_power]: This filters out all targets below a certain signal strength, measured in decibels (dB). It’s a way to ignore networks that are too far away and likely unreachable.
—skip-crack: This tells Wifite to only capture handshakes or PMKIDs and not attempt to crack them. It’s useful if you want to use a different tool or method for cracking.
—clients-only: This option shows only targets with currently connected clients, which can be necessary for certain attacks.
—num-deauths [num]: This specifies the number of de-authentication packets to send to clients connected to the target network.
You also have other options for WEP, WPS, WPA, and PKMID.

WEP (Wired Equivalent Privacy)
—wep: Targets only WEP-encrypted networks
—pps [pps]: Sets the speed of packet injections, which is important for speeding up data collection
—wept [seconds]: The time to attempt the attack before giving up
WPA (WiFi Protected Access)
—wpa: Focuses only on WPA-encrypted networks
—hs-dir [dir]: Designates where to store captured handshakes
—dict [file]: Specifies the dictionary file for cracking the WPA handshake
—wpadt [seconds]: The interval between de-authentication attacks to disassociate clients and capture handshakes
—wpat [seconds]: The time to wait before considering the WPA attack as failed
WPS (WiFi Protected Setup)
—wps: Shows only networks with WPS enabled
—pixie: It uses the Pixie-Dust attack to exploit WPS vulnerabilities
—bully: Chooses the Bully tool for performing WPS attacks
—reaver: Chooses the Reaver tool for performing WPS attacks
—ignore-locks: Continues the WPS attack even if the access point has locked WPS after failed attempts
PMKID (Pairwise Master Key Identifier)
—pmkid: Focuses on capturing PMKID only, which can be used to crack the network password without needing a full handshake
—pmkid-timeout [sec]: Sets how long to wait for a PMKID capture
General Commands
—cracked: Lists all previously cracked access points
—check [file]: Analyzes a .cap file to check if it contains valid handshakes
—crack: Provides commands for cracking captured handshakes with a different tool
Starting Wifite
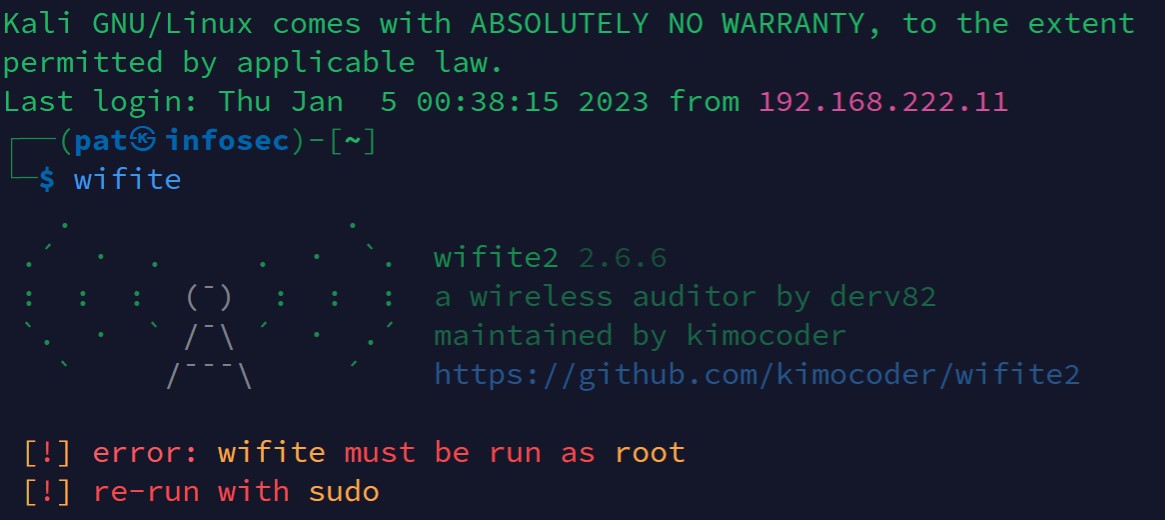
To start Wifite, you must run it as the root user or with sudo. The easiest way to begin using Wifite is by running the command without any other flags:
sudo wwifite -hifite

Here, we’re given some information that processes running could interfere with Wifite, specifically NetworkManager—which manages network connections in Linux—and wpa_supplicant—which manages WiFi security and connections.
Wifite suggests killing these processes to prevent conflicts and rerunning Wifite with the --kill flag to automatically stop conflicting processes.
It also provides us with interface information. One interface, wlan0 (our network adapter), uses the ath9k_htc driver for a Qualcomm Atheros Communications AR9271 chipset that supports 802.11n.
As you can see, Wifite enabled monitor mode for the adapter, simplifying the process and saving us from manually entering commands in the terminal.
By enabling monitor mode, the adapter can monitor network traffic without being associated with an access point.
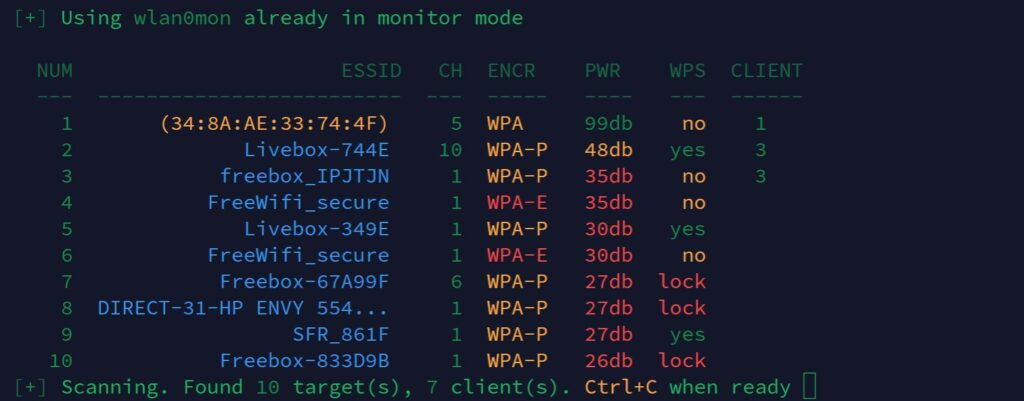
Wifite Scanning
Wifite will now begin scanning the area for any wireless networks.
It’ll display the information in a table format with information including the name of the wireless network or the MAC address if the SSID is hidden, the channel the network is operating on, the type of encryption used, the power level of the signal (higher dB means a stronger signal), whether WPS is enabled and the number of clients connected to the network.

To stop Wifite from scanning, hit CTRL + C.
Wifite Attacks
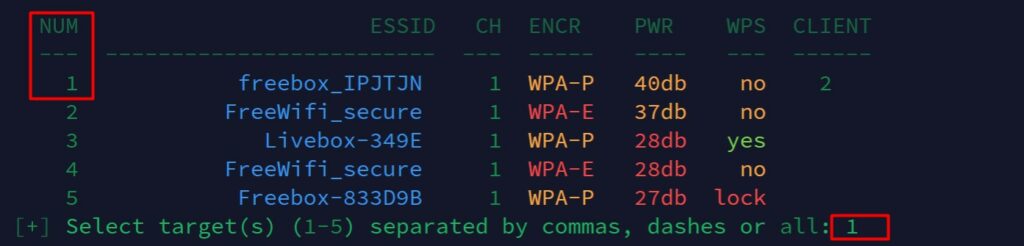
Wifite will now prompt you to select the target(s) you want to attack. You can enter targets separated by commas or use a dash for a range. If you want to select all the targets found, enter “all.”
We’ll select target 11, “Another Brick in the Firewall” network.
It’ll now start its attacks, and if WPS is enabled, it’ll begin these attacks first.
If you want to skip an attack, hit CTRL + C. You’ll be shown how many attacks remain. To continue the attacks, enter “c” or exit by entering “e.”

With default settings, Wifite will attempt five attacks: WPS Pixie-Dust, WPS NULL PIN, WPS PIN Attack, PMKID capture, and WPA Handshake capture.

Cracking WPA Handshake With Wifite
If Wifite can capture a handshake, it’ll attempt to crack it with Aircrack-ng, using the wordlist at /usr/share/dict/wordlist-probable.txt.
You can always provide your own wordlist using the flag --dict [file].--kill flag to

Wifite was able to crack the network’s pre-shared key.
Pros and Cons of Wifite for Hacking
Let’s look at some pros and cons of using Wifite compared to other tools such as Aircrack-ng.
Wifite is often praised for being relatively simple to use, as it takes the complexities of WiFi attacks and puts them into a simple command-line interface.
However, the automation that makes Wifite user-friendly can also be its most problematic aspect. In fact, it can encourage a «black box» mentality where you may not fully understand what’s happening under the hood.
Conversely, Aircrack-ng is less convenient but gives you more control, which can be important in certain testing scenarios. It also means you can pick the right tool for the job, leading to effective penetration testing.
The choice between Wifite, Aircrack-ng, or other tools depends on the task and objectives.
While Wifite is a great tool for streamlined workflows, learning to use Aircrack-ng and similar tools is necessary for anyone serious about becoming a penetration tester or ethical hacker.
Pros:
Automated processes for ease of use
User-friendly for beginners
Integrates multiple tools into one
Cons:
Less control over individual attack steps
Potentially slower due to automation overhead
Less educational value for learning technical detailsList item
Conclusion
In this Wifite tutorial we showed you how it makes hacking wireless networks simple and efficient. It can automate various attacks, including capturing and cracking the WPA handshake.
We encourage you to create a home lab and test some of Wifite’s other functionalities to see what else it can do.
Now that we’ve shown you how to use Wifite, why not learn other types of WiFi hacking by joining the StationX Accelerator Program? You can enroll in courses and labs to hone your skills.
We also provide you with access to career roadmaps and mentorship, helping you achieve a successful career in cyber security.
Frequently Asked Questions
What hardware do I need to hack WiFi?
To hack WiFi, you’ll need a compatible wireless adapter and the tools to perform the attacks. Linux distributions such as Kali or Parrot OS have the necessary tools included.
Will I get in trouble hacking WiFi?
Absolutely. If you don’t have explicit written permission to perform testing on WiFi networks, you’ll get in trouble, which could include fines and/or jail time.
Where can I download Wifite?
If you’re using Kali Linux or Parrot OS, Wifite is already included. You can download it from the Wifite GitHub page if it’s not included in your distro.
-
Richard Dezso is a Security+, ICCA, and eJPT-certified cybersecurity writer and penetration tester with hands-on experience in vulnerability assessment, offensive security labs, and Python tooling. He translates complex topics into practical, accessible guides, develops open-source tools, and advocates for cybersecurity education through actionable, real-world content. Find him on LinkedIn or explore his projects via Linktree.
Install Wifite
Wifite is a powerful tool for hacking WiFi networks in Kali Linux. To install Wifite, open a terminal window and type the following command: sudo apt-get install wifite. This will install the latest version of Wifite on your system. After the installation is complete, you can run Wifite by typing wifite in the terminal window. You can also update Wifite by typing sudo apt-get update wifite in the terminal window. This will ensure that you have the latest version of Wifite installed on your system.
Update Wifite
Updating Wifite is an important step in order to ensure that you are using the latest version of the tool. To update Wifite, open a terminal window in Kali Linux and type the following command: git clone https://github.com/derv82/wifite2.git. This will clone the latest version of Wifite from the official GitHub repository. Once the cloning is complete, you can run the ./install.sh script to install the latest version of Wifite. After the installation is complete, you can run the wifite command to launch the tool.
Run Wifite
In this step, we will learn how to run Wifite in Kali Linux. Wifite is a powerful tool for hacking WiFi networks. To run Wifite, open a terminal window and type wifite. This will launch the Wifite tool. You can also use the -h flag to view the help menu. To update Wifite, type wifite -update. This will download the latest version of Wifite and install it. After running Wifite, you will be presented with a list of available networks. Select the target network you want to attack and then select the attack type. You can choose from a variety of attack types, such as WPA/WPA2, WEP, and WPS. Once you have selected the attack type, you can start the attack by typing wifite -start. You can monitor the attack by typing wifite -monitor. To stop the attack, type wifite -stop. For more information on using Wifite, please refer to the Kali Linux documentation.
Select Target Network
In this step of the tutorial, we will learn how to select a target network using the Wifite tool in Kali Linux. Wifite is a powerful tool that can be used to hack into wireless networks. It is a command-line tool that can be used to scan for available networks, select a target network, and launch an attack. To select a target network, open a terminal window and type the following command: wifite -i [interface] -e [ESSID]. Replace [interface] with the name of your wireless interface and [ESSID] with the name of the target network. For example, if your wireless interface is wlan0 and the target network is MyNetwork, the command would be wifite -i wlan0 -e MyNetwork. Once the command is executed, Wifite will scan for available networks and list them. Select the target network by typing its number and press Enter. Wifite will then start to scan the target network and display information about it, such as the type of encryption used and the signal strength.
Select Attack Type
Once you have selected the target network, you can now select the attack type. Wifite supports several attack types, including WEP, WPA/WPA2, and WPS attacks. To select the attack type, type the following command in the terminal: wifite --attack [attack type]. For example, to select a WPA/WPA2 attack, type wifite --attack wpa. You can also use the --all option to select all attack types. Once you have selected the attack type, Wifite will start scanning for the target network.
It is important to note that Wifite is not a tool for beginners. It is recommended that you have a basic understanding of the different attack types before using Wifite. For more information on the different attack types, you can refer to Kali’s official documentation.
Start Attack
Once you have selected the target network and the attack type, you can start the attack. To do this, open a terminal window and type in the following command: wifite --start. This will start the attack and Wifite will begin to scan for the target network. Once it finds the target network, it will start the attack. You can monitor the progress of the attack by looking at the output in the terminal window. You can also use the --show option to show the progress of the attack in real-time. Once the attack is complete, you can stop the attack by typing in the following command: wifite --stop. This will stop the attack and Wifite will exit.
Monitor Attack
Once you have started the attack, you need to monitor it to make sure it is running correctly. To do this, you can use the wifite --monitor command. This will show you the progress of the attack, including the number of packets sent, the number of packets received, and the number of packets that have been cracked. You can also use the wifite --status command to get a more detailed view of the attack. This will show you the status of each attack type, including the number of packets sent, the number of packets received, and the number of packets that have been cracked. If you want to stop the attack, you can use the wifite --stop command. This will stop all of the attacks that are currently running.
Stop Attack
Once you have successfully hacked the target network, you can stop the attack by pressing the Ctrl+C key combination. This will terminate the attack and Wifite will display the results of the attack. You can also use the --stop command line argument to stop the attack. To do this, open a terminal window and type wifite --stop. This will stop the attack and display the results.
It is important to note that Wifite does not always successfully crack the target network. If the attack fails, you can try again with a different attack type or a different target network. You can also try using a different tool such as Aircrack-ng or Reaver to crack the target network.
Useful Links
- Kali Linux Official Website
- Wifite2 Github Repository
- Aircrack-ng Official Website
- How to Use a Disc Image File for Easy Software Installation
- How to Use the Wifite Tool for WiFi Hacking in Kali Linux
Cracking Wi-Fi networks is one of the main use of the Kali Linux toolkit, and it has always been. I remember playing Aircrack-NG when I was at school, many years ago. The process was a bit complicated, but hopefully, it’s now easier than ever, thanks to a new tool: Wifite. I’ll show you how to use it in the latest versions of Kali Linux.
Wifite is a command-line tool, available on Kali Linux, to crack wireless network passwords. It’s included with the essentials tools, and can be used directly on a fresh installation of Kali Linux.
Let’s start with a brief introduction about this tool, and then see how you can use it to test wireless network security.

Master Linux Commands
Your essential Linux handbook
Want to level up your Linux skills? Here is the perfect solution to become efficient on Linux. 20% off today!
Download now
What is Wifite?
Wifite is a command-line tool for Linux, pre-installed on Kali Linux and used to crack wireless network passwords.
Wifite relies on different older tools, mostly the Aircrack-NG suite, making the process of scanning, auditing and detecting Wi-Fi clients easier than ever. It can also be used to attempt password crackings using different methods (Aircrack or other options we’ll see later).
And nope, Wifite is not the Nintendo thing you had in your living room over a decade ago to pretend you were exercising :-). Too young for this one? That’s what I’m talking about.
Seriously now, Wifite supports cracking of WPA/WPA2, WEP and WPS networks, and the good news is that it can also be used to attack multiple networks at once.
In short, it’s a simple and efficient tool that is commonly used by security professionals and ethical hackers to test the security of wireless networks. Let’s see how it works now.
How to install Wifite on Kali Linux
There are three ways to get Wifite on Kali Linux:
- It can be pre-installed if you choose to add the essentials tools during the installation.
- It’s available in the default repository, and can be installed with APT.
- Or it can be downloaded from the GitHub repository to get the latest version.
Hide your IP address and location with a free VPN:
Try it for free now, with advanced security features.
2900+ servers in 65 countries. It’s free. Forever.
I’ll give you more details about each solution in this section.
Pre-installed
In my case, Wifite was already installed on my test laptop. I think I choose to install the essentials tools during the installation, so it comes directly with this application.
Before trying the other installation method, you can do a quick check on your system:
- Open a terminal.
- Type this command:
wifite - If you get a screen looking like that, Wifite is already installed on your device:

Don’t worry about the errors or warnings you get here, if you see something like that, it’s ok, you have Wifite and can skip this installation part.
Only follow one of the two installations methods below if you get an error like “command not found” when trying this. But in most cases, Wifite is probably already installed on your computer.
Installation with APT
If Wifite is not already installed on your system, Wifite is included in the default package repositories of Kali Linux, so it can be easily installed using the APT package manager.
Here are the steps to install Wifite on Kali Linux:
- Open a terminal.
- Update the package repositories:
sudo apt-get update - Install the Wifite package with this command:
sudo apt-get install wifite - A few seconds later, Wifite is installed and ready to use.
You can try to run the command I gave you earlier to make sure it’s working properly:wifite
Manual installation
Even if using APT is the easiest way, it’s not always up-to-date.
So, another option you can use is to install the tool by cloning the GitHub project:
- Open a terminal.
- Create a folder where you’ll download the files and move into it.
For example:cd /opt
sudo mkdir wifite
cd wifite - Run the command
sudo git clone https://github.com/derv82/wifite2.git
The project is tiny, it should be pretty fast. - Once done, go into the “wifite2” directory:
cd wifite2 - Add the execution permission to the Python file:
sudo chmod +x Wifite.py - And you can finally run the tool directly with:
sudo ./Wifite.py
Remember to use this command in the examples I’ll give you later, it’s slightly different from the command used with the APT installation.
Note: Wifite will store temporary files in your current directory when you run it, so it might be a good idea to always run it from the same folder. Maybe you can even create a subfolder in your home directory, and then use the full path to run the Python file, for example:cd /home/pat
mkdir wifite
cd wifite
sudo /opt/wifite/wifite2/Wifite.py
You can also run the setup file to add it to your system path so that you can use the same command as with apt:sudo python3 setup.py install
Getting started with Wifite on Kali Linux
Wifite requires administrator privileges, and you shouldn’t be using the wireless interface for your interface connection. So, before anything else, make sure you have enough permissions, and use an Ethernet cable to follow the instructions on this page.
Disclaimer
Hacking a wireless network you don’t own is a crime in many countries
It’s illegal, and you can go to jail for this. This tutorial is here for an educational purpose only.
Only try this on your own network, to learn how hackers work and then protect yourself.
Don’t use these techniques on other networks without the owner permission.
In no case, I can be held responsible for your actions.
Now that this is clear, let’s get down to the practice.
Scanning wireless networks
By default, Wifite will start scanning for wireless networks directly.
Just run the application with:sudo wifiteAnd wait a few seconds to get a list of the detected networks, the encryption type they use, and other information like the number of clients, and the signal power.
Note: You must use sudo (or root) to run Wifite, or it won’t be able to change the wireless card settings.
Select targets
After running the scanner for a while, you should have a good overview of the networks available near you. You can then press “CTRL+C” to select one or several targets.
To capture authentication packets and improve the probability to crack the network password, it’s better to start with a network that has a few clients connected.
As you can see on my screenshot, I just typed the number corresponding to one of the wireless network detected during the scan.
It’s possible to choose several targets (by separating the IDs with commas). It’s even possible to attack them all, even if it’s not necessarily recommended (stay focus on one target and then try another later if it doesn’t work).
Cracking the Wi-Fi password
Once the target selected, Wifite will start focusing on the selected network(s), listening to authentication process and trying to reauthenticate clients to capture handshakes.

A handshake typically involves a series of messages exchanged between the devices to authenticate each other and negotiate the details of the connection. During this process, the client will send an encrypted version of the key to the access point, that’s the packet Wifite will intercept to try to crack the password.
Once Wifite captures a handshake, you’ll get something like that on your screen:
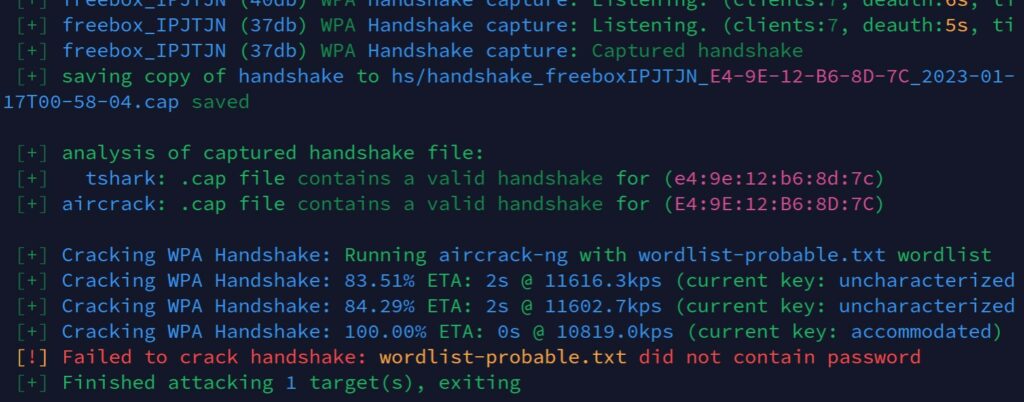
The captured handshake is saved to a subfolder (hs) and Wifite will use the tools available to attempt to crack the password (in this example, AirCrack-NG is used, with a basic word list). That’s why I told you to always run Wifite from the same folder.
The default word list is pretty small, so there is a very low chance to find a typical password with the default options, but you can try other options to improve the likelihood of cracking the Wi-Fi password. I’ll tell you more about that in the next part.
Going further
You now know the basics of Wifite on Kali Linux, here are a few tips to go a bit further.
Using another word list
By default, Wifite uses a local word list that is really small (wordlist-probable.txt), but you can generate your own word lists, or simply download bigger ones from online sources.
For example, here is a GitHub repository where you can download a few of them. The biggest ones are not available (and most of the time they aren’t free), but it’s already good enough to do a few more tests (especially for English users).
Let’s say you want to try with the Richelieu French Top 20000 list from this repository.
You’ll first download it on your computer with:wget https://raw.githubusercontent.com/danielmiessler/SecLists/master/Passwords/richelieu-french-top20000.txt
You can also use your browser directly if the command line is not your friend :-).
Then, you can run Wifite, specifying the file in the parameters instead of the default file:sudo wifite --dict richelieu-french-top20000.txt
If you already have handshake files in your “hs” folder, you don’t need to redo the whole process (scan, capture, etc.) to try another list.
You can simply run this command:sudo wifite --crack --dict <filename>It will just try the same handshake(s) with the specified word list.
Repeat this process with all your files.
Other options
I showed you the basic usage of Wifite, but many other options are available.
You can filter the network detected, choose the types of attacks, etc.
Use this command to see all the options available:sudo wifite -h
And obviously, the GitHub project page is the place to go to get more details on how to use the advanced options of this tool.
Using other tools to crack the password
Wifite is like a meta-tool, giving you access to many other tools in an easier interface. Before that, cracking a Wi-Fi password directly with Aircrack-NG was way more complicated (check the “old” procedure here).
But it’s based on the same technologies, so you can still use the other tools if needed.
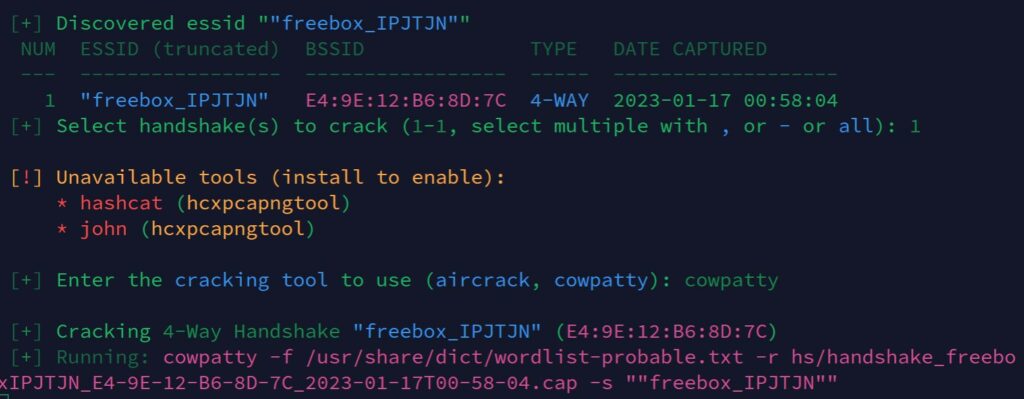
For example, when you run the crack command as mentioned earlier:sudo wifite --crackWifite will suggest using other tools like Hashcat, John the ripper or Cowpatty.
You may need to install these tools before using them, but Wifite will make your life easier, by running the commands directly.
Here is an example below with Cowpatty:
If you liked this tutorial, I have many other articles about Kali Linux on this website. Here are a few suggestions:
- Does Kali Linux have a VPN client? (Get one for free)
- Getting Started With John The Ripper On Kali Linux
- How To Install & Use Wireshark On Kali Linux
Hi, my name is Patrick, I’m a web developer and network administrator. I have always been interested in security, and I created this website to share my findings with you.
In this post, we are going to see How To Use Wifite In Kali Linux and the detailed guide and tutorial based on the latest methods of 2024.
Wireless penetration testing is a crucial skill in cyber security and for this, our Linux distributions by default contain some tools for wifi penetration testing like Wifite which is one of the most popular tools. I also love using this for wifi penetration testing. To Use Wifite we only need to run the Wifite command in our Linux terminal and we are good to go just select the network and Wifite will do all things automatically for you.
- 1 What is Wifite?
- 2 Why Use Wifite in Kali Linux?
- 3 Before we dive in, you’ll need a few things:
- 4 Step-by-Step Guide: How to Use Wifite in Kali Linux
- 5 Conclusion
- 6 FAQs
- 6.1 Q: Do I need a special Wi-Fi adapter for using Wifite?
- 6.2 Q: Is it cool to use Wifite on any network I want?
- 6.3 Q: Can Wifite crack those fancy WPA3 networks?
- 6.4 Q: What’s the best list of passwords to try when cracking WPA?
- 6.5 Q: How long does it take to crack a WPA handshake?
What is Wifite?
Wifite is a Python script designed to automate the process of auditing wireless networks. It supports a variety of attacks such as WEP, WPA, and WPS. Its main advantage is its simplicity: instead of manually running different tools for different attacks, Wifite automates the process.
What can Wifite do? In a nutshell:
- It automates Wi-Fi attacks
- Works on WEP, WPA, and WPA2 networks
- Brute-forces WPS
- Grabs and cracks WPA handshakes
Why Use Wifite in Kali Linux?
It’s simple. Kali is the Swiss Army knife of hacking tools, and Wifite comes pre-installed. It’s like they were made for each other.
Read also: How To Use Aircrack-ng Tool In Kali Linux
Before we dive in, you’ll need a few things:
- Kali Linux (duh!)
- A wireless adapter that can go into monitor mode
- Root access (because we’re doing some serious stuff here)
- An up-to-date system
Run the below command in the Linux terminal to Update the Linux system
sudo apt update && sudo apt upgradeStep-by-Step Guide: How to Use Wifite in Kali Linux
Now After Confirming all the above Pre-Requisites let’s see the step-by-step guide to using Wifite in Kali Linux.
Step 1: First things first – make sure Wifite is installed. Type this into your terminal:
No dice? No worries. Just run:
sudo apt-get install wifiteStep 2: Now, we need to put on our spy glasses – I mean, put our wireless adapter in monitor mode. It’s like turning your Wi-Fi card into a super-sensitive antenna. Here’s how:
Find your wireless adapter:
Put it in monitor mode (let’s say it’s called wlan0):
sudo ifconfig wlan0 down
sudo iwconfig wlan0 mode monitor
sudo ifconfig wlan0 up
Step 3: Ready for the main event? Fire up Wifite:
Now sit back and watch the magic happen. Wifite will scan for nearby networks faster than you can say “free Wi-Fi”.
Once it’s done, you’ll see a list of networks. Each one gets a number, like contestants in a hacking beauty pageant. Pick your target, and let Wifite do its thing.
Remember, with great power comes great responsibility. Only use this on networks you own or have permission to test. Stay ethical, my friends.
For instance, if you wish to attack network number 4, type:
Wifite will now launch attacks based on the type of network selected (WEP, WPA, WPA2, or WPS)
Here is a breakdown of common Wifite commands and their functions:
| Command | Function |
|---|---|
wifite -wep |
Focuses only on WEP-encrypted networks |
wifite -wps |
Attacks only WPS-enabled networks |
wifite -all |
Targets all networks and attacks them simultaneously |
wifite -dict /path/to/wordlist |
Uses a custom dictionary for WPA handshake cracking |
wifite -mac |
Automatically randomizes your MAC address before attacking |
wifite --no-wps |
Skips WPS attacks |
Conclusion
In this post, we have successfully learned How To Use Wifite in Kali Linux in detail, and the latest methods with live tutorials and easy to copy paste commands. Hope you have found this post helpful if you are facing any difficulties or errors then let me know in the comment section. I will try my best to fix your issue. Don’t forget to share and rate this post. Thanks For reading this post.
FAQs
Q: Do I need a special Wi-Fi adapter for using Wifite?
A: Yes, you need a Wi-Fi adapter that supports monitor mode and packet injection. Most built-in adapters don’t support these features, so an external adapter is recommended.
Q: Is it cool to use Wifite on any network I want?
A: Absolutely not. Using Wifite without permission is like breaking into someone’s house. It’s illegal and, frankly, a jerk move. Don’t do it.
Q: Can Wifite crack those fancy WPA3 networks?
A: Not yet, buddy. WPA3 is like the Fort Knox of Wi-Fi security. Wifite’s still working on its lockpicking skills for that one. But hey, there are other tools out there if you’re dead set on testing WPA3.
Q: What’s the best list of passwords to try when cracking WPA?
A: The classic rockyou.txt is like the Swiss Army knife of wordlists. It’s been around the block a few times. But if you’re feeling creative, why not cook up your own with Crunch? Or, you know, Google’s your friend for finding more extensive lists.
Q: How long does it take to crack a WPA handshake?
A: How long is a piece of string? It could be minutes, it could be weeks. Depends on how clever (or not) the password is and how big your wordlist is. If the password is “password123”, you’re in luck. If it’s a random string of characters? Well, grab a coffee. Or ten.
WiFi remains one of the most sought-after targets for penetration testing. Whether you’re assessing the security of your own network or diving deeper into wireless security, Kali Linux stands as one of the go-to tools for ethical hackers. One powerful tool within Kali’s arsenal is WiFite, an automated wireless attack tool designed for cracking WiFi passwords. With WiFite, testing for weak passwords or poorly configured networks becomes much easier.
By using WiFite in conjunction with the recommended wordlists mentioned below, hackers can potentially recover passwords from 20-40% of vulnerable networks that rely on weak or commonly used passwords. Stronger passwords and modern encryption standards, such as WPA3, are much harder to crack, highlighting the importance of maintaining robust network security.

In this guide, we will walk you through how to hack WiFi using WiFite on Kali Linux, covering everything from installation and setup to launching an attack. Remember, the purpose of this guide is to help you ethically test and improve your network security.
Required Hardware: WiFi Adapter that Supports Monitor Mode
Before diving into WiFite, it’s important to know that to effectively carry out WiFi penetration testing, you’ll need a WiFi adapter that supports monitor mode. Most built-in WiFi adapters in laptops or desktops do not support this mode, so it’s crucial to use an external USB wireless adapter.
Recommended Wifi Adapter
A highly recommended WiFi adapter for this purpose is the Alfa Network AWUS036NHA. This adapter supports monitor mode and packet injection, making it ideal for ethical hackers and penetration testers. In addition, this Alfa adapter is very easy to use with Kali Linux and does not require any configuration. Simply plug it in with USB and you’re ready to start using the adapter. You can use any WiFi adapter that supports monitor mode, but the Alfa Network adapters are well-regarded for their reliability and performance.

Buy from Amazon US
Buy from Amazon UK
Affiliate Notice
The links to purchase this adapter are affiliate links, meaning we may receive a small commission if you make a purchase, at no additional cost to you. However, this recommendation is based solely on performance and reliability, and any WiFi adapter that supports monitor mode can be used for the task.
If you are using Kali Linux as your main or native operating system, the Alfa Network Adapter will typically connect straight away without any additional configuration. Kali Linux comes pre-installed with the necessary drivers for most Alfa adapters, allowing for immediate recognition and usage. Simply plug in the adapter, and it should be ready for use, enabling you to start scanning networks or using wireless penetration testing tools right out of the box. If you are using Kali Linux on VirtualBox, you may need to take some additional steps, as described in the next section.
Using the Alfa Network Adapter with VirtualBox and Kali Linux
When using the Alfa Network Adapter in a Kali Linux virtual machine on VirtualBox, the adapter should be automatically recognized once it is plugged into the USB port on your PC. However, there are instances where the adapter may not be detected right away by the virtual machine. If this happens, follow these steps to ensure the adapter is recognized and functional:
Step 1: Install the VirtualBox Extension Pack
To enable VirtualBox to properly detect and work with USB devices, you need to install the Oracle VirtualBox Extension Pack. This pack enables support for USB 2.0 and 3.0 devices, including network adapters.
- Make sure your VirtualBox installation is up to date. The Extension Pack version must match the installed VirtualBox version.
- Download the Extension Pack from the VirtualBox website.

- Open VirtualBox, go to File > Tools > Extension Manager, and add the Extension Pack by clicking the + icon and selecting the downloaded file.
- Once installed, restart VirtualBox and ensure the extension is active.

Installation of WiFite on Kali Linux – WiFite Tutorial
WiFite is typically pre-installed on Kali Linux. However, in some instances, you may need to install or update it manually. Below is a quick guide to ensure you have WiFite set up on your system.
Step 1: Checking if WiFite is installed
Open the terminal in Kali Linux and type:
If WiFite is installed, you should see a list of options or commands:

If Wifite isn’t installed, follow these steps:
Step 2: Installing WiFite manually
To install WiFite, first, ensure that your system is up to date:
Bash
sudo apt update && sudo apt upgradeNext, install WiFite by running:
Bash
sudo apt install wifiteAlternatively, you can install WiFite from the source, using the official GitHub repository. Run the following commands to clone and install the latest version:
Bash
git clone https://github.com/derv82/wifite2.git
cd wifite2
sudo python3 setup.py install
Now, WiFite should be successfully installed and ready for use.
Adding Dependencies for WiFite
WiFite is powerful, but to carry out all the attacks it’s capable of, you’ll need to install additional dependencies. The dependencies required are primarily for specific attacks on different encryption methods (WEP, WPA, WPA2, etc.).
Step 1: Find Dependencies
Dependencies can be found on the WiFite GitHub page (https://github.com/derv82/wifite2). Some common ones include aircrack-ng, reaver, pyrit, and tshark.

You can check whether you have the dependencies already installed by using the following commands:
This will check whether a program or command is available in your system’s PATH and displays the path to the executable if installed, for example:

If the program is not available in the PATH you can check if the package is installed by using the following:
Bash
dkpg -l | grep <package-name>If the package is on the system, you will receive some feedback like this:

If both the which command and the dpkg command do not return any information, this indicates that the dependency is not installed. If you have a fresh installation of Kali Linux, pyrit is often not installed:

Step 2: Install Dependencies
Install the necessary tools. In the first instance, try sudo apt … as in the following example to install reaver and tshark:
Bash
sudo apt install aircrack-ng reaver tsharkImportant Legal Notice
Before proceeding further, it’s crucial to understand the legal and ethical implications of scanning and attacking WiFi networks. For the purpose of this blog, we are only demonstrating how to use WiFite to attack our own WiFi network, which we have full permission to test.
You should never attempt to scan or attack any WiFi network that you do not own or do not have explicit permission to hack. Unauthorized access to WiFi networks is illegal and can lead to serious legal consequences, including fines and imprisonment, depending on your location.
Always ensure that you have the legal right to test the security of a network before conducting any kind of penetration test or ethical hacking activity. Ethical hacking should be used solely for the purpose of improving security and defending against real attacks.
By continuing, you acknowledge that you are responsible for your own actions and any consequences that may arise.
Using WiFite: Finding Targets
Once WiFite is installed and the dependencies are configured, you can immediately begin scanning for nearby WiFi networks. Unlike some other tools, WiFite can automatically put your WiFi adapter into monitor mode if it’s not already enabled, making the setup even easier.
Step 1: Let WiFite Manage Monitor Mode
There’s no need to manually put your WiFi adapter into monitor mode using airmon-ng beforehand—WiFite will handle this for you. When you run the tool, it checks if your adapter is already in monitor mode. If it’s not, WiFite will switch it for you.
However, if you prefer to set monitor mode manually, you can still use:
Bash
sudo airmon-ng start wlan0Step 2: Randomize Your MAC Address for Privacy
When performing WiFi penetration tests, it’s a good practice to randomize your MAC address. This helps protect your identity by masking your real hardware address from potential logging systems or monitoring devices on the network. WiFite allows you to randomize your MAC address with a simple switch.
To start scanning with WiFite and randomize your MAC address, run the following command:
Bash
sudo wifite --mac-randomThis will ensure that your MAC address is randomized during the WiFi scan, making it more difficult for the network administrator to trace your device.
Step 3: Scan for Nearby Networks
Now that WiFite is running, it will begin scanning for nearby WiFi networks. The tool will display a list of detected networks, including important details such as:
- Signal strength (dBm)
- Encryption type (WEP, WPA, WPA2)
- Whether the network is vulnerable to WPS attacks
You’ll also see each network’s ID number, which allows you to select a target for further testing.

Selecting a Target with WiFite
When WiFite finishes scanning, it will display all detected networks with their respective IDs. You can select a specific target by pressing Ctrl + C to stop scanning, then enter the ID number of the network you want to target. In this instance, we are seeking to attack the WiFi network listed at number 12 in the list, so we simply press Ctrl + C and then in response to the prompt, type 12:

WiFite will then begin attacking that specific network, attempting different techniques depending on the encryption type (WEP, WPA, WPA2).
Changing the Wordlist or Dictionary in WiFite
For WiFite to crack WPA/WPA2 networks, it will need a wordlist to brute force the password. WiFite comes with a limited default wordlist, but for better results, you might want to use a custom list.
Step 2: Best Wordlists for WiFite – WiFite Tutorial
Here are five of the best wordlists to use with WiFite:
- rockyou.txt – Found in the Kali Linux distribution at
/usr/share/wordlists/rockyou.txt. - SecLists – A comprehensive collection of multiple wordlists available on GitHub.
- Weakpass – Another popular wordlist repository with a large selection.
- Darkc0de.lst – A widely used list for password cracking.
- CrackStation – A huge wordlist available online for WiFi password cracking.
These wordlists significantly increase your chances of success when attempting to crack WiFi passwords.
Running the Attack
Once you’ve selected your target and set the appropriate wordlist, WiFite will automatically begin attempting various attacks. For example, it may attempt:
- Deauthentication attacks: Forcing clients to reconnect and capturing WPA/WPA2 handshakes.
- WEP attacks: Cracking WEP keys using packet injection techniques.
- WPS PIN brute force: Exploiting routers with vulnerable WPS settings.
If WiFite successfully captures a WPA/WPA2 handshake, it will proceed to use the wordlist to crack the password. Depending on the strength of the password and the quality of the wordlist, this process can take some time.
Conclusion
WiFite is an incredibly useful tool for WiFi penetration testing, simplifying the process of targeting and attacking WiFi networks. By following this guide, you should now have the knowledge to install WiFite, configure its dependencies, and use it effectively to test your network’s security.
Remember, always ensure you have permission before testing any network, as unauthorized hacking is illegal. Ethical hacking should be done with the aim of improving security, not causing harm.
If you’re serious about wireless network security and want to dive deeper into ethical hacking, tools like WiFite on Kali Linux are indispensable.