
Kettler Corsa
Computer- und Trainingsanleitung
ST2701-8 / ST2703-8 / ST2705-8
Der Umwelt zuliebe: Wir drucken auf 100% Altpapier!
View the manual for the Kettler Corsa here, for free. This user manual comes under the category hometrainers and has been rated by 23 people with an average of a 8.2. This manual is available in the following languages: English. Do you have a question about the Kettler Corsa?
Ask your question here
Product Images (1)
Kettler Corsa specifications
Below you will find the product specifications and the manual specifications of the Kettler Corsa.
The Kettler Corsa hometrainer is a stationary bike designed to provide an effective workout. It features multiple resistance levels that can be adjusted to increase or decrease the intensity of your ride. The bike is equipped with an LCD display that shows your workout statistics, including time, speed, distance, and calories burned. The display is easy to read and use, making it simple to track your progress throughout your workout.
The Corsa’s frame is sturdy and durable, ensuring that it can withstand heavy use over time. The bike is also designed to be comfortable, featuring an adjustable saddle and handlebars that can be customized to fit your body properly. The bike’s pedals include toe clips and straps, keeping your feet secure and in place during your ride.
The Corsa hometrainer is compact and easy to store, making it a great option for those with limited space. It is also equipped with transport wheels, allowing you to easily move it around your home. The bike is self-powered, meaning that you do not need to plug it in or use batteries to operate it. The Kettler Corsa hometrainer is a reliable and effective way to get a great workout at home.
General
Frequently asked questions
Can’t find the answer to your question in the manual? You may find the answer to your question in the FAQs about the Kettler Corsa below.
What is an adult’s maximum heart rate?
As a rule of thumb for your maximum heart rate, you can use 220 minus your age.
How much should I exercise as an adult per week?
As an adult, it is recommended to do moderately intensive exercise for at least 2.5 hours per week. Preferably spread over several days.
Is the manual of the Kettler Corsa available in English?
Yes, the manual of the Kettler Corsa is available in English .
Is your question not listed? Ask your question here
Computer- und Trainingsanleitung
ST2701-8 / ST2703-8 / ST2705-8
Der Umwelt zuliebe: Wir drucken auf 100% Altpapier!
2
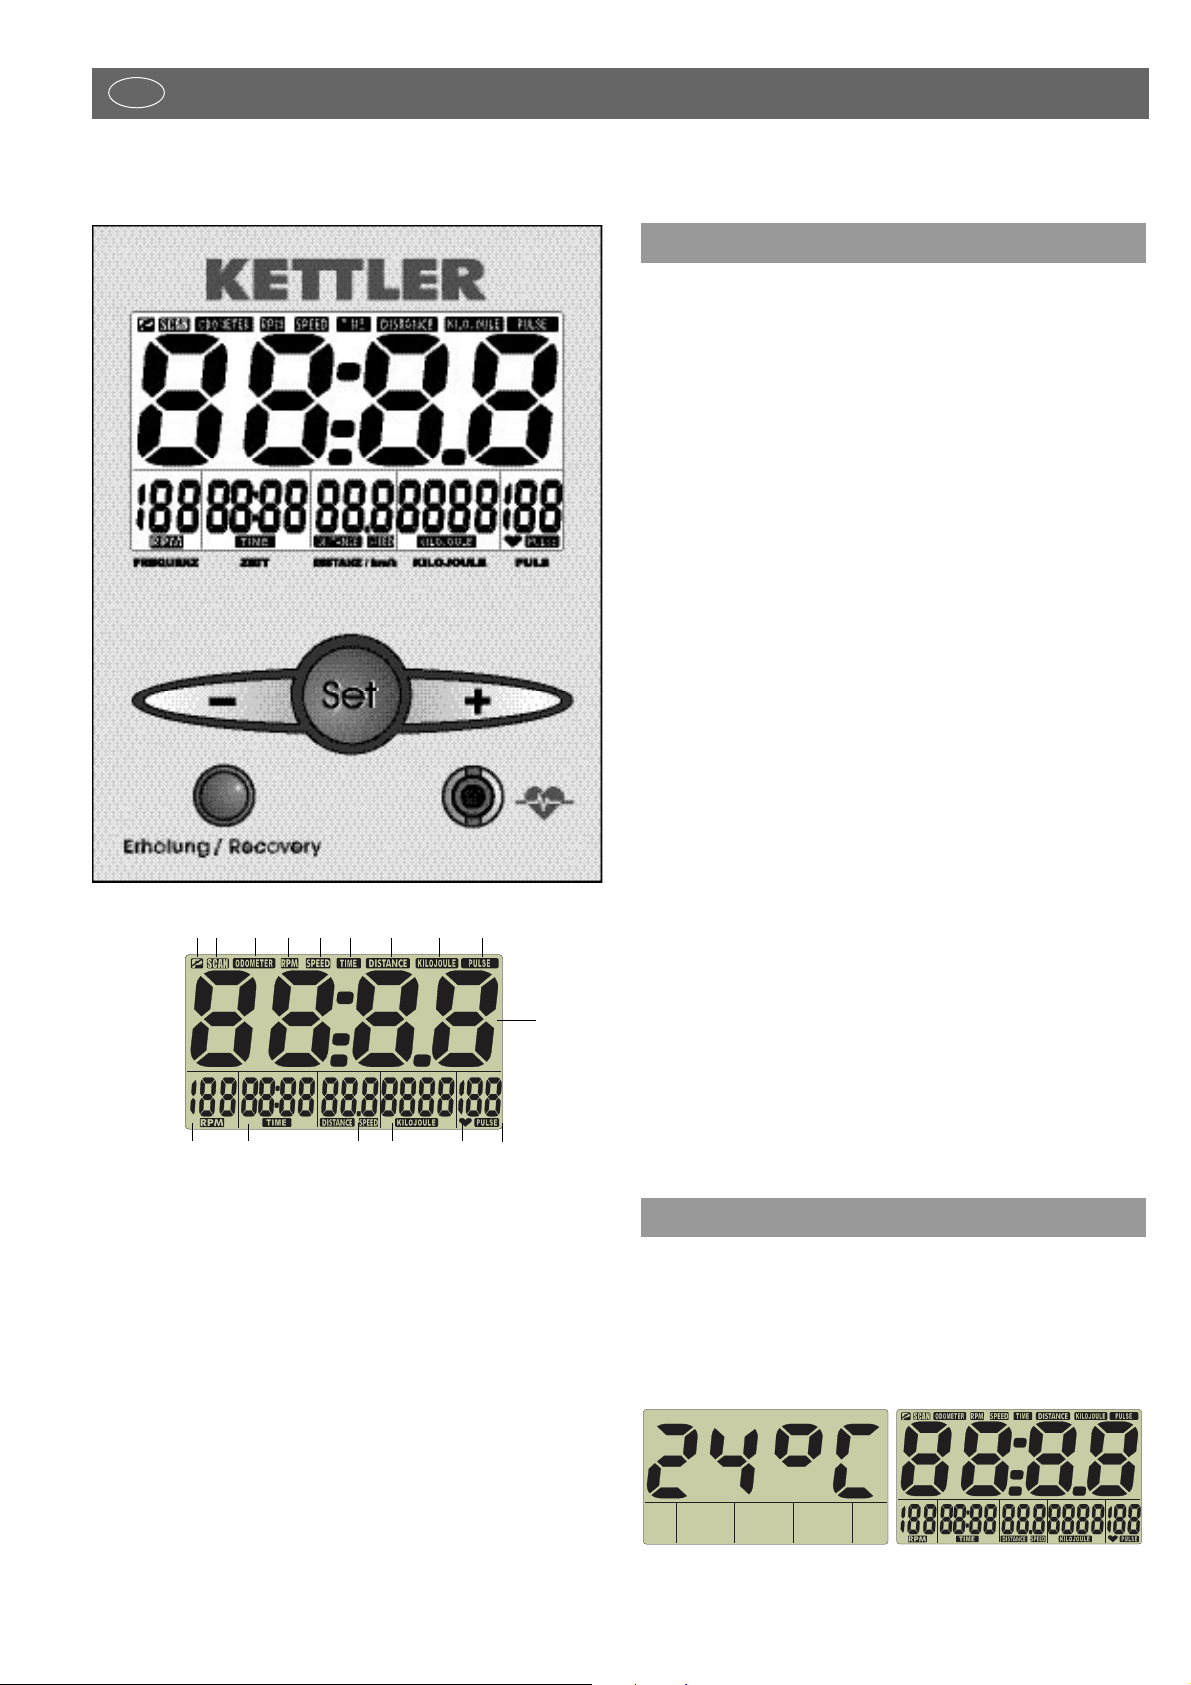
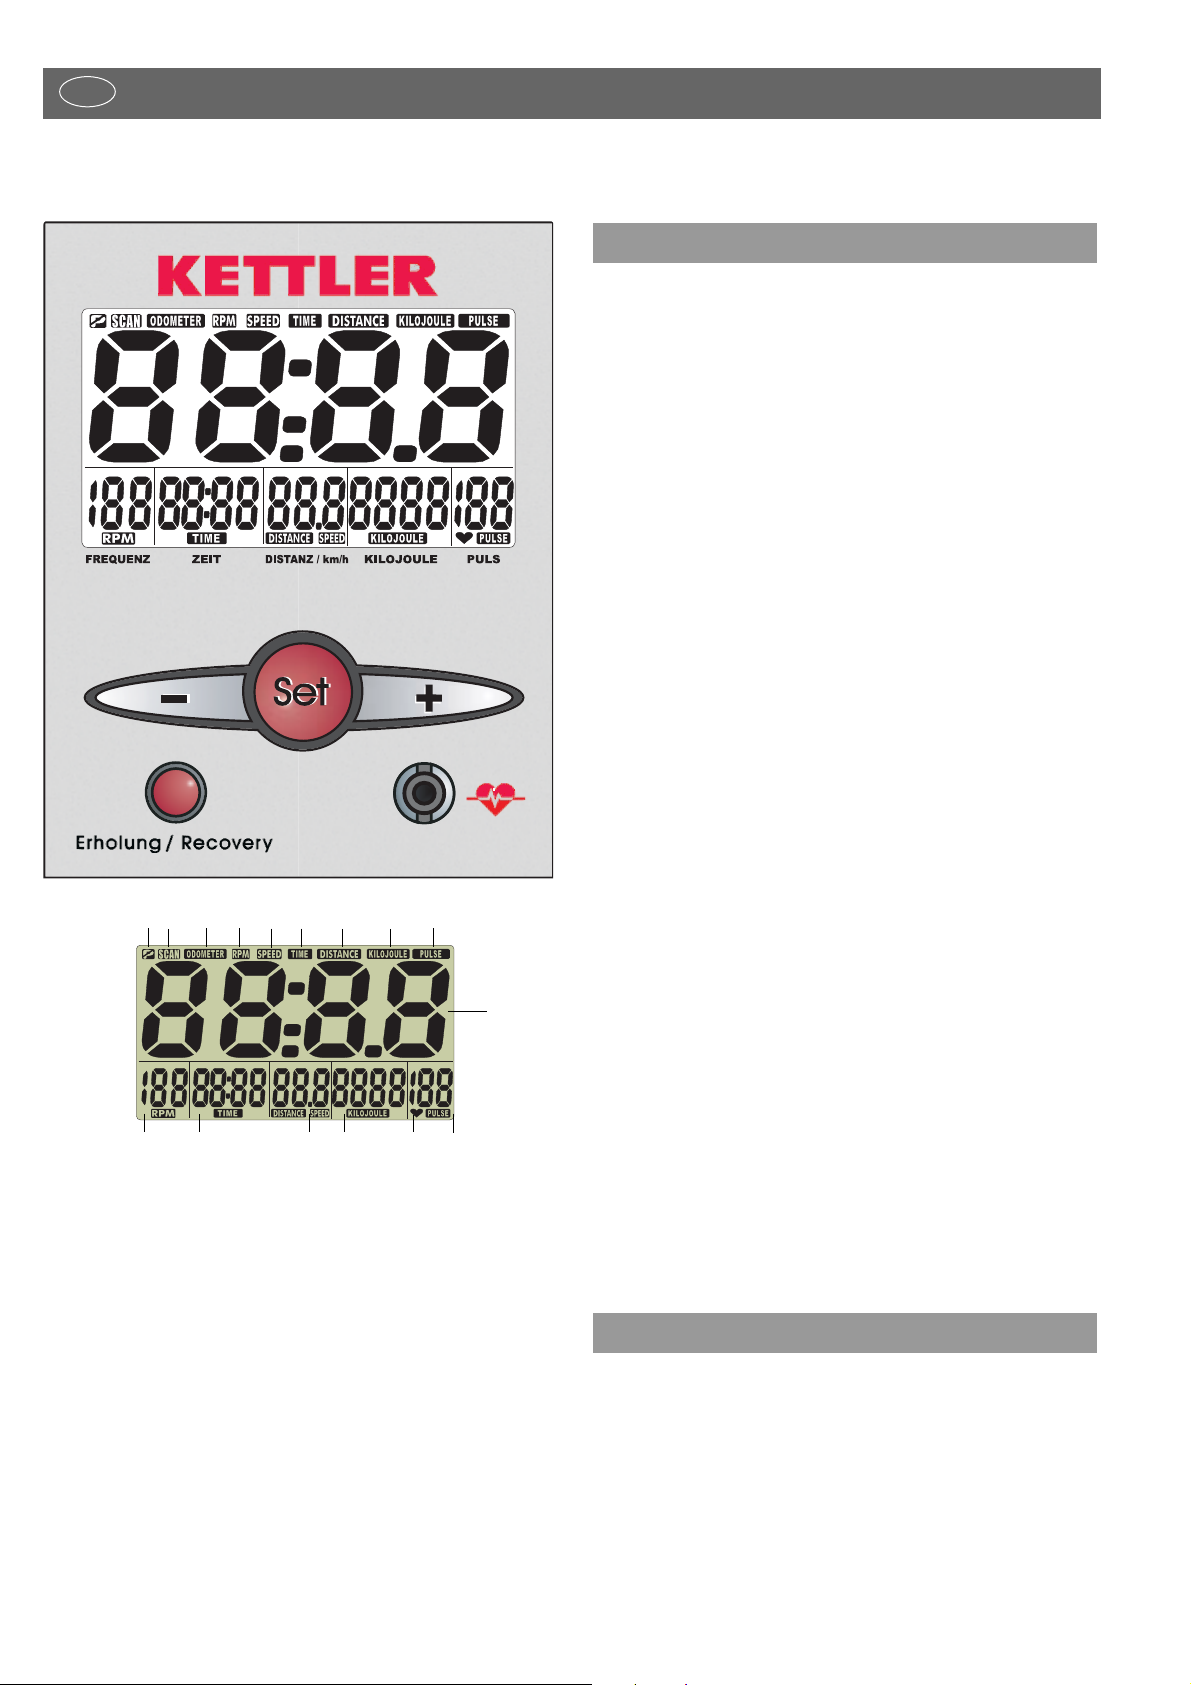
Funktionen und Bedienung des Trainingscomputers
D
12 3 5 846
9
10
11 12 14 1571613
Bedienungsanleitung für den Trainingscomputer mit Digitalanzeige
(ST2701-8) / (ST2703-8) / (ST2705-8)
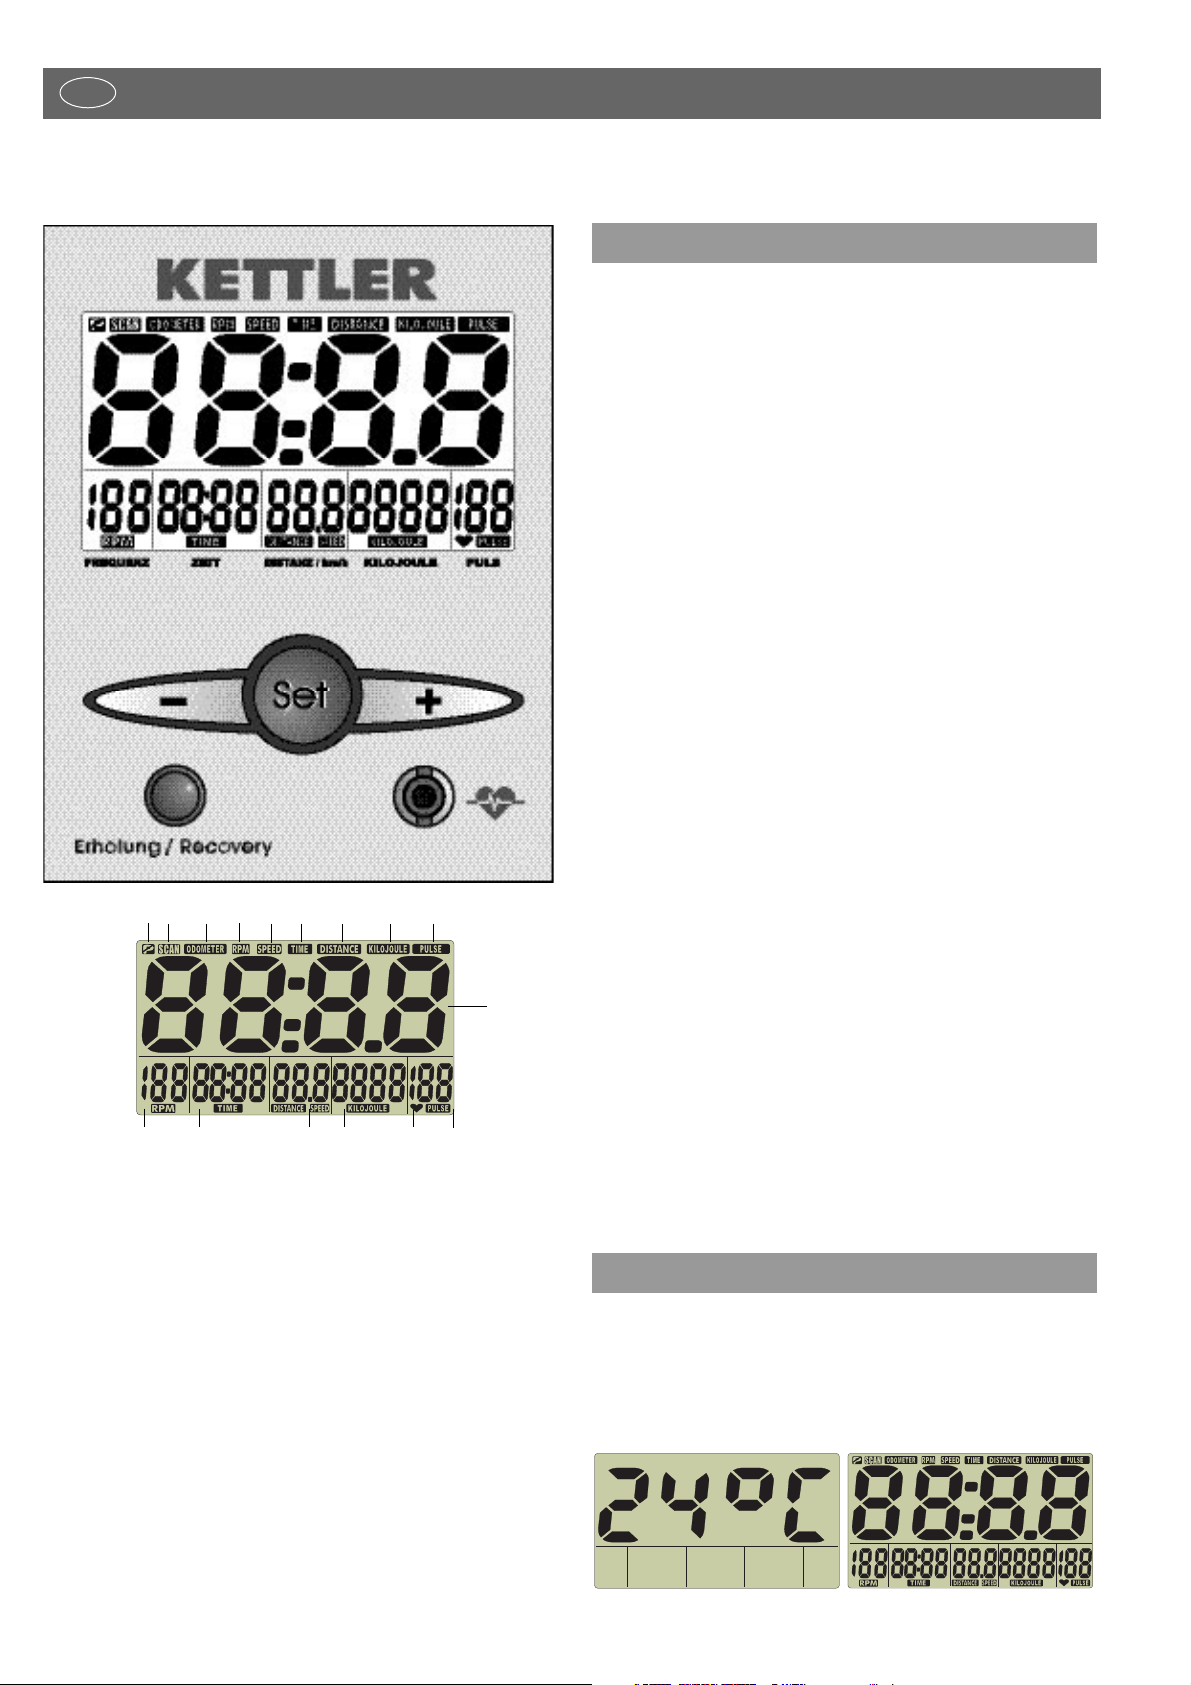
Symbole:
1. P kein Training: bereit für Vorgabewerte
2. SCAN automatischer Anzeigewechsel
3. ODOMETER Anzeige der Gesamtkilometer
4. RPM Anzeige der Pedalumdrehungen TrittFrequenz
5. SPEED Anzeige der Geschwindigkeit
6. TIME Anzeige der Trainingszeit
7. DISTANCE Anzeige der Trainingsstrecke
8. KILOJOULE Anzeige des Energieverbrauchs
9. PULSE Anzeige des aktuellen Pulses
15. Herz blinkt im Takt des Pulsschlags
Werte:
10. Groß-Anzeige Raumtemperatur [0 — 40 °]
Odometer [0 — 9999 km]
Fitnessnote [F1.0 — F6.0]
11. Pedalumdrehungen 20 — 199 [Umdrehungen/min]
Trittfrequenz
12. Zeit 0:00 — 99:59 [min:sec]
13. Distanz 0.0 — 99.9 [km]
Geschwindigkeit 0.0 — 99.9 [km/h]
14. Energieverbrauch 0 — 9999 [KJ]
16. Puls 50 — 199 [Schläge/min]
Tasten:
Minus-Taste Werte vermindern (Anzeigebereich
zurück)
Set-Taste Funktionstaste [Vorgabe, Wechsel,
Rücksetzen (Reset) der Anzeige]
Plus-Taste Werte erhöhen (Anzeigebereich vor)
Recovery- Taste Funktionstaste [Fitnessnotenermittlung]
Anschlüsse (vorne)
Buchse für den Ohrclip
Anschlüsse (hinten)
Buchse (4 polig) für die Handpulssensoren
Buchse (2 polig) für den Geschwindigkeitsaufnehmer
Batteriefach 2 Batterien: Mignon 1,5 Volt, LR6, AA
1. Raumtemperatur Bild 1 [vor und nach dem Training]
2. Vollanzeige Bild 2 [nach Pedaltreten oder Tasten-
druck, 1 sec]
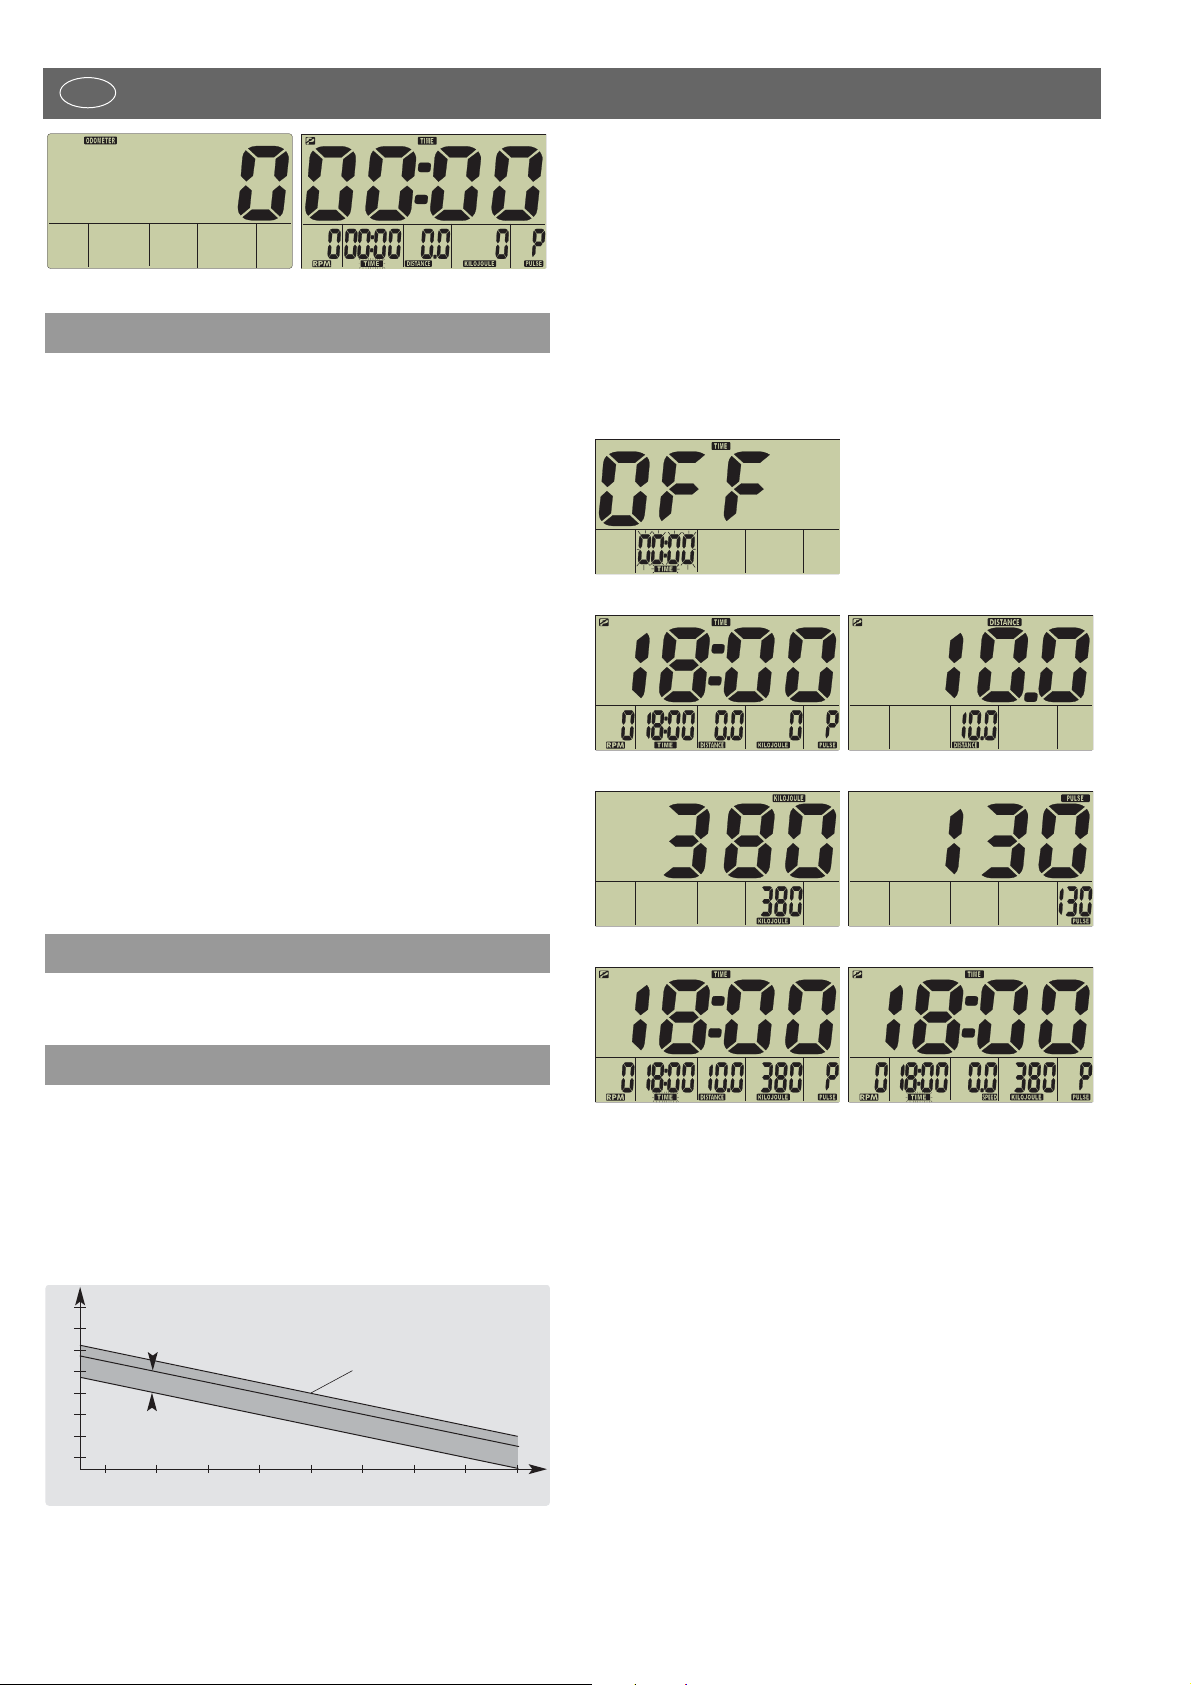
3. Gesamtkilometer Bild 3 [Anzeigedauer:10 Sekunden
oder Taste]
4. Trainingsbereitschaft Bild 4 [mit Set-Taste]
Bild 1 Raumtemperatur Bild 2 Vollanzeige
1.0 Anzeigen vorm Training
Ausstattung
3
D
Bild 3 Gesamtkilometer Bild 4 Trainingsbereitschaft:
Zeit blinkt
Diese Anzeige bietet drei Pulserfassungen:
1. mit dem Ohrclip
2. mit den Handpulssensoren
3. mit einem Cardio Puls Set Art.-Nr. 07937-000 (als Zubehör
im Fachhandel erhältlich)
Einstellen der Pulsanzeige
Sie haben die Trainingsbereitschaft (Bild 4) eingestellt.
Pulserfassung mit dem Ohrclip
Stecken Sie den Ohrclip in die Buchse
Reiben Sie ein Ohrläppchen zur besseren Durchblutung
Stecken Sie den Ohrclip an das Ohrläppchen
Pulserfassung mit den Handpulssensoren
Die Hände umfassen die Handpulssensoren
Pulsanzeige
Das Herzsymbol(15) blinkt im Takt Ihres Pulsschlages
Der Pulsschlag wird als Wert (16) angezeigt.
Hinweise zur Pulsmessung
Es ist gleichzeitig nur eine Art der Pulserfassung möglich.(Ohrclip
oder Handpulssensoren oder Cardio Puls Set)
Die Pulsberechnung beginnt, wenn das Herz in der Anzeige im
Takt Ihres Pulsschlages blinkt.
Treten Sie in die Pedalen. Alle Werte zählen aufwärts.
Der richtige Trainingspuls [Aerobe Zone]
Der Trainingspuls ist abhängig vom Alter. Es gibt für jedes Alter
den “richtigen“ sogenannten aeroben Trainingsbereich (Faustformel: 180 minus Lebensalter), der durch eine obere und eine untere Pulsgrenze (+/– 10 Schläge) gekennzeichnet ist. Der Trainingspuls sollte immer innerhalb der aeroben Zone liegen. Die
maximale Pulsfrequenz (200 minus Lebensalter) sollte nicht überschritten werden. Gesunde Personen orientieren sich an nachstehendem Diagramm
Einstellen von Zeit (12), Distanz (13), Kilojoule (14,) Pulsgrenze (16).
Puls / min.
220
200
180
160
140
120
100
20 30 40 50 60 70 80 90 100
Alter
Aerobe Zone
OK
200 minus Lebensalter
80
4.0 Training mit Vorgaben von Trainingsdaten
3.0 Training ohne Vorgabe von Trainingsdaten
2.0 Pulserfassung
Vor dem Training oder bei Trainingsunterbrechung erscheint das
Symbol P (1)(Bild 4) links oben in der Anzeige. Drücken Sie die
Set-Taste, kommen Sie in den Vorgabenmodus (Bild 5) und mit der
+ oder — Taste stellen Sie den gewünschten Wert ein.
Die veränderbaren Werte sind mit blinkenden Segmenten dargestellt.
Drücken Sie länger auf die +/– Taste erfolgt ein schneller Vor-
oder Rücklauf der Vorgabewerte.
Drücken Sie die +/– Tasten zusammen, springt der Wert auf Null
zurück.
Mit der Set-Taste erreichen Sie die nächsten Vorgaben.
Nach der Pulsvorgabe kommen Sie mit der Set-Taste in die Trai-
ningsbereitschaftsmodus aber mit der Anzeige aller Vorgaben
(Bild 10/11).
Drücken Sie länger die Set-Taste, springt die Anzeige auf die Voll-
anzeige (Resetfunktion) (Bild 2)
Bild 5
Bild 6 Bild 7
Bild 8 Bild 9
Bild 10 Bild 11
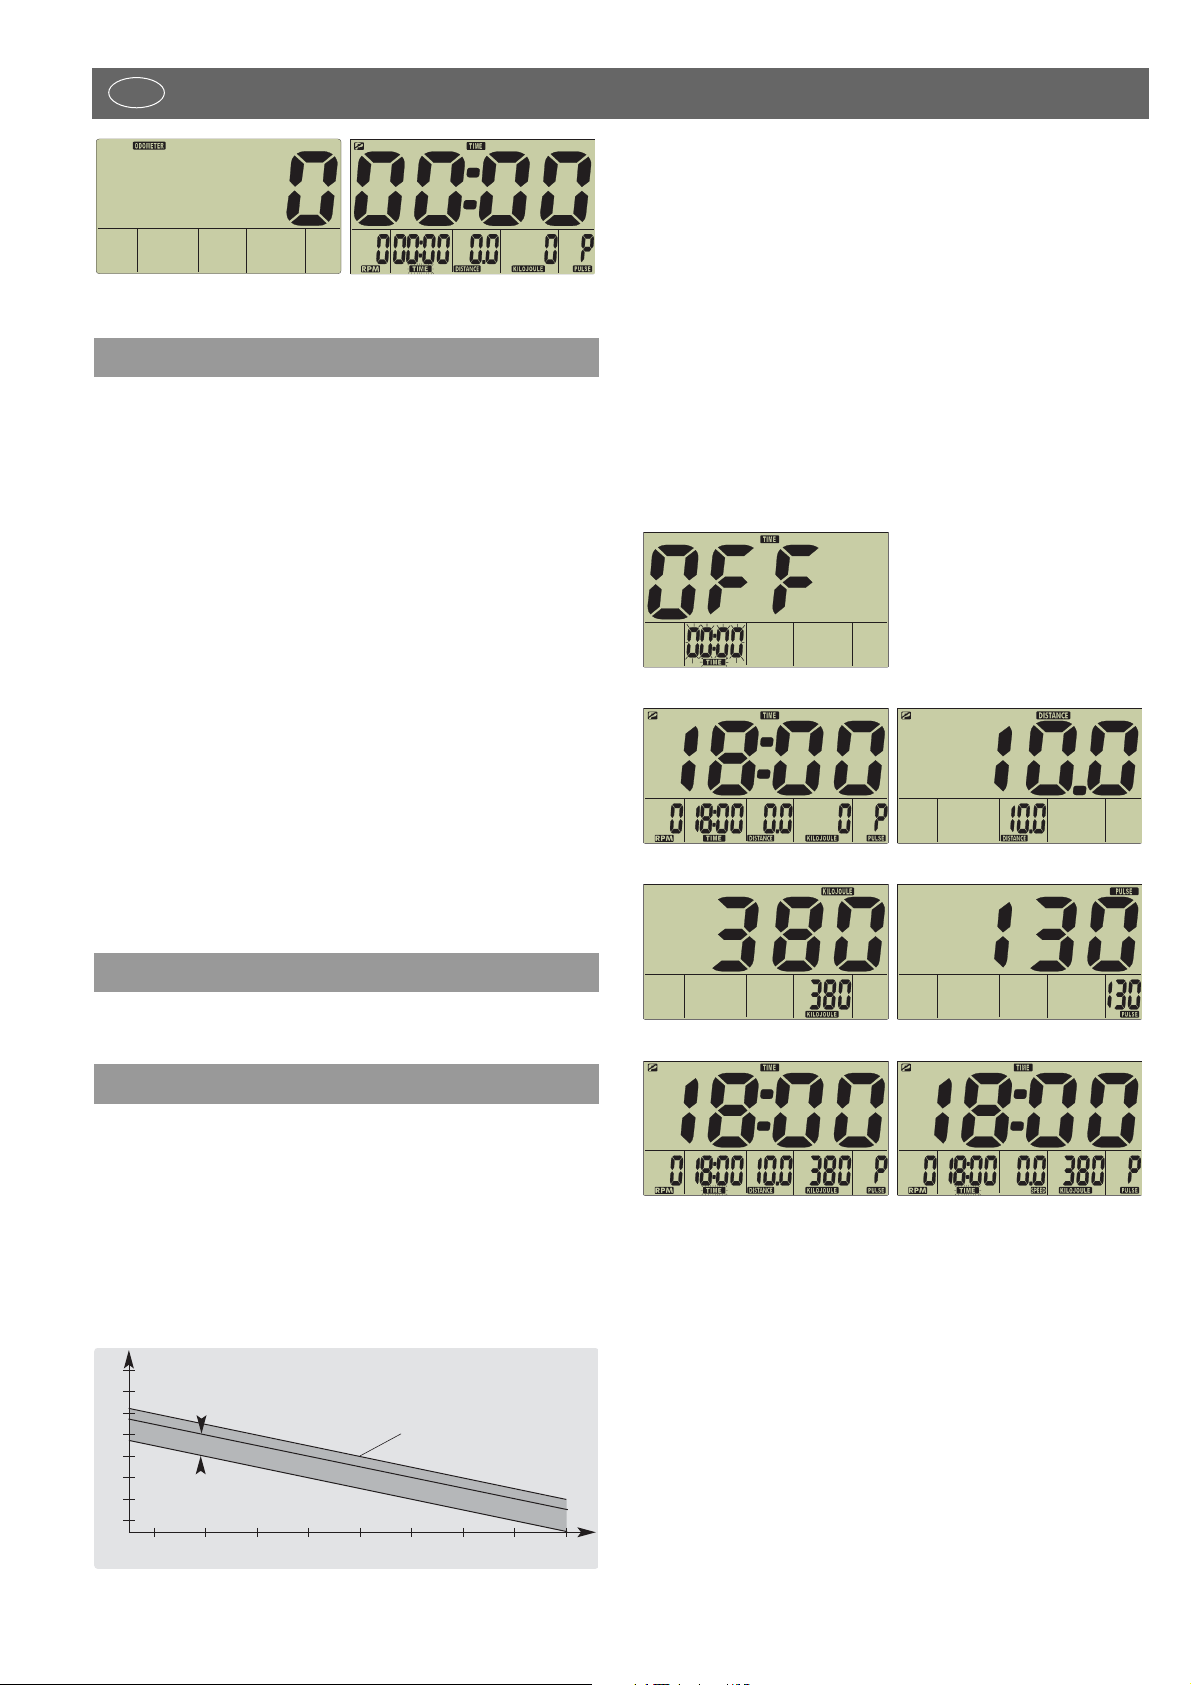
Bild 5: Zeit-Vorgabe startet mit “OFF”
Bild 6: Vorgabe Zeit: z. B. 18 Minuten
Bild 7: Vorgabe Strecke: z. B. 10 Kilometer
Bild 8: Vorgabe Energieverbrauch: z. B. 380 Kilojoule
Bild 9: Vorgabe Pulsgrenze: z. B. 130 Pulsschläge
Bild10: Trainingsbereitschaft mit Anzeige aller Vorgaben (DI-
STANCE)
Bild11: Trainingsbereitschaft mit Anzeige aller Vorgaben
(SPEED)
Bemerkung
Distance und Speed (13) wechseln im 5 Sekundentakt.
Geben Sie innerhalb 4 Minuten keine Vorgabewerte ein, springt
die Anzeige auf Raumtemperatur (Bild 1).
4
D
Funktion
Treten Sie in die Pedalen. Alle Vorgabewerte (außer Pulsgrenze)
zählen rückwärts, blinken bei Null ein paar Sekunden und zählen
dann vom Vorgabewert weiter aufwärts.
Steigt Ihr Pulsschlag über die eingegebene Pulsgrenze, blinkt zur
Warnung der Puls-Wert und ein Piepsen ertönt.
Treten Sie über 20 Umdrehungen in die Pedalen beginnt im 5 Sekunden-Takt ein automatischer Anzeigewechsel SCAN (Symbol 2
in der Anzeige). Mit der Set -Taste können Sie ihn ausschalten. Mit
den +/– Taste können Sie dann einen Anzeigebereich vor- oder
zurückspringen.
Bemerkung
Distance und Speed(13) wechseln im 5 Sekunden-Takt.
Wird eine Vorgabe (außer Pulsgrenze) erreicht, wird sie sofort in
der Großanzeige (10) übernommen.
Treten Sie unter 20 Umdrehungen erkennt die Elektronik Trainingsunterbrechung. Der automatische Anzeigewechsel stoppt,
das Symbol SCAN verschwindet, P wird angezeigt und der aktuelle Bereich bleibt in der Großanzeige stehen. Setzen Sie das
Training innerhalb 4 Minuten nicht fort, wechselt die Anzeige auf
Raumtemperatur (Bild 1) Dabei wird die Strecke auf die Gesamtkilometer addiert. Alle anderen Werte werden nicht gespeichert.
Bemerkung
Distance und Speed(13) wechseln im 5 Sekundentakt.
Mit der +/– Taste können Sie einen Anzeigebereich vor- oder
zurückspringen. Mit der Set-Taste kommen Sie wieder in den Eingabemodus. Dabei werden alle vorherigen Trainingsdaten und
Vorgaben gelöscht.
Treten Sie in die Pedalen. Die Werte zählen weiter.
Der Trainingscomputer ist mit einer Erholungspuls-Funktion ausgestattet. Diese ermöglicht bei Trainingsende Ihren Erholungspuls zu
messen.
Drücken Sie bei Trainingsende die Erholungspulstaste . Der Computer misst 60 Sekunden rücklaufend Ihren Puls (Bild 12). Danach
wird eine Fitnessnote mit ( F ) angezeigt (Bild 13). Die Berechnung
wird unter 9.0 Allgemeines erklärt. Wird die Pulsmessung unterbrochen, wird statt eines Wertes ( E ) angezeigt. Drücken Sie die
Recovery-Taste, erscheint wieder die aktuelle Trainingsanzeige
8.0 Erholungspulsmessung
7.0 Anzeige bei Trainingsfortsetzung
6.0 Anzeige vor dem Training, bei Trainingsunterbrechung, -ende
5.0 Anzeige im Training
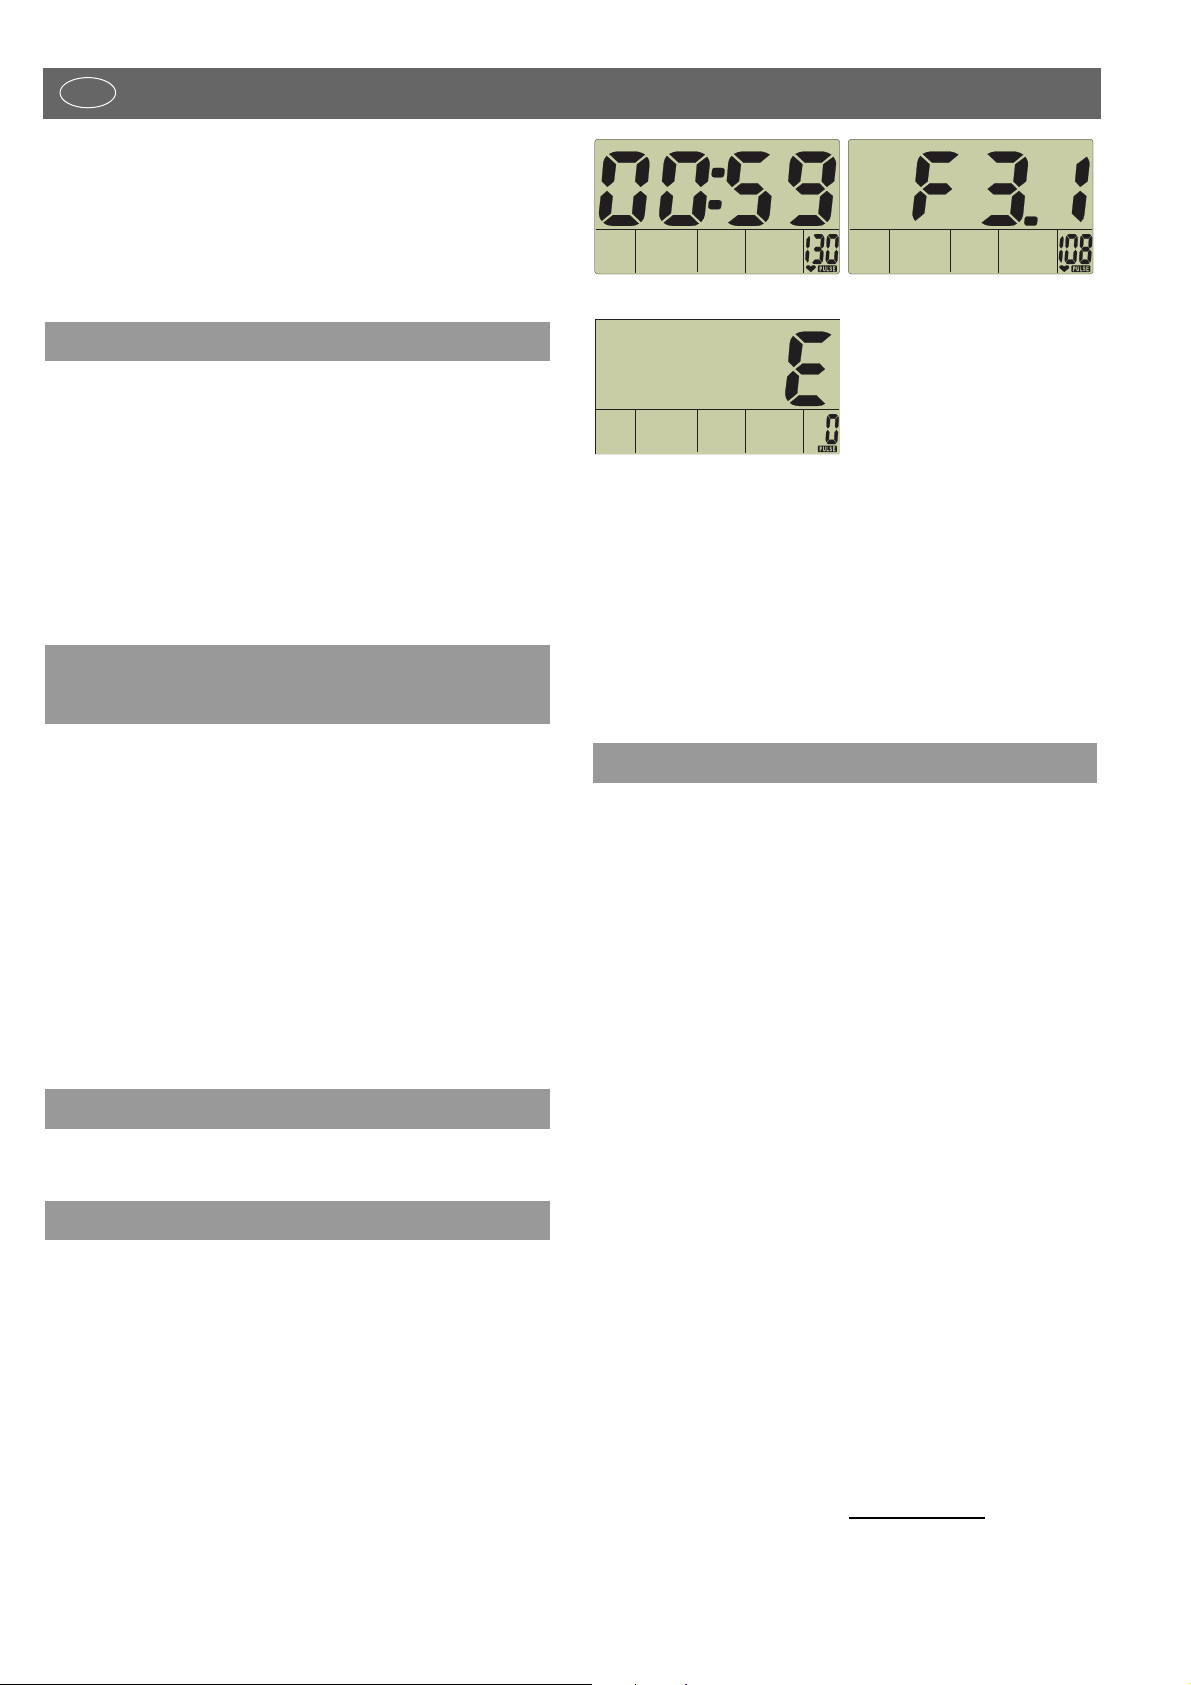
Bild 12 Bild 13
Bild 14
Bild12: Erholpulsmessung mit Zeitrücklauf (0:60 — 0:00)
Bild13: Fitnessnotenanzeige
Bild14: Keine Pulserkennung ( E ) bei Erholpulsmessung
Bemerkung
Wird kein Pulswert angezeigt, wird die Erholpuls-Funktion nicht
ausgeführt.
Umfassen Sie nach dem Drücken der Recovery-Taste schnell wieder
den Handpulssensor, sonst wird die Pulsmessung unterbrochen.
Heimtrainer
Geschwindigkeitsberechnung
60 Pedalumdrehungen pro Minute ergeben eine Geschwindigkeit
von 21,3 km/h.
Kilojouleberechnung
Aus sportmedizinischer Sicht ergibt sich beim Radfahren folgender Energieverbrauch: 1 Stunde Radfahren bei 24 km/h verbraucht 1680 kJ
1 Kilometer ergeben 70 Kilojoule
Die Berechnung basiert auf mittlerer Belastungsstufe und ändert
sich nur durch Variation der Trittfrequenz.
Crosstrainer
Geschwindigkeitsberechnung
60 Pedalumdrehungen ergeben eine Geschwindigkeit von 9,5
km/h.
Kilojouleberechnung
Aus sportmedizinischer Sicht ergibt sich beim Crosstraining folgender Energieverbrauch: 1 Stunde Training bei 9,5 km/h verbraucht 3344 kJ
1 Kilometer ergeben 352 Kilojoule (bei mittlerer Belastungsstufe)
Fitnessnotenberechnung
Der Computer berechnet und bewertet die Differenz zwischen Belastungspuls und Erholungspuls und Ihre hieraus resultierende
«Fitnessnote» nach folgender Formel:
Note ( F ) = 6 —
(
10 x ( P1 — P2 )
)
2
P1
P1 = Belastungspuls P2 = Erholungspuls
Note 1 = sehr gut Note 6 = ungenügend
9.0 Allgemeines

5
D
mäßiges Training kann zu Gesundheitsschäden führen
Dieses Trainingsgerät ist speziell für den Freizeitsportler entwickelt
worden. Es eignet sich hervorragend für das Herz-Kreislauf-Training.
Das Training ist methodisch nach den Grundsätzen des Ausdauertrainings zu gestalten. Dadurch werden vornehmlich Veränderungen und Anpassungen am Herz-Kreislauf-System hervorgerufen. Hierzu zählen das Absinken der Ruhepulsfrequenz und des
Belastungspulses.
Damit steht für das Herz mehr Zeit für die Füllung der Herzkammern und die Durchblutung der Herzmuskulatur (durch die Herzkranzgefäße) zur Verfügung. Ferner nehmen Atemtiefe und Menge der Luft zu, die eingeatmet werden kann (Vitalkapazität). Weitere positive Veränderungen finden im Stoffwechselsystem statt.
Um diese positiven Veränderungen zu erreichen, muss man das
Training nach bestimmten Richtlinien planen.
Zur Trainingsintensität (Heimtrainer)
Die Intensität wird beim Training mit dem Heimtrainer zum einen
über die Tretfrequenz und zum anderen über den Tretwiderstand
geregelt. Den Tretwiderstand bestimmt der Trainierende mit der
Bremskraftverstellung an der Lenksäule.
Zur Trainingsintensität (Crosstrainer)
Die Intensität wird beim Training mit dem Crosstrainer zum einen
über die Tretfrequenz und zum anderen über den Tretwiderstand
geregelt. Den Tretwiderstand bestimmt der Trainierende mit der
10-stufigen Schaltung.
Es ist stets darauf zu achten, sich hinsichtlich der Intensität nicht zu
überfordern und Überlastungen zu vermeiden. Falsches oder übermäßiges Training kann zu gesundheitlichen Schäden führen.
Kontrollieren Sie deshalb während des Trainings anhand Ihrer
Pulsfrequenz, ob Sie Ihre Trainingsintensität richtig bestimmt haben. Als Faustregel für eine angemessene Pulsfrequenz gilt:
Daraus folgt, dass z.B. eine 50jährige Person ihr Ausdauertraining mit einer Pulsfrequenz von 130 gestalten sollte.
Trainingsempfehlungen auf der Grundlage dieser Berechnungen
werden von zahlreichen anerkannte Sportmedizinern als günstig
erachtet. Demnach sollten Sie die Tretfrequenz und den Tretwiderstand beim Training so festlegen, dass Sie Ihre optimale Pulsfrequenz gemäß der o.g. Faustregel erreichen.
Diese Empfehlungen treffen jedoch nur für gesunde Personen zu
und gelten nicht für Herz-Kreislauf-Kranke!
Zum Belastungsumfang
Der Anfänger steigert den Belastungsumfang seines Trainings nur
allmählich. Die ersten Trainingseinheiten sollten relativ kurz und
intervallartig aufgebaut sein.
Als fitnesspositiv werden von Seiten der Sportmedizin folgende
Belastungsfaktoren erachtet:
Anfänger sollten nicht mit Trainingseinheiten von 30-60 Minuten
beginnen.
Trainingshäufigkeit Trainingsdauer
täglich 10 min
2-3 x wöchentlich 20-30 min
1-2 x wöchentlich 30-60 min
180 minus Lebensalter
Der Vergleich von Belastungs- und Erholungspuls ist eine einfache
und schnelle Möglichkeit, die körperliche Fitness zu kontrollieren.
Die Fitnessnote ist ein Orientierungswert für Ihre Erholungsfähigkeit nach körperlichen Belastungen. Bevor Sie die Erholungspulstaste (15) drücken und Ihre Fitnessnote ermitteln, sollten Sie über
einen längeren Zeitraum, d.h. mind. 10 Minuten, in Ihrem Belastungsbereich trainieren. Bei regelmäßigem Herz-Kreislauf-Training werden Sie feststellen, dass sich Ihre «Fitnessnote» verbessert.
Hinweise zur Pulsmessung
Die Pulsberechnung beginnt, wenn das Herz in der Anzeige im
Takt Ihres Pulsschlages blinkt.
Pulsmessung mit Ohrclip
Der Pulssensor arbeitet mit Infrarotlicht und misst die Veränderungen der Lichtdurchlässigkeit Ihrer Haut, die von Ihrem Pulsschlag
hervorgerufen werden. Bevor Sie den Pulssensor an Ihr Ohrläppchen klemmen, reiben Sie es zur Durchblutungssteigerung 10 mal
kräftig.
Vermeiden Sie Störimpulse.
• Befestigen Sie den Ohrclip sorgfältig an Ihrem Ohrläppchen
und suchen Sie den günstigsten Punkt für die Abnahme (Herzsymbol blinkt ohne Unterbrechnung auf).
• Trainieren Sie nicht direkt unter starkem Lichteinfall z.B. Neonlicht, Halogenlicht, Spot-Strahler, Sonnenlicht.
• Schließen Sie Erschütterungen und Wackeln des Ohrsensors
inclusive Kabel vollkommen aus. Stecken Sie das Kabel immer
mittels Klammer an Ihrer Kleidung oder noch besser an einem
Stirnband fest.
Pulsmessung mit Handpulssensoren
Eine durch die Kontraktion des Herzens erzeugte Kleinstspannung
wird durch die Handsensoren erfasst und durch die Elektronik ausgewertet.
• Umfassen Sie die Kontaktflächen immer mit beiden Händen.
• Vermeiden Sie ruckartiges Umfassen
• Halten Sie die Hände ruhig und vermeiden Sie Kontraktionen
und Reiben auf den Kontaktflächen.
Mit Cardio Puls Set
Beachten Sie die dazugehörige Anleitung.
Störungen in der Pulsanzeige
Falls es doch einmal zu Pulserfassungsproblemen kommen sollte,
überprüfen Sie nochmals obige Punkte.
Überprüfen Sie die Batteriespannung.
Störungen mit dem Trainingscomputer
Bei merkwürdigem Verhalten des Trainingscomputers entnehmen
Sie die Batterien, überprüfen Sie die Batteriespannung und setzten die Batterien wieder ein. Notieren Sie vorher den Kilometerstand. Die gespeicherten Gesamtkilometer gehen beim Batterie-
wechseln verloren.
Zu Ihrer Sicherheit
■ Lassen Sie vor Aufnahme des Trainings durch Ihren Hausarzt
klären, ob Sie gesundheitlich für das Training mit diesem Gerät
geeignet sind. Der ärztliche Befund sollte Grundlage für den
Aufbau Ihres Trainingsprogramms sein. Falsches oder über-
10.0 Trainingsanleitung

6
D
Das Anfängertraining kann in den ersten 4 Wochen folgendermaßen konzipiert sein:
Zur persönlichen Trainingsdokumentation können Sie die erreichten Trainingswerte in der Leistungstabelle eintragen.
Vor und nach jeder Trainingseinheit dient eine ca. 5 — minütige
Gymnastik dem Aufwärmen bzw. dem Cool — Down. Zwischen
zwei Trainingseinheiten sollte ein trainingsfreier Tag liegen, wenn
Sie im späteren Verlauf das 3 mal wöchentliche Training von 20
— 30 Minuten bevorzugen. Ansonsten spricht nichts gegen ein tägliches Training.
Trainingshäufigkeit Umfang einer Trainingseinheit
3 x wöchentlich 2 Minuten Training
1 Minute Pause für Gymnastik
2 Minuten Training
1 Minute Pause für Gymnastik
2 Minuten Training
3 x wöchentlich 3 Minuten Training
1 Minute Pause für Gymnastik
3 Minuten Training
1 Minute Pause für Gymnastik
2 Minuten Training
3 x wöchentlich 4 Minuten Training
1 Minute Pause für Gymnastik
3 Minuten Training
1 Minute Pause für Gymnastik
3 Minuten Training
3 x wöchentlich 5 Minuten Training
1 Minute Pause für Gymnastik
4 Minuten Training
1 Minute Pause für Gymnastik
4 Minuten Training
4. Woche
3. Woche
2. Woche
1. Woche
Bewegungsablauf (Crosstraining)
Der Bewegungsablauf des Cross-Trainings ist durch die elliptische
Rotation der Trittflächen und die Lagerung der Griffstangen bereist
vorgegeben. Trotzdem sollten einige Punkte beachtet werden:
■ Stets vor dem Training auf korrekten Aufbau und Stand des
Gerätes achten.
■ Beim Aufsteigen auf das Gerät muß sich eine Trittfläche in un-
terster, eine in oberster Position befinden. Fassen Sie mit beiden
Händen die Griffstangen und steigen Sie zuerst auf die untere
Trittfläche. Beim Absteigen entlasten Sie zuerst die obere Trittfläche.
■ Stellen Sie sich die Trittflächen auf den für Sie optimalen Ab-
stand zu den Griffstangen ein; achten Sie dabei auf genügend
Beinfreiheit zu den Griffstangen.
■ Trainieren Sie mit entsprechenden Sportschuhen und achten Sie
auf einen sicheren Stand auf den Trittflächen.
■ Halten Sie sich am Griffbügel zwischen den beweglichen Griff-
stangen fest, falls Sie nur das Unterkörpertraining durchführen
möchten. (Nicht freihändig trainieren.)
■ Achten Sie auf einen gleichmäßigen, runden Bewegungsablauf.
■ Den Bremswiderstand entsprechend den individuellen Bedürf-
nissen an dem Drehknopf unter dem Cockpit einstellen.
■ Variieren Sie während des Trainings zwischen Vorwärts- und
Rückwärtsbewegungen der Trittflächen, um die Bein- und Gesäßmuskulatur auf unterschiedliche Weise zu beanspruchen.
Bei regelmäßigem Training können Sie Ihre Ausdauer, Ihre Kraftfähigkeit und damit auch Ihr Wohlbefinden steigern. Der Trainingserfolg wird durch eine gesundheitsbewußte Lebensweise optimiert, die von einer ausgewogenen, vollwertigen Ernährung bestimmt wird.
7
Computer and training instructions
GB
Operating instructions for the training computer with digital display
(ST2701-8) / (ST2703-8) / (ST2705-8)
Symbols:
1. P no training: ready to accept set values
2. SCAN automatic change of display
3. ODOMETER display of total kilometres covered
4. RPM display of pedal rotations / step frequency
5. SPEED display of speed
6. TIME display of training time
7. DISTANCE display of training distance
8. KILOJOULE display of energy consumption
9. PULSE display of current pulse
15. Heart will flash in accordance with pulse
Values:
10. Large display room temperature [0 — 40 °]
odometer [0 — 9999 km]
fitness value [F1.0 — F6.0]
11.Pedal rotations 20 — 199 [Rotations/min]
Step frequency
12. Time 0:00 — 99:59 [min:sec]
13.Distance 0.0 — 99.9 [km]
Speed 0.0 — 99.9 [km/h]
14. Energy 0 — 9999 [KJ]
consumption
16. Pulse 50 — 199 [Beats/min]
Buttons:
Minus button reduce values (Count down display range)
Set button function button [Set value, change, reset of
display]
Plus button increase values (Display range forward)
Recovery button function button [Fitness value determination]
Connections (at front)
Jack (4 poles) for the ear clip
Connections (at rear)
Jack (4 poles) for the hand pulse sensors
Jack (2 poles) for the speed pickup
Battery compartment 2 batteries: Mignon1,5 Volt, LR6, AA,
1. Room temperature fig. 1 [prior to and after training]
2. Complete display fig. 2 [after pedal rotation or pressing
a button, 1 sec]
3. Total kilometres covered fig. 3 [display term:10 seconds or but-
ton]
4. fig. 4 readiness for training
fig. 1 Room temperature fig. 2 Comlete display
1.0 Displays before starting the training
Features
12 3 5 846
9
10
11 12 14 1571613
8
fig. 3 Total kilometres covered fig. 4 readiness for training
This display offers three kinds of pulse measurement:
1. via ear clip
2. via hand pulse sensors
3. via Cardio Pulse Set, Art.-No. 07937-000 (available as accessory at local dealers)
Setting pulse display
You have set the mode “ready for exercise” (fig. 4).
Pulse measurement via ear clip
Insert ear clip cable in jack.
Rub ear lobe to stimulate blood circulation.
Fasten ear clip to ear lobe.
Pulse measurement via hand pulse sensors
Hands grasp hand pulse sensors.
Pulse display
The heart symbol (15) will flash according to your pulse.
The pulse rate is displayed as a value (16)
Information on pulse measuring
It is only possible to measure the pulse rate with one system at the
time (either ear clip or hand pulse sensors or Cardio Pulse Set).
Pulse measurement commences when the heart in the display is
flashing in time with your pulse.
Step on the pedals. All values will count upwards.
The right training pulse [Aerobic zone]
The training pulse depends on your age. For every age there is an
ideal aerobic training range (rule of thumb: 180 minus age)
which is marked by an upper and a lower pulse limit (+/– 10 beats). Your training pulse should always be within the aerobic
zone. The maximum pulse frequency (200 minus age) should not
be exceeded. Healthy persons may use the following diagram.
Adjusting the Time (12), Distance (13), Kilojoule (14,) Pulse limit
(16).
Symbol P (1) (Fig. 4) appears in the top left display prior to trai-
pulse /min.
220
200
180
160
140
120
100
20 30 40 50 60 70 80 90 100
age
Aerobc zone
OK
200 less age
80
4.0 Training with preset training data
3.0 Training without preset training data
2.0 Pulse measuring
ning or during training interruption. Press the Set button and you
get into the set mode (Fig. 5) where you can set the desired value
with the + or — button.
The adjustable values are represented with flashing segments.
If you press the +/– button longer there will be a fast forward or
return motion of the preset values.
If you press the +/– buttons together, the value will return to zero.
With the Set button you will get to the next preset values.
After setting the pulse value you stay in the stand-by mode with the
Set button but with a display of all presets (Fig. 10/11).
If you press the Set button longer, the display will skip to the com-
plete display (reset function) (Fig. 2).
fig. 5
fig. 6 fig. 7
fig. 8 fig. 9
fig. 10 fig. 11
fig. 5: preset time starts with «OFF»
fig. 6: preset time: e. g. 18 minutes
fig. 7: preset distance: e.g. 10 kilometres
fig. 8: preset energy consumption: e.g. 380 Kilojoule
fig. 9: preset pulse limit: e.g. 130 pulse beats
fig: 10: stand-by mode with display of all presets (DISTANCE)
fig: 11: stand-by mode with display of all presets (SPEED)
To be noted
Distance and Speed (13) change in a 5-second-cycle.
If you do not enter any preset values within 4 minutes, the display
will skip to room temperature (Fig. 1).
Function
Step onto the pedals. All preset values (except pulse limit) will
count down, then flash for a few seconds when reaching zero and
afterwards count upwards from the preset value.
If your pulse beat exceeds the preset pulse limit, the pulse value
will flash and a bleep will sound as a warning.
GB9GB
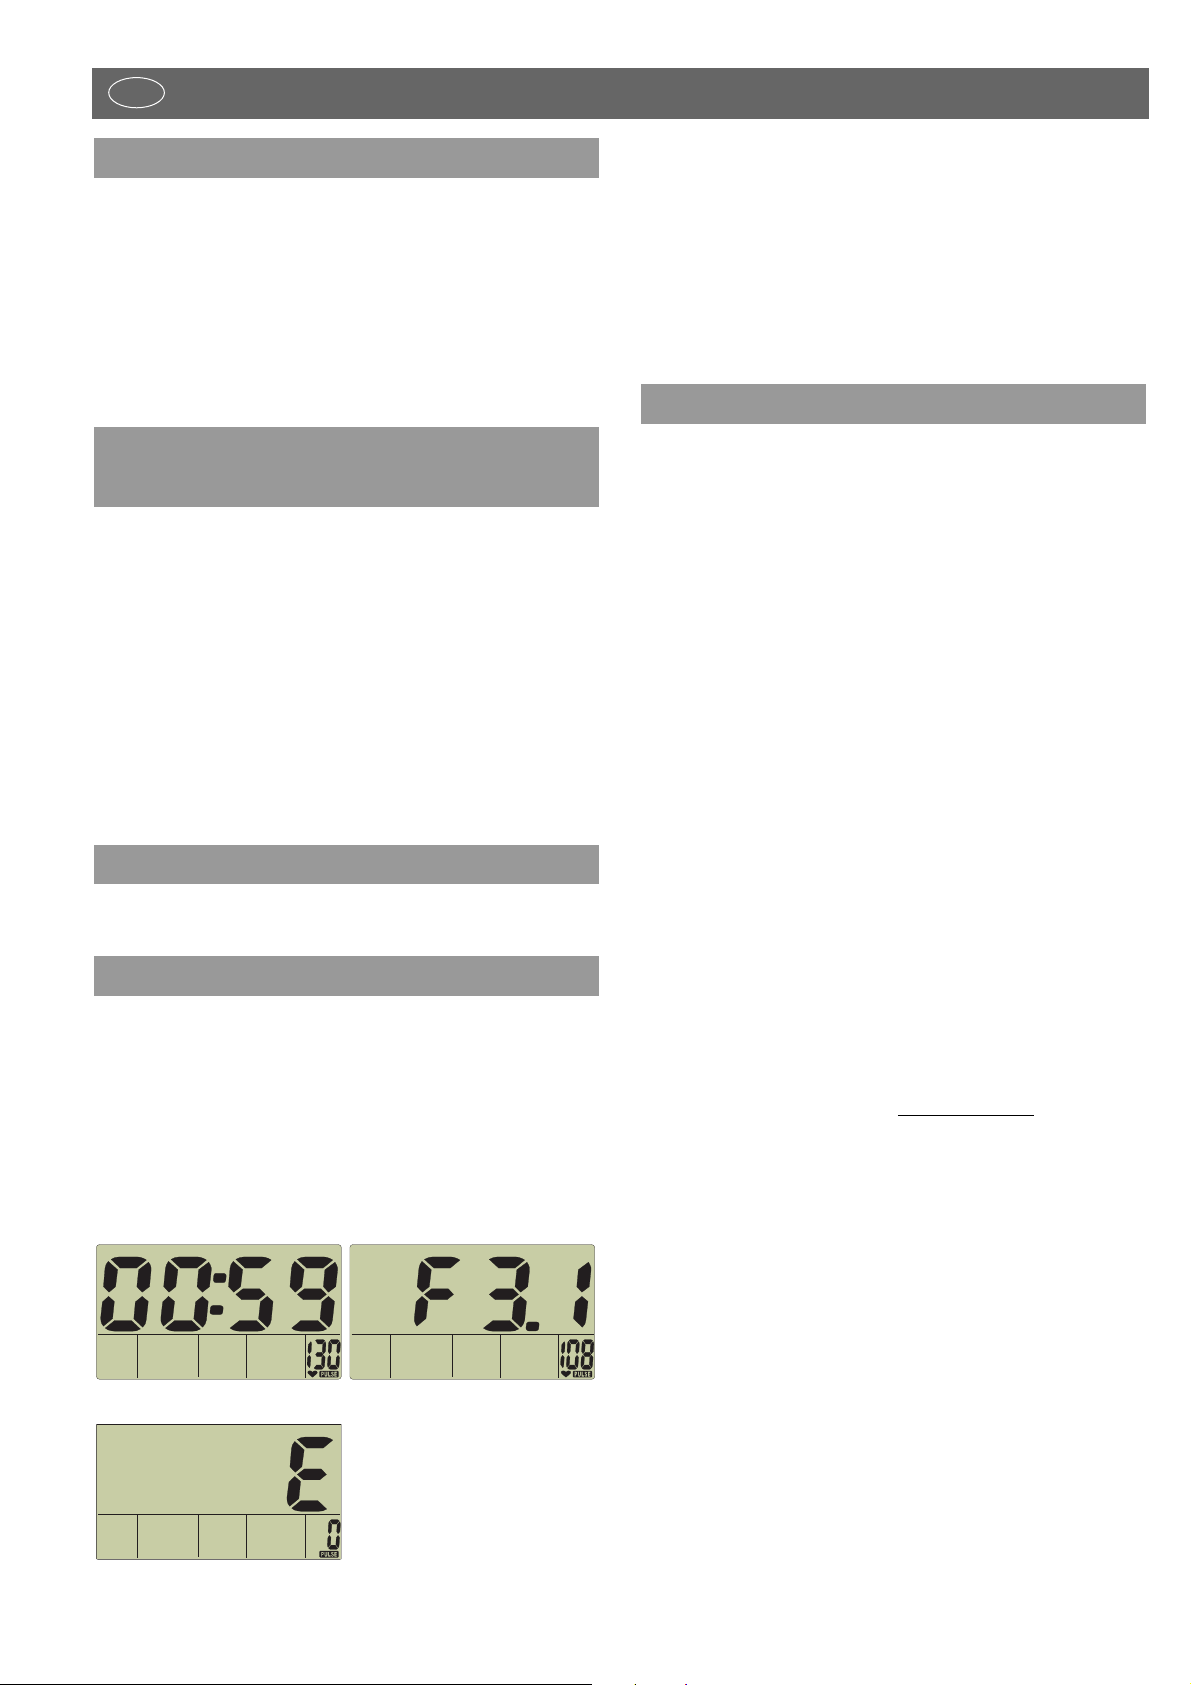
fig.12: Recovery pulse measuring with count down (0:60 — 0:00)
fig.13: Fitness value display
fig.14: No pulse recognition (E) during recovery pulse measuring
To be noted
If no pulse value is displayed, no recovery pulse function will be
performed.
After pressing the recovery button, quickly grasp the hand pulse
sensor again since otherwise pulse measuring will be interrupted.
Home trainer
Speed calculation
60 pedal rotations per minute result in a speed of 21.3 km/h.
Kilojoule calculation
From the view of sports physicians there is the following energy
consumption during cycling: 1 hour cycling at 24 km/h requires
1680 kJ
1 kilometre results in 70 kJ
This calculation is based upon a medium training intensity and is
only changed by a variation of the pedalling frequency.
Cross trainer
Speed calculation
60 pedal rotations result in a speed of 9.5 km/h.
Kilojoule calculation
From the view of sports physicians there is the following energy
consumption during cross training: 1 hour training at 9.5 km/h requires 3344 kJ
1 kilometre results in 352 kJ (with medium training intensity)
Fitness value calculation
The computer calculates and assesses the difference between load
pulse and recovery pulse and your resulting «fitness value» on the
basis of the following formula:
Note ( F ) = 6 —
(
10 x ( P1 — P2 )
)
2
P1
P1 = load pulse P2 = recovery pulse
Value 1 = very good Value 6 = unsatisfactory
The comparison of load and recovery pulse is a simple and fast
method to control your physical fitness. The fitness value is a value of orientation with regard to your ability to recover after physical load. Before you press the recovery pulse button (15) and
have the computer calculate your fitness value you should train in
your load range for a longer time, this means for at least 10 minutes. With regular cardiovascular training you will notice that
your «fitness value» will improve.
Information on pulse measuring
Pulse measuring starts when the heart in the display flashes according to the beat of your pulse.
Pulse measurement via ear clip
Teh pulse sensor works with infrared light and measures the changes in the light transmission of the skin caused by your pulse frequency. Before fitting the ear clip the ear lobe should be rubbed
10 times to stimulate blood circulation.
9.0 General
If you step in the pedals for more than 20 rotations, an automatic
display change SCAN (symbol 2 in the display) will take place in
a 5-second cycle. With the Set button you can switch it off. With
the +/– button you can then skip one display range forward or
backward.
To be noted
Distance and Speed (13) change in a 5-second-cycle.
If a preset value (except the pulse limit) is reached, it will immediately be shown in the large display (10).
If you stay below 20 rotations, the electronic system will recognise an interruption of training. The automatic display change will
stop, the SCAN symbol disappears, P will be displayed and the
current range remains standing still in the large display. If you do
not continue training within 4 minutes, the display will change to
room temperature (Fig. 1). In this case, the distance is added to
the total kilometres covered. All other values will not be stored.
To be noted
Distance and Speed (13) change in a 5-second-cycle.
With the +/– button you can skip one display range forward or
backward. With the Set button you get back into the input mode.
In this case, all previous training data and preset values are de-
leted.
Step on the pedals. The values will count on.
The training computer is equipped with a recovery pulse function
that enables you to measure your recovery pulse at the end of
your training.
At the end of your training press the recovery pulse button. The
computer will count down for 60 seconds and measure your pulse (Fig. 12). Afterwards, a fitness value with (F) is displayed (Fig.
13) the calculation of which is explained in 9.0 General. If pulse
measuring is interrupted, (E) is displayed instead of a value. If you
press the recovery button, the current training display will appear
again.
fig. 12 fig. 13
fig. 14
8.0 Recovery pulse measuring
7.0 Display after continuation of training
6.0 Display prior to training, at an interruption
of training, at the end of training
5.0 Display during training

10
Avoid interfering impulses
Fasten the ear clip carefully to your ear lobe, searching for the
best point to get signals (heart symbol fashing without interruption).
Avoid exercise in full light, e.g. neon lamps, halogen lamps, spot
lights or direct sunlight.
Furthermore avoid vibration and moving the ear clip or its cable.
Always fix the cable to your clothes or better still to a headband,
using the provided clip.
Pulse measurement via hand pulse sensors
The contraction of the heart produces an extra-low voltage which
ist detected by the hand sensors and evaluated by the electronic
system.
• Always grasp the contact surfaces with both hands.
• Avoid any jerky grasping.
• Hold your hands steady and avoid any contractions and friction on the contact surfaces.
With Cardio Pulse Set
Please follow the respective set of instructions.
Failures in the pulse display
Should there once be any problems with pulse detection, please
check the above mentioned points once again.
Check the battery voltage.
Failures in the training computer
In case of strange behaviour of the training computer remove the
batteries, check battery voltage and insert batteries again. Previously record the kilometres covered. The stored total value of ki-
lometres covered will be lost during an exchange of batteries.
For Your Safety:
■ Before beginning your program of exercise, consult your doctor
to ensure that you are fit enough to use the equipment. Base
your program of exercise on the advice given by your doctor.
Incorrect or excessive exercise may damage your health.
This training device has been particularly developed for leisure
time sportsmen. It is excellently suited for cardiovascular training.
The training method must be based on the principles of stamina
training. This will predominantly cause changes and adaptations
of the cardiovascular system. This includes the reduction of the
resting pulse frequency and of the load pulse.
This gives the heart more time for filling the ventricles and for the
blood circulation of the cardiac musculature (through the coronary
vessels). Moreover, depth of breathing and the volume of air that
can be breathed in (vital capacity) are increased. Further positive
changes take place in the metabolic system. In order to achieve
these positive changes, the training has to be planned according
to certain guidelines.
Intensity of training (exercise bike)
When training with the exercise bike, the intensity of training on
the one hand is regulated through the pedaling frequency and on
the other hand through the resistance. The training person can adjust the resistance via the braking force regulation at the steering
column. Always pay attention to the fact not to overstrain yourself
with regard to intensity of training and to avoid overstress. Wrong
or excessive training may be prejudicial to health.
10.0 Training instructions
GB
Training intensity (home trainer)
The intensity of training with the home trainer on the one hand is
regulated through the pedalling frequency and on the other hand
through the pedalling resistance. The training person can set the
pedalling resistance with the braking force regulation at the steering column.
Training intensity (cross trainer)
The intensity of training with the cross trainer on the one hand is
regulated through the step frequency and on the other hand
through the step resistance. The training person can set the step
resistance with the 10-step gear.
Always pay attention to the fact not to exaggerate the training intensity and to avoid overstrain. Wrong or excessive training may
lead to injuries to your health.
For this reason, during training check with your pulse frequency
whether your training intensity is appropriate. Rule of thumb for
an appropriate pulse frequency:
This means that a 50 year old person, for example, should organise his/her training at a pulse frequency of 130.
Training recommendations on the basis of this calculation are considered to be favourable by numerous recognised sports physicians. According to them you should determine your pedalling frequency and the pedalling resistance in such a way that you achieve your optimal pulse frequency according to the above mentioned rule of thumb.
These recommendations, however, only apply to healthy persons
and are not valid for cardiovascular patients!
Exercise and load scope
Beginners should increase the load and intensity of their training
only step by step. The first training units should be relatively short
and organised in intervals.
Sports physicians consider the following load factors to be positive for fitness:
Beginners should not start with training units of 30 to 60 minutes.
Frequency Duration
daily 10 min
2-3 times weekly 20-30 min
1-2 times weekly 30-60 min
180 minus age

11
A beginner training could be organised as follows during the first
four weeks:
In order to have a personal training documentation, you can enter the training values achieved in the performance table.
Prior to and after every training unit gymnastic exercises lasting
approx. 5 minutes serve for warming up and/or cooling down.
There should be a day without training between two training units,
if you later on prefer to train three times a week for 20 — 30 minutes each. Otherwise nothing can be said against a daily training.
Break of 1 minute for physical exercises
2 minutes of training
Break of 1 minute for physical exercises
2 minutes of training
Break of 1 minute for physical exercises
3 minutes of training
Break of 1 minute for physical exercises
2 minutes of training
Break of 1 minute for physical exercises
4 minutes of training
Break of 1 minute for physical exercises
3 minutes of training
Break of 1 minute for physical exercises
4 minutes of training
Break of 1 minute for physical exercises
4 minutes of training
4th week
3rd week
2nd week
1st week
GB
Sequence of motions (cross training)
Through the elliptical rotation of the step boards and the arrangement of the grip bars the sequence of motions during cross training is already predetermined. Nevertheless, pay attention to the
following items:
■ Prior to training always pay attention to the correct installation
and positioning of the device.
■ When mounting the device one step board has to be in the bot-
tom most and the other in the top most position. Grasp the grip
bars with both hands and mount the lower step board first.
When dismounting from the device, first relieve the upper board.
■ Set the step boards at your optimal distance to the grip bars.
Pay attention to having sufficient leg-room towards the grip
bars.
■ Train with appropriate sports shoes and pay attention to having
a safe foothold on the step boards.
■ Hold tight at the grip bracket between the movable grip bars, if
you only want to train the lower part of your body. (Do not train
no-handed.)
■ Try to achieve a uniform, round sequence of motions.
■ Set the brake resistance at the control knob under the cockpit
according to your individual requirements.
■ During training vary between forward and backward motions
of the step boards in order to strain leg and gluteal muscles in
a different manner.
A regular training can increase your stamina, your force and thus
also your well-being. Training success is optimised by a healthy
way of life which is determined by a well-balanced, high-quality
nourishment.
12
Fonctions et manipulation de l’ordinateur d’entraînement
F
Mode d’emploi de l’ordinateur d’entraînement avec affichage numérique
(ST2701-8) / (ST2703-8) / (ST2705-8)
Symboles:
1. P pas d’entraînement: prêt pour des valeursprésélectionnées
2. SCAN changement d’affichage automatique
3. ODOMETER affichage du nombre de kilomètres to-tal
4. RPM affichage des tours pédales / fréquen-ce
de pédalage
5. SPEED affichage de la vitesse
6. TIME affichage de la durée d’entraînement
7. DISTANCE affichage de la distance d’entraîne-ment
8. KILOJOULE affichage de la dépense énergétique
9. PULSE affichage du pouls actuel
15. Cœur clignote au rythme des pulsations cardiaques
Valeurs:
10. Grand affichage Température ambiante [0 — 40 °]
Odomètre [0 — 9999 km]
Note «condition physique» [F1.0 — F6.0]
11. Tours pédales 20 — 199 [tours/min]
fréquence de pédalage
12. Temps 0:00 — 99:59 [min:sec]
13. Distance 0.0 — 99.9 [km]
Vitesse 0.0 — 99.9 [km/h]
14. Dépense énergétique 0 — 9999 [KJ]
16. Pouls 50 — 199 [pulsations/min]
Touches:
Touches moins Diminuer les valeurs
Touche Set Touches de fonctions [présélection, chan-
gement, remise à zéro (Reset) de l’affichage]
Touche plus Augmenter les valeurs
Touche Recovery Touche de fonction [calcul de la note
«condition physique»]
Branchements (avant)
Prise pour l’Oreillette
Branchements (arrière)
Prise (4 pôles) pour les détecteurs du pouls de la main
Prise (2 pôles) pour le capteur de vitesse
Logement piles 2 piles: Mignon 1,5 Volt, LR6, AA
1.Température ambiante illustration 1 [avant et après l’entraîne-
ment]
2.Affichage complet illustration 2 [après pédalage ou ap-
pui sur une touche, 1 sec]
3.Nombre de kilomètres illustration 3 [durée de l’affichage:
total 10 secondes ou touche]
4.Prêt à l’entraînement illustration 4
1.0 Affichages avant l’entraînement
Equipement
12 3 5 846
9
10
11 12 14 1571613
Loading…
Русский
- Bedienungsanleitung Kettler 07946-800 Corsa
- Kettler 07946-800 Corsa User Manual
- Manual Usuario Kettler 07946-800 Corsa
- Mode d’emploi Kettler 07946-800 Corsa
- Istruzioni Kettler 07946-800 Corsa
- инструкция Kettler 07946-800 Corsa
- Kettler 07946-800 Corsaの取扱説明書
- Handleiding Kettler 07946-800 Corsa
- Manual de uso Kettler 07946-800 Corsa
Вам нужна инструкция? Мы поможем Вам ее найти и сэкономить Ваше время.
- 60 stron
- 3.32 mb
Изделие Kettler 07946-800 Corsa, а также другие, которыми Вы пользуетесь ежедневно, наверняка вы получили в комплекте с инструкцией обслуживания. Из опыта наших пользователей мы знаем, что большинство из Вас не уделили этому особого внимания. Большая часть инструкций, сразу же после покупки попадает в корзину для мусора вместе с коробкой — это ошибка. Ознакомьтесь с информацией, касающейся инструкции Kettler 07946-800 Corsa, которая поможет Вам в будущем сэкономить нервы и избежать головной боли.
Важная подсказка — не забывайте хотя бы раз прочитать инструкцию Kettler 07946-800 Corsa
Если вы не хотите каждый раз читать информационные брошюры, касающиеся, тех или Kettler 07946-800 Corsa иных изделий, достаточно, прочитать их раз — сразу же после покупки устройства. Вы получите основное знания, касающиеся поддержания изделия Kettler 07946-800 Corsa в хорошем эксплуатационном состоянии, так, чтобы без проблем достигнуть его планируемого цикла работы. Затем инструкцию можно отложить на полку и вернуться к ней только в случае, если вы не уверены, правильно ли проводится техобслуживание изделия. Правильный уход является необходимым элементом Вашего удовольствия Kettler 07946-800 Corsa.
Раз в году пересмотрите шкафчик, в котором держите инструкции для всех устройств, — выбросите те, которыми вы уже не пользуетесься. Это поможет Вам сохранять порядок в своей домашней базе инструкций обслуживания.
Summary of Contents for Kettler 07946-800 Corsa
Что находится в инструкции Kettler 07946-800 Corsa? Почему стоит ее прочитать?
- Гарантия и подробности, касающиеся техобслуживания изделия
Хорошей идеей будет прикрепить чек к странице инструкции. Если что-то плохое случится во время использования Kettler 07946-800 Corsa, у вас будет комплект документов, необходимый для гарантийного ремонта. В этой части инструкции вы найдете информацию об авторизованных сервисных центрахKettler 07946-800 Corsa а также, как самостоятельно правильно ухаживать за оборудованием — так, чтобы не потерять гарантийных прав. - Указания по монтажу и Setup
Не терять нервов и времени на самостоятельную попытку установки и первого запуска изделия. Воспользуйтесь рекомендациями производителя Kettler 07946-800 Corsa чтобы правильно запустить изделие, без лишнего риска повреждения оборудования. - Информация, касающаяся дополнительных запчастей (входящих в комплект а также являющихся опцией)
Пересматривая эту часть документа вы сможете проверить, доставлен ли ваш Kettler 07946-800 Corsa с полним комплектом аксессуаров. Вы также сможете узнать, какие дополнительные запчасти или аксессуары для Kettler 07946-800 Corsa Вы сможете найти и докупить к своему устройству. - Troubleshooting
Самые частые проблемы, касающиеся Kettler 07946-800 Corsa и методы их решения. Это очень полезная часть руководства по обслуживанию — она позволит Вам сэкономить много времени на поиск решений. 90% проблем с Kettler 07946-800 Corsa повторяется у многих пользователей. - Требования, касающиеся питания и энергетический класс
Информация, касающаяся количества потребляемой энергии, а также рекомендации, касающиеся установки и питания Kettler 07946-800 Corsa. Прочитайте, чтобы оптимально пользоваться Kettler 07946-800 Corsa и не использовать большего количества ресурсов, нежели это необходимо для правильной работы изделия. - Специальные функции Kettler 07946-800 Corsa
Здесь вы можешь узнать, как персонализировать изделие Kettler 07946-800 Corsa. Вы узнаете, какие дополнительные функции могут помочь Вам удобно использовать продукт Kettler 07946-800 Corsa а также, какие функции Вашего устройства оптимальны для выполнения конкретной деятельности.
Как видите в инструкции вы найдете информацию, которая реально поможет Вам в использовании Вашего изделия. Стоит с ней ознакомиться, чтобы избежать разочарований, возникающих из более короткого, нежели предусматривалось, периода исправности изделия Kettler 07946-800 Corsa. Если все же вы не хотите копить инструкции в своем доме, наш сайт поможет Вам в этом — вы должны найти у нас руководство по обслуживанию большинства из своих устройств, а также Kettler 07946-800 Corsa.
Комментарии (0)
Kettler corsa Exercise Bike PDF User Guides and Manuals for Free Download: Found (2) Manuals for Kettler corsa Device Model (Assembly Instruction Manual, Assembly Instructions Manual)
The Kettler Corsa is an excellent addition to any fitness enthusiast’s routine, offering a dynamic blend of functionality and design. Known for its robust quality and innovative features, this product promises to enhance indoor cycling experiences. With its sleek frame and user-friendly interface, the Kettler Corsa caters to both beginners and seasoned athletes alike.
One of the standout features of the Kettler Corsa is its adjustable resistance levels. Riders can choose from a range of intensities, allowing for a tailored workout experience that meets individual fitness goals. Whether you’re going for a high-intensity interval training session or a leisurely ride, the flexibility provided by the resistance settings is commendable. Additionally, the smooth pedaling motion is a testament to the quality engineering that Kettler is known for.
Comfort is another key aspect where the Kettler Corsa excels. The bike comes equipped with an adjustable saddle and handlebars, ensuring that users can find their ideal riding position. This is particularly beneficial for long workout sessions, as it minimizes the risk of strain or discomfort. The ergonomic design promotes better posture, making it easier to maintain focus during workouts.
Here are some key features that contribute to the Kettler Corsa’s appeal:
- High-quality construction for durability and stability.
- Multiple resistance settings for personalized workout intensity.
- Comfortable saddle and adjustable handlebars for ergonomic riding.
- Integrated display for tracking workout metrics such as time, distance, speed, and calories burned.
- Compact design, making it suitable for smaller spaces.
- Easy-to-use interface with straightforward controls.
In terms of technology, the Kettler Corsa doesn’t disappoint. The integrated display unit offers clear visibility, allowing users to easily keep track of their performance metrics. This feature plays a crucial role in motivational tracking, helping users set and meet fitness goals. It’s this attention to detail that truly sets Kettler apart in a competitive market.
Moreover, the bike lends itself well to various workout regimes. It’s not just for cycling; it can serve as a platform for off-bike exercises such as upper-body workouts, providing versatility in training. This multifunctionality can be a game-changer for those looking to diversify their fitness routines without needing multiple pieces of equipment.
On the maintenance front, the Kettler Corsa is relatively low-maintenance. Regular checks on the resistance mechanism and keeping the bike clean will ensure its longevity. Users have reported minimal issues with the bike over time, suggesting that Kettler has delivered a reliable product that stands the test of time.
However, as with any product, the Kettler Corsa may not be for everyone. Potential buyers should consider their specific needs and workout styles. While this bike caters well to road cycling enthusiasts and fitness buffs, those seeking advanced features might want to explore pricier options. Nevertheless, for a solid indoor cycling experience, the Kettler Corsa stands as a worthy investment.
In summary, the Kettler Corsa impresses with its blend of comfort, durability, and performance features. It is a quintessential indoor bike that aligns with Kettler’s reputation for producing high-quality fitness equipment. Whether you’re just starting your cycling journey or looking to upgrade your home gym, the Kettler Corsa could be the perfect solution.
Report abuse
Libble takes abuse of its services very seriously. We’re committed to dealing with such abuse according to the laws in your country of residence. When you submit a report, we’ll investigate it and take the appropriate action. We’ll get back to you only if we require additional details or have more information to share.
Product:
Get your user manual by e-mail
Enter your email address to receive the manual of Kettler Corsa 7946-500 in the language / languages: German as an attachment in your email.
The manual is 6,73 mb in size.
You will receive the manual in your email within minutes. If you have not received an email, then probably have entered the wrong email address or your mailbox is too full. In addition, it may be that your ISP may have a maximum size for emails to receive.
The manual is sent by email. Check your email
If you have not received an email with the manual within fifteen minutes, it may be that you have a entered a wrong email address or that your ISP has set a maximum size to receive email that is smaller than the size of the manual.