
Table of Contents
- Logitech K780 Multi-Device Wireless Keyboard
- K780 MULTI-DEVICE KEYBOARD
- EXPLORE THE K780 MULTI-DEVICE KEYBOARD
- K780 Multi-Device at a glance
- GET CONNECTED
- Quick Setup
- Dual Connectivity
- Connect with : Unifying
- Connect with : Bluetooth
- ENHANCED FUNCTIONS
- Hot keys and media keys
- Shortcuts
- DUAL LAYOUT
- How to configure your keyboard
- Specs & Details
- Dimensions
- Technical Specifications
- Warranty Information
- Part Number
- California Warnings
- FAQ – Frequently Asked Questions
- Read More About:
- Download:
- Read User Manual Online (PDF format)
- Download This Manual (PDF format)
Logitech K780 Multi-Device Wireless Keyboard

User Manual
Meet K780, a compact keyboard that’s designed for today’s multi-tasking era.
Compatible with up to three devices, you can switch typing between your phone,
tablet, and computer in one easy flow.
K780 MULTI-DEVICE KEYBOARD
One keyboard. Fully equipped. For computer, phone, and tablet

EXPLORE THE K780 MULTI-DEVICE KEYBOARD
The K780 Multi-Device Keyboard is a fully equipped computer keyboard that also
works perfectly with smartphones and tablets. Enjoy quiet, comfortable typing,
switching easily between all the devices you enter text on. Works with
Windows, Mac, Chrome OS, Android and iOS.
To enhance your experience on MacOS and Windows download Logitech Options. In
addition to optimizing the keyboard for your preferred operating system, the
software lets you customize the K780 according to your individual needs.
K780 Multi-Device at a glance

- Easy-Switch keys
- Dual-printed layout
- Integrated device stand
- Battery door and receiver storage
- Dual connectivity

GET CONNECTED
K780 Multi-Device keyboard allows you to connect up to three devices either
via Bluetooth Smart or via the pre-paired Unifying USB receiver*.
Quick Setup
Follow the steps below to quickly connect to your computer, laptop or tablet.
For more information on how to connect with Unifying or Bluetooth Smart, go to
the sections below.
*The Unifying Receiver is stored in the keyboard under the battery door.

Dual Connectivity
Connect Geneva K780 lets you connect up to 3 devices (computer, laptops,
tablets or smartphones) either via the Unifying Receiver (2.4 Ghz) or
Bluetooth Smart

Connect with : Unifying
K780 Multi-Device comes with a pre-paired receiver that provides a plug-and-
play connection to your computer or laptop. If you want to pair a 2nd time to
the receiver in the box or pair to an existing Unifying Receiver, follow these
steps.
Requirements
- A USB port
- Unifying Software
- Windows 7, 8, 10 or later
- Mac OS X 0.08 or later
- Chrome OS
How to connect
-
Download Unifying software. You can download the software here.
-
Make sure your keyboard is turned on.
-
Press and hold one of the white easy-switch keys for 3 seconds
(Then LED on the selected channel rapidly blink). -
Configure your keyboard according to your operating system:
For MacOS: Press & Hold fn + o for 3 seconds (The LED on selected channel
will light up)
For Windows, Chrome or Android: Press & Hold fn + p for 3 seconds (The
LED on selected channel will light up) -
Plug in the Unifying receiver.
-
Open the Unifying software and follow the instructions on the screen.
Connect with : Bluetooth
K780 Multi-Device Keyboard allows you to connect via Bluetooth Smart. Please
ensure your device is Bluetooth Smart ready and runs one of the following
operating systems:
Requirements
- Windows 8 or later
- Mac OS X 10.10 or later
- iOS 5 or later
- Android 5.0 or later
- Chrome OS
How to connect
- Make sure your K780 Multi-Device is turned on and Bluetooth is enabled on your computer, tablet or phone.
- Press and hold one of the easy-switch keys for 3 seconds (The LED on the selected channel will blink rapidly).
- Open Bluetooth settings on your device and pair with “Keyboard K780”.
- Type the on-screen password and press enter or return.
ENHANCED FUNCTIONS
The K780 Multi-Device has a number of enhanced functions to get even more out
of your new keyboard. The following enhanced functions and shortcuts are
available.
Hot keys and media keys
The table below shows hot keys and media keys available for Windows, Mac OS X,
Android, and iOS.

Shortcuts
To perform a shortcut, hold down the fn (function) key while pressing the key
associated with an action. The
table below shows function key combinations for the different operating
systems.

DUAL LAYOUT
Unique dual-printed keys make the K780 Multi-Device compatible across
different operating system (e.g. Mac OS X, iOS,Windows, Chrome, Android). Key
label colors and split lines identify functions or symbols reserved for
different operating systems.
Key Label Color
Grey labels indicate functions valable on Apple devices running mack OSX or
iOS.
White labels on grey cirlces identify symbols reserved for us with Alt GR on
Windows computers.*
Split keys
Modifier keys on either side of the space bar display two sets of labels
separated by split lines.
The Label above the split line shows the modifier sent to a Windows or Android
device.
The Label Below the split line shows the modifier sent to an Apple computer,
iPhone, or iPad. The Keyboard automatically uses modifiers associated with the
currently selected device.
How to configure your keyboard
To configure the layout according to your operating system you have to press
one of the following shortcuts for 3 seconds. (The LED on selected channel
will light up to confirm when the layout has been configured).
iOS fn + i
Mac OS X fn + o
Windows fn + p
If you connect in Bluetooth Smart this step is not necessary as OS Detection
will configure it automatically.
© 2016 Logitech. Logitech, Logi, and other Logitech marks are owned by
Logitech and may be registered. The Bluetooth® word mark and logos are
registered trademarks owned by Bluetooth SIG, Inc. and any use of such marks
by Logitech is under license.
All other trademarks are the property of their respective owners.
Specs & Details
Dimensions
Height : 6.22 in (158 mm)
Width : 14.96 in (380 mm)
Depth : 0.31 in (8 mm at front, 22 mm at back)
Weight : 30.86 oz (875 g)
Technical Specifications
Connection Type
- Logitech Unifying protocol (2.4 GHz)
- Bluetooth Smart technology
- Wireless range : >33 ft / 10m wireless range
Customization software
- Logi Options+ for Mac : OS 10.15 or later
- Logi Options+ for Windows : 10 or later
Indicator Lights (LED)
- 3 Bluetooth channel LEDs
- Battery indicator light
Battery
- Battery: 2 x AAA (included)
- Battery : 18 months
Special Keys
- Hotkeys (e.g. Home, Search, Back, App-Switch and Contextual Menu), Easy-Switch
- Connect/Power : iPad mini® (5th gen)
Key Life
- Up to 10 million keystrokes
Tablet Cover and Stand
- Supports most smartphones and tablets with thickness up to 11.3mm (0.4 inch), in portrait or landscape mode. iPad Pro® (12.9″) in landscape mode only.
Warranty Information
1-Year Limited Hardware Warranty
Part Number
- 920-008149
California Warnings
-
WARNING: Proposition 65 Warning
-
-
FAQ – Frequently Asked Questions
How to enable Accessibility and Input monitoring permissions for
Logitech Options****
We’ve identified a few cases where devices aren’t detected in the Logitech
Options software or where the device fails to recognize customizations made in
the Options software (however, the devices do work in out-of-box mode with no
customizations).
Most of the time this happens when macOS is upgraded from Mojave to
Catalina/BigSur or when interim versions of macOS are released. To resolve the
problem, you can enable permissions manually. Please follow the steps below to
remove the existing permissions and then add the permissions. You should then
restart the system to allow the changes to take effect.
– Remove existing permissions
– Add the permissions
Remove existing permissions
To remove the existing permissions:
- Close Logitech Options software.
- Go to System Preferences -> Security & Privacy. Click the Privacy tab, and then click Accessibility.
- Uncheck Logi Options and Logi Options Daemon.
- Click on Logi Options and then click on the minus sign ‘ – ’ .
- Click on Logi Options Daemon and then click on the minus sign ‘ – ’ .
- Click on Input Monitoring.
- Uncheck Logi Options and Logi Options Daemon.
- Click on Logi Options and then click on the minus sign ‘ – ’.
- Click on Logi Options Daemon and then click on the minus sign ‘ – ’.
- Click Quit and Reopen.
Add the permissions
To add the permissions:
- Go to System Preferences > Security & Privacy. Click the Privacy tab and then click Accessibility.
- Open Finder and click on Applications or press Shift + Cmd + A from the desktop to open Applications on Finder.
- In Applications , click Logi Options. Drag and drop it to the Accessibility box in the right panel.
- In Security & Privacy, click on Input Monitoring.
- In Applications , click Logi Options. Drag and drop it to the Input Monitoring box.
- Right-click on Logi Options in Applications and click on Show Package Contents.
- Go to Contents , then Support.
- In Security & Privacy, click on Accessibility.
- In Support , click Logi Options Daemon. Drag and drop it to the Accessibility box in the right pane.
- In Security & Privacy, click on Input Monitoring.
- In Support , click Logi Options Daemon. Drag and drop it to the Input Monitoring box in the right pane.
- Click Quit and Reopen.
- Restart the system.
- Launch the Options software and then customize your device.
My NumPad/KeyPad is not working, what should I do?****
– Make sure that the NumLock key is enabled. If pressing the key once doesn’t
enable NumLock, press and hold the key for five seconds.
– Verify that the correct keyboard layout is selected in Windows Settings and
that the layout matches your keyboard.
– Try enabling and disabling other toggle keys such as Caps Lock, Scroll Lock,
and Insert while checking if the number keys work on different apps or
programs.
– Disable Turn on Mouse Keys :
1. Open the Ease of Access Center — click the Start key, then
click Control Panel > Ease of Access and then Ease of Access Center.
2. Click Make the mouse easier to use.
3. Under Control the mouse with the keyboard , uncheck Turn on Mouse
Keys.
– Disable Sticky Keys, Toggle Keys & Filter Keys:
1. Open the Ease of Access Center — click the Start key, then
click Control Panel > Ease of Access and then Ease of Access Center.
2. Click Make the keyboard easier to use.
3. Under Make it easier to type , make sure all checkboxes are
unchecked.
– Verify the product or receiver is connected directly to the computer and not
to a hub, extender, switch, or something similar.
– Make sure the keyboard drivers are updated. Click
here to learn how to do this in
Windows.
– Try using the device with a new or different user profile.
– Test to see if the mouse/keyboard or receiver on a different computer.
Logitech Keyboard, Presentation and Mice Software – macOS 11 (Big Sur)
Compatibility****
Apple has announced a forthcoming update macOS 11 (Big Sur) due to be released
in the fall of 2020.
Logitech Options
Version: 8.36.76
Fully Compatible
Click to learn more
|
Logitech Control Center
(LCC)
Version: 3.9.14
Limited Full Compatibility
Logitech Control Center will be fully compatible with macOS 11 (Big Sur), but
only for a limited compatibility period.
macOS 11 (Big Sur) support for Logitech Control Center will end early 2021.
Click to learn more
—|—
Logitech Presentation
Software
Version: 1.62.2
Fully Compatible
|
Firmware Update Tool
Version: 1.0.69
Fully Compatible
Firmware Update Tool has been tested and is fully compatible with macOS 11
(Big Sur).
Unifying
Version: 1.3.375
Fully Compatible
Unifying software has been tested and is fully compatible with macOS 11 (Big
Sur).
|
Solar App
Version: 1.0.40
Fully Compatible
Solar app has been tested and is fully compatible with macOS 11 (Big Sur).
Logitech Options and Logitech Control Center macOS message: Legacy
System Extension****
If you are using Logitech Options or Logitech Control Center (LCC) on macOS
you may see a message that legacy system extensions signed by Logitech Inc.
will be incompatible with future versions of macOS and recommending to contact
the developer for support. Apple provides more information about this message
here: About legacy system extensions.
Logitech is aware of this and we are working on updating Options and LCC
software to ensure we comply with Apple’s guidelines and also to help Apple
improve its security and reliability.
The Legacy System Extension message will be displayed the first time Logitech
Options or LCC loads and again periodically while they remain installed and in
use, and until we have released new versions of Options and LCC. We do not yet
have a release date, but you can check for the latest downloads
here.
NOTE: Logitech Options and LCC will continue to work as normal after you click
OK.
External keyboard shortcuts for iPadOS****
You can view the available keyboard shortcuts for your external keyboard.
Press and hold the Command key on your keyboard to display the
shortcuts.
Change modifer keys of external keyboard on iPadOS****
You can change the position of your modifier keys at any time. Here’s how:
– Go to Settings > General > Keyboard > Hardware
keyboard > Modifier Keys.
Toggle between multiple languages on iPadOS with an external
keyboard****
If you have more than one keyboard language on your iPad, you can move from
one to the other using your external keyboard. Here’s how:
1. Press Shift + Control + Space bar.
2. Repeat the combination to move between each language
Warning message when Logitech device is connected to iPadOS****
- Warning message when Logitech device is connected to iPadOS
When you connect your Logitech device, you might see a warning message.
If this happens, make sure to connect only the devices you’ll be using. The
more devices that are connected, the more interference you might have between
them.
If you are having connectivity issues, disconnect any Bluetooth accessories
that you’re not using. To disconnect a device:
– In Settings > Bluetooth , tap the information button next to the
device name, then tap Disconnect.
Bluetooth mouse or keyboard not recognized after reboot on macOS (Intel-
based Mac) – FileVault****
If your Bluetooth mouse or keyboard does not reconnect after a reboot at the
login screen and only reconnects after the login, this might be related to
FileVault encryption.
When FileVault is enabled, Bluetooth mice and keyboards will only re-connect
after login.
Potential solutions:
– If your Logitech device came with a USB receiver, using it will solve the
issue.
– Use your MacBook keyboard and trackpad to login.
– Use a USB keyboard or mouse to login.
Note: This issue is fixed from macOS 12.3 or later on M1. Users with an older
version might still experience it.
Cleaning your Logitech device****
In the event your Logitech device needs cleaning we have some recommendations:
Before You Clean
– If your device is cabled, please unplug your device from your computer
first.
– If your device has user-replaceable batteries, please remove the batteries.
– Be sure to switch off your device and then wait 5-10 seconds before starting
to clean.
– Don’t put cleaning liquids directly on your device.
– For devices that are not waterproof, please keep moisture to a minimum and
avoid any liquid dripping or seeping into the device
– When using cleaning sprays, spray the cloth and wipe — do not spray the
device directly. Never submerge the device in a liquid, cleaning or otherwise.
– Don’t use bleach, acetone/nail polish remover, strong solvents, or
abrasives.
Cleaning Keyboards
– To clean the keys, use regular tap water to lightly moisten a soft, lint-
free cloth and gently wipe down the keys.
– Use compressed air to remove any loose debris and dust between the keys. If
you do not have compressed air available, you could also use cold-air from a
hair-dryer.
– You can also use fragrance-free disinfecting wipes, fragrance-free anti-
bacterial wet wipes, makeup removing tissue, or alcohol swabs containing less
than 25% concentration of alcohol.
– Don’t use bleach, acetone/nail polish remover, strong solvents, or
abrasives.
Cleaning Mice or Presentation Devices
– Use tap water to lightly moisten a soft, lint-free cloth and gently wipe
down the device.
– Use lens cleaner to lightly moisten a soft, lint-free cloth and gently wipe
down your device.
– You can also use fragrance-free disinfecting wipes, fragrance-free anti-
bacterial wet wipes, makeup removing tissue, or alcohol swabs containing less
than 25% concentration of alcohol.
– Don’t use bleach, acetone/nail polish remover, strong solvents, or
abrasives.
Cleaning Headsets
– Plastic parts (headband, mic boom, etc.): it is recommended to use
fragrance-free disinfecting wipes, fragrance-free anti-bacterial wet wipes,
makeup-removing tissue, or alcohol swabs containing less than 25%
concentration of alcohol.
– Leatherette earpads: it is recommended to use fragrance-free disinfecting
wipes, fragrance-free anti-bacterial wet wipes, or make-up removal tissue.
Alcohol wipes can be used on a limited basis.
– For the braided cable: it is recommended to use anti-bacterial wet wipes.
When wiping cables and cords, grip the cord mid-way and pull towards the
product. Don’t forcefully pull the cable away from the product or away from
the computer.
– Don’t use bleach, acetone/nail polish remover, strong solvents, or
abrasives.
Cleaning Webcams
– Use tap water to lightly moisten a soft, lint-free cloth and gently wipe
down the device.
– Use lens cleaner to lightly moisten a soft, lint-free cloth and gently wipe
down the webcam lens.
– Don’t use bleach, acetone/nail polish remover, strong solvents, or
abrasives.
If Your Device Still Isn’t Clean
In most cases, you can use isopropyl alcohol (rubbing alcohol) or fragrance-
free anti-bacterial wipes and apply more pressure when cleaning. Before using
rubbing alcohol or wipes, we suggest you test it first in an inconspicuous
area to make sure it doesn’t cause discoloration or remove any printing on
your device.
If you’re still not able to get your device clean, please consider contacting
us.
COVID-19
Logitech encourages users to properly sanitize their products in accordance
with guidelines put out by the World Health Organization and the Centers for Disease
Control guidelines.
Backup device settings to the cloud in Logitech Options+****
INTRODUCTION
This feature on Logi Options+ allows you to backup the customization of your
Options+ supported device automatically to the cloud after creating an
account. If you are planning to use your device on a new computer or wish to
go back to your old settings on the same computer, log into your Options+
account on that computer and fetch the settings you want from a backup to set
up your device and get going.
HOW IT WORKS
When you are logged into Logi Options+ with a verified account, your device
settings are automatically backed up to the cloud by default. You can manage
the settings and the backups from the Backups tab under More settings of your
device (as shown):

Manage settings and backups by clicking on More > Backups:
AUTOMATIC BACKUP OF SETTINGS — if the Automatically create backups of
settings for all devices checkbox is enabled, any settings you have or
modify for all of your devices on that computer are backed up to the cloud
automatically. The checkbox is enabled by default. You can disable it if you
don’t want the settings of your devices to be backed up automatically.
CREATE A BACKUP NOW — this button allows you to backup your current
device settings now, if you need to fetch them later.
RESTORE SETTINGS FROM BACKUP — this button lets you view and restore all
the available backups you have for that device that are compatible with that
computer, as shown above.
The settings for a device are backed up for every computer that you have your
device connected to and have Logi Options+ that you are logged into. Every
time you make some modifications to your device settings, they get backed up
with that computer name. The backups can be differentiated based on the
following:
1. Name of the computer. (Ex. John’s Work Laptop)
2. Make and/or model of the computer. (Ex. Dell Inc., Macbook Pro (13-inch)
and so on)
3. The time when the backup was made
The desired settings can then be selected and restored accordingly.
WHAT SETTINGS GET BACKED UP
– Configuration of all the buttons of your mouse
– Configuration of all the keys of your keyboard
– Point & Scroll settings of your mouse
– Any application-specific settings of your device
WHAT SETTINGS ARE NOT BACKED UP
– Flow settings
– Options+ app settings
Logitech Options permission prompts on macOS Monterey, macOS Big Sur,
macOS Catalina, and macOS Mojave****
– Logitech Options permission prompts on macOS Monterey and macOS Big Sur
– Logitech Options permission prompts on macOS Catalina
– Logitech Options permission prompts on macOS Mojave
– Download the
latest version of Logitech Options software.
Logitech Options permission prompts on macOS Monterey and macOS Big
Sur****
For official macOS Monterey and macOS Big Sur support, please upgrade to the
latest version of Logitech Options (9.40 or later).
Starting with macOS Catalina (10.15), Apple has a new policy that requires
user permission for our Options software for the following features:
– Bluetooth Privacy prompt needs to be accepted to connect Bluetooth
devices through Options.
– Accessibility access is needed for scrolling, gesture button,
back/forward, zoom, and several other features.
– Input monitoring access is needed for all the features enabled by the
software such as scrolling, gesture button, and back/forward among others for
devices connected via Bluetooth.
– Screen recording access is needed to capture screenshots using a
keyboard or a mouse.
– System Events access is needed for the Notifications feature and
Keystroke assignments under different applications.
– Finder access is needed for the Search feature.
– System Preferences access if needed for launching Logitech Control
Center (LCC) from Options.
Bluetooth Privacy prompt
When an Options supported device is connected with Bluetooth/Bluetooth Low
Energy, launching the software for the first time will show the below pop-up
for Logi Options and Logi Options Daemon:
Once you click OK , you will be prompted to enable the checkbox for Logi
Options in Security & Privacy > Bluetooth.
When you enable the checkbox, you will see a prompt to Quit & Reopen.
Click on Quit & Reopen for the changes to take effect.
Once the Bluetooth Privacy settings are enabled for both Logi Options and Logi
Options Daemon, the Security & Privacy tab will appear as shown:
Accessibility Access
Accessibility access is needed for most of our basic features such as
scrolling, gesture button functionality, volume, zoom, and so on. The first
time you use any feature that requires accessibility permission, you’ll be
presented with the following prompt:
To provide access:
1. Click Open System Preferences.
2. In System Preferences, click the lock at the bottom left corner to unlock.
3. In the right panel, check the boxes for Logitech Options and
Logitech Options Daemon.
If you already clicked Deny , follow these steps to manually allow
access:
1. Launch System Preferences.
2. Click Security & Privacy, then click the Privacy tab.
3. In the left panel, click Accessibility and then follow steps 2-3
above.
Input Monitoring Access
Input monitoring access is needed when devices are connected using Bluetooth
for all features enabled by the software such as scrolling, gesture button,
and back/forward to work. The following prompts will be displayed when access
is needed:
1. Click Open System Preferences.
2. In System Preferences, click the lock at the bottom left corner to unlock.
3. In the right panel, check the boxes for Logitech Options and
Logitech Options Daemon.
4. After you check the boxes, select Quit Now to restart the
application and allow the changes to take effect.
If you already clicked Deny , please do the following to allow access
manually:
1. Launch System Preferences.
2. Click Security & Privacy, and then click the Privacy tab.
3. In the left panel, click Input Monitoring and then follow steps 2-4 from
above.
Screen Recording Access
Screen recording access is needed to capture screenshots using any supported
device. You’ll be presented with the prompt below when you first use the
screen capture feature:
1. Click Open System Preferences.
2. In System Preferences, click the lock at the bottom left corner to unlock.
3. In the right panel, check the box for Logitech Options Daemon.
4. Once you check the box, select Quit Now to restart the application
and allow the changes to take effect.
If you already clicked Deny , use the following steps to allow access
manually:
1. Launch System Preferences.
2. Click Security & Privacy, then click the Privacy tab.
3. In the left panel, click on Screen Recording and follow steps 2-4
from above.
System Events prompts
If a feature requires access to a specific item like System Events or Finder,
you will see a prompt the first time you use this feature. Please note that
this prompt appears only once to request access for a specific item. If you
deny access, all the other features that need access to the same item will not
work and another prompt will not be shown.
Please click OK to allow access for Logitech Options Daemon so that you
can continue to use these features.
If you already clicked on Don’t Allow , use the following steps to allow
access manually:
1. Launch System Preferences.
2. Click Security & Privacy.
3. Click the Privacy tab.
4. In the left panel, click Automation and then check the boxes under
Logitech Options Daemon to provide access. If you are unable to interact
with the checkboxes, please click the lock icon on the bottom left corner and
then check the boxes.
NOTE: If a feature still doesn’t work after you grant access, please reboot
the system.
Logitech Options permission prompts on macOS Catalina****
For official macOS Catalina support, please upgrade to the latest version of
Logitech Options (8.02 or later).
Starting with macOS Catalina (10.15), Apple has a new policy that requires
user permission for our Options software for the following features:
– Accessibility access is needed for scrolling, gesture button,
back/forward, zoom and several other features
– Input monitoring (new) access is needed for all the features enabled by
the software such as scrolling, gesture button and back/forward among others
for devices connected via Bluetooth
– Screen recording (new) access is needed to capture screenshots using a
keyboard or a mouse
– System Events access is needed for Notifications feature and Keystroke
assignments under different applications
– Finder access is needed for the Search feature
– System Preferences access if needed for launching Logitech Control
Center (LCC) from Options
Accessibility Access
Accessibility access is needed for most of our basic features like scrolling,
gesture button functionality, volume, zoom, and so on. The first time you use
any feature that requires accessibility permission, you’ll be presented with
the following prompt:
To provide access:
1. Click Open System Preferences.
2. In System Preferences , click the lock at the bottom left corner to
unlock.
3. In the right panel, check the boxes for Logitech Options and
Logitech Options Daemon.
If you already clicked ‘Deny’, do the following to allow access manually:
1. Launch System Preferences.
2. Click Security & Privacy, then click the Privacy tab.
3. In the left panel, click Accessibility and then follow steps 2-3
above.
Input Monitoring Access
Input monitoring access is needed when devices are connected using Bluetooth
for all features enabled by the software such as scrolling, gesture button and
back/forward to work. The following prompts will be displayed when access is
needed:
1. Click Open System Preferences.
2. In System Preferences , click the lock at the bottom left corner to
unlock.
3. In the right panel, check the boxes for Logitech Options and
Logitech Options Daemon.
4. After you check the boxes, select Quit Now to restart the
application and allow the changes to take effect.
If you already clicked ‘Deny’, please do the following to allow access
manually:
1. Launch System Preferences.
2. Click Security & Privacy, and then click the Privacy tab.
3. In the left panel, click Input Monitoring and then follow steps 2-4
from above.
Screen Recording Access
Screen recording access is needed to capture screenshots using any supported
device. You’ll be presented with the prompt below when you first use the
screen capture feature.
1. Click Open System Preferences.
2. In System Preferences , click the lock at the bottom left corner to
unlock.
3. In the right panel, check the box for Logitech Options Daemon.
4. Once you check the box, select Quit Now to restart the application
and allow the changes to take effect.
If you already clicked ‘Deny’, use the following steps to allow access
manually:
1. Launch System Preferences.
2. Click Security & Privacy, then click the Privacy tab.
3. In the left panel, click on Screen Recording and follow steps 2-4
from above.
System Events prompts
If a feature requires access to a specific item like System Events or Finder,
you will see a prompt the first time you use this feature. Please note that
this prompt appears only once to request access for a specific item. If you
deny access, all the other features that need access to the same item will not
work and another prompt will not be shown.
Please click on OK to allow access for Logitech Options Daemon so that
you can continue to use these features.
If you already clicked on Don’t Allow, use the following steps to allow access
manually:
1. Launch System Preferences.
2. Click Security & Privacy.
3. Click the Privacy tab.
4. In the left panel, click Automation and then check the boxes under
Logitech Options Daemon to provide access. If you are unable to interact
with the checkboxes, please click the lock icon on the bottom left corner and
then check the boxes.
NOTE: If a feature still doesn’t work after you grant access, please reboot
the system.
– Click here for
information on macOS Catalina and macOS Mojave permissions on Logitech Control
Center.
– Click here for
information on macOS Catalina and macOS Mojave permissions on Logitech
Presentation software.
Logitech Options permission prompts on macOS Mojave****
For official macOS Mojave support, please upgrade to the latest version of
Logitech Options (6.94 or later).
Starting with macOS Mojave (10.14), Apple has a new policy that requires user
permission for our Options software for the following features:
– Accessibility access is needed for scrolling, gesture button, back/forward,
zoom and several other features
– Notifications feature and keystroke assignments under different applications
need access to System Events
– Search feature needs access to Finder
– Launching Logitech Control Center (LCC) from Options requires access to
System Preferences
The following are the user permissions the software needs for you to get
complete functionality for your Options-supported mouse and/or keyboard.
Accessibility Access
Accessibility access is needed for most of our basic features like scrolling,
gesture button functionality, volume, zoom, and so on. The first time you use
any feature that requires accessibility permission, you’ll see a prompt as
shown below.
Click Open System Preferences and then turn on the checkbox for Logitech
Options Daemon.
In case you clicked Deny , use the following steps to allow access
manually:
1. Launch System Preferences.
2. Click on Security & Privacy.
3. Click the Privacy tab.
4. In the left panel, click on Accessibility and check the boxes under
Logitech Options Daemon to provide access (as shown below). If you are unable
to interact with the checkboxes, please click the lock icon on the bottom left
corner and then check the boxes.
System Events prompts
If a feature requires access to any specific item such as System Events or
Finder, you will see a prompt (similar to the screenshot below) the first time
you use this feature. Please note that this prompt appears only once,
requesting access for a specific item. If you deny access, all the other
features that need access to the same item will not work and another prompt
will not be shown.
Click OK to allow access for Logitech Options Daemon so that you can
continue to use these features.
In case you clicked Don’t Allow , use the following steps to allow access
manually:
1. Launch System Preferences.
2. Click Security & Privacy.
3. Click the Privacy tab.
4. In the left panel, click Automation and then check the boxes under
Logitech Options Daemon to provide access (as shown below). If you are unable
to interact with the checkboxes, please click the lock icon on the bottom left
corner and then check the boxes.
NOTE: If a feature still doesn’t work after you grant access, please reboot
the system.
Special Key Combination on Multi-device, Multi-OS keyboards****
Our multi-device, multi-OS keyboards such as Craft, MX Keys, K375s, MK850, and
K780, have a special key combination that lets you swap the layouts for
language and operating systems. For each combination, you’ll need to hold the
keys down until the LED on the Easy-Switch channel lights up.
Before performing a key combination, make sure your device is connected to
your computer. If you’re not sure, turn your keyboard off and then back on,
then press on the different channel buttons until you find a channel with a
stable, non-blinking LED. If none of the channels are stable, you’ll need to
re-pair your keyboard. Click here for
information on how to connect.
Once the keyboard is connected, the LED on the Easy-Switch channel should be
stable as shown in the image below:
Easy-Switch key 1
Craft
K375s
MK850
K780
FN + U — swaps ‘#’ and ’A’ with the ‘>’ and ’<’ keys
NOTE: This only affects European 102 and US International layouts. FN+U only
works on Mac layouts, so make sure you have switched to Mac layout by pressing
FN+O.
FN + O — swaps PC layout to Mac layout
FN + P — swaps Mac layout to PC layout.
FN + B — Pause Break
FN + ESC — swaps between the smart keys and F1-12 keys.
NOTE: This syncs with the same checkbox feature in the
Options software.
You’ll get a visual confirmation with the LED on the Easy-Switch channel
turning back ON.
Logitech Bluetooth keyboard unable to pair with Android 7.x device****
Some users have reported that their Logitech keyboard will not pair with their
Android 7.x device after they’ve entered the pairing code.
– Users get a “connection timed out” error or no error message at all.
– Clearing the Bluetooth cache, power cycling the device, attempting to pair
again, or pair to another Android 7.x device does not work.
If you are experiencing this issue, please try the following:
1. Boot your Andriod 7.x device into Safe Mode. This typically involves
holding down the power button and volume key at the same time, but you should
confirm the exact steps on your device manufacturer’s website.
NOTE: You’ll see an on-screen notification when the device is in Safe Mode.
2. While in Safe Mode, pair the keyboard with your device.
3. After the keyboard has successfully paired, restart your device normally.
The keyboard should continue to be paired with your device.
Bluetooth troubleshooting for Logitech Bluetooth Mice, Keyboards and
Presentation remotes****
Bluetooth troubleshooting for Logitech Bluetooth Mice, Keyboards and
Presentation remotes
Try these steps to fix issues with your Logitech Bluetooth device:
– My Logitech device doesn’t connect with my computer, tablet or phone
– My Logitech device has already been connected, but frequently gets
disconnected or laggy
Logitech Bluetooth device doesn’t connect with computer, tablet or phone
Bluetooth allows you to connect your device wirelessly to your computer
without using a USB receiver. Follow these steps to connect via Bluetooth.
Check if your computer is compatible with the latest Bluetooth technology
The latest generation of Bluetooth is called Bluetooth Low Energy and is not
compatible with computers that have an older version of Bluetooth (called
Bluetooth 3.0 or Bluetooth Classic).
NOTE: Computers with Windows 7 cannot connect with devices that use Bluetooth
Low Energy.
1. Make sure that your computer has a recent operating system:
– Windows 8 or later
– macOS 10.10 or later
2. Check if your computer hardware supports Bluetooth Low Energy. If you
don’t know, click here for more information.
Set your Logitech device in ‘pairing mode’
In order for the computer to see your Logitech device, you need to put your
Logitech device in discoverable mode or pairing mode.
Most Logitech products are equipped with a Bluetooth button or Bluetooth key
and have a Bluetooth status LED.
1. Make sure your device is turned ON
2. Hold down the Bluetooth button for three seconds, until the LED starts
blinking rapidly. This indicates that the device is ready for pairing.
See the Support page for your product to find
more information on how to pair your specific Logitech device.
Complete the pairing on your computer
You will need to complete the Bluetooth pairing on your computer, tablet or
phone.
See Connect your Logitech Bluetooth device for more information on how to do this depending on
your operating system (OS).
My Logitech Bluetooth device frequently gets disconnected or laggy
Follow these steps if you experience disconnections or lag with your Logitech
Bluetooth device.
Troubleshooting checklist
1. Make sure that Bluetooth is ON or enabled on your computer.
2. Make sure your Logitech product is ON.
3. Make sure that your Logitech device and computer are within close
proximity of each other.
4. Try moving away from metal and other sources of wireless signal.
Try moving away from:
– Any device that could emit wireless waves: Microwave, cordless phone, baby
monitor, wireless speaker, garage door opener, WiFi router
– Computer power supplies
– Strong WiFi signals (learn more)
– Metal or metal wiring in the wall
5. Check the battery of your Logitech Bluetooth product. Low battery
power can adversely affect connectivity and overall functionality.
6. If your device has removable batteries, try removing and re-inserting
the batteries in your device.
7. Make sure your operating system (OS) is up to date.
Advanced troubleshooting
If the problem still persists, you will need to follow specific steps based on
your device OS:
Click on the link below to resolve Bluetooth wireless issues on:
– Windows
– Mac OS X
Send a feedback report to Logitech
Help us improve our products by submitting a bug report using our Logitech
Options Software:
1. Open Logitech Options.
2. Click More.
3. Select the problem you see and then click Send feedback report.
Install and use the SecureDFU firmware update****
Some K780, K375s, and K850 keyboards may experience the following:
– When your keyboard is in sleep mode, it takes more than one keypress to wake
it
– The keyboard enters sleep mode too quickly
If you are experiencing this problem, please download the Logitech Firmware
Updating Tool (SecureDFU) from your product’s Download page and follow the
onscreen instructions.
NOTE: You’ll need a Unifying receiver to perform the update.
Install and use the SecureDFU tool
1. Download and open SecureDFU_x.x.xx and select Run. The following
window appears:
NOTE: During the firmware update process, Unifying devices will be
unresponsive.
2. Click CONTINUE until you reach the window shown:
3. Click UPDATE to update your device. It’s important to not disconnect
your keyboard during the update, which may take several minutes.
4. Once the update is finished, the DFU tool will prompt you to update your
Unifying receiver.
5. Click UPDATE.
6. Once the update has finished, click CLOSE. Your device is ready to
use.
System Extension Blocked message when installing Logitech Options or
LCC****
Starting with macOS High Sierra (10.13), Apple has a new policy that requires
user approval for all KEXT (driver) loading. You may see a “System Extension
Blocked” prompt (shown below) during the installation of Logitech Options or
Logitech Control Center (LCC).
If you see this message, you’ll need to approve the loading of the KEXT
manually so that your device drivers can be loaded and you can continue to use
its functionality with our software. To allow KEXT loading, please open
System Preferences and navigate to the Security & Privacy section.
On the General tab, you should see a message and an Allow button,
as shown below. In order to load the drivers, click Allow. You may need
to reboot your system so the drivers are properly loaded and the functionality
of your mouse is restored.
NOTE: As set by the system, the Allow button is only available for 30
minutes. If it has been longer than that since you installed LCC or Logitech
Options, please restart your system to see the Allow button under the
Security & Privacy section of System Preferences.
NOTE: If you don’t allow KEXT loading, all devices supported by LCC will not
be detected by software. For Logitech Options, you need to perform this
operation if you’re using following devices:
– T651 Rechargeable trackpad
– Solar Keyboard K760
– K811 Bluetooth keyboard
– T630/T631 Touch mouse
– Bluetooth Mouse M557/M558
Logitech Options issues when Secure Input is enabled****
- Logitech Options issues when Secure Input is enabled
Ideally, Secure Input should only be enabled while the cursor is active in a
sensitive information field, such as when you enter a password, and should be
disabled right after you leave the password field. However, some applications
may leave the Secure Input state enabled. In that case, you may experience the
following issues with devices supported by Logitech Options:
– When the device is paired in Bluetooth mode, it’s either not detected by
Logitech Options or none of the software-assigned features work (basic device
functionality will continue to work, however).
– When the device is paired in Unifying mode, it’s not possible to perform
keystroke assignments.
If you encounter these issues, check to see if Secure Input is enabled on your
system. Do following:
1. Launch Terminal from /Applications/Utilities folder.
2. Type the following command in Terminal and press Enter :ioreg -l -d 1
-w 0 | grep SecureInput
– If the command returns back no information, then Secure Input is not enabled
on the system.
– If the command returns back some information, then look for
“kCGSSessionSecureInputPID”=xxxx. The number xxxx points to the Process ID
(PID) of the application that has Secure Input enabled:
1. Launch Activity Monitor from /Applications/Utilities folder.
2. Search for PID which has secure input enabled.
– Once you know which application has Secure Input enabled, close that
application to resolve the issues with Logitech Options.
K780 keyboard does not work or loses connection frequently****
– Keyboard isn’t working
– Keyboard frequently stops working
– Before reconnecting your keyboard
– Reconnect your keyboard
Keyboard isn’t working
In order for your keyboard to work with your device, the device must have
built-in Bluetooth capability or be using a third-party Bluetooth receiver or
dongle.
NOTE: The K780 keyboard isn’t compatible with a Logitech Unifying receiver,
which uses Logitech Unifying wireless technology.
If your system is Bluetooth-capable and the keyboard isn’t working, the
problem is likely a lost connection. The connection between the K780 keyboard
and the computer or tablet can be lost for several reasons, such as:
– Low battery power
– Using your wireless keyboard on metal surfaces
– Radio frequency (RF) interference from other wireless devices, such as:
– Wireless speakers
– Computer power supplies
– Monitors
– Cell phones
– Garage door openers
Try to rule out these and other possible problem sources that might be
affecting your keyboard.
Keyboard frequently loses connection
If your keyboard frequently stops working and you keep having to reconnect it,
try these suggestions:
– Keep other electrical devices at least 8 inches (20 cm) away from the
keyboard
– Move the keyboard closer to the computer or tablet
Before reconnecting your keyboard
Before you try to connect your keyboard again:
1. Check the battery power by turning the keyboard off and then back on again
using the ON/OFF switch on the bottom of the keyboard. Notice the LED
indicator color to the left of the ON/OFF switch. If the LED indicator
is red, the batteries need to be replaced.
2. Try using the Windows key or type something to verify it’s working.
3. If it’s still not working, follow the link below to reconnect your
keyboard.
Reconnect your keyboard
To reconnect your keyboard, please follow the steps for your specific
operating system in Connect your Logitech Bluetooth
device.
Switch devices with the K780 keyboard****
After you’ve connected up to three devices with your keyboard, you can switch
between them when you press one of the Easy-Switch buttons.
The button’s status light slowly blinks before turning solid for 5 seconds to
confirm your selection. The keyboard is then ready to use with your device.
NOTE: Make sure the device’s Bluetooth connection is enabled before you switch
to that device.
K780 keyboard battery life and replacement****
Battery level
When your keyboard is turned on, the status LED in the right corner of the
keyboard turns green to indicate battery power is good. The status LED will
turn red when the battery power is low and it’s time to change batteries.
Replace batteries
1. Slide and lift the battery cover off.
2. Replace the spent batteries with two new AAA batteries and reattach the
compartment door.
TIP: Install Logitech Options to set up and receive battery status
notifications. You can get Logitech Options from this product’s
Download page.
Shortcut and media keys for the K780 keyboard****
Hot keys and media keys
The following hot keys and media keys are available for Windows, Mac OS X,
Android and iOS:
Key| Windows 10| Windows 7
Windows 8 or later| Android| iOS| Mac OS
—|—|—|—|—|—
| Task View| Browser home page| Home| Home| Mission Control
| Contextual menu| Contextual menu| Menu| Show/hide virtual keyboard|
Dashboard*
| Back in browser| Back in browser| Back| Home| Back in browser
| Cortana search| Search| Search| Search| Search
| Prev track| Prev track| Prev track| Prev track| Prev track
| Play/pause| Play/pause| Play/pause| Play/pause| Play/pause
| Next track| Next track| Next track| Next track| Next track
| Mute| Mute| Mute| Mute| Mute
| Volume down| Volume down| Volume down| Volume down| Volume down
| Volume up| Volume up| Volume up| Volume up| Volume up
*Requires installation of Logitech Options
Shortcuts
To perform a shortcut, hold down the fn (function) key while pressing
the key associated with an action.
The following key combinations are available:
Key| Windows 10| Windows 7
Windows 8 or later| Android| iOS| Mac OS
—|—|—|—|—|—
| Insert| Insert| —| Insert| Insert
| Print screen| Print screen| Print screen| Screen capture| Print screen
| Lock screen| Lock screen| Lock screen| Lock screen| Lock screen
| Home (when editing text)| Home (when editing text)| Home (when editing
text)| Home (when editing text)| Home (when editing text)
| End (when editing text)| End (when editing text)| End (when editing text)|
End (when editing text)| End (when editing text)
| Page up| Page up| Page up| Brightness down| Brightness down
| Page down| Page down| Page down| Brightness up| Brightness up
*Requires installation of Logitech Options
Connect the K780 keyboard to an iPad or iPhone****
You can connect your keyboard to an iPad or iPhone running iOS 5.0 or later.
Here’s how:
1. With your iPad or iPhone turned on, tap the Settings icon.
2. In Settings, tap General and then Bluetooth.
3. If the on-screen switch beside Bluetooth doesn’t currently show as ON, tap
it once to enable it.
4. Turn the keyboard on by sliding the power switch on the bottom of the
keyboard over to the right.
5. Press one of the three buttons on the top left side of the keyboard until
the LED light on the button starts blinking rapidly. Your keyboard is now
ready to pair to your device.
6. At the top right of the keyboard, press and hold the “ i ” button
until the light to the right of the button rapidly blinks blue.
7. On your iPad or iPhone, in the Devices list, tap Logitech
Keyboard K780 to pair it.
8. Your keyboard may pair automatically, or it may request a PIN code to
complete the connection. On your keyboard, type the code shown on-screen, and
then press the Return or Enter key.
NOTE: Each connect code is randomly generated. Make sure you enter the one
shown on your iPad or iPhone screen.
9. Once you press Enter (if required), the pop-up will disappear and
Connected will appear beside your keyboard in the Devices list.
Your keyboard should now be connected to your iPad or iPhone.
NOTE: If the K780 is already paired but having problems connecting, remove it
from the Devices list and then follow the instructions above to connect
it.
Re-pair a Bluetooth device to the K780 keyboard****
You can easily re-pair a device with your K780 keyboard. Here’s how:
– On the keyboard, press and hold down one of the Easy-Switch buttons until
the status light starts blinking.
The keyboard is in pairing mode for the next three minutes.
– On the device, see Connect your Logitech Bluetooth
device.
Manually select the operating system for the K780 keyboard****
The Logitech Keyboard K780 includes an OS-adaptive key that has different
functions, depending on the operating system of the device you’re typing on.
Your keyboard can detect the operating system of the device you’re currently
connected to. It automatically remaps keys to provide functions and shortcuts
where you expect them to be.
If the keyboard fails to correctly detect the operating system of your device,
you can manually select the operating system by pressing one of the following
function key combinations for three seconds:
Mac OS X and iOS
Press and hold for three seconds
Windows, Android, and Chrome
Press and hold for three seconds
Connect your Logitech Bluetooth device****
The following steps show you how to prepare your Logitech device for Bluetooth
pairing and then how to pair it to computers or devices running:
- Windows
- macOS
- Chrome OS
- Android
- iOS
Prepare your Logitech device for Bluetooth pairing
Most Logitech products are equipped with a Connect button and will have
a Bluetooth Status LED. Usually the pairing sequence is started by holding
down the Connect button until the LED starts blinking rapidly. This
indicates that the device is ready for pairing.
NOTE: If you’re having trouble starting the pairing process, please refer to
the user documentation that came with your device, or visit the support page
for your product at support.logitech.com.
Windows
Select the version of Windows you’re running and then follow the steps to pair
your device.
- Windows 7
- Windows 8
- Windows 10
Windows 7
- Open the Control Panel.
- Select Hardware and Sound.
- Select Devices and Printers.
- Select Bluetooth Devices.
- Select Add a device.
- In the list of Bluetooth devices, select the Logitech device you want to connect to and click Next.
- Follow the onscreen instructions to finish pairing.
Windows 8
- Go to Apps , then find and select Control Panel.
- Select Devices and Printers.
- Select Add a device.
- In the list of Bluetooth devices, select the Logitech device you want to connect to and select Next.
- Follow the onscreen instructions to finish pairing.
Windows 10
- Select the Windows icon, then select Settings.
- Select Devices , then Bluetooth in the left pane.
- In the list of Bluetooth devices, select the Logitech device you want to connect to and select Pair.
- Follow the onscreen instructions to finish pairing.
NOTE: It may take up to five minutes for Windows to download and enable all
drivers, depending on your computer’s specifications and your internet speed.
If you have not been able to connect your device, repeat the pairing steps and
wait a while before you test the connection.
macOS
- Open System Preferences and click Bluetooth.
- Select the Logitech device you want to connect to from the Devices list and click Pair.
- Follow the onscreen instructions to finish pairing.
Upon pairing, the LED light on your Logitech device stops blinking and glows
steady for 5 seconds. The light then turns off to save energy.
Chrome OS
-
Click the status area in the lower right corner of your desktop.
-
Click Bluetooth enabled or Bluetooth disabled in the pop-up menu.
NOTE: If you had to click on Bluetooth disabled , that means the
Bluetooth connection on your Chrome device needs to first be enabled. -
Select Manage devices… and click Add Bluetooth device.
-
Select the name of the Logitech device you want to connect to from the list of available devices and click Connect.
-
Follow the onscreen instructions to finish pairing.
Upon pairing, the LED light on your Logitech device stops blinking and glows
steady for 5 seconds. The light then turns off to save energy.
Android
- Go to Settings and Networks and select Bluetooth.
- Select name of the Logitech device you want to connect from the list of available devices and click Pair.
- Follow the onscreen instructions to finish pairing.
Upon pairing, the LED light on the Logitech device stops blinking and glows
steady for 5 seconds. The light then turns off to save energy.
iOS
- Open Settings and click Bluetooth.
- Tap on the Logitech device you want to connect to from the Other Devices list.
- The Logitech device will be listed under My Devices when paired successfully.
Upon pairing, the LED light on the Logitech device stops blinking and glows
steady for 5 seconds. The light then turns off to save energy.
Unifying devices not detected after macOS 10.12.1 Sierra update****
We are aware that after updating from macOS 10.12 Sierra to macOS Sierra
10.12.1, Logitech Options software does not detect supported Unifying devices
on some systems.
To fix this issue, unplug the Unifying receiver and then plug it back into the
USB port. If Logitech Options still doesn’t detect the device, you may also
need to reboot your system
Read More About:
Logitech K780 Multi-Device Wireless Keyboard User
Manual
Download:
Logitech K780 Multi-Device Wireless Keyboard User Manual – [ Download
PDF ]
Read User Manual Online (PDF format)
Read User Manual Online (PDF format) >>
Download This Manual (PDF format)
Download this manual >>
Logitech K780
EXPLORE THE K780
MULTI-DEVICE
KEYBOARD
DUAL LAYOUTS
GET STARTED ENHANCED FUNTIONS
EXPLORE THE K780 MULTI-DEVICE KEYBOARD
The K780 Multi-Device Keyboard is a fully equipped computer keyboard that also
works perfectly with smartphones and tablets. Enjoy quiet, comfortable typing,
switching easily between all the devices you enter text on. Works with Windows,
Mac, Chrome OS, Android and iOS.
To enhance your experience on MacOS and Windows download Logitech Options. In
addition to optimizing the keyboard for your preferred operating system, the software
lets you customize the K780 according to your individual needs.
K780 MULTI-DEVICE KEYBOARD
One keyboard. Fully equipped. For computer, phone, and tablet.
View the manual for the Logitech K780 here, for free. This manual comes under the category keyboards and has been rated by 6 people with an average of a 8.5. This manual is available in the following languages: English. Do you have a question about the Logitech K780 or do you need help?
Ask your question here
Product Images (4)

Logitech K780 specifications
Below you will find the product specifications and the manual specifications of the Logitech K780.
The Logitech K780 keyboard is a Swiss-designed QWERTZ keyboard with a battery power source. Featuring device interfaces for both RF wireless and Bluetooth, this keyboard comes without an included mouse. Its dimensions measure 380 centimeters in width, 22 centimeters in depth, and 158 centimeters in height, with a weight of 875 grams.
This keyboard is supported by Windows 10 and Windows 11 operating systems, as well as iPadOS, iOS 11.0, iOS 11.4, iOS 12, iOS 13, iOS 14.5, Android 7.0, Android 7.1, Android 7.1.2, Android 8.0, Android 9.0, and Android 10.0 mobile operating systems. Additionally, it is supported by Mac OS X 10.14 Mojave, Mac OS X 10.15 Catalina, Mac OS X 10.15.3 Catalina, Mac OS X 11.0 Big Sur, and Mac OS X 12.0 Monterey.
Operating on a 2.4 GHz frequency band, this keyboard has a wireless range of 10 meters and features a battery LED indicator. The Logitech K780 keyboard includes nine hot keys for quick access to frequently-used functions.
Overall, the Logitech K780 keyboard is a sleek and versatile option for those needing a Swiss QWERTZ keyboard that can switch between multiple operating systems with ease. Its wireless capabilities and battery life provide convenience, while its hot keys offer additional functionality.
Power source type
Battery
Keyboard dimensions (WxDxH)
380 x 22 x 158 mm
Windows operating systems supported
Windows 10, Windows 11
General
| Brand | Logitech |
| Model | K780 | 920-008036 |
| Product | keyboard |
| EAN | 5099206064966 |
| Language | English |
| Filetype | User manual (PDF) |
Keyboard
| Keyboard language | Swiss |
| Keyboard layout | QWERTZ |
| Device interface | RF Wireless + Bluetooth |
| Frequency band | 2.4 GHz |
| Hot keys | Yes |
| Number of hot keys | 9 |
| Numeric keypad | Yes |
| Pointing device | No |
| USB hub | No |
| Fingerprint reader | No |
| Keyboard form factor | Full-size (100%) |
| Connectivity technology | Wireless |
| Keyboard key switch | — |
| Purpose | Universal |
| Recommended usage | Universal |
| Keyboard number of keys | 107 |
| Key travel distance | 2.2 mm |
| Key pitch | 19 mm |
| Keyboard keys operating life | 10 million characters |
| Silent keys | Yes |
| Noise level | 45 dB |
| Keyboard keys technology | Scissor |
| Certification | CE, FCC, CB |
| On/off switch | Yes |
Power
| Power source type | Battery |
| Keyboard battery type | AAA |
| Number of batteries (keyboard) | 2 |
| Rechargeable | Yes |
| Auto power off | Yes |
| Battery type | AAA |
| Number of batteries supported | 4 |
| Battery technology | Alkaline |
| Battery capacity | 1000 mAh |
| Service life of battery | 24 month(s) |
Mouse
| Mouse included | No |
| Form factor | — |
Weight & dimensions
| Keyboard dimensions (WxDxH) | 380 x 22 x 158 mm |
| Keyboard weight | 875 g |
System requirements
| Windows operating systems supported | Windows 10, Windows 11 |
| Mobile operating systems supported | iPadOS, iOS 11.0, iOS 11.4, iOS 12, iOS 13, iOS 14.5, Android 7.0, Android 7.1, Android 7.1.2, Android 8.0, Android 9.0, Android 10.0, Android 10 |
| Mac operating systems supported | Mac OS X 10.14 Mojave, Mac OS X 10.15 Catalina, Mac OS X 10.15.3 Catalina, Mac OS X 11.0 Big Sur, Mac OS X 12.0 Monterey |
| Mac compatibility | Yes |
| Other operating systems supported | ChromeOS |
Features
| Wireless range | 10 m |
| Plug and Play | Yes |
Design
| Battery LED indicator | Yes |
| Backlight | No |
| Product colour | Grey, White |
| Wrist rest | No |
| Keyboard style | Straight |
| Full-size keyboard | Yes |
| Material | Metal, Plastic, Rubber |
| Mean time to failure (MTTF) | 150000 h |
| LED indicators | Battery |
Packaging content
| Receiver included | Yes |
| Batteries included | Yes |
| User guide | Yes |
| Wireless receiver interface | USB Type-A |
| Unifying receiver | Yes |
| Receiver type | Unifying receiver |
| Packaging content | — |
Logistics data
| Master (outer) case GTIN (EAN/UPC) | 50992060649617 |
| Products per intermodal container (20ft) | 10752 pc(s) |
| Products per intermodal container (40ft) | 22272 pc(s) |
| Products per intermodal container (40ft, HC) | 25984 pc(s) |
| Products per pallet | 528 pc(s) |
| Master (outer) case volume | 20800 cm³ |
| Master (outer) case width | 274 mm |
| Master (outer) case length | 410 mm |
| Master (outer) case height | 185 mm |
| Master (outer) case gross weight | 9200 g |
| Harmonized System (HS) code | 84716060 |
Operational conditions
| Operating temperature (T-T) | 0 — 40 °C |
| Storage temperature (T-T) | -40 — 60 °C |
Other features
| Internal | No |
| Channels quantity | 3 channels |
Packaging data
| Package width | 169 mm |
| Package depth | 400 mm |
| Package height | 33 mm |
| Package weight | 1084 g |
| Package volume | 2231 cm³ |
| Package type | Box |
show more
Questions & answers
Can’t find the answer to your question in the manual? You may find the answer to your question in the FAQs about the Logitech K780 below.
Why isn’t my keyboard connecting to my device?
Make sure that the Bluetooth on your device is enabled and set to discoverable mode. Press and hold the Bluetooth button on the keyboard until the LED starts flashing rapidly. Then, follow the pairing instructions specific to your device to establish a connection.
How can I switch between connected devices?
To switch between devices, simply press one of the Easy-Switch buttons located at the top-left corner of the keyboard. Each button corresponds to a specific device paired with the keyboard, making it easy to seamlessly toggle between them.
Why are some keys not working on my {keyboard} Logitech K780?
Firstly, ensure that the keyboard is properly charged or equipped with fresh batteries. If this is not the issue, try removing any obstacles or debris that might be affecting the key’s functionality. Also, check the Logitech Options software to confirm that the keys are not being reassigned or disabled.
How do I customize the function keys on my keyboard?
Install the Logitech Options software from the Logitech website and follow the on-screen instructions to pair your keyboard. Once connected, open the software and go to the Keyboard tab. From there, you can customize the function keys to perform specific actions or launch applications based on your preferences.
Can I use the keyboard with multiple operating systems?
Absolutely! The Logitech K780 is designed to be compatible with various operating systems including Windows, macOS, iOS, Android, and even Apple TV. Simply follow the standard Bluetooth pairing process for each device and enjoy seamless typing across multiple platforms.
Is the Logitech K780 keyboard wireless?
Yes, the Logitech K780 keyboard is wireless, with both RF Wireless and Bluetooth connectivity options. This means that users can connect their device to the keyboard without any cables, providing convenience and flexibility in their setup.
Does the Logitech K780 keyboard have a battery indicator?
Yes, the keyboard Logitech K780 has a battery LED indicator. This allows users to easily monitor the battery level of the keyboard and know when it needs to be recharged or replaced. This feature enhances the user experience by providing a visual cue for battery status.
How many hot keys does the Logitech K780 keyboard have?
The Logitech K780 keyboard has 9 hot keys. These hot keys provide shortcuts for commonly used functions, such as media controls, volume adjustment, and launching applications. With these hot keys, users can perform tasks more efficiently and quickly navigate through their devices.
What operating systems are supported by the Logitech K780 keyboard?
The Logitech K780 keyboard supports various operating systems. It is compatible with Windows 10 and Windows 11 for Windows users. For Apple users, it supports macOS 10.14 Mojave, macOS 10.15 Catalina, macOS 10.15.3 Catalina, macOS 11.0 Big Sur, and macOS 12.0 Monterey. Additionally, it supports mobile operating systems such as iPadOS, iOS, and Android. This wide compatibility makes it a versatile keyboard for different users and devices.
Does the Logitech K780 keyboard come with a mouse?
No, the Logitech K780 keyboard does not come with a mouse. It is a standalone keyboard designed for users who may already have a separate mouse or prefer to use a different mouse model. This allows users to choose a mouse that best suits their needs and preferences.
How can I best clean my keyboard?
A slightly damp cleaning cloth or soft, dust-free cloth works best to remove fingerprints. Dust in hard-to-reach places is best removed with compressed air.
What certifications does the Logitech K780 have?
The Logitech K780 has the following certifications: CE, FCC, CB.
How do I clean my keyboard?
Hold the keyboard upside down and use a can of compressed air to blow away the dirt. The keys can even be cleaned with a damp cloth.
Is the manual of the Logitech K780 available in English?
Yes, the manual of the Logitech K780 is available in English .
Is your question not listed? Ask your question here
УНИВЕРСАЛЬНАЯ КЛАВИАТУРА K780 MULTI-DEVICE
Одна клавиатура. Максимум возможностей.
Для компьютера, телефона и планшета.
ОБЗОР УНИВЕРСАЛЬНОЙ
КЛАВИАТУРЫ K780
MULTI-DEVICE
ОБЗОР УНИВЕРСАЛЬНОЙ КЛАВИАТУРЫ K780
MULTI-DEVICE
НАЧАЛО РАБОТЫ РАСШИРЕННЫЕ
ФУНКЦИИ
ДВЕ РАСКЛАДКИ
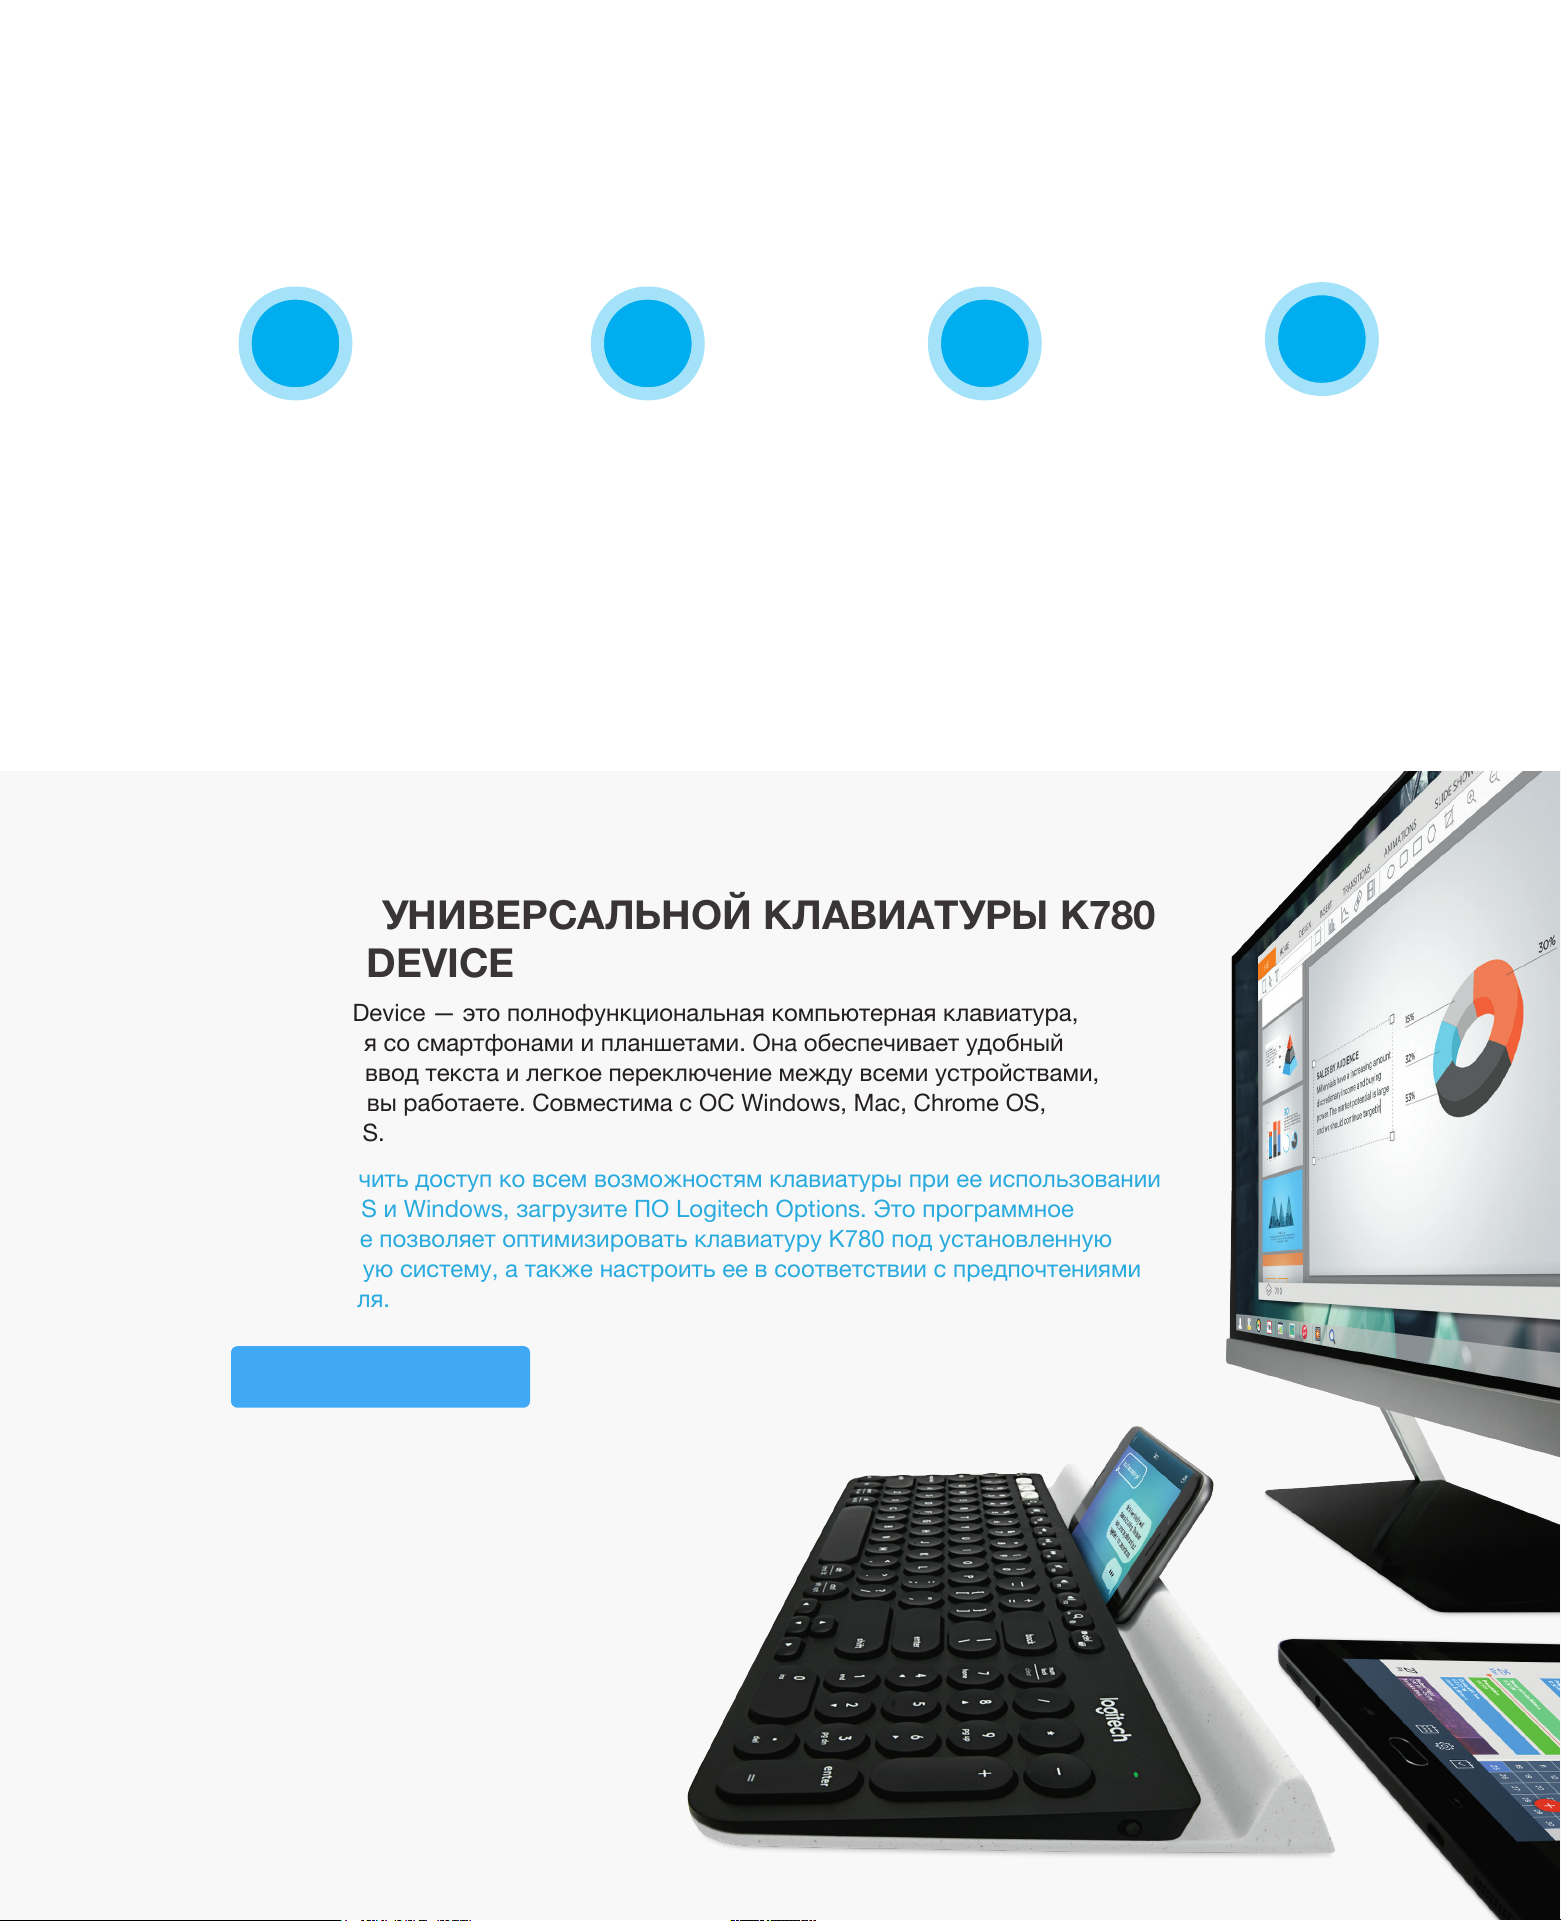
K780 Multi-Device — это полнофункциональная компьютерная клавиатура,
совместимая со смартфонами и планшетами. Она обеспечивает удобный
бесшумный ввод текста и легкое переключение между всеми устройствами,
с которыми вы работаете. Совместима с ОС Windows, Mac, Chrome OS,
Android и iOS.
Чтобы получить доступ ко всем возможностям клавиатуры при ее использовании
с ОС Mac OS и Windows, загрузите ПО Logitech Options. Это программное
обеспечение позволяет оптимизировать клавиатуру K780 под установленную
операционную систему, а также настроить ее в соответствии с предпочтениями
пользователя.
Logitech Options
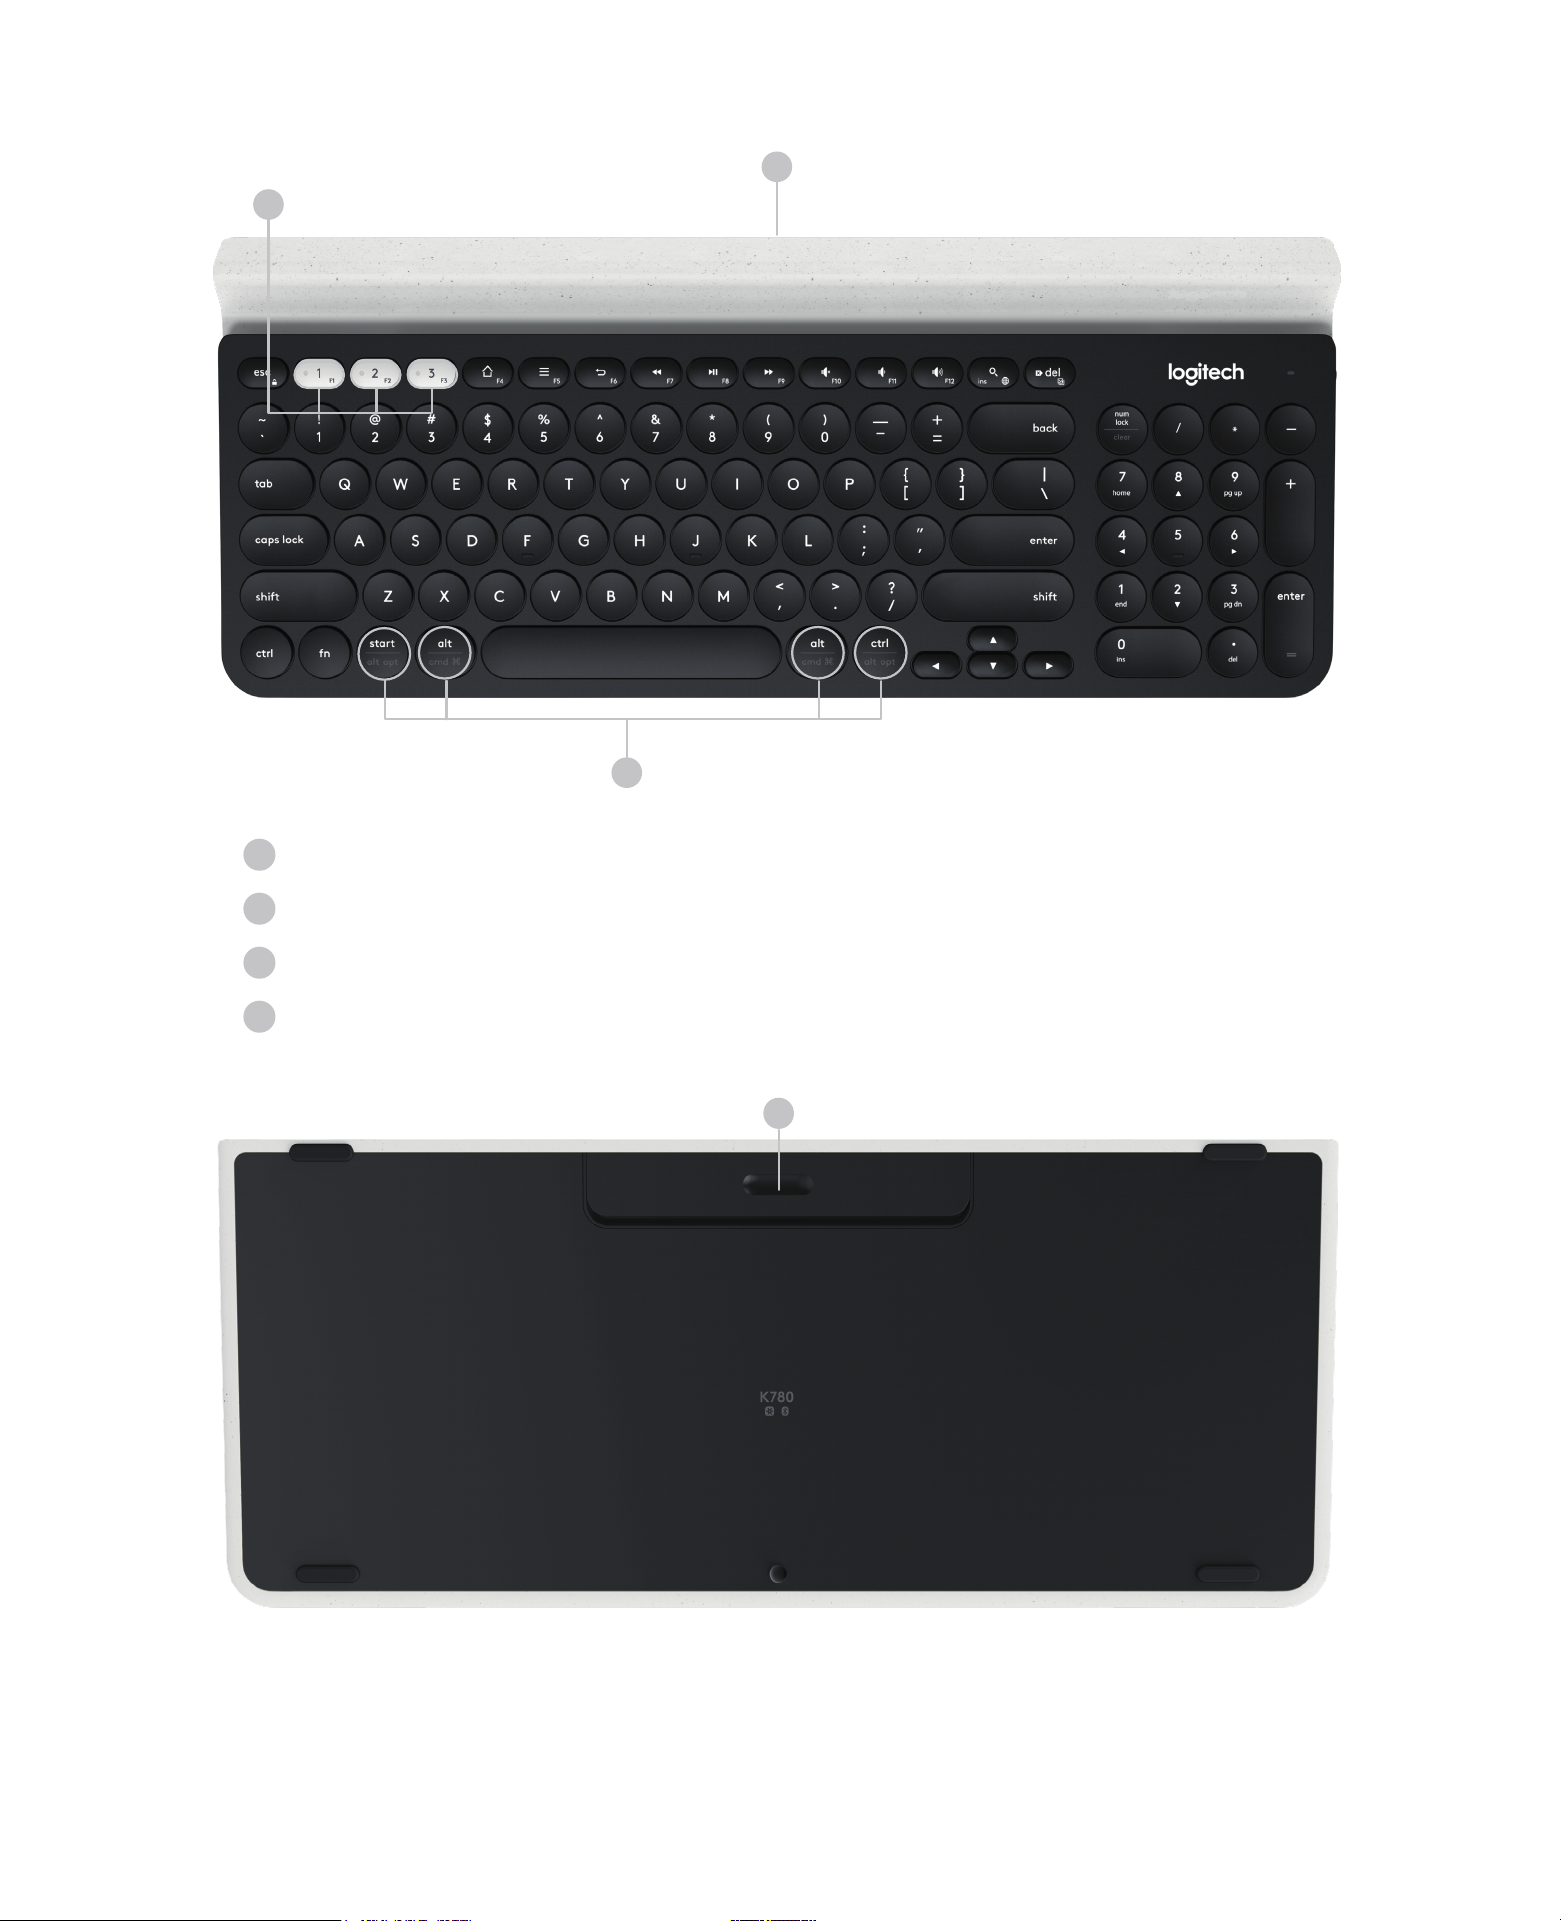
Внешний вид универсальной клавиатуры K780 Multi-Device
3
1
2
1
Кнопки Easy-Switch
2
Две раскладки с обозначениями
3
Интегрированная подставка для мобильных устройств
4
Крышка батарейного отсека и расположение приемника
MX: FAVOR DE LEER EL INSTRUCTIVO ANTES
DE INSTALAR Y OPERAR EL PROD UCTO
650-023723 009
www.logitech.com/downloads
Mac | Windows
Logitech
®
Options
0:03 Sec.
www.logitech.com/k780
1
4
0:03 Sec.Mac:
+
0:03 Sec.Windows®:
+
3
3
2
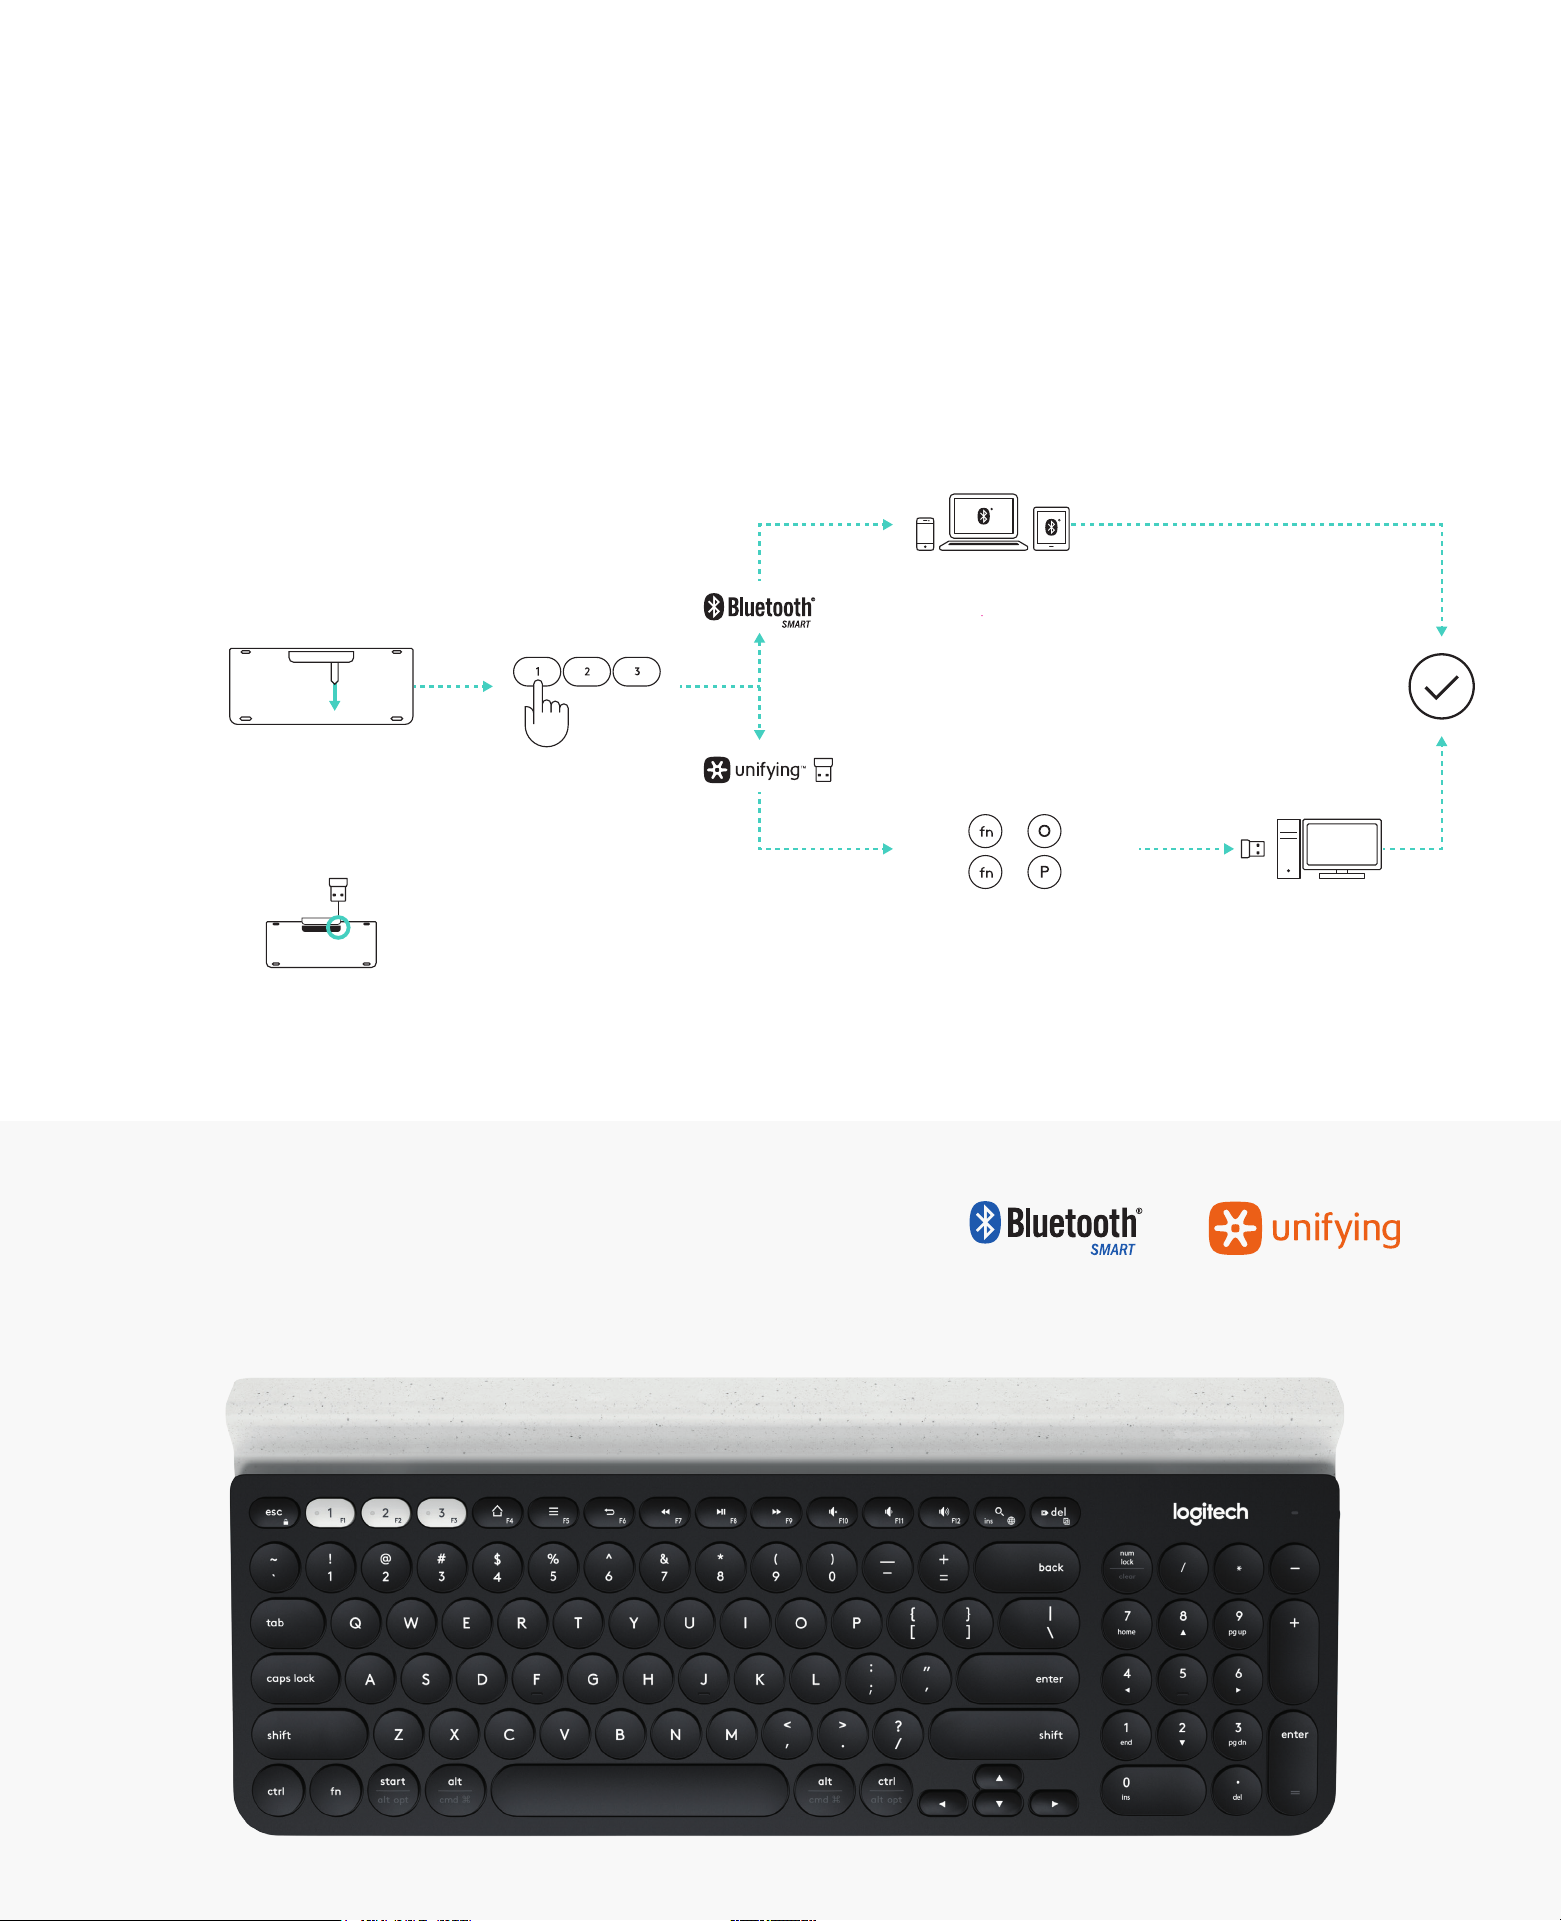
ПОДКЛЮЧЕНИЕ
К клавиатуре K780 Multi-Device можно подключить до трех устройств,
применяя технологию Bluetooth Smart или USB-приемник Unifying, который по
умолчанию используется для подключения*.
Быстрая настройка
Чтобы быстро подключить клавиатуру к компьютеру, ноутбуку или планшету,
выполните перечисленные ниже действия. Дополнительные сведения по подключению
с использованием технологий Unifying или Bluetooth Smart см. в разделах ниже.
* Приемник Unifying расположен под крышкой батарейного отсека клавиатуры.
Два способа подключения
К клавиатуре K780 можно подключить до трех устройств
одновременно (компьютеры, ноутбуки, планшеты,
смартфоны), используя приемник Unifying (2,4 ГГц)
или технологию Bluetooth Smart.
Loading…
EXPLORE THE K780 MULTI-DEVICE
KEYBOARD
DUAL LAYOUTSGET STARTED ENHANCED FUNTIONS
EXPLORE THE K780 MULTI-DEVICE KEYBOARD The K780 Multi-Device Keyboard is a fully equipped computer keyboard that also works perfectly with smartphones and tablets. Enjoy quiet, comfortable typing, switching easily between all the devices you enter text on. Works with Windows, Mac, Chrome OS, Android and iOS.
To enhance your experience on MacOS and Windows download Logitech Options. In addition to optimizing the keyboard for your preferred operating system, the software lets you customize the K780 according to your individual needs.
K780 MULTI-DEVICE KEYBOARD One keyboard. Fully equipped. For computer, phone, and tablet.
4
5
2
1
3
K780 Multi-Device at a glance
1 Easy-Switch keys
2 Dual-printed layout
3 Integrated device stand
4 Battery door and receiver storage
6 Dual connectivity
MX: FAVOR DE LEER EL INSTRUCTIVO ANTES DE INSTALAR Y OPERAR EL PRODUCTO
650-023723 009
www.logitech.com/downloads
Mac | Windows Logitech Options
0:03 Sec.
www.logitech.com/k780
1
4 0:03 Sec.Mac: +
0:03 Sec.Windows: +
3
3
2
2205-10-3229
PMS 3255C Dieline (does not print)
K Project Date File Name P/N
InksGeneva QSG insert 17 June 2016 PKG_0455 — 650-023723 009 Geneva QSG Insert WW.ai 650-023723.009
Print size Trim size
383mm x 202.5mm 383mm x 202.5mm
Finish Paper
Dieline: DWS-650-023723_004-GENEVA INSERT
Standard AQ 300gsm Duplex
Fonts Brown Pro
GET CONNECTED K780 Multi-Device keyboard allows you to connect up to three devices either via Bluetooth Smart or via the pre-paired Unifying USB receiver*.
Quick Setup Follow the steps below to quickly connect to your computer, laptop or tablet. For more information on how to connect with Unifying or Bluetooth Smart, go to the sections below.
*The Unifying Receiver is stored in the keyboard under the battery door.
Dual Connectivity Connect Geneva K780 lets you con ect up to 3 devices (computer, laptops, tablets or smartphones) either via the Unifying Receiver (2.4 Ghz) or Bluetooth Smart
How to connect
1 Download Unifying software. You can download the software here.
2 Make sure your keyboard is turned on.
3 Press and hold one of the white easy-switch keys for 3 seconds (Then LED on the selected channel rapidly blink).
4 Configure your keyboard according to your operating system:
For MacOS: Press & Hold fn + o for 3 seconds (The LED on selected channel will light up)
For Windows, Chrome or Android: Press & Hold fn + p for 3 seconds (The LED on selected channel will light up)
5 Plug in the Unifying receiver.
6 Open the Unifying software and follow the instructions on the screen.
Connect with K780 Multi-Device comes with a pre-paired receiver that provides a plug-and-play connection to your computer or laptop. If you want to pair a 2nd time to the receiver in the box or pair to an existing Unifying Receiver, follow these steps.
Requirements A USB port Unifying Software Windows 7, 8, 10 or later Mac OS X 0.08 or later Chrome OS
Connect with K780 Multi-Device Keyboard allows you to connect via Bluetooth Smart. Please ensure your device is Bluetooth Smart ready and runs one of the following operating systems:
Requirements Windows 8 or later Mac OS X 10.10 or later iOS 5 or later Android 5.0 or later Chrome OS
How to connect
1 Make sure your K780 Multi-Device is turned on and Bluetooth is enabled on your computer, tablet or phone.
2 Press and hold one of the easy-switch keys for 3 seconds (The LED on the selected channel will blink rapidly).
3 Open Bluetooth settings on your device and pair with Keyboard K780.
4 Type the on-screen password and press enter or return.
Keys
Windows 10 Task View Contextual menu*
Back in browser
Cortana search Prev track Play/pause Next Track Mute Volume
down Volume up
Windows 7, Windows 8 or later
Browser home page
Contextual menu*
Back in browser Search Prev track Play/pause Next Track Mute Volume
down Volume up
Android Home Menu Back Search Prev track Play/pause Next Track Mute Volume down Volume up
iOS Home Show/
hide virtual keyboard
Home Search Prev track Play/pause Next Track Mute Volume down Volume up
MacOS Mission Control Dashboard* Back in
browser Search Prev track Play/pause Next Track Mute Volume down Volume up
Hot keys and media keys The table below shows hot keys and media keys available for Windows, Mac OS X, Android, and iOS.
Shortcuts To perform a shortcut, hold down the fn (function) key while pressing the key associated with an action. The table below shows function key combinations for the different operating systems.
Keys
Windows 10 Insert Print screen Lock screen Home (when editing text)
End (when editing text) Page up Page down
Windows 7, Windows 8 or later
Insert Print screen Lock screen Home (when editing text)
End (when editing text) Page up Page down
Android — Print screen Lock screen Home (when editing text)
End (when editing text) Page up Page down
iOS Language switch Screen Capture Lock screen Home (when editing text)
End (when editing text) Brightness down Brightness up
MacOS Language switch Print screen Lock screen Home (when editing text)
End (when editing text) Brightness down Brightness up
ENHANCED FUNCTIONS The K780 Multi-Device has a number of enhanced functions to get even more out of your new keyboard. The following enhanced functions and shortcuts are available.
*Requires installation of Logitech Options software
*Requires installation of Logitech Options software
2016 Logitech. Logitech, Logi, and other Logitech marks are owned by Logitech and may be registered.
The Bluetooth word mark and logos are registered trademarks owned by Bluetooth SIG, Inc. and any use of such marks by Logitech is under license.
All other trademarks are the property of their respective owners.
To select an OS
Hold down key combination for 3 seconds
Mac OS X +
Windows +
IOS +
White on gray circle Symbol reserved for use with Alt Gr on computers running Windows
Gray Reserved for use with Apple computers (Mac OS X) or iPhones and iPads (iOS)
Example (Windows)
Example (Mac OS X or iOS)
Above: Windows and Android
Below: Mac OS X and iOS Split line
Split key labels
Reserved key labels
+ =
+ =
Key Label Color Grey labels indicate functions valable on Apple devices running mack OSX or iOS.
White labels on grey cirlces identify symbols reserved for us with Alt GR on Windows computers.*
Split keys Modifier keys on either side of the space bar display two sets of labels separated by split lines. The Label above the split line shows the modifier sent to a Windows or Android device.
The Label Below the split line shows the modifier sent to an Apple computer, iPhone, or iPad. The Keyboard automatically uses modifiers associated with the currently selected device.
How to configure your keyboard To configure the layout according to your operating system you have to press one of the following shortcuts for 3 seconds. (The LED on selected channel will light up to confirm when the layout has been configured).
iOS fn + i
Mac OS X fn + o
Windows fn + p
If
-
Contents
-
Table of Contents
-
Bookmarks
K780 MULTI-DEVICE KEYBOARD
One keyboard. Fully equipped. For computer, phone, and tablet.
EXPLORE THE K780
GET STARTED
ENHANCED FUNCTIONS
DUAL LAYOUTS
MULTI-DEVICE
KEYBOARD
EXPLORE THE K780 MULTI-DEVICE KEYBOARD
The K780 Multi-Device Keyboard is a fully equipped computer keyboard that also works
perfectly with smartphones and tablets. Enjoy quiet, comfortable typing, switching easily
between all the devices you enter text on. Works with Windows, Mac, Chrome OS,
Android and iOS.
To enhance your experience on Mac OS and Windows, download Logitech Options.
In addition to optimizing the keyboard for your preferred operating system, the software
lets you customize the K780 according to your individual needs.
Logitech Options