
Эргономичный дизайн модели xSmall соответствует современным веяниям моды. На прошедших презентациях модель произвела фурор и оставила о себе только положительный отзыв. Только родившись, машинка сразу же стала обладательницей премии IFA 2008. И сегодня, несколько лет спустя с начала серийного производства, Saeco Xsmall остается самой компактной автоматической кофемашиной.
Saeco Xsmall располагает особенно тихой кофемолкой с жерновами из керамики. Кофе размалывается непосредственно перед приготовлением. Специальная конструкция кофемолки оборудована системой автоматической подстройки помола в зависимости от твердости зерна. Система экономии энергии отключит кофемашину через час, если Вы забыли её отключить уходя из дома. Ёмкости для отходов и воды извлекаются с фронтальной стороны. При нажатии на кнопку приготовления 2 раза, кофеварка сварит 2 порции кофе кофсразу.
Вы можете просмотреть инструкцию на нашем сайте, а также скачать её к себе на компьютер:
Нажмите ссылку, чтобы открыть документ pdf в новом окне
Версия инструкции с автоматической очисткой от накипи (одновременное нажатие двух кнопок кофе):
Нажмите ссылку, чтобы открыть документ pdf в новом окне
Предлагаемые продукты
Вы покидаете официальный веб-сайт Philips Здравоохранение (“Philips”). Любые ссылки на сторонние веб-сайты, которые могут быть размещены на этом сайте, предоставлены исключительно для вашего удобства. Philips не даёт никаких гарантий относительно каких-либо сторонних веб-сайтов и содержащейся на них информации.
Я понимаю
You are about to visit a Philips global content page
Continue
ИНСТРУКЦИЯ ПО ЭКСПЛУАТАЦИИ
ПЕРЕД ИСПОЛЬЗОВАНИЕМ МАШИНЫ ВНИМАТЕЛЬНО ПРОЧИТАЙТЕ ДАННОЕ РУКОВОДСТВО ПО ЭКСПЛУАТАЦИИ.
Зарегистрируйте вашу покупку и обращайтесь за поддержкой на сайт
www.philips.com/welcome
Русский
Type HD8743 / HD8745 / HD8747
RU
14
14
2
РУССКИЙ
Поздравляем Вас с покупкой суперавтоматической
кофемашины Saeco Xsmall!
Чтобы максимально воспользоваться поддержкой
Philips Saeco, зарегистрируйте вашу покупку на
www.philips.com/welcome.
Данное руководство по эксплуатации действительно
для моделей HD8743, HD8745 и HD8747.
Машина предназначена для приготовления кофе
эспрессо с использованием кофе в зернах; кроме того,
она оснащена устройством для подачи пара и горячей
воды. В этом руководстве вы найдете всю необходи-
мую информацию по установке, использованию, чист-
ке и очистке от накипи вашей машины.
РУССКИЙ
3
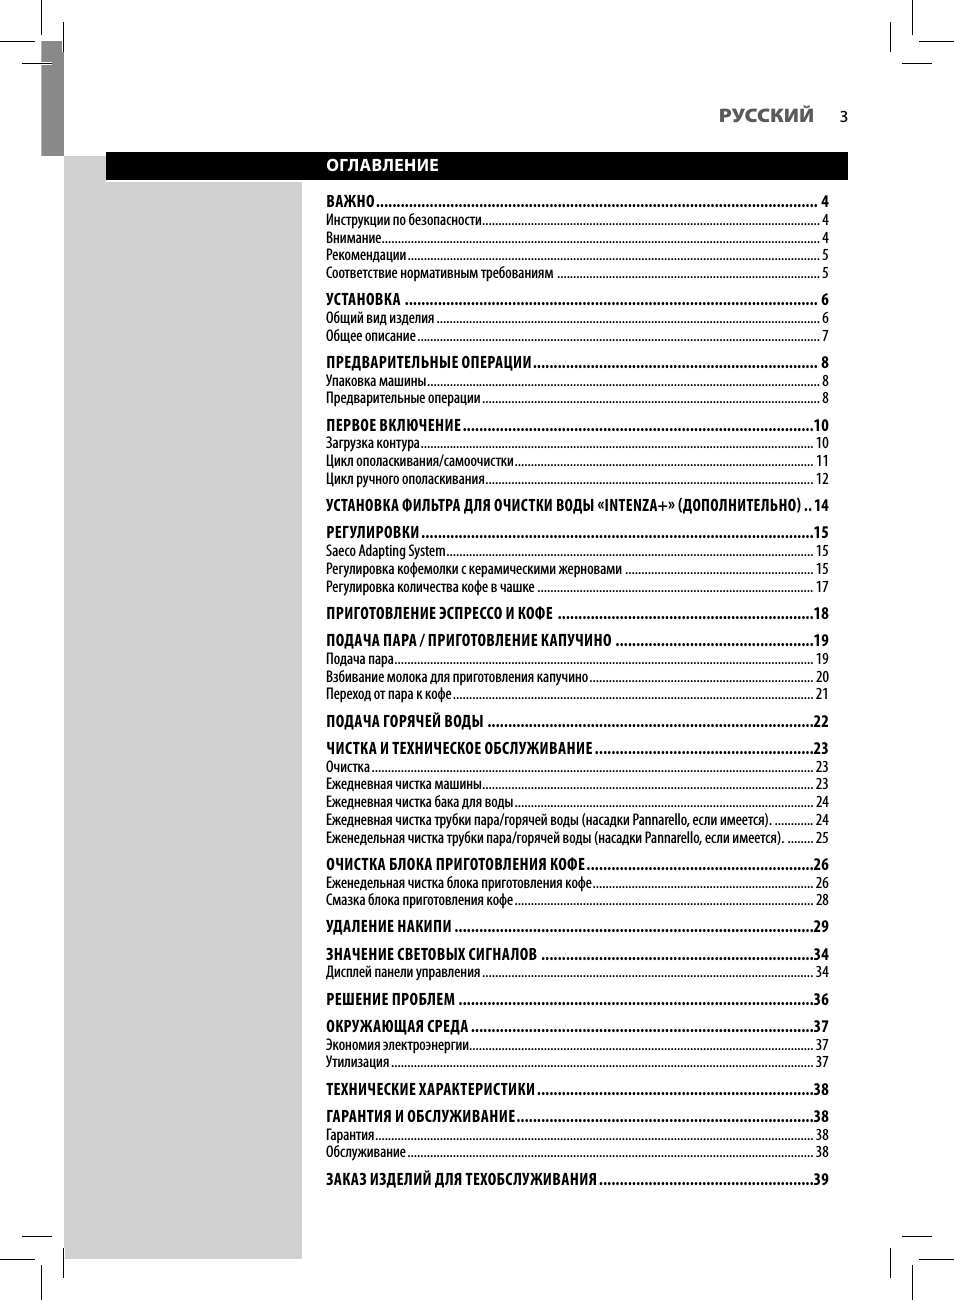
ОГЛАВЛЕНИЕ
ВАЖНО …………………………………………………………………………………………….. 4
Инструкции по безопасности ………………………………………………………………………………………….. 4
Внимание……………………………………………………………………………………………………………………… 4
Рекомендации ………………………………………………………………………………………………………………. 5
Соответствие нормативным требованиям ……………………………………………………………………… 5
УСТАНОВКА ………………………………………………………………………………………. 6
Общий вид изделия ………………………………………………………………………………………………………. 6
Общее описание ……………………………………………………………………………………………………………. 7
ПРЕДВАРИТЕЛЬНЫЕ ОПЕРАЦИИ …………………………………………………………… 8
Упаковка машины …………………………………………………………………………………………………………. 8
Предварительные операции ………………………………………………………………………………………….. 8
ПЕРВОЕ ВКЛЮЧЕНИЕ ………………………………………………………………………….10
Загрузка контура …………………………………………………………………………………………………………. 10
Цикл ополаскивания/самоочистки ……………………………………………………………………………….. 11
Цикл ручного ополаскивания ……………………………………………………………………………………….. 12
УСТАНОВКА ФИЛЬТРА ДЛЯ ОЧИСТКИ ВОДЫ «INTENZA+» (ДОПОЛНИТЕЛЬНО) .. 14
РЕГУЛИРОВКИ …………………………………………………………………………………..15
Saeco Adapting System ………………………………………………………………………………………………….. 15
Регулировка кофемолки с керамическими жерновами …………………………………………………. 15
Регулировка количества кофе в чашке …………………………………………………………………………. 17
ПРИГОТОВЛЕНИЕ ЭСПРЕССО И КОФЕ ……………………………………………………..18
ПОДАЧА ПАРА / ПРИГОТОВЛЕНИЕ КАПУЧИНО …………………………………………19
Подача пара ………………………………………………………………………………………………………………… 19
Взбивание молока для приготовления капучино …………………………………………………………… 20
Переход от пара к кофе ………………………………………………………………………………………………… 21
ПОДАЧА ГОРЯЧЕЙ ВОДЫ …………………………………………………………………….22
ЧИСТКА И ТЕХНИЧЕСКОЕ ОБСЛУЖИВАНИЕ ……………………………………………..23
Очистка ………………………………………………………………………………………………………………………. 23
Ежедневная чистка машины ………………………………………………………………………………………… 23
Ежедневная чистка бака для воды ……………………………………………………………………………….. 24
Ежедневная чистка трубки пара/горячей воды (насадки Pannarello, если имеется). ………… 24
Еженедельная чистка трубки пара/горячей воды (насадки Pannarello, если имеется). …….. 25
ОЧИСТКА БЛОКА ПРИГОТОВЛЕНИЯ КОФЕ ……………………………………………….26
Еженедельная чистка блока приготовления кофе ………………………………………………………….. 26
Смазка блока приготовления кофе ……………………………………………………………………………….. 28
УДАЛЕНИЕ НАКИПИ ……………………………………………………………………………29
ЗНАЧЕНИЕ СВЕТОВЫХ СИГНАЛОВ …………………………………………………………34
Дисплей панели управления ………………………………………………………………………………………… 34
РЕШЕНИЕ ПРОБЛЕМ …………………………………………………………………………..36
ОКРУЖАЮЩАЯ СРЕДА ………………………………………………………………………..37
Экономия электроэнергии……………………………………………………………………………………………. 37
Утилизация …………………………………………………………………………………………………………………. 37
ТЕХНИЧЕСКИЕ ХАРАКТЕРИСТИКИ ………………………………………………………….38
ГАРАНТИЯ И ОБСЛУЖИВАНИЕ ………………………………………………………………38
Гарантия ……………………………………………………………………………………………………………………… 38
Обслуживание …………………………………………………………………………………………………………….. 38
ЗАКАЗ ИЗДЕЛИЙ ДЛЯ ТЕХОБСЛУЖИВАНИЯ …………………………………………….39
4
РУССКИЙ
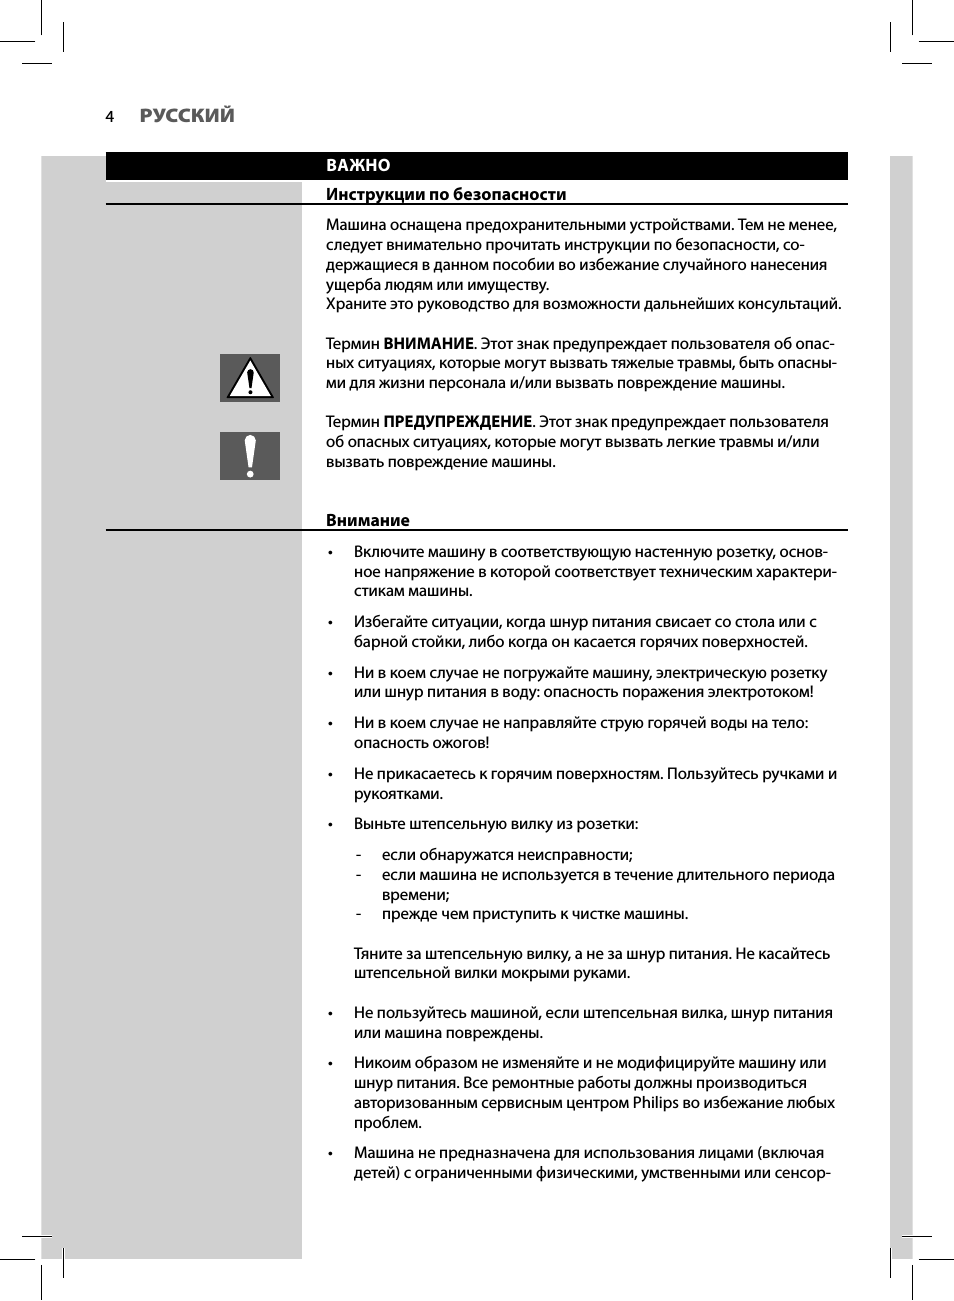
ВАЖНО
Инструкции по безопасности
Машина оснащена предохранительными устройствами. Тем не менее,
следует внимательно прочитать инструкции по безопасности, со-
держащиеся в данном пособии во избежание случайного нанесения
ущерба людям или имуществу.
Храните это руководство для возможности дальнейших консультаций.
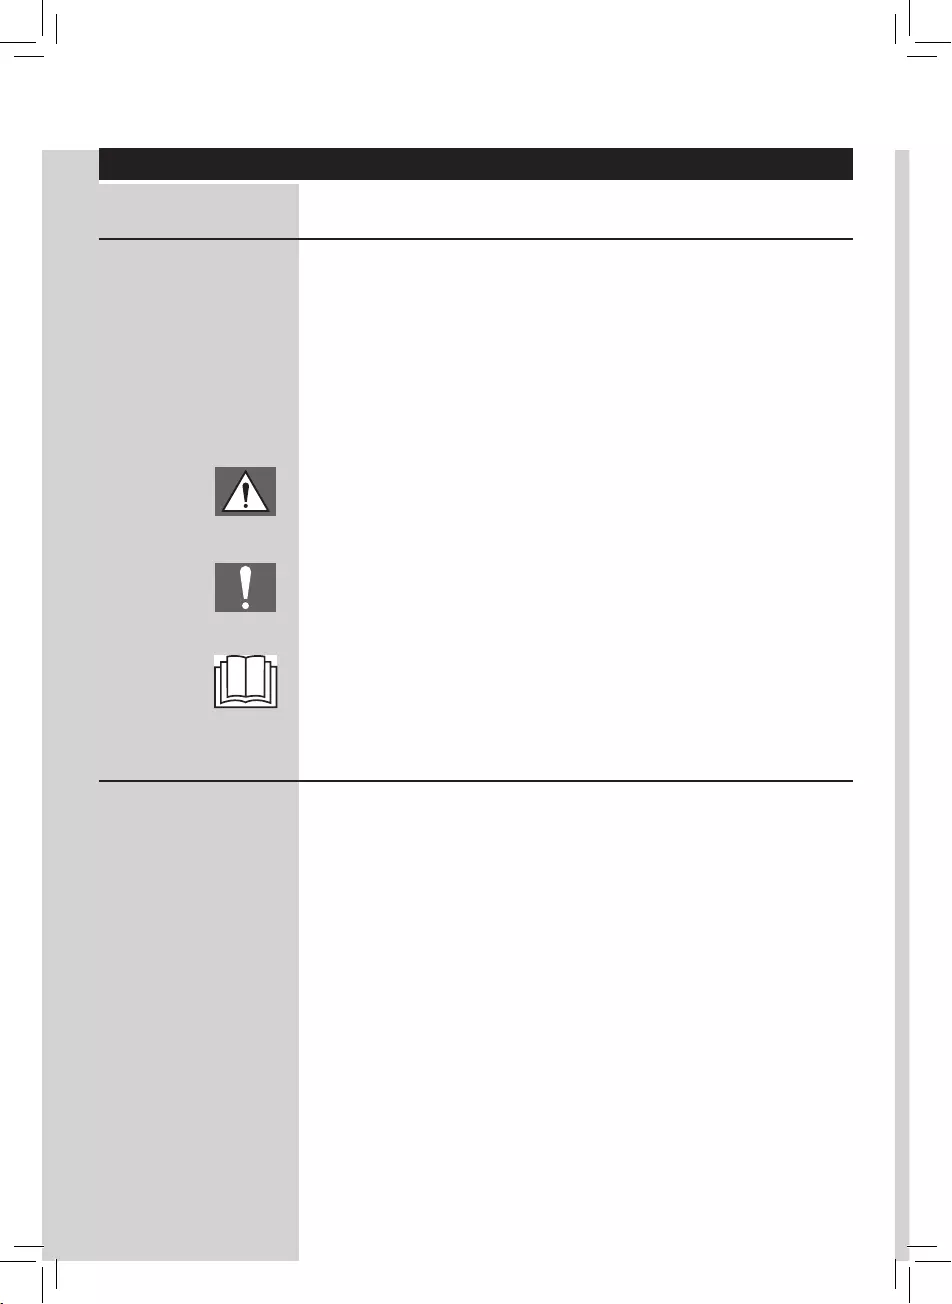
Термин ВНИМАНИЕ. Этот знак предупреждает пользователя об опас-
ных ситуациях, которые могут вызвать тяжелые травмы, быть опасны-
ми для жизни персонала и/или вызвать повреждение машины.
Термин ПРЕДУПРЕЖДЕНИЕ. Этот знак предупреждает пользователя
об опасных ситуациях, которые могут вызвать легкие травмы и/или
вызвать повреждение машины.
Внимание
•
Включите машину в соответствующую настенную розетку, основ-
ное напряжение в которой соответствует техническим характери-
стикам машины.
•
Избегайте ситуации, когда шнур питания свисает со стола или с
барной стойки, либо когда он касается горячих поверхностей.
•
Ни в коем случае не погружайте машину, электрическую розетку
или шнур питания в воду: опасность поражения электротоком!
•
Ни в коем случае не направляйте струю горячей воды на тело:
опасность ожогов!
•
Не прикасаетесь к горячим поверхностям. Пользуйтесь ручками и
рукоятками.
•
Выньте штепсельную вилку из розетки:
—
если обнаружатся неисправности;
—
если машина не используется в течение длительного периода
времени;
—
прежде чем приступить к чистке машины.
Тяните за штепсельную вилку, а не за шнур питания. Не касайтесь
штепсельной вилки мокрыми руками.
•
Не пользуйтесь машиной, если штепсельная вилка, шнур питания
или машина повреждены.
•
Никоим образом не изменяйте и не модифицируйте машину или
шнур питания. Все ремонтные работы должны производиться
авторизованным сервисным центром Philips во избежание любых
проблем.
•
Машина не предназначена для использования лицами (включая
детей) с ограниченными физическими, умственными или сенсор-
РУССКИЙ
5
ными возможностями или лицами, не имеющими достаточного
опыта и/или квалификации, если они не обучены пользоваться
машиной лицом, ответственным за их безопасность, либо не на-
ходятся под его присмотром.
•
Не оставляйте детей без присмотра и не позволяйте им играть с
машиной.
•
Ни в коем случае не вставляйте пальцы или любые другие пред-
меты в керамическую кофемолку.
Рекомендации
•
Машина предусмотрена исключительно для домашнего использо-
вания и не предназначена для работы в столовых или на кухнях в
магазинах, офисах, хозяйствах или в других рабочих помещениях.
•
Располагайте всегда машину на ровной и устойчивой поверхности.
•
Не ставьте машину на горячие поверхности, вблизи от горячих пе-
чей, нагревательных приборов и др. подобных источников тепла.
•
Наполняйте емкость всегда и только кофе в зернах. Порошкообраз-
ный, растворимый кофе, а также различные предметы, помещен-
ные внутрь емкости для кофе в зернах, могут повредить машину.
•
Дайте остынуть машине прежде, чем вставлять или снимать какую-
либо деталь и прежде, чем приступать к чистке машины.
•
Ни в коем случае не заливайте в бак для воды горячую или кипя-
щую воду. Используйте только холодную воду.
•
Для чистки не следует использовать абразивные порошки или
агрессивные моющие средства. Достаточно мягкой увлажненной
водой тряпки.
•
Регулярно осуществляйте удаление накипи в машине. Машина сама
вам укажет, когда нужно будет выполнить удаление накипи. Если эта
операция не будет выполнена, ваша машина перестанет правильно
работать. В этом случае ремонт не является гарантийным!
•
Не держите машину при температуре ниже 0°C или 32°F. Остатки
воды в нагревательной системе могут замерзнуть и повредить
машину.
•
Не оставляйте воду в баке, если машина не будет использоваться
в течение долгого времени. Вода может загрязниться. Всегда при
работе машины используйте свежую воду.
Соответствие нормативным требованиям
В соответствии со ст. 13 Законодательного декрета от 25 июля 2005 года
№ 151 о «Выполнении Директив 2005/95/ЕС, 2002/96/ЕС и 2003/108/
ЕС, регламентирующих уменьшение использования опасных веществ в
электрических и электронных приборах, а также переработку отходов».
Это изделие соответствует европейской директиве 2002/96/ЕС.
6
УСТАНОВКА
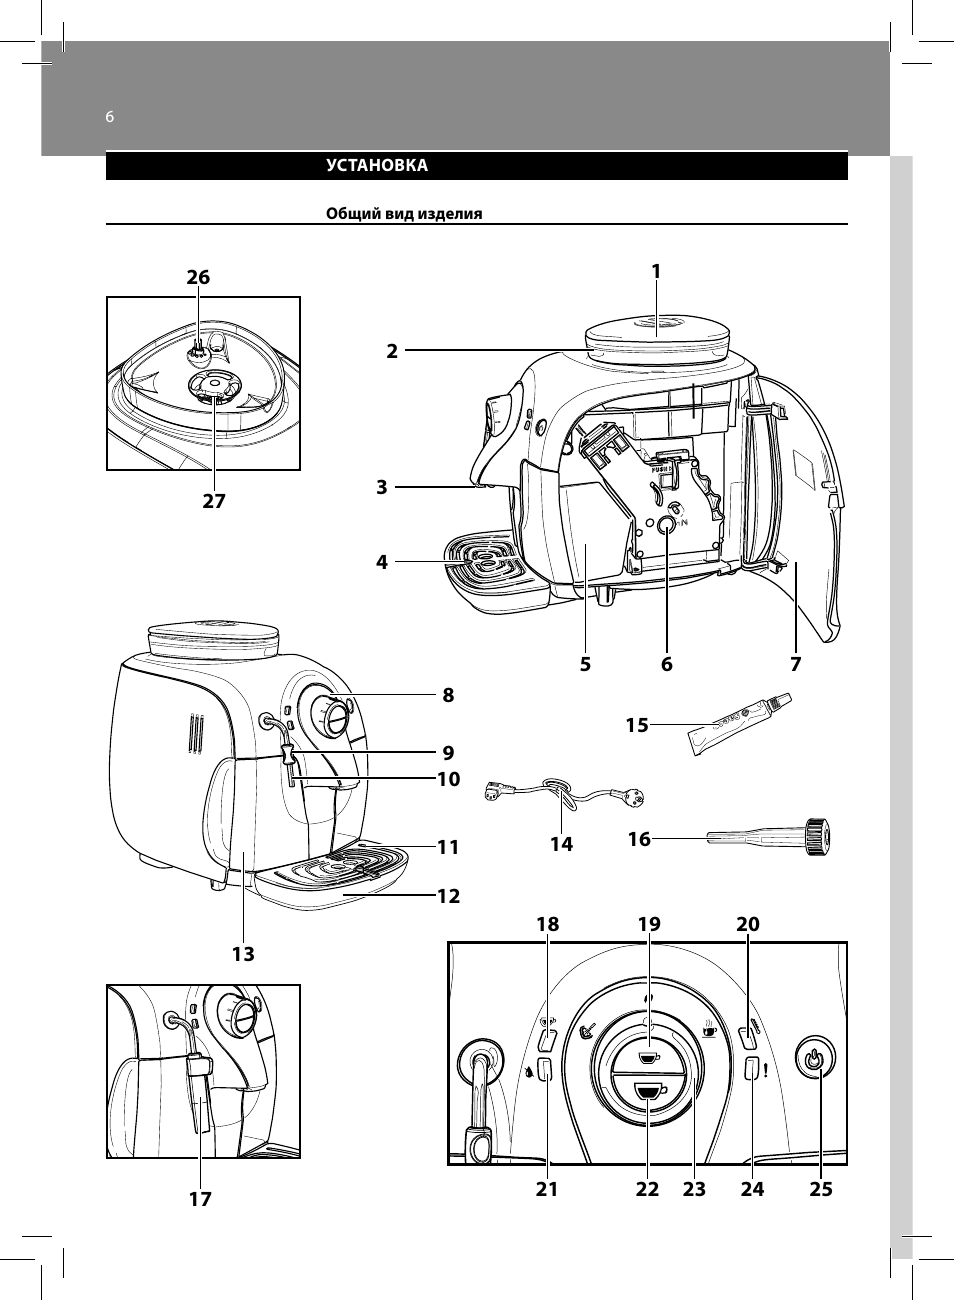
Общий вид изделия
1
26
21
18
19
20
22
23
24
25
13
17
14
5
27
6
7
2
3
4
16
15
8
9
10
11
12
РУССКИЙ
7
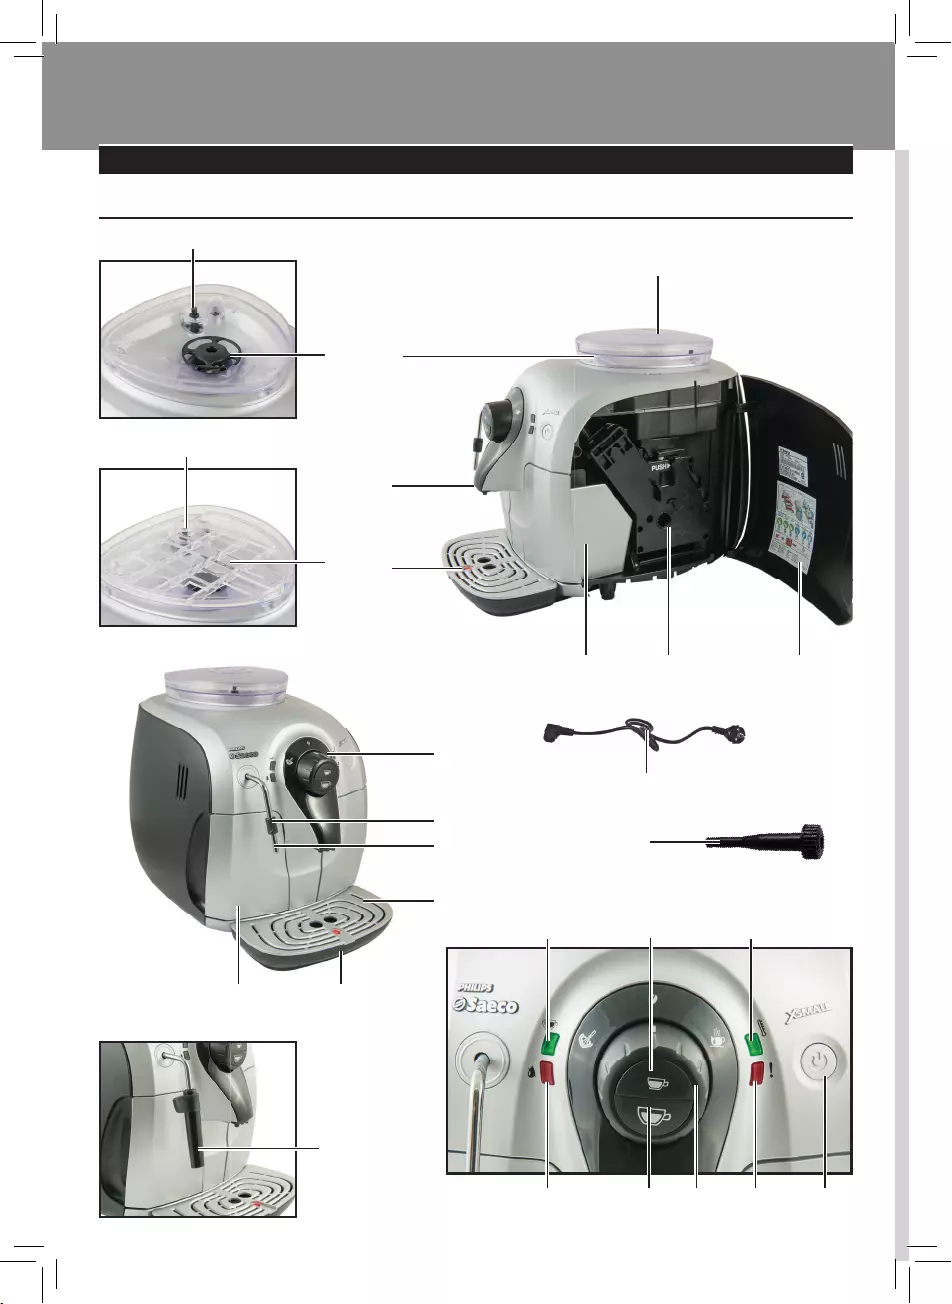
Общее описание
1. Крышка емкости для кофе в зернах
2. Емкость для кофе в зернах
3. Устройство подачи кофе
4. Индикатор заполненного поддона для сбора капель
5. Контейнер для сбора отходов
6. Блок приготовления кофе
7. Дверца для обслуживания
8. Панель
управления
9. Защитная
рукоятка
10. Трубка пара / горячей воды
11. Решетка
12. Поддон для сбора капель
13. Бак для воды
14. Шнур питания
15. Смазка для блока приготовления кофе
16. Ключ для регулирования помола
17. Насадка Pannarello
(имеется только на некоторых моделях — HD8745 — HD8747)
18. Светодиод двойного кофе и программирования количества кофе в чашке
19. Кнопка эспрессо
20. Светодиод температуры
21. Светодиод уровня воды в баке
22. Кнопка кофе
23. Ручка управления
24. Светодиод «Аварийный сигнал»
25. Кнопка ON/OFF
26. Ручка регулирования помола
27. Кофемолка с керамическими жерновами
8
РУССКИЙ
ПРЕДВАРИТЕЛЬНЫЕ ОПЕРАЦИИ
Упаковка машины
Оригинальная упаковка была спроектирована и изготовлена для за-
щиты машины во время ее отгрузки. Рекомендуется сохранять ее для
возможной транспортировки в будущем.
Предварительные операции
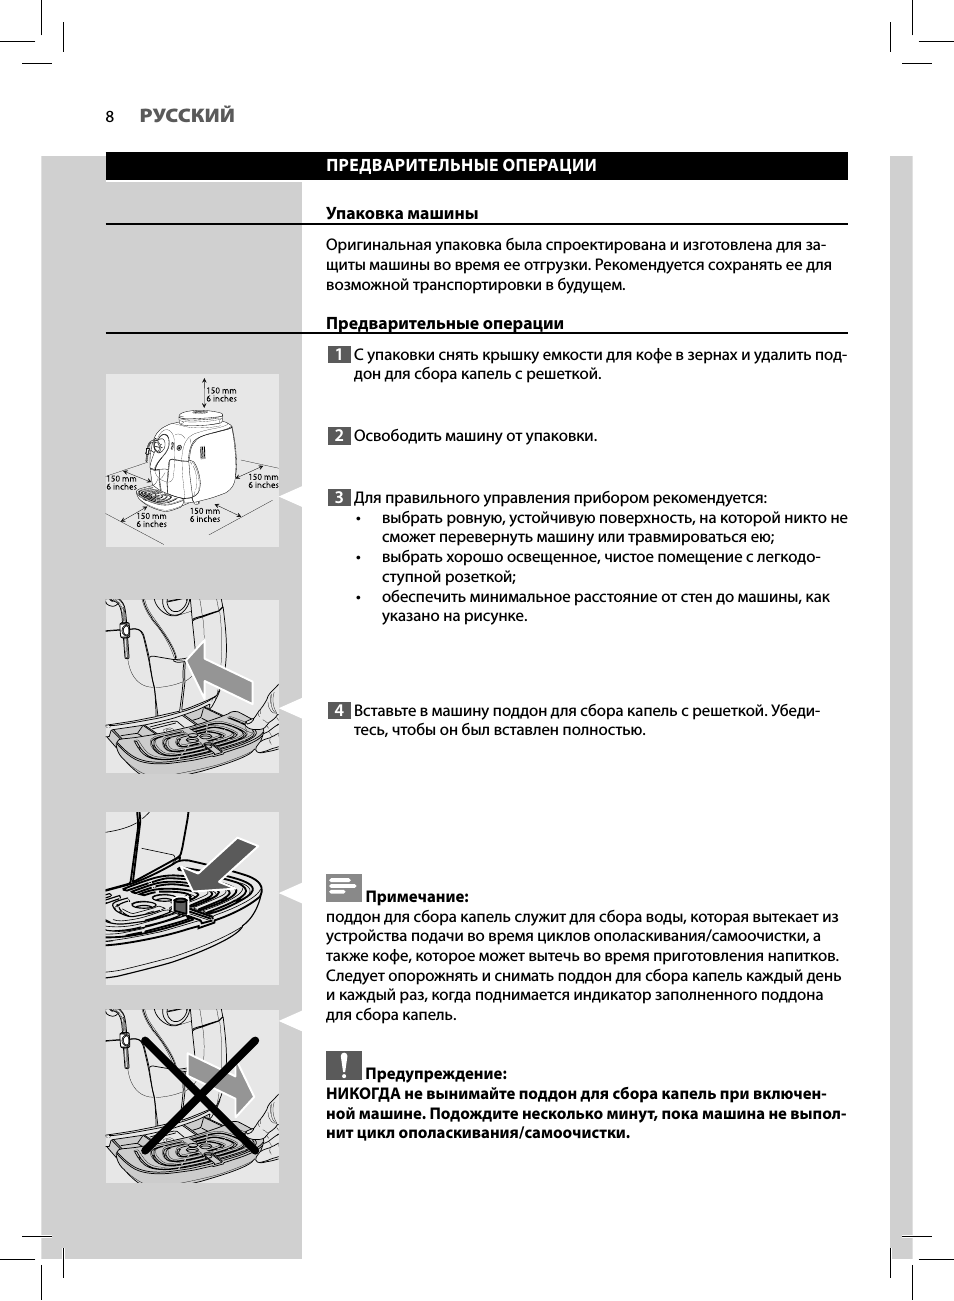
1
С упаковки снять крышку емкости для кофе в зернах и удалить под-
дон для сбора капель с решеткой.
2
Освободить машину от упаковки.
3
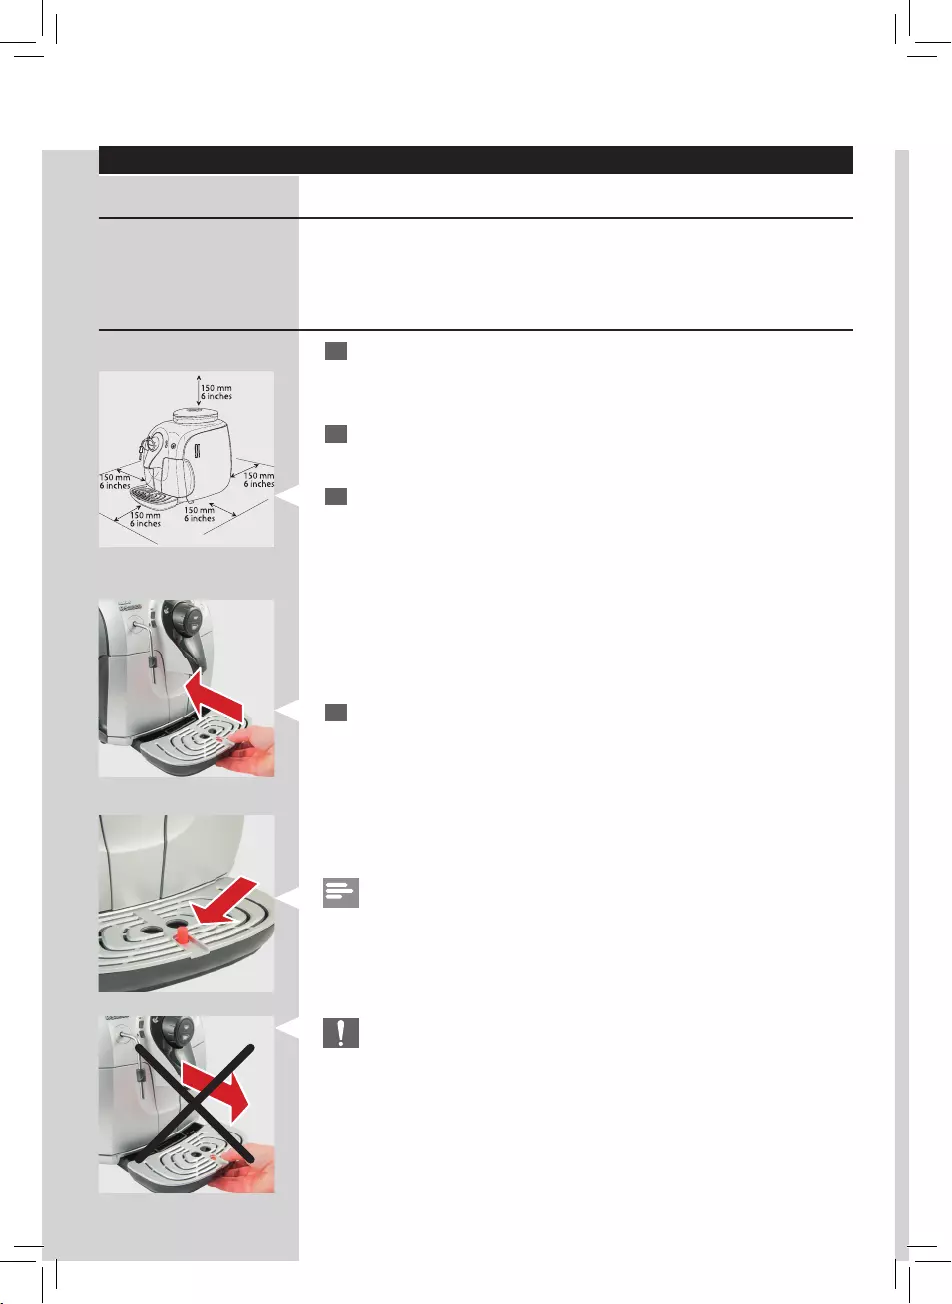
Для правильного управления прибором рекомендуется:
•
выбрать ровную, устойчивую поверхность, на которой никто не
сможет перевернуть машину или травмироваться ею;
•
выбрать хорошо освещенное, чистое помещение с легкодо-
ступной розеткой;
•
обеспечить минимальное расстояние от стен до машины, как
указано на рисунке.
4
Вставьте в машину поддон для сбора капель с решеткой. Убеди-
тесь, чтобы он был вставлен полностью.
Примечание:
поддон для сбора капель служит для сбора воды, которая вытекает из
устройства подачи во время циклов ополаскивания/самоочистки, а
также кофе, которое может вытечь во время приготовления напитков.
Следует опорожнять и снимать поддон для сбора капель каждый день
и каждый раз, когда поднимается индикатор заполненного поддона
для сбора капель.
Предупреждение:
НИКОГДА не вынимайте поддон для сбора капель при включен-
ной машине. Подождите несколько минут, пока машина не выпол-
нит цикл ополаскивания/самоочистки.
РУССКИЙ
9
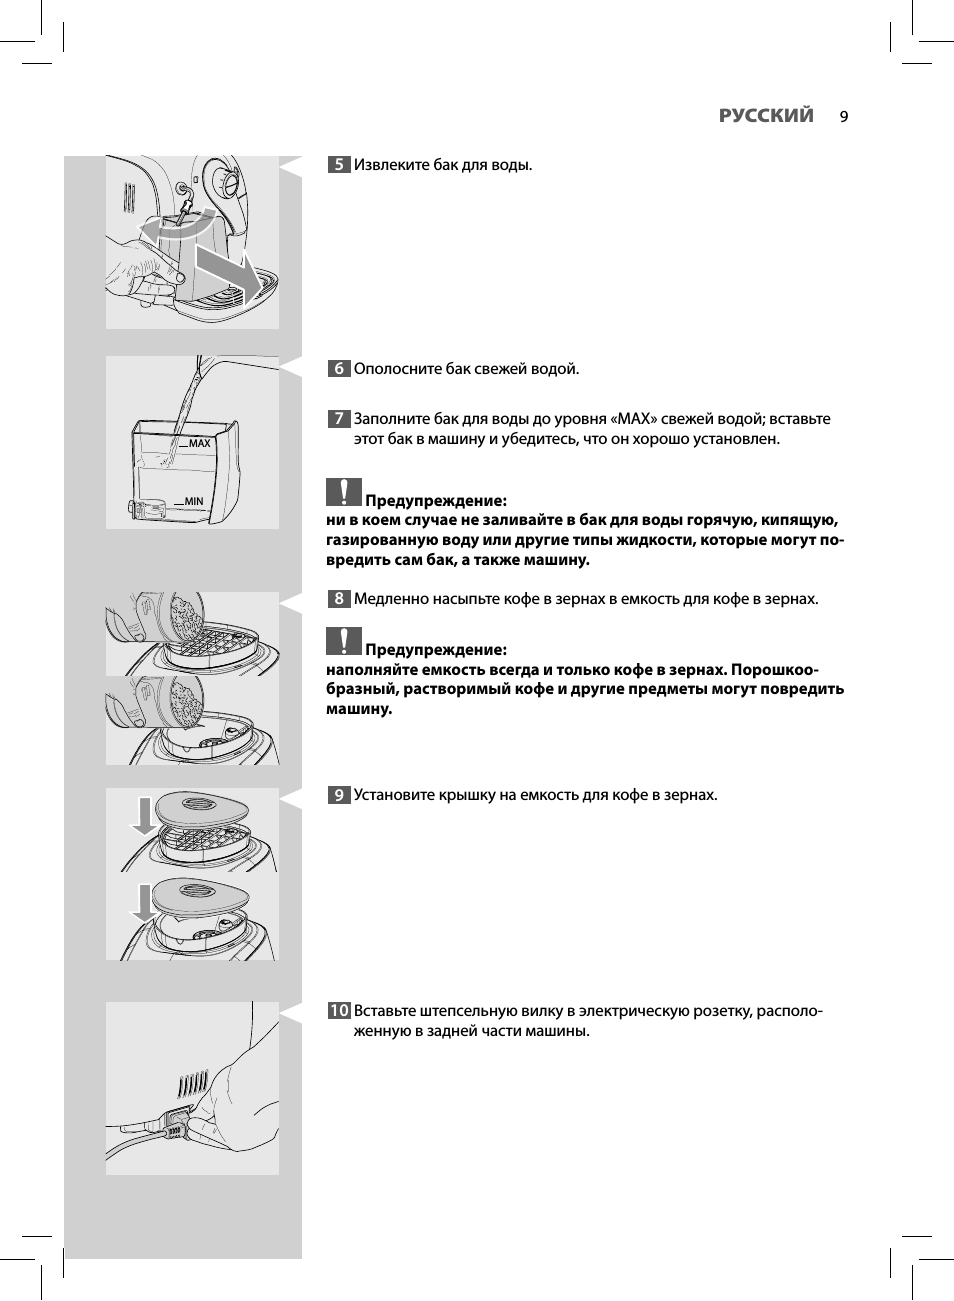
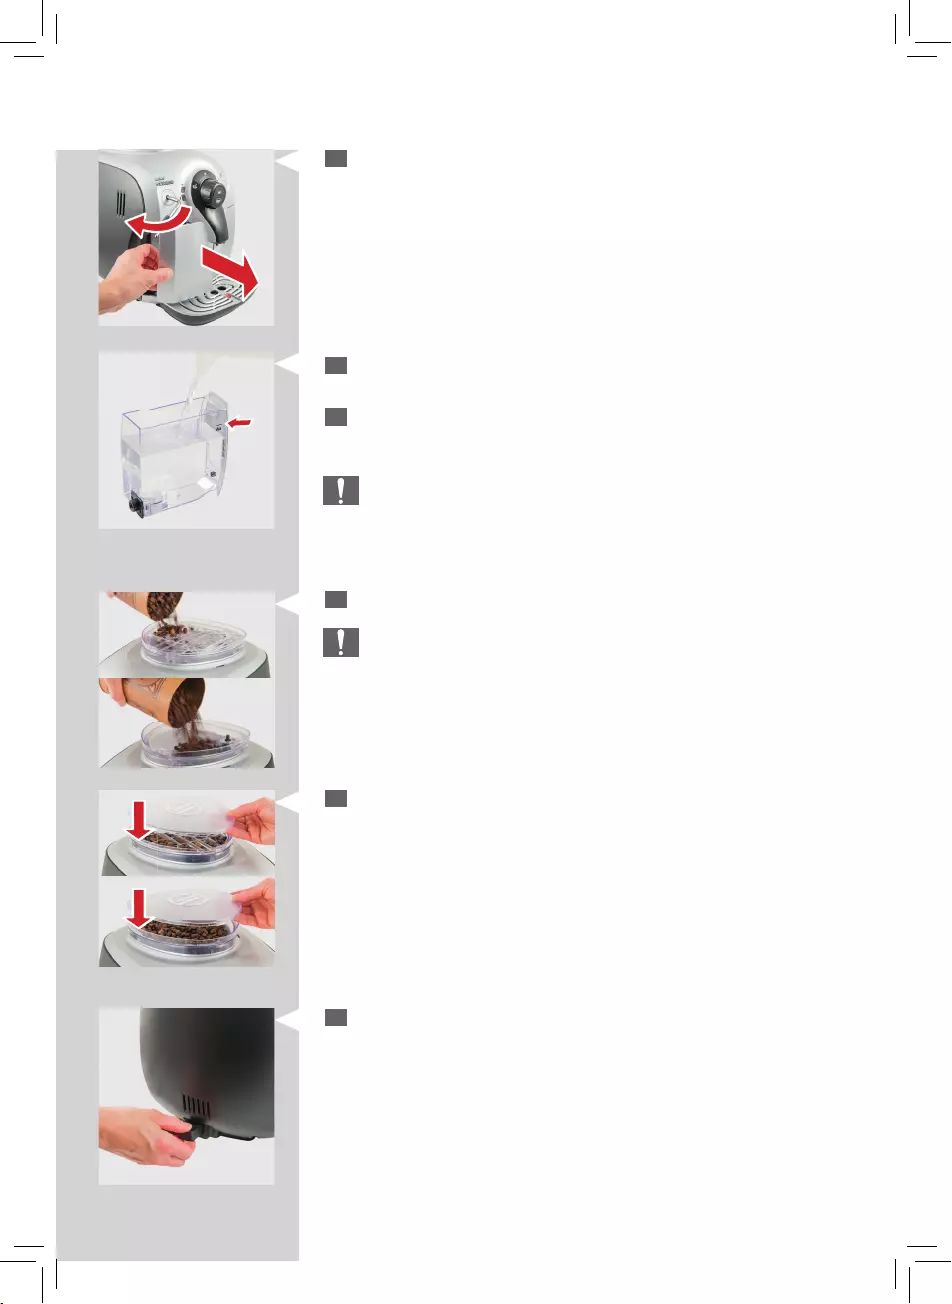
5
Извлеките бак для воды.
6
Ополосните бак свежей водой.
7
Заполните бак для воды до уровня «MAX» свежей водой; вставьте
этот бак в машину и убедитесь, что он хорошо установлен.
Предупреждение:
ни в коем случае не заливайте в бак для воды горячую, кипящую,
газированную воду или другие типы жидкости, которые могут по-
вредить сам бак, а также машину.
8
Медленно насыпьте кофе в зернах в емкость для кофе в зернах.
Предупреждение:
наполняйте емкость всегда и только кофе в зернах. Порошкоо-
бразный, растворимый кофе и другие предметы могут повредить
машину.
9
Установите крышку на емкость для кофе в зернах.
10
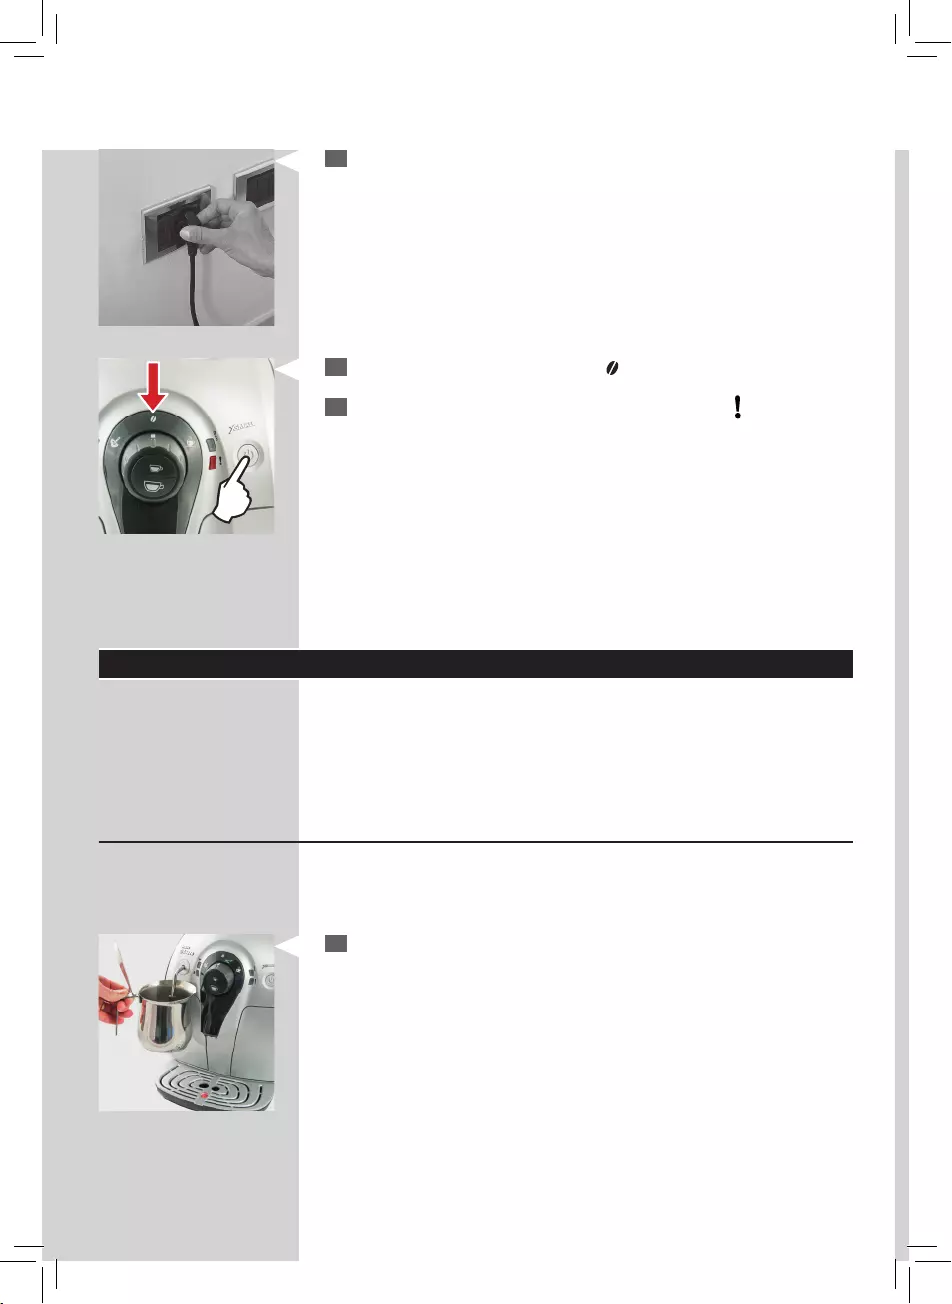
Вставьте штепсельную вилку в электрическую розетку, располо-
женную в задней части машины.
MAX
MIN
10
РУССКИЙ
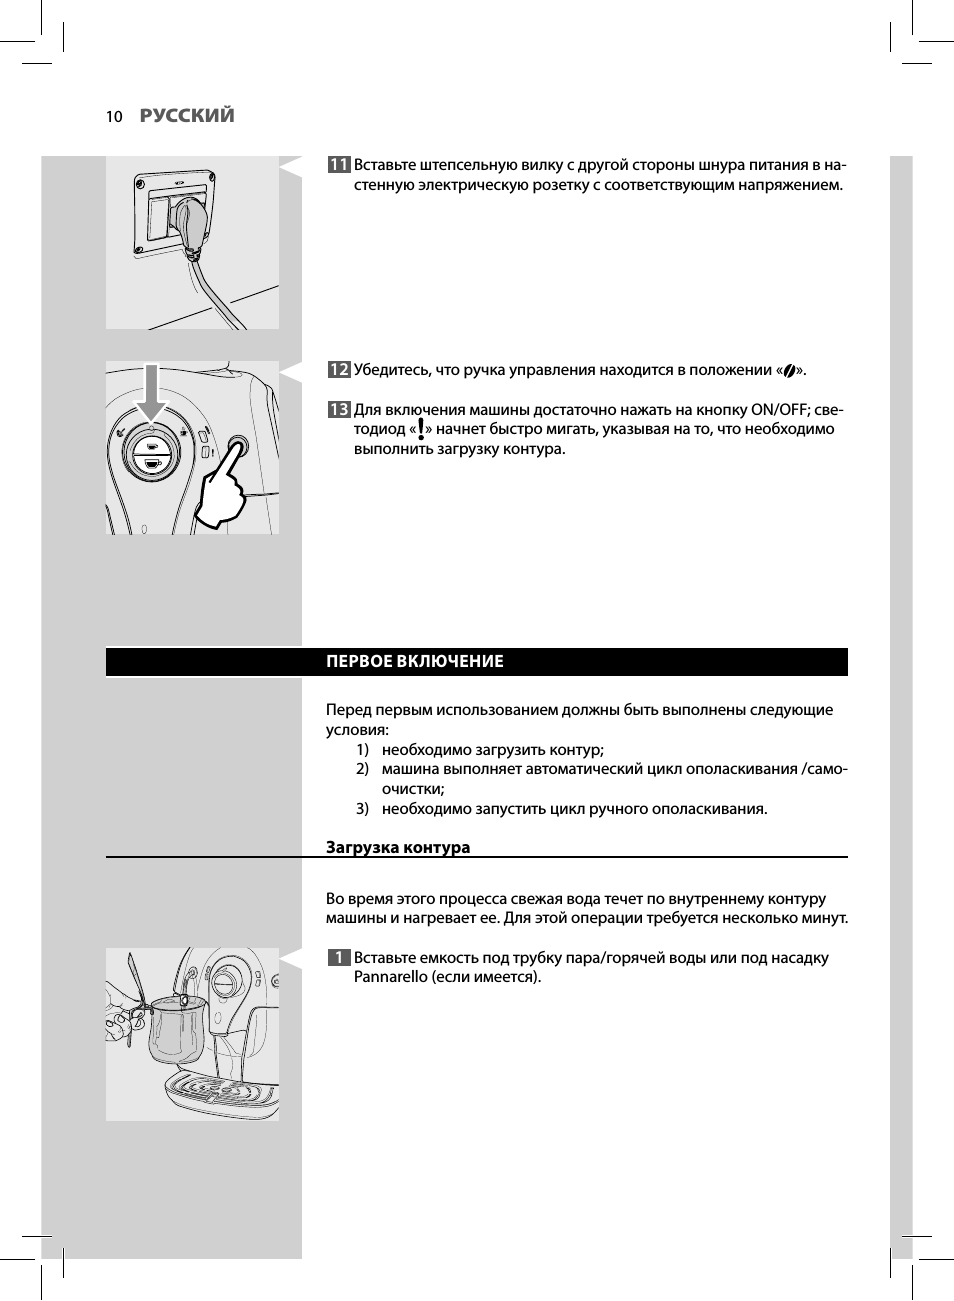
11
Вставьте штепсельную вилку с другой стороны шнура питания в на-
стенную электрическую розетку с соответствующим напряжением.
12
Убедитесь, что ручка управления находится в положении « ».
13
Для включения машины достаточно нажать на кнопку ON/OFF; све-
тодиод « » начнет быстро мигать, указывая на то, что необходимо
выполнить загрузку контура.
ПЕРВОЕ ВКЛЮЧЕНИЕ
Перед первым использованием должны быть выполнены следующие
условия:
1) необходимо загрузить контур;
2) машина выполняет автоматический цикл ополаскивания /само-
очистки;
3) необходимо запустить цикл ручного ополаскивания.
Загрузка контура
Во время этого процесса свежая вода течет по внутреннему контуру
машины и нагревает ее. Для этой операции требуется несколько минут.
1
Вставьте емкость под трубку пара/горячей воды или под насадку
Pannarello (если имеется).
10:12
Как почистить и смазать варочный блок Saeco Philips Gaggia
22:54
Ремонт кофеварки Saeco Xsmall HD8743 | PTService
07:12
Philips Saeco Xsmall entkalken HD8743 HD8745 HD8747
07:22
Ремонт кофемашины Philips Saeco X-Small black HD 8743(часть1)
07:32
Очистка от накипи Philips Saeco Xsmall
16:26
Saeco Xsmall слабое давление воды. Как устранить
04:27
Кофемашина Saeco Xsmall. Опыт использования. Часть I
Нажмите на кнопку для помощи
Зарегистрируйте вашу покупку и обращайтесь за поддержкой на сайт 14 Русский www.philips.com/welcome Type HD8743 / HD8745 / HD8747 14 RU ИНСТРУКЦИЯ ПО ЭКСПЛУАТАЦИИ ПЕРЕД ИСПОЛЬЗОВАНИЕМ МАШИНЫ ВНИМАТЕЛЬНО ПРОЧИТАЙТЕ ДАННОЕ РУКОВОДСТВО ПО ЭКСПЛУАТАЦИИ.
2 РУССКИЙ Поздравляем Вас с покупкой суперавтоматической кофемашины Saeco Xsmall! Чтобы максимально воспользоваться поддержкой Philips Saeco, зарегистрируйте вашу покупку на www.philips.com/welcome. Данное руководство по эксплуатации действительно для моделей HD8743, HD8745 и HD8747. Машина
РУССКИЙ ОГЛАВЛЕНИЕ ВАЖНО …………………………………………………………………………………………….. 4 Инструкции по безопасности………………………………………………………………………………………….. 4
4 РУССКИЙ ВАЖНО Инструкции по безопасности Машина оснащена предохранительными устройствами. Тем не менее, следует внимательно прочитать инструкции по безопасности, содержащиеся в данном пособии во избежание случайного нанесения ущерба людям или имуществу. Храните это руководство для возможности
РУССКИЙ 5 ными возможностями или лицами, не имеющими достаточного опыта и/или квалификации, если они не обучены пользоваться машиной лицом, ответственным за их безопасность, либо не находятся под его присмотром. • Не оставляйте детей без присмотра и не позволяйте им играть с машиной. • Ни в коем
6 УСТАНОВКА Общий вид изделия 1 26 2 3 27 4 5 6 7 8 15 9 10 11 14 16 12 18 19 21 22 20 13 17 23 24 25
РУССКИЙ 7 Общее описание 1. Крышка емкости для кофе в зернах 2. Емкость для кофе в зернах 3. Устройство подачи кофе 4. Индикатор заполненного поддона для сбора капель 5. Контейнер для сбора отходов 6. Блок приготовления кофе 7. Дверца для обслуживания 8. Панель управления 9. Защитная рукоятка 10.
8 РУССКИЙ ПРЕДВАРИТЕЛЬНЫЕ ОПЕРАЦИИ Упаковка машины Оригинальная упаковка была спроектирована и изготовлена для защиты машины во время ее отгрузки. Рекомендуется сохранять ее для возможной транспортировки в будущем. Предварительные операции 1 С упаковки снять крышку емкости для кофе в зернах и
РУССКИЙ 9 5 Извлеките бак для воды. 6 Ополосните бак свежей водой. 7 Заполните бак для воды до уровня «MAX» свежей водой; вставьте MAX MIN этот бак в машину и убедитесь, что он хорошо установлен. Предупреждение: ни в коем случае не заливайте в бак для воды горячую, кипящую, газированную воду или
10 РУССКИЙ 11 Вставьте штепсельную вилку с другой стороны шнура питания в настенную электрическую розетку с соответствующим напряжением. 12 Убедитесь, что ручка управления находится в положении « ». 13 Для включения машины достаточно нажать на кнопку ON/OFF; светодиод « » начнет быстро мигать,
РУССКИЙ 11 2 Поверните ручку управления по часовой стрелке и расположите ее в положении « »; подождите несколько секунд. 3 Если вода течет правильным образом и светодиод « » медленно мигает, поверните ручку управления против часовой стрелки и расположите ее в положении « ». Машина нагревается
12 РУССКИЙ Цикл ручного ополаскивания Во время этого процесса подается кофе, а через контур подачи пара/ горячей воды вытекает свежая вода. Для этой операции требуется несколько минут. 1 Поставьте чашку под устройством подачи. 2 Убедитесь, что светодиод « » горит, не мигая. Горит, не мигая 3
РУССКИЙ 13 8 Теперь поверните ручку управления против часовой стрелки и расположите ее в положении « ». 9 По завершении снова наполните бак для воды. С этого момента машина может использоваться для подачи напитков. Примечания: если машина не использовалась в течение двух или более недель, при
14 РУССКИЙ УСТАНОВКА ФИЛЬТРА ДЛЯ ОЧИСТКИ ВОДЫ «INTENZA+» (ДОПОЛНИТЕЛЬНО) Фильтр для воды Intenza+ может быть приобретен отдельно. Для получения более подробной информации см. страницу принадлежностей в данном руководстве. Вода является очень важным компонентом для приготовления эспрессо, поэтому
РУССКИЙ 15 6 Для активации фильтра подайте воду, содержащуюся в баке для воды, с помощью функции горячей воды (см. параграф «Подача горячей воды»). 7 Снова наполните бак для воды. Теперь машина готова. РЕГУЛИРОВКИ Машина позволяет выполнять некоторые регулировки для возможности подачи как можно
16 РУССКИЙ Внимание: ручка регулирования помола, расположенная внутри емкости для кофе в зернах, должна поворачиваться только при работе керамической кофемолки. Можно выполнить эту регулировку, нажав и повернув ручку регулирования помола, расположенную внутри емкости для кофе в зернах, используя
РУССКИЙ 17 Регулировка количества кофе в чашке Машина позволяет регулировать количество подаваемого кофе эспрессо в соответствии с вашим вкусом и размером ваших чашек/ чашечек. При каждом нажатии и отпускании кнопки эспрессо « » или кнопки » машина подает запрограммированное количество кофе. кофе «
18 РУССКИЙ ПРИГОТОВЛЕНИЕ ЭСПРЕССО И КОФЕ Перед приготовлением кофе убедитесь, что зеленый светодиод температуры горит, не мигая, и что бак для воды и емкость для кофе в зернах оба заполнены. Горит, не мигая Удерживать ручку управления в положении кофе « » во время фазы подачи. 1 Поставьте 1 или 2
РУССКИЙ 19 ПОДАЧА ПАРА / ПРИГОТОВЛЕНИЕ КАПУЧИНО Пар может использоваться для взбивания молока, необходимого для приготовления капучино. Внимание: опасность ожогов! В начале подачи могут образоваться небольшие брызги горячей воды. Трубка пара/горячей воды может сильно нагреться: избегайте
20 РУССКИЙ 5 Поверните ручку управления по часовой стрелке и расположите ее в положении « », чтобы остановить подачу пара. Взбивание молока для приготовления капучино 1 Наполните графин на 1/3 холодным молоком. Примечание: используйте холодное молоко (~5°C / 41°F) с содержанием белка не меньше 3%
РУССКИЙ 21 Предупреждение: после использования пара для взбивания молока, прочистите трубку пара/горячей воды (или насадку Pannarello, если она имеется), подав небольшое количество горячей воды в емкость. Подробные инструкции можно получить в главе «Чистка и техническое обслуживание». Если
22 РУССКИЙ ПОДАЧА ГОРЯЧЕЙ ВОДЫ Внимание: опасность ожогов! В начале подачи могут образоваться небольшие брызги горячей воды. Трубка пара/горячей воды может сильно нагреться: избегайте непосредственных прикосновений к ней руками. Пользуйтесь только специальной защитной рукояткой. 1 Перед началом
РУССКИЙ 23 ЧИСТКА И ТЕХНИЧЕСКОЕ ОБСЛУЖИВАНИЕ Очистка Предупреждение: пунктуальная чистка и техобслуживание машины важны для того, чтобы продлить срок ее эксплуатации. Ваша машина постоянно подвергается воздействию влаги, кофе и накипи! Эта глава описывает аналитически, какие работы следует
24 РУССКИЙ Ежедневная чистка бака для воды 1 Снимите маленький белый фильтр или фильтр для очистки воды «Intenza+» (если он имеется) с бака для воды и вымойте его свежей водой. 2 Установите маленький белый фильтр или фильтр для очистки воды «Intenza+» (если он имеется) в его гнездо, слегка надавив
РУССКИЙ 25 Еженедельная чистка трубки пара/горячей воды (насадки Pannarello, если имеется). Эти операции должны выполняться раз в неделю. Для машин без насадки Pannarello: 1 очистите трубку пара/горячей воды влажной салфеткой, чтобы удалить остатки молока; 2 снимите защитную рукоятку с трубки
26 РУССКИЙ ОЧИСТКА БЛОКА ПРИГОТОВЛЕНИЯ КОФЕ Еженедельная чистка блока приготовления кофе Блок приготовления кофе должен очищаться при каждом наполнении емкости для кофе в зернах или хотя бы один раз в неделю. 1 Выключите машину, нажав на кнопку ON/OFF, и извлеките штепсельную вилку из электрической
РУССКИЙ 27 7 Убедитесь, что блок приготовления кофе находится в нерабочем положении; должны совпадать две метки. В противном случае, следует выполнить операцию, описанную в пункте (8). 8 Слегка нажмите рычаг вниз, пока он не коснется основания блока приготовления кофе, и пока не совпадут две метки
28 РУССКИЙ Смазка блока приготовления кофе Смазывайте блок приготовления кофе после приготовления около 500 чашек кофе или один раз в месяц. Пищевую смазку для смазывания блока приготовления кофе (HD5061) можно приобрести в интернетмагазине Philips по адресу www.shop.philips.com/service, у вашего
РУССКИЙ 29 УДАЛЕНИЕ НАКИПИ Процесс удаления накипи требует около 30 мин. Очень быстрое мигание Во время использования внутри машины образуется накипь. Ее необходимо регулярно удалять, так как она может засорить водяной контур и контур кофе вашей машины. Машина сама вам укажет, когда нужно будет
30 РУССКИЙ 4 выключите машину, нажав кнопку ON/OFF; 5 убедитесь, что ручка управления находится в положении « »; 6 поставьте емкость 1,2 л под трубку пара/горячей воды; 7 Нажмите кнопки « »и« » одновременно и удерживайте 3 сек. Светодиод « » начинает мигать очень быстро. Машина запускает подачу
РУССКИЙ 31 8 При включении светодиода « », поверните ручку управления по часовой стрелке и расположите её в положении « ». Машина начнет выдачу из трубки пара / подачи горячей воды до опорожнения бака для воды. 9 Затем светодиод « » начинает медленно мигать. Поверните ручку управления в положение «
32 РУССКИЙ 14 По окончании загрузки светодиод « » начинает медленно мигать. Поверните ручку управления в положение « ». Машина подает непосредственно в поддон для сбора капель. 15 По окончании подачи светодиод « » выключается. Поверните ручку управления по часовой стрелке и расположите ее в
РУССКИЙ 33 19 После того как бак для воды установлен обратно в машину, заго». Поверните ручку управления по часовой рается светодиод « стрелке и расположите ее в положении « ». Машина начинает ополаскивание вплоть до опорожнения бака для воды. 20 По окончании ополаскивания машина выключится, а
34 РУССКИЙ ЗНАЧЕНИЕ СВЕТОВЫХ СИГНАЛОВ Дисплей панели управления Световые сигналы Горит, не мигая Медленно мигающий Быстрое мигание Мигающий очень быстро Медленно мигающий Причины Способ устранения Машина в температуре готовности: — для подачи кофе; — для подачи горячей воды; — для подачи пара
РУССКИЙ 35 Световые сигналы Быстрое мигание Медленно мигающий + Причины Способ устранения Водяной контур разгружен. Наполнить бак вежей водой и загрузить водяной контур, как описано в параграфе «Первое включение». Блок приготовления кофе не вставлен. Контейнер для Убедиться, что все узлы и детали
36 РУССКИЙ РЕШЕНИЕ ПРОБЛЕМ Эта глава описывает наиболее часто встречающиеся проблемы, которые могут возникнуть у вас с машиной. Если информация, приведенная ниже, не поможет вам решить проблему, см. страницу FAQ на сайте www.philips.com/support либо свяжитесь по горячей линии с Philips Saeco в
РУССКИЙ 37 Неисправность Возможная причина Способ устранения Кофе выходит медленно. Кофе слишком тонкий. Сменить кофейную смесь или отрегулировать помол, как указано в параграфе «Регулировка кофемолки с керамическими жерновами». Водяной контур не загружен. Загрузить водяной контур (параграф «Первое
38 РУССКИЙ ТЕХНИЧЕСКИЕ ХАРАКТЕРИСТИКИ Производитель оставляет за собой право изменять технические характеристики изделия. Номинальное напряжение — Номинальная мощность Питание См. табличку, расположенную внутри дверцы для обслуживания Материал корпуса AБС — Термопластик Размеры (д х ш х г) 295 x
РУССКИЙ 39 ЗАКАЗ ИЗДЕЛИЙ ДЛЯ ТЕХОБСЛУЖИВАНИЯ Для чистки и удаления накипи используйте только продукты для обслуживания производства Saeco. Принадлежности для вашей машины можно приобрести в интернетмагазине Philips по адресу www.shop.philips.com/service, у вашего местного продавца или в
RU 14 Rev.00 del 15-07-12 14 Производитель оставляет за собой право вносить любые изменения без предварительного уведомления. www.philips.com/saeco
USER MANUAL
PLEASE READ THIS USER MANUAL CAREFULLY BEFORE USING THE MACHINE.
Register your product and get support at
www.philips.com/welcome
English
Type HD8743 / HD8745 / HD8747
02

IMPORTANT SAFEGUARDS
When using electrical appliances, basic safety precautions should always be
followed, including the following:
1. Read all instructions.
2. Do not touch hot surfaces. Use handles or knobs.
3. To protect against fire, electric shock and injury to persons do not immerse
cord, plugs, or appliance in water or other liquid.
4. Close supervision is necessary when the appliance is used by or near
children.
5. Unplug from outlet when not in use and before cleaning. Allow to cool
before putting on or taking off parts, and before cleaning the appliance.
6. Do not operate any appliance with a damaged cord or plug or after the
appliance malfunctions, or has been damaged in any manner. Return
appliance to the nearest authorized service facility for examination, repair
or adjustment.
7. The use of accessory attachments not recommended by the appliance
manufacturer may result in fire, electric shock or injury to persons.
8. Do not use outdoors.
9. Do not let cord hang over edge of table or counter, or touch hot surfaces.
10. Do not place on or near a hot gas or electric burner, or in a heated oven.
11. Always attach plug to appliance first, then plug cord into wall outlet. To
disconnect, turn any control to “off”, then remove plug from wall outlet.
12. Do not use appliance for other than intended use.
13. Save these instructions.
SAVE THESE INSTRUCTIONS

CAUTION
This appliance is for household use only. Any servicing, other than cleaning
and user maintenance, should be performed by an authorized service center.
Do not immerse machine in water. To reduce the risk of fire or electric shock,
do not disassemble the machine. There are no parts inside the machine
serviceable by the user. Repair should be done by authorized service personnel
only.
1. Check voltage to be sure that the voltage indicated on the nameplate
corresponds with your voltage.
2. Never use warm or hot water to fill the water tank. Use cold water only.
3. Keep your hands and the cord away from hot parts of the appliance during
operation.
4. Never clean with scrubbing powders or harsh cleaners. Simply use a soft
cloth dampened with water.
5. For optimal taste of your coffee, use purified or bottled water. Periodic
descaling is still recommended every 2-3 months.
6. Do not use caramelized or flavored coffee beans.
INSTRUCTIONS FOR THE POWER
SUPPLY CORD
A. A short power—supply cord (or detachable power-supply cord) is to be
provided to reduce risks resulting from becoming entangled in or tripping
over a longer cord.
B. Longer detachable power-supply cords or extension cords are available
and may used if care is exercised in their use.
C. If a long detachable power-supply cord or extension cord is used,
1. The marked electrical rating of the detachable power—supply cord or
extension cord should be at least as great as the electrical rating of the
appliance
2. If the appliance is of the grounded type, the extension cord should be a
grounding-type 3-wire cord, and
3. The longer cord should be arranged so that it will not drape over the
counter top or table top where it can be pulled on by children or tripped
over.

2
Congratulations on your purchase of a Saeco Xsmall full
automatic espresso machine!
To fully benet from the support that Philips Saeco oers,
please register your product at www.philips.com/welcome.
This user manual applies to HD8743, HD8745 and HD8747.
The machine is suitable for preparing espresso coees using
whole coee beans. It can also dispense steam and hot wa-
ter. In this user manual you will nd all the information you
need to install, use, clean and descale your machine.

3
CONTENTS
INSTALLATION ……………………………………………………………………………………. 8
Product overview ……………………………………………………………………………………………………………. 8
General description …………………………………………………………………………………………………………. 9
PREPARING FOR USE ……………………………………………………………………………10
Machine Packaging ……………………………………………………………………………………………………….. 10
Preparing for use …………………………………………………………………………………………………………… 10
USING THE MACHINE FOR THE FIRST TIME ………………………………………………..12
Circuit priming ……………………………………………………………………………………………………………… 12
Automatic rinse/self-cleaning cycle …………………………………………………………………………………. 13
Manual rinse cycle…………………………………………………………………………………………………………. 14
“INTENZA+” water lter installation ………………………………………………………………………………… 15
ADJUSTMENTS ……………………………………………………………………………………17
Saeco Adapting System ………………………………………………………………………………………………….. 17
Adjusting the Ceramic Coee Grinder ……………………………………………………………………………….. 17
Adjusting the Coee Length …………………………………………………………………………………………… 18
ESPRESSO AND COFFEE BREWING …………………………………………………………..20
FROTHING MILK / CAPPUCCINO BREWING ………………………………………………..21
Frothing milk ……………………………………………………………………………………………………………….. 21
Steam/Coee Switchover ……………………………………………………………………………………………….. 23
Making a capuccino……………………………………………………………………………………………………….. 24
DISPENSING HOT WATER ………………………………………………………………………25
CLEANING AND MAINTENANCE ………………………………………………………………26
Daily Cleaning of the Machine …………………………………………………………………………………………. 26
Daily cleaning of water tank ……………………………………………………………………………………………. 27
Daily cleaning of hot water/steam wand (Pannarello, if supplied) ………………………………………… 27
Weekly cleaning of hot water/steam wand (Pannarello, if supplied) …………………………………….. 28
Weekly Cleaning of the Brew Group and of the coee exit duct ……………………………………………. 29
Monthly Lubrication of the Brew Group ……………………………………………………………………………. 31
DESCALING ………………………………………………………………………………………..32
Preparation ………………………………………………………………………………………………………………….. 32
Descaling …………………………………………………………………………………………………………………….. 33
Rinsing Cycle 1 ……………………………………………………………………………………………………………… 34
Rinsing Cycle 2 ……………………………………………………………………………………………………………… 35
MEANING OF THE WARNING SIGNALS ………………………………………………………36
Control panel………………………………………………………………………………………………………………… 36
TROUBLE SHOOTING ……………………………………………………………………………39
ENERGY SAVING ………………………………………………………………………………….41
Stand-by ……………………………………………………………………………………………………………………… 41
Disposal ………………………………………………………………………………………………………………………. 41
TECHNICAL SPECIFICATION ……………………………………………………………………42
GUARANTEE AND SERVICE …………………………………………………………………….42
Guarantee ……………………………………………………………………………………………………………………. 42
Service ………………………………………………………………………………………………………………………… 42
ORDERING MAINTENANCE PRODUCTS ……………………………………………………..43
4
IMPORTANT
Safety Instructions
This machine is equipped with safety features. Nevertheless
read the safety instructions carefully and only use the
machine as described in these instructions to avoid accidental
injury or damage.
Keep this user manual for future reference.
The term WARNING and this icon warn against possible
severe injuries, danger to life and/or damage to the machine.
The term CAUTION and this icon warn against slight
injuries and/or damage to the machine.
This icon requests to read carefully this instruction manual,
before performing any use or maintenance operation.
Warning
• Connect the machine to a wall socket with a voltage
matching the technical specications of the machine.
• Do not let the power cord hang over the edge of a table or
counter, or touch hot surfaces.
• Never immerse the machine, mains plug or power cord in
water (danger of electrical shock).
• Never direct the hot water jet towards body parts: danger
of burns!
• Do not touch hot surfaces. Use handles and knobs.

5
• Remove the mains plug from the wall socket:
— If a malfunction occurs.
— If the machine will not be used for a long time.
— Before cleaning the machine.
Pull on the plug, not on the power cord. Do not touch the
mains plug with wet hands.
• Do not use the machine if the mains plug, the power cord
or the machine itself is damaged.
• Do not make any modications to the machine or its
power cord. Only have repairs carried out by a service
centre authorised by Philips to avoid a hazard.
• The machine should not be used by children younger than
8 years old.
• The machine can be used by children of 8 years and
upwards if they have previously been instructed on
the correct use of the machine and made aware of the
associated dangers or if they are supervised by an adult.
• Cleaning and maintenance should not be carried out
by children unless they are more than 8 years old and
supervised by an adult.
• Keep the machine and its power cord out of reach of
children under 8 years old.
• The machine may be used by persons with reduced
physical, sensory or mental capabilities or lacking
sucient experience and/or skills if they have previously
been instructed on the correct use of the machine and
made aware of the associated dangers or if they are
supervised by an adult.

6
• Children should be supervised to ensure that they do not
play with the machine.
• Never insert ngers or other objects into the coee
grinder.
Caution
• The machine is for household use only and is not intended
for use in environments such as canteens, sta kitchens of
shops, oces, farms or other work environments.
• Always put the machine on a at and stable surface.
• Do not place the machine on hot surfaces, directly next to
a hot oven, heater or similar source of heat.
• Only put coee beans into the coee bean hopper. If
ground coee, instant coee or any other substance is put
in the coee bean hopper, it may damage the machine.
• Let the machine cool down before inserting or removing
any parts.
• Never use warm or hot water to ll the water tank. Use
only cold non sparkling drinking water.
• Never clean with scrubbing powders or harsh cleaners.
Simply use a soft cloth dampened with water.
• Descale your machine regularly. The machine indicates
when descaling is needed. Not doing this will make your
appliance stop working properly. In this case repair is not
covered under your warranty!
• Do not keep the machine at temperature below 0 °C.
Residue water in the heating system may freeze and cause
damage.

7
• Do not leave water in the water tank when the machine
is not used over a long period of time. The water can be
contaminated. Use fresh water every time you use the
machine.
Compliance with Standards
The machine complies with art.13 of the Italian Legislative
Decree dated 25 July 2005, no. 151 “Implementation of the
Directives 2005/95/EC, 2002/96/EC and 2003/108/EC on
the restriction of the use of certain hazardous substances in
electrical and electronic equipment, as well as waste disposal”.
This machine complies with EU Directive 2002/96/EC.
This Philips appliance complies with all the applicable
standards and regulations relating to the exposure to
electromagnetic elds.
8
INSTALLATION
Product overview
1
26
26
21 22 23 24 25
13 12
17
14
5
15
15
6 7
2
3
4
16
8
9
10
11
18 19 20

ENGLISH
9
General description
1. Co ee bean hopper lid
2. Co ee bean hopper
3. Dispensing spout
4. Full drip tray indicator
5. Co ee grounds drawer
6. Brew group
7. Service door
8. Control panel
9. Protective handle
10. Hot water/steam wand
11. Grill
12. Drip tray
13. Water tank
14. Power cord
15. Ceramic co ee grinder
16. Grinder adjustment key
17. Pannarello (optional — only available for certain models)
18. Double co ee light
19. Espresso button
20. Temperature light
21. No water light
22. Co ee button
23. Control dial
24. Warning light
25. ON/OFF button
26. Grinder adjustment knob
10
ENGLISH
PREPARING FOR USE
Machine Packaging
The original packaging has been designed and constructed to protect the
machine during transport. We recommend keeping the packaging material
for possible future transport.
Preparing for use
1 Remove the co ee bean hopper lid and the drip tray with grill from the
packaging.
2 Remove the machine from the packaging.
3 For best use, it is recommended to:
• Choose a safe, level surface, where there will be no danger of over—
turning it or being injured.
• Choose a location that is su ciently well-lit, clean and near an eas-
ily reachable socket.
• Allow for a minimum distance from the sides of the machine as
shown in the illustration.
4 Insert the drip tray with grill to the machine. Make sure it is fully in-
serted.
Note:
The drip tray collects the water that comes out of the dispensing spout
during each rinse/self-cleaning cycle as well as co ee that might be spilled
during beverage preparation. Empty and clean the drip tray daily and each
time the full drip tray indicator is raised.
Caution:
NEVER remove the drip tray when the machine has just been turned
on. Wait a couple of minutes, since the machine will carry out a rinse/
self-cleaning cycle.
ENGLISH
11
5 Remove the water tank.
6 Rinse the water tank with fresh water.
7 Fill the water tank with fresh water up to the MAX level and reinsert it
into the machine. Make sure it is fully inserted.
Caution:
Never fi ll the water tank with warm, hot, sparkling water or any other
liquid, as this may cause damage to the water tank and the machine.
8 Slowly pour the co ee beans into the co ee bean hopper.
Caution:
Only coff ee beans must be put into the coff ee bean hopper. Ground
coff ee, instant coff ee, caramelized coff ee or any other object may
damage the machine.
9 Put the lid on the co ee bean hopper.
10 Insert the plug into the socket located on the back of the machine.
MAX
12
ENGLISH
11 Insert the plug of the other end of the power cord into a wall socket
with suitable power voltage.
12 Make sure the control dial is on the “ ” position.
13 Press the ON/OFF button to turn the machine on; the “ “ light will
begin to ash quickly indicating that the circuit has to be primed.
USING THE MACHINE FOR THE FIRST TIME
When using the machine for the rst time, the following activities need to
happen:
1) You need to prime the circuit.
2) The machine will perform an automatic rinse/self-cleaning cycle.
3) You need to initiate a manual rinse cycle.
Circuit priming
During this process fresh water ows through the internal circuit of the
machine and the machine warms up. This takes a few seconds.
1 Place a container (1L) under the hot water/steam wand or Pannarello
(if supplied).
ENGLISH
13
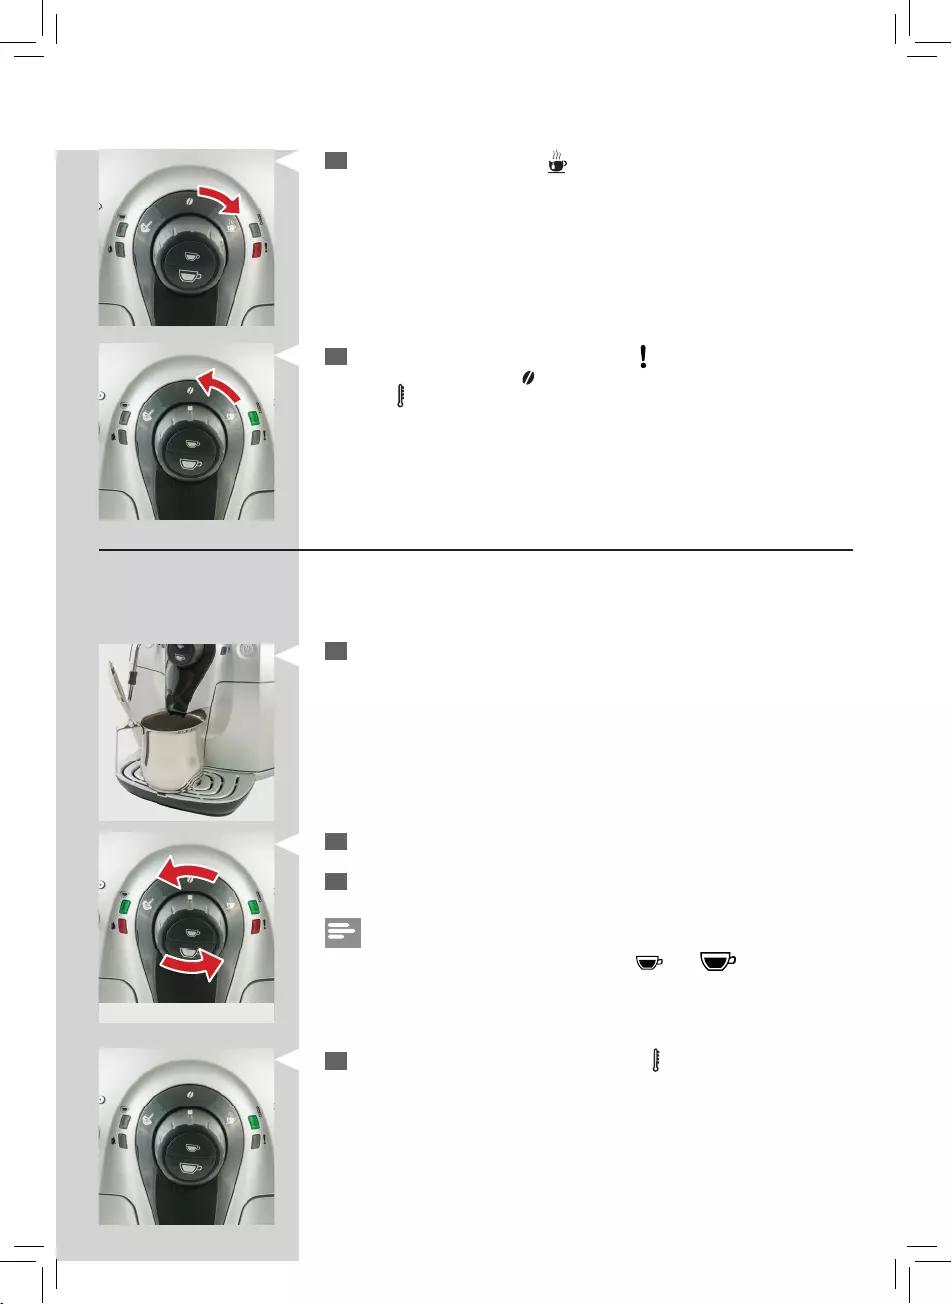
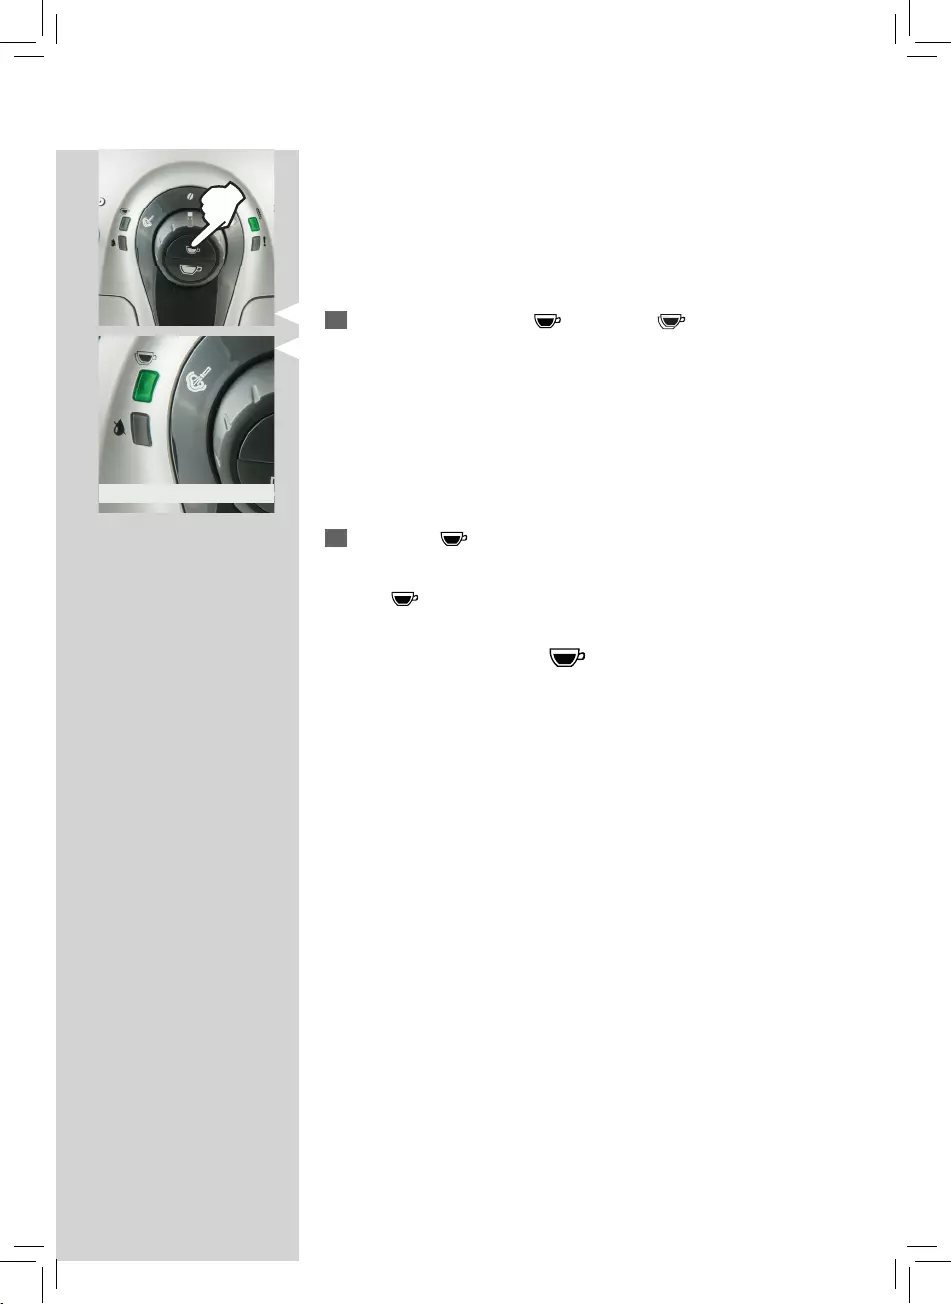
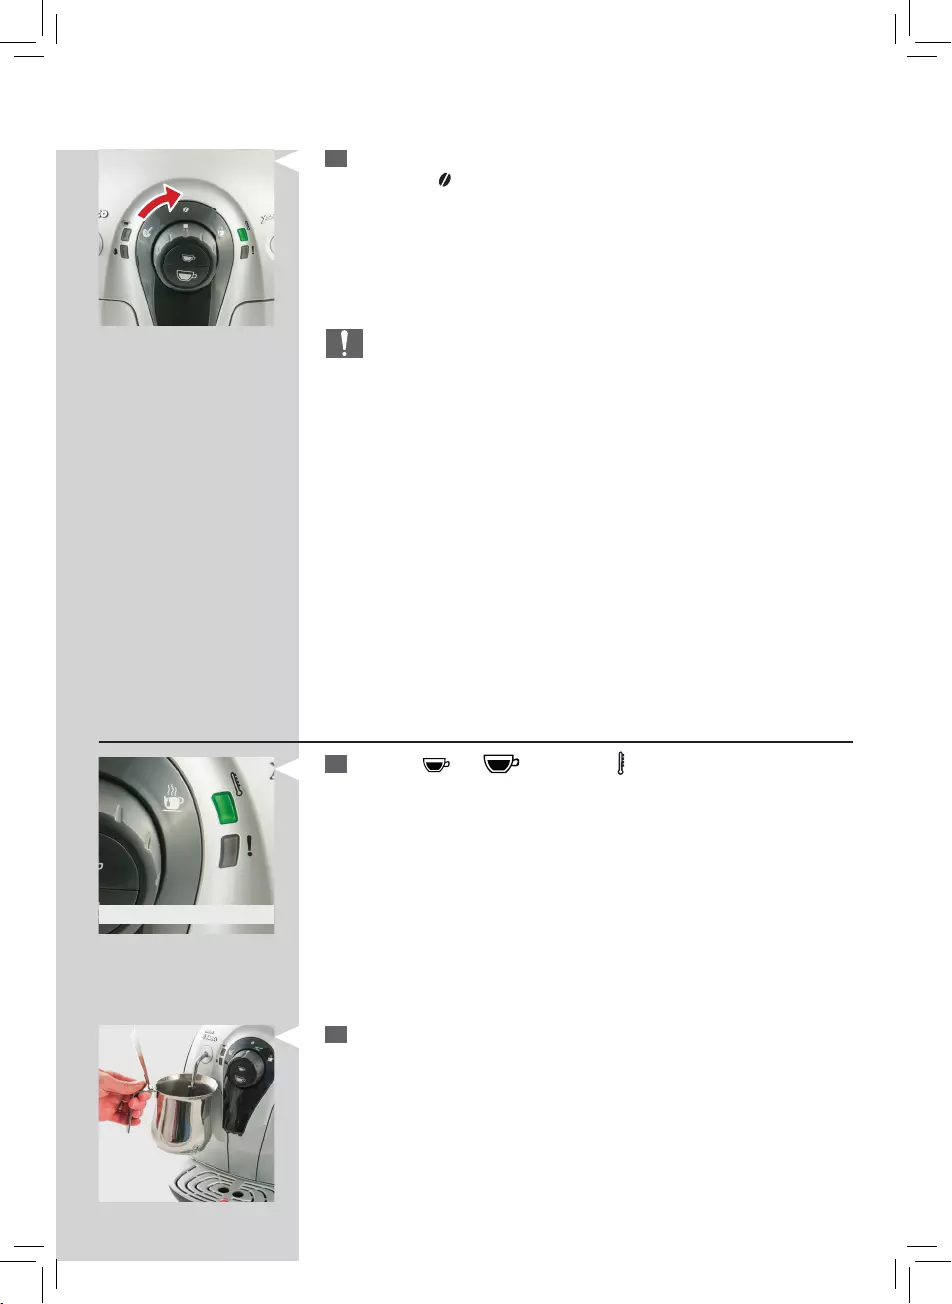
2 Turn the control dial to the “ ” position and wait few seconds.
3 When water steadily comes out and the “ “ light ashes slowly, turn the
control dial back to the “ ” position. The machine is in warm-up mode
(light “ “ ashes slowly).
Automatic rinse/self-cleaning cycle
When warm-up is complete, the machine automatically performs a rinse/
self- cleaning cycle of the internal circuit with fresh water. This takes less
than a minute.
1 Place the container under the dispensing spout to catch the small
amount of water which will be dispensed.
2 The indicator lights ash counter clock wise.
3 Wait for the cycle to nish automatically.
Note:
You can stop dispensing, by pressing either “ “ or “ “ button.
4 Wait for the water dispensing to stop. The “ “ light is now shining stea-
dily.
Flashing

14
ENGLISH
Manual rinse cycle
During this process you activate the co ee brewing cycle and fresh water
ows through the steam/hot water circuit. This takes a few minutes.
1 Place the container under the dispensing spout
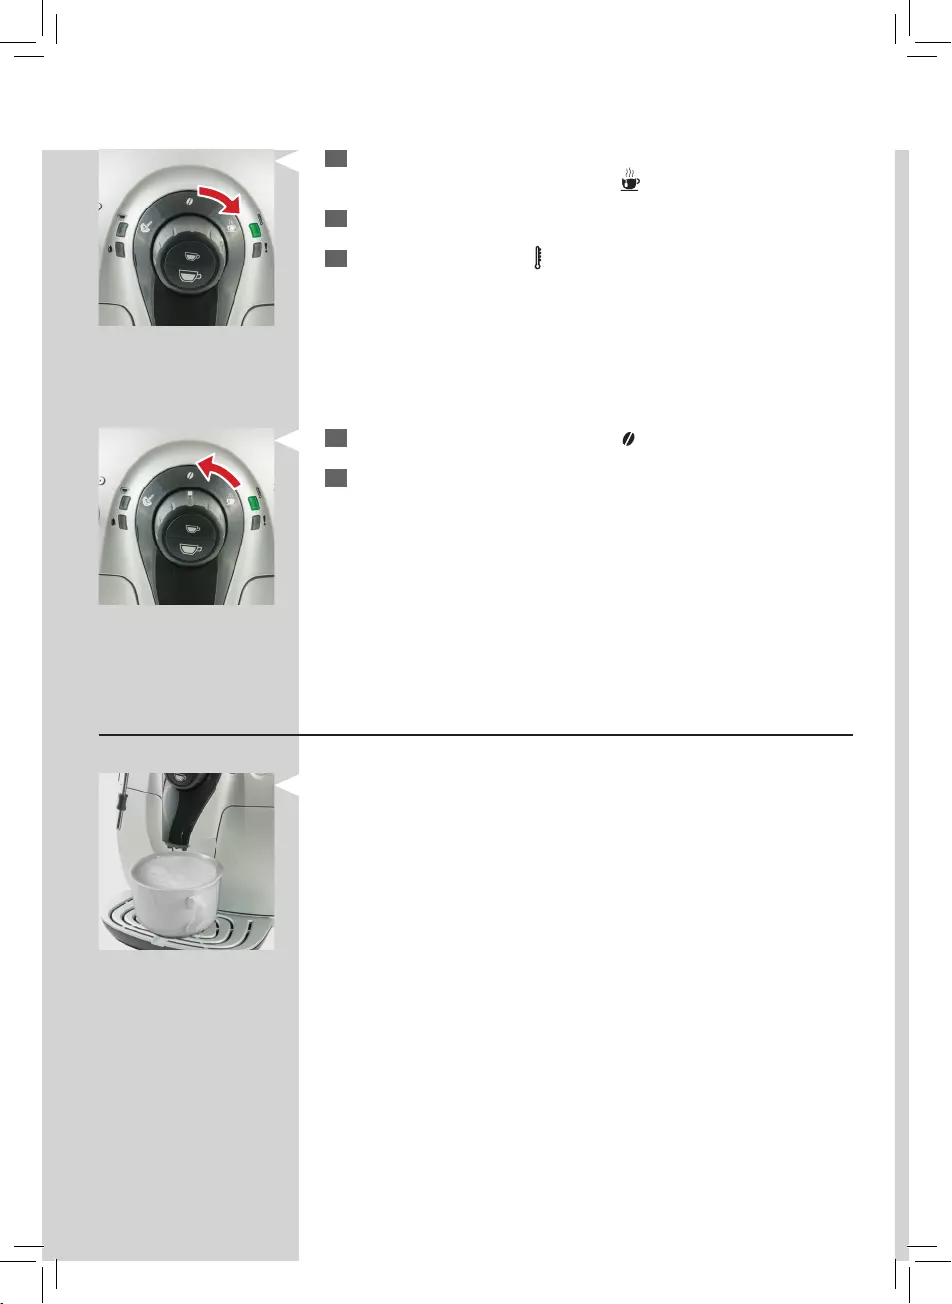
2 Check that the “ “ light shines steadily.
3 Press the “ “ button. The machine starts brewing co ee.
4 Wait until brewing has been completed and empty the container.
5 Place the container under the hot water/steam wand (Pannarello, if
supplied).
6 Turn the control dial to the “ ” position.
7 Dispense all remaining water. The “ ” light shines steadily.
Steady on
ENGLISH
15
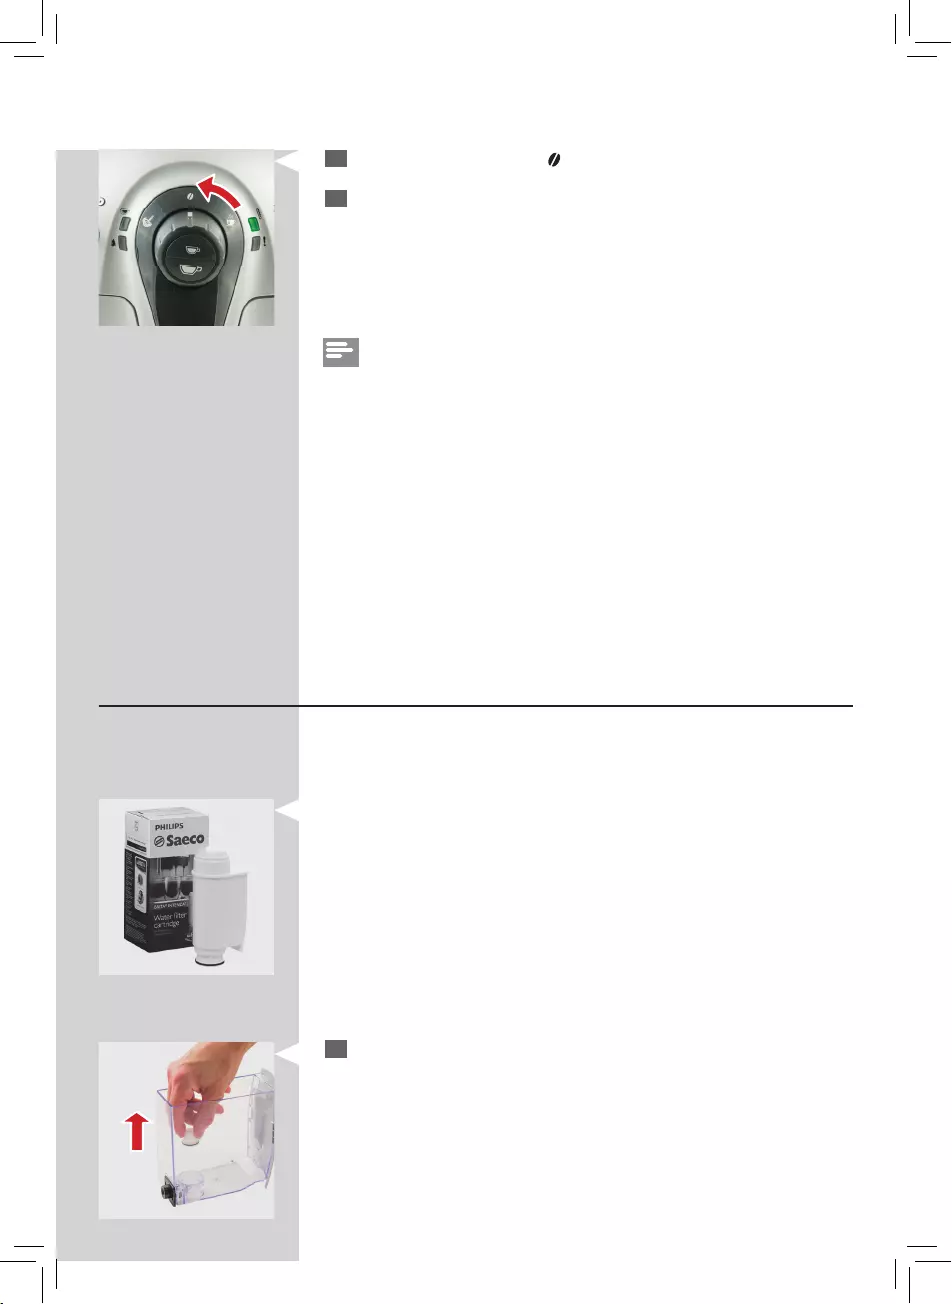
8 Turn the control dial to the “ ” position.
9 Fill in the water tank again and put it back in the machine. Now the
machine is ready for making co ee.
Notes:
When you haven’t used the machine for 2 or more weeks, the machine
will automatically perform an automatic rinse/self-cleaning cycle after you
have switched on the machine. There after you need to initiate the manual
rinse cycle as described above.
The automatic rinse/self-cleaning cycle is also initiated when the machine
has been in stand-by mode, or switched o , for more than 15 minutes.
After this cycle has been completed, you can brew a co ee.
“INTENZA+” water fi lter installation
We recommend you to install the “INTENZA+” water lter as this prevents
limescale build-up in your machine and preserves a more intense aroma of
your co ee.
The “INTENZA+” water lter can be purchased separately. For further de—
tails, please refer to the maintenance products page in this manual.
Water is a crucial part of every co ee, so it is very important to always have
it professionally ltered. Using the “INTENZA+” water lter will prevent
mineral deposits from building up and improve your water quality.
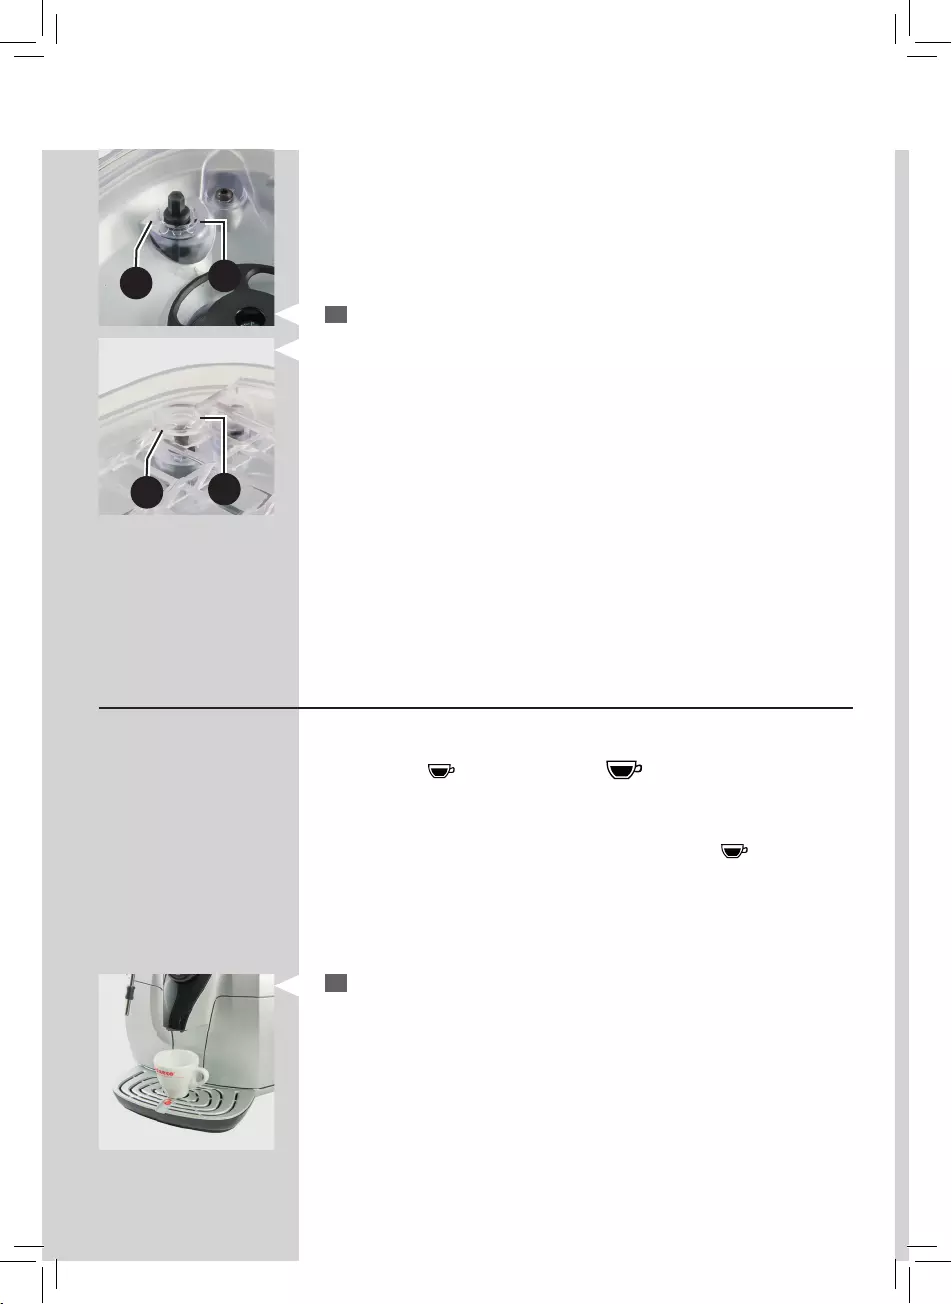
1 Remove the small white lter from the water tank and store it in a dry
place.
16
ENGLISH
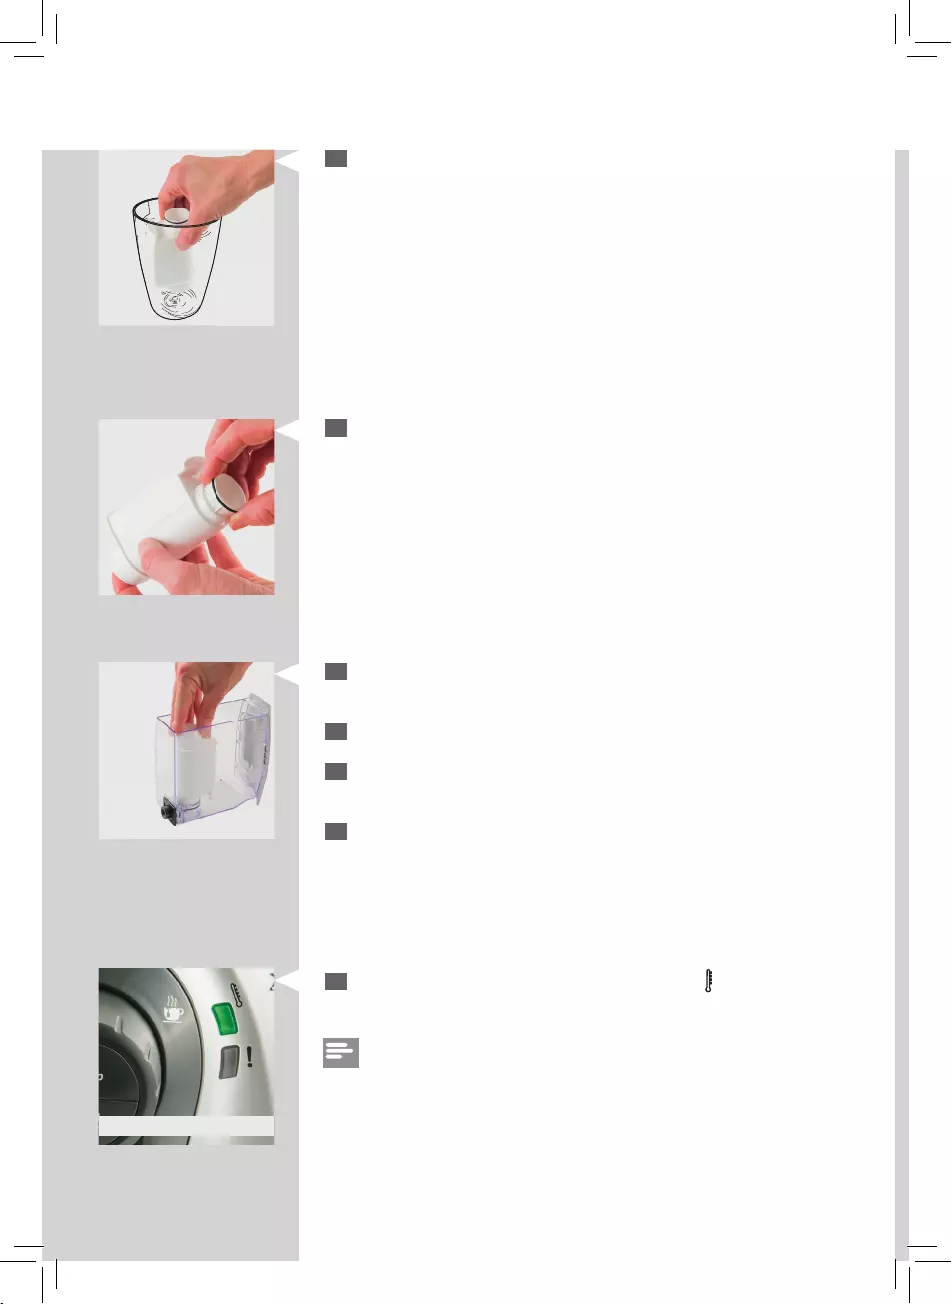
4 Put the “INTENZA+” water lter into the empty water tank. Press it
down until it cannot move any further.
5 Fill the water tank with fresh water and reinsert it into the machine.
6 Dispense all the water of the tank by using the hot water function (see
chapter “Hot water dispensing.
7 Remove the water tank, ll it with fresh water up to the MAX level. Put
it back into machine.
2 Remove the “INTENZA+” water lter from its packaging, immerse it ver-
tically (with the opening positioned upwards) in cold water and gently
press the sides so as to let the air bubbles out.
3 Set the “INTENZA+” water lter according to the hardness of the water
used:
A = Soft water
B = Hard water (standard)
C = Very hard water
Steady on
8 When the above steps have been completed, the “ “ light is shining
steadily.
Note:
We recommend you to replace the Intenza + lter every 2 months.
ENGLISH
17
ADJUSTMENTS
The machine allows for certain adjustments so that you can brew the best
tasting co ee possible.
Saeco Adapting System
Co ee is a natural product and its characteristics may change according to
its origin, blend and roast. The machine is equipped with a self-adjusting
system that allows the use of all types of co ee beans available on the
market except for caramelized and avored co ee beans.
The machine automatically adjusts itself after brewing several cups of cof-
fee to optimize the extraction.
Adjusting the Ceramic Coff ee Grinder
Ceramic co ee grinders always guarantee accurate and perfect grinding
and coarseness for every co ee specialty.
This provides for full aroma preservation, delivering the truly Italian taste in
every cup.
Warning:
Do not insert fi ngers or other objects. Only adjust the ceramic coff ee
grinder using the grinder adjustment key. The ceramic coff ee grinder
contains moving parts that may be dangerous.
You can adjust the ceramic grinders to set the co ee grinding to your
personal taste.
Warning:
You can only adjust the grinder settings when the machine is grinding
coff ee beans.
1 Press and turn the grinder adjustment knob inside the co ee bean
hopper one notch at a time. Use the co ee grinder adjustment key
provided with the machine. You will taste the di erence after brewing
2-3 espresso’s.
Warning:
Do not turn the grinder more than 1 notch at the time to prevent dam-
age.
18
ENGLISH
2 The reference marks inside the co ee bean hopper indicate the grind
setting. There are 5 di erent grind settings to choose from position
1 for coarse grind — milder taste to position 2 for ne grind — stronger
taste.
Adjusting the Coff ee Length
The machine allows you to adjust the amount of brewed espresso accord-
ing to your taste and the size of your cups.
Each time the “ ” espresso button or “ ” co ee button are pressed
and released, the machine brews a pre-set amount of co ee. Each button
may be individually programmed for a speci c brew setting.
The following procedure describes how to program the “ ” button.
1 Place a cup under the dispensing spout.
12
12
ENGLISH
19
2 Press and hold down the “ ” button; the “ ” light ashes during
this phase.
3 Release the “ ” button as soon as the desired amount of co ee is
reached.
Now the “ ” button is programmed; each time it is pressed, the machine
will brew the same amount of espresso that was just programmed.
Same procedure applies to the “ ” co ee button.
Flashing
20
ENGLISH
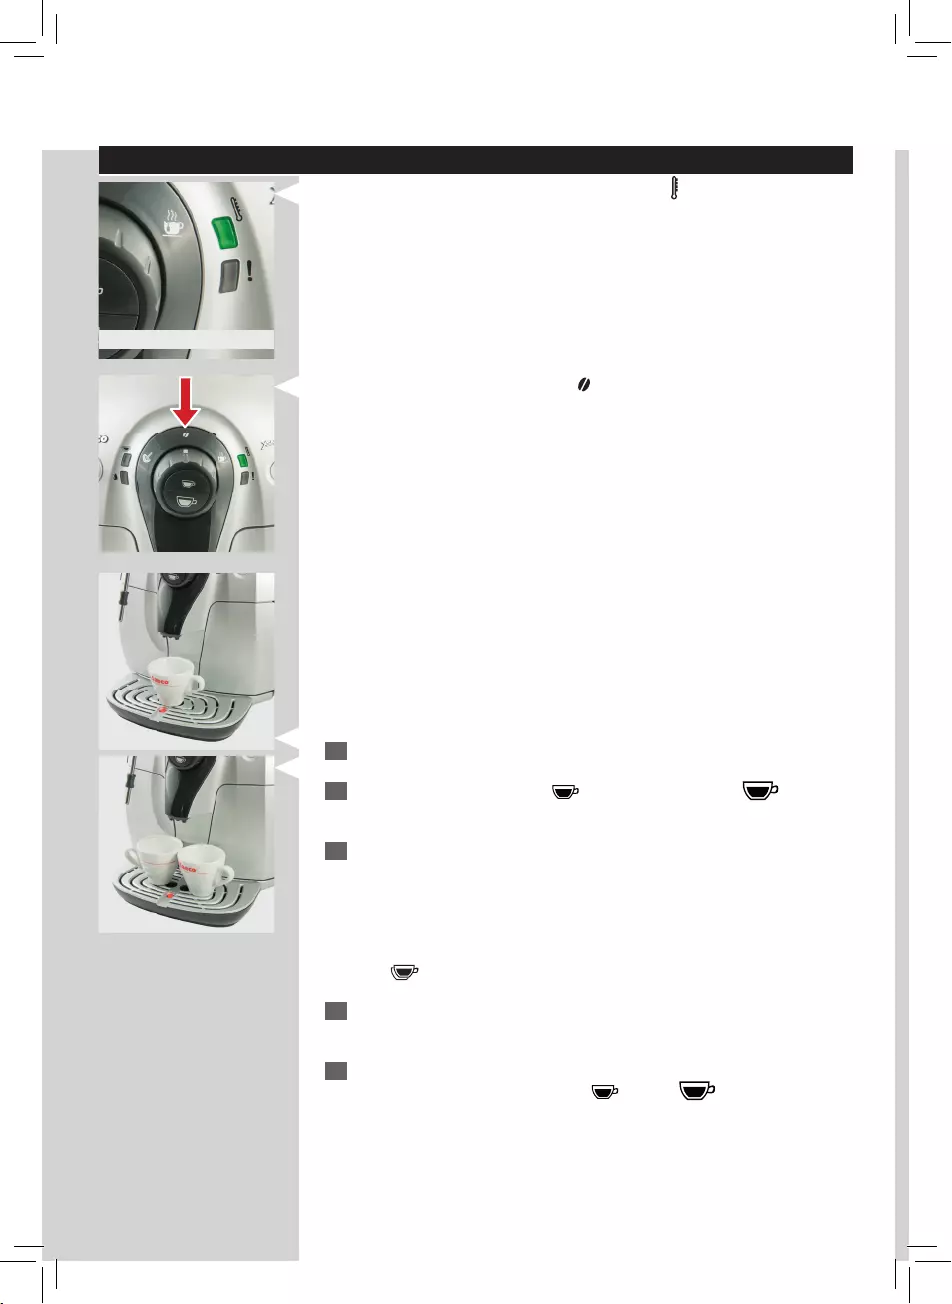
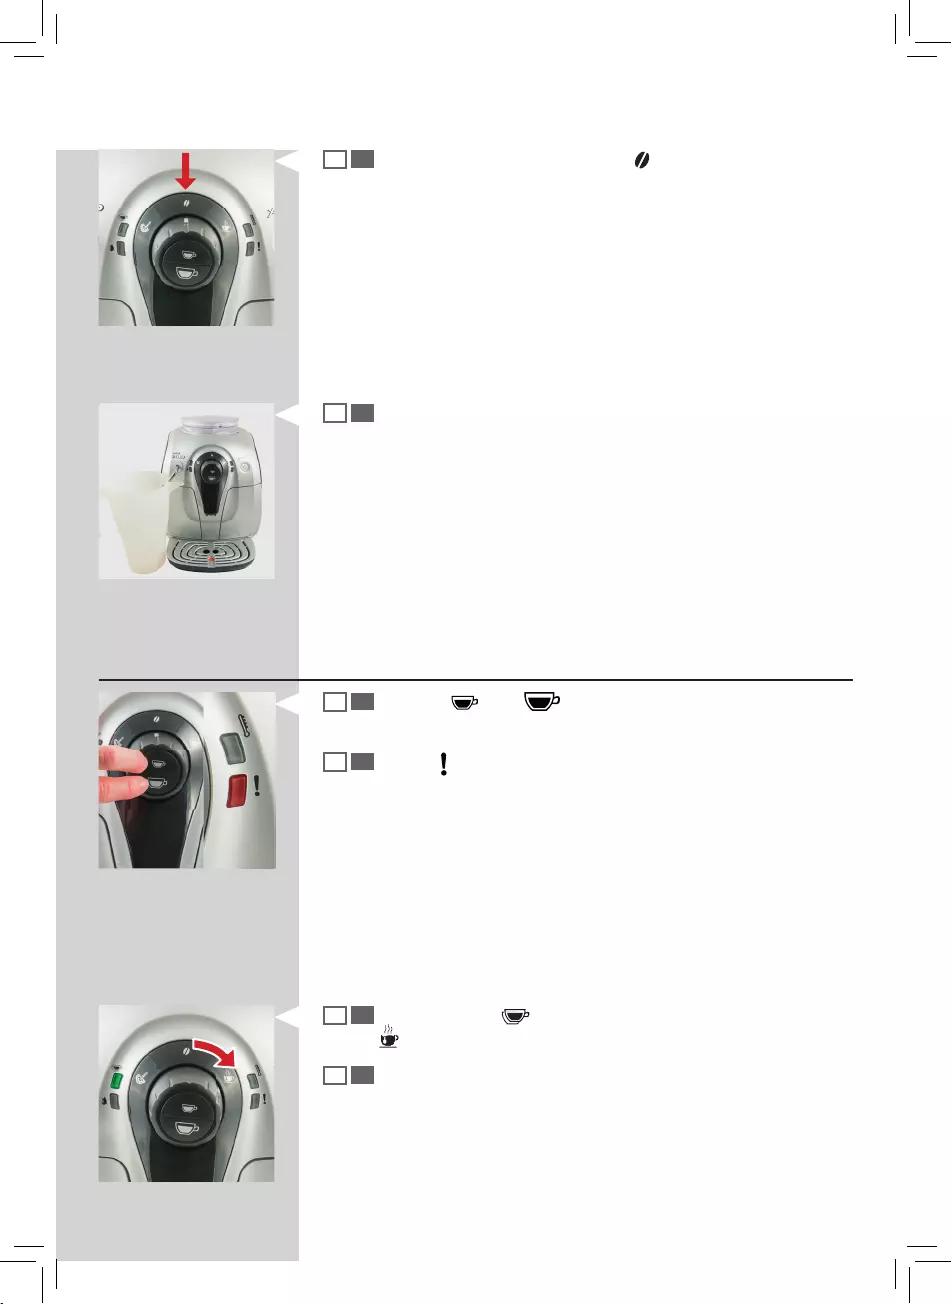
ESPRESSO AND COFFEE BREWING
Before brewing co ee, make sure that the green “ “ light shines steadily
and that the water tank and the co ee bean hopper are lled.
Make sure the control dial is on the “ ” position.
1 Place 1 or 2 cups under the dispensing spout.
2 To brew espresso, press the “ ” espresso button; the “ ” co ee
button for a co ee.
3 To brew 1 cup of espresso, press the button once. To brew 2 cups of
espresso, press the button twice consecutively.
In this operating mode, the machine automatically grinds and doses the
correct amount of co ee. Brewing two espressos requires two grinding
and brewing cycles, automatically carried out by the machine; during this
time the “ ” light is shining steadily.
4 After the pre-brewing cycle, co ee begins to dispense out of the dis-
pensing spout.
5 Co ee brewing stops automatically when the pre-programmed level is
reached. You can press either the “ ” or the “ ” button to stop it
earlier.
Steady on

ENGLISH
21
FROTHING MILK / CAPPUCCINO BREWING
Warning:
Danger of scalding! Dispensing may be preceded by small jets of hot
water. The hot water/steam wand may reach high temperatures: Never
touch it with bare hands. Use the appropriate protective handle only.
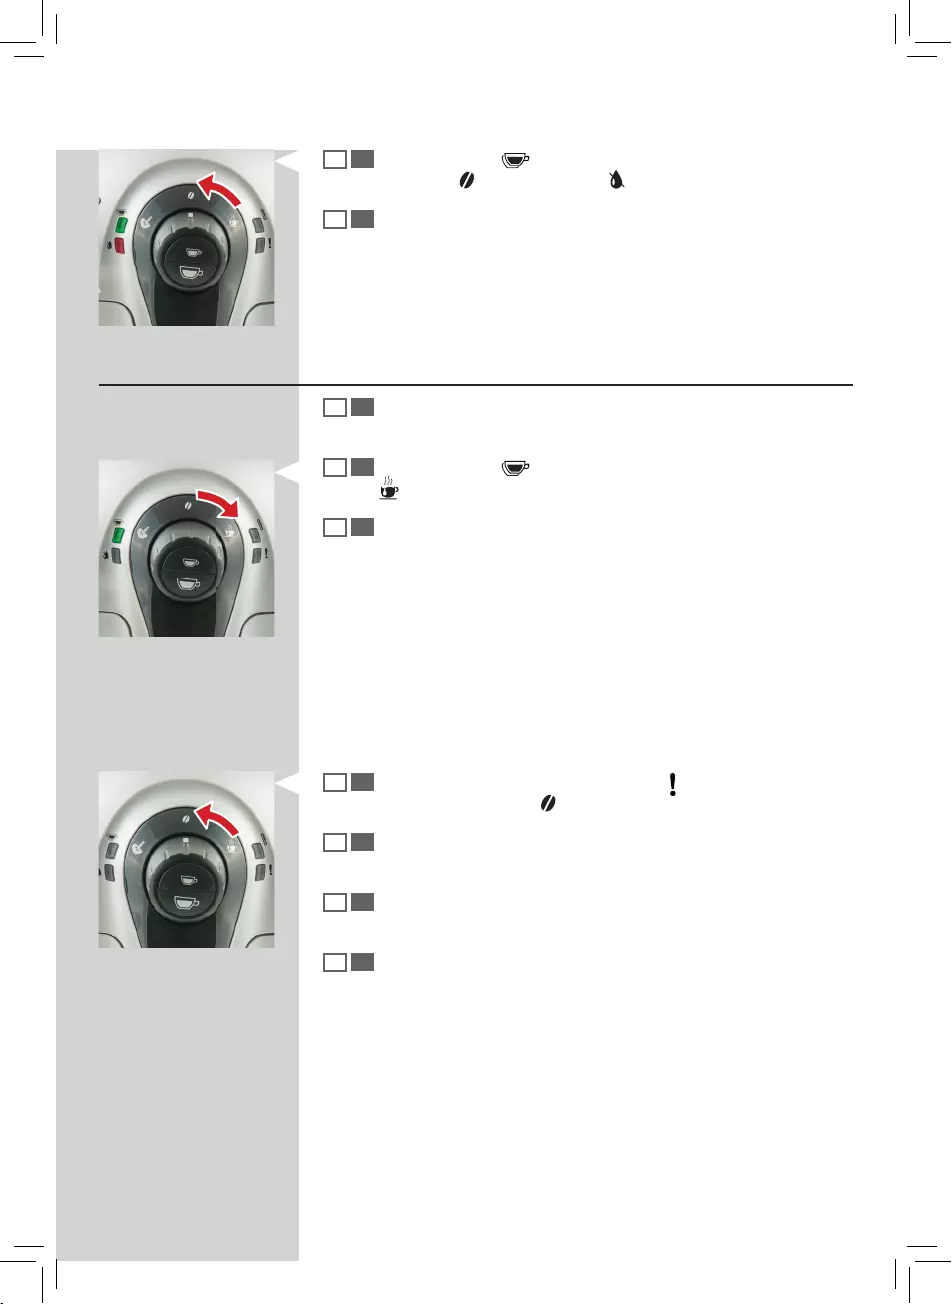
Frothing milk
When you plan to dispense steam right after switching on the machine or
after brewing a co ee, some water still present in the circuit may need to
be dispensed rst.
For this follow steps below:
1 Place a container under the hot water/steam wand (Pannarello, if sup-
plied).
2 Turn the control dial to the “ ” position.
3 The “ ” light ashes during the preheating time required by the ma-
chine.
Flashing
22
ENGLISH
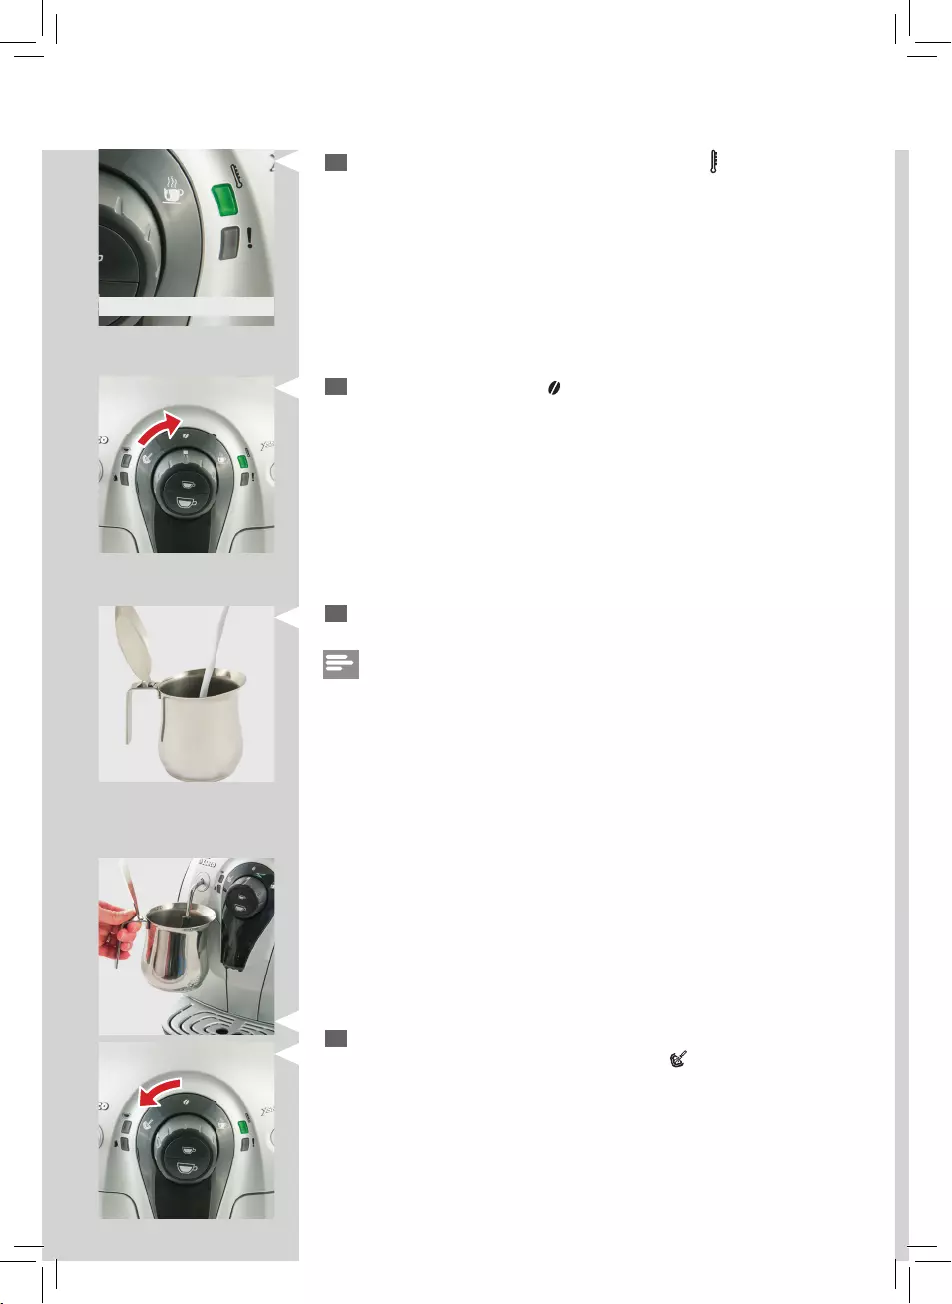
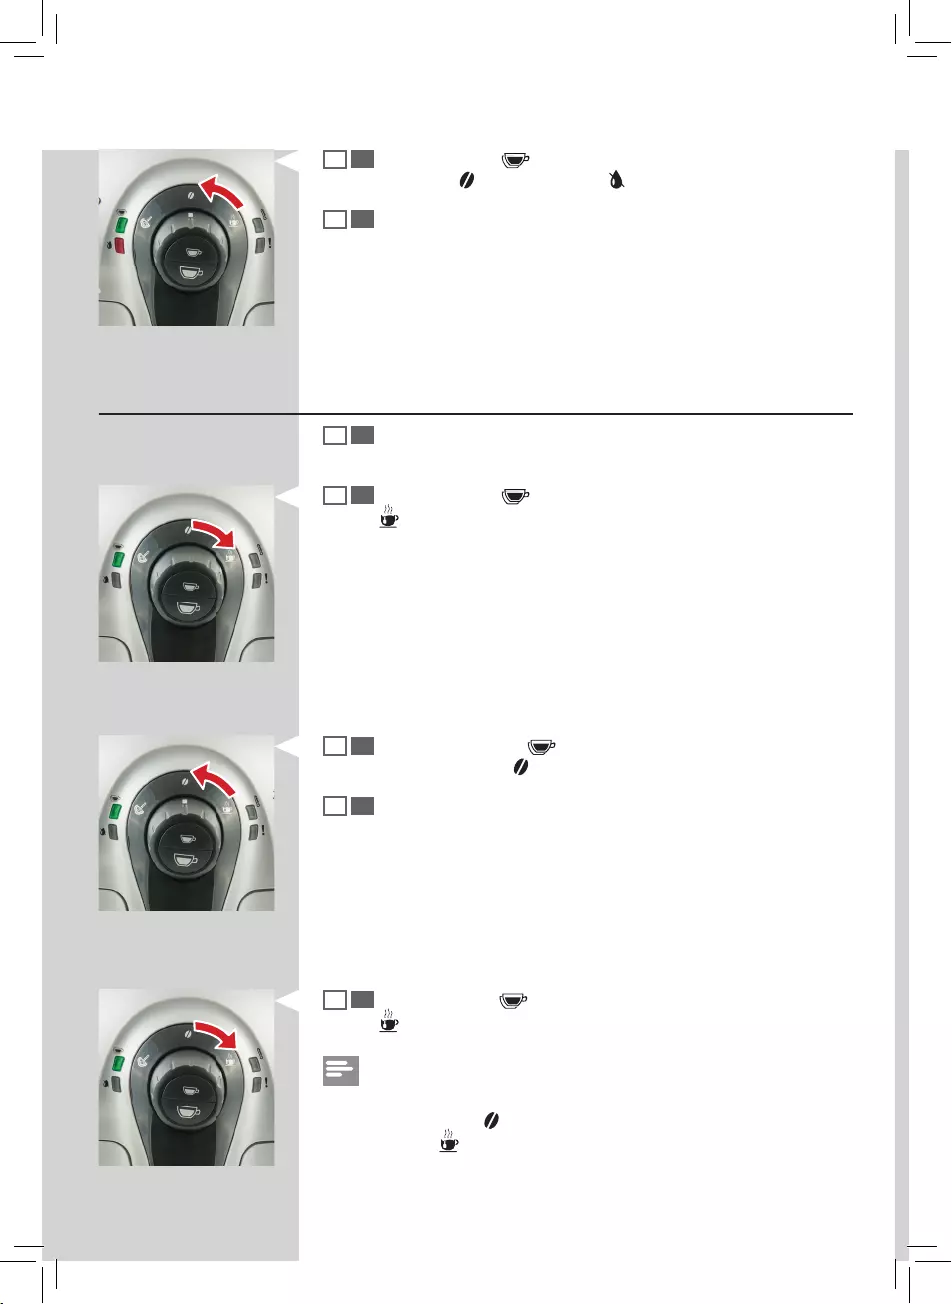
4 Steam dispensing will begin when the green light “ ” shines steadily.
5 Turn the control dial to the “ ” position to stop dispensing steam.
6 Fill 1/3 of a carafe with cold milk.
Note:
Use cold (~5°C / 41°F) milk with a protein content of at least 3% to ensure
optimum results when preparing a cappuccino. You can use whole milk or
low-fat milk depending on your personal taste.
7 Immerse the hot water/steam wand (Pannarello, if supplied) in the milk
to be heated and turn the control dial to the “ ” position. Froth the
milk by gently swirling the container and moving it up and down.
Steady on
ENGLISH
23
8 When the milk froth has the desired consistency, turn the control dial
back to the “ ” position to stop dispensing steam.
Caution:
After using steam to froth the milk, clean the hot water/steam wand
(or Pannarello, if supplied) by dispensing a small amount of hot water
into a container. For detailed cleaning instructions please see the
“Cleaning and Maintenance” section.
After having dispensed steam, you rst need to cool down the machine be—
fore you can brew an espresso or co ee. For this follow the steps described
below:
Steam/Coff ee Switchover
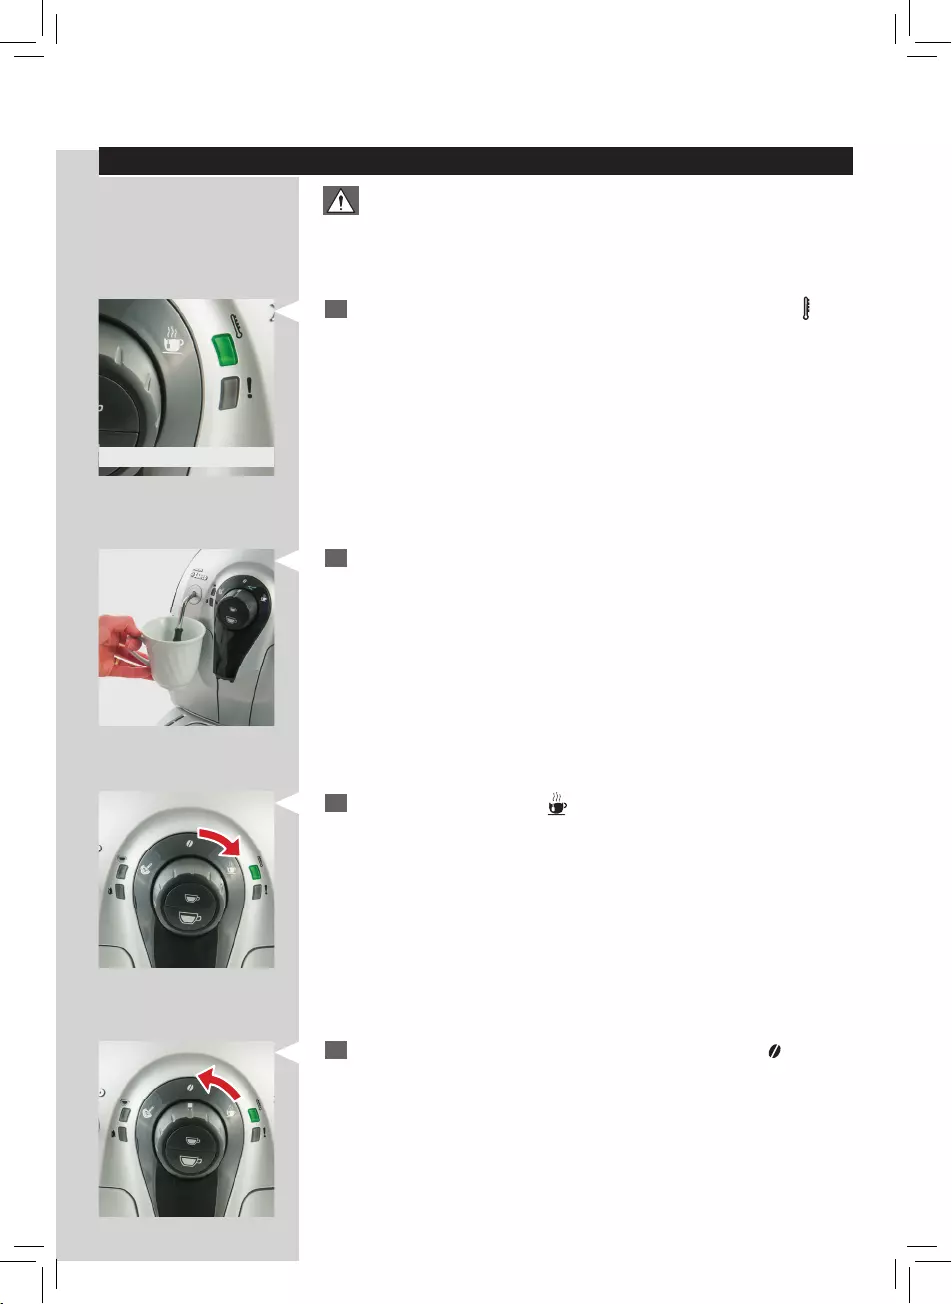
1 Press the “ ” or “ ” button; the “ ” light ashes fast to show that
the machine is overheated and cannot brew co ee.
2 You rst need to dispense a small amount of water to cool down the
machine.
Flashing fast
24
ENGLISH
3 Place a container under the hot water/steam wand (Pannarello, if sup-
plied) and turn the control dial to the “ ” position.
4 Hot water will be dispensed.
5 Wait for the temperature “ ” light to shine steadily.
6 Then turn the control dial back to the “ ” position to stop dispensing.
7 Now you can brew an espresso or co ee.
Making a capuccino
To make a cappuccino place your cup with frothed milk under the co ee
dispensing spout and brew an espresso.
ENGLISH
25
DISPENSING HOT WATER
Warning:
Danger of scalding! Dispensing may be preceded by small jets of hot
water. The hot water/steam wand may reach high temperatures: Never
touch it with bare hands. Use the appropriate protective handle only.
1 Before dispensing hot water, check that the green temperature “ ” light
shines steadily. If the light ashes slowly, wait for the machine to heat
up.
2 Place a cup under the hot water/steam wand (Pannarello, if supplied);
3 Turn the control dial to the “ ” position. The machine is warming up
and after a few seconds hot water will be dispensed.
4 To stop hot water dispensing, turn control dial back to the
“”
position.
Steady on
26
ENGLISH
CLEANING AND MAINTENANCE
Daily Cleaning of the Machine
Caution:
Timely cleaning and maintenance of your machine is very important
as it prolongs the life of your machine. Your machine gets exposed to
moist, coff ee and limescale continuously!
In this chapter it is described in detail which activities you need to
perform at which frequency. Not doing this will ultimately make your
machine stop working properly. This repair is NOT covered by your
warranty!
Note:
• Use a soft, dampened cloth to clean the machine.
• Do not immerse the machine in water
• Do not wash any of its parts in the dishwasher.
• Do not use alcohol, solvents, and/or abrasive objects to clean the machine.
• Do not dry the machine and/or its components using a microware
and/or standard oven.
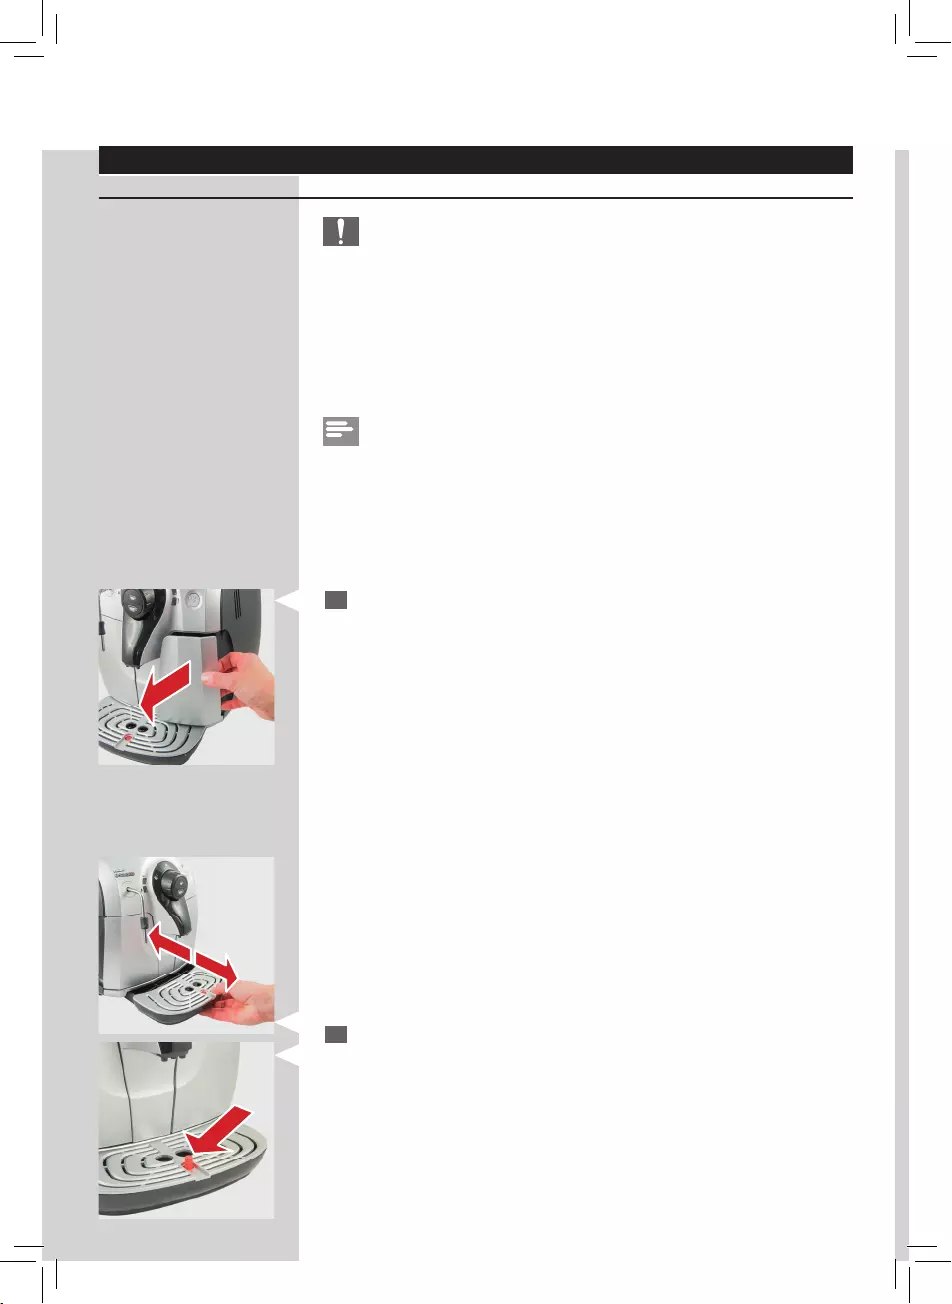
1 Empty and clean the co ee grounds drawer daily with the machine
turned on.
Other maintenance operations can only be carried out when the machine
is turned o and unplugged.
2 Empty and clean the drip tray. Do this also when the full drip tray indi-
cator is raised.
ENGLISH
27
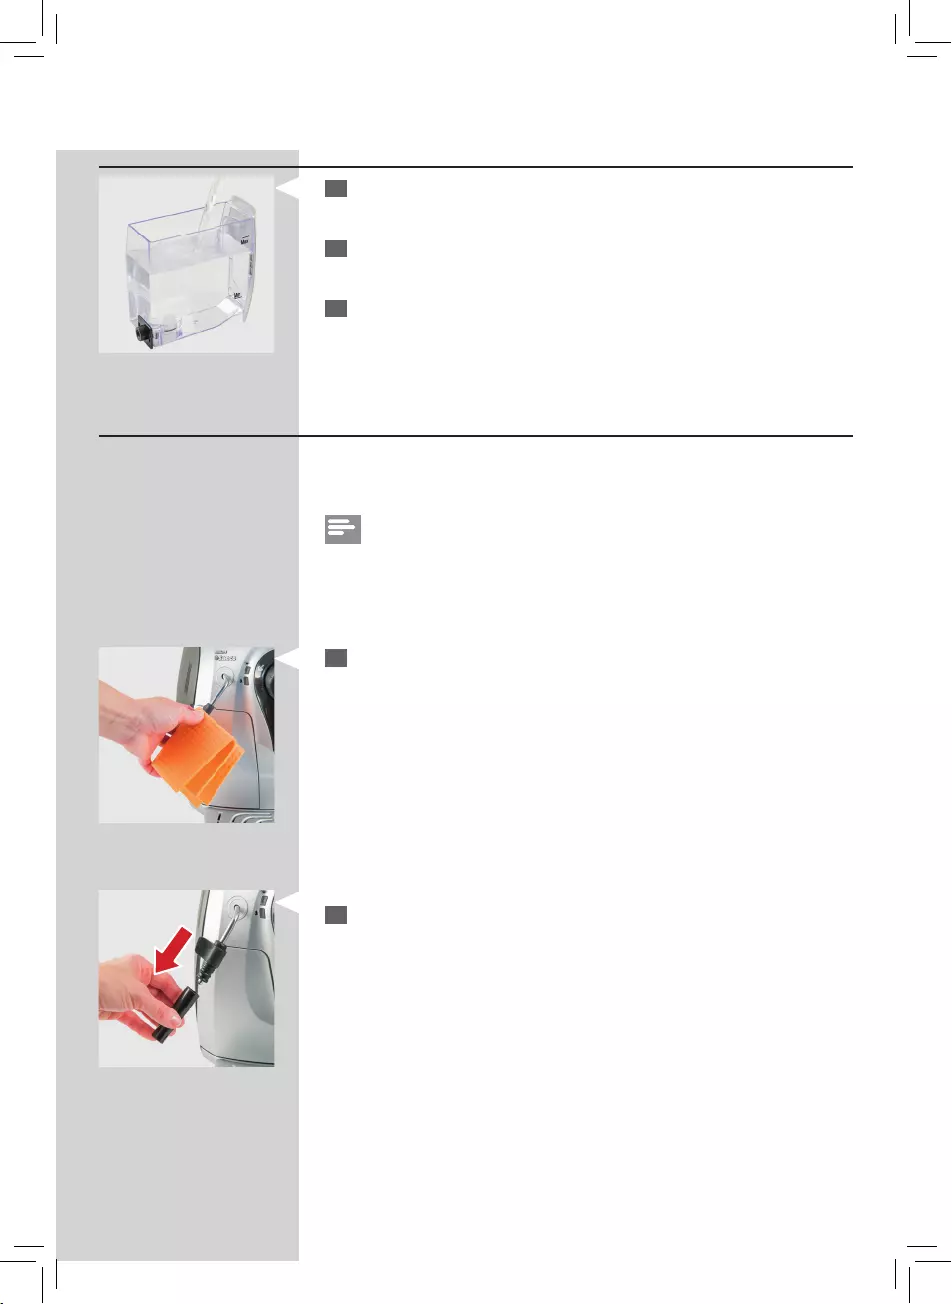
Daily cleaning of water tank
1 Remove the small white lter or the Intenza+ water lter (if installed)
from the water tank and wash it with fresh water.
2 Put the small white lter back or the Intenza+ water lter (if installed)
in its housing by gently pressing and turning it at the same time.
3 Fill the water tank with fresh water.
Daily cleaning of hot water/steam wand (Pannarello, if supplied)
The hot water/steam wand (Pannarello, if supplied) needs to be cleaned
each time after frothing milk.
Note:
Some models of the machine are supplied with a Pannarello and some
are not. Please follow the cleaning steps, depending on the model of your
machine.
For machine without Pannarello:
1 Clean the hot water/steam wand with a wet cloth to remove milk
residues.
For machine with Pannarello:
1 Remove the external part of the Pannarello and wash it with fresh
water.
28
ENGLISH
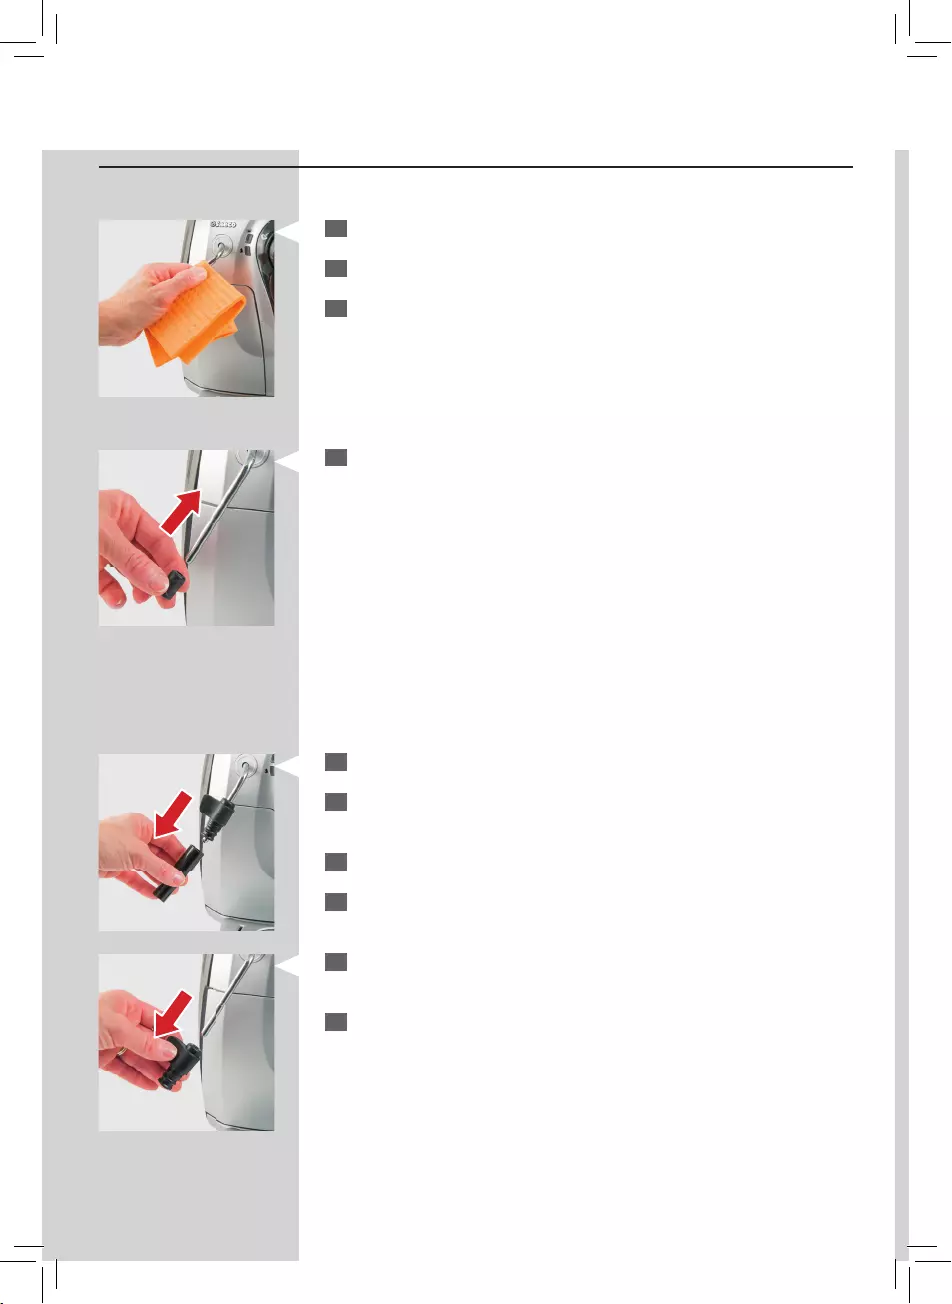
Weekly cleaning of hot water/steam wand (Pannarello, if supplied)
For machine without Pannarello:
1 Remove the protective handle from the hot water/steam wand.
2 Wash the protective handle with fresh water and dry it with a cloth.
3 Clean the hot water/steam wand with a wet cloth to remove milk
residues and dry it.
For machine with Pannarello:
1 Remove the external part of the Pannarello.
2 Remove the upper part of the Pannarello from the hot water/steam-
wand.
3 Wash the upper part of the Pannarello with fresh water.
4 Clean the hot water/steam wand with a wet cloth to remove milk
residues.
5 Put the upper part back into the hot water/steam wand (make sure it is
completely inserted).
6 Reassemble the external part of the Pannarello.
4 Put the protective handle back onto the hot water/steam wand.
ENGLISH
29
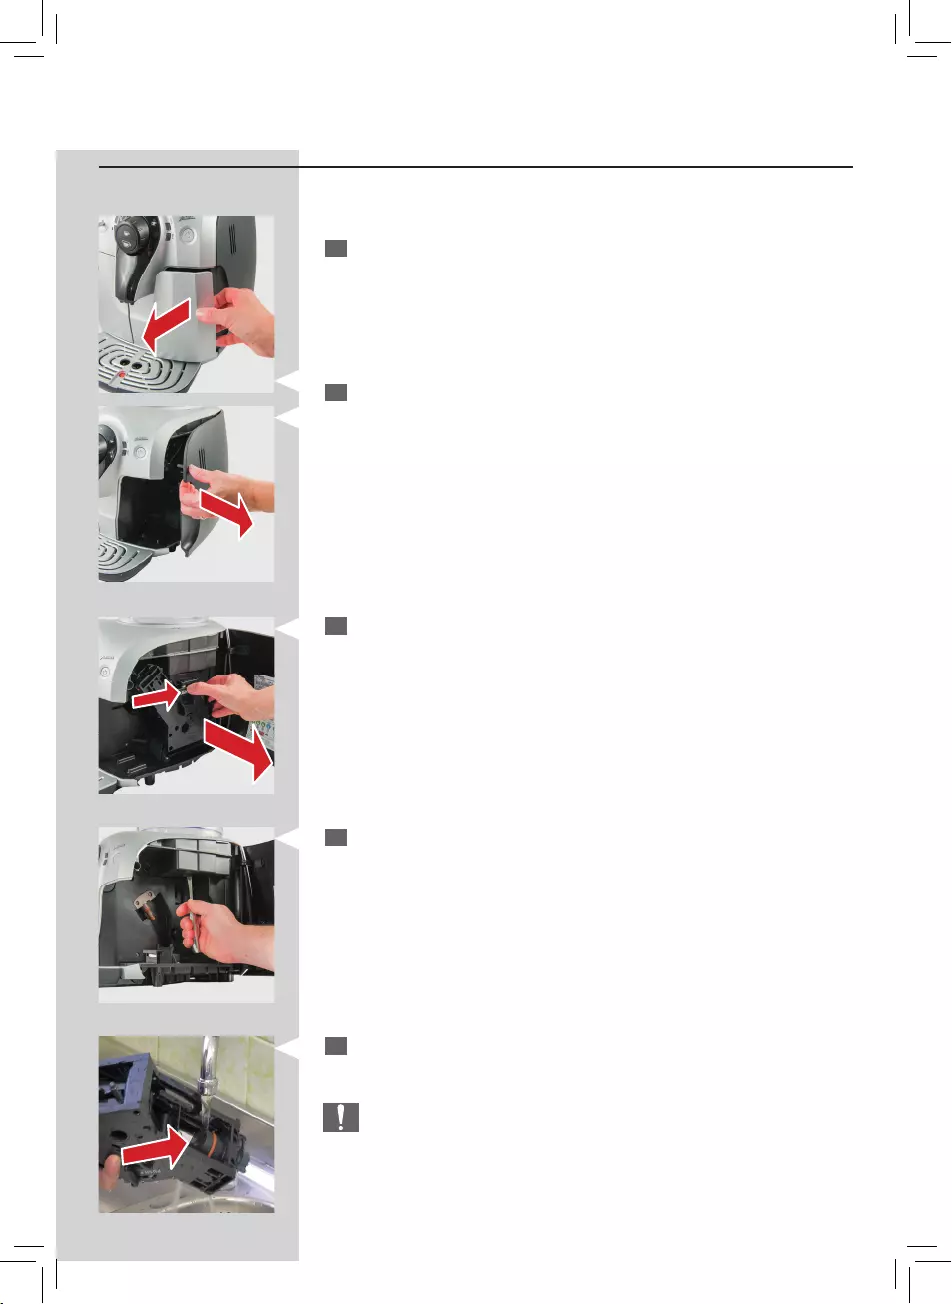
Weekly Cleaning of the Brew Group and of the coff ee exit duct
The brew group should be cleaned every time the co ee bean hopper is
lled or at least once a week.
1 Turn o the machine by pressing the ON/OFF button and unplug the
power cord.
2 Remove the co ee grounds drawer. Open the service door.
3 To remove the brew group, press the «PUSH» button and pull it by the
handle. Pull it horizontally by the handle without turning it.
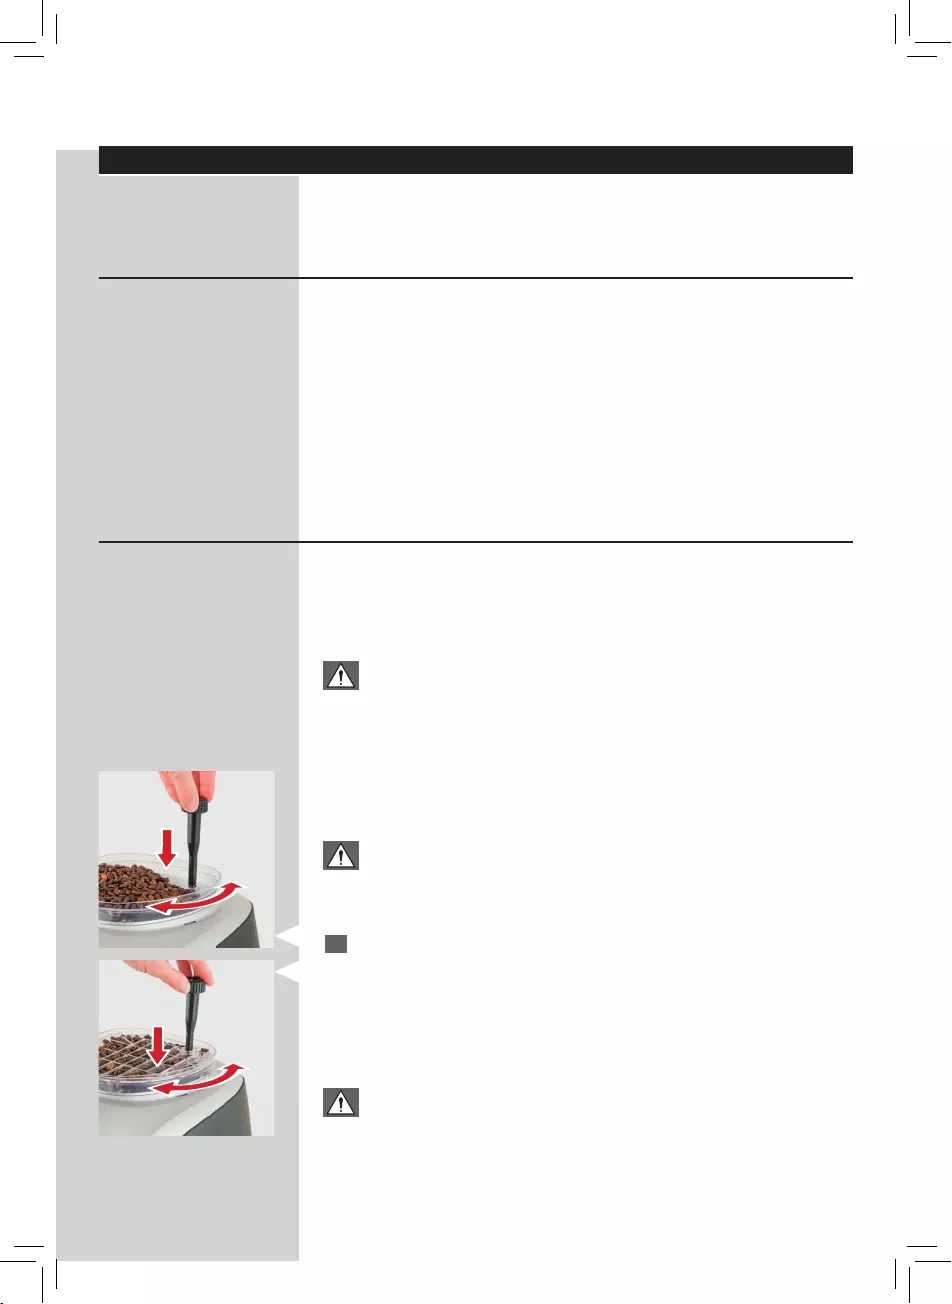
5 Thoroughly wash the brew group with fresh, lukewarm water and care-
fully clean the upper lter.
Caution:
Do not use detergent/ soap to clean the brew group.
4 Clean the co ee exit duct thoroughly with a spoon handle or with
another round-tipped kitchen utensil.
30
ENGLISH
6 Let the brew group air-dry thoroughly.
7 Thoroughly clean the inside of the machine using a soft, dampened
cloth.
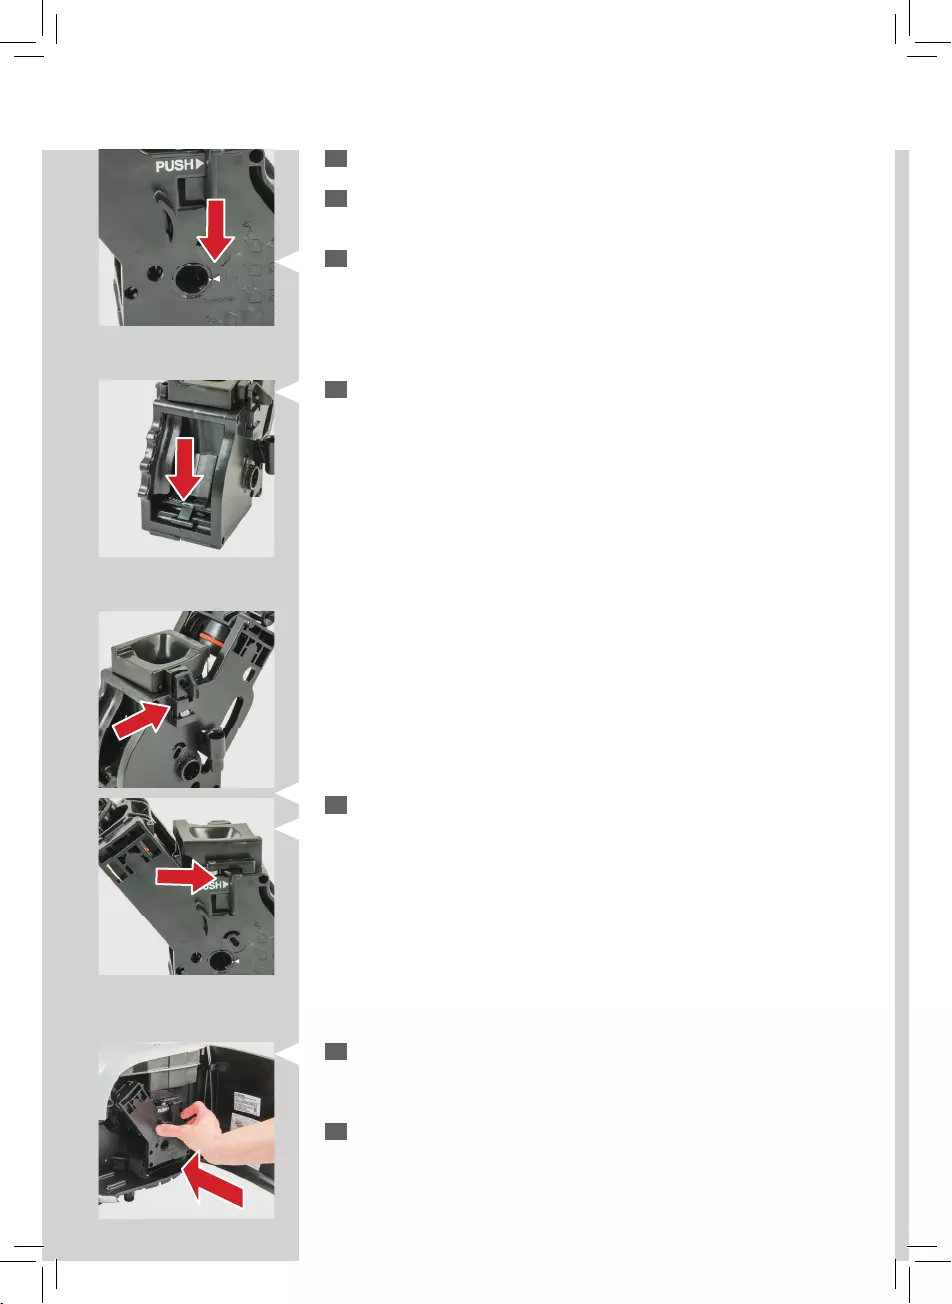
8 Make sure the brew group is in the rest position; the two reference signs
must match. If they do no match, proceed as described in step (8).
9 Gently pull down the lever until it is in contact with the brew group
base and the two reference signs on the side of the brew group do
match
10 Make sure the hook to lock the brew group is in the correct position
by rmly pressing the “PUSH” button until you hear a click. Check if the
hook is at the top end position. If it is not, please try again.
11 Insert the brew group in its seat again until it locks into place WITHOUT
pressing the “PUSH” button.
12 Insert the co ee grounds drawer. Close the service door.
ENGLISH
31
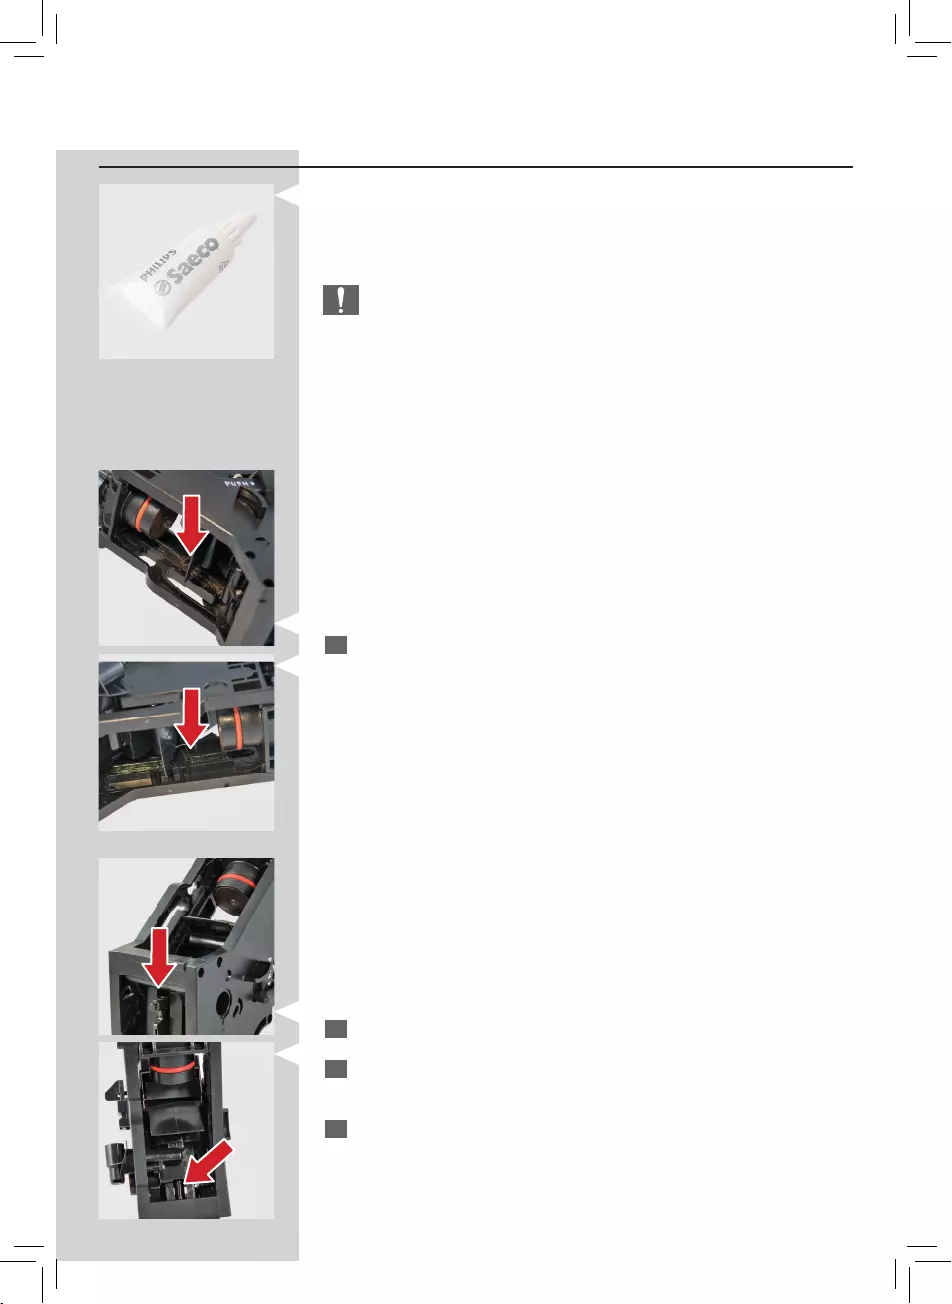
Monthly Lubrication of the Brew Group
Lubricate the brew group after approximately 500 cups of co ee or once a
month. The grease to lubricate the brew group can be purchased sepa-
rately. For further details, please refer to the maintenance products page in
this manual.
Caution:
Before lubricating the brew group, clean it under fresh water and let it
dry, as described in the “Weekly Cleaning of the Brew Group” section.
1 Apply the grease evenly on both side guides.
2 Lubricate the shaft too.
3 Insert the brew group in its seat until it locks into place. (see “Weekly
Cleaning of the Brew Group” section).
4 Insert the co ee grounds drawer and close the service door.

32
ENGLISH
DESCALING
When the red “ ” light starts fl ashing quickly and the green “ ” light is
on, you need to descale the machine.
Descaling time: 30 minutes
Caution:
Not descaling will ultimately make your machine stop working pro-
perly. In this case repair is NOT covered by your warranty.
Preparation
1 Empty the drip tray and place it back. Remove the Pannarello and
the Intenza water lter (as applicable).
2 Empty the water tank and poor the entire descaling solution in it.
Fill it up with fresh water to the MAX level and put it back.
3 Turn o the machine!
Warning:
If you don’t turn off the machine you will be making a coff ee instead of
activating the descaling cycle!
Use the Saeco decalci er only. Its formula has been designed to ensure
better machine performance. You can purchase the Saeco decalci er sepa-
rately. Please refer to the maintenance products page in this user manual
for further details.
Warning:
Once started you need to complete the descaling cycle till the very
end. During the process, you cannot turn the machine off through the
power on/off button.
If you have unplugged the power cord to stop, you need to plug it
back in, turn the machine on and redo the descaling process from
step 7.
Warning:
Never drink the descaling solution or any products dispensed until the
cycle has been carried out to the end. Never use vinegar as a discaling
solution.
ENGLISH
33
4 Make sure the control dial is on the “ ” position.
5 Place a large container under the hotwater/steam wand.
Descaling
6 Press the “ ” and “ ” button at the same time for about 5
seconds.
7 The red “ ” light starts ashing quickly and will keep on doing this
through out the entire descaling cycle.
The machine dispenses internally at several one minute intervals
the descaling solution in the drip tray.
It does not dispense through the hot water/steam wand. This will
take approximately 5 minutes.
8 When the green “ ” light turns on, turn the control dial to the “
” position.
9 After approximately 1 minute, the machine dispenses at several
one minute intervals through the hot water/steam wand until the
water tank is empty. This will take approximately 15 minutes.
34
ENGLISH
10 When the green “ ” light starts ashing slowly, turn the control
dial to the “ ” position. The red “ ” light turns on.
11 Empty the large container and the drip tray and place them back.
Rinsing Cycle 1
12 Rinse the water tank and ll it up to the MAX level with fresh water.
Put it back in the machine.
13 When the green “ ” light turns on, turn the control dial to the “
” position. The machine will prime its internal circuits.
14 After this, the green “ ” light starts ashing slowly. Turn the
control dial to the “ ” position.
15 The machine dispenses water internally in the drip tray. It does not
dispense through the hot water/steam wand.
16 When the green“ ” light turns on, turn the control dial to the “
” position. The machine now dispenses through the hot water/
steam wand until the water tank is empty.
Note:
If you want to stop dispensing (for example to empty the container), turn
the control dial to the “ ” position. To restart dispensing, turn the control
dial back to the “ ” position.
ENGLISH
35
17 When the green “ ” light starts ashing slowly. Turn the control
dial to the “ ” position. The red “ ” light turns on.
18 Empty the large container and the drip tray and place them back.
Rinsing Cycle 2
19 Rinse the water tank and ll it up to the MAX level with fresh water.
Put it back in the machine.
20 When the green “ ” light turns on, turn the control dial to the “
” position.
21 The machine dispenses through the hot water/steam wand until
the water tank is empty.
22 After this, the machine turns o . The red “ ” light switches o . Turn
the control dial to the “ ” position.
23 Rinse the drip tray and put it back. Reinstall the Pannarello and
Intenza water lter (as applicable).
24 Rinse the water tank and ll it up to the MAX level with fresh water.
Put it back in the machine.
25 To make co ee, turn on the machine.
36
ENGLISH
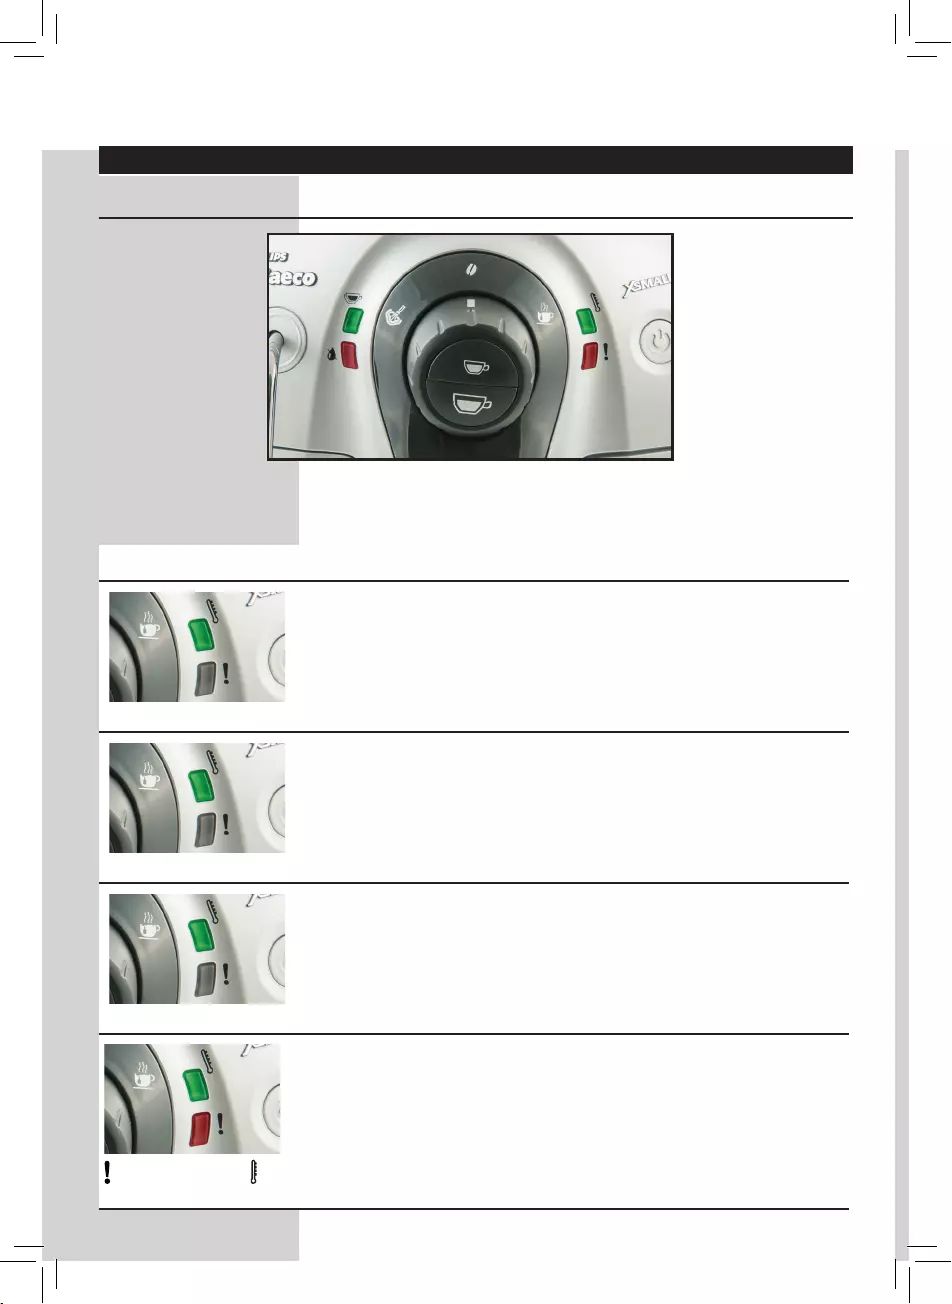
MEANING OF THE WARNING SIGNALS
Control panel
Light Signals Causes Solutions
Steady on
The machine has warmed up and is now
ready:
— For co ee brewing;
— For hot water dispensing;
— For steam dispensing
Slowly fl ashing
The machine is warming up to brew
espresso or dispense hot water or steam.
Quickly fl ashing
Overheating protection active.
You cannot brew co ee yet.
You need to dispense some hot water rst to cool down the machine.
Flashing quickly and light
steady on
You need to descale the machine! Not descaling will ultimately make your machine stop
working properly.
This is NOT covered by your warranty!
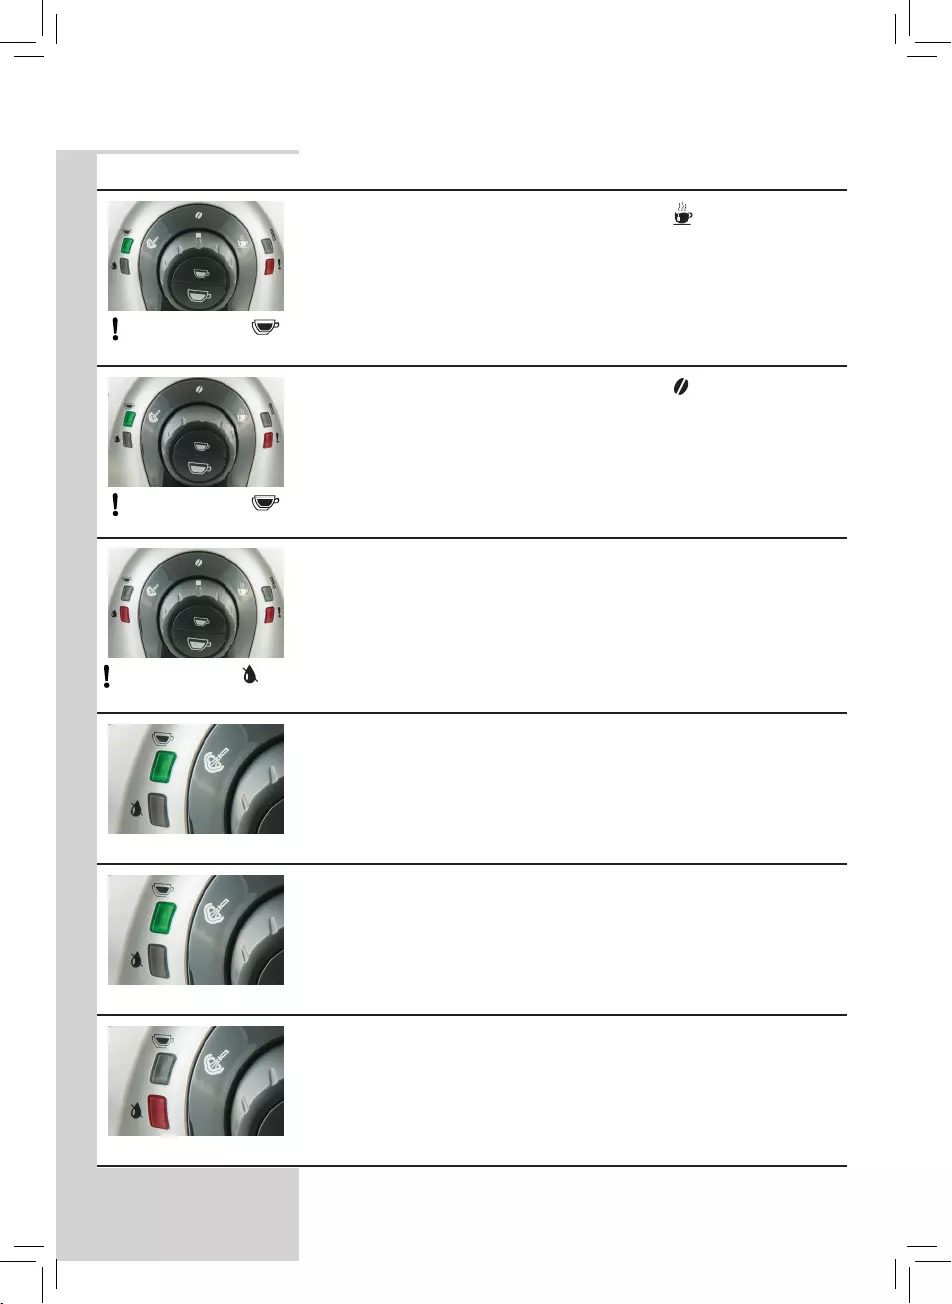
ENGLISH
37
Light Signals Causes Solutions
Flashing quickly and
light steady on
The machine is in descaling mode.
Complete the descaling procedure till
the very end.
Turn the control dial to the “ ” position.
Flashing quickly and
slowly fl ashing.
The machine is in descaling mode.
Complete the descaling procedure till
the very end.
Turn the control dial to the “ ” position.
Flashing quickly and light
steady on.
The machine is in descaling mode.
Complete the descaling procedure till
the very end.
Rinse the water tank and ll it up to the MAX level.
Slowly fl ashing
The machine is programming the amount
of co ee to brew .
Release the button as soon as the desired amount of co ee is
reached.
Steady on
The machine is brewing a double co ee.
Steady on
Low water level. Fill the water tank with fresh water. After reinserting the lled water
tank, the indicator light turns o .
38
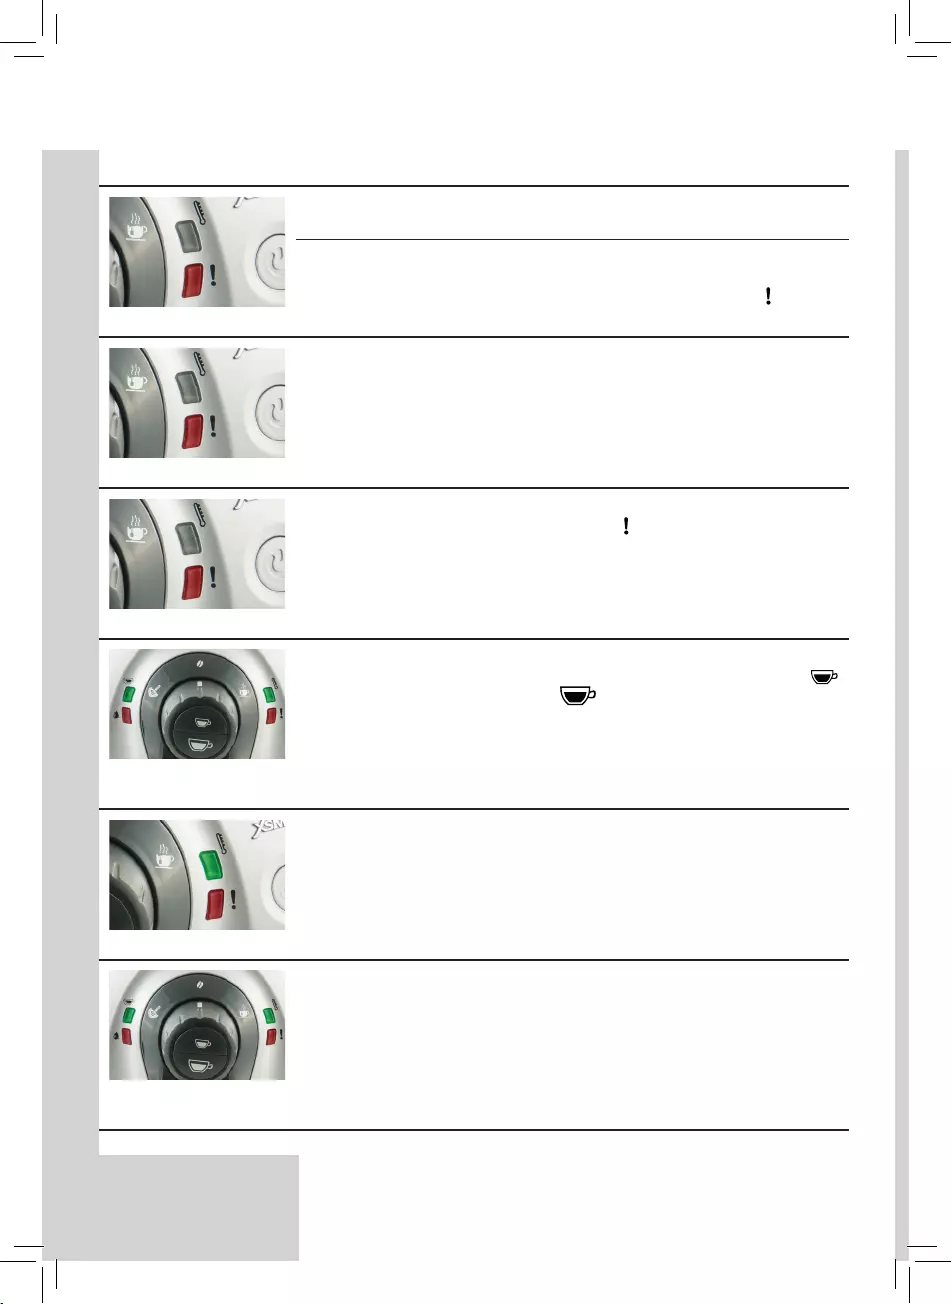
ENGLISH
Light Signals Causes Solutions
Steady on
The co ee bean hopper is empty. Fill the coffee bean hopper with coffee beans and start the
procedure again.
The co ee grounds drawer is full. With the machine turned on, empty the co ee grounds drawer. If
the co ee grounds drawer is emptied with the machine turned o
the co ee cycle counter is not reset. Wait until the “ ” light starts to
ash before placing back the co ee grounds drawer.
Quickly fl ashing
The water circuit is empty. Fill the water tank with fresh water and dispense hot water as
described in Section “Using the Machine for the First Time”.
Slowly fl ashing
Brew group is not inserted. Coffee ground
drawer is not inserted.
Service door is open.
Control dial is not in correct position.
Make sure that all components have been correctly inserted and
closed. The ashing “ ” light will now turn o .
Flashing in counter-clockwise
direction
The machine is performing the rinse/self-
cleaning cycle.
The machine ends the rinse/self-cleaning cycle automatically.
You can interrupt the rinse/self-cleaning cycle by pressing “”
either “” buttons
Flashing alternately
A fault has occurred in the brew group. Try again to brew another espresso or a co ee.
Flashing
simultaneously
The machine is out of order. Turn the machine o . After 30-seconds, turn it back on.
Try this 2 or 3 times.
If the machine does NOT start, contact the Philips Saeco hotline.
39
TROUBLE SHOOTING
This chapter summarizes the most common problems you could encoun-
ter with your machine. If you are unable to solve the problem with the
information below, visit www.philips.com/support for a list of frequently
asked questions or contact the Philips Saeco hotline in your country. You
nd its contact details in the warranty booklet bypacked separately or on
www.philips.com/support.
Problem Possible Cause Solution
The machine does not turn
on.
The machine is not connected to
the power source.
Connect the machine to the power
source.
The coee is not hot enough. The cups are cold. Preheat the cups with hot water.
Hot water or steam is not
dispensed.
The hole of the hot water/steam
wand is clogged.
Clean the hole of the hot water/
steam wand using a pin.
Make sure that the machine is
turned o and has cooled down
before performing this operation.
Pannarello is dirty (if supplied). Clean the Pannarello.
The espresso does not have
enough crema (see note).
The coee blend is unsuitable,
the coee is not freshly roasted or
the grind is too coarse.
Change coee blend or adjust the
ceramic coee grinder as explained
in section “How to adjust the ce-
ramic coee grinder”.
The machine takes a long
time to warm up or the
amount of water dispensed
from the hot water/steam
wand is too small
The machine’s water circuit is
clogged by limescale build-up.
Descale the machine.
The brew group cannot be
removed.
The brew group is out of place. Turn the machine on. Close the ser-
vice door. The brew group automati-
cally returns to the correct position.
The coee grounds drawer is
inserted.
Remove the coee grounds drawer,
thereafter remove the brew group.
The machine grinds the
coee beans but no coee
comes out (see note).
The brew group is dirty. Clean the brew group (section
“Weekly Cleaning of the Brew
Group”).
The water circuit is not primed. Fill the water tank with fresh water
and dispense hot water.
This may sometimes occur when
the machine is automatically
adjusting the dose.
Brew a few espressos as described in
the section “Saeco Adapting System”.
The dispensing spout is dirty. Clean the dispensing spout.
40
Problem Possible Cause Solution
The coee is too weak (see
note).
This may sometimes occur when
the machine is automatically
adjusting the dose.
Brew a few espressos as described in
the section “Saeco Adapting System”.
The ceramic coee grinder is set
to a coarse grind.
Adjust the ceramic coee grinder to
a ner setting (see section “Adjust-
ing the Ceramic Coee Grinder”)
Coee is brewed slowly (see
note).
The coee grind is too ne. Change coee blend or adjust the
grind as explained in section “Adjust-
ing the Ceramic Coee Grinder”.
The water circuit is not primed. Fill the water tank with fresh water
and dispense hot water.
The brew group is dirty. Clean the brew group (section
“Weekly Cleaning of the Brew
Group”).
The drip tray gets lled al-
though no water is drained.
Sometimes water is drained auto-
matically by the machine into the
drip tray to manage the rinsing of
the circuits and ensure optimum
machine performance.
This is seen as normal machine
behaviour.
Note:
These problems can be considered normal if the coee blend has been changed or if the machine has just been
installed. In this case wait until the machine performs a self-adjusting operation as described in section “Saeco
Adapting System”.
41
ENERGY SAVING
Stand-by
The machine is designed for energy saving- proven by the Class A energy
label.
After 60 minutes of inactivity, the machine turns o automatically.
Disposal
Do not throw away the machine with the normal household waste at the
end of its life, but hand it in at an ocial collection point for recycling. By
doing this, you help to preserve the environment.
The packing materials can be recycled.
— Machine: unplug the machine and cut the power cord.
— Deliver the appliance and power cord to a service center or public
waste disposal facility.
This product complies with eu directive 2002/96/EC.
The symbol on the product or on its packaging indicates that this product
may not be treated as household waste.
Instead it shall be handed over to the applicable collection point for the
recycling of electrical and electronic equipment.
By ensuring this product is disposed of correctly, you will help prevent
potential negative consequences for the environment and human health,
which could otherwise be caused by inappropriate waste handling of this
product. For more detailed information about recycling of this product,
please contact your local city oce, your household waste disposal service
or the shop where you purchased the product.
42
TECHNICAL SPECIFICATION
The manufacturer reserves the right to make changes to the technical
specications of the product
Nominal Voltage — Power Rating
— Power Supply
See label on the inside of the service
door
Housing material ABS — Thermoplastic
Size (w x h x d) 295 x 325 x 420 mm — 11.5” x 13” x 16.5”
Weight 6.9 kg — 15 lbs
Power Cord Length 800 — 1200 mm / 31.5” — 47”
Control Panel Front
Pannarello (only available for
certain models)
Special for cappuccinos
Cup sizes Up to 95mm
Water Tank 1.0 litres – 33 oz. / Removable
Coee Bean Hopper Capacity 170 g / 6.5 oz.
Coee grounds Drawer Capacity 8
Pump pressure 15 bar
Boiler Stainless steel
Safety mechanisms Thermal fuse
GUARANTEE AND SERVICE
Guarantee
For detailed information on your warranty and related conditions, please
read the warranty booklet bypacked separately.
Service
We want to ensure that you remain satised with your machine. If not done
already, please register your product on www.philips.com/welcome so
that we can stay in contact with you and send you cleaning and descaling
reminders.
If you need service or support, please visit the Philips website at
www.philips.com/support or contact the Philips Saeco hotline in your
country. You nd its phone number in the worldwide booklet by packed
separately or on www.philips.com/support.
ENGLISH
43
ORDERING MAINTENANCE PRODUCTS
For cleaning and descaling, use Saeco maintenance products only.You can
purchase these products at the Philips online shop (if available in your
country) at www.shop.philips.com/service,
your local dealer or at
authorised service centres.
If you have any di culties obtaining maintenance products for your
machine, please contact the Philips Saeco hotline in your country.
The contact details can be found in the warranty booklet by-packed
separately or on www.philips.com/support.
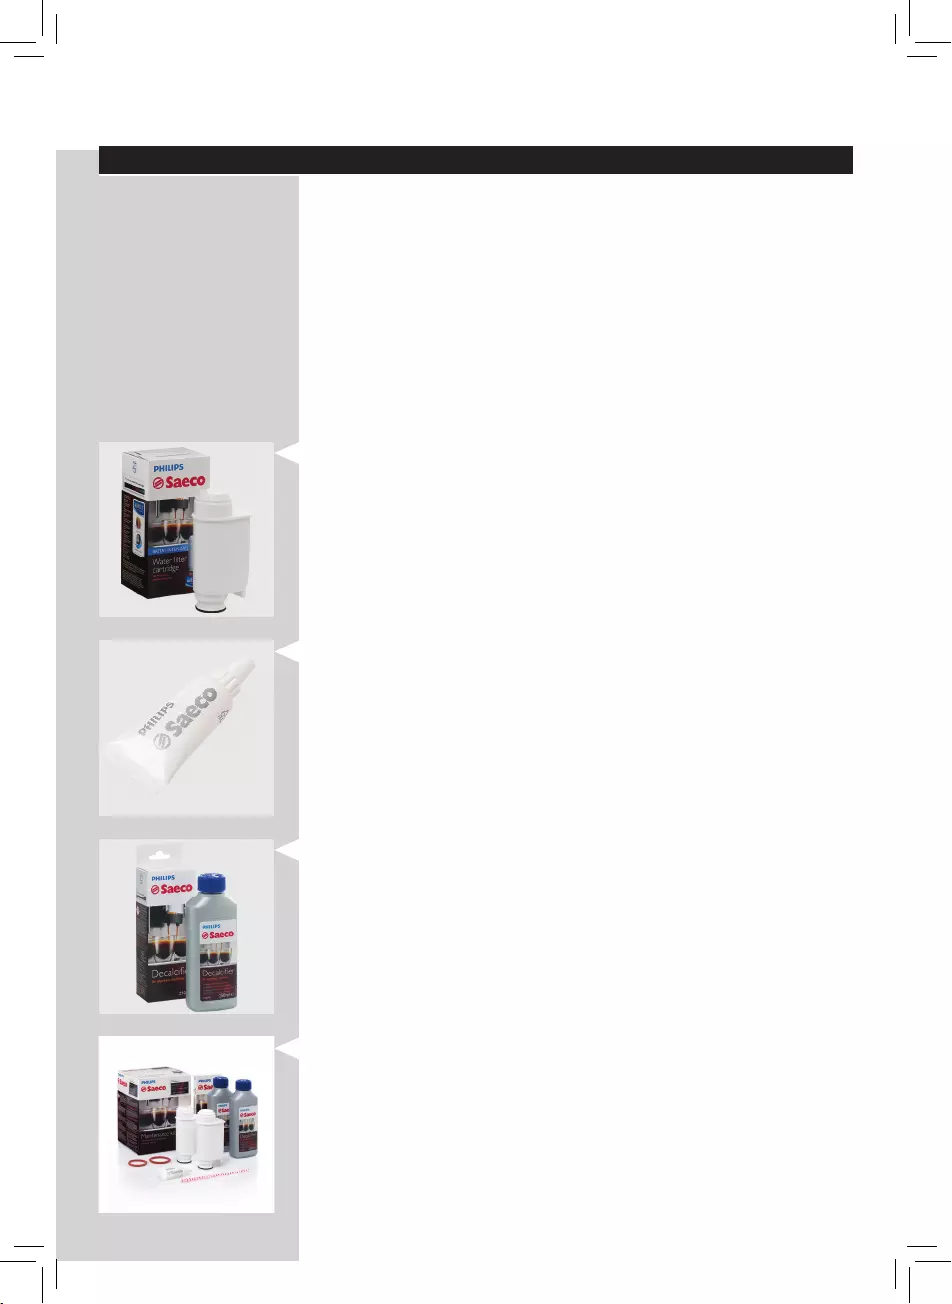
Overview of maintenance products
INTENZA+ WATER FILTER CA6702
GREASE HD5061
DECALCIFIER CA6700
MAINTENANCE KIT CA 6706

www.philips.com/saeco
The manufacturer reserves the right to make changes without prior notice.
Rev.00 del 15-11-13
02