
-
Consumer services
>
-
User manual, instruction for use
>
-
Beverages
>
-
Filter
>
User manual and frequently asked questions FCM smart’n’light
Light on your world automatically on at the touch of a button – to choose the strength of your coffee
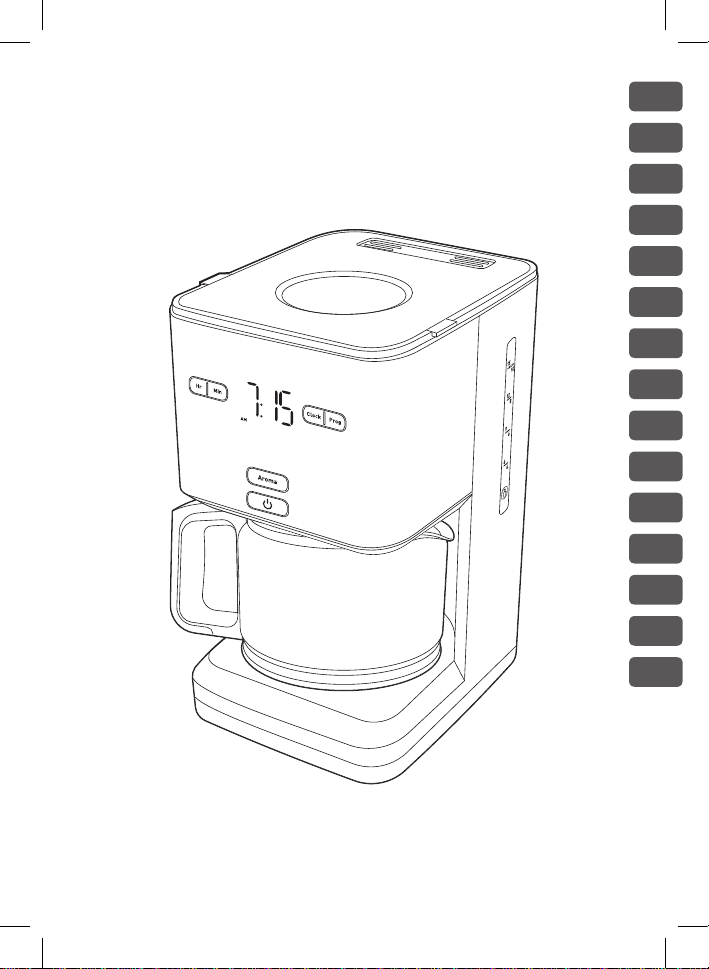
The Tefal Smart’n Light Coffee Maker is the perfect way to kick-start your day, offering delicious and aromatic coffee every time. Perfect coffeemaking is at your fingertips with a crystal-clear, highly intuitive display and simple controls. The oversized water head design ensures quick results, while the AROMA function offers two-step pre-infusion brewing that draws out maximum flavor and aroma from your coffee. All this, with a stylish modern aesthetic that blends seamlessly into any kitchen.
Reference : CM600810
Frequent questions
Never put your jug or insulated pot in the microwave oven, dishwasher or on a hotplate.
You can use a paper filter or permanent filter (nylon or metal). These two types of filter are sold in stores.
Operate your filter coffee maker for the first time without any coffee and with the equivalent of one jug of water to rinse it.
The hotplate is used to keep the coffee at the required temperature while leaving the coffee maker switched on. This function is available only with coffee makers that come with a glass pot.
Depending your appliance model, you can buy it from an after sales service or from the «Accessories» section of the website.
Scale deposits naturally form in your coffee maker. Regular descaling helps protect your coffee maker and ensures it a longer life. It will also help maintain a quality of coffee that remains constant over time.
Use the descaling kit or some white vinegar:
• Use some descaling solution diluted in half a litre of water or use 25cl of white vinegar in half a litre of water.
• Pour the solution into the water tank (without coffee),
• Start the cycle (without any coffee). After 2 minutes, stop the cycle manually. Leave the coffee maker for an hour,

• Restart the coffee maker to finish the cycle,

• To rinse the machine, run 2 cycles with water but without coffee.

Repeat the complete descaling operation, if necessary.
How often you descale your coffee maker depends on the hardness of the water and on how often you use your coffee maker. The following are tell-tell signs of scaling: the coffee making cycle takes longer, the appliance produces lots of steam, makes much more noise at the end of the cycle or stops during the cycle, this means that scale has built up in your coffee maker. You should descale your coffee maker between every 20 to 40 cycles or once a month depending on the hardness of the water.
Insulated carafes should never be put into the dishwasher!
A plastic insulated carafe should be rinsed under hot water immediately after use.
Never clean the carafe with a dishwashing brush or any other object as this may create hairline cracks that can cause the glass to implode. A brushed steel insulated carafe can easily be cleaned with a dishwashing brush or similar object, even inside.
The glass coffee pot and the filter receptacle must be washed in the upper rack of the dishwasher.
• The quantity of ground coffee is too large. We recommend using one measure of coffee (7 grams) per mug.
• The ground coffee is too fine (‘Espresso’ type ground coffee).
• If you use a permanent filter, do not use a paper filter as well.
• Certain types of paper filter (to make full-bodied coffees) can prolong the time in which it takes for the water to pass through the filter and ultimately cause the water to overflow.
The coffee maker is lined with scale. You should descale it.
In the event of a power cut, it may be necessary to press the On/Off button again.
On models with a timer, the clock must be programmed.
Clean the anti-drip valve of the filter holder under running water, activating it manually.
After following the instructions in the user manual for starting the appliance, make sure that your electrical socket is working by plugging another appliance. If it still does not work, do not try to dismantle or repair the appliance yourself, instead, take it to an approved repair centre
Do not use your appliance. To avoid any danger, have it replaced by an approved repair centre.
This is entirely dependent on taste: you can buy pre-ground coffee for filter machines from supermarkets in a variety of strengths and flavours, you can grind your own coffee beans or you can buy beans at a coffee shop and ask for them to be ground to filter consistency.
Always keep ground coffee in an airtight container or seal the pack with a bag clip. Keep the container in the fridge to prolong freshness.
Medium to fine ground (but not too fine). You can also ask for «Espresso ground».
The inner circuits scale up, water doesn’t flow through properly, and flows much slower.
The warranty excludes failures due to a lack of regular descaling.
Your appliance contains valuable materials which can be recovered or recycled. Leave it at a local civic waste collection point.
Please go to the “Accessories” section of the website to easily find whatever you need for your product.
Find more detailed information in the Guarantee section of this website.
If you believe that one part is missing, please call Consumer Services Center and we will help you find a suitable solution.
Перейти к контенту
Русские электронные инструкции по эксплуатации
Постоянно обновляемый большой каталог документации по эксплуатации и использованию современных устройств и оборудования на русском языке. Бесплатное скачивание файлов.
Поиск:
Главная
♥ В закладки
Просмотр инструкции в pdf
Инструкция по эксплуатации кофеварки Tefal Smart&Light CM600810.
Скачать инструкцию к кофеварке Tefal Smart&Light CM600810 (1,94 МБ)
Инструкции кофеварок Tefal
« Инструкция к кофеварке WILFA WSP-2 A
» Инструкция к кофеварке Marta MT-2140 Red Ruby
Вам также может быть интересно

Инструкция к фену Tefal Motion Dry HV5700

Инструкция к кофеварке Tefal Confidence CM361838

Инструкция к роботу-пылесосу Tefal RG7975WH X-plorer Serie 95 Animal Care
Инструкция к пылесосу Tefal Silence Force Cyclonic TW7260EA

Инструкция к пылесосу Tefal Silence Force 4A TW7647EA
Инструкция к пылесосу Tefal Silence Force Cyclonic TW7690EA

Инструкция к пылесосу Tefal Allergy TY6837WO

Инструкция к мультиварке Tefal Turbo Cuisine CY753832
Добавить комментарий
Имя *
Email *
Сайт
Комментарий
Сохранить моё имя, email и адрес сайта в этом браузере для последующих моих комментариев.
- Добавить инструкцию
- Заказать инструкцию
- Политика конфиденциальности
View the manual for the Tefal CM600810 here, for free. This manual comes under the category coffee makers and has been rated by 1 people with an average of a 7.5. This manual is available in the following languages: English. Do you have a question about the Tefal CM600810 or do you need help?
Ask your question here
Frequently Asked Questions
Can’t find the answer to your question in the manual? You may find the answer to your question in the FAQs about the Tefal CM600810 below.
What is the weight of the Tefal CM600810?
The Tefal CM600810 has a weight of 2100 g.
What is the height of the Tefal CM600810?
The Tefal CM600810 has a height of 318 mm.
What is the width of the Tefal CM600810?
The Tefal CM600810 has a width of 186 mm.
What is the best way to descale my coffee maker?
To descale the coffee maker, it is recommended to use a liquid descaling agent which is labelled as suitable for coffee machines.
What is the depth of the Tefal CM600810?
The Tefal CM600810 has a depth of 235 mm.
How often should I descale my coffee maker?
How often a coffee machine needs to be descaled depends on how often it is used and the hardness of the water.
If hard water is used it is recommended to descale once a month, if soft water is used once a quarter is sufficient.
What does the grind say about the taste of the coffee?
How the coffee beans are ground strongly influences the taste of the coffee. If the coffee beans are very finely ground you will have a stronger taste and if the grind is coarser you will have a milder taste.
What is espresso?
Espresso is a small amount of concentrated coffee.
How long can I keep coffee beans?
The best-before date can be found on the packaging of the coffee beans. This best-before date applies as long as the bag is closed.
What is the best way to store coffee?
It is recommended to store coffee in an airtight and clean container.
Is the manual of the Tefal CM600810 available in English?
Yes, the manual of the Tefal CM600810 is available in English .
Is your question not listed? Ask your question here
FR
EN
DE
NL
IT
ES
PT
EL
TR
RU
PL
BG
HR
RO
SL
N°4
1 2 3
4 5 6
7 8 9
10 11 12
B
P
C
A
H
L
M
N
I
D
E
F
G
K
Aroma
J
O
1 2 3
4 5 6
N°4
7 8 9
10 11 12
13 14
1716 18
15a
15b

Lire attentivement le mode d’emploi avant la première utilisation de
votre appareil et conservez-le : une utilisation non conforme dégagerait le
fabricant de toute responsabilité.
CONSIGNES DE SÉCURITÉ
• Cet appareil n’est pas prévu pour être utilisé par
des personnes (y compris les enfants) dont les
capacités physiques, sensorielles ou mentales
sont réduites ou des personnes dénuées
d’expérience ou de connaissance, sauf si elles ont
pu bénéficier, par l’intermédiaire d’une personne
responsable de leur sécurité, d’une surveillance ou
d’instructions préalables concernant l’utilisation
de l’appareil.
• Il convient de surveiller les enfants pour s’assurer
qu’ils ne jouent pas avec l’appareil.
• Si le câble d’alimentation est endommagé,
n’utilisez pas l’appareil. Faites obligatoirement
remplacer le câble d’alimentation par le fabricant,
son service après-vente ou des personnes de
qualification similaire afin d’éviter tout danger.
• Votre appareil est destiné uniquement à un usage
domestique et à l’intérieur de la maison et à une
altitude inférieure à 2000m.
• Ne pas mettre l’appareil, le câble d’alimentation
ou la fiche dans l’eau ou tout autre liquide.
• Votre machine a été conçue pour un usage
5

domestique seulement.
• Elle n’a pas été conçue pour être utilisée dans
les cas suivants qui ne sont pas couverts par la
garantie :
– Dans des coins de cuisines réservés au
personnel dans des magasins, bureaux et autres
environnements professionnels,
– Dans des fermes,
– Par les clients des hôtels, motels et autres
environnements à caractère résidentiel,
– Dans des environnements de type chambres
d’hôtes.
• Toujours suivre les instructions de nettoyage pour
nettoyer votre appareil:
– Débrancher l’appareil.
– Ne pas nettoyer l’appareil chaud.
– Nettoyer avec un chiffon ou une éponge
humide.
– Ne jamais mettre l’appareil dans l’eau ou sous
l’eau courante.
• AVERTISSEMENT : Risques de blessures en cas de
mauvaise utilisation de l’appareil.
• AVERTISSEMENT : Après utilisation, ne pas toucher
la plaque de maintien au chaud, soumise à une
chaleur résiduelle. Assurez-vous de ne toucher
que la poignée de la verseuse verre pendant la
6

chauffe et jusqu’au refroidissement complet.
• Cet appareil peut être utilisé par des enfants âgés
d’au moins 8 ans, à condition qu’ils bénéficient
d’une surveillance ou qu’ils aient reçu des
instructions quant à l’utilisation de l’appareil
en toute sécurité et qu’ils comprennent bien les
dangers encourus. Le nettoyage et l’entretien
par l’utilisateur ne doivent pas être effectués par
des enfants, à moins qu’ils ne soient âgés de plus
de 8 ans et qu’ils soient sous la surveillance d’un
adulte.
• Conserver l’appareil et son câble hors de portée
des enfants âgés de moins de 8 ans.
• Cet appareil peut être utilisé par des personnes
dont les capacités physiques, sensorielles ou
mentales sont réduites ou dont l’expérience
ou les connaissances ne sont pas suffisantes, à
condition qu’ils bénéficient d’une surveillance
ou qu’ils aient reçu des instructions quant à
l’utilisation de l’appareil en toute sécurité et en
comprennent bien les dangers potentiels.
• Les enfants ne doivent pas utiliser l’appareil
comme un jouet.
• La cafetière ne doit pas être placée dans un
placard lorsqu’elle est utilisée.
7

• Avant de brancher l’appareil, vérifier que la tension d’alimentation
de votre installation correspond à celle de l’appareil et que la prise de
courant comporte bien la terre.
• Toute erreur de branchement annule la garantie.
• Débrancher l’appareil lors d’une absence prolongée et lors du nettoyage.
• Ne pas utiliser l’appareil s’il ne fonctionne pas correctement ou s’il a été
endommagé. Dans ce cas, s’adresser à un centre service agréé.
• Toute intervention autre que le nettoyage et l’entretien usuel par le
client doit être effectuée par un centre service agréé.
• Le câble d’alimentation ne doit jamais être à proximité ou en contact
avec les parties chaudes de votre appareil, près d’une source de chaleur
ou sur un angle vif.
• Pour votre sécurité, n’utiliser que des accessoires et des pièces détachées
adaptés à votre appareil.
• Ne pas débrancher la fiche de la prise en tirant sur le câble.
• Ne pas utiliser la verseuse dans un four à micro-ondes, sur une flamme
et sur des plaques de cuisinières électriques.
• Ne pas remettre d’eau dans l’appareil s’il est encore chaud.
• Tous les appareils sont soumis à un contrôle qualité sévère. Des essais
d’utilisation pratiques sont faits avec des appareils pris au hasard ce qui
explique d’éventuelles traces d’utilisation.
• Toujours fermer le couvercle lors du fonctionnement de la cafetière.
• N’utilisez pas la verseuse sans le couvercle. Ne pas mettre d’eau chaude
dans les réservoirs.
• Ne pas réaliser une préparation de café si la carafe contient déjà du
café.
• Pour éviter tout débordement, la carafe doit être bien placée sur la plaque
chauffante de la cafetière, sinon il pourrait y avoir un débordement
d’eau chaude ou de café chaud.
• La carafe devient très chaude pendant le cycle d’infusion. Veuillez la
manipuler avec précaution.
• Ne démontez pas l’appareil.
8

DESCRIPTION
A Corps de l’appareil
B Couvercle
C Réservoir d’eau
D Indicateur de niveau d’eau
E Couvercle de la carafe
F Poignée de la carafe
G Carafe
H Plaque chauffante
I Porte-filtre
J Bouton ON/OFF
K Bouton PROG
L Bouton HR
M Bouton MIN
N Bouton AROMA
O Bouton CLOCK
P Cuillère
PROGRAMMATION DE L’HORLOGE
• Posez la cafetière sur une surface dure et plane.
• Branchez le cordon d’alimentation sur la prise murale de 220V-240V.
–Lorsque vous branchez la cafetière pour la première fois, 12:00 AM
paraît et clignote à l’écran. Fig. 1. Programmez l’heure en appuyant
sur les boutons HR (L) pour les heures et MIN (M) pour les minutes.
L’heure paraît. Elle est validée automatiquement au bout d’environ 5
secondes ou en appuyant sur le bouton CLOCK (O).
Note : Votre horloge est maintenant programmée et continuera
d’afficher l’heure courante même lorsque votre appareil est en veille. Si
vous souhaitez régler à nouveau l’heure, appuyez sur le bouton CLOCK (O)
puis répétez les étapes ci-dessus.
Si l’appareil est débranché ou en cas de panne de courant, l’horloge
reviendra à 12:00 AM. Il faut répéter les instructions ci-dessus pour
programmer de nouveau l’horloge.
AVANT LA PREMIÈRE UTILISATION
• Retirez les autocollants de la machine.
• Avant la première utilisation, faites fonctionner votre cafetière sans café
pour rincer le circuit. Remplissez le réservoir d’eau jusqu’au niveau max
et lancez un cycle en appuyant sur le bouton ON/OFF (J).
IMPORTANT : Votre appareil a été conçu pour fonctionner seulement
avec de l’eau froide ou tempérée.
9

PRÉPARATION DU CAFÉ
• Soulevez le couvercle de la cafetière (b). Fig. 3.
• Remplissez la carafe (g) d’eau froide ou tempérée. Versez l’eau dans le
réservoir d’eau (c) Fig. 4.
• Le nombre de tasses est indiqué par les graduations sur la carafe et par
l’indicateur de niveau d’eau. Ne dépassez pas 10-15 tasses. Fig. 5.
• Mettez la carafe (g) avec son couvercle (e) sur la plaque chauffante
(h) en vous assurant qu’elle est bien placée pour activer le mécanisme
permettant au café de s’écouler. Fig. 8.
• Assurez-vous que le porte-filtre (i) est inséré. Fig. 6. Mettez un filtre
papier dans le porte-filtre (i). Assurez vous que le filtre papier est bien
ouvert et bien en place dans le porte-filtre. Fig. 7.
• Si de la mouture devait être versée par mégarde dans le réservoir,
veuillez ne pas lancer le cycle et nettoyez le réservoir.
La mouture risque en effet de boucher le circuit d’eau.
• Ajoutez 1 cuillerée (P) de mouture par tasse. Ne pas dépasser 10
cuillerées (70 g). Fig. 9.
• Fermez le couvercle (b) .
Si la cafetière est en mode veille, appuyez sur n’importe quel bouton
pour sortir du mode veille.
• Appuyez sur le bouton ON/OFF (J) pour démarrer le cycle. La cafetière
émet un “bip” et le symbole de la carafe s’affiche à l’écran. Fig. 10.
• Une fois le cycle terminé, la fonction de maintien au chaud s’active
automatiquement pour une durée de 30 minutes. Le symbole de la
carafe reste affiché à l’écran pendant la durée du maintien au chaud.
• Pour arrêter la cafetière durant le cycle, appuyez sur le bouton ON/OFF
(J).
Note :
• La quantité de café dans la carafe à la fin du cycle est inférieure à la
quantité d’eau versée dans le réservoir puisque la mouture et le filtre en
absorbent environ 10%.
• Le réservoir est muni d’un orifice de trop-plein à l’arrière de l’appareil.
Sivous ajoutez trop d’eau, elle fuira par cet orifice.
10

AUTRES FONCTIONS
–DÉPART DIFFÉRÉ (PROG)
Réglage de l’heure du départ différé
• Votre appareil a un programme de départ différé.
• Assurez-vous que l’horloge est à la bonne heure. Si ce n’est pas le cas,
suivez les instructions à la section PROGRAMMATION DE L’HORLOGE.
• Appuyez sur le bouton PROG (K) pour régler l’heure de démarrage
automatique. L’icône PROG apparaîtra sur l’affichage. Fig. 11.
• Programmez l’heure en appuyant sur les boutons HR (L) pour les heures
et MIN (M) pour les minutes. Fig. 12. Le réglage de l’heure est validé
automatiquement après 5 secondes environ ou en appuyant sur le
bouton PROG (K). Fig. 13.
• Votre cafetière démarrera automatiquement à l’heure programmée.
Vous pouvez consulter à tout moment cette heure de programmation
en appuyant sur le bouton PROG (K).
• Pour annuler le démarrage différé, appuyez sur le bouton PROG (K)
pendant 5 secondes.
–MODE PRE-INFUSION — FONCTION AROMA
Note : La fonction AROMA permet de révéler le maximum d’arômes du
café grâce à une phase de pré-infusion de la mouture.
• Appuyez sur le bouton AROMA (N) avant de démarrer le cycle de café
pour lancer le mode PRE-INFUSION.
• Le voyant AROMA s’allume. Fig. 14.
• Pour annuler le mode PRE-INFUSION, appuyez à nouveau sur le bouton
AROMA (N).
11

NETTOYAGE
• Pour enlever la mouture usagée, retirez le filtre et le porte-filtre de la
cafetière. Fig. 15a.
• Jetez le marc de café et le filtre papier à la poubelle. Fig. 15b.
• Ne nettoyez pas l’appareil s’il est encore chaud.
• Lavez le porte-filtre amovible à l’eau chaude savonneuse.
ATTENTION : Ne mettez aucune pièce de la cafetière au lave-vaisselle.
• Nettoyez la cafetière à l’aide d’un chiffon doux ou
d’une éponge humide. N’utilisez jamais de produits
abrasifs ou puissants sur n’importe quelle pièce de
votre cafetière.
• Pour nettoyer les pièces en acier inoxydable de
votre cafetière, humidifiez un chiffon doux ou une
éponge à l’eau chaude. Essuyez-les bien à l’aide
d’un chiffon sec.
• Pour les taches difficiles, utilisez un chiffon avec
du vinaigre blanc.
• N’immergez pas l’appareil dans l’eau ou sous le
robinet.
DÉTARTRAGE
Pourquoi détartrer ?
• Le calcaire se dépose naturellement dans votre cafetière. Le détartrage
préserve la cafetière et lui assure une plus longue durée de vie et assure
une qualité de café constante dans le temps. Le calcaire risque d’altérer
de façon définitive le rendement de l’appareil.
12
Quand détartrer ?
• La fréquence du détartrage dépend de la dureté de l’eau et du nombre
de cycles de café. Lorsque l’on rencontre les signes suivants : temps de
cycle rallongé, forte vaporisation, niveau de bruits élevé en fin de cycle,
arrêt en cours de cycle, cela signifie que votre machine est entartrée.
• Le détartrage de la cafetière doit être fait environ une fois par mois
selon la dureté de l’eau.
Comment détartrer votre cafetière ?
• Utilisez une solution de détartrage ou 0,5L de vinaigre blanc dilué dans
0,5L d’eau froide ou tempérée. Fig. 16.
• Versez la solution dans le réservoir d’eau. Fig. 17.
• Ne mettez pas de café dans le filtre et appuyez sur le bouton ON/OFF (J)
pour démarrer le cycle de détartrage. Fig. 18.
• Veuillez patienter jusqu’à la fin du cycle.
• Afin de rincer la machine, lancez 2 cycles complets de 10 tasses avec
l’eau, mais sans café.
• Répétez l’opération au besoin.
• La garantie exclut les cafetières ne fonctionnant pas ou mal en
raison d’un manque de détartrage.
DÉPANNAGE
PROBLÈME SOLUTION
Le café ne s’infuse pas ou
l’appareil ne s’allume pas.
L’appareil semble fuir. • Assurez-vous que le réservoir d’eau n’a pas été rempli
• Assurez-vous que l’appareil est bien branché dans une
prise fonctionnelle.
• Le réservoir d’eau est vide.
• Il y a eu une panne de courant.
• Débranchez la machine, puis rebranchez-la.
• L’horloge doit être reprogrammée après une panne de
courant.
• La fonction d’arrêt automatique a éteint l’appareil.
Éteignez l’appareil puis rallumez-le pour préparer d’autre
café. Pour plus de renseignements, consultez la section
« Préparation du café ».
au-delà de la limite maximale.
• Assurez-vous que le réservoir d’eau n’est pas
endommagé.
13
PROBLÈME SOLUTION
L’infusion prend beaucoup
de temps.
Le porte-filtre déborde
ou le café s’écoule trop
lentement.
Le café a mauvais goût. • La mouture ne convient pas à votre cafetière.
Le café ne coule pas. • Assurez-vous qu’il y a de l’eau dans le réservoir.
L’heure n’est pas juste. • La minuterie est synchronisée et dépendante de votre
• Il est peut-être temps de détartrer l’appareil.
• Pour plus de renseignements, consultez la section
« Détartrage ».
• La cafetière a besoin d’être nettoyée.
• Il y a trop de café. Nous vous recommandons d’utiliser
une cuillère à mesurer par tasse.
• La mouture est trop fine (par exemple, la mouture pour
l’espresso ne convient pas à une cafetière à percolation).
• Il y a de la mouture qui s’est insérée entre le filtre papier
et le porte-filtre.
• Le papier filtre n’est pas bien ouvert ou est mal placé.
• Rincez le porte-filtre avant d’y mettre le filtre papier afin
que ce dernier adhère aux parois humides du porte-filtre.
• Il y a plus d’un filtre papier dans le porte-filtre.
• Assurez vous que le porte-filtre est inséré entièrement.
• Le proportion de café et d’eau est inadéquate. Modifiezla selon vos goûts.
• La qualité et la fraîcheur du café ne sont pas optimales.
• L’eau est de piètre qualité.
• Le système d’écoulement de café est peut-être obstrué.
Vous pouvez le nettoyer simplement en le rinçant à l’eau.
réseau électrique. S’il y a un décalage, nous vous
recommandons de programmer l’heure une fois par
semaine pour vous assurer qu’elle est exacte.
Si votre appareil ne fonctionne pas correctement, contactez le service
client de votre pays.
14

Please read the instructions for use carefully before using your appliance
for the first time and retain them for future reference: Manufacturer
cannot accept any liability for non compliant appliance use.
SAFETY INSTRUCTIONS
• This appliance is not intended for use by persons
(including children) with reduced physical, sensory
or mental capabilities, or lack of experience
and knowledge, unless they have been given
supervision or instruction concerning use of the
appliance by a person responsible for their safety.
• Children should be supervised to ensure that they
do not play with the appliance.
• Do not use the appliance if the power cord
or plug is damaged. The power cord must be
replaced by the manufacturer, its after-sales
service or similarly qualified persons in order to
avoid danger.
• Your appliance is intented for domestic use inside
the home only at an altitude below 2000m.
• Do not immerse the appliance, power cord or
plug in water or any other liquid.
• Your appliance is designed for domestic use only.
• It is not intended to be used in the following
applications, and the guarantee will not apply for:
– staff kitchen areas in shops, offices and other
working environments;
15

– farm houses;
– by clients in hotels, motels and other residential
type environments;
– bed and breakfast type environments.
• Always follow the cleaning instruction to clean
your appliance;
– Unplug the appliance.
– Do not clean the appliance while hot.
– Clean with a damp cloth or sponge.
– Never immerse the appliance in water or put it
under running water.
• WARNING: Risks of injuries if you don’t use this
appliance correctly.
• WARNING: After using, do not to touch the keep
warm plate, subjected to residual heat. Be sure
to manipulate only the handle of glass jar during
heating until cooling down.
• This appliance may be used by children of at least 8
years of age, as long as they are supervised and have
been given instructions about using the appliance
safely and are fully aware of the dangers involved.
Cleaning and user maintenance shall not be made
by children unless they are older than 8 and they are
supervised by an adult.
16

• Keep the appliance and its cord out of reach of
children under 8 years of age.
• This appliance may be used by persons with
reduced physical, sensory or mental capabilities,
or whose experience or knowledge is not
sufficient, provided they are supervised or have
received instruction to use the appliance safely
and understand the dangers.
• Children should not use the appliance as a toy.
• The coffee-maker shall not be placed in a cabinet
when in use.
• Before plugging the appliance in, make sure that the power it uses
corresponds to your electrical supply system and that the outlet is
earthed.
• Any error in the electrical connection will negate your guarantee.
• Unplug the appliance when you have finished using it and when you
clean it.
• Do not use the appliance if it is not working properly or if it has been
damaged. If this occurs, contact an authorised service centre.
• All interventions other than cleaning and everyday maintenance by the
customer must be performed by an authorised service centre.
• The power cord must never be close to or in contact with the hot parts of
your appliance, near a source of heat or over a sharp edge.
• For your safety, only use the manufacturer’s accessories and spare parts
designed for your appliance.
• Do not pull on the cord to unplug the appliance.
• Never put your coffee jug in a microwave oven, on a flame or a electric
cooking plates.
• Do not fill the appliance with water if it is still hot.
17

• All appliances are subject to strict quality control procedures. These
include actual usage tests on randomly selected appliances, which
would explain any traces of use.
• Always close the lid when running the coffee maker.
• Do not brew coffee if the carafe already has coffee in it.
• To prevent any overflow, the carafe must be placed on the heated base
of the coffee maker, otherwise there could be some overflow of hot
water or hot coffee.
• The coffee maker becomes very hot during the infusion cycle. Please
handle it with care.
• Do not disassemble the appliance.
• Do not use the jug without the lid.
• Do not pour hot water in the tanks.
18

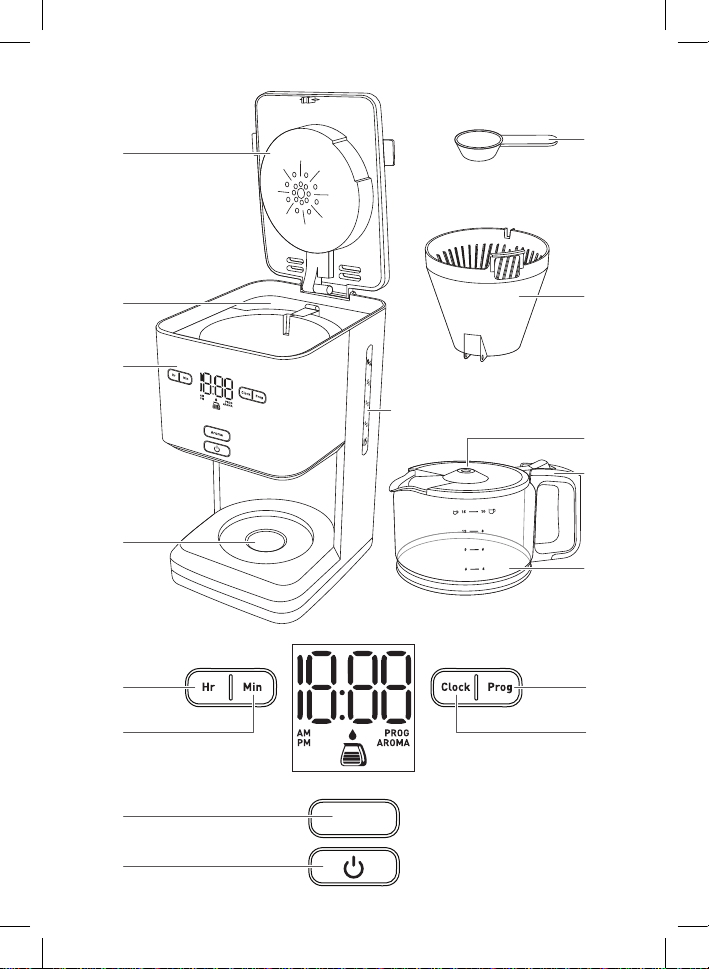
DESCRIPTION
A Appliance body
B Lid
C Water container
D Water level gauge
E Carafe lid
F Carafe handle
G Carafe
H Heating plate
I Filter holder
J ON/OFF button
K PROG button
L HR button
M MIN button
N AROMA button
O CLOCK button
P Spoon
PROGRAMMING THE CLOCK
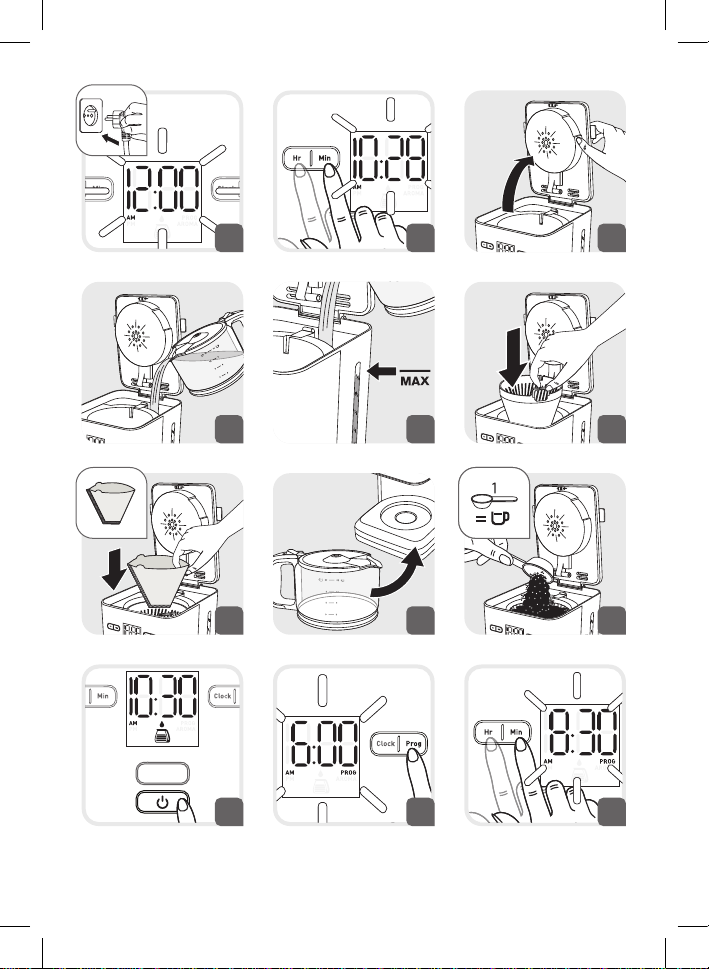
• Place the coffee maker on a hard, flat surface.
• Plug the power cable into a 220 V — 240 V wall outlet.
–When you plug in the coffee maker for the first time, 12:00 AM
appears and blinks on the screen. Fig. 1. Set the hour by pressing
the HR button (L) for the hours and MIN (M) button for the minutes.
The time appears. It is automatically confirmed after 5 seconds have
elapsed or by pressing the CLOCK button (O).
Note: Your clock is now set and will continue to display the current time
even when your appliance is in standby mode. If you want to set the time
again, press the CLOCK (O) button and repeat the steps above.
If the unit is unplugged or if there is a power failure, the clock will return
to 12:00 AM. The above instructions must be repeated to program the
clock again.
BEFORE USING FOR THE FIRST TIME
• Remove the stickers from the machine.
• Prior to first use, run your coffee maker without any coffee to rinse the
circuit. Fill the water reservoir up to the maximum level and start a cycle
by pressing on the ON/OFF button (J).
IMPORTANT: Your appliance has been designed to operate using only
cold or warm water.
19

COFFEE PREPARATION
• Lift the coffee maker’s lid (b). Fig. 3.
• Fill the carafe (g) with cold or warm water. Pour water in the water tank
(c) Fig. 4.
• The number of cups is indicated by marks on the carafe and by the
water level indicator. Do not exceed 10-15 cups. Fig. 5.
• Place the carafe (g) with its lid (e)closed on the heated base (h) by
ensuring that it is properly in place in order to activate the mechanism
that allows the coffee to flow. Fig. 8.
• Make sure that the filter holder (i) is inserted. Fig. 6. Place the filter
paper into the filter holder (i). Make sure that the filter paper is fully
open and properly in place in the filter holder. Fig. 7.
• Should some ground coffee be inadvertently poured into the reservoir,
refrain from starting the cycle and first clean the reservoir.
The ground coffee could otherwise block the water circuit.
• Add 1 spoonful (P) of ground coffee per cup. Do not exceed 10 spoonfuls
(70 g). Fig. 9.
• Close the lid (b).
If the coffee maker is in standby, press any button to switch it on.
• Press the ON/OFF (J) button to start the cycle. The coffee maker beeps
and the carafe symbol is displayed on the screen. Fig. 10.
• When the cycle is complete, the warm-up feature automatically turns
on for 30 minutes. The carafe symbol remains on the display for the
duration of the warm-up period.
• To stop the coffee maker during the cycle, press the ON/OFF button (J).
Please note:
• The quantity of coffee in the carafe at the end of the cycle is less than
the quantity of water poured into the reservoir, since the ground coffee
and the filter absorb approximately 10% of it.
• The reservoir is equipped with an overflow opening at the back of the
appliance. If you add too much water, it will come out of this opening.
20

OTHER FUNCTIONS
–DELAYED START (PROG)
Setting the time of the Delayed Start
• Your appliance features a delayed start program.
• Make sure that the clock is set to the correct time. If this is not the case,
follow the instructions in the section PROGRAMMING THE CLOCK.
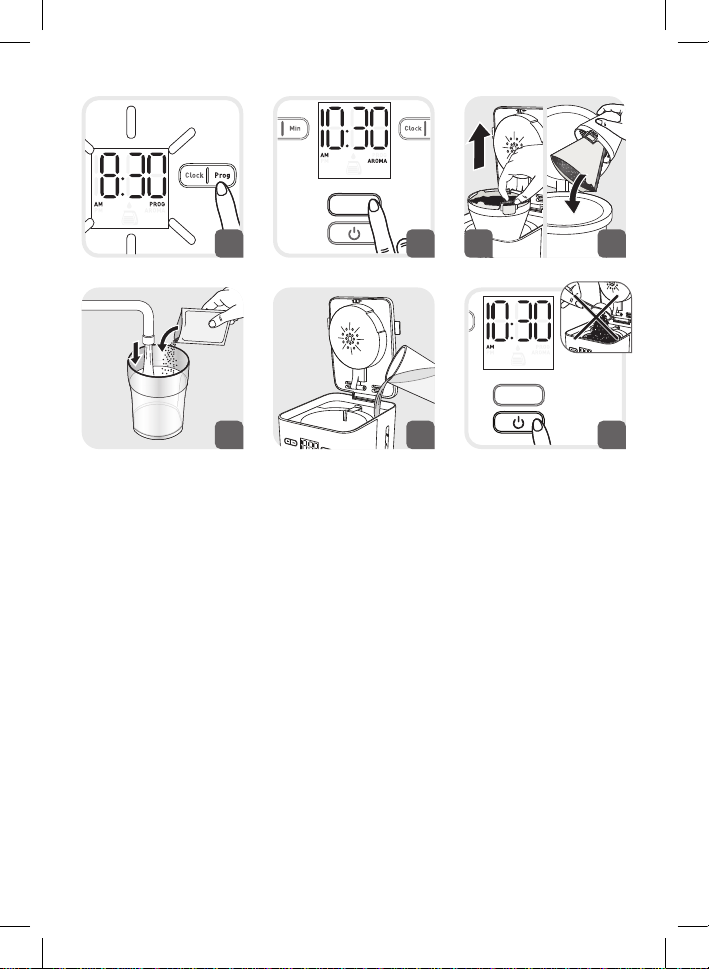
• Press the PROG button (K) to set the automatic start time. The PROG
icon will appear on the display. Fig. 11.
• Set the time by pressing the HR button (L) for the hours and MIN
(M) button for the minutes. Fig. 12. The time setting is automatically
confirmed after approximately 5 seconds or by pressing the PROG (K)
button. Fig. 13.
• Your coffee maker will start automatically at the programmed time.
You can view the programmed time at any time by pressing the PROG
button (K).
• To cancel the delayed start, hold down the PROG (K) button for 5
seconds.
–PRE-INFUSION MODE — AROMA FUNCTION
Please note: The AROMA function gets the most from the coffee flavours
thanks to the grind pre-infusion phase.
• Press the AROMA (N) button before starting the coffee cycle to start the
PRE-INFUSION mode.
• The AROMA indicator light turns on. Fig. 14.
• To cancel the PRE-INFUSION mode, press the AROMA (N) button again.
21

CLEANING
• To remove the used grounds, remove the filter and filter holder from the
coffee maker. Fig. 15a.
• Discard the coffee grounds and the filter paper. Fig. 15b.
• Do not clean the appliance if it is still hot.
• Wash the removable filter holder using hot soapy water.
CAUTION: Do not put the parts of the coffee maker in the dishwasher.
• Clean the coffee maker using a damp soft cloth or
sponge. Never use abrasive or strong products on
any part of your coffee maker.
• To clean the stainless steel parts of your coffee
maker, moisten a soft cloth or sponge with hot
water. Wipe them well using a dry cloth.
• For stubborn stains, use a cloth with some white
vinegar.
• Do not immerse the appliance in water or under
the tap.
DESCALING
Why is descaling important?
• Limescale builds up naturally in your coffee maker. Descaling helps to
protect the coffee maker, ensure a longer service life and consistently
high-quality coffee over time. Limescale may permanently alter the
appliance’s performance.
22

When is it time to descale?
• The frequency of descaling depends on water hardness and the number
of coffee cycles. When users observe signs such as extended cycle
lengths, intense boil-off, loud noise levels at the end of the cycle or
stoppage during a cycle, this means your machine requires descaling.
• Descaling the coffee maker must be performed approximately once a
month, depending on the water hardness.
How to descale your coffee maker
• Use a descaling solution or 0.5 L of white vinegar diluted in 0.5 L of cold
or warm water. Fig. 16.
• Pour the solution into the water tank. Fig. 17.
• Do not put any coffee in the filter and press the ON/OFF button (J) to
start the descaling cycle. Fig. 18.
• Please wait until the end of the cycle.
• To rinse the machine, start 2 complete 10-cup cycles with water, but
without coffee.
• Repeat the operation as needed.
• The guarantee does not cover coffee makers that are inoperative or
which run badly due to a lack of descaling.
TROUBLESHOOTING
PROBLEM SOLUTION
The coffee does not infuse
or the appliance does not
turn on.
The appliance appears to
leak.
The infusion requires lots
of time.
• Make sure that the appliance is properly plugged into a
functioning socket.
• The water reservoir is empty.
• There was a power failure.
• Unplug the machine, and then plug it in again.
• The clock time must be reset after a power failure.
• The automatic stop function has switched the appliance
off. Turn off the appliance and then turn it on again to
make more coffee. For more information, see the section
«Coffee Preparation».
• Make sure that the water reservoir has not been filled
beyond the maximum limit.
• Ensure that the water reservoir is not damaged.
• It may be time to descale the appliance.
• For more information, see the section «Descaling».
23
PROBLEM SOLUTION
The coffee is spilling from
the filter holder or the
coffee is flowing very slowly.
The coffee tastes bad. • The coffee grind is not suitable for your coffee maker.
The coffee does not flow. • Make sure that there is water in the reservoir.
The time is not correct. • The timer is synchronised and depends upon your
• The coffee maker needs to be cleaned.
• There is too much coffee. We recommend using a
measuring spoon per cup.
• The ground coffee is too fine (for example, the grind for
expresso is not suitable for a filter coffee maker).
• Some ground coffee has become embedded between the
filter paper and the filter holder.
• The filter paper is not open enough or is incorrectly
positioned.
• Rinse the filter holder before inserting the filter paper
so that the latter adheres to the damp sides of the filter
holder.
• There is more than one filter paper in the filter holder.
• Make sure that the filter holder is fully inserted.
• The proportion of coffee and water is incorrect. Modify it
to suit your taste.
• The quality and freshness of the coffee are not optimal.
• The water is of poor quality.
• The coffee flow system may be blocked. You can clean it
by simply rinsing it with water.
electrical network. If there is a difference, we recommend
setting the time once a week to make sure that it is
correct.
If your appliance is still not running properly, please contact the customer
service department for your country.
24

Bitte lesen Sie die Anleitungen sorgfältig durch, bevor Sie Ihr Gerät zum
ersten Mal benutzen, und bewahren Sie die Anleitungen zum Nachlesen auf.
Der Hersteller übernimmt keine Haftung für eine unsachgemäße Benutzung
des Gerätes.
SICHERHEITSHINWEISE
• Dieses Gerät ist nicht dazu gedacht, von Personen
(einschließlich Kindern) benutzt zu werden,
deren körperlichen, sensorischen oder mentalen
Fähigkeiten eingeschränkt sind oder denen es
an Erfahrung und Kenntnissen mangelt; es sei
denn, sie wurden in die Benutzung des Gerätes
unterwiesen und werden von einer für ihre
Sicherheit verantwortlichen Person beaufsichtigt.
• Kinder sollten beaufsichtigt werden, um
sicherzustellen, dass sie nicht mit dem Gerät
spielen.
• Benutzen Sie das Gerät nicht, wenn das Netzkabel
oder der Netzstecker beschädigt ist. Das Netzkabel
muss vom Hersteller, seinem Kundendienst oder
ähnlich qualifizierten Personen ausgetauscht
werden, um jegliche Gefahr zu vermeiden;
• Ihr Gerät ist nur für den Privatgebrauch im Haus
auf einer Höhe von unter 2.000 m bestimmt.
• Tauchen Sie das Gerät, das Netzkabel oder den
Netzstecker nicht in Wasser oder eine andere
Flüssigkeit.
25

• Ihr Gerät ist nur für den privaten Gebrauch
konzipiert.
• Es ist nicht für den Gebrauch in den folgenden
Einsatzbereichen bestimmt und die Garantie ist
nicht gültig für:
– Personalküchen in Geschäften, Büros und
anderen Arbeitsumgebungen;
– Landwirtschaftlichen Anwesen;
– Benutzung durch Gäste in Hotels, Motels und
anderen Unterkünften;
– Pensionsähnliche Umgebungen.
• Folgen Sie stets den Reinigungsanleitungen zum
Reinigen Ihres Gerätes.
– Das Gerät muss aus der Steckdose gezogen
werden:
– Reinigen Sie das Gerät nicht, solange es heiß ist.
– Reinigen Sie es mit einem feuchten Tuch oder
Schwamm.
– Tauchen Sie das Gerät niemals in Wasser bzw.
halten Sie es niemals unter laufendes Wasser.
• WARNUNG: Es besteht Verletzungsgefahr, wenn
Sie dieses Gerät nicht sachgemäß benutzen.
• WARNUNG: Berühren Sie nach dem Gebrauch
nicht die Warmhalteplatte; sie enthält noch
Restwärme. Achten Sie darauf, dass Sie während
des Erhitzens nur die Glaskanne anfassen.
26

• Dieses Gerät kann von Kindern ab 8 Jahren
verwendet werden, wenn sie überwacht werden
oder bezüglich der sicheren Verwendung des Geräts
unterrichtet wurden und die Risiken genau kennen.
Die Reinigung und vom Benutzer auszuführende
Wartungsarbeiten dürfen nicht von Kindern
ausgeführt werden; es sei denn, sie sind älter als
acht Jahre und werden von einem Erwachsenen
beaufsichtigt.
• Halten Sie das Gerät und sein Netzkabel außer
Reichweite von Kindern unter acht Jahren.
• Dieses Gerät kann von Personen mit
eingeschränkten körperlichen, sensorischen oder
geistigen Fähigkeiten oder Personen, denen es
an Erfahrung und Kenntnis mangelt, benutzt
werden, sofern sie beaufsichtigt werden oder in
die sichere Benutzung des Gerätes unterwiesen
wurden und die Gefahren verstehen.
• Kinder dürfen nicht mit dem Gerät spielen.
• Die Kaffeemaschine darf während des Gebrauchs
nicht in einem Schrank stehen.
• Bevor Sie das Gerät mit einer Steckdose verbinden, stellen Sie bitte sicher,
dass sein Strombedarf mit Ihrem Stromversorgungsnetz übereinstimmt
und dass die Steckdose geerdet ist.
• Jegliche Fehler beim elektrischen Anschluss setzen Ihre Garantie außer
Kraft.
• Ziehen Sie den Netzstecker des Gerätes, wenn Sie es nicht mehr
27

benutzen und wenn Sie es reinigen.
• Benutzen Sie das Gerät nicht, wenn es nicht ordnungsgemäß
funktioniert oder beschädigt wurde. Wenden Sie sich in diesem Fall an
eine autorisierte Reparaturwerkstätte.
• Alle Eingriffe, außer die Reinigung und die tägliche Wartung durch
den Benutzer, müssen von einer autorisierten Reparaturwerkstätte
vorgenommen werden.
• Das Netzkabel darf niemals in der Nähe der heißen Teile Ihres Gerätes
oder einer Wärmequelle liegen oder diese berühren. Das Kabel darf
nicht über scharfe Kanten hängen.
• Verwenden Sie zu Ihrer Sicherheit nur Zubehör und Ersatzteile vom
Hersteller, die für Ihr Gerät entwickelt sind.
• Ziehen Sie nicht am Kabel, um den Netzstecker des Gerätes aus der
Steckdose zu entfernen.
• Stellen Sie Ihre Kaffeekanne niemals in einen Mikrowellenofen, auf eine
Gasherdflamme oder eine elektrische Herdplatte.
• Füllen Sie kein Wasser in das Gerät, wenn es noch heiß ist.
• Alle Geräte unterliegen strengen Qualitätskontrollverfahren. Dazu
gehören stichprobenartige Gebrauchstests, die etwaige Nutzungsspuren
erklären würden.
• Schließen Sie immer den Deckel, wenn die Kaffeemaschine läuft.
• Benutzen Sie die Kanne nicht ohne Deckel.
• Gießen Sie kein heißes Wasser in den Wassertank.
• Brühen Sie keinen Kaffee auf, wenn die Kanne bereits Kaffee enthält.
• Um ein Überlaufen zu vermeiden, muss die Kanne auf die
Warmhalteplatte der Kaffeemaschine gestellt werden, da es sonst zu
einem Überlauf von heißem Wasser oder heißem Kaffee kommen kann.
• Die Kanne wird während des Brühvorgangs sehr heiß. Bitte gehen Sie
vorsichtig damit um.
• Nehmen Sie das Gerät nicht auseinander!
28

BESCHREIBUNG
A Haupteinheit
B Deckel
C Wassertank
D Wasserstandsanzeige
E Kannendeckel
F Kannengriff
G Kanne
H Warmhalteplatte
I Filterhalter
J EIN/AUS-Taste
K PROG-Taste
L HR-Taste
M MIN-Taste
N AROMA-Taste
O CLOCK-Taste
P Löffel
EINSTELLUNG DER UHRZEIT
• Stellen Sie die Kaffeemaschine auf eine harte, ebene Fläche.
• Schließen Sie das Netzkabel an eine 220V-240V-Steckdose an.
–Wenn Sie die Kaffeemaschine zum ersten Mal anschließen, erscheint
12:00 AM und blinkt auf der Anzeige. Abb. 1. Stellen Sie die Zeit ein,
indem Sie die Tasten HR (L) für die Stunden und MIN (M) für die
Minuten drücken. Die Uhrzeit wird angezeigt. Sie wird automatisch
nach ca. 5 Sekunden oder durch Drücken der CLOCK-Taste (O)
bestätigt.
Hinweis: Ihre Uhr ist nun eingestellt und zeigt weiterhin die aktuelle
Uhrzeit an, auch wenn sich Ihr Gerät im Standby-Modus befindet. Wenn
Sie die Uhrzeit zurücksetzen möchten, drücken Sie die Taste CLOCK (O)
und wiederholen Sie die obigen Schritte.
Wenn das Gerät von der Stromversorgung getrennt wird oder bei einem
Stromausfall, kehrt die Uhr auf 12:00 Uhr zurück. Die obigen Anweisungen
müssen wiederholt werden, um die Uhr zurückzusetzen.
VOR DEM ERSTEN GEBRAUCH
• Entfernen Sie die Aufkleber von der Maschine.
• Lassen Sie Ihre Kaffeemaschine vor der ersten Benutzung einmal
ohne Kaffee durchlaufen, um den Kreislauf zu spülen. Füllen Sie
den Wassertank bis zum maximalen Füllstand und starten Sie einen
Brühvorgang durch Drücken der EIN/AUS-Taste (J).
WICHTIG: Ihr Gerät ist für den Gebrauch mit kaltem Wasser konzipiert.
29

KAFFEEZUBEREITUNG
• Heben Sie den Deckel der Kaffeemaschine (b) an. Abb. 3.
• Füllen Sie die Kanne (g) mit kaltem Wasser. Gießen Sie das Wasser in
den Wassertank (c) Abb. 4.
• Die Anzahl der Tassen wird durch die Skala an der Kanne und an der
Wasserstandsanzeige angezeigt. Überschreiten Sie nicht 10-15 Tassen.
Abb. 5.
• Stellen Sie die Kanne(g) mit ihrem Deckel (e) auf die Warmhalteplatte
(h) und achten Sie darauf, dass sie gut positioniert ist, um den
Mechanismus zu aktivieren, der den Kaffee fließen lässt. Abb. 8.
• Achten Sie darauf, dass der Filterhalter (i) eingesetzt ist. Abb. 6. Legen Sie
einen Papierfilter in den Filterhalter ein (i). Vergewissern Sie sich, dass der
Papierfilter geöffnet und sicher im Filterhalter platziert ist. Abb. 7.
• Wenn das Kaffepulver versehentlich in den Tank gegeben wird, starten
Sie bitte nicht den Brühvorgang und reinigen Sie den Tank.
Das Kaffeepulver kann den Wasserkreislauf verstopfen.
• Geben Sie 1 Löffel (P) Kaffeepulver pro Tasse hinein. Verwenden Sie
nicht mehr als 10 Löffel (70 g). Abb. 9.
• Schließen Sie den Deckel(b) .
Wenn sich die Kaffeemaschine im Standby-Modus befindet, drücken Sie
eine beliebige Taste, um den Standby-Modus zu verlassen.
• Drücken Sie die EIN/AUS-Taste, um den Brühvorgang zu starten. Die
Kaffeemaschine gibt einen „Piepton“ ab und das Kannensymbol
erscheint auf dem Display. Abb. 10.
• Nach Beendigung des Brühvorgangs wird die Aufwärmfunktion für 30
Minuten automatisch aktiviert. Das Kannensymbol wird für die Dauer
der Warmhaltephase auf dem Display angezeigt.
• Um die Kaffeemaschine während des Brühvorgangs abzustellen,
drücken Sie die EIN/AUS-Taste (J).
Hinweis:
• Die Kaffeemenge in der Kanne am Ende des Brühvorgangs geringer als
die Menge an Wasser, die in den Tank gegossen wird, da das Kaffeepulver
und der Filter etwa 10% davon aufnehmen.
• Der Tank hat eine Überlauföffnung an der Rückseite des Gerätes. Wenn
Sie zu viel Wasser hinzufügen, tritt es durch diese Öffnung aus.
30
Loading…
Что делать в случае неисправности устройства?
После ознакомления с инструкциями по запуску прибора в руководстве пользователя убедитесь, что электрическая розетка находится в рабочем состоянии, подключив к ней другое устройство. Если прибор не заработал, не пытайтесь разобрать или отремонтировать его. Отнесите прибор в авторизованный центр технического обслуживания.
Что делать, если кабель питания прибора поврежден?
Не пользуйтесь устройством. Во избежание опасности, замените кабель в центре технического обслуживания.
Как можно утилизировать этот прибор по окончании срока его службы?
В Вашем приборе содержатся ценные материалы, которые могут быть подвергнуты вторичной переработке. Отнесите его на городской пункт сбора отходов.
Чем отличается настоящий кофе эспрессо?
Признаком настоящего эспрессо является пенка, созданная под давлением в кофемашине в процессе приготовления кофе. Давление измеряется в барах (от 1,5 до 19). Чем выше давление, тем гуще и выше пенка.
Почему необходимо удалять накипь из кофемашины?
В вашей кофемашине образуется накипь. Регулярное удаление накипи позволяет защитить кофеварку и продлить ее срок службы. Также это помогает поддерживать качество кофе на неизменно высоком уровне. Накипь может ухудшить работу устройства.
Как можно сохранить кофе свежим в течение длительного времени?
Контейнер с молотым кофе должен быть герметичным. Кроме того, для хранения молотого кофе можно использовать емкости, плотно закрывающиеся с помощью зажимных запоров. Упакованный таком образом молотый кофе рекомендуется хранить в холодильнике.
Какой тип помола кофейных зерен мне выбрать при покупке?
От среднего до тонкого помола (но не слишком тонкий помол). Вы также можете попросить «помол для эспрессо».
Какую воду следует заливать в бачок для приготовления напитков?
Для этой цели отлично подходит водопроводная вода (обычная бытовая питьевая вода) при условии, что в ней нет запахов, которые могут изменить вкус напитков. Также подходит бутилированная вода. Не пользуйтесь охлажденной или подогретой водой, так как это может повлиять на температуру напитка. Всегда пользуйтесь свежей водой и заменяйте ее, если система простояла без использования более 2 дней. Для холодных напитков используйте воду комнатной температуры, но не из холодильника, и положите в стакан два кубика льда (по 20 г) или больше. Необходимо отметить, что жесткость воды является основной причиной образования кальциевого налета, поэтому рекомендуется регулярно чистить машину (каждые 3 месяца или чаще в зависимости от степени жесткости воды).
Я только что распаковал(-а) свой новый товар, и мне кажется, что не хватает одной из частей. Что делать?
Если вам кажется, что каких-то частей не хватает, позвоните в центр обслуживания покупателей, и мы поможем вам найти приемлемое решение.