
Manuals.eu
- Manuals.eu
- IKEA
- Home & Kitchen
- Ovens
- KULINARISK 80300957
- User Manual
×
1
2
3
4
5
6
7
8
9
10
11
12
13
14
15
16
17
18
19
20
21
22
23
24
25
26
27
28
29
30
31
32
33
34
35
36
37
38
39
40
41
42
43
44
⟨
⟩
Copyright © Manuals.eu
Agreement
Privacy Policy
Contact us
Просмотр
Доступно к просмотру 51 страница. Рекомендуем вам скачать файл инструкции, поскольку онлайн просмотр документа может сильно отличаться от оригинала.
-
RU
KULINARISK
Кулинарная книга
-
РУССКИЙ                                                              3
Содержание
Таблицы приготовления пищи       3  Рецепты – Рыба                  29
Автоматические программы        20  Рецепты – Торт                  32
Рецепты – Свинина/Телятина      21  Рецепты – Пицца/Пирог/Хлеб      39
Рецепты – Говядина/Дичь/Бар.    24  Рецепты – Запеканки             43
Рецепты – Птица                 27  Быстрое Приготовление           47
Право на изменения сохраняется.
Таблицы приготовления пищи
Время приготовления                 Автоматически поддерживается
температура 80°C.
Время приготовления зависит от типа
приготовляемых продуктов, их
консистенции и количества.           Подогрев Тарелок
Приступая к использованию прибора,  Для подогрева тарелок.
следите за ходом приготовления.     Равномерно разместите тарелки по всей
Подберите оптимальные настройки     решетке. Переверните стопки по
(мощность нагрева, время приготовления  истечении половины времени подогрева.
и т.д.) для кухонной посуды, своих
рецептов, количества продуктов.     Автоматически поддерживается
температура 70°C.
Во-первых, воспользуйтесь инструкциями
на упаковке продуктов. Если инструкции  Рекомендуемое положение противня: 3.
недоступны, обратитесь к Таблицам.
Подготовка теста
Приведенные в таблицах
значения температуры и         Данная автоматическая функция может
времени выпекания являются     использоваться с любым рецептом, в
ориентировочными. Они          котором присутствует дрожжевое тесто. В
зависят от рецепта, а также, от  условиях, которые создает этот режим,
качества и количества          тесто хорошо поднимается. Положите
используемых ингредиентов.     тесто в достаточно большую миску, чтобы
тесто могло подняться, и накройте его
Рекомендации по использованию       влажным полотенцем или
особых режимов нагрева духового     полиэтиленовой пленкой. Установите
шкафа                               решетку на первый уровень и поставьте
на нее миску. Закройте дверцу и
Поддержание Тепла                   выберите функцию Подготовка теста.
Установите необходимое время.
Используйте данный режим, если
требуется поддерживать блюдо горячим.
-
РУССКИЙ                                                              4
Таблица выпечки и жарки
Пироги
Продукты  Верхн/нижн. нагрев    Горячий воздух     Время   Комментар
Температу Положение Температу Положение    (мин)      ии
ра (°C)  противня   ра (°C)  противня
Изделия из 170      2          160       3 (2 и 4)  45 - 60  В форме
взбитого                                                     для
теста                                                        выпечки
Песочное  170       2          160       3 (2 и 4)  20 - 30  В форме
тесто                                                        для
выпечки
Сырный    170       1          165       2         80 - 100  В форме
сливочный                                                    для
торт                                                         выпечки
(чизкейк)                                                    диаметром
26 см
Яблочный  170       2          160       2 (лев.   80 - 100  В двух 20
торт                                     +прав.)             см
(яблочный                                                    формах
пирог) 1)                                                    для
выпечки
на
решетке
Штрудель  175       3          150       2         60 - 80   В
глубоком
противне
Пирог с   170       2          165       2 (лев.   30 - 40   В форме
джемом                                   +прав.)             для
выпечки
диаметром
26 см
Бисквит   170       2          150       2         40 - 50   В форме
для
выпечки
диаметром
26 см
- 1
- 2
- 3
- 4
- 51

KULINARISK
GB


ENGLISH 4

ENGLISH 4
Contents
Safety information 4
Safety instructions 5
Installation 8
Product description 8
Before first use 9
Daily use 9
Clock functions 12
Using the accessories 13
Subject to change without notice.
Additional functions 14
Helpful hints and tips 15
Care and cleaning 16
What to do if… 19
Technical data 20
Environment concerns 21
IKEA GUARANTEE 21
Safety information
Before the installation and use of the appliance, carefully read
the supplied instructions. The manufacturer is not responsible if
an incorrect installation and use causes injuries and damages.
Always keep the instructions with the appliance for future reference.
Children and vulnerable people safety
Warning! Risk of suffocation, injury or permanent disability.
• This appliance can be used by children aged from 8 years
and above and persons with reduced physical, sensory or
mental capabilities or lack of experience and knowledge if
they are supervised by an adult or a person who is responsible for their safety.
• Do not let children play with the appliance.
• Keep all packaging away from children.
• Keep children and pets away from the appliance when it operates or when it cools down. Accessible parts are hot.
• If the appliance has a child safety device, we recommend
that you activate it.
• Cleaning and user maintenance shall not be made by children without supervision.

ENGLISH 5
General Safety
• Only a qualified person must install this appliance and replace the cable.
• Internally the appliance becomes hot when in operation. Do
not touch the heating elements that are in the appliance. Always use oven gloves to remove or put in accessories or
ovenware.
• Do not use a steam cleaner to clean the appliance.
• Before maintenance cut the power supply.
• Do not use harsh abrasive cleaners or sharp metal scrapers
to clean the glass door since they can scratch the surface,
which may result in shattering of the glass.
• Excess spillage must be removed before the pyrolytic cleaning. Remove all parts from the oven.
• Only use the core temperature sensor recommended for this
appliance.
• To remove the shelf supports first pull the front of the shelf
support and then the rear end away from the side walls. Install the shelf supports in the opposite sequence.
• If the supply cord is damaged, it must be replaced by the
manufacturer, an authorized Service or similarly qualified
persons in order to avoid a hazard.
• Ensure that the appliance is switched off before replacing the
lamp to avoid the possibility of electric shock.
Safety instructions
Installation
Warning! Only a qualified person must
install this appliance.
• Remove all the packaging.
• Do not install or use a damaged appli-
ance.
• Obey the installation instruction supplied
with the appliance.
•Always be careful when you move the
appliance because it is heavy. Always
wear safety gloves.
• Do not pull the appliance by the handle.
• Make sure that the appliance is installed
below and adjacent safe structures.
• The sides of the appliance must stay adjacent to appliances or to units with the
same height.

ENGLISH 6
Electrical connection
Warning! Risk of fire and electrical
shock.
• All electrical connections should be made
by a qualified electrician.
• The appliance must be earthed.
• Make sure that the electrical information
on the rating plate agrees with the power
supply. If not, contact an electrician.
• Always use a correctly installed shockproof socket.
• Do not use multi-plug adapters and extension cables.
• Make sure not to cause damage to the
mains plug and to the mains cable. Contact the Service or an electrician to
change a damaged mains cable.
• Do not let mains cables to come in touch
with the appliance door, specially when
the door is hot.
• The shock protection of live and insulated
parts must be fastened in such a way that
it cannot be removed without tools.
• Connect the mains plug to the mains
socket only at the end of the installation.
Make sure that there is access to the
mains plug after the installation.
• If the mains socket is loose, do not connect the mains plug.
• Do not pull the mains cable to disconnect
the appliance. Always pull the mains
plug.
• Use only correct isolation devices: line
protecting cut-outs, fuses (screw type
fuses removed from the holder), earth
leakage trips and contactors.
• The electrical installation must have an
isolation device which lets you disconnect
the appliance from the mains at all poles.
The isolation device must have a contact
opening width of minimum 3 mm.
• This appliance complies with the E.E.C.
Directives
• Fully close the appliance door, before
you connect the mains plug to the mains
socket.
Use
Warning! Risk of injury, burns or
electric shock or explosion.
• Use this appliance in a household environment.
• Do not change the specification of this
appliance.
• Make sure that the ventilation openings
are not blocked.
• Do not let the appliance stay unattended
during operation.
• Deactivate the appliance after each use.
• Be careful when you open the appliance
door while the appliance is in operation.
Hot air can release.
• Do not operate the appliance with wet
hands or when it has contact with water.
• Do not apply pressure on the open door.
• Do not use the appliance as a work surface or as a storage surface.
• Always keep the appliance door closed
when the appliance is in operation.
• Open the appliance door carefully. The
use of ingredients with alcohol can cause
a mixture of alcohol and air.
• Do not let sparks or open flames to come
in contact with the appliance when you
open the door.
• Do not put flammable products or items
that are wet with flammable products in,
near or on the appliance.
Warning! Risk of damage to the
appliance.
• To prevent damage or discoloration to
the enamel:
– do not put ovenware or other objects in
the appliance directly on the bottom.
– do not put aluminium foil directly on the
bottom of the appliance.
– do not put water directly into the hot
appliance.
– do not keep moist dishes and food in
the appliance after you finish the cooking.
– be careful when you remove or install
the accessories.

ENGLISH 7
• Discoloration of the enamel has no effect
on the performance of the appliance. It is
not a defect in the sense of the warranty
law.
• Use a deep pan for moist cakes. Fruit juices cause stains that can be permanent.
Care and Cleaning
Warning! Risk of injury, fire or damage
to the appliance.
• Before maintenance, deactivate the appliance and disconnect the mains plug
from the mains socket.
• Make sure the appliance is cold. There is
the risk that the glass panels can break.
• Replace immediately the door glass panels when they are damaged. Contact the
Service.
• Be careful when you remove the door
from the appliance. The door is heavy!
• Clean regularly the appliance to prevent
the deterioration of the surface material.
• Remaining fat or food in the appliance
can cause fire.
• If you use an oven spray, obey the safety
instructions on the packaging.
Pyrolytic cleaning
Warning! Risk of fire and burns.
• Before carrying out a Pyrolitic self-cleaning function or the First Use function
please remove from the oven cavity:
– Any excess food residues, oil or grease
spills / deposits.
– Any removable objects (including
shelves, side rails etc., provided with
the product) particularly any non-stick
pots, pans, trays, utensils etc.
• Read carefully all the instructions for Pyrolytic cleaning.
• Keep children away from the appliance
while the Pyrolytic cleaning is in operation. The appliance becomes very hot.
• Pyrolitic cleaning is a high temperature
operation that can release fumes from
cooking residues and construction materials, as such consumers are strongly advised to:
– Provide good ventilation during and
after each Pyrolytic cleaning.
– Provide good ventilation during and
after the first use at maximum temperature operation.
– Remove any pets (especially birds)
from the vicinity of the appliance location during and after the Pyrolytic
cleaning and first use maximum temperature operation to a well ventilated
area.
• Unlike all humans, some birds and reptiles can be extremely sensitive to potential fumes emitted during the cleaning
process of all Pyrolytic Ovens.
• Small pets can also be highly sensitive to
the localized temperature changes in the
vicinity of all Pyrolytic Ovens when the
Pyrolytic self cleaning program is in operation.
• Non-stick surfaces on pots, pans, trays,
utensils etc., can be damaged by the high
temperature Pyrolytic cleaning operation
of all Pyrolytic Ovens and can be also a
source for low level harmful fumes.
• Fumes released from all Pyrolytic Ovens /
Cooking Residues as described are not
harmful to humans, including infants or
persons with medical conditions.
Internal light
• The type of light bulb or halogen lamp
used for this appliance, is only for household appliances. Do not use it for house
lighting.
Warning! Risk of electrical shock.
• Before replacing the lamp, disconnect the
appliance from the power supply.
• Only use lamps with the same specifications.
Disposal
Warning! Risk of injury or suffocation.
• Disconnect the appliance from the mains
supply.
• Cut off the mains cable and discard it.
ENGLISH 8
• Remove the door catch to prevent children and pets to get closed in the appliance.
Installation
Warning! Refer to the Safety chapters.
Refer to the Assembly Instructions for
the installation.
Electrical installation
Warning! Only a qualified person must
do the electrical installation.
The manufacturer is not responsible if
you do not follow the safety precau-
tions from the chapter «Safety Information».
This appliance is only supplied with a main
cable.
Cable
Cable types applicable for installation or
replacement: H07 RN-F, H05 RN-F, H05
RRF, H05 VV-F, H05 V2V2-F (T90), H05 BBF.
For the section of the cable refer to the total
power (on the rating plate) and to the table:
Total power Section of the cable
maximum 1380W3 x 0.75 mm²
maximum 2300W3 x 1 mm²
maximum 3680W3 x 1.5 mm²
The earth cord (green / yellow cable) must
be 2 cm longer than phase and neutral cables (blue and brown cables).
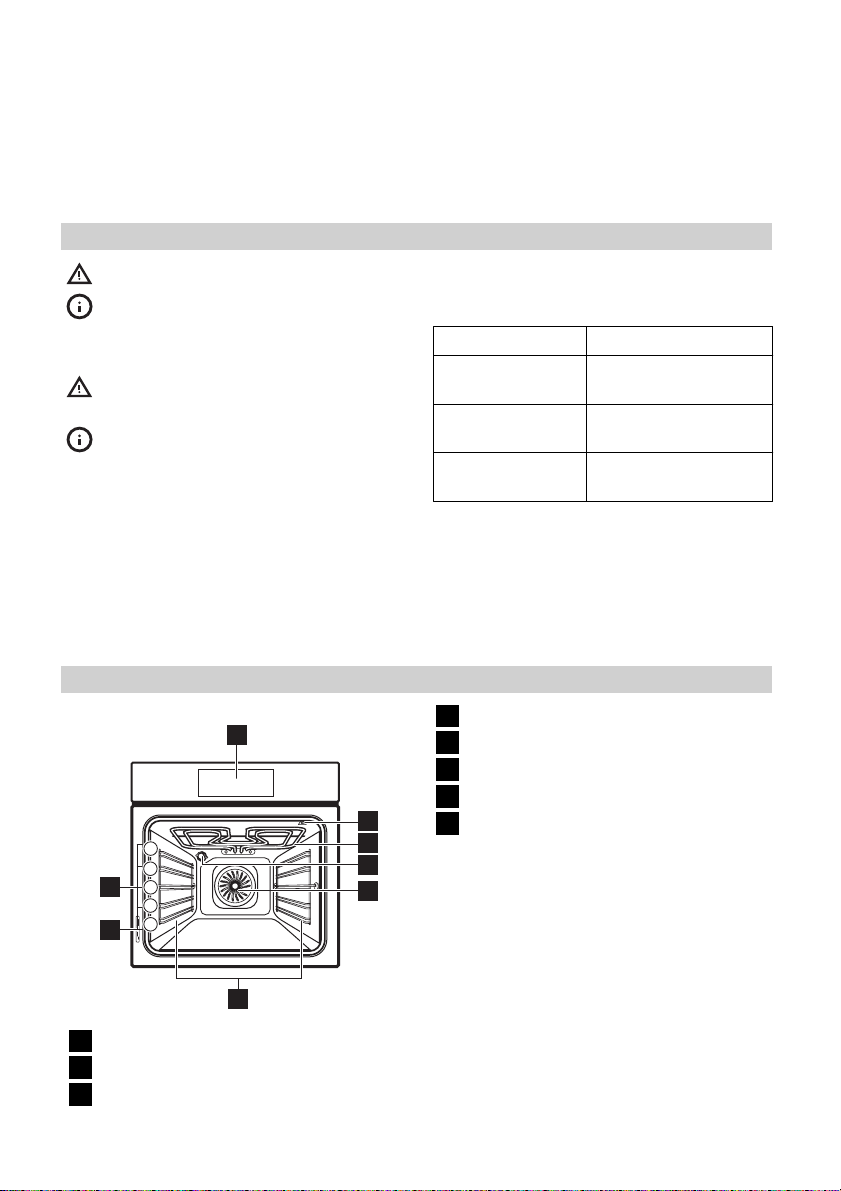
Product description
1
5
4
3
8
2
1
7
6
Electronic programmer
1
Socket for the core temperature sensor
2
Grill
3
Oven lamp
4
Fan
5
Shelf support, removable
6
Rating plate
7
2
3
4
5
Shelf positions
8
Oven accessories
• Wire shelf x 2
For cookware, cake tins, roasts.
• Baking tray x 1
For cakes and biscuits.
• Grill- / Roasting pan x 1
To bake and roast or as pan to collect
fat.
• Core temperature sensor x 1
To measure how far the food is cooked.
• Telescopic runners x 2 sets
For shelves and trays.
ENGLISH 9
Before first use
Warning! Refer to the Safety chapters.
Initial cleaning
• Remove all accessories and removable
shelf supports.
• Clean the appliance before first use.
Important! Refer to the chapter «Care and
cleaning».
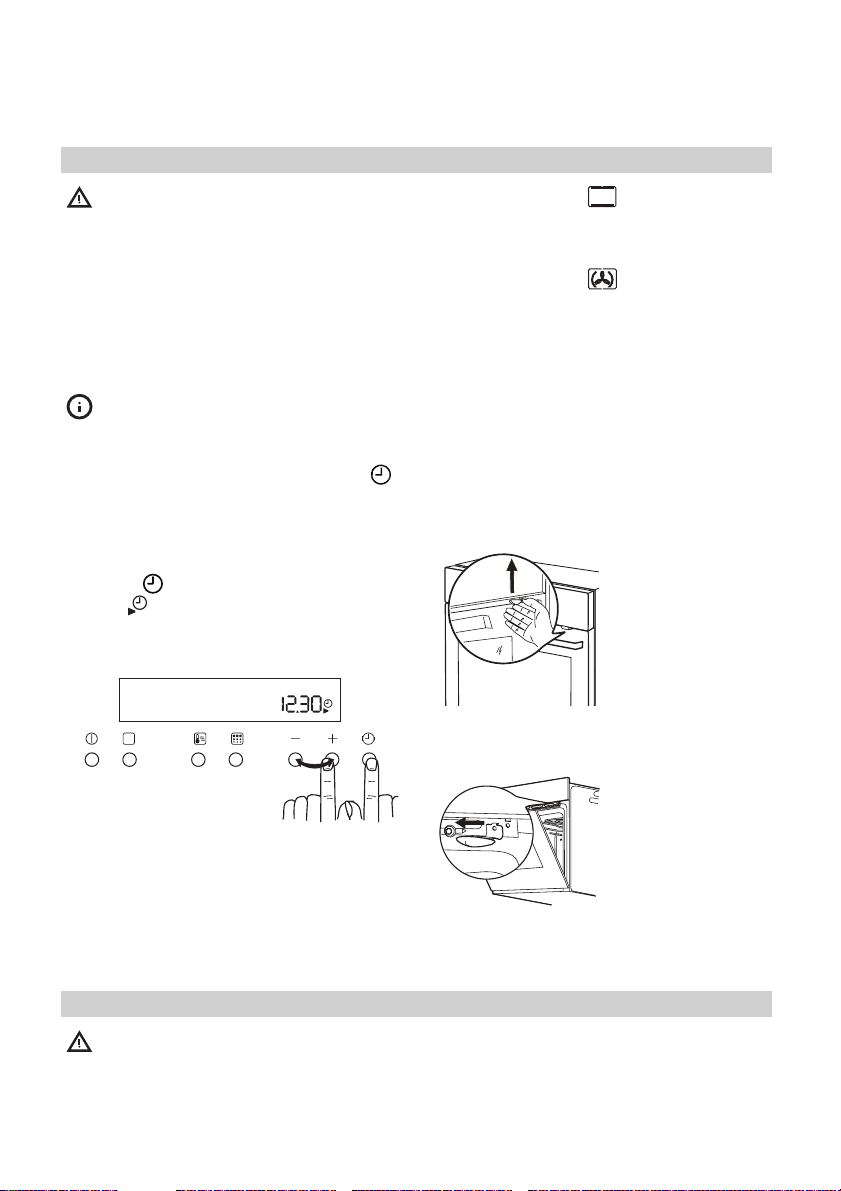
Setting and changing the time
You must set the time before you operate the oven.
When you connect the oven to the electrical
supply or after a power cut, the symbol
flashes.
Press the + or — button to set the correct
time.
Changing the time
1.
Press
bol
2. Press the + or — button to set the correct
time.
again and again until the sym-
flashes.
1.
Set the function
temperature.
2. Let the appliance operate for 45 minutes.
3.
Set the function
temperature.
4. Let the appliance operate for 15 minutes.
Accessories can become hotter than usually.
The appliance can emit an odour and
smoke. This is normal. Make sure that the
airflow is sufficient.
Mechanical child lock
The appliance has the child lock installed
and activated. It is below the control panel
on the right side.
and the maximum
and the maximum
To open the oven
door with the child
lock installed, pull
the child lock handle up as shown in
the picture.
Close the oven door
without pulling the
child lock.
12
After approximately 5 seconds, the flashing
stops and the display shows the time of day
you set.
Preheating
Preheat the empty appliance to burn off the
remaining grease.
Daily use
Warning! Refer to the Safety chapters.
To remove the child
lock, open the oven
door and remove
the child lock with
the torx key. The
torx key is in the
oven fitting bag.
Loading…
FAQ: Types of Manuals and Their Contents
IKEA KULINARISK 203.008.75 Manuals come in various types, each serving a specific purpose to help users effectively operate and maintain their devices. Here are the common types of IKEA KULINARISK 203.008.75 User Guides and the information they typically include:
- User Manuals: Provide comprehensive instructions on how to use the device, including setup, features, and operation. They often include troubleshooting tips, safety information, and maintenance guidelines.
- Service Instructions: Designed for technicians and repair professionals, these manuals offer detailed information on diagnosing and repairing issues with the device. They include schematics, parts lists, and step-by-step repair procedures.
- Installation Guides: Focus on the installation process of the device, providing detailed instructions and diagrams for proper setup. They are essential for ensuring the device is installed correctly and safely.
- Maintenance Manuals: Provide guidance on routine maintenance tasks to keep the device in optimal condition. They cover cleaning procedures, part replacements, and regular servicing tips.
- Quick Start Guides: Offer a concise overview of the essential steps needed to get the device up and running quickly. They are ideal for users who need immediate assistance with basic setup and operation.
Each type of IKEA KULINARISK 203.008.75 instruction is designed to address specific needs, ensuring users have the necessary information to use, maintain, and repair their devices effectively.
Related Instructions for IKEA KULINARISK 203.008.75:
1
BLECKBERGET
Manual BLECKBERGET Manual — 8JTQJR
16
1295
234
2
BEMOTA
Manual BEMOTA (Ventilation Hood ePDF User Guide, #C23117)
8
159
37
3
GENOMSNITT
Manual IKEA Scales Manual (File: ikea-genomsnitt-manual-8, Sat 01.2025)
8
503
111
4
ANDY DRAWER UNIT W/CASTERS 15X23″
Instructions manual ANDY DRAWER UNIT W/CASTERS 15X23″ Instructions manual — 15WP65
8
1153
173
5
JASNING
Manual IKEA JASNING Guide (Manual ), @75688S
32
192
47
7
BESTÅ TOFTA DOOR 24X15″
Instructions manual IKEA BESTÅ TOFTA DOOR 24X15″ Guide (Instructions manual), @1G539M
8
111
26
8
FRAMTID HGC6T
56
1096
274
9
FORMAT AA-109442-2
Assembly instructions IKEA Indoor Furnishing Assembly instructions (File: ikea-format-aa-109442-2-assembly-instructions-2, 18th Oct 2024)
2
435
83
Oven Devices by Other Brands:
|
Belling platinum db3A Installation & User’s Instructions platinum db3A (Oven ePDF User Guide, #5ALBG3) 1 14 Mar 2025 | 36 |
|
|
GE JT912SFSS Dimensions And Installation Information User Manual: GE JT912SFSS (4I5ITI, Upd.14th Mar 2025) TM 14 Mar 2025 | 3 |
|
|
GE PB969SPSS — Profile 30 in. Double Oven Ran Dimensions And Installation Information PB969SPSS — Profile 30 in. Double Oven Ran Dimensions and installation information — 7P3EEJ Dimensions and Installation Information (in inches) 10 Jan 2025 | 2 |
|
|
Cleveland 24-CGM-200 Specification Sheet 24-CGM-200 (Oven ePDF Manual, #4G14CD) Cleveland 29 Jan 2025 | 2 |
Categories:
Wireless modules
Dispenser
Pet Care Product
Induction cooktop
Home Safety Product
Washing machine
2AA-2048587-6
ENGLISH
Warning! Before proceeding with
installation, read the safety information in
the User Manual.
DEUTSCH
Achtung! Lesen Sie vor Beginn der
Installation die Sicherheitshinweise in der
Gebrauchsanweisung.
FRANÇAIS
Attention! Veuillez lire les consignes de
sécurité que contient la Notice d’utilisation
avant d’installer l’appareil.
ITALIANO
Attenzione! Prima di procedere
all’installazione, leggere le istruzioni di
sicurezza contenute nel Libretto Istruzioni.
DANSK
Vigtigt! Læs brugsanvisningens
instruktioner vedrørende sikkerhed, før
installationen påbegyndes.
NORSK
Advarsel! Før du begynner installasjonen,
les sikkerhetsinformasjonene i
bruksanvisningen.
SUOMI
Varoitus! Ennen kuin aloitat asennuksen, lue
käyttöohjeen sisältämät turvallisuusohjeet.
SVENSKA
Varning! Innan du fortsätter
med installationen, läs noga
igenom säkerhetsinformationen i
bruksanvisningen.
ÍSLENSK
Viðvörun! Áður en hast er handa við
uppsetningu, skal lesa öryggisupplýsingar
í leiðbeiningum fyrir notendur.
PORTUGUÊS
Atenção! Antes de continuar a instalação,
leia as informações de segurança no
Manual de Utilizador.
ESPAÑOL
¡Atención! Antes de realizar la instalación,
lea la información de seguridad del Manual
del usuario.
ΕΛΛΗΝΙΚΑ
Προειδοποίηση! Πριν συνεχίσετε με την
εγκατάσταση, διαβάστε τις πληροφορίες
ασφάλειας στο εγχειρίδιο χρήστη.
NEDERLANDS
Waarschuwing! Lees de
veiligheidsinformatie in de
gebruikershandleiding voordat u met de
installatie begint.
POLSKI
Ostrzeżenie! Przed rozpoczęciem instalacji
należy przeczytać informacje dotyczące
bezpieczeństwa podane w „Instrukcji
obsługi”.
TÜRKÇE
Uyarı! Montaj işlemine başlamadan önce,
Kullanma Kılavuzundaki güvenlik bilgilerini
okuyunuz.
РУССКИЙ
Внимание! Перед тем как приступать
к установке прибора, ознакомьтесь
с правилами техники безопасности,
приведенными в Руководстве
пользователя.
SLOVENSKY
Upozornenie! Pred inštaláciou si prečítajte
bezpečnostné informácie v Návode na
používanie.
LIETUVIŲ K.
Įspėjimas! Prieš įrengdami, perskaitykite
saugos informaciją naudojimo instrukcijoje.
ČESKY
Upozornění! Před začátkem instalace si
přečtěte bezpečnostní informace v návodu
k použití.