
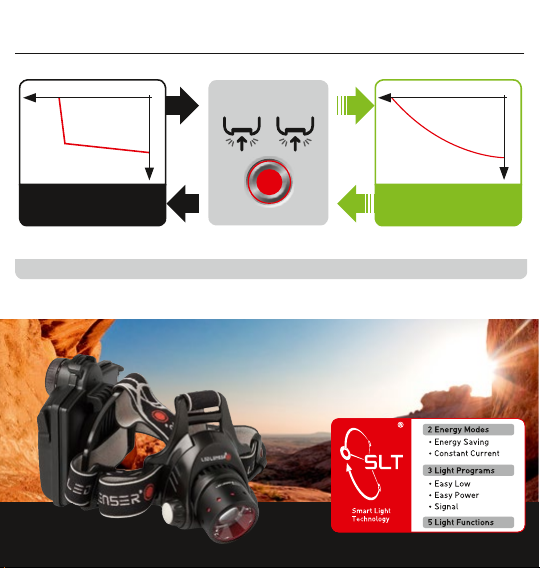
controlled, continuous light output.
Mode, which op timizes burning l ife, and Constant Current Mode (constant c urrent contro l) with electr onically
The Ener gy Modes are the s electable “b asic settings” o f your flashlig ht. You can choose be tween Energy S aving
Time (h)
LED LENSER®*
V1.0
H14.2 | H14R.2
Lumens (lm)
Constant Current
1 sec.
press
hold down
7x
8th
Multi-function switch
Time (h)
Lumens (lm)
Energy Saving
CHANGE OF ENERGY MODES
MULTI-FUNCTION SWITCH
Smart Instruction Card
www.ledlenser.com/SLT

FRONT SWITCH
press
MULTI-FUNCTION SWITCH
on
1 x 2 x 3 x
turn
within 1 sec.
ON OFF
PROGR AM 1 – EA SY LOW
CHANGE PROGRAM
ON
OFF
hold
down
2 sec.
turn
5 s
press & hol d
Brightness is
infinitely adjustable
(Power to 5 Lumen)
Flashing frequency is
infinitely adjustable
(Blink to Strobe)
Lamp ha s to be switched o !
The numb er of blinks sho ws
the chos en Program.
Lamp turns on.
PROGR AM 2 – EA SY POWER
Additional functions of the
H14R .
multi-function switch
ON
OFF
2
PROGR AM 3 – SIGNAL
REAR LIGHT
press &
hold
5 sec.
ON/OFF
LOCK FUNCTION
For more in teractive tr aining on your fla shlight from LED LENSER®* please v isit www.ledlenser.com/SLT
CHARGING STATUS DISPLAY (3 stages)
100-50% | 50-20% | 20-0%
press
1x ON
2x BLIN K
Loading…

24
RU
Pусский
|
Cтраница
светить с минимальной яркостью (функция
«приглушенный свет»). При следующем
нажатии на кнопку в верхней части фонаря
фонарь начнет светить с максимальной
яркостью (функция «яркий свет»), при третьем
нажатии на кнопку фонарь выключится.
b) Второй режим: когда фонарь выключен,
нажмите кнопку находящуюся на лицевой
стороне фонаря, и удерживайте ее, пока
фонарь не мигнет два раза. Фонарь будет
светить с максимальной яркостью (функция
«яркий свет»). При следующем нажатии
на кнопку в верхней части фонаря фонарь
начнет светить с минимальной яркостью
(функция «приглушенный свет»), при третьем
нажатии на кнопку фонарь выключится.
с) Третий режим: когда фонарь выключен,
нажмите кнопку, находящуюся на лицевой
стороне фонаря, и удерживайте ее, пока
фонарь не мигнет три раза. Фонарь будет
светить с максимальной яркостью (функция
«яркий свет»). При следующем нажатии на
эту кнопку фонарь начнет мигать (с частотой
12 Гц), при третьем нажатии на кнопку фонарь
выключится. Пользователь может изменить
частоту, с которой мигает фонарь, повернув
ручку на батарейном отсеке.
Поверните прозрачную ручку на батарейном
отсеке, когда фонарь включен, чтобы
изменить яркость света. Поверните ручку
влево, чтобы уменьшить яркость света, или
поверните ручку вправо, чтобы увеличить
яркость (не действует для функции
«проблесковый маяк).
d) Режим повышенной яркости: нажмите
на кнопку на фонаре, и удерживайте ее в
течение 2 секунд, чтобы включить режим
повышенной яркости. Через 10 секунд фонарь
переключится в предыдущий режим.
Описанные функции фонаря переключаются
циклически.
При переключении режимов не удерживайте
ручку, находящуюся на батарейном отсеке,
нажатой дольше 2 секунд, в противном
случае фонарь выключится.
6. Режимы потребления энергии
Выбрав один из двух Режимов потребления
энергии (режим экономии энергии или
режим непрерывной работы), Вы решаете,
каким образом будет использоваться энергия
аккумулятора или элементов питания.
6.1 Режим экономии энергии:
Интегрированная технология Smart Light
Technology регулирует яркость света. Яркость
света зависит от условий окружающей среды,
в которых используется фонарь, работающий
в обычном режиме работы, этот режим
позволяет увеличить время работы фонаря.
6.2 Непрерывный режим работы: В этом
режиме потребления энергии Вы можете
использовать любые функции фонаря
независимо от яркости света. Этот режим
потребления энергии рекомендуется
использовать в условиях, когда яркий свет
фонаря важнее его времени работы.
Выбор режима потребления энергии
Режим потребления энергии можно изменить
только тогда, когда фонарь работает в режиме
«белый свет». Для того чтобы изменить
режим потребления энергии, выключите
фонарь, а затем нажмите кнопку включения
на батарейном на отсеке 8 раз; при последнем
нажатии удерживайте нажатую кнопку
в течение 2 секунд. После этого фонарь
переключится в режим экономии энергии или
в непрерывный режим работы.
a)Непрерывный режим работы: Если через
2 секунды резко уменьшится яркость света,
фонарь H14.2 работает в непрерывном
режиме.
b)Режим экономии энергии: Если яркость
света будет постепенно уменьшаться, и через
некоторое время фонарь погаснет, фонарь
H14R.2 работает в режиме экономии энергии.
Выполнив вышеуказанные действия, Вы
можете изменить режим потребления
энергии. Вы не сможете определить, в какой
режим потребления энергии работает фонарь
H14.2. Выполните вышеуказанные действия,
чтобы определить, какой режим потребления
энергии используется в данный момент. Если
после этого фонарь H14.. переключился в
режим потребления энергии, который Вы не
намерены использовать, снова повторите
вышеуказанные действия, чтобы выбрать
другой режим. После замены элементов
питания или отключения питания фонарь
переключается в режим экономии энергии.
7. Защитная блокировка
Чтобы включить защитную блокировку,
нажмите кнопку включения / выключения
на фонаре Н14.2, когда он выключен, и
удерживайте ее в течение 5 секунд, пока не
погаснет свет. После этого Вы не сможете
включить фонарь. Таким образом, Вы не
сможете намеренно или случайно включить
фонарь Н7, что позволяет предотвратить
случайный расход энергии.
Для того чтобы снять защитную блокировку
нажмите и удерживайте кнопку включения
/ выключения в нажатом состоянии более
5 секунд, после этого фонарь включится в
определенном режиме освещения.
8. Функция сброса
При извлечении из батарейного отсека
щелочных элементов питания происходит
«сброс» фонаря Н7. Таким образом, вы
сбросите некоторые функции, в том числе
отключите защитную блокировку (см. Пункт 6)
и включите функцию «Приглушенный свет»
(см. пункт 5.1) со слабой яркостью.
9.Замена щелочных элементов питания
Выключите фонарь Н14.2 перед заменой
элементов питания.
На задней стенке фонаря, рядом с
креплением для ремня, находится крышка
батарейного отсека. Откройте заднюю крышку
батарейного отсека, извлеките разряженные
элементы питания, затем вставьте новые
элементы питания.
Вставьте новые элементы питания (4
щелочных элемента питания размером
View the manual for the Ledlenser H14R.2 here, for free. This user manual comes under the category torches and has been rated by 8 people with an average of a 8.7. This manual is available in the following languages: English. Do you have a question about the Ledlenser H14R.2?
Ask your question here
Ledlenser H14R.2 specifications
Below you will find the product specifications and the manual specifications of the Ledlenser H14R.2.
The Ledlenser H14R.2 is a headband flashlight that offers a zoom capability and is controlled by buttons and rotary motion. Its single LED lamp produces a maximum light output of 1000 lumens and can light a distance of up to 300 meters. The device runs on a single battery and has a battery life of up to 40 hours.
Constructed with premium materials, the Ledlenser H14R.2 promises durability and reliability over time. It is designed to be worn comfortably on the head, making it ideal for hands-free operation in various activities such as camping, hiking, or working in low-light environments.
The on/off switch ensures easy operation, while the ability to zoom the light beam allows the user to adjust for specific situations. With its powerful light output and ergonomic design, this torch provides a dependable lighting solution for a variety of needs.
Overall, the Ledlenser H14R.2 is a high-quality and efficient headband torch with impressive features that make it a must-have for those who require reliable lighting in a hands-free design.
Flashlight type
Headband flashlight
Number of batteries supported
1
Quantity per pack
1 pc(s)
General
| Brand | Ledlenser |
| Model | H14R.2 | 7933-R |
| Product | torch |
| EAN | 4029113739986 |
| Language | English |
| Filetype | User manual (PDF) |
Design
| Flashlight type | Headband flashlight |
| Product colour | Black |
| Housing material | — |
| Control type | Buttons, Rotary |
| Zoom capability | Yes |
| On/off switch | Yes |
| Adjustable headband | Yes |
Features
Lighting
| Lamp type | LED |
| Lamps quantity | 1 lamp(s) |
| Light beam distance (max) | 300 m |
| Light output (max) | 1000 lm |
| Number of power levels | — |
Power
| Number of batteries supported | 1 |
| Battery life | 40 h |
| Battery technology | Lithium-Ion (Li-Ion) |
Packaging data
| Quantity per pack | 1 pc(s) |
Weight & dimensions
show more
Frequently asked questions
Can’t find the answer to your question in the manual? You may find the answer to your question in the FAQs about the Ledlenser H14R.2 below.
What is the weight of the Ledlenser H14R.2?
The Ledlenser H14R.2 has a weight of 340 g.
Is the manual of the Ledlenser H14R.2 available in English?
Yes, the manual of the Ledlenser H14R.2 is available in English .
Is your question not listed? Ask your question here
LED LENSER® * h14R.2
Operating instructions
Bedienungsanleitung
Instrucciones de uso
Mode d‘emploi
Gebruiksaanwijzing
Istruzioni per l‘uso
Käyttöohje
Bruksanvisning
Руководство по эксплуатации
English ……………………………………. 02-05
Suomi ……………………………………… 27-30
Deutsch …………………………………… 06-09
Svenska ………………………………….. 31-34
Español …………………………………… 10-13
Pусский ………………………………….. 35-39
Français ………………………………….. 14-18
…………………………………….. 40-43
Nederlands…………………………….. 19-22
……………………………. 44-46
Italian………………………………………. 23-26
……………………………….. 47-49
01

English | Page 02-05
GB
We are delighted that you have purchased one
You also can adjust the hinge of the headlamp.
of our products.
Depending on whether you want to illuminate
These are usage instructions to help you
an area in the distance or in front of you. For
familiarise yourself with your new purchase.
this you can simply tilt the part of the lamp
All the documents accompanying the product
head, which contains the reflector lens and
must be read attentively before using the
the white LED. The gradual detent allows also
product, preserved carefully and if the product
intermediate positions.
is transferred to a third party, the documents
must be handed over as well. This ensures that
4. Smart Light Technology (SLT)
maximum benefit is drawn from the product
The H14R.2 is equipped with our Smart Light
and questions from users are anticipated before
Technology (SLT). Thanks to the use of a
they arise.
microcontroller, the light output of the white
Above all, comply with the warnings and safety
front LED can be controlled and the user can
instructions and dispose of the packaging
use various Energy Modes, Light Programs and
material properly.
Light Functions. The red rear light also has two
light functions. Through the front switch and the
Additional information for H14R.2 with “TEST—
“Multi-function Wheel» switch on the back, the
IT” function
handling is simple and user-friendly. To turn the
Your LED LENSER H14R.2 headlamp is
headlamp on and off and to select the various
packaged with a “TEST-IT” function (item no.
Light Functions etc., the front switch has to be
7399-R). This allows users to test the brightness
used. (see point 5).
while the product is still in the package. For
What basically applies is that the brightness
testing, simply push the yellow “TEST-IT” button
of the H14R.2 is monitored by the in-built
on the front of the package. When testing, please
temperature control unit.
do not look directly into the light.
The “TEST-IT” button is connected to the battery
5. Light Programs and Light Functions
housing of the H14R.2 via two wires and should
In the H14R.2 are equipped with one white LED
be removed prior to use.
(LED = Light Emitting Diode) ,
To remove the “TEST-IT” button and wires, open
The white LED is very strong, ideal for normal
the battery box rear cover and remove 4xAAA
use, for example if the Speed Focus or the
alkaline battery (see also “Changing of the
adjustment of the angle of light beam to the
battery “further below). Separate the two “TEST-
horizontal should be used. This very bright
IT” button wires from the battery housing by
white light might be not good when your eyes
pulling on each wire until it releases from the
have become accustomed through the so-called
battery housing. Insert the battery and noting
dark adaptation to low ambient light.
the correct polarity. Close the battery box rear
cover. Please dispose and recycle the packaging
5.1 Light Program White (Front light)
and “TEST-IT” button with the wires according to
In H14.2, there are three different modes (Easy
the local regulations.
Low, Easy Power, Signal). The default mode is
Easy Low.
Product
7299-R, LED LENSER® H14R.2
When the product is off, press the “Multi-function
7399-R, LED LENSER® H14R.2 (Blister)
Wheel” switch the for 5 second, it will achieve
mode transition, blink for one time, that means
Version of the operating manual: 1.3
you has entered sub-mode one; blink for two
times, that means you has entered sub-mode
1. Battery set:
two; and 3 times blink for three times, that
1 x Li-ion battery pack 3.7 V 4400mAh
means you has entered sub-mode three.
4XAA alkaline battery (Blister)
a) Light Mode one — Easy Low: when the product
2. Switching on and off
is off, push the front switch hardly until you hear
The H14R.2 has two switches. The front switch
click sound, the white LED will glows with lower
is located on the right side of the headlamp
brightness (light function: Low Power); second
housing. This switch button is used to turn the
touch the white LED will glows full brightness
H14R.2 ON/OFF. It is also used to activate the
(light function: Power), third time touch the
various Light Programs and Lighting Functions
button is off;
(see section 5.1) and the “Transport Lock”
function (see Point 7). The “Multi-function
b) Light Mode two — Easy Power: when the
Wheel” switch is located on the backside at the
product is off, push the front switch hardly until
upper part of the battery box. This allows you
you hear click sound, the white LED will glows
to adjust the brightness and flash rate infinitely
with full brightness (light function: Power);
and to change into different modes. In this
second touch the white LED will glows with
switch is also a battery indicator and the red
lower brightness (light function: Low Power),
rear light located (see Section 5).
third time touch the button is off;
3. Focus
c) Light Mode three — Signal: when the product
In the front, narrower region of the headlamp
is off, push the front switch hardly until you hear
housing is the reflector lens through which the
click sound, the white LED will glows with full
light of the white LED is focusable. The light
brightness (light function: Power); second touch
is focusable through our patented «Advanced
the white LED flashes frequently (12 Hz) (light
Focus System», by pushing easily the lamp head
function: Signal), third time touch the button is
forward and backwards (Speed Focus).
off;
02
LED LENSER® * h14R.2
When the headlamp is on, rotate the “Multi-
seconds. Then you change the mode between
function Wheel» switch on the back to adjust the
„energy mode“ and „constant current mode“.
LED brightness based on your needs. Turning
left: the brightness of white LED will getting
a) Constant current mode: In case the
lower.Turning right: the brightness of white LED
brightness reduces immediately in 2 seconds,
will getting brighter (except the strobe function).
the H14R.2 is on constant current mode;
The LED will blink once to indicate the maximal
and minimum brightness.
b) Energy saving mode: in case the brightness
reduce gradually to zero, the H14R.2 is in the
d) Boost mode: in each setting, push the front
Energy Mode.
switch for 2 seconds, you will enter to boost
mode, after a short time the flashlight will
With this procedure, you can switch between
return to previous choosing.
the two Energy Modes. It is not possible to
All Light Functions above are in a loop. You can
determine in which Energy Mode the H14R.2
change the functions by press the switch button.
is. To find this out, you must carry out the
Note: when switching between modes, press the
procedure. If the H14R.2 is thereafter not in the
“Multi-function Wheel” switch no longer than 2
desired Energy Mode any more, you must repeat
seconds, otherwise the product will turn off.
the procedure again. The flashlight will reset to
energy saving mode if you change the battery or
5.2 Light Program Red (rear light)
cut the power.
ON-OFF/ change the function within 2 seconds.
More than 2 seconds the lamp will turn off) /
7. „Transport Lock“
charge indicator/ battery capacity indicator
When the H14R.2 switched Off, press the front
function is available for the red LED:
switch for approx. 5 seconds till the light turns
off in order to enable the “Transport Lock.” The
1) ON-OFF function: in any status, two red LED
H14R.2 cannot be turned on any more, either
will light up by pressing the “Multi-function
intentionally or unintentionally. Accidental
Wheel” switch once: the LEDs will start to blink,
power consumption is not possible.
by pressing the switch twice; at the third push
To deactivate the “Transport Lock”, just press
the LEDs will turn OFF.
the front switch again for 5 seconds. The
headlamp will now return to the Light Program.
2) Charge indicator function: the red LED will
glows when charging, after full charge, the LED
8. Reset function
will glows green, please be noticed that the
If the Accumulator-Pack, the alkaline batteries
white LED couldn’t working when charging;
are taken out the battery box you have «reset»
the H14R.2. You have thus reset a few functions:
3) Battery capacity indicator: when you start to
The „Transport Lock“ (see Point 7) is
use white LED, the red LED on the battery box
deactivated.
will glows for 5 seconds and then off, green
The Light Function Dim (see Point 5.1) is set to
means the battery capacity is 50%-100%; yellow
low brightness.
means the battery capacity is 20-49%; when the
As Energy Mode Energy Saving is active (see
red LED is glows means the battery capacity is
Point 6).
lower than 19%, it’s not suit for long time use,
The Light Program White (see Point 5.1) is
you need to charge the battery.
activated.
6. Energy Modes
9. Charging
By selecting one of the two Energy Modes
The H14R.2 indicates by the flashing of the
(Energy Saving or Constant Current), you take
white LED that it is running out of energy in
a decision on how the energy contained in the
near future. Please charge the Accumulator-
accumulator respectively in the batteries is
pack in time. Charge the Accumulator-pack of
used.
your H14R.2 in a dry place and only by using the
charger that is included in the delivery or by a
6.1 Energy Saving: The light output is controlled
USB port (see below).
by the integrated Smart Light Technology (SLT).
The following information applies only to the
The brightness is matched to the real conditions
included accessories. You cannot charge any
that occur during normal use of the lamp, thus
other accumulators or batteries in the H14R.2.
providing a longer burn time.
In case Li-ion Accumulators are used, they must
be charged in approved external chargers.
6.2 Constant Current: This Energy Mode allows
In the scope of delivery of the H14R.2 there
the continuous use of all the Light Functions
is a plug and a charger. In case both are not
with a more or less constant light output. This
connected already please connect them so that
Energy Mode is to be preferred when a high
the connection clicks.
brightness level is more important than a long
The charger of H14R.2 has a USB port, which
burn time
must be connected with the corresponding
port at the supplied charging cable in order to
Changing of the Energy Modes
charge Accumulator-pack. The other side of the
Changing the Energy Modes can only be done
charging cable (micro USB) must be connected
when the flashlight is in Light Program White
to the micro USB port on the battery box.
and the lamp is turned Off. To change the energy
The last step is to connect the plug into a socket
mode, with the white LED off, press the “Multi-
(Input: 100 V to 240 V / 50 Hz to 60 Hz). When
function Wheel” on the back 8 times, then on the
charging is completed (after maximum 4 to
8th click keep the knob pressed for approx. 2-4
5 hours), unplug the charger from the socket
03
GB
again and the charging cable (micro-USB) of the
period, please take out the Accumulator-Pack
Accumulator-pack. But it is no problem to go
respectively the NiMH-Accumulators / alkaline
on loading the Accumulator-pack although it is
batteries in order to avoid damage.
already full.
Used batteries and accumulators have to be
Instead of connecting the charging cable to the
taken out the item and disposed of in keeping
USB port of the charger, you can also connect
with the national laws.
it to a different USB port (5 V / 900 mA) e.g. of a
computer.
13. Disposal for rechargeable batteries and
While using our optionally available car USB
non-rechargeable batteries
charger connection (Led Lenser Car Charger:
Basically, the possibility of short-circuits of
Item no. 0380), the H14R.2 also can be charged
accumulators and batteries must be eliminated
at the cigarette lighter and sockets in vehicles.
and they may neither be opened, nor enter the
These accessory units match themselves
human body in any way, nor may they be thrown
automatically to the respective input voltage
into a fire.
(12 V ó 24 V). These alternatives are suitable to
charge the Accumulator-pack in case a power
14. Cleaning
outlet is not available.
For cleaning, please use a dry, lint-free, clean
Note – Please ensure that there is no short-
cloth.
circuit at the charging contacts. The charging
If salt water is spilled on the head lamp, it must
contacts may not be touched with moist or
be immediately entirely removed with such a
metallic objects.
cloth.
The headband can be washed in a washing
10. Charge indications
machine at 30 °C.
In case you are charging the Accumulator-Pack
of the H14R.2 with the corresponding charger
15. Scope of delivery
and charging cable respectively by a USB port
The H14R.2 incl. headband is supplied with the
(see Point 9) the status LED at it glows while
following accessories:
charging in red and the light changes to green
1xH14R.2 headlamp;
when the charging is completed. The white LED
1xcharger and plug;
of H14R.2 couldn’t use while charging.
1xUSB cable, connect the rechargeable battery
and charger for charge;
11. Changing of the Accumulator-Pack / Li-ion-
1xLi-ion battery pack;
Accumulator / Alkaline batteries
1x user manual.
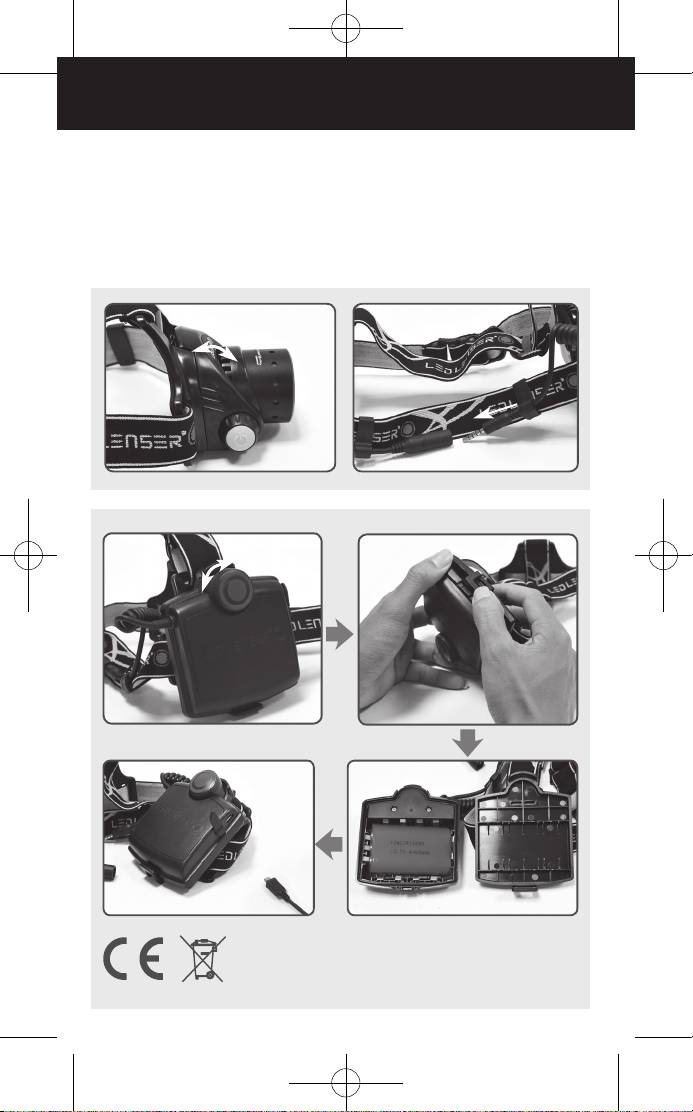
Prior to the change, please turn off the H14R.2.
On the button side of the head lamp battery box
16. Caution
there is the gate of the battery box. Open the
Do not swallow any small parts or batteries/
battery box rear cover, remove the battery, and
accumulators that are present. The products
then insert a new one.
or parts thereof (including batteries /
Also alkaline batteries can be inserted. But then
accumulators) must be stored outside the reach
the charger cannot be used!
of children.
During insertion, it is always necessary that
For reasons of safety and approval (CE), the
this is in the correct direction. Therefore, pay
product must not be modified and/or changed.
attention to the polarities (+ and -) both in the
The product is to be used exclusively as an
battery box and also on the Accumulator-Pack
accumulator or battery powered lamp. If the
/ alkaline batteries. Otherwise, the hypothetical
H14R.2 is used for any other purpose, or used
risk that Accumulators / batteries are damaged
incorrectly, it can get damaged and hazard-
and may explode.
free use is not guaranteed any more (danger
The supplied Accumulator-Pack can only be
from fire, short-circuit, electric shock etc.).
recharged with the original charger or by a USB
There is then no liability for harm to persons
port (see Point 9)!
or damage to property, and the warranty of the
After replacing the cover of the battery box has
manufacturer is also rendered null and void.
to be closed again.
The temperature range in which the H14R.2
can be operated is -20 C° to +50 C°. Ensure that
12. Headband
the H14R.2 is not subjected to more extreme
The headband can be washed, and please refer
temperatures, intense vibrations, explosive
to the picture about how to disassemble and
atmosphere, solvents and / or vapors. Also
assemble the headband.
continuously exposed to direct sunlight, high
humidity and/or moisture have to be avoided.
13. Rechargeable batteries / Accumulators
Changes, repairs and maintenance over and
Non rechargeable batteries or other
above those described in the documents
accumulators that are not of the same type as
accompanying the product may only be carried
the accumulator that is scope of delivery are not
out by authorized technical personnel.
allowed to be charged by the charger. Never use
Once it is found that the product is filled with full
non rechargeable batteries and accumulators
batteries / accumulators in correct orientation
together. Change always all non-rechargeable
(polarity!) and correctly closed, but nonetheless
batteries and accumulators at the same time.
a normal, safe operation is not possible or the
Use in the H14R.2 below batteries can be used
product shows damage, it must be rendered
4 x AA alkaline / 4 x AA Ni-MH / 4 x CR123A
inoperative and not used any further. In this
Lithium batteries / 4xCR123A rechargeable
case, for warranty matters, contact your dealer.
Lithium batteries / 2 x ICR 18650 batteries / Li-
ion battery pack.
17. Safety instructions
If you intend not to use the item for an extended
This product is not a children’s toy.
04