
Other languages:
- Afrikaans
- Bahasa Indonesia
- Deutsch
- English
- Esperanto
- Gaeilge
- Kiswahili
- Kreyòl ayisyen
- Malti
- Nederlands
- Tagalog
- Tiếng Việt
- Türkçe
- Yorùbá
- bosanski
- català
- dansk
- eesti
- español
- euskara
- français
- hrvatski
- italiano
- lietuvių
- magyar
- norsk
- polski
- português
- português do Brasil
- română
- slovenčina
- slovenščina
- suomi
- svenska
- íslenska
- Ελληνικά
- български
- монгол
- русский
- српски / srpski
- українська
- اردو
- العربية
- فارسی
- हिन्दी
- বাংলা
- ไทย
- 中文
- 中文(中国大陆)
- 中文(简体)
- 日本語
- 한국어
Помогите нам обновить это руководство!
Это руководство является вики — просто войдите в свою учетную запись LimeSurvey.org и начните редактирование!
Общие
Основные главы:
- LimeSurvey Cloud против LimeSurvey CE
- LimeSurvey Cloud — Краткое руководство
- LimeSurvey CE — Установка
- Как разработать хороший опрос (Руководство)
- Начиная
- Конфигурация LimeSurvey
- Введение — Опросы
- Просмотр настроек опроса
- Посмотреть меню опроса
- Посмотреть структуру опроса
- Введение — Вопросы
- Введение — группы вопросов
- Введение — Опросы — Менеджмент
- Параметры панели инструментов опроса
- Многоязычный опрос
- Краткое руководство — ExpressionScript
- Расширенные возможности
- Общие вопросы и ответы
- Поиск неисправностей
- Обходные пути
- Лицензия
- Журнал изменений версий
- Плагины — Расширенный
LimeSurvey позволяет пользователям быстро создавать интуитивно понятные, мощные онлайн-формы и опросы, которые могут работать для всех, от малого до крупного бизнеса. Программное обеспечение для опроса является самостоятельным для респондентов. В этом руководстве показано, как установить приложение на собственный сервер (хотя мы настоятельно рекомендуем нашу облачную версию для полной поддержки), администрировать установку, а также оказывать поддержку создателям опросов, администраторам и пользователям, которым необходимо создавать отчеты.
За последние несколько лет произошел значительный скачок в разработке, что привело к появлению множества новых функций и изменений. Обязательно обновитесь до последней версии LimeSurvey, чтобы использовать выделенные здесь возможности. Если вы предпочитаете использовать веб-версию, пропустите загрузку.
Основные главы руководства расположены в рамке справа. Вы также можете прокрутить страницу вниз, чтобы просмотреть полное содержание и перейти непосредственно к интересующей вас теме.
Окно поиска (верхний правый угол вики), наш список Общие вопросы и ответы и Временные решения помогут вам, если у вас возникнут какие-либо проблемы. Если вам нужна помощь сообщества, присоединяйтесь к нашим форумам и проверьте LimeSurvey.
Помните, что LimeSurvey — это бесплатное приложение с открытым исходным кодом. Видите что-то отсутствует или неправильно? Тогда помогите нам это исправить. Эта документация представляет собой вики, которую можете редактировать вы или кто-либо еще, или вы можете сделать пожертвование или купить план Basic, Expert, Enterprise на странице [цены https://www.limesurvey.org/ru/pricing], чтобы помочь поддержать Основная группа разработчиков пытается изменить ситуацию 
Руководство — Содержание
- LimeSurvey Cloud против LimeSurvey CE
- Что мне нужно?
- LimeSurvey Cloud — Краткое руководство
- Что такое LimeSurvey?
- Создайте бесплатную учетную запись LimeSurvey
- Настройка сайта опроса
- Начните использовать LimeSurvey
- Другие функции LimeSurvey
- Установка — LimeSurvey CE
- Дополнительные настройки
- Обновление с предыдущей версии
- ComfortUpdate
- Установка с использованием интерфейса командной строки (CLI)
- Перенос установки
- Installation FAQ
- Советы по безопасности установки
- Localization
- Как разработать хороший опрос (Руководство)
- Getting Started
- Первый вход
- Измените свой пароль
- Настройки вашей учетной записи
- Конфигурация LimeSurvey
- Настройки
- Настройки домашней страницы
- Глобальные настройки
- Менеджер плагинов
- Конфигурация меню (New in 3.0 )
- Конфигурация пунктов меню (New in 3.0 )
- Пользователи
- Управление пользователями
- Управление группами пользователей
- Central Participant Database (CPDB)
- Передовой
- Редактор темы (LimeSurvey 2.x)
- Новая система шаблонов в LS3.x
- Темы
- Темы вопросов
- Наборы этикеток
- Проверить целостность данных
- Резервное копирование всей базы данных
- КомфортОбновление
- Редактор темы (LimeSurvey 2.x)
- Настройки
- Введение — Опросы
- Общий
- Опросы
- Импорт опроса
- Скопируйте опрос
- Список опросов
- Удалить опрос
- Экспорт опроса
- Группы опросов
- Группы опросов
- Создать группу опроса
- Изменить группу опроса
- Удалить группу опроса
- Разрешения группы опроса
- Просмотр настроек опроса
- Введение
- Обзор
- Общие настройки
- Текстовые элементы
- Параметры политики данных
- Варианты темы
- Презентация
- Настройки участника
- Уведомления и данные
- Публикация и доступ
- Посмотреть меню опроса
- Введение
- Список вопросов
- Список групп вопросов
- Изменить порядок вопросов и групп вопросов
- Участники опроса (was Tokens)
- Система отслеживания отказов электронной почты
- Повторить опрос
- квоты
- Оценки
- Разрешения на опрос
- Шаблоны электронной почты
- Заполнители электронной почты
- Интеграция с панелью
- Ресурсы
- Меню плагина
- Посмотреть структуру опроса
- Введение
- Структура опроса
- Группы вопросов
- Вопросы
- Изменение порядка вопросов и групп вопросов
- Введение — Вопросы
- Типы вопросов
- Тип вопроса — Массив
- Тип вопроса — Массив по столбцу
- Тип вопроса — двойная шкала массива
- Тип вопроса — Массив (5 баллов на выбор)
- Тип вопроса — Массив (на выбор 10 баллов)
- Тип вопроса — Массив (Увеличение-Совпадение-Уменьшение)
- Тип вопроса — Массив (Числа)
- Тип вопроса — Массив (Тексты)
- Тип вопроса — Массив (Да-Нет-Неопределенно)
- Тип вопроса — Дата
- Тип вопроса — Уравнение
- Тип вопроса — Загрузка файла
- Тип вопроса — Пол
- Тип вопроса — переключение языка
- Тип вопроса — числовой ввод
- Тип вопроса — множественный числовой ввод
- Тип вопроса — Рейтинг
- Тип вопроса — текстовый дисплей
- Тип вопроса — Да-Нет
- Тип вопроса — Множественный выбор
- Тип вопроса — Множественный выбор с комментариями
- Тип вопроса — выбор из 5 баллов
- Тип вопроса — Список (Выпадающий)
- Тип вопроса — Список (Радио)
- Тип вопроса — Список с комментариями
- Тип вопроса — Короткий произвольный текст
- Настройка карт и сохранение местоположения
- Тип вопроса — Длинный произвольный текст
- Тип вопроса — Огромный свободный текст
- Тип вопроса — Несколько коротких текстов
- Изменить порядок вопросов
- Типы вопросов
- Введение — Группы вопросов
- Параметры панели инструментов группы вопросов
- Предварительный просмотр группы вопросов
- Изменить групповой порядок
- Введение — Опросы — Менеджмент
- Тестирование опроса
- Активация опроса
- Безопасное проведение опроса
- Просмотр результатов опроса
- Закрытие опроса
- Изменение активного опроса
- Ввод данных
- Статистика
- Экспорт результатов
- Экспорт структуры опроса
- Экспорт QueXML в PDF
- Быстрый перевод
- Параметры панели вопросов
- Функция предварительного просмотра
- Изменить вопрос
- Проверить логику вопроса
- Удалить вопрос
- Экспорт вопроса
- Копировать вопрос
- Условия настройки
- Добавление ответов или подвопросов
- Ответы по умолчанию
- Параметры панели инструментов опроса
- Тестирование опроса
- Активация опроса
- Безопасное проведение опроса
- Изменение активного опроса
- Закрытие опроса
- Повторить опрос
- Инструменты
- Удалить опрос
- Быстрый перевод
- Условия сброса
- Файл логики опроса
- Восстановить коды вопросов
- Display/Export survey
- Экспорт QueXML в PDF
- Структура опроса значений с разделителями вкладок
- Участники опроса
- Ответы (результаты опроса)
- Ответы и статистика
- Сводка ответов
- Ответы
- Ввод данных
- Статистика
- Статистика — экспертный режим
- Статистика — простой режим
- Статистика времени
- Экспорт ответов
- Импорт ответов
- Проблемы и решения
- Просмотр сохраненных, но не отправленных ответов
- Повторить опрос
- Пакетное удаление
- Ввод данных
- Частичные (сохраненные) ответы
- Ответы и статистика
- Многоязычный опрос
- Движок ExpressionScript — краткое руководство
- ExpressionScript — Презентация
- Инструкции по ExpressionScript
- Примеры ExpressionScript
- Дорожная карта движка ExpressionScript
- ExpressionScript для разработчиков
- Образцы опросов ExpressionScript
- Диспетчер выражений — old page with full documentation
- Расширенные возможности
- Идентификатор SGQA
- Использование регулярных выражений
- поля URL
- API дистанционного управления 2
- REST API
- Шифрование данных
- Custom translation
- Защита данных
- Печенье
- Общие вопросы и ответы
- Поиск неисправностей
- Обходные пути
- Обходные пути: вопрос о дизайне, макете и шаблонах
- Обходные пути: управление опросом во время выполнения с помощью Javascript
- Обходные пути: поведение опроса
- Обходные пути: дополнительные решения, предоставленные пользователями LimeSurvey.
- Лицензия
- Журнал изменений версий
- Плагины — продвинутые
- Сделайте ваш плагин совместимым с LS5
- Доступные сторонние плагины
LimeSurvey Development
- Руководство по версии — Краткое руководство по нумерации версий
- Обзор разработки — Общие страницы о разработке LimeSurvey
- Документация по разработке LimeSurvey 2.x
- Новая система шаблонов в LS3.x — Краткий обзор новинок системы шаблонов LimeSurvey 3
Перевод LimeSurvey
Если вы хотите добавить новые переводы или исправить перевод, следуйте этим инструкциям:
- Как перевести LimeSurvey
- Ручной перевод LimeSurvey — резюме
Семестр участия в коде
- Семестр кода 2014
Google Summer of Code / Code-In Участие
- Идеи проекта для GSoC 2015
- Идеи проекта для GSoC 2013
- LimeSurvey Google Code-in 2012
- LimeSurvey Google Code-in 2011
- LimeSurvey GSoC 2011/Начало работы с GSoC
- LimeSurvey GSoC 2010
- LimeSurvey GSoC 2009
Other languages:
- Deutsch
- English
- Nederlands
- Tiếng Việt
- dansk
- español
- français
- italiano
- magyar
- polski
- português do Brasil
- română
- slovenščina
- български
- русский
- 中文(中国大陆)
- 日本語
- 한국어
Attention : Обратите внимание, что в этом руководстве используются пояснения и снимки экрана, применимые к LimeSurvey 3.xx. Существуют небольшие различия между LimeSurvey 3.xx и LimeSurvey 2.xx, особенно когда речь идет о графическом интерфейсе пользователя (GUI). Мы рекомендуем использовать последнюю версию LimeSurvey.
General
Опрос включает в себя различные взаимосвязанные базы данных: языки, группы вопросов, вопросы, атрибуты вопросов, ответы, подвопросы, ответы по-умолчанию, оценки, квоты, члены квот, и языковые настройки квот. Чтобы упростить управление опросами,был добавлен функционал группы опросов в (New in 3.0 ).
Опросы
Есть два способа попасть на страницу создания нового опроса:
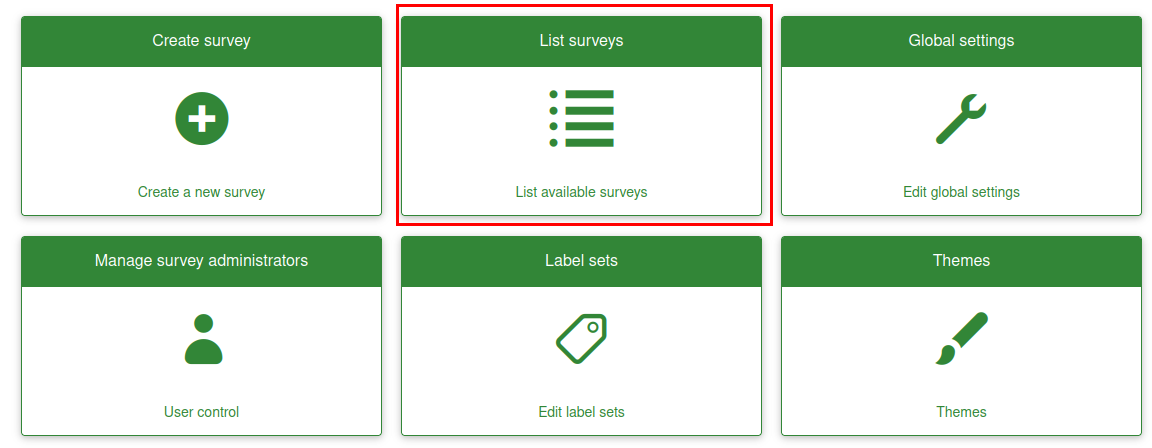
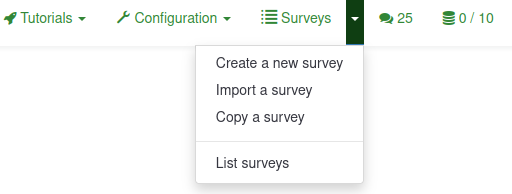
1. Первый — это нажать на стрелку, правее кнопки «Опросы» на главной панели инструментов домашней страницы вашей установки LimeSurvey. Появится раскрывающийся список, из которого вы можете выбрать пункт «Создать новый опрос»:
2. Второй — нажать кнопку «Опросы», расположенную на главной панели инструментов домашней страницы вашей установки LimeSurvey:

Отобразится список опросов. Чтобы создать новый опрос, нажмите кнопку Создать новый опрос, расположенную в верхней левой части окна над списком опросов.

Создание нового опроса
После того, как вы нажали Создать новый опрос, загрузится следующая страница:
(1) Enter the Survey title.
Note: The Survey title field is required. The remaining fields are optional. For a detailed explanation of each field, please refer to the Text Elements section below.
(2) Click Save (In the top-right just below your Username).
Чтобы настроить опрос, проверьте параметры, доступные на каждой вкладке, расположенной на панели инструментов:
- Текстовые элементы
- Общие настройки
- Публикация и навигация
- Публикация и управление доступом
- Уведомления и управление данными
- Настройки участников
- Text elements
- General settings
- Presentation & navigation
- Publication & access control
- Notification & data management
- Participant settings
Вы также можете изменить большинство этих настроек, открыв Общие настройки и тексты недавно созданного опроса и изменив нужные параметры.
Attention : Редактор HTML WYSIWYG не позволяет загружать файлы в процессе создания опроса. Попытка сделать это приведет к появлению сообщения об ошибке, например: «Это средство загрузки файлов отключено». Если вам необходимо загрузить изображения или другие ресурсы, сделайте это после создания опроса, открыв Панель ресурсы в Общие настройки и тексты.
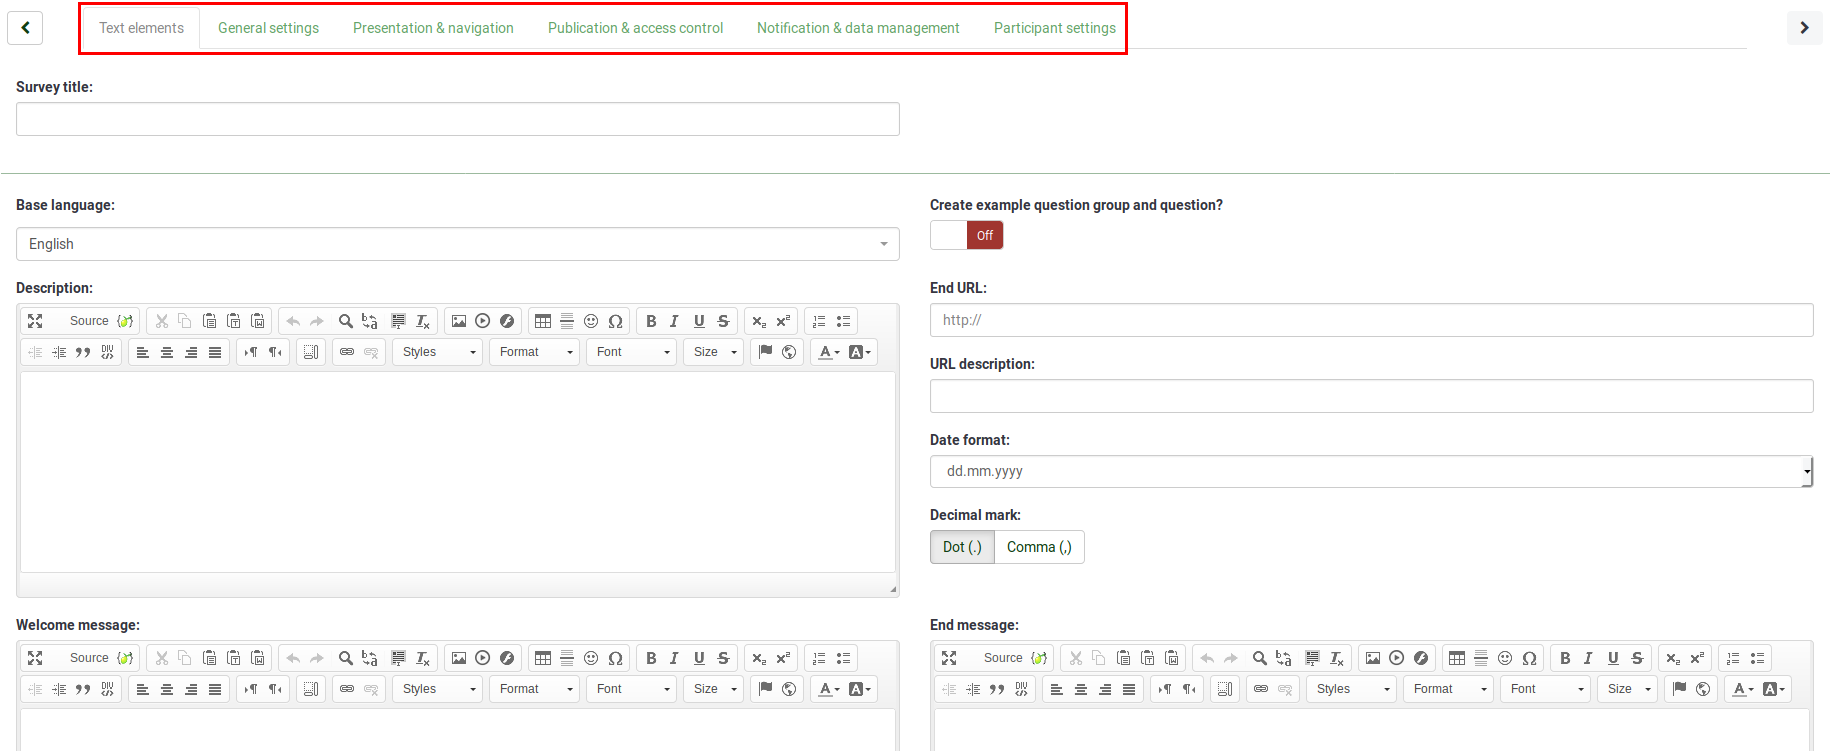
Текстовые элементы
На этой вкладке расположены следующие параметры:
- Название опроса: Название опроса можно изменить из этого поля;
- Create example question and question group?: (New in 3.0 ) Если включено, группа вопросов и вопросов будет добавлена в ваш опрос по умолчанию при создании опроса; ;
Attention : Обратите внимание, что вопрос должен быть сначала добавлен в группу вопросов, чтобы отображаться в опросе! В противном случае вопрос не будет отображаться участнику опроса.
- Основной язык: редставляет основной язык опроса. Если вы хотите добавить другие языки опроса, сначала создайте опрос, затем откройте Общие настройки недавно созданного опроса и добавьте дополнительные языки.
- Описание: Вы можете ввести описание опроса. Если этот параметр включен в глобальные настройки, используйте HTML редактор чтобы лучше настроить поле описания;
- Финальный URL: У вас есть возможность перенаправить пользователей на другую страницу, когда они закончат заполнять анкету. Если вы хотите перенаправить их, введите URL-адрес и активируйте опцию Автоматически перейти по ссылке после окончания опроса, расположенную на вкладке Публикация и навигация;
- Описание URL: Можно добавить краткое описание URL в случае, если пользователь перенаправлен на веб-страницу несвязанного опроса. Это может помочь администратору опроса добавить примечания относительно использования соответствующего URL;
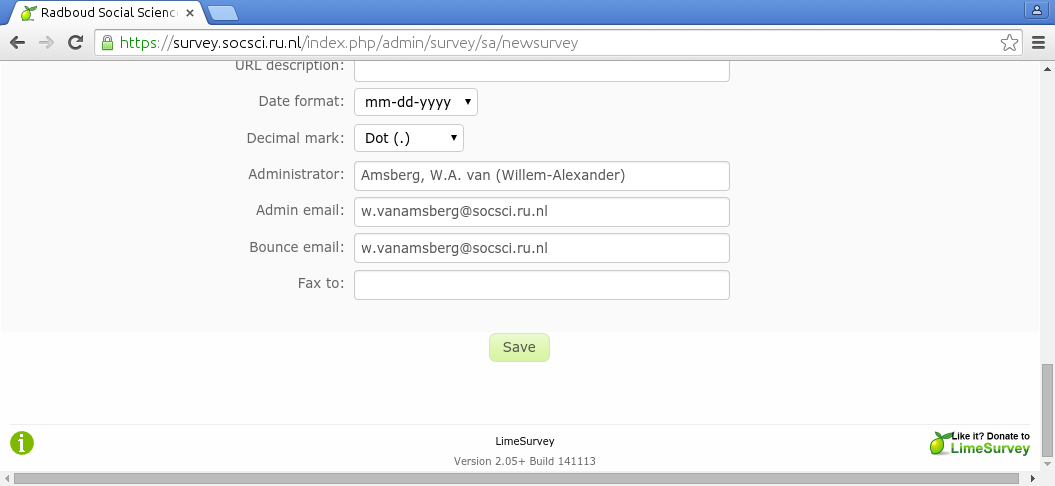
- Формат даты: Этот параметр важен, если вы хотите записать метки времени вместе с ответами участников опроса. Если щелкнуть по нему, появится раскрывающийся список с множеством форматов даты. Выберите тот, который подходит вашим респондентам. Не забывайте, что во всем мире используются разные форматы даты. Например, рекомендуется использовать другой формат времени, если ваша анкета ориентирована на рынок США (мм-дд-гггг), а не на британский рынок (дд-мм-гг);
- Десятичный знак: Доступны два варианта: точка (.) И запятая (,). Выберите тот, который подходит для места, где вы проводите свое исследование (например, США vs Германия);
- Приветственное сообщение: Введите сообщение, которое будет приветствовать участников опроса при доступе к вашей ссылке опроса;
- Сообщение по окончании: TВведите сообщение, которое будет отображаться участникам опроса после заполнения анкеты. Если поле Финальный URL имеет значение и Автоматически перейти по ссылке после окончания опроса включено, сообщение о завершении не отображаться не будет.
Общие настройки
На этой вкладке расположены следующие параметры:
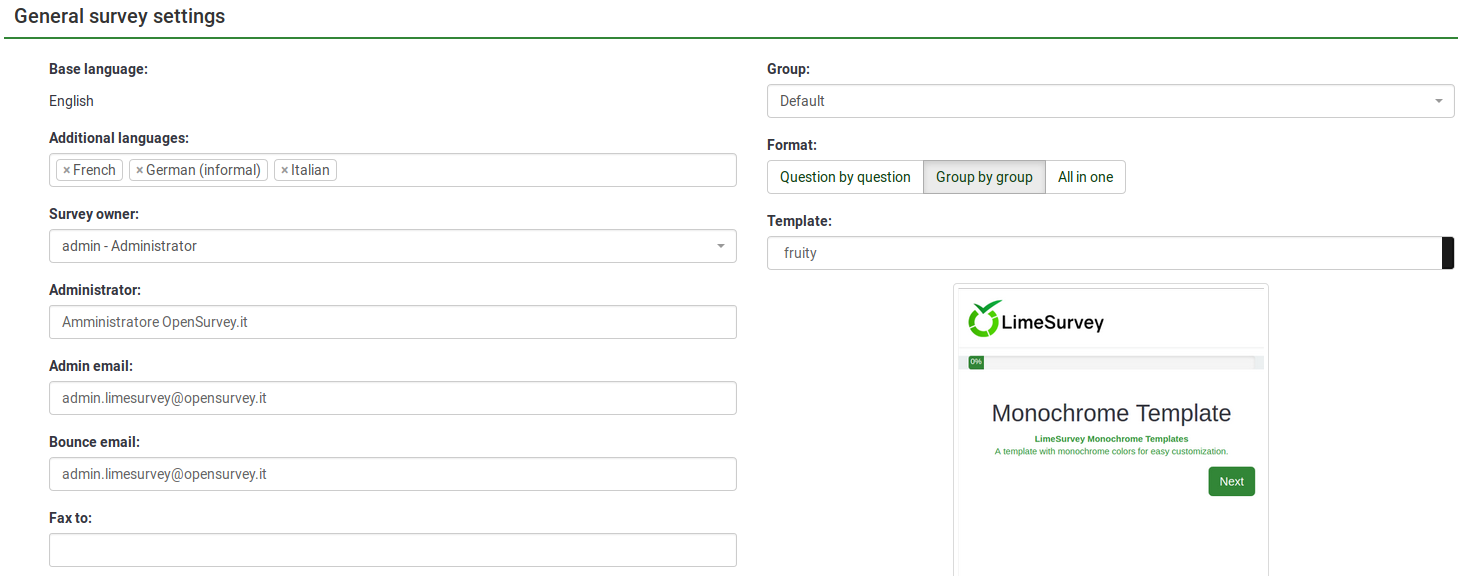
- Владелец опроса: Выберите владельца опроса;
- Администратор: Администратор опроса;
- E-mail администратора: Введите адрес электронной почты администратора опроса;
SMTP-серверы многих хостинг-провайдеров будут принимать только электронные письма, чей адрес «От:» находится в локальном домене. Любые электронные письма, которые не соответствуют этому правилу, удаляются молча, без каких-либо видимых сообщений об ошибках. Если это произойдет с вами, убедитесь, что вы используете адрес электронной почты поставщика в поле «E-mail администратора». Вы также можете настроить пересылку электронной почты на стороне провайдера, чтобы любые отправленные туда сообщения передавались на ваш предпочтительный адрес.
- Bounce email: This is the email address where the delivery error notification emails (bounced emails) will be sent to.
A bounce email is an electronic email which is returned to the sender for various reasons (e.g. invalid address, temporary unavailable mail server, the recipient’s mailbox is full, etc).
- Fax To: This field is used to print a fax number on the «printable survey» — i.e.: when you want to send someone a hard copy because he or she cannot use the online survey.
- Group (New in 3.0 ): Select the survey group that the newly created survey should be added to.
- Format: This function allows you to choose the way in which the questions will be displayed to the survey respondents. Three options are available:
- Question by Question : The questions will be displayed one by one (one question per page). If this option is chosen, a separate «welcome» page and «end» page will be displayed when taking the survey.
- Group by Group : Each survey page will display a question group. Also, a separate «welcome» page and «end» page will be displayed when taking the survey, as with the «Question by Question» surveys.
- All In One : If chosen, all the pages will be displayed on a single page. If you select this option, no separate pages will be displayed for the «welcome» and «end» pages — they will all appear on the same page, together with the questions.
- Шаблон: Шаблон по умолчанию довольно простой, но функциональный. Более подробная информация о создании ваших собственных шаблонов доступна здесь.
Presentation & navigation
The following options can be found under the Presentation & Navigation tab:
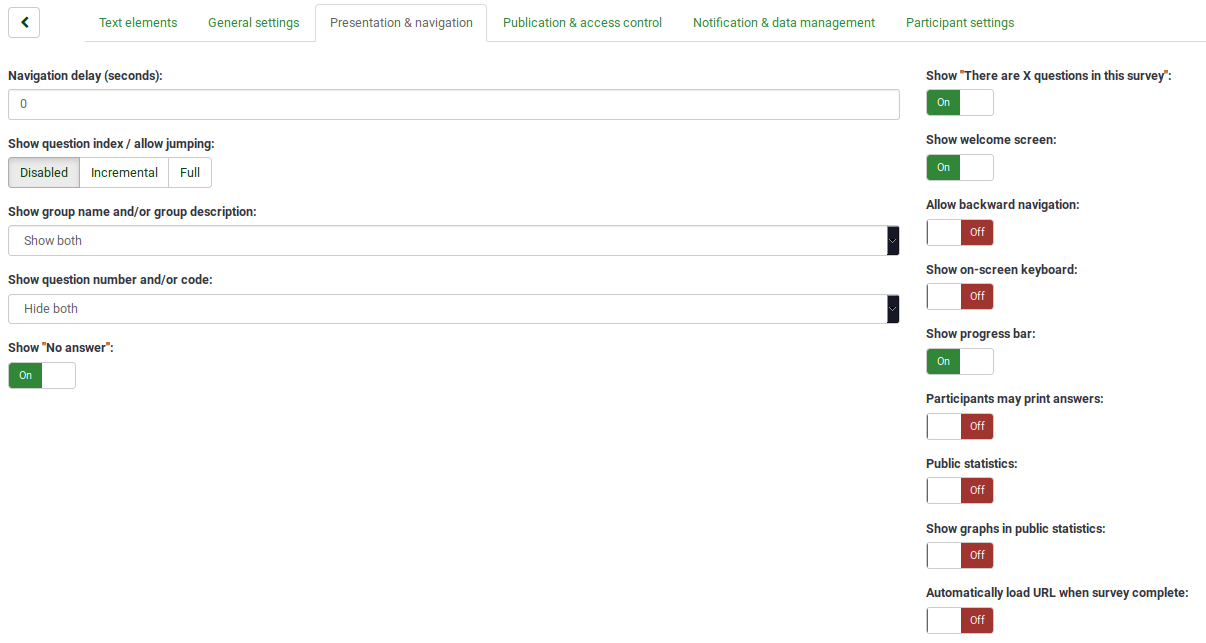
- Navigation Delay (Seconds): This feature displays the number of seconds before the previous, next, and submit buttons are enabled. If none is specified, the option will use the default value, which is «0» (seconds).
- Show Question Index / Allow Jumping: A question index can be displayed in the survey if this function is enabled, allowing the user to jump from one question group to another. You can choose the following:
- Disabled : If this option is selected, no index is shown in the survey.
- Incremental : If this option is selected, the question groups will be shown incrementally in an index menu located on the survey page. You are allowed to «jump back» only to the question groups that were previously visited/accessed.
- Full : Jumping from question group to question group is allowed via the index menu.
- ‘Показать’ В этом опросе есть X вопросов ‘: показывает общее количество вопросов в вашем опросе;
- Show Group Name and/or Group Description: This function allows you to choose whether your survey will show participants the question group name only, the group description only or both. You may also choose to hide both.
- Show Question Number and/or Code: This function allows you to choose whether your survey will show participants the question number only, the question code only or both. You may also choose to hide both. Please note, the question number is shown the moment someone starts the survey, while the question code is shown next to each survey question.
- Show «No Answer»: When a «radio button» or «select type» question that contains editable answers (e.g.: List & Array questions) has the Show «No Answer» option enabled and it is also not mandatory, an additional entry «No Answer» is displayed for each question/sub-question. In this way, the respondents may choose not to answer the respective question/sub-question. The following two options are available for survey administrators:
-
- On : If this option is selected, the respondents can choose the «No Answer» option for a non-mandatory question.
- Off : If selected, the «No Answer» option will not be displayed as a possible answer for any non-mandatory question.
Options set in the global settings override all other survey settings. Therefore, if the super-administrator chooses to have the «No Answer» option displayed, then the Show «No Answer» of the local survey field becomes non-selectable. The same applies to the «Off» option. To offer freedom to survey administrators, the super-administrator has to choose «Selectable» for the Show «No Answer» option from the global settings of your LimeSurvey installation.
- Show Welcome Screen: If turned off, the welcome text message will not be displayed at the beginning of the questionnaire.
- Allow Backward Navigation: If enabled, this will allow the users to navigate backwards and change his or her previous answers.
- Show On-Screen Keyboard: If turned on, an on-screen keyboard will will be displayed when answering questions that require typing in information.
- Show Progress Bar: When enabled, this function displays a progress bar that shows participants how much of the survey they have completed and how much is left to be completed.
- Participants May Print Answers: If turned on, the survey participants may choose at the end of the survey to print their answers.
- Public Statistics: A link to a set of statistics will be shown at the end of the survey if this option is enabled.
- Show Graphs In Public Statistics: If enabled, graphs will also be shown in the Public Statistics at the end of the survey. Please note that the «Public Statistics» option has to be enabled to allow the survey participants to see the graphs.
- Automatically Load URL When Survey Complete: The end URL becomes a redirect link once the survey is completed if this option is turned on.
Publication & access control
The following options can be found under the Publication & Access Control tab:
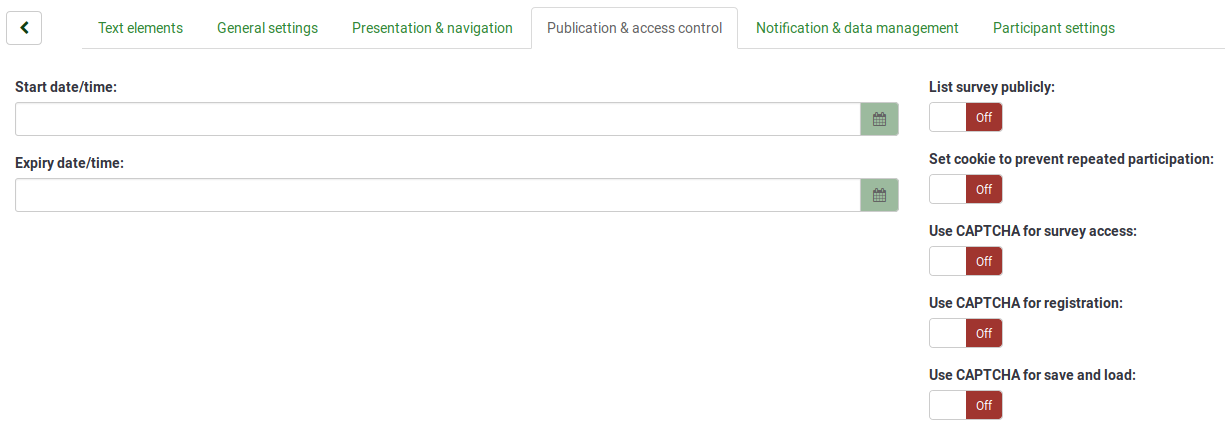
- Start Date/Time: This is the date/time the survey starts.
- Expiry Date/Time: This function allows you to choose a date for your survey to expire. This is the last date on which the public survey script will let people participate. (Example: If you set the expiry date for the 31st of December, then people will no longer be able to fill out the survey on the 1st of January). To remove an expiry date, just clear the date from the input field.
- List Survey Publicly: The default value is «No». When it is set to «Yes», your survey will be listed in the «Available Surveys» portal where it can be seen by all LimeSurvey users.
- Set Cookie to Prevent Repeated Participation: If this is turned on, a survey participant will be blocked from completing a survey a second time.
- Use CAPTCHA for Survey Access: In order to access the survey, a CAPTCHA code has be typed in by the survey participant.
- Use CAPTCHA for Registration: In order to register for the survey, a CAPTCHA code has be typed in by the survey participant.
- Use CAPTCHA for Save and Load: Enable this function if you want a survey participant to type in a CAPTCHA code when he or she loads the survey again after only a part of it was completed (to prevents automated responses).
Notification & data management
The following options can be found under the Notification & Data Management tab:
- Date Stamp: Enable this functionality if you would like to see the time when the answers were submitted.
- Save IP Address: If «yes» is selected, the IP address of the survey respondent will be stored together with his or her answers.
- Save Referrer URL: If «yes» is selected, the referrer URL will be stored together with the answers.
- Save Timings: If this functionality is enabled, the time spent on each page of the survey by each participant is recorded.
- Enable Assessment Mode: You can enable/disable assessments for this survey with this setting.
- Participant May Save and Resume Later: This setting allows a participant to save his/her responses and resume the survey at a later time. Please note that this is most useful with open surveys or surveys in which the participants are anonymous. If you are using tokens and the survey is not anonymous, in most cases it is better to activate token-based response persistence from the Participant settings panel.
- Send Basic Admin Notification Email To and Send Detailed Admin Notification Email To: These two functions allow you to send notifications or survey responses to any email address once the survey is submitted. You can edit the templates for these emails from the Email templates menu. You can choose the option to send emails to multiple recipients simultaneously by separating the email address entries with a semicolon (;) (e.g «yourname@test.com; myname@test.com; hisname@test.com» or (if using placeholders) «yourname@test.com;{INSERTANS:82733X12X73};{TOKEN:EMAIL}»).
To send an email to the survey administrator, you must use {ADMINEMAIL}.
There are different ways for entering an email address:
- Enter a specific email address (ie: yourname@test.com).
- Enter a SGQA code and the response will be sent to an email address entered as an answer to that particular question (use the format {INSERTANS:9999X88X12} in the same way you would reuse information from previous answers).
- The following is only possible if your survey is not anonymous. Enter a token code and the response will be sent to an email address retrieved from a token field. Use the format {TOKEN:EMAIL} or {TOKEN:ATTRIBUTE_1} in the same way you would re-use Information from the Survey participants table.
- Google Analytics Settings: If you would like to get details about the survey web traffic, use Google Analytics. Three options are available:
- None : Google Analytics will not be used.
- Use Settings Below : If this option is chosen, the survey owner can type in his or her Google Analytics Tracking ID to be stored only with the respective survey. You also have the ability to choose one of the three Google Analytics styles.
- Do Not Use Google Analytics — so {GOOGLE_ANALYTICS_JAVASCRIPT} is an empty string.
- Default Google Analytics — {GOOGLE_ANALYTICS_JAVASCRIPT} uses the standard Google Analytics code, inserting the proper Google Analytics Key.
- SurveyName-[SID]/GroupName — {GOOGLE_ANALYTICS_JAVASCRIPT} contains customized Google Analytics code to log the URL as {SURVEYNAME}-[{SID}]/{GROUPNAME}. This can be helpful if you want to analyze navigation paths through your survey, time spent per page, and drop-off rates per page.
- Use Global Settings : If this option is chosen, the survey will use the same Google Analytics Tracking ID as the one saved in the global settings and then you choose the desired Google Analytics style.
Google Analytics Tracking ID for a specific survey allows for integration with Google Analytics. The tracking ID can be inserted into templates using {GOOGLE_ANALYTICS_API_KEY}. The full JavaScript that Google Analytics expects (including the key) can be included in templates via {GOOGLE_ANALYTICS_JAVASCRIPT}.
For further details on how to use Google’s API with LimeSurvey, check our Google API howto page.
Participant settings
The following options can be found under the Participant Settings tab:
- Set Token Length To: Usually, the default value of 15 digits does not need to be changed (the maximum supported value is 35). However, if you wish to change this setting, please enter a number (X) which is greater than 5. If the number entered is less than 5, it will be converted to the default value of 15. When generating tokens, all tokens will use a length of X digits.
- Anonymized Responses: This functionality allows you to determine whether responses to your survey are matched with information from the Survey Participants table (utilized in the respective survey) or are kept «anonymous». The default is «No». If you choose «Yes», then your survey is set to anonymize responses — there will be no way to connect answers and participants. Even the survey administrator will not be able to link response data and participant/token data. However, you will always be able to specifically view each response entered by your participants in the survey. Thus individual and anonymous analyses can still be done.
Attention : If this feature is activated, the response submission date and the token completed date are always set to 1980-01-01 00:00, regardless of other settings. Invalidating the submission date ensures no match with the web server logs where the token key might show up when a survey is started. Invalidating the token completed date guarantees that you cannot align the order of submitted responses to the order of the token date/time.
- Enable Token-Based Response Persistence: If your survey uses tokens and your responses are not anonymized, you may want to enable this feature. If you enable this feature, your participants will be able to leave the survey and resume later at any time without using the Resume Later function — for example, when they get distracted or their browser crashes. Upon clicking the invitation link again, they will be returned to the point in the survey where they left off with previous entries saved.
- Allow Multiple Responses or Update Responses With One Token: If this option is activated, participants will be able to return to their survey by clicking the invitation link, even if they have already submitted the survey. If the survey is anonymous or «Enable Token-Based Response Persistence» is set to «No», this will add a new response. If the survey is not anonymous and «Enable Token-Based Response Persistence» is enabled, the user will update the existing responses.
- Allow Public Registration: If you use tokens to control access to your survey, the only people who can use the survey are those who have an entry and a unique token code allocated in the Survey participants table. If you would like to use tokens, but also allow public registration, set this to «Yes». The «Yes» setting will allow visitors to register his or her name and email address. The script will create a new entry in your Survey Participants table for this person, then send them an invitation email. The script will ensure that only one person per email address can complete your survey.
- Use HTML Format For Token Emails: When enabled, all emails sent by the token management interface (invite, reminder, confirmation) will be formatted as HTML. You will then be able to use rich formatting for these emails. The default value is «Yes».
Attention : When you switch this feature on or off, you will have to double check that your email templates are still displayed as you want.
- Send Confirmation Emails: If enabled, the participant will receive a confirmation email that the survey was submitted.
Import a survey
You can import a survey from the Create, import, or copy survey screen.
(1) From the Surveys dropdown options (on the top toolbar of your Limesurvey homepage) select Import a survey.
(2) On the Import tab, click Browse and choose the file you wish to import.
(3) Click the Import survey button.
Choose from the following formats:
- .LSS files (XML-format created by LimeSurvey 1.90 or later);
- .LSA files (Survey archive which may include also token, responses and timings — available since LimeSurvey 2.0);
- .TXT files (Text-format created by Excel — available since LimeSurvey 2.0);
- .CSV files (Created by early LimeSurvey versions from 1.50 to 1.90).
The import function «intelligently» re-numbers the survey, groups, questions, answers, and condition IDs so that they all match each other. No existing survey is going to be overwritten during the import process.
By default, the resource links and expression fields are also imported. Basically, the more advanced type of questions are going to be also imported along questions that include complex branching, assessments, validation, and tailoring.
For further details on LimeSurvey expression manager, read our wiki.
Once the import process is completed, a survey structure import summary will be displayed, showing whether it was successful or not:
If you wish to use another method, read our wiki on import alternatives for more information.
Copy a survey
(1) Access your LimeSurvey homepage and from the Surveys dropdown options (on the top toolbar) select Copy a survey.
(2) From the Copy tab, choose the survey that want to copy from the Select survey to copy options.
(3) Complete the required fields and set preferred options.
(4) Once you are done selecting the preferred options, click the Copy survey button located on the bottom of the page. A survey copy summary will be displayed:
Copy Survey Fields:
- New survey title: Type in the title you wish the copied survey to have.
- New survey id: You can type in a new survey ID or leave the field empty. If the field is left empty, a survey ID will be automatically assigned.
- Convert resource links and expression fields: If you disable this option, the more advanced question types that use the expression manager will not be copied.
- Exclude quotas: The quotas are going to be excluded if this option is disabled.
- Exclude survey permissions: If enabled, no survey permissions will be copied into the new survey.
- Exclude answers: Exclude the answer options.
- Reset conditions/relevance: You can choose to reset the conditions that were set in the original survey.
- Reset start/end date/time?: You can choose to reset the survey start/end date/time.
- Reset response start ID?: Each response has a corresponding ID. If enabled, the ID of the responses will be reset. However, bear in mind that it is better not to have an ID with two matching responses because it might influence the output of your survey.
Below is a screenshot of the Survey Copy Summary.
To access the copied survey, click Go to survey to be redirected to the settings of the newly added survey.
List surveys
There are now two ways to see a list of available surveys.
(1) From the Surveys options (on the top toolbar of your LimeSurvey homepage) select List surveys.

(2) Or click the List surveys box on your LimeSurvey homepage.
A list of surveys will be displayed.

- Survey ID: When created, the survey receives a unique id that is used to make the connection between different LimeSurvey tables.
- Status: Status of available surveys:
- Title: The title of the survey.
- Group: The survey group to which the survey belongs to.
- Created: The date when the survey was created.
- Owner: The name of the user that owns the survey.
- Anonymized responses: This shows whether the responses are anonymized when stored into the database or not.
- Partial: The number of surveys that were partially completed.
- Full: The number of surveys that were fully completed.
- Total: The number of partially and fully completed surveys.
- Closed group: This is either «Yes» (if a Survey participants table is used) or «No».
- Actions: The last column presents the actions that are available for each survey:
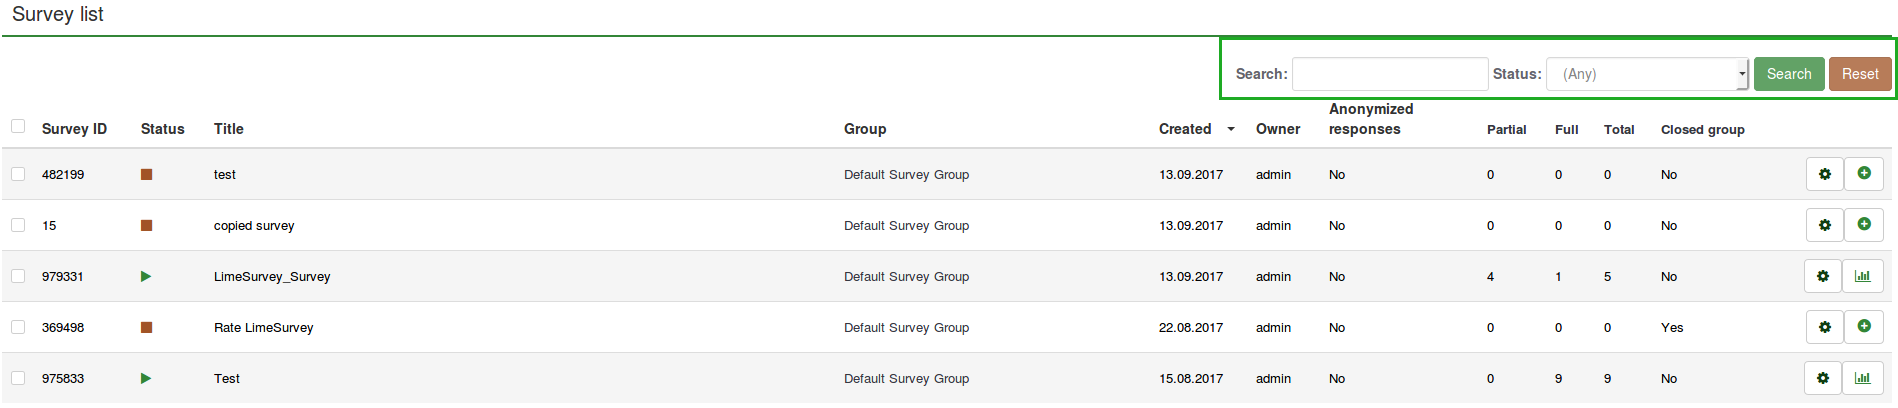
If you want to look for a specific survey, use the search bar and filter the results via the survey status field («active», «active and running», «inactive», «active but expired», and «active but not yet started»).
Delete a survey
(1) From the list of Surveys dropdown options (on the top toolbar of your LimeSurvey homepage) select List surveys.
(2) Select the survey(s) you wish to delete (by ticking the box to the left of the survey ID).
(3) Click on the Selected survey(s)… button located on the bottom-left side of the page.
(4) Select Delete.
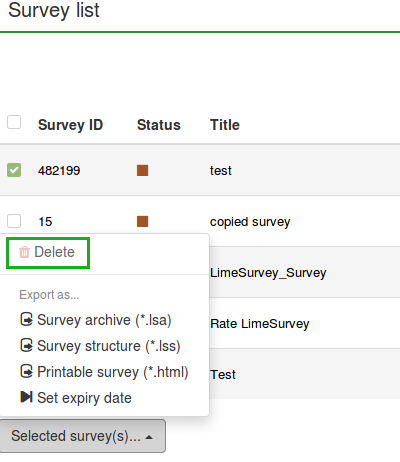
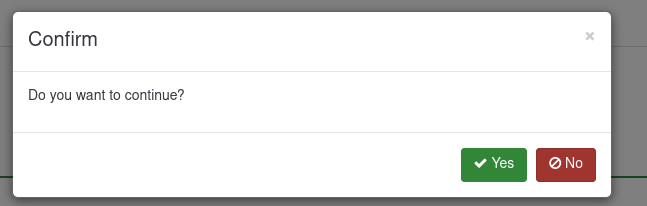
(5) When you click Delete, a confirmation window will appear asking you to confirm your action. Select Yes to confirm.
Export a survey
(1) From the Surveys dropdown options (on the top toolbar of your LimeSurvey homepage) select List Surveys.
(2) Select the survey(s) that you want to export by ticking the box to the left of the survey ID.
(3) Click the Selected survey(s)… box at the bottom of the list of surveys.
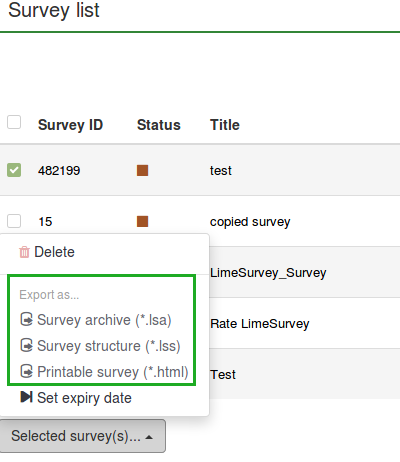
The following options are available:
- Survey archive (*.lsa);
- Survey structure (*.lss);
- Printable survey (*.html): This option allows you to export the survey in a printable format in order to be filled out «offline».
(4) Select the export file type that you want to export the survey as.
For more details, check how to export a survey structure.
Survey groups
The survey group functionality has been added with the launch of LimeSurvey 3. More survey group features will be added in future releases. If you wish to help, join us on IRC and give us a hand with the code or else donate to help the core LimeSurvey development group.
Currently survey groups can list a set of surveys and apply theme/template options.
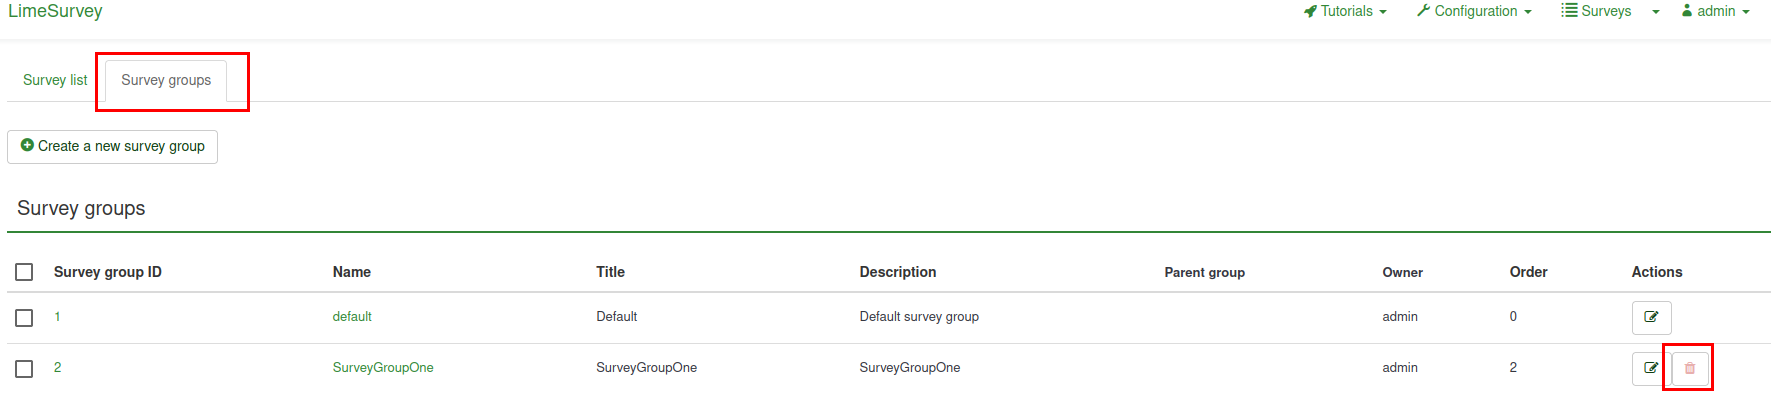
(1) To access the survey group functionalities, click Surveys located on the main toolbar of the LimeSurvey home page.

(2) Then click the Survey groups tab:
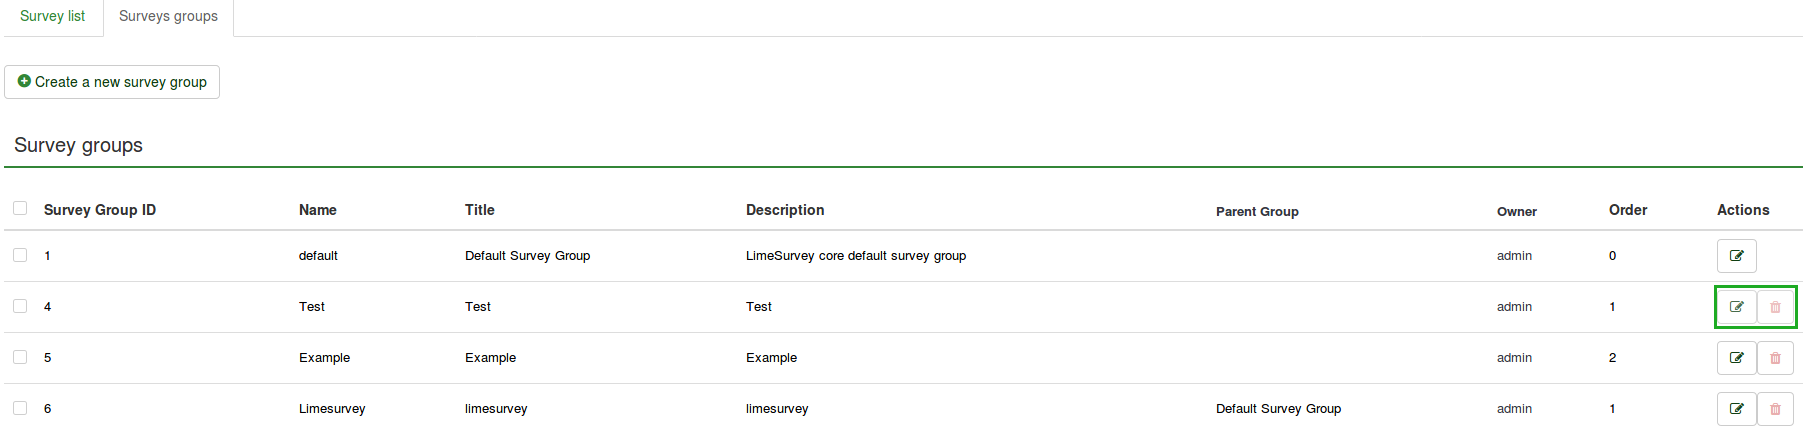
A survey groups list will be displayed.
On this page you can:
- Create a survey group — located above the survey groups table;
- Edit a survey group — located on the last column (the green pencil icon);
- Delete a survey group — located on the last column (the red trash icon).
Create a survey group
To create a new survey group:
(1) Click Surveys located on the main toolbar of the LimeSurvey home page.

(2) Click the Survey groups tab.

(3) Click the Create a new survey group button located above the survey groups list.
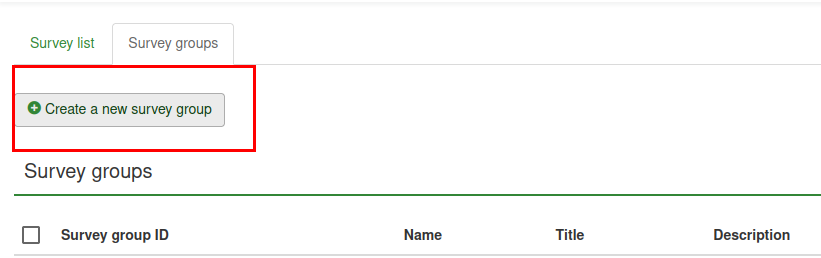
(4) Complete the following fields and Save:
- Name: Type in the name of the survey group;
- Title: Type in the title of the survey group;
- Description: Type in a short description of the survey group;
- Order: Helps you organize the order of the survey groups within a parent group;
- Parent: Choose the survey group that will be the parent survey group. The parent group option is used to ease the edit of template-related options of a high number of survey groups via a few clicks.
To add surveys to the group:
(1) Go to the General settings tab of a survey.
(2) Click the arrow in the Group field to display a list of survey groups.
(3) Select the survey group and Save.

Edit survey group
The following options of a survey group can be edited:
- Surveys in this group;
- Settings for this survey group;
- Template options for this survey group (New in 3.0 ).
(1) From the top toolbar of your LimeSurvey homepage, click Surveys.

(2) Click the Survey group tab.
(3) Select the survey group that you want to edit, by clicking the edit icon under the Actions column.

The survey group will be displayed in edit mode.
Surveys in this group
If you click on the first tab, all the surveys from the respective group will be displayed.
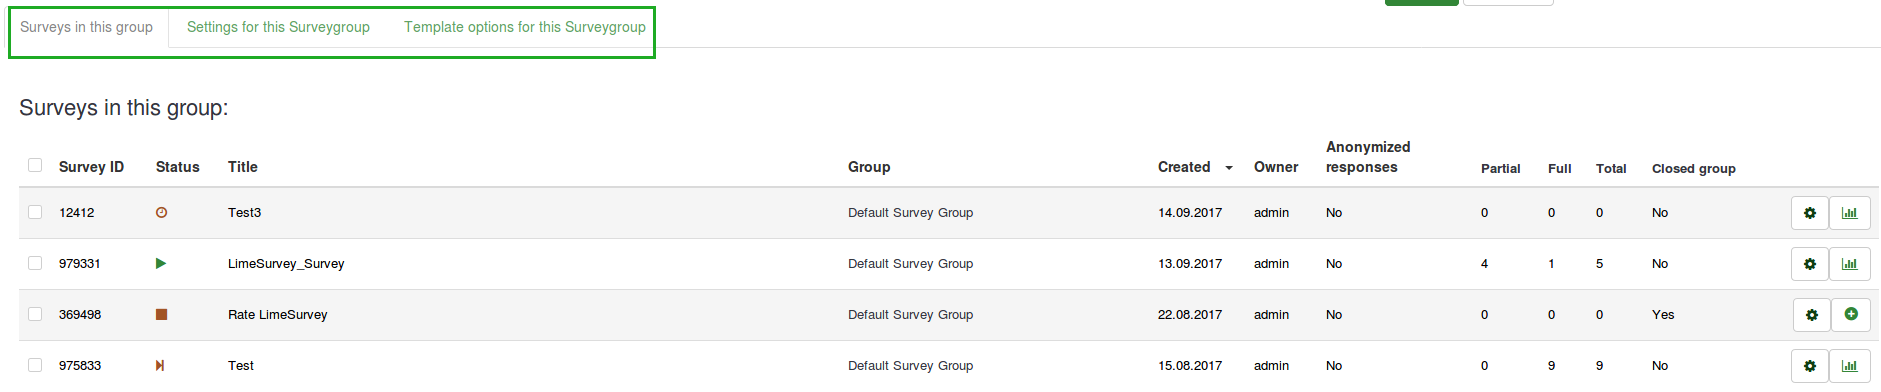
This works as a filtering function, filtering out all the surveys not listed in the chosen survey group. You can now select the desired survey and start editing it. To see which survey-editing functionalities are available, check the list surveys section.
Settings for this survey group
The following fields can be edited from the Settings for this Surveygroup tab:

- Title: Type in the title of the survey group;
- Description: Type in a short description of the survey group;
- Order: Helps you organize the order of the survey groups within a parent group;
- Parent: Choose the survey group that will be the parent survey group. The parent group option is used to ease the edit of template-related options to a higher number of survey groups via a few clicks.
Template options for this survey group
The template options functionalities are present in LimeSurvey 3.0+. It offers a set of various options that allows you to quickly and easily change the templates-related settings of the surveys that belong to the same survey group:
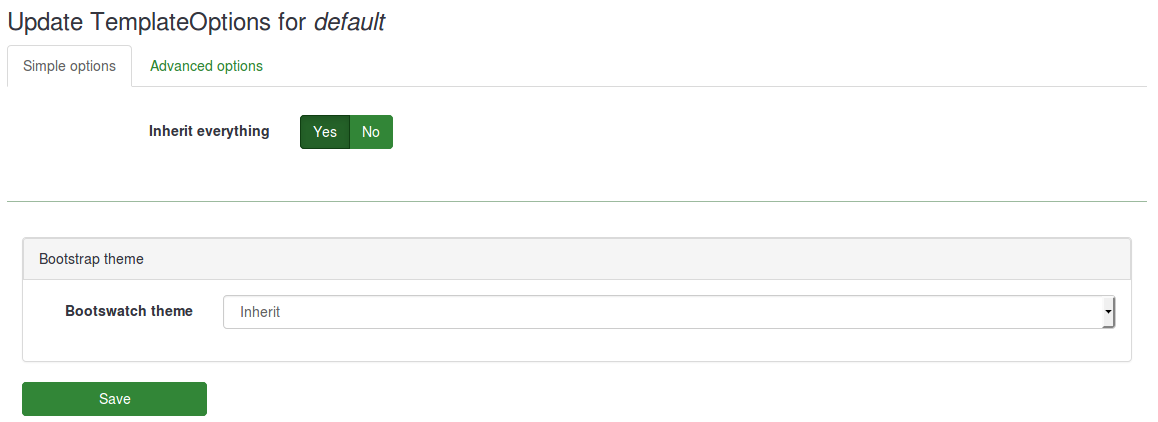
The Inherit everything functionality lets you decide whether you want the survey group to inherit everything or not from the parent survey group theme.
If you do not want this to happen, select «No». The following options will show up which will allow you to choose what should be inherited from the parent survey group theme:
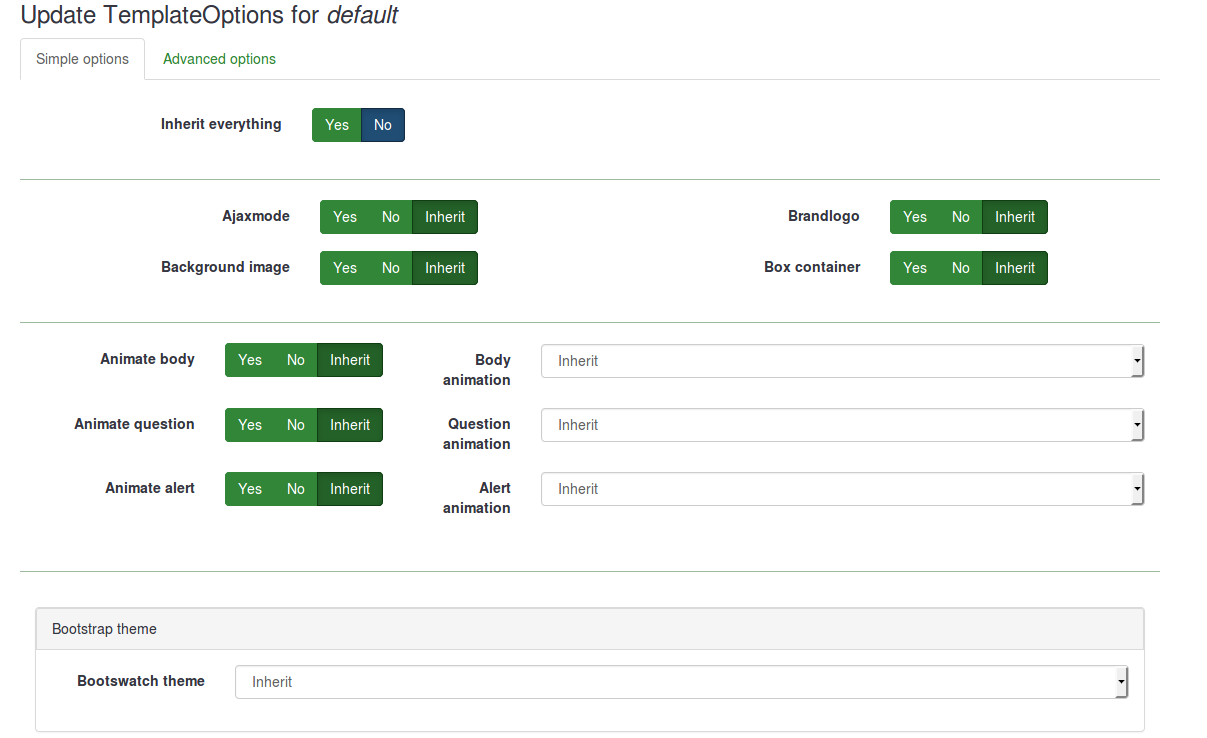
Below, you will see that you can choose a bootswatch theme for your survey group. Bootswatch themes can be used to quickly edit your templates. Basically, bootswatch is a collection of themed swatches which can be freely downloaded and dropped into your Bootstrap site. Some of these themes are already included into your LimeSurvey installation and they can be selected from the Bootswatch theme drop-down list.
Bootstrap is a free and open-source front-end web framework for designing websites and web applications. For more details, check the following wiki.
Bootswatch enables users to easily try new looks without investing too much time or energy. For more information on bootswatch themes, check the following link.
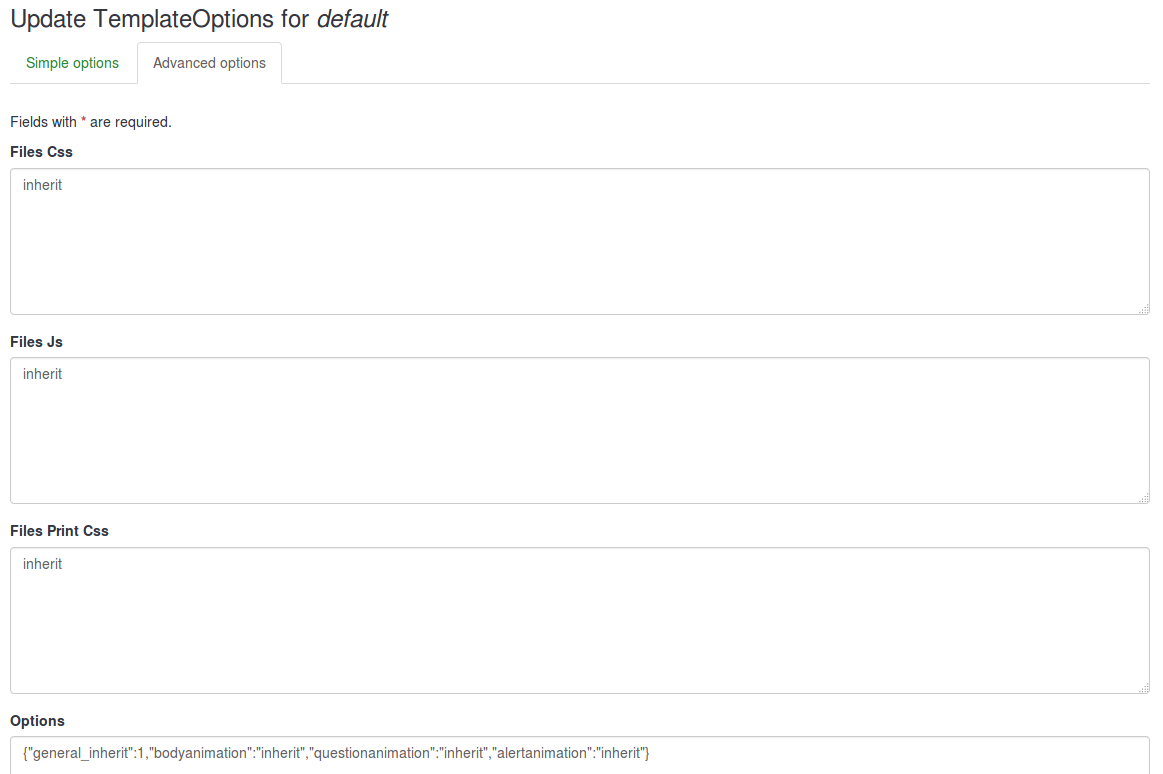
If you want to tweak more a survey group template options, click on the advanced option tab (recommended for advanced users):
Delete a survey group
(1) Display a list of your surveys. (From the Surveys tab on the top toolbar of your LimeSurvey homepage, click List surveys or click the List surveys box).
(2) Click the Survey group tab.
(3) Select the survey group you want to delete and click the Delete icon located in the Actions column.
(4) Confirm the deletion by clicking Yes.
Что такое LimeSurvey
LimeSurvey – это программа для проведения опросов через Интернет. LimeSurvey распространяется на условиях свободной лицензии GPL, что позволяет использовать эту программу бесплатно.
Технические требования
LimeSurvey устанавливается на сервере в Интернете или локальной сети. Для установки LimeSurvey требуется веб-сервер (например Apache), PHP-движок, система управления базами данных (например MySQL/MariaDB). Администрирование системы, управление опросами и заполнение анкет респондентами происходит через любой веб-браузер.
Анкеты, вопросы и ответы
LimeSurvey позволяет создавать анкеты различной сложности, с логическими переходами. В анкету, помимо форматированного текста, можно включать изображения, видеофайлы. LimeSurvey поддерживает 29 типов вопросов от дихотомического “Да”-“Нет” до таких сложных, которые реализуют семантический дифференциал или шкалу Ликерта. Каждый тип вопроса включает ряд общих или специфических параметров. Например, в вопросе, в котором респондент должен ответить числом, можно задать проверку на максимальное значение. В вопросе с несколькими вариантами ответов можно указать,чтобы порядок следования вариантов ответа был случайным.
Как респонденты попадают в опрос
Доступ к опросу может быть открытым; в этом случае любой пользователь, у которого есть ссылка, может заполнить анкету. Также доступ к опросу можно ограничить только перечнем определённых пользователей. В этом случае система LimeSurvey разошлёт по электронной почте всем указанным пользователям приглашение принять участие в опросе, а через заданный промежуток времени отправит напоминание об опросе тем, кто ещё не заполнил анкету.
Результаты опроса
Ответы респондентов можно просмотреть в LimeSurvey в виде сырых данных или получить агрегированные результаты в виде обобщающих таблиц или графиков (столбчатые и круговые диаграммы). Для дальнейшего анализа данные можно экспортировать в CSV, Excel, SPSS или R.
Для чего можно использовать LimeSurvey
Демонстрационная версия
Ознакомиться с административной частью LimeSurvey можно на официальном сайте (имя admin, пароль test): http://demo.limesurvey.org/admin/admin.php.
Техническая поддержка пользователей LimeSurvey
Компания “Матрунич Консалтинг” оказывает услуги по внедрению и поддержке LimeSurvey.
По всем вопросам обращайтесь по электронной почте office@matrunich.com или по телефону +79532319631.
This is the print version. Click here for the web version of this tutorial
Radboud University Nijmegen, Faculty of Social Sciences
Pieter van Groenestijn
Wilbert van Ham
Willem van der Veld
Limesurvey, 1 Introduction
Making surveys in Limesurvey
This tutorial has been written for the
Faculty of Social Sciences of the
Radboud University.
Introduction
Limesurvey is a free and open source (GPLv2) survey creation and publication tool. This means that you have the right install it, to use it, to alter it, to sell it, to give it away and to keep using it whenever and wherever you want. In this tutorial you will learn to use Limesurvey version 2.05 as it is installed on the Radboud University, Faculty of Social Sciences web server.
Limesurvey is made for scientific use. It can do much more than most other cloud based survey tools. Surveys with hunderds of questions, thousands of participants and complicated survey logic are possible. Fortunately most is under the hood. All you need to make a survey is a computer and a webbrowser. You will only touch the keyboard for typing questions and answer options. No programming skills required. Guaranteed!
This tutorial will show you how to make a quite complicated survey with many elements that you may one day want to use. It will however start with the simplest possible survey that will only ask the participants name.
This tutorial will only briefly look at the problem of data analysis. You will see that Limesurvey can export survey structure, data and codebook to a large number of file formats, allowing data analysis is SPSS, Excel, R, Python, Matlab or whatever you like. It also has a few analysis tools itself, mainly for observing survey progress.
Let’s make a survey.
Continue with the next lesson
Limesurvey, 2 My first survey
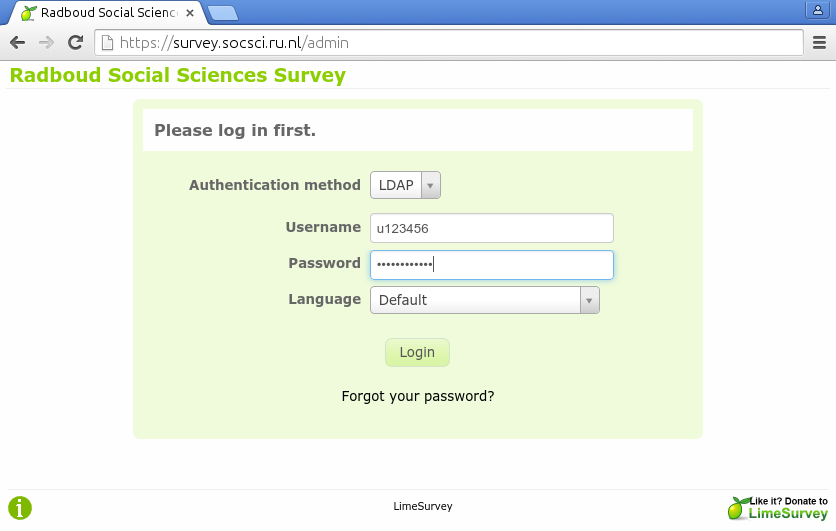
In this lesson you will log on to Limesurvey and make your first survey. Let’s go to the Limesurvey administrative interface. You may want to open it in a second browser window. (right click -> Open Link in New Window)
Getting Started
Log on with your university number. Usually this will start with a «u» for employees/grad students or an «s» for undergrad students. This tutorial assumes that you are using the English language interface. If your operating system has another language then you must select «English» as interface language here. Chosing the «Default» language will present you with an interface in your own language. The interface language is independent of the language of the surveys that you make. You will select the survey language later.
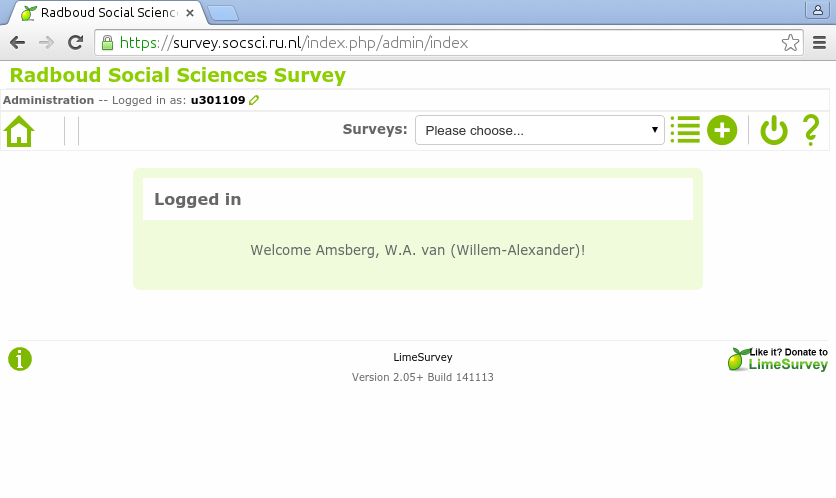
Now you will see the welcome screen. Make sure that your name (center) and university number (top left) are correct. Click the circled plus icon to make your very first survey.
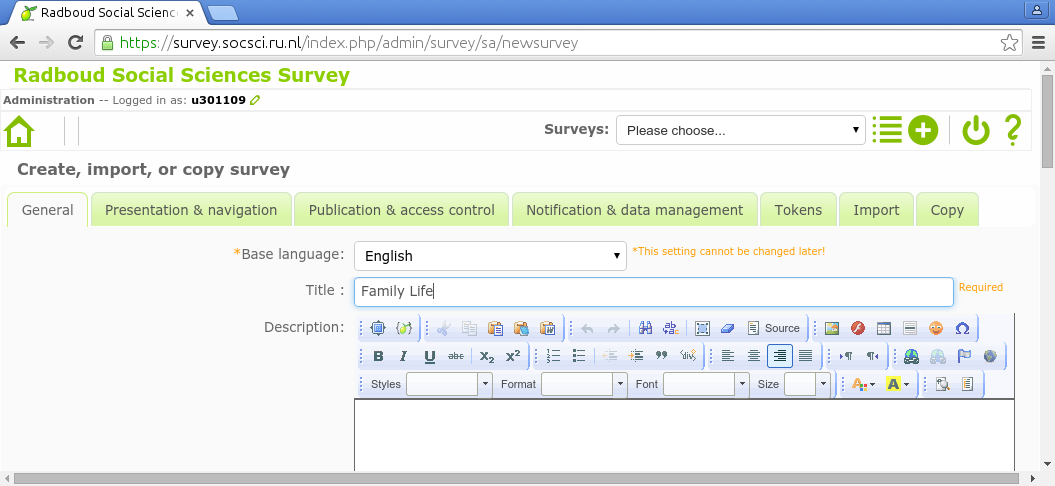
Your survey needs a name. Let’s call it Family Life. This name will appear in your list of surveys in the future. Make sure you select English as the base language of your survey. If you select another language now, you will not be able to complete this tutorial.
Now scroll to the bottom of the page. Check your e-mail address. Click Save to save your your very first survey.
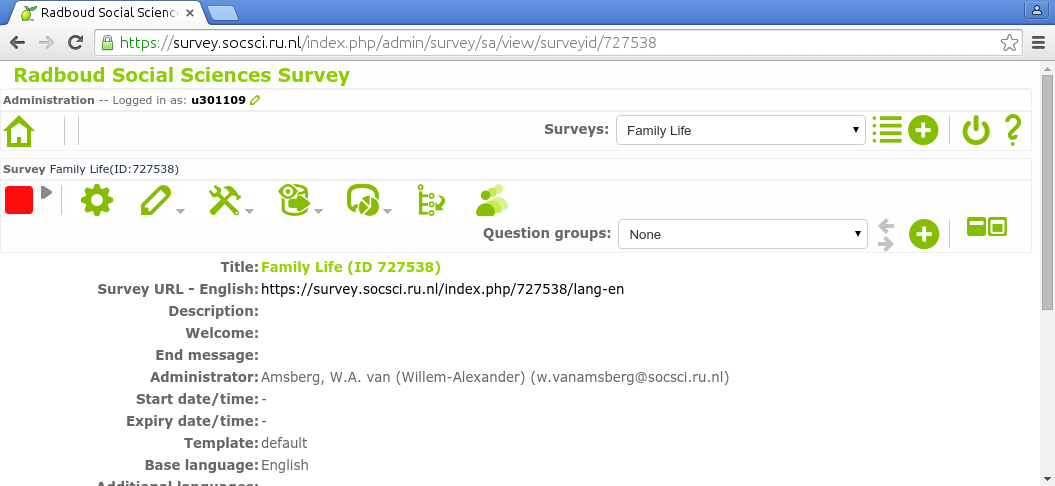
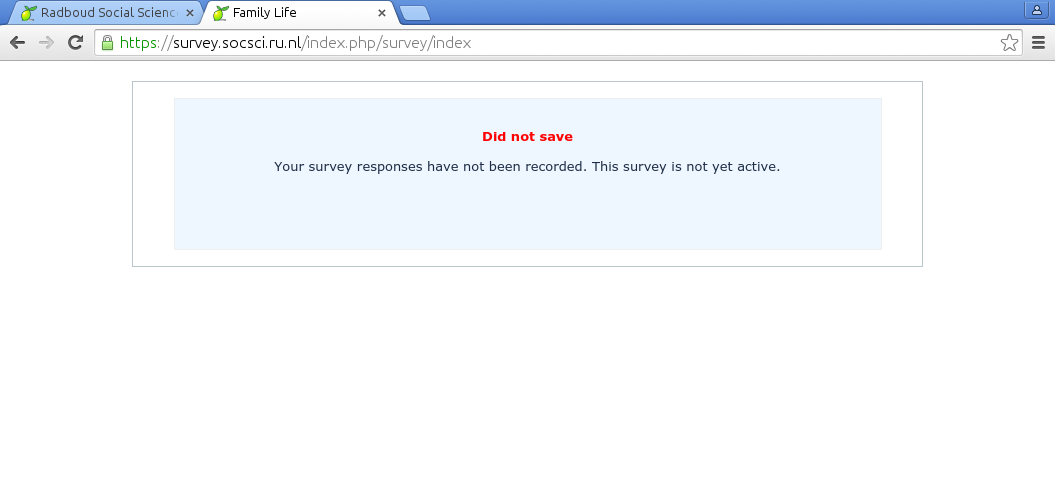
You just made your first survey. It doesn’t contain any questions yet. It cannot be started, but it has a name and it was succesfully saved on the server. Congratulations.
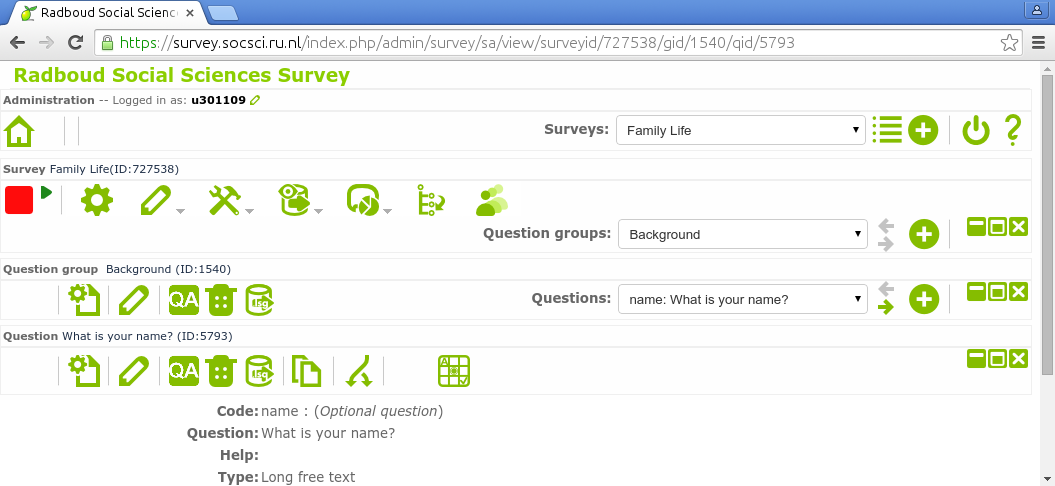
Adding a question
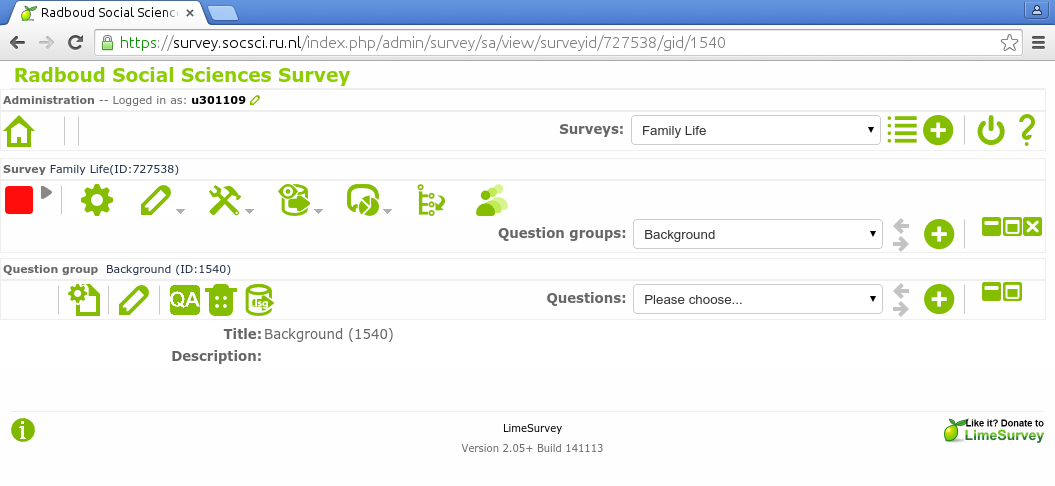
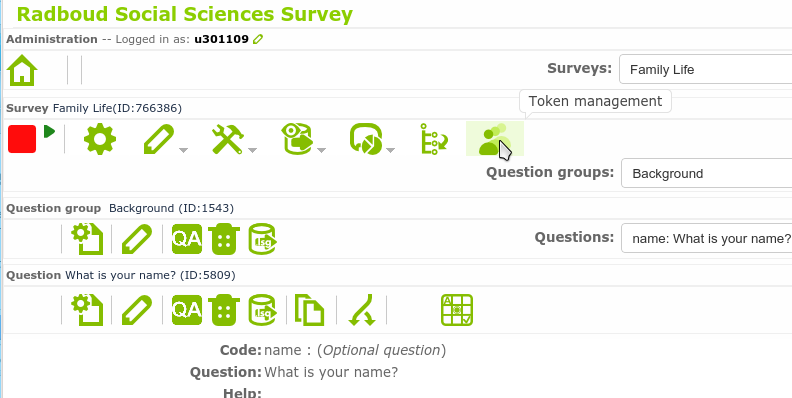
Surveys contain questions. These questions are grouped in question groups. For now you can think of a question group as a page. The survey participant will see one question group at a time. If you look at the screen that appeared after you saved your survey, then you will note another circled plus icon . Click it to create a new question group.
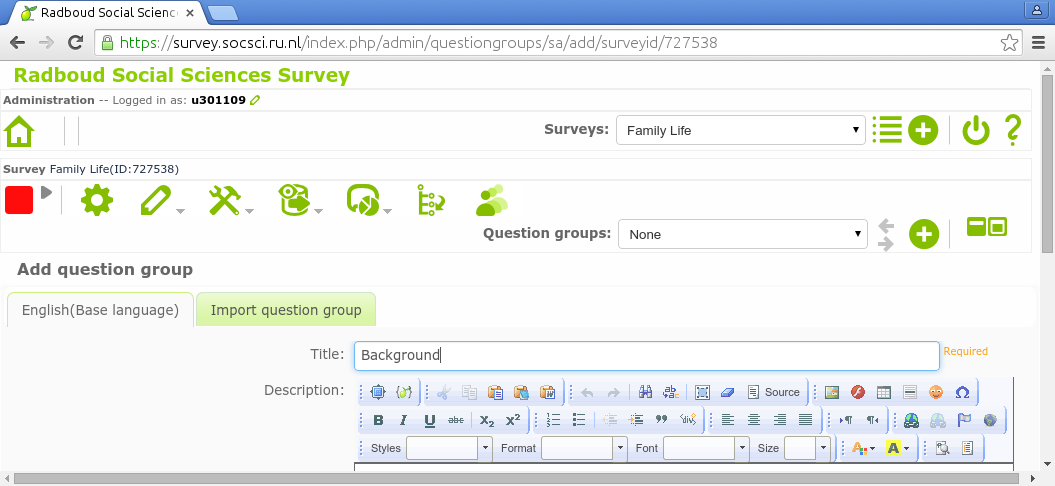
Just like the survey itself, the question group needs a name. Call it Background. It will contain some background questions before the survey proper starts.
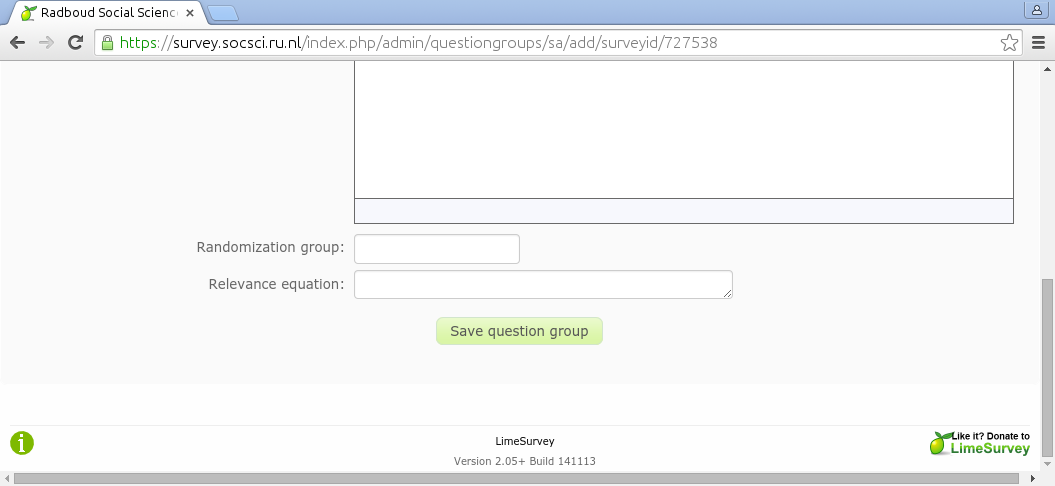
Now scroll to the bottom of the page to save your your first question group.
If you look at the screen that appeared after you saved the first question group, then you will note yet another circled plus icon , the third one. Click it to create a new question.
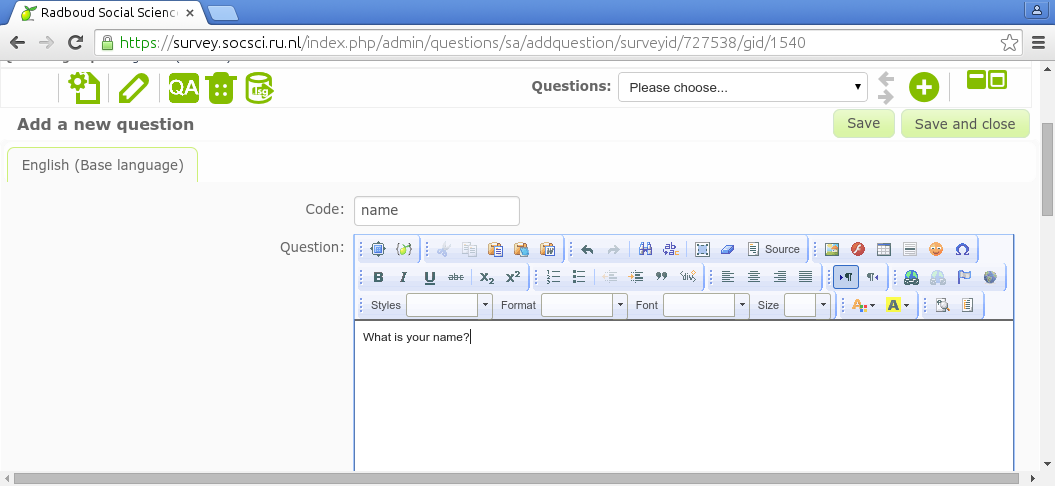
The page that you see now will let you create a question. The question code will later appear as variable name in your data file. Type for instance name. The rich text editor below it allows you to type a question. You will later see that it can do much more. You can change text font and appearance with it. You can use it to insert tables, pictures, sound and video. You can even use it for inserting complete interactive apps. Right now you will simply type the question: What is your name?. Press Save and close to complete your first survey.
Did you notice the three rows of icons? If a survey has been selected, there is a survey toolbar on top. If a question group has been selected, there is a question group toolbar below it and if a question has been selected, there is a question toolbar below that one. Some icons are present in several toolbars.
Running the survey
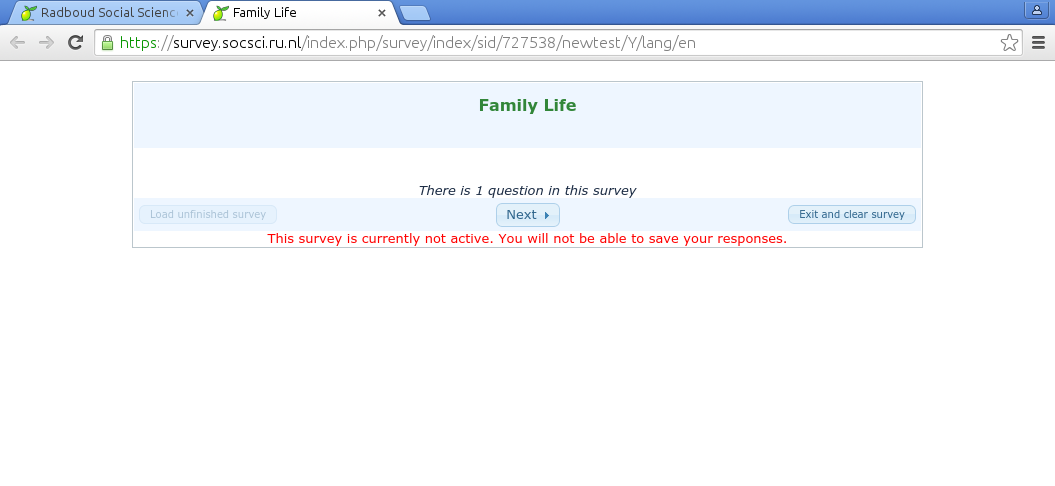
Press the gear icon for a test run of your first survey. No data will be saved because the survey has not been activated yet. The survey contains a welcome page, a question page and a goodbye page.
Press next after reading to introduction text of the survey
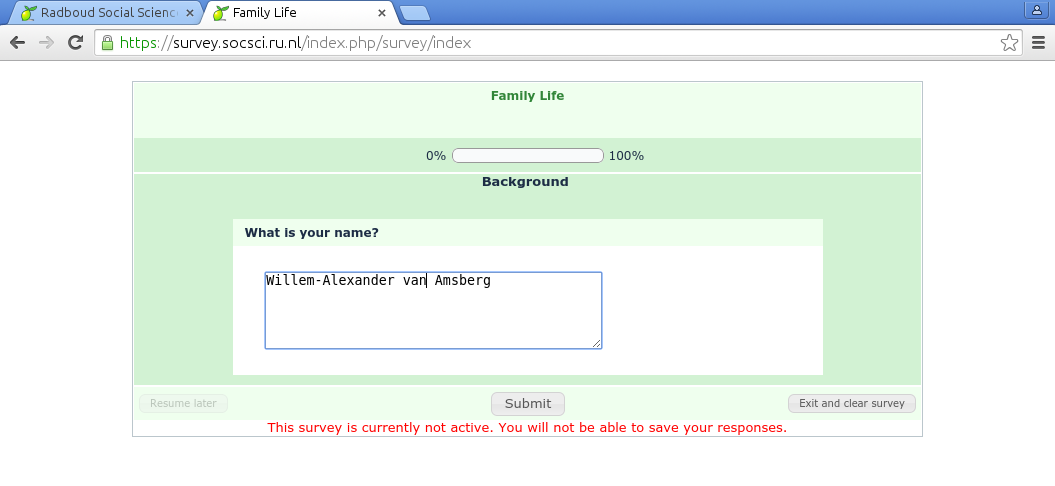
Type your name. Press submit after completing the survey
You can close the browser tab after completing the survey.
Continue with the next lesson
Limesurvey, 3 More question types and validation
In this lesson we will extend our first survey with some questions of different types. The number of images will go down. This is not kindergarten.
Now add a question where you ask the participants gender in question group background. All you have to do is type the question text and select the question type gender. Save and close the question.

Now change the question type of the question asking the participant’s name. No-one has a name this long, not even Mr. Van Amsberg*. Click the pencil icon in the question toolbar (the bottom toolbar). Change the question type from Long free text in Short free text. Save the question and test run the survey to see the difference. Clicking the gear icon in the question toolbar allows you to test run the question without running the entire survey.
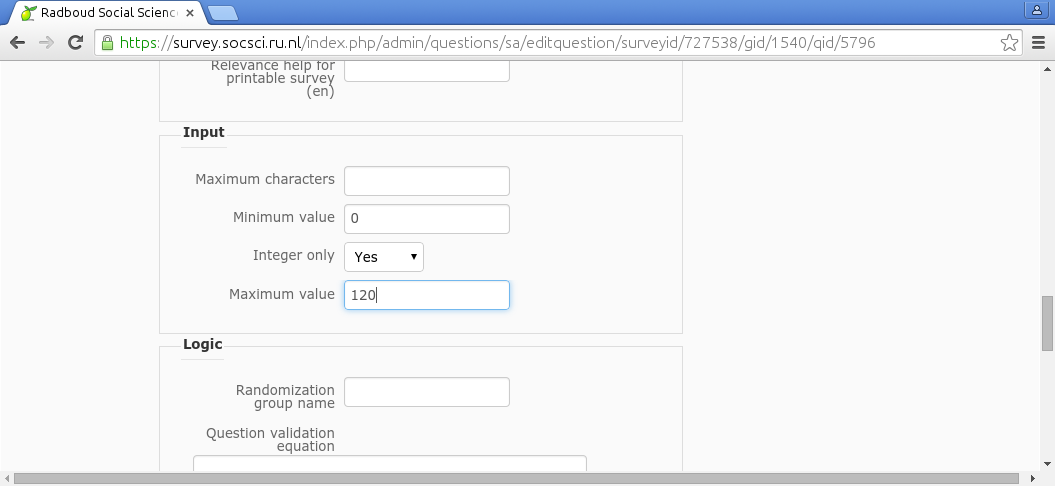
Add a question asking the participants age. Make sure the question type is numerical input. The participant will now only be able to enter numbers. Test run the question to see what happens if you try to enter text.
Limiting age to numbers is not enough. We all know that the maximum age that anyone can ever reach is 120 years*. Let’s make sure the participant cannot enter a number larger than 120. Use the advanced settings at the bottom of the page to limit the possible answers. Test run your question. What happens if you enter an invalid value?
Continue with the next lesson
Limesurvey, 4 Routing Relevance
Routing is the process of determining a route through your survey. After asking the age of a person in question 1, you can decide what the next question has to be. If the age is more than 18, you can for instance go to question 2 about marriage and later skip question 3, otherwise skip question 2 and go to question 3 about toys. Tradionally routing is hard and leads to complicated graphs with many arrows and complicated if this, then that statements. Fortunately Limesurvey decided to stop using routing altogether from version 2.0 onward. Rejoice! We are using version 2.05. You will never, ever have to learn about routing.
Instead of routing (remember, routing is bad, complicated and error prone) Limesurvey uses the concept of Relevance. Relevance is good, trivial to use and can stop global warming, war and bad music. All you have to do is decide for each question wether it is relevant given the circumstances.
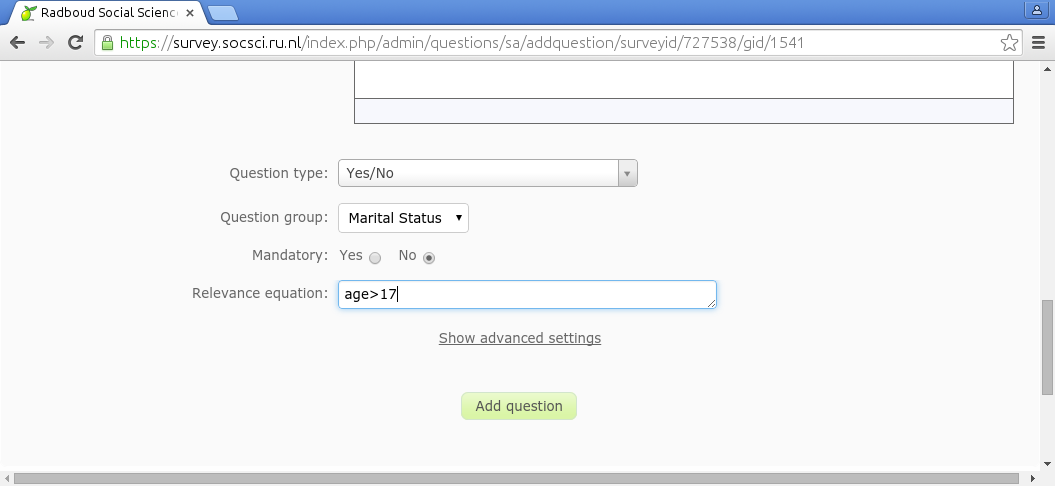
Now go back to our survey Family Life. Make a new question group called Marital Status. Add a question Are you married?. In the field Relevance equation type: age>17. Remember that age is the question code of a previous question.
Test the entire survey by clicking the gear icon in the survey toolbar. Try it twice. Once using 12 for age, once using 20 for age. Do you notice that the question about mariage is only asked if it is relevant? That is what the relevance field is all about. By default there is a 1 in this field. That means true. You can replace it with 0, which would make the question always irrelevant
It is essential that you put this question in a new question group. If the question about age would be in the same group as the question about marriage, then it cannot appear conditionally. It wil be there always or never. Question group do not change once they are shown on the screen.
More complicated
To replace routing, more complex relevance equations are necessary too:
- You may want set two conditions to prevent certain people from entering your survey.
- age>17 && name!=»Elizabeth Taylor»
- Or make exceptions to allow some to marry younger.
- age>17 || name==»Bo Derek»
Continue with the next lesson
Limesurvey, 5 Random
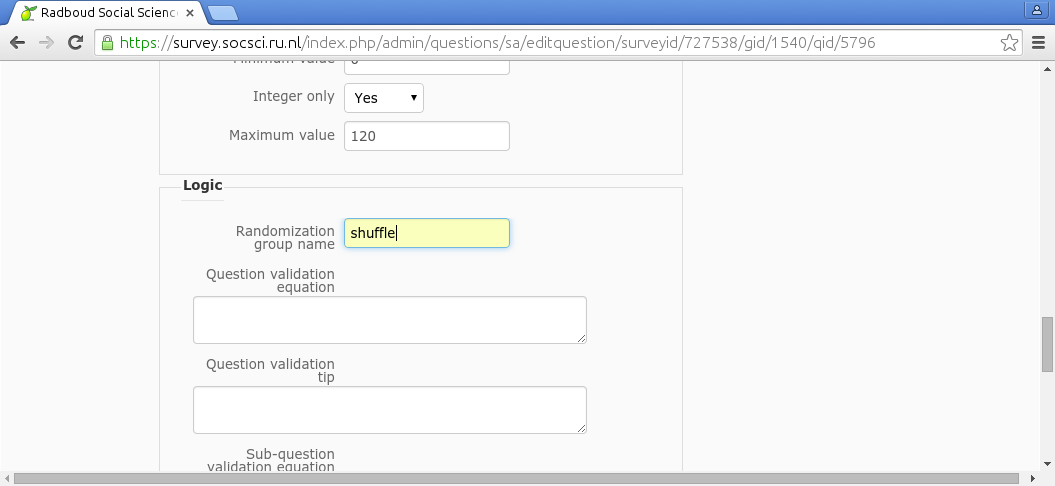
Why do the three questions in the Background question group appear in this order? It may be undesirable always to let them appear in the same order. In Limesurvey we can easily shuffle questions groups, questions, subquestions or answer options. By default each question stays at its own place. If you want it trade places with another one, these questions must be in the same randomization group. For questions groups, this setting is in the main settings page. For questions, where its use is less common, this setting is in the the advanded settings part. Let’s set the randomization group of all three questions in the Background question group to shuffle. After you changed the randomization group of one question, Limesurvey will give you the option to select this name from a list for the other questions. Please use this feature to prevent typo’s.
To test the randomization you must test run the survey from the survey toolbar. Test running the question group will not show the randomized questions.
More complcated example
Imagine you want to have more control over the question order. You want the first and last question to stay in place and the others to be shuffled. Proceed as shown in the following table:
| Question | Randomization group |
|---|---|
| How where you feeling last year? | fixed1 |
| How do you do? | shuffle |
| How are you? | shuffle |
| Are you all right? | shuffle |
| How will you be feeling next year? | fixed2 |
What would have happened if the first and last question both had the randomization group fixed?
Continue with the next lesson
Limesurvey, 6 Expressions and tokens
According to my dictionary, an expression is the act or an instance of transforming ideas into words. The text age>17 in the chapter about routing and relevance is an example of an expression. The outcome of this expressions was either true or false, The outcome of an expressions need not be true or false. It can be a number or a text as well. Let’s try the latter.
Go back to the question about marriage. Change the question text into {name}, are you married?. name is the question code of a previous question. We put curly brackets around it to distinguish it from normal text. Save the question and see what happens if you run the whole survey.

Indeed, the participant sees a nice greeting with his or her name inserted.
Tokens
Often a survey participant will not type his own name. A list of special logins is made and invitations are send. Such special logins are called tokens in Limesurvey. If you use tokens, only invited people can enter the survey. Special expressions such as {TOKEN}, {TOKEN:FIRSTNAME} and {TOKEN:EMAIL} become valid. Feel free to play around with tokens, but do not forget to delete the token list before continuing with the tutorial.
Continue with the next lesson
Limesurvey, 7 A real life example
In this lesson it is you who does the work. Change your survey Family Life to be as close as possible to the following example survey. Not everything is possible. No more step-by-step pampering. Find your own solutions.
Well, a little bit of help to start with. You can have my Background question group if you like. Just click: Add new group to survey -> Import question group -> Choose File -> Import question group and delete the old question group Background.
1. What is your gender?
(1) Male
(2) Female
2. How old have you become on your last birthday? !_____________!
|
The next questions are about past, present, and future family life. |
3. What was your marital status 5 years ago, in 2010? Answer the first option that applies to you.
a/ Married
b/ Co-habited
c/ Widowed
d/ Divorced
e/ Separated
f/ Single, never married
4. What is your present marital status? Answer the first option that applies to you.
a/ Married —>TO Q.5, 6, 7
b/ Co-habited —>TO Q.5, 6, 7
c/ Widowed —>TO Q.5, 6
d/ Divorced —>TO Q.5, 7
e/ Separated —>TO Q.5, 6, 7
f/ Single, never married —>SKIP 5,6,7
5. How old were you when you married (for the first time)?
!_____________! /WRITE THE EXACT AGE/
Yes No
6. Did you ever divorce? 1 2
7. Did you ever become a widow? 1 2
INTERVIEWER, CHECK BY THE QUESTION 4 AND WRITE DOWN HERE – IS THE RESPONDENT MARRIED OR CO-HABITED.
1. MARRIED—>TO Q.8
2 CO-HABITED, SINGLE, DIVORCED, WIDOWED, SEPARATED —> TO Q.10
8. How satisfied you are with your marriage at present?
| Not at all satisfied |
1 2 3 4 5 6 7 8 9 10 | Very much satisfied |
9. How you would describe your marriage?
(1) Very happy
(2) Pretty happy
(3) Not too happy
(9) Do not know
10. Would you like to change anything in your family life?
(1) Yes —>TO Q.11
(2) No —> SKIP Q.11, 12
(9) Do not know —> SKIP Q.11, 12
11. How are you going to change your family life? /MARK AS MANY AS MENTIONED/
(1) Will get married
(2) Will find a partner /new/
(3) Will get divorced, separated
(4) Will separate from parents, children
(5) Will have /more/ children, grandchildren
(6) Will live with the adult children
(7) Will spend more time with the family
(8) Children will get married
(98) Other /SPECIFY/____________________________________
(99) Do not know
12. How likely, in your opinion, is it that your family life will be changed in the next 2 years?
1. Very likely
2. Somewhat likely
3. Somewhat unlikely
4. Not likely at all
(9) Do not know /DO NOT READ/
13. How often do you feel….
|
Never |
Rarely |
Sometimes |
Always |
DK |
||
|
1. That you lack companionship? |
1 |
2 |
3 |
4 |
(9) |
|
|
2. That there is no one you can turn to? |
1 |
2 |
3 |
4 |
(9) |
|
|
3. That you are no longer close to anyone? |
1 |
2 |
3 |
4 |
(9) |
|
|
4. Outgoing and friendly? |
1 |
2 |
3 |
4 |
(9) |
|
|
5. Close to people? |
1 |
2 |
3 |
4 |
(9) |
|
|
6. That no one really knows you well? |
1 |
2 |
3 |
4 |
(9) |
|
|
7. You can find companionship when you want it? |
1 |
2 |
3 |
4 |
(9) |
|
|
8. That there are people who really understand you? |
1 |
2 |
3 |
4 |
(9) |
|
|
9. That people are around you but not with you? |
1 |
2 |
3 |
4 |
(9) |
Continue with the next lesson
Limesurvey, 8 Data analysis
Let’s assume you activated this survey. You collected a lot of data. Now you click the responses icon in the survey toolbar, you click Responses & statistics, you click the SPSS icon . In the following screen you click both Export syntax and Export data.

If you use this syntax file to import the data file in IBM SPSS or GNU PSPP, you will see that not only the data is nicely exported, but the entire codebook is correctly exported as well:

Here are an example syntax file and data file. Make sure you alter the data file name in the syntax file before executing it. This is only necessary in SPSS. PSPP will understand it right away.
Can you find the average age of the participants? The number of married participants? The average difference and average deviation from average of the current age and the age when marrying? What is the correlation between questions How satisfied you are with your marriage at present? and
How you would describe your marriage?
Others
GNU PSPP and IBM SPSS are not the only two software packages capable of analysing our data. GNU R and Python Pandas are two other popular options. They cannot read the codebook created by Limesurvey, but they can analyze your data just as well. Try loading your data in one of them and getting the numbers asked above. This is what would give you the solution in Python Pandas:
import pandas as pd

d = pd.read_csv("survey.csv", usecols = range(4, 13), quotechar="'",
	names = ['gender','age','status5','status','age2','divorce','widow','satisfied','unhappy'])
d.age.mean()
(d.status==1).sum()
(d.age-d.age2).mean()
(d.age-d.age2).std()
d.satisfied.corr(d.unhappy)
This is what would give you the solution in GNU R:
d <- read.csv("survey.csv", head=FALSE, quote="'")
colnames(d) <- c('','','','', 'gender','age','status5','status','age2','divorce','widow','satisfied','unhappy')
mean(d[,'age'])
sum(d[,'status']==1)
mean(d[,'age']-d[,'age2'], na.rm=TRUE)
sd(d[,'age']-d[,'age2'], na.rm=TRUE)
cor(d[,'satisfied'], d[,'unhappy'], use='complete')
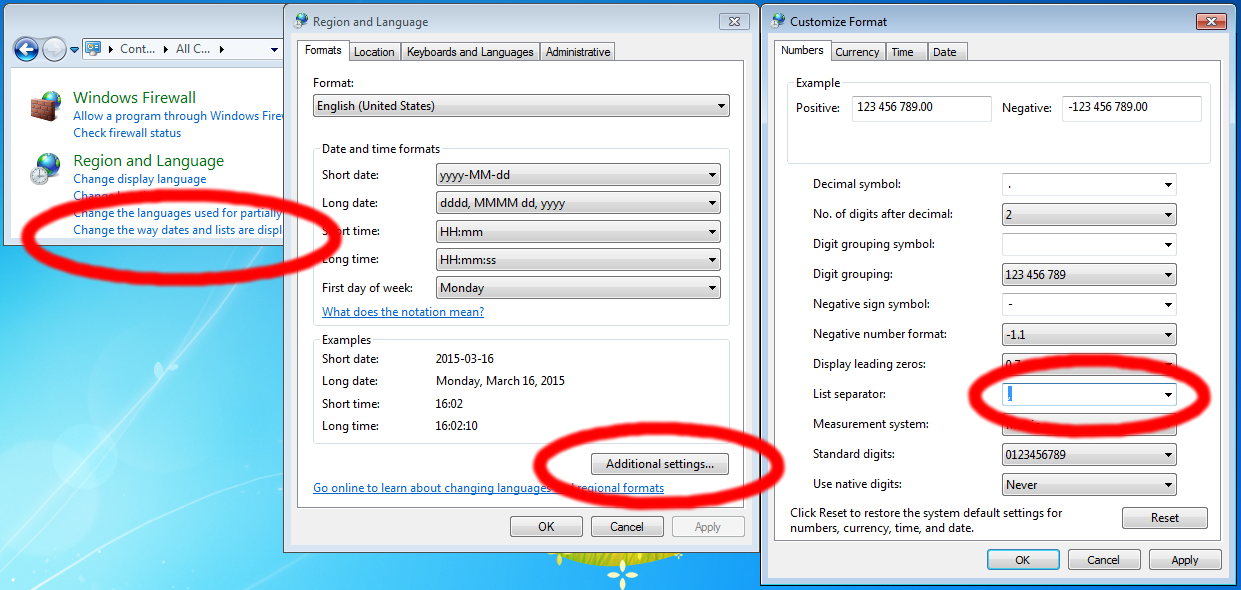
If you want to import the data in MS Excel, you must set the list separator to comma. In Europe its default setting is semicolon:
That was the last lesson of this beginner tutorial. There are some additional unordered lessons which you can access from the menu bar on the left.

LimeSurvey: The world’s #1 open-source survey platform
It’s what we love and do best since 2006…
🌐 Website · 🔮 Demo · 📚 Documentation · ⚙️ Request a feature · 🐛 Report a bug · 🗨️ Forums · 🗨️ Discord
LimeSurvey is a free and open-source online survey platfrom used by businesses of all sizes, professionals, academic institutions, teachers, students, governments, financial institutes, and Anja from HR (who is hiring and looking for a DevOps and Technical Support Engineer/Developer – drop her a Lime…) in 80+ countries worldwide. It offers features like conditional logic, question branching, customizable templates, multilingual support, and GDPR compliance.
🌟 Why LimeSurvey?
LimeSurvey is perfect for you if you are…
- 📊 Gathering feedback from customers, employees, or stakeholders
- 🎓 Conducting academic research or field studies
- 🌍 Running multilingual surveys for global audiences
- 🔐 Prioritizing privacy and GDPR compliance in data collection
- 🛠 Needing customizable, flexible survey platform for various projects
- 🚀 Scaling surveys for startups, mid-sized businesses, or large organizations
- 🎯 Looking for an open-source solution with no vendor lock-in
🚀 Features
- ✅ Unlimited surveys
- ✅ Unlimited questions
- ✅ 30+ question types
- ✅ 900+ survey templates
- ✅ Easy LimeSurvey editor
- ✅ On-brand surveys (fonts, colors, logo, CSS, JavaScript)
- ✅ Multilingual surveys (80+ languages)
- ✅ Skip logic and question branching
- ✅ Easy survey sharing (via public link, QR code, socials)
- ✅ Closed access mode (via personal link, invite-only)
- ✅ Responses & statistics
- ✅ Advanced data analysis tools
- ✅ RemoteControl API (via XML-RPC / JSON-RPC)
- ✅ Google Analytics
- ✅ Data security & anonymization
- ✅ Two-factor authentication
- ✅ GDPR compliance and strong data security
- ✅ WCAG 2.0 compliance 🌐💚
- ✅ Plugins (questions themes, survey themes, audit log, ExportR, ExportSTATAxml, AuthCAS …)
- ✅ Integrations (SAML, LDAP, SURFconext, Remote Control, REST API …)
- ✅ And much more …
Installation
⬇️ Stable Release: We recommend downloading the latest stable version for optimal reliability and performance.
⚠️ Repository: You can also access the development repository. Be aware that it may contain versions that are not fully tested.
Requirements
Minimal
- Apache ≥ 2.4, nginx ≥ 1.1, or any PHP-ready web server
- PHP ≥ 7.4 with mbstring and PDO drivers
- MySQL ≥ 8.0, PostgreSQL ≥ 12, MariaDB ≥ 10.3.38, or MSSQL ≥ 2016
Recommended
- Latest nginx version
- Latest PHP version with php-fpm, mbstring, gd2, imap, ldap, zip, zlib, and database drivers
- Latest MariaDB or MySQL version
☁️ You don’t want to host yourself? Let us do it for you!
Skip the technical setup and focus on creating and analyzing surveys. With our hosted SaaS, you get a fast, easy-to-use online survey platform that ensures security and complies with privacy regulations like GDPR. We take care of all the hosting and maintenance, so you don’t have to worry about it and can scale away:
👉 Create free online survey!
❤️ Join the community
- ⭐ Show your support and star this repo now
- 💬 Join the discussion in our forums
- 🐛 Submit bugs and feature requests
- 🔗 Follow us on LinkedIn
- 💬 Join our Discord
- 🦸 Make contributions or join the LimeSurvey project team
All Thanks to our contributors

License
LimeSurvey is licensed under GPL v2.0, with the option to use any later GPL version. Pictures and the LimeSurvey Logo are registered trademarks of LimeSurvey GmbH, based in Hamburg, Germany.
🔼 Back to top