
LineageOS — это одна из самых популярных прошивок с открытым исходным кодом для Android-устройств, которая основана на исходном коде операционной системы Android. Вот несколько причин, по я считаю LineageOS лучшим выбором по сравнению с другими прошивками:
-
Свобода выбора: LineageOS предоставляет пользователям свободу выбора, которую не предоставляет официальная прошивка от производителя устройства. Вы можете устанавливать и настраивать прошивку по своему усмотрению.
-
Безопасность: LineageOS активно обновляется и исправляет уязвимости безопасности. Это означает, что вы получаете более безопасную операционную систему, чем официальная прошивка.
-
Поддержка старых устройств: LineageOS поддерживает широкий диапазон устройств, включая старые модели, которые больше не обновляются официально. Это означает, что вы можете продлить жизнь своего устройства, получив последнюю версию Android и новые функции.
-
Нет предустановленных приложений: LineageOS не включает предустановленные приложения от производителя устройства или поставщика услуг.
В целом, LineageOS представляет собой отличный выбор для пользователей Android, которые хотят больше контроля над своим устройством и не хотят ограничиваться официальной прошивкой от производителя.
Для удобства, инструкция разделена на этапы.
Прежде чем начинать что-то делать обязательно нужно обновить телефон до Android 13, а так же я столкнулся с проблемой, я не смог закрыть загрузчик(bootload lock). Мне пришлось восстанавливать устройство через утилиту от компании Google прежде чем выполнять все действия ниже.
Этап 1. Разблокировка загрузчика
Загрузчик (bootloader) — это программа, которая запускается при старте устройства Android и предназначена для подготовки системы к запуску операционной системы. Загрузчик находится на специальном разделе во внутренней памяти устройства, и он ответственен за выполнение ряда задач, таких как проверка целостности системных файлов, загрузка ядра операционной системы и загрузочного образа (boot image), настройка системных переменных и запуск пользовательской среды.
Нужно на устройстве активировать режим разработчика.
Активация режима разработчика позволяет получить дополнительные функции и возможности для настройки и управления устройством. Этот режим предназначен для разработчиков Android, но может быть полезен и для обычных пользователей, которые хотят получить больше контроля над своим устройством.
В режиме разработчика нам нужно:
-
Разрешить разблокировку загрузчика — это позволяет разблокировать загрузчик устройства и установить на него неофициальные прошивки и модификации.
-
Разрешить отладку по USB — это позволяет подключить устройство к компьютеру и управлять им через Android Debug Bridge (adb), что может быть полезно для установки приложений, отладки и тестирования на устройстве.
Теперь выполняем в устройстве
Настройки -> О телефоне -> Номер сборки(нажимаем до тех пор пока не увидим надпись "Не нужно, вы уже разработчик"
Теперь переходим
Настройки -> Система -> Для разработчиков -> Заводская разблокировка(включаем эту опцию) -> Включить -> Отладка по USB(включаем эту опцию) -> OK
Этап 2. Подготовка инструментов
Прошивку моего устройства я делал из операционной системы Windows 11.
Нам нужна специальная утилита ADB, качаем последнюю версию от сюда для операционной системы Windows.
ADB (Android Debug Bridge) — это инструмент для отладки и тестирования приложений на устройствах Android. Он позволяет разработчикам подключаться к Android-устройствам по USB или Wi-Fi и выполнять различные задачи из командной строки компьютера.
После того как скачали архив, его нужно извлечь в удобное для вас место, я буду извлекать в корень диска C:\
Так же нам нужен будет драйвер для того что бы устройство через adb корректно определялось и работало. Скачивать от сюда
Подключаем устройство к компьютеру через USB кабель. Открываем диспетчер устройств(Winx+X -> Диспетчер устройств) и проверяем, определилось ли устройство в системе, если устройство определилось, то продолжаем, если нет, то нужно указать вручную устройству где брать драйвер.
Так же нам необходимо скачать рекавери(vendor_boot.img) и сам образ LineageOS(lineage-20… смотрим на самую свежую дату в названии) по этой ссылке
Этап 3. Подготовка устройства
Если все выполнено правильно, то нужно проверить определит ли adb наше устройство. Запускаем командную строку или power shell, для удобства я буду везде говорить терминал. У меня не получилось быстро сделать так, что бы в терминале утилита adb работала всегда, поэтому я буду запускать утилиту adb из папки куда я ее извлек.
Это делать не обязательно
Если кого то смущает что нужно все время писать adb.exe, то добавьте директорию с утилитами adb в системную переменную PATH. Для этого нажмите Win+R на клавиатуре, введите «sysdm.cpl» и нажмите «ОК», чтобы открыть свойства системы. Нажмите на кнопку «Переменные среды» и найдите переменную PATH в разделе «Системные переменные». Щелкните на этой переменной и выберите «Изменить». Добавьте путь к директории с утилитами ADB в конец поля «Значение переменной», разделяя его от других путей точкой с запятой (;). Например, если у вас директория находится по адресу C:\platform-tools, то добавьте «;C:\platform-tools» в конец значения переменной PATH.
Переходим в каталог с adb cd C:\platform-tools
Выполняем команду в терминале .\adb.exe devices
После выполнения команды .\adb.exe devices в терминале будут отображены все подключенные устройства Android, у которых разрешен режим отладки по USB. Каждое устройство будет иметь уникальный идентификатор, известный как «Device ID».
Пример вывода в консоль:
List of devices attached
emulator-5554 device
Если в терминале устройство отобразилось, то все хорошо.
Теперь перезагружаем устройство в bootloader
.\adb.exe reboot bootloader
Как только устройство загрузилось нужно проверить находит ли его компьютер с помощью утилиты fastboot
.\fasboot.exe devices
Если выводе в командной строки устройство отобразилось, то все хорошо.
Разблокируем загрузчик .\fastboot.exe flashing unlock
Качельками громкости выбираем что хотим открыть загрузчик, клавишей блокировки соглашаемся.
Этап 4. Прошивка
Прошиваем vendor_boot.img fastboot flash vendor_boot <vendor_boot>.img не забываем указать полный путь к файлу vendor_boot.img на диске
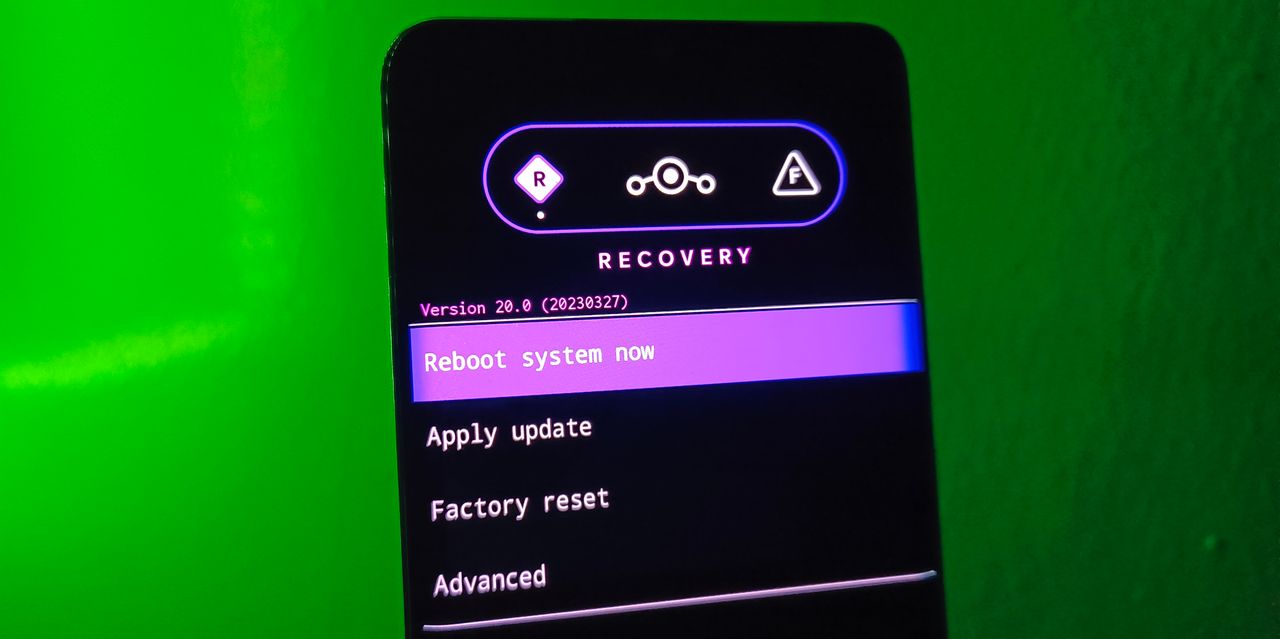
Грузимся в Recovery. Качельками громкости выбираем Recovery Mode, клавишей блокировки подтверждаем выбор. Ждем пока загрузится режим Recovery. Обязательно должен быть логотип LineageOS в Recovery Mode.
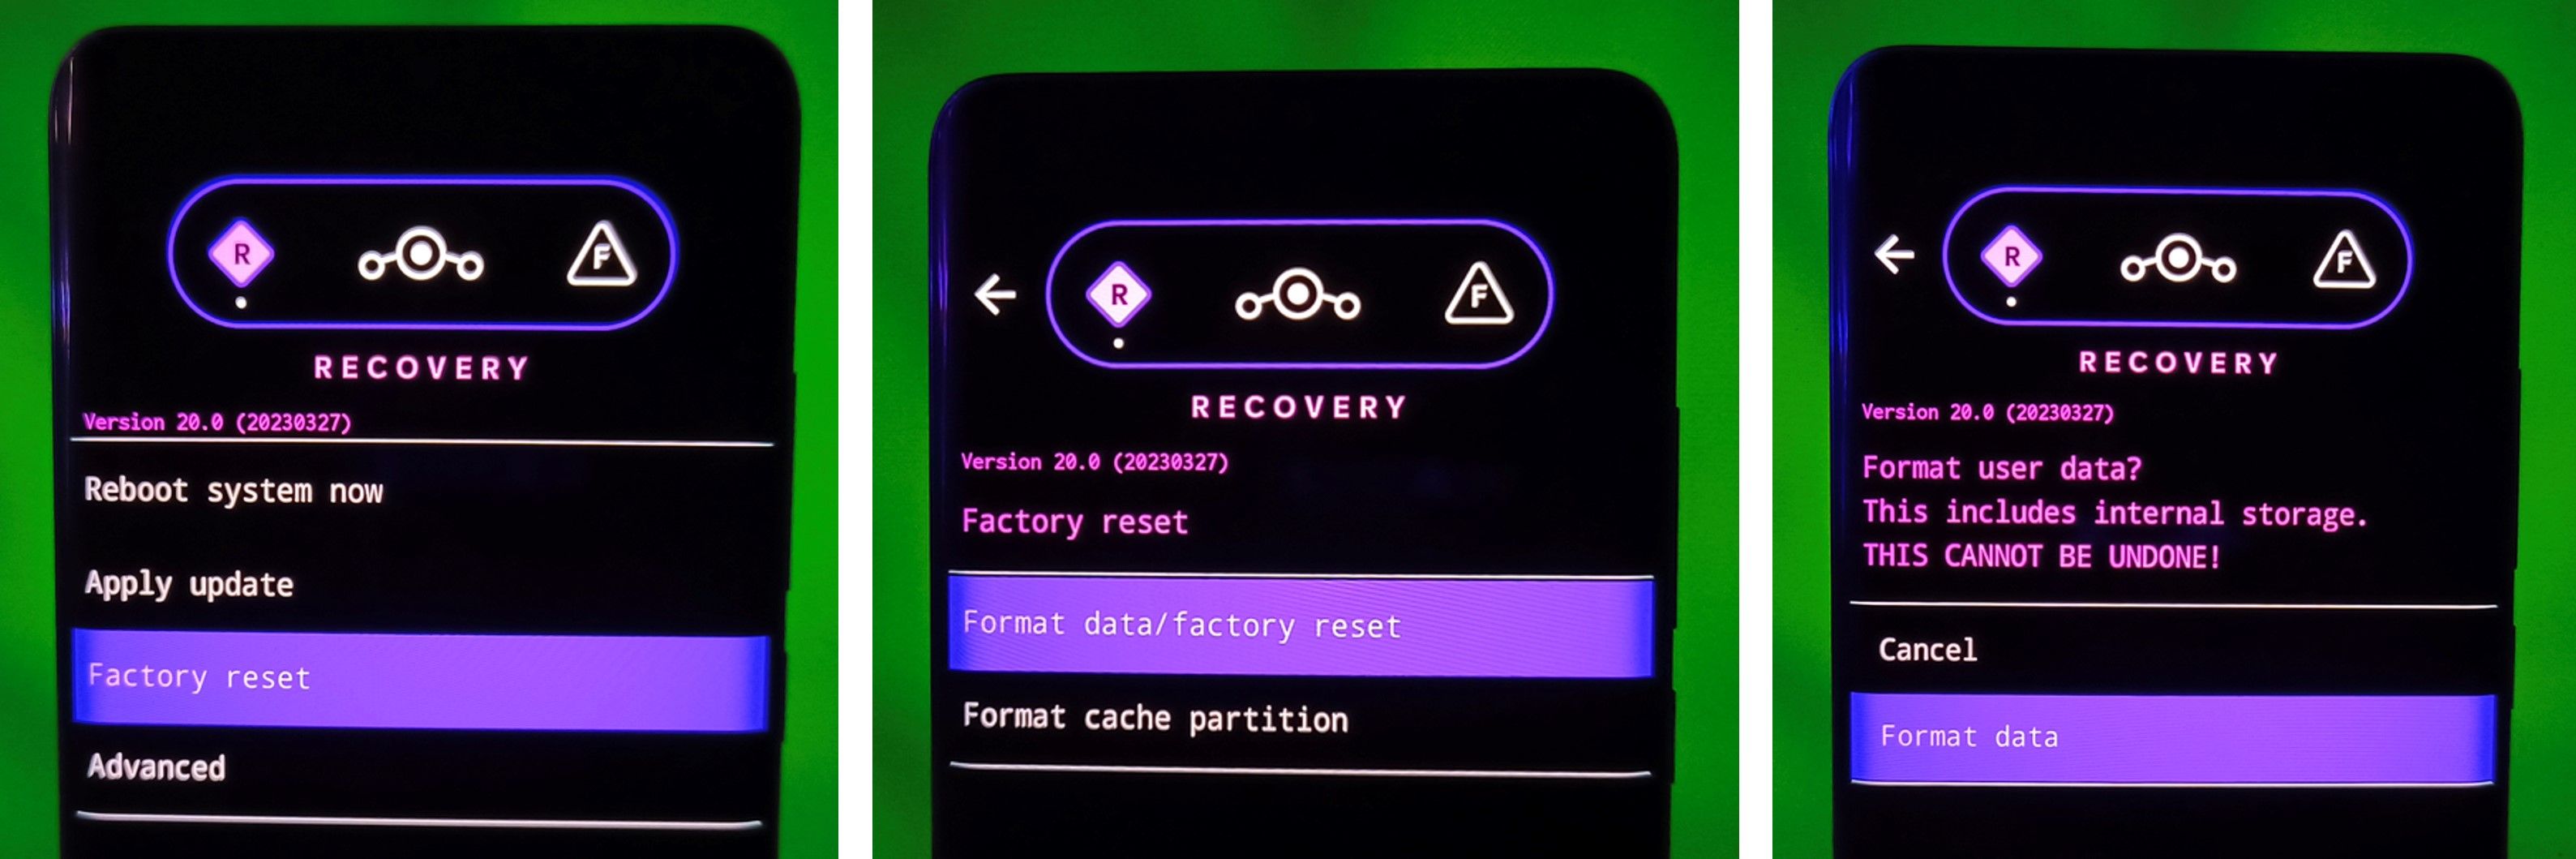
Делаем FactoryReset и FormatData, так же выбрав этот пункт качельками громкости и клавишей блокировки.
Factory reset -> Format data/factory reset -> Format data
Выходим назад, нажав на экране назад.
Теперь прошиваем сам образ LineageOS
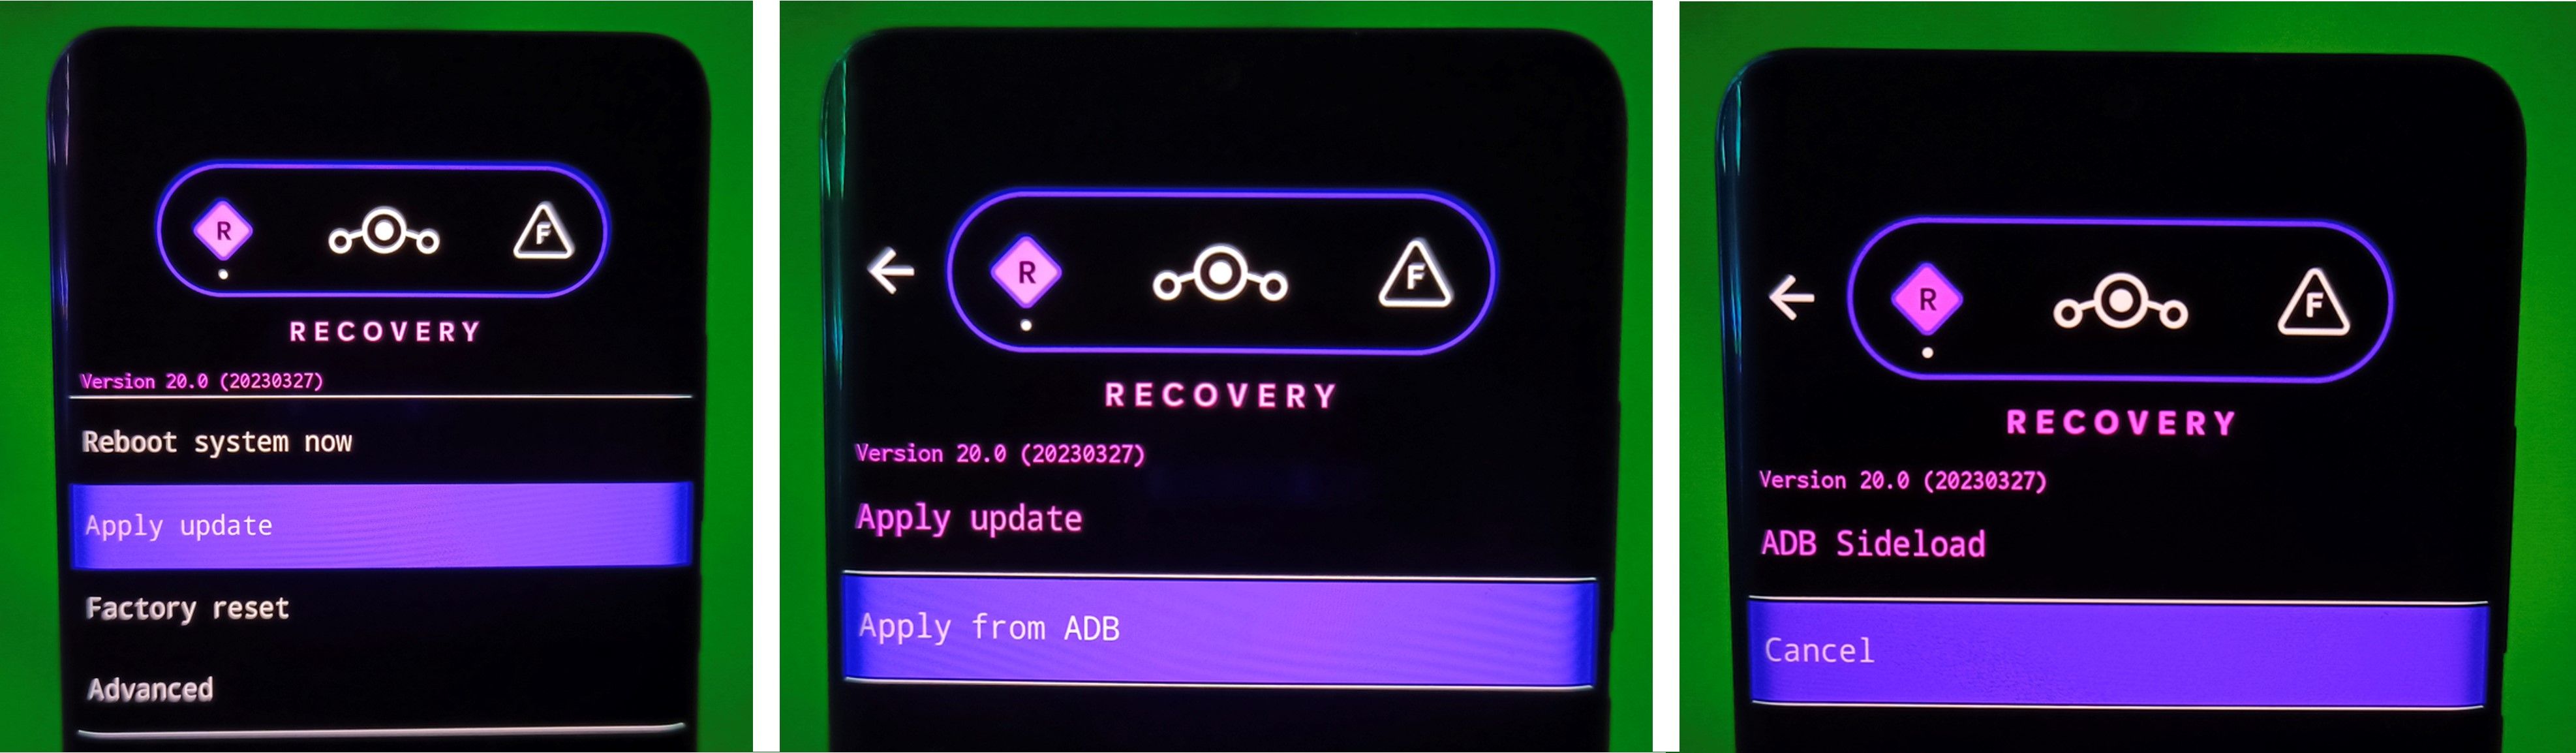
Apply update -> Apply from ADB
Выполняем команду в терминале
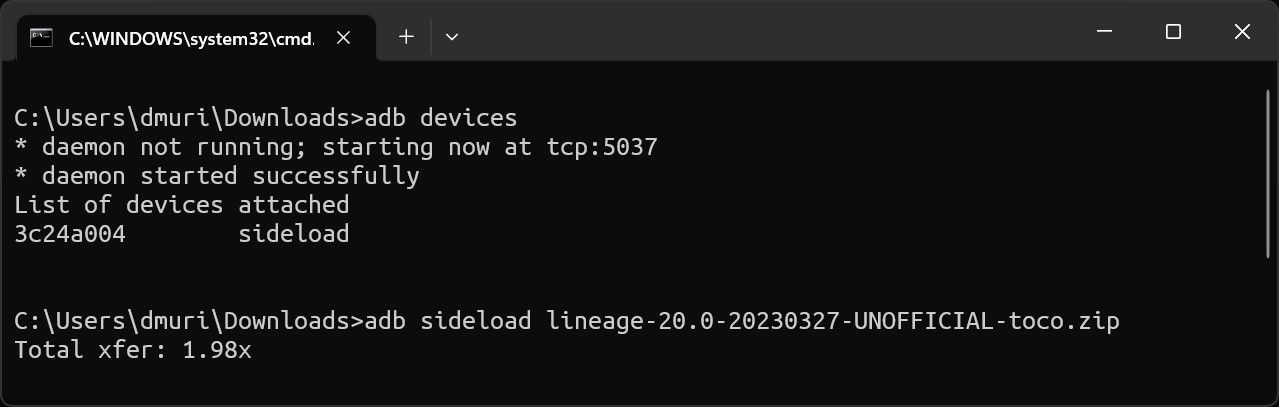
.\adb.exe sideload <filename>.zip меняем на путь куда скачан образ LineageOS включая само название файла образа
У меня загрузка все время зависала на 6, 7, 8% пока я не подключил устройство через обычный USB-C — USB-A кабель. Из коробки с устройством идет USB-C — USB -C кабель.
После того как прошивка прошла перезагружаем устройство, делаем первичные настройки и подключаемся к беспроводной сети.
Этап 5. Magisk
Magisk — это программа, которая позволяет пользователям Android получать root-права на своих устройствах без изменения системных файлов. Это означает, что Magisk позволяет пользователю получить полный доступ к системе и выполнить различные задачи, такие как установка модификаций системы, настройка различных параметров, скрытие рут-прав от приложений, которые проверяют их наличие, и т.д., не изменяя саму систему и не нарушая ее целостность.
Скачиваем по этой ссылке Magisk для того что бы получить полные права в операционной системе. Нужно изменить у скаченного файла расширение с .apk на .zip и перезагрузить телефон в Recovery Mode.
.\adb.exe reboot bootloader
Грузимся в Recovery. Качельками громкости выбираем Recovery Mode, клавишей блокировки подтверждаем выбор. Ждем пока загрузится режим Recovery.
Выходим назад и выбираем
Apply update -> Apply from ADB
Выполняем команду в командной строке
.\adb.exe sideload <filename>.zip нужно заменить на название файла приложения Magisk
После того как процесс установки завершится перезагружаем устройство.
Запускаем приложение Magisk и в настройках включаем Zygisk
Zygisk — позволяет изолировать процессы приложений, которые требуют root-доступа, от остальных процессов на устройстве. Это позволяет предотвратить возможные конфликты с другими процессами и уменьшить нагрузку на систему.
Magisk -> Настройки -> Zygisk
Скачиваем последнюю версию LSPosed Zygisk(не путать с riru) по ссылке
LSPosed для Magisk позволяет пользователям использовать хуки, чтобы изменять и настраивать поведение приложений на устройстве Android, добавлять дополнительные функции, скрывать рекламу и многое другое. Кроме того, LSPosed для Magisk поддерживает модули, которые можно загрузить из репозитория, чтобы добавить дополнительную функциональность или изменить поведение системы.
Скаченный файл нужно скопировать на телефон, я скопировал в папку Downloads.
Запускаем Magisk
Magisk -> Модули -> Установить из хранилища -> выбрать скопированный файл(LSPosed) -> Перезагрузка
Свайпаем шторку, нажимаем на уведомление от LSPosed и нажимаем на
Ярлык -> Добавить на главный экран
Открываем приложение LSPosed
LSPosed -> Репозитории -> ищем модуль FakeGApps -> Версии -> Установить
Модуль FakeGApps LSPosed содержит набор имитированных сервисов Google Play, таких как Google Cloud Messaging, Google Location Services, Google Drive, Google Play Games и другие, которые могут использоваться в приложениях, требующих Google Play Services.
После того как модуль установился включаем его.
Этап 6. Установка MicroG
После установки и настройки LineageOS нужно опять включить режим разработчика и включить отладку USB.
Теперь почему microG, а не gapps.
MicroG — это альтернативный пакет приложений Google, который имеет открытый исходный код и позволяет использовать функциональность Google без необходимости устанавливать полный набор Google Apps (GApps). Это может быть полезно для пользователей, которые хотят использовать Android без Google, но все еще хотят иметь доступ к некоторым функциям, таким как магазин приложений Google Play. MicroG включает в себя ряд замененных Google сервисов, таких как Google Cloud Messaging (GCM), Google Maps API и Google Play Services.
OpenGApps — это пакет приложений и служб Google, доступный для установки на устройства с открытым исходным кодом операционной системы Android, такие как LineageOS. Эти приложения включают в себя Google Play, YouTube, Google Chrome и другие популярные приложения и сервисы Google.
Основная разница между MicroG и OpenGApps заключается в том, что MicroG предоставляет открытую реализацию сервисов Google, которая не требует установки настоящих сервисов Google, тогда как Open GApps предоставляет полный пакет приложений и сервисов Google, включая Google Play Store и Google Play Services.
Для установки нам понадобится утилита adb
Скачиваем по этой ссылке zip архив с названием microG_Installer_Revived.zip и копируем файл на телефон
Открываем Magisk
Magisk -> Модули -> Установить из хранилища -> выбрать скопированный файл(microG_Installer_Revived.zip) -> Перезагрузка
Теперь открываем настройки microG
Настройки microG -> Проверка работоспособности
Должны стоять галочки везде.
Этап 7. Магазины
Скачиваем по этой ссылки магазин opensource приложений F-Droid.
F-Droid представляет собой альтернативу Google Play Store и предоставляет пользователю доступ к бесплатным и открытым приложениям, которые могут быть загружены и установлены на устройство без каких-либо ограничений. В каталоге F-Droid представлены приложения, которые соответствуют определенным стандартам, таким как свобода использования, безопасность и конфиденциальность данных, и которые не содержат встроенной рекламы или шпионских приложений.
С помощью командной строки устанавливаем все приложения
.\adb.exe install <filename>.apk за место указываем название каждого скаченного apk файла
Я не буду устанавливать Play Market, все нужные мне приложения такие как банкинги я буду брать с помощью приложения Aurora Store приложение ищем в F-Droid и устанавливаем его. Авторизацию в Aurora Store я не использую, скачиваю приложения анонимно.
Этап 8. Блокируем загрузчик
Upd*
По поводу загрузчика, у меня так и не получилось его закрыть именно на этом устройстве, единственный способ который я нашел это само-подписанную сборку LineageOS
Перезагружаем в режим bootloader через терминал
.\adb.exe reboot bootloader
выполняем команду
.\fastboot.exe flashing lock
Качельками громкости выбираем что хотим закрыть загрузчик, клавишей блокировки соглашаемся.
Basic requirements
- Read through the instructions at least once before actually following them, so as to avoid any problems due to any missed steps!
- Make sure your computer has
adbandfastboot. Setup instructions can be found here. - Enable USB debugging on your device.
- Make sure that your model number is one of the following (exact match required!):
- XT1952-1
- XT1952-2
- XT1952-3
- Boot your device with the stock OS at least once and check every functionality.
- Remove all Google accounts from your device to avoid “Factory reset protection”
- LineageOS is provided as-is with no warranty. While we attempt to verify everything works you are installing this at your own risk!
Unlocking the bootloader
- Connect the device to your PC via USB.
- On the computer, open a command prompt (on Windows) or terminal (on Linux or macOS) window, and type:
You can also boot into fastboot mode via a key combination:
- With the device powered off, hold Volume Down + Power.
- Once the device is in fastboot mode, verify your PC finds it by typing:
If you don’t get any output or an error:
- on Windows: make sure the device appears in the device manager without a triangle. Try other drivers until the command above works!
- on Linux or macOS: If you see
no permissions fastboottry runningfastbootas root. When the output is empty, check your USB cable and port!
-
Follow the instructions at Motorola Support to unlock your bootloader.
- Since the device resets completely, you will need to re-enable USB debugging to continue.
Installing Lineage Recovery using fastboot
- Download Lineage Recovery. Simply download the latest recovery file, named
boot.img. - Connect your device to your PC via USB if it isn’t already.
- If your device isn’t already in fastboot mode, on the computer, open a command prompt (on Windows) or terminal (on Linux or macOS) window, and type:
You can also boot into fastboot mode via a key combination:
- With the device powered off, hold Volume Down + Power.
- Once the device is in fastboot mode, verify your PC finds it by typing:
If you don’t get any output or an error:
- on Windows: make sure the device appears in the device manager without a triangle. Try other drivers until the command above works!
- on Linux or macOS: If you see
no permissions fastboottry runningfastbootas root. When the output is empty, check your USB cable (preferably use a USB Type-A 2.0 one or a USB hub) and port!
- Flash recovery onto your device:
fastboot flash boot boot.img - Now reboot into recovery to verify the installation.
- Use the menu to navigate to and to select the
Recoveryoption.
- Use the menu to navigate to and to select the
Ensuring all firmware partitions are consistent
In some cases, the inactive slot can be unpopulated or contain much older firmware than the active slot, leading to various issues including a potential hard-brick. We can ensure none of that will happen by copying the contents of the active slot to the inactive slot.
To do this, sideload the copy-partitions-20220613-signed.zip package by doing the following:
- Download the
copy-partitions-20220613-signed.zipfile from here. - Sideload the
copy-partitions-20220613-signed.zippackage:- On the device, select “Apply Update”, then “Apply from ADB” to begin sideload.
- On the host machine, sideload the package using:
adb -d sideload copy-partitions-20220613-signed.zip
- Now reboot to recovery by tapping “Advanced”, then “Reboot to recovery”.
Installing LineageOS from recovery
- Download the LineageOS zip file that you would like to install or build the package yourself.
- If you are not in recovery, reboot into recovery:
- With the device powered off, hold Volume Down + Power, then select “Recovery mode” using Volume keys.
- Now tap Factory Reset, then Format data / factory reset and continue with the formatting process. This will remove encryption and delete all files stored in the internal storage, as well as format your cache partition (if you have one).
- Return to the main menu.
- Sideload the LineageOS
.zippackage but do not reboot to system before you read/followed the rest of the instructions!- On the device, select “Apply Update”, then “Apply from ADB” to begin sideload.
- On the host machine, sideload the package using:
adb -d sideload filename.zip.
Installing Add-Ons
- Click
Apply Update, thenApply from ADB, thenadb -d sideload filename.zipfor all desired packages in sequence.
When presented with a screen that saysSignature verification failed, clickYes. It is expected as add-ons aren’t signed with LineageOS’s official key!
All set!
Once you have installed everything successfully, you can now reboot your device into the OS for the first time!
- Click the back arrow in the top left of the screen, then “Reboot system now”.
If you are wondering about the next steps, continue, otherwise, enjoy your new LineageOS installation.
What next?
- If you are considering relocking your bootloader, see our FAQ about it.
- If your device is displaying a warning on every boot — there is nothing you can do about it but ignoring.
- Please do not use any methods to deinstall system apps. We are already shipping only a minimal set of apps and doing so can break your system. You are warned!
- We don’t support any methods for rooting and thus won’t provide support with it on any of our platforms
- LineageOS is Android. It supports apps the same way as any other Android device, but apps might choose to exclude you from using them. Please go back to your device’s quirks section and read about “Device integrity”.
LineageOS продолжает оставаться одним из самых популярных пользовательских ROM, предоставляя альтернативу стандартным прошивкам Android, которые поставляются с большинством устройств. С выпуском LineageOS 21, основанного на Android 14, команда разработчиков представляет ряд значительных улучшений и новых функций, которые делают эту версию особенно привлекательной.
LineageOS 21 включает в себя все ключевые особенности Android 14, а также дополнительные улучшения, разработанные сообществом LineageOS:
- Обновленный Интерфейс: С улучшенным дизайном Material You, LineageOS 21 предлагает большую гибкость в настройке внешнего вида системы, позволяя пользователям изменять цветовые схемы и шрифты.
- Улучшенные Функции Безопасности: Включает обновленные политики разрешений и улучшенные инструменты для контроля над данными пользователя, обеспечивая лучшую защиту конфиденциальности.
- Продвинутые Настройки: Пользователи могут настраивать элементы управления системой, такие как статус-бар, кнопки навигации и уведомления, для создания уникального пользовательского интерфейса.
- Поддержка Новых Устройств: LineageOS 21 расширяет список поддерживаемых устройств, включая некоторые из последних моделей на рынке.
Подготовка к Установке LineageOS
Перед началом установки LineageOS 21 важно подготовиться:
- Резервное Копирование: Создайте полную резервную копию всех данных на вашем устройстве.
- Разблокировка Загрузчика: Убедитесь, что загрузчик устройства разблокирован, что является предварительным условием для установки пользовательского ROM.
- Заряд Устройства: Перед началом процесса установки убедитесь, что устройство полностью заряжено или имеет достаточный уровень заряда.
Пошаговое руководство по установке LineageOS 21 через терминал Ubuntu
LineageOS 21, основанный на Android 14, является одним из наиболее ожидаемых пользовательских ROM в сообществе Android, предлагая обновленные функции безопасности, улучшенную производительность и расширенные возможности настройки. В этом руководстве мы обсудим, как установить LineageOS 21 на совместимое устройство, используя терминал Ubuntu.
Установка ADB и Fastboot
Откройте терминал в Ubuntu и введите следующие команды для установки ADB и Fastboot:
sudo apt update
sudo apt install adb fastboot
Скачивание LineageOS 21
Перейдите на официальный сайт LineageOS и скачайте образ прошивки для вашего устройства. Поместите скачанный файл в удобное место на вашем компьютере.
Подключение Устройства и Перезагрузка в Fastboot
Подключите ваше устройство к компьютеру и введите следующую команду для перезагрузки в режим Fastboot:
adb reboot bootloader
Прошивка LineageOS 21
После перезагрузки в режим Fastboot, выполните следующие команды для прошивки загрузчика и системы:
fastboot flash boot /path/to/boot.img
fastboot flash system /path/to/system.img
Замените /path/to/boot.img и /path/to/system.img на путь к файлам образа загрузчика и системы, соответственно.
Перезагрузка Устройства
После успешной прошивки перезагрузите устройство, используя следующую команду:
fastboot reboot
Настройка LineageOS 21
После перезагрузки следуйте инструкциям на экране для настройки LineageOS 21.
Важные Моменты
- Проверка Совместимости: Перед установкой убедитесь, что выбранный образ LineageOS совместим с вашим устройством.
- Гарантия: Установка пользовательской прошивки может привести к потере гарантии.
- Риски: Следуйте инструкциям точно, так как неправильные действия могут повредить ваше устройство.
Заключение
LineageOS 21 предоставляет пользователям Android новый уровень контроля над их устройствами, предлагая обновленный интерфейс, улучшенную безопасность и широкие возможности настройки. Следуя вышеуказанным инструкциям, вы можете установить LineageOS 21 на свое устройство, используя Ubuntu. Не забудьте регулярно проверять обновления и поддерживать вашу систему в актуальном состоянии.
This post may contain affiliate links/ads and I may earn a small commission when you click on the links/ads at no additional cost to you. As an Amazon Affiliate, I earn from qualifying purchases. Techsphinx also participates in the StationX Affiliate program. You can read my full disclaimer here.

This tutorial will show you how to install Lineage OS custom ROM on an Android phone.
What is Lineage OS?
If you have heard about custom ROMs, then I bet you have heard these 2 names – CyanogenMod and Lineage OS.
Although CyanogenMod discontinued in 2016, it was the most popular custom ROM in the world. After its discontinuation, the CyanogenMod developers forked and re-branded the cyanogen code into a new project called Lineage OS.
Now, Lineage is the most popular custom ROM in the world. It’s a free and open-source operating system for various devices based on the Android mobile platform.
One of the main reasons why people turn to custom ROM is that their phone manufacturers stop providing updates. Lineage OS extends the functionality and lifespan of mobile devices by providing users with the latest Android experience on their old devices.
Many other custom ROM devs use Lineage as a base for their ROM. It also has the biggest open source community in the world of custom ROMs.
Lineage OS Compatible Devices
The most popular custom ROM supports almost every Android phone officially or unofficially. As of writing this post, Lineage OS supports 25+ vendors and 150+ devices officially.
Here’s a list of all the vendors Lineage OS supports officially:
Note: The lineage OS team regularly updates the list of supported devices, so always check their official site for updated information.
- Asus
- BQ
- Essential
- Fairphone
- FxTec
- HTC
- Huawei
- LeEco
- Lenovo
- LG
- Motorola
- Nextbit
- Nokia
- Nubia
- OnePlus
- OPPO
- Razer
- Realme
- Samsung
- Sony
- Wileyfox
- Wingtech
- Xiaomi
- Yandex
- Zuk
The above mentioned are the list of device manufacturers, if you want to know that your particular device supports this ROM, then head over to the Lineage OS official website.
Lineage supports almost every android phone out there. If there is no official build of Lineage OS for your phone, then you can try the following:
1. Go to XDA developers and find an unofficial port of Lineage for your device. There’s a high chance you’ll find an unofficial port for your device.
2. Wait for someone to create/port a build of Lineage OS for your phone. You can also build one yourself if you have enough knowledge. Lineage also offers an easy to follow build guide.
3. If you have no luck with the above 2, then navigate to my Best custom Roms for android post and pick another custom ROM for your device.
Features of Lineage OS
Unlike other custom ROMs, Lineage OS doesn’t provide you with loads of customizations. They tend to keep things simple and stable as possible.
Here’s the list of some additional features and customizations Lineage OS provides:
- No Bloatware
- Native theme support
- LiveDisplay
- Lock screen customization
- Weather providers
- System Profiles
- ADB root
- Expanded Desktop
- LineageOS’s Privacy Guard
- CPU overclocking
- Option for root access
- And some other enhancements.
Disclaimer
If you follow along with this post, your device warranty will be void. Any damages or loss incurred is your sole responsibility. Don’t blame me if your WiFi stops working or your device is hard bricked.
I or Techsphinx shall not be held responsible for your actions.
Pre-Requisites to Install Lineage OS
- Unlocked bootloader
To install Lineage OS ROM on your device, you will need to unlock the bootloader. If you want to know more about OEM unlocking, then check the following link:
What is OEM Unlock? and How to enable it?
- Custom recovery installed on your device.
You’ll need a custom recovery to install a custom ROM. If you don’t have one installed already then check the below link:
Best Custom Recovery for Android devices
- Full NANDroid Backup of device.
A Complete NANDroid backup is recommended as you have to wipe the old system to install the new one. If there is trouble during installation, you may have to revert to your old ROM.
Learn more about NANDroid backup from the following link:
How to Create and Restore NANDroid Backup?
Note: NANDroid backup doesn’t backup internal storage files like Pictures or downloads, make sure to back up all those files manually.
- Lineage OS ROM for your device.
Head over to the Lineage OS website and download the ROM file compatible with your phone.
- GAPPS compatible with your device. (Optional)
To gain play store functionality and other google apps, you’ll need to download and flash Gapps.
Head over to OpenGapps, and download the version compatible with your device.
- Magisk App (Optional)
If you want to root your device, then you’ll need to flash the Magisk App.
Download Magisk App from its official Github repository.
- Device charged up to 70%
Charge your device at least 70%. The last thing you want is to run out of juice while installing or troubleshooting custom ROM.
Install Lineage OS on Android Phone
I am installing Lineage OS on my Moto G5S Plus device with TWRP recovery installed. Lineage doesn’t have an official build for Moto G5s Plus, so I am installing an unofficial port.
Follow these steps to clean flash Lineage OS:
-
Reboot your phone to recovery and click on Wipe > Advanced Wipe. Then select System, data, cache, Dalvik cache partition and Wipe it.
-
Connect your phone to the PC and copy the Lineage OS installation zip file to your phone.
-
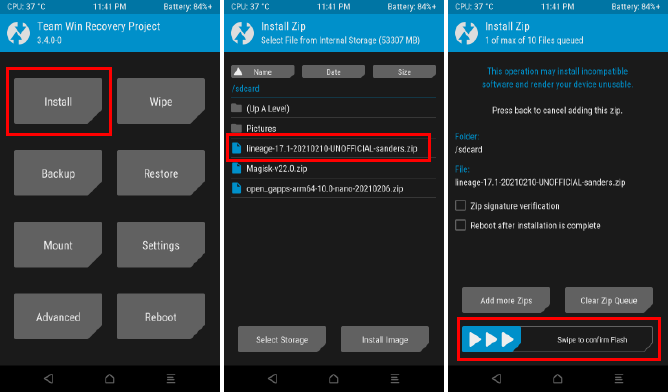
Click on Install.
-
Select the Lineage OS zip file.
-
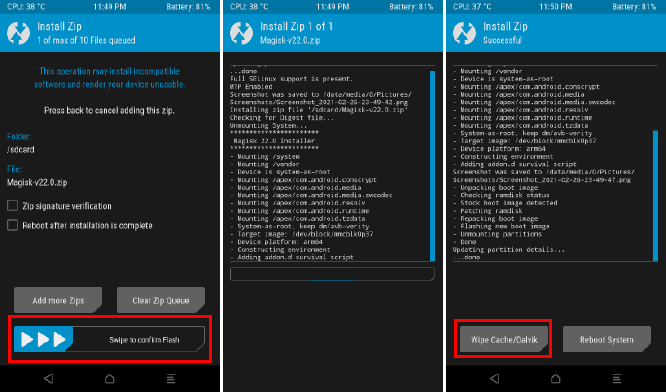
Swipe to Confirm Flash.

-
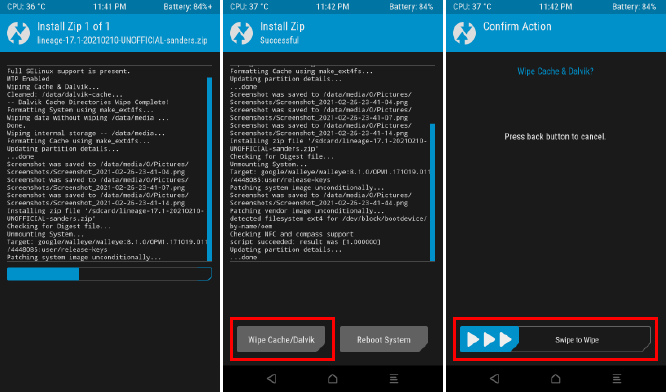
Wait for the flashing process to complete.
-
Wipe Cache/Dalvik.

-
Reboot to system.
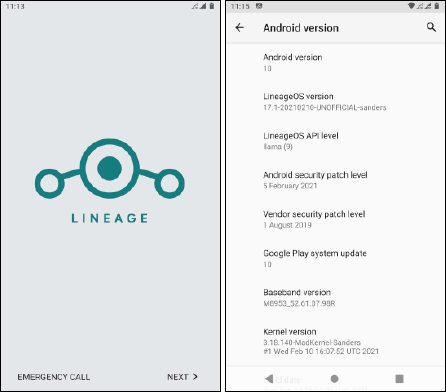
First boot may take some time; after that you can setup Lineage OS.
Flash Gapps (Optional)
To flash Gapps, reboot your device to recovery then follow the steps:
1. Copy the Gapps package to your phone.
2. Select install.
3. Select the Gapps zip file.
4. Swipe to Confirm flash.
5. Wipe Cache/Dalvik.
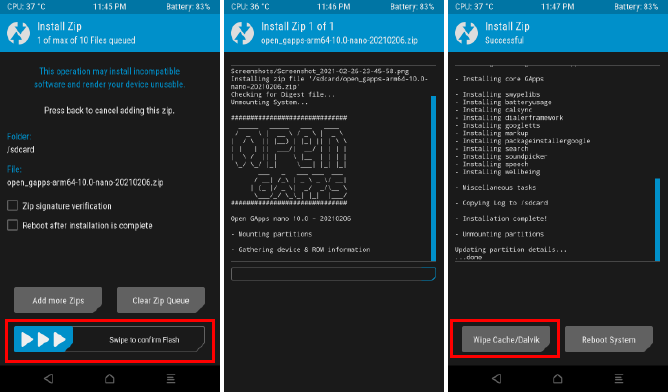
6. Reboot to system.
Now, you’ll see play store and other Google apps in your app drawer.
Flash Magisk (Optional)
In Lineage OS, you can enable/disable root access via developer options without the need for flashing Magisk.
However, there are several benefits of flashing Magisk App to gain root access. Using Magisk you can hide root access from other apps and services.
This way you can run apps that doesn’t run on rooted devices.
Before you make up your mind on rooting your device, I recommend you to have a look at my rooting android phone post, in which I have mentioned the advantages and disadvantages of rooting an Android phone.
Steps to flash Magisk:
1. Change the extension of the Magisk file from “.apk” to “.zip”. This will make it flashable.
2. Copy Magisk App (.zip file) to the phone.
3. Reboot to recovery.
4. Select install.
5. Choose the Magisk zip file.
6. Swipe to confirm flash.
7. Wait for the process to complete then Wipe Cache/Dalvik.
8. Reboot to system. Once rebooted, go to the app drawer and click on the Magisk app icon.
9. If it says to download and install the full Magisk package, then go ahead and do that.
10. Once it’s done, you can click on the “Check SafetyNet” option in the Magisk app.
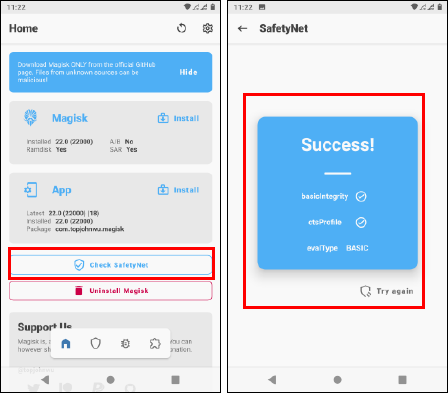
11. You should get a success message.
Troubleshoot: If SafetyNet check fails, then download and flash kdrag0n’s SafetyNet-fix.
FAQ on Lineage OS
Is Lineage OS ROM pre-rooted?
You can enable/disable root access through developer options on Lineage OS.
Is Lineage OS ROM open source?
Yes, Lineage OS is open source and its source code is available on GitHub. If you have enough knowledge, then you can build Lineage OS for your device yourself.
Does Lineage OS ROM has an Android 11 version?
As of writing this post Lineage devs are working on an Android 11 build, but it is not released to the public yet.
Do Lineage OS provides frequent updates for the ROM?
Yes, the ROM is frequently updated with the latest security patches.
Is Lineage OS safe to use?
Lineage OS is the most popular and well-maintained custom ROM available out there. It also releases security patches as soon as Google releases patches for Android. The ROM is also open source, so I don’t have any reason to call it unsafe.
Your device may be at a security risk but it may not be because of any custom ROM but because of your day to day habits.
I have written a guide on securing an android phone. You can check that out if you want.
Conclusion
I hope this tutorial helped you to install Lineage OS custom ROM on your Android phone.
The flashing process of custom ROM is similar on most phones. If you encountered any device-specific errors, then you can go to XDA developers to find the solution to your problem.
If you like the ROM, then support the developers so they can continue this awesome project.
As I said previously, you can even build your own Lineage OS ROM, they have provided an easy to follow build guide. However, a little bit of technical knowledge will be required.

If you like this post, then follow Techsphinx on Facebook and Twitter for more reviews, tricks, tips and tutorials.
This article needs update or correction? Report the issue here so I can update it.
LineageOS is the most popular ROM for Android devices. It garners vast success due to its near-stock Android experience with no bloatware, and a clean and uncluttered interface. It provides regular security updates and bug fixes that often lack in some stock ROMs. Additionally, it gives you a higher level of customization than the stock Android firmware.
Even better, this ROM supports an extensive list of devices, including older ones that no longer receive official updates. Here is a comprehensive step-by-step guide to installing LineageOS on your Android phone.
What You Need Before Installing LineageOS
You can install LineageOS via Windows, Mac, or Linux. We’re focusing on Windows in this guide, so have a Windows PC and a USB cable for your Android device ready.
Before you begin, install the OEM USB drivers for your phone, to ensure your device is recognized when connected to the PC.
Next, back up all your vital data on the device since the installation process wipes everything in the internal memory. While doing this, ensure your device is fully charged.
Set Up ADB and Fastboot
You also need to set up the ADB and Fastboot tools on your PC. These help you to control your Android device by running terminal commands via USB. For instance, Fastboot allows you to perform tasks like unlocking the bootloader, flashing system images, and more.
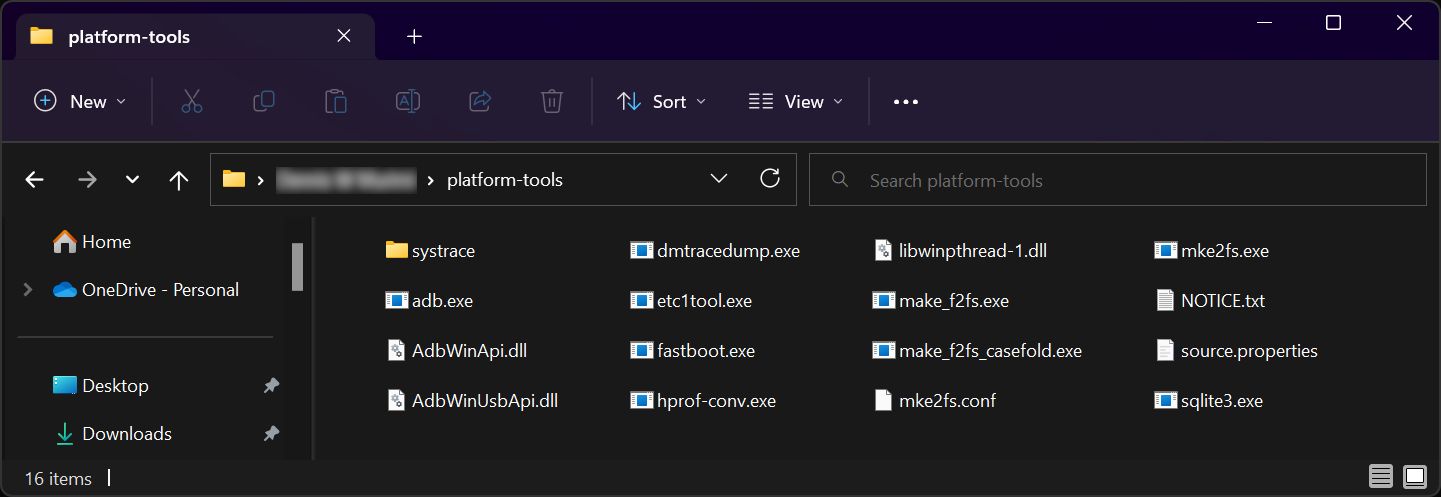
Download the ADB and Fastboot tools from the Android Developer website in the form of the SDK Platform-Tools package. Unzip the downloaded package and find the contents of interest in the platform-tools folder. Keep this folder in mind.
Enable USB Debugging
Next, enable USB Debugging on your Android device. To unlock this option, launch the Settings app, open About phone, scroll down till you find the Build number section, and then tap on it until you see a notification informing you that you’re now a developer. If you have configured a screen lock, it will be needed in this step.
After that, go back to the Settings app, and due to differences in Android versions, search for the words Developer options in the search bar at the top. Tap on the Developer options search result when it pops up, scroll down to the Debugging section, and enable the USB debugging toggle.
You’re now almost ready to start. You now just need to confirm your device’s CPU architecture. This will be helpful when downloading a Google Apps installation package. Download the Treble Info app from Google Play Store, open it, and check the Architecture section. Most devices will be ARM or ARM64.
Double-check the prerequisites above and continue to the next step.
Step 1: Download LineageOS and Everything Else You Need
Before continuing, confirm that LineageOS is available to download for your device. Some devices with official support include the Google Pixel lineup, select Samsung phones (but not recent Galaxy S models), as well as devices from Xiaomi, Motorola, Asus, and more.
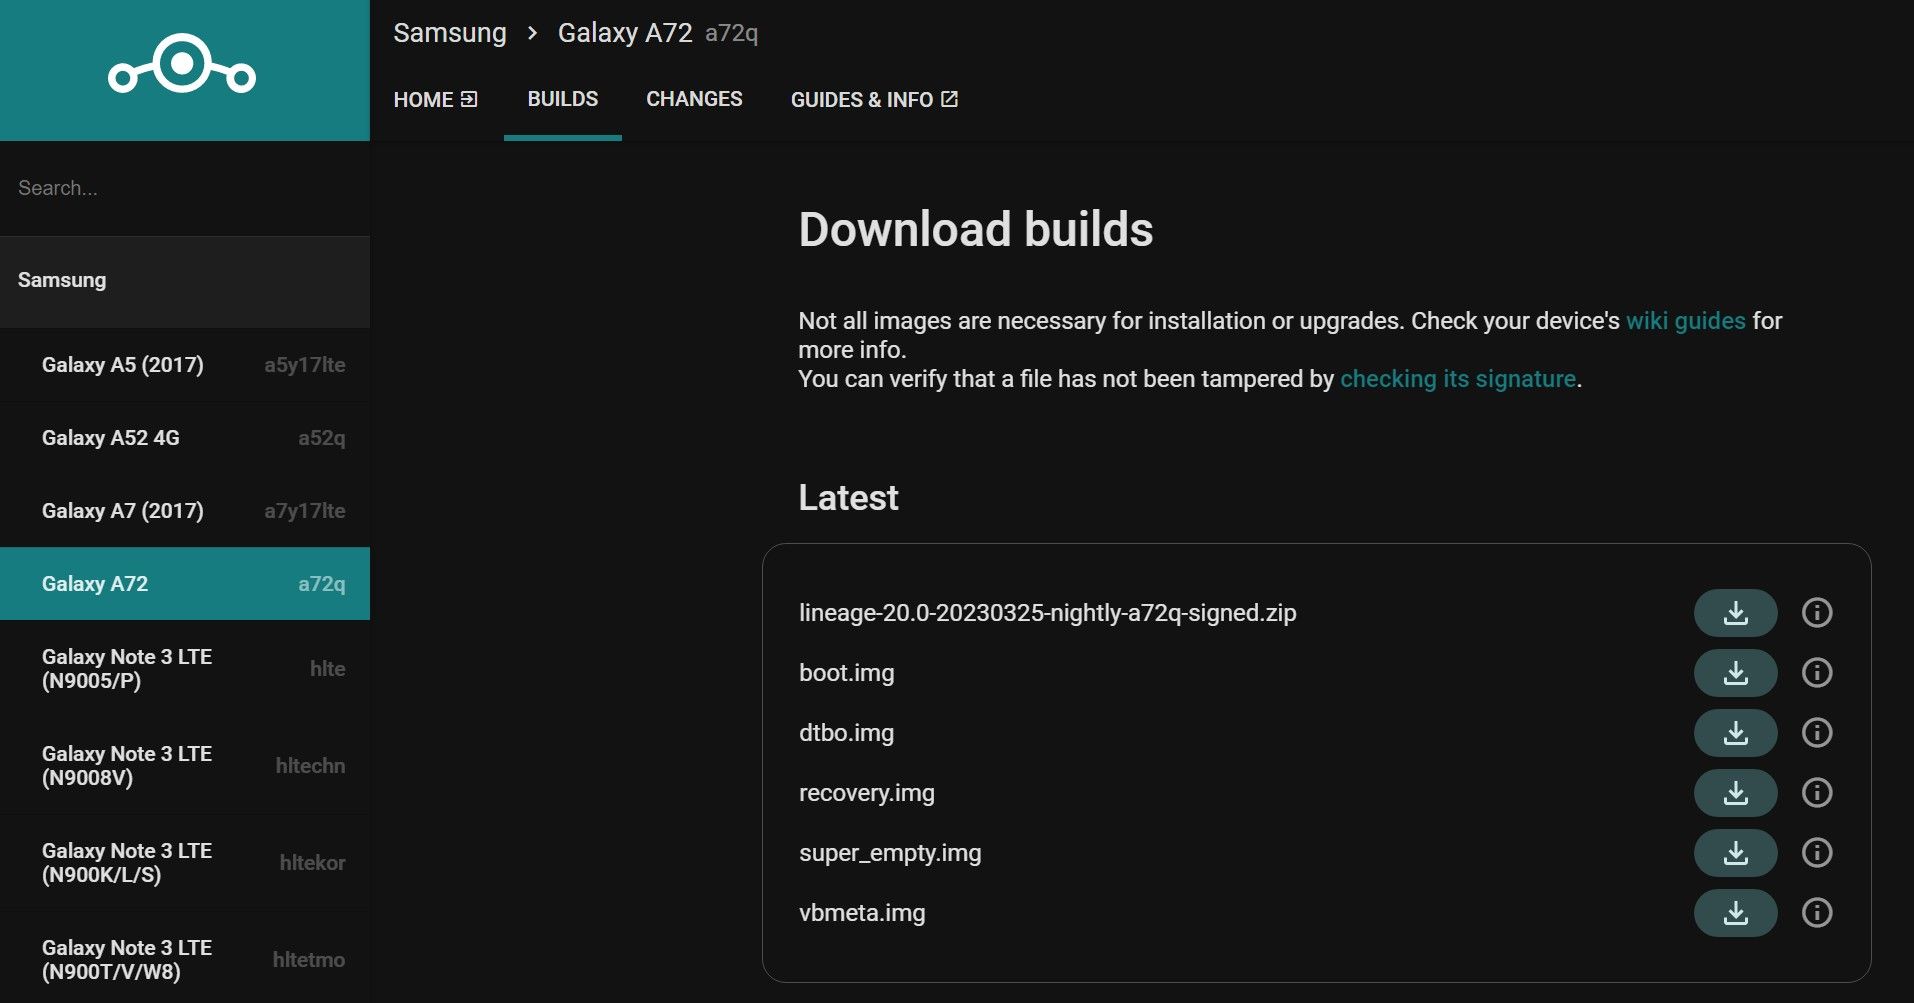
Visit the official LineageOS devices website, choose your device manufacturer category, select your device model name, open the builds section, and download the ROM installation package (a ZIP file) you wish to install.
If you are out of luck on the official website, visit the reputable XDA forums and check for your device. On XDA, how-to-install instructions will be provided, so keep an eye out for that.
Download a Recovery
The stock Android recovery does not support flashing a custom ROM package, so you need a custom recovery. If your Android device is officially supported, download Lineage Recovery for it. Again, head over to the website and open the builds section.
Depending on your device partitioning scheme, the Lineage Recovery can be downloaded as a recovery.img, boot.img, or vendor_boot.img.
- If you find a recovery.img file in the LineageOS Download builds section, download it and ignore the other image files that you see in that section.
- If you only find boot.img, your device uses the boot partition for recovery. Download this image file.
- Devices like the Google Pixel 7 Pro come with a vendor_boot partition for recovery, meaning the image to download will be vendor_boot.img.
As for unofficial devices, check the XDA forums for popular custom Android recoveries like TWRP or the top TWRP recovery alternatives. The forum posts will provide download links and installation instructions.
Download the Google Apps
LineageOS does not ship with Google apps. Therefore, if you wish to have Google Play Store functionality, download an add-on application package from the recommended LineageOS Google Apps website. Ensure you download the proper Google Apps package for your device architecture (which you should have checked above) and match the ROM version you plan to install.
For convenience, place all the files you have downloaded in the platform-tools folder you unzipped previously—the ROM file, the recovery image, and the Google Apps package.
Step 2: Unlock the Bootloader
You must unlock your device’s bootloader for the ultimate gateway to fully-fledged Android modding. Unlocking the bootloader means that you disable the security restrictions put in place by the manufacturer that prevent you from flashing your device partitions.
Luckily, many popular manufacturers like Google, Samsung, Xiaomi, Motorola, Sony, and OnePlus allow you to unlock the bootloader. However, keep in mind that an unlocked bootloader may void the warranty of your device.
Unlocking the bootloader will wipe your phone, so make sure you’ve backed up your data before you begin.
If your device is unlockable, follow our how to unlock the Android bootloader guide. Once done, re-enable USB Debugging since your device is factory reset during the unlock process.
Step 3: Install the Custom Recovery
To install the recovery image file, start by opening a Command Prompt window. Open the platform-tools folder, type cmd in the address bar, and hit Enter. This is the only Command Prompt window you will use for all the subsequent steps since you should have copied all the files into the same folder.
Next, connect your device to the PC and type the following ADB command into the Command Prompt window to confirm the device is connected.
adb devices
You’ll be prompted to allow USB debugging in a pop-up that appears on the phone screen. Then, reboot your device into bootloader mode by running the command below.
adb reboot bootloader
Once in bootloader mode, flash the recovery.img file using the following command.
fastboot flash recovery recovery.img
If you have a boot.img for recovery instead, execute the command below.
fastboot flash boot boot.img
And for vendor_boot.img file, run the following command.
fastboot flash vendor_boot vendor_boot.img
After you have flashed the correct recovery image, reboot into recovery mode using the following command.
fastboot reboot recovery
If the command doesn’t take you into recovery mode, use your device-specific key-combination method as an alternative. For instance, many devices require you to long press the Power button + Volume Up key when off.
Step 4: Install LineageOS Using Custom Recovery
Your device should now be in Recovery Mode and should be able to see the Lineage Recovery UI.
On the recovery interface, tap Factory reset, then Format data/factory reset, and select Format data to confirm. This process will wipe all the data associated with the current system on your device. After that, use the back arrow in the top-left corner to return to the main menu.
It is time to activate ADB sideload mode to help you flash the ROM. ADB sideload mode allows you to push and install a ZIP package on your Android device using a single command on your PC. To do this, tap Apply update and select the Apply from ADB option.
Ensure your device is still connected to the PC. Execute the command below to confirm that your device is connected in sideload mode. You will get feedback on your Android device serial number and the word sideload as output.
adb devices
To sideload the ROM via ADB, run the following command. Replace the word romname with the actual filename of the ROM file you downloaded.
adb sideload romname.zip
Be patient as the ROM is installed, and once the process is complete, the recovery will exit the sideload mode and take you to the main screen. A success message will also be displayed at the bottom of the screen.
Step 5: Install Google Apps Add-On (Optional)
If you prefer a vanilla experience on LineageOS, skip this step, but you will not have any Google Play Services installed on your device.
To install the Google apps, and assuming you are still in recovery mode, tap Advanced and select Reboot to recovery option. Once back in recovery, activate ADB sideload mode as you did for the ROM and flash the Google Apps ZIP package you downloaded using the adb sideload command.
Step 6: Reboot Into LineageOS
After completing all the steps above, you are ready to boot into the LineageOS system. Tap on the Reboot system now option and wait for the boot process to complete. The first boot takes some time, so be patient.
The moment you see the welcome screen, the installation process is a success. Go through the initial Android setup process and restore your data before exploring all the goodies in store for you.
Revitalize Your Android Device With LineageOS
Custom ROMs breathe new life into old and new devices, and LineageOS is one of the best examples as it extends the life span of Android devices significantly compared to the manufacturers.
If you have an old Android device that stopped getting security updates, there is a possibility to turn that around by installing LineageOS. Alternatively, you can find an even wider number of devices being supported with unofficial builds on the XDA forums. All in all, this is a custom ROM that you should not miss out on.