
Русский
- Bedienungsanleitung Lowrance HOOK-5
- Lowrance HOOK-5 User Manual
- Manual Usuario Lowrance HOOK-5
- Mode d’emploi Lowrance HOOK-5
- Istruzioni Lowrance HOOK-5
- инструкция Lowrance HOOK-5
- Lowrance HOOK-5の取扱説明書
- Handleiding Lowrance HOOK-5
- Manual de uso Lowrance HOOK-5
Вам нужна инструкция? Мы поможем Вам ее найти и сэкономить Ваше время.
- 60 stron
- 6.22 mb
Изделие Lowrance HOOK-5, а также другие, которыми Вы пользуетесь ежедневно, наверняка вы получили в комплекте с инструкцией обслуживания. Из опыта наших пользователей мы знаем, что большинство из Вас не уделили этому особого внимания. Большая часть инструкций, сразу же после покупки попадает в корзину для мусора вместе с коробкой — это ошибка. Ознакомьтесь с информацией, касающейся инструкции Lowrance HOOK-5, которая поможет Вам в будущем сэкономить нервы и избежать головной боли.
Важная подсказка — не забывайте хотя бы раз прочитать инструкцию Lowrance HOOK-5
Если вы не хотите каждый раз читать информационные брошюры, касающиеся, тех или Lowrance HOOK-5 иных изделий, достаточно, прочитать их раз — сразу же после покупки устройства. Вы получите основное знания, касающиеся поддержания изделия Lowrance HOOK-5 в хорошем эксплуатационном состоянии, так, чтобы без проблем достигнуть его планируемого цикла работы. Затем инструкцию можно отложить на полку и вернуться к ней только в случае, если вы не уверены, правильно ли проводится техобслуживание изделия. Правильный уход является необходимым элементом Вашего удовольствия Lowrance HOOK-5.
Раз в году пересмотрите шкафчик, в котором держите инструкции для всех устройств, — выбросите те, которыми вы уже не пользуетесься. Это поможет Вам сохранять порядок в своей домашней базе инструкций обслуживания.
Summary of Contents for Lowrance HOOK-5
Что находится в инструкции Lowrance HOOK-5? Почему стоит ее прочитать?
- Гарантия и подробности, касающиеся техобслуживания изделия
Хорошей идеей будет прикрепить чек к странице инструкции. Если что-то плохое случится во время использования Lowrance HOOK-5, у вас будет комплект документов, необходимый для гарантийного ремонта. В этой части инструкции вы найдете информацию об авторизованных сервисных центрахLowrance HOOK-5 а также, как самостоятельно правильно ухаживать за оборудованием — так, чтобы не потерять гарантийных прав. - Указания по монтажу и Setup
Не терять нервов и времени на самостоятельную попытку установки и первого запуска изделия. Воспользуйтесь рекомендациями производителя Lowrance HOOK-5 чтобы правильно запустить изделие, без лишнего риска повреждения оборудования. - Информация, касающаяся дополнительных запчастей (входящих в комплект а также являющихся опцией)
Пересматривая эту часть документа вы сможете проверить, доставлен ли ваш Lowrance HOOK-5 с полним комплектом аксессуаров. Вы также сможете узнать, какие дополнительные запчасти или аксессуары для Lowrance HOOK-5 Вы сможете найти и докупить к своему устройству. - Troubleshooting
Самые частые проблемы, касающиеся Lowrance HOOK-5 и методы их решения. Это очень полезная часть руководства по обслуживанию — она позволит Вам сэкономить много времени на поиск решений. 90% проблем с Lowrance HOOK-5 повторяется у многих пользователей. - Требования, касающиеся питания и энергетический класс
Информация, касающаяся количества потребляемой энергии, а также рекомендации, касающиеся установки и питания Lowrance HOOK-5. Прочитайте, чтобы оптимально пользоваться Lowrance HOOK-5 и не использовать большего количества ресурсов, нежели это необходимо для правильной работы изделия. - Специальные функции Lowrance HOOK-5
Здесь вы можешь узнать, как персонализировать изделие Lowrance HOOK-5. Вы узнаете, какие дополнительные функции могут помочь Вам удобно использовать продукт Lowrance HOOK-5 а также, какие функции Вашего устройства оптимальны для выполнения конкретной деятельности.
Как видите в инструкции вы найдете информацию, которая реально поможет Вам в использовании Вашего изделия. Стоит с ней ознакомиться, чтобы избежать разочарований, возникающих из более короткого, нежели предусматривалось, периода исправности изделия Lowrance HOOK-5. Если все же вы не хотите копить инструкции в своем доме, наш сайт поможет Вам в этом — вы должны найти у нас руководство по обслуживанию большинства из своих устройств, а также Lowrance HOOK-5.
Комментарии (0)
Хорошее руководство по эксплуатации
Законодательство обязывает продавца передать покупателю, вместе с товаром, руководство по эксплуатации Lowrance HOOK-5. Отсутствие инструкции либо неправильная информация, переданная потребителю, составляют основание для рекламации в связи с несоответствием устройства с договором. В законодательстве допускается предоставлении руководства в другой, чем бумажная форме, что, в последнее время, часто используется, предоставляя графическую или электронную форму инструкции Lowrance HOOK-5 или обучающее видео для пользователей. Условием остается четкая и понятная форма.
Что такое руководство?
Слово происходит от латинского «instructio», тоесть привести в порядок. Следовательно в инструкции Lowrance HOOK-5 можно найти описание этапов поведения. Цель инструкции заключается в облегчении запуска, использования оборудования либо выполнения определенной деятельности. Инструкция является набором информации о предмете/услуге, подсказкой.
К сожалению немного пользователей находит время для чтения инструкций Lowrance HOOK-5, и хорошая инструкция позволяет не только узнать ряд дополнительных функций приобретенного устройства, но и позволяет избежать возникновения большинства поломок.
Из чего должно состоять идеальное руководство по эксплуатации?
Прежде всего в инструкции Lowrance HOOK-5 должна находится:
— информация относительно технических данных устройства Lowrance HOOK-5
— название производителя и год производства оборудования Lowrance HOOK-5
— правила обслуживания, настройки и ухода за оборудованием Lowrance HOOK-5
— знаки безопасности и сертификаты, подтверждающие соответствие стандартам
Почему мы не читаем инструкций?
Как правило из-за нехватки времени и уверенности в отдельных функциональностях приобретенных устройств. К сожалению само подсоединение и запуск Lowrance HOOK-5 это слишком мало. Инструкция заключает ряд отдельных указаний, касающихся функциональности, принципов безопасности, способов ухода (даже то, какие средства стоит использовать), возможных поломок Lowrance HOOK-5 и способов решения проблем, возникающих во время использования. И наконец то, в инструкции можно найти адресные данные сайта Lowrance, в случае отсутствия эффективности предлагаемых решений. Сейчас очень большой популярностью пользуются инструкции в форме интересных анимаций или видео материалов, которое лучше, чем брошюра воспринимаются пользователем. Такой вид инструкции позволяет пользователю просмотреть весь фильм, не пропуская спецификацию и сложные технические описания Lowrance HOOK-5, как это часто бывает в случае бумажной версии.
Почему стоит читать инструкции?
Прежде всего здесь мы найдем ответы касательно конструкции, возможностей устройства Lowrance HOOK-5, использования отдельных аксессуаров и ряд информации, позволяющей вполне использовать все функции и упрощения.
После удачной покупки оборудования/устройства стоит посвятить несколько минут для ознакомления с каждой частью инструкции Lowrance HOOK-5. Сейчас их старательно готовят или переводят, чтобы они были не только понятными для пользователя, но и чтобы выполняли свою основную информационно-поддерживающую функцию.
HOOK Series
Operation manual
ENGLISH
HOOK-4 HOOK-5 HOOK-7 HOOK-9
lowrance.com

Copyright © 2016 Navico
All rights reserved.
Lowrance® and Navico® are registered trademarks of Navico.
Fishing Hot Spots® is a registered trademark of Fishing Hot Spots Inc.
Navionics® is a registered trademark of Navionics, Inc.
Navico may nd it necessary to change or end our policies, regulations and special oers at any time. We reserve
the right to do so without notice. All features and specications subject to change without notice.
Compliance Statements
Lowrance HOOK-4, HOOK-5, HOOK-7 and HOOK-9
• meets the technical standards in accordance with Part 15.103 of the FCC rules
• complies with CE under RTTE directive 1999/5/EC
• complies with the requirements of level 2 devices of the Radiocommunications (Electromagnetic
Compatibility) standard 2008
For more information please refer to our website: www.lowrance.com.

Warning
The user is cautioned that any changes or modications not expressly approved by the party responsible for compliance
could void the user’s authority to operate the equipment. This equipment has been tested and found to comply with the
limits for a Class B digital device, pursuant to Part 15 of the FCC rules. These limits are designed to provide reasonable
protection against harmful interference in a residential installation. This equipment generates, uses and can radiate radio
frequency energy and, if not installed and used in accordance with the instructions, may cause harmful interference to
radio communications. However, there is no guarantee that the interference will not occur in a particular installation. If
this equipment does cause harmful interference to radio or television reception, which can be determined by turning the
equipment o and on, the user is encouraged to try to correct the interference by one or more of the following measures:
• Reorient or relocate the receiving antenna
• Increase the separation between the equipment and receiver
• Connect the equipment into an outlet on a circuit different from that of the receiver
• Consult the dealer or an experienced technician for help
WARNING: When a GPS unit is used in a vehicle, the vehicle operator is solely responsible for operating
the vehicle in a safe manner. Vehicle operators must maintain full surveillance of all pertinent driving or
boating conditions at all times. An accident or collision resulting in damage to property, personal injury or
death could occur if the operator of a GPS-equipped vehicle fails to pay full attention to travel conditions
and vehicle operation while the vehicle is in motion.
NOTE: This manual covers HOOK-4, HOOK-5, HOOK-7 and HOOK-9 units. As a result, screenshots of
menus and dialogs may not match the look of your unit.

Table of contents
Introduction ……………………………….. 6
Unit controls………………………………………6
Inserting microSD cards …………………….. 7
Basic operation………………………….. 8
Setup wizard …………………………………….. 8
Pages ………………………………………………8
Selecting pages ………………………………… 8
Page menus ……………………………………..8
Working with menus …………………………10
Dialogs……………………………………………10
Entering text …………………………………… 11
Fishing modes ………………………………… 11
Cursor ……………………………………………. 12
Goto cursor …………………………………….. 12
Advanced mode ………………………………13
Standby mode …………………………………13
Restore defaults ………………………………13
Table of Contents | HOOK series
Pages ………………………………………. 14
Steer page ……………………………………… 14
Sonar page …………………………………….. 14
Downscan page ……………………………… 15
Chart page ……………………………………… 15
Combo pages …………………………………. 16
Overlay data …………………………………… 17
Sonar operation ……………………….. 18
CHIRP ……………………………………………18
Trackback ……………………………………….19
Sonar menu ……………………………………. 19
Sonar options ………………………………….23
Downscan options …………………………… 24
Sonar settings………………………………….25
Installation ………………………………………27
4

DownScan operation ………………… 28
Trackback ………………………………………28
DownScan menu …………………………….. 28
Ping speed………………………………………30
Downscan options …………………………… 30
Chart operation ………………………… 33
Chart menu …………………………………….. 33
Waypoints, Routes, Trails ………………….34
Routes screen …………………………………35
Trails screen ……………………………………39
Orientation ……………………………………… 41
Chart settings ………………………………….42
Navigation settings ………………………….. 43
AIS…………………………………………… 45
AIS setup ……………………………………….. 45
Target symbols ………………………………..46
Viewing AIS target information …………..47
Settings …………………………………… 48
Settings menu………………………………….48
System……………………………………………48
Alarms …………………………………………..50
Saving screenshots …………………………. 50
Specications ………………………….. 52
Index ……………………………………….. 56
5
Table of Contents | HOOK series
Introduction
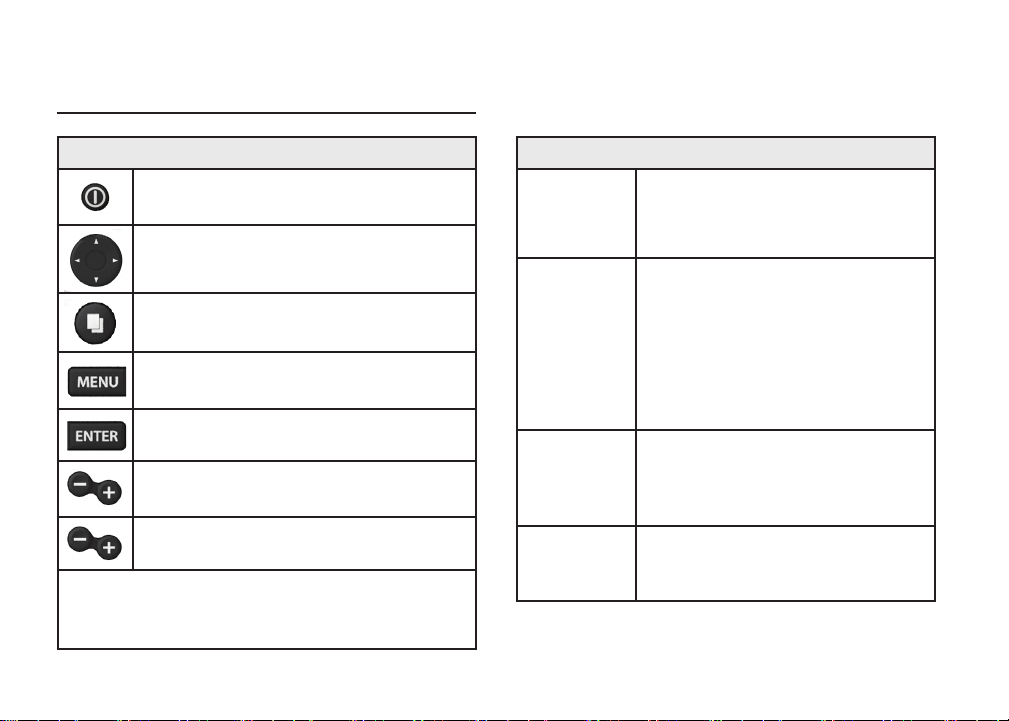
Unit controls
LIGHT/POWER: controls backlight level
and turns unit on/off
KEYPAD: controls cursor & selects
items on menus
PAGES: allows you to select a page to
view
MENU: opens settings, context and
page menus
ENTER: nalizes menu selections; save
waypoint at cursor position
MOB: press and hold both Zoom keys to
create a Man Overboard waypoint
ZOOM Keys: used to zoom in/zoom out
microSD slot: insert a blank microSD card to save
screen captures; or insert a microSD mapping card to
use mapping data
Introduction | HOOK series
6
Turn unit
on/off
Man
Overboard
waypoint
Adjusting
the
backlight
Muting
Audio
Getting started
To turn on/off the unit, press and
hold the LIGHT/POWER key for
three seconds.
Press the ZOOM IN and ZOOM OUT
keys at the same time to set a Man
Overboard waypoint. Your system will
automatically create an active route
back to the MOB waypoint. You must
cancel navigation to terminate the
function.
This unit has
Press the LIGHT/POWER key to
switch backlight levels.
Select Audio from the System
menu and press ENTER. Enable/
disable
10 backlight levels.
Mute.
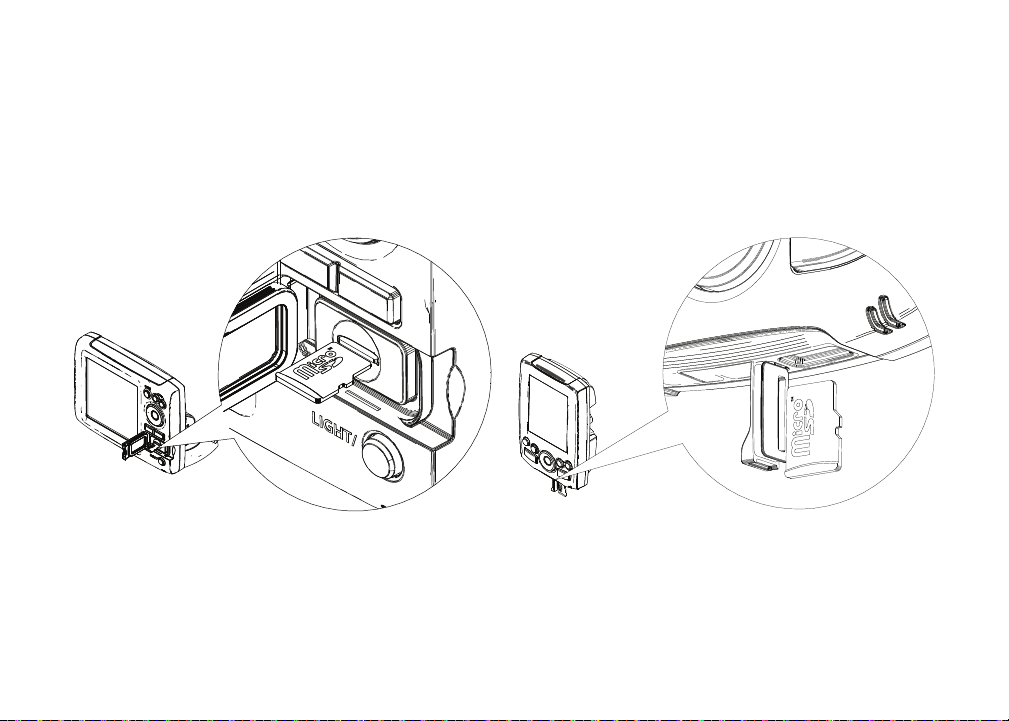
Inserting microSD cards
Carefully slide the microSD card into the slot until it clicks into place. To remove, carefully push in the
card until it clicks out of place.
HOOK-5, HOOK-7 and HOOK-9
HOOK-4
7
Introduction | HOOK series
Basic operation
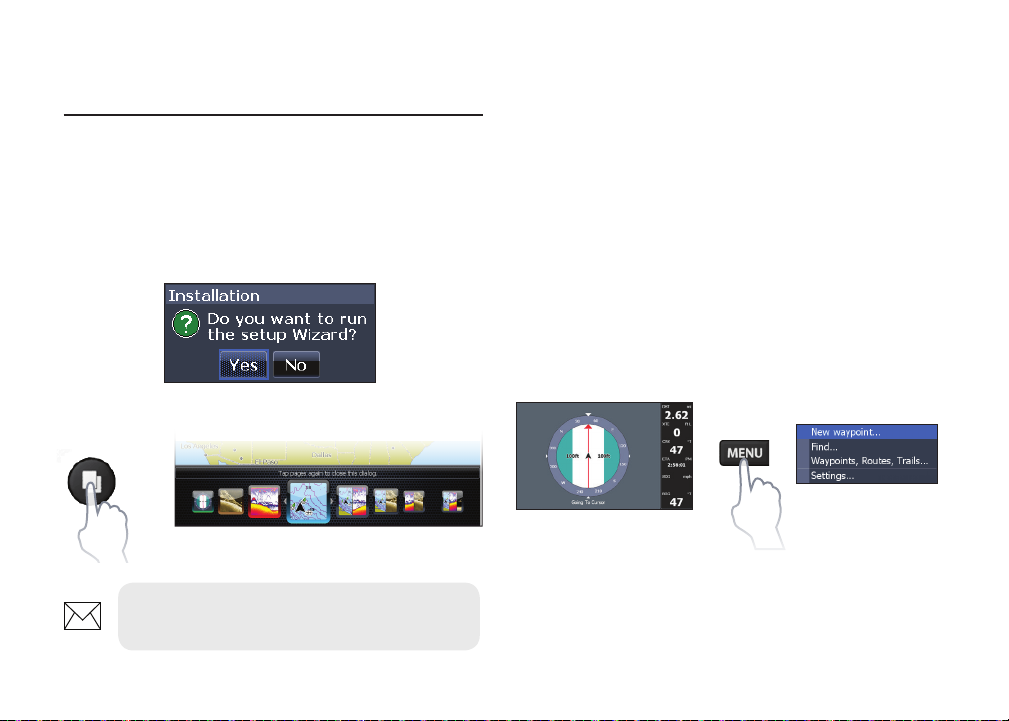
Setup wizard
The Setup wizard will appear when the unit is
turned on for the rst time. To choose your own
settings, do not run the setup wizard. To restart
the Setup wizard, restore defaults.
Pages
Pages dialog
NOTE: Available pages vary depending
on the unit and the connected transducer.
Basic Operation | HOOK series
Selecting pages
To select a page, press the keypad in the direction
of the desired page and press ENTER.
Page menus
The Steer, Downscan, Sonar and Chart pages have
menus that can only be accessed when those
pages are displayed.
Steer menu
Steer page
8

Combo pages
Downscan page
Sonar page
Chart page
Downscan menu
Sonar menu
Chart menu
Two-panel page
Three-panel page
Press the PAGES key twice to switch active
panels. The page menu for active page will be
displayed when the MENU key is pressed. The
active panel is denoted by an orange border.
Accessing the Settings menu
x2
9
Basic Operation | HOOK series
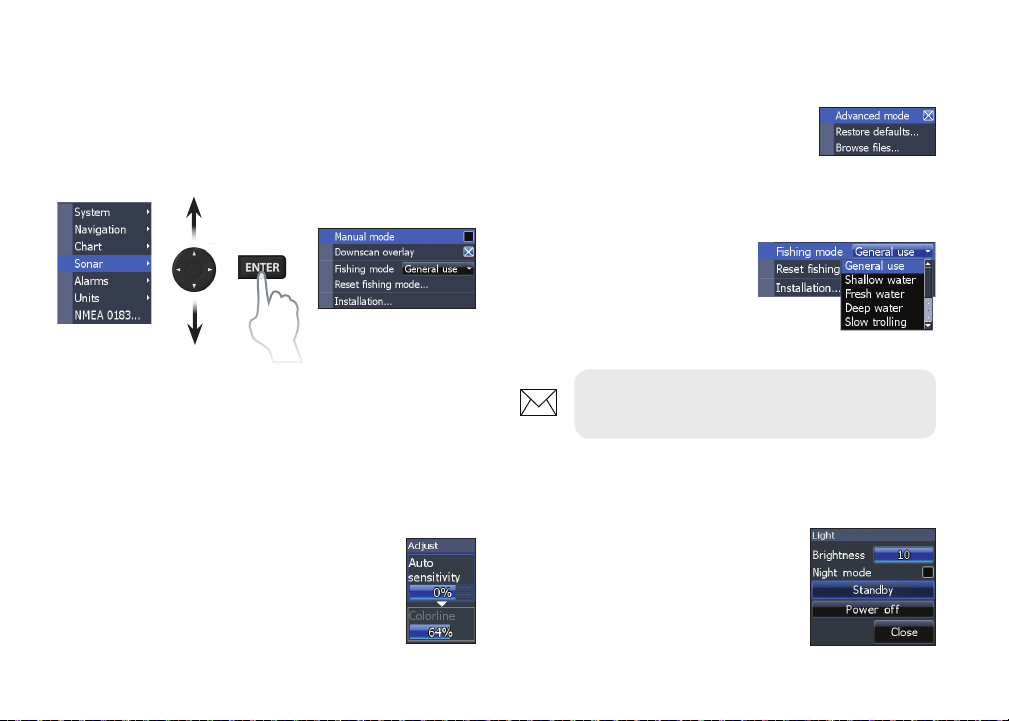
Accessing menu items
On/Off features
The keypad and ENTER key are used to select
menu items and open submenus. Use the keypad
to highlight the desired item and press ENTER.
Working with menus
There are several menu types used to make
adjustments to options and settings, including
scrollbars, on/o features and dropdown menus.
Scrollbars
Select the scrollbar and press the
keypad left (decrease) or right
(increase).
Basic Operation | HOOK series
Select an on/o menu item and
press ENTER to turn it on/o.
Dropdown menus
Access the dropdown
menu and press the
keypad up/down to select
the desired item and press
ENTER.
NOTE: Press the MENU key to Exit
menus.
Dialogs
Dialogs are used for user input
or for presenting information to
the user. Depending on the type
of entry, dierent methods are
used to conrm, cancel or close
the dialog.
10
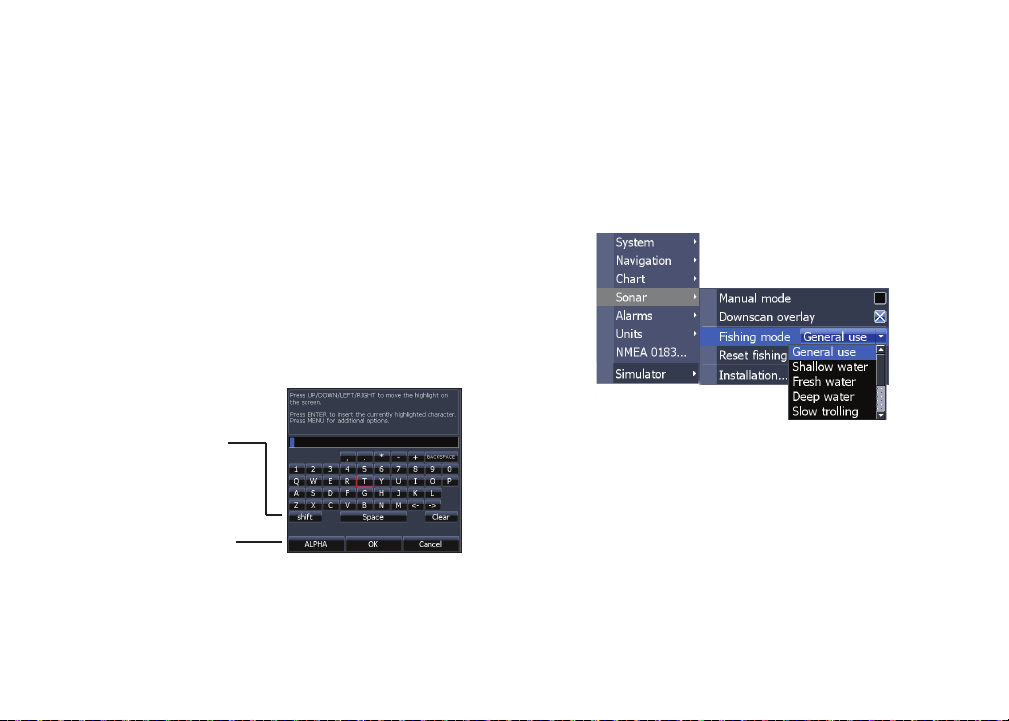
Entering text
Fishing modes
Some functions, like naming a waypoint, route or
trail, will require you to input text.
To input text:
1. Use the keypad to select the desired
character and press ENTER.
2. Repeat Step 1 for each character.
3. When entry is completed, highlight OK
and press ENTER.
Switches letters
to uppercase/
lowercase
Switches keyboard
between Alpha and
QWERTY layout
(Conventional sonar only)
Fishing modes enhance the performance of your
unit by providing preset packages of sonar settings geared to specic shing conditions.
11
Basic Operation | HOOK series
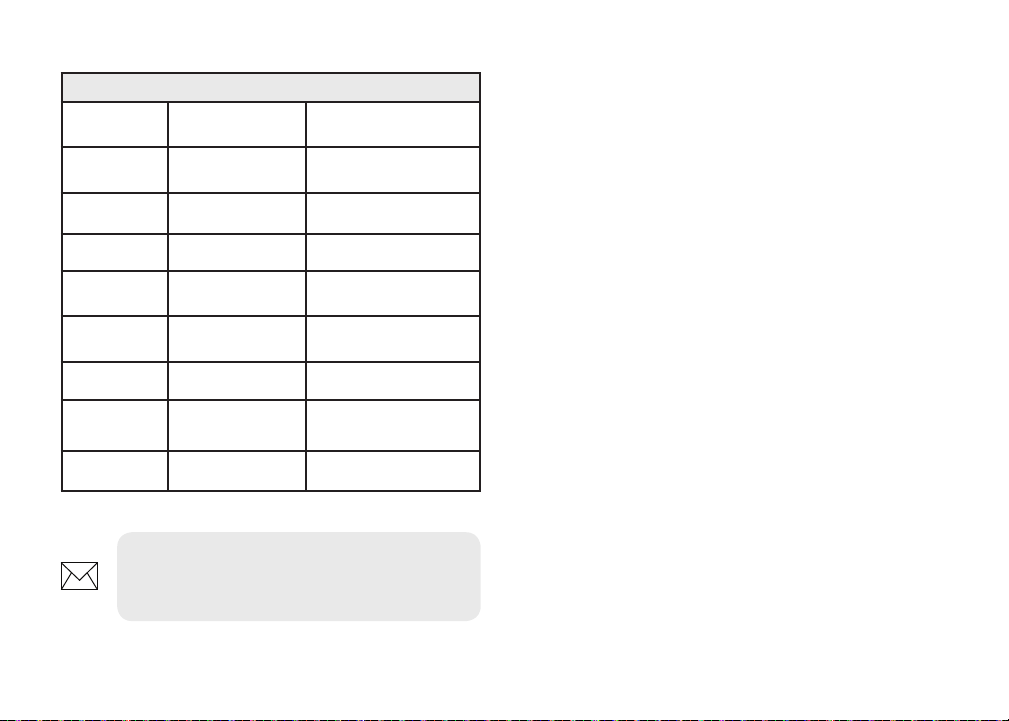
Fishing mode options
General Use 1000 ft or less Coastal
Shallow
Water
Fresh Water 400 ft or less Inland/Near coastal
Deep Water 1000 ft or more Offshore
Slow
Trolling
Fast
Trolling
Clear Water 400 ft or less Inland/Coastal
Brackish
Water
Ice 400 ft or less Ice shing
60 ft or less
400 ft or less Inland/Coastal
400 ft or less Inland/Coastal
400 ft or less Fresh-Saltwater mix
Shallow weedy
bottoms
NOTE: Use Fresh Water mode when shing
in less than 100 feet of water; otherwise
your unit may not track bottom properly.
Cursor
The keypad moves the cursor around the display,
allowing you to scroll the map, select map items
and review sonar history.
Press MENU and select Return to vessel or Exit
cursor mode to clear the cursor.
Goto cursor
Used to navigate to the cursor.
1. Move the cursor to a desired location
and press MENU.
2. Select Goto cursor and press ENTER.
Basic Operation | HOOK series
12
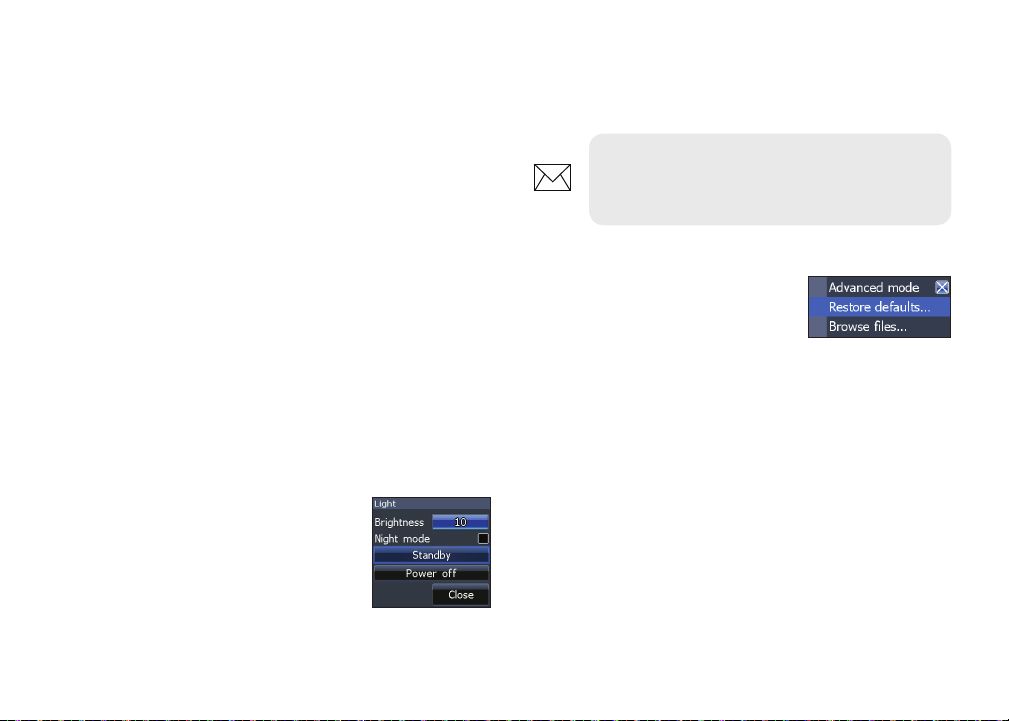
Advanced mode
Enables advanced features and settings.
Press the PWR/LIGHT key to access the Backlight
dialog.
The following features are enabled when Advanced mode is turned on:
• Navigation (Enables arrival radius, offcourse distance and Bearings setting)
• Alarms (Enables arrival, off course and
anchor alarm options)
• NMEA 0183 Output (Requires optional
Power/NMEA cable 000-0127-49)
• Units (Enables distance, speed, depth,
temperature, and bearings options)
Standby mode
Lowers power consumption by
turning o sonar and the display.
NOTE: Leaving your unit in Standby
mode when your boat is not in use will
run down your battery.
Restore defaults
Resets unit options and settings
to defaults.
13
Basic Operation | HOOK series
Pages
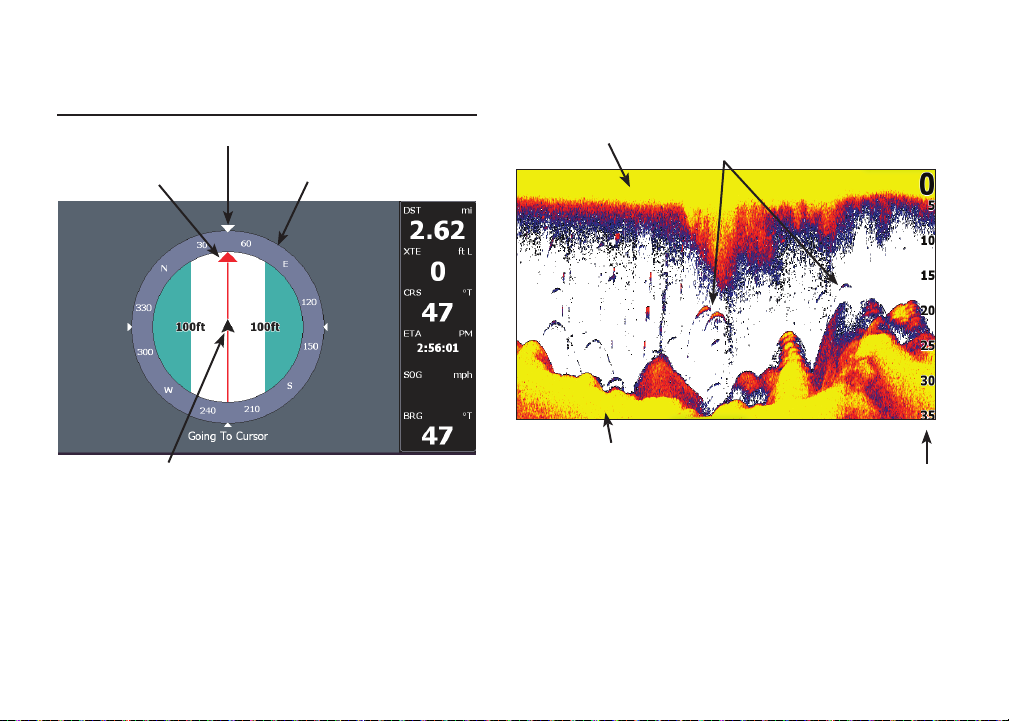
Direction to cursor
Current Track
Your location
Compass
Navigation
information
Steer page
The Steer page has a compass that shows your
current track, the direction to your destination,
and a digital data navigation panel.
Pages | HOOK series
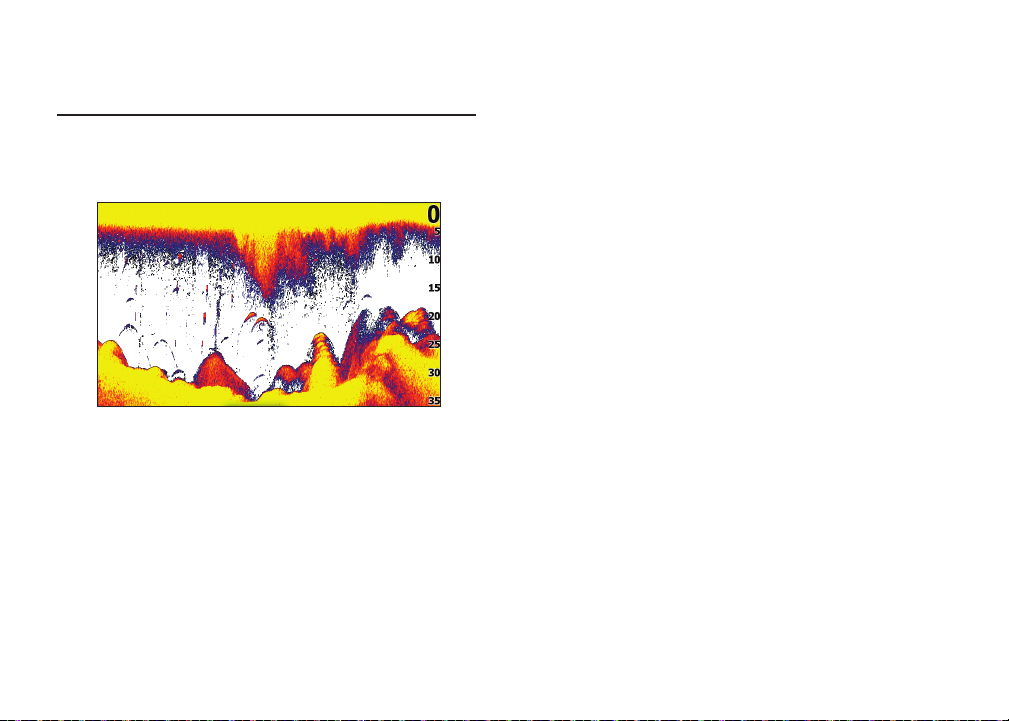
Surface Clutter
Fish arches
Bottom
Range
Scale
Sonar page
Displays the water column moving from right to
left on your unit’s screen.
14
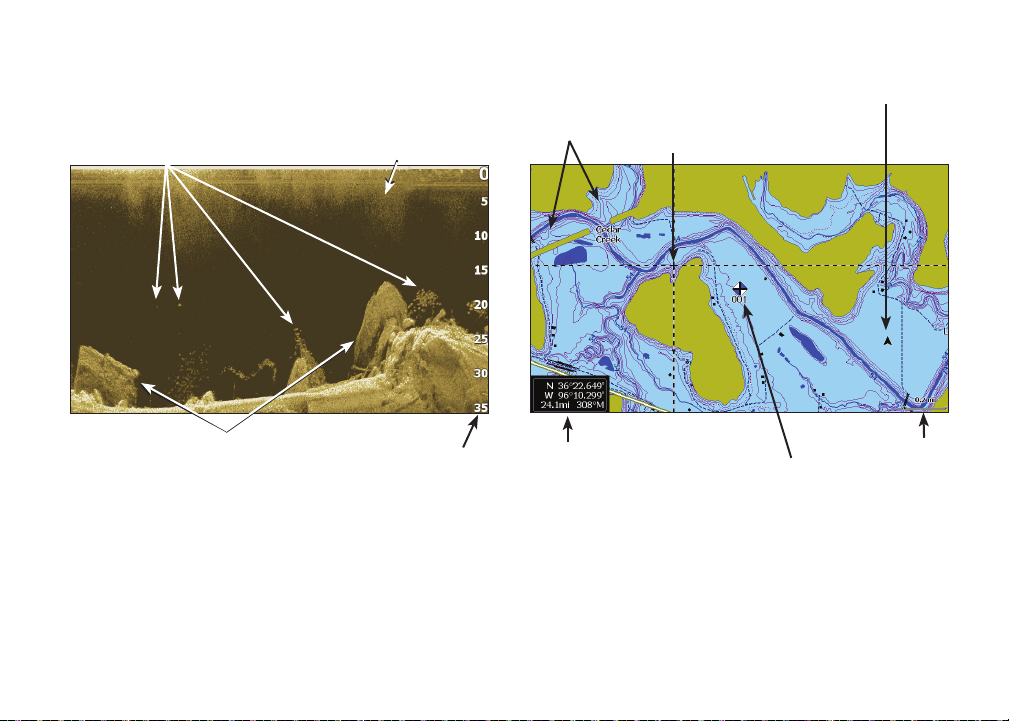
Fish
Surface clutter
Depth
contours
Current location
Cursor
Structure
Range scale
Downscan page
The Downscan page shows the water column
moving from right to left. You can overlay
downscan sonar on the conventional sonar page
by selecting Downscan Overlay on the Sonar
settings menu.
Current cursor location;
distance to cursor
Waypoint
Chart page
Consists of map that moves in real-time as you
move. By default, the map is shown from a birdseye view with North at the top of the screen.
15
Pages | HOOK series
Zoom
Range
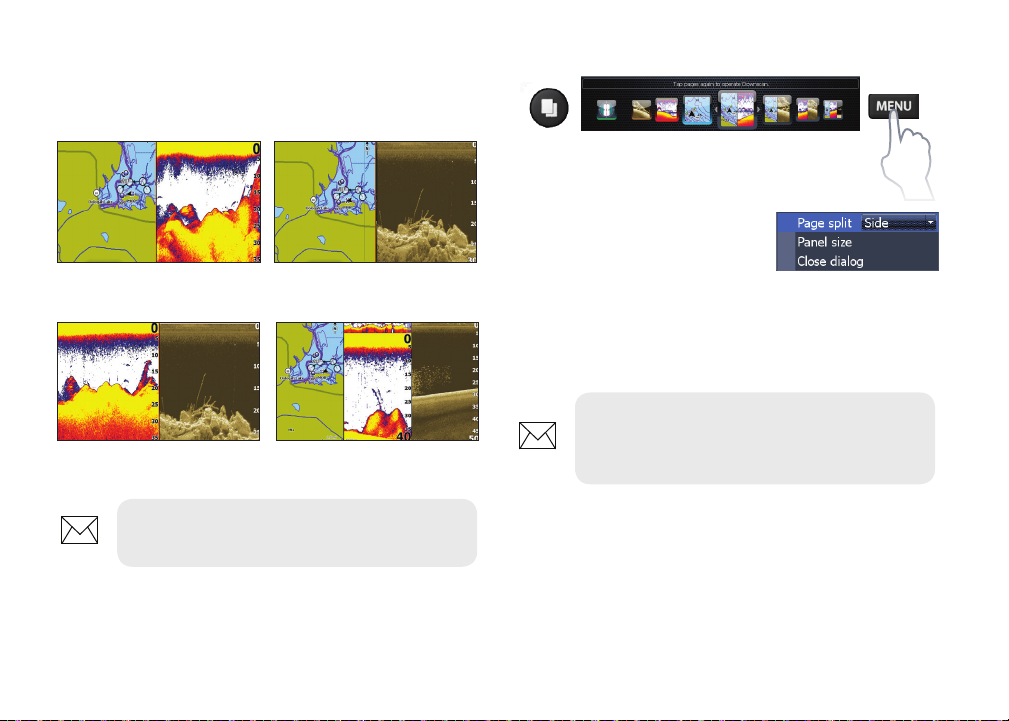
Combo pages
This unit has four pre-congured combo pages.
Chart/Sonar Chart/Downscan
Sonar/Downscan Chart/Sonar/Downscan
Customizing combo pages
You can adjust the panel size
of combo pages and control
how the pages will be
arranged on the screen:
vertically (side) or horizontally (over).
To make adjustments to combo page panels,
select a combo page from the Pages carousel and
press MENU.
NOTE: To adjust panel size, access the
customize menu after selecting a combo
page for display and select Panel size.
NOTE: Press the PAGES key twice to
switch active panels.
Pages | HOOK series
16

Overlay data
Used to select data shown on the Sonar, Structure
and Chart pages.
Overlay data
Show
Enables/disables the display of overlay data,
allowing you to remove overlay data from the
screen without deleting the current overlay data
conguration.
Congure
Allows you to select/customize overlay data.
To add overlay data:
1. From the Sonar, Chart or DownScan
page, press MENU.
2. Select Overlay data and press ENTER.
3. Select Congure and press ENTER.
4. Press MENU and select Add. Press
ENTER.
5. Select a data category and press
ENTER.
6. Select the desired data and press
ENTER.
7. Press MENU and select Return to
Overlays. Press ENTER.
8. Press MENU, select Done Conguring
and press ENTER.
17
Pages | HOOK series
Sonar operation
This unit supports two types of sonar:
Conventional and Downscan.
The features described in this section are for
conventional sonar. Refer to the Downscan section
for information on Downscan features.
CHIRP
A CHIRP (Compressed High Intensity Radar
Pulse) transducer transmits a modulated pulse
of multiple frequencies within the bandwidth
of the selected transducer type. This results in
better image quality, better target separation and
greater depth penetration.
This unit supports High CHIRP, Medium CHIRP
and Low CHIRP, depending on the transducer.
CHIRP can be used with Lowrance conventional
sonar transducers.
• 50/200 kHz (Low/High CHIRP)
• 83/200 kHz (Medium/High CHIRP)
To use CHIRP, select the desired CHIRP frequency
from the Frequency menu.
Sonar Operation | HOOK series
18
Loading…
ИНСТРУКЦИИ
- Инструкция к эхолотам Lowrance X-4, X-4 Pro | Скачать (3,4МБ)
- Инструкция к эхолотам X52, X59DF | Скачать (4,5МБ)
- Инструкция к эхолотам HDS-5x | Скачать (1.8 МБ)
- Инструкция к картплоттерам/эхолотам HDS-5, HDS-7, HDS-8, HDS-10 | Скачать (7.5 МБ)
- Инструкция к эхолотам Mark-5x, Mark-5x PRO, Elite-5x | Скачать (8 МБ)
- Инструкция к картплоттерам/эхолотам Elite-5 | Скачать (10 МБ)
- Инструкция по бесплатному обновлению карт C-MAP 4D | Скачать (формат doc, 800Kb)
ЭМУЛЯТОРЫ
Эмуляторы Lowrance — загружаемые программные приложения, которые моделируют на Вашем компьютере работу фактического прибора. Вы можете установить эмулятор на свой компьютер и программа создаcт виртуальный эхолот или GPS, который в точности повторяет внешний вид и работу прибора! Демонстрационные карты Navionics® включены в эмуляторы продуктов, у которых есть возможность чтения карты памяти.
Эти эмуляторы позволяют Вам:
- попробовать эхолот, эхолот-навигатор Lowrance в работе, не покупая его
- спокойно, в домашней обстановке, разобраться во всех функциях сонара и не тратить драгоценное время на обучение на воде
- экспериментировать с дополнительными функциями и установками для максимально точной настройки под собственные нужды
- детально осматривать сохраненные маршруты ваших путешествий, исследуя пути и рельеф дна в излюбленных местах рыбалки не расходуя топливо для лодки
Эмуляторы серий Mark, Elite выделены жирным.
- Elite-5 Emulator|Загрузить (17 MB)
- Elite-5x Emulator | Загрузить (15 MB)
- Mark-5x Emulator | Загрузить (15 MB)
- Lowrance AirMap® 2000C | Загрузить (12.6 MB)
- Lowrance LCX-25C | Загрузить (14.6 MB)
- Lowrance LCX-112C | Загрузить (17.3 МБ)
- Lowrance LMS-520C | Загрузить (17.3 МБ)
- Lowrance LMS-522C iGPS | Загрузить (17.3 МБ)
- Lowrance LMS-525C DF | Загрузить (17.3 МБ)
- Lowrance LMS-527C DF iGPS | Загрузить (17.3 МБ)
- Lowrance X125 | Загрузить (5.3 МБ)
- Lowrance X126DF | Загрузить (5.3 МБ)
- Lowrance X510C | Загрузить (5 МБ)
- Lowrance X515C DF | Загрузить (4.9 МБ)
- Lowrance X87 | Загрузить (3.3 МБ)
- Lowrance X88DF | Загрузить (3.3 МБ)
- Lowrance iFINDER® H2O | Загрузить (12.5 МБ)
- Lowrance iFINDER® Pro | Загрузить (12.8 МБ)
Установка эмулятора предельно проста. Кликните на кнопку «загрузить», напротив интересующего вас прибора. В появившемся меню выберите кнопку «сохранить», затем укажите папку на вашем компьютере в которую загрузится эмулятор. После завершения загрузки запустите установочную программу и следуйте инструкциям (достаточно просто нажимать кнопку «Next»). По завершении установки в меню «Пуск/Программы» (Start/Programs) появиться новый раздел, в котором и будет эмулятор.
Выключение программы происходит как и в настоящем приборе, а именно — необходимо нажать и удерживать кнопку «PWR».
Для удаления программы достаточно зайти в «Панель управления» в раздел «Установка и удаление программ», найти там программу, которую вы хотите удалить и нажать на кнопку «Заменить/Удалить».
SONAR LOG VIEWER (SLV)
Sonar Log Viewer (SLV) — программа для просмотра эхограмм для любых эхолотов имеющих слот для SD/MMC карточки.
- Поддерживает эхограммы StructureScan
- Поддерживает SL2 файлы
- Позволяет выводить информацию в формате Exel
- Увеличение масштаба изображения (zoom), чувствительность,
- Цветная интерпретация сигналов эхолота может быть определенна пользователем
- Динамически изменяемое окно
- Работает как Windows Multimedia Player (кнопки вперед, назад, быстрая перемотка, пауза и т.д.)
- Курсор мыши показывает GPS координаты, глубину, температуру и прочее
- Поддержка просмотра нескольких каналов с синхронизацией
Скачать Sonar Log Viewer — Версия 2.1.2 (20МБ, exe)Установка программы предельно проста. Скачайте программу. После завершения скачивания запустите установочную программу и следуйте инструкциям (достаточно просто нажимать кнопку «Дальше»). По завершении установки в меню «Пуск/Программы» появиться новый раздел Lowrance Electronics, в котором и будет Sonar Log Viewer.
ПРИМЕР ЭХОГРАММЫ ЛОВЛИ СОМА НА КВОК
Вы можете скачать эхограмму ловли сома (38 Mб) и просмотреть ее с помощью Sonar Log Viewer. Запись любезно предоставлена Олегом Омельянчуком и сделана картплоттером/эхолотом Lowrance HDS 5.
Ниже представлены — скриншоты этой эхограммы с расшифровкой.


Для увеличения картинки кликните на ней
Скачать Sonar Log Viewer — Версия 2.1.2 (20МБ, exe)
Удачной рыбалки!
Lowrance Hook-5 Installation Guide
Lowrance Hook-5 Fish Finder Specification
The Lowrance Hook-5 Fish Finder is designed to enhance the angling experience by offering advanced sonar capabilities and user-friendly features. It integrates a 5-inch color display that delivers high-resolution images, ensuring clear visibility in various lighting conditions. The Hook-5 is equipped with CHIRP Sonar technology, which provides improved target separation and superior clarity, allowing anglers to distinguish between fish and underwater structures with precision.
This fish finder also includes DownScan Imaging, offering a detailed view of the underwater environment directly beneath the boat. The built-in GPS antenna and detailed U.S. map enhance navigation, providing accurate location tracking and mapping of fishing hotspots. The device supports multiple map options and upgrades, catering to a variety of fishing locations and preferences.
The Hook-5 features an intuitive interface with simple menus and easy access to essential functions, making it accessible even to novice users. Its Advanced Signal Processing (ASP) reduces the need for manual adjustments, automatically enhancing image quality for optimal fish detection. The unit is designed to withstand tough marine conditions, with a waterproof casing that ensures durability and reliability on the water.
Connectivity options include NMEA 0183, allowing integration with other marine electronics for a more comprehensive fishing system. The Lowrance Hook-5 is powered by a 12-volt DC power supply, ensuring consistent performance during extended fishing trips. Overall, the Lowrance Hook-5 Fish Finder combines cutting-edge sonar technology, reliable navigation features, and user-friendly operation to provide a comprehensive tool for both recreational and professional anglers.
Lowrance Hook-5 Fish Finder F.A.Q.
To perform a factory reset on your Lowrance Hook-5, press the MENU button twice to access the main menu. Use the arrow keys to navigate to the ‘Settings’ option, then select ‘System’ followed by ‘Reset Options.’ Choose ‘Factory Reset’ and confirm your selection.
First, check that the device is receiving power by ensuring all connections are secure. If the power is fine, try performing a soft reset by pressing and holding the POWER button until the device turns off and back on. If the issue persists, a factory reset may be necessary.
To update the software, visit the Lowrance website and download the latest update for your Hook-5 model. Transfer the update to a microSD card, insert it into the device, and power it on. Follow the on-screen instructions to complete the update.
Install the transducer on the transom of your boat, ensuring it is parallel to the waterline. Use the included mounting bracket and hardware, and make sure it’s submerged when the boat is in the water. Follow the installation guide for detailed steps and diagrams.
Calibration involves setting the depth, range, and sensitivity. Navigate to the ‘Settings’ menu, select ‘Sonar,’ and adjust these parameters according to your fishing environment. Use the manual to understand each setting’s impact on performance.
The sonar display shows underwater structures, fish, and the bottom contour. Fish arches appear as curved lines, and the bottom contour is indicated by a solid line. Use the color palette settings to differentiate between different elements.
Ensure the device has a clear view of the sky for optimal satellite reception. Check for any obstructions or interference. You can also perform a GPS reset from the ‘Settings’ menu to recalibrate the system.
To save a waypoint, press the MARK button when you reach the desired location. Enter a name and select ‘Save’ to store the waypoint. You can manage saved waypoints in the ‘Waypoints, Routes, and Trails’ menu.
Regularly clean the screen with a soft cloth and non-abrasive cleaner. Inspect the transducer and cables for wear or damage. Store the device in a dry place when not in use, and update the software periodically.
Access the ‘Sonar’ menu from the settings, then select ‘Sensitivity.’ Adjust the sensitivity level to filter out noise while ensuring clear target detection. Higher sensitivity may be required in deeper waters.