
Код товара: 1108
Тип: MIDI-клавиатура
Артикул: Keystation 61 MK3
Производитель:
M-Audio
-
Серия: Keystation
-
Число октав: Пятиоктавная
-
Молоточковая механика: Нет
-
Тип интерфейса: USB
-
Регуляторы: Нет
-
Контроллер высоты тона (питч): Есть
-
Контроллер модуляции: Есть
-
Дисплей: Нет
-
MIDI разъем: MIDI OUT
-
USB разъем: USB type B
-
Страна: Китай
Цена
26 500 p.
Нет в наличии
Остались вопросы?
Получите консультацию нашего специалиста
- Описание Keystation 61 MK3
- Характеристики Keystation 61 MK3
- Инструкции
- Отзывы Keystation 61 MK3
- Похожие
- Аксессуары
MIDI-клавиатура M-Audio Keystation 61 MK3
M-AUDIO Keystation 61 MK3 — MIDI-клавиатура
Начните свое компьютерное музыкальное творчество и исполнение с обновленного контроллера Keystation 61 MK3 от M-Audio.
Простое управление программным обеспечением
Keystation 61 MK3 — это простой, мощный MIDI-контроллер, разработанный для секвенирования музыки и проигрывания виртуальных инструментов на Мас и РС, предназначенный как для опытных профи, так и для начинающих. Модель характеризуется 61 полноразмерными чувствительными к скорости нажатия клавишами и серией регуляторов, которые расширяют диапазон проигрываемых нот, экспрессивные возможности и совершенствуют ваш рабочий процесс записи.
Музыкальное управление
Благодаря Keystation 61 MK3, ваше творчество максимизируется, сводя к минимуму сложности всего процесса: используйте полностью назначаемые кнопки октавного диапазона, колеса питч-бенд и модуляции, слайдер громкости, транспортируйте и направляйте управление для воспроизведения, исполнения и записи с музыкального программного обеспечения без использования мыши или трекпэда. Кроме того, клавиатура имеет 5-контактный MIDI-выход для подключения к вашему любимому аппаратному синтезатору и 1/4” (6,3 мм) вход для сустейн педали, который позволяет использовать внешние педали, например M-Audio SP2 (приобретается отдельно), для подлинного фортепианного сустейна.
Опытный игрок
Компактный, легковесный и прочный контроллер Keystation 61 MK3 идеален для путешествующих музыкантов, тем кому нужно музыкальное программное обеспечение на живых выступлениях или продюсерам, которые хотят добавить в их студию интуитивный миди-контроллер с натуральной чувствительностью клавиатуры. Для легкого использования и портативной установки, Keystation 61 MK3 оборудован питанием по USB и поддерживает USB-MIDI подключение. Плюс iOS подключение с Apple Lightning to USB Camera Adapter (продается отдельно), что позволяет исполнять и сочинять посредством аудио приложений на iPad и других iOS устройствах.
Включенный комплект премиального программного обеспечения
Pro Tools | First M-Audio Edition
Pro Tools — это потрясающая коллекция аудио и MIDI звукозаписывающего программного обеспечения, предназначенная специально для работы с оборудованием M-Audio и вдохновляющее многих исполнителей, музыкантов, певцов и композиторов, позволяя им создавать, записывать и делиться всеми своими идеями по всему миру и в любое время. Этот эксклюзив является оптимальным пакетом для записи, и к нему прилагается 1 Гб облачного пространства для хранения и обмена записями с любым компьютером, а также совместимость с прилагающимися к комплекту AIR Music Tech Virtual Instruments.
Ableton Live Lite — самое популярное во всем мире программное обеспечение. Мощные инструменты этой программы позволяют музыкантам и продюсерам спонтанно сочинять, записывать, ремикшировать, импровизировать и редактировать музыкальные идеи в живом аудио/миди окружении. Вы сможете открывать для себя новые звуковые возможности в реальном времени и независимо от места, на сцене или в студии. А когда работа окончена, и вы полностью удовлетворены собой, Ableton Live Lite сохранит ваш очередной шедевр или выведет в микс.
AIR Music Mini Grand — это простое в использовании, но мощное виртуальное пианино, со звучанием семи различных акустических пианино, соответствующее широкому диапазону музыкальных стилей и производству. Сочетание высококачественных сэмплов, инновационной технологии ре-педалирования, встроенной симуляции комнаты и равномерной и растянутой настройки, Mini Grand — это плагин для подлинного, экспрессивного фортепьянного звучания.
AIR Music Velvet — это виртуальное электропиано, объединяющее в себе легендарное звучание пяти инструментов из 60-х и 70-х: Fender Rhodes Suitcase, Fender Rhodes MK I и MK II Stage Pianos, Wurlitzer 200A и Hohner Pianet-T. Velvet с точностью эмулирует качество звука, диапазон и нюансы каждого оригинального инструмента, оживляя ваши фортепианные треки.
AIR Music Xpand!2 — многотембровая рабочая станция, предлагающая четыре активных звуковых слота или партии для каждого патча. Каждая партия обеспечена своим собственным миди каналом, зоной, миксом, арпеджиатором, модуляцией и эффектами – превосходный способ для создания индивидуальных партий. Используйте четыре партии вместе для построения одного изумительного патча и Xpand!2 раскроет вам всю свою мощь. Специально для вас команда AIR Music Tech тщательно создавала тысячу готовых к игре патчей от FM синтезаторов до сэмплов воспроизведения.
Со Skoove вы научитесь играть на фортепиано с сотнями интерактивных, высококачественных онлайн-уроков, структурированных для начинающих, средних и продвинутых игроков. Уникальный метод Skoove поможет вам с обратной связью в режиме реального времени во время игры, позволяя быстрее оттачивать свои навыки и изучать все необходимое, чтобы стать полноценным пианистом.
Присоединяйтесь к более чем 100 000 музыкантам, создающих свои навыки с Melodics. Melodics — это настольное приложение, которое обучает игре и исполнению с MIDI-клавиатурами, пэд контроллерами и ударными, приложение и для начинающих и для опытных профи, изучающих передовые техники исполнения. Melodics включает в себя более чем 60 бесплатных уроков (включая 5 эксклюзивных для M-Audio)!
Нарезайте и миксуйте с 2 гигабайтами сэмплов, начиная от глубоких окружающих синтезаторных пэд лупов до винтажных барабанных разовых ударов. Все они предназначены для вдохновляющего музыкального производства и обеспечения профессионального сэмпл звучания. Тач лупы прекрасно фиксируют тон и интенсивность каждого сэмпла, улучшая и дополняя любую композицию, где бы вы их ни использовали.
Особенности
• USB-MIDI контроллер
• 61 полноразмерные чувствительные к скорости нажатия клавиши с натуральной чувствительностью
• USB-MIDI подключение для проигрывания виртуальных инструментов, контролирования программного обеспечения и др.
• 5-контактный MIDI выход для подключения к аналоговому синтезатору
• Кнопки транспонирования и направления для управления любым звукозаписывающим программным обеспечением/DAW
• Фейдер громкости для более глубокого управления плагинами
• Эргономичные колеса высоты тона и модуляции для выразительного исполнения
• Расширенная функциональность настраивает фейдер, кнопки, колеса тона и модуляции для управления любым параметром DAW или плагина
• Компактный дизайн идеален для любой студийной, сценической и рабочей установки
• USB-питание, поддерживает plug-and-play подключение к Mac или PC — никаких драйверов не требуется
• iOS совместимая, используя Apple iPad Camera Connection Kit (продается отдельно)
• Включены: Pro Tools | First M-Audio Edition, Ableton Live Lite
• Включает AIR Music Tech Mini Grand со звучанием семи акустических пианино
• Включает AIR Music Tech Velvet виртуальное электропиано, с пятью легендарными электропиано из 60-х и 70-х
• Включает AIR Music Tech Xpand!2 многотембровая все-в-одном рабочая станция
Минимальные системные требования
Windows 7
macOS 10.11
Доступный USB порт
В комплекте: Карты загрузки программного обеспечения, USB кабель, руководство пользователя, безопасность и гарантийное руководство
Питание: через USB или DC 9 В, центр положительный источник питания 500 мА (продается отдельно) — не требуется для использования с PC или Mac
Размеры: 995 x 189 x 68 мм
Вес: 4,1 кг
Транспортирование и управление направлением: Mackie Control, Mackie / HUI или MIDI
MIDI-клавиатура M-Audio Keystation 61 MK3 характеристики товара
| Производитель | M-Audio |
| Количество клавиш | 61 клавиша (5 октав) |
| Тип | MIDI-клавиатура |
| Цвет | Черный |
| Цвет клавиш | Белый |
| Рабочее расположение | Стационарное |
| Функция обучения | Нет |
| Подключение к iPad | Да |
| Подсветка клавиш | Нет |
| Чувствительность к скорости нажатия | Есть |
| Жесткость клавиш | Динамическая |
| Совместимость с DAW | Есть |
| Моторизированные фейдеры | Нет |
| Совместимость с Windows | Да |
| ПО в комплекте | Есть |
| Совместимость с Mac OS X | Да |
| Автономное питание | Нет |
| Совместимость с iOS | Да |
| Питание по USB | Есть |
MIDI-клавиатура M-Audio Keystation 61 MK3 инструкция на русском языке
На этот товар еще нет инструкций
Отзывы на M-Audio Keystation 61 MK3
- На этот товар еще нет отзывов.
Русский
- Bedienungsanleitung M-Audio Keystation 61 MK3
- M-Audio Keystation 61 MK3 User Manual
- Manual Usuario M-Audio Keystation 61 MK3
- Mode d’emploi M-Audio Keystation 61 MK3
- Istruzioni M-Audio Keystation 61 MK3
- инструкция M-Audio Keystation 61 MK3
- M-Audio Keystation 61 MK3の取扱説明書
- Handleiding M-Audio Keystation 61 MK3
- Manual de uso M-Audio Keystation 61 MK3
Вам нужна инструкция? Мы поможем Вам ее найти и сэкономить Ваше время.
- 72 stron
- 3.22 mb
Изделие M-Audio Keystation 61 MK3, а также другие, которыми Вы пользуетесь ежедневно, наверняка вы получили в комплекте с инструкцией обслуживания. Из опыта наших пользователей мы знаем, что большинство из Вас не уделили этому особого внимания. Большая часть инструкций, сразу же после покупки попадает в корзину для мусора вместе с коробкой — это ошибка. Ознакомьтесь с информацией, касающейся инструкции M-Audio Keystation 61 MK3, которая поможет Вам в будущем сэкономить нервы и избежать головной боли.
Важная подсказка — не забывайте хотя бы раз прочитать инструкцию M-Audio Keystation 61 MK3
Если вы не хотите каждый раз читать информационные брошюры, касающиеся, тех или M-Audio Keystation 61 MK3 иных изделий, достаточно, прочитать их раз — сразу же после покупки устройства. Вы получите основное знания, касающиеся поддержания изделия M-Audio Keystation 61 MK3 в хорошем эксплуатационном состоянии, так, чтобы без проблем достигнуть его планируемого цикла работы. Затем инструкцию можно отложить на полку и вернуться к ней только в случае, если вы не уверены, правильно ли проводится техобслуживание изделия. Правильный уход является необходимым элементом Вашего удовольствия M-Audio Keystation 61 MK3.
Раз в году пересмотрите шкафчик, в котором держите инструкции для всех устройств, — выбросите те, которыми вы уже не пользуетесься. Это поможет Вам сохранять порядок в своей домашней базе инструкций обслуживания.
Summary of Contents for M-Audio Keystation 61 MK3
Что находится в инструкции M-Audio Keystation 61 MK3? Почему стоит ее прочитать?
- Гарантия и подробности, касающиеся техобслуживания изделия
Хорошей идеей будет прикрепить чек к странице инструкции. Если что-то плохое случится во время использования M-Audio Keystation 61 MK3, у вас будет комплект документов, необходимый для гарантийного ремонта. В этой части инструкции вы найдете информацию об авторизованных сервисных центрахM-Audio Keystation 61 MK3 а также, как самостоятельно правильно ухаживать за оборудованием — так, чтобы не потерять гарантийных прав. - Указания по монтажу и Setup
Не терять нервов и времени на самостоятельную попытку установки и первого запуска изделия. Воспользуйтесь рекомендациями производителя M-Audio Keystation 61 MK3 чтобы правильно запустить изделие, без лишнего риска повреждения оборудования. - Информация, касающаяся дополнительных запчастей (входящих в комплект а также являющихся опцией)
Пересматривая эту часть документа вы сможете проверить, доставлен ли ваш M-Audio Keystation 61 MK3 с полним комплектом аксессуаров. Вы также сможете узнать, какие дополнительные запчасти или аксессуары для M-Audio Keystation 61 MK3 Вы сможете найти и докупить к своему устройству. - Troubleshooting
Самые частые проблемы, касающиеся M-Audio Keystation 61 MK3 и методы их решения. Это очень полезная часть руководства по обслуживанию — она позволит Вам сэкономить много времени на поиск решений. 90% проблем с M-Audio Keystation 61 MK3 повторяется у многих пользователей. - Требования, касающиеся питания и энергетический класс
Информация, касающаяся количества потребляемой энергии, а также рекомендации, касающиеся установки и питания M-Audio Keystation 61 MK3. Прочитайте, чтобы оптимально пользоваться M-Audio Keystation 61 MK3 и не использовать большего количества ресурсов, нежели это необходимо для правильной работы изделия. - Специальные функции M-Audio Keystation 61 MK3
Здесь вы можешь узнать, как персонализировать изделие M-Audio Keystation 61 MK3. Вы узнаете, какие дополнительные функции могут помочь Вам удобно использовать продукт M-Audio Keystation 61 MK3 а также, какие функции Вашего устройства оптимальны для выполнения конкретной деятельности.
Как видите в инструкции вы найдете информацию, которая реально поможет Вам в использовании Вашего изделия. Стоит с ней ознакомиться, чтобы избежать разочарований, возникающих из более короткого, нежели предусматривалось, периода исправности изделия M-Audio Keystation 61 MK3. Если все же вы не хотите копить инструкции в своем доме, наш сайт поможет Вам в этом — вы должны найти у нас руководство по обслуживанию большинства из своих устройств, а также M-Audio Keystation 61 MK3.
Комментарии (0)
Хорошее руководство по эксплуатации
Законодательство обязывает продавца передать покупателю, вместе с товаром, руководство по эксплуатации M-Audio Keystation 61 MK3. Отсутствие инструкции либо неправильная информация, переданная потребителю, составляют основание для рекламации в связи с несоответствием устройства с договором. В законодательстве допускается предоставлении руководства в другой, чем бумажная форме, что, в последнее время, часто используется, предоставляя графическую или электронную форму инструкции M-Audio Keystation 61 MK3 или обучающее видео для пользователей. Условием остается четкая и понятная форма.
Что такое руководство?
Слово происходит от латинского «instructio», тоесть привести в порядок. Следовательно в инструкции M-Audio Keystation 61 MK3 можно найти описание этапов поведения. Цель инструкции заключается в облегчении запуска, использования оборудования либо выполнения определенной деятельности. Инструкция является набором информации о предмете/услуге, подсказкой.
К сожалению немного пользователей находит время для чтения инструкций M-Audio Keystation 61 MK3, и хорошая инструкция позволяет не только узнать ряд дополнительных функций приобретенного устройства, но и позволяет избежать возникновения большинства поломок.
Из чего должно состоять идеальное руководство по эксплуатации?
Прежде всего в инструкции M-Audio Keystation 61 MK3 должна находится:
— информация относительно технических данных устройства M-Audio Keystation 61 MK3
— название производителя и год производства оборудования M-Audio Keystation 61 MK3
— правила обслуживания, настройки и ухода за оборудованием M-Audio Keystation 61 MK3
— знаки безопасности и сертификаты, подтверждающие соответствие стандартам
Почему мы не читаем инструкций?
Как правило из-за нехватки времени и уверенности в отдельных функциональностях приобретенных устройств. К сожалению само подсоединение и запуск M-Audio Keystation 61 MK3 это слишком мало. Инструкция заключает ряд отдельных указаний, касающихся функциональности, принципов безопасности, способов ухода (даже то, какие средства стоит использовать), возможных поломок M-Audio Keystation 61 MK3 и способов решения проблем, возникающих во время использования. И наконец то, в инструкции можно найти адресные данные сайта M-Audio, в случае отсутствия эффективности предлагаемых решений. Сейчас очень большой популярностью пользуются инструкции в форме интересных анимаций или видео материалов, которое лучше, чем брошюра воспринимаются пользователем. Такой вид инструкции позволяет пользователю просмотреть весь фильм, не пропуская спецификацию и сложные технические описания M-Audio Keystation 61 MK3, как это часто бывает в случае бумажной версии.
Почему стоит читать инструкции?
Прежде всего здесь мы найдем ответы касательно конструкции, возможностей устройства M-Audio Keystation 61 MK3, использования отдельных аксессуаров и ряд информации, позволяющей вполне использовать все функции и упрощения.
После удачной покупки оборудования/устройства стоит посвятить несколько минут для ознакомления с каждой частью инструкции M-Audio Keystation 61 MK3. Сейчас их старательно готовят или переводят, чтобы они были не только понятными для пользователя, но и чтобы выполняли свою основную информационно-поддерживающую функцию.
User Guide
English ( 2 – 14 )
Guía del usuario
Español ( 15 – 27 )
Guide d’utilisation
Français ( 28 – 41 )
Guida per l’uso
Italiano ( 42 – 55 )
Benutzerhandbuch
Deutsch ( 56 – 69 )
Appendix
English ( 70 – 71 )
User Guide (English)
Introduction
Thank you for purchasing the Keystation 61 MK3. At M-Audio, we know how serious music is
to you. That’s why we design our equipment with only one thing in mind—to make your
performance the best it can be.
Box Contents
Keystation 61 MK3
USB Cable
Software Download Cards
User Guide
Safety & Warranty Manual
Support
Visit m-audio.com to view and download the latest documentation, system requirements, and
other information about your product.
For additional product support, visit m-audio.com/support.
Quick Start
Connecting Your Keyboard
You can power the keyboard either via a powered USB port or a third-party power supply. The
Keystations are low-power devices and an external power supply is not necessary unless
using the Keystation without being connected to a computer (e.g., controlling external
synthesizers). It is recommended that you connect the Keystation to an onboard USB port or
to a powered USB hub. Use a USB cable to power Keystation when connecting to a computer
to trigger software synths.
You can also use Keystation 61 MK3 with your iPad to control supported music creation apps.
Connecting your Keystation 61 MK3 to an iPad requires the iPad Camera Connection Kit,
which is available from the Apple Store.
2
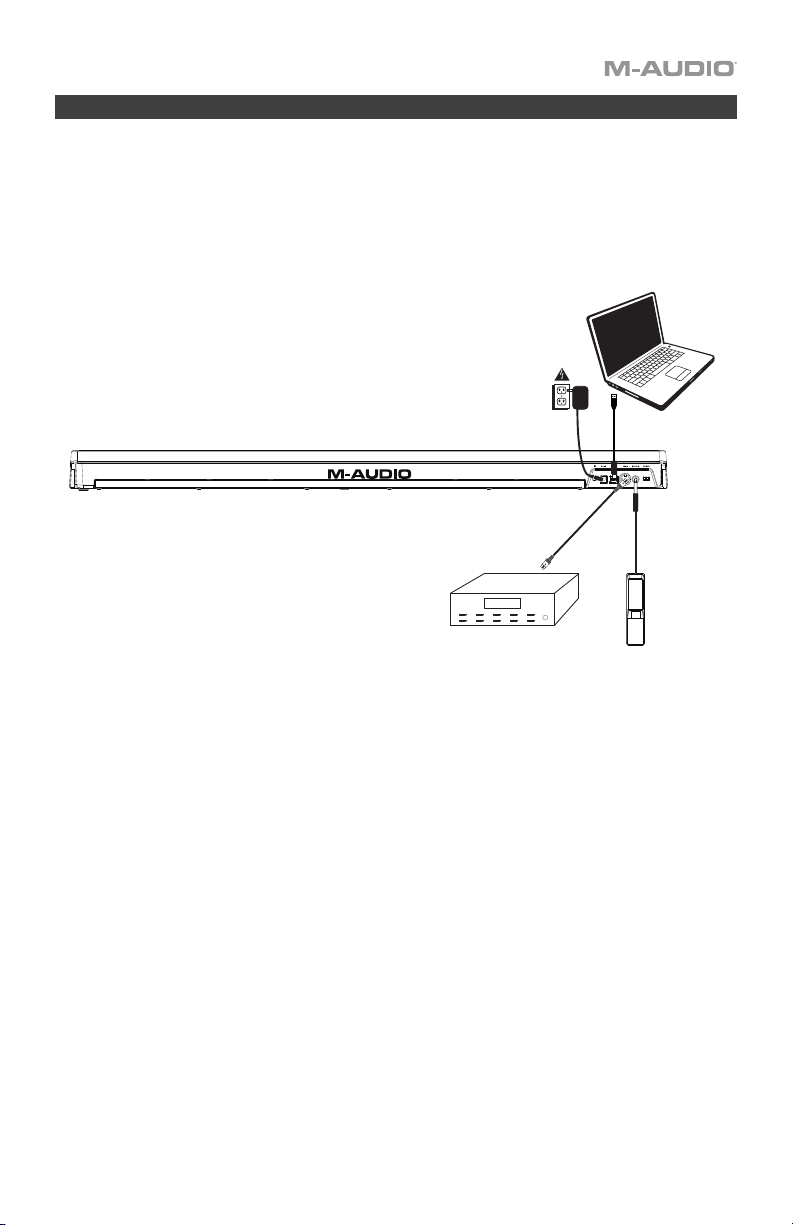
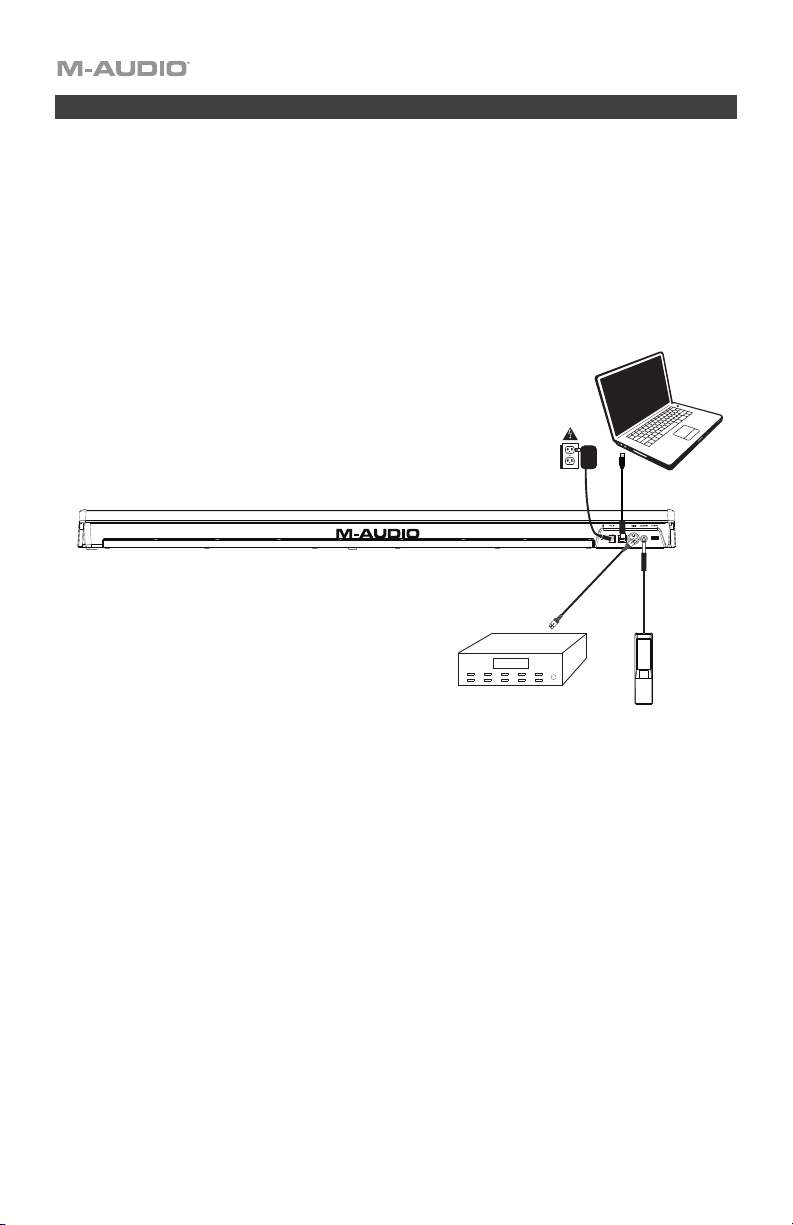
Setup
Items not listed under Introduction > Box Contents are sold separately.
POWER
ADAPTER
(optional)
SOUND MODULE
COMPUTER
SUSTAIN
PEDAL
3

Recommended Installation
Pro Tools | First M-Audio Edition: We’ve included Pro Tools | First M-Audio Edition with your
Keystation 61 MK3 so you can get started making music with professional software right out
of the box. Register your Keystation 61 MK3 on m-audio.com, and follow the Pro Tools | First
M-Audio Edition install instructions in your User Account.
Ableton Live Lite: We’ve included Ableton Live Lite with your Keystation 61 MK3 so you can
get started making music with professional software right out of the box. Follow the
instructions on the included software download card for installing Ableton Live Lite.
Virtual Instruments: Follow the instructions on the software download card for installing the
included virtual instrument plugins. After installation, most DAWs will not load virtual
instrument plugins automatically. In order to access the virtual instrument plugins with Pro
Tools | First M-Audio Edition and Ableton Live Lite, you will need to choose the plugin folder
for the software to scan:
Pro Tools | First M-Audio Edition/AAX plugin folders:
Ableton/VST Plugins:
To set your plugin folder in Ableton Live Lite:
1. Go to the Preferences menu.
2. Select the File Folder tab. Under Plug-In Sources click Browse and select the appropriate
3. After making your selection, the Use VST Custom Plug-In Folder button should be ON.
Exit the Preferences menu.
4
Windows (32-bit):
C:\Program Files (x86)\Common Files\Avid\Audio\Plug-Ins
Windows (64-bit):
C:\Program Files\Common Files\Avid\Audio\Plug-Ins
Mac:
Macintosh HD/Library/Application Support/Avid/Audio/Plug-Ins
Windows (32-bit):
C:\Program Files (x86)\VSTplugins
Windows (64-bit):
C:\Program Files\VSTplugins
MacOS:
Macintosh HD\Library\Audio\Plugins\VST
plugin folder.
If it is not, click the button to turn it on.

Ableton Live Lite Setup
1. First, connect Keystation 61 MK3 to an available USB port on your computer using the
supplied USB cable, and launch Ableton Live Lite.
2. Next, open the Ableton Live Lite Preferences window. Choose your Audio Device in
the Audio tab. This will be dependent upon the audio interface that you are using.
MAC: Select Live > Preferences
PC: Select Options > Preferences
3. Select the MIDI/Sync tab. Within the MIDI Ports section, adjust the settings as listed
below:
Next to Input: Keystation 61, toggle the On button in the Track and Remote columns.
Next to Output: Keystation 61, toggle the On button in the Track and Remote columns.
4. Next, at the top of the window under Control Surface, choose MackieControl from the
drop-down list in row 1. Under the Input column in Row 1, choose Keystation 61 MK3
(Port 2). Ensure the third drop-down menu in Row 1 under Output is set to None.
The
Transport control (Play, Stop, and Record) on the Keystation 61 MK3 controller will now
control and correspond with the Transport functions in Ableton Live Lite. In addition, the
Directional buttons on the Keystation series controller will now control selecting tracks
and triggering clips.
5. Close the Preferences window.
6. To add an instrument or plugin to Ableton Live Lite in order to generate sound, in
the Categories column, choose Instruments or Plug-ins.
7. In the Name column just to the right of the Categories column, locate the Instrument or
Plug-in of your choice. Click-and-drag the instrument to a MIDI track in Ableton Live Lite
to load the instrument.
The Instrument can now be triggered with Keystation 61 MK3.
Pro Tools | First M-Audio Edition Setup
1. Connect Keystation 61 MK3 to an available USB port on your computer using the
supplied USB cable, and launch Pro Tools | First M-Audio Edition.
2. Open or Create a Project.
3. Select the Setup pulldown menu and open MIDI Input Devices. Enable MIDI Input from
the Keystation 61 MK3 by clicking the box next to the Keystation 61 MK3.
4. Select the Setup pulldown menu and open Playback Engine. Choose your audio device
from the Playback Engine pulldown menu.
5. To create a new Instrument track, select the Track pulldown menu and select New.
6. In the New pulldown menu, select Stereo, and then Instrument Track.
7. In the newly created track, add an Insert to your track by clicking in your track’s Inserts
A-E and selecting Multichannel Plugin > Instrument and select the instrument you
would like to use, such as Xpand!2 (Stereo). The plugin can now be triggered with
Keystation 61 MK3.
Note: Windows users will need either an external soundcard (such as the M-Track 2X2) or a
low-latency ASIO driver.
5

Configuration
Once you have finished installation you will need to configure your MIDI software to use the
Keystation. Please note that when you press a key on the keyboard, you will not hear any
sound. This is because pressing a key causes the keyboard to send out MIDI data. MIDI data
gives instructions on how a sound should play, but in order to actually hear that sound you
need to configure your music software to read the MIDI data being sent from the Keystation
and play the sound back accordingly. This setup will more than likely entail going into an
Options or Device Set-Up menu in your music software application and selecting the
appropriate device. The Keystation should appear under the name “USB Audio Device” for
Windows 7, Windows 8, or as “Keystation 61 MK3” for other operating systems in the MIDI
devices section of your music software application. Please consult the manual that came with
your software for the proper setup procedure.
Features
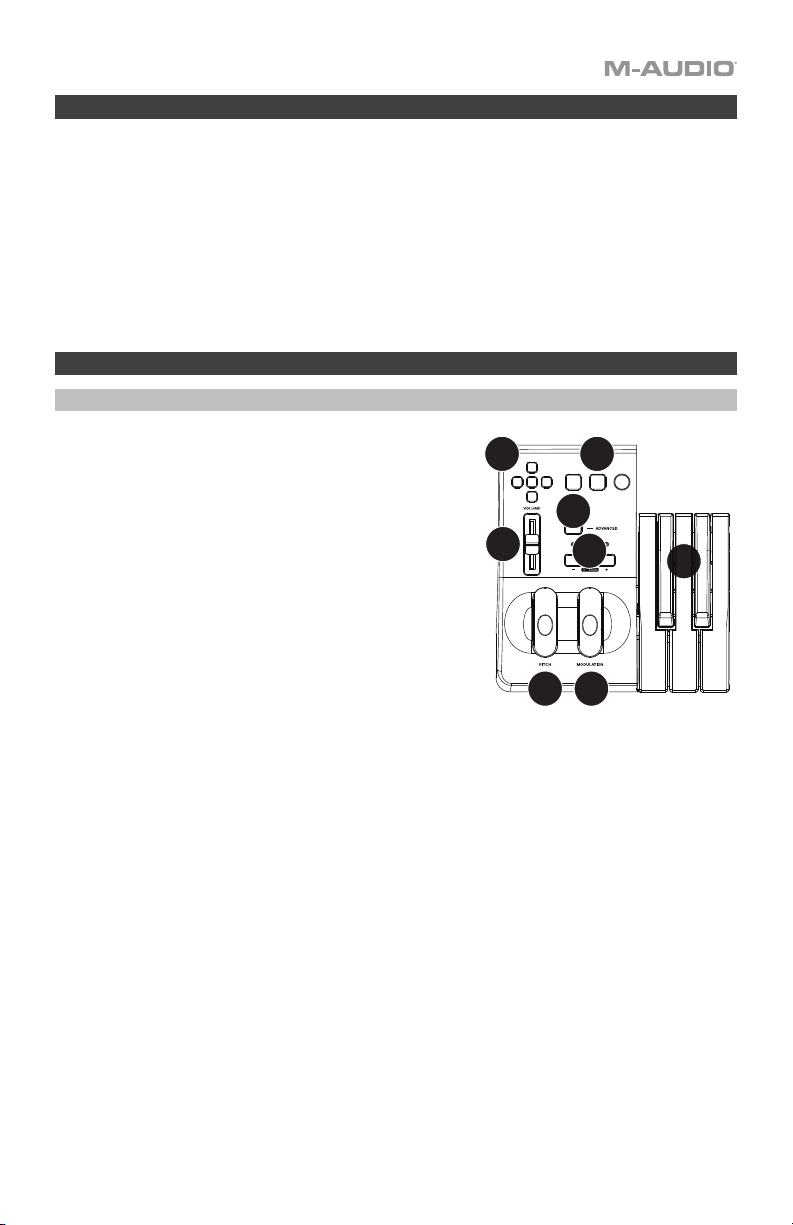
Top Panel
1. Keyboard: Most of the white keys and black keys on
the Keystation are labeled with names. When in the
Advanced mode, pressing any of the labeled keys will
allow for special operations such as adjusting the MIDI
channel, transposing, and sending program change
messages.
2. Octave Buttons: If you press the octave “+” button
once, the LED above the octave “-” button will turn off,
indicating the keyboard’s octave is now shifted up. If
you press the octave “+” key again, you will shift one
more octave up, and so on. It is possible to shift the
keyboard up 4 octaves or down 4 octaves from 0
octave shift.
To shift the octave down, press the octave “-” button and notice that the LED above the
octave “+” turns off. If only the LED above the octave “-” key is lit, the octave is shifted
down and, if only the LED above the octave “+” key is lit, the octave is shifted up. The
octave “+” and octave “-” LEDs will change color when moving up or down more than
one octave.
To return the octave shift to 0, press both the octave “+” and “-” keys together. Both
LEDs will light, indicating that the octave shift has returned to 0.
The Octave “+” and “-” buttons may be assigned to control one of seven possible MIDI
functions. (See Advanced Functions for more information.)
3. Volume Slider: The Volume Slider sends a MIDI message that controls the volume of the
notes you are playing. The Volume Slider can also be assigned to different effects such
as pan (balance), attack, reverb, chorus and many more. (See Advanced Functions for
more information.)
4. Pitch Bend Wheel: As the name indicates, the pitch bend wheel is primarily used to
bend the notes played on the keyboard up or down. This allows you to play phrases not
normally associated with keyboard playing, such as guitar-style riffs. Your sound source
determines how far you can bend the note. The usual setting is two semitones, but it can
be up to two octaves up or down.
6
5. Modulation Wheel: The modulation wheel is typically used for modulation of the sound
you are playing. This type of real-time controller was originally introduced on electronic
keyboard instruments to give the performer options such as adding vibrato, just like
players of acoustic instruments do. The modulation wheel is fully MIDI-assignable.
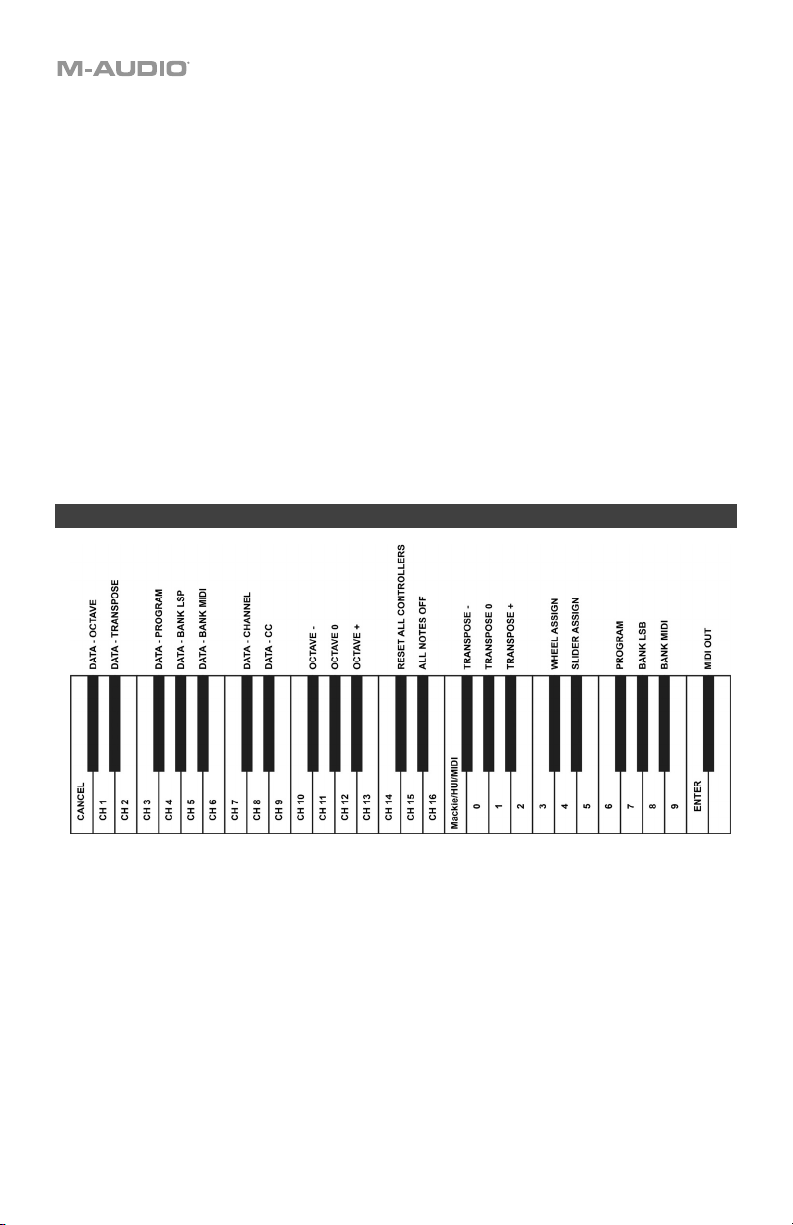
6. Advanced Button: The Advanced button is used to access all the advanced functions of
the keyboard.
When the Advanced button is pressed, the keyboard goes into “Edit Mode.” In Edit
Mode, the keys on the keyboard are used for selecting functions and entering data.
The LED above the Advanced button indicates whether or not Edit Mode is engaged. In
Edit Mode, the black keys on the keyboard are used for selecting functions, while the
white keys are used for data entry, channel selection, and DAW selection.
Your keyboard will exit out of Edit Mode as soon as a function is selected, or the
Advanced button, CANCEL or ENTER key is pressed (the LED above the Advanced
button will turn off). The keyboard can then be used to play notes again.
Note: Refer to the Advanced section for more information.
7. Directional Buttons: These buttons can use the MIDI, Mackie Control® or HUI® protocols
to control certain functions in software that support them. Please see the Directional
Buttons and Transport Buttons section of the Advanced Functions chapter for more
information.
8. Transport Buttons: These buttons can use the MIDI, Mackie Control or HUI
to control certain functions in software that support them. Please see the Directional
Buttons and Transport Buttons section of the Advanced Functions chapter for more
information.
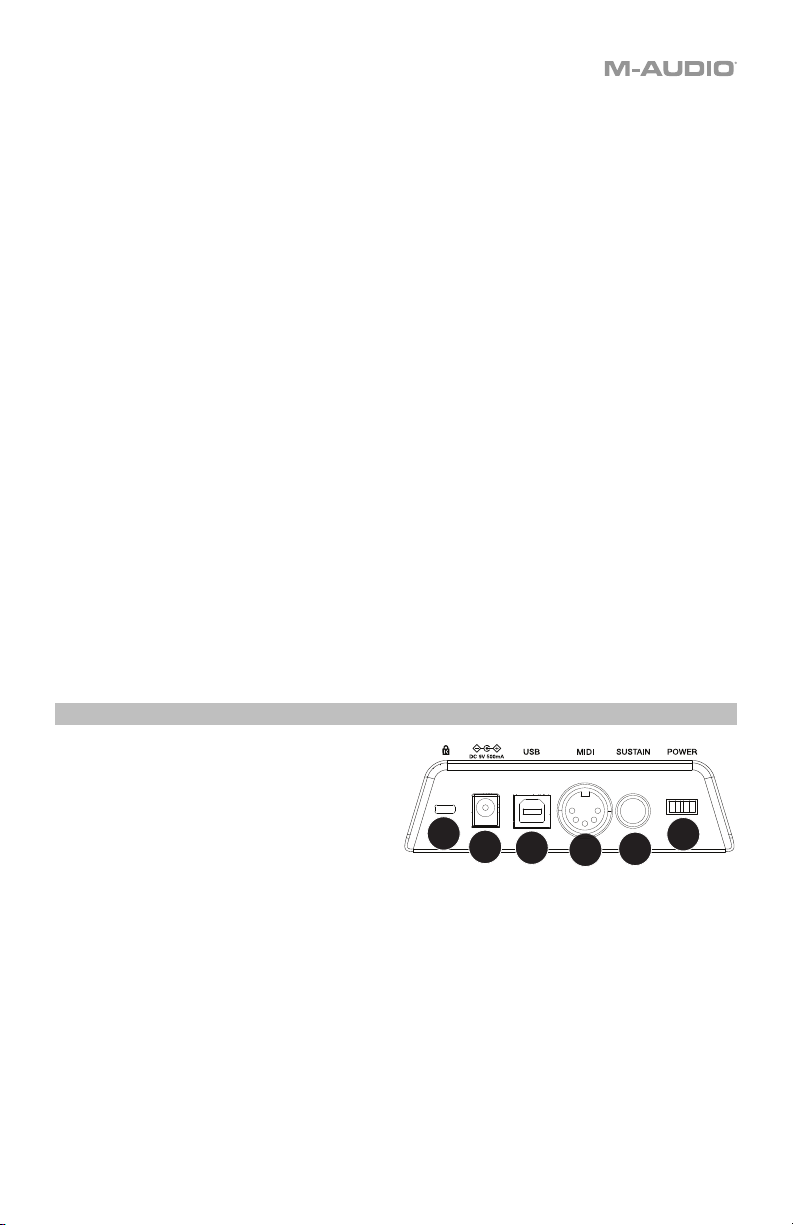
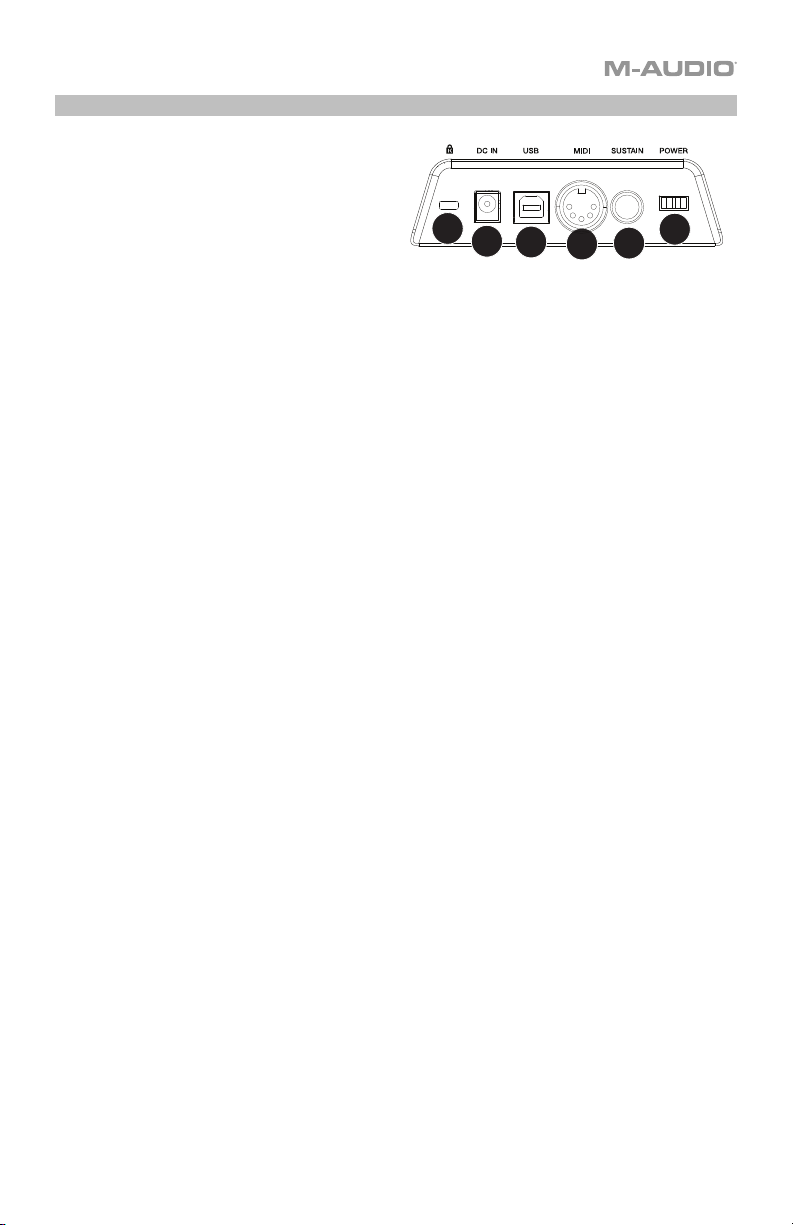
Rear Panel
1. Kensington® Lock: Use this port to
attach a security cable to the unit.
2. DC Power Adapter Input: If you do not
wish to power Keystation through the
USB connection and are using the MIDI
connector to trigger an external sound
module, connect a DC 9 V, 500 mA
power adapter (sold separately) here.
3. USB Port: The USB port delivers power to the keyboard and transmits MIDI data when
connected to a computer to trigger a software synth or MIDI sequencer.
4. MIDI Out: Use a five-pin MIDI cable (sold separately) to connect this jack to the MIDI IN of
an external sound module or to the MIDI In of a synthesizer.
®
protocols
7
5. Sustain Pedal Input: This socket accepts a momentary-contact foot pedal (sold
separately). When pressed, this pedal will sustain the sound you are playing without having
to keep your fingers pressed down on the keys.
NOTE: For realistic pedal action, check out the SP-2. The SP-2 is M-Audio’s switchable
sustain pedal with the ability to connect to the Sustain Pedal input on Keystation 61 MK3.
NOTE: The polarity of the sustain pedal is determined by the keyboard upon startup.
When Keystation 61 MK3 is powering up, the sustain pedal is assumed to be in the «up»
(Off) position. It is important that the sustain pedal is not pressed during startup, otherwise
the pedal will reverse its operation, and notes will sustain when the pedal is not pressed.
NOTE: A foot pedal can be used for sustaining the sound that you are playing without
having to keep your hands on the keyboard (just like the sustain pedal on a piano).
You can plug a foot pedal of any polarity into the foot pedal input on your M-Audio
keyboard. The keyboard will automatically detect the correct polarity when powering up. If
you want to reverse the polarity, simply depress the pedal when you switch on your
keyboard.
6. On/Off Switch: Use this switch to power the device on or off.
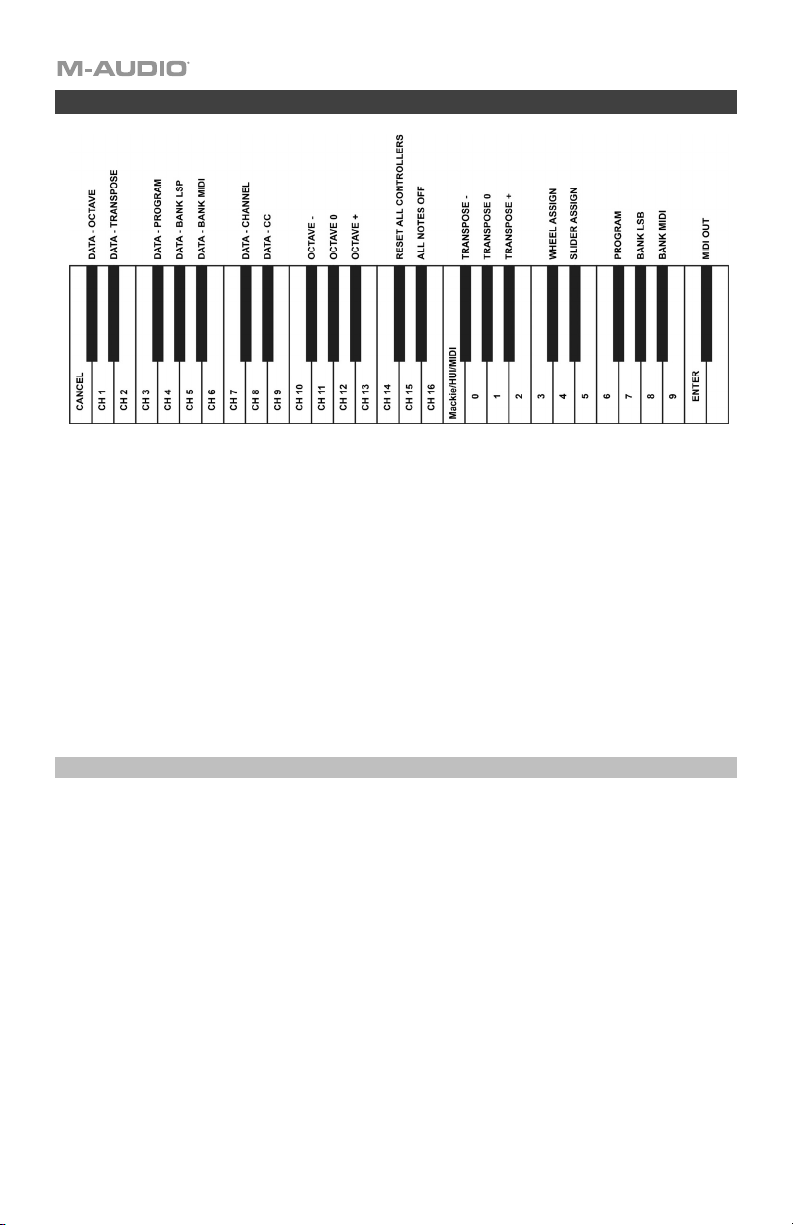
Advanced Functions
In addition to setting an octave shift, the two OCTAVE “+” and “-” buttons discussed earlier in
the manual under the section “Octave Buttons” can also be used to control one of seven MIDI
functions.
The first 7 black keys are used to select the function of the octave buttons. Some of the
functions that these keys can be used for cannot send out a value less than 0. When used to
control these functions, both LEDs above the buttons will remain on, regardless of the current
setting of that function.
To select an alternate function:
1. Press the Advanced button, putting the keyboard into Edit Mode.
2. Press the black key that represents the function you want. With the exception of CC,
Edit Mode will finish as soon as you have selected the function and you will be able to
play notes again.
8

Octave Shift
Another method of shifting the Keystation octaves is with the use of the keys labeled “Octave
+” and “Octave -”. After the Advanced button has been pressed, placing the keyboard in Edit
Mode, pressing these keys will shift the keyboard’s pitch up or down one or more octaves
(one for each time pressed). The default octave shift designation is “0” and will be the octave
setting each time you power up the keyboard. The lights above the octave buttons indicate
that 0 octave shift is set when both are on.
To assign the “+” and “-” keys to control the octave:
1. Press the Advanced button to get the keyboard into Edit Mode.
2. Press the black key representing “OCTAVE”. Edit Mode will finish as soon as OCTAVE
has been pressed.
There is also a method of performing a quick octave change, which can be useful when using
the octave buttons to control another MIDI function. This is accomplished as follows:
1. Press the Advanced button to put the keyboard in Edit Mode.
2. Press the black key representing “OCTAVE +”, increasing the octave by 1 (you may
press it again to increase the octave by 2, and so on). Press the black key representing
“OCTAVE -”, decreasing the octave by 1 (you may press it again to decrease the octave
by 2, and so on). Press the black key representing «OCTAVE 0» to reset the octave shift
to 0.
3. When you have chosen your octave shift press “ENTER,” to select your Octave and
leave Edit Mode. Selecting Cancel or Advanced will cancel the selection, and exit from
Advanced mode.
Transposition
In some cases, it may be useful to reduce or increase the pitch by a number of semitones
rather than an entire octave. For example, if you are playing a song with a singer that is having
difficulty hitting the top notes, you may want to reduce the pitch by one or two semitones. This
is achieved using a MIDI function called “Transpose.”
Transpose works in the same way as Octave Shift, except the shift can be up to +/- 12
semitones. As with Octave Shift, there are two ways of transposing the keyboard. You can use
the Octave “+” and “-” buttons, or the black keys “TRANSPOSE -,” “TRANSPOSE 0” and
“TRANSPOSE +,” respectively.
To assign the Octave “+” and “-” buttons to transpose:
1. Press the Advanced button to engage Edit Mode.
2. Press the black key labeled “TRANSPOSE” (Eb2). (Edit Mode will disengage as soon as
“TRANSPOSE” has been pressed.)
3. Press the “+” key and you will hear the pitch of the note you play go up.
4. Press the “-” key to transpose the keyboard down a half-step.
5. Press both “+” and “-” together to return to no transposition change.
9

Program Change
Program Changes are used to change the instrument or voice you are using. For the sake of
example, we will change the instrument to a bass sound. To do this we need to send a
program change of 32. There are two ways to send a program change:
Incremental/Decremental Program Change:
1. Press the Advanced button.
2. Press the black key labeled «PROGRAM» (F#2).
3. Now the Octave “+” and “-” keys can be used to change the program.
4. Press “+” and continue to play notes until you find the instrument you want.
This method is useful if you want to cycle through different instruments to see which sounds
best in your song.
Quick Select Program Change:
1. Press the Advanced button.
2. Press the black key labeled “PROGRAM #.”
3. Press keys “3,” “2,” “ENTER.” Now the keyboard will play a bass sound: Number 32.
This method is useful if you want to select a specific number, as is the case here.
If the Octave “+” and “-” keys are selected to vary the Program number (Method 1). Pressing
both the “+” and “-” buttons together will recall Program 0, which selects a grand piano
sound.
Bank LSB and Bank MSB
Program Changes are most commonly used to change instruments and voices. However, the
number of instruments accessible via Program Changes is limited to 128. Some devices have
more than 128 voices and require a different method to access these extra voices. Generally,
these devices use Bank LSB and Bank MSB messages.
Incremental/Decremental Bank LSB and Bank MSB Changes:
1. Press the Advanced button.
2. Press the black key labeled “Bank LSB” (G#2) or “Bank MSB” (Bb2), respectively.
3. Now the Octave “+” and “-” keys can be used to change the Bank LSB or Bank MSB.
4. Press “+” and continue to play notes until you find the instrument you want.
Using the Quick Select Method:
1. Press the Advanced button.
2. Press the black key labeled “Bank LSB #” or “Bank MSB #,” respectively.
3. Press keys “3,” “2,” “ENTER.”
As with Program Change, if the Octave “+” and “-” keys are selected to vary the Bank LSB or
MSB number (Method 1). Pressing both the “+” and “-” buttons together will recall Bank 0.
10

MIDI Channel
MIDI data from the keyboard can be sent on any of 16 MIDI Channels. However, certain MIDI
devices and MIDI software applications require the keyboard to send data on a specified
channel. If this is the case, you can change the channel the data is sent using the following
method:
1. Press the Advanced button to engage Edit Mode.
2. Press one of the 16 Channel keys (D2 to E4), according to the Channel that you need.
For example, if a device specifies that you need to send data on Channel 10, press the
Advanced button, and select Channel 10. The Channel can also be assigned to the Octave “+”
and “-” buttons. Once assigned, pressing “+” or “-” will increase or decrease the channel
incrementally. When Channel 16 is reached and “+” is pressed, Channel 1 will be selected.
Pressing both the “+” and “-” buttons together will recall Channel 1.
Control Change
To assign the Octave/Data buttons to send Control Change messages that can be toggled on
and off, follow these steps:
1. Press the Advanced button to engage Edit Mode.
2. Press the black key labeled «CC» (Eb3).
3. Use the Numerical Data Entry keys G4-B5 to enter the number of the Control Change to
assign to the +/- buttons.
4. The unit will transmit the assigned MIDI Control Change messages that toggle on and
off (Press once On, Press again Off).
The Octave +/- buttons can also send momentary MIDI Control Change messages. To assign
the Octave/Data buttons to Control Change momentary messages, follow these steps:
1. Press the Advanced button to engage Edit Mode.
2. Press the black key labeled «CC» (Eb3) 2 times.
Note: The Advanced LED will flash/blink when assigning a momentary CC message to
the -/+ buttons.
3. Use the Numerical Data Entry keys G4-B5 to enter the number of the Control Change to
assign to the +/- buttons.
4. The unit will transmit the assigned MIDI Control Change messages (Press On, Release
Off).
11

Volume Slider Assignment
To assign the Volume Slider to an effect:
1. Press the Advanced button to engage Edit Mode.
2. Press the black key labeled “FADER.”
3. Use the Numerical Data Entry keys to enter the CC number you want to assign to the
Volume Fader.
If you have made an error while entering the numerical data value, you can press the
“CANCEL” key to exit Edit Mode without changing the effect assigned to the Volume Slider.
Modulation Wheel Assignment
It is possible to assign different CC, and MIDI messages to the Modulation Wheel. Some
useful messages are: MIDI CC 01 (Modulation), MIDI CC 07 (Volume), MIDI CC 10 (Pan), and
MIDI CC 05 (Portamento).
There are 132 messages in total. However, for these messages to have any affect on the
sound, the receiving MIDI device must be able to read and respond to these MIDI messages.
Most devices will at least respond to volume, modulation, and pan data.
To assign a message to the Modulation Wheel:
1. Press the Advanced button to engage Edit Mode.
2. Press the black key labeled “WHEEL.”
3. Use the Numerical Data Entry keys to enter the number of the message you want to
assign to the Modulation Wheel.
If you have made an error while entering the numerical data value, you can press the CANCEL
key to exit Edit Mode without changing the effect assigned to the Modulation Wheel.
For the sake of example, we will assign CC number 10 (pan, or balance) to the Modulation
Wheel.
1. Press the Advanced button to engage Edit Mode.
2. Press the black key labeled “WHEEL.”
3. Press “1.”
4. Press “0” so you have entered “10.”
5. Press “ENTER.”
12
Directional Buttons and Transport Controls
The directional buttons and transport buttons use the MIDI, Mackie Control, or HUI protocols
to control certain functions in software that support them.
To select which protocol these buttons use to communicate with your software:
1. Press the Advanced button to get the keyboard into Edit Mode.
2. Press the key labeled “DAW”.
Note: «+» and «-» LEDs will be lit green when in Mackie Control mode, red when in HUI
mode, and orange when in MIDI mode.
3. Press Enter.
Note: Your software must also be set to receive commands from an external device
(i.e., Keystation) using the MIDI, Mackie Control, or HUI protocol. MIDI, Mackie
Control, and HUI controls are sent on Virtual Port 2.
Troubleshooting
General
Here are answers to common questions you may have, using your Keystation keyboard:
Problem 1: My M-Audio hardware suddenly stopped working after having performed fine
since installation.
Solution 1: Switch off the unit and let it sit for 10 seconds. Then restart your computer and try
again.
Problem 2: I have plugged a sustain pedal into my M-Audio keyboard, but it works the
wrong way around.
Solution 2: The polarity of the sustain pedal is calculated by the keyboard when it is powered
up. On power up, the sustain pedal is assumed to be in the OFF position. So if you want the
sustain pedal to be off when it is not depressed, make sure the pedal is not depressed when
you power up.
Problem 3: When I press a key, there is a delay before I hear any sound.
Solution 3: This delay is known as latency. Latency with MIDI signals is due to the software
application you are using. MIDI data is simply control data. The MIDI data is read by your
software. The software then completes a large number of complex calculations in order to
produce the sound you hear—all this takes time.
We strongly recommend a proper audio interface. Refer to m-audio.com for a selection of
options. If you already have an adequate audio interface, try reinstalling the latest drivers for
the audio interface, or try reducing the buffer sizes of the audio drivers.
13
MIDI Functionality
The Keystation keyboards have been designed to make working with MIDI on your computer
as simple as possible. Nonetheless, you may still experience some difficulties. In many cases,
the keyboard is not at fault; the problem lies with the receiving device. To counter this, there is
a useful MIDI function: Reset All Controllers.
Reset All Controllers
If you find there is an effect on a voice that you do not want, rather than having to isolate and
identify that effect, you can send a “Reset All Controllers” MIDI message by performing the
following:
1. Press the Advanced button to engage Edit Mode.
2. Press the black key representing “RESET.”
3. Edit Mode will disengage, eliminating all effects.
Factory Reset
1. Power off Keystation.
2. Hold down the buttons «+» and «-» simultaneously, until step 4.
3. Power on Keystation.
4. Release the buttons.
The Keyboard is now back to the factory default settings.
MIDI Out
The MIDI Out port is located on the back of the keyboard, and can be used to connect the
keyboard to an external sound module or MIDI keyboard.
By default (when you switch the unit on), all controller data is sent out via the MIDI output as
well as the USB out. If you want the MIDI output to act like a traditional USB-to-MIDI interface,
engage “MIDI Out” mode by carrying out the following:
1. Press the Advanced button to engage Edit Mode.
2. Press the black key representing “MIDI OUT.”
3. Edit Mode will disengage.
4. The keyboard is now able to send data received from the computer via its MIDI OUT
jack to whatever device is connected.
In order to use the MIDI output, select the Keystation USB MIDI Out as the MIDI output device
in your sequencer.
14
Guía del usuario (Español)
Introducción
Gracias por comprar el Keystation 61 MK3. En M-Audio, sabemos que usted se toma la
música en serio. Por eso es que diseñamos nuestros equipos con una sola cosa en mente—
hacer que pueda tocar su mejor interpretación.
Contenido de la caja
Keystation 61 MK3
Cable USB
Tarjetas de descarga de software
Guía del usuario
Manual sobre la seguridad y garantía
Soporte
Visite m-audio.com para ver y descargar la documentación más reciente, los requisitos del
sistema y demás información relativa a su producto.
Para obtener soporte adicional del producto, visite m-audio.com/support.
Inicio rápido
Conexión del teclado
Puede alimentar el teclado a través del bus USB o mediante una fuente de alimentación
externa opcional. Los Keystations son dispositivos de bajo consumo de energía por lo cual no
es necesaria una fuente de alimentación externa a menos que use el Keystation desconectado
del ordenador (por ej., para controlar sintetizadores externos). Le recomendamos conectar el
Keystation a un puerto USB nativo o a un concentrador USB alimentado. Use un cable USB
para alimentar el Keystation cuando lo conecta a una computadora para disparar
sintetizadores de software.
También puede utilizar el Keystation 61 MK3 con su iPad para controlar las aplicaciones de
creación de música compatibles.
La conexión del Keystation 61 MK3 con un iPad requiere el iPad Camera Connection Kit, que
está disponible en Apple Store.
15
Instalación
Los elementos que no se enumeran en Introducción > Contenido de la caja se venden por
separado.
DAPTADOR DE
LIMENTACIÓN
(opcional)
COMPUTADORA
MÓDULO DE
SONIDO
16
PEDAL DE
SOSTENIDO

Instalación recomendada
Pro Tools | First M-Audio Edition: Hemos incluido Pro Tools | First M-Audio Edition con su
Keystation 61 MK3 de modo que puede comenzar a hacer música con software profesional en
cuanto lo saca de la caja. Registre su Keystation 61 MK3 en m-audio.com y siga las
instrucciones de instalación de Pro Tools | First M-Audio Edition en su Cuenta de usuario.
Ableton Live Lite: Hemos incluido Ableton Live Lite con su Keystation 61 MK3 de modo que
puede comenzar a hacer música con software profesional en cuanto lo saca de la caja. Siga
las instrucciones de la tarjeta de descarga de software incluida para instalar Ableton Live Lite.
Instrumentos virtuales: Siga las instrucciones de la tarjeta de descarga de software para
instalar los plugins de instrumentos virtuales incluidos. Tras la instalación, muchos DAW no
cargarán plugins de instrumentos virtuales de forma automática. A fin de acceder a los plugins
de instrumentos virtuales con Pro Tools | First M-Audio Edition, deberá seleccionar la carpeta
con plugins para que el software explore:
Carpetas de plugins de Pro Tools | First M-Audio Edition/AAX:
Plugins de Ableton/VST:
Para establecer su carpeta de plugins en Ableton Live Lite:
1. Vaya al menú Preferences (Preferencias).
2. Seleccione la pestaña File Folder (Carpeta de archivos). Bajo Plug-In Sources (Fuentes
3. Después de hacer su selección, el botón Use VST Custom Plug-In Folder (Usar carpeta
4. Salga del menú Preferences (Preferencias).
Windows (32-bit):
C:\Program Files (x86)\Common Files\Avid\Audio\Plug-Ins
Windows (64-bit):
C:\Program Files\Common Files\Avid\Audio\Plug-Ins
Mac:
Macintosh HD/Library/Application Support/Avid/Audio/Plug-Ins
Windows (32-bit):
C:\Program Files (x86)\VSTplugins
Windows (64-bit):
C:\Program Files\VSTplugins
Mac:
Macintosh HD\Library\Audio\Plugins\VST
de plugin) haga clic en Browse (Explorar) y seleccione la carpeta de plugins apropiada.
de plugins personalizada) debe estar en ON (encendido). Si no lo está, haga clic en el
botón para encenderlo.
17

Configuración de Ableton Live Lite
1. Primero, conecte el Keystation 61 MK3 a un puerto USB disponible en su ordenador
utilizando el cable USB suministrado y ejecute Ableton Live Lite.
2. A continuación, abra la ventana Preferences (Preferencias) de su Ableton Live Lite.
Seleccione su dispositivo de audio en la pestaña Audio. Esto dependerá de la interfaz
de audio que esté utilizando.
MAC: Seleccione Live > Preferences
PC: Seleccione Options > Preferences
3. Seleccione la pestaña MIDI / Sync (MIDI / Sincronización). Dentro de la sección MIDI
Ports (puertos MIDI), ajuste la configuración como se muestra a continuación:
Junto a Input: (Entrada) Keystation 61 MK3, conmute el botón On en las columnas
Track y Remote (pista y remoto).
Junto a Output: (Salida) Keystation 61 MK3, conmute el botón On en las columnas
Track y Remote (pista y remoto).
4. A continuación, en la parte superior de la ventana debajo de la superficie de control,
seleccione MackieControl de la lista desplegable de la fila 1. Debajo de la columna
Input (entrada) en la fila 1, seleccione Keystation 61 MK3 (Port 2). Asegúrese de que el
tercer menú desplegable de la fila 1 de bajo de Output, este ajustado en «None»
(ninguno).
El control de transporte (reproducir, detener y grabar) del controlador
Keystation 61 MK3 ahora controlará e imitará las funciones de transporte del Ableton
Live Lite. Además, los botones direccionales del controlador de la serie Keystation ahora
controlarán la selección de pistas y la ejecución de clips.
5. Cierre la ventana Preferences (Preferencias).
6. En la columna Name (Nombre) justo a la derecha de la columna Categorías, localice el
Instrumento o Plugin de su elección. Haga clic y arrastre el instrumento sobre una pista
MIDI en Ableton Live Lite para cargarlo.
El instrumento ahora puede dispararse desde Keystation 61 MK3.
Configuración del Pro Tools | First M-Audio Edition
1. Conecte el Keystation 61 MK3 a un puerto USB disponible en su ordenador utilizando el
cable USB suministrado y abra Pro Tools | First M-Audio Edition.
2. Abra o cree un proyecto.
3. Seleccione el menú desplegable Setup y abra MIDI Input Devices. Active MIDI Input
desde el Keystation 61 MK3 haciendo clic en la casilla junto al Keystation 61 MK3.
4. Seleccione el menú desplegable Setup y abra Playback Engine. Seleccione su
dispositivo de audio en el menú desplegable Playback Engine.
5. Para crear una pista de un instrumento nuevo, seleccione el menú desplegable Track y
seleccione New.
6. En el menú desplegable New, seleccione Stereo y luego Instrument Track.
7. En la pista recientemente creada, añada un inserto en su pista haciendo clic en los
insertos A-E de su pista y seleccionando Multichannel Plugin > Instrument y seleccione
el instrumento que desea utilizar, como por ejemplo Xpand!2 (Stereo). El plugin ahora
puede dispararse desde del Keystation 61 MK3.
Nota: Los usuarios de Windows necesitarán una tarjeta de sonido externa (como por ejemplo
la M-Track 2X2) o un controlador ASIO de baja latencia.
18
Guía de inicio rápido
Una vez concluida la instalación deberá configurar su software MIDI para poder utilizar el
Keystation. Recuerde que de momento el teclado no producirá ninguna clase de sonido
cuando pulse una tecla. Esto se debe a que, al pulsar una tecla, el teclado se limita a enviar
datos MIDI. Los datos MIDI son información acerca de cómo debe reproducirse un sonido,
pero para poder oírlo necesita configurar su software musical para que lea los datos MIDI que
Keystation le envía y los reproduzca de manera adecuada. Muy probablemente, esta
configuración implicará la selección del dispositivo adecuado en algún menú “Opciones” o
“Configuración de dispositivos” de su software musical. El teclado Keystation aparecerá en
sus programas como “Dispositivo de audio USB” (en Windows 7, Windows  o como
“Keystation 61 MK3” (en otros sistemas operativos). Por favor, consulte el manual
suministrado con su software para realizar una configuración correcta.
Características
Panel superior
1. Teclado: La mayoría de las teclas blancas y negras
del Keystation tienen rótulos con nombres. Dentro
del menú Advanced (Funciones avanzadas),
presionar las teclas rotuladas permitirá realizar
operaciones especiales tales como ajustar el canal
MIDI, transponer enviar mensajes de cambio de
programa.
2. Octave Buttons: Si oprime el botón OCT (octava)
“+” una vez, el LED que está arriba del botón de
octava “-” se apagará, indicando que la octava del
teclado está desplazada hacia arriba. Si pulsa de
nuevo el botón de octava “+”, el rango del teclado
aumentará en dos octavas, y así sucesivamente.
Puede modificar el rango del teclado hasta 4
octavas hacia arriba o hacia abajo partiendo de la
posición predeterminada.
Para desplazar la octava hacia abajo, oprima el botón OCT “-” y note que el LED que
está arriba del botón de octava “+” se apaga.Si sólo permanece iluminada la tecla de
octava “-”, el rango de octavas está desplazado hacia abajo; Si sólo permanence
iluminada la tecla de octava “+”, el rango de octavas está desplazado hacia arriba. Los
LED de octava “+” y octava “-” cambiarán de color cuando se desplace hacia arriba o
hacia abajo más de una octava.
Para regresar al rango normal 0, pulse ambas teclas de octava (“+” y “-”) al mismo
tiempo. Ambos LEDs se iluminarán para indicar que el rango de octava se encuentra de
nuevo en “0”.
Los botones Octave (octava) “+” y “—” pueden asignarse para controlar una de las siete
funciones MIDI posibles. (Consulte Funciones avanzadas para obtener más
información).
19

3. Deslizador volume: El deslizador de volumen envía un mensaje MIDI que controla el
volumen de las notas que está tocando.
También puede asignarlo a diferentes efectos, como por ejemplo el panorama (balance),
ataque, reverberación o chorus, entre otros. Para más información, consulte la sección
Funciones avanzadas.
4. Rueda de pitch bend: La rueda de pitch bend se usa generalmente para alterar el tono
de las notas tocadas en el teclado hacia arriba o hacia abajo, lo cual le permite tocar
frases que no se asocian normalmente con un instrumento de teclado, por ejemplo un
fraseo de guitarra.
Su fuente de sonido determina el rango en que la rueda de pitch bend altera el tono. El
ajuste más común es dos semitonos, aunque puede ser de hasta dos octavas hacia
arriba o hacia abajo.
5. Rueda de modulación: La rueda de modulación se usa normalmente para modular el
sonido que está tocando. Este tipo de controlador en tiempo real se incorporó
originalmente en los teclados electrónicos para ofrecer al instrumentista opciones como
las de agregar vibrato, tal como lo hace un músico al tocar un instrumento acústico. La
rueda de modulación es totalmente asignable vía MIDI.
6. Advanced Functions botón: El botón Advanced Functions permite acceder a las
funciones avanzadas del teclado.
Al pulsar este botón, el teclado entra en modo de programación. Mientras se encuentre
en este modo, las teclas del teclado permiten seleccionar funciones e introducir datos.
En el modo de edición, las teclas negras del teclado se usan para seleccionar funciones,
mientras que las blancas se usan para entrada de datos y la selección de canales y
DAW.
El LED situado sobre el botón Advanced Functions indica si el teclado está o no en modo
de programación. Cuando está en modo de programación, las teclas negras permiten
seleccionar funciones, mientras que las blancas se usan para introducir datos y
seleccionar canales.
Su teclado saldrá del modo Edit (Edición) cuando se seleccione una función o se pulse el
botón Advanced, las teclas CANCEL (Cancelar) o ENTER (se encenderá el LED que está
arriba del botón Advanced Functions [Funciones avanzadas]). Entonces podrá volver a
utilizar el teclado para tocar notas.
Nota: Para más información, consulte la sección Funciones avanzadas.
7. Botones direccionales: Estos botones pueden usar los protocolos MIDI, Mackie
®
Control
o HUI® para controlar ciertas funciones del software que los soporta. Para más
información, consulte la sección Botones direccionales y botones de transporte del
capítulo Funciones avanzadas.
8. Botones de transporte: Estos botones pueden usar los protocolos MIDI, Mackie
Control, o HUI para controlar ciertas funciones del software que los soporta. Para más
información, consulte la sección Botones direccionales y botones de transporte del
capítulo Funciones avanzadas.
20
Panel trasero
1. Bloqueo Kensington: Use este orificio
para fijar un cable de seguridad a la
unidad.
2. Entrada Del Adaptador de
Alimentación de CC: Si no desea
alimentar el Keystation por la conexión
USB y está usando el conector MIDI
para disparar un módulo de sonido externo, conecte aquí un CC 9 V, 500 mA adaptador
(que se vende por separado).
3. Puerto USB: El puerto USB suministra alimentación al teclado y transmite datos MIDI
cuando se conecta a una computadora para disparar un secuenciador MIDI o
sintetizador de software.
4. Salida MIDI: Use un cable MIDI de cinco pines (que se vende por separado) para
conectar este conector hembra a la entrada MIDI de un módulo de sonido externo o a la
entrada MIDI de un sintetizador.
5. Entrada para pedal de sustain: Esta toma permite conectar un pedal (se vende por
separado). Cuando se presiona, este pedal sostiene el sonido que está reproduciendo
sin necesidad de tener pulsadas las teclas con los dedos.
NOTA: Para lograr un funcionamiento realista del pedal, consulte sobre el SP-2. El SP-2
es el pedal de sostenido conmutable de M-Audio que tiene la capacidad de conectarse a
una de las entradas para pedal de sostenido del Keystation 61 MK3.
ATENCIÓN: El teclado detecta la polaridad del pedal de sustain en el momento de su
puesta en marcha. Al poner en marcha un teclado Keystation, se asume que el pedal de
sustain está en posición «inactiva» (Off). Es importante no pulsar el pedal de sustain
durante el arranque de la unidad; de lo contrario, el pedal invertirá su funcionamiento y
las notas se reproducirán en sostenido cuando no se pulse el pedal.
ATENCIÓN: El pedal se usa normalmente para sostener el sonido sin necesidad de
mantener las manos sobre el teclado, tal como sucede con un piano acústico. Puede
conectar un pedal de cualquier polaridad en la entrada para pedal del teclado. Al ponerse
en funcionamiento, el teclado detectará automáticamente la polaridad del pedal
conectado. Si desea invertir la polaridad, mantenga el pedal pulsado al poner el teclado
en funcionamiento.
6. Conmutador On/Off: Este conmutador enciende y apaga la unidad.
21
Funciones avanzadas
Además de determinar el cambio de octava, los botones de octava “+” y “-” mencionados
anteriormente en la sección “Botones de octava” también pueden usarse para controlar una
de las 7 funciones MIDI disponibles.
Las 7 primeras teclas negras se usan para seleccionar la función de los botones de octava.
Algunas de las funciones asignadas a estas teclas no admiten valores inferiores a 0. Si usa los
botones de octava para controlar dichas funciones, se iluminarán los indicadores situados
sobre ambos botones, con independencia del ajuste actual de la función.
Selección de una función alternativa.
1. Pulse el botón Advanced Functions para acceder al modo de programación.
2. Pulse la tecla negra correspondiente a la función deseada. Con la excepción de CC, el
modo de edición terminará tan pronto como usted haya seleccionado la función y
podrá tocar las notas nuevamente.
Cambio de octava: Los botones de octava “+” y “-”
Otro método para cambiar el rango de octavas del teclado consiste en usar las teclas
etiquetadas como “Octava +” y “Octava-”. Después de pulsar el botón Advanced Functions y
haber entrado en modo de programación, pulsando estas teclas podrá cambiar el rango de
octavas una o más octavas hacia arriba o abajo (una octava por pulsación). El ajuste de rango
de octavas predeterminado es “0”. Éste es también el ajuste que encontrará cada vez que
ponga el teclado en funcionamiento Cuando los indicadores situados sobre los botones de
octava están ambos iluminados ello significa que el teclado usa el ajuste predeterminado (“0”).
Para asignar los botones “+” y “-” al control del rango de octavas:
1. Pulse el botón Advanced Functions para acceder al modo de programación.
2. Pulse la tecla negra que representa “OCTAVE”. El teclado abandonará el modo de
programación en cuanto pulse OCTAVE.
22
Loading…