
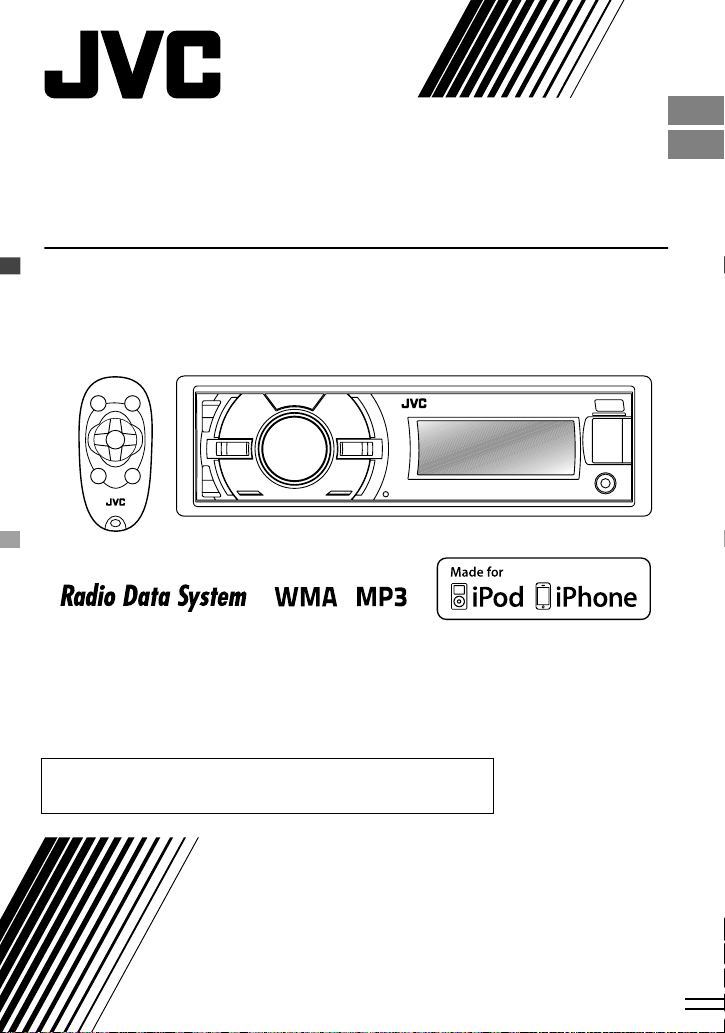
KD-X40/KD-X30
DIGITAL MEDIA RECEIVER /
RÉCEPTEUR MULTIMÉDIA NUMÉRIQUE
ENGLISH
FRANÇAIS
For canceling the display demonstration, see page 3. /
Pour annuler la démonstration des affichages, référez-vous à la page 3.
For installation and connections, refer to the separate manual.
Pour l’installation et les raccordements, se référer au manuel séparé.
INSTRUCTIONS
MANUEL D’INSTRUCTIONS
ʷʾʿʺƖʷʷʺ
ƾƭƿ
Please read all instructions carefully before operation, to ensure your complete understanding and to
Thank you for purchasing a JVC product.
obtain the best possible performance from the unit.
.
Warning:
Stop the car before operating the unit.
Caution:
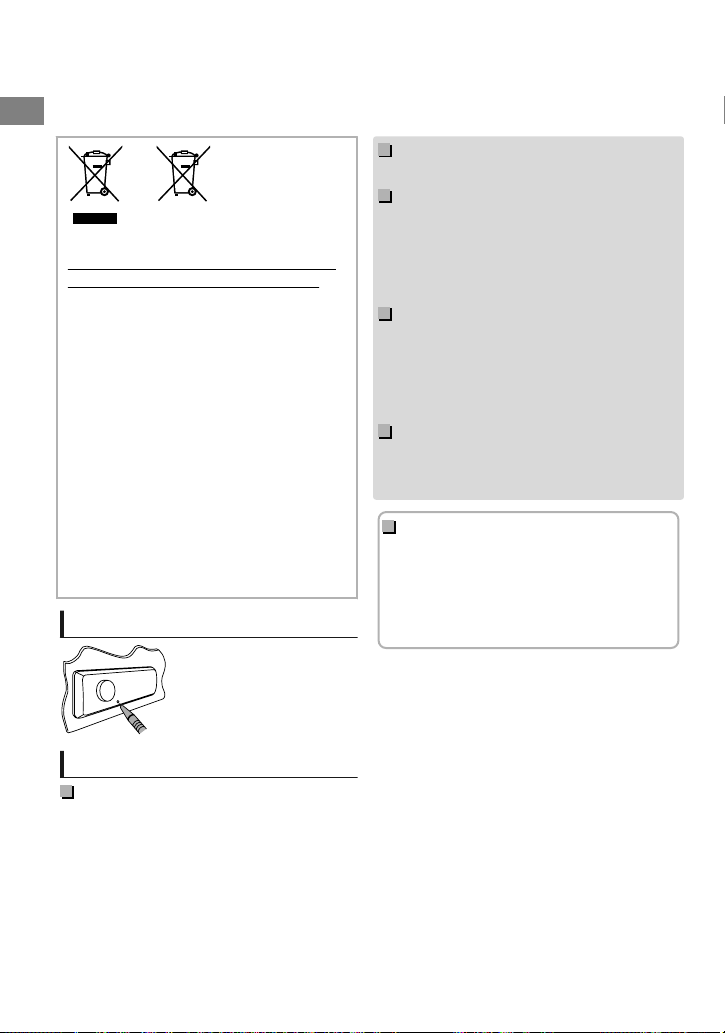
Battery
Products
Information for Users on Disposal
of Old Equipment and Batteries
[European Union only]
These symbols indicate that the product
and the battery with this symbol should
not be disposed as general household
waste at its end-of-life.
If you wish to dispose of this product and
the battery, please do so in accordance
with applicable national legislation or other
rules in your country and municipality.
By disposing of this product correctly, you
will help to conserve natural resources and
will help prevent potential negative effects
on the environment and human health.
Notice:
The sign Pb below the symbol for batteries
indicates that this battery contains lead.
.
How to reset your unit
Your preset adjustments will
also be erased.
Adjust the volume so that you can hear sounds
outside the car. Driving with the volume too high
may cause an accident.
Avoid using the USB device or iPod/iPhone if it
might hinder driving safety.
Caution on volume setting:
Digital devices (USB) produce very little noise
compared with other sources. Lower the volume
before playing these digital sources to avoid
damaging the speakers by the sudden increase of
the output level.
Temperature inside the car:
If you have parked the car for a long time in hot
or cold weather, wait until the temperature in the
car becomes normal before operating the unit.
How to read this manual:
This manual mainly explains operations using
the buttons on the control panel.
< > indicates the displays on the control
panel.
[XX] indicates the initial setting of a menu
item.
Maintenance
Cleaning the unit
Wipe off the dirt on the panel with a dry silicon or
soft cloth. Failure to observe this precaution may
result in damage to the unit.
|ޓENGLISH
2
Contents
Preparation …………………………………………………… 3
Canceling the display demonstration
Setting the clock
Basic operations …………………………………………… 4
Remote controller
Radio ……………………………………………………………… 6
USB …………………………………………………………………. 8
iPod/iPhone
External components ……………………………….. 10
………………………………………….. 5
(KD-X40 only)
……………………………. 9
Preparation
Bluetooth姞
Illumination color adjustments
(KD-X40 only)
Brightness adjustments ……………………………. 12
Sound adjustments …………………………………… 12
Menu operations ……………………………………….. 13
Additional information …………………………….. 16
Troubleshooting ………………………………………… 18
Specifications …………………………………………….. 19
…………………………………………………… 10
………………………………………………… 11
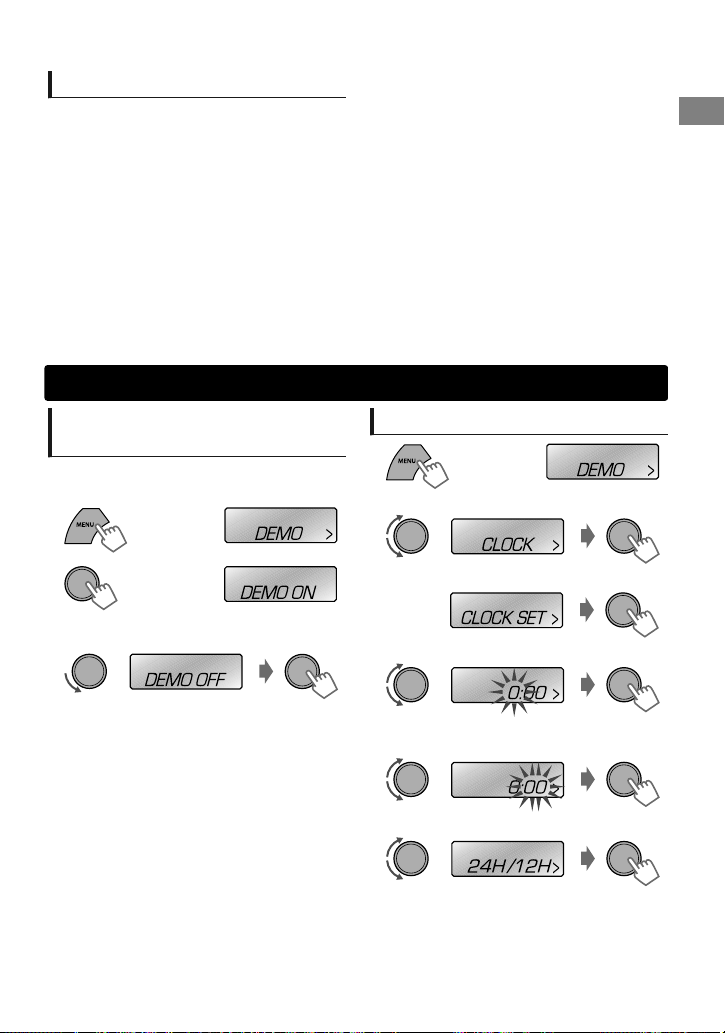
Canceling the display
demonstration
The display demonstration is always turned on
unless you cancel it.
1
2
3
Select <DEMO OFF>.
4
Press MENU to exit.
(Hold)
(Initial setting)
Setting the clock
1
2
Select <CLOCK>.
3
Select <CLOCK SET>.
4
Adjust the hour.
5
Adjust the minute.
6
Select <24H/12H>.
7
Select <24 HOUR> or <12 HOUR>.
8
Press MENU to exit.
ENGLISHޓ|
3
Basic operations
Basic operations
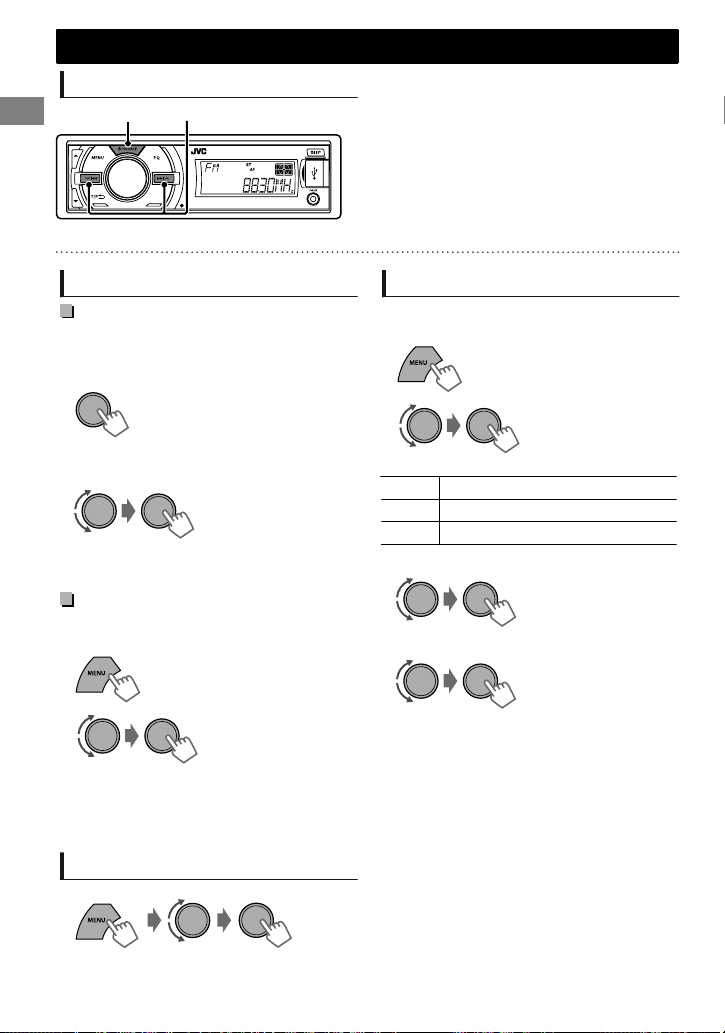
Control panel
Display window
Remote controller
(For KD-X40 only)
Control dial
Remote sensor
Aim the remote controller directly at the sensor.
DO NOT expose to bright sunlight.
Front AUX input jack
USB input terminal
When you press or hold the following button(s)…
Control panel
/SOURCE
Control dial
(turn)
Control dial
(press)
iPod —
EQ SOUND
/ /
/
.
KD-X30 can be remotely controlled as instructed here (with an optionally purchased remote
controller). We recommend that you use remote controller RM-RK52 with your unit.
Remote
controller
—
Turns on.
Turns off. (Hold)
Press the /SOURCE button on the control panel and turn
the control dial within 2 seconds to select the source.
General function
SOURCE Press repeatedly to select the source.
VOL — / + Adjusts the volume level.
— Selects items.
Mutes the sound or pauses playback.
)
Press the button again to cancel muting or resume
playback.
— Confirms selection.
—
Enters <BRIGHTNESS> menu directly. (KD-X30 only)
(‘ page 12)
Switches to iPod source. (KD-X40 only)
Switches the iPod mode when in the iPod source. (KD-X40
only) (‘ page 9)
Selects the preset sound mode. (‘ page 12)
Activates/deactivates TA Standby Reception. (‘ page 7)
—
/
Enters PTY Search mode. (Hold) (‘ page 7)
Returns to the previous menu.
Exits from the menu. (Hold)
Selects a preset station. (‘ page 6)
Selects MP3/WMA folder. (‘ page 
Searches for a station automatically. (‘ page 6)
Searches for a station manually. (Hold)
Selects track. (‘ page 8, 9)
Fast-forwards or reverses track. (Hold)
|ޓENGLISH
4
Display information
Changes the display information. (Press)
Scrolls the current display information. (Hold)
Source Display
Radio
USB
iPod/iPhone (HEAD MODE/
IPOD MODE) *1
iPod/iPhone (EXT MODE) *1
External Components (AUX)
Bluetooth Audio
*1 For KD-X40 only.
Non-Radio Data System station: Frequency ) Clock
FM Radio Data System station: Station name (PS) — Frequency —
Programme type (PTY) — Clock — (back to the beginning)
Album title/Artist — Track title — Track no./Playing time — Track no./
Clock — (back to the beginning)
EXT MODE) Clock
F-AUX or R-AUX) Clock
BT AUDIO) Clock
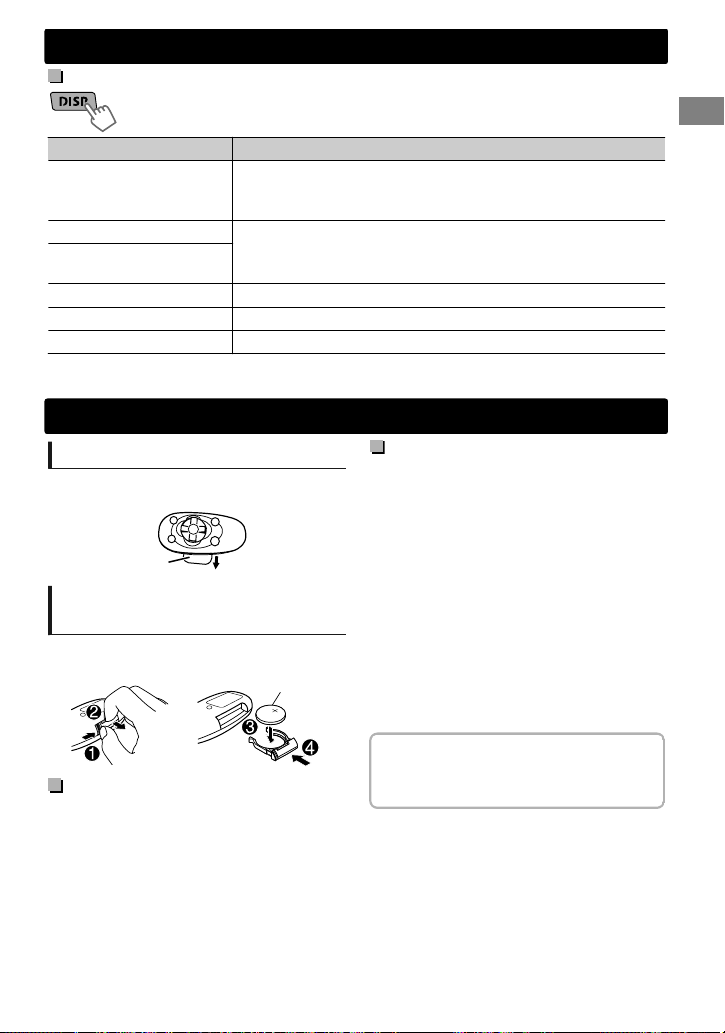
Remote controller
Preparing
When you use the remote controller for the first
time, pull out the insulation sheet.
Insulation sheet
Replacing the lithium coin
battery
If the effectiveness of the remote controller
decreases, replace the battery.
Caution:
Danger of explosion if battery is incorrectly
replaced. Replace only with the same or
equivalent type.
Battery shall not be exposed to excessive heat
such as sunshine, fire, or the like.
CR2025
Basic operations
Warning:
Do not install any battery other than CR2025 or
its equivalent.
Do not leave the remote controller in places
(such as dashboards) exposed to direct
sunlight for a long time.
Store the battery in places out of reach of
children.
Do not recharge, short, disassemble, heat the
battery, or dispose of it in a fire.
Do not place the battery with other metallic
materials.
Do not poke the battery with tweezers or
similar tools.
Insulate the battery by wrapping it with tape
when disposing or storing it.
This unit is equipped with the steering wheel
remote control function. For details, refer also to
the instructions supplied with the remote
adapter.
ENGLISHޓ|
5
Radio
Radio
Searching for a station
A
B
“ST” lights up when receiving an FM stereo broadcast with sufficient signal strength.
Select <FM> or <AM>.
Auto search. (Press)
Manual search. (Hold)
“M” flashes, then press the button repeatedly.
Storing stations in memory
Manual presetting
You can preset up to 18 stations for FM and 6
stations for AM.
While listening to a station…
1
“PRESET MODE” flashes.
2
The preset number flashes and “MEMORY”
appears.
(Hold)
Select preset number.
Auto presetting (FM only)
SSM (Strong-station Sequential Memory)
You can preset up to 18 stations for FM.
1
2
“SSM” flashes. When all the stations are stored,
“SSM” stops flashing.
To preset <SSM 07 – 12>/<SSM 13 – 18>,
repeat steps 1 and 2.
(Hold)
—<TUNER>
—<SSM>
—<SSM 01 – 06>
Selecting a preset station
Setting the Radio Timer
You can tune in to a preset station at a specific
time regardless of the current source.
1
2
[OFF] Cancels Radio Timer.
ONCE Activates once.
DAILY Activates daily.
3
Select the preset station.
4
Set the activation time.
5
Press MENU to exit.
lights up after the Radio Timer has been set.
Only one timer can be set. Setting a new timer
will override the previous setting.
The Radio Timer will not activate if the unit is
turned off or if <AM> is set to <OFF> after
selecting an AM station for the timer.
—<TUNER>
—<RADIO TIMER>
—<OFF>/<ONCE>/
<DAILY>
—<FM>/<AM>
—<01> … <18> for FM/
<01> … <06> for AM
You can also select a preset station using / .
|ޓENGLISH
6
The following features are available only
for FM Radio Data System stations.
Radio
NEWS Standby Reception
1
Searching for your favorite
Programmes—Programme
Type (PTY) Search
1
2
Select a PTY code.
PTY Search starts.
If there is a station broadcasting a programme of the
same PTY code as you have selected, that station is
tuned in.
PTY codes
NEWS, AFFAIRS, INFO, SPORT, EDUCATE, DRAMA, CULTURE,
SCIENCE, VARIED, POP M (music), ROCK M (music), EASY M
(music), LIGHT M (music), CLASSICS, OTHER M (music),
WEATHER, FINANCE, CHILDREN, SOCIAL, RELIGION,
PHONEIN, TRAVEL, LEISURE, JAZZ, COUNTRY, NATION M
(music), OLDIES, FOLK M (music), DOCUMENT
(Hold)
Activating TA/News Standby
Reception
Standby Reception allows the unit to switch
temporarily to Traffic Announcement (TA) or
NEWS programme from any source other than
AM.
TA Standby Reception
TP indicator TA Standby Reception
Lights up
Flashes
To deactivate, press again.
The unit will temporarily switch
to Traffic Announcement (TA) if
available.
Not yet activated. Tune in to
another station providing the
Radio Data System signals.
2
The unit will temporarily switch to News
Programme if available.
If the volume is adjusted during reception of
Traffic Announcement or News, the adjusted
volume is automatically memorized. It will be
applied the next time the unit switches to
Traffic Announcement or News.
—<TUNER>
—<NEWS-STBY>
—<NEWS ON>
Tracking the same programme
—Network-Tracking Reception
When driving in an area where FM reception is
not sufficient enough, this unit automatically
tunes in to another FM Radio Data System station
of the same network, possibly broadcasting the
same programme with stronger signals.
1
2
[AF ON]
AF-REG ON
OFF
* AF-REG: Alternative Frequencies-Regional
—<TUNER>
—<AF-REG> *
Switches to another station.
The programme may differ
from the one currently received
(the AF indicator lights up).
Switches to another station
broadcasting the same
programme (the AF indicator
lights up).
Cancels.
Automatic station selection—
Programme Search
When the signal of a preset station you have
selected is weak, this unit searches for another
station possibly broadcasting the same
programme as the original preset station is
broadcasting.
<P-SEARCH> (‘ page 15)
ENGLISHޓ|
7
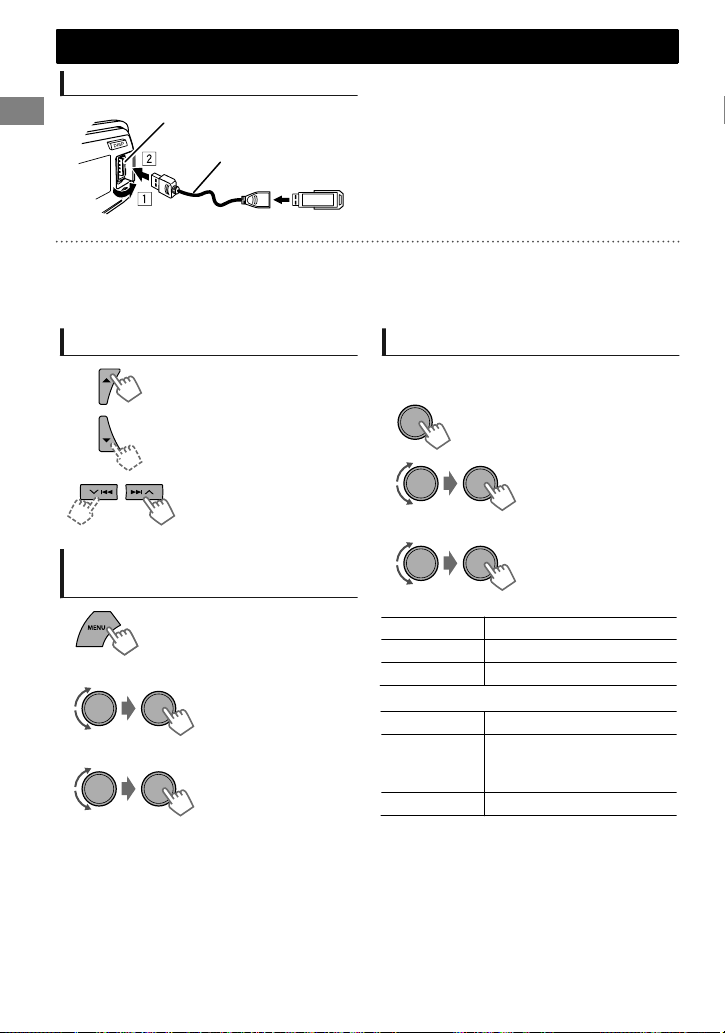
USB
USB
Playing a USB device
USB input terminal
USB 2.0 cable (not supplied)
The source changes to “USB” and playback starts.
This unit can play MP3/WMA files stored in USB mass storage device (such as a USB memory and
Digital Audio Player).
Make sure all important data has been backed up. We shall bear no responsibility for any loss of data
in USB mass storage class device while using this system.
Selecting a folder/track
Selects folder.
Selects track. (Press)
Fast-forwards or reverses
the track. (Hold)
Selecting a track/folder from
the list
1
2
Select a folder.
3
Select a track.
If the USB device contains many folders or
tracks, you can fast search for desired folder or
track by turning the control dial quickly.
Selecting the playback modes
You can select one of the following playback
modes at a time.
1
2
#<REPEAT>)<RANDOM>
3
REPEAT
RPT OFF Cancels repeat playback.
TRACK RPT Repeats current track.
FOLDER RPT Repeats current folder.
RANDOM
RND OFF Cancels random playback.
FOLDER RND
ALL RND Randomly plays all tracks.
Randomly plays all tracks of
current folder, then tracks of
next folders.
|ޓENGLISH
8
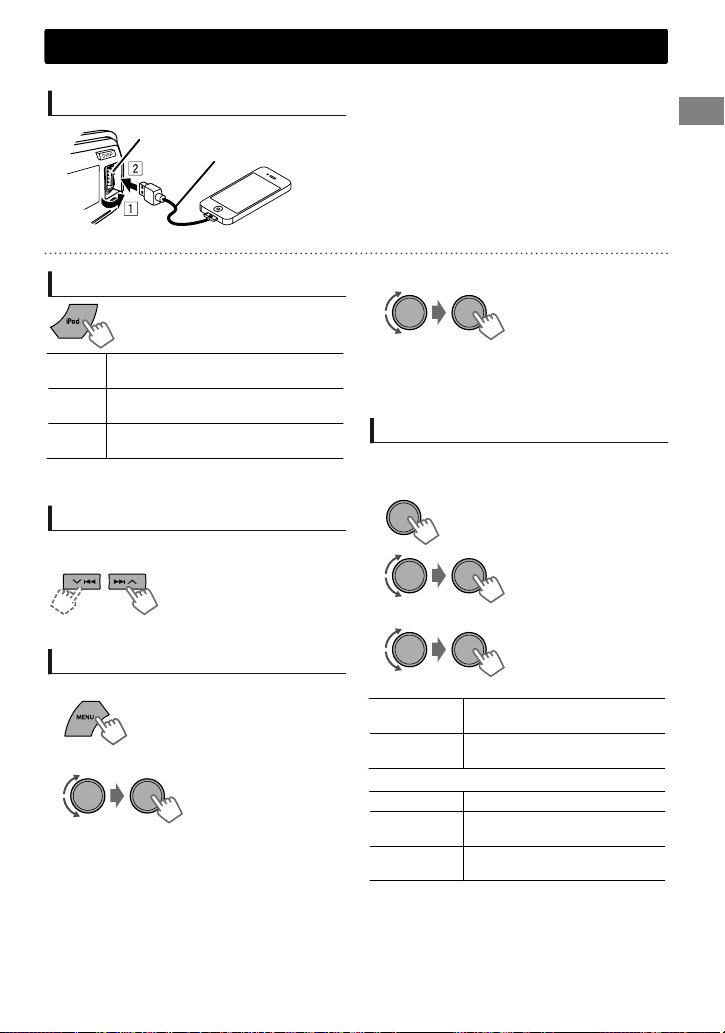
iPod/iPhone
KD-X40 only
Playing an iPod/iPhone
USB input terminal
USB 2.0 cable (accessory of the iPod/iPhone)
The source changes to “USB”-“USB-IPOD” and playback starts.
3
Selecting the control mode
#<HEAD MODE>/<IPOD MODE>/
<EXT MODE>
HEAD
Controls iPod playback through this
MODE
unit.
IPOD
Controls iPod playback from the
MODE
iPod/iPhone.
EXT
Allows any audio signals from iPod/
MODE
iPhone.
You can also change the setting using <IPOD
SWITCH> in the menu. (‘ page 15)
Selecting a track
Applicable under <HEAD MODE/IPOD MODE>
only.
Selects track/chapter.
(Press)
Fast-forwards or reverses
the track. (Hold)
Selecting a track from the list
Applicable under <HEAD MODE> only.
1
2
Select the desired list.
PLAYLISTS)ARTISTS)ALBUMS)SONGS)
PODCASTS)GENRES)COMPOSERS) (back to
the beginning)
Select the desired track.
Repeat this step until the desired track is selected.
If the selected menu contains many tracks, you
can fast search for the desired track by turning
the control dial quickly.
Selecting the playback modes
Applicable under <HEAD MODE> only.
You can select one of the following playback
modes at a time.
1
2
#<REPEAT>)<RANDOM>
3
REPEAT
ONE RPT
ALL RPT
RANDOM
RND OFF Cancels random playback.
SONG RND
ALBUM RND
“ALBUM RND” is not applicable for some iPod/
iPhone.
Functions the same as “Repeat
One” of the iPod.
Functions the same as “Repeat
All” of the iPod.
Functions the same as “Shuffle
Songs” of the iPod.
Functions the same as “Shuffle
Albums” of the iPod.
ENGLISHޓ|
9
External components
External components
For details, refer also to the instructions supplied with the external components.
Playing an external component from Front/Rear AUX
1
Connect to F-AUX on the control panel
3.5 mm stereo mini plug
(not supplied)
and/or R-AUX on the rear panel.
2
Set the source as necessary.
Portable audio
player, etc.
3.5 mm stereo mini plug
(with “L” shaped connector)
(not supplied)
Use a 3-terminal plug head stereo mini plug for optimum audio output. Otherwise, sound
may be interrupted or unclear while listening to an external component.
Bluetooth
For Bluetooth operations, it is required to connect the Bluetooth adapter, KS-BTA100
(separately purchased) to the auxiliary input jack (R-AUX/BT ADAPTER) on the rear of
the unit. (‘Installation/Connection Manual)
KS-BTA100 is not available in some countries. Please contact your dealer where you
purchased this unit.
Operations may be different depending on the connected Bluetooth device. For
details, refer also to the instructions supplied with the device.
姞
Press MENU to exit.
3
Select <F-AUX> or <R-AUX>.
4
Turn on the connected component and
start playing the source.
—<SRC SELECT>
—<F-AUX>/<R-AUX>
—<F-AUX ON> or
<R-AUX ON>
Preparation
For details on registering and using the Bluetooth device, refer to the instructions manual supplied with
KS-BTA100.
1
Register (pair) a Bluetooth device with KS-BTA100.
2
3
Change the <SRC SELECT> settings of this unit.
(Hold)
Press MENU to exit.
—<SRC SELECT>
—<R-AUX>
—<BT ADAPTER>
|ޓENGLISH
10

Illumination color adjustments
KD-X40 only
All zone
Display zoneButton zone
All zone: Includes both Button zone and
Display zone.
Selecting the preset color
You can select a preset color for <BUTTON
ZONE>, <DISP ZONE>, and <ALL ZONE>
separately.
1
2
Select <COLOR>.
3
BUTTON ZONE
DISP ZONE
ALL ZONE
Initial color: BUTTON ZONE [06], DISP ZONE
[01], ALL ZONE [06].
If <ALL ZONE> is selected, the button and
display illumination will change to the current/
selected <BUTTON ZONE> color.
4
Press MENU to exit.
(Hold)
COLOR 01-29/USER/
COLOR FLOW 01-03*
* Color changes in
different speeds.
Storing your own adjustments
You can store your own day and night colors for
<BUTTON ZONE> and <DISP ZONE> separately.
1
2
Select <COLOR SETUP>.
3
BUTTON
DAY
COLOR
NIGHT
COLOR
MENU
COLOR
4
ZONE
DISP
ZONE
BUTTON
ZONE
DISP
ZONE
ON
OFF
NIGHT COLOR/DAY COLOR is changed by
turning on/off your car’s headlight.
Press MENU to exit.
Select a primary
color <RED/GREEN/
BLUE>, and then
adjust the level
<00-31>. Repeat this
procedure until you
have adjusted all the
three primary colors.
Your adjustment is
automatically stored
to “USER”.
If “00” is selected for
all the primary colors
for <DISP ZONE>,
nothing appears on
the display.
Changes the display and
buttons illumination
during menu, list search,
and playback mode
operations.
ENGLISHޓ|
11
Brightness adjustments
Brightness adjustments
You can select your preferred brightness for <BUTTON ZONE>, <DISP ZONE> separately.
1
Brightness button is only available for KD-X30.
For KD-X40, ‘ page 13.
2
BUTTON ZONE BUTTON 00 to 31
DISP ZONE DISP 00 to 31
3
Press MENU to exit.
Sound adjustments
This unit memorizes sound settings adjusted for each individual source.
Selecting the preset sound
You can select a preset sound mode, for each
individual source, suitable for the music genre.
Pro Equalizer
1
— — — — — — — — or — — — — — — — —
DYNAMIC-VOCAL BOOST-BASS BOOSTUSER-FLAT-NATURAL-(back to the beginning)
Press repeatedly.
Storing your own adjustments
While listening, you can adjust and store the tone
level for each individual source.
Easy Equalizer
1
2
Adjust the level.
SUB.W* 00 to 08 [08]
BASS LVL** -06 to +06 [+05]
MID LVL -06 to +06 [00]
TRE LVL -06 to +06 [+05]
The adjustments are stored and <USER> is
activated.
(Hold)
(Initial: [XX])
2
—<PRO EQ>
—<BASS>**/<MIDDLE>/
<TREBLE>
3
Adjust the sound elements of the selected tone.
BASS (Initial: [XX])
Frequency 60/80/[100]/200 Hz
Level LVL -06 to +06 [+05]
Q [Q1.0]/Q1.25/Q1.5/Q2.0
MIDDLE
Frequency 0.5/[1.0]/1.5/2.5 kHz
Level LVL -06 to +06 [00]
Q Q0.75/Q1.0/[Q1.25]
TREBLE
Frequency 10.0/[12.5]/15.0/17.5 kHz
Level LVL -06 to +06 [+05]
Q [Q FIX]
4
Repeat steps 2 and 3 to adjust other tones.
The adjustments are stored and <USER> is
activated.
5
Press MENU to exit.
* Available only when <L/O MODE> is set to
<SUB.W>. (‘ page 14)
** Available only when <HPF> is set to <OFF>.
(‘ page 14)
|ޓENGLISH
12
Loading…
Manual
View the manual for the JVC KD-X30 here, for free. This user manual comes under the category car radios and has been rated by 11 people with an average of a 8. This manual is available in the following languages: English. Do you have a question about the JVC KD-X30?
Ask your question here
JVC KD-X30 specifications
Below you will find the product specifications and the manual specifications of the JVC KD-X30.
The JVC KD-X30 is a car radio that offers a range of features to enhance the driving experience. With a sleek and modern design, it provides a user-friendly interface that allows for easy navigation and control. The radio includes Bluetooth connectivity, enabling users to stream music and make hands-free phone calls while driving. Additionally, the KD-X30 includes a front USB port, allowing for direct connection to compatible devices and playback of audio files.
The KD-X30 also offers a 13-band equalizer, providing advanced audio customization options. The radio’s MOS-FET amplifier delivers high-quality sound, with a power output of up to 50 watts per channel. The KD-X30 has the ability to play FLAC files, ensuring high-resolution playback of lossless audio.
The radio’s LCD display provides clear and concise information, while its rotary encoder allows for quick and simple adjustments. The KD-X30 is designed to fit into a standard car stereo slot, with a detachable faceplate for added convenience and security. Overall, the JVC KD-X30 is a reliable and feature-packed car radio that is sure to enhance the driving experience.
General
| Brand | JVC |
| Model | KD-X30 |
| Product | car radio |
| Language | English |
| Filetype | Manual (PDF) |
Frequently asked questions
Can’t find the answer to your question in the manual? You may find the answer to your question in the FAQs about the JVC KD-X30 below.
What is bluetooth?
Bluetooth is a way of exchanging data wirelessly between electronic devices via radio waves. The distance between the two devices that exchange data can in most cases be no more than ten metres.
My car radio does not turn on, now what?
If your car radio does not turn on, it will not receive any power. Check that the red wire is connected to the contact power supply and the yellow wire to the constant power supply.
When is my volume too loud?
A volume above 80 decibels can be harmful to hearing. When the volume exceeds 120 decibels, direct damage can even occur. The chance of hearing damage depends on the listening frequency and duration.
How can I best clean my car radio?
A slightly damp cleaning cloth or soft, dust-free cloth works best to remove fingerprints. Dust in hard-to-reach places is best removed with compressed air.
What is the difference between FM and AM?
FM stands for Frequency Modulation and AM stands for Amplitude Modulation. The biggest difference between FM radio stations compared to AM radio stations is the sound quality.
Is the manual of the JVC KD-X30 available in English?
Yes, the manual of the JVC KD-X30 is available in English .
Is your question not listed? Ask your question here
Перейти к контенту
Автомагнитолы JVC
- Размер инструкции: 1.55 Мб
- Формат файла: pdf
Если вы потеряли инструкцию от автомагнитолы JVC KD-X30, можете скачать файл для просмотра на компьютере или печати.
Инструкция для автомагнитолы JVC KD-X30 на русском языке. В руководстве описаны возможности и полезные функции, а также правила эксплуатации. Перед использованием внимательно ознакомьтесь с инструкцией.
Чтобы не читать всю инструкцию вы можете выполнить поиск по содержимому внутри инструкции и быстро найти необходимую информацию. Рекомендации по использованию помогут увеличить срок службы автомагнитолы JVC KD-X30. Если у вас появилась проблема, то найдите раздел с описанием неисправностей и способами их решения. В нем указаны типичные поломки и способы их решения.
-
Page 1
DIGITAL MEDIA RECEIVER / RÉCEPTEUR MULTIMÉDIA NUMÉRIQUE For canceling the display demonstration, see page 3. / Pour annuler la démonstration des affichages, référez-vous à la page 3. ENGLISH FRANÇAIS INSTRUCTIONS MANUEL D’INSTRUCTIONS GET0783-003A [E/EN] KD-X40/KD-X30 For installation and connections, refer to the separate manual. Pour l?[…]
-
Page 2
Thank you for purchasing a JVC product. Please read all instructions carefully before operation, to ensure your complete understanding and to obtain the best possible performance from the unit. Battery Products Information for Users on Disposal of Old Equipment and Batteries [European Union only] These symbols indicate that the product and the batt[…]
-
Page 3
Contents Preparation …………………………………………………… 3 Canceling the display demonstration Setting the clock Basic operations …………………………………………… 4 Remote controller ………………………………………….. 5 Radio ……………………………………………………….[…]
-
Page 4
Remote controller USB input terminal Front AUX input jack DO NOT expose to bright sunlight. Remote sensor Display window Control dial Control panel (For KD- X40 only) Aim the remote controller directly at the sensor. When you press or hold the following button(s)… Control panel Remote controller General function /SOURCE — Turns on. […]
-
Page 5
Display information Changes the display information. (Press) Scrolls the current display information. (Hold) Source Display Radio Non-Radio Data System station: Frequency ) Clock FM Radio Data System station: Station name (PS) — Frequency — Programme type (PTY) — Clock — (back to the beginning) USB Album title/Artist — Track title — Track no./Playi[…]
-
Page 6
Searching for a station A B Select <FM> or <AM>. Auto search. (Press) Manual search. (Hold) “ M ” flashes, then press the button repeatedly. “ ST ” lights up when receiving an FM stereo broadcast with sufficient signal strength. Storing stations in memory Manual presetting You can preset up to 18 stations for FM and 6 st[…]
-
Page 7
The following features are available only for FM Radio Data System stations. Searching for your favorite Programmes—Programme Type (PTY) Search (Hold) 1 PTY Search starts. If there is a station broadcasting a programme of the same PTY code as you have selected, that station is tuned in. 2 Select a PTY code. PTY codes NEWS, AFFAIRS, IN[…]
-
Page 8
Playing a USB device USB 2.0 cable (not supplied) USB input terminal The source changes to “ USB ” and playback starts. This unit can play MP3/WMA files stored in USB mass storage device (such as a USB memory and Digital Audio Player). Make sure all important data has been backed up. We shall bear no responsibility for any loss of data […]
-
Page 9
iPod/iPhone KD-X40 only Playing an iPod/iPhone USB 2.0 cable (accessory of the iPod/iPhone) USB input terminal The source changes to “ USB ” — “ USB-IPOD ” and playback starts. Selecting the control mode # < HEAD MODE > / < IPOD MODE > / < EXT MODE > HEAD MODE Controls iPod playback through this unit. IPOD MODE Con[…]
-
Page 10
For details, refer also to the instructions supplied with the external components. Playing an external component from Front/Rear AUX Portable audio player, etc. 3.5 mm stereo mini plug (not supplied) 3.5 mm stereo mini plug (with “L” shaped connector) (not supplied) 1 Connect to F-AUX on the control panel and/or R-AUX on the rear panel. (Hold) […]
-
Page 11
Illumination color adjustments KD-X40 only All zone Display zone Button zone All zone: Includes both Button zone and Display zone. Selecting the preset color You can select a preset color for < BUTTON ZONE > , < DISP ZONE > , and < ALL ZONE > separately. (Hold) 1 2 Select <COLOR>. BUTTON ZONE COLOR 01-29/USER/ COLOR FLOW 01-[…]
-
Page 12
You can select your preferred brightness for < BUTTON ZONE > , < DISP ZONE > separately. Brightness button is only available for KD-X30. For KD-X40, ‘ page 13. 1 BUTTON ZONE BUTTON 00 to 31 DISP ZONE DISP 00 to 31 2 3 Press MENU to exit. Sound adjustments This unit memorizes sound settings adjusted for each individual sourc[…]
-
Page 13
(Hold) If no operation is done for about 60 seconds, the operation will be canceled. 1 2 3 Repeat step 2 if necessary. To return to the previous menu, press . To exit from the menu, press DISP or MENU . Menu item Selectable setting (Initial: [XX]) DEMO For settings, ‘ page 3. CLOCK CLOCK SET 24H/12H CLOCK ADJ *1 (Clock adjustment) […]
-
Page 14
Menu item Selectable setting (Initial: [XX]) AUDIO FADER *5*6 R06 — F06 [00] : Adjusts the front and rear speaker output balance. BALANCE *6 L06 — R06 [00] : Adjusts the left and right speaker output balance. LOUD (Loudness) ON : Boosts low and high frequencies to produce a well-balanced sound at a low volume level. [OFF] : Cancels. VOL[…]
-
Page 15
Menu item Selectable setting (Initial: [XX]) TUNER SSM For settings, ‘ page 6. (Displayed only when the source is “ FM ” .) AF-REG *11 For settings, ‘ page 7. NEWS-STBY *11 (News standby) ON / [OFF] : Activates or deactivates NEWS Standby Reception. (Displayed only when the source is “ FM ” .) ( ‘ page 7) P-SEARCH *11 (Progra[…]
-
Page 16
About audio files Playable files File extensions: MP3(.mp3), WMA(.wma) Bit rate: MP3: 8 kbps — 320 kbps WMA: 32 kbps — 192 kbps Sampling frequency: MP3: 48 kHz, 44.1 kHz, 32 kHz, 24 kHz, 22.05 kHz, 16 kHz, 12 kHz, 11.025 kHz, 8 kHz WMA: 48 kHz, 44.1 kHz, 32 kHz Variable bit rate (VBR) files. (The elapsed time for VBR files will […]
-
Page 17
About iPod/iPhone iPod/iPhone that can be connected to this unit: — iPod touch (4th generation) — iPod touch (3rd generation) — iPod touch (2nd generation) — iPod touch (1st generation) — iPod classic — iPod with video (5th generation)* — iPod nano (6th generation) — iPod nano (5th generation) — iPod nano (4th generation) — iPod nano (3rd gener[…]
-
Page 18
Symptom Remedy/Cause 4 General No sound, sound interrupted or static noise. Check the cords, aerial and cable connections. Check the condition of the connected device and recorded tracks. “ MISWIRING CHK WIRING THEN RESET UNIT ” / “ WARNING CHK WIRING THEN RESET UNIT ” appears on the display and no operations can be done. Ensure the[…]
-
Page 19
AUDIO AMPLIFIER SECTION Maximum Power Output 50 W per channel Continuous Power Output (RMS) 20 W per channel into 4Ω, 40 Hz to 20 000 Hz at less than 1% total harmonic distortion. Load Impedance 4Ω (4Ω to 8Ω allowance) Frequency Response 40 Hz to 20 000 Hz Signal-to-Noise Ratio 70 dB Line-Out, Subwoofer-Out Level/Impedance 2.5 V/20 kΩ load (fu[…]
-
Page 20
Merci pour avoir acheté un produit JVC. Veuillez lire attentivement toutes les instructions avant d’utiliser l’appareil afin de bien comprendre son fonctionnement et d’obtenir les meilleures performances possibles. Pile Produits Informations relatives à l’élimination des appareils et des piles usagés, à l’intention des utilisateurs [[…]
-
Page 21
Table des matières Préparation …………………………………………………… 3 Annulation des démonstrations des affichages Réglage de l’horloge Opérations de base ……………………………………… 4 Télécommande ……………………………………………. 5 Radio ………………………………….[…]
-
Page 22
Télécommande Prise d’ entrée USB Prise d’ entrée AUX avant N’ EXPOSEZ PAS à la lumière directe du soleil. Capteur de télécommande Fenêtre d’ affichage Molette de commande Panneau de commande (Pour KD-X40 uniquement) Visez la télécommande directement en direction du capteur. Quand vous appuyez ou maintenez pressées les touches su[…]
-
Page 23
Informations à l’écran Change l’information sur l’affichage. (Appuyez sur la touche) Fait défiler les informations actuelles de l’affichage. (Maintenez pressée) Source Affichage Radio Station non Radio Data System : Fréquence ) Horloge Station FM Radio Data System : Nom de la station (PS) — Fréquence — Type de programme (PTY) — Horlog[…]
-
Page 24
Recherche d’une station A B Choisissez <FM> ou <AM>. Recherche automatique. (Appuyez sur la touche) Recherche manuelle. (Maintenez pressée) “ M ” clignote, puis appuyez sur la touche répétitivement. “ ST ” s’allume lors de la réception d’une émission FM stéréo avec un signal suffisamment fort. Mémorisation […]
-
Page 25
Les fonctionnalités suivantes sont accessibles uniquement pour les stations FM Radio Data System. Recherche de vos programmes préférés—Recherche par type de programme (PTY) (Maintenez pressée) 1 La recherche PTY démarre. S’il y a une station diffusant un programme du code PTY que vous avez choisi, la station est accordée. 2 Choisissez un[…]
-
Page 26
Lecture d’un périphérique USB Câble USB 2.0 (non fourni) Prise d’ entrée USB La source change en “ USB ” et la lecture démarre. Cet appareil peut reproduire les fichiers MP3/WMA mémorisées dans un périphérique USB à mémoire de grande capacité (tel qu’une mémoire USB ou un lecteur audio numérique). Assurez-vous que to[…]
-
Page 27
iPod/iPhone KD-X40 uniquement Lecture d’un iPod/iPhone Câble USB 2.0 (accessoire du iPod/iPhone) Prise d’ entrée USB La source change en “ USB ” — “ USB-IPOD ” et la lecture démarre. Sélection du mode de contrôle # < HEAD MODE > / < IPOD MODE > / < EXT MODE > HEAD MODE Commande la lecture du iPod à traver[…]
-
Page 28
Pour plus d’informations, référez-vous aussi aux instructions fournies avec les appareils extérieurs. Lecture d’un appareil extérieur à partir de l’entrée auxiliaire avant/ arrière (Front/Rear AUX) Lecteur audio portable, etc. Mini fiche stéréo de 3,5 mm (non fournie) Mini fiche stéréo de 3,5 mm (avec connecteur en forme de “L ?[…]
-
Page 29
Réglages de la couleur d’éclairage KD-X40 uniquement Toutes les zones Zone d’ affichage Zone des touches Toutes les zones : inclut la zone Touches et la zone Affichage. Sélection de la couleur préréglée Vous pouvez choisir une couleur prédéfinie pour < BUTTON ZONE > , < DISP ZONE > , et < ALL ZONE > séparément. (Main[…]
-
Page 30
Vous pouvez sélectionner la luminosité de votre choix pour < BUTTON ZONE > , < DISP ZONE > séparément. Le bouton de luminosité n’est disponible que pour KD-X30. Pour KD-X40, ‘ page 13. 1 BUTTON ZONE BUTTON 00 à 31 DISP ZONE DISP 00 à 31 2 3 Appuyez sur MENU pour quitter. Réglages du son Cet appareil met en mémoir[…]
-
Page 31
(Maintenez pressée) Si aucune opération n’est effectuée pendant environ 60 secondes, l’opération est annulée. 1 2 3 Répéter l’étape 2 si nécessaire. Pour revenir au menu précédent, appuyez sur . Pour quitter le menu, appuyez sur DISP ou MENU . Article de menu Réglages pouvant être choisis (Réglage initial : [XX]) DEM[…]
-
Page 32
Article de menu Réglages pouvant être choisis (Réglage initial : [XX]) AUDIO FADER *5*6 R06 — F06 [00] : ajuste la balance de sortie avant-arrière des enceintes. BALANCE *6 L06 — R06 [00] : ajuste la balance de sortie gauche-droite des enceintes. LOUD (Volume) ON : accentue les basses et hautes fréquences pour produire un son plus […]
-
Page 33
Article de menu Réglages pouvant être choisis (Réglage initial : [XX]) TUNER SSM Pour les réglages, ‘ page 6. (Est affiché uniquement quand la source “ FM ” .) AF-REG *11 Pour les réglages, ‘ page 7. NEWS-STBY *11 (Attente d’informations) ON / [OFF] : met en ou hors service de l’attente de réception d’informations. (Est a[…]
-
Page 34
À propos des fichiers audio Fichiers compatibles Extensions de fichiers : MP3(.mp3), WMA(.wma) Débit binaire : MP3 : 8 kbps à 320 kbps WMA : 32 kbps à 192 kbps Fréquence d’échantillonnage : MP3 : 48 kHz, 44,1 kHz, 32 kHz, 24 kHz, 22,05 kHz, 16 kHz, 12 kHz, 11,025 kHz, 8 kHz WMA : 48 kHz, 44,1 kHz, 32 kHz Fichiers à déb[…]
-
Page 35
À propos d’iPod/iPhone iPod/iPhone qui peuvent être raccordés à cet appareil : — iPod touch (4e Génération) — iPod touch (3e Génération) — iPod touch (2e Génération) — iPod touch (1e Génération) — iPod classic — iPod avec vidéo (5e Génération)* — iPod nano (6e Génération) — iPod nano (5e Génération) — iPod nano (4e Généra[…]
-
Page 36
Symptôme Remède/Cause 4 Généralités Pas de son, son coupé ou bruit statique. Vérifiez les cordons, l’antenne et les connexions du câble. Vérifiez l’état du périphérique connecté et les plages enregistrées. “ MISWIRING CHK WIRING THEN RESET UNIT ” / “ WARNING CHK WIRING THEN RESET UNIT ” apparaît sur l’affichage […]
-
Page 37
SECTION DE L’AMPLIFICATEUR AUDIO Puissance de sortie maximum 50 W par canal Puissance de sortie en mode continu (RMS) 20 W par canal pour 4Ω, 40 Hz à 20 000 Hz avec moins de 1% de distorsion harmonique totale. Impédance de charge 4 (4 à 8 admissible) Réponse en fréquence 40 Hz à 20 000 Hz Rapport signal sur bruit 70 dB Niveau de […]
-
Page 38
Having TROUBLE with operation? Please reset your unit Refer to page of How to reset your unit Vous avez des PROBLÈMES de fonctionnement? Réinitialisez votre appareil Référez-vous à la page intitulée Comment réinitialiser votre appareil EN, FR © 2011 JVC KENWOOD Corporation 1111DTSSANJEIN[…]