
29
Р
УCCKИЙ
ПРОЧИЕ ОСНОВНЫЕ ФУНКЦИИ
О демонстрационном
режиме (DEMO MODE)
При поставке изготовителем установлено
для настройки “DEMO” устройства
установлено значение “DEMO ON”.
Демонстрация начинается автоматически,
если воспроизведение звука не начинается в
течение трех минут. (См. стр. 31).
Выключение демонстрационного
режима
1
Нажмите кнопку SEL (выбор) и
удерживайте ее нажатой более 2
секунд, пока на дисплее не
появится один из параметров
PSM. (См. стр. 31).
2
Нажмите
¢
или
4
, чтобы
выбрать “DEMO”.
3
Нажмите –, чтобы выбрать
“DEMO OFF”.
4
Завершите настройку.
ПРОДОЛЖЕНИЕ НА СЛЕДУЮЩЕЙ СТРАНИЦЕ
Настройка часов
После установки правильно установите
встроенные часы.
1
Нажмите кнопку SEL (выбор) и
удерживайте ее нажатой более 2
секунд, пока на дисплее не
появится один из параметров
PSM. (См. стр. 31).
2
Если не появилась надпись
“CLOCK HOUR”, нажимайте
¢
или
4
несколько раз, пока
эта надпись не появится.
3
Установите час.
4
Нажимайте
¢
или
4
,
пока на дисплее не появится
надпись “CLOCK MIN” (минуты).
RU29-33KW-XC939[EE]f.pm6
6/23/03, 4:08 AM
29
30
Р
УCCKИЙ
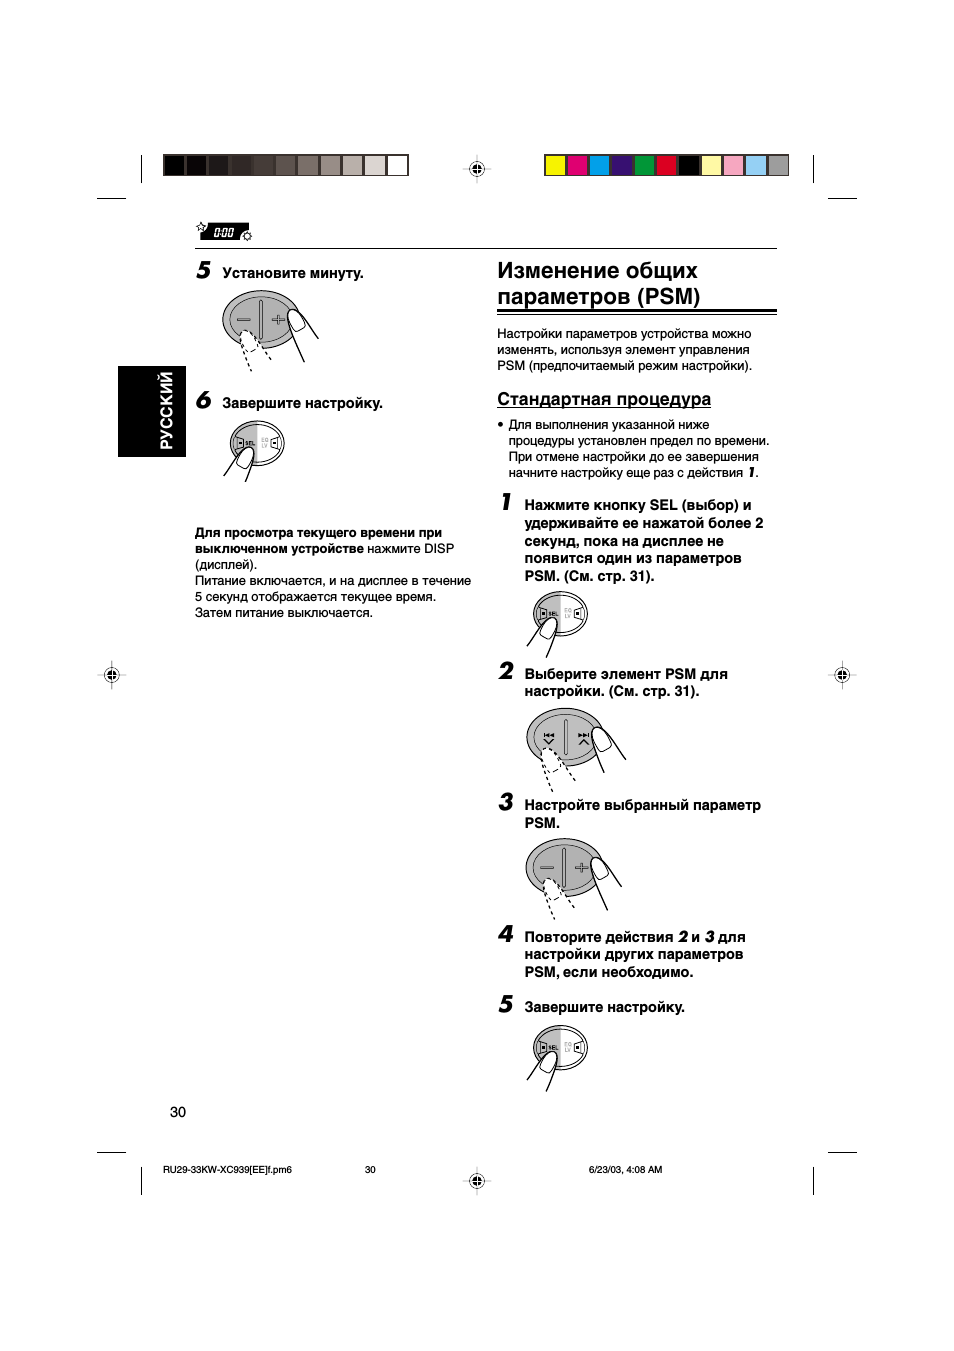
Изменение общих
параметров (PSM)
Настройки параметров устройства можно
изменять, используя элемент управления
PSM (предпочитаемый режим настройки).
Стандартная процедура
• Для выполнения указанной ниже
процедуры установлен предел по времени.
При отмене настройки до ее завершения
начните настройку еще раз с действия
1.
1
Нажмите кнопку SEL (выбор) и
удерживайте ее нажатой более 2
секунд, пока на дисплее не
появится один из параметров
PSM. (См. стр. 31).
2
Выберите элемент PSM для
настройки. (См. стр. 31).
3
Настройте выбранный параметр
PSM.
4
Повторите действия
2 и 3 для
настройки других параметров
PSM, если необходимо.
5
Завершите настройку.
5
Установите минуту.
6
Завершите настройку.
Для просмотра текущего времени при
выключенном устройстве нажмите DISP
(дисплей).
Питание включается, и на дисплее в течение
5 секунд отображается текущее время.
Затем питание выключается.
RU29-33KW-XC939[EE]f.pm6
6/23/03, 4:08 AM
30
31
Р
УCCKИЙ
Элементы предпочитаемого режима настройки (PSM)
DEMO
Демонстрационный режим
CLOCK HOUR Установка часа
CLOCK MIN
Установка минуты
CLOCK DISP
Отображение часов
EQ LINK
Привязка настройки
эквалайзера
DIMMER
Режим затемнения
CONTRAST
Контрастность дисплея
SCROLL
Режим прокрутки
EXT INPUT
Выбор внешнего
входного сигнала
AUX ADJ
Настройка уровня
дополнительного
входного сигнала
TAG DISP
Отображение тегов
Включение и выключение
демонстрационного режима
—DEMO MODE
Демонстрационный режим можно включать и
выключать.
При поставке изготовителем установлено
значение “DEMO ON”.
• DEMO OFF:
Демонстрационный режим
выключен.
• DEMO ON:
Демонстрационный режим
включен. Демонстрация
начинается автоматически,
если воспроизведение
звука не начинается в
течение трех минут.
Примечание:
После сброса и повторного включения устройства
демонстрация начинается, если звук не
воспроизводится в течение 15 секунд.
Настройка отображения часов
—CLOCK DISP
Можно настроить часы так, чтобы они
отображались на дисплее после выключения
устройства.
Заводская настройка не предусматривает
отображения часов на дисплее.
• CLOCK OFF:
Отображение часов
выключено.
• CLOCK ON:
Отображение часов
включено.
Примечание:
Если подача питания не прекращается при
выключении зажигания автомобиля,
рекомендуется выбрать “CLOCK OFF” для
сохранения заряда аккумулятора автомобиля.
DEMO OFF
DEMO ON
1
DEMO ON
31
Удержание.
Выбор.
Уменьшение
значения
Увеличение
значения
1:00
Уменьшение
значения
Увеличение
значения
29
CLOCK OFF
CLOCK ON
CLOCK OFF
31
LINK ON
LINK OFF
LINK OFF
26
DIM OFF
DIM ON
DIM AUTO
SCRL ONCE
SCRL AUTO
SCRL OFF
CD CHANGER
LINE INPUT
CD CHANGER
32
CONTRAST 1 – CONTRAST 10 CONTRAST 5
32
A.ADJ 00 – A.ADJ 05
A.ADJ 00
32
TAG OFF
TAG ON
TAG ON
32
SCRL ONCE
32
DIM AUTO
32
2
3
Установка.
–
+
Заводские
настройки
См.
стр.
RU29-33KW-XC939[EE]f.pm6
6/23/03, 4:08 AM
31

32
Р
УCCKИЙ
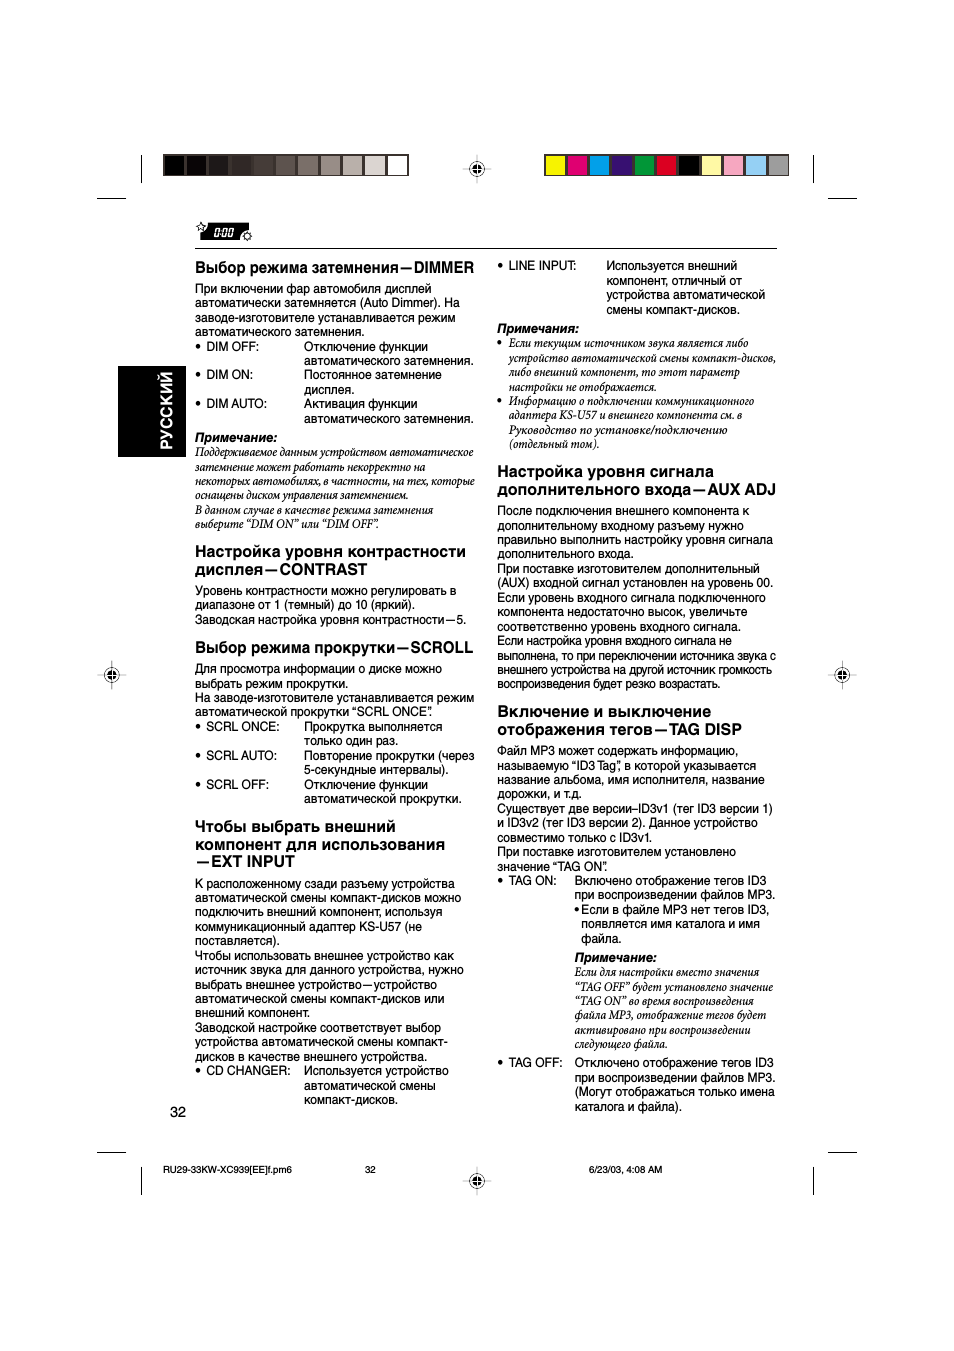
• LINE INPUT:
Используется внешний
компонент, отличный от
устройства автоматической
смены компакт-дисков.
Примечания:
• Если текущим источником звука является либо
устройство автоматической смены компакт-дисков,
либо внешний компонент, то этот параметр
настройки не отображается.
• Информацию о подключении коммуникационного
адаптера KS-U57 и внешнего компонента см. в
Руководство по установке/подключению
(отдельный том).
Настройка уровня сигнала
дополнительного входа—AUX ADJ
После подключения внешнего компонента к
дополнительному входному разъему нужно
правильно выполнить настройку уровня сигнала
дополнительного входа.
При поставке изготовителем дополнительный
(AUX) входной сигнал установлен на уровень 00.
Если уровень входного сигнала подключенного
компонента недостаточно высок, увеличьте
соответственно уровень входного сигнала.
Если настройка уровня входного сигнала не
выполнена, то при переключении источника звука с
внешнего устройства на другой источник громкость
воспроизведения будет резко возрастать.
Включение и выключение
отображения тегов—TAG DISP
Файл MP3 может содержать информацию,
называемую “ID3 Tag”, в которой указывается
название альбома, имя исполнителя, название
дорожки, и т.д.
Существует две версии–ID3v1 (тег ID3 версии 1)
и ID3v2 (тег ID3 версии 2). Данное устройство
совместимо только с ID3v1.
При поставке изготовителем установлено
значение “TAG ON”.
• TAG ON:
Включено отображение тегов ID3
при воспроизведении файлов MP3.
• Если в файле MP3 нет тегов ID3,
появляется имя каталога и имя
файла.
Примечание:
Если для настройки вместо значения
“TAG OFF” будет установлено значение
“TAG ON” во время воспроизведения
файла MP3, отображение тегов будет
активировано при воспроизведении
следующего файла.
• TAG OFF:
Отключено отображение тегов ID3
при воспроизведении файлов MP3.
(Могут отображаться только имена
каталога и файла).
Выбор режима затемнения—DIMMER
При включении фар автомобиля дисплей
автоматически затемняется (Auto Dimmer). На
заводе-изготовителе устанавливается режим
автоматического затемнения.
• DIM OFF:
Отключение функции
автоматического затемнения.
• DIM ON:
Постоянное затемнение
дисплея.
• DIM AUTO:
Активация функции
автоматического затемнения.
Примечание:
Поддерживаемое данным устройством автоматическое
затемнение может работать некорректно на
некоторых автомобилях, в частности, на тех, которые
оснащены диском управления затемнением.
В данном случае в качестве режима затемнения
выберите “DIM ON” или “DIM OFF”.
Настройка уровня контрастности
дисплея—CONTRAST
Уровень контрастности можно регулировать в
диапазоне от 1 (темный) до 10 (яркий).
Заводская настройка уровня контрастности—5.
Выбор режима прокрутки—SCROLL
Для просмотра информации о диске можно
выбрать режим прокрутки.
На заводе-изготовителе устанавливается режим
автоматической прокрутки “SCRL ONCE”.
• SCRL ONCE:
Прокрутка выполняется
только один раз.
• SCRL AUTO:
Повторение прокрутки (через
5-секундные интервалы).
• SCRL OFF:
Отключение функции
автоматической прокрутки.
Чтобы выбрать внешний
компонент для использования
—EXT INPUT
К расположенному сзади разъему устройства
автоматической смены компакт-дисков можно
подключить внешний компонент, используя
коммуникационный адаптер KS-U57 (не
поставляется).
Чтобы использовать внешнее устройство как
источник звука для данного устройства, нужно
выбрать внешнее устройство—устройство
автоматической смены компакт-дисков или
внешний компонент.
Заводской настройке соответствует выбор
устройства автоматической смены компакт-
дисков в качестве внешнего устройства.
• CD CHANGER:
Используется устройство
автоматической смены
компакт-дисков.
RU29-33KW-XC939[EE]f.pm6
6/23/03, 4:08 AM
32
33
Р
УCCKИЙ
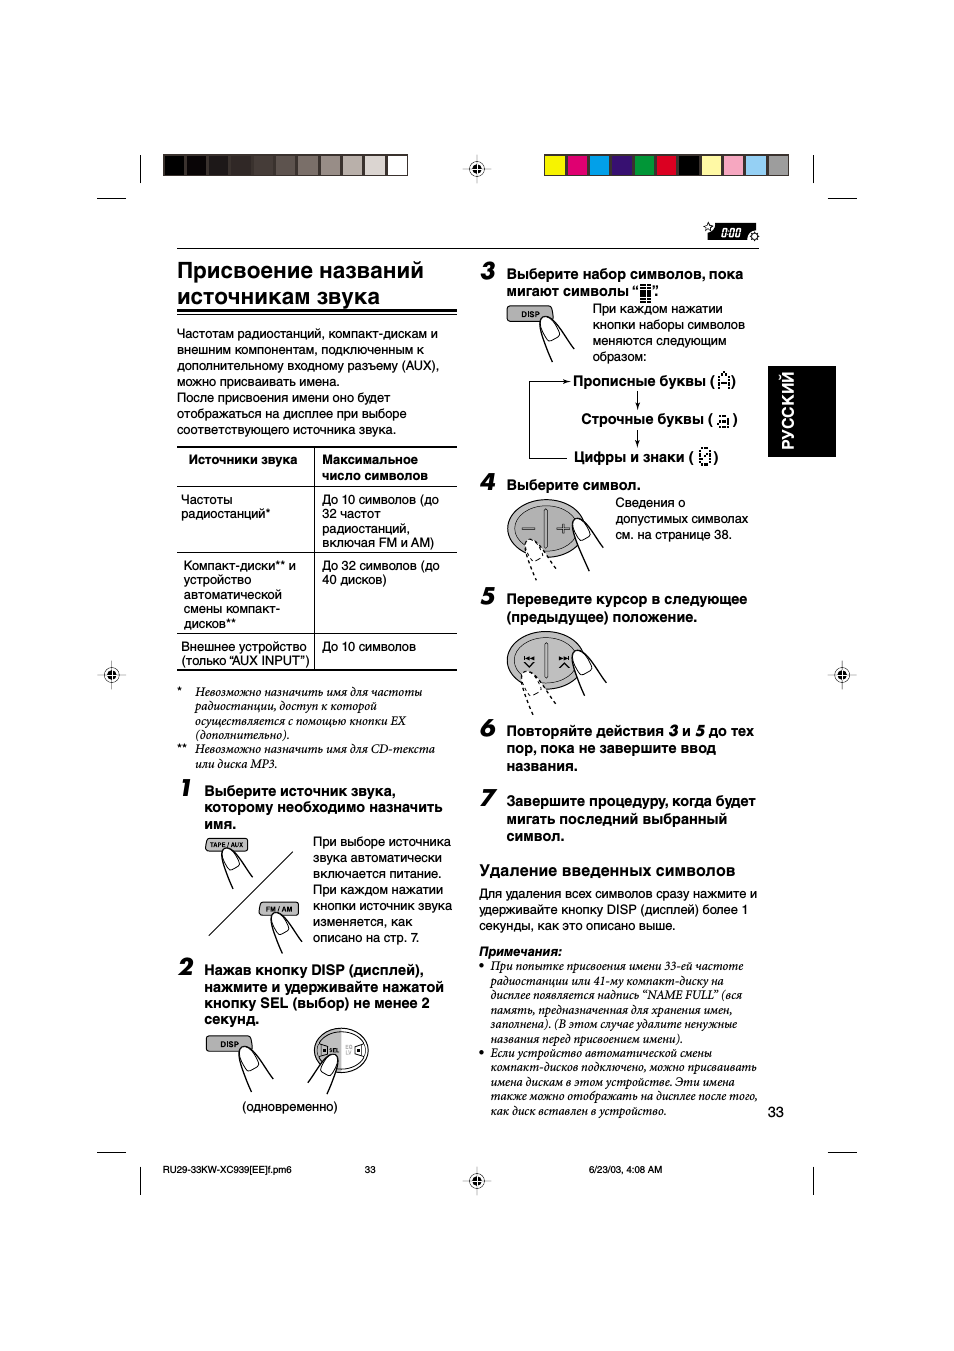
Присвоение названий
источникам звука
Частотам радиостанций, компакт-дискам и
внешним компонентам, подключенным к
дополнительному входному разъему (AUX),
можно присваивать имена.
После присвоения имени оно будет
отображаться на дисплее при выборе
соответствующего источника звука.
Источники звука
Максимальное
число символов
Частоты
До 10 символов (до
радиостанций*
32 частот
радиостанций,
включая FM и AM)
Компакт-диски** и
До 32 символов (до
устройство
40 дисков)
автоматической
смены компакт-
дисков**
Внешнее устройство
До 10 символов
(только “AUX INPUT”)
*
Невозможно назначить имя для частоты
радиостанции, доступ к которой
осуществляется с помощью кнопки EX
(дополнительно).
** Невозможно назначить имя для CD-текста
или диска MP3.
1
Выберите источник звука,
которому необходимо назначить
имя.
При выборе источника
звука автоматически
включается питание.
При каждом нажатии
кнопки источник звука
изменяется, как
описано на стр. 7.
2
Нажав кнопку DISP (дисплей),
нажмите и удерживайте нажатой
кнопку SEL (выбор) не менее 2
секунд.
(одновременно)
3
Выберите набор символов, пока
мигают символы “ ”.
При каждом нажатии
кнопки наборы символов
меняются следующим
образом:
4
Выберите символ.
Сведения о
допустимых символах
см. на странице 38.
5
Переведите курсор в следующее
(предыдущее) положение.
6
Повторяйте действия
3 и 5 до тех
пор, пока не завершите ввод
названия.
7
Завершите процедуру, когда будет
мигать последний выбранный
символ.
Удаление введенных символов
Для удаления всех символов сразу нажмите и
удерживайте кнопку DISP (дисплей) более 1
секунды, как это описано выше.
Примечания:
• При попытке присвоения имени 33-ей частоте
радиостанции или 41-му компакт-диску на
дисплее появляется надпись “NAME FULL” (вся
память, предназначенная для хранения имен,
заполнена). (В этом случае удалите ненужные
названия перед присвоением имени).
• Если устройство автоматической смены
компакт-дисков подключено, можно присваивать
имена дискам в этом устройстве. Эти имена
также можно отображать на дисплее после того,
как диск вставлен в устройство.
Прописные буквы ( )
Строчные буквы ( )
Цифры и знаки ( )
RU29-33KW-XC939[EE]f.pm6
6/23/03, 4:08 AM
33
34
Р
УCCKИЙ
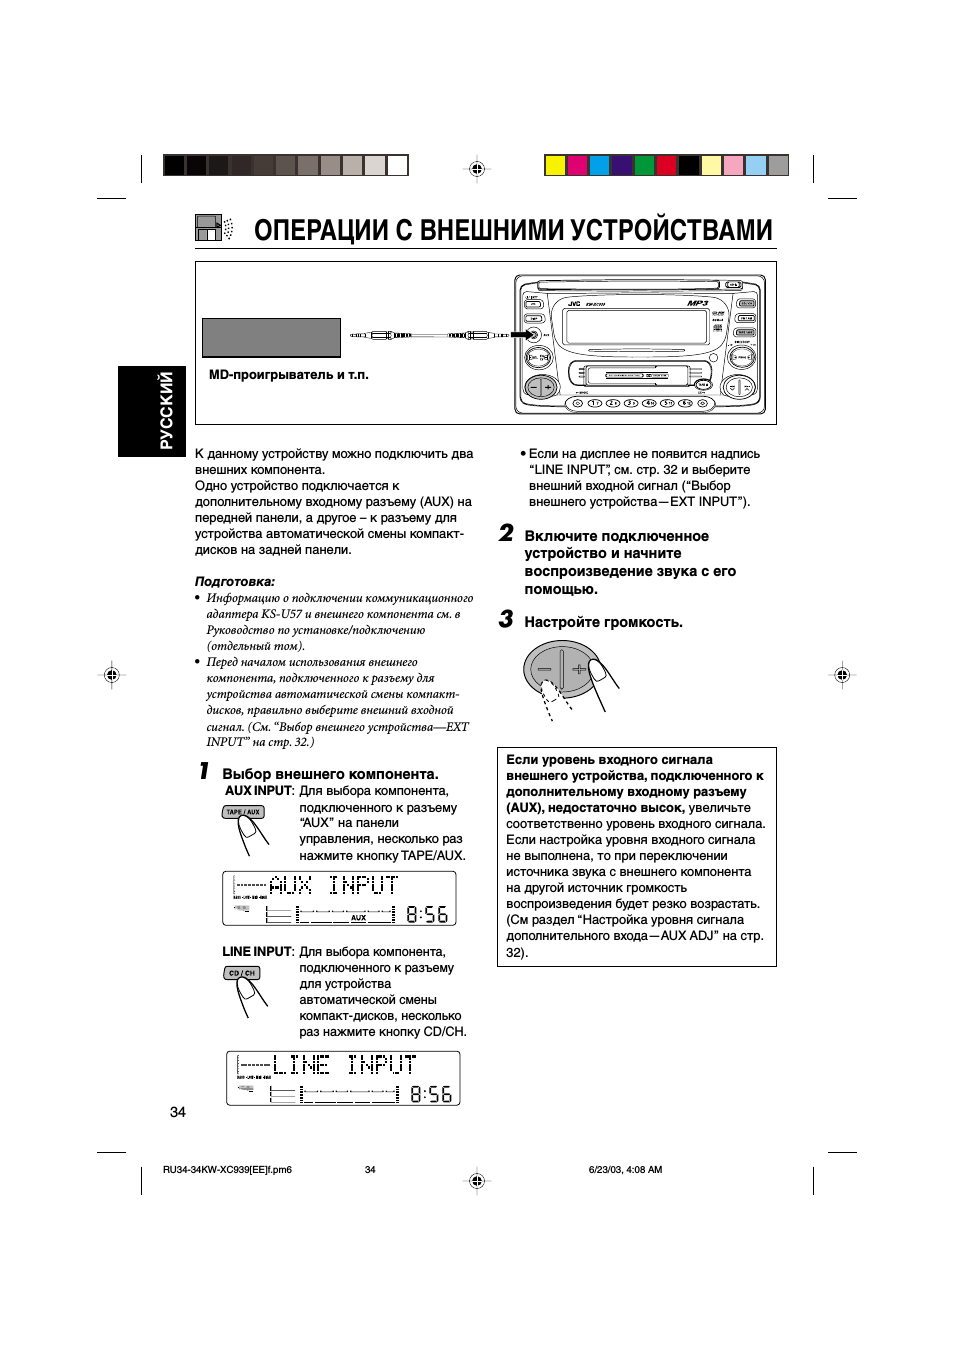
ОПЕРАЦИИ С ВНЕШНИМИ УСТРОЙСТВАМИ
К данному устройству можно подключить два
внешних компонента.
Одно устройство подключается к
дополнительному входному разъему (AUX) на
передней панели, а другое – к разъему для
устройства автоматической смены компакт-
дисков на задней панели.
Подготовка:
• Информацию о подключении коммуникационного
адаптера KS-U57 и внешнего компонента см. в
Руководство по установке/подключению
(отдельный том).
• Перед началом использования внешнего
компонента, подключенного к разъему для
устройства автоматической смены компакт-
дисков, правильно выберите внешний входной
сигнал. (См. “Выбор внешнего устройства—EXT
INPUT” на стр. 32.)
1
Выбор внешнего компонента.
AUX INPUT: Для выбора компонента,
подключенного к разъему
“AUX” на панели
управления, несколько раз
нажмите кнопку TAPE/AUX.
LINE INPUT: Для выбора компонента,
подключенного к разъему
для устройства
автоматической смены
компакт-дисков, несколько
раз нажмите кнопку CD/CH.
MD-проигрыватель и т.п.
• Если на дисплее не появится надпись
“LINE INPUT”, см. стр. 32 и выберите
внешний входной сигнал (“Выбор
внешнего устройства—EXT INPUT”).
2
Включите подключенное
устройство и начните
воспроизведение звука с его
помощью.
3
Настройте громкость.
Если уровень входного сигнала
внешнего устройства, подключенного к
дополнительному входному разъему
(AUX), недостаточно высок, увеличьте
соответственно уровень входного сигнала.
Если настройка уровня входного сигнала
не выполнена, то при переключении
источника звука с внешнего компонента
на другой источник громкость
воспроизведения будет резко возрастать.
(См раздел “Настройка уровня сигнала
дополнительного входа—AUX ADJ” на стр.
32).
RU34-34KW-XC939[EE]f.pm6
6/23/03, 4:08 AM
34
35
Р
УCCKИЙ
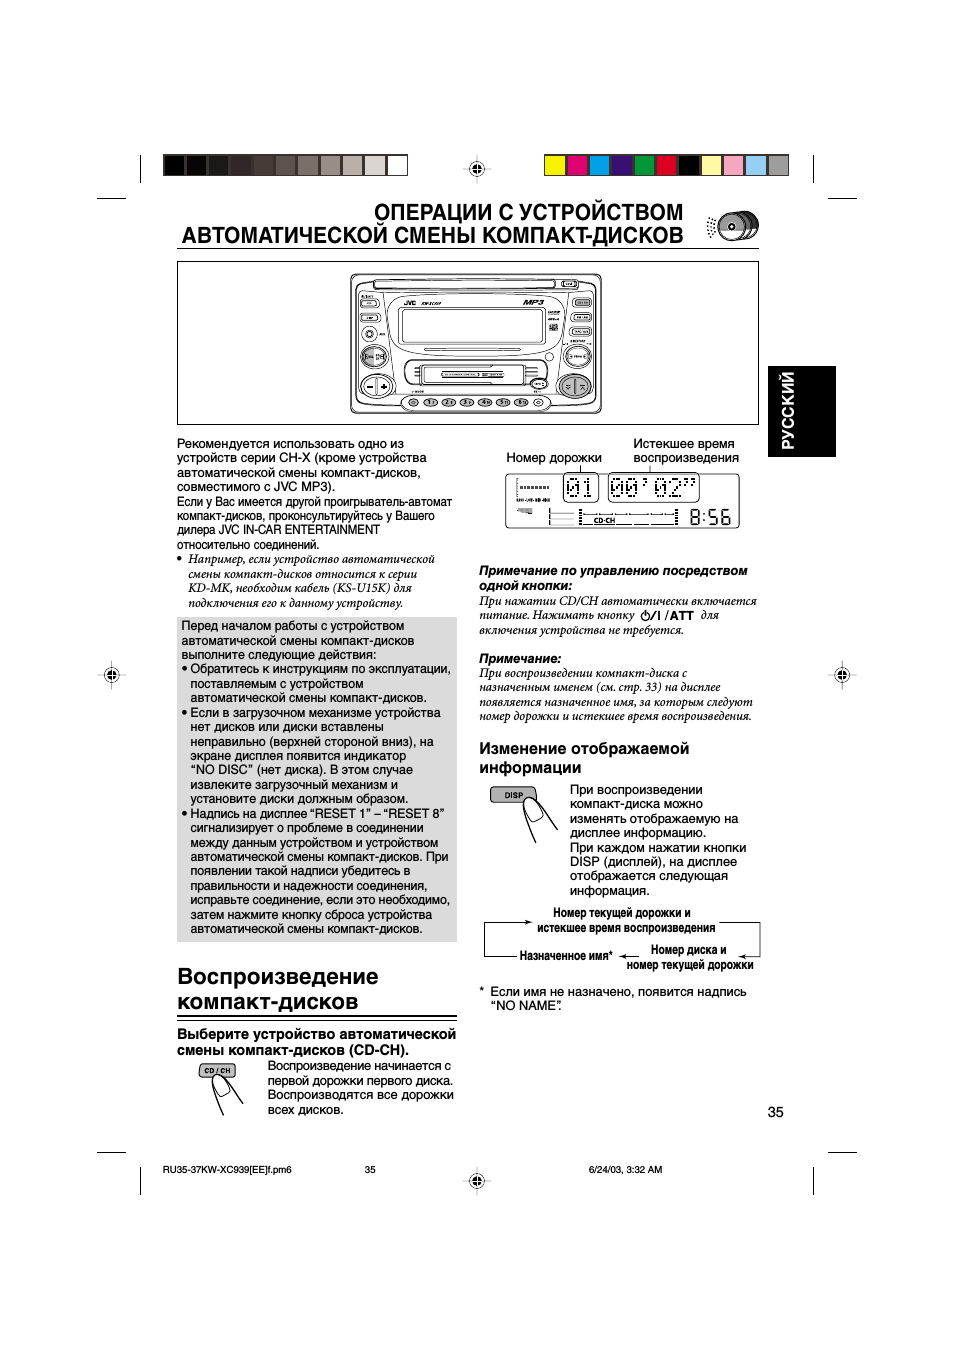
Рекомендуется использовать одно из
устройств серии CH-X (кроме устройства
автоматической смены компакт-дисков,
совместимого с JVC MP3).
Если у Вас имеется другой проигрыватель-автомат
компакт-дисков, проконсультируйтесь у Вашего
дилера JVC IN-CAR ENTERTAINMENT
относительно соединений.
• Например, если устройство автоматической
смены компакт-дисков относится к серии
KD-MK, необходим кабель (KS-U15K) для
подключения его к данному устройству.
Перед началом работы с устройством
автоматической смены компакт-дисков
выполните следующие действия:
• Обратитесь к инструкциям по эксплуатации,
поставляемым с устройством
автоматической смены компакт-дисков.
• Если в загрузочном механизме устройства
нет дисков или диски вставлены
неправильно (верхней стороной вниз), на
экране дисплея появится индикатор
“NO DISC” (нет диска). В этом случае
извлеките загрузочный механизм и
установите диски должным образом.
• Надпись на дисплее “RESET 1” – “RESET 8”
сигнализирует о проблеме в соединении
между данным устройством и устройством
автоматической смены компакт-дисков. При
появлении такой надписи убедитесь в
правильности и надежности соединения,
исправьте соединение, если это необходимо,
затем нажмите кнопку сброса устройства
автоматической смены компакт-дисков.
Воспроизведение
компакт-дисков
Выберите устройство автоматической
смены компакт-дисков (CD-CH).
Воспроизведение начинается с
первой дорожки первого диска.
Воспроизводятся все дорожки
всех дисков.
Примечание по управлению посредством
одной кнопки:
При нажатии CD/CH автоматически включается
питание. Нажимать кнопку
ATT
/
для
включения устройства не требуется.
Примечание:
При воспроизведении компакт-диска с
назначенным именем (см. стр. 33) на дисплее
появляется назначенное имя, за которым следуют
номер дорожки и истекшее время воспроизведения.
Изменение отображаемой
информации
При воспроизведении
компакт-диска можно
изменять отображаемую на
дисплее информацию.
При каждом нажатии кнопки
DISP (дисплей), на дисплее
отображается следующая
информация.
* Если имя не назначено, появится надпись
“NO NAME”.
ОПЕРАЦИИ С УСТРОЙСТВОМ
АВТОМАТИЧЕСКОЙ СМЕНЫ КОМПАКТ-ДИСКОВ
Истекшее время
воспроизведения
Номер дорожки
Назначенное имя*
Номер диска и
номер текущей дорожки
Номер текущей дорожки и
истекшее время воспроизведения
RU35-37KW-XC939[EE]f.pm6
6/24/03, 3:32 AM
35
36
Р
УCCKИЙ
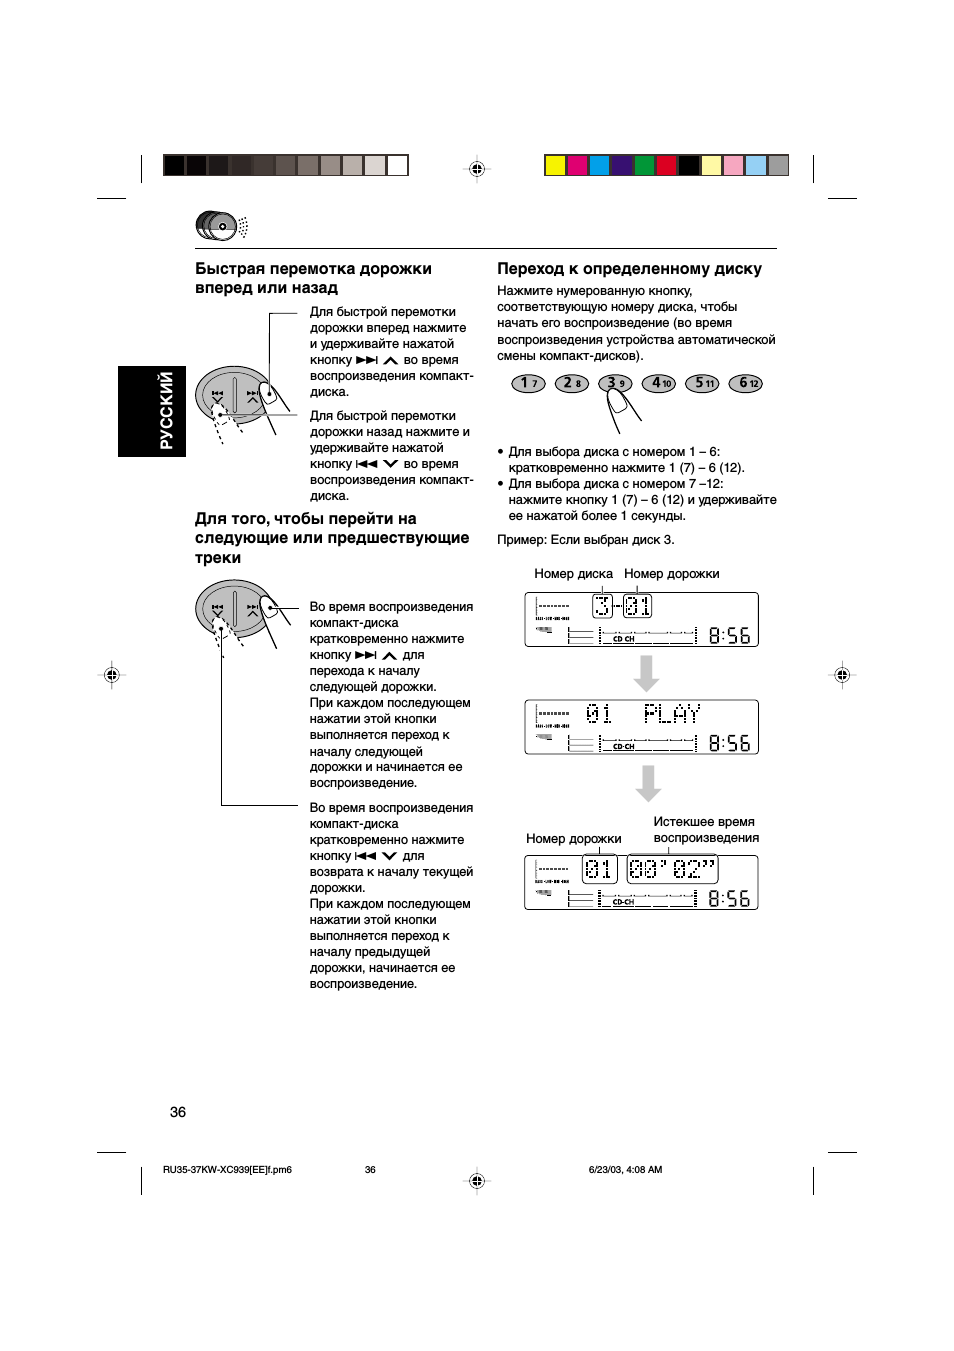
Переход к определенному диску
Нажмите нумерованную кнопку,
соответствующую номеру диска, чтобы
начать его воспроизведение (во время
воспроизведения устройства автоматической
смены компакт-дисков).
• Для выбора диска с номером 1 – 6:
кратковременно нажмите 1 (7) – 6 (12).
• Для выбора диска с номером 7 –12:
нажмите кнопку 1 (7) – 6 (12) и удерживайте
ее нажатой более 1 секунды.
Пример: Если выбран диск 3.
Номер диска Номер дорожки
\
\
Номер дорожки
Истекшее время
воспроизведения
Во время воспроизведения
компакт-диска
кратковременно нажмите
кнопку
¢
для
перехода к началу
следующей дорожки.
При каждом последующем
нажатии этой кнопки
выполняется переход к
началу следующей
дорожки и начинается ее
воспроизведение.
Во время воспроизведения
компакт-диска
кратковременно нажмите
кнопку
4
для
возврата к началу текущей
дорожки.
При каждом последующем
нажатии этой кнопки
выполняется переход к
началу предыдущей
дорожки, начинается ее
воспроизведение.
Быстрая перемотка дорожки
вперед или назад
Для того, чтобы перейти на
следующие или предшествующие
треки
Для быстрой перемотки
дорожки вперед нажмите
и удерживайте нажатой
кнопку
¢
во время
воспроизведения компакт-
диска.
Для быстрой перемотки
дорожки назад нажмите и
удерживайте нажатой
кнопку
4
во время
воспроизведения компакт-
диска.
RU35-37KW-XC939[EE]f.pm6
6/23/03, 4:08 AM
36
37
Р
УCCKИЙ
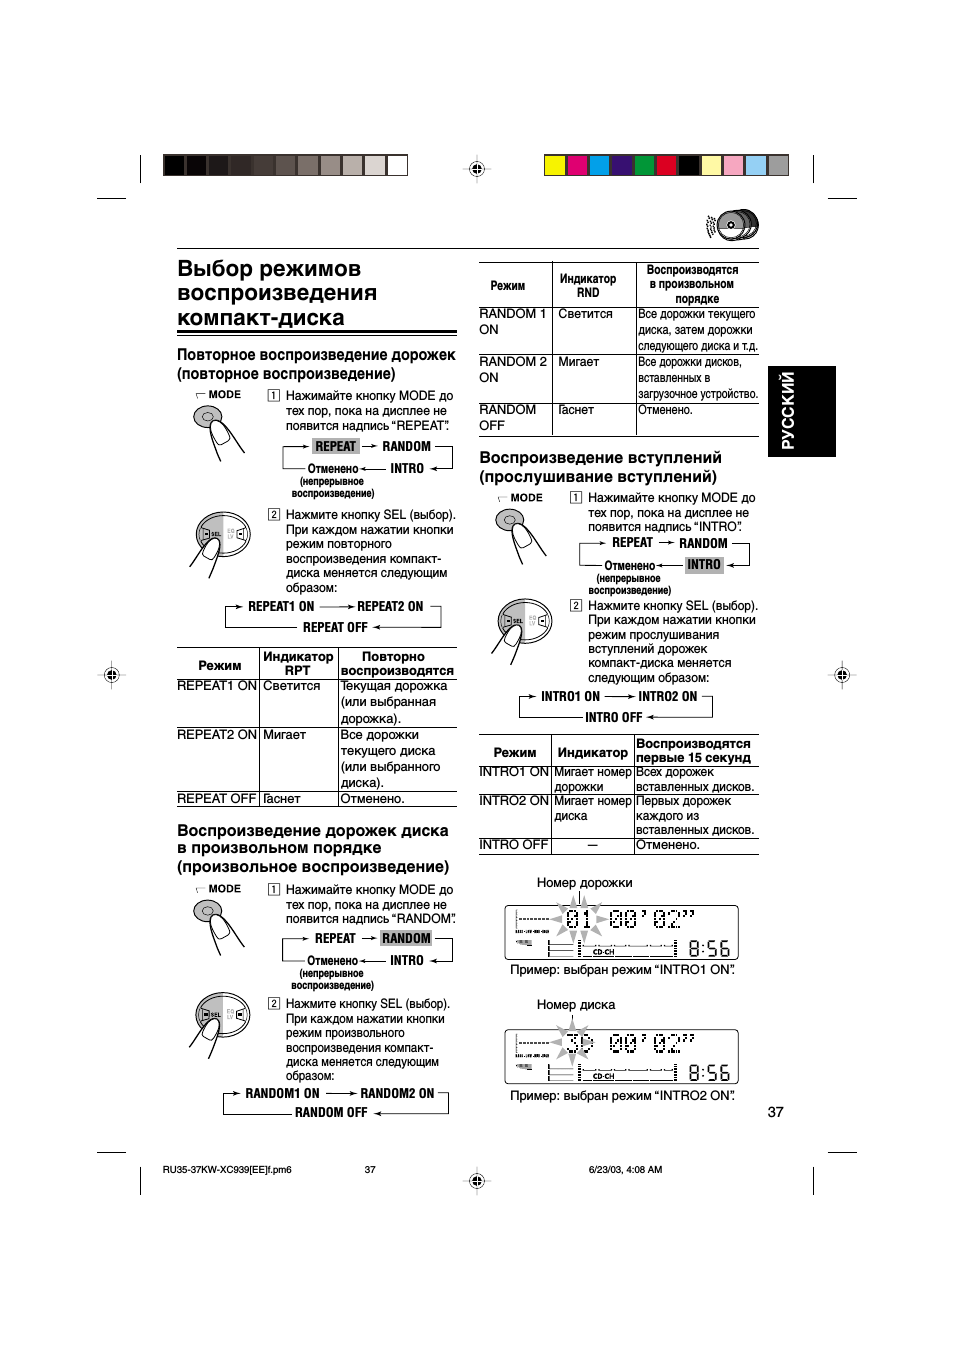
Воспроизведение вступлений
(прослушивание вступлений)
1 Нажимайте кнопку MODE до
тех пор, пока на дисплее не
появится надпись “INTRO”.
2 Нажмите кнопку SEL (выбор).
При каждом нажатии кнопки
режим прослушивания
вступлений дорожек
компакт-диска меняется
следующим образом:
Режим
Индикатор
Воспроизводятся
первые 15 секунд
INTRO1 ON Мигает номер Всех дорожек
дорожки
вставленных дисков.
INTRO2 ON Мигает номер Первых дорожек
диска
каждого из
вставленных дисков.
INTRO OFF —
Отменено.
Пример: выбран режим “INTRO1 ON”.
Пример: выбран режим “INTRO2 ON”.
Номер диска
Номер дорожки
REPEAT
RANDOM
INTRO
Отменено
(непрерывное
воспроизведение)
INTRO1 ON
INTRO OFF
INTRO2 ON
Выбор режимов
воспроизведения
компакт-диска
Повторное воспроизведение дорожек
(повторное воспроизведение)
1 Нажимайте кнопку MODE до
тех пор, пока на дисплее не
появится надпись “REPEAT”.
2 Нажмите кнопку SEL (выбор).
При каждом нажатии кнопки
режим повторного
воспроизведения компакт-
диска меняется следующим
образом:
Режим
Индикатор Повторно
RPT
воспроизводятся
REPEAT1 ON Светится
Текущая дорожка
(или выбранная
дорожка).
REPEAT2 ON Мигает
Все дорожки
текущего диска
(или выбранного
диска).
REPEAT OFF Гаснет
Отменено.
Воспроизведение дорожек диска
в произвольном порядке
(произвольное воспроизведение)
1 Нажимайте кнопку MODE до
тех пор, пока на дисплее не
появится надпись “RANDOM”.
2 Нажмите кнопку SEL (выбор).
При каждом нажатии кнопки
режим произвольного
воспроизведения компакт-
диска меняется следующим
образом:
REPEAT
RANDOM
INTRO
Отменено
(непрерывное
воспроизведение)
REPEAT1 ON
REPEAT OFF
REPEAT2 ON
REPEAT
RANDOM
INTRO
Отменено
(непрерывное
воспроизведение)
RANDOM1 ON
RANDOM OFF
RANDOM2 ON
Режим
Индикатор
Воспроизводятся
RND
в произвольном
порядке
RANDOM 1 Светится
Все дорожки текущего
ON
диска, затем дорожки
следующего диска и т.д.
RANDOM 2 Мигает
Все дорожки дисков,
ON
вставленных в
загрузочное устройство.
RANDOM
Гаснет
Отменено.
OFF
RU35-37KW-XC939[EE]f.pm6
6/23/03, 4:08 AM
37
38
Р
УCCKИЙ
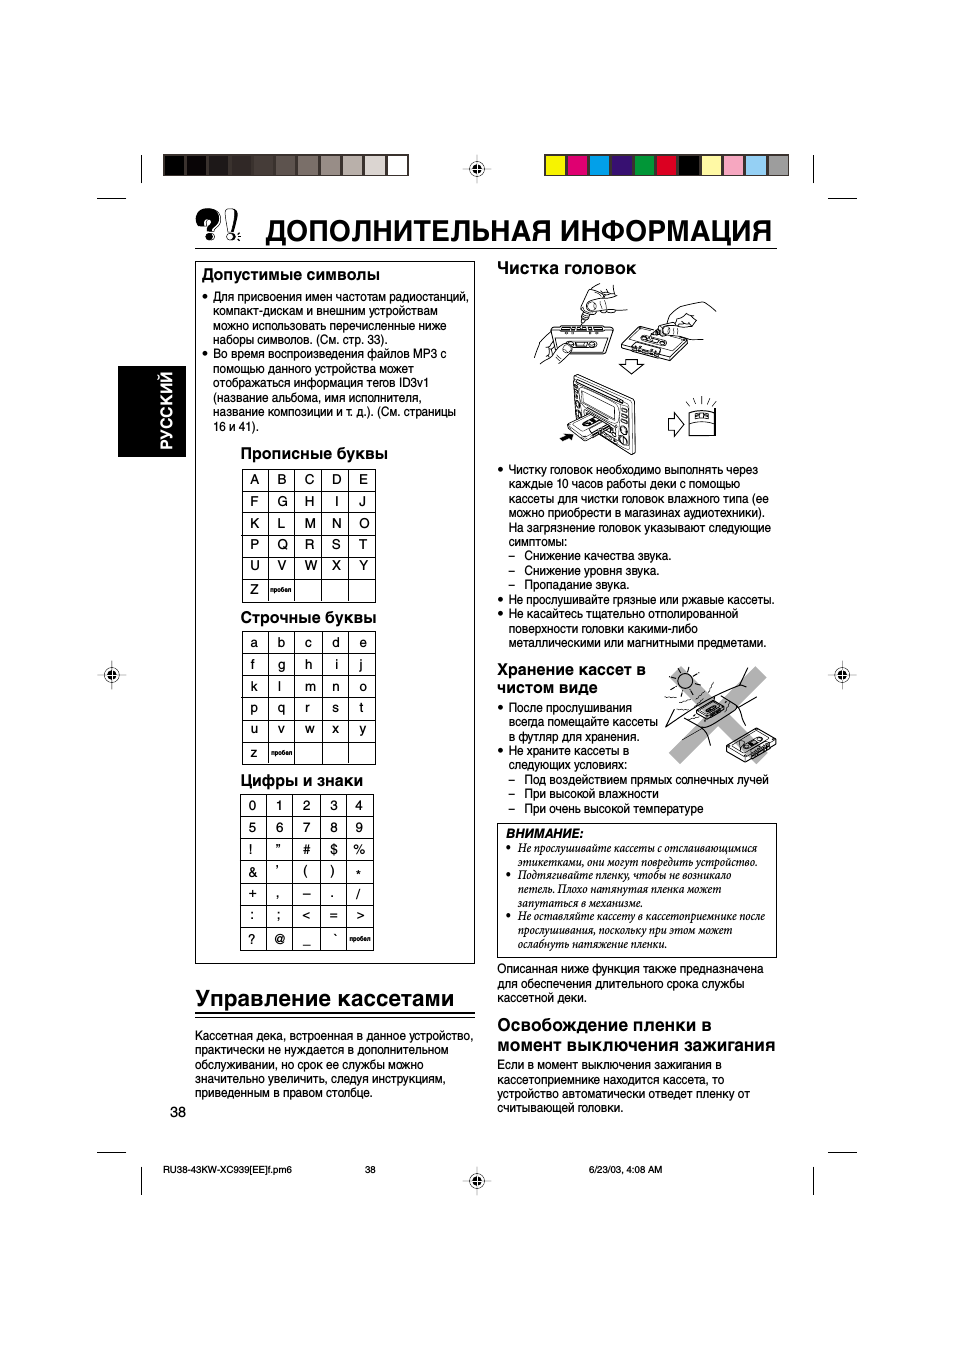
ДОПОЛНИТЕЛЬНАЯ ИНФОРМАЦИЯ
Чистка головок
• Чистку головок необходимо выполнять через
каждые 10 часов работы деки с помощью
кассеты для чистки головок влажного типа (ее
можно приобрести в магазинах аудиотехники).
На загрязнение головок указывают следующие
симптомы:
– Снижение качества звука.
– Снижение уровня звука.
– Пропадание звука.
• Не прослушивайте грязные или ржавые кассеты.
• Не касайтесь тщательно отполированной
поверхности головки какими-либо
металлическими или магнитными предметами.
Хранение кассет в
чистом виде
• После прослушивания
всегда помещайте кассеты
в футляр для хранения.
• Не храните кассеты в
следующих условиях:
– Под воздействием прямых солнечных лучей
– При высокой влажности
– При очень высокой температуре
ВНИМАНИЕ:
• Не прослушивайте кассеты с отслаивающимися
этикетками, они могут повредить устройство.
• Подтягивайте пленку, чтобы не возникало
петель. Плохо натянутая пленка может
запутаться в механизме.
• Не оставляйте кассету в кассетоприемнике после
прослушивания, поскольку при этом может
ослабнуть натяжение пленки.
Описанная ниже функция также предназначена
для обеспечения длительного срока службы
кассетной деки.
Освобождение пленки в
момент выключения зажигания
Если в момент выключения зажигания в
кассетоприемнике находится кассета, то
устройство автоматически отведет пленку от
считывающей головки.
Допустимые символы
• Для присвоения имен частотам радиостанций,
компакт-дискам и внешним устройствам
можно использовать перечисленные ниже
наборы символов. (См. стр. 33).
• Во время воспроизведения файлов MP3 с
помощью данного устройства может
отображаться информация тегов ID3v1
(название альбома, имя исполнителя,
название композиции и т. д.). (См. страницы
16 и 41).
Прописные буквы
Строчные буквы
Цифры и знаки
Управление кассетами
Кассетная дека, встроенная в данное устройство,
практически не нуждается в дополнительном
обслуживании, но срок ее службы можно
значительно увеличить, следуя инструкциям,
приведенным в правом столбце.
A
B
C
D
E
F
G
H
I
J
K
L
M
N
O
P
Q
R
S
T
U
V
W
X
Y
Z
пробел
a
b
c
d
e
f
g
h
i
j
k
l
m
n
o
p
q
r
s
t
u
v
w
x
y
z
пробел
<
=
>
?
@
_
`
0
1
2
3
4
5
6
7
8
9
!
”
#
$
%
&
’
(
)
*
+
,
–
.
/
:
;
пробел
RU38-43KW-XC939[EE]f.pm6
6/23/03, 4:08 AM
38
11:42
РЕМОНТ МАГНИТОЛЫ JVC KW — AV 726
01:07
Настройка часов на автомагнитоле JVC KW-XG707
01:04
Обзор на магнитолу JVC KW-XC939
01:58
JVC KW-X840BT Display and Controls Demo | Crutchfield Video
02:03
JVC KW-R940BTS Display and Controls Demo | Crutchfield Video
Нажмите на кнопку для помощи

CD/CASSETTE RECEIVER
ПРИЕМНИК С ПРОИГРЫВАТЕЛЕМ КОМПАКТ-ДИСКОВ
И КАССЕТ
KW-XC939
SOUND
ATT
U
SOURCE
F
R
D
VOL
VOL
В соответствии с Законом Российской Федерации “О защите прав
потребителей” срок службы (годности) данного товара “по истечении которого
он может представлять опасность для жизни, здоровья потребителя,
причинять вред его имуществу или окружающей среде” составляет семь (7) лет
For installation and
connections, refer to
the separate manual.
Указания по
установке и
выполнению
соединений
приводятся в
отдельной
инструкции.
со дня производства. Этот срок является временем, в течение которого
потребитель данного товара может безопасно им пользоваться при условии
соблюдения инструкции по эксплуатации данного товара, проводя
необходимое обслуживание, включающее замену расходных материалов и/или
соответствующее ремонтное обеспечение в специализированном сервисном
центре.
Дополнительные косметические материалы к данному товару, поставляемые
вместе с ним, могут храниться в течение двух (2) лет со дня его производства.
Срок службы (годности), кроме срока хранения дополнительных
косметических материалов, упомянутых в предыдущих двух пунктах, не
затрагивает никаких других прав потребителя, в частности, гарантийного
свидетельства JVC, которое он может получить в соответствии с законом о
правах потребителя или других законов, связанных с ним.
ENGLISH
РУCCKИЙ
INSTRUCTIONS
ИНСТРУКЦИИ ПО ЭКСПЛУАТАЦИИ
LVT1099-001A
[EE]

IMPORTANT FOR LASER PRODUCTS
1. CLASS 1 LASER PRODUCT
2. CAUTION: Do not open the top cover. There are no user serviceable parts inside unit; leave all
servicing to qualified service personnel.
ENGLISH
3. CAUTION: Visible and invisible laser radiation when open and interlock failed or defeated. Avoid
direct exposure to beam.
4. REPRODUCTION OF LABEL: CAUTION LABEL, PLACED OUTSIDE THE UNIT.
CAUTION on Volume Setting
CDs produce very little noise compared with other sources. If the volume level is adjusted for the tuner, for
example, the speakers may be damaged by the sudden increase in the output level. Therefore, lower the
volume before playing a CD and adjust it as required during playback.
How to reset your unit
Press the reset button on the front panel using
a ball-point pen or similar tool.
Note:
Your preset adjustments—such as preset channels or
sound adjustments—will be erased.
2

Thank you for purchasing a JVC product. Please read all instructions carefully before operation, to
ensure your complete understanding and to obtain the best possible performance from the unit.
CONTENTS
How to reset your unit ……………………………… 2
LOCATION OF THE BUTTONS ………… 4
Control panel ……………………………………… 4
Remote controller ……………………………….. 5
Preparing the remote controller ……………. 6
BASIC OPERATIONS ………………….. 7
RADIO OPERATIONS …………………. 8
Listening to the radio …………………………… 8
Storing stations in memory ………………….. 9
Tuning in to a preset station …………………. 10
Other convenient tuner functions ………….. 11
CD OPERATIONS ……………………… 12
Playing a CD ……………………………………… 12
Locating a track or a particular portion
on a CD …………………………………………. 13
Selecting CD playback modes ……………… 14
Playing a CD Text ……………………………….. 15
Other convenient CD functions …………….. 15
MP3 INTRODUCTION …………………. 16
What is MP3? …………………………………….. 16
How are MP3 files recorded and
played back? ………………………………….. 16
MP3 OPERATIONS ……………………. 18
Playing an MP3 disc …………………………… 18
Locating a file or particular portion
on an MP3 disc ………………………………… 19
Selecting MP3 playback modes ……………. 21
TAPE OPERATIONS …………………… 22
Listening to a tape ………………………………. 22
Finding the beginning of a tune …………….. 23
Other convenient tape functions …………… 24
SOUND ADJUSTMENTS ………………. 25
Adjusting the sound ……………………………. 25
Reinforcing the bass sound …………………. 25
Selecting preset sound modes ……………… 26
Storing your own sound adjustments …….. 27
LEVEL METER SETTING ………………. 28
Selecting level meter patterns ………………. 28
OTHER MAIN FUNCTIONS ……………. 29
About the demonstration mode
(DEMO MODE) ……………………………….. 29
Setting the clock …………………………………. 29
Changing general settings (PSM) …………. 30
Assigning names to the sources …………… 33
EXTERNAL COMPONENT OPERATIONS … 34
CD CHANGER OPERATIONS ………….. 35
Playing CDs ………………………………………. 35
Selecting CD playback modes ……………… 37
ADDITIONAL INFORMATION …………. 38
Handling cassettes ……………………………… 38
Handling discs ……………………………………. 39
TROUBLESHOOTING …………………. 40
SPECIFICATIONS……………………… 43
ENGLISH
BEFORE USE
*For safety….
• Do not raise the volume level too much, as this will
block outside sounds, making driving dangerous.
• Stop the car before performing any complicated
operations.
*Temperature inside the car….
If you have parked the car for a long time in hot or
cold weather, wait until the temperature in the car
becomes normal before operating the unit.
3

LOCATION OF THE BUTTONS
Control panel
ENGLISH
1
2
3
4
5
6
7
8
9
p
Display window
o
f
Control panel
1 Display window
2 CD loading slot
3
4 DISP (display) button
5 Auxiliary input jack
6 SEL (select) button
7 EQ LV (Equalizer/Level) button
8 + / – buttons
9 Reset button
p MODE button
q Cassette compartment
w CD 0 (eject) button
e Source buttons
• CD/CH button
• FM/AM button
• TAPE/AUX button
r • 2 PROG 3 button
• +10 / –10 button
t TAPE 0 (eject) button
y 4 / ¢ buttons
u EX (extra) button
i Number buttons
4
(standby/on/attenuator) button
ATT
/
q
w
e
r
t
y
u
i
;asd
g
hjkl
Display window
o Dolby NR indicator
; S.BASS EQ (Super Bass/Equalizer) level /
level meter
a Main display
s Level meter
d Play mode indicators
RND (random), RPT (repeat),
B.SKIP (blank skip)
f CD indicator
g TAPE indicator
h Text name indicators
DISC, TRACK, STATION
j Source indicators
MP3, CD, CD-CH (CD-changer), TAPE, AUX,
F1, F2, F3, A
k Tuner reception indicators
MO (monaural), ST (stereo)
l Clock display

Remote controller
ATT
1
2
3
R
U
SOURCE
D
SOUND
F
4 Functions the same as the +/– buttons on the
main unit.
Note:
These buttons do not function for the preferred
setting mode (PSM) adjustment.
5
5 Selects the sound mode.
ENGLISH
Each time you press the button, the EQ
(equalizer) mode changes.
6
6 Selects the source.
7
Each time you press the button, the source
changes.
4
VOL
1 Functions the same as the
VOL
ATT
/
button
on the main unit.
2 • Changes the band while listening to the
radio.
• Skips to the first file of the next directory if
pressed while listening to an MP3 disc.
• Changes the tape direction while listening to
a tape.
• Selects disc numbers in increasing order,
and starts playing while listening to the CD
changer.
3 • Selects preset numbers in increasing order
while listening to the radio.
• Skips to the first file of the previous directory
if pressed while listening to an MP3 disc.
• Selects disc numbers in decreasing order,
and starts playing while listening to the CD
changer.
7 • Searches for stations while listening to the
radio.
• Fast-forwards or reverses the track/file if
pressed and held while listening to any disc.
• Skips to the beginning of the next track/file
or goes back to the beginning of the current
(or previous) track/file if pressed briefly
while listening to any disc.
• Fast-forwards or rewinds a tape and finds
the beginning of a tune (MMS) while
listening to a tape. To release this operation,
press button 2 which then starts playback.
5

Preparing the remote controller
Before using the remote controller:
• Aim the remote controller directly at the remote
sensor on the main unit. Make sure there is no
ENGLISH
obstacle in between.
• Do not expose the remote sensor to strong
light (direct sunlight or artificial lighting).
2. Place the battery.
Slide the battery into the holder with the +
side facing upwards so that the battery is
fixed in the holder.
Lithium coin battery
(product number:
CR2025)
3. Return the battery holder.
Insert again the battery holder pushing it until
you hear a clicking sound.
Remote sensor
Installing the battery
When the controllable range or effectiveness of
the remote controller decreases, replace the
battery.
1. Remove the battery holder.
1) Push out the battery holder in the direction
indicated by the arrow using a ball-point
pen or a similar tool.
2) Remove the battery holder.
(back side)
1)
2)
(back side)
WARNING:
• Store the battery in a place where children
cannot reach.
If a child accidentally swallows the battery,
consult a doctor immediately.
• Do not recharge, short, disassemble or heat the
battery or dispose it in a fire.
Doing any of these things may cause the battery
to give off heat, crack or start a fire.
• Do not leave the battery with other metallic
materials.
Doing this may cause the battery to give off
heat, crack or start a fire.
• When throwing away or saving the battery,
wrap it in tape and insulate; otherwise, the
battery may start to give off heat, crack or start
a fire.
• Do not poke the battery with tweezers or similar
tools.
Doing this may cause the battery to give off
heat, crack or start a fire.
CAUTION:
DO NOT leave the remote controller in a place
(such as dashboards) exposed to direct sunlight
for a long time. Otherwise, it may be damaged.
6

BASIC OPERATIONS
1
3
1
Turn on the power.
“HELLO!” appears on the
display.
Note on One-Touch Operation:
When you select a source in step 2 below, the
power automatically comes on. You do not have
to press this button to turn on the power.
2
Select the source.
• Each time you press CD/CH,
the source alternates between
CD* and CD-changer (or
external component)**.
• Each time you press FM/AM, the
band changes to FM (FM1,
FM2, FM3) and AM.
• Each time you press TAPE/AUX,
the source alternates between
TAPE*** and external
component (AUX INPUT).
* If a disc is not in the loading slot, you cannot
select CD as the source to play. (“NO DISC” will
appear on the display.)
** Without connecting the CD changer or the
external component, you cannot select it as the
source to play.
*** If a cassette is not in the cassette compartment,
you cannot select TAPE as the source to play.
(“NO TAPE” will appear on the display.)
To operate the tuner, see pages 8 – 11.
To play the CD, see pages 12 – 15.
To play an MP3 disc, see pages 18 – 21.
To operate the tape deck, see pages 22 – 24.
To operate the external components, see page 34.
To operate the CD changer, see pages 35 – 37.
2
Note:
When you use this unit for the first
time, set the built-in clock correctly, see
page 29.
3
Adjust the volume.
4
Adjust the sound as you want
(see pages 25 – 27).
• If you need to change the level meter
pattern, see page 28.
To drop the volume immediately
Press
source. “AT T ” starts flashing on the display, and
the volume level will drop immediately.
To resume the previous volume level, press the
button briefly again.
ATT
/
To turn off the power
Press
“SEE YOU” appears, then the unit turns off.
• If you turn off the power while listening to a
disc, the disc play will start from where
playback has been stopped previously, next
time you turn on the power.
• If you turn off the ignition key without
turning off this unit, the unit will automatically
turn on when you turn on the ignition key next
time. If the last selected source is ready for
playback (ex. a disc or a tape is in the unit),
playback starts automatically.
ATT
/
To increase the volume
To decrease the volume
Volume level
Clock time
briefly while listening to any
for more than 1 second.
ENGLISH
7

ENGLISH
RADIO OPERATIONS
Listening to the radio
You can use either automatic searching or manual
searching to tune in to a particular station.
Searching for a station automatically:
Auto search
1
Select the band (FM1, FM2, FM3 or
AM).
FM2
FM1
Note:
This receiver has three FM bands (FM1, FM2,
and FM3). You can use any one of them to listen
to an FM broadcast.
Selected band appears.
2
Start searching for a station.
To search stations of
higher frequencies
To search stations of
lower frequencies
When a station is received, searching stops.
To stop searching before a station is
received, press the same button you have
pressed for searching.
FM3
AM
Searching for a station manually:
Manual search
1
Select the band (FM1, FM2, FM3, or
AM).
2
Press and hold ¢ or 4
until “M” (manual) starts flashing on
the display.
3
Tune in to a station you want while
“M” is flashing.
• If you release your finger from the button, the
manual mode will automatically turn off after
5 seconds.
• If you hold down the button, the frequency
keeps changing (in 50 kHz intervals for FM and
9 kHz for AM) until you release the button.
FM2
FM1
To tune in to stations of
higher frequencies
To tune in to stations of
lower frequencies
FM3
AM
8

Storing stations in memory
You can use one of the following methods to
store broadcasting stations in memory.
• Automatic preset: SSM (Strong-station
Sequential Memory)
• Manual preset
• Storing your favorite station into the EX button
Automatic preset: SSM
You can preset up to 6 local stations in each FM
band (FM1, FM2, and FM3).
1
Select the band (FM1, FM2, or FM3).
FM2
FM1
2
Press MODE repeatedly until “SSM”
appears.
FM3
AM
Manual preset
You can preset up to 6 stations in each band
(FM1, FM2, FM3, and AM) manually.
Ex.: Storing an FM station of 88.3 MHz into the
preset channel number 1 of the FM1 band
1
Select the FM1 band.
2
Tune in to a station (in this example,
of 88.3 MHz).
To tune in to stations of
higher frequencies
To tune in to stations of
lower frequencies
3
Press and hold the number button
(in this example, 1) for more than
2 seconds.
ENGLISH
3
Press SEL (select).
“—SSM—” appears, then disappears
when automatic preset is over.
Local stations with the strongest signals are
searched for and stored automatically in the
band you have selected (FM1, FM2, and FM3).
These stations are preset in the number
buttons—No. 1 (lowest frequency) to No. 6
(highest frequency).
When automatic preset is over, the station stored
in the number 1 button will be automatically tuned
in.
“P1” flashes for a few seconds.
4
Repeat the above procedure to store
other stations into other preset
numbers.
9

Storing your favorite station into the
EX (extra) button
You can preset an FM or AM station (such as
your favorite station or traffic announcement
ENGLISH
station); and recall it by one touch operation even
if the unit is turned off.
Ex.: Storing an FM station of 88.3 MHz into the
EX button
1
Select the FM1 band.
2
Tune in to a station (in this example,
of 88.3 MHz).
To tune in to stations of
higher frequencies
To tune in to stations of
lower frequencies
3
Press and hold the EX (extra) button
until “EX” flashes.
EX
Tuning in to a preset station
You can easily tune in to a preset station.
Remember that you must store stations first. If
you have not stored them yet, see page 9.
1
Select the band (FM1, FM2, FM3, or
AM) you want.
FM2
FM1
2
Select the number (1 – 6) for the
preset station you want.
To tune in the favorite station (EX)
EX
• If you press the button again, the previous
source will be played back again.
Press EX (extra) so that the unit
automatically turns on (if it has
been off).
Your favorite station is tuned in.
FM3
AM
“EX” flashes on the display.
Notes:
• The previously preset station is erased when a new
station is stored.
• Preset stations are erased when the power supply to
the memory circuit is interrupted (for example,
during battery replacement). If this occurs, preset
the stations again.
10

Other convenient tuner functions
SSM
SCAN
MONO
Canceled
(frequency indication)
Scanning broadcast stations
1
Select “SCAN.”
*SSM
Canceled
(frequency indication)
* When receiving an FM stereo broadcast.
2
Start scanning.
Each time a broadcast is tuned
in, scanning stops for about
5 seconds (tuned frequency
number flashes on the display),
and you can check what
program is now being
broadcasted.
If you want to listen to that program, press
MODE button again to stop scanning.
SCAN
*MONO
Selecting FM reception mode
When an FM stereo broadcast is hard to
receive, follow the procedure below:
1
Select “MONO.”
2
Select FM reception mode.
FM reception mode turns on
(“MONO ON”) and off (“MONO
OFF”) alternately.
When the monaural mode is turned on, the
sound you hear becomes monaural but reception
will be improved.
ENGLISH
Showing an assigned name
If you have assigned a name to a station
frequency, the display shows its assigned name
after the station frequency is displayed.
When the station name is displayed, the
STATION indicator lights up on the display (see
page 33).
Lights up
To confirm the station frequency while the
assigned name is shown, press DISP (display).
Each time you press the button, the assigned
name and the station frequency alternate on the
display.
Note:
If no name is assigned, “NO NAME” will appear
when you press DISP (display).
Lights up when receiving an FM
broadcast in stereo.
J
11

ENGLISH
CD OPERATIONS
Playing a CD
1
Insert a disc into the loading slot.
The unit turns on, draws
in the CD and starts
playback automatically.
CD indicator lights up.
Total track number of
the inserted disc
\
Total playing time of
the inserted disc
\
Current track
Note on One-Touch Operation:
When a CD is already in the loading slot, pressing
CD/CH turns on the unit and starts playback
automatically.
Elapsed playing time
Notes:
• When a CD is inserted upside down, the CD
automatically ejects.
• When you play a CD Text, the disc title and
performer appear on the display. Then the current
track title appears on the display, followed by the
track number and elapsed playing time. See also
“Playing a CD Text” (page 15) and “Selecting the
scroll mode—SCROLL” (page 32).
If a CD Text includes much text information, some
may not appear on the display.
• If you play a CD with assigned name (see page 33),
the assigned name appears on the display, followed
by the track number and elapsed playing time. See
also “Showing an assigned name” on page 15.
To stop play and eject the CD
Press CD 0.
CD play stops and the CD automatically ejects
from the loading slot (“EJECT” appears on the
display). The source changes to the last selected
source.
Notes:
• If the ejected disc is not removed for about
15 seconds, the disc is automatically inserted again
into the loading slot to protect it from dust. (CD
play will not start this time.)
• You can eject the CD even when the unit is turned
off.
• If you change the source, CD play also stops
(without ejecting the disc).
Next time you select “CD” as the source, CD play
starts from where playback had been stopped
previously.
12

Locating a track or a
particular portion on a CD
To skip 10 tracks
1 Press MODE repeatedly until
“2 –10 +10 3” appears.
To fast-forward or reverse the track
Press and hold ¢ while
playing a CD, to fast-forward
the track.
Press and hold 4 while
playing a CD, to reverse the
track.
To go to the next tracks or the previous
track
Press ¢ briefly while
playing a CD, to go ahead to
the beginning of the next track.
Each time you press the
button consecutively, the
beginning of the next track is
located and played back.
Press 4 briefly while
playing a CD, to go back to the
beginning of the current track.
Each time you press the
button consecutively, the
beginning of the previous track
is located and played back.
To go to a particular track directly
Press the number button corresponding to the
track number to start its playback.
2 –10 +10 3
2 Press +10 or –10 button.
To skip 10 tracks* forwards to
the last track
To skip 10 tracks* backwards
to the first track
* The first time you press +10 or –10 button, the
track skips to the nearest higher or lower track
with a track number of multiple ten (ex. 10th,
20th, 30th).
Then each time you press the button, you can
skip 10 tracks (see “How to use the +10 and –10
buttons” below).
• After the last track, the first track will be
selected, and vice versa.
How to use the +10 and –10 buttons
• Ex. 1: To select track number 32 while
playing track number 6
REPEAT
RANDOMINTROCanceled
ENGLISH
• To select a track number from 1 – 6:
Press 1 (7) – 6 (12) briefly.
• To select a track number from 7 – 12:
Press and hold 1 (7) – 6 (12) for more than
1 second.
(Three times) (Twice)
Track 6 \10 \ 20 \ 30 \ 31 \ 32
• Ex. 2: To select track number 8 while playing
track number 32
(Three times) (Twice)
Track 32 \30 \ 20 \ 10 \ 9 \ 8
13

Selecting CD playback modes
To play back tracks repeatedly
(Repeat Play)
ENGLISH
You can play back the current track repeatedly.
1 Press MODE repeatedly until
“REPEAT” appears.
2 –10 +10 3
2 Press SEL (select).
Each time you press the
button, CD repeat play mode
turns on (“REPEAT ON”) and
off (“REPEAT OFF”)
alternately.
When the repeat mode is turned on, the RPT
indicator lights up on the display.
To play back tracks at random
(Random Play)
You can play back all tracks on the CD at
random.
REPEAT
RANDOMINTROCanceled
2 Press SEL (select).
Each time you press the
button, CD random play mode
turns on (“RANDOM ON”)
and off (“RANDOM OFF”)
alternately.
When the random mode is turned on, the RND
indicator lights up on the display and a randomly
selected track starts playing.
To play back only intro (Intro scan)
You can play back the first 15 seconds of each
track sequentially.
1 Press MODE repeatedly until
“INTRO” appears.
2 –10 +10 3
2 Press SEL (select).
Each time you press the
button, CD Intro scan mode
turns on (“INTRO ON”) and
off (“INTRO OFF”) alternately.
REPEAT
RANDOMINTROCanceled
14
1 Press MODE repeatedly until
“RANDOM” appears.
2 –10 +10 3
REPEAT
RANDOMINTROCanceled
\
When the Intro scan mode is turned on, the
current track number flashes.

Playing a CD Text
Other convenient CD functions
In a CD Text, some information about the disc (its
disc title, performer and track title) is recorded.
You can show these disc information on the
display.
1
Select text display mode while
playing a CD Text.
Each time you press the
button, the display changes
as follows:
Disc Title / Performer
Current track no.
and Elapsed playing time
When disc information appears on the display,
the corresponding name indicator lights up.
When a disc title/performer is displayed.
When a track title is displayed.
Notes:
• You can use the scroll mode to show the disc
information on the display.
See also “Selecting the scroll mode—SCROLL” on
page 32.
• When you press DISP (display) while playing a
conventional CD, “NO NAME” appears for the
disc title/performer (unless you have assigned a
name to the CD) and the track title.
Current track no.
and Track Title
Showing an assigned name
You can assign names to conventional CDs.
If you have assigned a name to a CD, the
assigned name appears on the display, followed
by the current track number and elapsed playing
time.
When the CD name is displayed, the DISC
indicator lights up on the display (see page 33).
Lights up
To confirm the current track number and
elapsed playing time while the assigned
name is shown, press DISP (display).
Each time you press the button, the assigned
name and current track number/elapsed playing
time alternate on the display.
Note:
You cannot assign a name to a CD Text or an MP3
disc.
Prohibiting CD ejection
You can prohibit CD ejection and can lock a CD
in the loading slot.
While pressing CD/CH, press and
hold CD 0 for more than
2 seconds. “CD ” flashes on the
display for a while, and the CD is
locked and cannot be ejected.
ENGLISH
To cancel the prohibition and unlock the CD,
press and hold CD 0 for more than 2 seconds
again, while pressing CD/CH.
“EJECT OK” flashes on the display for a while,
and the CD is unlocked.
15

MP3 INTRODUCTION
What is MP3?
MP3 is an abbreviation of Motion Picture Experts
Group (or MPEG) Audio Layer 3*. MP3 is simply
a file format with a data compression ratio of
ENGLISH
1:10 (128 Kbps**). That means, by using MP3
format, one CD-R or CD-RW can contain 10
times as much data volume as a regular CD can.
* This player is not compatible with the data encoded
with Layer 1 and 2 formats.
** Bit rate is the average number of bits that one
second of audio data will consume. The unit used is
Kbps (1024 bits/second). To get a better audio
quality, choose a higher bit rate. The most popular
bit rate for encoding is 128 Kbps.
An MP3 decoder is incorporated into this unit.
You can play back MP3 files (tracks) recorded on
CD-Rs, CD-RWs, and CD-ROMs.
Compatible with ID3v1
Extra information data such as album title,
performer name, song title, recording year, music
genre and a brief comment can be stored within
an MP3 file.
This unit can show ID3v1 tags (album name,
performer name and song title) on the display.
• Some characters cannot be shown correctly.
• This unit is not compatible with ID3v2.
Precautions when recording MP3 files
on a CD-R or CD-RW
This unit can only read MP3 files that are
recorded in the format that is compliant with ISO
9660 Level 1, Level 2 or Joliet.
How are MP3 files recorded
and played back?
MP3 “files (tracks)” can be recorded in
“directories (folders)”—in PC terminology.
During recording, the files and directories can be
arranged in a way similar to arranging files and
directories/folders of computer data.
“Root” is similar to the root of a tree. Every file
and directory can be linked to and be accessed
from the root.
Playback order, file search order, and directory
search order of the MP3 files recorded on a disc
are determined by the writing (or encoding)
application; therefore, playback order may be
different from the one you have intended while
recording the directories and the files.
The illustration on the next page shows an
example of how MP3 files are recorded on a
CD-R or CD-RW, how they are played back, and
how they are searched for on this unit.
Other main features in this unit:
• Maximum number of directories/files: 289
• Available characters: A–Z, 0–9, _(underscore)
• Maximum number of characters for file name
(ISO 9660 Level 1):12 (inclusive of
separation mark—“.” and
extension code—“mp3”)
(ISO 9660 Level 2): 31 (inclusive of
separation mark—“.” and
extension code—“mp3”)
(Joliet): 64 (inclusive of
separation mark—“.” and
extension code—“mp3”)
• Maximum number of characters for directory
name: 64
16
(Total)
Notes:
• The unit can read a CD-ROM containing MP3 files.
However, if non-MP3 files are recorded together
with MP3 files, this unit will take a longer time to
scan the disc. It may also cause the unit to
malfunction.
• The unit cannot read or play an MP3 file without
the extension code—mp3.
• The unit is not compatible with Playlist*.
* A playlist is a simple text file, used on a PC, which
enables users to make their own playback order
without physically rearranging the files.

MP3 directory/file configuration
Level 1
Level 2
Level 3
1 2
Hierarchy
Level 4
Level 5
Level 6
ROOT
01
3 4
5 6
: Root
: Directories
ROOT
01
02
03
04
05 09
1110
18
08
19
06 07
8
7
9
1312
Note:
There is no limit on the number of the hierarchy levels (nested
directories). However, up to 8 hierarchy levels is recommended for
stable operations.
15 1614
17
ENGLISH
22
2120
: MP3 files
MP3 playback/search order
• The numbers in circles below the MP3 files ( ) indicate the playback order and search order of
the MP3 files. Normally this unit plays back MP3 files in the recorded order.
• The numbers inside the directories indicate the playback order and search order of the directories
on an MP3 disc. Normally this unit plays back MP3 files in the directories in the recorded order.
17

ENGLISH
MP3 OPERATIONS
Refer also to “CD OPERATIONS” on pages
12 to 15.
Playing an MP3 disc
1
Insert an MP3 disc into the loading
slot.
The unit turns on, draws
in an MP3 disc and
starts playback
automatically.
Ex.: When the disc contains 13 directories
and 125 MP3 files
Lights up
\
\
Playback starts automatically from the first file of
the first directory once file check is completed.
Then, the display changes to show the following:
• When “TAG ON” is selected (initial setting:
see page 32)
Album name/performer name (directory
name)* = Track title (file name)* =
Elapsed playing time
* If an MP3 file does not have ID3 tags, directory
name and file name appear.
• When “TAG OFF” is selected
Directory name and file name appear.
Notes:
• All the files on the disc will be played repeatedly
until you stop playback—All File Repeat Play.
• MP3 discs require a longer readout time**.
(The readout time differs due to the complexity of
the directory/file configuration.)
**Readout time is the time taken by the unit to
scan or check the disc for files and file
information.
18
MP3 indicator lights up.

To change the display information
While playing back an MP3 file,
you can change the file
information shown on the display.
Each time you press DISP
(display), the display changes to
show the following:
• When “TAG ON” is selected (initial setting:
see page 32)
Album name/
Performer name
(Directory name)*
Elasped playing time
* If an MP3 file does not have ID3 tags, directory
name and file name appear.
• When “TAG OFF” is selected
Directory name
Elasped playing time
Notes:
• You can use the scroll mode to show the disc
information on the display.
See also “Selecting the scroll mode—SCROLL” on
page 32.
• If you change the setting from “TAG OFF” to “TAG
ON” while playing an MP3 file, the tag display will
be activated when the next file starts playing.
Track title
(File name)*
File name
To stop play and eject the disc
Press CD 0.
Disc play stops and the disc automatically ejects
from the loading slot (“EJECT” appears on the
display). The source changes to the last selected
source.
If you change the source, the disc play also stops
(without ejecting the disc this time).
Locating a file or a particular
portion on an MP3 disc
To fast-forward or reverse the file
Press and hold ¢ while
playing an MP3 disc, to fastforward the file.
Press and hold 4 while
playing an MP3 disc, to
reverse the file.
To go to the next or previous files
Press ¢ briefly while
playing an MP3 disc, to go
forward to the beginning of
the next file.
Each time you press the
button consecutively, the
beginning of the next file is
located and played back.
(See “MP3 playback/search
order” on page 17.)
Press 4 briefly while
playing an MP3 disc, to go
back to the beginning of the
current file.
Each time you press the
button consecutively, the
beginning of the previous file
is located and played back.
(See “MP3 playback/search
order” on page 17.)
ENGLISH
Notes:
• If the ejected disc is not removed for about
15 seconds, the disc is automatically inserted again
into the loading slot to protect it from dust. (Disc
play will not start this time.)
• You can eject the disc even when the unit is turned
off.
19

To skip 10 files
ENGLISH
1 Press MODE repeatedly until
“2 –10 +10 3” appears.
2 –10 +10 3
Canceled
2 Press +10 or –10 button.
To skip 10 files* forwards to
the last file
To skip 10 files* backwards
to the first file
REPEAT
RANDOM
Press the number button corresponding to the
directory number to start playing the first file in
the selected directory.
• To select a directory number from 1 – 6:
Press 1 (7) – 6 (12) briefly.
• To select a directory number from 7 – 12:
Press and hold 1 (7) – 6 (12) for more than
1 second.
Notes:
• If “MP3” flashes on the display after you have
selected a directory, it means that the directory does
not contain any MP3 files.
• You cannot directly select a directory with a number
greater than 12.
* The first time you press +10 or –10 button, the
file skips to the nearest higher or lower file with
a file number of multiple ten (ex. 10th, 20th,
30th).
Then each time you press the button, you can
skip 10 files.
• After the last file, the first file will be selected,
and vice versa.
To go to a particular directory directly
IMPORTANT:
To directly select the directories using the
number button(s), it is required that directories
are assigned 2 digit numbers at the beginning
of their directory names. (This can only be
done during the recording of CD-Rs or
CD-RWs.)
Ex.: If directory name is “01 ABC”
= press 1 to go to directory 01 ABC
If directory name is “1 ABC”
= cannot directly select this directory.
If directory name is “12 ABC”
= press and hold 6 (12) to go to
directory 12 ABC
20
To select a particular file in a directory, press
¢ or 4 after selecting the directory.
To skip to the next directory or the
previous directory—either on the same
hierarchy level or on a different hierarchy
level
Press 3 (+10) briefly while
playing an MP3 disc.
Each time you press the button
consecutively, the next directory
is located (and the first file in
the directory starts playing, if
recorded).
(See “MP3 playback/search
order” on page 17.)
Press 2 (–10) briefly while
playing an MP3 disc.
Each time you press the button
consecutively, the previous
directory is located (and the
first file in the directory starts
playing, if recorded).
(See “MP3 playback/search
order” on page 17.)
Note:
If the directory does not contain any MP3 files, it is
skipped.

Selecting MP3 playback modes
To play back tracks repeatedly (Repeat
Play)
1 Press MODE repeatedly until
“REPEAT” appears.
2 –10 +10 3
Canceled
2 Press SEL (select).
Each time you press the
button, repeat play mode
changes as follows:
REPEAT1 ON
REPEAT OFF
Mode
REPEAT1 ON Lights The current file (or
REPEAT2 ON Flashes All files of the current
REPEAT OFF Goes off Canceled.
RPT
Indicator
specified file).
directory (or specified
directory).
REPEAT
RANDOM
REPEAT2 ON
Plays repeatedly
To play back tracks at random
(Random Play)
1 Press MODE repeatedly until
“RANDOM” appears.
2 –10 +10 3
Canceled
2 Press SEL (select).
Each time you press the
button, random play mode
changes as follows:
RANDOM1 ON
RANDOM OFF
Mode
RANDOM1 ON Lights All files of the current
RANDOM2 ON Flashes All files of all
RANDOM OFF Goes off Canceled.
RND
Indicator
directory, then the
files of the next
directory, and so on.
directories.
REPEAT
RANDOM
RANDOM2 ON
Plays at random
ENGLISH
21

ENGLISH
TAPE OPERATIONS
Listening to a tape
You can play back type I (normal) tapes.
1
Insert a cassette into the cassette
compartment.
The unit turns on and tape play starts
automatically.
When one side of the tape reaches its end
during play, the other side of the tape
automatically starts playing. (Auto Reverse)
Tape indicator flashes
Note on One-Touch Operation:
When a cassette is already in the cassette
compartment, pressing TAPE/AUX turns on the
unit and starts tape play automatically.
2 Press SEL (select).
Each time you press the
button, the Dolby B NR turns
on (“DOLBY ON”) and off
(“DOLBY OFF”).
This indicator lights up when the
Dolby B NR is turned on.
3
Select the tape direction.
Each time you press the
button, the tape direction
changes alternately.
j
22
2
Turn on or off the Dolby B NR* as
needed.
1 Press MODE repeatedly until
“DOLBY B” appears.
DOLBY B
Canceled
B.SKIP
REPEAT
* Manufactured under license from Dolby
Laboratories.
“Dolby” and the double-D symbol are
trademarks of Dolby Laboratories.

To stop play and eject the cassette
Press TAPE 0.
Tape play stops and the cassette automatically
ejects from the cassette compartment.
If you change the source, the tape play also
stops (without ejecting the cassette this time).
• You can also eject the cassette by pressing TAPE 0
while the unit is turned off.
To fast-forward and rewind a tape
Press ¢ for more than
1 second to fast-forward the
tape.
When the tape reaches its
end, the tape is reversed
and playback starts from the
beginning of the other side.
Press 4 for more than
1 second to rewind the tape.
When the tape reaches its
end, playback of the same
side starts.
Finding the beginning of a
tune
Multi Music Scan allows you to automatically
start playback from the beginning of a specified
tune. You can specify up to 9 tunes ahead or
before the current tune.
During playback
1
Specify where (how many tunes
ahead of or before the current tune)
the tune you want is located.
To locate a tune ahead
of the current tune on
the tape
To locate a tune before
the current tune on the
tape
Each time you press the button, the
number changes up to ±9.
ENGLISH
To stop fast-forward and rewind at any
position on the tape, press 2 PROG 3.
Tape play starts from that position on the tape.
Note:
When the tape reaches its end while fast-forwarding,
the tape direction will be changed automatically.
When the beginning of the specified tune is
located, playback starts automatically.
Notes:
• While locating a specified tune:
– If the tape is rewound to its beginning, playback
starts from the beginning of that side.
– If the tape is fast-forwarded to the end, it is
reversed and played from the beginning of the
other side.
• In the following cases, Multi Music Scan may not
operate correctly:
– Tapes with tunes having long pianissimo
passages (very quiet parts) or non-recorded
portions.
– Tapes with short non-recorded sections.
– Tapes with high level noise or humming between
tunes.
– The Dolby NR setting does not match. For
example, if the tape is recorded with the Dolby C
NR.
23

Other convenient tape
functions
Skipping blank portions on the tape
ENGLISH
You can skip blank portions between the tunes
(Blank Skip).
1 Press MODE repeatedly until
“B.SKIP” appears.
DOLBY B
Canceled
2 Press SEL (select).
Each time you press the
button, skip function mode
turns on (“B.SKIP ON”) and
off (“B.SKIP OFF”)
alternately.
B.SKIP
REPEAT
Notes:
In the following cases, Blank Skip and Repeat Play
may not operate correctly:
– Tapes with tunes having long pianissimo passages
(very quiet parts) or non-recorded portions.
– Tapes with short non-recorded sections.
– Tapes with high level noise or humming between
tunes.
– The Dolby NR setting does not match. For example,
if the tape is recorded with the Dolby C NR.
Prohibiting tape ejection
You can prohibit the tape ejection and can lock a
tape in the cassette compartment.
While pressing TAPE/AUX, press
and hold TAPE 0 for more than
2 seconds. “TAPE ” flashes
on the display for a while, and
the tape is locked and cannot be
ejected.
When this function is on, the B.SKIP indicator
lights up on the display and the unit skips blank
portions of 15 seconds or more, fast-forwards to
the next tune, then starts playing it.
Playing the current tune repeatedly
You can play the current tune repeatedly
(Repeat Play).
24
1 Press MODE repeatedly until
“REPEAT” appears.
DOLBY B
Canceled
2 Press SEL (select).
Each time you press the
button, repeat play mode
turns on (“REPEAT ON”) and
off (“REPEAT OFF”)
alternately.
B.SKIP
REPEAT
To cancel the prohibition and unlock the tape,
press and hold TAPE 0 for more than 2 seconds
again, while pressing TAPE/AUX.
“EJECT OK” flashes on the display for a while,
and the tape is unlocked.

SOUND ADJUSTMENTS
EQ
S.BASS
L.V.METERCanceled
Adjusting the sound
You can adjust the sound characteristics to your
preference.
1
Select the item you want to adjust.
Each time you press the
button, the adjustable items
change as follows:
FADER
Indication To do: Range
FADER* Adjust the front R06 (Rear only)
and rear speaker |
balance. F06 (Front only)
BAL Adjust the left L06 (Left only)
(Balance) and right speaker |
balance. R06 (Right only)
VOLUME Adjust the volume. 00 (min.)
BAL
(Balance)
VOLUME
|
50 (max.)
Reinforcing the bass sound
You can also adjust the level of Super Bass.
1
Select “S.BASS.”
While adjusting Super Bass, S. BASS level
flashes.
As the number increases, Super Bass
level also increases.
2
Adjust the level within the range of
“00” to “08.”
ENGLISH
* If you are using a two-speaker system, set the
fader level to “00.”
2
Adjust the level.
Note:
Normally + / – buttons work for volume adjustment.
So you do not have to select “VOLUME” to adjust the
volume level.
25

Selecting preset sound modes
You can select a preset sound adjustment
suitable to the music genre.
ENGLISH
1
Select “EQ.”
2
Select the sound mode.
EQ
The sound mode
changes as follows:
S.BASS
L.V.METERCanceled
To store a sound mode separately for each
playback source (EQ Link)
Once you select a sound mode, it is stored in
memory. It will be recalled every time you select
the same source. A sound mode can be stored
for each of the following sources—FM1, FM2,
FM3, AM, CD, tape, external components and
the EX (extra) button (see page 10).
• See also “Changing general settings (PSM)” on
page 30.
1 Press and hold SEL (select) for more than
2 seconds so that one of the PSM items
appears on the display.
2 Press ¢ or 4 to select “EQ LINK
(Equalization Link).”
3 Press + to select “LINK ON.”
4 Press SEL (select) to finish the setting.
To cancel EQ Link, repeat the same procedure
and select “LINK OFF” by pressing – in step 3.
FLAT Hard Rock
R & B*
POP JAZZ DanceMusic
ClassicRaggaeCountry
USER** (back to the beginning)
* Rhythm and Blues
** If you want to adjust and store your original
sound mode (USER), see “Storing your own
sound adjustments” on page 27.
EQ level changes as you
select the sound mode.
Ex.: When you select “R & B”
To cancel the sound mode, select “FLAT” in
step 2.
Note:
You can adjust the sound mode to your preference,
and store it in memory.
• When “EQ LINK” is set to “LINK ON”
The selected sound mode and Super Bass
level can be stored in memory for the current
source.
Each time you select the same source, the
same sound mode is also recalled, and shown
after the source name.
• When “EQ LINK” is set to “LINK OFF”
The selected sound mode effect applies to all
the sources selected.
26
Loading…
1
KW-XC939
Installation/Connection Manual
Руководство по установке/подключению
ENGLISH
• This unit is designed to operate on 12 V DC, NEGATIVE ground electrical systems.
INSTALLATION (IN-DASH MOUNTING)
The following illustration shows a typical installation. However, you should make adjustments
corresponding to your specific car. In this case consult the manual included with the installation kit
(option).
In some case, depending of the type and the model of your car, it is not possible to install the unit
into the center console.
If you have any questions or require information regarding installation kits, consult your JVC
IN-CAR ENTERTAINMENT dealer or a company supplying kits.
Before installing the unit
• To prevent short circuits, it is recommended to disconnect the battery’s negative terminal and
make all electrical connections before installing the unit.
• For reason of security, do not install the unit in a place where it may disturb your driving or where
there is not enough ventilation space around the unit.
• When the installation position has been determined, confirm that the cords are sufficiently long.
• When mounting the unit, be sure to use the screws provided, as instructed. If other screws are
used, there is a possibility that parts could become loose or damaged.
• If you are not sure how to install this unit correctly, consult a JVC IN-CAR ENTERTAINMENT
dealer or have it installed by a qualified technician.
• When tightening screws or bolts be careful not to pinch any connection cord.
Caution:
To install the mounting brackets to the unit, use only the supplied screws (M5 x 6 mm).
If you use any screw longer than 6 mm, the unit can be damaged.
After installing the unit
Check if all the brake lamps, lights, flasher, wiper, etc. work correctly.
0603MNMMDWJEIN
EN, RU
LVT1099-002A
[EE]
J
V
C
РУССКИЙ
• Это устройство разработано для эксплуатации на 12 В постоянного напряжения с
минусом на массе.
УСТАНОВКА (УСТАНОВКА В ПРИБОРНУЮ ПАНЕЛЬ)
На следующей иллюстрации показана типовая установка. Однако возможны
дополнительные регулировки в соответствии с определенным автомобилем. В этом случае
обратитесь к руководству, включенному в монтажный комплект (поставляется отдельно).
В некоторых случаях, в зависимости от типа и модели автомобиля, устройство можно
установить на центральной панели.
При появлении вопросов или при необходимости получения информации относительно
монтажных комплектов обратитесь к поставщику автомобильных аудиосистем компании
JVC IN-CAR ENTERTAINMENT или в компанию, поставляющую монтажные комплекты.
Перед установкой устройства
• Для предотвращения коротких замыканий рекомендуется отключить отрицательный
терминал аккумуляторной батареи и выполнить все электрические соединения перед
установкой устройства.
• В целях безопасности не устанавливайте данное устройство в местах, где оно может
помешать вождению или в местах с недостаточной вентиляцией.
• После определения места установки проверьте, достаточна ли длина кабелей.
• При установке устройства используйте только прилагаемые болты в соответствии с
инструкцией. В случае использования других болтов существует вероятность, что детали
могут быть потеряны или повреждены.
• Если нет уверенности в том, как правильно установить устройство, обратитесь за
консультацией к поставщику автомобильных аудиосистем компании JVC IN-CAR
ENTERTAINMENT или к квалифицированному техническому специалисту.
• Аккуратно затягивайте болты, чтобы не пережать соединительные кабели.
Внимание:
Для прикрепления крепежных скоб к устройству используйте только прилагаемые болты
(M5 x 6 мм). Использование любых болтов длиной более 6 мм может привести к
повреждению устройства.
После установки устройства
Убедитесь, что стоп-сигналы, фары, поворотники, дворники и т.п. устройства работают
корректно.
Plate for use with a Nissan car
Пластина для автомобилей
марки Nissan
Batteries
Батарейка
Remote controller
дистанционного управления
Binding screws (M5 x 6 mm)
Зажимные болты (M5 x 6 мм)
Flat countersunk screws (M5 x 6 mm)
Болты с плоской потайной головкой
(M5 x 6 мм)
CR2025
TROUBLESHOOTING
• The fuse blows.
* Are the red and black leads connected correctly?
• Power cannot be turned on.
* Is the yellow lead connected?
• No sound from the speakers.
* Is the speaker output lead short-circuited?
• Sound is distorted.
* Is the speaker output lead grounded?
* Are the “–” terminals of L and R speakers grounded in common?
• Unit becomes hot.
* Is the speaker output lead grounded?
* Are the “–” terminals of L and R speakers grounded in common?
BЫЯВЛЕНИЕ НЕИСПРАВНОСТЕЙ
• Сработал предохранитель.
* Правильно ли подключены черный и красный провода?
• Питание не включается.
* Подключен ли желтый провод?
• Звук не выводится через громкоговорители.
* Нет ли короткого замыкания на кабеле выхода громкоговорителей?
• Звук искажен.
* Заземлен ли провод выхода громкоговорителей?
* Заземлены ли разъемы “–” правого (R) и левого (L) громкоговорителей?
• Устройство нагревается.
* Заземлен ли провод выхода громкоговорителей?
* Заземлены ли разъемы “–” правого (R) и левого (L) громкоговорителей?
Parts list for installation and connection
The following parts are provided with this unit.
After checking them, please set them correctly.
Список деталей для установки и подключения
Следующие детали поставлены в комплекте с устройством.
После проверки комплектации, пожалуйста, установите их правильно.
Power cord
Кабель питания
Install_KW-XC939[EE]002A_4.p6
6/10/03, 9:31 AM
1
KW-XC939
Installation/Connection Manual
Руководство по установке/подключению
|
LVT1099-002A |
V |
0603MNMMDWJEIN |
|
|
[EE] |
J |
C |
EN, RU |
ENGLISH
• This unit is designed to operate on 12 V DC, NEGATIVE ground electrical systems.
РУССКИЙ
•Это устройство разработано для эксплуатации на 12 В постоянного напряжения с минусом на массе.
INSTALLATION (IN-DASH MOUNTING) |
УСТАНОВКА (УСТАНОВКА В ПРИБОРНУЮ ПАНЕЛЬ) |
|
The following illustration shows a typical installation. However, you should make adjustments corresponding to your specific car. In this case consult the manual included with the installation kit (option).
In some case, depending of the type and the model of your car, it is not possible to install the unit into the center console.
If you have any questions or require information regarding installation kits, consult your JVC IN-CAR ENTERTAINMENT dealer or a company supplying kits.
На следующей иллюстрации показана типовая установка. Однако возможны дополнительные регулировки в соответствии с определенным автомобилем. В этом случае обратитесь к руководству, включенному в монтажный комплект (поставляется отдельно).
Внекоторых случаях, в зависимости от типа и модели автомобиля, устройство можно установить на центральной панели.
При появлении вопросов или при необходимости получения информации относительно монтажных комплектов обратитесь к поставщику автомобильных аудиосистем компании JVC IN-CAR ENTERTAINMENT или в компанию, поставляющую монтажные комплекты.
Before installing the unit
•To prevent short circuits, it is recommended to disconnect the battery’s negative terminal and make all electrical connections before installing the unit.
•For reason of security, do not install the unit in a place where it may disturb your driving or where there is not enough ventilation space around the unit.
•When the installation position has been determined, confirm that the cords are sufficiently long.
•When mounting the unit, be sure to use the screws provided, as instructed. If other screws are used, there is a possibility that parts could become loose or damaged.
•If you are not sure how to install this unit correctly, consult a JVC IN-CAR ENTERTAINMENT dealer or have it installed by a qualified technician.
•When tightening screws or bolts be careful not to pinch any connection cord.
Caution:
To install the mounting brackets to the unit, use only the supplied screws (M5 x 6 mm). If you use any screw longer than 6 mm, the unit can be damaged.
After installing the unit
Check if all the brake lamps, lights, flasher, wiper, etc. work correctly.
Перед установкой устройства
•Для предотвращения коротких замыканий рекомендуется отключить отрицательный терминал аккумуляторной батареи и выполнить все электрические соединения перед установкой устройства.
•В целях безопасности не устанавливайте данное устройство в местах, где оно может помешать вождению или в местах с недостаточной вентиляцией.
•После определения места установки проверьте, достаточна ли длина кабелей.
•При установке устройства используйте только прилагаемые болты в соответствии с инструкцией. В случае использования других болтов существует вероятность, что детали могут быть потеряны или повреждены.
•Если нет уверенности в том, как правильно установить устройство, обратитесь за консультацией к поставщику автомобильных аудиосистем компании JVC IN-CAR ENTERTAINMENT или к квалифицированному техническому специалисту.
•Аккуратно затягивайте болты, чтобы не пережать соединительные кабели.
Внимание:
Для прикрепления крепежных скоб к устройству используйте только прилагаемые болты (M5 x 6 мм). Использование любых болтов длиной более 6 мм может привести к повреждению устройства.
После установки устройства
Убедитесь, что стоп-сигналы, фары, поворотники, дворники и т.п. устройства работают корректно.
Parts list for installation and connection
The following parts are provided with this unit. After checking them, please set them correctly.
Список деталей для установки и подключения
Следующие детали поставлены в комплекте с устройством.
После проверки комплектации, пожалуйста, установите их правильно.
Flat countersunk screws (M5 x 6 mm) Болты с плоской потайной головкой (M5 x 6 мм)
CR2025
|
Power cord |
Plate for use with a Nissan car |
Batteries |
Remote controller |
|
Кабель питания |
Пластина для автомобилей |
Батарейка |
дистанционного управления |
|
марки Nissan |
Binding screws (M5 x 6 mm)
Зажимные болты (M5 x 6 мм)
| TROUBLESHOOTING |
BЫЯВЛЕНИЕ НЕИСПРАВНОСТЕЙ |
||
•The fuse blows.
* Are the red and black leads connected correctly?
•Power cannot be turned on. * Is the yellow lead connected?•No sound from the speakers.
* Is the speaker output lead short-circuited?
•Sound is distorted.
*Is the speaker output lead grounded?
*Are the “–” terminals of L and R speakers grounded in common?
•Unit becomes hot.
*Is the speaker output lead grounded?
*Are the “–” terminals of L and R speakers grounded in common?
•Сработал предохранитель.
* Правильно ли подключены черный и красный провода?
•Питание не включается.
* Подключен ли желтый провод?
•Звук не выводится через громкоговорители.
* Нет ли короткого замыкания на кабеле выхода громкоговорителей?
•Звук искажен.
*Заземлен ли провод выхода громкоговорителей?
*Заземлены ли разъемы “–” правого (R) и левого (L) громкоговорителей?
•Устройство нагревается.
*Заземлен ли провод выхода громкоговорителей?
*Заземлены ли разъемы “–” правого (R) и левого (L) громкоговорителей?
1
Перейти к контенту
Автомагнитолы JVC
- Размер инструкции: 4.03 Мб
- Формат файла: pdf
Если вы потеряли инструкцию от автомагнитолы JVC KW-XC939, можете скачать файл для просмотра на компьютере или печати.
Инструкция для автомагнитолы JVC KW-XC939 на русском языке. В руководстве описаны возможности и полезные функции, а также правила эксплуатации. Перед использованием внимательно ознакомьтесь с инструкцией.
Чтобы не читать всю инструкцию вы можете выполнить поиск по содержимому внутри инструкции и быстро найти необходимую информацию. Рекомендации по использованию помогут увеличить срок службы автомагнитолы JVC KW-XC939. Если у вас появилась проблема, то найдите раздел с описанием неисправностей и способами их решения. В нем указаны типичные поломки и способы их решения.