
Приложения DJI
Products
Flight Controllers Series
Propulsion Systems Series
Video Transmission Series
программное обеспечение для настройки
Документация
Mavic 2 Enterprise — Пояснительная записка
2022-06-20
Mavic 2 Enterprise — Руководство пользователя v1.8
2021-04-13
Mavic 2 Enterprise — Комплект поставки
2018-10-29
Mavic 2 Enterprise — Краткое руководство (Mavic 2 Enterprise) v1.4
2020-06-10
Mavic 2 Enterprise — Краткое руководство (Mavic 2 Enterprise Dual) v1.2
2020-06-10
Mavic 2 Enterprise — Комплект поставки (Smart_Controller)
2021-03-09
Mavic 2 Enterprise — Краткое руководство (Mavic 2 Enterprise with Smart_Controller) v1.2
2020-06-10
Mavic 2 Enterprise — Краткое руководство (Mavic 2 Enterprise Dual with Smart_Controller) v1.2
2020-06-10
Mavic 2 Enterprise — Заявление об отказе от ответственности и руководство по технике безопасности v1.8
2023-07-28
Mavic 2 Enterprise — Руководство по технике безопасности для аккумулятора Intelligent Flight Battery
2021-03-09
Mavic 2 Enterprise Примеры использования Более эффективная работа полиции
2018-11-06
Mavic 2 Enterprise Примеры использования Спасение людей в труднодоступных местах
2018-11-06
Mavic 2 Enterprise Примеры использования Спасение жизней в пустыне
2018-11-06
DJI Assistant 2 для Mavic(Установка обновлений приостановлена)
Совместимость с Mavic. В настоящий момент приложение DJI Assistant 2 недоступно для macOS 11 и более поздних версий. Проблема будет решена в будущих обновлениях.
система программного обеспечения
Документы
DJI Assistant 2 для Mavic Пояснительная записка V2.0.14
2020-08-05
- Публикация
- Товары4
Инструкции: Первый полёт DJI Mavic 2 (инструкция на русском)
- Скачайте приложение DJI Go 4 для своего мобильного устройства в магазинах Apple Store или Google Play.
- Разложите зажимы пульта дистанционного управления и прикрутите рычаги управления.
- Раскройте антенны пульта управления.
- Кабель с левой стороны пульта управления служит для подключения телефона к пульту.
- После того как пульт подключен к телефону, а телефон находится в зажимах пульта, раскройте лучи дрона.
- Нажмите и удерживайте кнопку питания 2 секунды для включения дрона и пульта управления.
- Поместите летательный аппарат на землю.
- Запустите приложение DJI Go 4, нажав на ярлык Mavic 2 на рабочем столе.
- Панель статуса полета в верхней части экрана показывает состояние и работоспособность дрона и сенсоров.
- При статусе приложения “Ready to Go” потяните оба стика на себя и к центру для запуска моторов.
- Затем двигайте левый стик от себя для взлета.
- Также Вы можете нажать кнопку “Автовзлет” в левой части экрана для того, чтобы подняться в воздух.
- Для примера возьмем режим управления рычагами “mode” 2.
- Левый стик отвечает за высоту и направление дрона
- В то время как правый контролирует его движения вперед, назад, влево или вправо
- Нажмите иконку в верхнем правом углу приложения для входа в меню пульта управления и изменения режима управления рычагами.
- Если аппарат улетел слишком далеко, Вы можете проверить его позицию на карте в нижнем левом углу.
- Нажмите кнопку “Flight Pause” на пульте управления для экстренного торможения и зависания.
- В левой части меню “Intellegent Flight” встроено очень много интеллектуальных режимов полета, которые значительно упрощают любые действия в воздухе
- A.P.A.S. позволяет автоматически обходить препятствия и значительно увеличивает безопасность полета
- Нажмите “Return to home” — возврат домой или нажмите и удерживайте кнопку “Smart RTH” на пульте управления, чтобы вернуть аппарат назад к точке взлета.
- Функциональные кнопки в правой части приложения — это текущие параметры камеры
- Меню установок для настройки установок съемки, таких как экспозиция и также слайд-бар регулирующий угол подвеса и кнопка “Play”.
- Вы можете записать свой полет и снять великолепные моменты кнопками на пульте управления.
- Например, колесо подвеса контролирует наклон камеры.
- Кнопка спуска — нажмите ее, чтобы сделать фото.
- Кнопка записи — нажмите ее для старта или окончания записи видео.
- Для посадки дрона потяните левый рычаг на себя и удерживайте пока он не коснется земли.
- Также Вы можете нажать кнопку “Auto Landing” в приложении и позволить дрону выполнить посадку самостоятельно.
Товары
Все4
DJI Mavic 22
DJI Mavic 2 Enterprise1
Аксессуары DJI Mavic 21
Артикул: 3005
Добавить к сравнению
Артикул: 3001
Добавить к сравнению
Артикул: 3159
Добавить к сравнению
Артикул: 3003
Добавить к сравнению
MAVIC 2 ENTERPRISE SERIES
User Manual
2018.12
v1.2
Searching for Keywords
Search for keywords such as “battery” and “install” to find a topic. If you are using Adobe Acrobat
Reader to read this document, press Ctrl+F on Windows or Command+F on Mac to begin a search.
Navigating to a Topic
View a complete list of topics in the table of contents. Click on a topic to navigate to that section.
Printing this Document
This document supports high resolution printing.
Using This Manual
Legend
Warning Important Hints and Tips Reference
Read Before the First Flight
Read the following documents before using the MAVICTM 2 Enterprise series:
1. In the Box
2. User Manual
3. Quick Start Guide
4. Disclaimer and Safety Guidelines
5. Intelligent Flight Battery Safety Guidelines
TM
It is recommend to watch all tutorial videos on the ocial DJI
Safety Guidelines before rst time use. Prepare for your rst ight by reviewing the Quick Start Guide and
refer to this User Manual for more details.
website and read the Disclaimer and
Video Tutorials
Go to the address below or scan the QR code on the right to watch the Mavic 2 Enterprise
series tutorial videos, which demonstrate how to use the Mavic 2 Enterprise series safely:
http://www.dji.com/mavic-2-enterprise/info#video
Download the DJI Pilot App
Be sure to use the DJI Pilot app during ight. * Scan the QR code on the right to download
the latest version. The Android version of DJI Pilot is compatible with Android v5.0 and
later. The iOS version of DJI Pilot is compatible with iOS v10.0 and later.
* For increased safety, flight is restricted to a height of 98.4 ft (30 m) and range of 164 ft (50 m) when not connected
or logged into the app during flight. This applies to DJI Pilot and all apps compatible with DJI aircraft.
Download DJI Assistant 2 for Mavic
Download DJI ASSISTANTTM 2 for Mavic at http://www.dji.com/mavic-2-enterprise/info#downloads.
2018 DJI All Rights Reserved.
2
©

Contents
Using This Manual
Legend
Read Before the First Flight
Video Tutorials
Download the DJI Pilot App
Download DJI Assistant 2 for Mavic
Product Prole
Introduction
Preparing the Aircraft
Preparing the Remote Controller
Aircraft Diagram
Activation
Aircraft
Flight Modes
Aircraft LEDs and Status Indicator
Return to Home
Vision Systems and Infrared Sensing Systems
Advanced Pilot Assistance Systems
Flight Recorder
Password Protection
Attaching and Detaching the Propellers
Intelligent Flight Battery
Gimbal and Camera
DJI AirSense
Modular Accessories
Remote Controller
Using the Remote Controller
Linking the Remote Controller
DJI Pilot App
Manual Flight
Mission Flight (Coming soon)
Album
DJI FlightHub
2
2
2
2
2
2
6
6
7
8
10
13
15
15
16
17
21
24
25
25
25
26
30
32
33
36
36
42
44
44
51
51
51
2018 DJI All Rights Reserved.
©
3

Flight
Flight Environment Requirements
Flight Limits and GEO Zones
Pre-Flight Checklist
Starting/Stopping the Motors
Test Flight
Appendix
Specications
Calibrating the Compass
Firmware Updates
Remote Controller LCD Screen Menu Information
After-Sales Information 66
54
54
54
55
56
57
59
59
63
64
65
2018 DJI All Rights Reserved.
4
©

Product Prole
This section introduces
2 Enterprise series
components of the aircraft and remote
controller.
and lists the
Mavic
2018 DJI All Rights Reserved.
©
5
Product Prole
Introduction
The DJI Mavic 2 Enterprise series features omnidirectional Vision Systems and Infrared Sensing
Systems. DJI signature technologies such as Obstacle Sensing and the Advanced Pilot Assistance
System*, help you capture complex shots effortlessly. Additional features like the built-in AirSense
makes you aware of your surrounding airspace, and password protection helps you maintain secure
access to your aircraft and protect your data. The Mavic 2 Enterprise series also has attachable modular
accessories like the M2E Spotlight, M2E Beacon and M2E speaker that are purpose-built for various
industrial applications.
The Mavic 2 Enterprise features a fully stabilized 3-axis gimbal camera that shoots 4K video,
12-megapixel photos, supports 2x optical zoom, 24-48 mm lens, and supports lters.
The Mavic 2 Enterprise Dual features a fully stabilized 3-axis gimbal camera with a FLIR longwave
infrared thermal camera and a visual camera, providing both infrared and visible light imaging
simultaneously. The infrared thermal camera records 640×480 video, and the visual camera captures 4K
videos and 12MP photos.
The Mavic 2 Enterprise series uses the latest technology to increase stability and footage quality,
reducing the Mavic 2 Enterprise angle vibration range to within ±0.005° and Mavic 2 Enterprise Dual
angle vibration range to within ±0.01°.
Built into the remote controller is DJI’s long-range transmission technology OCUSYNCTM 2.0, oering a
maximum transmission range of 5 mi (8 km) and displaying video from the aircraft to DJI Pilot on your
mobile device at up to 1080p. The remote controller works at both 2.4 GHz and 5.8 GHz, and it can
select the best transmission channel automatically without any latency. The aircraft and camera can
easily be controlled using the onboard buttons. An onboard LCD screen gives real-time aircraft data
information, and the detachable control sticks make the remote controller easier to store. The maximum
run time is 2 hours and 15 minutes. The Mavic 2 Enterprise series boasts a maximum ight speed of
44.7 mph (72 kph) and a maximum ight time of 31 minutes.
The major difference between the Mavic 2 Enterprise and Mavic 2 Enterprise Dual is the camera.
The general descriptions in this manual apply to both Mavic 2 Enterprise series.
Maximum flight time was tested in an environment with no wind while flying at a consistent 15.5
mph (25 kph) and the maximum flight speed was tested at sea level altitude with no wind. These
values are for reference only.
The remote controller reaches its maximum transmission distance (FCC) in a wide-open area
with no electromagnetic interference at an altitude of about 400 ft (120 m). The maximum
runtime was tested in a laboratory environment. This value is for reference only.
5.8 GHz is not supported in some regions. Please observe the local laws and regulations.
* The Advanced Pilot Assistance System is not supported for Mavic 2 Enterprise Dual.
2018 DJI All Rights Reserved.
6
©
Mavic 2 Enterprise Series User Manual
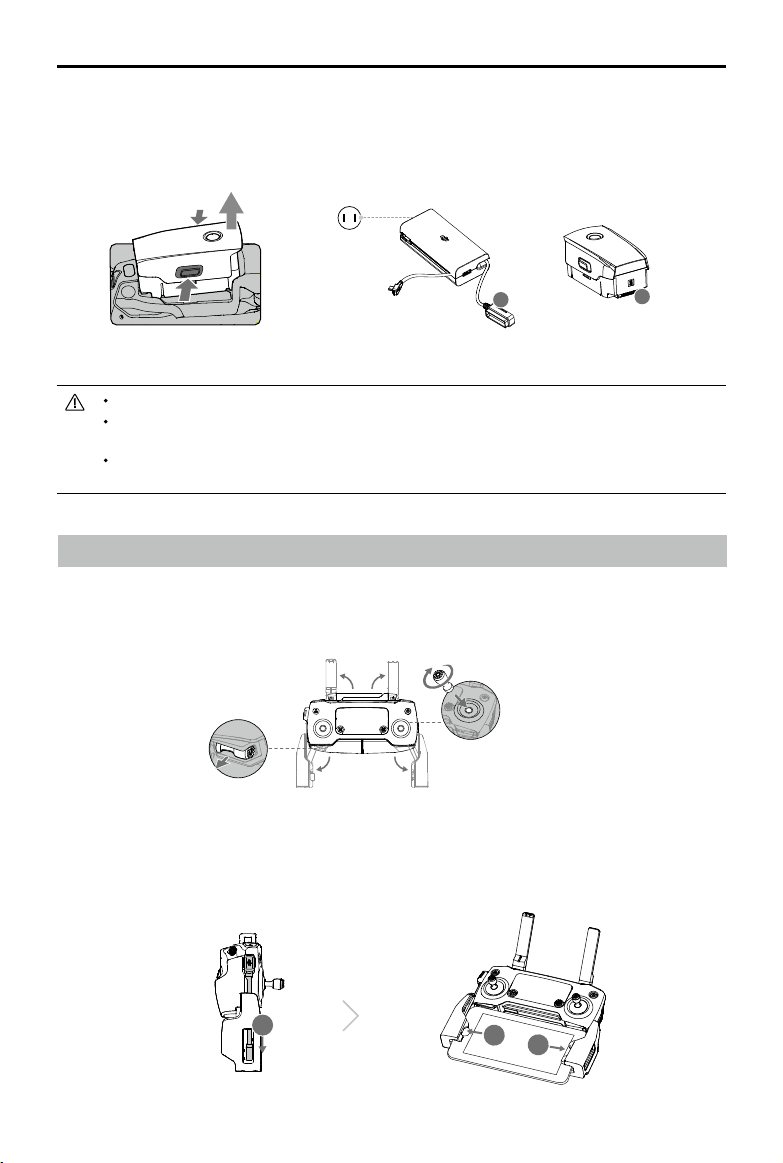
Preparing the Aircraft
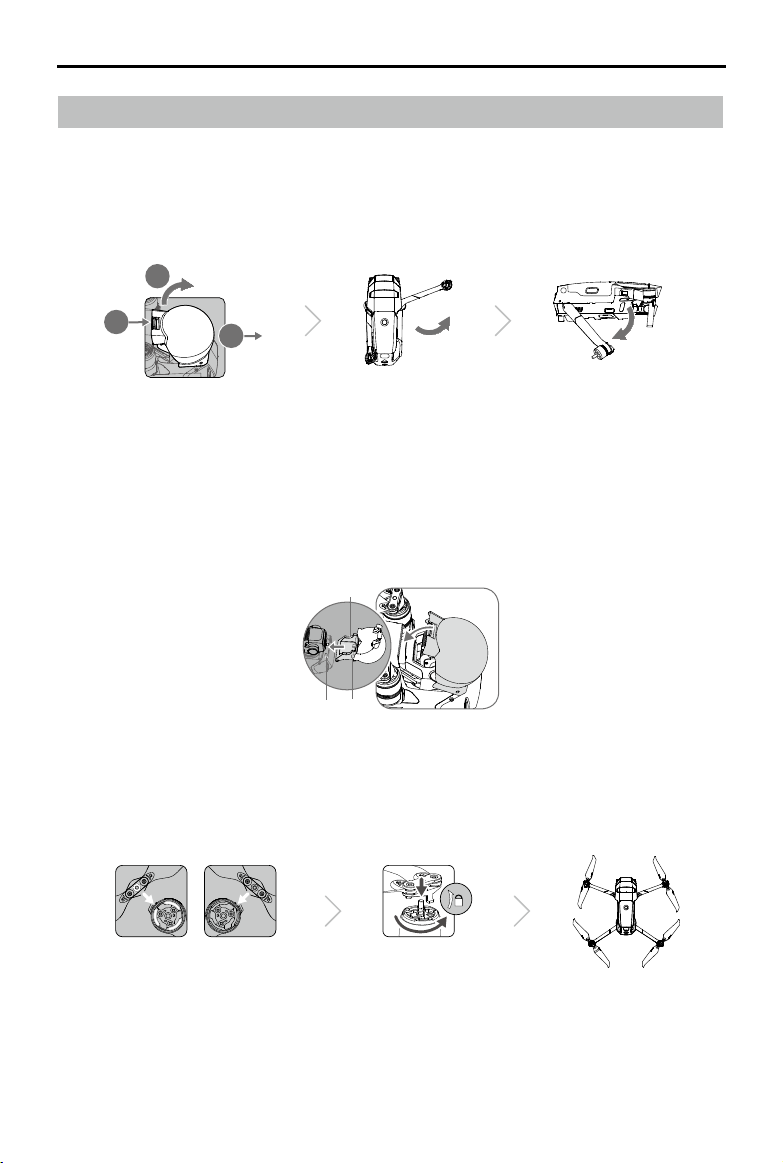
All aircraft arms are folded before the aircraft is packaged at the factory. Follow the steps below to
unfold the aircraft.
1. Remove the gimbal cover from the camera.
2. Unfold the front arms, and then unfold the rear arms.
2
1
*Attach the gimbal cover when not in use.
1)Hold the gimbal in place and insert gimbal clamp between the aircraft and the gimbal.
2) Make sure the hooks on the Gimbal Protector are locked in the grooves of the aircraft, then lower
the Gimbal Protector over the gimbal and secure with the buckle. The buckle will click when it is
securely attached.
3. Attaching the propellers.
Attach the propellers marked white to the motors with white marks. Press the propeller down onto
the motors and turn until it is secure. Attach the other propellers to the unmarked motors. Unfold all
the propeller blades.
3
Gimbal clamp
Grooves Hooks
2018 DJI All Rights Reserved.
©
7
Mavic 2 Enterprise Series User Manual
4. All Intelligent Flight Batteries are in Hibernation mode before shipment to ensure safety. Use the
provided AC power adapter to charge and activate Intelligent Flight Batteries for the rst time. To
charge an Intelligent Flight Battery after ight, remove it from the aircraft and attach it to the AC
power adapter.
Power Outlet
100-240 V
A
Unfold the front arms and propellers before unfolding the rear arms.
It is normal if there is friction on the arms and aircraft due to the firmly folding design of the
Mavic 2 Enterprise series aircraft.
Be sure the gimbal cover is removed and all arms and propellers are unfolded before powering
on the aircraft. Otherwise, it may affect the aircraft self-diagnostics.
A
Charging Time:
~1 hour 30 minutes
Preparing the Remote Controller
1. Unfold the mobile device clamps and the antennas.
2. Remove the control sticks from their storage slots on the remote controller and screw them into
place.
3. Choose an appropriate RC cable based on the type of mobile device. A cable with a Lightning
connector is connected by default to the cable slider. Micro USB and USB-C cables are also
included in the packaging. Connect the end of the RC cable to your mobile device. Secure your
mobile device by pushing both clamps inward.
2018 DJI All Rights Reserved.
8
©
1
2
3
Mavic 2 Enterprise Series User Manual
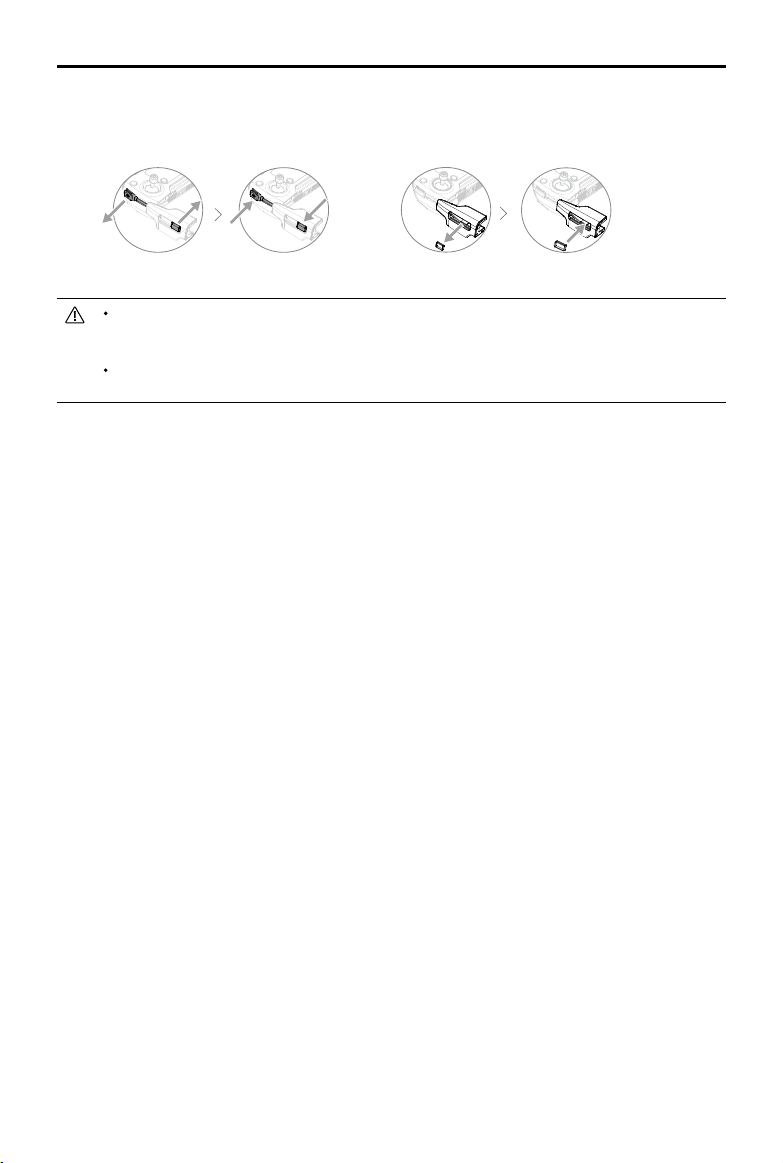
Refer to the gure below for how to replace the RC cable. The RC cable slider must be replaced if using
a USB-C RC cable.
You can also connect your mobile device to the remote controller using a USB cable if the
mobile device is too big to place into the clamps. Plug one end of the cable into your mobile
device and the other end into the USB port on the bottom of the remote controller.
Do not use the Micro USB and USB ports simultaneously for video linking. Remove the cable
from one port before connecting a device to the other port for video linking.
2018 DJI All Rights Reserved.
©
9
Mavic 2 Enterprise Series User Manual
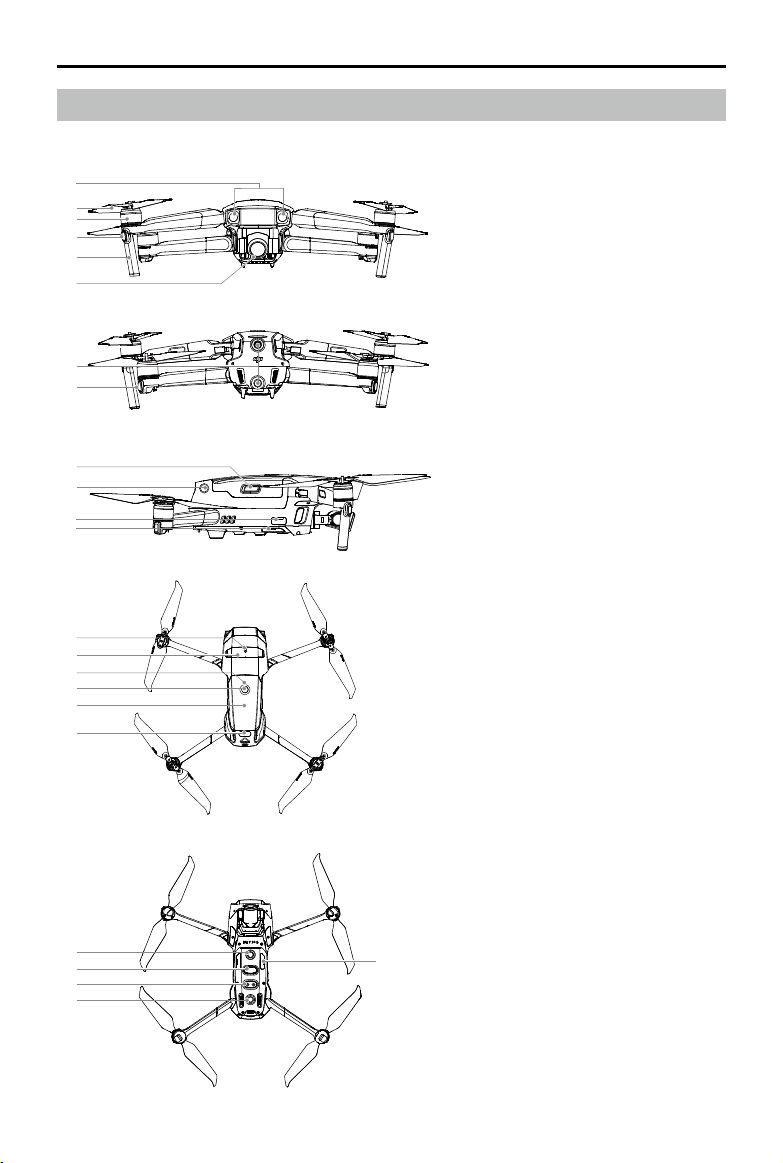
Aircraft Diagram
Mavic 2 Enterprise (Model: L1ZE)
1
2
3
4
5
6
7
8
9
10
11
12
13
14
15
16
17
18
19
21
22
19
1. Forward Vision System
2. Propellers
3. Motors
4. Front LEDs
5. Antennas
6. Gimbal and Camera
7. Backward Vision System
8. Aircraft Status Indicator
9. Battery Buckles
10. Lateral Vision System
11. USB-C Port
12. Link Button/Linking Status
Indicator
13. Extended Port (to connect
accessories)
14. Extended Port Cover
15. Battery Level LEDs
16. Power Button
17. Intelligent Flight Battery
18. Upward Infrared Sensing System
19. Downward Vision System
20. microSD Card Slot
21. Downward Infrared Sensing
System
22. Auxiliary Bottom Light
20
(can be used as a beacon in low
light conditions)
2018 DJI All Rights Reserved.
10
©
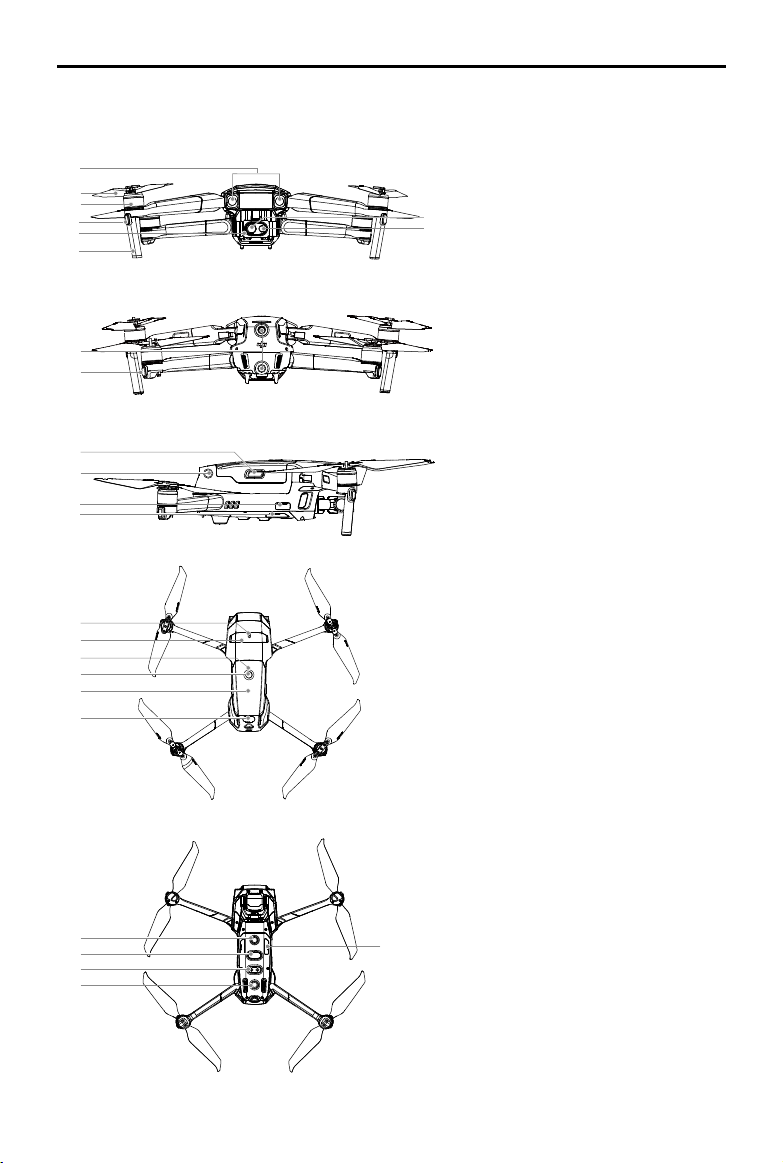
Mavic 2 Enterprise Dual (Model: L1DE)
1
2
3
4
5
6
7
8
9
10
11
12
13
14
15
16
17
18
19
21
22
19
Mavic 2 Enterprise Series User Manual
A
1. Forward Vision System
B
2. Propellers
3. Motors
4. Front LEDs
5. Gimbal and Camera
A. Visual Camera
B. Thermal Camera
6. Antennas
7. Backward Vision System
8. Aircraft Status Indicator
9. Battery Buckles
10. Lateral Vision System
11. USB-C Port
12. Link Button/Linking Status
Indicator
13. Extended Port (to connect
accessories)
14. Extended Port Cover
15. Battery Level LEDs
16. Power Button
17. Intelligent Flight Battery
18. Upward Infrared Sensing System
19. Downward Vision System
20. microSD Card Slot
21. Downward Infrared Sensing
System
22. Auxiliary Bottom Light
20
(can be used as a beacon in low
light conditions)
2018 DJI All Rights Reserved.
©
11

Mavic 2 Enterprise Series User Manual
1
2
3
4
5
6
7
8
1. Antennas
Relay aircraft control and video wireless
signals.
2. Return to Home (RTH) Button
Press and hold the button to initiate RTH.
The aircraft returns to the last recorded Home
Point. Press again to cancel RTH.
3. LCD Screen
Displays the aircraft and remote controller
system status.
4. Removable Control Sticks
The removable control sticks are easy to
store. The default ight control is set to Mode
2. Set the ight control mode in DJI Pilot.
5. Flight Pause Button
Press to make the aircraft brake and hover in
place (only when GPS or Vision System are
available).
6. Control Sticks Storage Slot
For storing the control sticks.
7. Mobile Device Clamps
Securely mount your mobile device onto the
remote controller.
8. Reserve Video-Downlink Port (USB)
Connect to a mobile device for video
downlink via a standard USB cable.
9. 5D Button
The default conguration is listed below. The
conguration can be adjusted based on your
preferences in DJI Pilot.
12
11
13
10
14
9
15
18
17
16
Left: Decrease EV value.
Right: Increase EV value.
Up: Recenter gimbal/gimbal downward.
Down: Recenter gimbal/gimbal downward.
10. Flight Mode Switch
Switch between S-mode, P-mode, and
T-mode.
11. Power Button
Press once to check the current battery
level. Press once, then again, and hold to
turn on/o the remote controller.
12. C1 Button (Customizable)
The default configuration is center focus.
Adjust the conguration in DJI Pilot based
on your preferences.
13. Gimbal Dial
Controls the camera’s tilt.
14. Video-Downlink/Power Port (micro USB)
Connect to a mobile device for video
linking via the RC cable. Connect to the
AC Power Adapter to charge the remote
controller battery.
15. Record Button
Press to start recording video. Press again
to stop recording.
16. Focus/Shutter Button
Press halfway to autofocus. Press once
to take photos according to the mode
selected in the DJI Pilot.
2018 DJI All Rights Reserved.
12
©

Mavic 2 Enterprise Series User Manual
17. Zoom Adjustment Dial (Mavic 2 Enterprise)
Turn to adjust the zoom of the camera.
EV Adjustment Dial (Mavic 2 Enterprise Dual)
Turn to adjust the exposure value of the camera.
18. C2 Button (Customizable)
The default conguration is playback. Adjust
the conguration in DJI Pilot based on your
preferences.
Activation
The Mavic 2 Enterprise series requires activation before rst time use. Follow the onscreen guide to
activate the Mavic 2 Enterprise series using DJI Pilot.
2018 DJI All Rights Reserved.
©
13

Aircraft
This section introduces the ight
controller, Intelligent Flight Battery, and
the Forward, Backward and Downward
Vision Systems.
2018 DJI All Rights Reserved.
14
©

Aircraft
The Mavic 2 Enterprise series contains a flight controller, vision systems, video downlink system,
propulsion system, and an Intelligent Flight Battery. Refer to the aircraft diagram in the Product Prole
section.
Flight Modes
The Mavic 2 Enterprise series has three ight modes, plus a fourth ight mode that the aircraft switches
to in certain circumstances:
P-mode (Positioning): P-mode works best when the GPS signal is strong. The aircraft utilizes GPS and
the Vision Systems to locate itself, stabilize, and navigate between obstacles.
When the Forward and Backward Vision Systems are enabled and lighting conditions are sucient, the
maximum ight altitude angle is 25°, the maximum forward ight speed is 31 mph (50 kph), and the
maximum backward ight speed is 27 mph (43 kph).
Note: P-mode requires larger stick movements to achieve high speeds.
The aircraft automatically changes to Attitude (ATTI) mode when the Vision Systems are unavailable or
disabled and when the GPS signal is weak or the compass experiences interference. When the Vision
Systems are unavailable, the aircraft cannot position itself or brake automatically, which increases
the risk of potential flight hazards. In ATTI mode, the aircraft may be more easily affected by its
surroundings. Environmental factors such as wind can result in horizontal shifting, which may present
hazards, especially when ying in conned spaces.
S-mode (Sport): In S-mode, the Obstacle Sensing function is disabled and the aircraft uses GPS and
the Vision Systems for positioning. The maximum ight speed is 44.7 mph (72kph). The aircraft cannot
sense or avoid obstacles.
Note: In S-mode, aircraft responses are optimized for agility and speed making it more responsive to
stick movements.
T-mode (Tripod): T-mode is based on P-mode and the ight speed is limited, which makes the aircraft
more stable during shooting. The maximum flight speed, maximum ascend speed and maximum
descend speed are 1 m/s.
The Obstacle Sensing function and the Upward Infrared Sensing System are disabled in S-mode,
which means the aircraft cannot sense obstacles on its route automatically.
The aircraft’s maximum speed and braking distance significantly increase in S-mode. A minimum
braking distance of 98.4 ft (30 m) is required in windless conditions.
Descent speed significantly increases in S-mode.
The aircraft’s responsiveness significantly increases in S-mode, which means a small stick
movement on the remote controller translates into the aircraft moving a large distance. Be
vigilant and maintain adequate maneuvering space during flight.
Use the Flight Mode switch on the remote controller to switch between Flight Modes. Enable
Multiple Flight Modes in DJI Pilot to switch between Flight Modes.
2018 DJI All Rights Reserved.
©
15
Mavic 2 Enterprise Series User Manual
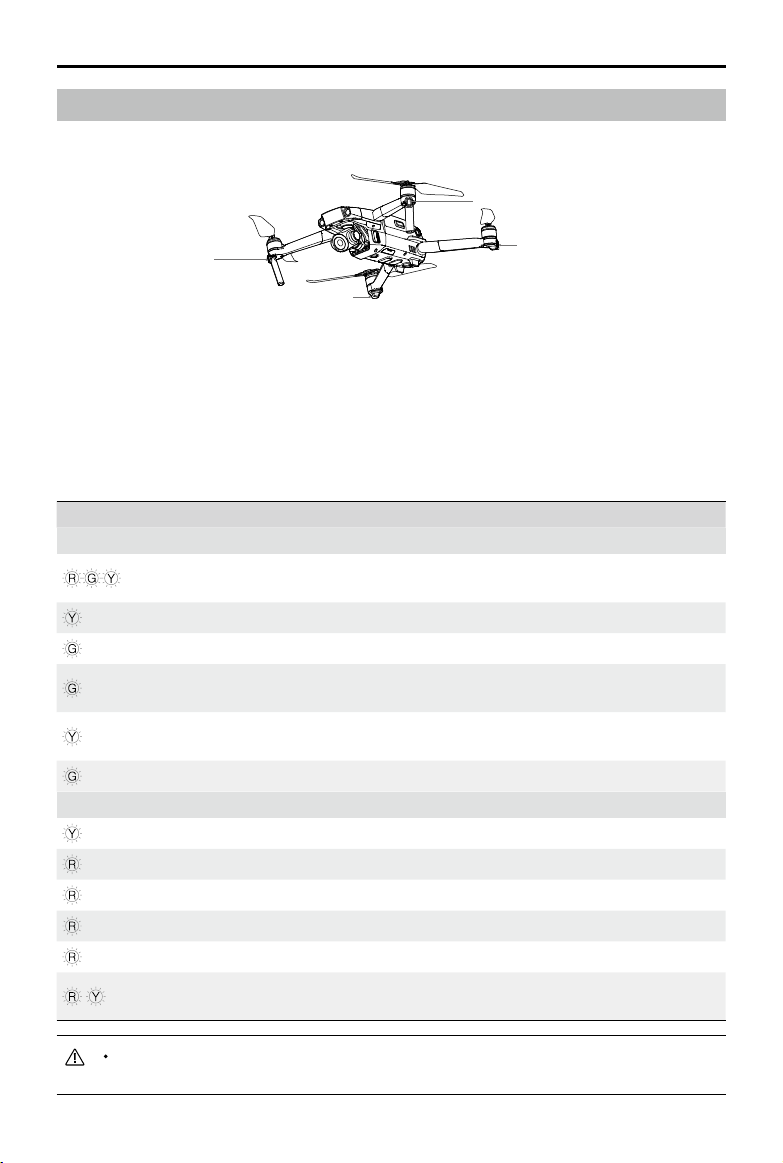
Aircraft LEDs and Status Indicator
The Mavic 2 Enterprise series has Front LEDs and Aircraft Status Indicators as shown in the figure
below.
Front LEDs
Front LEDs
Aircraft Status Indicator
Aircraft Status Indicator
The Front LEDs show the orientation of the aircraft and glow solid red when the aircraft is turned on to
indicate the front of the aircraft (they can be turned o in the DJI Pilot).
The Aircraft Status Indicators communicate the status of the aircraft’s ight control system. Refer to the
table below for more information about the Aircraft Status Indicators. The Aircraft Status Indicators also
ash when the Home Point is being recorded, as described in the Return to Home section.
Aircraft Status Indicator States
Color Blinking/Solid Description of Aircraft State
Normal States
Alternating red,
green, and yellow
Blinking
Yellow Blinks four times Warming up
Green Blinking slowly P-mode with GPS
Green
Periodically blinks
twice
Yellow Blinking slowly
Green Blinking quickly Braking
Warning States
Yellow Blinking quickly Remote controller signal lost
Red Blinking slowly Low battery
Red Blinking quickly Critically low battery
Red Blinking IMU error
Red Solid Critical error
Alternating red
and yellow
Blinking quickly Compass calibration required
Turning on and performing self-diagnostic
tests
P-mode with Forward and Downward Vision
Systems
No GPS, Forward Vision System or
Downward Vision System
For missions that require an unobtrusive ight, you can simply enter the setting of the camera and
select Smart Arm LEDs in DJI Pilot to turn all the LED lights o.
2018 DJI All Rights Reserved.
16
©
Mavic 2 Enterprise Series User Manual
Return to Home
The Return to Home (RTH) function brings the aircraft back to the last recorded Home Point. There are
three types of RTH: Smart RTH, Low Battery RTH, and Failsafe RTH. This section describes these three
scenarios in detail.
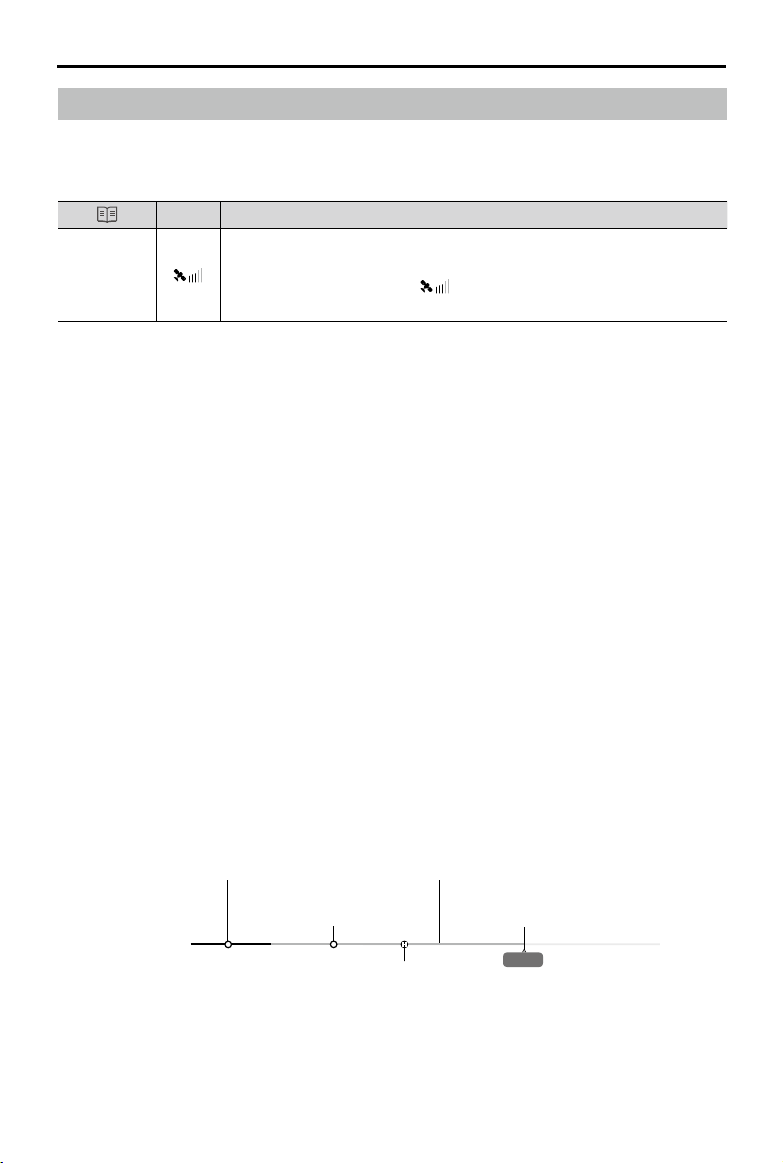
GPS
If a strong GPS signal was acquired before takeoff, the Home Point is
Home Point
the location from which the aircraft launched. The GPS signal strength is
indicated by the GPS icon ( ). The Aircraft Status Indicator will blink
green quickly when the Home Point is recorded.
Smart RTH
If the GPS signal is suciently strong, Smart RTH can be used to bring the aircraft back to the Home
Point. Smart RTH is initiated by pressing and holding the RTH button on the remote controller.
Exit Smart RTH by pressing the RTH button on the remote controller.
Low Battery RTH
Low Battery RTH is triggered when the Intelligent Flight Battery is depleted to the point that the safe
return of the aircraft may be aected. Return home or land the aircraft immediately when prompted. DJI
Pilot displays a warning when the battery level is low. The aircraft will automatically return to the Home
Point if no action is taken after a ten-second countdown. The user can cancel RTH by pressing the RTH
button or Flight Pause button on the remote controller.
If RTH is cancelled following a low battery level warning, the Intelligent Flight Battery may not have
enough charge for the aircraft to land safely, which may lead to the aircraft crashing or being lost. The
thresholds for the battery level warnings are automatically determined based on the aircraft’s current
altitude and distance from the Home Point.
The aircraft will land automatically if the current battery level can only support the aircraft long enough
to descend from its current altitude. The user cannot cancel the auto landing but can use the remote
controller to alter the aircraft’s orientation during the landing process.
Description
Critically low battery level warning
(Red)
Low battery level warning
DJI Pilot Battery Level Indicator Bar
Battery level is sufficient
(Yellow)
Charge required to
return to Home Point
(Green)
Remaining flight time
12:29
2018 DJI All Rights Reserved.
©
17
Mavic 2 Enterprise Series User Manual
The colored zones and markers on the DJI Pilot battery level indicator bar reect the estimated
remaining ight time. They automatically adjust according to the aircraft’s current location and status.
If the current battery level can only support the aircraft long enough to descend from its current
altitude, a critically low battery level warning triggers and the aircraft descends and lands
automatically. This cannot be canceled. If there is a danger of a collision, push the throttle up
and try to navigate away.
If the battery level is sufficient, the battery level indicator bar in DJI Pilot displays the estimated
remaining flight time based on the current battery level.
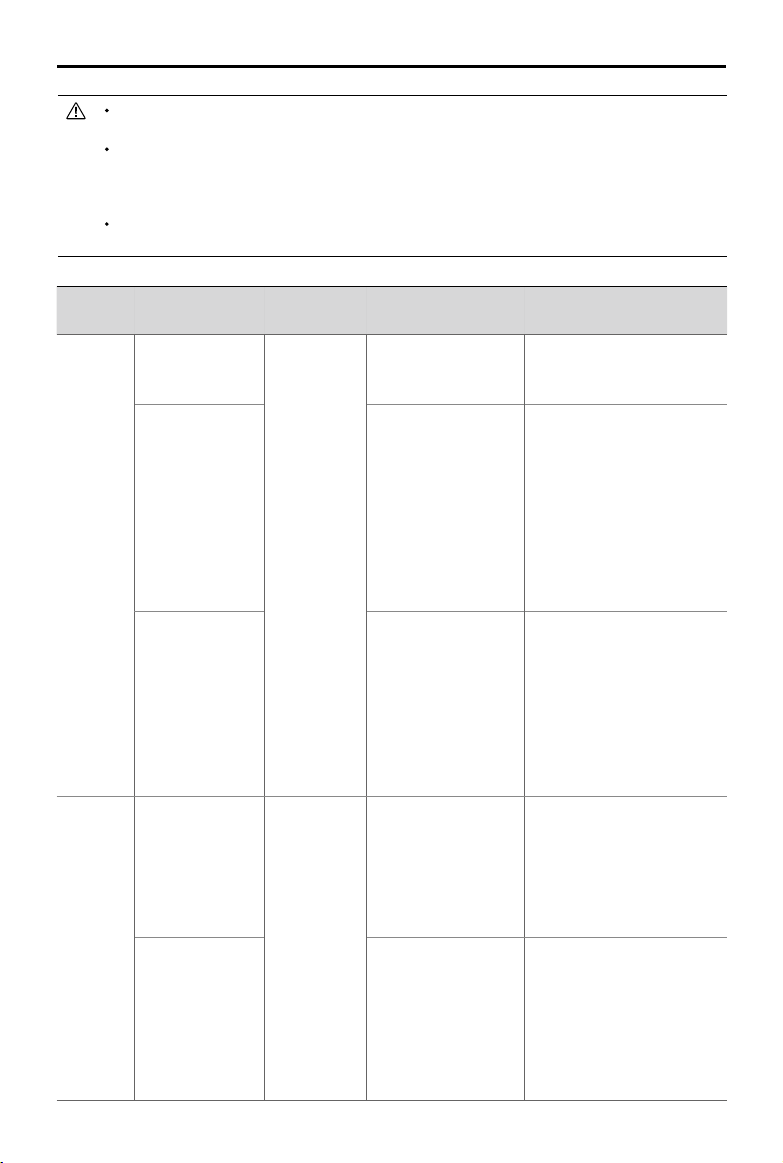
Warning Instructions
Remaining battery
level supports RTH.
Remaining
battery level
supports
Emergency RTH
(when in RTH,
Low
Battery
Level
Critically
Low
Battery
Level
with a normal RC
signal, and at an
altitude higher
than 50 m).
Remaining
battery level
supports
Emergency
Landing (when
in RTH with
a normal RC
signal).
Aircraft lands
after 10 seconds
(when flying
normally with
a critical low
battery level).
Aircraft lands
automatically
(when flying
normally with an
extremely critical
low battery
level).
Aircraft Status
Indicator
Blinks red
slowly
Blinks red
quickly
DJI Pilot App Actions
Choose RTH or
resume normal flight.
Choose Emergency
RTH or resume RTH.
Aircraft lands. Action
cannot be canceled.
Aircraft lands after
10 seconds. Action
cannot be canceled.
Aircraft lands
immediately. Action
cannot be canceled.
Select an option. If no action
is taken, the aircraft will enter
RTH.
Select an option.
Emergency RTH (aircraft
descends to 50 m and
returns to the Home Point)
or resume RTH (aircraft
flies to Home Point without
descending). If no action is
taken, the aircraft will enter
Emergency RTH.
Aircraft lands immediately.
Aircraft lands after 10
seconds.
Aircraft lands immediately.
2018 DJI All Rights Reserved.
18
©
Mavic 2 Enterprise Series User Manual
Failsafe RTH
The Forward Vision System allows the aircraft to create a real-time map of its flight route as it flies.
If the Home Point was successfully recorded and the compass is functioning normally, Failsafe RTH
automatically activates after the remote control signal is lost for more than two seconds.
When Failsafe RTH is activated, the aircraft starts to retrace its original ight route home. If the remote
control signal is re-established within 60 seconds of Failsafe RTH being activated, the aircraft hovers at
its present location for 10 seconds and waits for pilot commands. The user may press the RTH button
on the remote controller to cancel Failsafe RTH and retake control. If no pilot command is given, the
aircraft ies to the Home Point in a straight line. If the remote control signal is still lost 60 seconds after
activating Failsafe RTH, the aircraft stops retracing its original ight route and ies to Home Point in a
straight line.
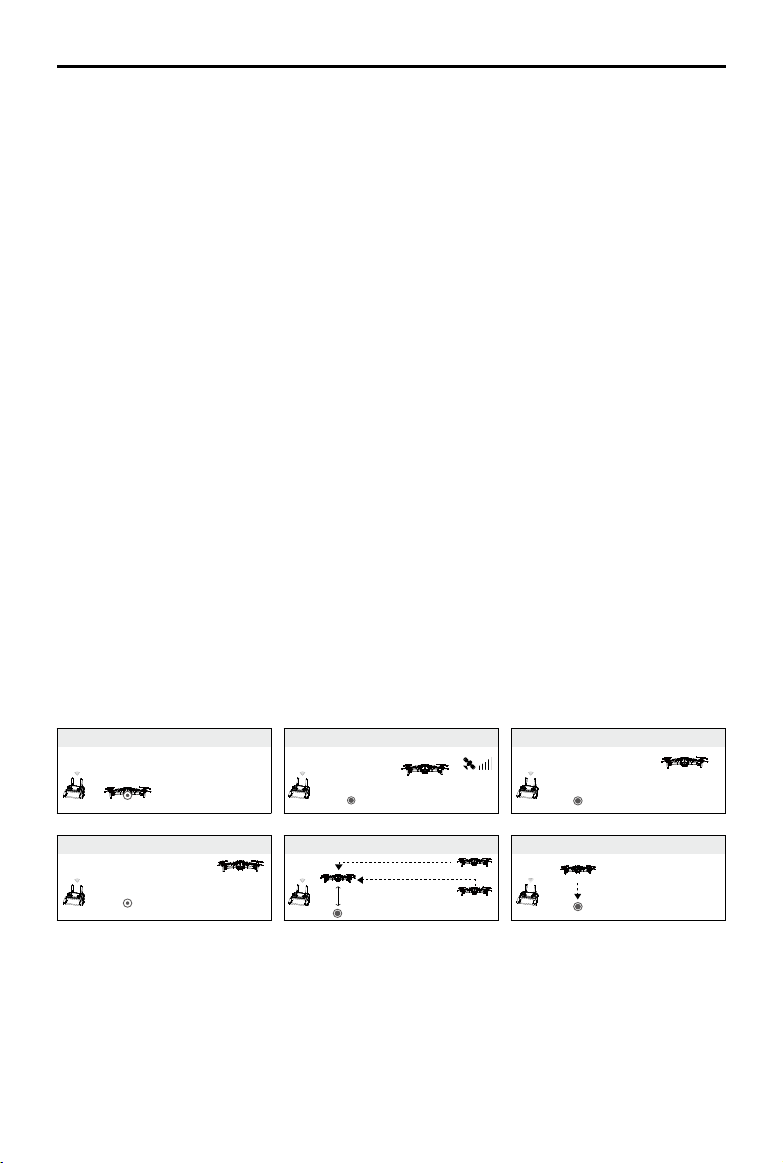
RTH Procedure
Smart RTH, Low Battery RTH, and Failsafe RTH all follow the RTH procedure:
1. The aircraft adjusts its orientation.
2. a. If the aircraft is further than 20 m from the Home Point when the RTH procedure begins, it
ascends to the pre-set RTH altitude and then ies to the Home Point at a speed of 12 m/s. If the
current altitude is higher than the RTH altitude, the aircraft ies to the Home Point at the current
altitude. Forward and Backward vision systems are enabled.
b. If the aircraft is between 5 m and 20 m from the Home Point when the RTH procedure begins:
i. If the RTH at Current Altitude option is enabled the aircraft ies to the Home Point at the current
altitude, unless the current altitude is less than 2 m, in which case the aircraft ascends to 2 m
and then ies to the Home Point at a speed of 3 m/s.
ii. If the RTH at Current Altitude option is disabled, the aircraft lands immediately.
c. If the aircraft is less than 5 m from the Home Point when the RTH procedure begins, it lands
immediately.
3. After reaching the Home Point, the aircraft lands and the motors stop.
1 Record Home Point 2 Conrming Home Point
4 Signal Lost for Extended Time
×
5
RTH (adjustable altitude)
Height over HP > Failsafe Altitude
×
Elevate to Failsafe Altitude
Failsafe Altitude
Height over HP ≤ Failsafe Altitude
3 Remote Controller Signal Lost
×
6 Landing
×
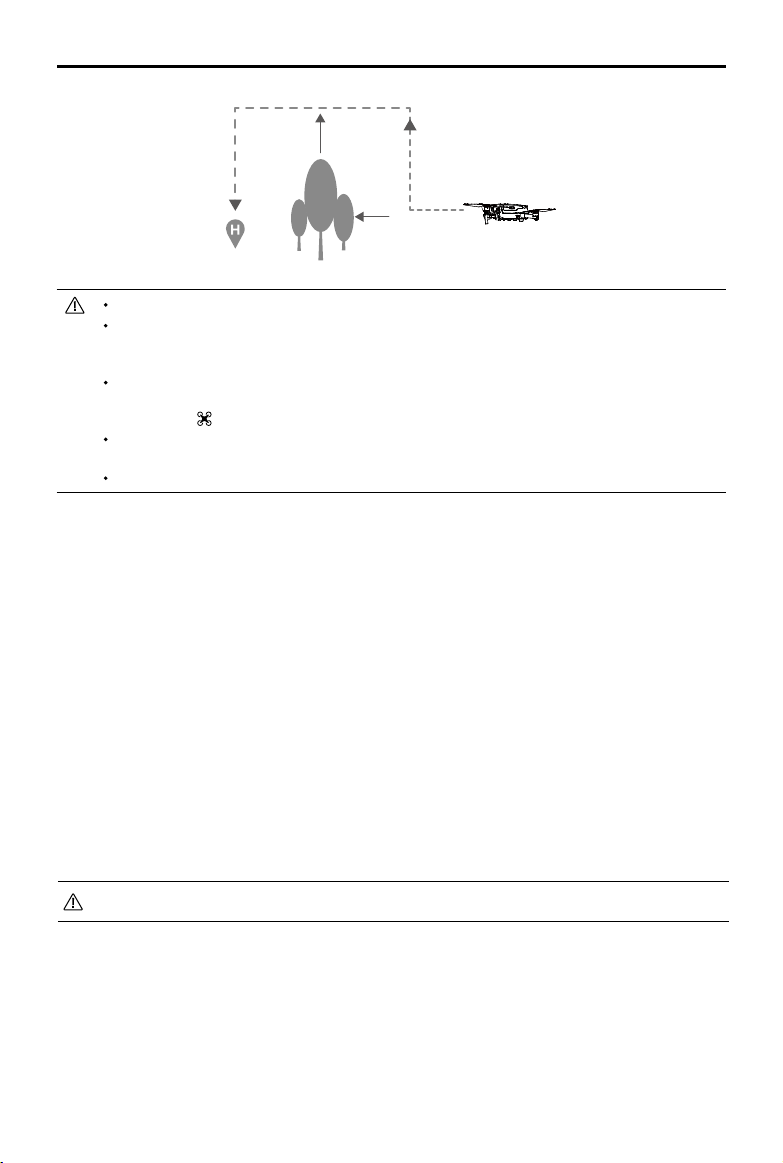
Obstacle Avoidance during RTH
Provided that lighting conditions are sucient for the Forward and Backward Vision Systems to operate,
the Mavic 2 Enterprise series senses and actively attempts to avoid obstacles during RTH. The obstacle
avoidance procedure is as follows:
1. The aircraft decelerates when an obstacle is sensed.
2. The aircraft stops and hovers and then ascends until no obstacle is sensed.
3. The RTH procedure resumes. The aircraft ies to the Home Point at the new altitude.
2018 DJI All Rights Reserved.
©
19
Mavic 2 Enterprise Series User Manual
The aircraft cannot return to the Home Point if the GPS signal is weak or unavailable.
In Smart RTH and Low Battery RTH, the aircraft automatically ascends to an altitude of 65 ft
(20 m). Once the altitude is 65 ft (20 m) or higher, move the throttle stick and the aircraft stops
ascending and flies to the Home Point at its current altitude.
The aircraft cannot avoid obstacles during Failsafe RTH if the Forward and Backward Vision
Systems are unavailable. It is important to set a suitable RTH Altitude before each flight. Launch
DJI Pilot, tap and then set the RTH Altitude.
During RTH, the aircraft’s speed and altitude can be controlled using the remote controller or
DJI Pilot, but the flight controller controls its orientation and direction of flight.
During RTH, obstacles on either side of the aircraft cannot be detected or avoided.
Landing Protection
Landing Protection activates during Smart RTH and the aircraft performs as follows:
1. When Landing Protection determines that the ground is suitable for landing, the aircraft lands gently.
2. If Landing Protection determines that the ground is not suitable for landing, the aircraft hovers and
waits for the pilot to conrm it is suitable to land.
3. If Landing Protection is not operational, DJI Pilot displays a landing prompt when the aircraft
descends below 0.5 m. Pull down on the throttle for one second or use the auto landing slider in the
app to land.
Landing Protection activates during Low Battery RTH and Failsafe RTH. The aircraft performs as
follows:
During Low Battery RTH and Failsafe RTH, the aircraft hovers at 2 m above the ground and waits for
the pilot to conrm it is suitable to land. Pull down on the throttle for one second or use the auto landing
slider in the app to land. Landing Protection activates and the aircraft performs the steps listed above.
Vision Systems are disabled during landing. Be sure to land the aircraft with caution.
2018 DJI All Rights Reserved.
20
©
Mavic 2 Enterprise Series User Manual
Vision Systems and Infrared Sensing Systems
The Mavic 2 Enterprise series is equipped with Forward, Backward, Downward, and Lateral Vision
Systems, and Upward and Downward Infrared Sensing Systems, providing omnidirectional obstacle
sensing (if lighting conditions are adequate).
The main components of the Forward, Backward, and Downward Vision Systems are six cameras
located on the nose, rear side, and the underside of the aircraft. Lateral Vision Systems are two cameras
located on either side of the aircraft.
The main components of the Upward and Downward Infrared Sensing Systems are two 3D infrared
modules located on the upper and underside of the aircraft.
The Downward Vision System and Infrared Sensing System helps the aircraft maintain its current
position and hover in place more precisely and to y indoors or in other environments where a GPS
signal is unavailable. In addition, the Auxiliary Bottom Light located on the underside of the aircraft
improves visibility for the Downward Vision System in weak light conditions.
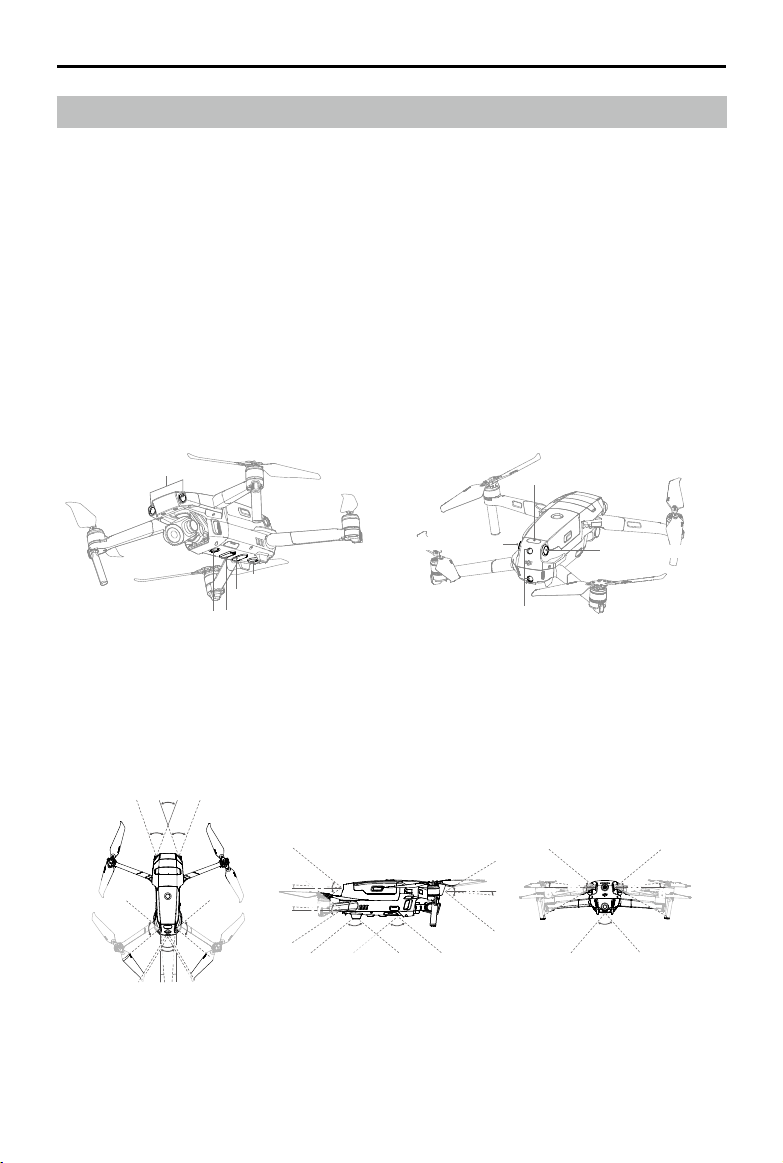
Forward Vision System
Downward Vision System
Lateral Vision System
Downward Vision System
Auxiliary Bottom Light
Downward Infrared Sensing System
Upward Infrared Sensing System
Lateral Vision System
Backward Vision System
Detection Range
The detection range of the Vision Systems is depicted as followed. Please note that the aircraft cannot
sense or avoid the obstacles that are not within detection range.
40°
40° 40°
3°
80°
77°
77°
80°
60°
4°
4°
3°
100°100°
70°
5°
65°
6°
83°
65°
6°
2018 DJI All Rights Reserved.
©
21
Loading…
|
Код: 127185 Извините, товара сейчас нет в наличии
Бесплатная доставка Извините, товара сейчас нет в наличии Сравнить Новости интернет-магазина «Лаукар»:23.04.2025 26.02.2025 17.02.2025 Дополнительная информация в категории Квадрокоптер:Таблица Авторизованных сервисных центров по брендам. Описание Инструкция Отзывы (0) В интернет-магазине бытовой техники «Лаукар» Вы можете скачать инструкцию к товару Квадрокоптер DJI Mavic 2 Enterprise Dual L1DE совершенно бесплатно. Все инструкции, представленные на сайте интернет-магазина бытовой техники «Лаукар», предоставляются производителем товара. Для того чтобы скачать инструкцию, Вам необходимо нажать на ссылку «скачать инструкцию», расположенную ниже, а в случае, если ссылки нет, Скачать инструкцию Смотреть инструкцию 
Фирма-производитель оставляет за собой право на внесение изменений в конструкцию, дизайн и комплектацию товара: Квадрокоптер DJI Mavic 2 Enterprise Dual L1DE. Пожалуйста, сверяйте информацию о товаре с информацией на |
Если вы купили Мавик 2 или планируете купить — эта статья будет полезна для Вас. Мы собрали все популярные настройки, калибровки и советы в этой статье.
1. Как активировать Mavic 2?
Инструкция по запуску дрона Мавик 2
1. Зарядите аккумулятор и пульт управления Мавик 2
- Подключите аккумулятор к зарядному устройству.
- Подключите пульт управления к источнику питания с помощью кабеля USB-C.
2. Установите приложение DJI GO4 на Ваш смартфон
- Загрузите приложение DJI GO4 из App Store (для iOS) или Google Play Store (для Android).
- Установите приложение на свой смартфон.
3. Подключите к интернету Ваш телефон
- Убедитесь, что ваш смартфон подключен к сети Wi-Fi или мобильной сети передачи данных.
4. Подсоедините Ваш телефон к пульту управления и зайдите в приложение DJI GO4
- Подключите свой смартфон к пульту управления с помощью кабеля USB-C.
- Запустите приложение DJI GO4 на своем смартфоне.
5. Включите дрон и активируйте его через приложение DJI GO4
- Нажмите кнопку питания на дроне.
- Следуйте инструкциям в приложении DJI GO4 для активации дрона.
- После активации дрон готов к полету.
2. Перед первым полетом на Мавик 2, что нужно сделать?
Предполетный контрольный список для безопасного запуска дрона DJI Mavic 2:
- Зарядите аккумулятор и пульт управления Mavic 2.
- Выберите просторное место для запуска, свободное от препятствий и вне запретных зон для полетов.
- Зарядите свой смартфон.
- Посмотрите обучающие видео о том, как безопасно летать на Mavic 2, прежде чем совершить свой первый полет.
- Если у вас есть друг, который умеет летать на дроне, попросите его сопровождать вас во время первого полета.
Следуя этим простым шагам, вы сможете безопасно и успешно запустить свой дрон Mavic 2 и насладиться полетом.
3. Как соединить пульт управления с Мавик 2?
Соединение пульта управления с дроном обычно выполняется на заводе-изготовителе и не требует дополнительных действий со стороны пользователя.
4. Как откалибровать IMU в Мавик 2?
Калибровка IMU:
- Выполняйте калибровку IMU только в том случае, если приложение DJI GO4 выдает ошибку или если дрон держит неровный горизонт.
- Для калибровки IMU найдите идеально ровную поверхность вдали от металлических предметов или устройств, излучающих электромеханические волны.
Примечание: Соединение пульта управления с дроном обычно выполняется на заводе-изготовителе и не требует дополнительных действий со стороны пользователя.
5. Как обновить прошивку на Мавик 2?
Инструкции по обновлению прошивки DJI Mavic 2:
Перед обновлением:
- Убедитесь, что уровень заряда аккумулятора дрона, пульта управления и смартфона составляет более 50%.
- Найдите место с устойчивым интернет-соединением.
Процедура обновления:
- Включите дрон и пульт управления.
- Подключите смартфон к пульту управления через кабель USB.
- Запустите приложение DJI GO 4.
- Перейдите в меню «Настройки» > «Общие» > «Обновление прошивки».
- Следуйте инструкциям на экране, чтобы загрузить и установить обновление прошивки.
Во время обновления:
- Не отключайте дрон, пульт управления или смартфон.
- Держите дрон и пульт управления на расстоянии не менее 2 метров друг от друга.
- Обязательно дождитесь завершения обновления до конца.
После обновления:
- Если у вас несколько аккумуляторов, вставьте каждый аккумулятор по очереди и обновите прошивку каждого аккумулятора.
- Перезагрузите дрон и пульт управления.
Примечание: Во время обновления прошивки не перемещайте дрон и не нажимайте на какие-либо кнопки.
6. Как обновить Мавик 2 через программу DJI Assistant 2?
Для обеспечения совместимости с вашим дроном Mavic 2 настоятельно рекомендуется установить специальную версию DJI Assistant 2, разработанную именно для этой модели.
7. Как выполнить Dolly Zoom?
*Доступно только для квадрокоптера Мавик 2 Зум
8. Как сделать гиперлапс на Мавик 2?
В этом видео вы узнаете о четырех способах выполнить Hyperlaps.