
Подключив клавиатуру Apple Keyboard with Numeric Keypad к компьютеру с ОС Windows 8.1 я столкнулся с стандартной проблемой раскладки. Раскладка клавиатур Apple отличается от Windows, к который мы все привыкли, а так как при печати я смотрю на клавиатуру, постоянно путался со знаками препинания и буквой “Ё”, которую постоянно использую. Поэтому стал смотреть в сторону создания кастомной, в моём случае Apple, раскладки.
Для создания кастомной раскладки, Microsoft предлагает программу Microsoft Keyboard Layout Creator (MKLC). Требует Framework 2.0.50727.
Для примера создадим русскую раскладку клавиатуры Apple.
1. Откроем программу

2. Выберем тип расположения клавиш на клавиатуре в меню View –> Options

3. Чтобы не настраивать каждую клавишу, загрузим существующую в системе русскую раскладку в меню File –> Load Existing Keyboard…

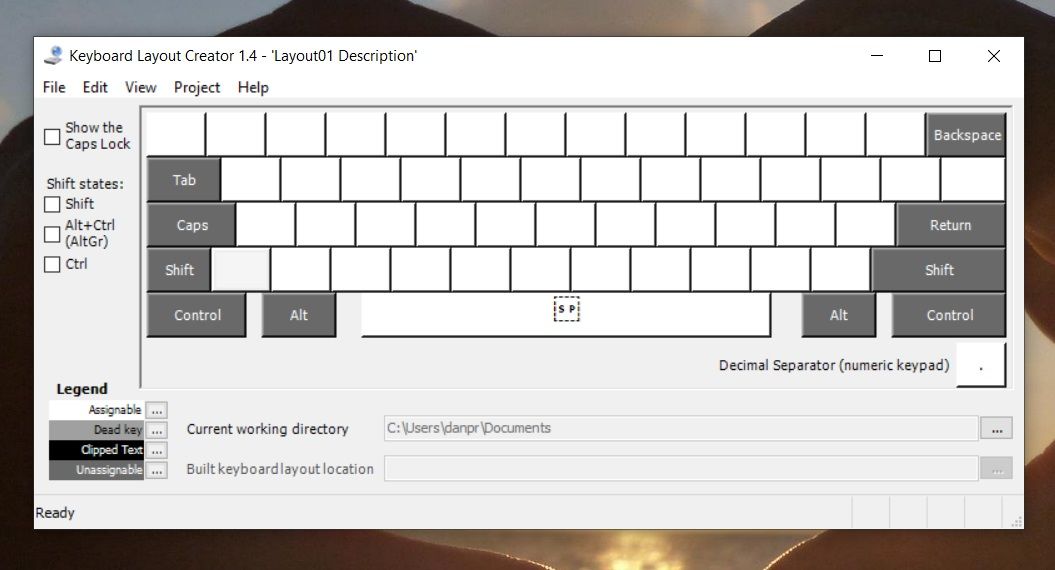
4. Присвоим имя и описание раскладке в меню Project –> Properties. Выполняя одиночный клик на клавишах делаем необходимые изменения. В итоге получится:

И тоже самое, только с “нажатым” Shift

5. Напоследок проверим как работает новая раскладка. Для этого вызовем тест раскладки в меню Project –> Test Keyboard Layout…
6. Если ошибок нет, соберём пакет новой раскладки в меню Project –> Build DLL and Setup Package.
На выходе получим файлы для установки.
7. Для установки с правами администратора запускаем setup.exe, установка пройдёт автоматически, система сообщит об успешной установке

8. В языковых параметрах системы остаётся только настроить раскладки клавиатуры

9. Для того, чтобы новая раскладка работала на экране приветствия и для новых пользователей, необходимо скопировать текущие настройки пользователя в профиль системы и в профиль пользователя по умолчанию.

10. Для восстановления или удаления раскладки из системы, необходимо запустить сформированный на шаге 6 setup.exe и выбрать необходимый параметр.

Introduction
Are you tired of using the same old keyboard layout that comes with your Windows operating system? Do you want to create a custom keyboard layout that suits your language or typing needs? Look no further than the Microsoft Keyboard Layout Creator. This powerful tool allows you to create your own custom keyboard layouts from scratch or edit existing ones, giving you the flexibility to type in your preferred language or with your preferred keyboard layout.
What is Microsoft Keyboard Layout Creator?
Microsoft Keyboard Layout Creator is a free tool provided by Microsoft that enables users to create custom keyboard layouts for Microsoft Windows. With this tool, you can create keyboard layouts for languages that Microsoft doesn’t support, or modify existing layouts to suit your needs. The tool is designed to be user-friendly, making it easy for anyone to create and edit keyboard layouts without requiring extensive technical knowledge.
Key Features of Microsoft Keyboard Layout Creator
- Create Custom Keyboard Layouts: With Microsoft Keyboard Layout Creator, you can create your own custom keyboard layouts from scratch or edit existing ones. This means you can create a layout that suits your language or typing needs, or modify an existing layout to make it more efficient or user-friendly.
- Edit Existing Keyboard Layouts: If you already have a keyboard layout that you like, you can edit it using Microsoft Keyboard Layout Creator. This allows you to make changes to the layout without having to start from scratch.
- Multilingual Input Locales: Microsoft Keyboard Layout Creator includes support for multilingual input locales within edit control fields. This means you can type in multiple languages using a single keyboard layout.
- Font Customization: You can easily change the fonts of the buttons in your keyboard layout, giving you more flexibility in terms of design and aesthetics.
- Keyboard Layout Validation and Testing: The tool includes tools for validating and testing your keyboard layout for errors. This ensures that your layout is error-free and works as expected.
- DLL Generation: After you have edited your layout, you can generate DLLs for x86, x64, and IA64 platforms. This allows you to distribute your custom keyboard layout to other users.
- Installation Package Creation: You can create an installation package of your layout for delivery and installation on other systems.
How to Use Microsoft Keyboard Layout Creator
Using Microsoft Keyboard Layout Creator is relatively straightforward. Here’s a step-by-step guide to get you started:
- Download and Install: Download the Microsoft Keyboard Layout Creator tool from the Microsoft website and install it on your computer.
- Launch the Tool: Launch the tool and select the language or keyboard layout you want to create or edit.
- Create a New Layout: If you want to create a new layout from scratch, select the «Create a new layout» option and follow the prompts to create your layout.
- Edit an Existing Layout: If you want to edit an existing layout, select the «Edit an existing layout» option and choose the layout you want to edit.
- Customize Your Layout: Use the tool’s interface to customize your layout, including changing the fonts of the buttons and selecting from three different keyboard layouts.
- Validate and Test Your Layout: Use the tool’s validation and testing tools to ensure that your layout is error-free and works as expected.
- Generate DLLs and Installation Package: After you have edited your layout, generate DLLs for x86, x64, and IA64 platforms and create an installation package for delivery and installation on other systems.
Benefits of Using Microsoft Keyboard Layout Creator
Using Microsoft Keyboard Layout Creator offers several benefits, including:
- Increased Productivity: By creating a custom keyboard layout that suits your needs, you can increase your productivity and typing speed.
- Improved User Experience: A custom keyboard layout can make typing more efficient and user-friendly, reducing errors and improving overall user experience.
- Flexibility: Microsoft Keyboard Layout Creator allows you to create and edit keyboard layouts for languages that Microsoft doesn’t support, giving you more flexibility in terms of language support.
- Customization: The tool allows you to customize your keyboard layout to suit your needs, including changing the fonts of the buttons and selecting from three different keyboard layouts.
System Requirements
Microsoft Keyboard Layout Creator requires the following system requirements:
- Windows Operating System: Microsoft Keyboard Layout Creator requires a Windows operating system, including Windows Vista, Windows 7, Windows 8, and Windows 10.
- Processor: The tool requires a 32-bit or 64-bit processor, including x86, x64, and IA64 platforms.
- Memory: The tool requires a minimum of 512 MB of RAM, although more memory is recommended for optimal performance.
Conclusion
Q: What is Microsoft Keyboard Layout Creator?
A: Microsoft Keyboard Layout Creator is a free tool provided by Microsoft that enables users to create custom keyboard layouts for Microsoft Windows. With this tool, you can create keyboard layouts for languages that Microsoft doesn’t support, or modify existing layouts to suit your needs.
Q: What are the system requirements for Microsoft Keyboard Layout Creator?
A: Microsoft Keyboard Layout Creator requires a Windows operating system, including Windows Vista, Windows 7, Windows 8, and Windows 10. The tool also requires a 32-bit or 64-bit processor, including x86, x64, and IA64 platforms, and a minimum of 512 MB of RAM.
Q: How do I create a custom keyboard layout using Microsoft Keyboard Layout Creator?
A: To create a custom keyboard layout using Microsoft Keyboard Layout Creator, follow these steps:
- Download and install the tool from the Microsoft website.
- Launch the tool and select the language or keyboard layout you want to create or edit.
- Select the «Create a new layout» option and follow the prompts to create your layout.
- Customize your layout using the tool’s interface, including changing the fonts of the buttons and selecting from three different keyboard layouts.
- Validate and test your layout using the tool’s validation and testing tools.
- Generate DLLs for x86, x64, and IA64 platforms and create an installation package for delivery and installation on other systems.
Q: Can I edit an existing keyboard layout using Microsoft Keyboard Layout Creator?
A: Yes, you can edit an existing keyboard layout using Microsoft Keyboard Layout Creator. To do this, follow these steps:
- Download and install the tool from the Microsoft website.
- Launch the tool and select the language or keyboard layout you want to edit.
- Select the «Edit an existing layout» option and choose the layout you want to edit.
- Customize your layout using the tool’s interface, including changing the fonts of the buttons and selecting from three different keyboard layouts.
- Validate and test your layout using the tool’s validation and testing tools.
- Generate DLLs for x86, x64, and IA64 platforms and create an installation package for delivery and installation on other systems.
Q: Can I use Microsoft Keyboard Layout Creator to create a keyboard layout for a language that Microsoft doesn’t support?
A: Yes, you can use Microsoft Keyboard Layout Creator to create a keyboard layout for a language that Microsoft doesn’t support. The tool allows you to create custom keyboard layouts for languages that Microsoft doesn’t support, giving you more flexibility in terms of language support.
Q: How do I distribute my custom keyboard layout to other users?
A: To distribute your custom keyboard layout to other users, follow these steps:
- Generate DLLs for x86, x64, and IA64 platforms using the tool’s DLL generation feature.
- Create an installation package for delivery and installation on other systems using the tool’s installation package creation feature.
- Share the installation package with other users, either by email or by uploading it to a file-sharing website.
Q: Can I use Microsoft Keyboard Layout Creator to create a keyboard layout for a specific industry or profession?
A: Yes, you can use Microsoft Keyboard Layout Creator to create a keyboard layout for a specific industry or profession. The tool allows you to create custom keyboard layouts that are tailored to the specific needs of your industry or profession.
Q: Is Microsoft Keyboard Layout Creator free?
A: Yes, Microsoft Keyboard Layout Creator is a free tool provided by Microsoft. You can download and install it from the Microsoft website without incurring any costs.
Q: Can I use Microsoft Keyboard Layout Creator on a Mac?
A: No, Microsoft Keyboard Layout Creator is only compatible with Windows operating systems. It is not compatible with Mac operating systems.
Q: Can I use Microsoft Keyboard Layout Creator to create a keyboard layout for a specific device or hardware?
A: Yes, you can use Microsoft Keyboard Layout Creator to create a keyboard layout for a specific device or hardware. The tool allows you to create custom keyboard layouts that are tailored to the specific needs of your device or hardware.
Q: How do I get support for Microsoft Keyboard Layout Creator?
A: You can get support for Microsoft Keyboard Layout Creator by visiting the Microsoft website and searching for the tool’s support page. You can also contact Microsoft support directly for assistance with any issues you may be experiencing with the tool.
- Home
- Windows Tips
- Install custom keyboard windows 10
Windows 10 has a long list of keyboard layouts that a user can add to their system. These layouts cater to multiple languages including Mandarin and Arabic, and they are available for all types of keyboards.
Installing a keyboard layout on Windows 10 is easy; all you have to do is select one from a list and it will be added. Users can switch between keyboard layouts on the fly with a keyboard shortcut (Ctrl+Shift).
Note that Windows 10 keyboard layouts are all preset and they cannot be edited. In order to get a custom keyboard layout, you either have to download it or create one yourself.
Creating a keyboard layout is easy but time-consuming since every single key has to be mapped and assigned individually. Try to find a ready-made keyboard layout if you can. If a ready-made keyboard layout isn’t available, you’ll have to make the layout yourself.
See our video tutorial on how create a custom keyboard layout on Windows 10 or follow the step-by-step guide below:
Video Tutorial
Step-by-Step Guide
- Download the Microsoft Keyboard Layout Creator.
- Open the app and notice the blank visual keyboard.
You’ll get a basic keyboard layout without a dedicated numpad. The keys are color coded. All white keys can be assigned whereas the dark grey ones cannot. The dark grey keys represent keys like Tab, Shift, Caps, etc.
- Tap a key on the visual keyboard and select the character / key you want to assign to it, one-by-one.
Click inside an assignable key, and in the box that opens, enter what key/character you want to enter when that particular key is pressed. This will enter the default character for that key. If you want to record the shift state character for a key, click the All button on this same box.Recording a Shift key is just as easy as recording the default state key but it isn’t compulsory. You can skip it if you want. You can also couple keys with Ctrl and Alt keys.
- Map the entire keyboard.
- Go to Project>Build DLL and Setup Package.
When you’re done, go to Project>Build DLL and Setup Package. You’ll see a prompt asking if you want to check the properties of the keyboard layout you’re creating and you definitely should. That’s where you can give the keyboard layout a proper name and description.It will create an MSI file and an EXE, either one of which you can run to install your custom keyboard layout. I created a basic one that types in all Caps and named it angry. Once installed, it allowed me to type in all Caps without holding down the Shift key. For more complicated keyboard layouts, it’s going to take more time to create but the tool is still just as easy to use!
- Save the layout.
Install custom keyboard layout
A keyboard layout, whether it’s custom made with the Microsoft Keyboard Layout Creator or if you’ve downloaded it yourself, is going to be an executable file or an installer file. Installing it is as easy as installing any app.
- Open File Explorer and navigate to the EXE or MSI file for the keyboard layout.
- Run the file.
- Grant the app admin permission to install (The keyboard is installed for the current language).
- Open the Settings app.
- Go to Time & Language.
- Select the Language tab.
- Select the current language.
- Click the keyboard button under it.
- The current and new keyboard layout will be listed. Remove the one you do not want to use.
Conclusion
Keyboard layouts for commonly spoken languages like English are more common. If you need to type in a language that doesn’t have many layouts available, or you need to set the keys up in a layout that you can’t find in any configuration, a custom layout is the best alternative.
It’s worth mentioning that if you only need to change one or two keys, you can do with remapping them instead of creating a custom layout. Remapping tools like AutoHotKey and PowerToys are good options. If you remove the layout at any point, you can still use the MSI or the EXE file for it to install it again.

Fatima Wahab
Fatima has been writing for AddictiveTips for six years. She began as a junior writer and has been working as the Editor in Chief since 2014.
Fatima gets an adrenaline rush from figuring out how technology works, and how to manipulate it. A well-designed app, something that solves a common everyday problem and looks
In today’s digital age, users are continuously looking for ways to enhance their productivity and personalize their technology experience. One aspect of personal computing that often goes overlooked is the keyboard layout. For multilingual users, programmers, or anyone who frequently types special characters, the standard keyboard layout might not suffice. This is where the Microsoft Keyboard Layout Creator (MSKLC) steps in, offering a powerful tool for designing custom keyboard layouts tailored to individual needs. This article delves into the features, functionality, and benefits of using the Microsoft Keyboard Layout Creator, as well as a step-by-step guide for creating your very own keyboard layout.
Understanding Keyboard Layouts
A keyboard layout refers to the arrangement of keys and the characters they produce when pressed. Different languages have different character requirements, making standardized layouts often inadequate for multilingual users. The QWERTY layout is the most common in English-speaking countries, but other layouts like AZERTY, QWERTZ, and Dvorak cater to different languages or typing preferences.
Why Create Custom Keyboard Layouts?
There are several reasons why a user might choose to create a customized keyboard layout:
-
Multilingual Needs: For users who engage in multilingual typing, certain characters and diacritics may not be readily available on their default keyboard layout. Custom layouts allow for quicker access to these characters.
-
Programming Symbols: Developers often need to type various symbols and characters not easily accessible on standard keyboards. A custom layout can streamline this process, improving efficiency.
-
Personal Preferences: Users may find that their typing style could be enhanced by reorganizing keys. Custom layouts provide the freedom to optimize the keyboard for comfort and speed.
-
Accessibility: Some users may have accessibility needs that demand a specific arrangement of keys to accommodate ease of use. Custom layouts can help in making technology more accessible.
-
Educational Purposes: Teachers or students studying various languages can benefit from custom layouts to facilitate learning and typing practice.
Introduction to Microsoft Keyboard Layout Creator
The Microsoft Keyboard Layout Creator (MSKLC) is an application developed by Microsoft that enables users to create, modify, and manage keyboard layouts. It provides a user-friendly interface for remapping keys, designing new layouts, and packaging them for easy installation.
Key Features of MSKLC
-
User-Friendly Interface: MSKLC is designed for simplicity, featuring an easy-to-navigate interface that makes it accessible for users with varying levels of technical expertise.
-
Custom Key Mapping: The tool allows users to remap existing keys or assign new functions to them. Users can specify what each key should produce, from letters to symbols.
-
Import and Export Functionality: Users can save and export their custom layouts and share them with others. Likewise, existing layouts can be imported for modification.
-
Support for Multiple Languages: MSKLC supports a variety of languages and scripts, making it versatile for global users who require specific character sets.
-
Testing and Previewing: The application enables users to test their custom layouts in real-time, ensuring they can see how their changes will function before finalizing the layout.
-
Complete Documentation: Microsoft provides comprehensive documentation and tutorials, helping users navigate the process of creating their layouts effectively.
Getting Started with MSKLC
System Requirements
Before installing the Microsoft Keyboard Layout Creator, make sure your system meets the necessary requirements:
- Windows 7, 8, 10, or later
- .NET Framework version 4.0 or later
- At least 50 MB of free disk space
Installation of MSKLC
-
Download the Installer: Visit the official Microsoft website to download the latest version of the Keyboard Layout Creator.
-
Run the Installer: Double-click the downloaded file and follow the on-screen instructions to complete the installation process.
-
Launch MSKLC: After installation, open the application, and familiarize yourself with the interface, which consists of a main window with options to create new layouts, open existing ones, and access various settings.
Creating Your First Custom Keyboard Layout
Step 1: Select a Base Layout
When you begin a new layout, you will start by selecting a base layout to work from. This could be a layout already installed on your system. To select a base layout:
- In the MSKLC app, click on «File» and then «Load Existing Keyboard.»
- Browse through the list of keyboard layouts and select the one that best suits your needs (for example, the U.S. QWERTY layout).
Step 2: Customize Keys
Once you have selected a base layout, you can begin customizing the keys:
- Click on a key in the visual representation of the keyboard to open the key properties.
- In the properties window, assign a new character or function to that key. This can include letters, numbers, punctuation marks, or special symbols.
- If you want to define additional key states (such as Shift, AltGr, etc.), you can select these additional states from a dropdown menu.
Step 3: Adding Special Characters
For users who need to frequently type special characters or diacritics, MSKLC allows you to add these directly to your layout:
- Click on the key where you’d like the special character to appear.
- In the dialog box, input the Unicode value of the character you want, or select it from the provided list.
Step 4: Naming Your Layout
Every custom layout should have a unique name for easy identification:
- Navigate to «Project» and select «Properties.»
- Enter a name, a language, and a description for your layout.
Step 5: Testing Your Layout
Before you finalize and install the layout, it’s important to test it:
- Go to «Project» and select «Test Keyboard Layout.»
- A testing window will appear where you can type and see how your new layout functions in real-time.
Step 6: Building and Installing the Layout
Once you’ve tested your layout and are satisfied with it:
- Go to the «Project» menu and select «Build DLL and Setup Package.»
- Choose a save location for the installation files and click «OK.»
- After this process completes, navigate to the save location and run the setup file to install your custom keyboard layout.
Switching to Your Custom Layout
After installation, you can switch to your new custom keyboard layout:
- Open Settings in Windows.
- Go to Time & Language and select Language.
- Click on the language you want to modify, then select Options.
- In the Keyboards section, you can add your new custom layout for use.
Managing and Sharing Custom Keyboard Layouts
Modifying Existing Layouts
If you wish to tweak any existing layouts—whether it’s a custom one you created or one that you downloaded—you can easily load it into MSKLC, make your modifications, and rebuild the layout. This adaptability allows for continual refinements based on changing personal or professional needs.
Sharing Your Layout
Once you have created a custom keyboard layout that you believe others may benefit from, MSKLC makes sharing straightforward:
- Simply provide the installation file created in the build process to others.
- They can install it on their computers with the same steps you followed.
Custom layouts are particularly beneficial for language teachers, software developers, or communities of users who share a common need for specific input methods.
Troubleshooting Common Issues
Layout Not Showing Up
If your new layout doesn’t appear after installation, check the following:
- Ensure that your system’s language settings are correctly configured to include your custom layout.
- Restart your computer to refresh the keyboard settings.
- Confirm that the layout build process was completed without errors.
Key Does Not Function as Expected
If a key does not produce the intended character:
- Reopen MSKLC and verify that you have correctly assigned the key.
- Check if there are any conflicting third-party software or settings potentially overriding your custom layout.
Compatibility Issues
Because MSKLC is developed with Windows in mind, compatibility with non-Windows operating systems may be limited. If you require a layout for Mac or Linux environments, consider looking into alternative solutions compatible with those systems.
Advanced Tips and Tricks
Utilizing Unicode Characters
For multilingual users or those needing frequent access to symbols, learn how to utilize Unicode inputs effectively. This allows for a broader range of characters to be added to your custom layout.
Creating Layouts for Specific Applications
Consider developing specialized layouts for certain applications that necessitate specific shortcuts or symbols, such as coding environments or graphic design software.
Version Control for Custom Layouts
If you often modify your layouts, consider keeping a version-controlled system (like using Git) for tracking changes. This can be particularly useful if you are creating layouts in a professional context.
Backup Your Custom Layouts
Regularly backup your custom layouts to cloud storage or an external drive. This ensures that you will not lose your work if your system fails or if the Microsoft Keyboard Layout Creator becomes unavailable.
Conclusion
The Microsoft Keyboard Layout Creator (MSKLC) proves to be an invaluable tool for anyone looking to elevate their typing experience through custom keyboard layouts. Whether your needs arise from multilingual typing, programming, personal comfort, accessibility concerns, or educational purposes, MSKLC offers the tools necessary to create an optimal keyboard layout tailored to your unique requirements.
By following the straightforward steps outlined in this article, users can confidently create and manage their custom keyboard layouts, ultimately enhancing productivity and user satisfaction. Embrace the power of personalization, and dive into the world of keyboard layouts with MSKLC today!
Sign in to your MUO account

Windows users have a few different options when it comes to creating customized keyboard layouts.
Here’s how to make a custom keyboard layout.
Custom Keyboard Options in Windows
You could use the ever-popular Portable Keyboard Layout software. Despite its age, it still works well. The app is open-source and lets you keep different keyboard layouts on a USB stick so you can easily use them on any machine.
Of course, Windows also offers a native way to jump between different keyboard layouts.
You can also try using keyboard remapping software. There are lots of free options available, but one of the most overlooked apps is the official Microsoft Keyboard Layout Creator.
How to Create a Custom Keyboard Layout on Windows
Before we start, a word of warning: the Microsoft Keyboard Layout Creator app is nearly a decade old. It still works perfectly and runs on Windows 10, but occasionally you might encounter a bug.
First, you need to download and install the app from the official site. When it’s installed, follow the instructions below to create your own keyboard layout:
- Open the Microsoft Keyboard Layout Creator app.
- Head to File > Load Existing Keyboard.
- Pick the layout you want to customize. You should make sure you pick the layout that matches your current keyboard setup, for example, QWERTY (U.S.).
- Go to File > Save Source File As so you have a backup before you start making changes.
- Set your new keyboard’s parameters in Project > Properties. You can pick a language and give the keyboard a name and description.
- Click on a key and follow the on-screen prompt to remap it to a character of your choosing.
If you want to add hotkeys for accented letters or other obscure characters that you frequently use, the easiest way is to program them to Ctrl + Alt + [Number]. You cannot overwrite existing shortcuts like Ctrl + S (Save) or Ctrl + A (Select All).
The Key to Remapping Your Keyboard
If you dislike the tools you’ve been given, you can always create a custom keyboard layout in Windows 10. It takes a little work, and the tools are beginning to show their age, but it works!
If you’re interested in this topic because one of your keys has just died, don’t worry. There are plenty of ways to remap a keyboard around a dead key while you work on getting a new one.