
Mindeo MD6600 — это ручной сканер для считывания штрихкодов. Он соответствует требованиям 54-ФЗ. Его используют в магазинах, общепитах, ломбардах, службах доставки и на складах. Устройство распознаёт одномерные и двумерные графические данные. Работает с ЕГАИС и товарами, подлежащими обязательной маркировке. Сканирует информацию с экранов смартфонов с помощью встроенного фотомодуля.
В обзоре рассмотрим основные характеристики Mindeo MD6000, его комплектацию, эргономику, настройки и модификации сканера.
В магазинах представлены две модели сканера Mindeo MD6600: Standard Rage (SR) и High-Density (HD). В устройствах отличаются сканирующие элементы.
В модель SR встроен модуль стандартной дальности. Он считывает типовые одномерные и двумерные штрихкоды. Читает информацию с бликующих поверхностей, в том числе и с экранов гаджетов. Его используют курьерские службы, пункты выдачи заказов или супермаркеты.
Версия HD имеет мегапиксельный считывающий модуль, который сканирует штрихкоды с мелких этикеток. Читает цифровую информацию с тиснённой или изогнутой поверхности. Модель используют в ювелирных салонах, оптике, аптеках и магазинах, где плотность маркировки составляет от 3 mils до 20 mils.
Обе модификации имеют широкие функциональные возможности:
- автоматическое или ручное распознавание штрихкодов;
- высокую производительность;
- взаимодействие с ЕГАИС, «Честный ЗНАК», Мониторингом движения лекарственных препаратов;
- моментальное подключение к различному оборудованию;
- сканирование штрихкодов под разными углами;
- использование в различных сферах бизнеса.
Обзор технических характеристик моделей:
- габариты — 90×62,8×153 мм;
- вес — 132 гр.;
- форма устройств — ручные;
- разрешение сканирующих элементов:
- HD — 1280×800 px;
- SR — 640×480 px;
- HD — 340 мм;
- SR — 430 мм;
- индикаторы — светодиод и звуковой сигнал;
- интерфейс подключения к внешнему оборудованию — USB Virtual COM-port, RS-232, USB Keyboard; У модели SR есть возможность подключаться через IBM 46xx (RS485);
- многоплоскостной режим сканирования;
- поле обзора — горизонтальное 41°; вертикальное:
- HD — 28°;
- SR — более 28,9°;
- степень защиты корпуса — IP52;
- прочность — выдерживают падение с 2 метровой высоты.
глубина распознавания:
Сканер Mindeo MD6600 соответствует международным стандартам электро- и фотобиологической безопасности.
В стандартный комплект поставки входит считывающее устройство, 2-х метровый USB-кабель и руководство пользователя, которое записано на компакт-диск. Также в набор входит инструкция по подключению и команды для настройки сканера.
Подставку и кабель с разъёмом RS-232 и адаптер продают отдельно.
Сканер изготавливают из ударопрочного пластика. Фотоэлемент защищает закалённое стекло. Корпус имеет эргономичный и стильный дизайн. Моментальное считывание происходит благодаря зелёному прицельному маркеру. Прицел уменьшается и увеличивается по мере приближения или удаления объекта от устройства. Во избежание зрительного раздражения модели используют мягкую белую подсветку. Световой и звуковой индикатор информирует работника о том, что считывание прошло успешно, после чего прицел и подсветка выключаются. Кабель подключения к оборудованию надёжно закреплён. Фиксатор размещён в глубине специального отверстия, что исключает его случайное отсоединение и перебои в работе.
Сканер программируют с помощью специальных штрихкодов. Обновления программного обеспечения осуществляются автоматически в режиме онлайн. Подключение сканера к компьютеру через эмуляцию COM-порта проверяют через «Диспетчер устройств». Если компьютер не находит устройство, требуется установить USB Virtual COM driver. Утилита подходит для моделей Mindeo MD6600 SR и Mindeo MD6600 HD. Драйвер можно скачать на официальном сайте производителя. Там же представлена инструкция пользователя на английском языке под названием Manual Instruction. Русскоязычный перевод данного текста доступен по нашей ссылке.
Сканер работает с учётными программами. Для взаимодействия не требуется дополнительное перепрограммирование. Изменения вносят в саму программу.
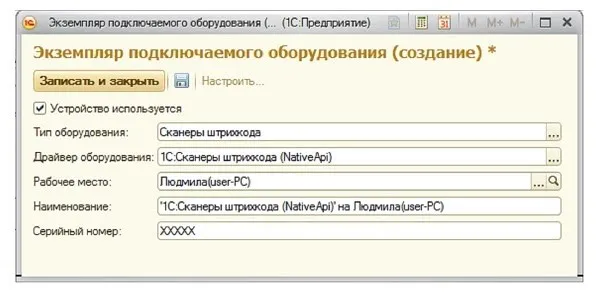
Рассмотрим, как это сделать на примере с «1С: Розница 8»:
- Зайти в «Подключаемое оборудование» через «Администрирование»;
- Выбрать «Использовать подключаемое оборудование», затем в поле «Сканеры штрихкодов» нажать «Создать»;
- В открывшемся окне во вкладке «Драйверы ШК» выбрать «1С: Сканеры штрихкода (NativeApi)», написать серийный номер сканера.
- Нажать «Записать и закрыть».

- Скопировать созданное поле и нажать кнопку «Настроить»;
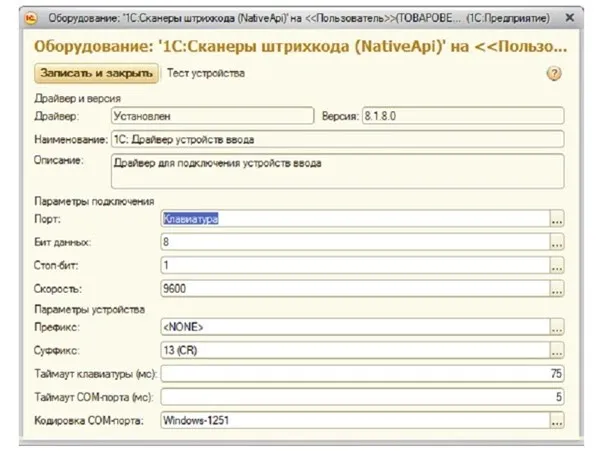
- Ввести параметры с картинки представленной ниже и завершить подключение.
Окончательная стоимость зависит от комплектации оборудования. Если в заказ включить подставку и кабель RS-232, комплект обойдётся дороже.
Сканер Mindeo MD6600 оптимальный вариант сочетания цена-качество. Устройство стоит недорого, при этом имеет высокие характеристики считывания. Распознаёт не только обычные одно- и двумерные штрихкоды, но и DataMatrix. Работает с маркированными и подакцизными товарами. Взаимодействует с учётными программами и легко к ним подключается. Инженерные решения обеспечивают моментальное считывание символов с бликующей поверхности, экрана гаджета, мелкого флакона или фольгированного блистера. Модели подойдут для реализации товаров в магазинах или учёта продукции на складах любых отраслей.
Купить Mindeo MD6600 или другой подходящий сканер рекомендуем в нашем интернет-магазине. В каталоге можно найти не только оборудование и расходные материалы, но и готовые решения для вашего бизнеса. На сайте можно получить бесплатную консультацию специалистов или самостоятельно подобрать кассу исходя из своего вида деятельности, характера работы и бюджета.
-
Contents
-
Table of Contents
-
Bookmarks
MD6600 Handheld Image Scanner
User Manual
Version: MD6600_UM_EN_V1.1.3
Need help?
Do you have a question about the MD6600 and is the answer not in the manual?
Questions and answers
Related Manuals for Mindeo MD6600
Summary of Contents for Mindeo MD6600
-
Page 1
MD6600 Handheld Image Scanner User Manual Version: MD6600_UM_EN_V1.1.3… -
Page 3
Notice Ensure that the optional DC adapter works at +5 VDC, especially for the RS-232 interface cable. 1. All software, including firmware, furnished to the user is on a licensed basis. 2. The right is reserved to make changes to any software or product to improve reliability, function, or design. -
Page 5: Table Of Contents
Contents Contents …………………………iii 1 Specifications ……………………….. 1 1-1 Technical specifications ……………………1 1-2 Default setting for each barcode …………………. 3 2 Get started ……………………….4 2-1 Dimensions ……………………….4 2-2 Parts of the scanner ……………………. 5 2-3 Cable connector pin-outs descriptions ………………… 6 2-4 Installation and uninstallation of cable …………………
-
Page 6
3-22 UCC/EAN 128 ……………………..54 3-23 ISBT 128 ……………………….56 3-24 Code 93 ……………………….57 3-25 Code 11 ……………………….58 3-26 MSI/Plessey ……………………..60 3-27 UK/Plessey ……………………… 62 3-28 China Post ………………………. 63 3-29 China Finance ……………………..64 3-30 GS1 DataBar (GS1 DataBar Truncated) ………………66 3-31 GS1 DataBar Limited …………………… -
Page 7: Specifications
1 Specifications 1-1 Technical specifications Dimensions Height × Width × Depth:90 mm × 62.8 mm × 153 mm Weight 132 g, without cable Cable Straight 2.0 m Connector Type RJ-45 phone jack connector Case Material PC+TPU Exit Window Material Tempered glass Indicator Beeper, LED Interface Supported…
-
Page 8
ESD Protection: EN55024 RF Immunity: IEC61000-4-3, 10 V/m Immunity: 0~100,000 lux Sealing: IP52 Drop Resistance: Withstands multiple 2.0 m drops to concrete… -
Page 9: Default Setting For Each Barcode
1-2 Default setting for each barcode Read Check digit Check digit Min. code Proprietary Code type enable verification transmissio length code ID code ID UPC-A √ √ √ (12) UPC-E √ √ √ UPC-E1 √ √ EAN-13 √ √ √ (13) EAN-8 √…
-
Page 10: Get Started
2 Get started 2-1 Dimensions…
-
Page 11: Parts Of The Scanner
2-2 Parts of the scanner Figure 2-1 ① LED ② Beeper ③ Scan window ④ Trigger ⑤ Release-hole of the cable ⑥ Cable interface port…
-
Page 12: Cable Connector Pin-Outs Descriptions
2-3 Cable connector pin-outs descriptions The scanner provides a RJ-45 cable connector. Figure 2-2 Cable connector interface pin-outs The pin-outs descriptions in Table 2-1 apply to the cable connector on the scanner and are for reference only. Table 2-1 Cable connector pin-outs descriptions RS232 Power (+5V) Power (+5V)
-
Page 13: Installation And Uninstallation Of Cable
2-4 Installation and uninstallation of cable Note: If any of the below operation is incorrect, turn off the power immediately and check the scanner for any improper connections. Go through all steps again. 2-4-1 Installation — USB The scanner attaches directly to a USB host, and is powered by it. No additional power supply is required.
-
Page 14: Uninstallation Of Cable
2-4-3 Uninstallation of cable Figure 2-5 Remove the interface cable: 1. Find the release-hole. 2. Insert a thin wire into the hole and pull out the cable gently. 2-5 Assembling the stand Note: The stand is an optional accessory.
-
Page 15: Auto-Detection
2-6 Auto-detection Note: The stand is an optional accessory. To scan a bar code, present the bar code and ensure that the scan angle from the scan window can cover the symbol. Upon successful decode, the scanner beeps and the LED lights. When the scanner stops scanning, the present bar code must be removed to active next scanning.
-
Page 16: Programming
3 Programming 3-1 Example 1: Single-parameter setting by scanning 1D barcodes Important notes: 1. During the process of programming, LED is lighting to indicate the programming correctness. LED will go off if any incorrect programming operation performed. 2. After each successful programming, LED will go off and the scanner will beep twice. 3.
-
Page 17: Example 2: Multiple-Parameter Setting By Scanning A Qr Code Barcode
3-2 Example 2: Multiple-parameter setting by scanning a QR code barcode User can customize a QR code to set multiple parameters. The scanner can set multiple parameters by scanning this single QR code barcode. 1. The data format of the QR code barcode is as following. Parameter set 1 Parameter set 2 Parameter set N…
-
Page 18: Operate The Scanner By Receiving Command Via Uart
3-3 Operate the scanner by receiving command via UART Note: 1- The information in this chapter is provided for the scanner with RS232 cable or USB cable. 2- If the scanner is with USB cable, the setting of USB device type must be set as “USB virtual COM”. Please refer to 3-6 USB interface.
-
Page 19: Interface Selection
3-4 Interface selection This scanner supports interfaces such as RS-232 serial wedge and USB interface. In most of the cases, simply selecting an appropriate cable provided by the manufacturer will work for a specific interface. Interface selection: Auto detection- By setting this function, the scanner will automatically detect the RS-232 interface or USB interface for user.
-
Page 20: Rs-232 Interface
3-5 RS-232 interface Host type: Standard- The scanner is connected to a standard RS-232 interface. OPOS/JPOS- The scanner is connected to a POS terminal which may be necessary to install the OPOS/JPOS driver to be compatible with the manufacturer’s scanner. The OPOS/JPOS driver is provided by the scanner manufacturer;…
-
Page 21
Multiple-scan setting Single-scan setting Option barcode Option Alpha. entry Standard Host type OPOS/JPOS None RTS/CTS (Host idle: Low RTS) Flow control RTS/CTS (Host idle: High RTS) XON/XOFF ACK/NAK 0 ms 5 ms 10 ms Inter-character delay 20 ms 40 ms 80 ms 00-99 Response delay… -
Page 22
Multiple-scan setting Single-scan setting Option barcode Option Alpha. entry 19200 38400 57600 115200 None Parity bit Even 8 bits Data bit 7 bits One bit Stop bit Two bits… -
Page 23: Usb Interface
3-6 USB interface USB device type: HID keyboard– By setting, the scanner is used as a USB HID keyboard emulation device. HID keyboard for Apple Mac– By setting, the scanner is compatible with Apple Mac. USB virtual COM– By setting, the scanner emulates a regular RS232-based COM port. If a Microsoft Windows PC is connected to the scanner, a driver is required to install on the connected PC.
-
Page 24
Multiple-scan setting Alpha. Single-scan setting Option barcode Option entry HID keyboard HID keyboard for Apple Mac USB device type USB virtual COM Simple COM Port Emulation HID for OPOS/JPOS Turkish F Turkish Q French Italian Spanish Slovak Denmark Keyboard layout Japanese German Belgian… -
Page 25
Multiple-scan setting Single-scan setting Alpha. Option barcode Option entry Portugal Character encoding system 3-7 Scan mode & some global settings Refer to 0 ms 5 ms 10 ms Inter-character delay 20 ms 40 ms 60 ms Alphabetic key Numeric keypad Alt + keypad Numeric key BIGS… -
Page 26: Scan Mode & Some Global Settings
3-7 Scan mode & some global settings Scan mode: Good-read off-The trigger button must be pressed once to activate scanning. The light source of scanner stops scanning when there is a successful reading or no code is decoded after the Stand-by duration elapsed.
-
Page 27
2. The number of check digits is included in max./min. code length. 3. These two settings have no effect on the symbols with fixed-length, e.g. UPC-A, UPC-E, EAN-13, EAN-8 and China Post. Global G1-G6 string selection: The scanner offer one or two string group for ALL symbols. By setting one or two digits to indicate which string group you want to apply. -
Page 28
Multiple-scan setting Single-scan setting Option barcode Option Alpha. entry Good-read off Momentary Scan mode Good-read on Auto-detection- Good-read on Auto-detection- Good-read off Disable* Barcode detection Enable Always detection 5 seconds 10 seconds Barcode detection delay 30 seconds 60 seconds Never detection 4 seconds 8 seconds 16 seconds… -
Page 29
Multiple-scan setting Single-scan setting Option barcode Option Alpha. entry 7 minutes 10 minutes 15 minutes 20 minutes 30 minutes 45 minutes 1 hour 00-FF Same barcode delay time for 1D symbol 00-FF (50 ms) 00-FF Same barcode delay time for 2D symbol 00-FF (50 ms) -
Page 30
Multiple-scan setting Single-scan setting Option barcode Option Alpha. entry Enable None Character output restraint Printable character only Alphanumeric character only Disable Decoder optimization Enable Data output delay in 00-FF 00-99 (100 ms) continue-scan mode FF (Never) ASCII UTF-8 Windows-1251 Simplified Chinese Character encoding system Traditional Chinese Windows-1250… -
Page 31
Multiple-scan setting Single-scan setting Option barcode Option Alpha. entry 10 seconds 30 seconds 60 seconds (1 minute) 300 seconds (5 minutes) 600 seconds (10 minutes) 1800 seconds (30 minutes) 3600 seconds (1 hour) 10800 seconds (3 hours) -
Page 32: Indication
3-8 Indication Power on alert: After power-on the scanner will generate an alert signal to indicate a successful self-test. LED indication: After each successful reading, the LED above the scanner will light up to indicate a good barcode reading. Beeper indication: After each successful reading, the scanner will beep to indicate a good barcode reading, and its beep tone duration is adjustable.
-
Page 33: Decode Illumination And Decode Aiming Pattern
3-9 Decode illumination and decode aiming pattern Decode illumination mode: Enable illumination causes the scanner to turn on the illumination to aid decoding. Disable illumination to turn off illumination for the scanner during decoding. Better quality images could be obtained with illumination support. The effectiveness of the illumination decreases as the distance to the target increases.
-
Page 34
Multiple-scan setting Single-scan setting Option barcode Option Alpha. Entry Always Off Always On Decode illumination mode Flashing Always On when reading Always Off Always On Decode aiming pattern On before reading On when reading Disable decode illumination Level of decode illumination Middle High Always off… -
Page 35: Other Settings
3-10 Other settings 1D symbols read: A global setting of 1D symbols readability. 2D symbols read: A global setting of 2D symbols readability. Vertical centering read: By setting Enable, the scanner reads only the barcode centered by the aimer in vertical direction.
-
Page 36
Multiple-scan setting Single-scan setting Option barcode Option Alpha. entry Follow respective 1D 1D symbols read symbol setting All 1D OFF Follow respective 2D symbol setting All 2D OFF All 2D ON Only PDF417 ON 2D symbols read Only QR code ON Only Data Matrix ON Only MaxiCode ON Only Aztec Code ON… -
Page 37: Note 1 : The Instruction Of Calibrating The Aimer In Vertical Centering Direction
Note 1 : The instruction of calibrating the aimer in vertical centering direction Scan the barcode on this page. The scanner will give three musical short beeps to indicate entering calibration mode. Press the trigger of the scanner while maintaining the distance of about 15cm between the scan window of the scanner and this paper.
-
Page 38: Note 2 : Scan Barcode Or Send Command To Enter Upgrade Mode
Note 2 : Scan barcode or send command to enter upgrade mode Scan barcode to enter upgrade mode Send command 0x16 0x4D 0x0D 0x25 0x4E 0x4D 0x55 Send command to enter upgrade mode 0x47 0x44 0x2E by USB virtual COM or RS232 COM.
-
Page 39: Upc-A
3-11 UPC-A Read: Format System character Data digits (10 digits) Check digit Check digit verification: The check digit is optional. Check digit trans.: By setting Enable, check digit will be transmitted. Code ID setting: Code ID is a one-or-two-character string used to represent the symbol upon a succeeding reading.
-
Page 40
Multiple-scan setting Single-scan setting Option barcode Option Alpha. entry Disable Read Enable Disable Check digit verification Enable Disable Check digit trans. Enable 00-FF Code ID setting 00-FF (ASCII) <A>* 00-44 Insert group selection 00-44 None 2 digits Supplement digits 5 digits 2 or 5 digits None Truncate leading zeros… -
Page 41: Upc-E
3-12 UPC-E Read: Format System character “0” Data digits (6 digits) Check digit Check digit verification: The check digit is optional and made as the sum of the numerical value of the data digits. Check digit trans.: By setting Enable, check digit will be transmitted. 3-11 UPC-A Code ID setting: Refer to Code ID setting of 3-11 UPC-A…
-
Page 42
Multiple-scan setting Single-scan setting Option barcode Option Alpha. entry Disable Read Enable Disable Check digit verification Enable Disable Check digit trans. Enable 00-FF Code ID setting 00-FF (ASCII) <D>* 00-44 Insert group selection 00-44 None 2 digits Supplement digits 5 digits 2 or 5 digits None Truncate leading zeros… -
Page 43: Upc-E1
3-13 UPC-E1 Read: Format System character “1” Data digits (5 digits) Check digit Check digit verification: The check digit is optional and made as the sum of the numerical value of the data digits. Check digit trans.: By setting Enable, check digit will be transmitted. 3-11 UPC-A Code ID setting: Refer to Code ID setting of 3-11 UPC-A…
-
Page 44
Multiple-scan setting Single-scan setting Option barcode Option Alpha. entry Disable Read Enable Disable Check digit verification Enable Disable Check digit trans. Enable 00-FF Code ID setting 00-FF (ASCII) <D>* 00-44 Insert group selection 00-44 None 2 digits Supplement digits 5 digits 2 or 5 digits None Expand to EAN-13… -
Page 45: Ean-13 (Isbn/Issn)
3-14 EAN-13 (ISBN/ISSN) Read: Format Data digits (12 digits) Check digit Check digit verification: The check digit is optional and made as the sum of the numerical value of the data digits. Check digit transmission: By setting Enable, check digit will be transmitted. 3-11 UPC-A EAN-13 code ID setting: Refer to Code ID setting of 3-11 UPC-A…
-
Page 46
Multiple-scan setting Single-scan setting Option barcode Option Alpha. entry Disable Read Enable Disable Check digit verification Enable Disable Check digit transmission Enable 00-FF 00-FF EAN-13 code ID setting (ASCII) <A>* 00-44 Insert group selection 00-44 None 2 digits Supplement digits 5 digits 2 or 5 digits Disable… -
Page 47: Ean-8
3-15 EAN-8 Read: Format Data digits (7 digits) Check digit Check digit verification: The check digit is optional and made as the sum of the numerical value of the data digits. Check digit trans.: By setting Enable, check digit will be transmitted. 3-11 UPC-A Code ID setting: Refer to Code ID setting of 3-11 UPC-A…
-
Page 48
Multiple-scan setting Single-scan setting Option barcode Option Alpha. entry Disable Read Enable Disable Check digit verification Enable Disable Check digit trans. Enable 00-FF Code ID setting 00-FF (ASCII) <C>* 00-44 Insert group selection 00-44 None 2 digits Supplement digits 5 digits 2 or 5 digits None Truncation/Expansion… -
Page 49: Code 39 (Code 32, Trioptic Code 39)
3-16 Code 39 (Code 32, Trioptic Code 39) Read: Format Start character (*) Data digits (variable) Check digit (optional) End character (*) Check digit verification: The check digit is optional and made as the sum module 43 of the numerical value of the data digits.
-
Page 50
Multiple-scan setting Single-scan setting Option barcode Option Alpha. entry Disable Read Enable Disable Check digit verification Enable Disable Check digit transmission Enable 00-99 Max. code length 00-99 00-99 Min. code length 00-99 00-FF Code ID setting 00-FF (ASCII) <M>* 00-44 Insert group selection 00-44 Standard… -
Page 51
Multiple-scan setting Single-scan setting Option barcode Option Alpha. entry Enable Disable Code 32 Prefix “A” transmission Enable Disable Trioptic Code 39 read Enable Trioptic Code 39 Start/End Disable transmission Enable… -
Page 52: Interleaved 2 Of 5
3-17 Interleaved 2 of 5 Read: Format Data digits (Variable) Check digit (optional) Check digit verification: The check digit is made as the sum module 10 of the numerical values of all data digits. There are two optional check digit algorithms: the specified Uniform Symbol Specification (USS) and the Optical Product Code Council (OPCC).
-
Page 53
Multiple-scan setting Single-scan setting Option barcode Option Alpha. entry Disable Read Enable Disable Check digit verification OPCC Disable Check digit transmission Enable 00-99 Max. code length 00-99 00-99 Min. code length 00-99 00-FF Code ID setting 00-FF (ASCII) <I>* 00-44 Insert group selection 00-44… -
Page 54: Industrial 2 Of 5 (Discrete 2 Of 5)
3-18 Industrial 2 of 5 (Discrete 2 of 5) Read: Format Data digits (variable) 3-16 Code 39 Max./Min. code length: Refer to Max./Min. code length of 3-11 UPC-A Code ID setting: Refer to Code ID setting of 3-11 UPC-A Insertion group selection: Refer to Insertion group selection of Multiple-scan setting Single-scan setting Option barcode…
-
Page 55: Matrix 2 Of 5
3-19 Matrix 2 of 5 Read: Format Data digits (variable) Check digit (optional) Check digit verification: The check digit is made as the sum module 10 of the numerical values of all data digits. Check digit transmission: By setting Enable, check digit will be transmitted. 3-16 Code 39 Max./Min.
-
Page 56: Codabar
3-20 Codabar Read: Format Start Data digits (variable) Check digit (optional) Check digit verification: The check digit is made as the sum module 16 of the numerical values of all data digits. Check digit transmission: By setting Enable, check digit will be transmitted. 3-16 Code 39 Max./Min.
-
Page 57
Multiple-scan setting Single-scan setting Option barcode Option Alpha. entry 00-44 Insert group selection 00-44 ABCD/ABCD abcd/abcd Start/End type ABCD/TN*E abcd/tn*e Disable Start/End transmission Enable Disable Start/End character equality Enable… -
Page 58: Code 128
3-21 Code 128 Read: Format Data digits (variable) Check digit (optional) Check digit verification: The check digit is made as the sum module 103 of all data digits. Check digit transmission: By setting Enable, check digit will be transmitted. 3-16 Code 39 Max./Min.
-
Page 59
Multiple-scan setting Single-scan setting Option barcode Option Alpha. entry Disable Read Enable Disable Check digit verification Enable Disable Check digit transmission Reserved 00-99 Max. code length 00-99 00-99 Min. code length 00-99 00-FF Code ID setting 00-FF (ASCII) <K>* 00-44 Insert group selection 00-44 Disable… -
Page 60: Ucc/Ean 128
3-22 UCC/EAN 128 Read: Format Data digits (variable) Check digit (optional) Check digit verification: The check digit is made as the sum module 103 of all data digits. Check digit transmission: By setting Enable, check digit will be transmitted. 3-16 Code 39 Max.
-
Page 61
Multiple-scan setting Single-scan setting Option barcode Option Alpha. entry Read Disable Enable Check digit verification Disable Enable Check digit transmission Disable Reserved Max. code length 00-99 00-99 Min. code length 00-99 00-99 Code ID setting 00-FF 00-FF (ASCII) <K>* Insert group selection 00-44 00-44 Disable… -
Page 62: Isbt 128
3-23 ISBT 128 Read: Format “=” or “&” Data digits (variable) Check digit (optional) Check digit verification: The check digit is made as the sum module 103 of all data digits. Check digit transmission: By setting Enable, check digit will be transmitted. 3-16 Code 39 Max./Min.
-
Page 63: Code 93
3-24 Code 93 Read: Format Data digits (variable) 2 check digits (optional) Check digit verification: The check digit is made as the sum module 47 of the numerical values of all data digits. Check digit transmission: By setting Enable, check digit will be transmitted. 3-16 Code 39 Max./Min.
-
Page 64: Code 11
3-25 Code 11 Read: Format Data digits (variable) Check digit 1 (optional ) Check digit 2 (optional) Check digit verification: The check digit is presented as the sum module 11 of all data digits. Check digit transmission: By setting Enable, check digit 1 and check digit 2 will be transmitted upon your selected check digit verification method.
-
Page 65
Multiple-scan setting Single-scan setting Option barcode Option Alpha. entry Disable Read Enable Disable One digit Check digit verification Reserved Reserved Disable Check digit transmission Enable 00-99 Max. code length 00-99 00-99 Min. code length 00-99 00-FF Code ID setting 00-FF (ASCII) <V>* 00-44… -
Page 66: Msi/Plessey
3-26 MSI/Plessey Read: Format Data digits (variable) Check digit 1 (optional) Check digit 2 (optional) Check digit verification: The MSI/Plessey has one or two optional check digits. There are three methods of verifying check digits, i.e. Mod 10, Mod 10/10 and Mod 10/11. The check digit 1 and check digit 2 will be calculated as the sum module 10 or 11 of the data digits.
-
Page 67
Multiple-scan setting Single-scan setting Option barcode Option Alpha. entry Disable Read Enable Disable 1 digit (Mod 10) Check digit verification 2 digit (Mod 10/10) 2 digit (Mod 10/11) Disable Check digit transmission Enable 00-99 Max. code length 00-99 00-99 Min. code length 00-99 00-FF Code ID setting… -
Page 68: Uk/Plessey
3-27 UK/Plessey Read: Format Data digits (variable) 2 check digits (optional) Check digit verification: The UK/Plessey has one or two optional check digits. The check digit 1 and check digit 2 will be calculated as the sum module 10 or 11 of the data digits. Check digit transmission: By setting Enable, check digit will be transmitted.
-
Page 69: China Post
3-28 China Post Read: Format 11 Data digits 3-16 Code 39 Max. /Min. code length: Refer to Max./Min. code length of . The code length of China Post is 11. 3-11 UPC-A Code ID setting: Refer to Code ID setting of 3-11 UPC-A Insertion group selection: Refer to Insertion group selection of Multiple-scan setting…
-
Page 70: China Finance
3-29 China Finance Note: This type of barcode is not Omni-directionally decodable. The encodable character set includes numeric 0 to 9. Among the symbol of 0 to 9, 0 and 2, 4 and 9, 5 and 8, 6 and 7, have the symmetrical pattern;…
-
Page 71
Multiple-scan setting Single-scan setting Option barcode Option Alpha. entry Only 7 converted to C Only 8 converted to D Only 9 converted to E Disable Assigned to 0 Assigned to 5 (A) Assigned to 6 (B) Assigned to 7 (C) Leading character assignment Assigned to 8 (D) Assigned to 9 (E) -
Page 72: Gs1 Databar (Gs1 Databar Truncated)
3-30 GS1 DataBar (GS1 DataBar Truncated) GS1 DataBar Truncated is structured and encoded the same as the standard GS1 DataBar format, except its height is reduced to a 13 modules minimum; while GS1 DataBar should have a height greater than or equal to 33 modules. Read: Format 16 Data digits…
-
Page 73: Gs1 Databar Limited
3-31 GS1 DataBar Limited Read: Format 16 Data digits 3-11 UPC-A Code ID setting: Refer to Code ID setting of 3-11 UPC-A Insertion group selection: Refer to Insertion group selection of 3-30 GS1 DataBar (GS1 DataBar Truncated) Conversion: Refer to Conversion of Multiple-scan setting Single-scan setting Option barcode…
-
Page 74: Gs1 Databar Expanded
3-32 GS1 DataBar Expanded Read: Format Data characters (variable) 3-11 UPC-A Code ID setting: Refer to Code ID setting of 3-11 UPC-A Insertion group selection: Refer to Insertion group selection of Conversion: 3-41 String transmission UCC/EAN 128- Refer to Code ID transmission of , ]Cm will be identified as AIM Multiple-scan setting Single-scan setting…
-
Page 75: Pdf417
3-33 PDF417 Read: Format Data characters (variable) Multiple-scan setting Single-scan setting Option barcode Option Alpha. entry Disable Read Enable…
-
Page 76: Qr Code
3-34 QR Code Read: Format Data characters (variable) Multiple-scan setting Single-scan setting Option barcode Option Alpha. entry Disable Read Enable…
-
Page 77: Data Matrix
3-35 Data Matrix Read: Format Data characters (variable) Multiple-scan setting Single-scan setting Option barcode Option Alpha. entry Disable Read Enable…
-
Page 78: Han Xin Code
3-36 Han Xin Code Note: The support for this feature is available with customized firmware version. Read: Format Data digits (variable) Multiple-scan setting Single-scan setting Option barcode Option Alpha. entry Disable Read Enable…
-
Page 79: Aztec Code
3-37 Aztec Code Read: Format Data digits (variable) Multiple-scan setting Single-scan setting Option barcode Option Alpha. entry Disable Read Enable…
-
Page 80: Microqr Code
3-38 MicroQR Code Note: The support for this feature is available with customized firmware version. Read: Format Data digits (variable) Multiple-scan setting Single-scan setting Option barcode Option Alpha. entry Disable Read Enable…
-
Page 81: Micropdf417 Code
3-39 MicroPDF417 Code Note: The support for this feature is available with customized firmware version. Read: Format Data digits (variable) Multiple-scan setting Single-scan setting Option barcode Option Alpha. entry Disable Read Enable…
-
Page 82: G1-G6 & C1-C3 & Fn1 Substitution String Setting
3-41 G1-G6 & C1-C3 & FN1 substitution string setting Format of barcode data transmission: Prefix Code name Preamble Code ID Code length Code data Code ID Postamble Suffix Suffix string setting: The <enter > key is represented in different ASCII when it is applied by different OS. For a Windows/DOS OS, <enter>…
-
Page 83
Testing barcode: FN1 substitution string setting: The FN1 character (0x1D) in an UCC/EAN128 barcode, or a Code 128 barcode, or a GS1 DataBar barcode can be substituted with a defined string. Truncate leading G5 string setting: By setting, a defined leading character or string can be truncated. Also a single character can be un-defined. -
Page 84
Testing barcode: Multiple characters C3 replacement: By setting, a number of defined characters in the data string can be replaced by other defined characters. The maximum number of characters to replace is 11. Example: Replace all the “A” character in a data string with “B” character; replace “C” with “D”; replace “E”… -
Page 85
Multiple-scan setting Single-scan setting Option barcode Option Alpha. Entry 0-22 characters 00-FF Prefix string setting None Suffix string setting 0-22 characters 00-FF <ENTER> 0D0A* 0-22 characters 00-FF Preamble string setting None Postamble string setting 0-22 characters 00-FF None Insert G1 string setting 0-22 characters 00-FF None… -
Page 86
Multiple-scan setting Single-scan setting Option barcode Option Alpha. Entry Once Repeat of a G5 character setting Defined times 01-22 Un-defined times (All) A un-defined character Truncate ending G6 string setting 1-22 defined characters 01-7F <0> Once Repeat of a G6 character setting Defined times 01-22 Un-defined times (All) -
Page 87: G1-G4 String Position & Code Id Position
3-41 G1-G4 string position & Code ID position Format of barcode data transmission: Prefix Code name Preamble Code ID Code length Code data Code ID Postamble Suffix Insert G1/G2/G3/G4 string position: The scanner offers 4 positions to insert strings among the symbol. In case of the insertion position is greater than the length of the symbol, the insertion of string is not effective.
-
Page 88: String Transmission
3-42 String transmission Note: The information in this chapter is closely related to the chapter of String setting. Format of barcode data transmission: Prefix Code name Preamble Code ID Code length Code data Code ID Postamble Suffix Prefix transmission: By setting Enable, prefix will be appended before the data transmitted. Suffix transmission: By setting Enable, suffix will be appended after the data is transmitted.
-
Page 89
Multiple-scan setting Single-scan setting Option barcode Option Alpha. entry Prefix transmission Disable Enable Disable Suffix transmission Enable Disable Code name transmission Enable Preamble transmission Disable Enable Disable Postamble transmission Enable Disable Code ID transmission Proprietary ID AIM ID Code length transmission Disable Enable Disable… -
Page 90
Multiple-scan setting Single-scan setting Option barcode Option Alpha. entry RS-232 USB/RS-232 All-non-printable-character string Disable transmission with string setting Enable Transmit the first N data characters only 01-99 Transmit the last N data characters only 01-99… -
Page 91: Maintenance
4 Maintenance Cleaning the scan window is the only maintenance required. A dirty window may affect scanning accuracy. Do not allow any abrasive material to touch the window. Remove any dirt particles with a damp cloth. Wipe the window using a tissue moistened with water. Do not spray water or other cleaning liquids directly into the window.
-
Page 92: Barcode Representing Non-Printable Character
5 Barcode representing non-printable character Notes to make the following barcode: 1. According to different barcode printing software, the method of printing following barcode is different. 2. If using CODESOFT software, firstly read the information through “Help→Index→Code128→Special input syntax”. Also refer to ASCII table. For example, if we wish to make “F1” barcode, select “Code128”, then select “CODE A”…
-
Page 93: Ascii Table
6 ASCII Table for keyboard wedge for RS-232 Null Down Left Right PgUp PgDn Home Enter Insert Ctrl+ Delete Alt+ Notes: The 2nd and the 3rd columns above are used for keyboard wedge only. “ & ‘ < > Example: ASCII “A” = “41”.
-
Page 94: Test Barcode
7 Test barcode UPC-A UPC-E UPC-E1 (Default setting: Disable) EAN-13 ISBN/ISSN EAN-8 Code 39 Interleaved 2 of 5 Industrial 2 of 5 (Default setting: Disable) Matrix 2 of 5…
-
Page 95
Codabar Code 128 UCC/EAN 128 ISBT 128 Code 93 Code 11 (Default setting: Disable) MSI/Plessey (Default setting: Disable) UK/Plessey (Default setting: Disable) China Post GS1 DataBar (GS1 DataBar Truncated) GS1 DataBar Limited GS1 DataBar Expanded… -
Page 96
PDF417 12=890ab-+%xyz QR code 1234567890ABCD-+()&*%^@#$!XYZ Data Matrix 123890abc-+=&*%^!mdo Aztec Code (Default setting: Disable) 12345678901234567890 Han Xin Code (Default setting: Disable) 1234567890Hanxin Micro QR Code (Default setting: Disable) 0123456789MicroQR… -
Page 97: Return Default Parameters & List Firmware Version
8 Return default parameters & list firmware version WARNING: Default value initialization If you wish to return the scanner to all the factory default settings, scan the barcode above. Firmware version list If you wish to display the firmware version, scan the barcode above.
-
Page 98: Configuration Alphanumeric Entry Barcode
9 Configuration alphanumeric entry barcode To finish parameter setting, please scan the bar code below.
Mindeo MD6600-HD/SR — представляет собой ручной сканер, созданный специально из учёта предписаний ФЗ №54. Аппарат предназначен для считывания как 1D, так и 2D штрих-кодов, включая DataMatrix повышенной плотности, которые наносятся на пачки сигарет и коробочки с медикаментами. Распознавание данных с акцизных марок предоставляет возможность пользоваться сканером для работы с ЕГАИС, а встроенный фотосканирующий элемент позволяет считывать информацию с цифровых носителей.
Модель является достаточно универсальной и может использоваться почти во всех сферах деятельности, как малого, так и среднего бизнеса.
Сканеры серии MD6600 реализуются в двух основных конфигурациях: Standard Rage (SR) и High-Density (HD). Основное их отличие заключается в типе сканирующего элемента. Так, например, в первом варианте, в устройство устанавливается модуль стандартной деятельности, который позволяет без ошибок распознавать стандартные 1D и 2D штрих-коды, в том числе и с цифровых экранов.
Устройство является отличным решением для курьерских и почтовых служб, а также логистических пунктов и т.п.
Во второй версии предусмотрен мегапиксельный модуль, который даёт считывать штрих-кода повышенной плотности, которые обычно предусмотрены на этикетках мелких электронных компонентов, а также ювелирных изделий, подходит и для считывания небольших штрих-кодов, которые размещаются на глянцевых, тисненных либо блестящих поверхностях.
Также, помимо этого, сканеры Миндео обладают такими возможностями как:
-
Переключение между ручным и автоматическим считыванием.
-
Высокую скорость распознавания.
-
Возможность работы с МДЛП, «Честный ЗНАК» и остальными информационными системами.
-
Возможность работы в разных сферах деятельности.
-
Интерфейс Plug-and-Play — позволяет использовать сканер с разнообразным оборудованием.
-
Многоплоскостное сканирование.
Технические характеристики:
-
Ручной форм-фактор.
-
Разрешение сканирующего элемента — 1280х800 рх; 640х480 px.
-
Глубина считывания, в соответствии с типом и размером штрих-кода, может быть до 340 миллиметров, или до 430 миллиметров.
-
Свето- и звуко индикация.
-
Порты для подсоединения периферии — USB Virtual COM, RS-232, USB Keyboard + IBM 46xx (RS485) у модификации SR.
-
Многоплоскостное сканирование.
-
Пылевлагозащита – IP52.
-
Ударопрочность.
Оборудование полностью отвечает международным стандартам электро- и фотобиологической безопасности.
Стандартная комплектация Mindeo MD6600-HD/SR
Стандартная комплектация помимо самого сканера включает в себя:
-
Пособие по использованию устройства.
-
USB-шнур.
-
Подставку с RS232 портом.
-
Адаптер.
Также в отдельной инструкции есть руководство по подсоединению сканера штрих-кодов, а также программные коды для настройки сканера.
Внешний вид и удобство использования
Сканер выпускается в пластиковом корпусе и имеет функциональный и красивый дизайн. А прицельный сканирующий луч сокращает время считывания и повышает скорость обслуживания посетителей. При этом область считывания может увеличиваться или уменьшаться, в соответствии со сменой расстояния до штрих-кода. Мягкий белый свет не даёт глазам уставать даже при долгой работе, что существенно повышает работоспособность кассира.
Помимо свето-индикации, в модели предусмотрено звуковое оповещение, что очень удобно в условиях повышенного шума, например, если устройство используется в крупном гипермаркете с высокой посещаемостью. Серия отличается компактным размером (90х62,5х153 мм), малым весом (132 грамма) и мягким ходом спускового курка. Считывающий элемент надёжно защищён прочным закалённым стеклом.
Руководство, драйверы и прошивки для сканера Mindeo MD6600-HD/SR
Сканер создан на базе микропроцессора ARM и может настраиваться при помощи специальных программных кодов, а ПО обновляется автоматически онлайн. Руководство по эксплуатации пользователи могут найти на официальном портале производителя (правда, оно представлено только на английском).
После интеграции сканера с основным устройством следует, в первую очередь, проверить, переведён ли сканер в режим эмуляции COM-порта. Для этого войдите во вкладку «Диспетчер устройств» и убедитесь в том, что компьютер распознал сканирующее устройство. Если не найдено, то следует установить драйвер USB Virtual COM, скачать который можно на сайте производителя.
Сканеры Mindeo адаптированы для интеграции с «1С», поэтому для их взаимодействия не нужно совершать какие-либо действия или производить дополнительное перепрограммирование. Нужно только внести точные изменения в саму программу. Разберём процесс на примере конфигурации «Розница 8»:
-
Войдите в 1С и в режиме администрирования откройте вкладку «Подключаемое оборудование».
-
Поставьте отметку рядом с «Использовать подключаемое оборудование», после чего в поле «Сканеры штрих-кодов» кликните на «Создать».
-
В появившейся форме в «Драйверы ШК» из открывшегося перечня, выберите «1С: Сканеры штрихкода (NativeApi)» и внесите серийный номер сканера.
-
После окончания настроек, для подтверждения внесённых изменений, нажмите «Записать и закрыть».
-
Скопируйте сформированное поле подсоединения и кликните на «Настроить».
-
В появившемся системном окне укажите необходимые параметры и завершите процедуру.
Цена на сканер Mindeo MD6600
На итоговую цену сканера значительно влияет комплектация устройства, а если точней, элементы, которые поставляются дополнительно.
Также перед покупкой устройства правильным будет заранее познакомиться с функциональностью и характеристиками устройства.
В заключение можно отметить, что в соответствии с отзывами пользователей, сканер Mindeo MD6600 является наиболее верным выбором, так как по цене и качеству модели занимает одну из самых высоких позиций среди компактных, бюджетных сканеров.
Данный материал носит информационный характер. ООО «Компания Интегро» не несет ответственности за актуальность предоставленной информации и возможные последствия.
Товар:
Cannot find ‘b_v4_blog’ template with page »
Наш каталог продукции
У нас Вы найдете широкий ассортимент товаров в сегментах кассового, торгового, весового, банковского и офисного оборудования
Краткая инструкция. Настройка сканера Mindeo MD6600.
1. Версия ПО сканера
2. Настройка режима USB COM
2.2. Настройка режима USB COM
Если не сканируется ШК в пункте 2, то сканируйте этот ШК:
3. Добавить суффикс возврат каретки
Штрих код добавит суффикс CR.
4. Сброс на заводские настройки
5. Настройка уровня звукового сигнала
Полезные заметки:
Маркировка
Проверьте сканер
Вопросы и ответы
Настройка работы сканера в личном кабинете Честного знака.
Мой склад. Добавление маркированной продукции. Количество должно быть больше 0.¹
Не сканируется маркированная молочная продукция.
Как для разных OC представлен возврат каретки:
Для ОС Windows / DOS ‘Enter’ представлен как CR LF (0x0D 0x0A); для ОС Apple MAC, ‘Enter’ представлен как CR (0x0D); для ОС Linux/Unix ‘Enter’ представлен как LF (0x0A).
Как убрать суффикс LF. Оставить только суффикс CR.
Сканер Mindeo MD6600. Настроить сканер для маркировки в 1с
mindeo 6600 hd после перевода в com перестал читать шк
Как подключить сканер к компьютеру через usb.
Настройка префикса и суффикса на сканере Mindeo MD6600. Настройка символа GS.
Пишите в support@kasselect.ru,
WhatsApp +7(987)-268-84-37
Автор: Нуруллин И. Н. Дата: 2020-09-09
Сканер работает в честном знаке только в режиме клавиатуры.
Хотим сканером миндео 6600 работать в программе честный знак , но при заводских настройках он сканирует гораздо больше символов , чем надо , подключили через com порт , он совсем перестал читать коды
Помогите, пожалуйста, настроить сканер для 1С
Подскажите пожалуйста как настроить миндео 6600 для отображения GS символов при сканировани?
Подскажите пожалуйста как настроить миндео 6600 для отображения GS символов при сканировании
Спасибо огромное специалисту, помог мне настроить сканер для работы в 1с!