
A1
A5
A4
A3
A2
1
A
I
J
K
L
B
C
D
G
A
E
F
H
A4a
A4b
L2
L3a
L3b
L3c
L3
L3d
L3e
L3f
L1
I2
I1
J1
J2
A
A
A
1
3
7
4
6
2
A
B
a
b
c
e
d
b
B
a
A
B
A
A
a
b
c
5
12
Wirfreuenuns,dassSieeinGerätvonMoulinexge-
wählt haben und danken Ihnen für Ihr Vertrauen.
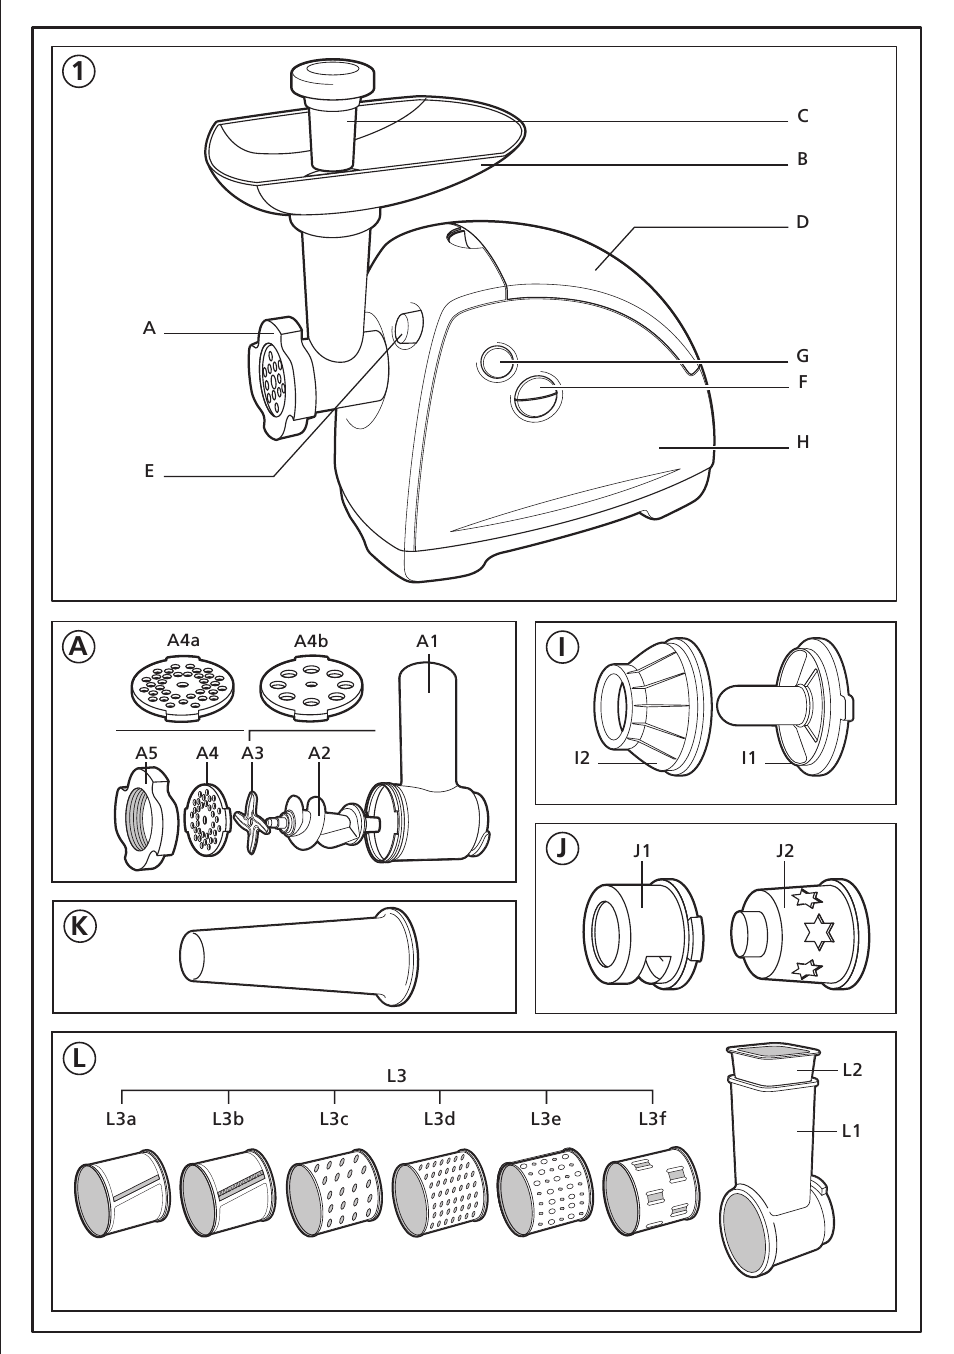
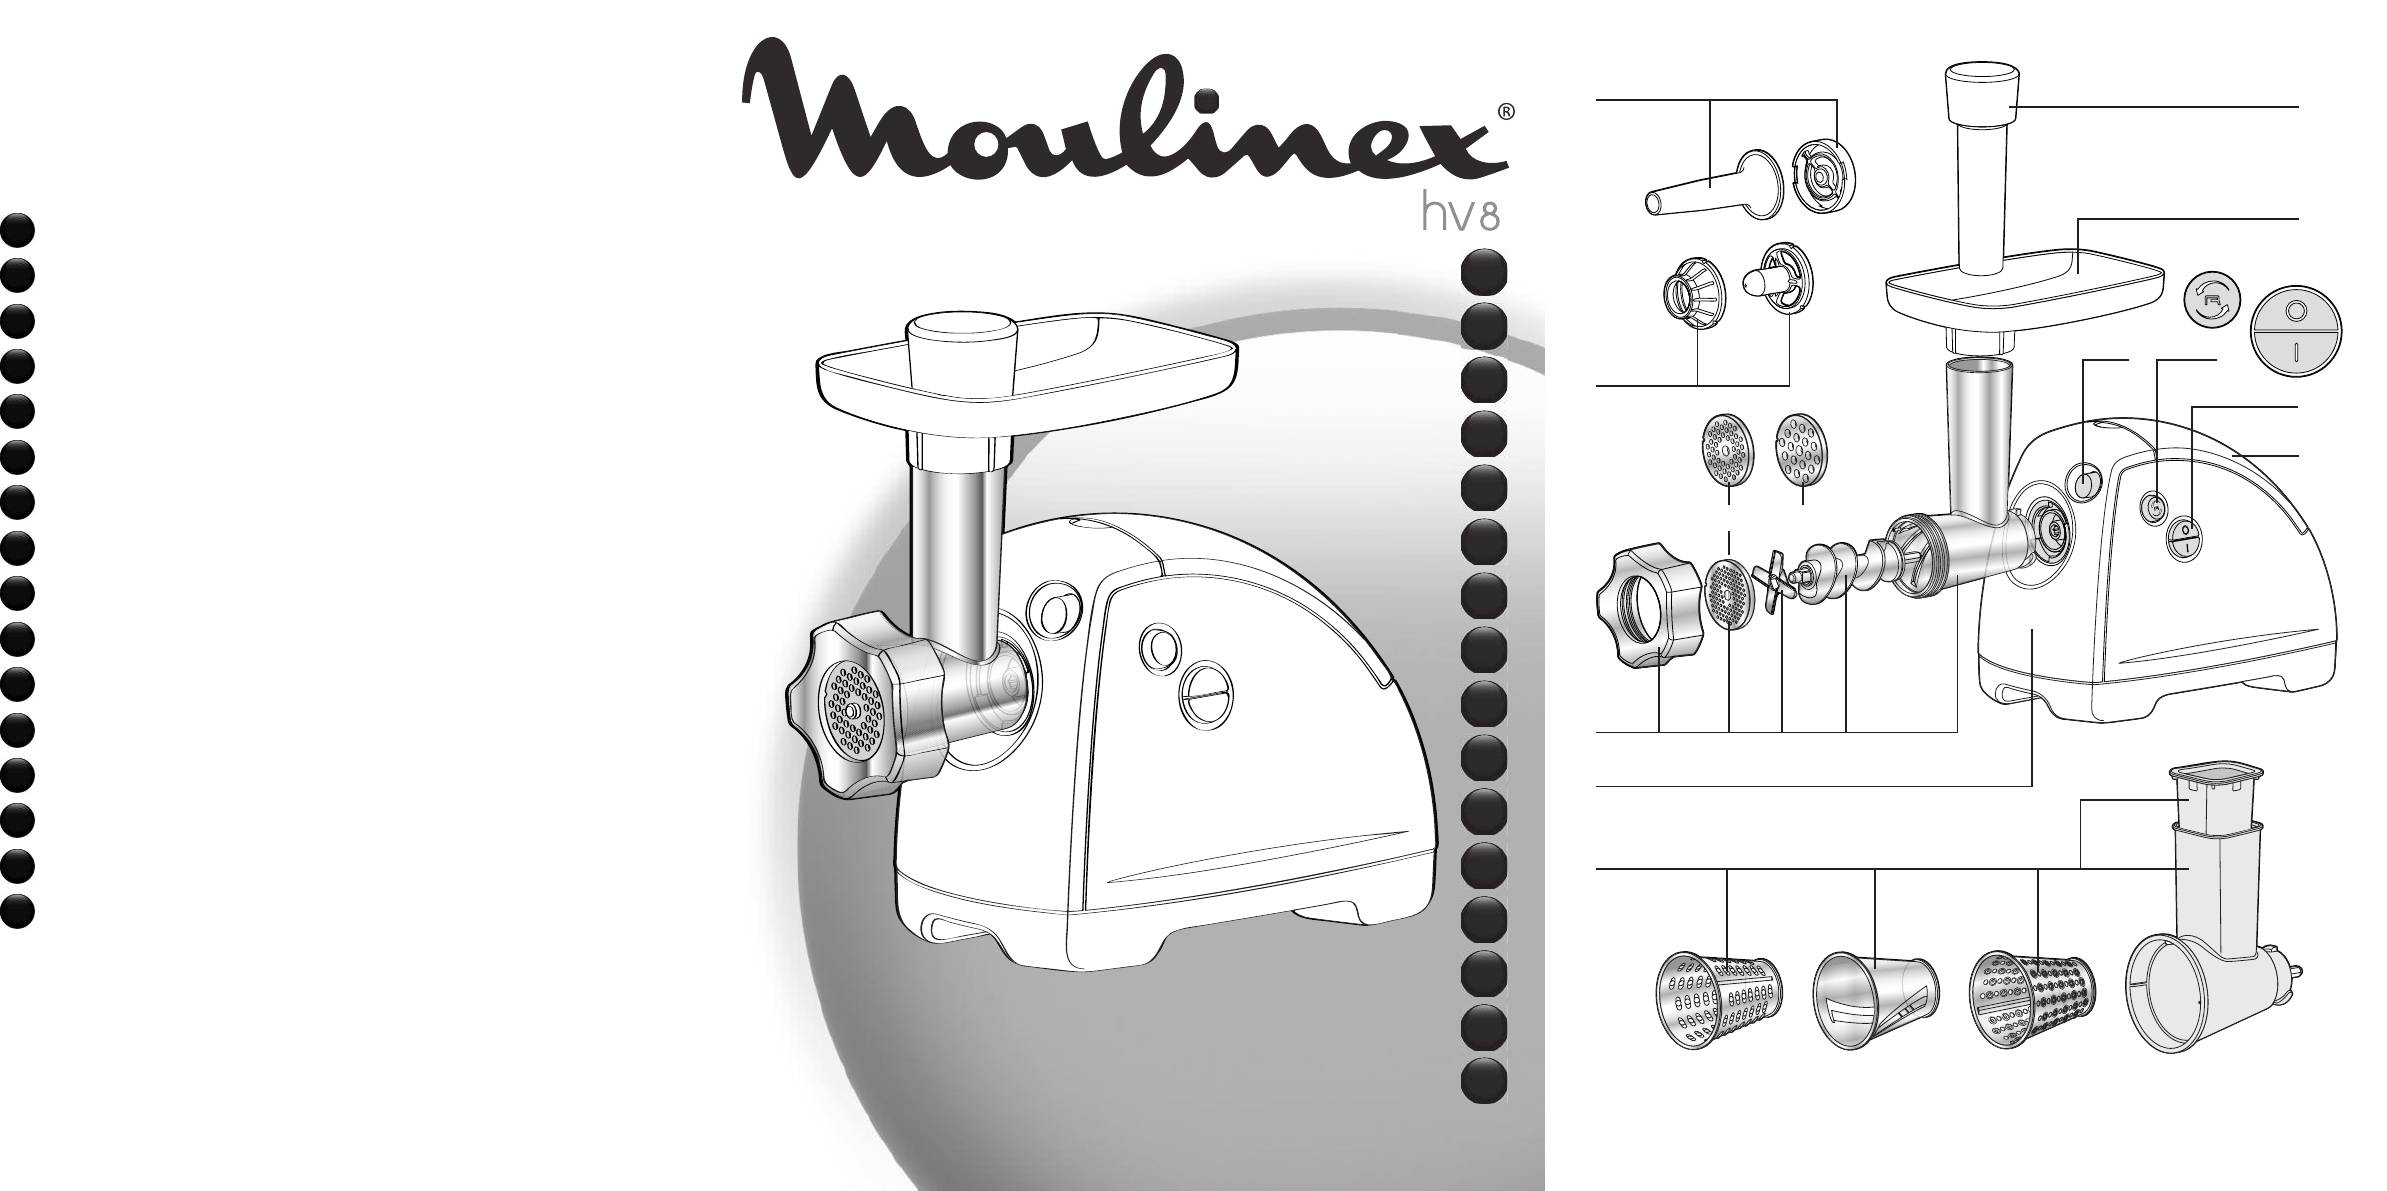
Beschreibung
A
Abnehmbarer Fleischwolf
A1
Gehäuse
A2
Schnecke
A3
Selbstschleifendes Edelstahlmesser
A4
Lochscheiben
A4a
Lochscheibe mit kleinen
Löchern: Feingehacktes
A4b
Lochscheibe mit großen
Löchern: Grobgehacktes
A5
Mutter
B
Abnehmbare Einfüllschale
C
Stopfer
D
Deckel des Zubehörfachs
E
Knopf zur Entriegelung des
Fleischwolfs
F
Ein/Aus-Schalter (0 — I)
G
„Reverse”-Knopf (kurzzeitiger
Rückwärtslauf)
H
Motorblock
I
Kebbe-Vorsatz (je nach Modell)
I1
Vorsatzhalter
I2
Ring
J
Spritzgebäck-Vorsatz (je nach
Modell)
J1
Halter
J2
Tülle
K
Wurstfülltrichter
(je nach Modell)
L
Gemüseschneider
(je nach Modell)
L1
Einfülltrichter
L2
Stopfer
L3
Trommeln (je nach Modell)
L3a
Scheibenschneidetrommel
L3b
Julienne-Trommel
L3c
Trommel zum Grobraspeln
L3d
Trommel zum
Feinschnetzeln
L3e
Parmesan-Trommel
L3f
Eistrommel
Sicherheitshinweise
—
Lesen Sie die Gebrauchsanweisung sorgfältig
vor der ersten Inbetriebnahme Ihres Gerätes
durch: unsachgemäße Verwendung entbindet
Moulinex von jeglicher Haftung.
— Überlassen Sie niemals unbeaufsichtigten
Kindern oder Personen das Gerät, wenn deren
physische oder sensorische Fähigkeiten oder
MangelanErfahrungundWissensieamsicheren
Gebrauch hindern. Sie müssen stets überwacht
werdenund zuvorunterwiesensein. Kinder müs-
sen beaufsichtigt werden, um sicher zu gehen,
dass sie nicht mit dem Gerät spielen.
— Überprüfen Sie, ob die Netzspannung mit der
Gerätespannung übereinstimmt.
Bei fehlerhaftem Anschluss erlischt die
Garantie.
— Das Gerät ist ausschließlich zur Zubereitung von
Lebensmitteln im Rahmen des Hausgebrauchs
in geschlossenen Räumen und unter Aufsicht
bestimmt.
— Stellen Sie das Gerät auf einer flachen, sauberen
und trockenen Unterlage auf.
— Halten Sie lange Haare, Schals und Krawatten
von dem laufenden Gerät fern.
— Stecken Sie das Gerät nach der Benutzung,
während der Reinigung und beim Anbringen und
Entfernen von Zubehörteilen aus.
— Benutzen Sie Ihr Gerät nicht, wenn es nicht fehler-
frei funktioniert oder Schäden aufweist. Wenden
Sie sich in diesem Fall an ein anerkanntes Mou-
linex-Kundendienst-zentrum (siehe Adressenliste
im Serviceheft).
— Alle anderen Eingriffe, außer der im Haushalt
üblichen Reinigung und Wartung durch den
Kunden, dürfen nur durch anerkannte Moulinex-
Kundendienstzentren durchgeführt werden.
— Das Gerät darf nicht benutzt werden, wenn das
Stromkabel oder der Stecker beschädigt sind.
Lassen Sie diese Teile zu Ihrer eigenen Sicherheit
unbedingt ausschließlich in anerkannten Moulinex-
Kundendienstzentren auswechseln (Adressenliste
siehe Service-heft).
— Tauchen Sie das Gerät, die Zuleitung und den
Stecker niemals in Wasser oder andere Flüssig-
keiten.
— Lassen Sie das Stromkabel nie in Reichweite von
Kindern herunterhängen.
— Lassen Sie das Stromkabel nie in die Nähe oder
in Kontakt mit den heißen Teilen des Geräts, in der
Nähe einer Hitzequelle oder einer scharfen Kante
geraten.
— Zu Ihrer eigenen Sicherheit sollten Sie aus-
schließlich für Ihr Gerät geeignetes Zubehör und
Ersatzteile von Moulinex verwenden.
Vor der ersten
Inbetriebnahme
Waschen Sie alle Zubehörteile und trocknen Sie sie
gleich sorgfältig ab.
Die Lochscheibe und das Messer müssen stets mit
einem Ölfilm bedeckt sein. Ölen Sie diese Teile.
Lassen Sie das Gerät nicht leer laufen, wenn die
Lochscheibe und das Messer nicht geölt sind.
Vor der ersten
Inbetriebnahme
6
13
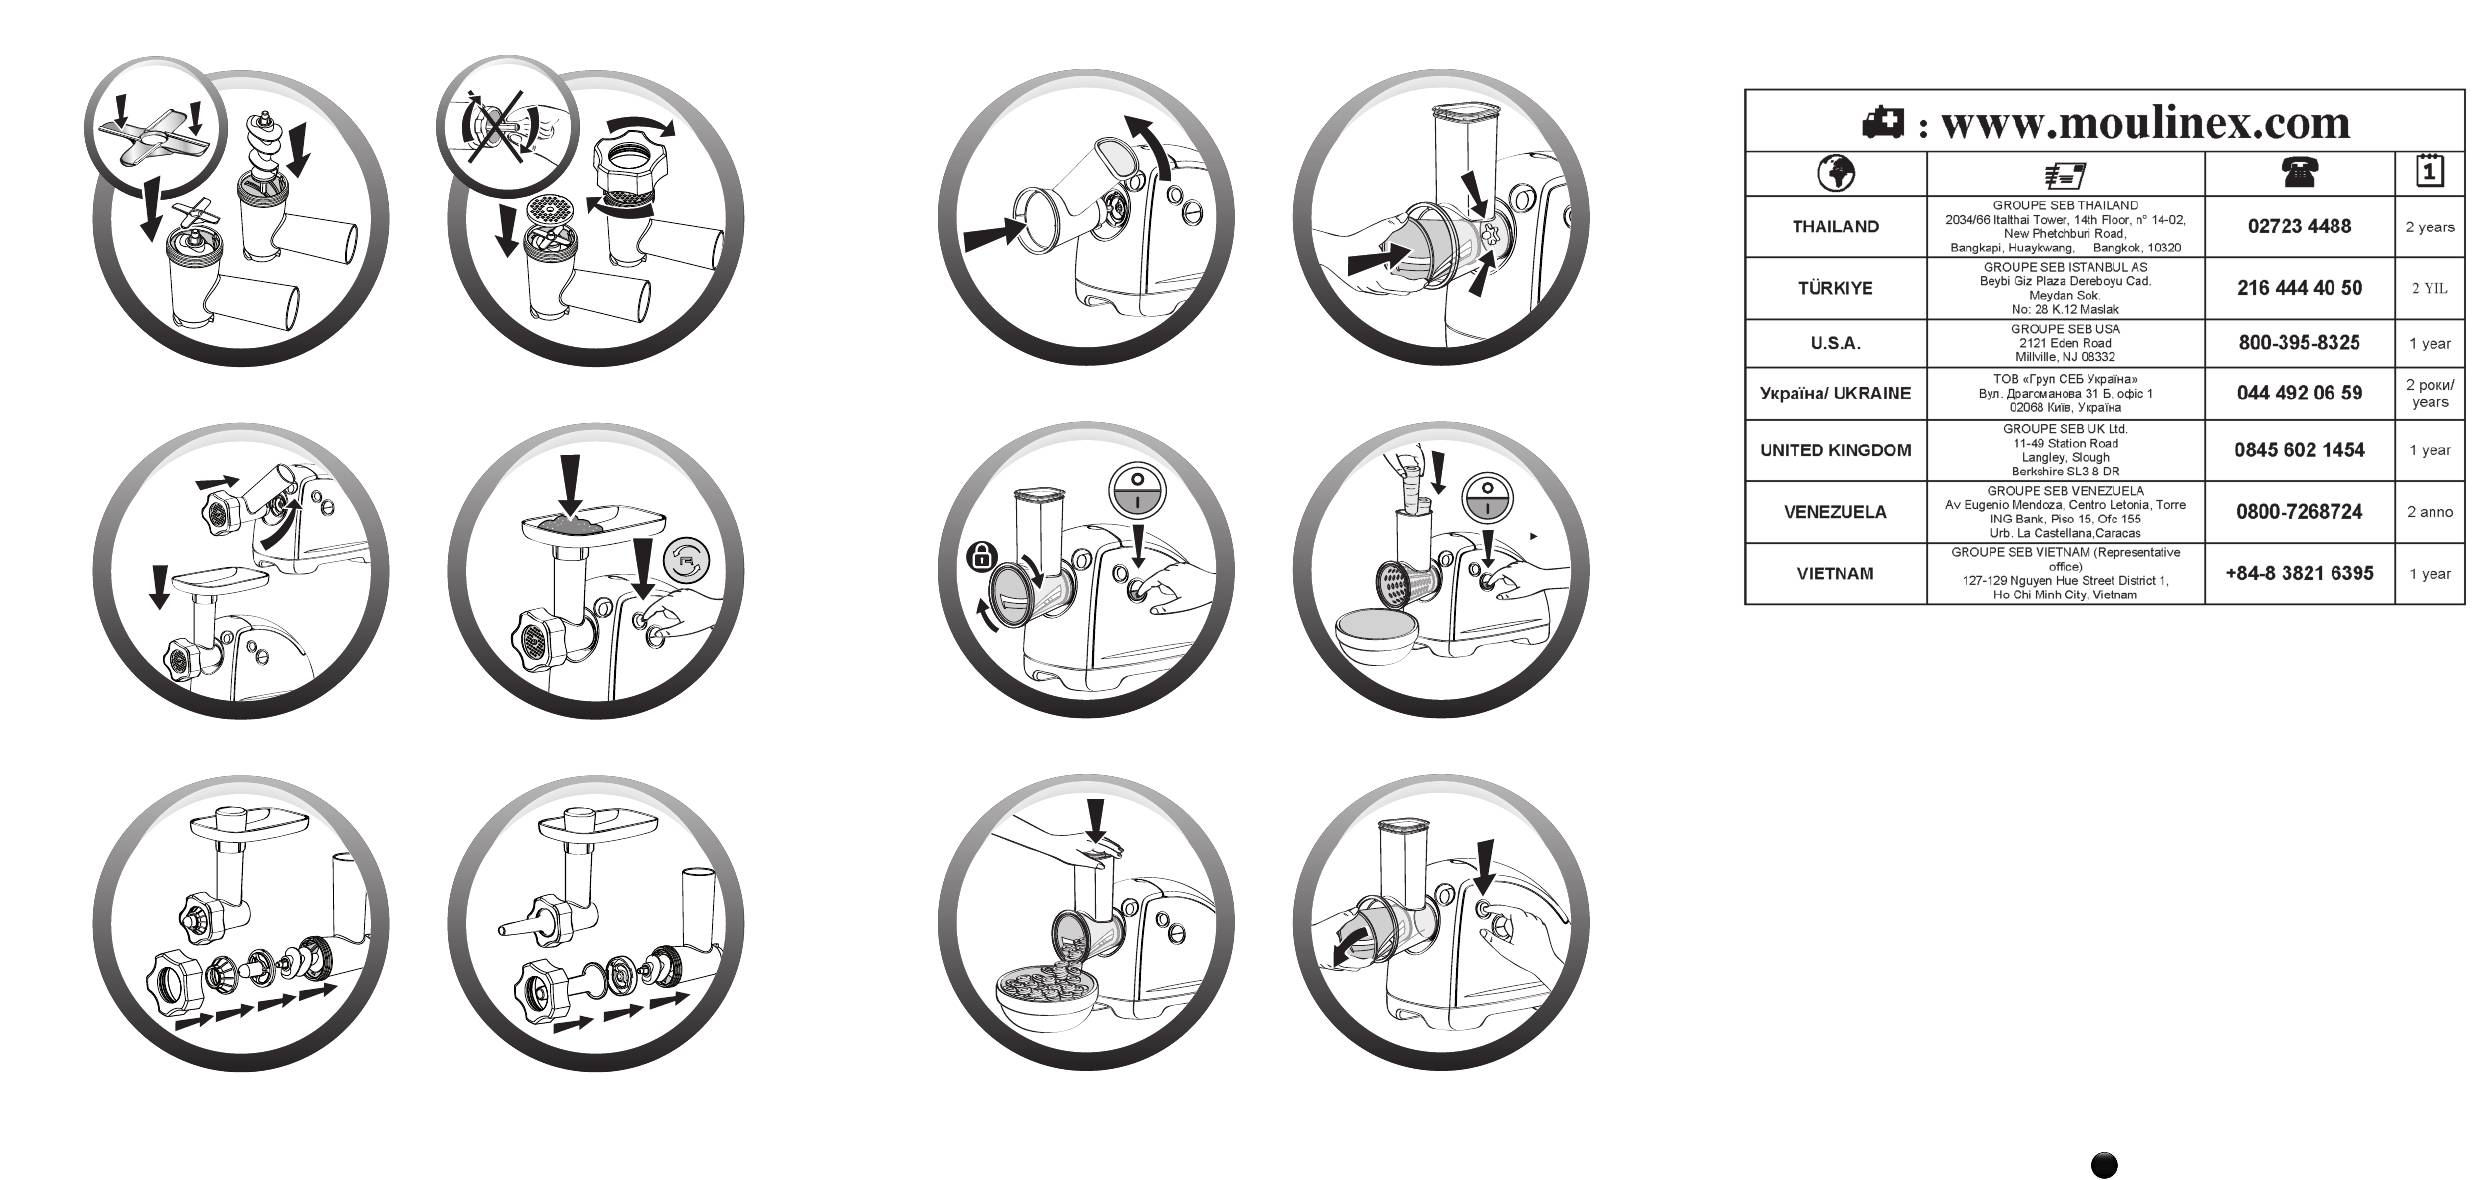
Inbetriebnahme
F
LEISCHWOLF
. Montage des Fleischwolfs
— Nehmen Sie das Gehäuse (A1) am Einfülltrichter
und richten Sie die Öffnung nach oben. Führen
Sie nun die Schnecke (A2) mit der langen Achse
zuerst in das Gehäuse (A1) ein.
— Stecken Sie das Messer (A3) mit den Schneide-
flächen nach vorne auf die kurze Achse.
— Stecken Sie die gewünschte Lochscheibe (A4a
oder A4b) auf das Messer (A3) und achten Sie
darauf, dass die beiden Zapfen der Lochscheibe
in die beiden Vertiefungen des Gehäuses (A1)
einrasten.
— Ziehen Sie die Mutter (A5) fest, aber ohne sie zu
blockieren, auf dem Gehäuse (A1) an.
— Überprüfen Sie die Montage. Die Achse darf kein
Spiel haben und sich auch nicht um sich selbst
drehen können. Im gegenteiligen Fall müssen
die vorhergehenden Arbeitsschritte wiederholt
werden.
. Befestigung des Fleischwolfs auf dem Gerät
— Halten Sie den Fleischwolf mit nach rechts
gedrehtem Einfülltrichter an den ausgesteckten
Motorblock und stecken Sie ihn fest auf den Mo-
torblock.
— Drehen Sie den Einfülltrichter bis zum Einrasten
nach oben.
— Stecken Sie die abnehmbare Einfüllschale (B) auf
die Zapfen des Einfülltrichters.
Stecken Sie das Gerät an. Es ist nun einsatzbe-
reit.
. Gebrauch
— Bereiten Sie die gesamte Menge des Hackguts
vor. Entfernen Sie alle Knochen, Knorpel und
Sehnen.
— Schneiden Sie das Fleisch in Stücke (etwa 2 cm
x 2 cm) und geben Sie diese in die Einfüllschale
(B).
— Stellen Sie eine Schüssel unter den Fleischwolf.
— Drücken Sie auf das Symbol „I” des Ein/Aus-
Schalters (F).
— Füllen Sie die Fleischstücke mit Hilfe des Stopfers
(C) einzeln in den Einfülltrichter.
— Schieben Sie niemals mit den Fingern oder
Utensilien jeder Art nach.
— Lassen Sie das Gerät beim Fleis
chhacken nicht
länger als
14 Minuten in Dauerbetrieb.
Ein Tipp: Um das gesamte Hackfleisch aus der Ma-
schine zu befördern, kann man am Schluss ein paar
kleine Brotstückchen in den Einfülltrichter geben.
Was tun, wenn das im Gerät befindliche Hack-
fleisch im Fleischwolf festsitzt?
— Schalten Sie den Fleischwolf durch einen Druck
auf das Symbol “0” des Ein/Aus-Schalters (F) aus.
1
1a
1b
1c
1d
1e
2
2a
2b
3
— Drücken Sie anschließend einige Sekunden
lang auf den „Reverse”-Knopf (G). Das im Gerät
befindliche Hackfleisch tritt nun aus.
— Drücken Sie auf das Symbol „I” des
Ein/Aus-Schalters (F) und machen Sie weiter.
Wichtig: Der „Ein”-Knopf (F) und der „Reverse”-
Knopf (G) dürfen erst nach völligem Stillstand des
Geräts gedrückt werden.
Rezepte:
Nota: Bei Rezepten, die eine hohe Leistung
erfordern, darf die Betriebsdauer des Geräts
20 Sekunden nicht überschreiten.
Rezeptbeispiel: Lammfleisch mit Grünen
Bohnen.
150g Lammfleisch, 90 g Grüne Bohnen, 60 g Mehl,
30 g Wasser, 1 mittelgroße Zwiebel, 2 Knoblauch-
zehe, Salz, Pfeffer.
MischenSieineinerSchüsseldieGrünenBohnenmit
dem Mehl und geben Sie nach und nach das Wasser
zu, bis eine homogene Masse entsteht.
Stecken Sie den Stopfer in den Einfülltrichter und
geben Sie die Mischung in die Einfüllschale.
Schalten Sie das Gerät an und schieben Sie die
Mischung mit dem Stopfer langsam in den Ein-
fülltrichter.
Schneiden Sie dann die Zwiebel, den Knoblauch
und das Lammfleisch in kleine Würfel.
Die durchgedrehten Bohnen beifügen, mit 0,8 Liter
Wasser, Salz und Pfeffer in einen Topf geben und
bei schwachem Feuer eine Stunde lang köcheln
lassen.
Nehmen Sie den Schaum ab und geben Sie einen
Deckel auf den Topf.
K
EBBE
-V
ORSATZ
(
JE NACH
M
ODELL
)
. Montage
— Führen Sie die Schnecke (A2) in das Gehäuse
(A1) des Fleischwolfs (A) ein.
— Stecken Sie den Vorsatzhalter (I1) auf den Fleisch-
wolf (A) und achten Sie darauf, dass die beiden
Zapfen des Vorsatzhalters in die Vertiefungen des
Fleischwolfs einrasten.
— Stecken Sie erst den Ring (I2) und dann die Mutter
(A5) auf den Vorsatzhalter (I1) und ziehen Sie sie
fest an.
— Bringen Sie den derart präparierten Fleischwolf
wie in 2A angegeben auf dem Motorblock an.
Bitte beach
ten:
Dieses Zubehörteil wird ohne
Lochscheibe und Messer verwendet.
S
PRITZGEBÄCK
-V
ORSATZ
(
JE NACH
M
ODELL
)
. Montage
— Führen Sie die Schnecke (A2) in das Gehäuse
(A1) des Fleischwolfs (A) ein.
4
4b
4c
4a
5
7

14
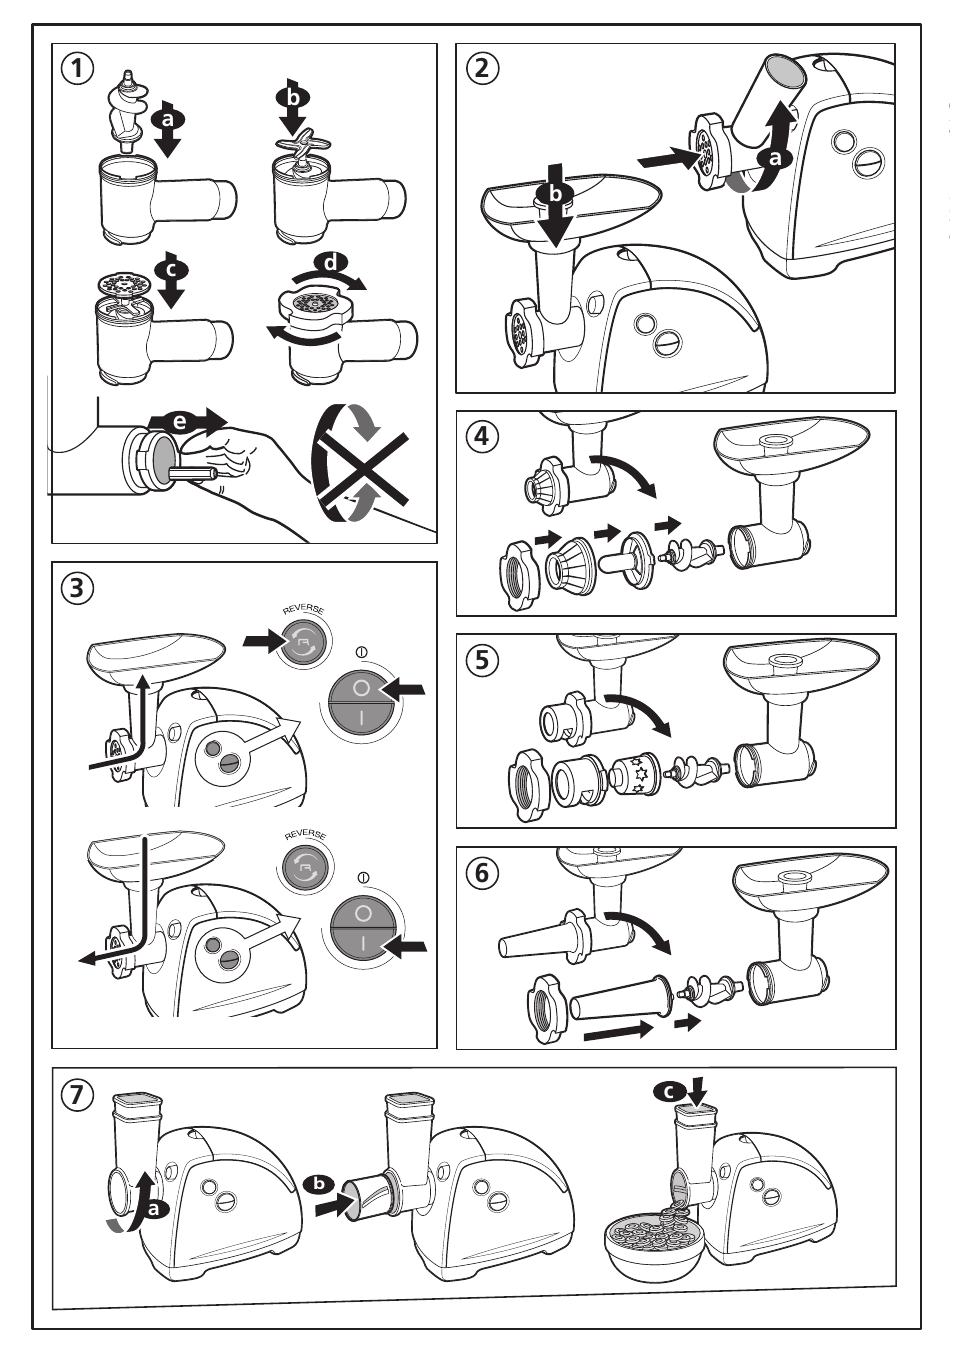
— Stecken Sie die Tülle (J2) auf den Vorsatzhalter
(J1).
— Achten Sie darauf, dass die beiden Zapfen des
Vorsatzhalters (J1) in die Vertiefungen des Fleisch-
wolfs (A) einrasten.
— Ziehen Sie die Mutter (A5) fest, aber ohne sie zu
blockieren, auf dem Gehäuse (A1) an.
— Bringen Sie den derart präparierten Fleischwolf wie
in 2A angegeben auf dem Motorblock an.
Bitte beachten:
Dieses Zubehörteil wird ohne Lochscheibe und
Messer verwendet.
. Gebrauch
— Bereiten Sie den Teig zu.
Mit etwas weichem Teig werden bessere Ergeb-
nisse erzielt.
— Wählen Sie nun das gewünschte Dekor, indem Sie
den Pfeil aus das gewünschte Dekor drehen.
— Führen Sie so lange Teig ein, bis Sie die gewünsch-
te Menge Spritzgebäck hergestellt haben.
W
URSTFÜLLTRICHTER
(
JE NACH
M
ODELL
)
Dieses Zubehörteil des Fleischwolfs (A) dient zur
Herstellung von Würsten aller Art ganz nach Ihrem
persönlichen Geschmack.
. Montage
— Führen Sie die Schnecke (A2) in das Gehäuse
(A1) des Fleischwolfs (A) ein.
— Stecken Sie den Wursteinfülltrichter (K) und die
Mutter (A5) auf und ziehen Sie sie fest an.
— Bringen Sie den derart präparierten Fleischwolf
wie in 2A angegeben auf dem Motorblock an.
Bitte beachten: Dieses Zubehörteil wird ohne
Lochscheibe und Messer verwendet.
. Gebrauch
— Dieses Zubehörteil kommt zum Einsatz, wenn
das Fleisch bereits gehackt und nach Ihrem
persönlichen Geschmack gewürzt ist.
— Lassen Sie die Wursthaut in lauwarmem
Wasser einweichen, um sie wieder geschmeidig
zu machen, ziehen Sie sie anschließend auf den
Wursteinfülltrichter (K) und lassen Sie unten etwa
5 cm überstehen.
— Füllen Sie den Einfülltrichter des Gehäuses (A1)
des Fleischwolfs (A) mit Wurstbrät, setzen Sie das
Gerät in Betrieb und schieben Sie mit dem Stopfer
nach, bis das Brät bis fast an den Wursteinfülltrich-
ter hinreicht.
— Schalten Sie das Gerät aus.
— Machen Sie einen Knoten in die überstehenden
5 cm Wursthaut und schieben Sie ihn in Richtung
Wursteinfüll-trichter hoch, um zu verhindern, dass
sich Luftblasen in der Wursthaut bilden.
— Schalten Sie das Gerät wieder ein und füllen Sie
weiter Brät nach. Die Wursthaut füllt sich. Um
ein übermäßiges Aufblähen der Wursthaut zu
6
verhindern, sollten die Würste nicht allzu prall
gefüllt werden.
— Diese Aufgabe lässt sich leichter zu zweit bewäl-
tigen: einer füllt Brät nach und der andere hält die
sich füllende Wursthaut fest.
— Wenn das ganze Brät verbraucht ist schalten Sie
das Gerät aus, nehmen die verbleibende Wurst-
haut ab und verknoten sie.
— Drehen Sie nun die Würste in der jeweils ge-
wünschten Länge ab.
G
EMÜSESCHNEIDER
(
JE NACH
M
ODELL
)
. Montage
— Halten Sie den nach rechts gedrehtem Einfülltrich-
ter (L1) an den ausgesteckten Motorblock (H).
— Führen Sie den Antriebsstift des Einfülltrichters
(L1) gerade in den Motorblock (H) ein.
— Drehen Sie den Einfülltrichter nach links.
— Nehmen Sie die gewünschte Trommel (L3) und
stecken Sie auf den Einfülltrichter. Drehen Sie sie
dabei leicht, damit sie richtig fest sitzt.
— Überprüfen Sie die Montage.
— Der „Reverse”-Knopf (G) darf bei Benutzung
des Gemüseschneiders nicht eingesetzt wer-
den.
. Gebrauch
— Bereiten Sie die gesamte Menge der zu verarbei-
tenden Lebensmittel vor.
— Stellen Sie eine Schüssel unter den Einfülltrichter
(L1).
— Stecken Sie das Gerät an. Nehmen Sie es durch
Drücken des Symbols „I” am Ein/Aus-Schalter (F)
in Betrieb.
— Geben Sie das Hackgut in den Einfülltrichter (L1)
und schieben Sie gleichmäßig mit dem Stopfer
(L2) nach.
— Schieben Sie niemals mit den Fingern oder
Utensilien jeder Art nach.
— Halten Sie niemals bei laufendem Gerät Ihre
Finger in die Trommel.
Reinigung
—
Ziehen Sie vor der Reinigung den Netzstecker.
— Drücken Sie den Entriegelungsknopf (E) und
kippen Sie das Ensemble (Fleischwolf (A) + Ein-
füllschale (B) oder Gemüseschneider (L)) zum
Abnehmen vom Motorblock (H) nach rechts ab.
— Zum Abnehmen des Fleischwolfs nehmen Sie die
Einfüllschale (B) vom Einfülltrichter ab, schrauben
Sie die Mutter (A5) auf und nehmen Sie die Loch-
scheibe (A4), das Messer (A3) und die Schnecke
(A2) ab.
— Gehen Sie vorsichtig mit den scharfen Teilen um.
— Reinigen Sie alle Teile mit warmem Seifenwas-
7
7a
7b
7c
Reinigung
8
15
ser, spülen Sie sie ab und trocknen Sie sie
sorgfältig ab.
— Die Lochscheibe (A4) und das Messer (A3)
müssen gefettet werden. Reiben Sie sie mit
Öl ein.
— Bringen Sie den Motorblock (H) nicht mit Wasser
in Berührung. Reiben Sie ihn einfach nur mit einem
leicht angefeuchteten Tuch ab.
— Der Fleischwolf (A), also das Gehäuse (A1),
die Schnecke (A2), das Messer (A3), die
Lochscheiben (A4) und die Mutter (A5) sind
nicht spülmaschinenfest.
Was tun, wenn Ihr Gerät
nicht funktioniert?
— Überprüfen Sie, ob das Gerät auch wirklich richtig
angesteckt ist.
Das Gerät funktioniert immer noch nicht? Wen-
den Sie sich in diesem Fall an ein anerkanntes
Moulinex-Kundendienstzen-trum (Adressen
siehe Serviceheft).
Denken Sie an den Schutz der
Umwelt !
Ihr Gerät enthält wertvolle Rohstoffe, die
wieder verwertet werden können.
Geben Sie Ihr Gerät deshalb bitte bei einer
Sammelstelle Ihrer Stadt oder Gemeinde ab.
9
Dzie$kujemy, z[e wybrali Pan;stwo urza$dzenie
firmy
Moulinex.
A
Kon;co;wka do mielenia mie$sa
A1 Korpus
A2 S:limak
A3 No;z[ ze stali nierdzewnej samoostrza$cy
A4 Sitka
A4a Sitko z ma`ymi otworami>
mielenie drobne
A4b Sitko z duz[ymi otworami>
grube mielenie
A5 Pierócien; dociskowy
B
Wyjmowana miska
C
Popychacz mie$sa
D
Os`ona schowka na akcesoria
E
Przycisk odblokowania kon;co;wki
do mielenia mie$sa
F
Przycisk W`a$czony ¶ wy`a$czony (0-I)
G
Przyciski ¤Do ty`u‹ (chwilowe
w`a$czenie obroto;w w przeciwnym
kierunku)
H
Silnik
I
Element wyposaz[enia kebbe
(zalez[nie od modelu)
I1
Kon;co;wka wyciskaja$ca
I2
Pierócien;
J
Wyciskarka do ciastek
(zalez[nie od modelu)
J1
Uchwyt
J2
Forma
K
Nasadka masarska
(zalez[nie od modelu)
L
Szatkownica (zalez[nie od modelu)
L1
Zasobnik
L2
Popychacz
L3
Be$bny (zalez[nie od modelu)
L3a Be$ben do plastro;w
L3b Be$ben do plastro;w dekoracyjnych
L3c Be$ben do tarcia grubego
L3d Be$ben do tarcia drobnego
L3e Be$ben do parmezanu
L3f Be$ben do lodu
— Przed pierwszym uz[yciem zakupionego
urza$dzenia prosze$ starannie przeczytac;
instrukcje$obs`ugi> nieprawid`owa obs`uga
zwalnia Moulinex z wszelkiej odpowied-
zialnoóci.
— Urządzenie nie powinno być użytkowane
przez osoby(włączając dzieci),które są upoś-
ledzone fizycznie lub umysłowo, jak również
przez osoby nie posiadające doświadczenia
iwiedzy,zwyjątkiemprzypadków, kiedy zna-
jdują się one pod opieką osoby
odpowiedzialnej za ich bezpieczeństwo
lub zostały przez nią poinstruowane w za-
kresie użytkowania urządzenia. Należy
dopilnować aby dzieci nie bawiły się
urządzeniem.
— Nalez[y upewnic; sie$, czy napie$cie na tabli-
czce znamionowej urza$dzenia jest zgodne
z napie$ciem w sieci zasilaja$cej.
Nieprawid`owe pod`a$czenie do sieci elektry-
cznej powoduje wygaónie$cie uprawnien;
gwarancyjnych.
— Urza$dzenie jest przeznaczone wy`a$cznie do
uz[ytku w gospodarstwie domowym do
celo;w kulinarnych i pod nadzorem.
— Ustawic; urza$dzenie na p`askiej, czystej i
suchej powierzchni.
— Zapobiegac; zwisaniu d`ugich w`oso;w, wsta$z[ek
lub krawato;w nad akcesoriami w czasie pracy.
— Od`a$czyc; urza$dzenie po zakon;czeniu
uz[ytkowania, w czasie mycia oraz w czasie
zak`adania i zdejmowania akcesorio;w.
— Nie uz[ywac; urza$dzenia jez[eli nie dzia`a pra-
wid`owo lub jez[eli zosta`o uszkodzone.
W takim przypadku nalez[y zwro;cic; sie$ do
autoryzowanego serwisu Moulinex (patrz
lista w ksia$z[eczce serwisowej).
— Kaz[da interwencja nie zwia$zana z czyszcze-
niem i zwyk`a$konserwacja$musi byc;wykonana
w autoryzowanym centrum serwisowym
Moulinex.
— Jez[eli kabel zasilania lub wtyczka sa$ uszkod-
zone nie uz[ywaj urza$dzenia. Aby zapobiec
wszelkiemu niebezpieczen;stwu przewo;d
musi byc; wymieniony przez autoryzowany
serwis Moulinex (patrz lista w ksia$z[eczce
serwisowej).
— Nie wk`adac; urza$dzenia, przewodu zasila-
nia lub wtyczki do wody lub innych p`yno;w.
— Przewo;d zasilania nie powinien swobodnie
zwisac; w miejscu doste$pnym dla dzieci.
— Przewo;d zasilania nie moz[e znajdowac; sie$
w pobliz[u lub stykac; sie$ z nagrzewaja$cymi
sie$ elementami urza$dzenia, z;ro;d`ami ciep`a
lub ostrymi krawe$dziami.
— Dla Pan;stwa bezpieczen;stwa, nalez[y uz[ywac;
tylko oryginalne wyposaz[enie i cze$óci zamien-
ne Moulinex dostosowane do urza$dzenia.
Umyc; wszystkie akcesoria i wytrzec; je do-
k`adnie.
Kratka i nó powinny zawsze by
ć natłuszc-
zone. Posmarowa
ć je olejem.
Nie u ywa
ć urządzenia, je eli kratka i nó nie
s
ą posmarowane olejem.
Opis
Zasady bezpieczen;stwa
10
Przed pierwszym uz[yciem
30:46
Мясорубка MOULINEX HV8 ME626132.
13:59
Обзор мясорубки Moulinex. Нарезка овощей . Такого обзора вы еще не видели
09:47
Электромясорубка Moulinex HV8 тестируем дома
03:59
Универсальная мясорубка. Обзор Moulinex HV8 Pro ME6878
03:42
Мясорубка Moulinex HV8 ME626132
22:01
Мясорубка Moulinex hv8 обзор недостатки Meat mincer Moulinex hv8 review
07:55
Мясорубка moulinex hv8 обзор от жены
08:56
Мясорубка MOULINEX HV8 ME688832
Нажмите на кнопку для помощи
Раздел: Бытовая, кухонная техника, электроника и оборудование
Тип: Мясорубка
Характеристики, спецификации
Мощность:
максимальная — 1800 Вт
Производительность:
2.9 кг/мин
Защита двигателя от перегрузки:
есть
Перфорированный диск для фарша:
есть, 2 в комплекте, диаметр отверстий 4.7 мм, 7.5 мм
Насадка для шинковки:
есть
Насадка для приготовления колбас:
есть
Материал изготовления лотка:
пластик
Материал изготовления корпуса:
пластик
Отсек для хранения насадок:
есть
Инструкция к Мясорубке Moulinex HV8 ME625
J
C
J2 J1
B
GE
I1I2
I
F
D
A4b A4c
A5 A3
A4a
A2 A1
A
H
K2
K1
K
K3a K3b K3c
EN
p 1 – p 6
RU
p 7 – p 12
UK
p 13 – p 18
CS
p 19 – p 24
SK
p 25 – p 30
HU
p 31 – p 36
PL
p 37 – p 42
LT
p 43 – p 48
LV
p 49 – p 54
ET
p 55 – p 60
BG
p 61 – p 66
SR
p 67 – p 72
HR
p 73 – p 78
SL
p 79 – p 84
RO
p 85 – p 90
BS
p 91 – p 96
EN
RU
UK
CS
SK
HU
PL
LT
LV
ET
BG
SR
HR
SL
RO
BS
www.moulinex.com
Réf. 2643130
101
!!
!!

choosing an appliance from the Moulinex range.
EN
DESCRIPTION:
A Removable mincer head
A1 Aluminium casing
A2 Screw feeder
A3 Self-sharpening stainless steel blades
A4 Screens
A4a Fine hole screen (2.4 mm)
(availability depends on model) very fine mincing
A4b Medium hole screen (4.7 mm) fine mincing
A4c Large hole screen (8 mm)coarse mincing
A5 Aluminium locking nut
B Removable tray
C Pusher
D Accessory storage compartment
E Mincer head release button
F On/off switch
G Reverse button (momentary reverse action)
H Motor unit
I KEBBE accessory
I1 Ring fitting
I2 Ring
J Sausage nozzle
(availability depends on model)
J1 Screw feeder centring ring
J2 Nozzle
K Vegetable cutter (availability depends on model)
K1 Drum holder / hopper
K2 Pusher
K3 Drums
K4a Shredder
K4b Slicer
K4c Grater
SAFETY RECOMMENDATIONS:
— Always read the instructions carefully before using your appliance for the first time: Moulinex will not accept
responsibility for any use which does not comply with the instructions for use.
— This appliance is not intended to be used by persons (including children) with reduced physical, sensory or
mental capacities or lack of experience and knowledge, unless they are supervised or have been given
instructions beforehand concerning use of the appliance by a person responsible for their safety.
— Children should be supervised to ensure they do not play with the appliance.
— Check that the voltage of your appliance corresponds to your domestic power supply.
— Any incorrect connection to the power supply will invalidate the guarantee.
— This product has been designed for domestic use only. Any commercial use, inappropriate use or failure to comply
with the instructions, the manufacturer accepts no responsibility and the guarantee will not apply
— Do not leave the appliance unattended when switched on and in use.
— Use the appliance on a flat, clean and dry surface.
— Never allow long hair, scarves or ties to hang down over the appliance when it is in use.
— Unplug the appliance after use and when you clean it or fit or remove accessories.
— Do not use the appliance if it is not working correctly or if it has been damaged. In this case contact an approved
Moulinex service centre (see list in service booklet).
1

— Any servicing other than cleaning and normal upkeep by the customer must be carried out by an approved service
centre.
— Do not use the appliance if the power lead is damaged. To avoid all possible danger, have it replaced at an approved
service centre (see list in the service booklet).
— Never place the appliance, the power cord or the plug in water or any other liquid.
— Keep the power lead out of the reach of children.
— The power lead should never touch hot surfaces, or be placed near heat sources or sharp edges.
— For your own safety, only use Moulinex accessories and spare parts which are suitable for your appliance.
— Do not use the appliance for longer than 14 minutes.
— For your safety, this appliance complies with all applicable standards and regulations:
• Low voltage directive
• Electro-magnetic compatibility
• Environmental regulations
• Regulations regarding materials in contact with foodstuffs.
BEFORE USING THE APPLIANCE FOR THE FIRST TIME:
Wash all accessories in soapy water. Rinse and dry carefully.
The screen and blades must be kept lubricated. Apply a little oil to them.
Do not run the appliance empty if the screen has not been oiled.
WARNING! Handle the drums carefully as the blades are extremely sharp.
USING THE APPLIANCE:
MINCER HEAD ASSEMBLY (A) :
Assembling the mincer head (figures 1.1 and 1.2)
Hold section A1 by the hopper with the wider opening at the top. Insert the screw feeder (A2) (long shaft first) in the
head assembly A1.
Fit the stainless steel blades (A3) on the short shaft of the screw feeder (A2), so that the cutting edges face outward.
Fit the screen of your choice over the blades (A3) ensuring that the pin fits into the notch on the assembly (A1).
Tighten the locking nut A5 (do not apply excessive pressure).
Fitting the mincer head to the appliance (diagram 2):
• The motor unit (H) must be unplugged. Position the mincer head in front of the unit with the hopper tilted to the
right. Fit the two pins on the mincer head into the two notches on the motor unit.
Push the mincer head firmly into the motor unit (H) and then turn the hopper to the left until it locks into position
(the hopper should be vertical).
• Fit the removable tray (B) onto the pins of the hopper.
Plug the appliance in. It is now ready for use.
Use:
Prepare all the food you wish to mince, eliminating any bones, cartilage or nerves.
Cut the meat into pieces (approximately 2 cm x 2 cm).
Place a container under the mincer head.
Press the On / Off switch (F) to start the appliance.
Place the pieces of meat on the tray (B) and use the pusher (C) to push them into the hopper one by one.
Never use your fingers or any other object to push the meat into the hopper.
To make extra fine Kebbe or Kefta mince, pass the meat through the mincer 2 or 3 times until it has the right consistency.
Tip:
When you have finished mincing put a few pieces of bread through the mincer to push out all the meat.
What to do if the mincer is blocked (diagram 3)
Turn off the mincer by pressing the On / Off switch (F).
Press the Reverse button (G) for a few seconds to clear the blockage.
Press the On / Off switch (F) to continue mincing.
Important : wait until the appliance stops completely before you use the On (F) or Reverse (G) buttons.
KEBBE ACCESSORY (I)
2
Assembly (diagram 4):
Fit the screw feeder (A2) into the mincer head assembly (A1). Insert the ring fitting (I1) in the head assembly (A1),
so that the pin fits into the notch.
Place the ring (I2) over the ring fitting and then secure them by tightening the locking nut (A5).
When assembled, fit the mincer head to the motor unit, as shown in diagram 4.
Note: this accessory is used without a screen or blades.
SAUSAGE NOZZLE (J) (availability depends on model)
This accessory can be fitted to the mincer head so that you can make sausages of all kinds, flavouring them to your
own taste.
Assembly (diagram 5) :
Fit the screw feeder (A2) into the mincer head assembly (A1). Fit the screw feeder centring plate (J1), aligning the
pin with the notch on the head assembly (A1). Fit the nozzle (J2) and secure it by tightening the locking nut (A5).
When assembled, fit the mincer head to the motor unit, as shown in diagram 5.
NB : this accessory is used without a screen or blades. The centring plate keeps the screw feeder in position while
the appliance is being used.
Use:
Important: this accessory should only be used after you have minced the meat, added seasoning and mixed the
preparation thoroughly.
Soak the sausage casing in warm water to soften it and insert the nozzle (J2) in it leaving about 5 cm clear.
Fill the hopper (A1) on the head assembly (A) with mince, turn the appliance on and push down with the pusher (C)
until the mince reaches the end of the nozzle.
Turn off the appliance.
Tie a knot in the 5 cm length of free casing. Slide the knot up to the end of the nozzle so that air is not trapped in
the casing.
Turn the appliance on again and continue to add mince. Ease the casing along as it fills. Do not overfill the sausages
as this will stretch the casing.
NB : this operation is easier if two people do it together, one feeding the mince into the mincer and the other
holding the casing in position as it fills.
Make sausages of the desired length by pinching the casing and twisting it where appropriate.
For the best results take care to prevent air becoming trapped in the casing during filling and make sausages 10 cm to
15 cm in length (separate the sausages by tying a knot round the casing).
VEGETABLE CUTTER (K) (availability depends on model)
Assembly (diagram 6):
The motor unit must be unplugged. Position the vegetable cutting unit (K1) in front of the motor unit tilted to the
right so that the lugs are aligned with the notches in the motor unit (H). Insert the shaft of the unit in the centre
hole of of the motor unit (H). Turn the hopper to the left until the unit clicks home with the hopper in the upright
position.
Use:
• Select the drum you wish to use.
• Fit the drum into the opening at the front of the vegetable cutter (K1), ensuring that it is pushed firmly home
(Fig. 7).
• Plug in the appliance.
• Press the On / Off button (F) once or twice to lock the drum into position (Fig.  .
.
• Start the appliance and feed the vegetables into the hopper (K1) (Fig. 9), pushing them down with the pusher (K2)
(Fig. 10).
• To change the drum, wait for the appliance to stop completely and then press the Reverse button (G) for 1 second.
The drum will be released automatically (Fig. 11).
WARNING! Before starting the appliance, check that the drum is correctly fitted on the shaft.
3

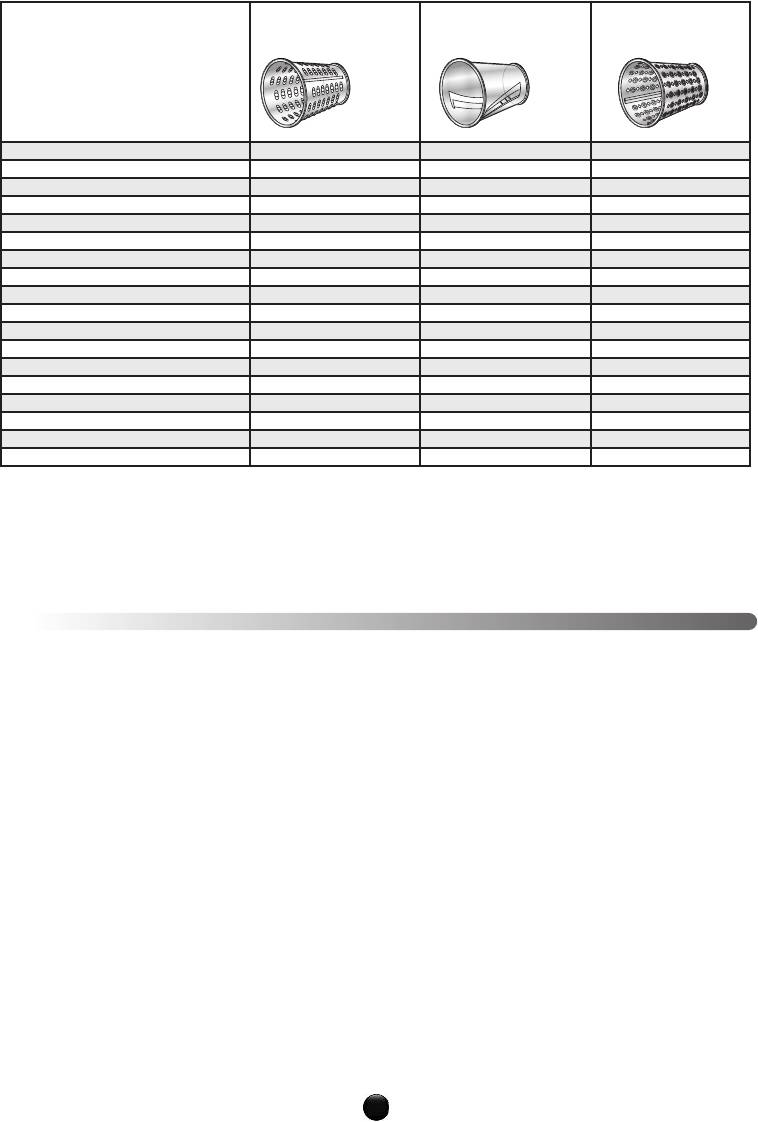
Use the right drum for each type of food:
(*) K3a Shredder (*) K3b Slicer (*) K3c Grater
C
arrots
X X
Courgettes
X X
Potatoes
X X
C
ucumber
X X
P
epper
X X
O
nions
X
Beetroot
X
Cabbage (white/red)
X
Apples
X
Black radish
X X
Celeriac
X
Banana
X
Parmesan
X
Gruyère
X X
Chocolate
X X
Dry bread/biscuits
X
Hazelnuts/walnuts/almonds
X
Coconut
X
(*) available according to model
Recommendations for the best results:
For best results the ingredients you use should be firm. Do not allow food remains to build up inside the unit. Do not
use the appliance to grate or mince substances which are too hard, such as sugar or large pieces of meat.
Cut food into small pieces so that it can be fed easily into the hopper.
CLEANING:
• Always unplug the appliance before cleaning the motor unit (H).
• Do not put the motor unit in water or hold it under a running tap. Clean the motor unit with a damp cloth and dry
it carefully.
1) Mincer accessories:
— Release the head or accessory by pressing button E.
— Turn the mincer head unit (A) to the right and pull it towards you to remove it from the motor unit (H).
— To remove the head unit (A), lift off the pusher (C) and the tray (B), unscrew the locking nut (A5), remove the screen
(A4), the blades (A3) and the screw feeder (A2).
— Take special care when handling sharp components.
— Wash all pieces in warm soapy water, rinse and dry carefully.
Do not put any parts of the head unit (A) in the dishwasher (main body (A1), screw feeder (A2), blades (A3),
screens (A4), locking nut (A5)).
2) Vegetable cutter accessories (available according to model):
• The drum holder (K1), the pusher (K2) and the drums (K3a, K3b, K3c) can be washed in the dishwasher in the
top tray using the ECONOMY or QUICK WASH settings.
• Handle the drums carefully as the blades are extremely sharp.
• If the plastic parts become stained by foods such as carrots, rub the discoloured areas with a cloth soaked in
vegetable oil and then clean as normal.
STORAGE:
The screens, the blades, the screw feeder centring plate, the Kebbe and sausage accessories (I1, I2 and J1, J2) can
be stored in the compartment (D) at the back of the appliance.
WHAT DO I DO IF THE APPLIANCE DOESN’T WORK?
Check that it is correctly connected to the power supply.
4

If the problem persists, contact an approved Moulinex service centre (see list in service booklet).
DISPOSAL OF ELECTRICAL OR ELECTRONIC PRODUCTS
Let’s work together to protect the environment!
Your appliance contains valuable materials which can be recovered or recycled.
Leave it at a local civic waste collection point.
RECIPES
N.B. When preparing recipes that require extensive use of the mincer take care not to operate it continuously
for more than 20 seconds.
Sample recipe, using 4.7 mm medium screen (A4b):
LEBANESE KEBBE
(meat balls with yoghurt)
(Serves 6) – Preparation time: 1 h
Leave to stand for 1 h in fridge
Ingredients for kebbe paste:
600 g of meat – 300 g of cracked bulgur wheat — Salt
Ingredients for sauce:
1 kg yoghurt – 1 bunch coriander – 4 cloves garlic – 3 soupspoons cornflour – Salt, pepper
1. Cut the meat into 4 pieces. Fit the 4.7 mm screen on your mincer. Mince the meat, adding the bulgur wheat as you
do so. Add salt and allow to stand for 1 hour in a cool place.
2. To make the kebbe balls: fit the kebbe accessory on to the mincer. Roll the paste into a ball, sealing the ends with
a little water.
3. To prepare the sauce: wash the coriander, dry it with kitchen paper and remove the leaves. Peel and crush the garlic.
Warm the coriander and garlic gently in a pan for 1 – 2 minutes. Set aside.
4. Beat the yoghurt and cornflour together. Add salt and pepper. Put the mixture into a saucepan after passing it
through a fine sieve. Heat until the mixture boils and then turn down the heat. Stir the mixture while it is cooking
to ensure that the yoghurt does not curdle.
5. Add the garlic and coriander. Warm the kebbe balls in the mixture for 10 minutes.
Variation on the recipe: You can also stuff the balls with a mixture of onion and minced meat (previously lightly
browned in a little oil with a few pine nuts).
BRIOUATS
(Serves 4) – Preparation time: 40 min. Cooking time: 35 min.
Ingredients:
250 g puff pastry – 350 g beef – 1 onion – 2 eggs – Paprika – Powdered cinnamon and ginger – Parsley – Coriander –
Chervil – Sugar – 60 g butter – Olive oil
1. Fit the 4.7 mm screen on your mincer. Cut the onion into 8 pieces and put it through the mincer. Warm 4 soupspoons
of olive oil in a pan and add the onion. Sweat it on a low heat without allowing it to brown. Set aside.
2. Mince the beef. Brown it on a low heat with the onion for 10 minutes. Set aside.
3. Mince the herbs. Add them to the pan with salt and pepper, half a coffeespoon of paprika, a pinch of ginger and a
small spoonful of cinnamon.
4. Add the beaten eggs, stir into the mixture and then remove from the heat.
5. Roll out the puff pastry. It should be quite thin. Cut it into squares 10 cm x 10 cm. Rub the edges with butter.
6. Put a small spoonful of filling on each square. Roll the squares up and seal the ends.
7. Fry the briouats in very hot oil. When fried, place on kitchen paper for a few seconds. Sprinkle with sugar and
cinnamon. Serve very hot.
Variation on the recipe:
Fit the 4.7 mm screen on your mincer. Cut the onion in 8 pieces. Mince a little meat and then the onion.
Then mince a little more meat, then the herbs and then the rest of the meat. Beat the eggs and add them to the stuf-
5
fing with salt and pepper, half a coffee spoon of paprika, a pinch of ginger and a small spoonful of cinnamon. Mix all
the ingredients together. Proceed as in steps 5 to 7 above.
PIROZHKI
(small fish pasties)
(
Serves 4) – Preparation time: 25 min. Cooking time: 10 — 15 min.
Ingredients:
250 g puff pastry – 300 g cooked fish or smoked salmon – 2 hard boiled eggs – 1 bunch dill – 2 onions – 100 g salted
butter, diced small — Oil
1. Fit the 4.7 mm screen on your mincer. Cut the onions into 8 and put them through the mincer. Brown them in a pan
with a little oil over a low heat. Set aside.
2. Mince a little fish, then put the cooked onion, butter and dill through the mincer and finally the rest of the fish.
3. Roll out the puff pastry so that it is quite thin and then cut circles out using a glass or a fairly large bowl.
4. Pre-heat the oven to 210oC (Th.6)
5. Place a little filling on each circle, fold the edges over and seal them together.
6. Brown in the oven for 10 – 15 minutes.
Beef balls
(Serves 4) – Preparation time: 20 min. Cooking time: 10 — 15 min.
Ingredients:
1 kg beef – 1 onion – 1 clove garlic – 2 slices black bread soaked in milk – 2 eggs – 1 potato – Flour – Salt, peppe
1. For this recipe choose lean pieces of beef. Mince the beef with the slices of bread.
2. Slice the onion using the slicing drum (K3b) and grate the garlic and the potato using the shredder drum (K3a).
3. Mix the minced meat and bread with the sliced onion, garlic and potato.
4. Add the eggs, ground black pepper and salt, and shape the mixture into balls.
5. Roll the balls in flour and fry in the oil.
Oven baked potato pie
(Serves 4) – Preparation time: 30 min. Cooking time: 45 min.
Ingredients:
400 g minced meat – 1 kg potatoes- 2 eggs – 2 glasses milk – 1 clove garlic – 1½ soupspoons butter – 2 soupspoons oil
– Salt, pepper
1. Clean wash and dry the potatoes. Slice them using the K3b drum.
2. Mince the beef and fry it in a pan with oil for 5 minutes.
3. Rub the inside of an oven dish with garlic and then grease it with some of the butter.
4. Put a first layer in the dish using Î of the potato. Then add a layer of meat, add salt and pepper and then a final
layer with the rest of the potato.
5. Beat the eggs with hot milk and pour this mixture over the potato. Add the rest of the butter and cook in a medium
oven for 45 minutes.
Apple gratin with almonds
(Serves 4) – Preparation time: 40 min. Cooking time: 30 min.
Ingredients:
6 apples – 60 g soft brown sugar – 50 g butter – 50 g whole almonds – 20 cl cream – 1 coffeespoons cinnamon
Peel the apples, remove the pips and cut into quarters. Slice finely using the K3b slicer attachment and brown with
30 g of butter. Lightly grease a gratin dish with butter and spread the caramelised apple over the bottom. Powder
the almonds using the K3c grater drum. Mix the powdered almond, the cream and the cinnamon in a bowl. Pour the
mixture over the apples and sprinkle with soft brown sugar. Heat the dish in the oven at 160°C.
6

‹²§ªµ«§·¯³®§¶µ±º¶±º¶·¯¨µ·§¸¬·¯¯Moulinex.
RU
ОПИСАНИЕ
A
šÁ¬³´§Æªµ²µ©±§³Æ¸µ·º¨±¯
A1
Š²Å³¯´¯¬©Â°±µ·¶º¸
A2
Œ¯´¹
A3
š§³µ®§¹§¾¯©§ÅÀ¯°¸Æ´µ-¯®´¬·-§©¬ÅÀ¬°¸¹§²¯
A4
™¬¿¬¹±§
A4a
•¬²±§Æ·¬¿¬¹±§³³
ž£œž¤-¤¨ª-®¤ª®¨ª ¡§¤
Ž²Æµ¾¬´Ã³¬²±µ°·º¨±¯
A4b
š·¬«´ÆÆ·¬¿¬¹±§³³
Ž²Æ³¬²±µ°·º¨±¯
A4c
¡¯·µ±§Æ·¬¿¬¹±§³³
Ž²Æ±·º¶´µ°·º¨±¯
A5
Š²Å³¯´¯¬©§Æª§°±§
B
šÁ¬³´Â°¶µ««µ´
C
›µ²±§¹¬²Ã³Æ¸§
D
¬¼µ²«²Æ§±¸¬¸¸º§·µ©
E
“´µ¶±§«²Æ¸´Æ¹¯Æªµ²µ©±¯³Æ¸µ·º¨±¯
F
“´µ¶±§®§¶º¸±§µ¸¹§´µ©±¯
G
“´µ¶±§T™¬©¬·¸U«©¯-¬´¯¬¹µ¹¾§¸³¬´Æ¬¹¸Æ´§¶·µ¹¯©µ¶µ²µ-´µ¬
H
‹²µ±³µ¹µ·§
I
Š±¸¬¸¸º§·“•‹‹•
I1
•¯²Ã¬·´§Æ´§¸§«±§
I2
“µ²Ã½¬©µ¬º¶²µ¹´¬´¯¬
J
Œµ·µ´±§«²Æ±µ²¨§¸µ±
ž£œž¤-¤¨ª-®¤ª®¨ª ¡§¤
J1
œ¸¹·µ°¸¹©µ«²Æ½¬´¹·¯·µ©§´¯Æ©¯´¹§
J2
Œµ·µ´±§
K
—©µÀ¬·¬®±§
ž£œž¤-¤¨ª-®¤ª®¨ª ¡§¤
K1
“µ´º¸´Â°±µ·¶º¸¸®§ª·º®µ¾´µ°ªµ·²µ©¯´µ°
K2
›µ²±§¹¬²Ã
K3
“µ´º¸Â
K3a
“µ´º¸¹¬·±§
K3b
“µ´º¸«²Æ·¬®±¯¹µ´±¯³¯²µ³¹¯±§³¯
K3c
“µ´º¸«²Æ¸±µ¨²¬´¯Æ
МЕРЫ ПРЕДОСТОРОЖНОСТИ :
Внимательно прочитайте инструкцию перед началом работы: использование прибора, не
-ªª®ž¡®-®ž¯ющее инструкции, освобождает ;@85:1Cª®ª®ž¡®-®¡©©ª-®¤
Данный прибор не предназначен для использования лицами (включая детей), чьи физические,
-¡©-ª¬©²¡ ¤§¤ ¯¨-®ž¡©©²¡ -«ª-ª•©ª-®¤ ªŸ¬œ©¤±¡©² ¤§¤ §¤цами, не имеющими опыта или
©¡ª•ходимых знаний, за исключением случаев, когда за ними присматривало или помогало третье лицо
ª®ž¡®-®ž¡©©ª¡£œ¤х безопасность.
Необходимо ограничить доступ детей к прибору, который не является игрушкой.
–§¶·Æ-¬´¯¬¶¯¹§´¯Æ©§¿¬ªµ¶·¯¨µ·§«µ²-´µ¸µµ¹©¬¹¸¹©µ©§¹Ã´§¶·Æ-¬´¯Å©§¿¬ªµÄ²¬±¹·¯¾¬¸±µªµ¶¯¹§´¯Æ
Любое неправильное подключение аннулирует гарантию.
˜·¯¨µ·¶·¬«´§®´§¾¬´¹µ²Ã±µ«²Æ«µ³§¿´¬ªµ¯¸¶µ²Ã®µ©§´¯Æ¯¶·¯ªµ¹µ©²¬´¯Æ¨²Å«¯¶µ«¶·¯¸³µ¹·µ³
’¸¶µ²Ã®º°¹¬¶·¯¨µ·¹µ²Ã±µ´§·µ©´µ°¶µ©¬·¼´µ¸¹¯¾¯¸¹µ°¯¸º¼µ°
–¬µ¸¹§©²Æ°¹¬´¬º¨·§´´Â³¯«²¯´´Â¬©µ²µ¸Â¿§·»¯²¯ª§²¸¹º±´§«§±¸¬¸¸º§·§³¯¶·¯©¬«¬´´Â³¯©«¬°¸¹©¯¬
š²¬«º¬¹µ¹±²Å¾¯¹Ã¶·¯¨µ·µ¹¶¯¹§´¯Æ±§±¹µ²Ã±µ©Â¶·¬±·§¹¯²¯·§¨µ¹ºµ¹±²Å¾¬´¯¬¹·¬¨º¬¹¸Æ¹§±-¬±µª«§
©Â¬ªµ³µ¬¹¬¸¹§©¯¹¬´§³¬¸¹µ¯²¯º¨¯·§¬¹¬§±¸¬¸¸º§·Â
7

–¬¯¸¶µ²Ã®º°¹¬¶·¯¨µ·¬¸²¯µ´·§¨µ¹§¬¹´¬¶·§©¯²Ã´µ¯²¯¶µ©·¬-«¬´ŒÄ¹µ³¸²º¾§¬¸²¬«º¬¹µ¨·§¹¯¹Ã¸Æ©
¸¬·©¯¸´Â°½¬´¹·Moulinex (¸³¸¶¯¸µ±©¨·µ¿Å·¬¶µµ¨¸²º-¯©§´¯Å).
— ”Ũµ¬©³¬¿§¹¬²Ã¸¹©µµ¹²¯¾´µ¬µ¹¾¯¸¹±¯¯¬-¬«´¬©´µªµº¼µ«§±²¯¬´¹µ³«µ²-´µµ¸ºÀ¬¸¹©²Æ¹Ã¸Æ©¸¬·©¯¸´µ³
½¬´¹·¬Moulinex.
— •¸²¯ ¶µ©·¬-«¬´ ¶·µ©µ« ´¬ ¯¸¶µ²Ã®º°¹¬ ¶·¯¨µ· Ž²Æ º¸¹·§´¬´¯Æ µ¶§¸´µ¸¹¯ µ¨·§¹¯¹¬¸Ã «²Æ ®§³¬´Â ©
¸¬·©¯¸´Â°½¬´¹·Moulinex (¸³¸¶¯¸µ±©¨·µ¿Å·¬¶µµ¨¸²º-¯©§´¯Å).
— –¬±²§«¯¹¬¶·¯¨µ·±§¨¬²Ã¶¯¹§´¯Æ¯²¯¿¹¬¶¸¬²Ã©©µ«º¯²¯«·ºªºÅ-¯«±µ¸¹Ã
œ¨¯·§°¹¬±§¨¬²Ã¶¯¹§´¯Æµ¹«¬¹¬°
“§¨¬²Ã¶¯¹§´¯Æ´¬«µ²-¬´´§¼µ«¯¹Ã¸Æ©¨²¯®¯¯²¯©±µ´¹§±¹¬¸´§ª·¬©§ÅÀ¯³¯¸ÆIJ¬³¬´¹§³¯¯¸¹µ¾´¯±µ³
¹¬¶²§¯²¯µ¸¹·Â³ºª²µ³
Ž²Æ©§¿¬°¨¬®µ¶§¸´µ¸¹¯¸²¬«º¬¹¯¸¶µ²Ã®µ©§¹Ã¹µ²Ã±µ§±¸¬¸¸º§·Â¯®§¶§¸´Â¬¾§¸¹¯Moulinex µ¹©¬¾§ÅÀ¯¬
¹·¬¨µ©§´¯Æ³©§¿¬ªµ¶·¯¨µ·§
–¬¶µ²Ã®º°¹¬¸Ã¶·¯¨µ·µ³¸©Â¿¬³¯´
Ž²Æ©§¿¬°¨¬®µ¶§¸´µ¸¹¯«§´´Â°¶·¯¨µ·µ¹©¬¾§¬¹«¬°¸¹©ºÅÀ¯³´µ·³§³¯¶·§©¯²§³
SŽ¯·¬±¹¯©§´¯®±µªµ´§¶·Æ-¬´¯Æ
S¥²¬±¹·µ³§ª´¯¹´§Æ¸µ©³¬¸¹¯³µ¸¹Ã
S—±·º-§ÅÀ§Æ¸·¬«§
S•§¹¬·¯§²Â±µ´¹§±¹¯·ºÅÀ¯¬¸¶·µ«º±¹§³¯¶¯¹§´¯Æ
ПЕРЕД НАЧАЛОМ ИСПОЛЬЗОВАНИЯ:
ŒÂ³µ°¹¬©¸¬§±¸¬¸¸º§·Â©µ«µ°¸³Â²µ³š¶µ²µ¸´¯¹¬¯¹À§¹¬²Ã´µ©Â¹·¯¹¬
Решетка и нож должны оставаться жирными. Необходимо покрыть их маслом.
Не включайте прибор в холостую, не смазав предварительно решетку.
ВНИМАНИЕ : Следует осторожно обращаться с конусами, так как лезвия конусов очень острые.
ЗАПУСК:
ГОЛОВКА МЯСОРУБКИ (
Сборка головки мясорубки (схемы 1.1 и 1.2)
–¬µ¨¼µ«¯³µ©®Æ¹Ã±µ·¶º¸A1 ®§®§ª·º®µ¾´ºÅªµ·²µ©¯´º´§¶·§©¯©¸§³µ¬¿¯·µ±µ¬µ¹©¬·¸¹¯¬±©¬·¼º‘§¹¬³
©¸¹§©Ã¹¬©¯´¹A2 («²¯´´ºÅµ¸Ã¸´§¾§²§) ©±µ·¶º¸A1.
Œ¸¹§©Ã¹¬´µ-¯®´¬·-§©¬ÅÀ¬°¸¹§²¯A3 ´§±µ·µ¹±ºÅµ¸Ã±µ¹µ·§Æ©Â¼µ«¯¹®§©¯´¹A2, ·¬-ºÀ¯³¯ª·§´Æ³¯±
¸¬¨¬”ŨºÅ·¬¿¬¹±º¶µ©§¿¬³º©Â¨µ·º´§«¬´Ã¹¬´§´µ-A3, ©Â¸¹º¶«µ²-¬´¶µ¶§¸¹Ã©¶§®±µ·¶º¸§A1.
‘§±·º¹¯¹¬´¬¨²µ±¯·º°¹¬ª§°±ºA5
Установка головки мясорубки (схема 2) :
S˜¬·¬« µ¹±²Å¾¬´´Â³ µ¹ ¶¯¹§´¯Æ ¨²µ±µ³ ³µ¹µ·§ H «¬·-¯¹¬ ªµ²µ©±º ³Æ¸µ·º¨±¯ ®§ª·º®µ¾´§Æ ªµ·²µ©¯´§
´§¶·§©²¬´§©¶·§©µšµ¸¹Â±º°¹¬¨§°µ´¬¹´Â¼¸µ¬«¯´¬´¯Æªµ²µ©±¯³Æ¸µ·º¨±¯¯¶§®§¨²µ±§³µ¹µ·§
•µ²µ©º ³Æ¸µ·º¨±¯ ©¸¹§©Ã¹¬ © ¨²µ± ³µ¹µ·§ H , ®§ª·º®µ¾´ºÅ ªµ·²µ©¯´º ¶µ©¬·´¯¹¬ ®§¹¬³ ©²¬©µ «µ ³¬¹±¯
®§ª·º®µ¾´§Æªµ·²µ©¯´§«µ²-´§®§´Æ¹Ã©¬·¹¯±§²Ã´µ¬¶µ²µ-¬´¯¬
Sœ¸¹§´µ©¯¹¬¸Á¬³´Â°¶µ««µ´B ´§©Â¸¹º¶Â®§ª·º®µ¾´µ°ªµ·²µ©¯´Â³Æ¸µ·º¨±¯
Œ±²Å¾¯¹¬¶·¯¨µ·µ´ªµ¹µ©±Ä±¸¶²º§¹§½¯¯
š-«ª§³£ªžœ©¤¡
˜·¯ªµ¹µ©Ã¹¬´¬µ¨¼µ«¯³µ¬«²Æ·º¨±¯±µ²¯¾¬¸¹©µ¶·µ«º±¹µ©º«§²¯¹¬±µ¸¹¯¼·ÆÀ¯¯¸º¼µ-¯²¯Æ
–§·¬-ù¬³Æ¸µ±º¸±§³¯¶·¯¨²¯®¯¹¬²Ã´µ¸³X 2 ¸³
˜µ«ªµ²µ©±º³Æ¸µ·º¨±¯¶µ¸¹§©Ã¹¬¬³±µ¸¹Ã
–§-³¯¹¬´§¶µ²µ-¬´¯¬TIU±´µ¶±¯®§¶º¸±§µ¸¹§´µ©±¯F , ¾¹µ¨Â©±²Å¾¯¹Ã¶·¯¨µ·
˜µ²µ-¯¹¬±º¸±¯³Æ¸§´§¶µ««µ´B ¯¶µµ«´µ³ºµ¶º¸±§°¹¬©µ¹©¬·¸¹¯¬¸¶µ³µÀÃŹµ²±§¹¬²ÆC.
Ни в коем случае не пытайтесь проталкивать пальцами или другим инструментом.
¹µ¨Â¶µ²º¾¯¹Ã³Æª±µ¬¹¬¸¹µ“¯¨¨¬¯²¯“¬»¹§¶·µ¶º¸¹¯¹¬³Æ¸µ·§®§¾¬·¬®³Æ¸µ·º¨±º«µ¶µ²º¾¬´¯Æ³§¸¸Â
-¬²§¬³µ°±µ´¸¯¸¹¬´½¯¯
Полезный совет:
Œ±µ´½¬·§¨µ¹Â©Â³µ-¬¹¬¶·µ¶º¸¹¯¹Ã´¬¸±µ²Ã±µ±º¸±µ©¼²¬¨§¾¹µ¨Â©Â¿²¯µ¸¹§¹±¯·º¨²¬´µªµ³Æ¸§
Что делать в случае застревания? (схема 3)
ŒÂ±²Å¾¯¹¬³Æ¸µ·º¨±º´§-§©´§¶µ²µ-¬´¯¬TU±´µ¶±¯®§¶º¸±§µ¸¹§´µ©±¯F.
8
‘§¹¬³´¬¸±µ²Ã±µ¸¬±º´««¬·-¯¹¬´§-§¹µ°±´µ¶±ºT™¬©¬·¸UG , ¾¹µ¨Âµ¸©µ¨µ«¯¹Ã®§¸¹·Æ©¿¯¬¶·µ«º±¹Â
–§-³¯¹¬´§¶µ²µ-¬´¯¬TIU±´µ¶±¯®§¶º¸±§µ¸¹§´µ©±¯F , ¾¹µ¨Â¶·µ«µ²-¯¹Ã·§¨µ¹º
Важно: «µ-«¯¹¬¸Ã µ±µ´¾§¹¬²Ã´µ°µ¸¹§´µ©±¯ ¶·¯¨µ·§¶¬·¬«¹¬³ ±§± §±¹¯©¯·µ©§¹Ã ±µ³§´«º T˜º¸±U¯²¯
±µ³§´«ºT™¬©¬·¸U
АКСЕССУАР КЕББЕ (
Сборка (схема 4) :
Œ¸¹§©Ã¹¬©¯´¹A2 ©±µ·¶º¸A1 ªµ²µ©±¯³Æ¸µ·º¨±¯œ¸¹§´µ©¯¹¬»¯²Ã¬·´ºÅ´§¸§«±ºI1 ¹§±¾¹µ¨Â
©Â¸¹º¶¶µ¶§²©¶§®±µ·¶º¸§A1. –§«¬´Ã¹¬±µ²Ã½¬©µ¬º¶²µ¹´¬´¯¬I2 ´§»¯²Ã¬·´ºÅ´§¸§«±º¯®§±·º¹¯¹¬ª§°±ºA5
«µ±µ´½§
šµ¨·§´´ºÅ¹§±¯³µ¨·§®µ³ªµ²µ©±ºº¸¹§´µ©¯¹¬´§¨²µ±³µ¹µ·§±§±º±§®§´µ©¸¼¬³¬
Примечание: «§´´Â°§±¸¬¸¸º§·¯¸¶µ²Ã®º¬¹¸Æ¨¬®·¬¿¬¹±¯¯¨¬®´µ-§
ВОРОНКА ДЛЯ КОЛБАСОК (ž£œž¤-¤¨ª-®¤ª®¨ª ¡§¤
Ž§´´Â° §±¸¬¸¸º§· ¶·¯±·¬¶²Æ¬³Â° ± ªµ²µ©±¬ ³Æ¸µ·º¨±¯ ¶µ®©µ²¯¹ «¬²§¹Ã ²Å¨Â¬ ±µ²¨§¸±¯ ±µ¹µ·Â¬ ©§³
µ¸¹§´¬¹¸Æ¹µ²Ã±µ¶·¯¶·§©¯¹Ã¶µ¸©µ¬³º©±º¸º
Сборка (схема 5)
Œ¸¹§©Ã¹¬©¯´¹A2 ©±µ·¶º¸A1. œ¸¹§´µ©¯¹¬®§¹¬³©µ·µ´±ºJ2, ®§±·º¹¯¹¬ª§°±ºA5 «µ±µ´½§œ¸¹§´µ©¯¹¬ªµ²µ©±º
³Æ¸µ·º¨±¯¸µ¨·§´´ºÅ¹§±¯³µ¨·§®µ³´§¨²µ±³µ¹µ·§±§±º±§®§´µ©¸¼¬³¬
˜·¯³¬¾§´¯¬«§´´Â°§±¸¬¸¸º§·¯¸¶µ²Ã®º¬¹¸Æ¨¬®·¬¿¬¹±¯¯¨¬®´µ-§œ¸¹·µ°¸¹©µ«²Æ½¬´¹·¯·µ©§´¯Æ©¯´¹§
¶µ®©µ²Æ¬¹º«¬·-§¹Ã©¯´¹©´º-´µ³¶µ²µ-¬´¯¯¶·¯¶·¯ªµ¹µ©²¬´¯¯·¬½¬¶¹§
š-«ª§³£ªžœ©¤¡
Важно: «§´´Â°§±¸¬¸¸º§·¸²¬«º¬¹¯¸¶µ²Ã®µ©§¹Ã¹µ²Ã±µ¶µ¸²¬¹µªµ±§±³Æ¸µ¨Â²µ¶µ·º¨²¬´µ¸¶¬½¯¯«µ¨§©²¬´Â
¯³§¸¸§¼µ·µ¿µ¶¬·¬³¬¿§´§
˜·¬«©§·¯¹¬²Ã´µ©Â³µ¾¬´´ºÅ©¹¬¶²µ°©µ«¬±µ²¨§¸´ºÅµ¨µ²µ¾±º¸¹§©¿ºÅ¸´µ©§Ä²§¸¹¯¾´µ°´§«¬´Ã¹¬´§
©µ·µ´±ºJ2 , µ¸¹§©¯©¶·¯¨²¯®¯¹¬²Ã´µ¸³
™º¨²¬´µ¬³Æ¸µ¶µ³¬¸¹¯¹¬©®§ª·º®µ¾´ºÅªµ·²µ©¯´º±µ·¶º¸§A1 ³Æ¸µ·º¨±¯A, ©±²Å¾¯¹¬¯¹µ²±§°¹¬¹µ²±§¹¬²¬³
C ¹§±¾¹µ¨Â·º¨²¬´µ¬³Æ¸µ©Â¿²µ´§±·§°©µ·µ´±¯
ŒÂ±²Å¾¯¹¬¶·¯¨µ·
š«¬²§°¹¬º®¬²¸µ¸¹§©²¬´´Â¼¸³±µ²¨§¸´µ°µ¨µ²µ¾±¯˜¬·¬«©¯´Ã¹¬º®¬²±±·§Å©µ·µ´±¯¾¹µ¨Â´¬¨²µ±¯·µ©§¹Ã
©µ®«º¼©±µ²¨§¸´µ°µ¨µ²µ¾±¬
Œ±²Å¾¯¹¬¶·¯¨µ·¯¶·µ«µ²-§°¹¬´§±²§«Â©§¹Ã·º¨²¬´µ¬³Æ¸µš²¬«¯¹¬®§±µ²¨§¸´µ°µ¨µ²µ¾±µ°¶µ±§µ´§´¬
´§¶µ²´¯¹¸Æ ¹µ¨Â¸¯²Ã´µ´¬·§¸¹Æª¯©§¹Ãµ¨µ²µ¾±º´¬«¬²§°¹¬¸²¯¿±µ³¹µ²¸¹Â¼±µ²¨§¸µ±
Примечание: работу лучше выполнять вдвоем, один накладывает рубленое мясо, а второй держит
ª•ª§ª±¦¯«ª¦œª©œ©œ«ª§©´¡®-´
“µ²¨§¸±¯³µ-´µ«¬²§¹Ã²Å¨µ°-¬²§¬³µ°«²¯´Â¸-¯³§Æ¯¶¬·¬±²§«Â©§Æµ¨µ²µ¾±º¸³¬¸¹§´§³¬¸¹µ
¹µ¨Â¶µ²º¾¯¹Ã±§¾¬¸¹©¬´´Â¬±µ²¨§¸±¯´¬µ¨¼µ«¯³µ¸²¬«¯¹Ã®§¹¬³¾¹µ¨Â¶·¯´§¶µ²´¬´¯¯©µ®«º¼´¬¸µ¨¯·§²¸Æ
©´º¹·¯·¬±µ³¬´«º¬³«¬²§¹Ã±µ²¨§¸±¯«²¯´µ°¸³µ¹«¬²Æ°¹¬±µ²¨§¸±¯µ¸¹§©²ÆƱº¸µ±µ¨µ²µ¾±¯«²Æ
»µ·³¯·µ©§´¯Æº®²§
ОВОЩЕРЕЗКА (ž£œž¤-¤¨ª-®¤ª®¨ª ¡§¤
š-«ª§³£ªžœ©¤¡
̌¨¬·¯¹¬±µ´º¸¸µµ¹©¬¹¸¹©ºÅÀ¯°-¬²§¬³µ³º¯¸¶µ²Ã®µ©§´¯Å
ÌŒ¸¹§©Ã¹¬©Â¨·§´´Â°±µ´º¸©µ¹©¬·¸¹¯¬´§¼µ«ÆÀ¬¬¸Æ©¶¬·¬«´¬°¾§¸¹¯±µ·¶º¸§K1, ±µ´º¸«µ²-¬´®§´¯³§¹Ã
¶·§©¯²Ã´µ¬¶µ²µ-¬´¯¬©´º¹·¯´¬¸ºÀ¬ªµÄ²¬³¬´¹§·¯¸
̘µ«±²Å¾¯¹¬¶·¯¨µ·±¶¯¹§´¯Å
Ì–§-³¯¹¬µ«¯´¯²¯«©§·§®§´§±´µ¶±º®§¶º¸±§µ¸¹§´µ©±¯F , ¾¹µ¨Â¨²µ±¯·µ©§¹Ã±µ´º¸·¯¸
ÌŒ±²Å¾¯¹¬ ¶·¯¨µ· ®§¹¬³ ¾¬·¬® ®§ª·º®µ¾´ºÅ ªµ·²µ©¯´º ±µ·¶º¸§ ´§±²§«Â©§°¹¬ ¶·µ«º±¹Â K1 (·¯¸ ) ¯
¶·µ¹§²±¯©§°¹¬¯¼¸¶µ³µÀÃŹµ²±§¹¬²ÆK2 (·¯¸).
● ¹µ¨Â®§³¬´¯¹Ã±µ´º¸´¬µ¨¼µ«¯³µ«µ-«§¹Ã¸Æ¶µ²´µ°µ¸¹§´µ©±¯±µ´º¸§œ«¬·-¯©§°¹¬´§-§¹µ°©¹¬¾¬´¯¬
¸¬±º´«Â±´µ¶±ºG ™¬©¬·¸±µ´º¸©Â°«¬¹§©¹µ³§¹¯¾¬¸±¯¬¤-
ВНИМАНИЕ : Перед включением прибора убедитесь, что конус правильно занял положение на несущем
элементе.
9
š-«ª§³£¯¥®¡¬¡¦ª¨¡© ¯¡¨²¥¦ª©¯- §´¦œ¢ ªŸª®¤«œ«¬ª ¯¦®œ
›ª©¯-®¡¬¦œ-
›ª©¯- §´¬¡£¦¤
›ª©¯- §´
®ª©¦¤¨¤§ª¨®¤¦œ¨¤.
-¦ª•§¡©¤´/
•
µ·±µ©Ã
* *
“§¨§¾±¯
* *
“§·¹µ»¬²Ã
* *
—ªº·¬½
* *
˜¬·¬½
* *
”º±
*
š©¬±²§
*
“§¶º¸¹§¨¬²§Æ±·§¸´§Æ
*
¦¨²µ±¯
*
™¬«Ã±§¾¬·´§Æ
* *
“µ·´¬©µ°¸¬²Ã«¬·¬°
*
‹§´§´Â
*
˜§·³¬®§´
*
•·Å°¬·
* *
¡µ±µ²§«
* *
šº¼µ°¼²¬¨¸º¼§·¯
*
”¬¸´µ°µ·¬¼ª·¬½±¯°µ·¬¼³¯´«§²Ã
*
“µ±µ¸µ©Â°µ·¬¼
*
ž£œž¤-¤¨ª-®¤ª®¨ª ¡§¤
Советы для получения хорошего результата:
¹µ¨Â¶µ²º¾¯¹Ãº«µ©²¬¹©µ·¯¹¬²Ã´Â°·¬®º²Ã¹§¹¯¶·¬«µ¹©·§¹¯¹Ã®§¸¹·¬©§´¯¬¶·µ«º±¹µ©©±µ·¶º¸¬¯¸¶µ²Ã®º¬³Â¬
¯´ª·¬«¯¬´¹Â«µ²-´Â¨Â¹Ã±·¬¶±¯³¯¯¸©¬-¯³¯–¬¯¸¶µ²Ã®º°¹¬¶·¯¨µ·¾¹µ¨Â¹¬·¬¹Ã¯²¯·¬®§¹Ã²µ³¹¯±§³¯
¶·µ«º±¹Â¸²¯¿±µ³-¬¸¹±¯¬¹§±¯¬±§±¸§¼§·¯²¯±º¸±¯³Æ¸§™§®·¬®§°¹¬¶·µ«º±¹Â¾¹µ¨Â¯¼¨Â²µ¶·µÀ¬
¶·µ¹§²±¯©§¹Ã©µ¹©¬·¸¹¯¬±µ·¶º¸§
ЧИСТКА:
•
Перед чисткой блока мотора Н всегда отключайте прибор от питания.
Ì–¬¶µª·º-§°¹¬¨²µ±³µ¹µ·§©©µ«º´¬¶µ«¸¹§©²Æ°¹¬¬ªµ¶µ«©µ«º ¯¸¹¯¹¬¨²µ±³µ¹µ·§©²§-´µ°¹·Æ¶±µ°
˜µ¸²¬¾¯¸¹±¯¸²¬«º¬¹¶µ²´µ¸¹Ãũ¸º¿¯¹Ã
Аксессуары мясорубки :
š´¯³¯¹¬¨²µ±¯·µ©±ºªµ²µ©±¯¯²¯§±¸¬¸¸º§·§µ©µÀ¬·¬®±¯´§-§©´§±´µ¶±ºE.
— ˜µ©¬·´¯¹¬ªµ²µ©±º³Æ¸µ·º¨±¯A ©¶·§©µ¯¶µ¹Æ´¯¹¬´§¸¬¨Æ¾¹µ¨Â·§®Á¬«¯´¯¹Ã¨²µ±³µ¹µ·§H.
— ¹µ¨Â¸´Æ¹Ãªµ²µ©±ºµ©µÀ¬·¬®±¯A, ©Â´Ã¹¬¹µ²±§¹¬²ÃC ¯¸´¯³¯¹¬¶µ««µ´B, µ¹©¯´¹¯¹¬ª§°±ºA5, ¸´¯³¯¹¬
·¬¿¬¹±ºA4, ´µ-A3 ¯©¯´¹A2.
— Осторожно обращайтесь с острыми запчастями.
ŒÂ³µ°¹¬©¸¬®§¶¾§¸¹¯¶µ«ªµ·Æ¾¬°©µ«µ°¸³Â²µ³¸¶µ²µ¸´¯¹¬¯¹À§¹¬²Ã´µ©Â¹·¯¹¬
–¬³µ°¹¬ªµ²µ©±º³Æ¸µ·º¨±¯A ©¶µ¸º«µ³µ¬¾´µ°³§¿¯´¬¹µ¬¸¹Ã±µ·¶º¸A1, ©¯´¹A2, ª§°±ºA5, ´µ-A3 ¯
·¬¿¬¹±¯A4
Аксессуары овощерезки (в зависимости от модели) :
Ì“µ·¶º¸K1¹µ²±§¹¬²ÃK2±µ´º¸ÂK3a, K3b, K3c³µ-´µ³Â¹Ã©¶µ¸º«µ³µ¬¾´µ°³§¿¯´¬©±µ·®¯´¬
¯¸¶µ²Ã®ºÆ¶·µª·§³³ºT¥“—U¯²¯T–•š’”¤–—•™¦‘–—•U
¶Следует осторожно обращаться с конусами, так как лезвия конусов очень острые.
Ì•¸²¯¶²§¸¹³§¸¸µ©Â¬¾§¸¹¯¶µ±·§¸¯²¯¸Ãµ¹¶·µ«º±¹µ©¹§±¯¼±§±´§¶·¯³¬·³µ·±µ©Ã¶·µ¹·¯¹¬¯¼¹·Æ¶±µ°
¸³µ¾¬´´µ°©¶¯À¬©µ³³§¸²¬®§¹¬³©Â³µ°¹¬µ¨Â¾´Â³¸¶µ¸µ¨µ³
ХРАНЕНИЕ:
™¬¿¬¹±¯´µ-º¸¹·µ°¸¹©µ«²Æ½¬´¹·¯·µ©§´¯Æ©¯´¹§§±¸¬¸¸º§·Â“¬¨¨¬¯«²Æ±µ²¨§¸µ±I1, I2 ¯J1, J2³µ-´µ
¼·§´¯¹Ã´§®§«´¬°¸¹¬´±¬¶·¯¨µ·§©¸¶¬½¯§²Ã´µ³µ¹«¬²¬´¯¯D
10

ЕСЛИ ПРИБОР НЕ РАБОТАЕТ, ЧТО ДЕЛАТЬ?
˜·µ©¬·Ã¹¬¶¯¹§´¯¬
•¸²¯¶·¯¨µ·¹§±¯´¬®§·§¨µ¹§²µ¨·§¹¯¹¬¸Ã©¸¬·©¯¸´Â°½¬´¹·!;@85:1B
¸³¸¶¯¸µ±©¨·µ¿Å·¬¶µµ¨¸²º-¯©§´¯Å
СРОК ЭКСПЛУАТАЦИИ ЭЛЕКТРОННЫХ ИЛИ ЭЛЕКТРИЧЕСКИХ
ПРИБОРОВ ЗАКАНЧИВАЕТСЯ
Поучаствуем в защите окружающей среды!
Œ§¿¶·¯¨µ·¸µ«¬·-¯¹³´µªµ³§¹¬·¯§²§¶·¯ªµ«´µªµ±¶¬·¬·§¨µ¹±¬
š«§°¹¬¬ªµ©¶º´±¹¸¨µ·§¯²¯©¸¬·©¯¸´Â°½¬´¹·«²Æ¶¬·¬·§¨µ¹±¯
РЕЦЕПТЫ
Обратить внимание: Для рецептов, для которых требуется более высокая мощность, время использования прибора не
ª§¢©ª«¬¡ž²шать 20 сек.
Пример рецепта (со средней решеткой – отверстия 4,7мм .
!
¦ª®§¡®²¦¤••¡-¥ªŸ¯¬®ª¨V«ª¬ций
Приготовление: 1 ч. Поставить на 1 ч в холодильник
š©Ÿ¬¡ ¤¡©®² §´«œ-®²¦¤••¡
ª³Æ¸§Wª¨º²Ãªº·§«·µ¨²¬´µ¬®¬·´µW¸µ²Ã
š©Ÿ¬¡ ¤¡©®² §´-ª¯-œ
±ª°µªº·¹§W¶º¾µ±±µ·¯§´«·§W®º¨¾¯±§¾¬¸´µ±§W¸¹µ²µ©Â¬²µ-±¯
±º±º·º®´µ°³º±¯W¸µ²Ã¶¬·¬½
™§®·¬-ù¬³Æ¸µ´§±º¸±§œ¸¹§´µ©¯¹¬·¬¿¬¹±º³³©³Æ¸µ·º¨±º˜·µ¶º¸¹¯¹¬³Æ¸µ«µ¨§©Ã¹¬¨º²Ãªº·
˜µ¸µ²¯¹¬¶µ¸¹§©Ã¹¬¶µ²º¾¬´´ºÅ³§¸¸º©¼µ²µ«´µ¬³¬¸¹µ´§¾§¸
¹µ¨Â¸»µ·³¯·µ©§¹Ã±µ¹²¬¹Â±¯¨¨¬º¸¹§´µ©¯¹¬´§³Æ¸µ·º¨±º§±¸¬¸¸º§·±¬¨¨¬˜·µ¶º¸¹¯¹¬³§¸¸º±·§Æ
±µ¹²¬¹Â¸±²¬°¹¬´¬¨µ²Ã¿¯³±µ²¯¾¬¸¹©µ³©µ«Â
Ž²Æ¶·¯ªµ¹µ©²¬´¯Æ¸µº¸§¶·µ³µ°¹¬¶º¾µ±±µ·¯§´«·§¶·µ³µ±´¯¹¬¨º³§ªµ°¯µ¹µ·©¯¹¬²¯¸¹ÃƘµ¾¯¸¹¯¹¬
¾¬¸´µ±¯·§®«§©¯¹¬¬ªµ ¬¸´µ±¯±µ·¯§´«·¶µ«¬·-¯¹¬³¯´º¹Â´§¸±µ©µ·µ«±¬´§¸²§¨µ³µª´¬—¸¹§©Ã¹¬
©¸¹µ·µ´º
Œ®¨¬°¹¬°µªº·¹¯±º±º·º®´ºÅ³º±º¶µ¸µ²¯¹¬¶µ¶¬·¾¯¹¬ŒÂ²¬°¹¬©¸¬©±§¸¹·Å²Å¾¬·¬®³¬²±µ¬¸¯¹¬¾±µ
Žµ©¬«¯¹¬¸³¬¸Ã«µ±¯¶¬´¯Æ®§¹¬³º³¬´Ã¿¯¹¬µªµ´Ã˜·¯¸³§¹·¯©§°¹¬®§¶·¯ªµ¹µ©²¬´¯¬³¶µ¸¹µÆ´´µ
¶µ³¬¿¯©§Æ¾¹µ¨Â°µªº·¹´¬¶·¯¸¹§©§²
Žµ¨§©Ã¹¬¾¬¸´µ±¯±µ·¯§´«·˜µ«¬·-¯¹¬±µ¹²¬¹Â±¯¨¨¬©ªµ·Æ¾¬°¸³¬¸¯³¯´º¹
Вариант: ŒÂ¹§±-¬³µ-¬¹¬´§¾¯´¯¹Ã±µ¹²¬¹Â¸³¬¸ÃŲº±§¯·º¨²¬´µªµ³Æ¸§¶·¬«©§·¯¹¬²Ã´µ¶·µ-§·¬´´µªµ©
´¬¨µ²Ã¿µ³±µ²¯¾¬¸¹©¬³§¸²§¸¶·Æ´µ¸¹Æ³¯
САМСА
«ª¬ции – Приготовление: 40 мин. Время запекания: 35 мин.
š©Ÿ¬¡ ¤¡©®²
ª¸²µÇ´µªµ¹¬¸¹§Wªªµ©Æ«¯´ÂW²º±µ©¯½§WÆ°½§W¶§¶·¯±§W³µ²µ¹§Æ±µ·¯½§¯
¯³¨¯·ÃW¶¬¹·º¿±§W±µ·¯§´«·W±¬·©¬²ÃW¸§¼§·Wª³§¸²§Wµ²¯©±µ©µ¬³§¸²µ
œ¸¹§´µ©¯¹¬·¬¿¬¹±º¸µ¹©¬·¸¹¯¬³³³©³Æ¸µ·º¨±º™§®·¬-ù¬²º±´§¾§¸¹¬°¯¶·µ¶º¸¹¯¹¬¾¬·¬®
³Æ¸µ·º¨±º˜µ«µª·¬°¹¬¸¹µ²µ©Â¬²µ-±¯µ²¯©±µ©µªµ³§¸²§©¸µ¹¬°´¯±¬®§¹¬³«µ¨§©Ã¹¬²º±˜µ¹µ³¯¹¬´§
¸²§¨µ³µª´¬«µ¶µ²º¾¬´¯Æ®µ²µ¹¯¸¹µªµ½©¬¹§—¹¸¹§©Ã¹¬©¸¹µ·µ´º
’®³¬²Ã¾¯¹¬ªµ©Æ«¯´º˜µ«·º³Æ´Ã¹¬´§¸²§¨µ³µª´¬©³¬¸¹¬¸²º±µ³©¹¬¾¬´¯¬³¯´º¹—¹¸¹§©Ã¹¬©¸¹µ·µ´º
˜·¯¶·§©Â¶·µ¶º¸¹¯¹¬¾¬·¬®³Æ¸µ·º¨±ºŒÂ¸Â¶Ã¹¬¯¼©¸µ¹¬°´¯±©³¬¸¹¬¸¸µ²Ãů¶¬·½¬³«µ¨§©Ã¹¬
¶µ²¾§°´µ°²µ-±¯¶§¶·¯±¯À¬¶µ¹±º¯³¨¯·Æ¯´¬³´µªµ±µ·¯½Â
‘§¹¬³©©¬«¯¹¬©®¨¯¹Â¬Æ°½§¶µ³¬¿§°¹¬¯©Â±²Å¾¯¹¬µªµ´Ã
™§¸±§¹§°¹¬«µ©µ²Ã´µ¹µ´±µ¸²µÇ´µ¬¹¬¸¹µ™§®·¬-ù¬´§±©§«·§¹Â¶µ¸³š³§-ù¬³§¸²µ³¯¸¶µ²Ã®º¬³ºÅ
¶µ©¬·¼´µ¸¹Ã
–§±§-«Â°±©§«·§¹¶µ²µ-¯¹¬´¬³´µªµ»§·¿§‘§©¬·´¯¹¬¸±²¬¯©®§¹¬³±·§Æ
•§·Ã¹¬¸§³¸§‰©±¯¶ÆÀ¬³³§¸²¬˜µ¸²¬-§·±¯©Â²µ-¯¹¬´§´¬¸±µ²Ã±µ³¯´º¹´§©¶¯¹Â©§ÅÀºÅ¨º³§ªº
11
˜µ¸Â¶Ã¹¬¸§¼§·µ³¯±µ·¯½¬°˜µ«§©§°¹¬ªµ·Æ¾¯³
Вариант:
œ¸¹§´µ©¯¹¬·¬¿¬¹±º¸µ¹©¬·¸¹¯Æ³¯³³©³Æ¸µ·º¨±º™§®·¬-ù¬²º±´§¾§¸¹¬°–§·º¨¯¹¬´¬³´µªµ³Æ¸§
²º±¶·µ¶º¸¹¯¹¬¾¬·¬®³Æ¸µ·º¨±º
˜·µ¶º¸¹¯¹¬¬À¬´¬³´µªµ³Æ¸§®§¹¬³¶·¯¶·§©Â¯´§±µ´¬½µ¸¹§¹µ±³Æ¸§Œ®¨¬°¹¬Æ°½§¯©©¬«¯¹¬¯¼©»§·¿
©³¬¸¹¬¸¸µ²Ãů¶¬·½¬³¶µ²¾§°´µ°²µ-±µ°¶§¶·¯±¯À¬¶µ¹±µ°¯³¨¯·Æ¯´¬¨µ²Ã¿¯³±µ²¯¾¬¸¹©µ³±µ·¯½Â
Œ¸¬¶¬·¬³¬¿§°¹¬˜µ©¹µ·¯¹¬¶º´±¹Â
ПИРОЖКИ С РЫБОЙ
¨œ§¡©³¦¤¡«¤¬ª¢¦¤-¬²•ª¥
«ª¬ции – Приготовление: 25 мин. Время запекания: 10 — 15 мин.
š©Ÿ¬¡ ¤¡©®²
ª¸²µÇ´µªµ¹¬¸¹§Wª©§·¬´µ°·Â¨Â¯²¯±µ¶¾¬´µªµ²µ¸µ¸ÆWÆ°½§¸©§·¬´´Â¼©±·º¹ºÅ
W¶º¾µ±«º¿¯¸¹µªµº±·µ¶§W²º±µ©¯½ÂWª¸µ²Ç´µªµ¸²¯©µ¾´µªµ³§¸²§³§²¬´Ã±¯³¯±º¸µ¾±§³¯W·§¸¹¯
¹¬²Ã´µ¬³§¸²µ
œ¸¹§´µ©¯¹·¬¿¬¹±º¸µ¹©¬·¸¹¯Æ³¯³³©³Æ¸µ·º¨±º™§®·¬-ù¬²º±´§¾§¸¹¬°¯¶·µ¶º¸¹¯¹¬¾¬·¬®
³Æ¸µ·º¨±º˜·¯¶º¸¹¯¹¬´§¸²§¨µ³µª´¬©¸µ¹¬°´¯±¬©´¬¨µ²Ã¿µ³±µ²¯¾¬¸¹©¬·§¸¹¯¹¬²Ã´µªµ³§¸²§—¸¹§©Ã¹¬
©¸¹µ·µ´º
–§·¬-ù¬´¬³´µªµ·Â¨Â«µ¨§©Ã¹¬®§¹¬³¶·¯ªµ¹µ©²¬´´Â°²º±¸²¯©µ¾´µ¬³§¸²µ«º¿¯¸¹Â°º±·µ¶¯
µ¸¹§©¿ºÅ¸Æ·Â¨º
™§¸±§¹§°¹¬¹µ´±¯³¸²µ¬³¸²µÇ´µ¬¹¬¸¹µ©Â·¬-ù¬±·ºª¯¸¹§±§´µ³¯²¯¨µ±§²µ³¨µ²¬¬¯²¯³¬´¬¬¨µ²Ã¿¯³
˜·¬«©§·¯¹¬²Ã´µ·§®µª·¬°¹¬«º¼µ©±º«µRC (¶).
5. –§±§-«Â°±·º-µ±¶µ²µ-¯¹¬´¬³´µªµ»§·¿§¸²µ-¯¹¬¹¬¸¹µ¯®§±²¬°¹¬±·§Æ
•µ¹µ©Ã¹¬©«º¼µ©±¬³¯´º¹
›ª®§¡®²¤£Ÿªž´ ¤©²
«ª¬ции – Приготовление: 20 мин. Время запекания: 10 — 15 мин.
š©Ÿ¬¡ ¤¡©®²
±ªªµ©Æ«¯´ÂW²º±µ©¯½§W®º¨¾¯±¾¬¸´µ±§W±º¸µ¾±§¾¬·´µªµ¼²¬¨§®§³µ¾¬´´µªµ©
³µ²µ±¬WÆ°½§W±§·¹µ¿¯´§W³º±§W¸µ²Ã¶¬·¬½
Ž²Æ¶·¯ªµ¹µ©²¬´¯Æŵªµ·¬½¬¶¹§©Â¨¬·¯¹¬´¬-¯·´Â¬±º¸±¯ªµ©Æ«¯´Â˜·µ¶º¸¹¯¹¬³Æ¸µ¾¬·¬®³Æ¸µ·º¨±º¸
±º¸µ¾±§³¯¼²¬¨§
–§·¬-ù¬²º±¹µ´±¯³¯²µ³¹¯±§³¯±µ´º¸µ³K3b¯´§¹·¯¹¬¾¬¸´µ±¯±§·¹µ»¬²Ã±µ´º¸µ³¹¬·±µ°K3a
š³¬¿§°¹¬·º¨²¬´µ¬³Æ¸µ¸¼²¬¨µ³´§·¬®§´´Â³²º±µ³¾¬¸´µ±µ³¯±§·¹µ»¬²¬³
Žµ¨§©Ã¹¬©¸³¬¸ÃÆ°½§³µ²µ¹Â°¾¬·´Â°¶¬·¬½¸µ²Ã¯¸»µ·³¯·º°¹¬±µ¹²¬¹Â
—¨©§²Æ°¹¬±µ²¬¹Â©³º±¬¯-§·Ã¹¬©·§¸¹¯¹¬²Ã´µ³³§¸²¬
›œ¬®ª°¡§³©²¥«¯ ¤©Ÿ«¬¤Ÿª®ªž§¡©©²¥ž ¯ховке
«ª¬ции – Приготовление: 30 мин. Время запекания: 45 мин.
š©Ÿ¬¡ ¤¡©®²
®º¨¾¯±¾¬¸´µ±§W¸¹µ²µ©µ°²µ-±¯¸²¯©µ¾´µªµ³§¸²§W¸¹µ²µ©Â¬²µ-±¯·§¸¹¯¹¬²Ã´µªµ
³§¸²§W¸µ²Ã¶¬·¬½
˜µ¾¯¸¹¯¹¬©Â³µ°¹¬¯©Â¸º¿¯¹¬±§·¹µ»¬²Ã–§·¬-ù¬¬ªµ¹µ´±¯³¯²µ³¹¯±§³¯±µ´º¸µ³K3b
•µ©Æ«¯´º¶·µ¶º¸¹¯¹¬¾¬·¬®³Æ¸µ·º¨±º¯¶·µ-§·Ã¹¬·º¨²¬´µ¬³Æ¸µ©«º¼µ©±¬©³§¸²¬©¹¬¾¬´¯¬³¯´º¹
–§¹·¯¹¬©´º¹·¬´´ÅŶµ©¬·¼´µ¸¹Ã¨²Å«§¾¬¸´µ±µ³®§¹¬³¸³§-ù¬µ«´µ°¾§¸¹ÃŸ²¯©µ¾´µªµ³§¸²§
š²µÆ³¯©Â²µ-¯¹¬±§·¹µ»¬²Æ¯·º¨²¬´µªµ³Æ¸§¶µ¸µ²¯¹¬¶µ¶¬·¾¯¹¬®§¹¬³©Â²µ-¯¹¬µ¸¹§©¿¯°¸Æ
±§·¹µ»¬²Ã
Œ®¨¬°¹¬Æ°½§¸¹¬¶²Â³³µ²µ±µ³¯©Â²¬°¹¬¸³¬¸Ã´§±§·¹µ»¬²ÃŽµ¨§©Ã¹¬µ¸¹§©¿¬¬¸Æ¸²¯©µ¾´µ¬³§¸²µ
•µ¹µ©Ã¹¬©«º¼µ©±¬¶·¯¸·¬«´¬°¹¬³¶¬·§¹º·¬³¯´º¹
Печеные яблоки с миндалем
«ª¬ции – Приготовление: 40 мин. Время запекания: 30 мин.
š©Ÿ¬¡ ¤¡©®²
ƨ²µ±Wª¸§¼§·§¸Â·½§Wª¸²¯©µ¾´µªµ³§¸²§Wª½¬²Ã´µªµ³¯´«§²ÆW³²¸²¯©µ±W
¾§°´§Æ²µ-±§±µ·¯½Â
˜µ¾¯¸¹¯¹¬Æ¨²µ±¯º«§²¯¹¬¸¬·«½¬©¯´º¯·§®·¬-ù¬´§¾¬¹©¬·¹¯–§·¬-ù¬Æ¨²µ±¯¹µ´±¯³¯²µ³¹¯±§³¯
±µ´º¸µ³K3b¯¶·µ-§·Ã¹¬©ª¸²¯©µ¾´µªµ³§¸²§š³§-ù¬¸²¬ª±§³§¸²µ³¨²Å«µ¯©Â²µ-¯¹¬®§¸§¼§·¬´´Â¬
ƨ²µ±¯´§«´µ’®³¬²Ã¾¯¹¬³¯´«§²Ã©¶µ·µ¿µ±±µ´º¸µ³K3cŒ¸§²§¹´¯½¬¶¬·¬³¬¿§°¹¬³µ²µ¹Â°³¯´«§²Ã
¸²¯©±¯¯±µ·¯½ºŒÂ²µ-¯¹¬¸³¬¸Ã´§Æ¨²µ±¯¯¶µ¸Â¶Ã¹¬¸§¼§·µ³¸Â·½µ³‹²Å«µ¶µ¸¹§©Ã¹¬©«º¼µ©±º
ªµ¹µ©Ã¹¬¶·¯RC.
12

ŽÆ±ºÈ³µ®§¶µ±º¶±º¶·¯²§«º¸¬·ÉÊMoulinex.
UK
ОПИС:
A
‘´É³´§ªµ²É©±§³Æ¸µ·º¨±¯
A1
Š²Å³É´ÉÈ©¯°±µ·¶º¸
A2
¡´¬±
A3
š§³µ®§ªµ¸¹·Å©§²Ã´¯°´É-©¯ªµ¹µ©²¬´¯°®´¬·-§©ÉžµÊ¸¹§²É
A4
™¬¿É¹±§
A4a
Ž·É¨´§·¬¿É¹±§³³
£œ§¡¢©ªžµ ¨ª ¡§µ
Ž²Æ«º-¬«·É¨´µÊ·º¨±¯
A4b
š¬·¬«´Æ·¬¿É¹±§³³
Ž²Æ«·É¨´µÊ·º¨±¯
A4c
¡¯·µ±§·¬¿É¹±§³³
Ž²Æª·º¨µÊ·º¨±¯
A5
Š²Å³É´ÉÈ©§ª§°±§
B
‘´É³´¯°²µ¹µ±
C
¡¹µ©¼§¾³Æ¸§
D
µ¼µ²«²Æ§±¸¬¸º§·É©
E
“´µ¶±§¨²µ±º©§´´Æ·µ®¨²µ±º©§´´Æªµ²É©±¯
F
“´µ¶±§®§¶º¸±º®º¶¯´±¯
G
“´µ¶±§T™¬©¬·¸U·º¼©É«·§®º-®³É´Åȹøƴ§®©µ·µ¹´É°
H
‹²µ±³µ¹µ·§
I
Š±¸¬¸º§·“•‹•
I1
•É²ÃÈ·´§´§¸§«±§
I2
“ɲý¬©¬ºÀɲô¬´´Æ
J
Œµ·µ´±§«²Æ±µ©¨§¸µ±
£œ§¡¢©ªžµ ¨ª ¡§µ
J1
˜·¯¸¹·É°«²Æ½¬´¹·º©§´´Æ¿´¬±§
J2
Œµ·µ´±§
K
—©µ¾¬·É®±§
£œ§¡¢©ªžµ ¨ª ¡§µ
K1
“µ´º¸´¯°±µ·¶º¸®ªµ·²µ©¯´µÅ
K2
›µ©±§¾
K3
“µ´º¸¯
K3a
“µ´º¸¹¬·¹±§
K3b
“µ´º¸«²Æ´§·É®±¯¹µ´±¯³¯¸±¯¨µ¾±§³¯
K3c
“µ´º¸«²Æ¸±µ¨²É´´Æ
ЗАХОДИ БЕЗПЕКИ:
Перед початком роботи уважно прочитайте інструкцію: неналежне використання приладу звільняє
¦ª¨«œ©µю « ;@85:1C» від відповідальності.
Цей пристрій не призначений для використання особами (включаючи дітей) з обмеженими фізичними,
-¡©-ª¬©¤¨¤œ•ª¬ª£¯¨ªž¤¨¤£ µ•©ª-®´¨¤œ•ªª-ª•œ¨¤що не мають досвіду або необхідних знань, за
ž¤©´®¦ª¨ž¤«œ ¦µž¦ª§¤£œ©¤¨¤©œŸ§´ œє або допомагає третя особа, відповідальна за їхню безпеку.
Необхідно обмежити доступ дітей до приладу, який не є іграшкою.
–§¶·ºª§-¯©²¬´´Æ©§¿µªµ¶·¯²§«º¶µ©¯´´§©É«¶µ©É«§¹¯´§¶·º®É¬²¬±¹·µ³¬·¬-ɺ©§¿µ³º«µ³É
‹º«ÃƱ¬´¬¶·§©¯²Ã´¬¶É«±²Å¾¬´´Æ§´º²ÅȪ§·§´¹ÉÅ
˜·¯²§«¶·¯®´§¾¬´¯°¹É²Ã±¯«²Æ«µ³§¿´Ãµªµ©¯±µ·¯¸¹§´´Æɶ·¯ªµ¹º©§´´Æ¸¹·§©¹§¶É«´§ª²Æ«µ³
Œ¯±µ·¯¸¹µ©º°¹¬¶·¯²§«¹É²Ã±¯´§·É©´É°¾¯¸¹É°¹§¸º¼É°¶µ©¬·¼´É
–¬«µ¶º¸±§°¹¬®©¯¸§´´Æ«µ©ªµªµ©µ²µ¸¸Æ¿§·»§¾¯±·§©§¹±¯´§«¶·¯©¬«¬´¯³¯©«Éŧ±¸¬¸º§·§³¯
˜É¸²Æ¶·¯¶¯´¬´´Æ·µ¨µ¹¯¸²É«®·§®º-©É«±²Å¾¯¹¯¶·¯²§«©É«¬²¬±¹·µ³¬·¬-É©É«±²Å¾¬´´Æ¶µ¹·É¨´¬¹§±µ-
±µ²¯©¯°µªµ³¯È¹¬¸¹§©¯¹¬´§³É¸½¬§¨µ®´É³§È¹¬§±¸¬¸º§·¯
13

–¬©¯±µ·¯¸¹µ©º°¹¬¶·¯²§«Æ±Àµ©É´¶·§½ÅÈ´¬¶·§©¯²Ã´µ§¨µ¶µ¿±µ«-¬´¯°œ½Ãµ³º©¯¶§«±º¸²É«®©¬·´º¹¯¸Æ
«µ¸¬·©É¸´µªµ½¬´¹·º±µ³¶§´ÉÊTMoulinexU«¯©¸¶¯¸µ±©¨·µ¿º·É®µ¨¸²ºªµ©º©§´´Æ
‹º«ÃƱ¬©¹·º¾§´´Æµ±·É³¾¯À¬´´ÆÉÀµ«¬´´µªµ«µª²Æ«º±²ÉÈ´¹µ³¶µ©¯´´µ®«É°¸´Å©§¹¯¸Æ©¸¬·©É¸´µ³º½¬´¹·É
TMoulinexU
–¬©¯±µ·¯¸¹µ©º°¹¬¶·¯²§«Æ±Àµ¿´º·-¯©²¬´´Æ¶µ¿±µ«-¬´¯°Ž²Æº¸º´¬´´Æ´¬¨¬®¶¬±¯®©¬·´É¹Ã¸Æ©¸¬·©É¸´¯°
½¬´¹·TMoulinexU«²Æ®§³É´¯«¯©¸¶¯¸µ±º¨·µ¿º·É®µ¨¸²ºªµ©º©§´´Æ
–¬±²§«É¹Ã¶·¯²§«¿´º·-¯©²¬´´Æ§¨µ¿¹¬¶¸¬²Ã´º©¯²±ºº©µ«º§¨µÉ´¿º·É«¯´º
‹¬·¬-ɹÿ´º·-¯©²¬´´Æ©É««É¹¬°
¡´º·-¯©²¬´´Æ´¬¶µ©¯´¬´®´§¼µ«¯¹¯¸Æ¶µ¨²¯®º§¨µ±µ´¹§±¹º©§¹¯®´§ª·É©§Å¾¯³¯¬²¬³¬´¹§³¯«-¬·¬²µ³
¹¬¶²§§¨µªµ¸¹·¯³¯±º¹§³¯
Ž²Æ ©§¿µÊ ¨¬®¶¬±¯ ¸²É« ©¯±µ·¯¸¹µ©º©§¹¯ ¹É²Ã±¯ §±¸¬¸º§·¯ É ®§¶§¸´É ¾§¸¹¯´¯ ±µ³¶§´ÉÊ TMoulinexU ƱÉ
©É«¶µ©É«§Å¹Ã©¯³µª§³©§¿µªµ¶·¯²§«º
–¬±µ·¯¸¹º°¹¬¸Æ¶·¯²§«µ³«µ©¿¬´É-¼©
Ž²Æ©§¿µÊ¨¬®¶¬±¯«§´¯°¶·¯²§«©É«¶µ©É«§È¾¯´´¯³´µ·³§³É¶·§©¯²§³
SŽ¯·¬±¹¯©§´¯®Ã±µÊ´§¶·ºª¯
S•²¬±¹·µ³§ª´É¹´§¸º³É¸´É¸¹Ã
S–§©±µ²¯¿´È¸¬·¬«µ©¯À¬
S•§¹¬·É§²¯Àµ±µ´¹§±¹ºÅ¹Ã®¶·µ«º±¹§³¯¼§·¾º©§´´Æ
ПЕРЕД ПОЧАТКОМ ВИКОРИСТАННЯ:
Œ¯³¯°¹¬©¸É§±¸¬¸º§·¯©µ«µÅ®³¯²µ³š¶µ²µ¸´É¹ÃÉ·¬¹¬²Ã´µ©¯¹·É¹Ã
Решітка і ніж повинні залишатися жирними. Необхідно змастити їх олією.
Не вмикайте прилад в холосту, не змастивши попередньо решітку.
УВАГА: Оскільки леза конусів дуже гострі, з ними слід поводитися обережно.
ЗАПУСК:
ГОЛІВКА М’ЯСОРУБКИ (
Складання голівки м’ясорубки (схеми 1.1 і 1.2)
–¬µ¨¼É«´µ©®Æ¹¯±µ·¶º¸A1 ®§ªµ·²µ©¯´º´§¶·§©¯©¿¯´§°¿¯·¿¯°µ¹©É·©ªµ·º˜µ¹É³©¸¹§©¹¬¿´¬±A2 (¸¶µ¾§¹±º
«µ©ªº©É¸Ã) ©±µ·¶º¸A1.
–§«É´Ã¹¬´É- ® ´¬·-§©ÉžµÊ ¸¹§²É A3 ´§ ±µ·µ¹±º©É¸ÃƱ§ ©¯¸¹º¶§È®§¿´¬±A2, ·É-º¾¯³¯²¬®§³¯«µ¸¬¨¬
‹º«ÃƱº·¬¿É¹±º®§©§¿¯³©¯¨µ·µ³´§«É´Ã¹¬´§´É-A3, ©¯¸¹º¶¶µ©¯´¬´¶µ¹·§¶¯¹¯©¶§®±µ·¶º¸ºA1.
‘§±·º¹É¹Ã´¬¨²µ±º°¹¬ª§°±ºA5.
Установка голівки м’ясорубки (схема 2) :
S˜¬·¬«©É«±²Å¾¬´¯³©É«¬²¬±¹·µ³¬·¬-ɨ²µ±º³µ¹µ·§H ¹·¯³§°¹¬ªµ²É©±º³Æ¸µ·º¨±¯ªµ·²µ©¯´§¸¶·Æ³µ©§´§
©¶·§©µ‘ɸ¹¯±º°¹¬¨§°µ´¬¹´É®È«´§´´Æªµ²É©±¯³Æ¸µ·º¨±¯É¶§®¯¨²µ±§³µ¹µ·§•µ²É©±º³Æ¸µ·º¨±¯©¸¹§©¹¬
© ¨²µ± ³µ¹µ·§ H, ¶É¸²Æ ¾µªµ ¶µ©¬·´É¹Ã ªµ·²µ©¯´º «µ ³É¹±¯ ªµ·²µ©¯´§ ¶µ©¯´´§ ®§°´Æ¹¯ ©¬·¹¯±§²Ã´¬
¶µ²µ-¬´´Æ
SŒ¸¹§´µ©É¹Ã®´É³´¯°²µ¹µ±B ´§©¯¸¹º¶¯ªµ·²µ©¯´¯ªµ²É©±¯³Æ¸µ·º¨±¯
œ©É³±´É¹Ã¶·¯²§«©É´ªµ¹µ©¯°«µ¬±¸¶²º§¹§½ÉÊ
Використання:
˜·¯ªµ¹º°¹¬´¬µ¨¼É«´º«²Æ·º¨±¯±É²Ã±É¸¹Ã¶·µ«º±¹É©©¯«§²É¹Ã±É¸¹±¯¼·ÆÀÉɸº¼µ-¯²²Æ
–§·É-¹¬³Æ¸µ¿³§¹±§³¯¶·¯¨²¯®´µ¸³X 2 ¸³
˜É«ªµ²É©±º³Æ¸µ·º¨±¯¶µ¸¹§©¹¬È³´É¸¹Ã
–§¹¯¸´É¹Ã´§¶µ²µ-¬´´ÆTIU±´µ¶±¯®§¶º¸±º®º¶¯´±¯F, Àµ¨©±²Å¾¯¹¯¶·¯²§«
˜µ±²§«É¹Ã¿³§¹±¯³Æ¸§´§¶É««µ´B ɶµµ«´µ³ºµ¶º¸±§°¹¬©µ¹©É·®§«µ¶µ³µªµÅ¿¹µ©¼§¾§C.
Ні в якому разі не намагайтеся проштовхувати пальцями або іншим інструментом.
¢µ¨µ¹·¯³§¹¯³Æ±¬¹É¸¹µ“¬¨¬§¨µ“¬»¹§¶·µ¶º¸¹É¹Ã³Æ¸µ·§®¯¾¬·¬®³Æ¸µ·º¨±º«µµ¹·¯³§´´Æ³§¸¯
¨§-§´µÊ±µ´¸¯¸¹¬´½ÉÊ
›ª¬¤-©œ«ª¬œ œ
Œ±É´½É·µ¨µ¹¯©¯³µ-¬¹¬¶·µ¶º¸¹¯¹¯±É²Ã±§¿³§¹±É©¼²É¨§Àµ¨©¯°¿²¯®§²¯¿±¯³¬²¬´µªµ³Æ¸§
Що робити у випадку застрягання? (Схема 3)
Œ¯³±´É¹Ã³Æ¸µ·º¨±º´§¹¯¸´º©¿¯´§¶µ²µ-¬´´ÆTU±´µ¶±¯®§¶º¸±º®º¶¯´±¯F.
14
˜µ¹É³±É²Ã±§¸¬±º´«¹·¯³§°¹¬´§-§¹µÅ±´µ¶±ºT™¬©¬·¸U‘©µ·µ¹´¯°¼É«G, Àµ¨®©É²Ã´¯¹¯®§¸¹·Æª²É¶·µ«º±¹¯
–§¹¯¸´É¹Ã´§¶µ²µ-¬´´ÆTIU±´µ¶±¯®§¶º¸±º®º¶¯´±¯F, Àµ¨¶·µ«µ©-¯¹¯·µ¨µ¹º
Важливо: дочекайтеся остаточної зупинки приладу перед тим, як активувати команду «Пуск» œ•ª
¦ª¨œ© ¯«Зворотний хід»
АКСЕСУАР КЕБЕ (
Складання (схема 4) :
Œ¸¹§©¹¬¿´¬±A2 ©±µ·¶º¸A1 ªµ²É©±¯³Æ¸µ·º¨±¯Œ¸¹§´µ©É¹Ã»É²ÃÈ·´º´§¸§«±ºI1 ¹§±Àµ¨©¯¸¹º¶¶µ¹·§¶¯©º¶§®
±µ·¶º¸ºA1. –§«É´Ã¹¬±É²Ã½¬©¬ºÀɲô¬´´ÆI2 ´§»É²ÃÈ·´º´§¸§«±ºÉ®§±·º¹É¹Ãª§°±ºA5 «µ±É´½Æ
‘ɨ·§´º¹§±¯³¾¯´µ³ªµ²É©±º©¸¹§´µ©É¹Ã´§¨²µ±³µ¹µ·§Æ±®§®´§¾¬´µ©¸¼¬³É
Примітка: даний аксесуар використовується без решітки та без ножа.
ВОРОНКА ДЛЯ КОВБАСОК (£œ§¡¢©ªžµ ¨ª ¡§µ
Ž§´¯° §±¸¬¸º§· Àµ ¶·¯±·É¶²ÅÈ¹Ã¸Æ «µ ªµ²É©±¯ ³Æ¸µ·º¨±¯ «µ®©µ²¯¹Ã ·µ¨¯¹¯ ¨º«ÃÆ±É ±µ©¨§¸±¯ Æ±É ©§³
®§²¯¿¯¹Ã¸Æ¹É²Ã±¯¶·¯¶·§©¯¹¯®§¸©µÊ³¸³§±µ³
Складання (схема 5)
Œ¸¹§©¹¬¿´¬±A2 ©±µ·¶º¸A1. ˜µ¹É³©¸¹§´µ©É¹Ã©µ·µ´±ºJ2, ®§±·º¹É¹Ãª§°±ºA5 «µ±É´½ÆŒ¸¹§´µ©É¹Ãªµ²É©±º
³Æ¸µ·º¨±¯®É¨·§´º´§¨²µ±³µ¹µ·§©É«¶µ©É«´µ«µ¸¼¬³¯
Примітка: даний аксесуар використовується без решітки та без ножа. Пристрій для центрування шнека
ª£žª§´є утримати шнек у потрібному положенні при приготуванні рецепта.
Використання:
Важливо: «§´¯°§±¸¬¸º§·¸²É«©¯±µ·¯¸¹µ©º©§¹¯¹É²Ã±¯¶É¸²Æ¹µªµÆ±³Æ¸µ¨º²µ¶µ³¬²¬´¬¸¶¬½ÉÊ«µ«§´Éɳ§¸§
«µ¨·¬¶¬·¬³É¿§´§
˜µ¶¬·¬«´Ãµ©¯³µ¾¬´º©¹¬¶²É°©µ«É±µ©¨§¸´ºµ¨µ²µ´±ºÆ±§¸¹§²§®´µ©º¬²§¸¹¯¾´µÅ´§«Æª´É¹Ã´§©µ·µ´±ºJ2,
®§²¯¿¯©¿¯¶·¯¨²¯®´µ¸³
•¬²¬´¬³Æ¸µ¶µ³É¸¹É¹Ã©ªµ·²µ©¯´º±µ·¶º¸ºA1 ªµ²É©±¯³Æ¸µ·º¨±¯A, ©±²Å¾É¹Ãɶ·µ¿¹µ©¼º°¹¬®§«µ¶µ³µªµÅ
¿¹µ©¼§¾§C ¹§±Àµ¨³¬²¬´¬³Æ¸µ©¯°¿²µ´§±·§°©µ·µ´±¯
Œ¯³±´É¹Ã¶·¯²§«
‘·µ¨É¹Ã©º®µ²®®§²¯¿¬´¯¼¸³±µ©¨§¸´µÊµ¨µ²µ´±¯˜¬·¬¸º´Ã¹¬©º®µ²«µ±·§Å©µ·µ´±¯Àµ¨´¬¨²µ±º©§¹¯
¶µ©É¹·Æ©±µ©¨§¸´µÊµ¨µ²µ´½É
œ©É³±´É¹Ã ¶·¯²§«É¶·µ«µ©-º°¹¬ ´§±²§«§¹¯³¬²¬´¬ ³Æ¸µ š¹¬-¹¬ ®§ ±µ©¨§¸´µÅ µ¨µ²µ´±µÅ ¶µ±¯ ©µ´§´¬
´§¶µ©´¯¹Ã¸Æ¢µ¨¸¯²Ã´µ´¬·µ®¹Æªº©§¹¯µ¨µ²µ´±º´¬·µ¨É¹Ã´§«¹µ¹µ©¸¹¯¼±µ©¨§¸µ±
Примітка: роботу краще виконувати удвох, один накладає мелене м’ясо, а інший тримає оболонку, поки
žª©œ©œ«ªž©юється.
“µ©¨§¸±¯³µ-´§·µ¨¯¹¯¨º«ÃƱµÊ¨§-§´µÊ«µ©-¯´¯¸¹¯¸±§Å¾¯É¶¬·¬±²§«§Å¾¯µ¨µ²µ´±º®³É¸½Æ´§³É¸½¬
¢µ¨µ¹·¯³§¹¯Æ±É¸´É±µ©¨§¸±¯´¬µ¨¼É«´µ¸¹¬-¯¹¯®§¹¯³Àµ¨¶·¯´§¶µ©´¬´´É¶µ©É¹·Æ´¬®¨¯·§²µ¸Æ©¸¬·¬«¯´É
™¬±µ³¬´«ºÈ³µ·µ¨¯¹¯±µ©¨§¸±¯«µ©-¯´µÅ¸³©É«µ±·¬³²Å°¹¬±µ©¨§¸±¯®§²¯¿§Å¾¯¾§¸¹¯´ºµ¨µ²µ´±¯«²Æ
»µ·³º©§´´Æ©º®²§
ОВОЧЕРІЗКА (£œ§¡¢©ªžµ ¨ª ¡§µ
Складання (схема 6) :
–§¶·µ¹¯©É«±²Å¾¬´µªµ©É«¬²¬±¹·µ³¬·¬-ɨ²µ±º³µ¹µ·§©¸¹§´µ©É¹Ã±µ·¶º¸K1, ´§¼¯²¬´¯°©¶·§©µ©º¿±§±µ·¶º¸º
¶µ©¯´´Éº©É°¹¯©µ¹©µ·¯¨²µ±§³µ¹µ·§H. Œ¸¹§´µ©É¹Ã¸¹¬·-¬´ÃÀµ©¯¼µ«¯¹Ã®±µ·¶º¸ºK1, º©É¸Ã¨²µ±§³µ¹µ·§H.
•µ·²µ©¯´º±µ·¶º¸§K1 ¶µ©¬·´É¹Ã©²É©µ«µ³É¹±¯
Використання:
ÌŒ¯¨¬·É¹Ã©É«¶µ©É«´¯°«²Æ©¯±µ·¯¸¹§´´Æ±µ´º¸
ÌŒ¸¹§©¹¬©¯¨·§´¯°±µ´º¸©µ¹©É·Àµ®´§¼µ«¯¹Ã¸Æ©¶¬·¬«´É°¾§¸¹¯´É±µ·¶º¸ºK1, ±µ´º¸¶µ©¯´¬´®§°³§¹¯
¶·§©¯²Ã´¬¶µ²µ-¬´´Æº¸¬·¬«¯´É´¬¸º¾µªµ¬²¬³¬´¹§³§²
̘ɫ±²Å¾É¹Ã¶·¯²§««µ¬²¬±¹·µ³¬·¬-É
Ì–§¹¯¸´É¹Ãµ«¯´§¨µ«©§·§®¯´§±´µ¶±º®§¶º¸±º®º¶¯´±¯F, Àµ¨¨²µ±º©§¹¯±µ´º¸³§²
Ìœ©É³±´É¹Ã¶·¯²§«¶µ¹É³¾¬·¬®ªµ·²µ©¯´º±µ·¶º¸º´§±²§«§°¹¬¶·µ«º±¹¯K1 (³§²) ɶ·µ¿¹µ©¼º°¹¬Ê¼®§
«µ¶µ³µªµÅ¿¹µ©¼§¾§K2 (³§²).
● ¢µ¨®§³É´¯¹¯±µ´º¸´¬µ¨¼É«´µ«µ¾¬±§¹¯¸Æ¶µ©´µÊ®º¶¯´±¯±µ´º¸§œ¹·¯³º°¹¬¶·µ¹Æªµ³¸¬±º´«¯±´µ¶±º
T™¬©¬·¸UG, ±µ´º¸©¯°«¬§©¹µ³§¹¯¾´µ³§²
УВАГА: Перед увімкненням приладу переконайтеся, що конус зайняв правильне положення на несучому
¡§¡¨¡©®µ
15

Використовуйте рекомендований конус для кожного типу продукту:
›ª©¯-®¡¬®¦œ
›ª©¯- §´©œ¬µ£¦¤
›ª©¯- §´
-
®ª©¦¤¨¤-¦¤•ª±¦œ¨¤.
-¦ª•§µ©©´/
•
µ·±©§
* *
“§¨§¾±¯
* *
“§·¹µ¶²Æ
* *
—ªÉ·µ±
* *
˜¬·¬½Ã
* *
Ÿ¯¨º²Æ
*
ܼ᮱
*
“§¶º¸¹§¨É²§¾¬·©µ´§
*
¦¨²º±§
*
™¬«Ã±§¾µ·´§
* *
“µ·¬´¬©§¸¬²¬·§
*
‹§´§´¯
*
˜§·³¬®§´
*
•·Å°¬·
* *
¡µ±µ²§«
* *
Œ¯¸º¿¬´¯°¼²É¨¸º¼§·É
*
”ɸµ©¯°ªµ·É¼ª·¬½Ã±¯°ªµ·É¼³¯ª«§²Ã
*
“µ±µ¸µ©¯°ªµ·É¼
*
£œ§¡¢©ªžµ ¨ª ¡§µ
Поради для отримання хорошого результату:
¢µ¨µ¹·¯³§¹¯®§«µ©É²Ã´¯°·¬®º²Ã¹§¹É®§¶µ¨Éª¹¯®§¸¹·Æª§´´Å¶·µ«º±¹É©º±µ·¶º¸É©¯±µ·¯¸¹µ©º©§´ÉÉ´ª·¬«ÉÈ´¹¯
¶µ©¯´´É¨º¹¯³É½´¯³¯É¸©É-¯³¯–¬©¯±µ·¯¸¹µ©º°¹¬¶·¯²§«Àµ¨¹¬·¹¯§¨µ·É®§¹¯¸±¯¨µ¾±§³¯®§´§«¹µ¹©¬·«É
¶·µ«º±¹¯¹§±ÉƱ½º±µ·§¨µ¿³§¹±¯³Æ¸§™µ®·É®§°¹¬¶·µ«º±¹¯Àµ¨Ê¼¨º²µ¶·µ¸¹É¿¬¶·µ¿¹µ©¼º©§¹¯©µ¹©É·
±µ·¶º¸º
ЧИЩЕННЯ:
•
Перед чищенням блока мотора Н завжди відключайте прилад від електромережі
Ì–¬®§´º·Å°¹¬¨²µ±³µ¹µ·§º©µ«º´¬¶É«¸¹§©²Æ°¹¬°µªµ¶É«©µ«º—¾¯¸¹É¹Ã¨²µ±³µ¹µ·§©µ²µªµÅª§´¾É·±µÅ
˜É¸²Æ¾¯À¬´´Æ©§·¹µ¶µ©´É¸¹Å©¯¸º¿¯¹¯
Аксесуари м’ясорубки:
‘´É³É¹Ã¨²µ±º©§´´Æªµ²É©±¯§¨µ§±¸¬¸º§·§µ©µ¾¬·É®±¯´§¹¯¸´º©¿¯´§±´µ¶±ºE.
— ˜µ©¬·´É¹Ãªµ²É©±º³Æ¸µ·º¨±¯A ©¶·§©µÉ¶µ¹Æª´É¹Ã´§¸¬¨¬Àµ¨©É«ZÈ«´§¹¯ÊÊ©É«¨²µ±§³µ¹µ·§H.
— ¢µ¨®´Æ¹¯ªµ²É©±ºµ©µ¾¬·É®±¯A, ©¯°³É¹Ã¿¹µ©¼§¾C É®´É³É¹Ã²µ¹µ±B, ©É«ª©¯´¹É¹Ãª§°±ºA5, ®´É³É¹Ã·¬¿É¹±º
A4, ´É-A3 É¿´¬±A2.
— Обережно поводьтеся з гострими деталями.
Œ¯³¯°¹¬©¸É®§¶¾§¸¹¯´¯¶É«ª§·Æ¾µÅ©µ«µÅ®³¯²µ³¸¶µ²µ¸´É¹ÃÉ·¬¹¬²Ã´µ©¯¹·É¹Ã
–¬³¯°¹¬ªµ²É©±º³Æ¸µ·º¨±¯A ©¶µ¸º«µ³¯°´É°³§¿¯´É¹µ¨¹µ±µ·¶º¸A1, ¿´¬±A2, ª§°±ºA5, ´É-A3 É
·¬¿É¹±¯A4
Аксесуари овочерізки (залежно від моделі):
Ì“µ·¶º¸K1¿¹µ©¼§¾K2±µ´º¸¯K3a, K3b, K3c³µ-´§³¯¹¯º¶µ¸º«µ³¯°´É°³§¿¯´É©±µ¿¯±º
©¯±µ·¯¸¹µ©ºÅ¾¯¶·µª·§³ºT•“—U§¨µT–•Žœ••‹™œŽ–•U
Ì—¸±É²Ã±¯²¬®§±µ´º¸É©«º-¬ªµ¸¹·É®´¯³¯¸²É«¶µ©µ«¯¹¯¸Æµ¨¬·¬-´µ
̦±Àµ¶²§¸¹³§¸µ©É¾§¸¹¯´¯¶µ»§·¨º©§²¯¸Æ¶·µ«º±¹§³¯¹§±¯³¯Æ±´§¶·¯±²§«³µ·±©§¶·µ¹·É¹Ãʼª§´¾É·±µÅ
®³µ¾¬´µÅ©¼§·¾µ©É°µ²Éʶµ¹É³©¯³¯°¹¬®©¯¾§°´¯³¸¶µ¸µ¨µ³
ЗБЕРІГАННЯ:
™¬¿É¹±¯´É-¶·¯¸¹·É°«²Æ½¬´¹·º©§´´Æ¿´¬±§§±¸¬¸º§·¯±¬¨¬É«²Æ±µ©¨§¸µ±I1, I2 i J1, J2³µ-´§®¨¬·Éª§¹¯
´§®§«´É°¸¹É´½É¶·¯²§«ºº¸¶¬½É§²Ã´µ³º©É««É²¬´´ÉD
16

ЩО РОБИТИ, ЯКЩО ПРИЛАД НЕ ПРАЦЮЄ?
˜¬·¬©É·¹¬-¯©²¬´´Æ
¦±Àµ¶·¯²§«¹§±É´¬®§¶·§½Å©§©®©¬·´É¹Ã¸Æ«µ¸¬·©É¸´µªµ½¬´¹·ºMoulinex
(Ž¯©¸¶¯¸µ±º¨·µ¿º·É®µ¨¸²ºªµ©º©§´´Æ).
ПІСЛЯ ЗАКІНЧЕННЯ ТЕРМІНУ ЕКСПЛУАТАЦІЇ ЕЛЕКТРОННИХ АБО
ЕЛЕКТРИЧНИХ ПРИЛАДІВ
Візьмімо участь у захисті навколишнього середовища!
Œ§¿¶·¯²§«³É¸¹¯¹Ã¨§ª§¹µ³§¹¬·É§²º¶·¯«§¹´µªµ«µ¶¬·¬·µ¨±¯
‘«§°¹¬°µªµ©¶º´±¹®¨µ·º§¨µ©¸¬·©É¸´¯°½¬´¹·«²Æ¶¬·¬·µ¨±¯
РЕЦЕПТИ
Зверніть увагу: Для рецептів, приготування яких вимагає більш високої потужності, час використання приладу не
«ªž¤©¡©«¡¬¡ž¤щувати 20 сек.
Приклад рецепту (з середньою решіткою — отвори 4,7 мм .
!¦ª®§¡®¤¦µ•¡£¥ªŸ¯¬®ª¨
«ª¬цій — Приготування: 1 година
Покласти на 1 год у холодильник
Інгредієнти для пасти кібе:
ª³Æ¸§ª¨º²Ãªº·º¶µ«·É¨´¬´¬®¬·´µ¸É²Ã
Інгредієнти для соусу:
±ª°µªº·¹º¶º¾µ±±µ·É§´«·º®º¨¾¯±¯¾§¸´¯±º¸¹µ²µ©É²µ-±¯
±º±º·º«®Æ´µªµ¨µ·µ¿´§¸É²Ã¶¬·¬½Ã
™µ®·É-¹¬³Æ¸µ´§¿³§¹±¯œ¸¹§´µ©É¹Ã·¬¿É¹±º®µ¹©µ·§³¯³³©³Æ¸µ·º¨±º˜·µ¶º¸¹É¹Ã³Æ¸µ«µ«§°¹¬
¨º²Ãªº·˜µ¸µ²É¹Ã¶µ¸¹§©¹¬µ¹·¯³§´º³§¸º©¼µ²µ«´¬³É¸½¬´§ªµ«¯´º
¢µ¨¸»µ·³º©§¹¯±µ¹²¬¹¯±É¨¬©¸¹§´µ©É¹Ã´§³Æ¸µ·º¨±º§±¸¬¸º§·±¬¨¬˜·µ¶º¸¹É¹Ã³§¸º±·§Ê±µ¹²¬¹¯
¸±²¬°¹¬´¬©¬²¯±µÅ±É²Ã±É¸¹Å©µ«¯
Ž²Æ¶·¯ªµ¹º©§´´Æ¸µº¸º¶·µ³¯°¹¬¶º¾µ±±µ·É§´«·º¶·µ³µ±´É¹Ã¶§¶¬·µ³É©É«É·©É¹Ã²¯¸¹Æ˜µ¾¯¸¹É¹Ã¾§¸´¯±
É·µ®«§©É¹Ã°µªµ §¸´¯±É±µ·É§´«·¶µ¹·¯³§°¹¬¼©¯²¯´¯´§¸±µ©µ·É«½É´§¸²§¨±µ³º©µª´ÉŒÉ«±²§«É¹Ãº
¨É±
‘¨¯°¹¬°µªº·¹É±º±º·º«®Æ´º³º±º¶µ¸µ²É¹Ã¶µ¶¬·¾É¹ÃŒ¯²¯°¹¬©¸¬©±§¸¹·º²Å¾¬·¬®«·É¨´¬¸¯¹¬¾±µ
Žµ©¬«É¹Ã¸º³É¿«µ±¯¶É´´Æ¶µ¹É³®³¬´¿¹¬©µªµ´Ãš¹¬-¹¬®§¶·¯ªµ¹º©§´´Æ³¶µ¸¹É°´µ¶µ³É¿ºÅ¾¯Àµ¨
°µªº·¹´¬¶·¯¸¹§©§©
Žµ«§°¹¬¾§¸´¯±É±µ·É§´«·˜µ¹·¯³§°¹¬±µ¹²¬¹¯±É¨¬©ª§·Æ¾É°¸º³É¿É¼©¯²¯´
Варіант: Ви також можете нафарширувати котлети (сумішшю цибулі і меленого м’яса, попередньо
«¬ª¢œ¬¡©ªŸªž©¡ž¡§¤¦µ¥¦µ§³¦ª-®µª§µї з прянощами).
САМСА
«ª¬ції – Приготування: 40 хвил. Час запікання: 35 хвил.
Інгредієнти:
ª²¯¸¹±µ©µªµ¹É¸¹§WªÆ²µ©¯¾¯´¯W½¯¨º²¯´§WÆ°½ÆW¶§¶·¯±§³¬²¬´§±µ·¯½Æ¹§
ɳ¨¯·W¶¬¹·º¿±§W±µ·É§´«·±¬·©¬²ÃW½º±µ·Wª³§¸²§Wµ²¯©±µ©§µ²ÉÆ
œ¸¹§´µ©É¹Ã·¬¿É¹±º®µ¹©µ·§³¯³³©³Æ¸µ·º¨±º™µ®·É-¹¬½¯¨º²Å´§¾§¸¹¯´É¶·µ¶º¸¹É¹Ã¾¬·¬®
³Æ¸µ·º¨±º˜É«Éª·É°¹¬¸¹µ²µ©É²µ-±¯µ²¯©±µ©µÊµ²ÉÊ©¸µ¹¬°´¯±º¶µ¹É³«µ«§°¹¬½¯¨º²Å˜µ¹º¿±º°¹¬´§
³§²µ³º©µª´É«µµ¹·¯³§´´Æ®µ²µ¹¯¸¹µªµ±µ²Ãµ·ºŒÉ«¸¹§©¹¬º¨É±
˜µ«·É¨´É¹ÃƲµ©¯¾¯´º˜É«·º³Æ´Ã¹¬´§¸²§¨±µ³º©µª´É·§®µ³®½¯¨º²¬Å¶·µ¹Æªµ³¼©¯²¯´ŒÉ«¸¹§©¹¬º¨É±
˜·¯¶·§©¯¶·µ¶º¸¹É¹Ã¾¬·¬®³Æ¸µ·º¨±ºŒ¯¸¯¶¹¬Ê¼©¸µ¹¬°´¯±·§®µ³®¸É²²Åɶ¬·½¬³«µ«§°¹¬¶É©¾§°´µÊ
²µ-±¯¶§¶·¯±¯Àɶ±ºÉ³¨¯·ºÉ¹·µ¼¯±µ·¯½É
˜µ¹É³«µ«§°¹¬®¨¯¹ÉÆ°½Æ¶¬·¬³É¿§°¹¬É©¯³±´É¹Ã©µªµ´Ã
™µ®±§¾§°¹¬«µ¸¯¹Ã¹µ´±µ²¯¸¹±µ©¬¹É¸¹µ˜µ·É-¹¬´§±©§«·§¹¯¶µ¸³‘³§¸¹É¹Ã³§¸²µ³¶µ©¬·¼´ÅƱ§
©¯±µ·¯¸¹µ©ºÈ¹Ã¸Æ
–§±µ-¬´±©§«·§¹¶µ±²§«É¹Ã¹·µ¼¯»§·¿º‘§ªµ·´É¹Ã§¶µ¹É³®§²É¶É¹Ã±·§Ê
17
š³§-¹¬¸§³¸§©±¯¶²Æ¾µ³º³§¸²É˜É¸²Æ¸³§-¬´´Æ©¯±²§«É¹Ã´§±É²Ã±§¼©¯²¯´´§¶µª²¯´§Å¾¯°¶§¶É·
˜µ¸¯¶¹¬½º±·µ³É±µ·¯½¬Å˜µ«§©§°¹¬ª§·Æ¾¯³
Вариант:
œ¸¹§´µ©É¹Ã·¬¿É¹±º®µ¹©µ·§³¯³³©³Æ¸µ·º¨±º™µ®·É-¹¬½¯¨º²Å´§¾§¸¹¯´–§³¬²É¹Ã¹·µ¼¯³Æ¸§
½¯¨º²Å¶·µ¶º¸¹É¹Ã¾¬·¬®³Æ¸µ·º¨±º
˜·µ¶º¸¹É¹ÃÀ¬¹·µ¼¯³Æ¸§¶µ¹É³¶·¯¶·§©¯É´§·¬¿¹É³Æ¸µÆ±¬®§²¯¿¯²µ¸Æ‘¨¯°¹¬Æ°½ÆÉ«µ«§°¹¬Ê¼«µ
»§·¿º·§®µ³®¸É²²Åɶ¬·½¬³¶µ²µ©¯´µÅ¾§°´µÊ²µ-±¯¶§¶·¯±¯Àɶ±µÅɳ¨¯·ºÉ´¬©¬²¯±µÅ±É²Ã±É¸¹Å
±µ·¯½ÉŒ¸¬¶¬·¬³É¿§°¹¬˜µ©¹µ·É¹Ã¶º´±¹¯
ПИРІЖКИ З РИБОЮ
«ª¬ції – Приготування: 25 хвил. Час запікання: 10 — 15 хвил.
Інгредієнти:
ª²¯¸¹±µ©µªµ¹É¸¹§Wª©§·¬´µÊ·¯¨¯§¨µ±µ¶¾¬´µªµ²µ¸µ¸ÆW®©§·¬´¯¼±·º¹µÆ°½ÆW
¶º¾µ±®§¶§¿´µªµ±·µ¶º½¯¨º²¯´¯Wª¸µ²µ´µªµ©¬·¿±µ©µªµ³§¸²§³§²¬´Ã±¯³¯¿³§¹µ¾±§³¯W
·µ¸²¯´´§µ²ÉÆ
œ¸¹§´µ©É¹Ã·¬¿É¹±º®µ¹©µ·§³¯³³©³Æ¸µ·º¨±º™µ®·É-¹¬½¯¨º²Å´§¾§¸¹¯´É¶·µ¶º¸¹É¹Ã¾¬·¬®
³Æ¸µ·º¨±º›º¿±º°¹¬´§¸²§¨±µ³º©µª´É©¸µ¹¬°´¯±º©´¬©¬²¯±É°±É²Ã±µ¸¹É·µ¸²¯´´µªµ³§¸²§ŒÉ«¸¹§©¹¬º
¨É±
–§·É-¹¬¹·µ¼¯·¯¨¯¶µ¹É³«µ«§°¹¬¶·¯ªµ¹µ©§´º½¯¨º²Å©¬·¿±µ©¬³§¸²µ®§¶§¿´¯°±·É¶É·¯¨ºÆ±§
®§²¯¿¯²§¸Æ
™µ®±§¾§°¹¬¹µ´±¯³¿§·µ³²¯¸¹±µ©¬¹É¸¹µ©¯·É-¹¬±·º-¬¾±¯¸±²Æ´±µÅ§¨µ±¬²¯¼µ³¨É²Ã¿³¬´¿©¬²¯±µªµ
·µ®³É·º
˜µ¶¬·¬«´Ãµ·µ®Éª·É°¹¬«º¼µ©±º«µRC (¶).
5. –§±µ-¬´±·º-¬¾µ±¶µ±²§«É¹Ã¹·µ¼¯»§·¿º¸±²§«É¹Ã¹É¸¹µÉ®§²É¶É¹Ã±·§Ê
•µ¹º°¹¬©«º¼µ©½É¶·µ¹Æªµ³¼©¯²¯´
›ª®§¡®¤£´§ªž¤±¤©¤
«ª¬ції – Приготування: 20 хвил. Час запікання: 10 — 15 хвил.
Інгредієнти
±ªÆ²µ©¯¾¯´¯W½¯¨º²¯´§W®º¨¾¯±¾§¸´¯±ºW¿³§¹µ¾±¯¾µ·´µªµ¼²É¨§®§³µ¾¬´µªµ©³µ²µ½É
WÆ°½ÆW±§·¹µ¶²¯´§W¨µ·µ¿´µW¸É²Ã¶¬·¬½Ã
Ž²Æ¶·¯ªµ¹º©§´´Æ½Ãµªµ·¬½¬¶¹º©¯¨¬·É¹Ã´¬-¯·´É¿³§¹±¯Æ²µ©¯¾¯´¯˜·µ¶º¸¹É¹Ã³Æ¸µ¾¬·¬®³Æ¸µ·º¨±º®
¿³§¹µ¾±§³¯¼²É¨§
–§·É-¹¬½¯¨º²Å¹µ´±¯³¯¸±¯¨µ¾±§³¯±µ´º¸µ³K3bÉ´§¹·É¹Ã¾§¸´¯±É±§·¹µ¶²Å±µ´º¸µ³¹¬·¹±µÅK3a
‘³É¿§°¹¬³¬²¬´¬³Æ¸µ®¼²É¨µ³¶µ·É®§´µÅ½¯¨º²¬Å¾§¸´¯±µ³É±§·¹µ¶²¬Å
Žµ«§°¹¬©¸º³É¿Æ°½Æ³¬²¬´¯°¾µ·´¯°¶¬·¬½Ã¸É²Ãɸ»µ·³º°¹¬±µ¹²¬¹¯
—¨©§²Æ°¹¬±µ¹²¬¹¯©¨µ·µ¿´Éɸ³§-¹¬´§·µ¸²¯´´É°µ²ÉÊ
›œ¬®ª«§´©¤¥«¯ ¤©Ÿ«¬¤Ÿª®ªžœ©¤¥ž ¯ховці
«ª¬ції – Приготування: 30 хвил. Час запікання: 45 хвил.
Інгредієнти:
ª³¬²¬´µªµ³Æ¸§W±ª±§·¹µ¶²ÉWÆ°½ÆW¸±²Æ´±¯³µ²µ±§W®º¨¾¯±¾§¸´¯±ºW
¸¹µ²µ©µÊ²µ-±¯©¬·¿±µ©µªµ³§¸²§W¸¹µ²µ©É²µ-±¯·µ¸²¯´´µÊµ²ÉÊW¸É²Ã¶¬·¬½Ã
˜µ¾¯¸¹É¹Ã©¯³¯°¹¬É©¯¸º¿É¹Ã±§·¹µ¶²Å–§·É-¹¬Êʹµ´±¯³¯¸±¯¨µ¾±§³¯±µ´º¸µ³K3b
¦²µ©¯¾¯´º¶·µ¶º¸¹É¹Ã¾¬·¬®³Æ¸µ·º¨±ºÉ¶·µ-§·¹¬·º¨²¬´¬³Æ¸µ©«º¼µ©½É´§µ²Éʶ·µ¹Æªµ³¼©¯²¯´
–§¹·É¹Ã©´º¹·É¿´Å¶µ©¬·¼´Å¨²Å«§¾§¸´¯±µ³¶µ¹É³®³§¸¹É¹Ãµ«´ÉÈž§¸¹¯´µÅ©¬·¿±µ©µªµ³§¸²§
Œ¯±²§«É¹Ã¿§·§³¯±§·¹µ¶²Éɳ¬²¬´¬³Æ¸µ¶µ¸µ²É¹Ã¶µ¶¬·¾É¹Ã¶µ¹É³©¯±²§«É¹Ã±§·¹µ¶²ÅÀµ®§²¯¿¯²§¸Æ
‘¨¯°¹¬Æ°½Æ®¹¬¶²¯³³µ²µ±µ³É©¯²¯°¹¬¸º³É¿´§±§·¹µ¶²ÅŽµ«§°¹¬©¬·¿±µ©¬³§¸²µÀµ®§²¯¿¯²µ¸Æ
•µ¹º°¹¬©«º¼µ©½É¶·¯¸¬·¬«´É°¹¬³¶¬·§¹º·É¼©¯²¯´
Печені яблука з мигдалем
«ª¬ції – Приготування: 40 хвил. Час запікання: 30 хвил.
Інгредієнти:
ƨ²º±Wª½º±·ºWª©¬·¿±µ©µªµ³§¸²§Wª½É²Ã´µªµ³¯ª«§²ÅW³²©¬·¿±É©W
¾§°´§²µ-±§±µ·¯½É
˜µ¾¯¸¹É¹Ãƨ²º±§©¯«§²É¹Ã¸¬·½¬©¯´ºÉ·µ®·É-¹¬´§¾©¬·¹É–§·É-¹¬¹µ´±¯³¯¸±¯¨µ¾±§³¯Æ¨²º±§±µ´º¸µ³K3b
ɶ·µ-§·¹¬©ª©¬·¿±µ©µªµ³§¸²§‘²¬ª±§®³§¸¹É¹Ã¨²Å«µ³§¸²µ³É©¯±²§«É¹Ã®§½º±·µ©§´Éƨ²º±§´§«´µ
˜µ«·É¨´É¹Ã³¯ª«§²Ã©¶µ·µ¿µ±±µ´º¸µ³K3c˜¬·¬³É¿§°¹¬º¸§²§¹´¯½É³¬²¬´¯°³¯ª«§²Ã©¬·¿±¯É±µ·¯½Å
Œ¯±²§«É¹Ã¸º³É¿´§Æ¨²º±§É¶µ¸¯¶¹¬½º±·µ³˜µ¸¹§©¹¬¨²Å«µ©«º¼µ©±ºªµ¹º°¹¬¶·¯¹¬³¶¬·§¹º·ÉRC.
18
Аннотации для Мясорубки Moulinex HV8 ME625 в формате PDF
Топ 10 инструкций
Другие инструкции
Код: 51580
Извините, товара сейчас нет в наличии
Бесплатная доставка
по Красноярску
Извините, товара сейчас нет в наличии
Новости интернет-магазина «Лаукар»:
Дополнительная информация в категории Мясорубка:
В интернет-магазине бытовой техники «Лаукар» Вы можете скачать инструкцию к товару Мясорубка Moulinex HV8 ME 626132 совершенно бесплатно.
Все инструкции, представленные на сайте интернет-магазина бытовой техники «Лаукар», предоставляются производителем товара.
Перед началом использования товара рекомендуем Вам ознакомиться с инструкцией по применению.
Для того чтобы скачать инструкцию, Вам необходимо нажать на ссылку «скачать инструкцию», расположенную ниже, а в случае, если ссылки нет,
Вы можете попробовать обратиться к данной странице позднее,
возможно специалисты интернет-магазина бытовой техники «Лаукар» еще не успели загрузить для скачивания инструкцию к товару:
Мясорубка Moulinex HV8 ME 626132.

Фирма-производитель оставляет за собой право на внесение изменений в конструкцию, дизайн и комплектацию товара: Мясорубка Moulinex HV8 ME 626132. Пожалуйста, сверяйте информацию о товаре с информацией на
официальном сайте компании производителя.
Мясорубка Moulinex HV8 Plus ME682832, черный
- Мощность: 2000Вт, при блокировке вала
- Производительность: 2.6 кг/мин
- Количество скоростей: 1
- Функции: реверс
- Насадки: для колбас, для кеббе
- Материал лотка: пластик
- Материал корпуса: пластик
Появились вопросы о товаре?
- Мощность: 2000Вт, при блокировке вала
- Производительность: 2.6 кг/мин
- Количество скоростей: 1
- Функции: реверс
- Насадки: для колбас, для кеббе
- Материал лотка: пластик
- Материал корпуса: пластик
Появились вопросы о товаре?
Мы используем файлы cookie. Подробнее
Мы используем файлы cookie для вашего удобства. Продолжая пользоваться сайтом, вы соглашаетесь с политикой использования cookie. Подробнее