
PRO 1600 Food Mincer
-
V
(Instruction manuals Italiano, Slovak, Spanish, Ukranian, Greek, Arabic Saudi Arabia, English, Turkish, Danish, German, Hungarian, French, Suomi, Brazilian Portuguese, Polish, Dutch, Norwegian)
PDF (1.768 MB) -
V
(Instruction manuals Arabic Saudi Arabia, English)
PDF (0.688 MB)
KENWOOD
O I
instructions
MG510 series TYPE MG51
e
KENWOOD
o
n
m
l
k
j
g
f
i
h
KENWOOD
O I
a
b
c
d
safety l Read these instructions carefully and retain
for future reference. l Remove all packaging and any labels. l If the cord is damaged it must, for safety
reasons, be replaced by Kenwood or an authorised Kenwood repairer.
l Always ensure bones and rind etc are removed from the meat before mincing.
l When mincing nuts only feed a few down at a time and allow the scroll to pick them up before adding any more.
l Always unplug: l before fitting or removing parts l after use l before cleaning.
l Always use the pusher supplied. Never put your fingers or utensils in the feed tube.
l Warning — the cutting blade is sharp, handle with care both in use and cleaning.
l Ensure the attachment is secured in position before switching on.
l To avoid electric shocks, never let the power unit, cord or plug get wet.
l Never use a damaged mincer. Get it checked or repaired: see service and customer care.
l Never use an unauthorised attachment. l Never let the cord hang down where a child
could grab it. l Appliances can be used by persons with
reduced physical, sensory or mental capabilities or lack of experience and knowledge if they have been given supervision or instruction concerning use of the appliance in a safe way and if they understand the hazards involved.
2
English
l Misuse of your appliance can result in injury. l This appliance shall not be used by children. Keep the appliance and its cord out of reach of children.
l Children should be supervised to ensure that they do not play with the appliance.
l Only use the appliance for its intended domestic use. Kenwood will not accept any liability if the appliance is subject to improper use, or failure to comply with these instructions.
3
Use the meat grinder to process meat, poultry and fish. Use the inclusive attachments to shape sausages and kebbe.
before plugging in l Make sure your electricity supply is the same as the one shown on the underside of the appliance.
Important UK only l The wires in the cord are coloured as follows: Blue = Neutral, Brown = Live.
l The appliance must be protected by a 3A approved (BS1362) fuse.
Note: l For non-rewireable plugs the fuse cover MUST be refitted when replacing the fuse. If the fuse cover is lost then the plug must not be used until a replacement can be obtained. The correct fuse cover is identified by colour and a replacement may be obtained from your Kenwood Authorised Repairer (see Service).
l If a non-rewireable plug is cut off it must be DESTROYED IMMEDIATELY. An electric shock hazard may arise if an unwanted non-rewireable plug is inadvertently inserted into a 13A socket outlet.
l This appliance conforms to EC Regulation 1935/2004 on materials and articles intended to come into contact with food.
before using for the first time 1 Wash the parts see care and cleaning
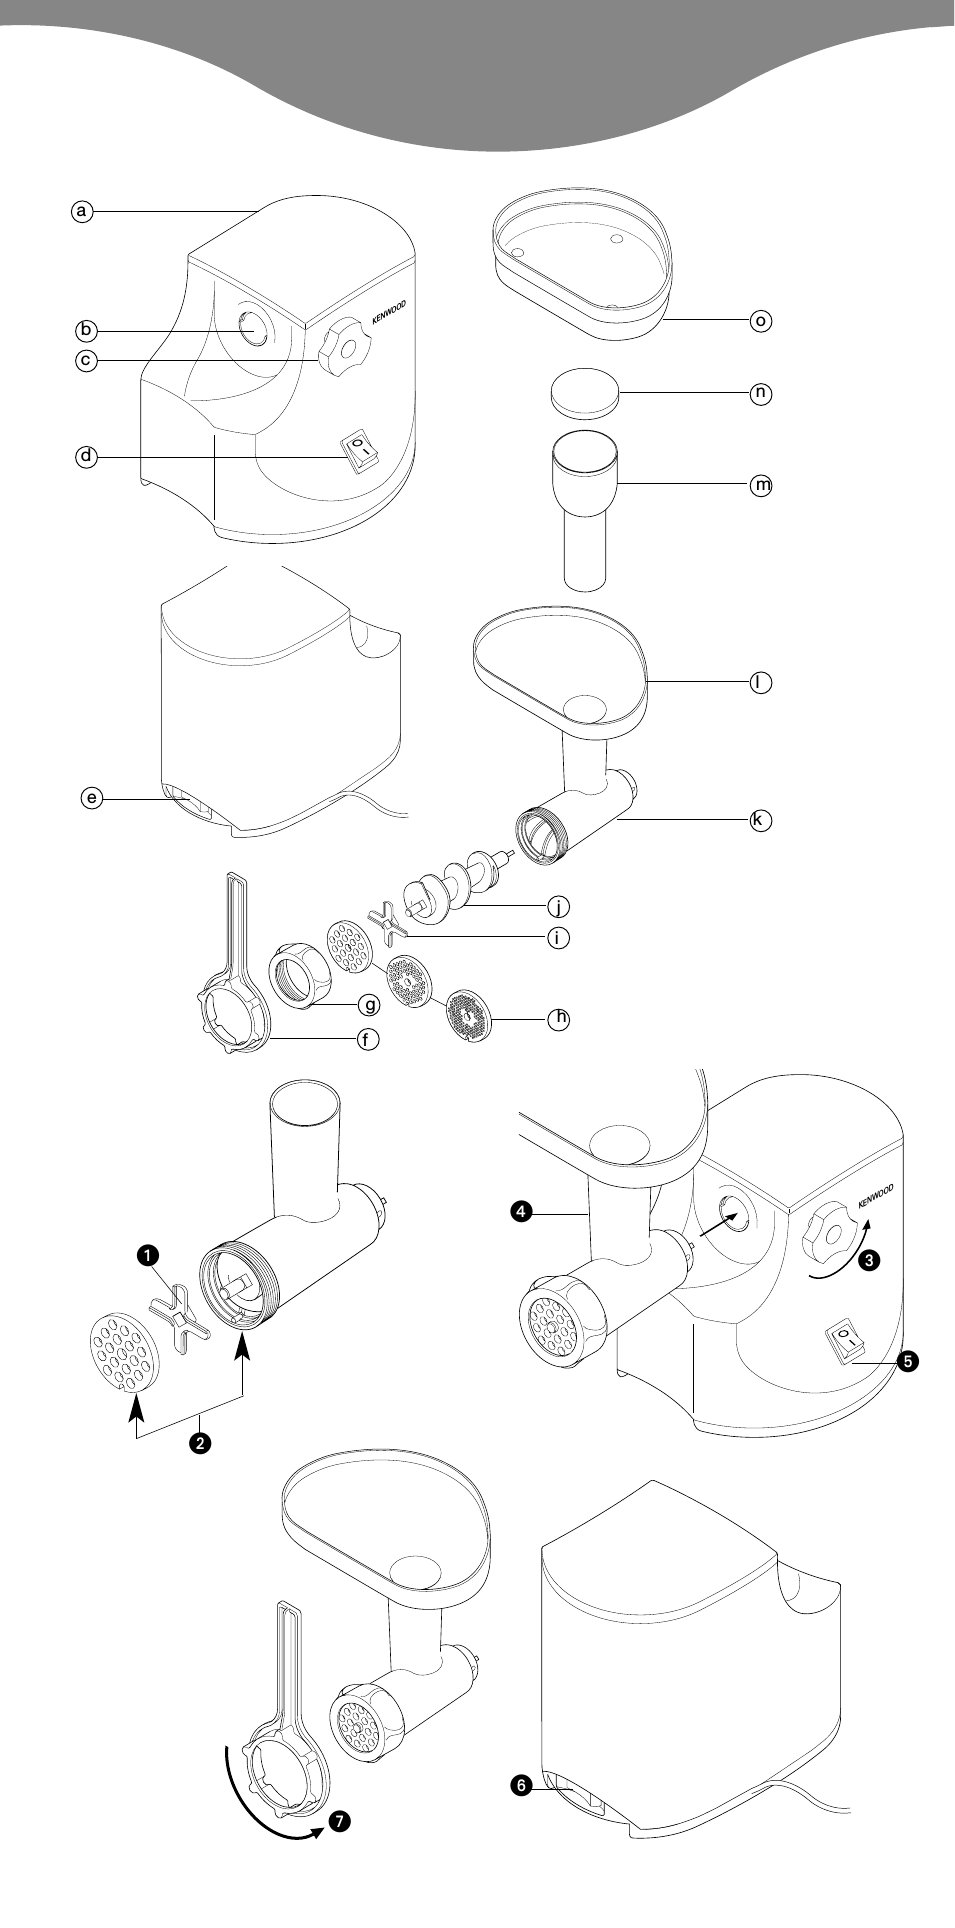
mincer power unit attachment outlet locking screw on/off switch reverse switch spanner ring nut mincer screens: fine, medium, coarse cutter scroll mincer body tray pusher pusher lid dish/cover
to assemble 1 Fit the scroll inside the mincer body. 2 Fit the cutter cutting side outermost . Ensure its seated properly otherwise you could damage your mincer.
3 Fit a mincer screen . Put the notch over the pin.
l Use the fine screen for raw meat; fish; small nuts; or cooked meat for shepherds pie or meat loaves.
l Use the medium and coarse screens for raw meat; fish and nuts.
4 Loosely fit the ring nut.
to use the mincer 1 Release the locking screw by turning
anticlockwise , then slide the attachment into the outlet .
2 Turn it both ways until it locks into place. Then turn the locking screw clockwise to secure.
3 Tighten the ring nut manually. 4 Fit the tray. Put the dish/cover under
the mincer to catch the food. 5 Thaw frozen food thoroughly before mincing. Cut meat into 2.5cm (1) -wide strips.
6 Switch on . Using the pusher, gently push the food through, one piece at a time. Dont push hard you could damage your mincer.
l If the machine stalls or jams during use, switch off. Depress the reverse switch for a few seconds to release the clogged food. Unplug and remove any clogged material.
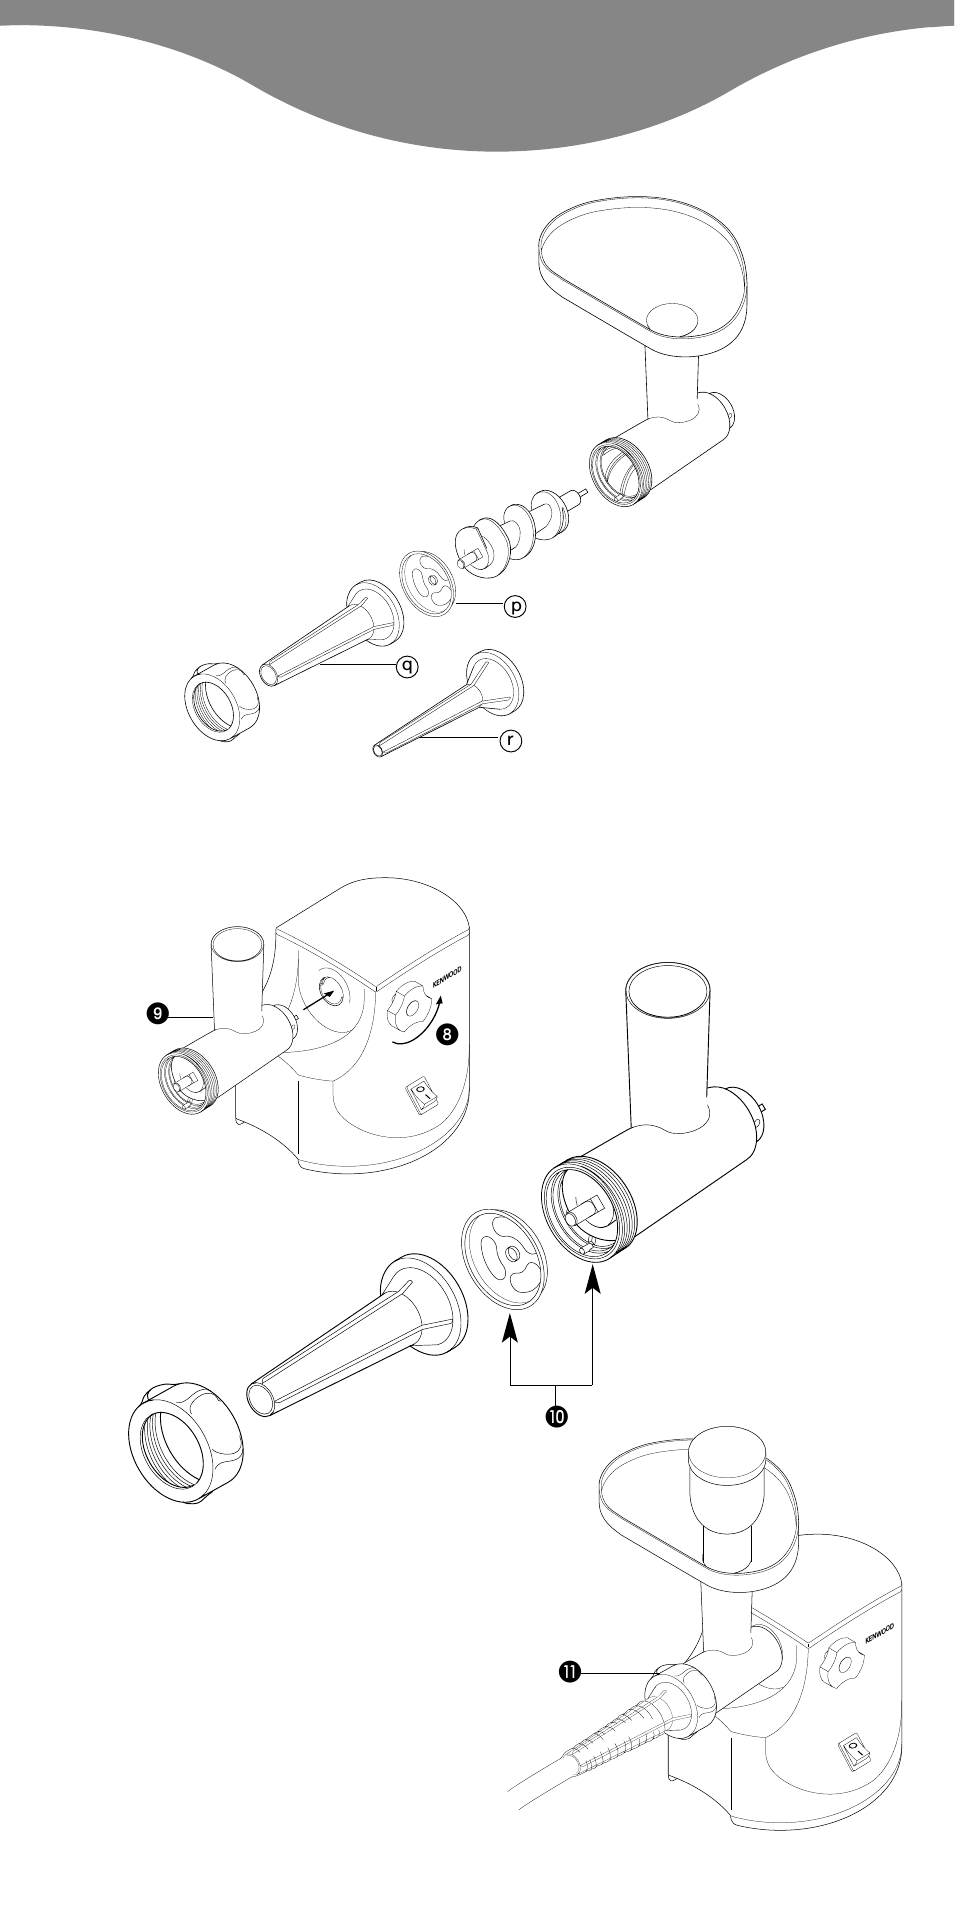
sausage filler base plate* large nozzle* (for thick sausages) small nozzle* (for thin sausages)
* Stored in the pusher
Ask your butcher for sausage skin or mail order from the Natural Casing Company Ltd, PO Box 133, Farnham, Surrey GU10 5HT, England. Use pig/hog skin on the large nozzle and sheep/lamb skin on the small nozzle. Or, instead of using skin, roll in breadcrumbs or seasoned flour before cooking.
to use the sausage filler 1 If youre using skin, soak it in cold
water for 30 minutes first. 2 Release the locking screw by turning
anticlockwise , then slide the attachment into the outlet .
3 Turn it both ways until it locks into place. Then turn the locking screw clockwise to secure.
4 Fit the scroll inside the mincer body. 5 Fit the base plate — put the notch
over the pin.
6 If youre using skin, open it up with a jet of water. Then put your chosen nozzle under a running tap and pull the skin onto the nozzle.
7 Hold the nozzle on the mincer and screw the ring nut on .
8 Fit the tray. 9 Switch on. Using the pusher, push
the food through. Dont push hard you could damage your mincer. Ease the skin off the nozzle as it fills. Dont overfill.
10Twist the skin to form sausages.
pork sausage recipe 100g (4oz) dry bread 600g (112lb) pork, lean and fat, cut into strips 1 egg, beaten 5ml (1tsp) mixed herbs salt and pepper
1 Soak the bread in water, then squeeze.
2 Mince the pork into a bowl. 3 Add the remaining ingredients and
mix well. 4 Make into sausages (see above). 5 Fry, grill or bake until golden brown.
kebbe maker shaper* cone*
* Stored in the pusher
Kebbe is a traditional Middle Eastern dish: deep-fried lamb-and-bulgur- wheat parcels with a minced meat filling.
to use the kebbe maker 1 Release the locking screw by turning
anticlockwise , then slide the attachment into the outlet .
2 Turn it both ways until it locks into place. Then turn the locking screw clockwise to secure.
3 Fit the scroll inside the mincer body. 4 Fit the shaper put the notch
over the pin. 5 Fit the cone . 6 Screw the ring nut on. 7 Fit the tray.
4
5
8 Switch on. Using the pusher, gently push your mixture through. Cut into lengths.
stuffed kebbe recipe outer casing 500g (1lb 2oz) lamb or fat-free mutton, cut into strips 500g (1lb 2oz) bulgur wheat, washed and drained 1 small onion, finely chopped
Important Always use the bulgur wheat straight away after draining. If it is allowed to dry out, it may increase the load on the mincer resulting in damage.
1 Using the fine screen, mince alternative batches of meat and wheat.
2 Mix. Then mince twice more. 3 Stir the onion into the mix. 4 Push through, using the kebbe maker (see above).
Filling 400g (10oz) lamb, cut into strips 15ml (1tbsp) oil 2 medium onions, finely chopped 5-10ml (1-2tsp) ground allspice 15ml (1tbsp) plain flour salt and pepper
1 Using the fine screen, mince the lamb.
2 Fry the onions until golden brown. Add the lamb.
3 Add the remaining ingredients and cook for 1-2 minutes.
4 Drain off any excess fat and allow to cool.
To finish 1 Push the casing mixture through, using the kebbe maker.
2 Cut into 8cm (3) lengths. 3 Pinch one end of the tube to seal it. Push some filling not too much into the other end, then seal.
4 Deep fry in hot (190C) oil for about 6 minutes or until golden brown.
care and cleaning power unit Wipe with a damp cloth, then dry.
mincer attachment 1 Loosen the ring nut manually or with the spanner and dismantle. Wash all the parts in hot soapy water, then dry. Dont wash any part in the dishwasher. Never use a soda solution.
2 Re-assemble. 3 Wipe the screens with vegetable oil, then wrap in greaseproof paper to prevent discolouring/rusting.
4 If you keep the mincer on the machine, put the dish/cover on the tray as a dust-cover.
5 You can pull the lid off the pusher and store the sausage and kebbe attachments inside.
service and customer UK If you need help with:
l using your machine or l servicing, spare parts or repairs (in or out of guarantee)
call Kenwood customer care on 023 9239 2333 or visit www.kenwoodworld.com. Have your model number (e.g. MG510) and date code (5 digit code e.g. 13L35) ready. They are on the underside of the power unit.
l spares and attachments call 0844 557 3653.
other countries l If you experience any problems with the operation of your appliance, before requesting assistance visit www.kenwoodworld.com.
l Please note that your product is covered by a warranty, which complies with all legal provisions concerning any existing warranty and consumer rights in the country where the product was purchased.
l If your Kenwood product malfunctions or you find any defects, please send it or bring it to an authorised KENWOOD Service Centre. To find up to date details of your nearest authorised KENWOOD Service centre visit www.kenwoodworld.com or the website specific to your Country.
l Designed and engineered by Kenwood in the UK.
l Made in China.
IMPORTANT INFORMATION FOR CORRECT DISPOSAL OF THE PRODUCT IN ACCORDANCE WITH THE EUROPEAN DIRECTIVE ON WASTE ELECTRICAL AND ELECTRONIC EQUIPMENT (WEEE) At the end of its working life, the product must not be disposed of as urban waste. It must be taken to a special local authority differentiated waste collection centre or to a dealer providing this service. Disposing of a household appliance separately avoids possible negative consequences for the environment and health deriving from inappropriate disposal and enables the constituent materials to be recovered to obtain significant savings in energy and resources. As a reminder of the need to dispose of household appliances separately, the product is marked with a crossed-out wheeled dustbin.
guarantee If your mincer goes wrong within one year from the date you bought it, we will repair it (or replace it if necessary) free of charge provided:
l you have not misused, neglected or damaged it;
l it has not been modified (unless by Kenwood);
l it is not second-hand; l it has not been used commercially; l you have not fitted a plug incorrectly; and
l you supply your receipt to show when you bought it.
This guarantee does not affect your statutory rights.
6
b MNUzw 1bl eZ G NU Lq JW. 2IDl v Dl Du 8 r (3 uW). 3Id b dw u GKIt. bl w
s Au — Of d s — w Dd d, r GKo.
4IKv FLo eX Us (091 W) uw 6 Uzo v B Ku Mw w.
FMUW MEOn b DUW L` IDFW LU W r Hn. DFW LHdW LKIW
1d LuW KIW bU Ub HU dj r UHJOp. q q _e w U T l BUu, r HHNU. Gq e w UW Bu. b Ku Bu.
2b dOV. 3` AJU eX Uw, r KHNU u
ALl LMl GOd KuX Bb. 4 MX Hk ULHdW Kv NU. {l
Bs/GDU Kv BOMOW LMl u GU.
5LJMJr V GDU s bFW e KIU Lq o JW w bq.
bW UW FL
lBLOr Dud doowneKw LLKJW Lb.
lMl w BOs.
w NUW FLd AGOKw KNU, V b Kh s NU w HUU LMUo CdW. q V c v de LOl U NW KOW BBW w Kh s c MHUU v Ud Ib c bW. Kh s _Ne LMeOW Kv u MHBq, MV U KOW LLKW Kv OW BW w MZ s Kh s c MHUU DdIW Od MUW, LU c FLKOW L Ud Lu LJuW _d c O Bu Kv u Od w U DUW Lu. KcOd Cd Kh s _Ne LMeOW Kv u MHBq, ub Kv NU u ADuW KW LUW .
01
.www.kenwoodworld.com
FLU NU Au o 1 MX FLq Kb, IFt w LU Lb
U Lb 03 OIW . 2d uV HU Ud FJf U dW
UW , r q IDFW LKIW w LMHc .
3dNU JKw UOs v Id w KNU. r d uV HU UU dW UW JU OX.
4V Ke q r LHdW. 5V HOW IUb , {l Kr u
LLU. 6 MX FLq Kb, t OU s
LU. r {l HuW LMW X OU U U V Kb Kv HuW.
7p HuW Kv LHdW d BLuW KIOW Kv .
8{l BOMOW. 9Gq. FL bFW, l DFU do,
DFW IDFW. bl Ab Ib Ko Cd ULHdW. Kb s HuW Mb zt. Hd ULq.
01d Kb AJOq o.
dIW Lq o Med 001r (4 BW) e U 006 r (5\1 Ub) r Med, d s. IDl v dz. OCW b HuW 5 q (KFIW FU) AU LeW K KHq
1MIl e ULU r FBd. 2Hd Kr w uU. 3CU Lu LIOW Le Ob. 4FLq o (Ed ). 5IKv Au Da o v B
Ku Mw w.
NU Lq JW UV AJOq * d *
*e w bFW JW w o IKOb w Ad j:NU U s Dl FU Ju s KHW Fb s r Lq dq L w KNU Au s Kr LHd IKOW UGLd FLOo.
FLU NU Lq JW 1d uV HU Ud FJf U dW
UW , r q IDFW LKIW w LMHc .
2dNU JKw UOs v Id w KNU. r d uV HU UU dW UW JU OX.
3{l Ke q r LHdW. 4X UV AJOq — {l Kr u
LLU. 5V Ld . 6d BLuW KIOW w KNU. 7V BOMOW. 8Gq. FL bFW, l LeZ do
NU. Dl v u LMUW.
dIW Lq JW LAOW G Uw 005 r (1 Ub 2 BW) r Lq r {Q b s, IDl v dz 005 r (1 Ub 2 BW) dq L , Gu BHv 1Ld Bq GOd Hd Ur U bw dq zLU Fb BHOW Ud. w UW d e Jw n, Ib R p v U Lq Kv LHdW LU R v KHNU.
1FL AJW MULW, Hd FU MUW d s Kr d s dq l {UW Bq q bFW Od.
2Le Lu. r Hd LdOs {UOOs. 3Kw Bq l KOj. 4bl Lu FL NU Lq JW
(Ed ) Au 004 r (01 BW) r Lq IDl v dz. 51 q (1 KFIW FU) X 2 BKW uDW HdW ULU 5-01 q (1-2 KFIW FU) NU LeW DuW. 51 q (1 KFIW FU) Os U K KHq
1UFLU AJW MULW, Hd Kr. 2IKv Bq v B Ku Mw w.
CU Kr. 3CU LJuU LIOW r Da Lb
1-2 OIW. 4Bd s zb d Od.
9
q FLU KLd v 1Gq e, Ed «dUW MEOn».
LHdW b DUW MHc LKIU uV HU HU AGOq/IU HU Jf U HU LuW KIOW JU LHdW: ULW, uDW, AMW JOs Dl Ke r LHdW OMOW FW DU bFW s/DU
KdOV 1X Ke q r LHdW. 2X JOs IDl — U NW IDl u
Kv . Qb s KONU BO — p b Cd LHdW.
3V JW d . {l Kr u LLU.
lFLq AJW MULW Kr MOT; Lp; u u BGOd; Kr LDu _q b DUzd dw Kr LDu Kv OW On.
l
4V BLuW KIOW AJq da.
FLU LHdW 1d uV HU Ud FJf U dW
UW , r q IDFW LKIW w LMHc .
2dNU JKw UOs v Id w KNU. r d uV HU UU dW UW JU OX.
3Jr b BLuW KIOW UOb. 4{l Bs/GDU X LHdW KIw
DFU. 5c LUU DFU LLb q Hd.
IDl Kr v dz Fd 5\2 r (1 uW).
6Gq . FL bFW, l DFU do, DFW IDFW. bl Ab Ib Ko Cd ULHdW.
l un FBv Lq NU MU FLU, n AGOq. {Gj HU Jf U Cl u dd Lu LFBOW. Bq s JNdU W u FBOW.
NU Au o HOW IUb* uW Od*(Ko LOp) uW GOd*(Ko MUr)
*e w bFW Bq s IBU Kv Kb Ko Kt Udb s: , b s FLU Kb, d o Kv d e Oo q q Da.
8
lV EW _HU KQb s b Nr UNU. lb NU w b LMew Ij. Lq doowneK
W uOW w UW Fd NU b Od BO b e Nc FKOLU.
W ldzw FKOLU UOW HEw NU w LMU
bU LIKOW LdFOW. lKw JuU GKOn W KBIU. lw UW Kn Kp JNdw, V bt _U
FKIW UW uDW DOOWNEK de OUW FLb s DOOWNEK.
lQb zLU s W FEU IAd a s Kr q Hd. lMb d u U Ut {l Ij Cl U q d
Ke KIDNU q {UW Leb. lzLU Bq s JNdU:
lq dOV W e lFb FLU lq MEOn.
lzLU FLq bFW Le. b Cl UFp W w uW GcW.
lcd- JOs IDOl U, V bNU FMUW w FLU MEOn Kv b u.
lQb s IDFW LKIW W UJU w KNU q AGOq. lMV BbU JNdUzOW, L b ub DUW Kp
IUf U. lb FLq HdW Cd. q BNU KNU: Ed
«bW». lb FLq KIU Of Bd UFLUNU. lb L KKp Ubw OY LJs DHq U t. lLJs b _Ne s q U b
bW OW IKOW MHCW Ls r d FdW Ub _Ne w UW MNr FKOLU UW Ub d KONr OY LJMNr bt DdIW MW l LUd w MDu Kv b NU.
lb R u b NU v b UU. l u b c NU s q _HU. HEw
UNU Kp JNdw FOb s MU _HU. 7
q Id, dU KV BHW _v Fd Bu
dw
Мануал на русском языке мясорубка Kenwood MG-510 PRO 1600.
Инструкция к мясорубка Kenwood MG-510 содержит подробные картинки, на которых понятно показано куда что нужно вставить, что бы собрать и начать эксплуатировать мясорубку, даже читать не нужно.
Но все же технику безопасности прочитать все-таки стоит. Документ на мясорубку Kenwood MG-510 рекомендует удалить все кости и сухожилия из мяса перед началом его обработки. Орехи проворачивайте порциями, следующую порцию положите только после проворачивания предыдущей.
Продукты проталкивайте только с помощью специального приспособления (имеется в комплекте), учтите, что режущие кромки ножа остро заточены, при мойке, сборке и разборке не порежьтесь! Не используйте насадки от других моделей мясорубок, пусть даже фирмы Kenwood. Шнур имеет достаточную длину, но если для вас он слишком длинный, то намотайте его излишек на специальную скобу в полости мясорубки Kenwood MG-510.
Паспорт мясорубки Kenwood MG-510 не рекомендует подпускать маленьких детей к прибору, особенно при его работе, это же касается и для людей с ограниченными возможностями (инвалиды по зрению).
Мясорубка Kenwood MG-510 предназначена для переработки (измельчения) продуктов (см.пункт инструкции пользователя) только в бытовых условиях. Собрать самому мясорубку Кенвуд мануал на русском. Как собрать мясорубку Кенвуд по инструкции?
The manual for the Kenwood MG-510 meat grinder contains detailed pictures that clearly show where what needs to be inserted in order to assemble and start operating the meat grinder, you don’t even need to read. But still, it’s worth reading the safety instructions. The document for the Kenwood MG-510 meat grinder recommends removing all bones and tendons from the meat before starting its processing. Turn the nuts in portions, put the next portion only after turning the previous one. Push the products only with the help of a special device (included), keep in mind that the cutting edges of the knife are sharpened, do not cut yourself when washing, assembling and disassembling! Do not use attachments from other models
meat grinders, even if made by Kenwood. The cord has a sufficient length, but if it is too long for you, then wind its excess on a special bracket in the cavity of the Kenwood MG-510 meat grinder.
The passport of the Kenwood MG-510 meat grinder does not recommend letting small children near the device, especially when it is working, the same applies to people with disabilities (visually impaired).
The Kenwood MG-510 meat grinder is designed for processing (grinding) products (see the item in the user manual) only in domestic conditions. Assemble the Kenwood manual meat grinder yourself in Russian. How to assemble a Kenwood meat grinder according to the instructions?
Скачать мануал на русском языке мясорубка Kenwood MG-510 PRO 1600.

ᕡ
ᕧ
KENW
OOD
ᕣ
ᕤ
ᕢ
o
n
m
l
k
j
g
f
i
ᕦ
h
KENW
OOD
O
I
a
b
c
d
e
ᕥ
KE
NW
OO
D
KE
NW
OO
D
ᕨ
p
q
r
ᕩ
µ
¸
KE
NW
OO
D
s
t
ƹ
ƺ
KE
NW
OO
D
Ƹ
¹

Меры предосторожности
●
Перед провертыванием
необходимо удалить из мяса все
кости и срезать пленки.
●
Провертывая орехи,
закладывайте их в мясорубку
порциями по нескольку штук.
Очередная порция
закладывается только после
провертывания преьедущей.
●
Вилка сетевого шнура в
обязательном порядке
отсоединяется от розетки в
следующих случаях:
●
●
перед установкой или снятием
деталей
●
●
после применения
●
●
перед мойкой.
●
Обрабатываемый продукт
разрешается продвигать по
подающей трубке только с
помощью специального
толкателя. Использовать для этой
цели пальцы или посторонние
предметы строго запрещается.
●
Внимание: Режущие кромки
ножей остро заточены! При
работе и мойке соблюдайте
осторожность.
●
Насадка должна быть надежно
установлена на мясорубке до
включения.
●
Во избежание поражения
электрическим током не
допускайте попадания влаги в
моторный блок, на сетевой шнур
и на вилку.
●
Пользоваться неисправной
мясорубкой запрещается. См.
информацию о проверке и
ремонте в разделе
«Обслуживание»
●
Использовать не
рекомендованные изготовителем
насадки запрещается.
●
Не допускайте свисания сетевого
шнура там, где ребенок может
дотянуться до него.
●
Для уменьшения длины шнура он
частично наматывается на
специальную скобу в задней
части мясорубки.
●
Детям и ослабленным людям
самостоятельно пользоваться
мясорубкой запрещается.
●
Не позволяйте маленьким детям
играть с лектроприбором.
●
Данный электроприбор
предназначен только для
бытового применения.
Перед включением в сеть
●
Убедитесь в том, что напряжение
электросети в вашем доме
соответствует указанному на
основании электроприбора.
●
Данный электроприбор
соответствует требованиям
Европейского экономического
сообщества 89/336/ЕЭС.
Перед первым использованием
1 Удалите упаковку.
2 Промойте детали мясорубки (см.
раздел «Уход и обслуживание»
Мясорубка
моторный блок
насадка
зажимной винт
выключатель
переключатель обратного хода
гаечный ключ
кольцевая гайка
решетки мясорубки: для мелкой,
средней и крупной рубки
нож
шнек
корпус мясорубки
лоток
толкатель
крышка толкателя
миска/крышка
61
Русский
См. иллюстра ии на передней страни е
k
m
l
b
c
d
e
f
g
h
i
j
n
o
a

Сборка
1 Вставьте шнек в корпус
мясорубки.
2 Установите нож — режущей
кромкой наружу ᕡ. Проверьте,
что нож установлен правильно
— иначе вы можете повредить
свою мясорубку.
3 Установите решетку мясорубки
ᕢ. Выступ должен войти в паз.
●
Решетку для мелкой рубки
следует использовать для рубки
сырого мяса, рыбы, мелких
орехов и вареного мяса для
пастушьей запеканки или мясного
хлеба.
●
Решетку для средней и грубой
рубки следует использовать для
рубки сырого мяса, рыбы, орехов,
овощей, твердого сыра, а также
очищенных от кожуры или
сушеных фруктов для
приготовления пудингов и
мармелада.
4 Установите кольцевую гайку (не
затягивайте).
Как пользоваться
мясорубкой
1 Ослабьте зажимной винт
поворотом против часовой
стрелки ᕣ и вставьте насадку в
гнездо ᕤ.
2 Последовательно поворачивая
насадку в противоположных
направлениях, добейтесь ее
установки в рабочее положение
(до щелчка). Затяните зажимной
винт.
3 Заверните рукой кольцевую гайку.
4 Установите лоток. Подставьте под
мясорубку миску/крышку, чтобы
собирать в нее порубленные
продукты.
5 Замороженные продукты перед
рубкой должны быть
полностью разморожены.
Нарежьте мясо полосками
шириной 2,5 см.
6 Включите мясорубку ᕥ.
Обрабатываемый продукт
продвигается по подающей
трубке с помощью толкателя.
Излишние усилия при подаче
продукта могут стать причиной
повреждения мясорубки.
●
В случае остановки или заедания
мясорубки во время работы ее
необходимо выключить. Нажмите
переключатель обратного хода ᕦ
на несколько секунд для вывода
из механизма застрявших частей
продукта. Откройте насадку и
удалите продукт, ставший
причиной остановки.
Насадка для набивки
колбас
Основание*
Большая воронка* (для толстых
колбас)
Малая воронка* (для тонких
колбас)
* Хранится в выталкивателе
Используйте свиную оболочку
для большой воронки и овечью
оболочку для маленькой воронки.
Или, если вы не используете
оболочку, перед приготовлением
колбасы обваляйте ее в
панировочных сухарях или в муке
со специями.
Как пользоваться
насадкой для набивки
колбас
1 Если вы используете оболочку, то
сначала отмочите ее в холодной
воде в течение 30 минут.
2 Ослабьте зажимной винт
поворотом против часовой
стрелки ᕨ и вставьте насадку в
гнездо ᕩ.
3 Последовательно поворачивая
насадку в противоположных
направлениях, добейтесь ее
62
p
q
r
Рецепт приготовления свиной колбасы, Насадка для приготовления «кебе, Как пользоваться насадкой для приготовления «кебе
Рецепт приготовления фаршированного «кебе Чат поддержки
- Изображение
- Текст
63
установки в рабочее положение
(до щелчка). Затяните зажимной
винт.
4 Вставьте в корпус мясорубки
шнек.
5 Установите основание µ — выступ
должен войти в паз.
6 Если вы используете оболочку
для набивки колбас, откройте ее
с помощью струи воды. Затем
установите нужную воронку под
струю воды и натяните на
воронку оболочку.
7 Установите воронку на мясорубку
и заверните кольцевую гайку ¸.
8 Установите лоток.
9 Включите мясорубку.
Обрабатываемый продукт
продвигается по подающей
трубке с помощью толкателя.
Излишние усилия при подаче
продукта могут стать причиной
повреждения мясорубки. По
мере наполнения оболочки
постепенно снимайте ее с
насадки. Не перегружайте
мясорубку.
10Скрутите оболочку, чтобы
получить колбасу.
Рецепт приготовления
свиной колбасы
100 г сухого хлеба
600 г свинины, нежирной и
жирной, нарезанной полосками
1 яйцо, взбитое
5 мл (1 чайная ложка) кухонных
трав
соль и перец
1 Замочите хлеб в воде, а затем
отожмите.
2 Пропустите мясо через
мясорубку в чашу.
3 Добавьте остальные ингредиенты
и хорошо перемешайте.
4 Сделайте колбасы (см. выше).
5 Обжарьте на сковороде, гриле
или в духовке до золотисто-
коричневого цвета.
Насадка для
приготовления «кебе»
Формовочная деталь*
Конус*
* Хранится в выталкивателе
«Кебе» это национальное блюдо,
которое готовят на Среднем
Востоке, оно представляет из
себя обжаренную во фритюре
оболочку из молодой баранины и
вареной, высушенной пшеничной
крупы с начинкой из мясного
фарша.
Как пользоваться
насадкой для
приготовления «кебе»
1 Ослабьте зажимной винт
поворотом против часовой
стрелки ¹ и вставьте насадку в
гнездо Ƹ.
2 Последовательно поворачивая
насадку в противоположных
направлениях, добейтесь ее
установки в рабочее положение
(до щелчка). Затяните зажимной
винт.
3 Вставьте в корпус мясорубки
шнек.
4 Установите формовочную деталь
ƹ — выступ должен войти в паз.
5 Установите конус ƺ.
6 Наверните кольцевую гайку.
7 Установите лоток.
8 Включите мясорубку. Для подачи
смеси используйте толкатель.
Нарежьте на порции.
Рецепт приготовления
фаршированного
«кебе»
Внешняя оболочка
500 г молодой или нежирной
баранины, порезанной на полоски
500 г и вареной и высушенной
s
t
пшеничной крупы, промытой и
отжатой
1 маленькая луковица
1 Используя решетку для мелкой
рубки, порубите в мясорубке
попеременно отдельными
порциями мясо и крупу, добавив
лук перед последней порцией.
2 Перемешайте, а затем порубите
еще два раза.
3 Протолкните через насадку для
приготовления «кебе» (см. выше).
Фарш
400 г молодой баранины,
порезанной на полоски
15 мл (1 столовая ложка) масла
2 средних луковицы, мелко
порубленных
5-10 мл (1-2 чайных ложки)
молотого душистого перца
15 мл (1 столовая ложка)
пшеничной муки
соль и перец
1 Используя решетку для мелкой
рубки, порубите молодую
баранину.
2 Поджарьте лук до золотисто-
коричневого цвета. Добавьте
молодую баранину.
3 Добавьте остальные ингредиенты
и варите в течение 1-2 минут.
4 Дайте стечь лишнему жиру и
остыть.
Как приготовить «кебе»
1 Пропустите смесь для оболочки
через насадку для приготовления
«кебе»
2 Порежьте на куски длиной 8 см.
3 Сожмите один конец трубки,
чтобы запечатать ее. Заложите
фарш (не слишком много) с
другого конца трубки и
запечатайте этот конец.
4 Обжарьте во фритюрнице с
горячим (190°С) маслом в
течение 6 минут или до
золотисто-коричневого цвета.
Уход и очистка
Моторный блок
Протереть влажной тряпкой и
просушить.
Насадка мясорубки
1 Отверните кольцевую гайку рукой
или гаечным ключом ᕧ и
снимите ее. Вымойте все детали
горячей мыльной водой, а затем
высушите. Не рекомендуется
мыть детали в посудомоечной
машине. Никогда не пользуйтесь
раствором соды.
2 Соберите мясорубку.
3 Протрите решетку растительным
маслом, а затем оберните ее
жиронепроницаемой бумагой,
чтобы предотвратить
обесцвечивание/ржавление.
4 Если вы храните насадку-
измельчитель на блоке
электродвигателя, используйте
миску/крышку в качестве
пылезащитной крышки, надев ее
на лоток.
5 Вы можете снять с толкателя
крышку и использовать его как
футляр для хранения насадок
для набивки колбас и
приготовления «кебе».
●
Поврежденный шнур питания
электроприбора в целях
безопасности подлежит замене
на предприятии фирмы Kenwood
или в фирменном сервисном
центре Kenwood.
Если вам необходима
консультация по поводу:
●
использования электроприбора, а
также
●
обслуживания, приобретения
запасных частей или ремонта
(как гарантийного, так и
послегарантийного), свяжитесь с
магазином, в котором вы
приобрели электроприбор.
64
Kenwood Limited, New Lane, Havant, Hampshire PO9 2NH, UK
www.kenwood.co.uk
56117/2

09:29
Ремонт Мясорубки Kenwood Кенвуд PRO 1600 / ЗАМЕНА ШЕСТЕРНИ
15:11
Полный ОБЗОР и ТЕСТ Мясорубки KENWOOD MG520, MG515 Pro 1600
03:50
Отзыв о мясорубке KENWOOD MG510
02:49
Мясорубка Kenwood MG 515 — видео обзор
00:37
Мясорубка KENWOOD MG515
03:18
Мясорубка Kenwood PRO 1600
Нажмите на кнопку для помощи