

NEWLONG INDUSTRIAL CO., LTD.
BAG
SEWING
MACHINE
I
No.1
For Operator Safety
Thank you for purc h a s ing t he N LI
Model DHR-6 Bag Sewing Machine Head.
• This
manual
contains the instructions
using
the
Model
DHR-6 Bag Sewing
sure to read and understand this
use
the
machine
• Keep this manual near
reference.
when
lending
company.
• Please order this
lost.
• The contents
prior notice
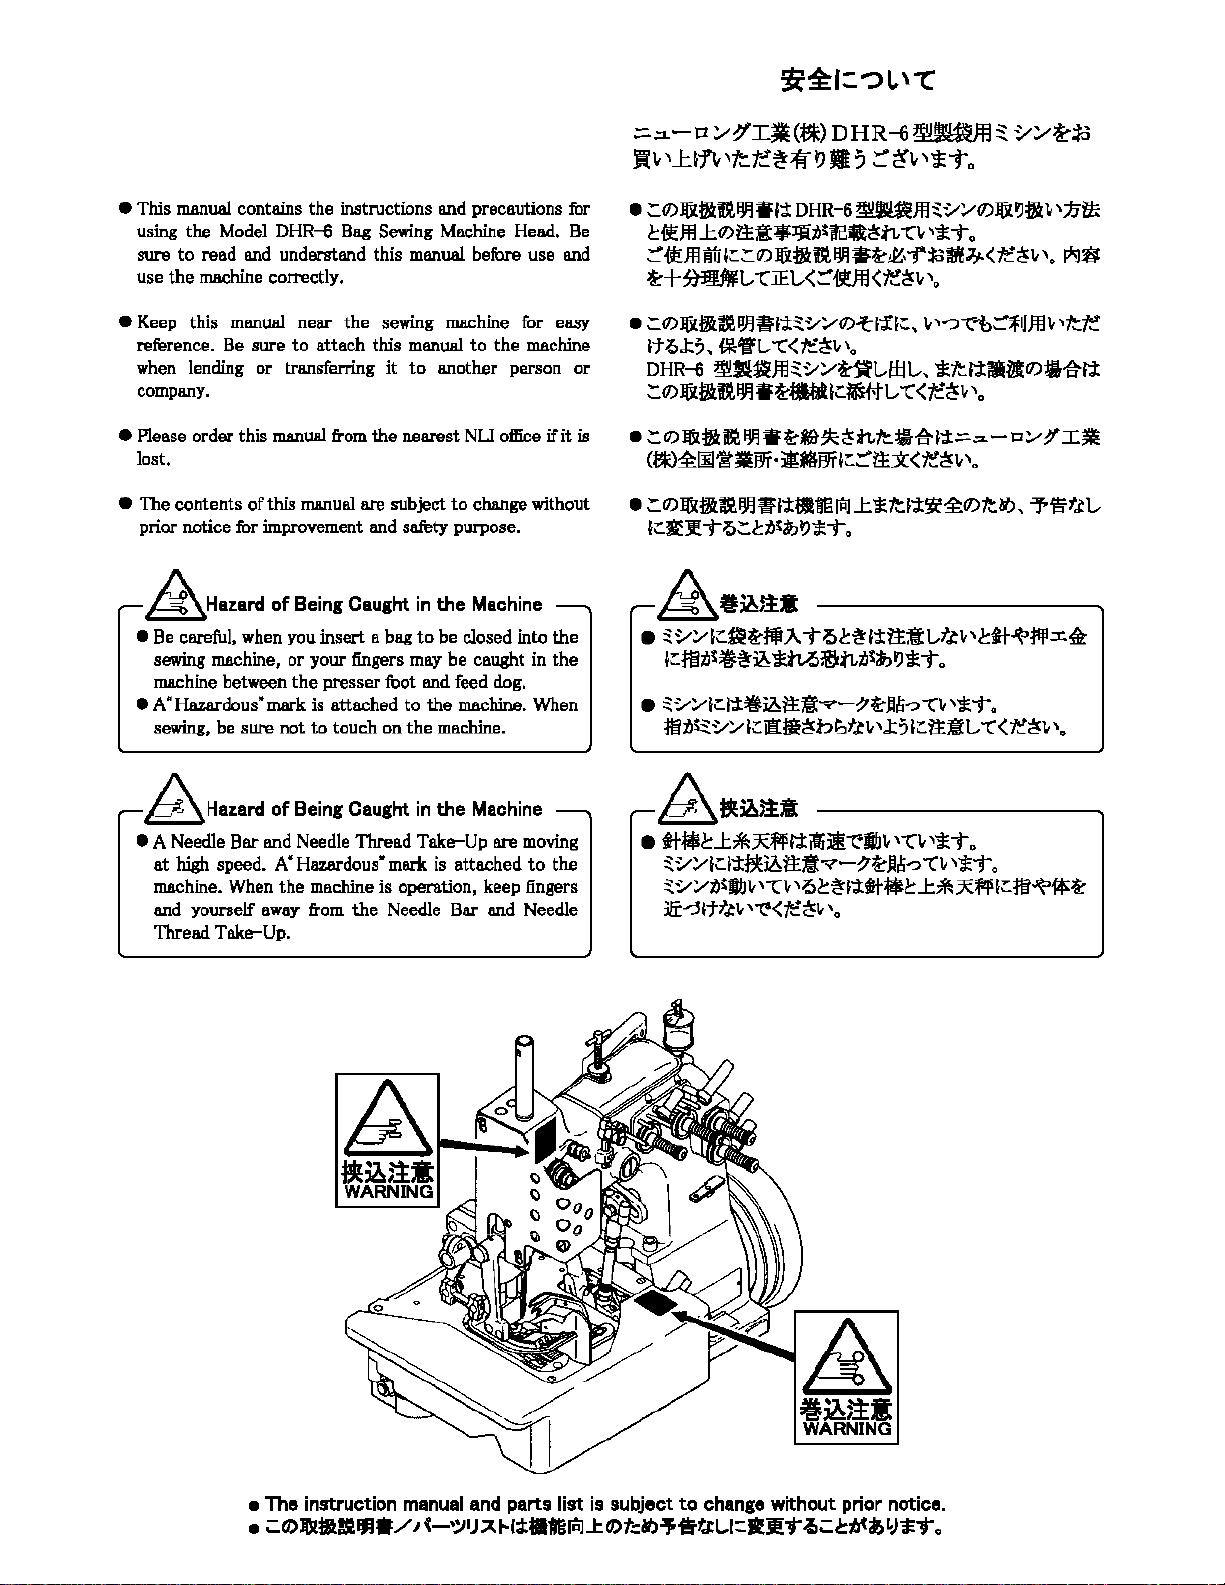
&Hazard
• Be careful, when
sewing
machine between
•A·
Hazardous·
sewing, be sure not
correctly.
the
Be
sure to attach this
or
transferring
manual
from
of
this manual are subject
for
improvement
of
Being
Caught
YoU
insert a bag to
machine, or your fingers
the
presser foot and feed
mark
is attached to the
to
touch on
the nearest NU
and safety purpose.
and
precautions
Machine
manual
sewing machine for easy
manual
it
to
another person
to
in the
be
ma:y
be caught
the
machine.
Head. Be
before use and
to the
office
change
Machine
closed into
dog.
machine.
for
machine
or
if it is
without
the
in
the
When
:=..::i.-rz :Y!>’°.I•(t*)
_R1,,J:l1″‘~tt~11~J1,
•
;:Q)Jtk•tt~•f:t
~fscffl
J:Q)ttt:•lJltilte.8~.tL -n,
DHR-6~
DHR-6
~
1/:Y~;td
:::-~1,»~T,,
~ffl~v~Q)Jlk~fl1,
‘*To
‘7i~
~fscfflKiH::;:Q)JlkflUM•~~,-ftdWf~<t.::~1,,0
~+~t,
•
;:Q)
11kffi~
lt-o.t;,
DHR-6
;:,Q)
11kffiit~-~,hl;:~L,
-CJE.t,<
IJJHIJ’1~v~Q),t
{*/fl,
::’ M
-c<r.:~1,,0
<te~v
J’f
l:::,
~,u~Jfl~v~Mfl,l:ijl,,
«(
‘o
1,
,—::i-c1,~1Jffl
*1tt.J:llill11J!l1tt.J:
<t.::~1,
,,,
1,
e;:Q)Jtk•U~-~~~~tLtt.•1tt.J:=.::i.-o~,I~
cm½1111t•m·i!llfm1:::.::-ttx<te~1,
•
:.11J
llilffili~
i!Fl’1M~
!Pl
J:
* ft.
,,,
1-x~½Q)ft.afJ,
7fit.t
1.:RJ! To:.ttit~t.>*T,,
&-~~-
•
~v~l.:a~t1JA-tot$f±tt:tL-t~11,l:tt~tfll.x~
l::tt)t,S~$l6*Mifctl,t,S~tJ*-t,,
• ~v~•~•’1~l6tt ……
m.o~~v~l;:a•~v~t.,!1,
-!l~Jli!i-:>-Cll
‘*i°»
,.t%:.tt•t-
a
-c
<~~1,
‘-·
P9~
,tt.te
t,
~
• A
Hazard
Needle
Bar and
at high speed.
machine. When the
and yourself
Thread Take-Up.
of
Being Caught in
Needle
A•
Hazardous»
machine
away
from
the
the
Machine
Thread Take-Up are
mark
is attached
is operation, keep fingers
Needle
Bar and
moving
to
the
Needle
.~
~]6~-
• tt-f*~..l:*~fft.J:itH!k~IIJ1,
~vYl;:•’;J:~JAtttl…,.-~~Jl~-:>
~v~t,11JJ1,
i!r—:Sltf~l,
,-c1,
,;s2::~1’1tH$~..l:*~ff
‘~<~~1,
,,,
,-c1,
‘*T.,
«Clt
‘°*To
l=ti~i*~
• The instruction manual and parts
•
~O)JDl
••
lJ.I.
/ I {-•:JIJ
At-lctatBtai
list
is subject
..t
O)f.:NJ~i!t(i:L.1::JIJ!»t
to
change
without prior notice .
-1,~ciJ(it)
‘:J;l;»t
0

WARNING
••
PERSONAL
RESULT
SAFETY
NOT
OBSERVED.
1.
BE
SURE
FREE
OF
ALL
OIL,
RUBBISH
INJURY.
2.
DO
NOT
OPERATE
AREA
OR
THE
MACHINE
TYPE
NOR
3.
DO
NOT
OPERATE
INSTRUCTION
4.
DO
NOT
OPERATE
THAN
SPECIFIED
5.
BE
SURE
MACHINE
ELECTRICAL
INJURY
IF
THE
PRECAUTIONS
THE
AREA
SURROUNDING
HAZARDS
OR
UNDER
IS
WATER-PROOF
MANUAL.
SAFETY
SUCH
ANYTHING
MACHINE
WET
NOT
IN
CONDITIONS.
AN
EXPLOSION-PROOF
TYPE.
MACHINE
MACHINE
FOR
IS
ON
THE
MACHINE.
CONNECTED
GROUND
MAY
FOLLOWING
ARE
MACHINE
AS
FIRE,
THAT
CAN
AN
EXPLOSIVE
BEFORE
VOLTAGES
TO
BUILDING
(EARTH).
IS
WATER,
CAUSE
READING
OTHER
~~©~~~§~~~L~~?~~~
l:::l~t:-Ml:©ffli~
L <
t::
~
I,
\0
1.
•
~
0)
)!] ill
~..
JJ<..
im..
(f;:~l,\o
2.
-~O)ffi;l!iO)
f.1,f.1,7a>.±Jl—c:l;t-ftffl
.:.0)-~l;t
..
c.
I=
$
i!it
i:iJ:I!~
if>
7a>•:tl
Rn-~.
t.;.
«)
a::»t©~~~
~
~
.:.
«t»
t.;
ct.it~
• ll<m!it.iti~Ji.~I=
L,tJl,\»»(:
Rnm!i~—C:l;tN.,
lvo
3.
Jljif&mBJ.lif~~»(McA,—c:f.l,
t ( f;:~
4. -~O)}~JE’.fflff
~l,\o
5.
7-7..~t.it~*.,’c~h t1.,7a>$~.fit~
f;:~l,\o
l,\o
J~H’l-
—c:l;tjifii
1:,—~jifii
mt
~
c.
t.;
1.
,t.i,.fitt.i,cY)
< t::~
(,\0
«)
Lt.;
I.’
—c:
Lt<
L
7a>
!k
t
‘tit
<
t::
L
6.
BE
SURE
POWER
BEFORE
PARTS
PERFORMING
REPLACEMENT,
CLEANING.
7.
DO
NOT
OPERATE
COVERS
8.
DO
AND
REMOVED.
NOT
TOUCH
MOVING
OPERATION.
9.
BE
SURE
MACHINE
(LEVEL)
SURFACE
MAINTENANCE,
ADJUSTMENTS,
10.
BE
SURE
THE
COMPLIES
11.
DO
»
NL!»
WITH
NOT
USE
GENUINE
(AND A IR
MACHINE
ADJUSTMENTS
MACHINE
KNIFE,
PARTS
NEEDLE,
WHEN
IS
PLACED
WHEN
PARTS
CLEANING
MATERIAL
THE
SPARE
TO
BE
MACHINE
PARTS
PARTS.
SUPPLY)
IS
OFF
MAINTENANCE,
OR
WITH
GUARDS
PULLEY,
MACH I NE
AND
BELT
IS
IN
ON A SMOOTH
PERFORMING
REPLACEMENT,
OR
STORAGE.
SEWN
OR
CLOSED
SPECIFICATIONS.
OTHER
THAN
6.
•~O)~iiffi
AAl=~»fffl;Ji
f;:~l,\o
7.
ii~1JJ{-t.i<~nt=~~—c:l;t·~~jifii
fJl,\»»(:( f;:~l,\o
8.
..O)jifji
~Ji.,
«-t
fJl,\»»(:( f;:~l,\o
9.
•~O)•iiffi·!B~3′.cm-~•-:m~~~~O)
~1=11:qr
10.
ifl;Js-3
7a,
f.1,-fitf.1,cY)
11.
«=-.:i.-Cl/~I~(*l)»
ilffl
Lt.;
• !B~3′.cm.
C.&ttI7-;Ji)
cp
l;j:
7.J
‘~
O)·fttt1.11., t 1.
i;
t.;:t1rffl=i’fi1.
c.
«t»
7a>~*1t.it-~O)f±~l=-€.—:i t
t <
t::
~
I.’
1: <
t::
~
5( -,.
,7a,
‘t
I,
\0
I.
‘o
ru11~
$t
._
~rffl=
<
t::
til!iE!B~~~l;t
• ~11:m~O)
~~-:it<
-;/-
11-¥
~
1.
,0
L
1) -._
~Mn
(,\
Identifying and Ordering Parts
Cautions When Using the Machine
Maintenance
Where the construction permits, each part
all
its part number. On
and
part name
Safety Rules
To prevent personal injury:
All
power sources to the machine must be turned
•
before threading, oiling, adjusting or replacing parts.
All
cover and guards must be
•
machine.
•
Do
not tamper with safety cover, guards, etc.,
machine
model name
is
in
orders, please include part number,
of
machine.
in
position before operating
operation.
is
stamped with
Safety Precautions
1)
Always
adjusting the machine or replacing parts.
2)
Wear safety glasses.
turn power off before threading, oiling, and
off
while
•
:=.=1-
-o:.,,~-I~
itililE
ti%fb
:a:-~-Om
:::·r±.x(J)~i-;:1:,
•
<tt~i.
\0
(~)
~OO~~ffl·~~ml;:.f’;:!: DHR-6
L,
—c
:Jo~
~To
/»-o/!J?-J—(1)/»-o/*%,1:~~—c:-:::·mjf-
•*fflL~~OO~~&O*ffl~(J)~-~~-~~-~
(J){i:!!l!f-0mftc1::—C:-/g¥~
f;:.
< v ,~_.g.l’i,
:Jo
J’l
v
‘LITv
‘tctc~
~L,tc:=.=1—01/~-I~(~)~OO~~Pfr·~mm1;:.~~m
<tt~v
‘o
j\!;j~(J)~.
1/1/:ffi:%:a:-:::·mjf-<tc~v
1>
~~~~
®&3′.t~.
• *mn(J),l:~(J)*ifilL,, *(1)3′.t~.
f*»‘f,¢.e~f’F~(J)irrr1;:.~,—rt7JJ:a:-m-::i—c<tt~
~fl~,
‘~T
~~:ffi:%, ~1/1/.lm®~,
J:5:Jol»lv
‘v
‘fcL,~»t»o
*1’i71:!l.
v’o
2)
W!Bl!ffp~(J),l:~l’i’ti:V:JJ
*(J)*ffl
:a:-:Jo»t»T~
L,~»t»
(J)
~
w.Bl!f.
o
3)
Make
sure, before starting the machine, that
and shields are
4)
Do
not touch on the machine when it
5)
Turn power
before you put your fingers under the cutter blades and
the needles to adjust.
6)
Do
not touch on the machine when it
in
place and closed.
is
off
and make sure the cutter does not operate
is
run.
run.
all
covers
in
mind
• Please keep
maintain the machine
• Thread fuzz or dust must be cleaned
throat plate,
after the day’s work.
• Wipe the area easy to rust with
• Check the machine for loose screws and tighten them, if
any, once a month.
• Good
maintenance
to handle the machine carefully and to
in
good condition.
with
air or brush on
in
the groove of feed dog or around looper
oil
cloth.
will
prolong
the
machine life.
4)
.iJ
/'{-ftc1::;vt1¥J~-::i
—Cv
,Q;:_,1::a:-~~
L,
—c;v,G~~L,
—c
tc~v\o
5) *(J)-fl;:.-¥:a:-AnQ,1:~1’i,
f~~W!ffl!f
:a:-~~L,
(J)
,1:~1’i,
~,
—c;v,Gf’F~:a:-rr-::i—c<tc~v’o
• ~1/1/llli’tf~l’i~!Wft1J,~ft$
r±.~~<
• —
~-
I&Wl5
,1:,1:t
f::l
(J)fp~;vt~TL,~L,tcG,
1v-/»-(J)~:b~1;:.~~-::itdi::.~~l’i~hv’l;:.I&~
~,—rt7JJ:a:-m-::i—c<tt~i.
—rt7JJ:a:-m
~~1/:.,,;vtllJ;v,ftv
Jl1=1;v>G/±:l*L;vt-::i—Cv
1;:. ~ 1;:.l!f-Om
1;:.,tA1Ht—c
*fi(J)L,
‘o
,;:_,1:
‘~To
<
tt~v
‘o
~!J~(J)r#(J)
~v’—C<tc~v\o
• -¥Ah(!).& L,~U’i~~(J)~~f;:.J&9L,~T(J)—c:’:::·r±.~
<tc~v\o
<
ii
CONTENTS/
1.
Specifications/fr~
2.
Threading/*ill,
3.
Lubrication/~nb 4
4.
A<tjusting/iffljg
1.
2.
3.
4.
5.
6.
7.
Setting
Setting
Setting
Setting
Setting
Setting
Setting
the
Needle
the
Overedging Lower Looper fitJ,tJ<LJffl»»FJL,-1{-0)~;E’. 6
the
Needle Bar Height
the
Overedging Spreader
the
Thread Retainer
the
Combined Chain-stitch Looper 2
the
Combined Chain-stitch Cross Looper 2 mJ1a1,
———————
——————~fO)Joli.tn)!——————5
~t,$0)
~
~
fiti,tJ<LJffiA:1v•;,1t-O)~JE’.——-7
~H.!JI]=\=-
A
O)~JE’.————-9
~
{X
m:J1a1,,Jt.,-1~-0)~JE’.——9
‘~H.IJI]=\=-
B
O)~;E’.
…………….
2
3
5
6
10
8 Setting
9.
Setting
10.
Installing
11.
Setting
12.
Setting
13.
Setting Edge Guide and Stitch Tongue
14.
Adjusting Stitch Length a
Parts
List/$~~····························································································································15,.,.,,,.,33
Numerical
Diagram
Screw ,Nut &
the
Needle Guard
the
Lower Feed
the
Throat Plate Support
the
Upper Feed
Presser
Index
of
Dog
Dog
Foot
Presser
Parts/
I
Washer/*~
~t:fl-~’O)~;E’.—————11
«»F~LJ~O)~JE’.————-11
~HJ.i~70)1fXi-t————11
..t~
LJ~O)~;E’.
:j:l:jl.I
~O)
ff.jJ
~;E
JE’.:ml=JE’.:mffiO)~;E’.
El
~;O)~;E’.
~-‘-Y~
S 1
·····················································································34,35
..
T’.:11—
..
r’J’:J~-‘t’-
···················································36
12
13
14
14
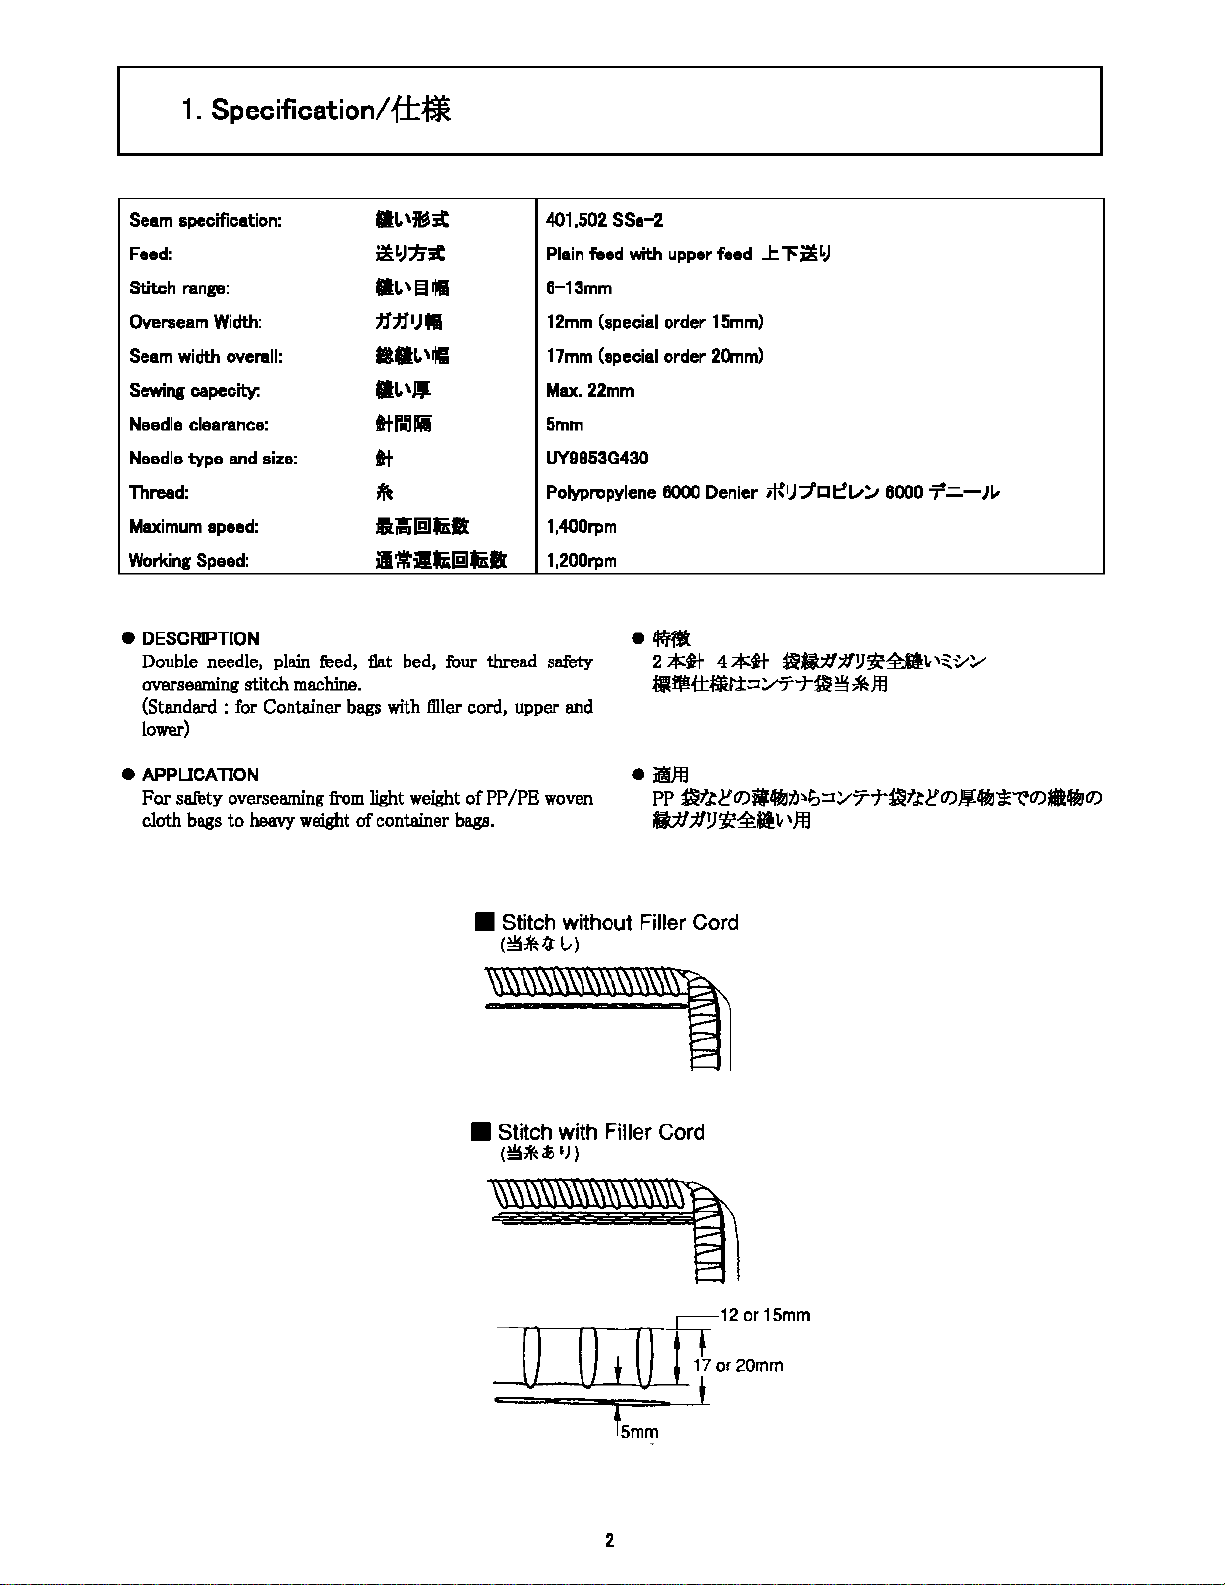
Seam
1.
Specification/
specification:
f.tW
a1.,~it
401,502
SSa-2
Feed:
Stitch
range:
Overseam
Seam
Sewing
Needle clearance:
Needle
Thread:
Maximum
Working
e
DESCRIPTION
Double
overseaming
(Standard :
lower)
e
APPLICATION
For safety overseaming
cloth
Width:
width
overall:
capacity.
type
apeed:
Speed:
needle,
bags
and size:
stitch
for
Container bags
to
heavy
plam
machme.
weight
m’:.11.iit
a1.,E1•
:fl:fl•J•
••
1,\ltl
.l,\jJ:
ttrii&:1111
tt
Kt
Aili!l&e
•’*•&11&•
feed,
from
tlat bed,
light
of
contamer
with
weight
four
filler
bags.
Plain
6-13mm
12mm
17mm
Max.
5mm
UY9853G430
Polypropylene
1,400rpm
1,200rpm
thread safety
cord, upper and
of PP /PB
woven
feed with upper feed
(special order
(special order
22mm
6000
15mm)
20mm)
Denier ;l’:
•U
2 ** 4 **
-~tt~t.t::J~’t»ti
iilJfl
•
pp
i!2fl~O)-*’t,~;::J~77″~fl~O))J1tJi~0)-4*/0)
ai/;f/!J’tc~-1,
..I:
«Fm
LJ
1
J:1cn:v!,,
6000
~aff#!J~~1,,~v~
~
*Jfl
,Jf.1
«T=.-JL,
• Stitch without Filler Cord
(
~,*~
~)
• Stitch with Filler Cord
(~*.i}IJ)
m~
TT12or15mm
] 0 I Q j
f
smm
‘{°’2omm
2
2.
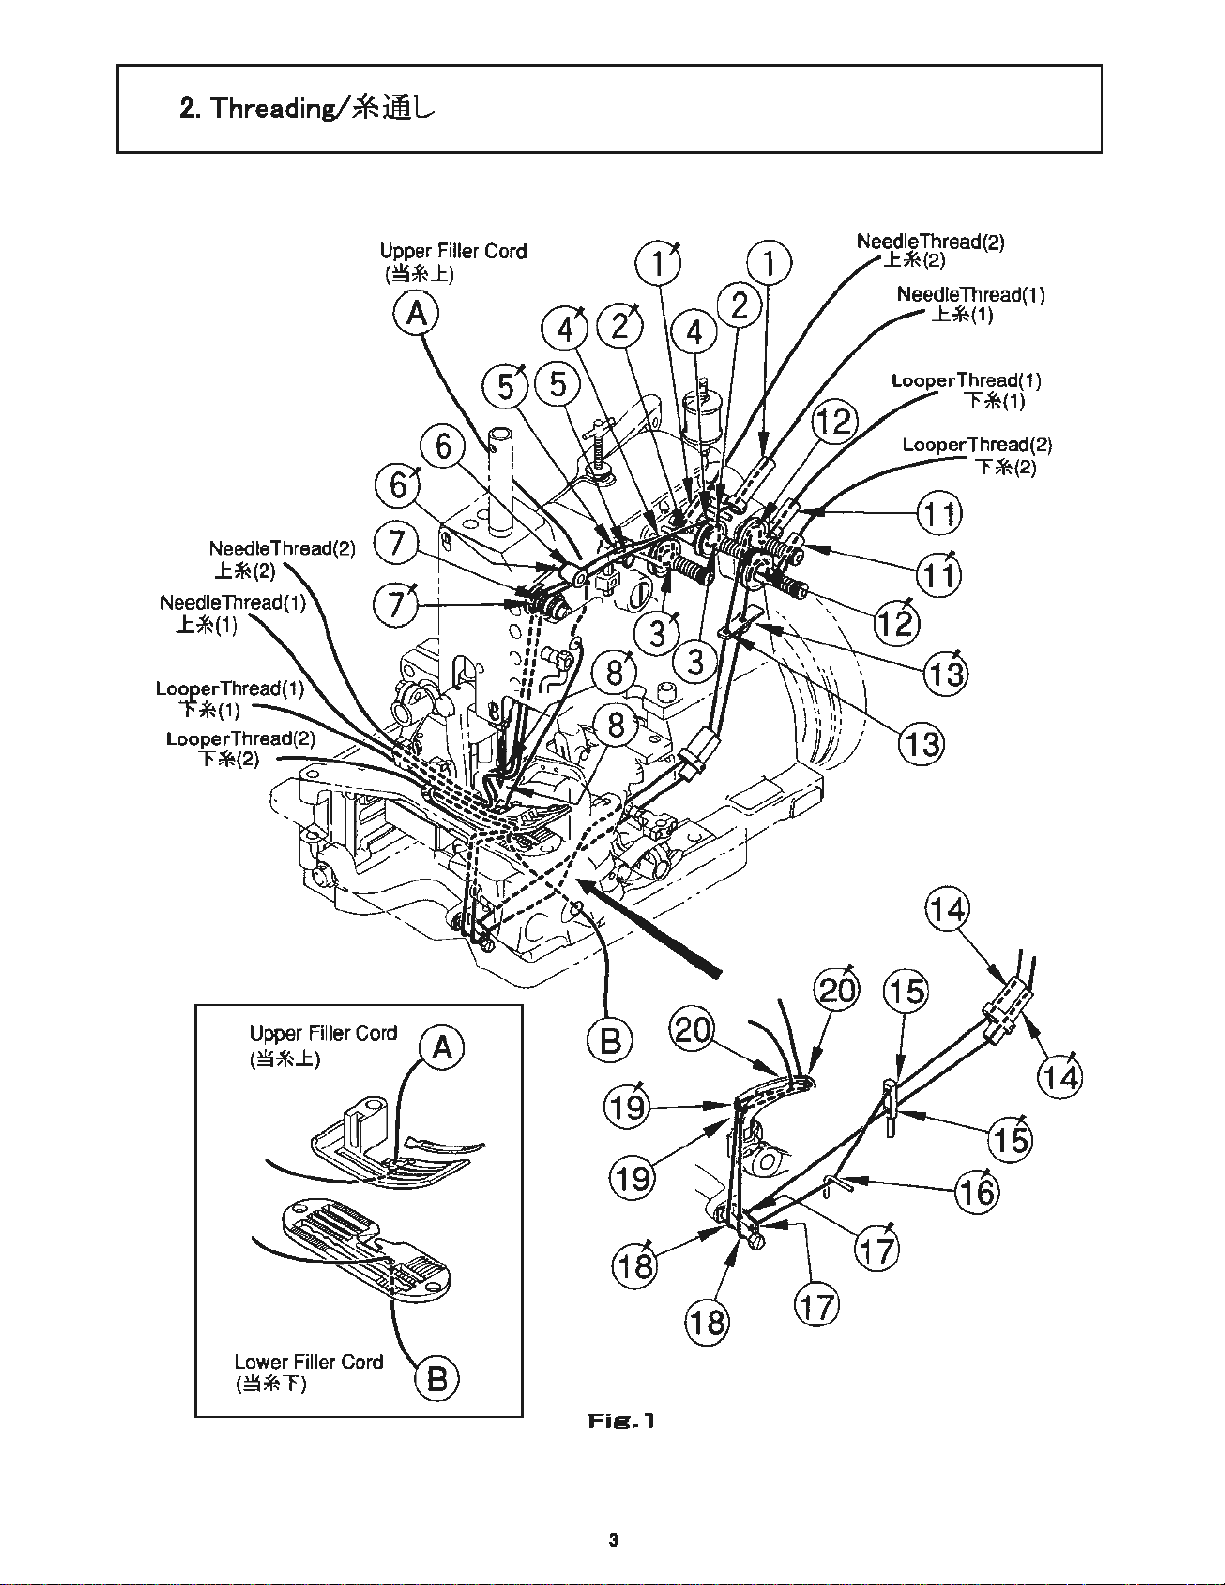
Threading/*
ii
L,
T*-(2)
Upper
(Mi~d
Filler

Cord
Lower Filler Cord
(~*-1′)
Fig.1
3
Oil
machine
machine,
are
not,
troubles.
viscosity
3.
Lubrication/M
at
red
marked
make
sure
sight feed oilers
refill. If
Uae
8
to
machine
white
12
cSt at
is
spindle
40″C).
holes
run
dry,
oil
#60 or
Example:
;Eb
daily.
are
tilled with
it
will
be
equivalent
Shell
Before starting
oil.
If
they
bound
or
cause
(kinematic
Tellus
Oil
010.
fi
1:1,
Jlliliairul.:.~i*$~-?O)#lt»lt1′:ti~;~ilbL:t=<~~
1,,0
-~fifl;::;;t-.-(7-l;::;;t-,f/v;bSJv:,»‘(l,’¢tJ~Ji1Jl,, /.Pft
•ttLt.fMML-,
~ilbilq;;+~»tiT~
tt~rt-tti~;,
;;f-.-(
Iv
12cSt/40″C)
(-011
:Vxlv’77A::t-.-f
~t,
«‘C<~~i.,
..
llilfi~#~ia:~~t,
~-i*~Ufiit, «‘C<t!~li’.,
f’;t
SA
t»:.,,
f:
Jv#60
~~U<~~1,
1v
ClO)
ffi
‘o
‘o
~
0)
;;f-.-(
..
‘M(liJO)_ffil!;I~
Iv
(
lb*6
r Oiler
lf
8-
Lubrication
*SjeJ
‘
Fl
4
•.
2
4.
Aqjusting/UJ m
4-1.
Setting
1)
Remove
before adjusting
forward until
Remove
2) With
new needles
as
with
needle should face in
Fix
on
3) Having installed
check
the
4)
To
loosening screw © on
Tighten screw © after adjusting.
the
Needle
the
top
the
needles.
the
needle holder kept in
(Fil\.lrea 3 and
cover, upper feed dog, and presser foot
the
sewing machine. Turn
the
needles reach
@ and © into
they
will go.
the
shank
the
needle with screw
the
flat on
that
center.
adjust when necessary,
The
needle point should face downward
put
into
the
the
forward direction,
the
needle.
the
needles, turn
left needle © enters
holder.
@.
the
4)
the
highest position.
the
highest position, insert
the
needle holder
The
long groove on the
or
toward
Be sure to apply
the
pulley forward and
the
throat plate hole
turn
needle
needle
bar
bar
coMection.
the
pulley
as
deep
YoU.
the
screw
@ after
4-1.
tf-O>af..tlt(Fig3,
Fig.4)
n ~V»~~••i»-0tim:, J:iii:b.,~—
~L,*i»o 7′-!J-~1i1,,7.1p!i}(~J@l,
at
~,(!LjR~»5″l,
2)
tf-t,Sif(t>..l:tl~»‘.Jit&M~
7.1’t,l~**’v1′-,~-••*»t’~L,ib~*i»o
;:(I)~,
*»t
..
;tt,»£i»a
fl-(1)~1,
-t-L-
-c-*~®
,tt~~L,*i»
‘fflf’;l:fiJn C*~v-~—OJJ)
~ft(I)-*~~
..
2
*(l)ifl,1,
J:~!J~,
«(,
l!Jl.x~~
tJ-t,1:fjU:>-.f:tll»‘.J
,tt@©t-*!5c(I)
~li!iJi,
-cS~l’JI
x.
#lffit-ml
,-ci,,
R
Needle Center
itZ
C
B
R
Fia.3
5
Fls.4
4-2.
4.
Acliusting/111
Setting
the
n
Overed&inc
Lower
Looper
(Figures
5)
4-2.
MfJ,titY
Jl:I
«»F
Jr1
<-O)il:JE:(Fig.5)
1) Remove
plate support and needle guard.
2)
Insert
drive
3) Turn
position.
6mm
4)
To
looper drive and ball joint
so
Tighten
Fix
5)
6) Turn
is
behind
7)
To
forth after loosening screw
the
4-3.
1)
Tum
5.2mm
2)
Check
hole.
3)
To
down
the
base cover.
lower looper @ into
@, and
the
from needle ® center.
adjust when necessary, Loosen
that
the
the
the
0.1mm
the
adjust when necessary, move
0.1mm
Needle
the
from
that
adjust when necessary, move needle
as
h1111d
pulley
foJward
At
this time, check
looper point is
the
nut
after adjusting.
lower looper in place with screws ©
pulley forward
lrom right needle @
needle.
gap
is achieved.
Bar
Height {Figure 6)
pulley
forward
the
center
looper bottom coincides with top
required after loosening needle
throat
tighten screw ©.
until
to
make sure
until
of
right needle
screw@.
Tighten
the
screw after adjusting.
plate, feed dog,
the
hole
the
needle is in
that
the
@,
and move
6mm
from
when
the
@.
Tighten
the
throat
at
the
rear
of
looper
the
lowest
lower looper point
nut
® holding
the
looper drive
needle
center.
and
that
the
looper point
the
looper passes
looper drive
the
screw when
looper @ point is
@.
back
the
and
@.
of
needle
bar
@
up
and
bar
connection
1) :&:im:~-A;b.1{-~ftai,
~!)~,
tt~~-7.&Vtt;(f
-~a>~L-*To
2) r 1v-.1.::-@~1v-.1{-,a@O)f&.n0)~,=~t..i6]j.
*~©
3) 7′-!J-~fl1,,jjlfill=J1It..tttisJ&:t rtis-=>tturtRi:, r
is
/v-/{-O)~-t,S;Ei».fl1JO)ft@O)tf-°$J:
1,
4) •••~i,-.,.::-,a~~-,v~-1:.—1-@a-J.1:ao-c1,,.r,r
:Yl-®~aao-c,1,-.1{-,a~ibti’llt.,, ,1,-.1{-0)~{ll~s
tl-‘$.J:!J
1,,0
5)
~·~~©@t=-cr
6)
7′-9-~*fi,
ti-@
ifi
1>
•••~v-.1~—aO)*V©~•ao-c,i,-.,.::—a~Mt&
l~lbti~t.,,
~\,’o
4-3.
1)
7-!J-t-ai,,jjlfill~JBL,,
ftO)ft@
2) .:.OJora'»l’,v-.1{-0)r.nOJlli.!:::tl-~O)J:.,nOJtiitJi-
j(l,
3)
illlH±tt~~(l)*v©
ti~t..
•=-ruao
,7.>t,’lliilit.,
,!::(l)lftfHJtl1
-r<r.:~1,
6mm
O)fl-ffl!J
iliia-iiHII
0.1mm
lmtfll1tJ1
tl-*-OJiii~
O)ft°$J:
«Clr
‘oil~8t.,
-CaJJIL,
«C(/i~l,
L-*’t’o
tJ
6mm
‘•
l::f.,e—::,tt1’Il:a»t’-t’o/f-~-af;#lt-C<r.:~
lv-.1~-~af)#lt-c<r.:~1,
‘.nlfil
i;:Jet.,
-c,
11,.,-.1.::-(l)~fl/Mt11~,t)IJJ(I)
‘t’-?>~,
l~f.t.-.:>»C~
0.1mm
(Fig.6)
1v-/{-O)
‘OXJ~i8l..
~Wit
-C<r.:~1,
OJOllR1:*Vf:*i~M•t-r<t-:
,1,.,-.,~-@0J~{lltJ~~,tllJJ
17
5.2mm
l:.fJ:-?>J:;
l::
L,j:»t
-c<r.:~1,,0
f:aao-rtt•®
‘o
~l,
-c*v~•aoat.-1:’t’.
t;:fJ:-:,
.!:::tf-O)tl
‘
..
f:
1:
r
«C
‘o
0
1::11.1
Note
When
you
have
changed
needle position relative
plate.
[see
paragraph
II,- .
4-1.3)]
6mm i
~ ,
(A~ I ‘
‘—7
the
needle bar position, re-check
to
the
needle hole
Flg.6
on
the
throat
B
Looper bottom
i~-,t
-JJi
o:>I
Needle hole top
&t7’J:1;o:>
II
Fis.a
8
4.
Actjusting/lJI
fl
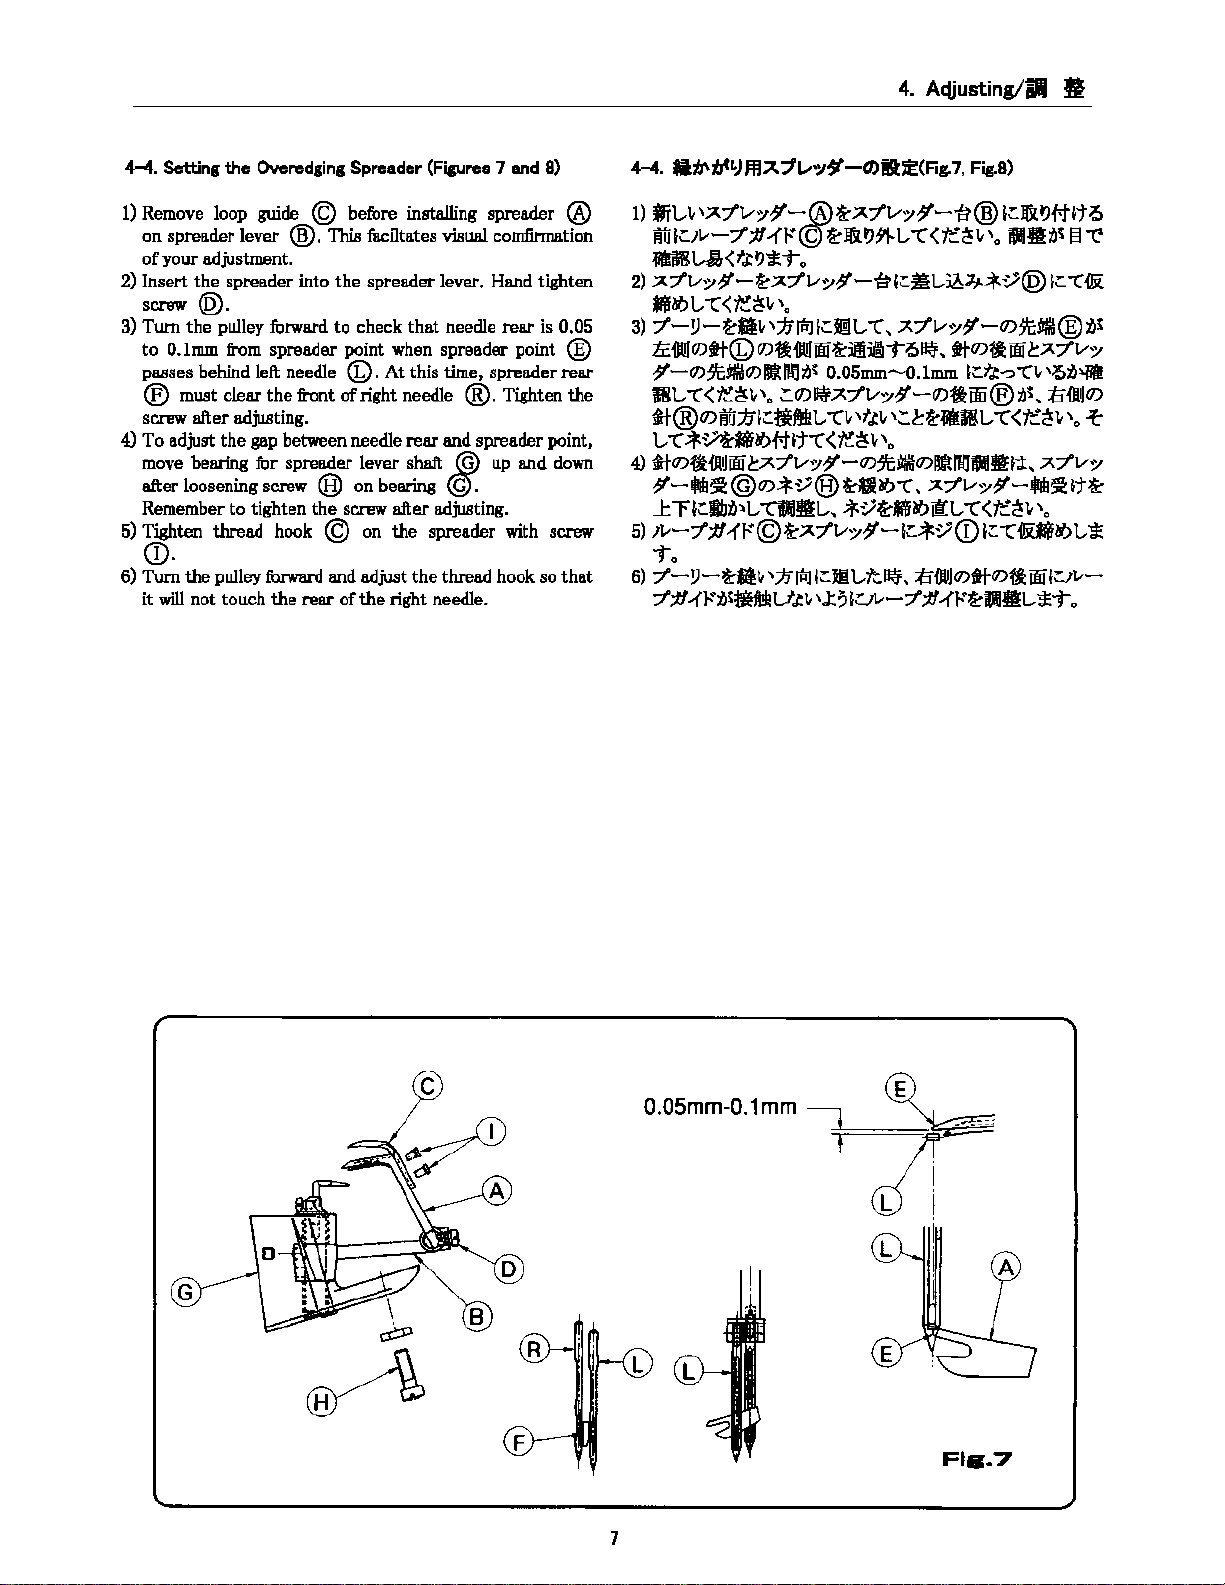
4-4. Setting the Overedging Spreader (Figures 7
1) Remove loop guide © before installing spreader @
on
spreader lever @. This faciltates visual comfirmation
of
your adjustment.
2) Insert
3)
4)
5) Tighten thread hook © on
the
spreader into
screw@.
Turn
the
pulley forward to check
to
0.1mm
from spreader point when spreader point @
passes behind left needle ©. At this time, spreader rear
® must clear
screw after adjusting.
To
adjust
move bearing for spreader lever shaft
after loosening screw @ on bearing
Remember to tighten
the
the
gap between needle
the
spreader lever. Hand tighten
front
of
right needle @. Tighten
the
screw after adjusting.
the
that
needle rear is 0.05
rear
and
@.
spreader with screw
and
spreader point.
@
up
and

the
down
(D.
6) Turn
it
will
the
not
pulley
touch
foJward
the
rear
and adjust
of
the
right needle.
the
thread hook
so
that
4-4. flt)\1,tl:)1′);;~::1v-:1~-0)il:,!(Fig.7,
1)
trL,1,
‘A:1’Vo/~-@~A:1’vo/~-i:r@l:J&t)#Jto
riil:1v-:1»JJ.{f-t@ ~l&tJ~L,
..
L-A<
ftt)’i:t»
2)
::A'»fvo/~ -~::A:1’v::,~
*fafJ
L,
«»C<ie~1,
3)
:1′-!J-~l11,,jjlfi)(;::ljl,»‘(«, A:1’v::,,,-0)1c;!/l@tl1
~
iJlll
O)tf-(1>
~
-0):S’c!IIO)
BL,
«»C<ie~l,\o
tJ-@O)ffli:1il:tfMt.,
t.,
«‘C’*~t*~t-t•t—c<r.:~1,,0
4)
tj-O)f&-fl1Jffij
o
‘o
O)f&iJlllffii~ifii{Qi'»oll~\ tf-O)ft
II:
111:1
ti~
0.05mm-O. lmm
~O)litA::fVo/~-O)f&ffii®iJ;,
—c1,
l;A:1’Vo/,,
_O);’i:J\IO)IIJtllQjlf!Jll±,
—c<~~1,,o
—t:r,:•L,~;,.;t.~@
,t,t1, \:.t~li’iBL,
~-!f!lll’.!Jl;@)O):.t-~@~af.>»‘C’,
J:
r
•=IIJtil
1.,
—cu!lli.,,
5)
,v-::t’JJ-fr©~A::tvo/~-•=-*~CD
*
~~•
Fig.8)
l’Hlti~
l:
ffii
l:A:1’v::,
l:f,t-:i
«‘(«1,
‘otl~
:E-fl~O)
—c<~~1,
::A:;fv::,
A:1’Vo/,,_!f!lll’.!Jl;•t~
atJ
it:L,
—c
<
~~1,
, •
•=—c-Oi*16~
To
6)
:1′-!J-~1,
:;t;t/ .{t;llSUffl!I! L,f,t1,
‘1i!Pl
i:JDL,*:llt, ti-OlJJO)ftO)fiffiil:Jv-
,J::?
lLJv-:;f ;ti .{~~PJ!IL,*i»
El
«t’
«‘C’-Oi
‘»
-t-
t.,~
0
C
7
L
Fls.7
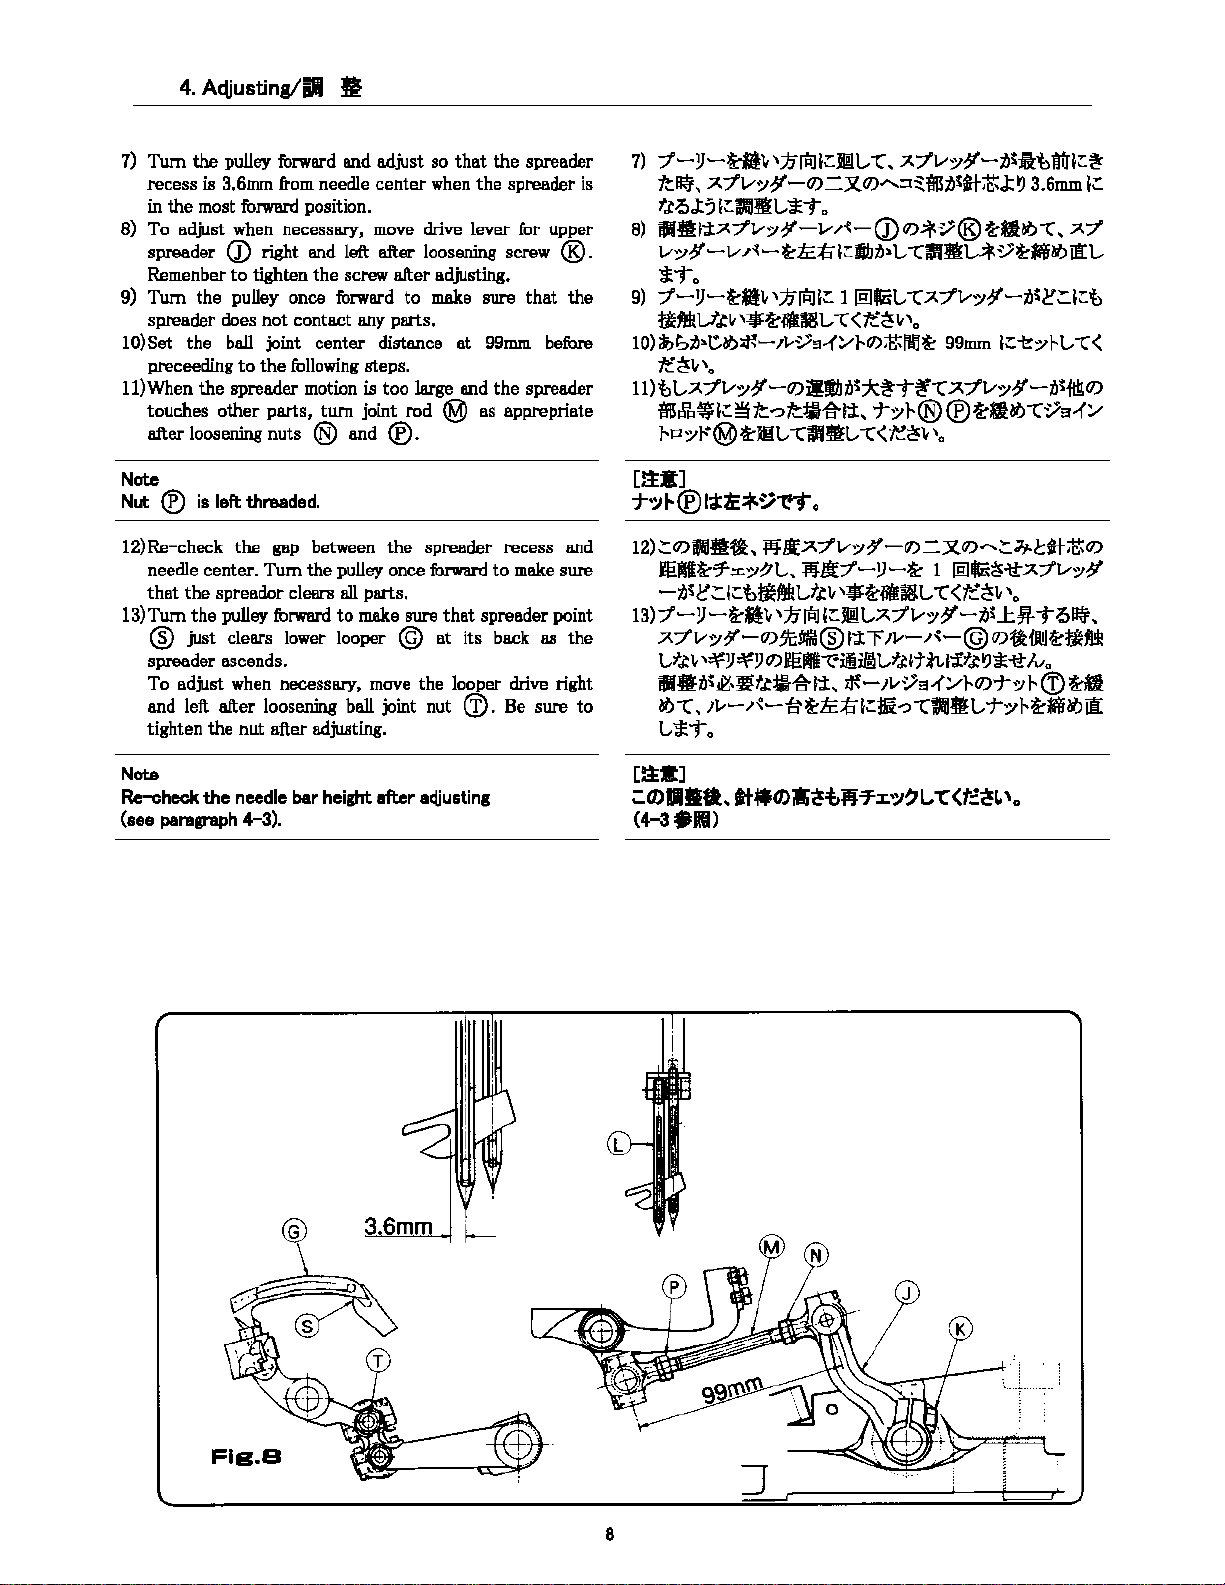
4.
Actjusting/11
7)
Tum
the
pulley forward and adjust
recess
is 3.6mm from needle
in
the
most fo.nvard position.
To adjust when necessary, move drive lever for upper
spreader
Remenber
9)
Tum
spreader does not contact any parts.
lO)Set
proceeding
11) When
touches
after loosening
Note
Nut
®
Q) right and left after looserung screw ®.
to
tighten
the
pulley once forward to make sure
the
ball joint
to
the
the
spreader motion is
other
parts,
nuts
is
left:
threaded.
fl
center
the
screw after adjusting.
center
following steps.
twn
joint rod @
distance
too
® and ®.
so
that
when
the
at
large and
the
spreader
spreader is
that
the
99mm before
the
spreader
as
appropriate
7)
7′-!J-t-fll,
ft~,
A7’v:Y?’-O)=J{O)»‘-:::t~tfRt,1tJ-~J::~
f.toJ::;
•••±7-7’v:Y1′-v/{-(j)O>*~®~•~—c,
,jyjpJl;:JEL,
(;:all’EL-*-t D
«»(,
A7’v-.y¥-til:lil:1)fin;:~
3.6mm.
l;:
7-7′
v-:;¥-v/{-~~;t,l;:fibiJ•L—CtlHIL-*~~-~il:L-
*’t»o
9)
7′-!J-~-1,
~MV_ti,
l0)1>bifr•C~if—,t,,~9-{~J-O)~flU~
‘fe~lt’o
1l)t,L,A7’v-.y?’-0>iWI/Jti~*~’t»~—c;x.7’v-.y?’-ti~fl!l:0>
S&i-,;:~tt~ttf.1~1±,
}-P-:;r@~JIL,
‘n!Rl
‘*~$.Ml-
—CIIIEL,
l;: l lfflllzil, —C7-7’v-.y¥-iJ$~;:l;:t
—c
<tt:~1,
‘o
99mm
l;:-t?-.yJ-L,—C<
‘1—Yl-@
—c<~~l,
®~a~—cV::1-1’~
‘a
12)Re-check the gap between
needle center.
that
the
13)Tum
Note
Re-check
(see
the
@
just
spreader ascends.
To adjust when necessary, move the looper drive right
and left
tighten
paragraph
Tum
the
spreader clears all parts.
pulley
forwlll’d
clears lower looper @
after
loosening ball joint nut (I).
the
nut
after adjusting.
the
needle
bar
height
4-3).
the
spreader recess and
pulley once fonnird
to
make sure
after
that
at
its
a(tiusting
to
make
spreader point
back
Be
as
sure
sure
the
to
12);:0)PJJlt&, :;ifLl;A7’v-:;¥-0>=)(0),-..;:3j.}:t{-~O)
leMH.·7″:r.-:;!/L,,
-tJ~J:’;:l:.t>~ftlH
13)7′-!J-~ft»
llflff7′-!J-~
…
tii, ‘*~¥ii8L.
‘n!Rl
,;:J1t.,;x.7’v-:;¥-tii1:;,.
1 lffl«i~-\tA7’v-:;¥
—C
<ft:~1,
‘o
-to~,
A7’v:Y?’-0>.$’c:!IIM@l±T1v-/{-@0>~ffill~~M
L,fJ!
1,
,:¥!J
:¥!J
0)
ffilili:iffiil L,tJ:JttLl’ffJ:l’.J*-lt
illliJ~~—tif.l~l’i,
if—,v~a..-(~}-0)-j-:)f
Iva
l-(I) t-a
~—c, 1v-/{-‘&~1i:til:.1i-?—Cl\’IJ•L,-r-:;J-~M~ii:
L*To
[~-]
=co•••
C4-3illl)
..
tt•co•~ifli7::c.-:.,~1.,
-c<t::~1.
,0
@ 3. mm
f-
Fis.a
8
Loading…
- Описание
- Отзывы (0)
Оверлок промышленный
Оверлок NEWLONG DHR-6 для изготовления Биг-Бэгов мкр
Newlong DHR-6
Представляем отличный оверлок промышленный . Двуигольная, простая подача, плоское основание, четырехниточный овершов стежок. Для пошива четырехстропных биг-бэгов, оверлок+прямая строчка (две иглы). Для прошивки полипропиленовых и полиэтиленовых тканей большой и малой плотности со шнуром по верхнему и нижнему краю.
| Характеристика шва | 401, 502 Ssa — 2 |
| Подача материала | Простая подача сверху |
| Размер стежка | 6-13 мм |
| Ширина овер-шва | 12 мм (по заказу-15 мм) |
| Полная ширина шва | 17 мм (по заказу — 20 мм) |
| Толщина материала | макс. 22 мм |
| Зазор иглы | 5 мм |
| Тип и размер иглы | UY9853G 430 |
| Макс. скорость | 1400 об/мин |
| Раб. скорость | 1200 об/мин |
| Нитки | Полипропиленовые 3000 денье |
Машина с двумя иглами, выполняет комбинированный цепной стежок / стежок через край, простая подача с верхней подачей, плоская платформа, выполняет стежок стачивающе-обметочной строчки в четыре нити, предназначена для шитья очень толстых полипропиленовых текстильных контейнерных мешков.
| Модель: | DHR-6 |
|---|---|
| Рабочая скорость: | ~1200 об./мин |
| Максимальная скорость: | 1400 ход/мин |
| Размер стежка: | 6 ~ 13 мм |
| Толщина ткани: | до 22 мм |
| Количество игл: | 2 |
| Тип иглы: | UY9853G — 430 |
| Количество нитей: | 4 |
| Нитки: | Полипропиленовые 3000 денье |
| Вес: | 52 кг |
Combined Overedging & Chain Stitch Machine , Two Needles, Upper & Lower Feeding, Four Thread Safety Stitch Used for Sewing Very Thick materials such as Polipropylene Container Bags, Big Bags, FIBC (Flexible Intermediate Bulk Container)

Technical Specifications
| Max. Speed ※ | 1,400 rpm |
| Seam | Safety Stitch Type 515 (2 Thread Chain Stitch ・ 2 Thread Overseaming Stitch) |
| Stitch Width | 6.5 – 15 mm |
| Bag Material | Bulk Bags, FIBC, Big Bag, Container Bag |
| Thickness | Up to 22 mm |
| Cutter | Overseaming width 12,15 mm |
| Needle & Thread | UY9853G 430 ・ 5000-6000 Denier |
| Oiling | By hand ・Oiler (Machine Oil Tellus #10) |
| Weight | 38.0 kg |
| Feature | Upper & Lower Feed ・ Double needle |
| Clutch Motor Required | 400w 2Pole, 1 or 3 Phase |
| Motor Pulley Required | Ø70(50hz), Ø55(60hz) |
| V-Belt Size Required | M39(50hz) M38(60hz) |
※ depending on the sewing material and operation
Needle type for Newlong Industrial DHR6: Organ Needle Japan UY9853G /430

Newlong Industrial Sewing Machine
Made in Japan
Primary Menu
- Home
- About Us
- Products
- Bag Closing Sewing Machines
- Bag Making Sewing Machines
- Special Sewing Head
- Spare Parts
- Catalogs
- Machines
- BLog
- Contact
Primary Menu
- Home
- About Us
- Products
- Bag Closing Sewing Machines
- Bag Making Sewing Machines
- Special Sewing Head
- Spare Parts
- Catalogs
- Machines
- BLog
- Contact
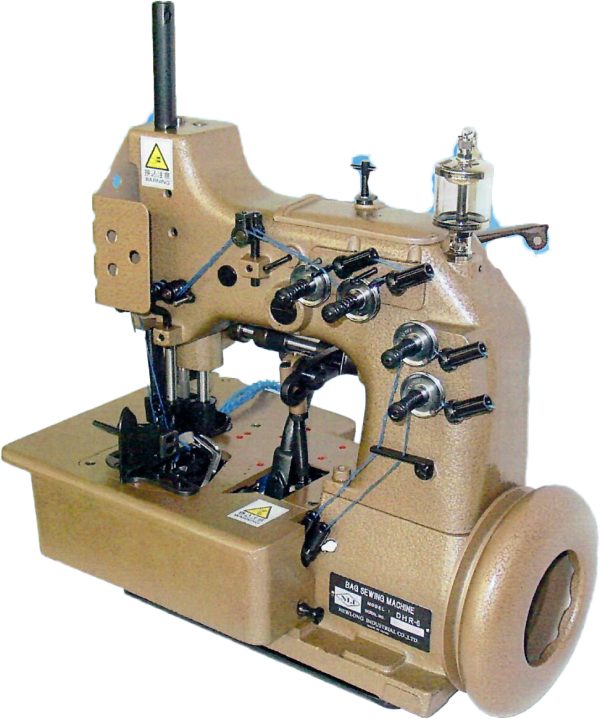
Safety Stitch Machine Head for Sewing Jumbo Bags (Two Needle, Upper-Lower Feed, Flat Bed, Four Thread Safety Stitch Machine)
| Specifications | |
|---|---|
| Max Speed | 1,400rpm | 1,200rpm Rotational Speed In Normal Operation |
| Seam | Double thread chain stitch | Overseaming stitch |
| Stich Width | 6.5-15mm |
| Bag Material | Container Bag |
| Thickness | 17mm-20mm |
| Cutter | Over seaming width 12mm (15mm) |
| Needle | UY9853G 430 |
| Oiling | by Hand – Oiler |
| Oil | Tellus #32 |
| Weight | 38.0kg |
| Feature | Upper & Lower sending | Double Needle |
| Related Machines | THR-6 |
- Description
Safety Stitch Machine Head for Sewing Jumbo Bags (Two Needle, Upper-Lower Feed, Flat Bed, Four Thread Safety Stitch Machine)
Related products
-
NP-7A
-
DS-9A
-
HR-2A
-
1A01002 Ball Bearing
NEWLONG NLI FZC
We take great pride in manufacturing high quality, technically advanced equipment that allows our customers to produce their products faster, more efficiently and cost effective, with less downtime.
- Phone: +971 54 558 5377
- sales@newlongindustrial.com
Subscribe
Subscribe to our Newsletter and get bonuses for the next purchase
Copyright © 2021 | NEWLONG NLI FZC All Rights Reserved.