
95755
В этой статье я познакомлю вас с новым маршрутизатором TP-Link Archer C64. Кроме обзора, технических характеристик, фото и другой информации об этой модели я так же продемонстрирую процесс подключения и настройки. Эта информация будет полезна всем владельцам данного маршрутизатора. Ну и конечно же с радостью отвечу на все ваши вопросы в комментариях.
TP-Link Archer C64 не удивит вас поддержкой Wi-Fi 6, многоядерным процессором, или еще какими-то супер новыми и продвинутыми технологиями. И это хорошо, так как отсутствие всего этого позволило выпустить достаточно быстрый, производительный и современный роутер стоимостью всего около 35 долларов. А возможностей этой модели будет более чем достаточно для большинства покупателей.

Archer C64 это двухдиапазонный роутер с поддержкой стандарта 802.11ac Wave 2. По Wi-Fi сети он обеспечивает соединение со скоростью до 867 Мбит/с в диапазоне 5 ГГц и до 300 Мбит/с в диапазоне 2.4 ГГц. Есть поддержка MU-MIMO. Эта технология позволяет роутеру общаться (передавать данные) с несколькими устройствами одновременно. За стабильное и широкое покрытие беспроводной сети отвечают 4 внешних Wi-Fi антенны. Так же есть поддержка технологии Beamforming, которая направляет луч сигнала в сторону подключенного устройства. На сайте производителя указано, что этот роутер подходит для трехкомнатных квартир. Имеется в виду по радиусу действия беспроводной сети.
По аппаратной части у Archer C64 все очень хорошо. Достаточно мощный процессор с тактовой частотой 1.2 ГГц. WAN/LAN порты – гигабитные. Поддерживают скорость передачи данных до 1000 Мбит/с. Это значит, что данный роутер подойдет даже если у вас подключен интернет со скоростью выше 100 Мбит/с.
Ниже я перечислю основные возможности и функционал TP-Link Archer C64:
- Поддержка Smart Connect. Эта технология позволяет автоматически распределять клиентов между диапазонами для распределения нагрузки. Так же она устанавливает одинаковое эфирное время для всех устройств.
- Поддержка приложения TP‑Link Tether для настройки и управления с мобильного телефона.
- Поддержка протокола WPA3 обеспечивает высокий уровень безопасности беспроводной сети и защиту от брутфорс‑атак.
- Поддержка TP-Link ID для удаленного управления. Подробнее в этой статье.
- Два режима работы: роутер и точка доступа. Режима усилителя Wi-Fi сигнала (репитера) почему-то нет.
- Гостевая Wi-Fi сеть.
- График работы Wi-Fi сети.
- Поддержка IPTV.
- Возможность обновлять прошивку роутера через интернет (онлайн).
- Функция отключения индикаторов (совсем или по расписанию).
С другими характеристиками Archer C64, а так же с эмулятором веб-интерфейса вы можете ознакомиться на сайте TP-Link: https://www.tp-link.com/ru/home-networking/wifi-router/archer-c64/#overview.
Обзор внешнего вида
По традиции начнем с комплектации. Здесь она такая же скучная, как и у всех роутеров: сам роутер, адаптер питания, сетевой кабель и небольшая инструкция.

Сам роутер небольшого размера. Выполнен полностью из черного матового пластика. Одна половина лицевой панели имеет волнистую структуру, а на второй размещен логотип компании TP-Link.

На передней грани расположены 5 индикаторов:
- Индикатор питания.
- Индикатор Wi-Fi сети в диапазоне 5 ГГц.
- Индикатор Wi-Fi сети в диапазоне 2.4 ГГц.
- Индикатор LAN-портов.
- Индикатор подключения к интернету (WAN-порта).

4 Wi-Fi антенны закреплены по бокам. Они не съемные, но их можно повернуть и сложить. Это может пригодиться, если вы захотите повестить роутер на стену.

Разъем питания, 1 порт WAN, 4 порта LAN и кнопка WPS/Reset занимают практически всю заднюю панель.

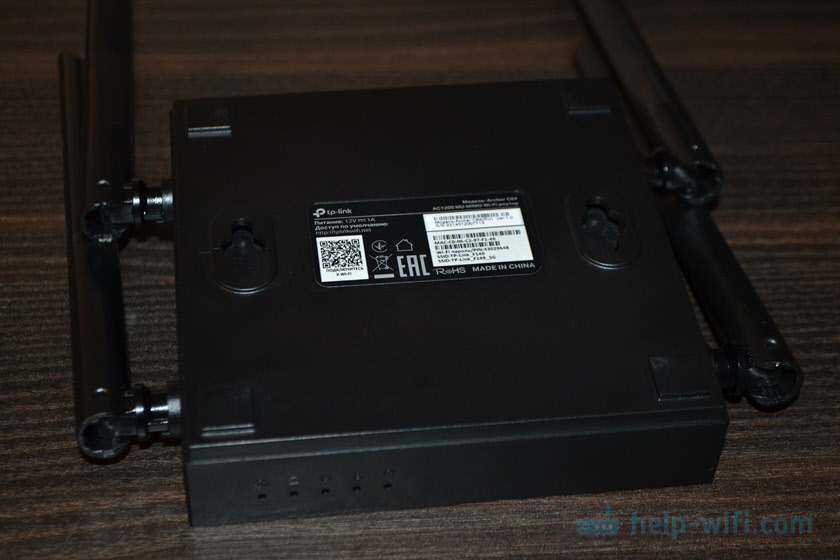
Снизу можно найти наклейку с необходимой заводской информацией (имя Wi-Fi сети, пароль, MAC-адрес, адрес для входа в настройки и т. д.). Там же расположен два отверстия, используя которые можно зафиксировать роутер на стене.
Симпатичный, компактный роутер, который без проблем подойдет под любой интерьер. Он без проблем справится с десятком подключенных устройств и обеспечит стабильное подключение к интернету. Буду рад видеть ваши отзывы о TP-Link Archer C64 в комментариях.
Подключение
Принесли домой, распаковали, можно подключать. Тут все максимально просто. Подключаем к роутеру адаптер питания и включаем его в розетку. Дальше нужно подключить интернет. Кабель от провайдера, или от модема (если он у вас установлен) нужно подключить в WAN-порт роутера. Он синего цвета.

Индикатор «Интернет «сразу может гореть оранжевым цветом. А подключения к интернету на подключенных устройствах (компьютерах, телефонах) может не быть. Ничего страшного. Просто интернет на роутере еще не настроен.
Следующий шаг – подключение устройства, с которого будем выполнять настройку. Подключиться можно либо по Wi-Fi (заводское имя Wi-Fi сети и пароль указаны снизу роутера, так же можно отсканировать находящийся там QR-код), либо по кабелю.

Если вы планируете настраивать TP-Link Archer C64 со смартфона, то лучше всего делать это через приложение TP‑Link Tether. Сначала установите приложение на телефон, затем подключите телефон к Wi-Fi сети Archer C64 (доступа к интернету может не быть) и выполните настройку в приложении. Я же буду показывать процесс настройки через браузер (веб-интерфейс) с компьютера.
Настройка роутера TP-Link Archer C64
Первым делом нужно открыть настройки роутера. Зайти в веб-интерфейс. Сейчас я покажу как это сделать. Но если у вас не получится, то смотрите отдельную инструкцию: как зайти в настройки роутера TP-Link.
Запускам на подключенном к Archer C64 устройстве любой браузер, набираем адрес tplinkwifi.net или 192.168.0.1 и переходим по нему. Должна появиться такая страница:

Роутер просит нас создать пароль администратора (для защиты настроек). Придумайте пароль, укажите его в двух полях и нажмите на кнопку «Приступим к работе».
Если появился запрос на ввод пароля, или настройки не открываются – сделайте сброс настроек. Для этого нужно на 10 секунд зажать кнопку WPS/Reset.
Зразу будет запущен мастер быстрой настройки, с помощью которого очень удобно настраивать маршрутизатор.
Мастер быстрой настройки
- Устанавливаем свой часовой пояс.

- Выбираем своего интернет-провайдера из списка. Сначала страну, город, провайдера и тип подключения к интернету.

Если вашего провайдера в списке нет – установите галочку «Выберите тип подключения вручную».
- Выбираем тип подключения, который использует ваш провайдер и нажимаем «Далее». Если не знаете какой выбрать – смотрите договор о подключении к интернету, или звоните в поддержу провайдера.

- Если у вас Динамический IP – просто выбираем его и нажимаем «Далее», дополнительная настройка не нужна. Если Статический IP – на следующем шаге понадобится прописать адреса, которые выдает интернет-провайдер. Если PPPoE – нужно будет указать имя пользователя и пароль. Эти данные так же выдает провайдер. Если же у вас L2TP или PPTP, то кроме имени пользователя (логина) и пароля, нужно еще узнать и прописать адрес сервера. Вот так выглядит настройка PPTP, например:

В случае с Динамический IP-адрес роутер предложит клонировать, или прописать вручную WAN MAC-адрес. Это нужно делать только в том случае, если ваш провайдер делает привязку по MAC-адресу.
- Настройка Wi-Fi сети. Здесь меняем имя сети оно же SSID (это по желанию) и меняем пароль (настоятельно рекомендую это сделать). Так же при необходимости можно отключить Wi-Fi сеть в одном из диапазоном. Например, если вам не нужна сеть в диапазоне 2.4 ГГц.

- Роутер сохранит настройки Wi-Fi и попросит нас заново подключиться к беспроводной сети. Уже с новым именем (если вы его меняли) и паролем. Подключаемся (если вы изначально были подключены по Wi-Fi) и нажимаем на кнопку «Далее».
- После проверки интернет-соединения появится окно с предложением войти, или зарегистрироваться в сервисе «Облако TP-Link». Если у вас будет аккаунт, то вы сможете выполнить в него вход в настройках роутера и в приложении TP‑Link Tether, после чего управлять роутером удаленно (через интернет). Эту настройку можно пропустить и позже настроить все в панели управления.

- Откроется веб-интерфейс роутера TP-Link Archer C64, откуда можно выполнить настройку дополнительных функций, посмотреть список подключенных устройств, сменить системные настройки и т. д.


На этом настройка TP-Link Archer C64 завершена. Главное, чтобы интернет через роутер работал. Надеюсь, у вас все получилось. Если же вы столкнулись с какими-то проблемами или ошибками в процессе настройки, то расскажите об этом в комментариях, а я в свою очередь постараюсь вам что-то подсказать и помочь в решении возникшей проблемы.

©2021 TP-Link REV1.0.0 1910012999
User Guide
AC1200 MU-MIMO Wi-Fi Router
Archer C64

Contents
About This Guide . . . . . . . . . . . . . . . . . . . . . . . . . . . . . . . . . . . . . . . . . . . . . . . . . . . . .1
Chapter 1. Get to Know About Your Router . . . . . . . . . . . . . . . . . . . . . . . . . . .3
1. 1. Product Overview. . . . . . . . . . . . . . . . . . . . . . . . . . . . . . . . . . . . . . . . . . . . . . . . . . . . . . . . . . . . 4
1. 2. Appearance . . . . . . . . . . . . . . . . . . . . . . . . . . . . . . . . . . . . . . . . . . . . . . . . . . . . . . . . . . . . . . . . . 4
1. 2. 1. Top Panel . . . . . . . . . . . . . . . . . . . . . . . . . . . . . . . . . . . . . . . . . . . . . . . . . . . . . . . . . . . . . 4
1. 2. 2. The Back Panel. . . . . . . . . . . . . . . . . . . . . . . . . . . . . . . . . . . . . . . . . . . . . . . . . . . . . . . . 6
Chapter 2. Connect the Hardware . . . . . . . . . . . . . . . . . . . . . . . . . . . . . . . . . . . .7
2. 1. Position Your Router . . . . . . . . . . . . . . . . . . . . . . . . . . . . . . . . . . . . . . . . . . . . . . . . . . . . . . . . . 8
2. 2. Connect Your Router. . . . . . . . . . . . . . . . . . . . . . . . . . . . . . . . . . . . . . . . . . . . . . . . . . . . . . . . . 8
Chapter 3. Log In to Your Router. . . . . . . . . . . . . . . . . . . . . . . . . . . . . . . . . . . . 11
Chapter 4. Set Up Internet Connection . . . . . . . . . . . . . . . . . . . . . . . . . . . . . 13
4. 1. Use Quick Setup Wizard . . . . . . . . . . . . . . . . . . . . . . . . . . . . . . . . . . . . . . . . . . . . . . . . . . . . 14
4. 2. Quick Setup Via TP-Link Tether App. . . . . . . . . . . . . . . . . . . . . . . . . . . . . . . . . . . . . . . . . 15
4. 3. Manually Set Up Your Internet Connection . . . . . . . . . . . . . . . . . . . . . . . . . . . . . . . . . . 15
4. 4. Set Up the Router as an Access Point . . . . . . . . . . . . . . . . . . . . . . . . . . . . . . . . . . . . . . . 18
4. 5. Set Up an IPv6 Internet Connection . . . . . . . . . . . . . . . . . . . . . . . . . . . . . . . . . . . . . . . . . 18
Chapter 5. TP-Link Cloud Service . . . . . . . . . . . . . . . . . . . . . . . . . . . . . . . . . . 21
5. 1. Register a TP-Link ID. . . . . . . . . . . . . . . . . . . . . . . . . . . . . . . . . . . . . . . . . . . . . . . . . . . . . . . . 22
5. 2. Change Your TP-Link ID Information. . . . . . . . . . . . . . . . . . . . . . . . . . . . . . . . . . . . . . . . . 22
5. 3. Manage the User TP-Link IDs . . . . . . . . . . . . . . . . . . . . . . . . . . . . . . . . . . . . . . . . . . . . . . . 23
5. 3. 1. Add TP-Link ID to Manage the Router . . . . . . . . . . . . . . . . . . . . . . . . . . . . . . . . . 24
5. 3. 2. Remove TP-Link ID(s) from Managing the Router . . . . . . . . . . . . . . . . . . . . . . 24
5. 4. Manage the Router via the TP-Link Tether App . . . . . . . . . . . . . . . . . . . . . . . . . . . . . . 25
Chapter 6. Guest Network. . . . . . . . . . . . . . . . . . . . . . . . . . . . . . . . . . . . . . . . . . 26
6. 1. Create a Network for Guests . . . . . . . . . . . . . . . . . . . . . . . . . . . . . . . . . . . . . . . . . . . . . . . 27
6. 2. Customize Guest Network Options. . . . . . . . . . . . . . . . . . . . . . . . . . . . . . . . . . . . . . . . . . 28
Chapter 7. Parental Controls . . . . . . . . . . . . . . . . . . . . . . . . . . . . . . . . . . . . . . . 29
7. 1. Setting Up Access Restrictions . . . . . . . . . . . . . . . . . . . . . . . . . . . . . . . . . . . . . . . . . . . . . 30
Chapter 8. QoS. . . . . . . . . . . . . . . . . . . . . . . . . . . . . . . . . . . . . . . . . . . . . . . . . . . . . 33

Chapter 9. Network Security . . . . . . . . . . . . . . . . . . . . . . . . . . . . . . . . . . . . . . . 35
9. 1. Protect the Network from Cyber Attacks . . . . . . . . . . . . . . . . . . . . . . . . . . . . . . . . . . . . 36
9. 2. Access Control . . . . . . . . . . . . . . . . . . . . . . . . . . . . . . . . . . . . . . . . . . . . . . . . . . . . . . . . . . . . . 36
9. 3. IP & MAC Binding . . . . . . . . . . . . . . . . . . . . . . . . . . . . . . . . . . . . . . . . . . . . . . . . . . . . . . . . . . . 38
9. 4. ALG (Application Layer Gateway). . . . . . . . . . . . . . . . . . . . . . . . . . . . . . . . . . . . . . . . . . . . 40
Chapter 10. NAT Forwarding. . . . . . . . . . . . . . . . . . . . . . . . . . . . . . . . . . . . . . . . . 41
10. 1. Share Local Resources on the Internet by Port Forwarding . . . . . . . . . . . . . . . . . . 42
10. 2. Open Ports Dynamically by Port Triggering . . . . . . . . . . . . . . . . . . . . . . . . . . . . . . . . . . 44
10. 3. Make Xbox Online Games Run Smoothly by UPnP . . . . . . . . . . . . . . . . . . . . . . . . . . . 45
10. 4. Make Applications Free from Port Restriction by DMZ . . . . . . . . . . . . . . . . . . . . . . . 46
Chapter 11. Customize Your Network Settings. . . . . . . . . . . . . . . . . . . . . . . 48
11. 1. Change the LAN Settings . . . . . . . . . . . . . . . . . . . . . . . . . . . . . . . . . . . . . . . . . . . . . . . . . . . 49
11. 2. Configure to Support IPTV Service. . . . . . . . . . . . . . . . . . . . . . . . . . . . . . . . . . . . . . . . . . 49
11. 3. Specify DHCP Server Settings . . . . . . . . . . . . . . . . . . . . . . . . . . . . . . . . . . . . . . . . . . . . . . 50
11. 4. Set Up a Dynamic DNS Service Account . . . . . . . . . . . . . . . . . . . . . . . . . . . . . . . . . . . . 51
11. 5. Create Static Routes. . . . . . . . . . . . . . . . . . . . . . . . . . . . . . . . . . . . . . . . . . . . . . . . . . . . . . . . 53
11. 6. Specify Wireless Settings. . . . . . . . . . . . . . . . . . . . . . . . . . . . . . . . . . . . . . . . . . . . . . . . . . . 55
11. 7. Schedule Your Wireless Function . . . . . . . . . . . . . . . . . . . . . . . . . . . . . . . . . . . . . . . . . . . 57
11. 8. Use WPS for Wireless Connection . . . . . . . . . . . . . . . . . . . . . . . . . . . . . . . . . . . . . . . . . . 57
11. 8. 1. Connect via the Client’s PIN . . . . . . . . . . . . . . . . . . . . . . . . . . . . . . . . . . . . . . . . . 58
11. 8. 2. Connect via the Router’s PIN . . . . . . . . . . . . . . . . . . . . . . . . . . . . . . . . . . . . . . . . 58
11. 8. 3. Push the WPS Button . . . . . . . . . . . . . . . . . . . . . . . . . . . . . . . . . . . . . . . . . . . . . . . 58
11. 9. Advanced Wireless Settings . . . . . . . . . . . . . . . . . . . . . . . . . . . . . . . . . . . . . . . . . . . . . . . . 59
Chapter 12. Manage the Router . . . . . . . . . . . . . . . . . . . . . . . . . . . . . . . . . . . . . 61
12. 1. Upgrade the Firmware . . . . . . . . . . . . . . . . . . . . . . . . . . . . . . . . . . . . . . . . . . . . . . . . . . . . . . 62
12. 1. 1. Online Upgrade . . . . . . . . . . . . . . . . . . . . . . . . . . . . . . . . . . . . . . . . . . . . . . . . . . . . . 62
12. 1. 2. Local Upgrade . . . . . . . . . . . . . . . . . . . . . . . . . . . . . . . . . . . . . . . . . . . . . . . . . . . . . . 62
12. 2. Backup and Restore Configuration Settings . . . . . . . . . . . . . . . . . . . . . . . . . . . . . . . . . 63
12. 3. Change the Login Password . . . . . . . . . . . . . . . . . . . . . . . . . . . . . . . . . . . . . . . . . . . . . . . . 64
12. 4. Local Management . . . . . . . . . . . . . . . . . . . . . . . . . . . . . . . . . . . . . . . . . . . . . . . . . . . . . . . . . 65
12. 5. Remote Management . . . . . . . . . . . . . . . . . . . . . . . . . . . . . . . . . . . . . . . . . . . . . . . . . . . . . . . 66
12. 6. View System Log . . . . . . . . . . . . . . . . . . . . . . . . . . . . . . . . . . . . . . . . . . . . . . . . . . . . . . . . . . . 67
12. 7. Test the Network Connectivity . . . . . . . . . . . . . . . . . . . . . . . . . . . . . . . . . . . . . . . . . . . . . . 68
12. 8. Set Up System Time & Language . . . . . . . . . . . . . . . . . . . . . . . . . . . . . . . . . . . . . . . . . . . 69
12. 9. Set the Router to Reboot Regularly. . . . . . . . . . . . . . . . . . . . . . . . . . . . . . . . . . . . . . . . . . 71
12. 10. Control the LED. . . . . . . . . . . . . . . . . . . . . . . . . . . . . . . . . . . . . . . . . . . . . . . . . . . . . . . . . . . . . 72
FAQ . . . . . . . . . . . . . . . . . . . . . . . . . . . . . . . . . . . . . . . . . . . . . . . . . . . . . . . . . . . . . . . . . 74
1
About This Guide
This guide is a complement of Quick Installation Guide. The Quick Installation Guide
instructs you on quick internet setup, and this guide provides details of each function
and shows you the way to configure these functions appropriate to your needs.
When using this guide, please note that features available of the router may vary by
model and software version. Router‘s availability may also vary by region or ISP. All
images, steps, and descriptions in this guide are only examples and may not reflect
your actual experience.
Conventions
In this guide the following conventions are used:
Convention Description
Underlined Underlined words or phrases are hyperlinks. You can click to redirect to a
website or a specific section.
Teal Contents to be emphasized and texts on the web page are in teal, including the
menus, items, buttons, etc.
>
The menu structures to show the path to load the corresponding page.
For example, Advanced > Wireless > MAC Filtering means the MAC Filtering
function page is under the Wireless menu that is located in the Advanced tab.
Note:
• Ignoring this type of note might result in a malfunction or damage to the
device.
Tips: Indicates important information that helps you make better use of your device.
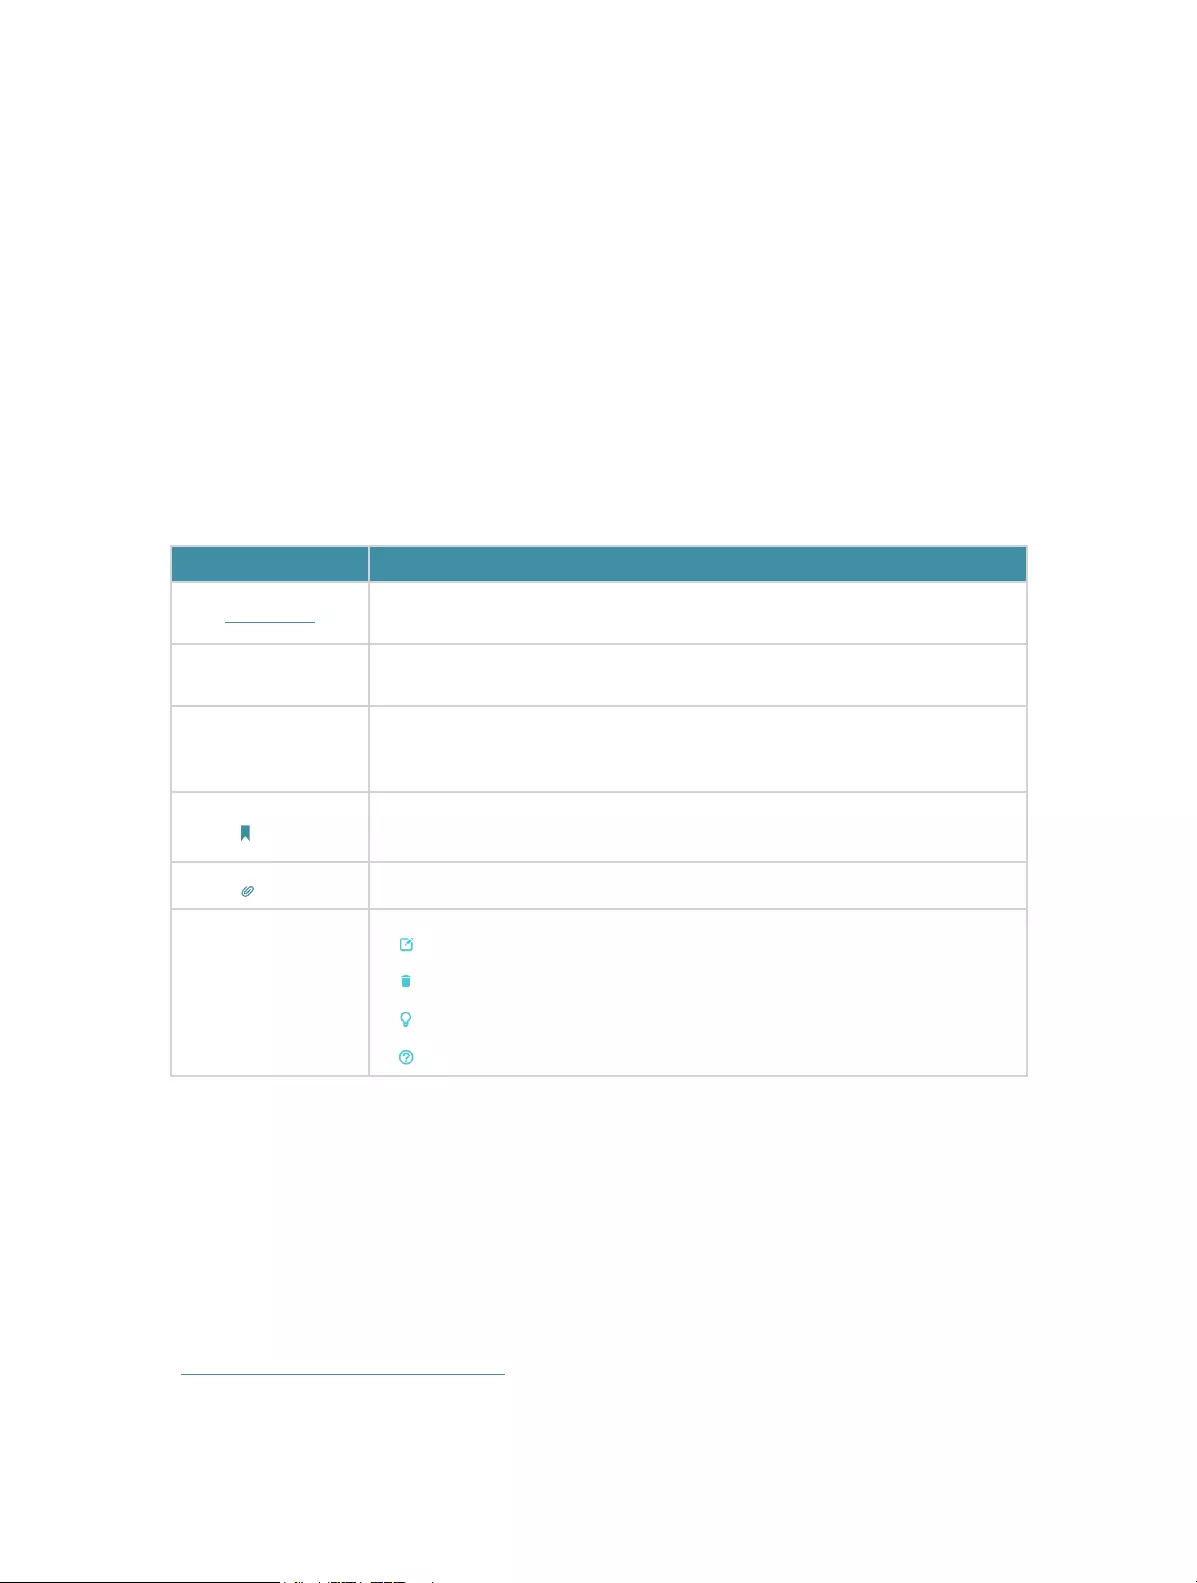
Symbols on the web
page
• Click to edit the corresponding entry.
• Click to delete the corresponding entry.
• Click to enable or disable the corresponding entry.
• Click to view more information about items on the page.
*Maximum wireless signal rates are the physical rates derived from IEEE Standard 802.11
specifications. Actual wireless data throughput and wireless coverage are not guaranteed and
will vary as a result of network conditions, client limitations, and environmental factors, including
building materials, obstacles, volume and density of traffic, and client location.
*Use of MU-MIMO requires clients to also support MU-MIMO.
More Info
• The latest software, management app and utility can be found at Download Center at
https://www.tp-link.com/support.
• The Quick Installation Guide can be found where you find this guide or inside the
package of the router.

2
• Specifications can be found on the product page at https://www.tp-link.com.
• A TP-Link Community is provided for you to discuss our products at
https://community.tp-link.com.
• Our Technical Support contact information can be found at the Contact Technical
Support page at https://www.tp-link.com/support.

Chapter 1
Get to Know About Your
Router
This chapter introduces what the router can do and shows its appearance.
It chapter contains the following sections:
• Product Overview
• Appearance

4
Chapter 1 Get to Know About Your Router
1. 1. Product Overview
The TP-Link router is designed to fully meet the need of Small Office/Home Office
(SOHO) networks and users demanding higher networking performance. The powerful
antennas ensure continuous Wi-Fi signal to all your devices while boosting widespread
coverage throughout your home, and the built-in Ethernet ports supply high-speed
connection to your wired devices.
Moreover, it is simple and convenient to set up and use the TP-Link router due to its
intuitive web interface and the powerful Tether app.
1. 2. Appearance
1. 2. 1. Top Panel
The router’s LEDs (view from left to right) are located on the front. You can check the
router’s working status by following the LED Explanation table.
5
Chapter 1 Get to Know About Your Router
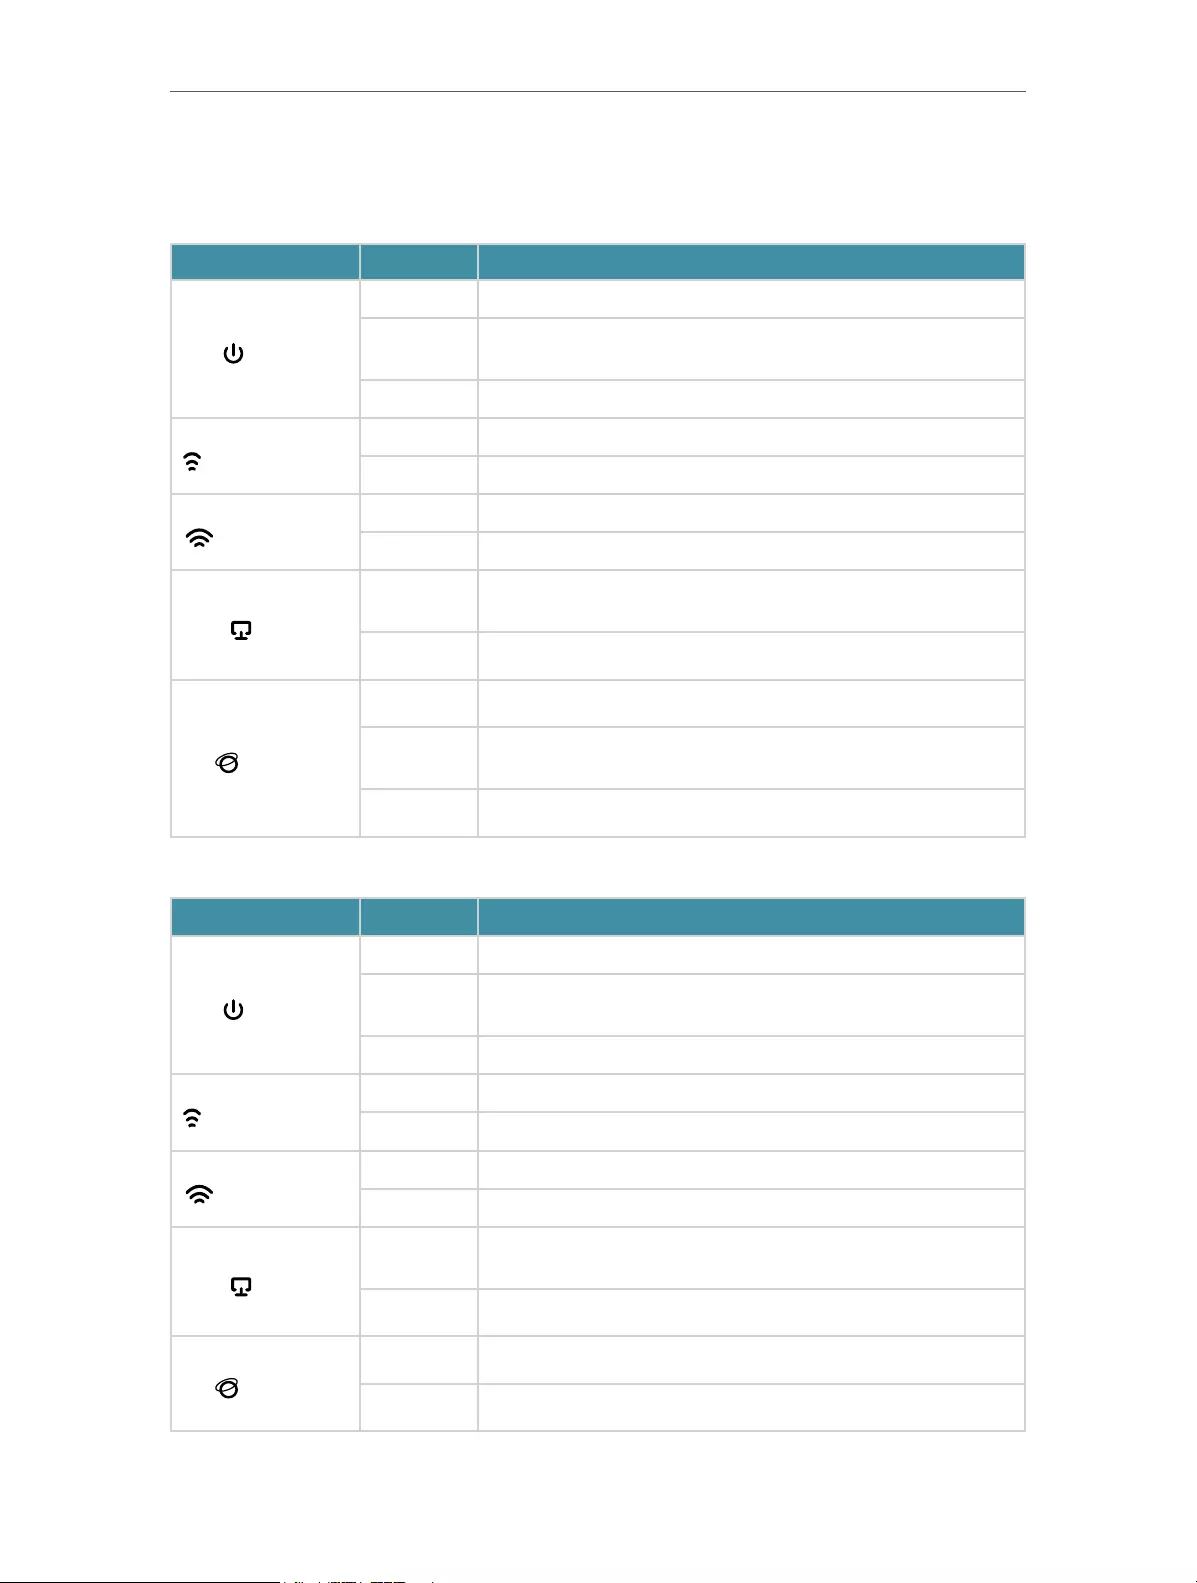
LED Explanation
• Router Mode
LED Status Indication
(Power)
On The system has started up successfully.
Flashing The system is starting up or the firmware is being upgraded. Do
not disconnect or power off your router.
Off Power is off.
(2.4GHz Wireless)
On The 2.4GHz wireless band is enabled.
Off The 2.4GHz wireless band is disabled.
(5GHz Wireless)
On The 5GHz wireless band is enabled.
Off The 5GHz wireless band is disabled.
(LAN)
On At least one powered-on device is connected to the router’s LAN
port.
Off No powered-on device is connected to the router’s LAN port.
(Internet)
Green On Internet service is available.
Orange On The router’s Internet port is connected, but the internet service
is not available.
Off The router’s Internet port is unplugged.
• Access Point Mode
LED Status Indication
(Power)
On The system has started up successfully.
Flashing The system is starting up or the firmware is being upgraded. Do
not disconnect or power off your router.
Off Power is off.
(2.4GHz Wireless)
On The 2.4GHz wireless band is enabled.
Off The 2.4GHz wireless band is disabled.
(5GHz Wireless)
On The 5GHz wireless band is enabled.
Off The 5GHz wireless band is disabled.
(LAN)
On At least one powered-on device is connected to the router’s LAN
port.
Off No powered-on device is connected to the router’s LAN port.
(Internet)
Green On The WAN port is connected.
Off The router’s Internet port is unplugged.

6
Chapter 1 Get to Know About Your Router
1. 2. 2. The Back Panel
The following parts (view from left to right) are located on the back panel.
Button and Port Explanation
Item Description
Power Port For connecting the router to a power socket via the provided power adapter.
WAN Port For connecting to a DSL/Cable modem, or an Ethernet jack.
LAN Ports (1/2/3/4) For connecting your PC or other wired devices to the router.
WPS/Reset Button
Press the button for 1 second, and immediately press the WPS button on
your client to start the WPS process.
Press and hold the button until all LEDs turn off to reset the router to its
factory default settings
Antennas Used for wireless operation and data transmit. Upright them for the best
Wi-Fi performance.

Chapter 2
Connect the Hardware
This chapter contains the following sections:
• Position Your Router
• Connect Your Router
8
Chapter 2 Connect the Hardware
2. 1. Position Your Router
• The product should not be located in a place where it will be exposed to moisture or
excessive heat.
• Place the router in a location where it can be connected to multiple devices as well as
to a power source.
• Make sure the cables and power cord are safely placed out of the way so they do not
create a tripping hazard.
• The router can be placed on a shelf or desktop.
• Keep the router away from devices with strong electromagnetic interference, such as
Bluetooth devices, cordless phones and microwaves.
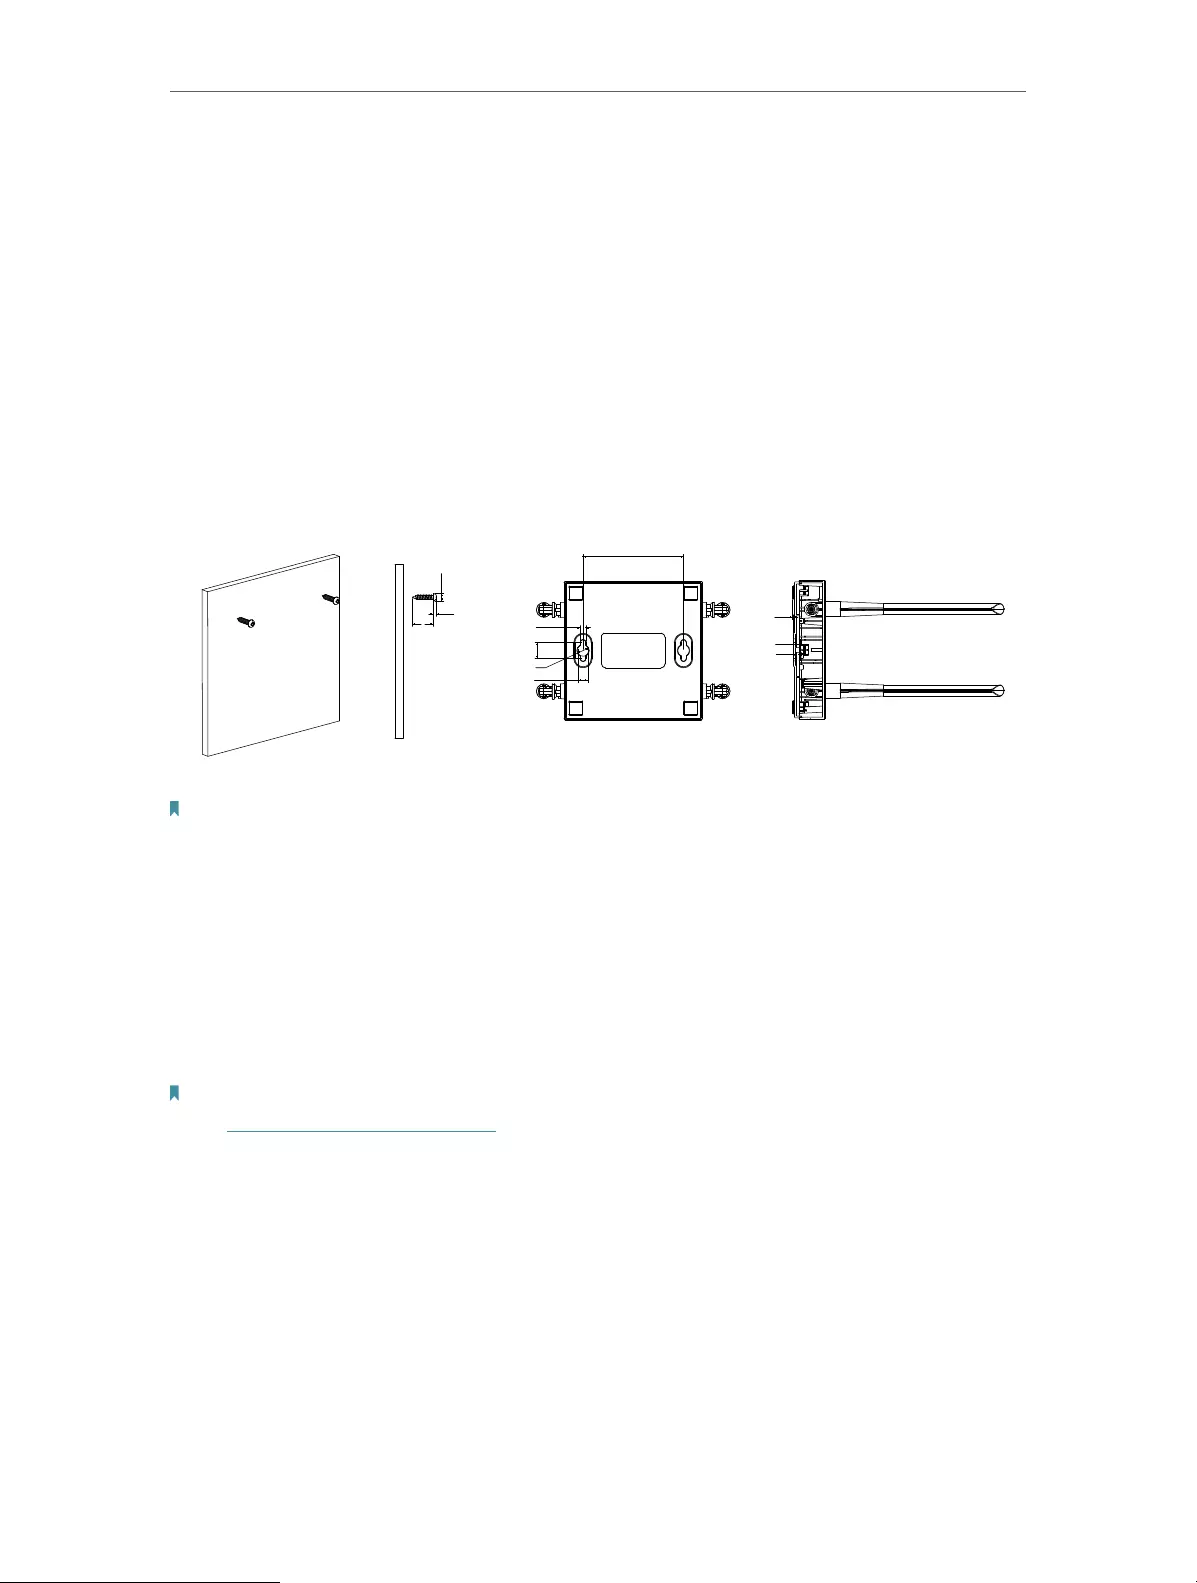
ΦD
H
NOTE:
5.5<D<8.58mm
H<3mm
L>8.3mm
L
87
14
∅10
5
9.08
3
1.8
0.5
Note:
The diameter of the screw, 5.5 mm<D<8.58mm. The distance of two screws is 87 mm. The screw that project from the
wall need around 3 mm based, and the length of the screw need to be at least 8.3 mm to withstand the weight of the
product.
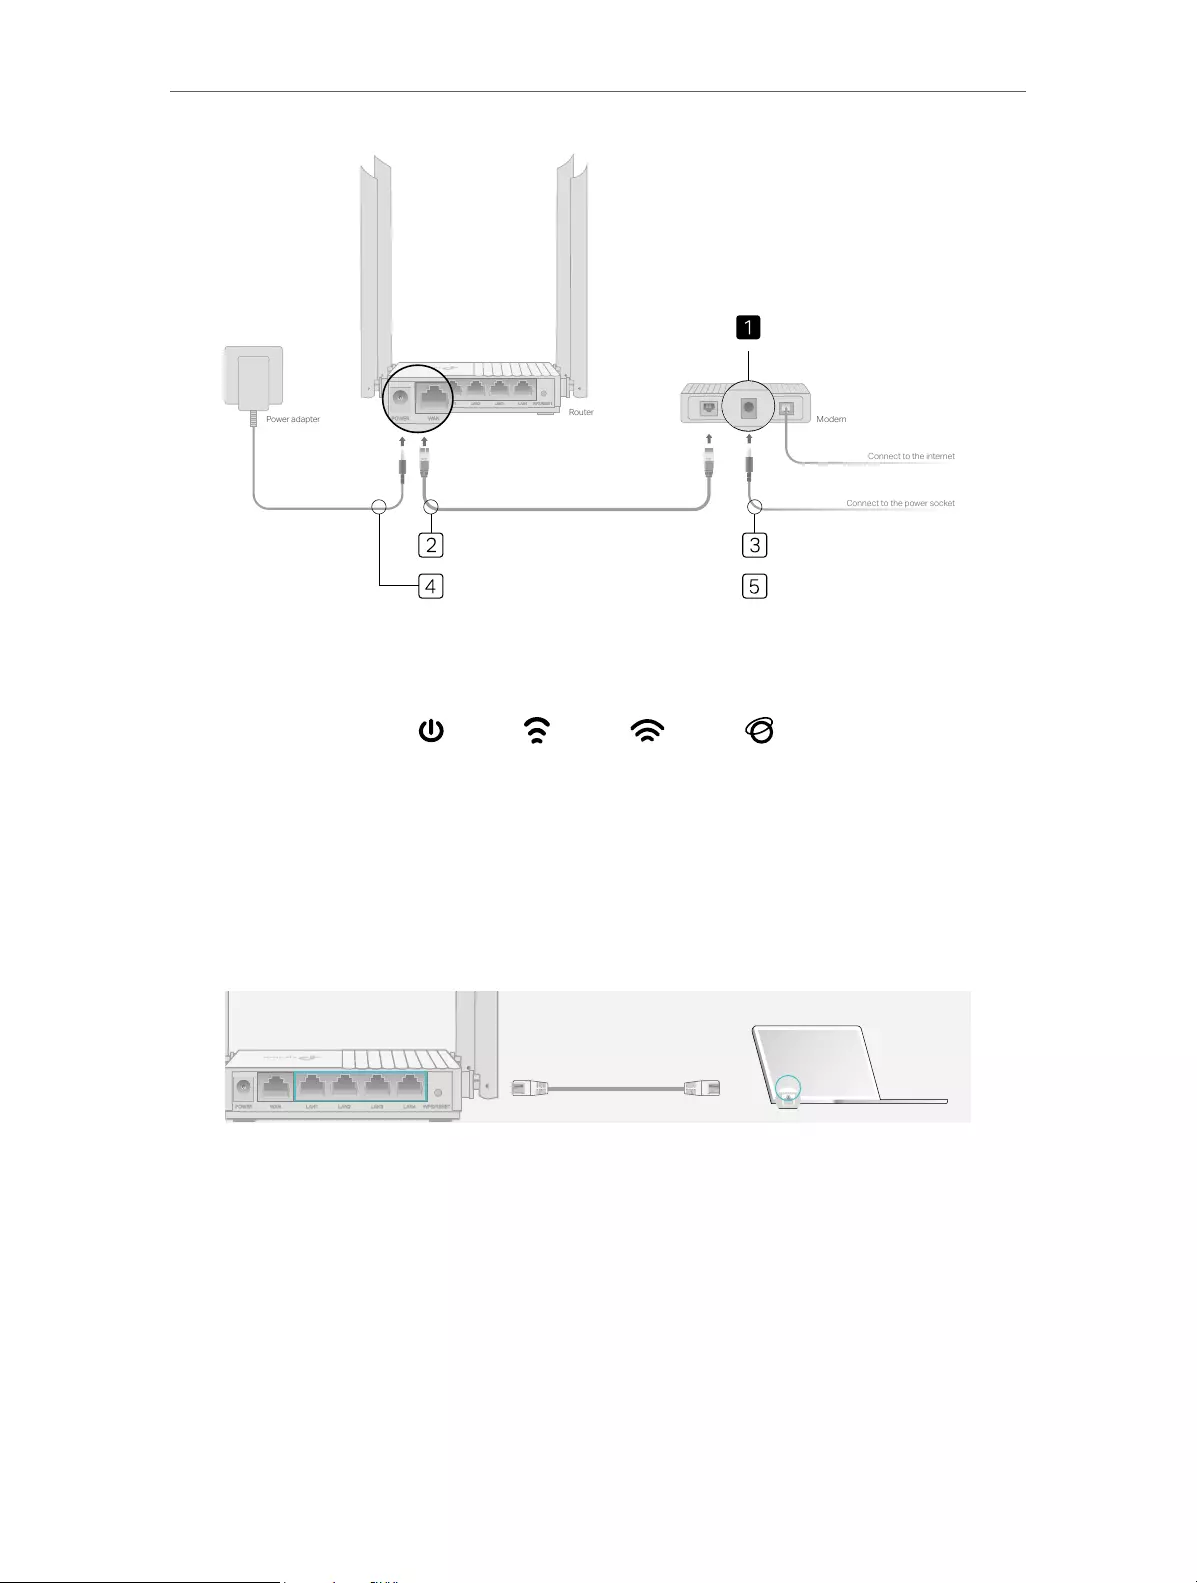
2. 2. Connect Your Router
Before you start, turn off your modem, if any, and remove the backup battery if it has
one. Then place the router horizontally and orient the antennas vertically.
Note: If you already have a router and want to configure this new router as an access point to extend your network,
refer to Set Up the Router as an Access Point.
Follow the steps below to connect your router.
If your internet connection is through an Ethernet cable directly from the wall instead
of through a DSL / Cable / Satellite modem, connect the Ethernet cable to the router’s
WAN port, and then follow steps 4 and 5 to complete the hardware connection.
1. Turn off the modem, and remove the backup battery if it has one.
2. Connect the modem to the router’s WAN port with an Ethernet cable.
3. Turn on the modem, and then wait about 2 minutes for it to restart.
9
Chapter 2 Connect the Hardware
Modem
Router
Power adapter
Connect to the internet
Connect to the power socket
4. Connect the power adapter to the router.
5. Verify that the following LEDs are on and solid to confirm the hardware is connected.
Power
On Internet
On
2.4GHz
On
5GHz
On
6. Connect your computer to the router.
• Method 1: Wired
Turn off the Wi-Fi on your computer and connect your computer to the router’s LAN
port as shown below.
Ethernet cable
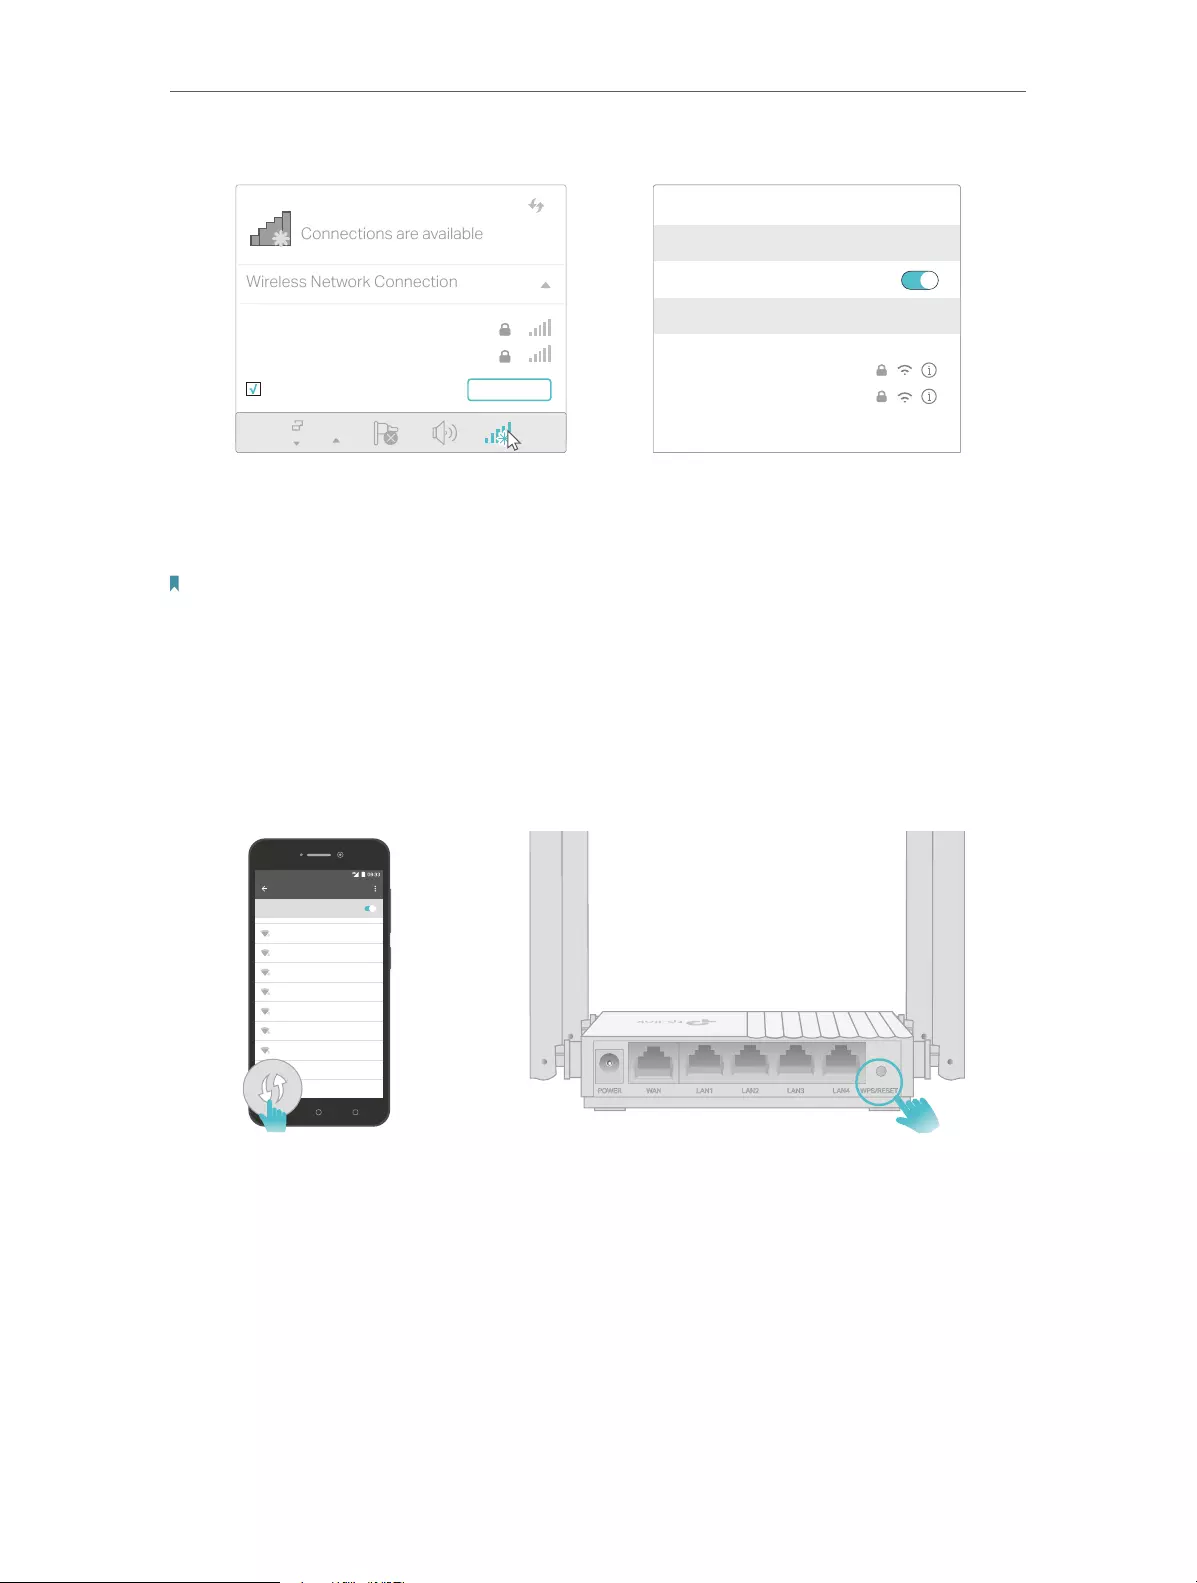
• Method 2: Wirelessly
1 ) Find the SSID (Network Name) and Wireless Password printed on the label at
the bottom of the router.
2 ) Click the network icon of your computer or go to Wi-Fi Settings of your smart
device, and then select the SSID to join the network.
10
Chapter 2 Connect the Hardware
Connections are available
Wireless Network Connection
TP-Link_XXXX
TP-Link_XXXX_5G
Connect automatically Connect
Wi-Fi
Wi-Fi
TP-Link_XXXX
TP-Link_XXXX_5G
CHOOSE A NETWORK…
Other…
< Settings
OR
Smart DeviceComputer
• Method 3: Use the WPS button
Wireless devices that support WPS, including Android phones, tablets, and most USB
network cards, can be connected to your router through this method.
Note:
• WPS is not supported by iOS devices.
• The WPS function cannot be configured if the wireless function of the router is disabled. Also, the WPS function will be
disabled if your wireless encryption is WEP. Please make sure the wireless function is enabled and is configured with
the appropriate encryption before configuring the WPS.
1 ) Tap the WPS icon on the device’s screen. Here we take an Android phone for
instance.
2 ) Within two minutes, press the WPS button on your router.
WLAN
On
TP-Link
MyHome
David
HomeNetwork
TP-Link_Home
TP-Link_Router
Test

Chapter 3
Log In to Your Router

12
Chapter 3 Log In to Your Router
With a web-based utility, it is easy to configure and manage the router. The web-based
utility can be used on any Windows, Mac OS or UNIX OS with a Web browser, such as
Microsoft Internet Explorer, Mozilla Firefox or Apple Safari.
Follow the steps below to log in to your router.
1. Set up the TCP/IP Protocol in Obtain an IP address automatically mode on your
computer.
2. Visit http://tplinkwifi.net, and create a login password for secure management
purposes. Then click Let’s Get Started to log in.
Note:
• If the login window does not appear, please refer to the FAQ Section.
• If you have registered a TP-Link ID and bound your cloud router to it, the login password you created here will be
invalid. Please log in to the cloud router using your TP-Link ID.

Chapter 4
Set Up Internet Connection
This chapter introduces how to connect your router to the internet. The router is
equipped with a web-based Quick Setup wizard. It has necessary ISP information built
in, automates many of the steps and verifies that those steps have been successfully
completed. Furthermore, you can also set up an IPv6 connection if your ISP provides
IPv6 service.
It contains the following sections:
• Use Quick Setup Wizard
• Quick Setup Via TP-Link Tether App
• Manually Set Up Your Internet Connection
• Set Up the Router as an Access Point
• Set Up an IPv6 Internet Connection

14
Chapter 4 Set Up Internet Connection
4. 1. Use Quick Setup Wizard
The Quick Setup Wizard will guide you to set up your router.
Tips:
If you need the IPv6 internet connection, please refer to the section of Set Up an IPv6 Internet Connection.
Follow the steps below to set up your router.
1. Visit http://tplinkwifi.net, and log in with the password you set for the router.
2. Follow the step-by-step instructions to complete Quick Setup configuration or go
to Advanced > Quick Setup for configuration to connect your router to the internet.
Then follow the step-by-step instructions to connect your router to the internet.
3. To enjoy a more complete service from TP-Link (remote management, TP-Link DDNS,
and more.), log in with your TP-Link ID or click Sign Up Now to get one. Then follow the
instructions to bind the cloud router to your TP-Link ID.
Note:
• To learn more about the TP-Link Cloud service, please refer to the TP-Link Cloud Service section.
• If you do not want to register a TP-Link ID now, you may click Skip to proceed.
• If you have changed the preset wireless network name (SSID) and wireless password during the Quick Setup process,
all your wireless devices must use the new SSID and password to connect to the router.

15
Chapter 4 Set Up Internet Connection
4. 2. Quick Setup Via TP-Link Tether App
The Tether app runs on iOS and Android devices, such as smartphones and tablets.
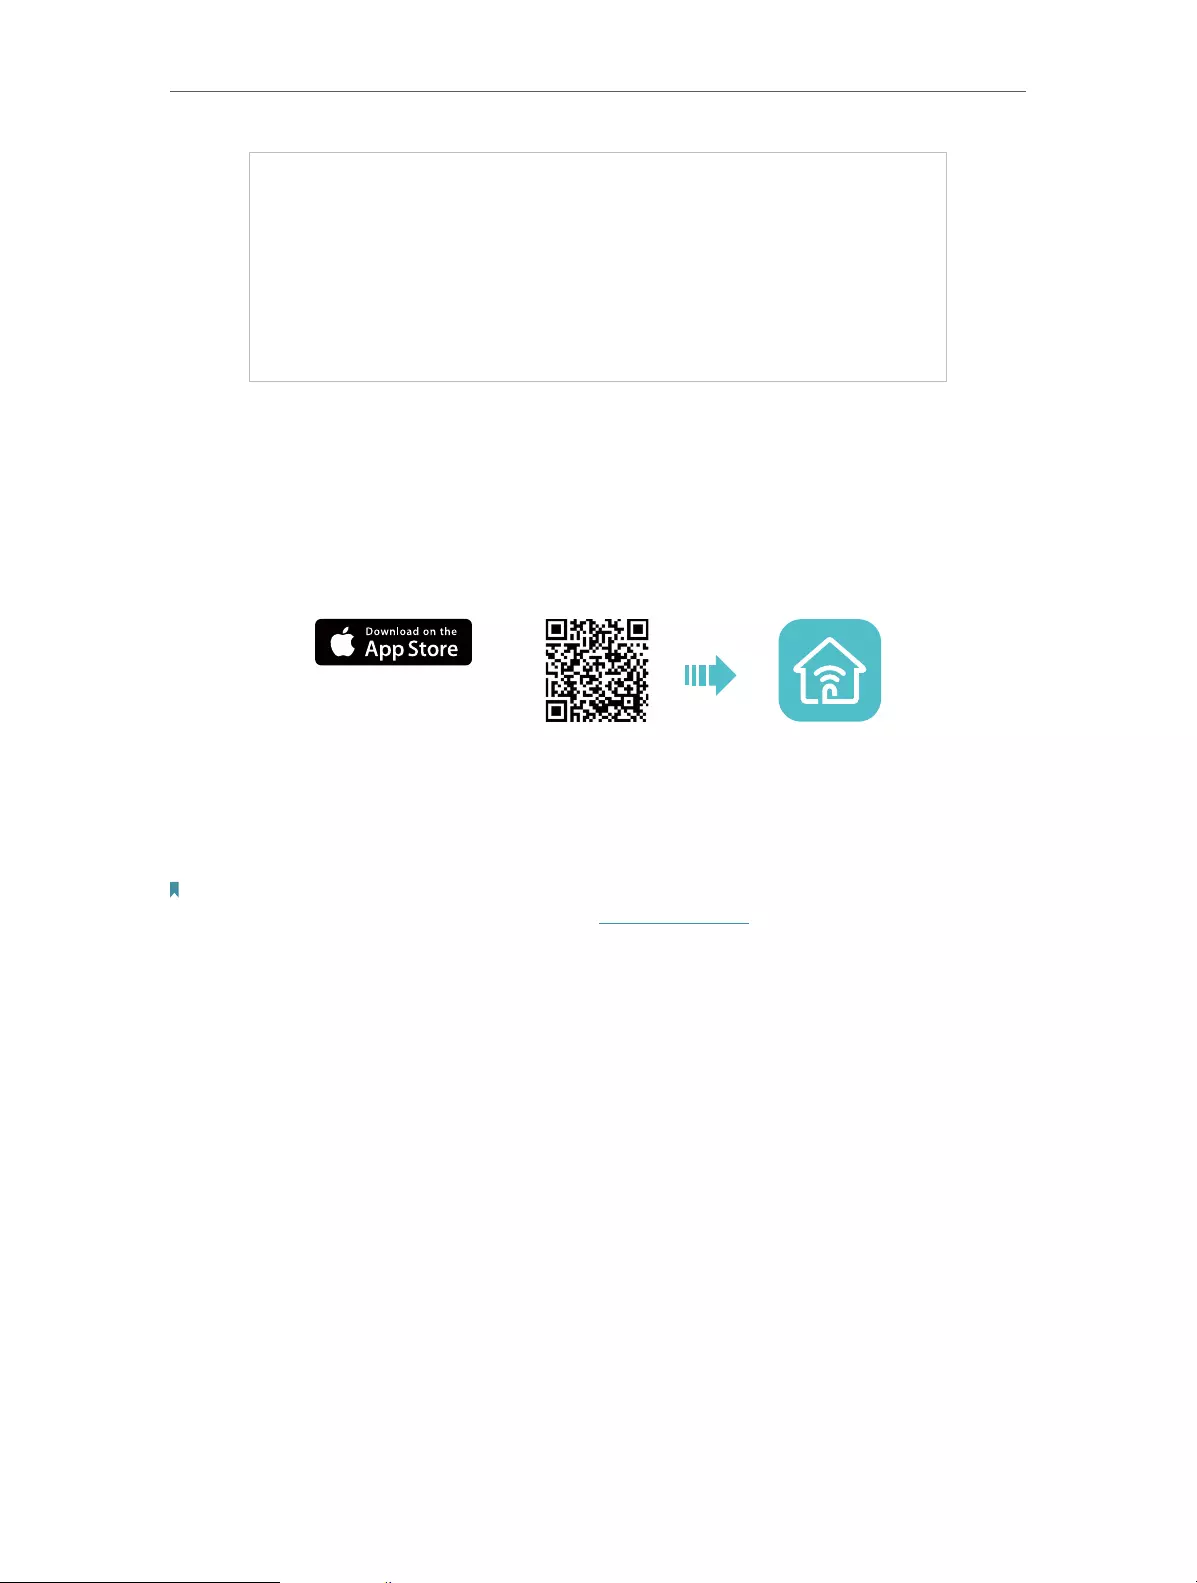
1. Launch the Apple App Store or Google Play store and search “TP-Link Tether” or
simply scan the QR code to download and install the app.
OR
2. Connect your device to the router’s wireless network.
3. Launch the Tether app, tap the + button and select Router > Wireless Router. Follow
the steps to complete the setup and connect to the internet.
4. Connect your devices to the newly configured wireless networks of the router and
enjoy the internet!
4. 3. Manually Set Up Your Internet Connection
In this part, you can check your current internet connection settings. You can also
modify the settings according to the service information provided by your ISP.
Follow the steps below to check or modify your internet connection settings.
1. Visit http://tplinkwifi.net, and log in with your TP-Link ID or the password you set for
the router.
2. Go to Internet.
3. Select your internet connection type from the drop-down list.
4. Follow the instructions on the page to continue the configuration. Parameters on the
figures are just used for demonstration.
1 ) If you choose Dynamic IP, you need to select whether to clone the MAC address.
Dynamic IP users are usually equipped with a cable TV or fiber cable.
16
Chapter 4 Set Up Internet Connection
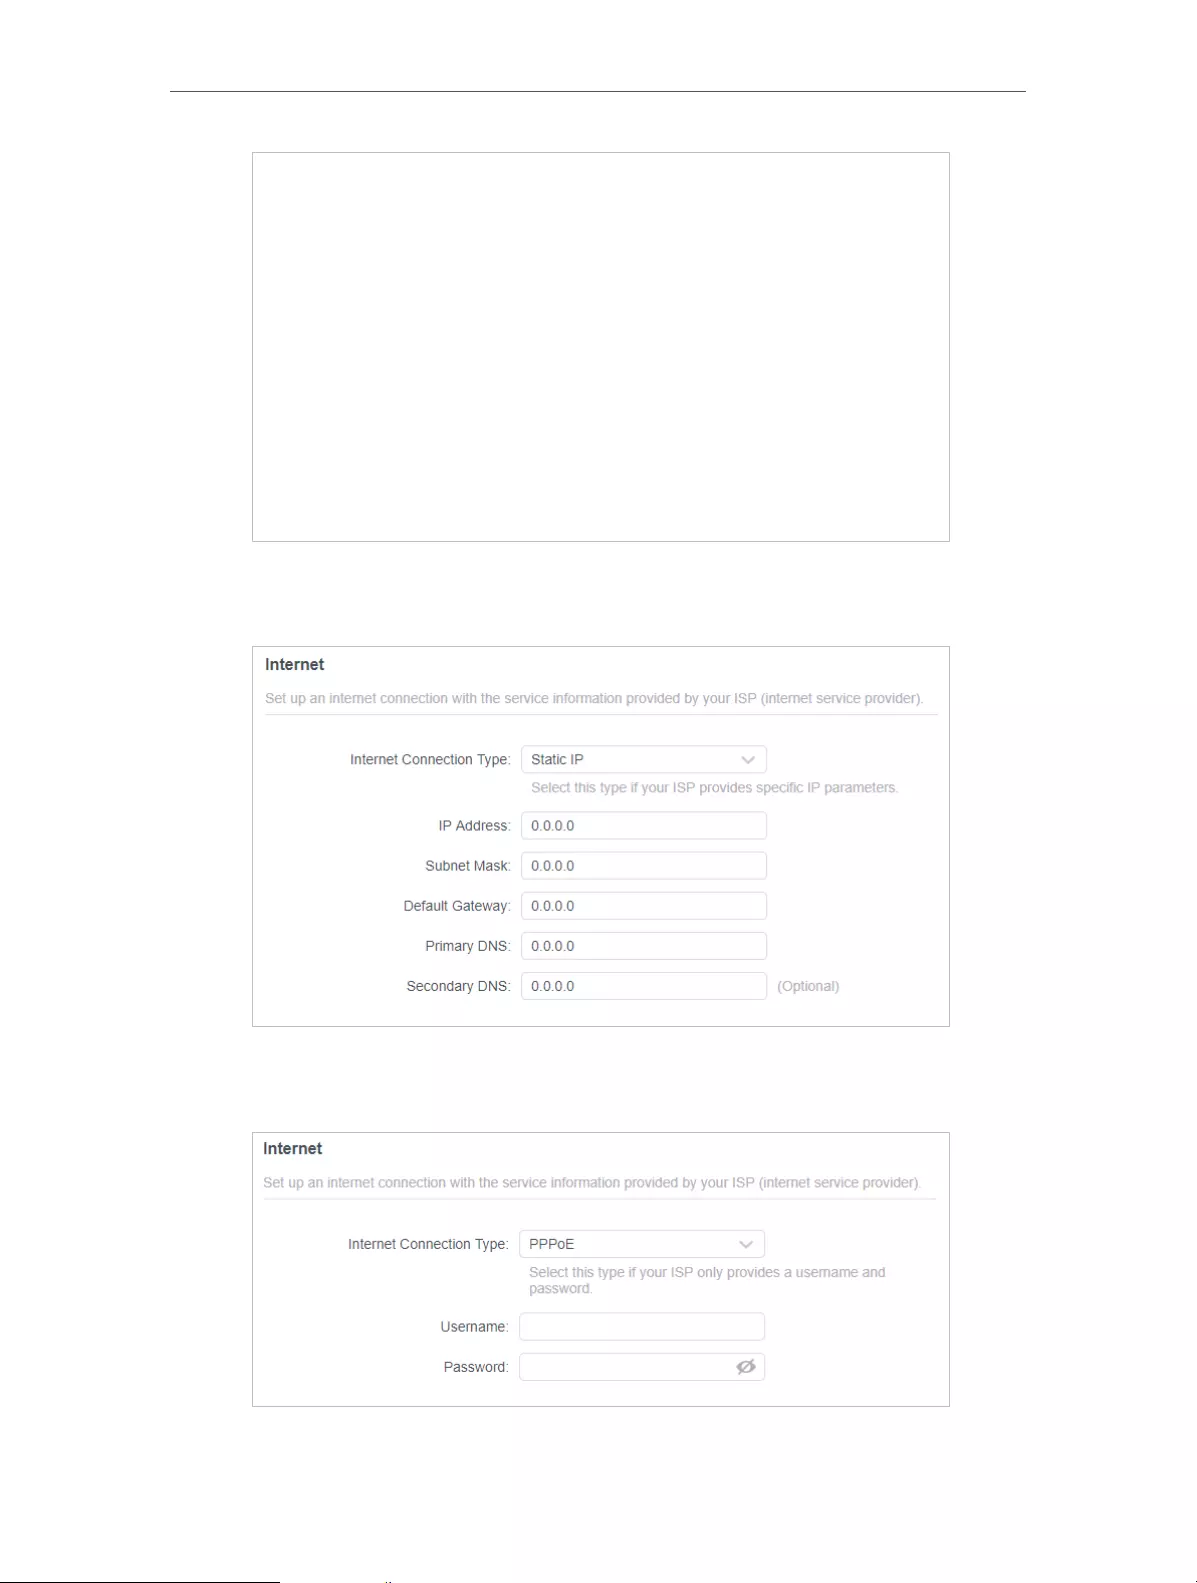
2 ) If you choose Static IP, enter the information provided by your ISP in the
corresponding fields.
3 ) If you choose PPPoE, enter the username and password provided by your ISP.
PPPoE users usually have DSL cable modems.
17
Chapter 4 Set Up Internet Connection
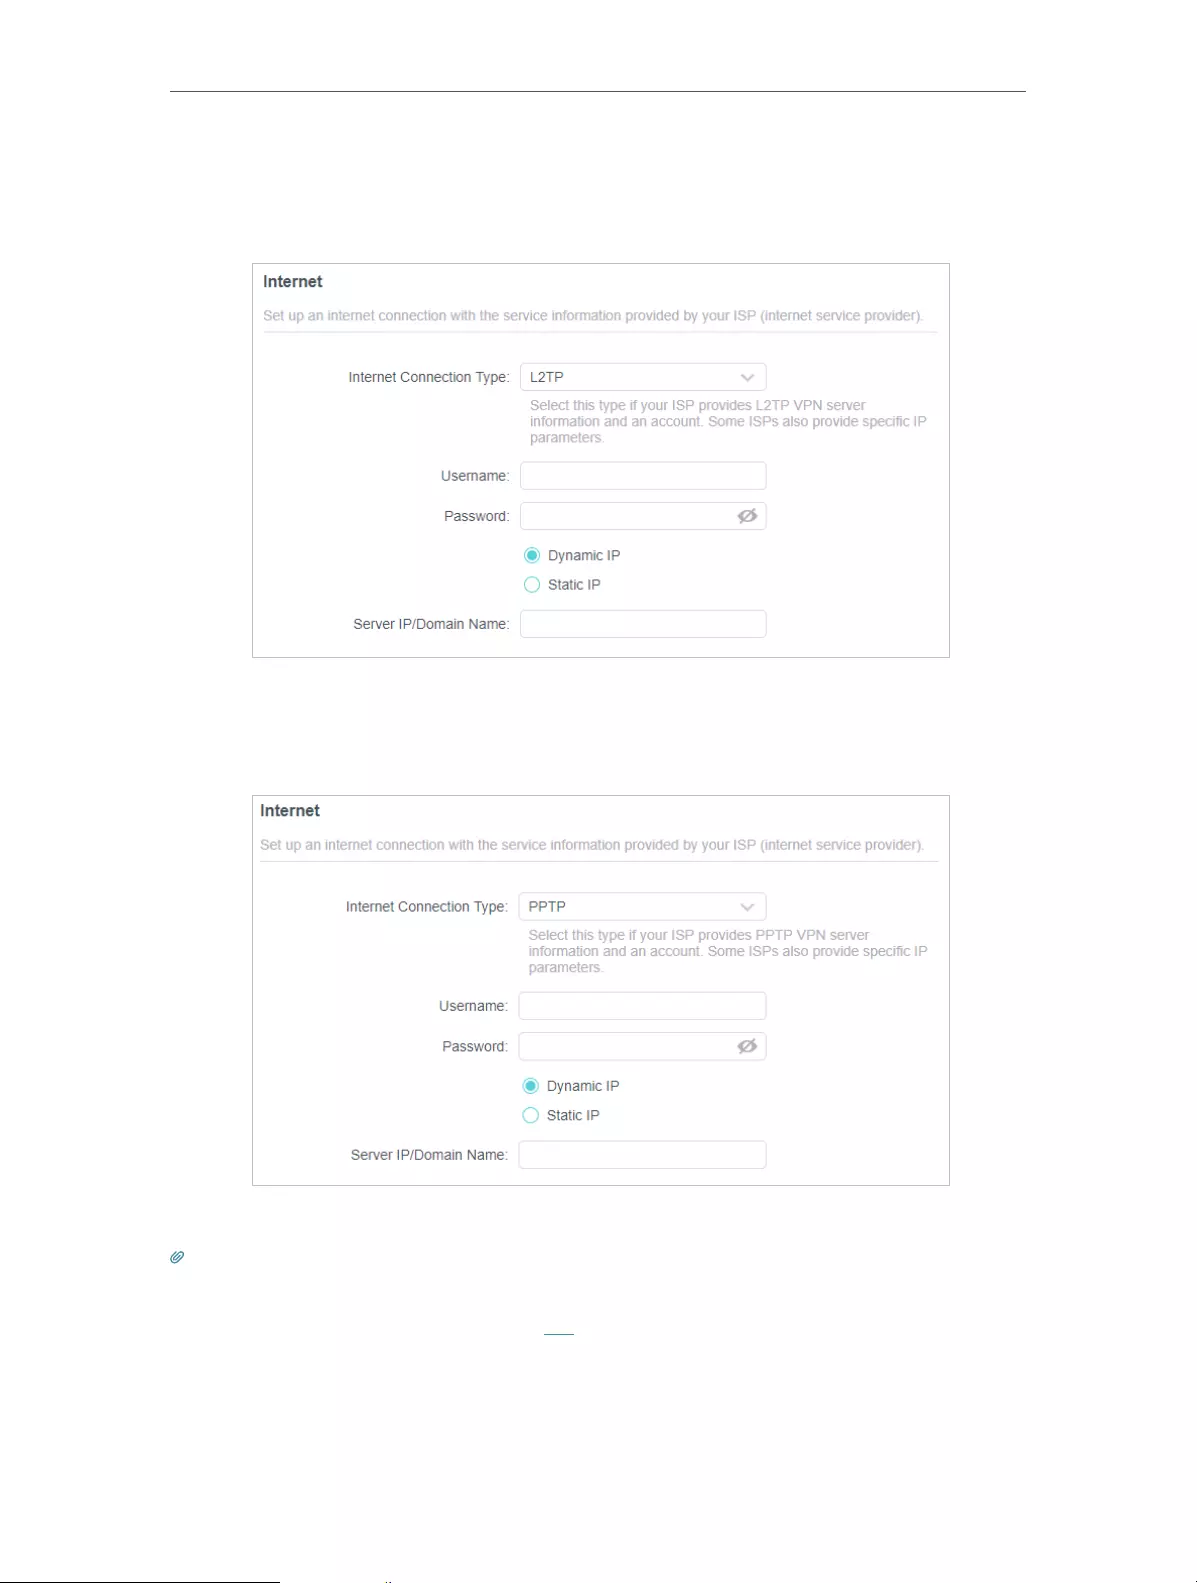
4 ) If you choose L2TP, enter the username and password and choose the
Secondary Connection provided by your ISP. Different parameters are needed
according to the Secondary Connection you have chosen.
5 ) If you choose PPTP, enter the username and password, and choose the
Secondary Connection provided by your ISP. Different parameters are needed
according to the Secondary Connection you have chosen.
5. Click Save.
Tips:
• If you use Dynamic IP and PPPoE and you are provided with any other parameters that are not required on the page,
please go to Advanced > Network > Internet to complete the configuration.
• If you still cannot access the internet, refer to the FAQ section for further instructions.

18
Chapter 4 Set Up Internet Connection
4. 4. Set Up the Router as an Access Point
The router can work as an access point, transforming your existing wired network to a
wireless one.
1. Visit http://tplinkwifi.net, and log in with your TP-Link ID or the password you set for
the router.
2. Go to Advanced > Operation Mode, select Access Point and click Save. The router
will reboot and switch to Access Point mode.
3. After rebooting, connect the router to your existing wired router via an Ethernet cable.
4. Log in again to the web management page http://tplinkwifi.net, and go to Advanced
> Quick Setup.
5. Configure your wireless settings and click Next.
6. Confirm the information and click Save. Now, you can enjoy Wi-Fi.
Tips:
• Functions, such as Parental Controls, QoS and NAT Forwarding, are not supported in the Access Point mode.
• Functions, such as Guest Network, are the same as those in the Router mode.
4. 5. Set Up an IPv6 Internet Connection
Set up an IPv6 connection if your ISP provides IPv6 service.
1. Visit http://tplinkwifi.net, and log in with your TP-Link ID or the password you set for
the router.
2. Go to Advanced > IPv6.

19
Chapter 4 Set Up Internet Connection
3. Select the mode provided by your ISP to enable IPv6 connection.
Tips:
If you do not know what your internet connection mode is, contact your ISP or judge according to the already known
information provided by your ISP.
• Pass-Through (Bridge):
1 ) Select Pass-Through (Bridge) and click Save.
• Router:
1 ) Select Router mode.
2 ) Configure the WAN connection.

20
Chapter 4 Set Up Internet Connection
Notes:
1. If you do not know what your internet connection mode is, contact your ISP or judge according to the already
known information provided by your ISP.
2. If your ISP provides two separate accounts for the IPv4 and IPv6 connections, manually enter the username
and password for the IPv6 connection.
3 ) Keep the default settings of LAN.
4 ) Click Connect then click Save to apply your settings.
5 ) Go to Network > Status to check whether you have successfully set up an IPv6
connection.
Tips:
Visit the FAQ section if there is no internet connection.

Chapter 5
TP-Link Cloud Service
TP-Link Cloud service provides a better way to manage your cloud devices. Log in to
your router with a TP-Link ID, and you can easily monitor and manage your home network
when you are out and about via the Tether app. To ensure that your router stays new and
gets better over time, the TP-Link Cloud will notify you when an important firmware
upgrade is available. Surely you can also manage multiple TP-Link Cloud devices with a
single TP-Link ID.
This chapter introduces how to register a new TP-Link ID, bind or unbind TP-Link IDs
to manage your router, and the Tether app with which you can manage your home
network no matter where you may find yourself.
It contains the following sections:
• Register a TP-Link ID
• Change Your TP-Link ID Information
• Manage the User TP-Link IDs
• Manage the Router via the TP-Link Tether App

22
Chapter 5 TP-Link Cloud Service
5. 1. Register a TP-Link ID
If you have skipped the registration during the Quick Setup process, you can:
1. Visit http://tplinkwifi.net, and log in with the password you set for the router.
2. Go to Advanced > TP-Link ID or click TP-Link ID on the very top of the page.
3. Click Sign Up and follow the instructions to register a TP-Link ID.
4. After activating your TP-Link ID, come back to the TP-Link ID page to log in. The
TP-Link ID used to log in to the router for the first time will be automatically bound as
an Admin.
Note:
• To learn more about the Admin and User TP-Link ID, refer to Manage the Router via the TP-Link Tether App.
• Once the router is bound to your TP-Link ID, you need to log in to the router with the TP-Link ID.
• Once you have registered a TP-Link ID on the web management page, you can only register another TP-Link ID via the
Tether APP. Please refer to Manage the Router via the TP-Link Tether App to install the app.
• If you want to unbind the admin TP-Link ID from your router, please go to Advanced > TP-Link ID, an click Unbind in the
Device Information section.
5. 2. Change Your TP-Link ID Information
Follow the steps below to change your email address and password of your TP-Link ID
as needed.
1. Visit http://tplinkwifi.net, and log in with your TP-Link ID.
2. Go to Advanced > TP-Link ID, and focus on the Account Information section.
• To change your email address:
1. Click behind the Email.
2. Enter the password of your TP-Link ID, then a new email address. And click Save.

23
Chapter 5 TP-Link Cloud Service
• To change your password:
1. Click behind the Password.
2. Enter the current password, then a new password twice. And click Save.
5. 3. Manage the User TP-Link IDs
The TP-Link ID used to log in to the router for the first time will be automatically bound
as the Admin account. An admin account can add or remove other TP-Link IDs to or

24
Chapter 5 TP-Link Cloud Service
from the same router as Users. All accounts can monitor and manage the router locally
or remotely, but user accounts cannot:
• Reset the router to its factory default settings either on the web management page
or in the Tether app.
• Add/remove other TP-Link IDs to/from the router.
5. 3. 1. Add TP-Link ID to Manage the Router
1. Visit http://tplinkwifi.net, and log in with your TP-Link ID.
2. Go to Advanced > TP-Link ID, and focus on the Bound Accounts section.
3. Click , enter another TP-Link ID as needed and click Save.
Note: If you need another TP-Link ID, please register a new one via the Tether app. Refer to Manage the Router via the
TP-Link Tether App to install the app and register a new TP-Link ID.
4. The new TP-Link ID will be displayed in the Bound Accounts table as a User.
5. 3. 2. Remove TP-Link ID(s) from Managing the Router
1. Visit http://tplinkwifi.net, and log in with your TP-Link ID.
2. Go to Advanced > TP-Link ID, and focus on the Bound Accounts section.
3. Tick the checkbox(es) of the TP-Link ID(s) you want to remove and click Unbind.
25
Chapter 5 TP-Link Cloud Service
5. 4. Manage the Router via the TP-Link Tether App
The Tether app runs on iOS and Android devices, such as smartphones and tablets.
1. Launch the Apple App Store or Google Play store and search “TP-Link Tether” or
simply scan the QR code to download and install the app.
OR
2. Connect your device to the router’s wireless network.
3. Launch the Tether app, select the model of your router and log in with your TP-Link ID
or the password you set for the router.
4. Manage your router as needed.
Note: If you need to remotely access your router from your smart devices, you need to:
• Log in with your TP-Link ID. If you don’t have one, refer to Register a TP-Link ID.
• Make sure your smartphone or tablet can access the internet with cellular data or a Wi-Fi network.

Chapter 6
Guest Network
This function allows you to provide Wi-Fi access for guests without disclosing your
main network. When you have guests in your house, apartment, or workplace, you can
create a guest network for them. In addition, you can customize guest network options
to ensure network security and privacy.
It contains the following sections:
• Create a Network for Guests
• Customize Guest Network Options

27
Chapter 6 Guest Network
6. 1. Create a Network for Guests
1. Visit http://tplinkwifi.net, and log in with your TP-Link ID or the password you set for
the router.
2. Go to Advanced > Wireless > Guest Network or click Wireless on the top page. Locate
the Guest Network section.
3. Create a guest network as needed.
1 ) Tick the Enable checkbox for the 2.4GHz or 5GHz wireless network.
2 ) Customize the SSID. Don‘t select Hide SSID unless you want your guests to
manually input the SSID for guest network access.
3 ) Select the Security type.
• If No security is selected, no password is needed to access your guest network.
• If WAP/WPA2-Personal is selected, customize your own password.
4. Click Save. Now your guests can access your guest network using the SSID and
password you set!
5. You can also click Sharing Network to share the SSID and password to your guests.
Tips:
To view guest network information, go to Network Map and locate the Guest Network section. You can turn on or off the
guest network function conveniently.

28
Chapter 6 Guest Network
6. 2. Customize Guest Network Options
1. Visit http://tplinkwifi.net, and log in with your TP-Link ID or the password you set for
the router.
2. Go to Advanced > Wireless >Guest Network. Locate the Guest Permissions section.
3. Customize guest network options according to your needs.
• Allow guests to see each other
Tick this checkbox if you want to allow the wireless clients on your guest network to
communicate with each other via methods such as network neighbors and Ping.
• Allow guests to access your local network
Tick this checkbox if you want to allow the wireless clients on your guest network to
communicate with the devices connected to your router’s LAN ports or main network
via methods such as network neighbors and Ping.
4. Click Save. Now you can ensure network security and privacy!

Chapter 7
Parental Controls
This function allows you to block inappropriate, explicit and malicious websites, and
control access to specified websites at specified time.

30
Chapter 7 Parental Controls
7. 1. Setting Up Access Restrictions
I want to:
Block access to inappropriate online content for my child’s devices, restrict internet
access to 2 hours every day and block internet access during bed time (10 PM to 7 AM)
on weekdays.
How can I do that?
1. Visit http://tplinkwifi.net, and log in with your TP-Link ID or the password you set for
the router.
2. Go to Advanced > Parental Controls.
3. Click to create a profile for a family member.
4. Add basic profile information.
1 ) Enter a Name for the profile to make it easier to identify.
2 ) Click to select the devices that belong to this profile. Access restrictions will
be applied to these devices. Click ADD when finished.
Note: Only devices that have previously been connected to your router’s network are listed here. If you are unable
to find the device you want to add, connect it to your network and then try again.
3 ) Click Next.
5. Customize the Blocked Content according to your needs for this profile.

31
Chapter 7 Parental Controls
1 ) Enter a keyword (for example, “Facebook”) or a URL (for example, “www.
facebook.com”). All websites containing the keywords will be blocked.
2 ) Click Next.
6. Set time restrictions on internet access.
1 ) Enable Time Limits on Monday to Friday and Saturday & Sunday then set the
allowed online time to 2 hours each day.

32
Chapter 7 Parental Controls
2 ) Enable Bed Time and use the up/down arrows or enter times in the fields. Devices
under this profile will be unable to access the internet during this time period.
3 ) Click Save.
Done!
The amount of time your child spends online is controlled and inappropriate content is
blocked on their devices.

Chapter 8
QoS
This chapter introduces how to create a QoS (Quality of Service) rule to specify
prioritization of traffic and minimize the impact caused when the connection is under
heavy load.

34
Chapter 8 QoS
I want to:
Specify priority levels for some devices or applications.
For example, I have several devices that are connected to my wireless network. I would
like to set an intermediate speed on the internet for my computer for the next 2 hours.
How can I do that?
1. Enable QoS and set bandwidth allocation.
1 ) Visit http://tplinkwifi.net, and log in with your TP-Link ID or the password you set
for the router.
2 ) Go to Advanced > QoS > Global Settings.
3 ) Tick to enable QoS.
Note: QoS and NAT Boost cannot be enabled at the same time. To disable NAT Boost, go to Advanced > Network
> Internet >NAT.
4 ) Input the maximum upload and download bandwidth provided by your internet
service provider. 1Mbps equal s to 1000Kbps.
5 ) Click SAVE .
2. In the Device Priority section, find your computer and toggle on Priority. Click the
entry in the Timing column and select 2 hours as the duration you want the device
to be prioritized for.
3. Click SAVE
Done! You can now enjoy using your computer for the next 2 hours.

Chapter 9
Network Security
This chapter guides you on how to protect your home network from cyber attacks and
unauthorized users by implementing these three network security functions. You can
protect your home network from cyber attacks, block or allow specific client devices to
access your network using Access Control, or you can prevent ARP spoofing and ARP
attacks using IP & MAC Binding.
It contains the following sections:
• Protect the Network from Cyber Attacks
• Access Control
• IP & MAC Binding
• ALG (Application Layer Gateway)
36
Chapter 9 Network Security
9. 1. Protect the Network from Cyber Attacks
The SPI (Stateful Packet Inspection) Firewall protects the router from cyber attacks
and validate the traffic that is passing through the router based on the protocol. This
function is enabled by default.
1. Visit http://tplinkwifi.net, and log in with your TP-Link ID or the password you set for
the router.
2. Go to Advanced > Security > Firewall. It’s recommended to keep the default settings.
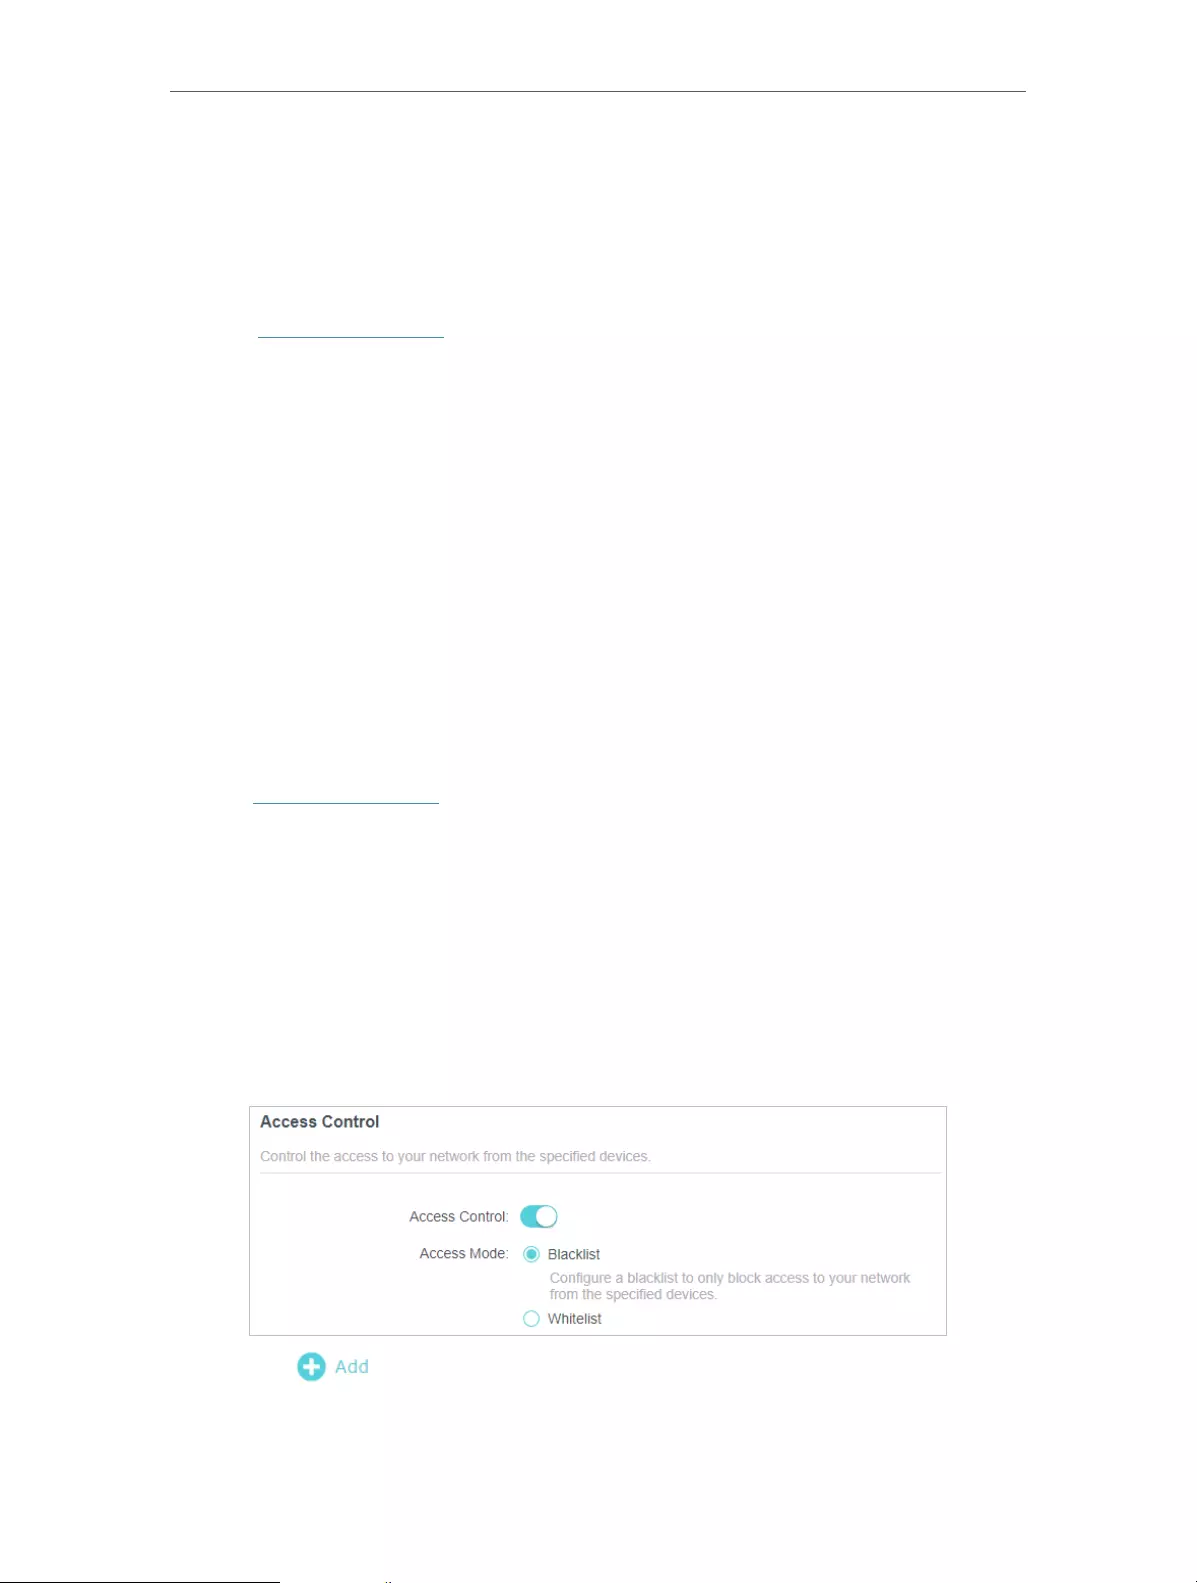
9. 2. Access Control
Access Control is used to block or allow specific client devices to access your network
(via wired or wireless) based on a list of blocked devices (Blacklist) or a list of allowed
devices (Whitelist).
I want to:
Block or allow specific client devices to access my network (via wired or wireless).
How can I do that?
1. Visit http://tplinkwifi.net, and log in with your TP-Link ID or the password you set for
the router.
2. Go to Advanced > Security > Access Control.
3. Toggle on to enable Access Control.
4. Select the access mode to either block (recommended) or allow the device(s) in the
list.
To block specific device(s):
1 ) Select Blacklist.
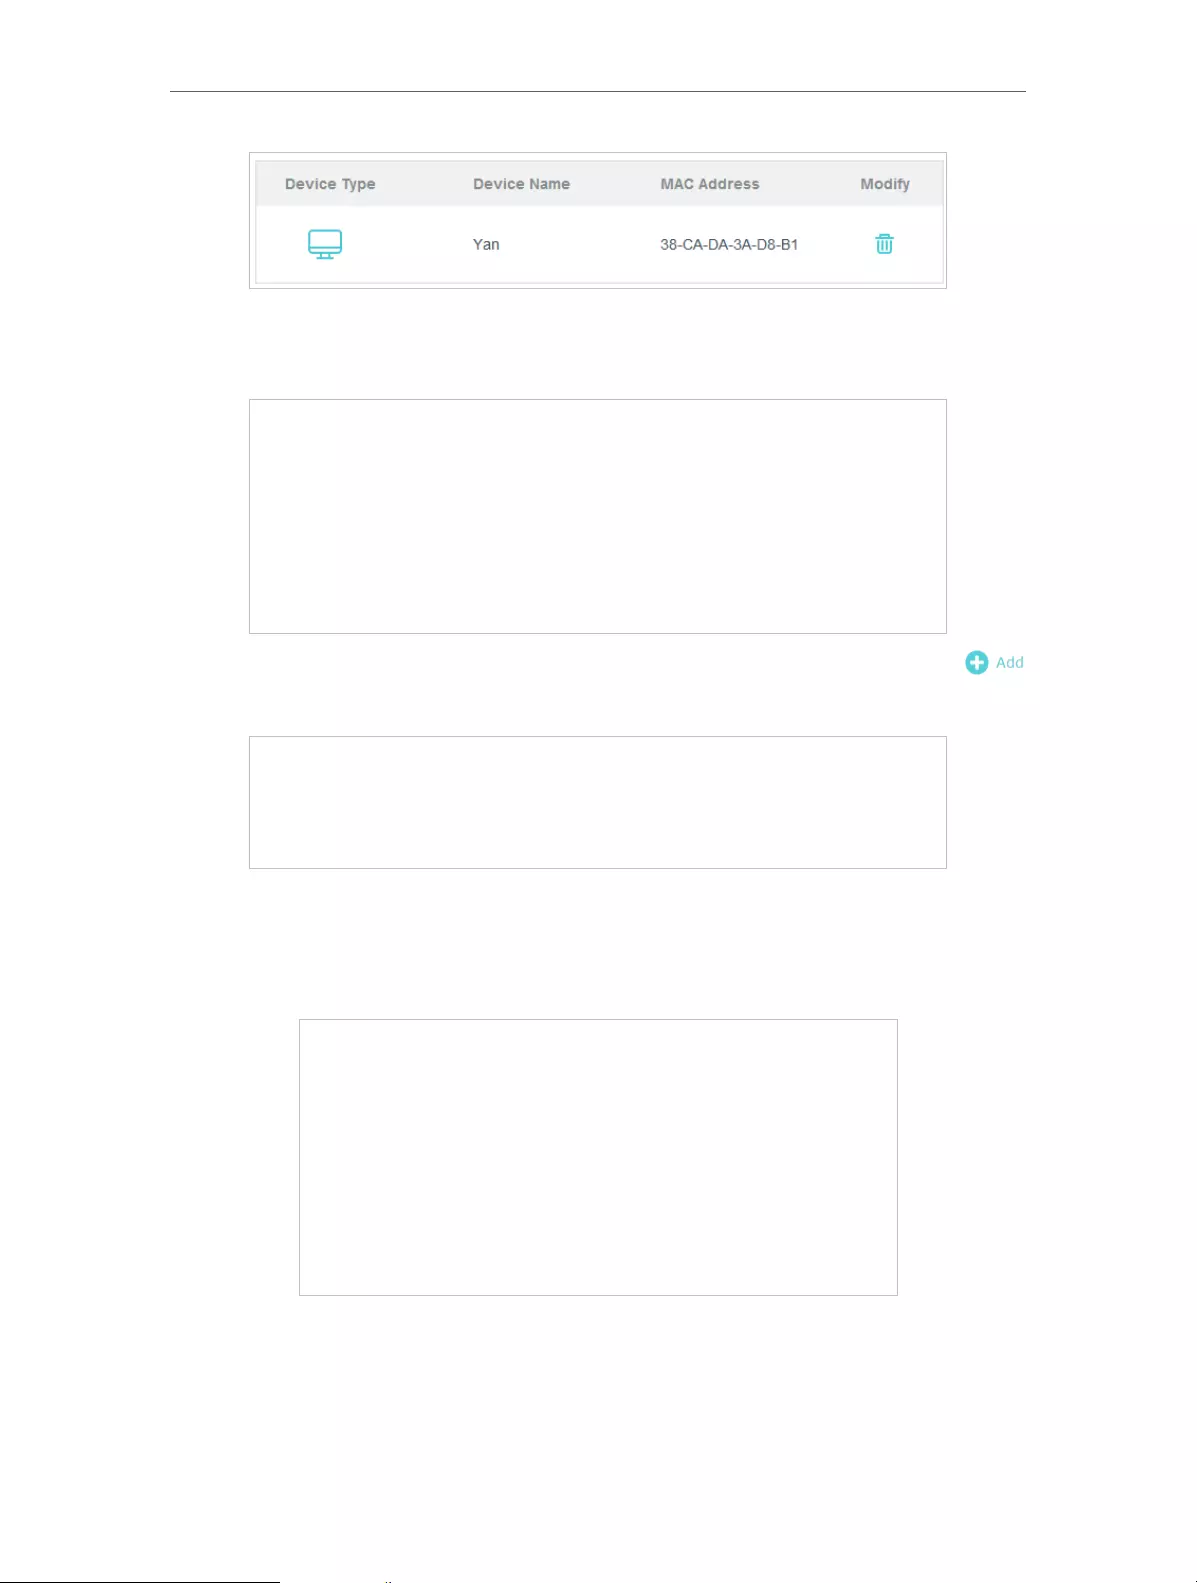
2 ) Click and select devices you want to be blocked and Click ADD.
3 ) The Operation Succeeded message will appear on the screen, which means the
selected devices have been successfully added to the blacklist.
37
Chapter 9 Network Security
To allow specific device(s):
1 ) Select Whitelist and click SAVE .
2 ) Your own device is in the whitelist by default and cannot be deleted. Click
to add other devices to the whitelist.
• Add connected devices
1 ) Click Select From Device List.
2 ) Select the devices you want to be allowed and click ADD.
3 ) The Operation Succeeded message will appear on the screen, which means the
selected devices have been successfully added to the whitelist.
• Add unconnected devices
1 ) Click Add Manually.

38
Chapter 9 Network Security
2 ) Enter the Device Name and MAC Address of the device you want to be allowed
and click ADD.
3 ) The Operation Succeeded message will appear on the screen, which means the
device has been successfully added to the whitelist.
Done!
Now you can block or allow specific client devices to access your network (via wired or
wireless) using the Blacklist or Whitelist.
9. 3. IP & MAC Binding
IP & MAC Binding, namely, ARP (Address Resolution Protocol) Binding, is used to bind
network device’s IP address to its MAC address. This will prevent ARP Spoofing and
other ARP attacks by denying network access to an device with matching IP address in
the Binding list, but unrecognized MAC address.
I want to:
Prevent ARP spoofing and ARP attacks.
How can I do that?
1. Visit http://tplinkwifi.net, and log in with your TP-Link ID or the password you set for
the router.
2. Go to Advanced > Security > IP & MAC Binding.
3. Enable IP & MAC Binding.

39
Chapter 9 Network Security
4. Bind your device(s) according to your need.
To bind the connected device(s):
1 ) Click in the Binding List section.
2 ) Click VIEW CONNECTED DEVICES and select the device you want to bind. The
MAC Address and IP Address fields will be automatically filled in.
3 ) Click SAVE .
To bind the unconnected device:
1 ) Click in the Binding List section.
2 ) Enter the MAC Address and IP Address that you want to bind.
Done!
Now you don’t need to worry about ARP spoofing and ARP attacks!

40
Chapter 9 Network Security
9. 4. ALG (Application Layer Gateway)
View your ALG (Application Layer Gateway) settings in this page. It is recommended to
keep them as default.

Chapter 10
NAT Forwarding
The router’s NAT (Network Address Translation) feature makes devices on the LAN use
the same public IP address to communicate with devices on the internet, which protects
the local network by hiding IP addresses of the devices. However, it also brings about
the problem that an external host cannot initiatively communicate with a specified
device on the local network.
With the forwarding feature the router can penetrate the isolation of NAT and allows
devices on the internet to initiatively communicate with devices on the local network,
thus realizing some special functions.
The TP-Link router supports four forwarding rules. If two or more rules are set, the
priority of implementation from high to low is Port Forwarding, Port Triggering, UPNP
and DMZ.
It contains the following sections:
• Share Local Resources on the Internet by Port Forwarding
• Open Ports Dynamically by Port Triggering
• Make Xbox Online Games Run Smoothly by UPnP
• Make Applications Free from Port Restriction by DMZ
42
Chapter 10 NAT Forwarding
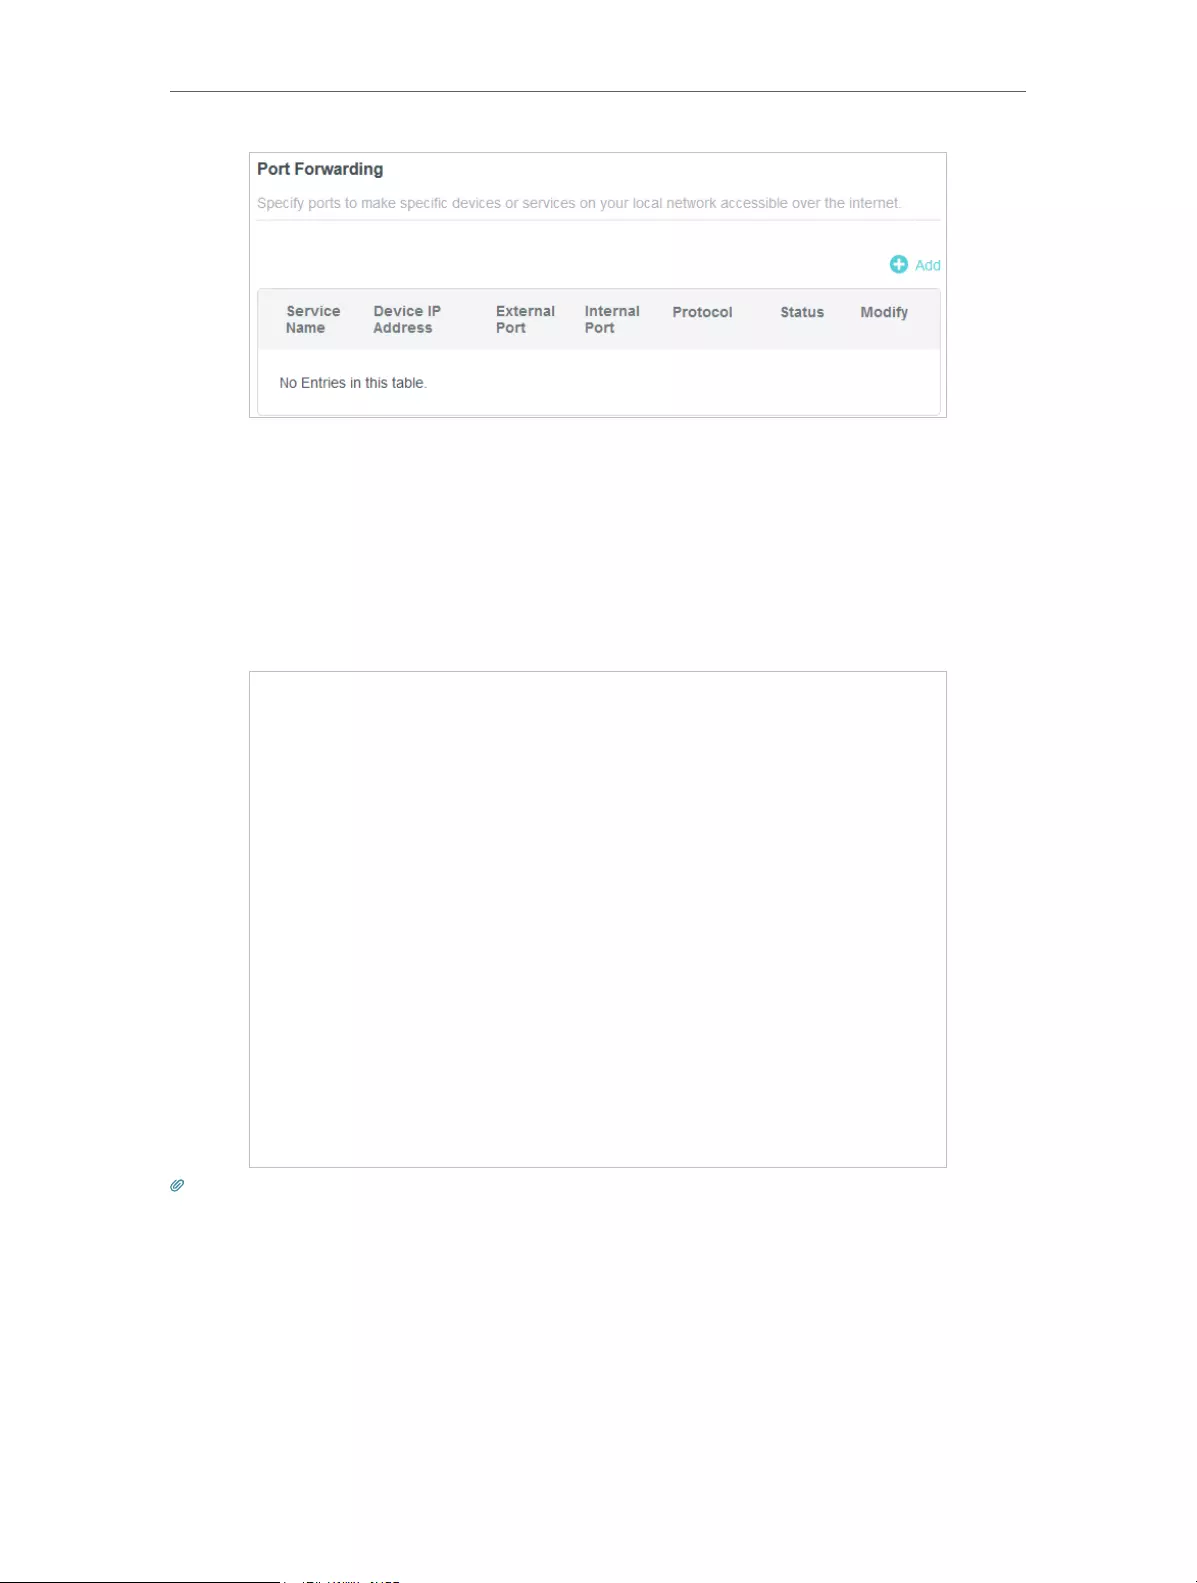
10. 1. Share Local Resources on the Internet by Port
Forwarding
When you build up a server on the local network and want to share it on the internet,
Port Forwarding can realize the service and provide it to internet users. At the same
time Port Forwarding can keep the local network safe as other services are still invisible
from the internet.
Port Forwarding can be used for setting up public services on your local network,
such as HTTP, FTP, DNS, POP3/SMTP and Telnet. Different services use different
service ports. Port 80 is used in HTTP service, port 21 in FTP service, port 25 in SMTP
service and port 110 in POP3 service. Please verify the service port number before the
configuration.
I want to:
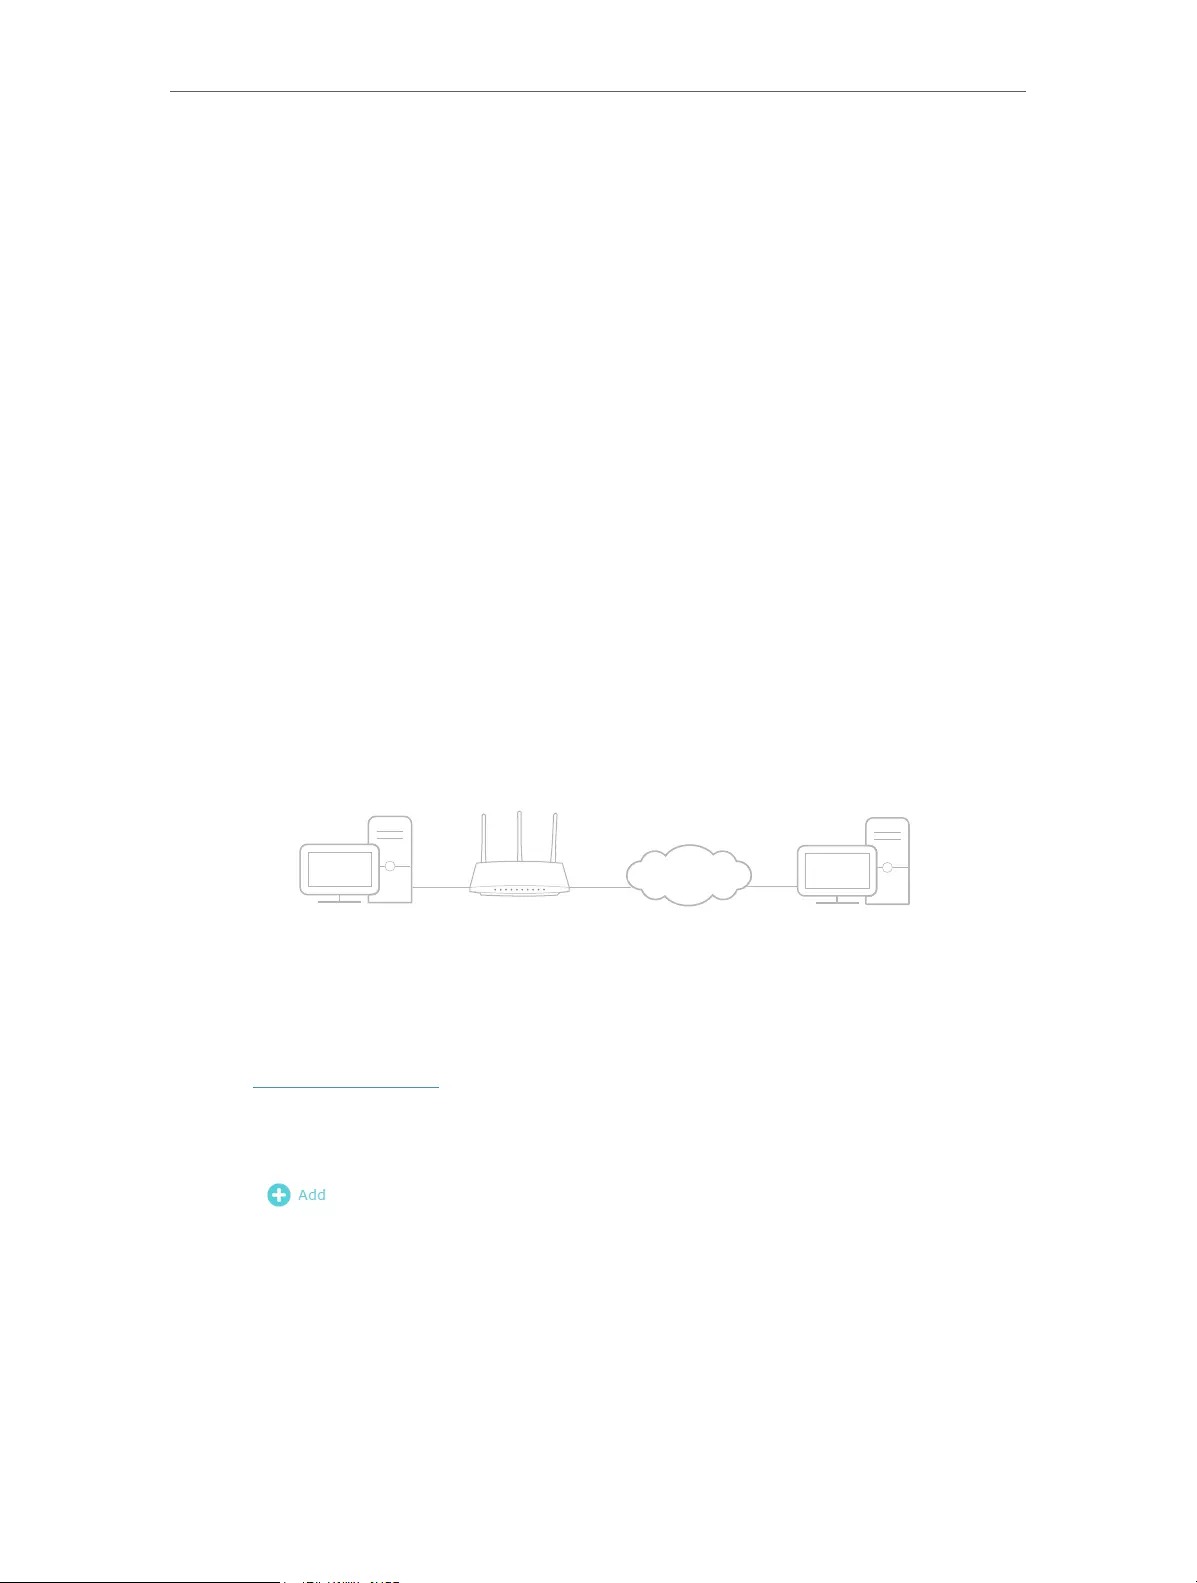
Share my personal website I’ve built in local network with my friends through the internet.
For example, the personal website has been built on my home PC (192.168.0.100). I hope
that my friends on the internet can visit my website in some way. The PC is connected
to the router with the WAN IP address 218.18.232.154.
INTERNET
WAN: 218.18.232.154LANHome
Personal Website Router
How can I do that?
1. Assign a static IP address to your PC, for example 192.168.0.100.
2. Visit http://tplinkwifi.net, and log in with your TP-Link ID or the password you set for
the router.
3. Go to Advanced > NAT Forwarding > Port Forwarding.
4. Click .
43
Chapter 10 NAT Forwarding
5. Click VIEW COMMON SERVICES and select HTTP. The External Port, Internal Port
and Protocol will be automatically filled in.
6. Click VIEW CONNECTED DEVICES and select your home PC. The Device IP
Address will be automatically filled in. Or enter the PC’s IP address manually in the
Device IP Address field.
7. Click SAVE .
Tips:
• It is recommended to keep the default settings of Internal Port and Protocol if you are not clear about which port and
protocol to use.
• If the service you want to use is not in the common services list, you can enter the corresponding parameters
manually. You should verify the port number that the service needs.
• You can add multiple port forwarding rules if you want to provide several services in a router. Please note that the
External Port should not be overlapped.
Done!
Users on the internet can enter http:// WAN IP (in this example: http:// 218.18.232.154)
to visit your personal website.

44
Chapter 10 NAT Forwarding
Tips:
• The WAN IP should be a public IP address. For the WAN IP is assigned dynamically by the ISP, it is recommended to
apply and register a domain name for the WAN referring to Make Applications Free from Port Restriction by DMZ.
Then users on the internet can use http:// domain name to visit the website.
• If you have changed the default External Port, you should use http:// WAN IP: External Port or http:// domain name:
External Port to visit the website.
10. 2. Open Ports Dynamically by Port Triggering
Port Triggering can specify a triggering port and its corresponding external ports.
When a host on the local network initiates a connection to the triggering port, all the
external ports will be opened for subsequent connections. The router can record the
IP address of the host. When the data from the internet return to the external ports, the
router can forward them to the corresponding host. Port Triggering is mainly applied to
online games, VoIPs, video players and common applications including MSN Gaming
Zone, Dialpad and Quick Time 4 players, etc.
Follow the steps below to configure the Port Triggering rules:
1. Visit http://tplinkwifi.net, and log in with your TP-Link ID or the password you set for
the router.
2. Go to Advanced > NAT Forwarding > Port Triggering and click .
3. Click VIEW COMMON SERVICES, and select the desired application. The Triggering
Port, Triggering Protocol and External Port will be automatically filled in. The following
picture takes application MSN Gaming Zone as an example.

45
Chapter 10 NAT Forwarding
4. Click SAVE .
Tips:
• You can add multiple port triggering rules according to your network need.
• The triggering ports can not be overlapped.
• If the application you need is not listed in the Existing Applications list, please enter the parameters manually. You
should verify the external ports the application uses first and enter them into External Port field according to the
format the page displays.
10. 3. Make Xbox Online Games Run Smoothly by
UPnP
The UPnP (Universal Plug and Play) protocol allows applications or host devices
to automatically find the front—end NAT device and send request to it to open the
corresponding ports. With UPnP enabled, the applications or host devices on the
local network and the internet can freely communicate with each other thus realizing
the seamless connection of the network. You may need to enable the UPnP if you
want to use applications for multiplayer gaming, peer-to-peer connections, real-time
communication (such as VoIP or telephone conference) or remote assistance, etc.
Tips:
• UPnP is enabled by default in this router.
• Only the application supporting UPnP protocol can use this feature.
• UPnP feature needs the support of operating system (e.g. Windows Vista/ Windows 7/ Windows 8, etc. Some of
operating system need to install the UPnP components).
For example, when you connect your Xbox to the router which has connected to
the internet to play online games, UPnP will send request to the router to open the
corresponding ports allowing the following data penetrating the NAT to transmit.
Therefore, you can play Xbox online games without a hitch.

46
Chapter 10 NAT Forwarding
Internet
If necessary, you can follow the steps to change the status of UPnP.
1. Visit http://tplinkwifi.net, and log in with your TP-Link ID or the password you set for
the router.
2. Go to Advanced > NAT Forwarding > UPnP and toggle on or off according to your
needs.
10. 4. Make Applications Free from Port Restriction
by DMZ
When a PC is set to be a DMZ (Demilitarized Zone) host on the local network, it is totally
exposed to the internet, which can realize the unlimited bidirectional communication
between internal hosts and external hosts. The DMZ host becomes a virtual server with
all ports opened. When you are not clear about which ports to open in some special
applications, such as IP camera and database software, you can set the PC to be a DMZ
host.
Note:
When DMZ is enabled, the DMZ host is totally exposed to the internet, which may bring some potential safety hazards. If
DMZ is not in use, please disable it in time.
I want to:
Make the home PC join the internet online game without port restriction.
For example, due to some port restriction, when playing the online games, you can log
in normally but cannot join a team with other players. To solve this problem, set your PC
as a DMZ host with all ports open.
How can I do that?
1. Assign a static IP address to your PC, for example 192.168.0.100.
2. Visit http://tplinkwifi.net, and log in with your TP-Link ID or the password you set for
the router.
3. Go to Advanced > NAT Forwarding > DMZ and tick to enable DMZ.

47
Chapter 10 NAT Forwarding
4. Click VIEW CONNECTED DEVICES and select your PC. The Device IP
Address will be automatically filled in. Or enter the PC’s IP address 192.168.0.100
manually in the DMZ Host IP Address field.
5. Click SAVE .
Done!
The configuration is completed. You’ve set your PC to a DMZ host and now you can
make a team to game with other players.

Chapter 11
Customize Your Network
Settings
This chapter guides you on how to configure advanced network features.
It contains the following sections:
• Change the LAN Settings
• Configure to Support IPTV Service
• Specify DHCP Server Settings
• Set Up a Dynamic DNS Service Account
• Create Static Routes
• Specify Wireless Settings
• Schedule Your Wireless Function
• Use WPS for Wireless Connection
• Advanced Wireless Settings

49
Chapter 11 Customize Your Network Settings
11. 1. Change the LAN Settings
The router is preset with a default LAN IP 192.168.0.1, which you can use to log in to
its web management page. The LAN IP address together with the Subnet Mask also
defines the subnet that the connected devices are on. If the IP address conflicts with
another device on your local network or your network requires a specific IP subnet, you
can change it.
1. Visit http://tplinkwifi.net, and log in with your TP-Link ID or the password you set for
the router.
2. Go to Advanced > Network > LAN.
3. Type in a new IP Address appropriate to your needs. And leave the Subnet Mask as
the default settings.
4. Click SAVE .
Note: If you have set the Port Forwarding, DMZ or DHCP address reservation, and the new LAN IP address is not in the
same subnet with the old one, then you should reconfigure these features.
11. 2. Configure to Support IPTV Service
I want to:
Configure IPTV setup to enable Internet/IPTV/Phone service provided by my internet
service provider (ISP).
How can I do that?
1. Visit http://tplinkwifi.net, and log in with your TP-Link ID or the password you set for
the router.
2. Go to Advanced > Network > IPTV/VLAN.
3. Configure IPTV/VLAN settings:
1 ) Tick Enable IPTV/VLAN.
2 ) Select the appropriate Mode according to your ISP.
• Select Bridge if your ISP is not listed and no other parameters are required.

50
Chapter 11 Customize Your Network Settings
• Select Custom if your ISP is not listed but provides necessary parameters.
3 ) After you have selected a mode, the necessary parameters, including the LAN
port for IPTV connection, are predetermined. If not, select the LAN type to
determine which port is used to support IPTV service.
4 ) Click SAVE .
5 ) Connect the set-top box to the corresponding LAN port which is predetermined
or you have specified in Step 3.
Done!
Your IPTV setup is done now! You may need to configure your set-top box before
enjoying your TV.
11. 3. Specify DHCP Server Settings
By default, the DHCP (Dynamic Host Configuration Protocol) Server is enabled and
the router acts as a DHCP server; it dynamically assigns TCP/IP parameters to client
devices from the IP Address Pool. You can change the settings of the DHCP Server if
necessary, and you can reserve LAN IP addresses for specified client devices.
1. Visit http://tplinkwifi.net, and log in with your TP-Link ID or the password you set for
the router.
2. Go to Advanced > Network > DHCP Server.
• To specify the IP address that the router assigns:

51
Chapter 11 Customize Your Network Settings
1. Tick the Enable checkbox.
2. Enter the starting and ending IP addresses in the IP Address Pool.
3. Enter other parameters if the ISP offers. The Default Gateway is automatically filled in
and is the same as the LAN IP address of the router.
4. Click SAVE .
• To reserve an IP address for a specified client device:
1. Click Add in the Address Reservation section.
2. Click VIEW CONNECTED DEVICES and select the you device you want to reserve an
IP for. Then the MAC Address will be automatically filled in. Or enter the MAC address
of the client device manually.
3. Enter the IP address to reserve for the client device.
4. Click SAVE .
11. 4. Set Up a Dynamic DNS Service Account
Most ISPs assign a dynamic IP address to the router and you can use this IP address
to access your router remotely. However, the IP address can change from time to time
and you don’t know when it changes. In this case, you might apply the DDNS (Dynamic

52
Chapter 11 Customize Your Network Settings
Domain Name Server) feature on the router to allow you and your friends to access your
router and local servers (FTP, HTTP, etc.) using a domain name without checking and
remembering the IP address.
Note: DDNS does not work if the ISP assigns a private WAN IP address (such as 192.168.1.x) to the router.
1. Visit http://tplinkwifi.net, and log in with your TP-Link ID or the password you set for
the router.
2. Go to Advanced > Network > Dynamic DNS.
3. Select the DDNS Service Provider: TP-Link, NO-IP or DynDNS. It is recommended
to select TP-Link so that you can enjoy TP-Link’s superior DDNS service. Otherwise,
please select NO-IP or DynDNS. If you don’t have a DDNS account, you have to
register first by clicking Register Now.
Note: To enjoy TP-Link’s DDNS service, you have to log in with a TP-Link ID. If you have not logged in with one, click
log in.
4. Click Register in the Domain Name List if you have selected TP-Link, and enter the
Domain Name as needed.
If you have selected NO-IP or DynDNS, enter the username, password and domain
name of your account.
53
Chapter 11 Customize Your Network Settings
5. Click LOGIN AND SAVE.
Tips: If you want to use a new DDNS account, please click Logout first, and then log in with a new account.
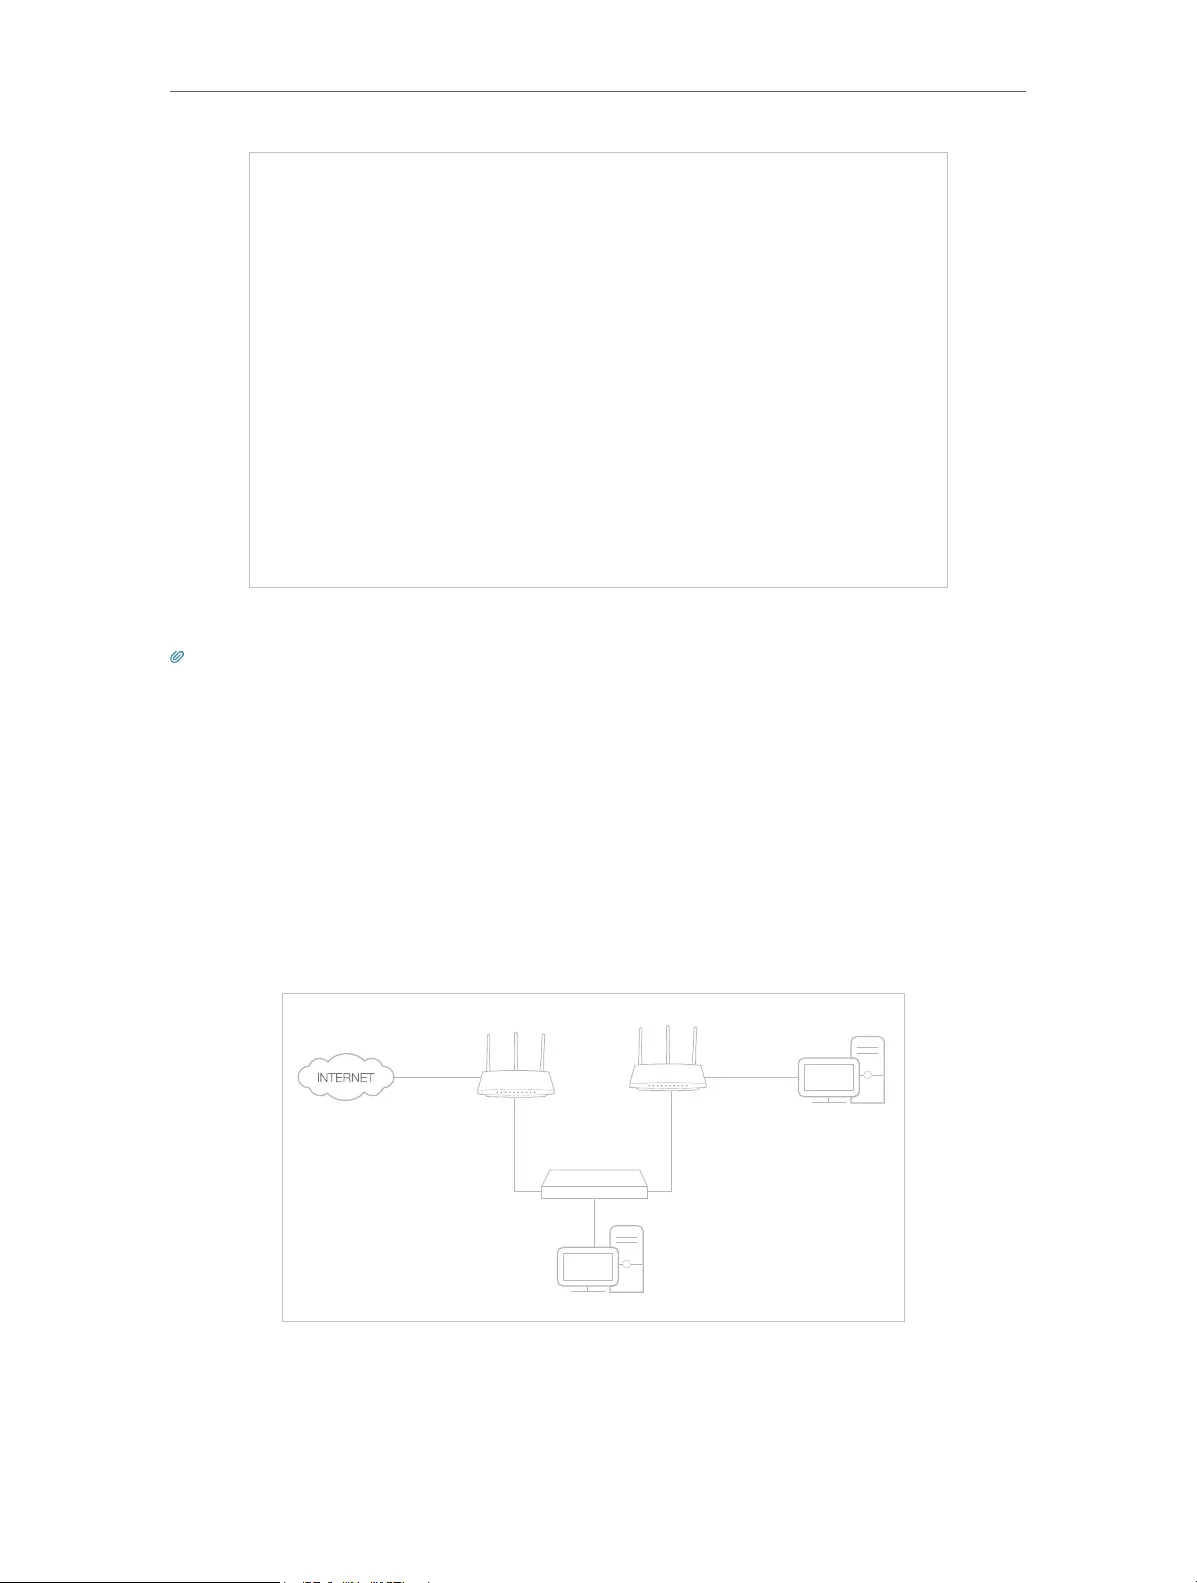
11. 5. Create Static Routes
Static routing is a form of routing that is configured manually by a network administrator
or a user by adding entries into a routing table. The manually-configured routing
information guides the router in forwarding data packets to the specific destination.
I want to:
Visit multiple networks and servers at the same time.
Company’s server
PC
Router BRouter A
Switch
LAN: 192.168.0.1
192.168.0.100
LAN: 192.168.0.2
WAN: 172.30.30.100
172.30.30.1
For example, in a small office, my PC can surf the internet through Router A, but I also
want to visit my company’s network. Now I have a switch and Router B. I connect the
devices as shown in the following figure so that the physical connection between my
PC and my company’s server is established. To surf the internet and visit my company’s

54
Chapter 11 Customize Your Network Settings
network at the same time, I need to configure the static routing.
How can I do that?
1. Change the routers’ LAN IP addresses to two different IP addresses on the same
subnet. Disable Router B’s DHCP function.
2. Visit http://tplinkwifi.net, and log in with your TP-Link ID or the password you set for
Router A.
3. Go to Advanced > Network > Routing.
4. Click Add and finish the settings according to the following explanations:
• Network Destination: The destination IP address that you want to assign to a static
route. This IP address cannot be on the same subnet with the WAN IP or LAN IP of
Router A. In the example, the IP address of the company network is the destination IP
address, so here enter 172.30.30.1.
• Subnet Mask: Determines the destination network with the destination IP address.
If the destination is a single IP address, enter 255.255.255.255; otherwise, enter the
subnet mask of the corresponding network IP. In the example, the destination network
is a single IP, so here enter 255.255.255.255.
• Default Gateway: The IP address of the gateway device to which the data packets will
be sent. This IP address must be on the same subnet with the router’s IP which sends
out data. In the example, the data packets will be sent to the LAN port of Router B and
then to the Server, so the default gateway should be 192.168.0.2.
• Interface: Determined by the port (WAN/LAN) that sends out data packets. In the
example, the data are sent to the gateway through the LAN port of Router A, so LAN/
WLAN should be selected.
• Description: Enter a description for this static routing entry.
5. Click SAVE .

55
Chapter 11 Customize Your Network Settings
6. Check the Routing Table below. If you can find the entry you’ve set, the static routing
is set successfully.
Done!
Open a web browser on your PC. Enter the company server’s IP address to visit the
company network.
11. 6. Specify Wireless Settings
The router’s wireless network name (SSID) and password, and security option are preset
in the factory. The preset SSID and password can be found on the label of the router.
You can customize the wireless settings according to your needs.
Visit http://tplinkwifi.net, and log in with your TP-Link ID or the password you set for the
router.
• To enable or disable the wireless function:
1. Go to Wireless or Advanced > Wireless > Wireless Settings.
2. The wireless function is enabled by default. If you want to disable the wireless function
of the router, just untick the Enable checkbox of each wireless network. In this case,
all the wireless settings will be invalid.
• To change the wireless network name (SSID) and wireless password:
1. Go to Wireless or Advanced > Wireless > Wireless Settings.
2. Create a new SSID in Network Name (SSID) and customize the password for the
network in Password. The value is case-sensitive.
Note: If you change the wireless settings with a wireless device, you will be disconnected when the settings are
effective. Please write down the new SSID and password for future use.
• To hide SSID:
1. Go to Wireless or Advanced > Wireless > Wireless Settings.

56
Chapter 11 Customize Your Network Settings
2. Select Hide SSID, and your SSID won’t display when you scan for local wireless
networks on your wireless device and you need to manually join the network.
• To use the Smart Connect function:
The Smart Connect function lets you to enjoy a more high-speed network by assigning
your devices to best wireless bands based on actual conditions to balance network
demands.
1. Go to Advanced > Wireless > Wireless Settings.
2. Enable Smart Connect.
3. Keep the default values or set a new SSID and password, and click SAVE . This SSID
and password will be applied for the 2.4GHz and 5GHz wireless networks.
• To change the security option:
1. Go to Advanced > Wireless > Wireless Settings.
2. Select an option from the Security drop-down list. We recommend you don’t change
the default settings unless necessary.
In addition
• Transmit Power — Select either High, Middle or Low to specify the data transmit power.
The default and recommended setting is High.
• Channel Width — Select a channel width (bandwidth) for the wireless network.
• Channel — Select an operating channel for the wireless network. It is recommended
to leave the channel to Auto, if you are not experiencing the intermittent wireless
connection issue.
• Mode — Select a transmission mode according to your wireless client devices. It is
recommended to just leave it as default.
• To enable the MU-MIMO feature:
A router with the MU-MIMO feature serves multiple devices simultaneously while a
traditional router serves only one user at a time. That means MU-MIMO can provide a
faster, more efficient Wi-Fi network for multiuser.
Note:
Devices supporting 5GHz wireless band can enjoy the MU-MIMO service.
1. Go to Advanced > Wireless > Wireless Settings.
2. Locate the 5GHz network.

57
Chapter 11 Customize Your Network Settings
3. Tick the Enable box for MU-MIMO.
4. Click SAVE .
11. 7. Schedule Your Wireless Function
The wireless network can be automatically off at a specific time when you do not need
the wireless connection.
1. Visit http://tplinkwifi.net, and log in with your TP-Link ID or the password you set for
the router.
2. Go to Advanced > Wireless > Wireless Schedule.
3. Enable the Wireless Schedule feature.
4. Click Add to specify a wireless off period during which you need the wireless off
automatically, and click SAVE .
Note:
• The Effective Time Schedule is based on the time of the router. You can go to Advanced > System > Time & Language
to modify the time.
• The wireless network will be automatically turned on after the time period you set.
11. 8. Use WPS for Wireless Connection
Wi-Fi Protected Setup (WPS) provides an easier approach to set up a security-protected
Wi-Fi connection.
1. Visit http://tplinkwifi.net, and log in with your TP-Link ID or the password you set for
the router.
2. Make sure the Wi-Fi of your router is on and go to Advanced > Wireless > WPS.

58
Chapter 11 Customize Your Network Settings
11. 8. 1. Connect via the Client’s PIN
Enter the PIN of your device and click Connect. Then your device will get connected to
the router.
11. 8. 2. Connect via the Router’s PIN
Select Router’s PIN in Method 1 to enable Router’s PIN. You can use the default PIN or
generate a new one.
Note:
PIN (Personal Identification Number) is an eight—character identification number preset to each router. WPS supported
devices can connect to your router with the PIN. The default PIN is printed on the label of the router.
11. 8. 3. Push the WPS Button
Click Start on the screen or directly press the router’s WPS button. Within two minutes,
enable WPS on your personal device. Success will appear on the screen and the WPS
LED of the router should change from flashing to solid on, indicating successful WPS
connection.

59
Chapter 11 Customize Your Network Settings
11. 9. Advanced Wireless Settings
Check advanced wireless settings for your device.
1. Visit http://tplinkwifi.net, and log in with your TP-Link ID or the password you set for
the router.
2. Go to Advanced > Wireless > Additional Settings.
3. Configure advanced wireless settings.
• WMM — WMM function can guarantee the packets with high-priority messages being
transmitted preferentially.

60
Chapter 11 Customize Your Network Settings
• Short GI — It is recommended to enable this function, for it will increase the data
capacity by reducing the guard interval time.
• AP Isolation — This function isolates all connected wireless stations so that wireless
stations cannot access each other through WLAN.
• Airtime Fairness — This function can improve the overall network performance by
sacrificing a little bit of network time on your slow devices.
• Beacon Interval — Enter a value between 40 and 1000 in milliseconds to determine the
duration between beacon packets that are broadcasted by the router to synchronize
the wireless network. The default value is 100 milliseconds.
• RTS Threshold— Enter a value between 1 and 2346 to determine the packet size of
data transmission through the router. By default, the RTS (Request to Send) Threshold
size is 2346. If the packet size is greater than the preset threshold, the router will send
RTS frames to a particular receiving station and negotiate the sending of a data frame.
• DTIM Interval — The value determines the interval of DTIM (Delivery Traffic Indication
Message). Enter a value between 1 and 15 intervals. The default value is 1, which
indicates the DTIM Interval is the same as Beacon Interval.
• Group Key Update Period — Enter a number of seconds (minimum 30) to control the
time interval for the encryption key automatic renewal. The default value is 0, meaning
no key renewal.

Chapter 12
Manage the Router
This chapter will show you the configuration for managing and maintaining your router.
It contains the following sections:
• Upgrade the Firmware
• Backup and Restore Configuration Settings
• Change the Login Password
• Local Management
• Remote Management
• View System Log
• Test the Network Connectivity
• Set Up System Time
• Set the Router to Reboot Regularly
• Control the LED

62
Chapter 12 Manage the Router
12. 1. Upgrade the Firmware
TP-Link aims at providing better network experience for users.
We will inform you through the web management page if there’s any update firmware
available for your router. Also, the latest firmware will be released at the TP-Link official
website www.tp-link.com, and you can download it from the Support page for free.
Notes:
• Backup your router configuration before firmware upgrade.
• Do NOT turn off the router during the firmware upgrade.
12. 1. 1. Online Upgrade
1. Visit http://tplinkwifi.net, and log in with your TP-Link ID or the password you set for
the router.
2. When the latest firmware is available for your router, the upgrade icon will
display in the top-right corner of the page. Click the icon to go to the Firmware
Upgrade page.
Alternatively, you can go to Advanced > System > Firmware Upgrade, and click
CHECK FOR UPGRADES to see whether the latest firmware is released. If there is
new firmware click UPGRADE.
3. Wait a few minutes for the upgrade and reboot to complete.
Tips: If there’s a new and important firmware update for your router, you will see the prompt notification on your
computer as long as a web browser is opened. Click UPGRADE, and log in to the web management page with the
username and password you set for the router. You will see the Firmware Upgrade page.
12. 1. 2. Local Upgrade
1. Download the latest firmware file for the router from www.tp-link.com.
2. Visit http://tplinkwifi.net, and log in with your TP-Link ID or the password you set for
the router.
3. Go to Advanced > System > Firmware Upgrade.

63
Chapter 12 Manage the Router
4. Focus on the Local Upgrade section. Click BROWSE to locate the downloaded new
firmware file, and click UPGRADE.
5. Wait a few minutes for the upgrade and reboot to complete.
Note: If you fail to upgrade the firmware for the router, please contact our Technical Support.
12. 2. Backup and Restore Configuration Settings
The configuration settings are stored as a configuration file in the router. You can
backup the configuration file to your computer for future use and restore the router to
a previous settings from the backup file when needed. Moreover, if necessary you can
erase the current settings and reset the router to the default factory settings.
1. Visit http://tplinkwifi.net, and log in with your TP-Link ID or the password you set for
the router.
2. Go to Advanced > System Tools > Backup & Restore.
• To backup configuration settings:
Click BACK UP to save a copy of the current settings to your local computer. A ‘.bin’ file
of the current settings will be stored to your computer.
• To restore configuration settings:
1. Click BROWSE to locate the backup configuration file stored on your computer, and
click RESTORE.

64
Chapter 12 Manage the Router
2. Wait a few minutes for the restoring and rebooting.
Note: During the restoring process, do not turn off or reset the router.
• To reset the router except your login password and TP-Link ID:
1. In the Factory Default Restore section, click RESTORE.
2. Wait a few minutes for the resetting and rebooting.
Note:
• During the resetting process, do not turn off the router.
• After reset, you can still use the current login password or the TP-Link ID to log in to the web management page.
• To reset the router to factory default settings:
1. Click FACTORY RESTORE to reset the router.
2. Wait a few minutes for the resetting and rebooting.
Note:
• During the resetting process, do not turn off or reset the router.
• We strongly recommend you backup the current configuration settings before resetting the router.
12. 3. Change the Login Password
The account management feature allows you to change your login password of the web
management page.
Note: If you are using a TP-Link ID to log in to the web management page, the account management feature will be
disabled. To manage the TP-Link ID, go to Advanced > TP-Link ID.

65
Chapter 12 Manage the Router
1. Visit http://tplinkwifi.net, and log in with the password you set for the router.
2. Go to Advanced > System > Administration and focus on the Change Password
section.
3. Enter the old password, then a new password twice (both case-sensitive). Click SAVE .
4. Use the new password for future logins.
12. 4. Local Management
This feature allows you to limit the number of client devices on your LAN from accessing
the router by using the MAC address-based authentication.
1. Visit http://tplinkwifi.net, and log in with your TP-Link ID or the password you set for
the router.
2. Go to Advanced > System > Administration and complete the settings In Local
Management section as needed.
• Allow all LAN connected devices to manage the router:
Select All Devices for Local Managers.
• Allow specific devices to manage the router:
1. Select All Devices for Local Managers and click SAVE .
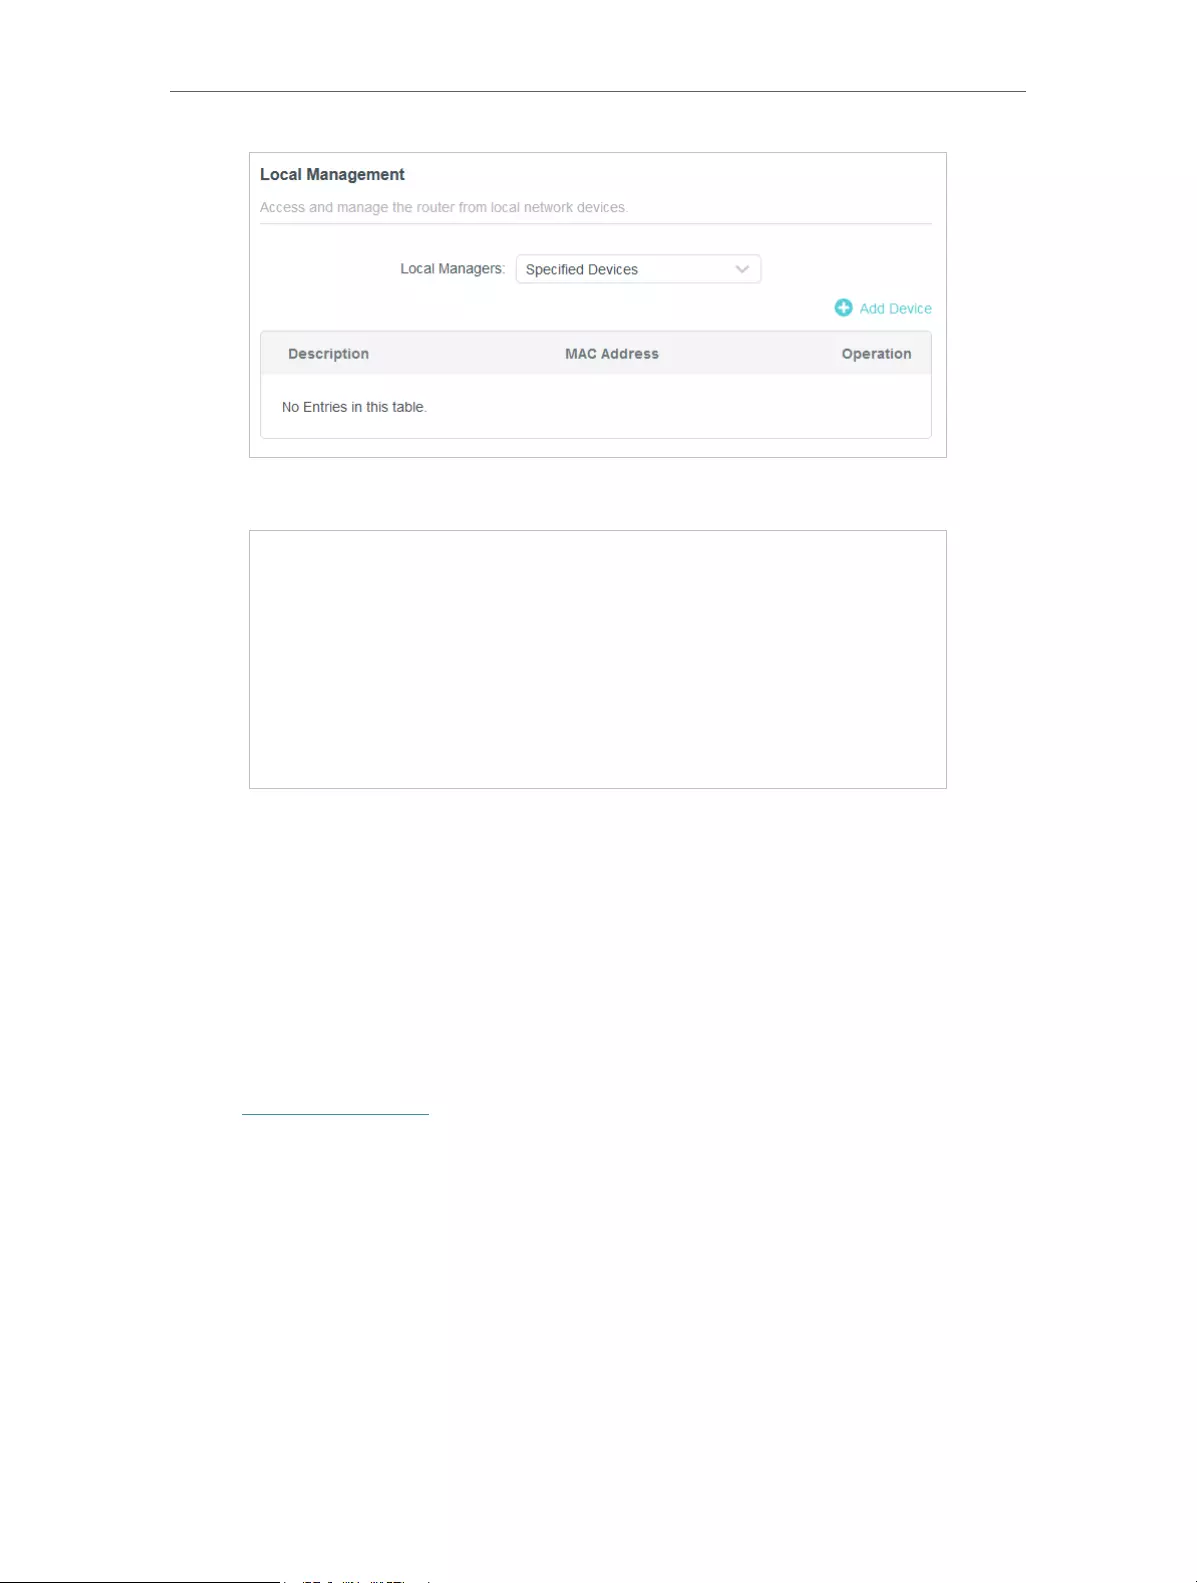
66
Chapter 12 Manage the Router
2. Click Add Device.
3. Click VIEW CONNECTED DEVICES and select the device to manage the router from
the Connected Devices list, or enter the MAC address of the device manually.
4. Specify a Description for this entry.
5. Click SAVE .
12. 5. Remote Management
This feature allows you to control remote devices’ authority to manage the router.
1. Visit http://tplinkwifi.net, and log in with your TP-Link ID or the password you set for
the router.
2. Go to Advanced > System > Administration and complete the settings in Remote
Management section as needed.
• Forbid all devices to manage the router remotely:
Do not tick the Enable checkbox of Remote Management.

67
Chapter 12 Manage the Router
• Allow all devices to manage the router remotely:
1. Tick the Enable checkbox of Remote Management.
2. Keep the HTTP port as default settings (recommended) or enter a value between
1024 and 65535.
3. Select All Devices for Remote Managers.
4. Click SAVE .
Devices on the internet can log in to http://Router’s WAN IP address:port number (such
as http://113.116.60.229:1024) to manage the router.
Tips:
• You can find the WAN IP address of the router on Network Map > Internet.
• The router’s WAN IP is usually a dynamic IP. Please refer to Set Up a Dynamic DNS Service Account if you want to log
in to the router through a domain name.
• Allow a specific device to manage the router remotely:
1. Tick the Enable checkbox of Remote Management.
2. Keep the and HTTP port as default settings (recommended) or enter a value between
1024 and 65535.
3. Select Specified Device for Remote Managers.
4. In the Only this IP Address field, enter the IP address of the remote device to manage
the router.
5. Click SAVE .
Devices using this WAN IP can manage the router by logging in to http://Router’s WAN
IP:port number (such as http://113.116.60.229:1024).
Tips: The router’s WAN IP is usually a dynamic IP. Please refer to Set Up a Dynamic DNS Service Account if you want
to log in to the router through a domain name.
12. 6. View System Log
When the router does not work normally, you can save the system log and send it to the
technical support for troubleshooting.
1. Visit http://tplinkwifi.net, and log in your TP-Link ID or the password you set for the
router.

68
Chapter 12 Manage the Router
2. Go to Advanced > System > System Log.
3. In the Save Log section, click SAVE TO LOCAL to save the system logs to a local disk.
12. 7. Test the Network Connectivity
Diagnostics is used to test the connectivity between the router and the host or other
network devices.
1. Visit http://tplinkwifi.net, and log in with your TP-Link ID or the password you set for
the router.
2. Go to Advanced > System > Diagnostics.
3. Enter the information:
1 ) Choose Ping or Tracert as the diagnostic tool to test the connectivity;
• Ping is used to test the connectivity between the router and the tested host,
and measure the round-trip time.
• Tracert is used to display the route (path) your router has passed to reach the
tested host, and measure transit delays of packets across an Internet Protocol
network.
2 ) Enter the IP Address or Domain Name of the tested host.
3 ) Modify the Ping Packet Number and the Ping Packet Size. It’s recommended to
keep the default value.
4 ) If you have chosen Tracert, you can modify the Traceroute Max TTL. It’s
recommended to keep the default value.

69
Chapter 12 Manage the Router
4. Click STA RT to begin the diagnostics.
The figure below indicates the proper connection between the router and the Yahoo
server (www.Yahoo.com) tested through Ping.
The figure below indicates the proper connection between the router and the Yahoo
server (www.Yahoo.com) tested through Tracert.
12. 8. Set Up System Time & Language
The the router’s default system language is English. When changed, the router’s settings
on web management will appear in another language.
System time is the time displayed while the router is running. The system time you
configure here will be used for other time-based functions like Parental Controls. You
can choose the way to obtain the system time as needed.
1. Visit http://tplinkwifi.net, and log in with your TP-Link ID or the password you set for
the router.
2. Go to Advanced > System > Time & Language.
• To change system language:
1. Select the language from the drop-down list.
2. Click SAVE .

70
Chapter 12 Manage the Router
• To get time from the internet:
1. Enable 24-Hour Time if you want the time to display in a 24-hour way.
2. In the Set Time field, select Get from Internet.
3. Select your local Time Zone from the drop-down list.
4. In the NTP Server I field, enter the IP address or domain name of your desired NTP
Server.
5. (Optional) In the NTP Server II field, enter the IP address or domain name of the
second NTP Server.
6. Click SAVE .
• To get time from your computer:
1. In the Set Time field, select Get from Managing Device.
2. The time of your computer will then be displayed and click SAVE .
• To manually set the date and time:
1. In the Set Time field, select Manually.

71
Chapter 12 Manage the Router
2. Set the current Date (In MM/DD/YYYY format).
3. Set the current Time (In HH/MM/SS format).
4. Click SAVE .
• To set up Daylight Saving Time:
1. Tick the Enable box of Daylight Saving Time.
2. Select the correct Start date and time when daylight saving time starts at your local
time zone.
3. Select the correct End date and time when daylight saving time ends at your local
time zone.
4. Click SAVE .
12. 9. Set the Router to Reboot Regularly
The Scheduled Reboot feature cleans the cache to enhance the running performance
of the router.
1. Visit http://tplinkwifi.net, and log in with your TP-Link ID or the password you set for
the router.
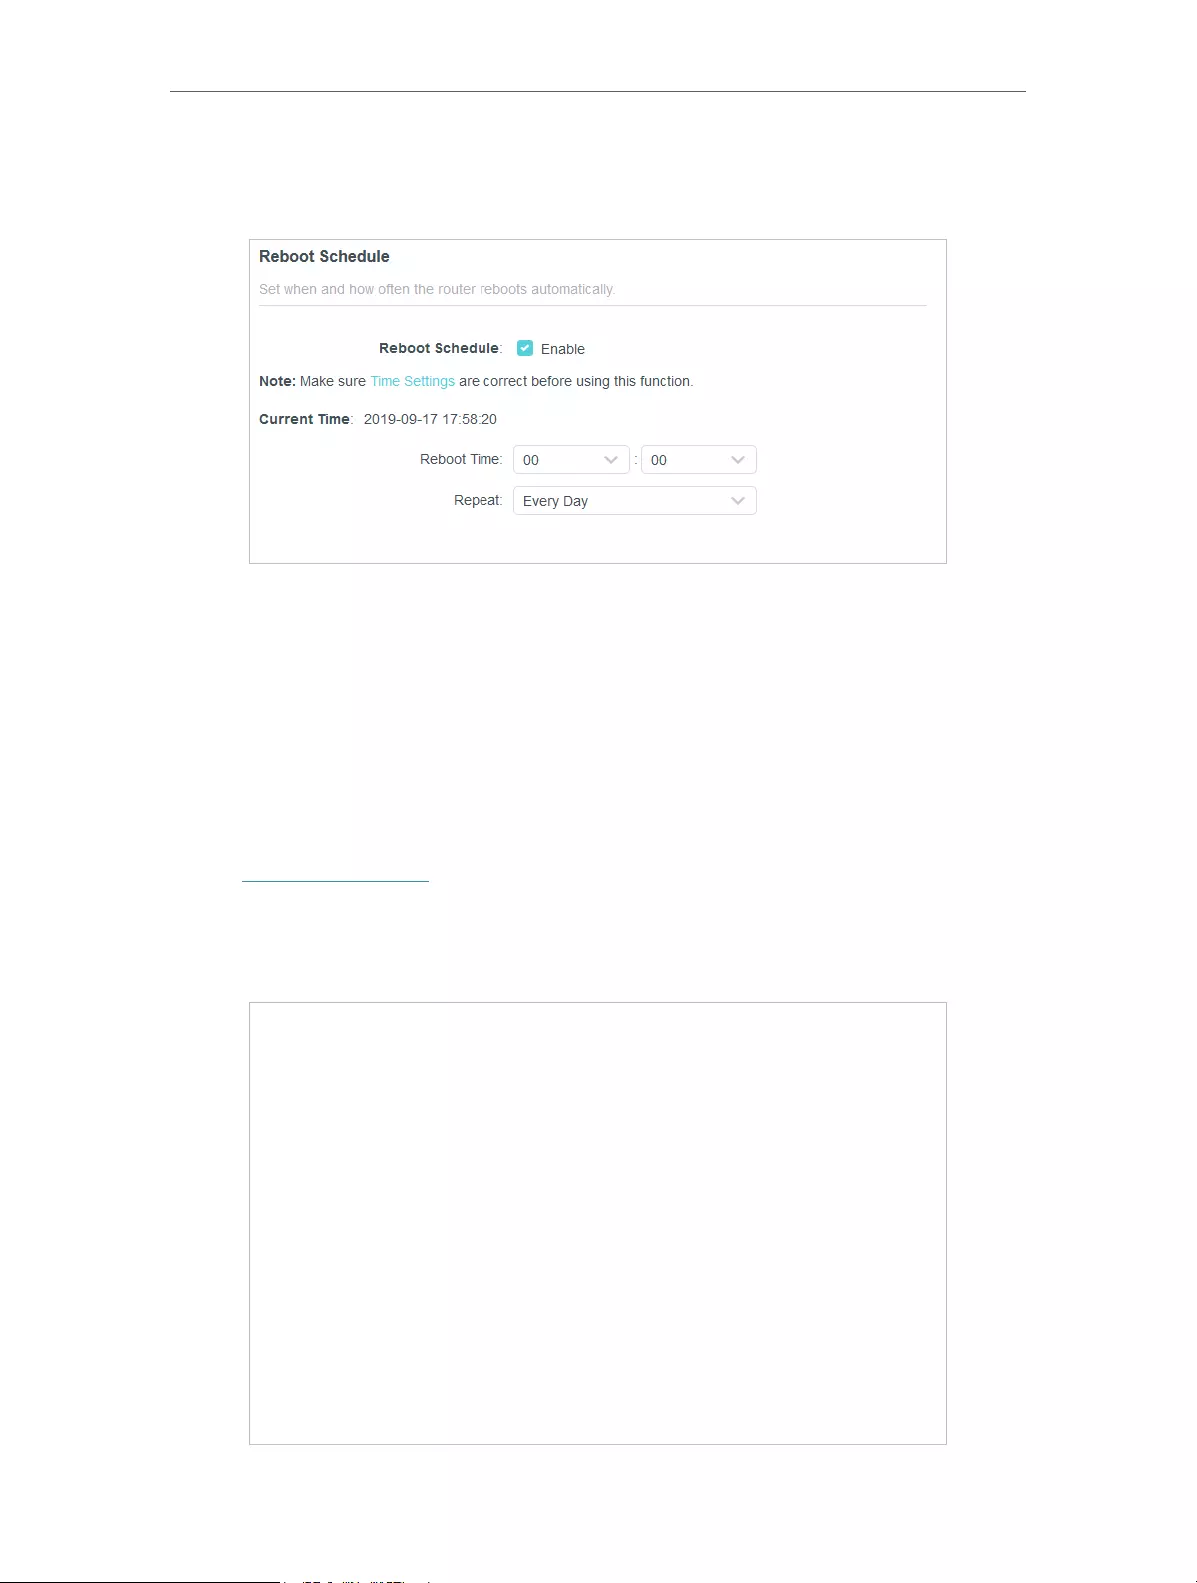
72
Chapter 12 Manage the Router
2. Go to Advanced > System > Reboot.
3. Tick the Enable box of Reboot Schedule.
4. Specify the Reboot Time when the router reboots and Repeat to decide how often it
reboots.
5. Click SAVE .
12. 10. Control the LED
The LED of the router indicates its activities and status. You can enable the Night Mode
feature to specify a time period during which the LED is off.
1. Visit http://tplinkwifi.net, and log in with your TP-Link ID or the password you set for
the router.
2. Go to Advanced > System > LED Control.
3. Enable Night Mode.

73
Chapter 12 Manage the Router
4. Specify the LED off time, and the LED will be off during this period every day.
5. Click SAVE .

74
FAQ
Q1. What should I do if I forget my wireless password?
The default wireless password is printed on the label of the router. If the password has
been altered:
1. Connect your computer to the router using an Ethernet cable.
2. Visit http://tplinkwifi.net, and log in with your TP-Link ID or the password you set for
the router.
3. Go to Wireless to retrieve or reset your wireless password.
Q2. What should I do if I forget my web management password?
• If you are using a TP-Link ID to log in, click Forgot password on the login page and
then follow the instructions to reset it.
• Alternatively, press and hold the Reset button of the router until LEDs turn on to reset
it, and then visit http://tplinkwifi.net to create a new login password.
Note:
• You’ll need to reconfigure the router to surf the internet once the router is reset, and please mark down your new
password for future use.
Q3. What should I do if I can’t log in to the router’s web management
page?
This can happen for a variety of reasons. Please try the methods below to log in again.
• Make sure your computer is connected to the router correctly and the corresponding
LED indicator(s) light up.
• Make sure the IP address of your computer is configured as Obtain an IP address
automatically and Obtain DNS server address automatically.
• Make sure http://tplinkwifi.net or http://192.168.0.1 is correctly entered.
• Check your computer’s settings:
1 ) Go to Start > Control Panel > Network and Internet, and click View network
status and tasks.
2 ) Click Internet Options on the bottom left.
3 ) Click Connections and select Never dial a connection.

75
4 ) Click LAN settings and deselect the following three options and click OK.
5 ) Go to Advanced > Restore advanced settings, click OK to save the settings.

76
• Use another web browser or computer to log in again.
• Reset the router to factory default settings and try again. If login still fails, please
contact the technical support.
Note: You’ll need to reconfigure the router to surf the internet once the router is reset.
Q4. What should I do if I can’t access the internet even though the
configuration is finished?
1. Visit http://tplinkwifi.net, and log in with your TP-Link ID or the password you set for
the router.
2. Go to Advanced> Network > Status to check internet status:
If IP Address is a valid one, please try the methods below and try again:
• Your computer might not recognize any DNS server addresses. Please manually
configure the DNS server.
1 ) Go to Advanced > Network > DHCP Server.
2 ) Enter 8.8.8.8 as Primary DNS, click SAVE.
Tips: 8.8.8.8 is a safe and public DNS server operated by Google.

77
• Restart the modem and the router.
1 ) Power off your modem and router, and leave them off for 1 minute.
2 ) Power on your modem first, and wait about 2 minutes until it gets a solid cable
or Internet light.
3 ) Power on the router.
4 ) Wait another 1 or 2 minutes and check the internet access.
• Reset the router to factory default settings and reconfigure the router.
• Upgrade the firmware of the router.
• Check the TCP/IP settings on the particular device if all other devices can get internet
from the router.
As the picture below shows, if the IP Address is 0.0.0.0, please try the methods below
and try again:
• Make sure the physical connection between the router and the modem is proper.
• Clone the MAC address of your computer.

78
1 ) Visit http://tplinkwifi.net, and log in with your TP-Link ID or the password you set
for the router.
2 ) Go to Internet or Advanced > Network > Internet and focus on the MAC Clone
section.
3 ) Choose an option as needed (enter the MAC address if Use Custom MAC
Address is selected), and click SAVE .
Tips:
• Some ISP will register the MAC address of your computer when you access the internet for the first time
through their Cable modem, if you add a router into your network to share your internet connection, the ISP will
not accept it as the MAC address is changed, so we need to clone your computer’s MAC address to the router.
• The MAC addresses of a computer in wired connection and wireless connection are different.
• Modify the LAN IP address of the router.
Note:
Most TP-Link routers use 192.168.0.1/192.168.1.1 as their default LAN IP address, which may conflict with the IP
range of your existing ADSL modem/router. If so, the router is not able to communicate with your modem and you
can’t access the internet. To resolve this problem, we need to change the LAN IP address of the router to avoid
such conflict, for example, 192.168.2.1.
1 ) Visit http://tplinkwifi.net, and log in with your TP-Link ID or the password you set
for the router.
2 ) Go to Advanced > Network > LAN.
3 ) Modify the LAN IP address as the follow picture shows. Here we take 192.168.2.1
as an example.
4 ) Click Save.
• Restart the modem and the router.

79
1 ) Power off your modem and router, and leave them off for 1 minute.
2 ) Power on your modem first, and wait about 2 minutes until it get a solid cable
or Internet light.
3 ) Power on the router.
4 ) Wait another 1 or 2 minutes and check the internet access.
• Double check the internet connection type.
1 ) Confirm your internet connection type, which can be learned from the ISP.
2 ) Visit http://tplinkwifi.net, and log in with your TP-Link ID or the password you set
for the router.
3 ) Go to Advanced > Network > Internet.
4 ) Select your Internet Connection Type and fill in other parameters.
5 ) Click Save.
6 ) Restart the modem and the router again.
• Please upgrade the firmware of the router.
If you’ve tried every method above but still cannot access the internet, please contact
the technical support.
Q5. What should I do if I can’t find my wireless network or I cannot
connect the wireless network?
If you fail to find any wireless network, please follow the steps below:
• Make sure the wireless function of your device is enabled if you’re using a laptop with
built-in wireless adapter. You can refer to the relevant document or contact the laptop
manufacturer.

80
• Make sure the wireless adapter driver is installed successfully and the wireless
adapter is enabled.
• On Windows 7
1 ) If you see the message No connections are available, it is usually because the
wireless function is disabled or blocked somehow.
2 ) Click Troubleshoot and windows might be able to fix the problem by itself.
• On Windows XP
1 ) If you see the message Windows cannot configure this wireless connection,
this is usually because windows configuration utility is disabled or you are
running another wireless configuration tool to connect the wireless.
2 ) Exit the wireless configuration tool (the TP-Link Utility, for example).
3 ) Select and right click on My Computer on desktop, select Manage to open
Computer Management window.
4 ) Expand Services and Applications > Services, find and locate Wireless Zero
Configuration in the Services list on the right side.
5 ) Right click Wireless Zero Configuration, and then select Properties.
6 ) Change Startup type to Automatic, click on Start button and make sure the
Service status is Started. And then click OK.
If you can find other wireless network except your own, please follow the steps below:
• Check the WLAN LED indicator on your wireless router/modem.
• Make sure your computer/device is still in the range of your router/modem. Move it
closer if it is currently too far away.
• Go to Wireless or Advanced > Wireless > Wireless Settings, and check the wireless
settings. Double check your wireless Network Name and SSID is not hided.

81
If you can find your wireless network but fail to connect, please follow the steps below:
• Authenticating problem/password mismatch:
1 ) Sometimes you will be asked to type in a PIN number when you connect to
the wireless network for the first time. This PIN number is different from the
Wireless Password/Network Security Key, usually you can only find it on the
label of your router.
2 ) If you cannot find the PIN or PIN failed, you may choose Connecting using a
security key instead, and then type in the Wireless Password/Network Security
Key.
3 ) If it continues to show note of Network Security Key Mismatch, it is suggested
to confirm the wireless password of your wireless router.
Note: Wireless Password/Network Security Key is case sensitive.
• Windows unable to connect to XXXX / Can not join this network / Taking longer than
usual to connect to this network:

82
• Check the wireless signal strength of your network. If it is weak (1~3 bars),
please move the router closer and try again.
• Change the wireless Channel of the router to 1, 6 or 11 to reduce interference
from other networks.
• Re-install or update the driver for your wireless adapter of the computer.

83
FCC compliance information statement
Product Name: AC1200 MU-MIMO Wi-Fi Router
Model Number: Archer C64
Component Name Model
I.T.E. Power Supply T120100-2B1
Responsible party:
TP-Link USA Corporation, d/b/a TP-Link North America, Inc.
Address: 145 South State College Blvd. Suite 400, Brea, CA 92821
Website: http://www.tp-link.com/us/
Tel: +1 626 333 0234
Fax: +1 909 527 6803
E-mail: sales.usa@tp-link.com
This equipment has been tested and found to comply with the limits for a Class
B digital device, pursuant to part 15 of the FCC Rules. These limits are designed
to provide reasonable protection against harmful interference in a residential
installation. This equipment generates, uses and can radiate radio frequency
energy and, if not installed and used in accordance with the instructions, may
cause harmful interference to radio communications. However, there is no
guarantee that interference will not occur in a particular installation. If this
equipment does cause harmful interference to radio or television reception,
which can be determined by turning the equipment off and on, the user is
encouraged to try to correct the interference by one or more of the following
measures:
• Reorient or relocate the receiving antenna.
• Increase the separation between the equipment and receiver.
• Connect the equipment into an outlet on a circuit different from that to which
the receiver is connected.
• Consult the dealer or an experienced radio/ TV technician for help.
This device complies with part 15 of the FCC Rules. Operation is subject to the
following two conditions:
1. This device may not cause harmful interference.
2. This device must accept any interference received, including interference
that may cause undesired operation.
Any changes or modifications not expressly approved by the party responsible
for compliance could void the user’s authority to operate the equipment.

84
Note: The manufacturer is not responsible for any radio or TV interference
caused by unauthorized modifications to this equipment. Such modifications
could void the user’s authority to operate the equipment.
FCC RF Radiation Exposure Statement
This equipment complies with FCC RF radiation exposure limits set forth for an
uncontrolled environment. This device and its antenna must not be co-located
or operating in conjunction with any other antenna or transmitter.
“To comply with FCC RF exposure compliance requirements, this grant is
applicable to only Mobile Configurations. The antennas used for this transmitter
must be installed to provide a separation distance of at least 20 cm from all
persons and must not be co-located or operating in conjunction with any other
antenna or transmitter.”
We, TP-Link USA Corporation, has determined that the equipment shown as
above has been shown to comply with the applicable technical standards, FCC
part 15. There is no unauthorized change is made in the equipment and the
equipment is properly maintained and operated.
Issue Date: 2021.04.04
FCC compliance information statement
Product Name: I.T.E. Power Supply
Model Number: T120100-2B1
Responsible party:
TP-Link USA Corporation, d/b/a TP-Link North America, Inc.
Address: 145 South State College Blvd. Suite 400, Brea, CA 92821
Website: http://www.tp-link.com/us/
Tel: +1 626 333 0234
Fax: +1 909 527 6803
E-mail: sales.usa@tp-link.com
This equipment has been tested and found to comply with the limits for a Class
B digital device, pursuant to part 15 of the FCC Rules. These limits are designed
to provide reasonable protection against harmful interference in a residential
installation. This equipment generates, uses and can radiate radio frequency
energy and, if not installed and used in accordance with the instructions, may
cause harmful interference to radio communications. However, there is no
guarantee that interference will not occur in a particular installation. If this
equipment does cause harmful interference to radio or television reception,
which can be determined by turning the equipment off and on, the user is
encouraged to try to correct the interference by one or more of the following
measures:
• Reorient or relocate the receiving antenna.

85
• Increase the separation between the equipment and receiver.
• Connect the equipment into an outlet on a circuit different from that to which
the receiver is connected.
• Consult the dealer or an experienced radio/ TV technician for help.
This device complies with part 15 of the FCC Rules. Operation is subject to the
following two conditions:
1. This device may not cause harmful interference.
2. This device must accept any interference received, including interference
that may cause undesired operation.
Any changes or modifications not expressly approved by the party responsible
for compliance could void the user’s authority to operate the equipment.
We, TP-Link USA Corporation, has determined that the equipment shown as
above has been shown to comply with the applicable technical standards, FCC
part 15. There is no unauthorized change is made in the equipment and the
equipment is properly maintained and operated.
Issue Date: 2021.04.04

86
CE Mark Warning
This is a class B product. In a domestic environment, this product may cause
radio interference, in which case the user may be required to take adequate
measures.
OPERATING FREQUENCY (the maximum transmitted power)
2400 MHz -2483.5 MHz(20dBm)
5150 MHz -5250 MHz(23dBm)
EU declaration of conformity
TP-Link hereby declares that the device is in compliance with the essential
requirements and other relevant provisions of directives 2014/53/EU, 2009/125/
EC, 2011/65/EU and (EU)2015/863.
The original EU declaration of conformity may be found at
https://www.tp-link.com/en/ce
TP-Link hereby declares that the device is in compliance with the essential
requirements and other relevant provisions of the Radio Equipment Regulations
2017.
The original UKCA declaration of conformity may be found at
https://www.tp-link.com/uk/ukca
RF Exposure Information
This device meets the EU requirements (2014/53/EU Article 3.1a) on the
limitation of exposure of the general public to electromagnetic fields by way of
health protection.
The device complies with RF specifications when the device used at 20 cm from
your body.
National restrictions
Attention: This device may only be used indoors in all EU member states, EFTA
countries and Northern Ireland.
Attention: This device may only be used indoors in Great Britain.
AT BE BG CH CY CZ DE DK
EE EL ES FI FR HR HU IE
IS IT LI LT LU LV MT NL
NO PL PT RO SE SI SK UK(NI)

87
UK
Canadian Compliance Statement
This device contains licence-exempt transmitter(s)/receiver(s) that comply with
Innovation, Science and Economic Development Canada’s licence-exempt
RSS(s). Operation is subject to the following two conditions:
1. This device may not cause interference.
2. This device must accept any interference, including interference that may
cause undesired operation of the device.
L’émetteur/récepteur exempt de licence contenu dans le présent appareil est
conforme aux CNR d’Innovation, Sciences et Développement économique
Canada applicables aux appareils radio exempts de licence. L’exploitation est
autorisée aux deux conditions suivantes :
1. l’appareil ne doit pas produire de brouillage;
2. l’utilisateur de l’appareil doit accepter tout brouillage radioélectrique subi,
meme si le brouillage est susceptible d’en compromettre le fonctionnement
Caution:
The device for operation in the band 5150–5250 MHz is only for indoor use
to reduce the potential for harmful interference to co-channel mobile satellite
systems;
Avertissement:
Le dispositif fonctionnant dans la bande 5150-5250 MHz est réservé uniquement
pour une utilisation à l’intérieur afin de réduire les risques de brouillage
préjudiciable aux systèmes de satellites mobiles utilisant les mêmes canaux;
Radiation Exposure Statement:
This equipment complies with IC radiation exposure limits set forth for an
uncontrolled environment. This equipment should be installed and operated
with minimum distance 20cm between the radiator & your body.
Déclaration d’exposition aux radiations:
Cet équipement est conforme aux limites d’exposition aux rayonnements IC
établies pour un environnement non contrôlé. Cet équipement doit être installé

88
et utilisé avec un minimum de 20 cm de distance entre la source de rayonnement
et votre corps.
Industry Canada Statement
CAN ICES-3 (B)/NMB-3(B)
Korea Warning Statements:
당해 무선설비는 운용중 전파혼신 가능성이 있음.
NCC Notice & BSMI Notice:
注意!
依據 低功率電波輻射性電機管理辦法
LP0002低功率射頻器材技術規範_章節3.8.2
取得審驗證明之低功率射頻器材,非經核准,公司、商號或使用者均不得擅自變
更頻率、加大功率或變更原設計之特性及功能。
低功率射頻器材之使用不得影響飛航安全及干擾合法通信;經發現有干擾現象
時,應立即停用,並改善至無干擾時方得繼續使用。
前述合法通信,指依電信管理法規定作業之無線電通信。
低功率射頻器材須忍受合法通信或工業、科學及醫療用電波輻射性電機設備之干
擾。
應避免影響附近雷達系統之操作。
高增益指向性天線只得應用於固定式點對點系統。
安全諮詢及注意事項
• 請使用原裝電源供應器或只能按照本產品注明的電源類型使用本產品。
• 清潔本產品之前請先拔掉電源線。請勿使用液體、噴霧清潔劑或濕布進行清
潔。
• 注意防潮,請勿將水或其他液體潑灑到本產品上。
• 插槽與開口供通風使用,以確保本產品的操作可靠並防止過熱,請勿堵塞或覆
蓋開口。
• 請勿將本產品置放於靠近熱源的地方。除非有正常的通風,否則不可放在密閉
位置中。
• 不要私自拆開機殼或自行維修,如產品有故障請與原廠或代理商聯繫。
限用物質含有情況標示聲明書
設備名稱:AC1200 MU-MIMO Wi-Fi Router
Equipment name
型號(型式):Archer C64
Type designation (Type)
89
單元
Unit
限用物質及其化學符號
Restricted substances and its chemical symbols
鉛
Lead
(Pb)
汞
Mercury
(Hg)
鎘 Cadmium
(Cd)
六價鉻
Hexavalent
chromium
(Cr+6)
多溴聯苯
Polybrominated
biphenyls
(PBB)
多溴二苯醚
Polybrominated
diphenyl ethers
(PBDE)
PCB ○ ○ ○ ○ ○ ○
外殼 ○ ○ ○ ○ ○ ○
電源供應
器—○ ○ ○ ○ ○
天線 ○ ○ ○ ○ ○ ○
備考 1.〝超出 0.1 wt %〞及〝超出 0.01 wt %〞係指限用物質之百分比含量超出百分比含量基準值
Note 1: “Exceeding 0.1 wt %” and “exceeding 0.01 wt %” indicate that the percentage content of the
restricted substance exceeds the reference percentage value of presence condition.
備考 2.〝○〞係指該項限用物質之百分比含量未超出百分比含量基準值。
Note 2: “○” indicates that the percentage content of the restricted substance does not exceed the
percentage of reference value of presence.
備考 3.〝-〞係指該項限用物質為排除項目。
Note 3: The “−” indicates that the restricted substance corresponds to the exemption.
Продукт сертифіковано згідно с правилами системи УкрСЕПРО на
відповідність вимогам нормативних документів та вимогам, що передбачені
чинними законодавчими актами України.
Safety Information
• Keep the device away from water, fire, humidity or hot environments.
• Do not attempt to disassemble, repair, or modify the device. If you need service,
please contact us.
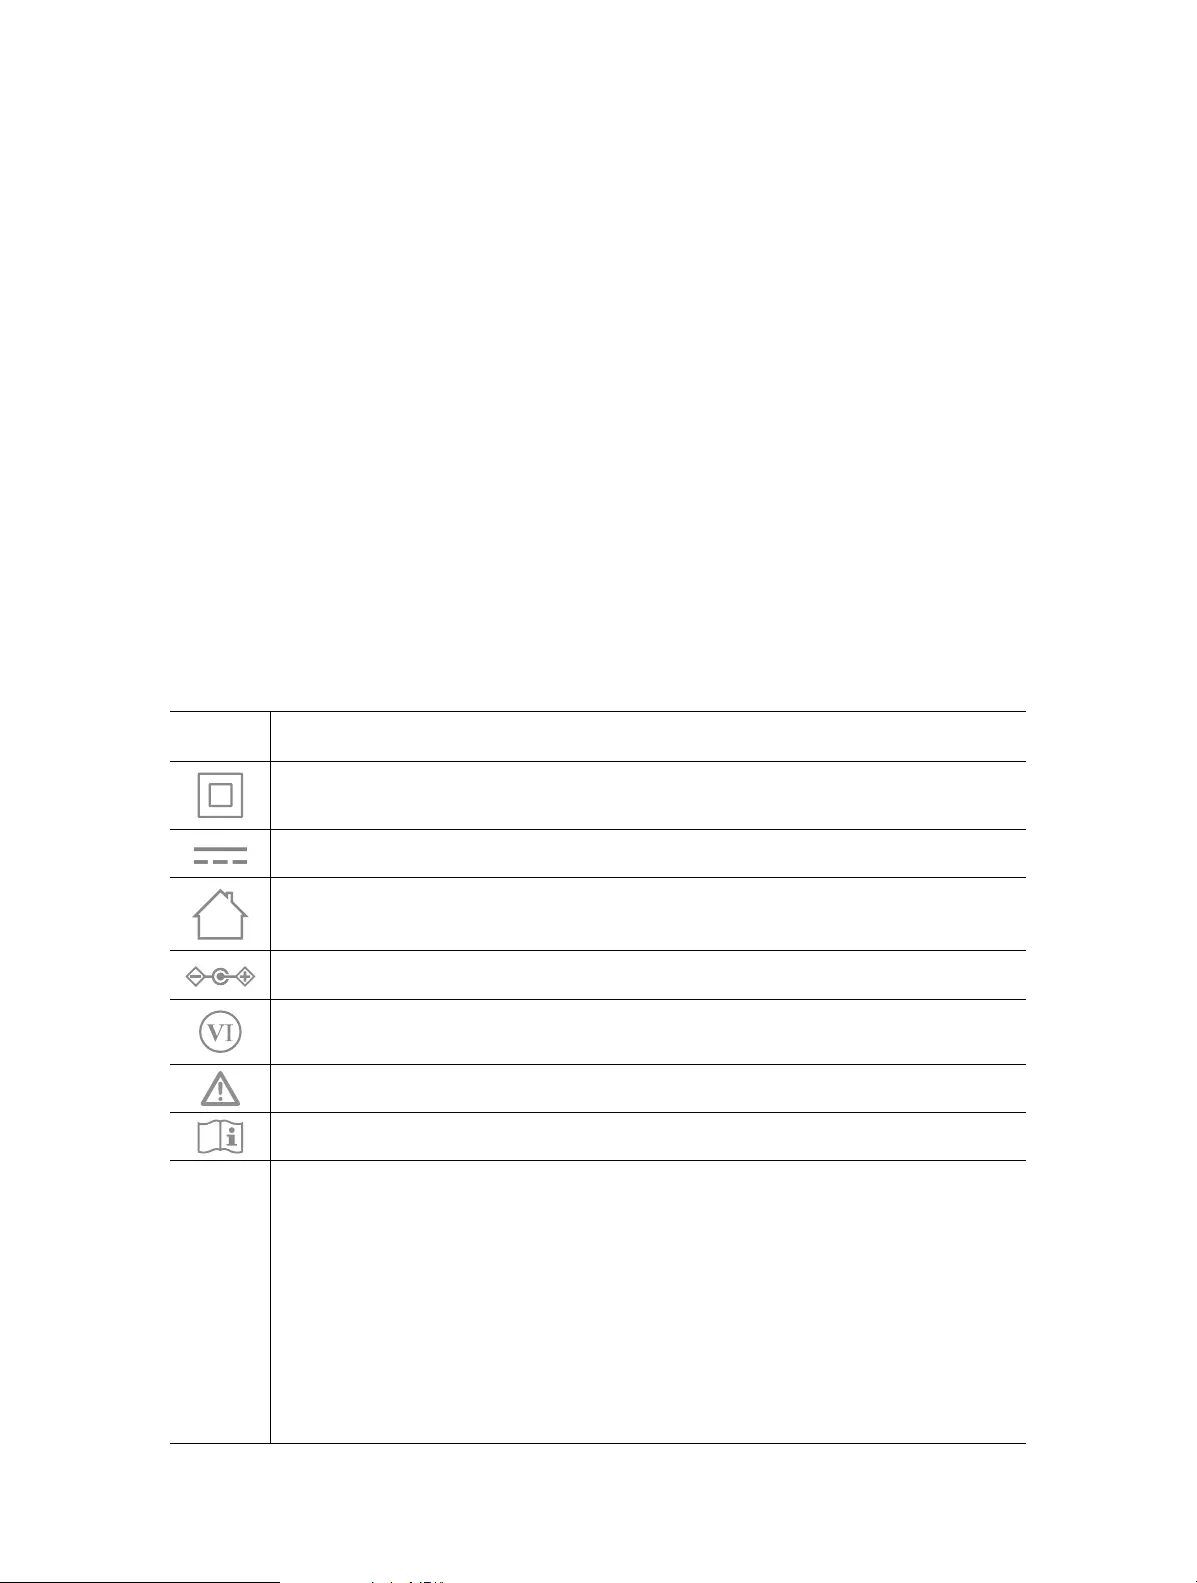
90
• Do not use damaged charger or USB cable to charge the device.
• Do not use any other chargers than those recommended
• Do not use the device where wireless devices are not allowed.
• Adapter shall be installed near the equipment and shall be easily accessible.
• Use only power supplies which are provided by manufacturer and in the original
packing of this product. If you have any questions, please don’t hesitate to
contact us.
Please read and follow the above safety information when operating the device.
We cannot guarantee that no accidents or damage will occur due to improper
use of the device. Please use this product with care and operate at your own risk.
Environment
• Operating Temperature: 0℃~40℃ (32℉ ~104℉)
• Operating Humidity: 10%~90% non-condensing
• Storage Humidity: 5%~90% non-condensing
Explanations of the symbols on the product label
Symbol Explanation
Class II equipment
DC voltage
Indoor use only
Polarity of output terminals
Energy efficiency Marking
Caution
Operator’s manual
RECYCLING
This product bears the selective sorting symbol for Waste electrical
and electronic equipment (WEEE). This means that this product must
be handled pursuant to European directive 2012/19/EU in order to
be recycled or dismantled to minimize its impact on the environment.
User has the choice to give his product to a competent recycling
organization or to the retailer when he buys a new electrical or
electronic equipment.
04 мая 2022
25949
Зачем платить за то, чем просто не будут пользоваться?
Ранее мы уже делали обзоры роутеров. Например, TP-Link Archer AX73 AX5400 оказался очень крутым решением — эдаким «комбайном», который не только раздаёт Wi-Fi, но и может стать центром мультимедиа-системы. Mercusys Halo H50G AC1900 показала себя как хорошая Mesh-система, предназначенная для домашнего использования без особых претензий.
Однако всё это не самые дешёвые устройства. Но как же быть человеку, которому просто нужен качественный роутер для относительно небольшой квартиры? Какое именно устройство выбрать, если не нужны актуальные? При этом если не хочется страдать из-за излишней экономии, но и переплачивать за ненужные характеристики тоже нет желания. В общем, я решил обратить внимание на TP-Link Archer C64, стоимость которого на момент написания текста чуть превышает три тысячи рублей.
Дизайн и комплектация
Как всегда, начинаем с коробки. Она является иллюстрацией продуктовой преемственности, поскольку все продукты TP-Link упаковываются в коробки в одной и той же лазурно-фиолетовой цветовой гамме:
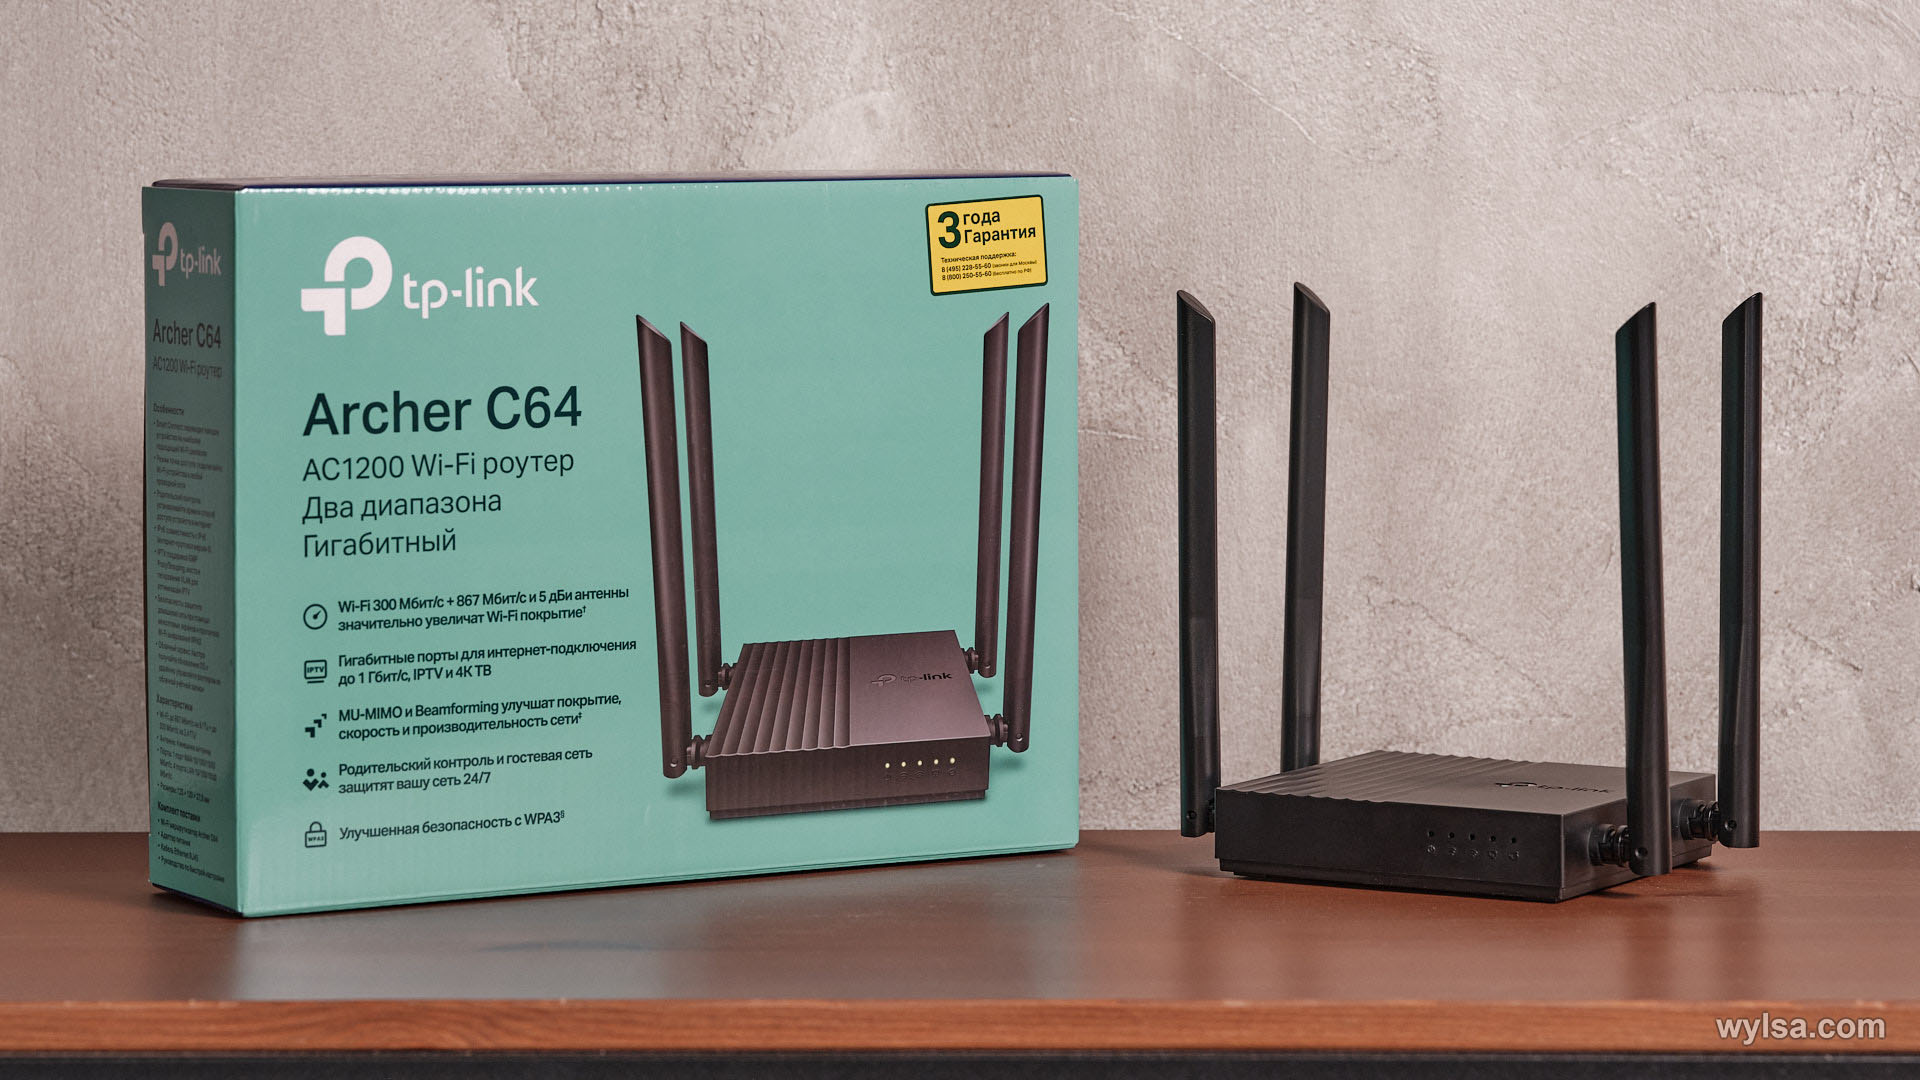
В комплекте, помимо самого роутера, вы найдёте блок питания и аккуратный Ethernet-кабель:
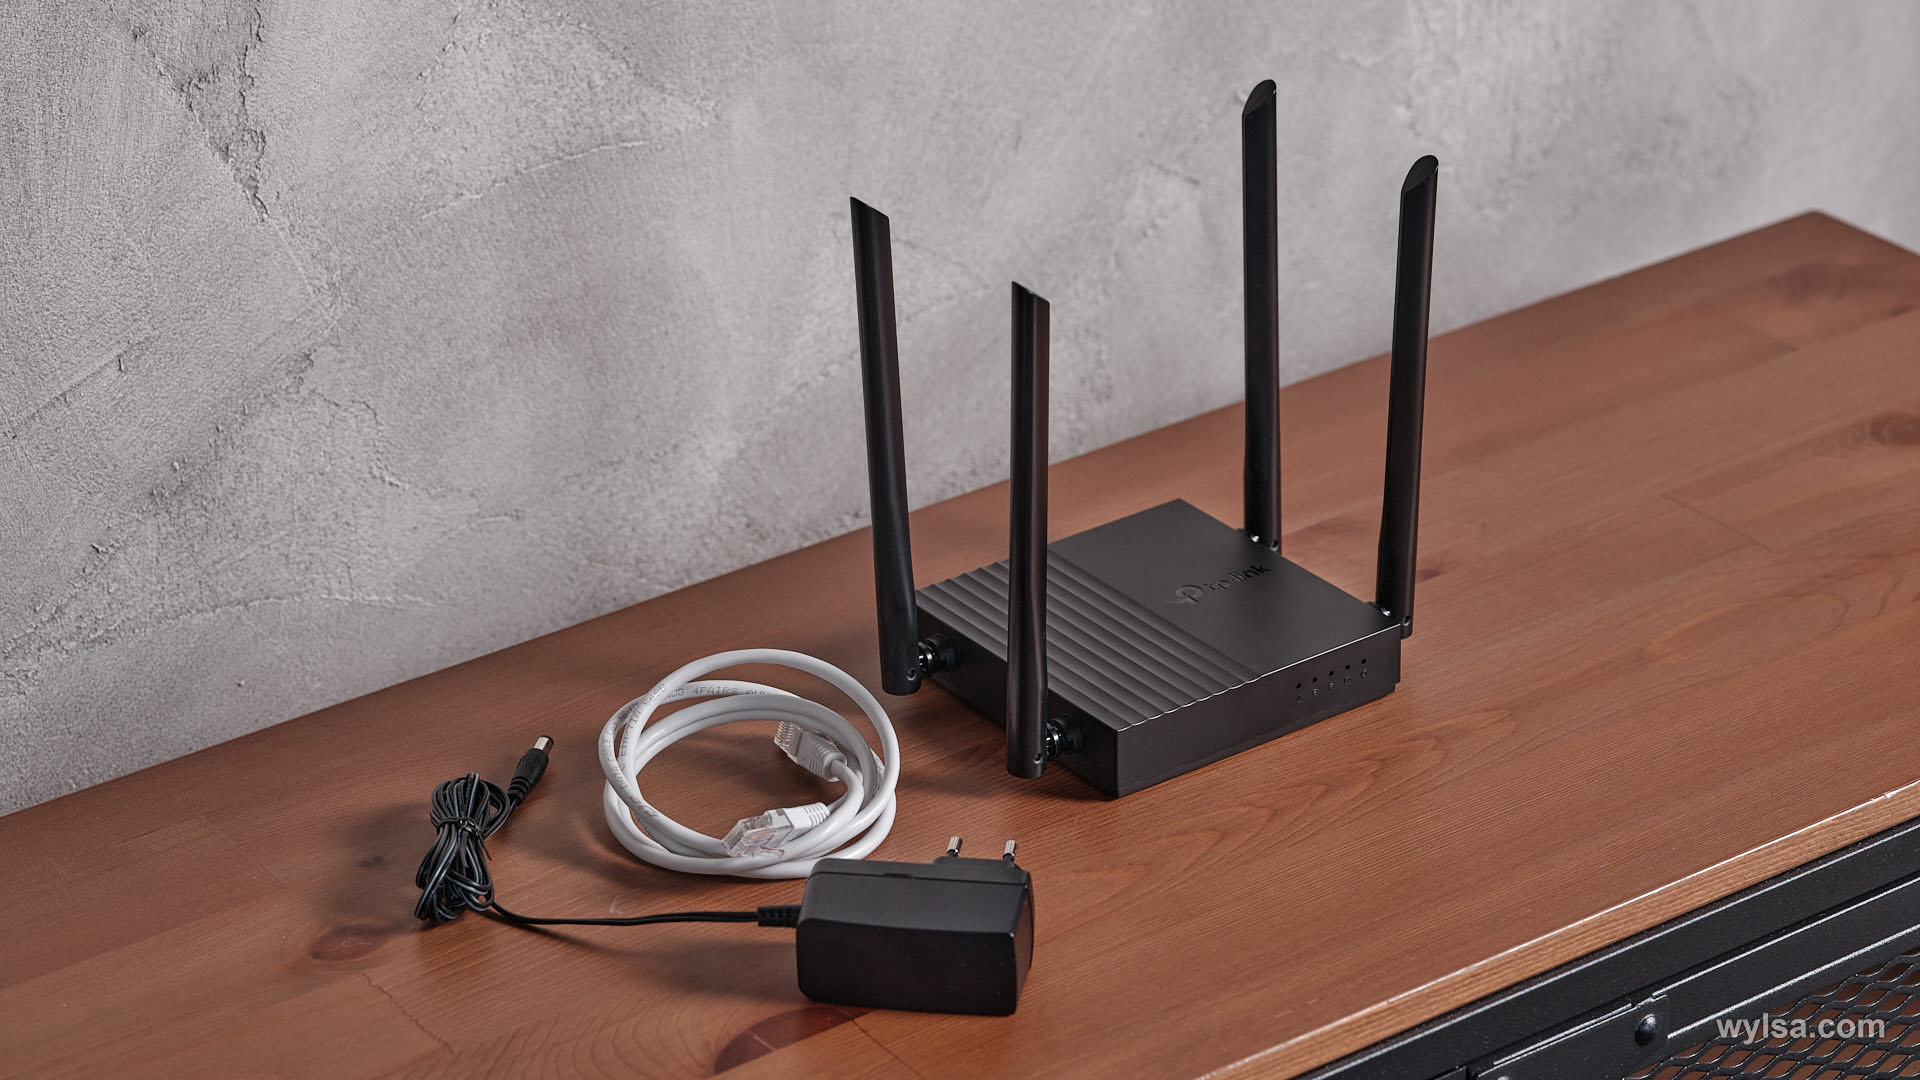
Сам роутер очень компактный. Без антенн его габариты были бы 120 × 120 × 28 мм. Вес — 230 граммов.
Снизу, как и у многих конкурентов, есть держатели для крепления устройства к стене:
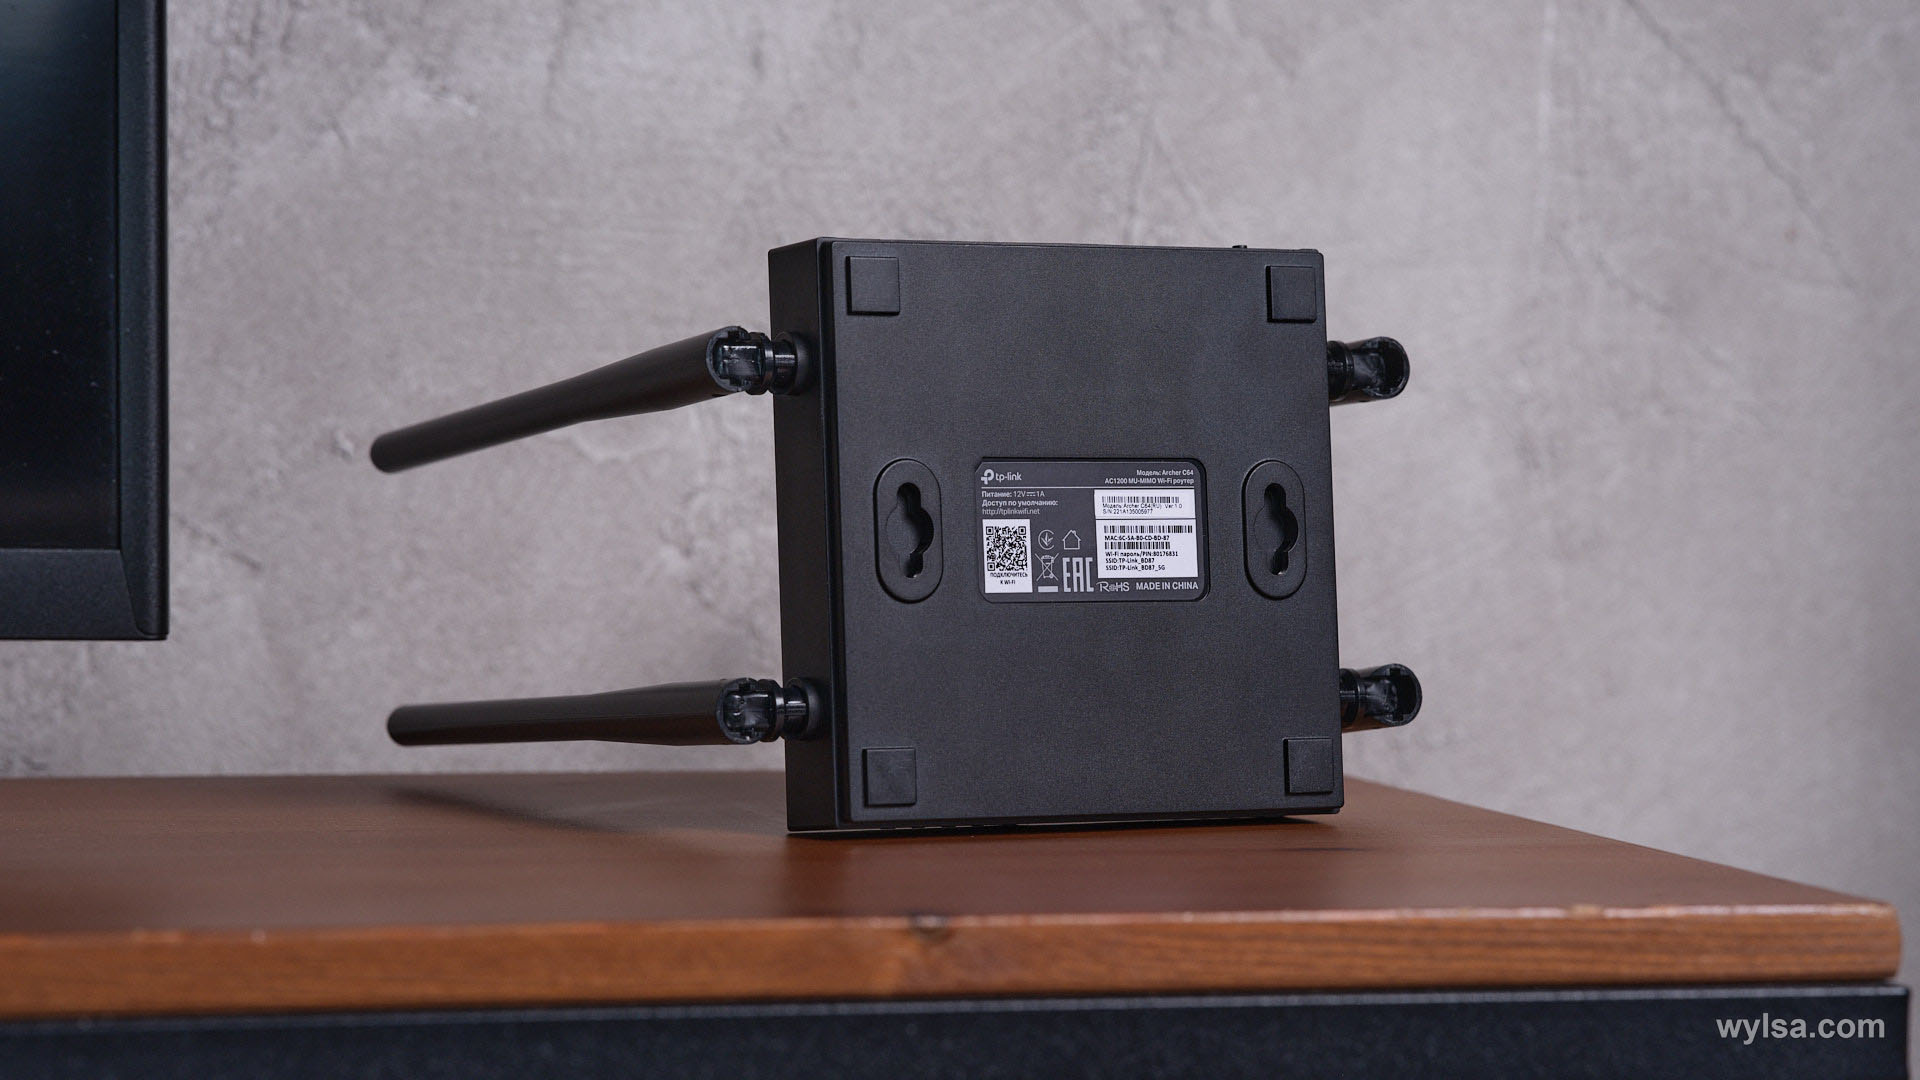
Антенны несъёмные, но есть возможность их регулировки примерно на 180° вдоль самого роутера, а также на 45° от него.
Сзади разъём питания, кнопка активации WPS/сброса и пять Ethernet-портов. Синий выступает главным. Сюда нужно подключать кабель с входящим гигабитным сигналом. Оставшиеся четыре жёлтых служат для подключения различных устройств, будь то компьютер, телевизор или приставка. Они также гигабитные.
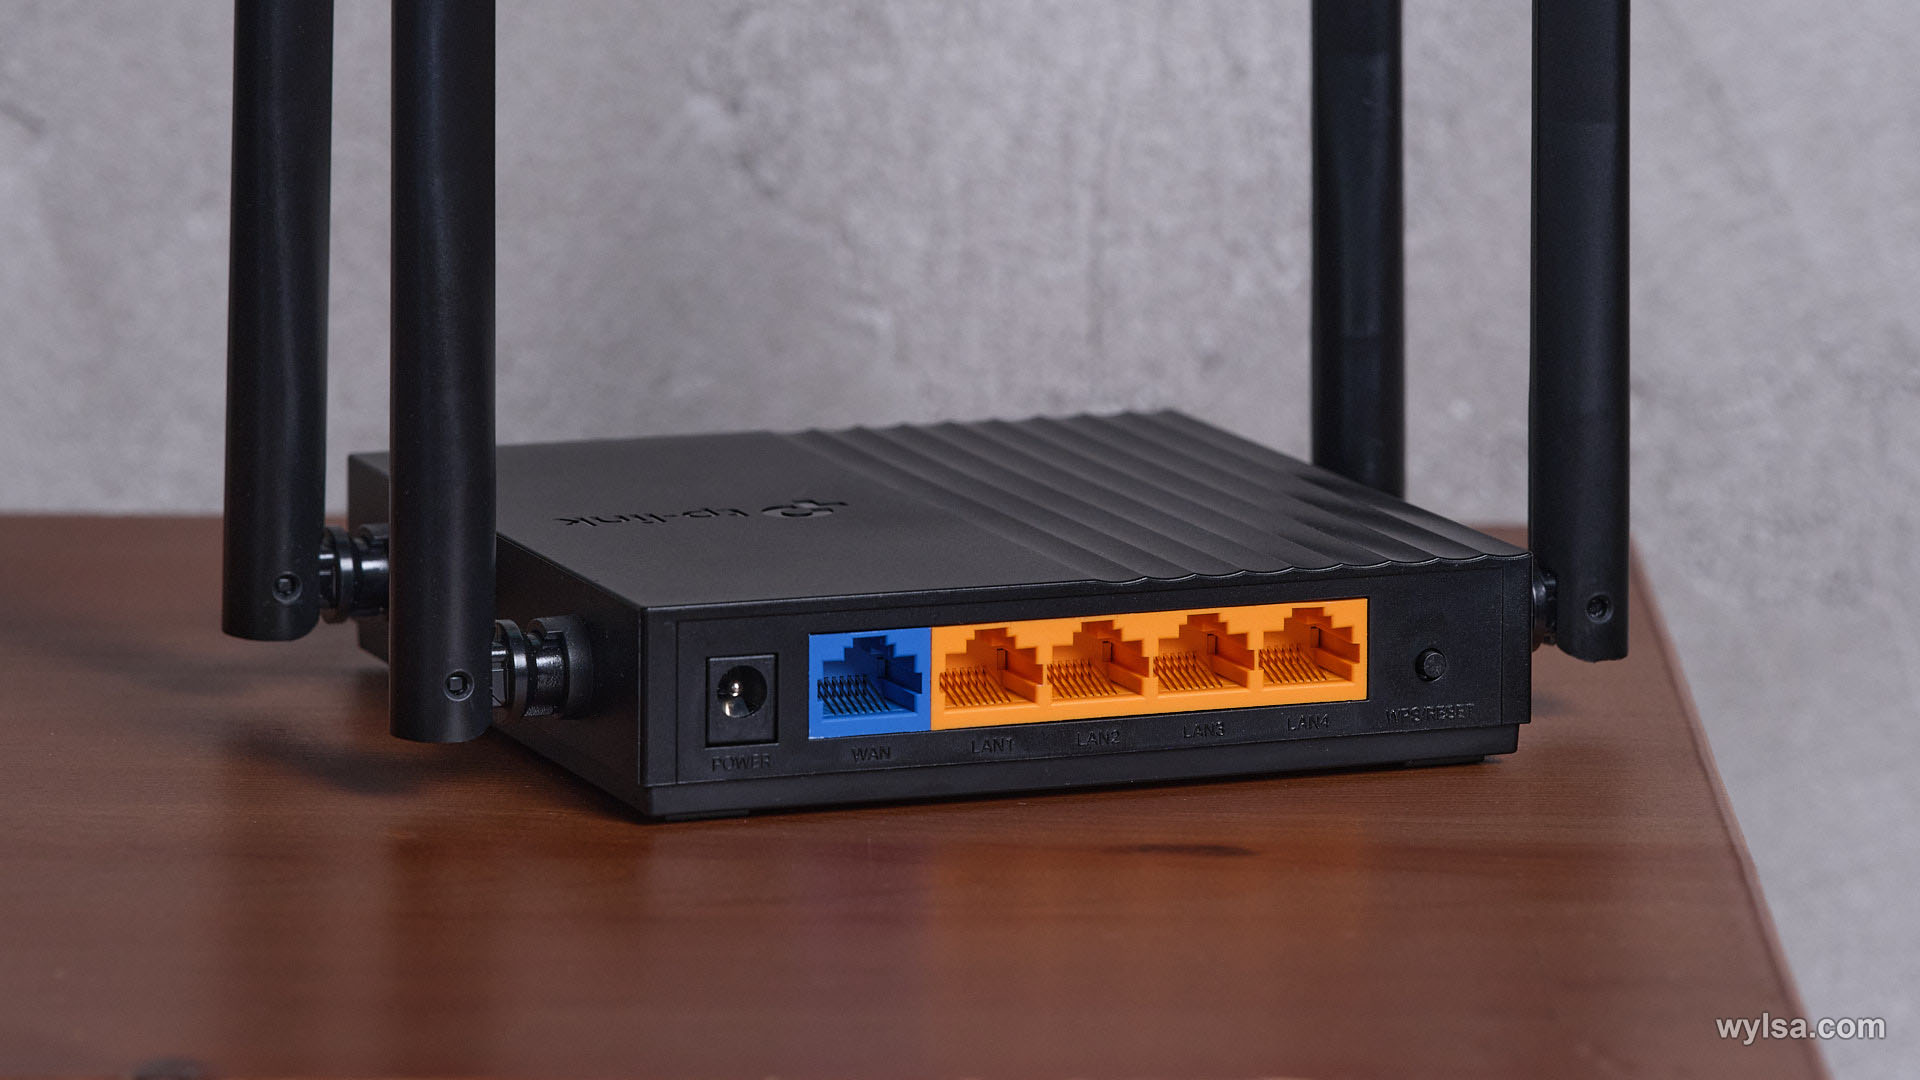
В отличие от более дорогого Archer AX73, Archer C64 не блистает рояльным глянцем. Это чисто утилитарный матовый пластик без каких-либо вентиляционных отверстий.
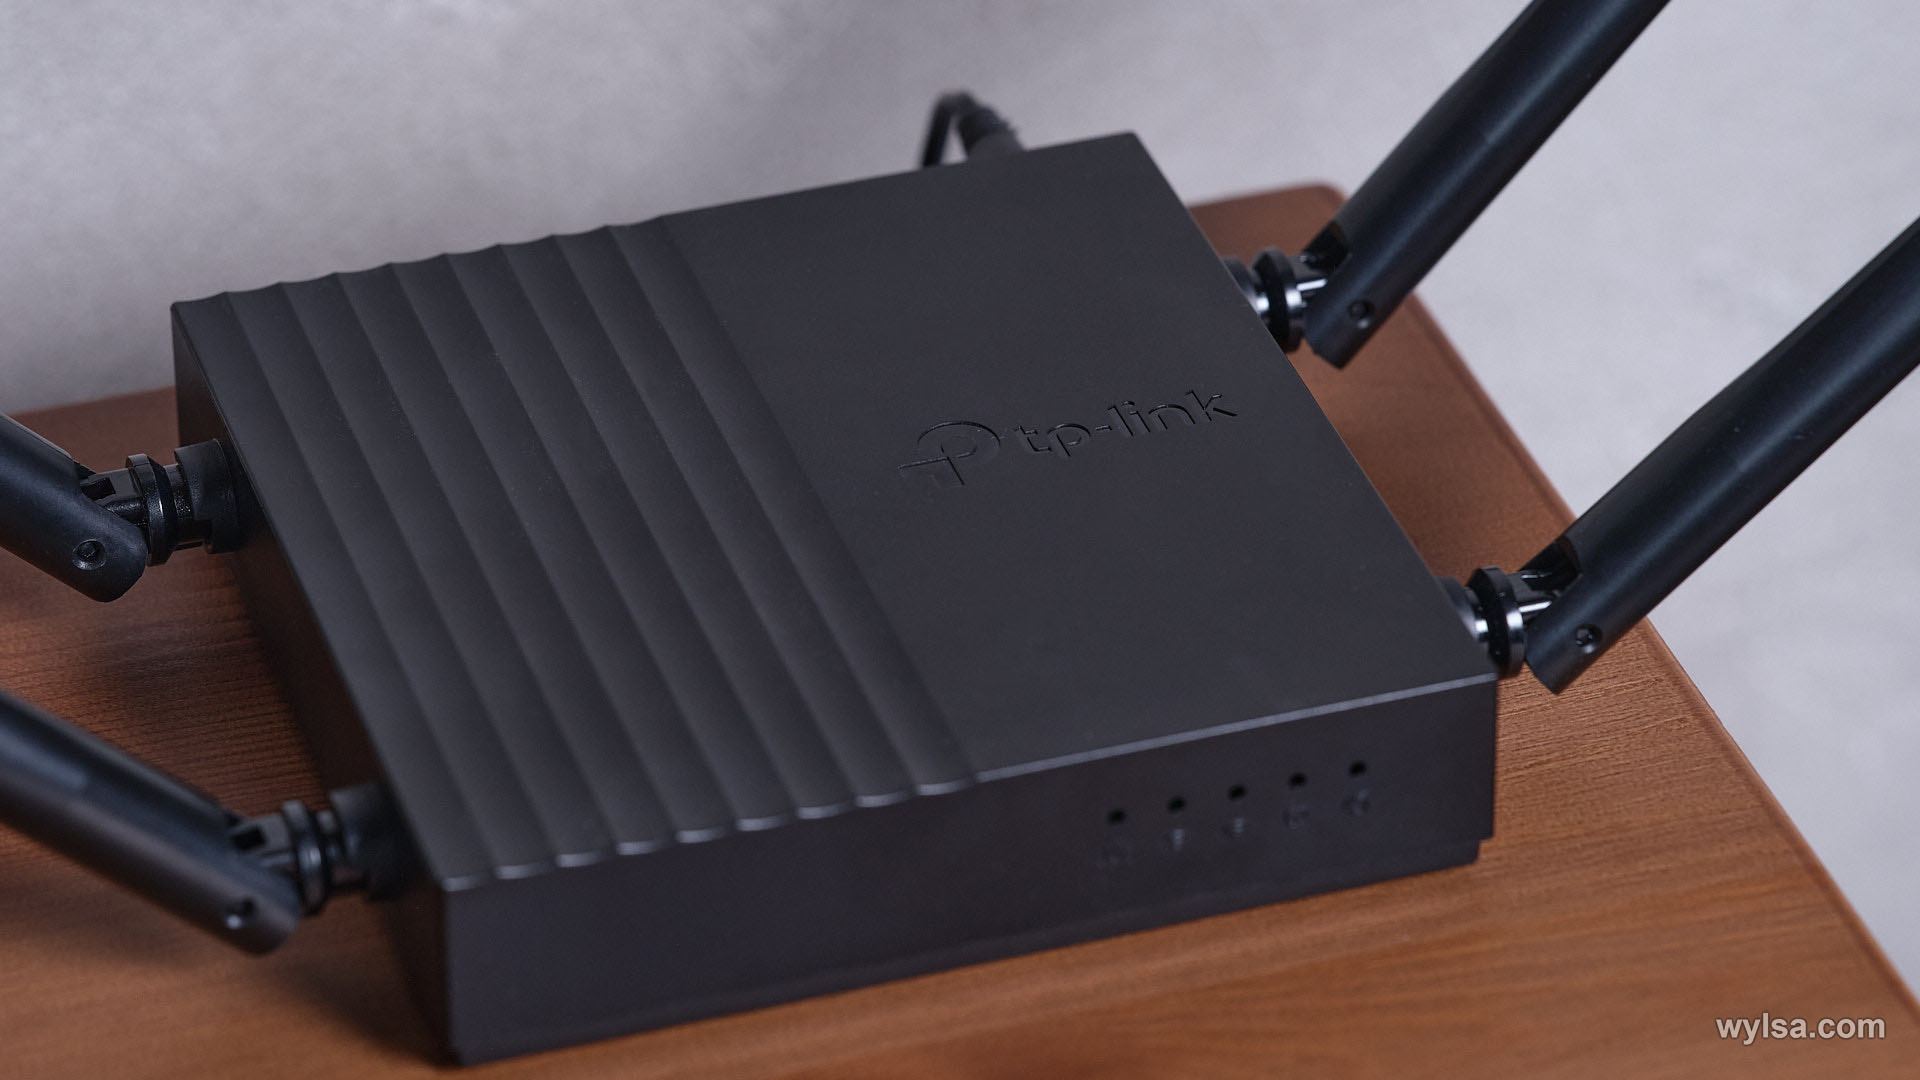
На передней панели есть несколько светодиодов, которые отображают состояние работы сети и самого роутера:
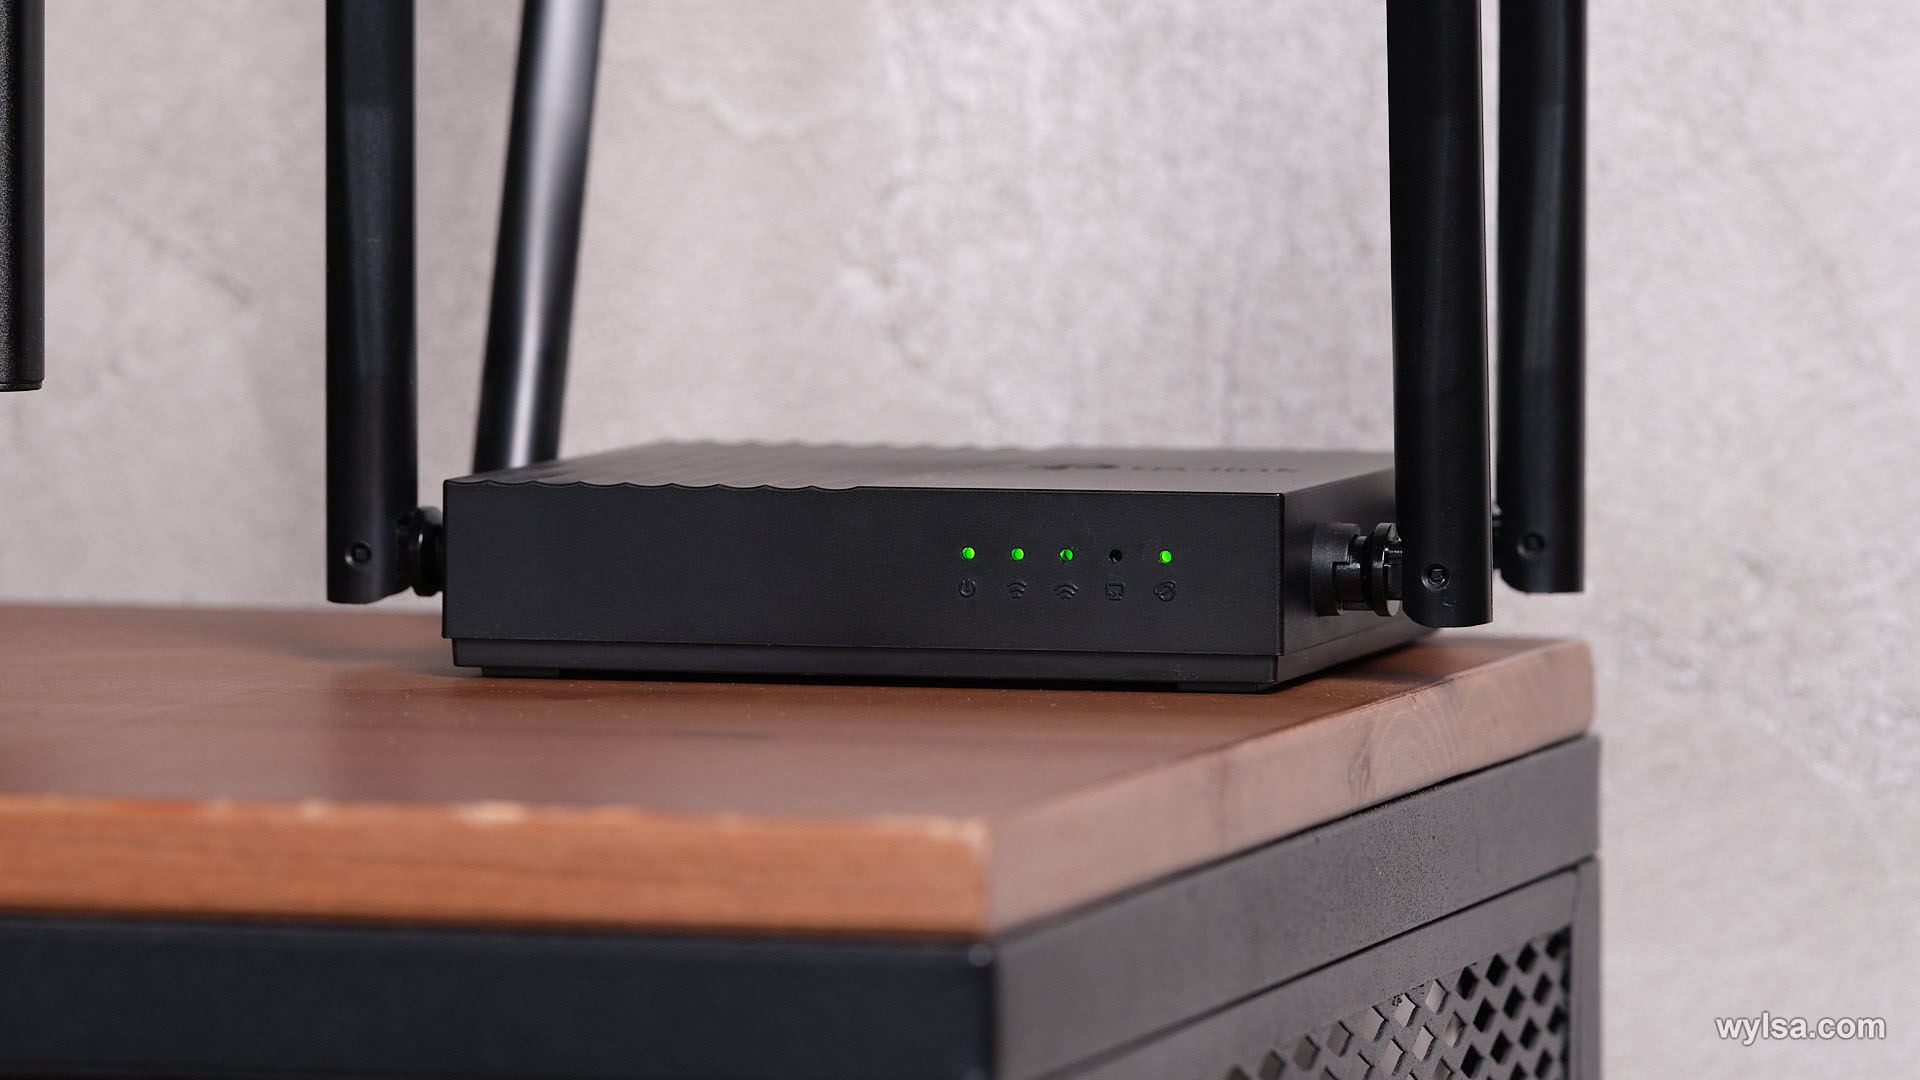
Возможности
TP-Link Archer C64 получил одноядерный двухпоточный процессор с тактовой частотой 1,2 ГГц. Собственно, это абсолютно нормальное решение, которое наиболее часто используют в бюджетных роутерах.
Роутер работает с классом Wi-Fi AC1200. Это означает, что по двум беспроводным каналам максимальная скорость будет близка к 1200 Мбит/с. Из них 300 Мбит/с на частоте 2,4 ГГц, а на 5 ГГц — 867 Мбит/с.
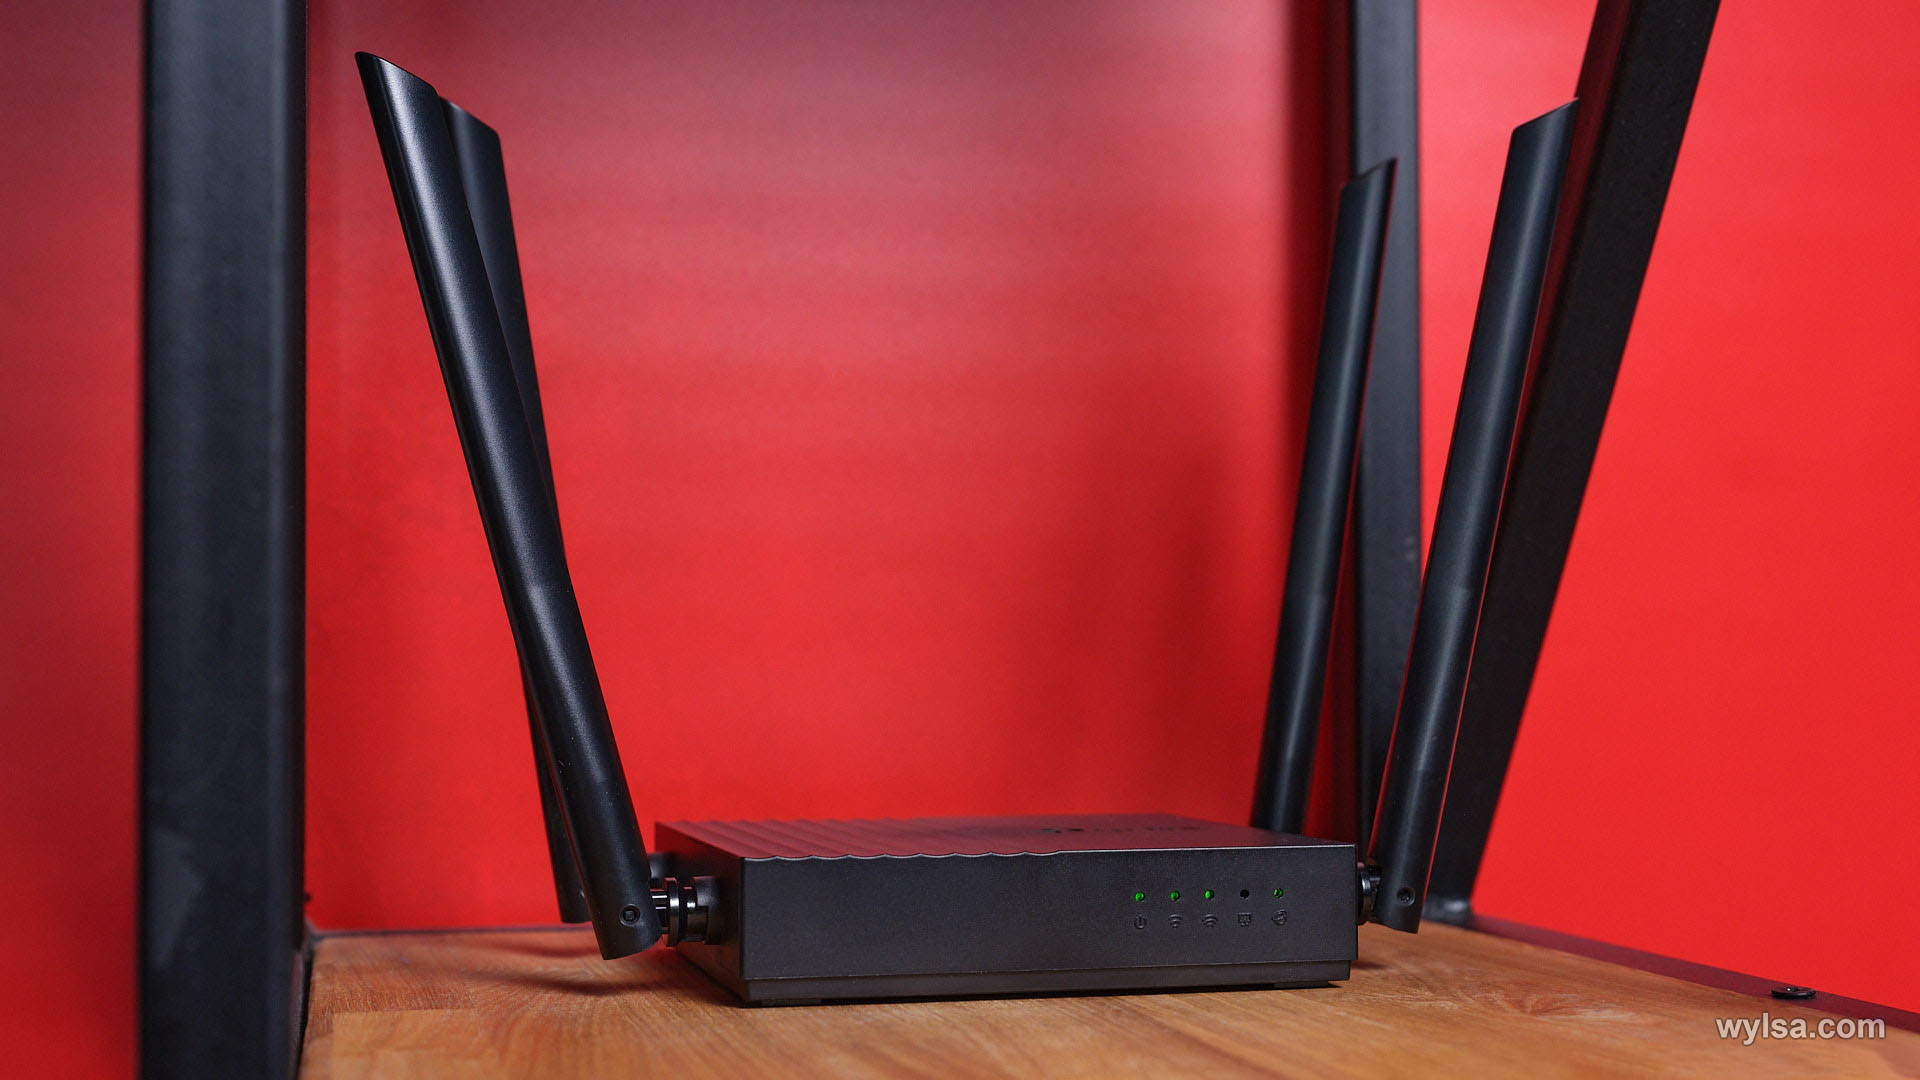
Одной из ключевых стала Beamforming — функция, с помощью которой роутер обнаруживает местоположение подключённых устройств. Это позволяет перенаправить сигнал именно в их сторону.
Шифрование проходит по программе сертификации WPA3, защищающей в том числе от брутфорс-атак. Также этот протокол получил упрощённую интеграцию с устройствами интернета вещей.
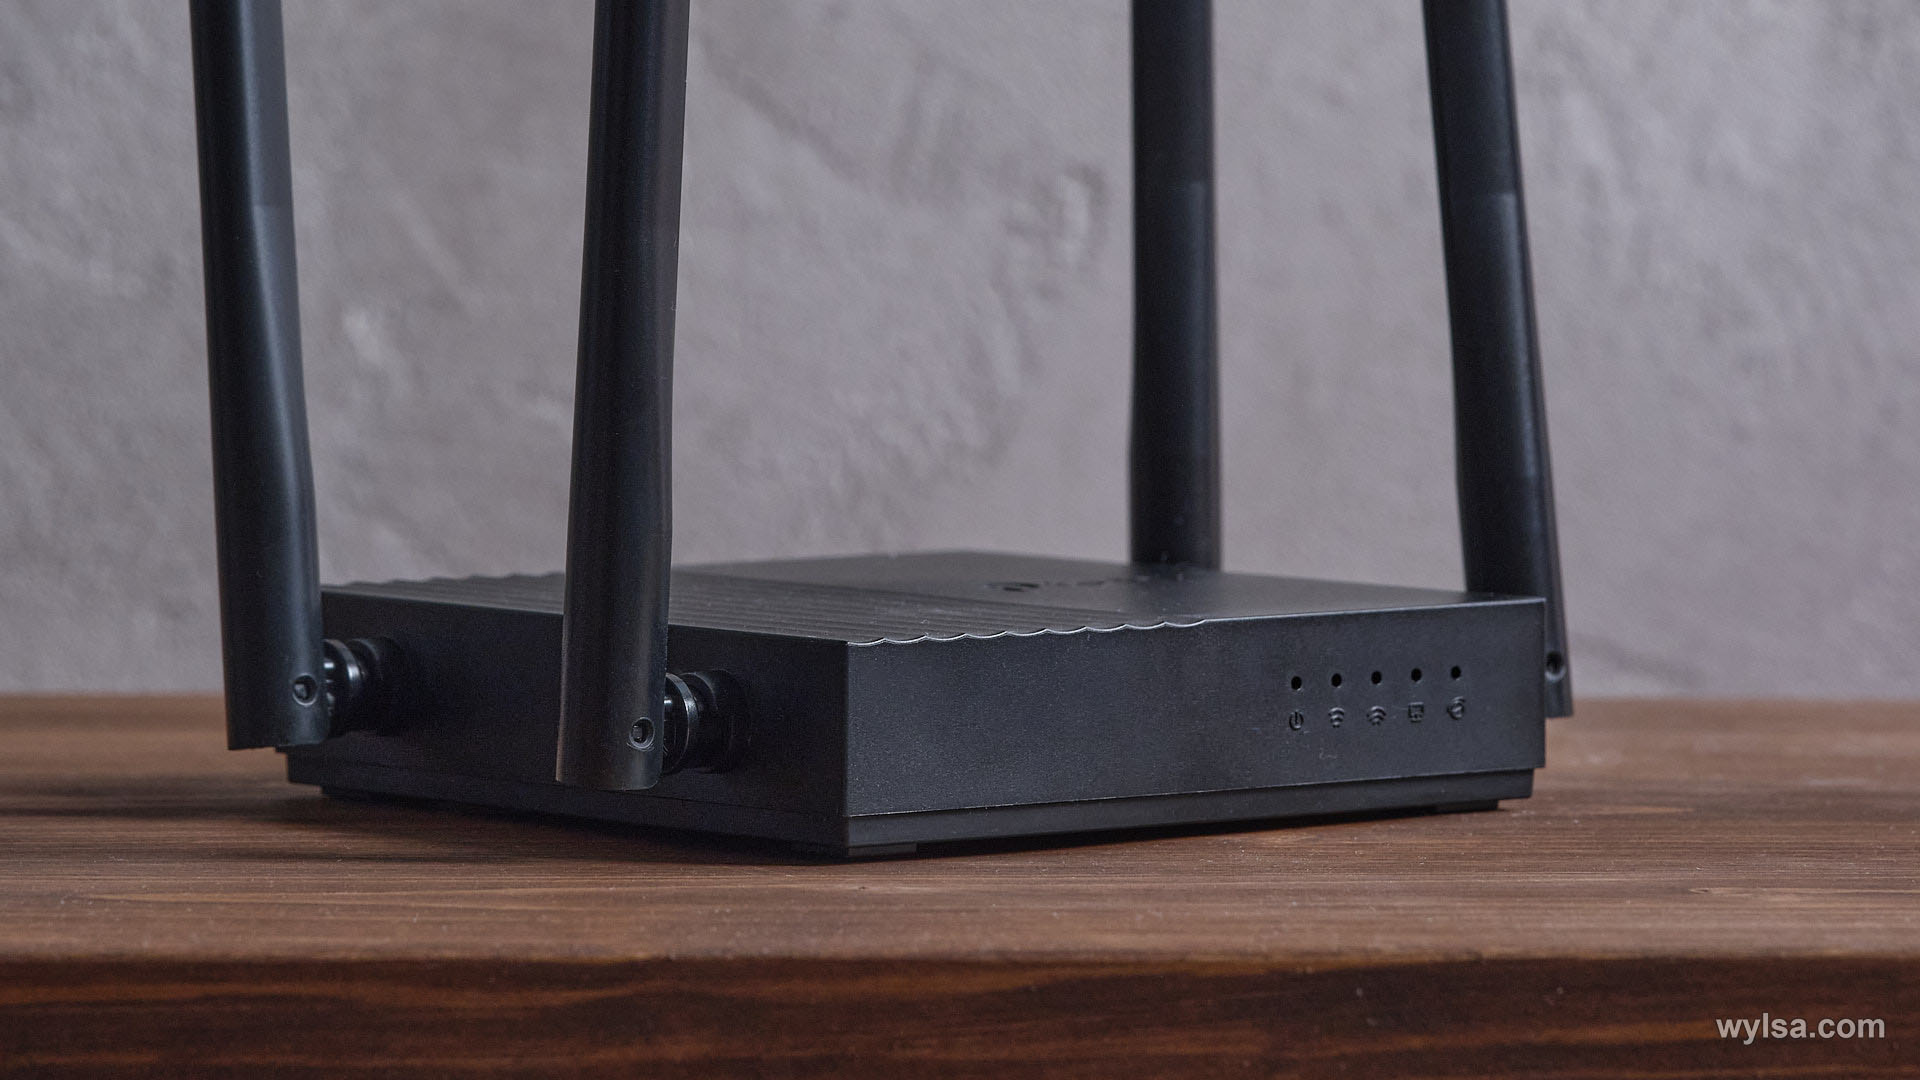
Есть в Archer C64 и MU-MIMO. Этот протокол создаёт три беспроводных соединения, которые умеют работать одновременно. Он позволяет избежать ситуаций, при которых вы просите своих сожителей остановить загрузку контента, чтобы срочно решить какой-то вопрос.
Настройка
Управление настройками возможно как через браузер, так и через приложение TP-Link Tether, доступное на iOS и Android. Я покажу процесс в браузере.
После того как вы подключите роутер к сети, вам нужно подключиться к созданной сети Wi-Fi. После этого заходите на сайт tplinkwifi.net и задавайте пароль для вашего аккаунта:
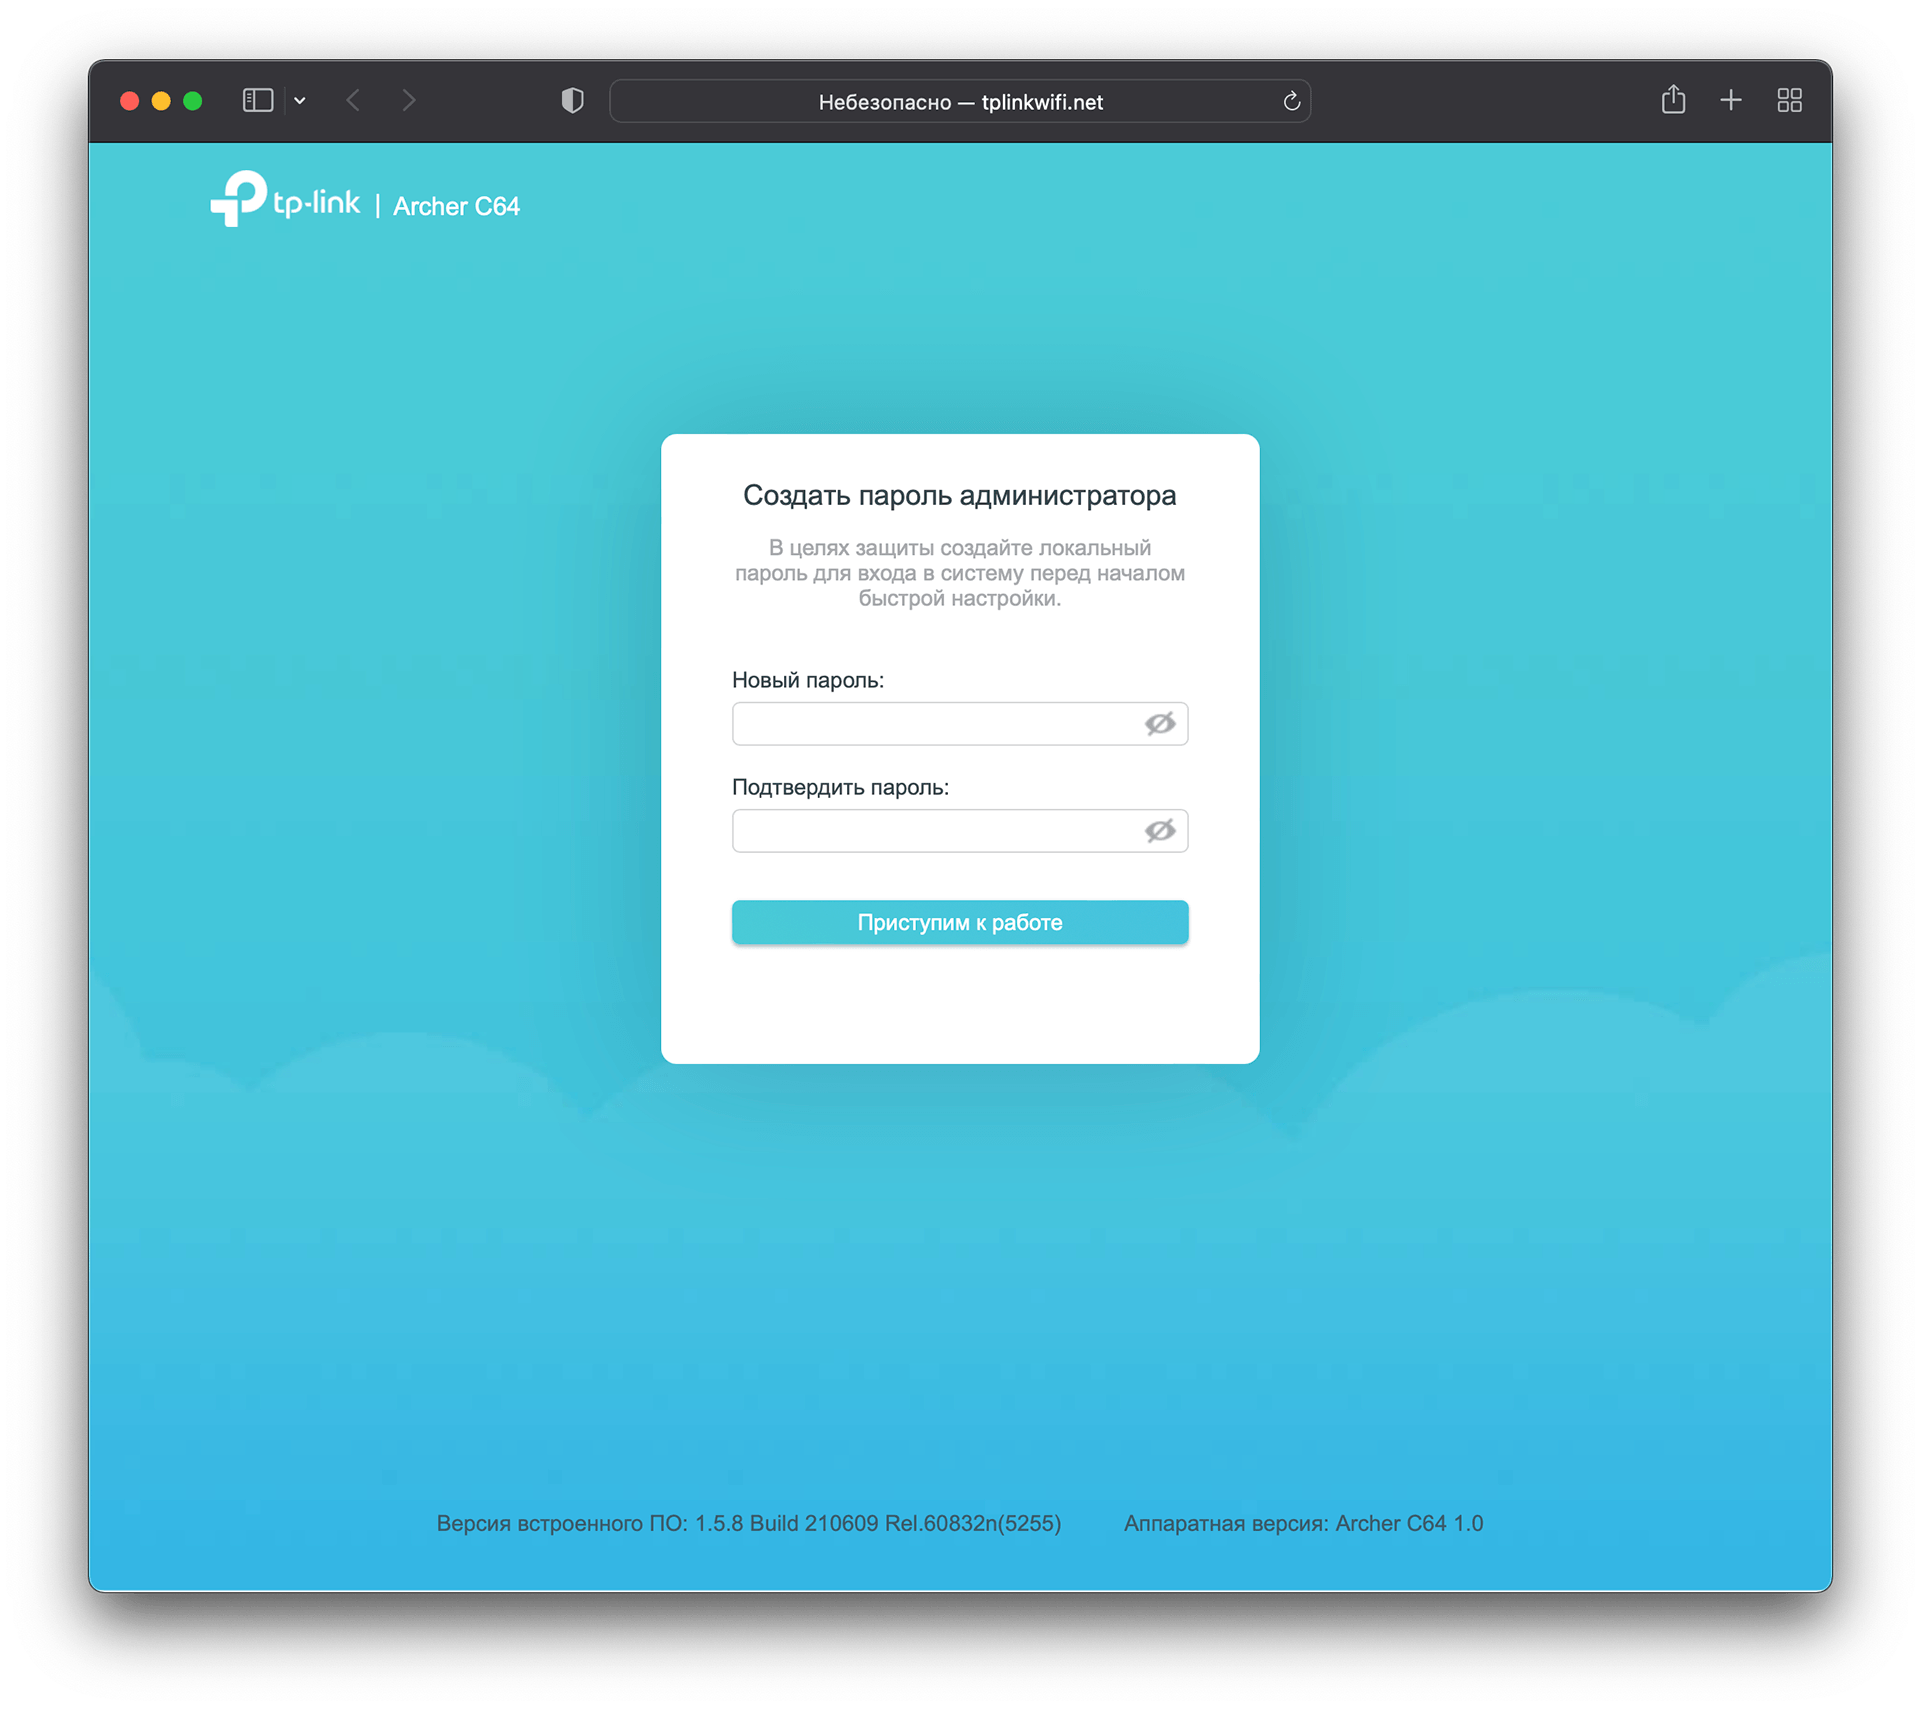
Затем вам нужно будет сделать несколько шагов по быстрой настройке. Тут предстоит выбрать регион, где вы пользуетесь роутером. Также будет длинный список провайдеров — в этом случае роутер применит все необходимые специфические настройки.
Тут вы сможете придумать имя своей сети и пароль. Прямо во время быстрой настройки:
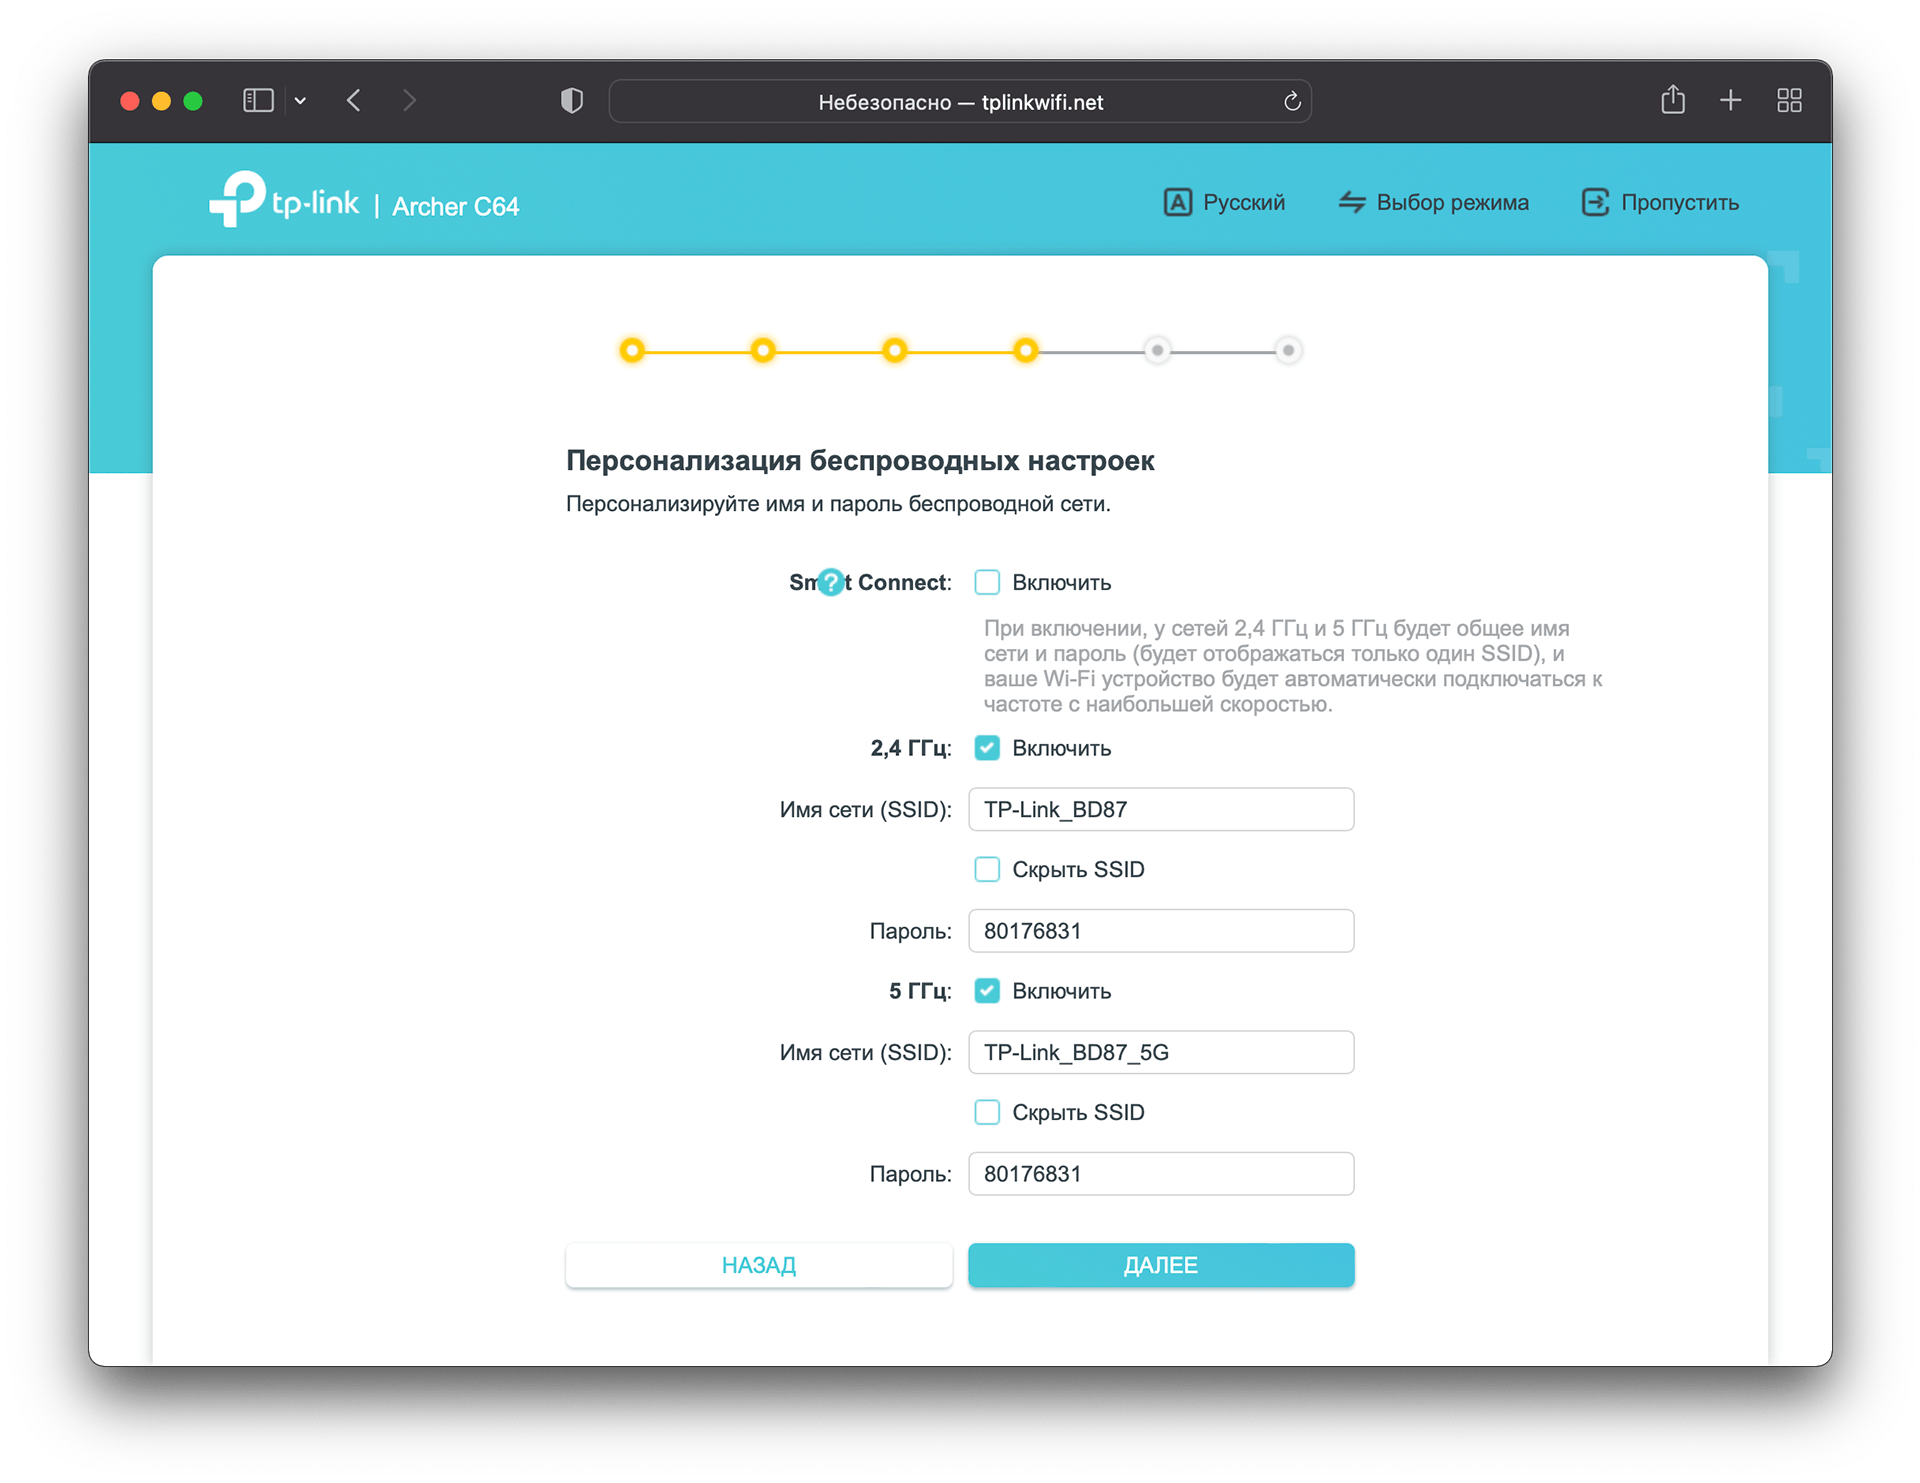
В принципе, дальше большинство пользователей заходить не будет. Однако для них экран веб-интерфейса будет выглядеть так:
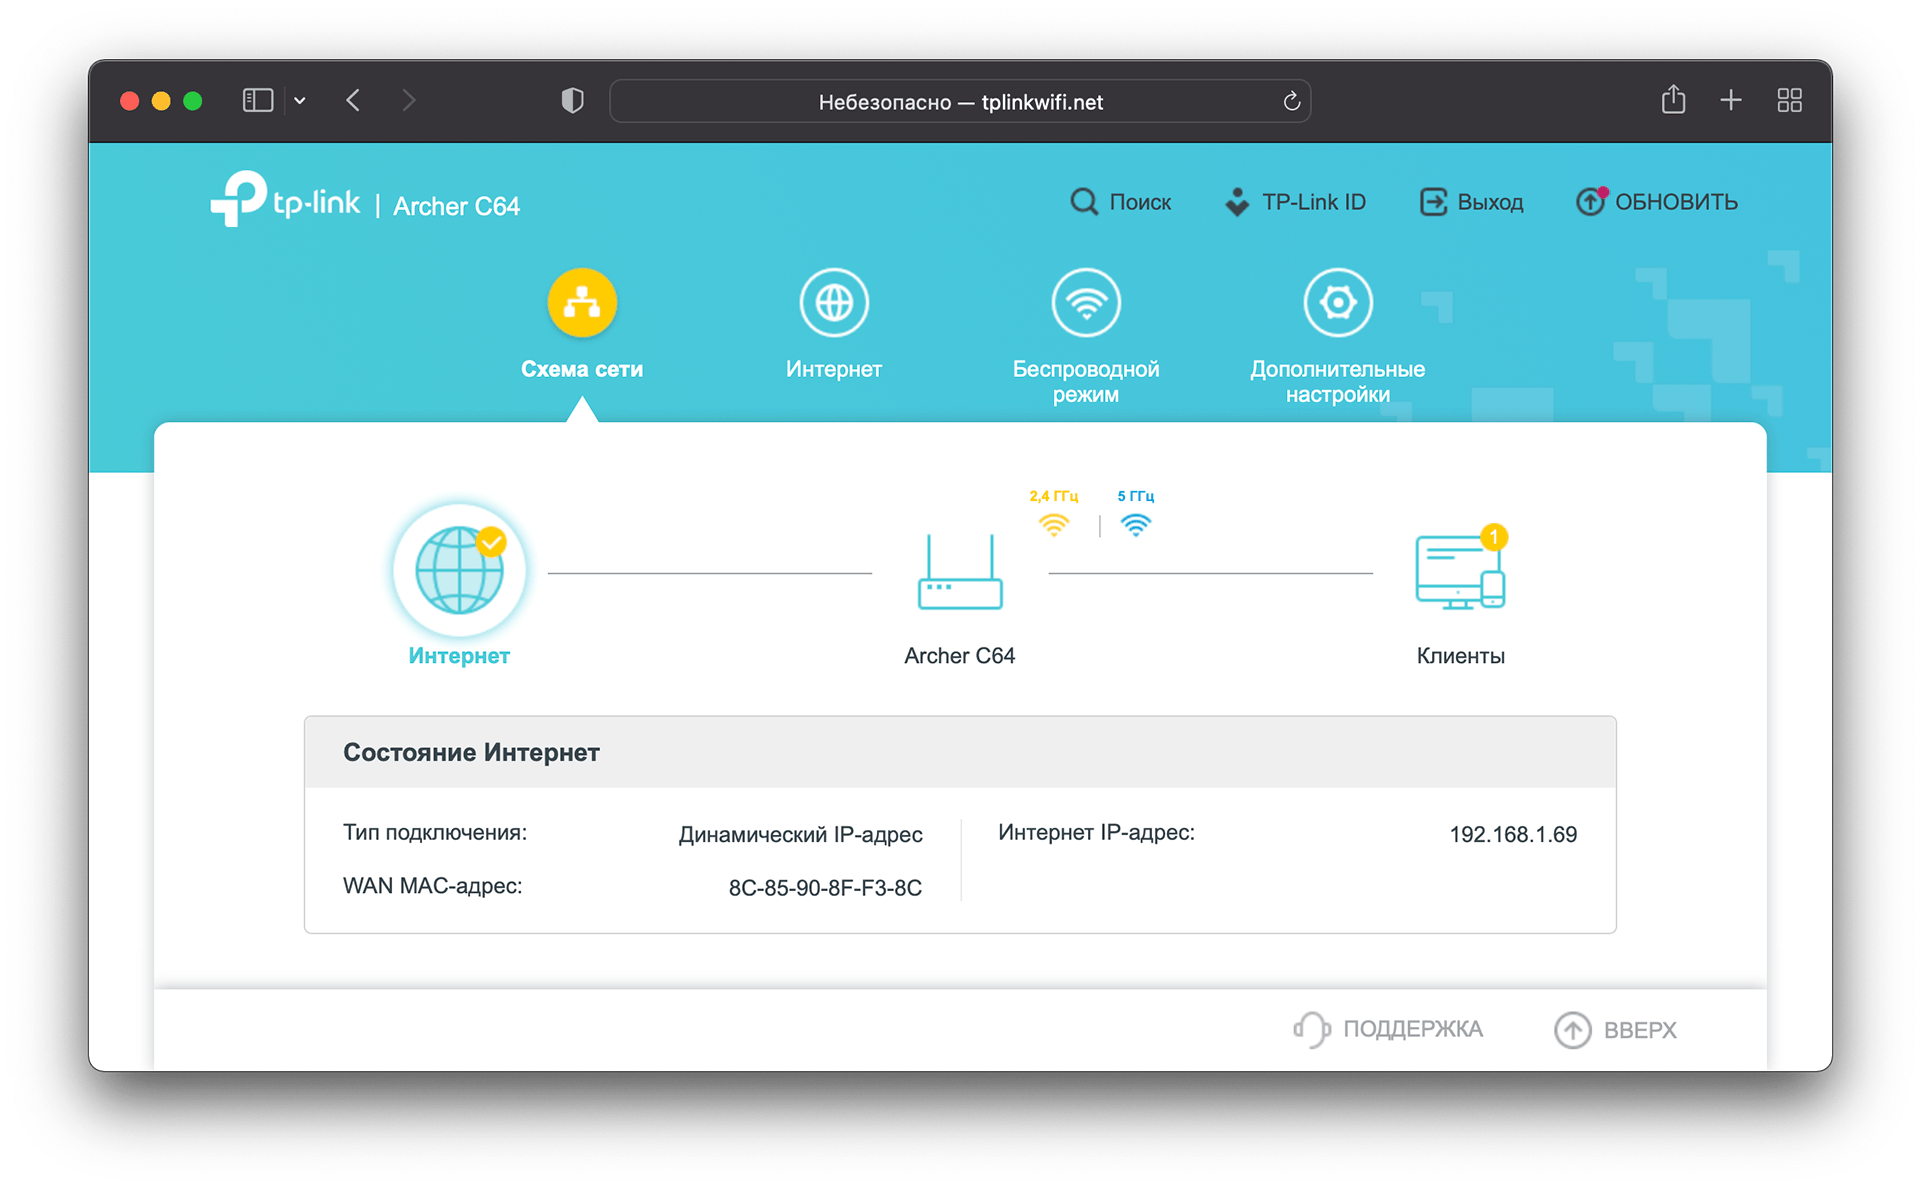
Вторая вкладка — «Интернет», где будет настройка IP и MAC-адресов:
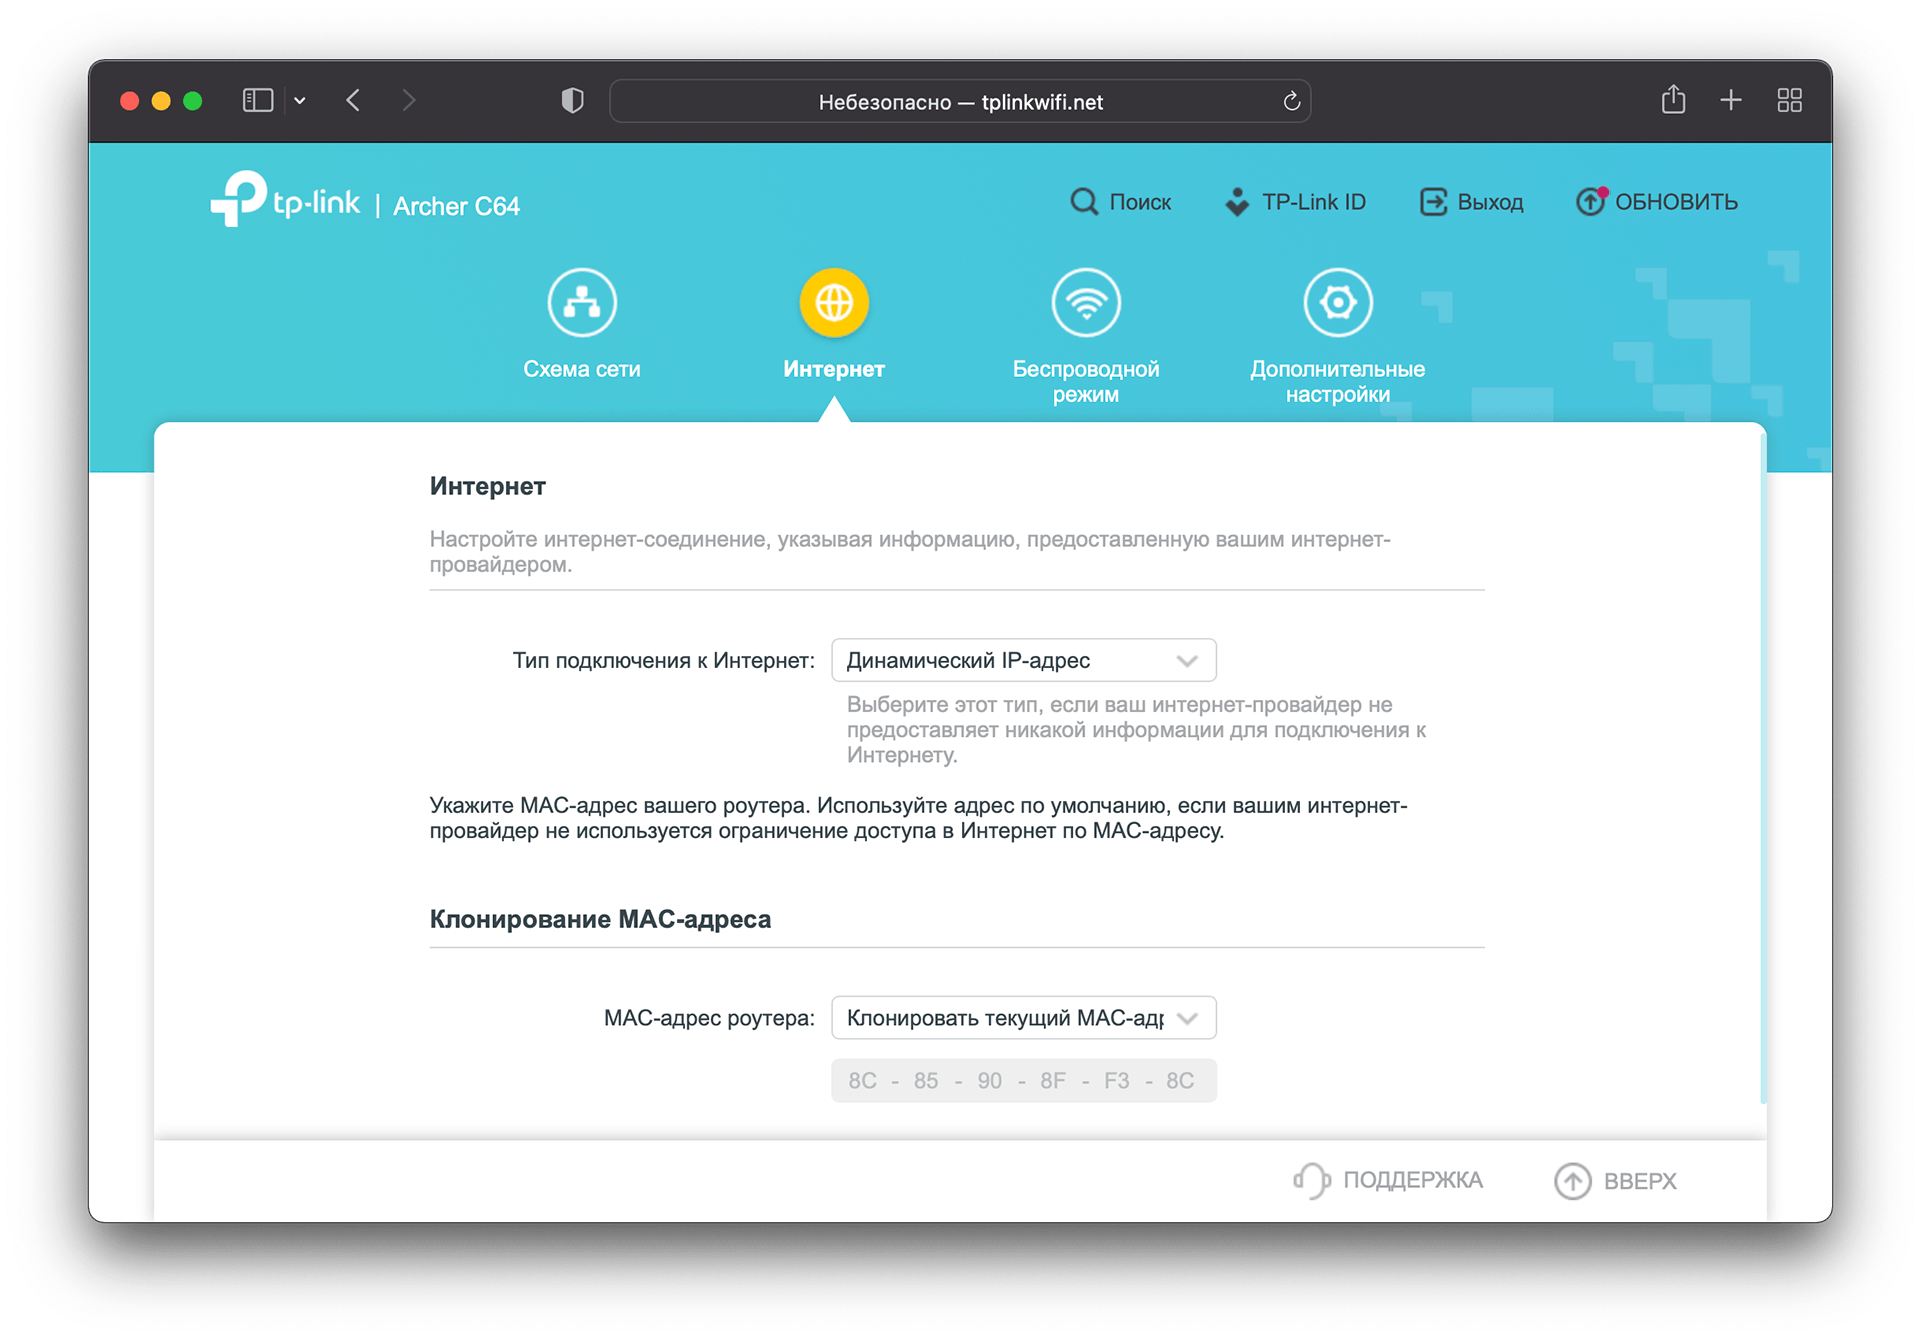
«Беспроводной режим» даст вам возможность переименовать сеть, задать новый пароль, выбрать, какой именно вариант WPA использовать, а также отключить одну из сетей:
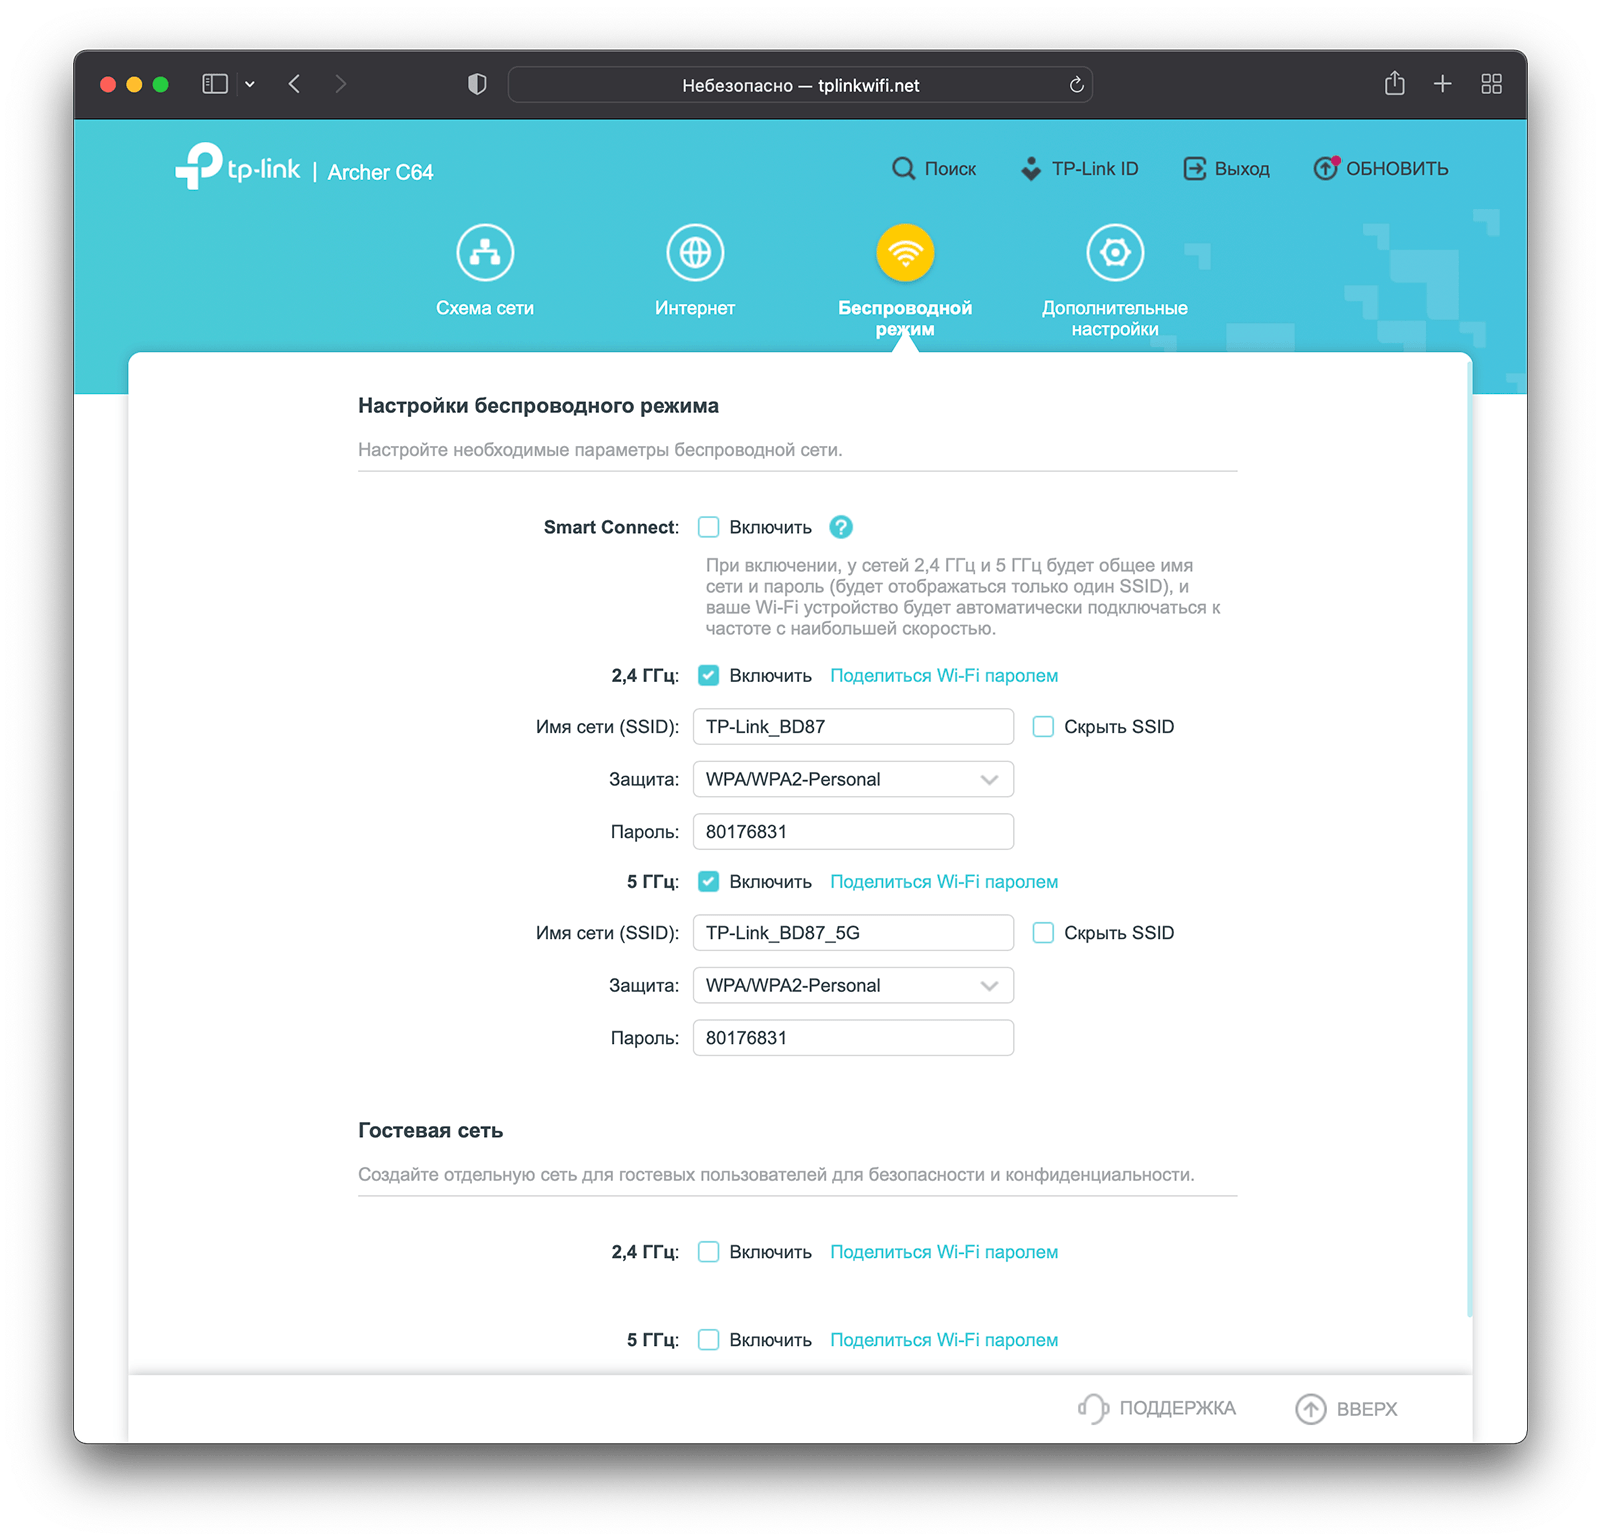
Обратите внимание на функцию Smart Connect. Если её активировать, то ваши сети Wi-Fi, работающие на 2,4 и 5 ГГц, объединяются в одну. Захламление канала не будет: роутер сам определит, какие устройства нужно подключить к 2,4 ГГц, а какие — к 5 ГГц.
В раздел «Дополнительные настройки» ушло всё остальное:
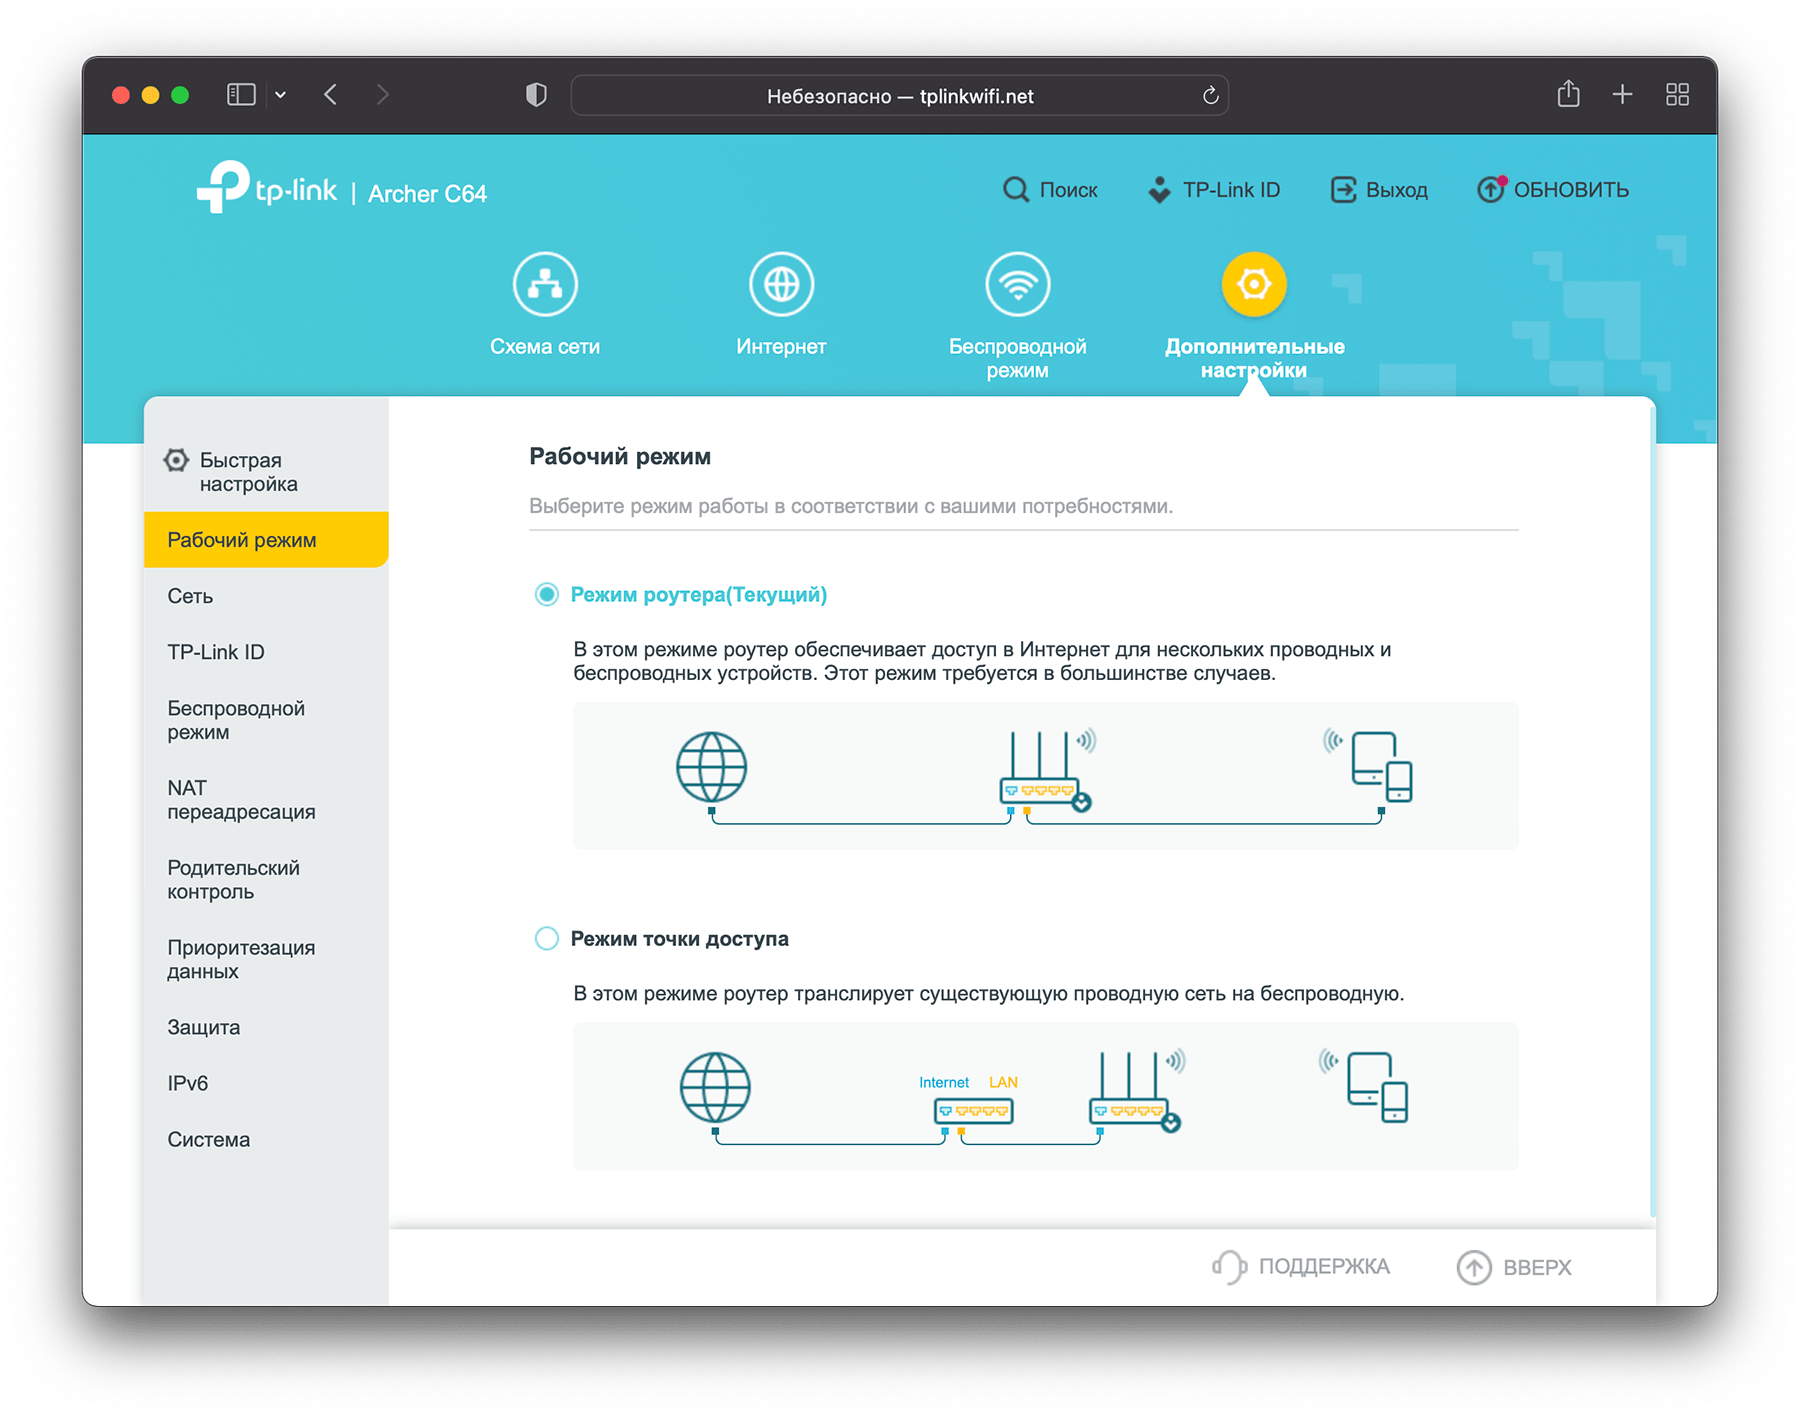
Во время настройки мне выпало уведомление, что пора обновить прошивку роутера:
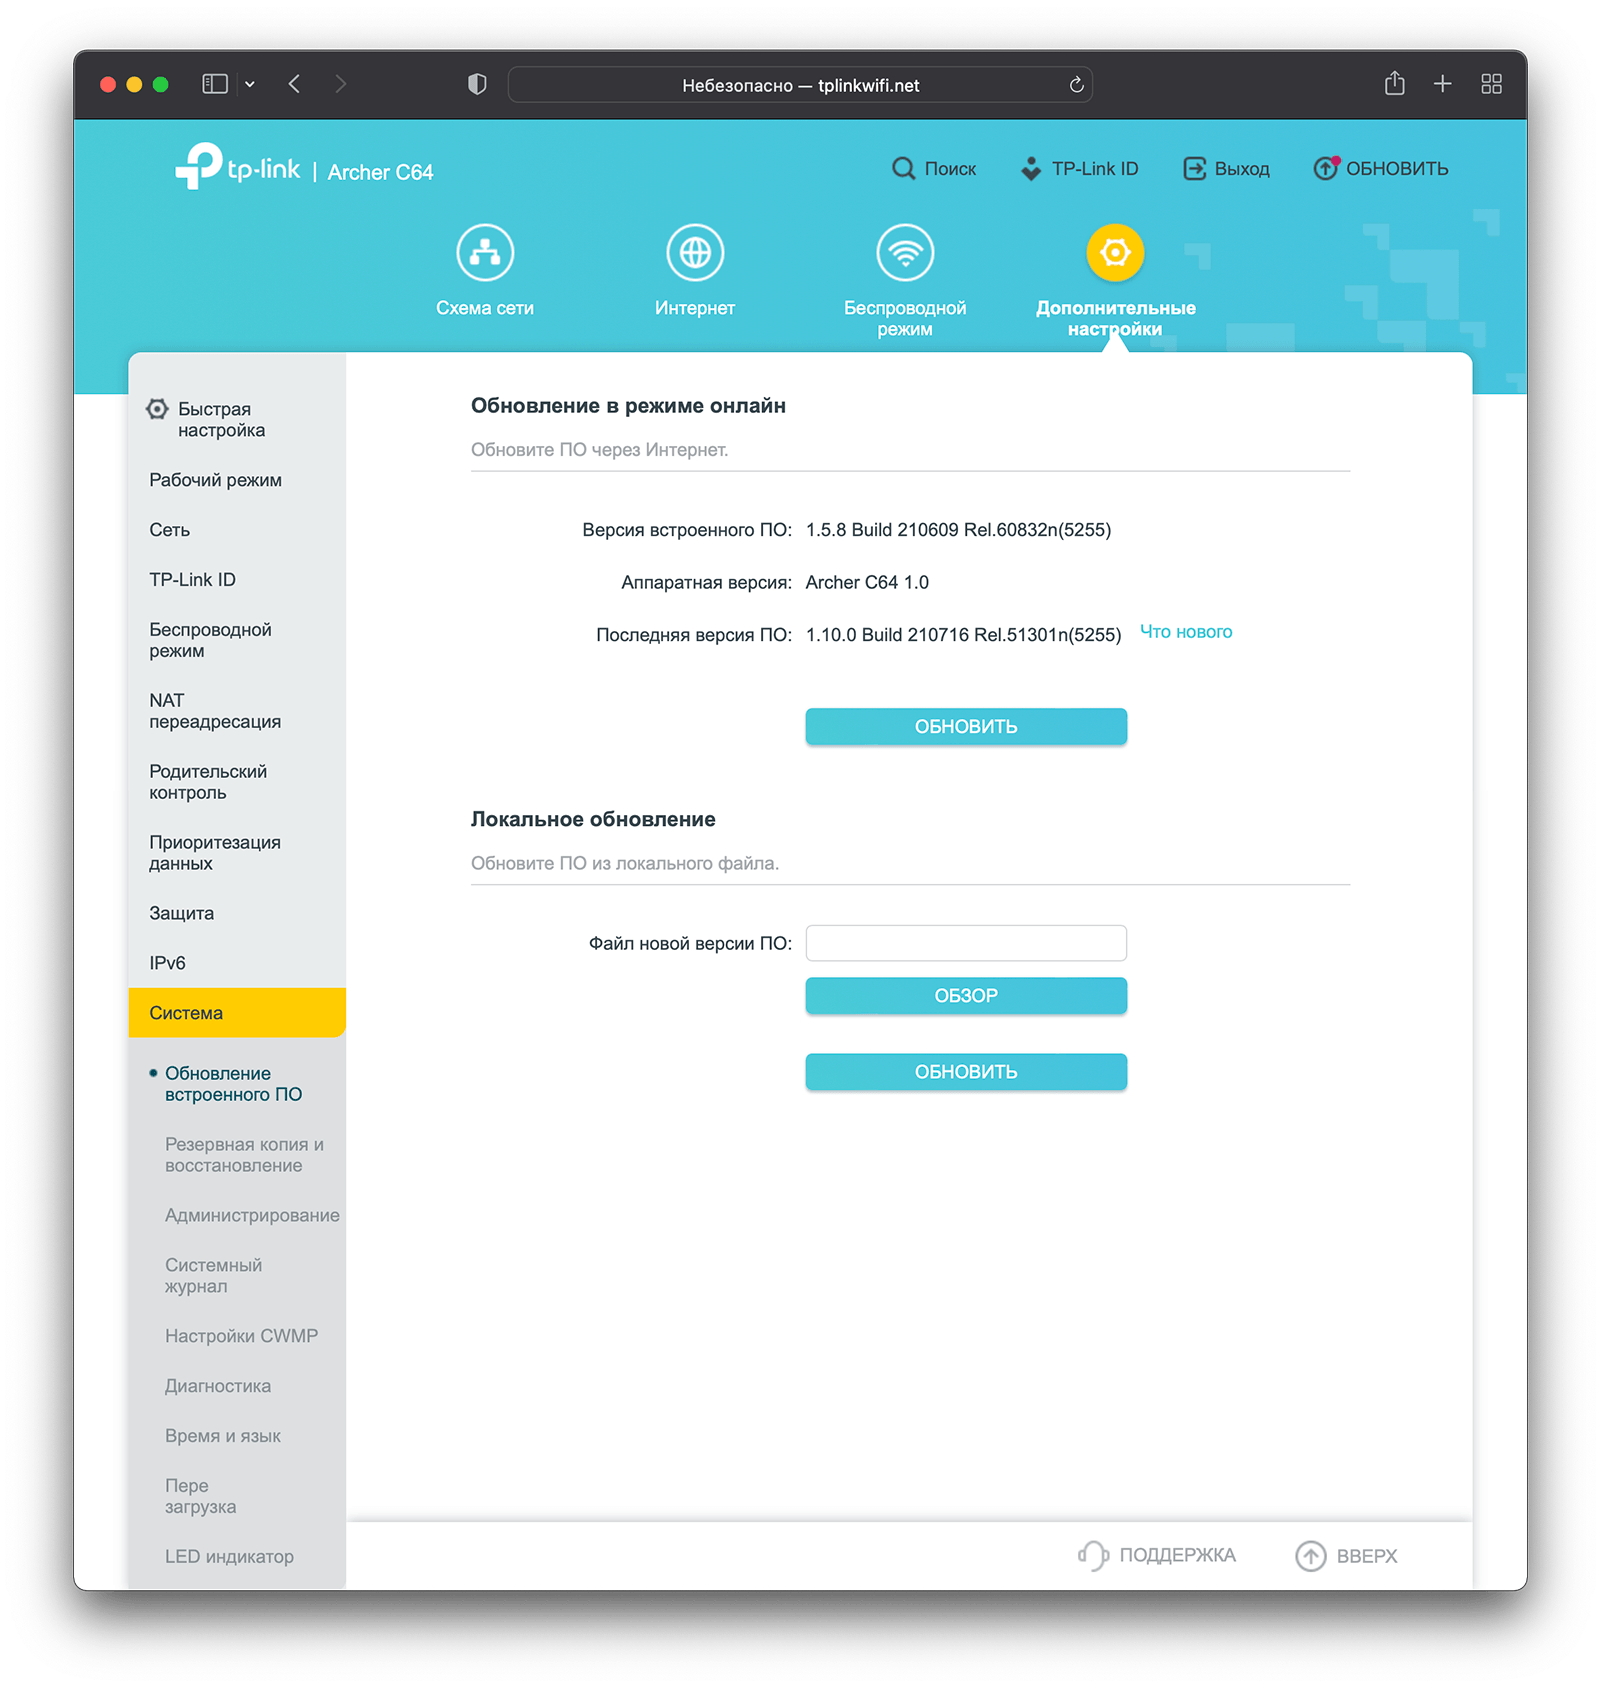
Скорость
С прошлых разов у нас в студии ничего не изменилось: тот же тариф для юрлиц с максимальной скоростью 300 Мбит/с. Я нахожусь далеко от точки доступа, поэтому у меня интернет не прямо-таки блещет скоростями:
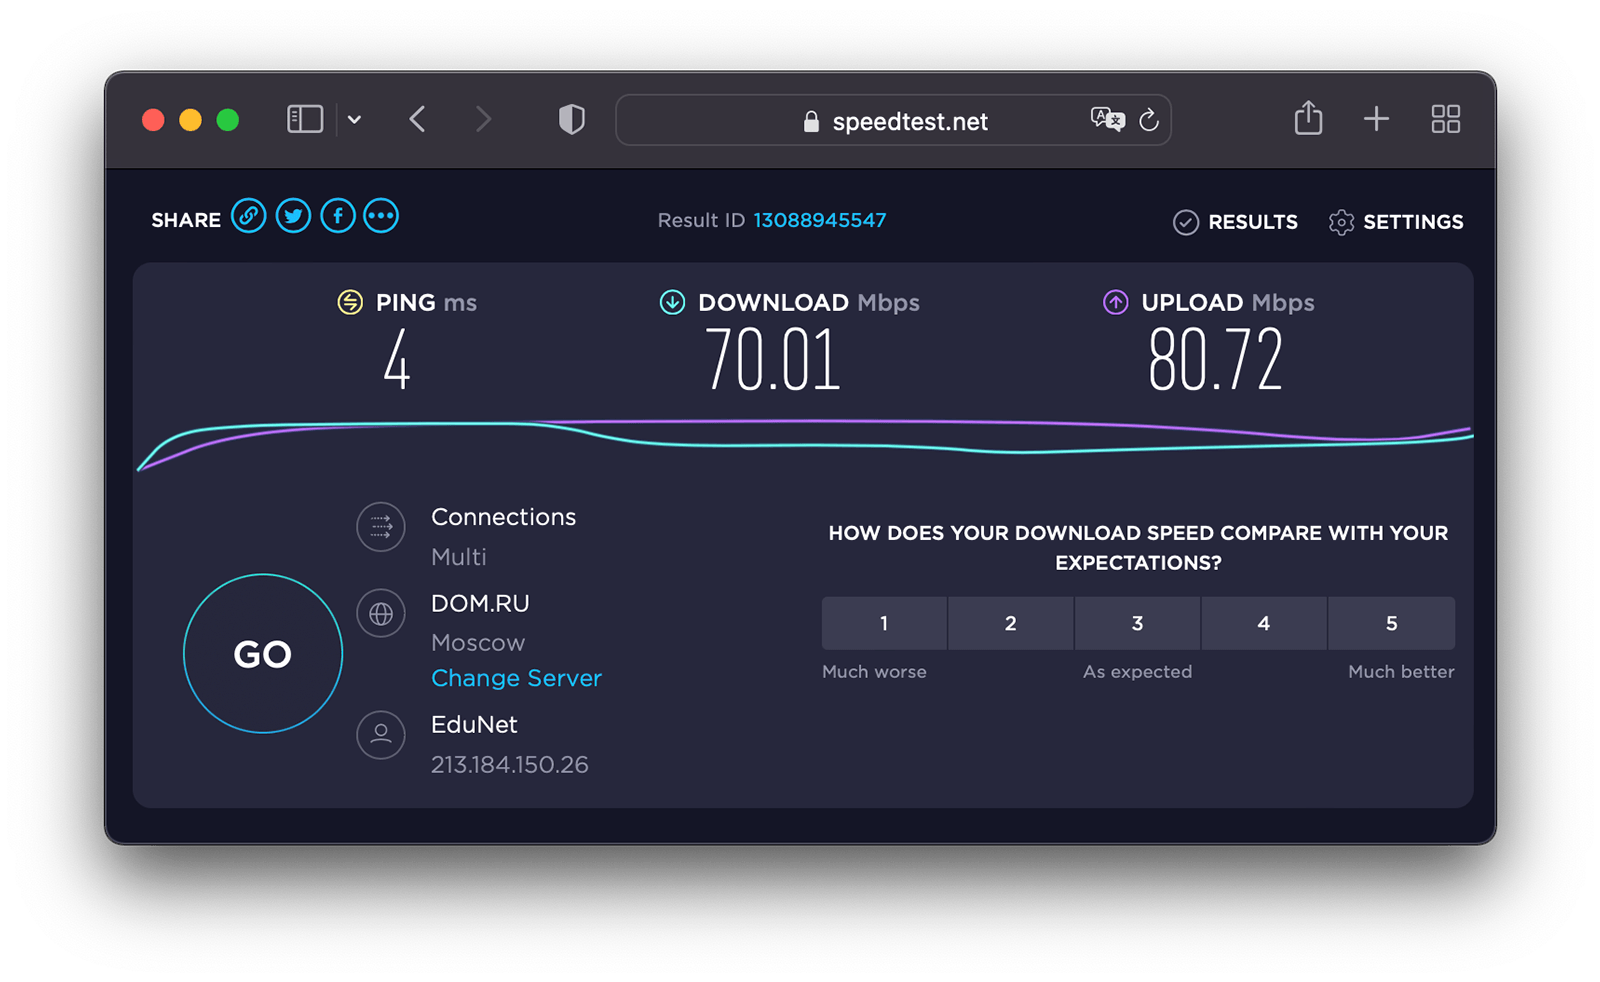
Включаю роутер, создаю сеть, а затем подключаю свой рабочий iMac Pro от него кабелем:
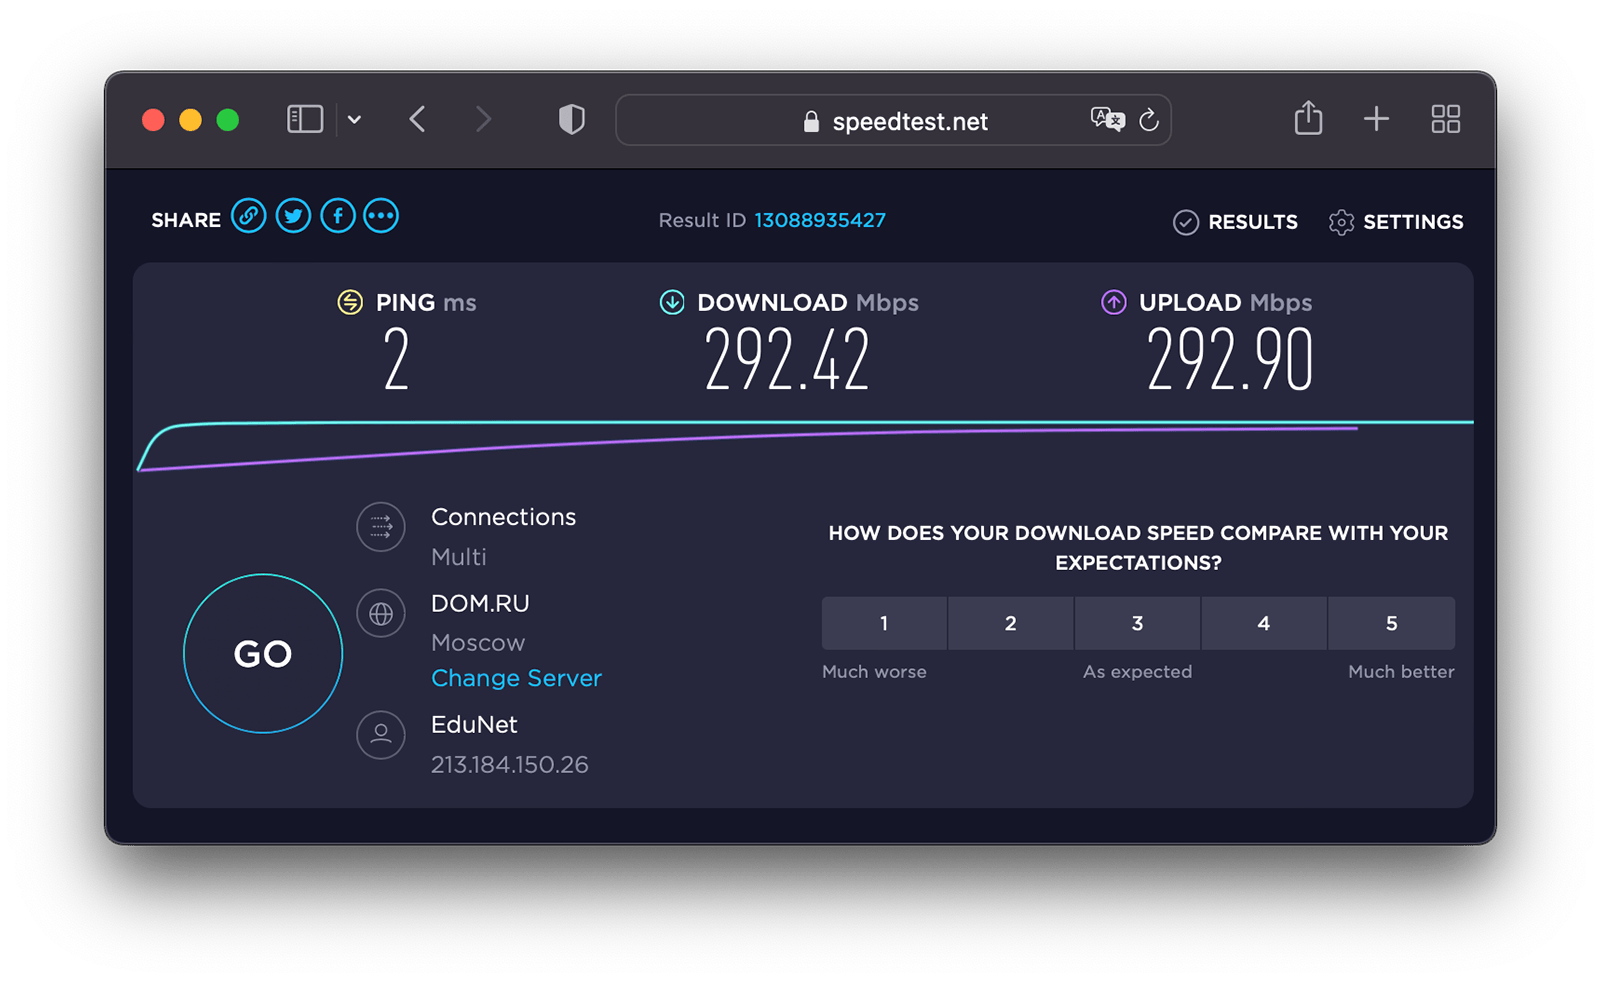
Затем замерили скорость на другом маке, который стоит в той же комнате:
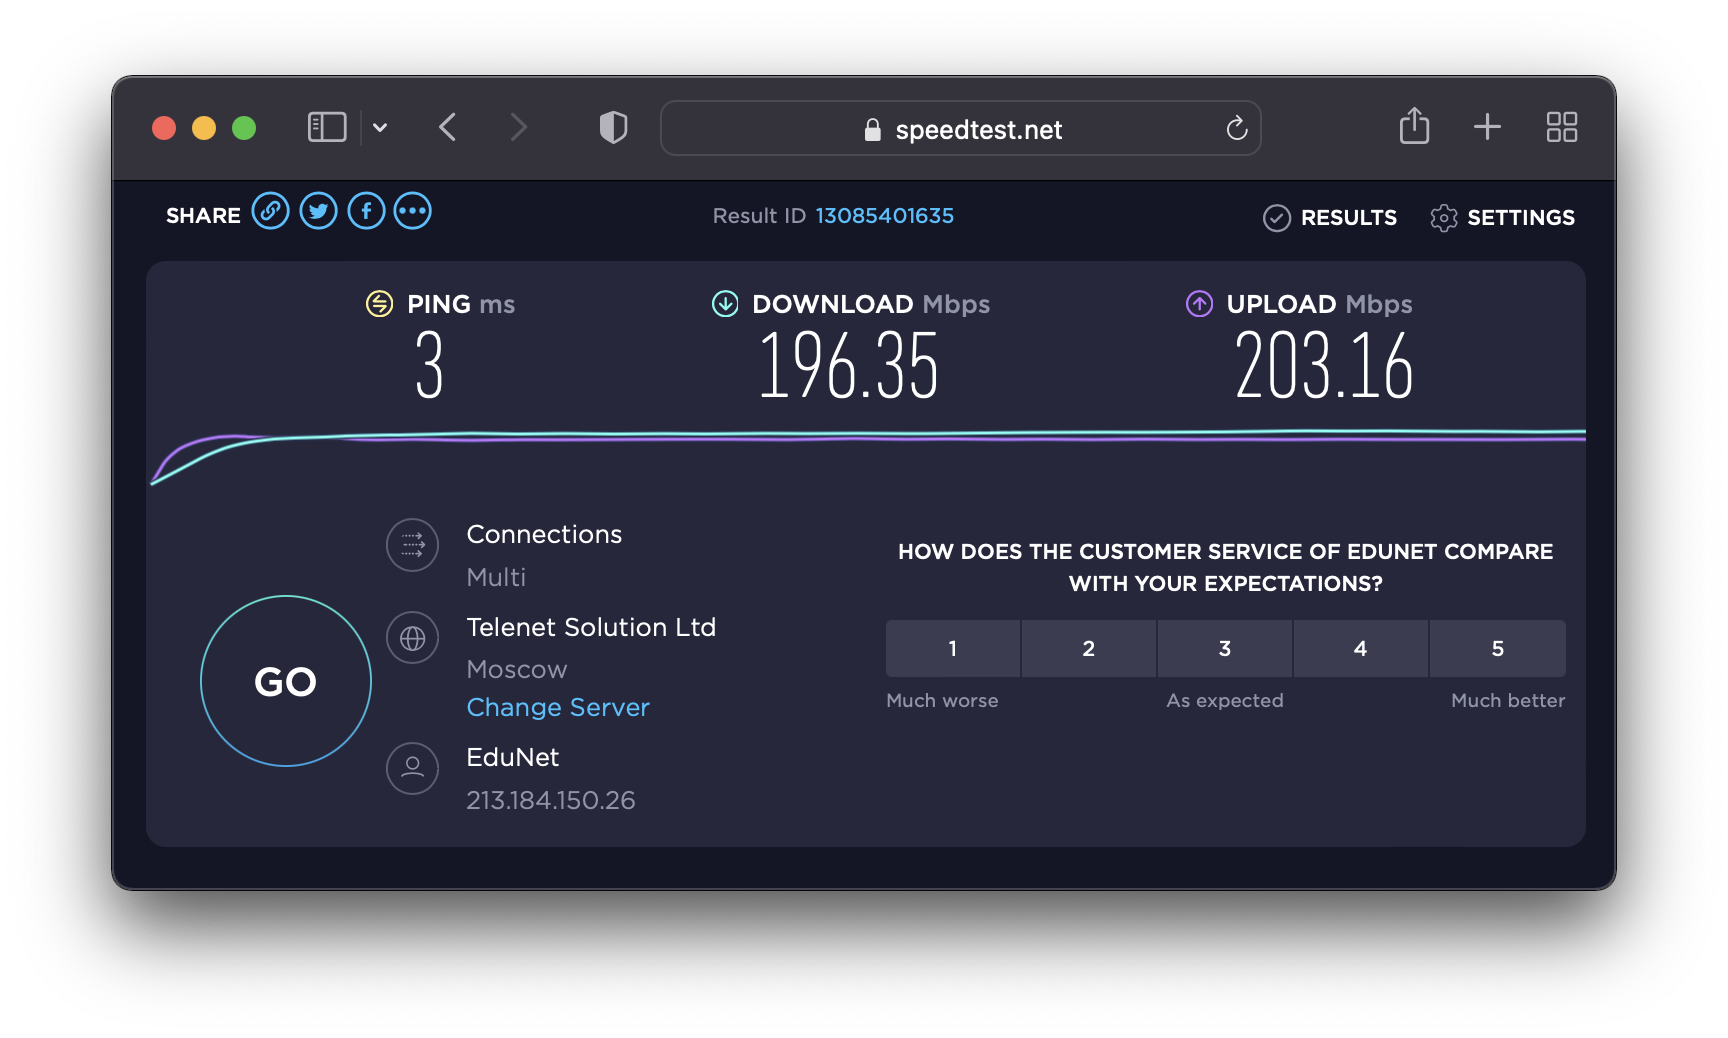
Один из последних айфонов выдал скорости получше:
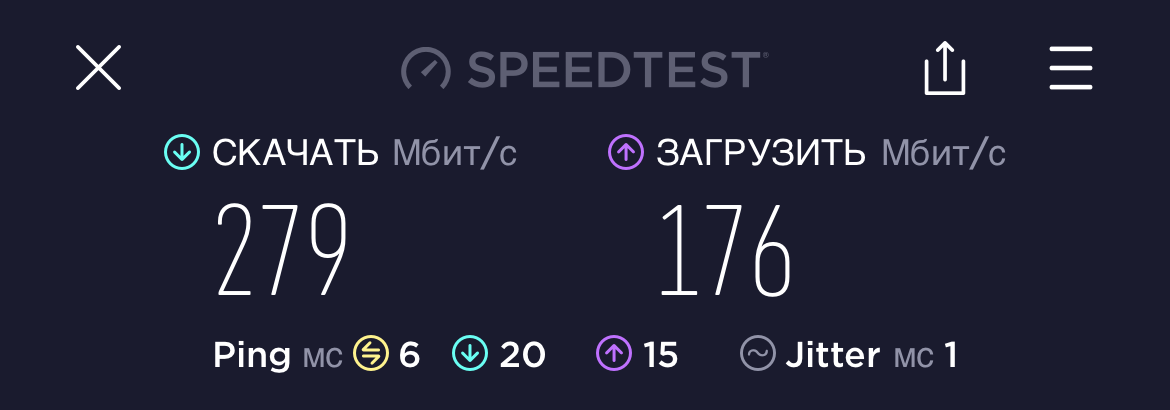
А вот замер скорости через очень толстую стену:
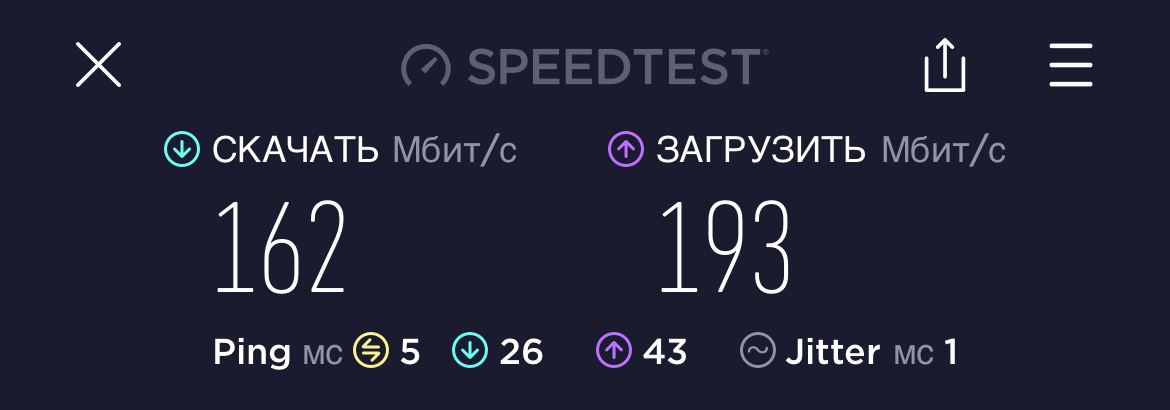
Дополнительные настройки
По традиции расписываю процесс настройки «Родительского контроля». Назван он так по понятным причинам для недопуска детей до опасного для них контента. Возможность настроить его есть как в веб-интерфейсе браузера, так и в приложении.
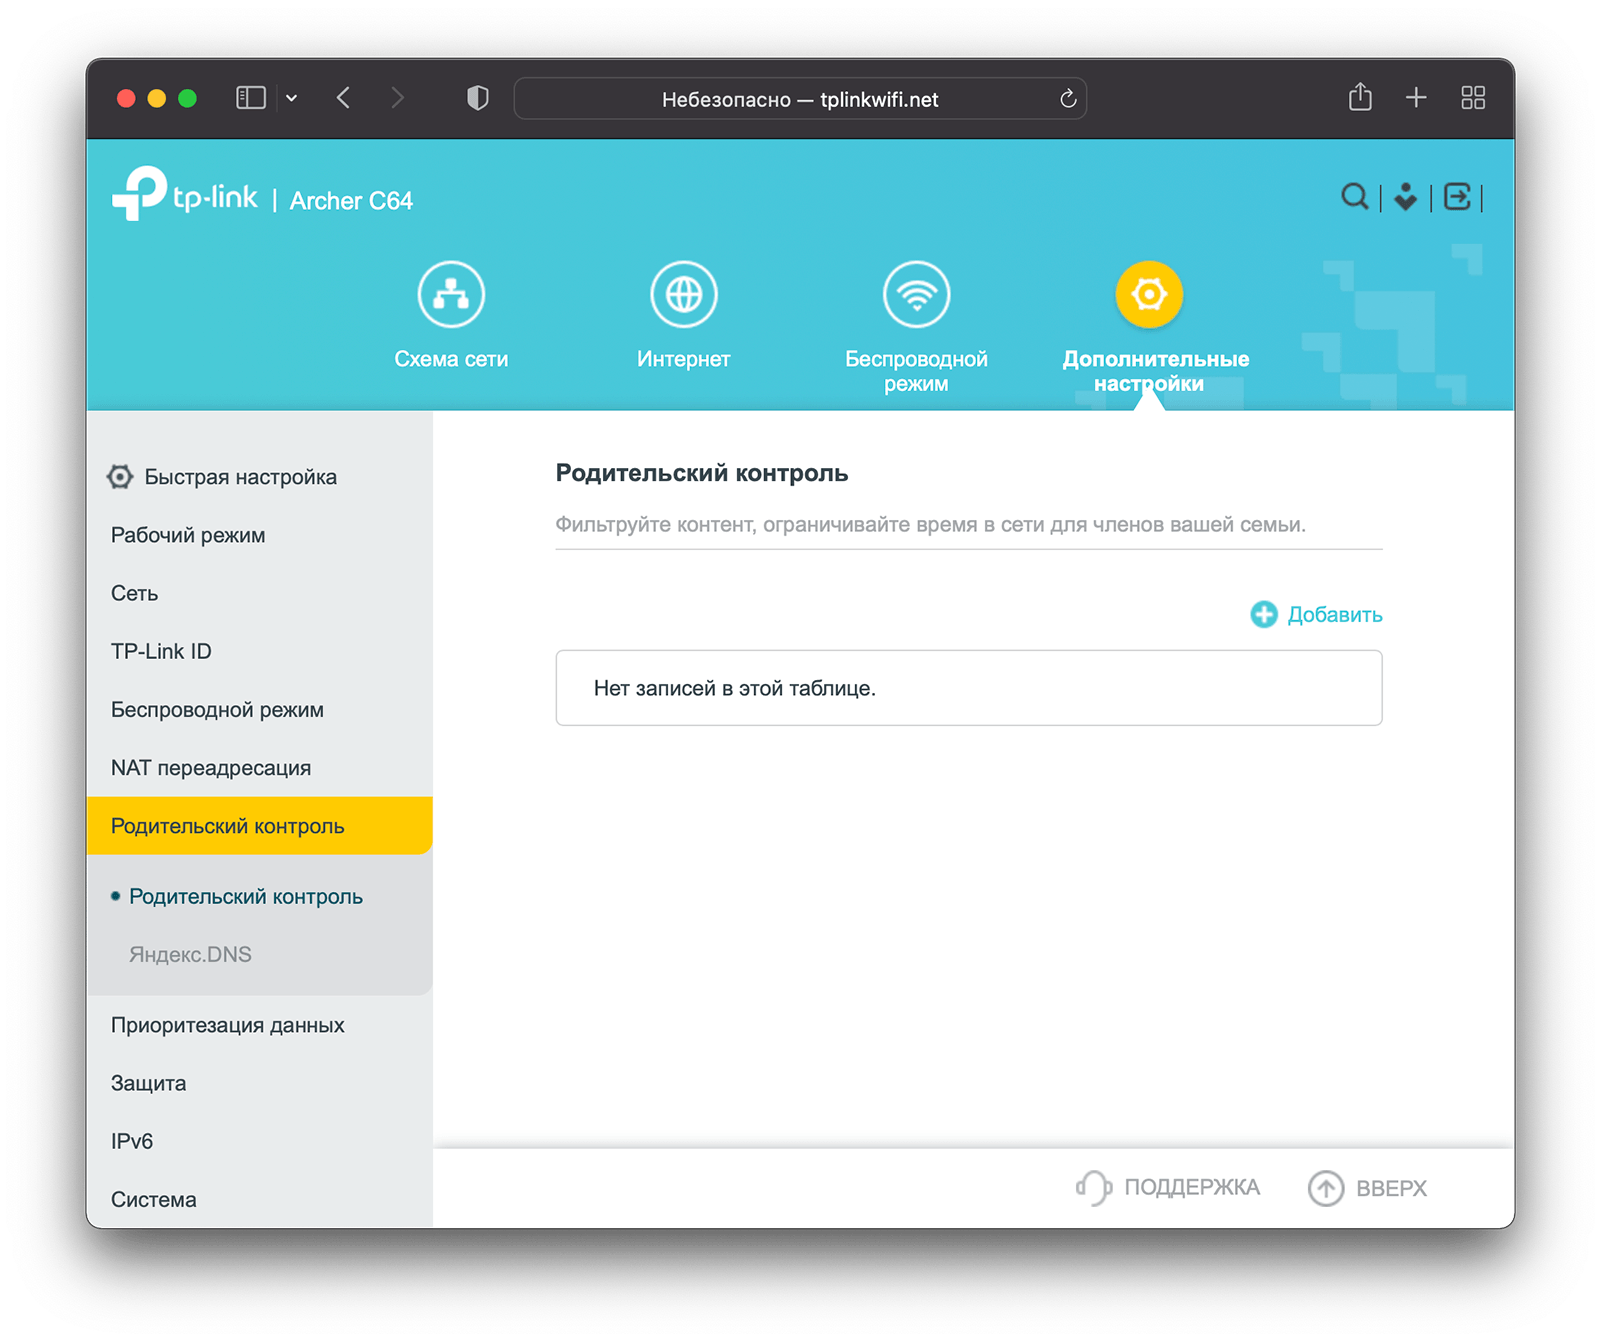
Нажимайте «Добавить», куда вводите любое имя, семейные узы или то, что придёт вам в голову:
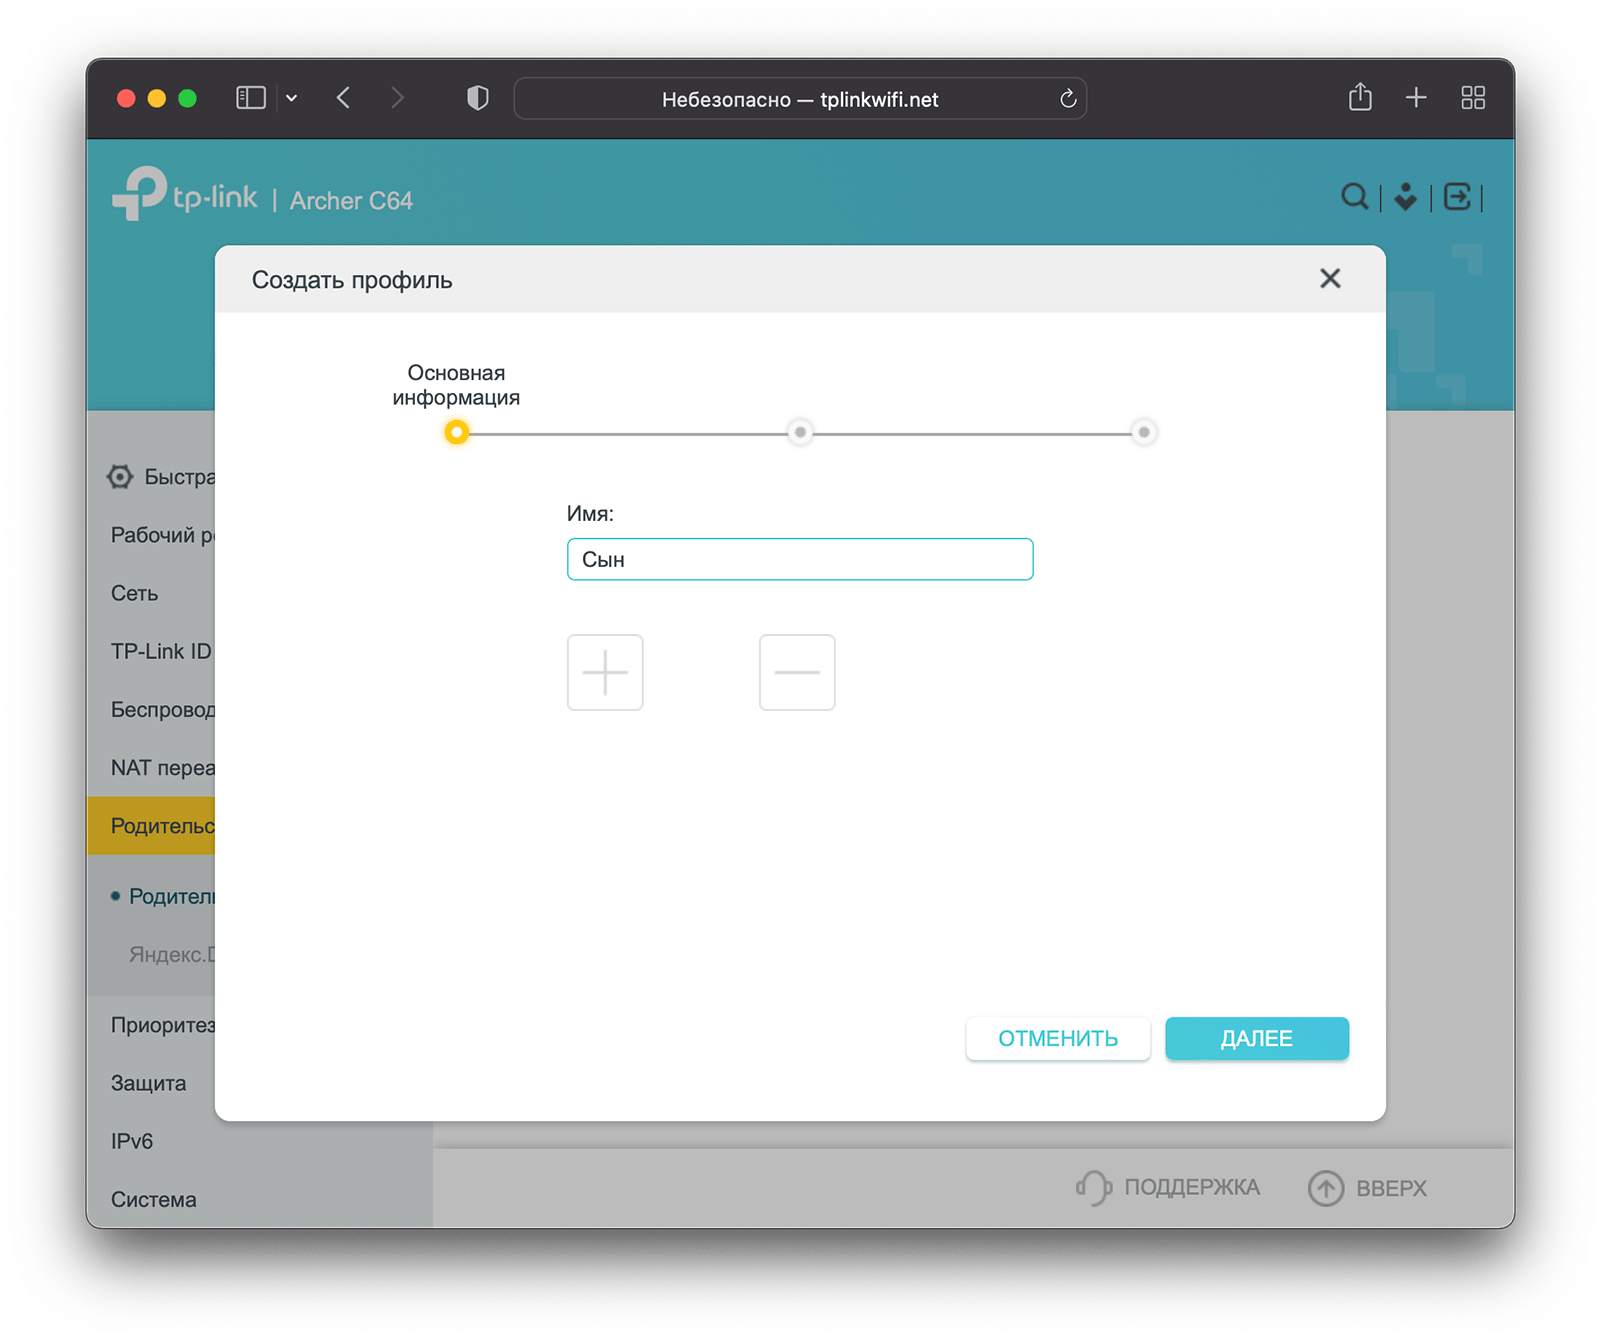
В следующем разделе нужно будет ввести ресурсы, доступ к которым вы хотите ограничить:
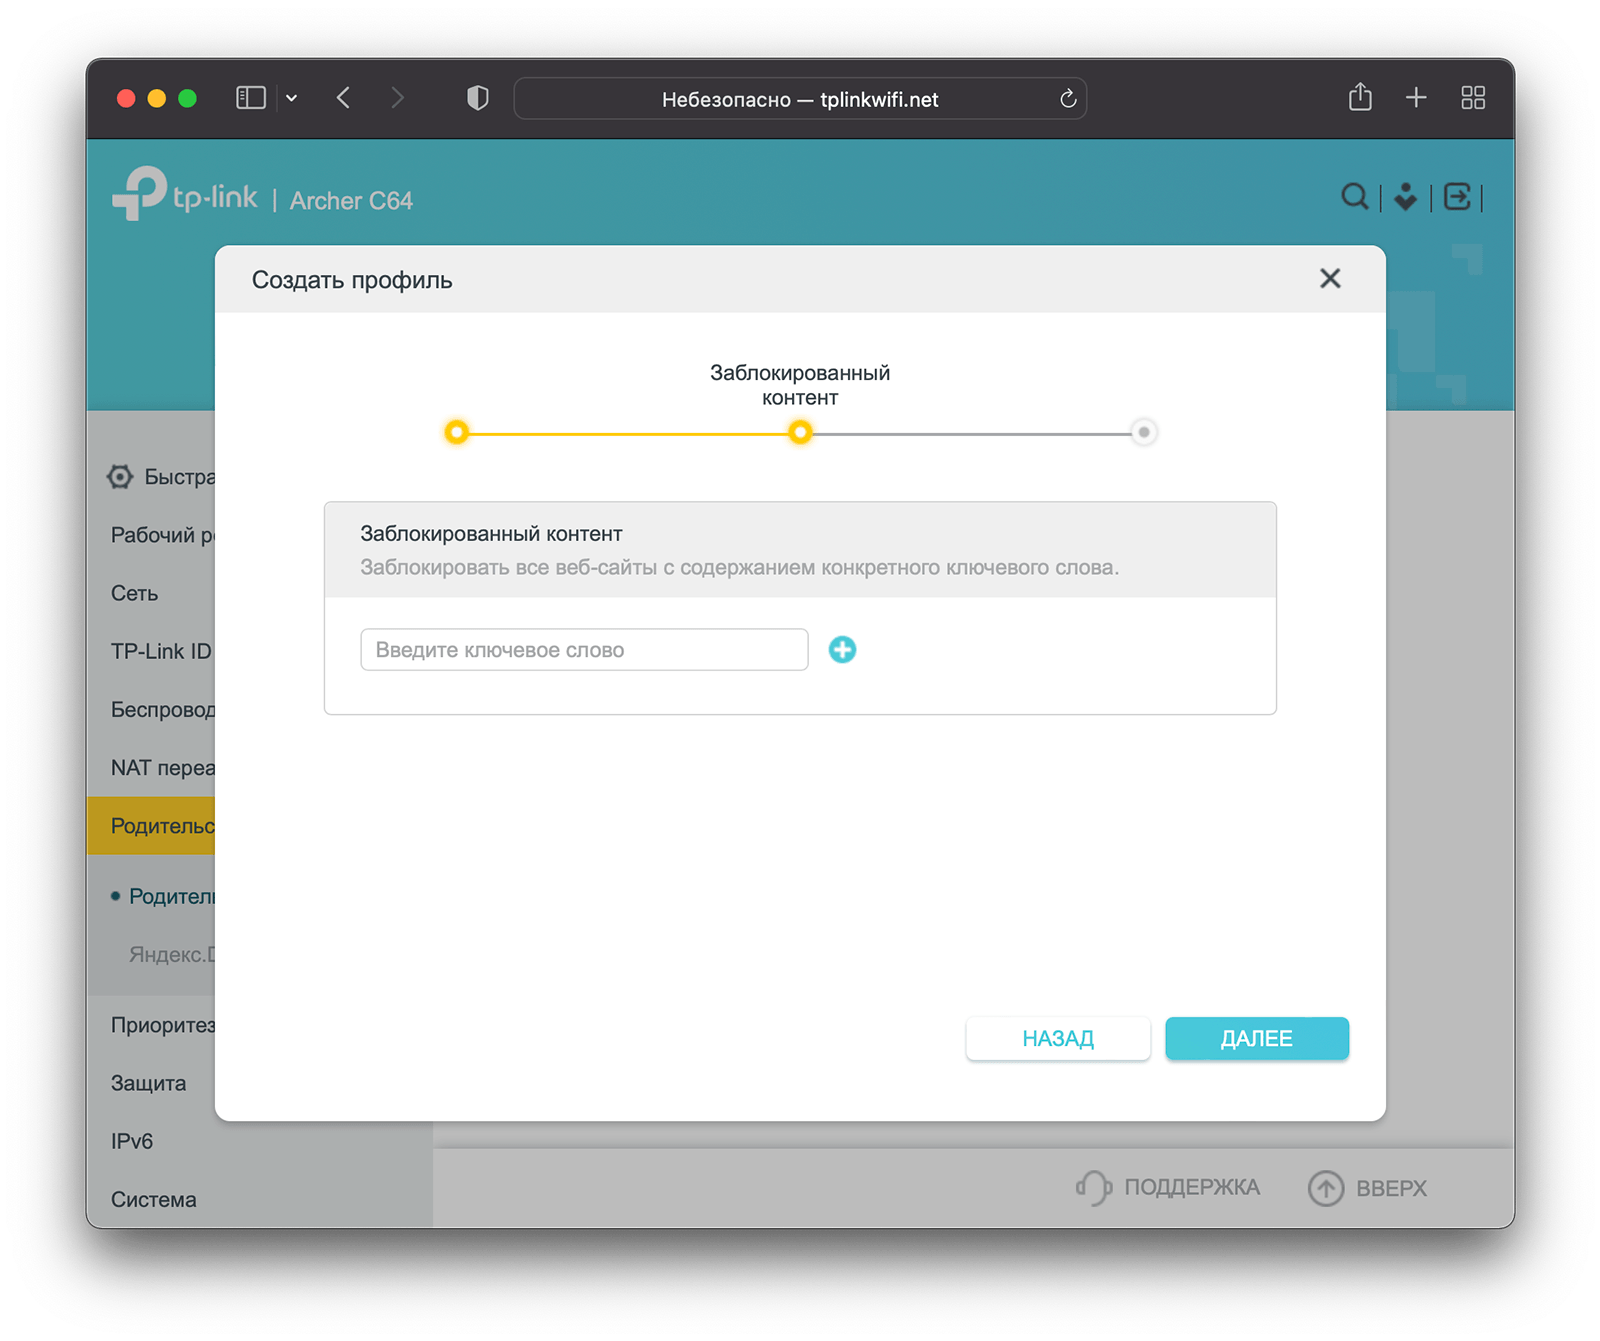
Далее предлагается настроить временные ограничения к указанным ресурсам:
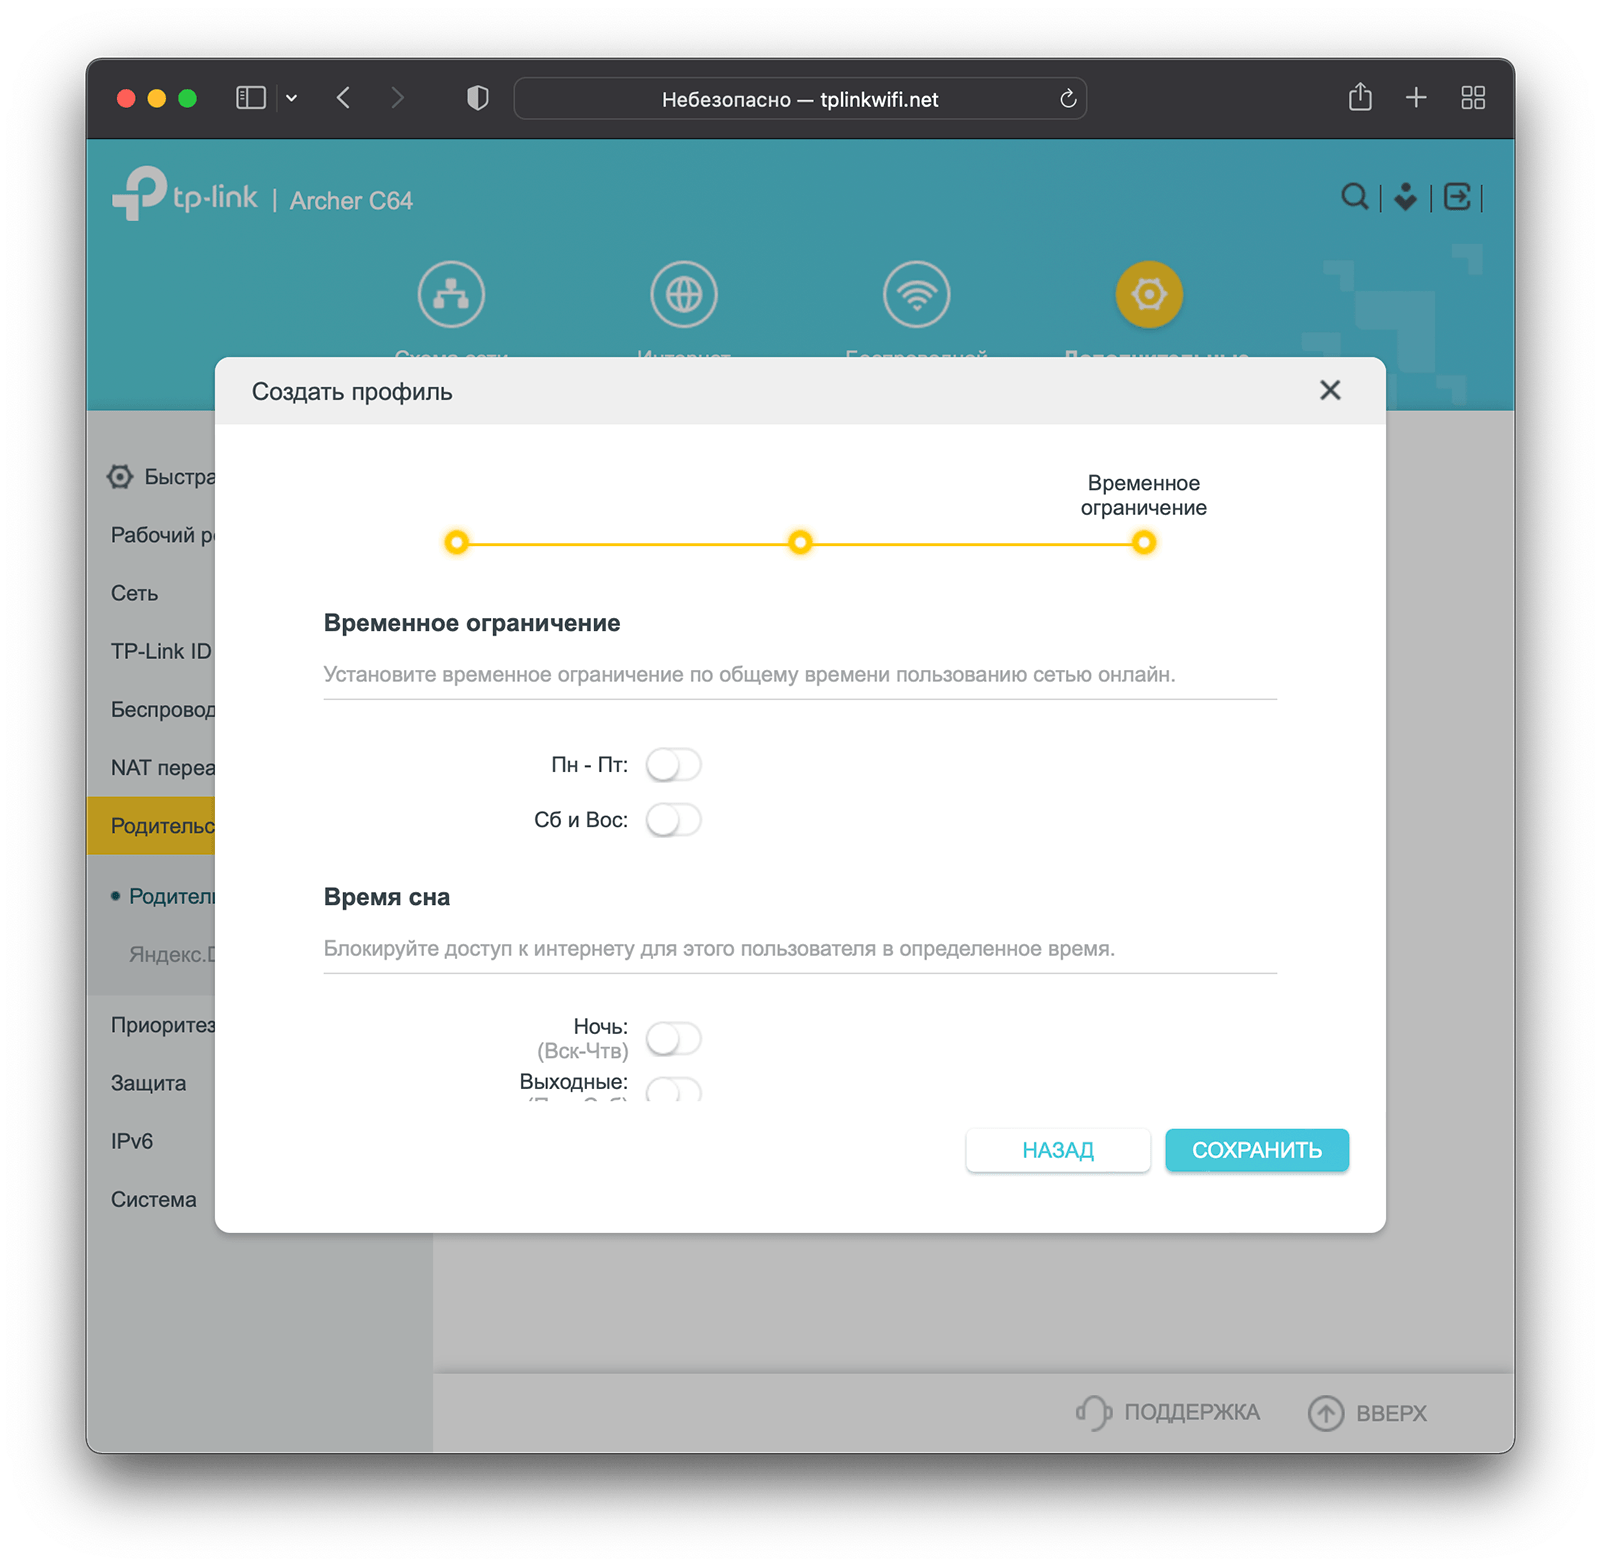
Нажимайте «Сохранить». После этого у вас обновится список пользователей, трафик устройств которых контролируется:
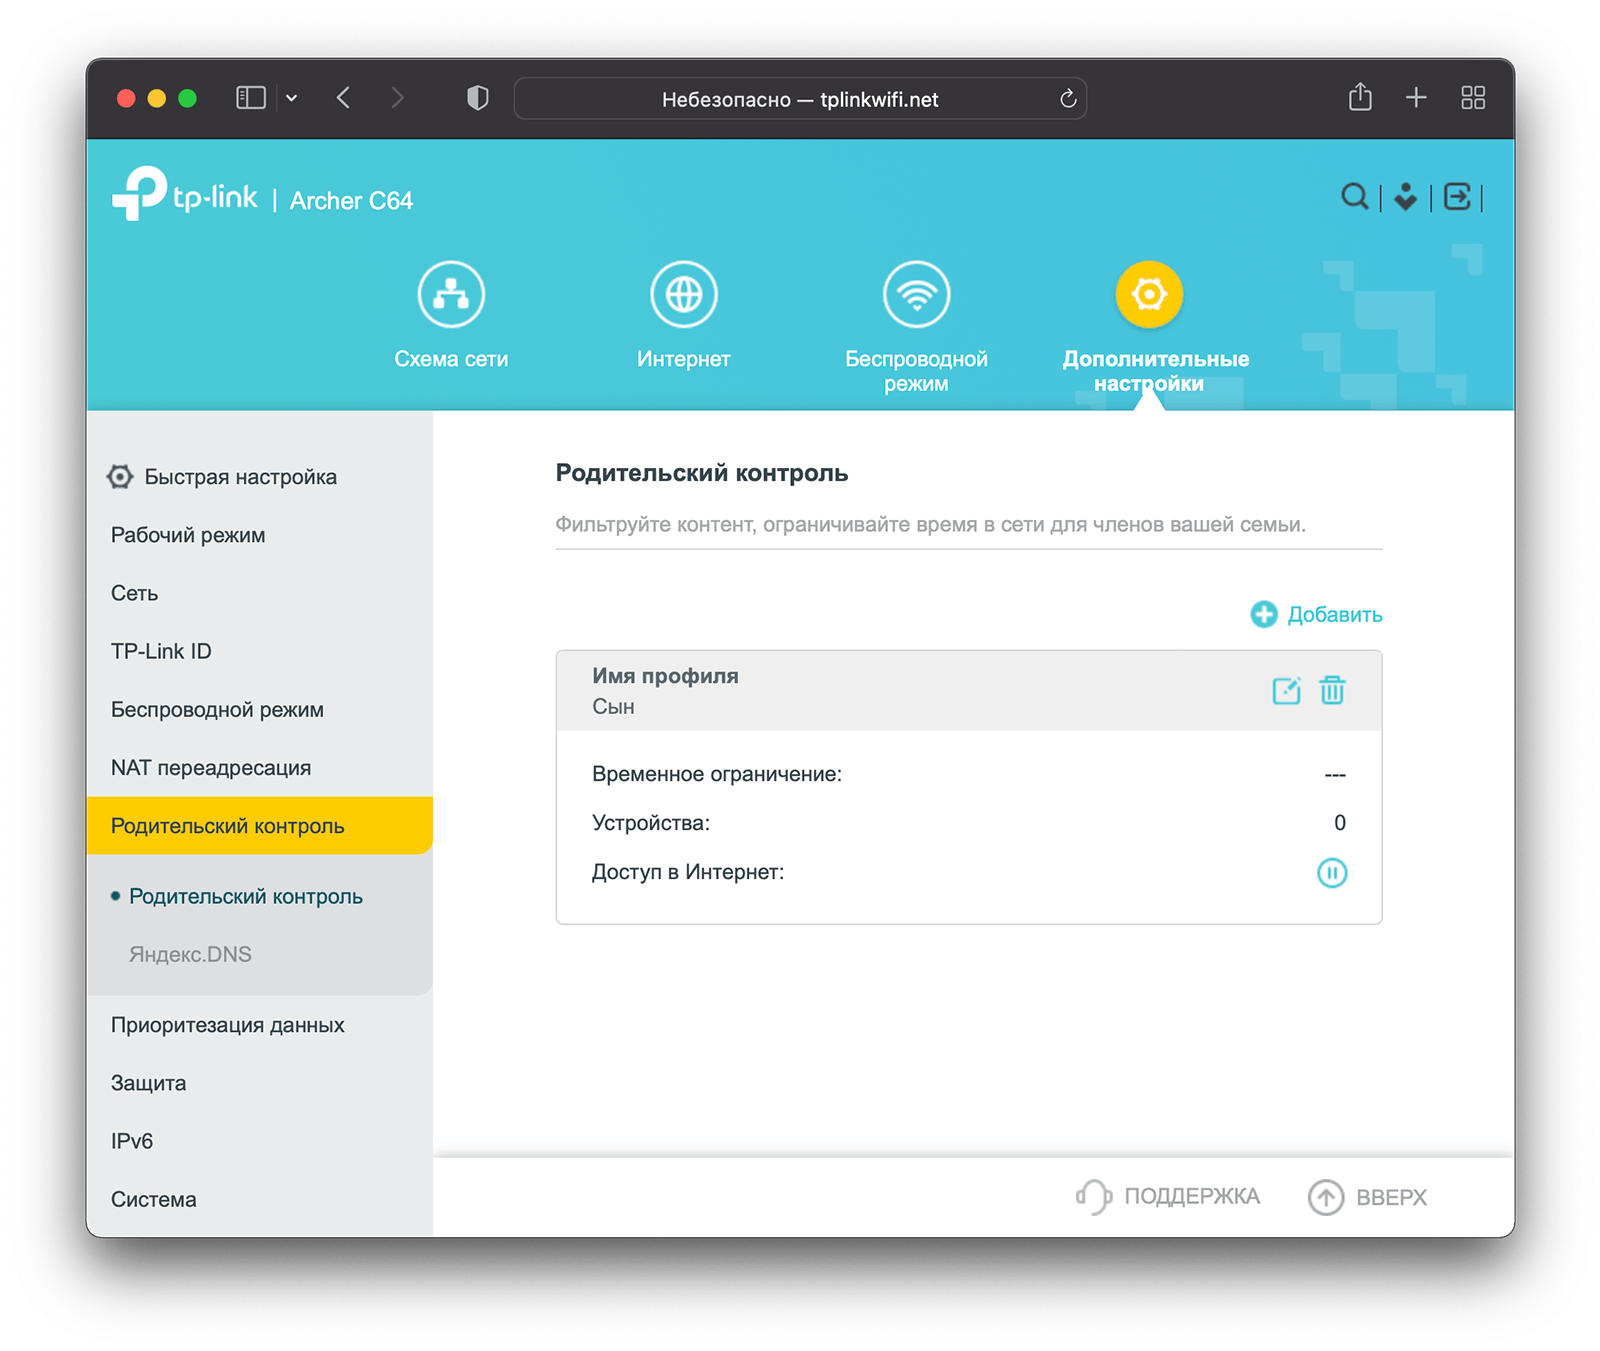
Чтобы добавить к этой записи устройство, нажмите на иконку «Редактировать». В открывшемся окне можно переименовать пользовательский аккаунт, добавить заблокированный контент, а также поменять временные ограничения. Но сейчас мы хотим добавить устройства, поэтому в открывшемся окне нажимаем на плюс:
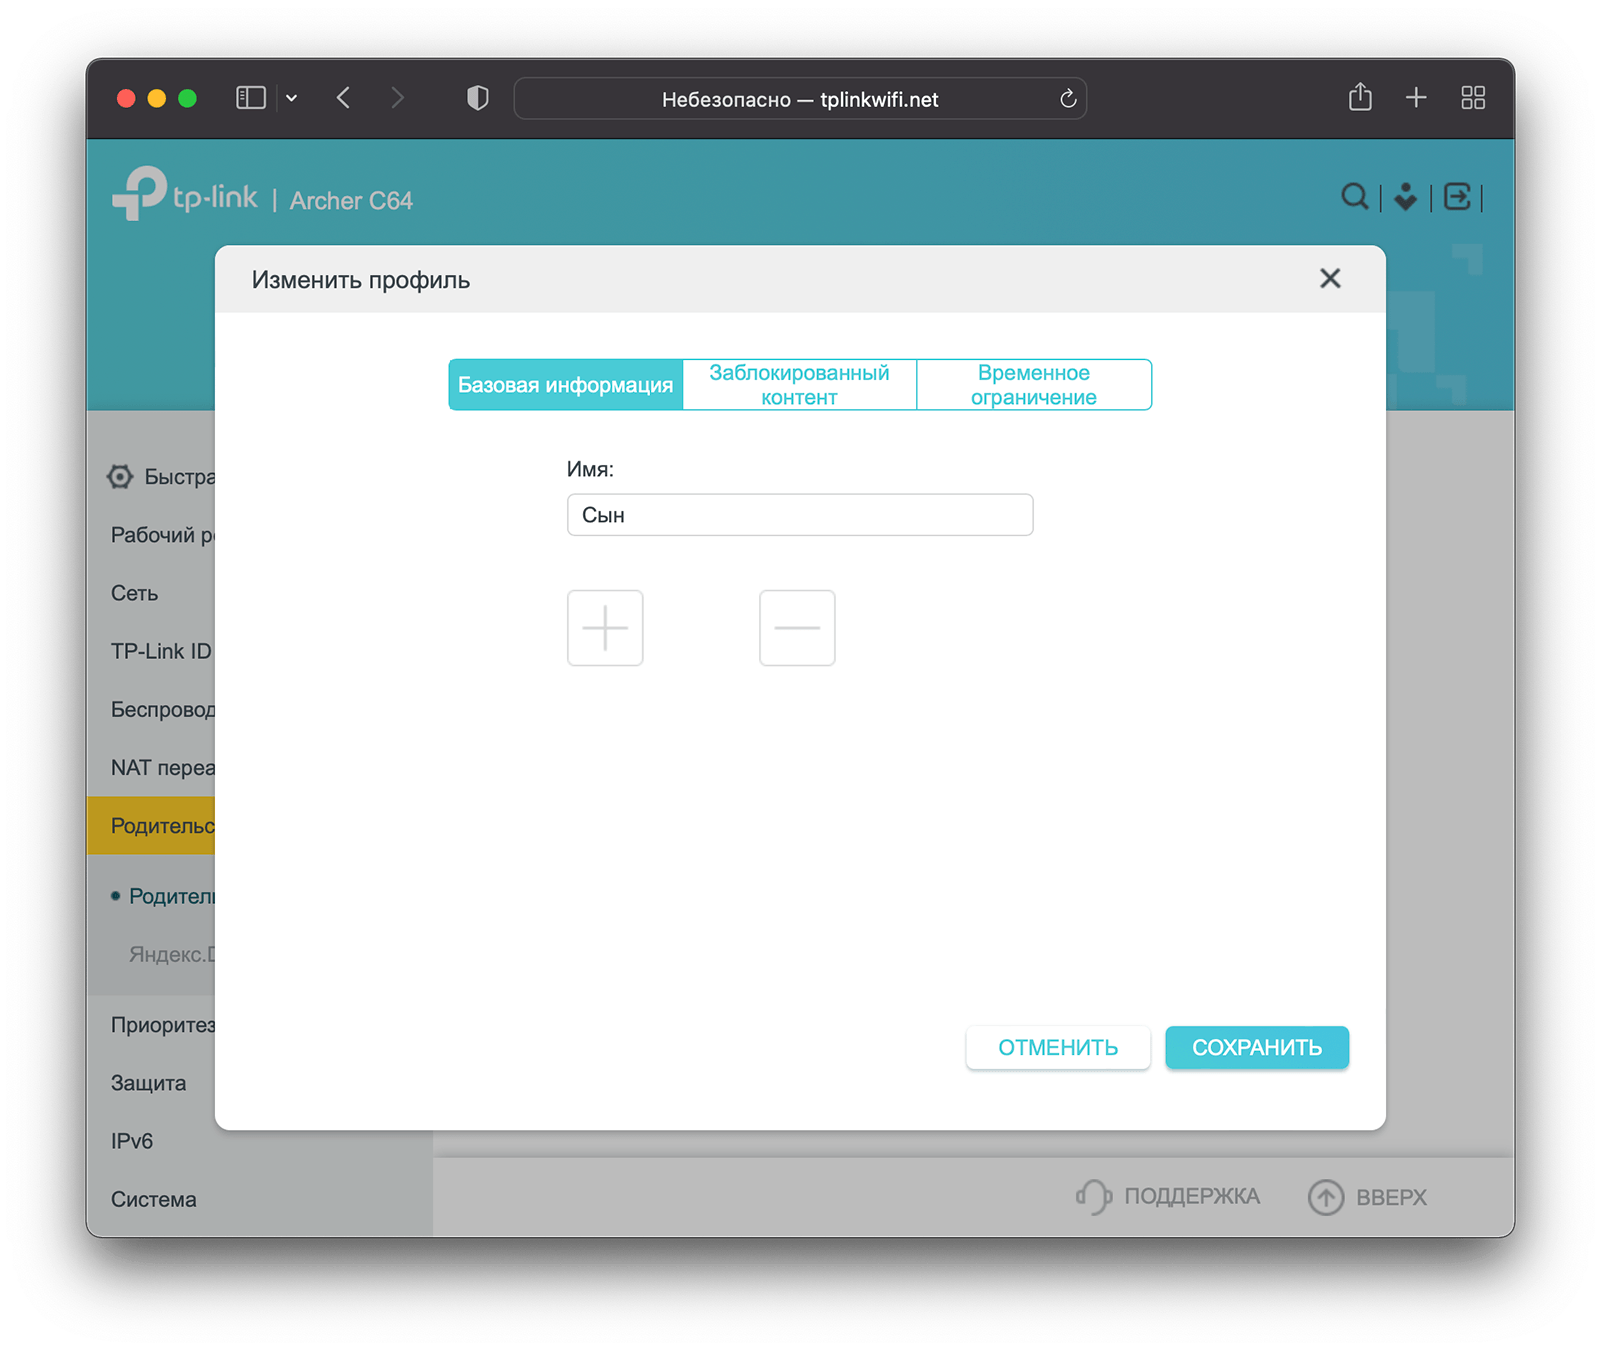
Тут вам предложат добавить устройства в пользовательский список:
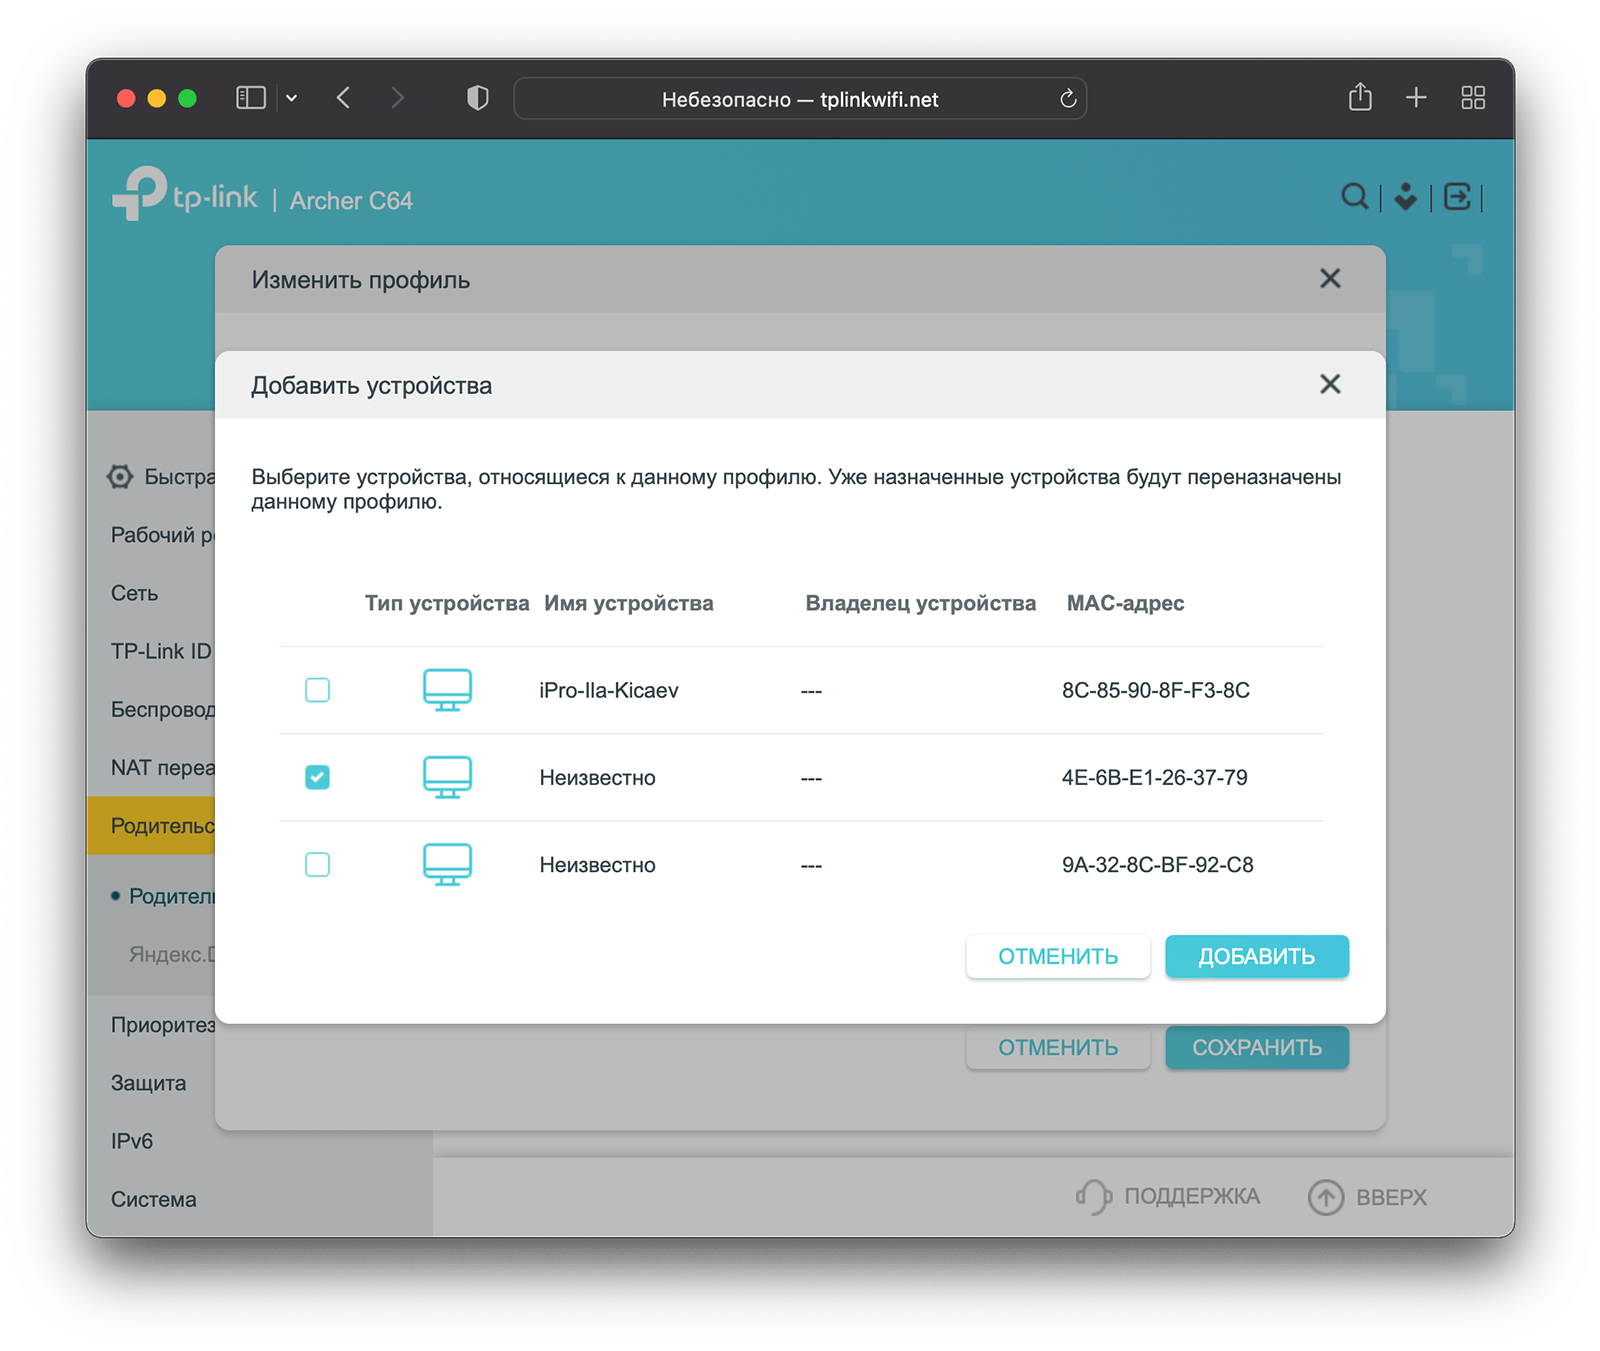
Аналогичные настройки есть и в TP-Link Tether:
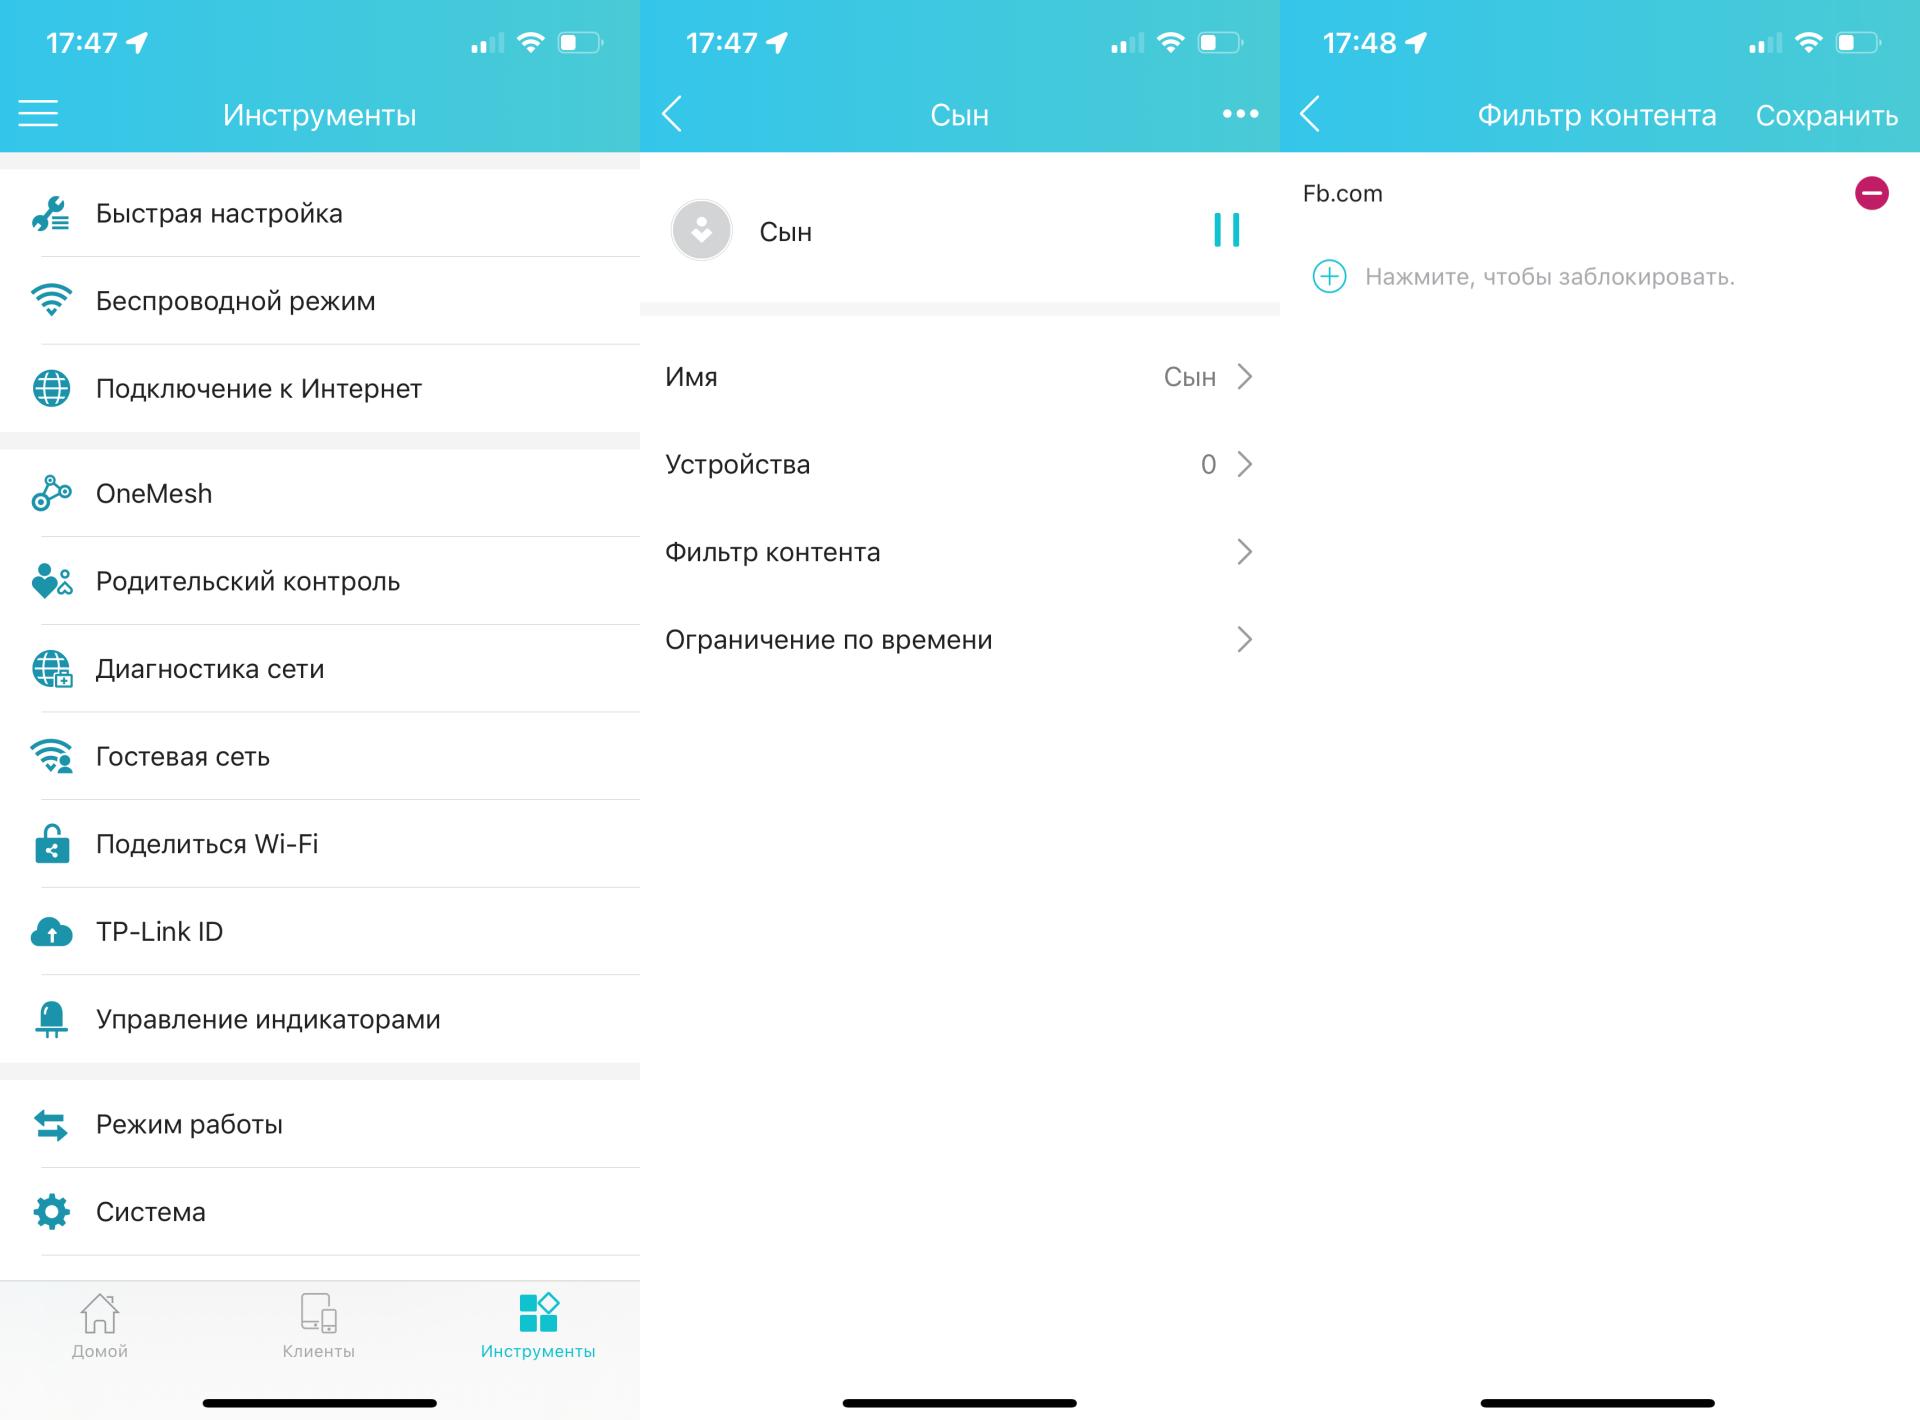
Функциональность приложения аналогична веб-версии интерфейса роутера.
Итог
Общая площадь нашего офиса составляет 230 м². И мощностей TP-Link Archer C64 на её покрытие не хватает — в дальние уголки студии сигнал просто не доходит. В обычное время мы используем дорогую Mesh-систему, которая из-за толстых стен, проблем с коммутацией и другими сопутствующими факторами не прям уж и вытягивает — скорости падают в три–четыре раза.
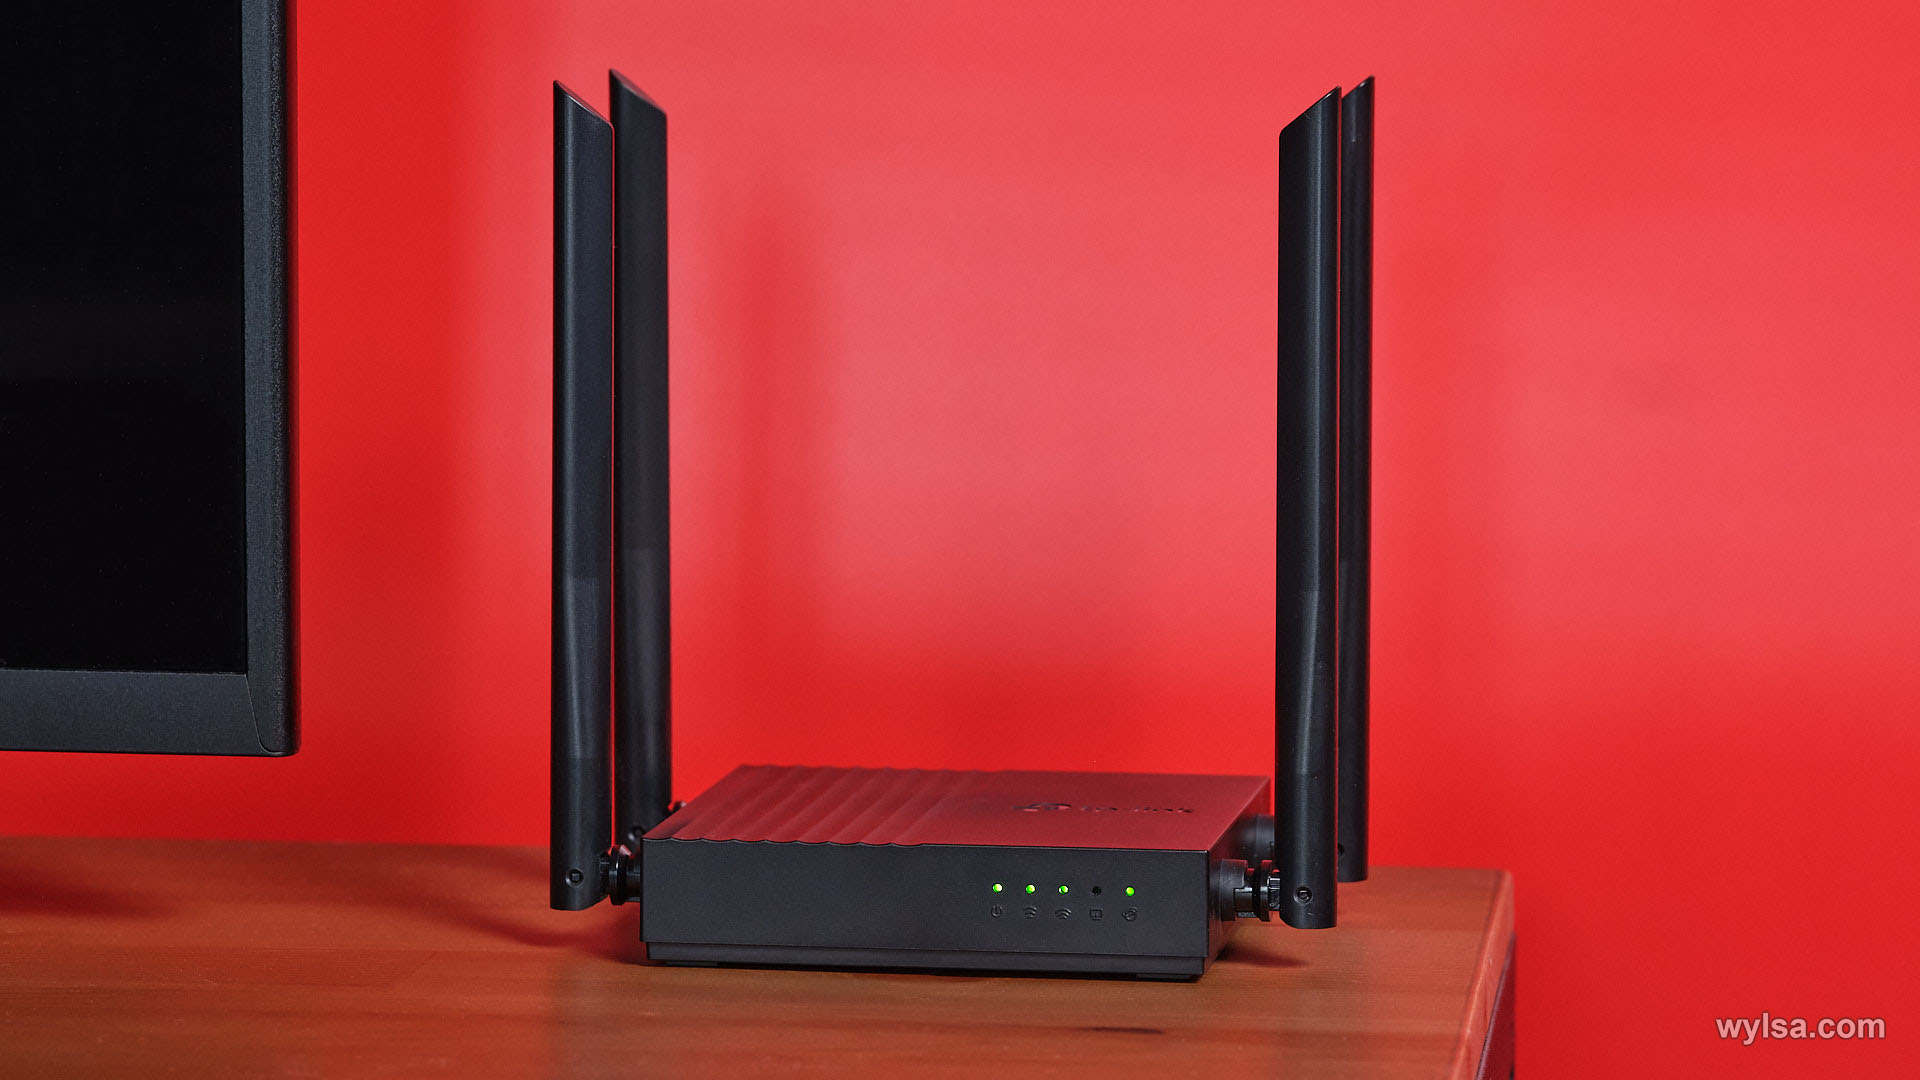
Archer C64 не подходит для таких помещений, что неудивительно. Ореол его «обитания» — квартиры в хрущёвках и панельках разных лет постройки. Вероятно, более чем для двухкомнатных квартир площадью больше 60–70 м² я бы не стал советовать его покупать — тут нужны решения помощнее и, соответственно, подороже. Например, тот же Archer AX73, обзор которого выходил раньше. Или же Archer C64, но уже с усилителями Wi-Fi. Один из вариантов — TP-Link RE305. Наш «Арчер» будет подключаться к нему c помощью функции OneMesh. В этом случае в вашем доме не будет «мёртвых» зон, где сигнал слабеет или вообще пропадает.

Покупатели Archer C64 не хотят переплачивать за ненужные функции, но и страдать от желания сэкономить тоже не собираются. Archer C64 подойдёт для неприхотливых пользователей, которым, как ни странно, тоже нужен роутер. Им не нужен Wi-Fi 6, поскольку к сети не будет подключено очень много устройств. Вероятно, в большей степени им важны компактность и аккуратность самого роутера. И всё это подкреплено известным именем TP-Link, к которому в нашей стране большое доверие.
Текст опубликован на правах рекламы.
Wi-Fi роутер TP-LINK Archer C64, AC1200, черный
- Входной интерфейс: 10/100/1000BASE-TX
- Частоты Wi-Fi: 2.4/5 ГГц
- Стандарты Wi-Fi 802.11: Wi-Fi 1 (b), Wi-Fi 2 (a), Wi-Fi 3 (g), Wi-Fi 4 (n), Wi-Fi 5 (ac)
- Класс Wi-Fi: AC1200
- Порты: 10/100/1000BASE-TX х 4
- Антенны: 4х внешние, несъемные
Появились вопросы о товаре?
- Входной интерфейс: 10/100/1000BASE-TX
- Частоты Wi-Fi: 2.4/5 ГГц
- Стандарты Wi-Fi 802.11: Wi-Fi 1 (b), Wi-Fi 2 (a), Wi-Fi 3 (g), Wi-Fi 4 (n), Wi-Fi 5 (ac)
- Класс Wi-Fi: AC1200
- Порты: 10/100/1000BASE-TX х 4
- Антенны: 4х внешние, несъемные
Появились вопросы о товаре?
Современную жизнь уже невозможно представить без Wi-Fi. «Есть вайфай? А пароль какой?» – вот что чаще всего спрашивают меня буквально с порога, заходя в гости.
Я живу в двухкомнатной квартире и много лет пользовался тем noname-роутером, который мне поставил провайдер. Ну, работал и работал интернет нормально, иногда подлагивали онлайн-игры на консоли, и Wi-Fi начинал «задумываться», если народу собиралось в квартире больше 5-ти человек.
И вот недавно мне предложили протестировать новый роутер Archer C64 от TP-Link, в котором есть всё, что нужно для быстрой и уверенной раздачи интернета:
▪️ поддержка MU-MIMO, Beamforming, Smart Connect, Airtime Fairness
▪️ 1 гигабитный порт WAN и 4 гигабитных порта LAN
▪️ поддержка сервисов IPTV, поддержка IPv6
▪️ приоритизация трафика, родительский контроль, гостевая сеть
Также Archer C64 поддерживает стандарт Wi-Fi 5, а значит к роутеру могут подключаться до 33 устройств одновременно. Поддерживаемые скорости – до 867 Мбит/с на 5 ГГц и 300 Мбит/с на 2,4 ГГц.
В плане защиты тоже всё хорошо: устройство поддерживает протокол безопасности WPA3, который был представлен миру в 2018 году. WPA3 лучше защищает пароль от Wi-Fi сети и позволяет избежать брутфорс атак.
А главное, этот роутер можно купить по цене устройства начального сегмента до 2500 рублей. Купить и забыть про лагающий Wi-Fi.
Подробно о преимуществах Archer C64
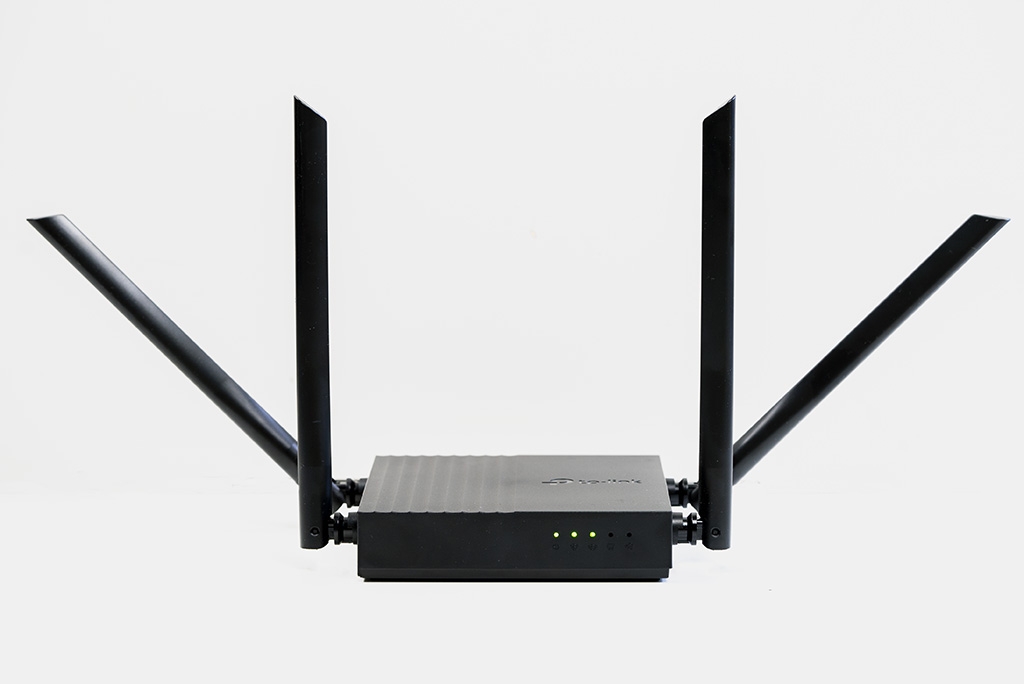
Для большинства пользователей слова MU-MIMO, Beamforming и другие не скажут ничего. Непонятно, что это за функции роутера такие и почему в сравнительно недорогом устройстве их наличие – явление достаточно редкое.
Сейчас всё объясню по-порядку простыми словами:
Технология MU-MIMO отвечает за одновременный обмен информацией между роутером и сразу несколькими устройствами, причём информация одновременно принимается и передаётся.
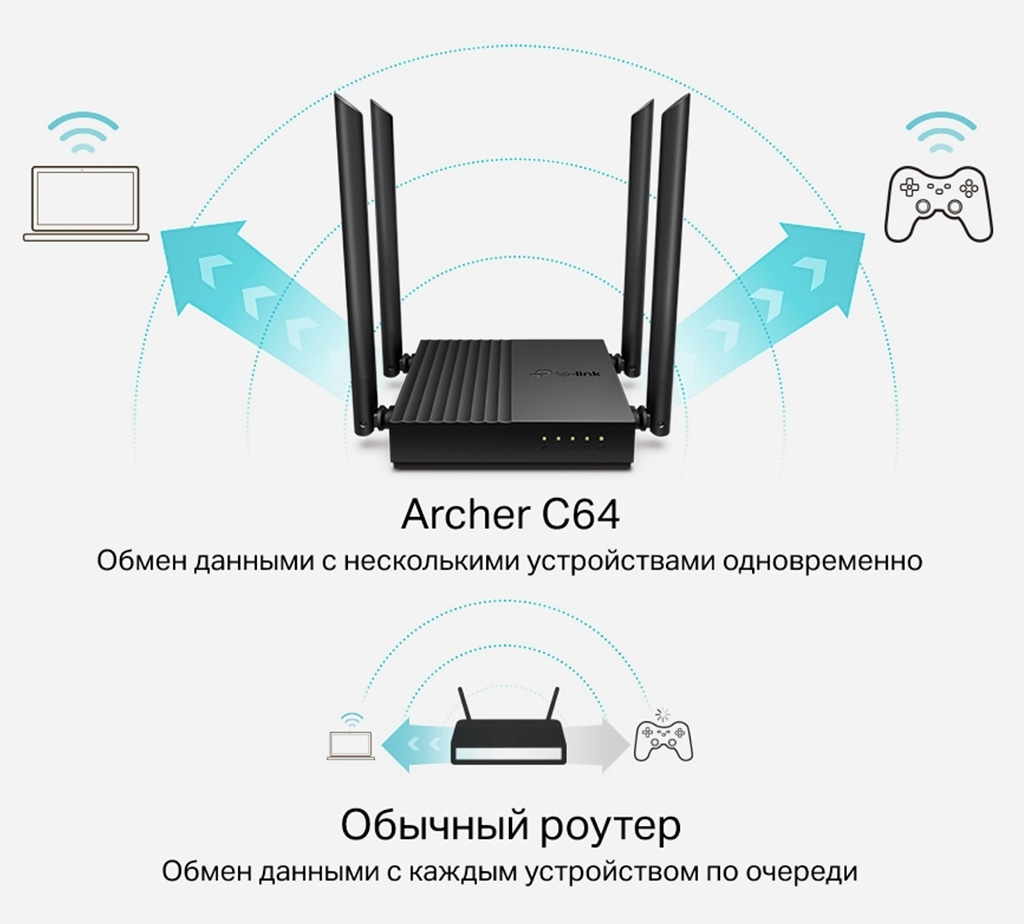
Технология MU-MIMO наглядно.
Другими словами, если к Archer C64 подключатся несколько смартфонов, планшет, умная колонка с голосовым помощником, и все эти устройства одновременно будут соединяться с интернетом, роутер сможет одновременно как принимать от гаджетов информацию, так и транслировать её обратно на устройства.
Технология Beamforming отвечает за формирование направленного сигнала от роутера в зависимости от местонахождения подключённого по Wi-Fi устройства.
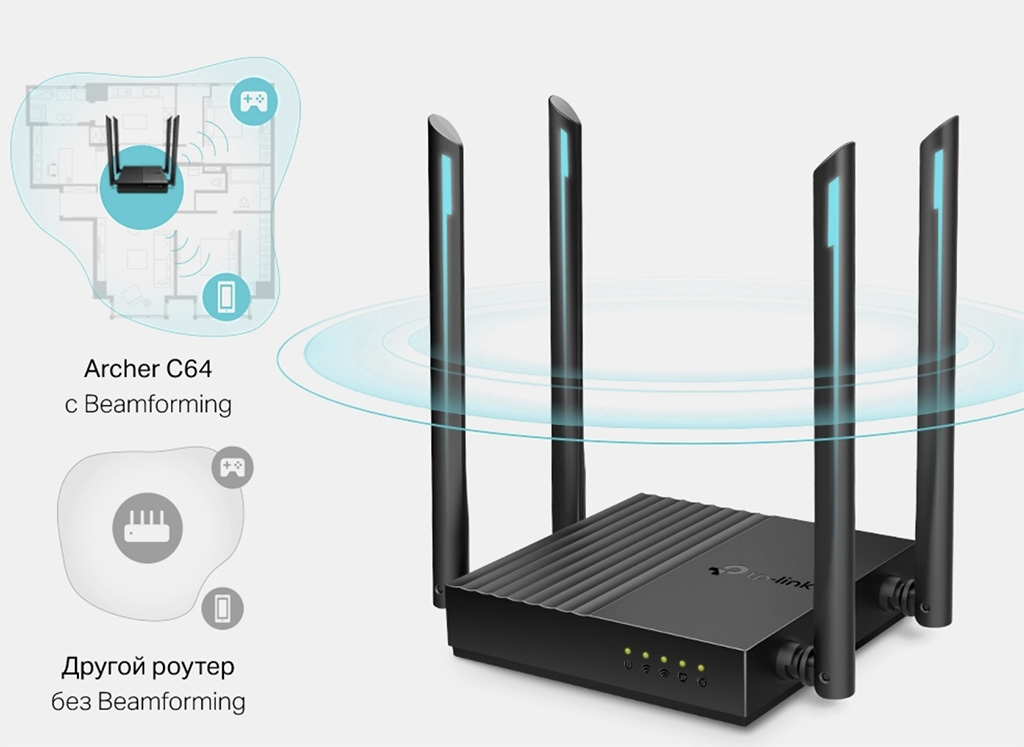
Так работает Beamforming.
То есть, если роутер установлен у меня в коридоре, а я сижу в самой дальней комнате с планшетом и хочу посмотреть свежие ролики в YouTube, роутер автоматически увеличит мощность сигнала в моём направлении, чтобы минимизировать возможные задержки в воспроизведении из-за стен и перекрытий.
Smart Connect следит за тем, какое устройство подключается к роутеру и переводит его на оптимальный канал.
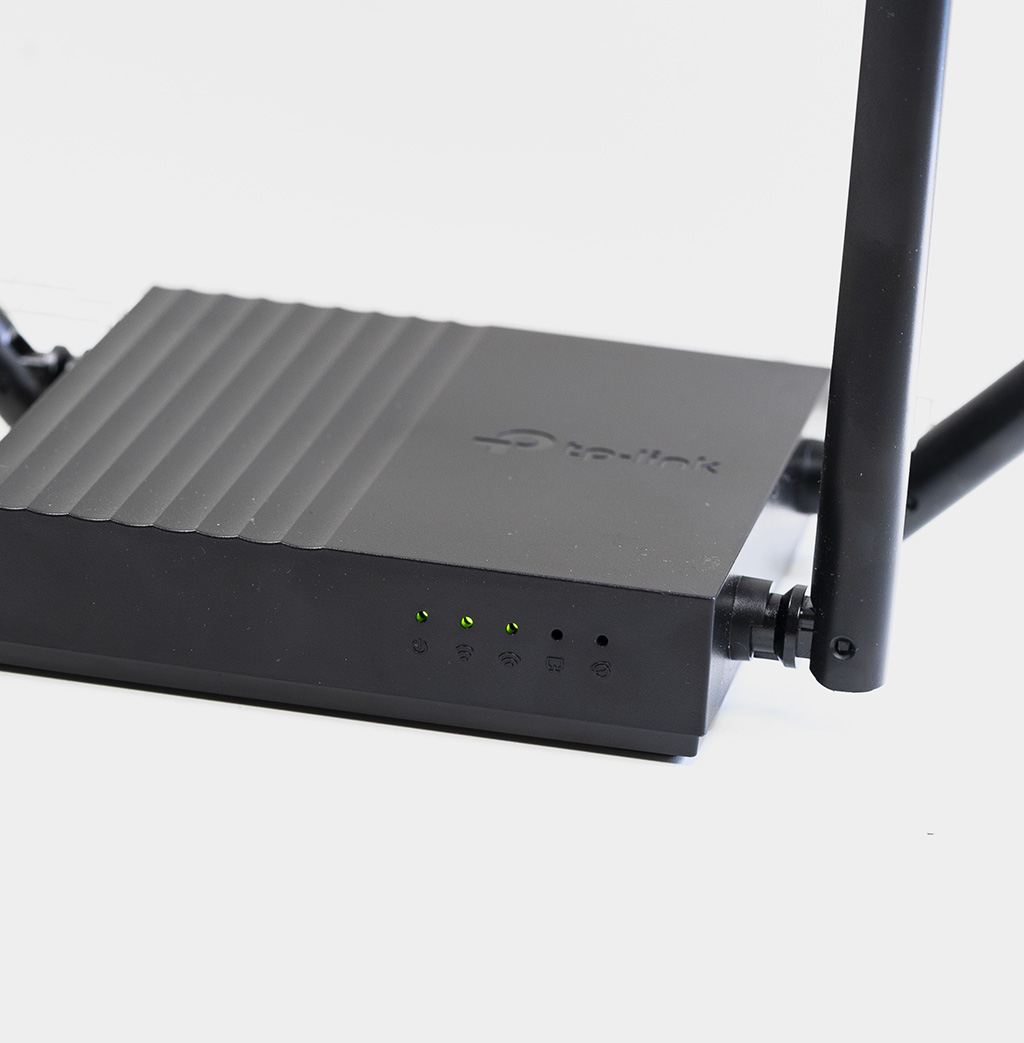
Четыре антенны мощностью 5 дБи каждая, вполне достаточно для квартиры.
К примеру, я вышел в интернет прочитать новый материал на сайте, а девушка рядом открыла планшет, чтобы посмотреть ролики по фотомонтажу. Роутер даст её подключению приоритет и более «жирный» канал, чтобы видео шло без лагов. А мне достанется более медленное соединение, но я этого не замечу, потому что буду просто читать текст.
Таким образом, даже при подключении множества устройств, все они будут пользоваться интернетом без задержек, благодаря грамотному распределению нагрузки.
Технология Airtime Fairness служит для повышения производительности и быстроты беспроводной сети.
К примеру, если у меня интернет 300 Мбит/с, а какое-то из моих устройств поддерживает максимальную скорость в 54 Мбит/с, оно не будет замедлять всю сеть.
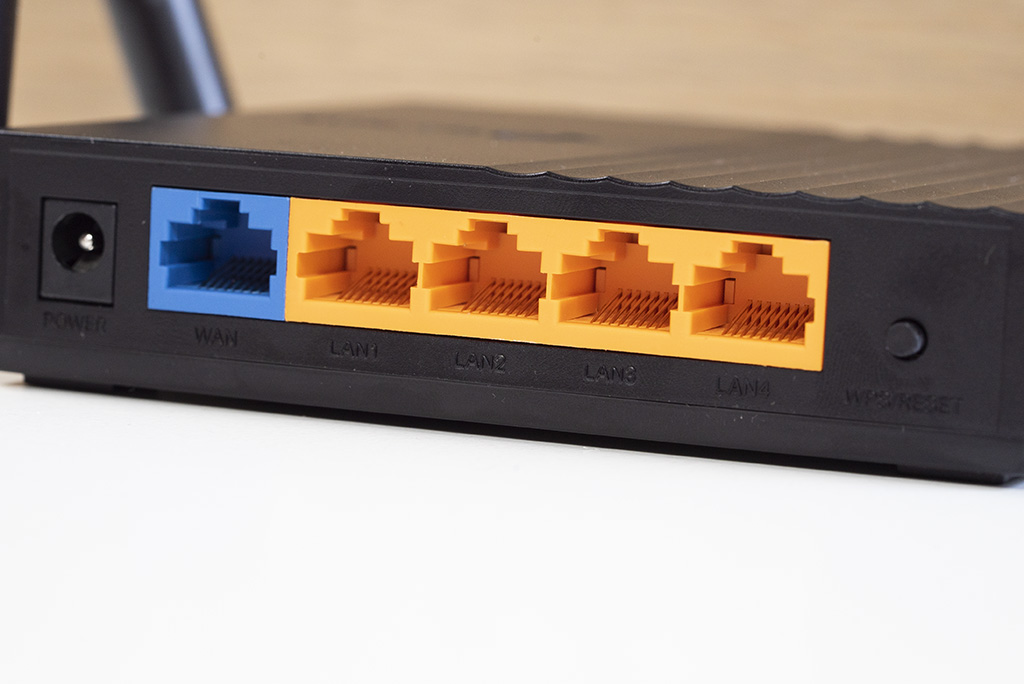
Четыре высокоскоростных порта хватит для телевизора, ПК и консоли. И ещё один про запас останется.
Стоит добавить, что в роутере, кроме одного гигабитного порта WAN, есть 4 гигабитных порта LAN, к которым обязательно надо подключить игровую консоль, стационарный ПК или смарт-телевизор.
Эти мультимедийные устройства, связанные с интернетом по проводу, а не через Wi-Fi, точно не подведут и не «замрут» в самый ответственный момент: во время онлайн-битвы, просмотра кино или стриминга на тот же Twitch.
Настройка роутера в 4 тапа на смартфоне и ПК
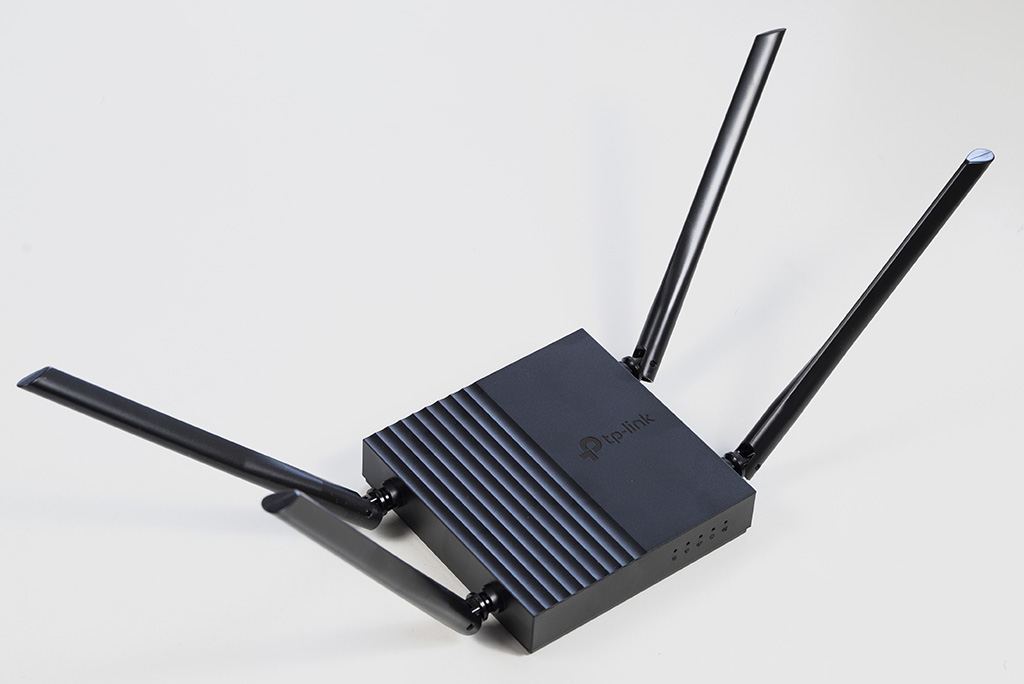
Этот раздел особенно понравится тем, кто не хочет ковыряться в настройках, разбираться с портами, адресами и DNS-записями.
Настройка Archer C64 максимально простая и делается через мобильное приложение TP-Link Tether, которое можно скачать в App Store или Google Play.
❶ После запуска приложения вам нужно будет создать учётную запись, а затем на экране появятся инструкции по настройке.
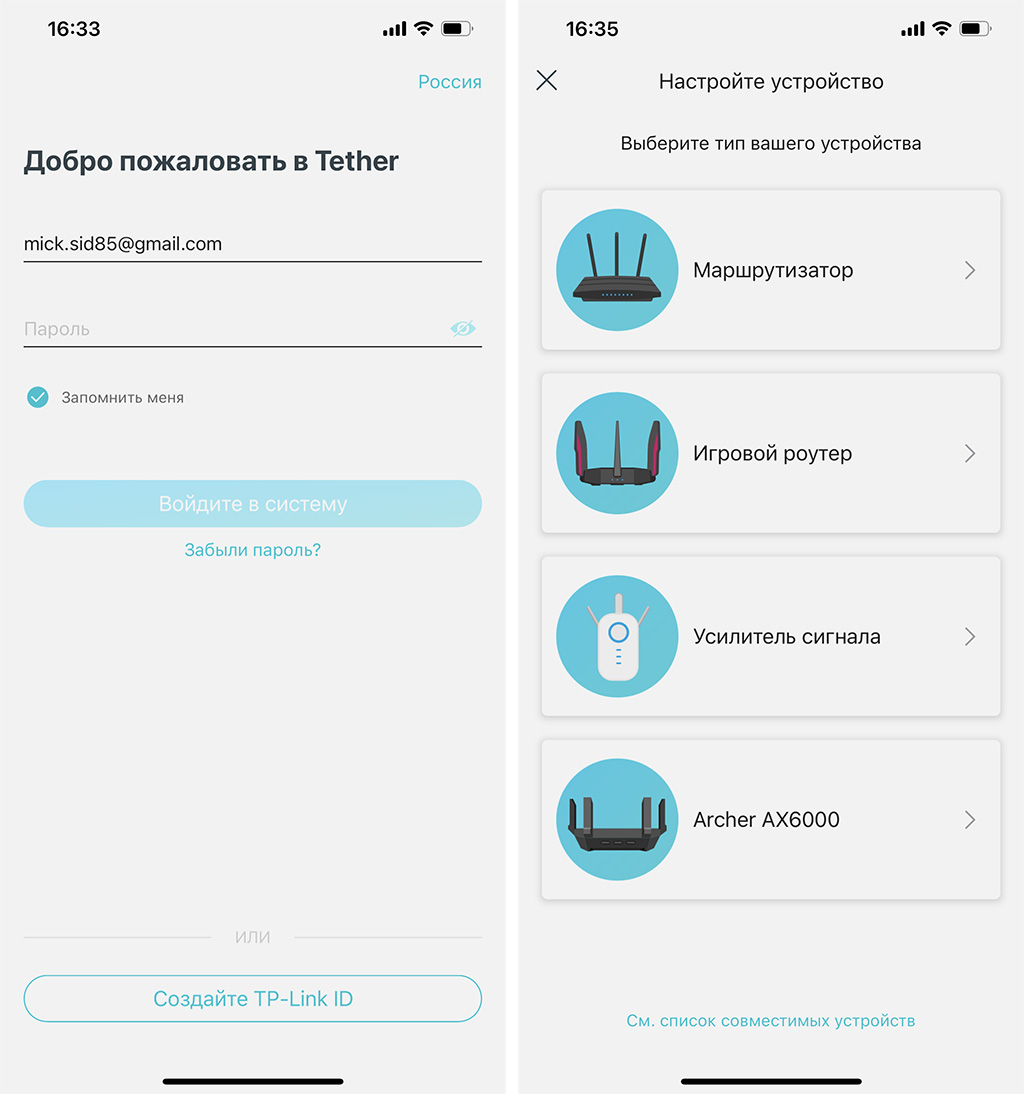
Чтобы найти Archer C64, тапайте на раздел «Маршрутизаторы».
❷ Затем вам будет предложено выйти из приложения и подключиться к дефолтной сети Wi-Fi через настройки смартфона. Имя сети и пароль написаны на нижней части корпуса роутера.
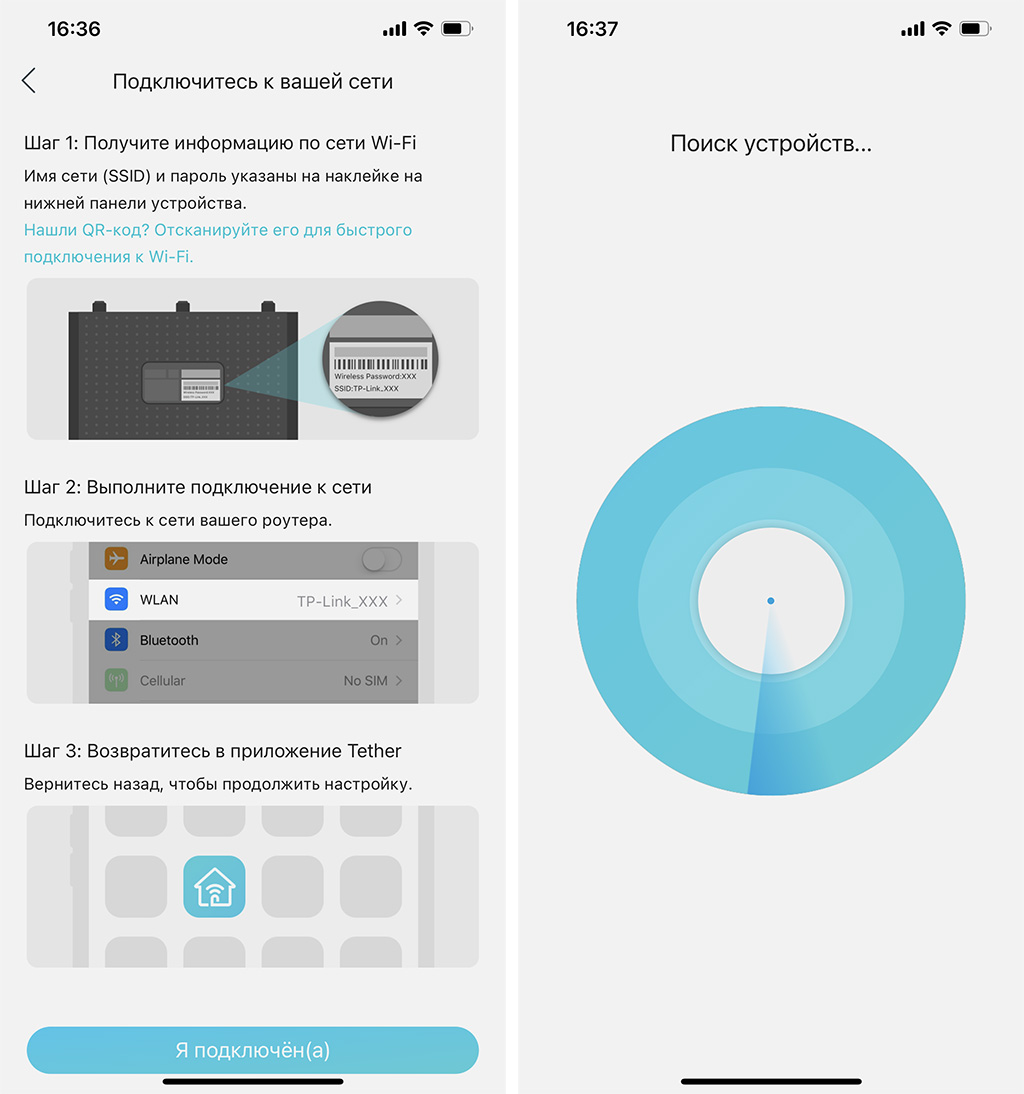
❸ После подключения возвращайтесь в приложение, которое само найдёт работающий роутер и предложит поменять установленный по умолчанию пароль к 2,4 Гц и к 5 Гц сетям.

❹ Первоначальная настройка завершена. Главное, не забудьте воткнуть в соответствующий порт на корпусе роутера заветный интернет-кабель.
Далее в приложении можно смотреть состояние подключения к интернету, сколько устройств и каким образом подключены к роутеру, а также настраивать родительский контроль или вообще, активировать гостевую сеть и урезать в ней вручную скорость до минимума – нечего в гостях в интернете сидеть.
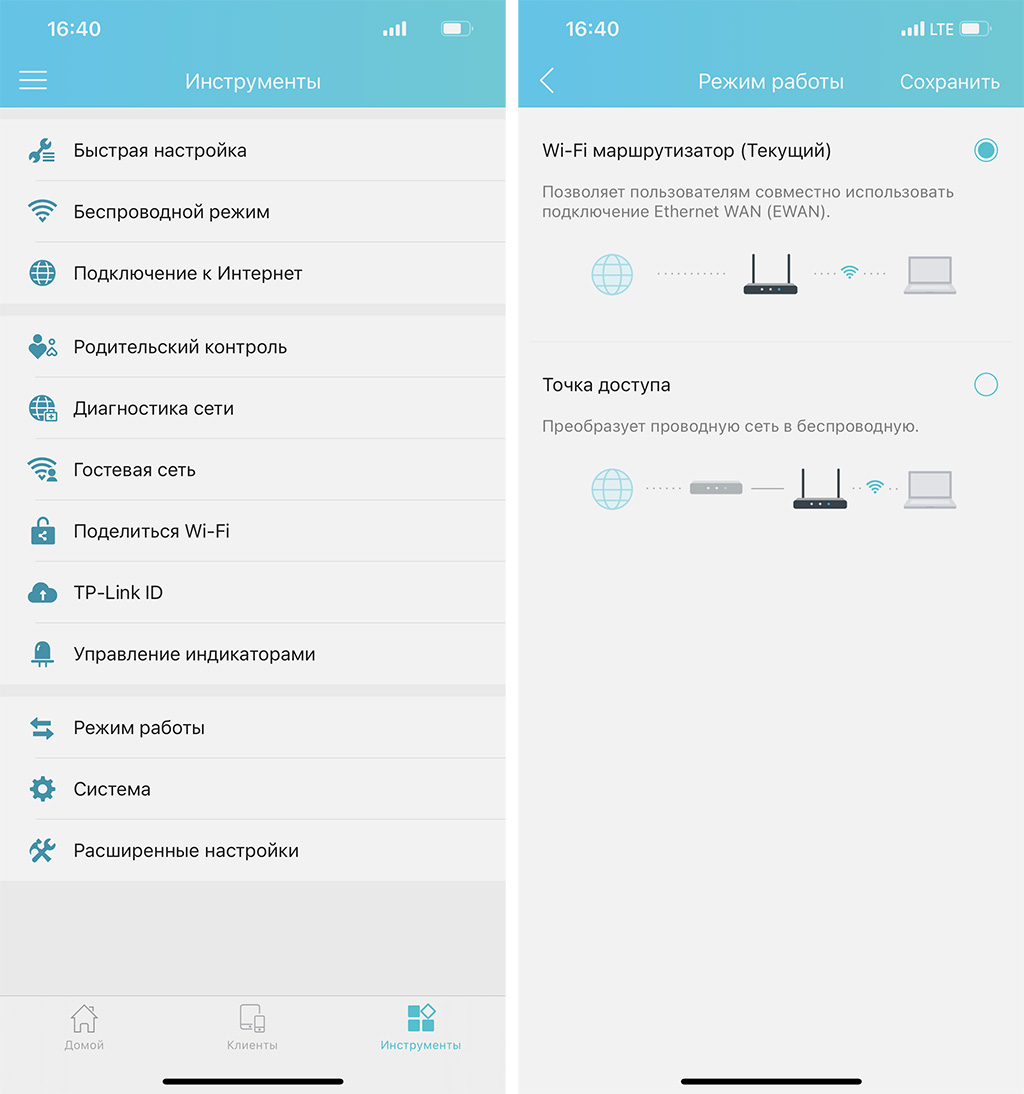
Я настраивал свой интернет именно так, но если вы хотите это сделать через ПК – всё будет так же просто.
Нужно включить роутер в сеть, воткнуть интернет-кабель, а локальным кабелем соединить устройство и ПК.
После подключения кабеля в компьютер, на экране автоматически запустится браузер с окошком входа в настройки нового роутера, а если этого не произошло, откройте браузер и пропишите в адресной строке 192.168.0.1.
Далее нужно будет придумать пароль, указать часовой пояс и придумать названия для сетей Wi-Fi и пароли для них же. Всё.
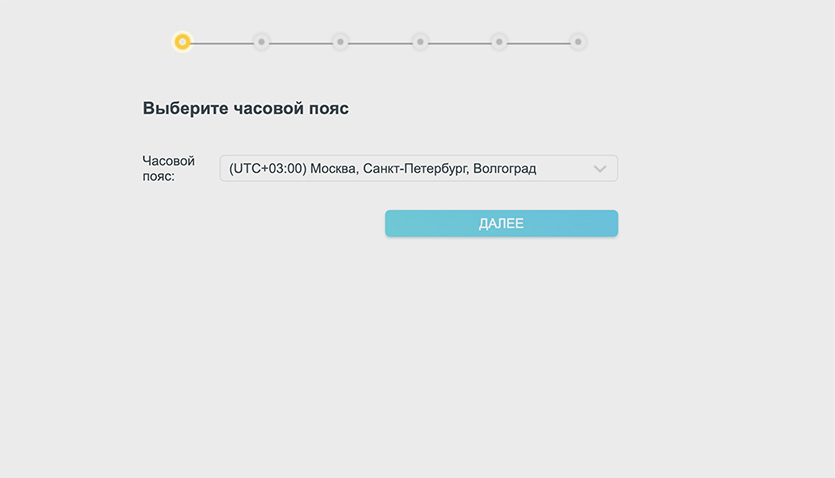
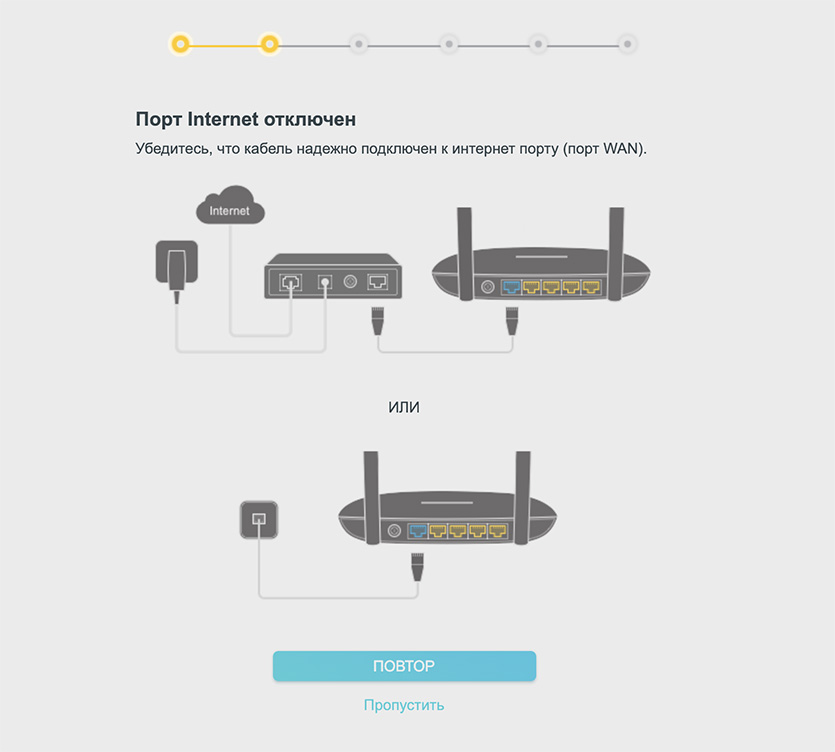
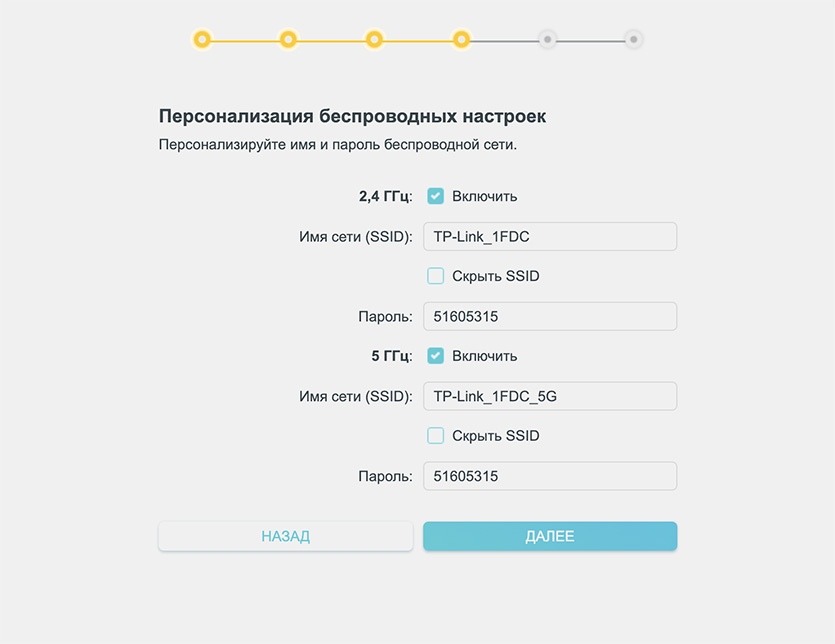
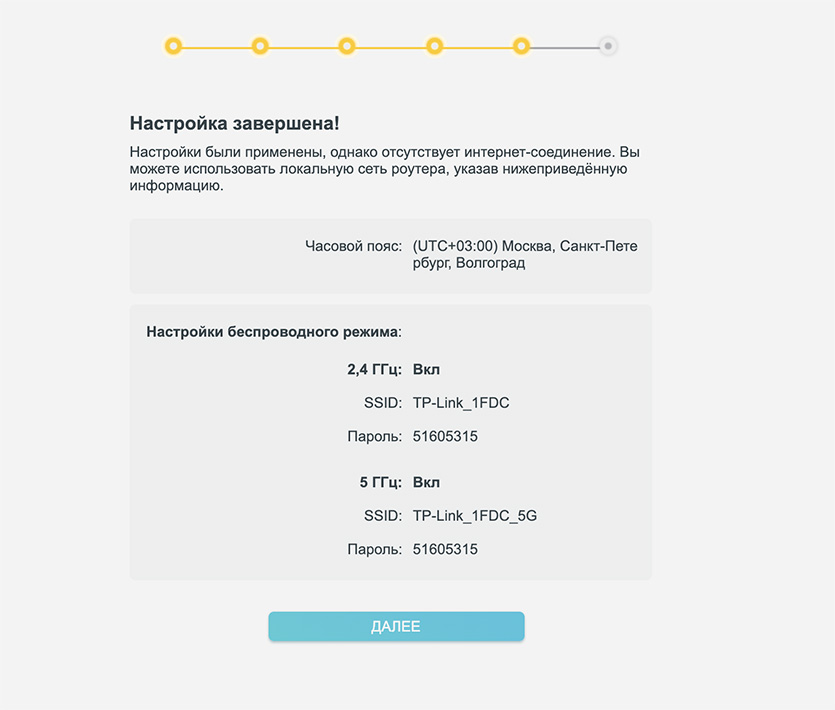
Я помню, как однажды вручную прописывал параметры настроек в ПО роутера, чтобы интернет заработал, постоянно сверяясь с договором, на котором цифры были написаны от руки и от времени половину невозможно было разобрать. Вот же был хардкор.
Сегодня настроить интернет сможет даже ребёнок.
Тесты и замеры: стабильное соединение в любом углу
У меня двухкомнатная квартира, с небольшим балконом. Роутер я поставил в прихожей, подключил ТВ-приставку и консоль PS4 по проводу, а айфон по Wi-Fi 5 Ггц.
Мой тарифный план – 150 Мбит/с, и с учётом работающего телевизора и обновляющегося Fortnite на «плойке», скорость соединения по Wi-Fi была такая:
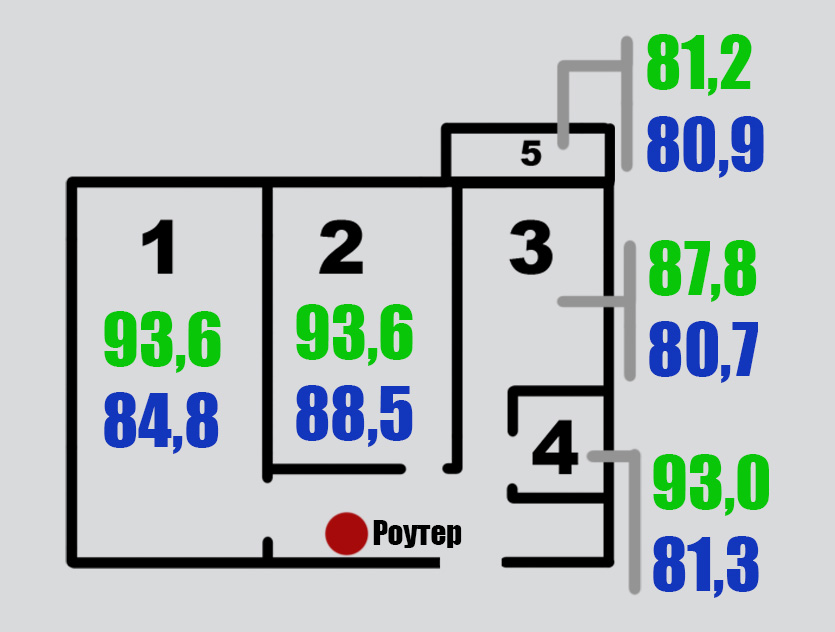
Зелёным я показал скорость закачки, синим – скорость отдачи данных в Мбит/с.
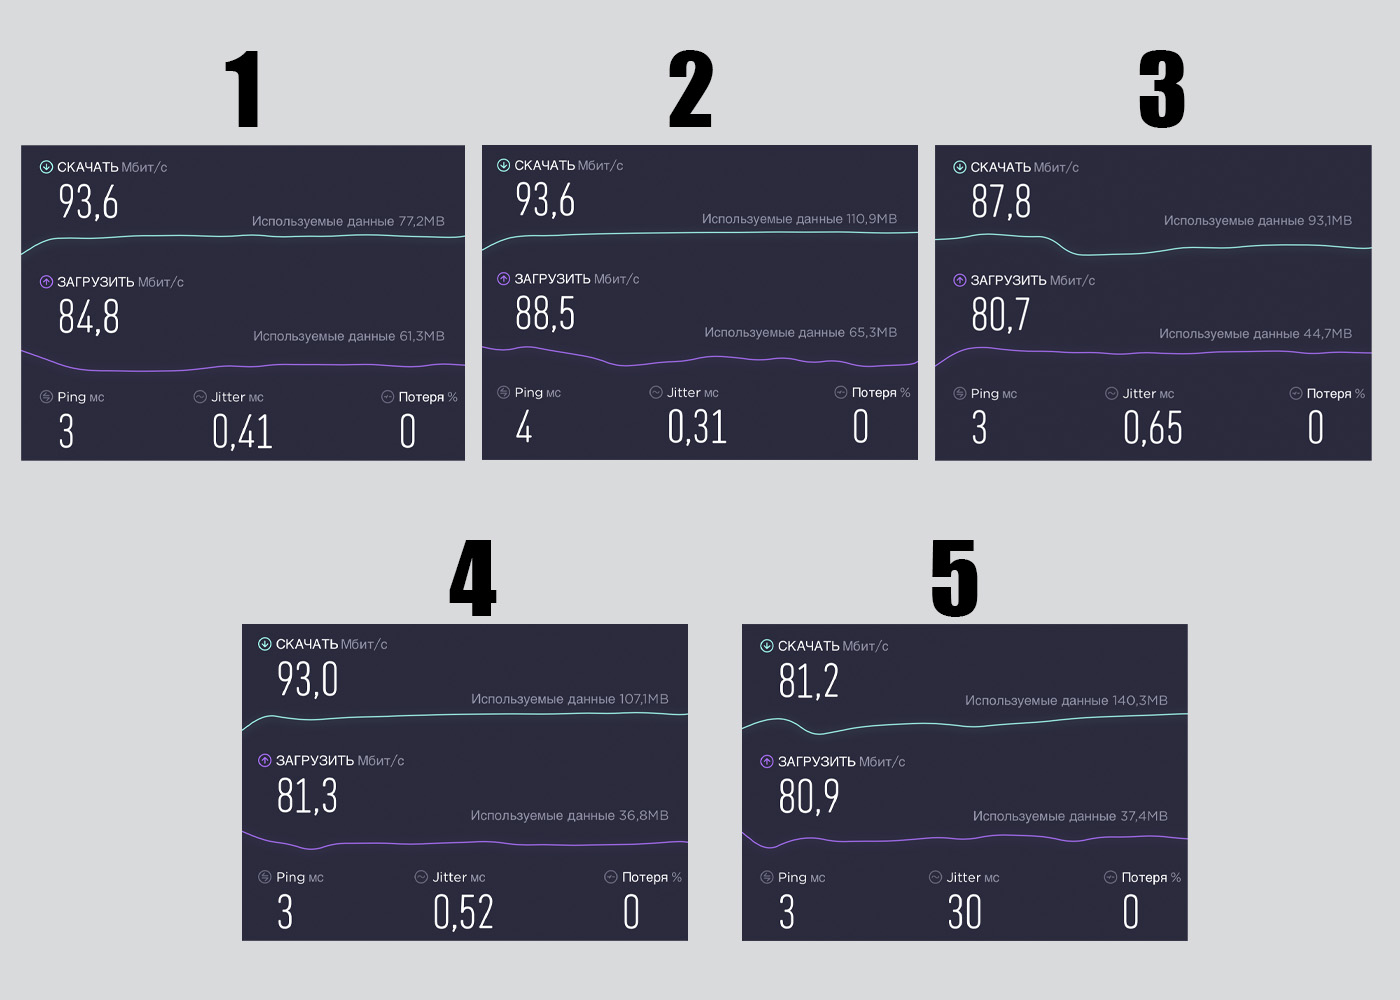
Как видно, достойная связь во всех помещениях, даже на балконе, максимально удалённом от точки доступа. Телевидение не лагает, обновления скачиваются, ютубчик на смартфоне в туалете прекрасно смотрится.
Большего и не надо. Спасибо, TP-Link.
Что в итоге: ни одного разрыва! (с)
В TP-Link Archer C64 нет сложных меню, тонких настроек и прочих, понятных лишь компьютерным гикам, функций. Это устройство для дома, где живёт несколько человек, использующих самые разные гаджеты: от смартфонов до настольных ПК. Кто-то играет в игры, кто-то смотрит видео в туалете, кто-то проверяет почту или подключается по удалённому соединению к компьютеру на работе.
Во всех этих сценариях Archer C64 не подведёт и выдаст максимально доступную скорость соединения, согласно вашему тарифному плану. Этот роутер нужно один раз подключить и забыть на несколько лет: за неделю у меня он не глючил, не перезагружался и не отваливался.
Плюсы Archer C64:
■ стабильное соединение
■ наличие технологий, которые можно найти в более дорогих роутерах
■ есть возможность крепления на стену
■ можно отключить светодиоды на ночь по расписанию
■ можно использовать в режиме дополнительной точки доступа
■ шустрый процессор 1,2 ГГц от MediaTek
Минусы:
Если у вас мега-тариф, в котором скорость интернета выше 1 Гбит – Archer C64 будет не в состоянии выдать максимальную скорость. Но таких тарифных планов очень мало, и если у вас именно такой – скорее всего вы профессиональный геймер или стример, и оборудование у вас уже стоит соответствующее.
В качестве дополнительных достоинств Archer C64 хочется отметить возможность обновления прошивки «по воздуху» и возможность подключения к облачному сервису TP-Link, который позволяет управлять роутером из любой точки мира, видеть состояние подключения, менять настройки, перезагружать и контролировать количество подключённых устройств.
Всем, кому важна стабильность работы домашнего Wi-Fi, я рекомендую обратить внимание на Archer C64. В пределах 2500 рублей лучшего аналога мне найти не удалось.
(45 голосов, общий рейтинг: 4.44 из 5)
iPhones.ru
Наконец-то, просто роутер, который работает без лагов и нареканий.
Микк Сид
@mickmaster
Пишу обо всём, что интересно и познавательно — гаджеты, события, репортажи. Увлекаюсь игрой на барабанах, меломан со стажем.