
675220
Non-Contact AC Voltage Detector
Non-Contact AC Voltage Detector
Détecteur de tension alternative sans contact
Berührungsloser Wechselspannungsdetektor
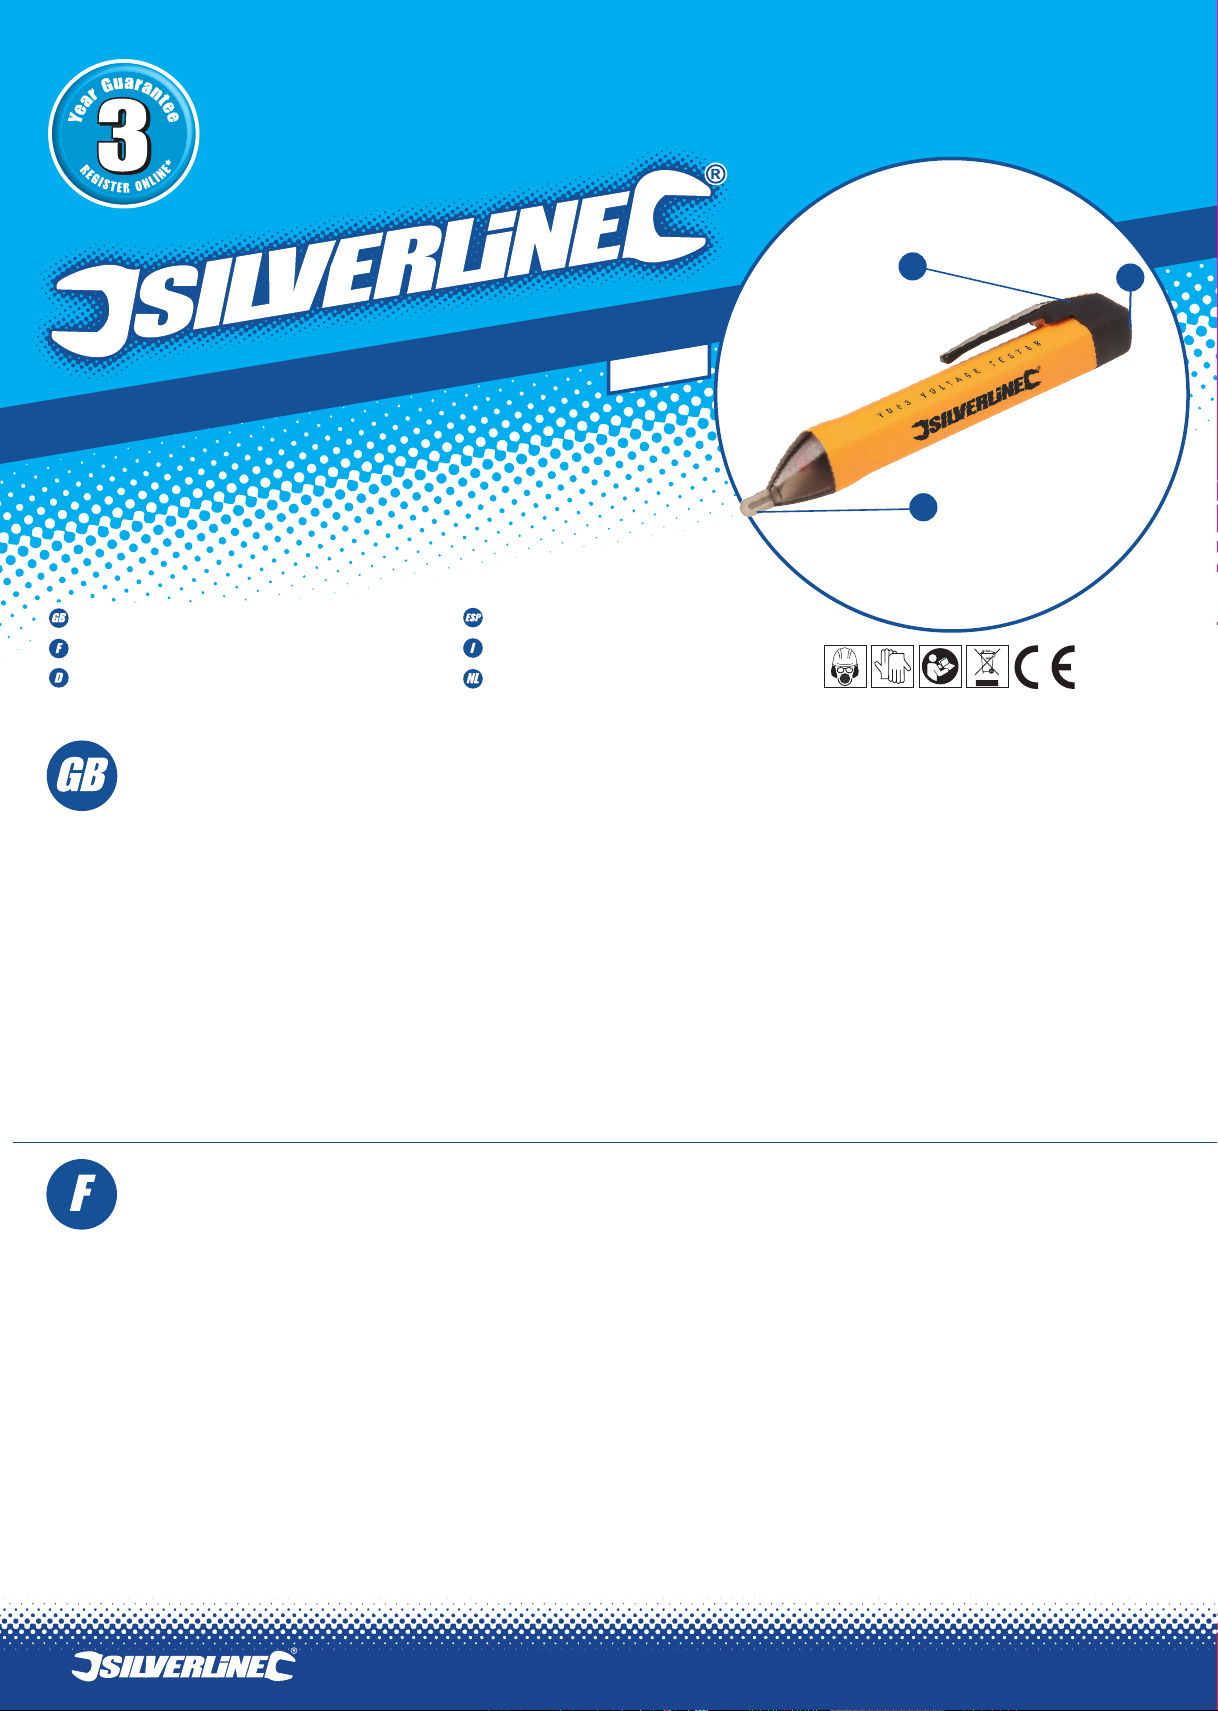
Product Familiarisation
1) Cap Retaining Clip
2) On/Off Button
3) Test Tip
Safety Instructions
Carefully read and understand this manual before use. Keep these instructions with the product for future reference. Ensure all persons
who use this product are fully acquainted with this manual
Even when used as prescribed it is not possible to eliminate all residual risk factors. Use with caution. If you are at all unsure of the correct
and safe manner in which to use this tool, do not attempt to use it
• Comply with all local and national safety requirements
• Do not expose this product to extremes in temperature or high humidity
• Use with caution with circuits above 30V AC as a shock hazard may exist
WARNING: Risk of electric shock and burns. Contact with live circuits could result in serious injury or even death
Assembly
• This voltage tester requires 2 x AAA 1.5V batteries (not included)
• Depress the Cap Retaining Clip (1) and slide the cap off the body of the tester
• Insert the batteries, ensuring the positive contacts are facing down towards the Test Tip (3) (as per installation diagram)
• Re-fit the cap: align the cap with the body of the tester and slide it into place so that the retaining clip ‘clicks home’
• Press the On/Off Button (2) to activate the tool. The green LED should illuminate, indicating power is available to the tool
• To switch the tool off, press the On/Off button again. If the tool is not used for a period of time, the auto power-off feature will switch
the tester off automatically to preserve battery life
Specification
Indication type: LED & audible
Voltage detection range: 50 — 1000V AC
Frequency detection range: 50 — 500Hz
Measurement categories: Category ACT III, 1000V per UL 3111-1
Category IV, 600V per IEC 61010-1
Operating temperature: 0 — 40ºC
Voltímetro sin contacto
Rivelatore di tensione
Contactloze AC spanningsdetector
1
2
140mm
3
Application
• This product is designed to detect voltage in power sockets, light fittings, circuit breakers, wires and cables, and to find breaks in wires
• Operational range: 50 – 1000V, AC frequency 50-500Hz
• Measurement category CAT II, 1000V per UL 3111-1 Cat IV, 600V per IEC61010-1
Operation
Warning
• Do not use if the green LED is not illuminated
• Do not use if the tester appears damaged or if the tester is not operating properly. If in doubt, replace the tester
• Do not apply more than the rated voltage of 1000V
• Always wear approved eye protection
• Do not rely on this tool when testing shielded wire. Operation may be affected by differences in socket design and insulation thickness
and type
Using this tool
IMPORTANT: Before each use, test on a known working circuit that is within the rating of the tester. If the tester does not indicate voltage
is present, DO NOT USE
• Depress the On/Off Button (2) to switch on the tool
• Hold the Test Tip (3) in close proximity to the area you need to test. Move it back and forth so that you cover the whole area
• The red LED illuminates and the tool emits a continuous beep to indicate that voltage is present
WARNING: If there is no indication, do not assume for certain that voltage is not present (environmental or other reasons may affect the
working of this tester; see, for example, note regarding shielded wire above)
Maintenance
• Do not attempt to repair this product. It contains no serviceable parts
Disposal
Always adhere to national regulations when disposing of power tools that are no longer functional and are not viable for repair.
• Do not dispose of power tools, or other waste electrical and electronic equipment (WEEE), with household waste
• Contact your local waste disposal authority for information on the correct way to dispose of power tools
Présentation du produit
1) Agrafe de retenue du capuchon
2) Bouton marche/arrêt
3) Pointe de détection
Caractéristiques techniques
Types d’indication : par LED et bip sonore
Types d’indication : de 50 à 1000 V c.a.
Plage de détection de fréquence : de 50 à 500 Hz
Catégories de mesure : catégorie III, 1000 V selon UL3111-1
catégorie IV, 600 V selon CEI 61010-1
Température de fonctionnement : de 0 à 40 ºC
Consignes de sécurité
Prenez le temps de lire et de comprendre ce manuel avant d’utiliser l’outil. Gardez ces instructions avec le produit pour pouvoir les
consulter ultérieurement. Assurez-vous que toute personne venant à utiliser ce produit ait entièrement pris connaissance de ce manuel.
Sachez qu’utiliser un outil conformément aux prescriptions ne garantit pas l’élimination de tous les facteurs de risque. Procédez avec
prudence. N’utilisez pas cet outil si vous avez des doutes quant à la manière sûre et correcte de procéder.
• Conformez-vous à toutes les exigences en vigueur sur le plan local et national.
• N’exposez pas ce produit à des températures extrêmes ni à une forte humidité.
• Utilisez le produit avec précaution sur des circuits supérieurs à 30 V c.a. car il existe un risque de choc électrique.
ATTENTION : risque de choc électrique et de brûlures. Tout contact avec un circuit sous tension peut entraîner des blessures graves voire
mortelles.
Assemblage
• Ce détecteur de tension fonctionne avec 2 piles AAA de 1,5 V.
• Enfoncez l’agrafe de retenue du capuchon (1) et enlevez le capuchon en le faisant glisser sur le corps du détecteur.
• Introduisez les piles, en vous assurant que la borne positive de chaque pile soit bien orientée vers la pointe de détection (3) (selon
l’illustration schématique)
• Réinstallez le capuchon : placez le capuchon dans l’axe du corps du détecteur et faites-le coulisser sur celui-ci jusqu’à ce que l’agrafe
s’encliquète.
• Appuyez sur le bouton marche/arrêt (2) pour activer l’appareil. La LED verte s’allumera, indiquant que l’appareil est sous tension.
• Pour éteindre l’appareil, appuyez de nouveau sur le bouton marche/arrêt. Si l’appareil demeure allumé sans être utilisé pendant une
période prolongée, le dispositif d’arrêt automatique entraînera la déconnexion de l’appareil, permettant ainsi d’économiser la pile
Utilisation
• Ce produit est conçu pour détecter la tension sur prises murales, douilles d’éclairage, coupe-circuits, fils et câbles, et pour déceler les
ruptures sur les fils.
• Plage fonctionnelle : de 50 à 1000 V c.a., Fréquence : de 50 à 500 Hz.
• Catégorie de mesure III, 1000 V selon UL3111-1 ; Catégorie IV, 600 V selon CEI 61010-1.
Fonctionnement
Attention
• N’utilisez pas l’appareil si la LED verte ne s’allume pas.
• N’utilisez pas l’appareil si le détecteur parait abimé ou s’il présente un dysfonctionnement. En cas de doute, faites-le remplacer.
• N’appliquez pas de tension supérieure à la tension nominale de 1000 V.
• Portez toujours une protection oculaire de bonne qualité.
• Cet outil n’offre pas de mesure fiable sur les fils blindés. Son fonctionnement peut se trouver altéré sur certaines prises murales de
conception différente ou certaines épaisseurs ou types d’isolation.
Utilisation de cet appareil
IMPORTANT : avant toute utilisation, vérifiez le bon fonctionnement de cet appareil en faisant un test sur un circuit dont vous savez que la
tension le traversant est comprise dans la plage de ce détecteur. Si le détecteur n’indique pas de présence de tension, NE L’UTILISEZ PAS.
• Enfoncez le bouton marche/arrêt (2) pour allumer l’appareil.
• Tenez la pointe de détection (3) tout proche de la zone que vous souhaitez tester. Effectuez un mouvement de va-et-vient sur toute la
zone à tester.
• La LED rouge s’allumera et l’appareil émettra un bip sonore continu indiquant la présence d’une tension.
ATTENTION : si l’appareil ne semble déceler aucune tension, ne supposez pas qu’il n’y ait aucune tension (des raisons d’environnement
ou autres peuvent influer sur le bon fonctionnement du détecteur, comme par exemple un câble blindé –voir note ci-dessus à ce sujet).
Entretien
• Ce produit n’est pas destiné à être réparé. Aucun de ses éléments n’est individuellement remplaçable.
• Recyclage
Lorsque l’appareil n’est plus en état de fonctionner et qu’il n’est pas réparable, recyclez l’appareil en accord avec les régulations
nationales.
• Ne jetez pas les outils électriques et autres équipements électriques ou électroniques(DEEE) avec les ordures ménagères
• Contactez les autorités locales compétentes en matière de gestion des déchets pour vous informer de la procédure à suivre pour
recycler les outils électriques
www.silverlinetools.com

Geräteübersicht
1) Entriegelungstaste für Schutzkappe
2) Ein-/Ausschalter
3) Prüfspitze
Sicherheitshinweise
Betreiben Sie das Gerät erst, wenn Sie diese Bedienungsanleitung sorgfältig gelesen und sich mit dem Inhalt vertraut gemacht haben.
Bewahren Sie alle Anleitungen mit dem Gerät für spätere Nachschlagezwecke auf. Vergewissern Sie sich, dass alle Benutzer dieses Produkts
diese Bedienungsanleitung vollständig verstanden haben.
Auch wenn dieses Gerät wie vorgeschrieben verwendet wird, ist es nicht möglich, sämtliche Restrisiken auszuschließen. Mit Vorsicht
verwenden. Sollten Sie sich in irgendeiner Weise unsicher bezüglich der sachgemäßen und sicheren Benutzung dieses Gerätes sein,
verwenden Sie es nicht.
• Beachten Sie alle regional und national geltenden Sicherheitsvorschriften.
• Setzen Sie dieses Gerät keinen extremen Temperaturen oder hoher Luftfeuchtigkeit aus.
• Lassen Sie bei Verwendung an Stromkreisen mit Wechselspannungen über 30 V äußerste Vorsicht walten, um der Gefahr eines
Stromschlags vorzubeugen.
WARNUNG: Stromschlag- und Verbrennungsgefahr! Der Kontakt mit spannungsführenden Stromkreisen kann zum Tode oder zu schweren
Verletzungen führen.
Technische Daten
Anzeigeart: LED und akustisches Signal
Spannungsbereich: 50–1000 V AC
Frequenzbereich: 50–500 Hz
Messkategorien: CAT III, 1000 V nach UL 3111-1
Betriebstemperatur: 0–40 °C
CAT IV, 600 V nach IEC 61010-1
Vor Inbetriebnahme
• Für den Betrieb dieses Spannungsprüfers werden zwei 1,5-V-AAA-Batterien benötigt (nicht im Lieferumfang enthalten).
• Betätigen Sie die Entriegelungstaste für die Schutzkappe (1) und nehmen Sie die Kappe vom Gerätegehäuse ab.
• Legen Sie die Batterien ein und achten Sie dabei darauf, dass die Pluspole nach unten zur Prüfspitze (3) weisen (siehe Abbildung).
• Setzen Sie die Kappe wieder auf, indem Sie sie auf das Gerätegehäuse ausrichten und aufschieben, bis die Entriegelungstaste hörbar
einrastet.
• Drücken Sie den Ein-/Ausschalter (2), um das Gerät einzuschalten. Die grüne LED-Lampe leuchtet nun auf und zeigt damit an, dass das
Gerät betriebsbereit ist.
• Drücken Sie den Ein-/Ausschalter zum Ausschalten des Gerätes erneut. Bei Nichtbenutzung des Gerätes über einen längeren Zeitraum
schaltet sich das Gerät automatisch ab, um die Batterien zu schonen.
Características del producto
1) Clip de retención
2) Botón de encendido/apagado
3) Punta de detección
Instrucciones de seguridad
Lea detenidamente el manual de instrucciones antes de usar este producto. Guarde las instrucciones con el producto para consultarlas en
otro momento. Asegúrese de que todas las personas que utilicen este producto hayan entendido correctamente este manual.
Incluso cuando se esté utilizando según lo prescrito, no es posible eliminar todos los factores de riesgo residuales. Utilice esta herramienta
con precaución. Si no está completamente seguro de como utilizar este producto correctamente, no intente utilizarlo.
• Siga las instrucciones de seguridad en todo momento.
• No exponga esta herramienta a temperaturas extremas o alta humedad.
• Utilice esta herramienta con precaución en circuitos de más de 30 V AC, podría correr el riesgo de electrocución.
ADVERTENCIA: Riesgo eléctrico y quemaduras. El contacto eléctrico directo puede causar daños personales graves e incluso la muerte.
Características técnicas
Tipo de indicación: LED & audible
Margen de detección de voltaje: 50 – 1.000 V AC
Margen de detección de frecuencia: 50 — 500 Hz
Catego rías de medici ón: Categoría CAT III, 1.000 V para UL 3111-1
Temperatura de funcionamiento: 0 — 40º C
Categoría IV, 600 V para IEC 61010-1
Montaje
• Esta herramienta requiere 2 pilas AAA de 1,5 V (no incluidas).
• Presione el clip de retención (1) y retire la tapa del voltímetro.
• Coloque las pilas, asegúrese de que los polos positivos estén mirando hacia la punta de detección (3).
• Vuelva a colocar la tapa: Alinee la tapa con el voltímetro y deslícelo en su sitio hasta que el clip de retención encaje adecuadamente.
• Pulse el botón de encendido/apagado (2) para poner en funcionamiento el voltímetro. Si no utiliza la herramienta durante un periodo de
tiempo, la función de apagado automático se activará apagando el voltímetro para alargar la duración de las pilas.
Utilización
• Esta herramienta ha sido diseñada para detectar el voltaje en tomas de corriente, lámparas, interruptores, cables y para encontrar cables rotos.
• Margen de detección de voltaje: 50 – 1000 V, frecuencia : 50 — 500 Hz a.c.
Anwendungsbereiche
• Dieses Gerät ist zur Ortung von Spannung in Netzsteckdosen, Beleuchtungskörpern, Trennschaltern, Leitungen und Kabeln sowie zum
Auffinden von Kabelbrüchen bestimmt.
• Betriebsbereich: 50–1000 V, Wechselspannung; Frequenz: 50–500 Hz
• Messkategorien: CAT III, 1000 V nach UL 3111-1; CAT IV, 600 V nach IEC 61010-1
Bedienung
Warnhinweis
• Gerät nur verwenden, wenn die grüne Lampe leuchtet.
• Nicht verwenden, wenn das Gerät beschädigt erscheint oder nicht ordnungsgemäß funktioniert. Spannungsprüfer im Zweifelsfall ersetzen.
• Gerät nicht mit mehr als der Nennspannung von 1000 V belasten.
• Stets geeigneten Augenschutz benutzen.
• Verlassen Sie sich nicht beim Prüfen abgeschirmter Leitungen auf dieses Gerät. Die Funktion kann durch unterschiedliche
Konstruktionsweisen von Steckdosen sowie die Stärke und Art der Isolation beeinträchtigt sein.
Verwendung des Gerätes
WICHTIGER HINWEIS: Überprüfen Sie das Gerät vor jedem Gebrauch an einer bekannten Spannungsquelle, deren Nennwerte sich innerhalb des für
den Spannungsprüfer geeigneten Bereichs befinden, auf Funktionstüchtigkeit. Falls das Gerät keine Spannung anzeigt, verwenden Sie es nicht!
• Drücken Sie zum Einschalten des Gerätes den Ein-/Ausschalter (2).
• Halten Sie die Prüfspitze (3) nahe an den zu prüfenden Bereich. Bewegen Sie sie hin und her, um den gesamten Prüfbereich abzudecken.
• Die rote LED-Lampe leuchtet auf und es ertönt ein durchgehender Signalton, wenn Spannung anliegt.
WARNUNG! Falls kein Signal ertönt und die rote LED-Lampe nicht aufleuchtet, heißt dies nicht unbedingt, dass keine Spannung vorhanden
ist (das einwandfreie Funktionieren dieses Spannungsprüfers kann durch Umwelteinflüsse und andere Gründe beeinflusst werden; siehe z.B.
Hinweis oben bezüglich abgeschirmter Leitungen).
Wartung
• Nehmen Sie keine eigenmächtigen Reparaturversuche an diesem Gerät vor. Es enthält keine zu wartenden Teile.
Entsorgung
Beachten Sie bei der Entsorgung von defekten und nicht mehr reparablen Elektrowerkzeugen die geltenden Vorschriften und Gesetze.
• Elektrowerkzeuge und andere elektrische und elektronische Altgeräte nicht über den Hausmüll entsorgen.
• Lassen Sie sich von der zuständigen Behörde bezüglich der ordnungsgemäßen Entsorgung von Elektrowerkzeugen beraten.
• Categorías de medición: Categoría CAT III, 1.000 V para UL 3111-1 Categoría IV, 600 V para IEC 61010-1.
Funcionamiento
Advertencia
• No utilice esta herramienta si el LED de color verde no se ilumina.
• No utilice el voltímetro si está dañado o no funciona correctamente. Sustituya el voltímetro.
• No utilice esta herramienta en voltajes superiores a 1.000 V.
• Lleve siempre protección ocular.
• No confíe en esta herramienta cuando esté detectando cable protegido. Pueden haber diferencias de medición debido al diseño de la
toma de corriente y el grosor del aislante del cable.
Instrucciones de funcionamiento
IMPORTANTE: Antes de cada uso, pruebe el voltímetro en un circuito eléctrico que ya conozca previamente. Si el voltímetro indica un voltaje
diferente al usual, NO LO USE.
• Pulse el botón de encendido/apagado (2) para encender el voltímetro.
• Mantenga la punta de detección (3) lo más cerca posible del objeto a detectar. Mueva el voltímetro alrededor del objeto para cubrir toda
la zona.
• El LED de color rojo se iluminará a la vez que se emitirá un tono audible indicando el voltaje presente.
ADVERTENCIA: El voltímetro no emitirá ningún tipo de señal si el objeto a detectar carece de voltaje. (Varios factores pueden alterar el
funcionamiento de este producto)
Mantenimiento
• No intente reparar este producto usted mismo. No contiene piezas que se puedan reparar.
Eliminación
Deshágase siempre de las herramientas eléctricas adecuadamente respetando las normas indicadas en su país.
• No elimine sus herramientas u otro equipo eléctrico o electrónico junto con la basura convencional. Recíclelos si hay puntos de reciclaje.
• Póngase en contacto con la autoridad local encargada de la gestión de residuos si necesita más información sobre cómo eliminar este
tipo de herramientas correctamente.
Conoscenza del prodotto
1) Gancio di ritenuta cappuccio
2) interruttore On/Off
3) Punta di rilevamento
Istruzioni di sicurezza
Leggere attentamente e comprendere questo manuale prima dell’uso. Conservare queste istruzioni con il prodotto per riferimento futuro.
Assicurarsi che tutte le persone che utilizzano questo prodotto sono pienamente a conoscenza di questo manuale
Anche quando l’utensile viene utilizzato nella maniera prescritta, non è possibile eliminare ogni rischio residuo. Usare con cautela. In caso di
dubbi su come usare in modo corretto e sicuro il prodotto, non cercare di usarlo.
• Rispettare tutte le norme di sicurezza locali e nazionali
• Non esporre il prodotto a estremi di temperatura o umidità elevata
• Usare con cautela con i circuiti di cui sopra 30V AC in quanto un pericolo di scossa potrebbe esistere
Attenzione: rischio di scosse elettriche e bruciature. Il contatto con i circuiti sotto tensione può causare morte o gravi lesioni
Specificazioni Tecniche
Tipo di indicatore: Visivo a LED e acustico
Intervallo di rilevamento della tensione: 50 — 1000Vca
Intervallo di rilevamento della frequenza: 50 — 500Hz
Categorie di misurazione: Categoria III, 1000V per UL3111-1
Temperatura in operazione: 0 – 40-C
Categoria IV, 600V per IEC 61010-1
Montaggio
• Questo rivelatore di tensione richiede 2 batterie AAA 1,5 V
• Premere il gancio di ritenuta cappuccio (1) e sfilare il cappuccio dal corpo del rivelatore
• Inserire le batterie, garantendo che i contatti positivi sono rivolti verso il basso e verso la punta (3) (come nel schema di installazione)
• Rimontare il cappuccio: allineare il cappuccio con il corpo del rivelatore e farlo scorrere in posizione in modo che il gancio si clicca in posizione
• Premere l’interruttore On / Off (2) per attivare lo strumento. La spia LED verde dovrebbe illuminarsi, indicando la disposizione
dell’alimentazione allo strumento
• Per spegnere l ‘utensile, premere l’interruttore On / Off di nuovo. Se lo strumento non viene utilizzato per un periodo di tempo, la funzione
di spegnimento automatico spegnerà il rivelatore automaticamente per preservare la durata della batteria
Applicazione
• Questo prodotto è progettato per rilevare tensione in prese elettriche, lampade, interruttori, fili e cavi, e per trovare le rotture in fili
Product beschrijving
1) Sluit kap vergrendelklip
2) Aan-/uitknop
3) Detectiepunt
Veiligheidsinstructies
Lees deze handleiding voor het gebruik van de spanningsdetector aandachtig door. Houdt de instructies bij het product voor toekomstig
gebruik. Zorg ervoor dat iedere gebruiker volledig bekend is met de informatie in deze handleiding.
Zelfs wanneer de detector volledig volgens instructies wordt gebruikt, zijn alle risicofactoren niet volledig uit te sluiten. Gebruik met beleid. Bij
enige twijfel met betrekking tot juist en veilig gebruik van het product, gebruik het niet.
• Leef alle lokale en nationale veiligheidsvoorschriften na.
• Stel het product niet bloot aan extreme temperaturen en vochtigheden.
• Ben voorzichtig bij het gebruik op stopcontacten met een spanning hoger dan 30 V AC, waar gevaar op elektrische schokken bestaat.
WAARSCHUWING: Het contact met een draad onder hoge spanning kan resulteren in elektrische schokken, serieuze verwondingen en zelfs overleiden
Specificaties
Indicatietype: LED en geluid
Spanning detectiebereik: 50 – 1000 V AC
Frequentie detectiebereik: 50 – 500 Hz
Detectie categorieën: Categorie ACT III, 1000 V per UL 3111-1
Gebruikstemperatuur: 0 – 40°C
Categorie IV, 600 V per IEC 61010-1
Montage
• De spanningsdetector werkt op 2 x AAA 1,5 V batterijen (niet inbegrepen).
• Druk de vergrendelklip (1) in en verwijder de sluit kap van de detector.
• Plaats de batterijen met de positieve zijden naar de detectiepunt wijzend, in de detector (zie diagram).
• Schuif de sluit kap terug op de detector waarbij deze in positie klikt en zo in positie vergrendeld is.
• Druk de aan-/uitknop (2) in om de detector in te schakelen. Het groene LED hoort nu te branden en duidt daarmee aan dat de detector van
stroom wordt voorzien.
• Om de detector uit te zetten drukt u de aan-uitknop weer in. Wanneer de detector voor enige tijd niet gebruikt wordt het zichzelf uit om het
leeglopen van de batterij te voorkomen.
• Campo di funzionamento: 50 — 1000V, AC frequenza 50-500Hz
• Categoria di misura II, 1000V per Cat IV UL3111-1, 600V per IEC61010-1
Operazione
Attenzione
• Non utilizzare l’utensile se la spia LED verde non si accende
• Non utilizzare se il rivelatore appare danneggiato o se non funziona correttamente. In caso di dubbio, sostituire il rivelatore
• Non applicare superiore tensione di quella nominale di 1000V
• Indossare sempre occhiali di protezione approvata
• Non fare affidamento su questo strumento quando si verifica un cavo schermato. Il funzionamento può essere influenzato da differenze
nel design della presa, spessore dell’isolante e tipo
L’utilizzo di questo strumento
IMPORTANTE: Prima di ogni utilizzo, testare su un circuito di lavoro noto entro la gamma del rivelatore. Se il rivelatore non indica che
tensione è presente, NON USARE
• Premere il pulsante On / Off (2) per accendere lo strumento
• Mantenere la punta di prova (3) in prossimità dalla zona dove volete provare. Spostarsi avanti e indietro in modo da coprire l’intera zona
• La spia a LED rossa si accende e lo strumento emette un segnale acustico continuo per indicare che ci sia tensione
ATTENZIONE: Se non c’è alcuna indicazione, non si assume per certo che la tensione non è presente (per motivi ambientali o di altro tipo;
possono influire sul funzionamento di questo rivelatore, vedi, per esempio, si noti quanto riguarda cavo schermato di sopra)
Manutenzione
• Non tentare di riparare questo prodotto. Non contiene parti riparabili
Disposal
Rispettare sempre le normative nazionali per lo smaltimento di elettroutensili che non sono più funzionali e non sono sostenibili per la
riparazione
• Gli elettroutensili e le altre attrezzature elettriche ed elettroniche (RAEE) non possono essere smaltite assieme ai normali rifiuti domestici
e urbani.
• Contattate le autorità locali preposte allo smaltimento dei rifiuti per ottenere ulteriori informazioni sulle corrette modalità di smaltimento
delle attrezzature
Toepassing
• De detector is ontworpen voor het opsporen van spanning in stopcontacten, lamp fittingen, stroombrekers, draden en kabels en voor het
opsporen van draadbreuken.
• Spanning detectiebereik: 50 – 1000 V AC, frequentie detectiebereik: 50 – 500 Hz.
• Meet categorieën ACT II, 1000 V per UL 3111-1, IV, 600 V per IEC 61010-1
Gebruik
Waarschuwing
• Gebruik de detector niet wanneer het groene licht niet brand.
• Gebruik de detector niet wanneer deze beschadigd is of niet juist werkt. Bij twijfel vervangt u de detector met een nieuwe.
• Gebruik niet bij een hogere spanning dan de bepaalde 1000 V.
• Draag de juiste oogbescherming.
• Ga niet uit van een correcte meting bij het detecteren van afgeschermde bedrading. De meting kan beïnvloed worden door verschil in
stopcontact ontwerp en isolatie dikte en type.
De detector gebruiken
BELANGRIJK: Test de detector voor elk gebruik op een circuit waarvan u zeker bent dat het werkt binnen de meetwaarde van de detector.
• Druk de aan-/uitschakelaar (2) in om de detector aan te zetten.
• Houd de detectiepunt (3) dicht bij het te testen gebied. Beweeg de detector heen en weer zodat het gehele gebied gemeten wordt.
• Wanneer de detector spanning waarneemt, ontbrand het rode licht en hoort u een ononderbroken piep.
WAARSCHUWING: Wanneer de detector geen spanning waarneemt, mag u er niet van uit gaan dat de spanning niet daar is. (vele redenen
beïnvloeden mogelijk de werking van de detector; zie bijvoorbeeld afgeschermde bedrading)
Onderhoud
• Probeer dit product niet te repareren. Het bevat niet onderhoud bare delen.
Verwijdering
Bij de verwijdering van elektrische machines neemt u de nationale voorschriften in acht
• Elektrische en elektronische apparaten mogen niet met uw huishoudelijk afval worden weggegooid
• Neem contact op met uw gemeente voor informatie betreffende de verwijdering van elektrisch gereedschap
www.silverlinetools.com
- June 12, 2024
- UNIKS
Table of Contents
- Safety instructions
- Instrument description
- Operation instructions
- Battery replacement
- ASSISTANCE
- Specifications
- Read User Manual Online (PDF format)
- Download This Manual (PDF format)
User Manual
R1D NON CONTACT AC Voltage Detector
REGISTER YOUR PRODUCT
www.uniks.it
The registration of your products will allow you to stay in formed about news,
take advantage of advantageous discounts dedicated to you for the purchase of
accessories and products far your daily work.
Safety instructions
Warning
To avoid possible electric shock or persona! injury:
- Please use this tester strictly according to this instruction, otherwise, the protection function provided by tester may be affected.
- Do not use if the power indicator is not on.
- Before use, test on the known power to ensure that the product is good.
- When using this tester, there may still be voltage even if there is no sound or light alarm. The tester only indicates the effective voltage when the AC voltage produces an electrostatic field with sufficient strength. If the field strength is very low, the tester may not be able to detect it. The tester may be affected by the following factors, including, but not limited to: Shielded wire / cable. Thickness and type of insulation. Distance from the voltage source. Complete insulating. Differences in socket design, etc..
- Do not use if the tester is damaged or the tester is not working properly. Before use, check that the probe is cracked or broken. lf in doubt, please timely repair tester.
- Please do not apply the rated voltage above the mark on the tester.
- To test AC voltage above 30V, special care must be taken in case of electric shock.
- Comply with local and national safety regulations.
- Use proper protective equipment in accordance with local or national regulations.
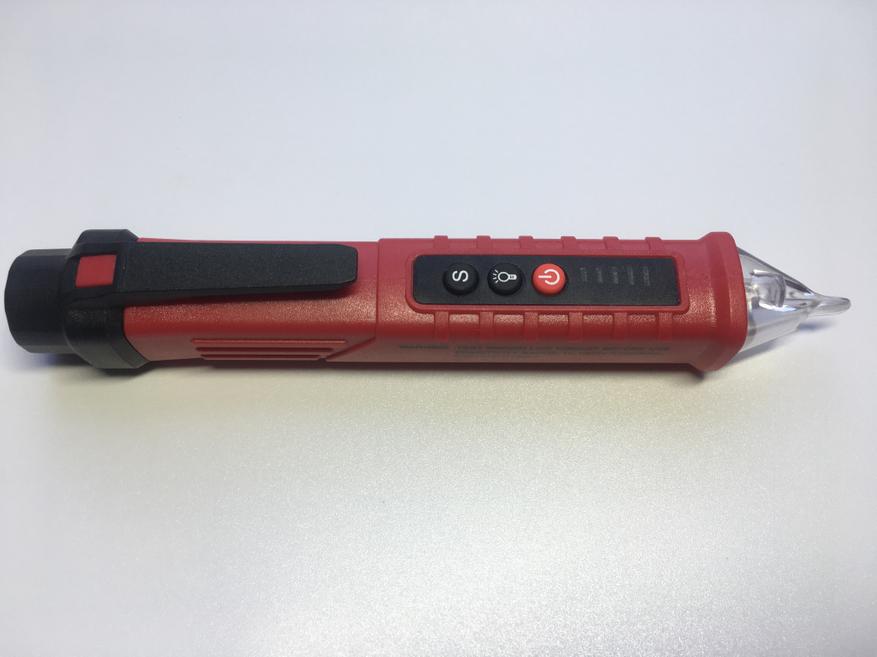
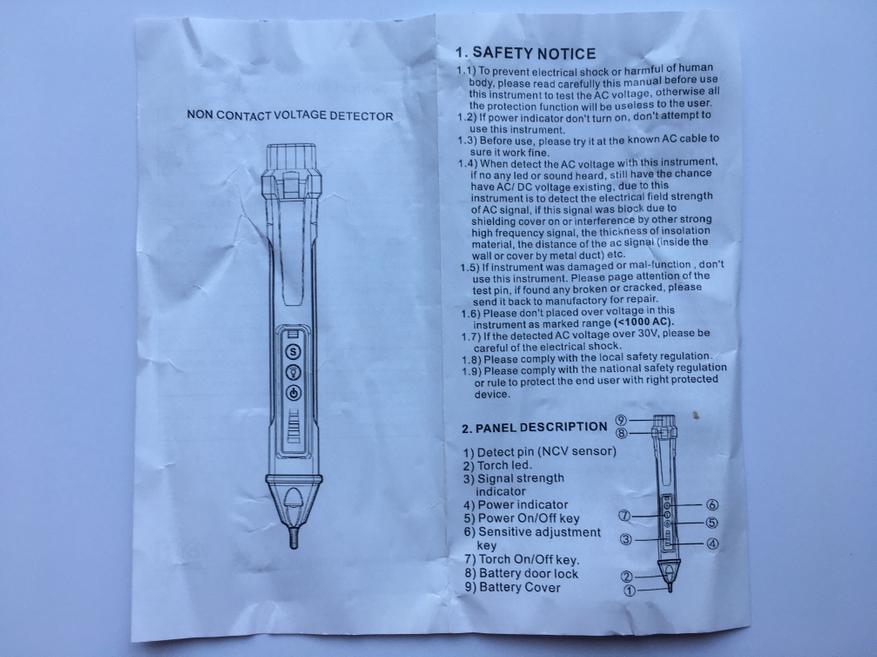
Instrument description

-
Probe (NCV induction head)
-
Torch lamp
-
LCD display
-
The power key, with power indicator
-
Torch key
-
AC voltage detection range switching key with indicator light
-
The battery cover
-
strong voltage
-
Medium voltag
-
Weak voltage
-
Battery Low voltage
-
high voltag
-
AC symbol
-
high sensitivity
LCD has two kinds of backlight colors: “white” and “red”.
(White means no AC signal is sensed, red means AC signal is sensed)
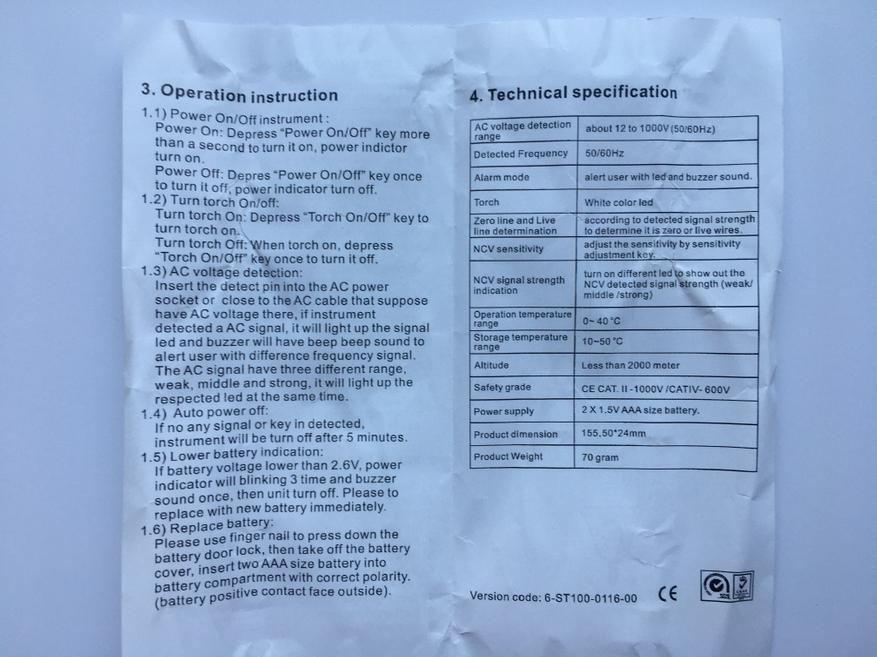
Operation instructions
-
Tum on/ off tester
Tum on: Press the power key greater than 1 second, the power indicator light
is lit.
Tum off: Press the power key, power indicator lights off. -
Tum on/ off Torch
Tum on: Press the torch key to turn on the torch.
Turn off: Press the torch key, the torch turn off.
If the torch doesn’t tum off, it will turn off automatically in about 5
minutes. -
AC voltage detection
When use this product, probe tester should insert into the power socket or
close to the live wire.
When the tester detectsAC voltage signal, LCD backlight will changes from
white to red, and LCD screen will flash according to the voltage signal. At
the same time, the buzzer sends out sounds in different frequency. When a weak
AC signal is sensed, the LCD screen displays “ ” in two cells; when a strong
AC signal is sensed, the LCD screen displays “ ” in four cells; when a very
strong AC signal is sensed, the LCD screen displays “ ” in six cells. -
Zero/live wire judgment
Try to separate the two wires to be detected as far as possible, Then close
the wire with the probe of the tester, If it is a socket, insert the probe
into the socket, One of the strong signals detected by a tester is live wire,
a weak or no inductive signal is zero wire. -
Selection of AC voltage detection range
The default AC voltage detection range: about 48-1000V0
To change the voltage range to a bout 12-1000V. Press sensitivity bottom “ “,
LCD display “HS”.
To switch it back, press sensitivity bottom “ ” again, “HS” disappears on LCD,
the tester detect voltage range 48-1 000V.
When the tester delecls AC voltage signal exceeds about 36V, the LCD displays”
“ -
Auto Power Off
When the tester does not operate for about 5 minutes and the voltage signal is
not detected, the tester will tum off automatically. -
Low battery indication
When the battery voltage is lower than about 2.7 V, LCD display flashing,
Please repiace the battery in time, When the voltage is lower than about 2.6V,
it will shut down automatically.
Battery replacement
As per the diagram below:
Battery rotation direction as indicated
- Rotate the battery cover
- Take out the used battery
- Insert new batteries follow battery anode and cathode indication.
Warning: To avoid electric shock, do not use this instrument before the
battery covar is replaced.
ASSISTANCE
WARRANTY CONDITIONS
This instrument is warranted against defects in materials and workmanship, in
accordance with the generai terms and conditions. During the warranty period,
defective parts can be replaced, but the manufacturer reserves the right to
repair or replace the produci. If the instrument is to be retumed to the after
-sales service or to a dealer transportation is berne by the customer. The
shipment musi, however, be agreed. Attached to dispatch an explanatory note
about the reasons of the instrument must always be inserted. Far shipping only
use the originai packaging.
Any damage caused by the use of non-originai packing shall be charged to the
customer. The manufacturer accepts no responsibility for damage caused to
people or objects.
The warranty does not apply in the following cases:
- Repair and / or replacement of accessories and battery (not covered by warranly).
- Repairs made necessary because of a misuse of the instrument or of its use with no compatible devices.
- Repairs made necessary due to improper packaging.
- Repairs made necessary due to work carried out by unauthorized personnel.
- Modification of the instrument without the explicit permission of the manufacturer.
- Use not provided far in the specifications of the instrument or in the instruction manual.
The conteni of this manual may not be reproduced in any form without the
permission of the manufacturer.
Our products are patented and their trademarks.
The manufacturer reserves the righi to change specifications and prices it
this is due to technological improvements.
Specifications
AC voltage detection range| About 12 ∼ 1000V
(Acousto-optic prompt)| About 48 ∼ 1000V
(Acousto-optic prompt)
—|—|—
Frequency| 50 Hz /60Hz
Alarm mode| Sound and light alarm
Torch| White LED illumination lamp
Auto power off| √
Low battery indication| √
Zero/live wire judgment| According to the signal strength, strong signal is
live wire
NCV intensity| Selecting 3 types of sensitivity automatically (low, mid, high)
NCV intensity indicaton mode| To indicate weak, median, or strong voltage
signal, the instrument uses different symble on screen and buzzer frequency.
Service temperature| 0∼40°C
Stcrage temperature| -10∼50°C
Altitude| <2000m
Security level| CE CAT. III 1000V /CAT. IV 600V
Power| 2x 1.5V AAA batteries
Size| 156mm x 20 mm x 20 mm
Weight| About 45g
UNIKS Srl
Via Vittori 57
48018 Faenza (RA) Italy
E-mail: info@uniks.it
Phone: +39 0546 623002
Fax: +39 0546 623691
Read User Manual Online (PDF format)
Read User Manual Online (PDF format) >>
Download This Manual (PDF format)
Download this manual >>

Application
• This product is designed to detect voltage in power sockets, light fittings, circuit breakers, wires and cables, and to find breaks in wires
• Operational range: 50 – 1000V, AC frequency 50-500Hz
• Measurement category CAT II, 1000V per UL 3111-1 Cat IV, 600V per IEC61010-1
Operation
Warning
• Do not use if the green LED is not illuminated
• Do not use if the tester appears damaged or if the tester is not operating properly. If in doubt, replace the tester
• Do not apply more than the rated voltage of 1000V
• Always wear approved eye protection
• Do not rely on this tool when testing shielded wire. Operation may be affected by differences in socket design and insulation thickness
and type
Using this tool
IMPORTANT: Before each use, test on a known working circuit that is within the rating of the tester. If the tester does not indicate voltage
is present, DO NOT USE
• Depress the On/Off Button (2) to switch on the tool
• Hold the Test Tip (3) in close proximity to the area you need to test. Move it back and forth so that you cover the whole area
• The red LED illuminates and the tool emits a continuous beep to indicate that voltage is present
WARNING: If there is no indication, do not assume for certain that voltage is not present (environmental or other reasons may affect the
working of this tester; see, for example, note regarding shielded wire above)
Maintenance
• Do not attempt to repair this product. It contains no serviceable parts
Disposal
Always adhere to national regulations when disposing of power tools that are no longer functional and are not viable for repair.
• Do not dispose of power tools, or other waste electrical and electronic equipment (WEEE), with household waste
• Contact your local waste disposal authority for information on the correct way to dispose of power tools
Specification
Indication type:
LED & audible
Voltage detection range:
50 — 1000V AC
Frequency detection range:
50 — 500Hz
Measurement categories:
Category ACT III, 1000V per UL 3111-1
Category IV, 600V per IEC 61010-1
Operating temperature:
0 — 40ºC
Caractéristiques techniques
Types d’indication :
par LED et bip sonore
Types d’indication :
de 50 à 1000 V c.a.
Plage de détection de fréquence : de 50 à 500 Hz
Catégories de mesure :
catégorie III, 1000 V selon UL3111-1
catégorie IV, 600 V selon CEI 61010-1
Température de fonctionnement : de 0 à 40 ºC
Safety Instructions
Carefully read and understand this manual before use. Keep these instructions with the product for future reference. Ensure all persons
who use this product are fully acquainted with this manual
Even when used as prescribed it is not possible to eliminate all residual risk factors. Use with caution. If you are at all unsure of the correct
and safe manner in which to use this tool, do not attempt to use it
• Comply with all local and national safety requirements
• Do not expose this product to extremes in temperature or high humidity
• Use with caution with circuits above 30V AC as a shock hazard may exist
WARNING: Risk of electric shock and burns. Contact with live circuits could result in serious injury or even death
Assembly
• This voltage tester requires 2 x AAA 1.5V batteries (not included)
• Depress the Cap Retaining Clip (1) and slide the cap off the body of the tester
• Insert the batteries, ensuring the positive contacts are facing down towards the Test Tip (3) (as per installation diagram)
• Re-fit the cap: align the cap with the body of the tester and slide it into place so that the retaining clip ‘clicks home’
• Press the On/Off Button (2) to activate the tool. The green LED should illuminate, indicating power is available to the tool
• To switch the tool off, press the On/Off button again. If the tool is not used for a period of time, the auto power-off feature will switch
the tester off automatically to preserve battery life
Non-Contact AC Voltag
e Detector
675220
1
Utilisation
• Ce produit est conçu pour détecter la tension sur prises murales, douilles d’éclairage, coupe-circuits, fils et câbles, et pour déceler les
ruptures sur les fils.
• Plage fonctionnelle : de 50 à 1000 V c.a., Fréquence : de 50 à 500 Hz.
• Catégorie de mesure III, 1000 V selon UL3111-1 ; Catégorie IV, 600 V selon CEI 61010-1.
Fonctionnement
Attention
• N’utilisez pas l’appareil si la LED verte ne s’allume pas.
• N’utilisez pas l’appareil si le détecteur parait abimé ou s’il présente un dysfonctionnement. En cas de doute, faites-le remplacer.
• N’appliquez pas de tension supérieure à la tension nominale de 1000 V.
• Portez toujours une protection oculaire de bonne qualité.
• Cet outil n’offre pas de mesure fiable sur les fils blindés. Son fonctionnement peut se trouver altéré sur certaines prises murales de
conception différente ou certaines épaisseurs ou types d’isolation.
Utilisation de cet appareil
IMPORTANT : avant toute utilisation, vérifiez le bon fonctionnement de cet appareil en faisant un test sur un circuit dont vous savez que la
tension le traversant est comprise dans la plage de ce détecteur. Si le détecteur n’indique pas de présence de tension, NE L’UTILISEZ PAS.
• Enfoncez le bouton marche/arrêt (2) pour allumer l’appareil.
• Tenez la pointe de détection (3) tout proche de la zone que vous souhaitez tester. Effectuez un mouvement de va-et-vient sur toute la
zone à tester.
• La LED rouge s’allumera et l’appareil émettra un bip sonore continu indiquant la présence d’une tension.
ATTENTION : si l’appareil ne semble déceler aucune tension, ne supposez pas qu’il n’y ait aucune tension (des raisons d’environnement
ou autres peuvent influer sur le bon fonctionnement du détecteur, comme par exemple un câble blindé –voir note ci-dessus à ce sujet).
Entretien
• Ce produit n’est pas destiné à être réparé. Aucun de ses éléments n’est individuellement remplaçable.
• Recyclage
Lorsque l’appareil n’est plus en état de fonctionner et qu’il n’est pas réparable, recyclez l’appareil en accord avec les régulations
nationales.
• Ne jetez pas les outils électriques et autres équipements électriques ou électroniques(DEEE) avec les ordures ménagères
• Contactez les autorités locales compétentes en matière de gestion des déchets pour vous informer de la procédure à suivre pour
recycler les outils électriques
Consignes de sécurité
Prenez le temps de lire et de comprendre ce manuel avant d’utiliser l’outil. Gardez ces instructions avec le produit pour pouvoir les
consulter ultérieurement. Assurez-vous que toute personne venant à utiliser ce produit ait entièrement pris connaissance de ce manuel.
Sachez qu’utiliser un outil conformément aux prescriptions ne garantit pas l’élimination de tous les facteurs de risque. Procédez avec
prudence. N’utilisez pas cet outil si vous avez des doutes quant à la manière sûre et correcte de procéder.
• Conformez-vous à toutes les exigences en vigueur sur le plan local et national.
• N’exposez pas ce produit à des températures extrêmes ni à une forte humidité.
• Utilisez le produit avec précaution sur des circuits supérieurs à 30 V c.a. car il existe un risque de choc électrique.
ATTENTION : risque de choc électrique et de brûlures. Tout contact avec un circuit sous tension peut entraîner des blessures graves voire
mortelles.
Assemblage
• Ce détecteur de tension fonctionne avec 2 piles AAA de 1,5 V.
• Enfoncez l’agrafe de retenue du capuchon (1) et enlevez le capuchon en le faisant glisser sur le corps du détecteur.
• Introduisez les piles, en vous assurant que la borne positive de chaque pile soit bien orientée vers la pointe de détection (3) (selon
l’illustration schématique)
• Réinstallez le capuchon : placez le capuchon dans l’axe du corps du détecteur et faites-le coulisser sur celui-ci jusqu’à ce que l’agrafe
s’encliquète.
• Appuyez sur le bouton marche/arrêt (2) pour activer l’appareil. La LED verte s’allumera, indiquant que l’appareil est sous tension.
• Pour éteindre l’appareil, appuyez de nouveau sur le bouton marche/arrêt. Si l’appareil demeure allumé sans être utilisé pendant une
période prolongée, le dispositif d’arrêt automatique entraînera la déconnexion de l’appareil, permettant ainsi d’économiser la pile
Product Familiarisation
1) Cap Retaining Clip
2) On/Off Button
3) Test Tip
Présentation du produit
1) Agrafe de retenue du capuchon
2) Bouton marche/arrêt
3) Pointe de détection
140mm
3
2
Non-Contact AC Voltage Detector
Détecteur de tension alternative sans contact
Berührungsloser Wechselspannungsdetektor
Voltímetro sin contacto
Rivelatore di tensione
Contactloze AC spanningsdetector
www.silverlinetools.com
675220_Z1MANPRO1.indd 1
17/07/2013 10:39
Для работы проектов iXBT.com нужны файлы cookie и сервисы аналитики.
Продолжая посещать сайты проектов вы соглашаетесь с нашей
Политикой в отношении файлов cookie
Сложно представить любые электротехнические работы без мультиметра или ручки индикатора. Подавляющая часть таких устройств работают по контактному типу: вставил щупы в розетку и получил результат. В чем же преимущество бесконтактного тестера? Он прост в эксплуатации и не требует прямого контакта с оголенной проводкой, находящийся под напряжением. Также способен определять обрыв провода или находить скрытый токоведущий кабель под напряжением в стене. Вот именно о подобном тестере, мы сегодня поговорим.
Цена на момент публикации: $3.90
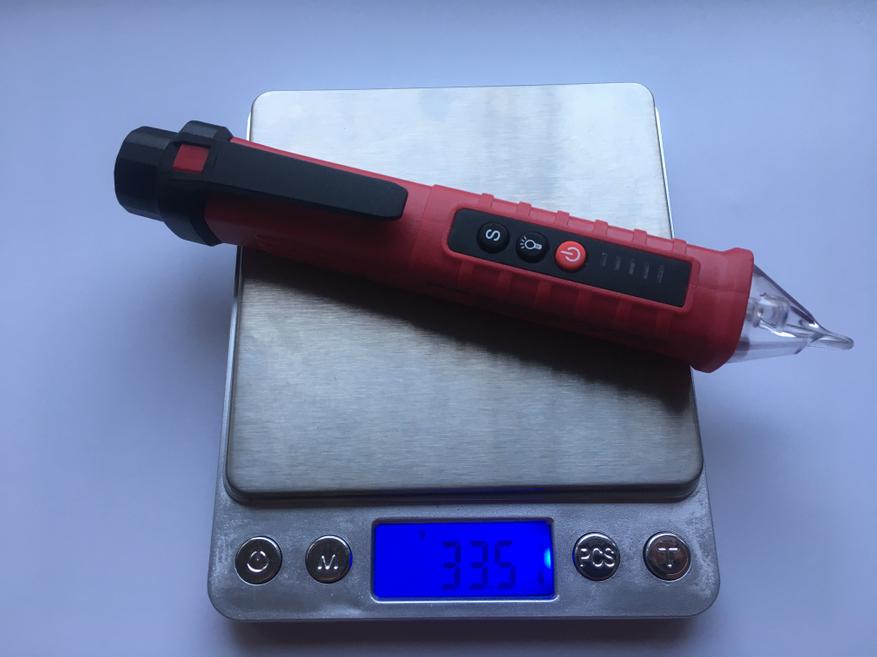
Технические характеристики
| Производитель | АNENG |
| Модель | VD802 |
| Диапазон измерения | 12 В – 1000 В |
| Класс точности | III класс |
| Режимы чувствительности | три режима |
| Индикация напряжения | Звуковая и световая индикация |
| Материал корпуса | АБС-пластик |
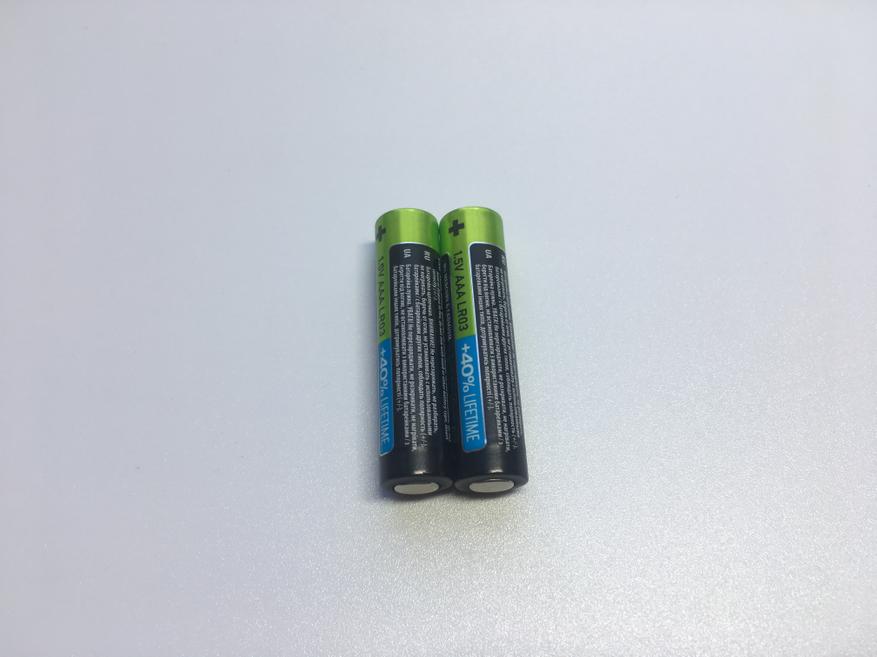
| Питание | Две батарейки ААА |
| Габаритные размеры | 156*26 мм |
| Вес | 33 грамм |
Упаковка и комплектация
Тестер приехал ко мне в пузырчатом пакете.
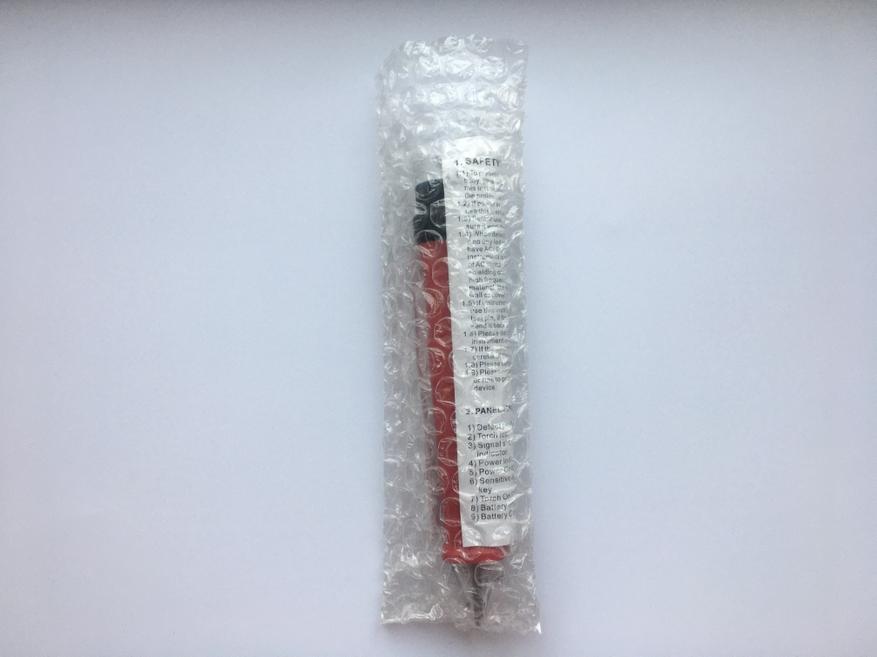
Внутри пакета находился прибор без элементов питания, а также краткая инструкция.
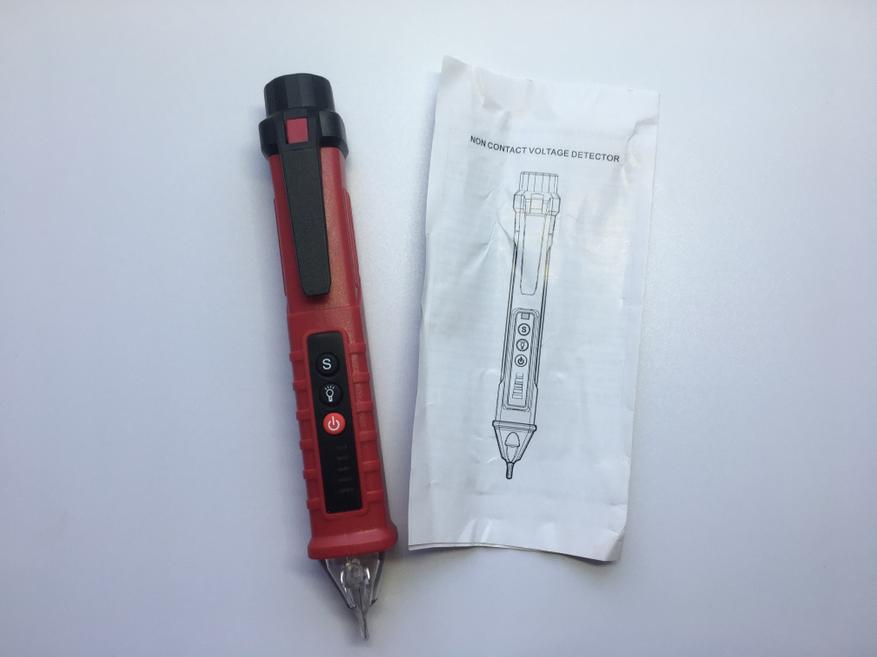
Инструкция написана на английском языке, в ней указаны основные технические параметры тестера, а также имеется руководство пользователя.
Внешний вид
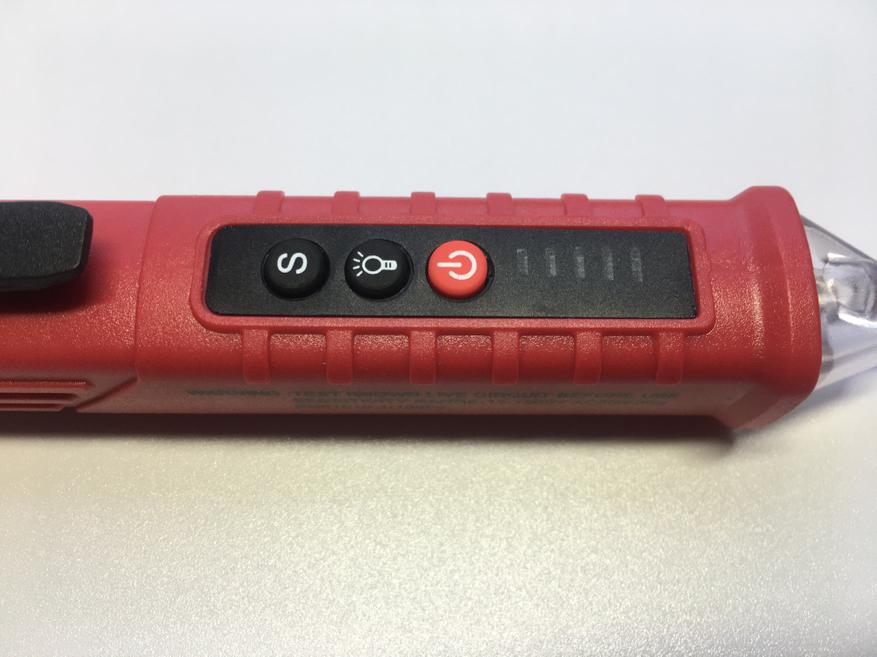
Прибор выполнен в виде небольшой ручки. Пластиковый корпус хоть и отдаёт дешевизной, но в целом, выглядит довольно достойно.

На лицевой стороне расположены три кнопки:
- Кнопка питания;
- Фонарик;
- Кнопка «S» (переключение режимов чувствительности тестера).
Ближе к щупу находится индикаторная панель. При обнаружении напряжения, она показывает насколько близок источник сигнала. Для этого предусмотрена пятиступенчатая шкала с разной световой индикацией: от бледно-желтого (слабый сигнал), до ярко-красного (сильный сигнал). Вместе со световой индикацией, срабатывает зуммер и тестер начинает «пищать».
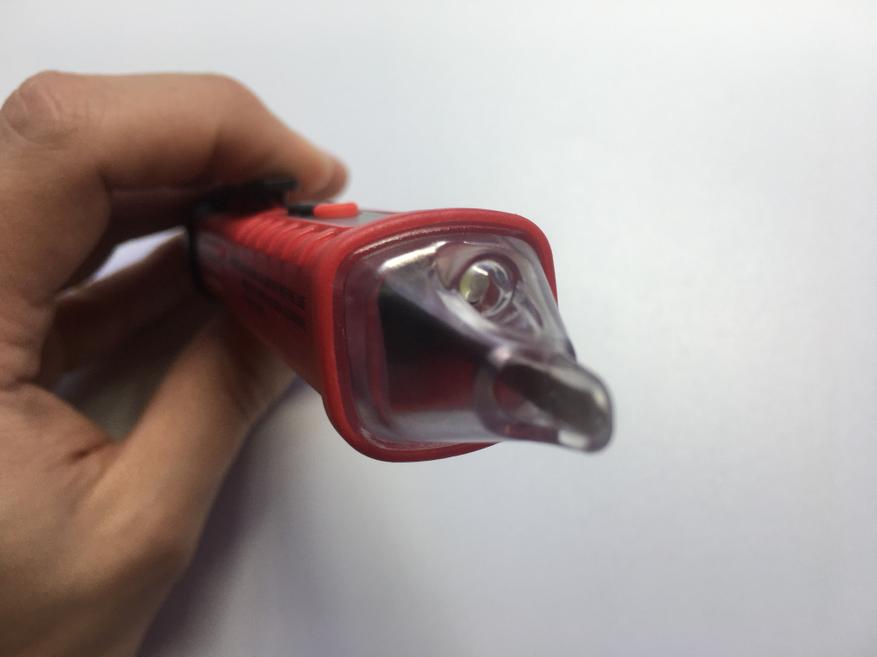
Спереди можно увидеть щуп, закрытый прозрачным колпаком. Немного выше расположен фонарик.
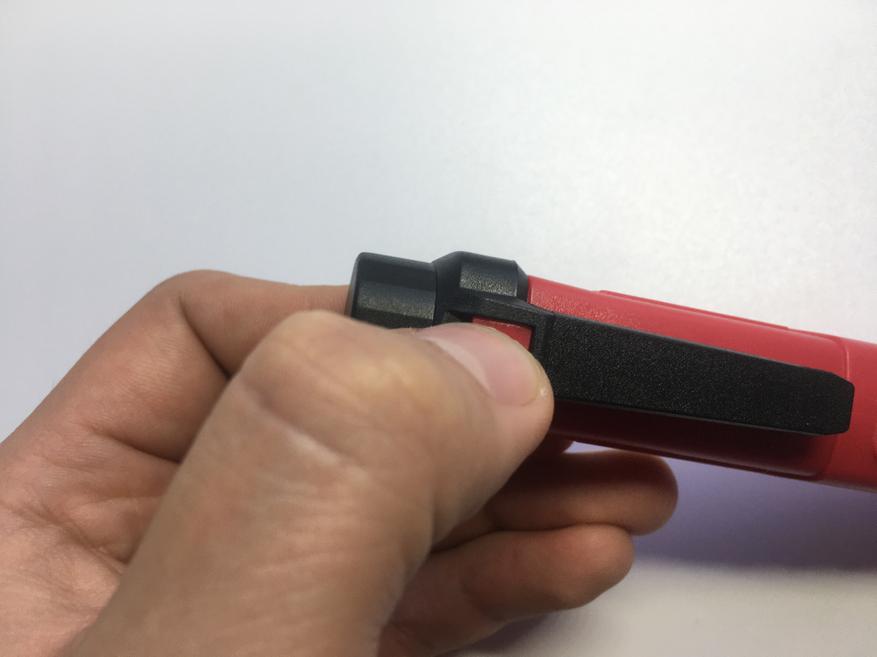
С обратной стороны есть защелка, открывающая доступ к отсеку с батарейками. Открыть её не просто: необходимо нажать на небольшой выступ и потянуть колпачок вверх.
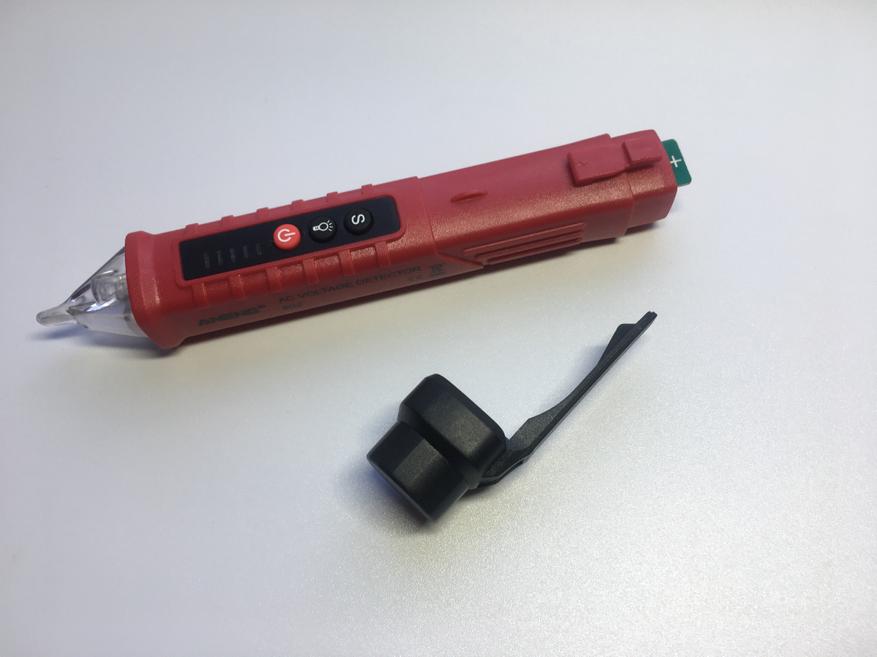
В качестве элементов питания используются две батарейки типоразмера ААА. Если батарейки имеют пониженное напряжение менее 2.6 В, то тестер сообщит об этом и индикатор возле щупа мигнет три раза. Еще у прибора есть функция автовыключения, после пяти минут бездействия.
На одной из сторон корпуса тестера, указана правильная полярность установки батареек. Разобраться с этим не сложно.

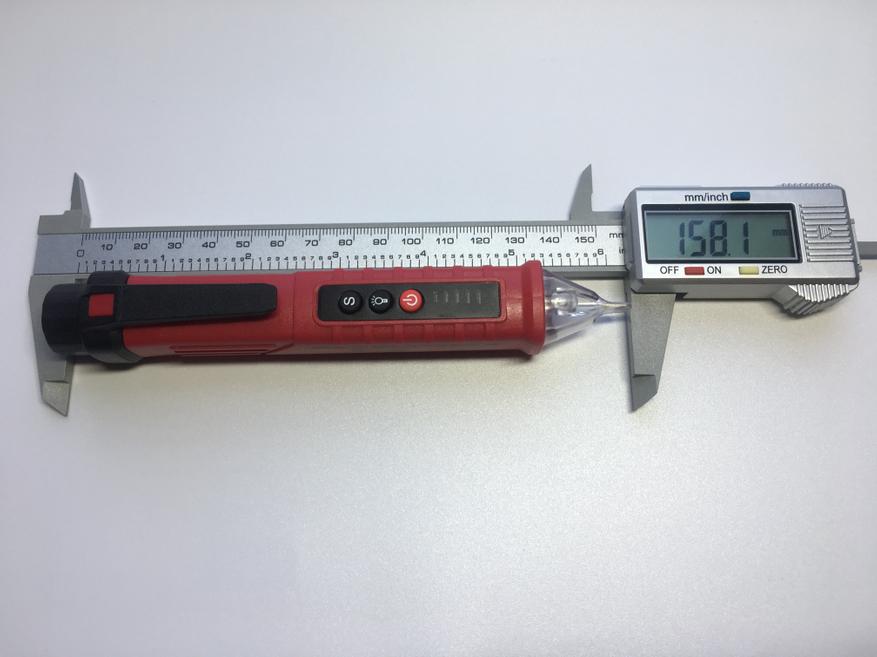
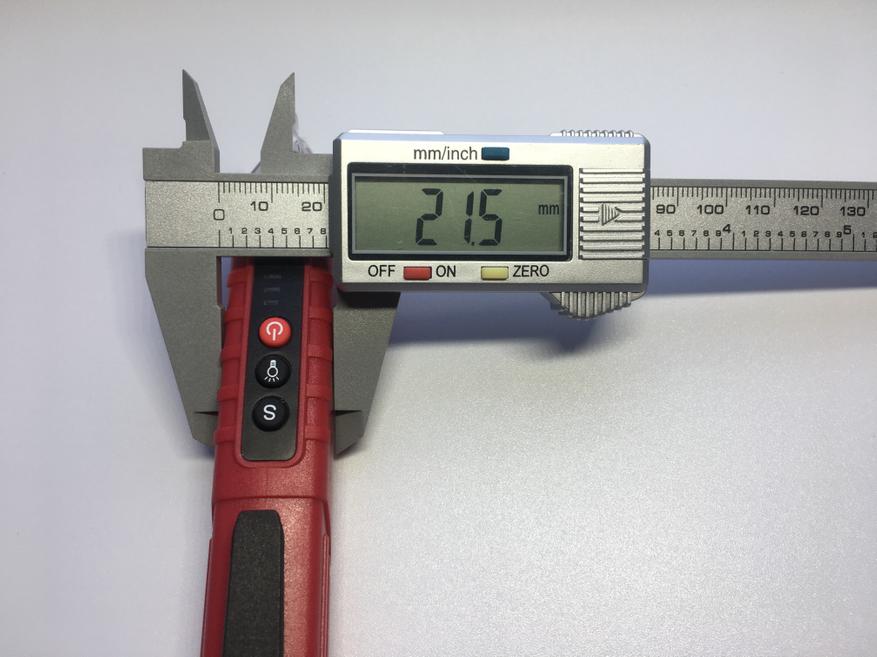
Измеренные габаритные размеры, а также вес тестера (без батареек), приведены на фотографиях ниже.
Тестирование
Ну что же, попробуем поработать тестером, так сказать, в «полевых условиях».
У прибора есть три режима чувствительности, которые разделяются на:
- Weak (слабая чувствительность сенсора);
- Middle (средняя чувствительность сенсора);
- Strong (высокая чувствительность сенсора).
Режимы переключаются циклически при нажатии кнопки «S» — Weak>Middle>Strong. При этом, каждое переключение фиксируется звуковым сигналом зуммера:
- Weak (одно срабатывание зуммера);
- Middle (два срабатывания зуммера);
- Strong (три срабатывания зуммера).
Допустим в режиме «Weak», найти токоведущий кабель в стене под напряжением, будет проблематично. Поскольку чувствительность сенсора слабая. Такой режим хорошо подойдет для проверки фазы и нуля в розетке, так как источник напряжения не скрыт и находится в близкой доступности.
Проведем несколько опытов на практике. Для начала попробуем найти фазу и ноль в электрической розетке. Включим прибор в режиме «Weak» и проведем замеры.
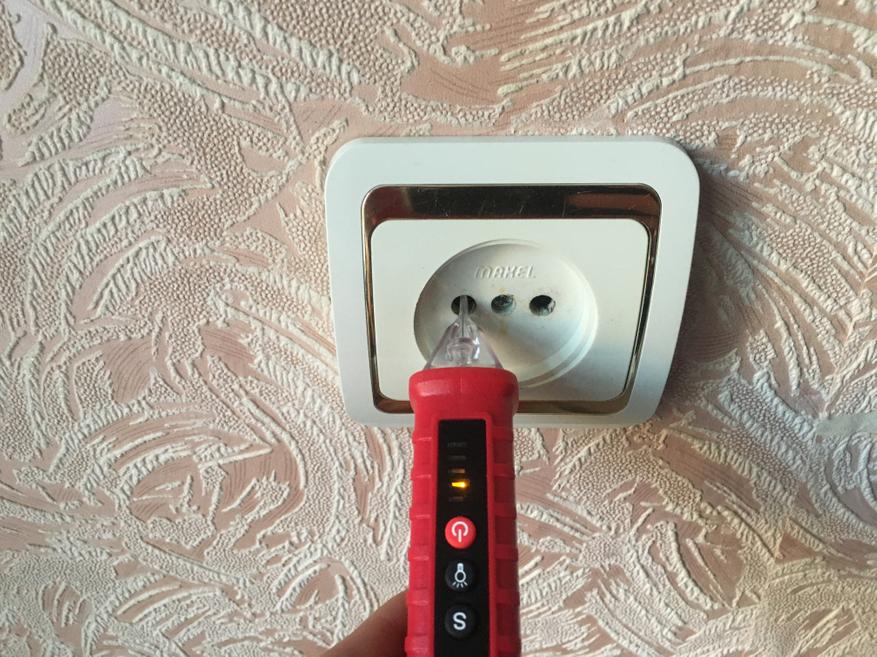

Тестер отлично справился с этой задачей.
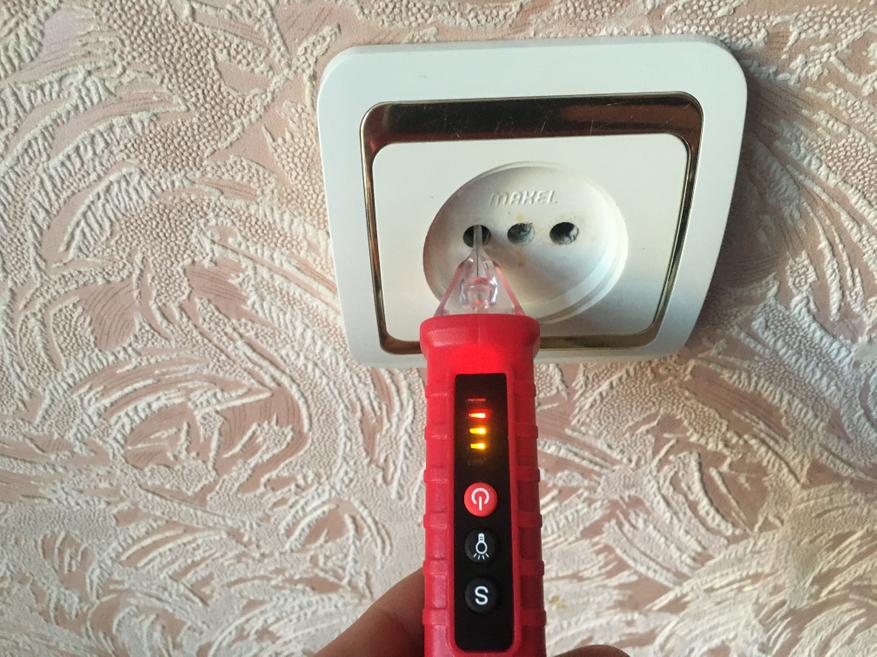
А что же если попробовать найти фазу и ноль в режиме «Strong»? Как видно из фотографий ниже, тестер начинает срабатывать на оба контакта, из-за высокой чувствительности сенсора. Поэтому, для данной задачи такой режим не применим.

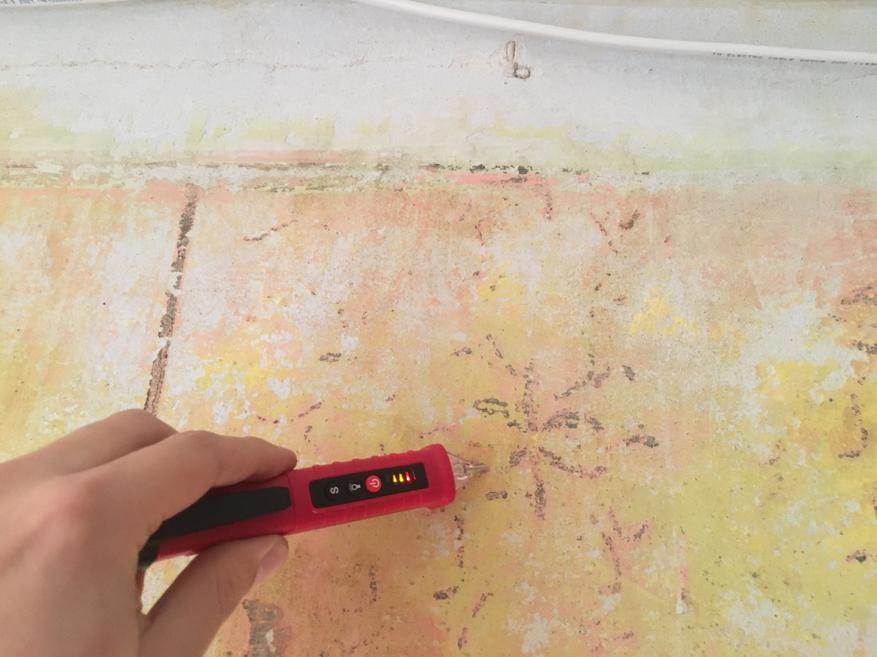
Теперь попробуем найти скрытую проводку под напряжением в стене. Переведем тестер в режим «Strong» и убедимся, что в стене присутствует провод под напряжением. На фотографии ниже виден фрагмент кабеля, остальная часть которого, замурована под шпаклевкой.
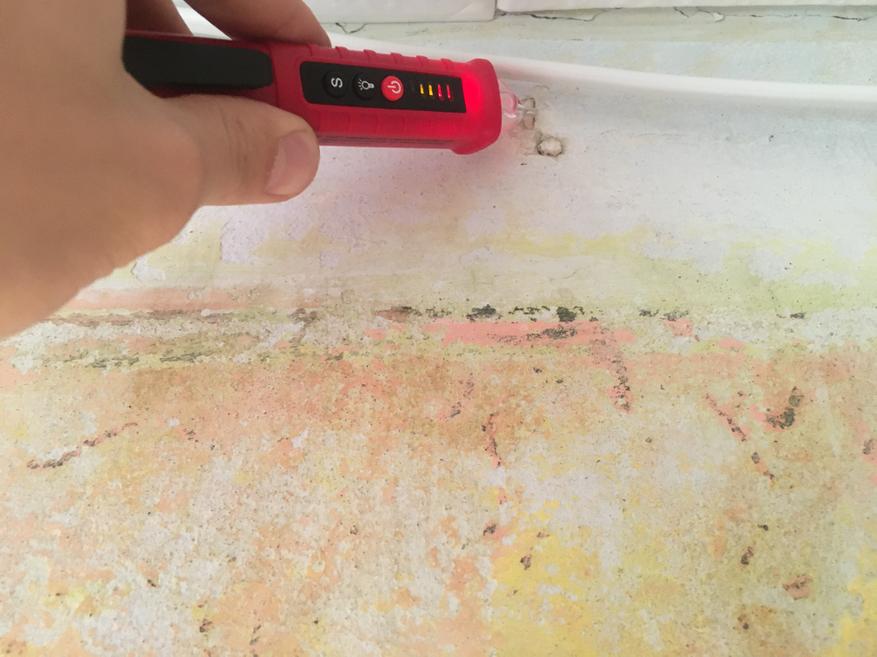
Затем я провел ниже по стене тестером и нашел место, где кабель опускается к полу. Так я смог проследить весь его путь к розетке.
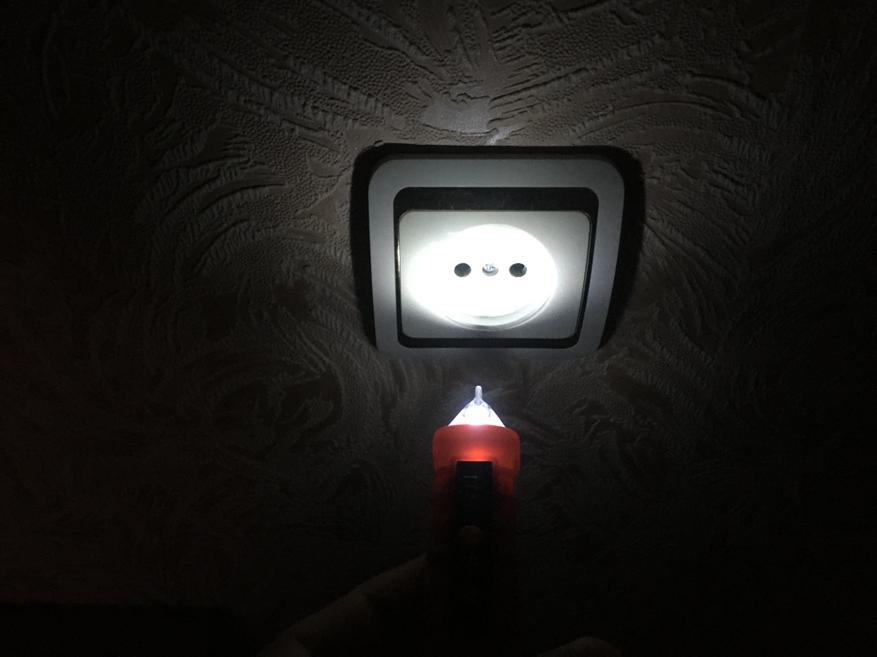
В завершении приведу пример, как работает подсветка фонариком на приборе. Снимки делались в полной темноте.

Купить тестер можно Здесь или Здесь
Выводы
Бесконтактный индикатор напряжения ANENG VD802 произвел достойное первое впечатление. Честно говоря, я ожидал худших результатов. В работе показал себя неплохо: фазу и ноль определяет, проводку под напряжением находит. Можно сказать так — минимальный набор функций, за разумные деньги. В заключении приведу основные достоинства и недостатки индикатора.
Достоинства:
- Небольшие размеры и удобная форма тестера
- Три режима чувствительности сенсора
- Можно определить место обрыва в проводе
- Определяет фазу и ноль
- Световая и звуковая индикация напряжения
- Функция автовыключения
- Функция определения низкого заряда батареек, питающих тестер
- Наличие фонарика
- Цена
Недостатки:
- Посредственное качество материалов, из которых изготовлен корпус устройства
- Защелка на задней крышке (при большом усилие её можно сломать)