
- June 9, 2024
- NUX
Table of Contents
- CORE Series Loop Station Loop Pedal
- FEATURES
- PRODUCT INTERFACE
- INSTALLING THE BATTERIES
- CONNECTIONS
- POWER ON/OFF
- OPERATION INSTRUCTION
- SPECIFICATIONS
- PRECAUTIONS
- ACCESSORIES
- Read User Manual Online (PDF format)
- Download This Manual (PDF format)
CORE Series Loop Station Loop Pedal
User Manual
LOOP CORE
Users Manual
www.nuxefx.com
CORE Series Loop Station Loop Pedal
Thank you for choosing the mum Loop Core pedal!
Loop Core allows you to record and create music phases and play back as loops!
Whether you practice, compose, or play live gigs, you will get inspired by the
well-considered functions of Loop Core!
Please take the time to read this manual carefully to get the most out of the
unit. We recommend that you keep the manual at hand for future reference.
FEATURES
- Record and overdub as many layers as you need.
- Up to 6 Hours recording time.
- Mono or Stereo recording*(stereo input only via AUX IN jack).
- 99 user memories.
- Built-in rhythm tracks with 40 patterns.
- Change the playback tempo of your recorded phrases without changing the key.
- Switching phrases without latency.
- Extensional pedal (optional) for more control.
- Import and backup phrases with PC.
- Runs on batteries and AC adaptor.
Copyright
Copyright 2013 Cherub Technology Co. All rights reserved. NUX and LOOP CORE
are trademarks of Cherub Technology Co. Other product names modeled in this
product are trademarks of their respective companies that do not endorse and
are not associated or affiliated with Cherub Technology Co.
Accuracy
Whilst every effort has been made to ensure the accuracy and content of this
manual, Cherub Technology Co. makes no representations or warranties regarding
the contents.
WARNING!-IMPORTANT SAFETY INSTRUCTIONS BEFORE CONNECTING, READ
INSTRUCTIONS
WARNING: To reduce the risk of fire or electric shock, do not expose this
appliance to rain or moisture.
CAUTION: To reduce the risk of fire or electric shock, do not remove
screws. No user-serviceable parts inside. Refer servicing to qualified service
personnel.
CAUTION: This equipment has been tested and found to comply with the
limits for a Class B digital device pursuant to Part 15 of FCC Rules.
Operation is subject to the following two conditions: (1) This device may not
cause harmful interference, and (2) this device must accept any interference
received, including interference that may cause undesired operation.
The lightning symbol within a triangle means “electrical caution!” It
indicates the presence of information about operating voltage and potential
risks of electrical shock.
The exclamation point within a triangle means “caution!” Please read the
information next to all caution signs.
- Use only the supplied power supply or power cord. If you are not sure of the type of power available, consult your dealer or local power company.
- Do not place near heat sources, such as radiators, heat registers, or appliances which produce heat.
- Guard against objects or liquids entering the enclosure.
- Do not attempt to service this product yourself, as opening or removing covers may expose you to dangerous voltage points or other risks. Refer all servicing to qualified service personnel.
- Refer all servicing to qualified service personnel. Servicing is required when the apparatus has been damaged in any way, such as when the power supply cord or plug is damaged, liquid has been spilled or objects have fallen into the apparatus, the apparatus has been exposed to rain or moisture, does not operate normally or has been dropped.
- The power supply cord should be unplugged when the unit is to be unused for long periods of time.
- Protect the power cord from being walked on or pinched particularly at plugs, convenience receptacles and at the point where they exit from the apparatus.
- Prolonged listening at high volume levels may cause irreparable hearing loss and/or damage. Always be sure to practice “safe listening”.
Follow all instructions and heed all warnings KEEP THESE INSTRUCTIONS!
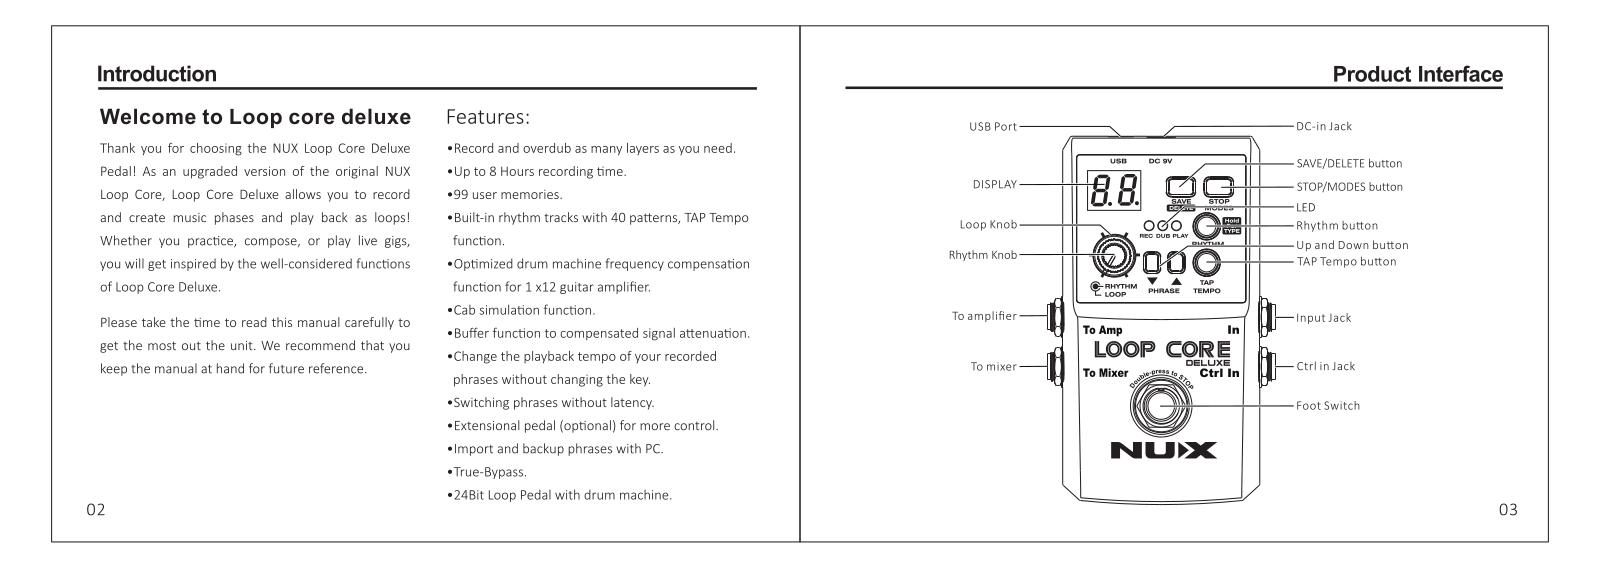
PRODUCT INTERFACE

-
DISPLAY
It indicates the memories and rhythm number, and other setting information. -
LOOP knob
To adjust the playback volume level of the recorded audio. -
RHYTHM knob
To adjust the volume level of the internal rhythm tracks. -
SAVE/DELETE button
To save the current phrase or delete the phrase in current memory. -
STOP MODES button
To select the way you want to stop during playback after you press pedal to
stop.(see. 1.4 for details.) -
RHTHM button
This is for turning on/off the rhythm or selecting rhythm patterns. -
LED Lights REC:
The red light indicates that you are recording. DUB: The orange light
indicates that you are overdubbing. PLAY: The green light indicates that it’s
during playback of current phase.
During overdubbing, both DUB and PLAY will light up. -
TAP button
Press this several times in time to set the tempo of rhythm. This can change
the playback speed of a saved loop. -
Up and Down buttons
For selecting memory numbers, rhythm patterns, and other setting options. -
Foot Switch
To record, overdub, playback, and you also press this pedal to stop, undo/redo
and clear recording. (Please see below instruction for details) -
USB Jack
Connect the Loop Core to your PC with a mini USB cable to import or backup
audio data. (See .4.7) -
POWER IN Loop
Core requires 9V DC/300 mA with center negative. Use the power supply with
identical specifications. (i.e. Optional NUX ACD-006A) -
AUX IN (Stereo In)
You can connect an extensional music playback device to input stereo music
signal to Loop Core, and record the input music as a stereo loop. Or, you can
use a “Y’ cable to input the stereo signal from your guitar effects or other
instruments to Loop Core. -
IN jack
This is a mono input. Plug your guitar to this jack. -
CtrI In
This is for connecting extensional pedals to stop playback, clear a phrase,
switching memories, or do TAP tempo. (See .3.7) -
0ut L/Out R Stereo
These output the signal to your guitar amp or mixer. Out L is the main mono
output. If you only input your guitar as mono signal, please use Out L.
IMPORTANT NOTICE :
Out L works as the power trigger as well. Unplug the cable from Out L will
turn off the power of Loop Core.
If you input stereo signal from AUX In, and the sound is only output from Out
L to monaural system, the sound will be output as mono signal.
INSTALLING THE BATTERIES
Battery is supplied with the unit. The life of battery may be limited,
however, since their primary purpose was to enable testing.
Insert the batteries as shown in figure, being careful to orient the batteries
correctly.

- Remove the old battery from the battery housing, and remove the snap cord connected to it.
- Connect the snap cord to the new battery, and place the battery inside the battery housing.
- When the battery run down, the sound of unit gets distort. If this happens, replace with new battery.
- Battery life can vary depending on battery type.
- The power comes on when you insert the connector plug into the OUT L jack.
- The use of an AC adaptor is recommended as the unit’s power consumption is relatively high.
CONNECTIONS

POWER ON/OFF
When running the unit on battery power, inserting a plug into the OUT L jack
will automatically switch the unit on.
To prevent malfunction and/or damage to speakers or other devices, always turn
down the volume, and turn off the power on all devices before making any
connections.
Once the connections have been completed, turn on power to your various device
in the order specified. By turning on device in the wrong order, you risk
causing malfunction and/or damage to speakers and other devices.
When powering up: Turn on the power to your guitar amp last. When powering
down:Turn off the power to your guitar amp first.
NOTE: Loop Core will take a few seconds to run self-test and the display
will shows “SC” after it is powered on. It will return to normal status after
self-test.
OPERATION INSTRUCTION
1.TO RECORD AND CREAT A LOOP PHRASE
1.1NORMAL RECORDING MODE (Default)
1.1.1 Select a empty memory location by pressing the Up and Down arrows. The
display shows the current memory number. A dot at the down right corner of the
display means the current memory number already has data saved. If there is no
dot, it means the current memory number has no data, and you can start to
create a new loop and save it in this memory location.
1.1.2 RECORD: Press the pedal to start to record a loop.
1.1.3 OVERDUB: After a loop was recorded, you can record overdubs on it. Each
time you press the pedal, the sequence is: Rec – Play – Overdub.
NOTE: You can change this sequence to: Record -Overdub – Play by
following this:
While holding down the pedal, turn on the power by inserting DC jack and plug
a cable in OUT L jack. The display will show “ ” or ” “, you can select either
one by pressing the arrow buttons, and press the pedal once again to confirm.
“ ” for Record – Overdub – Play.
“ ” for Record – Play – Overdub.
NOTE: To overdub on the current phrase. Loop Core requires that the total
remaining recording time must be longer than the time of current phrase. If
the DUB LED light keeps blinking after you overdub, it means you cannot
overdub under such status.
If the screen shows” ” , it means the memory is full and you are not able to
record.
1.1.4 STOP: During playback or overdubbing, double-press the pedal (press
the pedal twice within 1 sec) to stop.
1.2AUTO RECORDING MODE
You can temporary set the Loop Core to Auto Recording mode by following below
steps:
1.2.1 Under an empty memory slot, press and hold STOP MODE button for 2 sec, “
” will be blinking on the display, press STOP MODE button again within 2 sec
to change it to “ ” to enable Auto Recording mode.
1.2.2 Under this mode, the first time you press the pedal will enter recording
standby status, and the REC LED will be blinking. It automatically starts
recording as soon as it detects input sound signal from AUX In or Input jack.
1.2.3 Overdubbing and playback are the same as normal recording mode.
NOTE: Changing to Auto Recording mode only temporary functions for the
current memory location. Switching to next memory number will go back to
Normal Recording mode, which is the default mode for Loop Core.
1.3UNDO/REDO/CLEAR UNDO
During overdubbing or playback, you can hold down the pedal for 2 sec to undo
(cancel) the most recent overdubbing.
REDO During playback, press and hold the pedal for 2 sec can restore the
overdubbing that you have just canceled.
- Redo is Only for restoring overdubbing. There will be a little dot displayed in the middle of the two digits to indicate that you have data that can be restored.
CLEAR You can clear all recording data in this memory by holding the
pedal down for 2 sec while stopped. (Already saved data will not be cleared
this way, which is different from DELETE(see 1.8)
1.4 STOP MODES
LOOP CORE has three stop modes that you can choose to finish the playback.
1.4.1 Before start playing a loop or during playback, you can press STOP MODES
buttons to select the way you want the loop to end after you double-press the
pedal.
” .”: instantly stops.
” “: stop at the ending of this loop.
“ “: fade out and stop in 10sec.
1.4.2 If you choose “ “or “ “, after you double-press the pedal during
playback, the PLAY LED will start blinking until it finally stops. If you
still want the loop to end instantly during the time when the PLAY LED is
blinking, just quickly press the pedal once again.
1.5 SWITCHING MEMORY NUMBERS/LOOPS
You can press Up and DOWN buttons to switch memory numbers/loops, or using
optional extensional pedal (see 3 ).
During playback, if you switch to another loop, the number of the chosen
phrase will start blink, and when the current loop reaches its end, the chosen
loop will start playing. The transition has NO GAP, so it is perfect for
creating a complete backing track that has verse and chorus!!
1.6 SAVE A LOOP TO MEMORY
Once you have created a music loop, you can save it to memory. You can save up
to 99 memories. Each memory can be as long as you want until it reaches the
memory limit. The memory limit of Loop Core is 4GB. Maximum recording time is
about 6 hours.
1.6.1 Short press SAVE button and you will see the memory number and ” ”
will be blinking on the display in turn.
1.6.2 Press Up or Down to choose an empty memory location (the down right
corner of the display has no dot), and press SAVE again to confirm the
storage. Or, you can press any button other than SAVE and UP/DOWN to
abandon saving.
1.6.3 All the data including recordings, stop mode, tempo and the selected
rhythm pattern will be saved. But recording mode will not be saved. Auto
Recording mode can only be temporary set (see 1.2).
NOTE: You cannot save to a memory location that already has data. During
step 1.6.2, if you press UP or DOWN button and the next memory number already
has data, it will lead you to the closest empty memory location.
1.7 COPY A LOOP PHRASE
You may want to copy a saved loop to another memory location by following
below steps:
1.7.1 Choose the memory loop that you want to copy.
1.7.2 Short press SAVE/DELETE button and you will see the memory number on
the display start blinking.
1.7.3 Press Up or Down to choose an empty memory location (the down right
corner of the display has no dot), and press SAVE/DELETE again to confirm
the storage.
NOTE: If the remaining memory is not enough for copying the chosen loop,the
display will show “ ” .
1.8DELETE A MEMORY
1.8.1 Press and hold the SAVE/DELETE button for two second, you will
see “ .” blinking on the display.
1.8.2 Press SAVE/DELETE once again to confirm deleting. Or, you can press any
button other than SAVE/DELETE to abandon deleting.
1.8.3 All the data including recordings, stop mode, tempo and the selected
rhythm pattern will be deleted.
2.RHYTHM TRACKS
LOOP CORE has built-in rhythm tracks that with 40 patterns, ranging from
metronome click to drum tracks that cover various music styles. You can use
the rhythm to guide your recording, or even after you finishing recording, you
can turn on the rhythm tracks, and it will smartly immediately find your beat
and follow! Tap tempo button blinks to indicate the beat.
2.1 Press RHYTHM or TAP TEMPO button to turn on the rhythm. The
default sound is metronome click. The RHYTHM button blinks to indicate the
tempo. If you start the rhythm after the loop has been recorded, the Loop Core
will automatically detect the tempo of the loop.
2.2 TAP TEMPO button lights up to indicate that you can use this to set
tempo. If this button does not light up, it means tap tempo is not possible in
such status, i.e. during recording or overdubbing.
2.3 Press and hold R H YTHM button for 2 sec, and you will see the pattern
number blinking on the display.
2.4 Use UP and DOWN buttons to choose your favorite pattern.
2.5 Use TAP TEMPO button to set your desired tempo.
2.6 The default time signature of Loop Core is 4/4 beat. You can change it to
3/4 beat by:
2.6.1 Only in an empty memory location, turn on the rhythm, press and hold the
TAP TEMPO button until you see “ ” or “ ” blinking on the display.
2.6.2 Press Up or Down button to switch between “ ” or “ ”
2.6.3 Press TAP TEMPO again to confirm setting.
NOTE: Changing time signature to 3/4 is only valid for current memory.
You can only change time signature before you start record anything. It is not
possible to change time signature if there is already recording.
Rhythm
1| Metronome| 11| Hip-Hop 2
2| Hi-Hat| 12| Pop
3| Rock| 13| Pop 2
4| Rock 2| 14| Fast Rock
5| Shuffle| 15| Metal
6| Blues Rock| 16| Latin
7| Swing| 17| Latin 2
8| Country| 18| Old TimesRock
9| Country 2| 19| Reggae
10| Hip-Hop| 20| Dance
3.USING EXTENSIONAL CONTROL PEDALS
You can plug in an extensional control pedal to the Ctrl In jack, i.e. Cherub
WTB-004 Pedal(optional) to have more hand-free control during live
performance:
3.1 Plug in the WTB-004 to Ctrl In jack on Loop Core with the WTB-004 NOT
pressed for at least 1 second, so that the Loop Core can recognize the pedal.
3.2 Stop: short press the WTB-004 once to stop during recording, overdubbing
and playback. Same as double-press the pedal of Loop Core.
3.3 TAP TEMPO: press WTB-004 several times in time to set the tempo while
stops.
3.4 Clear Loop: press and hold the WTB-004 will clear all the recordings that
have not saved.
3.5 You can connect two WTB-004 pedals to Loop Core if you use a “Y”shape
cable like this:

Then
one WTB-004 will function like above, the other WTB-004 can be used to switch
memory numbers:
3.5.1 Short press the second WTB-004, it switched to next memory number, same
as pressing the Up button.
3.5.2 Press the second WTB-004 twice in one sec will switch to the previous
memory number, same as you press DOWN button.
NOTE: Do not switch the slide-switch of WTB-004 after you connect it to
loop Core.
4.USB CONNECTION
Connect a USB cable (like the USB cable for digital cameras) between Loop Core
and your PC, and turn on the power of Loop Core by connecting the power
adaptor and plug a cable into Out L. The display of Loop Core will show ” ”
when it is connected successfully. Now you can import WAV files to Loop Core,
or backup the recording phrases from Loop Core to your PC:
4.1 To import a WAV file to Loop Core
4.1.1 Click and open the Removable Disk of Loop Core, and open the
“Cherub” folder.
4.1.2 Open the WAV folder, and there will be 99 folders for 99 memory numbers:
“W001”, “W002″ …”W099”. Choose one empty folder that you want to import a
WAV file to. For example: folder “W031”.
4.1.3 Copy the WAV file from your computer to the folder “W031”, and rename
this WAV file to “w031.wav”.
4.1.4 This WAV file is imported successfully and can be played as a loop in
memory number 31 in Loop Core.
NOTE: Loop Core accept WAV file that is 16-bit, stereo 44.1kHz.
4.2 To back up and recover phrases from Loop Core to your PC
4.2.1 Copy the “Cherub” folder to your PC to back up.
4.2.2 Copy the “Cherub” folder from your PC to replace the Cherub folder in
Loop Core drive to recover.
IMPRTANT: The SAVE/DELETE button blinks when data is being
transferring. Do NOT cut the power by disconnecting the power cable or
unplugging the cable from Out 1 jack whenever the Loop Core is processing
data.
5.FORMATTING LOOP CORE
In case you want to reset the Loop Core back to factory setting, you can
format the Loop Core by follow below steps:
5.1 Power on the Loop Core while pressing down the pedal until the display
shows “ ” or “ “.
5.2 Press and hold Up or Down button for 2 sec until the display shows “ “.
5.3 Press the pedal once again to confirm formatting. Or, press any other
buttons other than the pedal to abandon formatting.
WARNING: Formatting the Loop Core will wipe away all recordings from
Loop Core and set everything to factory settings. Be sure to back up all your
data before you format the Loop Core! During formatting, loop core will run
self-test and the display will show “ ” until formatting is completed.
SPECIFICATIONS
-
Sampling Frequency: 44.1kHz
-
A/D converter: 16bit
-
Signal Processing: 16bit
-
Frequency response: 0Hz-20kHz
INPUT impedance: 1Mohm
AUX IN impedance : 33kohm
OUTPUT impedance: 10kohm -
Display: LED
-
Power: 9V DC Negative Tip (9V Battery, ACD-006A Adapter)
-
Current draw: 78mA
-
Dimensions: 122(L)x64(W)x48(H)mm
-
Weight:265g
PRECAUTIONS
-
Environment:
1.Do NOT use the pedal in high temperature, high humidity, or subzero
environments.
2.Do NOT use the pedal in the direct sunlight. -
Please do NOT disassemble the pedal by yourself.
-
Please keep this manual for future reference.
ACCESSORIES
- Owner’s manual
- 9V battery
- Warranty card
THE FCC REGULATION WARNING (for U.S.A.)
This equipment has been tested and found to comply with the limits for a Class
8 digital device, pursuant to Part 15 of the FCC Rules. These limits are
designed to provide reasonable protection against harmful interference in a
residential installation. This equipment generates, uses, and can radiate
radio frequency energy and, if not installed and used in accordance with the
instructions. may cause harmful interference to radio communications. However,
there is no guarantee that interference will not occur in a particular
installation. If this equipment does cause harmful interference to radio or
television reception, which can be determined by turning the equipment off and
on, the user is encouraged to try to correct the interference by one or more
of the following measures:
- Reorient or relocate the receiving antenna.
- Increase the separation between the equipment and receiver.
- Connect the equipment into an outlet on a circuit different from that to which the receiver is connected.
- Consult the dealer or an experienced radio/TV technician for help.
CE mark for European Harmonized Standards
CE Mark which is attached to our company’s products of Battery mains the
product is in fully conformity with the harmonized standard(s) EN 61000-6-
3:20071-A1:2011 & EN 61000-6-1:2007 Under the Council Directive 2004/108/ EC
on Electromagnetic Compatibility.
©2013 Cherub Technology-All rights reserved.
No part of this publication may be reproduced in any form
without prior written permission of Cherub Technology.
www.nuxefx.com
Made in China
Read User Manual Online (PDF format)
Read User Manual Online (PDF format) >>
Download This Manual (PDF format)
Download this manual >>
Nux Loop Core Deluxe – педаль-лупер с футсвитчем. Позволяет записывать до 8 часов аудио в WAV-формате в 24-бит, при том количество записанных друг на друга фраз неограничено. Педаль располагает встроенной драм-машиной с 40 грувами в разных стилях.(30 на 4/4, 10 на 3/4). Лупер можно соединить с компьютером с помощью разъема Mini-B USB и импортировать записанный материал.
Педаль обладает функцией компенсации частот и симуляции кабинета. К тому же, педаль сама определяет подключенный к ней аппарат и маршрутизирует сигнал — гитара и закольцованные фразы отправятся в усилитель, а партия драм-машины — в выход на микшере.
Loop Core также автоматически определяет темп играемых лупов. Можно записать фразу без клика или дорожки барабанов, и Loop Core Deluxe автоматически подгонит ее темп под паттерн. Педаль удобна для встраивания в педалборд — доступны режимы buffer bypass и true bypass.
Особенности Loop Core Deluxe Bundle:
- До 5 часов записи;
- Неограниченное количество овердабов;
- Аудио 24 бит;
- 99 слотов памяти;
- Встроенная драм-машина с 40 грувами в разных стилях;
- Автоподстройка темпа;
- Порт Mini-B USB для импорта и хранения лупов (только файлы 24-бит / 44.1 кГц WAV);
- Режимы True и Buffered Bypass;
- Футсвитч в комплекте.
- Nux
- Гитары Nux
- Педали эффектов Nux
Файлы для скачивания
- Инструкция для Nux NMP-2 (PDF 3 Мб 198 Кб)
- Инструкция для Nux Loop Core Deluxe (PDF 17 Мб 68 Кб)
Nux
Loading…
#
- 65O-10 6ixty 5ive Overdrive analog effectpedaal
A
- AC-25
- AC-50
- AC-80
- Acoustic 30
- Amp Force
- Analog Chorus
- Analog Delay
B
- B-10 Vlog draadloze dasspeldmicrofoon
- B-2B
- B-2 Plus
- B-3
- B-3MA universele telefoonhouder met 3.5mm TRS — TRRS adapter2
- B-3 Plus
- B-5RC
- B-6
- B-6 draadloze microfoon voor saxofoons
- B-7PSM draadloos in-ear monitor systeem
- B-8 Wireless 2.4 GHz draadloos gitaarsysteem met ingebouwd stemapparaat2
- Boost Core Deluxe
- Booster
C
- C-5RC
- C-5RC draadloos gitaarsysteem
- Cerberus3
- CHORUS
- Chorus Core
- Compressor
D
- DA-30BT personal drum monitor 30W met bluetooth
- Distortion
- DM-1
- DM-210
- DM-210 elektronisch drumstel
- DM-3
- DM-52
- DM-7
- DM-7X
- Drive Core Deluxe
- Drive Force
- Drive forcer
- DS-3 Classic Distortion
F
- Flanger Core
- FrontLine 15
- FrontLine 30
- FrontLine 50
- FrontLine 8
K
- Komp Core Deluxe
L
- LM3
- Loop Core
- Loop Core Deluxe2
M
- Melvin Lee Davis NBP-5 bas preamp + DI box
- metal core
- Metal Core Deluxe
- Metal Core Deluxe MK2 high gain preamp effectpedaal
- MF6
- MFX-10
- MG-100
- MG-101 multi-effectpedaal en modeler
- MG-20
- MG-30
- MG-300
- MG-400 multi-effectpedaal
- MIGHTY15SE
- Mighty 20 BT
- MIGHTY30SE
- Mighty30X
- Mighty 40 BT
- Mighty50X2
- Mighty8
- Mighty 8 BT
- Mighty Air
- Mighty Air stereo Bluetooth gitaar/basversterker draadloos
- Mighty Bass 50 BT
- Mighty Lite BT
- Mighty Lite BT MKII Bluetooth 3 watt mini-gitaarversterker combo
- Mighty Plug
- Mighty Space 30W draagbare wireless modelingversterker
- Mod Core Deluxe2
- Mod Core Deluxe MK2 modulatie effectpedaal
- MOD Force
- Morning Star
- MP-3 Mighty Plug Pro gitaar en bas amp modeler
- MUGHTY8SE
N
- NAI-5
- NAP5
- NBK-5
- NBP-5
- NCH-1
- NCH-3 Voodoo Vibe Uni-vibe effectpedaal
- NCH-4 Ukiyo-E Chorus effectpedaal
- NCH-5 Mini SCF Chorus Flanger & Pitch Modulation effectpedaal
- NCP-2
- NDD-2
- NDD-3 Edge Delay effectpedaal
- NDD-6
- NDD-6 Duotime dual delay gitaar effectpedaal
- NDD-7 Tape Echo Delay / Reverb effectpedaal
- NDL-3 Hook Drum & Loop looper pedaal
- NDL-5
Loading…
Loading…
Nothing found
Loop Core Deluxe
Owner`s Manual
28 pgs17.9 Mb0
Owner’s Manual
14 pgs12.56 Mb0
Table of contents
Loading…
…
Nux Owner`s Manual
Download
Specifications and Main Features
Frequently Asked Questions
User Manual


Loading…
+ 19 hidden pages
You need points to download manuals.
1 point = 1 manual.
You can buy points or you can get point for every manual you upload.
Buy points
Upload your manuals
Nux LOOP CORE STEREO Quick Start Guide
Pages
2
Year
0
Language(s)
en
Share
of 2
of 2
Quick Start Guide
2 pages
en
19 pages
en
zh
Loop-Core-Stereo Педаль эффектов
NUX Loop Core Stereo — педаль Looper нового поколения. Оснащенная цветным ЖК-дисплеем высокой четкости, стереовходами/выходами и входом управления MIDI, педаль Loop Core Stereo позволяет создавать до 6 часов музыкальных фраз, сохранять их в одном из 99 слотов памяти и воспроизводить в виде стерео петель! Также включены 50 различных рисунков ударных для завершения процесса. Независимо от того, практикуетесь ли вы, сочиняете музыку или играете на живых концертах, вы будете вдохновлены с самой первой петли!
Создавайте и сохраняйте.
С NUX Loop Core Stereo легко создавать петли и тренироваться.
Включите педаль Loop Core Stereo, поверните ручку VALUE, чтобы выбрать пустую ячейку памяти от 01 до 99, затем нажмите ножной переключатель для записи/воспроизведения/дублирования ваших петель. Вы также можете удерживать ножной переключатель для отмены/повтора действия/очистки.
Когда вы работаете над петлями или тренируетесь, нажмите ручку VALUE один или два раза, чтобы отрегулировать громкость Loop/Drum.
4 примера установок с использованием Loop Core Stereo.
Установка 1. Моно вход, моно выход.
Это наиболее распространенная установка педали для гитаристов. Подключите гитару ко входу A/Mono на Loop Core Stereo и подключите выход A/Mono непосредственно к гитарному усилителю. И, наконец, установите AUDIO PATH, как Stereo In/Out.
Установка 2. Стерео вход, стерео выход. Установите AUDIO PATH, как Stereo In/Out.
Установка 3. OUT A для гитары, OUT B для драм-машины. Чтобы получить наилучшее звучание, вы можете подключить педаль Loop Core Stereo к гитарному усилителю и полнодиапазонному усилителю. Установите AUDIO PATH, как Split In/Out. Это разделит сигнал гитары и сигнал драм-машины на выходы OUT A и OUT B.
Установка 4. Оба выхода A и B на микшер. Когда вы играете дома или в студии с помощью микшера и/или акустической системы, вы можете подключить педаль Loop Core Stereo для индивидуального управления миксом вашей гитары и драм-машины. Кроме того, эта установка включает функцию частотной компенсации для получения лучшего сигнала с выхода OUT A. Установите AUDIO PATH, как Split to mixer.
MIDI-управление.
Почти каждым параметром Loop Core Stereo можно управлять с помощью внешнего MIDI-контроллера, например, темпом, остановкой/стартом/записью и многим другим. Кабель MIDI-1/8″ входит в комплект поставки, чтобы вы могли быстро приступить к работе.
Установите свою собственную загрузочную картинку.
Педаль Loop Core Stereo позволяет пользователям персонализировать собственную загрузочную картинку в формате GIF.
— Подключите Loop Core Stereo к компьютеру и загрузите GIF-изображение в папку: NUX LOOPER > NUX_LOOP > GIF.
-Отключите и перезагрузите педаль Loop Core Stereo, а затем войдите в настройки экрана DISPLAY и установите для параметра загрузочное изображение BOOT-UP PICTURE значение USER.
— Снова перезагрузите Loop Core Stereo. Наслаждайтесь собственным пользовательским интерфейсом GIF!
Как импортировать аудио в Loop Core Stereo?
При подключении педали Loop Core Stereo к компьютеру «NUX LOOPER» отображается как USB-флеш-диск. Нажмите на него, и вы увидите папку NCL-2. Кликните на папку NCL-2, чтобы войти, затем вы увидите папку WAVE. Затем вы можете перетащить нужный WAV-файл в соответствующую папку. Например, если вы хотите поместить воспроизводимый WAV-файл на дорожку 3 цикла фраз, вы можете просто перетащить целевой WAV-файл в папку W003. Вот и всё!
Примечание. Loop Core Stereo поддерживает только стереоформат WAV 44,1 кГц/32 бита. Загрузите и используйте NuxFormatConverter для преобразования аудио в правильный формат.
- Абсолютно новый дизайн с цветным ЖК-дисплеем высокой четкости.
- Время записи до 6 часов (стерео).
- 99 пользовательских ячеек памяти.
- Встроенные ритм-треки с 50 рисунками.
- Выход на два усилителя.
- Моделирование кабинета для вывода на микшер.
- Встроенное MIDI-управление.
- Частота дискретизации: 44,1 кГц.
- Аналого-цифровой преобразователь: 24 бита.
- Обработка сигнала: 32-бит.
- Вход: моно/левый/правый.
- Выходы: моно/левый/правый/на наушники.
- Частотная характеристика: 20 Гц-20 кГц.
- Уровень шума: -100 дБ.
- Динамический диапазон: 108 дБ.
- Потребляемая мощность: 110–120 мА.
- Дисплей: цветной TFT-дисплей.
- Питание: адаптер питания минус в центре 9 В.
- Размеры: 122 х 72 х 48 мм.
- Вес: 264 г.
Ищешь, где купить Педаль эффектов Nux Loop-Core-Stereo? Заказывай на Струнки.ру!
- доставляем товары курьером и почтой в Москву, СПб, Самару и любые другие точки России и СНГ
- пожизненная скидка постоянным клиентам до 10%
- более 2 000 000 отправленных товаров с 2008 года
- более 5 000 отзывов на разных площадках со средней оценкой 5*
Для того, чтобы задать вопрос, необходимо авторизоваться