
- Фотография
- Техника
- Cancel
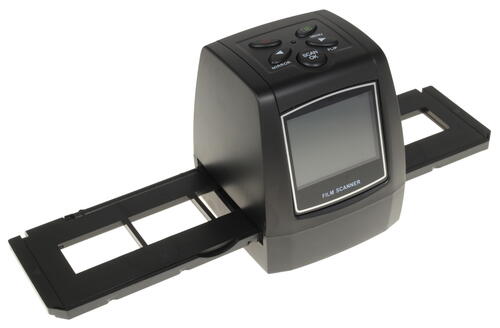
Film scanner EC718. Так называется игрушка, которую я себе недавно приобрёл.

Собственно, сканер по принципу работы, представляет из себя фотоаппарат для 35мм плёнки. Как и любой фотоаппарат, сканер работает независимо от компьютера, и записывает отснятые изображения на карту памяти.

Внуртенних источников питания (аккумулятор, батарейки) в сканере не предусмотрено. Работает сканер от сети 220В.

При включении сканера на несколько секунд появляется вот такая заставка-приветствие.

Сканер комплектуется двумя кассетами: для слайдов, и для плёнки. К сожалению, если работать кассетой для плёнки, то плёнку придётся резать на куски по шесть кадров. Перемещение плёнки в данной кассете не предусмотрено. Я для оцифровки плёнки использовал слайд-кассету. В этой кассете по краям имеются «щели», и нет фиксаторов перфорации.

При настройках: негативная плёнка — на экране появляется обращённое в позитив изображение. Очень удобно для просмотра архивов — «где что есть». Особенно хороша игрушка для просмотра затемнённых, перепроявленных, или переэкспонированных негативов!

На выходе имеется изображение 2736х1824 пикселя. Или, более привычно — 5 мегапикселей. Что касаетсч качества, то тут всё в первую очередь зависит от качества сканируемого негатива. Однако замечу, при работе данным сканером не будет лишним воспользоваться графическим редактором и немного добавить яркость и контрастность.

И ещё: сканер не имеет функций Dust Removal (удаление дефектов), поэтому перед началом сканирования плёнку лучше аккуратно протереть сухой салфеткой.
Сканер Espada FilmScanner EC718
слайд-сканер, CMOS, 1800×1800 dpi, USB
подробнее
38
Код товара: 1237065
Простое устройство позволяющее в домашних условиях перевести свои фотопленки в цифровой формат и сохранить на компьютере в виде файлов.
Работает автономно. Подключать к компьютеру не нужно.
Работает с черно-белыми и цветными пленками (негативы и позитивы)
На экране видно изображение со вставленной пленки причем негатив видно сразу в правильном виде.
Можно при помощи кнопок повернуть изображение или изменить экспозицию. И сохранить на карту памяти. Процесс сканирования кадра занимает около 1 секунды.
Экранное меню на английском языке но в нем только 5 слов все остальное символами. Подробная инструкция на русском языке в комплекте.
Так же сканер можно подключить к ТВ по композитному выходу и смотреть снимки не на маленьком экране а на большом. (кабель для подключения к ТВ в комплекте)
Характеристики
Рамки для нарезанной пленки для слайдов.в рамках и для протяжки пленки в рулоне.
Материал корпуса: пластмасса.
Сканирующее устройство: CMOS Sensor
Размер файла: 5 Megapixels (2592pixels x 1944pixels)
Разрешение: 3600dpi (программное) 1800 dpi (оптическое)
F/6.1 f=10.13 Focus Range:51.5mm(Macro)
Автоматический баланс цвета
Автоматическая и ручная настройка экспозиции
Сохранение файлов происходит на карту памяти SD (покупает отдельно) максимальный объем поддерживаемых карт памяти 32Gb
Питание от USB порта или от сети 220В (адаптер питания и кабель в комплекте)
При подключении к ПК сканер становиться карт-ридером. То есть можно работать с файлами на SD карте.
Обратите внимание что экран сканера при продаже защищен специальной пленкой. Некоторые не замечают ее и думают что экран дефектный. Пленку нужно удалить в начале работы под ней глянцевый и яркий экран.
| Наименование | Cлайд — сканер Espada FilmScanner EC718 для слайдов и фотопленок 35мм 5МП с цветным LCD экраном 2,4″ |
| Назначение |
Простое устройство, позволяющее в домашних условиях перевести свои фотопленки в цифровой формат и сохранить на компьютере в виде файлов. |
| Датчик изображения | 5.0 мега пикселей (2592*1944) |
| Качество сканирования | 1800 точек/дюйм & 3600 точек/дюйм (интерполяция) |
| Дисплей | Цветной 2.4 » TFT LCD (480×234) |
| Диапазон фокусировки | фиксированный фокус |
| Тип сканирующего элемента | CMOS |
| Источник света | СВЕТОДИОДНАЯ Подсветка |
| Баланс белого | Автоматический |
| Тип пленки | 35 мм пленки, черно-белые и цветные (негативы и позитивы) |
| Формат изображения | JPEG |
| ТВ-ВЫХОД | NTSC/PAL |
| Внешние карты памяти | Поддержка SD карт до 32 ГБ |
| Питание | DC 5В (Адаптер USB Порт) |
| Тип интерфейса | USB |
| Подключение к компьютеру |
При подключении к ПК сканер становиться карт-ридером |
| Мульти-языки поддержки | Английский, французский, немецкий, итальянский, испанский, китайский, японский |
| Поддержка системы | Windows XP/Vista/7 |
| Размеры | 86*86.2*102.4 мм |
| Размеры в упаковке | 270*110*180 мм |
| Вес | 300 гр |
| Вес в упаковке | 700гр |
| Комплектация | Cканер для плёнки, слайдов или негативов USB-кабель AV-кабель Адаптер питания Держатель для негативов Слайд держатель Держатель кассетный |
Ручной сканер Iscan S001 LCD является идеальным помощником для человека, работающего с документами, оригиналами текстов, фотографиями, которые нельзя выносить за пределы библиотеки. Сканер позволяет быстро и эффективно сканировать даже цветные материалы без помощи громоздких устройств. Гаджет легко помещается в рюкзак или женскую сумочку.
Слот памяти позволяет без лишних проблем расширить память устройства, чтобы непосредственно на нем хранить последние отсканированные фотографии или тексты.
Характеристики:
- Цвет корпуса: черный;
- Материал: пластмасса;
- Подключение: USB 2.0;
- Ширина поля сканирования: 30 см;
- Угол сканирования: 90 градусов;
- Расстояние считывания: 0 — 10 мм;
- Дополнительное расширение памяти за счет Micro SD карт: до 32 GB (в комплект не входит);
- Формат сканирования: JPEG/PDF;
- Размеры: 25,7 см 3 см 2,45 см;
- Вес: 190 г;
- Скорость сканирования: 900DPI, цветное — 12 сек; 600DPI, цветное — 8 сек; 300DPI, цветное — 3 сек;
- Длина сканирования: 900DPI — 89 см; 600DPI — 114 см; 300DPI — 248 см;
- Размер файла: High: 900х900DPI; Mi: 600х600DPI; Low: 300х300 DPI;
- Устройство автоматически выключается через 180 секунд бездействия;
- Совместимость: Windows XP/Vista,7 или выше;
- Питание: Две АА батарейки (в комплект не входят);
- Время работы: до 200 листов в низком разрешении и в цвете (в зависимости от емкости батареек).
Начало работы:
Для начала необходимо установить батарейки. Для этого откройте соответствующий отсек и вставьте в него соблюдая полярность две батарейки типа АА (в комплект не входят). Удерживайте кнопку SCAN (она же вкл\выкл) в течение 2 секунд, чтобы включить сканер. Далее необходимо вставить карту памяти (в комплект не входит). Установите в соответствующий слот карту памяти microSD card для последующей записи и хранения сканируемых материалов.
Установка времени:
Нажмите кнопку TIME SET. Так вы войдете в режим установки времени. Нажимайте кнопки JPG/PDF и DPI для установки времени. Нажмите кнопку SCAN, чтобы подтвердить установки.
Форматирование карты памяти:
После установки карты памяти в соответствующий слот, необходимо провести ее форматирование. Нажмите кнопку Format, на дисплее отобразится символ «F». Нажмите кнопку SCAN для начала форматирования карты памяти. Индикатор SD на дисплее будет мигать вплоть до окончания форматирования карты памяти MicroSD.
Установка разрешения сканирования:
Нажимайте клавишу DPI для выбора нужного разрешения: High: 900DPI; Mi:600DPI; Low:300DPI. На дисплее будут отображаться значки: Hi, Mi, Lo.
Установка режима цветности сканирования:
Нажимайте кнопку JPG/PDF для выбора формата. На дисплее отобразится значок JPG/PDF, C/BW, (Color/Black & White).
Сканирование:
Чтобы начать сканировать, возьмите сканер в руку и ровно расположите его над сканируемым объектом. В идеале прижать сканер к объекту по всей поверхности. Для начала процесса сканирования нажмите кнопку SCAN. Чтобы изображение получилось качественным, ведите сканер медленно, а сканируемое изображение не двигайте. Для окончания сканирования нажмите кнопку SCAN.
У многих из нас, особенно рождённых в СССР, хранится дома солидный архив фотоплёнок. Вот и у моего тестя, который в молодости, занимался в фотокружке этих негативов видимо-невидимо. И как-то он мне и говорит: «Вот в Китае, на том сайте, где вы обычно заказываете всякое разное есть такая штука с помощью которой можно негативы перевести в компьютер! Вот бы мне такую.» Ну и конечно зять (то есть я) начал искать и конечно же нашёл (в Китае есть даже то что о чём ты и не догадываешься). Заказали, обошёлся данный сканер нам в 2 817,51 руб. Пришла посылочка за 8 (восемь!!!) дней.
Сам сканер
— две рамки для слайдов
— одна рамка для пленок, она же универсальная для слайдов и катушечных пленок
— щёточка для чистки пленок
— кабель для подключения к телевизору
— USB кабель
— электрическая вилка.
Должна быть ещё инструкция, но положить видимо забыли… Да и ещё: электрическая вилка сгорела через полминуты… Хорошо сам сканер не пострадал. Так что запитывался я от ноутбука, с которого пишу данный обзор, по кабелю usb. Само собой открою диспут, долларов 10 с китайцев, думаю стрясу.
Собственно сканер.
Внизу слева кнопка включения, она же меню и справа кнопка сканирования. По бокам следующие кнопки: Слева – кнопка разворота (снизу) и просмотра (повыше), справа кнопки перемещения по меню.
Меню сканера выглядит так:
— выбор типа съемки (ч/б негатив, позитив и цветной негатив)
— экспозиция или яркость
— разрешение 5 или 10 мегапикселей (второе интерполяция).
— выбор языка – русского нет
— подключение по USB к компьютеру.
Меню сканера
Отсканированный кадр можно менять на ходу кнопками вверх, вниз. Кнопка поворот кадра при съемке разворачивает кадр влево, вправо и зеркально.
Негатив в катушке удобнее сканировать в универсальной рамке, нарезанный – в рамке для слайдов, хотя и то и то можно сканировать и с помощью рамки для слайдов – в ней есть держатели для предотвращения смещения.
Разрезанный негатив в рамке
Ну и для тех кому интересно как сканер выглядит в разобранном состоянии.
- Page 1
English Français Deutsch Italiano Español Film Scanner User’s Manual… -
Page 4: Important Safety Instructions
Copyright Copyright © 1999 by this company. All rights reserved. No part of this publication may be reproduced, transmitted, transcribed, stored in a retrieval system or translated into any language or computer language, in any form or by any means, electronic, mechanical, magnetic, optical, chemical, manual or otherwise, without the prior written permission of this company.
- Page 6
FCC Information The Federal Communication Commission Radio Frequency Interference Statement includes the following paragraph: This equipment has been tested and found to comply with the limits for a Class B Digital Device, pursuant to Part 15 of the FCC Rules. These limits are designed to provide reasonable protection against harmful interference in a residential installation. - Page 8
Eject button… 23 Zoom button… 23 Preview button… 23 Scan button… 23 Exit button … 23 … 24 UTTONS Film Type button … 24 Flip button… 24 Rotate button … 25 Mirror button … 25 Crop button … 25 Color Enhancement Tools button … 26 Invert button… - Page 10
English … -
Page 12: 1.2 Hardware Introduction
Friendly and Smart Driver MiraPhoto is the driver for your ScanWit film scanner. Its easy and instinctive interface design allows you to proceed with your scanning job quickly. You can also use it to adjust the scanning parameters efficiently. Its powerful functions can help you to optimize the scanned image for your specific purpose.
-
Page 14: Rear Panel
Ventilation holes These holes are used to ventilate the heat from inside of the film scanner. Do not block these holes when the film scanner is in use. SCSI ID selector You can use the SCSI ID selector to select the SCSI ID of your film scanner.
-
Page 16: 1.3 Software Introduction
English 1.3 Software Introduction MiraPhoto is the driver program for your scanner. It is TWAIN compliant and designed to be user-friendly. With its iconlized user- interface and fully logical task-flow design, you can complete a satisfactory scanning job with only a few mouse clicks. With MiraPhoto, you can: Preview, scan and import the scanned image into your image editing software.
-
Page 18: Step 3 Test The Scanner
Step 3 Test the scanner Turn the scanner power on by depressing the power button on the front panel of the scanner. You may notice that the scanner will start to perform a self-test, and the LED indicators will blink for a few seconds.
- Page 20
English Place the filmstrip on the filmstrip holder with the emulsion side facing Close the cover and push the “PUSH CLOSE” mark at the middle of the cover. You will hear a click when the cover is secured. Insert the filmstrip holder into the holder insertion slot. -
Page 22: Step 3. Scan
Close the cover and push the “PUSH CLOSE” mark and the middle of the cover. You will hear a click when the cover is secured. Insert the slide holder into the holder insertion slot. Step 3. Scan Now you can either push the SCAN button to activate automatic preview, or manually open an image editing software to activate MiraPhoto and do the preview:…
- Page 24
English … -
Page 26: Menu Bar
Menu Bar File submenu Load Config… Load the configuration file you created. When the configuration file is loaded successfully, MiraPhoto will apply the settings recorded in the configuration file automatically. Save Config… Save current MiraPhoto settings to the configuration file Save Config As……
-
Page 28: Monitor Gamma
English Monitor Gamma Generally, a monitor cannot display the real colors of an image in the real world. In order to have the monitor approximate the colors as close as possible, you may need to adjust the monitor gamma. Adjustment of the monitor gamma can make the monitor approximate the colors of the original image more closely.
-
Page 30: Image Thumbnail Area
Image Thumbnail Area The Image Thumbnail Area displays thumbnail images of each previewed scan. Click on the thumbnail image and the image will be displayed in the Preview Area. You can select the image you want to scan by clicking the red dot at the upper right corner of the thumbnail.
-
Page 32: Scan Mode Box
Frame You can click the number of the frame you want to scan. You can select multiple frames and the film scanner will scan all the images you selected. MiraPhoto will display the frame(s) selected in green. Click to select all the images in the Image Thumbnail Area for scanning.
-
Page 34: Tool Buttons
Tool Buttons Tool Buttons provide a full range of tools and image effect options to optimize the scan quality. Film Type button When this button is clicked, the Film Type dialog box will appear: If you do not know the type of your film or if your film type is not listed, select Generic from the drop-down list.
-
Page 36: Color Enhancement Tools Button
English Color Enhancement Tools button Click this button to activate the Tool Bar which contains the buttons for the following tools: Invert button Click this button to get an inverted image: Original image Image after Invert is applied…
-
Page 38: Color Balance Button
Color Balance button Click this button to evoke the Color Balance dialog box: To adjust the color balance, you will want to first select the channel you want to adjust, then drag the triangles under the three color bars. In addition, you can also enter the desired values directly into the three entry boxes to the right of the color bars to adjust the color balance.
- Page 40
Entry Box While you drag within the Color Wheel to choose the hue and saturation of color or drag the triangle below the Lightness Bar to specify the lightness of color, the related information will also be shown in the Entry Boxes. - Page 42
The original image and its Tonal Map. The curve is straight and diagnal. You can also click the curve to add new points and further change the shape of the curve: Click to add a new point. Input/Output Status Area You can read the precise input/output value here. - Page 44
Brighter images have brighter pixels, therefore the bars in the right are higher than that in the left. In addition, if we take a look at the two images below: Image 1 We notice that in Image 1, there is higher contrast between the brighter and darker part of the image;… - Page 46
If the Input Level is set as 20 to 230, then you may represent a total of 210 (230 minus 20) color levels in the image. If you set the Output Level as 10 to 250, you can “expand” the original 210 levels of color to 240 levels (250 minus 10). -
Page 48: Color Wizard Button
Color Wizard button The Color Wizard button offers two quick and convenient tools for you to adjust the overall quality of the scanned image: Auto Density: if you choose this item, MiraPhoto will optimize the density of the image automatically. Apply all button Click on the Apply All button to apply the setting changes you make in the Tool Bar to all images.
- Page 50
English … -
Page 52: Getting Started
English Getting Started To run Photo Express, double click the Photo Express icon on your Windows desktop or open from Windows Start Menu. When you run Photo Express, make sure that the monitor display is at a resolution of 800×600 or 1024×768 and Hi Color (15/16 bit) or True Color (24 bit) mode.
-
Page 54: Getting Images
Getting Images The first thing you want to do when you start Photo Express is to get the photos you want to work with into the actual program. The place you start is with Album. From here, you can do almost anything in Photo Express. All other ways of getting photos can work independently of Album, but they are also set up to let you capture or open images directly to it.
-
Page 56: Working On Images
Working on Images Adjusting Images After you have acquired an image from a scanner or digital camera, it may need some adjustments. Photo Express provides you with the perfect tool for adjusting your photos: the Transform tool. To re-align a photo: .To freely rotate a photo, select the spin wheel in the upper right or lower left corner of the photo and rotate into position.
-
Page 58: Sharing Images
Sharing Images Printing Images Once you have put the finishing touches onto your photos, it is time to print them out. Photo Express contains numerous printing options, letting you output posters and name cards in addition to its regular printing duties. To print an image: You can also print album thumbnails.
-
Page 60: Express Your Images
Express Your Images Create Calendars One of the easiest tasks to accomplish in Photo Express is making calendars, either for your Windows desktop or for your real desktop. They are great for keeping your loved ones close, in addition to being a convenient way to keep track of important dates in style.
-
Page 62: Working In Project Mode
Working in Project Mode The Project mode gives you a focused environment in which to create custom greeting cards, calendars, invitations, birthday and anniversary cards, name cards, and planners. The Project mode is useful for getting through a “project” as quickly and efficiently as possible. It is where Photo Express lives up to its name, speeding you through all the necessary tasks while keeping all the unnecessary or extraneous components secure in the background.
-
Page 64: Adding Decoration
Adding Decoration One category of tools on the Edit menu in Project mode is unique to that tab: Decoration. These are special, object-based effects such as Frames, Edges and Props you can use to enhance photo objects in a project. To add special edge effects to a photo object: To add frame to a photo object: Select a photo object.
-
Page 66: Sharing Templates
Sharing Templates Sharing templates works exactly the same way as sharing photos in Photo mode. You can print, e-mail, fax, or output them to web pages. For more on these tools, see the online help and related documents. To e-mail a template: To fax a template: To output a template as a Web page: Click the Share: E-mail button on the…
-
Page 68: 6.2 Faq
If you find that your ScanWit film scanner uses the same SCSI ID number with another SCSI device, you must either change the SCSI ID number of your scanner or that of the other SCSI device. To change the SCSI ID number of your ScanWit film scanner: 1.
-
Page 70: Appendix
Interface Platform Power Consumption Net Weight Dimension Film scanner with color-CCD optical module Color — 3 s Color — less than 10 ms / line — less than 38 s/ 35mm film, 2700 dpi Color — 3s for 35mm film…
Page 3
English Film Scanner User’s Manual…
Page 5
This product should be operated from the type of power indicated on the marking label. If you are not sure of the type of power available, consult your dealer or local power company. Do not allow anything to rest on the power cord. Do not locate this product where persons will walk on the cord.
Page 7: Table Of Contents
CHAPTER 1. INTRODUCTION… 1 1.1 F … 1 EATURES 1.2 H ARDWARE NTRODUCTION Front Panel … 2 Rear Panel … 4 1.3 S OFTWARE NTRODUCTION CHAPTER 2. INSTALLATION … 7 1. I SCSI NSTALL THE 2. C ONNECT THE SCANNER TO YOUR COMPUTER EST THE SCANNER 4.
Page 9
English … 60 RODUCT PECIFICATION MiraPhoto Quick Reference Map Menu Bar Image Thumbnail Area Tool Buttons page 16 page 20 page 23 Combo Boxes page 20 Film Selection Area page 22 Control Buttons Preview Area page 23 page 39…
Page 11: Chapter 1. Introduction
1.1 Features Congratulations on your purchase of the ScanWit film scanner! The ScanWit film scanner is the utmost cost-effective solution for film scanning. Its high capability is bound to boost your scan job efficiency significantly. It is equipped with the following unique features:…
Page 13: Led Indicators
READY: When the film scanner is powered on and ready to scan, this LED indicator will remain on, indicating that you can start to scan. Holder insertion slot You can insert the filmstrip/slide holder through this slot for scanning.
Page 15
This is a 25-pin SCSI connector. Use this connector to connect other SCSI devices from the film scanner. Note: when you position the ScanWit film scanner, be sure to leave the space illustrated below to ensure that the film/slide holder moves into/out of the film scanner without being blocked by any object.
Page 17: Chapter 2. Installation
Chapter 2. Installation Please follow the steps below to set up your ScanWit film scanner: Step 1. Install the SCSI interface card Power off your computer and disconnect the computer power from the power outlet. Open the computer cover and locate the PCI slot of your computer.
Page 19: Chapter 3. Making Your First Scan
Step 1. Test the scanner Turn on the power of your film scanner, then your computer. Wait until the scanner completes its self-test. You can judge the status of the film scanner from the LED indicators. Once the READY LED indicator stops flashing, the film scanner is ready to scan.
Page 21
English If you want to scan slides: You can use the slide holder (the holder with 4 rectangular lattices and a SLIDE mark) to place your slide. Slide holder Pull the handle on the cover to open the cover. Then place the slide on the slide holder with the emulsion side face up.
Page 23: Step 4. Edit
To use SCAN button: Push the SCAN button on the film scanner front panel. A dialogue box will pop up on the screen asking you to choose an image editing software to use. Choose the application you want to use and then click Note: if you have only one image editing software installed in your computer, this dialogue box will be skipped.
Page 25: Chapter 4. Using Miraphoto
Chapter 4. Using MiraPhoto You can access MiraPhoto through your image editing applications. When you click “Acquire” or “Scan” in your application, the MiraPhoto main screen will appear: Menu Bar Combo Boxes Film Selection Area Control Buttons The following sections in this chapter will describe MiraPhoto in more detail.
Page 27: Settings Submenu
Settings submenu Scan Size… When you choose this item, the following dialog box will appear: There are two selectable items: Max. Area and Custom. Choosing Max. Area, MiraPhoto will scan the full range of the image. If you choose Custom, you can enter the size you want into the Width (max.: 0.94 inches) and Height (max.: 1.38 inches) text boxes.
Page 29: Film Type
Film Type Choosing this item, the following dialog box will appear: If you do not know the type of your film or if your film type is not listed, select Generic from the drop-down list. When the selection is done, click OK to confirm or Cancel to abort. Auto Preview If this item is checked, MiraPhoto will perform the preview operation automatically each time it is invoked.
Page 31: Resolution Box
Resolution box Resolution is used to decide how delicate the scanner captures the original image. When the original is scanned and turned into a digital image, the scanner captures and records the image in terms of pixels. As more pixels are used to record an image, more details in the image can be represented.
Page 33: Control Buttons
Control Buttons Eject button Click this button to eject the filmstrip/slide holder from the film scanner. Zoom button Click this button to zoom in on the image. Preview button Click this button to begin previewing the image. Preview proceeds in color or in monochrome depending on the setting in the Image Type combo box.
Page 35: Rotate Button
English Rotate button Click this button to rotate the image 90 degrees clockwise. You can click this button several times to get the image orientation you want. Mirror button Click this button to get a mirror reflection effect on the original as if you were viewing the image in a mirror: Original image Image after Mirror is applied…
Page 37: Brightness/contrast Button
Brightness/Contrast button Click this button to bring up the Brightness/Contrast Dialog box: Brightness control You can drag the triangle below the bar to increase/decrease the overall brightness of the image, or click on the Auto button to let MiraPhoto adjust the brightness automatically. Contrast control You can drag the triangle below the bar to increase/decrease the overall contrast of the…
Page 39: Color Adjustment Button
Color Adjustment button Click this button, and the Color Adjustment dialog box will appear: The Color Adjustment tool uses three control items: Hue, Saturation and Lightness. Hue is a characteristic that distinguishes one color from another, while Saturation decides the intensity of a color.
Page 41: Curve Button
Curve button The Curve tool is used to adjust the brightness properties of midtone pixels in an image. The following dialogue box will appear after you click this button: Below component in the dialog box and how to use the Curve tool to adjust an image: Color Channel box Use this box to select the color channel to be adjusted.
Page 43: Level Button
Level button Clicking on the Level button, and the Level dialog box will appear: Color Channel box Use this box to select the color channel to be adjusted. This allows you to adjust the histogram property of each color channel respectively. Histogram The Histogram displays the distributing status of dark and bright pixels in an image.
Page 45
With the information from the histogram, we will be better able to adjust an image with the histogram tools. Below the Histogram, there are three tiny triangles: Shadow Threshold By dragging these triangles, you can adjust the brightness and contrast of an image precisely. For example, if you drag the Shadow Threshold triangle to the right, the pixels with lower brightness level than the Shadow Threshold will be cut into black, which makes the image look darker.
Page 47: Filter Button
Filter button This function allows you to sharpen or blur the image. You can choose from the list: No filter, Sharpen, Sharpen more, Blur, Blur more and Unsharp Mask. If you want the edge of the image to be sharper, i.e., in a higher contrast against the background, select sharpen or sharpen more.
Page 49: Preview Area
Preview Area Info button The Info button is located at the lower right corner of the MiraPhoto main window. You can click this button to read the detailed information of the image you are currently working on in the JobInfo dialog box, or click on the Save as… button in the dialog box to save the information as a .txt file for future reference.
Page 51: Chapter 5. Photo Express
Chapter 5. Photo Express In this chapter you will be introduced to the fantastic world of Photo Express. Learn more about this bundled software and make your everyday life more interesting and colorful! Refer to Photo Express electronic User’s Manual in the software disc for more details on how to use its different features and functions.
Page 53
Express between Photo mode and Project mode. Photo mode is where the majority of your work is done, while the Project mode lets you make greeting cards, name cards, and other fun things based on templates. Command Panel: The Command panel lists all of the available categories in Photo Express necessary for getting the most out of your creativity when working on photos.
Page 55
To add new images to an album: Select an album. Click the File icon and browse for the folder where the images are stored. 3. When they appear in the Options panel, click the Select All button (or select images individually by holding down the Ctrl key as you click them).
Page 57
To trim your photo: To re-size your photo: Click the Trim button in the Edit: Adjust category. The Trim options will open in the Options panel. Select a Trim shape and then set the amount of Soft edge you want to soften the edges of the trimmed photo with.
Page 59: Saving Images
Saving Images After work on your photo is complete, you may want to save it. In Photo Express, you can save a photo in a variety of different image file formats. Each file format has its own unique properties and characteristics. Some formats, however, are better than others for specific situations, such as saving for the Web are.
Page 61: Morphing Photos
Morphing Photos One of Photo Express’ more novel effects extras is that of image morphing. Morphing transforms an image over time to create interesting and unique “warps” of the original photo. Image morphs are output as either image sequences or animated GIF files. To morph an image: Note: you can output image morphs as either an image sequence or GIF animations.
Page 63: Working With Templates
Working with Templates Photo Express’ unique templates can be edited and customized to suit your own needs. Templates consist of multiple components, usually a combination of text and photos with a decoration or two perhaps thrown in. To change any one of these components, simply select it and choose the appropriate tools from the Toolbar.
Page 65: Printing Templates
Printing Templates As with Photo mode, Project mode lets you print your work when you’re finished with it. The same options available in Photo mode apply in Project mode as well. For more on printing, see Printing Images and the online help.
Page 67: Chapter 6. Troubleshooting And Faq
6.1.3 SCSI Connection Guideline ScanWit film scanner uses a SCSI interface to connect to your computer and other SCSI devices. Depending upon the configuration you use, there will be certain guidelines to follow in order to ensure the proper function of…
Page 69: Chapter 7. Service Information
Taiwan: [email protected] USA: [email protected] Europe: [email protected] For free driver updates, product information and news release, please visit the following web addresses: http://www.acerperipherals.com.tw (Taiwan)
Перейти на страницу of 23
Summary
-
Reflecta Film Scanner — page 1
Us er m anual …
-
Reflecta Film Scanner — page 2
1- For c ustomers in North and So u th America For custo mers in USA This device complie s w ith Part 15 of the FCC rules . Opera tion is subjec t to t he follow ing t w o condition s: (1) Thi s devi c e may not cause ha rmful interfer ence. (2) This devi c e must accept any in terf eren ce rece ived, including i nt erfere nce that may cause unde …
-
Reflecta Film Scanner — page 3
2 — 1. Name of p art s Note: Thi s film scanner supports Windows XP and Vista (32-bits) via USB 2.0 only. W e strongly sug ges t using a clean, dry, non-alcohol cotton swab to insert into the film scanner slot and clean th e glas s surface periodically to prod uce a clear imag e. Please make sure your film negativ es/mounted slides and cover tra …
-
Reflecta Film Scanner — page 4
3- 2. How to i n st all a film into the fil m holde r a. Open the film holde r as illustra ted b. Put a film in the fil m slot as show n c. Close the film holder …
-
Reflecta Film Scanner — page 5
4- 3. Inst all th e sof twa re and d river T o use the fil m scanner y ou need to i nstall t he s o ftw are d ri v er and ArcSof t PhotoImp ression 6 in ad vance. Inst alling Driver 1.T u rn on the comp ut e r . 2.Insert i nstallatio n CD in to t he CD- RO M drive and t he in stallati on CD m enu w ill appear . 3. W hen you se e the follow in …
-
Reflecta Film Scanner — page 6
5- Recommend ed to selec t “Install the so ftw are automatically . …
-
Reflecta Film Scanner — page 7
6- Choose “con t inue anyw a y” button. 3.Sele ct “Finish” but ton to comp lete the inst allatio n. …
-
Reflecta Film Scanner — page 8
7 — New Hardw are Wizard (Vist a) 1. Af ter connecting the fil m scanner to the computer wit h USB cable, the new hardware wizard will d etect the new device. 2. Follow the in s tructions on screen. Reco mm ended to select “I ns t all the sof tware auto ma tically . Choos e “Don’ t show this mes sage again for th is device” button. …
-
Reflecta Film Scanner — page 9
8- Choose “Ins tall this driver sof tw are anyw ay” button. 3.Sele ct “Finish” but ton to comp lete the inst allatio n. …
-
Reflecta Film Scanner — page 10
9- 4. Con nect film scanne r and y our compu ter with t he USB cable Note: For first time u ser , p lease do not plug the film holder include d with film sl ot i nto the f i lm scann er whi le connect the scanner with the co mpute r . Y ou w ill s ee t he P W R LED is re d 5. Using the film sc anner 1. Click “ Photo Impress ion 6” i co n o n …
-
Reflecta Film Scanner — page 11
10 — In select t he device option make sure OVT scanner is displ ayed. When u s ers st art the ope ration, the picture will show on “N ormal qualit y”. Then it is user ’s choice t o selec t “TIF” or “JPG”. I t is recom mended to select “JPG” format. Pic2 Select t he loca tion t o save the pic tures 1 Select the type of film …
-
Reflecta Film Scanner — page 12
1 1- Pic4 Y ou can adjust the locatio n of the film by moving t he film holde r , th e f ilm holder c an b e moved forw ard only one w ay . Pic5 Click “Sn ap Shot” or p res s the “Copy” button and th e “Snap Shot” w ill appear i n the smaller w indo w t o the right . On the film strip a gr een frame indi cates the cu rren t picture se …
-
Reflecta Film Scanner — page 13
12- Click exi t and you w ill see the pictur e in t he ma in Arcsof t w indow a s below . T o ensure t he best image quality , t he sc anner balances the sensor fo r each pi cture this m ay ta ke 3 or 5 se c. dep ending on the im age complexity and your compu ter hardw are. …
-
Reflecta Film Scanner — page 14
13- PIC 6 Click the “ format” to f ind out the re solution o f t he pi cture. 6. Now y ou can s t art to ed it the pictu re as yo u like: First you are suppo sed to select t he picture by clic k ing a t the picture . And then u se the Arc s o ft tools to edit the pictures. — Ma in Menu The M ain Men u appears in the uppe r left corner of the …
-
Reflecta Film Scanner — page 15
14- Select th e folde rs you want to scan -L e t» s you choose the folders f or scanning . * View Full Sc ree n /Play (F4) Play s or display s t he first selec te d file in full screen view . — Ma in Button s * Get Photos Acquire f rom Scanne r …
-
Reflecta Film Scanner — page 16
15- Here you can: Acquire image s from conne c ted T WAIN complian t devices s uch as scanners and some digi tal cameras. Assign na mes t o image file s as they are acquired (using today» s date or a descripti ve w ord). How to acqu ire images from a T W AIN c omplian t device: 1. Sele c t a scanner or othe r T WAIN de vice from the …
-
Reflecta Film Scanner — page 17
16- In additio n to the large photo w o rkspace, the Photo Editing T ools module includes five distinct sets of c ont rols: Enh ance The Enhan ce fun c tion i n c ludes tw o types o f contro ls: Auto E nhance Click «A ut o Enhan ce» button to impr ove the overall quality of your picture s with a single cli ck. Manua l F i x For prec …
-
Reflecta Film Scanner — page 18
17- How to fix the color o f a photo: 1. Drag t he c olor balanc e s lider s to make the photo c olor appear m or e natural. Add red or yellow to make the photo warmer . Add blue or gr een t o make the photo cooler . 2. Drag the Lighter/Dar ker slider t o the l eft to reveal detail s hidden in a dark photo o r to the righ t to make a faded pho t …
-
Reflecta Film Scanner — page 19
18- 5. Click «U ndo» if you make a m ista ke or don» t like the resul t. Crop This f eature enables you to trim p hoto s fo r d ra m ati c eff ect or c ut off the u gly/di st ractin g p arts of a pic t ure. How to use crop: 1. Choose the crop ori entation (portrait or landscape) . 2. Sele c t a f ixed proportion fo r t he crop rect …
-
Reflecta Film Scanner — page 20
19- 2. Drag the fi rst sli der to m ake the transition betw e en the b lurred and n on-blurred are a sharp o r smooth. 3. Drag the second s lider to increase o r decrea se the amou nt of blur . 4. Click «A pply» if you lik e the result . Cli c k «Can cel» if you d o not. Saving You r Results W he n you» re done edi tin g …
-
Reflecta Film Scanner — page 21
20- Clone The Clon e tool is g ood for removing un w anted element s from a p hoto. It c an also be used for fun effe ct, l i ke moving a nose from one person t o an other. How to use the Clone t ool to remove a t elepho ne pole from the ba ckground of a photo: 1. Esta blish a source point for th e Clone tool by holding t he Shif t key and clicki …
-
Reflecta Film Scanner — page 22
21- Paint Brush Let you «paint» on yo ur image w he n you click and drag the mouse. Plea se click and drag the sliders be low to change the brush si ze and transpar ency. Line Draw a straight line i n the photo. Ple ase click an d drag the s lider s below to change th e line w idth and tran sparency. Eraser Simula te an eraser, removing …
-
Reflecta Film Scanner — page 23
22 — 6. S p ecification Inte rface: USB 2.0 only Image Sensor: 1/1. 8” inch 5 mega CMOS sensor (5,174,400 pixels) Lens: F no.= 2.0, 4 Glass eleme nt s, Half-field A ngle=15 Frame Rate (M ax.): 5M(2592×1944) 2 f ps, SXGA (1280X960) 15 fp s Focus Range: Fixed focus Exposure Control: Automatic Color Balance: Automatic Scan high resolution 5MP …
Производитель Reflecta
Категория Photo Scanner
Документы, которые мы получаем от производителя устройства Reflecta Film Scanner мы можем разделить на несколько групп. Это в частности:
— технические чертежи Reflecta
— инструкции обслуживания Film Scanner
— паспорта изделия Reflecta
— информационные брошюры
— энергетические этикетки Reflecta Film Scanner
Все из них важны, однако самую важную информацию с точки зрения пользователя мы найдем в инструкции обслуживания Reflecta Film Scanner.
Группа документов, определяемая как инструкции обслуживания, делится также на более подробные типы, такие как: Инструкции монтажа Reflecta Film Scanner, инструкции обслуживания, короткие инструкции или инструкции пользователя Reflecta Film Scanner. В зависимости от потребностей, Вам необходимо поискать требуемый документ. На нашем сайте Вы можете просмотреть самую популярную инструкцию использования изделия Reflecta Film Scanner.
Полная инструкция обслуживания устройства Reflecta Film Scanner, как должна выглядеть?
Инструкция обслуживания, определяемая также как пособие пользователя, или просто «руководство» — это технический документ, цель которого заключается в использовании Reflecta Film Scanner пользователями. Инструкции пишет, как правило технический писатель, языком, доступным для всех пользователей Reflecta Film Scanner.
Полная инструкция обслуживания Reflecta, должна заключать несколько основных элементов. Часть из них менее важная, как например: обложка / титульный лист или авторские страницы. Однако остальная часть, должна дать нам важную с точки зрения пользователя информацию.
1. Вступление и рекомендации, как пользоваться инструкцией Reflecta Film Scanner
— В начале каждой инструкции, необходимо найти указания, как пользоваться данным пособием. Здесь должна находится информация, касающаяся местонахождения содержания Reflecta Film Scanner, FAQ и самых распространенных проблем — то есть мест, которые чаще всего ищут пользователи в каждой инструкции обслуживания
2. Содержание
— индекс всех советов, касающихся Reflecta Film Scanner, которое найдем в данном документе
3. Советы по использованию основных функций устройства Reflecta Film Scanner
— которые должны облегчить нам первые шаги во время использования Reflecta Film Scanner
4. Troubleshooting
— систематизированный ряд действия, который поможет нам диагностировать а в дальнейшем очередность решения важнейших проблем Reflecta Film Scanner
5. FAQ
— чаще всего задаваемые вопросы
6. Контактные данные
Информация о том, где искать контактные данные производителя / сервисного центра Reflecta Film Scanner в данной стране, если самостоятельно не получится решить проблему.
У вас вопрос, касающийся Reflecta Film Scanner?
Воспользуйтесь формуляром, находящимся ниже
| Интерфейс |
USB 2.0 |
|---|---|
| Оптическое разрешение |
1800 dpi (2592*1944) |
| Интерполяция |
3600 dpi |
| Качество сканирования |
5 мегапикселей / 10 мегапикселей |
| Дисплей |
Цветной 2.4 » TFT LCD (480×234) |
| Тип сканирующего элемента |
CMOS |
| Диапазон фокусировки |
Фиксированный фокус |
| Баланс белого |
Автоматический |
| Тип пленки |
35мм черно-белые / цветные (негативы/позитивы), слайды |
| Формат изображения |
JPEG |
| Метод сканирования |
Один проход |
| Воспроизведение |
Одно изображение |
| Подключение к компьютеру |
При подключении к ПК сканер становиться карт-ридером |
| ТВ-выход |
NTSC, PAL |
| Встроенная память |
Нет |
| Поддержка внешних носителей/карт памяти |
SD до 32 Гб |
| Поддержка языка |
Английский, французский, немецкий, итальянский, испанский, китайский, японский |
| Поддержка ОС |
Win10, Win8, Win7, Windows XP, Vista |
| Источник света |
Светодиодная подсветка |
| Питание |
DC 5В (Адаптер USB Порт) |
| Размер устройства |
88х86х102 мм |
| Размер упаковки |
270х170х105 мм |
| Вес нетто |
300 г |
| Вес брутто |
700 г |
| Комплектация |
Cканер для плёнки, слайдов или негативов |
Film scanner EC718. Так называется игрушка, которую я себе недавно приобрёл.
Собственно, сканер по принципу работы, представляет из себя фотоаппарат для 35мм плёнки. Как и любой фотоаппарат, сканер работает независимо от компьютера, и записывает отснятые изображения на карту памяти.
Внуртенних источников питания (аккумулятор, батарейки) в сканере не предусмотрено. Работает сканер от сети 220В.
При включении сканера на несколько секунд появляется вот такая заставка-приветствие.
Сканер комплектуется двумя кассетами: для слайдов, и для плёнки. К сожалению, если работать кассетой для плёнки, то плёнку придётся резать на куски по шесть кадров. Перемещение плёнки в данной кассете не предусмотрено. Я для оцифровки плёнки использовал слайд-кассету. В этой кассете по краям имеются «щели», и нет фиксаторов перфорации.
При настройках: негативная плёнка — на экране появляется обращённое в позитив изображение. Очень удобно для просмотра архивов — «где что есть». Особенно хороша игрушка для просмотра затемнённых, перепроявленных, или переэкспонированных негативов!
На выходе имеется изображение 2736х1824 пикселя. Или, более привычно — 5 мегапикселей. Что касаетсч качества, то тут всё в первую очередь зависит от качества сканируемого негатива. Однако замечу, при работе данным сканером не будет лишним воспользоваться графическим редактором и немного добавить яркость и контрастность.
И ещё: сканер не имеет функций Dust Removal (удаление дефектов), поэтому перед началом сканирования плёнку лучше аккуратно протереть сухой салфеткой.
- Page 1
English Français Deutsch Italiano Español Film Scanner User’s Manual… -
Page 4: Important Safety Instructions
Copyright Copyright © 1999 by this company. All rights reserved. No part of this publication may be reproduced, transmitted, transcribed, stored in a retrieval system or translated into any language or computer language, in any form or by any means, electronic, mechanical, magnetic, optical, chemical, manual or otherwise, without the prior written permission of this company.
- Page 6
FCC Information The Federal Communication Commission Radio Frequency Interference Statement includes the following paragraph: This equipment has been tested and found to comply with the limits for a Class B Digital Device, pursuant to Part 15 of the FCC Rules. These limits are designed to provide reasonable protection against harmful interference in a residential installation. - Page 8
Eject button… 23 Zoom button… 23 Preview button… 23 Scan button… 23 Exit button … 23 … 24 UTTONS Film Type button … 24 Flip button… 24 Rotate button … 25 Mirror button … 25 Crop button … 25 Color Enhancement Tools button … 26 Invert button… - Page 10
English … -
Page 12: 1.2 Hardware Introduction
Friendly and Smart Driver MiraPhoto is the driver for your ScanWit film scanner. Its easy and instinctive interface design allows you to proceed with your scanning job quickly. You can also use it to adjust the scanning parameters efficiently. Its powerful functions can help you to optimize the scanned image for your specific purpose.
-
Page 14: Rear Panel
Ventilation holes These holes are used to ventilate the heat from inside of the film scanner. Do not block these holes when the film scanner is in use. SCSI ID selector You can use the SCSI ID selector to select the SCSI ID of your film scanner.
-
Page 16: 1.3 Software Introduction
English 1.3 Software Introduction MiraPhoto is the driver program for your scanner. It is TWAIN compliant and designed to be user-friendly. With its iconlized user- interface and fully logical task-flow design, you can complete a satisfactory scanning job with only a few mouse clicks. With MiraPhoto, you can: Preview, scan and import the scanned image into your image editing software.
-
Page 18: Step 3 Test The Scanner
Step 3 Test the scanner Turn the scanner power on by depressing the power button on the front panel of the scanner. You may notice that the scanner will start to perform a self-test, and the LED indicators will blink for a few seconds.
- Page 20
English Place the filmstrip on the filmstrip holder with the emulsion side facing Close the cover and push the “PUSH CLOSE” mark at the middle of the cover. You will hear a click when the cover is secured. Insert the filmstrip holder into the holder insertion slot. -
Page 22: Step 3. Scan
Close the cover and push the “PUSH CLOSE” mark and the middle of the cover. You will hear a click when the cover is secured. Insert the slide holder into the holder insertion slot. Step 3. Scan Now you can either push the SCAN button to activate automatic preview, or manually open an image editing software to activate MiraPhoto and do the preview:…
- Page 24
English … -
Page 26: Menu Bar
Menu Bar File submenu Load Config… Load the configuration file you created. When the configuration file is loaded successfully, MiraPhoto will apply the settings recorded in the configuration file automatically. Save Config… Save current MiraPhoto settings to the configuration file Save Config As……
-
Page 28: Monitor Gamma
English Monitor Gamma Generally, a monitor cannot display the real colors of an image in the real world. In order to have the monitor approximate the colors as close as possible, you may need to adjust the monitor gamma. Adjustment of the monitor gamma can make the monitor approximate the colors of the original image more closely.
-
Page 30: Image Thumbnail Area
Image Thumbnail Area The Image Thumbnail Area displays thumbnail images of each previewed scan. Click on the thumbnail image and the image will be displayed in the Preview Area. You can select the image you want to scan by clicking the red dot at the upper right corner of the thumbnail.
-
Page 32: Scan Mode Box
Frame You can click the number of the frame you want to scan. You can select multiple frames and the film scanner will scan all the images you selected. MiraPhoto will display the frame(s) selected in green. Click to select all the images in the Image Thumbnail Area for scanning.
-
Page 34: Tool Buttons
Tool Buttons Tool Buttons provide a full range of tools and image effect options to optimize the scan quality. Film Type button When this button is clicked, the Film Type dialog box will appear: If you do not know the type of your film or if your film type is not listed, select Generic from the drop-down list.
-
Page 36: Color Enhancement Tools Button
English Color Enhancement Tools button Click this button to activate the Tool Bar which contains the buttons for the following tools: Invert button Click this button to get an inverted image: Original image Image after Invert is applied…
-
Page 38: Color Balance Button
Color Balance button Click this button to evoke the Color Balance dialog box: To adjust the color balance, you will want to first select the channel you want to adjust, then drag the triangles under the three color bars. In addition, you can also enter the desired values directly into the three entry boxes to the right of the color bars to adjust the color balance.
- Page 40
Entry Box While you drag within the Color Wheel to choose the hue and saturation of color or drag the triangle below the Lightness Bar to specify the lightness of color, the related information will also be shown in the Entry Boxes. - Page 42
The original image and its Tonal Map. The curve is straight and diagnal. You can also click the curve to add new points and further change the shape of the curve: Click to add a new point. Input/Output Status Area You can read the precise input/output value here. - Page 44
Brighter images have brighter pixels, therefore the bars in the right are higher than that in the left. In addition, if we take a look at the two images below: Image 1 We notice that in Image 1, there is higher contrast between the brighter and darker part of the image;… - Page 46
If the Input Level is set as 20 to 230, then you may represent a total of 210 (230 minus 20) color levels in the image. If you set the Output Level as 10 to 250, you can “expand” the original 210 levels of color to 240 levels (250 minus 10). -
Page 48: Color Wizard Button
Color Wizard button The Color Wizard button offers two quick and convenient tools for you to adjust the overall quality of the scanned image: Auto Density: if you choose this item, MiraPhoto will optimize the density of the image automatically. Apply all button Click on the Apply All button to apply the setting changes you make in the Tool Bar to all images.
- Page 50
English … -
Page 52: Getting Started
English Getting Started To run Photo Express, double click the Photo Express icon on your Windows desktop or open from Windows Start Menu. When you run Photo Express, make sure that the monitor display is at a resolution of 800×600 or 1024×768 and Hi Color (15/16 bit) or True Color (24 bit) mode.
-
Page 54: Getting Images
Getting Images The first thing you want to do when you start Photo Express is to get the photos you want to work with into the actual program. The place you start is with Album. From here, you can do almost anything in Photo Express. All other ways of getting photos can work independently of Album, but they are also set up to let you capture or open images directly to it.
-
Page 56: Working On Images
Working on Images Adjusting Images After you have acquired an image from a scanner or digital camera, it may need some adjustments. Photo Express provides you with the perfect tool for adjusting your photos: the Transform tool. To re-align a photo: .To freely rotate a photo, select the spin wheel in the upper right or lower left corner of the photo and rotate into position.
-
Page 58: Sharing Images
Sharing Images Printing Images Once you have put the finishing touches onto your photos, it is time to print them out. Photo Express contains numerous printing options, letting you output posters and name cards in addition to its regular printing duties. To print an image: You can also print album thumbnails.
-
Page 60: Express Your Images
Express Your Images Create Calendars One of the easiest tasks to accomplish in Photo Express is making calendars, either for your Windows desktop or for your real desktop. They are great for keeping your loved ones close, in addition to being a convenient way to keep track of important dates in style.
-
Page 62: Working In Project Mode
Working in Project Mode The Project mode gives you a focused environment in which to create custom greeting cards, calendars, invitations, birthday and anniversary cards, name cards, and planners. The Project mode is useful for getting through a “project” as quickly and efficiently as possible. It is where Photo Express lives up to its name, speeding you through all the necessary tasks while keeping all the unnecessary or extraneous components secure in the background.
-
Page 64: Adding Decoration
Adding Decoration One category of tools on the Edit menu in Project mode is unique to that tab: Decoration. These are special, object-based effects such as Frames, Edges and Props you can use to enhance photo objects in a project. To add special edge effects to a photo object: To add frame to a photo object: Select a photo object.
-
Page 66: Sharing Templates
Sharing Templates Sharing templates works exactly the same way as sharing photos in Photo mode. You can print, e-mail, fax, or output them to web pages. For more on these tools, see the online help and related documents. To e-mail a template: To fax a template: To output a template as a Web page: Click the Share: E-mail button on the…
-
Page 68: 6.2 Faq
If you find that your ScanWit film scanner uses the same SCSI ID number with another SCSI device, you must either change the SCSI ID number of your scanner or that of the other SCSI device. To change the SCSI ID number of your ScanWit film scanner: 1.
-
Page 70: Appendix
Interface Platform Power Consumption Net Weight Dimension Film scanner with color-CCD optical module Color — 3 s Color — less than 10 ms / line — less than 38 s/ 35mm film, 2700 dpi Color — 3s for 35mm film…
Page 3
English Film Scanner User’s Manual…
Page 5
This product should be operated from the type of power indicated on the marking label. If you are not sure of the type of power available, consult your dealer or local power company. Do not allow anything to rest on the power cord. Do not locate this product where persons will walk on the cord.
Page 7: Table Of Contents
CHAPTER 1. INTRODUCTION… 1 1.1 F … 1 EATURES 1.2 H ARDWARE NTRODUCTION Front Panel … 2 Rear Panel … 4 1.3 S OFTWARE NTRODUCTION CHAPTER 2. INSTALLATION … 7 1. I SCSI NSTALL THE 2. C ONNECT THE SCANNER TO YOUR COMPUTER EST THE SCANNER 4.
Page 9
English … 60 RODUCT PECIFICATION MiraPhoto Quick Reference Map Menu Bar Image Thumbnail Area Tool Buttons page 16 page 20 page 23 Combo Boxes page 20 Film Selection Area page 22 Control Buttons Preview Area page 23 page 39…
Page 11: Chapter 1. Introduction
1.1 Features Congratulations on your purchase of the ScanWit film scanner! The ScanWit film scanner is the utmost cost-effective solution for film scanning. Its high capability is bound to boost your scan job efficiency significantly. It is equipped with the following unique features:…
Page 13: Led Indicators
READY: When the film scanner is powered on and ready to scan, this LED indicator will remain on, indicating that you can start to scan. Holder insertion slot You can insert the filmstrip/slide holder through this slot for scanning.
Page 15
This is a 25-pin SCSI connector. Use this connector to connect other SCSI devices from the film scanner. Note: when you position the ScanWit film scanner, be sure to leave the space illustrated below to ensure that the film/slide holder moves into/out of the film scanner without being blocked by any object.
Page 17: Chapter 2. Installation
Chapter 2. Installation Please follow the steps below to set up your ScanWit film scanner: Step 1. Install the SCSI interface card Power off your computer and disconnect the computer power from the power outlet. Open the computer cover and locate the PCI slot of your computer.
Page 19: Chapter 3. Making Your First Scan
Step 1. Test the scanner Turn on the power of your film scanner, then your computer. Wait until the scanner completes its self-test. You can judge the status of the film scanner from the LED indicators. Once the READY LED indicator stops flashing, the film scanner is ready to scan.
Page 21
English If you want to scan slides: You can use the slide holder (the holder with 4 rectangular lattices and a SLIDE mark) to place your slide. Slide holder Pull the handle on the cover to open the cover. Then place the slide on the slide holder with the emulsion side face up.
Page 23: Step 4. Edit
To use SCAN button: Push the SCAN button on the film scanner front panel. A dialogue box will pop up on the screen asking you to choose an image editing software to use. Choose the application you want to use and then click Note: if you have only one image editing software installed in your computer, this dialogue box will be skipped.
Page 25: Chapter 4. Using Miraphoto
Chapter 4. Using MiraPhoto You can access MiraPhoto through your image editing applications. When you click “Acquire” or “Scan” in your application, the MiraPhoto main screen will appear: Menu Bar Combo Boxes Film Selection Area Control Buttons The following sections in this chapter will describe MiraPhoto in more detail.
Page 27: Settings Submenu
Settings submenu Scan Size… When you choose this item, the following dialog box will appear: There are two selectable items: Max. Area and Custom. Choosing Max. Area, MiraPhoto will scan the full range of the image. If you choose Custom, you can enter the size you want into the Width (max.: 0.94 inches) and Height (max.: 1.38 inches) text boxes.
Page 29: Film Type
Film Type Choosing this item, the following dialog box will appear: If you do not know the type of your film or if your film type is not listed, select Generic from the drop-down list. When the selection is done, click OK to confirm or Cancel to abort. Auto Preview If this item is checked, MiraPhoto will perform the preview operation automatically each time it is invoked.
Page 31: Resolution Box
Resolution box Resolution is used to decide how delicate the scanner captures the original image. When the original is scanned and turned into a digital image, the scanner captures and records the image in terms of pixels. As more pixels are used to record an image, more details in the image can be represented.
Page 33: Control Buttons
Control Buttons Eject button Click this button to eject the filmstrip/slide holder from the film scanner. Zoom button Click this button to zoom in on the image. Preview button Click this button to begin previewing the image. Preview proceeds in color or in monochrome depending on the setting in the Image Type combo box.
Page 35: Rotate Button
English Rotate button Click this button to rotate the image 90 degrees clockwise. You can click this button several times to get the image orientation you want. Mirror button Click this button to get a mirror reflection effect on the original as if you were viewing the image in a mirror: Original image Image after Mirror is applied…
Page 37: Brightness/contrast Button
Brightness/Contrast button Click this button to bring up the Brightness/Contrast Dialog box: Brightness control You can drag the triangle below the bar to increase/decrease the overall brightness of the image, or click on the Auto button to let MiraPhoto adjust the brightness automatically. Contrast control You can drag the triangle below the bar to increase/decrease the overall contrast of the…
Page 39: Color Adjustment Button
Color Adjustment button Click this button, and the Color Adjustment dialog box will appear: The Color Adjustment tool uses three control items: Hue, Saturation and Lightness. Hue is a characteristic that distinguishes one color from another, while Saturation decides the intensity of a color.
Page 41: Curve Button
Curve button The Curve tool is used to adjust the brightness properties of midtone pixels in an image. The following dialogue box will appear after you click this button: Below component in the dialog box and how to use the Curve tool to adjust an image: Color Channel box Use this box to select the color channel to be adjusted.
Page 43: Level Button
Level button Clicking on the Level button, and the Level dialog box will appear: Color Channel box Use this box to select the color channel to be adjusted. This allows you to adjust the histogram property of each color channel respectively. Histogram The Histogram displays the distributing status of dark and bright pixels in an image.
Page 45
With the information from the histogram, we will be better able to adjust an image with the histogram tools. Below the Histogram, there are three tiny triangles: Shadow Threshold By dragging these triangles, you can adjust the brightness and contrast of an image precisely. For example, if you drag the Shadow Threshold triangle to the right, the pixels with lower brightness level than the Shadow Threshold will be cut into black, which makes the image look darker.
Page 47: Filter Button
Filter button This function allows you to sharpen or blur the image. You can choose from the list: No filter, Sharpen, Sharpen more, Blur, Blur more and Unsharp Mask. If you want the edge of the image to be sharper, i.e., in a higher contrast against the background, select sharpen or sharpen more.
Page 49: Preview Area
Preview Area Info button The Info button is located at the lower right corner of the MiraPhoto main window. You can click this button to read the detailed information of the image you are currently working on in the JobInfo dialog box, or click on the Save as… button in the dialog box to save the information as a .txt file for future reference.
Page 51: Chapter 5. Photo Express
Chapter 5. Photo Express In this chapter you will be introduced to the fantastic world of Photo Express. Learn more about this bundled software and make your everyday life more interesting and colorful! Refer to Photo Express electronic User’s Manual in the software disc for more details on how to use its different features and functions.
Page 53
Express between Photo mode and Project mode. Photo mode is where the majority of your work is done, while the Project mode lets you make greeting cards, name cards, and other fun things based on templates. Command Panel: The Command panel lists all of the available categories in Photo Express necessary for getting the most out of your creativity when working on photos.
Page 55
To add new images to an album: Select an album. Click the File icon and browse for the folder where the images are stored. 3. When they appear in the Options panel, click the Select All button (or select images individually by holding down the Ctrl key as you click them).
Page 57
To trim your photo: To re-size your photo: Click the Trim button in the Edit: Adjust category. The Trim options will open in the Options panel. Select a Trim shape and then set the amount of Soft edge you want to soften the edges of the trimmed photo with.
Page 59: Saving Images
Saving Images After work on your photo is complete, you may want to save it. In Photo Express, you can save a photo in a variety of different image file formats. Each file format has its own unique properties and characteristics. Some formats, however, are better than others for specific situations, such as saving for the Web are.
Page 61: Morphing Photos
Morphing Photos One of Photo Express’ more novel effects extras is that of image morphing. Morphing transforms an image over time to create interesting and unique “warps” of the original photo. Image morphs are output as either image sequences or animated GIF files. To morph an image: Note: you can output image morphs as either an image sequence or GIF animations.
Page 63: Working With Templates
Working with Templates Photo Express’ unique templates can be edited and customized to suit your own needs. Templates consist of multiple components, usually a combination of text and photos with a decoration or two perhaps thrown in. To change any one of these components, simply select it and choose the appropriate tools from the Toolbar.
Page 65: Printing Templates
Printing Templates As with Photo mode, Project mode lets you print your work when you’re finished with it. The same options available in Photo mode apply in Project mode as well. For more on printing, see Printing Images and the online help.
Page 67: Chapter 6. Troubleshooting And Faq
6.1.3 SCSI Connection Guideline ScanWit film scanner uses a SCSI interface to connect to your computer and other SCSI devices. Depending upon the configuration you use, there will be certain guidelines to follow in order to ensure the proper function of…
Page 69: Chapter 7. Service Information
Taiwan: [email protected] USA: [email protected] Europe: [email protected] For free driver updates, product information and news release, please visit the following web addresses: http://www.acerperipherals.com.tw (Taiwan)
Оценок — 3
, средний балл: 2.7
()
Фрагмент инструкции
Step 2. Place original on the holder Place the film in the film holder. Two types of film holders are supplied with your film scanner. You can select the appropriate film holder that fits the type of your film: Note: When you place the film/slide in the filmstrip/slide holder, make sure that the film/slide is free from dust. You may also want to check that the film/slide is cleaned properly. If you want to scan a filmstrip: You can use the filmstrip holder (the holder with 6 rectangular lattices and a FILM mark) to place your filmstrip. F I L M P U S H C L O S E Filmstrip holder Pull the handle on the cover to open the cover. 9 English Place the filmstrip on the filmstrip holder with the emulsion side facing up. Close the cover and push the “PUSH CLOSE” mark at the middle of the cover. You will hear a click when the cover is secured. PUSH PUSHPUSH Insert the filmstrip holder into the holder insertion slot. 10 English If you want to scan slides: You can use the slide holder (the holder with 4 rectangular lattices and a SLIDE mark) to place your slide. Slide holder Pull the handle on the cover to open the cover. Then place the slide on the slide holder with the emulsion side face up. When you place the slide in the lattice, insert the lower left corner of the slide into the plastic stopper, then push the slide into the lattice until it is firmly fixed. You can place up to 4 slides in the slide holder. 11 English Close the cover and push the “PUSH CLOSE” mark and the middle of the cover. You will hear a click when the cover is secured. P U S H P U SH Insert the slide holder into the holder insertion slot. Step 3. Scan Now you can either push the SCAN button to activate automatic preview, or manually open an image editing software to activate MiraPhoto and do the preview: 12 English To use SCAN button: Push the SCAN button on the film scanner front panel. A dialogue box will pop up on the screen asking you to choose an image editing software to use. Choose the application you want to use and then click OK. Note: if you have only one image editing software installed in your computer, this dialogue box will be skipped. The application you choose will be activated. Meanwhile, MiraPhoto will start to preview the original. To preview manually: (1) Open your image editing application software. (2) From “File” menu, choose “Scanner”, “Select source” or “Select TWAIN_32 source” to select MiraPhoto as the TWAIN image source. (This differs according to the application you use) (3) Choose “Scan”, “Acquire” or “TWAIN_32 source” (this also differs according to the application you use), MiraPhoto will pop up on the screen. Click “Preview” to preview the original. According to the original you scan, choose an appropriate image type from the “Image Type” drop-down listbox in MiraPhoto. Specify a scanning resolution in the “Resolution” drop-down listbox and adjust the size and position of the dotted rectangle in the Preview Area to specify a scan area. Click «Scan» to start scanning the original. Step 4. Edit When scanning has completed, MiraPhoto will import the images into your image editing software. You can now close MiraPhoto and begin editing or saving the image. 13 English 14 English Chapter 4. Using MiraPhoto You can access MiraPhoto through your image editing applications. When you click “Acquire” or “Scan” in your application, the MiraPhoto main screen will appear: Menu Bar Image Thumbnail Area Tool Buttons Combo Boxes Film Selection Area Control Buttons Job Info ButtonPreview Area The following sections in this chapter will describe MiraPhoto in more detail. 15 English Menu Bar There are three selectable menu items in the Menu Bar. Each menu item contains several options in its submenu: File submenu MiraPhoto can record the settings you make for each scan session in a configuration file. With this feature, you can specify different settings for each individual scan job in a configuration file. You can then load the configuration file when you want to apply the settings. For example, you can save the settings you make for scanning artwork films in a configuration file called “Artwork”. The next time you want to scan artwork films, you can load the “Artwork” configuration file, and MiraPhoto will apply the settings recorded in it. Load Config… Load the configuration file you created. When the configuration file is loaded successfully, MiraPhoto will apply the settings recorded in the configuration file automatically. Save Config… Save current MiraPhoto settings to the configuration file Save Config As… Save current MiraPhoto Settings as another new configuration file. Usually you can create a new configuration file in this way. You can designate different file names for each configuration file. Reset Config When you select this item, the settings you make in MiraPhoto will reset to their default value. Auto Save Config When you select this item, your settings will be saved automatically in a configuration file a…
- Page 1
English Français Deutsch Italiano Español Film Scanner User’s Manual… -
Page 4: Important Safety Instructions
Copyright Copyright © 1999 by this company. All rights reserved. No part of this publication may be reproduced, transmitted, transcribed, stored in a retrieval system or translated into any language or computer language, in any form or by any means, electronic, mechanical, magnetic, optical, chemical, manual or otherwise, without the prior written permission of this company.
- Page 6
FCC Information The Federal Communication Commission Radio Frequency Interference Statement includes the following paragraph: This equipment has been tested and found to comply with the limits for a Class B Digital Device, pursuant to Part 15 of the FCC Rules. These limits are designed to provide reasonable protection against harmful interference in a residential installation. - Page 8
Eject button… 23 Zoom button… 23 Preview button… 23 Scan button… 23 Exit button … 23 … 24 UTTONS Film Type button … 24 Flip button… 24 Rotate button … 25 Mirror button … 25 Crop button … 25 Color Enhancement Tools button … 26 Invert button… - Page 10
English … -
Page 12: 1.2 Hardware Introduction
Friendly and Smart Driver MiraPhoto is the driver for your ScanWit film scanner. Its easy and instinctive interface design allows you to proceed with your scanning job quickly. You can also use it to adjust the scanning parameters efficiently. Its powerful functions can help you to optimize the scanned image for your specific purpose.
-
Page 14: Rear Panel
Ventilation holes These holes are used to ventilate the heat from inside of the film scanner. Do not block these holes when the film scanner is in use. SCSI ID selector You can use the SCSI ID selector to select the SCSI ID of your film scanner.
-
Page 16: 1.3 Software Introduction
English 1.3 Software Introduction MiraPhoto is the driver program for your scanner. It is TWAIN compliant and designed to be user-friendly. With its iconlized user- interface and fully logical task-flow design, you can complete a satisfactory scanning job with only a few mouse clicks. With MiraPhoto, you can: Preview, scan and import the scanned image into your image editing software.
-
Page 18: Step 3 Test The Scanner
Step 3 Test the scanner Turn the scanner power on by depressing the power button on the front panel of the scanner. You may notice that the scanner will start to perform a self-test, and the LED indicators will blink for a few seconds.
- Page 20
English Place the filmstrip on the filmstrip holder with the emulsion side facing Close the cover and push the “PUSH CLOSE” mark at the middle of the cover. You will hear a click when the cover is secured. Insert the filmstrip holder into the holder insertion slot. -
Page 22: Step 3. Scan
Close the cover and push the “PUSH CLOSE” mark and the middle of the cover. You will hear a click when the cover is secured. Insert the slide holder into the holder insertion slot. Step 3. Scan Now you can either push the SCAN button to activate automatic preview, or manually open an image editing software to activate MiraPhoto and do the preview:…
- Page 24
English … -
Page 26: Menu Bar
Menu Bar File submenu Load Config… Load the configuration file you created. When the configuration file is loaded successfully, MiraPhoto will apply the settings recorded in the configuration file automatically. Save Config… Save current MiraPhoto settings to the configuration file Save Config As……
-
Page 28: Monitor Gamma
English Monitor Gamma Generally, a monitor cannot display the real colors of an image in the real world. In order to have the monitor approximate the colors as close as possible, you may need to adjust the monitor gamma. Adjustment of the monitor gamma can make the monitor approximate the colors of the original image more closely.
-
Page 30: Image Thumbnail Area
Image Thumbnail Area The Image Thumbnail Area displays thumbnail images of each previewed scan. Click on the thumbnail image and the image will be displayed in the Preview Area. You can select the image you want to scan by clicking the red dot at the upper right corner of the thumbnail.
-
Page 32: Scan Mode Box
Frame You can click the number of the frame you want to scan. You can select multiple frames and the film scanner will scan all the images you selected. MiraPhoto will display the frame(s) selected in green. Click to select all the images in the Image Thumbnail Area for scanning.
-
Page 34: Tool Buttons
Tool Buttons Tool Buttons provide a full range of tools and image effect options to optimize the scan quality. Film Type button When this button is clicked, the Film Type dialog box will appear: If you do not know the type of your film or if your film type is not listed, select Generic from the drop-down list.
-
Page 36: Color Enhancement Tools Button
English Color Enhancement Tools button Click this button to activate the Tool Bar which contains the buttons for the following tools: Invert button Click this button to get an inverted image: Original image Image after Invert is applied…
-
Page 38: Color Balance Button
Color Balance button Click this button to evoke the Color Balance dialog box: To adjust the color balance, you will want to first select the channel you want to adjust, then drag the triangles under the three color bars. In addition, you can also enter the desired values directly into the three entry boxes to the right of the color bars to adjust the color balance.
- Page 40
Entry Box While you drag within the Color Wheel to choose the hue and saturation of color or drag the triangle below the Lightness Bar to specify the lightness of color, the related information will also be shown in the Entry Boxes. - Page 42
The original image and its Tonal Map. The curve is straight and diagnal. You can also click the curve to add new points and further change the shape of the curve: Click to add a new point. Input/Output Status Area You can read the precise input/output value here. - Page 44
Brighter images have brighter pixels, therefore the bars in the right are higher than that in the left. In addition, if we take a look at the two images below: Image 1 We notice that in Image 1, there is higher contrast between the brighter and darker part of the image;… - Page 46
If the Input Level is set as 20 to 230, then you may represent a total of 210 (230 minus 20) color levels in the image. If you set the Output Level as 10 to 250, you can “expand” the original 210 levels of color to 240 levels (250 minus 10). -
Page 48: Color Wizard Button
Color Wizard button The Color Wizard button offers two quick and convenient tools for you to adjust the overall quality of the scanned image: Auto Density: if you choose this item, MiraPhoto will optimize the density of the image automatically. Apply all button Click on the Apply All button to apply the setting changes you make in the Tool Bar to all images.
- Page 50
English … -
Page 52: Getting Started
English Getting Started To run Photo Express, double click the Photo Express icon on your Windows desktop or open from Windows Start Menu. When you run Photo Express, make sure that the monitor display is at a resolution of 800×600 or 1024×768 and Hi Color (15/16 bit) or True Color (24 bit) mode.
-
Page 54: Getting Images
Getting Images The first thing you want to do when you start Photo Express is to get the photos you want to work with into the actual program. The place you start is with Album. From here, you can do almost anything in Photo Express. All other ways of getting photos can work independently of Album, but they are also set up to let you capture or open images directly to it.
-
Page 56: Working On Images
Working on Images Adjusting Images After you have acquired an image from a scanner or digital camera, it may need some adjustments. Photo Express provides you with the perfect tool for adjusting your photos: the Transform tool. To re-align a photo: .To freely rotate a photo, select the spin wheel in the upper right or lower left corner of the photo and rotate into position.
-
Page 58: Sharing Images
Sharing Images Printing Images Once you have put the finishing touches onto your photos, it is time to print them out. Photo Express contains numerous printing options, letting you output posters and name cards in addition to its regular printing duties. To print an image: You can also print album thumbnails.
-
Page 60: Express Your Images
Express Your Images Create Calendars One of the easiest tasks to accomplish in Photo Express is making calendars, either for your Windows desktop or for your real desktop. They are great for keeping your loved ones close, in addition to being a convenient way to keep track of important dates in style.
-
Page 62: Working In Project Mode
Working in Project Mode The Project mode gives you a focused environment in which to create custom greeting cards, calendars, invitations, birthday and anniversary cards, name cards, and planners. The Project mode is useful for getting through a “project” as quickly and efficiently as possible. It is where Photo Express lives up to its name, speeding you through all the necessary tasks while keeping all the unnecessary or extraneous components secure in the background.
-
Page 64: Adding Decoration
Adding Decoration One category of tools on the Edit menu in Project mode is unique to that tab: Decoration. These are special, object-based effects such as Frames, Edges and Props you can use to enhance photo objects in a project. To add special edge effects to a photo object: To add frame to a photo object: Select a photo object.
-
Page 66: Sharing Templates
Sharing Templates Sharing templates works exactly the same way as sharing photos in Photo mode. You can print, e-mail, fax, or output them to web pages. For more on these tools, see the online help and related documents. To e-mail a template: To fax a template: To output a template as a Web page: Click the Share: E-mail button on the…
-
Page 68: 6.2 Faq
If you find that your ScanWit film scanner uses the same SCSI ID number with another SCSI device, you must either change the SCSI ID number of your scanner or that of the other SCSI device. To change the SCSI ID number of your ScanWit film scanner: 1.
-
Page 70: Appendix
Interface Platform Power Consumption Net Weight Dimension Film scanner with color-CCD optical module Color — 3 s Color — less than 10 ms / line — less than 38 s/ 35mm film, 2700 dpi Color — 3s for 35mm film…
Page 3
English Film Scanner User’s Manual…
Page 5
This product should be operated from the type of power indicated on the marking label. If you are not sure of the type of power available, consult your dealer or local power company. Do not allow anything to rest on the power cord. Do not locate this product where persons will walk on the cord.
Page 7: Table Of Contents
CHAPTER 1. INTRODUCTION… 1 1.1 F … 1 EATURES 1.2 H ARDWARE NTRODUCTION Front Panel … 2 Rear Panel … 4 1.3 S OFTWARE NTRODUCTION CHAPTER 2. INSTALLATION … 7 1. I SCSI NSTALL THE 2. C ONNECT THE SCANNER TO YOUR COMPUTER EST THE SCANNER 4.
Page 9
English … 60 RODUCT PECIFICATION MiraPhoto Quick Reference Map Menu Bar Image Thumbnail Area Tool Buttons page 16 page 20 page 23 Combo Boxes page 20 Film Selection Area page 22 Control Buttons Preview Area page 23 page 39…
Page 11: Chapter 1. Introduction
1.1 Features Congratulations on your purchase of the ScanWit film scanner! The ScanWit film scanner is the utmost cost-effective solution for film scanning. Its high capability is bound to boost your scan job efficiency significantly. It is equipped with the following unique features:…
Page 13: Led Indicators
READY: When the film scanner is powered on and ready to scan, this LED indicator will remain on, indicating that you can start to scan. Holder insertion slot You can insert the filmstrip/slide holder through this slot for scanning.
Page 15
This is a 25-pin SCSI connector. Use this connector to connect other SCSI devices from the film scanner. Note: when you position the ScanWit film scanner, be sure to leave the space illustrated below to ensure that the film/slide holder moves into/out of the film scanner without being blocked by any object.
Page 17: Chapter 2. Installation
Chapter 2. Installation Please follow the steps below to set up your ScanWit film scanner: Step 1. Install the SCSI interface card Power off your computer and disconnect the computer power from the power outlet. Open the computer cover and locate the PCI slot of your computer.
Page 19: Chapter 3. Making Your First Scan
Step 1. Test the scanner Turn on the power of your film scanner, then your computer. Wait until the scanner completes its self-test. You can judge the status of the film scanner from the LED indicators. Once the READY LED indicator stops flashing, the film scanner is ready to scan.
Page 21
English If you want to scan slides: You can use the slide holder (the holder with 4 rectangular lattices and a SLIDE mark) to place your slide. Slide holder Pull the handle on the cover to open the cover. Then place the slide on the slide holder with the emulsion side face up.
Page 23: Step 4. Edit
To use SCAN button: Push the SCAN button on the film scanner front panel. A dialogue box will pop up on the screen asking you to choose an image editing software to use. Choose the application you want to use and then click Note: if you have only one image editing software installed in your computer, this dialogue box will be skipped.
Page 25: Chapter 4. Using Miraphoto
Chapter 4. Using MiraPhoto You can access MiraPhoto through your image editing applications. When you click “Acquire” or “Scan” in your application, the MiraPhoto main screen will appear: Menu Bar Combo Boxes Film Selection Area Control Buttons The following sections in this chapter will describe MiraPhoto in more detail.
Page 27: Settings Submenu
Settings submenu Scan Size… When you choose this item, the following dialog box will appear: There are two selectable items: Max. Area and Custom. Choosing Max. Area, MiraPhoto will scan the full range of the image. If you choose Custom, you can enter the size you want into the Width (max.: 0.94 inches) and Height (max.: 1.38 inches) text boxes.
Page 29: Film Type
Film Type Choosing this item, the following dialog box will appear: If you do not know the type of your film or if your film type is not listed, select Generic from the drop-down list. When the selection is done, click OK to confirm or Cancel to abort. Auto Preview If this item is checked, MiraPhoto will perform the preview operation automatically each time it is invoked.
Page 31: Resolution Box
Resolution box Resolution is used to decide how delicate the scanner captures the original image. When the original is scanned and turned into a digital image, the scanner captures and records the image in terms of pixels. As more pixels are used to record an image, more details in the image can be represented.
Page 33: Control Buttons
Control Buttons Eject button Click this button to eject the filmstrip/slide holder from the film scanner. Zoom button Click this button to zoom in on the image. Preview button Click this button to begin previewing the image. Preview proceeds in color or in monochrome depending on the setting in the Image Type combo box.
Page 35: Rotate Button
English Rotate button Click this button to rotate the image 90 degrees clockwise. You can click this button several times to get the image orientation you want. Mirror button Click this button to get a mirror reflection effect on the original as if you were viewing the image in a mirror: Original image Image after Mirror is applied…
Page 37: Brightness/contrast Button
Brightness/Contrast button Click this button to bring up the Brightness/Contrast Dialog box: Brightness control You can drag the triangle below the bar to increase/decrease the overall brightness of the image, or click on the Auto button to let MiraPhoto adjust the brightness automatically. Contrast control You can drag the triangle below the bar to increase/decrease the overall contrast of the…
Page 39: Color Adjustment Button
Color Adjustment button Click this button, and the Color Adjustment dialog box will appear: The Color Adjustment tool uses three control items: Hue, Saturation and Lightness. Hue is a characteristic that distinguishes one color from another, while Saturation decides the intensity of a color.
Page 41: Curve Button
Curve button The Curve tool is used to adjust the brightness properties of midtone pixels in an image. The following dialogue box will appear after you click this button: Below component in the dialog box and how to use the Curve tool to adjust an image: Color Channel box Use this box to select the color channel to be adjusted.
Page 43: Level Button
Level button Clicking on the Level button, and the Level dialog box will appear: Color Channel box Use this box to select the color channel to be adjusted. This allows you to adjust the histogram property of each color channel respectively. Histogram The Histogram displays the distributing status of dark and bright pixels in an image.
Page 45
With the information from the histogram, we will be better able to adjust an image with the histogram tools. Below the Histogram, there are three tiny triangles: Shadow Threshold By dragging these triangles, you can adjust the brightness and contrast of an image precisely. For example, if you drag the Shadow Threshold triangle to the right, the pixels with lower brightness level than the Shadow Threshold will be cut into black, which makes the image look darker.
Page 47: Filter Button
Filter button This function allows you to sharpen or blur the image. You can choose from the list: No filter, Sharpen, Sharpen more, Blur, Blur more and Unsharp Mask. If you want the edge of the image to be sharper, i.e., in a higher contrast against the background, select sharpen or sharpen more.
Page 49: Preview Area
Preview Area Info button The Info button is located at the lower right corner of the MiraPhoto main window. You can click this button to read the detailed information of the image you are currently working on in the JobInfo dialog box, or click on the Save as… button in the dialog box to save the information as a .txt file for future reference.
Page 51: Chapter 5. Photo Express
Chapter 5. Photo Express In this chapter you will be introduced to the fantastic world of Photo Express. Learn more about this bundled software and make your everyday life more interesting and colorful! Refer to Photo Express electronic User’s Manual in the software disc for more details on how to use its different features and functions.
Page 53
Express between Photo mode and Project mode. Photo mode is where the majority of your work is done, while the Project mode lets you make greeting cards, name cards, and other fun things based on templates. Command Panel: The Command panel lists all of the available categories in Photo Express necessary for getting the most out of your creativity when working on photos.
Page 55
To add new images to an album: Select an album. Click the File icon and browse for the folder where the images are stored. 3. When they appear in the Options panel, click the Select All button (or select images individually by holding down the Ctrl key as you click them).
Page 57
To trim your photo: To re-size your photo: Click the Trim button in the Edit: Adjust category. The Trim options will open in the Options panel. Select a Trim shape and then set the amount of Soft edge you want to soften the edges of the trimmed photo with.
Page 59: Saving Images
Saving Images After work on your photo is complete, you may want to save it. In Photo Express, you can save a photo in a variety of different image file formats. Each file format has its own unique properties and characteristics. Some formats, however, are better than others for specific situations, such as saving for the Web are.
Page 61: Morphing Photos
Morphing Photos One of Photo Express’ more novel effects extras is that of image morphing. Morphing transforms an image over time to create interesting and unique “warps” of the original photo. Image morphs are output as either image sequences or animated GIF files. To morph an image: Note: you can output image morphs as either an image sequence or GIF animations.
Page 63: Working With Templates
Working with Templates Photo Express’ unique templates can be edited and customized to suit your own needs. Templates consist of multiple components, usually a combination of text and photos with a decoration or two perhaps thrown in. To change any one of these components, simply select it and choose the appropriate tools from the Toolbar.
Page 65: Printing Templates
Printing Templates As with Photo mode, Project mode lets you print your work when you’re finished with it. The same options available in Photo mode apply in Project mode as well. For more on printing, see Printing Images and the online help.
Page 67: Chapter 6. Troubleshooting And Faq
6.1.3 SCSI Connection Guideline ScanWit film scanner uses a SCSI interface to connect to your computer and other SCSI devices. Depending upon the configuration you use, there will be certain guidelines to follow in order to ensure the proper function of…
Page 69: Chapter 7. Service Information
Taiwan: [email protected] USA: [email protected] Europe: [email protected] For free driver updates, product information and news release, please visit the following web addresses: http://www.acerperipherals.com.tw (Taiwan)
Перейти на страницу of 23
Summary
-
Reflecta Film Scanner — page 1
Us er m anual …
-
Reflecta Film Scanner — page 2
1- For c ustomers in North and So u th America For custo mers in USA This device complie s w ith Part 15 of the FCC rules . Opera tion is subjec t to t he follow ing t w o condition s: (1) Thi s devi c e may not cause ha rmful interfer ence. (2) This devi c e must accept any in terf eren ce rece ived, including i nt erfere nce that may cause unde …
-
Reflecta Film Scanner — page 3
2 — 1. Name of p art s Note: Thi s film scanner supports Windows XP and Vista (32-bits) via USB 2.0 only. W e strongly sug ges t using a clean, dry, non-alcohol cotton swab to insert into the film scanner slot and clean th e glas s surface periodically to prod uce a clear imag e. Please make sure your film negativ es/mounted slides and cover tra …
-
Reflecta Film Scanner — page 4
3- 2. How to i n st all a film into the fil m holde r a. Open the film holde r as illustra ted b. Put a film in the fil m slot as show n c. Close the film holder …
-
Reflecta Film Scanner — page 5
4- 3. Inst all th e sof twa re and d river T o use the fil m scanner y ou need to i nstall t he s o ftw are d ri v er and ArcSof t PhotoImp ression 6 in ad vance. Inst alling Driver 1.T u rn on the comp ut e r . 2.Insert i nstallatio n CD in to t he CD- RO M drive and t he in stallati on CD m enu w ill appear . 3. W hen you se e the follow in …
-
Reflecta Film Scanner — page 6
5- Recommend ed to selec t “Install the so ftw are automatically . …
-
Reflecta Film Scanner — page 7
6- Choose “con t inue anyw a y” button. 3.Sele ct “Finish” but ton to comp lete the inst allatio n. …
-
Reflecta Film Scanner — page 8
7 — New Hardw are Wizard (Vist a) 1. Af ter connecting the fil m scanner to the computer wit h USB cable, the new hardware wizard will d etect the new device. 2. Follow the in s tructions on screen. Reco mm ended to select “I ns t all the sof tware auto ma tically . Choos e “Don’ t show this mes sage again for th is device” button. …
-
Reflecta Film Scanner — page 9
8- Choose “Ins tall this driver sof tw are anyw ay” button. 3.Sele ct “Finish” but ton to comp lete the inst allatio n. …
-
Reflecta Film Scanner — page 10
9- 4. Con nect film scanne r and y our compu ter with t he USB cable Note: For first time u ser , p lease do not plug the film holder include d with film sl ot i nto the f i lm scann er whi le connect the scanner with the co mpute r . Y ou w ill s ee t he P W R LED is re d 5. Using the film sc anner 1. Click “ Photo Impress ion 6” i co n o n …
-
Reflecta Film Scanner — page 11
10 — In select t he device option make sure OVT scanner is displ ayed. When u s ers st art the ope ration, the picture will show on “N ormal qualit y”. Then it is user ’s choice t o selec t “TIF” or “JPG”. I t is recom mended to select “JPG” format. Pic2 Select t he loca tion t o save the pic tures 1 Select the type of film …
-
Reflecta Film Scanner — page 12
1 1- Pic4 Y ou can adjust the locatio n of the film by moving t he film holde r , th e f ilm holder c an b e moved forw ard only one w ay . Pic5 Click “Sn ap Shot” or p res s the “Copy” button and th e “Snap Shot” w ill appear i n the smaller w indo w t o the right . On the film strip a gr een frame indi cates the cu rren t picture se …
-
Reflecta Film Scanner — page 13
12- Click exi t and you w ill see the pictur e in t he ma in Arcsof t w indow a s below . T o ensure t he best image quality , t he sc anner balances the sensor fo r each pi cture this m ay ta ke 3 or 5 se c. dep ending on the im age complexity and your compu ter hardw are. …
-
Reflecta Film Scanner — page 14
13- PIC 6 Click the “ format” to f ind out the re solution o f t he pi cture. 6. Now y ou can s t art to ed it the pictu re as yo u like: First you are suppo sed to select t he picture by clic k ing a t the picture . And then u se the Arc s o ft tools to edit the pictures. — Ma in Menu The M ain Men u appears in the uppe r left corner of the …
-
Reflecta Film Scanner — page 15
14- Select th e folde rs you want to scan -L e t» s you choose the folders f or scanning . * View Full Sc ree n /Play (F4) Play s or display s t he first selec te d file in full screen view . — Ma in Button s * Get Photos Acquire f rom Scanne r …
-
Reflecta Film Scanner — page 16
15- Here you can: Acquire image s from conne c ted T WAIN complian t devices s uch as scanners and some digi tal cameras. Assign na mes t o image file s as they are acquired (using today» s date or a descripti ve w ord). How to acqu ire images from a T W AIN c omplian t device: 1. Sele c t a scanner or othe r T WAIN de vice from the …
-
Reflecta Film Scanner — page 17
16- In additio n to the large photo w o rkspace, the Photo Editing T ools module includes five distinct sets of c ont rols: Enh ance The Enhan ce fun c tion i n c ludes tw o types o f contro ls: Auto E nhance Click «A ut o Enhan ce» button to impr ove the overall quality of your picture s with a single cli ck. Manua l F i x For prec …
-
Reflecta Film Scanner — page 18
17- How to fix the color o f a photo: 1. Drag t he c olor balanc e s lider s to make the photo c olor appear m or e natural. Add red or yellow to make the photo warmer . Add blue or gr een t o make the photo cooler . 2. Drag the Lighter/Dar ker slider t o the l eft to reveal detail s hidden in a dark photo o r to the righ t to make a faded pho t …
-
Reflecta Film Scanner — page 19
18- 5. Click «U ndo» if you make a m ista ke or don» t like the resul t. Crop This f eature enables you to trim p hoto s fo r d ra m ati c eff ect or c ut off the u gly/di st ractin g p arts of a pic t ure. How to use crop: 1. Choose the crop ori entation (portrait or landscape) . 2. Sele c t a f ixed proportion fo r t he crop rect …
-
Reflecta Film Scanner — page 20
19- 2. Drag the fi rst sli der to m ake the transition betw e en the b lurred and n on-blurred are a sharp o r smooth. 3. Drag the second s lider to increase o r decrea se the amou nt of blur . 4. Click «A pply» if you lik e the result . Cli c k «Can cel» if you d o not. Saving You r Results W he n you» re done edi tin g …
-
Reflecta Film Scanner — page 21
20- Clone The Clon e tool is g ood for removing un w anted element s from a p hoto. It c an also be used for fun effe ct, l i ke moving a nose from one person t o an other. How to use the Clone t ool to remove a t elepho ne pole from the ba ckground of a photo: 1. Esta blish a source point for th e Clone tool by holding t he Shif t key and clicki …
-
Reflecta Film Scanner — page 22
21- Paint Brush Let you «paint» on yo ur image w he n you click and drag the mouse. Plea se click and drag the sliders be low to change the brush si ze and transpar ency. Line Draw a straight line i n the photo. Ple ase click an d drag the s lider s below to change th e line w idth and tran sparency. Eraser Simula te an eraser, removing …
-
Reflecta Film Scanner — page 23
22 — 6. S p ecification Inte rface: USB 2.0 only Image Sensor: 1/1. 8” inch 5 mega CMOS sensor (5,174,400 pixels) Lens: F no.= 2.0, 4 Glass eleme nt s, Half-field A ngle=15 Frame Rate (M ax.): 5M(2592×1944) 2 f ps, SXGA (1280X960) 15 fp s Focus Range: Fixed focus Exposure Control: Automatic Color Balance: Automatic Scan high resolution 5MP …
Производитель Reflecta
Категория Photo Scanner
Документы, которые мы получаем от производителя устройства Reflecta Film Scanner мы можем разделить на несколько групп. Это в частности:
— технические чертежи Reflecta
— инструкции обслуживания Film Scanner
— паспорта изделия Reflecta
— информационные брошюры
— энергетические этикетки Reflecta Film Scanner
Все из них важны, однако самую важную информацию с точки зрения пользователя мы найдем в инструкции обслуживания Reflecta Film Scanner.
Группа документов, определяемая как инструкции обслуживания, делится также на более подробные типы, такие как: Инструкции монтажа Reflecta Film Scanner, инструкции обслуживания, короткие инструкции или инструкции пользователя Reflecta Film Scanner. В зависимости от потребностей, Вам необходимо поискать требуемый документ. На нашем сайте Вы можете просмотреть самую популярную инструкцию использования изделия Reflecta Film Scanner.
Полная инструкция обслуживания устройства Reflecta Film Scanner, как должна выглядеть?
Инструкция обслуживания, определяемая также как пособие пользователя, или просто «руководство» — это технический документ, цель которого заключается в использовании Reflecta Film Scanner пользователями. Инструкции пишет, как правило технический писатель, языком, доступным для всех пользователей Reflecta Film Scanner.
Полная инструкция обслуживания Reflecta, должна заключать несколько основных элементов. Часть из них менее важная, как например: обложка / титульный лист или авторские страницы. Однако остальная часть, должна дать нам важную с точки зрения пользователя информацию.
1. Вступление и рекомендации, как пользоваться инструкцией Reflecta Film Scanner
— В начале каждой инструкции, необходимо найти указания, как пользоваться данным пособием. Здесь должна находится информация, касающаяся местонахождения содержания Reflecta Film Scanner, FAQ и самых распространенных проблем — то есть мест, которые чаще всего ищут пользователи в каждой инструкции обслуживания
2. Содержание
— индекс всех советов, касающихся Reflecta Film Scanner, которое найдем в данном документе
3. Советы по использованию основных функций устройства Reflecta Film Scanner
— которые должны облегчить нам первые шаги во время использования Reflecta Film Scanner
4. Troubleshooting
— систематизированный ряд действия, который поможет нам диагностировать а в дальнейшем очередность решения важнейших проблем Reflecta Film Scanner
5. FAQ
— чаще всего задаваемые вопросы
6. Контактные данные
Информация о том, где искать контактные данные производителя / сервисного центра Reflecta Film Scanner в данной стране, если самостоятельно не получится решить проблему.
У вас вопрос, касающийся Reflecta Film Scanner?
Воспользуйтесь формуляром, находящимся ниже
| Интерфейс |
USB 2.0 |
|---|---|
| Оптическое разрешение |
1800 dpi (2592*1944) |
| Интерполяция |
3600 dpi |
| Качество сканирования |
5 мегапикселей / 10 мегапикселей |
| Дисплей |
Цветной 2.4 » TFT LCD (480×234) |
| Тип сканирующего элемента |
CMOS |
| Диапазон фокусировки |
Фиксированный фокус |
| Баланс белого |
Автоматический |
| Тип пленки |
35мм черно-белые / цветные (негативы/позитивы), слайды |
| Формат изображения |
JPEG |
| Метод сканирования |
Один проход |
| Воспроизведение |
Одно изображение |
| Подключение к компьютеру |
При подключении к ПК сканер становиться карт-ридером |
| ТВ-выход |
NTSC, PAL |
| Встроенная память |
Нет |
| Поддержка внешних носителей/карт памяти |
SD до 32 Гб |
| Поддержка языка |
Английский, французский, немецкий, итальянский, испанский, китайский, японский |
| Поддержка ОС |
Win10, Win8, Win7, Windows XP, Vista |
| Источник света |
Светодиодная подсветка |
| Питание |
DC 5В (Адаптер USB Порт) |
| Размер устройства |
88х86х102 мм |
| Размер упаковки |
270х170х105 мм |
| Вес нетто |
300 г |
| Вес брутто |
700 г |
| Комплектация |
Cканер для плёнки, слайдов или негативов |
Film scanner EC718. Так называется игрушка, которую я себе недавно приобрёл.
Собственно, сканер по принципу работы, представляет из себя фотоаппарат для 35мм плёнки. Как и любой фотоаппарат, сканер работает независимо от компьютера, и записывает отснятые изображения на карту памяти.
Внуртенних источников питания (аккумулятор, батарейки) в сканере не предусмотрено. Работает сканер от сети 220В.
При включении сканера на несколько секунд появляется вот такая заставка-приветствие.
Сканер комплектуется двумя кассетами: для слайдов, и для плёнки. К сожалению, если работать кассетой для плёнки, то плёнку придётся резать на куски по шесть кадров. Перемещение плёнки в данной кассете не предусмотрено. Я для оцифровки плёнки использовал слайд-кассету. В этой кассете по краям имеются «щели», и нет фиксаторов перфорации.
При настройках: негативная плёнка — на экране появляется обращённое в позитив изображение. Очень удобно для просмотра архивов — «где что есть». Особенно хороша игрушка для просмотра затемнённых, перепроявленных, или переэкспонированных негативов!
На выходе имеется изображение 2736х1824 пикселя. Или, более привычно — 5 мегапикселей. Что касаетсч качества, то тут всё в первую очередь зависит от качества сканируемого негатива. Однако замечу, при работе данным сканером не будет лишним воспользоваться графическим редактором и немного добавить яркость и контрастность.
И ещё: сканер не имеет функций Dust Removal (удаление дефектов), поэтому перед началом сканирования плёнку лучше аккуратно протереть сухой салфеткой.
- Page 1
English Français Deutsch Italiano Español Film Scanner User’s Manual… -
Page 4: Important Safety Instructions
Copyright Copyright © 1999 by this company. All rights reserved. No part of this publication may be reproduced, transmitted, transcribed, stored in a retrieval system or translated into any language or computer language, in any form or by any means, electronic, mechanical, magnetic, optical, chemical, manual or otherwise, without the prior written permission of this company.
- Page 6
FCC Information The Federal Communication Commission Radio Frequency Interference Statement includes the following paragraph: This equipment has been tested and found to comply with the limits for a Class B Digital Device, pursuant to Part 15 of the FCC Rules. These limits are designed to provide reasonable protection against harmful interference in a residential installation. - Page 8
Eject button… 23 Zoom button… 23 Preview button… 23 Scan button… 23 Exit button … 23 … 24 UTTONS Film Type button … 24 Flip button… 24 Rotate button … 25 Mirror button … 25 Crop button … 25 Color Enhancement Tools button … 26 Invert button… - Page 10
English … -
Page 12: 1.2 Hardware Introduction
Friendly and Smart Driver MiraPhoto is the driver for your ScanWit film scanner. Its easy and instinctive interface design allows you to proceed with your scanning job quickly. You can also use it to adjust the scanning parameters efficiently. Its powerful functions can help you to optimize the scanned image for your specific purpose.
-
Page 14: Rear Panel
Ventilation holes These holes are used to ventilate the heat from inside of the film scanner. Do not block these holes when the film scanner is in use. SCSI ID selector You can use the SCSI ID selector to select the SCSI ID of your film scanner.
-
Page 16: 1.3 Software Introduction
English 1.3 Software Introduction MiraPhoto is the driver program for your scanner. It is TWAIN compliant and designed to be user-friendly. With its iconlized user- interface and fully logical task-flow design, you can complete a satisfactory scanning job with only a few mouse clicks. With MiraPhoto, you can: Preview, scan and import the scanned image into your image editing software.
-
Page 18: Step 3 Test The Scanner
Step 3 Test the scanner Turn the scanner power on by depressing the power button on the front panel of the scanner. You may notice that the scanner will start to perform a self-test, and the LED indicators will blink for a few seconds.
- Page 20
English Place the filmstrip on the filmstrip holder with the emulsion side facing Close the cover and push the “PUSH CLOSE” mark at the middle of the cover. You will hear a click when the cover is secured. Insert the filmstrip holder into the holder insertion slot. -
Page 22: Step 3. Scan
Close the cover and push the “PUSH CLOSE” mark and the middle of the cover. You will hear a click when the cover is secured. Insert the slide holder into the holder insertion slot. Step 3. Scan Now you can either push the SCAN button to activate automatic preview, or manually open an image editing software to activate MiraPhoto and do the preview:…
- Page 24
English … -
Page 26: Menu Bar
Menu Bar File submenu Load Config… Load the configuration file you created. When the configuration file is loaded successfully, MiraPhoto will apply the settings recorded in the configuration file automatically. Save Config… Save current MiraPhoto settings to the configuration file Save Config As……
-
Page 28: Monitor Gamma
English Monitor Gamma Generally, a monitor cannot display the real colors of an image in the real world. In order to have the monitor approximate the colors as close as possible, you may need to adjust the monitor gamma. Adjustment of the monitor gamma can make the monitor approximate the colors of the original image more closely.
-
Page 30: Image Thumbnail Area
Image Thumbnail Area The Image Thumbnail Area displays thumbnail images of each previewed scan. Click on the thumbnail image and the image will be displayed in the Preview Area. You can select the image you want to scan by clicking the red dot at the upper right corner of the thumbnail.
-
Page 32: Scan Mode Box
Frame You can click the number of the frame you want to scan. You can select multiple frames and the film scanner will scan all the images you selected. MiraPhoto will display the frame(s) selected in green. Click to select all the images in the Image Thumbnail Area for scanning.
-
Page 34: Tool Buttons
Tool Buttons Tool Buttons provide a full range of tools and image effect options to optimize the scan quality. Film Type button When this button is clicked, the Film Type dialog box will appear: If you do not know the type of your film or if your film type is not listed, select Generic from the drop-down list.
-
Page 36: Color Enhancement Tools Button
English Color Enhancement Tools button Click this button to activate the Tool Bar which contains the buttons for the following tools: Invert button Click this button to get an inverted image: Original image Image after Invert is applied…
-
Page 38: Color Balance Button
Color Balance button Click this button to evoke the Color Balance dialog box: To adjust the color balance, you will want to first select the channel you want to adjust, then drag the triangles under the three color bars. In addition, you can also enter the desired values directly into the three entry boxes to the right of the color bars to adjust the color balance.
- Page 40
Entry Box While you drag within the Color Wheel to choose the hue and saturation of color or drag the triangle below the Lightness Bar to specify the lightness of color, the related information will also be shown in the Entry Boxes. - Page 42
The original image and its Tonal Map. The curve is straight and diagnal. You can also click the curve to add new points and further change the shape of the curve: Click to add a new point. Input/Output Status Area You can read the precise input/output value here. - Page 44
Brighter images have brighter pixels, therefore the bars in the right are higher than that in the left. In addition, if we take a look at the two images below: Image 1 We notice that in Image 1, there is higher contrast between the brighter and darker part of the image;… - Page 46
If the Input Level is set as 20 to 230, then you may represent a total of 210 (230 minus 20) color levels in the image. If you set the Output Level as 10 to 250, you can “expand” the original 210 levels of color to 240 levels (250 minus 10). -
Page 48: Color Wizard Button
Color Wizard button The Color Wizard button offers two quick and convenient tools for you to adjust the overall quality of the scanned image: Auto Density: if you choose this item, MiraPhoto will optimize the density of the image automatically. Apply all button Click on the Apply All button to apply the setting changes you make in the Tool Bar to all images.
- Page 50
English … -
Page 52: Getting Started
English Getting Started To run Photo Express, double click the Photo Express icon on your Windows desktop or open from Windows Start Menu. When you run Photo Express, make sure that the monitor display is at a resolution of 800×600 or 1024×768 and Hi Color (15/16 bit) or True Color (24 bit) mode.
-
Page 54: Getting Images
Getting Images The first thing you want to do when you start Photo Express is to get the photos you want to work with into the actual program. The place you start is with Album. From here, you can do almost anything in Photo Express. All other ways of getting photos can work independently of Album, but they are also set up to let you capture or open images directly to it.
-
Page 56: Working On Images
Working on Images Adjusting Images After you have acquired an image from a scanner or digital camera, it may need some adjustments. Photo Express provides you with the perfect tool for adjusting your photos: the Transform tool. To re-align a photo: .To freely rotate a photo, select the spin wheel in the upper right or lower left corner of the photo and rotate into position.
-
Page 58: Sharing Images
Sharing Images Printing Images Once you have put the finishing touches onto your photos, it is time to print them out. Photo Express contains numerous printing options, letting you output posters and name cards in addition to its regular printing duties. To print an image: You can also print album thumbnails.
-
Page 60: Express Your Images
Express Your Images Create Calendars One of the easiest tasks to accomplish in Photo Express is making calendars, either for your Windows desktop or for your real desktop. They are great for keeping your loved ones close, in addition to being a convenient way to keep track of important dates in style.
-
Page 62: Working In Project Mode
Working in Project Mode The Project mode gives you a focused environment in which to create custom greeting cards, calendars, invitations, birthday and anniversary cards, name cards, and planners. The Project mode is useful for getting through a “project” as quickly and efficiently as possible. It is where Photo Express lives up to its name, speeding you through all the necessary tasks while keeping all the unnecessary or extraneous components secure in the background.
-
Page 64: Adding Decoration
Adding Decoration One category of tools on the Edit menu in Project mode is unique to that tab: Decoration. These are special, object-based effects such as Frames, Edges and Props you can use to enhance photo objects in a project. To add special edge effects to a photo object: To add frame to a photo object: Select a photo object.
-
Page 66: Sharing Templates
Sharing Templates Sharing templates works exactly the same way as sharing photos in Photo mode. You can print, e-mail, fax, or output them to web pages. For more on these tools, see the online help and related documents. To e-mail a template: To fax a template: To output a template as a Web page: Click the Share: E-mail button on the…
-
Page 68: 6.2 Faq
If you find that your ScanWit film scanner uses the same SCSI ID number with another SCSI device, you must either change the SCSI ID number of your scanner or that of the other SCSI device. To change the SCSI ID number of your ScanWit film scanner: 1.
-
Page 70: Appendix
Interface Platform Power Consumption Net Weight Dimension Film scanner with color-CCD optical module Color — 3 s Color — less than 10 ms / line — less than 38 s/ 35mm film, 2700 dpi Color — 3s for 35mm film…
Page 3
English Film Scanner User’s Manual…
Page 5
This product should be operated from the type of power indicated on the marking label. If you are not sure of the type of power available, consult your dealer or local power company. Do not allow anything to rest on the power cord. Do not locate this product where persons will walk on the cord.
Page 7: Table Of Contents
CHAPTER 1. INTRODUCTION… 1 1.1 F … 1 EATURES 1.2 H ARDWARE NTRODUCTION Front Panel … 2 Rear Panel … 4 1.3 S OFTWARE NTRODUCTION CHAPTER 2. INSTALLATION … 7 1. I SCSI NSTALL THE 2. C ONNECT THE SCANNER TO YOUR COMPUTER EST THE SCANNER 4.
Page 9
English … 60 RODUCT PECIFICATION MiraPhoto Quick Reference Map Menu Bar Image Thumbnail Area Tool Buttons page 16 page 20 page 23 Combo Boxes page 20 Film Selection Area page 22 Control Buttons Preview Area page 23 page 39…
Page 11: Chapter 1. Introduction
1.1 Features Congratulations on your purchase of the ScanWit film scanner! The ScanWit film scanner is the utmost cost-effective solution for film scanning. Its high capability is bound to boost your scan job efficiency significantly. It is equipped with the following unique features:…
Page 13: Led Indicators
READY: When the film scanner is powered on and ready to scan, this LED indicator will remain on, indicating that you can start to scan. Holder insertion slot You can insert the filmstrip/slide holder through this slot for scanning.
Page 15
This is a 25-pin SCSI connector. Use this connector to connect other SCSI devices from the film scanner. Note: when you position the ScanWit film scanner, be sure to leave the space illustrated below to ensure that the film/slide holder moves into/out of the film scanner without being blocked by any object.
Page 17: Chapter 2. Installation
Chapter 2. Installation Please follow the steps below to set up your ScanWit film scanner: Step 1. Install the SCSI interface card Power off your computer and disconnect the computer power from the power outlet. Open the computer cover and locate the PCI slot of your computer.
Page 19: Chapter 3. Making Your First Scan
Step 1. Test the scanner Turn on the power of your film scanner, then your computer. Wait until the scanner completes its self-test. You can judge the status of the film scanner from the LED indicators. Once the READY LED indicator stops flashing, the film scanner is ready to scan.
Page 21
English If you want to scan slides: You can use the slide holder (the holder with 4 rectangular lattices and a SLIDE mark) to place your slide. Slide holder Pull the handle on the cover to open the cover. Then place the slide on the slide holder with the emulsion side face up.
Page 23: Step 4. Edit
To use SCAN button: Push the SCAN button on the film scanner front panel. A dialogue box will pop up on the screen asking you to choose an image editing software to use. Choose the application you want to use and then click Note: if you have only one image editing software installed in your computer, this dialogue box will be skipped.
Page 25: Chapter 4. Using Miraphoto
Chapter 4. Using MiraPhoto You can access MiraPhoto through your image editing applications. When you click “Acquire” or “Scan” in your application, the MiraPhoto main screen will appear: Menu Bar Combo Boxes Film Selection Area Control Buttons The following sections in this chapter will describe MiraPhoto in more detail.
Page 27: Settings Submenu
Settings submenu Scan Size… When you choose this item, the following dialog box will appear: There are two selectable items: Max. Area and Custom. Choosing Max. Area, MiraPhoto will scan the full range of the image. If you choose Custom, you can enter the size you want into the Width (max.: 0.94 inches) and Height (max.: 1.38 inches) text boxes.
Page 29: Film Type
Film Type Choosing this item, the following dialog box will appear: If you do not know the type of your film or if your film type is not listed, select Generic from the drop-down list. When the selection is done, click OK to confirm or Cancel to abort. Auto Preview If this item is checked, MiraPhoto will perform the preview operation automatically each time it is invoked.
Page 31: Resolution Box
Resolution box Resolution is used to decide how delicate the scanner captures the original image. When the original is scanned and turned into a digital image, the scanner captures and records the image in terms of pixels. As more pixels are used to record an image, more details in the image can be represented.
Page 33: Control Buttons
Control Buttons Eject button Click this button to eject the filmstrip/slide holder from the film scanner. Zoom button Click this button to zoom in on the image. Preview button Click this button to begin previewing the image. Preview proceeds in color or in monochrome depending on the setting in the Image Type combo box.
Page 35: Rotate Button
English Rotate button Click this button to rotate the image 90 degrees clockwise. You can click this button several times to get the image orientation you want. Mirror button Click this button to get a mirror reflection effect on the original as if you were viewing the image in a mirror: Original image Image after Mirror is applied…
Page 37: Brightness/contrast Button
Brightness/Contrast button Click this button to bring up the Brightness/Contrast Dialog box: Brightness control You can drag the triangle below the bar to increase/decrease the overall brightness of the image, or click on the Auto button to let MiraPhoto adjust the brightness automatically. Contrast control You can drag the triangle below the bar to increase/decrease the overall contrast of the…
Page 39: Color Adjustment Button
Color Adjustment button Click this button, and the Color Adjustment dialog box will appear: The Color Adjustment tool uses three control items: Hue, Saturation and Lightness. Hue is a characteristic that distinguishes one color from another, while Saturation decides the intensity of a color.
Page 41: Curve Button
Curve button The Curve tool is used to adjust the brightness properties of midtone pixels in an image. The following dialogue box will appear after you click this button: Below component in the dialog box and how to use the Curve tool to adjust an image: Color Channel box Use this box to select the color channel to be adjusted.
Page 43: Level Button
Level button Clicking on the Level button, and the Level dialog box will appear: Color Channel box Use this box to select the color channel to be adjusted. This allows you to adjust the histogram property of each color channel respectively. Histogram The Histogram displays the distributing status of dark and bright pixels in an image.
Page 45
With the information from the histogram, we will be better able to adjust an image with the histogram tools. Below the Histogram, there are three tiny triangles: Shadow Threshold By dragging these triangles, you can adjust the brightness and contrast of an image precisely. For example, if you drag the Shadow Threshold triangle to the right, the pixels with lower brightness level than the Shadow Threshold will be cut into black, which makes the image look darker.
Page 47: Filter Button
Filter button This function allows you to sharpen or blur the image. You can choose from the list: No filter, Sharpen, Sharpen more, Blur, Blur more and Unsharp Mask. If you want the edge of the image to be sharper, i.e., in a higher contrast against the background, select sharpen or sharpen more.
Page 49: Preview Area
Preview Area Info button The Info button is located at the lower right corner of the MiraPhoto main window. You can click this button to read the detailed information of the image you are currently working on in the JobInfo dialog box, or click on the Save as… button in the dialog box to save the information as a .txt file for future reference.
Page 51: Chapter 5. Photo Express
Chapter 5. Photo Express In this chapter you will be introduced to the fantastic world of Photo Express. Learn more about this bundled software and make your everyday life more interesting and colorful! Refer to Photo Express electronic User’s Manual in the software disc for more details on how to use its different features and functions.
Page 53
Express between Photo mode and Project mode. Photo mode is where the majority of your work is done, while the Project mode lets you make greeting cards, name cards, and other fun things based on templates. Command Panel: The Command panel lists all of the available categories in Photo Express necessary for getting the most out of your creativity when working on photos.
Page 55
To add new images to an album: Select an album. Click the File icon and browse for the folder where the images are stored. 3. When they appear in the Options panel, click the Select All button (or select images individually by holding down the Ctrl key as you click them).
Page 57
To trim your photo: To re-size your photo: Click the Trim button in the Edit: Adjust category. The Trim options will open in the Options panel. Select a Trim shape and then set the amount of Soft edge you want to soften the edges of the trimmed photo with.
Page 59: Saving Images
Saving Images After work on your photo is complete, you may want to save it. In Photo Express, you can save a photo in a variety of different image file formats. Each file format has its own unique properties and characteristics. Some formats, however, are better than others for specific situations, such as saving for the Web are.
Page 61: Morphing Photos
Morphing Photos One of Photo Express’ more novel effects extras is that of image morphing. Morphing transforms an image over time to create interesting and unique “warps” of the original photo. Image morphs are output as either image sequences or animated GIF files. To morph an image: Note: you can output image morphs as either an image sequence or GIF animations.
Page 63: Working With Templates
Working with Templates Photo Express’ unique templates can be edited and customized to suit your own needs. Templates consist of multiple components, usually a combination of text and photos with a decoration or two perhaps thrown in. To change any one of these components, simply select it and choose the appropriate tools from the Toolbar.
Page 65: Printing Templates
Printing Templates As with Photo mode, Project mode lets you print your work when you’re finished with it. The same options available in Photo mode apply in Project mode as well. For more on printing, see Printing Images and the online help.
Page 67: Chapter 6. Troubleshooting And Faq
6.1.3 SCSI Connection Guideline ScanWit film scanner uses a SCSI interface to connect to your computer and other SCSI devices. Depending upon the configuration you use, there will be certain guidelines to follow in order to ensure the proper function of…
Page 69: Chapter 7. Service Information
Taiwan: [email protected] USA: [email protected] Europe: [email protected] For free driver updates, product information and news release, please visit the following web addresses: http://www.acerperipherals.com.tw (Taiwan)
Оценок — 3
, средний балл: 2.7
()
Фрагмент инструкции
Step 2. Place original on the holder Place the film in the film holder. Two types of film holders are supplied with your film scanner. You can select the appropriate film holder that fits the type of your film: Note: When you place the film/slide in the filmstrip/slide holder, make sure that the film/slide is free from dust. You may also want to check that the film/slide is cleaned properly. If you want to scan a filmstrip: You can use the filmstrip holder (the holder with 6 rectangular lattices and a FILM mark) to place your filmstrip. F I L M P U S H C L O S E Filmstrip holder Pull the handle on the cover to open the cover. 9 English Place the filmstrip on the filmstrip holder with the emulsion side facing up. Close the cover and push the “PUSH CLOSE” mark at the middle of the cover. You will hear a click when the cover is secured. PUSH PUSHPUSH Insert the filmstrip holder into the holder insertion slot. 10 English If you want to scan slides: You can use the slide holder (the holder with 4 rectangular lattices and a SLIDE mark) to place your slide. Slide holder Pull the handle on the cover to open the cover. Then place the slide on the slide holder with the emulsion side face up. When you place the slide in the lattice, insert the lower left corner of the slide into the plastic stopper, then push the slide into the lattice until it is firmly fixed. You can place up to 4 slides in the slide holder. 11 English Close the cover and push the “PUSH CLOSE” mark and the middle of the cover. You will hear a click when the cover is secured. P U S H P U SH Insert the slide holder into the holder insertion slot. Step 3. Scan Now you can either push the SCAN button to activate automatic preview, or manually open an image editing software to activate MiraPhoto and do the preview: 12 English To use SCAN button: Push the SCAN button on the film scanner front panel. A dialogue box will pop up on the screen asking you to choose an image editing software to use. Choose the application you want to use and then click OK. Note: if you have only one image editing software installed in your computer, this dialogue box will be skipped. The application you choose will be activated. Meanwhile, MiraPhoto will start to preview the original. To preview manually: (1) Open your image editing application software. (2) From “File” menu, choose “Scanner”, “Select source” or “Select TWAIN_32 source” to select MiraPhoto as the TWAIN image source. (This differs according to the application you use) (3) Choose “Scan”, “Acquire” or “TWAIN_32 source” (this also differs according to the application you use), MiraPhoto will pop up on the screen. Click “Preview” to preview the original. According to the original you scan, choose an appropriate image type from the “Image Type” drop-down listbox in MiraPhoto. Specify a scanning resolution in the “Resolution” drop-down listbox and adjust the size and position of the dotted rectangle in the Preview Area to specify a scan area. Click «Scan» to start scanning the original. Step 4. Edit When scanning has completed, MiraPhoto will import the images into your image editing software. You can now close MiraPhoto and begin editing or saving the image. 13 English 14 English Chapter 4. Using MiraPhoto You can access MiraPhoto through your image editing applications. When you click “Acquire” or “Scan” in your application, the MiraPhoto main screen will appear: Menu Bar Image Thumbnail Area Tool Buttons Combo Boxes Film Selection Area Control Buttons Job Info ButtonPreview Area The following sections in this chapter will describe MiraPhoto in more detail. 15 English Menu Bar There are three selectable menu items in the Menu Bar. Each menu item contains several options in its submenu: File submenu MiraPhoto can record the settings you make for each scan session in a configuration file. With this feature, you can specify different settings for each individual scan job in a configuration file. You can then load the configuration file when you want to apply the settings. For example, you can save the settings you make for scanning artwork films in a configuration file called “Artwork”. The next time you want to scan artwork films, you can load the “Artwork” configuration file, and MiraPhoto will apply the settings recorded in it. Load Config… Load the configuration file you created. When the configuration file is loaded successfully, MiraPhoto will apply the settings recorded in the configuration file automatically. Save Config… Save current MiraPhoto settings to the configuration file Save Config As… Save current MiraPhoto Settings as another new configuration file. Usually you can create a new configuration file in this way. You can designate different file names for each configuration file. Reset Config When you select this item, the settings you make in MiraPhoto will reset to their default value. Auto Save Config When you select this item, your settings will be saved automatically in a configuration file a…
Ручной сканер Iscan S001 LCD является идеальным помощником для человека, работающего с документами, оригиналами текстов, фотографиями, которые нельзя выносить за пределы библиотеки. Сканер позволяет быстро и эффективно сканировать даже цветные материалы без помощи громоздких устройств. Гаджет легко помещается в рюкзак или женскую сумочку.
Слот памяти позволяет без лишних проблем расширить память устройства, чтобы непосредственно на нем хранить последние отсканированные фотографии или тексты.
Характеристики:
- Цвет корпуса: черный;
- Материал: пластмасса;
- Подключение: USB 2.0;
- Ширина поля сканирования: 30 см;
- Угол сканирования: 90 градусов;
- Расстояние считывания: 0 — 10 мм;
- Дополнительное расширение памяти за счет Micro SD карт: до 32 GB (в комплект не входит);
- Формат сканирования: JPEG/PDF;
- Размеры: 25,7 см 3 см 2,45 см;
- Вес: 190 г;
- Скорость сканирования: 900DPI, цветное — 12 сек; 600DPI, цветное — 8 сек; 300DPI, цветное — 3 сек;
- Длина сканирования: 900DPI — 89 см; 600DPI — 114 см; 300DPI — 248 см;
- Размер файла: High: 900х900DPI; Mi: 600х600DPI; Low: 300х300 DPI;
- Устройство автоматически выключается через 180 секунд бездействия;
- Совместимость: Windows XP/Vista,7 или выше;
- Питание: Две АА батарейки (в комплект не входят);
- Время работы: до 200 листов в низком разрешении и в цвете (в зависимости от емкости батареек).
Начало работы:
Для начала необходимо установить батарейки. Для этого откройте соответствующий отсек и вставьте в него соблюдая полярность две батарейки типа АА (в комплект не входят). Удерживайте кнопку SCAN (она же вкл\выкл) в течение 2 секунд, чтобы включить сканер. Далее необходимо вставить карту памяти (в комплект не входит). Установите в соответствующий слот карту памяти microSD card для последующей записи и хранения сканируемых материалов.
Установка времени:
Нажмите кнопку TIME SET. Так вы войдете в режим установки времени. Нажимайте кнопки JPG/PDF и DPI для установки времени. Нажмите кнопку SCAN, чтобы подтвердить установки.
Форматирование карты памяти:
После установки карты памяти в соответствующий слот, необходимо провести ее форматирование. Нажмите кнопку Format, на дисплее отобразится символ «F». Нажмите кнопку SCAN для начала форматирования карты памяти. Индикатор SD на дисплее будет мигать вплоть до окончания форматирования карты памяти MicroSD.
Установка разрешения сканирования:
Нажимайте клавишу DPI для выбора нужного разрешения: High: 900DPI; Mi:600DPI; Low:300DPI. На дисплее будут отображаться значки: Hi, Mi, Lo.
Установка режима цветности сканирования:
Нажимайте кнопку JPG/PDF для выбора формата. На дисплее отобразится значок JPG/PDF, C/BW, (Color/Black & White).
Сканирование:
Чтобы начать сканировать, возьмите сканер в руку и ровно расположите его над сканируемым объектом. В идеале прижать сканер к объекту по всей поверхности. Для начала процесса сканирования нажмите кнопку SCAN. Чтобы изображение получилось качественным, ведите сканер медленно, а сканируемое изображение не двигайте. Для окончания сканирования нажмите кнопку SCAN.
У многих из нас, особенно рождённых в СССР, хранится дома солидный архив фотоплёнок. Вот и у моего тестя, который в молодости, занимался в фотокружке этих негативов видимо-невидимо. И как-то он мне и говорит: «Вот в Китае, на том сайте, где вы обычно заказываете всякое разное есть такая штука с помощью которой можно негативы перевести в компьютер! Вот бы мне такую.» Ну и конечно зять (то есть я) начал искать и конечно же нашёл (в Китае есть даже то что о чём ты и не догадываешься). Заказали, обошёлся данный сканер нам в 2 817,51 руб. Пришла посылочка за 8 (восемь!!!) дней.
Сам сканер
— две рамки для слайдов
— одна рамка для пленок, она же универсальная для слайдов и катушечных пленок
— щёточка для чистки пленок
— кабель для подключения к телевизору
— USB кабель
— электрическая вилка.
Должна быть ещё инструкция, но положить видимо забыли… Да и ещё: электрическая вилка сгорела через полминуты… Хорошо сам сканер не пострадал. Так что запитывался я от ноутбука, с которого пишу данный обзор, по кабелю usb. Само собой открою диспут, долларов 10 с китайцев, думаю стрясу.
Собственно сканер.
Внизу слева кнопка включения, она же меню и справа кнопка сканирования. По бокам следующие кнопки: Слева – кнопка разворота (снизу) и просмотра (повыше), справа кнопки перемещения по меню.
Меню сканера выглядит так:
— выбор типа съемки (ч/б негатив, позитив и цветной негатив)
— экспозиция или яркость
— разрешение 5 или 10 мегапикселей (второе интерполяция).
— выбор языка – русского нет
— подключение по USB к компьютеру.
Меню сканера
Отсканированный кадр можно менять на ходу кнопками вверх, вниз. Кнопка поворот кадра при съемке разворачивает кадр влево, вправо и зеркально.
Негатив в катушке удобнее сканировать в универсальной рамке, нарезанный – в рамке для слайдов, хотя и то и то можно сканировать и с помощью рамки для слайдов – в ней есть держатели для предотвращения смещения.
Меню сканера
Отсканированный кадр можно менять на ходу кнопками вверх, вниз. Кнопка поворот кадра при съемке разворачивает кадр влево, вправо и зеркально.
Негатив в катушке удобнее сканировать в универсальной рамке, нарезанный – в рамке для слайдов, хотя и то и то можно сканировать и с помощью рамки для слайдов – в ней есть держатели для предотвращения смещения.
Разрезанный негатив в рамке
Ну и для тех кому интересно как сканер выглядит в разобранном состоянии.
Эмоксипин капли: инструкция по применению

Форма выпуска:
Цены в аптеках: Минск
2,61 — 3,18 р.
Содержание
- Что собой представляет препарат, и для чего его применяют
- Не применяйте препарат, если
- Особые указания и меры предосторожности
- Другие препараты
- Беременность, грудное вскармливание и фертильность
- Управление транспортными средствами и работа с механизмами
- Применение препарата
- Возможные нежелательные реакции
- Хранение препарата
- Состав
- Внешний вид препарата и содержимое упаковки
- Условия отпуска
Что собой представляет препарат, и для чего его применяют
Препарат ЭМОКСИПИН является ангиопротектором, уменьшает проницаемость сосудистой стенки, является ингибитором свободнорадикальных процессов, уменьшает вязкость крови и агрегацию тромбоцитов. Обладает ретинопротекторными свойствами, способствует рассасыванию внутриглазных кровоизлияний и улучшению микроциркуляции глаза.
Глазные капли ЭМОКСИПИН применяют:
— для лечения кровоизлияния в передней камере глаза;
— для лечения и профилактики кровоизлияния в склере у лиц пожилого возраста;
— для лечения и профилактики воспаления и ожогов роговицы;
— для лечения осложнений при близорукости;
— для лечения осложнений при ношении контактных линз.
Не применяйте препарат, если
• у Вас повышенная чувствительность к метилэтилпиридинола гидрохлориду или любому вспомогательному компоненту препарата (см. раздел Состав);
• Вы беременны.
С осторожностью: в период лактации.
Особые указания и меры предосторожности
Перед применением препарата ЭМОКСИПИН проконсультируйтесь с лечащим врачом, если:
• Вам необходимо одновременно использовать другие офтальмологические лекарственные препараты (глазные капли и другие). Интервал между применением ЭМОКСИПИН и других препаратов должен составлять не менее 15 минут. ЭМОКСИПИН следует применять последним.
Любые контактные линзы следует снимать перед закапыванием препарата и надевать не ранее чем через 20 мин после него.
Важная информация о вспомогательных веществах
Препарат ЭМОКСИПИН содержит натрия бензоат Е 211. Может слабо раздражать кожу, глаза и слизистые оболочки.
Дети и подростки
Применение лекарственного препарата не рекомендовано у детей и подростков до 18 лет в связи с отсутствием достаточных данных.
Другие препараты
Негативных проявлений при применении ЭМОКСИПИН на фоне терапии другими лекарственными препаратами не описано. Однако сообщите лечащему врачу, если Вы принимаете, недавно принимали или собираетесь принимать любые другие препараты. Это относится к любым растительным препаратам или препаратам, которые Вы купили без назначения врача.
ЭМОКСИПИН не следует смешивать с другими лекарственными препаратами.
Беременность, грудное вскармливание и фертильность
Если Вы беременны или кормите грудью, думаете, что можете быть беременны, или планируете беременность, перед началом применения препарата проконсультируйтесь с лечащим врачом.
Беременность:
применение противопоказано.
Лактация: применение возможно только в случае, если ожидаемая польза для матери превышает потенциальный риск для ребенка.
Управление транспортными средствами и работа с механизмами
Воздержитесь от управления автотранспортом в течение 15-20 минут после применения лекарственного препарата, поскольку ЭМОКСИПИН может вызвать кратковременное чувство жжения и зуда.
Применение препарата
Всегда применяйте этот препарат в полном соответствии с рекомендациями врача. При появлении сомнений, проконсультируйтесь с лечащим врачом.
Врач определит длительность лечения в зависимости от тяжести заболевания (обычно составляет 3-30 дней). При необходимости и хорошей переносимости курс лечения может быть продолжен до 6 месяцев. При необходимости повторные курсы лечения проводятся с интервалом 4-6 месяцев.
Препарат применяется местно в виде инстилляций в конъюнктивальный мешок по 1-2 капли 2-3 раза в день.
Рекомендации по использованию флаконов в комплекте с крышкой-капельницей
Перед применением внимательно прочитайте этот раздел и последовательно выполните операции, представленные ниже в тексте и на рисунках 1-6.
1. Достать из упаковки флакон.
2. Если флакон укупорен колпачком алюминиевым: расположить ножницы под углом 45 градусов к крышке, подцепив её нижний край, движением, направленным вверх, снять алюминиевый колпачок вместе с резиновой крышкой (рис. А 1-2).
3. Если флакон укупорен колпачком алюминиевым с пластиковой накладкой: с усилием потянуть за пластиковую накладку со стороны надрезов, поднимая ее вертикально, затем резко потянуть вниз вдоль флакона для нарушения целостности колпачка. Снять алюминиевый колпачок и резиновую пробку (рис. Б 1-2).
4. Достать капельницу из упаковки и плотно надеть ее на флакон (рис. 3).
5. Перевернуть флакон строго вертикально для удаления воздушного пузырька и подождать несколько секунд. В случае большого пузырька вернуть флакон в исходное положение, а затем медленно повторить действие, аккуратно постучав по дну флакона (рис. 4).
6. Закапать капли, нажимая указательным и большим пальцем на пипетку (рис. 5). Нельзя прикасаться пипеткой к глазу или другим поверхностям – это может привести к инфицированию раствора.
7. Перевернув флакон, закрыть пипетку специальной пробкой (рис. 6).

После закапывания глазных капель рекомендуется закрыть глаза ватным тампоном. Не открывая глаз, прижмите внутренний угол глаза на 1-2 минуты.
Если Вы применили препарата ЭМОКСИПИН больше, чем следовало
Если Вы считаете, что закапали слишком большую дозу препарата, промойте глаза водой или физиологическим раствором и при необходимости обратитесь к врачу.
Если Вы забыли применить препарат ЭМОКСИПИН
Если Вы забыли закапать глазные капли, сделайте это при первой возможности. Не закапывайте двойную дозу, чтобы компенсировать пропущенную. Если Вы пропустили несколько доз, сообщите об этом врачу.
Возможные нежелательные реакции
Подобно всем лекарственным препаратам ЭМОКСИПИН может вызывать нежелательные реакции, однако они возникают не у всех.
При применении препарата может возникнуть чувство жжения, зуд, кратковременное покраснение конъюнктивы (тонкая прозрачная ткань, покрывающая глаз снаружи и заднюю поверхность век), уплотнение параорбитальных тканей (ткани вокруг глаз), аллергические реакции.
Сообщение о нежелательных реакциях
Если у Вас появились нежелательные реакции, сообщите об этом своему лечащему врачу. Это также относится к любым нежелательным реакциям, которые не указаны в данном листке-вкладыше.
Вы также можете сообщить о нежелательных реакциях в информационную базу данных по нежелательным реакциям (действиям) на лекарственные препараты, включая сообщения о неэффективности лекарственных препаратов (УП «Центр экспертиз и испытаний в здравоохранении», rceth.by). Сообщая о нежелательных реакциях, Вы помогаете получить больше сведений о безопасности препарата.
Хранение препарата
Хранить в защищенном от света месте при температуре не выше 25 °C.
Хранить в недоступном и невидимом для детей месте.
Вскрытый флакон хранить в защищенном от света месте при температуре от 15 °C до 25 °C в течение 4 недель.
Срок годности – 3 года.
Не применять по истечении срока годности.
Состав
Один флакон содержит действующее вещество –
метилэтилпиридинола гидрохлорид – 10 мг/мл;
вспомогательные вещества: натрия сульфит безводный Е 221, натрия бензоат Е 211, калия дигидрофосфат, динатрия фосфат дигидрат, вода для инъекций.
Внешний вид препарата и содержимое упаковки
ЭМОКСИПИН, раствор (капли глазные) 10 мг/мл, – прозрачный бесцветный или с желтоватым оттенком раствор.
По 5 мл во флаконы, укупоренные пробками резиновыми и колпачками алюминиевыми или алюминиевыми с пластиковой накладкой. На флакон наклеивают этикетку самоклеящуюся. Флакон в комплекте с крышкой-капельницей и листком-вкладышем помещают в пачку из картона.
Условия отпуска
По рецепту.
Держатель регистрационного удостоверения и производитель
РУП «Белмедпрепараты»,
Республика Беларусь, 220007, г. Минск, ул. Фабрициуса, 30,
тел./факс:(+375 17) 220 37 16
e-mail: medic@belmedpreparaty.com
Цены в аптеках Минск
Эмоксипин, капли, 1% 5 мл ×1
глазные, Белмедпрепараты, Беларусь • Без рецепта
Эмоксипин – антиоксидант синтетический для применения в офтальмологической практике. Средство способны укреплять сосуды органа зрения, стимулируя рассасывание мелких кровоизлияний в слизистую и сетчатку глаза, защищать сетчатку при избыточном уровне освещения. Он улучшает кровообращение в тканях, повышая устойчивость последних к воздействию свободны радикалов.
Состав и форма выпуска
Глазные капли «Эмоксипин» – раствор 1%-ный стерильный, содержит:
- Активнодействующий компонент: метилэтилпиридинола -1 мг.
Упаковка. Пластиковые флаконы по 5 мл.
Фармакологическое действие
Для чего назначают препарат? «Эмоксипин» представляет собой синтетический антиоксидант с ангиопротекторным, а также антигипоксическим действиями. Препарат снижает проницаемость стенок сосудов, нормализует циркуляторную функцию внутриглазной жидкости. «Эмоксипин» обладает способностью рассасывать мелкие кровоизлияния внутрь глаза, расширять сосуды сердца, а также повышать устойчивость головного мозга к условиям ишемии и гипоксии.
Показания к применению
- Кровоизлияния внутрь глаза разного генеза;
- Тромбоз центральной вены сетчатой оболочки, диабетическая ретинопатия;
- Ожоги роговицы (для лечения и профилактики);
- Осложненные миопия и глаукома;
- Нарушения мозгового кровообращения.
Кроме того, Эмоксипин рекомендован пользователям контактных линз для улучшения кровоснабжения глаз.
Способ применения и дозы
Перед использованием прочтите инструкцию по применению. Назначается по 1–2 кап. до трех раз в сутки, длительностью 3–30 дней, что определяется тяжестью заболевания.
Противопоказания
- Индивидуальная гиперчувствительность.
- Беременность.
Побочные действия
- Раздражения глаз: отек, жжение, зуд, гиперемия конъюнктивы.
- Повышение артериального давления (очень редко).
Передозировка
Маловероятна при местном применении.
Лекарственные взаимодействия
Не отмечены.
Особые указания
Перед применением раствора следует извлекать контактные линзы, устанавливать их вновь стоит не ранее чем через четверть часа после внесения «Эмоксипина». При назначении нескольких офтальмологических средств одновременно обязательно делать 20-минутный перерыв между их инстилляциями.
Вскрытый флакон хранят в холодильнике. Срок хранения невскрытого флакона — два года.
Цена препарата Эмоксипин
Цена на препарат «Эмоксипин» в аптеках Москвы начинается от 140 руб.
Аналоги Эмоксипина
Чтобы посмотреть аналоги лекарства, например, «Тауфон», нажмите на интересующее Вас средство и перейдите на страницу.
Обратившись в «Московскую Глазную Клинику», Вы сможете пройти обследование на самом современном диагностическом оборудовании, а по его результатам – получить индивидуальные рекомендации ведущих специалистов по лечению выявленных патологий.
Клиника работает семь дней в неделю без выходных, с 9 до 21 ч. Записаться на прием и задать специалистам все интересующие Вас вопросы можно по телефонам 8 (800) 777-38-81 и 8 (499) 322-36-36 или онлайн, воспользовавшись соответствующей формой на сайте. Посмотреть отзывы о препарате можно внизу страницы.
Эзиклен — инструкция по применению
Синонимы, аналоги
Статьи
Регистрационный номер:
ЛП-004957
Торговое наименование:
Эзиклен®
Международное непатентованное или группировочное наименование:
калия сульфат + магния сульфат + натрия сульфат
Лекарственная форма:
концентрат для приготовления раствора для приема внутрь
Состав:
Состав (г/один флакон):
| Действующие вещества: | |
| Натрия сульфат безводный | 17,510 |
| Магния сульфата гептагидрат | 3,276 |
| Калия сульфат | 3,130 |
| Вспомогательные вещества: | |
| Натрия бензоат | 0,098 |
| Лимонная кислота безводная | 0,315 |
| Яблочная кислота | 0,315 |
| Сукралоза | 0,3025 |
| Ароматизатор плодово-ягодный коктейль1 | 0,7875 |
| Вода очищенная | 169,641 |
Состав (г/два флакона):
| Действующие вещества: | |
| Натрия сульфат безводный | 35,020 |
| Магния сульфата гептагидрат | 6,552 |
| Калия сульфат | 6,260 |
| Вспомогательные вещества: | |
| Натрия бензоат | 0,196 |
| Лимонная кислота безводная | 0,630 |
| Яблочная кислота | 0,630 |
| Сукралоза | 0,605 |
| Ароматизатор плодово-ягодный коктейль1 | 1,575 |
| Вода | 339,282 |
1 Ароматизатор плодово-ягодный коктейль состоит из смеси натуральных и синтетических ароматизаторов, пропиленгликоля (Е1520), этилового спирта, уксусной кислоты и бензойной кислоты (Е210).
Описание:
Прозрачная или слегка опалесцирующая жидкость с фруктовым запахом.
Фармакотерапевтическая группа
Осмотическое слабительное средство
Код ATX:
A06AD10.
Фармакологические свойства
Фармакодинамика:
Эзиклен® является осмотическим слабительным средством. Механизм действия препарата в первую очередь обусловлен ограниченным по насыщаемости процессом активного транспорта сульфатов. При достижении порога насыщения всасывания сульфаты остаются в просвете кишечника.
Осмотический эффект неабсорбированных сульфатов и прием внутрь значительного объема воды вызывает задержку воды в кишечнике, что обеспечивает слабительное действие, вызывая обильную водянистую диарею, и приводит к очищению кишечника.
Фармакокинетика:
Абсорбция сульфата представляет собой ограниченный по насыщаемости процесс активного транспорта; абсорбированные сульфаты выводятся преимущественно почками. В клинических исследованиях после приема препарата, сходного по содержанию сульфатов с препаратом Эзиклен®, у шести здоровых добровольцев (в режиме дробного применения, т.е. прием двух доз с перерывом в 12 ч) максимальная концентрация (Сmax) сульфатов в сыворотке наблюдалась приблизительно через 16 ч после приема первой дозы и через 5 ч после приема второй дозы и составила 499,50 мкМоль/л, по сравнению с исходным значением 141-467 мкМоль/л, в среднем — 335 мкМоль/л. Затем сывороточная концентрация сульфатов снижалась с периодом полувыведения 8,5 ч.
Основным путем выведения сульфатов является выведение кишечником (около 70% от принятого количества).
Системная экспозиция сульфатов: AUC (площадь под фармакокинетической кривой «концентрация-время») и Сmax после приема препарата Эзиклен® было изучено в ходе сравнительного исследования у здоровых добровольцев, у 6 пациентов с нарушением функции почек средней степени тяжести (клиренс креатинина от 30 до 49 мл/мин) и у 6 пациентов с нарушением функции печени легкой или средней степени тяжести (по шкале Чайлд-Пью: А (N=5) и В (N=1), соответственно). Нарушение функции почек приводило к снижению количества сульфатов, выводимых почками. Средние значения AUC и Сmax сульфатов были приблизительно на 50% выше у пациентов с нарушением функции почек по сравнению со здоровыми добровольцами. Системное воздействие препарата на концентрацию сульфатов не зависело от нарушения функции печени. Во всех трех исследуемых группах концентрация сульфатов в сыворотке вернулась к исходному значению на 6-й день после приема препарата Эзиклен®. В данном исследовании прием препарата Эзиклен® не привел к клинически значимому повышению концентрации сульфатов в крови у пациентов с нарушением функции печени или почек.
Показания к применению
Препарат Эзиклен® предназначен для очищения толстой кишки у взрослых пациентов при подготовке к эндоскопическому и радиологическому исследованию толстой кишки или к хирургическим вмешательствам, требующим отсутствия содержимого в толстой кишке.
Противопоказания
- Гиперчувствительность к действующим веществам или к любому из компонентов препарата
- Желудочно-кишечная обструкция или подозрение на желудочно-кишечную обструкцию
- Перфорация кишечника
- Нарушения опорожнения желудка (в том числе, гастропарез)
- Кишечная непроходимость
- Токсический колит или токсический мегаколон
- Профузная рвота
- Дегидратация тяжелой степени
- Застойная сердечная недостаточность
- Асцит
- Тяжелая почечная недостаточность (скорость клубочковой фильтрации <30 мл/мин/1,73м²)
- Активная фаза воспалительных заболеваний кишечника (таких, как болезнь Крона, язвенный колит)
- Беременность и период грудного вскармливания
- Детский возраст до 18 лет
С осторожностью
Пожилой возраст; нарушение функции почек легкой или средней степени тяжести; нарушение функции печени; одновременное применение препаратов, влияющих на концентрацию электролитов: блокаторы кальциевых каналов, диуретики, препараты лития или другие препараты подобного действия; одновременное применение препаратов, удлиняющих интервал QT; снижение моторики ЖКТ (в т. ч. в анамнезе), наличие хирургических вмешательств на ЖКТ, которые привели к нарушению моторики; у пациентов с нарушенным рвотным рефлексом, со склонностью к регургитации и аспирации; у истощенных, ослабленных пациентов; у пациентов с клинически значимыми нарушениями функции сердца; у пациентов, имеющих высокий риск развития водно-электролитных нарушений (включая гипонатриемию и гипокалиемию).
Применение при беременности и в период грудного вскармливания
Беременность
Исследования репродуктивной функции у животных с применением сульфатов натрия, магния и калия не проводились.
Данные по применению данного препарата у беременных женщин отсутствуют.
Препарат Эзиклен® не рекомендуется принимать во время беременности.
Грудное вскармливание
Неизвестно, происходит ли проникновение препарата Эзиклен® с грудным молоком.
Нельзя исключать риск для новорожденного/младенца.
Следует прекратить грудное вскармливание на период приема препарата Эзиклен® и вплоть до 48 часов после приема второй дозы.
Фертильность
Данные о влиянии на фертильность отсутствуют.
Способ применения и дозы
Внутрь.
Взрослые
Для надлежащего очищения кишечника требуется прием двух флаконов препарата Эзиклен®.
Перед приемом содержимое каждого флакона необходимо развести водой. Пациент должен выпить полученный разведенный раствор и еще две чашки, наполненные до метки водой или разрешенной прозрачной жидкостью (т.е. приблизительно 1 л), в течение следующих двух часов, как описано ниже в разделах Режим применения и Схема разведения и применения.
Разрешенными прозрачными жидкостями являются: вода, чай или кофе (без молока или немолочных сливок), газированные (обогащенные углекислым газом) или негазированные легкие напитки, осветленные фруктовые соки (без мякоти, не красные и не фиолетовые), бульоны или процеженные от твердых ингредиентов супы.
В общей сложности, для очистки кишечника перед проведением процедуры необходимо выпить не менее 3 л жидкости.
Раствор после разведения должен быть использован незамедлительно.
Режим применения
Препарат принимают либо в режиме дробного применения (первый флакон принимается вечером накануне процедуры, а второй — на следующее утро), либо в режиме единовременного применения (прием накануне процедуры). Подходящий режим приема препарата Эзиклен® может быть определен врачом.
Если позволяет время назначенной процедуры, то режим дробного применения предпочтительнее, чем режим единовременного приема накануне процедуры. Режим единовременного применения накануне процедуры потенциально подходит в качестве альтернативного режима.
- Режим дробного применения
День перед процедурой:
Вечером накануне процедуры (например, в 18.00) необходимо следовать следующим инструкциям:- Содержимое одного флакона препарата Эзиклен® следует вылить в прилагаемый мерный стакан и развести водой до метки (т.е. до объема 0,5 л).
- В течение последующих двух часов пациент должен выпить полученный раствор и дополнительно два мерных стакана воды или прозрачной жидкости (т.е. около 1 л).
День процедуры:
Утром в день процедуры (через 10-12 ч после вечернего приема препарата) необходимо повторить действия, согласно инструкциям для вечера накануне:- Содержимое второго флакона препарата Эзиклен® следует вылить в прилагаемый мерный стакан и развести водой до метки (т.е. до объема 0,5 л).
- В течение последующих двух часов пациент должен выпить полученный раствор и дополнительно два мерных стакана воды или прозрачной жидкости (т.е. около 1 л).
Прием полного объема разведенного раствора препарата Эзиклен® и дополнительного количества воды или прозрачной жидкости должен быть закончен как минимум за 2 часа и не позднее 4 часов до начала процедуры.
- Режим единовременного применения
(режим применения для использования в зависимости от индивидуальных потребностей пациента)
День перед процедурой:
Вечером накануне процедуры (например, в 18:00):- Содержимое одного флакона препарата Эзиклен® следует вылить в прилагаемый мерный стакан и развести водой до метки (т.е. до объема 0,5 л).
- В течение последующих двух часов пациент должен выпить полученный раствор и дополнительно два мерных стакана воды или прозрачной жидкости (т.е. около 1 л).
Приблизительно через 2 ч после начала приема первой дозы:
- Содержимое второго флакона препарата Эзиклен® следует вылить в прилагаемый мерный стакан и развести водой до метки (т.е. до объема 0,5 л).
- В течение последующих двух часов пациент должен выпить полученный раствор и дополнительно два мерных стакана воды или прозрачной жидкости (т.е. около 1 л).
Прием полного объема разведенного раствора препарата Эзиклен® и дополнительного количества воды или прозрачной жидкости должен быть закончен как минимум за 2 часа и не позднее 4 часов до начала процедуры.
Схема разведения и приема препарата
- Откройте флакон, нажав на крышку и поворачивая ее против часовой стрелки.
- Вылейте содержимое одного флакона в прилагаемый мерный стакан.
- Разведите препарат водой до метки (т.е. до объема 0,5 л).
- Медленно выпейте всю жидкость из стакана, в течение 30-60 мин.
- ВАЖНО: Выпейте еще два (2) мерных стакана воды или прозрачной жидкости.
Каждый раз наполняйте стакан до метки. - Медленно выпейте жидкость из каждого стакана в течение 30 мин (2 х 30 мин).
Выполнение этапов с 1 по 6 занимает около 2 часов.
Следует повторить все этапы со вторым флаконом препарата Эзиклен®.
После процедуры
Для того чтобы восполнить потерянную в процессе подготовки к процедуре жидкость, пациенты должны выпить достаточное ее количество, чтобы поддержать соответствующий уровень гидратации.
Ограничения в питании
В день накануне процедуры допускается легкий завтрак. Далее пациент может употреблять только прозрачные жидкости в качестве приема пищи вплоть до процедуры. Следует избегать приема жидкостей красного и фиолетового цвета, молока и алкогольных напитков.
Особые группы пациентов
Пожилые пациенты
В ходе клинических исследований препарата не было выявлено разницы в эффективности и безопасности препарата Эзиклен® у пожилых пациентов и пациентов других возрастных групп. Для пожилых пациентов не требуется коррекция дозы, однако, следует соблюдать осторожность при применении препарата у таких пациентов, как и в любой другой популяции высокого риска.
Пациенты с нарушением функции почек
Существуют ограниченные данные по этой группе пациентов. Не требуется коррекции дозы для пациентов с нарушением функции почек легкой или средней степени тяжести, однако, следует соблюдать осторожность при применении препарата у таких пациентов, как и в любой другой популяции высокого риска. Препарат Эзиклен® противопоказан пациентам с нарушением функции почек тяжелой степени тяжести.
Пациенты с нарушением функции печени
Существуют ограниченные данные по этой группе пациентов. Не требуется коррекция дозы для пациентов с нарушением функции печени, однако, следует соблюдать осторожность при применении препарата у таких пациентов, как и в любой другой популяции высокого риска.
Детская популяция
Безопасность и эффективность препарата Эзиклен® у детей (т.е. у пациентов младше 18 лет) пока не установлена. Данные отсутствуют.
Побочное действие
Диарея, возникающая после приема препарата Эзиклен®, является ожидаемым эффектом при очищении кишечника в ходе подготовки перед процедурами и возникает у большинства пациентов. Наиболее частыми сообщаемыми побочными реакциями в клинических исследованиях и пострегистрационном наблюдении были: дискомфорт, вздутие живота, боль в животе, тошнота и рвота.
Во время клинических исследований сообщения о рвоте поступали с большей частотой при использовании режима единовременного применения, чем при использовании режима дробного применения.
Частота побочных реакций при применении препарата Эзиклен® классифицирована следующим образом:
Очень часто (≥1/10); часто (от ≥1/100 до <1/10); нечасто (от ≥1/1 000 до <1/100), редко (от ≥1/10 000 до <1/1 000), очень редко (<1/10 000), неизвестно (невозможно оценить на основании имеющихся данных).
| Системно-органный класс | Частота | Побочное действие |
| Нарушения со стороны иммунной системы | Неизвестно (пострегистрационные данные) | Гиперчувствительность (включая крапивницу, зуд, сыпь, эритему, диспноэ, чувство сдавления в горле) |
| Нарушения со стороны нервной системы | Нечасто | Головная боль, головокружение |
| Нарушения со стороны желудочно-кишечного тракта (ЖКТ) | Очень часто | Вздутие живота, боль в животе, тошнота, рвота |
| Нечасто | Дискомфорт в аноректальной области, сухость во рту | |
| Нарушения со стороны почек и мочевыводящих путей | Нечасто | Дизурия |
| Общие расстройства и нарушения в месте введения | Очень часто | Дискомфорт |
| Нечасто | Лихорадка | |
| Лабораторные и инструментальные данные | Нечасто | Повышение активности аспартатаминотрансферазы, креатинфосфокиназы, лактатдегидрогеназы в крови; повышение концентрации фосфора в крови; гипербилирубинемия; отклонения в результатах биохимического анализа крови, включая гипонатриемию, гипокалиемию, гипокальциемию и гиперурикемию |
Дополнительная информация для особых групп пациентов
Во время клинических исследований было обнаружено временное повышение концентрации мочевой кислоты. Для пациентов у которых в анамнезе имеются клинические проявления подагры или гиперурикемии см. информацию в разделе «Особые указания».
В ходе клинических исследований не было обнаружено разницы в безопасности приема препарата Эзиклен® у пожилых пациентов и пациентов других возрастных групп. Следует соблюдать осторожность при применении препарата у таких пациентов, как и в любой другой популяции высокого риска (см. раздел «Особые указания»).
Передозировка
В случае передозировки или неправильного применения (например, применение неразведенного препарата и/или прием недостаточного объема воды) возможно возникновение тошноты, рвоты, диареи и электролитных нарушений. Обычно в этом случае применяется симптоматическая терапия, в том числе прием жидкости внутрь. В редких случаях передозировки, сопровождающихся тяжелыми метаболическими нарушениями, рекомендуется проведение внутривенной регидратация.
Взаимодействие с другими лекарственными средствами
Как и для любых других препаратов для очищения кишечника:
- С осторожностью применять у пациентов, получающих терапию препаратами, влияющими на концентрацию электролитов: блокаторы «медленных» кальциевых каналов, диуретики, препараты лития или другие препараты подобного действия.
- Следует соблюдать осторожность при приеме препаратов, удлиняющих интервал QT.
- Диарея является ожидаемым эффектом, и прием внутрь других лекарственных препаратов в течение 1-3 ч после начала приема препарата Эзиклен® и до окончания процесса очищения кишечника может привести к вымыванию их из ЖКТ и нарушению абсорбции. Может быть изменен терапевтический эффект препаратов, применяемых регулярно внутрь, имеющих узкий терапевтический диапазоном или короткий период полувыведения (например, пероральные контрацептивы, противоэпилептические препараты, гипогликемические препараты, антибиотики, левотироксин натрия, дигоксин и т. д.).
Особые указания
Препарат Эзиклен® не применяется для лечения запоров.
Электролитные расстройства и дегидратация:
- Учитывая потенциальный риск развития серьезных электролитных нарушений, необходимо тщательно оценить соотношение польза/риск прежде, чем применять препарат Эзиклен® в группах высокого риска. Перед применением препарата Эзиклен® должны быть исключены противопоказания для его назначения. Особое внимание необходимо уделить применению специальных мер предосторожности, включая необходимость поддержания соответствующей гидратации.
- Все пациенты должны быть предупреждены о необходимости поддержания адекватного уровня гидратации до, во время и после приема препарата Эзиклен®. Если у пациента развивается обильная рвота или признаки дегидратации после приема препарата, должны быть приняты меры по регидратации во избежание потенциального риска серьезных осложнений, связанных с нарушением водно-электролитного баланса (такими как, судороги и аритмия сердца). Кроме того, рекомендуется проведение предварительных лабораторных анализов (определение концентрации электролитов, креатинина и азота мочевины крови). Пациентам необходимо рекомендовать пить как можно больше воды или прозрачных жидкостей для поддержания соответствующего уровня гидратации.
Пациенты группы высокого риска:
- У истощенных, ослабленных пациентов, пожилых пациентов, пациентов с клинически значимыми нарушениями функции почек, печени или сердца, а также у пациентов, имеющих высокий риск развития электролитных нарушений, необходимо провести биохимические анализы с определением сывороточной концентрации электролитов и оценить функцию почек перед началом и после применения препарата.
- Пациентам с дегидратацией или нарушениями водно-электролитного баланса необходимо провести соответствующую терапию для их устранения до приема препарата для очищения кишечника. Кроме того, следует соблюдать осторожность при использовании препарата у пациентов с патологическими состояниями или у пациентов, принимающих препараты, которые увеличивают риск появления нарушений водно-электролитного баланса (включая гипонатриемию и гипокалиемию) или повышают риск потенциальных осложнений. Необходимо наблюдение за такими пациентами.
- Существует теоретический риск удлинения интервала QT, которое может произойти в результате электролитных нарушений.
Необходимо соблюдать осторожность при использовании препарата у следующих групп пациентов:
- Препарат должен применяться с осторожностью и только под наблюдением медицинского персонала у пациентов с нарушенным рвотным рефлексом и у пациентов со склонностью к регургитации и аспирации.
- Снижение моторики ЖКТ, в том числе наличие в анамнезе хирургических вмешательств на желудочно-кишечном тракте, которые привели к снижению моторики.
Гиперурикемия:
- Прием препарата Эзиклен® может вызвать временное легкое или умеренное повышение концентрации мочевой кислоты. Возможность повышения концентрации мочевой кислоты должна учитываться до назначения препарата пациентам с проявлениями подагры или гиперурикемией.
Дополнительная информация:
- Перед приемом препарат необходимо развести водой. Прием неразбавленного раствора может увеличить риск тошноты, рвоты, дегидрации и электролитных нарушений. Каждый флакон препарата необходимо разводить водой, а также употреблять рекомендуемое дополнительное количество воды для обеспечения хорошей переносимости препарата у пациента.
- Лекарственный препарат содержит 247,1 ммоль (или 5,684 г) натрия на флакон. Это необходимо принимать во внимание у пациентов, которые находятся на диете с контролем потребления натрия.
- Лекарственный препарат содержит 35,9 ммоль (или 1,405 г) калия на флакон. Это необходимо принимать во внимание у пациентов со сниженной функцией почек или у пациентов, которые находятся на диете с контролем потребления калия.
Влияние на способность управлять транспортными средствами, механизмами
Прием препарата Эзиклен® не оказывает влияния на способность управлять автомобилем и работать с механизмами.
Форма выпуска
Концентрат для приготовления раствора для приема внутрь.
176 мл концентрата в прозрачном флаконе из полиэтилентерефталата темно-коричневого цвета вместимостью 180 мл с запечатанной завинчивающейся крышкой из полиэтилена высокой плотности, защищенной от случайного открывания детьми.
Два флакона с концентратом и один полипропиленовый мерный стакан для разведения и приема помещены вместе с инструкцией по медицинскому применению в пачку картонную.
Условия хранения
Хранить в недоступном для детей месте. При температуре не выше 30 °С.
Срок годности
3 года.
После вскрытия флакона и/или разведения водой раствор должен быть использован незамедлительно.
Не применять по истечении срока годности.
Условия отпуска
Отпускают по рецепту.
Производитель
Бофур Ипсен Индастри
Рю Эт Виртон — 28100 Дрё, Франция
Владелец регистрационного удостоверения/организация, принимающая претензии потребителей.
Владелец регистрационного удостоверения: Ипсен Фарма, Франция.
В случае необходимости, претензии потребителей направлять по адресу представительства в РФ:109147, Москва, ул. Таганская, 17-23
Купить Эзиклен в apteka.ru
Купить Эзиклен в ГорЗдрав
Купить Эзиклен в megapteka.ru
Купить Эзиклен в Планета Здоровья
*Цены в Москве. Точная цена в Вашем городе будет указана на сайте аптеки.
Комментарии
(видны только специалистам, верифицированным редакцией МЕДИ РУ)
Фильм-сканер EC718 – это устройство, позволяющее преобразовывать пленочные фотографии в цифровые форматы, что очень удобно для архивирования и редактирования. В данной инструкции мы рассмотрим основные функции и настройки данного сканера, а также дадим полезные советы по его использованию.
Первоначальная настройка
Перед началом работы с Film Scanner EC718 убедитесь, что устройство подключено к источнику питания и правильно соединено с компьютером. Ознакомьтесь с инструкцией по установке драйверов и программного обеспечения, которое обычно прилагается в комплекте. Убедитесь, что на вашем компьютере установлены все необходимые обновления для корректной работы устройства.
Процесс сканирования
Для сканирования пленки необходимо загрузить ее в специальный лоток, который соответствует типу вашей пленки (35 мм, 120, и т.д.). Убедитесь, что пленка установлена правильно и плотно. Запустите программу для сканирования на вашем компьютере и выберите режим сканирования. Вы можете задать разрешение сканирования, формат сохраняемого файла (JPEG, TIFF и др.) и другие параметры, такие как яркость и контрастность.
Обработка изображений
После завершения сканирования вы сможете редактировать полученные изображения. Используйте графические редакторы для коррекции яркости, контрастности и цветового баланса. Это поможет вам добиться наилучшего качества фотографий. Не забудьте сохранить измененные изображения в нужном формате и в удобном для вас месте на компьютере.
Следуя данной инструкции, вы сможете легко и быстро освоить Film Scanner EC718 и насладиться процессом оцифровки ваших пленочных фотографий.
Перед началом работы с Film Scanner EC718, убедитесь, что все компоненты устройства исправны и находятся в комплекте. Включите сканер и подготовьте пленку для сканирования.
Основные характеристики
- Разрешение: 14 МП
- Поддерживаемые форматы пленки: 35 мм, 110, 126
- Интерфейс: USB 2.0
- Совместимость: Windows, Mac
Инструкция по использованию
- Подключите сканер к компьютеру с помощью USB-кабеля.
- Включите устройство. На экране появится меню.
- Выберите тип пленки, которую вы собираетесь сканировать.
- Установите пленку в соответствующий слот.
- Нажмите кнопку «Сканировать».
- После завершения сканирования, изображения сохранятся на компьютере.
Советы по уходу
- Регулярно очищайте линзы устройства от пыли.
- Храните сканер в сухом месте, вдали от прямых солнечных лучей.
- Не используйте агрессивные химические вещества для чистки.
Технические параметры
| Параметр | Значение |
|---|---|
| Размер устройства | 25 x 15 x 8 см |
| Вес | 1.5 кг |
| Питание | DC 5V |
Инструкция по использованию Film Scanner EC718
Фотосканер Film Scanner EC718 предназначен для сканирования пленок и слайдов. Он обеспечивает высокое качество изображения и простоту в использовании.
В данной инструкции вы найдете основные шаги по настройке и эксплуатации сканера, а также советы по устранению возможных проблем.
Основные функции и характеристики
- Поддержка различных типов пленки и слайдов
- Высокое разрешение сканирования до 14 МП
- Встроенная память для хранения изображений
- USB-подключение для передачи данных на компьютер
Инструкция по использованию
- Подключите сканер к компьютеру с помощью USB-кабеля.
- Включите устройство, нажав кнопку питания.
- Выберите тип пленки или слайда, который вы собираетесь сканировать.
- Загрузите пленку в держатель и поместите его в сканер.
- Выберите настройки сканирования (разрешение, формат файла и т.д.).
- Нажмите кнопку сканирования и дождитесь окончания процесса.
- Сохраните отсканированные изображения на ваш компьютер.
Устранение неполадок
| Симптом | Решение |
|---|---|
| Сканер не включается | Проверьте подключение к сети и кабель питания. |
| Изображения получаются размытыми | Убедитесь, что пленка чистая и правильно установлена. |
| Не удается сохранить изображения | Проверьте доступное место на компьютере и формат файлов. |
Инструкция к сканеру Film Scanner EC718
Сканер Film Scanner EC718 предназначен для цифровой обработки пленки и слайдов. Устройство позволяет быстро и качественно преобразовывать аналоговые изображения в цифровой формат.
Следуя приведённой инструкции, вы сможете настроить и использовать сканер с максимальной эффективностью.
Подключение сканера
- Подключите сканер к компьютеру с помощью USB-кабеля.
- Включите сканер с помощью кнопки питания.
- Убедитесь, что устройство распознано системой.
Сканирование пленки
Для сканирования пленки выполните следующие шаги:
- Подготовка пленки: Убедитесь, что пленка чистая и без царапин.
- Вставка пленки: Поместите пленку в соответствующий отсек сканера.
- Настройки сканирования: Выберите параметры качества и разрешения через меню сканера.
- Запуск сканирования: Нажмите кнопку «Сканировать» для начала процесса.
Сохранение изображений
После завершения сканирования, изображения можно сохранить:
- Выберите формат файла (JPEG, TIFF и т.д.).
- Укажите место на компьютере для сохранения изображений.
- Нажмите «Сохранить» для завершения процесса.
Устранение неполадок
| Проблема | Решение |
|---|---|
| Сканер не включается | Проверьте подключение к сети и исправность кабеля. |
| Изображения не загружаются | Перепроверьте установку драйверов и настройки устройства. |
| Низкое качество сканирования | Увеличьте разрешение сканирования в настройках. |
Инструкция к Film Scanner EC718 на русском языке
В этой инструкции мы рассмотрим, как использовать Film Scanner EC718, а также основные функции и советы по эксплуатации.
Установка и подключение
- Извлеките сканер из упаковки.
- Подключите устройство к источнику питания с помощью прилагаемого адаптера.
- Подключите USB-кабель к компьютеру.
- Включите сканер, нажав кнопку питания.
Сканирование пленки
Для сканирования пленки выполните следующие шаги:
- Вставьте пленку в соответствующий слот устройства.
- Выберите требуемый формат сканирования с помощью кнопок управления.
- Нажмите кнопку «Сканировать» для начала процесса.
- После завершения сканирования сохраните изображение на компьютер.
Основные функции
- Сканирование различных форматов пленок: 35 мм, 110 и другие.
- Поддержка различных разрешений: 5 мегапикселей и выше.
- Интерфейс USB 2.0 для быстрой передачи данных.
Советы по эксплуатации
Для достижения наилучших результатов при сканировании следуйте этим рекомендациям:
- Перед сканированием очистите пленку от пыли и грязи.
- Регулярно обновляйте программное обеспечение сканера.
- Избегайте длительного воздействия солнечных лучей на пленку.
Технические характеристики
| Параметр | Значение |
|---|---|
| Разрешение | 5 МП и выше |
| Подключение | USB 2.0 |
| Тип пленки | 35 мм, 110 и другие |
Инструкция по использованию Film Scanner EC718
В данном руководстве представлены основные шаги по использованию сканера, а также советы по его настройке и эксплуатации.
Основные функции устройства
- Сканирование пленок 35 мм, 126 и 110 формата
- Поддержка различных разрешений сканирования
- Возможность редактирования изображений
Шаги по использованию сканера
- Подключите устройство к источнику питания и включите его.
- Установите пленку в соответствующий отсек сканера.
- Выберите необходимое разрешение для сканирования.
- Нажмите кнопку сканирования и дождитесь завершения процесса.
- Сохраните отсканированные изображения на выбранный носитель.
Советы по эксплуатации
- Регулярно очищайте стекло сканера для получения качественных изображений.
- Храните пленку в темном и сухом месте, чтобы избежать повреждений.
Технические характеристики
| Параметр | Значение |
|---|---|
| Разрешение | 1800, 2400, 3600 dpi |
| Подключение | USB 2.0 |
| Форматы изображений | JPEG, TIFF |
Инструкция к сканеру Film Scanner EC-718
Сканер Film Scanner EC-718 предназначен для оцифровки негативов и слайдов. Он обеспечивает высокое качество изображения и удобство в использовании. Данная инструкция поможет вам разобраться с основными функциями устройства и начать работу с ним.
Перед началом работы убедитесь, что у вас есть все необходимые материалы и устройства, чтобы подключить сканер к компьютеру.
Комплектация
- Сканер Film Scanner EC-718
- USB-кабель
- Адаптер питания
- Руководство пользователя
- Программное обеспечение
Подключение сканера
- Подключите адаптер питания к сканеру и вставьте в розетку.
- Соедините сканер с компьютером с помощью USB-кабеля.
- Убедитесь, что компьютер распознал устройство.
Сканирование пленки
Для сканирования негативов или слайдов выполните следующие шаги:
- Включите сканер.
- Выберите тип пленки (негатив или слайд) с помощью кнопки на панели управления.
- Поместите пленку в специальный лоток и вставьте его в сканер.
- Запустите программу на компьютере и следуйте инструкциям на экране.
Советы по использованию
- Перед сканированием убедитесь, что пленка чистая и свободна от пыли.
- Регулярно обновляйте программное обеспечение для обеспечения наилучшей совместимости.
- Экспериментируйте с настройками разрешения для достижения наилучшего качества изображения.
Технические характеристики
| Характеристика | Значение |
|---|---|
| Разрешение | 3600 dpi |
| Тип поддерживаемой пленки | 135, 110, слайды |
| Интерфейс подключения | USB 2.0 |
Следуя данной инструкции, вы сможете легко и быстро оцифровывать свои пленочные изображения и сохранять их в цифровом формате.
Инструкция по использованию Film Scanner EC718
Перед началом работы с сканером важно ознакомиться с инструкцией, чтобы избежать возможных ошибок и получить наилучшее качество сканирования.
Основные характеристики
- Разрешение: 14 Мпикс
- Тип пленки: 35 мм
- Интерфейсы: USB 2.0
Шаги по сканированию
- Подключите сканер к компьютеру через USB-кабель.
- Включите устройство и дождитесь его инициализации.
- Установите пленку в специальный слот.
- Запустите программное обеспечение для сканирования на вашем компьютере.
- Настройте параметры сканирования согласно вашему предпочтению.
- Нажмите кнопку «Сканировать» для начала процесса.
Советы по качеству сканирования
| Параметр | Рекомендация |
|---|---|
| Яркость | Регулируйте для достижения естественных цветов |
| Контраст | Увеличивайте для улучшения деталей |
| Разрешение | Выбирайте максимальное для сохранения качества |
Заключение
Сканер Film EC718 – удобное устройство, которое поможет вам сохранить ваши фотографии в цифровом виде. Следуя данной инструкции, вы сможете быстро и эффективно сканировать пленки и получать качественные изображения.