
DIGITAL CAMERA
Instruction Manual
Table of Contents
Quick task index
Preparing the camera and flow of
1.
operations
2. Shooting
3. Viewing photographs and movies
4. Basic operations
5. Using shooting options
6. Menu functions
Connecting the camera to a
7.
smartphone
Connecting the camera to a
8.
computer and a printer
9. Battery, battery charger, and card
10. Interchangeable lenses
11. Using separately sold accessories
12. Information
13. SAFETY PRECAUTIONS
Thank you for purchasing an O lympus digital camera. Before you star t to use your new camera,
please read these instructions caref ully to enj oy optimum performance and a longer servic e life.
Keep this manual in a safe place for future reference.
We recommend that you take test shots to get accustomed to your camera before taking impor tant
photographs.
The screen and camera illustrations shown in this manual were produc ed during the development
stages and may dif fer fro m the actual product.
If there are additions an d/or modific ations of funct ions due to firmware update for the c amera, the
content s will differ. For the latest information, please visit the Olympus website.

This notice concerns the supplied fl ash unit and is chiefl y directed to users in
North America.
Information for Your Safety
IMPORTANT SAFETY
INSTRUCTIONS
When using your photographic equipment, basic safety precautions should always be
followed, including the following:
• Read and understand all instructions before using.
• Close supervision is necessary when any fl ash is used by or near children. Do not leave
fl ash unattended while in use.
• Care must be taken as burns can occur from touching hot parts.
• Do not operate if the fl ash has been dropped or damaged — until it has been examined by
qualifi ed service personnel.
• Let fl ash cool completely before putting away.
• To reduce the risk of electric shock, do not immerse this fl ash in water or other liquids.
• To reduce the risk of electric shock, do not disassemble this fl ash, but take it to qualifi ed
service personnel when service or repair work is required. Incorrect reassembly can
cause electric shock when the fl ash is used subsequently.
• The use of an accessory attachment not recommended by the manufacturer may cause a
risk of fi re, electric shock, or injury to persons.
SAVE THESE INSTRUCTIONS
Indications used in this manual
The following symbols are used throughout this manual.
Important information on factors which may lead to a malfunction
or operational problems. Also warns of operations that should be
absolutely avoided.
Points to note when using the camera.
Useful information and hints that will help you get the most out of
your camera.
Reference pages describing details or related information.
2
EN
Cautions
Notes
$
Tips
%
g

Table of Contents
Quick task index 7
Unpack the box contents ………….9
Preparing the camera and fl ow
of operations 10
Names of parts ………………………10
Charging and inserting the
battery …………………………………..12
Inserting the card …………………..13
Removing the card ……………….13
Attaching a lens to the
camera …………………………………..14
Power on ……………………………….15
Setting the date/time ………………16
Selecting a shooting mode ……..17
Shooting 18
Shooting still pictures…………….18
Self-portraits ………………………..19
Recording movies …………………20
Using the touch screen …………..22
Selecting a focusing method ….22
Using the wireless LAN
function ……………………………….23
Setting shooting functions ……..24
Using live guides ………………….24
Viewing photographs and
movies 26
Viewing photographs and
movies …………………………………..26
Index display/Calendar
display ………………………………..26
Viewing still images ………………27
Watching movies ………………….27
Volume………………………………..27
Protecting images …………………27
Erasing images …………………….28
Setting a transfer order on
images ([Share Order]) ………….28
Selecting images
([Share Order Selected],
[0], [Erase Selected]) ………..28
Using the touch screen …………..29
Selecting and protecting
images ………………………………..29
Basic operations 30
Information displays while
shooting ………………………………..30
Monitor display when
shooting ………………………………30
Switching the information
display ………………………………..31
Using the shooting modes ……..32
“Point-and-shoot” photography
(P program mode) ………………..32
Choosing aperture
(A aperture-priority mode) …….33
Choosing shutter speed
(S shutter-priority mode) ……….34
Choosing aperture and shutter
speed (M manual mode) ……….35
Comparative bright composites
(live composite photography) …36
Using movie mode
Adding effects to a movie
[Movie Effect] ……………………….37
Using PHOTO STORY ………….39
Shooting in scene mode ………..42
Using art fi lters……………………..44
Commonly used shooting
options ………………………………….46
Controlling exposure
(exposure compensation) ………46
(n) …………37
Table of Contents
3
EN

Changing the brightness of
highlights and shadows …………46
Choosing a focus target
Table of Contents
(AF Area) …………………………….47
Setting the AF target ……………..47
Face priority AF/
pupil detection AF …………………48
Zoom frame AF/zoom AF……….49
Information display during
playback ………………………………..50
Playback image information …..50
Switching the information
display ………………………………..51
Changing the playback
information display method…….52
Manipulating playback
images ………………………………..53
Using shooting options 56
Adjusting settings while
shooting ………………………………..56
Reducing camera shake
(image stabilizer) ………………….57
Adjusting color
(white balance) …………………….58
Processing options
(picture mode) ……………………..60
Sequential shooting/
using the self timer ……………….61
Setting the image aspect ……….62
Adding effects to a movie ………62
Image quality (record mode)…..63
Using a fl ash
(fl ash photography)……………….65
Adjusting fl ash output
(fl ash intensity control)…………..68
Choosing how the camera
measures brightness
(metering) ……………………………68
Choosing a focus mode
(AF mode)……………………………69
ISO sensitivity ………………………70
4
EN
Movie sound options
(recording sound with movies)..70
Menu functions 71
Basic menu operations …………..71
Using Shooting Menu 1/
Shooting Menu 2 ……………………72
Formatting the card
(Card Setup) ………………………..72
Deleting all images
(Card Setup) ………………………..72
Returning to default settings
(Reset) ………………………………..73
Registering Favorites settings
(Myset)………………………………..73
Processing options
(Picture Mode) ……………………..74
Image quality (K) ……………….75
Setting the self timer
(j/Y) ……………………………….75
Varying settings over a series of
photographs (bracketing)……….76
Taking HDR (High Dynamic
Range) images …………………….78
Recording multiple exposures
in a single image
(multiple exposure) ……………….79
Shooting automatically with a
fi xed interval
(time lapse shooting) …………….80
Wireless remote control fl ash
photography…………………………81
Digital Zoom
(Digital Tele-converter) ………….81
Using the playback menu ……….81
Displaying images rotated
(R) ……………………………………81
Editing still images ………………..82
Canceling all protections ……….83
Using the setup menu …………….84
X (Date/time setting) ……………84
W (Changing the display
language)…………………………….84

i (Monitor brightness
adjustment) ………………………….84
Rec View …………………………….84
Wi-Fi Settings ………………………84
c/#
Menu Display ………………84
Firmware……………………………..84
Using the custom menus ………..85
R AF/MF …………………………….85
S Button/Dial ………………………86
T Release/j …………………….86
U Disp/8/PC ……………………..87
V Exp/p/ISO ……………………..88
W # Custom ……………………….89
X K/Color/WB …………………..90
Y Record/Erase …………………..91
Z Movie ……………………………..92
b
K Utility ………………………… 92
AEL/AFL ……………………………..93
MF Assist …………………………….93
Button Function ……………………94
Viewing camera images on
TV ………………………………………96
Choosing the control panel
displays……………………………….97
Adding information displays……99
Shutter speeds when the fl ash
fi res automatically ……………….100
Accessory Port Menu ……………101
Using OLYMPUS PENPAL …..101
A OLYMPUS PENPAL
Share ………………………………..102
B OLYMPUS PENPAL
Album ……………………………….103
C Electronic Viewfi nder ………103
Connecting the camera to a
smartphone 104
Connecting to a smartphone …105
Transferring images to a
smartphone ………………………….105
Shooting remotely with a
smartphone ………………………….106
Adding position information to
images …………………………………106
Setting up your camera for
wireless LAN connection
(Wi-Fi settings) …………………….107
Connecting the camera to a
computer and a printer 108
Installing OLYMPUS Viewer 3 ..108
Copying pictures to a computer
without OLYMPUS Viewer 3 …..110
Direct printing (PictBridge) …..111
Easy printing ……………………… 111
Custom printing ………………….112
Print reservation (DPOF) ………113
Creating a print order………….. 113
Removing all or selected pictures
from the print order ……………..114
Battery, battery charger, and
card 115
Battery and charger ……………..115
Using your charger abroad …..115
Usable cards ………………………..116
Record mode and fi le size/number
of storable still pictures ……….. 117
Interchangeable lenses 118
M.ZUIKO DIGITAL lens
specifi cations ……………………..118
Using separately sold
accessories 122
Electronic Viewfi nder (VF-4) ….122
External fl ash units designated
for use with this camera ……….124
Wireless remote control fl ash
photography……………………….124
Table of Contents
5
EN

Other external fl ash units ……..126
Principal Accessories …………..127
Table of Contents
System chart ………………………..128
Information 130
Shooting tips and
information …………………………..130
Error codes ………………………….132
Cleaning and storing the
camera …………………………………134
Cleaning the camera …………..134
Storage ……………………………..134
Cleaning and checking the
image pickup device ……………134
Pixel Mapping — Checking the
image processing functions ….135
Menu directory ……………………..136
Specifi cations ………………………141
SAFETY PRECAUTIONS 144
SAFETY PRECAUTIONS ……….144
Index 154
6
EN

Quick task index
Shooting
Taking pictures with automatic settings
Easy photography with special effects
Choosing an aspect ratio
Quickly matching settings to the scene
Pro-level photography made simple
Adjusting the brightness of a photograph
Taking pictures with a blurred background
Taking pictures that stop the subject in
motion or convey a sense of motion
Taking pictures with the correct color
Processing pictures to match the subject/
Taking monotone pictures
When the camera will not focus on your
subject/Focusing on one area
Focusing on a small spot in the frame/
confi rming focus before shooting
Recomposing photographs after focusing
Taking photos without the fl ash
Reducing camera shake
Taking pictures of a subject against
backlight
Photographing fi reworks
Taking pictures without white subjects
appearing too white or black subjects
appearing too dark
Reducing image noise (mottling)
Optimizing the monitor/
adjusting monitor hue
g
iAUTO (A)
Art fi lter (ART)44
Aspect ratio 62
Scene mode (SCN)42
Live Guide 24
Exposure compensation 46
Live Guide 24
Aperture priority shooting 33
Live Guide 24
Shutter priority shooting 34
Scene mode (SCN)42
White balance 58
One-touch white balance 59
Picture Mode 60
Art fi lter (ART)44
Using the touch screen 22
AF Area 47
Zoom frame AF/zoom AF 49
Zoom frame AF/zoom AF 49
C-AF+TR (AF tracking) 69
DIS Mode/ISO 42/70
Image Stabilizer/Anti-Shock z
Self-timer 61
Remote cable 127
Flash shooting 65
Gradation (Picture Mode) 74
Bulb/time photography 35
Live composite photography 36
Scene mode (SCN)42
Gradation (Picture Mode) 74
Histogram/
Exposure compensation
Highlight & Shadow Control 46
Noise Reduct. 88
Monitor brightness
adjustment/Live View Boost
17
57/89
31/46
84/87
Quick task index
EN
7

Checking set effect before taking a
picture
Checking horizontal or vertical orientation
Quick task index
before shooting
Shooting with deliberate composition
Zooming in on photos to check focus
Self-portraits
Sequential shooting Sequential shooting 61
Extending the useful life of the battery
Increasing the number of pictures that
can be taken
Shooting remotely with a smartphone
(wireless LAN function)
Preview function 94
Test Picture 94
Level gauge 31
Displayed Grid 87
Autoq (Rec View)
mode2 (q Close Up Mode)
Self-timer 61
Scene mode (SCN)42
Sleep 88
Record mode 63
Shooting remotely with a
smartphone
84
88
106
Playback/Retouch
Viewing images on a TV
Viewing slideshows with background
music
Brightening shadows
Dealing with red-eye
Printing made easy
Commercial prints
Sharing images easily
Transferring images to a smartphone
(wireless LAN function)
Adding location data to images (wireless
LAN function)
HDMI/Video Out 87
Playback on TV 96
Slideshow 55
Shadow Adj (JPEG Edit) 82
Redeye Fix (JPEG Edit) 82
Direct printing 111
Creating a print order 113
OLYMPUS PENPAL 101
Transferring images to a
smartphone
Adding location data to images
Camera Settings
Synchronizing the date and time Setting the date/time 16
Restoring default settings
Saving the settings
Changing the menu display language
Turning off the auto focus sound
8
EN
Reset 73
Myset 73
W
8 (Beep sound)
g
105
106
g
84
88
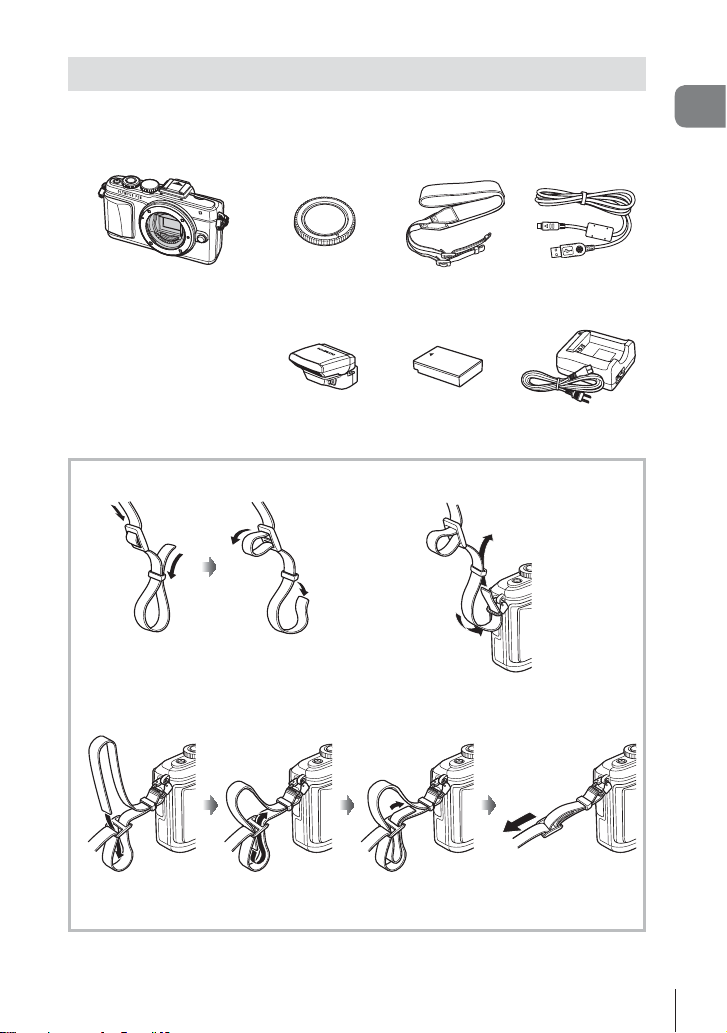
Unpack the box contents
The following items are included with the camera.
If anything is missing or damaged, contact the dealer from whom you purchased the
camera.
Unpack the box contents
Camera Body cap Strap USB cable
• Flash case
• Computer software CD-ROM
• Instruction manual
• Warranty card
Attaching the strap
1
3
Flash
FL-LM1
Lithium ion battery
BLS-50
2
CB-USB6
Lithium ion charger
BCS-5
• Attach the strap on the other side in the same way.
• Lastly, pull the strap fi rmly, making sure that it is fastened securely.
EN
9
1
Preparing the camera and fl ow of
operations
1
Preparing the camera and fl ow of operations
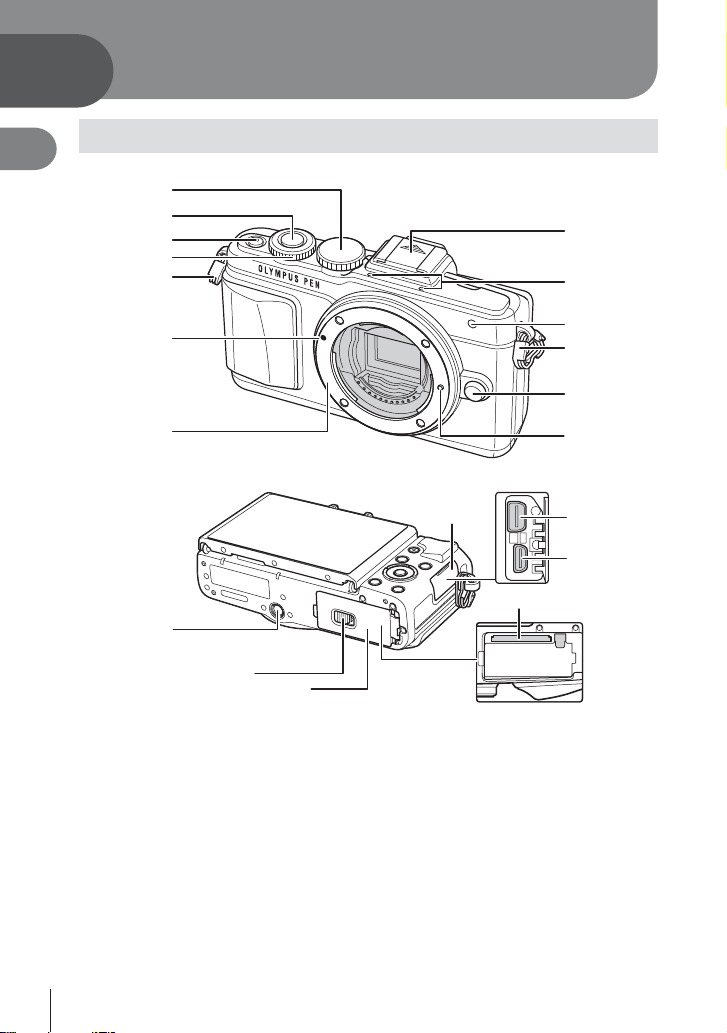
Names of parts
1
2
3
4
5
6
7
f
c
d
e
1 Mode dial ………………………………….P. 17
2 Shutter button ……………………………P. 18
3 ON/OFF button …………………………P. 15
4 Control dial* P ………………………….P. 26
5 Strap eyelet…………………………………P. 9
6 Lens attachment mark ………………..P. 14
7 Mount (Remove the body cap before
attaching the lens.)
8 Hot shoe cover
9 Stereo microphone ………….P. 54, 70, 83
0 Self-timer lamp/AF illuminator
………………………………………..P. 61/P. 85
* In this manual, the P icon represent operations performed using the control dial.
a Lens release button ……………………P. 14
b Lens lock pin
c Tripod socket
d Battery/card compartment lock …….P. 12
e Battery/card compartment cover…..P. 12
f Connector cover
g Multi-connector …………… P. 96, 108, 111
h HDMI connector (Type D) ……………P. 96
i Card slot …………………………………..P. 13
8
9
0
5
a
b
g
h
i
10
EN
1
2
3
4
5
6
7
8
9
0
b
c
a
1
Preparing the camera and fl ow of operations
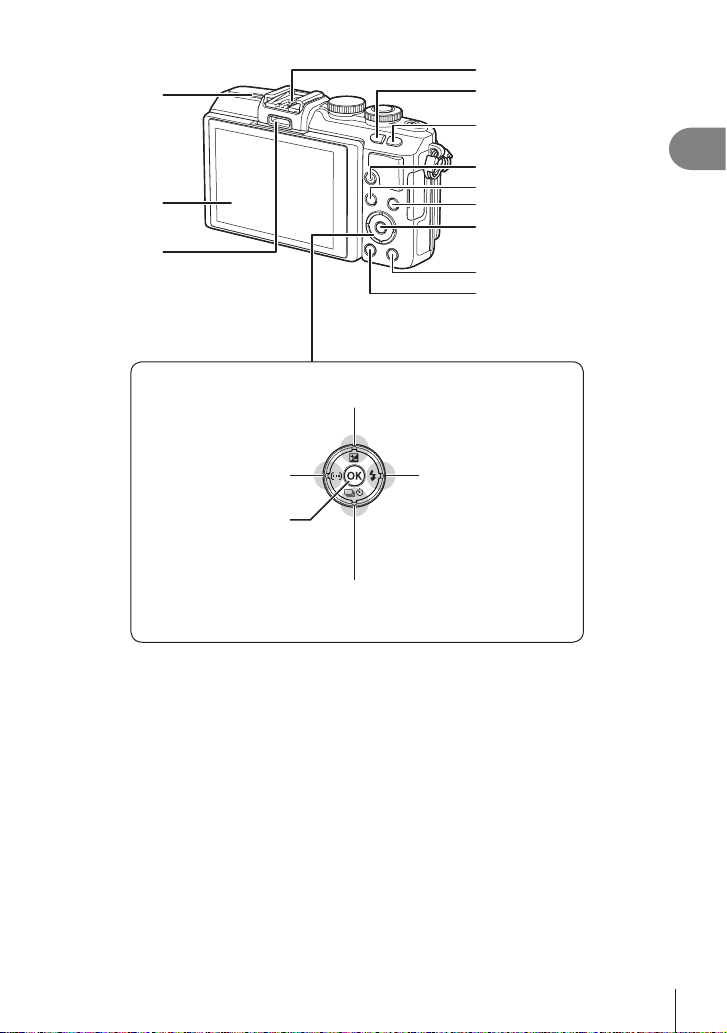
F (Up) / F (Exposure compensation)
H (Left) / P (AF
target) button (P. 47)
Q button (P. 56, 71)
1 Speaker
2 Monitor ………………..P. 15, 22, 29, 31, 50
3 Accessory port ………………….P. 101, 140
4 Hot shoe …………………………………P. 124
5 G/Fn button …………………………….P. 24
6 U button ……………………………..P. 38, 49
7 R (Movie)/H button ………..P. 20, 28, 37
* In this manual, the FGHI icons represent operations performed using the arrow
pad.
button (P. 46)
I (Right) /# (Flash)
button (P. 65)
G (Down) / jY
(Sequential shooting/Self-timer)
button (P. 61)
8 MENU button ……………………………P. 71
9 INFO (Information display) button
………………………………………………..P. 31
0 Q button …………………………….P. 56, 71
a Arrow pad* ………………………………..P. 26
b q (Playback) button …………….P. 26, 52
c D (Erase) button ……………………….P. 28
EN
11
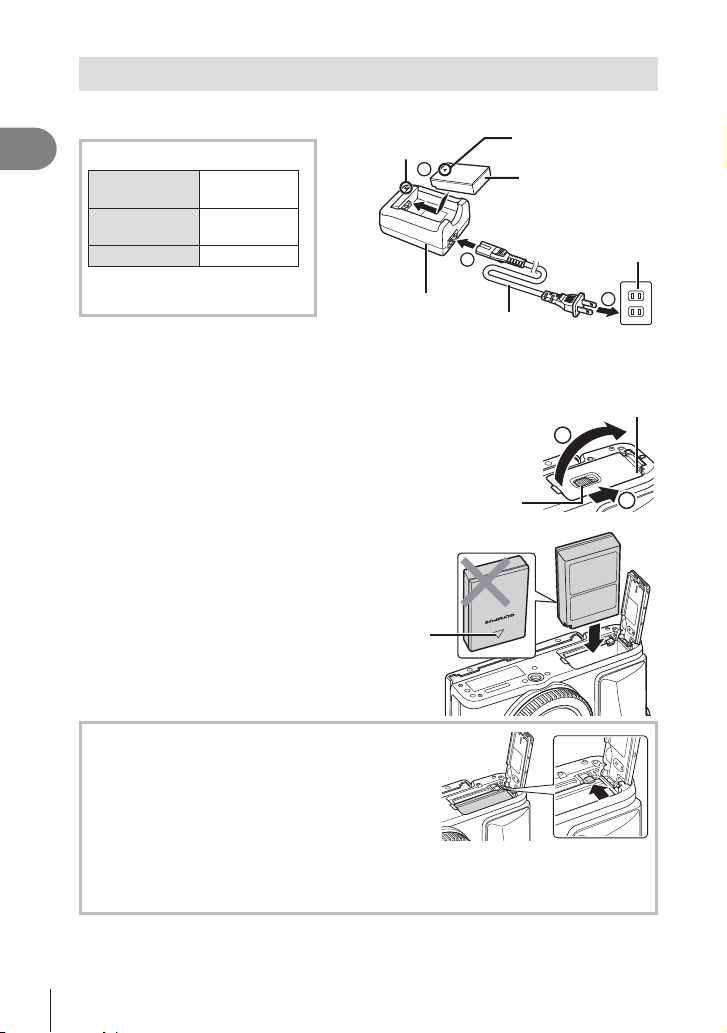
Charging and inserting the battery
Charging the battery.
1
1
Preparing the camera and fl ow of operations
Charging indicator
Charging in
progress
Charging
complete
Charging error
(Charging time: Up to
approximately 3 hours 30 minutes)
Cautions
• Unplug the charger when
charging is complete.
Opening the battery/card
2
compartment cover.
Loading the battery.
3
Lights orange
Off
Blinks orange
Charging
indicator
3
Lithium ion
charger
Battery/card
compartment lock
1
AC cable
Direction indicating
mark (S)
Lithium ion battery
AC wall outlet
2
Battery/card
compartment cover
2
1
Direction indicating
Removing the battery
Turn off the camera before opening or closing the
battery/card compartment cover. To remove the battery,
fi rst push the battery lock knob in the direction of the
arrow and then remove.
Cautions
• Contact an authorized distributor or service center if you are unable to remove the
battery. Do not use force.
mark
$ Notes
• It is recommended to set aside a backup battery for prolonged shooting in case the
battery in use drains.
• Also read “Battery, battery charger, and card” (P. 115).
12
EN
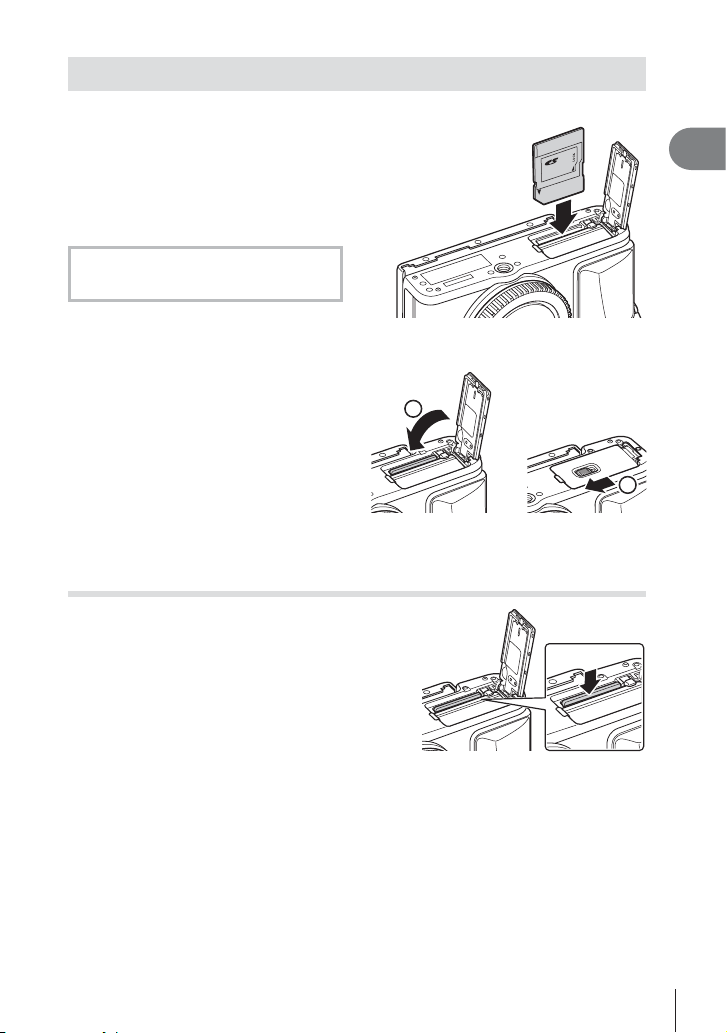
Inserting the card
Loading the card.
1
• Open the battery/card compartment
cover.
• Slide the card in until it is locked into
place.
g “Usable cards” (P. 116)
Eye-Fi Cards
Read “Usable cards” (P. 116) before use.
Cautions
• Turn off the camera before loading or
removing the battery or card.
Closing the battery/card
2
compartment cover.
• Close the cover and slide the battery/
card compartment lock in the direction
shown by the arrow.
Cautions
• Be sure the battery/card compartment cover is closed before using the camera.
Removing the card
Press the inserted card lightly and it will be ejected. Pull
out the card.
Cautions
• Do not remove the battery or card while the card
write indicator (P. 30) is displayed.
1
1
Preparing the camera and fl ow of operations
2
EN
13

Attaching a lens to the camera
Attach a lens to the camera.
1
1
Preparing the camera and fl ow of operations
1
3
Rear cap
2
2
1
2
1
4
2
Lens release button
2
1
• Remove the rear cap of the lens and the body cap of the camera.
• Align the lens attachment mark (red) on the camera with the alignment mark (red) on
the lens, then insert the lens into the camera’s body.
• Rotate the lens clockwise until you hear it click (direction indicated by arrow 3).
Cautions
• Make sure the camera is turned off when attaching or removing the lens.
• Do not press the lens release button.
• Do not touch internal portions of the camera.
Remove the lens cap.
2
Using lenses with an UNLOCK switch
Retractable lenses with an UNLOCK switch cannot
be used while retracted. Turn the zoom ring in the
direction of arrow (1) to extend the lens (2).
To store, turn the zoom ring in the direction of arrow
(4) while sliding the UNLOCK switch (3).
Removing the lens from the camera
Make sure the camera is turned off when removing
the lens.
While pressing the lens release button, rotate the
lens in the direction of the arrow.
1
3
Interchangeable lenses
Read “Interchangeable lenses” (P. 118).
14
EN
1
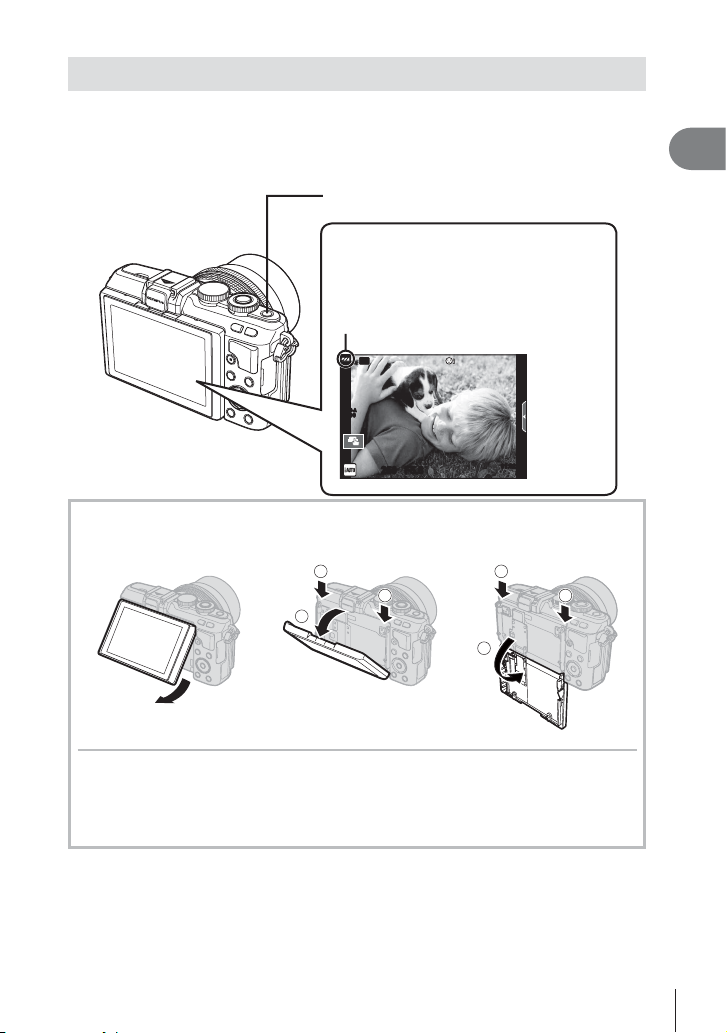
Power on
Press the ON/OFF button to turn on the camera.
1
• When the camera is turned on, the monitor will turn on.
• To turn off the camera, press the ON/OFF button again.
ON/OFF button
Monitor
Battery level
; (green): Camera ready to shoot.
: (green): Low battery
] (blinks red): Charge the battery.
Wi-Fi
ISO-A
200
1
Preparing the camera and fl ow of operations
250250 F5.6
01:02:0301:02:03
3838
Using the monitor
1 Press the monitor down.
2 Adjust the angle of the monitor according to the hinge axis.
Lower angle Self portraitUpper angle
1
1
2
1
1
2
For information on self portraits, read “Self-portraits” (P. 19).
Camera sleep operation
If no operations are performed for a minute, the camera enters “sleep” (stand-by) mode to
turn off the monitor and to cancel all actions. The camera activates again when you touch
any button (the shutter button, q button, etc.). The camera will turn off automatically if
left in sleep mode for 5 minutes. Turn the camera on again before use.
EN
15
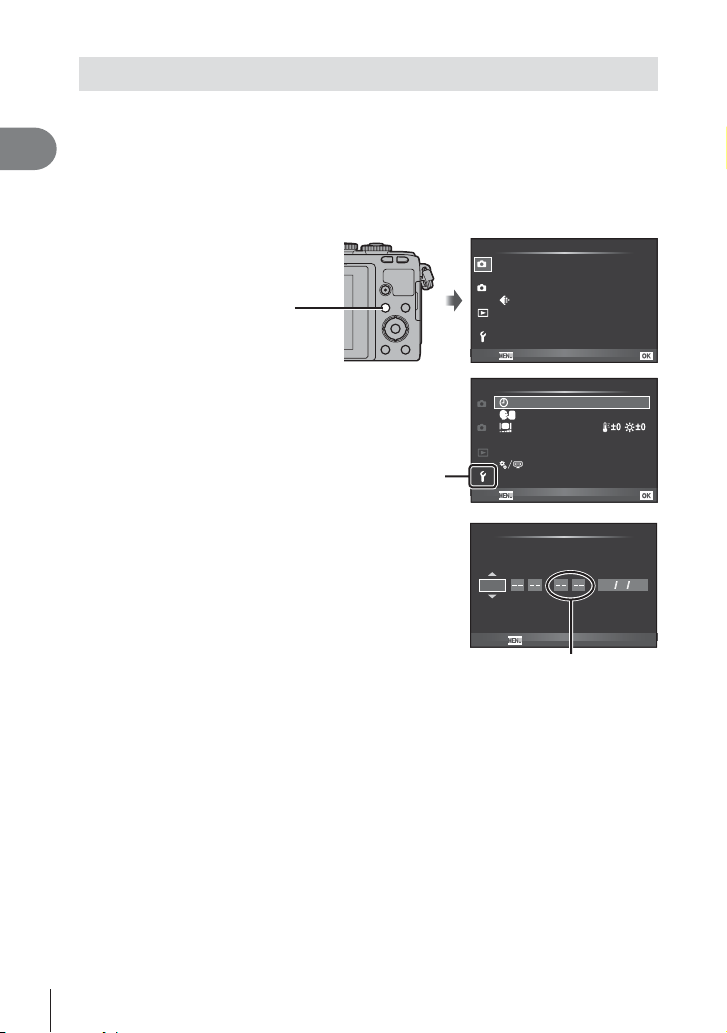
Setting the date/time
Date and time information is recorded on the card together with the images. The fi le
name is also included with the date and time information. Be sure to set the correct
date and time before using the camera. Some functions cannot be used if the date and
1
time have not been set.
Preparing the camera and fl ow of operations
Display the menus.
1
• Press the MENU button to display the menus.
Shooting Menu 1
Card Setup
1
Reset/Myset
Picture Mode
2
MENU button
Select [X] in the [d] (setup) tab.
2
• Use FG on the arrow pad to select
[d] and press I.
• Select [X] and press I.
[d] tab
Image Aspect
Digital Tele-converter
Back Set
1
2
Rec View
Wi-Fi Settings
Menu Display
Firmware
Setup Menu
’—.—.— —:—
English
0.5sec
SetBack
h
4:3
Off
Set the date and time.
3
• Use HI to select items.
• Use FG to change the selected item.
• Use FG to select the date format.
Save settings and exit.
4
YMD Time
2014
Cancel
The time is displayed using a
24-hour clock.
• Press Q to set the camera clock and exit to the main menu.
• Press the MENU button to exit the menus.
Cautions
• If the battery is removed from the camera and the camera is left for a while, the date and
time may reset to the factory default setting.
$ Notes
• You can synchronize the time correctly by pressing Q at a time signal of 0 seconds while
setting [min].
16
EN
X
Y/M/D
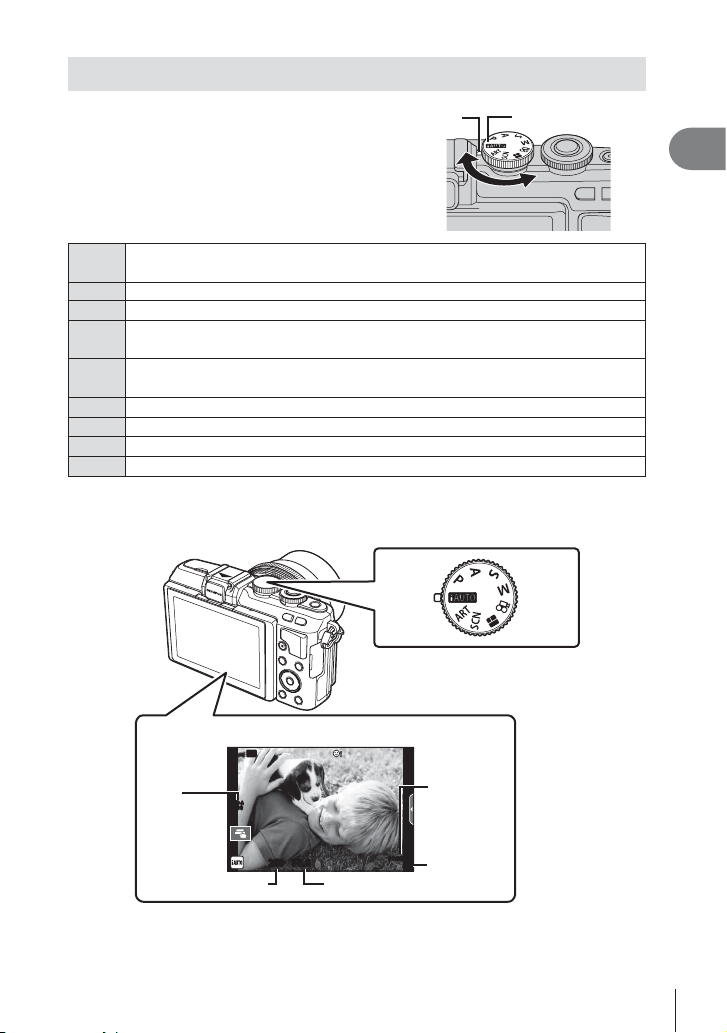
Selecting a shooting mode
Use the mode dial to select the shooting mode.
A full auto mode in which the camera automatically optimizes settings for the
A
current scene. The camera does all the work, which is convenient for beginners.
Aperture and shutter speed are automatically adjusted for optimal results.
P
You control aperture. You can sharpen or soften background details.
A
You control shutter speed. You can express the motion of moving subjects, or
S
freeze motion without any blur.
You control aperture and shutter speed. You can shoot with long exposures for
M
fi reworks or other dark scenes.
Shoot movies using shutter speed and aperture effects and movie special effects.
n
You can shoot a PHOTO STORY. Shoot with selected PHOTO STORY type.
J
Select a scene according to the subject.
SCN
Select an art fi lter.
ART
Indicator
First, try taking photographs in full auto mode.
Set the mode dial to A.
1
Mode icon
1
Preparing the camera and fl ow of operations
Monitor
ISO
sensitivity
Shutter speed Aperture value
Wi-Fi
ISO-A
200
250250 F5.6
01:02:0301:02:03
3838
Available
recording
time
Number of
storable still
pictures
EN
17
2
Shooting
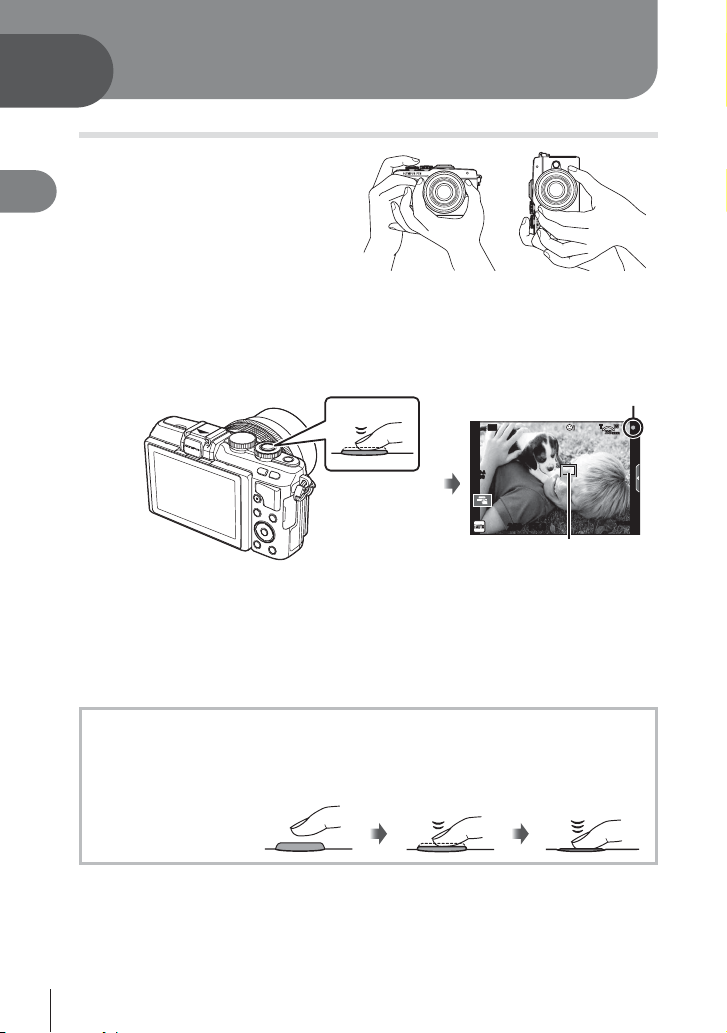
Shooting still pictures
Set up the camera and decide
1
2
Shooting
on the composition.
• Be careful that your fi ngers or
the camera strap do not obstruct
the lens or AF illuminator.
Adjust the focus.
2
• Display the subject in the center of the monitor, and lightly press the shutter button
down to the fi rst position (press the shutter button halfway).
The AF confi rmation mark (() will be displayed, and a green frame (AF target) will
be displayed in the focus location.
• The ISO sensitivity, shutter speed and aperture value that have been set
automatically by the camera are displayed.
• If the AF confi rmation mark blinks, the subject is not in focus. (P. 130)
Release the shutter.
3
• Press the shutter button all the way (fully).
• The shutter sounds and the picture is taken.
• The shot image will be displayed on the monitor.
Landscape position Portrait position
Wi-Fi
ISO-A
Press the shutter
button halfway.
200
250250 F5.6
AF confi rmation mark
28
mm
01:02:0301:02:03
AF target
3838
Pressing the shutter button halfway and all the way down
The shutter button has two positions. The act of lightly pressing the shutter button to the
fi rst position and holding it there is called “pressing the shutter button halfway,” that of
pressing it all the way
down to the second
position “pressing the
shutter button all (or the
rest of) the way down.”
Press halfway
$ Notes
• You can also take photographs using the touch screen. g “Using the touch screen”
(P. 22)
18
EN
Press the rest of
the way down
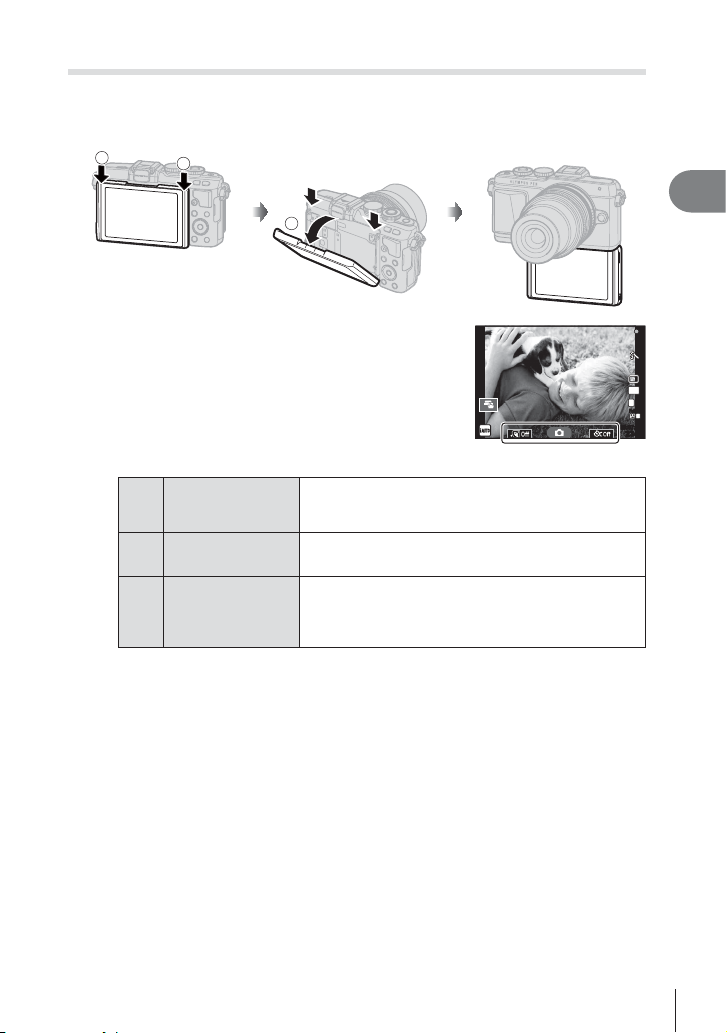
Self-portraits
Inverting the monitor allows you to take pictures of yourself while you preview the
frame.
Lower the monitor slightly and invert it.
1
1
• If a power zoom lens is attached, the camera
automatically switches to wide angle.
• The self portrait menu is displayed in the
monitor.
• The monitor displays a mirror image (fl ipped
horizontally).
1
2
45:67:8945:67:89
23412341
4:3
L
N
FullHD
F
2
Shooting
One Touch
A
e-Portrait
Shutter Touch
C
One Touch
D
Custom Self Timer
Frame the shot.
2
• Be careful that your fi ngers or the camera strap do not obstruct the lens.
Touch C and shoot.
3
• The shot image will be displayed on the monitor.
• You can also shoot by touching the subject displayed in the monitor, or by pressing
the shutter button.
Turning this on makes skin look smooth and
translucent.
Valid only during iAUTO mode (A).
When the icon is touched, the shutter is released
about 1 second later.
Shoot 3 frames using the self timer. You can set
the number of times the shutter is released and the
interval between each release using Custom Self
Timer (P.61).
$ Notes
You can shoot by operating the camera with a smartphone. g “Shooting remotely with a
smartphone” (P. 106)
EN
19

Recording movies
You can record movies when the mode dial is on any mode except J (PHOTO
STORY). Try recording in full auto mode fi rst.
Set the mode dial to A.
1
Press the R button to begin recording.
2
2
Shooting
• You can change the focus location by touching
the screen while recording (P. 22).
Press the R button again to end recording.
3
Displayed during
recording
Cautions
• When using a camera with a CMOS image sensor, moving objects may appear distorted
due to the rolling shutter phenomenon. This is a physical phenomenon whereby distortion
occurs in the fi lmed image when shooting a fast-moving subject or due to camera shaking.
In particular, this phenomenon becomes more noticeable when using a long focal length.
• If the camera is used for extended periods, the temperature of the image pickup device
will rise and noise and colored fog may appear in images. Turn off the camera for a short
time. Noise and colored fog may also appear in images recorded at high ISO sensitivity
settings. If the temperature rises further, the camera will turn off automatically.
• When using a Four Thirds system lens, the AF will not operate while recording movies.
• The R button cannot be used to record movies in the following instances:
Multiple exposure (still photography also ends.)/shutter button pressed halfway/during
bulb, time or composite photography/sequential shooting/Panorama/SCN mode
(e-Portrait, Hand-Held Starlight, 3D)/time lapse shooting
R button
Recording time
42
mm
00:02:1800:02:18
20
EN

Taking photographs during movie recording (Movie+Photo Mode)
• Press the shutter button during movie recording to record one of the frames of the movie
as a photograph (mode1). To end movie recording, press the R button. The photograph
and movie fi les will be recorded separately to the memory card. The record mode of the
photographs will be XN (16:9).
• There is also a way of recording a photograph of a higher quality (mode2). In mode2, the
movie footage from before and after the photograph is recorded in separate fi les.
g [Movie+Photo Mode] (P. 92)
Cautions
• In mode2 and certain shooting modes, it is only possible to capture a single-frame as a
picture during recording. Other shooting functions may also be limited.
• The autofocus and metering used in movie mode may differ from that used to take
photographs.
• If the record mode for the movie is Motion JPEG (H or I), the camera is set to mode2.
2
Shooting
EN
21

Using the touch screen
You can use the touch screen during playback or when framing pictures in the monitor.
Cautions
• The situations in which touch screen operations are not available include the following.
Panorama/3D/e-portrait/multiple exposure/during bulb, time or live composite
2
Shooting
photography/one-touch white balance dialog/when buttons or dials are in use
• Do not touch the display with your fi ngernails or other sharp objects.
• Gloves or monitor covers may interfere with touch screen operation.
• Also available in the ART, SCN or J menu screens. Tap an icon to select it.
Selecting a focusing method
You can focus and shoot by tapping the monitor.
Ta p
to cycle through touch screen settings.
T
Tap a subject to focus and automatically
T
release the shutter. This function is not
available in n mode.
Touch screen operations disabled.
U
Tap to display an AF target and focus on the
V
subject in the selected area. You can use the
touch screen to choose the position and size of
the focus frame. Photographs can be taken by
pressing the shutter button.
Wi-Fi
ISO-A
200
250250 F5.6
01:02:0301:02:03
3030
Previewing Your Subject ( V )
Tap the subject in the display.
1
• An AF target will be displayed.
• Use the slider to choose the size of the frame.
• Touch S to turn off the display of the AF target.
Use the slider to adjust the size of the AF
2
target, and then tap Y to zoom in at the
frame position.
• Use your fi nger to scroll the display when the picture
is zoomed in.
• Tap Z to cancel the zoom display.
22
EN
S-IS AUTOS-IS AUTO
1414
ISO-A
200
Off
250250 F5.6
1010
7
7
5x5x

Using the wireless LAN function
You can connect the camera to a smartphone and
control the camera over Wi-Fi. You must have the
specifi ed app installed on the smartphone in advance.
g “Connecting the camera to a smartphone” (P. 104)
Wi-Fi
Wi-Fi
ISO-A
200
250250 F5.6
01:02:0301:02:03
3030
2
Shooting
EN
23
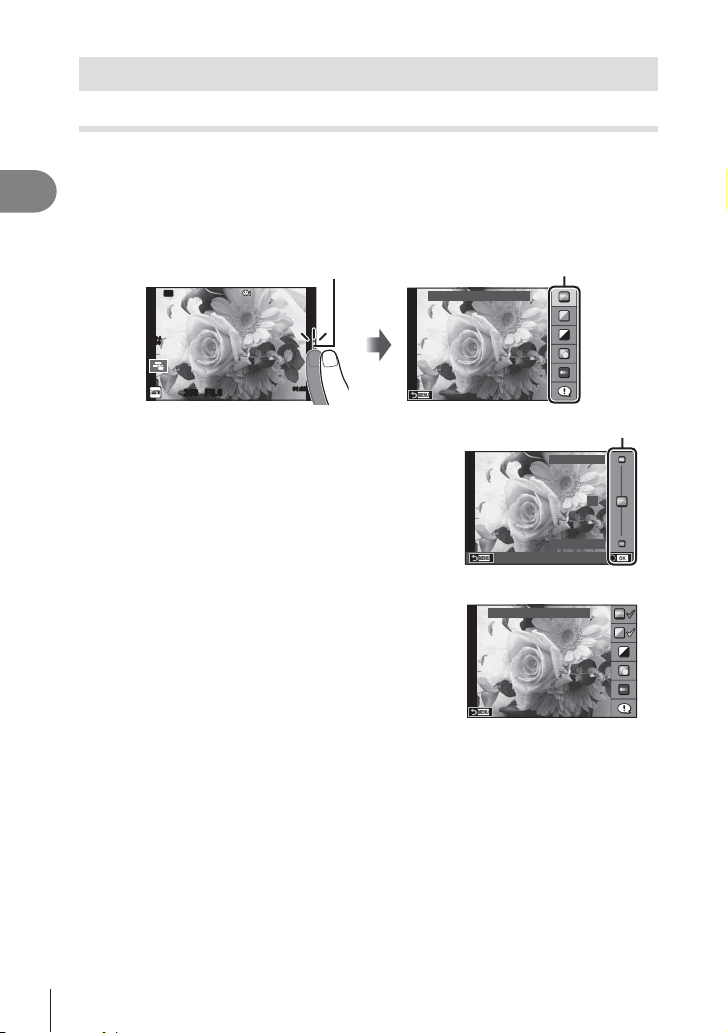
Setting shooting functions
Using live guides
Live guides are available in iAUTO (A) mode. While iAUTO is a full auto mode, live
guides make it easy to access a variety of advanced photographic techniques.
2
Shooting
Set the mode dial to A.
1
Touch the tab or press the Fn button to display live guides.
2
• Touch a guide item and press Q after selecting to display the slider of the level bar.
Wi-Fi
ISO-A
200
Ta b
Change Color Saturation
Guide item
250250 F5.6
Use your fi nger to position the sliders.
3
• Tap a to enter the setting.
• To cancel the live guide setting, tap k on the
screen.
• When [Shooting Tips] is selected, select an item and
touch a to display a description.
• The effect of the selected level is visible in the
display. If [Blur Background] or [Express Motions]
is selected, the display will return to normal, but the
selected effect will be visible in the fi nal photograph.
To set multiple live guides, repeat Steps 2 and 3.
4
• A check is displayed on the guide item for live
guides that are already set.
Shoot.
5
• To clear the live guide from the display, press the MENU button.
01:02:0301:02:03
3838
Level bar/selection
Clear & Vivid
0
Flat & Muted
Change Color Saturation
24
EN

Cautions
• [Blur Background] and [Express Motions] cannot be set at the same time.
• If [RAW] is currently selected for image quality, image quality will automatically be set to
[YN+RAW].
• Live guide settings are not applied to the RAW copy.
• Pictures may appear grainy at some live guide setting levels.
• Changes to live guide setting levels may not be visible in the monitor.
• Frame rates drop when [Blurred Motion] is selected.
• The fl ash cannot be used with the live guide.
• Choosing live guide settings that exceed the limits of the camera exposure meters may
result in pictures that are over or underexposed.
2
Shooting
EN
25
Viewing photographs and movies
3
Viewing photographs and movies
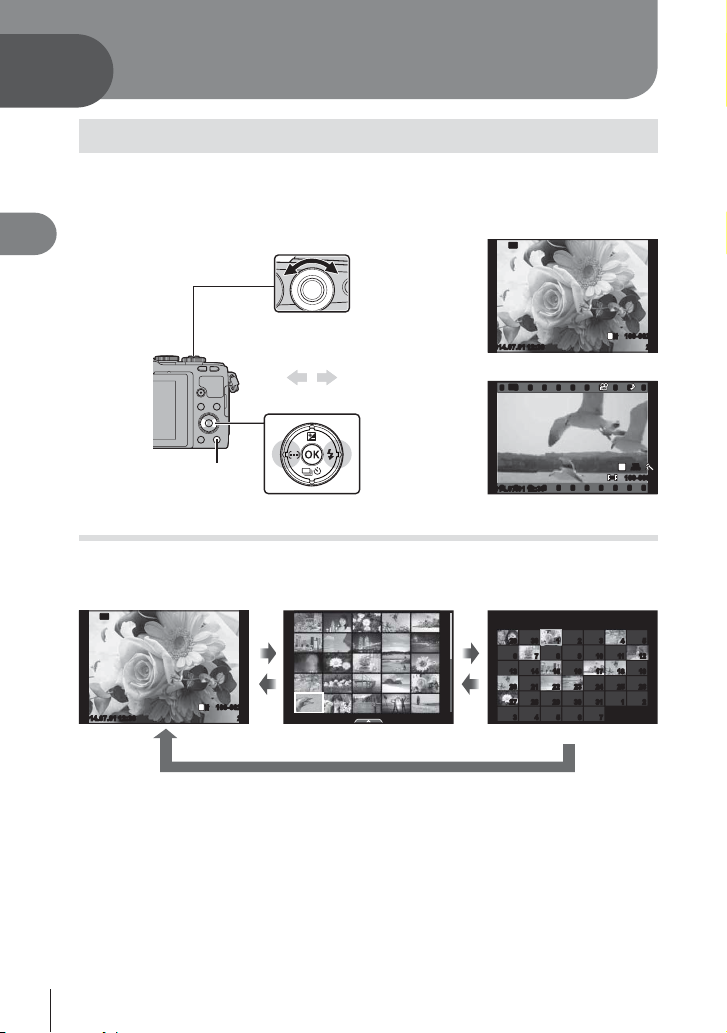
Press the q button.
1
• Your most recent photograph or movie will be displayed.
3
Viewing photographs and movies
• Select the desired photograph or movie using the control dial (P) or arrow pad.
control dial
Wi-Fi
Displays the
previous
frame
Displays the
next frame
2014.07.01 12:30 20
Still image
Wi-Fi
q button
2014.07.01 12:30 4
Movie
Index display/Calendar display
• To view multiple frames, press G during single-frame playback. To start calendar
playback, press the G button repeatedly.
• Press the Q button to view the currently selected picture full frame.
Wi-Fi
100-0020
L
2014.07.01 12:30 20
N
GG
UU
2014.07.01 12:30 21
Index display
2014.7
Sun Mon Tue Wed Thu Fri Sat
29 30 1 2 3 4 5
29 30 1 2 3 4 5
6 7 8 9 10 11 12
6 7 8 9 10 11 12
13 14 15 16 17 18 19
13 14 15 16 17 18 19
20 21 22 23 24 25 26
20 21 22 23 24 25 26
27 28 29 30 31 1 2
27 28 29 30 31 1 2
3 4 5 6 7
3 4 5 6 7
Calendar display
Q
100-0020
L
N
WB
WBWBWB
P
AUTO
AUTOAUTOAUTO
HD
100-0004
26
EN
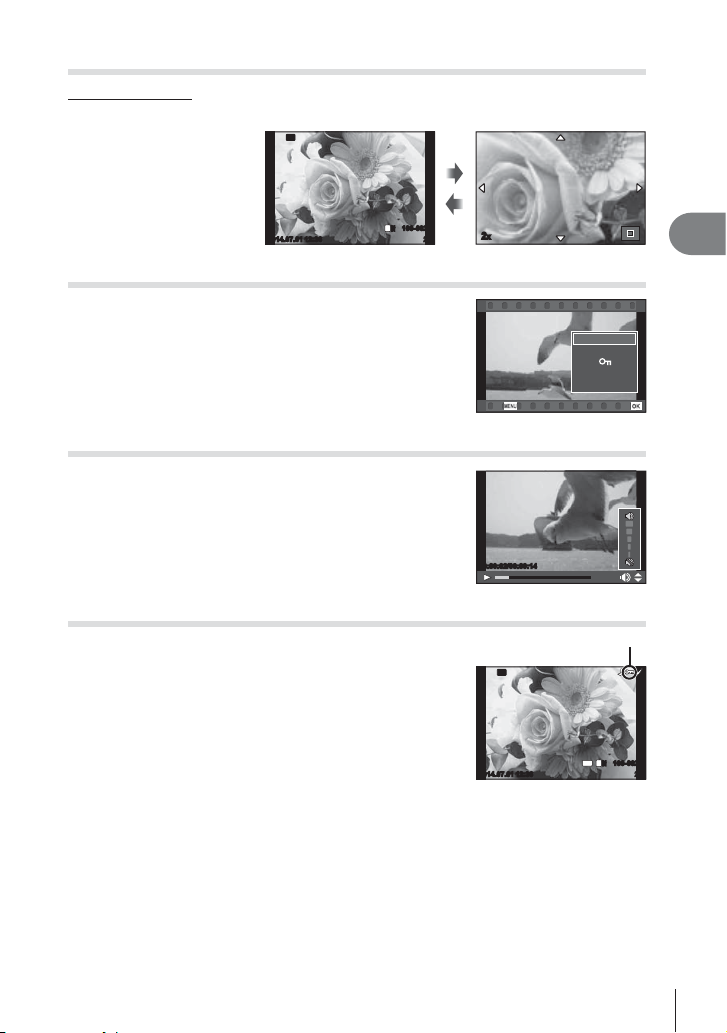
Viewing still images
Close-up playback
In single-frame playback, press U to zoom in; press G to return to single-frame playback.
Wi-Fi
100-0020
L
2014.07.01 12:30 20
N
2x
Watching movies
Select a movie and press the Q button to display the
playback menu. Select [Movie Play] and press the Q
button to begin playback. Press it again to pause playback.
Press the MENU button to end playback.
Back
Movie
Movie Play
Share Order
m
Erase
Set
Volume
Volume can be adjusted by pressing F or G during singleframe and movie playback.
00:00:02/00:00:14
Protecting images
Wi-Fi
0 (protect) icon
4:3
100-0020
L
N
Protect images from accidental deletion. Display an image
you wish to protect and press Q to display the playback
menu. Select [0] and press Q, and then press F or G
to protect the image. Protected images are shown by a 0
(protect) icon. Press F or G to remove protection.
You can also protect multiple selected images.
g “Selecting images ([Share Order Selected], [0],
[Erase Selected])” (P. 28)
2014.07.01 12:30 20
3
Viewing photographs and movies
Cautions
• Formatting the card erases all images even if they have been protected.
EN
27
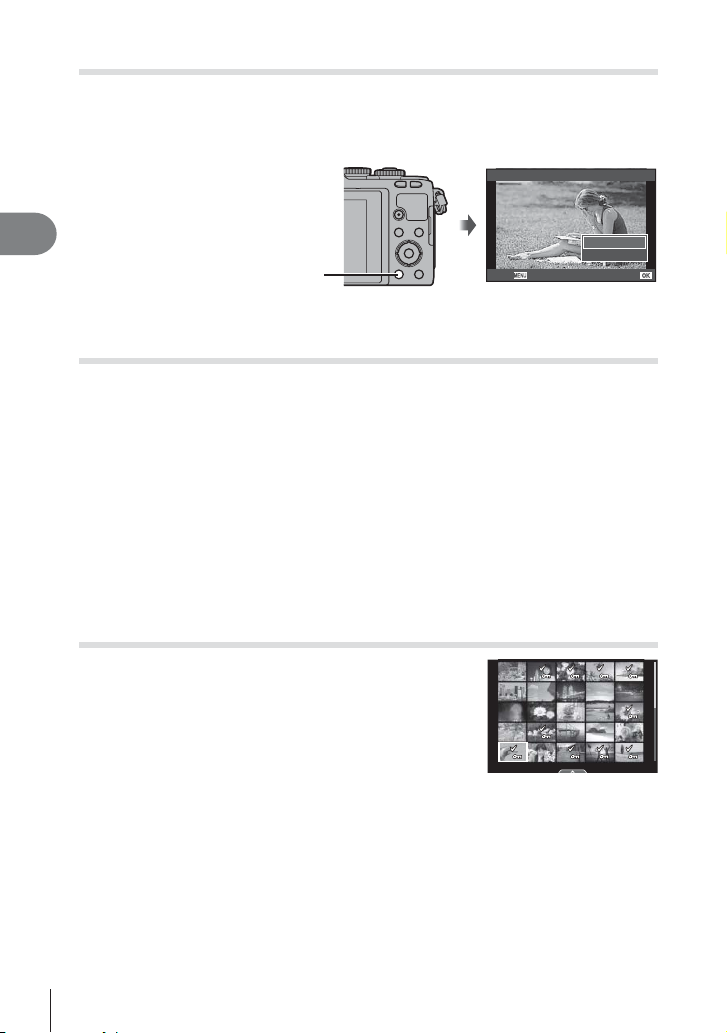
Erasing images
Display an image you want to delete and press the D button. Select [Yes] and press
the Q button.
You can erase images without the confi rmation step by changing the button settings.
g [Quick Erase] (P. 91)
Erase
3
Viewing photographs and movies
D button
Setting a transfer order on images ([Share Order])
You can select images you want to transfer to a smartphone in advance. When playing
back images you want to transfer, press Q to display the playback menu. After
selecting [Share Order] and pressing Q, press F or G to set a share order on an
image and display h.
To cancel a share order, press F or G. You can select images you want to transfer in
advance and set a share order all at once.
g Selecting images ([Share Order Selected], [0], [Erase Selected])
Cautions
• You can set a share order on 200 frames.
• Share orders cannot include RAW images or Motion JPEG (H or I) movies.
Selecting images ([Share Order Selected], [0], [Erase Selected])
You can select multiple images for [Share Order Selected],
[0], or [Erase Selected].
Press the H button in the index display screen (P. 29) to
select an image; a v icon will appear on the image. Press
the H button again to cancel the selection.
Press Q to display the menu, and then select from [Share
Order Selected], [0], or [Erase Selected].
Back
2014.07.01 12:30 21
Yes
No
Set
28
EN
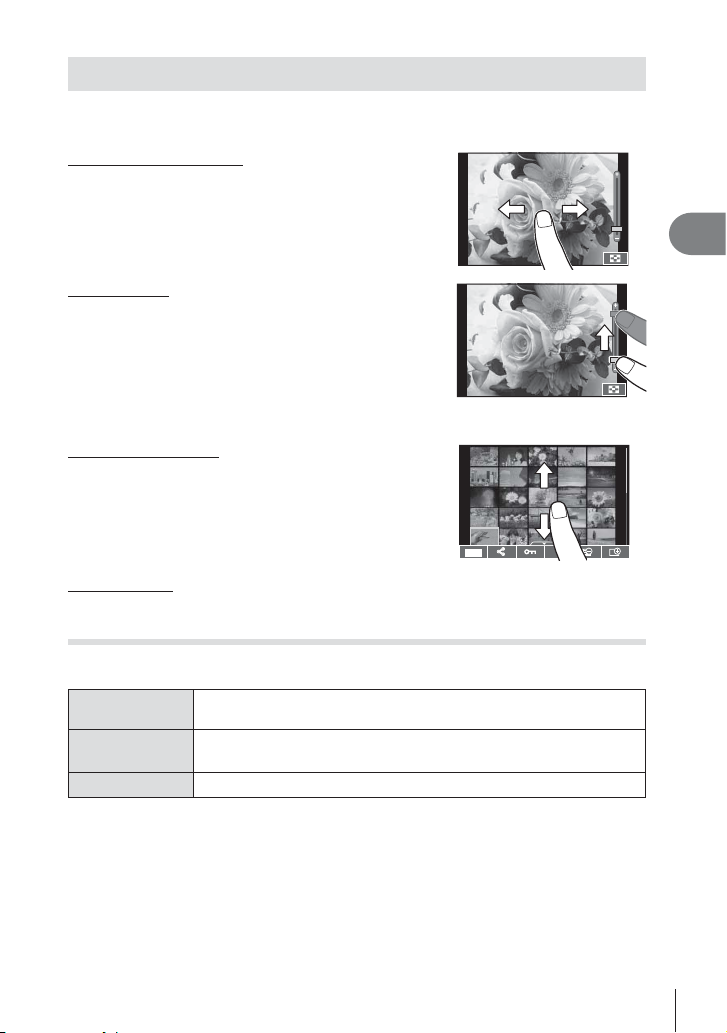
Using the touch screen
You can use the touch panel to manipulate images.
Full-frame playback
Viewing additional images
• Slide your fi nger to the left to view later frames, right to
scroll view earlier frames.
Playback zoom
• Lightly touch the screen to display the slider and P.
• Slide the bar up or down to zoom in or out.
• Use your fi nger to scroll the display when the picture is
zoomed in.
• Tap P to display index playback.
Tap Q again for calendar playback.
Index/Calendar Playback
Page ahead/Page back
• Slide your fi nger up to view the next page, down to view
the previous page.
• Use Q or R to choose the number of images
displayed.
• Tap R several times to return to single-frame
playback.
Viewing images
• Tap an image to view it full frame.
Selecting and protecting images
In single-frame playback, lightly touch the screen to display the touch menu. You can
then perform the desired operation by touching the icons in the touch menu.
H
h
0
Select an image. You can select multiple images and delete them
collectively.
Images you want to share with a smartphone can be set.
g “Setting a transfer order on images ([Share Order])” (P. 28)
Protects an image.
S
3
Viewing photographs and movies
Cautions
• Do not touch the display with your fi ngernails or other sharp objects.
• Gloves and monitor covers may interfere with touch screen operation.
EN
29
Basic operations
4
Information displays while shooting
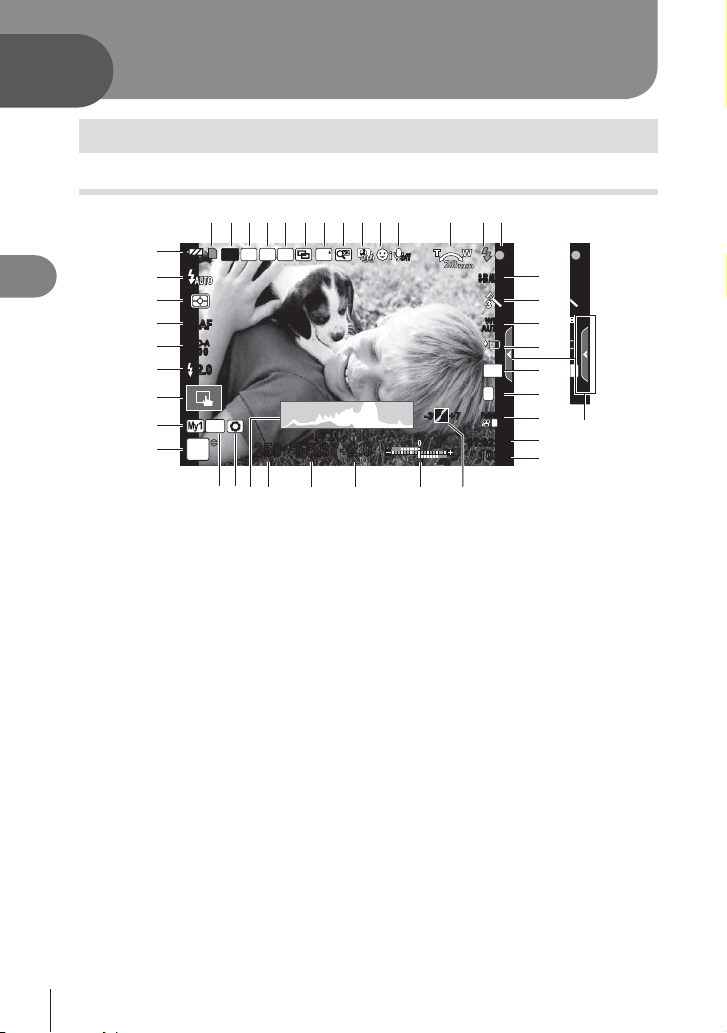
Monitor display when shooting
1
32 654 97 0a b
8
dc
D
4
Basic operations
C
B
A
z
y
S-AFS-AF
ISO-A
400
—
2.0-2.0
Wi-Fi
x
w
v
1 Card write indicator …………………….P. 13
2 Wireless LAN connection……..P. 23, 107
3 Super FP fl ash …………………………P. 124
4 RC mode…………………………………P. 124
5 Auto bracket/HDR ………………P. 76/P. 78
6 Multiple exposure……………………….P. 79
7 High frame rate ………………………….P. 87
8 Digital Tele-converter ………………….P. 81
9 Time lapse shooting ……………………P. 80
0 Face priority/Eye priority ……………..P. 48
a Movie sound ……………………………..P. 70
b Zoom operation direction/
Focal length/Internal temperature
warning m …………….P. 121/P. 133
c Flash ………………………………………..P. 65
(blinks: charging in progress,
lights up: charging completed)
d AF confi rmation mark………………….P. 18
e Image stabilizer………………………….P. 57
f Art fi lter …………………………………….P. 44
Scene mode………………………………P. 42
Picture mode……………………………..P. 60
AEL
P
u
t
RC
BKT
FP
FPS
250250 F5.6
qp o
r
s
off
28
mm
S-IS AUTOS-IS AUTO
e
f
WB
WBWBWB
g
AUTO
AUTOAUTOAUTO
h
4:3
i
L
N
j
FullHD
+7+7
+
2.0+2.0
-3-3
01:02:0301:02:03
F
10231023
k
l
m
n
g White balance ……………………………P. 58
h Sequential shooting/self-timer/Anti-
Shock ………………………………….P. 61, 89
i Aspect ratio ……………………………….P. 62
j Record mode (still images) ………….P. 63
k Record mode (movies) ……………….P. 64
l Available recording time
m Number of storable still pictures …P. 117
n Highlight and shadow control……….P. 46
o Top: Flash intensity control ……P. 68
Bottom: Exposure compensation
indicator……………………….P. 46
p Exposure compensation value……..P. 46
q Aperture value …………………….P. 32 – 35
r Shutter speed ……………………..P. 32 – 35
s Histogram …………………………………P. 31
t Preview …………………………………….P. 94
u AE Lock ……………………………………P. 93
v Shooting mode……………….P. 17, 32 – 44
w Myset ……………………………………….P. 73
x Shooting using touch screen
operations …………………………………P. 22
1
TO
TO
OOO
O
3
N
E
30
EN
Loading…
Table of Contents
Quick task index
1.
Preparing the camera and flow of
operations
2. Shooting
3. Viewing photographs and movies
4. Basic operations
5. Using shooting options
6. Menu functions
7.
Connecting the camera to a
smartphone
8.
Connecting the camera to a
computer and a printer
9. Battery, battery charger, and card
10. Interchangeable lenses
11. Using separately sold accessories
12. Information
13. SAFETY PRECAUTIONS
Thank you for purchasing an Olympus digital camera. Before you start to use your new camera,
please read these instructions carefully to enjoy optimum performance and a longer service life.
Keep this manual in a safe place for future reference.
We recommend that you take test shots to get accustomed to your camera before taking important
photographs.
The screen and camera illustrations shown in this manual were produced during the development
stages and may differ from the actual product.
If there are additions and/or modifications of functions due to firmware update for the camera, the
contents will differ. For the latest information, please visit the Olympus website.
Instruction Manual
DIGITAL CAMERA
When you use links on apotelyt.com to buy products,
the site may earn a commission.
PW,
Did you lose or misplace the instruction manual that came with your Olympus PEN E-PL7? It happens all too easily, but fortunately Olympus
makes a soft copy available that you can browse through online, print out, or download (see the pdf file below).
It is certainly good practice to carefully familiarize oneself with the many different functionalities and options that the E-PL7 offers, and the
official user manual is without doubt an authoritative and comprehensive source of respective information.
That said, the instruction booklet
can be a dry read, so that a dedicated camera
guide book from a professional photographer that illustrates the camera’s core functions in a real life photography context can be a very helpful complement. Yes,
getting one of these camera guides (see here at amazon)
would involve an additional expense, but if that book helps to exploit the camera’s potential to the full,
the (small) additional investment may well be worth it.
Also, you might want to check out the video tutorial on the Olympus PEN E-PL7 below.

In any case, the E-PL7 is an advanced imaging tool, whose many features merit serious attention. This
mirrorless interchangeable lens camera was officially introduced on August 28th, 2014,
which means that, as of today, the camera is 3886 days old (young?). The camera has meanwhile been discontinued and was succeeded by the Olympus E-PL8 as a replacement in the same line of cameras.
Olympus’s instruction manual for the E-PL7
The camera’s instruction manual is 159 pages long. The pdf version is embedded below.
As you browse through, you will hopefully find the information you are looking for.
You can also print out a hard copy by right clicking on the manual and then choosing the respective menu option. For convenience,
a summary of the key specs of the E-PL7 is included towards the bottom of this webpage.
Don’t forget to bookmark this page for future reference (Ctrl-Shift-D on a Windows PC; Cmd-Shift-D on a Mac). Happy browsing!
Click on the button below to download the pdf version of the Olympus PEN E-PL7 manual to your computer. The file will open in a new browser window.
Download the Manual
If you prefer to read the user guide in another language, please check the respective availability on
Olympus’s support site.
That site also provides complementary online resources, such as information on the compatibility of various camera accessories or the availability of
firmware updates that are not necessarily comprehensively covered in the instruction manual.
Printed, hardcopy versions of the Olympus E-PL7 manual can sometimes be found online. You can check the availability on amazon and ebay via the buttons below.
amazon.com
ebay.com
Video tutorial for the Olympus PEN E-PL7
Perhaps instead of reading through a manual or operations guide,
you might prefer to better familiarize yourself with your E-PL7 by watching a video tutorial. It can notably help to quickly get to know the
key functions and to set up your camera according to your particular preferences and needs.
Once again, the Olympus E-PL7 is a sophisticated imaging tool and not exploiting its capabilities to the full would be a pity. Hence, taking the time to
study online information material or to read through a well-written camera guide book is highly recommended to make the most of your purchase.
Find E-PL7 guide book at
amazon.com
Olympus E-PL7 FAQ
Below are some additional questions and answers
concerning some particular features of the E-PL7.
What technology is the imaging sensor in the Olympus E-PL7 based on?
The camera features a CMOS (Complementary Metal–Oxide–Semiconductor) sensor.
Which image processing chip is used in the Olympus E-PL7 to convert the raw signal into an image file and perform noise reduction and image sharpening?
Olympus equipped the E-PL7 with the TruePic VII image processor.
What is the ISO sensitivity range of the Olympus E-PL7?
The camera has a native sensitivity range from ISO 200 to ISO 25600, which can be extended to ISO 100-25600.
Can the Olympus E-PL7 be equipped with an optional viewfinder?
Yes, Olympus provides the VF-4 as an accessory
(here on amazon) that can be mounted on the hotshoe.
Does the Olympus E-PL7 have a selfie-friendly screen?
Yes, the LCD-screen of the E-PL7 is flexible and can be turned to be front-facing for capturing selfies.
What is the life expectancy of the shutter in the Olympus PEN E-PL7?
Olympus does not publish a shutter rating for the E-PL7. Yet, shutters in comparable cameras from other
manufacturers are said to be good for at least 100 000 actuations. It should be noted, though, that this number represents a Mean Time before Failure.
The shutter might fail earlier, or it might last longer. Anyway, in order
to exhaust an expected shutter life of 100 000 shots over, say, three years, one would have to take about 100 pictures each and every day.
How do I find the shutter count on my Olympus E-PL7?
Olympus embeds the number of shutter actuations in hidden menus. You can check the number of shots that your E-PL7 has taken up to now by carefully following the steps described on the Olympus E-PL7 shutter count page.
Do I need to purchase an external camera trigger to shoot time-lapse sequences with the Olympus E-PL7?
No, the Olympus PEN E-PL7 has an intervalometer built-in, so that low frequency shooting (for example, flower blooming, sunset, moon rise) can be undertaken without the need to purchase a separate external intervalometer and related software.
Is it difficult to use manual focus lenses with the Olympus E-PL7?
The E-PL7 offers focus peaking as a manual focus aid. This feature works by placing a colored highlight on in-focus zones within the image.
Does the Olympus E-PL7 feature an autofocus assist light?
Yes, the camera has a lamp built-in that can illuminate the subject and improve autofocus in low-light settings.
What is the fastest shutter speed that can be used with the Olympus E-PL7 for flash photography?
The E-PL7’s flash sync speed is 1/250 sec.
Does the Olympus E-PL7 support the Ultra High Speed (UHS) bus interface for SD cards?
Yes, the camera can indeed use UHS-I cards (data transfer speed of up to 104 MB/s).
Which battery does the Olympus E-PL7 use?
The camera gets its power from the Olympus BLS-50 (here at amazon), which is a rechargeable Lithium-Ion power pack.
Further reading
How does the E-PL7 stack up against available alternatives?
If you would like to see a side-by-side review with another camera, just make your choice using the following search menu. An an alternative, you can also directly jump to any one of the listed comparisons that were previously generated by the CAM-parator tool.
- Canon 200D vs Sony A9 II
- Canon 6D vs Sony A9 II
- Fujifilm X-S20 vs Olympus E-PL7
- Fujifilm X-T3 vs Olympus E-PL7
- Nikon D40 vs Olympus E-PL7
- Nikon D4S vs Sony A9 II
- Nikon D7500 vs Olympus E-PL7
- Nikon Z30 vs Olympus E-PL7
- Olympus E-M10 III vs Sony A9 II
- Olympus E-PL7 vs Sony WX800
- Olympus PEN-F vs Sony A9 II
- Panasonic TZ100 vs Sony A9 II
Core camera specifications
Here is a list of the main features and technical characteristics of the Olympus PEN E-PL7.
Specifications Summary
| Camera Model | Olympus E-PL7 | |
|---|---|---|
| Camera Type | Mirrorless system camera | |
| Camera Lens | Micro Four Thirds lenses | |
| Launch Date | August 2014 | |
| Launch Price | USD 599 | |
| Sensor Specs | ||
| Sensor Technology | CMOS | |
| Sensor Format | Four Thirds Sensor | |
| Sensor Size | 17.3 x 13.0 mm | |
| Sensor Area | 225 mm2 | |
| Sensor Diagonal | 21.6 mm | |
| Crop Factor | 2.0x | |
| Sensor Resolution | 15.9 Megapixels | |
| Image Resolution | 4 608 x 3 456 pixels | |
| Pixel Pitch | 3.76 μm | |
| Pixel Density | 7.08 MP/cm2 | |
| Moiré control | Anti-Alias filter | |
| Movie Capability | 1080/30p Video | |
| ISO Setting | 200 — 25 600 ISO | |
| ISO Boost | 100 — 25 600 ISO | |
| Image Processor | TruePic VII | |
| DXO Sensor Quality (score) | 72 | |
| DXO Color Depth (bits) | 22.7 | |
| DXO Dynamic Range (EV) | 12.4 | |
| DXO Low Light (ISO) | 873 | |
| Screen Specs | ||
| Viewfinder Type | Viewfinder optional | |
| Top-Level Screen | no Top Display | |
| LCD Framing | Live View | |
| LCD Size | 3.0 inch | |
| LCD Resolution | 1037k dots | |
| LCD Attachment | Tilting screen | |
| V-logging Friendliness | Front-flip possible | |
| Touch Input | Touchscreen | |
| Shooting Specs | ||
| Focus System | Contrast-detect AF | |
| Manual Focusing Aid | Focus Peaking | |
| Maximum Shutter Speed | 1/4000s | |
| Continuous Shooting | 8 shutter flaps/s | |
| Shutter Life Expectancy | 100 000 actuations | |
| Silent Shooting | no E-Shutter | |
| Time Lapse Photography | Intervalometer Built-in | |
| Image Stabilization | In-body stabilization | |
| Fill Flash | no On-Board Flash | |
| Storage Medium | SDXC cards | |
| Single or Dual Card Slots | Single card slot | |
| UHS card support | UHS-I | |
| Connectivity Specs | ||
| External Flash | Hotshoe | |
| USB Connector | USB 2.0 | |
| HDMI Port | micro HDMI | |
| Wifi Support | Wifi built-in | |
| Body Specs | ||
| Battery Type | Olympus BLS-50 power pack | |
| Battery Life (CIPA) | 350 shots per charge | |
| Body Dimensions |
115 x 67 x 38 mm (4.5 x 2.6 x 1.5 in) |
|
| Camera Weight | 357 g (12.6 oz) |
Did you notice an error on this page? If so, please get in touch, so that we can correct the information.
You are here:
Home
»
Olympus E-PL7 Review
»
Olympus E-PL7 User Manual
Table of Contents
Quick task index
1.
Preparing the camera and flow of
operations
2.
Shooting
3.
Viewing photographs and movies
4.
Basic operations
5.
Using shooting options
6.
Menu functions
7.
Connecting the camera to a
smartphone
8.
Connecting the camera to a
computer and a printer
9.
Battery, battery charger, and card
10.
Interchangeable lenses
11.
Using separately sold accessories
12.
Information
13.
SAFETY PRECAUTIONS
Thank you for purchasing an Olympus digital camera. Before you start to use your new camera,
please read these instructions carefully to enjoy optimum performance and a longer service life.
Keep this manual in a safe place for future reference.
We recommend that you take test shots to get accustomed to your camera before taking important
photographs.
The screen and camera illustrations shown in this manual were produced during the development
stages and may differ from the actual product.
If there are additions and/or modifications of functions due to firmware update for the camera, the
contents will differ. For the latest information, please visit the Olympus website.
Instruction Manual
DIGITAL CAMERA