
- Addeddate
- 2021-02-09 03:37:04
- Identifier
- manuallib-id-2448665
- Identifier-ark
- ark:/13960/t3427h97t
- Ocr
- tesseract 5.0.0-alpha-20201231-10-g1236
- Ocr_autonomous
- true
- Ocr_detected_lang
- qu
- Ocr_detected_lang_conf
- 1.0000
- Ocr_detected_script
-
Latin
Cyrillic
HanS
HanT
- Ocr_detected_script_conf
-
0.4397
0.4877
0.0329
0.0329
- Ocr_module_version
- 0.0.12
- Ocr_parameters
- -l kir+spa+chi_sim+mon+bul+deu+bel+rus+mkd+srp+eng+Latin+Cyrillic+HanS
- Page_number_confidence
- 40.91
comment
Reviews
There are no reviews yet. Be the first one to
write a review.
368
Views
DOWNLOAD OPTIONS
Temporarily Unavailable
DAISY
For users with print-disabilities
Uploaded by
chris85
on
DIGITAL CAMERA
T-100
Instruction Manual
● Thank you for purchasing an Olympus digital camera. Before you start
to use your new camera, please read these instructions carefully to
enjoy optimum performance and a longer service life. Keep this manual
in a safe place for future reference.
● We recommend that you take test shots to get accustomed to your
camera before taking important photographs.
● In the interest of continually improving our products, Olympus reserves
the right to update or modify information contained in this manual.
● The screen and camera illustrations shown in this manual were
produced during the development stages and may differ from the actual
product.
1
Step
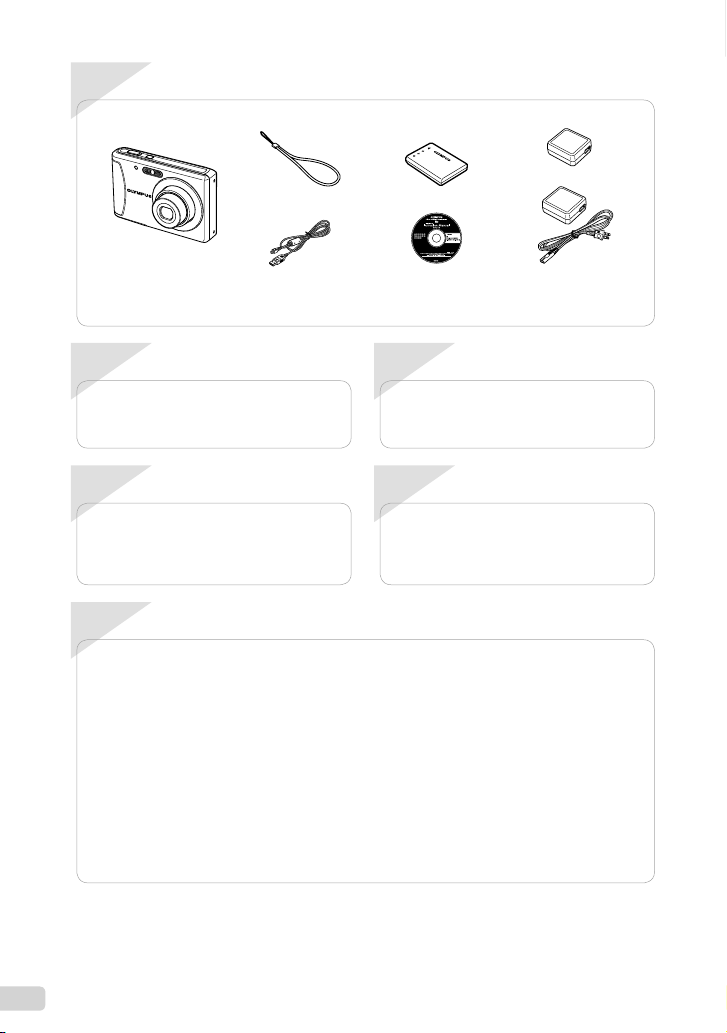
Checking the contents of the box
Strap LI-80B Lithium Ion Battery
Digital camera
USB cable ib CD-ROM
Other accessories not shown: Instruction Manual (this manual), warranty card.
Contents may vary depending on purchase location.
or
F-2AC USB-AC adapter
2
Step
Preparing the Camera
“Preparing the Camera” (p. 10)
4
Step
How to Use the Camera
“Camera Settings” (p. 3)
Contents
Names of Parts ………………………… 6
¾
Preparing the Camera ……………..10
¾
Shooting, Viewing, and Erasing
¾
Using Shooting Modes ……………. 20
¾
Using Shooting Functions ……….23
¾
Menus for Shooting Functions … 27
¾
… 14
3
Step
Shooting and Playing Back Images
“Shooting, Viewing, and Erasing” (p. 14)
5
Step
Printing
“Direct printing (PictBridge)” (p. 37)
“Print Reservations (DPOF)” (p. 40)
Menus for Playback, Editing, and
¾
Printing Functions …………………..30
Menus for Other Camera
¾
Settings …………………………………. 32
Printing ………………………………….. 37
¾
Usage Tips …………………………….. 42
¾
Appendix ……………………………….. 46
¾
2
EN
Camera Settings
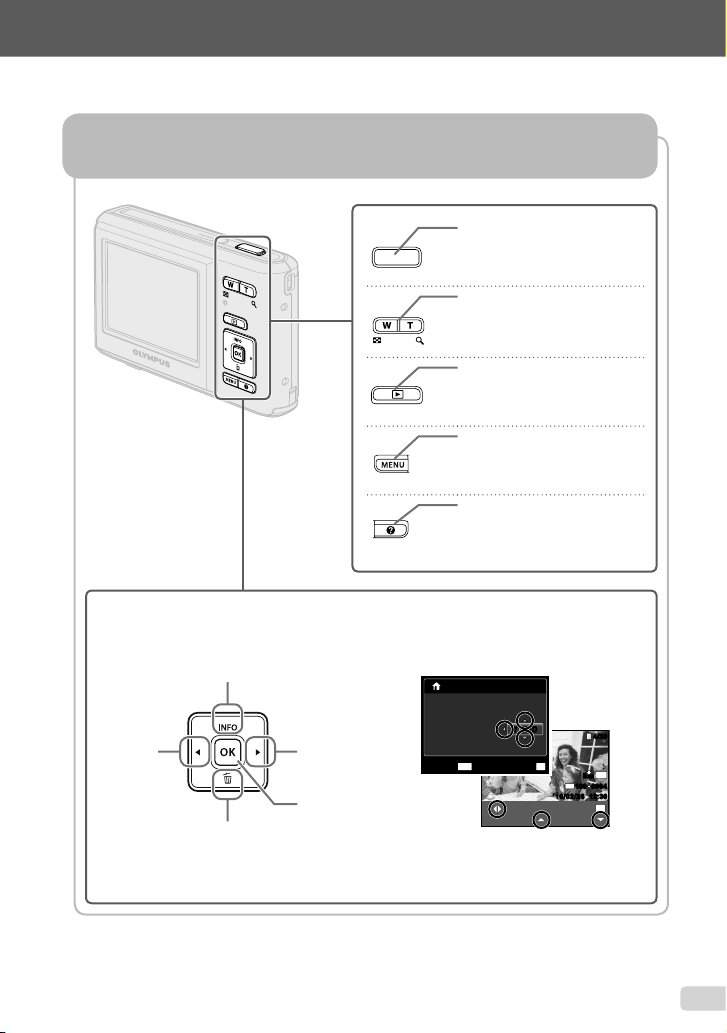
Using the Direct Buttons
Frequently used functions can be accessed using the direct buttons.
Arrow pad
The symbols FGHI displayed for image
selections and settings indicate that the arrow
pad is to be used.
H (left)
F (up) /
INFO button (change
information display) (p. 16, 19)
I (right)
H button
G (down) /
D button (erase) (p. 18)
(p. 12)
Shutter button (p. 14)
Zoom buttons (p. 16)
q button (switch between
shooting and playback) (p. 15)
m button (p. 4)
E button (menu guide) (p. 19)
X
YMDTIME
MENU
Y/M/DY/M/D
SET
SINGLE PRINT
02 26 12 30:..2010
CANCEL
OK
’10/02/26 12:30’10/02/26 12:30
FILE
PRINT
MORE
ORM
ORM
N
N
100 0004100 0004
4/304/30
12
M
OK
EN
3
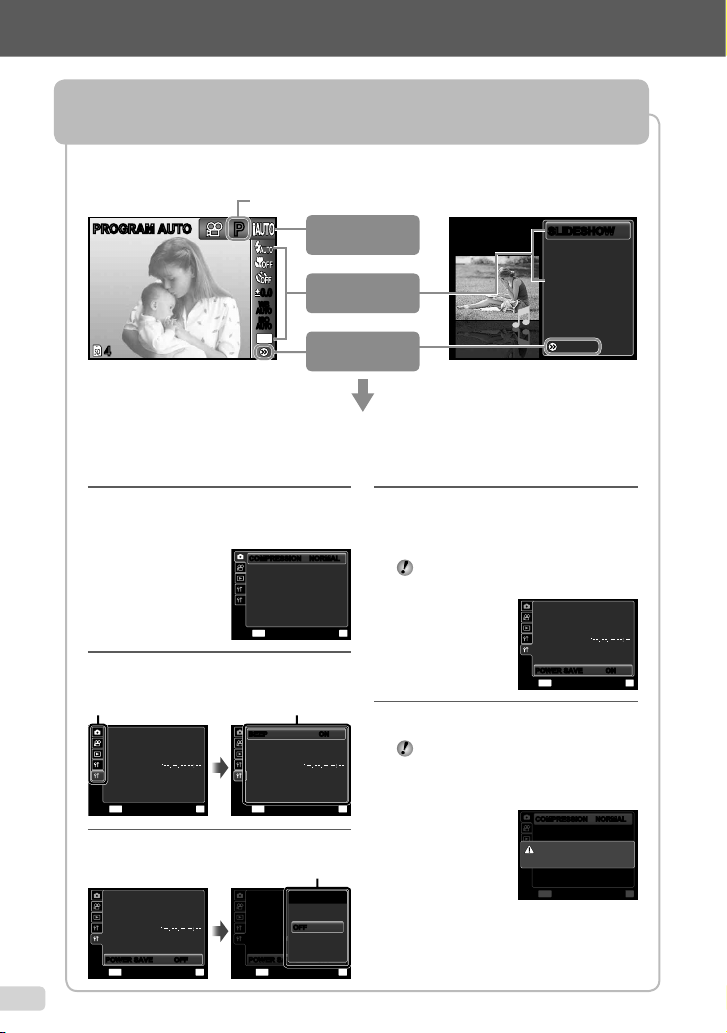
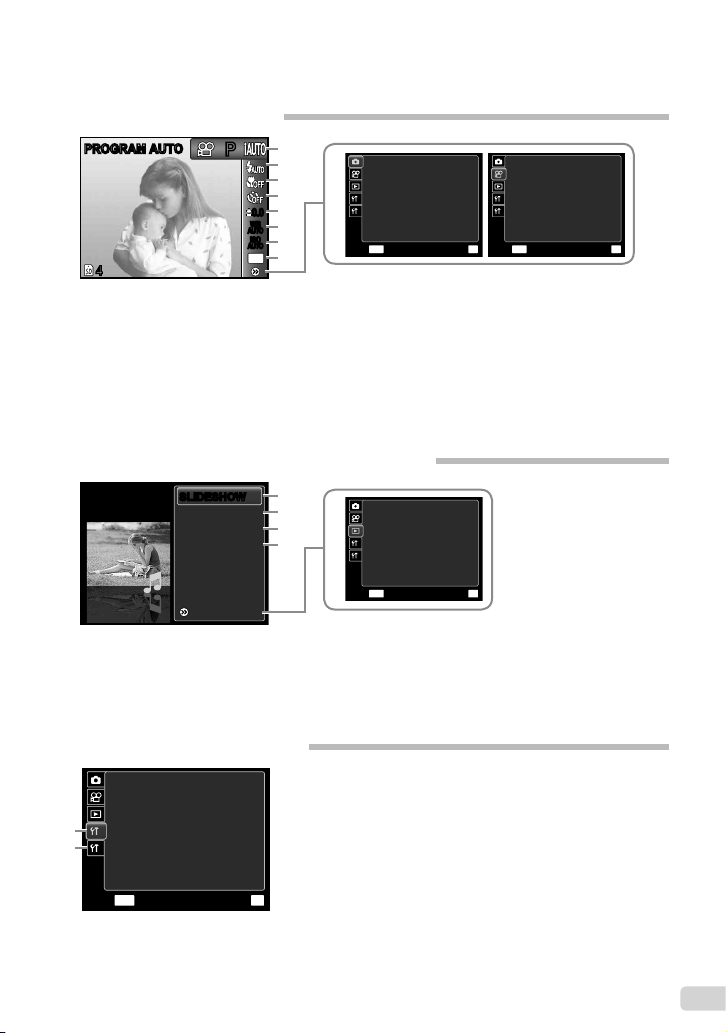
Using the Menu
Use the menu to change camera settings such as the shooting mode.
Press the m button to display the function menu. The function menu can be used to set frequently
used shooting and playback functions such as shooting mode.
Shooting Playback
PROGRAM AUTOPROGRAM AUTO
Selected option
PP
Shooting
mode
SLIDESHOWSLIDESHOW
PERFECT FIX
EDIT
0.00.0
WB
AUTOWBAUTO
ISO
ISO
AUTO
AUTO
12
44
To select the shooting mode
Use HI to select a shooting mode and press
the H button.
To select the function menu
Use FG to select a menu and use HI to
select a menu option. Press the H button to
set the function menu.
M
Function
menu
o [SETUP]
menu
In the [SETUP] menu, various camera functions can be set,
including shooting and playback functions not displayed in the
function menu, and other settings such as date, time and screen
display.
Use FG to select a menu and press
the H button.
ERASE
SETUP
1 Select [SETUP] and then press the H
button.
The [SETUP] menu is displayed.
●
COMPRESSIONCOMPRESSION NORMALNORMAL
AF MODE FACE/iESP
FINE ZOOM OFF
1
R OFF
2
ICON GUIDE ON
MENU
2 Press H to highlight the page tabs. Use
FG to select the desired page tab and
press I.
Page tab
NTSC
NTSC
ON
OK
SETEXIT
ON
OK
SETEXIT
BEEP
PIXEL MAPPING
s NORMAL
1
X
2
WORLD TIME
VIDEO OUT
POWER SAVE OFF
MENU
3 Use FG to select the desired submenu 1
and then press the H button.
BEEP
PIXEL MAPPING
s NORMAL
1
X
2
WORLD TIME
VIDEO OUT
POWER SAVEPOWER SAVE OFFOFF
MENU
4
EN
Submenu 1
BEEPBEEP ONON
PIXEL MAPPING
s NORMAL
1
X
2
WORLD TIME
VIDEO OUT
POWER SAVE OFF
MENU
BEEP
PIXEL MAPPING
s
1
X
2
WORLD TIME
VIDEO OUT
POWER SAVEPOWER SAVE OFFOFF
MENU
BACK
Submenu 2
POWER SAVE
NORMAL
OFFOFF
ON
4 Use FG to select the desired submenu 2
and then press the H button.
Once a setting is selected, the display returns
●
to the previous screen.
There may be additional operations.
“Menu Settings” (p. 27 to 36)
OK
SETEXIT
5 Press the m button to complete the
setting.
Some functions cannot be used in some
shooting modes. In such cases, the
NTSC
NTSC
OK
SETEXIT
ON
OK
SET
following message is displayed after
setting.
BEEP
PIXEL MAPPING
s NORMAL
1
X
2
WORLD TIME
VIDEO OUT
POWER SAVEPOWER SAVE ONON
MENU
COMPRESSIONCOMPRESSION NORMALNORMAL
AF MODE FACE/iESP
FINE ZOOM OFF
1
CONFLICTING SETTINGS
R OFF
2
ICON GUIDE ON
MENU
NTSC
ON
OK
SETEXIT
OK
SETEXIT
Menu Index
Menus for Shooting Functions
PROGRAM AUTOPROGRAM AUTO
44
1 Shooting mode
P (PROGRAM AUTO) ……. p. 14
M
(iAUTO) ………………..p. 20
N (DIS MODE) ……………p. 20
s (SCENE MODE) ……p. 20
P (MAGIC FILTER) ….. p. 21
~ (PANORAMA) …………… p. 22
A (MOVIE) …………………..p. 15
2 Flash ……………………………. p. 23
3 Macro …………………………..p. 23
1
PP
0.00.0
WB
AUTOWBAUTO
ISO
ISO
AUTO
AUTO
12
M
9
2
3
4
5
6
7
8
4 Self-timer ………………………p. 24
5 Exposure compensation …. p. 24
6 White balance ………………..p. 25
7 ISO ………………………………p. 25
8 Image size (Still images) …p. 26
9 o (SETUP) X
z
(Shooting) / A (Movie)
IMAGE SIZE (Movies) …….p. 27
COMPRESSION (Still images)
………………………………… p. 27
COMPRESSION NORMAL
AF MODE FACE/iESP
FINE ZOOM OFF
1
R OFF
2
ICON GUIDE ON
MENU
Menus for Playback, Editing, and Printing Functions
SLIDESHOWSLIDESHOW
PERFECT FIX
EDIT
ERASE
SETUP
1 SLIDESHOW ………………… p. 30
2 PERFECT FIX ……………….p. 30
3 EDIT …………………………….p. 30
4 ERASE …………………………p. 30
Menus for Other Camera Settings
FORMAT
BACKUP
W
1
1
RESET
2
USB CONNECTION
2
q POWER ON NO
SAVE SETTINGS
MENU
ENGLISH
STORAGE
1
5
2
3
4
5 o (SETUP) X q (Playback)
PRINT ORDER ……………… p. 31
0 (Protect) …………………p. 31
y (Rotate)…………………….p. 31
R (Add sound to still images)
………………………………… p. 31
1 r (Settings 1)
MEMORY FORMAT/
FORMAT ……………………….p. 32
BACKUP ……………………….p. 32
W (Language) …………….. p. 32
RESET………………………….p. 32
USB CONNECTION ……….p. 33
NO
SETEXIT
q POWER ON …………….p. 33
SAVE SETTINGS …………..p. 33
OK
PRINT ORDER
0
y
1
R
2
MENU
OK
SETEXIT
OK
SETEXIT
IMAGE SIZE VGA
FRAME RATE 30fps
IS MOVIE MODE
1
R
2
MENU
FRAME RATE (Movies) ….. p. 27
AF MODE ……………………..p. 28
FINE ZOOM ………………….p. 28
IS MOVIE MODE …………… p. 28
R (Still images) ………………p. 29
R (Movies) …………………….p. 29
ICON GUIDE …………………p. 29
2 s (Settings 2)
BEEP ……………………………p. 34
PIXEL MAPPING …………… p. 34
s (Monitor) …………………p. 34
X (Date/time) ………………p. 34
WORLD TIME………………..p. 35
VIDEO OUT ………………….. p. 35
POWER SAVE……………….p. 36
OFF
ON
OK
SETEXIT
EN
5
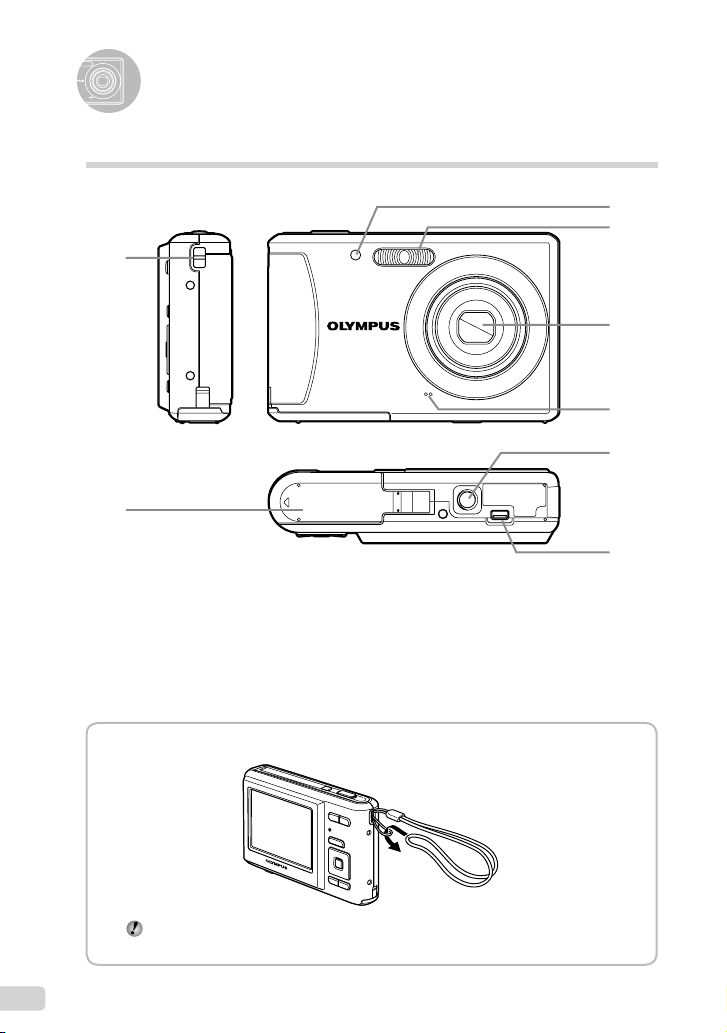
Names of Parts
Camera unit
1
2
3
4
5
6
7
8
1 Strap eyelet
2 Battery/card compartment cover … p. 10
3 Self-timer lamp ………………………… p. 24
4 Flash ……………………………………… p. 23
Attaching the camera strap
Pull the strap tight so that it does not come loose.
6
EN
5 Lens …………………………………. p. 46, 59
6 Microphone ……………………….. p. 29, 31
7 Tripod socket
8 Multi-connector ……….. p. 11, 12, 35, 37
1
5
6
2
3
4
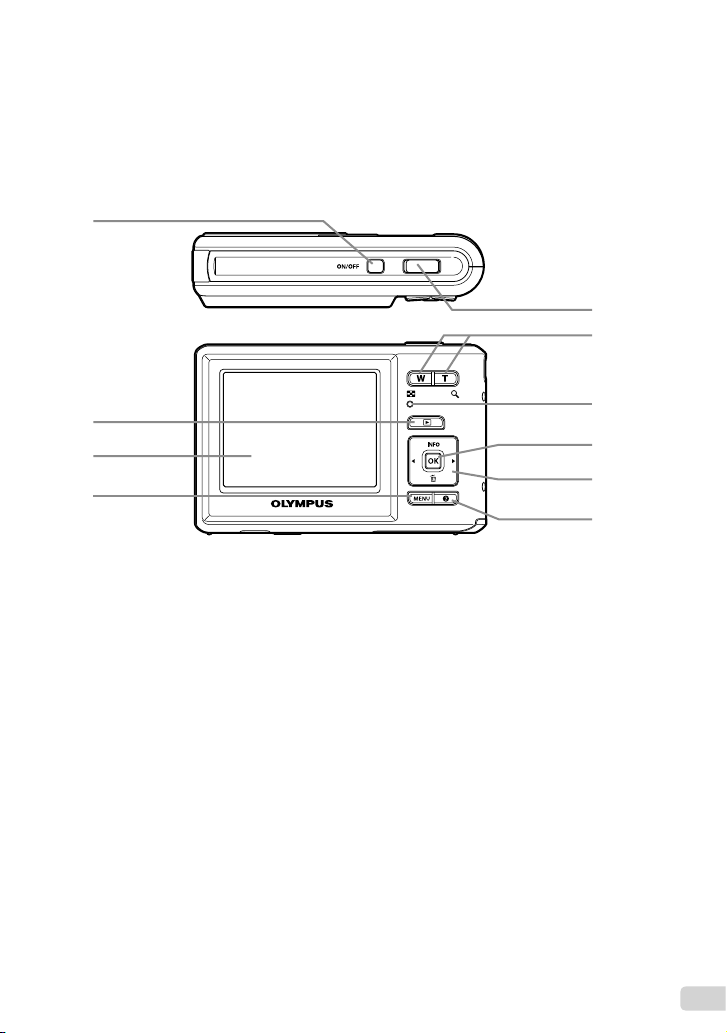
1 n button ……………………p. 12, 14
2 q button (switch between shooting
and playback) ………………………….. p. 15
3 Monitor ……………………………… p. 14, 42
4 m button …………………………….. p. 4
5 Shutter button ………………………….p. 14
6 Zoom buttons …………………………..p. 16
7
8
9
10
7 Indicator lamp ……………………. p. 11, 12
8 H button (OK) …………………….. p. 3, 12
9 Arrow pad …………………………………. p. 3
INFO button (change information
display) ………………………..p. 16, 19
D button (erase) ………………..p. 18
10 E button (menu guide) ……………..p. 19
EN
7
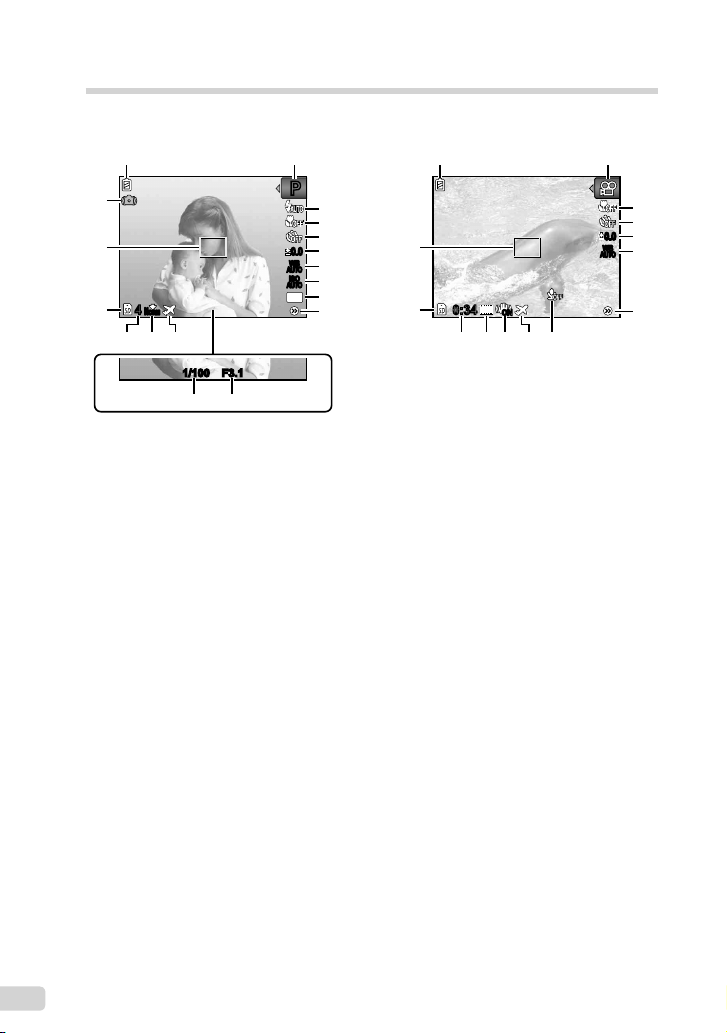
Monitor
Shooting mode display
1 2 1 2
AUTOWBAUTO
AUTO
AUTO
12
PP
3
4
5
0.00.0
6
PP
WB
7
ISO
ISO
8
M
9
10
17
16
0:340:34
VGA
ONON
1213915
Movie
18
17
16
44
ORM
N
121415
1/1001/100 F3.1F3.1
1920
Still image
4
5
0.00.0
6
WB
7
AUTOWBAUTO
10
11
1 Battery check ………………………….. p. 11
2 Shooting mode ……………………p. 14, 20
3 Flash ………………………………………p. 23
Flash standby/fl ash charge ………..p. 42
4 Macro …………………………………….. p. 23
5 Self-timer ………………………………… p. 24
6 Exposure compensation ……………p. 24
7 White balance ………………………….p. 25
8 ISO …………………………………………p. 25
9 Image size …………………………. p. 26, 27
10 [SETUP] menu ……………………….p. 4, 5
11 Recording with sound (movies)
……….. ………………………………….. p. 29
8
EN
12 World time ……………………………….p. 35
13 Digital image stabilization ……….. .p. 28
14 Compression (still images) ………… p. 27
15 Number of storable pictures (still
images) ………………………………….. p. 14
Continuous recording length (movies)
……………………………………………. p. 15
16 Current memory ……………………….p. 48
17 AF target mark …………………………p. 14
18 Camera shake warning ………………….. —
19 Aperture value …………………………. p. 14
20 Shutter speed ………………………….. p. 14
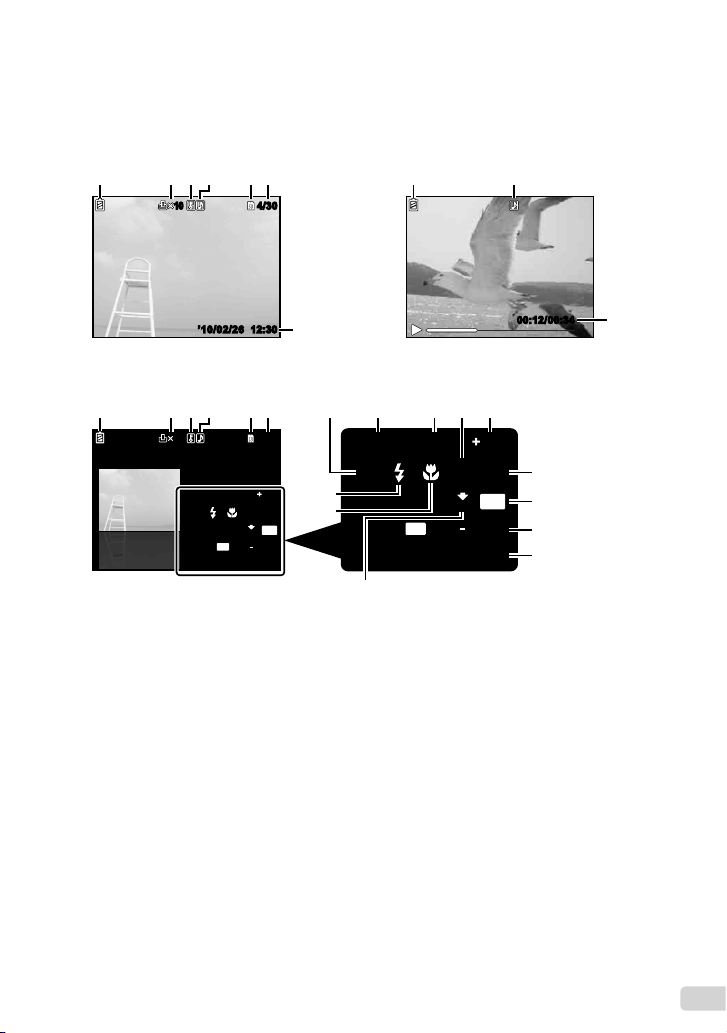
Playback mode display
Normal display
●
1 65432 1 4
●
Detailed display
1010
Still image Movie
4/30
4/30
’10/02/26 12:30’10/02/26 12:30
15
1 6 87 9 11105432
1010
1/1000 F3.1 2.0
P
4/304/30
ISO
ORM
N
FILE
100 0004
’10/02/26 12:30
1/1000 F3.1 2.0
WB
FILE
100 0004
ISO
AUTO
ORM
N
AUTO
12
M
P
18
17
AUTOWBAUTO
12
M
’10/02/26 12:30
16
00:1
2/00:3400:12/00:34
12
13
14
15
1 Battery check ………………………….. p. 11
2 Print reservation/
number of prints ……………….p. 40/p. 39
3 Protect ……………………………………. p. 31
4 Adding sound …………………….. p. 29, 31
5 Current memory ………………………. p. 48
6 Frame number/total number of images
(still images) ……………………………. p. 16
Elapsed time/total recording time
(movies) …………………………………. p. 17
7 Shooting mode ……………………p. 14, 20
8 Shutter speed ………………………….. p. 14
9 Aperture value …………………………. p. 14
10 ISO ………………………………………… p. 25
11 Exposure compensation …………… p. 24
12 White balance ………………………….p. 25
13 Image size …………………………. p. 26, 27
14 File number ………………………………….. —
15 Date and time ………………………….. p. 12
16 Compression (still images) ………… p. 27
Frame rate (movies) …………………. p. 27
17 Macro …………………………………….. p. 23
18 Flash ……………………………………… p. 23
EN
9
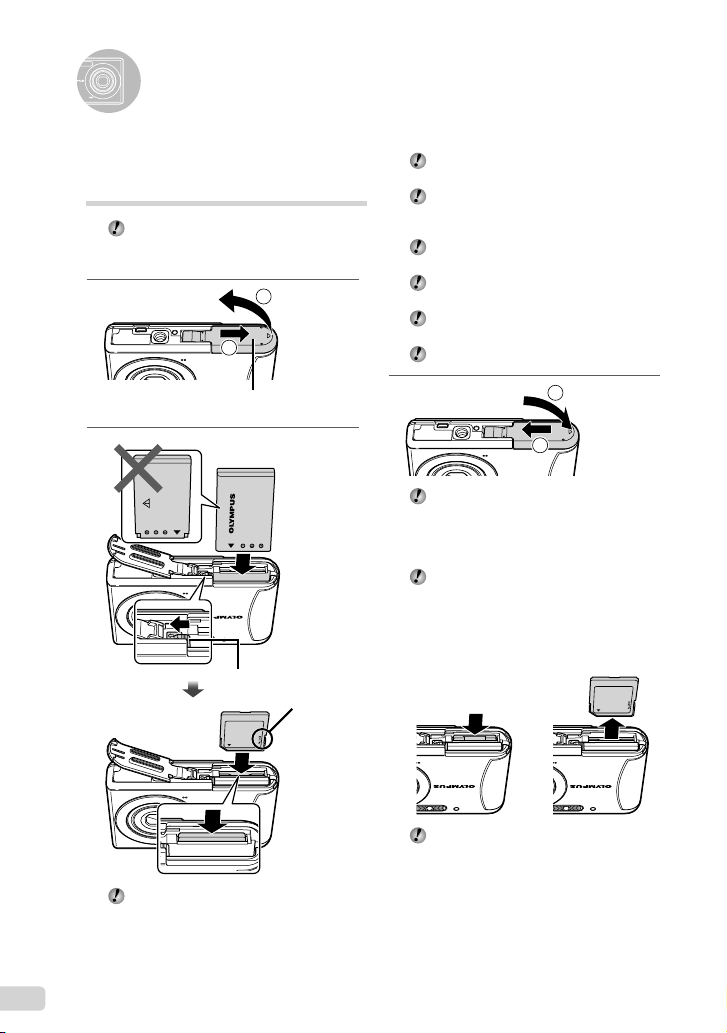
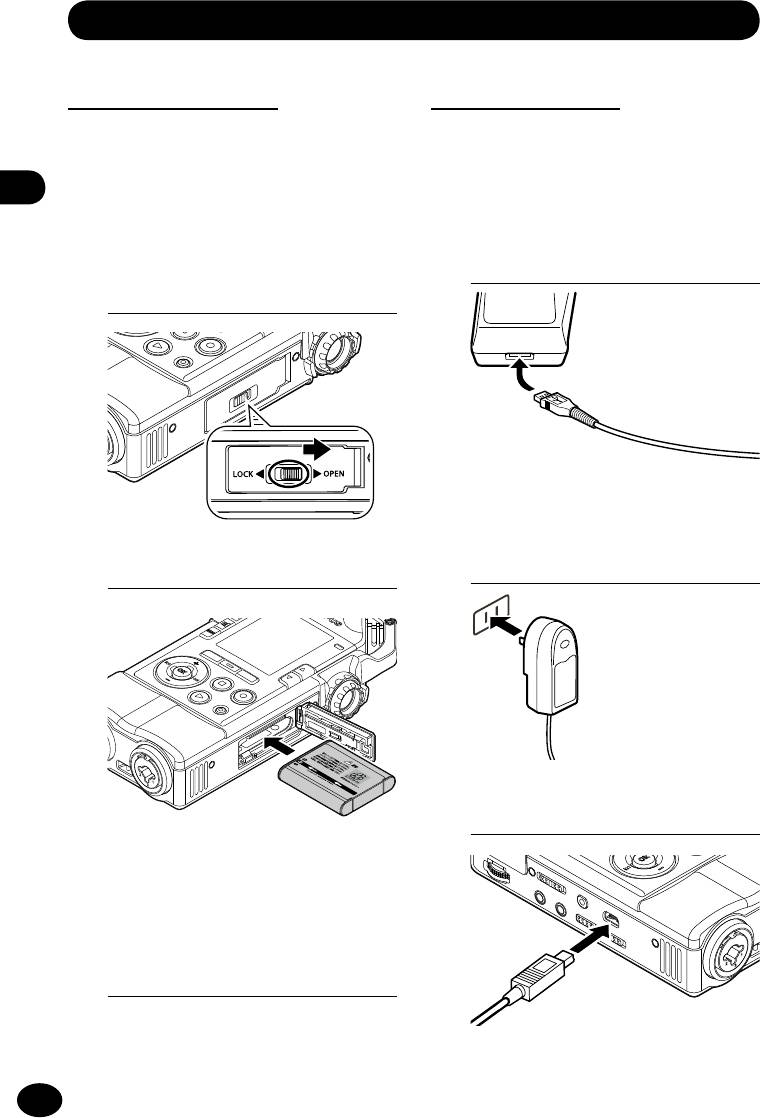
Preparing the Camera
Inserting the battery and the
SD/SDHC memory card (sold
separately)
Always use SD/SDHC memory cards with
this camera. Do not insert any other types of
memory card.
1
Battery/card compartment cover
2
11
2
Battery lock knob
Write-protect switch
Insert the battery while sliding the battery
lock knob in the direction of the arrow.
Slide the battery lock knob in the direction
of the arrow to unlock, and then remove the
battery.
Turn off the camera before opening the
battery/card compartment cover.
When using the camera, be sure to close
the battery/card compartment cover.
Insert the card straight until it clicks into
place.
Do not touch the contact area directly.
3
This camera allows the user to take pictures
using the internal memory even when no
SD/SDHC memory card (sold separately) is
inserted. “Using an SD/SDHC memory card”
(p. 47)
“Number of storable pictures (still images)/
Continuous recording length (movies) in the
internal memory and SD/SDHC memory
cards” (p. 49)
11
2
To remove the SD/SDHC memory card
12
Press the card in until it clicks and comes
out slightly, then grab the card and pull it
out.
Insert the battery by putting in the ▼ marked
side fi rst, with the C mark toward the
battery lock knob.
Damage to the battery exterior (scratches,
etc.) may produce heat or an explosion.
10
EN
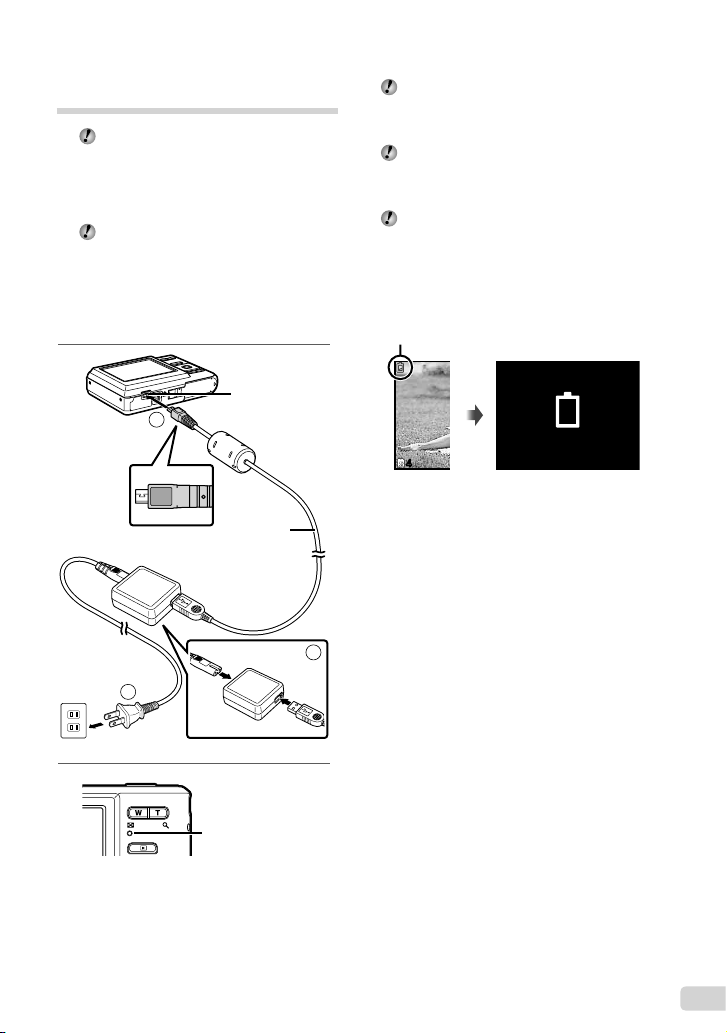
Charging the battery with the
supplied USB-AC adapter
The included F-2AC USB-AC adapter
(with an AC cable or plug-in type; hereafter
referred to as AC adapter) differs depending
on the region where you purchased the
camera. If you received a plug-in type AC
adapter, plug it directly into an AC outlet.
The included AC adapter has been designed
to be used only for charging. Make sure
that operations such as shooting, viewing
images and so on are not being used while
the AC adapter is connected to the camera.
Example: AC adapter with an AC cable
1
Multi-connector
2
USB cable
(supplied)
The battery is not fully charged at the time
of purchase. Before use, be sure to charge
the battery until the indicator lamp turns off
(up to 4 hours).
If the indicator lamp does not light, the
camera is not correctly connected or the
battery, camera, or AC adapter may be
damaged.
For details on the battery and the AC
adapter, see “Battery and AC adapter
(included)” (p. 46).
When to charge the batteries
Charge the battery when the error message
shown below appears.
Flashes in red
BATTERY EMPTY
44
Monitor top left Error message
1
AC outlet
2
3
Indicator lamp
On: Charging
Off: Charged
11
EN
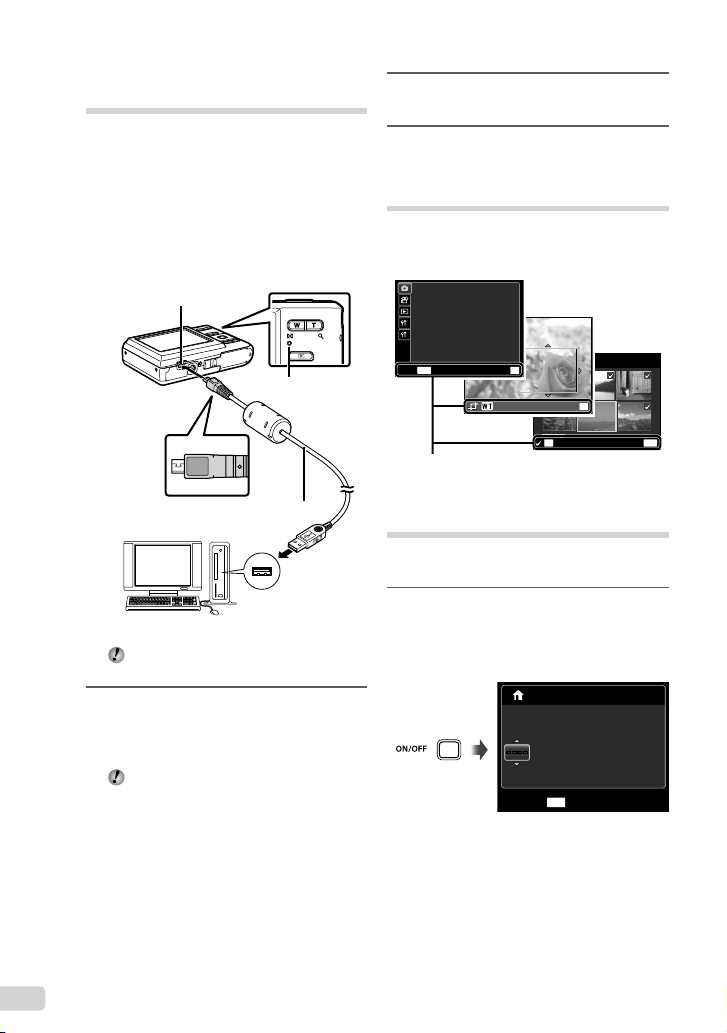
Installing the supplied
computer software (ib)
After checking the system requirements, follow
the instructions below to connect the camera to
a computer and install the supplied computer
software (ib).
System requirements
Windows XP (Service Pack 2 or later)/
Windows Vista/Windows 7
Connecting the camera
Multi-connector
Indicator lamp
2
Connect the camera to the
computer.
3
Follow the on-screen instructions
on your computer.
Operation guide
Operation guides displayed at the bottom of the
screen indicate that the m button, H button,
or zoom buttons should be used.
COMPRESSION NORMAL
AF MODE FACE/iESP
FINE ZOOM OFF
1
R OFF
2
ICON GUIDE ON
MENU
SEL. IMAGE
OK
SETEXIT
OK
SET
MENU
USB cable (supplied)
OK
ERASE/CANCEL
Operation guide
Setting the date, time and
time zone
The date and time set here are saved to image
fi le names, date prints, and other data.
1
Press the n button to turn on
Computer (on and running)
For information on using the computer
software (ib), see the software’s online help.
1
Insert the supplied CD in a CD-ROM
drive.
A setup screen will appear on the computer
●
monitor.
If the setup window is not displayed,
select “My Computer” (Windows XP) or
“Computer” (Windows Vista/Windows 7)
from the start menu. Double-click the
icon for the CD-ROM drive to open the
setup CD window and then double-click
“CameraInitialSetup.exe”.
12
EN
the camera.
The date and time setting screen is displayed
●
when the date and time are not set.
X
Y M D TIME
— — — —
———
CANCEL
Date and time setting screen
:..
MENU
Y/M/D
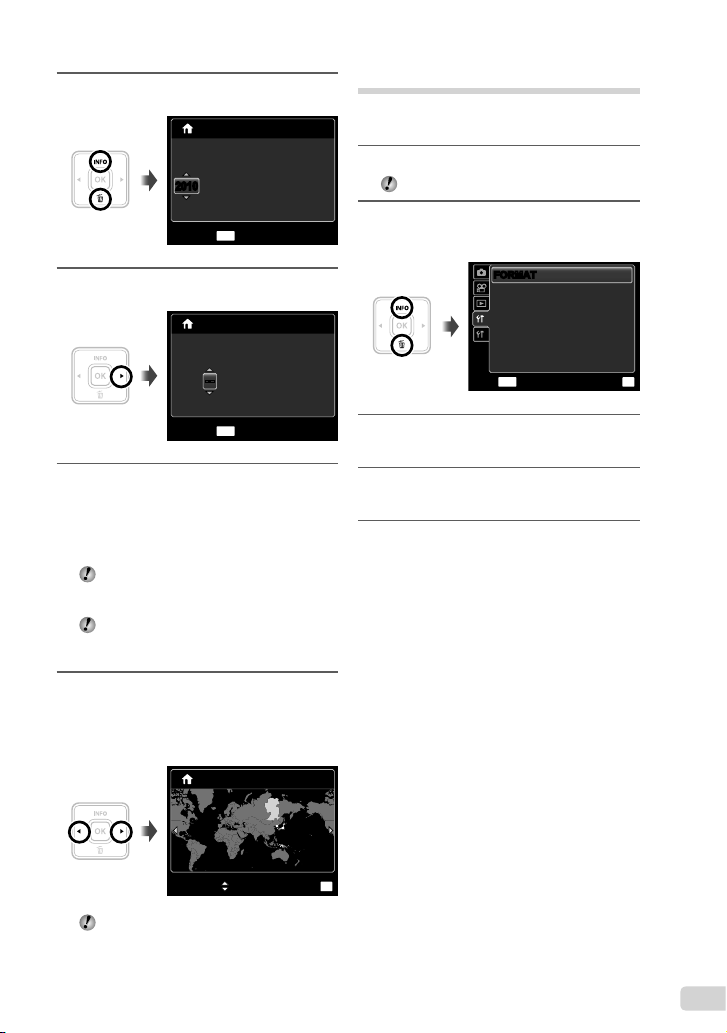
2
Use FG to select the year for [Y].
X
Y M D TIME
— — — —
20102010
CANCEL
:..
MENU
Y/M/D
Changing the display language
The language for the menu and error messages
displayed on the monitor is adjustable.
1
Display the [SETUP] menu.
“Using the Menu” (p. 4)
2
Use FG to select the r (Settings
1) tab and then press I.
3
Press I to save the setting for [Y].
X
Y M D TIME
— — ———
:..2010
MENU
CANCEL
4
As in Steps 2 and 3, use FGHI
and the H button to set [M]
(month), [D] (day), [TIME] (hours
and minutes), and [Y/M/D] (date
order).
For a more accurate setting, press the
H button when the time signal hits
00 seconds while setting the minutes.
To change the date and time, adjust the
setting from the menu. [X] (Date/time)
(p. 34)
5
Use HI to select your home time
zone and press the H button.
Use FG to turn daylight saving time ([SUMMER])
●
on or off.
’10.02.26.12:30
Seoul
Seoul
Tokyo
Tokyo
Y/M/D
FORMATFORMAT
BACKUP
W ENGLISH
1
RESET
2
USB CONNECTION
q POWER ON NO
SAVE SETTINGS
MENU
3
Use FG to select [W] and press
STORAGE
the H button.
4
Use FGHI to select your
language and press the H button.
5
Press the m button.
NO
OK
SETEXIT
SUMMER
The menus can be used to change the
selected time zone. [WORLD TIME] (p. 35)
SET
OK
13
EN
Shooting, Viewing, and Erasing
Shooting with the optimum
aperture value and shutter
speed [PROGRAM AUTO]
In this mode, automatic shooting settings are
activated while also allowing changes to a wide
range of other shooting menu functions, such
as exposure compensation, white balance, etc.
as needed.
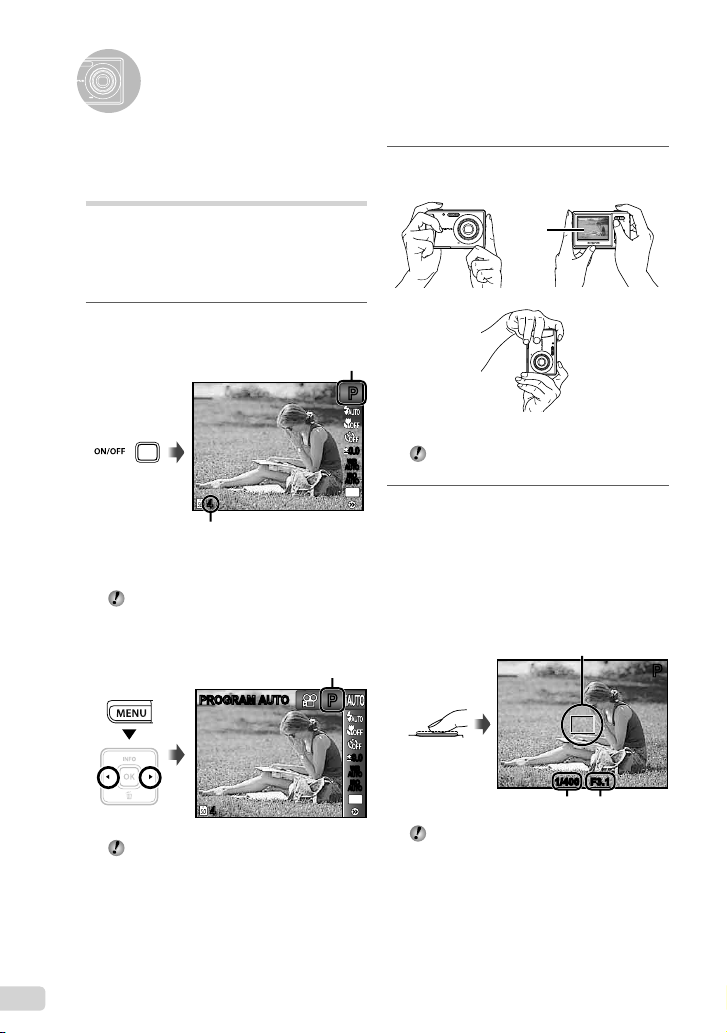
1
Press the n button to turn on
the camera.
[PROGRAM AUTO] indicator
44
Number of storable still pictures (p. 49)
Monitor
(standby mode screen)
If the [PROGRAM AUTO] indicator is not
displayed, press the m button to display
the function menu and then set the shooting
mode to P. “Using the Menu” (p. 4)
Current shooting mode display
PROGRAM AUTOPROGRAM AUTO
PP
2
Hold the camera and compose the
shot.
Monitor
Horizontal grip
PP
Vertical grip
0.00.0
WB
AUTOWBAUTO
ISO
ISO
AUTO
AUTO
12
M
When holding the camera, take care not to
cover the fl ash with your fi ngers, etc.
3
Press the shutter button halfway
down to focus on the subject.
When the camera focuses on the subject, the
●
exposure is locked (shutter speed and aperture
value are displayed), and the AF target mark
changes to green.
●
The camera was unable to focus if the AF target
mark fl ashes red. Try focusing again.
AF target mark
PP
Press halfway
0.00.0
WB
AUTOWBAUTO
ISO
ISO
AUTO
AUTO
12
44
Press the n button again to turn off
the camera.
14
EN
M
“Focusing” (p. 44)
1/4001/400 F3.1F3.1
Shutter speed Aperture value
4
0:00
RECREC
0:34
0:00
0:34
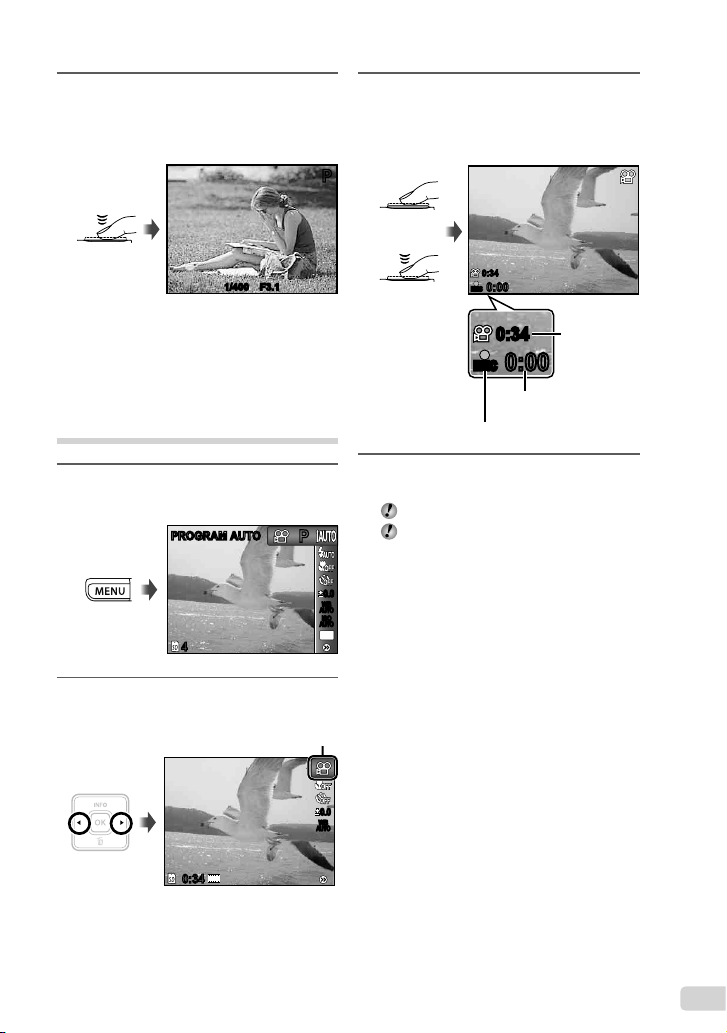
To take the picture, gently press
the shutter button all the way down
while being careful not to shake the
camera.
Press fully
1/4001/400 F3.1F3.1
Image review screen
To view images during shooting
Pressing the q button enables playback of
images. To return to shooting, either press
the q button or press the shutter button
halfway down.
Shooting movies [MOVIE]
1
Press the m button to display
the function menu screen.
PROGRAM AUTOPROGRAM AUTO
44
3
Press the shutter button halfway
down to focus on the subject, and
gently press the button all the way
down to start recording.
PP
Press
halfway
0:34
0:34
RECREC
0:00
Press fully
4
Gently press the shutter button all
the way down to stop recording.
Sound will also be recorded.
PP
0.00.0
WB
AUTOWBAUTO
ISO
ISO
AUTO
AUTO
12
M
During sound recording, only the digital
zoom can be used. To record a movie with
optical zoom, set [R] (movies) (p. 29) to
[OFF].
0:00
Continuous
recording
length (p. 49)
Current length
Lights up red when recording
2
Use HI to set the shooting mode
to A and then press the H button.
VGA
0:340:34
[MOVIE] indicator
0.00.0
WB
AUTOWBAUTO
EN
15
Using the zoom
Pressing the zoom buttons adjusts the shooting
range.
Pressing the wide
(W) button
Zoom bar
44
Optical zoom: 3x
Digital zoom: 4x
Select [DIS MODE] for the shooting mode
(p. 20) when shooting with the telephoto
zoom.
To take larger images without reducing
image quality [FINE ZOOM] (p. 28)
The zoom bar appearance identifi es the
status of the fi ne zoom/digital zoom.
When using optical
zoom and digital
zoom
When using fi ne
zoom
Pressing the telephoto
(T) button
PP
0.00.0
WB
AUTOWBAUTO
ISO
ISO
AUTO
AUTO
12
M
Optical zoom
range
44
Fine zoom range
Digital zoom
range
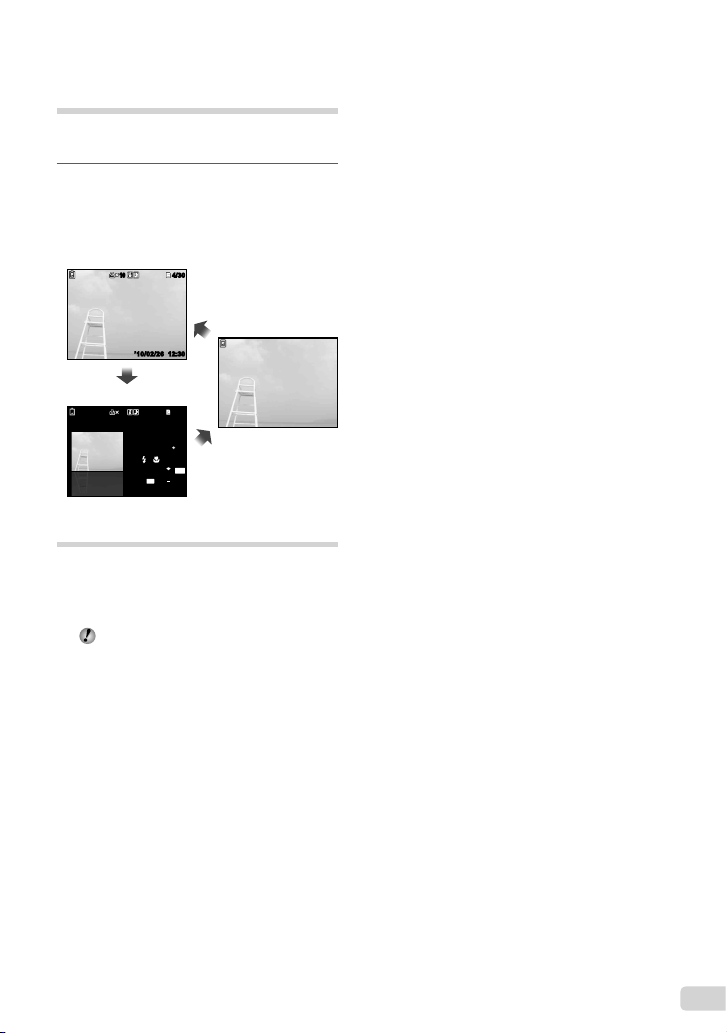
Changing the shooting
information display
The display of the screen information can
be changed to best match the situation, for
example, the need for a clear view of the screen
or for making a precise composition by using the
grid display.
1
Press F (INFO).
The displayed shooting information changes in
●
PP
0.00.0
WB
AUTOWBAUTO
ISO
ISO
AUTO
AUTO
12
M
the order shown below each time the button is
pressed. “Shooting mode display” (p. 
Normal
PP
0.00.0
WB
AUTOWBAUTO
No information
ISO
ISO
AUTO
AUTO
44
12M
Detailed
PP
0.00.0
WB
AUTOWBAUTO
ISO
ISO
AUTO
AUTO
44
N
ORM
12M
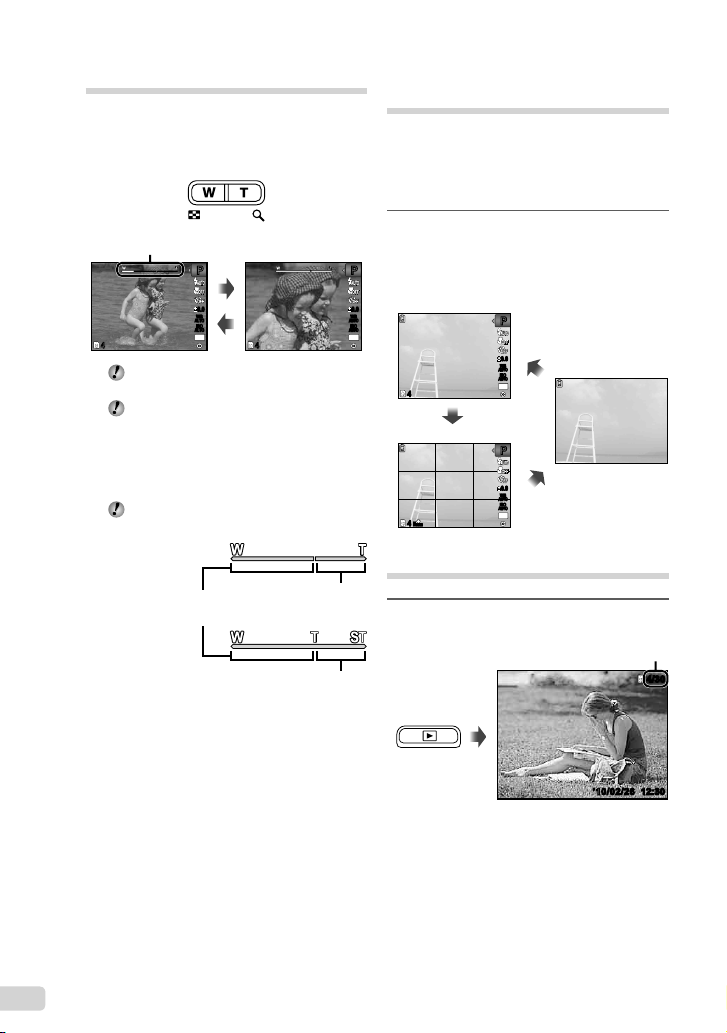
Viewing images
1
Press the q button.
Number of frames/
Total number of images
4/30
4/30
’10/02/26 12:30’10/02/26 12:30
Playback image
16
EN
2
Use HI to select an image.
Displays
previous
image
Hold I to fast forward and hold H to
reverse.
The display size of the images can be
changed. “Index view and close-up view”
(p. 18)
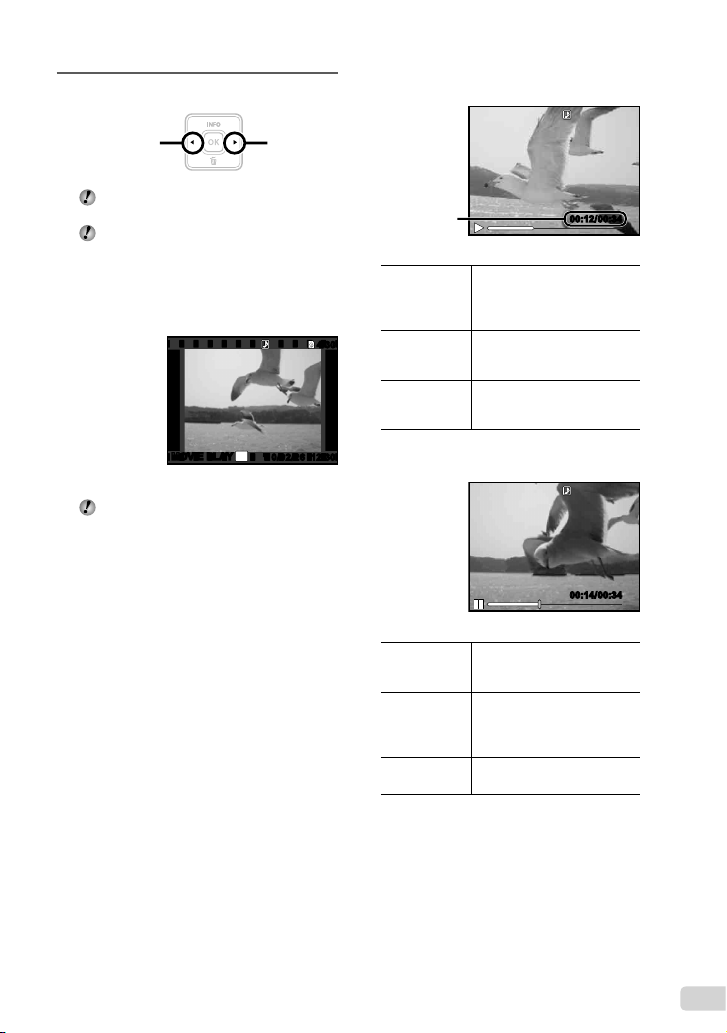
To play back movies
Select a movie, and press the H button.
Displays
next image
4/30
4/30
Operations during movie playback
Elapsed time/
Total recording
time
Pausing and
resuming
playback
Fast forward
Rewind
Press the H button to pause
playback. To resume playback
during pause, fast forward, or
rewind, press the H button.
Press I to fast forward. Press
I again to increase the fast
forward speed.
Press H to rewind. The
rewinding speed increases
each time H is pressed.
00:12/00:3400:12/00:34
During playback
MOVIE PLAYMOVIE PLAY
The sound recorded in movie mode cannot
be played back with this camera. To listen to
the sound, connect to a TV or PC.
OK
Movie
’10/02/26 12:30’10/02/26 12:30
Operations during pausing playback
00:14/00:3400:14/00:34
During pause
Cueing
Advancing
and rewinding
one frame at
a time
Resuming
playback
Press F to display the fi rst
frame and press G to display
the last frame.
Press I or H to advance or
rewind one frame at a time.
Hold I or H pressed for
continuous advance or rewind.
Press the H button to resume
playback.
To stop movie playback
Press the m button.
EN
17
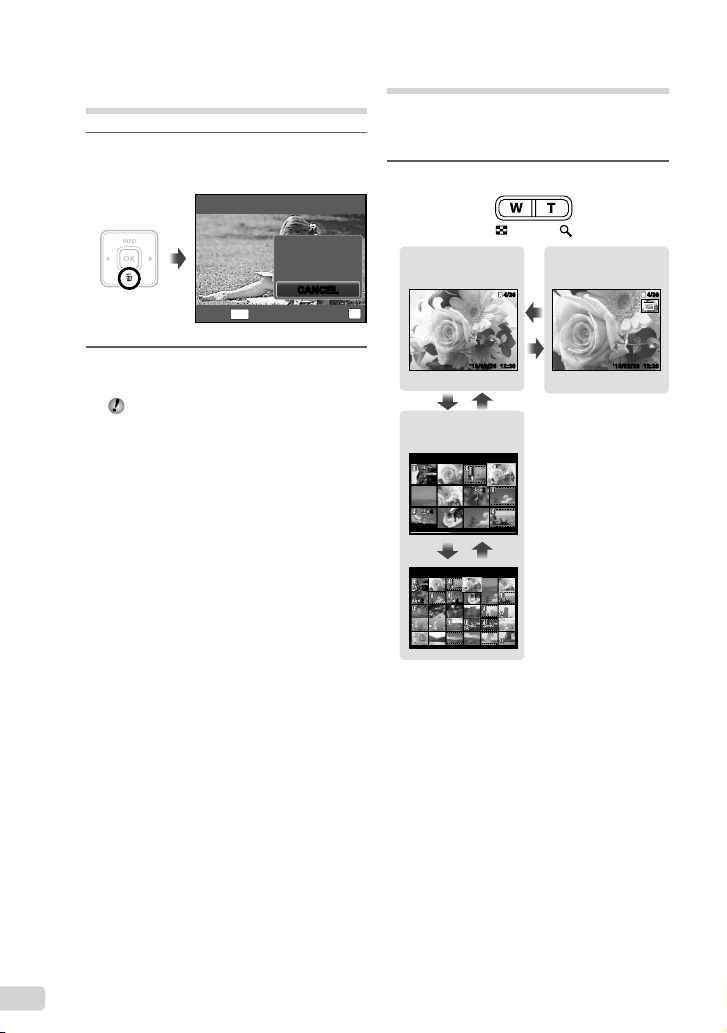
Erasing images during
playback (Single image erase)
1
Display the image you want to erase
and press G (D).
ERASE
ALL ERASE
SEL. IMAGE
ERASE
CANCEL
CANCEL
MENU
BACK
SET
Index view and close-up view
Index view enables quick selection of a desired
image. Close-up view (up to 10x magnifi cation)
allows checking of image details.
1
Press the zoom buttons.
Single-image view Close-up view
4/30
4/30
OK
W
4/30
4/30
2
Press FG to select [ERASE], and
press the H button.
[ALL ERASE] (p. 30) and [SEL. IMAGE]
(p. 30) can be used to erase multiple images
at the same time.
’10/02/26 12:30’10/02/26 12:30
T
’10/02/26
12:30’10/02/26 12:30
WT
Index view
’10/02/26
2
2
44
WT
’10/02/26
24
42
To select an image in index view
Use FGHI to select an image, and press
the H button to display the selected image
in single-image view.
To scroll an image in close-up view
Use FGHI to move the viewing area.
18
EN
Changing the image
information display
Shooting information settings displayed on the
screen can be changed.
1
Press F (INFO).
The displayed image information changes in
●
the order shown below each time the button is
pressed.
Normal
1010
4/30
4/30
No information
’10/02/26 12:30’10/02/26 12:30
Detailed
1010
4/304/30
1/1000 F3.1 2.0
ISO
P
AUTOWBAUTO
12
M
ORM
N
FILE
100 0004
’10/02/26 12:30
Using the menu guide
If the E button is pressed while settings are
being made in the playback function or [SETUP]
menu, a description of the selected option is
displayed.
“Using the Menu” (p. 4)
EN
19
Loading…
User manual
View the manual for the Olympus LS-100 here, for free. This manual comes under the category audio recorder and has been rated by 4 people with an average of a 8.1. This manual is available in the following languages: English. Do you have a question about the Olympus LS-100 or do you need help?
Ask your question here
Frequently Asked Questions
Can’t find the answer to your question in the manual? You may find the answer to your question in the FAQs about the Olympus LS-100 below.
What is the weight of the Olympus LS-100?
The Olympus LS-100 has a weight of 280 g.
What is the height of the Olympus LS-100?
The Olympus LS-100 has a height of 159 mm.
What is the width of the Olympus LS-100?
The Olympus LS-100 has a width of 70 mm.
What is the depth of the Olympus LS-100?
The Olympus LS-100 has a depth of 33.5 mm.
What is the screen size of the Olympus LS-100?
The screen size of the Olympus LS-100 is 2 «.
Is the manual of the Olympus LS-100 available in English?
Yes, the manual of the Olympus LS-100 is available in English .
Is your question not listed? Ask your question here
Питание
Установка батареи
Зарядка батареи
Используйте одну литий—ионную
▌
Зарядка батареи от USB-адаптера
аккумуляторную батарею производства
для сети переменного тока
Olympus(LI-50B).
Не используйте других батарей.
Питание
ПодсоединитеUSB-кабельк
1
разъемуUSBнаадаптередля
Сдвиньте замок в направлении
1
сети переменного тока.
[OPEN] и откройте крышку
отделения батареи.
Подсоедините шнур питания от
2
сети переменного тока к сетевому
адаптеру для сети переменного
тока и к бытовой розетке.
Установите батарею.
2
ПодсоединитеUSB-кабельк
3
разъемуUSBнарекордере.
•
Устанавливайте таким образом,
чтобы стрелка на рекордере
(наклейка)истрелканабатарее
совпадали.
Закройте крышку отделения
3
батареи.
•
После закрытия крышки отделения
батареи передвиньте замок в
•
ИндикаторPEAK(R)загорится
сторону [LOCK].
оранжевым цветом, и начнется
зарядка батареи.
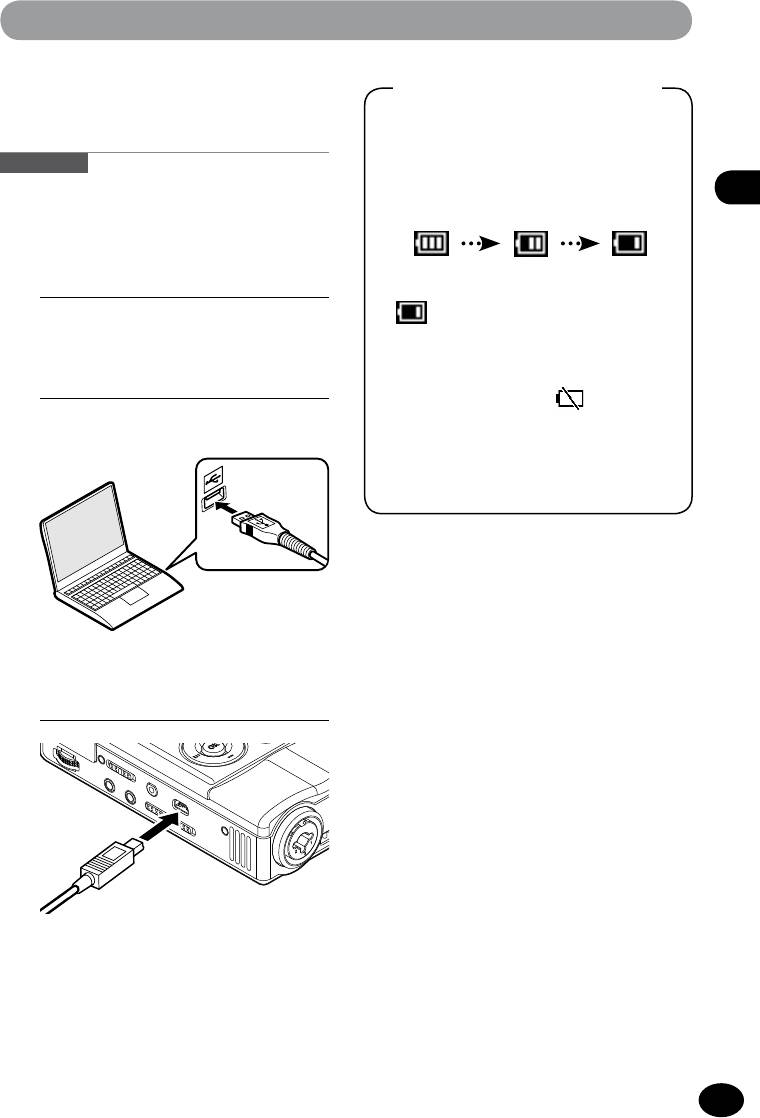
Питание
▌
Зарядка батареи через USB-
Индикация заряда батареи
соединение с компьютером
В соответствии с расходом заряда
батареи индикация остаточного
Внимание!
заряда батареи на дисплее изменяется
•
ОставляйтеUSBкабельподключенным
следующим образом.
до остановки или полного выключения
Питание
питания рекордера.
Запустите компьютер.
•
Если на дисплее отобразится значок
1
[
], как можно быстрее выполните
подзарядку батареи.
ПодсоединитеUSB-кабелькUSB-
Если заряд полностью
2
израсходуется, на дисплее
порту на компьютере.
отобразится значок [
] и
сообщение [Низкий заряд батареи]
и работа рекордера прекратится.
•
Во время выполнения зарядки
индикация отображается повторно.
ПодсоединитеUSB-кабельк
3
разъемуUSBнарекордере.
•
ИндикаторPEAK(R)загорится
оранжевым цветом, и начнется
зарядка батареи.

Питание
Внимание!
•
Надежно и полностью подсоединяйте
разъемыUSB.Неправильноеподсоединение
•
Всегда используйте только прилагаемый
является причиной сбоев в работе.
USB-кабель.Нивкоемслучаенеиспользуйте
изделий других компаний, поскольку это
может привести к поломке. Кроме того,
▌
Зарядка
никогда не используйте прилагаемый кабель
для подключения изделий других компаний.
Питание
4
Естественная разрядка:
•
Не устанавливайте батарею в неправильной
Поскольку литий-ионные аккумуляторные батареи
ориентации.
имеют свойство разряжаться естественным образом,
•
Выполняйте замену батареи только после
при первом использовании после вскрытия упаковки
выключения питания рекордера. Вынимание
изделия выполните зарядку прилагаемой в комплекте
батареи во время работы рекордера
поставки литий-ионной аккумуляторной батареи.
может привести к тому, что файл не сможет
воспроизводиться, или к другим поломкам.
4
Рабочая температура:
•
Продолжение состояния рекордера с
Аккумуляторная батарея является химическим
вынутой батареей или вынимание батареи
изделием. Рабочие свойства батареи изменяются
с коротким интервалом может привести к
даже при использовании в рекомендуемом диапазоне
тому, что потребуется заново установить
температур, это не является неисправностью.
дату и время (
☞
стр.29).
•
Вынимайте батарею, когда рекордер не
4
Рекомендуемый диапазон
используется в течение длительного времени.
температур:
•
При замене батареи всегда используйте
Работарекордера:от0до42°C
литий-ионную аккумуляторную батарею
Зарядкабатареи:от5до35°C
производстваOlympus(LI-50B).Нивкоемслучае
не используйте изделий других компаний,
Длительноехранение:от–20до30°C
поскольку это может привести к поломке.
Эксплуатация батареи вне указанного выше
•
Для выполнения зарядки подсоединяйте
рекомендуемого диапазона температур
USB-кабельпослевключенияпитания
вызывает ухудшение рабочих характеристик
компьютера. Зарядка не может выполняться,
батареи и уменьшение ее срока службы.
когда питание компьютера не включено или
Когда рекордер не используется в течение
компьютер находится в спящем режиме или
в режиме автоматического выключения.
длительного времени, вынимайте батарею и
храните ее отдельно в целях предупреждения
•
Не выполняйте зарядку, подсоединив рекордер
ккомпьютеручерезконцентраторUSB.
ее протекания или появления ржавчины.
•
Зарядка завершена, когда на дисплее
•
Из-за характерных свойств литий-ионной
отображает индикация [
<
] (Время зарядки
аккумуляторной батареи, при покупке новой
составляетоколо3часов*).
батареи или если батарея не использовалась
*
Ориентировочное время, требуемое для
в течение длительного времени (1 месяц и
полной зарядки полностью разряженной
дольше),онаможетнезаряжатьсяполностью.
батареи при комнатной температуре.
Вэтомслучаеповторитезарядку2или3раза.
Время зарядки отличается в зависимости от
•
Утилизируйте батарею в соответствии
остаточного заряда батареи и условий зарядки.
с соответствующими законами и
•
Если на дисплее отображается индикация
постановлениями. При утилизации не
[
;
] или [
=
] зарядка выполняться не может.
полностью разряженной батареи изолируйте
Заряжайте батарею при окружающей
контактные клеммы батареи изоляционной
температуреот5до35°C.
лентой или другими материалами, чтобы
[
;
]:
Слишком низкая окружающая температура
предотвратить короткое замыкание.
[
=
]:
Слишком высокая окружающая температура
•
Если время работы рекордера заметно
4
Пользователям в Германии:
сократилось даже при полной зарядке батареи,
КомпанияOlympusзаключиладоговорсGRS
это свидетельствует о том, что срок службы
(Объединенная ассоциация по утилизации
батареи истек. Замените батарею на новую.
батарей)вГермании,чтобыгарантировать
экологически безопасную утилизацию.
Использование переключателя POWER/HOLD
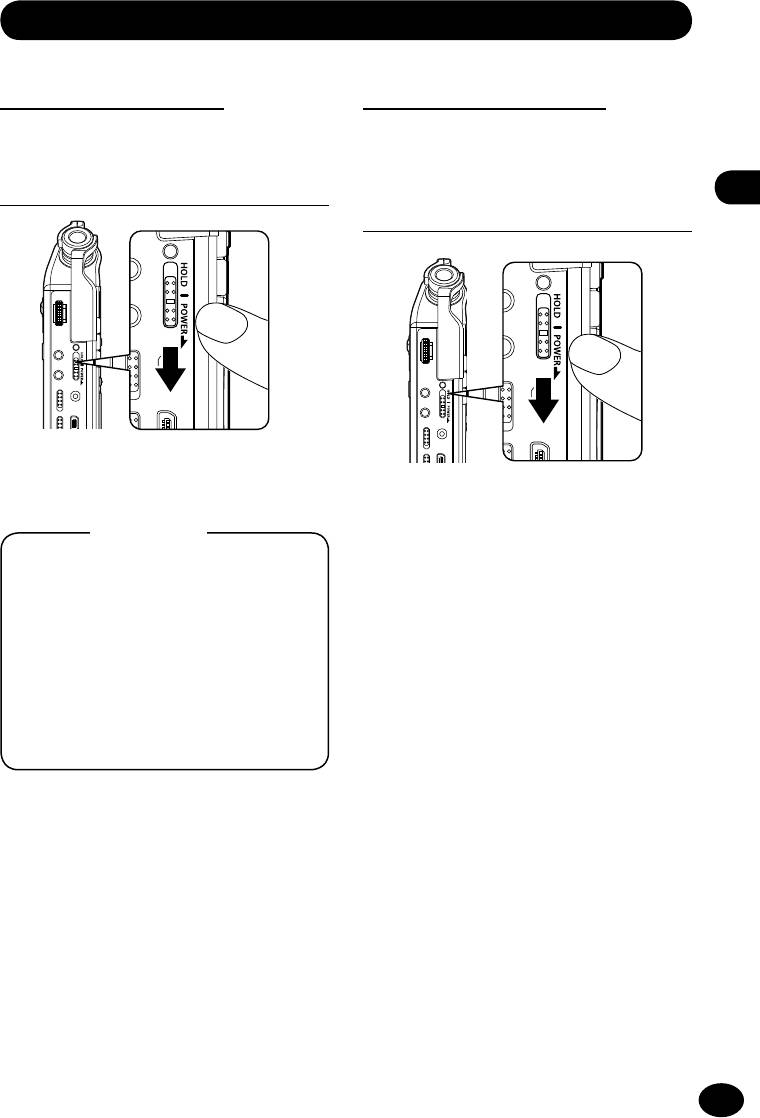
Включение питания
Выключение питания
ПередвиньтепереключательPOWER/
ПередвиньтепереключательPOWER/
HOLDвнаправлении,указанном
HOLDвнаправлении,указанном
стрелкой.
стрелкой, и удерживайте его в этом
положении 1 секунду и дольше.
ИспользованиепереключателяPOWER/HOLD
•
Отобразится главный экран
(Домой).
Режим сна
A
•
Даже при выключении питания
Если состояние остановки работы
существующие данные и настройки всех
рекордера длится в течение
режимов сохраняются.
10минутидольше(поумолчанию),
рекордер переходит в режим сна
(энергосбережения)(
☞
стр.110).
Чтобы отменить режим сна, включите
питание, передвинув переключатель
POWER/HOLDвнаправлении,
указанном стрелкой.
Использование переключателя POWER/HOLD
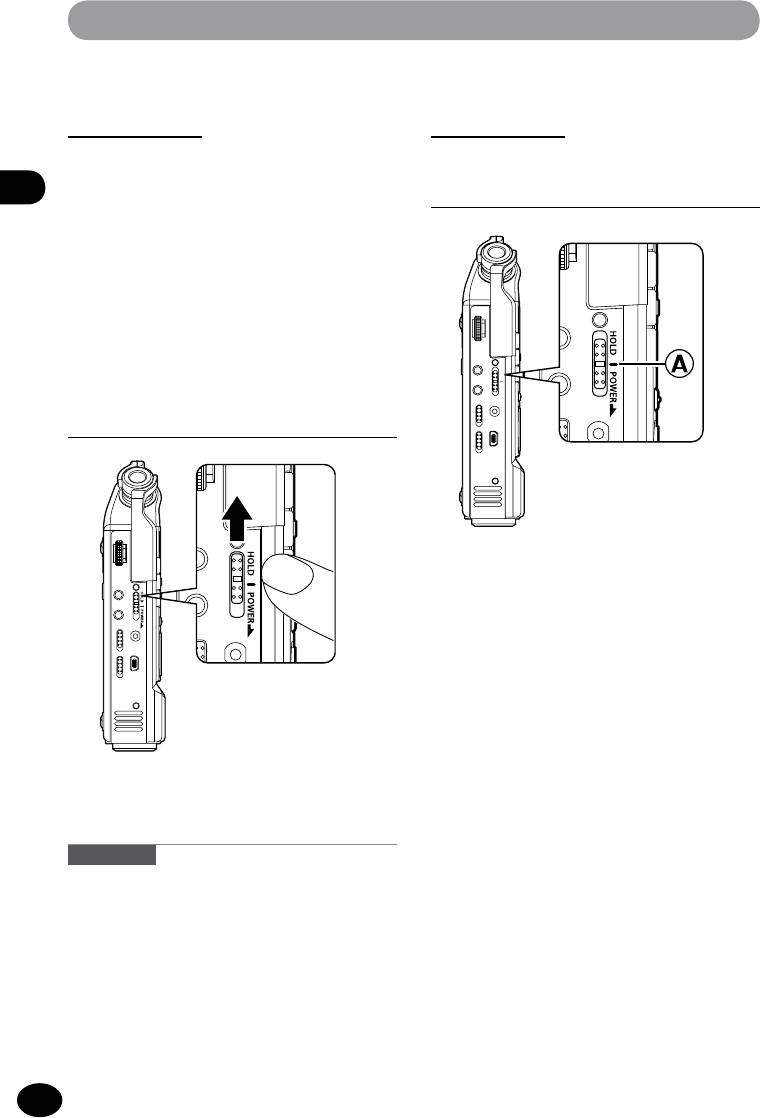
Установка блокировки
Снятие блокировки
управления
управления
Когда установлена блокировка
ПередвиньтепереключательPOWER/
управления, рекордер сохраняет
HOLDвположение
A
.
текущий режим работы и операции
ИспользованиепереключателяPOWER/HOLD
управления с кнопками не работают. Это
позволяет спокойно носить рекордер в
портфеле, не опасаясь ошибки в работе
рекордера в результате случайного
нажатия кнопок. Кроме того, это
предотвращает случайную остановку
работы рекордера во время записи.
ПередвиньтепереключательPOWER/
HOLDвнаправлении[HOLD].
•
На дисплее отобразится
индикация [ЗАБЛОКИР.].
Внимание!
•
В режиме установленной блокировки
управления при нажатии какой-либо кнопки
индикаторPEAK(R)мигаеторанжевым
цветом.
•
При установке блокировки управления
вовремявоспроизведения(илизаписи)
воспроизведение(запись)продолжится,
а управление станет невозможным
(рекордер перейдет в режим остановки
при завершении воспроизведения или
завершениизаписииз-занехваткипамяти).
Начальная настройка перед использованием
Установка даты и времени [Время и дата]
После выполнения установки даты и времени в файле будет автоматически
записываться информация о том, когда была сделана запись. Предварительно
установите дату и время, чтобы упростить работу с записанными файлами.
Начальная настройка перед использованием
При включении питания рекордера из следующих состояний на дисплее отображается
индикация [Установить время и дату]. Выполните настройку, начиная с шага 1.
•
При первом использовании после покупки.
•
При включении питания после длительного перерыва в эксплуатации.
•
Если не были установлены дата и время.
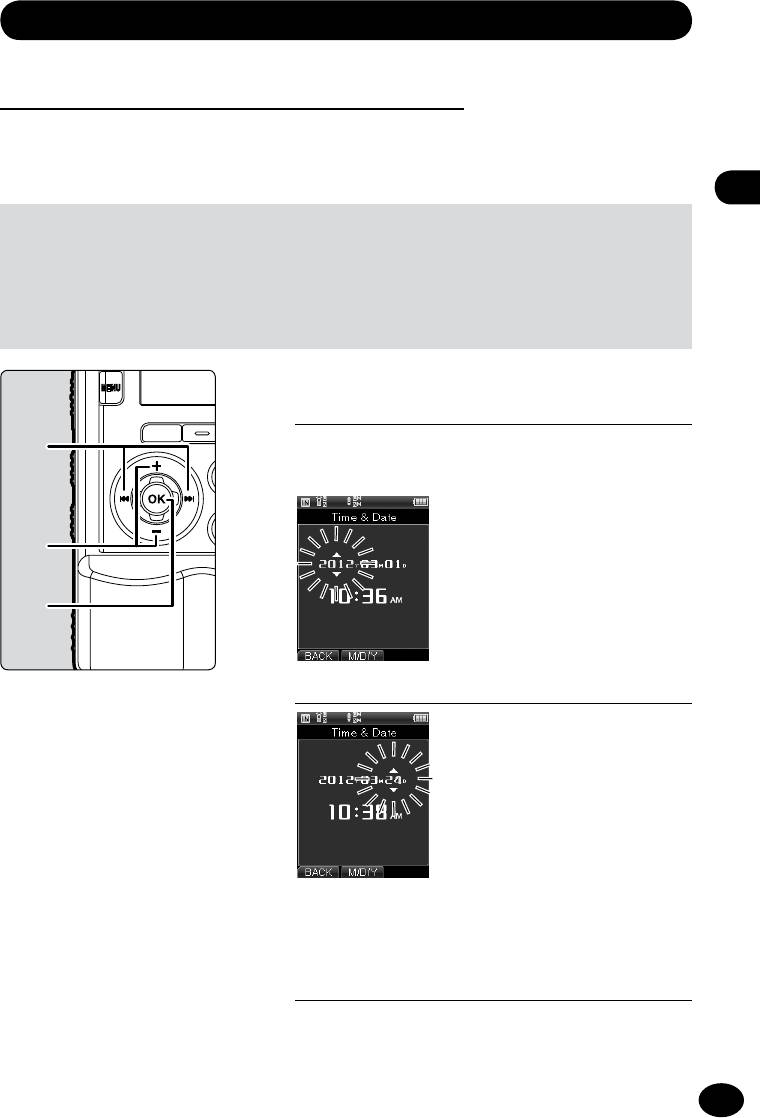
Выберите элемент настройки, нажимая
1
кнопки
9
/
0
.
•
Наведите мигающий маркер на элемент, который
выхотитеустановить:год,месяц,часы,минуты.
Выберите настройку, нажимая кнопки +/–.
2
•
Далее таким же образом выберите следующий
элемент настройки, нажимая кнопки
9
/
0
,
и выберите настройку, нажимая кнопки +/–.
Нажмите кнопку
OK
, чтобы завершить настройку.
3
•
Часы рекордера начнут отсчет времени с
установленной даты и времени. Нажимайте
кнопку
OK
по сигналу точного времени и т. п.
Начальная настройка перед использованием
Настройка голосового
A
помощника
•
При нажатии кнопки F2 во время
После выполнения установки даты
выполнения установки часов и минут
и времени прозвучит сообщение
происходит переключение формата
[Выключите голосовые подсказки, они
Начальная настройка перед использованием
индикациивремени:12-или24-часовой
не требуются] и будет выполнен переход
формат.
к настройке [Голос. подск.] (
☞
стр.106).
Пример:для10ч.38мин.вечера
Если вам не требуется голосовой
PM10час.38мин.
22час.38
помощник, выберите [ВЫКЛ].
(поумолчанию)
мин.
•
При нажатии кнопки F2 во время
выполнения установки года, месяца и дня
A
происходит переключение индикации в
следующем порядке.
•
После завершения установки даты
и времени и настройки голосового
Пример:для24марта2012года
помощника вы можете приступить к
24 марта 2012 года (по
работе с рекордером. Возможности
умолчанию)
использования рекордера см. в разделе
«Попробуйте поработать с LS—100!»
(
☞
стр.18—19).
3.24.2012
24.3.2012
Установка и извлечение карты памяти SD
•
При неполной установке карты
Установка карты памяти SD
памяти SD запись может оказаться
Под «SD» в данном документе понимаются
невозможной.
следующиекартыпамяти:SD,SDHC,SDXC.
С данным рекордером могут
Закройте крышку слота карты
использоваться карты памяти SD,
3
Установка и извлечение карты памяти SD
имеющиеся в свободной продаже.
памяти SD.
•
После закрытия крышки слота
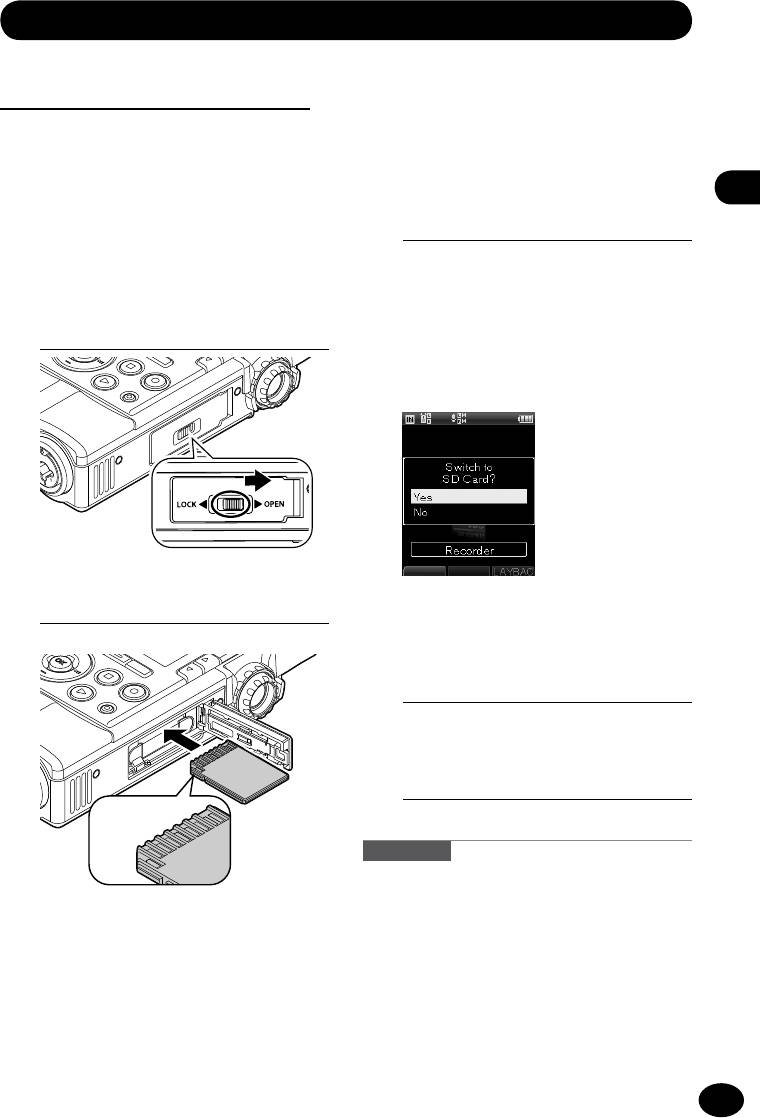
Сдвиньте замок в направлении
карты памяти SD передвиньте
1
[OPEN] и откройте крышку слота
замок в сторону [LOCK].
карты памяти SD.
•
После установки карты памяти SD
отобразится экран переключения
носителя памяти.
Установка карты памяти SD.
2
Для выполнения записи на карту
4
памяти SD, нажимая кнопки +/–
выберите [Да].
Нажмите кнопку
OK
, чтобы
5
завершить настройку.
Сторона
контактов
Внимание!
•
Вы можете переключить носитель памяти на
встроенную память (
☞
стр. 109).
•
Устанавливайте карту памяти SD
•
Рекордер может не распознавать
стороной контактов вверх, как это
карты памяти SD, отформатированные
(инициализированные)накомпьютереили
показано на рисунке.
другом устройстве. Перед использованием
•
Установка карты памяти SD в
карты памяти обязательно отформатируйте
ошибочной ориентации или под
ее на рекордере (
☞
стр. 115).
углом может привести к повреждению
контактов или невозможности
извлечения карты памяти.
Установка и извлечение карты памяти SD
Внимание!
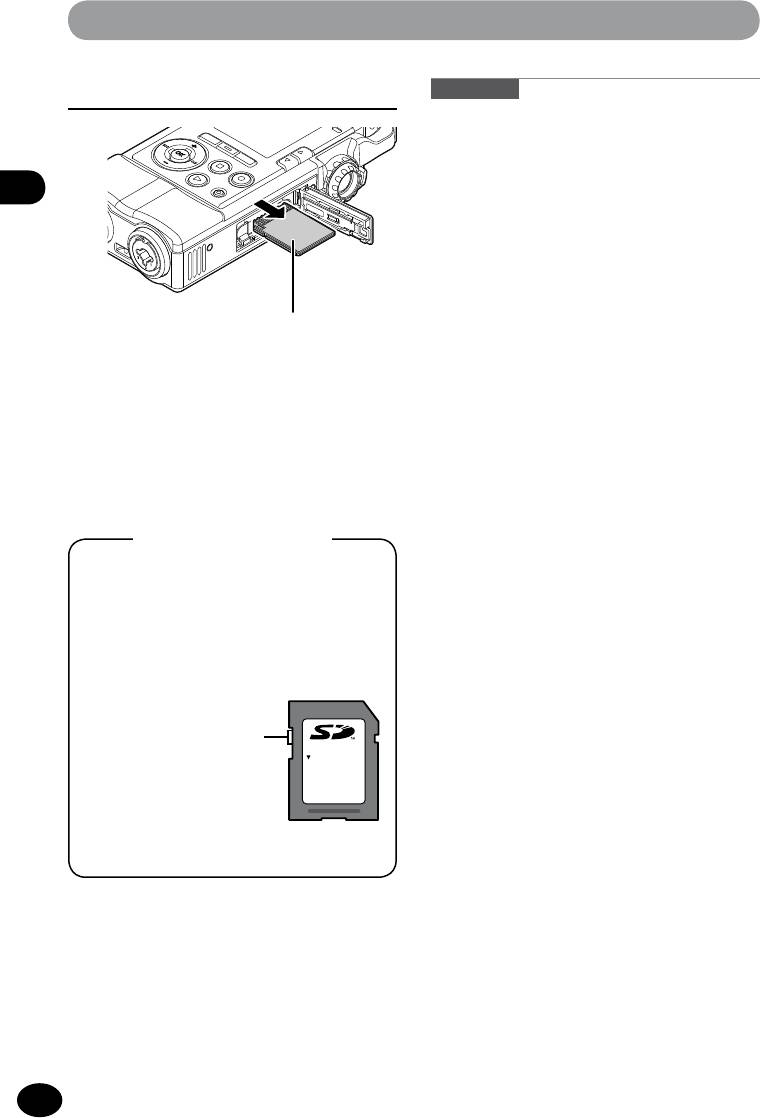
Извлечение карты памяти SD
•
Если вы быстро уберете палец или
отрывисто нажмете на карту памяти SD
во время ее извлечения, карта памяти SD
может выскочить из слота.
•
КартыпамятиSD,SDHC,SDXCвзависимости
от их производителей или типов могут не
Установка и извлечение карты памяти SD
распознаваться рекордером правильно
из-за проблем их совместимости с данным
устройством.
•
При использовании карты памяти SD
обязательно ознакомьтесь прилагаемой к
Нажмите на карту памяти SD до упора,
ней инструкцией.
затем осторожно выньте ее.
•
Если карта памяти SD не распознается
рекордером, попробуйте ее извлечь и
вставить снова.
•
В зависимости от карты памяти SD
•
Если для настройки [Выбор памяти]
работа рекордера с данными может
было установлено [SD-карта], то
замедлиться. Кроме того, многократная
отобразится индикация [Выбрана
запись и стирание данных может вызывать
внутренняя память].
ухудшение рабочих характеристик карты
памяти SD. В таком случае выполните
повторное форматирование карты памяти
Карта памяти SD
SD (
☞
стр.115).
•
Информацию о картах памяти SD, работа
Если на карте памяти SD установлена
которых в соответствии с установленными
компаниейOlympusстандартамибыла
защита от записи, на дисплее
подтверждена, см. на странице поддержки
отобразится индикация [SD-карта
навеб-сайтекомпанииOlympus.
заблокир.]. Перед установкой карты
http://olympus-imaging.jp/
памяти снимите защиту от записи.
На веб-сайте представлена информация о
производителях и типах карт памяти SD,
Когда
работа с которым была подтверждена,
однакоOlympusнедаетникакихгарантий
переключатель
относительно работы карт памяти SD с
защиты от записи
приобретенным рекордером. Кроме того,
установлен в
обратите внимание, что из-за возможного
положение [
LOCK
],
внесения производителем изменений в
выполнение записи
технических характеристиках, указанные
невозможно.
карты могут перестать распознаваться
устройством. Просим проявить понимание.
LOCK
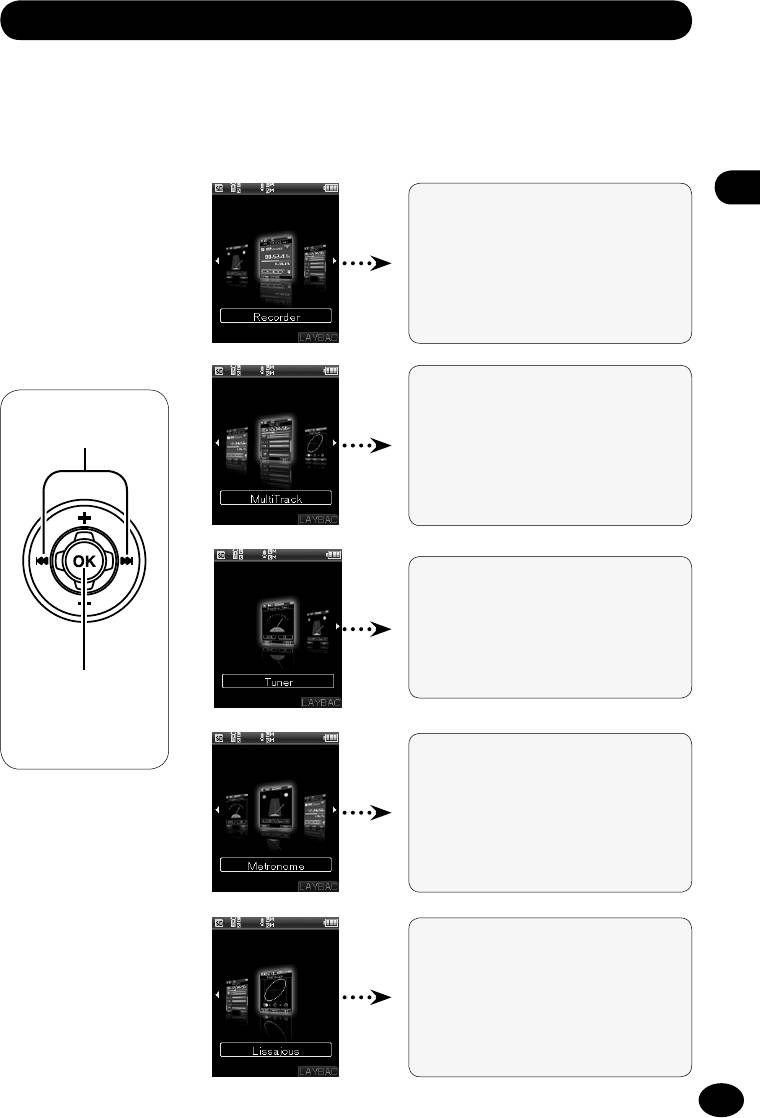
Операции управления на главном экране
При включении питания рекордера отображается главный экран. Рекордер оснащен
5режимами.Главныйэкранпозволяетперейтиводинизрежимов.Описаниекаждого
из режимов см. на указанных страницах.
[Диктофон]
☞
стр.35
Операции управления на главном экране
Вы можете вести запись в
нормальном режиме, с наложением,
в режиме синхронизации с
воспроизводящимся файлом и в
режиме синхронизации по голосу.
[Многодорожечный режим]
☞
стр.56
Выбор режима
Вы можете создавать файлы,
накладывая друг на друга звук
исполнения на музыкальных
инструментах и вокал.
[Тюнер]
☞
стр. 69
Эта функция позволяет
выполнить настройку
музыкального инструмента.
Переход в
соответствующий
режим
[Метроном]
☞
стр. 72
Данный рекордер оснащен
функцией метронома.
[Лиссажу]
☞
стр. 71
Функция, позволяющая
определить разность фаз
между микрофоном и
звуковым источником.