
Перейти к контенту
Тонометры Omron
- Размер инструкции: 10.39 Мб
- Формат файла: pdf
Если вы потеряли инструкцию от тонометра Omron M3 Intellisense (HEM-7051-E), можете скачать файл для просмотра на компьютере или печати.
Инструкция для тонометра Omron M3 Intellisense (HEM-7051-E) на русском языке. В руководстве описаны возможности и полезные функции, а также правила эксплуатации. Перед использованием внимательно ознакомьтесь с инструкцией.
Чтобы не читать всю инструкцию вы можете выполнить поиск по содержимому внутри инструкции и быстро найти необходимую информацию. Рекомендации по использованию помогут увеличить срок службы тонометра Omron M3 Intellisense (HEM-7051-E). Если у вас появилась проблема, то найдите раздел с описанием неисправностей и способами их решения. В нем указаны типичные поломки и способы их решения.

7051_E.book Page 1 Friday, July 15, 2005 4:36 PM
Digital Automatic Blood Pressure Monitor
Model M3 Intellisense
• Instruction Manual
• Mode d’emploi
• Gebrauchsanweisung
• Manuale di istruzioni
• Manual de instrucciones
• Gebruiksaanwijzing
• РУКОВОДСТВО ПО ЭКСПЛУАТАЦИИ
IM-HEM-7051-E-01-07/05
EN
FR
DE
IT
ES
NL
RU

7051_E.book Page 2 Friday, July 15, 2005 4:36 PM
Contents
Contents…………………………………………………………………………2
Introduction ……………………………………………………………………3
Important Safety Information …………………………………………..4
1. Overview ……………………………………………………………………5
2. Preparation ………………………………………………………………..8
2.1 Installing/Replacing the Batteries……………………………….8
2.2 Setting the Date and Time ………………………………………10
2.3 Adjusting the Settings Modes ………………………………….13
3. Using the Unit…………………………………………………………..14
3.1 How to Sit Correctly When Taking a Measurement…….14
3.2 Applying the Arm Cuff …………………………………………….16
3.3 Taking a Reading…………………………………………………..18
3.4 Instructions for special conditions …………………………….22
3.5 Using the Memory Function …………………………………….23
4. Quick Reference Guide……………………………………………..26
5. Handling Errors and Problems ………………………………….27
5.1 Error Messages……………………………………………………..27
5.2 Troubleshooting …………………………………………………….29
6. Maintenance and Storage………………………………………….31
7. Optional Parts…………………………………………………………..34
8. Technical Data………………………………………………………….35
9. Some Useful Information about Blood Pressure ………..37
2

7051_E.book Page 3 Friday, July 15, 2005 4:36 PM
Introduction
Thank you for purchasing the OMRON M3 Intellisense Upper
Arm Blood Pressure Monitor.
The OMRON M3 Intellisense is a fully automatic blood
pressure monitor, operating on the oscillometric principle. It
measures your blood pressure and pulse rate simply and
quickly. For comfortable controlled inflation without the need for
pressure pre-setting or re-inflation the device uses its
advanced “IntelliSense” technology.
The unit also stores up to 42 measurements in memory and
calculates an average reading based on the three most recent
measurements taken within 10 minutes of the last reading. (If
there are only two readings in memory for that period, the
average will be based on two readings. If there is only one
reading in memory for that period, that reading will be
displayed as the average value.)
Please read this instruction manual thoroughly before
using the unit. For specific information about your own
blood pressure, CONSULT YOUR DOCTOR.
EN
3

7051_E.book Page 4 Friday, July 15, 2005 4:36 PM
Important Safety Information
Consult your doctor during pregnancy, arrhythmia and
arteriosclerosis.
You should never change the dosage of medication prescribed by
your doctor.
Use the M3 Intellisense only for yourself.
Caution:
• Do not leave the unit unattended with infants or persons who
cannot express their consent.
• Do not use the unit for any purpose other than measuring
blood pressure.
• Do not use a cellular phone near the unit. This may result in
incorrect operation of the unit.
• Do not operate unit in a moving vehicle (car, airplane).
• Do not apply strong shocks and vibrations to or drop the main
unit and arm cuff.
• Please observe the following points.
— Do not insert the batteries with their polarities incorrectly aligned.
— Replace old batteries with new ones immediately.
— When you are not going to use the unit for a long period of time
(approximately three months or more), take out the batteries.
— Do not use new and used batteries together.
— Do not use batteries of a different type together.
— Only use four
Do not use other types of batteries.
— When using batteries, the battery liquid may leak and damage the
main unit.
• Do not forcibly bend the arm cuff or bend the air tube
excessively.
• When removing the air tube, pull on the air plug at the
connection with the main unit not the tube itself.
• Do not inflate the arm cuff when it is not wrapped around your
arm.
“AA” manganese or alkaline batteries with this unit.
4
7051_E.book Page 5 Friday, July 15, 2005 4:36 PM
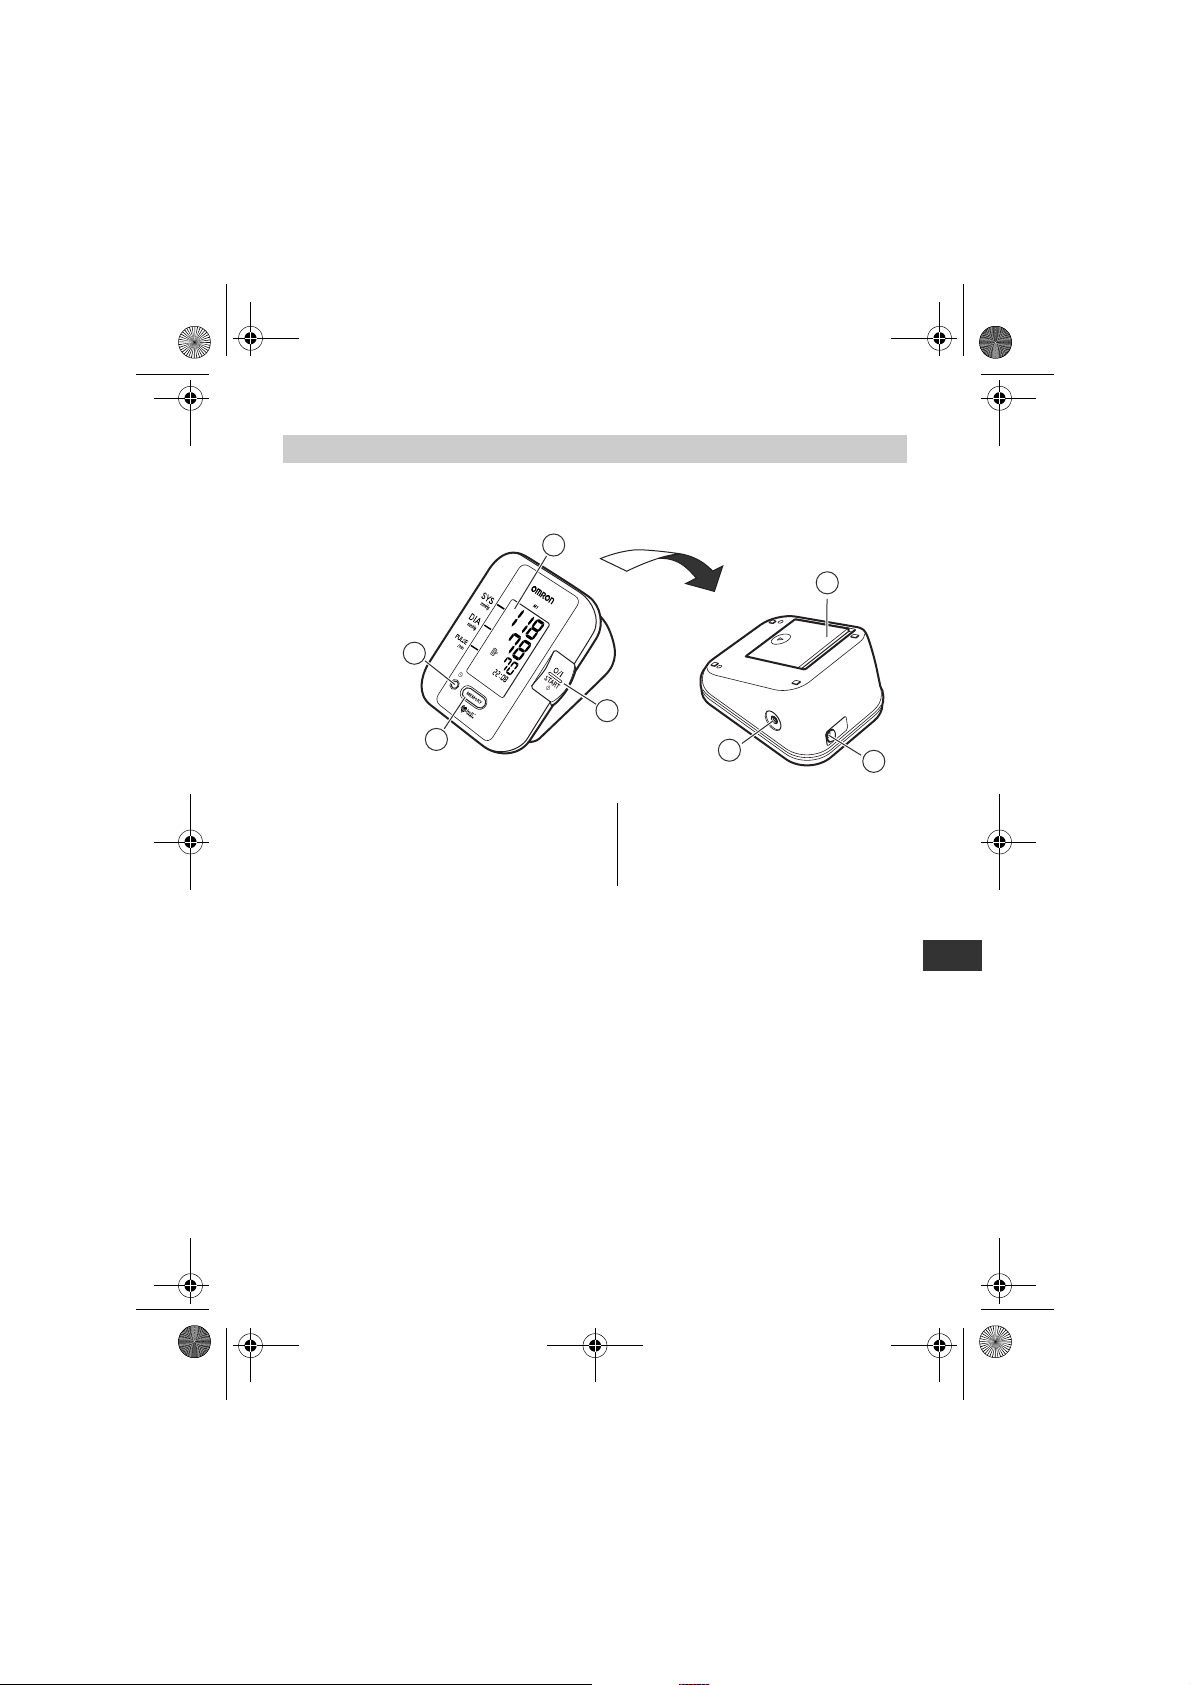
1. Overview
Main unit
A
D
C
1.Overview
E
B
F
G
A. Display
B. O/I START button
C. MEMORY button
D. SET button
E. Battery compartment
F. Ai r jac k
G. AC adapter jack (for optional
AC adapter)
EN
5

7051_E.book Page 6 Friday, July 15, 2005 4:36 PM
1.Overview
Arm Cuff
If air starts to leak from the arm cuff, please replace with a new
one. (Refer to Chapter 7 “Optional Parts”.)
H. Arm cuff
(Medium cuff: arm circumference 22-32 cm)
I. Air Tube
J. Air Plug
IH
J
6

7051_E.book Page 7 Friday, July 15, 2005 4:36 PM
Display
K
L
M
N
O
P
K. Systolic blood pressure
L. Diastolic blood pressure
M. Memory symbol
(Displayed when viewing
values stored in memory)
N. Average value symbol
(Displayed when viewing value
for the last three
measurements)
O. Buzzer symbol
P. Battery low symbol
Package contents
1.Overview
Q
R
S
T
U
Q. Heartbeat symbol
1. (Flashes during measurement)
2. (If flashing after measurement
complete indicates blood
pressure out of recommended
range)
R. Pulse display
S. Deflation symbol
T. Date/Time display
U. Irregular heartbeat symbol
V. Storage case
W. Four “AA” alkaline (LR6)
batteries
EN
WV
• Instruction manual
• Guarantee card
• Blood pressure pass
• Blood Pressure Monitor unit
7

7051_E.book Page 8 Friday, July 15, 2005 4:36 PM
2.Preparation
2. Preparation
2.1 Installing/Replacing the Batteries
1. Turn the main unit upside down.
2. Slide the battery cover in the
direction of the arrow while
pressing the ribbed part of the
cover.
3. Install or replace four “AA” size
batteries so that the + (positive)
and — (negative) polarities
match the polarities indicated
on the battery compartment.
4. Put the battery cover back in
place.
Slide the battery cover as indicated, until it clicks into place.
Note: The measurement values continue to be stored in
memory even after the batteries are replaced.
8

7051_E.book Page 9 Friday, July 15, 2005 4:36 PM
Battery Life & Replacement
If the battery low symbol ( ) appears on the display, replace
all four batteries at the same time.
— When the battery low symbol ( ) starts to blink, you will still
be able to use the unit for a short while. You should replace
the batteries with new ones ahead of time.
— When the symbol ( ) remains lit, the batteries are
exhausted. You should replace the batteries with new ones
at once.Turn the unit off before replacing the batteries.
• Remove the batteries if the unit will not be used for three
months or more.
• If the batteries have been removed for more than 30 seconds,
the Date/Time setting will need to be reset. See “2.2 Setting
the Date and Time” for details.
• Dispose of batteries according to applicable local regulations.
Four new
“AA” alkaline batteries will last for approximately
1500 measurements, when used to take two measurements a
day.
Since the supplied batteries are for monitoring use only, they
may have a shorter life and not last for 1500 measurements.
2.Preparation
EN
9

7051_E.book Page 10 Friday, July 15, 2005 4:36 PM
2.Preparation
2.2 Setting the Date and Time
Your blood pressure monitor automatically stores up to 42
measurements values in its memory and calculates an average
value based on the three most recent measurements taken
within 10 minutes of the last reading. (If there are only two
readings in memory for that period, the average will be based
on two readings. If there is only one reading in memory for that
period, that reading will be displayed as the average value.) To
make use of the memory and average values functions:
• Set the unit to the correct date and time before taking a
measurement for the first time.
• If the batteries have been removed for more than 30 seconds,
the Date/Time setting will need to be reset.
1. When the O/I START button is
pressed to turn the unit on for
the first time after inserting
batteries, the year digits
(2005) will flash on the
display.
2. Press the MEMORY button to
advance the digits one at a
time.
Notes:
• The range for the year
setting is 2005 to 2030. If the
year reaches 2030, it will
return to 2005.
• If you hold down the
MEMORY button, the digits
will advance rapidly.
10

7051_E.book Page 11 Friday, July 15, 2005 4:36 PM
3. Press the SET button to confirm the setting when the desired
number appears on the display.
The year is set and the month digits flash on the display.
4. Repeat steps 2 and 3 to set
the month.
The month is set and the day
digits flash on the display.
5. Repeat steps 2 and 3 to set
the day.
The day is set and the hour
digits flash on the display.
2.Preparation
11
EN

7051_E.book Page 12 Friday, July 15, 2005 4:36 PM
2.Preparation
6. Repeat steps 2 and 3 to set
the hour.
The hour is set and the
minutes digits flash on the
display.
7. Repeat steps 2 and 3 to set
the minutes.
The minutes settings is set.
The unit automatically turns
itself off after the minute
setting has been set.
To adjust the date and time,
press the Set button while the
monitor is in standby mode.
12

7051_E.book Page 13 Friday, July 15, 2005 4:36 PM
2.3 Adjusting the Settings Modes
You can modify the options for the various settings of your unit.
This is done by pressing the SET button to select a setting,
then pressing the MEMORY button to select the options for that
setting. After selecting a setting, press the O/I START button to
confirm the setting and turn the power off.
Buzzer Mode
When Buzzer mode is on, the unit emits sounds, during
measurement, and when measurement is complete.
1. Press the SET button once
while the unit is turned off.
The buzzer symbol
appears on the display.
2. Press the MEMORY button to select
“on” or “off”.
The setting alternates between “on”
and “off” with each press of the
MEMORY button.
The default setting is “on”.
2.Preparation
EN
3. When you have selected the desired setting, press the O/I
START button to turn the unit off.
Notes:
• If you want to adjust the date or time, press the SET button
after setting the buzzer setting, follow steps for setting date
and time (Refer to 2.2) press the O/I START button to turn the
unit off.
• If you forget to turn the unit off, it will automatically shut itself
off after five minutes.
13

7051_E.book Page 14 Friday, July 15, 2005 4:36 PM
3.Using the Unit
3. Using the Unit
3.1
How to Sit Correctly When Taking a Measurement
You can take a measurement on either your left or right arm.
Notes:
• Measurements should be taken in a quiet place and you
should be in a relaxed, seated position. Make sure that the
room is not too hot or cold.
• Do not take measurement after bathing, drinking alcohol, or
exercising.
• Do not move or talk during measurement.
Correct
Posture
Sit upright
with your
back straight.
Remove tight fitting clothing from
your upper arm, and any thick
clothing such as a sweater.
Do not place the cuff over thick
clothes and do not roll up your sleeve
if it is too tight.
Place your arm on a table so
that the cuff will be at the same
level as your heart.
14
The gap between the
chair and the top of the
table should be between
25cm to 30cm.

7051_E.book Page 15 Friday, July 15, 2005 4:36 PM
Notes:
• Correct posture during measurement is necessary to get
accurate results.
• You should also try to measure your blood pressure at the
same time each day. (Within 1 hour after waking up is
recommended.)
Incorrect Posture
• Arched back (leaning
forwards)
• Sitting cross-legged
• Sitting on a sofa or at a low
table so that you tend to lean
forward
These situations could lead to higher blood pressure values due to
strain or the arm cuff being lower than the heart.
If the arm cuff is at a lower position than your heart use cushions
etc., to adjust the height of your arm.
3.Using the Unit
15
EN

7051_E.book Page 16 Friday, July 15, 2005 4:36 PM
3.Using the Unit
3.2 Applying the Arm Cuff
Be sure to wrap the arm cuff correctly so that you get accurate
results.
Measurements can be taken in light clothing. However, please
remove thick clothes, such as sweaters, before taking a
reading.
1. Insert the air plug into the air jack on
the left side of the main unit.
2. Put your left arm through the cuff
loop.
The air tube should run down the
inside of your forearm and be in line
with your middle finger.
16
Note: If the cuff is not assembled,
pass the end of the cuff
furthest from the tubing
through the metal D-ring to
form a loop. The smooth cloth
should be on the inside of the
cuff loop.

7051_E.book Page 17 Friday, July 15, 2005 4:36 PM
3. Position the arm correctly.
1) The air tube should run
down the inside of your
forearm and be in line with
your middle finger.
2) The bottom of the cuff
should be approximately 1
to 2 cm above your elbow.
3) Apply the cuff to your
upper arm so that the
coloured marker (blue
arrow under tube) is
centered on the middle of
your inner arm and points
down the inside of the
arm.
Taking measurements on the right arm
Apply the cuff so that the
air tube is at the side of
your elbow.
• Be careful not to rest
your arm on the air tube,
or otherwise restrict the
flow of air to the cuff.
• The cuff should be 1 to 2
cm above the elbow.
3.Using the Unit
EN
1 to 2 cm
4. When the cuff is positioned correctly, close the fabric fastener
FIRMLY.
17

7051_E.book Page 18 Friday, July 15, 2005 4:36 PM
3.Using the Unit
3.3 Taking a Reading
1. Press the O/I START button to turn on the unit.
Sit in a chair with your feet flat on the floor and place your arm
on a table so that the cuff will be at the same level as your
heart. Keep still and do not talk during measurement.
During measurement, the buzzer (if set to “on”) will beep in
rhythm with your heartbeat.
Note: To cancel a measurement, press the O/I START button
to turn off the unit and to release the air in the arm cuff.
Common Causes of Inaccurate Results
during measurement.
Leaning forwards.Arm cuff is too loose. Movement or talking
18
Note: If the arm cuff is at a lower position than
your heart use cushions etc., to adjust the
height of your arm.

7051_E.book Page 19 Friday, July 15, 2005 4:36 PM
3.Using the Unit
2. Check the measurement results.
The unit automatically stores blood
pressure and pulse rate into its
memory. Refer to “3.5 Using the
Memory Function”.
Systolic blood
pressure
Diastolic blood
pressure
Pulse display
The buzzer will sound when
measurement is completed.
Notes:
• Self-diagnosis of measured results and treatment are
dangerous. Please follow the instructions of your doctor.
• Wait 2-3 minutes before taking another blood pressure
measurement. Waiting between readings allows the arteries
to return to the condition prior to taking the blood pressure
measurement.
Important:
• If your systolic or diastolic pressure is outside
the standard range, the heartbeat symbol will
blink when the measurement result is
displayed.
Recent research suggests that the following
values can be used as a guide to high blood
pressure for measurements taken at home.
Systolic Blood Pressure Above 135 mmHg
Diastolic Blood Pressure Above 85 mmHg
EN
This criteria is for home blood pressure measurement.
For professional office blood pressure measurement criteria,
please refer to Chapter 9 “Some Useful Information about
Blood Pressure”.
19

7051_E.book Page 20 Friday, July 15, 2005 4:36 PM
3.Using the Unit
• Your blood pressure monitor includes an
irregular heartbeat feature. Irregular heartbeats
can influence the results of the measurement.
The irregular heartbeat algorithm automatically
determines if the measurement is usable or
needs to be repeated. If the measurement
results are affected by irregular heartbeats but
the result is valid, the result is shown together
with the irregular heartbeat icon. If the irregular heartbeats
cause the measurement to be invalid, no result is shown. If
the irregular heartbeat icon ( ) is shown after you have
taken a measurement, repeat the measurement. If the
irregular heartbeat icon is shown frequently, please make
your doctor aware of it.
What is Irregular Heartbeat?
An irregular heartbeat is a
heartbeat rhythm that varies
by more than 25% from the
average heartbeat rhythm
detected while the unit is
measuring the systolic and
diastolic blood pressure.
If such an irregular rhythm is
detected more than twice
during measurement, the irregular heartbeat symbol ( )
appears on the symbol when the measurement results are
displayed.
Pulse
Blood pressure
Pulse
Blood pressure
ormal Heartbeat
Irregular Heartbeat
Short
Long
20

7051_E.book Page 21 Friday, July 15, 2005 4:36 PM
What is Arrhythmia?
A heartbeat is stimulated by electrical signals that cause the
heart to contract.
Arrhythmia is a condition where the heartbeat rhythm is
abnormal due to flaws in the bio-electrical system that drives
the heartbeat. Typical symptoms are skipped heartbeats,
premature contraction, an abnormally rapid (tachycardia) or
slow (bradycardia) pulse. This can be caused by heart disease,
aging, physical predisposition, stress, lack of sleep, fatigue etc.
Arrhythmia can only be diagnosed by a doctor through a
special examination.
Whether the appearance of the irregular heartbeat symbol
( ) in the results indicates arrhythmia or not can only be
determined by an examination and diagnosis by your doctor.
If the irregular heartbeat symbol ( ) is shown frequently,
please make your doctor aware of it. Conducting self-diagnosis
and treatment based on measurement results is dangerous. Be
sure to follow the instructions of your doctor.
3. Remove the arm cuff.
3.Using the Unit
4. Press the O/I START button to turn the unit off.
Note: If you forget to turn the unit off, it will automatically shut
itself off after five minutes.
EN
21

7051_E.book Page 22 Friday, July 15, 2005 4:36 PM
3.Using the Unit
3.4 Instructions for special conditions
If your systolic pressure is known to be more than 220 mmHg,
press and hold the O/I START button until the arm cuff inflates
30 to 40 mmHg higher than your suspected systolic pressure.
1. Press the O/I START button to turn
the unit on.
Measurement starts.
2. When the cuff starts to inflate, press the O/I START button and
keep it pressed until the pressure is 30 to 40 mmHg higher than
your suspected systolic pressure.
Note: You cannot inflate the cuff above 299 mmHg. (An error
will be displayed if you try to inflate the cuff above
300 mmHg.)
3. Release the O/I START button when the cuff has been inflated
to the desired pressure.
The cuff starts to deflate and measurement starts.
4. The rest of the procedure is the same as for normal
measurement. Refer to 3.3, steps 2 to 4.
Note: Do not apply more pressure than necessary.
22

7051_E.book Page 23 Friday, July 15, 2005 4:36 PM
3.5 Using the Memory Function
This unit has a memory capable of storing 42 sets of readings.
Every time you complete the measurement, the unit
automatically stores the blood pressure and pulse rate.
If there are three readings within 10 minutes of the last reading,
the average of the three readings is displayed. (If there are only
two readings in memory for that period, the average will be
based on two readings. If there is only one reading in memory
for that period, that reading will be displayed as the average
value.)
Note: When 42 sets of readings are stored in memory, the
oldest set will be deleted to store a new set.
1. Press the MEMORY button.
If there are three readings stored in
memory that were taken within 10
minutes of the last reading, an
average value for those reading is
displayed. (If there are only two
readings in memory for that period, the average will be based
on two readings. If there is only one reading in memory for that
period, that reading will be displayed as the average value.)
3.Using the Unit
EN
Note: If there are no measurements results stored in
memory, the screen to the right is displayed.
23

7051_E.book Page 24 Friday, July 15, 2005 4:36 PM
3.Using the Unit
2. Press the MEMORY button again,
while the average values screen is
displayed.
The result from the most recent
measurement is displayed.
The date and time of each
measurement is displayed
alternately with the measurement
values.
Important: If your systolic or
diastolic pressure is
outside the standard
range, the heartbeat
symbol will blink when
the measurement result is displayed.
Refer to 3.3, number 2.
3. Press the MEMORY button
repeatedly to cycle through the
previous measurement results.
Keep the button pressed down to
cycle rapidly through the previous
results.
If the irregular heartbeat symbol was displayed at the time of a
measurement, this is displayed when that result is displayed.
4. Press the O/I START button to turn the unit off.
If you forget to turn the unit off, it will automatically shut itself off
after five minutes.
24

7051_E.book Page 25 Friday, July 15, 2005 4:36 PM
To Delete All the Values Stored in Memory
You cannot delete individual stored readings, all the readings in
the unit will be deleted.
1. To delete stored readings, first press
the MEMORY button. Then while
holding it down, press the O/I
START button simultaneously for
about 2-3 seconds. All readings will
then be deleted.
Important: Be careful not to press
the O/I START button
first. If the O/I START
button is pressed first,
measurement will start.
2. Press the O/I START button to turn the unit off.
If you forget to turn the unit off, it will automatically shut itself off
after five minutes.
Note: If the date and time are reset to a time before the most
recent measurement, the average value will be based on
any measurements taken after the date and time were
reset. However, you can still view the readings stored in
memory.
3.Using the Unit
2
1
EN
25

7051_E.book Page 26 Friday, July 15, 2005 4:36 PM
4.Quick Reference Guide
4. Quick Reference Guide
If you are using this device for the first time, please read
carefully chapter 3 of this instruction manual. To help ensure
a reliable reading, avoid eating, smoking, or exercising for at
least 30 minutes before taking a measurement.
Note: Remove any tight-fitting clothing from your upper arm.
1.
Sit on a chair with your feet flat on the floor and place your arm on
a table so that the arm cuff will be at the same level as your heart.
2. Apply the arm cuff to your upper arm. The coloured marker
should be centred on the inside of your arm and point down the
inside of the arm, so that the air tube runs down the inside of
your forearm and is in line with your middle finger.
3. Secure the cuff around your arm using the fabric fastener strip.
4. Press the O/I START button.
When measurement is complete,
the monitor displays your blood
pressure and pulse rate, and
automatically deflates the cuff.
Notes:
• Always wait at least 2-3 minutes before taking another blood
pressure measurement.
• Please note that all measurements are stored in the memory.
If different people measure with the same device make sure
that you are aware of this fact.
26

7051_E.book Page 27 Friday, July 15, 2005 4:36 PM
5. Handling Errors and Problems
5.1 Error Messages
Error Display Cause Remedy
5.Handling Errors and Problems
Blinks or appears
continuously
Cuff is under inflated.
Movement during
measurement
Air plug disconnected.
Arm cuff not applied
correctly.
Clothing is interfering with
the arm cuff.
Air is leaking from the arm
cuff.
The arm cuff was inflated
above 299 mmHg when
inflating the cuff manually.
Battery power is low.
Carefully read and repeat the steps
listed under section 3.4.
Repeat measurement. Remain still
and do not talk during
measurement.
Refer to section 3.3.
Insert the air plug securely.
Refer to section 3.2.
Apply the arm cuff correctly.
Refer to section 3.2.
Remove any clothing interfering
with the arm cuff.
Refer to section 3.2.
Replace cuff with new one.
Refer to Chapter 7.
Release your finger from the O/I
START button before the pressure
reaches 299 mmHg, when inflating
the cuff manually.
Refer to section 3.4.
Replace all four “AA” batteries with
new ones.
Refer to section 2.1.
EN
27

7051_E.book Page 28 Friday, July 15, 2005 4:36 PM
5.Handling Errors and Problems
Error Display Cause Remedy
Contact your OMRON retail outlet
Device error.
Note: The irregular heartbeat symbol may also be displayed with error messages.
or distributor.
Refer to Chapter 8.
28

7051_E.book Page 29 Friday, July 15, 2005 4:36 PM
5.2 Troubleshooting
Problem Cause Remedy
5.Handling Errors and Problems
The reading is
extremely low (or high).
Arm cuff pressure does
not rise.
Arm cuff deflates too
soon.
Cannot measure or
readings are too low or
too high.
The unit loses power
during measurement.
Nothing happens when
you press the buttons.
Arm cuff not applied
correctly.
Movement or talking
during measurement.
Clothing is interfering
with the arm cuff.
Is the air jack securely
inserted into the main
unit?
Air is leaking from the
arm cuff.
The arm cuff is loose.
Has the arm cuff been
inflated sufficiently?
The batteries are empty.
The batteries are empty.
The batteries have been
inserted incorrectly.
Apply the arm cuff
correctly.
Refer to section 3.2.
Remain still and do not
talk during
measurement.
Refer to section 3.3.
Remove any clothing
interfering with the arm
cuff.
Refer to section 3.1.
Make sure that the air
jack is connected
securely.
Refer to section 3.2.
Replace the arm cuff
with a new one.
Refer to Chapter 7.
Apply the cuff correctly
so that it is firmly
wrapped around the
arm.
Refer to section 3.2.
Inflate the cuff so that it
is 30 to 40 mmHg above
your previous
measurement result.
Refer to section 3.4.
Replace the batteries
with new ones.
Replace the batteries
with new ones.
Insert the batteries with
the correct (+/ -) polarity.
EN
29

7051_E.book Page 30 Friday, July 15, 2005 4:36 PM
5.Handling Errors and Problems
Problem Cause Remedy
Press the O/I START button and repeat
measurement.
Other problems.
If the problem continues, try replacing the batteries
with new ones.
If this still does not solve the problem, contact your
OMRON retail outlet or distributor.
30
Loading…

Check following components!
Vérifier les composants suivants !
Prüfen Sie folgende Teile des Lieferumfangs!
Controllare i componenti indicati di seguito!
¡Compruebe los siguientes componentes!
Controleer de volgende onderdelen!
Проверьте следующие компоненты!
HEM-7200-E_B_M01_100917.pdf
Digital Automatic Blood Pressure Monitor
Model M3
Instruction Manual
English
Français
Deutsch
Italiano
Español
Nederlands
IM-HEM-7200-E-05-11/2010
5329491-4C
Manufacturer
OMRON HEALTHCARE Co., Ltd.
24, Yamanouchi Yamanoshita-cho, Ukyo-ku, Kyoto
615-0084 JAPAN
EU-representative
OMRON HEALTHCARE EUROPE B.V.
Kruisweg 577, 2132 NA Hoofddorp THE NETHERLANDS
www.omron-healthcare.com
Production facility
Site de production
Produktionsstätte
Stabilimento di produzione
Oficina de producción
Productiefaciliteit
Производственное подразделение
OMRON (DALIAN) CO., LTD.
Economic & Technical Development Zone
Dalian 116600, CHINA
OMRON HEALTHCARE UK LIMITED
Opal Drive
Fox Milne Milton Keynes, MK15 0DG U.K.
Subsidiary
Succursale
Niederlassung
Consociata
Empresa filial
Dochteronderneming
Дочерняя компания
OMRON MEDIZINTECHNIK HANDELSGESELLSCHAFT mbH
John-Deere-Str. 81a 68163 Mannheim GERMANY
www.omron-medizintechnik.de
OMRON Santé France SAS
14, rue de Lisbonne 93561 Rosny-sous-Bois Cedex, FRANCE
Prodotto in Cina
Сделано в КитаеHergestellt in China
Geproduceerd in ChinaFabriqué en Chine
Fabricado en China
Made in China
Русский
Хорошее руководство по эксплуатации
Законодательство обязывает продавца передать покупателю, вместе с товаром, руководство по эксплуатации Omron M3 Intellisense — HEM 7051-E. Отсутствие инструкции либо неправильная информация, переданная потребителю, составляют основание для рекламации в связи с несоответствием устройства с договором. В законодательстве допускается предоставлении руководства в другой, чем бумажная форме, что, в последнее время, часто используется, предоставляя графическую или электронную форму инструкции Omron M3 Intellisense — HEM 7051-E или обучающее видео для пользователей. Условием остается четкая и понятная форма.
Что такое руководство?
Слово происходит от латинского «instructio», тоесть привести в порядок. Следовательно в инструкции Omron M3 Intellisense — HEM 7051-E можно найти описание этапов поведения. Цель инструкции заключается в облегчении запуска, использования оборудования либо выполнения определенной деятельности. Инструкция является набором информации о предмете/услуге, подсказкой.
К сожалению немного пользователей находит время для чтения инструкций Omron M3 Intellisense — HEM 7051-E, и хорошая инструкция позволяет не только узнать ряд дополнительных функций приобретенного устройства, но и позволяет избежать возникновения большинства поломок.
Из чего должно состоять идеальное руководство по эксплуатации?
Прежде всего в инструкции Omron M3 Intellisense — HEM 7051-E должна находится:
— информация относительно технических данных устройства Omron M3 Intellisense — HEM 7051-E
— название производителя и год производства оборудования Omron M3 Intellisense — HEM 7051-E
— правила обслуживания, настройки и ухода за оборудованием Omron M3 Intellisense — HEM 7051-E
— знаки безопасности и сертификаты, подтверждающие соответствие стандартам
Почему мы не читаем инструкций?
Как правило из-за нехватки времени и уверенности в отдельных функциональностях приобретенных устройств. К сожалению само подсоединение и запуск Omron M3 Intellisense — HEM 7051-E это слишком мало. Инструкция заключает ряд отдельных указаний, касающихся функциональности, принципов безопасности, способов ухода (даже то, какие средства стоит использовать), возможных поломок Omron M3 Intellisense — HEM 7051-E и способов решения проблем, возникающих во время использования. И наконец то, в инструкции можно найти адресные данные сайта Omron, в случае отсутствия эффективности предлагаемых решений. Сейчас очень большой популярностью пользуются инструкции в форме интересных анимаций или видео материалов, которое лучше, чем брошюра воспринимаются пользователем. Такой вид инструкции позволяет пользователю просмотреть весь фильм, не пропуская спецификацию и сложные технические описания Omron M3 Intellisense — HEM 7051-E, как это часто бывает в случае бумажной версии.
Почему стоит читать инструкции?
Прежде всего здесь мы найдем ответы касательно конструкции, возможностей устройства Omron M3 Intellisense — HEM 7051-E, использования отдельных аксессуаров и ряд информации, позволяющей вполне использовать все функции и упрощения.
После удачной покупки оборудования/устройства стоит посвятить несколько минут для ознакомления с каждой частью инструкции Omron M3 Intellisense — HEM 7051-E. Сейчас их старательно готовят или переводят, чтобы они были не только понятными для пользователя, но и чтобы выполняли свою основную информационно-поддерживающую функцию.
Тонометр OMRON M3 Intellisense
нет отзывов
Описание товара
0 руб.
нет в наличии
Подробнее о товаре
Характеристики товара
- Тип тонометра:
- автоматический
- Расположение тонометра:
- плечо
Инструкция
Инструкция:
Вес документа:
Тонометр OMRON M3 Intellisense
11.1 Мб
pdf
Отзывы о приборе
На данный прибор пока нет отзывов
Оставить отзыв могут только зарегистрированные пользователи. Авторизоваться можно здесь.
Хиты продаж
Трейд-ин
Хит продаж
#легкий#компактный
Небулайзер OMRON Comp AIR C21 basic
2 480 руб.
2 755 руб.
Хит продаж
#здоровье#уход
Перкуссионный массажер для тела CS Medica VibraPulsar CS-v9 NANO Massage Gun
2 554 руб.
2 838 руб.
нет в наличии
Хит продаж
#здоровье#уход
Массажная подушка CS Medica VibraPulsar CS-cr5
3 078 руб.
Хит продаж
#здоровье#уход
Электрическая звуковая зубная щетка CS Medica «Волшебный фонарик», голубая
943 руб.
1 048 руб.
Хит продаж
#здоровье#уход
Электрическая звуковая зубная щетка CS Medica «Волшебный фонарик», желтая
1 048 руб.
Хит продаж
#здоровье#уход
Электрическая звуковая зубная щетка CS Medica CS-562 Junior (розовая)
1 238 руб.
Хит продаж
#здоровье#уход
Электрическая звуковая зубная щетка CS Medica CS-562 Junior (зеленая)
1 238 руб.
Трейд-ин
Хит продаж
#здоровье#простота измерения
Тонометр OMRON M2 Basic с адаптером и веерообразной манжетой (22 — 32 см)
3 589 руб.
Трейд-ин
Хит продаж
#детский небулайзер#игрушка в комплекте
Небулайзер OMRON Comp AIR C24 Kids
4 934 руб.
Трейд-ин
Хит продаж
#здоровье#высокая производительность
Небулайзер OMRON C28 Plus
8 831 руб.
Хит продаж
#здоровье#уход
Массажер для тела CS Medica VibraPulsar CS-r9 CELLU PRO+
2 130 руб.
2 930 руб.
нет в наличии
Хит продаж
#здоровье#уход
Ирригатор полости рта портативный CS Medica AquaPulsar CS-9 Comfort ZERO WHITE
3 541 руб.
3 934 руб.
Хит продаж
#здоровье#уход
Ирригатор полости рта портативный CS Medica AquaPulsar CS-9 Comfort ZERO BLACK
3 934 руб.
нет в наличии
Хит продаж
#здоровье#уход
Ирригатор полости рта портативный CS Medica AquaPulsar CS-9 Comfort ZERO CREME
3 934 руб.
Хит продаж
#здоровье#уход
Ирригатор полости рта CS Medica AquaPulsar OS-1 ULTRA Black
3 660 руб.
4 067 руб.
Хит продаж
#здоровье#уход
Ирригатор полости рта CS Medica AquaPulsar OS-1 ULTRA White
4 067 руб.
Трейд-ин
Хит продаж
#комфорт измерения#360
Тонометр OMRON M2 Comfort
4 027 руб.
4 474 руб.
Трейд-ин
Хит продаж
#простое измерение#оптимальный функционал
Тонометр OMRON M1 Basic с адаптером и веерообразной манжетой
3 295 руб.
Трейд-ин
Хит продаж
#веерообразная манжета#простое измерение
Тонометр OMRON M3 Expert
6 019 руб.
Хит продаж
#здоровье#уход
Портативный ирригатор полости рта CS Medica AquaPulsar CS-3, розовый
3 072 руб.
нет в наличии
Хит продаж
#здоровье#уход
Портативный ирригатор полости рта CS Medica AquaPulsar CS-3, черный
4 110 руб.
нет в наличии
Хит продаж
#здоровье#уход
Стетофонендоскоп (тип Раппапорт) CS-421 черный
1 459 руб.
Купить в один клик
Оставьте Ваши данные и наш оператор свяжется с Вами для уточнения деталей заказа.
Ваше имя*
Ваш телефон*
Приборы, которые вы хотите купить:
Тонометр OMRON M3 Intellisense (1 шт)
Я согласен(на) на обработку персональных данных в соответствии с Политикой конфиденциальности персональных данных*
* — поля обязательны для заполнения.