
A-9130 – это надежный и универсальный интегрированный стерео усилитель с широкими возможностями подсоединения и поразительно привлекательным звучанием. Стремясь добиться музыкальности и верности звука источнику, его создатели специально подобрали теплый и живой характер звучания, который прекрасно выражает тональную окраску ваших любимых альбомов.
Способность стабильно выдавать большие токи обеспечивает точное и быстрое звучание по всей широкой и реалистичной по размерам звуковой сцене. Фирменная технология широкополосного усиления WRAT (Wide Range Amplification Technology) была тонко настроена для A-9130 ведущими инженерами Onkyo. Два накопительных конденсатора емкостью по 10000 мкФ изготовлены на заказ по результатам длительных прослушиваний, чтобы реализовать все богатство и динамику музыки, которая так нам нравится.
Цифровые источники декодируются ЦАП премиум-класса Wolfson WM8718, расположенным на цифровой аудио плате A-9130. Этот цифро-аналоговый конвертер часто устанавливается в аудио компонентах самого высокого уровня благодаря чрезвычайно хорошему качеству преобразования и поддержке воспроизведения аудио файлов с разрешением 192 кГц / 24-бит.
Оптический TOSLINK или коаксиальный цифровой аудио вход также готовы усилить эффект от просмотра телепередач, придавая мощное hi-fi звучание кинофильмам, играм, спортивным репортажам и концертам. Когда обнаружен аналоговый входной сигнал, цифровая аудио плата автоматически отключается, чтобы уменьшить возможные помехи для сигнала.
Сделайте A-9130 сердцем вашей домашней hi-fi системы и наслаждайтесь таким утонченным воспроизведением музыки, которое присуще лишь гораздо более дорогим компонентам.
Технические характеристики:
Модель: A-9130
Страна производства: МАЛАЙЗИЯ
Производитель: Onkyo
Цвет: Black
Другие цвета: Silver
Выходная мощность: 60 Вт + 60 Вт (4 Ом, 20 Гц 20 кГц, 0.5% THD, оба канала активны, IEC), усилитель, выдающий большие токи
Динамическая мощность: 260 Вт (3 ), 220 Вт (4 ), 130 Вт (8 )
Искажения THD+N: 0.04% (на 8 Ом, 1 кГц при 0.5 мощности)
Диапазон частот: 10 Гц – 100 кГц/+1 дБ, -3 дБ (Direct)
Отношение сигнал/шум: 106 дБ (IHF-A, Line In, Speaker Out), 81 дБ (IHF-A, Phono In)
Импеданс АС: .4 Ом – 16 Ом
Технология широкополосного усиления WRAT (Wide Range Amplification Technology)
Режим Direct для воспроизведения максимально близко к оригинальному источнику
Подчеркивание басов с согласованием по фазе
Заказной Ш-образный силовой трансформатор, выдающий большие токи и два накопительных конденсатора емкостью по 10000 мкФ
ЦАП Wolfson® WM8718
Вход MM phono, 5 x RCA входов и 2 x цифровых входа
Новый четкий дисплей для облегчения выбора с индикацией активного источника
Схема оптимальной регулировки громкости – для чистого воспроизведения на малой громкости
Жесткое антирезонансное металлическое шасси толщиной 1.6 мм
Возможность работы с 4-омными акустическими системами
Высококачественный ЦАП Wolfson® WM8718 с разрешением 192 кГц/24-бит
Функция прямого входа на каскады усиления мощности
Толстый съемный кабель питания с IEC-совместимым разъемом
5 позолоченных аналоговых аудио входов на RCA
2 цифровых аудио входа (1 коаксиальный, 1 оптический, 192 кГц/24-бит)
Вход отдельного фонокорректора Phono (MM)
Аналоговый линейный выход на RCA
Выход Pre Out на сабвуфер
Высококачественные немагнитные колоночные клеммы с прозрачными головками
Посеребренный 6.35-мм разъем для наушников
Вход для RI (Remote Interactive) – шины удаленного управления
Алюминиевая ручка регулятора громкости (моторизованного)
Независимые регулировки тембра (Bass/Treble) и баланса
Легкие в использовании органы управления – для управления без пульта
Вход RI (Remote Interactive) – для подсоединения совместимых компонентов и управления с единого пульта
Авто переключение в режим Standby
Питание: AC 220–230 В~, 50/60 Гц
Потребление: 150 Вт, в Standby — 0.2 Вт, на хол. ходу — 18.3 Вт
Размеры (W x H x D): 435 x 129 x 330 мм, вес: 8.0 кг
Доступен в черной или серебристой отделке
Инструкция: Onkyo-A-9130-rus
Каталог: Onkyo_2019_RUS
Видеообзор:
Доставка
Доставка по Санкт-петербургу и ленинградской области
Бесплатная доставка по Санкт-Петербургу в пределах КАД осуществляется при стоимости заказа свыше 10 000 рублей. При стоимости заказа до 10 000 рублей, стоимость доставки составит 500 рублей. Доставка товара по Санкт-Петербургу осуществляется в срок 1-2 дня с момента оформления заказа, в согласованное с покупателем время. Внимание! Бесплатная доставка действует на Юго-западе СПб до границ ул. Пионерстроя, на Севере СПб до пересечения КАД с Приморским шоссе. Доставка по Ленинградской области осуществляется из расчета 30 рублей за каждый километр от границы Санкт-Петербурга.Специалисты отдела доставки доставят и поднимут товар к Вам в квартиру и поставят там, где Вы скажете.
Подъем товара в Санкт-петербурге
Подъем товара до 10кг осуществляется бесплатно до квартиры
Подъем товара на лифте от 10кг до 30кг составляет 300р
Подъем товара по лестнице от 10кг до 30кг составляет 300р (занос) + 100р этаж
Подъем товара свыше 30кг рассчитывается индивидуально
Доставка по России
Доставка по России осуществляется до терминала транспортной компании в Вашем городе при стоимости заказа выше 10 000 рублей. Стоимость доставки транспортной компанией до терминала в Вашем городе рассчитывается исходя из тарифов транспортной компании и оплачивается покупателем при получении.
Доставка товара на терминал транспортной компании в Санкт-Петербурге осуществляется в срок 1-2 дня с момента оплаты заказа (по безналичному расчету). Сроки доставки до вашего города, Вы можете уточнить у наших менеджеров.Интернет-магазин MuzPlanet.com осуществляет доставку товаров по всей территории России. Мы уже много лет успешно сотрудничаем с самыми крупными и надежными в России транспортными компаниями, поэтому все заказы приходят точно в срок. Заказать звуковое оборудование и музыкальные иструменты в интернет-магазине MuzPlanet.com намного выгоднее, чем покупать в региональном магазине! Зачем переплачивать посредникам? Мы продаем товар напрямую от мировых производителей и предлагаем нашим клиентам безупречное качество по самым низким ценам!
Рекомендуемые нами ТК:
- Возовоз — www.vozovoz.ru;
- Деловые Линии — www.dellin.ru;
- КИТ — www.tk-kit.ru;
- ПЭК — www.pecom.ru;
- ЖелДорЭкспедиция — www.jde.ru;
- Автотрейдинг — www.ae5000.ru.
Оплата
Оплата в Санкт-петербурге
1. Оплата наличными при получении.
Данный способ оплаты подразумевает, что оплата будет произведена наличными деньгами при получении курьеру.
2. Оплата картой visa, mastercard или maestro при получении.
Данный способ оплаты подразумевает, что оплата будет произведена банковской картой через терминал при получении курьеру. На сегодня данный способ оплаты доступен только при выборе способов доставки: «Курьерская доставка по Санкт-Петербургу».
3. Предоплата по счету на физическое лицо через банк.
Данный способ оплаты подразумевает, что оплата будет произведена безналичным перечислением денежных средств на расчетный cчет компании (для юридических лиц). На сегодня данный способ оплаты доступен только при выборе способов доставки: «Доставка до Транспортной компании (для других городов)».
4. Безналичный расчет.
Данный способ оплаты подразумевает, что оплата будет произведена безналичным перечислением денежных средств на расчетный cчет компании (для юридических лиц).
5. Оплата через сайт по карте visa, mastercard или maestro или Яндекс.Деньги.
Данный способ оплаты подразумевает, что вы оставляете заявку (на сайте, по телефону или по e-mail), после чего наш менеджер высылает по электронной почте номер Вашего заказа и ссылку на страницу оплаты:
- Для оплаты банковской картой Вы будете перенаправлены на защищенную платежную страницу процессинговой компании PayKeeper . Страница оплаты отвечает последним международным требованиям безопасности платежных систем Visa и MasterCard.
- В процессе оплаты банковской картой введите ее номер, срок действия, код CVV, указанный на обороте, а также имя и фамилию владельца и контактные данные владельца карты.
- Убедитесь, что Вы ввели корректные данные, а затем нажмите на кнопку «Оплатить».
- Если ваша банковская карта поддерживает технологию 3D Secure, Вы автоматически перейдете на сайт своего банка, где Вас попросят ввести секретный код активации, который будет отправлен Вам на телефон.
- Если реквизиты карты введены верно и на счете достаточно денег, Вы увидите подтверждение оплаты заказа. После чего Вам будет предложено вернуться на страницу магазина.
Стереофонический оптимизатор для комфортных занятий в наушниках
При использовании наушников функция стереофонической оптимизации обеспечивает рассеивание звука — так, как это слышит пианист, играющий на акустическом рояле. При этом звуки, созданные на основе сэмплов реального фортепиано, исходят словно из корпуса инструмента, а не из наушников.
Читать больше
Свернуть
На какое время нужна рассрочка?
Какой первый взнос готовы сделать?
Рассрочка
Покупка в рассрочку — нет ничего проще!
*Обращаем Ваше внимание, что при покупке товара в рассрочку, любые акции или скидки не суммируются с данным предложением.
- Покупайте товары в рассрочку и в кредит прямо на нашем сайте, не выходя из дома и не приезжая в банк.
- Получение рассрочки или кредита займет не более 20 минут.
- Доступно для всех граждан России, кроме республики Крым.
Необходимые документы для оформления рассрочки
- Паспорт гражданина РФ (данные вы предоставляете в банк).
- После подтверждения рассрочки банком, с Вами свяжется менеджер магазина и договорится о времени и адресе доставки товара.
Кредит
Условия кредитования:
- Сумма: от 3 000 до 300 000 руб.
- Срок: от 6 до 36 мес.
- Первоначальный взнос: от 0 до 50% от суммы товара
- Условия погашения без комиссии: в банкоматах ВТБ и Почта Банка, через мобильное приложение или интернет-банк с карт любых банков. Комиссии за досрочное погашение отсутствуют.
Требования к заемщику:
- От 18 лет
- Наличие паспорта РФ
- Наличие постоянной регистрации на территории РФ
- Трудоустройство на текущем месте работы от 3 мес.
Процедура оформления:
Для получения решения банка необходимо заполнить анкету на сайте. В случае одобрения вы сможете подписать документы одним из следующих способов:
- В любом отделении Почта Банка по всей России
- Онлайн в приложении (для действующих клиентов)
- Непосредственно в офисе компании (при наличии технической возможности)
Преимущества
- Широкая сеть отделений по всей России,
- Низкая процентная ставка по кредиту или отсутствие переплаты по рассрочке,
- Минимальный комплект документов и решение в течение 30 минут,
- Выгодные условия и надёжный банк,
- Возможность пользоваться товаром уже сейчас!
Читать больше
Свернуть
Manual
View the manual for the Onkyo A-9130 here, for free. This user manual comes under the category receivers and has been rated by 1 people with an average of a 9.7. This manual is available in the following languages: English. Do you have a question about the Onkyo A-9130?
Ask your question here
Frequently asked questions
Can’t find the answer to your question in the manual? You may find the answer to your question in the FAQs about the Onkyo A-9130 below.
What is the weight of the Onkyo A-9130?
The Onkyo A-9130 has a weight of 800 g.
Can bluetooth devices of different brands be connected to each other?
Yes, bluetooth is a universal method that allows different devices equipped with bluetooth to connect to each other.
What is the height of the Onkyo A-9130?
The Onkyo A-9130 has a height of 129 mm.
What is the width of the Onkyo A-9130?
The Onkyo A-9130 has a width of 435 mm.
What is bluetooth?
Bluetooth is a way of exchanging data wirelessly between electronic devices via radio waves. The distance between the two devices that exchange data can in most cases be no more than ten metres.
What is the depth of the Onkyo A-9130?
The Onkyo A-9130 has a depth of 330 mm.
What is HDMI?
HDMI stands for High-Definition Multimedia Interface. An HDMI cable is used to transport audio and video signals between devices.
When is my volume too loud?
A volume above 80 decibels can be harmful to hearing. When the volume exceeds 120 decibels, direct damage can even occur. The chance of hearing damage depends on the listening frequency and duration.
How can I best clean my receiver?
A slightly damp cleaning cloth or soft, dust-free cloth works best to remove fingerprints. Dust in hard-to-reach places is best removed with compressed air.
Wat is Dolby Atmos?
Dolby Atmos is a technology that ensures that the sound is reflected from the ceiling to where you are listening. This makes it possible to create a 5.1 effect with only 1 speaker.
Is the manual of the Onkyo A-9130 available in English?
Yes, the manual of the Onkyo A-9130 is available in English .
Is your question not listed? Ask your question here

Before use
INTEGRATED AMPLIFIER
A-9130
Instruction Manual
2
Preparations
8
Basic Operations
16
En
Others
20
s

Before u se
Table of Contents What’s in the box
Before use
Before use
What’s in the box ………………………………………… 2
Safety Information ………………………………………. 3
Part Names ……………………………………………………4
Front Panel ……………………………………………….. 4
Rear Panel ………………………………………………… 5
Remote Controller ……………………………………….6
Preparations
Connections …………………………………………………. 8
Connecting speakers ………………………………….. 8
Connecting a Powered subwoofer ………………… 9
Connecting players (DIGITAL IN connection) …. 9
Connecting players (LINE IN connection) …….. 10
Connecting players (Turntable connection) ….. 10
Connecting with Onkyo RI Components ………..11
Using this unit as a power amplifier …………….. 12
Power Cord Hookup…………………………………… 12
Setup ………………………………………………………….. 13
Remote controller preparations …………………… 13
Turn on the power of the unit ……………………… 13
Speaker impedance settings ………………………. 14
RI function settings …………………………………… 15
Basic Operations
Playback …………………………………………………….. 16
Switching input and adjusting the volume …….. 16
Subwoofer output settings …………………………. 17
Using the Direct Function …………………………… 18
Adjusting the sound quality and balance ……… 18
Switching the unit to power amplifier mode …… 19
Others
1. Main unit (1)
2. Remote controller (RC-968S) (1), batteries (AAA/R03) (2)
3. Power Cord (1)
≥ Instruction Manual (This document)
0 Connect speakers with 4 ≠ to 16 ≠ impedance.
0 The power cord must be connected only after all other
cable connections are completed.
0 We will not accept responsibility for damage arising from
the connection of equipment manufactured by other
companies.
0 Specifications and appearance are subject to change
without prior notice.
Useful functions …………………………………………. 20
Setting auto standby …………………………………. 20
Troubleshooting …………………………………………. 21
Specifications …………………………………………….. 23
2

Safety Information
WARNING
RISK OF ELECTRIC SHOCK
DO NOT OPEN
The lightning flash with arrowhead symbol, within
an equilateral triangle, is intended to alert the user
to the presence of uninsulated «dangerous
voltage» within the product’s enclosure that may
be of sufficient magnitude to constitute a risk of
electric shock to persons.
The exclamation point within an equilateral
triangle is intended to alert the user to the
presence of important operating and maintenance
(servicing) instructions in the literature
accompanying the appliance.
CAUTION:
TO PREVENT THE RISK OF ELECTRIC SHOCK, DO
NOT REMOVE COVER (OR BACK). NO USERSERVICEABLE PARTS INSIDE. REFER SERVICING TO
QUALIFIED SERVICE PERSONNEL.
AVIS
RISQUE DE CHOC ELECTRIQUE
NE PAS OUVRIR
Before use
This product is for general household purposes. Any failure due to use
for other than household purposes (such as long-term use for business
purposes in a restaurant or use in a car or ship) and which requires
repair will be charged for even during the warranty period.
Power-Cord Caution
Handle the power cord by the plug. Do not pull out the plug by tugging
the cord and never touch the power cord when your hands are wet as
this could cause a short circuit or electric shock. Do not place the unit, a
piece of furniture, etc., on the power cord, or pinch the cord. Never make
a knot in the cord or tie it with other cords. The power cords should be
routed such that they are not likely to be stepped on. A damaged power
cord can cause a fire or give you an electrical shock. Check the power
cord once in a while. When you find it damaged, ask your nearest our
authorized service center or your dealer for a replacement.
For European models
Information for users on collection and disposal of old equipment
and used batteries
Symbol for
equipment
Symbol examples
for batteries
WARNING
TO PREVENT THE RISK OF ELECTRIC SHOCK, DO NOT REMOVE
COVER (OR BACK). NO USER-SERVICEABLE PARTS INSIDE.
REFER SERVICING TO QUALIFIED SERVICE PERSONNEL.
This equipment is not waterproof. To prevent a fire or shock hazard, do
not place any container filled with liquid near this equipment (such as a
vase or flower pot) or expose it to dripping, splashing, rain or moisture.
To prevent a fire hazard, do not place any naked flame sources (such as
a lighted candle) on the equipment.
Store small parts out of the reach of children and infants. If accidentally
swallowed, contact a doctor immediately.
Slots and openings in the cabinet are provided for ventilation to ensure
reliable operation of the product, and to protect it from overheating. To
prevent fire hazard, the openings should never be blocked or covered
with items (such as newspapers, tablecloths, curtains) or by operating
the equipment on thick carpet or a bed.
Do not use or store batteries in direct sunlight or other excessively hot
place, such as inside a car or near a heater. This can cause batteries to
leak, overheat, explode or catch fire. It can also reduce the life or
performance of batteries.
Risk of explosion if battery is replaced by an incorrect type. Risk of
explosion If disposal of a battery into fire or a hot oven, or mechanically
crushing or cutting of a battery.
Precautions
If you install the apparatus in a built-in installation, such as a bookcase or
rack, ensure that there is adequate ventilation.
Leave 20 cm (8”) of free space at the top and sides and 10 cm (4”) at the
rear. The rear edge of the shelf or board above the apparatus shall be
set 10 cm (4”) away from the rear panel or wall, creating a flue-like gap
for warm air to escape.
Operating Environment
Operating environment temperature and humidity: +5 °C to +35 °C (+41
°F to +95 °F); less than 85 %RH (cooling vents not blocked)
Do not install this unit in a poorly ventilated area, or in locations exposed
to high humidity or direct sunlight (or strong artificial light).
Important Notice
The model number and serial number of this equipment are on the rear
or bottom. Record these numbers on your enclosed warranty card and
keep in a safe place for future reference.
CAUTION
The power switch on this unit will not completely shut off all power from
the AC outlet. Since the power cord serves as the main disconnect
device for the unit, you will need to unplug it from the AC outlet to shut
down all power. Therefore, make sure the unit has been installed so that
the power cord can be easily unplugged from the AC outlet in case of an
accident. To avoid fire hazard, the power cord should also be unplugged
from the AC outlet when left unused for a long period of time (for
example, when on vacation).
Pb
These symbols on the products, packaging, and/or accompanying
documents mean that used electrical and electronic products and
batteries should not be mixed with general household waste.
For proper treatment, recovery and recycling of old products and used
batteries, please take them to applicable collection points in
accordance with your national legislation.
By disposing of these products and batteries correctly, you will help to
save valuable resources and prevent any potential negative effects on
human health and the environment which could otherwise arise from
inappropriate waste handling.
For more information about collection and recycling of old products and
batteries, please contact your local municipality, your waste disposal
service or the point of sale where you purchased the items.
These symbols are only valid in the European Union.
For countries outside the European Union:
If you wish to discard these items, please contact your local authorities
or dealer and ask for the correct method of disposal.
WEEE
http://www.onkyo.com/manual/weee/weee.pdf
En
3
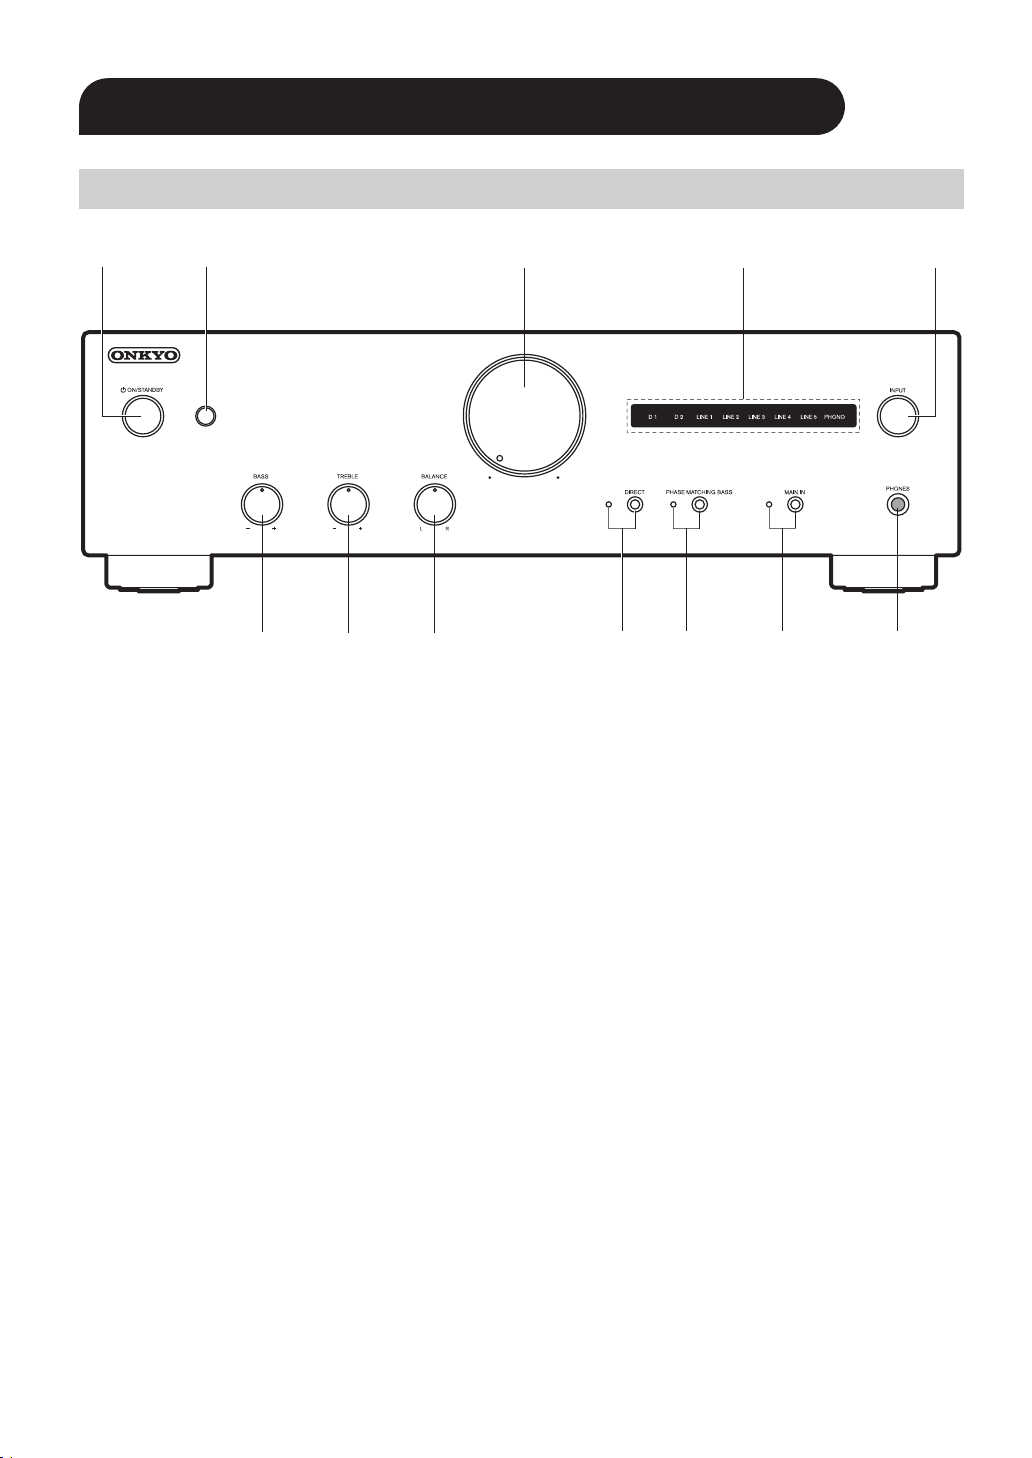
Front Panel
Before use
1. Í ON/STANDBY button
2. Remote control sensor: Receives signals from the remote
controller.
0 The signal range of the remote controller is within
about 16y/5 m, at an angle of 20° on the perpendicular
axis and 30° to either side.
3. Volume controller
4. Input source indicators: The indicators light according to
the selected input source.
0 The indicator for the selected input source blinks when
MUTING (p6) is active.
5. INPUT dial: Switches the input source to be played.
6. BASS -/+ controller: Enhance or moderate the bass range
of the speakers. (p18)
7. TREBLE -/+ controller: Enhance or moderate the treble
range of the speakers. (p18)
8. BALANCE L/R controller: Adjust the left/right audio
balance. (p19)
9. DIRECT button/indicator: Switch the DIRECT feature on
and off. The indicator lights when the DIRECT feature is
on. (p18)
10.
PHASE MATCHING BASS button/indicator: Switch the
PHASE MATCHING BASS feature on and off. The
indicator lights when the PHASE MATCHING BASS
feature is on. (p18)
11.
MAIN IN button/indicator: Button for making settings
when this unit is used as a power amplifier. The indicator
lights when the mode to use this unit as a power amplifier
is on. (p19)
12.
PHONES jack: Connect stereo headphones with a
standard plug (Ø1/4″/6.3 mm diameter).
4

Rear Panel
Before use
1. RI REMOTE CONTROL jack: This jack is for linking when
you connect an Onkyo CD player, tuner, network audio
player, or RI dock that has an RI (“Remote Interactive”)
jack. (p11)
2. DIGITAL IN COAXIAL D1/DIGITAL IN OPTICAL D2 jacks:
Input digital audio signals from a playback device with a
digital coaxial cable or digital optical cable. (p9)
3. SPEAKERS terminals: Connect speakers with speaker
cables. (Not compatible with connection using banana
plugs or Y plugs.) (p8)
4. AC INLET: Connect the supplied power cord. (p12)
5. GND terminal: The ground wire of the turntable is
connected.
6. PHONO (MM) jacks: Use an Analog audio cable to
connect a Turntable that uses an MM type cartridge.
(p10)
7. LINE IN jacks: Input audio signals from a playback device
with an analog audio cable. (p10)
8. LINE OUT jacks: Use an Analog audio cable to output
audio signals to recording equipment, such as a cassette
tape deck. To select the input source for recording, use
the INPUT dial on this unit or use the remote controller.
9. MAIN IN jacks: When using this unit as a power amplifier,
connect the pre-amplifier here. (p12)
10.
SUBWOOFER PRE OUT jack: Connect a powered
subwoofer with a subwoofer cable. (p9)
En
5

Remote Controller
Operating this unit
Before use
1. Í button: Sets this unit to On or Standby.
2. Cursors (D/C/B/A), ENTER button: Select the item
with the cursors and press ENTER to confirm.
3. VOLUME buttons
4. INPUT(D/C) buttons: Switches the input source to be
played.
5. SETUP button: Switches to the settings menu. Make
speaker impedance settings (p14), RI function settings
(p15), subwoofer output settings (p17), and auto
standby settings (p20).
6. RETURN button: Returns the display to the previous
display/state during setting.
7. MUTING button: Temporarily mutes audio. Press again to
cancel muting.
8. DIRECT button: Switch the DIRECT feature on and off.
(p18)
9. PM BASS button: Switch the PHASE MATCHING BASS
feature on and off. (p18)
6

Before use
Operating other components
You can operate Onkyo CD players, tuners, network audio players, and RI docks with the remote controller of this unit.
∫ Operating an Onkyo CD player
Point the remote controller at the CD player’s remote control
sensor and operate.
10.
CD Í button
11.
Play mode buttons
0 If you have a Network CD player, then the RI function
enables use of the < and > buttons when you connect it
with an RI cable (p11). When using these buttons, point
the remote controller at the remote control sensor of this
unit.
∫ Operating an Onkyo tuner, network audio
player, or RI dock
You can use the RI function to centrally control with the
remote controller of this unit by connecting this unit and the
other audio components with an RI cable (p11). Point the
remote controller at the remote control sensor of this unit to
operate.
12.
Cursor buttons (D/C/B/A), ENTER button: Select items
with the cursor buttons and press ENTER to confirm.
13.
Play mode buttons
0 When using a network audio player, pressing the
MENU button returns to the previous display/state
during setting.
14.
INPUT button
0 When using a tuner, this works as a BAND button.
0 The INPUT button is not used for RI docks.
En
7
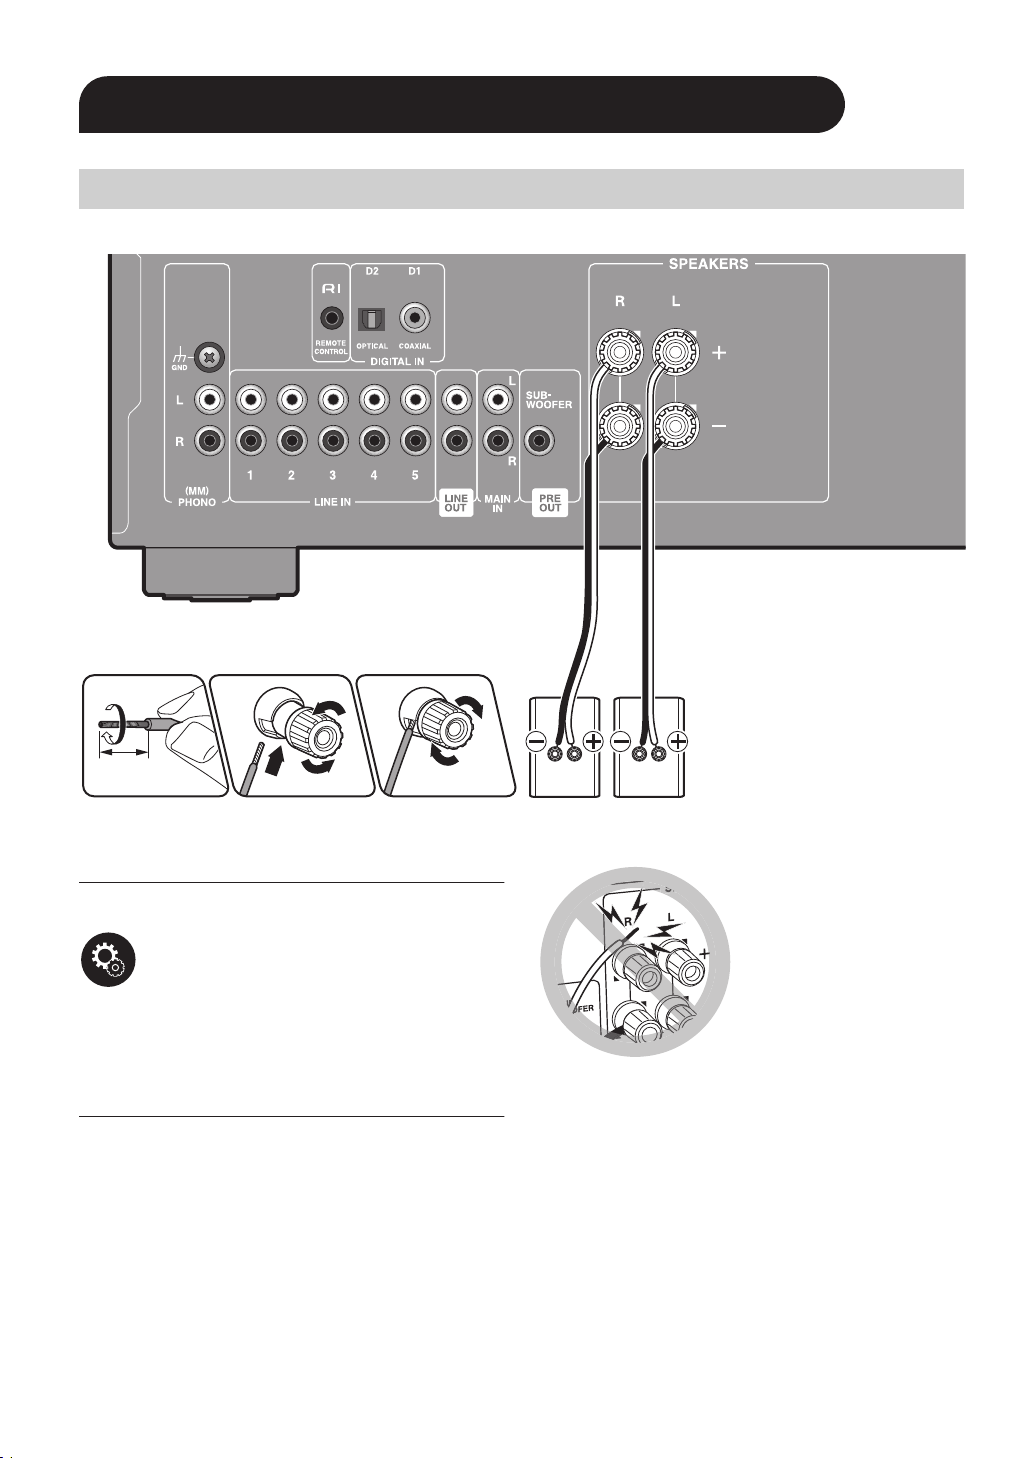
Connecting speakers
a Speaker Cable
Preparations
(Note) Speaker Impedance
Connect speakers with an impedance of 4 ≠ to 16 ≠.
Setup: You have to change the setting on this unit if any of
the connected speakers have 4 ≠ or more to less than 8 ≠
impedance. Change the speaker impedance setting to 4 ≠.
(p14)
Connect the Speaker Cables
Make correct connection between the unit’s jacks and
speaker’s jacks (+ side to + side, and — side to — side) for
each channel. If the connection is wrong, a bass sound will
not be reproduced properly due to reverse phase. Twist the
wires exposed from the tip of the speaker cable so that the
wires do not stick out of the speaker terminal when
connecting. If the exposed wires touch the rear panel, or the
+ side and — side wires touch each other, the protection
circuit will be activated.
a
8

Preparations
Connecting a Powered subwoofer
a Subwoofer Cable
Connecting players (DIGITAL IN
connection)
a Digital Optical Cable, b Digital Coaxial Cable
You can also connect a Powered subwoofer to the
SUBWOOFER PRE OUT jack to boost bass playback even
more. Use a subwoofer cable for connection.
You can switch the subwoofer output setting between auto/
on/off according to your preference. Refer to «Subwoofer
output settings» (p17) for details.
0 It is recommended to set this off if you are not using a
subwoofer.
Use a Digital coaxial cable to connect a player to the
DIGITAL IN COAXIAL D1 jack. Alternatively, use a Digital
optical cable to connect a player to the DIGITAL IN
OPTICAL D2 jack. Refer to «Connecting with Onkyo RI
Components» (p11) to use the RI function.
0 Only PCM audio is supported for input through the
DIGITAL IN OPTICAL/COAXIAL jacks. Set the audio
output on the playback device to output PCM.
9
En

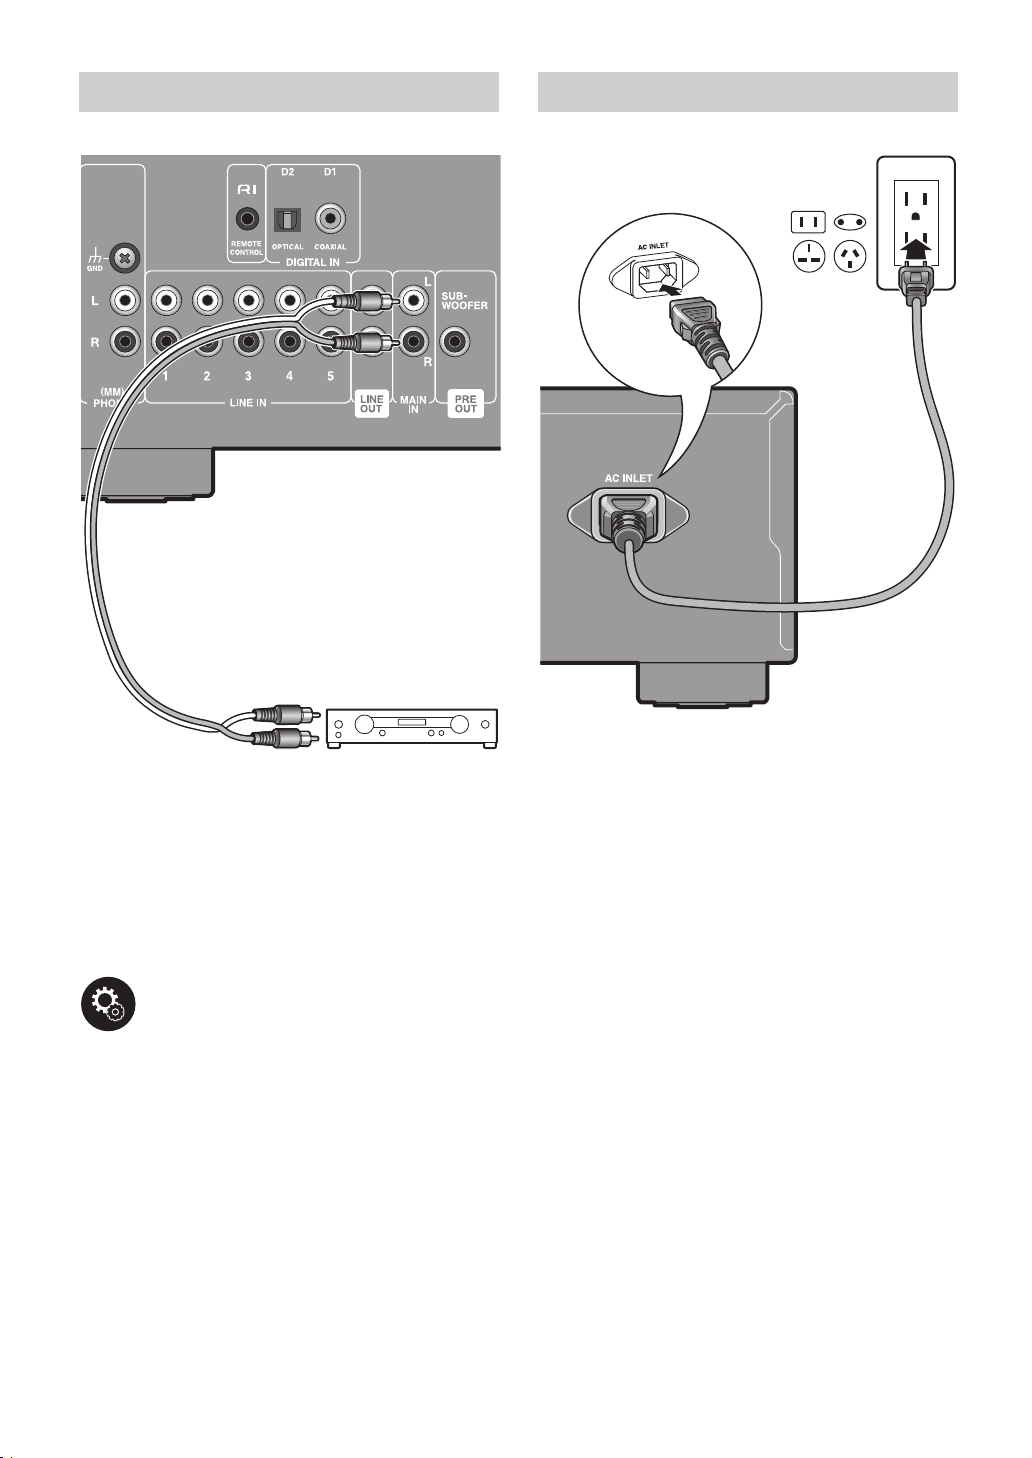
Preparations
Connecting players (LINE IN
connection)
a Analog Audio Cable
Connecting players (Turntable
connection)
a Analog Audio Cable
Use an Analog audio cable to connect a player to one of the
LINE IN 1/2/3/4/5 jacks. Refer to «Connecting with Onkyo RI
Components» (p11) to use the RI function.
10
Use an analog audio cable to connect a turntable that uses
an MM-type cartridge to the PHONO (MM) jack.
If the turntable has a ground wire, connect it to the GND
terminal. With some turntables, connecting the ground wire
may cause hum, in which case it should be disconnected.
0 If the turntable has a built-in audio equalizer, connect it to
an LINE IN jack other than the PHONO (MM) jack. Also, if
the turntable uses an MC type cartridge, install an audio
equalizer compatible with the MC type cartridge between
the unit and the turntable, then connect to any LINE IN
jack other than the PHONO (MM) jack.

Connecting with Onkyo RI
Components
a RI Cable, b Digital Coaxial Cable
Preparations
are required to use the RI function. Refer to «RI function
settings» (p15) for details.
The RI function
The follow system functions can be used with the RI
function.
0 Some functions may not be supported depending on the
product even when an RI connection is used.
∫ Auto Power On
When this unit is in standby mode, if a component
connected by an RI cable is turned on, this unit
automatically turns on.
∫ Direct change
When playback is started on a component connected via RI,
the unit selects that component as the input source.
∫ System off
When this unit is turned off, components connected by an RI
cable are automatically turned off.
∫ Remote controller operations
You can use the remote controller of this unit to centrally
control components by connecting with an RI cable. Refer to
«Remote Controller» — «Operating other components» (p7)
for information about the buttons and operations for the
components.
Connection and Setup
If you have an Onkyo CD player, tuner, network audio
player, or RI dock, if these have RI jacks, then you can
connect them to this unit and link switching between on and
standby, and use the remote controller of this unit to
centrally control the equipment. (RI function)
These linked operations are enabled by the connection with
an RI cable between the equipment with an RI jack and this
unit, and the connection using a Digital cable or Analog
audio cable. Refer to the following table for connections.
When connecting to the DIGITAL IN COAXIAL D1 jack, use
a Digital coaxial cable. When connecting to the DIGITAL IN
OPTICAL D2 jack, use a Digital optical cable. When
connecting to LINE IN 1/2/3, use an Analog audio cable.
Equipment connected Jack to connect to
CD player (*) DIGITAL IN COAXIAL D1
Tuner (*) DIGITAL IN OPTICAL D2 or
Network audio player / RI
dock
or LINE IN 1
LINE IN 2
LINE IN 3
0 The RI feature on this unit supports Onkyo CD players,
tuners, network audio players, and RI docks only. It does
not work properly with other devices such as MD
recorders. Refer to the instruction manual of the
component with the RI jack for details.
(*)Setup: When connecting a CD player or tuner, settings
En
11
Preparations
Using this unit as a power amplifier
a Analog Audio Cable
Power Cord Hookup
a Power Cord
a
a
Connect your pre-amplifier and you can use this unit as a
power amplifier. Connect the MAIN IN jacks of the unit and
the PRE OUT jacks of the pre-amplifier with an analog audio
cable.
0 Do not connect a source device (CD device, etc.) to the
MAIN IN jack. Doing so may produce high-volume sound
that can damage the unit, speakers, and various other
devices.
Setup: Switch the unit to power amplifier mode to use this
unit as a power amplifier. (p19)
This model includes a removable power cord. The power
cord must be connected only after all other connections are
completed. Make sure you first connect the power cord to
AC INLET terminal of the unit and then connect to the outlet.
Always disconnect the outlet side first when disconnecting
the power cord.
12
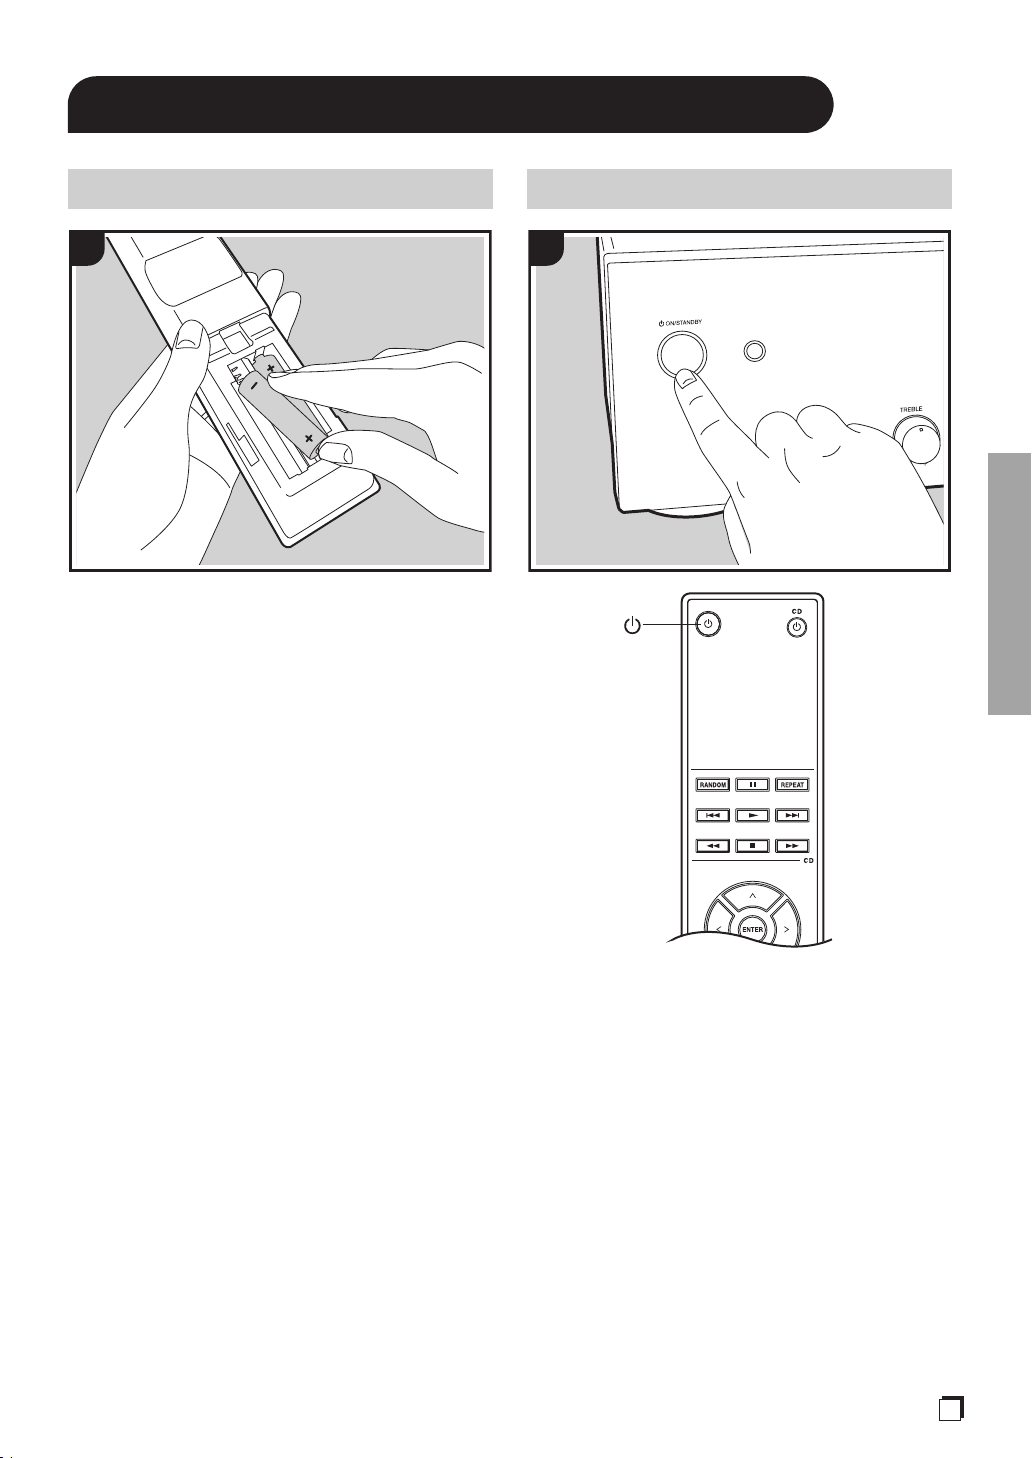
Preparations
Remote controller preparations
1
Match the polarity when inserting the batteries.
Turn on the power of the unit
1
Press Í ON/STANDBY on this unit or Í on the remote
controller.
En
13
Preparations
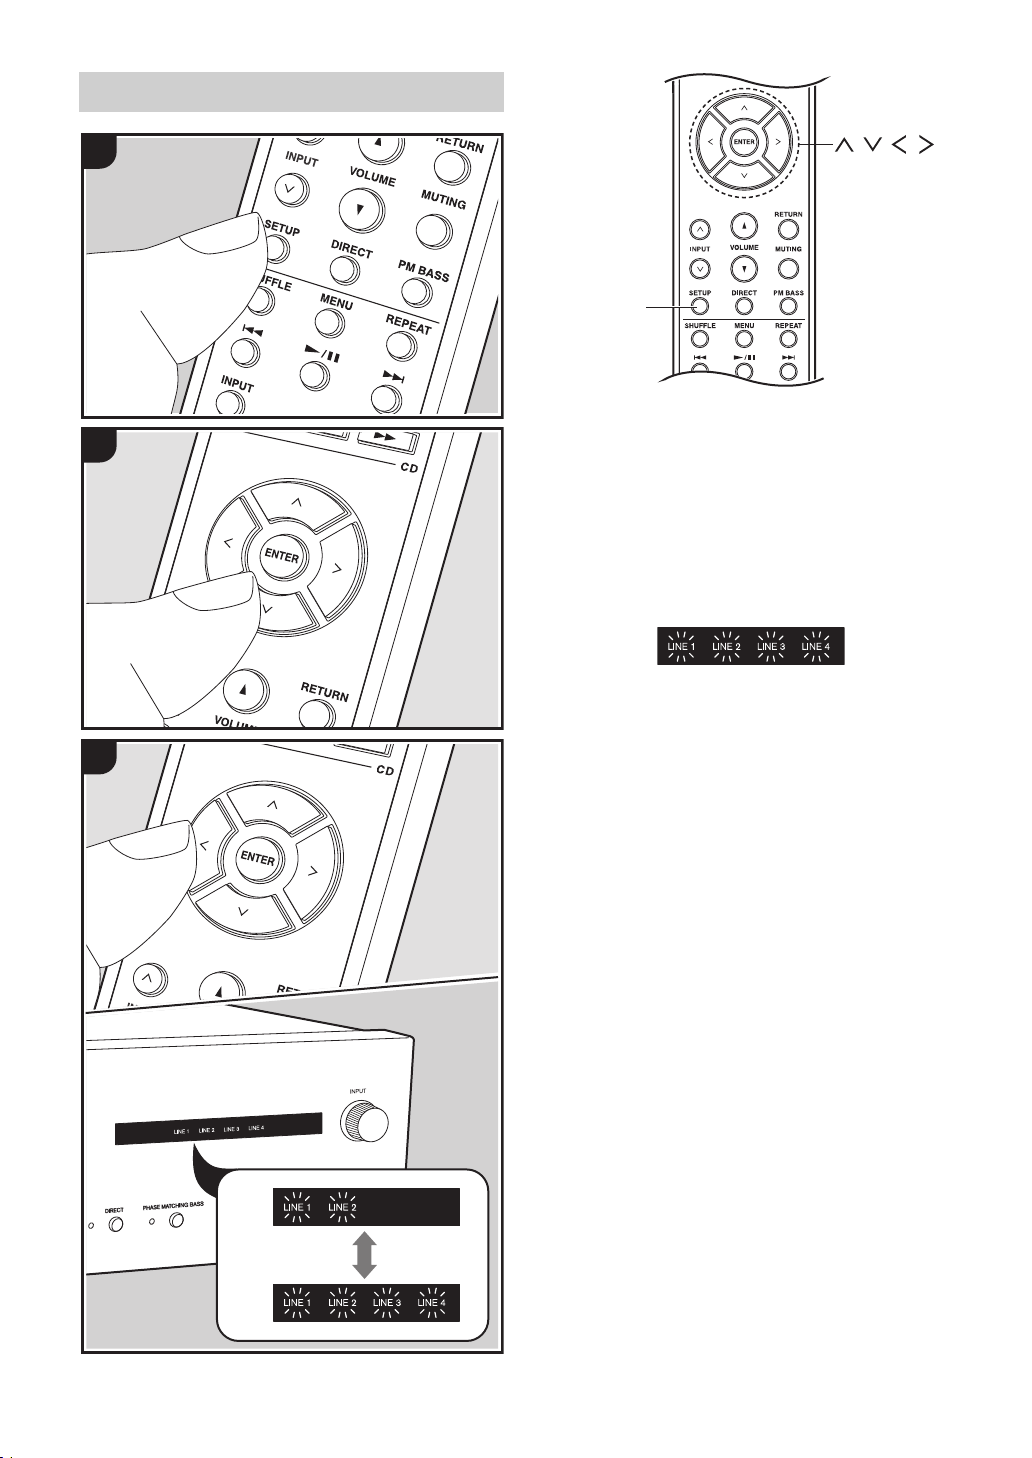
Speaker impedance settings
///
SETUP
Depending on the speakers you connect, you may need to
change the speaker impedance setting on this unit. Refer to
the page describing speaker connection (p8) and do the
following procedures if the change is required.
1. Press SETUP on the remote controller.
0 If this unit is set to be used as a power amplifier, the
SETUP button will not work. Check the setting. (p19)
2. Press D/C on the remote controller several times so
that input source indicators on the unit, such as «LINE 1»
and «LINE 2», start blinking.
(BLINKING)
0 The indicators blink and the current setting is
displayed.
3. Press B/A on the remote controller to change the
setting.
-4 ≠: «LINE 1» and «LINE 2» indicators are blinking
-8 ≠ (default value): «LINE 1», «LINE 2», «LINE 3» and
«LINE 4» indicators are blinking
4. To exit the settings, press SETUP.
0 The setting mode ends after 5 seconds elapse with no
operations performed.
14
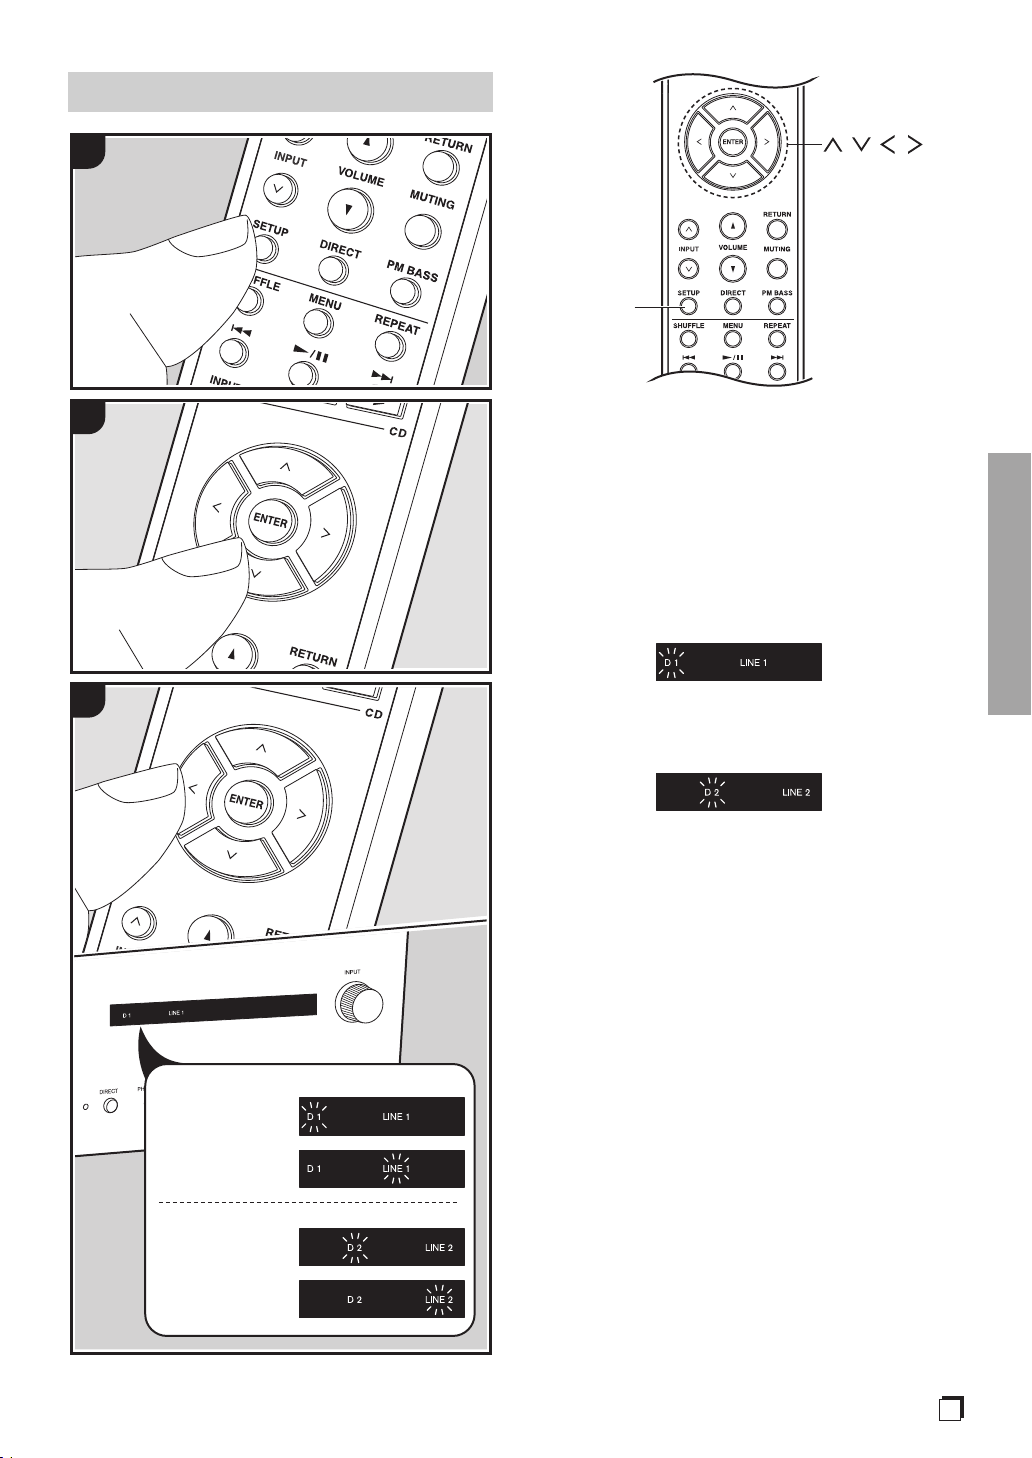
RI function settings
(Tuner)
Linked D2
Linked LINE IN 2
Linked D1
Linked LINE IN 1
Preparations
1
///
SETUP
2
When connecting an Onkyo CD player or tuner to the RI
REMOTE CONTROL jack on this unit (p11) and using the
RI function, you need to make RI function settings.
1. Press SETUP on the remote controller.
0 If this unit is set to be used as a power amplifier, the
SETUP button will not work. Check the setting. (p19)
2. Press D/C on the remote controller several times to
switch to the RI function setting mode.
0 When connecting a CD player, make it so that one of the
«D1» and «LINE 1» indicators blinks and the other one
lights.
3
0 When connecting a tuner, make it so that one of the «D2»
and «LINE 2» indicators blinks and the other one lights.
3. Press B/A on the remote controller to switch the setting.
(When connecting a CD player)
— When connecting to the DIGITAL IN COAXIAL D1 jack
(default value): The «D1» indicator blinks and «LINE 1»
lights.
— When connecting to the LINE IN 1 jack: The «LINE 1»
indicator blinks and «D1» lights.
(When connecting a tuner)
— When connecting to the DIGITAL IN OPTICAL D2 jack
(default value): The «D2» indicator blinks and «LINE 2»
lights.
— When connecting to the LINE IN 2 jack: The «LINE 2»
indicator blinks and «D2» lights.
4. To exit the settings, press SETUP.
0 The setting mode ends after 5 seconds elapse with no
operations performed.
En
15
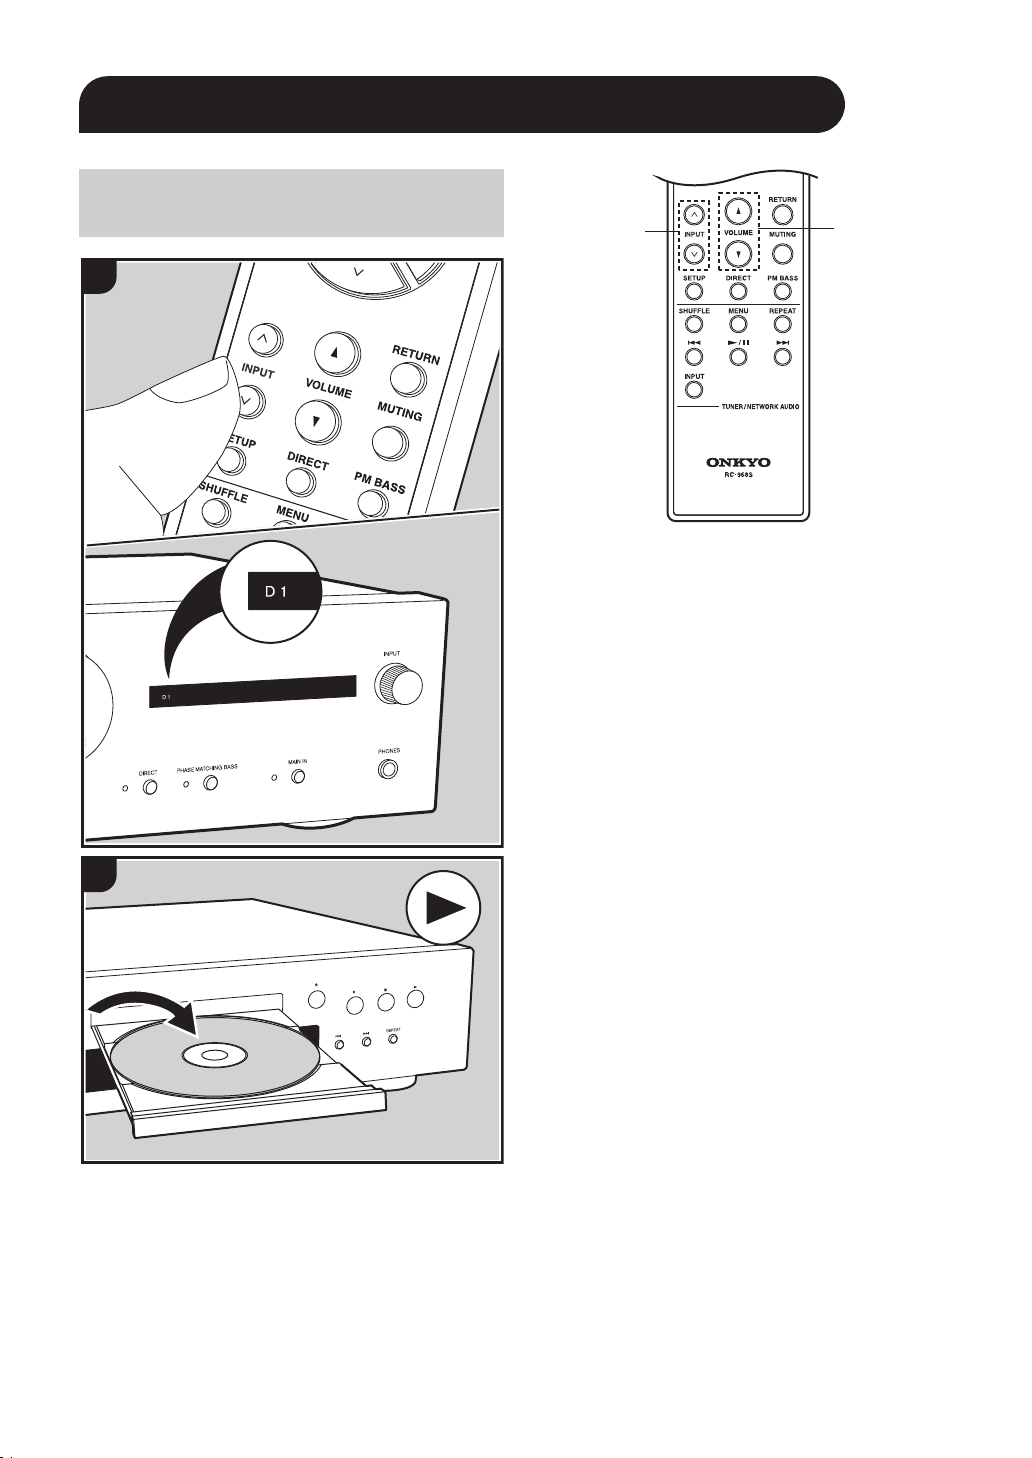
Switching input and adjusting the
volume
1
Basic Operations
INPUT
Perform the following procedure when the unit is on.
1. Press INPUTD/C on the remote controller to switch to
the input with the same name as the jack to which you
have connected the player.
For example, switch to D1 to play the device connected to
the DIGITAL IN COAXIAL D1 jack.
When operating on the main unit, turn the INPUT dial to
switch the input.
0 The indicator for the selected input source lights.
0 If there is no digital audio signal input while D1 or D2 is
selected, the indicator blinks while the source is
selected.
2. Start play on the connected player.
3. Press VOLUME on the remote controller or turn the
volume controller on the main unit to adjust the volume.
VOLUME
2
16
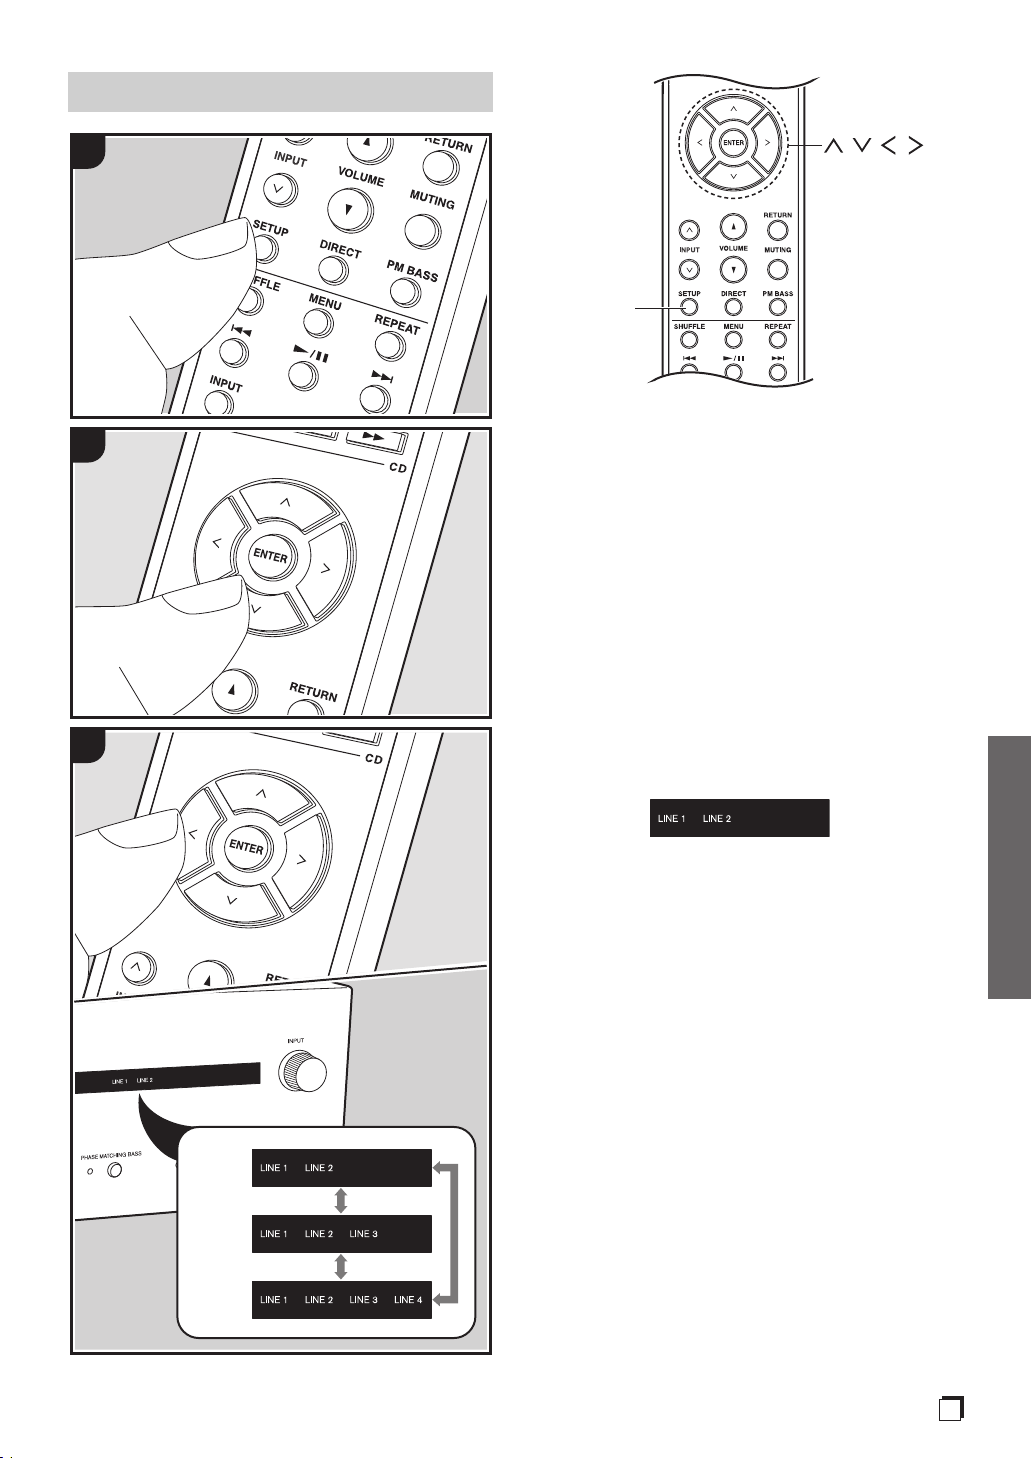
Subwoofer output settings
Basic Operations
1
///
SETUP
This unit enables you to choose the subwoofer output mode,
2
3
with the choices being «Auto» (default setting), «On», and
«Off».
Auto : The subwoofer signal is not output when the
DIRECT function (p18) is on.
On : The subwoofer signal is always output.
Off : The subwoofer signal output is stopped, and the
effect on sound quality can be moderated within
the unit. It is recommended to set this off if you are
not using a subwoofer.
0 There is no audio output from the subwoofer when
headphones are connected, irrespective of the setting.
1. Press SETUP on the remote controller.
0 If this unit is set to be used as a power amplifier, the
SETUP button will not work. Check the setting. (p19)
2. Press D/C on the remote controller several times so
that some input source indicators, such as «LINE 1» and
«LINE 2», light on the unit.
0 The indicators light and the current setting is displayed.
3. Press B/A on the remote controller to change the
setting.
— Auto (default value): «LINE 1» and «LINE 2» indicators
light
— On: «LINE 1», «LINE 2» and, «LINE 3» indicators light
— Off: «LINE 1», «LINE 2», «LINE 3» and «LINE 4»
indicators light
4. To exit the settings, press SETUP.
0 The setting mode ends after 5 seconds elapse with no
operations performed.
En
17

Basic Operations
Using the Direct Function
1
Adjusting the sound quality and
balance
1
18
When you turn the DIRECT feature on (default value), the
unit bi-passes the tone control circuits that adjust the bass
and treble, taking the shortest route which favors sound
quality.
0 PHASE MATCHING BASS/BASS/TREBLE cannot be
adjusted when DIRECT feature is on.
1. Press DIRECT on the main unit or the remote controller to
switch on or off. The DIRECT indicator lights when on.
PHASE MATCHING BASS
Turning the PHASE MATCHING BASS function on
maintains smooth and powerful bass reproduction while
effectively keeping the mid-range clear and making vocals
and strings stand out (The default value is “off”).
0 This cannot be set when DIRECT is on (default value).
Press DIRECT to turn the DIRECT indicator off before
operating. Note that the PHASE MATCHING BASS
setting reverts to the previous setting when the DIRECT
function is turned off.
1. Press PHASE MATCHING BASS on the main unit or PM
BASS on the remote controller to switch on or off. The
PHASE MATCHING BASS indicator lights when on.
BASS (main unit only)
0 This cannot be set when DIRECT is on (default value).
Press DIRECT to turn the DIRECT indicator off before
operating.
1. Turn the BASS -/+ controller to enhance or moderate the
bass.
TREBLE (main unit only)
0 This cannot be set when DIRECT is on (default value).
Press DIRECT to turn the DIRECT indicator off before
operating.

1. Turn the TREBLE -/+ controller to enhance or moderate
the treble.
BALANCE (main unit only)
1. Turn the BALANCE L/R controller on the main unit to
adjust the balance of the sounds output from the left and
right speakers.
Switching the unit to power
amplifier mode
1
3″
Basic Operations
“Speaker impedance settings” (p14) / “RI function
settings” (p15) / “Switching input and adjusting the
volume” (p16) / “Subwoofer output settings” (p17) /
“Adjusting the sound quality and balance” (p18) /
“Setting auto standby” (p20)
0 When switched to power amplifier mode, if the volume of
the connected pre-amplifier is low, auto standby (p20)
may function and the power may automatically switch to
standby. If this happens, you may be able to fix it by
increasing the volume on the pre-amplifier.
0 Also read the instruction manual of the pre-amplifier you
connected to this unit.
Perform the following operations to switch the unit to power
amplifier mode to use this unit as a power amplifier when
you have connected a pre-amplifier to the MAIN IN jack on
this unit (p12).
0 Power amplifier modes settings are not available if
headphones are connected.
1. Press and hold MAIN IN until the «DIRECT» and «MAIN
IN» indicators light on the main unit. Press and hold MAIN
IN to cancel the power amplifier mode.
Note that the power amplifier mode is not canceled even
if this unit goes to standby mode.
0 When you cancel the power amplifier mode, BASS,
TREBLE, BALANCE, DIRECT, and PHASE MATCHING
BASS revert to the settings prior to changing to the power
amplifier mode.
0 There is no audio output from the PHONES jack and
LINE OUT jacks while the power amplifier mode is
engaged. The following functions are also unavailable
while the power amplifier mode is on.
En
19

Setting auto standby
(LIGHTING)
OFF
(BLINKING)
ON
Others
1
///
SETUP
2
3
When automatic standby is on (default value), the unit
automatically switches to standby mode after 20 minutes of
no audio input without any operations.
1. Press SETUP on the remote controller.
0 If this unit is set to be used as a power amplifier, the
SETUP button will not work. Check the setting. (p19)
2. Press D/C on the remote controller several times to
make the «DIRECT» and «PHASE MATCHING BASS»
indicators either blink or light.
0 The indicators blink or light and the current setting
value is displayed.
3. Press B/A on the remote controller to switch auto
standby on or off.
— On (default value): «DIRECT» and «PHASE MATCHING
BASS» indicators are blinking
— Off: «DIRECT» and «PHASE MATCHING BASS»
indicators light
4. To exit the settings, press SETUP.
0 The setting mode ends after 5 seconds elapse with no
operations performed.
0 60 seconds before switching to standby mode, the input
source indicator for the currently selected source starts
blinking.
0 Depending on the connected device, the auto standby
feature may not engage due to factors such as noise.
20

Before starting the procedure
Problems may be solved by simply turning the power on/off
or disconnecting/connecting the power cord, which is easier
than working on the connection, setting and operating
procedure. Try the simple measures on both the unit and the
connected device. After reconnecting, turn off and on the
unit and the connected device.
0 This unit contains a microPC for signal processing and
control functions. In very rare situations, severe
interference, noise from an external source, or static
electricity may cause it to lockup. In the unlikely event that
this happens, unplug the power cord from the wall outlet,
wait at least 5 seconds, and then plug it back in.
0 We are not responsible for reparations for damages (such
as CD rental fees) due to unsuccessful recordings caused
by the unit’s malfunction. Before you record important
data, make sure that the material will be recorded
correctly.
∫ Resetting the unit (this resets the unit settings
to the default)
Resetting the unit to the status at the time of shipment may
solve the problem. If the unit is reset, your settings are
restored to the default values. Be sure to note down your
setting contents before performing the following operations.
1. While the power is on, press Í ON/STANDBY while
pressing DIRECT.
Others
speaker wires are not touching each other or the back
panel of the unit, then turn the unit on again. If this unit
does not turn on, immediately unplug the power cord from
the wall outlet and contact your dealer.
0 The protective circuit function may have been activated
because the temperature of the unit rose abnormally. If
this happens, then the power will continue to turn off after
you have turned the unit on again. Make sure the unit has
plenty of space for ventilation around it, wait for the unit to
cool down sufficiently, and then try turning it on again.
0 When switched to power amplifier mode, if the volume of
the connected pre-amplifier is low, auto standby (p20)
may function and the power may automatically switch to
standby. If this happens, you may be able to fix it by
increasing the volume on the pre-amplifier.
WARNING: If smoke, smell or abnormal noise is produced
by the unit, unplug the power cord from the wall outlet
immediately and contact the dealer or customer support.
Audio
0 Confirm that the connection between the output jack on
the device and the input jack on this unit is correct.
0 Make sure that none of the connecting cables are bent,
twisted, or damaged.
0 If MUTING is active, press MUTING on the remote
controller to cancel. MUTING is active when the indicator
for the selected input source is blinking.
0 While headphones are connected to the PHONES jack,
no sound is output from the speakers or subwoofer.
Power
∫ Cannot turn on the unit
0 Make sure that the power cord is properly plugged into
the wall outlet.
0 Unplug the power cord from the wall outlet, wait 5
seconds or more, then plug it in again.
∫ The unit turns off unexpectedly
0 The unit automatically enters standby mode when auto
standby (p20) is activated.
0 A speaker cable may have shorted and the protective
circuit function may have been activated. Make sure bare
∫ Audio performance
0 Audio performance will be at its best about 10 to 30
minutes after the integrated amplifier has been turned on
and had time to warm up.
0 The sound quality can be affected by strong magnetic
fields, such as those from a TV. Try moving any such
devices away from the integrated amplifier.
0 If you have any devices that emit high-intensity radio
waves near the integrated amplifier, such as a cellular
phone that’s being used to make a call, the integrated
amplifier may output noise.
0 Install the integrated amplifier on a sturdy rack or shelf.
Position it so that its weight is evenly dispersed on its four
insulators. Do not install the integrated amplifier in a place
with vibration or an unstable location.
∫ No sound from a connected playback device
0 Change the input selector on this unit to the position of
the terminal to which the playback device is connected.
0 Only PCM audio is supported for input through the
DIGITAL IN OPTICAL/COAXIAL jacks. Set the audio
output on the playback device to output PCM.
∫ A speaker produces no sound
0 Make sure that the polarity of the speaker cables (+/-) is
correct, and that no bare wires are in contact with the
metal part of speaker terminals.
0 Make sure that the speaker cables have not shorted.
En
21

0 Make sure the speakers are connected correctly. (p8)
∫ Noise can be heard
0 Using cable ties to bundle analog audio cables, power
cords, speaker cables, etc. may degrade the audio
performance, Do not bundle cords.
0 An audio cable may be picking up interference. Try
repositioning your cables.
∫ Headphone output is intermittent or there’s no
sound
0 The connection part may be dirty. Clean the headphones
plug. See your headphones’ instruction manual for
cleaning information. Also, make sure that the
headphones cable is not broken or damaged.
The RI function
∫ The RI function isn’t working properly
0 Make sure that the RI REMOTE CONTROL jacks are
properly connected.
0 A connection to the RI REMOTE CONTROL jack is not
enough for the units to operate as a system. Connect the
Digital cable or Analog audio cable properly. (p11)
Remote Controller
Others
0 Make sure that the batteries are installed with the correct
polarity.
0 Install new batteries. Do not mix different types of
batteries, or old and new batteries.
0 Make sure that the unit is not subjected to direct sunshine
or inverter-type fluorescent lights. Relocate if necessary.
0 If the unit is installed in a rack or cabinet with colored-
glass doors or if the doors are closed, the remote
controller may not work reliably.
∫ Cannot switch the input source
0 If this unit is set to be used as a power amplifier, you will
be unable to switch the input source or adjust the sound
quality. Check the setting. (p19)
Others
∫ Strange noises can be heard from the unit
0 If you have connected another unit to the same wall outlet
as this unit, this noise may be an effect from the other
unit. If the symptoms improve by unplugging the power
cord of the other unit, use different wall outlets for this unit
and the other unit.
22
Loading…
Document Download |
‹
›
Onkyo A-9130 Manual Online:
3.65,
2768
votes
Onkyo A-9130 User Manual
Onkyo A-9130 User Guide
Onkyo A-9130 Online Manual
Text of Onkyo A-9130 User Guide:
More Instructions:
|
Onkyo A-9130 Instruction manual
|
DOWNLOAD |
Related Products and Documents (Amplifier):
-
Onkyo P-304 Amplifier Instruction manual
P-304
onkyo/p-304.pdf, 10 -
Onkyo TX-890 Amplifier Instruction manual
TX-890
onkyo/tx-890.pdf, 16 -
Onkyo TX-906 Amplifier Instruction manual
TX-906
onkyo/tx-906.pdf, 20 -
Onkyo TX-8211 Amplifier Instruction manual
TX-8211
onkyo/tx-8211.pdf, 24 -
Onkyo TX-SV535 Amplifier Instruction manual
TX-SV535
onkyo/tx-sv535.pdf, 32 -
Onkyo AS-V640 Amplifier Instruction manual
AS-V640
onkyo/as-v640.pdf, 32 -
Onkyo A-RV401 Amplifier Instruction manual
A-RV401
onkyo/a-rv401.pdf, 11 -
Onkyo P-3200 Amplifier Service manual
P-3200
onkyo/p-3200.pdf, 13
Comparable Devices:
| # | Manufacturer | Model | Document Type | File | Updated | Pages | Size |
|---|---|---|---|---|---|---|---|
| 1 | widos | 6100 | Working instructions translation | widos/6100-8W9.pdf | 08 Jan 2025 | 42 | |
| 2 | Honeywell | CL201AE | Operation & user’s manual | honeywell/cl201ae-1O4.pdf | 23 Jan 2025 | 11 | |
| 3 | Sealey | BBQ10 | Instructions manual | sealey/bbq10-WXG.pdf | 13 Mar 2025 | 10 | |
| 4 | Vax | VEC-01 | Instruction manual | vax/vec-01-RGG.pdf | 14 Oct 2023 | 12 | 0.3 Mb |
| 5 | Whyte | 20C Team | Supplementary service manual | whyte/20c-team-2JD.pdf | 27 Mar 2024 | 20 | |
| 6 | Sterling | Separated Combustion Tubular Gas Fired UnitHeater | Installation instructions and parts list | sterling/separated-combustion-tubular-gas-fired-unitheater-15B.pdf | 02 Mar 2024 | 28 |
Similar Resources:
Amplifier Instructions:
-
Multiaqua Heater FSFCA
Multiaqua FSFCA User Manual (Installation and operation manual), @2U23I8
FSFCA, 6
-
TC-HeliconHelicon Music Equipment VoiceLive Play
VoiceLive Play (Music Equipment ePDF Manual, #2384GM)
VoiceLive Play, 30
-
Shandong Printer BTP-R880NP
Shandong Printer BTP-R880NP Operation & user’s manual
BTP-R880NP, 34
-
Civco Laboratory Equipment GUS G32-S
Civco GUS G32-S Guide (Doc Type: Laboratory Equipment Operator’s manual)
GUS G32-S, 14
-
Tecknet Battery Charger U502
Battery Charger User manuals (Tecknet U502)
U502, 4
-
Motorola Baby Monitor MBP853CONNECT
Baby Monitor PDF Operation & user’s manual
MBP853CONNECT, 54
-
MEE AUDIO Headphone M6 PRO
M6 PRO Operation & user’s manual — 8T5AOM
M6 PRO, 23
-
Dell Laptop Latitude 5285
Laptop PDF Owner’s manual
Latitude 5285, 19
-
YASKAWA Servo Drives Sigma-7-S Series
PDF Guide (@7Y6J2R), YASKAWA Sigma-7-S Series Servo Drives (05.04.2025)
Sigma-7-S Series, 111
-
Atlanta Kettle ATH-2420
Kettle Instruction manual (Atlanta ATH-2420)
ATH-2420, 22
-
IRIS Pet Care Product CI-604
CI-604 Quick start manual — 1G6N8G
CI-604, 2
-
Aiwa Cassette Player HS-PX590
User Guide: Aiwa HS-PX590 (1DA9WY, Upd.Tue 12.2024)
HS-PX590, 12