
Если вы хотите изменить геймплей в GTA V, OpenIV – то, что вам нужно! Мощный редактор и менеджер файлов позволяет редактировать и модифицировать игру, открывая двери к бесконечным возможностям. Давайте разберемся, как скачать и использовать OpenIV, чтобы сделать игровой процесс еще более увлекательным!
Дата выхода Out of Hands – трейлер игры и системные требования

OpenIV – бесплатная программа, разработанная для редактирования игр от Rockstar Games, включая GTA V, Max Payne 3 и Red Dead Redemption 2. С помощью OpenIV вы можете управлять игровыми файлами, заменять текстуры, редактировать сценарии и даже создавать собственные миссии.
Чтобы загрузить программу OpenIV, выполните следующие действия:
-
Зайдите на официальный сайт OpenIV.
-
Найдите вкладку с загрузками и выберите версию программы, которая подходит для вашей операционной системы (32-битную или 64-битную).
-
Скачайте файл установки и запустите его.
-
Следуйте инструкциям на экране, чтобы завершить установку.
-
После того как установка будет завершена, откройте OpenIV и добавьте игру GTA 5. Укажите путь к папке с игрой — и можно приступать к редактированию!
Как пользоваться
Использование OpenIV может показаться сложным на первый взгляд, но на самом деле это довольно просто.

Вот пошаговая инструкция:
-
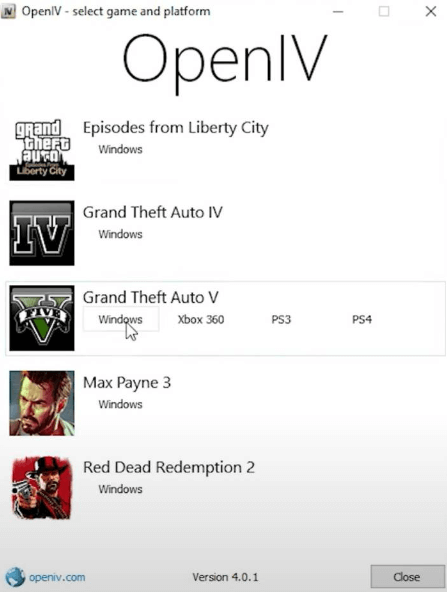
Запустите OpenIV – кликнете иконку программы и выберите GTA 5, затем укажите вашу систему.
-
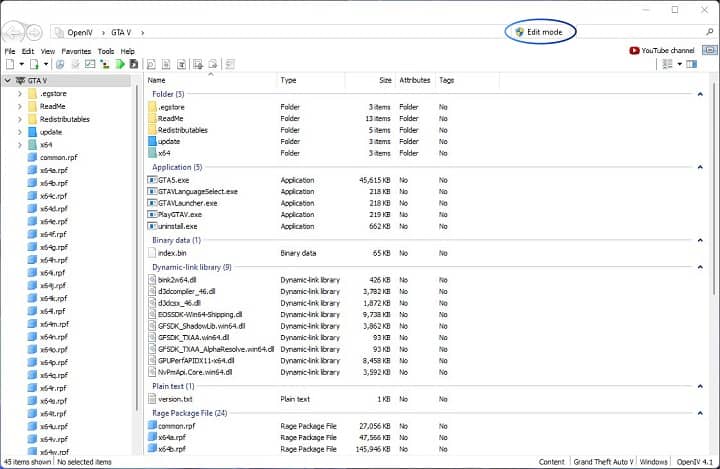
Изучите интерфейс – вы увидите стандартный проводник, где можете просматривать все файлы и папки игры. Чтобы редактировать файлы, включите режим редактирования – это важно!
-
Замените файлы – чтобы установить модификацию, вам нужно будет заменить оригинальные файлы. Обычно это текстуры или скрипты. Например, для установки новых автомобилей вам нужно перейти по пути: GTA5\x64e.rpf\levels\gta5\vehicles.rpf\
-
Правой кнопкой мыши кликните на нужный файл и выберите опцию «Заменить».
-
Затем укажите путь к файлам мода, которые вы хотите использовать вместо оригинальных.
-
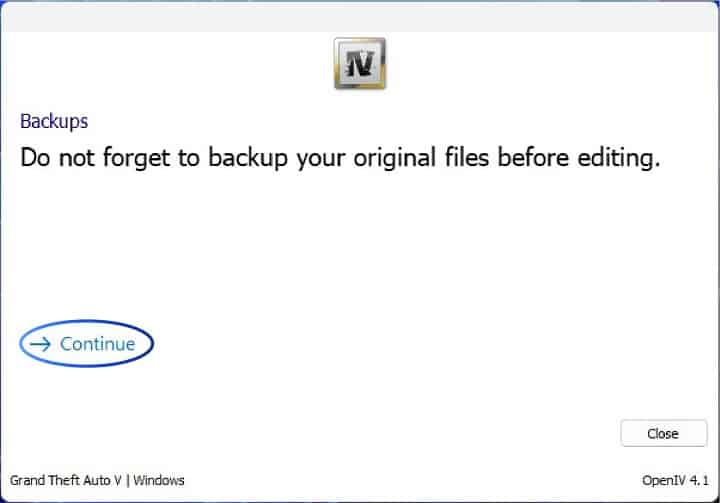
Прежде чем вносить изменения, всегда создавайте резервные копии файлов. Для этого щелкните правой кнопкой мыши по файлу и выберите функцию «Сохранить содержимое» или используйте сочетание клавиш Ctrl+S. Это позволит вам восстановить оригинальные файлы, если что-то пойдёт не так.
-
После завершения всех настроек запустите игру. Закройте OpenIV и откройте GTA 5. Теперь вы можете наслаждаться новыми модификациями!

OpenIV – мощный инструмент для тех, кто хочет сделать свою игру неповторимой. С его помощью можно не только устанавливать моды, но и создавать собственные миссии и сценарии. Следуйте инструкциям, делайте резервные копии и наслаждайтесь новыми возможностями в Лос-Сантосе! Удачи в ваших моддинг-проектах!
Дата выхода Fatal Fury: City of the Wolves – трейлер игры и системные требования
Дата выхода Steel Seed – трейлер игры и системные требования
How To Use OpenIV On Your PC
Would you like to know how to use openiv like an advanced gamer? then you must read this post. We have shared everything that you should know about the tool’s options, settings and some other advanced concepts.
We strongly recommend you to follow our instructions if this is the very first time that you are using the OpenIV on your pc. Not a problem even if you are an experienced gamer, we have something that you don’t know about.

How To Specify GTA 5 Game Location To OpenIV?
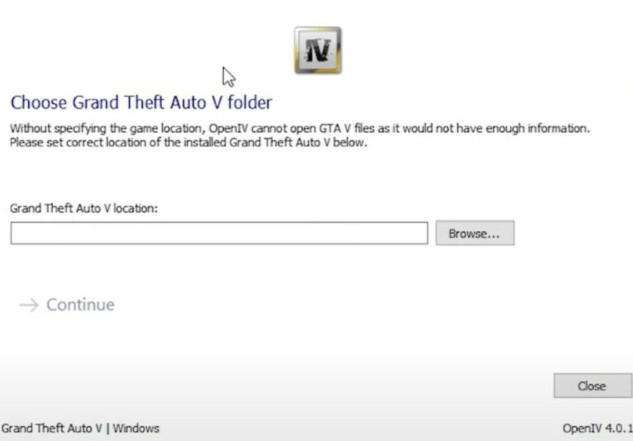
It is necessary to specify the game’s directory folder location to the OpenIV. Otherwise, the tool won’t work as expected. Follow the steps below and follow them accordingly to specify the path of the game’s directory.
Steam Users:
- Let’s say that you have installed the GTA 5 through the Steam Client.
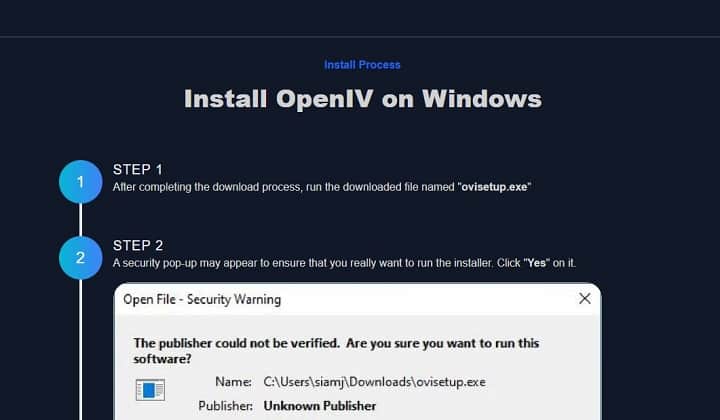
- Double click the OpenIV’s shortcut on your pc’s desktop location to launch it. Go to our download page if you haven’t downloaded the app. Also, read this guide to install the app.
- Tap the “Windows” button which is available right below the GTA 5 section.
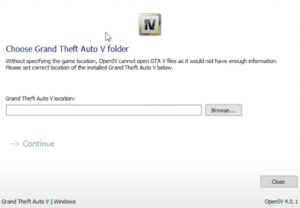
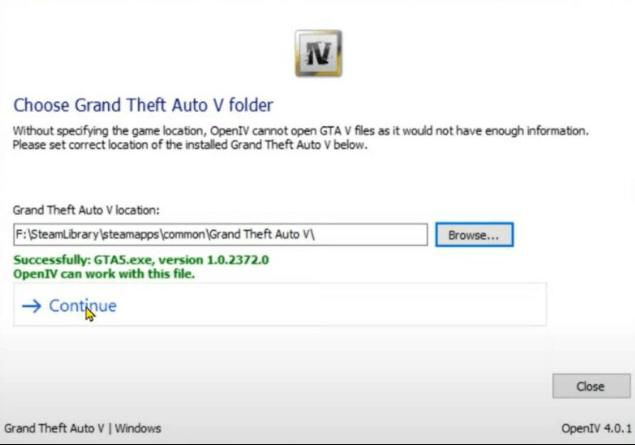
- The default path is empty as shown in the below image. Let’s specify the path as instructed.
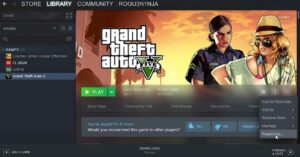
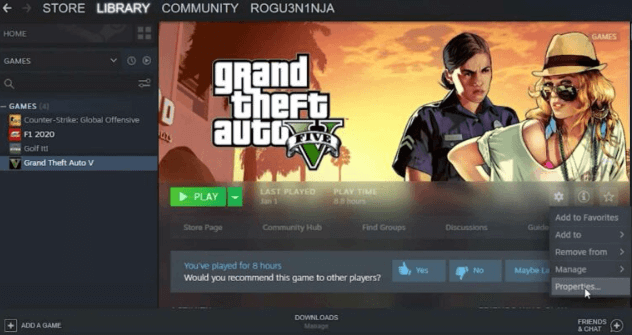
- Launch Steam client on your pc and select Grand Theft Auto V in the left side menu.
- Go to Settings button, scroll down a bit and tap “Properties”.
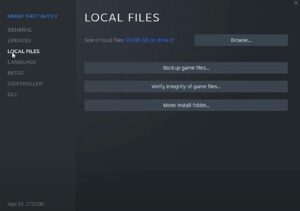
- Now, go to LOCAL FILES section in the left hand side menu. And click “Browse” button to open the GTA 5’s directory folder.
- That will open up the directory folder of the GTA 5 game on your personal computer.
- The path that we have observed on our pc is C > Program Files (x86) > SteamLibrary > steamapps > common > Grand Theft Auto V.
- The path could be something else on your pc. So, follow the above instructions to find out the exact location of the GTA V’s main directory.
- Go back to the OpenIV’s window and tap “Browse” button.
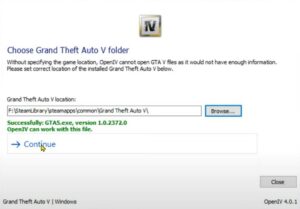
- Select the path that you have observed on your pc (not ours).
Rockstar Games Client Users:
- Launch Rockstar games client on your pc now.
- Select the Grand Theft Auto V from the left side panel.
- Tap “Settings” and then select Grand Theft Auto V.
- Scroll down a bit and tap “Open” button available right to the View Installation Folder option.

- That will open up the folder and you can see the path.
- Make a note of it and select the exact path in the OpenIV.
Epic Games Client Users:
- The procedure to find out the GTA V’s directory for the Epic Games users is completely different.
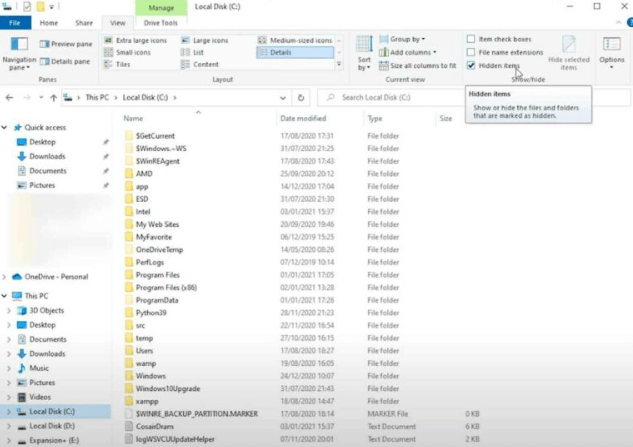
- Open C Drive on your pc and go to “View” in the folder options.
- Turn on “Hidden items” option to view some hidden folders in your C Drive.

- Open the ProgramData folder which is semi visible to the eye.
- Scroll down to the folder “Epic” and open it.
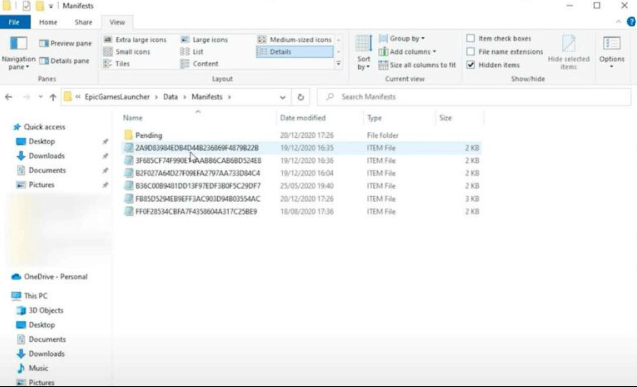
- Now, open the sub folder “EpicGamesLauncher” and “Data” folder inside it.
- Open the “Manifests” folder now.
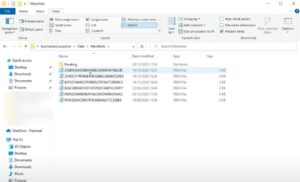
- There, you can see various txt files as a list.
- Open each file in the notepad and use the Find option “Control + F” and type GTA5.exe and hit enter.
- I am pretty sure that you will find the correct file after several attempts.
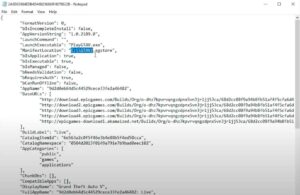
- Whatever we have highlighted in the above image is the directory for GTA 5 in our pc.
- By following the above guidelines, you can find out the GTA 5 directory folder on your pc very easily.
- Come back to the Open IV’s window and tap “Browse” and then select the directory location now.
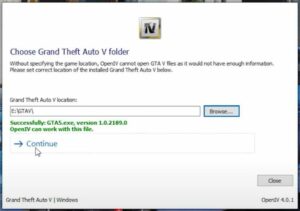
- Tap “Continue” button once you see all in green color.
That’s all! OpenIV will now initiate all required files and will open up very soon. Once it is opened up, you will be able to see all the files including the “Mods” folder. If you would like to know how to tweak the mods folder, you must check out the below section.
In order to create and use the mods folder, you will have to follow certain steps. Don’t worry, we have got your back and shared everything right below in a step by step manner.
- Make sure that you have selected the GTA V’s main directory path before making any changes as described below.
- Launch the OpenIV app on your personal computer now.
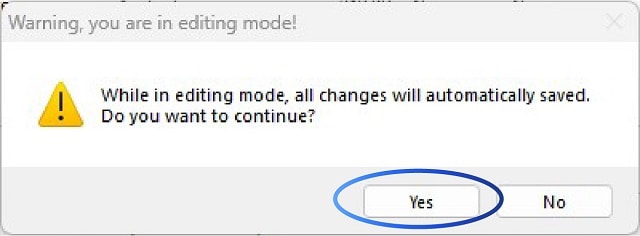
- Tap “Edit Mode” in order to turn it on. Remember that you should do it each time you want to edit something until and unless you keep the edit mode permanent.
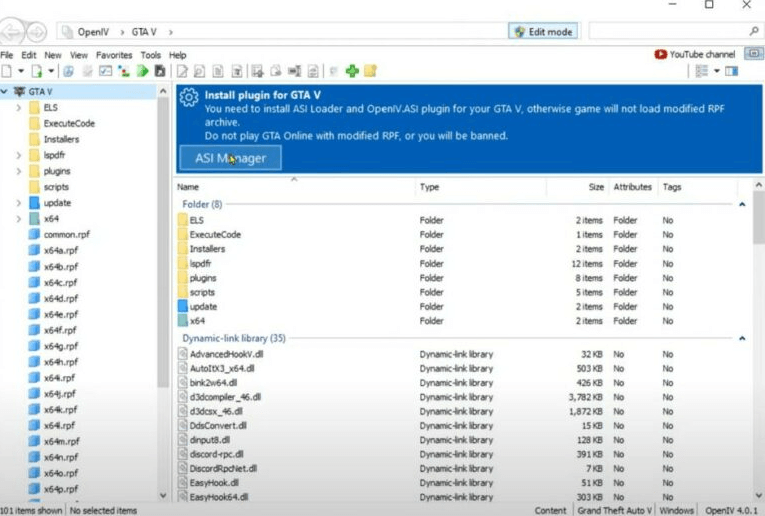
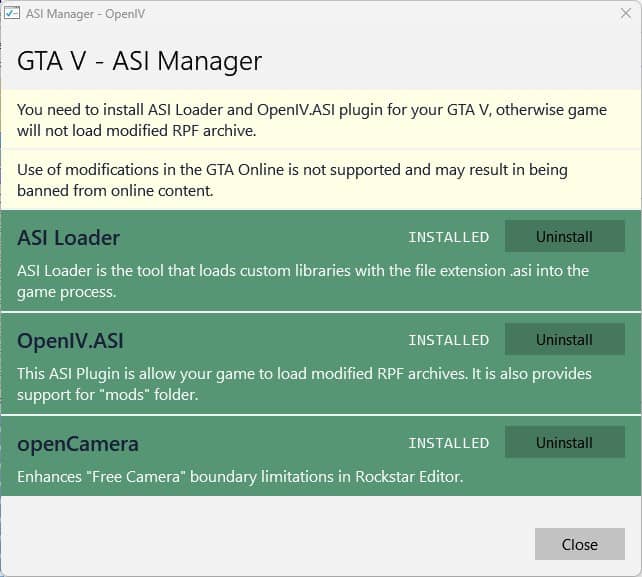
- Go over to “Tools” in the app and tap ASI Manager.
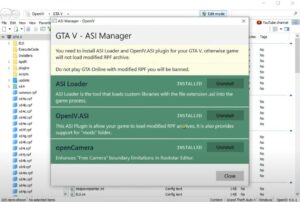
- If you have installed all the plugins as shown in the above image, uninstall OpenIV.ASI and OpenCamera for now and hit “Close”.
- Now, you will see something like in the below image.

- Tap “ASI Manager” button now and hit “Install” button of the OpenIV.ASI.
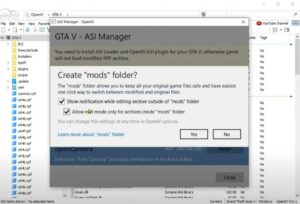
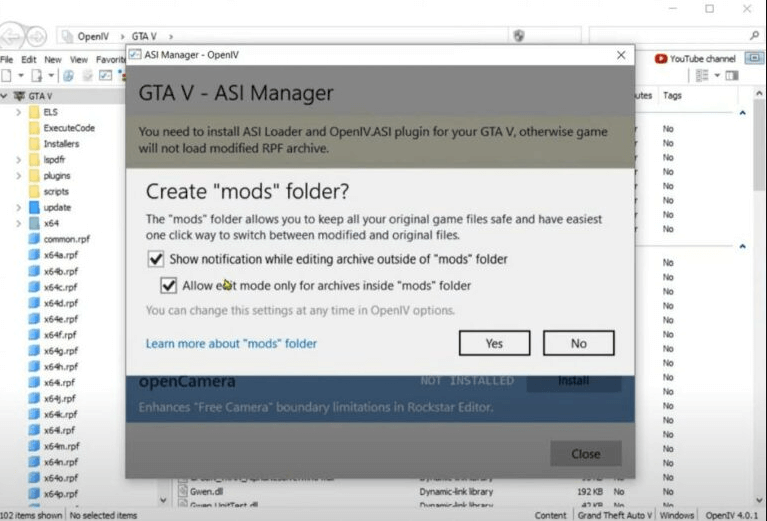
- Turn on both the options that you see on the screen and tap “Yes” button to create mods folder now.
- When you come back to the ASI Manager, make sure to install OpenCamera plugin as well.
- Once it is done, close the ASI Manager window now.
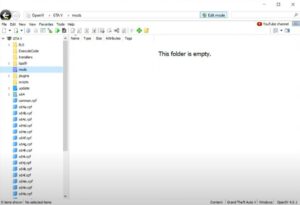
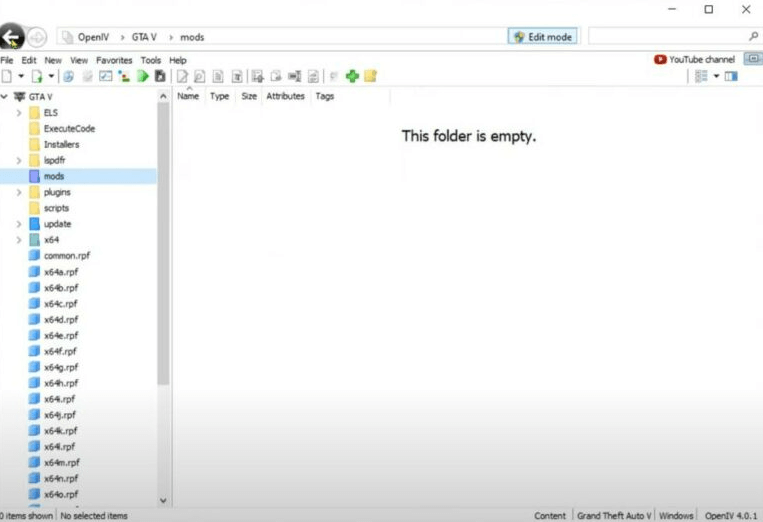
- Now, you can see the mods folder is created but it is empty. Because we haven’t added any files to the folder.
- Actually, your main directory folder will also have the Mods folder from now. Go and check for it if you want to confirm yourselves.
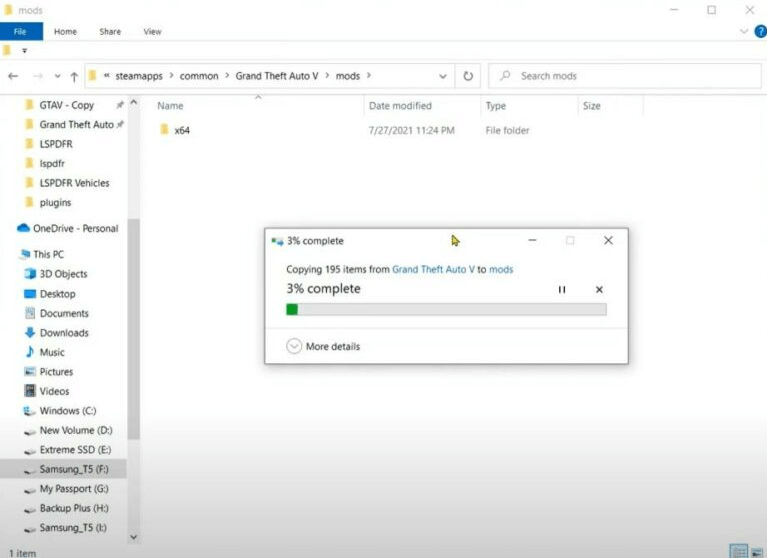
- Launch the main directory of your GTA 5 game on your pc.
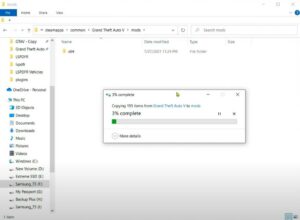
- Select “update” folder and “x64” folder and copy both of them and paste them into the mods folder.
- Once the file transfer is done, launch the OpenIV and open up the mods folder to view the contents.
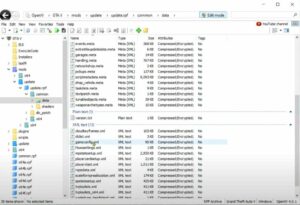
- If you have followed all the steps correctly, you will see all the necessary files inside the mods folder of OpenIV.
That’s all for this tutorial friends! now all your main files are safe. You may now enjoy editing the files and folders that are there inside the mods folder. Up for questions? comment below this page for the answers from us.
Are you interested in learning how to utilize OpenIV like an advanced gamer? If so, this post is a must-read. We have covered everything you need to know about the tool’s options, settings, and other advanced concepts.
Whether you are a beginner or an experienced gamer, we highly recommend following our instructions. Even if you are experienced, we guarantee that there will be something new for you to discover.
How can you specify the game location of GTA 5 in OpenIV?
To start, let’s learn how to specify the game location for GTA 5 in OpenIV. It is essential to do this in order for the tool to function properly. Please follow the steps below carefully to specify the game’s directory path.
For Steam Users:
If you have installed GTA 5 through the Steam Client, here’s what you need to do:
- Double-click the OpenIV shortcut on your PC’s desktop to launch it. If you haven’t downloaded the app yet, you can find it on our download page. Make sure to also read the installation guide.
- Look for the “Windows” button located below the GTA 5 section.
- Launch the Steam client on your PC and select “Grand Theft Auto V” from the menu on the left side.
- Click on the “Settings” button and scroll down slightly until you find the “Properties” option.
- Now, navigate to the “LOCAL FILES” section located in the left-hand side menu. Click on the “Browse” button to open the directory folder of GTA 5.
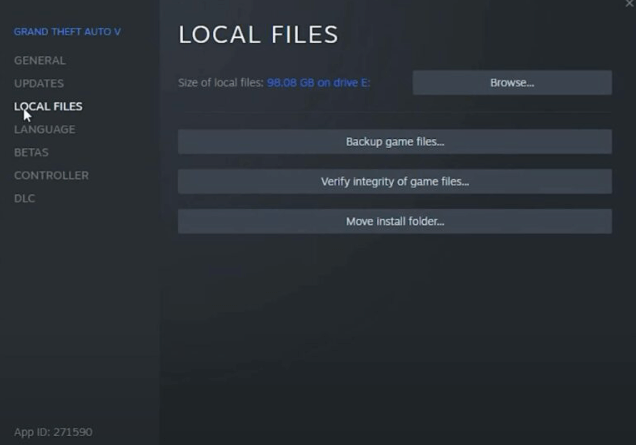
- This will open the directory folder of the GTA 5 game on your personal computer.
- On our PC, the observed path is C > Program Files (x86) > SteamLibrary > steamapps > common > Grand Theft Auto V.
- Please note that the path may vary on your PC. Follow the previous instructions to determine the exact location of GTA V’s main directory.
- Once you have done that, return to the OpenIV window and click the “Browse” button.
- Choose the path that you have observed on your PC (not the one we provided).
For Rockstar Games Client Users:
- Launch the Rockstar Games client on your PC.
- Select “Grand Theft Auto V” from the left side panel.
- Click on “Settings” and then choose “Grand Theft Auto V”.
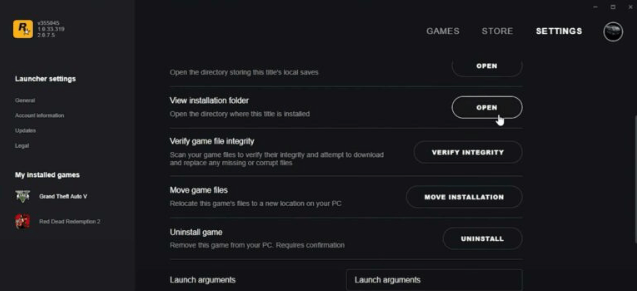
- Scroll down a bit and click on the “Open” button located next to the “View Installation Folder” option.
- This will open the folder, and you will be able to see the path. Take note of it and select the precise path in OpenIV.
For Epic Games Client Users:
The procedure for finding the GTA V directory is different for Epic Games users.
- Open the C Drive on your PC.
- In the folder options, navigate to “View“.
- Enable the “Hidden items” option to view hidden folders in your C Drive.
- To open the semi-visible ProgramData folder, scroll down and locate the “Epic” folder.
- Open it and then access the subfolders “EpicGamesLauncher” and “Data“.
- From there, open the “Manifests” folder, where you will find a list of various TXT files.
- To locate the correct file, open each file in Notepad and use the “Find” option (Control + F) to search for “GTA5.exe“.

- After several attempts, you should be able to identify the correct file, which indicates the directory location of GTA 5 on your PC.
- Returning to the OpenIV window, click “Browse” and select the directory location you identified.
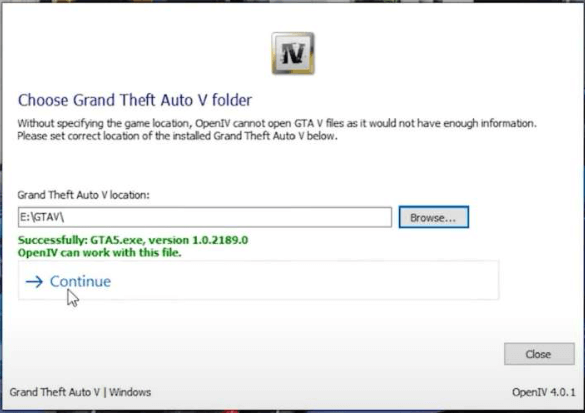
- Once you see everything in green color, click “Continue“.
OpenIV will initiate the required files and open up shortly, displaying all the files, including the “Mods” folder. For information on how to work with the mods folder, refer to the section below.
Would you like to learn how to create and utilize the mods folder in OpenIV?
Creating and using the mods folder in OpenIV requires a series of steps:
- Ensure that you have selected the main directory path of GTA V before making any changes.
- Launch the OpenIV app on your PC.
- Activate “Edit Mode” to enable editing. Remember to do this each time you want to make edits, unless you set the edit mode to be permanent.
- In the app, go to “Tools” and click on “ASI Manager“.
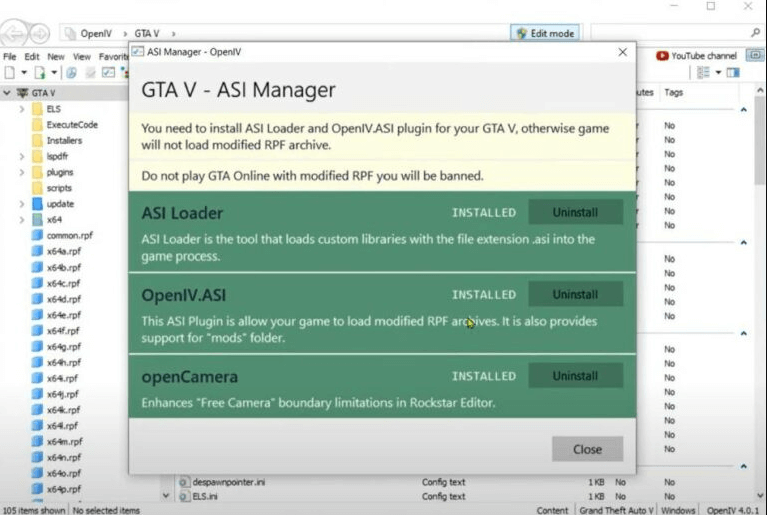
- If you have installed all the plugins as shown in the image, temporarily uninstall OpenIV.ASI and OpenCamera and then click “Close“.
- Now, click the “ASI Manager” button and select “Install” for OpenIV.ASI.
- Enable both options on the screen and click “Yes” to create the mods folder.
- Once back in the ASI Manager, make sure to install the OpenCamera plugin as well.
- Close the ASI Manager window.
- You will notice that the mods folder has been created, but it is currently empty. This folder will also be present in your main directory folder.
- Launch the main directory of your GTA 5 game on your PC.
- Copy both the “update” folder and the “x64” folder, and paste them into the mods folder.
- Once the file transfer is complete, open OpenIV and access the mods folder to view its contents.
- If you have followed all the steps correctly, you should see the necessary files inside the mods folder of OpenIV.
That concludes this tutorial! Your main files are now secure, and you can enjoy editing the files and folders within the mods folder. If you have any questions, feel free to comment below for assistance.

MD Shahariar Jaman Siam
MD Shahariar Jaman Siam is the CEO and the founder of Fileion.Com & NearFile.Com. He is a professio…
In this article, we are going to discuss how you can install mods on Rockstar-presented GTA games using OpenIV.
Install mods using OpenIV
There are more than a thousand mods available. But for this tutorial, we are going to add a new vehicle to our game. To install mods using OpenIV for Rockstar Grand Theft Auto (GTA) games, you can follow these basic steps:
Step 1: Open your favorite browser.
Step 2: Download and Install Script Hook V.
Step 3: After installing Script Hook V, install Menyoo PC GTA Mod.
Step 4: Now everything is almost ready but one. Download OpenIV and install it on your PC. You can find the installation process here.
Step 5: Open OpenIV and from the Grand Theft Auto V section, click on Windows.

Step 6: Click on «Browse» and select the GTA V installation folder.
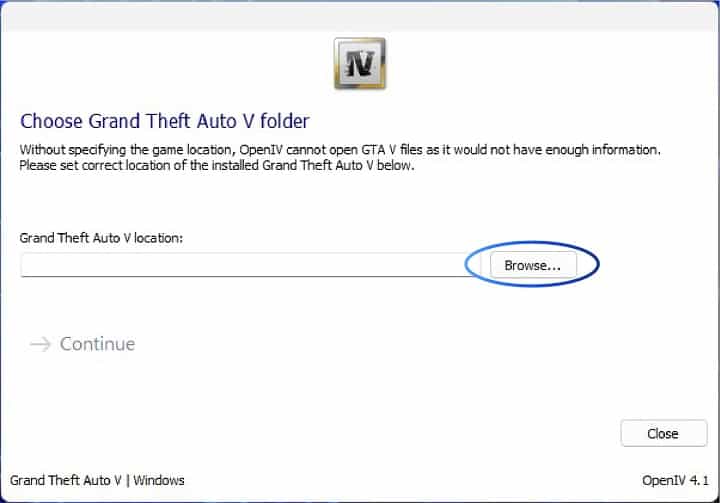
Step 7: After selecting the location, make sure the green text is shown as the below image. Then click on «Continue«

Step 8: Again click on «Continue«.
Step 9: Wait for a moment until OpenIV processes all files.
Step 10: Now the OpenIV file manager will be opened. from there click on «Edit Mode«.
Step 11: Click on «Yes«.
Step 12: Now click on «ASI Manager«.
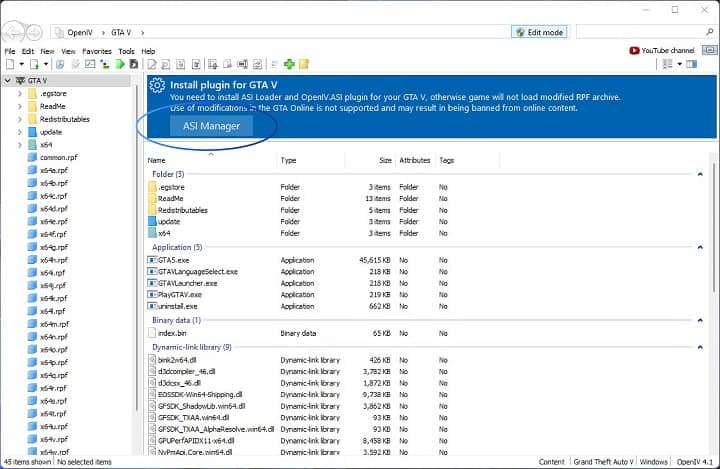
Step 13: A window will be opened. From there, you will find 3 tools. Click on the «Install» button one by one to install each of them. Make sure it looks the same as the below image.
Step 14: Now go to the installation folder of GTA V, there you will see a new folder named «mods». All the mods will be installed through this folder and the original files will be untouched.
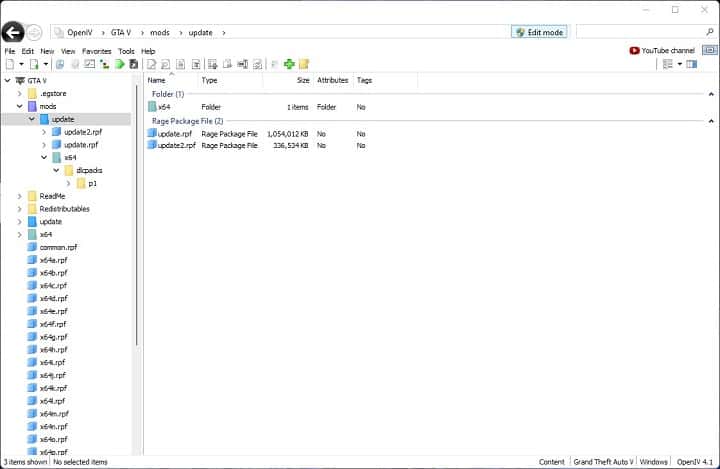
Step 15: From the installation folder, open the «update» folder and copy the «update.rpf» file.
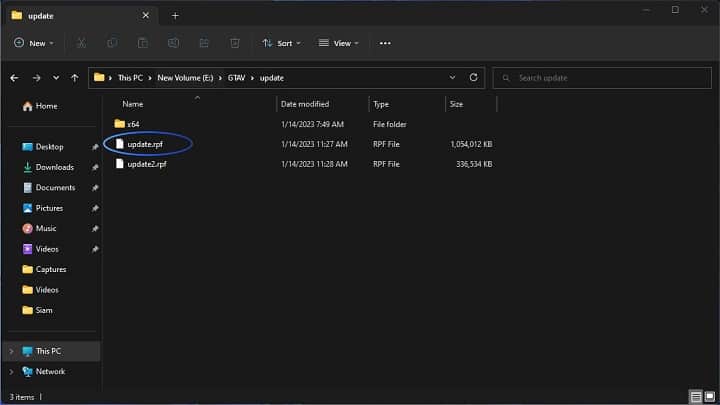
Step 16: Now open the «mods» folder and create a folder named «update» and paste the «update.rpf» file inside that «update» folder.
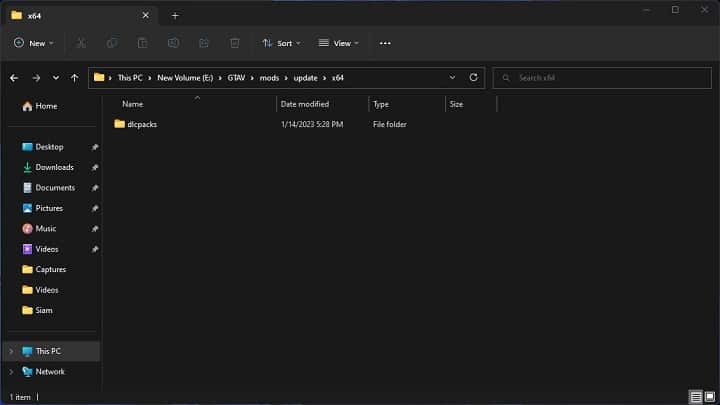
Step 17: Inside that «mods» folder create another folder named «x64«. and inside the «x64» folder create another folder named «dlcpacks«.
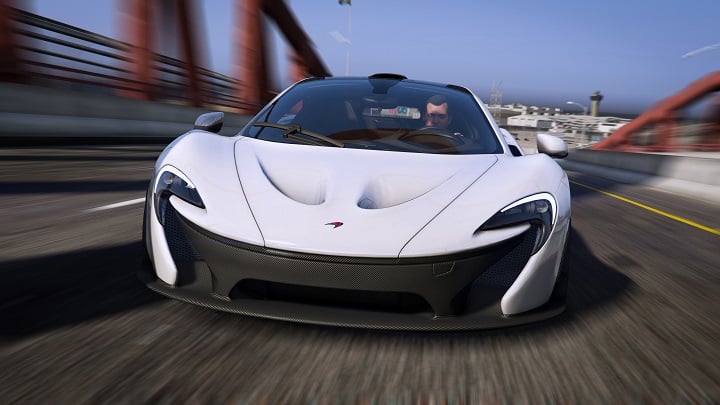
Step 18: Download the mod you want to install. It should be in the form of a .rar or .zip file. For this tutorial, we are going to add 2014 McLaren P1 vehicle mod to our game.
Step 19: Extract the file and find the «dlcpacks» folder.
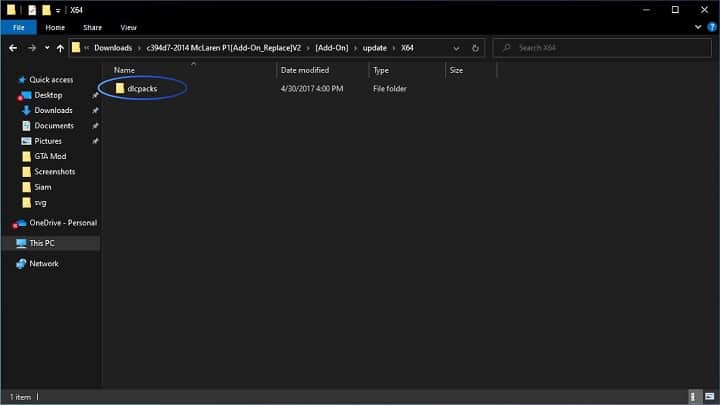
Step 20: Copy all the files from that folder and paste them into «{GTA V Game Location}/mods/update/x64/dlcpacks«.
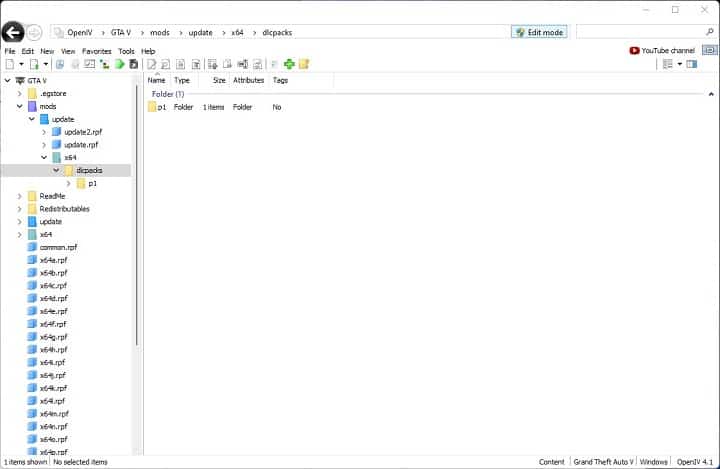
Step 21: Now go back to OpenIV and go to «mods/update«.
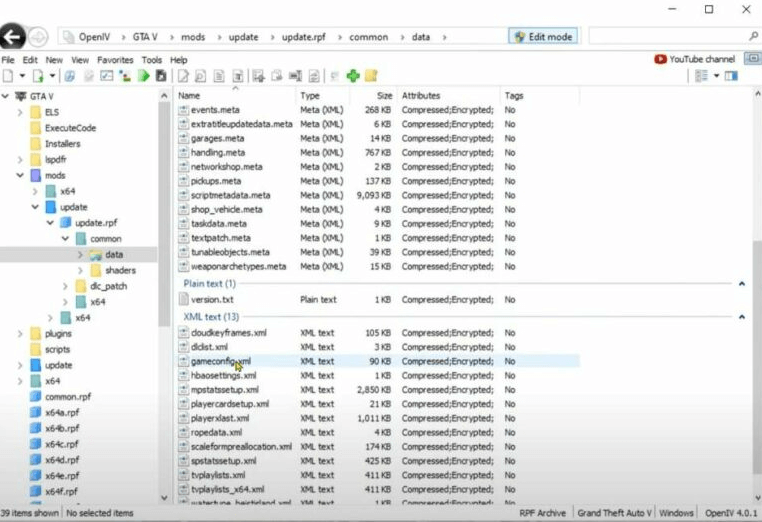
Step 22: Open the «update.rpf» file and navigate to the «common/data» folder.
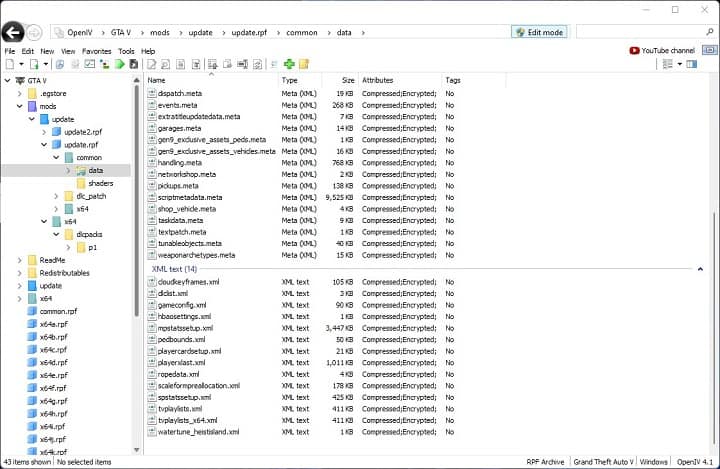
Step 23: From there, look for the «dlclist.xml» file. Right-click on it and click on «Edit«.
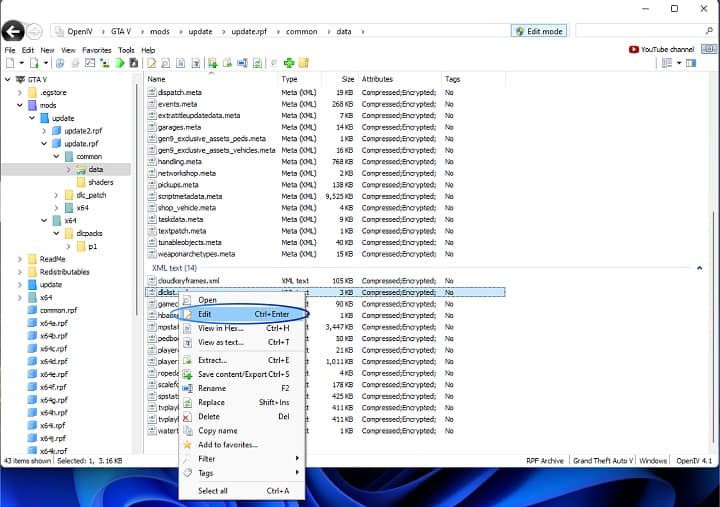
Step 24: A text editor will be opened. There you will see a list of <item> lines.
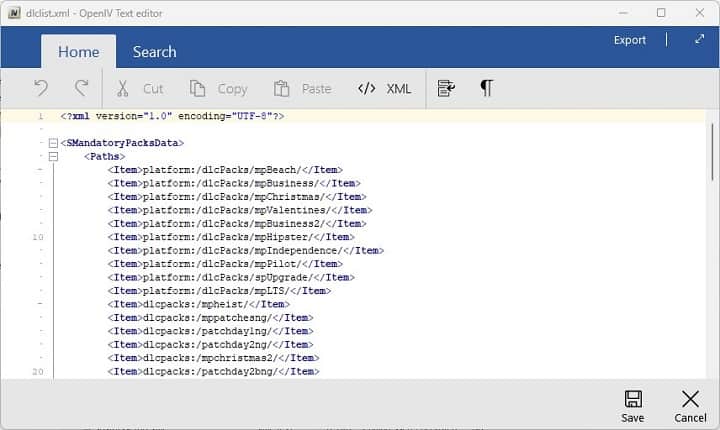
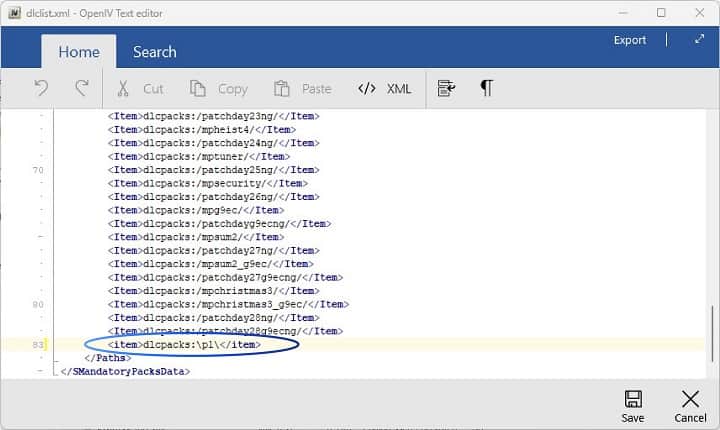
Step 25: Navigate to the last line and add the following line: (this line will be different for you if you install a different mod)
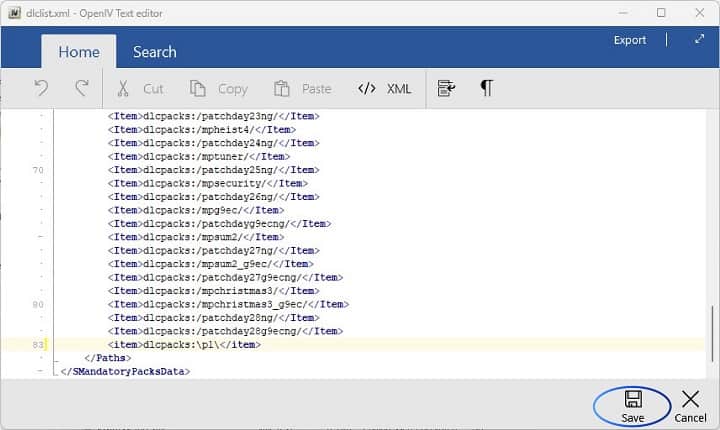
<item>dlcpacks:\p1\</item>
If you install any different mod then just replace «p1» with your mod’s folder name (that folder which you added in the «dlcpacks» folder).
Step 26: Now click on the «Save» icon.
Everything is done. You have successfully installed the «2014 McLaren P1» vehicle mod on your GTA V game.
Now run the game and enjoy!
Please be aware that installing mods can cause issues and may violate the terms of service of the game. Always use mods from trusted sources, and make sure to back up your game files before installing any mods.
Conclusion
We have tried our level best to provide you with all the steps. Don’t hesitate to comment us below if you face any issues. We will be glad to help you.
Please share this article with your friends so that they also can be benefitted from it.