
Хорошее руководство по эксплуатации
Законодательство обязывает продавца передать покупателю, вместе с товаром, руководство по эксплуатации Pioneer VSX-831. Отсутствие инструкции либо неправильная информация, переданная потребителю, составляют основание для рекламации в связи с несоответствием устройства с договором. В законодательстве допускается предоставлении руководства в другой, чем бумажная форме, что, в последнее время, часто используется, предоставляя графическую или электронную форму инструкции Pioneer VSX-831 или обучающее видео для пользователей. Условием остается четкая и понятная форма.
Что такое руководство?
Слово происходит от латинского «instructio», тоесть привести в порядок. Следовательно в инструкции Pioneer VSX-831 можно найти описание этапов поведения. Цель инструкции заключается в облегчении запуска, использования оборудования либо выполнения определенной деятельности. Инструкция является набором информации о предмете/услуге, подсказкой.
К сожалению немного пользователей находит время для чтения инструкций Pioneer VSX-831, и хорошая инструкция позволяет не только узнать ряд дополнительных функций приобретенного устройства, но и позволяет избежать возникновения большинства поломок.
Из чего должно состоять идеальное руководство по эксплуатации?
Прежде всего в инструкции Pioneer VSX-831 должна находится:
— информация относительно технических данных устройства Pioneer VSX-831
— название производителя и год производства оборудования Pioneer VSX-831
— правила обслуживания, настройки и ухода за оборудованием Pioneer VSX-831
— знаки безопасности и сертификаты, подтверждающие соответствие стандартам
Почему мы не читаем инструкций?
Как правило из-за нехватки времени и уверенности в отдельных функциональностях приобретенных устройств. К сожалению само подсоединение и запуск Pioneer VSX-831 это слишком мало. Инструкция заключает ряд отдельных указаний, касающихся функциональности, принципов безопасности, способов ухода (даже то, какие средства стоит использовать), возможных поломок Pioneer VSX-831 и способов решения проблем, возникающих во время использования. И наконец то, в инструкции можно найти адресные данные сайта Pioneer, в случае отсутствия эффективности предлагаемых решений. Сейчас очень большой популярностью пользуются инструкции в форме интересных анимаций или видео материалов, которое лучше, чем брошюра воспринимаются пользователем. Такой вид инструкции позволяет пользователю просмотреть весь фильм, не пропуская спецификацию и сложные технические описания Pioneer VSX-831, как это часто бывает в случае бумажной версии.
Почему стоит читать инструкции?
Прежде всего здесь мы найдем ответы касательно конструкции, возможностей устройства Pioneer VSX-831, использования отдельных аксессуаров и ряд информации, позволяющей вполне использовать все функции и упрощения.
После удачной покупки оборудования/устройства стоит посвятить несколько минут для ознакомления с каждой частью инструкции Pioneer VSX-831. Сейчас их старательно готовят или переводят, чтобы они были не только понятными для пользователя, но и чтобы выполняли свою основную информационно-поддерживающую функцию.
Просмотр
Доступно к просмотру 92 страницы. Рекомендуем вам скачать файл инструкции, поскольку онлайн просмотр документа может сильно отличаться от оригинала.
-
De   Nl    Ru
It         3  5  7  10  12  13  14  16  18  19  20  20
Nome dei componenti            .......................................  ...............................11
>                            Passaggio 1: Collegamento dei diffusori  ................................ Passaggio 2: Collegare il televisore  Passaggio 3: Collegamento dei componenti AV ..................... Passaggio 4: Collegare gli altri cavi ...................................... Passaggio 5: Accensione e Initial Setup  Setup HDMI .......................................................................... Riproduzione base ...............................
Riproduzione               Collegamento  Setup  Riproduzione  Altri  Nome dei componenti  leggere su PC o smartphone.
>
Setup
SN29402185_VSX-831_BAS_It_1601XX.book  1 ???  2016?1?18? ??? ??7?26?
>
Collegamento                 Manuale
>                                          di Base
Prima di iniziare                                    VSX-831  AV Receiver
>
-
Nome dei componenti    5. Microfono di configurazione dei diffusori ?1  ohm,   W (6  ?. Il cavo di alimentazione deve essere
>                              selezionare la sorgente utilizzando il selettore di ingresso. E possibile collegare 5.1ch di diffusori a questa unita,  kHz, distorsione armonica totale 0,9%) (Modelli per Nord America) / 130 kHz, distorsione armonica totale 1%) (Modelli per Europa, Australia e Asia) per canale piu un terminale pre-out  Il terminale HDMI supporta l'utilizzo di segnali video in formato 4K, sia in ingresso che in uscita. I terminali IN1 -  Funz
Riproduzione         2. Telecomando (RC-914R) ?1, Batterie (AAA/R03) ?2 4. Antenna a telaio AM ?1 Questa unita viene collegata in posizione intermedia tra il televisore e i componenti AV. Per riprodurre,   ARC: Possibilita di collegare l'unita a televisori compatibili con ARC tramite un cavo HDMI  collegato solo dopo che sono stati completati tutti gli altri collegamenti.
>                                ohm, 1             televisore anche se questa unita e in standby  riproduzione come radio AM/FM e riproduzione BLUETOOTH ®  ATTENZIONE: Collegare diffusori con impedenza da 6
Setup              Contenuto della confezione  3. Antenna FM interna ?1  Funzioni principali  W (6  3 e OUT supportano HDCP2.2  unita quando si spegne il televisore  operazioni sul televisore  altre aziende.
SN29402185_VSX-831_BAS_It_1601XX.book  2 ???  2016?1?18? ??? ??7?26?
>                    1. Unita principale  con 5ch a 140  1  per subwoofer attivo.  $  $  $  $  $  $  $  0
Collegamento
>                                                                      4
Prima di iniziare                                      1               3
>                                                                      2        5
2
-
It
3
Nome dei componenti                                         ?2
>               Disposizione diffusori per sistema a  I diffusori anteriori emettono l'audio stereo centrale ed un diffusore centrale  emette l'audio centrale, ad esempio i dialoghi e le voci. I diffusori surround  consentono di creare un campo sonoro posteriore. Il subwoofer attivo  riproduce i suoni bassi e crea un ricco campo sonoro. I diffusori anteriori  devono essere posizionati all'altezza delle orecchie, mentre i diffusori  surround devono essere p
Riproduzione       5.1 canali           riproduce della musica.  sistema a 5.1 canali.
>                                         0
Setup
SN29402185_VSX-831_BAS_It_1601XX.book  3 ???  2016?1?18? ??? ??7?26?
>
Collegamento
>        Passaggio 1: Collegamento dei diffusori
Prima di iniziare                                                      Diffusori anteriori  Diffusore centrale  Diffusori surround  Subwoofer attivo
>                                                                       12  3  45  6
- 1
- 2
- 3
- 4
- 92
Русский
- Bedienungsanleitung Pioneer VSX-831
- Pioneer VSX-831 User Manual
- Manual Usuario Pioneer VSX-831
- Mode d’emploi Pioneer VSX-831
- Istruzioni Pioneer VSX-831
- инструкция Pioneer VSX-831
- Pioneer VSX-831の取扱説明書
- Handleiding Pioneer VSX-831
- Manual de uso Pioneer VSX-831
Вам нужна инструкция? Мы поможем Вам ее найти и сэкономить Ваше время.
- 92 stron
- 9.19 mb
Изделие Pioneer VSX-831, а также другие, которыми Вы пользуетесь ежедневно, наверняка вы получили в комплекте с инструкцией обслуживания. Из опыта наших пользователей мы знаем, что большинство из Вас не уделили этому особого внимания. Большая часть инструкций, сразу же после покупки попадает в корзину для мусора вместе с коробкой — это ошибка. Ознакомьтесь с информацией, касающейся инструкции Pioneer VSX-831, которая поможет Вам в будущем сэкономить нервы и избежать головной боли.
Важная подсказка — не забывайте хотя бы раз прочитать инструкцию Pioneer VSX-831
Если вы не хотите каждый раз читать информационные брошюры, касающиеся, тех или Pioneer VSX-831 иных изделий, достаточно, прочитать их раз — сразу же после покупки устройства. Вы получите основное знания, касающиеся поддержания изделия Pioneer VSX-831 в хорошем эксплуатационном состоянии, так, чтобы без проблем достигнуть его планируемого цикла работы. Затем инструкцию можно отложить на полку и вернуться к ней только в случае, если вы не уверены, правильно ли проводится техобслуживание изделия. Правильный уход является необходимым элементом Вашего удовольствия Pioneer VSX-831.
Раз в году пересмотрите шкафчик, в котором держите инструкции для всех устройств, — выбросите те, которыми вы уже не пользуетесься. Это поможет Вам сохранять порядок в своей домашней базе инструкций обслуживания.
Summary of Contents for Pioneer VSX-831
Что находится в инструкции Pioneer VSX-831? Почему стоит ее прочитать?
- Гарантия и подробности, касающиеся техобслуживания изделия
Хорошей идеей будет прикрепить чек к странице инструкции. Если что-то плохое случится во время использования Pioneer VSX-831, у вас будет комплект документов, необходимый для гарантийного ремонта. В этой части инструкции вы найдете информацию об авторизованных сервисных центрахPioneer VSX-831 а также, как самостоятельно правильно ухаживать за оборудованием — так, чтобы не потерять гарантийных прав. - Указания по монтажу и Setup
Не терять нервов и времени на самостоятельную попытку установки и первого запуска изделия. Воспользуйтесь рекомендациями производителя Pioneer VSX-831 чтобы правильно запустить изделие, без лишнего риска повреждения оборудования. - Информация, касающаяся дополнительных запчастей (входящих в комплект а также являющихся опцией)
Пересматривая эту часть документа вы сможете проверить, доставлен ли ваш Pioneer VSX-831 с полним комплектом аксессуаров. Вы также сможете узнать, какие дополнительные запчасти или аксессуары для Pioneer VSX-831 Вы сможете найти и докупить к своему устройству. - Troubleshooting
Самые частые проблемы, касающиеся Pioneer VSX-831 и методы их решения. Это очень полезная часть руководства по обслуживанию — она позволит Вам сэкономить много времени на поиск решений. 90% проблем с Pioneer VSX-831 повторяется у многих пользователей. - Требования, касающиеся питания и энергетический класс
Информация, касающаяся количества потребляемой энергии, а также рекомендации, касающиеся установки и питания Pioneer VSX-831. Прочитайте, чтобы оптимально пользоваться Pioneer VSX-831 и не использовать большего количества ресурсов, нежели это необходимо для правильной работы изделия. - Специальные функции Pioneer VSX-831
Здесь вы можешь узнать, как персонализировать изделие Pioneer VSX-831. Вы узнаете, какие дополнительные функции могут помочь Вам удобно использовать продукт Pioneer VSX-831 а также, какие функции Вашего устройства оптимальны для выполнения конкретной деятельности.
Как видите в инструкции вы найдете информацию, которая реально поможет Вам в использовании Вашего изделия. Стоит с ней ознакомиться, чтобы избежать разочарований, возникающих из более короткого, нежели предусматривалось, периода исправности изделия Pioneer VSX-831. Если все же вы не хотите копить инструкции в своем доме, наш сайт поможет Вам в этом — вы должны найти у нас руководство по обслуживанию большинства из своих устройств, а также Pioneer VSX-831.
Комментарии (0)

http://www.pioneer-audiovisual.com/manual/vsx831/adv/en.html
Advanced Manual found here
> Before start > Hookup > Setup > Playback > Part Names
Basic
Manual
VSX-831
AV Receiver
Hookup
Step1: Connect the Speakers …………………………………………..3
Step2: Connect the TV ……………………………………………………5
Step3: Connect the AV Components …………………………………7
Step4: Connect Other Cables …………………………………………10
Setup
Step5: Power On & Initial Setup ……………………………………..11
HDMI Setup …………………………………………………………………12
Playback
Basic Playback …………………………………………………………….13
Network Functions ………………………………………………………..14
Others …………………………………………………………………………16
Part Names
Front Panel ………………………………………………………………….18
Rear Panel ………………………………………………………………….19
Remote Controller ………………………………………………………..20
Display ………………………………………………………………………..20
This manual includes information needed when starting up and also
instructions for frequently used operations. The «Advanced Manual» is
available on the internet with details about the playback features/
listening modes/settings details, specifications, and troubleshooting.
The Advanced Manual is created in a format that makes it easy to read
on a PC or Smartphone.
> Before start > Hookup > Setup > Playback > Part Names
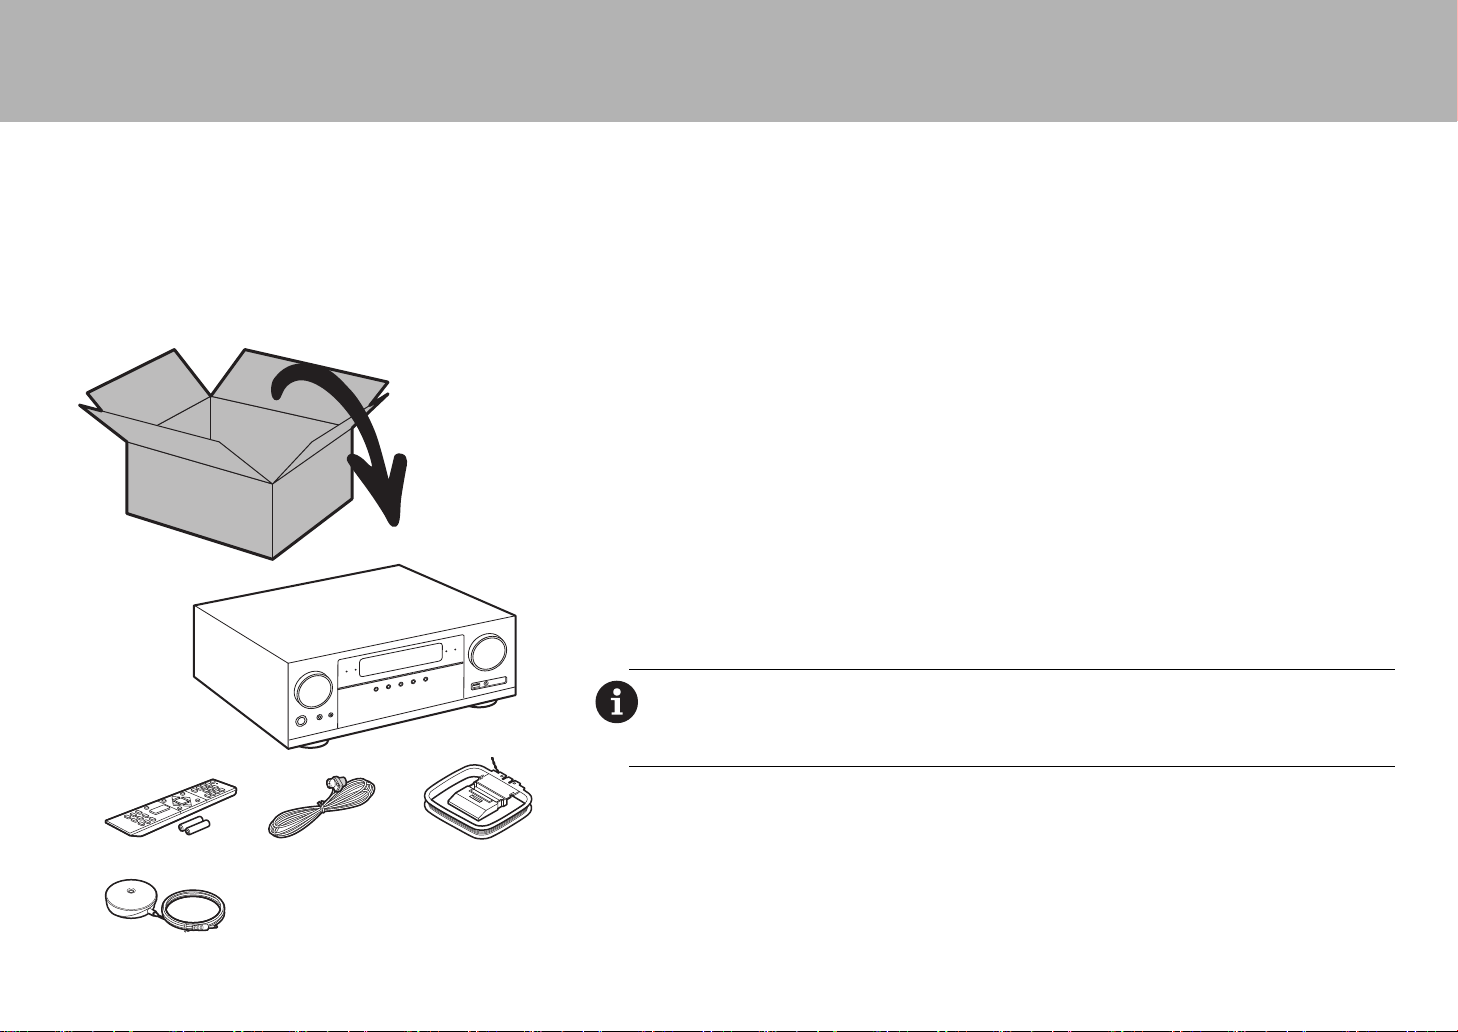
What’s in the box
1. Main unit 2. Remote controller (RC-914R) ×1, Batteries (AAA/R03) ×2
3. Indoor FM antenna ×1 4. AM loop antenna ×1 5. Speaker setup microphone ×1
Main features
This unit is connected between your TV and your AV components. To play, select the source with the input
selector. You can connect 5.1ch of speakers to this unit, with 5ch at 140 W (6 ohms, 1 kHz, 0.9%THD) (North
American models) / 130 W (6 ohms, 1 kHz, 1%THD) (European, Australian and Asian models) per channel plus a
powered subwoofer pre out jack.
$
The HDMI jack supports 4K video input and output. Jacks IN1 to 3 and OUT support HDCP2.2
$
HDMI CEC functionality: Control features such as linking input switching with the input selector and players
conforming to the CEC standard, switching audio output and volume using the remote controller of a CECcompliant TV, and automatically switching this unit to standby when the TV is turned off
$
HDMI Standby Through: Video and audio signals from AV components can be transmitted to the TV even if this
unit is in standby
$
ARC: Connection with an ARC-compatible TV is complete with one HDMI cable
$
Easy Initial Setup using onscreen guidance and On-Screen Display (OSD) showing operations on the TV
$
Internet radio and AirPlay via wired LAN or Wi-Fi (wireless LAN) and network features such as Music Server
1
that enables PC music file playback, USB playback, plus other playback features such as AM/FM radio and
BLUETOOTH
$
Playback formats supported by Music Server and USB include WAV, FLAC and DSD high-res source
®
play
CAUTION: Connect speakers with 6 Ω to 16 Ω impedance. The power cord must be connected only after
all other cable connections are completed.
0 We will not accept responsibility for damage arising from the connection of equipment manufactured by
other companies.
2
34
5
2
> Before start > Hookup > Setup > Playback > Part Names
Step1: Connect the Speakers
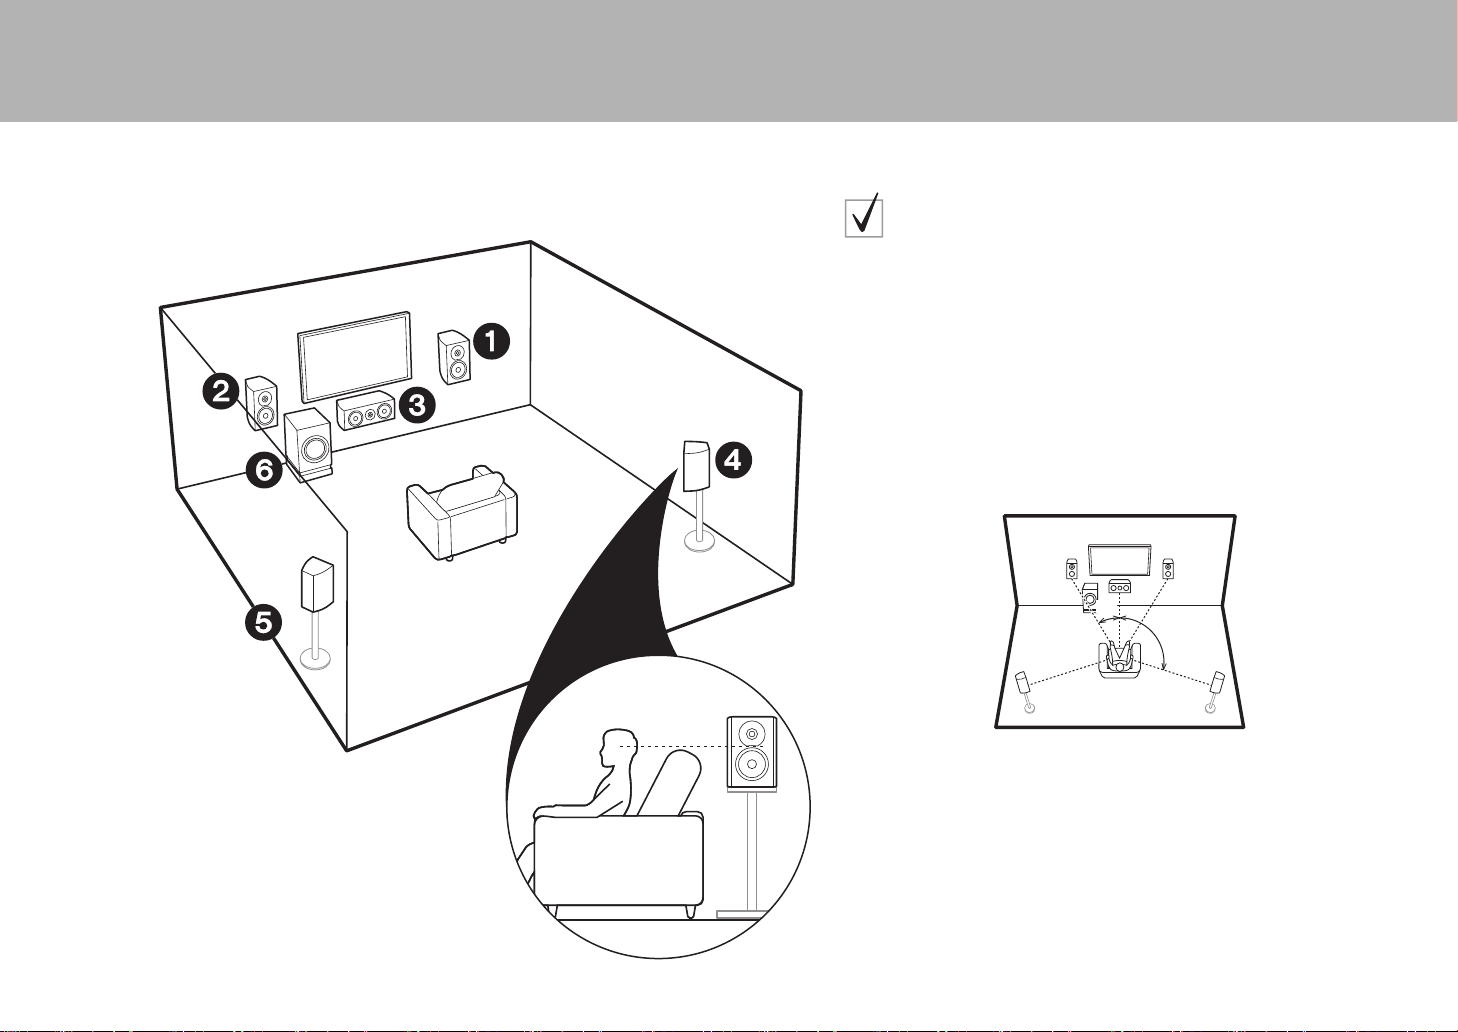
Speaker Layout for 5.1-Channel
System
Front speakers output front stereo sound and a center speaker outputs center
sound such as dialogs and vocals. Surround speakers create back sound
field. Powered subwoofer reproduces bass sounds and creates rich sound
field. The front speakers should be positioned at ear height, while the
surround speakers should be positioned just above ear height. Center
speaker should be set up facing the listening position. Place the powered
subwoofer towards the front. Placing it between the center speaker and a front
speaker gives you a natural sound even when playing music.
0 The front speakers, center speaker, and surround speakers are counted as
5 channels, and the powered subwoofer is counted as 0.1 of a channel,
giving us the name 5.1ch system.
1
*
2
*
12
3
45
6
* 1: 22e to 30e, * 2: 120e
Front Speakers
Center Speaker
Surround Speakers
Powered Subwoofer
3
> Before start > Hookup > Setup > Playback > Part Names
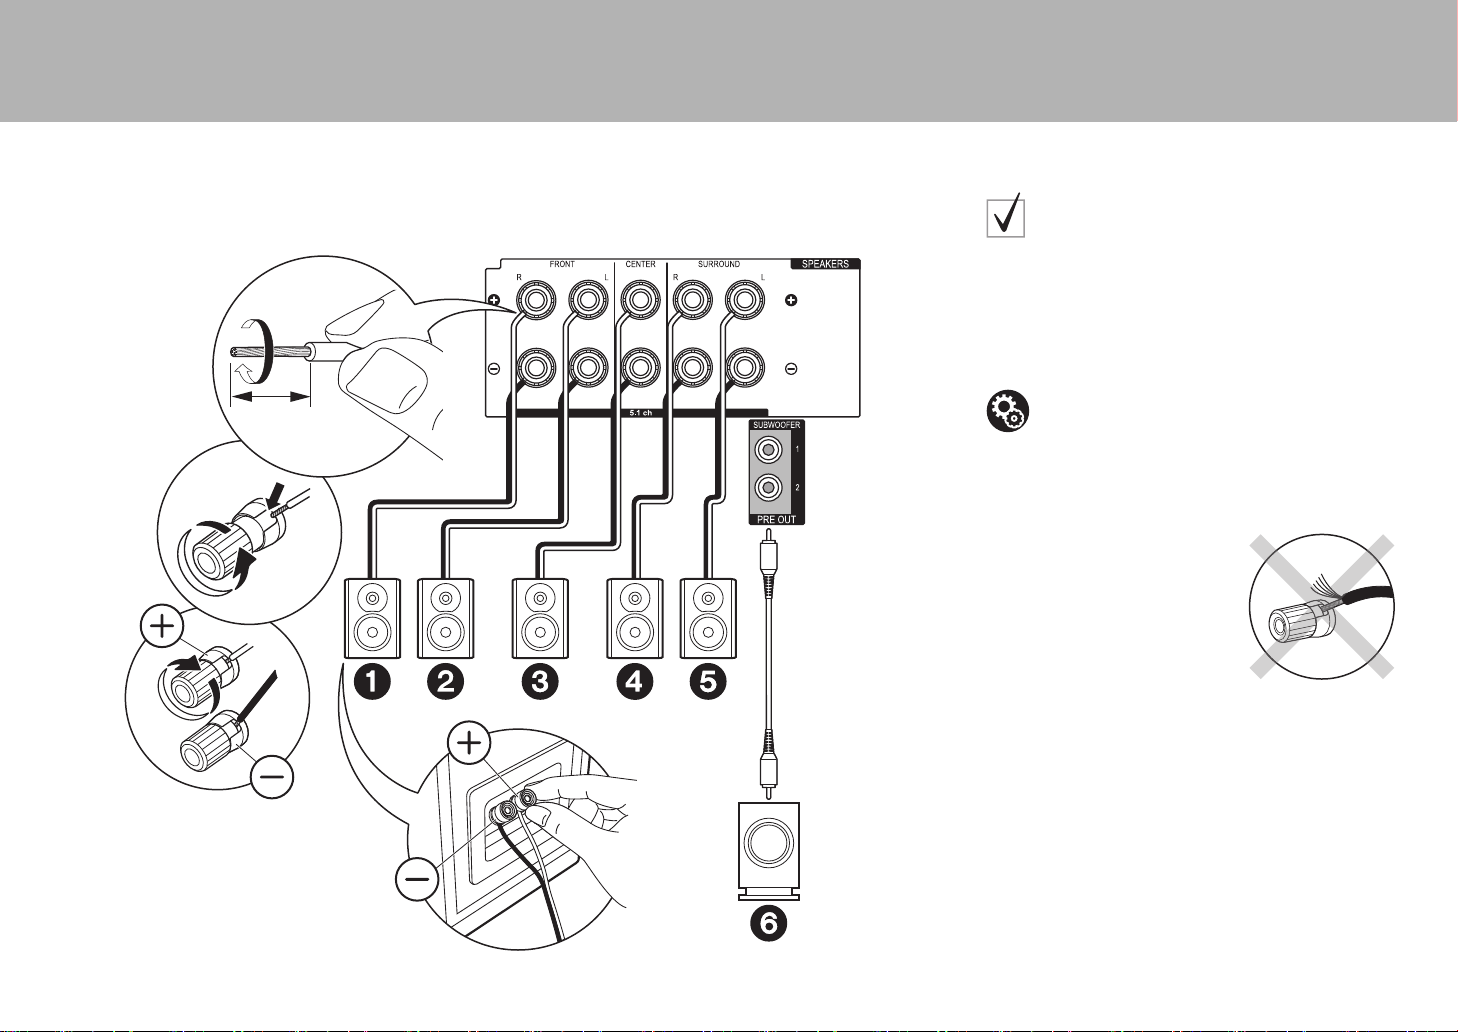
Connect 123456 for a 5.1-channel system. Up to
two powered subwoofers can be connected. The same
signal is output from each of the SUBWOOFER jacks.
Note that it is possible to connect just 12 and no other
jacks.
1/2˝
(12 mm)
1
Connections for 5.1Channel System
Setup
0 The speaker configuration is set to 5.1ch audio
output by default. If there are speakers you won’t
be connecting, you need to change the settings in
Initial Setup, «1. Full Auto MCACC» (
the audio from those speakers you are not
connecting is sent to other speakers.
P11) so that
Make sure the exposed wires of the speakers do not stick out of
the speaker terminals when connecting. If the exposed wires of
the speakers touch the rear panel or the + and – wires touch each
other, the protection circuit will be activated.
2
1 Speaker cable, 2 Subwoofer cable
4
> Before start > Hookup > Setup > Playback > Part Names
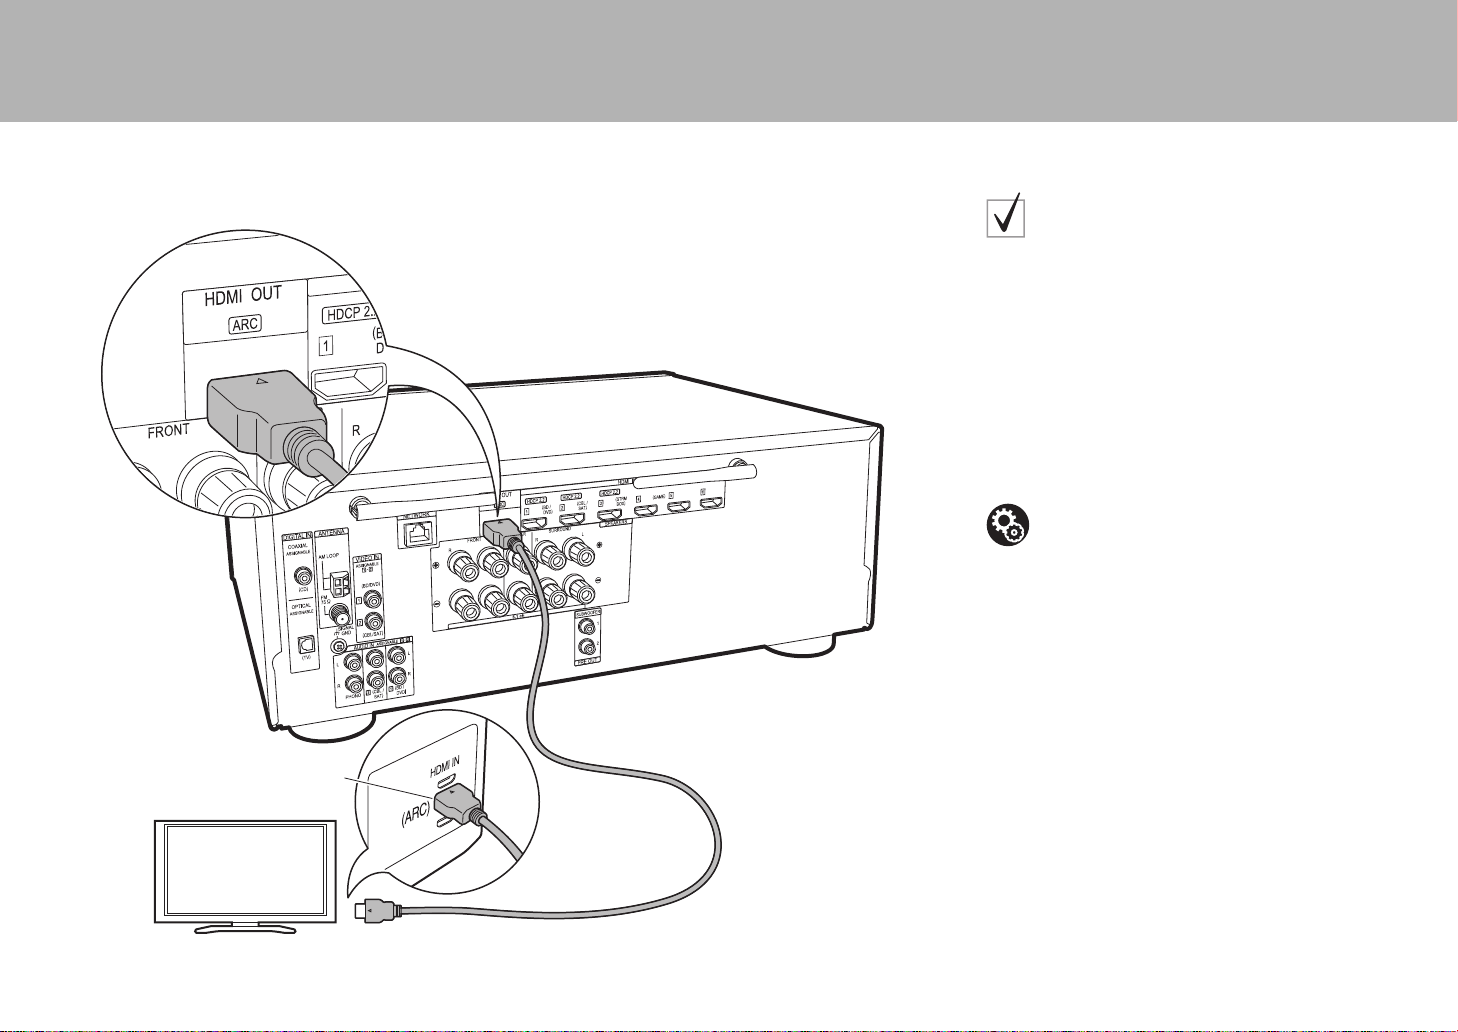
Step2: Connect the TV
This unit is connected between your TV and AV
components. If you connect two or more AV components,
you can select the video displayed on the TV and the
audio output from this unit by changing the input selector.
Shown here are the connections for a TV that supports
the ARC (Audio Return Channel) feature. By connecting
with a single HDMI cable, you can not only output the
video input to this unit to the TV, but you can also play the
sound from the TV through this unit.
Choose an HDMI IN jack on the TV that supports ARC
when connecting.
if you have:
ARC TV
Setup
0 Settings are required to use the ARC function.
Select «Yes» in «4. Audio Return Channel» (
in the Initial Setup.
0 Please refer to the TV’s operation manual for
directions on connections and setup for the TV.
P12)
HDMI IN (ARC)
1 HDMI cable
1
TV
5
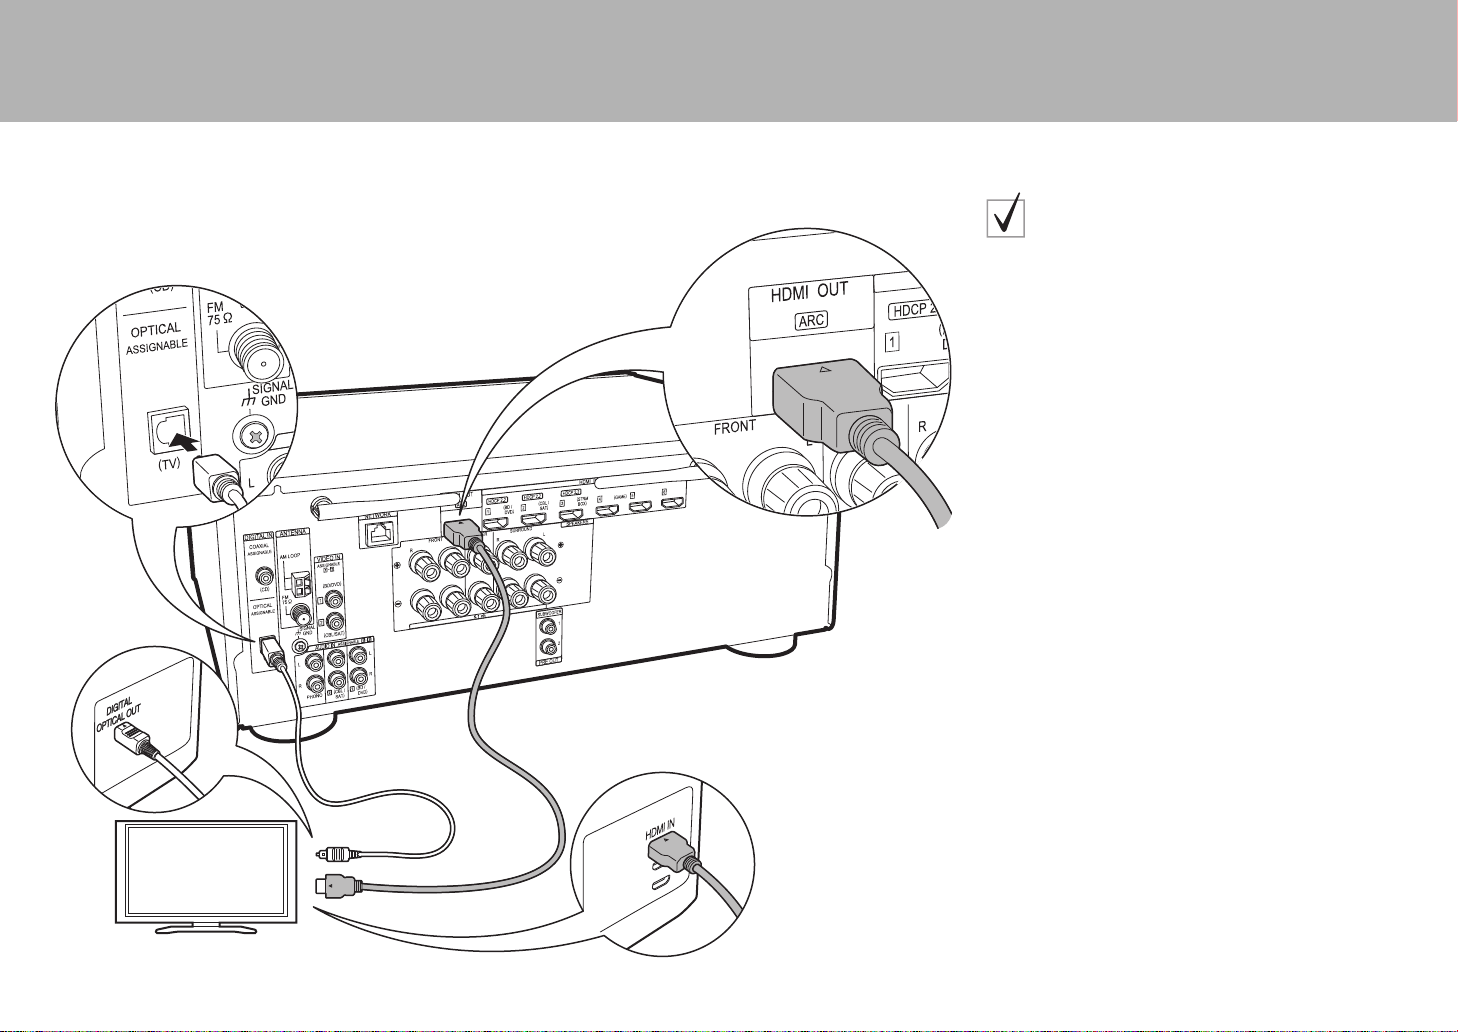
> Before start > Hookup > Setup > Playback > Part Names
This unit is connected between your TV and AV
components. If you connect two or more AV components,
you can select the video displayed on the TV and the
audio output from this unit by changing the input selector.
This describes the connections for a TV that does not
support the ARC (Audio Return Channel) feature. By
connecting with both an HDMI cable and a digital optical
cable, you can not only output the video input to this unit
to the TV, but you can also play the sound from the TV
through this unit.
0 Connection with a digital optical cable is not necessary
if you will watch TV through a device such as a cable
set-top box (that is, not use a tuner built into the TV).
if you have:
Non-ARC TV
12
TV
1 HDMI cable, 2 Digital optical cable
6
> Before start > Hookup > Setup > Playback > Part Names
Cable/Satellite set-top
box
Streaming media
player
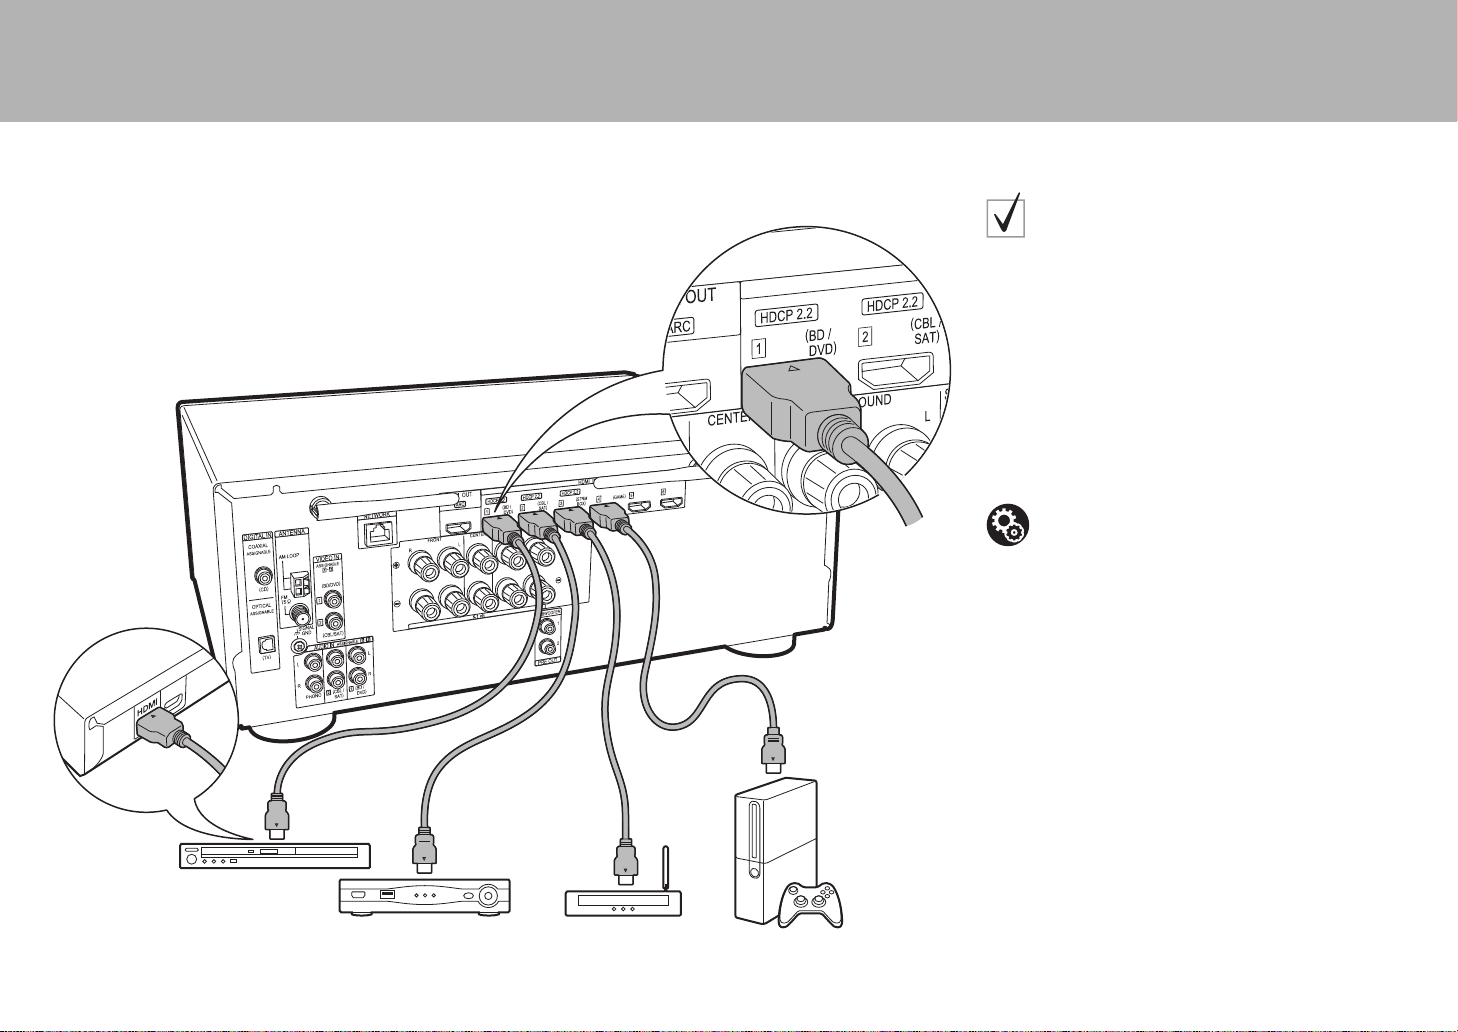
Step3: Connect the AV Components
This is an example of connection with an AV component
that has an HDMI jack. With connection to an AV
component that conforms with the CEC (Consumer
Electronics Control) standard, you can use features such
as the HDMI CEC feature that links with the input selector,
and the HDMI Standby Through feature which allows you
to play video and audio from AV components on the TV
even when this unit is in standby mode.
0 To play 4K or 1080p video, use a high speed HDMI
cable. Further, to enjoy HDCP2.2 compatible video,
connect to the HDMI IN1 to IN3 jacks.
if you have:
HDMI AV Components
Setup
0 HDMI setup (
CEC and HDMI Standby Through features. Make
settings after all connections are complete.
0 To enjoy digital surround sound including Dolby
Digital, audio output should be set to «Bitstream
output» on the connected Blu-ray Disc player or
other device.
P12) is required to use the HDMI
1 HDMI cable
BD/DVD
1
GAME
7

> Before start > Hookup > Setup > Playback > Part Names
Cable/Satellite set-top
box
This is an example of connection with an AV component
that does not have an HDMI jack. Make the connections
to the AV component to match the jacks it has. When
video input connection is to the CBL/SAT jack, the audio
input connection should also be to the CBL/SAT jacks,
and so on, so that you connect the video input jacks to the
jacks with the same name as the audio input jacks. Note
that video signals input to the VIDEO IN jack will be
upconverted to HDMI signals and then output from the
HDMI OUT jack.
if you have:
Non-HDMI AV Components
8
1 Analog audio/video cable
1
Loading…
-
Инструкции по эксплуатации
1
Pioneer VSX-831-B инструкция по эксплуатации
(92 страницы)
- Языки:Русский
-
Тип:
PDF -
Размер:
8.56 MB -
Описание:
Ресивер
Просмотр
На NoDevice можно скачать инструкцию по эксплуатации для Pioneer VSX-831-B. Руководство пользователя необходимо для ознакомления с правилами установки и эксплуатации Pioneer VSX-831-B. Инструкции по использованию помогут правильно настроить Pioneer VSX-831-B, исправить ошибки и выявить неполадки.