
-
Homepage
>
-
Instructions for use
>
-
Linen Care
>
-
Steam iron
>
User manual and frequently asked questions EXPRESS STEAM DW4345D1
Powerful steam, higher performance*
Delivering impressive steam performance for all your garment care needs, the Rowenta Express Steam Iron offers easy and efficient ironing day after day. This high-performance steam iron comes equipped with a stainless steel soleplate featuring advanced Microsteam technology, with over 350 micro-holes to ensure maximum steam coverage and high-quality engineering designed for extra durability.
Référence : DW4345D1
Voir les documents liés
Documentation
Voir les questions les plus fréquentes
FAQ
Choose a board that is height-adjustable to adjust it to your height. It should be steady and robust so that you can place the ironing appliance on it.
The board should be perforated to allow the steam to pass through the fibres of the fabric to soften it and make ironing easier. The ironing board cover should also be suitable to allow the flow of steam through.
There could be several reasons for this:
• You are not using the right type of water (Refer to the FAQ «What water should I use for ironing?»).
• You have used a starch type product on your laundry (Always spray to the reverse side of the fabric to be ironed and clean your iron afterwards).
• Fibers from clothes have been trapped in the holes in the iron and have become carbonised.
• The clothes have not been rinsed enough and there is detergent left on them or you have ironed a new item of clothing before washing it.
• See the instructions for use to find out what type of water is appropriate and clean the soleplate from time to time with a damp sponge.
It is essential to select the right ironing temperature.
Your iron has a built-in thermostat controlling the temperature very precisely over the entire surface of the soleplate. The thermostat dial contains international markers with dots corresponding to three ironing temperatures.
Make sure that you use the right temperature for your clothes:
• Marker with 1 dot for synthetic fabrics.
• Marker with 2 dots for wool and silk.
• Marker with 3 dots for cotton and linen.
• Don’t use the Boost steam button intensively. Wait few seconds between each use.
• The temperature button must be placed on Steam area (between 2 dots and MAX).
• Use steam only when the iron is hot (the light must be off).
This function allows you to iron fabrics in situ or on a hanger.
To do this, set the iron temperature button to the maximum position.
• Leave the item on a hanger and gently pull the fabric with one hand.
• Press the steam control button intermittently and move the iron from top to bottom.
As the steam produced is very hot, it softens the fibres and removes creases.
Note: Never use the vertical steam function on an item being worn by anyone.
Yes and you do not need to fill the tank with water. Set the variable steam control to Dry and set the temperature to suit the type of material (care points •, ••, •••).
At the end of your ironing session, we would suggest that once your iron has cooled down, you should wipe over the soleplate and around the steam holes to remove any burned fibers that may have started collecting around the steam holes.
If it has not been used for a long time (for example several weeks), use it over the sink for a few minutes to remove any residue that could stain your laundry.
No, you must always unplug the iron before filling it.
To avoid damaging the soleplate, follow this advice:
• Always place your iron on its heel rest or its base (depending on model).
• Avoid ironing over abrasive items (buttons, zip fastenings, etc.).
• Never clean your iron’s soleplate with abrasive or metallic pads.
Shiny marks can appear on some fabrics, especially on dark coloured fabrics. We would advise ironing dark clothes inside out and using the correct temperature.
If ironing mixed-fibre fabrics, set the temperature for the most fragile fibre.
Important: The iron takes longer to cool down than to heat up. We recommend that you start with fabrics to be ironed at a low temperature.
Leave the iron to cool down before putting it away and follow these 4 tips:
Empty out the water remaining in the tank, set the thermostat to minimum, switch off the steam control and stand it upright or put it back in its base (depending on the model).
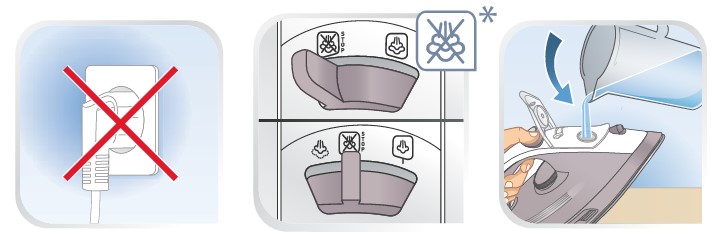
To fill the tank, the cursor must be positioned on the “STOP” setting (crossed-out steam symbol).
* Depending on model
Firstly, fill the iron tank to MAX with water.
Set the thermostat control to Max and the steam control on DRY and switch on.
Place the iron on its heel and leave to heat up for around 5 minutes.
Unplug the iron then hold your iron horizontally above the sink.
Remove the anti-scale valve (or set the control to self-clean/autoclean depending on the model). Steam, water and scale deposits will leave the steam chamber through the steam holes and the iron will be clean.
At the end of the operation, push the anti-calc valve back into position. When your iron is cold, you will also be able to use your vacuum to gently suction limescale and dirt that may have clogged the holes in the soleplate.
Four good tips:
After use, empty the tank, close the steam control, set the thermostat to minimum and stand the iron upright or place it on the base (depending on model).
Cleaning:
Use a damp soft cloth to wipe your iron and never use cleaners or solvents.
If your iron has an auto-clean function, refer to the instruction manual before using it.
Tips:
• Always use untreated water in your iron. If your water is very hard, we recommend you use a mix of 50% untreated tap water and 50% distilled water.
• Avoid placing your iron on sharp objects such as zip fasteners and metal buttons.
• Do not put your iron down flat on rough surfaces.
You must take precautions so that using your iron is risk-free.
• Above all, never leave a hot iron unattended.
This is not only to avoid overheating of the iron or the surface on which it is placed but also to ensure that no-one gets burned. If safety is one of your main concerns, choose an iron that has an automatic cut-off function.
Never leave a hot iron within reach of children or pets who risk knocking it over and injuring themselves.
• Like any electrical appliance, never put your iron in water.
• Do not use an iron that has fallen down or has a damaged power cord. If you have the slightest doubt concerning the condition of your iron, contact the Service Centre.
• Always unplug your iron before leaving it, cleaning it or filling it with water (unless it is a model that has a removable water tank). Regularly check the water level to ensure that there is always enough.
Never use any descaling agent or vinegar when rinsing the boiler: they could damage it.
• Self-cleaning: heat the iron, unplug it, remove the anti-calc valve and spray the iron over the sink.
• Cleaning the anti-calc valve: Remove the antiscale valve and soak the valve in a cup of white vinegar or plain lemon juice for 4 hours.
If your iron has an anti-calc system, you should clean the anti-calc valve once a month.
To do this:
• Unplug the iron and leave it to cool for 30-45 minutes.
• Empty the water and remove the valve, holding it by the top.
• Let the anti-calc valve soak for 4 hours in a glass of natural lemon juice or citric acid, then thoroughly rinse the anti-calc valve under tap water.
• Reposition the anti-calc valve into your iron. Warning! Never touch the end of the anti-calc valve.
It is not designed for the water to be removed completely. It is okay to use or store the iron even with a small amount of water remaining. When storing, please remove as much water as possible and store in an upright position.
• The Durillium soleplate:
Regularly clean the soleplate with a damp, non metallic washing up pad. For easier, non-corrosive cleaning of your iron’s soleplate, use a damp sponge on the soleplate while it is still warm.
If cleaning dirt off is an issue, use the stick which is made specifically for cleaning the Durillium soleplates.
• The stainless soleplate:
Clean the soleplate of your iron when it is cool with a damp cloth or a non-abrasive sponge.
• The autoclean soleplate:
It is recommended that you use a soft damp cloth on the warm soleplate, in order not to damage the surface.
Warning: The use of iron cleaner will cause damage to your soleplate’s autoclean coating.
3 possible causes:
• There is no power in the mains socket: check that the plug is properly connected, or try to plug the iron into a different socket.
• Temperature control set too low: set the temperature control to a higher temperature.
• The automatic electronic cut-out* is active: move your iron.
* depending on model
Always set your iron to the ‘No Steam’ function before you start to fill.
Some irons (depending on model) can produce steam when set on the One dot setting. However, the majority of our irons will only produce steam when set on the 2 dot or 3 dot setting. When you look on your iron’s thermostat dial you will notice that the 2 dot and 3 dot settings have a shaded background, this indicates that the iron will produce steam when the dial is set inside this shaded area.
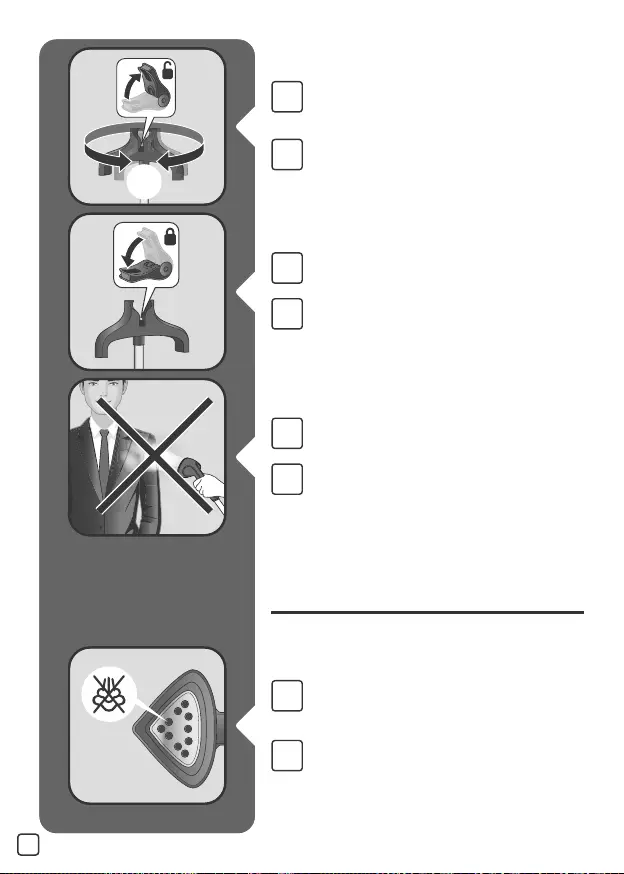
Not all of the steam holes release steam, the smaller holes on the soleplate that look like they might be steam holes are actually designed to assist soleplate glide ability.
There is not enough water in the tank. Fill it up with the quantity indicated in the instructions for use and push spray button several times to fill the system complete.
All irons contain a thermostat light. It is normal for the thermostat to turn on and off. It indicates the thermostat is working and your soleplate is being maintained at the desired temperature. If the auto-off light blinks, you must disengage the auto-off function. This is done by gently shaking the iron which will allow the iron to reheat.
When heating your iron for the first time, you may notice a small amount of odour and smoke, this is simply the engineering residues from the manufacturing process burning off. These are harmless and will quickly disappear.
It is normal. Your iron generates a lot of steam; this steam is condensing on the board. Some waterdrops could appeared underneath the ironing board and fall on the flooring.
Your iron has been stored horizontally, without draining the water tank and with the selector placed on steam position. When you store your iron horizontally, check that the tank is empty and the selector on «DRY» position.
Check the following points:
• The tank is empty or almost empty: add more water.
• The selected temperature is too low and does not allow steam to be produced: set the thermostat to the steam zone (between 2 dots and MAX).
• If your iron has a Dry/Steam control: set it to the Steam position.
• Scale has built up in your iron: descale it.
• Your iron has an intelligent system (a moving sensor) which temporarily stops steam being released when the iron is not moving, even when it is placed horizontally. This function eliminates wasted steam while you are handling the clothes.
Please check the following points:
• The tank is empty or almost empty: add more water.
• The selected temperature is too low to use this function: set the thermostat to the zone between 3 dots and MAX.
The «supersteam» or «turbo» function should not be used intensively – wait a few seconds between pressing the button.
You are filling the tank with the «Dry/Steam» control set to Steam – it needs to be in the «Dry» position.
Or, you have over-filled your iron – do not go beyond the «MAX» level on the tank.
Gently shake your iron to reactivate it, the lights should start to flash and then the iron should start to heat up.
Some laundry starches and synthetic fibres may stick to the surface of the iron. Please clean the Iron’s surface.
This is probably crystallized calcium chlorohypochlorite. Carry out the self-cleaning instructions in the instruction manual two or three times. If that hasn’t resolved the problem, it may be that your iron needs repair. Please contact the service centre.
The internal parts may make metallic noises with the change in temperature. There is nothing wrong with it.
After following the instructions in the user manual for starting the appliance, make sure that your electrical socket is working by plugging another appliance. If it still does not work, do not try to dismantle or repair the appliance yourself, instead, take it to an approved repair centre
Do not use your appliance. To avoid any danger, have it replaced by an approved repair centre.
This may be due to the use of chemical descaling agents or additives in the water for ironing. Never use this type of product in the water tank (see our recommendations regarding water to be used). Some residues could also been present in the steam chamber or on the soleplate; use the self cleaning function (Depending model). All linen, especially new garments, must be washed and rinsed thoroughly to remove any soap and chemical deposits before you iron them. If these are not removed by washing they may appear later out of the soleplate in the form of small brown or white spots or streaks on your linen.
Use the right temperatures on the thermostat for the right fabrics. A reason for sticking may be the use of starch. If you want to use starch, simply spray it on the reverse side of the garment, so that there is no contact between the soleplate and the starch. Clean the soleplate from rubber prints of fabric. (Which always must be ironed on reverse side of the rubber prints.)
The anti-calc collector is a scale collector which automatically collects the scale which forms inside your iron. The amount of scale collected depends on the hardness of your water.
The electronic system cuts off the power supply and the auto-stop light flashes if the iron is not moved for more than 8 minutes (on its rest or base) or is left flat for more than 30 seconds.
To turn the iron back on, shake it gently until the light goes out.
This system prevents the soleplate from clogging. Its active coating eliminates fibres and impurities that often become stuck to the plate and end up reducing its glide.
The higher the wattage, the faster the iron will reach the desired temperature.
Your appliance contains valuable materials which can be recovered or recycled. Leave it at a local civic waste collection point.
If you believe that one part is missing, please call Consumer Services Center and we will help you find a suitable solution.
Please go to the “Accessories” section of the website to easily find whatever you need for your product.
Find more detailed information in the Guarantee section of this website.
Consumerservices

www.rowenta.com
EN
ES
IT
PT
DE
NL
RU
UK
AR
FR
IS65XX
1800138683-02 IS65XX.qxp_Mise en page 1 23/09/2016 08:23 Page1
4
5
6
7
1B*
1A
2B
2A
11
8
9
10
3
12A*
12B*
12C*
* EN Depending on model / FR Selon le modèle /
* ES Según modelo / IT Su alcuni modelli / PT Consoante o
modelo
/ DE je nach Modell / NL afhankelijk van het model / RU В зависимости от модели / UK Залежно від
моделі / AR
•ºV «∞Luœ¥q
1800138683-02 IS65XX.qxp_Mise en page 1 23/09/2016 08:23 Page2

3
……………….p. 5
……………….p. 5
……………….p. 23
……………….p. 23
……………….p. 23
……………….p. 41
……………….p. 41
……………….p. 59
……………….p. 59
……………….p. 94
EN
FR
ES
IT
PT
DE
NL
RU
UK
AR
1800138683-02 IS65XX.qxp_Mise en page 1 23/09/2016 08:23 Page3

1800138683-02 IS65XX.qxp_Mise en page 1 23/09/2016 08:23 Page4

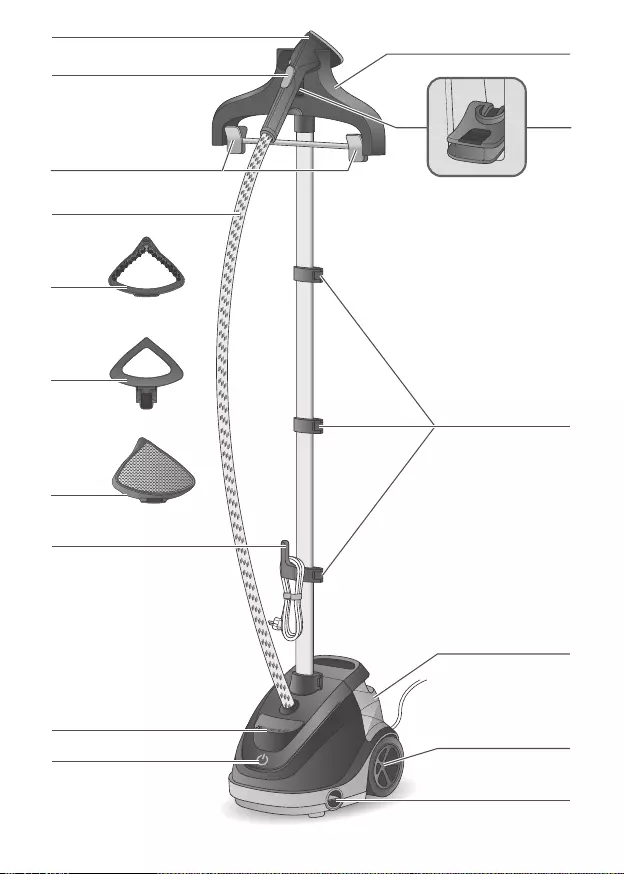
* EN Depending on model / FR Selon le modèle
PRODUCT DESCRIPTION / DESCRIPTION DU PRODUIT
1A. EN Steam Head
FR Tête vapeur
1B*. EN Precision Shot Button
FR Bouton vapeur précision
2A. EN Hanger
FR Cintre
2B. EN Lock system for hanger rotation
FR Bouton verrouillage de rotation du
cintre.
3. EN Trouser Clips
FR Pinces à pantalons
4. EN Woven fabric steam hose
FR Tuyau vapeur
5. EN Power Cord Hook
FR Crochet du cordon d’alimentation
6. EN On/Off Pedal
FR Pédale Marche/Arrêt
7. EN On/Off Indicator
FR Voyant lumineux
Marche/Arrêt
8. EN «Anti calc» screwing cap &
entry
FR Bouchon de vidange
9. EN Wheels
FR Roues
10. EN Water tank
FR Réservoir d’eau amovible
11. EN Pole locking clips
FR Dispositifs de blocage
du mât
12A*. EN Fabric Brush
FR Brosse à tissu
12B*. EN Crease attachment
FR Accessoire de pli
12C*. EN Steam Cap
FR Housse
5
1800138683-02 IS65XX.qxp_Mise en page 1 23/09/2016 08:23 Page5

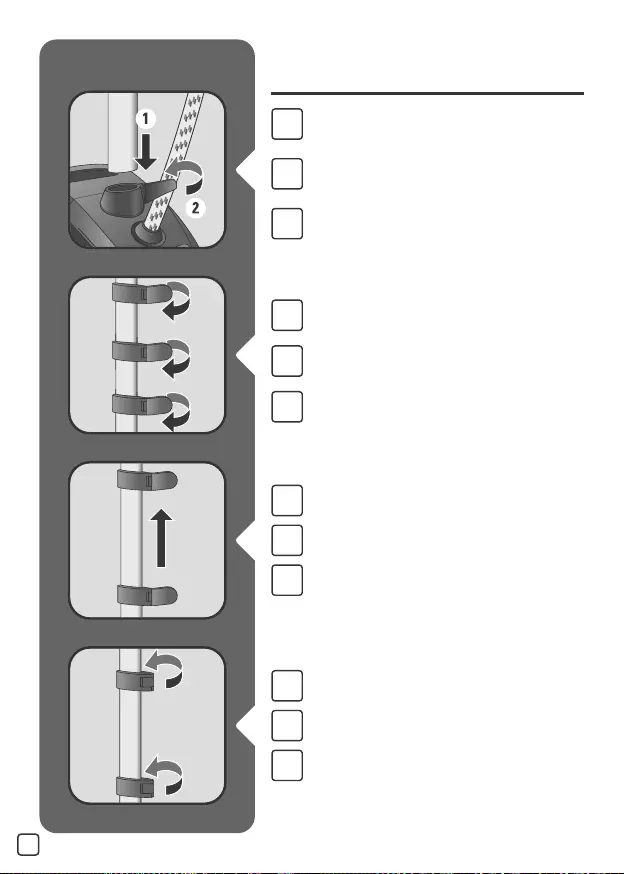
1. ASSEMBLY / ASSEMBLAGE
EN
FR
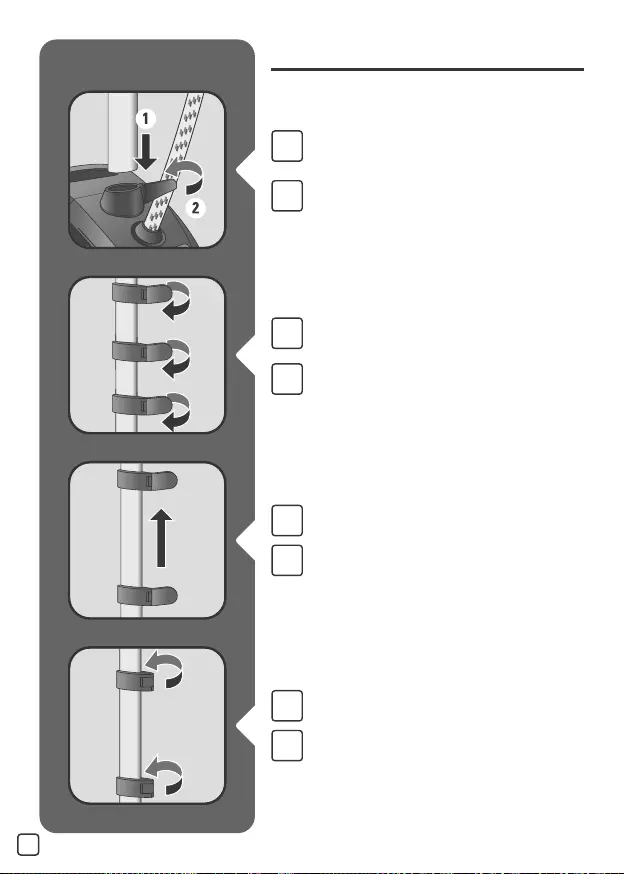
Insert the pole in the housing & then lock.
Insérez le mât dans le boîtier, puis verrouillez.
EN
FR
Open the three pole locks.
Ouvrez les trois verrous du mât.
EN
FR
Extend the pole fully.
Allongez le mât au maximum.
EN
FR
Close the three locks.
Fermez les trois verrous.
6
1800138683-02 IS65XX.qxp_Mise en page 1 23/09/2016 08:23 Page6

EN
FR
Fully insert the hanger vertically on top of the
pole.
Insérez entièrement jusqu’au clic le cintre
verticalement sur le dessus du mât.
7
EN
FR
Position the steam head on its cradle.
Placez la tête vapeur sur son support.
1800138683-02 IS65XX.qxp_Mise en page 1 23/09/2016 08:23 Page7

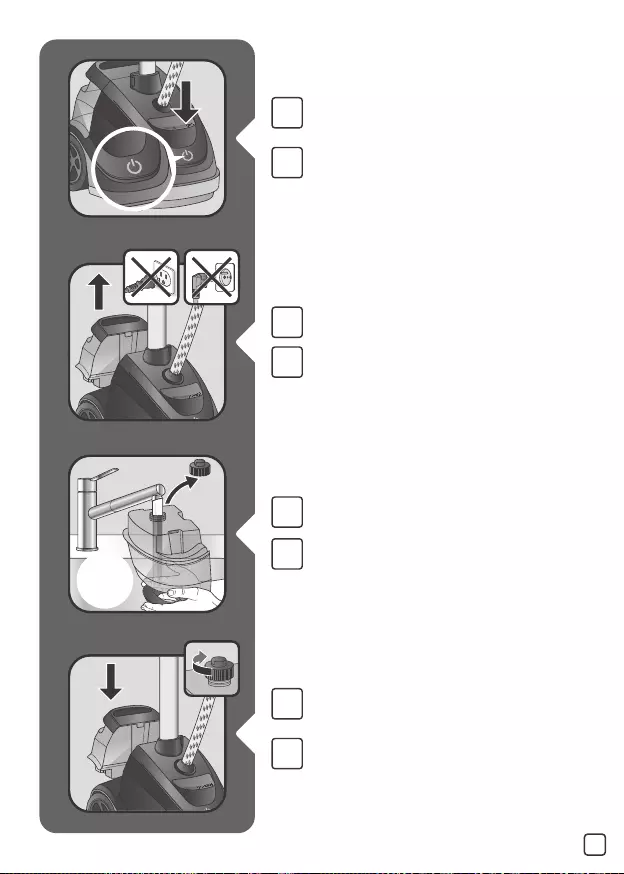
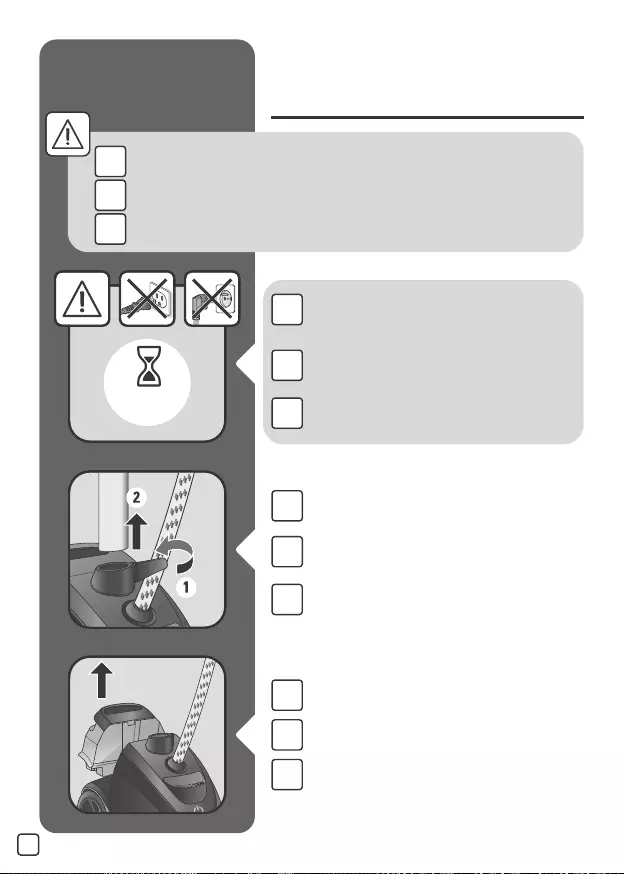
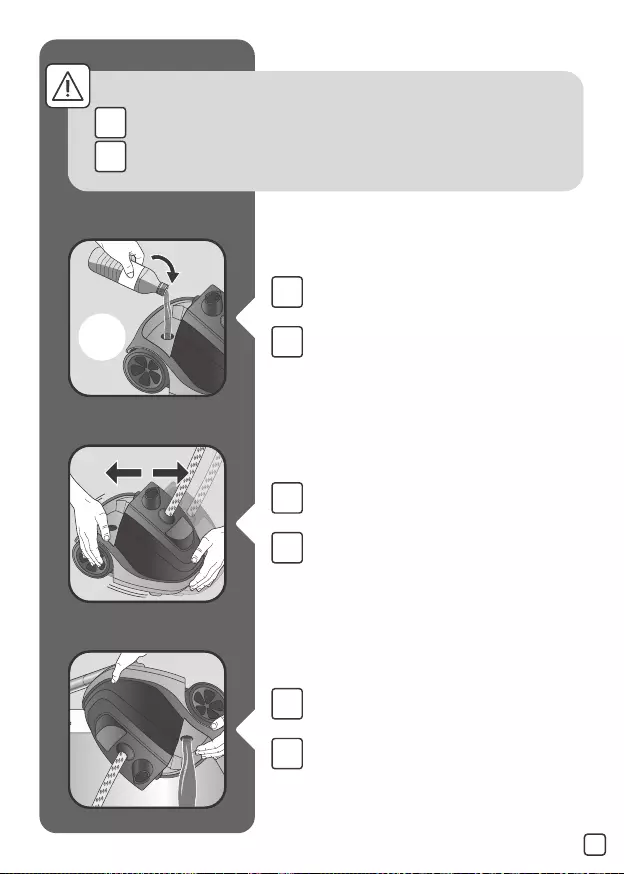
2. BEFORE USE / AVANT CHAQUE
UTILISATION
EN
FR
Remove the water tank.
Retirez le réservoir d’eau.
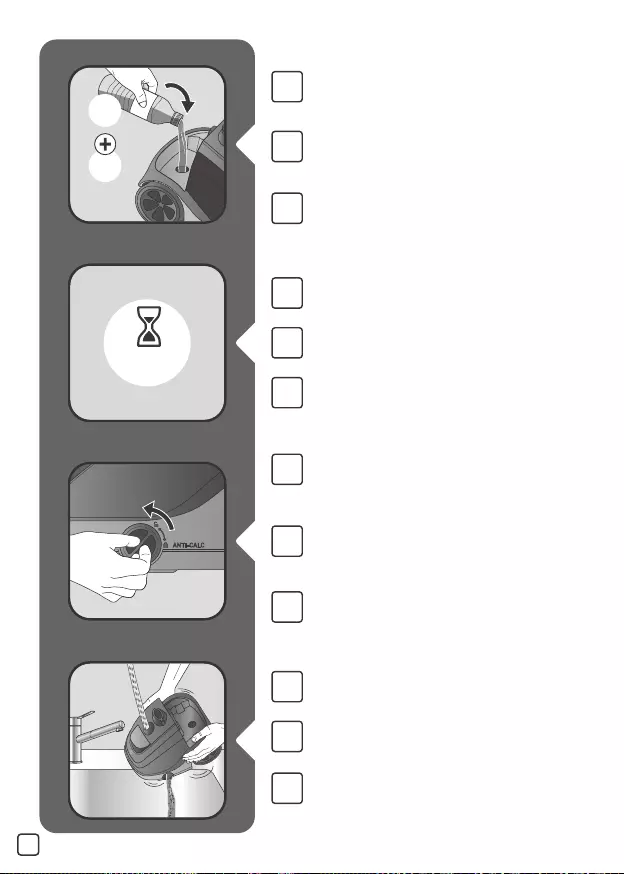
EN
FR
Remove the cap then ll the water tank.
Retirez le bouchon, puis remplissez le
réservoir d’eau.
EN
FR
Fully screw the water tank cap and insert tank
back in appliance.
Vissez entièrement le bouchon du réservoir
d’eau et remettez le réservoir dans l’appareil.
8
EN
FR
Place the garment on the hanger.
Placez le vêtement de votre choix sur le cintre.
1800138683-02 IS65XX.qxp_Mise en page 1 23/09/2016 08:23 Page8

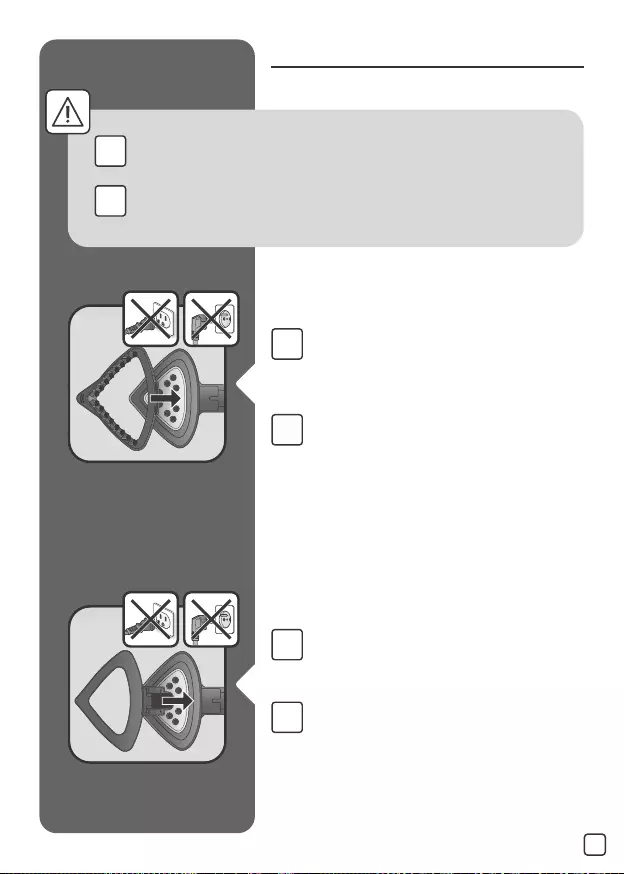
3. ACCESSORIES / ACCESSOIRES
EN
FR
The fabric brush opens the weaves of the
fabrics for better steam penetration.
Attach the fabric brush to the steam head
when appliance is unplugged and has cooled
down.
La brosse à tissu ouvre les bres des tissus et
permet à la vapeur de mieux pénétrer. Fixez
la brosse à tissu sur l’embout de vapeur
lorsque l’appareil est débranché.
9
EN
FR
Make sure the appliance is unplugged and completely cool before attaching
accessories.
Les accessoires doivent être ajoutés ou retirés lorsque l’appareil est froid et
qu’il n’est pas en marche.
EN
FR
The crease attachment allows you to create a
crease on your trousers or jackets. Attach the
crease attachment to the steam head when
appliance is unplugged and has cooled down.
L‘accessoire de pli vous permet de créer un pli
sur vos pantalons et vos vestes. Fixez et retirez
l’accessoire de pli sur l’embout de vapeur
lorsque l’appareil est débranché.
1800138683-02 IS65XX.qxp_Mise en page 1 23/09/2016 08:23 Page9

10
EN
FR
Position the steam head on its cradle.
Placez la tête vapeur sur son support.
EN
FR
The steam cap lters water impurities and
protects fabrics from water drips. Attach steam
cap to the steam head when appliance is
unplugged and has cooled down.
La housse pour tissus délicats ltre les impuretés
et protège le tissu des coulures d’eau. Fixez et
retirez l’accessoire sur l’embout de vapeur
lorsque l’appareil est débranché.
4. USE / UTILISATION
EN
FR
Only operate the appliance on a oor clear of
any materials which may obstruct the base of
the steamer (at and horizontal surface). Do not
obstruct the openings on the lower part of the
appliance. This appliance should not be used
on very thick carpets or rugs.
L‘appareil doit demeurer en position
horizontale sur le sol.
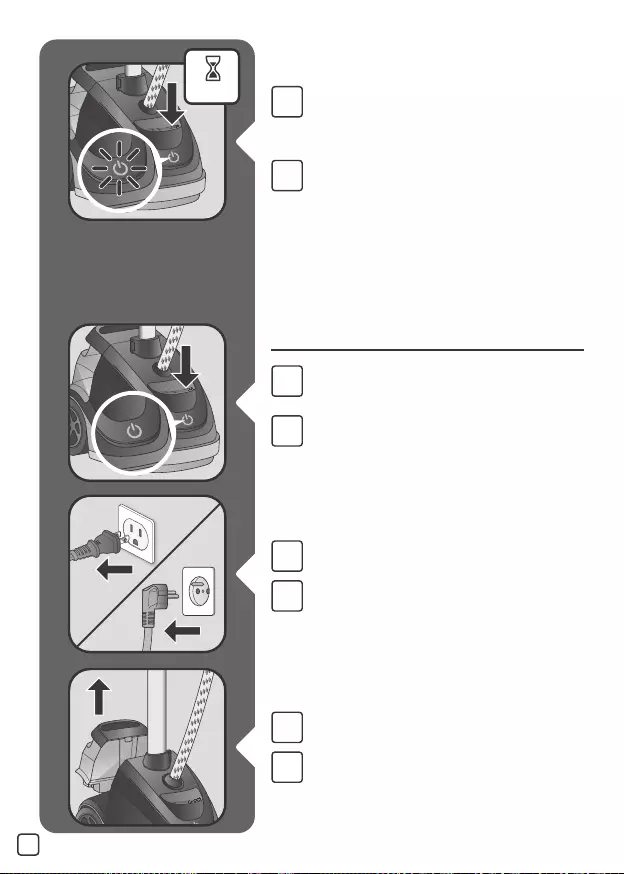
EN
FR
Plug in the appliance.
Branchez l’appareil.
1800138683-02 IS65XX.qxp_Mise en page 1 23/09/2016 08:23 Page10

11
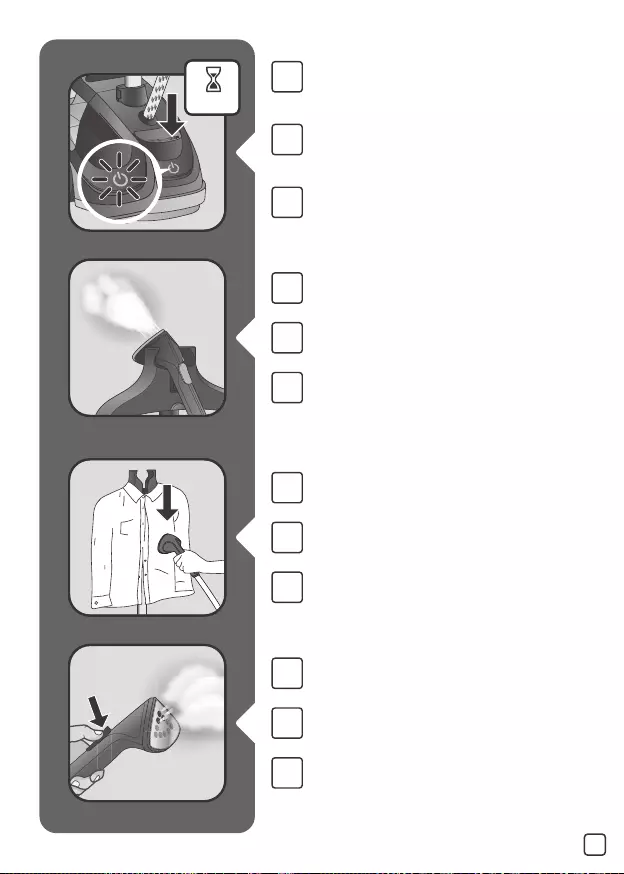
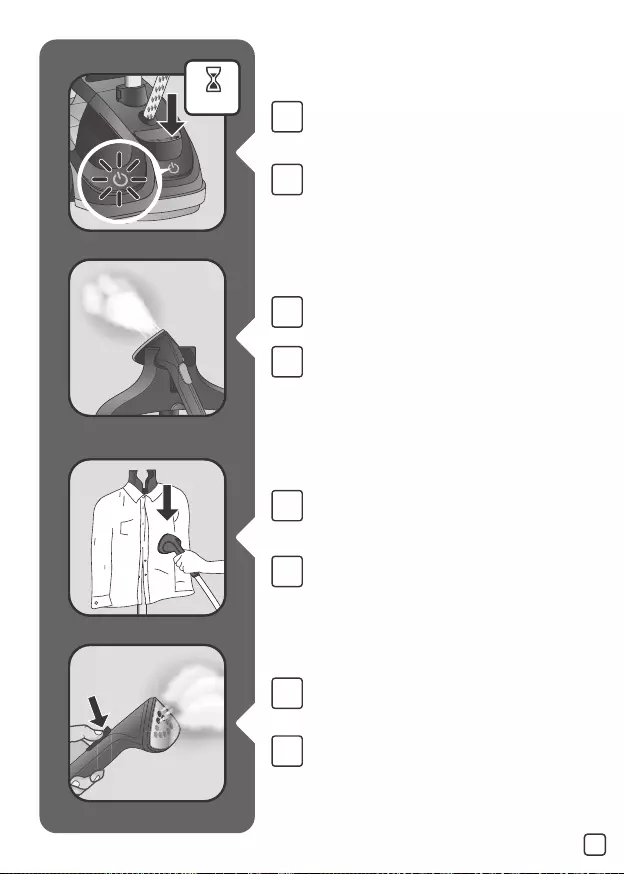
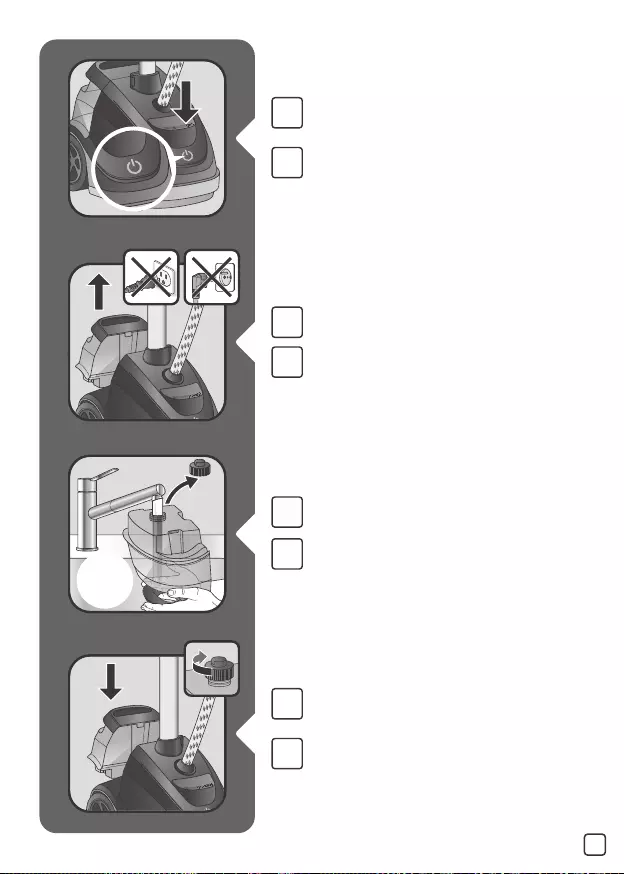
EN
FR
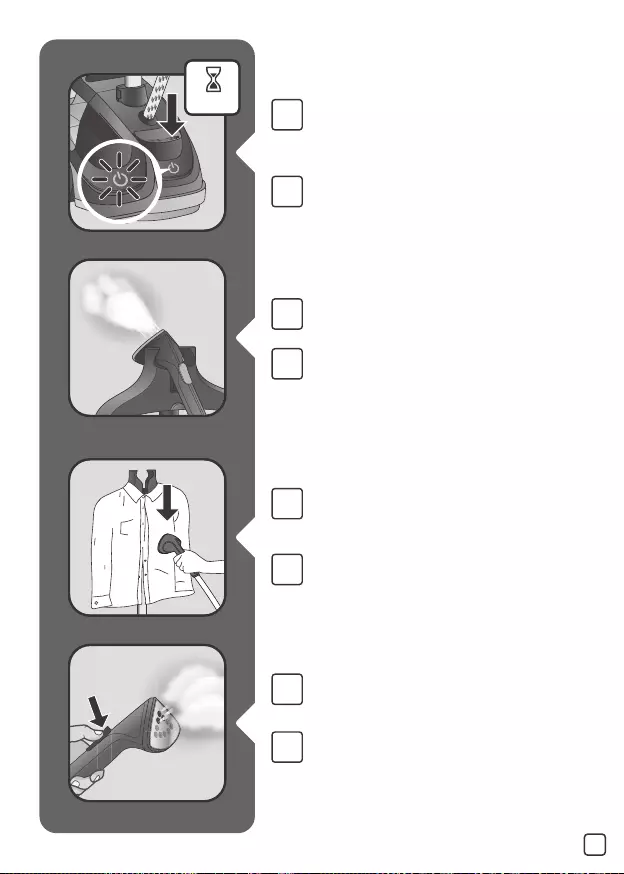
Press on the ON/OFF pedal and check that
light is switching on. Wait for 45 seconds
before steaming.
Appuyez sur la pédale Marche/Arrêt et vériez
que l’indicateur lumineux est allumé.
Attendez 45secondes avant que la vapeur
soit disponible.
EN
FR
After 45 seconds approximately, steam will
come out.
Après 45secondes environ, la vapeur sortira
de l’appareil.
EN
FR
For optimal use, pass the steam jets on your
garment from top to bottom.
Pour obtenir de meilleurs résultats, appliquez
les jets de vapeur sur votre vêtement de haut
en bas.
EN
FR
If you want to have concentrated steam, hold on
the Precision shot button.
Pour avoir de la vapeur concentrée, restez
appuyé sur le bouton vapeur précision.
1800138683-02 IS65XX.qxp_Mise en page 1 23/09/2016 08:23 Page11

12
EN
FR
Warning: Never steam a garment while it is
being worn.
Ne projetez jamais de vapeur directement sur
les personnes.
EN
FR
If steam is not coming out anymore, this can
be due to low water level in tank.
Si l’appareil ne produit plus de vapeur, cela
peut-être dû à un niveau d’eau trop bas dans
le réservoir.
5. DURING USE / PENDANT
L‘UTILISATION
EN
FR
Lock the hanger by pulling down the locker.
Verrouillez le cintre en descendant le lock.
EN
FR
To release the hanger, unlock the locker by
pulling it up.
Déverrouillez le cintre en levant verrou puis
orienter le cintre.
1800138683-02 IS65XX.qxp_Mise en page 1 23/09/2016 08:23 Page12
13
EN
FR
Remove the water tank.
Retirez le réservoir d’eau.
EN
FR
Remove the cap then ll the water tank.
Retirez le bouchon, puis remplissez le
réservoir d’eau.
EN
FR
Fully screw the water tank cap and insert tank
back in appliance.
Vissez entièrement le bouchon du réservoir
d’eau et remettez le réservoir dans l’appareil.
EN
FR
Press the On/Off Pedal and check that light is
switched Off.
Appuyez sur la pédale Marche/Arrêt et vériez
que l’indicateur lumineux est éteint.
1800138683-02 IS65XX.qxp_Mise en page 1 23/09/2016 08:23 Page13

6. AFTER USE / APRÈS CHAQUE
UTILISATION
EN
FR
Press the On/Off Pedal and check that light is
switched Off.
Appuyez sur la pédale Marche/Arrêt et vériez
que l’indicateur lumineux est éteint.
EN
FR
Unplug the appliance.
Débranchez l’appareil.
EN
FR
Remove the water tank.
Retirez le réservoir d’eau.
14
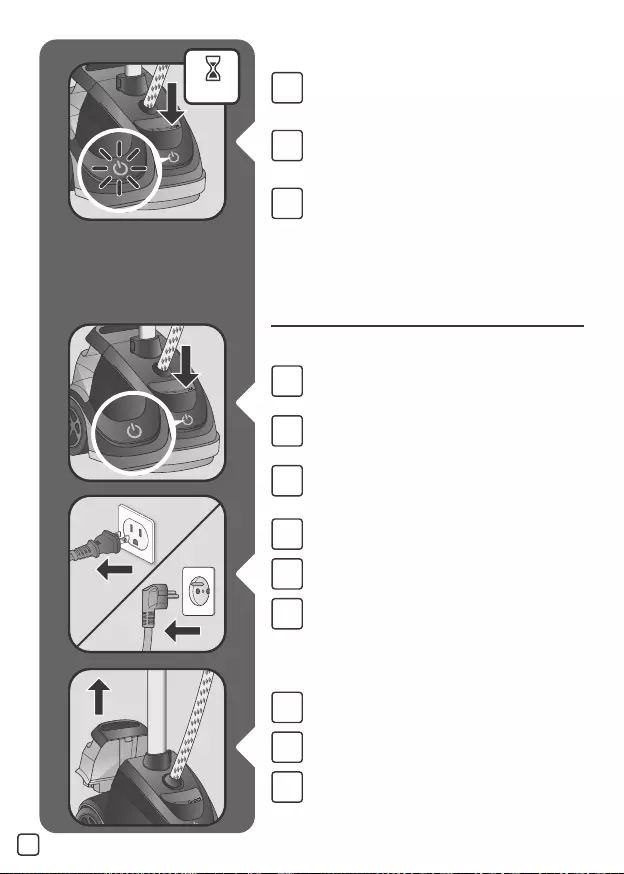
EN
FR
Press the ON/OFF pedal and check that light is
switching on. Wait for 45 seconds before
steaming.
Appuyez sur la pédale Marche/Arrêt et vériez
que l’indicateur lumineux est allumé. Attendez
45secondes avant que la vapeur soit disponible.
1800138683-02 IS65XX.qxp_Mise en page 1 23/09/2016 08:23 Page14

15
EN
FR
Screw back the cap and place the water tank
back onto the appliance.
Revissez le bouchon et remettez le réservoir
d’eau dans l’appareil.
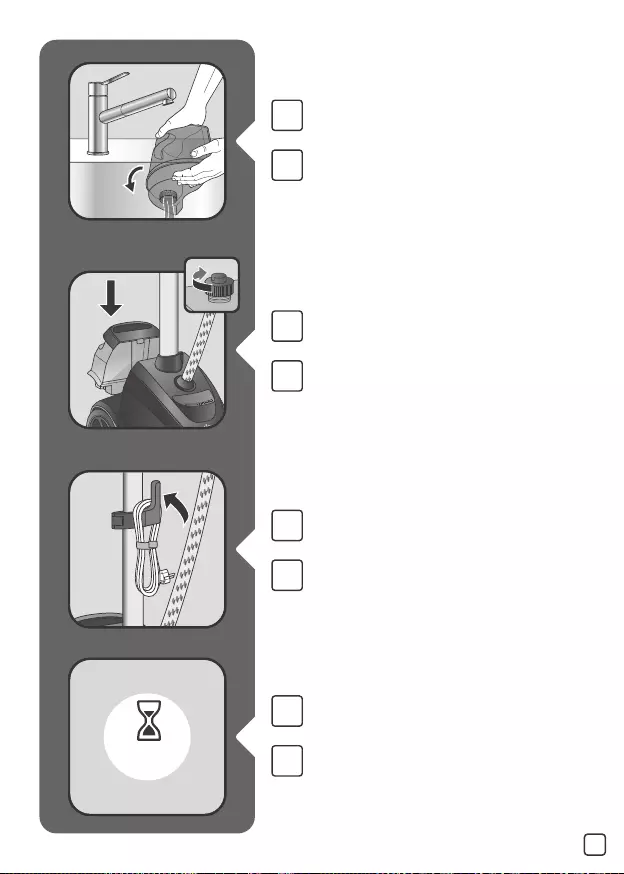
EN
FR
Roll up the power cord and place it on its
hook.
Enroulez le cordon d’alimentation et placez-
le sur son crochet.
EN
FR
Wait for an hour for your appliance to cool
before storing.
Attendez une heure pour que votre appareil
refroidisse avant de le ranger.
EN
FR
Unscrew the cap and then empty the water
tank completely in a sink.
Dévissez le bouchon, puis videz
complètement le réservoir d’eau dans un
évier.
1800138683-02 IS65XX.qxp_Mise en page 1 23/09/2016 08:23 Page15
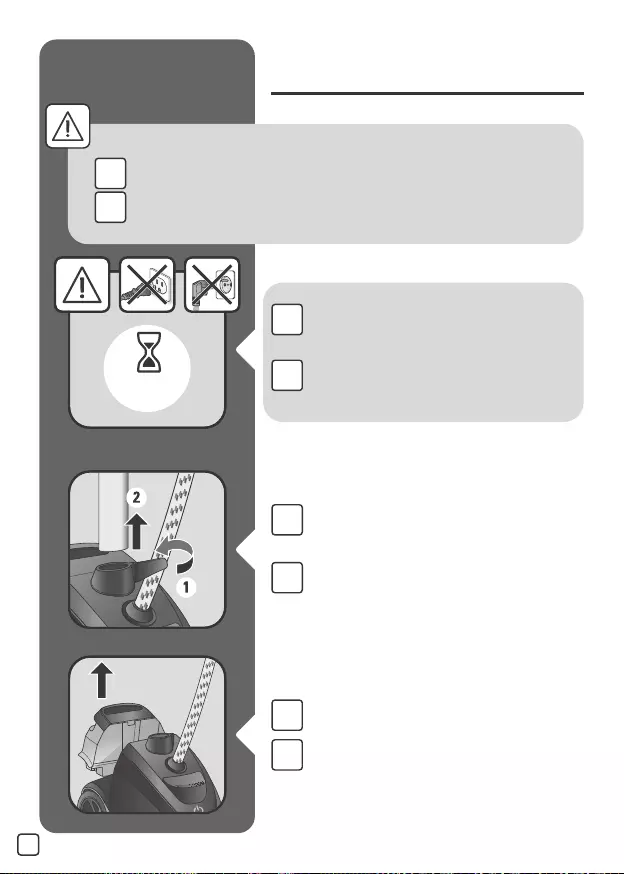
EN
FR
Remove the steam head from the hanger &
unlock the locker and pull out the pole.
Enlevez la tête vapeur du cintre et libérez le
dispositif de blocage et tirez sur le mât pour le
retirer.
16
EN
FR
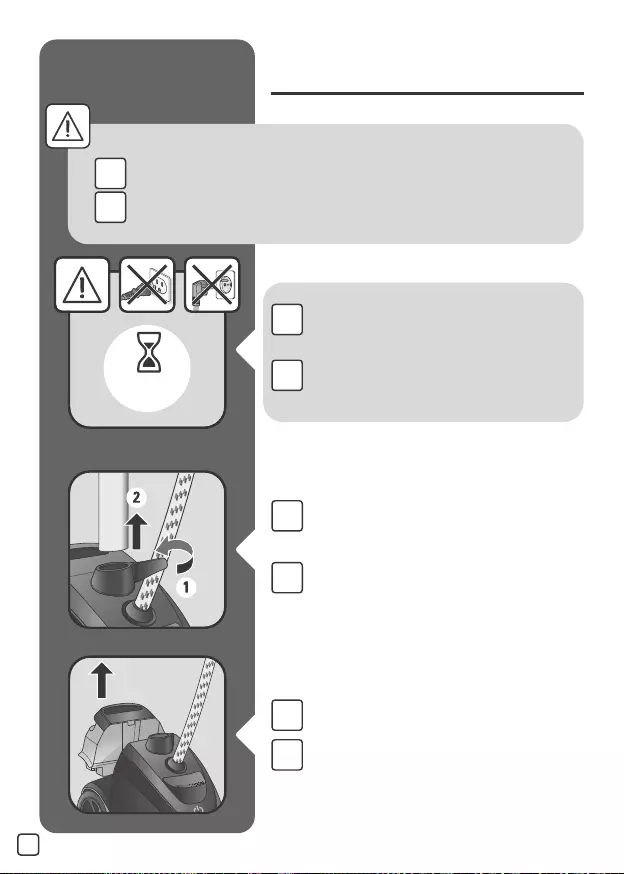
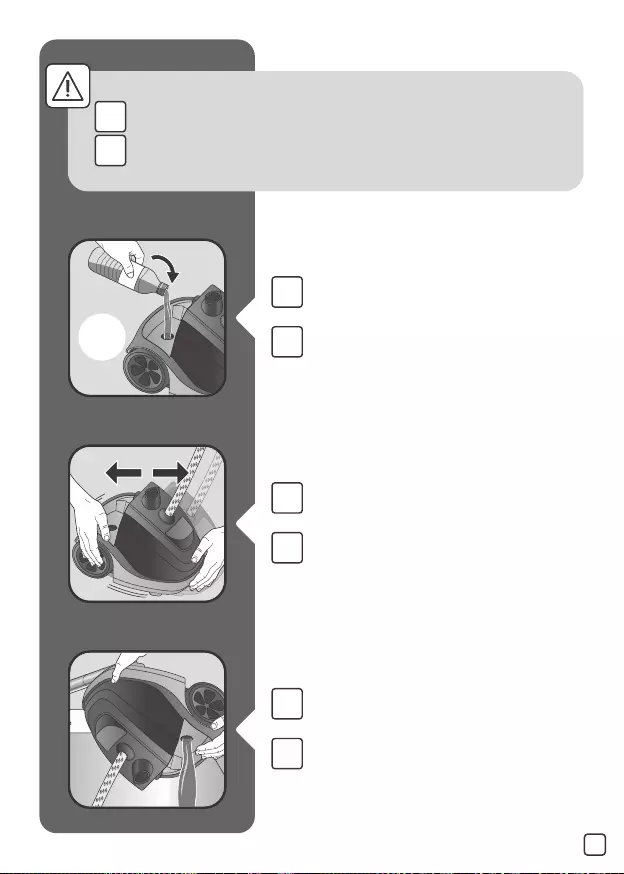
WARNING! Wait an hour so that the
appliance has completely cooled down.
ATTENTION ! Débranchez le produit et
attendez une heure pour que l’appareil
refroidisse entièrement.
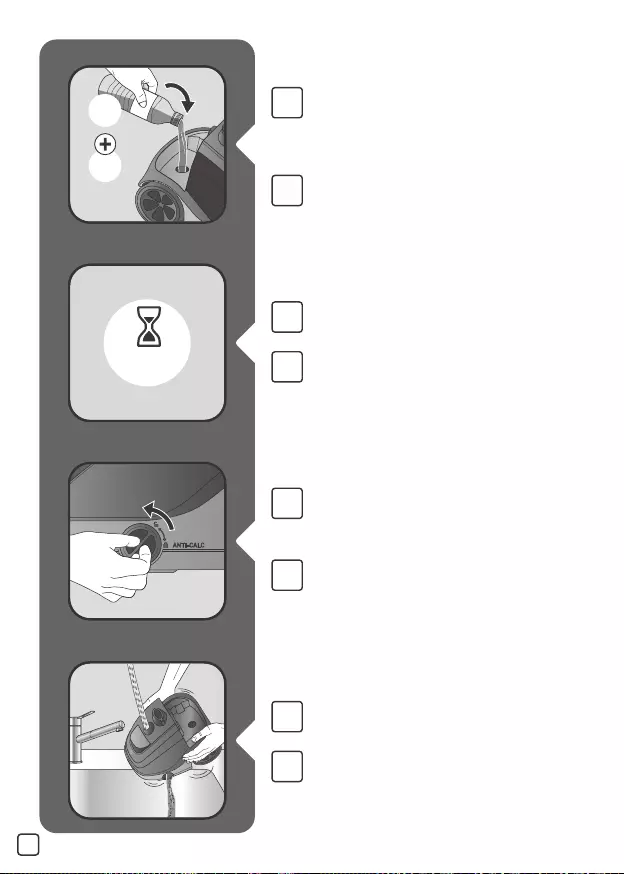
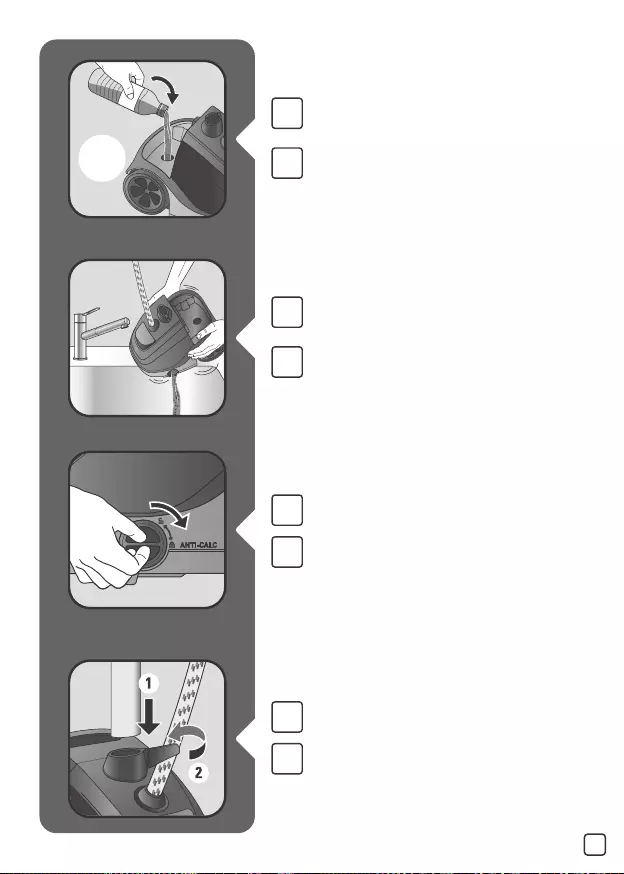
7. DESCALING PROCEDURE /
DÉTARTRAGE
FR
EN Remove the water tank.
Retirez le réservoir d’eau.
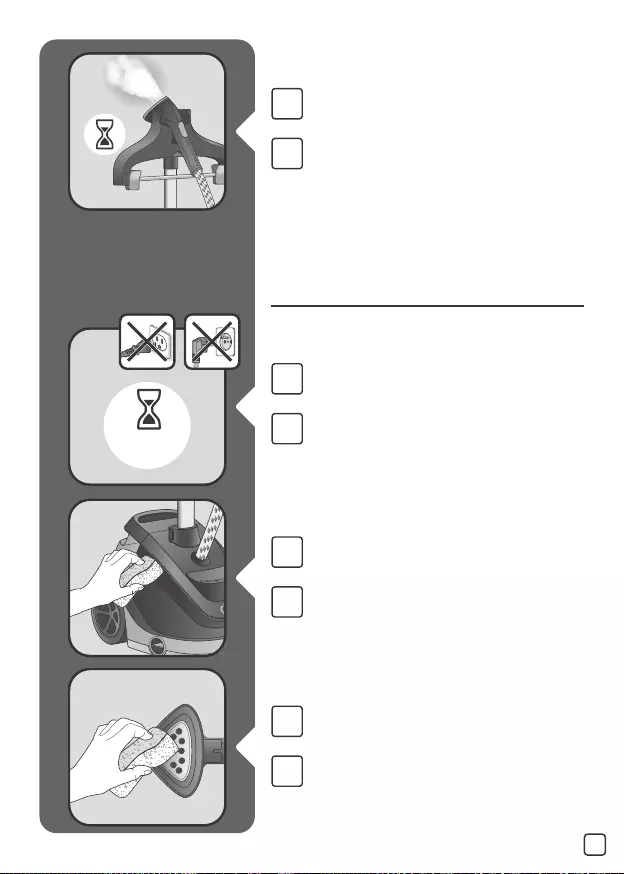
EN
FR
This process should be made every 6 months or as soon as you feel that the
performance of the appliance (steam output) is decreasing.
A effectuer tous les 6 mois ou en cas de baisse de performance.
1800138683-02 IS65XX.qxp_Mise en page 1 23/09/2016 08:23 Page16

17
EN
FR
Pour 500 ml of water into the water tank inlet.
Ajoutez 0,5 l d’eau dans l’ouverture du
réservoir de l’appareil.
EN
FR
Vertically tilt the appliance to empty the water
into the sink.
Inclinez verticalement l’appareil an de le
vider de son eau dans l’évier.
EN
FR
Gently shake the appliance.
Secouez doucement l‘appareil an de décoller
les plus grosses particules.
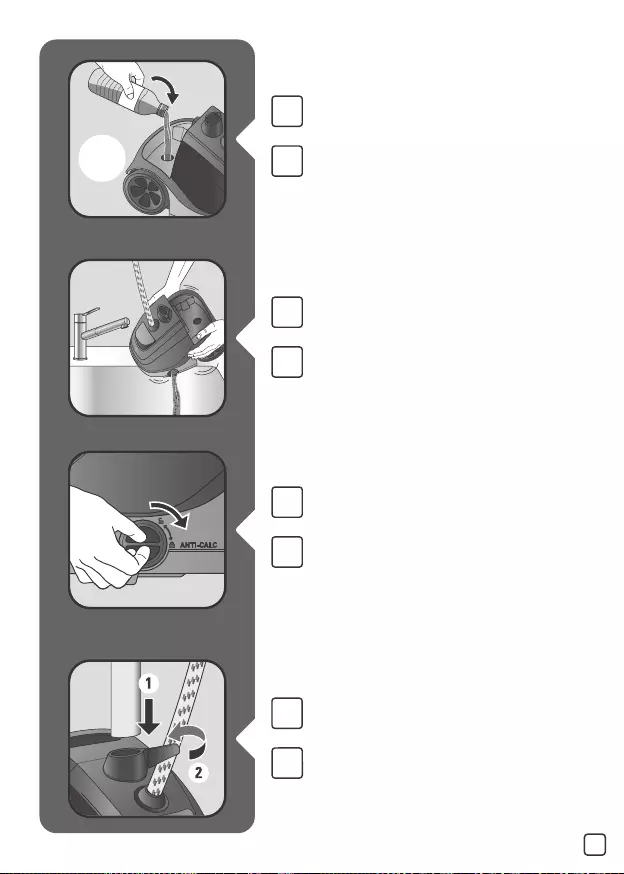
EN
FR
Never ll inside the pole connection.
Ne versez jamais d’eau dans le raccord du mât.
1800138683-02 IS65XX.qxp_Mise en page 1 23/09/2016 08:23 Page17
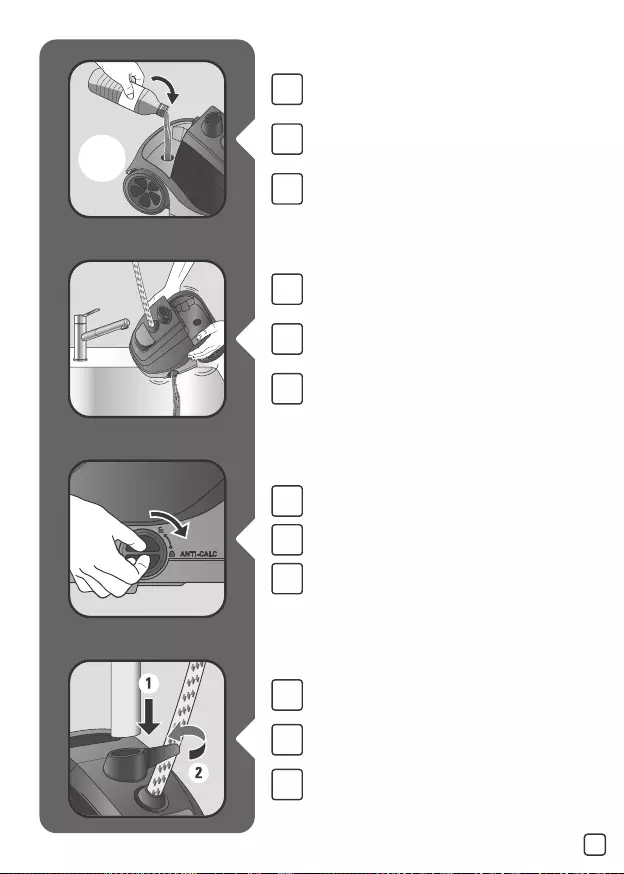
EN
FR
Vertically tilt the appliance to empty the water
into the sink.
Inclinez verticalement l’appareil an de le
vider du mélange dans l’évier.
18
EN
FR
For best results leave to soak for a minimum
of 12hrs.
Attendez au moins 12 heures pour que le
mélange fasse effet.
EN
FR
Place the appliance over a sink & unscrew the
«Anti calc» cap by turning it anti clockwise
Positionnez l’appareil au dessus d’un évier et
dévissez le bouchon « Anti calc » en le tournant
dans le sens contraire de l’aiguille d’une
montre.
50%
WhiteWhite
VinegarVinegar
White
Vinegar
50%
WaterWaterWater
1 L
34OZ
EN
FR
Descale the appliance by lling the water tank
inlet with a preparation of white vinegar /
water (cold appliance). In a bottle, mix by
adding 500 ml of white vinegar and 500 ml of
water.
Préparez un mélange de 1 l composé de 0,5 l
d’eau et de 0,5 l de vinaigre blanc uniquement.
Ajoutez 1 l dans l’ouverture du réservoir de
l’appareil.
1800138683-02 IS65XX.qxp_Mise en page 1 23/09/2016 08:23 Page18

19
EN
FR
Insert the pole in the housing & then lock.
Insérez le mât dans le boîtier, puis verrouillez.
EN
FR
Vertically tilt the appliance to empty the water
into the sink.
Inclinez verticalement l’appareil an de le
vider de son eau dans l’évier.
EN
FR
Pour 500 ml of water into the water tank inlet.
Ajoutez 0,5 l d’eau dans l’ouverture du
réservoir de l’appareil.
EN
FR
Re-assemble the anti-calc cap by screwing it
in completely to ensure that it is watertight
but do not over tighten it
Remettez le bouchon « Anti calc » et revissez.
1800138683-02 IS65XX.qxp_Mise en page 1 23/09/2016 08:23 Page19

20
EN
FR
Re-assemble the water tank cap by screwing
it in completely to ensure that it is watertight
but do not over tighten it and insert the water
tank back into the appliance.
Vissez entièrement le bouchon du réservoir
d’eau et remettez le réservoir sur l’appareil.
EN
FR
Plug in the appliance.
Branchez l’appareil.
EN
FR
Position the steam head on its cradle.
Placez la tête vapeur sur son support.
EN
FR
Remove the cap then llthe water tank.
Retirez le bouchon, puis remplissez le
réservoir d’eau.
1800138683-02 IS65XX.qxp_Mise en page 1 23/09/2016 08:23 Page20

21
EN
FR
only use a damp sponge/cloth with water to
clean the base.
Utilisez seulement une éponge et de l’eau
pour nettoyer la base.
8. CLEANING / NETTOYAGE
EN
FR
Wait an hour so that the appliance has
completely cooled down/
Attendez une heure pour que l’appareil
refroidisse complètement.
EN
FR
Only use a damp sponge/cloth with water to
clean the steam head.
Utilisez seulement une éponge et de l’eau pour
nettoyer la tête vapeur.
EN
FR
Let the appliance run until the water tank has
completely emptied.
Pour nir l’opération de détartrage, Laissez
l’appareil en marche jusqu’à ce que le
réservoir d’eau soit complètement vide.
1800138683-02 IS65XX.qxp_Mise en page 1 23/09/2016 08:23 Page21

22
EN
FR
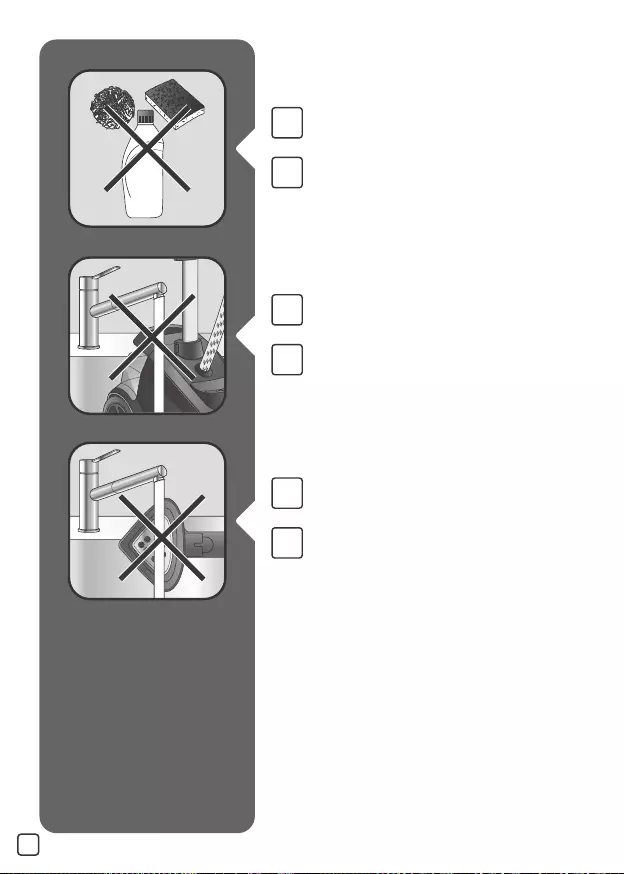
Never wash or rinse appliance directly over a
sink.
Ne lavez et ne rincez jamais l’appareil au-
dessus d’un évier.
EN
FR
Never wash or rinse the steam head directly
over a sink.
Ne lavez et ne rincez jamais la tête vapeur au-
dessus d’un évier.
EN
FR
Never use detergents when cleaning your
appliance.
N’utilisez jamais de détergents pour nettoyer
votre appareil.
1800138683-02 IS65XX.qxp_Mise en page 1 23/09/2016 08:23 Page22

* ES Según modelo / IT Su alcuni modelli / PT Consoante o modelo
DESCRIPCIÓN DEL PRODUCTO / DESCRIZIONE DEL PRODOTTO /
DESCRIÇÃO DO PRODUTO
1A. ES Cabezal de vapor
IT Testa vapore
PT Cabeça de vapor
1B*. ES Shot de precision
IT Pulsante getto di precisione
PT Botão de jato de vapor
2A. ES Perchero
IT Appendiabito
PT Cabide
2B. ES Locker para el bloqueo del perchero
IT Sistema di bloccaggio per
l’appendiabito rotazione
PT Sistema de bloqueio de rotação do
cabide
3. ES Pinzas para pantalones
IT Clip per pantaloni
PT Cabide com molas para calças
4. ES Manguera de vapor de tela tejida
IT Tubo vapore per tessuti
PT Cabo de vapor revestido a tecido
5. ES Gancho del cable de alimentación
IT Gancio cavo di alimentazione
PT Gancho do cabo de alimentação
6. ES Pedal de encendido/apagado
IT Pedale On/Off
PT Pedal de ligar/desligar
7. ES Indicador de
encendido/apagado
IT Spia On/Off
PT Indicador luminoso de
ligar/desligar
8. ES Tapa de drenaje
IT Cappuccio di drenaggio
PT Tampa de drenagem
9. ES Ruedas
IT Ruote
PT Rodas
10. ES Depósito de agua
IT Serbatoio dell’acqua
PT Depósito de água amovível
11. ES Abrazaderas
IT Fermi dell’asta
PT Bloqueadores do cabo
12A*. ES Cepillo para tejido
IT Spazzola per tessuti
PT Escova para tecidos
12B*. ES Accesorio para pliegues
IT Accessori piega
PT Acessório para vincos
12C*. ES La cubierta de vapor
IT Panno protettivo
PT Capa de vapor
23
1800138683-02 IS65XX.qxp_Mise en page 1 23/09/2016 08:23 Page23
1. MONTAJE / MONTAGGIO /
MONTAGEM
ES
PT
IT
Inserte el brazo telescópico y bloquealo.
Inserire l’asta nell’alloggiamento e bloccarla.
Introduzir o tubo no encaixe e bloquear.
ES
PT
IT
Abra las tres abrazaderas.
Aprire i tre fermi dell’asta.
Abrir os três bloqueadores do tubo.
ES
PT
IT
Extienda el brazo telescópico por completo.
Estendere l’asta interamente.
Esticar totalmente o tubo.
ES
PT
IT
Cierre las tres abrazaderas.
Chiudere i tre fermi.
Fechar os três bloqueadores.
24
1800138683-02 IS65XX.qxp_Mise en page 1 23/09/2016 08:23 Page24

ES
PT
IT
Inserte por completo el perchero plegable en
sentido vertical en la parte superior del brazo
telescópico.
Inserire interamente l’appendiabito
verticalmente nell’estremità superiore
dell’asta.
Introduzir o cabide na posição vertical no
topo do tubo.
25
ES
ES
IT
Posicione el cabezal de vapor en el soporte.
Posizionare la testa vapore nella base.
Posicionar a cabeça de vapor na sua base.
1800138683-02 IS65XX.qxp_Mise en page 1 23/09/2016 08:23 Page25

2. ANTES DE UTILIZAR / PRIMA
DELL‘USO / ANTES DA UTILIZAÇÃO
ES
PT
IT
Retire el depósito de agua.
Rimuovere il serbatoio dell’acqua.
Retirar o depósito de água.
ES
PT
IT
Retire la tapa y luego llene el depósito de
agua.
Rimuovere il tappo quindi riempire il
serbatoio.
Retirar a tampa, a seguir, encher o depósito
de água.
ES
PT
IT
Enrosque la tapa del depósito de agua en su
totalidad e inserte el depósito nuevamente en
el dispositivo.
Avvitare a fondo il tappo del serbatoio e
inserirlo nuovamente nell’apparecchio.
Fechar bem a tampa do depósito de água e
voltar a introduzir o depósito no aparelho.
26
ES
PT
IT
Coloque la prenda que desee en el perchero
plegable.
Sistemare l’indumento sull’appendiabito.
Colocar a peça de roupa no cabide.
1800138683-02 IS65XX.qxp_Mise en page 1 23/09/2016 08:23 Page26

3. ACCESORIOS / ACCESSORI /
ACESSÓRIOS
ES
PT
IT
El cepillo para tejidos abre las tramas de los
tejidos para una mejor penetración del vapor.
Acople el cepillo para tejidos en el cabezal de
vapor cuando el dispositivo esté desconectado.
La spazzola per tessuti apre le bre del tessuto
consentendo una migliore penetrazione del
vapore. Applicare la spazzola per tessuti alla
testa vapore quando l’apparecchio è
scollegato.
A escova para tecidos abre as bras dos
tecidos para melhor penetração do vapor.
Fixar a escova para tecidos à cabeça de vapor
quando o aparelho estiver desligado da
tomada.
27
ES
ES
IT
Los accesorios deben colocarse cuando el dispositivo esté frío y no esté en
funcionamiento.
Gli accessori devono essere applicati quando l’apparecchio è freddo e non
è in funzione.
Os acessórios devem ser colocados ou retirados apenas quando o
dispositivo estiver frio e não estiver em funcionamento.
ES
PT
IT
Los accesorios para pliegues le permiten crear
pliegues en los pantalones. Acople los
accesorios para tejidos en el cabezal de vapor
cuando el dispositivo esté desconectado.
L‘accessorio piega consente di dare una piega ai
pantaloni o ai cappotti. Applicarel’accessorio
piega alla testa vapore quando l’apparecchio è
scollegato.
O acessório para vincos permite vincar as calças
ou os casacos. Fixar o acessório para vincos à
cabeça de vapor quando o aparelho estiver
desligado da tomada.
1800138683-02 IS65XX.qxp_Mise en page 1 23/09/2016 08:23 Page27

28
ES
PT
IT
Posicione el cabezal de vapor en el soporte.
Posizionare la testa vapore nella base.
Posicionar a cabeça de vapor na sua base.
ES
PT
IT
La cubierta de vapor ltra las impurezas del
agua y protege los tejidos contra el goteo de
agua. Acople los accesorios para tejidos en el
cabezal de vapor cuando el dispositivo esté
desconectado.
Il panno protettivo ltra le impurità dell’acqua
e protegge il tessuto dalle gocce d’acqua.
Applicare il panno protettivo alla testa vapore
quando l’apparecchio è scollegato.
A capa para tecidos delicados ltra as
impurezas da água e protege os tecidos de
pingos de água. Fixar a capa à cabeça de
vapor quando o aparelho estiver desligado da
tomada.
4. USO / USO / UTILIZAÇÃO
ES
PT
IT
El dispositivo debe permanecer en posición
horizontal en relación al suelo.
L‘apparecchio deve rimanere sul pavimento,
in posizione orizzontale.
O aparelho tem de permanecer na posição
horizontal e assente no chão.
ES
PT
IT
Conecte el dispositivo.
Collegare l’apparecchio alla rete elettrica.
Ligar o aparelho à corrente.
1800138683-02 IS65XX.qxp_Mise en page 1 23/09/2016 08:23 Page28
29
ES
PT
IT
Presione una vez el pedal de
encendido/apagado y verique que la luz
esté encendida. Espere 45 segundos antes de
echar vapor.
Premere il pedale ON/OFF e vericare che la
spia si accenda. Attendere 45 secondi prima
di erogare il vapore.
Premir o pedal de ligar/desligar e vericar se
a luz está acesa. Aguardar 45 segundos antes
de começar a produzir vapor.
ES
PT
IT
Después de aproximadamente 45 segundos,
saldrá vapor del dispositivo.
Dopo circa 45 secondi l’apparecchio produrrà
vapore.
Após cerca de 45 segundos, começa a libertar
vapor.
ES
PT
IT
Para un uso óptimo, pase el vapor por su ropa
de arriba a abajo.
Per un uso ottimale, passare i getti di vapore
sull’indumento, dall’alto verso il basso.
Para uma utilização otimizada, aplicar jatos de
vapor na peça de roupa de cima para baixo.
ES
PT
IT
Si quiere tener una concentración del vapor,
deje presionado el botón golpe de precision.
Se si desidera vapore concentrato, premere il
pulsante Getto di precisione.
Se pretender obter vapor concentrado, manter
pressionado o botão de jato de vapor.
1800138683-02 IS65XX.qxp_Mise en page 1 23/09/2016 08:23 Page29

30
ES
PT
IT
Nunca eche vapor directamente a las
personas.
Non indirizzare mai il vapore contro le
persone.
Nunca libertar vapor diretamente sobre as
pessoas
ES
PT
IT
Si ya no sale vapor del dispositivo, esto puede
deberse a un bajo nivel de agua en el tanque.
Se non esce più vapore, è possibile che il
livello dell’acqua nel serbatoio sia basso.
Se já não estiver a sair vapor, pode dever-se
ao baixo nível de água no depósito.
5. DURANTE EL USO / DURANTE L‘USO /
DURANTE A UTILIZAÇÃO
ES
PT
IT
Bloquee el perchero bajando el bloqueador.
Per bloccare l’appendiabito tirare il fermo
verso il basso.
Bloquear o cabide pressionando a tranca para
baixo.
ES
PT
IT
Desbloquee el perchero subiendo el
bloqueador.
Per rimuovere l’appendiabito, sbloccare il
fermo tirandolo verso l’alto.
Para soltar o cabide, desbloquear a tranca
puxando-a para cima.
1800138683-02 IS65XX.qxp_Mise en page 1 23/09/2016 08:23 Page30

31
ES
PT
IT
Retire el depósito de agua.
Rimuovere il serbatoio dell’acqua.
Retirar o reservatório de água.
ES
PT
IT
Retire la tapa y luego llene el tanque de agua.
Rimuovere il tappo quindi riempire il
serbatoio.
Retirar a tampa, a seguir, encher o depósito
de água.
ES
PT
IT
Enrosque la tapa del depósito de agua en su
totalidad e inserte el depósito nuevamente en
el dispositivo.
Avvitare a fondo il tappo del serbatoio e
inserirlo nuovamente nell’apparecchio.
Fechar bem a tampa do depósito de água e
voltar a introduzir o depósito no aparelho.
ES
PT
IT
Presione el pedal de encendido/apagado y
verique que la luz se haya apagado.
Premere il pedale On/Off e vericare che la spia si
spenga.
Premir o pedal de ligar/desligar e vericar se a luz
está apagada.
1800138683-02 IS65XX.qxp_Mise en page 1 23/09/2016 08:23 Page31
6. DESPUÉS DEL USO / DOPO L‘USO /
APÓS A UTILIZAÇÃO
ES
PT
IT
Presione el pedal de encendido/apagado y
verique que la luz se haya apagado.
Premere il pedale On/Off e vericare che la spia si
spenga.
Premir o pedal de ligar/desligar e vericar se a luz
está apagada.
ES
PT
IT
Desenchufe el dispositivo.
Scollegare l’apparecchio.
Desligar o aparelho da corrente.
ES
PT
IT
Retire el depósito de agua.
Rimuovere il serbatoio dell’acqua.
Retirar o reservatório de água.
32
ES
PT
IT
Presione el pedal de encendido/apagado y
verique que la luz esté encendida. Espere 45
segundos antes de echar vapor.
Premere il pedale ON/OFF e vericare che la spia
si accenda. Attendere 45 secondi prima di
erogare il vapore.
Premir o pedal de ligar/desligar e vericar se a luz
está acesa. Aguardar 45 segundos antes de
começar a produzir vapor.
1800138683-02 IS65XX.qxp_Mise en page 1 23/09/2016 08:23 Page32

33
ES
PT
IT
Vuelva a enroscar la tapa y coloque el tanque
de agua nuevamente en el dispositivo.
Riavvitare il tappo e riposizionare il serbatoio
nell’apparecchio.
Fechar bem a tampa e voltar a colocar o
depósito de água no aparelho.
ES
PT
IT
Enrolle el cable de alimentación y colóquelo
en el gancho.
Avvolgere il cavo di alimentazione e
posizionarlo sul suo gancio.
Enrolar o cabo de alimentação e colocá-lo no
seu gancho.
ES
PT
IT
Espere una hora para que el dispositivo se
enfríe antes de guardarlo.
Attendere un’ora che l’apparecchio si raffreddi
prima di riporlo.
Aguardar uma hora até o aparelho arrefecer
antes de o guardar
ES
PT
IT
Desenrosque la tapa y luego vacíe el depósito
de agua por completo en un lavabo.
Svitare il tappo e svuotare il serbatoio
dell’acqua completamente nel lavandino.
Abrir a tampa e, a seguir, esvaziar totalmente
o depósito de água num lavatório.
1800138683-02 IS65XX.qxp_Mise en page 1 23/09/2016 08:23 Page33
ES
PT
IT
Libere el bloqueo y quite el brazo telescópico.
Rimuovere la testa vapore dall‘appendiabito,
sbloccare i fermi ed estrarre l‘asta.
Retirar a cabeça de vapor do cabide,
desbloquear o bloqueador e retirar o tubo.
34
ES
PT
IT
¡ADVERTENCIA! Espere una hora para que el
dispositivo se enfríe por completo.
AVVERTENZA Attendere un‘ora che
l’apparecchio si raffreddi completamente.
AVISO! Aguardar uma hora até o aparelho
arrefecer por completo.
7. PROCEDIMIENTO DE DESCALCIFICACIÓN /
PROCEDURA DI DECALCIFICAZIONE /
PROCEDIMENTO DE DESCALCIFICAÇÃO
PT
IT
ES Retire el depósito de agua.
Rimuovere il serbatoio dell’acqua.
Retirar o depósito de água.
ES
PT
IT
El aparato debe descalsicarse por lo menos una vez cada 6 meses
Da eseguire ogni 6 mesi o in caso di peggioramento delle prestazioni.
Realizar de 6 em 6 meses ou em caso de diminuição do desempenho do
aparelho.
1800138683-02 IS65XX.qxp_Mise en page 1 23/09/2016 08:23 Page34

35
ES
PT
IT
Llene la entrada del depósito del dispositivo
con 0.5 l de agua.
Versare in 0,5l di acqua nel serbatoio
dell’apparecchio.
Introduzir 0,5l de água no orifício de entrada
do reservatório do aparelho.
ES
PT
IT
Incline el dispositivo es posición vertical para
vaciar el agua en un lavabo.
Ribaltare verticalmente l’apparecchio per
svuotare l’acqua nel lavandino.
Inclinar verticalmente o aparelho para
esvaziar a água num lavatório.
ES
PT
IT
Agite gentilmente el dispositivo para eliminar
las partículas principales.
Scuotere delicatamente l’apparecchio per
rimuovere le particelle più importanti.
Agitar suavemente o aparelho para remover
as principais partículas.
ES
PT
IT
Nunca coloque agua dentro de la conexión del brazo telescópico.
Non versare mai all’interno del collegamento dell’asta.
Nunca introduzir líquidos no encaixe do tubo.
1800138683-02 IS65XX.qxp_Mise en page 1 23/09/2016 08:23 Page35
ES
PT
IT
Incline el dispositivo es posición vertical para
vaciar la mezcla en un lavabo.
Ribaltare verticalmente l’apparecchio per
svuotare la miscela nel lavandino.
Inclinar verticalmente o aparelho para
esvaziar a mistura num lavatório.
36
ES
PT
IT
Espere 12 horas como mínimo para que la
mezcla sea ecaz.
Per il massimo risultato attendere almeno 12
ore.
Aguardar 12 horas, no mínimo, para uma boa
ecácia da mistura.
ES
PT
IT
Desenrosque la tapa «anti calc» en el sentido
dirección contrario de las agujas del reloj.
Posizionare l’apparecchio sopra un lavandino
e svitare il tappo «anti calcalre» ruotandolo in
senso antiorario.
Colocar o aparelho por cima do lavatório e
desenroscar a tampa «anticalcário», rodando-
a no sentido contrário aos ponteiros do
relógio.
50%
WhiteWhite
VinegarVinegar
White
Vinegar
50%
WaterWaterWater
1 L
34OZ
ES
PT
IT
Prepare 1 l de mezcla de 0.5 l de agua y 0.5 l de
vinagre blanco únicamente. Llene la entrada del
depósito de agua del dispositivo con 1 l de mezcla.
Preparare a 1L, miscelando 0,5L di acqua e 0,5L di
solo aceto bianco. Versare in 1L della miscela nel
serbatoio dell’apparecchio.
Preparar uma mistura de 1l apenas com 0,5l de
água e 0,5l de vinagre de vinho branco. Introduzir
1l da mistura no orifício de entrada do reservatório
do aparelho.
1800138683-02 IS65XX.qxp_Mise en page 1 23/09/2016 08:23 Page36
37
ES
PT
IT
Inserte el brazo telescópico y bloquealo.
Inserire l’asta nell’alloggiamento e bloccarla.
Introduzir o tubo no encaixe e bloquear.
ES
PT
IT
Incline el dispositivo es posición vertical para
vaciar el agua en un lavabo.
Ribaltare verticalmente l’apparecchio per
svuotare l’acqua nel lavandino.
Inclinar verticalmente o aparelho para
esvaziar a água num lavatório.
ES
PT
IT
Llene la entrada del depósito de agua del
dispositivo con 0.5 l de agua.
Versare in 0,5L di acqua nel serbatoio
dell’apparecchio.
Introduzir 0,5l de água no orifício de entrada
do reservatório do aparelho.
ES
PT
IT
Coloque la tapa «anti calc» y atornillela.
Inserire il tappo «anti calcare» e riavvitarlo.
Voltar a colocar a tampa «anticalcário» e
enroscá-la.
1800138683-02 IS65XX.qxp_Mise en page 1 23/09/2016 08:23 Page37

38
ES
PT
IT
Enrosque la tapa del depósito de agua en su
totalidad e inserte el depósito nuevamente en
el dispositivo.
Avvitare a fondo il tappo del serbatoio e
inserirlo nuovamente nell’apparecchio.
Fechar bem a tampa do depósito de água e
voltar a introduzir o depósito no aparelho.
ES
PT
IT
Conecte el dispositivo.
Collegare l’apparecchio alla rete elettrica.
Ligar o aparelho à tomada.
ES
PT
IT
Posicione el cabezal de vapor en el soporte.
Posizionare la testa vapore nella base.
Posicionar a cabeça de vapor na sua base.
ES
PT
IT
Retire la tapa y luego llene el depósito de
agua.
Rimuovere il tappo quindi riempire il
serbatoio.
Retirar a tampa, a seguir, encher o depósito
de água.
1800138683-02 IS65XX.qxp_Mise en page 1 23/09/2016 08:23 Page38

39
ES
PT
IT
Use únicamente una esponja con agua para
limpiar la base.
Per pulire la base utilizzare unicamente un
spugna inumidita con acqua.
Utilizar apenas uma esponja com água para
limpar o corpo do aparelho.
8. LIMPIEZA / PULIZIA / LIMPEZA
ES
PT
IT
Espere una hora para que el dispositivo se
enfríe por completo.
Attendere un’ora no a quando non si sia
completamente raffreddato.
Aguardar uma hora até arrefecer por
completo.
ES
PT
IT
Use únicamente una esponja con agua para
limpiar el cabezal de vapor.
Per pulire la testa vapore utilizzare unicamente
una spugna inumidita con acqua.
Utilizar apenas uma esponja com água para
limpar a cabeça de vapor.
ES
PT
IT
Deje que el dispositivo funcione hasta que el
tanque de agua se vacíe completamente.
Fa funzionare l’apparecchio no a quando il
serbatoio dell’acqua non sia completamente
vuoto.
Para nalizar o processo de descalcicação,
deixar o aparelho a funcionar até o depósito de
água ter esvaziado por completo.
1800138683-02 IS65XX.qxp_Mise en page 1 23/09/2016 08:23 Page39

40
ES
PT
IT
Nunca lave o enjuague el dispositivo
directamente sobre un lavabo.
Non lavare né risciacquare l’apparecchio
direttamente sopra il lavandino.
Nunca lavar nem passar diretamente o
aparelho por água num lavatório.
ES
PT
IT
Nunca lave o enjuague el cabezal de vapor
directamente sobre un lavabo.
Non lavare né risciacquare la testa vapore
direttamente sopra il lavandino.
Nunca lavar nem passar diretamente a cabeça
de vapor por água num lavatório.
ES
PT
IT
Nunca use detergentes para limpiar el
dispositivo.
Non usare mai detergenti per pulire
l’apparecchio.
Nunca utilizar detergentes para proceder à
limpeza do aparelho.
1800138683-02 IS65XX.qxp_Mise en page 1 23/09/2016 08:23 Page40

* DE je nach Modell / NL afhankelijk van het model
PRODUKTBESCHREIBUNG / PRODUCTBESCHRIJVING
1A. DE Dampfkopf
NL Stoomkop
1B*. DE Taste für Präzisionsdampfstoß
NL Precisieshot-knop
2A. DE Kleiderbügel
NL Hanger
2B. DE Verriegelungssystem zur Fixierung des
Kleiderbügels
NL Vergrendelingssysteem voor rotatie van
de hanger
3. DE Hosenklammern
NL Broekclips
4. DE Dampfschlauch aus Stoff
NL Stoomsnoer van geweven stof
5. DE Netzkabelhaken
NL Haak voor netsnoer
6. DE Ein-/Aus-Pedal
NL Aan/uit-pedaal
7. DE Ein-/Aus-Anzeige
NL Aan/uit-indicator
8. DE Auslass-Verschlusskappe
NL Afvoerkap
9. DE Räder
NL Wieltjes
10. DE Wassertank
NL Waterreservoir
11. DE Sperrvorrichtungen der
Stange
NL Stangvergrendelingen
12A*. DE Stoffbürste
NL Textielborstel
12B*. DE Faltenaufsatz
NL Opzetstuk voor plooien
12C*. DE Dampfaufsatz
NL Stoomkap
41
1800138683-02 IS65XX.qxp_Mise en page 1 23/09/2016 08:23 Page41

1. ZUSAMMENBAU / MONTAGE
DE
NL
Die Stange in das Gehäuse einsetzen und
dann verriegeln.
Plaats de stang in de behuizing en vergrendel
deze.
DE
NL
Die drei Sperrvorrichtungen der Stange lösen.
Open de drie stangvergrendelingen.
DE
NL
Die Stange zur vollen Länge ausziehen.
Schuif de stang uit tot de volledige lengte.
DE
NL
Die drei Sperrvorrichtungen verriegeln.
Sluit de drie stangvergrendelingen.
42
1800138683-02 IS65XX.qxp_Mise en page 1 23/09/2016 08:23 Page42

DE
NL
Den Kleiderbügel in vertikaler Position auf das
obere Ende der Stange fest aufsetzen.
Plaats de hanger verticaal bovenaan de stang.
43
DE
NL
Den Dampfkopf in der Halterung
positionieren.
Plaats de stoomkop op de houder van de
hanger.
1800138683-02 IS65XX.qxp_Mise en page 1 23/09/2016 08:23 Page43

2. VOR DEM GEBRAUCH / VOOR
GEBRUIK
DE
NL
Den Wassertank abnehmen.
Verwijder het waterreservoir.
DE
NL
Die Verschlusskappe entfernen und den
Wassertank befüllen.
Verwijder de dop en vul het waterreservoir.
DE
NL
Die Verschlusskappe des Wassertanks
festschrauben und den Tank wieder in das
Gerät einsetzen.
Schroef de dop van het waterreservoir er
opnieuw op en plaats de tank opnieuw in het
toestel.
44
DE
NL
Das gewünschte Kleidungsstück auf den
Kleiderbügel hängen.
Plaats uw kledingstuk op de hanger.
1800138683-02 IS65XX.qxp_Mise en page 1 23/09/2016 08:23 Page44
3. ZUBEHÖR / ACCESSOIRES
DE
NL
Die Stoffbürste dient dazu, das Gewebe des
Stoffs zu lockern, damit der Dampf besser
eindringen kann.
Die Stoffbürste am Dampfkopf anbringen,
wenn das Gerät ausgesteckt ist.
De textielborstel opent de weefsels van de
stoffen zodat de stoom beter doordringt.
Plaats de textielborstel op de stoomkop als
het toestel niet is aangesloten.
45
DE
NL
Das Zubehör darf nur angebracht werden, wenn das Gerät kalt und nicht
eingeschaltet ist.
Accessoires mogen alleen geplaatst worden als het toestel is afgekoeld en
niet aan staat.
DE
NL
Mithilfe des Faltenaufsatzes können Falten auf
Hosen oder Jacken aufgebracht werden. Den
Faltenaufsatz am Dampfkopf anbringen, wenn
das Gerät ausgesteckt ist.
Met het opzetstuk voor plooien kunt u plooien
vormen in uw broeken of jasjes. Plaats het
opzetstuk op de stoomkop als het toestel niet is
aangesloten.
1800138683-02 IS65XX.qxp_Mise en page 1 23/09/2016 08:23 Page45

46
DE
NL
Den Dampfkopf in der Halterung
positionieren.
Plaats de stoomkop op de houder van de
hanger.
DE
NL
Der Dampfaufsatz ltert Unreinheiten aus
dem Wasser und verhindert Wassertropfen
auf dem Stoff. Den Dampfaufsatz am
Dampfkopf anbringen, wenn das Gerät
ausgesteckt ist.
De stoomkap ltert onzuiverheden uit het
water en beschermt het textiel tegen
waterdruppels. Plaats de stoomkap op de
stoomkop als het toestel niet is aangesloten.
4. GEBRAUCH / GEBRUIK
DE
NL
Das Gerät muss während des Gebrauchs
waagerecht auf dem Boden stehen.
Het toestel moet horizontaal op de vloer
blijven staan.
DE
NL
Schließen Sie das Gerät an die Steckdose an.
Steek de stekker in het stopcontact.
1800138683-02 IS65XX.qxp_Mise en page 1 23/09/2016 08:23 Page46
47
DE
NL
Das EIN-/AUS-Pedal betätigen und prüfen, ob
die Lampe leuchtet. Warten Sie 45 Sekunden,
bevor der Dampf verfügbar sein wird
Druk op de AAN/UIT-knop en controleer of
het licht begint te branden. Wacht 45
seconden voordat u begint te stomen.
DE
NL
Nach etwa 45 Sekunden tritt Dampf aus dem
Gerät aus.
Na ongeveer 45 seconden komt er stoom uit
de stoomkop.
DE
NL
Für den optimalen Gebrauch die Dampfdüsen
von oben nach unten über die Kleidung
führen.
Beweeg voor een optimaal resultaat de
stoomkop van boven naar beneden langs uw
kledingstuk.
DE
NL
Für einen konzentrierten Dampfausstoß die
Taste für den Präzisionsdampfstoß gedrückt
halten.
Als u geconcentreerde stoom wilt, houd dan de
precisieshot-knop ingedrukt.
1800138683-02 IS65XX.qxp_Mise en page 1 23/09/2016 08:23 Page47
48
DE
NL
Den Dampf niemals direkt auf Personen
richten.
Richt de stoom nooit direct op personen.
DE
NL
Falls kein Dampf mehr ausströmt, kann dies
an einem niedrigen Wasserstand des Tanks
liegen.
Als er geen stoom meer uit de stoomkop
komt, kan het waterniveau in de tank te laag
zijn.
5. WÄHREND DES GEBRAUCHS /
TIJDENS HET GEBRUIK /
DE
DE
Den Kleiderbügel verriegeln, indem der
Verschluss nach unten gedrückt wird.
Vergrendel de hanger door de vergrendeling
naar beneden te duwen.
DE
NL
Den Verschluss zum Entriegeln nach oben
ziehen, um den Kleiderbügel Auszurichten
oder abzunehmen.
Om de hanger los te maken, maakt u de
vergrendeling los door deze naar boven te
trekken.
1800138683-02 IS65XX.qxp_Mise en page 1 23/09/2016 08:23 Page48

49
DE
NL
Den Wassertank abnehmen.
Verwijder het waterreservoir.
DE
NL
Die Verschlusskappe entfernen und den
Wassertank befüllen.
Verwijder de dop en vul het waterreservoir.
DE
NL
Die Verschlusskappe des Wassertanks
festschrauben und den Tank wieder in das
Gerät einsetzen.
Schroef de dop van het waterreservoir er
opnieuw op en plaats de tank opnieuw in het
toestel.
DE
NL
Das Ein-/Aus-Pedal betätigen und prüfen, ob die
Lampe ausgeschaltet ist.
Druk op de aan/uit-knop en controleer of het licht
is uitgeschakeld.
1800138683-02 IS65XX.qxp_Mise en page 1 23/09/2016 08:23 Page49

6. NACH DEM GEBRAUCH / NA
GEBRUIK
DE
NL
Das Ein-/Aus-Pedal betätigen und prüfen, ob die
Lampe ausgeschaltet ist.
Druk op de aan/uit-knop en controleer of het licht
is uitgeschakeld.
DE
NL
Den Stecker des Geräts aus der Steckdose
ziehen.
Trek de stekker van het apparaat uit het
stopcontact.
DE
NL
Den Wassertank abnehmen.
Verwijder het waterreservoir
50
DE
NL
Das EIN-/AUS-Pedal betätigen und prüfen, ob die
Lampe leuchtet. Warten Sie 45 Sekunden, bevor
der Dampf verfügbar sein wird.
Druk op de AAN/UIT-knop en controleer of het
licht begint te branden. Wacht 45 seconden
voordat u begint te stomen.
1800138683-02 IS65XX.qxp_Mise en page 1 23/09/2016 08:23 Page50

51
DE
NL
Die Verschlusskappe wieder festschrauben
und den Wassertank wieder in das Gerät
einsetzen.
Schroef de dop er opnieuw op en plaats het
waterreservoir opnieuw in het toestel.
DE
NL
Das Netzkabel aufrollen und auf den Haken
hängen.
Rol het netsnoer op en plaats het op de haak.
DE
NL
Vor Lagerung 1 Stunde warten, bis das Gerät
abgekühlt ist
Wacht een uur zodat het toestel kan afkoelen
voordat u het opbergt.
DE
NL
Die Verschlusskappe abschrauben und den
Wassertank vollständig in einem
Waschbecken entleeren.
Schroef de dop los en leeg het waterreservoir
in de gootsteen.
1800138683-02 IS65XX.qxp_Mise en page 1 23/09/2016 08:23 Page51

DE
NL
Den Dampfkopf vom Kleiderbügel entfernen,
den Verschluss entriegeln und die Stange
herausziehen.
Haal de stoomkop van de hanger, maak de
vergrendeling los en trek de stang eruit.
52
DE
NL
ACHTUNG! 1 Stunde warten, bis das Gerät
vollständig abgekühlt ist.
OPGELET! Wacht een uur zodat het toestel
volledig kan afkoelen.
7. ENTKALKUNG / ONTKALKEN
NL
DE Den Wassertank abnehmen.
Verwijder het waterreservoir.
DE
NL
Alle 6 Monate oder bei verminderter Leistung anwenden.
Ontkalk het toestel elke 6 maanden of wanneer het prestatievermogen
afneemt.
1800138683-02 IS65XX.qxp_Mise en page 1 23/09/2016 08:23 Page52
53
DE
NL
0,5 l Wasser über die Öffnung in den Tank des
Geräts einfüllen.
Giet 0,5 l water in de opening van het
waterreservoir van het toestel.
DE
NL
Das Gerät so umdrehen, dass das Wasser in
das Waschbecken abläuft.
Kantel het toestel verticaal om het water in
een gootsteen weg te gieten.
DE
NL
Das Gerät vorsichtig schütteln, um die
größten Partikel zu entfernen.
Schud het toestel zachtjes om grove deeltjes
te verwijderen.
DE
NL
Niemals über die Öffnung für die Stange befüllen.
Let erop dat u nooit water in de stangopening giet.
1800138683-02 IS65XX.qxp_Mise en page 1 23/09/2016 08:23 Page53

DE
NL
Das Gerät so umdrehen, dass die Mischung in
das Waschbecken abläuft.
Kantel het toestel verticaal om het mengsel in
een gootsteen weg te gieten.
54
DE
NL
Mindestens 12 Stunden warten, damit die
Mischung einwirken kann.
Wacht minstens 12 uur om het mengsel te
laten inwerken.
DE
NL
Das Gerät über ein Waschbecken halten und
die „Anti-Kalk“-Verschlusskappe durch Drehen
gegen den Uhrzeigersinn abschrauben.
Plaats het toestel over de gootsteen en
schroef de «antikalk»-dop los door het tegen
de klok in te draaien.
50%
WhiteWhite
VinegarVinegar
White
Vinegar
50%
WaterWaterWater
1 L
34OZ
DE
NL
Eine 1-l-Mischung nur aus 0,5 l Wasser und 0,5 l
weißem Essig anfertigen. Die 1 l-Mischung über
die Öffnung in den Tank des Geräts einfüllen.
Maak een mengsel van 1 l met uitsluitend 0,5 l
water en O,5 l witte azijn. Giet 1 l van het mengsel
in de opening van het waterreservoir van het
toestel.
1800138683-02 IS65XX.qxp_Mise en page 1 23/09/2016 08:23 Page54
55
DE
NL
Die Stange in das Gehäuse einsetzen und
dann verriegeln.
Plaats de stang in de behuizing en vergrendel
deze.
DE
NL
Das Gerät so umdrehen, dass das Wasser in
das Waschbecken abläuft.
Kantel het toestel verticaal om het water in
een gootsteen weg te gieten.
DE
NL
0,5 l Wasser über die Öffnung in den Tank des
Geräts einfüllen.
Vul het waterreservoir van het toestel met 0,5l
water.
DE
NL
Die „Anti-Kalk“-Verschlusskappe einsetzen
und wieder festschrauben.
Plaats de «antikalk»-dop terug door hem er
opnieuw op te schroeven.
1800138683-02 IS65XX.qxp_Mise en page 1 23/09/2016 08:23 Page55

56
DE
NL
Die Verschlusskappe des Wassertanks
festschrauben und den Tank wieder in das
Gerät einsetzen.
Schroef de dop van het waterreservoir er
opnieuw op en plaats de tank opnieuw in het
toestel.
DE
NL
Schließen Sie das Gerät an die Steckdose an.
Steek de stekker in het stopcontact.
DE
NL
Den Dampfkopf in der Halterung
positionieren.
Plaats de stoomkop op de houder van de
hanger.
DE
NL
Die Verschlusskappe entfernen und den
Wassertank befüllen.
Verwijder de dop en vul het waterreservoir.
1800138683-02 IS65XX.qxp_Mise en page 1 23/09/2016 08:23 Page56
57
DE
NL
Zur Reinigung des Hauptgeräts lediglich
einen Feuchten Schwamm verwenden.
Gebruik alleen een spons met water om de
behuizing schoon te maken.
8. REINIGUNG / REINIGING
DE
NL
1 Stunde warten, bis das Gerät vollständig
abgekühlt ist.
Wacht een uur tot het toestel volledig is
afgekoeld.
DE
NL
Zur Reinigung des Dampfkopfs lediglich einen
Feuchten Schwamm Verwenden.
Gebruik alleen een spons met water om de
stoomkop schoon te maken.
DE
NL
Lassen Sie das Gerät solange eingeschaltet,
bis der Wassertank vollständig entleert ist.
Laat het toestel lopen tot het waterreservoir
volledig leeg is.
1800138683-02 IS65XX.qxp_Mise en page 1 23/09/2016 08:23 Page57
58
DE
NL
Das Gerät niemals direkt in einem
Waschbecken waschen oder spülen.
Was of spoel het toestel nooit af onder een
gootsteen.
DE
NL
Den Dampfkopf niemals direkt in einem
Waschbecken waschen oder spülen.
Was of spoel de stoomkop nooit af onder een
gootsteen
DE
NL
Zur Reinigung des Geräts niemals
Reinigungsmittel verwenden.
Gebruik nooit reinigingsmiddelen om uw
toestel schoon te maken.
1800138683-02 IS65XX.qxp_Mise en page 1 23/09/2016 08:23 Page58

* RU В зависимости от модели / UK Залежно від моделі
ОПИСАНИЕ ИЗДЕЛИЯ / ОПИС ВИРОБУ
1A. RU Паровое сопло
UK Парове сопло
1B*. RU Кнопка парового удара
UK Кнопка відпарювання
2A. RU Встроенные плечики
UK Вішалка
2B. RU Зажим блокировки для вращения
плечиков
UK Система блокування для обертання
вішалки
3. RU Зажимы для брюк
UK Затискачі для брюк
4. RU Паровой шланг
UK Тканинний паровий шланг
5. RU Крючок для хранения шнура питания
UK Гачок для зберігання шнура живлення
6. RU Переключатель Вкл./Выкл.
UK Перемикач Увімк./Вимк.
7. RU Индикатор Вкл./Выкл.
UK Індикатор Увімк./Вимк.
8. RU Крышка для слива
UK Кришка для зливу
9. RU Колеса для
транспортировки
UK Коліщатка
10. RU Резервуар для воды
UK Резервуар для води
11. RU Блокирующие зажимы
UK Замки стійки
12A*. RU Щетка для ткани
UK Насадка-щітка для тканини
12B*. RU Насадка для формирования
стрелок
UK Насадка для складок
12C*. RU Насадка для деликатных
тканей
UK Паровий ковпачок
59
1800138683-02 IS65XX.qxp_Mise en page 1 23/09/2016 08:23 Page59
1. СБОРКА / ЗБИРАННЯ
RU
UK
Вставьте телескопическую стойку в корпус
и заблокируйте.
Вставте стійку в корпус і заблокуйте.
RU
UK
Откройте три зажима стойки.
Відкрийте три замки стійки.
RU
UK
Вытяните телескопическу стойку
полностью.
Витягніть стійку повністю.
RU
UK
Закройте три зажима.
Закрийте три замки.
60
1800138683-02 IS65XX.qxp_Mise en page 1 23/09/2016 08:23 Page60

RU
UK
Полностью вставьте плечики вертикально
в верхнюю часть стойки.
Повністю вставте вішалку вертикально у
верхню частину стійки.
61
RU
UK
Установите паровое сопло на верхнюю
часть плечиков.
Установіть парове сопло в його гніздо.
1800138683-02 IS65XX.qxp_Mise en page 1 23/09/2016 08:23 Page61

2. ПЕРЕД ИСПОЛЬЗОВАНИЕМ / ПЕРЕД
ВИКОРИСТАННЯМ
RU
UK
Убедитесь, что отпариватель выключен из
сети. Извлеките резервуар для воды.
Зніміть резервуар для води.
RU
UK
Открутите крышку резервуара и наполните
его водой.
Зніміть кришку й наповніть резервуар для
води.
RU
UK
Полностью закрутите крышку резервуара
для воды и вставьте резервуар обратно в
прибор.
Повністю закрутіть кришку резервуара для
води і вставте резервуар назад у прилад.
62
RU
UK
Повесьте выбранную одежду на плечики.
Повісьте обраний одяг на вішалку.
1800138683-02 IS65XX.qxp_Mise en page 1 23/09/2016 08:23 Page62

3. НАСАДКИ / НАСАДКИ
RU
UK
Щетка для ткани раскрывает волокна для
лучшего проникновения пара, подходит
для плотных тканей.
Закрепите щетку для ткани на паровом
сопле, когда прибор отключен от
электросети.
Щітка для тканини розкриває плетіння,
сприяючи проникненню пари.
Прикріпіть щітку для тканини до парового
сопла, коли прилад відключений від
електромережі.
63
RU
UK
Аксессуары следует устанавливать, когда прибор охлаждён и не
подключен к сети.
Аксесуари слід установлювати, коли прилад холодний і не працює.
RU
UK
Насадка для для формирования стрелок
позволяет делать складки на ваших брюках
или пиджаках. Закрепите насадку для для
формирования стрелок к паровому соплу,
когда прибор отключен от электросети.
Насадка для складок дає змогу зробити
складки на ваших брюках і піджаках.
Прикріпіть насадку для складок до парового
сопла, коли прилад відключений від
електромережі.
1800138683-02 IS65XX.qxp_Mise en page 1 23/09/2016 08:23 Page63

64
RU
UK
Установите паровое сопло на верхнюю
часть плечиков.
Установіть парове сопло в його гніздо.
RU
UK
Насадка для деликатных тканей
обеспечивает равномерное распределение
пара, фильтрует воду, очищая ее от
примесей, и защищает одежду от капель
воды. Наденьте насадку для деликатных
тканей на паровое сопло, когда прибор
отключен от электросети.
Паровий ковпачок фільтрує домішки у воді
і захищає тканини від крапель води.
Прикріпіть паровий ковпачок до парового
сопла, коли прилад відключений від
електромережі.
4. ИСПОЛЬЗОВАНИЕ /
ВИКОРИСТАННЯ
RU
UK
Прибор должен оставаться в
горизонтальном положении на полу.
Прилад має залишатися в горизонтальному
положенні на підлозі.
RU
UK
Включите прибор в розетку.
Підключіть пристрій до електромережі.
1800138683-02 IS65XX.qxp_Mise en page 1 23/09/2016 08:23 Page64
65
RU
UK
Нажмите на переключатель Вкл./Выкл. и
проверьте, загорелся ли индикатор.
Подождите 45 секунд, прежде чем
приступать к отпариванию.
Натисніть на перемикач Увімк./Вимк. і
перевірте, чи загоряється індикатор.
Зачекайте 45 секунд, перш ніж приступати
до відпарювання.
RU
UK
Прибор начнет производить пар примерно
через 45 секунд.
Приблизно через 45 секунд почне
виходити пара.
RU
UK
Для оптимального использования
направляйте струи пара на одежду сверху
вниз.
Для оптимального використання
спрямовуйте струмені пари на одяг зверху
вниз.
RU
UK
Если вам нужен концентрированный пар,
удерживайте кнопку парового удара.
Якщо вам потрібна концентрована пара,
утримуйте кнопку відпарювання.
1800138683-02 IS65XX.qxp_Mise en page 1 23/09/2016 08:23 Page65

66
RU
UK
Никогда не направляйте пар
непосредственно на людей.
Ніколи не спрямовуйте пару
безпосередньо на людей.
RU
UK
Если пар больше не выходит, возможно, в
резервуаре мало воды.
Якщо пара більше не виходить, можливо, у
резервуарі мало води.
5. ВО ВРЕМЯ ИСПОЛЬЗОВАНИЯ / ПІД
ЧАС ВИКОРИСТАННЯ
RU
UK
Для фиксации положения плечиков,
опустите зажим вниз.
Закріпіть вішалку, потягнувши замок вниз.
RU
UK
Чтобы повернуть плечики, откройте зажим
блокировки, потянув его вверх.
Щоб від’єднати вішалку, відкрийте замок,
потягнувши його вгору.
1800138683-02 IS65XX.qxp_Mise en page 1 23/09/2016 08:23 Page66
67
RU
UK
Извлеките резервуар для воды.
Зніміть резервуар для води.
RU
UK
Открутите крышку резервуара и наполните
его водой.
Зніміть кришку й наповніть резервуар для
води.
RU
UK
Полностью закрутите крышку резервуара
для воды и вставьте резервуар обратно в
прибор.
Повністю закрутіть кришку резервуара для
води і вставте резервуар назад у прилад.
RU
UK
Нажмите на переключатель Вкл./Выкл. и
проверьте, погас ли индикатор.
Натисніть на перемикач Увімк./Вимк. і
перевірте, чи згас індикатор.
1800138683-02 IS65XX.qxp_Mise en page 1 23/09/2016 08:23 Page67
6. РЕКОМЕНДАЦИИ ПОСЛЕ
ИСПОЛЬЗОВАНИЯ / РЕКОМЕНДАЦІї
ПІСЛЯ ВИКОРИСТАННЯ
RU
UK
Нажмите на переключатель Вкл./Выкл. и
проверьте, погас ли индикатор.
Натисніть на перемикач Увімк./Вимк. і
перевірте, чи згас індикатор.
RU
UK
Отключите прибор от сети.
Від’єднайте прилад від електромережі.
RU
UK
Извлеките резервуар для воды.
Зніміть резервуар для води.
68
RU
UK
Нажмите на переключатель Вкл./Выкл. и
проверьте, загорелся ли индикатор.
Подождите 45 секунд, прежде чем приступать
к отпариванию.
Натисніть на перемикач Увімк./Вимк. і
перевірте, чи загоряється індикатор.
Зачекайте 45 секунд, перш ніж приступати до
відпарювання.
1800138683-02 IS65XX.qxp_Mise en page 1 23/09/2016 08:23 Page68
69
RU
UK
Закрутите обратно крышку и установите
резервуар для воды снова в прибор.
Закрутіть кришку і встановіть резервуар
для води знову в прилад.
RU
UK
Сверните кабель питания и повесьте его на
крючок.
Згорніть кабель живлення й повісьте його
на гачок.
RU
UK
Подождите в течение часа, пока прибор
остынет прежде чем убрать его на
хранение.
Зачекайте протягом години, доки прилад
охолоне, перед його зберіганням.
RU
UK
Открутите крышку, а затем слейте всю воду
в раковину.
Відкрутіть кришку, а потім злийте всю воду
в раковину.
1800138683-02 IS65XX.qxp_Mise en page 1 23/09/2016 08:23 Page69
RU
UK
Снимите паровое сопло с встроенных
плечиков, разблокируйте замок и вытащите
телескопическую стойку.
Зніміть парове сопло з вішалки,
розблокуйте замок і витягніть стійку.
70
RU
UK
ПРЕДУПРЕЖДЕНИЕ! Подождите в течение
одного часа, пока прибор полностью
остынет.
ПОПЕРЕДЖЕННЯ! Зачекайте впродовж
однієї години, доки прилад повністю
охолоне.
7. ПРОЦЕДУРА УДАЛЕНИЯ НАКИПИ /
ПРОЦЕДУРА ВИДАЛЕННЯ НАКИПУ
UK
RU Извлеките резервуар для воды.
Зніміть резервуар для води.
RU
UK
Выполнять через каждые 6 месяцев или в случае ухудшения работы.
Виконувати кожні 6 місяців або в разі погіршення роботи.
1800138683-02 IS65XX.qxp_Mise en page 1 23/09/2016 08:23 Page70
71
RU
UK
Залейте 0,5 л воды в отверстие для
заполнения резервуара.
Налийте 0,5 л води в отвір для заповнення
резервуара.
RU
UK
Наклоните прибор в вертикальное
положение, чтобы слить воду в раковину.
Нахиліть прилад у вертикальне положення,
щоб злити воду в раковину.
RU
UK
Осторожно потрясите устройство, чтобы
удалить основные частицы накипи.
Обережно струсіть пристрій, щоб видалити
основні частки.
RU
UK
Никогда не наливайте воду внутрь соединения стойки.
Ніколи не наливайте воду всередину з’єднання стійки.
1800138683-02 IS65XX.qxp_Mise en page 1 23/09/2016 08:23 Page71

RU
UK
Наклоните прибор в вертикальное
положение, чтобы слить смесь в раковину.
Нахиліть прилад у вертикальне положення,
щоб злити суміш у раковину.
72
RU
UK
Подождите минимум 12 часов, чтобы смесь
подействовала.
Зачекайте мінімум 12 годин, щоб суміш
подіяла.
RU
UK
Расположите прибор над раковиной и
открутите крышку Anti calc, повернув ее
против часовой стрелки.
Розташуйте прилад над раковиною і
відкрутіть ковпачок для видалення накипу
Anti calc, обертаючи його проти
годинникової стрілки.
50%
WhiteWhite
VinegarVinegar
White
Vinegar
50%
WaterWaterWater
1 L
34OZ
RU
UK
Приготовьте 1 л смеси, состоящей только
из 0,5 л воды и 0,5 л белого уксуса. Налейте
1 л смеси в отверстие для заполнения
резервуара.
Приготуйте 1 л суміші, що складається
тільки з 0,5 л води і 0,5 л білого оцту.
Налийте 1 л суміші в отвір для заповнення
резервуара.
1800138683-02 IS65XX.qxp_Mise en page 1 23/09/2016 08:23 Page72
73
RU
UK
Вставьте телескопическую стойку в корпус
и заблокируйте
Вставте стійку в корпус і заблокуйте.
RU
UK
Наклоните прибор в вертикальное
положение, чтобы слить воду в раковину.
Нахиліть прилад у вертикальне положення,
щоб злити воду в раковину.
RU
UK
Налейте 0,5 л воды в отверстие для
заполнения резервуара.
Налийте 0,5 л води в отвір для заповнення
резервуара.
RU
UK
Вставьте крышку Anti calc и закрутите ее.
Накрутіть ковпачок для видалення накипу.
1800138683-02 IS65XX.qxp_Mise en page 1 23/09/2016 08:23 Page73
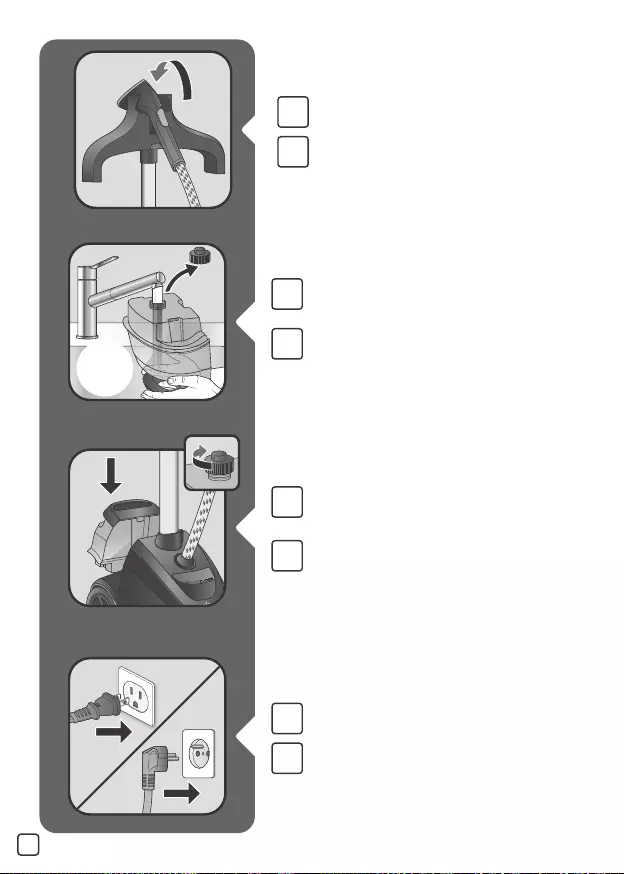
74
RU
UK
Полностью закрутите крышку резервуара
для воды и вставьте резервуар обратно в
прибор.
Повністю закрутіть кришку резервуара для
води і вставте резервуар назад у прилад.
RU
UK
Включите электроприбор в сеть.
Підключіть пристрій до електромережі.
RU
UK
Установите паровое сопло на верхнюю
часть плечиков.
Установіть парове сопло в його гніздо.
RU
UK
Снимите крышку и наполните резервуар
для воды.
Зніміть кришку й наповніть резервуар для
води.
1800138683-02 IS65XX.qxp_Mise en page 1 23/09/2016 08:23 Page74

75
RU
UK
Для очистки корпуса используйте только
губку, смоченную водой.
Для чищення підставки використовуйте
тільки губку, змочену водою.
8. ОЧИСТКА / ЧИЩЕННЯ
RU
UK
Подождите 1 час пока прибор не остынет
полностью.
Зачекайте протягом години до повного
охолодження.
RU
UK
Для очистки парового сопла используйте
только губку, смоченную водой.
Для чищення парового сопла
використовуйте тільки губку, змочену водою.
RU
UK
Пусть прибор работает, пока резервуар для
воды не опустошится полностью.
Нехай прилад працює, доки резервуар для
води не спорожниться повністю.
1800138683-02 IS65XX.qxp_Mise en page 1 23/09/2016 08:23 Page75

76
RU
UK
Никогда не мойте и не полоскайте прибор
непосредственно под водой.
Ніколи не мийте й не полощіть прилад
безпосередньо під проточною водою.
RU
UK
Никогда не мойте и не полоскайте паровое
сопло непосредственно под водой.
Ніколи не мийте й не полощіть парове
сопло безпосередньо під проточною
водою.
RU
UK
Никогда не используйте моющие средства
для чистки прибора.
Ніколи не використовуйте мийні засоби
для чищення приладу.
1800138683-02 IS65XX.qxp_Mise en page 1 23/09/2016 08:23 Page76

Отпариватели для одежды
Rowenta IS65xxxx, где х – любая цифра от
0 до 9 и/или буква от A до Z
Изготовлено в Китае для холдинга “GROUPE SEB”, France
(Groupe SEB, 112 Chemin du Moulin Carron 69130 Ecully, France)
Груп СЕБ,112 Шмэн дю Мулен Каррон 69130 Экюли Франс
Официальный представитель, импрортёр — ЗАО “Группа СЕБ-Восток”
125171, г. Москва, Ленинградское ш., д. 16А, стр. 3 тел. 213-32-32
Информация о сертификации:
• Сертификат соответствия № ТС RU C-FR.АЕ61.B.08236
• Срок действия с 13.09.2016 по 12.09.2021
• Выдан ЦС «Евро-Тест»
Соответствуют требованиям:
• ТР ТС 004/2011 «О безопасности низковольтного оборудования», утв. Решением
КТС от 16.08.
2011г. №768.
• ТР ТС 020/2011 «Электромагнитная совместимость технических средств», утв.
Решением
КТС от 09.12.2011г. №879.
Срок службы изделия 2 года с даты продажи в условиях эксплуатации и
хранения при температуре от 0°С до 40 °С
77
1800138683-02 IS65XX.qxp_Mise en page 1 23/09/2016 08:23 Page77

78
AR
AR
AR
ô ¢º∑FLq ±u«œ «∞∑MEOn ∞Nc« «∞πNU“.
ô ¢Gºq «∞πNU“ ±∂U®d… ≠u‚ «∞∫u÷.
ô ¢Gºq ¸√” «∞∂ªU¸ ±∂U®d… ≠u‚ «∞∫u÷.
1800138683-02 IS65XX.qxp_Mise en page 1 23/09/2016 08:23 Page78

AR
/.8
AR
AR
AR
«∞∑MEOn
œŸ «∞LM∑Z ¥FLq «∞v √Ê ¥Hd⁄ «∞ªe«Ê ≤NUzOUÎ ±s
«∞LU¡.
«≤∑Ed ±b… ßU´W ØU±KW ∞O∂dœ «∞πNU“.
«ß∑FLq ≠Ij «ôßHMπW Ë«∞LU¡ ∞∑MEOn «∞IU´b….
«ß∑FLq ≠Ij «ôßHMπW Ë«∞LU¡ ∞∑MEOn ¸√”
«∞∂ªU¸.
79
1800138683-02 IS65XX.qxp_Mise en page 1 23/09/2016 08:23 Page79

80
AR
AR
AR
AR
{l ¸√” «∞∂ªU¸ ≠w ±A∂Jt «∞ªU’.
«≤eŸ «∞ºb«œ… £r «±ú «∞ªe«Ê °U∞LU¡.
«ÆHq ßb«œ… îe«Ê «∞LU¡ Ë«œîKt «∞v «∞LM∑Z.
√ËÅq «∞πNU“ °U∞∑OU¸ «∞JNd°Uzw.
1800138683-02 IS65XX.qxp_Mise en page 1 23/09/2016 08:23 Page80

AR
AR
AR
AR
≈•Lq «∞πNU“ ´Luœ¥UÎ °u{l ±Uzq ∞∑Hd¥m «∞LU¡
≠w «∞∫u÷.
≈±ú «∞ªe«Ê °LIb«¸ ≤Bn ∞∑d ±s «∞LU¡ ±s îö‰
≠uÒ≥W «∞∑F∂µW .
√œîq ßb«œ… «±Ml «∞∑JKf» Ë«ÆHKNU .
{l «∞FLuœ ≠w ≠∑∫∑t «∞ªUÅW £r «ÆHKt.
81
1800138683-02 IS65XX.qxp_Mise en page 1 23/09/2016 08:23 Page81

82
AR
AR
AR
50%
WhiteWhite
VinegarVinegar
White
Vinegar
50%
WaterWaterWater
1 L
34OZ
AR
¥Ô∫CÒd ±Ib«¸ ≤Bn ∞∑d ±s «∞LU¡ ±Le˧UÎ
°MBn ∞∑d ±s «∞ªq «_°Oi. «±ú «∞ªe«Ê °Nc«
«∞Le¥Z ±s îö‰ ≠uÒ≥W «∞∑F∂µW.
«≤∑Ed ±b… 21 ßU´W ∞Jw ¥Qîc «∞Le¥Z ±HFu∞t.
«•Lq «∞πNU“ ≠u‚ «∞∫u÷ Ë«≤eŸ ¨DU¡ «±Ml
«∞∑JKf» °Sœ«¸¢t °FJf «¢πUÁ ´IU¸» «∞ºU´W.
≈•Lq «∞πNU“ ´Luœ¥UÎ °u{l ±Uzq ∞∑Hd¥m «∞Le¥Z
≠w «∞∫u÷.
1800138683-02 IS65XX.qxp_Mise en page 1 23/09/2016 08:23 Page82

AR
AR
AR
AR
ô ¢ºJV «∞LU¡ œ«îq ±JUÊ ¢∏∂OX «∞FLuœ.
«ßJV ±Ib«¸ 5,0 ∞∑d ±s «∞LU¡ ≠w ≠ÔuÒ≥W «∞ªe«Ê.
•d„ «∞πNU“ «≥∑e«“¥UÎ ù“«∞W «∞Au«zV ±Mt.
≈•Lq «∞πNU“ ´Luœ¥UÎ °u{l ±Uzq ∞∑Hd¥m «∞LU¡
≠w «∞∫u÷.
83
1800138683-02 IS65XX.qxp_Mise en page 1 23/09/2016 08:23 Page83

84
AR
/ .7
AR
AR
≈§d«¡¬‹ ≈“«∞W «∞∑dß∂U‹
∞KIOU °Nc« «ù§d«¡ Øq 6 √®Nd ≠w •U‰ «ùß∑FLU‰ «∞FUœÍ.
«≤eŸ ¸√” «∞∂ªU¸ ´s «∞FöÆW Ë•d¸ «∞IHq
Ë«ß∫V «∞FLuœ.
«≠Bq îe«Ê «∞LU¡.
AR
¢∫c¥d ! «≤∑Ed ±b… ßU´W ∞Jw ¥∂dœ «∞LM∑Z ¢LU±UÎ.
1800138683-02 IS65XX.qxp_Mise en page 1 23/09/2016 08:23 Page84
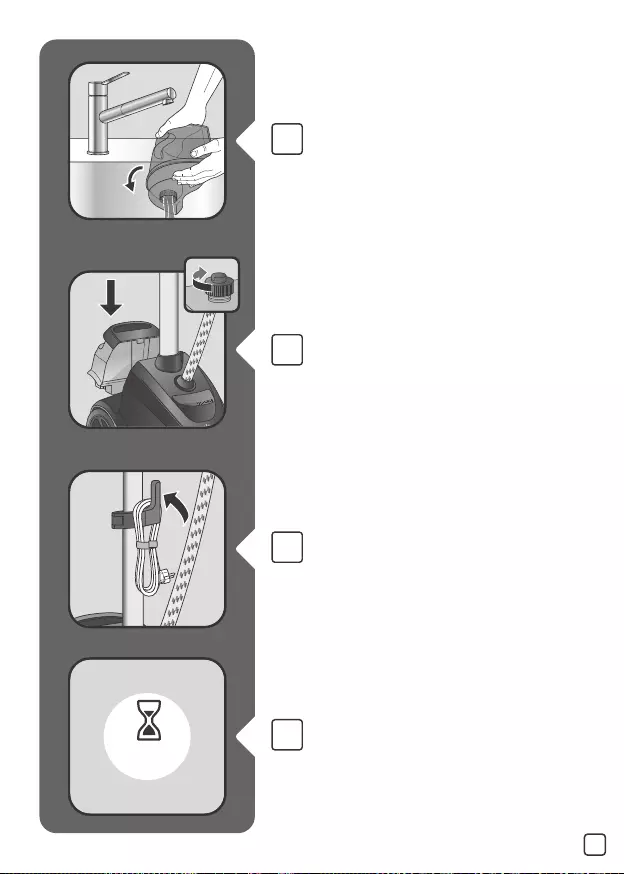
AR
AR
AR
AR
«≤eŸ «∞ºb«œ… Ë√≠d⁄ «∞LU¡ ¢LU±UÎ ±s «∞ªe«Ê ≠w
«∞∫u÷.
«ÆHq îe«Ê «∞LU¡ °U∞ºb«œ… Ë«¸§Ft «∞v «∞LM∑Z.
∞nÒ «∞ºKp «∞JNd°Uzw Ë{Ft ≠w «∞LA∂p
«∞LªBh ∞t.
«≤∑Ed ±b… ßU´W ∞Jw ¥∂dœ «∞πNU“ Æ∂q ¢ªe¥Mt.
85
1800138683-02 IS65XX.qxp_Mise en page 1 23/09/2016 08:23 Page85
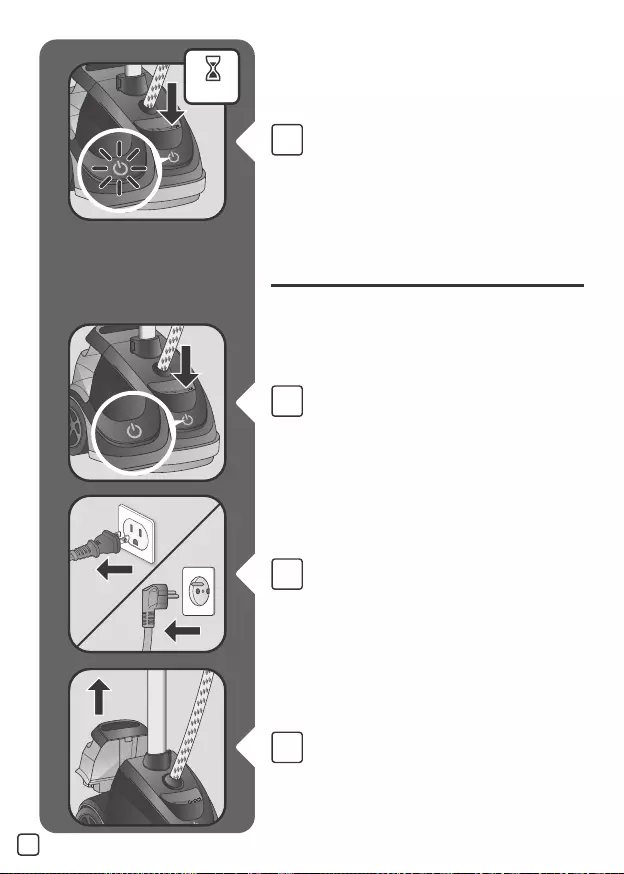
86
/.6
AR
AR
AR
AR
°Fb «ùß∑FLU‰
«{Gj ´Kv œËÒ«ßW «∞∑AGOq/«ù¥IU·, Ë¢QØb √Ê
«∞LR®d «∞Cuzw Æb √{w¡. «≤∑Ed 54 £U≤OW Æ∂q
«∞∑∂ªOd.
«{Gj ´Kv œËÒ«ßW «∞∑AGOq/«ù¥IU·, Ë¢QØb √Ê
«∞LR®d «∞Cuzw Æb «≤DHQ.
«≠Bq «∞πNU“ ´s «∞∑OU¸ «∞JNd°Uzw.
«≠Bq îe«Ê «∞LU¡
1800138683-02 IS65XX.qxp_Mise en page 1 23/09/2016 08:23 Page86

AR
AR
AR
AR
∞∑∫d¥d «∞FöÒÆW, «≠∑` «∞IHq °u«ßDW ß∫∂t.
«{Gj ´Kv œËÒ«ßW «∞∑AGOq/«ù¥IU·, Ë¢QØb √Ê
«∞LR®d «∞Cuzw Æb «≤DHQ.
«≠Bq îe«Ê «∞LU¡.
«≤eŸ «∞ºb«œ… Ë«±ú «∞ªe«Ê °U∞LU¡.
87
1800138683-02 IS65XX.qxp_Mise en page 1 23/09/2016 08:23 Page87

88
AR
AR
/ .5
AR
AR
∞∑∫d¥d «∞FöÒÆW, «≠∑` «∞IHq °u«ßDW ß∫∂t.
«ÆHq «∞FöÒÆW °b≠l «∞IHq «∞v «_ßHq.
ô ¢u§Òt «∞∂ªU¸ ≤∫u «_®ªU’ √°b«Î.
√£MU¡ «ùß∑FLU‰
≈–« ∞r ¥Fb ¥ªdà «∞∂ªU¸, Æb ¥Fuœ –∞p «∞v
«≤ªHU÷ ±º∑uÈ «∞LU¡ ≠w «∞ªd«Ê
1800138683-02 IS65XX.qxp_Mise en page 1 23/09/2016 08:23 Page88
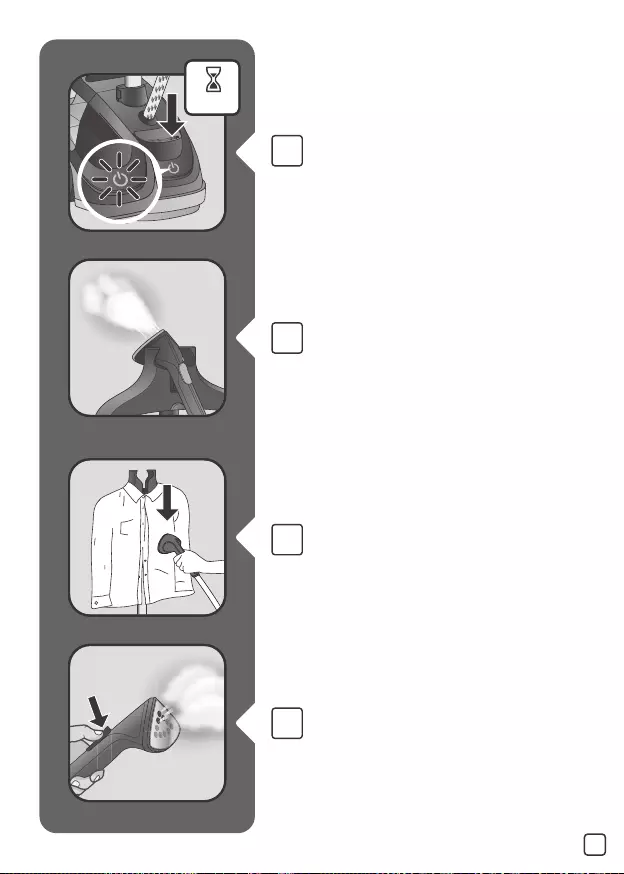
AR
AR
AR
AR
«{Gj ´Kv œËÒ«ßW «∞∑AGOq Ë¢QØb √Ê «∞LR®d
«∞Cuzw ¥FLq. «≤∑Ed ±b… 54 £U≤OW Æ∂q «∞∂b¡
°Uß∑FLU‰ «∞∂ªU¸.
ßu· ¥ªdà «∞∂ªU¸ °Fb 54 £U≤OW ¢Id¥∂UÎ.
∞ûß∑FLU‰ «∞L∏U∞w, ¥ÔLd¸ «∞∂ªU¸ ±s √´Kv
«∞Lö°f «∞v «ßHKNU.
≈–« «¸œ‹ «∞∫Bu‰ ´Kv °ªU¸ ±ÔdØÒe, «{Gj ´Kv
“¸ ≤HY «∞∂ªU¸ «∞LÔdØe .
89
1800138683-02 IS65XX.qxp_Mise en page 1 23/09/2016 08:23 Page89
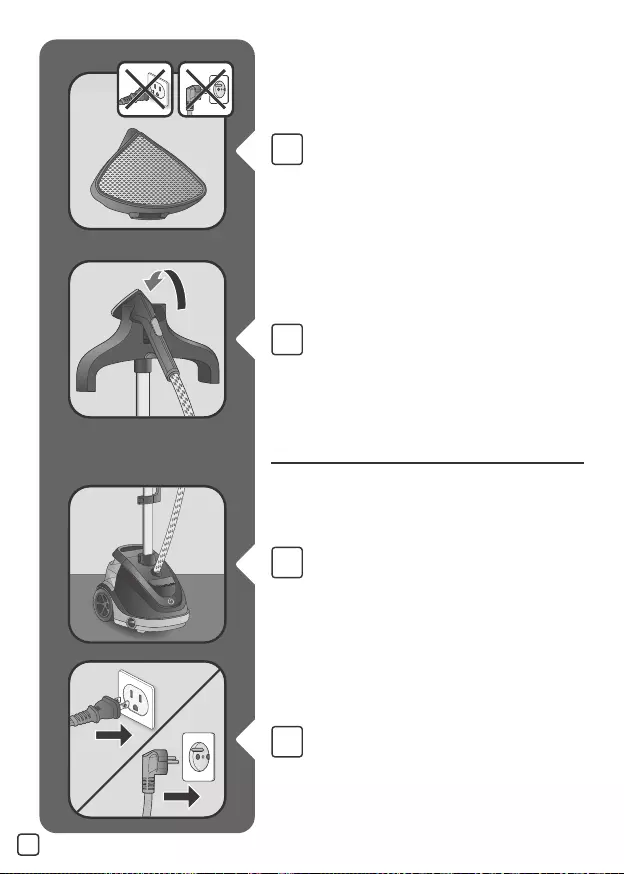
90
AR
AR
/.4
AR
AR
¨DU¡ ≠K∑d «∞∂ªU¸ ¥ÔBHw «∞LU¡ ±s «∞Au«zV
Ë¥∫Lw «∞ILU‘ ±s ¢MIOj «∞LU¡. ¥ÔdØV ≥c« «∞GDU¡
´Kv ¸√” «∞∂ªU¸ ´Mb±U ¥JuÊ «∞πNU“ ¨Od
±uÅu‰ °U∞∑OU¸ «∞JNd°Uzw.
{l ¸√” «∞∂ªU¸ ≠w ±A∂Jt «∞ªU’.
«ùß∑FLU‰
¥πV √Ê ¥∂Iv «∞πNU“ °u{l ´LuœÍ ´Kv «∞∂ö◊.
√ËÅq «∞πNU“ °U∞∑OU¸ «∞JNd°Uzw.
1800138683-02 IS65XX.qxp_Mise en page 1 23/09/2016 08:23 Page90

/ .3
AR
AR
AR
«∞LK∫IU‹
¢ÔdØÒV «∞LK∫IU‹ ´Mb±U ¥JuÊ «∞πNU“ °U¸œ«Î Ë∞Of ÆOb «∞∑AGOq.
¢H∑` ≠d®U… «∞ILU‘ ±ºU «∞ILU‘ ∞MHU– «∞∂ªU¸
°AJq √ÆuÈ. ¢ÔdØV ≠d®U… «∞ILU‘ ≠w ¸√”
«∞∂ªU¸ ´Mb±U ¥JuÊ «∞πNU“ ¨Od ±uÅu‰ °U∞∑OU¸
«∞JNd°Uzw.
¥Ô∑O` ±ÔK∫o «∞∑πU´Ob ´Lq «∞∏MOU‹ ´Kv «∞ºd«Ë¥q
√Ë ´Kv «∞º∑d«‹. ¥ÔdØV ±ÔK∫o «∞∏MOU‹ «≠w ¸√”
«∞∂ªU¸ ´Mb±U ¥JuÊ «∞πNU“ ¨Od ±uÅu‰ °U∞∑OU¸
«∞JNd°Uzw.
91
1800138683-02 IS65XX.qxp_Mise en page 1 23/09/2016 08:23 Page91

92
/ .2
AR
AR
AR
AR
Æ∂q «ùß∑FLU‰
«≠Bq îe«Ê «∞LU¡.
«≤eŸ «∞ºb«œ… Ë«±ú «∞ªe«Ê °U∞LU¡.
¸ØÒV «∞ºb«œ… ¢dØO∂UÎ §Ob«Î Ë√œîq «∞ªe«Ê «∞v
«∞πNU“.
{l ÆDFW ±ö°f ±s ≈î∑OU¸„ ´Kv «∞FöÆW.
1800138683-02 IS65XX.qxp_Mise en page 1 23/09/2016 08:23 Page92
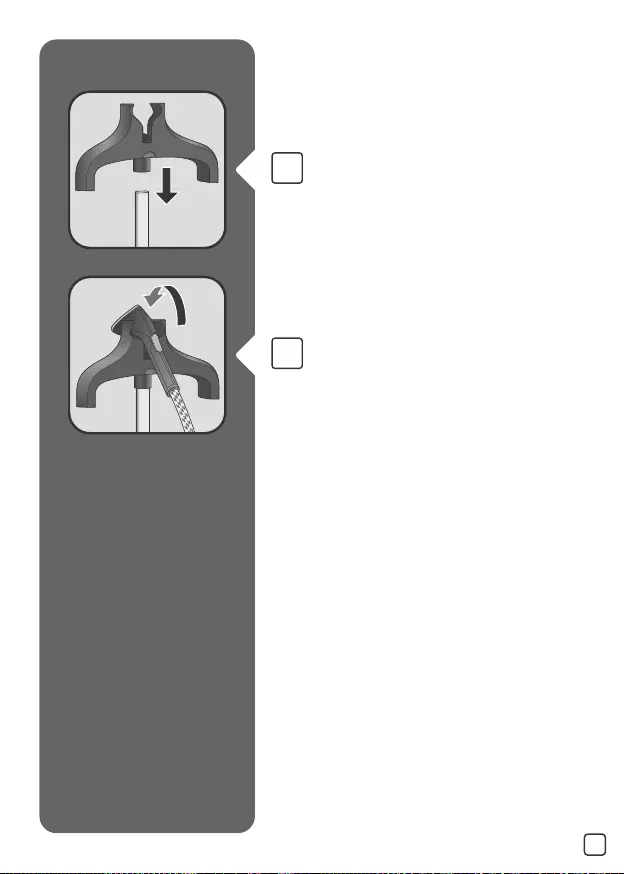
AR
AR
√œîq «∞FöÆW ´Luœ¥UÎ ´Kv √´Kv «∞FLuœ .
{l ¸√” «∞∂ªU¸ ≠w ±A∂Jt.
93
1800138683-02 IS65XX.qxp_Mise en page 1 23/09/2016 08:23 Page93
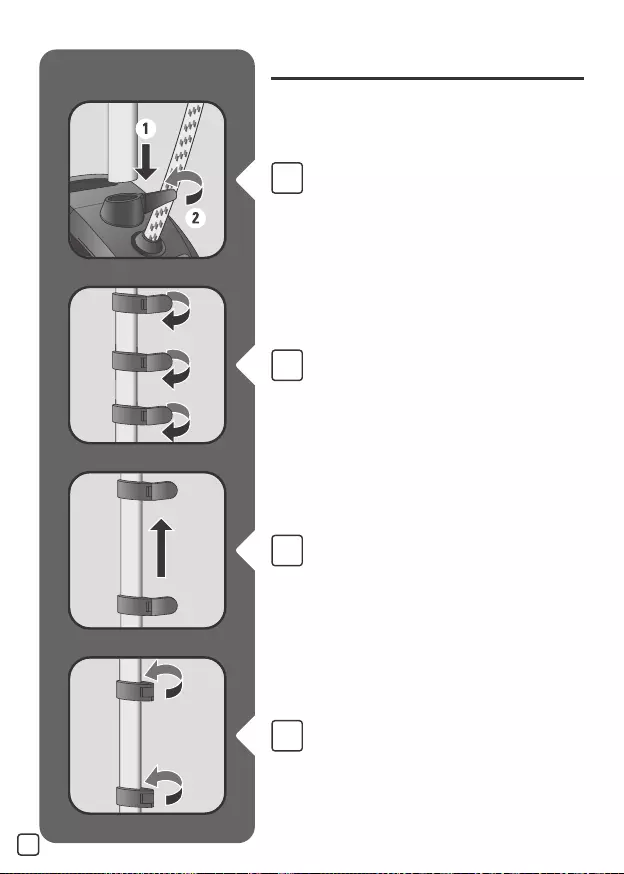
94
/ .1
AR
AR
AR
AR
«∞∑dØOV
√œîq «∞ªd©u ≠w ±JU≤t £r «ÆHKt
«≠∑` «_ÆHU‰ «∞∏ö£W.
±bœ «∞FLuœ ´Kv ¬îdÁ.
«ÆHq «_ÆHU‰ «∞∏ö£W.
1800138683-02 IS65XX.qxp_Mise en page 1 23/09/2016 08:23 Page94

* AR
ËÅn √§e«¡ «∞LM∑Z
¸√” «∞∂ªU¸
“¸ ≈©ö‚ «∞∂ªU¸ «∞LÔdØe
´öÒÆW
≤EU ≈ÆHU‰ ∞KFöÆW «∞bËÒ«¸…
±AU°p ∞Kºd«Ë¥q
îd©u ÆLU®w ∞K∂ªU¸
´öÒÆW ∞KºKp «∞JNd°Uzw
œËÒ«ßW ¢AGOq/≈¥IU·
7
8
9
10
11
12A*
12B*
12C*
AR
1A
1B*
2A
2B
3
4
5
6
±R®Òd {uzw ¢AGOq/≈¥IU·
¨DU¡ ±MHc «∞∑Bd¥n
´πö‹
îeÒ«Ê «∞LU¡
ÆHq «∞FLuœ
≠d®U… ∞KILU‘
±K∫o ∞K∏MOU‹
≠K∑d «∞∂ªU¸
•ºV «∞Luœ¥q
95
1800138683-02 IS65XX.qxp_Mise en page 1 23/09/2016 08:23 Page95

1800138683-02 — 38/16
1800138683-02 IS65XX.qxp_Mise en page 1 23/09/2016 08:23 Page96
Код: 42009
Извините, товара сейчас нет в наличии
Бесплатная доставка
по Красноярску
Извините, товара сейчас нет в наличии
Новости интернет-магазина «Лаукар»:
Дополнительная информация в категории Отпариватель:
В интернет-магазине бытовой техники «Лаукар» Вы можете скачать инструкцию к товару Отпариватель Rowenta IS 9200 D1 совершенно бесплатно.
Все инструкции, представленные на сайте интернет-магазина бытовой техники «Лаукар», предоставляются производителем товара.
Перед началом использования товара рекомендуем Вам ознакомиться с инструкцией по применению.
Для того чтобы скачать инструкцию, Вам необходимо нажать на ссылку «скачать инструкцию», расположенную ниже, а в случае, если ссылки нет,
Вы можете попробовать обратиться к данной странице позднее,
возможно специалисты интернет-магазина бытовой техники «Лаукар» еще не успели загрузить для скачивания инструкцию к товару:
Отпариватель Rowenta IS 9200 D1.

Фирма-производитель оставляет за собой право на внесение изменений в конструкцию, дизайн и комплектацию товара: Отпариватель Rowenta IS 9200 D1. Пожалуйста, сверяйте информацию о товаре с информацией на
официальном сайте компании производителя.
Юридическим лицам
Доставка
Оплата товара
Оплата кредита
Оплата рассрочки
Вопросы и ответы
Как купить товар
Доставка
Оплата
Гарантия
Защита техники
Обмен? Легко!
Покупка в кредит
Покупка в рассрочку
Советы по выбору
Наклейка пленок
О корпорации «Центр»
Контакты
Партнеры
События
Юридическим лицам
Арендодателям
Отзывы о магазине
Вакансии
Наши магазины
8-800-100-3000
Искать в kcentr
Сравнение
Избранное
Корзина
Акции
Каталог товаров
Отпариватели
Rowenta
Код товара: 1054826
Краткие характеристики
Конструкция
напольный
Мощность
1550 Вт
Время нагрева воды
60 с
Объем бака для воды
3.8 л
Регулировка подачи пара
есть
Перейти к характеристикам
Нет в наличии
Характеристики
Описание
Отзывы
Инструкции и документация
1
Все товары Rowenta
Все отпариватели Rowenta
Инструкции Отпариватель Rowenta IS 9100
Отпариватель Rowenta IS 9100 инструкция на русском языке
Адреса магазинов
С нами выгодно
Акции
С нами удобно
Сервисный центр
Установка и настройка
Оплата кредита
Оплата рассрочки
Доставка
Юридическим лицам
8-800-100-3000
8:00 — 17:00 МСК
Бесплатный звонок по России
kcentr.ru — официальный Интернет-магазин Корпорации «Центр» — российской розничной торговой сети по продаже
бытовой техники и электроники известных мировых производителей.
© 1990 — 2025, Корпорация «Центр»
Политика конфиденциальности
Информация на сайте не является публичной офертой