
Основная инструкция по эксплуатации HD Видеокамера Номер мод…
Hc-x800ee, Основная инструкция по эксплуатации, Hd видеокамера Чат поддержки
- Изображение
- Текст
Основная инструкция по эксплуатации
HD Видеокамера
Номер модели
HC-X800EE
Перед пользованием прочтите, пожалуйста, эту инструкцию полностью.
Более подробные инструкции по эксплуатации данного
устройства приведены в документе “Инструкции по
эксплуатации (формат PDF)” на поставляемом в комплекте
компакт-диске. Для прочтения установите его на ПК.
VQT4E69
until
2012/1/31
HC-X800_EG-VQT4E69_rus.book 1 ページ 2012年1月16日 月曜日 午後2時39分

2
VQT4E69 (RUS)
∫ Об аккумуляторах
Используйте только рекомендуемые
принадлежности.
≥ Всегда используйте фирменный мини-
кабель Panasonic HDMI (RP-CDHM15,
RP-CDHM30: дополнительно).
∫ Идентификационная
маркировка изделия
Информация для вашей
безопасности
ПРЕДУПРЕЖДЕНИЕ:
Для уменьшения риска пожара,
поражения электрическим током или
повреждения изделия:
≥ Берегите устройство от воздействия
дождя, влажности, капель и брызг.
≥ Не ставьте на это устройство
емкости с водой, например, вазы.
≥ Рекомендуется пользоваться только
рекомендуемыми
принадлежностями.
≥ Не снимайте крышки.
≥ Не ремонтируйте устройство
самостоятельно. Доверьте
обслуживание квалифицированному
персоналу.
ПРЕДОСТЕРЕЖЕНИЕ!
Для уменьшения риска пожара,
поражения электрическим током или
повреждения изделия:
≥ Не устанавливайте и не помещайте
данное устройство в книжный или
встроенный шкаф, или в иное
ограниченное пространство.
Убедитесь, что для устройства
имеется достаточная вентиляция.
≥ Не закрывайте вентиляционные
отверстия устройства газетами,
скатертями, шторами и подобными
предметами.
≥ Не помещайте источники открытого
огня, такие как горящие свечи, на
устройство.
Устанавливайте данное устройство
таким образом, чтобы при
возникновении неполадок имелась
возможность мгновенного отключения
кабеля питания переменного тока от
розетки.
Предупреждение
Риск пожара, взрыва и ожогов.
Запрещается разбирать, нагревать
свыше 60 oC или сжигать.
ВНИМАНИЕ
≥ При неправильной установке
аккумуляторной батареи имеется
риск взрыва. Замену аккумуляторной
батареи производите с
использованием батареи типа,
рекомендованного изготовителем.
≥ Если вы собираетесь утилизировать
аккумуляторную батарею, узнайте в
местных органах власти или у
дилера, как следует поступать с
отходами такого типа.
Изделие
Расположение
HD видеокамера
Крепление
аккумулятора
Адаптер
переменного тока
Низ
HC-X800_EG-VQT4E69_rus.book 2 ページ 2012年1月16日 月曜日 午後2時39分

3
(RUS) VQT4E69
-Если вы увидите такой символ-
∫ На что необходимо обратить
внимание при использовании
Храните данное устройство как можно
дальше от источников электромагнитного
излучения (например, микроволновых
печей, телевизоров, видеоигр и т.д.).
≥ При использовании данного устройства,
размещенного на телевизоре или
вблизи него, снимки и/или звуки
данного устройства могут искажаться
под действием электромагнитных волн.
≥ Не пользуйтесь данным устройством
вблизи сотовых телефонов, так как это
может привести к помехам, отрицательно
влияющим на снимки и/или звук.
≥ Снятые данные могут повреждаться или
изображения могут искажаться сильными
магнитными полями, создаваемыми
динамиками или крупными двигателями.
≥ Электромагнитное излучение, создаваемое
микропроцессорами, может отрицательно
влиять на данное устройство, вызывая
искажение изображений и/или звука.
≥ Если на данное устройство негативно
влияет электромагнитное
оборудование, и данное устройство
прекращает нормальную работу,
выключите его, извлеките аккумулятор
или отключите адаптер переменного
тока. Затем снова вставьте аккумулятор
или подключите адаптер переменного
тока и включите данное устройство.
Не используйте данное устройство
возле радиопередатчиков или
высоковольтных линий.
≥ Если вы производите съемку возле
радиопередатчиков или высоковольтных
линий, на записанные изображения
и/или звук могут накладываться помехи.
О подключении к ПК
≥ Не используйте другие кабели USB,
кроме входящего в комплект поставки.
∫ Сведения о форматах записи
видеоизображения
Можно выбрать форматы записи AVCHD*
или iFrame для записи видео данной
камерой.
* Совместимость с AVCHD 3D или
AVCHD Progressive (1080/50p).
AVCHD 3D:
Можно записывать впечатляющие
реалистичные 3D-изображения с
качеством Full HD.
Для просмотра Full HD изображения в
режиме 3D необходим 3D-совместимый
телевизор, поддерживающий формат
чередования кадров.
AVCHD Progressive:
Можно записывать 2D-изображения в
наиболее высоком качестве (1080/50p).
iFrame:
Это формат записи для просмотра или
редактирования Mac (iMovie’11). С
помощью iMovie’11 видео iFrame можно
импортировать быстрее, чем видео
AVCHD. Кроме того, размер
импортируемого файла видео iFrame
будет меньше файла видео AVCHD.
≥ Не совместимо с видео, записанным в
формате AVCHD.
Информация по обращению с
отходами для стран, не входящих
в Европейский Союз
Действие этого символа
распространяется только
на Европейский Союз.
Если Вы собираетесь
выбросить данный
продукт, узнайте в
местных органах власти
или у дилера, как следует
поступать с отходами
такого типа.
HC-X800_EG-VQT4E69_rus.book 3 ページ 2012年1月16日 月曜日 午後2時39分

4
VQT4E69 (RUS)
∫ Ответственность за
записанное содержание
Panasonic не несет ответственности за
прямой либо косвенный ущерб,
вызванный любого рода проблемами,
приводящий к потере записанного или
редактируемого содержимого, а также не
дает гарантий на какое-либо содержимое,
если запись или редактирование не
выполняются надлежащим образом.
Аналогично, вышесказанное применимо
также в случае любого ремонта камеры.
∫ О конденсации (при
запотевании объектива
объектива или монитора
ЖКД)
Конденсация происходит, когда
окружающая температура или влажность
изменяются, как описано ниже.
Остерегайтесь конденсации, поскольку
она вызывает появление пятен на
объективе или мониторе ЖКД, плесени
или приводит к сбоям в работе камеры.
∫ Карты, которые можно
использовать с данным
устройством
Карты памяти SD, SDHC и SDXC
≥ Карты памяти емкостью 4 ГБ или более
без логотипа SDHC или карты памяти
емкостью 48 ГБ или более без логотипа
SDXC не основаны на технических
характеристиках карт памяти SD.
≥ Более подробная информация о картах
SD приведена нас странице 10.
∫ В настоящей инструкции по
эксплуатации
≥ Карта памяти SD, карта памяти SDHC и
карта памяти SDXC обозначены в
документе как “карта SD”.
≥ Функции, которые можно использовать
в режиме записи видео:
Функции, которые можно использовать
в режиме записи снимков:
≥ Данную функцию можно использовать в
режиме воспроизведения:
Данную функцию можно использовать в
режиме воспроизведения (только для
видео):
Данную функцию можно использовать в
режиме воспроизведения (только для
фотографий):
≥ Одна или несколько сцен, записанных в
формате 1080/50p, 1080/50i, AVCHD 3D
или формате горизонтальной
стереопары ([SbS 3D]): сцена(-ы)
AVCHD
≥ Страницы для справки обозначаются
стрелкой, например: l 00
HC-X800_EG-VQT4E69_rus.book 4 ページ 2012年1月16日 月曜日 午後2時39分
5
(RUS) VQT4E69
Информация для вашей
безопасности …………………………………….2
Принадлежности ……………………………….6
Подготовка
Питание ……………………………………………..7
Как вставлять/извлекать
аккумулятор ………………………………….7
Зарядка аккумулятора …………………..8
Время зарядки и записи…………………9
Подготовка карт SD………………………….10
Карты, которые можно
использовать с данным
устройством ………………………………..10
Как вставлять/извлекать карту
SD ……………………………………………… 11
Включение/выключение камеры …….12
Выбор режима …………………………………12
Использование сенсорного
экрана ……………………………………………..13
О сенсорном меню ………………………14
Установка даты и времени ………………15
Основные сведения
Интеллектуальный автоматический
режим ………………………………………………16
Съемка фильмов …………………………….17
Фотосъемка……………………………………..17
Воспроизведение видео/
стоп-кадров ……………………………………..18
Просмотр видео/снимков на ТВ ……19
Использование экрана меню …………..20
Выбор языка ……………………………….20
Использование масштабирования ….21
Форматирование ……………………………..21
Прочее
Технические характеристики …………..22
Об авторском праве ………………………..26
Чтение инструкции по эксплуатации
(формат PDF) …………………………………..27
Оглавление
HC-X800_EG-VQT4E69_rus.book 5 ページ 2012年1月16日 月曜日 午後2時39分
6
VQT4E69 (RUS)
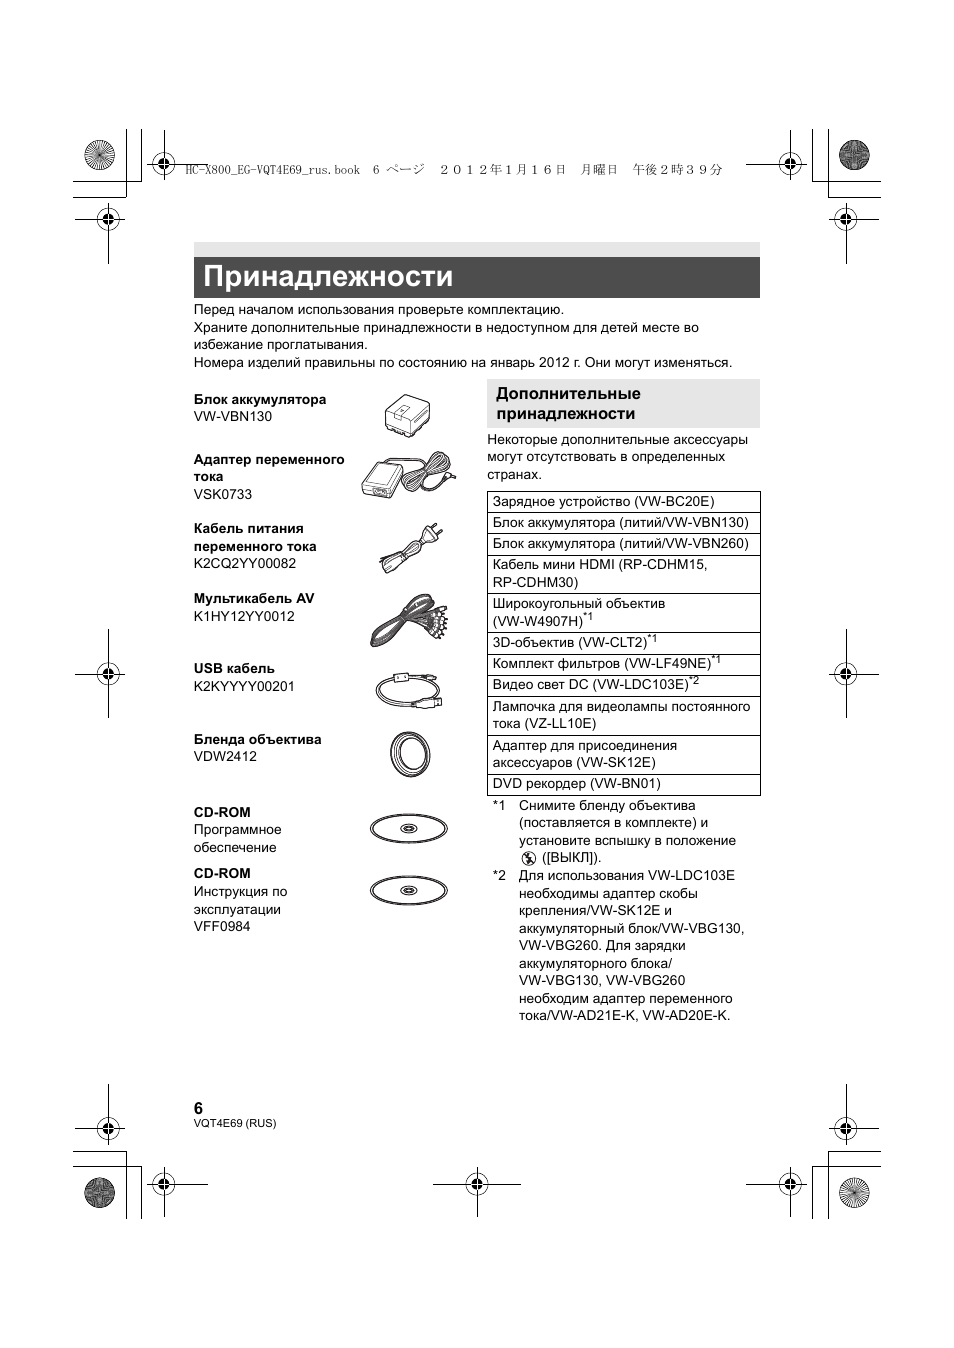
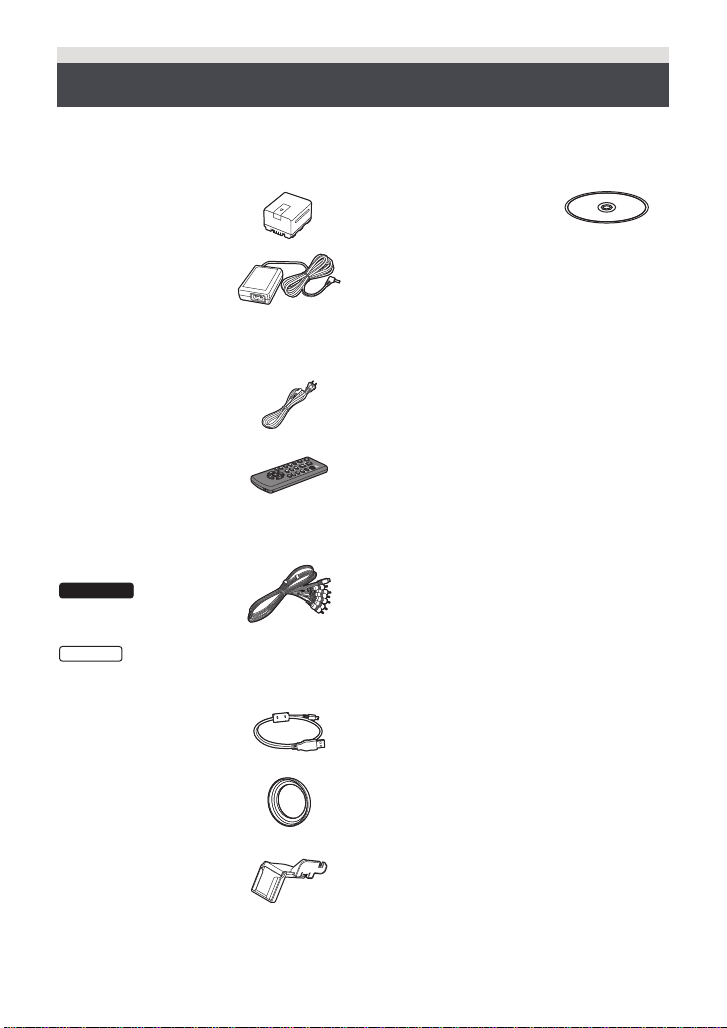
Перед началом использования проверьте комплектацию.
Храните дополнительные принадлежности в недоступном для детей месте во
избежание проглатывания.
Номера изделий правильны по состоянию на январь 2012 г. Они могут изменяться.
Некоторые дополнительные аксессуары
могут отсутствовать в определенных
странах.
Принадлежности
Блок аккумулятора
VW-VBN130
Адаптер переменного
тока
VSK0733
Кабель питания
переменного тока
K2CQ2YY00082
Мультикабель AV
K1HY12YY0012
USB кабель
K2KYYYY00201
Бленда объектива
VDW2412
CD-ROM
Программное
обеспечение
CD-ROM
Инструкция по
эксплуатации
VFF0984
Дополнительные
принадлежности
Зарядное устройство (VW-BC20E)
Блок аккумулятора (литий/VW-VBN130)
Блок аккумулятора (литий/VW-VBN260)
Кабель мини HDMI (RP-CDHM15,
RP-CDHM30)
Широкоугольный объектив
(VW-W4907H)
*1
3D-объектив (VW-CLT2)
*1
Комплект фильтров (VW-LF49NE)
*1
Видео свет DС (VW-LDC103E)
*2
Лампочка для видеолампы постоянного
тока (VZ-LL10E)
Адаптер для присоединения
аксессуаров (VW-SK12E)
DVD рекордер (VW-BN01)
*1 Снимите бленду объектива
(поставляется в комплекте) и
установите вспышку в положение
([ВЫКЛ]).
*2 Для использования VW-LDC103E
необходимы адаптер скобы
крепления/VW-SK12E и
аккумуляторный блок/VW-VBG130,
VW-VBG260. Для зарядки
аккумуляторного блока/
VW-VBG130, VW-VBG260
необходим адаптер переменного
тока/VW-AD21E-K, VW-AD20E-K.
HC-X800_EG-VQT4E69_rus.book 6 ページ 2012年1月16日 月曜日 午後2時39分
7
(RUS) VQT4E69
∫ Сведения об аккумуляторах, которые можно использовать для данной
камеры
Данную камеру можно использовать с аккумулятором типа VW-VBN130/VW-VBN260.
≥ Камера оснащена функцией распознавания аккумуляторов, которые можно использовать
безопасно. Эту функцию поддерживает специальный аккумулятор (VW-VBN130/
VW-VBN260). Для использования с данной камерой подходят только фирменные изделия
Panasonic и аккумуляторы других производителей, сертифицированные компанией
Panasonic. (Аккумуляторы, которые не поддерживают данную функцию, использовать
нельзя). Panasonic никоим образом не может гарантировать качество, производительность
или безопасность аккумуляторов, которые были изготовлены другими компаниями и не
являются фирменными изделиями Panasonic.
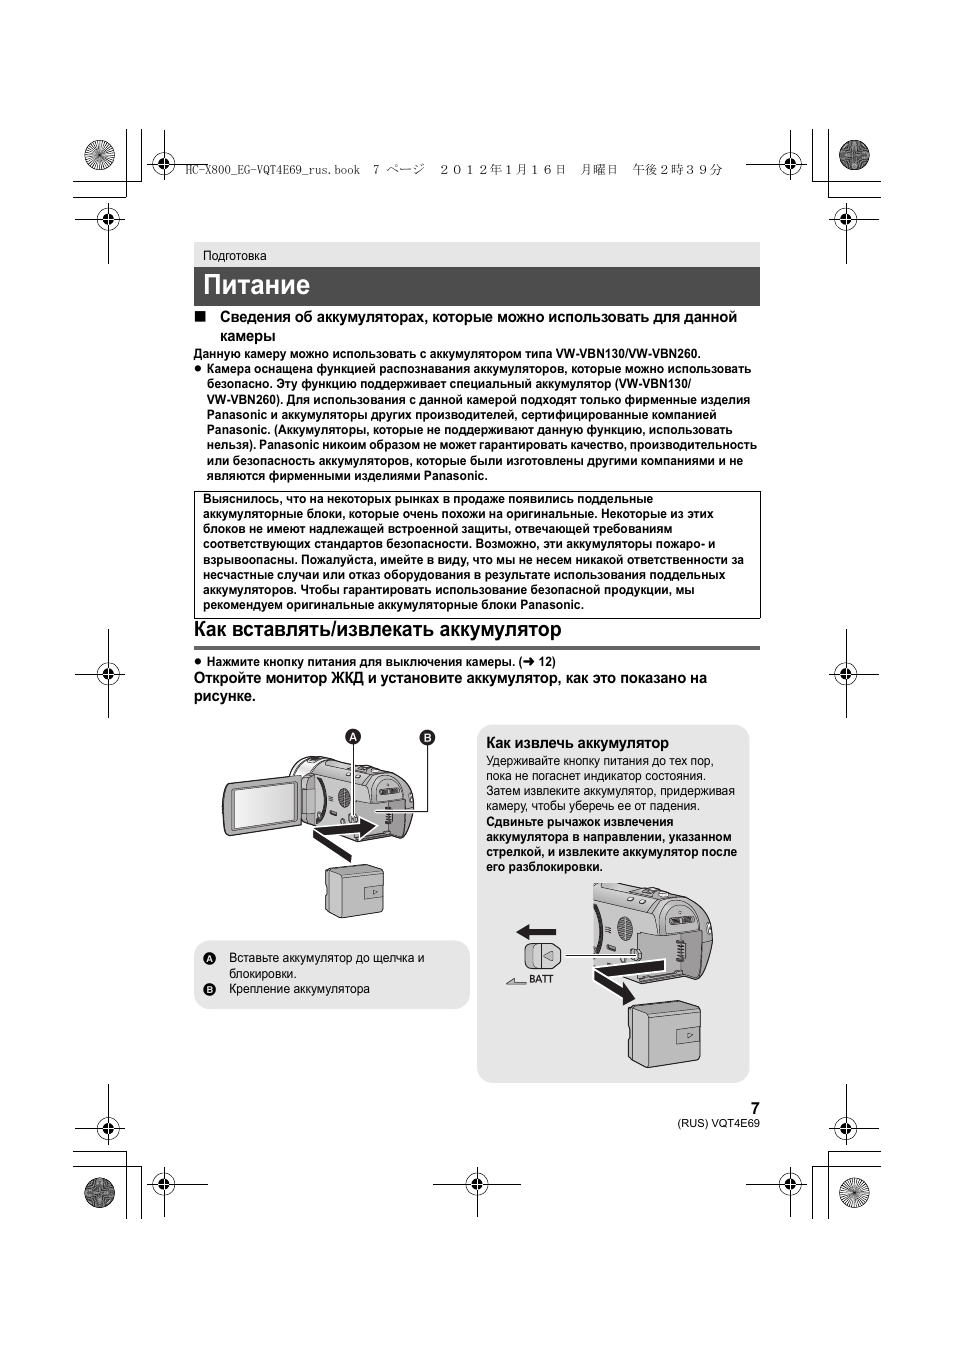
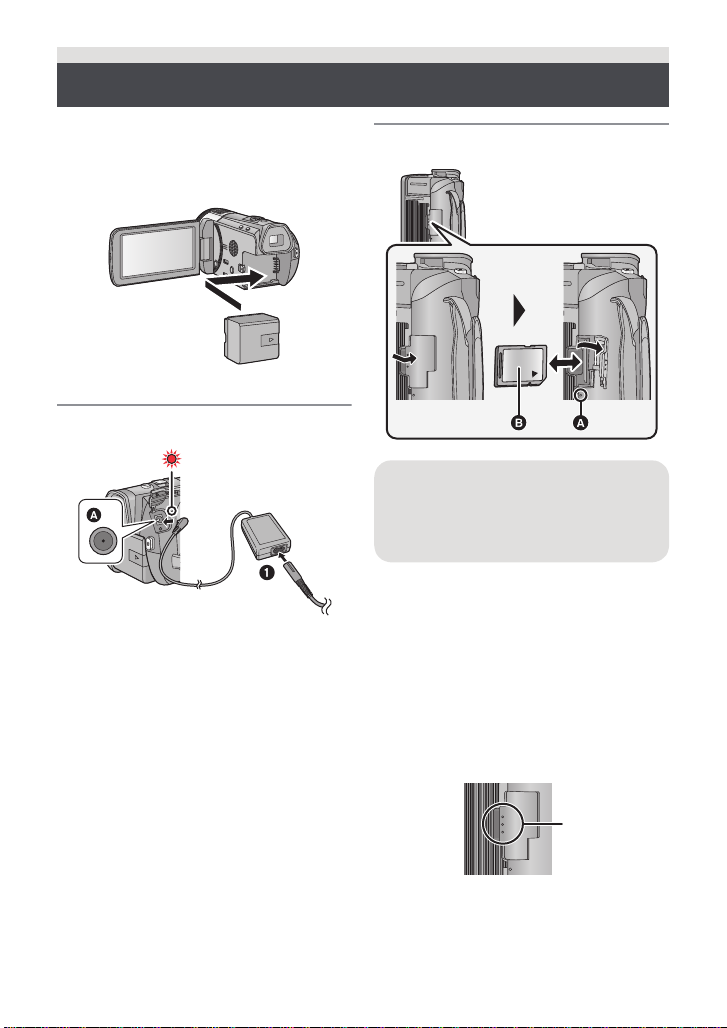
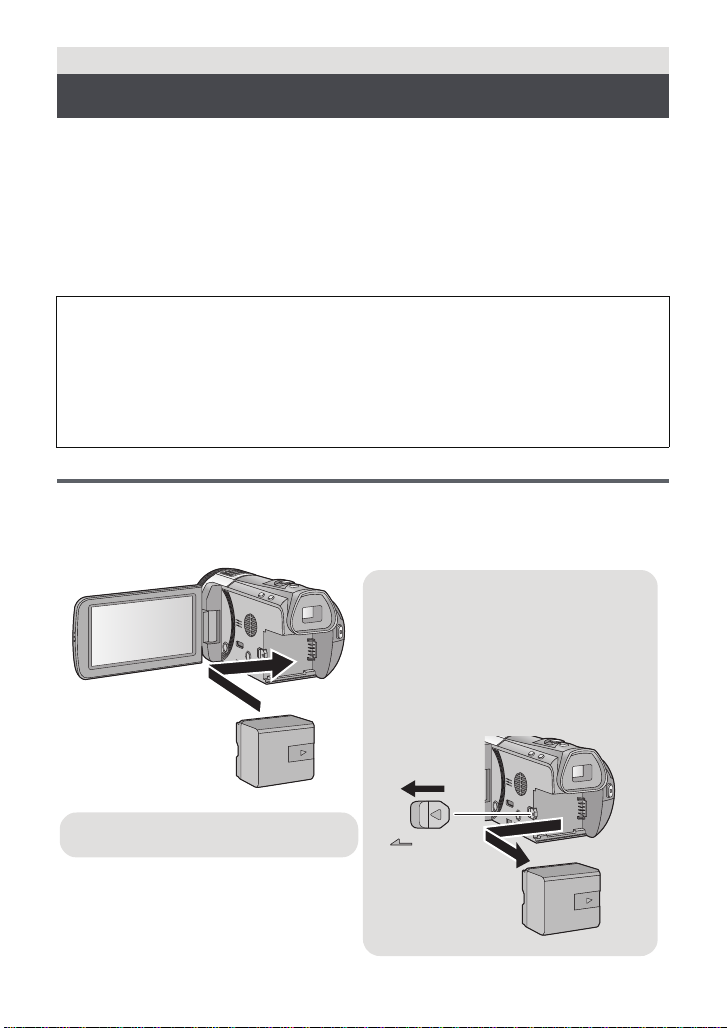
Как вставлять/извлекать аккумулятор
≥ Нажмите кнопку питания для выключения камеры. (
l 12)
Откройте монитор ЖКД и установите аккумулятор, как это показано на
рисунке.
Подготовка
Питание
Выяснилось, что на некоторых рынках в продаже появились поддельные
аккумуляторные блоки, которые очень похожи на оригинальные. Некоторые из этих
блоков не имеют надлежащей встроенной защиты, отвечающей требованиям
соответствующих стандартов безопасности. Возможно, эти аккумуляторы пожаро- и
взрывоопасны. Пожалуйста, имейте в виду, что мы не несем никакой ответственности за
несчастные случаи или отказ оборудования в результате использования поддельных
аккумуляторов. Чтобы гарантировать использование безопасной продукции, мы
рекомендуем оригинальные аккумуляторные блоки Panasonic.
Как извлечь аккумулятор
Удерживайте кнопку питания до тех пор,
пока не погаснет индикатор состояния.
Затем извлеките аккумулятор, придерживая
камеру, чтобы уберечь ее от падения.
Сдвиньте рычажок извлечения
аккумулятора в направлении, указанном
стрелкой, и извлеките аккумулятор после
его разблокировки.
BATT
A Вставьте аккумулятор до щелчка и
блокировки.
B Крепление аккумулятора
HC-X800_EG-VQT4E69_rus.book 7 ページ 2012年1月16日 月曜日 午後2時39分
8
VQT4E69 (RUS)
Зарядка аккумулятора
При подключенном адаптере переменного тока камера находится в режиме ожидания.
Первичная цепь всегда “работает”, если адаптер переменного тока подключен к
электрической розетке.
Важная информация:
≥ Используйте поставляемый в комплекте адаптер переменного тока. Не
используйте адаптер переменного тока от другого устройства.
≥ Не используйте кабель переменного тока для работы с другими устройствами,
так как он предназначен только для данной камеры. Не используйте также
кабель переменного тока других устройств для работы с данной камерой.
≥ Аккумулятор также может быть заряжен с помощью зарядного устройства
(VW-BC20E: поставляется отдельно).
≥ Аккумуляторная батарея не будет заряжаться, если питание включено.
≥ Рекомендуется заряжать аккумулятор при температуре от 10 °C до 30 °C.
(Температура аккумулятора должна быть такой же.)
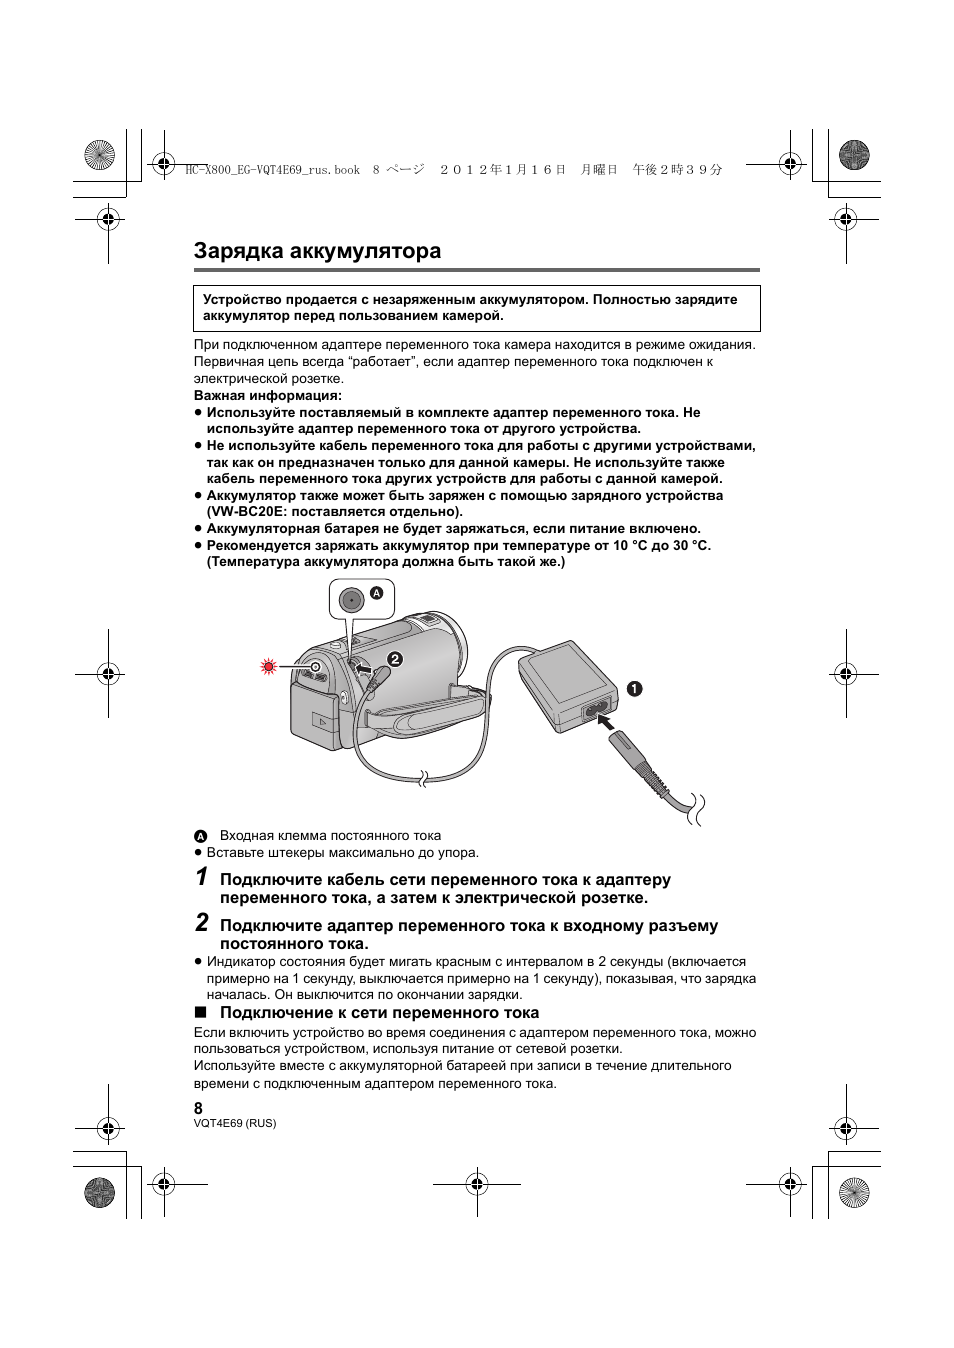
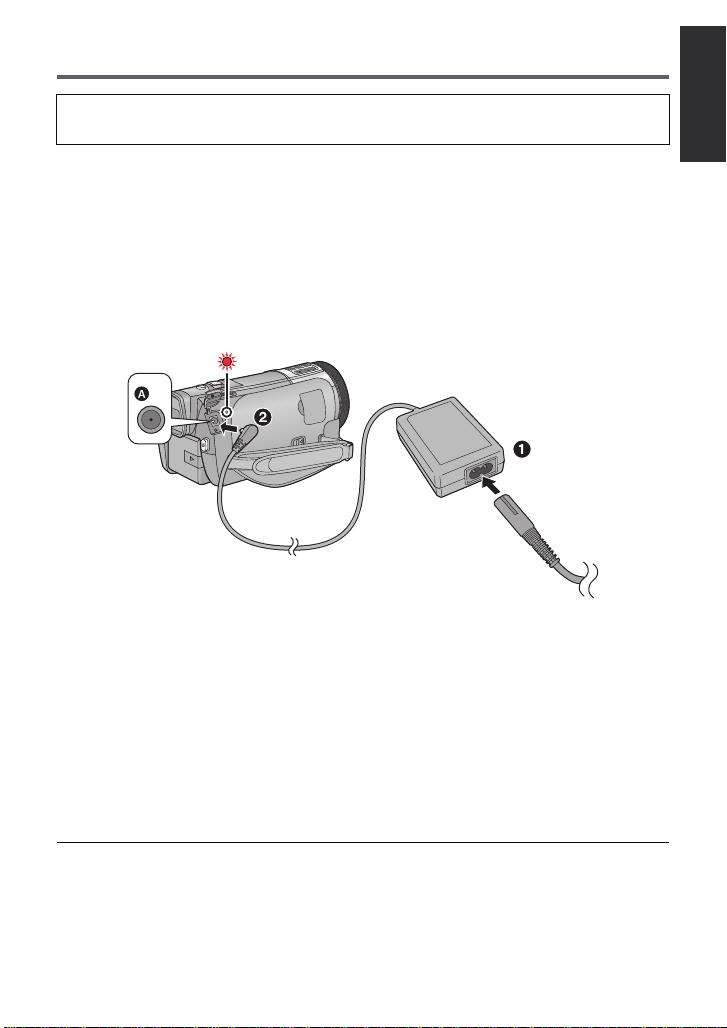
A Входная клемма постоянного тока
≥ Вставьте штекеры максимально до упора.
1
Подключите кабель сети переменного тока к адаптеру
переменного тока, а затем к электрической розетке.
2
Подключите адаптер переменного тока к входному разъему
постоянного тока.
≥ Индикатор состояния будет мигать красным с интервалом в 2 секунды (включается
примерно на 1 секунду, выключается примерно на 1 секунду), показывая, что зарядка
началась. Он выключится по окончании зарядки.
∫ Подключение к сети переменного тока
Если включить устройство во время соединения с адаптером переменного тока, можно
пользоваться устройством, используя питание от сетевой розетки.
Используйте вместе с аккумуляторной батареей при записи в течение длительного
времени с подключенным адаптером переменного тока.
Устройство продается с незаряженным аккумулятором. Полностью зарядите
аккумулятор перед пользованием камерой.
HC-X800_EG-VQT4E69_rus.book 8 ページ 2012年1月16日 月曜日 午後2時39分
9
(RUS) VQT4E69
≥ Не используйте любые другие адаптеры переменного тока, за исключением входящего в
комплект.
≥ Рекомендуется использовать аккумуляторы Panasonic (
l 6).
≥ При использовании других аккумуляторов мы не можем гарантировать качество изделия.
≥ Не нагревайте и не подвергайте воздействию огня.
≥ Не оставляйте одну или несколько аккумуляторных батарей в автомобиле под прямыми
солнечными лучами на длительное время при закрытых дверях и окнах.
≥ Перезаряжаемый аккумулятор может перезаряжаться около 500 раз.
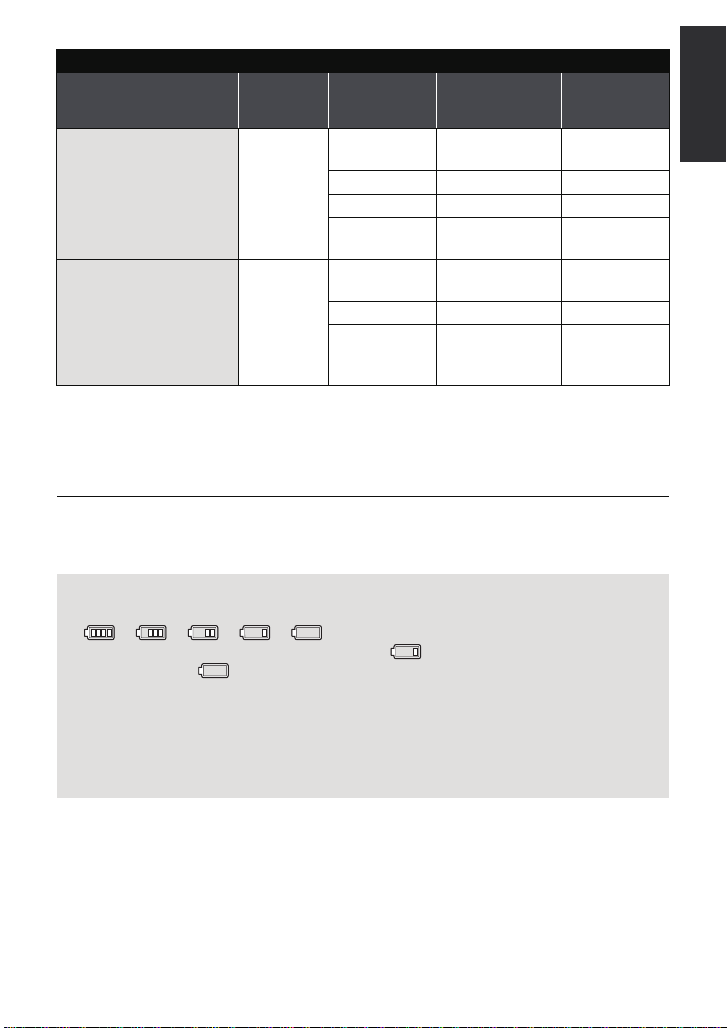
Время зарядки и записи
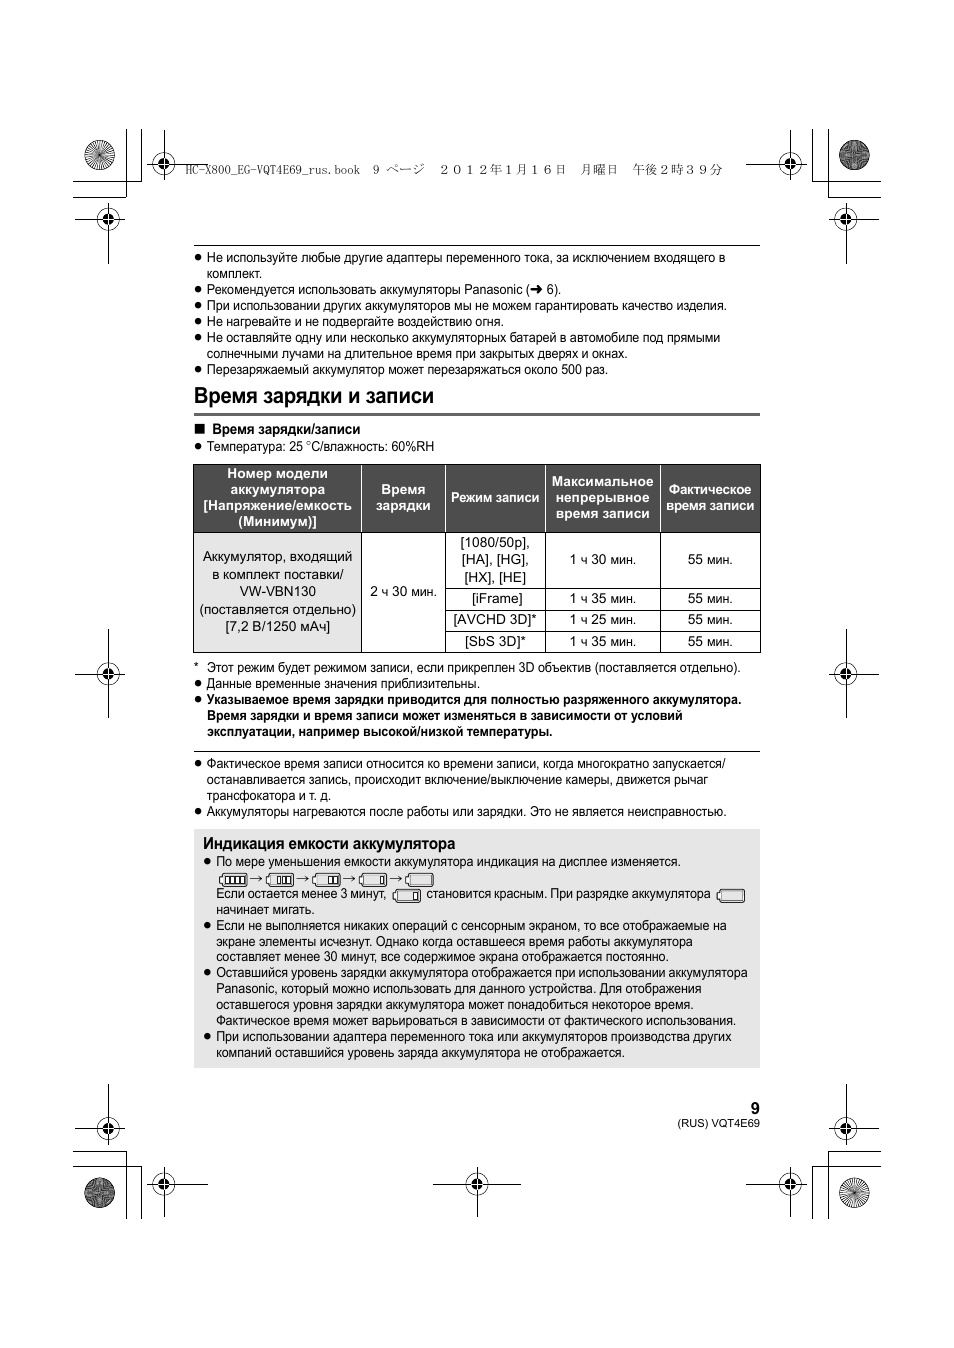
∫ Время зарядки/записи
≥ Температура: 25 oC/влажность: 60%RH
* Этот режим будет режимом записи, если прикреплен 3D объектив (поставляется отдельно).
≥ Данные временные значения приблизительны.
≥ Указываемое время зарядки приводится для полностью разряженного аккумулятора.
Время зарядки и время записи может изменяться в зависимости от условий
эксплуатации, например высокой/низкой температуры.
≥ Фактическое время записи относится ко времени записи, когда многократно запускается/
останавливается запись, происходит включение/выключение камеры, движется рычаг
трансфокатора и т. д.
≥ Аккумуляторы нагреваются после работы или зарядки. Это не является неисправностью.
Номер модели
аккумулятора
[Напряжение/емкость
(Минимум)]
Время
зарядки
Режим записи
Максимальное
непрерывное
время записи
Фактическое
время записи
Аккумулятор, входящий
в комплект поставки/
VW-VBN130
(поставляется отдельно)
[7,2 В/1250 мАч]
2 ч 30 мин.
[1080/50p],
[HA], [HG],
[HX], [HE]
1 ч 30 мин.
55 мин.
[iFrame]
1 ч 35 мин.
55 мин.
[AVCHD 3D]*
1 ч 25 мин.
55 мин.
[SbS 3D]*
1 ч 35 мин.
55 мин.
Индикация емкости аккумулятора
≥ По мере уменьшения емкости аккумулятора индикация на дисплее изменяется.
#
#
#
#
Если остается менее 3 минут,
становится красным. При разрядке аккумулятора
начинает мигать.
≥ Если не выполняется никаких операций с сенсорным экраном, то все отображаемые на
экране элементы исчезнут. Однако когда оставшееся время работы аккумулятора
составляет менее 30 минут, все содержимое экрана отображается постоянно.
≥ Оставшийся уровень зарядки аккумулятора отображается при использовании аккумулятора
Panasonic, который можно использовать для данного устройства. Для отображения
оставшегося уровня зарядки аккумулятора может понадобиться некоторое время.
Фактическое время может варьироваться в зависимости от фактического использования.
≥ При использовании адаптера переменного тока или аккумуляторов производства других
компаний оставшийся уровень заряда аккумулятора не отображается.
HC-X800_EG-VQT4E69_rus.book 9 ページ 2012年1月16日 月曜日 午後2時39分
10
VQT4E69 (RUS)
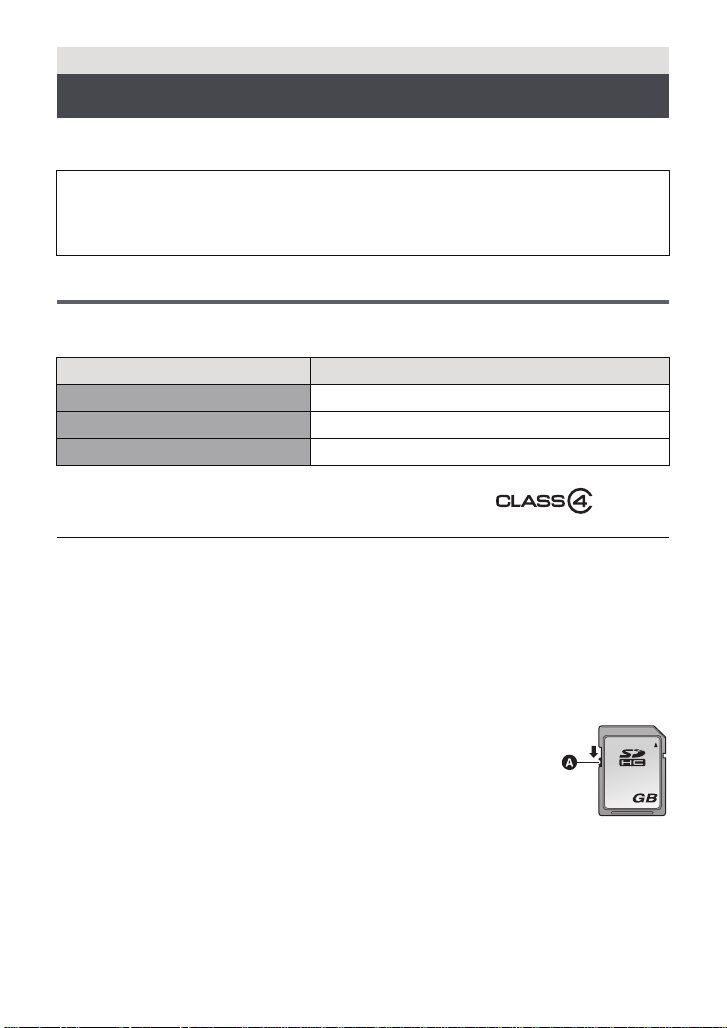
Карты, которые можно использовать с данным
устройством
Для видеозаписи используйте карты SD, соответствующие Class 4 или выше SD
Speed Class Rating*.
* Стандартной скоростью непрерывной
записи является SD Speed Class Rating.
См. надписи на карте и т. д.
≥ Пожалуйста, проверьте последнюю информацию о картах памяти SD/картах памяти
SDHC/картах памяти SDXC, которые могут использоваться для записи фильма, на
следующей странице в Интернете.
http://panasonic.jp/support/global/cs/e_cam
(Страница только на английском языке.)
≥ Работа карт памяти SD емкостью 256 МБ или меньше не гарантируется. Кроме того,
невозможно использовать карты памяти SD емкостью 32 МБ или меньше для записи
видео.
≥ Карты памяти емкостью 4 ГБ или более без логотипа SDHC или карты памяти
емкостью 48 ГБ или более без логотипа SDXC не основаны на технических
характеристиках карт памяти SD.
≥ Работоспособность карт памяти объемом свыше 64 ГБ не гарантируется.
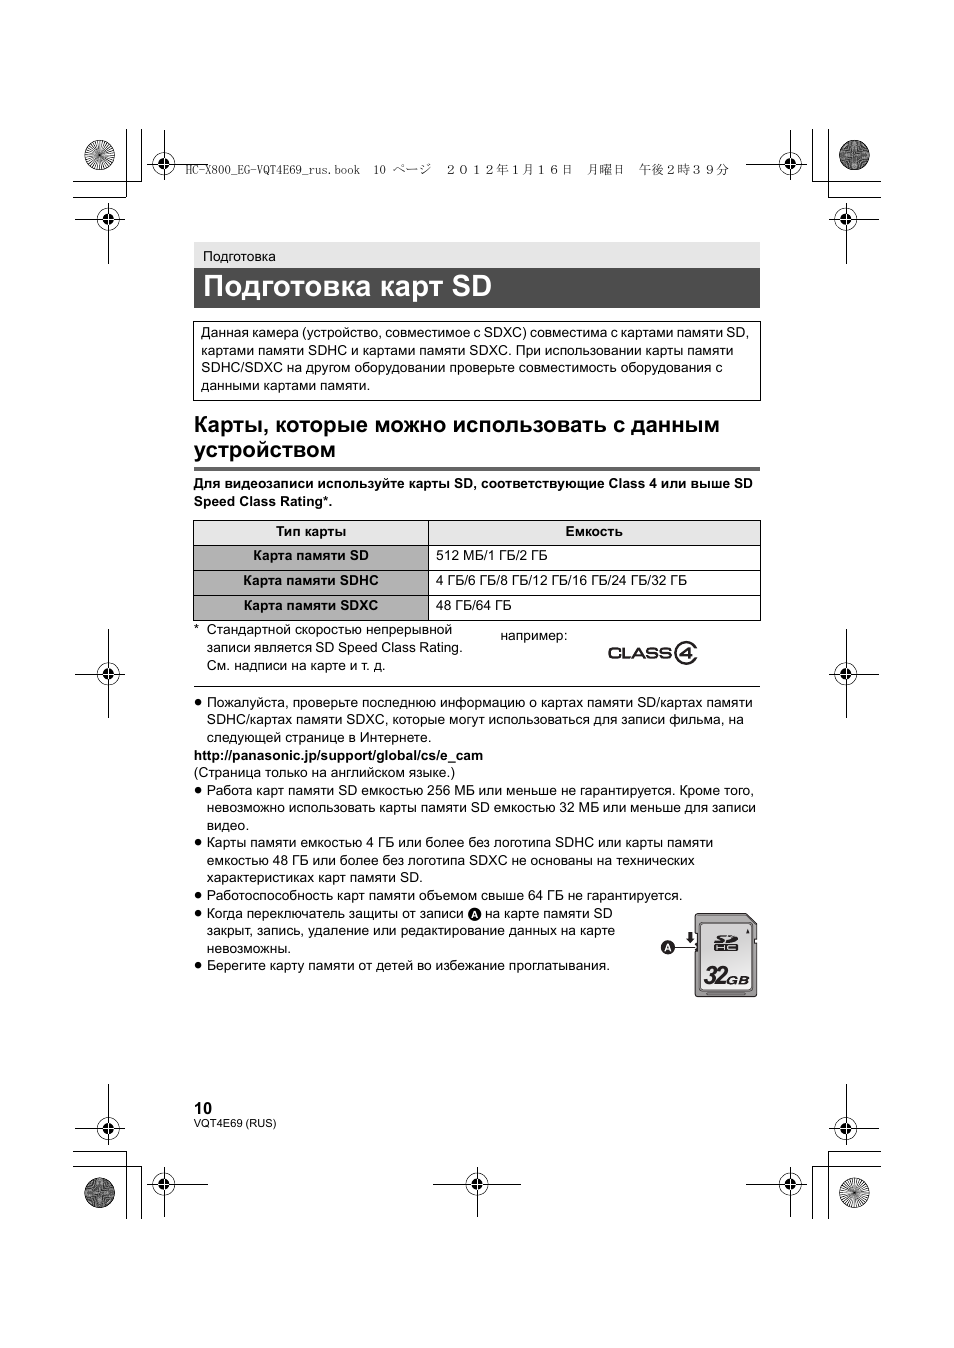
≥ Когда переключатель защиты от записи A на карте памяти SD
закрыт, запись, удаление или редактирование данных на карте
невозможны.
≥ Берегите карту памяти от детей во избежание проглатывания.
Подготовка
Подготовка карт SD
Данная камера (устройство, совместимое с SDXC) совместима с картами памяти SD,
картами памяти SDHC и картами памяти SDXC. При использовании карты памяти
SDHC/SDXC на другом оборудовании проверьте совместимость оборудования с
данными картами памяти.
Тип карты
Емкость
Карта памяти SD
512 МБ/1 ГБ/2 ГБ
Карта памяти SDHC
4 ГБ/6 ГБ/8 ГБ/12 ГБ/16 ГБ/24 ГБ/32 ГБ
Карта памяти SDXC
48 ГБ/64 ГБ
например:
32
HC-X800_EG-VQT4E69_rus.book 10 ページ 2012年1月16日 月曜日 午後2時39分
31:36
ВИДЕОКАМЕРА Panasonic HC-V800 ► ПОДРОБНЫЙ ОБЗОР
06:54
Видеокамера Panasonic HC-X800
04:43
Test Panasonic HC-X800
27:36
СРАВНЕНИЕ ВИДЕОКАМЕР PANASONIC HC-V760 и HC-V800 ► ЧТО КУПИТЬ? ПЛЮСЫ и МИНУСЫ!
12:12
Panasonic HC X800 обзор FULL HD видеокамеры.Мысля от Эдгара
10:44
Цифровая камера Panasonic HC-X800.Чем я снимаю.
07:25
Тестируем видеокамеру Panasonic HC-V800
24:43
Panasonic HC V-800 Новинка 2018 года! Обзор режимов съёмки. Тест.
Нажмите на кнопку для помощи
Owner’s Manual
For USA and Puerto Rico assistance, please call: 1-800-211-PANA(7262) or,
contact us via the web at: http://www.panasonic.com/contactinfo
For Canadian assistance, please call: 1-800-561-5505 or visit us at www.panasonic.ca
High Definition Video Camera
Model No. HC-X900M
HC-X800
Before connecting, operating or adjusting this product, please read the instructions completely.
VQT4C76
Dear Customer,
The lightning flash with arrowhead
symbol, within an equilateral
triangle, is intended to alert the user
to the presence of uninsulated
“dangerous voltage” within the
product’s enclosure that may be of
sufficient magnitude to constitute a
risk of electric shock to persons.
CAUTION
CAUTION: TO REDUCE THE RISK OF ELECTRIC
SHOCK, DO NOT REMOVE SCREWS.
NO USER-SERVICEABLE PARTS
INSIDE.
REFER SERVICING TO QUALIFIED
SERVICE PERSONNEL.
The exclamation point within an
equilateral triangle is intended to
alert the user to the presence of
important operating and
maintenance (servicing) instructions
in the literature accompanying the
appliance.
RISK OF ELECTRIC SHOCK
DO NOT OPEN
Thank you for choosing Panasonic!
You have purchased one of the most
sophisticated and reliable products on
the market today. Used properl y, we’r e
sure it will bring you and your family
years of enjoyment. Pleas e take time to
fill in the information on the right.
The serial number is on the tag loca te d
on the back of your camera. Be sure to
retain this manual as your convenient
camera information source.
Date of Purchase
Dealer Purchased From
Dealer Address
Dealer Phone No.
Model No.
Serial No.
Safety Precautions
WARNING:
To reduce the risk of fire, electric shock or produc t damage,
≥ Do not expose this unit to rain, moistu re, dripping or splashing.
≥ Do not place objects filled with liquids, such as vases, on this unit.
≥ Use only the recommended accessories.
≥ Do not remove covers.
≥ Do not repair this unit by yourself. Refer serv icing to qualified service perso nnel.
CAUTION!
To reduce the risk of fire, electric shock or produc t damage,
≥ Do not install or place this unit in a bookcase, built-in cabinet or in anot her confined
space. Ensure this unit is well ventilated.
≥ Do not obstruct this unit’ s ventilation opening s with n ewspape rs, t ableclot hs, curt ains, an d
similar items.
≥ Do not place sources of naked flames, s uch as lighted candles, on this unit.
THE FOLLOWING APPLIES ONLY IN THE U.S.A. AND CANADA.
2
VQT4C76
THE FOLLOWING APPLIES ONLY IN THE U.S.A.
FCC Note:
This equipment has been tested and found to comply with the limits for a Class B digital
device, pursuant to Part 15 of the FCC Rules. These limits are designed to provide
reasonable protection against harmful int erference in a residential installation. This
equipment generates, uses, a nd can radia te radio fr equenc y energy and, if not inst alled and
used in accordance with the instructions, may cause harmful interference to radio
communications. However, there is no guarantee that interference will not occur in a
particular installa tion. If this equipment does cause harmful interference to radio or
television recept ion, whic h ca n be determin ed b y tur ning th e eq uipment off and on, the us er
is encouraged to try to correct the interference by one or more of the following measures :
≥ Reorient or relocate the receiving antenna.
≥ Increase the separation between the equipment and receiver.
≥ Connect the equipment into an outlet on a circuit different from that to which the receiver
is connected.
≥ Consult the dealer or an experienced radio/TV technician for help.
FCC Caution: To assure continued complian ce, follow the attached installation
instructions and use only shielded interface cables with ferrite
core when connecting to computer or peripheral devices.
Any changes or modifications not expressly approved by the party responsible for
compliance could void the us er’s authority to operate this equipment.
Declaration of Conform ity
Trade Name: Panasonic
Model No.: HC-X900MP/HC-X800P
Responsible Party: Panasonic Corporation of North Amer ica
One Panasonic Way, Secaucus, NJ 07094
Support Contact: Panasonic Consumer Marketing Company of North America
1-800-211-PANA (7262)
This device complies with Part 15 of the FCC Rules. Operation is subject to the following
two conditions: (1) This dev ice may not c ause harmf ul interfer ence, and (2) this device mus t
accept any interference received, including interference that may cause undesired
operation.
THE FOLLOWING APPLIES ONLY IN CANADA.
This Class B digital apparatus complies with Canadian ICES-003.
VQT4C76
3

THE FOLLOWING APPLIES ONLY IN THE U.S.A. AND CANADA.
AC adaptor
This AC adaptor operates on AC between 110 V and 240 V.
But
≥ In the U.S.A. and Canada, the AC adaptor must be connected to a 120 V AC power
supply only.
≥ When connecting to an AC supply out side of th e U.S .A. or Canada , use a plu g ada ptor to
suit the AC outlet configuration.
≥ When connecting to a supply of greater than AC 125 V, ensure the cord you use is suited
to the voltage of the AC supply and the rated current of the AC adaptor.
≥ Contact an electrical parts dis tributor for assistance in selecting a suitable AC plug
adaptor or AC cord set.
Install this unit so that the power cord can b e unplugged from the sock et outlet immediately
if any problem occurs.
THE FOLLOWING APPLIES ONLY IN LATIN AMERICAN COUNTRIES.
Install this unit so that the AC mains lead can be unplugged from the socket outlet
immediately if any problem occurs.
∫ Concerning the battery
Button-type battery: CR2025 (supplied for HC-X900M)
Batteries
1 Battery pack (Li thium ion battery pack)
≥ Use the specified unit to recharge the battery pack.
≥ Do not use the battery pack with equipment other than the specified unit.
≥ Do not get dirt, sand, liquids, or other foreign matter on the terminals.
≥ Do not touch the plug terminals (i and j) with metal objects.
≥ Do not disassemble, remodel, heat or throw into fire.
2 Button-type battery (Lithium battery)
≥ Insert with poles aligned.
≥ Do not touch the terminals (i and j) with metal objects.
≥ Do not recharge, disassemble, remodel, heat or throw into fire.
≥ Keep out of reach of children.
If any electrolyte should come int o con tac t wit h yo ur hands or cl othes, wash i t off th oroughly
with water.
If any electrolyte should come into contact with your eyes, never rub the eyes. Rinse eyes
thoroughly with water, and then cons ult a doctor.
Warning
Risk of fire, explosion and burns. Do not disassemble.
Do not heat the batteries above the following temperatures or incinerate.
Button-type battery 60 oC (140 oF)
Battery pack 60 oC (140 oF)
4
VQT4C76
CAUTION
≥ Danger of explosion if battery is incorrect ly replaced. Replace only with the type
recommended by the manufacturer.
≥ When disposing the batteries, ple ase cont act yo ur local au thorities or de aler and as k for
the correct method of disposal.
Warning
Keep the Button-Type battery out of the reach of children. Never put Button-Type battery
in mouth. If swallowed call your doctor.
∫ Product Identification Marking
Product Location
High Definition Video Camera Battery holder
AC adaptor Bottom
U.S.A./CANADA CONSUMERS: ATTENTION:
A lithium ion battery that is recyclable powers the product
you have purchased. Please call 1-800-8-BATTERY for information
on how to recycle this battery.
HC-X900M
<For USA-California only>
This product contains a CR Coin Cell Lith ium Battery which cont ains Perchlorate Material –
special handling may apply.
See www.dtsc.ca.gov/h azardouswaste/perchlorate
.
VQT4C76
5

IMPORTANT SAFETY
INSTRUCTIONS
Read these operating instructions carefully before using the unit. Follow the safety
instructions on the unit and the applicable safety instructions listed below. Keep these
operating instructions handy for future reference.
1) Read these instructions.
2) Keep these inst ructions.
3) Heed all warnings.
4) Follow all instructions.
5) Do not use this apparatus near water.
6) Clean only with dry cloth.
7) Do not block any ventilat i on openings.
Install in accordance with the
manufacturer’s instructions.
 Do not install near any heat sources
such as radiators, heat registers,
stoves, or other apparatus (including
amplifiers) that produce heat.
9) Do not defeat the safety purpose of the
polarized or grounding-type plug. A
polarized plug has two blades with one
wider than the other. A grounding-type
plug has two blades and a third
grounding prong. The wide blade or the
third prong are provided fo r your safety.
If the provided plug does not fit into your
outlet, consult an electrician for
replacement of the obsolete outlet.
11) O nl y us e attachments/a c cessories
specified by the manufacturer.
12) Use only with the
cart, stand, tripod,
bracket, or table
specified by the
manufacturer, or
sold with the
apparatus. When a
cart is used, use caution when moving
the cart/apparatus combination to avoid
injury from tip-over.
13) Unplug this apparatus during lightning
storms or when unused for long periods
of time.
14) Refer all servicing to qualified service
personnel. Servicing is required when
the apparatus has been damage d in any
way, s uc h as power-supply cord or plug
is damaged, liquid has been spilled or
objects have fallen into the apparatus,
the apparatus has been exp osed to rain
or moisture, does not operate normally,
or has been dropped.
10) Protect the power cord from being
walked on or pinched particularly at
plugs, convenience recept acles, and the
point where they exit fr om the
apparatus.
6
VQT4C76
Precautions
USE & LOCATION
≥ TO AVOID SHOCK HAZARD … Your
camera and power supply shoul d not be
exposed to rain or moisture. Do not
connect the power supply or operate your
camera if it gets wet. Your camera has
been designed for outdoor use, howeve r it
is not designed to sust ain direct exposure
to water, rain, sleet, snow, sand, dust, or a
direct splashing fro m a pool or even a c up
of coffee. This action could permanently
damage the internal parts of your camera.
Do not attempt to disassemble this unit.
There are no user serviceable parts
inside. Unplug your camera from the
power supply before cleaning.
≥ AS WITH ANY SMALL OBJECT, SD
CARDS CAN BE SWALLOWED BY
YOUNG CHILDREN. DO NOT ALLOW
CHILDREN TO HANDLE THE SD CARD.
≥ DO NOT AIM YOUR CAMERA AT THE
SUN OR OTHER BRIGHT OBJECTS
≥ DO NOT LEAVE THE CAMERA WITH
THE EVF AIMED DIRECTLY AT THE
SUN AS THIS MAY CAUSE DAMAGE TO
THE INTERNAL PARTS OF THE EVF
≥ DO NOT EXPOSE YOUR CAMERA TO
EXTENDED HIGH TEMPERATURE …
Such as, in direct sunlight, inside a closed
car, ne xt to a heater, etc… This acti on
could permanently damage the i nternal
parts of your camera.
≥ AVOID SUDDEN CHANGES IN
TEMPERATURE … If the unit is suddenly
moved from a cold place to a warm place,
moisture may form on the SD card and
inside the unit.
≥ DO NOT LEAVE YOUR CAMERA OR
THE POWER SUPPLY TURNED ON
WHEN NOT IN USE.
≥ STORAGE OF YOUR CAMERA … Store
and handle your camera in a manner tha t
will not subject it to unnecessary
movement (avoid shaking and striking).
Y our camera contains a sensitiv e pick-up
device which could be damaged by
improper handling or storage.
CARE
≥ TO CLEAN YOUR CAMERA … Do not
use strong or abrasive detergents when
cleaning your camera body.
≥ TO PROTECT THE LENS … Do not touch
the surface of the lens with your hand.
Use a commercial camera lens solution
and lens paper when cleaning the lens.
Improper cleaning can scratch the lens
coating.
≥ TO PROTECT THE FINISH OF YOUR
CAMERA … Before handling your
camera, make sure your hands and face
are free from any chemical prod ucts , su ch
as suntan lotion, as it may damage the
finish.
-If you see this symbol-
Information on Disposa l in other
Countries outside the European
Union
This symbol is only valid
in the European Union.
If you wish to discard
this product, please
contact your local
authorities or dealer and
ask for the correct
method of disposal.
VQT4C76
7

∫ About the recording format for
recording motion pictures
Y ou can select from AVCHD* or iFrame
recording formats to record motion pictures
using this unit. (l 68)
* It is compatible with A VCHD 3D or A VCHD
Progressive (1080/60 p).
AVCHD 3D:
It is possible to record powerful, lifelike 3D
full high-definition images.
A 3D compatible television compatible to the
frame sequential format is required to view
the 3D full high-definition images. (l 114,
118)
AVCHD Progressive:
It is possible to record 2D image in the
highest quality (1080/60p) f or this unit.
iFrame:
This is a recording format suitable for
viewing or editing on Mac (iMovie’11). Using
iMovie’11, iFrame motion pictures can be
imported faster than AVCHD motion
pictures. Also, the imported file size of
iFrame motion pictures will be smaller than
that of AVCHD motion pictures.
≥ It is not compatible with motion pictures
recorded in AVCHD format.
∫ Indemnity about recorded
content
Panasonic does not accept any
responsibility for damages directly or
indirectly due to any type of problems that
result in loss of recording or edited content,
and does not guarantee any cont ent if
recording or editing does not work properly.
Likewise, the above also applies in a case
where any type of repair is made to the unit
(including any other non-built-in memory
related component).
∫ Handling of built-in memory
[HC-X900M]
This unit is equipped with the built-in
memory. When using this component, pay
attention to the following points.
Back up data periodically.
The built-in memory is temporary storag e. In
order to avoid erasing data due to static
electricity, electromagnetic waves,
breakage, and failur es, back up the dat a t o a
PC or DVD disc. (l 123, 136)
≥ Access lamp [ACCESS] (l 18)
illuminates while the SD card or built-in
memory is being accessed (initial ization,
recording, playback, del eting, etc.). Do not
perform the following ope rati ons whe n th e
lamp illuminates. It may damage the builtin memory or cause a malfunction in the
unit.
jTurn the unit off (remove the batt e ry )
jInsert and remove the USB cable
jExpose th e un i t to vibrations or sho c k
≥ About disposing of or giving a way this unit .
(l 157)
8
VQT4C76

∫
About Condensation
(When the lens, the viewfinder
or LCD Monitor is fogged up)
Condensation occurs when the ambient
temperature or humidit y changes . Be ca reful
of condensation since it causes lens,
viewfinder and LCD monitor stains, fungus
and camera malfunction.
≥ For more details about the cause and
action required for condensation, refer to
page 161.
∫
About Condensation
(When the lens or LCD Monitor
is fogged up)
Condensation occurs when the ambient
temperature or humidit y changes . Be ca reful
of condensation since it causes lens and
LCD monitor stains, fungus and camera
malfunction.
≥ For more details about the cause and
action required for condensation, refer to
page 161.
∫ Cards that you can use with
this unit
SD Memory Card, SDHC Memor y Card
and SDXC Memory Card
≥ 4 GB or more Memory Cards that do not
have the SDHC logo or 48 GB or more
Memory Cards that do not have t he SDXC
logo are not based on SD Memory Card
Specifications.
≥ Refer to page 24 for more details on SD
cards.
∫ For the purposes of this
owner’s manual
≥ SD Memory Card, SDHC Memory Card
and SDXC Memory Card are referred to
as the “SD card”.
≥ Functions that can be used for Motion
Picture Recording Mode:
Functions that can be used for Still Picture
Recording Mode:
≥ Function that can be used for the
Playback Mode:
Function that can be used for the Playback
Mode (motion picture only):
Function that can be used for the
Playback Mode (still pictures only):
≥ Scene(s) recorded in 1080/60p, 1080/60i,
AVCHD 3D or side-by-side ([SbS 3D]):
AVCHD scene(s)
≥ Pages for reference are indicated by an
arrow, for example: l 00
This owner’s manual is designed for use
with models and .
Pictures may be slightly different from the
original.
≥ The illustrations used in this owner’s
manual shows model ,
however, p art s of t he ex planati on r ef er to
different models.
≥ Depending on the model, some functi ons
are not available.
≥ Features may vary, so please read
carefully.
≥ Not all models may be available
depending on the region of purchase.
HC-X800
VQT4C76
9

Contents
Accessories………………………………………12
Quick Guide……. … .. … …………….. … … .. …..13
Advanced (Recording)
Preparation
Names and Functions of Main Parts. . …17
Power supply.. … … …………………………… ..20
Inserting/removing the battery……….. 20
Charging the battery ……………………. 21
Charging and reco rdi n g tim e…. … …… 22
Recording to a card …………………………..24
Cards that you can use
with this unit ……………………………….. 24
Inserting/removing an SD card………. 25
Turning the unit on/off……………………….26
Selecting a mode ………………………………27
Preparation of the LCD monitor/
Viewfinder [HC-X900M]………………………28
How to use the touch screen……………..28
About the Touch Menu.. .. …………….. . 29
Setting date and time…………………………30
Basic
Before recording……………………………….31
Selecting a media to record
[HC-X900M]……………………………………….32
Recording motion pictures ………………..33
Recording still pictures……………………..35
Recording still pictures in
Motion Picture Recording Mode…….. 36
Intelligent Auto Mode ………………………..37
Motion picture/Still picture playback ….39
Using the menu scre e n ………. …………….42
Using the quick menu ………………….. 42
Using the Setup M enu …………… ………….43
Using with the remote control
[HC-X900M]……………………………………….52
Operation of direction buttons/
OK button….. ………………………………. 53
Using the zoom…………….. … …………….. .. 54
Ring zoom [HC-X 900 M ]……………….. 54
Zoom ratio during
the Still Picture Recording Mode……. 55
Image Stabilizer Function…………………. 55
1080/60p recording…………………………… 56
Recording with the Touch function…….57
Touch function icons ……………………. 57
Recording functions of
operation icons ………….. ……………………. 60
Operation icons…………………………… 60
Recording functions of menus………….. 66
Manual recording……………………………… 83
White Balance…………………………….. 84
Manual shutter speed/
iris adjustment…………………………….. 85
Recording with Manual Focus ………. 86
Recording 3D image…………………………. 88
Advanced (Playback)
Playback Operatio ns…………………………91
Motion picture playback us ing
operation icon ……….. … ………………… 91
Creating still picture from
motion picture ……….. … … ……………… 9 2
Highlight & Time Frame Index ………. 92
Repeat Playba ck………. …………….. … . 93
Resuming the previous playback…… 93
Zooming in on a still picture during
playback (Playbac k zoom )……………. 94
Various playback function s … … .. ……….. 95
Playing back motion pictures/
still pictures by date …………………….. 95
Highlight Playback ………………………. 96
Changing the playback settings and
playing back the slide show………… 101
10
VQT4C76

Deleting scene s/ sti ll p ic t ure s ……… .. … 102
Deleting part of a scene
(AVCHD)………………………………….. 103
Dividing a scene (AVCHD)………….. 104
Dividing a scene to partially delete
(iFrame/MP4) ……………………………. 105
Deleting personal information ……… 106
Protecting scenes/still pictures…….. 106
Relay scene combining
[HC-X900M]…………………………………….. 107
Watching Video/Pictures
on your TV ………… ……………. … … … ……..108
Connecting with
a HDMI mini cable……………………… 110
Listening in 5.1 channel sound
(AVCHD) [HC-X900M]…………. …….. 111
Connecting with
the AV multi cable ……………………… 111
Playback using VIERALink
3D image playback [HC-X900M] ………. 114
Viewing with 3D compatible TV……. 114
Viewing on the LCD mo n itor . … … …. 116
Converting and playing back
2D (3D) images as 3D (2D)…………. 117
Adjusting 3D effect of
the 3D image…………………………….. 118
3D image playback [HC-X800] …………. 118
Converting and playing back
2D images as 3D …. …………………… 120
Adjusting 3D effect of
the 3D image…………………………….. 120
™
………….. 112
Copy/Dubbing
Copying between SD card and Built-in
Memory [HC-X90 0M] ………………………..121
Connecting a DVD burner to copy to/
play back a disc……………………… ………123
Preparing for copying/
playing back ……………………………… 123
Copying to discs………………………… 125
Playing back the copied disc……….. 127
Managing the copie d disc …………… 128
Dubbing with a Blu-ray disc recorder,
video devices, etc……………………………129
3D image storage…………………………….133
With a PC
What you can do with a PC……………… 136
End User License Agreement……… 138
Operating environment ……………………139
Installation………………………………………142
Connecting to a PC …………………………142
About the PC displ a y ………… ………. 144
Starting HD Writer AE 4.1…………………145
Reading the operating instructions
of the software applications ………… 145
If using Mac ……………………………………. 145
Others
Indications……………………………………… 147
Messages ………………………………………. 150
About recovery………………………….. 150
Troubleshooting …………………………….. 151
Cautions for use …………………………….. 156
About copyright………………………………162
Recording modes/approximate
recordable time ………………………………. 163
Approximate number of recordable
pictures…………………………………………..164
Specifications ………………………………… 166
Optional accessories …………….. ……….170
Accessory Order Form (For USA
and Puerto Rico Customers)………. 173
Limited Warranty (ONL Y FOR U.S.A.
AND PUERTO RICO)………………………..174
Warranty
(For Canadian Cust o me rs ) .. … … ……….. 176
Useful Information (Only For Latin
American Countries) ………………………. 177
Index …………………………………………….. 178
Spanish Quick Use Guide/
Guía española para el uso rápido ……. 180
PreparationBasicAdvanced
(Recording)
(Playback)
Copy/DubbingWith a PCOthers Advanced
11
VQT4C76
Accessories
Check the accessories before using this unit.
Keep the accessories out of reach of children to prevent swallowing.
Product numbers correct as of Jan. 2012. These may be subject to change.
Battery pack
VW-VBN130
AC adaptor
(P/PC)
VSK0732
(PU)
VSK0733
AC cable
K2CA2CA00025
Remote control
(Battery built-in)
(supplied for HC-X900M;
not supplied for HC-X800)
N2QAEC000024
AV multi cable
K1HY12YY0012 or
K1HY12YY0008
HC-X800
K1HY12YY0012
CD-ROM
Software
USB cable
K2KYYYY00201
Lens hood
VDW2412
Shoe adaptor
(supplied for HC-X900M;
not supplied for HC-X800)
VYC0996
12
VQT4C76
Quick Guide
∫ Inserting the battery
Open the LCD monitor and install the bat tery
by inserting it in the direction shown in the
figure.
≥ Insert the battery unti l it clicks and locks.
∫ Charging the battery
A DC input terminal
1 Connect the AC cable to the AC
adaptor, then the AC outlet.
2 Connect the AC adaptor to the DC inp ut
terminal.
≥ The status indicator will flash red at an
interval of 2 seconds (approximately 1
second on, 1 second off), indicating that
charging has begun. It will turn off when
the charging is completed.
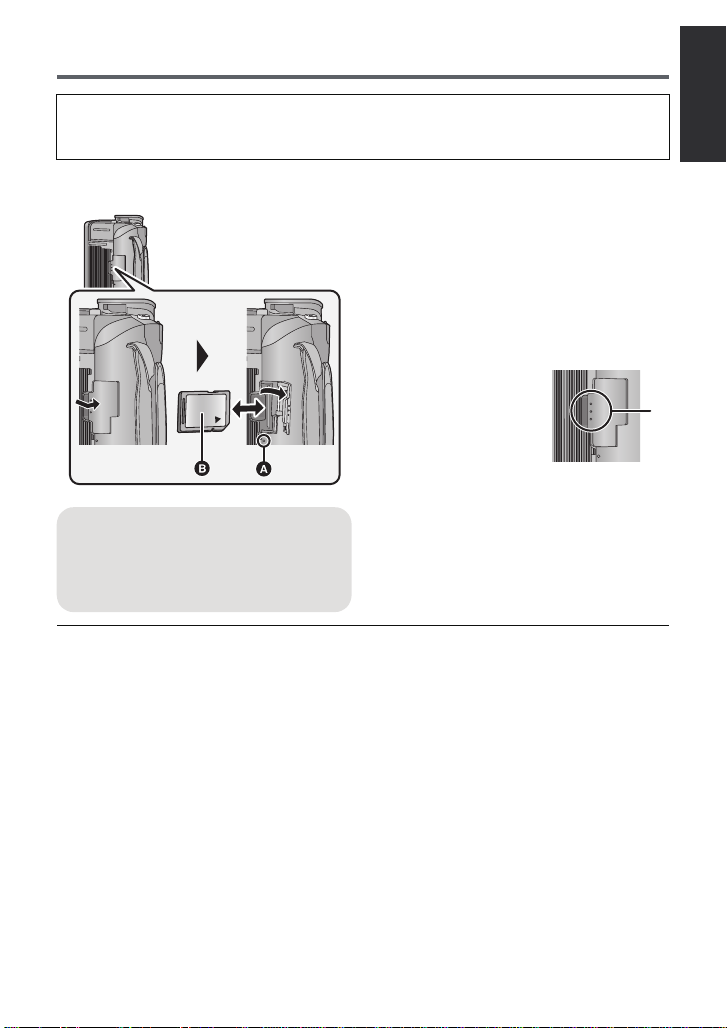
∫ Inserting/removing an SD card
Access lamp [ACCESS] A
≥ When this unit is accessing the SD
card or built-in memory, the acces s
lamp lights up.
≥ Check that the access lamp has gone off.
1) Open the SD card cover and insert/
remove the SD card into/from the card
slot.
≥ Face the label side B in the direction
shown in the illustration and press it
straight in as far as it will go.
≥ Press the center of the SD card and then
pull it straight out.
2) Press the C par t of the SD card co ver
and close the SD card cover.
≥ Securely close it until it clicks.
13
VQT4C76
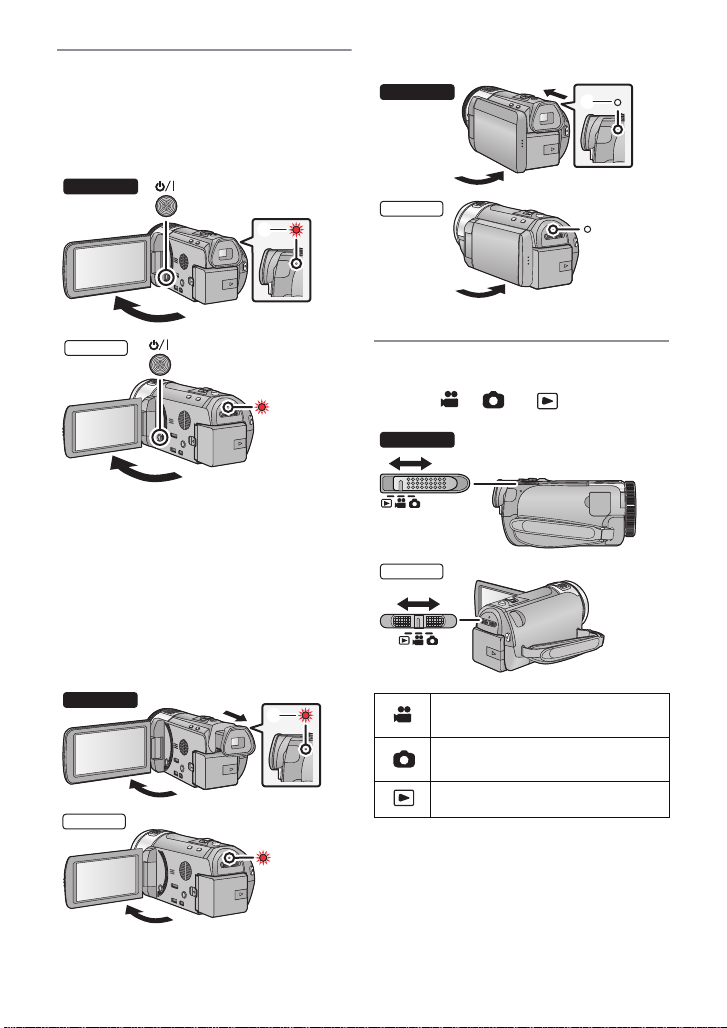
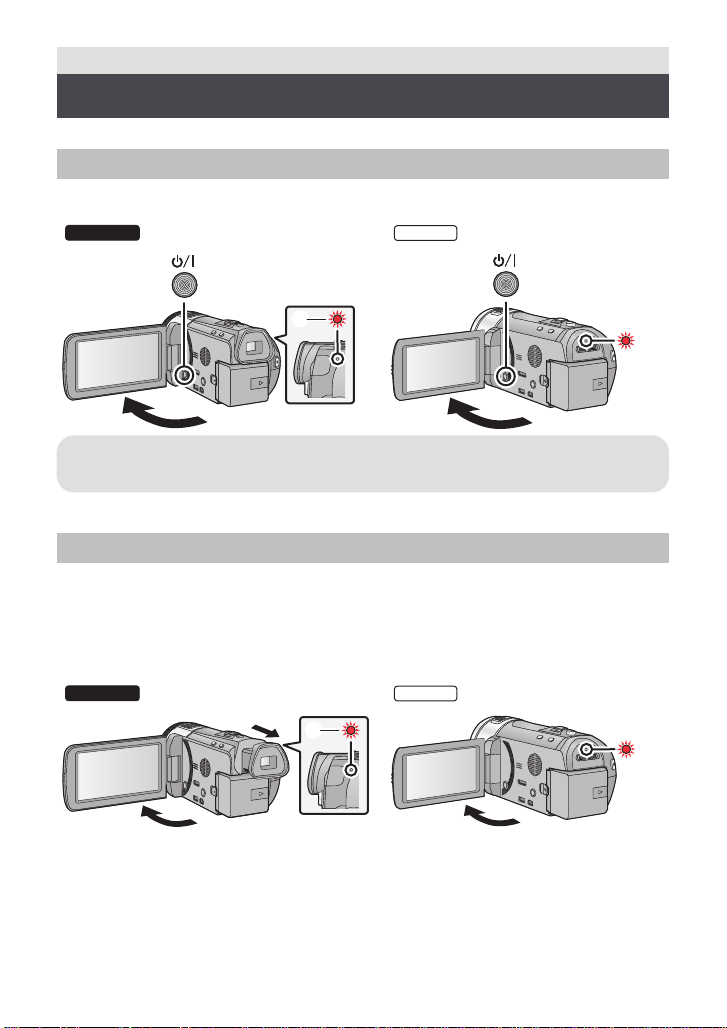
∫ Turning the unit on/off
Turning the unit on and off with the
power button
Open the LCD monitor and press the power
button to turn on the unit.
A The status indicator lights on.
≥ To turn off the unit, hold down the power
button until the status indicator goes off.
Turning the unit on and off with the LCD
monitor/viewfinder
Opening the LCD monitor or extending the
viewfinder turns on the unit . Closing the LCD
monitor/viewfinder turns off the unit.
To turn on the unit
To turn off the unit
B The status indicator goes off.
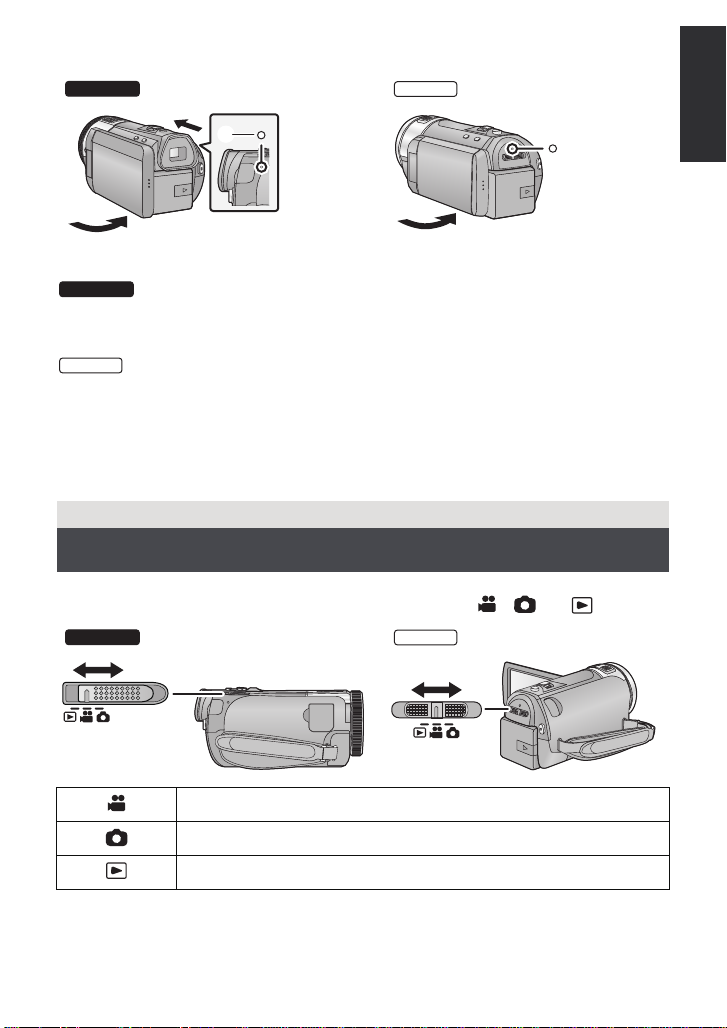
∫ Selecting a mode
Operate the mode switch to change the
mode to , or .
A The status indicator lights on.
14
VQT4C76
Motion Picture Recording
Mode (l 33)
Still Picture Recording Mode
(l 35)
Playback Mode (l 39, 91)
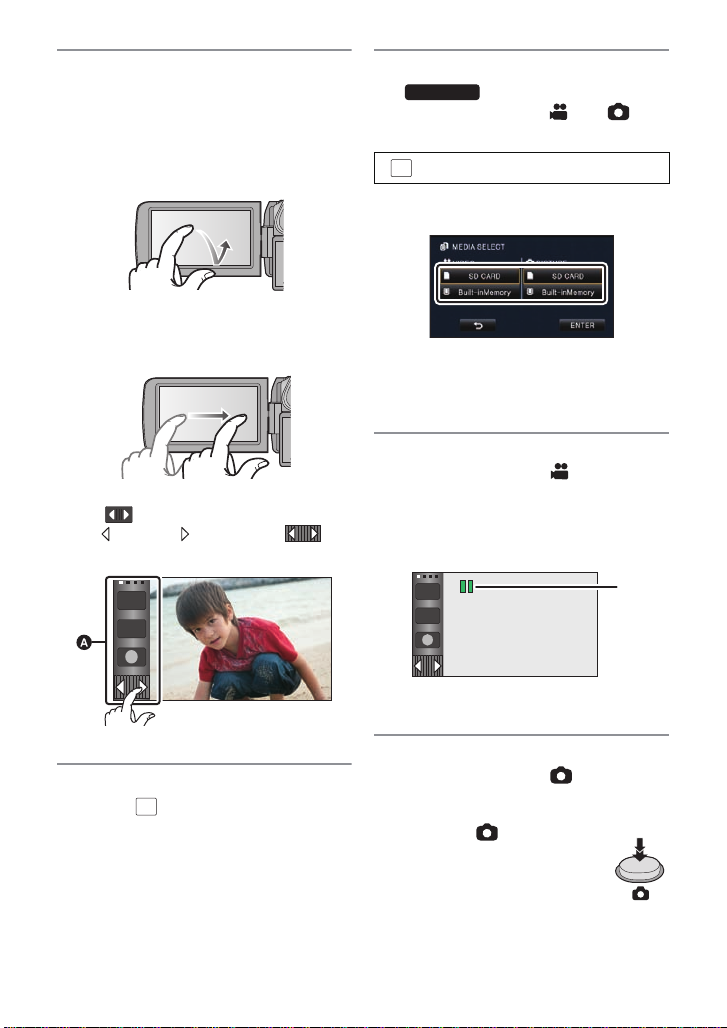
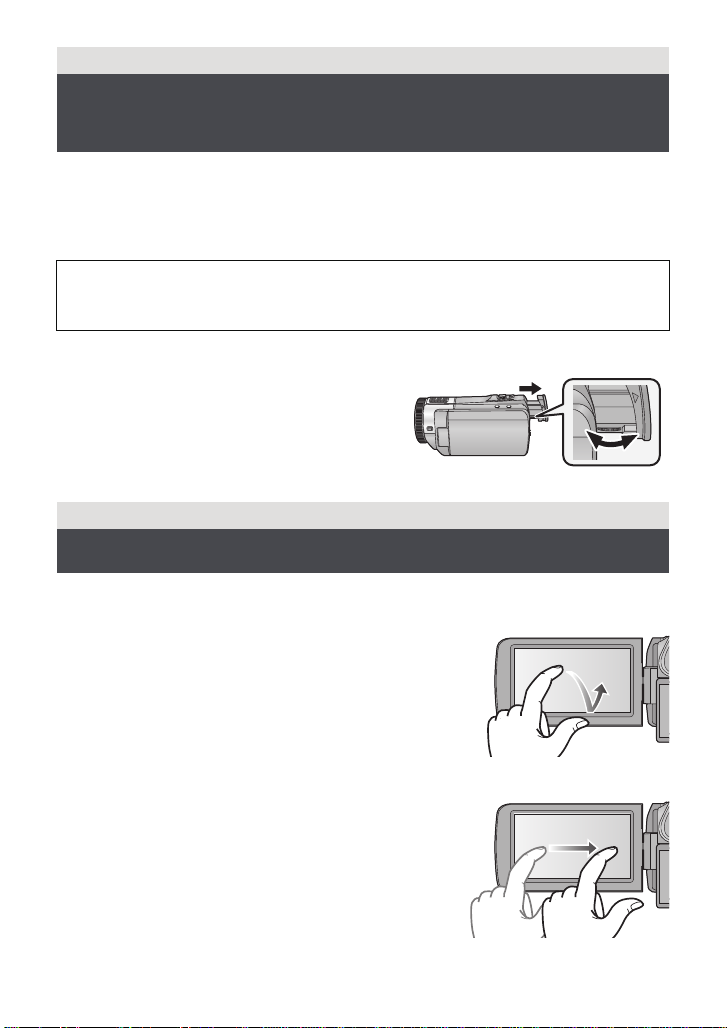
∫ How to use the touch screen
You can operate by direct l y touching the
LCD monitor (touch screen) with your finger.
Touch
T ouch and release the tou ch screen to select
icon or picture.
Slide while touching
Move your finger while pr essing on t he touch
screen.
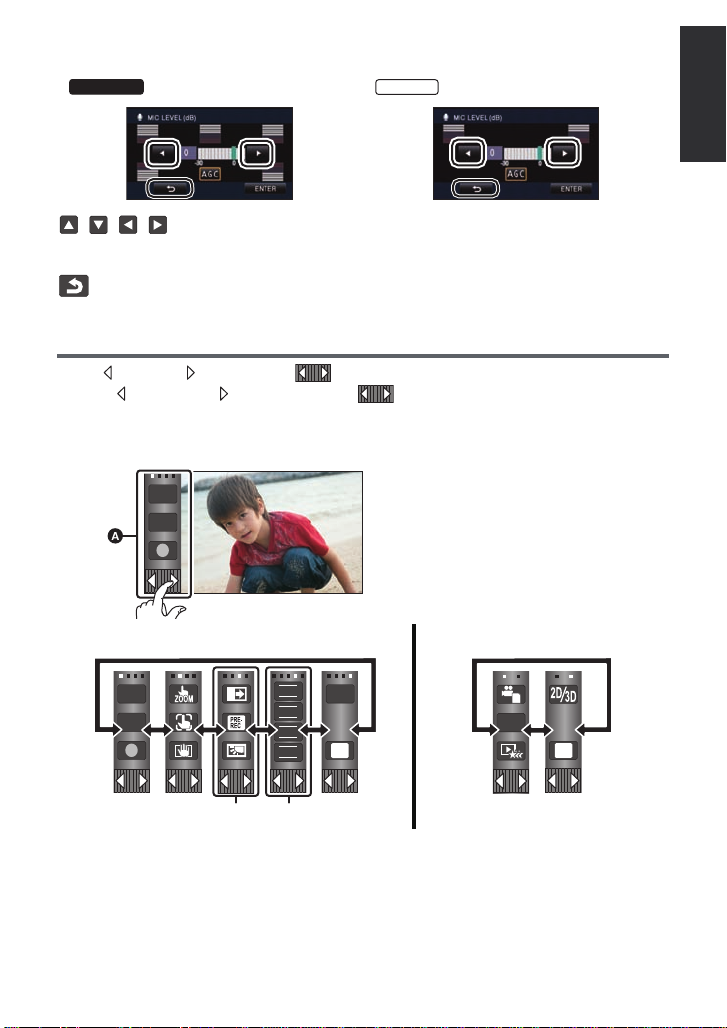
Touch Menu
Touch to display the Touch Menu.
Touch (left side)/ (right side) of on
the Touch Menu to switch the operation icons.
∫ Selecting a media to record
1) Change the mode to or .
2) Select the menu.
: [MEDIA SELECT]
3) Touch the media to record motion
pictures or still pictures.
≥ The media is selected separately to
motion pictures or still pictures is
highlighted in yellow.
4) Touch [ENTER].
∫ Recording motion pictures
1) Change the mode to .
2) Open the LCD monitor or ext end the
viewfinder.
3) Press the recor ding start/stop butt on to
start recording.
T
W
A Touch Menu
∫ Language selection
1) Touch , then touch [SETUP] #
2) Touch desired language.
MENU
[LANGUAGE].
T
W
A When you begin recording, ; changes
to ¥.
∫ Recording still pictures
1) Change the mode to .
2) Open the LCD monitor or ext end the
viewfinder.
3) Press the button fully to
take the picture.
VQT4C76
15
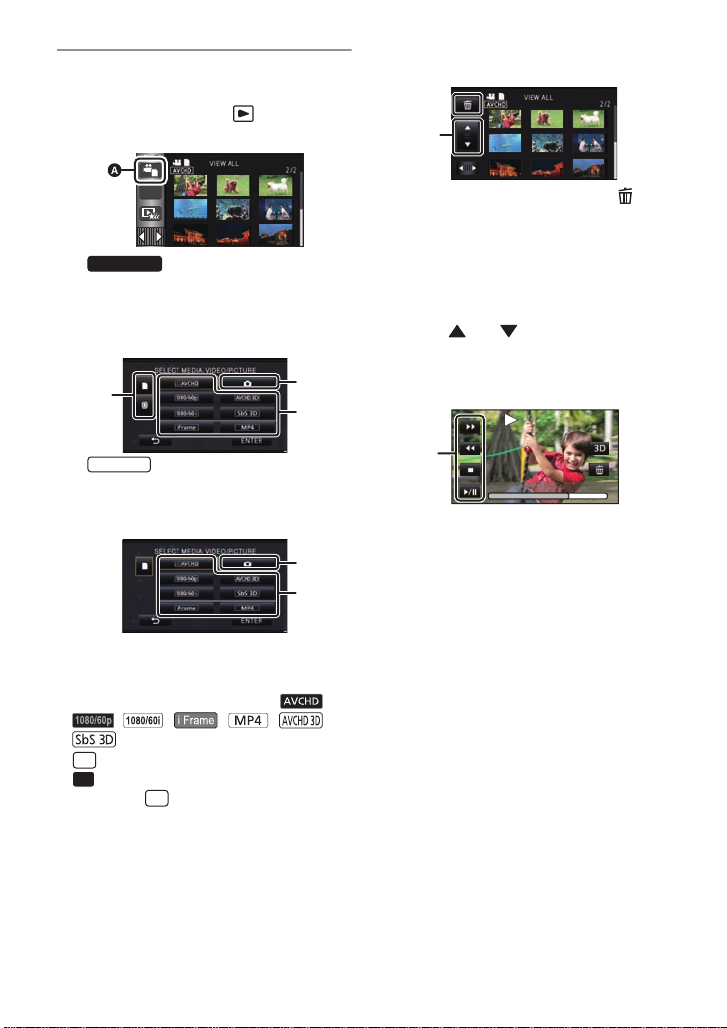
∫ Motion picture/Still picture
0h01m30s0h01m30s0h01m30s
playback
1) Change the mode to .
2) Touch the pla y mode select icon A.
3)
Select the media typ e D and then select
the still picture B or the recording
format of the motion picture C you wish
to play back.
HC-X800
Select the still picture B or the
recording format of the motion picture C
you wish to play back.
≥ Touc h [ENTER].
≥ The recording format of the selected
scene is displayed in the thumbnail
display of the motion pictures. ( ,
, , , , ,
)
≥ is displayed on the 1080/60p scene,
(Blue) is displayed on the A VCHD 3D
scene and is displayed on the sideby-side scene by touching [ALL AVCHD].
4) Touch t he scene or the still picture to be
played back.
≥
It will switch to the screen displaying and
thumbnail scroll lever
performed for approximately 5 seconds
the thumbnail display screen
E
when no operation is
.
on
≥ To display the next (previous) page:
jSlide the thumbnail display upward
(downward) while touching it.
jTouch (up)/ (down) on the
thumbnail scroll lever.
5) Select the playback operation by
touching the operation ic on.
F Operation icon
≥ Operation icons and screen display will
disappear when no touch operation is
performed for a specific period of time. To
display them again, touc h the screen.
(Motion picture playback)
1/;: Playback/Pause
6: Rewind playback
5: Fast forward playback
∫: Stops the playback and shows
the thumbnails.
(Still picture pl ayback)
1/;: Slide show (playback of the still
pictures in numerical order) start/
pause.
2;: Plays back the previous picture.
;1: Plays back the next picture.
∫: Stops the playback and shows
the thumbnails.
16
VQT4C76
Preparation
AV MULTI
10
11
12
13
16
14
17
18
15
879
4563
21
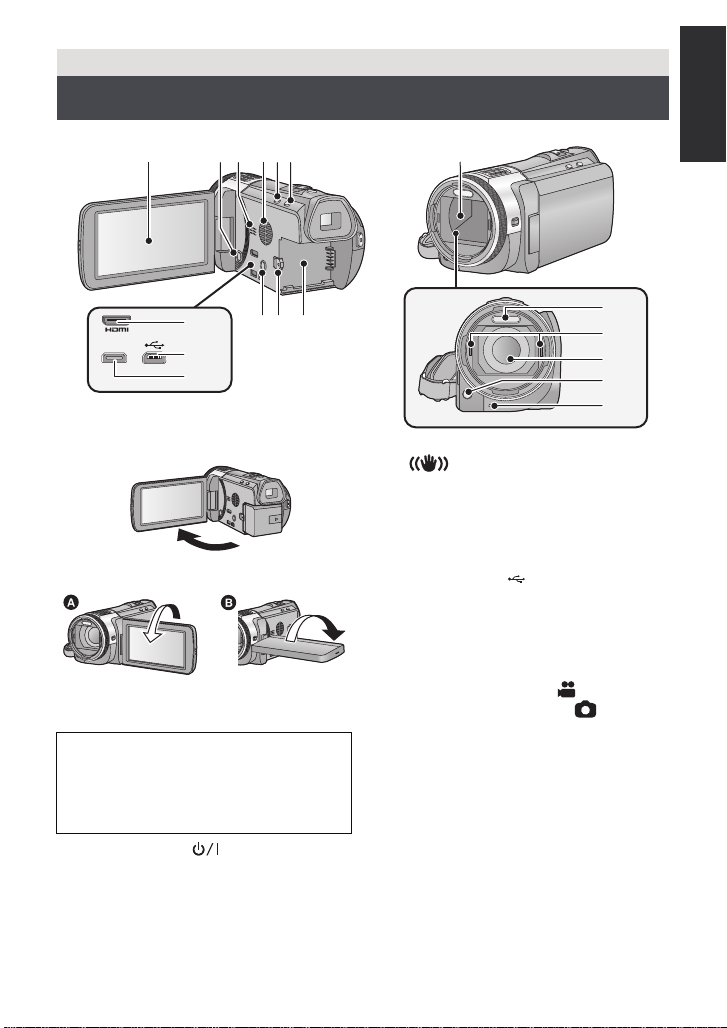
Names and Functions of Main Parts
1 LCD monitor (Touch screen) (l 28)
≥ It can open up to 90o.
≥ It can rotate up to 18 0o A t owards t he lens
or 90o B towards the opposite directio n.
Due to limitations in LCD production
technology, there may be some tiny bright
or dark spots on the LCD monitor scr een.
However, this is not a malfunction and
does not affect the recorded picture.
2 Power button [ ] (l 26)
3 Speaker
4 Inlet (cooling fan) (l 31)
5 Intelligent auto/Manual button
[iA/MANUAL] (l 37, 83)
6 Optical image stabilizer button
[ O.I.S.] (l 55)
7 1080/60p button [1080/60p] (l 56)
8 Battery release lever [BATT] (l 20)
9 Battery holder (l 20)
10 HDMI mini connector [HDMI]
(l 108, 112)
11 USB terminal [ ] (l 124, 129, 142)
12 AV multi connector [AV MULTI]
(l 108, 132)
≥ Use the AV multi cable (only the supplied
cable).
13 Lens cover
≥ The lens cover opens in Motion
Picture Recording Mode or Still
Picture Recording Mode. (l 27)
14 Built-in flash (l 63)
15 3D Conversion Lens attachment part
(concave) (l 88)
16 Lens (LEICA DICOMAR)
≥ Please refer to page 31 for details about
attaching the lens hood.
17 AF assist lamp (l 82)
18 Recording lamp (l 47)
VQT4C76
17
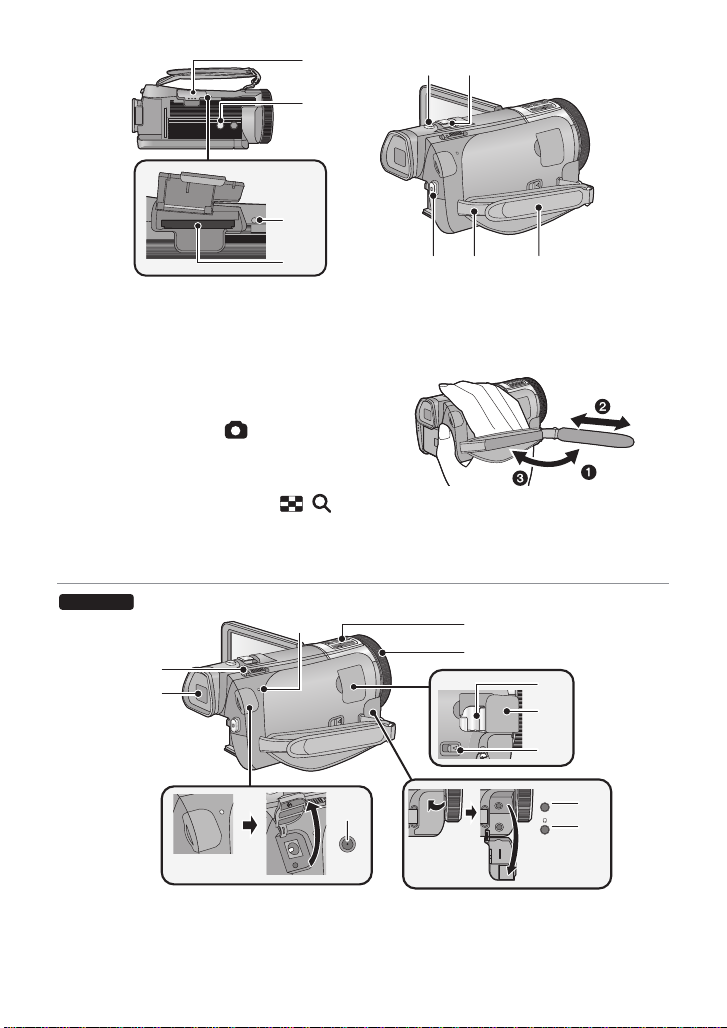
19 SD card cover (l 25)
21
22
20
19
2423
25 26 27
MIC
34
35
38
37
28
29
30
31
32
33
36
20 Tripod receptacle
≥ If you attach a tripod which has 5.5 mm
(0.22 q) screw or larger, it may damage
this unit.
21 Access lamp [ACCESS] (l 25)
22 Card slot (l 25)
23 Photoshot button [ ] (l 35)
24 Zoom lever [W/T] (In Motion Picture
Recording Mode or Still Picture
Recording Mode) (l 54)
Thumbnail display switch [ / ]/
Vo lume lever [sVOLr] (In Playback
Mode) (l 40)
25 Recording start/ stop button (l 33)
26 Shoulder strap fixture
27 Grip belt
Adjust the length o f the grip bel t so tha t it fits
your hand.
1 Flip the belt.
2 Adjust the length.
3 Replace the belt.
28 Status indicator (l 26)
29 Internal microphones
30 Multi manual ring (l 83 , 86 )
18
VQT4C76
31 Shoe adaptor mounting part (l 172)
32 Shoe adaptor cover (l 172)
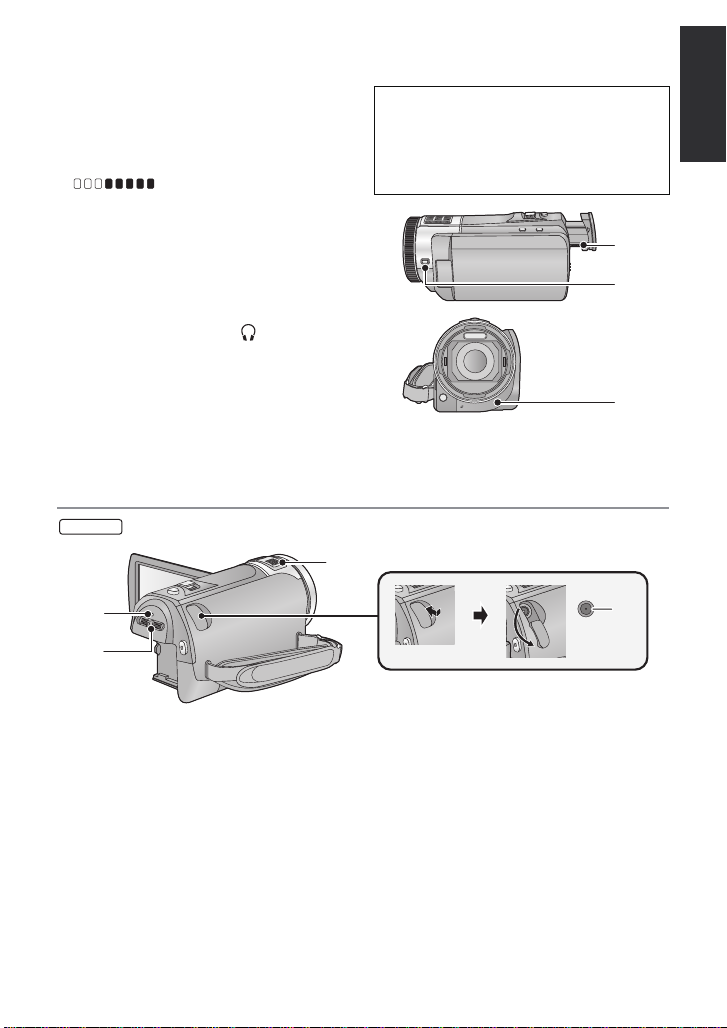
33 Shoe adaptor release l ever
[SHOE ADAPTOR RELEASE] (l 172)
34 Microphone terminal [MIC]
≥ A compatible plug-in powered microphone
can be used as an external microphone.
≥ Audio will be stereo (2 ch) with the
external microphone input.
≥ (Microphone input level
meter) is displayed when the external
microphone is connected. (l 76)
≥ When the unit is connected with the AC
adaptor, sometimes noise may be heard
depending on the microph one type . In th is
case, please switch to the battery for the
power supply and the noise will stop.
35 Headphone terminal [ ] (l 65)
≥ Excessive sound pressure from
earphones and headphones can cause
hearing loss.
≥ Listening at full volume for long periods
may damage the user’s ears.
36 DC input terminal [DC IN ] (l 21)
≥ Do not use any other AC adaptors except
the supplied one.
HC-X800
42
37 Mode switch (l 27)
38 Viewfinder (l 28)
Due to limitations in LCD production
technology , t here may be some ti ny bright
or dark spots on the viewf i nder screen.
However, t his is not a malfunction and
does not affect the recorded picture.
39 Eyepiece corrector di al (l 28)
40 Camera function button
[CAMERA FUNCTION] (l 83)
41 Remote control sensor (l 53)
43
44
42 Internal microphones
43 Status indicator (l 26)
44 Mode switch (l 27)
45 DC input terminal [DC IN ] (l 21)
≥ Do not use any other AC adaptors except
the supplied one.
45
VQT4C76
19
Preparation
Removing the battery
Be sure to hold down the power button
until the status indicator goes off. Then
remove the battery while supporting the
unit to prevent it from dropping.
Move the battery release lever in the
direction indicated by the arrow and
remove the battery when unlocked.
Insert the battery until it clicks and locks.
Power supply
∫ About batteries that you can use with this unit
The battery that can be used with this unit is VW-VBN130/VW-VBN260.
≥ The unit has a function for distinguishing batteries which can be used safely. The
dedicated battery (VW-VBN130/VW-VBN260) supports this function. The only
batteries suitable for use with this unit are genuine Panasonic products and
batteries manufactured by other companies and certified by Panasonic. (Batteries
which do not support this function cannot be used). Panasonic cannot in any way
guarantee the quality, performance or safety of batteries which have been
manufactured by other companies and are not genuine Panasonic products.
It has been found that counterfeit battery packs which look very similar to the
genuine product are made available to purchase in some markets. Some of these
battery packs are not adequately protected with internal protection to meet the
requirements of appropriate safety standards. There is a possibility that these
battery pack s may l ead to fi re o r exp losio n. Pleas e be ad vise d th at we ar e not lia ble
for any accident or failure occurr ing as a r esult of use of a counte rf eit bat tery p a ck.
To ensure that safe products are used we would recommend that a genuine
Panasonic battery pack is used.
Inserting/removing the battery
≥ Press the power button to turn off the unit. (l 26)
Open the LCD monitor and install the battery by inserting it in the
direction shown in the figure.
20
VQT4C76
Charging the battery
When this unit is purchased, the battery is not charged. Charge the battery fully
before using this unit for the first time.
The unit is in the standby condition when the AC adaptor is c onnected. The primar y circuit is
always “live” as long as the AC adaptor is connected to an electrical outlet.
Important:
≥ Use the supplied AC adaptor. Do not use the AC adaptor of another device.
≥ Do not use the AC cable with any other equipment as it is designed only for this unit.
Also, do not use the AC cable from other equipment with this unit.
≥ The battery can also be charged using a battery charger (VW-BC20PP; optional).
≥ The battery will not be charged if the unit is turned on.
≥ It is recommended to charge the battery in a temperatu re between 10 °C and 30 °C
(50 °F and 86 °F). (The battery temperature should also be the same.)
A DC input terminal
≥ Insert the plugs as far as they will go.
1 Connect the AC cable to the AC adaptor, then the AC outlet.
2 Connect the AC adaptor to the DC input terminal.
≥
The status indicator will flash red at an interval of 2 seconds (approximately 1 second on,
1 second off), indicating that charging has begun. It will turn off when the charging is completed.
∫ Connecting to the AC outlet
If you turn on the unit while connecting with the AC adaptor, you can use the unit with power
supplied from the outlet.
When recording for a long time, keep the AC adaptor connected and us e it together with the
battery.
≥ If the status indicator flashes at a particularly fast or slow rate, refer to page 158.
≥ We recommend using Panasonic batteries. (l 12 , 22, 23, 170)
≥ If you use other batteries, we cannot guarantee the quality of this product.
≥ Do not heat or expose to flame.
≥ Do not leave the battery(ies) in a car exposed t o di rect sunlight for a long period of time
with doors and windows closed.
VQT4C76
21

Charging and recording time
∫ Charging/Recording time
≥ Temperature: 25 oC (77 °F)/humidity: 60%RH
≥
HC-X900M
When using the viewfinder (times in parentheses are when using the LCD mon i tor)
HC-X900M
Battery model number
[Voltage/Capacity
(minimum)]
Supplied battery/
VW-VBN130 (optional)
[7.2 V/1250 mAh]
VW-VBN260 (optional)
[7.2 V/2500 mAh]
Charging
time
2h30min
4h30min
Recording
mode
[1080/60p],
[AVCHD 3D]*
[HA], [HG]
[HX], [HE],
[SbS 3D]*
[iFrame]
[1080/60p],
[AVCHD 3D]*
[HA], [HG]
[HX]
[HE], [iFrame],
[SbS 3D]*
Maximum
continuous
recordable time
1h20min
(1h15min)
1h25min
(1h15min)
1h25min
(1h15min)
1h30min
(1h20min)
2h55min
(2h35min)
3h
(2h40min)
3h5min
(2h40min)
3h5min
(2h45min)
Actual
recordable
time
50 min
(45 min)
50 min
(45 min)
55 min
(45 min)
55 min
(45 min)
1h45min
(1h35min)
1h50min
(1h40min)
1h50min
(1h40min)
1h55min
(1h40min)
22
VQT4C76
HC-X800
Battery model number
[Voltage/Capacity
(minimum)]
Supplied battery/
VW-VBN130 (optional)
[7.2 V/1250 mAh]
VW-VBN260 (optional)
[7.2 V/2500 mAh]
* This will be the recording mode when the 3D Conver sion Lens (optional) is attached.
≥ These times are approximations.
≥ The indicated charging time is f or when the batter y has been disc harged compl etely.
Charging time and recordable time vary depending on the usage conditions such as
high/low temperature.
≥ The actual recordable time refers to the recorda ble t ime when repeat ed ly st art ing/s toppin g
recording, turning the unit on/off, moving the zoom le ver etc.
≥ The batteries heat up after use or charging. This is not a malfunction.
Charging
time
2h30min
4h30min
Recording
mode
[1080/60p],
[AVCHD 3D]*
[HA], [HG] 1h25min 50min
[HX], [HE] 1 h 25 min 55 min
[iFrame],
[SbS 3D]*
[1080/60p],
[AVCHD 3D]*
[HA], [HG]
[HX],
[HE],
[iFrame],
[SbS 3D]*
Maximum
continuous
recordable time
1h20min 50min
1h30min 55min
2h55min 1h45min
3h 1h50min
3h5min 1h55min
Actual
recordable
time
Battery capacit y indica tion
≥ The display changes as the battery capacity reduces.
####
If there is less than 3 minutes rema ining, then will become red. If the battery
discharges, then will flash.
≥ Screen display will disappe ar when no touch op eration is performed. However, it will be
constantly displayed when the remaining battery time becomes less than 30 minutes.
≥ The remaining battery capacity is displayed when using the Panasonic battery that you
can use for this unit. The actual time can vary depending on your actual use.
≥ When using the AC adaptor or batteries made by other companies, the remaining
battery capacity will not be shown.
23
VQT4C76
Preparation
Recording to a card
The unit can record still pictures or motion pictures to an SD card or built-in memory. To
record to an SD card, read the following.
This unit (an SDXC compatible device) is compatible with SD Memory Cards, SDHC
Memory Cards and SDXC Memory Cards. When using an SDHC Memory Card/SDXC
Memory Card with other equipment, check the equipment is compatible with these
Memory Cards.
Cards that you can use with this unit
Use SD cards conforming to Class 4 or higher of the SD Speed Class Rating* for
motion picture record ing.
Card type Capacity
SD Memory Card 512 MB/1 GB/2 GB
SDHC Memory Card 4 GB/6 GB/8 GB/12 GB/16 GB/24 GB/32 GB
SDXC Memory Card 48 GB/64 GB
* SD Speed Class Rating is the speed
standard regarding continuous writing.
Check via the label on the card, etc.
≥
Please confirm the latest information about SD Memory Cards/SDHC Memory Cards/SDXC
Memory Cards that can be used for motion picture recording on the following website.
http://panasonic.jp/support/global/cs/e_cam
(This website is in English only.)
≥ Operation of the SD Memory Card 256 MB or less is not guaranteed. Also, the SD Memory
Card 32 MB or less cannot be used for the motion picture recording.
≥ 4 GB or more Memory Cards that do not have the SDHC logo or 48 GB or more Memory
Cards that do not have the SDXC logo are not based on SD Memory Card Specifications.
≥ The operation of Memory Cards exceeding 64GB cannot be guaranteed.
≥ When the write-protect switch A on SD card is locked, no recording,
deletion or editing will be possible on th e card.
≥ Keep the Memory Card out of reach of children to prevent swallowing.
e.g.:
24
VQT4C76
Inserting/removing an SD card
When using an SD card not from Pana sonic, or one previously used on other equipment,
for the first time on this unit, format the SD card. (l 50) When the SD card is formatted, all
of the recorded data is deleted. Once the data is deleted, it cannot be res tored.
Caution:
Check that the access lamp has gone off.
1 Open the SD card cover and
insert/remove the SD card into/
from the card slot.
≥ Face the label side B in the direction
shown in the illustration and press it
straight in as far as it will go.
≥ Press the center of the SD card and then
pull it straight out.
2 Press the C
part of the SD
card cover and
close the SD
card cover.
≥ Securely close it until it clicks.
Access lamp [ACCESS] A
≥ When this unit is accessing the SD
card
or built-in memory
lights up.
, the access lamp
≥ Do not touch the terminals on the back of
the SD card.
≥ Do not apply strong shocks, bend, or drop
the SD card.
≥ Electrical noise, static electricity or the
failure of this unit or the SD card may
damage or erase the dat a st ored on the
SD card.
≥ When the card access lam p is lit, do not:
jRemove the SD card
jTurn the unit off
jInsert and remove the USB cable
jExpose the unit to vibrations or shock
Performing the above while the lamp is on
may result in damage to data/SD card or
this unit.
≥ Do not expose the terminals of the SD
card to water, dirt or dust.
≥ Do not place SD cards in the following
areas:
jIn direct sunlight
jIn very dusty or humid areas
jNear a hea ter
jLocations susceptible to significant
difference in temperat ure (cond ensation
can occur.)
jWhere static electricity or
electromagnetic waves occur
≥ To protect SD cards, return them to their
cases when you are not using th em.
≥ About disposing of or giving away the SD
card. (l 160)
VQT4C76
25
Preparation
Turning the unit on/off
You can turn the unit on and off using the power button, the LCD monitor or the viewfinder.
Turning the unit on and off with the power button
Open the LCD monitor and press the power button to turn on the unit.
HC-X900M
To turn off the unit
Hold down the power button until the status indicator goes off.
A The status indicator lights on.
Turning the unit on and off with the LCD monitor/viewfinder
Opening the LCD monitor or extending the viewfinder turn s on the unit. Closing the LCD
monitor/viewfinder turns off the unit.
During general use, you may find it convenient to turn the unit on/off using the LCD
monitor or viewfinder.
∫ To turn on the unit
HC-X800
HC-X800
A The status indicato r lights on.
26
VQT4C76
∫ To turn off the unit
HC-X900M
B The status indicator goes off.
HC-X900M
≥ The unit will not turn off unless the LCD monitor is closed and th e viewfinder is retracted.
≥ The unit will not turn off while recording motion pictures even if the LCD monitor is closed
and the viewfinder is retracted.
≥ The unit will not turn off while recording motion pictures even if the LCD monitor is closed.
≥ In the following cases, opening the LCD monitor or ex tending the viewfinder does not turn
on the unit. Press the power button to turn on the unit.
jWhen the un i t i s originally purchased
jWhen you have turned off the unit using the power button
Preparation
Selecting a mode
Change the mode to recording or pl ayback.
Operate the mode switch to change the mode to , or .
HC-X900M
HC-X800
Motion Picture Recording Mode (l 33)
Still Picture Re co rding Mode (l 35)
Playback Mode (l 39, 91)
27
VQT4C76
Preparation
Preparation of the LCD monitor/
Viewfinder
The viewfinder is turned off and the LCD monitor is turned on when the LCD monit or is
opened.
The viewfinder is turned on when the LCD moni tor is closed and the viewfinder i s extended.
≥ Live image recording or 3D recordings can be viewed in 3D on the LCD monit or. (l 88,
114)
There are differences in th e way tha t diffe rent people exp eri ence 3D image s. Check
from a position directly in front of and at around 25 cm (0. 82 feet) from th e L C D
monitor, where you can easily see pi cture.
∫ To adjust the image in the viewfinder
Adjust to make the image clear by
rotating the eyepiece corrector dial.
≥ Extend the viewfinder and close the LCD monit or
to turn on the viewfinder.
Preparation
[HC-X900M]
How to use the touch screen
You can operate by directly touching the LCD monitor (touch screen) with your finger.
∫ Touch
Touch and release the tou ch screen to select icon or
picture.
≥ Touch the center of the icon.
≥ Touc hing the t ouch scre en will not op erate wh ile you are
touching another part of the touch screen.
∫ Slide while touching
Move your finger while pressing on the touch screen.
28
VQT4C76
∫ About the operation icons
///:
These icons are used to switch the menu and thumbnail display page, for item
selection and setting etc.
:
Touch to return to the previous screen such as when setting menus.
About the Touch Menu
Touch (left side)/ (right side) of on the Touch Menu to swit ch the operation icons.
Touch (left side)/ (right side) of on the Touch Menu.
≥ It is also possible to swit ch the operation icon s by sliding the Touch Menu right or left while
touching it.
A Touch Menu
T
W
Recording Mode Playback Mode
T
W
FOCUS
WB
SHTR
IRIS
* Above image is example of display for HC-X900M.
B Operati on icons to display can be chang ed. (l 47)
C Displayed only during the Manual Mode. (l 83)
Q.
MENU
MENU
29
VQT4C76
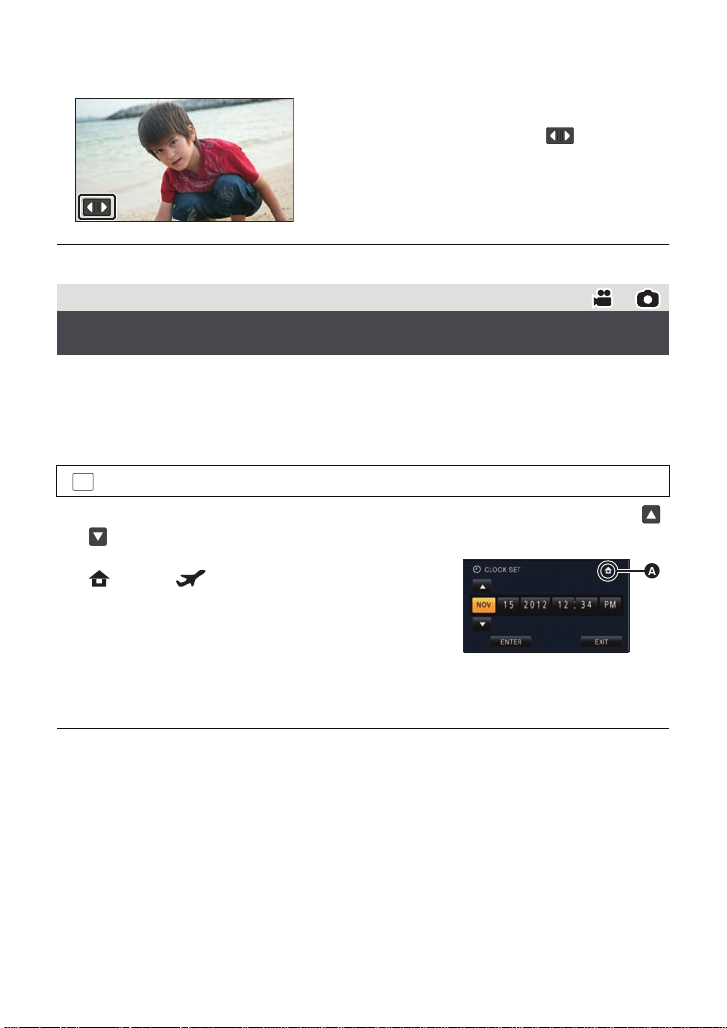
∫ To display the Touch Menu
Display of the Touch Menu will disappear when no
touch operation is performed for a specific period
of time. To display it again, touch .
≥ Do not touch the LCD monitor with hard pointed t i ps, such as ball point pens.
Preparation
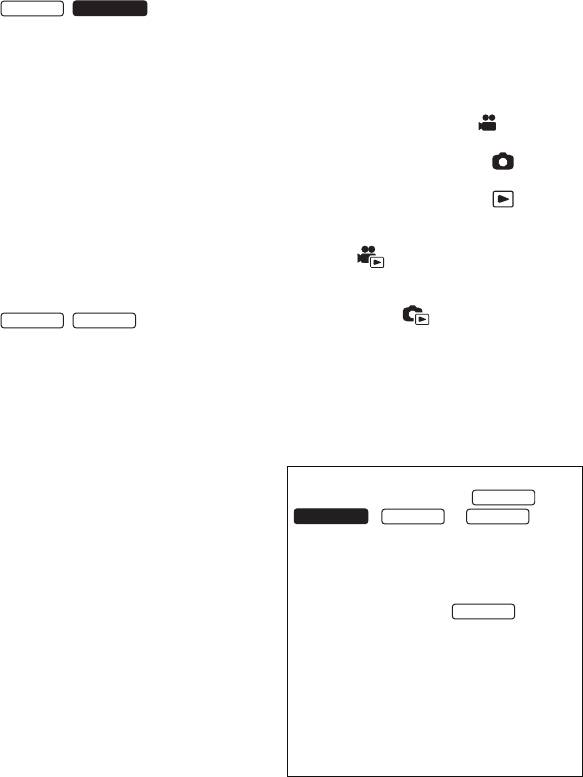
Setting date and time
When the unit is turned on for the first time, a message asking you to set the date and time
will appear.
Select [YES] and perform Steps 2 to 3 below to set the date and time.
1 Select the menu. (l 42)
: [SETUP] # [CLOCK SET]
2 Touch the date or time to be set, then set the des ired value using /
.
A Displaying the World Time setting (l 43):
[HOME]/ [DESTINATION]
≥ The year can be set between 2000 and 2039.
≥ The 12-hour system is used to display the time.
3 Touch [ENTER].
≥ A message prompting for World Ti me setting may be
displayed. Perform the W orld Time setting by touching the screen. (l 43)
≥ Touch [EXIT] to complete the setting.
≥ The date and time function is driven by a built-in lithium battery.
≥ If the time display becomes [- -], the built-in lithium battery needs to be charged. To
recharge the built-in lithium battery , connect the AC adaptor or attach the battery to th is
unit. Leave the unit as it is for approx. 24hours and the battery will maintain the date and
time for approx. 6 months. (The battery is still being recharged even if the unit is off.)
30
VQT4C76
Loading…
Manual
View the manual for the Panasonic HC-X800 here, for free. This user manual comes under the category camcorders and has been rated by 5 people with an average of a 8.1. This manual is available in the following languages: English. Do you have a question about the Panasonic HC-X800?
Ask your question here
Frequently asked questions
Can’t find the answer to your question in the manual? You may find the answer to your question in the FAQs about the Panasonic HC-X800 below.
What is the weight of the Panasonic HC-X800?
The Panasonic HC-X800 has a weight of 345 g.
What is the height of the Panasonic HC-X800?
The Panasonic HC-X800 has a height of 68 mm.
What is the width of the Panasonic HC-X800?
The Panasonic HC-X800 has a width of 63 mm.
What is the depth of the Panasonic HC-X800?
The Panasonic HC-X800 has a depth of 134 mm.
What is the screen size of the Panasonic HC-X800?
The screen size of the Panasonic HC-X800 is 3 «.
How much storage capacity does the Panasonic HC-X800 have?
The Panasonic HC-X800 has — GB storage capacity.
What does the abbreviation ‘MP’ stand for?
MP stands for MegaPixels.
What is a megapixel?
The number of megapixels denotes how many pixels there are in the sensor. 1 megapixel equals 1 million pixels. The more pixels, the higher the potential image quality.
Is the manual of the Panasonic HC-X800 available in English?
Yes, the manual of the Panasonic HC-X800 is available in English .
Is your question not listed? Ask your question here
Инструкция по эксплуатации
HD Видеокамера
Номер модели HC-X900
HC-X900M
HC-X810
HC-X800
Перед использованием этого изделия, пожалуйста, внимательно прочитайте данные
инструкции и сохраните это руководство для дальнейшего использования.
VQT4V66-1

Информация для вашей безопасности
∫ Сведения о форматах записи
∫ Обращение со встроенной
видеоизображения
памятью [HC-X900M]
Можно выбрать форматы записи AVCHD*
Данная камера оборудована встроенной
или iFrame для записи видео данной
памятью. При использовании данного
камерой. (l 59)
компонента обратите внимание на
* Совместимость с AVCHD 3D или
следующее.
AVCHD Progressive (1080/50p).
Регулярно создавайте резервные
AVCHD 3D:
копии данных.
Можно записывать впечатляющие
Встроенная память является временным
реалистичные 3D-изображения с
хранилищем. Во избежание стирания
качеством Full HD.
данных ввиду статического электричества,
Для просмотра Full HD изображения в
электромагнитных волн, поломок и отказов
режиме 3D необходим 3D-совместимый
сохраняйте резервные копии данных на
телевизор, поддерживающий формат
ПК или диске DVD. (
l
120, 134)
чередования кадров. (l 109, 114)
≥
Индикатор доступа [ACCESS] (
l
7)
светится во время обращения к карте SD
AVCHD Progressive:
или встроенной памяти (инициализация,
Можно записывать 2D-изображения в
запись, воспроизведение, удаление и
наиболее высоком качестве (1080/50p)
т.д.). Не выполняйте следующие
для данного устройства.
операции, когда индикатор светится. Это
iFrame:
может привести к поломке встроенной
Это формат записи для просмотра или
памяти или неисправности камеры.
редактирования Mac (iMovie’11). С помощью
jВыключите питание камеры (выньте
iMovie’11 видео iFrame можно импортировать
аккумулятор)
быстрее, чем видео AVCHD. Кроме того,
jНе вставляйте и не извлекайте
размер импортируемого файла видео iFrame
соединительный кабель USB
будет меньше файла видео AVCHD.
jНе подвергайте камеру вибрации или
≥ Не совместимо с видео, записанным в
ударам
формате AVCHD.
≥ Об утилизации или передаче данной
∫ Ответственность за
камеры. (l 158)
записанное содержание
Panasonic не несет ответственности за
прямые либо косвенные повреждения,
вызванные любого рода проблемами,
приводящие к потере записанного или
редактируемого содержимого, а также не
дает гарантий на какое—либо содержимое,
если запись или редактирование не
выполняются надлежащим образом.
Аналогично, вышесказанное применимо
также в случае любого ремонта камеры
(включая любой другой компонент,
связанный с не в
строенной памят
ью).
— 2 —
∫ В настоящей инструкции по
∫
HC-X900
/
HC-X900M
эксплуатации
Информация о конденсации
≥ Карта памяти SD, карта памяти SDHC и
(когда затуманивается
карта памяти SDXC обозначены в
объектив, видоискатель или
документе как “карта SD”.
монитор ЖКД)
≥ Функции, которые можно использовать
Конденсация происходит, когда
в режиме записи видео:
окружающая температура или влажность
Функции, которые можно использовать
изменяются. Остерегайтесь конденсации,
в режиме записи снимков:
поскольку она вызывает появление пятен,
≥ Данную функцию можно использовать в
плесени на объективе, видоискателе и
режиме воспроизведения:
мониторе ЖКД или неисправностей в
Данную функцию можно использовать в
работе камеры.
режиме воспроизведения (
только для
≥ Подробную информацию о причинах
видео
):
конденсации и принятии необходимых
Данную функцию можно использовать в
мер см. на стр. 162.
режиме воспроизведения (только для
фотографий):
∫ /
HC-X810 HC-X800
≥ Одна или несколько сцен, записанных в
Информация о конденсации
формате 1080/50p, 1080/50i, AVCHD 3D
(когда затуманивается
или формате горизонтальной
объектив или монитор ЖКД)
стереопары ([SbS 3D]): сцена(-ы)
Конденсация происходит, когда
AVCHD
окружающая температура или влажность
≥ Страницы для справки обозначаются
изменяются. Остерегайтесь конденсации,
стрелкой, например: l 00
поскольку она вызывает появление пятен,
Данная инструкция по эксплуатации
плесени на объективе и мониторе ЖКД
составлена для моделей ,
или неисправностей в работе камеры.
, и .
≥ Подробную информацию о причинах
Иллюстрации могут незначительно
конденсации и принятии необходимых
отличаться от оригинала.
мер см. на стр. 162.
≥ Иллюстрации, использованные в
∫ Карты, которые можно
данной инструкции по эксплуатации,
использовать с данным
отображают модель , однако
устройством
части объяснения относятся и к
другим моделям.
Карты памяти SD, SDHC и SDXC
≥ В зависимости от модели некоторые
≥ Карты памяти емкостью 4 ГБ или более
функции не подключены.
без логотипа SDHC или карты памяти
≥ Параметры могут отличаться, поэтому
емкостью 48 ГБ или более без логотипа
внимательно читайте инструкцию.
SDXC не основаны на технических
≥ Не все модели мо
гут быт
ь доступны, в
характеристиках карт памяти SD.
зависимости от региона покупки.
≥ Более подробная информация о картах
SD приведена нас странице 15.
— 3 —
HC-X900
HC-X900M
HC-X810 HC-X800
HC-X900

Оглавление
Информация для вашей
безопасности ……..………………..………..…. 2
Дополнительно (Запись)
Подготовка
Использование масштабирования…. 45
Кольцо трансфокатора
[HC-X900/HC-X900M] …….……..……. 45
Названия и функции основных
Коэффициент масштабирования
компонентов …….…..…………..………..…….6
в режиме записи стоп—кадров …….. 46
Питание….………………..………..………….... 10
Функция стабилизатора
Как вставлять/извлекать
изображения ……………..……………..…….. 46
аккумулятор ………..……..……………… 10
Запись 1080/50p….……..………………..….. 47
Зарядка аккумулятора ……..………… 11
Запись с помощью сенсорных
Время зарядки и записи…………..…. 12
кнопок ……………..…………..………..……….. 48
Запись на карту …….………..…………..….. 15
Сенсорные кнопки.…..…………..……. 48
Карты, которые можно
Назначение значков функцийпри
использовать с данным
записи ……………..…………..………..……….. 51
устройством ……..…………..………..…. 15
Значки функций ..……..………..………. 51
Как вставлять/извлекать
Функции записи меню….…………..…….. 57
карту SD …………..…………..………..…. 16
Запись вручную …………..…………..…….. 74
Включение/выключение камеры ……. 17
Баланс белого ….…..………………..…. 76
Выбор режима .……..………..…………..….. 18
Ручная настройка скорости
Подготовка монитора ЖКД/
затвора/диафрагмы …………..………. 77
видоискателя [HC-X900/HC-X900M]….19
Запись при ручной фокусировке…. 78
Использование сенсорного
Запись 3D изображений….……..……….. 80
экрана .……..………..…………..………………. 19
О сенсорном меню ………..…………... 20
Установка даты и времени …..………....21
Дополнительно
(Воспроизведение)
Основные сведения
Операции воспроизведения ..…..…….. 84
Перед началом записи ……………………. 22
Воспроизведение видео с
Выбор носителя для записи
использованием значка
[HC-X900M]….……..……..…………..……..….23
операции…….………..…………..………. 84
Съемка фильмов ….…………..………..…..24
Создание стоп—кадра из
Фотосъемка………..…………..……………....26
видеоизображения…..…………..……. 85
Запись стоп—кадров в режиме
Покадровый указатель
записи видео…….………..…………..…. 27
выделенного и времени………..……. 85
Интеллектуальный автоматический
Повтор воспроизведения.…..………. 86
режим ..…..………………..………..………….... 28
Возобновление предыдущего
Воспроизведение видео/
воспроизведения……..…………..……. 86
стоп—кадров …………..…………..………..….. 30
Оптическое увеличение
Использование экрана меню…….…....33
стоп—кадра во время
Использование быстрого меню..…. 33
воспроизведения
Использование меню настроек ………. 34
(масштабирование при
Использование пульта
воспроизведении) ……………..………. 87
дистанционного управления
Различные функции
[HC-X900/HC-X900M]…..……….……………43
воспроизведения….…..…………..……….. 88
Пользование кнопками
Воспроизведение видео/
направления/кнопкой OK .………..…. 44
стоп—кадров по дате……………..……. 88
— 4 —

Воспроизведение наиболее
Подготовка к копированию/
ярких моментов …..…………..………... 89
воспроизведению …….………..…….. 120
Изменение настройки
Копирование на диски ……..…….... 122
воспроизведения и показ
Воспроизведение
слайдов .………..…………..……………… 94
скопированного диска…………..….. 125
Удаление сцен/стоп—кадров….………....96
Управление диском, на который
Удаление части сцены (AVCHD) …. 98
выполнено копирование…….…….. 126
Разделение сцен (AVCHD)………….. 99
Дублирование с помощью
Разделение сцены для
рекордера дисков Blu-ray, видео
частичного удаления
устройств и т.п.…..……..………………..… 127
(iFrame/MP4) ..…..…………..……….... 100
Сохранение 3D-изображения………… 131
Удаление личной информации …. 101
Защита сцен/стоп—кадров …………. 101
С ПК
Объединение сцены, записанной
с задержкой [HC-X900M] …….………..… 102
Просмотр видео/снимков на ТВ ..….. 103
Как можно использовать ПК ….……… 134
Подключение с помощью мини—
Лицензионное соглашение с
кабеля HDMI …….…………..……….... 105
конечным пользователем …..…….. 136
Прослушивание звука в
Операционная среда .…..…………..…… 137
формате 5.1 (AVCHD)
Инсталляция.…..…………..………..……… 140
[HC-X900/HC-X900M]……..……….... 106
Подключение к персональному
Подключение с по
мощью
компьютеру ……..………..…………..……… 141
мультикабеля AV ………..……………. 106
О дисплее ПК ..………..…………..….. 143
Воспроизведение с
Включение HD Writer AE 4.1 ……..…… 144
использованием VIERA Link …..…….. 107
Чтение инструкции по
Воспроизведение 3D-изображения
эксплуатации программных
[HC-X900/HC-X900M]…..……….………….109
приложений ……..…..…………..…….. 144
Просмотр на 3D-совместимом
При использовании Mac …………..…… 144
телевизоре …..…..…………..……….... 109
Просмотр на мониторе ЖКД..……. 112
Прочее
Преобразование и
воспроизведение изображений
Обозначения .…..…………..………..……… 146
2D (3D) как изображений
Сообщения .…..…………..………………..… 149
3D (2D) ..…………..…………..……….... 112
О восстановлении ………………….... 150
Регулировка 3D эффекта
Поиск и устранение
3D-изображений .………..………….... 113
неисправностей ………..…………..……… 151
Воспроизведение 3D-изображения
На что необходимо обратить
[HC-X810/HC-X800]…..……….……………. 114
внимание при использовании.……… 157
Преобразование и
Об авторском праве ….…………..……… 163
воспроизведение
Режимы записи/приблизительное
2D-изображений как 3D ……………. 116
возможное время записи..………..…… 164
Регулировка 3D эффекта
Приблизительное количество
3D-изображений .………..………….... 116
записываемых кадров …………..……… 165
Дополнительные
Копирование/
принадлежности…………..…………..…… 167
дублирование
Копирование данных между
картой SD и встроенной памятью
[HC-X900M]….……..……………..…………... 117
Подключение DVD рекордера для
копирования на диск/
воспроизведения с диска.…………..… 120
— 5 —